Owner 's Manual Compass SUV
GETTING TO KNOW YOUR VEHICLE
KEYS
KEY FOBS
Your vehicle is equipped with a keyless ignition key fob. The keyless ignition key fob supports Passive Entry, Remote Keyless Entry (RKE), Keyless Enter ‘n Go™ (if equipped), Remote Start (if equipped), and remote power liftgate operation. The keyless ignition key fob supports vehicles equipped with a START/STOP ignition button. The keyless ignition key fob also includes an emergency key, which is stored in the rear of the key fob. The key fob allows you to lock or unlock the doors and liftgate from distances up to approximately 66 ft (20 m). The key fob does not need to be pointed at the vehicle to activate the system.
NOTE:
- The key fob’s wireless signal may be blocked if the key fob is located next to a mobile phone, laptop, or other electronic device. This may result in poor performance.
- With the ignition on and the vehicle moving at mph (4 km/h), all RKE commands are disabled.
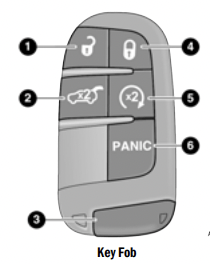
1 — Unlock Button
2 — Liftgate Button
3 — Emergency Key
4 — Lock Button
5 — Remote Start Button
6 — PANIC Button
NOTE: In case the ignition switch does not change with the push of a button, the key fob may have a low or fully depleted battery. A low key fob battery can be verified by referring to the instrument cluster, which will display directions to follow -> page 328.
To Unlock/Lock The Doors And Liftgate
Push and release the unlock button on the key fob once to unlock the driver’s door. If selected within Uconnect Settings, pushing the unlock button twice within five seconds will unlock all the doors and the liftgate. To lock all the doors and the liftgate, push the lock button once -> page 165.
When the doors are unlocked, the turn signals will flash and the illuminated entry system will be activated. When the doors are locked, the turn signals will flash and the horn will chirp.
Key Left Vehicle Feature
If a valid key fob is no longer detected inside the vehicle while the vehicle’s ignition system is in the ON/RUN or START position, the message “Key Left Vehicle” will be shown in the instrument cluster display along with an interior chime. An exterior audible and visual alert will also be activated to warn the driver.
The vehicle’s horn will rapidly chirp three times along with a single flash of the vehicle’s exterior lights.
NOTE:
- The doors have to be open and then closed in order for the vehicle to check for the presence of a key fob; the Key Left Vehicle feature will not activate until all of the doors are closed.
- These alerts will not be activated in situations where the vehicle’s engine is left running with the key fob inside.
Replacing The Battery In The Key Fob
The replacement battery is one CR2032 battery.
NOTE:
- Customers are recommended to use a battery obtained from Mopar®. Aftermarket coin battery dimensions may not meet the original OEM coin battery dimensions.
- Perchlorate Material — special handling may apply. See www.dtsc.ca.gov/hazardouswaste/perchlorate for further information.
- Do not touch the battery terminals that are on the back housing or the printed circuit board.
Key Fob:
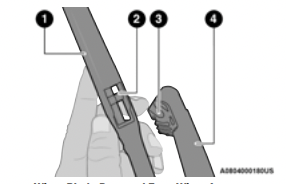
- Remove the emergency key (2) by sliding the emergency key release (1) on the back of the key fob and pulling the emergency key out with your other hand.
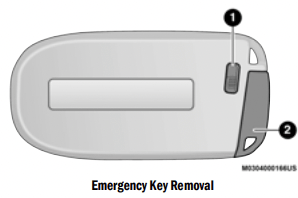
1 — Emergency Key Release
2 — Emergency Key
2. Separate the key fob halves using a #2 flat blade screwdriver or a coin, and gently pry the two halves of the key fob apart. Make sure not to damage the seal during removal.
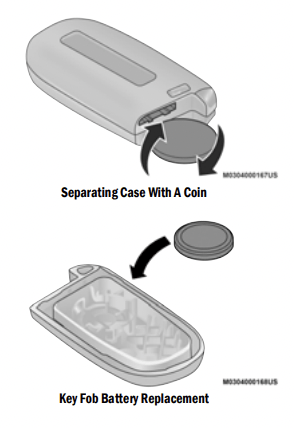
3. Remove the back cover to access and replace the battery. When replacing the battery, match the (+) sign on the battery to the (+) sign on the inside of the battery clip, located on the back cover. Avoid touching the new battery with your fingers. Skin oils may cause battery deterioration. If you touch a battery, clean it with rubbing alcohol.
4. To assemble the key fob case, snap the two halves together.
WARNING!
- The integrated key fob contains a coin cell battery. Do not ingest the battery; there is a chemical burn hazard. If the coin cell battery is swallowed, it can cause severe internal burns in just two hours and can lead to death.
- If you think a battery may have been swallowed or placed inside any part of the body, seek immediate medical attention.
- Keep new and used batteries away from children. If the battery compartment does not close securely, stop using the product and keep it away from children.
Programming And Requesting Additional Key Fobs
Programming the key fob may be performed by an authorized dealer.
NOTE:
- Once a key fob is programmed to a vehicle, it cannot be repurposed and reprogrammed to another vehicle.
- Only key fobs that are programmed to the vehicle electronics can be used to start and operate the vehicle. Once a key fob is programmed to a vehicle, it cannot be programmed to any other vehicle.
WARNING!
- Always remove the key fobs from the vehicle and lock all doors when leaving the vehicle unattended.
- For vehicles equipped with Keyless Enter ‘n Go™ Ignition, always remember to place the ignition in the OFF position.
Duplication of key fobs may be performed at an authorized dealer. This procedure consists of programming a blank key fob to the vehicle electronics. A blank key fob is one that has never been programmed.
NOTE:
- When having the Sentry Key Immobilizer system serviced, bring all vehicle keys with you to an authorized dealer.
- Keys must be ordered to the correct key cut to match the vehicle locks.
SENTRY KEY
The Sentry Key Immobilizer system prevents unauthorized vehicle operation by disabling the engine. The system does not need to be armed or activated. Operation is automatic, regardless of whether the vehicle is locked or unlocked.
The system uses a key fob, keyless push button ignition and a Radio Frequency (RF) receiver to prevent unauthorized vehicle operation. Therefore, only key fobs that are programmed to the vehicle can be used to start and operate the vehicle. The system cannot reprogram a key fob obtained from another vehicle.
After placing the ignition in the ON/RUN position, the Vehicle Security Light will turn on for three seconds for a bulb check. If the light remains on after the bulb check, it indicates that there is a problem with the electronics. In addition, if the light begins to flash after the bulb check, it indicates that someone attempted to start the engine with an invalid key fob. In the event that a valid key fob is used to start the engine but there is an issue with the vehicle electronics, the engine will start and shut off after two seconds.
If the Vehicle Security Light turns on during normal vehicle operation (vehicle running for longer than seconds), it indicates that there is a fault in the electronics. Should this occur, have the vehicle serviced as soon as possible by an authorized dealer.
CAUTION! The Sentry Key Immobilizer system is not compatible with some aftermarket Remote Start systems. Use of these systems may result in vehicle starting problems and loss of security protection.
All of the key fobs provided with your new vehicle have been programmed to the vehicle electronics -> page 328.
IGNITION SWITCH
KEYLESS ENTER ‘N GO™ IGNITION
This feature allows the driver to operate the ignition with the push of a button as long as the key fob is in the passenger compartment. The START/STOP ignition button has three operating modes. The three modes are OFF, ON/RUN, and START.
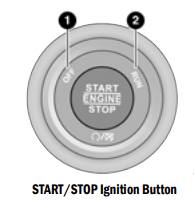
1 — OFF
2 — ON/RUN
The push button ignition can be placed in the following modes:
OFF
- The engine is stopped.
- Some electrical devices (e.g. power locks, alarm, etc.) are still available.
ON/RUN
- Driving mode.
- All electrical devices are available (e.g. climate controls, heated seats, etc.).
START
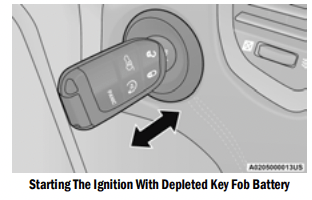
NOTE:
If the ignition state/mode does not change with the push of a button, the key fob may have a low or depleted battery. In this situation, a back up method can be used to operate the ignition switch. Put the nose side (side opposite of the emergency key) of the key fob against the START/STOP ignition button and push to operate the ignition.
WARNING!
- When exiting the vehicle, always remove the key fob from the vehicle and lock your vehicle.
- Never leave children alone in a vehicle, or with access to an unlocked vehicle.
- Allowing children to be in a vehicle unattended is dangerous for a number of reasons. A child or others could be seriously or fatally injured. Children should be warned not to touch the parking brake, brake pedal or the gear selector.
WARNING!
- Do not leave the key fob in or near the vehicle, or in a location accessible to children, and do not leave the ignition of a vehicle equipped with Keyless Enter ‘n Go™ in the ON/RUN position. A child could operate power windows, other controls, or move the vehicle.
- Do not leave children or animals inside parked vehicles in hot weather. Interior heat buildup may cause serious injury or death.
CAUTION!
An unlocked vehicle is an invitation for thieves. Always remove key fob from the vehicle and lock all doors when leaving the vehicle unattended.
NOTE:
- For information on normal starting, see page 100.
- When opening the driver's door and the ignition is in the ON/RUN (engine not running) position, a chime will sound to remind you to place the ignition in the OFF position. In addition to the chime, the “Vehicle On” message will display in the cluster.
REMOTE START — IF EQUIPPED
 This system uses the key fob to start the engine conveniently from outside the vehicle while still maintaining security. The system has a range of approximately 328 ft (100 m).
Remote Start is used to defrost windows in cold weather and to reach a comfortable climate in all ambient conditions before the customer enters the vehicle.
NOTE: Obstructions between the vehicle and key fob may reduce this range -> page 328.
WARNING!
- Do not start or run an engine in a closed garage or confined area. Exhaust gas contains Carbon Monoxide (CO) which is odorless and colorless. Carbon Monoxide is poisonous and can cause serious injury or death when inhaled.
- Keep key fobs away from children. Operation of the Remote Start system, windows, door locks or other controls could cause serious injury or death.
HOW TO USE REMOTE START
Push and release the Remote Start button on the key fob twice within five seconds. The vehicle doors will lock, the parking lights will flash, and the horn will chirp twice (if programmed). Then, the engine will start, and the vehicle will remain in the Remote Start mode for a 15 minute cycle. Pushing the Remote Start button a third time shuts the engine off.
To drive the vehicle, push the unlock button and place the ignition in the ON/RUN position.
NOTE:
- With Remote Start, the engine will only run for minutes.
- Remote Start can only be used twice.
- If an engine fault is present or fuel level is low, the vehicle will start and then shut down in seconds.
- The parking lights will turn on and remain on during Remote Start mode.
- For security, power window and power sunroof operation (if equipped) are disabled when the vehicle is in the Remote Start mode.
- The ignition must be placed in the ON/RUN position before the Remote Start sequence can be repeated for a third cycle.
All of the following conditions must be met before the engine will remote start:
- Gear selector in PARK
- Doors closed
- Hood closed
- Liftgate closed
- Hazard switch off
- Brake switch inactive (brake pedal not pressed)
- Battery at an acceptable charge level
- PANIC button not pushed
- System not disabled from previous Remote
- Start event
- Vehicle Security Light flashing (if equipped)
- Ignition in the OFF position
- Fuel level meets minimum requirement
- Vehicle Security system is not signaling an intrusion
- Malfunction Indicator Light is not illuminated
WARNING!
- Do not start or run an engine in a closed garage or confined area. Exhaust gas contains Carbon Monoxide (CO) which is odorless and colorless. Carbon Monoxide is poisonous and can cause serious injury or death when inhaled.
- Keep key fobs away from children. Operation of the Remote Start system, windows, door locks or other controls could cause serious injury or death.
TO EXIT REMOTE START MODE
To drive the vehicle after starting the Remote Start system, push and release the START/STOP ignition button prior to the end of the 15 minute cycle. The Remote Start system will turn the engine off if the Remote Start button on the key fob is pushed again, or if the engine is allowed to run for the entire 15 minute cycle. Once the ignition is placed in the ON/RUN position, the climate controls will resume previously set operations (temperature, blower control, etc.).
NOTE:
- For vehicles not equipped with the Keyless Enter ‘n Go™ — Passive Entry feature, the ignition switch must be in the ON/RUN position in order to drive the vehicle.
- For vehicles equipped with the Keyless Enter ‘n Go™ — Passive Entry feature, the message “Remote Start Active — Push Start Button” will show in the instrument cluster display until you push the START/STOP ignition button.
- To avoid unintentional shutdowns, the system will disable for two seconds after receiving a valid Remote Start request.
REMOTE START FRONT DEFROST ACTIVATION — IF EQUIPPED
When Remote Start is active, and the outside ambient temperature is 40°F (4.5°C) or below, the system will automatically activate front defrost for 15 minutes or less. The timing is dependent on the ambient temperature. Once the timer expires, the system will automatically adjust the settings depending on ambient conditions. See “Remote Start Comfort Systems — If Equipped” in the next section for detailed operation
REMOTE START COMFORT SYSTEMS — IF EQUIPPED
When Remote Start is activated, the front and rear defrost will automatically turn on in cold weather. The heated steering wheel and driver heated seat feature will turn on if programmed in the comfort menu screen within Uconnect Settings -> page 165. In warm weather, the driver vented seat feature will automatically turn on when Remote Start is activated, if programmed in the comfort menu screen. The vehicle will adjust the climate control settings depending on the outside ambient temperature.
Automatic Temperature Control (ATC) — If Equipped
The climate controls will automatically adjust to the optimal temperature and mode settings depending on the outside ambient temperature. This will occur until the ignition is placed in the ON/RUN position where the climate controls will resume their previous settings
Manual Temperature Control (MTC) — If Equipped
- In ambient temperatures of 40°F (4.5°C) or below, the climate settings will default to maximum heat, with fresh air entering the cabin. If the front defrost timer expires, the vehicle will enter Mix mode.
- In ambient temperatures from 40°F (4.5°C) to 78°F (26°C), the climate settings will be based on the last settings selected by the driver.
- In ambient temperatures of 78°F (26°C) or above, the climate settings will default to MAX A/C, Bi-Level mode, with Recirculation on.
For more information on ATC, MTC, and climate control settings, see page 50.
NOTE:
These features will stay on through the duration of Remote Start, or until the ignition is placed in the ON/RUN position. The climate control settings will change, and exit the automatic defaults, if manually adjusted by the driver while the vehicle is in Remote Start mode. This includes turning the climate controls off using the OFF button.
REMOTE START WINDSHIELD WIPER DE–ICER ACTIVATION — IF EQUIPPED
When Remote Start is active and the outside ambient temperature is less than 33°F (0.6°C), the Windshield Wiper De-Icer will activate. Exiting Remote Start will resume its previous operation. If the Windshield Wiper De-Icer was active, the timer and operation will continue.
REMOTE START ABORT MESSAGE — IF EQUIPPED
The following messages will display in the instrument cluster display if the vehicle fails to remote start or exits Remote Start prematurely:
- Remote Start Aborted — Door Open
- Remote Start Aborted — Hood Open
- Remote Start Aborted — Fuel Low
- Remote Start Aborted — Liftgate Open
- Remote Start Disabled — Start Vehicle To Reset
- Remote Start Aborted — Too Cold
- Remote Start Aborted — Time Expired
- Remote Start Disabled — Start Vehicle To Reset
The message will stay active until the ignition is placed in the ON/RUN position.
VEHICLE SECURITY SYSTEM — IF EQUIPPED
The Vehicle Security system monitors the vehicle doors, hood, liftgate, and the Keyless Enter ‘n Go™ Ignition for unauthorized operation. While the Vehicle Security system is armed, interior switches for door locks and liftgate release are disabled. If something triggers the system, the Vehicle Security system will provide the following audible and visible signals:
- The horn will pulse
- The turn signals will flash
- The Vehicle Security Light in the instrument cluster will flash
NOTE:
- The Vehicle Security system is factory adjusted to standards from different countries.
- The Vehicle Security system is a complementary security system developed to hinder the occurrence of vehicle theft and prevent vandalism. It does not prevent the theft of your vehicle; the system is a deterrent.
- The Vehicle Security system does not monitor glass breakage or the movement of objects or people inside the vehicle. The alarm does not intervene in the case of vehicle tilt variations when it is parked.
TO ARM THE SYSTEM
Follow these steps to arm the Vehicle Security system:
1. Make sure the vehicle’s ignition is placed in the OFF position.
- For vehicles equipped with Keyless Entry, make sure the vehicle’s keyless ignition system is OFF.
2. Perform one of the following methods to lock the vehicle:
- Push the lock button on the interior power door lock switch with the driver and/or passenger door open.
- Push the lock button on the exterior Passive Entry door handle with a valid key fob available in the same exterior zone -> page 23.
- Push the lock button on the key fob.
3. If any doors are open, close them.
When the Vehicle Security system is armed, the Vehicle Security Light (located in the lower left portion of the instrument cluster display) will begin to flash every three seconds until it is disarmed.
NOTE: If the system is armed by pushing the lock button on the interior door panel, the Vehicle Security Light will flash rapidly for about 15 seconds once the door is closed, then slow down to every three seconds.
TO DISARM THE SYSTEM
The Vehicle Security system can be disarmed using any of the following methods:
- Push the unlock button on the key fob.
- Grab the Passive Entry door handle to unlock the door -> page 23.
- Cycle the ignition out of the OFF position to disarm the system.
NOTE:
- The driver's door key cylinder and the liftgate button on the key fob cannot arm or disarm the Vehicle Security system.
- The Vehicle Security system remains armed during power liftgate entry. Pushing the liftgate button will not disarm the Vehicle Security system. If someone enters the vehicle through the liftgate and opens any door, the alarm will sound.
- When the Vehicle Security system is armed, the interior power door lock switches will not unlock the doors.
The Vehicle Security system is designed to protect your vehicle. However, you can create conditions where the system will give you a false alarm. If one of the previously described arming sequences has occurred, the Vehicle Security system will arm regardless of whether you are in the vehicle or not. If you remain in the vehicle and open a door, the alarm will sound. If this occurs, disarm the Vehicle Security system.
If the Vehicle Security system is armed and the battery becomes disconnected, the Vehicle Security system will remain armed when the battery is reconnected; the exterior lights will flash, and the horn will sound. If this occurs, disarm the Vehicle Security system.
DOORS
MANUAL DOOR LOCKS
The door locks can be manually locked from inside the vehicle by using the door lock knob.
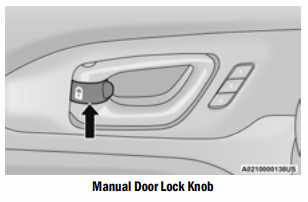
To lock each door, rotate the door lock knob on each door trim panel forward until the lock indicator is shown. To unlock the front doors, pull the inside door handle to the first detent or rotate the door lock button until the lock indicator is hidden. To unlock the rear doors, rotate the door lock button until the lock indicator is hidden. If the door lock button is locked (lock indicator visible) when you shut the door, the door will remain locked. Therefore, make sure the key fob is not inside the vehicle before closing the door.
NOTE:
- Manually locking the vehicle will not arm the Vehicle Security system.
- The manual door locks will not lock or unlock the liftgate.
WARNING!
- For personal security and safety in the event of a collision, lock the vehicle doors before you drive as well as when you park and exit the vehicle.
- When exiting the vehicle, always remove the key fob from the vehicle and lock your vehicle. If equipped with a Keyless Enter ‘n Go™ Ignition, always make sure the keyless ignition is in the OFF position, remove the key fob from the vehicle and lock the vehicle. Unsupervised use of vehicle equipment may cause severe personal injuries or death.
- Never leave children alone in a vehicle, or with access to an unlocked vehicle. Allowing children to be in a vehicle unattended is dangerous for a number of reasons. A child or others could be seriously or fatally injured. Children should be warned not to touch the parking brake, brake pedal or the gear selector.
- Do not leave the key fob in or near the vehicle, or in a location accessible to children. Do not leave the Keyless Enter ‘n Go™ Ignition in the ON/RUN position. A child could operate power windows, other controls, or move the vehicle.
POWER DOOR LOCKS
The power door lock switches are located on each front door panel. Push the switch to lock or unlock the doors and liftgate.
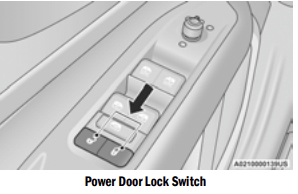
If you push the power door lock switch while the ignition is in the ON/RUN position, and any door or the liftgate is open, the power locks will not operate. This prevents you from accidentally locking the key fob in the vehicle. Placing the ignition in the OFF position or closing the doors and liftgate will allow the locks to operate.
KEYLESS ENTER ‘N GO™ — PASSIVE ENTRY
The Passive Entry system is an enhancement to the vehicle’s Remote Keyless Entry system and a feature of Keyless Enter ‘n Go™ — Passive Entry. This feature allows you to lock and unlock the vehicle’s door(s) without having to push the key fob lock or unlock buttons
NOTE:
- Passive Entry may be programmed on/off through Uconnect Settings -> page 165.
- The key fob may not detect the Passive Entry system if it is located next to a mobile phone, laptop or other electronic device; these devices may block the key fob’s wireless signal and prevent the Passive Entry system from locking and unlocking the vehicle.
- If wearing gloves, or if it has been raining/ snowing on the Passive Entry door handle, the unlock sensitivity can be affected, resulting in a slower response time.
- If the vehicle is unlocked by Passive Entry and no door is opened within 60 seconds, the vehicle will relock and, if equipped, will arm the Vehicle Security system.
To Unlock From The Driver's Side Or Passenger’s Side
With a valid Passive Entry key fob within 5 ft m) of either front door handle, grab the door handle to unlock the door automatically.
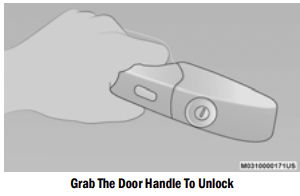
- Either the driver door only or all doors will unlock when you grab hold of the front driver’s door handle, depending on the selected setting in the Uconnect system -> page 165.
- All doors and the liftgate will unlock when the front passenger door handle is grabbed regardless of the driver’s door unlock preference setting
Frequency Operated Button Integrated Key (FOBIK-Safe)
To minimize the possibility of unintentionally locking a Passive Entry key fob inside your vehicle, the Passive Entry system is equipped with an automatic door unlock feature which will function if the ignition switch is in the OFF position.
There are three situations that trigger a FOBIK-Safe search in any Passive Entry vehicle:
- A lock request is made by a valid Passive Entry key fob while a door is open.
- A lock request is made by the Passive Entry door handle while a door is open.
- A lock request is made by the door panel switch while the door is open.
When any of these situations occur, after all open doors are shut, the FOBIK-Safe search will be executed. If it detects a Passive Entry key fob inside the vehicle and it does not detect any Passive Entry key fobs outside the vehicle, then the vehicle will unlock and alert the customer.
NOTE:
The vehicle will only unlock the doors when a valid Passive Entry key fob is detected inside the vehicle. The vehicle will not unlock the doors when any of the following conditions are true:
- The doors are manually locked using the door lock knobs.
- Three attempts are made to lock the doors using the door panel switch and then the doors are closed.
- There is a valid Passive Entry key fob outside the vehicle and within 5 ft (1.5 m) of either Passive Entry door handle.
To Lock The Vehicle’s Doors And Liftgate
With one of the vehicle’s Passive Entry key fobs within 5 ft (1.5 m) of either front door handle, push the Passive Entry lock button located on the outside door handle to lock the vehicle doors and liftgate.
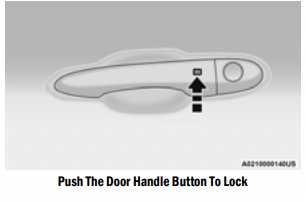
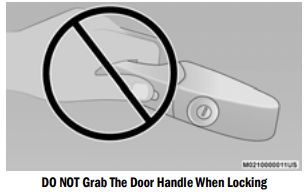
NOTE: DO NOT grab the door handle when pushing the door handle lock button. This could unlock the door(s).
NOTE:
- After pushing the door handle button, you must wait two seconds before you can lock or unlock the doors, using either Passive Entry door handle. This is done to allow you to check if the vehicle is locked by pulling the door handle without the vehicle unlocking.
- If Passive Entry is disabled using the Uconnect settings, the key protection described in Frequency Operated Button Integrated Key (FOBIK-Safe)" remains active/functional.
- The Passive Entry system will not operate if the key fob battery is depleted.
To Unlock/Enter The Liftgate
The liftgate Passive Entry unlock feature is built into the electronic liftgate release handle. With a valid Passive Entry key fob within 5 ft (1.5 m) of the liftgate, push the electronic liftgate release handle to open.
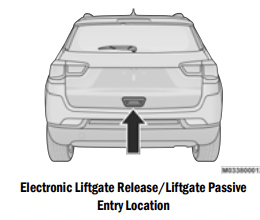
To Lock The Liftgate
With a valid Passive Entry key fob within 5 ft m) of the liftgate, push the Passive Entry lock button located to the right of the electronic liftgate release handle.
NOTE:
The liftgate Passive Entry lock button will lock all doors and the liftgate -> page 328.
AUTOMATIC UNLOCK DOORS ON EXIT
- The doors will unlock automatically on vehicles with power door locks if:
- The Automatic Unlock Doors On Exit feature is enabled.
- All doors are closed. The gear selector was not in PARK, then is placed in PARK.
- Any door is opened.
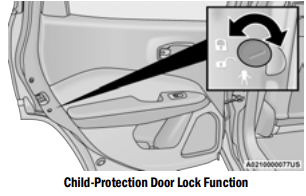
CHILD-PROTECTION DOOR LOCK
SYSTEM — REAR DOORS
To provide a safer environment for small children riding in the rear seats, the rear doors are equipped with a Child-Protection Door Lock system.
To use the system, open each rear door, use a flat blade screwdriver (or emergency key) and rotate the dial to the lock or unlock position. When the system on a door is engaged, that door can only be opened by using the outside door handle even if the inside door lock is in the unlocked position.
NOTE:
- When the Child-Protection Door Lock system is engaged, the door can be opened only by using the outside door handle even though the inside door lock is in the unlocked position.
- After disengaging the Child-Protection Door Lock system, always test the door from the inside to make certain it is in the desired position.
- After engaging the Child-Protection Door Lock system, always test the door from the inside to make certain it is in the desired position.
- For emergency exit with the system engaged, rotate the door lock button until the lock indicator is hidden (unlocked position), roll down the window, and open the door with the outside door handle.
WARNING! Avoid trapping anyone in a vehicle in a collision. Remember that the rear doors can only be opened from the outside when the Child-Protection locks are engaged (locked).
NOTE: Always use this device when carrying children. After engaging the child lock on both rear doors, check for effective engagement by trying to open a door with the internal handle. Once the Child-Protection Door Lock system is engaged, it is impossible to open the doors from inside the vehicle. Before getting out of the vehicle, be sure to check that there is no one left inside.
STEERING WHEEL
TILT/TELESCOPING STEERING COLUMN
This feature allows you to tilt the steering column upward or downward. It also allows you to lengthen or shorten the steering column. The tilt/ telescoping lever is located below the steering wheel at the end of the steering column.
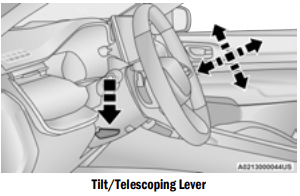
To unlock the steering column, push the control handle downward (toward the floor). To tilt the steering column, move the steering wheel upward or downward as desired. To lengthen or shorten the steering column, pull the steering wheel outward or push it inward as desired. To lock the steering column in position, push the control handle upward until fully engaged.
WARNING! Do not adjust the steering column while driving. Adjusting the steering column while driving or driving with the steering column unlocked, could cause the driver to lose control of the vehicle. Failure to follow this warning may result in serious injury or death.
STARTING AND OPERATING
STARTING THE ENGINE
Before starting your vehicle, adjust your seat, adjust both inside and outside mirrors, and fasten your seat belts.
WARNING!
- When exiting the vehicle, always remove the key fob from the vehicle and lock your vehicle.
- Never leave children alone in a vehicle, or with access to an unlocked vehicle.
- Allowing children to be in a vehicle unattended is dangerous for a number of reasons. A child or others could be seriously or fatally injured. Children should be warned not to touch the parking brake, brake pedal or the transmission gear selector.
- Do not leave the key fob in or near the vehicle, or in a location accessible to children, and do not leave the ignition of a vehicle equipped with Keyless Enter ’n Go™ in the ON/RUN position. A child could operate power windows, other controls, or move the vehicle.
- Do not leave children or animals inside parked vehicles in hot weather. Interior heat build-up may cause serious injury or death.
Start the engine with the gear selector in the NEUTRAL or PARK position. Apply the brake before shifting to any driving range.
NORMAL STARTING
Place the ignition switch in the START position and release when the engine starts. If the engine fails to start within 10 seconds, place the ignition switch in the LOCK/OFF position, wait 10 to seconds, then repeat the “Normal Starting” procedure.
Tip Start Feature
- Place the ignition switch in the START position and release it as soon as the starter engages. The starter motor will continue to run, and will automatically disengage itself when the engine is running. If the engine fails to start, place the ignition switch in the OFF position, wait 10 to seconds, then repeat the “Normal Starting” procedure.
Automatic Transmission
The gear selector must be in the NEUTRAL or PARK position before you can start the engine. Apply the brakes before shifting into any driving gear.
CAUTION!
Damage to the transmission may occur if the following precautions are not observed:
- Do not shift between PARK, REVERSE, NEUTRAL, or DRIVE when the engine is above idle speed.
- Shift into or out of PARK or REVERSE only after the vehicle has come to a complete stop.
- Before shifting into any gear, make sure your foot is firmly on the brake pedal.
Keyless Enter ’n Go™ Functions — Using The ENGINE START/STOP Button
- 1. The transmission must be in PARK or NEUTRAL.
- 2. Press and hold the brake pedal while pushing the ENGINE START/STOP button once.
- 3. The system starts the vehicle. If the vehicle fails to start, the starter will disengage automatically after 10 seconds.
- 4. If you wish to stop the cranking of the engine prior to the engine starting, push the ENGINE START/STOP button again.
Keyless Enter ’n Go™ — With Driver’s Foot OFF The Brake Pedal (In PARK Or NEUTRAL Position)
The Keyless Enter ’n Go™ feature operates similar to an ignition switch. It has three positions, OFF, ON/RUN, and START. To change the ignition switch positions without starting the vehicle and use the accessories follow, these steps starting with the ignition switch in the OFF position:
- Push the ENGINE START/STOP button once to change the ignition switch to the ON/RUN position.
- Push the ENGINE START/STOP button a second time to change the ignition switch to the OFF position.
COLD WEATHER OPERATION (BELOW –22°F OR −30°C)
To ensure reliable starting at these temperatures, use of an externally powered electric engine block heater (available from an authorized dealer) is recommended.
EXTENDED PARK STARTING
NOTE:
Extended Park condition occurs when the vehicle has not been started or driven for at least 30 days.
- Install a battery charger or jumper cables to the battery to ensure a full battery charge during the crank cycle.
- Place the ignition in the START position and release it when the engine starts.
- If the engine fails to start within 10 seconds, place the ignition in the OFF position, wait to 15 seconds to allow the starter to cool, then repeat the “Extended Park Starting” procedure.
- If the engine fails to start after eight attempts, allow the starter to cool for at least minutes, then repeat the procedure
CAUTION! To prevent damage to the starter, do not crank continuously for more than 10 seconds at a time. Wait 10 to 15 seconds before trying again.
AFTER STARTING — WARMING UP THE ENGINE
The idle speed is controlled automatically and it will decrease as the engine warms up.
IF ENGINE FAILS TO START
If the engine fails to start after you have followed the “Normal Starting” procedure, and has not experienced an Extended Park condition as identified in “Extended Park Starting” procedure, it may be flooded. Push the accelerator pedal all the way to the floor and hold it there. Crank the engine for no more than 15 seconds. This should clear any excess fuel in case the engine is flooded. Leave the ignition key in the ON/RUN position, release the accelerator pedal and repeat the “Normal Starting” procedure.
CAUTION! To prevent damage to the starter, do not continuously crank the engine for more than 25 seconds at a time. Wait 60 seconds before trying again.
WARNING!
- Never pour fuel or other flammable liquid into the throttle body air inlet opening in an attempt to start the vehicle. This could result in flash fire causing serious personal injury.
- Do not attempt to push or tow your vehicle to get it started. Vehicles equipped with an automatic transmission cannot be started this way. Unburned fuel could enter the catalytic converter and once the engine has started, ignite and damage the converter and vehicle.
- If the vehicle has a discharged battery, booster cables may be used to obtain a start from a booster battery or the battery in another vehicle. This type of start can be dangerous if done improperly -> page 258.
STOPPING THE ENGINE
Vehicles Equipped With Electronic Key (Keyless Enter ’n Go™):
To shut off the engine with vehicle speed greater than 5 mph (8 km/h), you must push and hold the ignition or push the ENGINE START/STOP button three times consecutively within a few seconds. The engine will shut down, and the ignition will be placed in the ON/RUN position.
Turning off the car (placing the ignition from the ON/RUN position to the OFF position), the power supply to the accessories are maintained for a period of three minutes.
Opening the driver’s side door with the ignition in ON/RUN will sound a short chime that reminds the driver to place the ignition to OFF.
When the ignition is in the OFF position, the window switches remain active for three minutes. Opening a front door will cancel this function.
After severe driving, idle the engine to allow the temperature inside the engine compartment to cool before shutting off the engine.
ENGINE BLOCK HEATER — IF EQUIPPED
The engine block heater warms the engine and permits quicker starts in cold weather.
Connect the cord to a 110-115 Volt AC electrical outlet with a grounded, three-wire extension cord.
For ambient temperatures below 0°F (-18°C), the engine block heater is recommended. For ambient temperatures below -20°F (-29°C), the engine block heater is required.
The engine block heater cord is routed under the hood, behind to the driver’s side headlamp.
NOTE:
- The engine block heater cord is a factory installed option. If your vehicle is not equipped, heater cords are available from an authorized dealer.
- The engine block heater will require 110 Volt AC and 6.5 Amps to activate the heater element.
- The engine block heater must be plugged in at least one hour to have an adequate warming effect on the engine.
WARNING! Remember to disconnect the engine block heater cord before driving. Damage to the 110-115 Volt electrical cord could cause electrocution.
ENGINE BREAK-IN RECOMMENDATIONS
A long break-in period is not required for the engine and drivetrain (transmission and axle) in your vehicle.
Drive moderately during the first 300 miles km). After the initial 60 miles (100 km), speeds up to 50 or 55 mph (80 or 90 km/h) are desirable.
While cruising, brief full-throttle acceleration within the limits of local traffic laws contributes to a good break-in. Wide-open throttle acceleration in low gear can be detrimental and should be avoided. The engine oil installed in the engine at the factory is a high-quality energy conserving type lubricant. Oil changes should be consistent with anticipated climate conditions under which vehicle operations will occur. For the recommended viscosity and quality grades -> page 323
CAUTION! Never use Non-Detergent Oil or Straight Mineral Oil in the engine or damage may result.
NOTE: A new engine may consume some oil during its first few thousand miles (kilometers) of operation. This should be considered a normal part of the break-in and not interpreted as a problem.
SERVICING AND MAINTENANCE
SCHEDULED SERVICING
Your vehicle is equipped with an automatic oil change indicator system. The oil change indicator system will remind you that it is time to take your vehicle in for scheduled maintenance.
Based on engine operation conditions, the oil change indicator message will illuminate in the instrument cluster. This means that service is required for your vehicle. Operating conditions such as frequent short-trips, trailer tow and extremely hot or cold ambient temperatures will influence when the “Change Oil” or “Oil Change Required” message is displayed. Have your vehicle serviced as soon as possible, within the next miles (805 km).
An authorized dealer will reset the oil change indicator message after completing the scheduled oil change. If a scheduled oil change is performed by someone other than an authorized dealer, the message can be reset by referring to the steps described under Instrument Cluster Display page 77.
NOTE:
Under no circumstances should oil change intervals exceed 10,000 miles (16,000 km), one year or 350 hours of engine run time, whichever comes first. The 350 hours of engine run or idle time is generally only a concern for fleet customers.
NOTE:
The Oil Change Indicator will not illuminate under these conditions.
Once A Month Or Before A Long Trip:
- Check engine oil level.
- Check windshield washer fluid level.
- Check the tire inflation pressures and look for unusual wear or damage. Rotate tires at the first sign of irregular wear, even if it occurs before the oil indicator system turns on.
- Check the fluid levels of the coolant reservoir, and brake master cylinder reservoir, and fill as needed.
- Check function of all interior and exterior lights
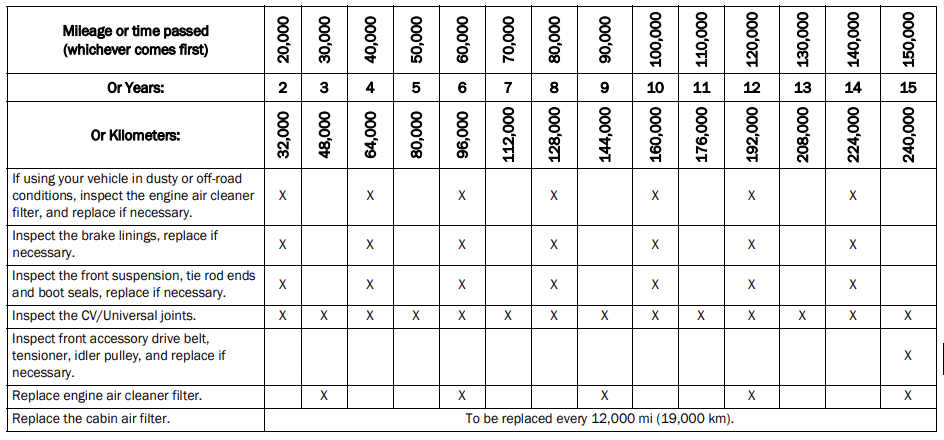
MAINTENANCE PLAN
Refer to the Maintenance Plan for the required maintenance intervals
At Every Oil Change Interval As Indicated By Oil Change Indicator System:
- Change oil and filter.
- Rotate the tires at the first sign of irregular wear, even if it occurs before the oil indicator system turns on.
- Inspect battery and clean and tighten terminals as required.
- Inspect the CV/Universal joints.
- Inspect brake pads, shoes, rotors, drums, and hoses.
- Inspect engine cooling system protection and hoses.
- Inspect exhaust system.
- Inspect engine air cleaner filter if using in dusty or off-road conditions, replace the engine air cleaner filter if necessary.
NOTE: Using white lithium grease, lubricate the door hinge roller pivot joints twice a year to prevent premature wear.
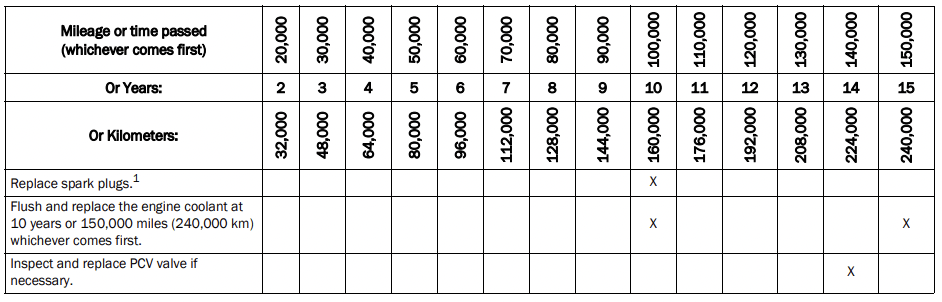
1. The spark plug change interval is mileage based only; yearly intervals do not apply.
WARNING!
- You can be badly injured working on or around a motor vehicle. Do only service work for which you have the knowledge and the right equipment. If you have any doubt about your ability to perform a service job, take your vehicle to a competent mechanic.
- Failure to properly inspect and maintain your vehicle could result in a component malfunction and effect vehicle handling and performance. This could cause an accident
ENGINE COMPARTMENT
2.4L ENGINE
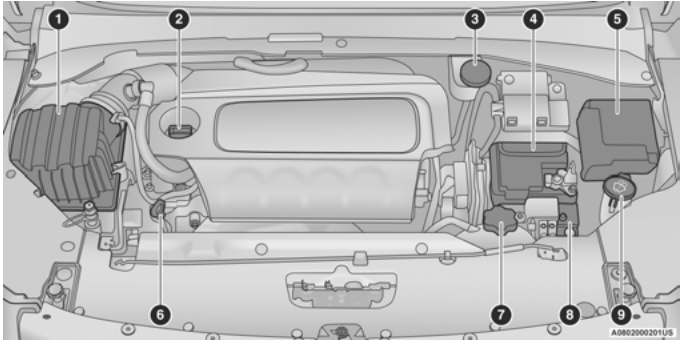
1 — Engine Air Cleaner Filter
2 — Engine Oil Fill
3 — Brake Fluid Reservoir Cap
4 — Battery
5 — Power Distribution Center (Fuses)
6 — Engine Oil Dipstick
7 — Coolant Pressure Bottle Cap
8 — Secondary Battery
9 — Washer Fluid Reservoir Cap
CHECKING OIL LEVEL
To ensure proper engine lubrication, the engine oil must be maintained at the correct level. Check the oil level at regular intervals, such as every fuel stop. The best time to check the engine oil level is about five minutes after a fully warmed up engine is shut off.
Checking the oil while the vehicle is on level ground will improve the accuracy of the oil level readings. There are four possible dipstick types:
- Crosshatched zone.
- Crosshatched zone marked SAFE.
- Crosshatched zone marked with MIN at the low end of the range and MAX at the high end of the range.
- Crosshatched zone marked with dimples at the MIN and the MAX ends of the range.
NOTE:
Always maintain the oil level within the crosshatch markings on the dipstick.
Adding 1 quart (1 liter) of oil when the reading is at the low end of the dipstick range will raise the oil level to the high end of the range marking.
CAUTION! Overfilling or underfilling the crankcase will cause aeration or loss of oil pressure. This could damage your engine.
ADDING WASHER FLUID
The fluid reservoir is located in the front of the engine compartment. Be sure to check the fluid level in the reservoir at regular intervals. Fill the reservoir with windshield washer solvent (not radiator antifreeze) and operate the system for a few seconds to flush out the residual washer fluid.
When refilling the washer fluid reservoir, take some washer fluid, apply it to a cloth or towel, and wipe clean the wiper blades; this will help blade performance.
To prevent freeze-up of your windshield washer system in cold weather, select a solution or mixture that meets or exceeds the temperature range of your climate. This rating information can be found on most washer fluid containers.
WARNING! Commercially available windshield washer solvents are flammable. They could ignite and burn you. Care must be exercised when filling or working around the washer solution.
MAINTENANCE-FREE BATTERY
Your vehicle is equipped with a maintenance-free battery. You will never have to add water, and periodic maintenance is not required.
WARNING!
- Battery fluid is a corrosive acid solution and can burn or even blind you. Do not allow battery fluid to contact your eyes, skin, or clothing. Do not lean over a battery when attaching clamps. If acid splashes in eyes or on skin, flush the area immediately with large amounts of water -> page 258.
- Battery gas is flammable and explosive. Keep flame or sparks away from the battery. Do not use a booster battery or any other booster source with an output greater than 12 Volts. Do not allow cable clamps to touch each other.
- Battery posts, terminals, and related accessories contain lead and lead compounds. Wash hands after handling.
CAUTION!
- It is essential when replacing the cables on the battery that the positive cable is attached to the positive post and the negative cable is attached to the negative post. Battery posts are marked positive (+) and negative (-) and are identified on the battery case. Cable clamps should be tight on the terminal posts and free of corrosion.
- If a “fast charger” is used while the battery is in the vehicle, disconnect both vehicle battery cables before connecting the charger to the battery. Do not use a “fast charger” to provide starting voltage.
PRESSURE WASHING
Cleaning the engine compartment with a high pressure washer is not recommended.
CAUTION! Precautions have been taken to safeguard all parts and connections however, the pressures generated by these machines is such that complete protection against water ingress cannot be guaranteed.
VEHICLE MAINTENANCE
An authorized dealer has the qualified service personnel, special tools, and equipment to perform all service operations in an expert manner. Service Manuals are available which include detailed service information for your vehicle. Refer to these Service Manuals before attempting any procedure yourself.
NOTE:
Intentional tampering with emissions control systems may void your warranty and could result in civil penalties being assessed against you.
WARNING! You can be badly injured working on or around a motor vehicle. Only do service work for which you have the knowledge and the proper equipment. If you have any doubt about your ability to perform a service job, take your vehicle to a competent mechanic.
ENGINE OIL
Engine Oil Selection
For engine oil selection -> page 323.
American Petroleum Institute (API)
Approved Engine Oil
These symbols mean that the oil has been certified by the API. The manufacturer only recommends API trademark oils.
 The API Starburst trademark certifies 0W-20, 0W-30 and 5W-30 engine oils.
 The API Donut trademark certifies 0W-40 and 5W-40 engine oil.
CAUTION! Do not use chemical flushes in your engine oil as the chemicals can damage your engine. Such damage is not covered by the New Vehicle Limited Warranty.
Synthetic Engine Oils
Your engine was designed for synthetic engine oils, only use synthetic API approved engine oils.
Synthetic engine oils which do not have both the correct API trademark and the correct SAE viscosity grade numbers should not be used.
Materials Added To Engine Oil
The manufacturer strongly recommends against the addition of any additives (other than leak detection dyes) to the engine oil. Engine oil is an engineered product and its performance may be impaired by supplemental additives
Disposing Of Used Engine Oil And Oil Filters
Care should be taken in disposing of used engine oil and oil filters from your vehicle. Used oil and oil filters, indiscriminately discarded, can present a problem to the environment. Contact an authorized dealer, service station or governmental agency for advice on how and where used oil and oil filters can be safely discarded in your area.
ENGINE OIL FILTER
The engine oil filter should be replaced with a new filter at every engine oil change.
Engine Oil Filter Selection
A full-flow type disposable oil filter should be used for replacement. The quality of replacement filters varies considerably. Only high quality Mopar® certified filters should be used.
ENGINE AIR CLEANER FILTER
For the proper maintenance intervals -> page 268.
WARNING! The air induction system (air cleaner, hoses, etc.) can provide a measure of protection in the case of engine backfire. Do not remove the air induction system (air cleaner, hoses, etc.) unless such removal is necessary for repair or maintenance. Make sure that no one is near the engine compartment before starting the vehicle with the air induction system (air cleaner, hoses, etc.) removed. Failure to do so can result in serious personal injury.
Engine Air Cleaner Filter Selection
The quality of replacement filters varies considerably. Only high quality Mopar® certified filters should be used.
AIR CONDITIONER MAINTENANCE
For best possible performance, your air conditioner should be checked and serviced by an authorized dealer at the start of each warm season. This service should include cleaning of the condenser fins and a performance test. Drive belt tension should also be checked at this time.
WARNING!
- Use only refrigerants and compressor lubricants approved by the manufacturer for your air conditioning system. Some unapproved refrigerants are flammable and can explode, injuring you. Other unapproved refrigerants or lubricants can cause the system to fail, requiring costly repairs. Refer to Warranty Information Book, located in your owner’s information kit, for further warranty information.
- The air conditioning system contains refrigerant under high pressure. To avoid risk of personal injury or damage to the system, adding refrigerant or any repair requiring lines to be disconnected should be done by an experienced technician.
CAUTION!
Do not use chemical flushes in your air conditioning system as the chemicals can damage your air conditioning components. Such damage is not covered by the New Vehicle Limited Warranty.
WIPER BLADES
Clean the rubber edges of the wiper blades and the windshield and rear window periodically with a sponge or soft cloth and a mild nonabrasive cleaner. This will remove accumulations of salt, waxes, or road film, and help reduce streaking and smearing.
Operation of the wipers on dry glass for long periods may cause deterioration of the wiper blades. Always use washer fluid when using the wipers to remove salt or dirt from a dry windshield or rear window.
Avoid using the wiper blades to remove frost or ice from the windshield or rear window. Make sure that they are not frozen to the glass before turning them on to avoid damaging the blade. Keep the wiper blade out of contact with petroleum products such as engine oil, gasoline, etc.
NOTE:
Life expectancy of wiper blades varies depending on geographical area and frequency of use. If chattering, marks, water lines or wet spots are present, clean the wiper blades or replace as necessary
Front Wiper Blade Removal/Installation
CAUTION! Do not allow the wiper arm to spring back against the glass without the wiper blade in place or the glass may be damaged.
- 1. Lift the wiper arm to raise the wiper blade off of the glass, until the wiper arm is in the full up position.
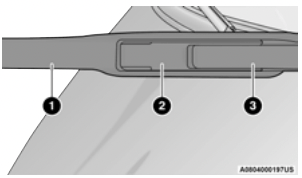
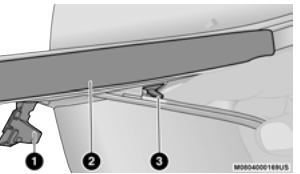
Windshield Wiper Arm And Blade
1 — Wiper
2 — Locking Tab
3 — Wiper Arm
- 2. To disengage the wiper blade from the wiper arm, flip up the locking tab.
Wiper Locking Assembly
1 — Wiper
2 — Locking Tab
- 3. Tilt the lower end of the wiper blade away from the arm and with one finger push the release tab toward the wiper arm.
Wiper Disengaging
1 — Locking Tab
2 — Wiper
3 — Release Tab
- 4. Slide the wiper blade down towards the base of the wiper arm.
- 5. With the wiper blade disengaged, remove the wiper blade from the wiper arm by holding the wiper arm with one hand and separating the wiper blade from the wiper arm with the other hand (move the wiper blade down toward the base of the wiper arm and away from the J hook in the end of the wiper arm).
Removing Wiper From Wiper Arm
1 — Wiper
2 — Locking Tab
3 — Wiper Arm J Hook
Installing The Front Wipers
- Lift the wiper arm off of the glass, until the wiper arm is in the full up position.
- Position the wiper blade under the hook on the tip of the wiper arm with the wiper locking tab open.
- Insert the receiver bracket on the wiper assembly into the hook on the tip of the arm through the opening in the wiper blade under the locking tab.
- Slide the wiper blade up into the hook on the wiper arm until it is latched (engagement will be accompanied by an audible click). Fold down the latch release tab and snap it into its locked position.
- Gently lower the wiper blade onto the glass.
Rear Wiper Blade Removal/Installation
- Lift the rear wiper arm pivot cap away from the glass to allow the rear wiper blade to be raised off of the glass.
NOTE:
The rear wiper arm cannot be fully raised off the glass unless the wiper arm pivot cap is unsnapped first. Attempting to fully raise the rear wiper arm without unsnapping the wiper arm pivot cap may damage the vehicle.
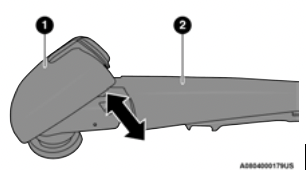
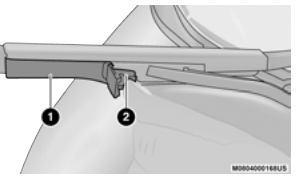
Wiper Pivot Cap In Unlocked Position
1 — Wiper Arm Pivot Cap
2 — Wiper Arm
- 2. Lift the rear wiper arm fully off the glass.
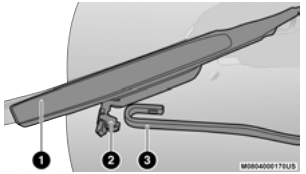
Wiper Blade In Folded Out Position
1 — Wiper Blade
2 — Wiper Arm
3 — Wiper Arm Pivot Cap
- 3. To remove the wiper blade from the wiper arm, grab the bottom end of the wiper blade nearest to wiper arm with your right hand. With your left hand, hold the wiper arm as you pull the wiper blade away from the wiper arm past its stop far enough to unsnap the wiper blade pivot pin from the receptacle on the end of the wiper arm.
NOTE: Resistance will be accompanied by an audible snap
- 4. Still holding the bottom end of the wiper blade, move the wiper blade upward and away from the wiper arm to disengage.
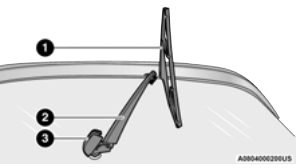
Wiper Blade Removed From Wiper Arm
1 — Wiper Blade
2 — Wiper Blade Pivot Pin
3 — Wiper Arm Receptacle
4 — Wiper Arm
- 5. Gently lower the tip of the wiper arm onto the glass
Installing The Rear Wiper
- Lift the rear wiper arm pivot cap away from the glass to allow the rear wiper blade to be raised off of the glass.
NOTE:
The rear wiper arm cannot be fully raised off the glass unless the wiper arm pivot cap is unsnapped first. Attempting to fully raise the rear wiper arm without unsnapping the wiper arm pivot cap may damage the vehicle.
2. Lift the rear wiper arm fully off the glass.
3. Insert the wiper blade pivot pin into the opening on the end of the wiper arm. Grab the bottom end of the wiper arm with one hand, and press the wiper blade flush with the wiper arm until it snaps into place.
4. Lower the wiper blade onto the glass and snap the wiper arm pivot cap back into place.