Loading ...
Loading ...
Loading ...
ENGLISH
4
1
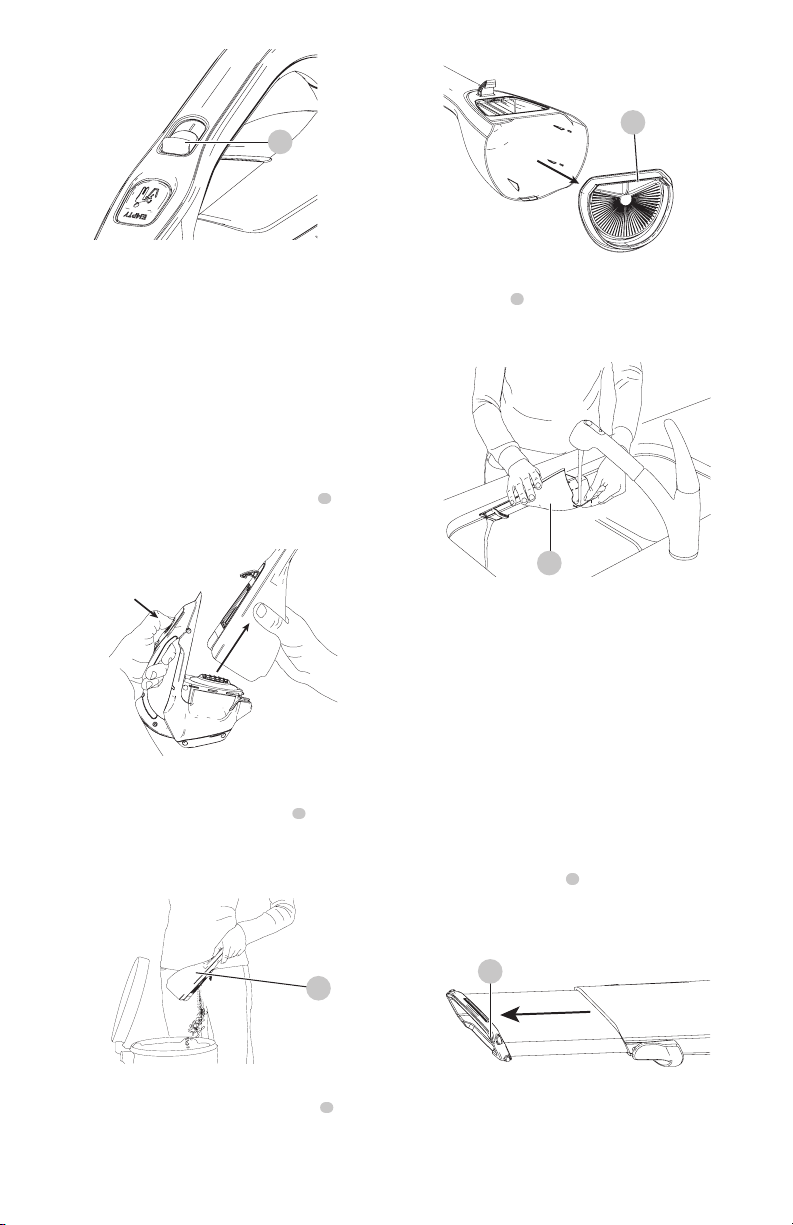
Fig. D
Cleaning and emptying the product
WARNING: Projectile/Respiratory Hazard:
Never use the vac without itsfilter.
NOTE: The filter is re-usable, do not confuse it with a
disposable dust bag, and do not throw it away when the
product is emptied. We recommend that you replace the
filter every 6–9 months depending on frequency ofuse.
There are two methods of cleaning the bowl, a quick empty
method and a thorough clean method.
For a quick empty (Fig. E, F)
• Figure E - Press the dust bowl release button
2
on the
handle and remove the dustbowl.
Fig. E
• The top of the bowl is open when the bowl is removed so
that dust can be easy dumped without touching thefilter.
• Figure F - Empty the dust from the bowl
3
.
• To replace dust bowl, place it back onto the handle until
it
“clicks” firmly intoposition.
For a more thorough cleaning, remove bowl as describedbelow.
Fig. F
3
For a more thorough cleaning (Fig.G,H)
• Figure G - Press the dust bowl release button
2
on the
handle and remove the dustbowl.
• Remove filter from within thebowl.
Fig. G
5
• Shake or lightly brush any loose dust off filter.
• The dust bowl
3
and filter can be washed in warm
soapy water. Allow to dry before placing back into
thevac.
Fig. H
3
• Place filter back into the bowl pressing firmly to ensure
a securefit.
• To replace dust bowl, place it back onto the handle until it
“clicks” firmly intoposition.
IMPORTANT: Maximum dust collection will only be
obtained with a clean filter and an empty dust bowl. If dust
begins to fall back out of the product after it is switched off,
this indicates that the bowl is full and requiresemptying.
• Wash the filters regularly using warm, soapy water and
ensure that it is completely dry before using again. The
cleaner the filter is, the better the product will perform.
• It is very important that the filter is correctly in position
beforeuse.
Nozzle / Accessories (Fig. I–K)
• Figure I - A crevice tool
4
is built into the nozzle and
can be extended as shown in Figure I by pulling the
extension piece until it locks intoposition.
Fig. I
4
Attaching Pet Head (Fig. J)
CAUTION: The unit needs to be switched
off when the pet head is attached ordetached.
NOTE: Do not use directly onpets.
Loading ...
Loading ...
Loading ...