
Loading ...
Step 2:
OPTION A: Prepare existing countertop
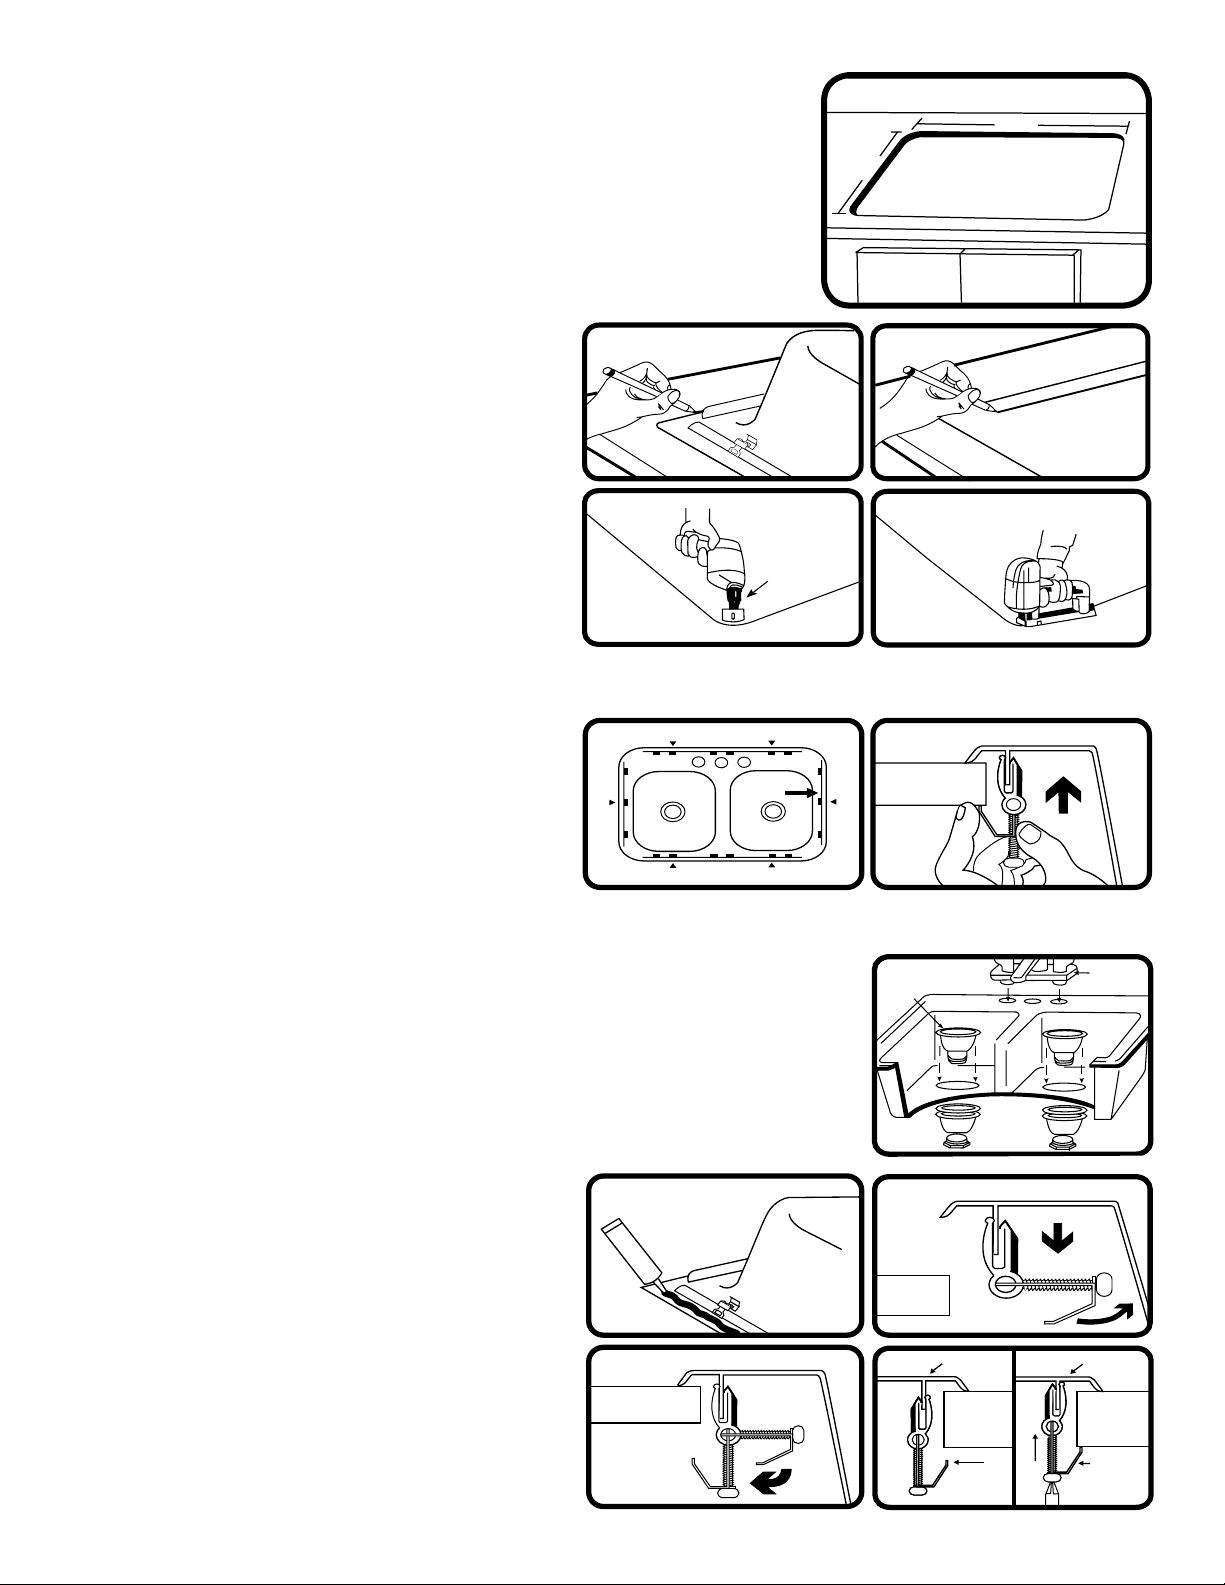
1. Make sure existing countertop cut-out opening is the proper size. Set the new
sink into opening. The sink rim should rest evenly on the countertop. Slight
adjustments can be made using a le or a jigsaw.
2. Use caution to avoid chipping or cracking the countertop while ling or
sawing.
3. After nal tting, remove the new sink from cut-out.
OPTION B: Prepare a new countertop using the sink as
a template
1. Carefully place the sink upside down on the
countertop at the desired position. Trace the outline
of the sink onto the countertop. Do not cut along
this line.
2. Draw a line 3/8” (9mm) inside the sink outline.
Measure the cut-out line you just drew and
compare to all sink dimensions. The cut-out should
be approximately 3/4” (19mm) smaller than the
overall sink dimensions.
3. Verify both measurements.
4. Drill a pilot hole inside the cutting line.
5. Using a jigsaw, cut along the inside line to create
the opening in the countertop.
Step 3: Apply the mounting clips
1. Turn sink upside down onto a clean, soft surface.
2. Six clips are recommended for installation. If
required, two extra clips are included.
3. Attach clips over the pre-drilled mounting slot in the
sink rim (see diagram for placement). Ensure clip
jaws are facing the outside edge of sink.
4. Verify clip snaps are fully seated into the mounting slot.
5. Turn all clip jaws parallel to the sink rim.
Step 4: Install accessories
Attach faucet and drains to the sink. Use plumber’s putty or silicone sealant under the
faucet base and under the top ange of the drain to provide a leak-proof seal.
Step 5: Insert sink and tighten mounting clips
1. With sink in the upside-down position, place a continuous and generous bead of
silicone sealant or plumber’s putty around the entire
perimeter of the rim. This serves as a watertight
seal.
2. Position clips back as noted in diagram in order to
prepare for inserting sink into countertop.
3. Lift sink, turn face-up and lower into the countertop
opening.
4. Line up front rim with the front edge of the counter.
5. Return clips to original position for tightening.
6. Underneath the countertop, begin tightening clips
with a screwdriver in an even fashion, alternating
sides while tightening until the entire rim is sealed.
Length
Widt h
Step 2
Countertop
Using a 2" hole saw, drill
a hole on the inside of the
line that was traced using
the cut-out template.
Countertop
Using a jigsaw, cut along outline
traced on countertop.
1
4
5
2
OPTION B: 1
4
2
5
Countertop
Sink
Integrated
installation
rail
Front rim
Clip
Clip
Clip
Clip
Clip
Clip
Step 3: 1-4 5
Faucet base
Top ange
of drain
Step 4
Slowly tighten
the clip with
a screwdriver
Push
up
Sink
Sink
Drop in
position
CountertopCountertop
Apply a bead of silicone
sealant or plumber’s putty
around the rim.
Countertop
Countertop
1
5
6
2
Step 5: 1
5
6
2
Loading ...
Loading ...
Loading ...