Loading ...
Loading ...
Loading ...
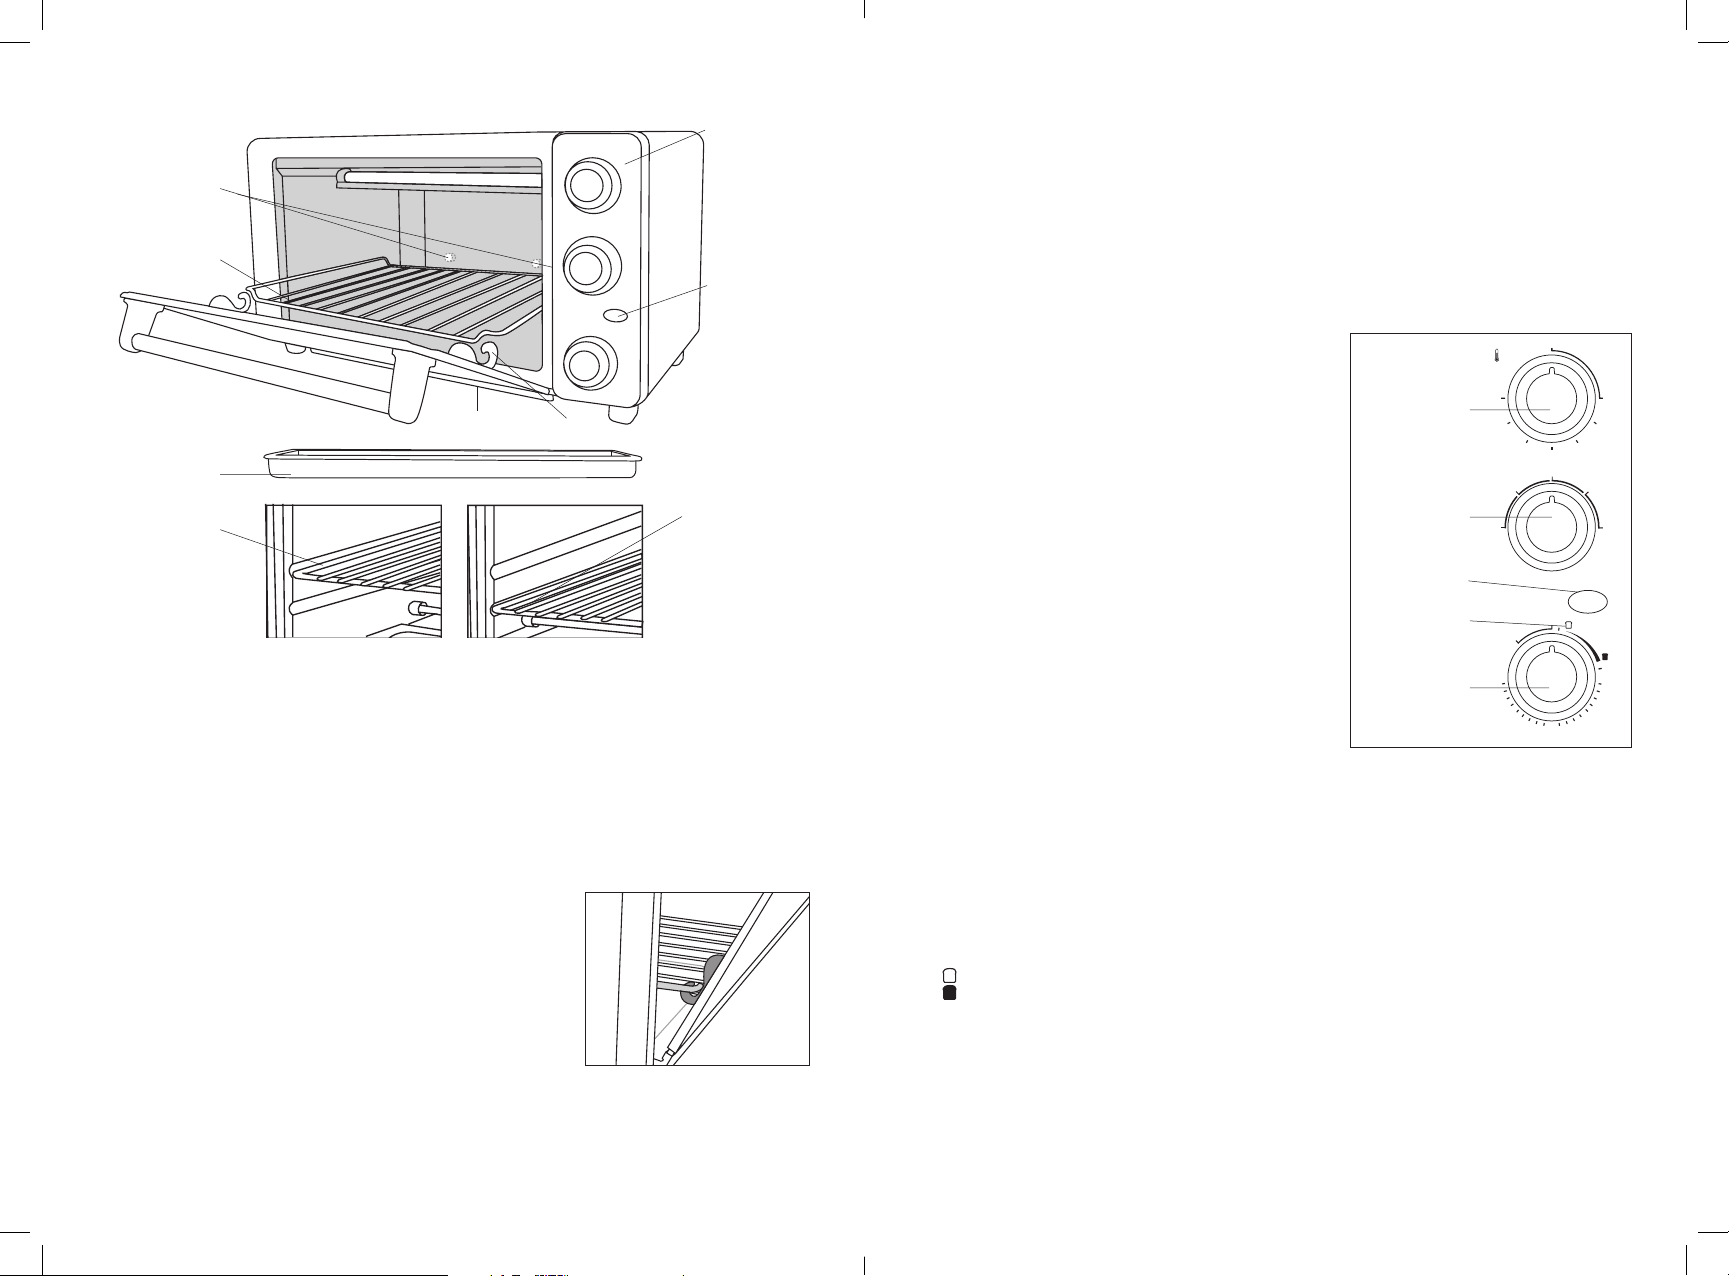
Getting To Know Your 4-Slice Countertop Oven
Product may vary slightly from illustration
Oven Rack
Rack Hooks
Slide Out
Crumb Tray
Rear Bumper
(Allows airow
between back of
oven and wall)
Baking Pan
Upper Oven
Rack Position
for broil
Lower oven rack
position for
bake/ toast
(Use this lower
position for pizza)
Control
Panel
Power
Indicator
Light
Before using for the rst time
• Remove all protective lm, accessories and shipping materials packed inside the oven; peel off clear
protective lm from control panel.
• Wash all removable parts in warm soapy water. Wipe the inside of the oven with a damp cloth or
sponge. Blot dry with paper towels to be sure the unit is dry before using.
• Place oven on a at counter or other stable surface. Place the Countertop Oven at least 2 to 4-inches
away from the wall to allow heat ow without causing damage to cabinets and walls.
DO NOT OPERATE ON THE SAME CIRCUIT WITH ANOTHER APPLIANCE.
• Make sure the Crumb Tray is properly installed below the lower heating elements before using.
• Insert reversible oven rack halfway into lower rack slot position.
• Lift oven door to bring up the rack hooks, then slide the rack along the slots until it engages with
thehooks.
IMPORTANT: The rack will not slide forward when the door is open unless it is inside the hooks
on the door (Figure 2).
NOTE: The hooks only function when rack is the lower slot.
• Close oven door, noting that rack slides completely into oven.
• Select a location where this unit is to be used allowing enough
space between the back of the unit and the wall to allow heat
ow without damage to cabinets and walls.
• Remove tie from cord and unwind.
• Plug unit into electrical outlet.
NOTE: During rst few minutes of use you may notice smoke
and slight odor. This is normal and should cause no concern.
• Before using for the rst time, set the Temperature Dial to 350°F, the function setting on BAKE
and the timer to 15 minutes without any food in oven to burn off any oils remained from
manufacturing.
IMPORTANT: The oven gets hot when in use. Always use oven mitts or pot holders when touching
the outer or inner surface of the oven.
How To Use the Countertop Oven
IMPORTANT: The oven gets hot when in use. Always use oven mitts or pot holders when touching
the outer or inner surface of the oven.
• Place the oven rack in position that will accommodate the height of the food to be cooked.
Be sure that the food is at least 1 ½ inches away from the upper or lower heating elements.
• Set the food on the rack. Make sure that you always use ovenproof containers, never use plastic
or cardboard containers in the oven. Do not put any containers directly onto the lower heating
elements.
• Never use glass, ceramic pans or containers with lids.
• Do not let juices run to the bottom of the oven. Use the baking pan and crumb tray when cooking.
• Turn the Temperature Dial to the desired cooking temperature.
• Securely shut the door and set the cooking time to begin operating the oven.
Control Panel
IMPORTANT: When using the timer for less than 10 minutes,
turn the dial past the 10 minute mark and then turn back to
theappropriate time/ toast browning setting.
Temperature Dial
Turn the Temperature Dial clockwise to the desired setting.
The temperature can be set from 150 °F (65 °C) to 450 °F
(230 °C). To keep food warm after it has been cooked,
set the Function Dial to warm.
FUNCTION DIAL
This oven offers different functions for versatile cooking all
in one appliance.
• BAKE: Both the upper and lower heating elements are
operational in this setting.
• BROIL: Only the upper heating elements are operational
in this setting. Turn the Temperature Dial to MAX
for optimal performance.
• TOAST: The upper and lower heating elements
are operational. Turn the Temperature Dial to MAX
for optimal performance.
• BAGEL: Only the upper heating elements are operational.
Turn the Temperature Dial to MAX for optimal performance.
• WARM
Power Indicator Light
The power indicator light will illuminate when the unit is plugged in and the time has been set, or STAY
ON has been selected. When the time set has expired, or the Timer Dial has been turned to the OFF
position, the power indicator light will turn off.
TIMER/TOAST DIAL
• OFF: Turn the Timer Dial to the OFF position when cooking is complete. The power indicator light will go off.
• STAY ON: When cooking for more than 30 minutes, or to cook manually for an unlimited amount
of time, turn the Timer Dial to STAY ON to turn the Countertop Oven ON. The power indicator
light will illuminate.
NOTE: Bread may catch re if the toasting time is setting too long. Close supervision is necessary
during toasting.
• Toast Browning:
Light
Dark
• 0-30 MINUTES: To begin operation, set the time by turning the dial clockwise to STAY ON or to the
desired cooking time. Cook time may be adjusted during any cooking cycle. Turn the Timer Dial to
the desired time and continue cooking. When the time set has expired, the Timer Dial will move to
the OFF position, a bell will be heard and the Countertop Oven will automatically turn OFF. When
the Timer Dial is in the OFF position, the oven will not operate.
NOTE: To set the timer for less than 10 minutes, always turn the Timer Dial to 10 minutes and then
rotate back to your chosen time. This will ensure an accurate cooking time.
Fig. 2
TEMP
°F
200
150
350
400
450
POWER
300
250
OFF
TIME
(MINUTES)
STAY ON
10
20
30
FUNCTION
BAKE
TOAST
BROIL
BAGEL
WARM
BAKE
TOAST
BROIL
BAGEL
WARM
OFF
Temperature
Dial
Power
Indicator Light
Function
Dial
Timer
Dial
Fig. 3
Toast Shade
Selector
5 4
SO-314454_14622 BELLA ultimate Elite TOV IM_R2.indd 4-5 2017-07-04 8:14 AM
Loading ...
Loading ...
Loading ...