Loading ...
Loading ...
Loading ...
14 15
ninjakitchen . co.uk
ninjakitchen . co.uk
USING YOUR FOODI
®
MAX MULTI-COOKER – CONT.
4 Press FUNCTION, then turn the
START/STOP dial to select PRESSURE.
The unit will default to high (HI) pressure
and a time setting of 2 minutes. Press
START/STOP to begin.
5
The display showing PRE and some steam
release indicate pressure is building. When
fully-pressurised, countdown will begin.
6 When the countdown is finished,
the unit will beep and display DONE
before automatically switching to KEEP
WARM mode, and begin counting up.
7 Turn the pressure release valve to the
VENT position to quick release the
pressurised steam. There will be a burst
of steam from the pressure release valve.
When steam is completely released, float
valve will drop and the lid can be opened.
NOTE: Time to pressure varies and may
take up to 15 minutes.
GRILL
GETTING STARTED PRESSURE
COOKING
It is recommended that first-time users
do the water test to familiarise themselves
with Pressure Cooking.
1 Place the pot in the cooker base and
add 750ml of room-temperature water
to the pot.
2 Assemble the pressure lid by aligning the
arrow on the front of the lid with the arrow
on the front of the cooker base. Then turn
the lid clockwise until it locks into place.
3 Make sure the pressure release valve
is in the SEAL position.
NOTE: To reduce the risk of injury from
unintended contact with hot foods, liquids
and steam when pressure cooking, you must
review and follow all warnings on pages 2-5.
Failure to follow these safeguards increases
your risk of experiencing a burn.
NATURAL PRESSURE RELEASE
VS. QUICK PRESSURE RELEASE
Natural Pressure Release: When pressure
cooking is complete, steam will naturally
release from the unit as it cools down.
This can take upwards of 20 minutes,
depending on the amount of ingredients in
the pot. During this time, the unit will switch
to Keep Warm mode. Press KEEP WARM if
you would like to turn Keep Warm mode o.
When natural pressure release is complete,
the float valve will drop down.
Quick Pressure Release: Use ONLY if your
recipe calls for it. After pressure cooking and
the KEEP WARM light comes on, turn the
pressure release valve to the VENT position
to quickly release the steam. Steam release
will be accompanied by an audible hiss.
Some steam will remain in the unit after
pressure release and will escape when the
lid is opened. Lift and tilt it away from you,
making sure no condensation drips into the
cooker base.
NOTE: At any time during the natural
release process, you can switch to quick
release by turning the pressure release
valve to the VENT position.
NOTE: It can take upwards of 20 minutes
to build pressure.
PRESSURISING
As pressure builds in the unit, the
control panel will display PRE. Time to
pressure varies based on the amount and
temperature of ingredients as well as liquid
in the pot. For safety, the lid will lock as
the unit pressurises, and it will not unlock
until pressure is released. Once the unit has
reached full pressure, the cooking cycle will
begin and the timer will start counting down.
GRILL
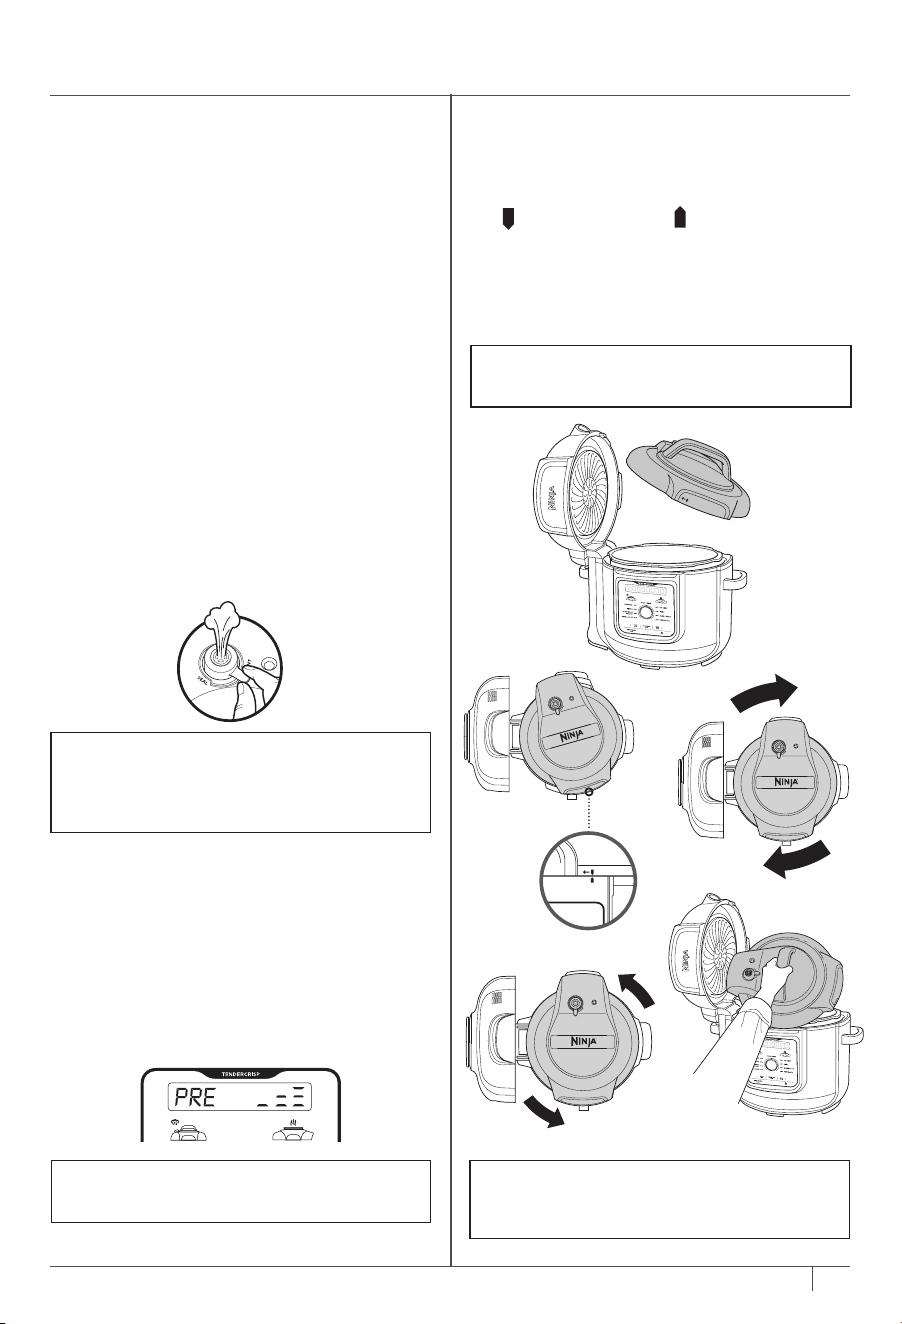
INSTALLING & REMOVING
THE PRESSURE LID
Place the pressure lid on top of the unit with
the on the lid and the on the base lined
up evenly. Turn the lid clockwise until it locks
in place.
To unlock the pressure lid, turn it
counterclockwise. Lift the lid at an angle to
prevent splatter. Do not lift the lid straight up.
NOTE: The pressure lid will not unlock
until the unit is completely depressurised.
WARNING: Serious burns can result from
the steam inside. ALWAYS lift and tilt the
lid towards you when removing.
Loading ...
Loading ...
Loading ...