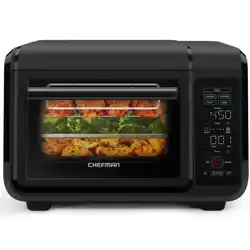
OWNER’S GUIDE Toaster Oven
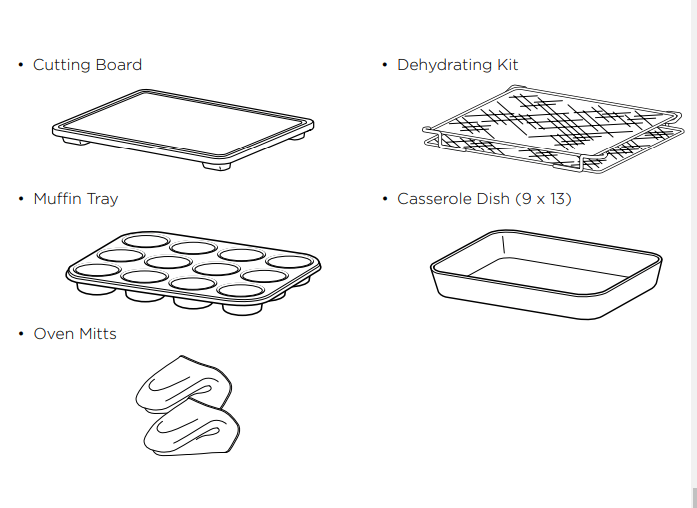
PARTS
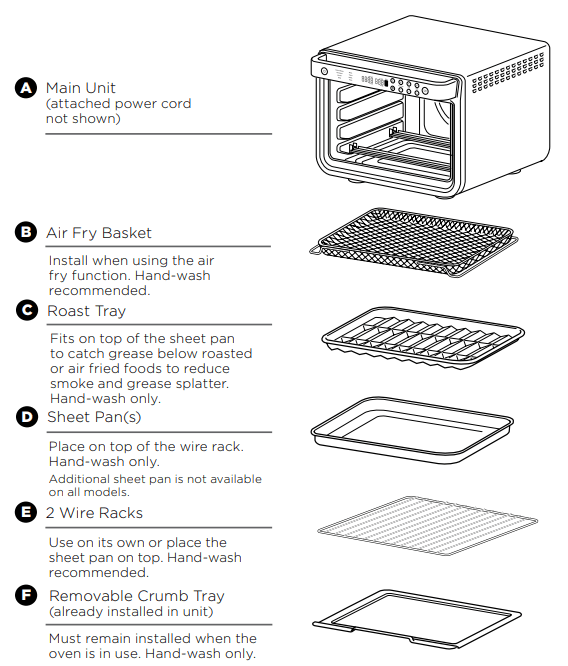
IMPORTANT: Place crumb tray below lower heating elements. DO NOT slide into any rack positions.
COMMON–SENSE PRACTICES/GOOD HABITS:
- DO NOT leave your toaster oven unattended while making food. If possible, unplug the oven while not in use to eliminate the possibility of accidents occurring.
- Have a fire extinguisher or fire containment blanket handy in a safe, known location. If you don’t have a fire extinguisher, douse the flames with baking soda until they are put out.
- If a fire occurs and the food in the oven is not greasy, immediately unplug the unit and douse the flames with water until the fire is extinguished. DO NOT use water if grease is present, since it could make the fire worse. Use baking soda instead.
ACCESSORY PLACEMENT
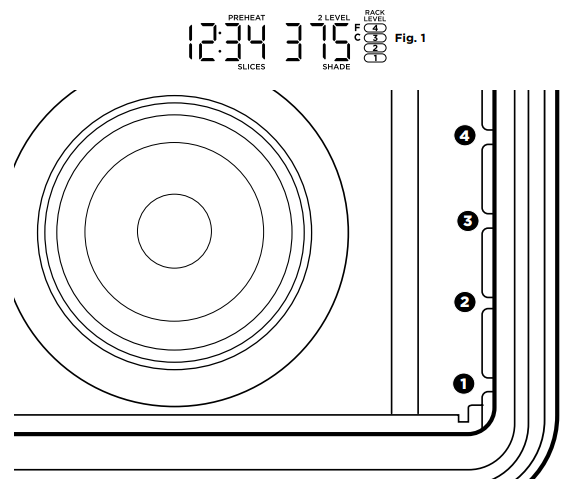
- The oven has 4 available rack positions where your accessories can slide into the unit (see image above). When you select a function, the corresponding rack number(s) will illuminate on the control panel. The numbers on the control panel will coincide with those on the interior of the unit. See the chart on page 8 for further details.
BEFORE FIRST USE
- Remove and discard any packaging material, promotional labels, and tape from the unit.
- Remove all accessories from the package and read this manual carefully. Please pay particular attention to operational instructions, warnings, and important safeguards to avoid any injury or property damage.
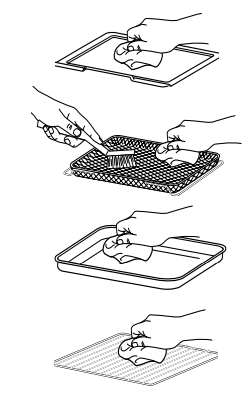
- Wash the air fry basket, sheet pan, wire rack, roast tray, and removable crumb tray in warm, soapy water, then rinse and dry thoroughly. DO NOT put sheet pan, roast tray, or removable crumb tray in the dishwasher. Finishes may degrade. NEVER submerse the main unit in water.
We recommend placing all accessories inside the oven and running it on Air Roast at 450°F for 20 minutes without adding food. This removes any residues. This is completely safe and not detrimental to the performance of the oven.
NOTE: The accessories are hand-wash recommended. The air fry basket and wire racks can be put in the dishwasher, but may wear more quickly over time.
USING THE CONTROL PANEL

FUNCTIONS: Once you’ve selected a function below, you can change temperature/shade and time/slices
- WHOLE ROAST: Simultaneously roast large proteins, like a 5-lb chicken, and sides for a complete meal. Or cook a larger protein, like a 12-lb turkey, on its own.
- AIR ROAST: Achieve a crispy outside and perfectly cooked inside for full-sized sheet pan meals, thicker proteins, and roasted veggies.
- AIR FRY: Foods that would traditionally be fried—such as chicken wings, French fries, and chicken nuggets—with little to no added oil.
- BAKE: Evenly bake everything from your favorite cookies to cakes.
- DEHYDRATE: Dehydrate meats, fruits, and vegetables for healthy snacks.
- BROIL: Evenly broil meats, fish and brown the tops of casseroles.
- TOAST: Toast up to 9 slices of bread to your desired level of darkness.
- BAGEL: Perfectly toast up to 9 bagel halves when they’re placed cut-side up on the wire rack.
- PIZZA: Cook frozen or homemade pizzas evenly.
- REHEAT: Heat leftovers without over cooking.
NOTE: The Dehydrate and Reheat functions are not included on all models.
NOTE: The oven’s technology leads to faster cooking. Always monitor food to prevent overcooking. Refer to cook charts in the Inspiration Guide for more guidance on cook times and temperatures.
CONTROL PANEL DISPLAY & OPERATING BUTTONS
1  (Power) button: Press to turn the unit on and off.
2 Time display: Shows the cook time. The time will count down when cooking is in progress.
3 PREHEAT: Flashes when the unit is preheating. If the oven is already up to temperature from using a previous cooking function, the unit will skip preheating.
4 SLICES: Illuminates when using the Toast or Bagel function to designate number of slices.
5 Temperature display: Shows the cook temperature.
NOTE: Time and temperature will always return to the settings used the last time the oven was in operation
6 RACK LEVEL: Depending on the function you choose, the illuminated rack level(s) will indicate where your accessory should be placed in the unit.
7 2 LEVEL: For functions that allow you to cook on 2 levels, press the button to select 2-level cooking and rack levels will update.
8 FUNCTION +/- buttons: To select a cooking function, press the FUNCTION +/- buttons.
NOTE: As you move through functions, you’ll notice the rack level recommendations change for best results.
9 TIME/SLICES +/- buttons: To select a cook time, press the TIME +/- buttons. When using the Toast or Bagel function, these buttons will adjust the number of slices/bagel halves instead of the time. Time will increase in 1-minute increments under 1 hour and 5-minute increments over 1 hour. Hold the +/- buttons for 2 seconds to activate faster scrolling in 5-minute increments.
10 TEMP/SHADE +/- buttons: To adjust temperature, press the TEMP +/- buttons. When using the Toast or Bagel function, these buttons will adjust the shade level (1, lightest – 7, darkest) instead of the temperature. Temperature will increase in 5-degree increments. Hold the +/- buttons for 2 seconds to activate faster scrolling in 10-degree increments.
NOTE: The cook time and temperature may be adjusted at any time during the cooking cycle.
11 START/STOP button: Press to start or stop cooking.
12 SHADE: Illuminates when using the Toast or Bagel function to designate desired shade.
13  (Light) button: Press to turn the oven’s interior light on and off.
NOTE: The light will automatically turn on when 1 minute of cook time remains and when door is open while cooking.
USING YOUR FOODI™ XL PRO AIR OVEN
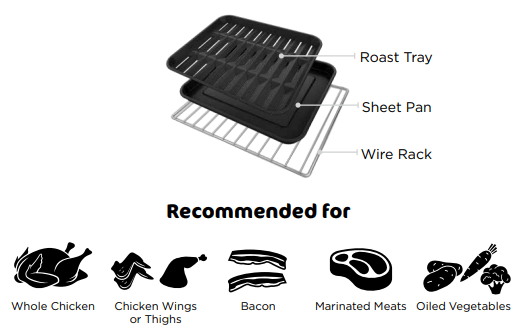
WHEN TO USE THE ROAST TRAY: Use Roast Tray on Sheet Pan when cooking on convection functions (such as Whole Roast, Air Roast, and Air Fry), or with greasy foods like: whole chicken, chicken wings, bacon, marinated meats, or oiled vegetables.
HOW TO REDUCE SMOKE
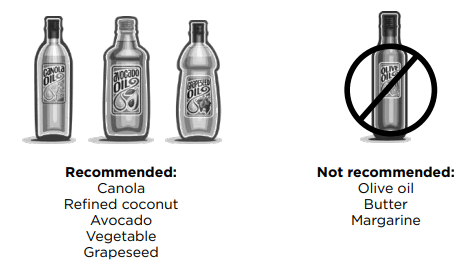
- We recommend using canola, coconut, avocado, grapeseed, or vegetable oil instead of olive oil.
- The unit may produce smoke when cooking on a hotter setting than what is recommended.
- NOTE: For more cooking charts, refer to your Inspiration Guide or visit ninjakitchen.com.
USING THE COOKING FUNCTIONS WITH RACK LEVELS
- When you select a cooking function, the control panel will illuminate the recommended rack height(s). The chart below outlines these recommendations along with the suggested accessories. For best results, use only the recommended accessories for a given function and remove others from the oven.
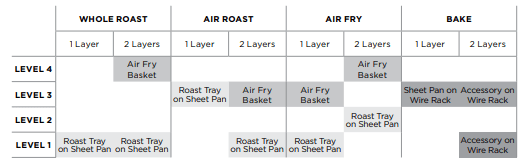
- NOTE: When cooking greasy, drippy foods on one level, place the Sheet Pan on the Wire Rack below to catch the drippings. Alternatively, use the Roast Tray on top of the Sheet Pan

- NOTE: Always place Sheet Pan on Wire Rack, DO NOT place directly on heating elements.
USING THE COOKING FUNCTIONS
- To turn on the unit, plug the power cord into an outlet and press the button. The unit will automatically shut off after 10 minutes of inactivity
Whole Roast
1 To select the function, press the function +/- buttons until WHOLE ROAST brightly illuminates. The default time and temperature settings will display. When cooking 2 layers, select the 2 LEVEL button so that “2 LEVEL” appears on the display.
2 Press the TIME/SLICES +/- buttons to select a cook time up to 4 hours.
NOTE: If cooking for 1 hour or less, the clock will count down by minutes and seconds. If cooking for more than 1 hour, the clock will count down by hours and minutes.
3 Press the TEMP/SHADE +/- buttons to select a temperature between 250°F–450°F.
4 Press START/PAUSE to begin preheating.
NOTE: Food cooks faster when using the Whole Roast function so refer to cook charts in the Inspiration Guide for more guidance on cook times and temperatures.
5 Place ingredients on the roast tray or directly on sheet pan. When the unit beeps to signify it has preheated, immediately place roast tray on the sheet pan on the wire rack on Level 1. Close oven door. When cooking on 2 levels, place the sheet pan on Level 1 and use the air fry basket as the second layer on Level 4.
NOTE: The timer will start counting down as soon as the unit has preheated. If ingredients are not ready to go into the oven, simply press the TIME +/- buttons to add more time.
6 When cook time is complete, the unit will beep and “END” will appear on the display
Air Roast
- To select the function, press the function +/- buttons until AIR ROAST brightly illuminates. The default time and temperature settings will display. When cooking 2 layers, select the 2 LEVEL button so that “2 LEVEL” appears on the display.
- Press the TIME/SLICES +/- buttons to select a cook time up to 4 hours. NOTE: If cooking for 1 hour or less, the clock will count down by minutes and seconds. If cooking for more than 1 hour, the clock will count down by hours and minutes
- Press the TEMP/SHADE +/- buttons to select a temperature between 250°F–450°F.
- Press START/PAUSE to begin preheating. NOTE: Food cooks faster when using the Air Roast function, so refer to cook charts in the Inspiration Guide for more guidance on cook times and temperatures
- Place ingredients on the sheet pan. When the unit beeps to signify it has preheated, immediately place the roast tray on sheet pan on the wire rack on Level 1. Close oven door. When cooking on 2 levels, place the sheet pan on Level 1 and use the air fry basket as the second layer on Level 3. NOTE: The timer will start counting down as soon as the unit has preheated. If ingredients are not ready to go into the oven, simply press TIME +/- buttons to add more time.
- When cook time is complete, the unit will beep and “END” will appear on the display
Air Fry
- To select the function, press the function +/- buttons until AIR FRY brightly illuminates. The default time and temperature settings will display. When cooking 2 layers, select the 2 LEVEL button so that “2 LEVEL” appears on the display.
- Press the TIME/SLICES +/- buttons to select a cook time up to 4 hours.
- Then press the TEMP/SHADE +/- buttons to select a temperature between 250°F–450°F.
- Press START/PAUSE to begin preheating. NOTE: Food cooks faster when using the Air Fry function. Refer to Air Fry Chart in the Inspiration Guide for more guidance on cook times and temperatures
- Place ingredients in the air fry basket and roast tray with sheet pan. If ingredients are fatty, oily, or marinated, place the basket on the sheet pan. Use air fry basket for dry ingredients.
- When the unit beeps to signify it has preheated, immediately slide the basket into the rack level(s) designated on the control panel. If also using the sheet pan, slide both into the oven at the same time, with the basket in the upper rack and the pan on the wire rack beneath the basket. Close oven door.
- When cook time is complete, the unit will beep and “END” will appear on the display. NOTE: The timer will start counting down as soon as the unit has preheated. If ingredients are not ready to go into the oven, simply press the TIME +/- buttons to add more time.
Bake
- To select the function, press the function +/- buttons until BAKE brightly illuminates. The default time and temperature settings will display. When cooking 2 layers, select the 2 LEVEL button so that “2 LEVEL” appears on the display.
- Press the TIME/SLICES +/- buttons to select a cook time up to 4 hours. NOTE: If cooking for 1 hour or less, the clock will count down by minutes and seconds. If cooking for more than 1 hour, the clock will count down by hours and minutes
- Press the TEMP/SHADE +/- buttons to select a temperature between 180°F–450°F.
- Press START/PAUSE to begin preheating.
- Place ingredients on the sheet pan, air fry basket, cake pan, or casserole dish. When the unit beeps to signify it has preheated, immediately place the sheet pan on the wire rack. Close oven door. NOTE: The timer will start counting down as soon as the unit has preheated. If ingredients are not ready to go into the oven, simply press the TIME +/- buttons to add more time.
- During cooking, you can turn on the light to check on progress.
- When cook time is complete, the unit will beep and “END” will appear on the display. NOTE: For best results with baked goods such as cookies, line the Ninja® Sheet Pan with parchment paper.
Dehydrate
NOTE: The unit does not preheat in Dehydrate mode
- To select the function, press the function +/- buttons until DEHYDRATE brightly illuminates. The default time and temperature settings will display. When dehydrating 2 layers, select the 2 LEVEL button so that “2 LEVEL” appears on the display.
- Press the TIME/SLICES +/- buttons to select a dehydrate time up to 24 hours.
- Press the TEMP/SHADE +/- buttons to select a temperature between 85°F–200°F.
- Place ingredients in the air fry basket and place basket in oven. Close oven door and press START/PAUSE to begin cooking. NOTE: For best results, lay ingredients flat on each layer; do not stack food.
- When cook time is complete, the unit will beep and “END” will appear on the display. NOTE: Purchase additional dehydrate accessory to dehydrate up to 4 levels at one time.
Broil
NOTE: The unit does not preheat in Broil mode.
- To select the function, press the function +/- buttons until BROIL brightly illuminates. The default time and temperature settings will display.
- Press the TIME/SLICES +/- buttons to select a cook time up to 30 minutes.
- Press the TEMP/SHADE +/- buttons to select either HI or LO.
- Place ingredients on the sheet pan. Place the sheet pan on the wire rack and close the oven door, press START/STOP to start cooking.
- When cook time is complete, the unit will beep and “END” will appear on the display.
Toast
NOTE: The unit does not preheat in Toast mode.
- To select the function, press the function +/- buttons until TOAST brightly illuminates. The default amount of slices and darkness level will display.
- Press the TIME/SLICES +/- buttons to select the number of bread slices. You may toast up to 9 slices at once.
- Press the TEMP/SHADE +/- buttons to select a darkness level. NOTE: There is no temperature adjustment available for the Toast function, and the unit does not preheat in Toast mode. It is very important to select the exact number of slices to avoid over- or under-toasting.
- Place bread slices on the wire rack. Close oven door and press START/PAUSE to begin cooking.
- When cook time is complete, the unit will beep and “END” will appear on the display
Bagel
NOTE: The unit does not preheat in Bagel mode.
- To select the function, press the function +/- buttons until BAGEL brightly illuminates. The default number of slices and darkness level will display.
- Press the TIME/SLICES +/- buttons to select the number of slices. You may toast up to 9 bagel slices at once.
- Press the TEMP +/- buttons to select a darkness level. NOTE: There is no temperature adjustment available for the Bagel function, and the unit does not preheat in Bagel mode. It is very important to select the exact number of slices to avoid over- or under-toasting.
- Place bagel slices, cut-side up, in the middle of the wire rack. Close oven door and press START/PAUSE to begin cooking.
- When cook time is complete, the unit will beep and “END” will appear on the display.
NOTE: You can also manually adjust the time once cooking has started to better choose your preferred shade.
Pizza
- To select the function, press the function +/- buttons until PIZZA brightly illuminates. The default number of slices and darkness level will display.
- Press the TIME/SLICES +/- buttons to select a cook time up to 4 hours.
- Press the TEMP +/- buttons to select a temperature between 180°F–450°F.
- Place pizza on the sheet pan or directly on the wire rack. Close oven door and press START/PAUSE to begin cooking.
- When cook time is complete, the unit will beep and “END” will appear on the display.
Reheat
NOTE: The unit does not preheat in Reheat mode.
- To select the function, press the function +/- buttons until REHEAT brightly illuminates.
- Press the TIME/SLICES +/- buttons to select a reheat time up to 4 hours.
- Press the TEMP/SHADE +/- buttons to select a temperature between 100°F–450°F.
- Place food on the sheet pan or in an oven-safe container and place the pan or container on the wire rack. Close oven door and press START/PAUSE to begin warming.
- When cook time is complete, the unit will beep and “END” will appear on the display
CLEANING & MAINTENANCE
EVERYDAY CLEANING
The unit should be cleaned thoroughly after every use.
- Unplug the unit from the outlet and allow it to cool down before cleaning.
- Empty crumb tray by sliding it out of the oven. NOTE: Empty crumb tray frequently. Hand-wash when necessary
- After every use, wipe away any food splatter on the interior walls and glass door of the unit with a soft, damp sponge.
- To clean the exterior of the main unit and the control panel, wipe them clean with a damp cloth. A non-abrasive liquid cleanser or mild spray solution may be used. Apply the cleanser to the sponge, not the oven surface, before cleaning.
- When using accessories, we recommend greasing them with recommended cooking oil, or covering them with parchment paper or aluminum foil before placing food on top. DO NOT cover roast tray holes with parchment paper or aluminum foil.
DEEP CLEANING
- Unplug the unit from the outlet and allow it to cool down before cleaning.
- Remove all accessories from the unit, including the crumb tray, and wash separately. Use a non-abrasive cleaning brush to more thoroughly wash the air fry basket. Accessories are hand-wash recommended. The air fry basket and wire racks can be put in the dishwasher, but may wear more quickly over time. DO NOT place roast tray, sheet pan, or crumb tray in dishwasher.
- Use warm, soapy water and a soft cloth to wash the oven’s interior and glass door, DO NOT use abrasive cleaners, scrubbing brushes, or chemical cleaners, as they will damage the oven. CAUTION: NEVER put the main unit in the dishwasher or immerse it in water or any other liquid.
- To remove tough grease, let sheet pan and roast tray soak overnight in warm, soapy water, then wash with a nonabrasive sponge or brush.
- Thoroughly dry all parts before placing them back in the oven.
IMPORTANT: Place crumb tray below lower heating elements. DO NOT slide into any rack positions.
ACCESSORIES FOR PURCHASE
We offer a suite of accessories custom made for your Ninja® Foodi™ XL Pro Air Fry Oven. Visit ninjaaccessories.com to expand your capabilities and take your cooking to the next level.
TROUBLESHOOTING & FAQ
ERROR MESSAGES
- “CALL CUSt SrVC” followed by “Er0” – “Er3”
- Power off the unit and call Customer Service at 1-877-646-5288. So we may better assist you, please register your product online at registeryourninja.com and have the product on hand when you call.
FAQ
1. Why won’t the oven turn on?
- Make sure the power cord is securely plugged into the outlet.
- Insert the power cord into a different outlet.
- Reset the circuit breaker if necessary.
- Press the power button.
2. Can I use the sheet pan instead of the air fry basket with Air Fry function?
- Yes, but crispiness results may vary.
3. Do I need to adjust the cook times and temperatures of traditional oven recipes?
- For best results, keep an eye out on your food while cooking. Refer to cook charts in the Inspiration Guide for more guidance on cook times and temperatures.
4. Can I restore the unit to its default settings?
- The oven will remember the last setting used for each function, even if you unplug it. To restore the oven’s default settings for each function, press the Light and 2 LEVEL buttons simultaneously for 5 seconds.
5. Why do the heating elements appear to be turning on and off?
- This is normal. The oven is designed to control temperature precisely for every function by adjusting the heating elements’ power levels.
6. Why is steam coming out from the oven door?
- This is normal. Foods with a high moisture content may release steam around the door.
7. Why is water dripping onto the counter from under the door?
- This is normal. The condensation created by foods with a high moisture content (such as frozen breads) may run down the inside of the door and drip onto the counter.
8. Why is the unit generating smoke?
- Ensure you are using the roast tray on the sheet pan when cooking all greasy foods, or when using Air Fry, Air Roast, or Whole Roast functions.
- If problem persists, run a Toast cycle on shade 7 with accessories removed; this will burn off any additional grease on the heating elements that are causing smoke.
9. How can I clean the sheet pan?
- For stuck-on food, let the sheet pan soak before cleaning.
- Line the sheet pan with aluminum foil or parchment paper when cooking to make cleanup easier.
10. Why did a circuit breaker trip while using the unit?
- The unit uses 1800 watts of power, so it must be plugged into an outlet on a 15-amp circuit breaker. It is also important that the unit be the only appliance plugged into an outlet when in use. To avoid tripping a breaker, make sure the unit is the only appliance plugged into an outlet on a 15-amp breaker.
11. Why does the unit sound like it is still running even though the power is off?
- The cooling fan may continue to run even after the unit has been turned off. This is a normal function and should not be a source of concern. The cooling fan will stop after the temperature of the unit reaches below 95°F (35°C).