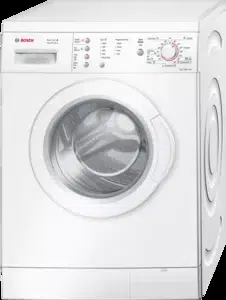
User Manual
Installation and con-nection
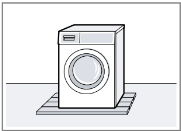
Unpacking the appliance
Note: Please read the information in the Safety → Page 4 and Preventing material damage → Page 10 sections to ensure that you use the appliance safely.
ATTENTION!
Objects remaining in the drum that are not designed for operation with the appliance may cause material damage and damage to the appli- ance.
►Remove these objects, along with all supplied accessories, from the drum before starting the appliance.
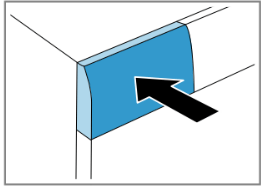
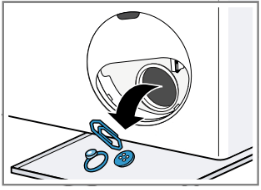
1. Remove any packaging and pro- tective covers completely from the appliance.
For the environmentally friendly disposal of the packaging materi- als, observe the information on the topic of
→ "Disposing of packaging", Page 11.
2. Check the appliance for visible damage.
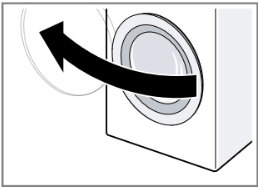
3. Open the door.
→ "Basic operation", Page 32
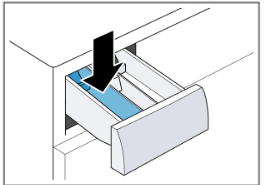
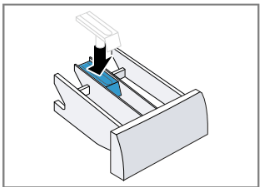
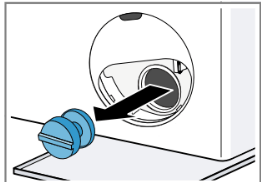
4. Remove the accessory from the drum.
5. Close the door.
Contents of package
After unpacking all parts, check for any damage in transit and completeness of the delivery.
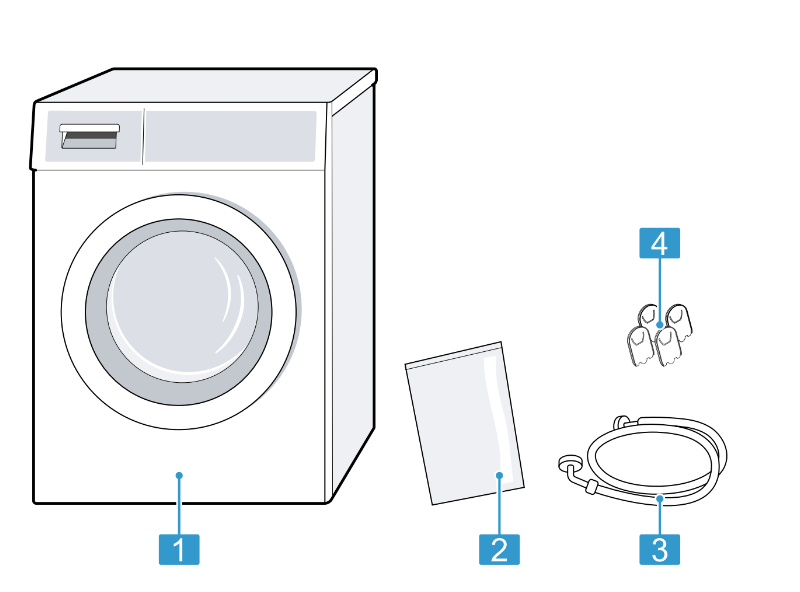
- Washing machine
- Accompanying documents
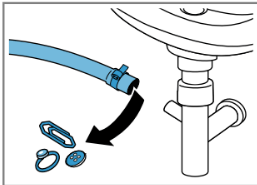
- Water inlet hose
- Cover caps
Requirements for the in- stallation location
Note: Please read the information in the Safety → Page 4 and Preventing material damage → Page 10 sections to ensure that you use the appliance safely.
 WARNING
Risk of electric shock!
The appliance contains live parts.
Touching live parts is dangerous.
►Do not operate the appliance without a cover cap.
 WARNING
Risk of injury!
When using the appliance on a base, the appliance may tip over.
► Always secure the feet of the appli- ance to a base using the manufac- turer's fixing brackets → Page 27 before using the appliance for the first time.
ATTENTION!
If the appliance is installed in areas exposed to frost or outdoors, frozen residual water may damage the appli- ance and frozen hoses may crack or split.
►Do not install or operate this appli- ance anywhere that is liable to ex- perience frost and/or outdoors.
The appliance underwent a function test before leaving the factory and may, therefore, contain residual wa- ter. This residual water may leak out if the appliance is tilted at an angle greater than 40°.
►Tilt the appliance carefully.
On a base
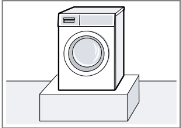
Secure the appli- ance with fixing brackets → Page 27.
On a wooden joist floor
Place the appli- ance on a water- resistant wooden board which is screwed tightly to the floor. The wooden board should be at least 30 mm thick.
In a kitchen unit
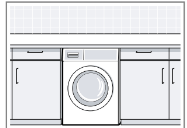
- A niche width of 60 cm is re- quired.
- Only install the appliance un- derneath a continuous worktop that is securely con- nected to adja- cent cabinets.
On a wall
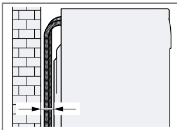
Do not trap the hoses between the wall and the appliance.
Note: If you want to install the wash- ing machine with a dryer as a washer-dryer stack, your washing ma- chine's worktop must be replaced first.
To replace the worktop, please con- tact customer service → Page 53.
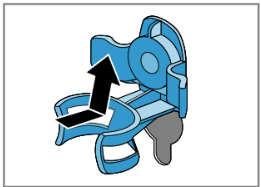
Removing the transit bolts
The appliance is secured for trans- portation using transit bolts on the rear of the appliance.
Notes
- Please read the information in the Safety → Page 4 and Preventing material damage → Page 10 sec- tions to ensure that you use the appliance safely.
- Keep the transit bolts, screws and sleeves in a safe place for future transport → Page 51.
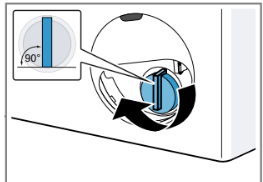
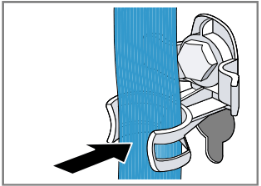
1. Pull the hoses out of the holders.
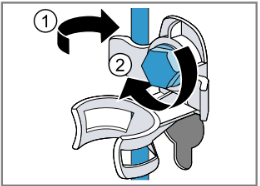
2. Unscrew and remove all four screws for the transit bolts with a WAF 13 wrench.

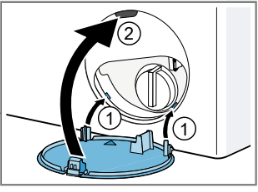
3. Pull the power cord out of the holder.
4. Remove the four sleeves.
5. Put on the four cover caps.
6. Press down on the four cover caps.
Connecting the appliance
Connecting the water inlet hose
Note
- Please read the information in the Safety → Page 4 and Preventing material damage → Page 10 sec- tions to ensure that you use the appliance safely.
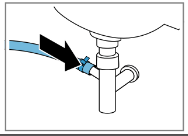
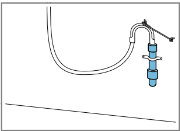
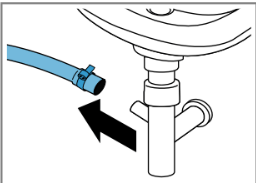
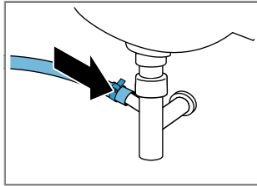
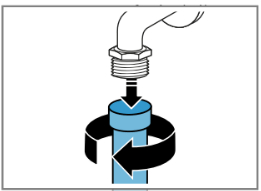
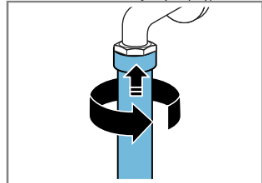
1. Connect the water inlet hose.
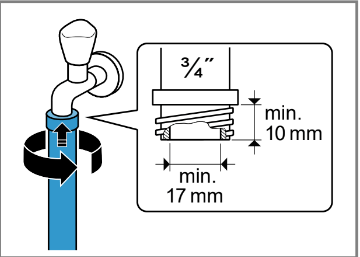
2. Connect the water inlet hose to a tap (26.4 mm = 3/4"). min.
3. Open the water tap carefully and check that the connection points are tight.
Water outlet connection types
This information is intended to help you to connect this appliance to the water outlet.
Note: Please read the information in the Safety → Page 4 and Preventing material damage → Page 10 sections to ensure that you use the appliance safely.
ATTENTION!
When draining, the water outlet hose is subject to water pressure and may come loose from the installed con- nection point.
► Secure the water outlet hose against unintentional loosening.
Drainage into a siphon
Secure the con- nection point with a (24–40 mm) hose clamp.
Drainage into a washbasin
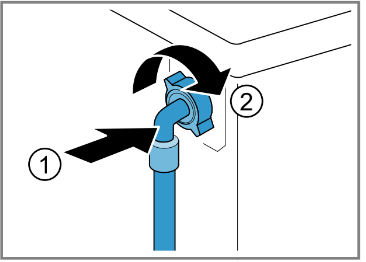
Fix and secure the water outlet using an elbow. → Page 27
Drainage into a plastic pipe with rubber sleeve.
Fix and secure the water outlet using an elbow. → Page 27
Aligning the appliance
Note: Please read the information in the Safety → Page 4 and Preventing material damage → Page 10 sections to ensure that you use the appliance safely.
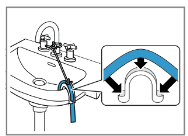
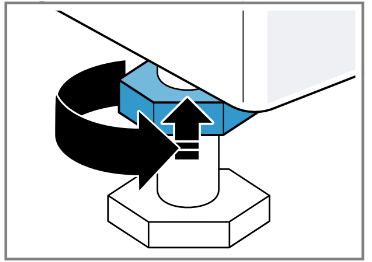
1. Loosen the lock nuts using a WAF wrench by turning it in a clock- wise direction.
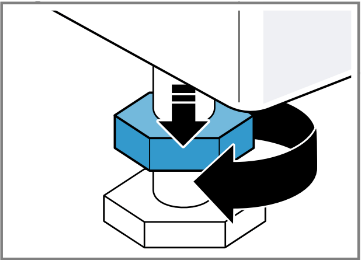
2. To align the appliance, turn the ap- pliance feet. Check that the appli- ance is level using a spirit level.
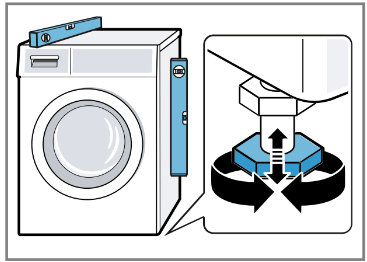
All appliance feet must stand firmly on the ground.
3. Screw the lock nuts tightly against the housing using a WAF 17 wrench.
In order to reduce noise and vibra- tion and to prevent the appliance from moving, align the appliance cor- rectly.
Connecting the appliance to the electricity supply
Note: Please read the information in the Safety → Page 4 and Preventing material damage → Page 10 sections to ensure that you use the appliance safely.
1. Insert the mains plug of the appli-ance's power cable in a socket nearby.
The connection details of the appli- ance can be found under Tech- nical data → Page 55.
2. Check the mains plug is inserted properly.
Familiarising yourself with your appliance
Appliance
You can find an overview of the parts of your appliance here.
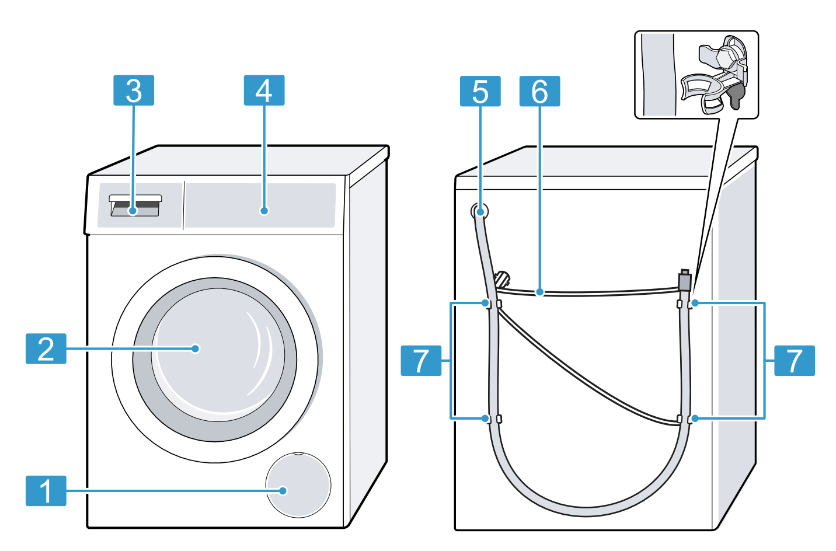
On certain models, specific details such as the colour and shape may differ from those pictured.
- Maintenance flap for the drain pump → Page 39
- Door
- Detergent drawer → Page 19
- Controls → Page 19
- Water outlet hose → Page 16
- Power cord → Page 17
- Transit bolts → Page 14
Detergent drawer
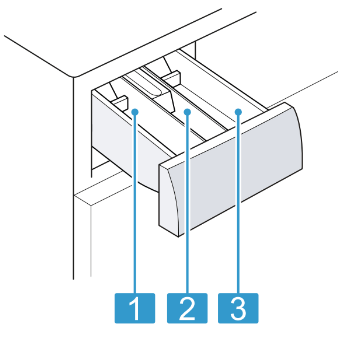
1. Compartment II:
- Detergent for main wash
- Water softener
- Bleach
- Stain remover
2. Compartment :
- Fabric softener
- Liquid starch
- Waterproofing agent
3. Compartment I:
- Detergent for prewash
- Hygiene detergent
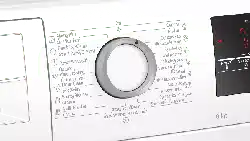
Controls
You can use the control panel to configure all functions of your appliance and to obtain information about the operating status.
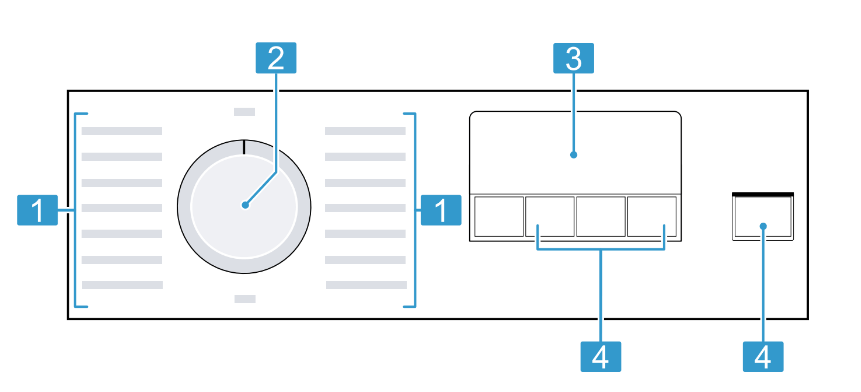
- Programmes → Page 23
- Programme selector → Page 32
- Display → Page 20
- Buttons → Page 22
Display
The display shows the current settings, options or relevant information.
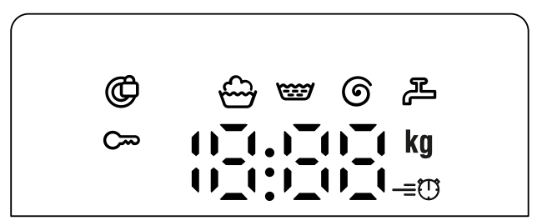
0:40 1
Programme dura- tion/programme time remaining
Approximate expected programme dura- tion or programme time remaining.
10h 1
"Ready in" time
The programme end has been set and the remaining number of hours is displayed.
→ "Buttons", Page 22
7 kg 1
Recommended load
The maximum load capacity for the selec- ted programme in kg.
- -- - 1200
Spin speed
Set spin speed in rpm.
→ "Buttons", Page 22
0=No final spin, only draining
- --: Rinse Hold, no draining

Wash
►Programme status

Rinse
►Programme status

Spin
► Programme status
– ––
Rinse Hold
► Programme status
End
End of pro- gramme
► Programme status

Childproof lock
- lights up: The childproof lock is activ- ated.
- flashes: The childproof lock is activated and the appliance has been operated.
→ "Deactivating the childproof lock", Page 35

SpeedPerfect
Short wash activated.
→ "Buttons", Page 22

Door
- Lights up: The door is locked and can- not be opened.
- Flashes: The door is not closed prop- erly.
- Off: The door is unlocked and can be opened.

Tap
- No water pressure.
- The water pressure is too low.
E:35 / -10 1
Error
Error code, error display, signal.
The selection of programme settings depends on the programme that is set.
You can see the selection options for each programme in the overview for
→ "Programmes", Page 23.
Start / Pause
Start, cancel or pause the pro- gramme.
Speed Perfect
Activate or deactivate a short washing programme.
Note: Energy consumption increases. The washing result is not affected by this.
Finish in
1–24 hours
Set the programme end.
The programme duration is already in- cluded in the set number of hours.
Once the programme has started, the programme duration is displayed.
Spin
– –– - 1200
Adjust the spin speed or activate – –– (Rinse Hold).
If – –– is selected, the water is not drained at the end of the washing cycle and the spin cycle is deactiv- ated. The laundry remains in the water used for rinsing.
3 sec.
Activate or deactivate the childproof lock.
Disable the control panel to prevent unwanted or accidental operation. If the childproof lock is activated and the appliance has been switched off, the childproof lock remains activated. → "Childproof lock", Page 35
Before using for the first time
Prepare the appliance for use.
Starting an empty wash- ing cycle
Your appliance was inspected thor- oughly before leaving the factory. To remove any residual water, run the first wash cycle without any laundry.
Note: Please read the information in the Safety → Page 4 and Preventing material damage → Page 10 sections to ensure that you use the appliance safely.
1. Turn the programme selector to Cottons 90°.
2. Close the door.
3. Pull out the detergent drawer.

4. Pour washing powder into com- partment II.
To prevent foaming, use only half of the amount of detergent recom- mended by the detergent manufac- turer for light soiling. Do not use detergent suitable for woollens or delicates.
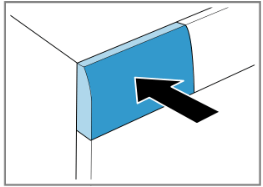
5. Push in the detergent drawer.
6. Press Start / Pause to start the programme.
- The display shows the remaining programme duration.
- After the programme has ended, the display shows: "End".
7. Start the first wash cycle or set the programme selector to Off to switch off the appliance.
→"Basic operation", Page 32
Laundry
Preparing the laundry
Note: Please read the information in the Safety → Page 4 and Preventing material damage → Page 10 sections to ensure that you use the appliance safely.
ATTENTION!
Objects remaining in the laundry may damage the laundry and the drum.
►Remove all items from any pock- ets in your laundry before using the appliance.
►To protect your appliance and the laundry, prepare the laundry be- forehand.
- Empty any pockets
- Brush sand out of all collars and pockets
- Close bed covers and cushion covers
- Close all zips, Velcro fasteners, hooks and eyes
- Tie cloth belts, apron strings, etc. together or use a laundry bag.
- Tie together longer drawstrings, and tie cords with solid end- pieces in hoods or trousers
- Remove curtain hooks and lead strips or use a mesh laundry bag
- Use a mesh laundry bag for small items of laundry, such as children's socks
- Some stubborn or dried-in stains can be removed by washing several times
- Wash large and small items of laundry together
- Do not rub fresh stains but dab them with soapy water
- Separate items of laundry and shake them out, or observe the programme description
Sorting laundry
Note: Please read the information in the Safety → Page 4 and Preventing material damage → Page 10 sections to ensure that you use the appliance safely.
►To improve washing results and prevent discolouration, sort the laundry according to the following criteria before washing.
- Type of fabric and fibre
Wash laundry of the same type of fabric and fibre to- gether.
- Care symbols on the care labels
→ Page 29
- Description of the programmes
→ Page 23
- Whites
- Colours
Wash new coloured items separately the first time you wash them.
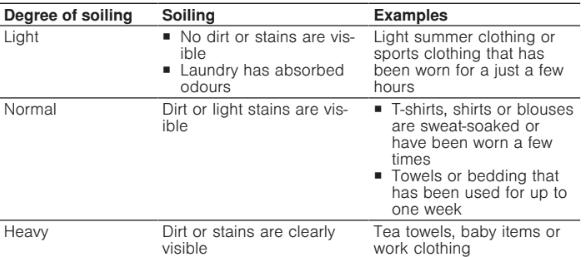
Degrees of soiling
Detergents and care products
Note: Please read the information in the Safety → Page 4 and Preventing material damage → Page 10 sections to ensure that you use the appliance safely.
The manufacturer's instructions for use and dosage can be found on the packaging.
Notes
- Only use liquid detergents that are self-flowing
- Do not mix different liquid deter- gents
- Do not mix detergent and fabric softener
- Do not use products that have ex- pired or are highly congealed
- Do not use products containing solvents, caustic agents or volatile substances (e.g. bleach)
- Use dyes sparingly as salt may damage stainless steel
- Do not use bleaching agents in the appliance
Detergent recommendation
Detergent dosage
The detergent dosage depends on:
- The amount of laundry
- Degree of soiling
- Water hardness
You can find out how hard your water is from your local water com- pany or measure it yourself using a water hardness tester.
Water hardness

Example of a manufacturer's instructions for detergent
These example values refer to a standard load of 4–5 kg.

The dosages can be found on the manufacturer's packaging.
- Adjust the dosage to the actual load.
Basic operation operation
Switching on the appli- ance
►Turn the programme selector to a programme.
Setting a programme
1. Set the programme selector to the required programme. → "Programmes", Page 23
2. If necessary, adjust the pro- gramme settings → Page 32.
Adjusting the pro- gramme settings
Requirement: A programme has been set.
→ "Setting a programme", Page 32
► Adjust the programme settings. → "Programmes", Page 23
Note: The programme settings are not saved permanently for the pro- gramme.
Loading laundry
Notes
- Please read the information in the Safety → Page 4 and Preventing material damage → Page 10 sec- tions to ensure that you use the appliance safely.
- To prevent creasing, take note of the maximum load for the → "Programmes", Page 23.
Requirement: The laundry is pre- pared and sorted. → "Laundry", Page 28
1. Open the door.
Make sure that the drum is empty.
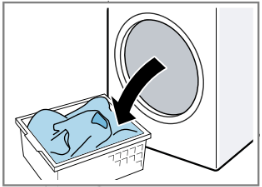
2. Load the laundry unfolded into the drum.
3. Close the door.
Ensure that there is no laundry trapped in the door.
Using a measuring aid for liquid detergent
If you order the measuring aid as an accessory, you must use the measur- ing aid.
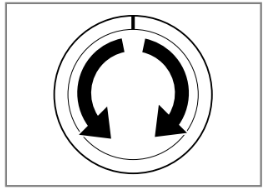
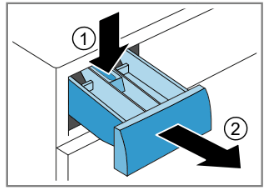
1. Press down on the insert and re- move the detergent drawer.
2. Insert the measuring aid.

3. Insert the detergent drawer.
Adding detergent and care product
Notes
- Please read the information in the Safety → Page 4 and Preventing material damage → Page 10 sec- tions to ensure that you use the appliance safely.
- Do not use the measuring aid for liquid detergent for gel detergents, washing powder, or if Prewash or "Ready in" time are activated.
Requirement: Find out the optimum dosage for detergent and care product. → Page 30
- Pull out the detergent drawer.
- Pour in detergent. → " Detergent drawer", Page 19
- If required, add the care product.
- Push in the detergent drawer.
Starting the programme
Note: If you want to change the time until the programme ends, set the "Ready in" time first.
►Press Start / Pause.
- The drum rotates and load detec- tion takes place. This can take up to 2 minutes, after which water enters the drum.
- The display shows either the pro- gramme duration or the "Ready in" time.
- After the programme has ended, the display shows: "End".
Soaking laundry
Note: No additional detergent is re- quired. The washing solution is then used for washing.
- Start the programme.
- To pause the programme, after ap- prox. 10 minutes, press Start / Pause.
- To resume the programme, after the desired soaking time, press Start / Pause.
Adding laundry
Note: Please read the information in the Safety → Page 4 and Preventing material damage → Page 10 sections to ensure that you use the appliance safely.
1. Press Start / Pause.
The appliance is paused and checks whether it is possible to add or remove laundry. Take note of the programme status.
2. Add or remove laundry.
3. Close the door.
4. Press Start / Pause.
Cancelling the pro- gramme
Once the programme has started, you can cancel it at any time.
Note: Please read the information in the Safety → Page 4 and Preventing material damage → Page 10 sections to ensure that you use the appliance safely.
1. Press Start / Pause.
2. Open the door.
The appliance door remains locked for safety reasons if the temperature and water levels are high.
- If the temperature is high, start the Rinse programme.
- If the water level is high: Start the Spin or Drain programme.
3. Remove the laundry.
Resuming the pro- gramme when the pro- gramme status is Rinse Hold
- Set the Spin or Drain programme.
- Press Start / Pause.
Unloading the laundry
Note: Please read the information in the Safety → Page 4 and Preventing material damage → Page 10 sections to ensure that you use the appliance safely.
- Open the door.
- Remove the laundry.
Switching off the appli- ance
1. Turn the programme selector to Off.
2. Turn off the tap.
3. Wipe the rubber gasket dry and re- move any foreign objects.

4. Leave the door and detergent drawer open so that residual water can evaporate.
Childproof lock
Secure your appliance against being operated unintentionally using the controls.
Activating the childproof lock
- Press and hold the two 3 sec. buttons for approx. 3 seconds.
►The display shows .
►The controls are locked.
►The childproof lock remains active even after the appliance has been switched off.
Deactivating the child- proof lock
Requirement: To deactivate the childproof lock, the appliance must be switched on.
- Press and hold the two 3 sec. buttons for approx. 3 seconds.
So that the programme currently running is not cancelled, the pro- gramme selector must be set to the initial programme.
goes out in the display.
Basic settings
You can configure the appliance to meet your needs.
Overview of the basic settings
Below is an overview of the basic settings on your appliance.
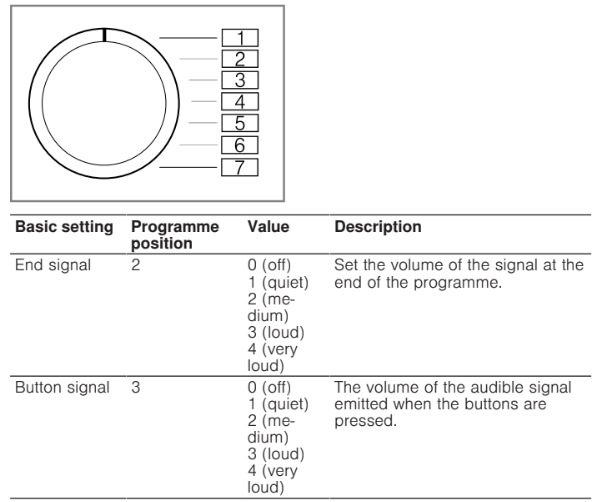
Changing the basic set- tings
1. Set the programme selector to po- sition 1.
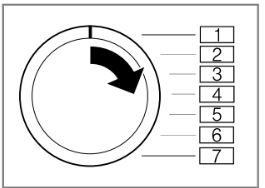
2. Press Start / Reload and, at the same time, turn the programme selector to position 2.
The display shows the current value.
3. Set the programme selector to the required position.
→ "Overview of the basic settings", Page 36
4. To change the value, press Finish in.
5. To save the changes, switch off the appliance.
Cleaning and servicing
To keep your appliance working effi- ciently for a long time, it is important to clean and maintain it carefully.
Tips on appliance care
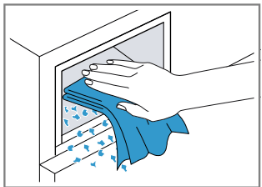
Wipe down the housing and the control panel with nothing but water and a damp cloth.
- This ensures the parts of the appli- ance will remain clean and hy- gienic.
Remove all de- tergent residue, spray residue or other residues immediately.
- Fresh deposits are easier to re- move without leaving any residue.
Keep the appli- ance door and detergent drawer open after use.
- This allows the residual water to dry, reducing odours in the ap- pliance.
Cleaning the drum
CAUTION
Risk of injury!
Permanently washing at low temper- atures and a lack of ventilation for the appliance may damage the drum and cause injury.
- Regularly run a programme for cleaning the drum or wash at tem- peratures of at least 60 °C.
- Leave the appliance to dry after every operation with the door open, and leave the detergent drawer to dry.
- Run the Cottons 90° programme without laundry.
Add washing powder.
Cleaning the detergent drawer
Note: Please read the information in the Safety → Page 4 and Preventing material damage → Page 10 sections to ensure that you use the appliance safely.
1. Pull out the detergent drawer.
2. Press down on the insert and re- move the detergent drawer.
3. Press out the insert upwards from below.
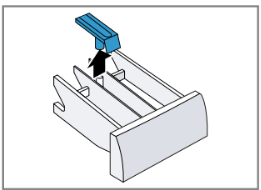
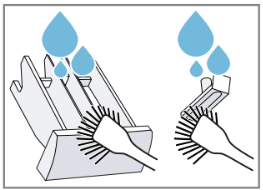
4. Clean the detergent drawer and in- sert with water and a brush, and then dry them.
5. Fit the insert and lock it into place.
6. Cleaning the opening for the deter- gent drawer.
7. Push in the detergent drawer.
Descaling
ATTENTION!
The use of unsuitable descaling agents, e.g. for coffee machines, may damage the appliance.
- For this appliance, only use de- scaling agents that are available from the manufacturer's website or our after-sales service.
Cleaning the drain pump
Clean the drain pump in the event of faults, e.g. blockages or rattling noises.
Emptying the drain pump
Note: Please read the information in the Safety → Page 4 and Preventing material damage → Page 10 sections to ensure that you use the appliance safely.
1. Turn off the water tap.
2. Switch off the appliance.
3. Disconnect the appliance's mains plug from the power supply.
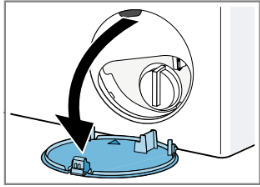
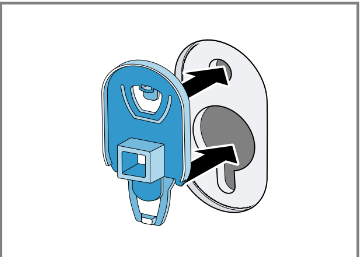
4. Open the maintenance flap.
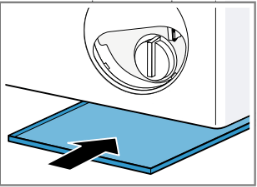
5. Slide a sufficiently large receptacle under the opening.
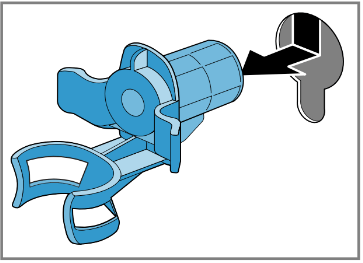
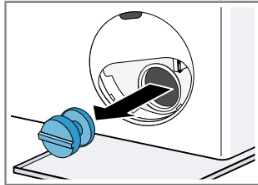
6. To allow the detergent solution to flow out into the container, remove the pump cap carefully.
Cleaning the drain pump
Note: Please read the information in the Safety → Page 4 and Preventing material damage → Page 10 sections to ensure that you use the appliance safely.
Requirement: The drain pump is empty. → Page 39
1. Since water may remain in the drain pump, remove the pump cap carefully.
2. Clean the interior, the thread on the pump cap and the pump hous- ing.
3. Make sure that the impeller in the drain pump can be rotated.
4. Insert the pump cap and screw it on as far as it will go.
The handle on the pump cap must be in a vertical position.
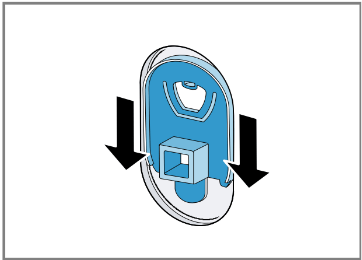
5. Insert the maintenance flap and lock it into place.
6. Close the maintenance flap.
Cleaning the water outlet hose at the siphon
1. Switch off the appliance.
2. Disconnect the appliance's mains plug from the power supply.
3. Loosen the hose clamp and care- fully remove the water outlet hose.
Residual water may leak out.
4. Clean the water outlet hose and si- phon connecting piece.
5. Reattach the water outlet hose and secure the connection point using the hose clamp.
Clean the water inlet fil- ters.
Emptying the water inlet hose
- Turn off the tap.
- Set a programme, except for Rinse, Spin or Drain.
- Start the programme and leave it to run for approx. 40 seconds.
- Switch off the appliance.
- Disconnect the appliance's mains plug from the power supply.
Cleaning the filter on the tap
Note: Please read the information in the Safety → Page 4 and Preventing material damage → Page 10 sections to ensure that you use the appliance safely.
Requirement: The water inlet hose is empty.
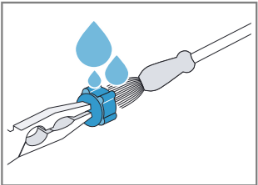
1. Remove the water inlet hose from the tap.
2. Clean the filter with a small brush.
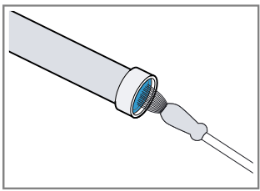
3. Connect the water inlet hose and check for leaks.
Cleaning the filter on the appliance
Note: Please read the information in the Safety → Page 4 and Preventing material damage → Page 10 sections to ensure that you use the appliance safely.
Requirement: The water inlet hose is empty.
→ "Emptying the water inlet hose", Page 41
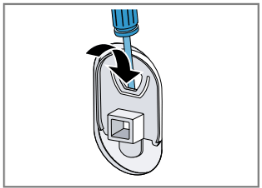
1. Disconnect the hose from the rear of the appliance.
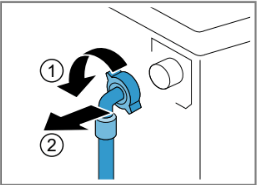
2. Use pliers to remove the filter.
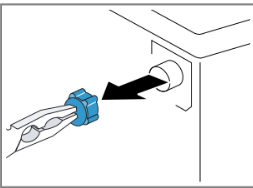
3. Clean the filter with a small brush.
4. Reinsert the filter.
5. Connect the hose and check for leaks.
Troubleshooting
You can rectify minor faults on your appliance yourself. Read the troubleshoot- ing information before contacting after-sales service. This will avoid unneces- sary costs.
 WARNING
Risk of electric shock!
Incorrect repairs are dangerous.
- Repairs to the appliance should only be carried out by trained specialist staff.
- Only use genuine spare parts when repairing the appliance.
- If the power cord of this appliance is damaged, it must be replaced by the manufacturer, the manufacturer's Customer Service or a similarly qualified person in order to prevent any risk.
The display goes out and Start / Pause flashes.
- Energy-saving mode is active
- Press any button. a The symbol lights up again.
" E:36 / -10"
Drain pipe or water outlet hose is blocked.
- Clean the drain pipe and the water outlet hose.
Drain pipe or water drain hose is caught or jammed.
- Ensure that the drain pipe and water drain hose are not kinked or trapped.
Drain pump is blocked.
- → "Cleaning the drain pump", Page 39
The water outlet hose is connected too high.
- Install the water outlet hose at a maximum height of metre.
Detergent dosage is too high.
- Immediate measure: Mix one tablespoon of fabric softener with 0.5 litres of water and pour the mix- ture into the left-hand compartment (not for outdoor clothing, sportswear or items stuffed with down).
- Reduce the amount of detergent for the next wash- ing cycle with the same load.
Unapproved extension installed on the water drain hose.
- Remove any unapproved extensions from the water hose. Connecting the appliance
E:36 / -25 / -26"
Drain pump is blocked.
- → " Cleaning the drain pump", Page 39

The water pressure is low.
No remedial action possible.
The filters in the water inflow are blocked.
- Clean the filters in the water inflow → Page 41.
The tap is turned off.
The water inlet hose is kinked or jammed.
- Ensure that the water inlet hose is not kinked or jammed.
 lights up.
The temperature is too high.
- Wait until the temperature has dropped.
- → " Cancelling the programme", Page 34
Water level is too high.
- Start the Drain programme.
Laundry is caught in the door.
- Open the door again.
- Remove any trapped laundry.
- Close the door.
- Press Start / Pause to start the programme.
 flashes.
Door is not closed.
- Close the door.
- Press Start / Pause to start the programme.
All other error codes.
Malfunction
- Call the after-sales service.
→ "Customer Service", Page 53
The appliance is not working.
The mains plug of the power cord is not plugged in.
- Connect the appliance to the power supply.
The circuit breaker is faulty.
- Check the circuit breaker in the fuse box.
There has been a power cut.
- Check whether the lighting in your kitchen or other appliances are working.
The programme does not start.
You have not pressed Start / Pause.
Door is not closed.
- Close the door.
- Press Start / Pause to start the programme.
Childproof lock is activated.
The programme does not start.
→ "Deactivating the childproof lock", Page 35
Finish in is activated.
- Check whether Finish in is activated.
→ "Buttons", Page 22
Laundry is caught in the door.
- Open the door again.
- Remove any trapped laundry.
- Close the door.
- Press Start / Pause to start the programme.
The door cannot be opened.
– –– is activated.
- Continue the programme by selecting Spin or Drain and pressing Start / Pause.
→ "Resuming the programme when the programme status is Rinse Hold", Page 34
The temperature is too high.
- Wait until the temperature has dropped.
- → "Cancelling the programme", Page 34
Water level is too high.
- Start the Drain programme.
Power failure.
- Open the door using the emergency release.
→ "Emergency release", Page 51
The water is not drain- ing.
Drain pipe or water outlet hose is blocked.
- Clean the drain pipe and the water outlet hose.
Drain pipe or water drain hose is caught or jammed.
- Ensure that the drain pipe and water drain hose are not kinked or trapped.
Drain pump is blocked.
- → " Cleaning the drain pump", Page 39
– –– is activated.
- Continue the programme by selecting Spin or Drain and pressing Start / Pause.
→ "Resuming the programme when the programme status is Rinse Hold", Page 34
The water outlet hose is connected too high.
- Install the water outlet hose at a maximum height of metre.
Detergent dosage is too high.
The water is not drain- ing.
- Immediate measure: Mix one tablespoon of fabric softener with 0.5 litres of water and pour the mix- ture into the left-hand compartment (not for outdoor clothing, sportswear or items stuffed with down).
- Reduce the amount of detergent for the next wash- ing cycle with the same load.
Unapproved extension installed on the water drain hose.
- Remove any unapproved extensions from the water hose. Connecting the appliance
Water is not flowing in. Detergent is not being dispensed.
You have not pressed Start / Pause.
The filters in the water inflow are blocked.
- Clean the filters in the water inflow → Page 41.
The tap is turned off.
The water inlet hose is kinked or jammed.
- Ensure that the water inlet hose is not kinked or jammed.
The spin cycle runs several times.
The unbalanced load detection system eliminates an imbalance by repeatedly redistributing the laundry.
- Not a fault – no action required.
Note: When loading, where possible, place large and small items of laundry together in the drum. Different sized items of laundry distribute themselves better during the spin cycle.
The programme dura- tion changes during the wash cycle.
The programme operation is optimised electronically. This may change the programme duration.
- Not a fault – no action required.
The unbalanced load detection system eliminates an imbalance by repeatedly redistributing the laundry.
- Not a fault – no action required.
Note: When loading, where possible, place large and small items of laundry together in the drum. Different sized items of laundry distribute themselves better during the spin cycle.
Foam detection system switches on a rinse cycle if foam build-up is too high.
- Not a fault – no action required.
No water is visible in the drum.
Water is below the visible area.
- Not a fault – no action required.
- Do not add any extra water to the appliance while it is operating.
Drum jerks after the programme starts.
This is caused by an internal motor test.
- Not a fault – no action required.
Residual water is present in the com- partment .
Insert in compartment is blocked.
→ " Cleaning the detergent drawer", Page 37
Vibrations and move- ment of the appliance whilst spinning.
Appliance is not correctly aligned.
The appliance feet are not fixed.
- Secure the appliance feet. Aligning the appliance
Transit bolts have not been removed.
- Removing the transit bolts
Drum does not turn, water does not flow in.
Load detection is active.
- Not a fault – no action required.
Note: The load detection can take up to two minutes.
Heavy foam build-up
Detergent dosage is too high.
- Immediate measure: Mix one tablespoon of fabric softener with 0.5 litres of water and pour the mix- ture into the left-hand compartment (not for outdoor clothing, sportswear or items stuffed with down).
- Reduce the amount of detergent for the next wash- ing cycle with the same load.
High spin speed not reached.
A low spin speed is selected.
- The next time you run a wash cycle, set a higher spin speed.
Unbalance load detection system is using a reduced spin speed to eliminate an unbalance.
Redistribute the laundry in the drum.
Note: Where possible, mix large and small items in the drum. Different sized items of laundry distribute themselves better during the spin cycle.
- Start the Spin programme.
The spin programme does not start.
Drain pipe or water outlet hose is blocked.
- Clean the drain pipe and the water outlet hose.
Drain pipe or water drain hose is caught or jammed.
The spin programme does not start.
- Ensure that the drain pipe and water drain hose are not kinked or trapped.
The unbalanced load detection system has interrupted the spin cycle because the laundry is unevenly distrib- uted.
- Redistribute the laundry in the drum.
Note: Where possible, mix large and small items in the drum. Different sized items of laundry distribute themselves better during the spin cycle.
- Start the Spin programme.
Rushing, hissing noise.
Water is flushed under pressure into the detergent drawer.
- Not a fault – normal operating noise.
Loud noises during the spin cycle.
Appliance is not correctly aligned.
The appliance feet are not fixed.
- Secure the appliance feet. Aligning the appliance
Transit bolts have not been removed.
- Removing the transit bolts
Banging noises, rat- tling in the drain pump.
Foreign bodies have got into the drain pump.
- → "Cleaning the drain pump", Page 39
Slurping, rhythmical suction noise.
The drain pump is active, the detergent solution is pumped out.
- Not a fault – normal operating noise.
Creasing.
The spin speed is too high.
- The next time you run a wash cycle, set a lower spin speed.
The load is too large.
- The next time you run a wash cycle, reduce the amount of laundry being loaded.
The wrong programme is selected for the type of fab- ric.
- Select the programmes that are suitable for the type of fabric.
→ "Programmes", Page 23
Detergent or fabric softener drips off the seal and collects on the door or in the seal fold.
Too much detergent/fabric softener in the detergent drawer.
- When dosing liquid detergent and fabric softener, observe the marking in the detergent drawer and do not dose above this.
The spin result is not satisfactory. The laun- dry is too wet/too damp.
A low spin speed is selected.
- The next time you run a wash cycle, set a higher spin speed.
- Start the Spin programme.
Drain pipe or water outlet hose is blocked.
- Clean the drain pipe and the water outlet hose.
Drain pipe or water drain hose is caught or jammed.
- Ensure that the drain pipe and water drain hose are not kinked or trapped.
The unbalanced load detection system has interrupted the spin cycle because the laundry is unevenly distrib- uted.
- Redistribute the laundry in the drum.
Note: Where possible, mix large and small items in the drum. Different sized items of laundry distribute themselves better during the spin cycle.
- Start the Spin programme.
Unbalance load detection system is using a reduced spin speed to eliminate an unbalance.
- Redistribute the laundry in the drum.
Note: Where possible, mix large and small items in the drum. Different sized items of laundry distribute themselves better during the spin cycle.
- Start the Spin programme.
Detergent residue on the damp washing.
Detergents may contain water-insoluble substances that deposit on the laundry.
- Start the Rinse programme.
Detergent residue on the dry laundry.
Detergents may contain water-insoluble substances that deposit on the laundry.
- Brush out the laundry after washing and drying.
Water is leaking out at the water inlet hose.
Water inlet hose is not correctly/securely connected.
- Connect the water supply hose correctly. Connect- ing the water inlet hose
- Tighten the screw connection.
Water is leaking out at the water outlet hose.
The water outlet hose is damaged.
- Replace the damaged water outlet hose.
Water outlet hose is not connected correctly.
- Connect the water outlet hose correctly. Water out- let connection types
Odours have formed in the appliance.
Humidity and detergent residue may promote the formation of bacteria.
- → "Cleaning the drum", Page 37
- If you are not using the appliance, leave the door and detergent drawer open so that residual water can evaporate.
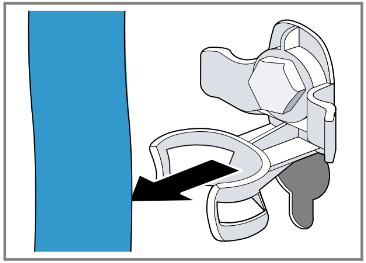
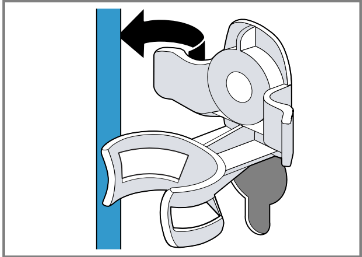
Emergency release
Releasing the door
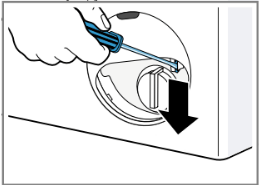
Requirement: The drain pump is empty. → Page 39
1. ATTENTION! Escaping water may cause material damage.
- Do not open the door if you can see water through the glass.
Pull the emergency release down- wards with a tool and release.
- The door lock is released.
2. Insert the maintenance flap and lock it into place.
3. Close the maintenance flap.
Transportation, storage and disposal
You can find out here how to prepare your appliance for transportation and storage. You will also find out how to dispose of old appliances.
Removing the appliance
1. Turn off the tap.
2. → Emptying the water inlet hose", Page 41.
3. Switch off the appliance.
4. Unplug the appliance's mains plug.
5. Drain the remaining detergent solution.
→ "Cleaning the drain pump", Page 39
6. Detach the hoses.
Inserting the transit bolts
Secure the appliance for transporta- tion using transit bolts in order to pre- vent damage.
1. Remove the four cover caps.
- If necessary, use a screwdriver to remove the cover caps.
Keep the cover caps.
2. Insert the four sleeves.
3. Insert all screws into the four transit bolts and tighten slightly.
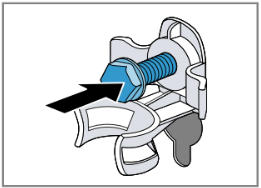
4. Insert the power cord into the holder and tighten all four screws for the transit bolts with a WAF 13 wrench .
5. Insert the hose into holder.
Using the appliance again
- Remove the transit bolts.
Disposing of old appli- ance
Valuable raw materials can be re- used by recycling.
 WARNING
Risk of harm to health!
Children can lock themselves in the appliance, thereby putting their lives at risk.
- Do not install the appliance behind a door as this may obstruct the ap- pliance door or prevent it from opening.
- With redundant appliances, unplug the power cord. Then cut through the cord and damage the lock on the appliance door beyond repair so that the appliance door will no longer close.
- Unplug the appliance from the mains.
- Cut through the power cord.
- Dispose of the appliance in an en- vironmentally friendly manner. Information about current disposal methods are available from your specialist dealer or local authority.
 This appliance is la- belled in accordance with European Directive EU concerning used electrical and elec- tronic appliances (waste electrical and electronic equipment - WEEE). The guideline determ- ines the framework for the return and recycling of used appliances as applicable throughout the EU.
Customer Service
If you have any queries on use, are unable to rectify faults on the appli- ance yourself or if your appliance needs to be repaired, contact Cus- tomer Service.
Function-relevant genuine spare parts according to the corresponding Eco- design Order can be obtained from Customer Service for a period of at least 10 years from the date on which your appliance was placed on the market within the European Eco- nomic Area.
Note: Under the terms of the manu- facturer's warranty the use of Cus- tomer Service is free of charge.
Detailed information on the warranty period and terms of warranty in your country is available from our after- sales service, your retailer or on our website. If you contact Customer Service, you will require the product number (E- Nr.) and the production number (FD) of your appliance. The contact details for Customer Ser- vice can be found in the enclosed Customer Service directory or on our website.
Product number (E-Nr.) and production number (FD)
You can find the product number (E- Nr.) and the production number (FD) on the appliance's rating plate. Depending on the model, the rating plate is located:
- On the inside of the door.
- On the inside of the maintenance flap.
- On the rear of the appliance.
Make a note of your appliance's de- tails and the Customer Service tele- phone number to find them again quickly.