Loading ...
Loading ...
Loading ...
6
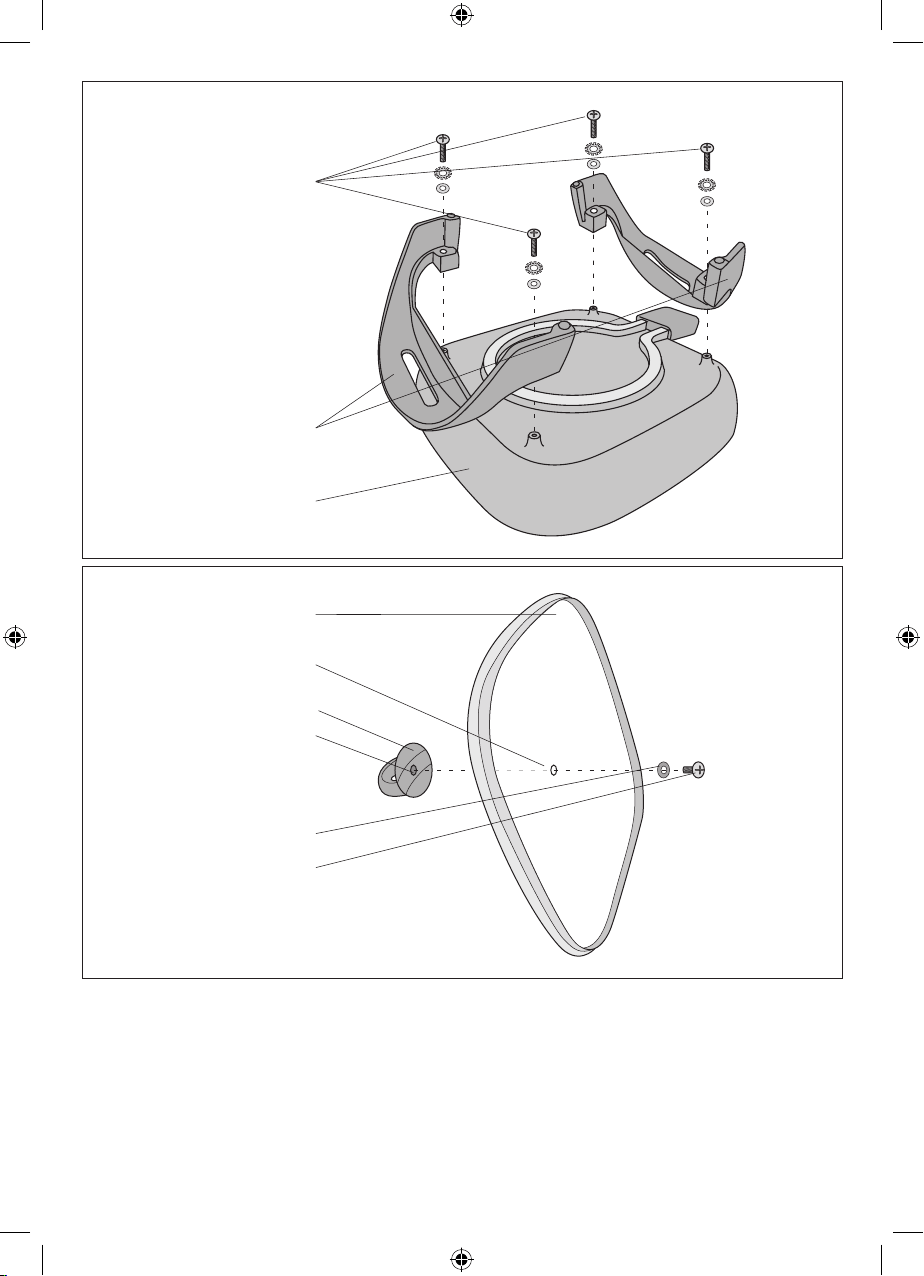
7. To assemble the tempered glass lid, locate the lid knob packaging.
8. Holding the lid knob on the outside top of the glass lid, align the lid hole with the screw hole.
9. Place the head Phillips screw through the screw hole and the plastic washer on the inside of the lid.
10. Use a large Phillips screw driver to tighten the screw until snug. (See Figure 3.) Do not over tighten.
The glass lid is now ready for use.
11. Before using for the rst time, turn the temperature control to 450˚ F and heat empty Electric Skillet
uncovered for approximately 5 minutes. This will ensure the non-stick coating is ready for use. You will
notice a slight odor; this is normal and should quickly disappear.
12. Turn the temperature control to OFF and allow to cool for 15 minutes.
13. Before cooking in the Electric Skillet for the rst time, wash the non-stick Skillet in mild dishwashing soap,
wipe and allow to dry.
Getting to Know Your Non-Stick Electric Skillet
Product may vary slightly from illustrationTemperature Control Probe
Temperature Control Probe
1. The temperature control probe is the nerve center and brain of the Electric Skillet. Treat it carefully.
Dropping or banging it could change its calibration and make the temperature settings inaccurate.
2. Rotate the dial to select the temperature as called for in the recipe.
3. The indicator light on the temperature control probe will illuminate as soon as the dial is rotated.
The light will go out once the selected temperature has been reached.
4. Allow the Electric Skillet to cool before removing the temperature control probe.
5. To clean the temperature control probe, simply wipe down with a soft, damp cloth. Make sure you
dry it thoroughly before using again.
NOTE: The temperature control probe is not submersible.
CAUTION: Use the temperature control probe supplied with this Electric Skillet only. The use of any other
temperature control probe may cause re, electric shock, or injury.
Before Using for the First Time
1. Carefully unpack the Electric Skillet and remove all packaging materials.
2. To assemble the Electric Skillet with handles, rst locate the 2 cool touch handles and
4 Phillips screws included.
3. Place the non-stick skillet face down onto a clean, at working surface. Position one handle so that the
holes align with the holes in the bottom of the skillet. Using a Phillips screw driver, tighten each screw,
the lock and at washers. Repeat the procedure with the second handle. (See Figure 2.)
4. Place the Electric Skillet on a level surface such as a countertop or table.
NOTE: Some countertop and table surfaces, such as Corian® and other surfaces, are not designed to
withstand the prolonged heat generated by this Electric Skillet. We recommend placing a hot pad or
trivet under the Electric Skillet beforehand to avoid possible damage to the surface.
5. Be sure the sides and back of the Electric Skillet are at least 4 inches away from any walls, cabinets,
or objects on the counter or table.
6. Before using for the rst time, wash Electric Skillet and tempered glass lid in hot, sudsy water.
Rinse and dry completely.
Figure 1
Cool Touch Handles
Ceramic non-stick
skillet pan
Polarized
Plug
Indicator
Light
Tempered Glass Lid
4 Phillips Screws (handle)
4 Lock Washers (handle)
1 Phillips Screw (lid)
4 Flat Washers (handle)
1 Plastic Washer (lid)
Lid Knob
Temperature Control
Probe Socket
Temperature
Control Probe
Temperature
Control Dial
Figure 2
Phillips Screws
and Washers
Cool Touch Handles
Non-Stick Skillet
Figure 3
Lid Knob
Glass Lid
Lid Hole
Plastic Washer
Phillips Screw
Screw Hole
SO-312584_14448 BELLA CERAMIC 12in Skillet IM.indd 6 2015-05-15 9:59 AM
Loading ...
Loading ...
Loading ...