Loading ...
Loading ...
Loading ...
36
ENGLISH
Note: The Auto Feed System may not operate correctly if
wheeled edge guide is not used.
Note: You will experience faster than normal cutting line wear
if the edging wheel is positioned too far from the edge with the
cutting line positioned over the pavement or abrasive surface.
3. To make a closer cut, slightly tilt the trimmer.
4. Return to the trimming postion by loosening the lock
collar and rotating the lower housing back 180°.
5. The tool will lock in the trimmer position.
Cutting Line / Line Feeding
Your trimmer uses 0.065 in. (1.65 mm) diameter, ROUND
nylon line. During use, the tips of the nylon lines will
become frayed and worn and the special self feeding
spool will automatically feed and trim a fresh length of
line. Cutting line will wear faster and require more feeding
if the cutting or edging is done along pavements or other
abrasive surfaces or heavier weeds are being cut. The
advanced automatic line feeding mechanism senses when
more cutting line is needed and feeds and trims the correct
length of line whenever it’s required. Do not bump trimmer
on ground in attempt to feed line or for any other purposes.
Helpful Cutting Tips
• Use the tip of the string to do the cutting; do not force
string head into uncut grass.
• Wire and fences cause extra string wear, even breakage.
Stone and brick walls, curbs, and wood may wear string
rapidly.
• Do not allow spool cap to drag on ground or other surfaces.
• In long growth, cut from the top down and do not
exceed 1 feet (30 cm) high.
• Keep trimmer tilted toward the area being cut; this is
the best cutting area.
• The trimmer cuts when passing the unit from the left to
right. This will avoid throwing debris at the operator.
• Avoid trees and shrubs. Tree bark, wood moldings, siding,
and fence posts can easily be damaged by the string.
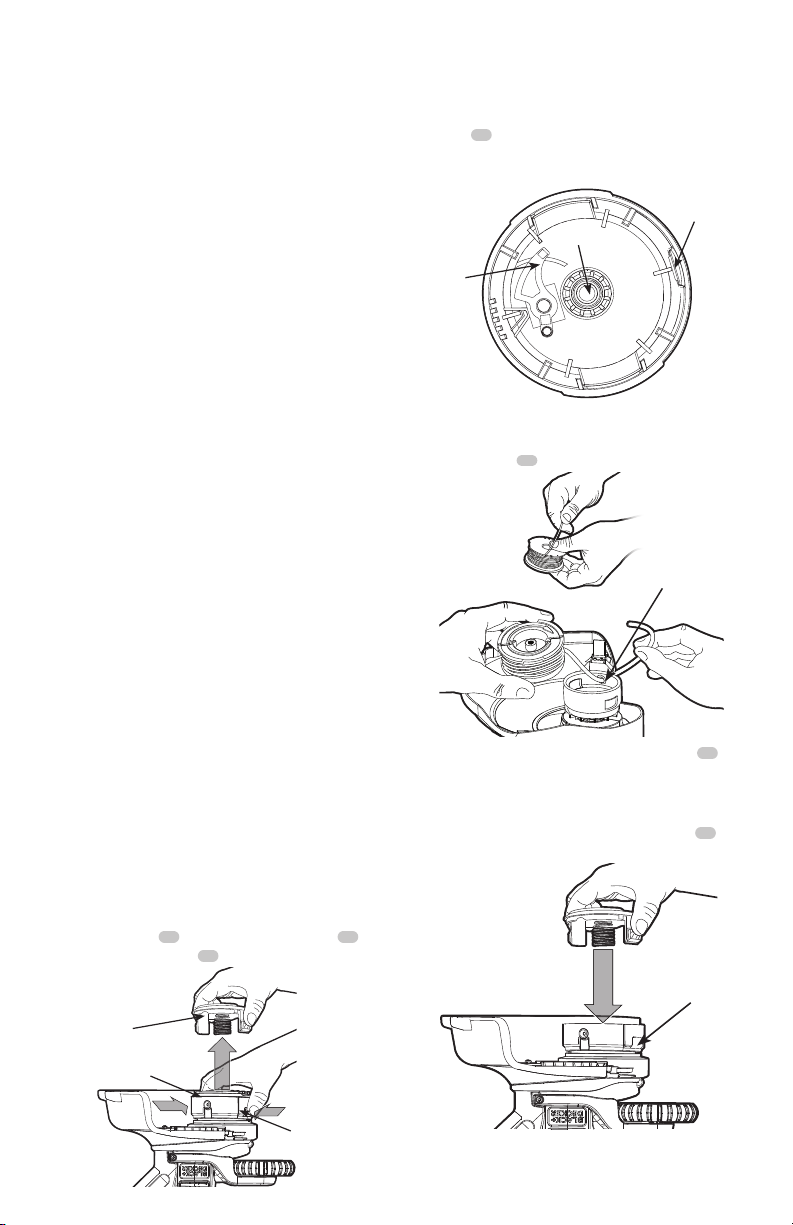
Replacing the Spool (Fig. N, O, P, Q)
WARNING: To reduce the risk of serious personal
injury, turn unit off and disconnect it from power
source before making any adjustments or removing/
installing attachments or accessories. An accidental
start-up can cause injury.
1. Depress the tabs
16
and remove the spool cap
17
from the spool housing
18
in the trimmer head (Fig. N).
17
18
16
Fig. N
2. For best results, replace spool with BLACK+DECKER
model No. AF-100.
3. Grasp empty spool with one hand and spool housing
with other hand and pull spool out.
4. If lever
19
, (Fig. O) n base of housing becomes
dislodged, replace in correct position before inserting
new spool into housing.
21
20
19
Fig. O
5. Remove any dirt and grass from the spool and housing.
6. Unfasten the end of the cutting line and guide the line
into the eyelet
21
Fig. P.
21
Fig. P
7. Take the new spool and push it onto the boss
20
in
the housing (Fig. O). Rotate the spool slightly until it is
seated. The line should protrude approximately 5-3/8 in.
(136 mm) from the housing.
8. Align the tabs on the spool cap with the slots
22
in the
housing (Fig. Q).
22
Fig. Q
9. Push the cap onto the housing until it snaps securely
into place.
Loading ...
Loading ...
Loading ...