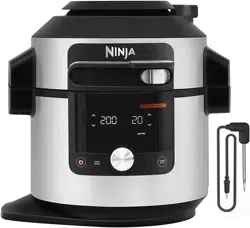
User Manual Multi-Cooker
Using the Control Panel
COOKING FUNCTIONS
PRESSURE: Cook food quickly while maintaining tenderness.
NOTE: For details about the 3 ways to automatically release pressure, see page 15.
STEAM MEALS: Create complete meals with the push of a button.
STEAM AIR FRY: Crisp vegetables and proteins with little to no oil.
STEAM ROAST: Cook and crisp large proteins.
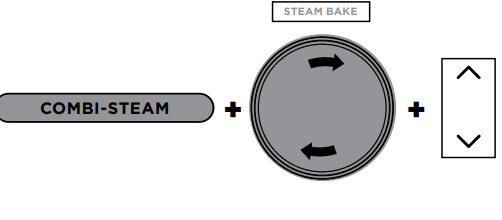
STEAM BAKE: Bake fluffy cakes and sweet treats.
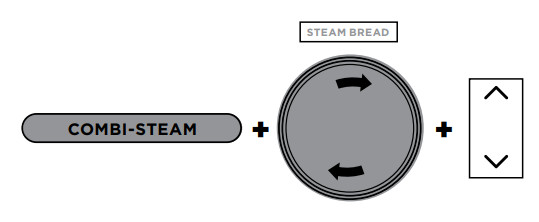
STEAM BREAD: Prove and bake in one pot. Crusty on the outside, chewy on the inside.
AIR FRY: Give food crispness and crunch with little to no oil.
GRILL: Use high temperature to caramelise and brown your food.
BAKE: Use the unit like an oven for baked treats and more.
DEHYDRATE: Dehydrate meats, fruits and vegetables for healthy snacks.
PROVE: Create an environment for dough to rest and rise.
SEAR/SAUTÉ: Use the unit as a hob for browning meats, sautéing vegetables, simmering sauces and more.
STEAM: Gently cook delicate foods at a high temperature.
SLOW COOK: Cook your food at a lower temperature for a longer period of time.
YOGURT: Pasteurise and ferment milk for creamy homemade yogurt.
KEEP WARM: When using steam, slow cook and pressure the unit will switch to KEEP WARM at the end of the cycle. Press the KEEP WARM button after the function has started to disable this automatic transition.
NOTE: If running for 1 hour or less, the clock will count down by minutes and seconds. If running for more than 1 hour, the clock will count down by minutes only. This function will time out after 12 hours.
OPERATING BUTTONS
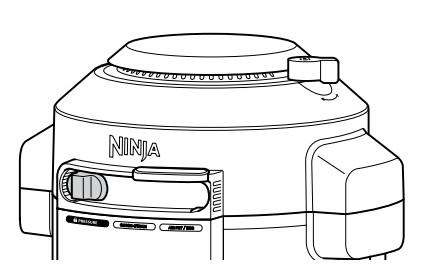
SMARTLID SLIDER™: As you move the slider, the available functions for each mode will illuminate.
DIAL: Once you've chosen a mode, use the dial to scroll through the available functions until your desired function is highlighted.
LEFT ARROWS: Press these to choose a cook temperature. Use the left arrows as well to set the internal outcome when using PRESET, and MANUAL buttons.
RIGHT ARROWS: Press these to choose a cook time. Use these arrows to set the food type when using PRESET.
PRESET: Switches the display screen so you can set the probe, food type, and internal outcome based on the PRESET temperatures. Preset is not available for Dehydrate, Prove, Steam, Slow Cook, Yogurt, Steam Bake and Steam Bread functions.
MANUAL: Switches the display screen so you can manually set the probe internal outcome. MANUAL is not available for Dehydrate, Prove, Steam, Slow Cook, Yogurt, Steam Bake and Steam Bread functions.
START/STOP button: Press to start cooking. Pressing the button while the unit is cooking will stop the current cooking function.
 (POWER): The Power button shuts the unit off and stops all cooking modes.
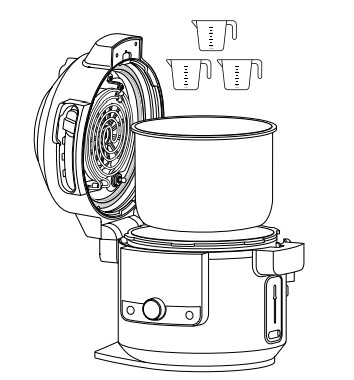
BEFORE FIRST USE
- Remove and discard any packaging material, stickers and tape from the unit.
- Pay particular attention to operational instructions, warnings and important safeguards to avoid any injury or property damage.
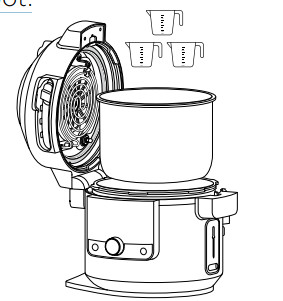
- Wash the silicone ring, removable cooking pot, Cook & Crisp™ Basket, reversible rack and condensation collector in warm, soapy water, then rinse and dry thoroughly. NEVER clean the cooker base, digital cooking probe or probe cap (if included) in the dishwasher.
- The silicone ring is reversible and can be inserted in either direction. Insert the silicone ring around the outer edge of the silicone ring rack on the underside of the lid. Ensure it is fully inserted and lies flat under the silicone ring rack.
- Use long-handed utensils and protective hot pads or insulated oven gloves when removing foods.
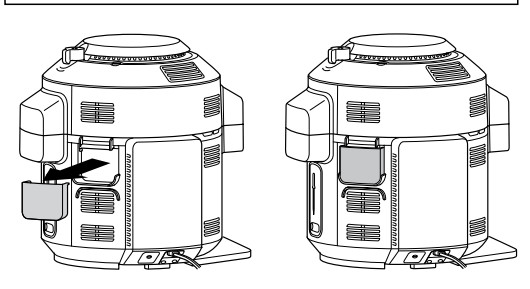
INSTALLING THE CONDENSATION COLLECTOR
To install the condensation collector, slide it into the slot on the cooker base. Slide it out to remove it for hand-washing after each use.
NOTE: Make sure to empty out excess water collected in the condensation collector after cooking.
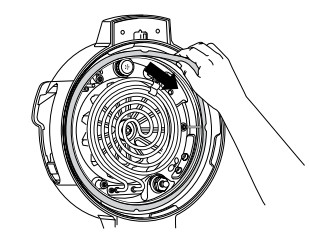
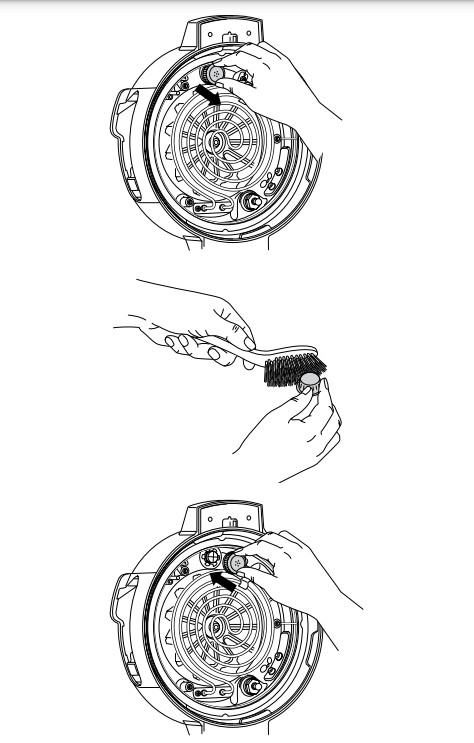
REMOVING & REINSTALLING THE ANTI-CLOG CAP
The anti-clog cap protects the inner valve of the pressure lid from clogging and protects users from potential food splatters. It should be cleaned after every use with a cleaning brush.
To remove it, hold the anti-clog cap between your thumb and bent index finger, then rotate your wrist clockwise. To reinstall, position it in place and press down. Make sure the anti-clog cap is in the correct position before using the unit.
NOTE: Prior to each use, make sure the silicone ring is well-seated in the silicone ring rack and the anti-clog cap is mounted properly on the pressure release valve.
USING THE NINJA® FOODI® DIGITAL COOKING PROBE
IMPORTANT: Digital Cooking Probe and cord will be hot during and after cooking. Use caution when removing probe from food.
Before Use
Make sure the probe socket is free of any residue and the cord is free of knots before plugging it into the socket.
- Press the bottom of the storage compartment on the right side of the unit to release it. Then unwind the cord from the compartment to remove the probe.
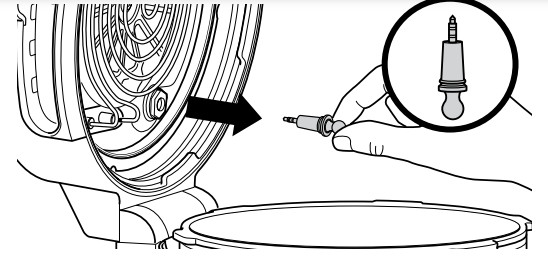
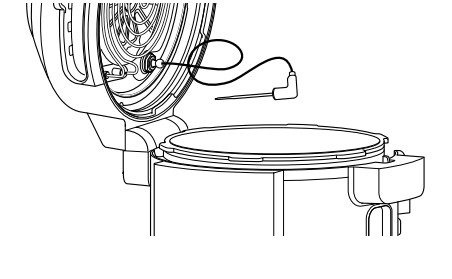
- Remove the cap from the socket inside the lid on the bottom right, then plug the probe into the socket. Push firmly on the probe until it clicks into place and cannot go into the socket any further. Place the cap in the storage compartment and place the storage compartment back onto the side of the unit.
- DO NOT lose the probe cap; the unit will not function without it.
- Once the probe is plugged into the socket, it will enable and illuminate the PRESET and MANUAL probe buttons if available for the selected function. Select the desired cook function and temperature.
- NOTE: There is no need to set a cook time, as the unit will automatically turn off the heating element and alert you when your food has finished cooking
- If using the Preset feature, press PRESET and use the arrows to the right of the display to select your desired food type and the arrows to the left of the display to set the internal outcome of your food (Rare to Well Done).
- NOTE: Cooking different meats or the same ones to a different outcome? Refer to the next page for details on programming.
- NOTE: In pressure cooking mode, you can only set for "Well" and "Shred" for preset. Use the arrows on the left to switch between these two settings.
- If using the Manual feature, press MANUAL and use the recommended internal cook temperatures below for functions besides Pressure Cook.
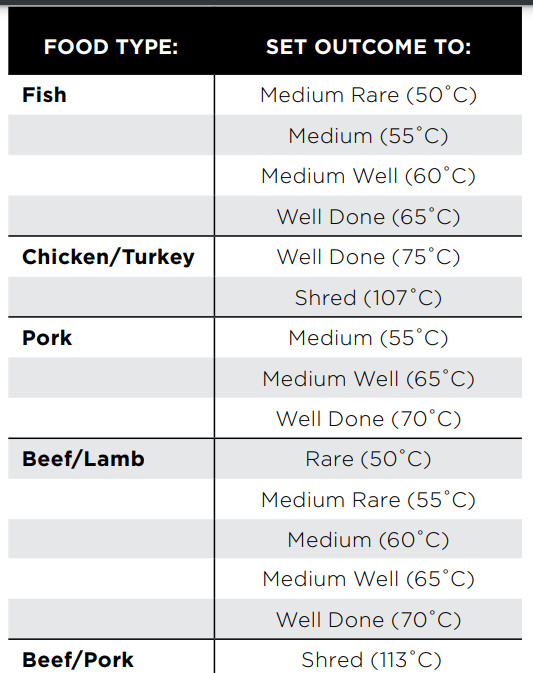
- NOTE: Set outcome for BEEF, FISH and PORK are lower than normal recommendations as unit will carry-over cook 5°C.
- Place the accessory required for your selected cook function in the unit.
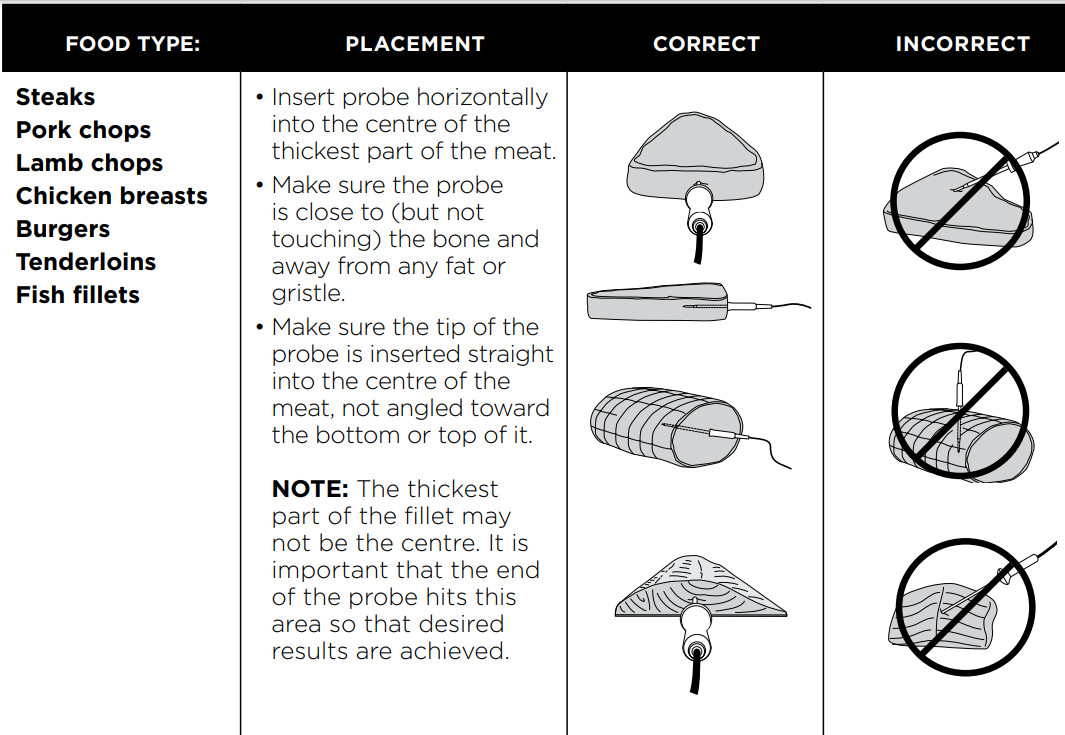
- Insert the probe horizontally into the centre of the thickest part of the piece of protein. Refer to the chart on the next page for further probe placement instructions.
- Place food with inserted probe in the unit and close the lid
- NOTE: Make sure the probe wire is not hanging outside of the unit/lid.
- The unit will automatically stop when desired outcome is almost reached, as it accounts for carry-over cooking. Remove food from the unit immediately to prevent over-cooking.
- The protein will continue to carry-over cook to your set outcome, which will take about 3-5 minutes. This is an important step, as not resting could lead to results looking "less" cooked. Carry-over cook times can vary based on size of protein, cut of protein and type of protein.
USING THE PROBE IN DIFFERENT COOKING SCENARIOS:
Cooking 2 or more proteins of the same size to different levels of outcome:
- Set the Preset feature to the highest desired level of outcome.
- Insert the probe in the protein with the higher desired level of outcome.
- Place proteins inside the unit and start the cooking program. When the lower desired level of outcome is reached on the display, remove the protein without probe.
NOTE: To check the internal temperature of other pieces of protein, press and hold MANUAL and insert the probe into each piece of meat.
NOTE: The probe will be HOT. Use either oven gloves or tongs to take the probe out of the food.
- Continue cooking the remaining protein until the next desired level of outcome is reached.
Cooking 2 or more proteins of different sizes:
- Insert probe in the smaller protein and use the Preset feature to choose the level of outcome.
- When that protein is done cooking, remove it from the unit.
- Using oven gloves, transfer probe to the larger protein and use the arrows to the left of the display to choose its level of outcome.
Cooking 2 or more different types of protein:
- Insert probe in the protein with the lower desired level of outcome.
- Use the Manual feature to choose the desired internal temperature.
- When that protein is done cooking, remove it from the unit.
- Using oven gloves, transfer probe to the other protein and use the Manual feature to choose the desired internal temperature.
USING YOUR NINJA® FOODI® MAX SMARTLID™ MULTI-COOKER
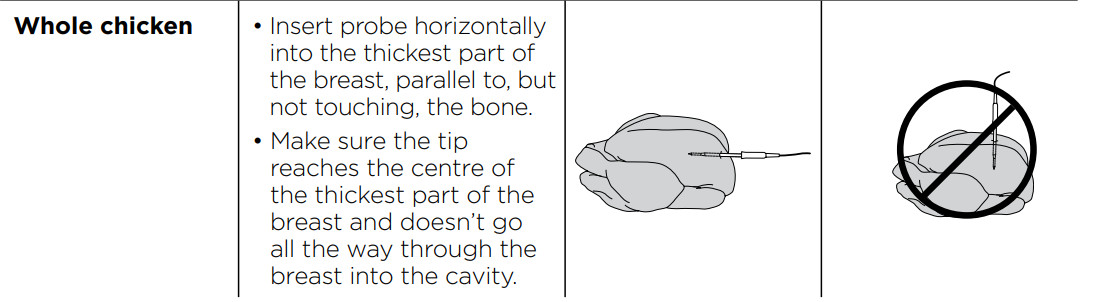
HOW TO CORRECTLY INSERT THE PROBE
NOTE: DO NOT use the probe with frozen protein or for cuts of meat thinner than 1.5cm.
USING THE PRESSURE COOKING FUNCTIONS
WATER TEST: GETTING STARTED PRESSURE COOKING
It is recommended that first-time users do the water test to familiarise themselves with pressure cooking.
- Place the pot in the cooker base and add 750ml of room-temperature water to the pot.
- Close the lid and move slider to the PRESSURE position.
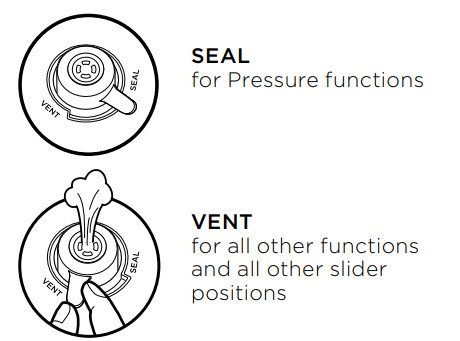
- Make sure the pressure release valve is in the SEAL position.
- NOTE: Valve will be loose when fully installed. Do not force the valve over the ridge.
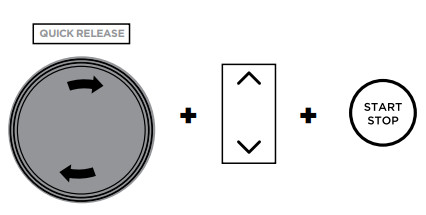
- Use the dial to select QUICK RELEASE. The unit will default to high (Hi) pressure. Use the right down arrow to adjust the time to 2 minutes. Press START/STOP to begin.
- This display will show "PrE" and a progress bar indicating the unit is building pressure. When the unit is fully pressurised, the timer will start counting down.

- NOTE: Time to pressure will vary based on quantity and temperature of ingredients, along with selected pressure level.
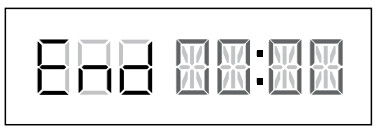
- When cook time reaches zero, the unit will beep and display "End" before automatically quick releasing the pressurised steam. A warning chime will sound, indicating the pressure release valve is about to open. When the pressure release valve opens, steam will escape from it. As soon as the unit reads "OPN Lid", move the slider to the right to unlock the lid. Then open the lid.
- NOTE: The unit will switch to KEEP WARM mode and the heating element will remain on
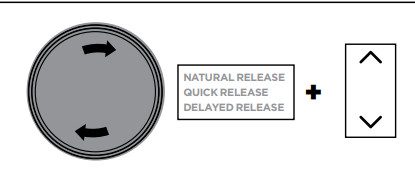
RELEASING PRESSURE AUTOMATICALLY
NATURAL: Natural release is best for larger cuts of meats that need extra time to cook. The heat will turn off, but the food inside will continue to cook. The unit will naturally depressurise once the cook time has ended and the unit cools down.
QUICK: Quick release is used for smaller foods or ingredients that are sensitive to overcooking. DO NOT quick release when cooking starchy or foamy foods. To quick release, use the dial to select this option before you start pressure cooking.
DELAYED: Delayed release is useful for recipes that require more time at pressure once the cook time has ended (for example, rice and grains). To delay release, use the dial to select this option. Delay release will default to 10 minutes. Press the Release pressure icon to change the delay release time. Pressing again allows you to change the time and pressure. When cook time has ended, the unit will then quick release pressure once the delay duration is complete.

NOTE: For larger food loads that require more depressurisation, you can manually release pressure by moving the valve to the VENT position. If choosing to manually release, move pressure release valve from SEAL to VENT or hold the RELEASE PRESSURE icon.
PRESSURISING
As pressure builds in the unit, the control panel display will show "PrE" and progress bars. Time to pressure varies based on the amount and temperature of ingredients as well as liquid in the pot. For safety, the lid will lock as the unit pressurises and it will not unlock until pressure is released. Once the unit has reached full pressure, cooking will begin and the timer will start counting down.
USING THE PRESSURE FUNCTION
To turn on the unit, plug the power cord into a wall socket, then press the button.
Pressure
- Place ingredients and at least 250ml of liquid in the pot, as well as any necessary accessory. DO NOT fill the pot past the PRESSURE MAX line.
- NOTE: When cooking rice, beans or other ingredients that expand, DO NOT fill the pot more than halfway

- Close the lid, then turn the pressure release valve to the SEAL position.
- Move the slider to PRESSURE. The unit will default to NATURAL RELEASE. Use the dial to select NATURAL RELEASE, QUICK RELEASE or DELAYED RELEASE. The default pressure level and time settings will display. Use the up and down arrows to the left of the display to select Hi or LO.
- NOTE: Delayed Release defaults to 10 minutes. If you are using Delayed Release and want to adjust the time, press the RELEASE PRESSURE button to set the desired time.
- Use the up and down arrows to the right of the display to adjust the cook time in minute increments up to 1 hour and then 5-minute increments from 1 hour to 4 hours.
- NOTE: If running for 1 hour or less, the clock will count down by minutes and seconds. If running for more than 1 hour, the clock will count down by minutes only.
- Press START/STOP to begin cooking. The unit will begin building pressure. The display will show "PrE" and a progress bar. The timer will begin counting down when the unit is fully pressurised.

- NOTE: Time to pressure varies depending on the selected pressure. current temperatures of the cooking pot and temperature/quantity of the ingredients.
- When cook time reaches zero, the unit will natural, quick or delayed release pressure depending on your selection. If you choose to manually release pressure, turn the pressure release valve to VENT position to release the steam
- NOTE: For details about the 3 ways to automatically release pressure, see page 15.
- The unit will beep, automatically switch to KEEP WARM mode and the timer will begin counting up
- NOTE: After cooking is complete, you may press KEEP WARM to turn the KEEP WARM mode off. Or press the START/STOP button.
- If using quick release or delay release the unit will release pressure and then switch to keep warm. If using natural release the unit will switch to keep warm after the cooking cycle has completed. The unit will beep, automatically switch to KEEP WARM mode, and the timer will begin begin counting up.
- When the unit displays "OPN Lid," it has depressurised and you can move the slider to the right to open the lid.
USING THE COMBI-STEAM MODE FUNCTIONS
To turn on the unit, plug the power cord into a wall socket, then press the button.
NOTE: The position of the pressure release valve does not matter. It can be in the SEAL or VENT position.
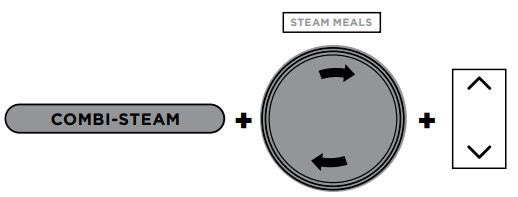
Steam Meals
- Using the reversible rack, load ingredients according to the recipe. Ensure there is liquid in the pot to create steam, then place rack into the pot. Close the lid.
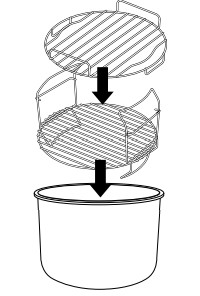
- NOTE: For extra capacity, use the top layer. See page 8 for 2-tier reversible rack assembly.
- Move slider to COMBI-STEAM mode. The function selection will default to STEAM MEALS. The default temperature and time settings will display. Use the up and down arrows to the left of the display to choose a temperature between in 5°C increments between 150°C and 240°C.
- Use the up and down arrows to the right of the display to adjust the cook time in minute increments up to 1 hour.
- Press START/STOP to begin cooking.
- The display will show "PrE" and a progess bar indicating the unit is building steam. The time to steam depends on the amount of ingredients in the pot.
- When the unit reaches the appropriate steam level, the display will show the set temperature and the timer will begin counting down.
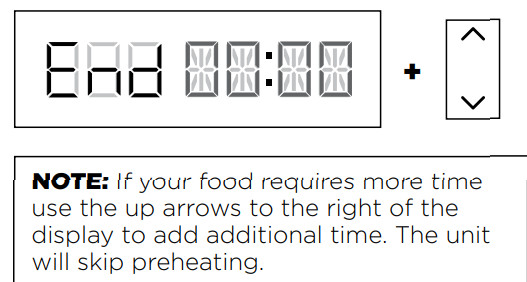
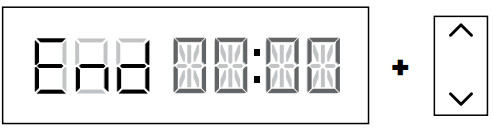
- When cook time reaches zero, the unit will beep and display "End" for 5 minutes.
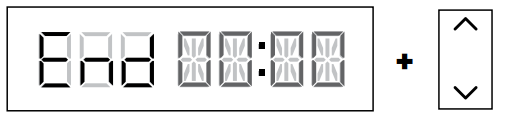
- NOTE: If your food requires more time use the up arrows to the right of the display to add additional time. The unit will skip preheating.
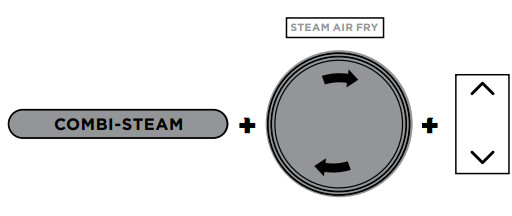
Steam Air Fry
- Using either the Cook & Crisp™ Basket or the reversible rack, load ingredients according to the recipe and place in the pot. Ensure there is liquid in the pot to create steam. Close the lid.
- Move slider to COMBI-STEAM mode, then use the dial to select STEAM AIR FRY. The default temperature and time settings will display. Use the up and down arrows to the left of the display to choose a temperature in 5°C increments between 150°C and 240°C.
- Use the up and down arrows to the right of the display to adjust the cook time in minute increments up to 1 hour.
- Press START/STOP to begin cooking.
- The display will show "PrE" and progress bars indicating the unit is building steam. The time to steam depends on the amount of ingredients in the pot.
- When the unit reaches the appropriate steam level, the display will show the set temperature and the timer will begin counting down.
- When cook time reaches zero, the unit will beep and display "End" for 5 minutes.
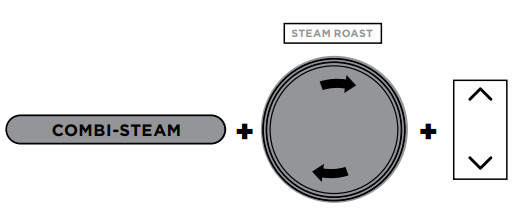
Steam Roast
- Place ingredients with designated accessory in the pot. Ensure there is liquid in the pot to create steam. Close the lid.
- Move slider to COMBI-STEAM mode, then use the dial to select STEAM ROAST. The default temperature and time settings will display. Use the up and down arrows to the left of the display to choose a temperature in 5°C increments between 120°C and 240°C.
- Use the up and down arrows to the right of the display to adjust the cook time in minute increments up to 1 hour 15 minutes.
- Press START/STOP to begin cooking.
- The display will show "PrE" and progress bars indicating the unit is building steam. The time to steam depends on the amount of ingredients in the pot.
- When the unit reaches the appropriate steam level, the display will show set temperature and the timer will begin counting down.
- When cook time reaches zero, the unit will beep and display "End" for 5 minutes.

- NOTE: If your food requires more time use the up arrows to the right of the display to add additional time. The unit will skip preheating.
Steam Bake
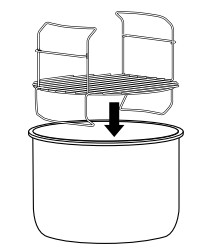
- Place the reversible rack in the pot. Ensure there is liquid in the pot to create steam. Add a baking tin or foil on the bottom of the lower position of reversible rack.
- Move slider to COMBI-STEAM mode, then use the dial to select STEAM BAKE. The default temperature setting will display. Use the up and down arrows to the left of the display to choose a temperature in 5°C increments between 105°C and 210°C.
- Use the up and down arrows to the right of the display to adjust the cook time in minute increments up to 1 hour 15 minutes.
- Press START/STOP to begin cooking.
- The display will show "PrE" and a progress bar indicating the unit is building steam. The time to steam is 20 minutes.
- When preheating has completed, the display will show the set temperature and the timer will begin counting down.
- When cook time reaches zero, the unit will beep and display "End" for 5 minutes.
NOTE: If your food requires more time, use the up arrow to the right of the display to add additional time. The unit will skip preheating.
Steam Bread
- Place ingredients with designated accessory in the pot. Ensure there is liquid in the pot to create steam. Close the lid.
- Move slider to COMBI-STEAM mode, then use the dial to select STEAM BREAD. The default temperature setting will display. Use the up and down arrows to the left of the display to choose a temperature in 5°C increments between 150°C and 240°C.
- Use the up and down arrows to the right of the display to adjust the cook time in minute increments up to 1 hour.
- Press START/STOP to begin cooking.
- The display will show "PrE" and a progress bar indicating the unit is building steam. The time to steam will take 15 minutes.
- When preheating has completed, the display will show the set temperature and the timer will begin counting down.
- When cook time reaches zero the unit will beep and display "End" for 2 minutes.
NOTE: If your food requires more time use the up arrows to the right of the display to add additional time. The unit will skip preheating.
CLEANING & MAINTENANCE
Cleaning: Dishwasher & Hand-Washing
The unit should be cleaned thoroughly after every use.
- Unplug the unit from the wall socket before cleaning.
- To clean the cooker base and the control panel, wipe them clean with a damp cloth.
- The cooking pot, silicone ring, reversible rack, Cook & Crisp™ Basket and detachable diffuser can be washed in the dishwasher.
- NOTE: NEVER put the cooker base, digital cooking probe or probe cap in the dishwasher or immerse it in water or any other liquid.
- The pressure release valve and anti-clog cap, can be washed with water and dish soap.
- If food residue is stuck on the cooking pot, reversible rack or Cook & Crisp™ Basket, fill the pot with water and allow to soak before cleaning. DO NOT use scouring pads. If scrubbing is necessary, use a non-abrasive cleanser or liquid dish soap with a nylon pad or brush.
- Air-dry all parts after each use.
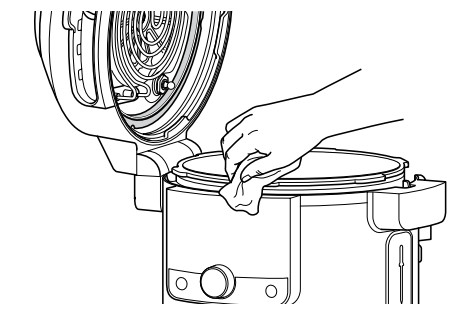
Removing & Reinstalling the Silicone Ring
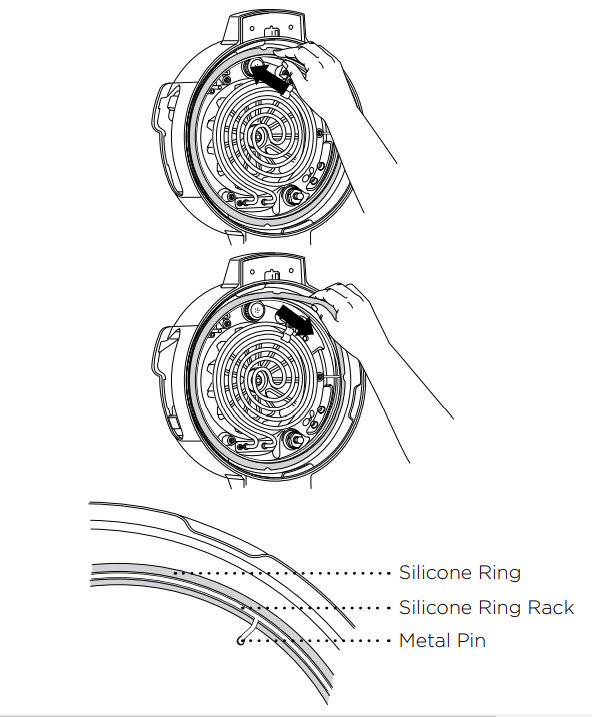
To remove the silicone ring, gently pull it outward, section by section, from the silicone ring rack. The ring can be installed with either side facing up. To reinstall, carefully insert the silicone ring under the rack. Start with one section and work in both clockwise and anticlockwise directions until gently working the last section of the silicone ring under the rack.
The last section of the silicone ring is easiest to install when in between two of the metal pins (see image above). After use, remove any food debris from the silicone ring and anti-clog cap
Keep the silicone ring clean to avoid odour
Washing it in warm, soapy water or in the dishwasher can remove odour. However, it is normal for it to absorb the smell of certain acidic foods. It is recommended to have more than one silicone ring on hand. You can purchase additional silicone rings at ninjakitchen.co.uk.
NEVER pull out the silicone ring with excessive force, as that may deform it and the rack and affect the pressure-sealing function. A silicone ring with cracks, cuts or other damage should be replaced immediately
NOTE: The silicone ring must be replaced by one that is specific to a Foodi® SmartLid Multi-cooker.
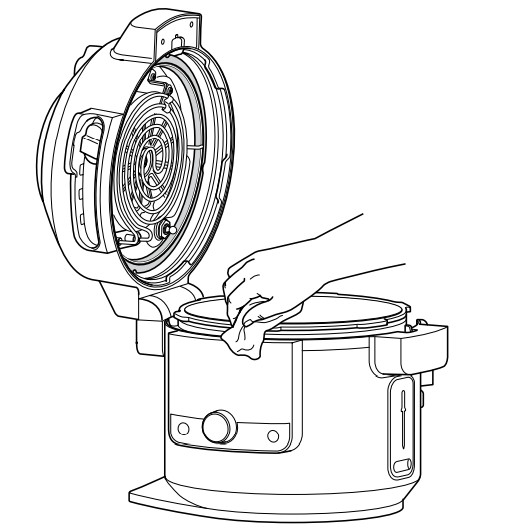
CLEANING THE LID
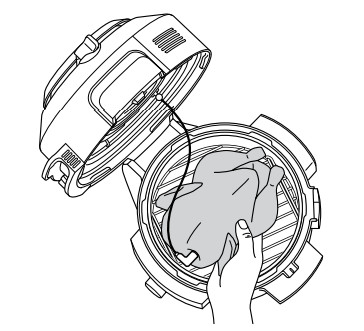
We recommend inspecting the interior of the lid and heating elements prior to cooking with “wet cooking functions,” which include Slow Cook, Steam, Sear/ Sauté, Pressure and all COMBI-STEAM modes. If you see any food residue or oil buildup, we recommend steam cleaning the unit (see instructions below), then wiping down the interior of the lid.
STEAM CLEANING INSTRUCTIONS:
- Fill pot with 750ml of water
- Move SmartLid Slider™ to Air Fry/Hob.
- Select STEAM, and set time to 30 minutes. Press START/STOP.
- When time reaches zero and the unit has cooled down, use a wet cloth or sponge to wipe down the interior of the lid and heating elements. CAUTION: When cleaning the interior of the lid, do not touch the fan.
- Repeat steps 3 and 4 as needed and spot clean as necessary.
- NOTE: If the unit is not open after the cycle is over, the unit will default to KEEP WARM and the heating element will continue running.
TROUBLESHOOTING GUIDE
Why is my unit taking so long to come to pressure? How long does it take to come to pressure?
- Cooking times may vary based on the selected temperature, current temperature of the cooking pot and temperature or quantity of the ingredients.
- Check to make sure the silicone ring is fully seated and flush against the lid. If installed correctly, you should be able to tug lightly on the ring to rotate it.
- Check that the pressure lid is fully locked and the pressure release valve is in the SEAL position when pressure cooking.
- Unit will not pressurise if there is not enough liquid.
Why is the time counting down so slowly?
- You may have set hours rather than minutes. When setting time, the display will show HH:MM and the time will increase/decrease in minute increments.
How can I tell when the unit is pressurising?
- The display will show progress bar loading the building animation to indicate the unit is building pressure.
"PrE" and moving lights are shown on the display screen when using the Pressure or Steam function or any Combi-Steam modes.
- This indicates the unit is building pressure or preheating when using STEAM or PRESSURE. When the unit has finished building pressure, your set cook time will begin counting down.
There is a lot of steam coming from my unit when using the Steam function.
- It’s normal for steam to release through the pressure release valve during cooking.
Why can’t I open the lid after pressurising?
- As a safety feature, the lid will not unlock until the unit is completely depressurised. Turn the pressure release valve to the VENT position to quick release the pressurised steam. A quick burst of steam will spurt out of the pressure release valve. When the steam is completely released, the unit will be ready to open.
Is the pressure release valve supposed to be loose?
- Yes. The pressure release valve’s loose fit is intentional; it enables a quick and easy transition between SEAL and VENT and helps regulate pressure by releasing small amounts of steam during cooking to ensure great results. Please make sure it is turned as far as possible toward the SEAL position when pressure cooking and as far as possible toward the VENT position when quick releasing.
The unit is hissing and not reaching pressure.
- Make sure the pressure release valve is turned to the SEAL position. If you’ve done this and still hear a loud hissing noise, it may indicate the silicone ring is not fully in place. Press START/STOP to stop cooking, VENT as necessary and open the lid. Press down on the silicone ring, ensuring it is fully inserted and lies flat under the ring rack. Once fully installed, you should be able to tug lightly on the ring to rotate it.
The unit is counting up rather than down.
- The cooking cycle is complete and the unit is in KEEP WARM mode.
How long does the unit take to depressurise?
- The time it takes to release pressure depends on the quantity of food in the unit and can vary from recipe to recipe. Always ensure the float valve has dropped before trying to remove the lid. If the unit is taking longer than normal to depressurise, unplug the unit and wait until the float valve drops before opening the lid.
“ADD POT” error message appears on display screen.
- Cooking pot is not inside the cooker base. Cooking pot is required for all functions.
“SHUT LID” error message appears on display screen.
- The lid is open and needs to be closed for the selected function to start.
“ADD WATER” error message appears on display screen when using the Steam and Pressure function.
- The water level is too low. Add more water to the unit for the function to continue.
“NO PRESSURE” error message appears on display screen when using the Pressure function.
- Add more liquid to the cooking pot before restarting the pressure cook cycle.
- Make sure the pressure release valve is in the SEAL position.
- Make sure the silicone ring is installed correctly.
“ERR” message appears.
- The unit is not functioning properly. Please contact Customer Service at 0800 862 0453.
“PLUG IN” error message appears on display screen.
- Insert the probe cap or the digital cooking probe into the socket in order to start cooking.
“PROBE ERROR” error message appears on display screen.
- The unit has reached the maximum time of the function selected before the probe reaches the set temperature.
“SLIDE” error message appears on display screen.
- Move the slider to the position desired before selecting a cooking function.
“LOCK LID” error message appears on display screen.
- Move the slider to the PRESSURE position in order to lock the lid.
HELPFUL TIPS
- For consistent browning, make sure ingredients are arranged in an even layer on the bottom of the cooking pot with no overlapping. If ingredients are overlapping, make sure to shake halfway through the set cook time.
- For smaller ingredients that could fall through the reversible rack, we recommend first wrapping them in a parchment paper or foil pouch.
- Use the KEEP WARM mode to keep food at a warm, food-safe temperature after cooking. To prevent food from drying out, we recommend keeping the lid closed and using this function just before serving.
- To reheat food, use the AIR FRY function.