
Loading ...
Loading ...
3
PREPARE THE
INSTALLATION LOCATION
ROOF INSTALLATIONS WALL INSTALLATIONS
2"
29-1/2"
2"
25"
7"
PREPARE THE
INSTALLATION LOCATION
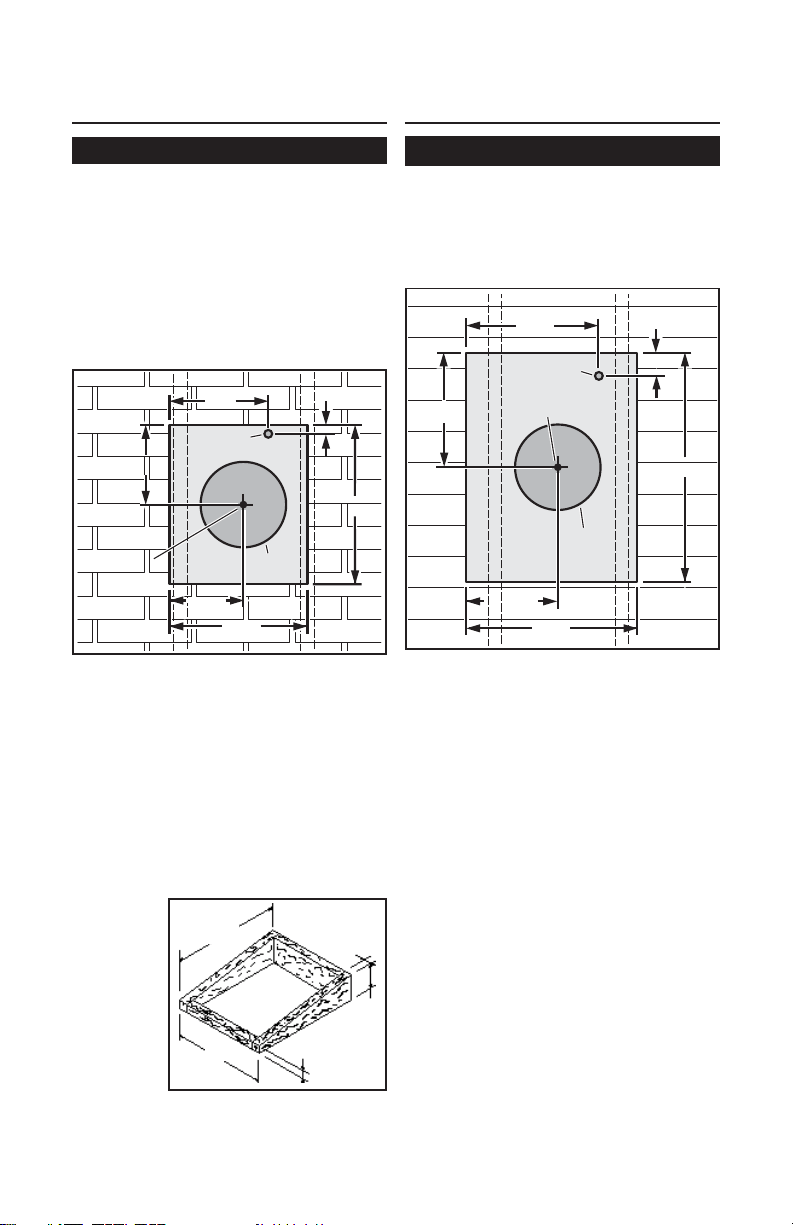
1. Locate the blower on the rear slope of
the roof. Place it in a location to minimize
duct run. The location should be free of
obstacles (T.V. leads, electrical lines,
etc.). If the blower top is level with the
roof peak, it will not be seen from the
street. Keep this approximate location in
mind as you work from within the attic.
2. Mark and drill a guide hole centered
between roof rafters.
11" dia.
hole
20½"
11" dia.
hole
1"
Ø
Ø
12
5
/
8"
20½"
Ø
Ø
18"
12
5
/
8"
18"
12
11
/
16"
1¼" dia. hole
1¼" dia. hole
Roof Rafter
Roof Rafter
Roof Rafter
REMOVE SHINGLES
REMOVE SHINGLES
Roof Rafter
Guide hole
(centered
between rafters)
Guide hole
(centered
between rafters)
12
11
/
16"
21"
3. From the outside, use the guide hole as
a starting point to lay out the installation:
A. Use a T-square to measure 12
5
/
8
" to the
left of the guide hole, then up 12
11
/
16
" to
locate the top-left corner of the layout.
B. Starting from the top-left corner, mark
the rectangular cutout (21" W x 20½" H)
and
remove only the shingles in this
area.
C. Mark an 11" diameter hole centered on
the guide hole. Cut this hole through the
roof board(s).
D. Mark and cut a 1¼" diameter hole
through
the roof
board(s)
where
shown.
4. For flat
roof in-
stalla-
tions,
build a
curb that
will
mount the blower at a minimum pitch of
2/12. Discharge end of the blower should
be pointed downward.
1. Choose a position on the outside wall.
Make sure that no wall studs, pipes or
wires run through the opening area.
2. From inside, mark and drill a guide hole
centered between wall studs.
11" dia.
hole
22"
Guide hole
(centered between studs)
25"
29½"
29½"
14
11
/
16
"
11
13
/
16
"
14
5
/
8
"
17"
Wall Stud
Wall Stud
11" dia.
hole
20"
1¼" dia. hole
1¼" dia. hole
3
"
Ø
Ø
Ø
Ø
REMOVE
SIDING
REMOVE
SIDING
Guide hole
(centered between studs)
3. From the outside, use the guide hole as
a starting point to lay out the installa-
tion:
A. Use a T-square to measure 14
5
/
8
"
to the
left of the guide hole, then up
14
11
/
16
" to locate the top-left corner
of the layout.
B. Starting from the top-left corner,
mark the rectangular cutout (25" W
x 29½" H) and
remove only the
siding in this area.
C. Mark an 11" diameter hole cen-
tered on the guide hole. Cut this
hole through the roof board(s).
D. Mark and cut a 1¼" diameter hole
through the roof board(s) where
shown.
Loading ...
Loading ...
Loading ...