Loading ...
Loading ...
Loading ...
Set-Up & First Brew
IMPORTANT: You cannot use your Keurig
brewer until it has been primed for its first use
as set forth below.
Priming your Brewer
1. Unwrap cord and plug the brewer into a
grounded outlet.
2. Ensure Brew/Drain is set to Brew.
3. Place a cup or mug on the Drip Tray Plate.
4. Remove the Water Reservoir from Brewer by
first removing Lid from Reservoir, then lifting
Reservoir straight up and away from Brewer
(may be tight). Rinse with fresh water.
5. Fill Water Reservoir with fresh water so
that the water level reaches the line just
below the top edge of the clear viewing
area. (Be careful not to over fill.)
6. Place Water Reservoir base into the left
side of the Brewer and be sure the
Water Reservoir Lock Tabs engage
with the Brewer. Replace Lid on Water Reservoir.
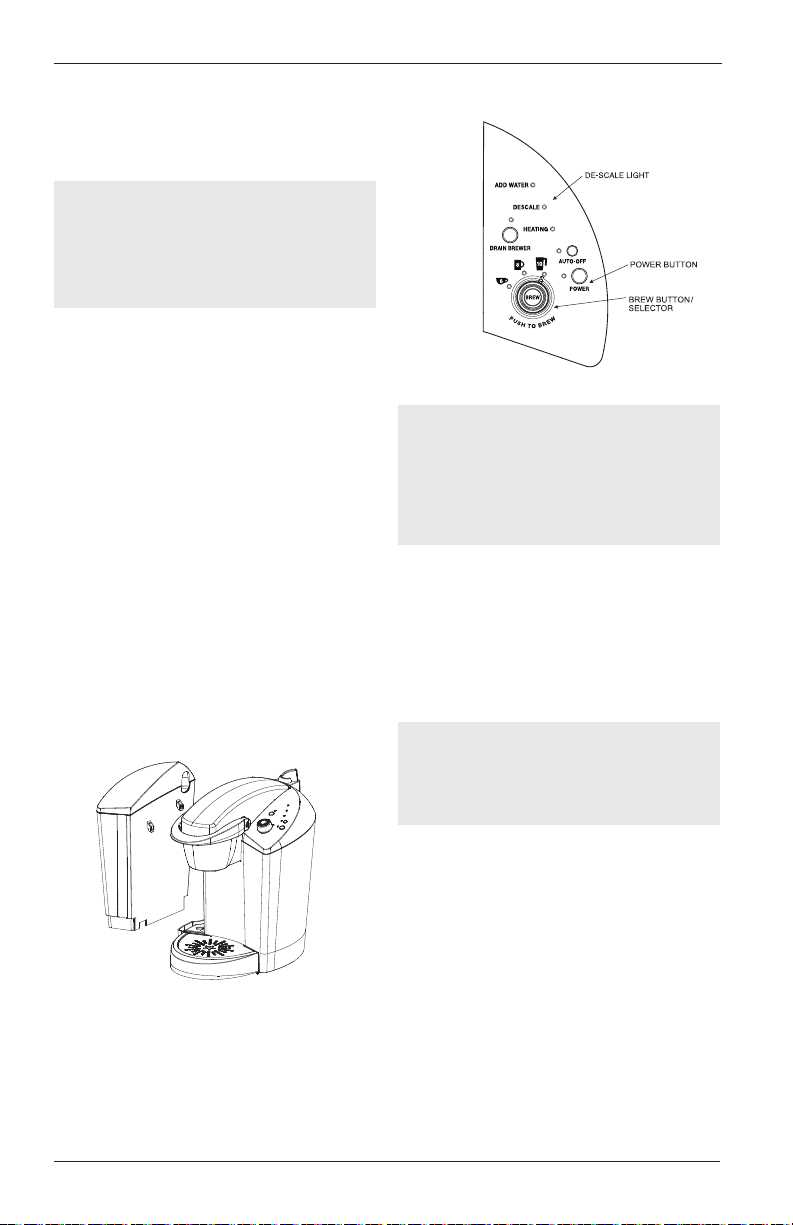
7. Press Power Button found on upper right
panel of the Brewer. The green light next to
the Power Button will become illuminated.
8. The green brew size selector lights on the
LED Control Center will flash to indicate the
Brewer needs to be primed. Make sure the
handle is all the way down before continuing.
Please note, a K-Cup
®
should not be used
for the Priming Sequence.
9. Press the flashing Brew Button.
10.The Brewer will automatically fill with water
(priming it) and then the water will be heat-
ed. This will take less than 5 minutes.
During the heating period the red light next
to 'HEATING' on the LED Control Center will
become illuminated. Once the water is heat-
ed, the red light will turn off.
11.Raise the handle, then press the flashing
back lit blue Brew Button to start a
cleansing brew, during which hot water will
flow into your cup or mug. Pour the hot
water into the sink.
12.The Brewer will take less than 20 seconds
to refill and reheat water between brews
during which time the red light next to
'HEATING' on the LED Control Center may
be illuminated. When the water has heated,
the red light will turn off.
13. The priming process is now complete and
you are ready to brew!
6
7
Ready to Brew your First Cup
1. The green light next to the Power Button on
the LED Control Center will be illuminated
to indicate the Brewer is powered on.
2. Place a cup or mug on the Drip Tray Plate.
3. Lift the Handle and the K-Cup
®
Holder will
open toward you.
4. Select a K-Cup
®
portion pack.
5. Place a K-Cup
®
portion pack in the K-Cup
Holder (as shown in exhibit at top of page).
6. Lower the Handle completely to close the
Lid.
7. Select the brew size you want using the
rotary selector switch.
8. Press the flashing blue Brew Button on the
LED Control Center. This will yield a serv-
ing of the selected size; small 6 oz. medium
8 oz. and large 10 oz. nominal sizes.
9. The blue Brew Button on the LED Control
Center will be on while brewing.
10.There may be a short pause before the brew-
ing process begins. The entire brew process
lasts for approximately 40 to 50 seconds
and ends with a burst of air to remove all
liquid coffee or tea from the K-Cup
®
. The
blue Brew Button will go off.
11.Lift the Handle to remove and dispose of
the used K-Cup
®
. CAUTION: K-Cup
®
will
be hot.
12.Enjoy your first cup of Keurig Brewed
®
gourmet coffee or tea!
13. The red light next to 'HEATING' on the
LED Control Center may light as the water
is heated for the next brew cycle. The
Brewer will be ready for use in approxi-
mately 20 seconds.
Stopping the Brew Process
If you need to stop the brewing after the
process has started, press the Power Button
to turn the Brewer ‘OFF’. The flow of coffee or
tea will stop, the heating element will shut off
and the green light next to the Power Button
will extinguish.
NOTE: You may see small amounts of water
coming from the Vent and dripping into the
Water Reservoir during this and subsequent
heating – this is normal.
NOTE: Do not remove the foil lid or
puncture the K-Cup
®
portion pack.
NOTE: If the Water Reservoir is empty or not
in place on the Brewer, then the blue light
next to 'ADD WATER' on the LED Control
Center will be illuminated. The Brew Button
will not be activated until water is added to
the Water Reservoir.
CAUTION: There are two sharp needles that
puncture the K-Cup
®
portion pack, one above
the K-Cup Holder and the other in the bottom
of the K-Cup Holder. T
o avoid risk of injury,
do not put your fingers in the K-Cup Chamber
.
NOTE: If you do not push the flashing Brew
Button in 60 seconds, the Brew Button will
be disabled to prevent accidental activation.
Re-activate the Brew Button by raising and
lowering the Handle completely, without
removing the unused K-Cup
®
.
CAUTION: There is extremely hot water in
the K-Cup Holder during the brew process.
T
o avoid risk of injury, do not lift the
Handle or open the K-Cup
®
Chamber
during the brew process.
Handle
K-Cup
Chamber
NOTE: If Brewer has been exposed to tempera-
tures below freezing, allow Brewer at least two
hours to reach room temperature before prim-
ing. A frozen or extremely cold brewer will not
prime properly and can cause damage.
NOTE: Following the brew, your Brewer will
fill in preparation for the next brew. The pump
will make a vibrating sound. This is normal.
K-Cup
®
portion pack
NOTE: You may get less coffee or tea in your
cup during your next brew. We recommend
that you perform a cleansing brew without a
K-Cup
®
after a terminated brew or when a prime
sequence has been completed. Then your
NEXT brew will be the proper selected volume.
Loading ...
Loading ...
Loading ...