Loading ...
Loading ...
Loading ...
23English
4. Usage
Take the appliance out of the package and remove all the packaging material. Place
it on a at and rm surface.
• Connect the plug to a properly installed socket.
• Place the juice container (1) under the juice spout with a drip stop funcon (6).
• Push the juice spout (6) up to use the drip stop funcon (e.g., when changing
the juice container).
• Close the locking latch (5).
• Switch on the appliance using the speed level switch (2). You have two speeds
to choose from. Choose level 1 for a slow juice extracon and level 2 for a fast
juice extracon.
• Take the desired fruit or vegetable and place it at the top in the opening of the lid
(9) and press it lightly with the plunger (10).
Cauon! You can run the appliance for about 1 minute. Then please wait for 1
minute. This process can be repeated up to three mes. Subsequently, allow the
juicer to cool down for 15 minutes.
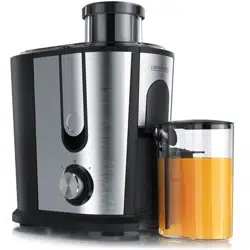
Number Descripon
1 Juice container
2 Speed level switch
3 Base unit/motor housing
4 Pulp container (waste container)
5 Locking latch
6 Spout with drip-stop funcon
7 Drip tray
8 Strainer
9 Transparent lid
10 Plunger
Note: When assembling, please ensure that the correct sequence (starng from 1
to 9) is followed, as shown in Figure 1.
Loading ...
Loading ...
Loading ...