Loading ...
Loading ...
Loading ...
21
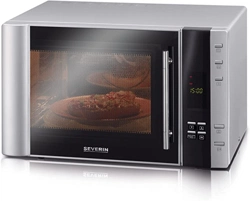
Microwave/grill or microwave/hot-air combinations
∙ When using the microwave + grill or microwave + hot-air combinations, each function is activated alternately. The containers or plates
must therefore be suitable for use in a microwave as well as being heat-resistant. Because of the relatively high temperatures, plastic
items must not be used. Make sure that container or plate used does not contain any metal parts.
Operation
General information on programming the unit
To ensure optimum results, this microwave oven uses state-of-the-art electronics.
∙ When any control button is pressed, the correct input is acknowledged by one beep signal.
∙ While a programme sequence is running, the current setting can be called up by pressing the appropriate key. E.g., if during the
microwave programme the
key is pressed, the display will show the selected power setting.
∙ A programme can be interrupted or restarted by pressing the key.
General operating sequence
∙ Place the food to be heated in a suitable container. Place the container onto the turntable in the oven.
∙ When food is placed in the microwave, it should be covered to prevent it from drying out. Glass or plastic covers especially
designed for use with microwave appliances are available at most kitchenware dealers.
∙ When using the grill, hot-air or any of the combination functions, do not cover the food to be cooked. The grill rack may be put
directly on the glass turntable with the food itself on the grill rack.
∙ Close the door and set the desired programme.
∙ As the programme is started, the turntable starts to rotate. During operation, the interior light remains on.
∙ If, during operation, the door is opened or the key is pressed (e.g. to stir or to turn the food in order to ensure that the
temperature is evenly distributed), the timer and programme functions are automatically suspended. The programme will
automatically resume only after the door is closed again and the key is pressed.
∙ Press twice to interrupt the programme.
∙ 5 beeps indicate that the pre-programmed period has elapsed; at the same time, the interior lighting switches off.
∙ Open the door and remove the container with the food.
∙ In order to achieve an even heat distribution through the food, the container should be set aside for several minutes.
Setting the clock:
Once the unit has been connected to the power supply, the display shows ‘0:00’ and an acoustic signal is heard.
Note: The time display does not start counting, unless the clock has been set. The time setting process can be cancelled by pressing
the key.
1. The clock must be set when the appliance is connected for the fi rst time, and also if a power failure has reset the clock.
2. Press once or twice to select the 24- or 12-hour display. The display shows 24H or 12H.
3. Press or to set the correct hour. The hour must be in the range 0-23 (for 24H) or 1-12 (for 12H).
4. Press . The minute digits start fl ashing.
5. Press or to set the correct minutes. The set time must be in the range 0-59.
6. Press to fi nish setting the time. The symbol ‘:’ fl ashes and the correct time is displayed.
Quick-programming
The most commonly used microwave time-settings can be called up simply by pressing . With this function, the microwave power
setting is always 100%. Each press on the key adds 30 seconds to the cooking time.
Note: The cooking process starts as soon as the key is pressed for the fi rst time.
Example: To programme the microwave function for a cooking time of 2 minutes at 100% power.
Press
4 times. The display shows 2:00, and the symbol
starts fl ashing.
The microwave function
To programme the unit for cooking, the correct mode (microwave), the required power setting and the cooking time must be selected,
before the programme sequence can be started. The power setting is selected by repeatedly pressing . The cooking time can be
pre-set to a maximum of 95 minutes.
Loading ...
Loading ...
Loading ...