My
Machine
*
* Ma machine
6926_UM_LATTISSIMA_PREMIUM_Z2A.indb 1 17.10.13 19:56

EN - FR 4-21
DE-IT 22-39
ES-PT 40-57
NL-GR 58-75
HU-CZ 76-93
PL-RU 94-111
* Ma machine
6926_UM_LATTISSIMA_PREMIUM_Z2A.indb 2 17.10.13 19:56
A B C
10
12
11
6
9
2
1
8
7
5
4
3
13
24
19
20
21
22
23
14 18
1 5 17
16
25
2827
26
29
31
25
30
34
33
32
4
3
6926_UM_LATTISSIMA_PREMIUM_Z2A.indb 3 17.10.13 19:56

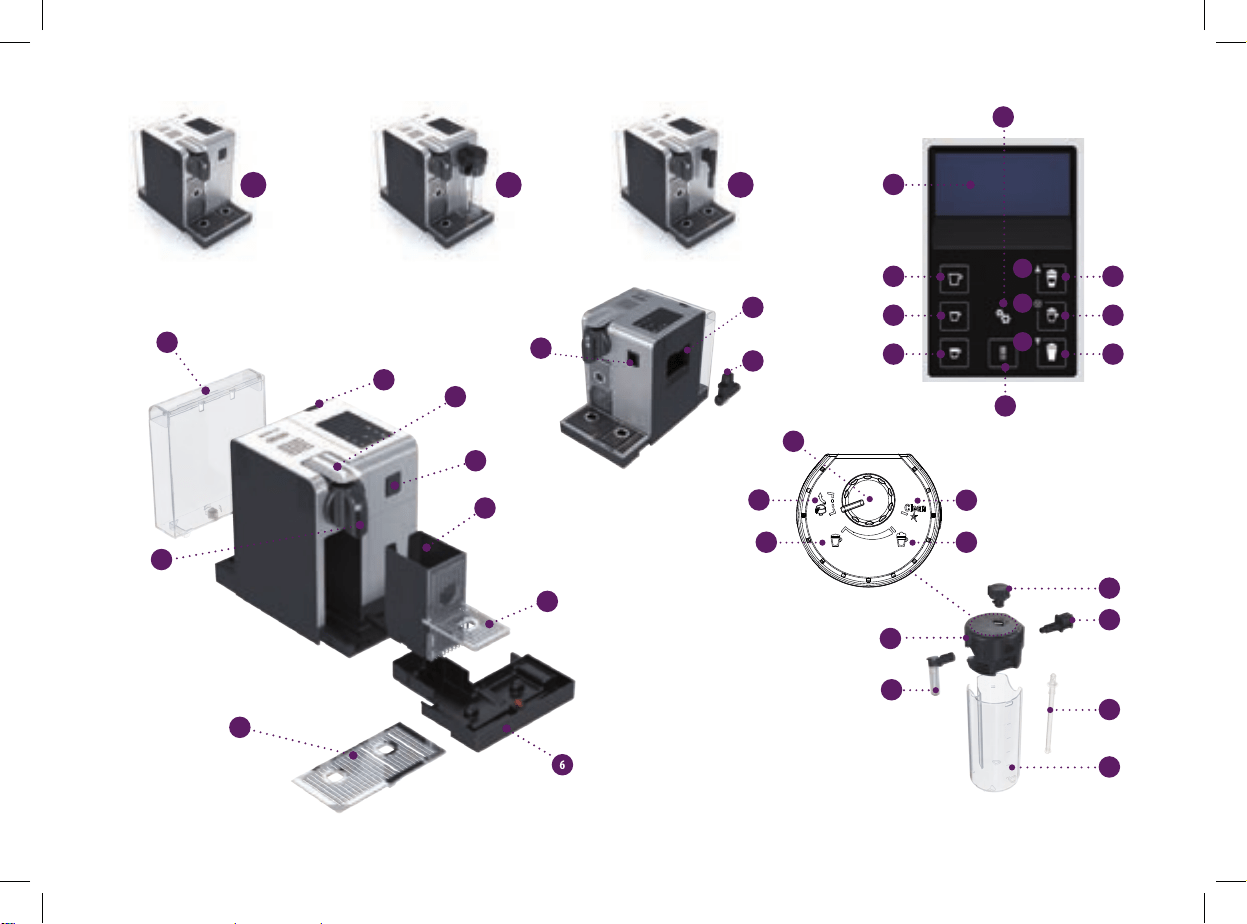
OVERVIEW/VUE D’ENSEMBLE
Display (preparations)/
Ecran (préparations)
13
Lungo/Lungo
14
Espresso/Espresso
15
Ristretto/Ristretto
16
Hot water/Eau chaude
17
Warm milk/Lait chaud
18
Cappuccino/Cappuccino
19
Latte Macchiato/Latte Macchiato
Display (navigation)/
Ecran (navigation)
20
Menu/Menu
21
Scroll up when Menu is activated/
Délement vers le haut lorsque le Menu est activé
22
Option selection when Menu is activated/
Sélection des options lorsque le Menu est activé
23
Scroll down when Menu is activated/
Délement vers le bas lorsque le Menu est activé
24
Text display/Ecran d’achage
Rapid Cappuccino System (R.C.S.)/
Rapid Cappuccino System (R.C.S.)
25
Milk Froth regulator knob/Bouton de réglage de mousse de lait
26
Insert position for Milk froth regulator knob/
Position d’insertion du bouton rotatif de réglage de mousse
27
Min. froth/Mousse min.
28
Max. froth/Mousse max.
29
«CLEAN»: automatic rinsing function/
«CLEAN»: fonction de rinçage automatique
30
Milk container Lid/Couvercle du réservoir à lait
31
Milk spout/Buse à lait
32
Milk container/Réservoir à lait
33
Milk aspiration tube/Tuyau d’aspiration de lait
34
R.C.S. connector/Connecteur du R.C.S.
Overview of machine/
Vue d’ensemble de la machine
A
Machine in coee only conguration/
Machine en conguration Café uniquement
B
Machine with Rapid Cappuccino System (for Cappuccino)/
Machine avec le Rapid Cappuccino System (pour les
Cappuccinos)
C
Machine with hot water spout/
Machine avec la buse Eau Chaude
1
Lever/Levier
2
ON/OFF button/Bouton ON/OFF
3
Water tank/Réservoir d’eau
4
Coee outlet/Sortie Café
5
Drip grid/Grille d’égouttage
6
Drip tray/Bac d’égouttage
7
Pivoting cup support (not removable)/
Support-tasse basculant (non amovible)
8
Used capsule container/Bac à capsules usagées
9
Steam connector door/Porte d’accès au connecteur vapeur
10
Telescopic hot water spout/Buse Eau Chaude télescopique
11
Hot water spout storage area/
Espace de rangement de la buse eau chaude
12
Steam connector/Connecteur vapeur
4
6926_UM_LATTISSIMA_PREMIUM_Z2A.indb 4 17.10.13 19:56

EN
FR
CONTENT/CONTENT
Nespresso, an exclusive system creating the perfect Espresso, time after time. All Nespresso machines are equipped with a unique extraction system that guarantees up to 19 bar pressure. Each parameter has been calculated
with great precision to ensure that all the aromas from each Grand Cru can be extracted, to give the coee body and create an exceptionally thick and smooth crema.
Nespresso est un système unique orant un Espresso parfait, tasse après tasse. Toutes les machines Nespresso sont équipées d’un système d’extraction unique à très haute pression allant jusqu’à 19 bar. Chaque paramètre est
calculé avec précision pour exprimer la totalité des arômes de chaque Grand Cru, lui donner du corps et orir une créma d’une densité et d’une onctuosité incomparables.
VOLUME FACTORY SETTINGS/RÉGLAGES USINE ...............................................
DESCALING/DÉTARTRAGE .............................................................................
WATER HARDNESS SETTING/RÉGLAGE DE LA DURETÉ D'EAU ............................
TROUBLESHOOTING/DÉPANNAGE ..................................................................
SPECIFICATIONS/SPÉCIFICATIONS .................................................................
DISPOSAL AND ECOLOGICAL CONCERNS/
MISE AU REBUT ET PROTECTION DE L'ENVIRONNEMENT
..................................
CONTACT THE NESPRESSO CLUB/CONTACTEZ LE CLUB NESPRESSO
....................
WARRANTY/GARANTIE ..................................................................................
OVERVIEW/VUE D'ENSEMBLE ............................................................................
PACKAGING CONTENT/CONTENU DE L‘EMBALLAGE ..............................................
MENU NAVIGATION/MENU/NAVIGATION ............................................................
MENU LIST/LISTE DU MENU ...............................................................................
FIRST USE OR AFTER A LONG PERIOD OF NONUSE/PREMIÈRE UTILISATION OU
APRÈS UNE LONGUE PÉRIODE DE NONUTILISATION
...........................................
COFFEE PREPARATION/PRÉPARATION CAFÉ........................................................
ASSEMBLING/DISASSEMBLING OF RAPID CAPPUCCINO SYSTEM R.C.S./
MONTAGE/DÉMONTAGE DU RAPID CAPPUCCINO SYSTEM R.C.S.
.........................
PREPARING CAPPUCCINO AND LATTE MACCHIATO/
PRÉPARATION D'UN CAPPUCCINO ET D'UN LATTE MACCHIATO
.............................
DAILY CARE/ENTRETIEN QUOTIDIEN ..................................................................
HAND WASHING OF RAPID CAPPUCCINO SYSTEM R.C.S./
LAVAGE À LA MAIN DU RAPID CAPPUCCINO SYSTEM R.C.S.
................................
15
16
17
18
19
20
20
20
CAUTION: when you see this sign, please refer to the safety precautions to avoid possible harm and damage.
INFORMATION: when you see this sign, please take note of the advice for the correct and safe usage of your coee machine.
AVERTISSEMENT: lorsque ce symbole apparaît, veuillez consulter les consignes de sécurité pour éviter d’éventuels dangers et dommages.
INFORMATION: lorsque ce symbole apparaît, veuillez prendre connaissance du conseil pour une utilisation sûre et conforme de votre
appareil.
04
06
06
07
08
10
10
11
14
14
5
6926_UM_LATTISSIMA_PREMIUM_Z2A.indb 5 17.10.13 19:56
EN SA FETY PRECAUTI ONS ............................................................................. 2
FR CONSIGNES DE SECURITE ......................................................................... 4
DE SICHERHEITSHINWEISE ........................................................................... 7
IT PRECAUZIONI DI SICUREZ ZA .................................................................... 10
ES PRECAUCIONES DE SEGURIDAD ................................................................ 12
PT MEDIDAS DE SEGURANÇA......................................................................... 15
NL V EILIGHEIDSMAATREGELEN ..................................................................... 18
GR ΜΈΤ ΡΑ ΑΣΦΑΛΈΙΑ Σ .................................................................................. 20
HU BIZTONSÁGI ELŐÍRÁSOK .......................................................................... 22
CZ BEZPEČNOSTNÍ POKYNY .......................................................................... 25
PL ZASADY BEZPIECZEŃSTWA ....................................................................... 28
RU МЕРЫ ПРЕДОСТОР ОЖНОСТИ ................................................................. 31
EN
FR
MENU NAVIGATION/MENU/NAVIGATION
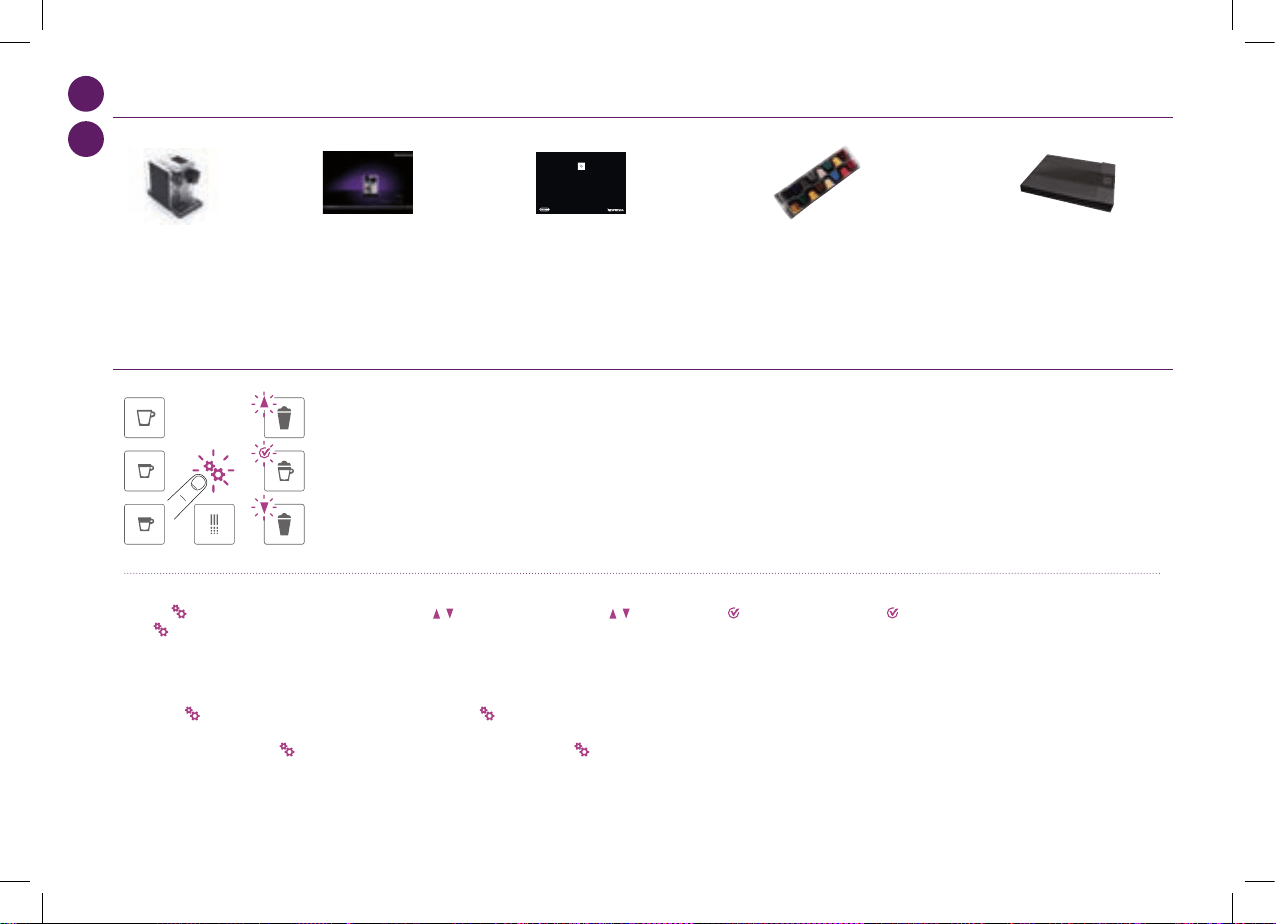
PACKAGING CONTENT/CONTENU DE L‘EMBALLAGE
Coee machine
Machine à café
«Welcome to Nespresso folder
»
Pochette de Bienvenue chez Nespresso
User manual
Mode d’emploi
Safety Instructions
Consignes de sécurité
Capsules set
Assortiment de Grands Crus
Enter the Menu list/Entrer dans la liste du menu
Press shortly symbol/Appuyez brièvement sur le
symbole .
Browse options/Délement des options
Press symbol/Appuyez sur les symboles .
Select option/Sélectionner une option
Press symbol/Appuyez sur le symbole .
Exit from the Menu list/
Sortir de la liste du menu
Scroll to EXIT option and select.
Or quickly press symbol.
Faites déler jusqu'à l'option QUITTER et valider la
sélection. Ou appuyez sur le symbole .
Exit from option and return to Menu list/
Sortir d'une option et retourner à la liste du menu
Scroll to EXIT option and select.
Or quickly press symbol.
Faites déler jusqu'à l'option QUITTER et valider la
sélection. Ou appuyez sur le symbole .
6
6926_UM_LATTISSIMA_PREMIUM_Z2A.indb 6 17.10.13 19:56
EN
FR
Enter the Menu list/Entrer dans la liste du menu
Press shortly symbol/Appuyez brièvement sur le
symbole .
Browse options/Délement des options
Press symbol/Appuyez sur les symboles .
Select option/Sélectionner une option
Press symbol/Appuyez sur le symbole .
Exit from the Menu list/
Sortir de la liste du menu
Scroll to EXIT option and select.
Or quickly press symbol.
Faites déler jusqu'à l'option QUITTER et valider la
sélection. Ou appuyez sur le symbole .
Exit from option and return to Menu list/
Sortir d'une option et retourner à la liste du menu
Scroll to EXIT option and select.
Or quickly press symbol.
Faites déler jusqu'à l'option QUITTER et valider la
sélection. Ou appuyez sur le symbole .
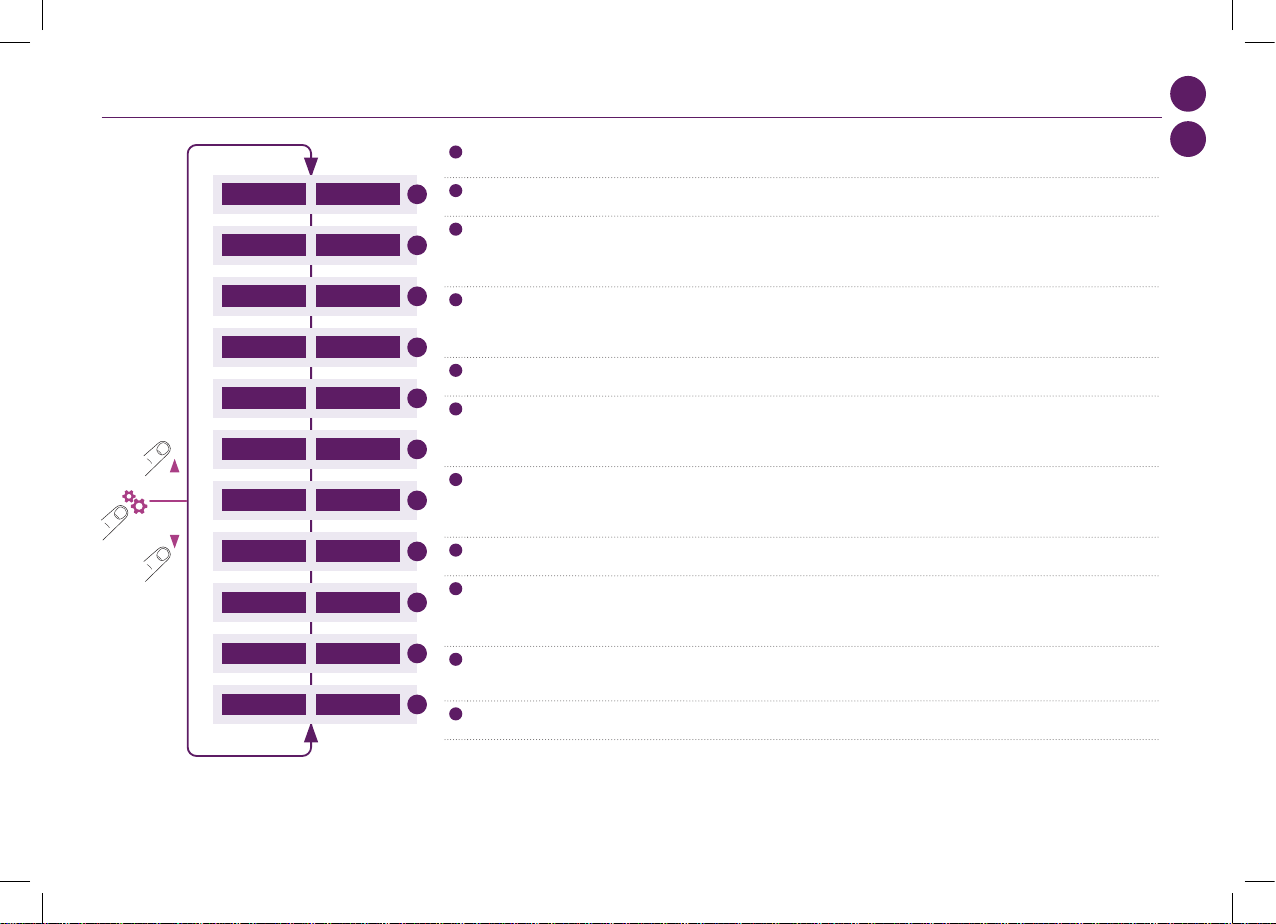
MENU LIST/LISTE DU MENU
1
Select this option to set your preferred language. Follow machine screen instructions.
Sélectionnez cette option pour choisir la langue. Suivez les instructions de l'écran de la machine.
2
Select this option once the descaling alert appears on the display. Refer to page 16. You will be guided throughout the descaling process.
Sélectionnez cette option lorsque l'alerte détartrage apparait sur l'écran. Voir page 16. Vous serez guidé tout au long du process de détartrage.
3
Select this option to set the water hardness level at your location. Use the water hardness sticker provided to determine it. This will optimize the descaling
frequency. Refer to page 17.
Sélectionnez cette option an de régler la dureté d'eau correspondant à votre région. Utilisez la bande de test fournie pour déterminer la dureté de l'eau. Cela
permettra d'optimiser la fréquence des détartrages. Voir page 17.
4
Select this option to set the time after which the machine switches o automatically. (Possible options are 9 minutes, 30 minutes, 2 hours, 8 hours). Follow
machine screen instructions.
Sélectionnez cette option pour régler la durée d'extinction automatique de la machine. (Les options possibles sont 9 minutes, 30 minutes, 2 heures, 8 heures).
Suivez les instructions de l'écran de la machine.
5
Select this option to reset all parameters of the machine to factory settings.
Sélectionnez cette option an de revenir aux réglages usines de la machine.
6
Select this option to empty the water inside the machine in case you need to send it for repair or before a long period of non use. Follow machine screen
instructions. You will not be able to use the machine for 10 minutes after this process.
Sélectionnez cette option pour vidanger l'eau à l'intérieur de la machine au cas où vous auriez besoin de l'expédier pour réparation ou avant une longue période de
non-utilisation. Suivez les instructions de l'écran de la machine. L'utilisation de la machine ne sera pas possible pendant 10 minutes après cette manipulation.
7
Select this option to program the volume of your beverages (coee cups, hot water and milk based preparations). Follow machine screen instructions. In addition,
you can reset all the beverages volumes to factory settings as well.
Sélectionnez cette option pour programmer la longueur de vos boissons (tasses de café, eau chaude et recettes à base de lait). Suivez les instructions de l'écran de
la machine. De plus, vous pouvez aussi revenir aux réglages usines des longueurs de tasses.
8
Select this option to get access of all machines settings at a glance.
Sélectionnez cette option pour accéder rapidement à tous les réglages machine.
9
Select this option to check the overall status of your machine. The consumption statistics are available either from the rst use (absolute) or since the last descaling
(relative). The serial number of machine is provided as well.
Sélectionnez cette option an de vérier l'état général de votre machine. Les statistiques de consommations sont disponibles soit à partir de la première mise en
service (totales), soit à partir du dernier détartrage (relatives). Le numéro de série de la machine est aussi accessible.
10
Select this option to get the best advice on how to get optimal milk froth quality day after day. The internet link is provided to know more about this feature.
Sélectionnez cette option pour obtenir les meilleurs conseils pour réussir une qualité de mousse de lait optimale jour après jour. Le lien internet est fourni an d'en
connaitre plus sur cette fonctionnalité.
11
Exit from the menu list and return to machine ready mode.
Sortir de la liste du menu et revenir au mode «PRÊTE» de votre machine.
1
LANGUELANGUAGE
2
DETARTRAGEDESCALING
3
DURETE EAUWATER HARDNESS
4
ARRÊT AUTOMATIQUEAUTO POWER OFF
5
REGLAGES USINEFACTORY SETTINGS
6
VIDER CIRCUITEMPTY FLUID SYSTEM
7
VOLUME PROGR.VOLUME PROGR.
8
INFO RÉGLAGESSETTINGS INFO
9
MAINTENANCEMAINTENANCE
10
AIDE HELP
QUITTER EXIT
11
7
6926_UM_LATTISSIMA_PREMIUM_Z2A.indb 7 17.10.13 19:56
max
SET LANGUAGE
to continue
LANGUAGE
Actual value : EN
New value : [ ]
to select
05
max
SET LANGUAGE
to continue
LANGUAGE
Actual value : EN
New value : [ ]
to select
05
max
SET LANGUAGE
to continue
LANGUAGE
Actual value : EN
New value : [ ]
to select
05
max
SET LANGUAGE
to continue
LANGUAGE
Actual value : EN
New value : [ ]
to select
05
max
SET LANGUAGE
to continue
LANGUAGE
Actual value : EN
New value : [ ]
to select
05
max
SET LANGUAGE
to continue
LANGUAGE
Actual value : EN
New value : [ ]
to select
05
EN
FR
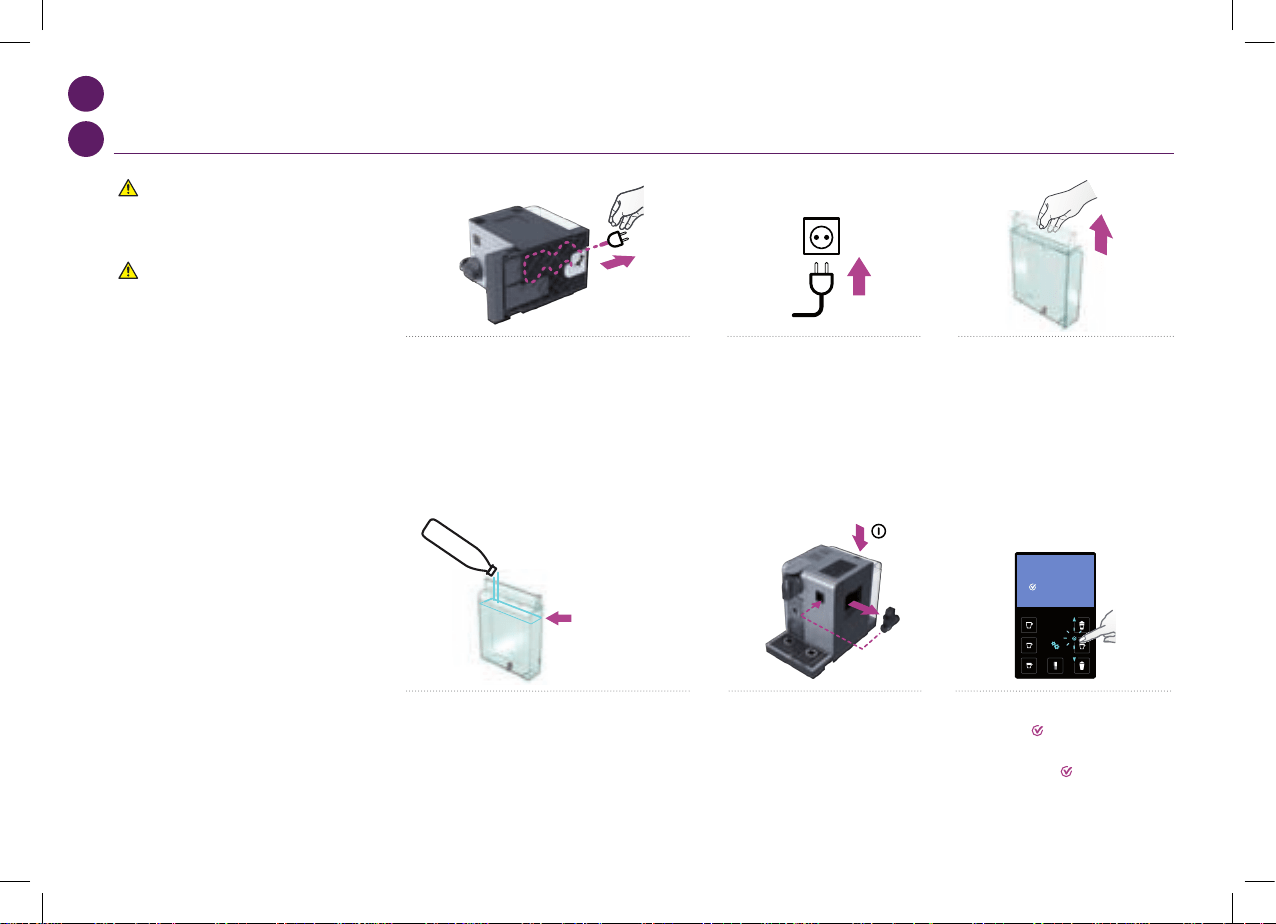
FIRST USE OR AFTER A LONG PERIOD OF NONUSE/
PREMIÈRE UTILISATION OU APRÈS UNE LONGUE PÉRIODE DE NONUTILISATION
CAUTION: rst read the safety
precautions to avoid risks of fatal
electrical shock and re.
AVERTISSEMENT: commencez
par lire les consignes de sécurité
pour éviter les risques de décharges
électriques mortelles et d‘incendie.
1. Remove the water tank, drip tray, and capsule
container. Adjust the cable length and store the
excess in the cable guide under the machine.
1. Retirez le réservoir d'eau, la grille d'égouttage, et le bac à
capsules. Ajustez la longueur de câble et rangez le superu
dans le guide-câble sous la machine.
5. Insert the hot water spout. Switch
machine ON.
5. Insérez la buse eau chaude. Allumez
la machine.
2. Put the machine in upright position,
plug machine into mains.
2. Placez la machine en position
verticale, branchez-la à la prise
électrique.
6. SET LANGUAGE: set your preferred
language. Press
to continue.
6. SET LANGUAGE: choisissez votre langue
préférée. Appuyez sur
pour continuer.
3. The water tank can be carried by
its cover.
3. Le réservoir d'eau peut être porté par son
couvercle.
4. Rinse the water tank before lling with
fresh potable water up to maximum level.
4. Rincez le réservoir d'eau avant de le remplir jusqu'au
niveau maximum avec de l'eau potable fraiche.
8
6926_UM_LATTISSIMA_PREMIUM_Z2A.indb 8 17.10.13 19:56
max
SET LANGUAGE
to continue
LANGUAGE
Actual value : EN
New value : [ ]
to select
05
max
First read the safety precautions to avoid risks of fatal electrical shock and fire
Remove the plastic films from grid,
lever and machine panels.
Remove the water tank, drip tray, and capsule
container. Adjust the cable length and store the
excess in the cable guide under the machine.
Put the machine in upright position,
plug machine into mains.
The water tank can be carried by
its cover.
Rinse the water tank before filling with
potable water up to maximum level.
Insert the hot water spout.
Switch machine ON
Set your preferred language.
Press to continue.
SET LANGUAGE
to continue
Select your language by scrolling the
options using up/down arrow. Press to
confirm.
LANGUAGE
Actual value : EN
New value : [ ]
to select
Coffee preparation
x3
x3
110 ml
40 ml
25 ml
05 06
4°
15”
Assembling / disassembling of Rapid Cappuccino system (R.C.S)
07
EN
FR
7. LANGUAGE: select your language by scrolling the options using
arrow. Press to conrm.
7. LANGUAGE: choisissez votre langue, faites déler les options avec
les
. Appuyez sur pour conrmer.
FIRST USE OR AFTER A LONG PERIOD OF NONUSE/
PREMIÈRE UTILISATION OU APRÈS UNE LONGUE PÉRIODE DE NONUTILISATION
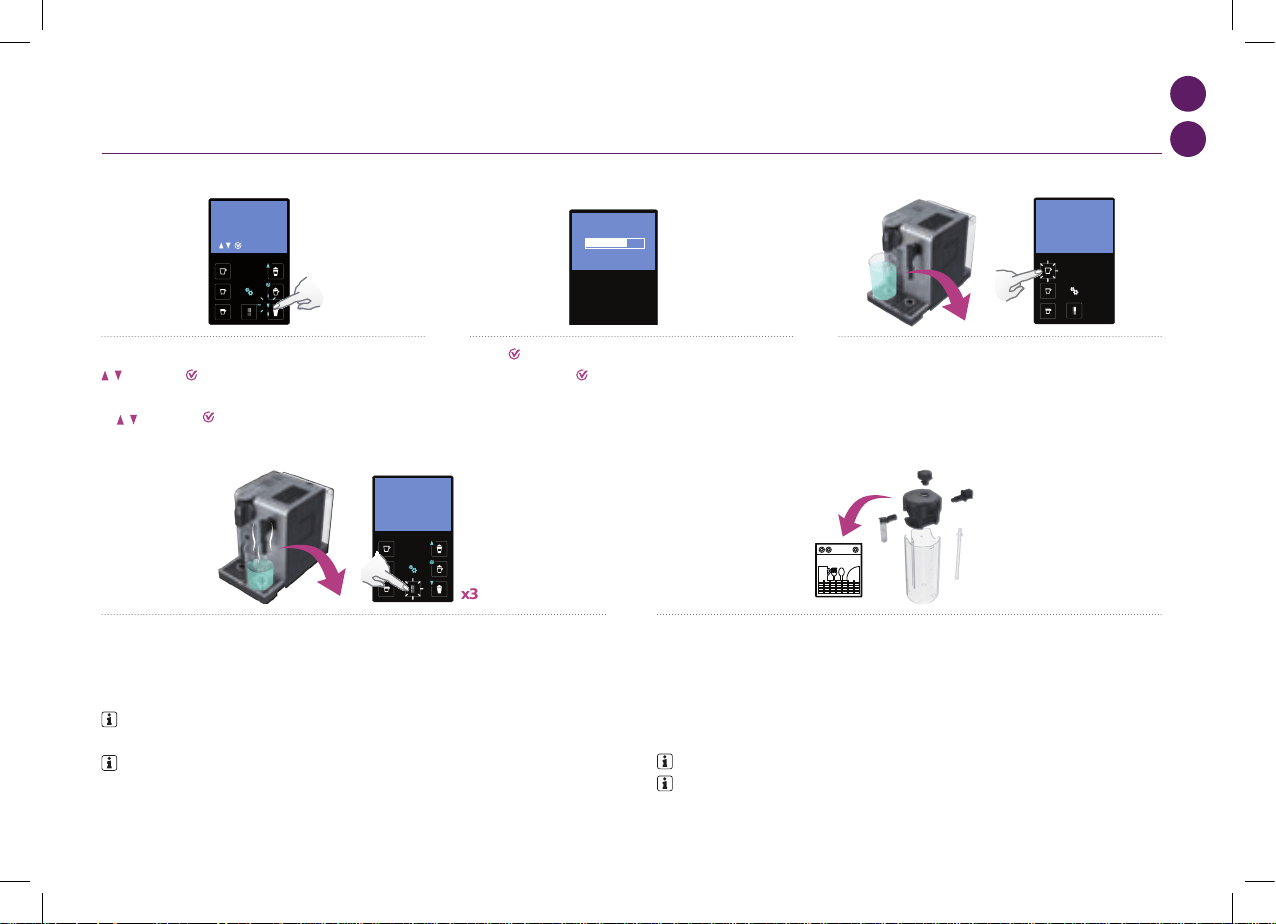
11. Disassemble the Rapid Cappuccino System (R.C.S.) and clean all components in the upper level of
your dishwasher. In case a dishwasher is not available, refer to section Hand washing of Rapid Cappuccino
System ( R.C.S.).
11. Démontez le Rapid Cappuccino System (R.C.S.) et lavez tous les composants dans le panier supérieur de
votre lave-vaisselle. Si vous ne disposez pas d'un lave-vaisselle, référez-vous à la section lavage à la main
du Rapid Cappuccino System (R.C.S.).
INFORMATION: refer to section Assembling/Disassembling of Rapid Cappuccino System.
INFORMATION: voir section Montage/Démontage du Rapid Cappuccino System.
10. Rinsing: repeat three times through the hot water spout. Once nished, remove it and store it back in
the storage area located on the machine right side. Close the steam connector door.
10. Rinçage: répétez trois fois via la buse eau chaude. Une fois terminé, retirez-le et rangez le dans l'espace
de rangement situé sur le côté droit de la machine. Fermez la porte d'accès au connecteur vapeur.
INFORMATION: machines are fully tested after being produced. Some traces of coee
powder could be found in rinsing water.
INFORMATION: toutes nos machines sont entièrement testées après avoir été fabriquées.
Des traces de poudre de café peuvent être visibles dans l'eau de rinçage.
9. Rinsing: place a container under coee outlet and press
the lungo button. Repeat three times.
9. Rinçage: placez un récipient sous la sortie café et appuyez sur la
touche Lungo. Répétez trois fois cette opération.
8. Once symbol is pressed, machine heats up.
8. Lorsque le symbole
est appuyé, la machine chaue.
9
6926_UM_LATTISSIMA_PREMIUM_Z2A.indb 9 17.10.13 19:56
max
First read the safety precautions to avoid risks of fatal electrical shock and fire
Remove the plastic films from grid,
lever and machine panels.
Remove the water tank, drip tray, and capsule
container. Adjust the cable length and store the
excess in the cable guide under the machine.
Put the machine in upright position,
plug machine into mains.
The water tank can be carried by
its cover.
Rinse the water tank before filling with
potable water up to maximum level.
Insert the hot water spout.
Switch machine ON
Set your preferred language.
Press to continue.
SET LANGUAGE
to continue
Select your language by scrolling the
options using up/down arrow. Press to
confirm.
LANGUAGE
Actual value : EN
New value : [ ]
to select
Coffee preparation
x3
x3
110 ml
40 ml
25 ml
05 06
4°
15”
Assembling / disassembling of Rapid Cappuccino system (R.C.S)
07
EN
FR
COFFEE PREPARATION/PRÉPARATION CAFÉ
ASSEMBLING/DISASSEMBLING OF RAPID CAPPUCCINO SYSTEM R.C.S./
MONTAGE/DÉMONTAGE DU RAPID CAPPUCCINO SYSTEM R.C.S.
1. Lift the lever completely and insert a
Nespresso capsule.
1. Levez le levier complètement et insérez
une capsule Nespresso.
2. Close the lever and place a cup under the
coee outlet.
2. Fermez le levier et placez une tasse sous
la sortie café.
3. Press the Ristretto (25 ml/0.75 oz), the Espresso (40 ml/1.35 oz) or the
Lungo (110 ml/3.7 oz) button. Preparation will stop automatically. To stop
the coee ow or top up your coee, press again.
3. Appuyez la touche Ristretto (25 ml), Espresso (40 ml) ou Lungo (110 ml).
La préparation s'arrêtera automatiquement. Pour arrêter l'écoulement de
votre café ou pour rallonger votre café, appuyez à nouveau.
4. Take the cup. Lift and close the lever
to eject the capsule into the used capsule
container.
4. Prenez la tasse. Levez et fermez le levier
pour éjecter la capsule dans le bac à capsules
usagées.
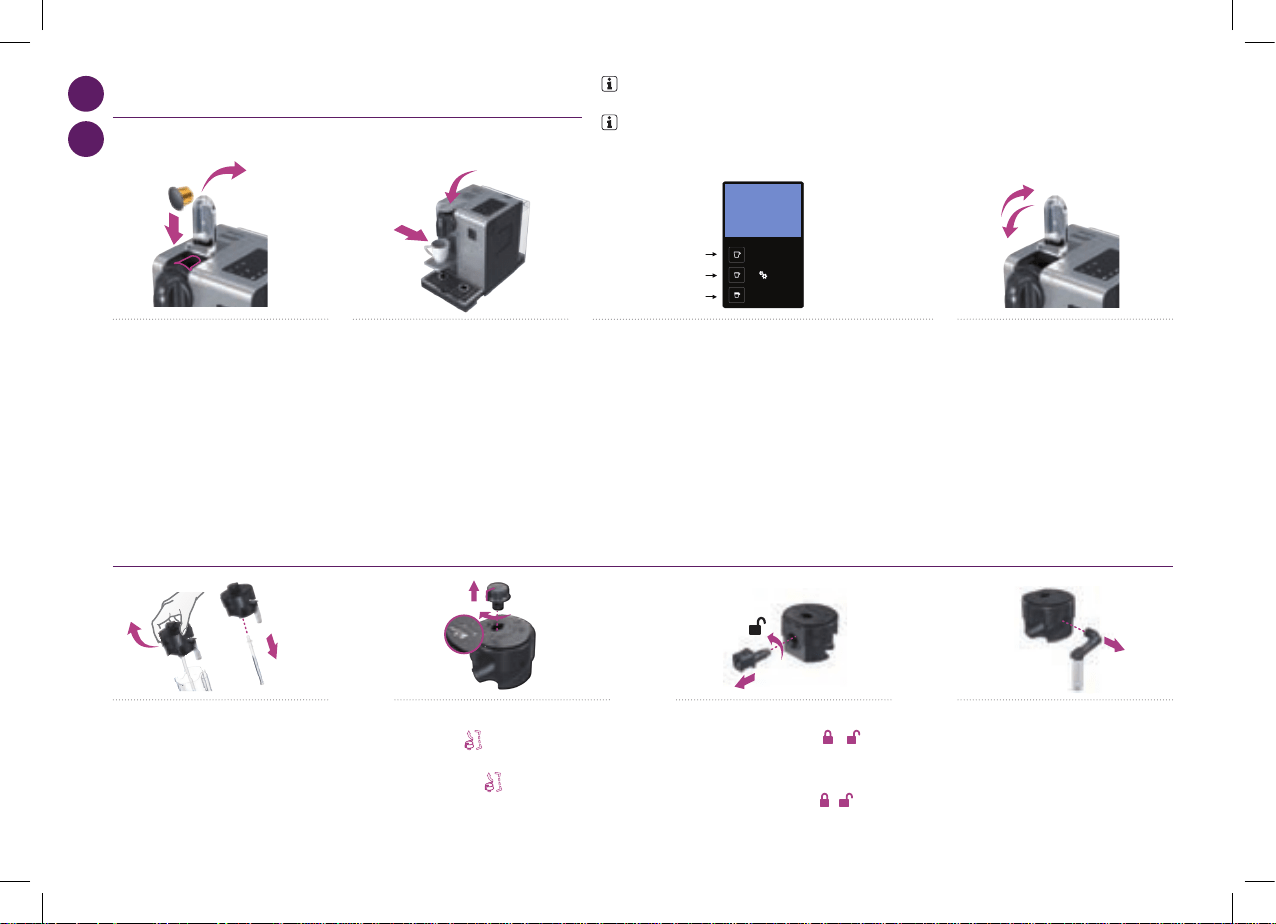
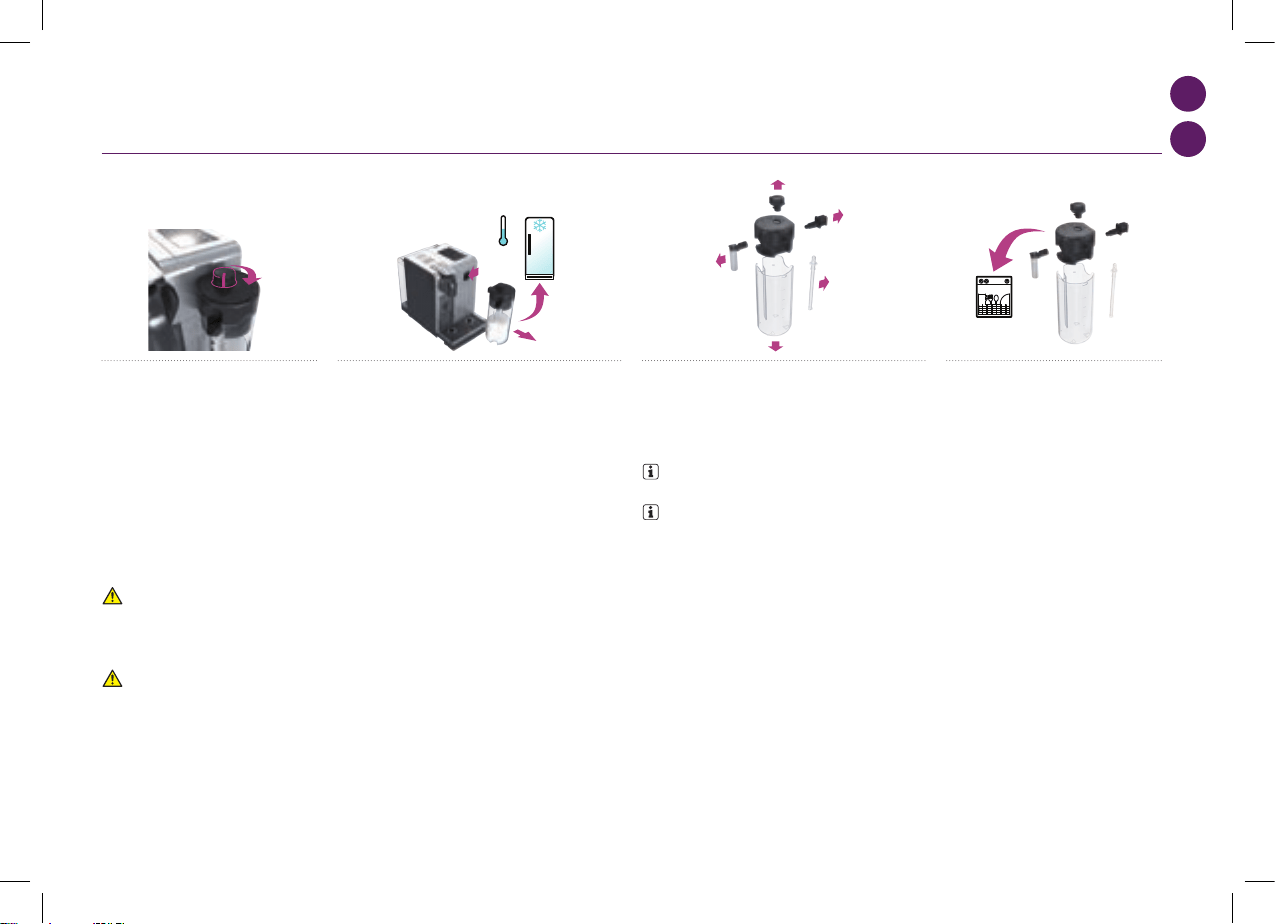
1. Remove the milk container lid and unplug
milk aspiration tube.
1. Retirez le couvercle du réservoir à lait et
retirez le tuyau d'aspiration de lait.
4. Remove the milk spout by pulling it o.
4. Retirez la buse à lait en la tirant.
2. Remove the milk froth regulator knob by
turning it until
and pulling it up.
2. Retirez le bouton de réglage de mousse en
le tournant jusqu'à
et tirez-le.
3. Remove Rapid Cappuccino System
connector by unlocking it from
to and
pulling it o.
3. Retirez le connecteur du Rapid Cappuccino
System en le déverrouillant de
à et le
tirant ensuite.
NOTE: during heat up, you can press any coee buttons. The coee will then ow automatically when the
machine is ready.
NOTE: durant le chauage de la machine, vous pouvez appuyer sur n'importe quelle touche café. Le café
s'écoulera automatiquement dès que la machine sera prête.
10
6926_UM_LATTISSIMA_PREMIUM_Z2A.indb 10 17.10.13 19:56
4°
15”
Assembling / disassembling of Rapid Cappuccino system (R.C.S)
07
4°
15”
Assembling / disassembling of Rapid Cappuccino system (R.C.S)
07
4°
15”
Assembling / disassembling of Rapid Cappuccino system (R.C.S)
07
4°
15”
Assembling / disassembling of Rapid Cappuccino system (R.C.S)
07
EN
FR
PREPARING CAPPUCCINO AND LATTE MACCHIATO/
PRÉPARATION D'UN CAPPUCCINO ET D'UN LATTE
MACCHIATO
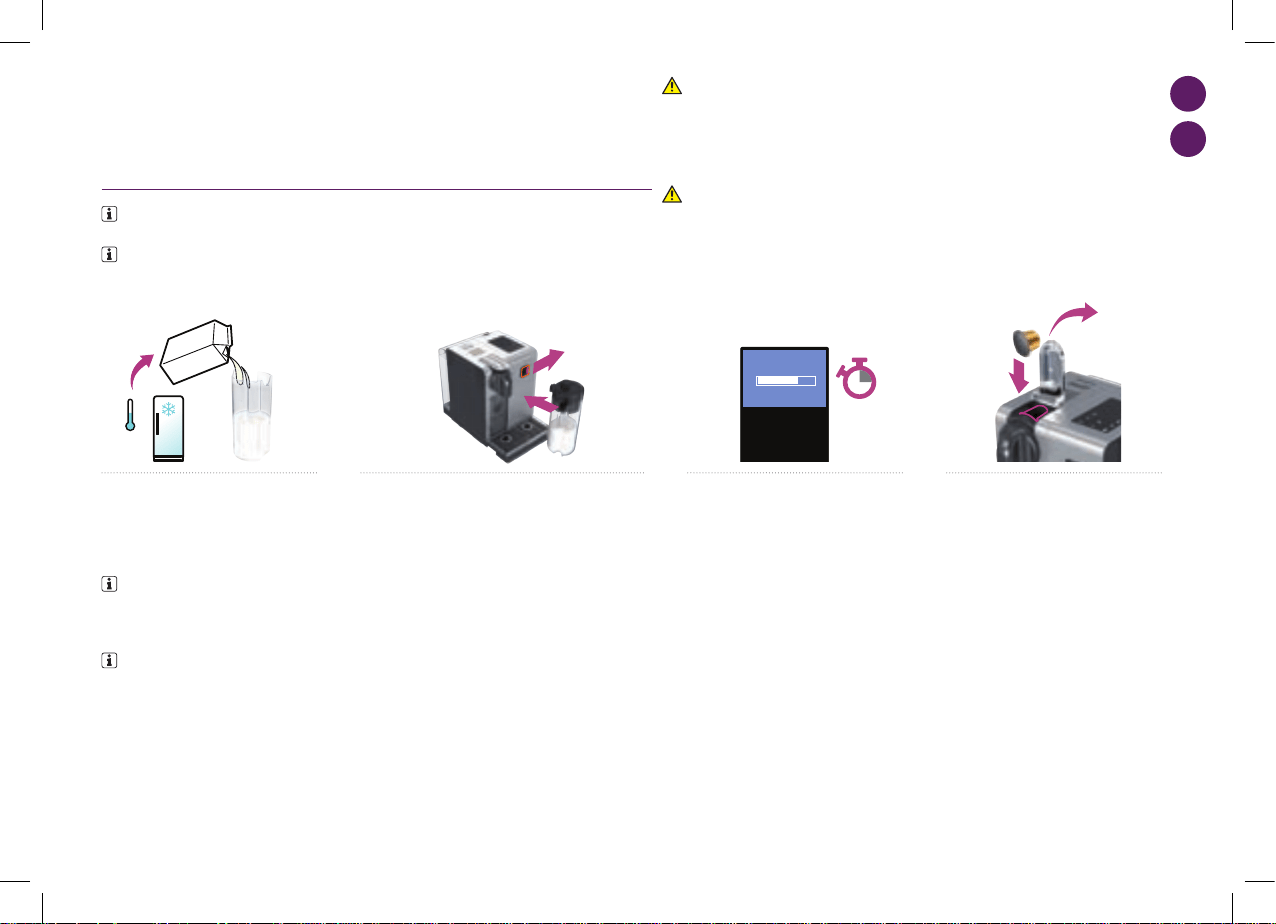
1. Fill the milk container with desired
quantity of milk.
1. Remplissez le réservoir à lait avec la
quantité de lait souhaité.
2. Close the milk container. Open the steam connector door
by sliding it to the right. Connect the Rapid Cappuccino
System to the machine.
2. Fermez le réservoir à lait. Ouvrir la porte d'accès au
connecteur vapeur en la faisant glisser sur la droite.
Connectez le Rapid Cappuccino System à la machine.
3. Machine heats up for approximately
15 sec.
3. La machine chaue pendant
approximativement 15 sec.
4. Lift the lever completely and insert a
Nespresso capsule.
4. Levez le levier complètement et insérez
une capsule Nespresso.
CAUTION: do not use the milk container for any other liquid
other than milk or potable water. Do not use raw unpasteurised
milk and be sure not to use milk after its expiration date as
indicated on the packaging.
AVERTISSEMENT: ne pas utiliser le réservoir à lait pour un
autre liquide que du lait ou de l'eau potable. Ne pas utiliser de
lait cru et assurez-vous de ne pas utiliser de lait après la date de
péremption indiquée sur l'emballage.
INFORMATION: for a perfect milk froth, use skimmed or semi-skimmed milk at refrigerator
temperature (about 4° C).
INFORMATION: pour une mousse parfaite, utilisez du lait écrémé ou demi-écrémé à température du
réfrigérateur (environ 4° C).
INFORMATION: when the milk
container is empty, before relling,
thoroughly rinse it and the milk
aspiration tube with potable water.
INFORMATION: lorsque le réservoir
de lait est vide, avant de le remplir, rincez
le abondamment avec de l'eau potable
ainsi que le tuyau d'aspiration de lait.
11
6926_UM_LATTISSIMA_PREMIUM_Z2A.indb 11 17.10.13 19:56
Preparing Cappuccino and Latte Macchiato
4°
i
When the milk container is empty, before refilling,
thoroughly rinse it and the milk aspiration tube
with potable water.
Close the milk container. Open the steam
connector door by sliding it to the right. Connect
the Rapid Cappuccino System to the machine.
15”
+
LATTE MACCHIATO
Clean
15”
i
Remove Rapid Cappuccino System
connector by unlocking it from (sign ) to
(sign) and pulling it off
Remove the milk container lid and
unplug milk aspiration tube.
Remove the milk froth regulator knob by
turning it until and pulling it up.
Remove the milk spout by pulling it off.
1 2 3 4
Assembling / disassembling of Rapid Cappuccino system (R.C.S)
RINSE MILK SYSTEM
07 08
EN
FR
PREPARING CAPPUCCINO AND LATTE MACCHIATO/
PRÉPARATION D'UN CAPPUCCINO ET D'UN LATTE MACCHIATO
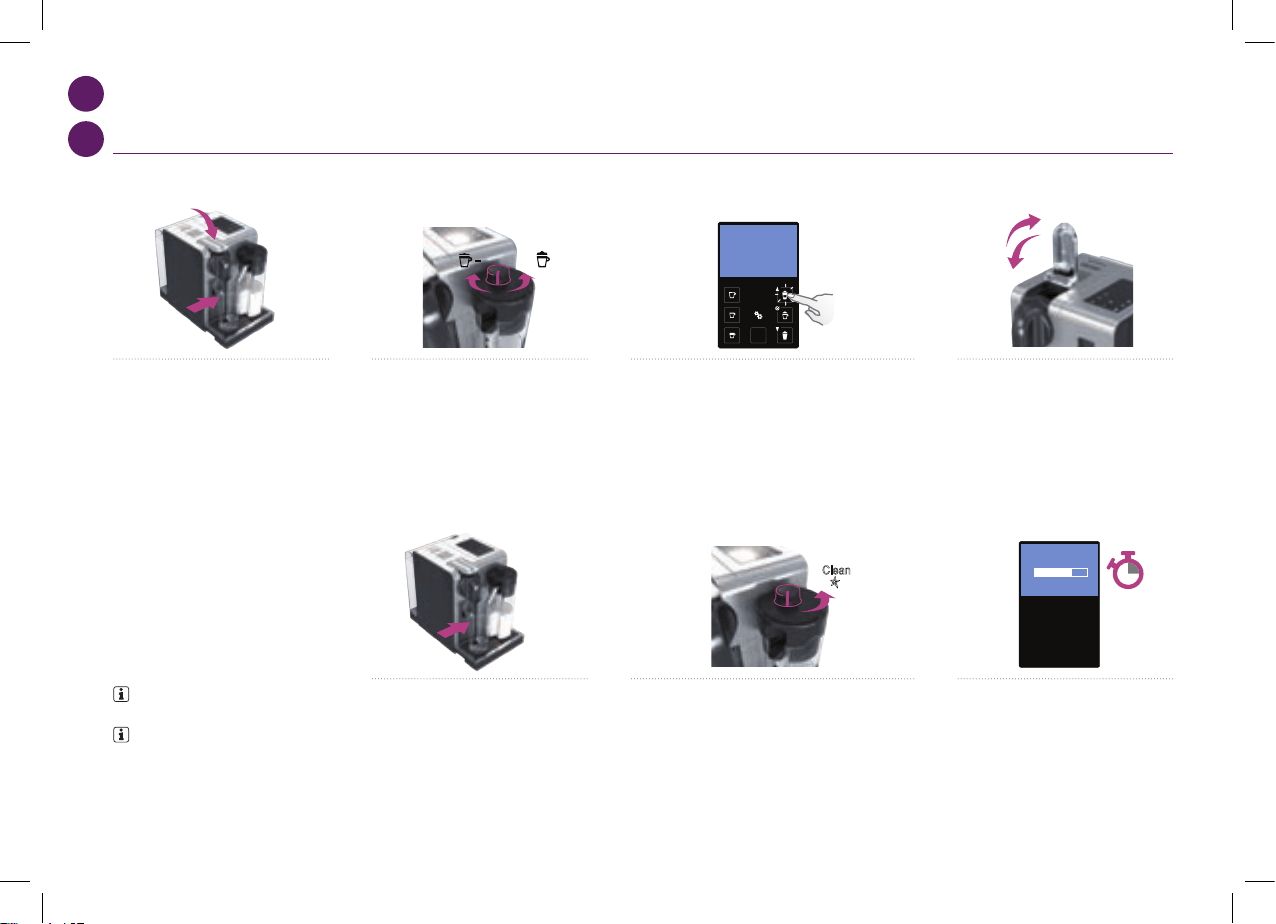
INFORMATION: rinse the milk
system after each use.
INFORMATION: rincez le système à
lait après chaque utilisation.
9. Place a container under milk spout.
9. Placez un récipient sous la buse à lait.
10. Rotate the milk regulator knob in «CLEAN» position.
Milk system rinsing process starts and hot water combined
with steam ows through the milk spout.
10. Tournez le bouton de réglage de mousse à lait sur la
position «CLEAN». Le process de rinçage du système à lait
démarre, de l'eau chaude et de la vapeur s'écoulent par la
buse à lait.
11. Rinsing process lasts approximately
15 sec. and stops automatically.
11. Le process de rinçage dure environ 15 sec.
et s'arrête automatiquement.
5. Close the lever, place a Cappuccino cup or a
Latte Macchiato glass under the coee outlet
and adjust milk spout position.
5. Fermez le levier, placez une tasse
Cappuccino ou un verre à Latte Macchiato
sous la sortie café et ajustez la position de la
buse à lait.
6. Adjust the milk froth regulator knob
according to the volume of froth you want.
6. Ajustez le bouton de réglage de la mousse
de lait au volume de mousse souhaité.
7. Press the Cappuccino or Macchiato button. The
preparation starts after a few seconds (rst milk and then
coee) and will stop automatically.
7. Appuyez la touche Cappuccino ou Macchiato. La
préparation commence après quelques secondes (le lait en
premier puis le café) et s'arrêtera automatiquement.
8. At the end of the preparation, lift and close
the lever to eject the capsule into the used
capsule container.
8. Lorsque la préparation est terminée, levez
et fermez le levier pour éjecter la capsule
dans le bac à capsules usagées.
12
6926_UM_LATTISSIMA_PREMIUM_Z2A.indb 12 17.10.13 19:57
PRESS to confirm.
The discaling agent flows alternately
trough the coffee outlet, hot water nozzle
and drip tray.
Descaling
Descaling process: Empty the drip tray and
the used capsules container.
Rinsing process: Empty the drip
tray and the used capsules
container.
Refer to safety precautions
+
100 ml
500 ml
1 2 3
5
7 8
4
6
Lift and close the lever to eject any capsule
in the used capsule container.
Descaling process: Fill water tank with 100
ml of Nespresso descaling agent and 500ml
water.
Descaling process: Insert the hot
water spout.
Enter the Menu, browse the options and
select DESCALING. You will be guided
throughout the whole process. Follow
machine display instructions.
Descaling process: Place one container
of minimum 1 litre under both the coffee
outlet and the hot water spout.
4°
Volume factory settings
LANGUAGE
DESCALING
WATER HARDNESS
09 10
EN
FR
PREPARING CAPPUCCINO AND LATTE MACCHIATO/
PRÉPARATION D'UN CAPPUCCINO ET D'UN LATTE MACCHIATO
12. Once rinsing has nished, turn the milk
froth regulator knob back in milk position.
12. Une fois le rinçage terminé, tournez
le bouton de réglage de mousse sur une
position lait.
13. Disconnect the R.C.S. from machine and place it
immediately in the refrigerator. Close the machine steam
connector door.
13. Déconnectez le R.C.S. de la machine et placez-le de
suite dans le réfrigérateur. Fermez la porte d'accès au
connecteur vapeur.
15. And clean all components in the upper
side of your dishwasher. In case a dishwasher
is not available, refer to section Hand washing
of Rapid Cappuccino System (R.C.S.).
15. Et lavez tous les composants dans le
panier supérieur de votre lave-vaisselle. Si
vous ne disposez pas d'un lave-vaisselle,
référez-vous à la section lavage à la main du
Rapid Cappuccino System (R.C.S.).
INFORMATION: refer to section «Assembling/
Disassembling of Rapid Cappuccino system (R.C.S.)».
INFORMATION: référez-vous à la section
«Montage/Démontage du Rapid Cappuccino System
(R.C.S.)».
CAUTION: this milk should not be kept for more than 2 days in the refrigerator. In the case the milk
container is kept outside refrigerator for longer than 2 hours, disassemble the R.C.S. and clean all components
(refer to dishwashing or hand washing recommendations).
AVERTISSEMENT: le lait ne doit pas être conservé plus de 2 jours dans le réfrigérateur. Si le réservoir à
lait est conservé en dehors du réfrigérateur pendant plus de 2 heures, démontez le R.C.S. et nettoyez tous les
composants (voir les recommandations de lavage au lave-vaisselle et lavage à la main).
14. Every two days, disassemble the Rapid Cappuccino
System.
14. Tous les deux jours, démontez le Rapid Cappuccino
System.
13
6926_UM_LATTISSIMA_PREMIUM_Z2A.indb 13 17.10.13 19:57

PRESS to confirm.
The discaling agent flows alternately
trough the coffee outlet, hot water nozzle
and drip tray.
Descaling
Descaling process: Empty the drip tray and
the used capsules container.
Rinsing process: Empty the drip
tray and the used capsules
container.
Refer to safety precautions
+
100 ml
500 ml
1 2 3
5
7 8
4
6
Lift and close the lever to eject any capsule
in the used capsule container.
Descaling process: Fill water tank with 100
ml of Nespresso descaling agent and 500ml
water.
Descaling process: Insert the hot
water spout.
Enter the Menu, browse the options and
select DESCALING. You will be guided
throughout the whole process. Follow
machine display instructions.
Descaling process: Place one container
of minimum 1 litre under both the coffee
outlet and the hot water spout.
4°
Volume factory settings
LANGUAGE
DESCALING
WATER HARDNESS
09 10
EN
FR
2. Lift and close the lever to eject the capsule into the used capsule container. Place
a container under coee outlet and press the Lungo button to rinse. Clean the coee
outlet with a clean damp cloth.
2. Levez et fermez le levier pour éjecter la capsule dans le bac à capsules usagées.
Placez un récipient sous la sortie café, appuyez sur la touche Lungo pour rincer.
Nettoyez la sortie café à l'aide d'un chion propre et humide.
3. Rinse away carefully any dirt residue on the hot water
spout under potable water. Clean it with a clean damp cloth.
3. Rincez soigneusement sous l'eau potable tout résidu de
saleté de la buse eau chaude. Nettoyez-le avec un chion
propre et humide.
1. Disassemble the Rapid Cappuccino System. Refer to
section «Assembling/Disassembling of Rapid Cappuccino
system (R.C.S)».
1. Démontez le Rapid Cappuccino System. Référez-vous
à la section «Montage/Démontage du Rapid Cappuccino
System (R.C.S.)».
2. Rinse away carefully any milk residue with
potable water.
2. Rincez soigneusement tous les résidus de
lait à l'eau potable.
3. Soak all components in warm water (approximately
40° C) together with soap detergent for at least 30 minutes.
3. Laissez tremper tous les composants dans de l'eau
chaude (environ 40° C) mélangée à un détergent pendant
minimum 30 minutes.
4. Rinse with potable water and dry them
with a clean damp cloth.
4. Rincez à l'eau potable et essuyez-les à
l'aide d'un chion propre.
DAILY CARE/ENTRETIEN QUOTIDIEN
INFORMATION: do not use any strong cleaning agent or solvent cleaner. Use a clean damp cloth and mild cleaning agent to clean the surface of the
machine. Do not put any machine components in dishwasher, except the Rapid Cappuccino System components.
INFORMATION: n’utilisez pas des produits de nettoyage agressifs ou à base de solvants. Utilisez un chion humide et un agent nettoyant doux pour nettoyer
la surface de la machine. Ne lavez aucun composant de la machine au lave-vaisselle, excepté les composants du Rapid Cappuccino System.
HAND WASHING OF RAPID CAPPUCCINO SYSTEM R.C.S./
LAVAGE À LA MAIN DU RAPID CAPPUCCINO SYSTEM R.C.S.
INFORMATION: when a dishwasher is not available, the R.C.S. components can be washed manually. In that case, the procedure must be performed daily for a maximum eciency.
INFORMATION: en l'absence de lave-vaisselle, les composants du R.C.S. peuvent être lavés à la main. Dans ce cas, le nettoyage doit être réalisé quotidiennement pour une meilleure ecacité.
1. Remove drip tray, capsule container. Empty and rinse.
Remove water tank. Empty, rinse it before lling with fresh
potable water.
1. Retirez la grille d'égouttage et le bac à capsules. Videz-le
et rincez-le. Retirez le réservoir d'eau. Videz-le, rincez-le
avant de le remplir avec de l'eau potable fraiche.
14
6926_UM_LATTISSIMA_PREMIUM_Z2A.indb 14 17.10.13 19:57
PRESS to confirm.
The discaling agent flows alternately
trough the coffee outlet, hot water nozzle
and drip tray.
Descaling
Descaling process: Empty the drip tray and
the used capsules container.
Rinsing process: Empty the drip
tray and the used capsules
container.
Refer to safety precautions
+
100 ml
500 ml
1 2 3
5
7 8
4
6
Lift and close the lever to eject any capsule
in the used capsule container.
Descaling process: Fill water tank with 100
ml of Nespresso descaling agent and 500ml
water.
Descaling process: Insert the hot
water spout.
Enter the Menu, browse the options and
select DESCALING. You will be guided
throughout the whole process. Follow
machine display instructions.
Descaling process: Place one container
of minimum 1 litre under both the coffee
outlet and the hot water spout.
4°
Volume factory settings
LANGUAGE
DESCALING
WATER HARDNESS
09 10
EN
FR
NOTE: *the milk froth volume depends on the kind of milk that is used, its temperature and the
position of the milk regulator knob.
NOTE: *le volume de la mousse de lait dépend de la nature de lait utilisé, de sa température et de la
position du bouton de réglage de mousse à lait.
NOTE: we recommend you to keep factory settings for Ristretto, Espresso and Lungo to ensure the
best in cup results for each of our coee varieties.
NOTE: nous vous recommandons de conserver les réglages usine pour le Ristretto, Espresso et Lungo
an d'assurer le meilleur résultat dans la tasse pour toutes nos variétés de cafés.
Water volume can be programmed from 50 to 400 ml.
Milk volume can be programmed from 30 to 200 ml.
Coee volume can be progammed from 25 to 200 ml.
Le volume d'eau maximum peut être programmé de 50 à 400 ml.
La volume de lait peut être programmé de 30 à 200 ml.
Le volume de café peut être programmé de 25 à 200 ml.
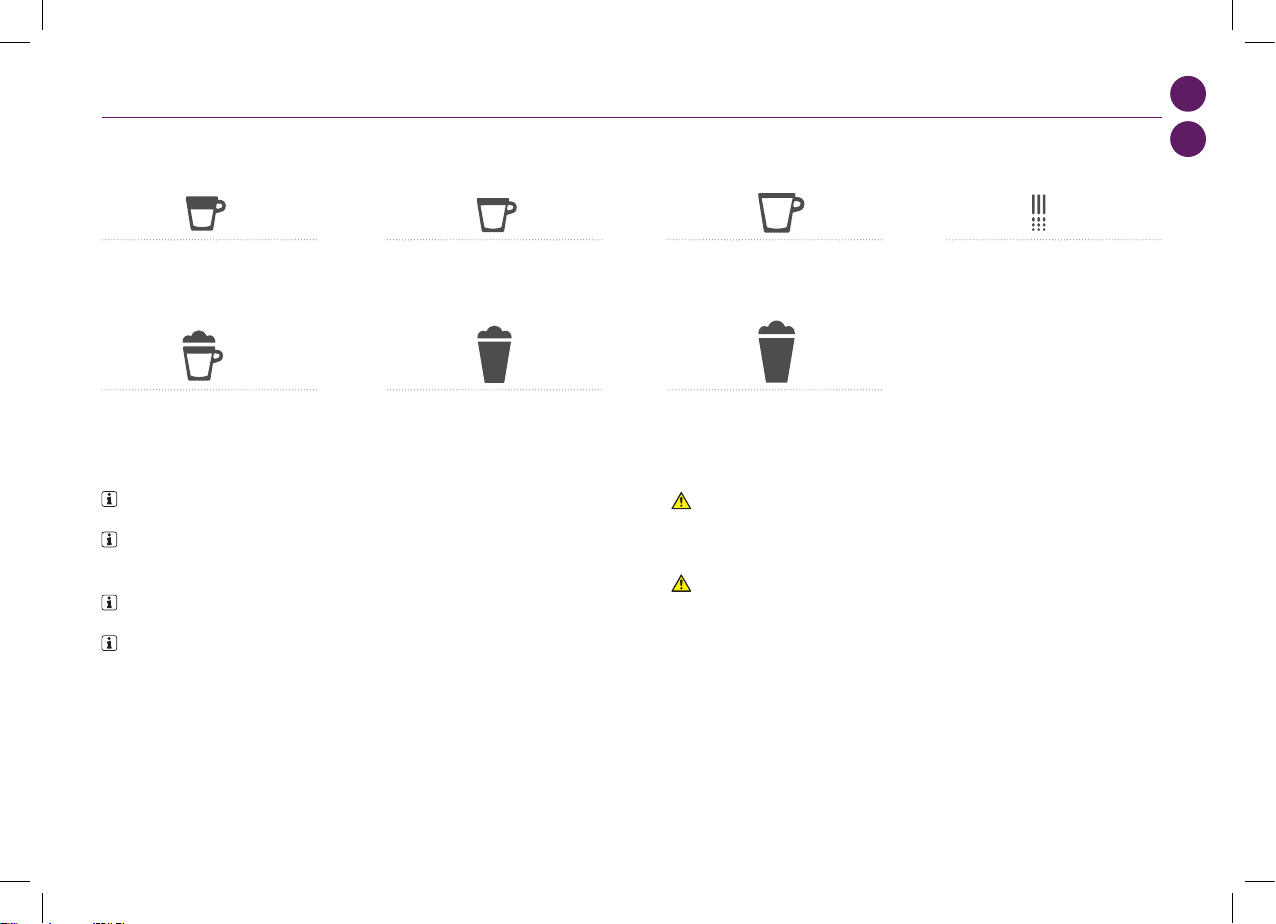
VOLUME FACTORY SETTINGS/RÉGLAGES USINE
Ristretto 25 ml
Ristretto 25 ml
Cappuccino Milk*: 50 ml/Coee: 40 ml
Cappuccino Lait*: 50 ml/Café: 40 ml
Lungo 110 ml
Lungo 110 ml
Latte Macchiato Milk*: 150 ml/Coee: 40 ml
Latte Macchiato Lait*: 150 ml/Café: 40 ml
Espresso 40 ml
Espresso 40 ml
Hot water 125 ml
Eau chaude 125 ml
Warm milk* 120 ml
Lait chaud* 120 ml
CAUTION: if coee volumes higher than 150 ml are
programmed: let the machine cool down for 5 minutes before
making the next coee. Risk of overheating!
AVERTISSEMENT: si la quantité de café programmée excède
150 ml; laissez la machine refroidir pendant 5 minutes avant de
préparer un autre café. Risque de surchaue!
15
6926_UM_LATTISSIMA_PREMIUM_Z2A.indb 15 17.10.13 19:57

+
100 ml
500 ml
10
+
100 ml
500 ml
10
+
100 ml
500 ml
10
+
100 ml
500 ml
10
+
100 ml
500 ml
10
+
100 ml
500 ml
10
+
100 ml
500 ml
10
+
100 ml
500 ml
10
EN
FR
DESCALING/DÉTARTRAGE
1. Lift and close the lever to eject any capsule
in the used capsule container.
1. Levez et fermez le levier pour éjecter la
capsule dans le bac à capsules usagées.
2. Enter the Menu, browse the options and select
DESCALING. You will be guided throughout the whole
process. Follow machine display instructions.
2. Entrez dans le menu, faites déler les options et
sélectionnez DÉTARTRAGE. Vous serez guidé tout au long
du process. Suivez les instructions de l'écran de la machine.
CAUTION: refer to safety precautions. AVERTISSEMENT: référez-vous aux consignes de sécurité.
7. Press to conrm. The descaling agent ows alternately
trough the coee outlet, hot water nozzle and drip tray.
7. Appuyez sur
pour conrmer. La solution détartrante
s'écoule alternativement par la sortie café, la buse eau
chaude et le bac d'égouttage.
5. Descaling process: insert the hot water
spout.
5. Process de détartrage: insérez la buse
eau chaude.
6. Descaling process: place one container of
minimum 1 litre under both the coee outlet
and the hot water spout.
6. Process de détartrage: placez un
récipient de minimum 1 litre sous les deux
sorties café et eau chaude.
3. Descaling process: empty the drip tray
and the used capsules container.
3. Process de détartrage: videz le bac
d'égouttage et le bac à capsules usagées.
4. Descaling process: ll water tank with
100 ml of Nespresso descaling agent and
500ml of potable water.
4. Process de détartrage: remplissez le
réservoir d'eau de 100 ml de la solution
détartrante Nespresso et 500 ml d'eau
potable.
8. Rinsing process: empty the drip tray
and the used capsules container. Rinse with
potable water.
8. Process de rinçage: videz le bac
d'égouttage et le bac à capsules usagées.
Rincez avec de l'eau potable.
16
6926_UM_LATTISSIMA_PREMIUM_Z2A.indb 16 17.10.13 19:57
max
1”
1
2
3
4
5
11
max
1”
1
2
3
4
5
11
max
1”
1
2
3
4
5
11
max
1”
1
2
3
4
5
11
max
1”
1
2
3
4
5
11
max
1”
1
2
3
4
5
11
max
1”
1
2
3
4
5
11
max
1”
1
2
3
4
5
11
EN
FR
DESCALING/DÉTARTRAGE
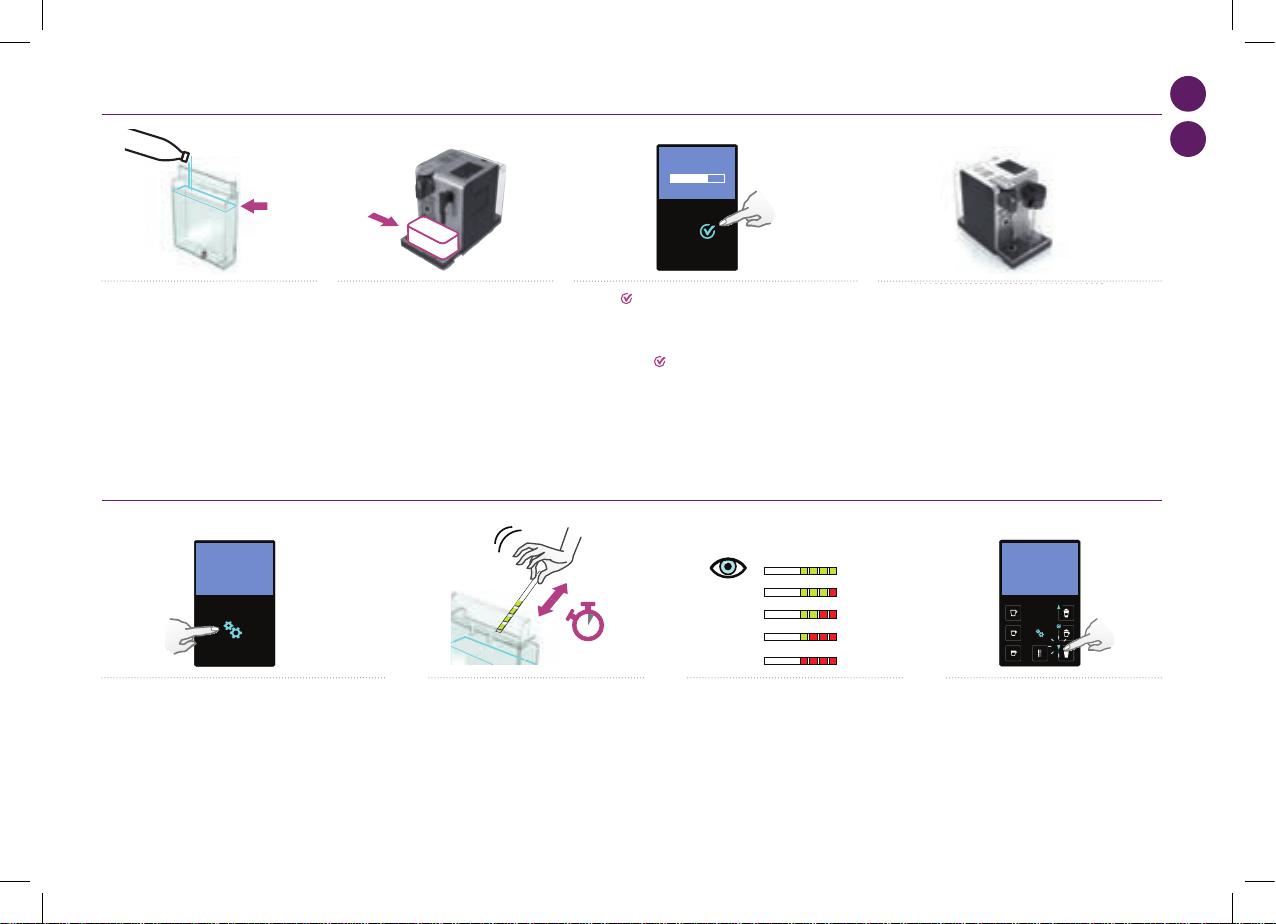
2. Place the water hardness sticker under
water for 1 second.
2. Placez la bande test sous l'eau pendant
1 seconde.
11. Press to conrm. The rinsing cycle continues
alternately through the coee outlet, hot water nozzle and
drip tray until the water tank runs empty.
11. Appuyez sur
pour conrmer. Le cycle de rinçage
continue alternativement par la sortie café, la buse eau
chaude et le bac d'égouttage jusqu'à ce que le réservoir
soit vide.
3. The number of red squares indicates the
water hardness level.
3. Le nombre de carrés rouges indique le
niveau de dureté d'eau.
12. Once the rinsing process is nished, the machine
switches o. Rinse the hot water spout and clean it with a
damp cloth. You have now nished descaling the machine.
12. Lorsque le process de rinçage est terminé, la machine
s'éteint. Rincez la buse eau chaude et nettoyez-la à l'aide
d'un chion propre. Vous avez maintenant terminé le
détartrage de votre machine.
4. Set the value accordingly.
4. Régler la valeur en fonction.
WATER HARDNESS SETTING/RÉGLAGE DE LA DURETÉ D'EAU
1. Enter the menu, browse the options and select
WATER HARDNESS. You will be guided to set the value.
Follow machine display instructions.
1. Entrez dans le menu, faites déler les options et
sélectionnez DURETÉ EAU. Vous serez guidé pour régler la
valeur. Suivez les instructions de l'écran de la machine.
9. Rinsing process: rinse and ll water tank
with fresh potable water up to MAX level.
9. Process de rinçage: rincez le réservoir
d'eau et remplissez-le d'eau potable jusqu'au
niveau MAX.
10. Rinsing process: place one container of
minimum 1 litre under both the coee outlet
and the hot water spout.
10. Process de rinçage: placez un récipient
de minimum 1 litre sous les deux sorties café
et eau chaude.
17
6926_UM_LATTISSIMA_PREMIUM_Z2A.indb 17 17.10.13 19:57
EN
FR
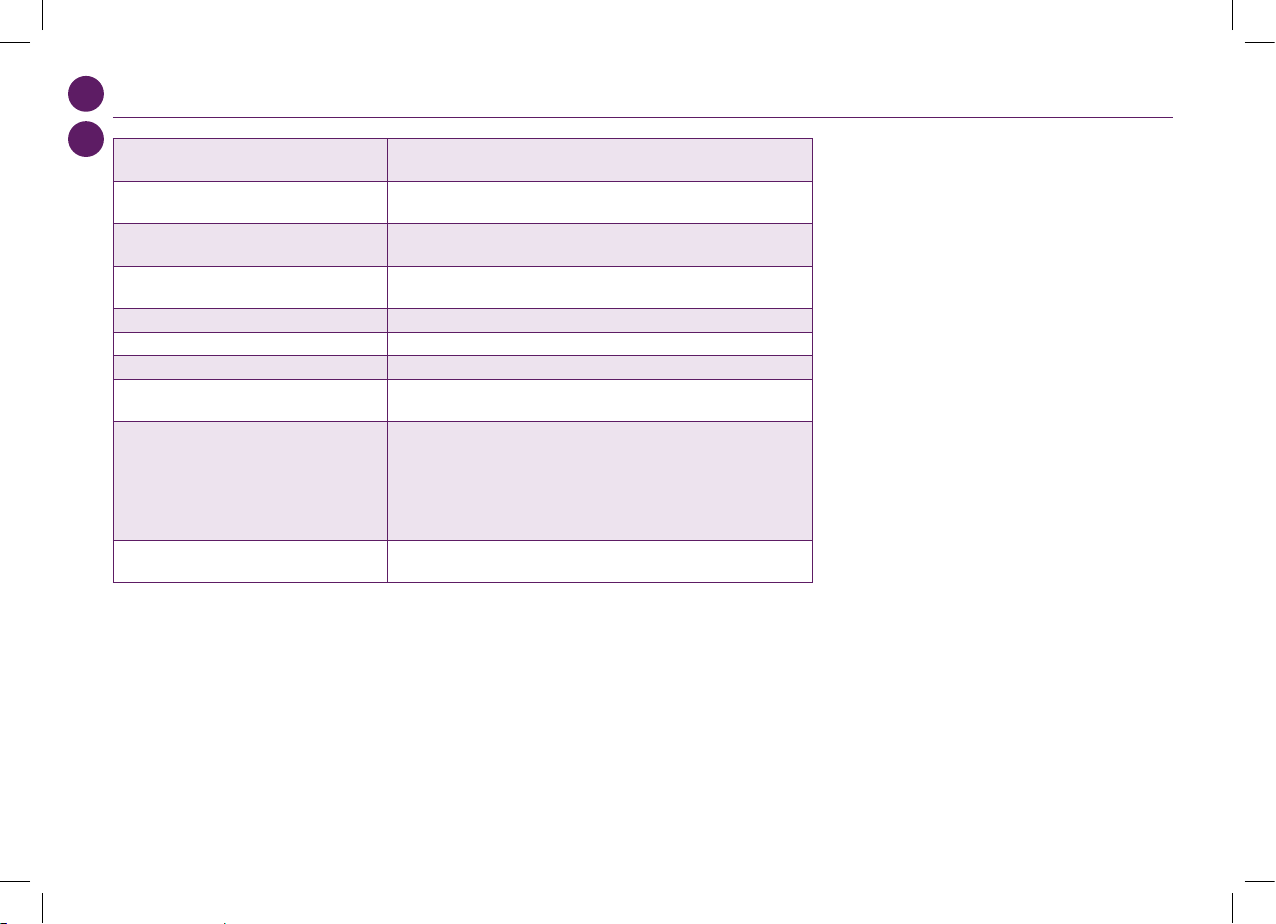
TROUBLESHOOTING
No light on display.
➔
Check the mains, plug, voltage, and fuse. Press the ON button located behind the machine
display. In case of problems, call the Nespresso Club.
Machine too hot message, indicated in display.
➔
In certain conditions, machine heater reaches high temperature, (ie. after an emptying of
the uid system). Simply wait, machine will cool down automatically.
Coee comes out very slowly.
➔
Flow speed depends on the coee variety.
➔ Descale if necessary; see Descaling section.
Coee is not ho t enough.
➔
Preheat cup.
➔ Descale if necessary; see Descaling section.
Capsule area is leaking (water in capsule container).
➔
Position capsule correctly. If leakages occur, call the Nespresso Club.
Irregular blinking.
➔
Send appliance to repair or call the Nespresso Club.
No coee, just water runs out (despite inserted capsule).
➔
In case of problems, call the Nespresso Club.
Lever cannot be closed completely.
➔
Empty capsule container. Make sure that no capsule is blocked inside the capsule
container.
Quality of milk froth is not up to standard.
➔
For a perfect milk froth, use skimmed or semi-skimmed milk at refrigerator temperature
(about 4° C).
➔
Rinse after each milk based preparation. Place a recipient under milk outlet, rotate the
milk regulator knob until «CLEAN» position.
➔
Every two days, disassemble the R. C. S. and clean all components in the upper level of a
dishwasher.
Machine needs repair message, indicated in display.
➔
Contact the Nespresso Club or Nespresso authorized representative for examination,
repair or adjustment.
18
6926_UM_LATTISSIMA_PREMIUM_Z2A.indb 18 17.10.13 19:57
EN
FR
DÉPANNAGE
Milk Premium
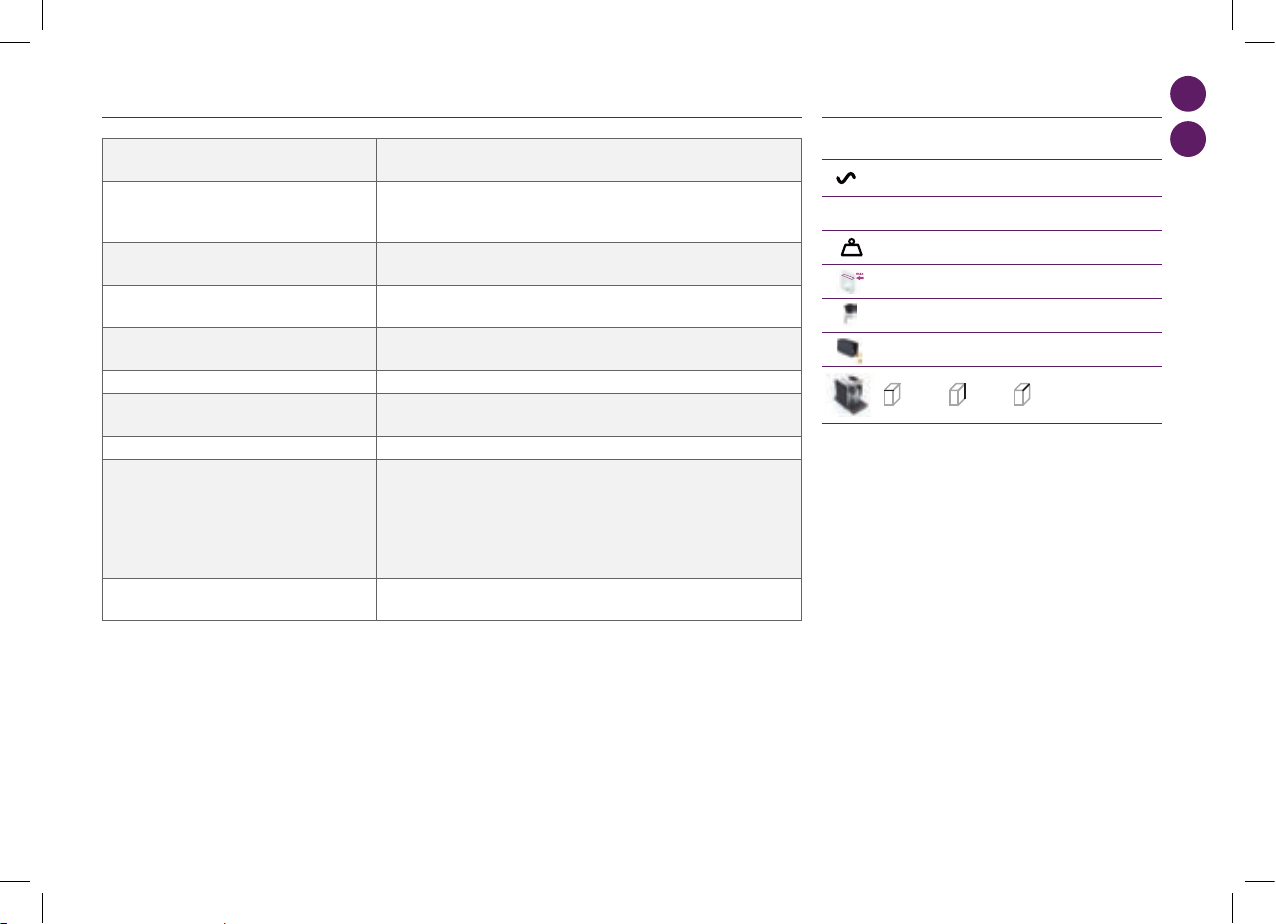
EUR,AUS,NZ: 220240 V, 50/60 Hz, 1300 W
US/CA: 120 V, 60 Hz, 1200 W
19 bar
6.5 kg
1,38 litre
500 ml
13-16 capsules
l=19,4 cm . L=33,2 cm . h=27,4 cm
Troubleshooting
Contact the Nespressso Club
For any additional information, in case of problems
or simply to seek advise, call the Nespresso Club.
Contact details of the Nespresso Club can be found
in the 'Welcome to Nespresso' folder in your
machine box or at nespresso.com
No light on display
Check the mains, plug, voltage, and fuse. In case of problems, call the Nespresso Club.
Coffee comes out very slowly.
Flow speed depends on the coffee variety.
Perform a self check of the machine. Enter the menu list and select Maintenance. Follow instruction
Coffee is not hot enough.
Preheat cup.
Perform a self check of the machine. Enter the menu list and select Maintenance. Follow instruction
Capsule area is leaking (water in capsule container).
Position capsule correctly. If leakages occur, call the Nespresso Club.
Irregular blinking.
Send appliance to repair or call the Nespresso Club.
No coffee, just water runs out (despite inserted capsule).
In case of problems, call the Nespresso Club.
Lever cannot be closed completely
Empty capsule container. Make sure that no capsule is blocked inside the capsule container.
Quality of milk froth is not up to standard
1) For a perfect milk froth, use skimmed or semi-skimmed milk at refrigerator temperature (about 4° C)
2) Rinse after each milk based preparation. Place a recipient under milk outlet, rotate the milk
regulator knob until “CLEAN” position.
3) Every two days, disassemble the R. C. S. and clean all components in the upper level of a
dishwasher
Warranty
Delonghi warrants this product against defects in materials and workmanship for a period of two years from the date of purchase. During this period, Delonghi will either repair or
replace, at its discretion, any defective product at no charge to the owner. Replacement products or repaired parts will be guaranteed for only the unexpired portion of the original
warranty or six months, whichever is greater. This limited warranty does not apply to any defect resulting from accident, misuse, improper maintenance, or normal wear and tear. Any
defect resulting from the usage of non genuine Nespresso capsules will not be covered by this warranty. Except to the extent allowed by applicable law, the terms of this limited warranty
do not exclude, restrict
or modify, and are in addition to, the mandatory statutory rights applicable to the sale of the product to you. If you believe your product is defective, contact Nespresso for instructions on
where to send or bring it for repair. Please visit our website at nespresso.com to discover more about Nespresso
Specifications
P
max
Once the rinsing process is finished, the
machine switches off. Clean the machine
using a damp cloth. You have now finished
descaling the machine.
9
10
11 12
Rinsing process Rinse and fill water with
fresh potable water up to MAX level.
Rinsing process Place one container of
minimum 1 litre under both the coffee
outlet and the hot water spout.
PRESS to confirm.
The rinsing cycle continues trough the coffee
outlet, hot water spout and drip tray until the
water tank is empty.
Water hardness setting
1
programmed buttons blinks 3 times: water hardness is set
i
1”
2 3 4
1
2
3
4
5
Place the water hardness sticker under
water for 1 second.
The number of red squares indicates
the water harness level.
Set the value accordinglyEnter the menu, browse the options and select
WATER HARDNESS.
You will be guided to set the value.
Follow machine display instructions.
max
max
Kg
11 12
EUR, AUS, NZ: 220-240 V, 50/60 Hz, 1400 W
EUR,AUS,NZ: 220240 V, 50/60 Hz, 1300 W
US/CA: 120 V, 60 Hz, 1200 W
19 bar
6.5 kg
1,38 litre
500 ml
13-16 capsules
l=19,4 cm . L=33,2 cm . h=27,4 cm
Troubleshooting
Contact the Nespressso Club
For any additional information, in case of problems
or simply to seek advise, call the Nespresso Club.
Contact details of the Nespresso Club can be found
in the 'Welcome to Nespresso' folder in your
machine box or at nespresso.com
No light on display
Check the mains, plug, voltage, and fuse. In case of problems, call the Nespresso Club.
Coffee comes out very slowly.
Flow speed depends on the coffee variety.
Perform a self check of the machine. Enter the menu list and select Maintenance. Follow instruction
Coffee is not hot enough.
Preheat cup.
Perform a self check of the machine. Enter the menu list and select Maintenance. Follow instruction
Capsule area is leaking (water in capsule container).
Position capsule correctly. If leakages occur, call the Nespresso Club.
Irregular blinking.
Send appliance to repair or call the Nespresso Club.
No coffee, just water runs out (despite inserted capsule).
In case of problems, call the Nespresso Club.
Lever cannot be closed completely
Empty capsule container. Make sure that no capsule is blocked inside the capsule container.
Quality of milk froth is not up to standard
1) For a perfect milk froth, use skimmed or semi-skimmed milk at refrigerator temperature (about 4° C)
2) Rinse after each milk based preparation. Place a recipient under milk outlet, rotate the milk
regulator knob until “CLEAN” position.
3) Every two days, disassemble the R. C. S. and clean all components in the upper level of a
dishwasher
Warranty
Delonghi warrants this product against defects in materials and workmanship for a period of two years from the date of purchase. During this period, Delonghi will either repair or
replace, at its discretion, any defective product at no charge to the owner. Replacement products or repaired parts will be guaranteed for only the unexpired portion of the original
warranty or six months, whichever is greater. This limited warranty does not apply to any defect resulting from accident, misuse, improper maintenance, or normal wear and tear. Any
defect resulting from the usage of non genuine Nespresso capsules will not be covered by this warranty. Except to the extent allowed by applicable law, the terms of this limited warranty
do not exclude, restrict
or modify, and are in addition to, the mandatory statutory rights applicable to the sale of the product to you. If you believe your product is defective, contact Nespresso for instructions on
where to send or bring it for repair. Please visit our website at nespresso.com to discover more about Nespresso
Specifications
P
max
Once the rinsing process is finished, the
machine switches off. Clean the machine
using a damp cloth. You have now finished
descaling the machine.
9
10
11 12
Rinsing process Rinse and fill water with
fresh potable water up to MAX level.
Rinsing process Place one container of
minimum 1 litre under both the coffee
outlet and the hot water spout.
PRESS to confirm.
The rinsing cycle continues trough the coffee
outlet, hot water spout and drip tray until the
water tank is empty.
Water hardness setting
1
programmed buttons blinks 3 times: water hardness is set
i
1”
2 3 4
1
2
3
4
5
Place the water hardness sticker under
water for 1 second.
The number of red squares indicates
the water harness level.
Set the value accordinglyEnter the menu, browse the options and select
WATER HARDNESS.
You will be guided to set the value.
Follow machine display instructions.
max
max
Kg
11 12
Max/Max. 19 bar
EUR,AUS,NZ: 220240 V, 50/60 Hz, 1300 W
US/CA: 120 V, 60 Hz, 1200 W
19 bar
6.5 kg
1,38 litre
500 ml
13-16 capsules
l=19,4 cm . L=33,2 cm . h=27,4 cm
Troubleshooting
Contact the Nespressso Club
For any additional information, in case of problems
or simply to seek advise, call the Nespresso Club.
Contact details of the Nespresso Club can be found
in the 'Welcome to Nespresso' folder in your
machine box or at nespresso.com
No light on display
Check the mains, plug, voltage, and fuse. In case of problems, call the Nespresso Club.
Coffee comes out very slowly.
Flow speed depends on the coffee variety.
Perform a self check of the machine. Enter the menu list and select Maintenance. Follow instruction
Coffee is not hot enough.
Preheat cup.
Perform a self check of the machine. Enter the menu list and select Maintenance. Follow instruction
Capsule area is leaking (water in capsule container).
Position capsule correctly. If leakages occur, call the Nespresso Club.
Irregular blinking.
Send appliance to repair or call the Nespresso Club.
No coffee, just water runs out (despite inserted capsule).
In case of problems, call the Nespresso Club.
Lever cannot be closed completely
Empty capsule container. Make sure that no capsule is blocked inside the capsule container.
Quality of milk froth is not up to standard
1) For a perfect milk froth, use skimmed or semi-skimmed milk at refrigerator temperature (about 4° C)
2) Rinse after each milk based preparation. Place a recipient under milk outlet, rotate the milk
regulator knob until “CLEAN” position.
3) Every two days, disassemble the R. C. S. and clean all components in the upper level of a
dishwasher
Warranty
Delonghi warrants this product against defects in materials and workmanship for a period of two years from the date of purchase. During this period, Delonghi will either repair or
replace, at its discretion, any defective product at no charge to the owner. Replacement products or repaired parts will be guaranteed for only the unexpired portion of the original
warranty or six months, whichever is greater. This limited warranty does not apply to any defect resulting from accident, misuse, improper maintenance, or normal wear and tear. Any
defect resulting from the usage of non genuine Nespresso capsules will not be covered by this warranty. Except to the extent allowed by applicable law, the terms of this limited warranty
do not exclude, restrict
or modify, and are in addition to, the mandatory statutory rights applicable to the sale of the product to you. If you believe your product is defective, contact Nespresso for instructions on
where to send or bring it for repair. Please visit our website at nespresso.com to discover more about Nespresso
Specifications
P
max
Once the rinsing process is finished, the
machine switches off. Clean the machine
using a damp cloth. You have now finished
descaling the machine.
9
10
11 12
Rinsing process Rinse and fill water with
fresh potable water up to MAX level.
Rinsing process Place one container of
minimum 1 litre under both the coffee
outlet and the hot water spout.
PRESS to confirm.
The rinsing cycle continues trough the coffee
outlet, hot water spout and drip tray until the
water tank is empty.
Water hardness setting
1
programmed buttons blinks 3 times: water hardness is set
i
1”
2 3 4
1
2
3
4
5
Place the water hardness sticker under
water for 1 second.
The number of red squares indicates
the water harness level.
Set the value accordinglyEnter the menu, browse the options and select
WATER HARDNESS.
You will be guided to set the value.
Follow machine display instructions.
max
max
Kg
11 12
~ 6.5 kg
1.3 L/litre
0.5 L/litre
13-16 capsules/capsules
19.4 cm 27.4 cm 33.2 cm
SPECIFICATIONS/SPÉCIFICATIONS
Pas de lumière sur l'écran.
➔
Vériez la prise, la che, la tension et fusible. Appuyez sur le bouton ON situé à l'arrière de
l'écran de la machine. En cas de problèmes, appelez le Club Nespresso.
L'écran indique «Machine trop chaude».
➔
Dans certains cas, le système de chaue de la machine atteint des hautes températures
(i.e. Après la vidange du circuit d'eau de la machine). Patientez simplement, la machine se
refroidit automatiquement.
Le café s'écoule très lentement.
➔
L'écoulement dépend de la variété de café.
➔ Détartrez si nécessaire: voir le paragraphe Détartrage.
Le café n'est pas assez chaud.
➔
Préchauez la tasse.
➔ Détartrez si nécessaire: voir le paragraphe Détartrage.
La cage à capsule fuit (de l'eau s'écoule directement dans
le bac à capsules).
➔
Positionnez correctement la capsule. Si les fuites continuent, appelez le Club Nespresso.
Clignotement irrégulier.
➔
Envoyez votre appareil en réparation ou appelez le Club Nespresso.
Aucun café ne s'écoule, uniquement de l'eau (bien qu'une
capsule ait été introduite).
➔
En cas de problèmes, appelez le Club Nespresso.
Le levier ne peut pas être fermé complètement.
➔
Videz le bac à capsules. Vériez qu'aucune capsule n'est coincée dans le bac à capsules.
La qualité de la mousse de lait n'est pas conforme aux
standards.
➔
Pour une parfaite mousse de lait, utilisez du lait écrémé ou demi-écrémé à température
du réfrigérateur (environ 4° C).
➔
Rincez après chaque préparation à base de lait. Placez un récipient sous la buse à lait,
tournez le bouton de réglage de la mousse de lait sur la position «CLEAN».
➔
Tous les deux jours, démontez le R.C.S. et lavez tous les composants dans le panier
supérieur de votre lave-vaisselle.
L'écran ache que la machine nécessite une réparation.
➔
Contactez le Club Nespresso ou un représentant agréé pour un diagnostic, une réparation
ou un réglage.
19
6926_UM_LATTISSIMA_PREMIUM_Z2A.indb 19 17.10.13 19:57

EN
FR
For any additional information, in case of problems or simply to seek advise, call the Nespresso Club.
Contact details of the Nespresso Club can be found in the «Welcome to Nespresso» folder in your machine box or at nespresso.com
Pour de plus amples informations, en cas de problème ou simplement pour demander des conseils, appelez le Club Nespresso.
Les coordonnées du Club Nespresso sont indiquées dans la pochette de Bienvenue chez Nespresso dans le carton de votre machine ou sur www.nespresso.com
CONTACT THE NESPRESSO CLUB/CONTACTEZ LE CLUB NESPRESSO
WARRANTY/GARANTIE
DISPOSAL AND ECOLOGICAL CONCERNS/MISE AU REBUT ET PROTECTION DE L'ENVIRONNEMENT
Disposal and Environmental Protection
Your appliance contains valuable materials that can be recovered or recycled. Separation of the remaining waste materials into dierent types facilitates the recycling of valuable raw material. Leave the appliance at a collection
point. You can obtain information on disposal from your local authorities.
Mise au rebut et protection de l'environnement
Votre appareil contient des matériaux précieux qui peuvent être récupérés ou recyclés. La séparation des déchets restants, en diérentes catégories, facilite le recyclage des matières premières précieuses. Laissez votre appareil
à un point de collecte. Vous pouvez obtenir des renseignements sur l’évacuation des déchets auprès de vos autorités locales.
De’Longhi warrants this product against defects in materials and workmanship for a period of two years from the date of purchase. during this period, De’Longhi will either repair or replace, at its discretion, any defective
product at no charge to the owner. Replacement products or repaired parts will be guaranteed for only the unexpired portion of the original warranty or six months, whichever is greater. This limited warranty does not apply
to any defect resulting from accident, misuse, improper maintenance, or normal wear and tear. Except to the extent allowed by applicable law, the terms of this limited warranty do not exclude, restrict or modify, and are in
addition to, the mandatory statutory rights applicable to the sale of the product to you. If you believe your product is defective, contact De’Longhi for instructions on where to send or bring it for repair. Any defect or dysfunction
resulting from the use of non-genuine Nespresso capsules will be not covered by this warranty.
De’Longhi garantit ce produit contre tous les défauts matériels et de fabrication pour une période de deux ans à compter de la date d’achat. Pendant cette période, De’Longhi réparera ou remplacera, à sa discrétion, tout produit
défectueux sans frais supplémentaires pour son propriétaire. Les produits de remplacement ou les pièces réparées seront exclusivement garantis pour la part non expirée de la garantie initiale ou pendant six mois, la durée
retenue étant la plus longue. Cette garantie limitée ne s’applique pas à un quelconque défaut résultant d’un accident, d’un usage inapproprié de la machine, d’un mauvais entretien ou d’une usure normale. Tout défaut résultant
d’une utilisation de capsules autres que Nespresso ne sera pas couvert par la garantie. Sauf si cela est prévu par la législation en vigueur, les conditions de cette garantie limité n’excluent, ni ne restreignent, ni ne modient les
droits légaux obligatoires relatifs à votre achat, voire y sont complémentaires. Si vous estimez que votre produit est défectueux, contactez Nespresso pour obtenir des précisions sur l’adresse à laquelle il convient de l’envoyer ou
de l’apporter pour réparation. Veuillez consulter notre site web www.nespresso.com pour en savoir plus sur Nespresso.
20
6926_UM_LATTISSIMA_PREMIUM_Z2A.indb 20 17.10.13 19:57

EN
FR
21
6926_UM_LATTISSIMA_PREMIUM_Z2A.indb 21 17.10.13 19:57

DE
IT
ÜBERSICHT/INDICAZIONI GENERALI
Display (Zubereitungen)/
Display (preparazione)
13
Lungo/Lungo
14
Espresso/Espresso
15
Ristretto/Ristretto
16
Heißwasser/Acqua calda
17
Warme Milch/Latte caldo
18
Cappuccino/Cappuccino
19
Latte Macchiato/Latte Macchiato
Display (Navigation)/
Display (navigazione)
20
Menü/Menu
21
Blättern Sie nach oben bei aktiviertem Menü/
Scorrere verso l’alto quando viene attivato il
Menu
22
Option Auswahl bei aktiviertem Menü/
Opzioni di selezione quando viene attivato
il Menu
23
Blättern Sie nach unten bei aktiviertem Menü/
Scorrere verso il basso quando viene attivato
il Menu
24
Text Display/Visualizzazione del testo
Rapid Cappuccino System (R.C.S.)/
Sistema Rapid Cappuccino (R.C.S.)
25
Schaumregulierer/
Manopola di regolazione della schiuma di latte
26
Steckplatz für Schaumregulierer/
Inserire la manopola di regolazione della schiuma di latte
27
Minimal Milchschaum/Schiuma Min.
28
Maximal Milchschaum/Schiuma Max.
29
Spültaste (Automatische Spülfunktion)/
«PULIRE»: funzione di risciacquo automatica
30
Deckel des Milchbehälters/Coperchio contenitore latte
31
Milchdüse/Tubo di erogazione latte
32
Milchbehälter/Contenitore latte
33
Milchansaugrohr/Condotto del latte
34
Verbindung R.C.S./Connettore R.C.S.
Übersicht der Maschine/
Indicazioni generali
A
Maschine im Kaeemodus/
Macchina congurata in modalità solo caè
B
Maschine mit Rapid Cappuccino System (für Cappuccino)/
Macchina con Rapid Cappuccino System (per Cappuccino)
C
Maschine mit Heißwasserfunktion/
Macchina con erogatore di acqua calda
1
Hebel/Leva
2
Ein/Aus Taste/Pulsante ON/OFF
3
Wassertank/Serbatoio dell’acqua
4
Kaeeauslauf/Erogatore di caè
5
Abtropfgitter/Griglia raccogligocce
6
Abtropfschale/Vassoio raccogligocce
7
Schwenkbare Tassenauage (nicht abnehmbar)/
Supporto girevole per tazza (non removibile)
8
Kapselbehälter/Contenitore capsule usate
9
Klappe des Dampfanschlusses/
Sportello per il connettore di vapore
10
Teleskop-Heißwasserdüse/
Erogatore telescopico di acqua calda
11
Aufbewahrungsfach der Heißwasserdüse/
Vano porta erogatore di acqua calda
12
Dampfanschluss/Connettore di vapore
22
6926_UM_LATTISSIMA_PREMIUM_Z2A.indb 22 17.10.13 19:57

23
DE
IT
INHALT/CONTENUTO
Nespresso ist ein einzigartiges System, welches zu jeder Zeit den perfekten Espresso zubereitet. Alle Nespresso Maschinen sind mit einem einzigartigen Extraktionssystem ausgestattet, welches bis zu 19 bar Druck garantiert.
Jeder einzelne Parameter wurde mit äußerster Präzision durchdacht, um die Aromenvielfalt, den Körper sowie die unvergleichbare Crema jedes einzelnen Grand Crus zum Ausdruck zu bringen.
Nespresso è un sistema esclusivo per preparare un Espresso eccezionale, tazzina dopo tazzina. Tutte le macchine Nespresso sono dotate di un sistema esclusivo che garantisce l’estrazione a 19 bar di pressione. Ogni parametro è
stato calcolato con grande precisione per assicurare che siano estratti tutti gli aromi di ogni Grand Cru, per dare corpo al caè e creare una crema particolarmente densa e liscia.
WERTE WERKSEINSTELLUNG/
RIPRISTINO DELLE IMPOSTAZIONI DI FABBRICA
.............................................
ENTKALKUNG/DECALCIFICAZIONE .................................................................
WASSERHÄRTE EINSTELLEN/IMPOSTAZIONI DELLA DUREZZA DELL’ACQUA .......
FEHLERBEHEBUNG/RICERCA GUASTI .............................................................
SPEZIFIKATIONEN/SPECIFICHE TECNICHE.......................................................
ENTSORGUNG UND UMWELTSCHUTZ/
SMALTIMENTO E PROTEZIONE AMBIENTALE
...................................................
KONTAKTIEREN SIE DEN NESPRESSO CLUB/CONTATTARE IL NESPRESSO CLUB
...
GEWÄHRLEISTUNG/GARANZIA ......................................................................
ÜBERSICHT DER MASCHINE/INDICAZIONI GENERALI ..........................................
VERPACKUNGSINHALT/CONTENUTO DELLA CONFEZIONE .....................................
MENÜ NAVIGATION/MENU DI NAVIGAZIONE.......................................................
MENÜLISTE/LISTA DEL MENU ............................................................................
INBETRIEBNAHME NACH LÄNGERER NICHTBENUTZUNG/IN CASO DI PRIMO
UTILIZZO O DOPO UN LUNGO PERIODO DI NON UTILIZZO
.....................................
KAFFEEZUBEREITUNG/PREPARAZIONE DEL CAFFÈ ..............................................
MONTAGE/DEMONTAGE VON RAPID CAPPUCCINO SYSTEM R.C.S./
ASSEMBLAGGIO/SMONTAGGIO DEL SISTEMA RAPID CAPPUCCINO R.C.S.
............
ZUBEREITUNG VON CAPPUCCINO ODER LATTE MACCHIATO/
PREPARAZIONE CAPPUCCINO E LATTE MACCHIATO
.............................................
TÄGLICHE PFLEGE/CURA QUOTIDIANA ................................................................
MANUELLE REINIGUNG DES RAPID CAPPUCCINO SYSTEMS R.C.S./
LAVAGGIO A MANO DEL SISTEMA RAPID CAPPUCCINO R.C.S.
.............................
22
24
24
25
26
28
28
29
32
32
VORSICHT: wenn Sie dieses Zeichen sehen, halten Sie sich bitte an die Sicherheitshinweise, um mögliche Gefahren und Schäden zu vermeiden.
INFORMATION: wenn Sie dieses Zeichen sehen, befolgen Sie den Rat für einen sicheren und einwandfreien Betrieb Ihrer Kaeemaschine.
ATTENZIONE: in presenza di questo simbolo, leggere le precauzioni di sicurezza per evitare eventuali danni.
INFORMAZIONI: in presenza di questo simbolo, leggere le indicazioni per un uso sicuro e adeguato dell’apparecchio.
33
34
35
36
37
38
38
38
6926_UM_LATTISSIMA_PREMIUM_Z2A.indb 23 17.10.13 19:57

DE
IT
EN SA FETY PRECAUTI ONS ............................................................................. 2
FR CONSIGNES DE SECURITE ......................................................................... 4
DE SICHERHEITSHINWEISE ........................................................................... 7
IT PRECAUZIONI DI SICUREZ ZA .................................................................... 10
ES PRECAUCIONES DE SEGURIDAD ................................................................ 12
PT MEDIDAS DE SEGURANÇA......................................................................... 15
NL V EILIGHEIDSMAATREGELEN ..................................................................... 18
GR ΜΈΤ ΡΑ ΑΣΦΑΛΈΙΑ Σ .................................................................................. 20
HU BIZTONSÁGI ELŐÍRÁSOK .......................................................................... 22
CZ BEZPEČNOSTNÍ POKYNY .......................................................................... 25
PL ZASADY BEZPIECZEŃSTWA ....................................................................... 28
RU МЕРЫ ПРЕДОСТОР ОЖНОСТИ ................................................................. 31
MENÜ NAVIGATION/MENU DI NAVIGAZIONE
VERPACKUNGSINHALT/CONTENUTO DELLA CONFEZIONE
Kaeemaschine
Macchina da caè
«Willkommen bei Nespresso Ordner»
Cofanetto «Benvenuto in Nespresso»
Bedienungsanleitung
Istruzioni per l’uso
Sicherheitshinweise
Istruzioni di sicurezza
16er Kapselset
Set di capsule Grand Cru Nespresso
Önen der Menüliste/Entrare nella lista del Menu
Symbol kurz drücken/Premere brevemente il simbolo .
Suchoptionen/Opzioni di ricerca
Kurz Symbol drücken/Premere il simbolo .
Optionsauswahl/Opzione di selezione
Kurz Symbol drücken/Premere il simbolo .
Verlassen der Menüliste/Uscire dalla lista del Menu
Blättern Sie zur Option [VERLASSEN] und wählen Sie diese aus.
Oder drücken Sie einfach das Symbol .
Scorrere le voci e selezionare l’opzione [USCITA] oppure
premere velocemente il simbolo .
Optionsauswahl verlassen und zurück zur Menüliste/
Uscire dall’opzione e ritornare alla lista del Menu
Blättern Sie zur Option [VERLASSEN] und wählen Sie diese
aus. Oder drücken Sie einfach das Symbol .
Scorrere le voci e selezionare l’opzione [USCITA] oppure
premere velocemente il simbolo .
24
6926_UM_LATTISSIMA_PREMIUM_Z2A.indb 24 17.10.13 19:57

25
DE
IT
MENÜLISTE/LISTA DEL MENU
1
Wählen Sie diese Option aus um Ihre bevorzugte Sprache auszuwählen. Befolgen Sie die Anweisungen auf dem Display der Maschine.
Selezionare questa opzione per impostare la lingua desiderata. Seguire le istruzioni sul display della macchina.
2
Wählen Sie diese Option aus, wenn der Entkalkungsalarm auf dem Display ausgelöst wird. Siehe Seite 34. Sie werden durch die Entkalkung geführt.
Selezionare questa opzione quando sul display appare l’avviso di decalcicazione. Vedere pagina 34. Riceverà le istruzioni per eseguire il processo di
decalcicazione.
3
Wählen Sie diese Option aus, um Ihre lokale Wasserhärte einzustellen. Nutzen Sie den beiliegenden Aufkleber, um die lokale Wasserhärte zu bestimmen. Die
Einstellung wird die Abstände der Entkalkungen optimieren. Siehe Seite 35.
Selezionare questa opzione per impostare la durezza dell’acqua nella propria regione. Per determinare il livello corretto, utilizzare l’etichetta fornita sulla durezza
dell’acqua. Ciò consentirà di ottimizzare la frequenza di decalcicazione. Vedere pagina 35.
4
Wählen Sie diese Option aus, um das Zeitfenster einzustellen, nachdem sich die Maschine automatisch ausschaltet. (Verfügbare Zeitfenster sind 9 Minuten,
30 Minuten, 2 Stunden, 8 Stunden). Folgen Sie den Anweisungen auf dem Display.
Selezionare questa opzione per impostare l’intervallo di tempo dopo il quale la macchina si spegnerà automaticamente. (Le opzioni possibili sono: 9 minuti,
30 minuti, 2 ore, 8 ore). Seguire le istruzioni sul display della macchina.
5
Wählen Sie diese Option aus, um alle Einstellungen auf die Werkseinstellung zurück zu setzen.
Selezionare questa opzione per ripristinare le impostazioni di fabbrica della macchina.
6
Wählen Sie diese Option aus, um den Wasserkreislauf zu entleeren. Entleeren Sie die Maschine im Falle einer Reparatur oder wenn die Maschine für einen längeren
Zeitraum nicht genutzt wird. Folgen Sie den Anweisungen auf dem Display. Nach der Entleerung kann die Maschine für 10 Minuten nicht genutzt werden.
Selezionare questa opzione per svuotare la macchina nel caso sia necessario mandarla in riparazione o prima di lunghi periodi di inutilizzo. Seguire le istruzioni sul
display della macchina. Dopo questo processo, non sarà possibile utilizzare la macchina per 10 minuti.
7
Wählen Sie diese Option aus, um die Tassenfüllmenge Ihrer Getränke zu programmieren (Kaee-, Milchrezepte und Heißwasser). Folgen Sie den Anweisungen auf
dem Display. Über die Werkseinstellung lassen sich alle Füllmengen auf die Werkseinstellung zurück setzen.
Selezionare questa opzione per programmare il volume delle bevande (preparazione del caè, di acqua calda e di ricette a base di latte). Seguire le istruzioni sul
display della macchina. Inoltre, è possibile resettare i volumi di tutte le bevande, ripristinando le impostazioni di fabbrica.
8
Wählen Sie diese Option aus, um alle vorliegenden Maschineneinstellungen einzusehen.
Selezionare questa opzione per avere la visione completa di tutte le impostazioni della macchina.
9
Wählen Sie diese Option aus, um den allgemeinen Status Ihrer Maschine zu prüfen. Die Verbrauchswerte der Maschine werden entweder von der ersten Nutzung
an (absolut) oder seit der letzten Entkalkung (relativ) dargestellt. Die Seriennummer der Maschine wird ebenfalls abgebildet.
Selezionare questa opzione per controllare lo stato generale della macchina. I dati di consumo sono disponibili sia dal primo utilizzo (dato totale), sia dall’ultima
decalcicazione eettuata (dato relativo). Viene fornito anche il codice seriale della macchina.
10
Wählen Sie diese Option aus, um Hilfestellung zu erhalten, wie Sie Tag für Tag eine ideale Milchschaumqualität erhalten. Über die angegebene Internetadresse
können Sie mehr über diese Funktion erfahren.
Selezionare questa opzione per avere suggerimenti su come ottenere una schiuma di latte eccezionale e di qualità, giorno dopo giorno.
11
Verlassen der Menüliste und Rückkehr in den Bereit-Modus.
Per uscire dalla lista del Menu e ritornare alla modalità «macchina pronta».
1
LINGUASPRACHE
2
DECALCIFICAZIONEENTKALKUNG
3
DUREZZA ACQUA
WASSERHÄRTE EINSTELLEN
4
AUTO-SPEGNIMENTOAUTO POWER OFF
5
IMP. DI FABBRICAWERKSEINSTELLUNG
6
SVUOTARE CIRCUITO
WASSERKREISLAUF ENTLEEREN
7
VOLUME PROGR.
FÜLLMENGENPROGRAMMIERUNG
8
INFO SETTAGGI
EINSTELLUNGSINFORMATION
9
MANUTENZIONEWARTUNG
10
AIUTOHILFE
USCITAMENÜ VERLASSEN
11
6926_UM_LATTISSIMA_PREMIUM_Z2A.indb 25 17.10.13 19:57
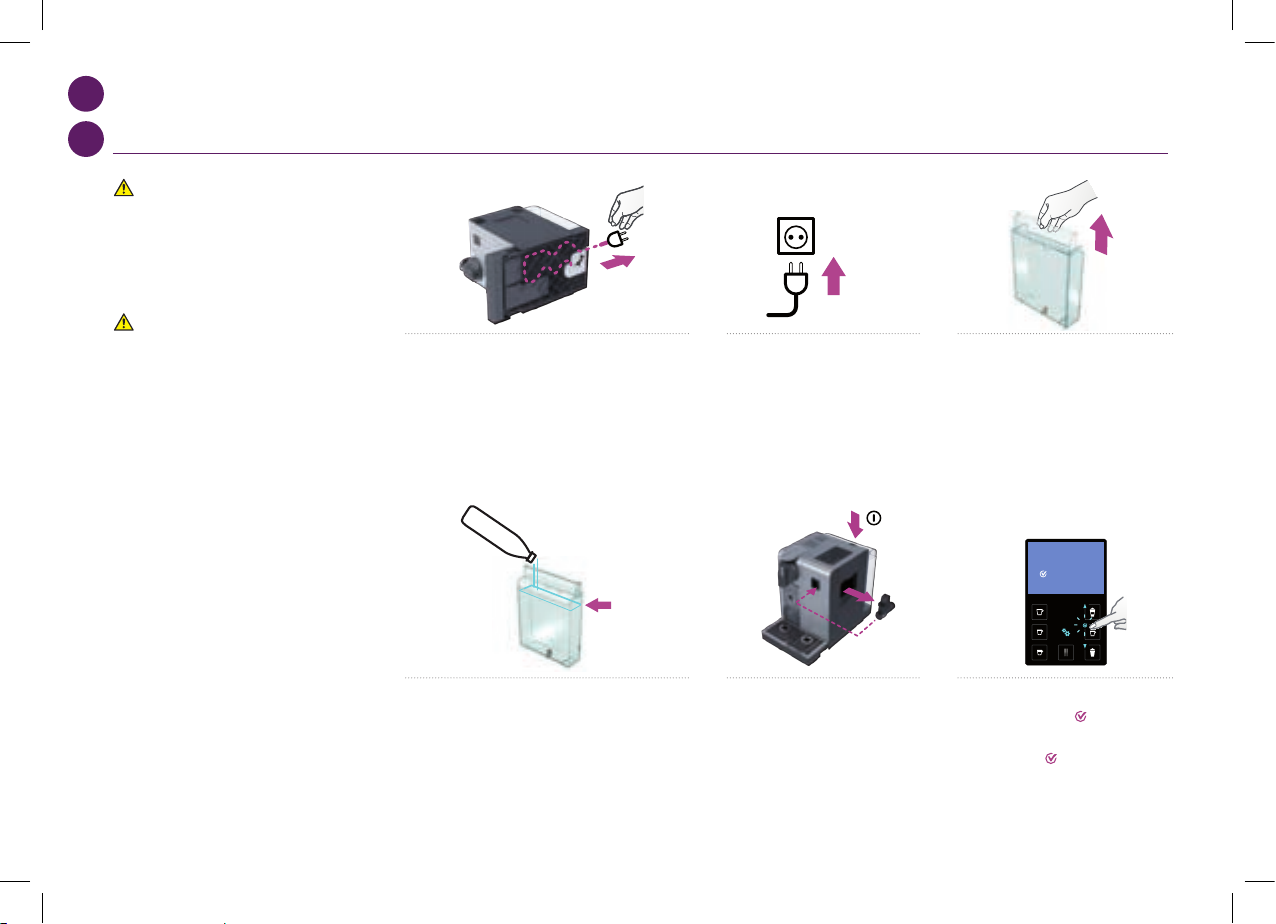
DE
IT
max
SET LANGUAGE
to continue
LANGUAGE
Actual value : EN
New value : [ ]
to select
05
max
SET LANGUAGE
to continue
LANGUAGE
Actual value : EN
New value : [ ]
to select
05
max
SET LANGUAGE
to continue
LANGUAGE
Actual value : EN
New value : [ ]
to select
05
max
SET LANGUAGE
to continue
LANGUAGE
Actual value : EN
New value : [ ]
to select
05
max
SET LANGUAGE
to continue
LANGUAGE
Actual value : EN
New value : [ ]
to select
05
max
SET LANGUAGE
to continue
LANGUAGE
Actual value : EN
New value : [ ]
to select
05
INBETRIEBNAHME NACH LÄNGERER NICHTBENUTZUNG/
IN CASO DI PRIMO UTILIZZO O DOPO UN LUNGO PERIODO DI NON UTILIZZO
VORSICHT: lesen Sie die
Sicherheitshinweise, um mögliche
Gefahren wie einen elektrischen
Stromschlag und Brand zu
vermeiden.
ATTENZIONE: leggere le
precauzioni di sicurezza per evitare
rischi di scariche elettriche e
incendi.
1. Entfernen Sie den Wassertank, die Abtropfschale und
den Kapselbehälter. Passen Sie die Kabellänge an und
verstauen Sie den Rest des Kabels in der Kabelführung
unterhalb der Maschine.
1. Rimuovere il serbatoio dell’acqua, il vassoio raccogligocce
e il contenitore delle capsule. Regolare la lunghezza del
cavo e ssare quello in eccesso nell’apposito vano sotto la
macchina.
5. Platzieren Sie die Heißwasserdüse.
Schalten Sie die Maschine ein.
5. Inserire l’erogatore di acqua calda.
Accendere la macchina.
2. Stellen Sie die Maschine aufrecht
auf und schließen Sie diese an das
Stromnetz an.
2. Posizionare la macchina in posizione
verticale e inserire la spina nella presa.
6. SET LANGUAGE: stellen Sie Ihre bevorzugte
Sprache ein. Drücken Sie
zur Bestätigung.
6. SET LANGUAGE: impostare la lingua
preferita. Premere
per continuare.
3. Der Wassertank kann über den Deckel
getragen werden.
3. Il serbatoio dell’acqua può essere sollevato
e spostato prendendolo dal coperchio.
4. Spülen Sie den Wassertank mir frischem Leitungswasser,
bevor Sie den diesen befüllen.
4. Sciacquare il serbatoio dell’acqua prima di riempirlo con
acqua fresca potabile no al livello massimo.
26
6926_UM_LATTISSIMA_PREMIUM_Z2A.indb 26 17.10.13 19:57
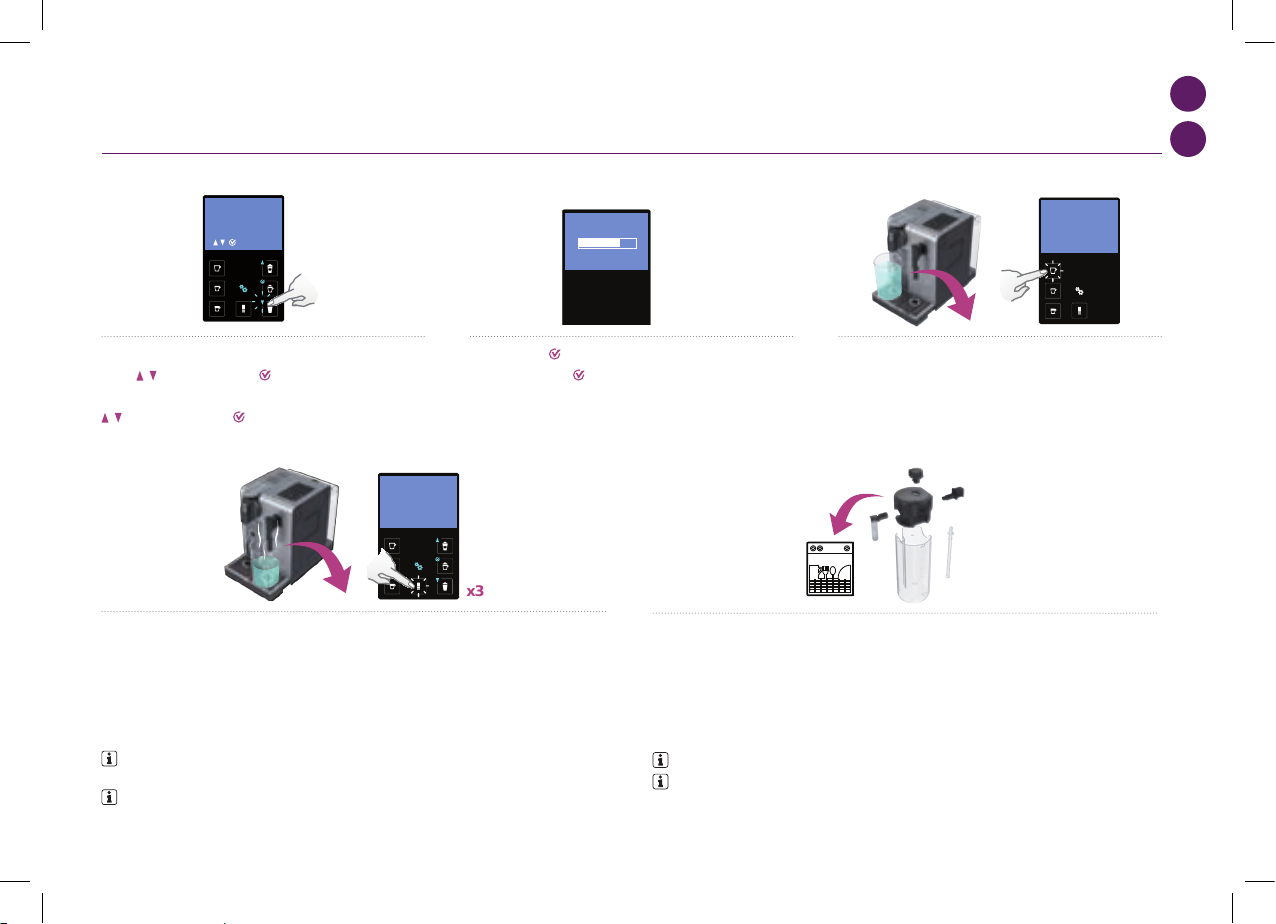
27
max
SET LANGUAGE
to continue
LANGUAGE
Actual value : EN
New value : [ ]
to select
05
max
First read the safety precautions to avoid risks of fatal electrical shock and fire
Remove the plastic films from grid,
lever and machine panels.
Remove the water tank, drip tray, and capsule
container. Adjust the cable length and store the
excess in the cable guide under the machine.
Put the machine in upright position,
plug machine into mains.
The water tank can be carried by
its cover.
Rinse the water tank before filling with
potable water up to maximum level.
Insert the hot water spout.
Switch machine ON
Set your preferred language.
Press to continue.
SET LANGUAGE
to continue
Select your language by scrolling the
options using up/down arrow. Press to
confirm.
LANGUAGE
Actual value : EN
New value : [ ]
to select
Coffee preparation
x3
x3
110 ml
40 ml
25 ml
05 06
4°
15”
Assembling / disassembling of Rapid Cappuccino system (R.C.S)
07
DE
IT
7. LANGUAGE: Wählen Sie Ihre Sprache aus, indem Sie mit den
Pfeilen
blättern. Drücken Sie zur Bestätigung.
7. LANGUAGE: Selezionare la lingua desiderata scorrendo le opzioni
con il cursore. Premere per confermare.
INBETRIEBNAHME NACH LÄNGERER NICHTBENUTZUNG/
IN CASO DI PRIMO UTILIZZO O DOPO UN LUNGO PERIODO DI NON UTILIZZO
11. Zerlegen Sie das Rapid Cappuccino System (R.C.S.) und reinigen Sie alle Einzelteile über das obere Fach
Ihrer Spülmaschine. Wenn Sie keine Spülmaschine besitzen, halten Sie sich an den Abschnitt «manuelle
Reinigung des Rapid Cappuccino Systems (R.C.S.)».
11. Smontare il Sistema Rapid Cappuccino (R.C.S.) e lavare tutti i componenti nello scomparto superiore
della lavastoviglie. Nel caso non si disponga di una lavastoviglie, consultare la sezione Lavaggio a mano del
Sistema Rapid Cappuccino (R.C.S.).
INFORMATION: siehe Abschnitt Montage/Demontage von Rapid Cappuccino System.
INFORMAZIONI: consultare la sezione Assemblaggio/Smontaggio del sistema Rapid
Cappuccino.
10. Spülen: wiederholen Sie den Spülvorgang 3-mal über den Heißwasserdüse. Nach dem Spülvorgang
Heißwasserdüse abnehmen und im Aufbewahrungsfach, rechts an der Maschine, aufbewahren. Schließen
Sie die Klappe des Dampfanschlusses.
10. Risciacquo: ripetere 3 volte per l’erogatore dell’acqua calda. Una volta terminato, rimuoverlo e riporlo
nell’apposito vano situato nella parte destra della macchina. Chiudere lo sportello del connettore del
vapore.
INFORMATION: bei der Produktion werden Maschinen vollständig getestet. Daher kann
beim Spülvorgang das Wasser Spuren von Kaeepulver enthalten.
INFORMAZIONI: le macchine vengono sottoposte a una serie di test completi. È possibile
rilevare tracce di caè in polvere nell’acqua del risciacquo.
9. Spülen: Stellen Sie einen Behälter unter den Kaeeauslauf und
drücken Sie die Lungotaste. Wiederholen Sie diesen Vorgang 3-mal.
9. Risciacquo: Sistemare un contenitore sotto l’erogatore del caè e
premere il pulsante Lungo. Ripetere 3 volte.
8. Nachdem das gedrückt wurde, heizt die Maschine auf.
8. Una volta premuto
, la macchina si riscalda.
6926_UM_LATTISSIMA_PREMIUM_Z2A.indb 27 17.10.13 19:57
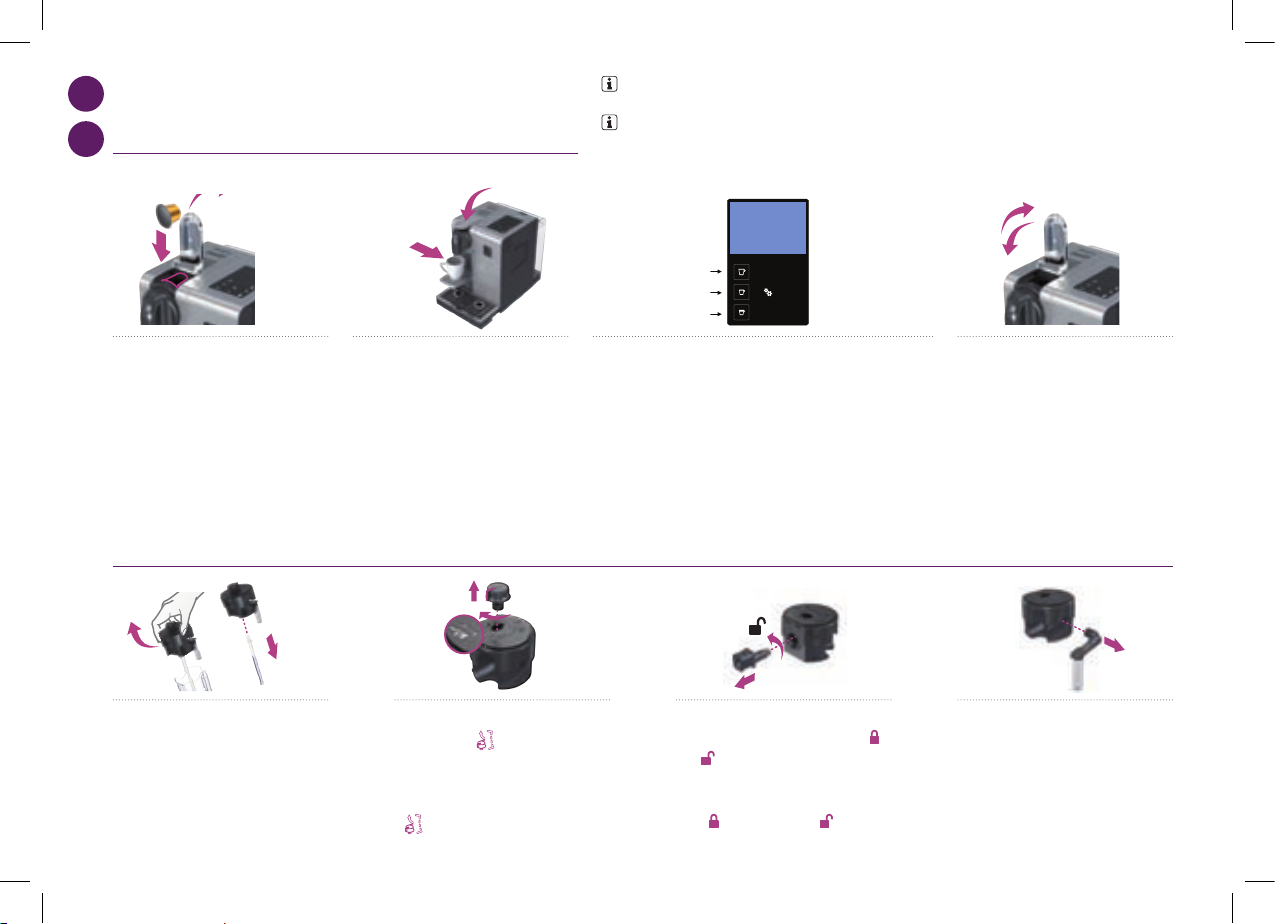
DE
IT
max
First read the safety precautions to avoid risks of fatal electrical shock and fire
Remove the plastic films from grid,
lever and machine panels.
Remove the water tank, drip tray, and capsule
container. Adjust the cable length and store the
excess in the cable guide under the machine.
Put the machine in upright position,
plug machine into mains.
The water tank can be carried by
its cover.
Rinse the water tank before filling with
potable water up to maximum level.
Insert the hot water spout.
Switch machine ON
Set your preferred language.
Press to continue.
SET LANGUAGE
to continue
Select your language by scrolling the
options using up/down arrow. Press to
confirm.
LANGUAGE
Actual value : EN
New value : [ ]
to select
Coffee preparation
x3
x3
110 ml
40 ml
25 ml
05 06
4°
15”
Assembling / disassembling of Rapid Cappuccino system (R.C.S)
07
KAFFEEZUBEREITUNG/
PREPARAZIONE DEL CAFFÈ
MONTAGE/DEMONTAGE VON RAPID CAPPUCCINO SYSTEM R.C.S./
ASSEMBLAGGIO/SMONTAGGIO DEL SISTEMA RAPID CAPPUCCINO R.C.S.
1. Önen Sie den Hebel vollständig, um eine
Nespresso Kapsel einzulegen.
1. Alzare completamente la leva e inserire
una capsula Nespresso.
2. Schließen Sie den Hebel und stellen Sie
eine Tasse unter dem Kaeeauslauf.
2. Abbassare la leva e posizionare una tazza
sotto l’erogatore del caè.
3. Drücken Sie die Ristretto- (25 ml), Espresso- (40 ml) oder Lungotaste
(110 ml). Die Zubereitung stoppt automatisch. Um den Kaeeuss frühzeitig
zu stoppen oder um den Kaee zu verlängern, drücken Sie erneut die Taste.
3. Premere i pulsanti Ristretto (25 ml), Espresso (40 ml) o Lungo (110 ml).
L’erogazione terminerà automaticamente. Per bloccare l’erogazione di
caè o per aggiungere ancora caè, premere nuovamente.
4. Entfernen Sie die Tasse. Önen und
Schließen Sie den Hebel um die Kapsel in den
Kapselbehälter auszuwerfen.
4. Prendere la tazza. Sollevare e abbassare la
leva per espellere la capsula direttamente nel
contenitore delle capsule usate.
1. Entfernen Sie den Deckel des
Milchbehälters und lösen Sie das
Milchansaugrohr.
1. Rimuovere il coperchio del contenitore
del latte e staccare il tubicino di aspirazione
del latte.
4. Entfernen Sie die Milchdüse, indem Sie
diese herausziehen.
4. Rimuovere il tubo di erogazione del latte
estraendolo.
2. Entfernen Sie den Schaumregulierer,
indem Sie diesen
bis zur Markierung
drehen und hochziehen.
2. Rimuovere la manopola di regolazione
della schiuma di latte facendola ruotare no
al
e sollevandola.
3. Entfernen Sie die Rapid Cappuccino
System Verbindung, indem Sie diese von
nach entriegeln und herausziehen.
3. Rimuovere il connettore del Sistema Rapid
Cappuccino sbloccandolo dalla posizione
aperta
alla posizione chiusa ed
estraendolo.
HINWEIS: während der Aufheizphase kann bereits eine Taste gedrückt werden. Nach der Aufheizphase
startet automatisch der Brühvorgang.
IMPORTANTE: durante il riscaldamento, è possibile premere qualunque pulsante del caè. Il caè verrà
erogato automaticamente non appena la macchina sarà pronta per l’uso.
28
6926_UM_LATTISSIMA_PREMIUM_Z2A.indb 28 17.10.13 19:57

29
4°
15”
Assembling / disassembling of Rapid Cappuccino system (R.C.S)
07
4°
15”
Assembling / disassembling of Rapid Cappuccino system (R.C.S)
07
4°
15”
Assembling / disassembling of Rapid Cappuccino system (R.C.S)
07
4°
15”
Assembling / disassembling of Rapid Cappuccino system (R.C.S)
07
DE
IT
ZUBEREITUNG VON CAPPUCCINO ODER LATTE MACCHIATO/
PREPARAZIONE CAPPUCCINO E LATTE MACCHIATO
1. Befüllen Sie den Milchbehälter mit der
gewünschten Menge an Milch.
1. Versare nel contenitore del latte la quantità
di latte desiderata.
2. Schließen Sie den Milchbehälter. Önen Sie die Klappe
des Dampfanschluss, indem Sie diese nach rechts schieben.
Verbinden Sie das Rapid Cappuccino System an die
Maschine.
2. Chiudere il contenitore del latte. Aprire il connettore del
vapore facendolo scorrere verso destra. Collegare il Sistema
Rapid Cappuccino alla macchina.
3. Maschine heizt für ca. 15 Sekunden auf.
3. La macchina si riscalderà per circa 15
secondi.
4. Önen Sie den Hebel vollständig und
legen Sie eine Nespresso Kapsel ein.
4. Alzare completamente la leva e inserire
una capsula Nespresso.
VORSICHT: nutzen Sie den Milchbehälter ausschließlich für
Milch und Leitungswasser. Verwenden Sie keine Rohmilch und
stellen Sie anhand des Ablaufsdatums auf der Verpackung sicher,
dass die Milch nicht abgelaufen ist.
ATTENZIONE: non utilizzare il contenitore del latte per nessun
altro liquido al di fuori del latte o dell’acqua potabile. Non usare
latte fresco e assicurarsi di non usare latte oltre la scadenza indicata
sulla confezione.
INFORMATION: für ein ideales Milchschaumergebnis nutzen Sie bitte gekühlte H-Milch (ca. 4° C).
INFORMAZIONI: per una schiuma di latte eccezionale, usare latte scremato o parzialmente scremato a
temperatura di frigorifero (circa 4° C).
INFORMATION: wenn der
Milchbehälter leer ist, spülen Sie
diesen und das Milchansaugrohr
mit Leitungswasser, bevor sie den
Milchbehälter erneut befüllen.
INFORMAZIONI: quando il
contenitore del latte è vuoto, prima di
riempirlo, risciacquarlo accuratamente
con acqua potabile insieme al tubicino di
aspirazione del latte.
6926_UM_LATTISSIMA_PREMIUM_Z2A.indb 29 17.10.13 19:57
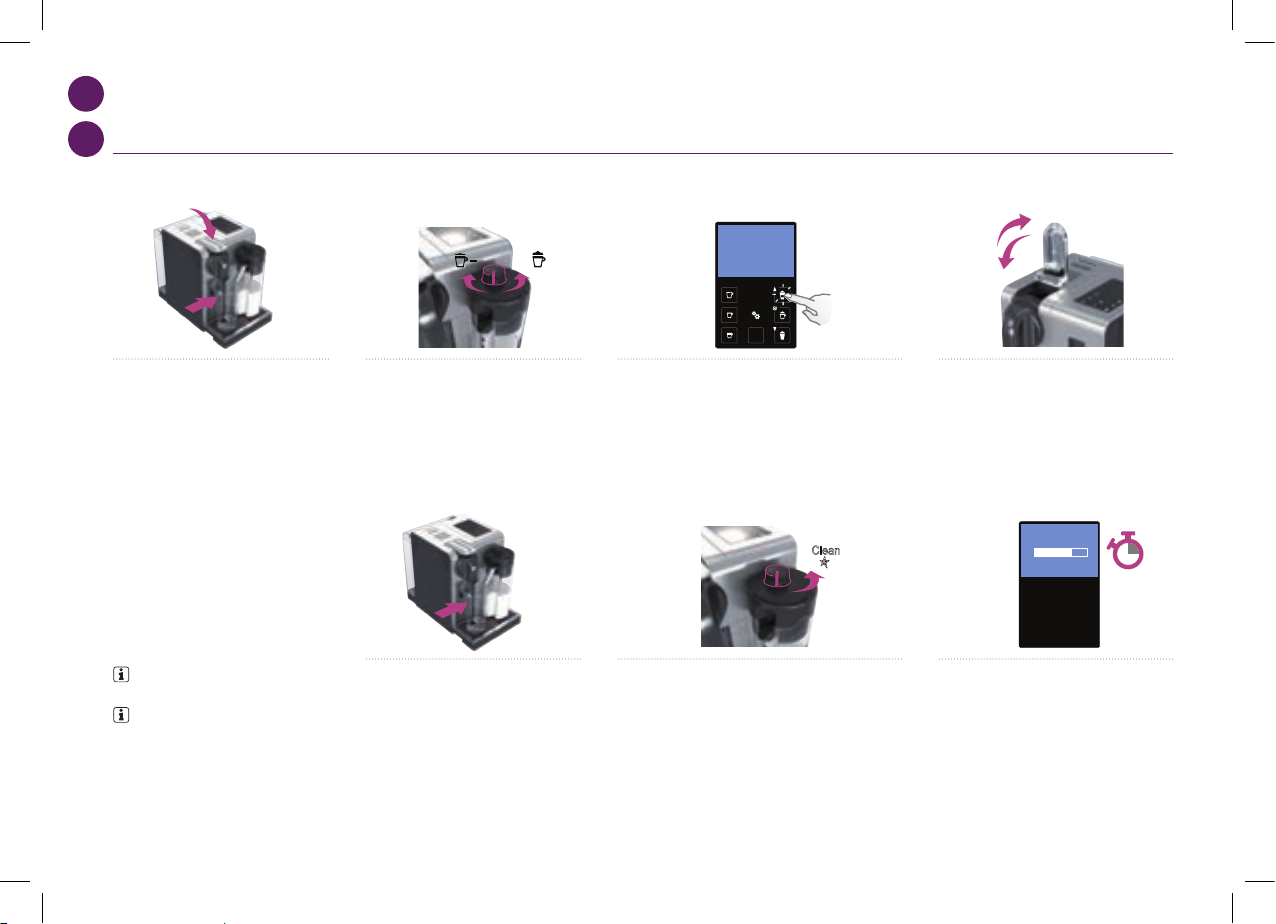
DE
IT
Preparing Cappuccino and Latte Macchiato
4°
i
When the milk container is empty, before refilling,
thoroughly rinse it and the milk aspiration tube
with potable water.
Close the milk container. Open the steam
connector door by sliding it to the right. Connect
the Rapid Cappuccino System to the machine.
15”
+
LATTE MACCHIATO
Clean
15”
i
Remove Rapid Cappuccino System
connector by unlocking it from (sign ) to
(sign) and pulling it off
Remove the milk container lid and
unplug milk aspiration tube.
Remove the milk froth regulator knob by
turning it until and pulling it up.
Remove the milk spout by pulling it off.
1 2 3 4
Assembling / disassembling of Rapid Cappuccino system (R.C.S)
RINSE MILK SYSTEM
07 08
ZUBEREITUNG VON CAPPUCCINO ODER LATTE MACCHIATO/
PREPARAZIONE CAPPUCCINO E LATTE MACCHIATO
INFORMATION: spülen Sie das
Milchsystem nach jeder Nutzung.
INFORMAZIONI: dopo ogni utilizzo,
risciacquare il sistema del latte.
9. Stellen Sie einen Behälter unter der
Milchdüse.
9. Posizionare un contenitore sotto
l’erogatore del latte.
10. Drehen Sie den Schaumregulierer in die Position
«CLEAN». Der Spülvorgang des Milchsystems startet,
Heißwasser und Dampf strömen aus der Milchdüse.
10. Ruotare la manopola di regolazione del latte sulla
posizione «CLEAN». Inizia così il processo di risciacquo del
sistema del latte e l’acqua calda, combinata al vapore, passa
attraverso l’erogatore del latte.
11. Der Spülvorgang dauert ca. 15 Sekunden und
stoppt automatisch.
11. Il processo di risciacquo dura circa 15 secondi
e si ferma automaticamente.
5. Schließen Sie den Hebel und stellen Sie
eine Cappuccino- oder Latte Macchiato Tasse
unter dem Kaeeauslauf und passen Sie die
Position der Milchdüse an.
5. Abbassare la leva, sistemare una tazza
per Cappuccino o un bicchiere per Latte
Macchiato sotto l’erogatore del caè e
regolare la posizione dell’erogatore del latte.
6. Verstellen Sie den Schaumregulierer, je
nach der gewünschten Schaumkonsistenz.
6. Regolare la manopola per la schiuma
di latte a seconda del volume di schiuma
desiderato.
7. Drücken Sie die Cappuccino- oder Latte Macchiato
Taste. Die Zubereitung startet nach ein paar Sekunden (erst
Milchschaum und dann Kaee) und stoppt automatisch.
7. Premere il pulsante Cappuccino o Macchiato. La
preparazione inizia dopo pochi secondi (prima il latte e poi il
caè) e si ferma automaticamente.
8. Önen und schließen Sie nach der Zubereitung
den Hebel, um die Kapsel in den Kapselbehälter
auszuwerfen.
8. Alla ne della preparazione, sollevare e
abbassare la leva per espellere la capsula
direttamente nel contenitore delle capsule usate.
30
6926_UM_LATTISSIMA_PREMIUM_Z2A.indb 30 17.10.13 19:57

31
PRESS to confirm.
The discaling agent flows alternately
trough the coffee outlet, hot water nozzle
and drip tray.
Descaling
Descaling process: Empty the drip tray and
the used capsules container.
Rinsing process: Empty the drip
tray and the used capsules
container.
Refer to safety precautions
+
100 ml
500 ml
1 2 3
5
7 8
4
6
Lift and close the lever to eject any capsule
in the used capsule container.
Descaling process: Fill water tank with 100
ml of Nespresso descaling agent and 500ml
water.
Descaling process: Insert the hot
water spout.
Enter the Menu, browse the options and
select DESCALING. You will be guided
throughout the whole process. Follow
machine display instructions.
Descaling process: Place one container
of minimum 1 litre under both the coffee
outlet and the hot water spout.
4°
Volume factory settings
LANGUAGE
DESCALING
WATER HARDNESS
09 10
DE
IT
ZUBEREITUNG VON CAPPUCCINO ODER LATTE MACCHIATO/
PREPARAZIONE CAPPUCCINO E LATTE MACCHIATO
12. Drehen Sie nach dem Spülvorgang der
Schaumregulierer zurück in die Milchposition.
12. Una volta terminato il risciacquo,
riportare la manopola per regolare la schiuma
del latte sulla modalità del latte.
13. Entfernen Sie den Milchbehälter und bewahren Sie
diesen im Kühlschrank auf. Schließen Sie die Klappe des
Dampfanschlusses.
13. Rimuovere l’R.C.S. dalla macchina e riporlo
immediatamente nel frigorifero. Chiudere la porta del
connettore di vapore.
15. Reinigen Sie alle Einzelteile über das
obere Fach Ihrer Spülmaschine. Wenn Sie
keine Spülmaschine besitzen, halten Sie sich
an den Abschnitt manuelle Reinigung des
Rapid Cappuccino Systems (R.C.S.).
15. Lavare tutti i componenti nello
scomparto superiore della lavastoviglie.
Nel caso non si disponga di una lavastoviglie,
consultare la sezione Lavaggio a mano del
Sistema Rapid Cappuccino (R.C.S.).
INFORMATION: siehe Abschnitt «Montage/
Demontage von Rapid Cappuccino System (R.C.S.)».
INFORMAZIONI: consultare la sezione
«Assemblaggio/Smontaggio del Sistema Rapid
Cappuccino (R.C.S.)».
VORSICHT: die Milch sollte nicht länger als zwei Tage im Kühlschrank aufbewahrt werden.
Wenn der Milchbehälter länger als 2 Stunden nicht im Kühlschrank gelagert wurde, zerlegen Sie die R.C.S. und
reinigen Sie alle Einzelteile (siehe Abschnitt Spülmaschinenreinigung oder Reinigung per Hand).
ATTENZIONE: non tenere il latte in frigo per più di 2 giorni. Nel caso il contenitore del latte rimanga fuori
dal frigorifero per più di 2 ore, smontare l’R.C.S. e lavare tutti i componenti (consultare i consigli per il lavaggio
manuale o in lavastoviglie).
14. Zerlegen Sie und reinigen Sie das Rapid Cappuccino
System mindestens alle 2 Tage.
14. Smontare il Sistema Rapid Cappuccino ogni due giorni.
6926_UM_LATTISSIMA_PREMIUM_Z2A.indb 31 17.10.13 19:57

DE
IT
PRESS to confirm.
The discaling agent flows alternately
trough the coffee outlet, hot water nozzle
and drip tray.
Descaling
Descaling process: Empty the drip tray and
the used capsules container.
Rinsing process: Empty the drip
tray and the used capsules
container.
Refer to safety precautions
+
100 ml
500 ml
1 2 3
5
7 8
4
6
Lift and close the lever to eject any capsule
in the used capsule container.
Descaling process: Fill water tank with 100
ml of Nespresso descaling agent and 500ml
water.
Descaling process: Insert the hot
water spout.
Enter the Menu, browse the options and
select DESCALING. You will be guided
throughout the whole process. Follow
machine display instructions.
Descaling process: Place one container
of minimum 1 litre under both the coffee
outlet and the hot water spout.
4°
Volume factory settings
LANGUAGE
DESCALING
WATER HARDNESS
09 10
2. Önen und schließen Sie nach der Zubereitung den Hebel, um die Kapsel in den
Kapselbehälter auszuwerfen. Stellen Sie einen Behälter unter dem Kaeeauslauf
und drücken Sie die Lungotaste, um zu spülen. Reinigen Sie den Kaeeauslauf
regelmäßig mit einem weichen, feuchten Tuch.
2. Sollevare e abbassare la leva per espellere la capsula direttamente nel contenitore
delle capsule usate. Sistemare un contenitore sotto l’erogatore del caè e premere
il pulsante Lungo per risciacquare. Pulire regolarmente l’erogatore di caè con un
panno umido pulito.
3. Reinigen Sie Rückstände an der Heißwasserdüse mit
Leitungswasser. Reinigen Sie die Heißwasserdüse mit einem
weichen, feuchten Tuch.
3. Risciacquare accuratamente con acqua potabile
qualunque residuo di sporco sul beccuccio dell’acqua calda.
Pulire con un panno umido pulito.
1. Zerlegen Sie das Rapid Cappuccino System. Siehe
Abschnitt «Montage/Demontage von Rapid Cappuccino
System (R.C.S.)».
1. Smontare il Sistema Rapid Cappuccino. Consultare la
sezione «Assemblaggio/Smontaggio del Sistema Rapid
Cappuccino (R.C.S.)».
2. Spülen Sie mit Leitungswasser sorgfältig
Milchrückstände ab.
2. Risciacquare accuratamente qualunque
residuo di latte con acqua potabile.
3. Legen Sie alle Einzelteile im warmen Wasser (ca. 40° C)
mit Spülmittel für mindestens 30 Minuten ein.
3. Immergere tutti i componenti in acqua calda (circa 40° C)
e detersivo per almeno 30 minuti.
4. Spülen Sie alle Einzelteile mit
Leitungswasser ab und trocken Sie diese mit
einem sauberen, weichen Tuch.
4. Sciacquarli con acqua potabile e asciugarli
con un panno umido pulito.
TÄGLICHE PFLEGE/CURA QUOTIDIANA
INFORMATION: verwenden Sie keine aggressiven Reinigungs- oder Lösungsmittel. Um die Oberäche Ihrer Maschine zu reinigen, verwenden Sie ein
feuchtes Tuch und milde Reinigungsmittel. Stellen Sie das Gerät oder Zubehörteile davon niemals in die Spülmaschine.
INFORMAZIONI: non utilizzare detersivi abrasivi o solventi. Utilizzare un panno umido e un detergente delicato per pulire la supercie della macchina. Non
mettere alcun componente della macchina nella lavastoviglie, ad eccezione dei componenti del Sistema Rapid Cappuccino.
MANUELLE REINIGUNG DES RAPID CAPPUCCINO SYSTEMS R.C.S./
LAVAGGIO A MANO DEL SISTEMA RAPID CAPPUCCINO R.C.S.
INFORMATION: falls keine Spülmaschine vorliegt, können die R.C.S. Einzelteile manuell gereinigt werden. In diesem Falle muss die Reinigung täglich erfolgen, damit die maximale Leistung gewährleistet ist.
INFORMAZIONI: se non si dispone di una lavastoviglie, lavare i componenti dell’R.C.S. manualmente. In tal caso, eseguire questo procedimento ogni giorno per la massima ecienza.
1. Entfernen Sie die Abtropfschale und den Kapselbehälter.
Entleeren und spülen. Entfernen Sie den Wassertank.
Entleeren und spülen Sie den Wassertank, bevor dieser mit
frischem Leitungswasser befüllt wird.
1. Rimuovere il vassoio raccogligocce e il contenitore delle
capsule. Svuotare e sciacquare. Rimuovere il serbatoio
dell’acqua. Svuotare e risciacquare prima di riempirlo con
acqua fresca potabile.
32
6926_UM_LATTISSIMA_PREMIUM_Z2A.indb 32 17.10.13 19:57
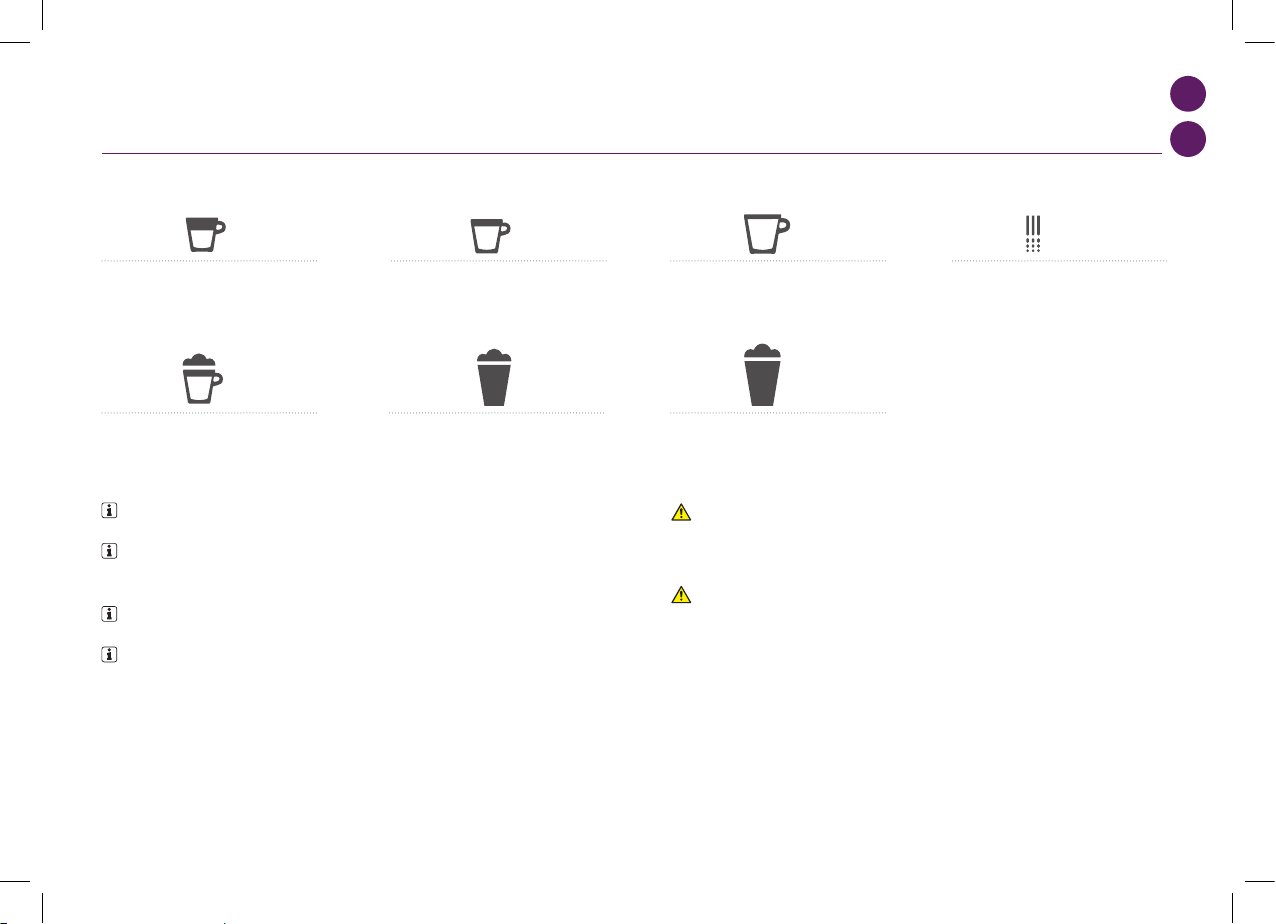
33
DE
IT
HINWEIS: *die Milchschaumkonsistenz ist abhängig von Art der verwendeten Milch, der
Milchtemperatur und der Position des Schaumregulierers.
IMPORTANTE: *il volume della schiuma di latte dipende dal tipo di latte utilizzato, dalla sua
temperatura e dalla posizione della manopola di regolazione del latte.
HINWEIS: wir empfehlen die Werkseinstellungen der Füllmengen für Ristretto, Espresso und
Lungo, um das beste Resultat jeder einzelnen Kaeevarietät zu gewährleisten.
IMPORTANTE: consigliamo di attenersi alle impostazioni di fabbrica per Ristretto, Espresso e Lungo,
per ottenere i migliori risultati in tazza per ciascuna delle nostre varietà di caè.
Die Füllmenge von Heißwasser kann zwischen 50 bis 400 ml programmiert werden.
Die Füllmenge von Milchschaum kann zwischen 30 bis 200 ml programmiert werden.
Die Füllmenge von Kaee kann zwischen 25 bis 200 ml programmiert werden.
Il volume dell’acqua può essere programmato da 50 a 400 ml.
Il volume del latte può essere programmato da 30 a 200 ml.
Il volume del caè può essere programmato da 25 a 200 ml.
WERTE WERKSEINSTELLUNG/
RIPRISTINO DELLE IMPOSTAZIONI DI FABBRICA
Ristretto 25 ml
Ristretto 25 ml
Cappuccino Milk*: 50 ml/Kaee: 40 ml
Cappuccino - Latte*: 50 ml/Caè: 40 ml
Lungo 110 ml
Lungo 110 ml
Latte Macchiato Milk*: 150 ml/Kaee: 40 ml
Latte Macchiato - Latte*: 150 ml/Caè: 40 ml
Espresso 40 ml
Espresso 40 ml
Heißwasser 125 ml
Acqua calda 125 ml
Warme Milch* 120 ml
Latte caldo* 120 ml
VORSICHT: falls die Füllmenge höher als 150 ml progammiert
ist: lassen Sie die Maschine 5 Minuten abkühlen, bevor Sie einen
weiteren Kaee zubereiten. Gefahr der Überhitzung!
ATTENZIONE: se si programma il volume del caè in quantità
superiore a 150 ml, lasciar rareddare la macchina per 5 minuti
prima di preparare un altro caè. Rischio di surriscaldamento!
6926_UM_LATTISSIMA_PREMIUM_Z2A.indb 33 17.10.13 19:57

DE
IT
+
100 ml
500 ml
10
+
100 ml
500 ml
10
+
100 ml
500 ml
10
+
100 ml
500 ml
10
+
100 ml
500 ml
10
+
100 ml
500 ml
10
+
100 ml
500 ml
10
+
100 ml
500 ml
10
ENTKALKUNG/DECALCIFICAZIONE
1. Önen und schließen Sie den Hebel, um
Kapseln in den Kapselbehälter auszuwerfen.
1. Sollevare e abbassare la leva per espellere
le capsule direttamente nel contenitore delle
capsule usate.
2. Önen Sie das Menü und wählen Sie die Option
ENTKALKUNG. Sie werden durch den kompletten
Entkalkungsprozess geführt. Folgen Sie den Instruktionen
im Display.
2. Aprire il Menu, scorrere le opzioni e selezionare
DECALCIFICAZIONE. La procedura guidata le permetterà
di eseguire tutto il processo. Seguire le istruzioni sul display
della macchina.
VORSICHT: siehe auch Sicherheitshinweise. ATTENZIONE: consultare le precauzioni di sicurezza.
7. Drücken Sie zur Bestätigung. Die Entkalkungslösung
läuft abwechselnd über den Kaeeauslauf, der
Heißwasserdüse und zur Abtropfschale.
7. Premere
per confermare. La soluzione decalcicante
passa alternativamente attraverso l’erogatore del caè,
l’erogatore di acqua calda e il vassoio raccogligocce.
5. Entkalkungsprozess: setzen Sie die
Heißwasserdüse auf.
5. Processo di decalcicazione: inserire il
beccuccio dell’acqua calda.
6. Entkalkungsprozess: platzieren Sie ein
Gefäß (min. 1 Liter) unter dem Kaeeauslauf
und der Heißwasserdüse.
6. Processo di decalcicazione: posizionare
un contenitore con capacità minima di 1 litro
sotto l’erogatore del caè e sotto il beccuccio
dell’acqua calda.
3. Entkalkungsprozess: leeren Sie die
Abtropfschale und den Kapselbehälter.
3. Processo di decalcicazione: svuotare
il vassoio raccogligocce e il contenitore delle
capsule usate.
4. Entkalkungsprozess: füllen Sie
den Wassertank mit 100 ml Nespresso
Entkalkungsmittel und 500 ml
Leitungswasser.
4. Processo di decalcicazione: riempire il
serbatoio dell’acqua con 100 ml di soluzione
decalcicante Nespresso e con 500 ml di
acqua potabile.
8. Spülvorgang: leeren Sie die Abtropfschale
und den Kapselbehälter. Spülen Sie mit
Leitungswasser.
8. Processo di risciacquo: svuotare il
vassoio raccogligocce e il contenitore delle
capsule usate. Sciacquare con acqua potabile.
34
6926_UM_LATTISSIMA_PREMIUM_Z2A.indb 34 17.10.13 19:57

35
max
1”
1
2
3
4
5
11
max
1”
1
2
3
4
5
11
max
1”
1
2
3
4
5
11
max
1”
1
2
3
4
5
11
max
1”
1
2
3
4
5
11
max
1”
1
2
3
4
5
11
max
1”
1
2
3
4
5
11
max
1”
1
2
3
4
5
11
DE
IT
ENTKALKUNG/DECALCIFICAZIONE
2. Halten Sie den Wasserhärte Aufkleber für
1 Sekunde unter Wasser.
2. Mettere l’etichetta per la durezza
dell’acqua sotto l’acqua corrente per
1 secondo.
11. Drücken Sie zur Bestätigung. Der Spülvorgang läuft
abwechselnd über den Kaeeauslauf, der Heißwasserdüse
und zur Abtropfschale, bis der Wassertank leer gelaufen ist.
11. Premere
per confermare. Il ciclo di risciacquo si
alterna fra l’erogatore del caè, l’erogatore dell’acqua calda
e il vassoio raccogligocce no a che il serbatoio dell’acqua
non si svuota.
3. Die Anzahl der roten Quadrate zeigt die
lokale Wasserhärte an.
3. Il numero di quadratini rossi indica il livello
di durezza dell’acqua.
12. Nach dem Spülvorgang schaltet sich die Maschine aus.
Spülen Sie über die Heißwasserdüse und reinigen Sie diese
anschließend mit einem sauberen, feuchtem Tuch.
Die Entkalkung ist abgeschlossen.
12. Una volta terminato il processo di risciacquo, la
macchina si spegne. Sciacquare l’erogatore dell’acqua calda
e pulirlo con un panno umido. A questo punto il processo di
decalcicazione della macchina è terminato.
4. Stellen Sie die Wasserhärte entsprechend
des Wertes ein.
4. Impostare quindi il valore.
WASSERHÄRTE EINSTELLEN/IMPOSTAZIONI DELLA DUREZZA DELL’ACQUA
1. Önen Sie das Menü und wählen Sie die Option
WASSERHÄRTE. Sie werden instruiert Ihre Wasserhärte zu
denieren. Folgen Sie den Instruktionen im Display.
1. Aprire il Menu, scorrere le opzioni e selezionare
DUREZZA ACQUA. La procedura guidata permetterà di
impostare il valore. Seguire le istruzioni sul display della
macchina.
9. Spülvorgang: spülen Sie den Wassertank
und füllen Sie diesen bis zur max. Markierung
mit Leitungswasser.
9. Processo di risciacquo: sciacquare e
riempire con acqua potabile no al livello
MAX.
10. Spülvorgang: platzieren Sie ein Gefäß
(min. 1 Liter) unter dem Kaeeauslauf und
der Heißwasserdüse.
10. Processo di risciacquo: posizionare un
contenitore con capacità minima di 1 litro
sotto l’erogatore del caè e sotto il beccuccio
dell’acqua calda.
6926_UM_LATTISSIMA_PREMIUM_Z2A.indb 35 17.10.13 19:57

DE
IT
FEHLERBEHEBUNG
Keine Beleuchtung auf dem Display.
➔
Prüfen Sie die Stromversorgung, Stecker, Spannung und Sicherungen. Drücken Sie die
Einschalttaste, welcher sich hinter dem Maschinen Display bendet. Bei Problemen
wenden Sie sich an den Nespresso Club.
Maschine ist zu heiß, Meldung erscheint im Display.
➔
Unter bestimmten Bedingungen erreicht der Thermoblock zu hohe Temperaturen
(z.B. nach einer Entleerung des Wasserkreislaufes). Bitte warten, die Maschine kühlt sich
automatisch ab.
Der Kaee läuft sehr langsam heraus.
➔
Die Durchlaufgeschwindigkeit ist abhängig von der Kaeesorte.
➔ Entkalken Sie falls notwendig; siehe Abschnitt Entkalkung.
Kaee ist nicht heiß genug.
➔
Tasse vorwärmen.
➔ Entkalken Sie falls notwendig; siehe Abschnitt Entkalkung.
Der Kapselbereich ist undicht (Wasser im Kapselbehälter).
➔
Lage der Kapsel korrigieren. Bei anhaltender Undichtigkeit wenden Sie sich an den
Nespresso Club.
Unregelmäßiges Intervallblinken.
➔
Senden Sie die Maschine zur Reparatur oder wenden Sie sich an den Nespresso Club.
Es läuft kein Kaee, sondern nur Wasser heraus (trotz
eingesetzter Kapsel).
➔
Bei Problemen wenden Sie sich bitte an den Nespresso Club.
Hebel kann nicht komplett geschlossen werden.
➔
Leeren Sie den Kapselbehälter. Stellen Sie sicher, dass keine Kapsel aus dem
Kapselbehälter die Brüheinheit blockiert.
Die Qualität des Milchschaums ist nicht in Ordnung.
➔
Für ein ideales Milchschaumergebnis nutzen Sie bitte gekühlte H-Milch (ca. 4° C).
➔ Spülen Sie das Milchsystem nach jeder Nutzung. Platzieren Sie einen Behälter unter der
Milchschaumdüse und drehen Sie den Schaumregulierer in die «CLEAN» Position.
➔
Zerlegen Sie und reinigen Sie das Rapid Cappuccino System mindestens alle 2 Tage und
reinigen Sie alle Einzelteile über das obere Fach der Spülmaschine.
Maschine muss zur Reparatur, Meldung erscheint im
Display.
➔
Für jegliche weiterführende Information, bei auftretenden Problemen oder auch wenn Sie
nur Rat suchen, kontaktieren Sie den Nespresso Club.
36
6926_UM_LATTISSIMA_PREMIUM_Z2A.indb 36 17.10.13 19:57
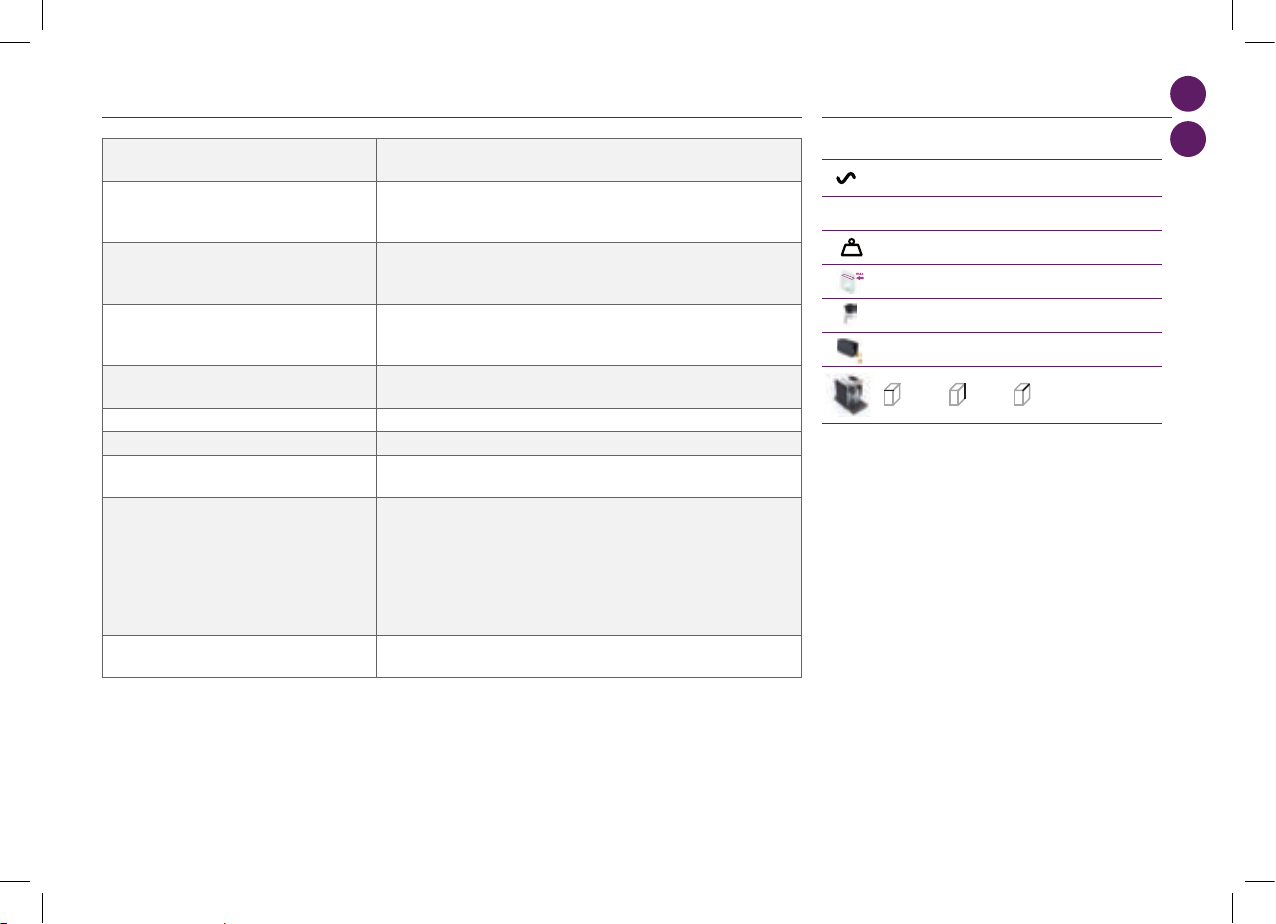
37
DE
IT
RICERCA GUASTI
Milk Premium
EUR,AUS,NZ: 220240 V, 50/60 Hz, 1300 W
US/CA: 120 V, 60 Hz, 1200 W
19 bar
6.5 kg
1,38 litre
500 ml
13-16 capsules
l=19,4 cm . L=33,2 cm . h=27,4 cm
Troubleshooting
Contact the Nespressso Club
For any additional information, in case of problems
or simply to seek advise, call the Nespresso Club.
Contact details of the Nespresso Club can be found
in the 'Welcome to Nespresso' folder in your
machine box or at nespresso.com
No light on display
Check the mains, plug, voltage, and fuse. In case of problems, call the Nespresso Club.
Coffee comes out very slowly.
Flow speed depends on the coffee variety.
Perform a self check of the machine. Enter the menu list and select Maintenance. Follow instruction
Coffee is not hot enough.
Preheat cup.
Perform a self check of the machine. Enter the menu list and select Maintenance. Follow instruction
Capsule area is leaking (water in capsule container).
Position capsule correctly. If leakages occur, call the Nespresso Club.
Irregular blinking.
Send appliance to repair or call the Nespresso Club.
No coffee, just water runs out (despite inserted capsule).
In case of problems, call the Nespresso Club.
Lever cannot be closed completely
Empty capsule container. Make sure that no capsule is blocked inside the capsule container.
Quality of milk froth is not up to standard
1) For a perfect milk froth, use skimmed or semi-skimmed milk at refrigerator temperature (about 4° C)
2) Rinse after each milk based preparation. Place a recipient under milk outlet, rotate the milk
regulator knob until “CLEAN” position.
3) Every two days, disassemble the R. C. S. and clean all components in the upper level of a
dishwasher
Warranty
Delonghi warrants this product against defects in materials and workmanship for a period of two years from the date of purchase. During this period, Delonghi will either repair or
replace, at its discretion, any defective product at no charge to the owner. Replacement products or repaired parts will be guaranteed for only the unexpired portion of the original
warranty or six months, whichever is greater. This limited warranty does not apply to any defect resulting from accident, misuse, improper maintenance, or normal wear and tear. Any
defect resulting from the usage of non genuine Nespresso capsules will not be covered by this warranty. Except to the extent allowed by applicable law, the terms of this limited warranty
do not exclude, restrict
or modify, and are in addition to, the mandatory statutory rights applicable to the sale of the product to you. If you believe your product is defective, contact Nespresso for instructions on
where to send or bring it for repair. Please visit our website at nespresso.com to discover more about Nespresso
Specifications
P
max
Once the rinsing process is finished, the
machine switches off. Clean the machine
using a damp cloth. You have now finished
descaling the machine.
9
10
11 12
Rinsing process Rinse and fill water with
fresh potable water up to MAX level.
Rinsing process Place one container of
minimum 1 litre under both the coffee
outlet and the hot water spout.
PRESS to confirm.
The rinsing cycle continues trough the coffee
outlet, hot water spout and drip tray until the
water tank is empty.
Water hardness setting
1
programmed buttons blinks 3 times: water hardness is set
i
1”
2 3 4
1
2
3
4
5
Place the water hardness sticker under
water for 1 second.
The number of red squares indicates
the water harness level.
Set the value accordinglyEnter the menu, browse the options and select
WATER HARDNESS.
You will be guided to set the value.
Follow machine display instructions.
max
max
Kg
11 12
EUR, AUS, NZ: 220-240 V, 50/60 Hz, 1400 W
EUR,AUS,NZ: 220240 V, 50/60 Hz, 1300 W
US/CA: 120 V, 60 Hz, 1200 W
19 bar
6.5 kg
1,38 litre
500 ml
13-16 capsules
l=19,4 cm . L=33,2 cm . h=27,4 cm
Troubleshooting
Contact the Nespressso Club
For any additional information, in case of problems
or simply to seek advise, call the Nespresso Club.
Contact details of the Nespresso Club can be found
in the 'Welcome to Nespresso' folder in your
machine box or at nespresso.com
No light on display
Check the mains, plug, voltage, and fuse. In case of problems, call the Nespresso Club.
Coffee comes out very slowly.
Flow speed depends on the coffee variety.
Perform a self check of the machine. Enter the menu list and select Maintenance. Follow instruction
Coffee is not hot enough.
Preheat cup.
Perform a self check of the machine. Enter the menu list and select Maintenance. Follow instruction
Capsule area is leaking (water in capsule container).
Position capsule correctly. If leakages occur, call the Nespresso Club.
Irregular blinking.
Send appliance to repair or call the Nespresso Club.
No coffee, just water runs out (despite inserted capsule).
In case of problems, call the Nespresso Club.
Lever cannot be closed completely
Empty capsule container. Make sure that no capsule is blocked inside the capsule container.
Quality of milk froth is not up to standard
1) For a perfect milk froth, use skimmed or semi-skimmed milk at refrigerator temperature (about 4° C)
2) Rinse after each milk based preparation. Place a recipient under milk outlet, rotate the milk
regulator knob until “CLEAN” position.
3) Every two days, disassemble the R. C. S. and clean all components in the upper level of a
dishwasher
Warranty
Delonghi warrants this product against defects in materials and workmanship for a period of two years from the date of purchase. During this period, Delonghi will either repair or
replace, at its discretion, any defective product at no charge to the owner. Replacement products or repaired parts will be guaranteed for only the unexpired portion of the original
warranty or six months, whichever is greater. This limited warranty does not apply to any defect resulting from accident, misuse, improper maintenance, or normal wear and tear. Any
defect resulting from the usage of non genuine Nespresso capsules will not be covered by this warranty. Except to the extent allowed by applicable law, the terms of this limited warranty
do not exclude, restrict
or modify, and are in addition to, the mandatory statutory rights applicable to the sale of the product to you. If you believe your product is defective, contact Nespresso for instructions on
where to send or bring it for repair. Please visit our website at nespresso.com to discover more about Nespresso
Specifications
P
max
Once the rinsing process is finished, the
machine switches off. Clean the machine
using a damp cloth. You have now finished
descaling the machine.
9
10
11 12
Rinsing process Rinse and fill water with
fresh potable water up to MAX level.
Rinsing process Place one container of
minimum 1 litre under both the coffee
outlet and the hot water spout.
PRESS to confirm.
The rinsing cycle continues trough the coffee
outlet, hot water spout and drip tray until the
water tank is empty.
Water hardness setting
1
programmed buttons blinks 3 times: water hardness is set
i
1”
2 3 4
1
2
3
4
5
Place the water hardness sticker under
water for 1 second.
The number of red squares indicates
the water harness level.
Set the value accordinglyEnter the menu, browse the options and select
WATER HARDNESS.
You will be guided to set the value.
Follow machine display instructions.
max
max
Kg
11 12
Max 19 bar
EUR,AUS,NZ: 220240 V, 50/60 Hz, 1300 W
US/CA: 120 V, 60 Hz, 1200 W
19 bar
6.5 kg
1,38 litre
500 ml
13-16 capsules
l=19,4 cm . L=33,2 cm . h=27,4 cm
Troubleshooting
Contact the Nespressso Club
For any additional information, in case of problems
or simply to seek advise, call the Nespresso Club.
Contact details of the Nespresso Club can be found
in the 'Welcome to Nespresso' folder in your
machine box or at nespresso.com
No light on display
Check the mains, plug, voltage, and fuse. In case of problems, call the Nespresso Club.
Coffee comes out very slowly.
Flow speed depends on the coffee variety.
Perform a self check of the machine. Enter the menu list and select Maintenance. Follow instruction
Coffee is not hot enough.
Preheat cup.
Perform a self check of the machine. Enter the menu list and select Maintenance. Follow instruction
Capsule area is leaking (water in capsule container).
Position capsule correctly. If leakages occur, call the Nespresso Club.
Irregular blinking.
Send appliance to repair or call the Nespresso Club.
No coffee, just water runs out (despite inserted capsule).
In case of problems, call the Nespresso Club.
Lever cannot be closed completely
Empty capsule container. Make sure that no capsule is blocked inside the capsule container.
Quality of milk froth is not up to standard
1) For a perfect milk froth, use skimmed or semi-skimmed milk at refrigerator temperature (about 4° C)
2) Rinse after each milk based preparation. Place a recipient under milk outlet, rotate the milk
regulator knob until “CLEAN” position.
3) Every two days, disassemble the R. C. S. and clean all components in the upper level of a
dishwasher
Warranty
Delonghi warrants this product against defects in materials and workmanship for a period of two years from the date of purchase. During this period, Delonghi will either repair or
replace, at its discretion, any defective product at no charge to the owner. Replacement products or repaired parts will be guaranteed for only the unexpired portion of the original
warranty or six months, whichever is greater. This limited warranty does not apply to any defect resulting from accident, misuse, improper maintenance, or normal wear and tear. Any
defect resulting from the usage of non genuine Nespresso capsules will not be covered by this warranty. Except to the extent allowed by applicable law, the terms of this limited warranty
do not exclude, restrict
or modify, and are in addition to, the mandatory statutory rights applicable to the sale of the product to you. If you believe your product is defective, contact Nespresso for instructions on
where to send or bring it for repair. Please visit our website at nespresso.com to discover more about Nespresso
Specifications
P
max
Once the rinsing process is finished, the
machine switches off. Clean the machine
using a damp cloth. You have now finished
descaling the machine.
9
10
11 12
Rinsing process Rinse and fill water with
fresh potable water up to MAX level.
Rinsing process Place one container of
minimum 1 litre under both the coffee
outlet and the hot water spout.
PRESS to confirm.
The rinsing cycle continues trough the coffee
outlet, hot water spout and drip tray until the
water tank is empty.
Water hardness setting
1
programmed buttons blinks 3 times: water hardness is set
i
1”
2 3 4
1
2
3
4
5
Place the water hardness sticker under
water for 1 second.
The number of red squares indicates
the water harness level.
Set the value accordinglyEnter the menu, browse the options and select
WATER HARDNESS.
You will be guided to set the value.
Follow machine display instructions.
max
max
Kg
11 12
~ 6.5 kg
1.3 L/litri
0.5 L/litri
13-16 Kapseln/capsule
19.4 cm 27.4 cm 33.2 cm
SPEZIFIKATIONEN/SPECIFICHE TECNICHE
Assenza di luce sul display.
➔
Controllare l’alimentazione: presa, tensione e fusibile. Premere il pulsante ON, posizionato
dietro il display della macchina. In caso di problemi, contattare il Nespresso Club.
Messaggio sul display che indica un eccessivo calore della
macchina.
➔
In alcune condizioni, il sistema di riscaldamento della macchina raggiunge una
temperatura elevata (ad esempio dopo lo svuotamento del circuito dell’acqua).
È suciente attendere e la macchina si raredderà automaticamente.
Il caè esce molto lentamente.
➔
La velocità di erogazione dipende dalla varietà di caè.
➔ Se necessario, eettuare la decalcicazione. Fare riferimento al paragrafo
Decalcicazione.
Il caè non è abbastanza caldo.
➔
Preriscaldare la tazzina.
➔ Se necessario, eettuare la decalcicazione. Fare riferimento al paragrafo
Decalcicazione.
Il vano delle capsule perde acqua (acqua nel contenitore
delle capsule).
➔
Posizionare la capsula correttamente. Se si vericano perdite, contattare il Nespresso Club.
Lampeggio irregolare.
➔
Far riparare la macchina o contattare il Nespresso Club.
Fuoriuscita di acqua ma non di caè (a capsula inserita).
➔ In caso di problemi, contattare il Nespresso Club.
La leva non si abbassa completamente.
➔
Svuotare il contenitore delle capsule. Assicurarsi che non vi siano capsule bloccate
all’interno del contenitore delle capsule.
La qualità della schiuma di latte non è all’altezza dello
standard.
➔
Per una schiuma di latte eccezionale, usare latte scremato o parzialmente scremato a
temperatura di frigorifero (circa 4° C).
➔
Risciacquare dopo ogni preparazione a base di latte. Posizionare un recipiente sotto
l’erogatore del latte, ruotare la manopola di regolazione del latte no a raggiungere la
posizione «CLEAN».
➔
Smontare l’R.C.S. ogni due giorni e lavare tutti i componenti nello scomparto superiore
della lavastoviglie.
Un messaggio sul display indica la necessità di far riparare
la macchina.
➔
Contattare il Nespresso Club o un rappresentante autorizzato Nespresso per un controllo o
una riparazione.
6926_UM_LATTISSIMA_PREMIUM_Z2A.indb 37 17.10.13 19:57

DE
IT
Für jegliche weiterführende Information, bei auftretenden Problemen oder auch wenn Sie nur Rat suchen, kontaktieren Sie den Nespresso Club.
Die Kontaktdaten des Nespresso Clubs nden Sie im Ordner «Willkommen bei Nespresso» im Maschinenkarton oder auf www.nespresso.com.
Per ulteriori informazioni, in caso di problemi o per avere assistenza, rivolgersi al Nespresso Club.
Le informazioni per contattare il Nespresso Club sono disponibili nel cofanetto «Benvenuto in Nespresso» oppure su www.nespresso.com
KONTAKTIEREN SIE DEN NESPRESSO CLUB/CONTATTARE IL NESPRESSO CLUB
GEWÄHRLEISTUNG/GARANZIA
ENTSORGUNG UND UMWELTSCHUTZ/SMALTIMENTO E PROTEZIONE AMBIENTALE
Entsorgung und Umweltschutz
Ihr Gerät enthält wertvolle Materialien, die wiedergewonnen und recycelt werden können. Die Trennung der verschiedenen Abfallmaterialien erleichtert das Recycling des wiederverwertbaren Materials. Bringen Sie das Gerät
zu einem Recycling- bzw. Wertstohof. Mehr Information zur Wiederverwertung erhalten Sie bei Ihren örtlichen Behörden.
Smaltimento e protezione ambientale
La macchina contiene materiali di valore che possono essere recuperati o riciclati. La separazione dei materiali di scarto consente il recupero di preziose materie prime. Smaltire l’apparecchio in un apposito centro di raccolta.
A tal proposito, è possibile ottenere maggiori informazioni contattando le autorità locali.
De’Longhi gewährt eine Garantie von 2 Jahren ab dem Kauf des Geräts gegen Materialdefekte und Fehler in der handwerklichen Ausführung. Während dieser Zeitspanne wird De’Longhi jedes defekte Produkt nach eigenem
Ermessen reparieren oder austauschen, ohne Kosten für den Besitzer. Die Austauschprodukte oder reparierten Einzelteile unterstehen der noch verbleibenden Original-Garantiedauer oder einer Garantiedauer von sechs
Monaten, je nachdem, was länger ist. Diese beschränkte Garantie kommt nicht zur Anwendung bei Beschädigungen, die durch einen Unfall, Missbrauch, unsachgemäße Pege oder normalem Verschleiss verursacht wurden.
Ausgenommen im durch das anwendbare Recht zulässigen Umfang, nehmen die Bestimmungen dieser eingeschränkten Garantie keine Ausschließungen, Einschränkungen, Änderungen oder Ergänzungen bezüglich des auf
Ihren Maschinenkauf zwingend anwendbaren Rechts vor. Wenn Sie der Meinung sind, dass Ihr Produkt fehlerhaft ist, kontaktieren Sie den Nespresso Club, um Anweisungen zu erhalten, wohin Sie es senden oder zur Reparatur
bringen können. Nespresso übernimmt keine Garantie für technische Probleme und Defekte, die durch die Verwendung von Nicht-Original Nespresso Kapseln entstehen.
De’Longhi garantisce questo prodotto contro eventuali difetti di fabbricazione o dei materiali per un periodo di due anni dalla data d’acquisto. Durante tale periodo De’Longhi riparerà o sostituirà gratuitamente, a sua
discrezione, qualunque prodotto difettoso. I prodotti sostituiti o i componenti riparati saranno garantiti solamente per la parte di garanzia originale non scaduta o per i successivi sei mesi, a seconda di quale sia il periodo
più lungo. Nei limiti e termini previsti dalla legge vigente, questa garanzia limitata non vale per difetti dovuti a incidenti, uso non corretto, manutenzione inadeguata o normale usura. Le condizioni di questa garanzia non
escludono, riducono o modicano quanto previsto dalla legge vigente applicabile alla vendita del prodotto al consumatore. In caso si ritenga che il prodotto sia difettoso, si prega di contattare De’Longhi che Le indicherà come
procedere per la riparazione.
38
6926_UM_LATTISSIMA_PREMIUM_Z2A.indb 38 17.10.13 19:57

39
DE
IT
6926_UM_LATTISSIMA_PREMIUM_Z2A.indb 39 17.10.13 19:57

ES
PT
DESCRIPCIÓN GENERAL/DESCRIÇÃO GERAL
Pantalla (preparaciones)/
Ecrã (preparação)
13
Lungo/Lungo
14
Espresso/Espresso
15
Ristretto/Ristretto
16
Agua caliente/Água quente
17
Leche templada/Leite quente
18
Cappuccino/Cappuccino
19
Latte Macchiato/Latte Macchiato
Pantalla (navegación)/
Ecrã (navegação)
20
Menú/Menu
21
Desplácese hacia arriba cuando el menú esté
activado/Ir para o topo quando o Menu está
ativo
22
Elija una opción cuando el menú esté activado/
Selecionar opção quando o Menu está ativo
23
Desplácese hacia abajo cuando el menú esté
activado/
Ir para o m quando o Menu está ativo
24
Pantalla de texto/Exibição de mensagem
Rapid Cappuccino System (R.C.S.)/
Rapid Cappuccino System (R.C.S.)
25
Regulador de espuma de leche/
Manípulo de regulação da Espuma de Leite
26
Introduzca la posición del regulador de espuma de leche/
Escolha a posição do manípulo de regulação da Espuma de leite
27
Nivel mínimo de espuma/Mín. de espuma
28
Nivel máximo de espuma/Máx. de espuma
29
«
LIMPIAR»: función de aclarado automático/
«LIMPEZA»: função de Enxaguamento Automático
30
Tapa del depósito de leche/Tampa do Reservatório de Leite
31
Tubo de salida de leche/Saída do leite
32
Depósito de leche/Depósito de Leite
33
Tubo de aspiración de leche/Tubo de aspiração do leite
34
Conector del R.C.S./Conector de R.C.S.
Descripción general de la máquina/
Descrição geral da máquina
A
Máquina solo con conguración de café/
Máquina congurada apenas para café
B
Máquina con Rapid Cappuccino System (para Cappuccino)/
Máquina com Rapid Cappuccino System (para Cappuccino)
C
Máquina con tubo de salida de agua caliente/
Máquina com saída de água quente
1
Palanca/Alavanca
2
Botón de encendido/apagado/Botão ON/OFF [Ligar/Desligar]
3
Depósito de agua/
Reservatório de água
4
Salida del café/Saída de café
5
Rejilla antigoteo/Grelha de gotejamento
6
Bandeja antigoteo/Tabuleiro de gotejamento
7
Soporte para tazas giratorio (no extraíble)/
Suporte de chávena giratório (não amovível)
8
Contenedor de cápsulas usadas/Recipiente de cápsulas usadas
9
Puerta del conector de vapor/Porta do conector de vapor
10
Tubo telescópico de salida de agua caliente
/
Saída telescópica de água quente
11
Zona de almacenamiento del tubo de salida de agua caliente
/
Armazenamento da saída de água quente
12
Conector de vapor/Conector de vapor
40
6926_UM_LATTISSIMA_PREMIUM_Z2A.indb 40 17.10.13 19:57
41
ES
PT
ÍNDICE/ÍNDICE
Nespresso, un sistema exclusivo para preparar siempre el espresso perfecto. Todas las máquinas Nespresso están equipadas con un sistema de extracción único que garantiza una presión de hasta 19 bares. Todos los parámetros
han sido calculados con la mayor precisión para asegurar la extracción de todos los aromas presentes en cada Grand Cru, dar cuerpo al café y crear una crema extraordinariamente densa y suave.
Nespresso, um sistema exclusivo que prepara o espresso, chávena após chávena. Todas as máquinas Nespresso estão equipadas com um sistema de extração único que assegura uma pressão até 19 bar. Cada parâmetro foi
calculado com grande precisão para garantir que todos os aromas de cada Grand Cru são extraídos, para dar corpo ao café e criar um creme excecionalmente suave e encorpado.
VOLÚMENES DE LA CONFIGURACIÓN DE FÁBRICA/
CONFIGURAÇÕES DE ORIGEM DO VOLUME
......................................................
DESCALCIFICACIÓN/DESCALCIFICAÇÃO ..........................................................
CONFIGURACIÓN DE LA DUREZA DEL AGUA/
CONFIGURAÇÃO DA DUREZA DA ÁGUA
............................................................
RESOLUCIÓN DE PROBLEMAS/RESOLUÇÃO DE PROBLEMAS .............................
ESPECIFICACIONES/ESPECIFICAÇÕES .............................................................
ELIMINACIÓN DE RESIDUOS Y CUESTIONES MEDIOAMBIENTALES/
ELIMINAÇÃO E PREOCUPAÇÕES ECOLÓGICAS
..................................................
CONTACTE CON EL CLUB NESPRESSO/
ENTRAR EM CONTACTO COM O CLUBE NESPRESSO
...........................................
GARANTÍA/GARANTIA ...................................................................................
DESCRIPCIÓN GENERAL/DESCRIÇÃO GERAL .......................................................
CONTENIDO DEL EMBALAJE/CONTEÚDO DA EMBALAGEM ....................................
NAVEGACIÓN POR EL MENÚ/MENU DE NAVEGAÇÃO .............................................
LISTA DEL MENÚ/LISTA DO MENU ......................................................................
PRIMER USO O DESPUÉS DE UN PERIODO PROLONGADO DE INACTIVIDAD/
PRIMEIRA UTILIZAÇÃO OU UTILIZAÇÃO APÓS UM LONGO PERÍODO DE NÃO
UTILIZAÇÃO
......................................................................................................
PREPARACIÓN DEL CAFÉ/PREPARAÇÃO DE CAFÉ .................................................
MONTAJE/DESMONTAJE DEL RAPID CAPPUCCINO SYSTEM R.C.S./
MONTAGEM/DESMONTAGEM DO RAPID CAPPUCCINO SYSTEM R.C.S.
.................
PREPARACIÓN DE CAPPUCCINO Y LATTE MACCHIATO/
PREPARAÇÃO DE CAPPUCCINO E LATTE MACCHIATO
............................................
CUIDADO DIARIO/CUIDADOS DIÁRIOS ................................................................
LIMPIEZA A MANO DEL RAPID CAPPUCCINO SYSTEM R.C.S./
LAVAGEM À MÃO DO RAPID CAPPUCCINO SYSTEM R.C.S.
..................................
51
52
53
54
55
56
56
56
ATENCIÓN: cuando vea este símbolo, consulte las instrucciones de seguridad para evitar posibles daños y lesiones.
NOTA: cuando vea este símbolo, siga los consejos para una utilización correcta y segura de su máquina de café.
ATENÇÃO: quando vir este símbolo, pedimos-lhe que consulte as instruções de segurança para evitar possíveis danos e lesões.
INFORMAÇÕES: quando vir este símbolo, pedimos-lhe que tenha em consideração os conselhos para a utilização correta e segura da
sua máquina de café.
40
42
42
43
44
46
46
47
50
50
6926_UM_LATTISSIMA_PREMIUM_Z2A.indb 41 17.10.13 19:57

EN SA FETY PRECAUTI ONS ............................................................................. 2
FR CONSIGNES DE SECURITE ......................................................................... 4
DE SICHERHEITSHINWEISE ........................................................................... 7
IT PRECAUZIONI DI SICUREZ ZA .................................................................... 10
ES PRECAUCIONES DE SEGURIDAD ................................................................ 12
PT MEDIDAS DE SEGURANÇA......................................................................... 15
NL V EILIGHEIDSMAATREGELEN ..................................................................... 18
GR ΜΈΤ ΡΑ ΑΣΦΑΛΈΙΑ Σ .................................................................................. 20
HU BIZTONSÁGI ELŐÍRÁSOK .......................................................................... 22
CZ BEZPEČNOSTNÍ POKYNY .......................................................................... 25
PL ZASADY BEZPIECZEŃSTWA ....................................................................... 28
RU МЕРЫ ПРЕДОСТОР ОЖНОСТИ ................................................................. 31
ES
PT
NAVEGACIÓN POR EL MENÚ/MENU DE NAVEGAÇÃO
CONTENIDO DEL EMBALAJE/CONTEÚDO DA EMBALAGEM
Máquina de café
Máquina de café
Carpeta de bienvenida a Nespresso
Dossier «Bem-vindo ao Clube Nespresso»
Manual de instrucciones
Manual do utilizador
Instrucciones de seguridad
Instruções de segurança
Juego de cápsulas
Conjunto de cápsulas
Para entrar en la lista del menú/Aceder à lista do Menu
Pulse el símbolo /Pressione brevemente o símbolo .
Para buscar opciones/Opções de navegação
Pulse el símbolo /Pressione símbolo .
Para seleccionar una opción/Selecione a opção
Pulse el símbolo /Pressione símbolo .
Para salir de la lista del menú/Sair da lista do Menu
Desplácese hasta la opción [EXIT] y selecciónela o pulse
rápidamente el símbolo .
Desloque até à opção [SAIR e selecione. Ou pressione
brevemente o símbolo .
Para abandonar una opción y volver a la lista del
menú/Sair da opção e voltar à lista do menu
Desplácese hasta la opción [SALIR] y selecciónela o pulse
rápidamente el símbolo .
Desloque até à opção [SAÍDA] e selecione. Ou pressione
brevemente o símbolo .
42
6926_UM_LATTISSIMA_PREMIUM_Z2A.indb 42 17.10.13 19:57
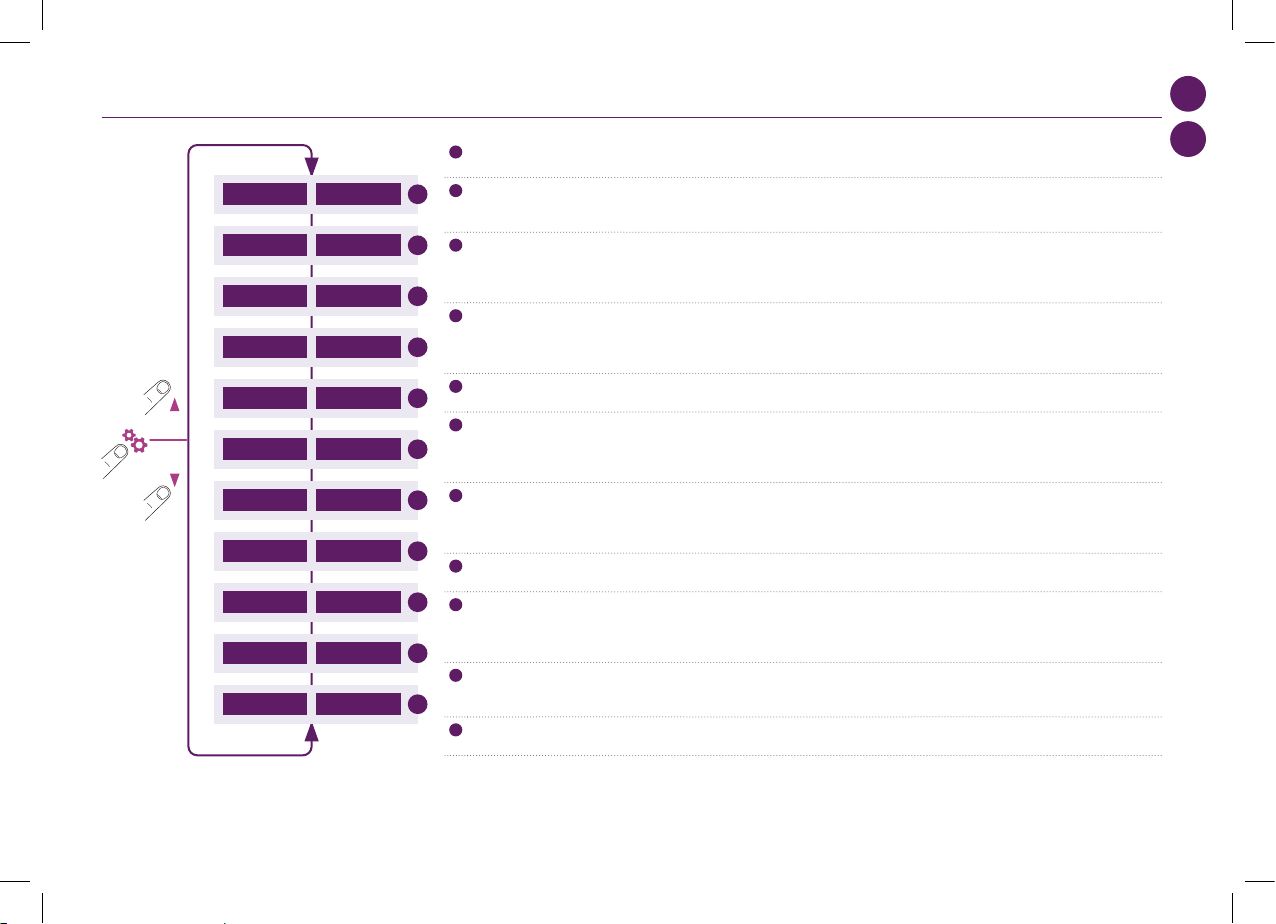
43
Text to translate
Text to translate
ES
PT
Para entrar en la lista del menú/Aceder à lista do Menu
Pulse el símbolo /Pressione brevemente o símbolo .
Para buscar opciones/Opções de navegação
Pulse el símbolo /Pressione símbolo .
Para seleccionar una opción/Selecione a opção
Pulse el símbolo /Pressione símbolo .
Para salir de la lista del menú/Sair da lista do Menu
Desplácese hasta la opción [EXIT] y selecciónela o pulse
rápidamente el símbolo
.
Desloque até à opção [SAIR e selecione. Ou pressione
brevemente o símbolo .
Para abandonar una opción y volver a la lista del
menú/Sair da opção e voltar à lista do menu
Desplácese hasta la opción [SALIR] y selecciónela o pulse
rápidamente el símbolo .
Desloque até à opção [SAÍDA] e selecione. Ou pressione
brevemente o símbolo .
LISTA DEL MENÚ/LISTA DO MENU
1
Seleccione esta opción para establecer el idioma que preera. Siga las instrucciones que aparecen en la pantalla de la máquina.
Selecione esta opção para denir o idioma pretendido. Siga as instruções da máquina no ecrã.
2
Seleccione esta opción en cuanto el aviso de descalcicación aparezca en la pantalla. Consulte la página 52. Recibirá instrucciones para seguir el proceso de
descalcicación.
Selecione esta opção assim que o alerta de descalcicação aparecer no ecrã. Consulte a página 52. Será orientado ao longo do processo de descalcicação.
3
Seleccione esta opción para establecer el nivel de dureza del agua en su localidad. Utilice la etiqueta de dureza del agua facilitada para determinarla. Esto optimizará
la frecuencia de descalcicación. Consulte la página 53.
Selecione esta opção para congurar o nível de dureza da água da sua localização. Para o determinar, utilize o autocolante de dureza de água fornecido. Isto irá
otimizar a frequência de descalcicação. Consulte a página 53.
4
Seleccione esta opción para establecer el tiempo tras el cual la máquina se apagará automáticamente. (Puede elegir entre las siguientes opciones: 9 minutos,
30 minutos, 2 horas u 8 horas). Siga las instrucciones que aparecen en la pantalla de la máquina.
Selecione esta opção para congurar o tempo após o qual a máquina ca inativa automaticamente. (As opções possíveis são: 9 minutos, 30 minutos, 2 horas ou
8 horas). Siga as instruções da máquina no ecrã.
5
Seleccione esta opción para restablecer todos los parámetros de la máquina según la conguración de fábrica.
Selecione esta opção para redenir todos os parâmetros da máquina para as congurações de origem.
6
Seleccione esta opción para vaciar el agua del interior de la máquina en caso de que necesite enviarla para su reparación o antes de un periodo prolongado sin
utilizarla. Siga las instrucciones que aparecen en la pantalla de la máquina. No podrá utilizar la máquina durante 10 minutos después de someterla a este proceso.
Selecione esta opção para retirar a água da máquina caso tenha de a enviar para reparação ou antes de um longo período de tempo sem utilização. Siga as
instruções da máquina no ecrã. Não poderá usar a máquina 10 minutos após realizar este processo.
7
Seleccione esta opción para programar el volumen de sus bebidas (tazas de café, agua caliente y recetas con leche). Siga las instrucciones que aparecen en la
pantalla de la máquina. Además, también podrá restablecer todos los volúmenes de las bebidas según la conguración de fábrica.
Selecione esta opção para denir o volume das suas bebidas (chávenas de café, água quente e receitas de leite). Siga as instruções da máquina no ecrã. Além disso,
pode também repor todos os volumes das bebidas para as congurações de origem.
8
Seleccione esta opción para acceder a una descripción general de la conguración de la máquina.
Selecione esta opção para aceder a todas as congurações da máquina ao mesmo tempo.
9
Seleccione esta opción para comprobar el estado general de la máquina. Las estadísticas de consumo están disponibles desde el primer uso de la máquina (totales) o desde
la última descalcicación (parciales). También se proporciona el número de serie de la máquina.
Selecione esta opção para vericar o estado geral da sua máquina. As estatísticas de consumo estão disponíveis tanto desde a primeira utilização (absolutas), como
desde a última descalcicação (relativas). O número de série da máquina é igualmente fornecido.
10
Seleccione esta opción para obtener asesoramiento sobre cómo conseguir siempre una espuma de leche de calidad óptima. Se proporciona el enlace de Internet
para obtener más información sobre esta opción.
Selecione esta opção para vericar o estado geral da sua máquina. É fornecido um link de internet para obter mais informações sobre esta funcionalidade.
11
Salga de la lista del menú y vuelva al modo «preparada» de la máquina.
Saia da lista do menu e regresse ao modo máquina pronta a utillizar.
1
IDIOMAIDIOMA
2
DESCALCIFICAÇÃODESCALCIFICACIÓN
3
DUREZA DA ÁGUADUREZA DEL AGUA
4
INATIVAÇÃO AUTOAPAGADO AUTO.
5
VALORES FÁBRICAVALORES FÁBRICA
6
ESVAZ. SISTEMAVACIAR CIRCUITO
7
PROGR. VOLUMEVOLUMEN PROGRAM.
8
INFO DEFINIÇÕESINFO. AJUSTES
9
MANUTENÇÃOMANUTENCIÕN
10
AJUDAHELP
SAÍDA SALIR
11
6926_UM_LATTISSIMA_PREMIUM_Z2A.indb 43 17.10.13 19:57
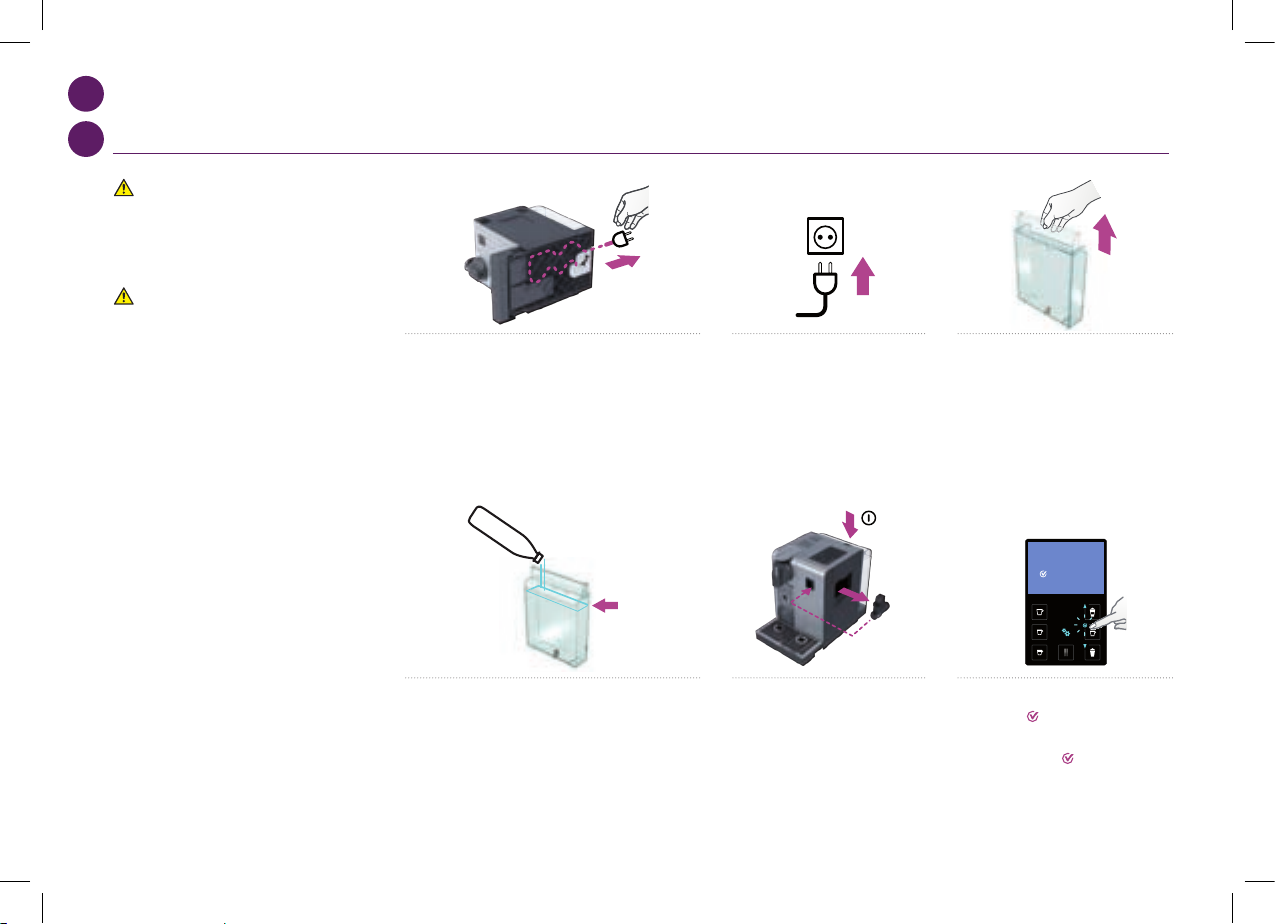
max
SET LANGUAGE
to continue
LANGUAGE
Actual value : EN
New value : [ ]
to select
05
max
SET LANGUAGE
to continue
LANGUAGE
Actual value : EN
New value : [ ]
to select
05
max
SET LANGUAGE
to continue
LANGUAGE
Actual value : EN
New value : [ ]
to select
05
max
SET LANGUAGE
to continue
LANGUAGE
Actual value : EN
New value : [ ]
to select
05
max
SET LANGUAGE
to continue
LANGUAGE
Actual value : EN
New value : [ ]
to select
05
max
SET LANGUAGE
to continue
LANGUAGE
Actual value : EN
New value : [ ]
to select
05
ES
PT
PRIMER USO O DESPUÉS DE UN PERIODO PROLONGADO DE INACTIVIDAD/
PRIMEIRA UTILIZAÇÃO OU UTILIZAÇÃO APÓS UM LONGO PERÍODO DE NÃO UTILIZAÇÃO
ATENCIÓN: en primer lugar, lea
las instrucciones de seguridad para
evitar riesgos de descarga eléctrica
mortal e incendio.
ATENÇÃO: em primeiro lugar,
leia as instruções de segurança para
evitar riscos fatais de choque elétrico
e de fogo.
1. Retire el depósito de agua, la bandeja antigoteo y el
contenedor de cápsulas usadas. Ajuste la longitud del cable
y almacene el exceso del mismo en la guía situada debajo de
la máquina.
1. Remova o reservatório de água, o tabuleiro de gotejamento
e o recipiente de cápsulas. Ajuste o comprimento do cabo e
arrume o excesso na guia do cabo, sob a máquina.
5. Inserte el tubo de salida de agua
caliente. Encienda la máquina.
5. Insira a saída de água quente. Ligue
a máquina.
2. Coloque la máquina en posición
vertical y conéctela a la red eléctrica.
2. Coloque a máquina na posição
vertical e ligue-a à corrente elétrica.
6. SET LANGUAGE: establezca el idioma que
preera. Pulse
para continuar.
6. SET LANGUAGE: dena o idioma
pretendido. Pressione
para continuar.
3. El depósito de agua se puede coger por
la tapa.
3. O reservatório de água pode ser
transportado pela tampa.
4. Aclare el depósito de agua y, a continuación, llénelo con
agua potable.
4. Enxague o reservatório de água antes de o encher com água
potável até ao nível máximo.
44
6926_UM_LATTISSIMA_PREMIUM_Z2A.indb 44 17.10.13 19:57
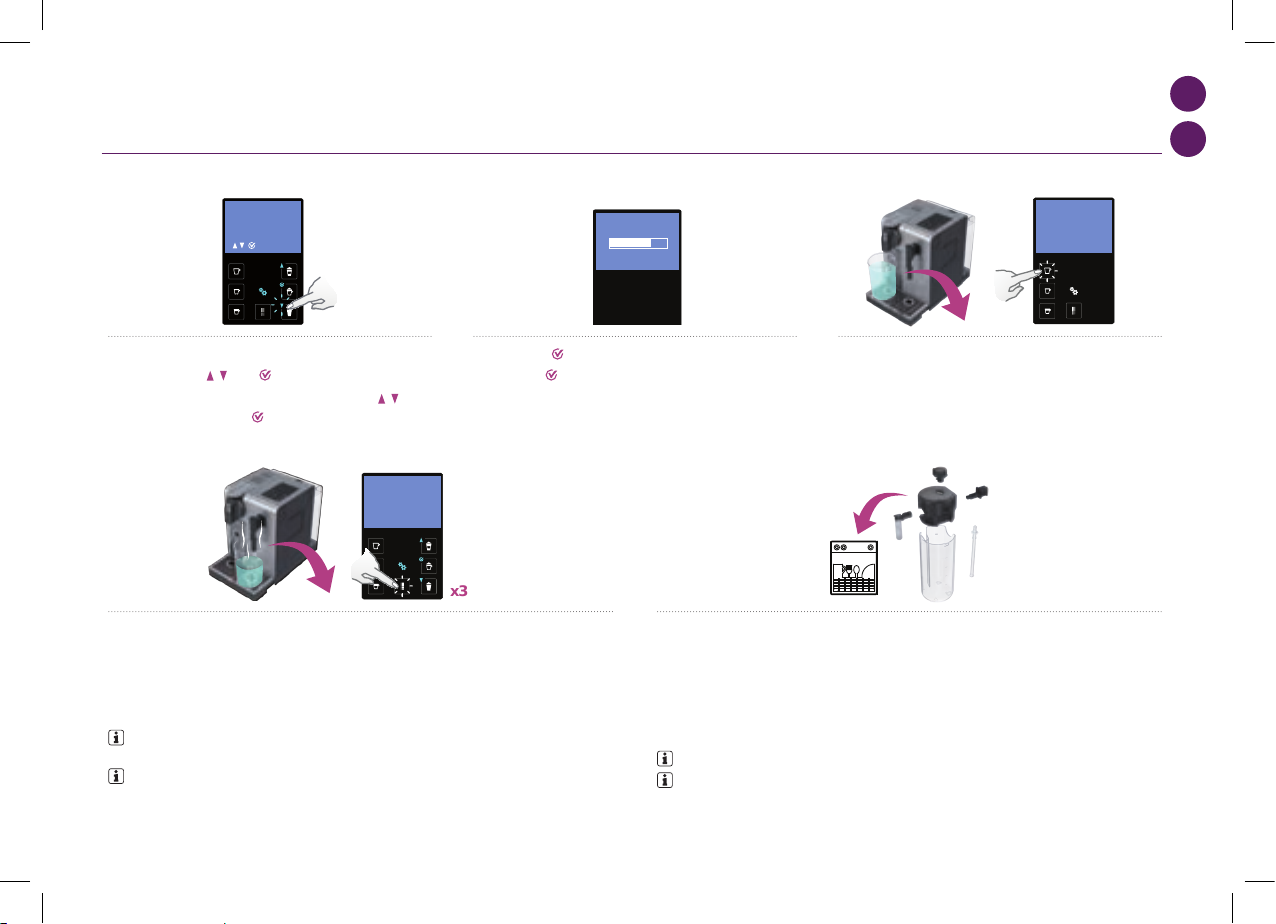
45
max
SET LANGUAGE
to continue
LANGUAGE
Actual value : EN
New value : [ ]
to select
05
max
First read the safety precautions to avoid risks of fatal electrical shock and fire
Remove the plastic films from grid,
lever and machine panels.
Remove the water tank, drip tray, and capsule
container. Adjust the cable length and store the
excess in the cable guide under the machine.
Put the machine in upright position,
plug machine into mains.
The water tank can be carried by
its cover.
Rinse the water tank before filling with
potable water up to maximum level.
Insert the hot water spout.
Switch machine ON
Set your preferred language.
Press to continue.
SET LANGUAGE
to continue
Select your language by scrolling the
options using up/down arrow. Press to
confirm.
LANGUAGE
Actual value : EN
New value : [ ]
to select
Coffee preparation
x3
x3
110 ml
40 ml
25 ml
05 06
ES
PT
7. LANGUAGE: seleccione el idioma desplazándose por las opciones
mediante las echas
. Pulse para continuar.
7. LANGUAGE: selecione o seu idioma usando a seta para
para
percorrer as opções. Pressione para conrmar.
PRIMER USO O DESPUÉS DE UN PERIODO PROLONGADO DE INACTIVIDAD/
PRIMEIRA UTILIZAÇÃO OU UTILIZAÇÃO APÓS UM LONGO PERÍODO DE NÃO UTILIZAÇÃO
11. Desmonte el Rapid Cappuccino System (R.C.S.) y lave todos los componentes en la parte superior
del lavavajillas. En caso de no disponer de lavavajillas, consulte el apartado «Limpieza a mano del Rapid
Cappuccino System (R.C.S.)».
11. Desmonte o Rapid Cappuccino System (R.C.S.) e lave todas as peças no cesto superior da máquina de
lavar louça. No caso de não ter uma máquina de lavar louça disponível, consulte a secção Lavagem à Mão
do Rapid Cappuccino System (R.C.S.).
NOTA: consulte el apartado «Montaje/Desmontaje del Rapid Cappuccino System».
INFORMAÇÃO: consulte a secção Montagem/Desmontagem do Rapid Cappuccino
System (R.C.S.).
10. Aclarado: repita tres veces con el tubo de salida de agua caliente. Cuando haya terminado, retírelo y
vuelva a guardarlo en la zona de almacenamiento situada en el lado derecho de la máquina. Cierre la puerta
del conector de vapor.
10. Enxaguamento: repita três vezes através da saída de água quente. Após terminar, remova-a e insira-a
na zona de armazenagem situada no lado direito da máquina. Feche a porta do conector de vapor.
NOTA: después de su fabricación se comprueba el funcionamiento de las máquinas, por lo que
es posible que aparezcan restos de café molido en el agua del aclarado.
INFORMAÇÃO: as máquinas são totalmente testadas após a sua produção. Poderão ser
encontrados vestígios de café na água de enxaguamento.
9. Aclarado: coloque un recipiente debajo de la salida del café y
pulse el botón Lungo. Repita esta acción tres veces.
9. Enxaguamento: coloque um recipiente sob a saída de café e
pressione o botão Lungo. Repita três vezes.
8. Cuando pulse , la máquina se calentará.
8. Assim que o
é pressionado, a máquina começa a aquecer.
4°
15”
Assembling / disassembling of Rapid Cappuccino system (R.C.S)
07
6926_UM_LATTISSIMA_PREMIUM_Z2A.indb 45 17.10.13 19:57

max
First read the safety precautions to avoid risks of fatal electrical shock and fire
Remove the plastic films from grid,
lever and machine panels.
Remove the water tank, drip tray, and capsule
container. Adjust the cable length and store the
excess in the cable guide under the machine.
Put the machine in upright position,
plug machine into mains.
The water tank can be carried by
its cover.
Rinse the water tank before filling with
potable water up to maximum level.
Insert the hot water spout.
Switch machine ON
Set your preferred language.
Press to continue.
SET LANGUAGE
to continue
Select your language by scrolling the
options using up/down arrow. Press to
confirm.
LANGUAGE
Actual value : EN
New value : [ ]
to select
Coffee preparation
x3
x3
110 ml
40 ml
25 ml
05 06
1
2
max
First read the safety precautions to avoid risks of fatal electrical shock and fire
Remove the plastic films from grid,
lever and machine panels.
Remove the water tank, drip tray, and capsule
container. Adjust the cable length and store the
excess in the cable guide under the machine.
Put the machine in upright position,
plug machine into mains.
The water tank can be carried by
its cover.
Rinse the water tank before filling with
potable water up to maximum level.
Insert the hot water spout.
Switch machine ON
Set your preferred language.
Press to continue.
SET LANGUAGE
to continue
Select your language by scrolling the
options using up/down arrow. Press to
confirm.
LANGUAGE
Actual value : EN
New value : [ ]
to select
Coffee preparation
x3
x3
110 ml
40 ml
25 ml
05 06
4°
15”
Assembling / disassembling of Rapid Cappuccino system (R.C.S)
07
ES
PT
PREPARACIÓN DEL CAFÉ/
PREPARAÇÃO DE CAFÉ
MONTAJE/DESMONTAJE DEL RAPID CAPPUCCINO SYSTEM R.C.S./
MONTAGEM/DESMONTAGEM DO RAPID CAPPUCCINO SYSTEM R.C.S.
1. Levante totalmente la palanca e introduzca
una cápsula Nespresso.
1. Levante completamente a alavanca e insira
uma cápsula Nespresso.
2. Baje la palanca y coloque una taza debajo
de la salida del café.
2. Baixe a alavanca e coloque uma chávena
por baixo da saída de café.
3. Pulse el botón Ristretto (25 ml), Espresso (40 ml) o Lungo (110 ml).
La preparación se detendrá automáticamente. Para detener el ujo de
café o llenar su café, pulse el botón de nuevo.
3. Pressione o botão Ristretto (25 ml), Espresso (40 ml) ou Lungo
(110 ml). A preparação irá parar automaticamente. Para parar o uxo de
café ou encher a sua chávena, pressione novamente o botão.
4. Coja la taza. Levante y baje la palanca
para expulsar la cápsula en el contenedor de
cápsulas usadas.
4. Retire a chávena. Levante e baixe a
alavanca para ejetar a cápsula para o
recipiente de cápsulas usadas.
1. Retire la tapa del depósito de leche y
desconecte el tubo de aspiración de leche.
1. Remova a tampa do recipiente do leite e
retire o tubo de aspiração de leite.
2. Retire el regulador de espuma de leche
girándolo hasta el símbolo
y tirando
hacia fuera.
2. Remova o manípulo de regulação
da espuma de leite girando-o até
e
empurrando para cima.
3. Retire el conector del Rapid Cappuccino
System. Desbloquee desde la posición
a
y quítelo.
3. Remova o conector do Rapid Cappuccino
System (R.C.S.) desbloqueando-o do
para
e empurrando para fora.
4. Retire el tubo de salida de leche.
4. Remova o bico de leite, empurrando-o
para fora.
NOTA: puede pulsar cualquier botón durante la fase de calentamiento. El café saldrá automáticamente
cuando la máquina esté lista.
INFORMAÇÃO: pode pressionar qualquer botão de café durante o período de aquecimento. O café irá uir
automaticamente assim que a máquina estiver pronta.
46
6926_UM_LATTISSIMA_PREMIUM_Z2A.indb 46 17.10.13 19:57

47
4°
15”
Assembling / disassembling of Rapid Cappuccino system (R.C.S)
07
4°
15”
Assembling / disassembling of Rapid Cappuccino system (R.C.S)
07
4°
15”
Assembling / disassembling of Rapid Cappuccino system (R.C.S)
07
4°
15”
Assembling / disassembling of Rapid Cappuccino system (R.C.S)
07
ES
PT
PREPARACIÓN DE CAPPUCCINO Y LATTE MACCHIATO/
PREPARAÇÃO DE CAPPUCCINO E LATTE MACCHIATO
1. Llene el depósito de leche con la cantidad
de leche que desee.
1. Encha o reservatório de leite com a
quantidade de leite desejada.
2. Cierre el depósito de leche. Abra la puerta del conector
de vapor deslizándola hacia la derecha. Conecte el Rapid
Cappuccino System a la máquina.
2. Feche o reservatório de leite. Abra a porta do conector
de vapor deslizando-a para a direita. Conecte o Rapid
Cappuccino System (R.C.S.) à máquina.
3. La máquina se calienta en
aproximadamente 15 segundos.
3. A máquina demora aproximadamente
15 seg. a aquecer.
4. Levante totalmente la palanca e introduzca
una cápsula Nespresso.
4. Levante completamente a alavanca e insira
uma cápsula Nespresso.
ATENCIÓN: no utilice el depósito de leche para almacenar otro
líquido que no sea leche o agua potable. No utilice leche cruda
sin pasteurizar y asegúrese de que la leche que utilice no haya
superado la fecha de caducidad que se indica en el envase.
ATENÇÃO: não utilize o reservatório de leite para qualquer
outro líquido que não seja leite ou água potável. Não utilize leite
não pasteurizado e certique-se de que não utiliza leite fora do
prazo de validade indicado na respetiva embalagem.
NOTA: para obtener una espuma de leche perfecta, utilice leche desnatada o semidesnatada a
temperatura del frigoríco (4° C aproximadamente).
INFORMAÇÃO: para obter uma espuma de leite perfeita, utilize leite magro ou meio-gordo à
temperatura do frigoríco (cerca de 4° C).
NOTA: cuando el depósito de leche
esté vacío, aclárelo bien con agua potable
antes de rellenarlo. Haga lo mismo con el
tubo de aspiración de leche.
INFORMAÇÃO: quando o recipiente
de leite car vazio, enxague-o bem com
água antes de o encher novamente.
Faça o mesmo com o tubo de aspiração
do leite.
6926_UM_LATTISSIMA_PREMIUM_Z2A.indb 47 17.10.13 19:57
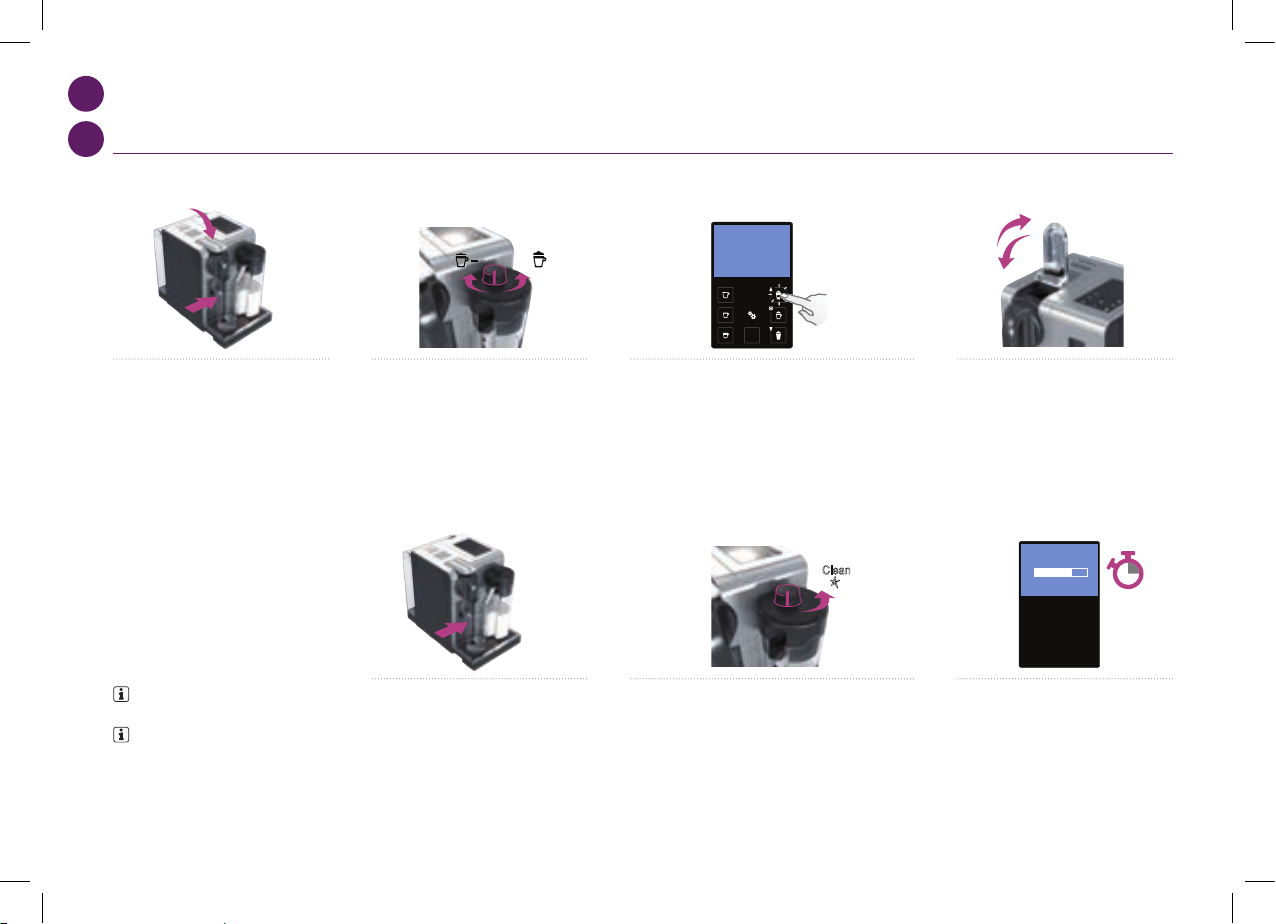
Preparing Cappuccino and Latte Macchiato
4°
i
When the milk container is empty, before refilling,
thoroughly rinse it and the milk aspiration tube
with potable water.
Close the milk container. Open the steam
connector door by sliding it to the right. Connect
the Rapid Cappuccino System to the machine.
15”
+
LATTE MACCHIATO
Clean
15”
i
Remove Rapid Cappuccino System
connector by unlocking it from (sign ) to
(sign) and pulling it off
Remove the milk container lid and
unplug milk aspiration tube.
Remove the milk froth regulator knob by
turning it until and pulling it up.
Remove the milk spout by pulling it off.
1 2 3 4
Assembling / disassembling of Rapid Cappuccino system (R.C.S)
RINSE MILK SYSTEM
07 08
ES
PT
PREPARACIÓN DE CAPPUCCINO Y LATTE MACCHIATO/
PREPARAÇÃO DE CAPPUCCINO E LATTE MACCHIATO
NOTA: aclare el sistema de leche
después de cada uso.
INFORMAÇÃO enxague o sistema de
leite após cada utilização.
9. Coloque un recipiente debajo del tubo de
salida de leche.
9. Coloque um recipiente sob a saída do leite.
10. Gire el regulador de leche hasta la posición «LIMPIEZA».
A continuación se inicia el proceso de aclarado del sistema
de leche y el agua caliente combinada con vapor uye a
través del tubo de salida de agua.
10. Gire o manípulo de regulação do leite para a posição
«LIMPEZA». O processo de enxaguamento do sistema de
leite é iniciado saíndo água quente e vapor através da saída
de leite.
11. El proceso de aclarado durará
aproximadamente 15 segundos y se detendrá
automáticamente.
11. O processo de enxaguamento
demora cerca de 15 segundos e pára
automaticamente.
5. Baje la palanca, coloque una taza
Cappuccino o un vaso Macchiato debajo de la
salida del café y ajuste la posición del tubo de
salida de leche.
5. Baixe a alavanca, coloque uma chávena de
Cappuccino ou um copo de Latte Macchiato
sob a saída de café e ajuste a posição da saída
de leite.
6. Ajuste el regulador de espuma de leche
según el volumen que desee.
6. Ajuste o manípulo de regulação da
espuma de leite de acordo com o volume de
espuma que deseja.
7. Pulse el botón Cappuccino o Macchiato. La preparación
comenzará después de unos segundos (primero la leche y
después el café) y se detendrá automáticamente.
7. Pressione o botão de Cappuccino ou Macchiato.
A preparação começa após alguns segundos (primeiro o
leite e em seguida o café) e irá parar automaticamente.
8. Cuando termine la preparación, levante y
baje la palanca para expulsar la cápsula en el
contenedor de cápsulas usadas.
8. No nal da preparação, levante e baixe
a alavanca para ejetar a cápsula para o
recipiente de cápsulas usadas.
48
6926_UM_LATTISSIMA_PREMIUM_Z2A.indb 48 17.10.13 19:57
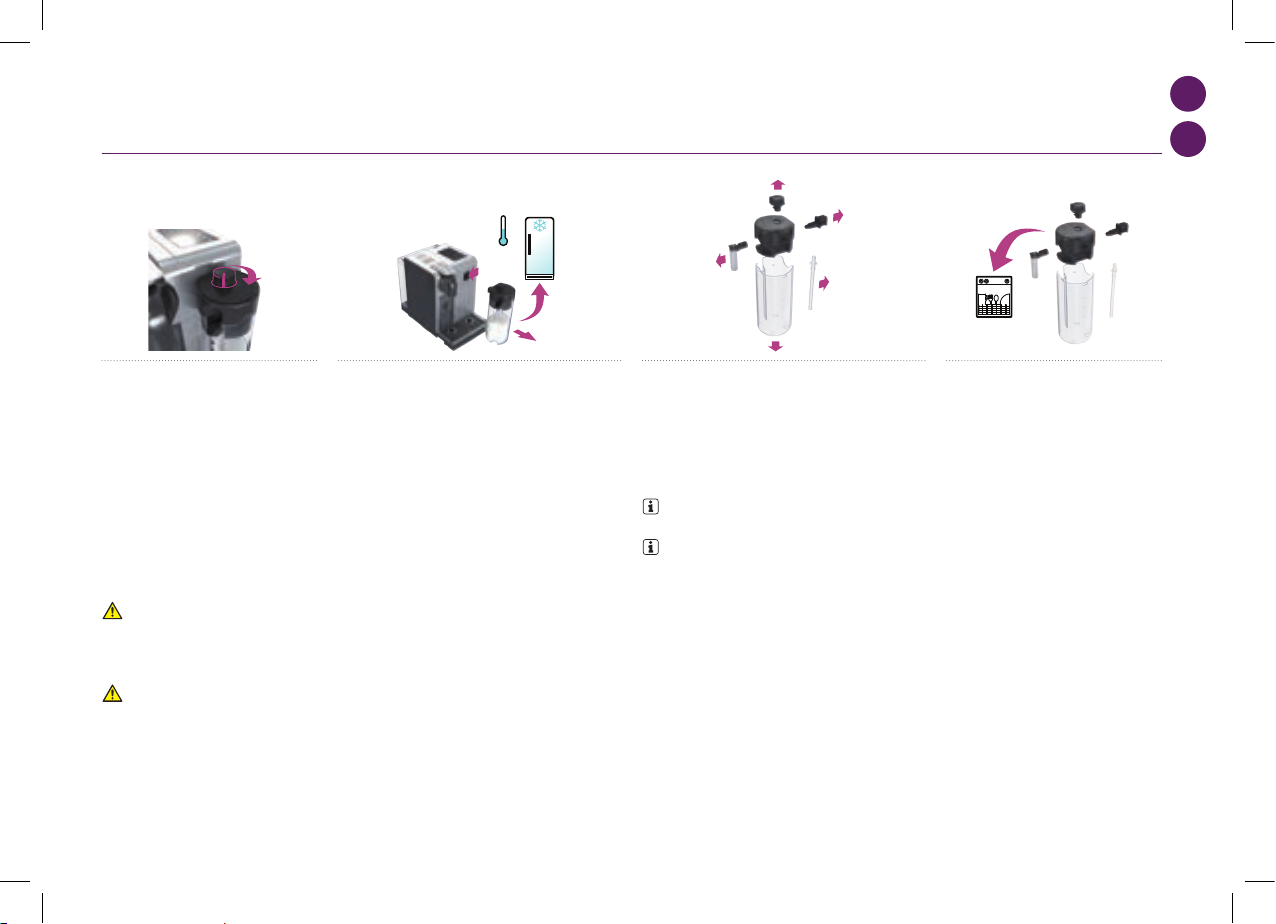
49
PRESS to confirm.
The discaling agent flows alternately
trough the coffee outlet, hot water nozzle
and drip tray.
Descaling
Descaling process: Empty the drip tray and
the used capsules container.
Rinsing process: Empty the drip
tray and the used capsules
container.
Refer to safety precautions
+
100 ml
500 ml
1 2 3
5
7 8
4
6
Lift and close the lever to eject any capsule
in the used capsule container.
Descaling process: Fill water tank with 100
ml of Nespresso descaling agent and 500ml
water.
Descaling process: Insert the hot
water spout.
Enter the Menu, browse the options and
select DESCALING. You will be guided
throughout the whole process. Follow
machine display instructions.
Descaling process: Place one container
of minimum 1 litre under both the coffee
outlet and the hot water spout.
4°
Volume factory settings
LANGUAGE
DESCALING
WATER HARDNESS
09 10
ES
PT
PREPARACIÓN DE CAPPUCCINO Y LATTE MACCHIATO/
PREPARAÇÃO DE CAPPUCCINO E LATTE MACCHIATO
12. Cuando el aclarado haya nalizado,
vuelva a situar el regulador de espuma de
leche en la posición de leche.
12. Quando o enxaguamento terminar,
coloque novamente o manípulo de regulação
da espuma de leite na posição de leite.
13. Desconecte el R.C.S. de la máquina y guárdelo
inmediatamente en el frigoríco. Cierre la puerta del
conector de vapor de la máquina.
13. Desligue o R.C.S. da máquina e coloque-o logo no
frigoríco. Feche a porta do conector de vapor.
15. Y lave todos los componentes en la
parte superior del lavavajillas. En caso de no
disponer de lavavajillas, consulte el apartado
«Limpieza a mano del Rapid Cappuccino
System ( R.C.S.)».
15. E lave todas as peças no cesto superior
da máquina de lavar louça. No caso de não
ter uma máquina de lavar louça disponível,
consulte a secção Lavagem à Mão do Rapid
Cappuccino System (R.C.S.).
NOTA: consulte el apartado «Montaje/Desmontaje
del Rapid Cappuccino System (R.C.S.)».
INFORMAÇÃO: consulte a secção «Montagem/
Desmontagem do Rapid Cappuccino System (R.C.S.)».
ATENCIÓN: esta leche no deberá conservarse más de dos días en el frigoríco.
Si mantiene el depósito de leche fuera del frigoríco durante más de 2 horas, desmonte el R.C.S. y limpie todos
los componentes (consulte las recomendaciones sobre lavado en lavavajillas o limpieza a mano).
AVISO: este leite não deve ser guardado no frigoríco por mais de 2 dias.
Caso o reservatório do leite permaneça mais de 2 horas fora do frigoríco, desmonte o R.C.S. e lave todas as
peças (consulte as recomendações de lavagem à mão ou na máquina de lavar louça).
14. Desmonte el Rapid Cappuccino System cada dos días.
14. De dois em dois dias, desmonte o Rapid Cappuccino
System.
6926_UM_LATTISSIMA_PREMIUM_Z2A.indb 49 17.10.13 19:57
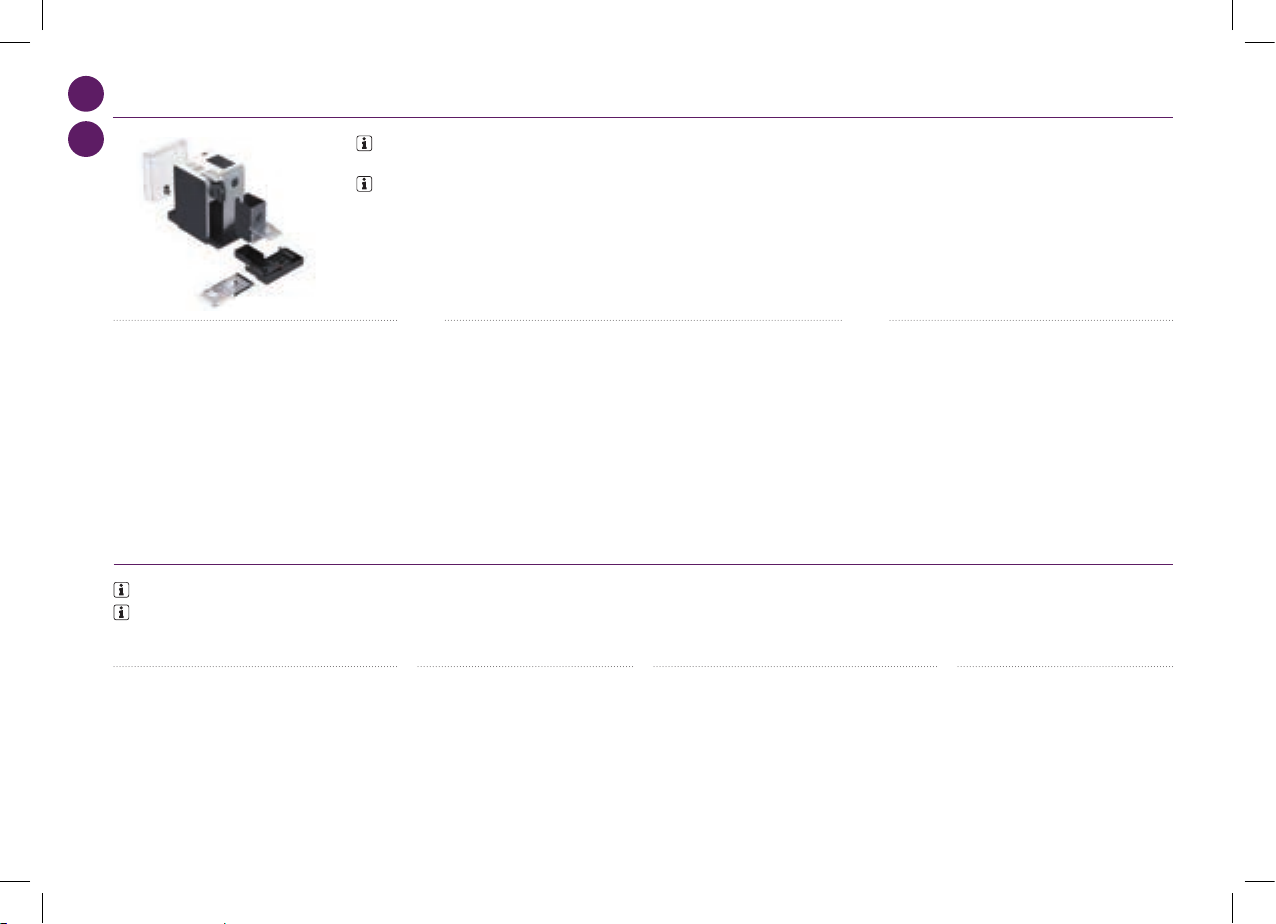
PRESS to confirm.
The discaling agent flows alternately
trough the coffee outlet, hot water nozzle
and drip tray.
Descaling
Descaling process: Empty the drip tray and
the used capsules container.
Rinsing process: Empty the drip
tray and the used capsules
container.
Refer to safety precautions
+
100 ml
500 ml
1 2 3
5
7 8
4
6
Lift and close the lever to eject any capsule
in the used capsule container.
Descaling process: Fill water tank with 100
ml of Nespresso descaling agent and 500ml
water.
Descaling process: Insert the hot
water spout.
Enter the Menu, browse the options and
select DESCALING. You will be guided
throughout the whole process. Follow
machine display instructions.
Descaling process: Place one container
of minimum 1 litre under both the coffee
outlet and the hot water spout.
4°
Volume factory settings
LANGUAGE
DESCALING
WATER HARDNESS
09 10
ES
PT
2. Levante y baje la palanca para expulsar las cápsulas en el contenedor de cápsulas
usadas. Coloque un recipiente debajo de la salida del café y pulse el botón Lungo
para realizar el aclarado. Limpie la salida del café con un paño húmedo.
2. Levante e baixe a alavanca para ejetar a cápsula para o recipiente de cápsulas
usadas. Coloque um recipiente sob a saída de café e pressione o botão Lungo. Limpe
a saída de café com um pano limpo e húmido.
3. Limpie con cuidado con agua potable cualquier resto de
suciedad en el tubo de salida de agua caliente. Límpielo con
un paño húmedo.
3. Enxague cuidadosamente debaixo de água corrente
qualquer resíduo de sujidade na saída de água quente.
Limpe com um pano limpo e húmido.
1. Desmonte el Rapid Cappuccino System. Consulte el
apartado «Montaje/Desmontaje del Rapid Cappuccino
System (R.C.S.)».
1. Desmonte o Rapid Cappuccino System (R.C.S.). Consulte
a secção «Montagem/Desmontagem do Rapid Cappuccino
System (R.C.S.)».
2. Limpie con cuidado con agua potable
cualquier resto de leche.
2. Enxague cuidadosamente quaisquer
resíduos de leite com água limpa.
3. Sumerja todos los componentes en agua templada
(aproximadamente a 40° C) con jabón o detergente durante
al menos 30 minutos.
3. Mergulhe todas as peças em água quente (a
aproximadamente 40º C) com detergente durante pelo
menos 30 minutos.
4. Aclárelos con agua potable y séquelos con
un paño húmedo.
4. Enxague com água limpa e seque com um
pano limpo e húmido.
CUIDADO DIARIO/CUIDADOS DIÁRIOS
NOTA: no utilice ningún producto de limpieza agresivo ni disolventes. Utilice un paño húmedo y un producto de limpieza suave para limpiar la supercie de
la máquina. No introduzca ningún componente de la máquina en el lavavajillas, excepto los que pertenezcan al Rapid Cappuccino System.
INFORMAÇÃO: não utilize nenhum produto de limpeza abrasivo ou solvente. Utilize um pano húmido e detergente suave para limpar a superfície da máquina.
Não coloque quaisquer peças da máquina na máquina de lavar louça, excepto as peças do Rapid Cappuccino System (R.C.S.).
LIMPIEZA A MANO DEL RAPID CAPPUCCINO SYSTEM R.C.S./
LAVAGEM À MÃO DO RAPID CAPPUCCINO SYSTEM R.C.S.
NOTA: si no dispone de lavavajillas, los componentes del R.C.S. se pueden limpiar manualmente. En este caso, para conseguir la máxima eciencia, la limpieza debe realizarse a diario.
INFORMAÇÃO: quando não tiver uma máquina de lavar louça disponível, as peças do R.C.S. podem ser lavadas à mão. Nesse caso, o procedimento deve ser realizado diariamente para uma completa
ecácia
1. Retire la bandeja antigoteo y el contenedor de cápsulas
usadas. Vacíelos y aclárelos. Retire el depósito de agua.
Vacíelo, aclárelo y, a continuación, llénelo con agua potable.
1. Remova o tabuleiro de gotejamento e o recipiente de
cápsulas usadas. Esvazie e enxague. Remova o reservatório
de água. Esvazie e enxague antes de o encher com água
potável limpa.
50
6926_UM_LATTISSIMA_PREMIUM_Z2A.indb 50 17.10.13 19:57

51
PRESS to confirm.
The discaling agent flows alternately
trough the coffee outlet, hot water nozzle
and drip tray.
Descaling
Descaling process: Empty the drip tray and
the used capsules container.
Rinsing process: Empty the drip
tray and the used capsules
container.
Refer to safety precautions
+
100 ml
500 ml
1 2 3
5
7 8
4
6
Lift and close the lever to eject any capsule
in the used capsule container.
Descaling process: Fill water tank with 100
ml of Nespresso descaling agent and 500ml
water.
Descaling process: Insert the hot
water spout.
Enter the Menu, browse the options and
select DESCALING. You will be guided
throughout the whole process. Follow
machine display instructions.
Descaling process: Place one container
of minimum 1 litre under both the coffee
outlet and the hot water spout.
4°
Volume factory settings
LANGUAGE
DESCALING
WATER HARDNESS
09 10
ES
PT
NOTA: *el volumen de la espuma de leche depende del tipo de leche que se utilice, de la
temperatura de esta y de la posición del regulador de leche.
NOTA: *o volume da espuma de leite depende do tipo de leite utilizado, da temperatura e da posição
do manípulo de regulação da espuma de leite.
NOTA: le recomendamos que mantenga la conguración de fábrica de los volúmenes de Ristretto,
Espresso y Lungo para garantizar el mejor resultado en la taza para todas nuestras variedades de café.
NOTA: recomendamos que mantenha as congurações de origem para as variedades Ristretto,
Espresso e Lungo para garantir os melhores resultados em chávena para cada uma das nossas variedades
de café.
El volumen de agua se puede programar entre 50 y 400 ml.
El volumen de leche se puede programar entre 30 y 200 ml.
El volumen de café se puede programar entre 25 y 200 ml.
O volume de água pode ser programado entre 50 a 400 ml.
O volume de leite pode ser programado entre 30 a 200 ml.
O volume do café pode ser programadas entre 25 a 200 ml.
VOLÚMENES DE LA CONFIGURACIÓN DE FÁBRICA/
CONFIGURAÇÕES DE ORIGEM DO VOLUME
Ristretto 25 ml
Ristretto 25 ml
Cappuccino Leche*: 50 ml/Café: 40 ml
Cappuccino Leche*: 50 ml/Café: 40 ml
Lungo 110 ml
Lungo 110 ml
Latte Macchiato Leche*: 150 ml/Café: 40 ml
Latte Macchiato Leite*: 150 ml/Café: 40 ml
Espresso 40 ml
Espresso 40 ml
Agua caliente 125 ml
Água quente 125 ml
Leche templada* 120 ml
Leite quente* 120 ml
ATENCIÓN: si el volumen de café supera al menos en
150 ml el volumen programado, deje que la máquina se enfríe
durante 5 minutos antes de preparar otro café. Existe riesgo de
sobrecalentamiento.
AVISO: caso o volume de café programado seja superior a
150 ml.: deixe a máquina arrefecer durante 5 minutos antes da
extração do café seguinte. Risco de sobre aquecimento!
6926_UM_LATTISSIMA_PREMIUM_Z2A.indb 51 17.10.13 19:57

53
max
1”
1
2
3
4
5
11
max
1”
1
2
3
4
5
11
max
1”
1
2
3
4
5
11
max
1”
1
2
3
4
5
11
max
1”
1
2
3
4
5
11
max
1”
1
2
3
4
5
11
max
1”
1
2
3
4
5
11
max
1”
1
2
3
4
5
11
ES
PT
DESCALCIFICACIÓN/DESCALCIFICAÇÃO
2. Sumerja la etiqueta de dureza del agua
durante 1 segundo.
2. Coloque o autocolante de dureza de água
debaixo de água durante 1 segundo.
11. Pulse para conrmar. El ciclo de aclarado continuará
a través de la salida del café, la boquilla del agua caliente y la
bandeja antigoteo hasta que se vacíe el depósito de agua.
11. Pressione
para conrmar. O ciclo de enxaguamento
continua alternadamente através da saída de café, saída de
água quente e tabuleiro de gotejamento até o reservatório
de água car vazio.
3. El número de cuadrados rojos indica el
nivel de dureza del agua.
3. O número de quadrados vermelhos indica
o nível de dureza da água.
12. Cuando el proceso de aclarado termine, la máquina
se apagará. Enjuague el tubo de agua caliente y límpielo
con un paño húmedo. El proceso de descalcicación de la
máquina ha nalizado.
12. A máquina desliga-se após o processo de enxaguamento
terminar. Lave a saída de água quente e limpe com um pano
húmido. O processo de descalcicação da máquina está agora
terminado.
4. Establezca el valor de acuerdo con este
nivel.
4. Dena o valor em conformidade.
CONFIGURACIÓN DE LA DUREZA DEL AGUA/CONFIGURAÇÃO DA DUREZA DA ÁGUA
1. Entre en el menú, consulte las opciones y seleccione
DUREZA DEL AGUA. Recibirá instrucciones para establecer
el valor. Siga las instrucciones que aparecen en la pantalla
de la máquina.
1. Aceda ao menu, percorra as opções e selecione DUREZA
DA ÁGUA. Irão surgir orientações para o ajudar a denir o
valor. Siga as instruções no ecrã da máquina.
9. Proceso de aclarado: enjuague el
depósito de agua y llénelo con agua potable.
9. Processo de enxaguamento: enxague
e encha o reservatório de água com água
potável até ao nível máximo.
10. Proceso de aclarado: coloque un
recipiente con una capacidad mínima de
1 litro debajo de la salida del café y del tubo
de salida de agua caliente.
10. Processo de enxaguamento: coloque
um recipiente com capacidade mínima de
1 litro sob a saída de café e de água quente.
6926_UM_LATTISSIMA_PREMIUM_Z2A.indb 53 17.10.13 19:57

ES
PT
RESOLUCIÓN DE PROBLEMAS
No hay luz en la pantalla.
➔
Compruebe la red, el enchufe, el voltaje, y los fusibles. Pulse el botón de encendido
situado detrás de la pantalla de la máquina. Si el problema persiste, llame al Club
Nespresso.
Aparece un mensaje en la pantalla que indica que la
máquina está demasiado caliente.
➔
En determinadas condiciones, el calentador de la máquina alcanza una temperatura
elevada (por ejemplo, después del vaciado del sistema de uido). Solo tiene que esperar a
que la máquina se enfríe automáticamente.
El café sale demasiado despacio.
➔
La velocidad de salida del café depende de la variedad elegida.
➔ Descalcique si es necesario. Consulte el apartado «Descalcicación».
El café no está lo sucientemente caliente.
➔
Precaliente la taza.
➔ Descalcique si es necesario. Consulte el apartado «Descalcicación».
Hay una fuga en la zona de las cápsulas (hay agua en el
portacápsulas).
➔
Coloque la cápsula correctamente. Si se produce una fuga, llame al Club Nespresso.
Las luces parpadean irregularmente.
➔
Envíe la máquina a reparar o llame al Club Nespresso.
No sale café, solo sale agua (a pesar de haber introducido
una cápsula).
➔
En caso de no poder resolver el problema, llame al Club Nespresso.
La palanca no se puede bajar totalmente.
➔
Vacíe el portacápsulas. Asegúrese de que no se ha quedado ninguna cápsula bloqueada
en el interior del portacápsulas.
La espuma de leche no tiene la calidad requerida.
➔
Para obtener una espuma de leche perfecta, utilice leche desnatada o semidesnatada a la
temperatura del frigoríco (4° C aproximadamente).
➔
Enjuague cada vez que prepare una receta con leche. Coloque un recipiente debajo de la
salida de la leche y sitúe el regulador de la leche en la posición «LIMPIEZA».
➔
Desmonte el R.C.S. cada dos días y lave todos los componentes en la parte superior del
lavavajillas.
Aparece un mensaje en la pantalla que indica que la
máquina necesita una reparación.
➔
Póngase en contacto con el Club Nespresso o con un representante autorizado de
Nespresso para que lleve a cabo la evaluación, la reparación o el ajuste.
54
6926_UM_LATTISSIMA_PREMIUM_Z2A.indb 54 17.10.13 19:57
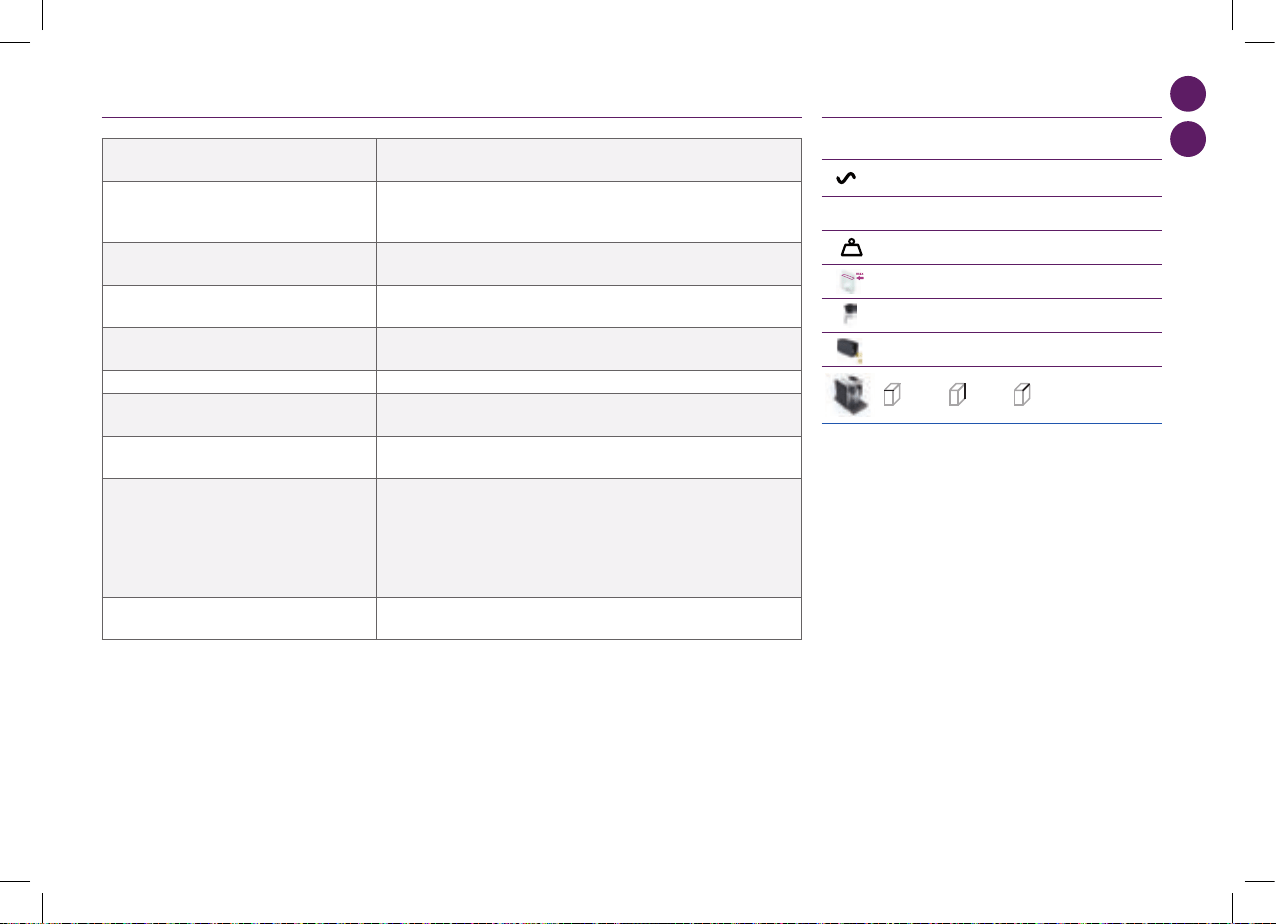
55
ES
PT
RESOLUÇÃO DE PROBLEMAS
Milk Premium
EUR,AUS,NZ: 220240 V, 50/60 Hz, 1300 W
US/CA: 120 V, 60 Hz, 1200 W
19 bar
6.5 kg
1,38 litre
500 ml
13-16 capsules
l=19,4 cm . L=33,2 cm . h=27,4 cm
Troubleshooting
Contact the Nespressso Club
For any additional information, in case of problems
or simply to seek advise, call the Nespresso Club.
Contact details of the Nespresso Club can be found
in the 'Welcome to Nespresso' folder in your
machine box or at nespresso.com
No light on display
Check the mains, plug, voltage, and fuse. In case of problems, call the Nespresso Club.
Coffee comes out very slowly.
Flow speed depends on the coffee variety.
Perform a self check of the machine. Enter the menu list and select Maintenance. Follow instruction
Coffee is not hot enough.
Preheat cup.
Perform a self check of the machine. Enter the menu list and select Maintenance. Follow instruction
Capsule area is leaking (water in capsule container).
Position capsule correctly. If leakages occur, call the Nespresso Club.
Irregular blinking.
Send appliance to repair or call the Nespresso Club.
No coffee, just water runs out (despite inserted capsule).
In case of problems, call the Nespresso Club.
Lever cannot be closed completely
Empty capsule container. Make sure that no capsule is blocked inside the capsule container.
Quality of milk froth is not up to standard
1) For a perfect milk froth, use skimmed or semi-skimmed milk at refrigerator temperature (about 4° C)
2) Rinse after each milk based preparation. Place a recipient under milk outlet, rotate the milk
regulator knob until “CLEAN” position.
3) Every two days, disassemble the R. C. S. and clean all components in the upper level of a
dishwasher
Warranty
Delonghi warrants this product against defects in materials and workmanship for a period of two years from the date of purchase. During this period, Delonghi will either repair or
replace, at its discretion, any defective product at no charge to the owner. Replacement products or repaired parts will be guaranteed for only the unexpired portion of the original
warranty or six months, whichever is greater. This limited warranty does not apply to any defect resulting from accident, misuse, improper maintenance, or normal wear and tear. Any
defect resulting from the usage of non genuine Nespresso capsules will not be covered by this warranty. Except to the extent allowed by applicable law, the terms of this limited warranty
do not exclude, restrict
or modify, and are in addition to, the mandatory statutory rights applicable to the sale of the product to you. If you believe your product is defective, contact Nespresso for instructions on
where to send or bring it for repair. Please visit our website at nespresso.com to discover more about Nespresso
Specifications
P
max
Once the rinsing process is finished, the
machine switches off. Clean the machine
using a damp cloth. You have now finished
descaling the machine.
9
10
11 12
Rinsing process Rinse and fill water with
fresh potable water up to MAX level.
Rinsing process Place one container of
minimum 1 litre under both the coffee
outlet and the hot water spout.
PRESS to confirm.
The rinsing cycle continues trough the coffee
outlet, hot water spout and drip tray until the
water tank is empty.
Water hardness setting
1
programmed buttons blinks 3 times: water hardness is set
i
1”
2 3 4
1
2
3
4
5
Place the water hardness sticker under
water for 1 second.
The number of red squares indicates
the water harness level.
Set the value accordinglyEnter the menu, browse the options and select
WATER HARDNESS.
You will be guided to set the value.
Follow machine display instructions.
max
max
Kg
11 12
EUR, AUS, NZ: 220-240 V, 50/60 Hz, 1400 W
EUR,AUS,NZ: 220240 V, 50/60 Hz, 1300 W
US/CA: 120 V, 60 Hz, 1200 W
19 bar
6.5 kg
1,38 litre
500 ml
13-16 capsules
l=19,4 cm . L=33,2 cm . h=27,4 cm
Troubleshooting
Contact the Nespressso Club
For any additional information, in case of problems
or simply to seek advise, call the Nespresso Club.
Contact details of the Nespresso Club can be found
in the 'Welcome to Nespresso' folder in your
machine box or at nespresso.com
No light on display
Check the mains, plug, voltage, and fuse. In case of problems, call the Nespresso Club.
Coffee comes out very slowly.
Flow speed depends on the coffee variety.
Perform a self check of the machine. Enter the menu list and select Maintenance. Follow instruction
Coffee is not hot enough.
Preheat cup.
Perform a self check of the machine. Enter the menu list and select Maintenance. Follow instruction
Capsule area is leaking (water in capsule container).
Position capsule correctly. If leakages occur, call the Nespresso Club.
Irregular blinking.
Send appliance to repair or call the Nespresso Club.
No coffee, just water runs out (despite inserted capsule).
In case of problems, call the Nespresso Club.
Lever cannot be closed completely
Empty capsule container. Make sure that no capsule is blocked inside the capsule container.
Quality of milk froth is not up to standard
1) For a perfect milk froth, use skimmed or semi-skimmed milk at refrigerator temperature (about 4° C)
2) Rinse after each milk based preparation. Place a recipient under milk outlet, rotate the milk
regulator knob until “CLEAN” position.
3) Every two days, disassemble the R. C. S. and clean all components in the upper level of a
dishwasher
Warranty
Delonghi warrants this product against defects in materials and workmanship for a period of two years from the date of purchase. During this period, Delonghi will either repair or
replace, at its discretion, any defective product at no charge to the owner. Replacement products or repaired parts will be guaranteed for only the unexpired portion of the original
warranty or six months, whichever is greater. This limited warranty does not apply to any defect resulting from accident, misuse, improper maintenance, or normal wear and tear. Any
defect resulting from the usage of non genuine Nespresso capsules will not be covered by this warranty. Except to the extent allowed by applicable law, the terms of this limited warranty
do not exclude, restrict
or modify, and are in addition to, the mandatory statutory rights applicable to the sale of the product to you. If you believe your product is defective, contact Nespresso for instructions on
where to send or bring it for repair. Please visit our website at nespresso.com to discover more about Nespresso
Specifications
P
max
Once the rinsing process is finished, the
machine switches off. Clean the machine
using a damp cloth. You have now finished
descaling the machine.
9
10
11 12
Rinsing process Rinse and fill water with
fresh potable water up to MAX level.
Rinsing process Place one container of
minimum 1 litre under both the coffee
outlet and the hot water spout.
PRESS to confirm.
The rinsing cycle continues trough the coffee
outlet, hot water spout and drip tray until the
water tank is empty.
Water hardness setting
1
programmed buttons blinks 3 times: water hardness is set
i
1”
2 3 4
1
2
3
4
5
Place the water hardness sticker under
water for 1 second.
The number of red squares indicates
the water harness level.
Set the value accordinglyEnter the menu, browse the options and select
WATER HARDNESS.
You will be guided to set the value.
Follow machine display instructions.
max
max
Kg
11 12
Máx. 19 bares/Máx. 19 bar
EUR,AUS,NZ: 220240 V, 50/60 Hz, 1300 W
US/CA: 120 V, 60 Hz, 1200 W
19 bar
6.5 kg
1,38 litre
500 ml
13-16 capsules
l=19,4 cm . L=33,2 cm . h=27,4 cm
Troubleshooting
Contact the Nespressso Club
For any additional information, in case of problems
or simply to seek advise, call the Nespresso Club.
Contact details of the Nespresso Club can be found
in the 'Welcome to Nespresso' folder in your
machine box or at nespresso.com
No light on display
Check the mains, plug, voltage, and fuse. In case of problems, call the Nespresso Club.
Coffee comes out very slowly.
Flow speed depends on the coffee variety.
Perform a self check of the machine. Enter the menu list and select Maintenance. Follow instruction
Coffee is not hot enough.
Preheat cup.
Perform a self check of the machine. Enter the menu list and select Maintenance. Follow instruction
Capsule area is leaking (water in capsule container).
Position capsule correctly. If leakages occur, call the Nespresso Club.
Irregular blinking.
Send appliance to repair or call the Nespresso Club.
No coffee, just water runs out (despite inserted capsule).
In case of problems, call the Nespresso Club.
Lever cannot be closed completely
Empty capsule container. Make sure that no capsule is blocked inside the capsule container.
Quality of milk froth is not up to standard
1) For a perfect milk froth, use skimmed or semi-skimmed milk at refrigerator temperature (about 4° C)
2) Rinse after each milk based preparation. Place a recipient under milk outlet, rotate the milk
regulator knob until “CLEAN” position.
3) Every two days, disassemble the R. C. S. and clean all components in the upper level of a
dishwasher
Warranty
Delonghi warrants this product against defects in materials and workmanship for a period of two years from the date of purchase. During this period, Delonghi will either repair or
replace, at its discretion, any defective product at no charge to the owner. Replacement products or repaired parts will be guaranteed for only the unexpired portion of the original
warranty or six months, whichever is greater. This limited warranty does not apply to any defect resulting from accident, misuse, improper maintenance, or normal wear and tear. Any
defect resulting from the usage of non genuine Nespresso capsules will not be covered by this warranty. Except to the extent allowed by applicable law, the terms of this limited warranty
do not exclude, restrict
or modify, and are in addition to, the mandatory statutory rights applicable to the sale of the product to you. If you believe your product is defective, contact Nespresso for instructions on
where to send or bring it for repair. Please visit our website at nespresso.com to discover more about Nespresso
Specifications
P
max
Once the rinsing process is finished, the
machine switches off. Clean the machine
using a damp cloth. You have now finished
descaling the machine.
9
10
11 12
Rinsing process Rinse and fill water with
fresh potable water up to MAX level.
Rinsing process Place one container of
minimum 1 litre under both the coffee
outlet and the hot water spout.
PRESS to confirm.
The rinsing cycle continues trough the coffee
outlet, hot water spout and drip tray until the
water tank is empty.
Water hardness setting
1
programmed buttons blinks 3 times: water hardness is set
i
1”
2 3 4
1
2
3
4
5
Place the water hardness sticker under
water for 1 second.
The number of red squares indicates
the water harness level.
Set the value accordinglyEnter the menu, browse the options and select
WATER HARDNESS.
You will be guided to set the value.
Follow machine display instructions.
max
max
Kg
11 12
6,5 kg aprox./~ 6,5 kg
1.3 l/litros
0.5 l/litros
13-16 cápsulas
19.4 cm 27.4 cm 33.2 cm
ESPECIFICACIONES/ESPECIFICAÇÕES
Não há luz no ecrã.
➔
Verique a alimentação elétrica, a cha, a tensão e o fusível. Pressione o botão ON
localizado atrás do ecrã da máquina. Em caso de problemas, ligue para o Clube Nespresso.
Aviso de máquina muito quente - indicado no ecrã.
➔
Em determinadas situações, o termostato da máquina atinge temperaturas elevadas, (por
exemplo, após esvaziar o sistema de líquidos). A máquina arrefece automaticamente,
aguarde simplesmente.
O café sai muito devagar.
➔
A velocidade do uxo depende da variedade de café.
➔ Descalcique se necessário; verique a secção "Descalcicação".
O café não ca quente o suciente.
➔ Pré-aqueça a chávena.
➔
Descalcique se necessário; verique a secção "Descalcicação".
A zona da cápsula está a verter (água no recipiente das
cápsulas).
➔
Posicione corretamente a cápsula. Se ocorrerem fugas, ligue para o Clube Nespresso.
Piscar irregular.
➔
Envie o equipamento para reparação ou ligue para o Clube Nespresso.
Não sai café, apenas sai água (apesar da cápsula estar
colocada).
➔
Em caso de problemas, ligue para o Clube Nespresso.
A alavanca não fecha completamente.
➔
Esvazie o recipiente das cápsulas. Certique-se de que não há nenhuma cápsula presa
dentro do recipiente das cápsulas.
A qualidade da espuma de leite não está ao nível habitual.
➔
Para obter uma espuma de leite perfeita, use leite magro ou meio-gordo à temperatura
do frigoríco (cerca de 4° C).
➔
Enxague após cada preparação à base de leite. Coloque um recipiente sob a saída do leite,
gire o manípulo de regulação do leite até à posição «LIMPEZA».
➔
De dois em dois dias, desmonte o Rapid Cappuccino System (R.C.S.) e lave todas as peças
no cesto superior da máquina de lavar louça.
Aviso de máquina a precisar de reparação - indicado no
ecrã.
➔
Contacte o Clube Nespresso ou um agente autorizado para vericação, reparação ou
programação.
6926_UM_LATTISSIMA_PREMIUM_Z2A.indb 55 17.10.13 19:57

ES
PT
Si desea obtener más información, resolver cualquier problema o conseguir asesoramiento, llame al Club Nespresso.
Podrá encontrar la información de contacto del Club Nespresso en la carpeta de bienvenida a Nespresso de su máquina o en nespresso.com
Para obter qualquer informação adicional, em caso de problemas ou simplesmente para aconselhamento, ligue para o Clube Nespresso.
As informações de contacto do Clube Nespresso podem ser encontradas na pasta «Bem-vindo à Nespresso», na caixa da sua máquina ou em www.nespresso.com
CONTACTE CON EL CLUB NESPRESSO/CONTACTAR O CLUBE NESPRESSSO
GARANTÍA/GARANTIA
ELIMINACIÓN DE RESIDUOS Y CUESTIONES MEDIOAMBIENTALES/
ELIMINAÇÃO E PREOCUPAÇÕES ECOLÓGICAS
Eliminación de residuos y protección medioambiental
Su máquina contiene materiales valiosos que se pueden recuperar o reciclar. La separación de los residuos en diferentes tipos facilita el reciclaje de materias primas valiosas.
Deje la máquina en un punto de reciclaje. Puede solicitar información sobre la eliminación de los residuos a las autoridades locales.
Eliminação e Proteção Ambiental
O seu equipamento contêm materiais valiosos que podem ser recuperados ou reciclados. A separação dos restantes materiais residuais por tipo facilita a reciclagem de matérias-primas valiosas.
Deixe o aparelho num ponto de recolha. Pode obter informações sobre a eliminação junto das autoridades locais.
De’Longhi garantiza este producto contra todos los defectos de materiales y de fabricación por un periodo de dos años a partir de la fecha de compra. Durante este periodo, De’Longhi reparará o sustituirá, según su criterio, todo
producto defectuoso sin cargo alguno para el propietario. Los productos de sustitución o las piezas reparadas tendrán una garantía que cubrirá el plazo restante de la garantía inicial o bien de seis meses, el periodo que sea más
largo de los dos. Esta garantía limitada no se aplicará a los defectos resultantes de un accidente, un uso incorrecto, un mantenimiento defectuoso o el desgaste normal. Salvo en la medida en que esté previsto por la legislación
en vigor, los términos de esta garantía limitada no excluyen, restringen ni modican los derechos legales obligatorios relativos a la compra del producto, y les son complementarios. Si cree que su producto es defectuoso,
póngase en contacto con De’Longhi para obtener la dirección a la que hay que enviar o llevar la máquina para su reparación. Cualquier defecto resultante del uso de cápsulas no originales de Nespresso no será cubierto por esta
garantía.
A De’Longhi assegura garantia a este produto contra defeitos em materiais e de fabrico por um período de dois anos, a partir da data de compra. Durante este período, a De’Longhi repara ou substitui, ao seu critério, qualquer
produto defeituoso, sem custos para o proprietário. Os produtos de substituição ou peças reparadas, estão em garantia até ao nal da garantia original ou por 6 meses, prevalecendo o maior período. Esta garantia limitada
não se aplica a defeitos resultantes de acidentes, uso incorreto, manutenção indevida, ou desgaste normal. Excetuando alguma medida prevista na lei em vigor, os termos desta garantia limitada não excluem, restrigem, ou
modicam, e são complementares aos direitos legais obrigatórios aplicáveis à venda de produtos. Se acredita que este produto é defeituoso, contacte a De’Longhi para instruções sobre como colocá-lo em reparação. Qualquer
defeito ou anomalia resultante da utilização de cápsulas Nespresso não genuínas não será abrangido por esta garantia.
56
6926_UM_LATTISSIMA_PREMIUM_Z2A.indb 56 17.10.13 19:57

57
ES
PT
6926_UM_LATTISSIMA_PREMIUM_Z2A.indb 57 17.10.13 19:57

CZ
HU
POPIS KÁVOVARU/A KÉSZÜLÉK ÁTTEKINTÉSE
Zobrazení (příprava)/
Kijelző (receptek)
13
Lungo/Lungo
14
Espresso/Espresso
15
Ristretto/Ristretto
16
Horká voda
/Forró víz
17
Teplé mléko
/Meleg tej
18
Cappuccino/Cappuccino
19
Latte Macchiato/Latte Macchiato
Zobrazení (navigace)/
Kijelző (navigáció)
20
Menu/Menü
21
Listování v Menu nahoru
/
Görgessen fel, amikor a menü aktív
22
Výběr z Menu
/
Opció kiválasztása amikor a menü aktív
23
Listování v Menu dolů
/
Görgessen le, amikor a menü aktív
24
Zobrazení textu/Szöveges kijelző
Rapid Cappuccino Systém (R.C.S.)/
Rapid Cappuccino System (R.C.S.)
25
Regulátor mléčné pěny/Tejhabszabályozó gomb
26
Poloha pro vložení Regulátoru mléčné pěny/
Válassza ki a tejhabszabályozó gomb helyzetét
27
Min. pěna/Min. tejhab
28
Max. pěna/Max tejhab
29
«ČIŠTĚNÍ»: funkce Automatického Čištění/
«CLEAN»: automatikus öblítési funkció
30
Víčko nádoby na mléko/Tejtartály-fedő
31
Mléčná tryska/Tejkifolyó
32
Nádoba na mléko/Tejtartály
33
P
řívodní trubička mléka/Tejfelszívó cső
34
R.C.S. přípojka/R.C.S. csatlakozó
Popis kávovaru/A készülék áttekintése
A
Kávovar v nastavení KÁVA/Készülék csak kávéfőzéshez
B
Kávovar s Rapid Cappuccino Systémem (pro Cappuccino)/
Készülék Rapid Cappuccino System-mel (Cappuccino-hoz)
C
Kávovar s tryskou na horkou vodu/Készülék forróvíz-kifolyóval
1
Páka/Kar
2
Tlačítko ON/OFF/BE/KI gomb
3
Nádoba na vodu /Víztartály részecskeszűrővel
4
Výpusť kávy/Kávé-kifolyó
5
Odkapávací mřížka/Csepprács
6
Odkapávací miska/Csepptálca
7
Otočná podložka šálku (nelze vyjmout)/
Felhajtható csészetartó (nem kivehető)
8
Kontejner na použité kapsle/Használtkapszula-tartó
9
Dvířka přípojky na páru/Gőzcsatlakozás ajtaja
10
Teleskopická tryska na horkou vodu/Teleszkópos forróvíz-kifolyó
11
Prostor pro uložení trysky na horkou vodu/Forróvíz-kifolyó tároló
12
Přípojka na páru/Gőzcsatlakozó
58
6926_UM_LATTISSIMA_PREMIUM_Z2A.indb 58 17.10.13 19:57

CZ
HU
OBSAH/TARTALOM
Nespresso, exkluzivní systém pro přípravu výjimečné kávy Espresso, den za dnem. Všechny kávovary jsou vybaveny jedinečným extrakčním systémem, který zaručuje tlak až 19 barů. Každý parametr byl vypočítán s velkou
přesností tak, aby bylo možné vyjádřit veškeré aroma každé kávy Grand Cru, dodat jí tělo a vytvořit nesrovnatelnou a bohatou cremu.
A Nespresso, exkluzív rendszerével nap mint nap tökéletes eszpresszót készíthet. Minden kávégép egy egyeduülálló kivonó-rendszerrel van ellátva, mely maximum 19 bar nyomást biztosít. Minden paramétert a lehető
legpontosabban számítottunk ki, hogy az összehasonlíthatatlanul sűrű és selymes krémben kibontakozhasson a Grand Cru kávéőrlemények minden aromája.
TOVÁRNÍ NASTAVENÍ/MENNYISÉGEK GYÁRI BEÁLLÍTÁSA ................................
ODVÁPNĚNÍ/VÍZKŐMENTESÍTÉS. ...................................................................
NASTAVENÍ TVRDOSTI VODY/VÍZKEMÉNYSÉG BEÁLLÍTÁSA ..............................
ODSTRAŇOVÁNÍ ZÁVAD/HIBAELHÁRÍTÁS .......................................................
SPECIFIKACE/MŰSZAKI ADATOK ....................................................................
LIKVIDACE ODPADU A OCHRANA ŽIVOTNÍHO PROSTŘEDÍ/
ÁRTALMATLANÍTÁSI ÉS KÖRNYEZETVÉDELMI ELŐÍRÁSOK
...............................
KONTAKTUJTE NESPRESSSO CLUB/
LÉPJEN KAPCSOLATBA A NESPRESSO CLUBBAL
..............................................
ZÁRUČNÍ PODMÍNKY/GARANCIA ....................................................................
POPIS KÁVOVARU/A KÉSZÜLÉK ÁTTEKINTÉSE .....................................................
OBSAH BALENÍ/A CSOMAG TARTALMA ................................................................
NAVIGACE MENU/MENÜ HASZNÁLATA ................................................................
SEZNAM MENU/MENÜLISTA ..............................................................................
PRVNÍ POUŽITÍ NEBO SPUŠTĚNÍ PO DELŠÍ DOBĚ NEČINNOSTI/ELSŐ
HASZNÁLATKOR, VAGY HA HOSSZABB IDEIG NEM HASZNÁLTA A KÉSZÜLÉKET
......
PŘÍPRAVA KÁVY/KÁVÉKÉSZÍTÉS ........................................................................
SMONTOVÁNÍ/ROZMONTOVÁNÍ RAPID CAPPUCINO SYSTÉMU R.C.S./
RAPID CAPPUCCINO SYSTEM R.C.S. ÖSSZESZERELÉSE/SZÉTSZERELÉSE
..............
PŘÍPRAVA CAPPUCCINA A LATTE MACCHIATA/
CAPPUCCINO ÉS LATTE MACCHIATO KÉSZÍTÉSE
...................................................
KAŽDODENNÍ PÉČE/NAPI KARBANTARTÁS .........................................................
RUČNÍ MYTÍ RAPID CAPPUCCINO SYSTÉMU R.C.S./
A RAPID CAPPUCCINO SYSTEM R.C.S. KÉZI TISZTÍTÁSA
.....................................
69
70
71
72
73
74
74
74
POZOR: pokud uvidíte toto upozornění, přečtěte si bezpečnostní pokyny, abyste předešli možnému úrazu či poškození přístroje.
POZNÁMKA: pokud uvidíte toto upozornění, vezměte na vědomí doporučení pro bezpečné a správné používání vašeho přístroje.
FIGYELEM: ha ezt a jelet látja, az esetleges sérülések és károk megelőzése érdekében olvassa el a biztonsági előírásokat.
INFORMÁCIÓ: ha ezt a jelet látja, a készülék biztonságos és megfelelő használata érdekében vegye gyelembe az adott tanácsot.
58
60
60
61
62
64
64
65
68
68
59
6926_UM_LATTISSIMA_PREMIUM_Z2A.indb 59 17.10.13 19:57
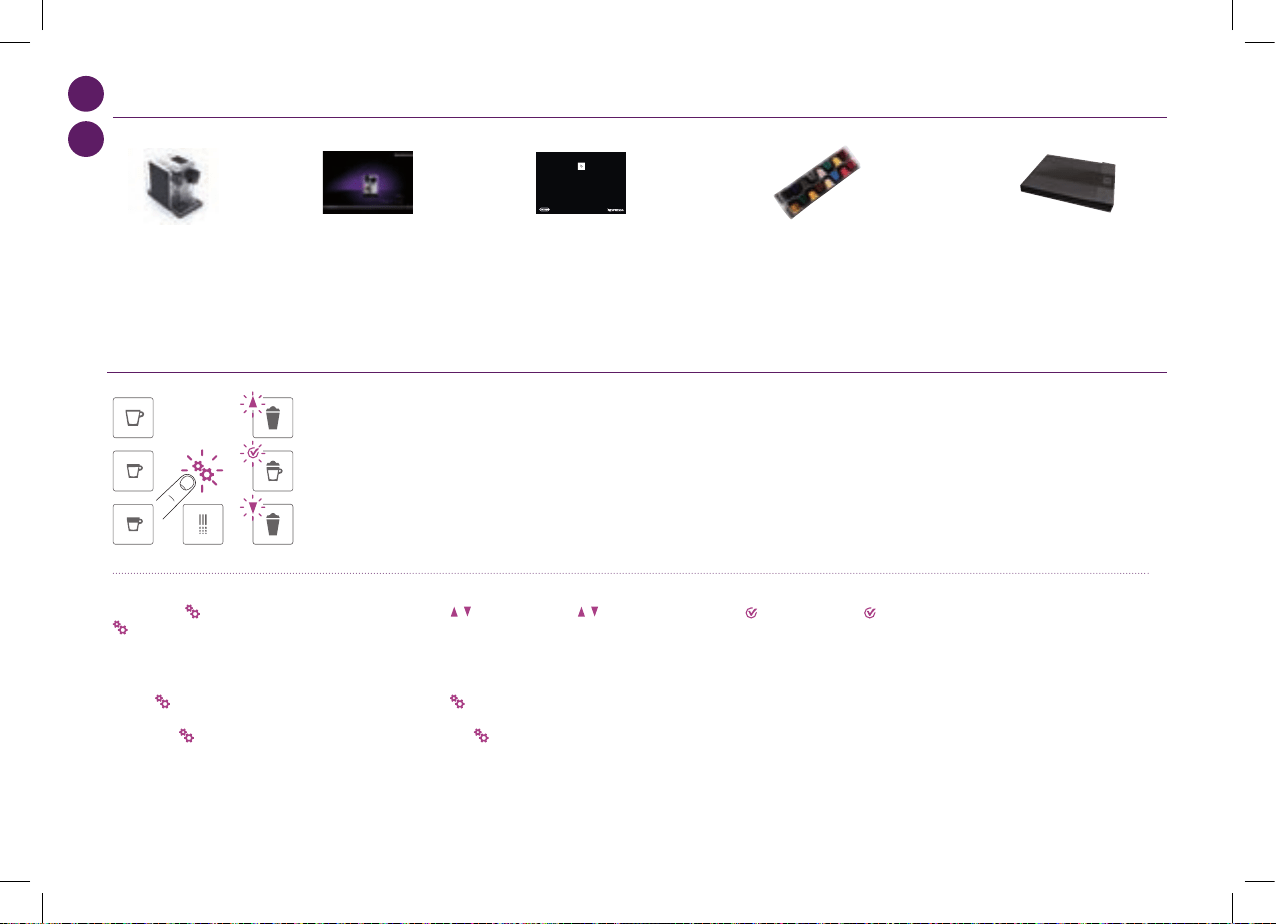
EN SA FETY PRECAUTI ONS ............................................................................. 2
FR CONSIGNES DE SECURITE ......................................................................... 4
DE SICHERHEITSHINWEISE ........................................................................... 7
IT PRECAUZIONI DI SICUREZ ZA .................................................................... 10
ES PRECAUCIONES DE SEGURIDAD ................................................................ 12
PT MEDIDAS DE SEGURANÇA......................................................................... 15
NL V EILIGHEIDSMAATREGELEN ..................................................................... 18
GR ΜΈΤ ΡΑ ΑΣΦΑΛΈΙΑ Σ .................................................................................. 20
HU BIZTONSÁGI ELŐÍRÁSOK .......................................................................... 22
CZ BEZPEČNOSTNÍ POKYNY .......................................................................... 25
PL ZASADY BEZPIECZEŃSTWA ....................................................................... 28
RU МЕРЫ ПРЕДОСТОР ОЖНОСТИ ................................................................. 31
CZ
HU
NAVIGACE MENU/MENÜ HASZNÁLATA
OBSAH BALENÍ/A CSOMAG TARTALMA
Kávovar
kávéfőző
«Uvítací desky Nespresso»
«Üdvözöljük a Nespresso világában» című mappa
Návod k použití
Használati útmutató
Bezpečnostní pokyny
Biztonsági előírások
Set Nespresso kapslí
Kapszulaszett
Vstup do seznamu Menu/Lépjen be a menülistába
Stiskněte krátce
symbol/Nyomja meg röviden a
szimbólumot.
Možnosti procházení/Keresse meg a kívánt opciót
Stiskněte
symbol/Nyomja meg a szimbólumot.
Vybrat možnost/Válassza ki az opciót
Stiskněte
symbol/Nyomja meg a
szimbólumot.
Opustit seznam Menu/
Kilépés a menülistából
Nalistujte [ODCHOD] možnost a vyberte ji nebo krátce
stiskněte symbol.
Görgesse az [KILÉPÉS] opcióra, és válassza ki. Vagy nyomja
meg röviden a szimbólumot.
Opustit možnosti a vrátit se do seznamu Menu/
Kilépés az adott opcióból, és visszatérés a menülistába
Nalistujte [ODCHOD] možnost a vyberte ji nebo krátce
stiskněte symbol.
Görgesse az [KILÉPÉS] opcióra, és válassza ki. Vagy nyomja
meg röviden a szimbólumot.
60
6926_UM_LATTISSIMA_PREMIUM_Z2A.indb 60 17.10.13 19:57
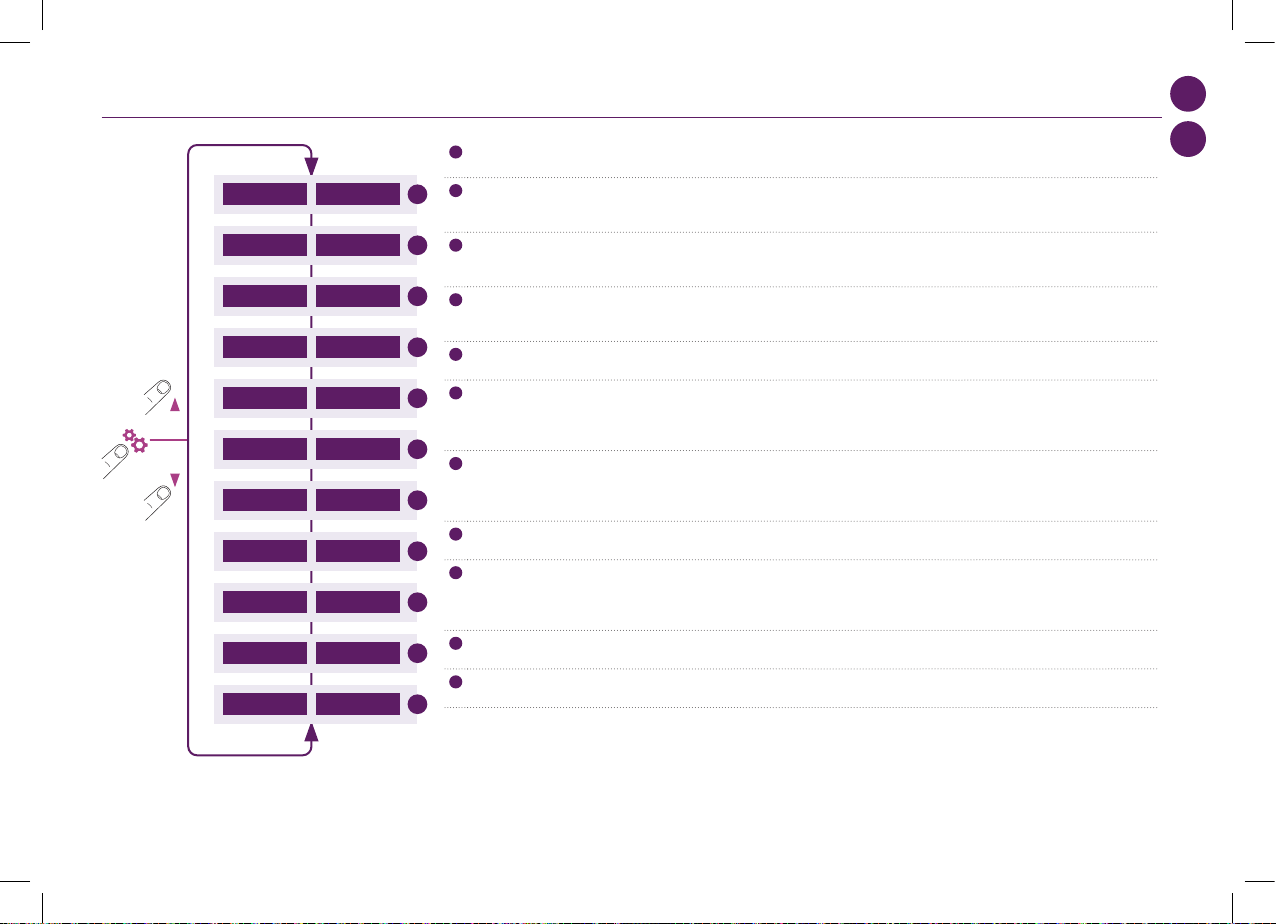
CZ
HU
«Uvítací desky Nespresso»
«Üdvözöljük a Nespresso világában» című mappa
Vstup do seznamu Menu/Lépjen be a menülistába
Stiskněte krátce
symbol/Nyomja meg röviden a
szimbólumot.
Možnosti procházení/Keresse meg a kívánt opciót
Stiskněte
symbol/Nyomja meg a szimbólumot.
Vybrat možnost/Válassza ki az opciót
Stiskněte
symbol/Nyomja meg a
szimbólumot.
Opustit seznam Menu/
Kilépés a menülistából
Nalistujte [ODCHOD] možnost a vyberte ji nebo krátce
stiskněte symbol.
Görgesse az [KILÉPÉS] opcióra, és válassza ki. Vagy nyomja
meg röviden a szimbólumot.
Opustit možnosti a vrátit se do seznamu Menu/
Kilépés az adott opcióból, és visszatérés a menülistába
Nalistujte [ODCHOD] možnost a vyberte ji nebo krátce
stiskněte symbol.
Görgesse az [KILÉPÉS] opcióra, és válassza ki. Vagy nyomja
meg röviden a szimbólumot.
SEZNAM MENU/MENÜLISTA LIST
1
Vyberte tuto možnost pro nastavení preferovaného jazyka. Postupujte podle pokynů na displeji.
Válassza ki ezt az opciót, hogy beállítsa a kívánt nyelvet. Kövesse a készülék utasításait.
2
Vyberte tuto možnost, jakmile se na displeji zobrazí upozornění potřeby odvápnění. Viz strana 70. Budete provedeni procesem odvápnění.
Válassza ki ezt az opciót, amikor a vízkőmentesítési gyelmeztetés megjelenik a kijelzőn. Részletek a 70 oldalon. A készülék végigvezeti Önt a vízkőmentesítési
folyamaton.
3
Vyberte tuto možnost pro nastavení tvrdosti vody. Použijte testovací proužek ke stanovení tvrdosti vody. Optimalizujete tak frekvenci odvápnění. Viz strana 71.
Válassza ki ezt az opciót, hogy beállítsa az Önnél jellemző vízkeménységet. Használja a csomagolásban lévő vízkeménység-mérő csíkot a meghatározáshoz.
Ez optimizálja a vízkőmentesítés gyakoriságát. Részletek a 71 oldalon.
4
Vyberte tuto možnost pro nastavení intervalu automatického vypnutí. (Možnosti jsou 9 minut, 30 minut, 2 hodiny, 8 hodin). Postupujte podle pokynů na displeji.
Válassza ki ezt az opciót, hogy beállítsa az időt, ami után a gép automatikusan kikapcsol. (Lehetséges opciók: 9 perc, 30 perc, 2 óra, 8 óra) Kövesse a készülék
utasításait.
5
Vyberte tuto možnost pro vymazání všech nastavených parametrů a vrácení kávovaru do továrního nastavení.
Válassza ki ezt az opciót, hogy visszaállítsa a készülék gyári beállításait.
6
Vyberte tuto možnost pro vypuštění vody z kávovaru (před odesláním do opravy nebo nebudete-li jej delší dobu používat). Postupujte podle pokynů na displeji.
Kávovar bude po vypuštění 10 minut zablokován.
Válassza ki ezt az opciót, hogy kiengedje a gépben lévő vizet arra az esetre, ha szervizbe kellene küldeni, vagy ha hosszabb ideig nem fogja használni. Kövesse a
készülék utasításait. A folyamat után 10 percig a készülék nem használható.
7
Vyberte tuto možnost pro naprogramování objemu nápoje (kávy, horké vody a mléčných variací). Postupujte podle pokynů na displeji. Naprogramované objemy
lze v případě potřeby vymazat a vrátit do továrního nastavení.
Válassza ki ezt az opciót, hogy beprogramozza az italok mennyiségét (kávék, forró víz, tejalapú receptek). Kövesse a készülék utasításait. Ezen kívül vissza lehet
állítani az összes italt a gyári mennyiségekre is.
8
Vyberte tuto možnost pro zobrazení všech nastavení kávovaru.
Válassza ki ezt az opciót hogy megtekinthesse a készülék beállításait.
9
Vyberte tuto možnost pro kontrolu celkového stavu vašeho kávovaru. Údaje o spotřebě jsou k dispozici buď od prvního použití kávovaru (absolutní) nebo od
posledního odvápnění (relativní). Sériové číslo kávovaru je k dispozici také.
Válassza ki ezt az opciót hogy ellenőrizhesse a készülék állapotát. A fogyasztási adatok elérhetők az első használattól (abszolút, vagy az utolsó vízkőmentesítéstől
(relatív) számolva. A készülék sorozatszáma is látható.
10
Vyberte tuto možnost pro radu, jak dosáhnout optimální kvality mléčné pěny. Odkaz na internet s podrobnějšími informacemi o této funkci.
Válassza ki ezt az opciót az optimális tejhab-minőség kapcsán nyújtott legjobb tanácsokért. A jelzett internet-linken még többet megtudhat erről a funkcióról.
11
Odchod ze seznamu Menu a návrat kávovaru do pohotovostního režimu.
Kilépés a menü módból, és a gép visszaállítása készenléti módba.
1
NYELVJAZYK
2
VÍZKŐOLDÁSODVÁPNĚNÍ
3
VÍZKEMÉNYSÉGTVRDOST VODY
4
AUT. KIKAPCSOLÁSAUT. VYPNUTÍ
5
GYÁRI ÉRTÉKEKTOVÁRNÍ NASTAVENÍ
6
RENDSZERT ÜRÍTSE
VYPUŠTĚNÍ
7
MENNY. PROG.PROGRAM. OBJEMU
8
INFO BEÁLLÍTÁSOKINFO O NASTAVENÍ
9
KARBANTARTÁSÚDRŽBA
10
SEGÍTSÉGPOMOC
11
KILÉPÉS
ODCHOD
61
6926_UM_LATTISSIMA_PREMIUM_Z2A.indb 61 17.10.13 19:57

max
SET LANGUAGE
to continue
LANGUAGE
Actual value : EN
New value : [ ]
to select
05
max
SET LANGUAGE
to continue
LANGUAGE
Actual value : EN
New value : [ ]
to select
05
max
SET LANGUAGE
to continue
LANGUAGE
Actual value : EN
New value : [ ]
to select
05
max
SET LANGUAGE
to continue
LANGUAGE
Actual value : EN
New value : [ ]
to select
05
max
SET LANGUAGE
to continue
LANGUAGE
Actual value : EN
New value : [ ]
to select
05
max
SET LANGUAGE
to continue
LANGUAGE
Actual value : EN
New value : [ ]
to select
05
CZ
HU
PRVNÍ POUŽITÍ NEBO SPUŠTĚNÍ PO DELŠÍ DOBĚ NEČINNOSTI/
ELSŐ HASZNÁLATKOR, VAGY HA HOSSZABB IDEIG NEM HASZNÁLTA A KÉSZÜLÉKET
POZOR: přečtěte si pozorně
bezpečnostní pokyny, abyste
předešli úrazu elektrickým proudem
a požáru.
FIGYELEM: először olvassa el a
biztonsági előírásokat, hogy elkerülje
a halálos áramütés és tűz kockázatát.
1. Vyjměte nádobu na vodu, odkapávací misku a kontejner
na použité kapsle. Upravte délku přívodního kabelu a
přebytečnou část uložte do prostoru na spodní straně
kávovaru.
1. Vegye ki a víztartályt, csepptálcát és a kapszulatartót.
Állítsa be a kábel hosszát, a felesleget helyezze a gép alján
lévő kábelvezetőbe.
5. Nasaďte trysku na horkou vodu.
Zapněte kávovar.
5. Helyezze be a forróvíz-kifolyót.
Kapcsolja be a gépet.
2. Postavte kávovar do svislé polohy a
zapojte do sítě.
2. Helyezze a talpára a készüléket, és
csatlakoztassa a konnektorba.
6. SET LANGUAGE: nastavte požadovaný
jazyk. Stiskněte
pro pokračování.
6. SET LANGUAGE: állítsa be a kívánt nyelvet.
Nyomja meg az
-t a folytatáshoz.
3. Nádobu na vodu lze přenášet za víčko.
3. A víztartályt a fedelénél fogva lehet vinni.
4. Vypláchněte nádobu na vodu předtím, než ji naplníte
čerstvou pitnou vodou.
4. Öblítse el a víztartályt, mielőtt a maximumig töltené
friss ivóvízzel.
62
6926_UM_LATTISSIMA_PREMIUM_Z2A.indb 62 17.10.13 19:58
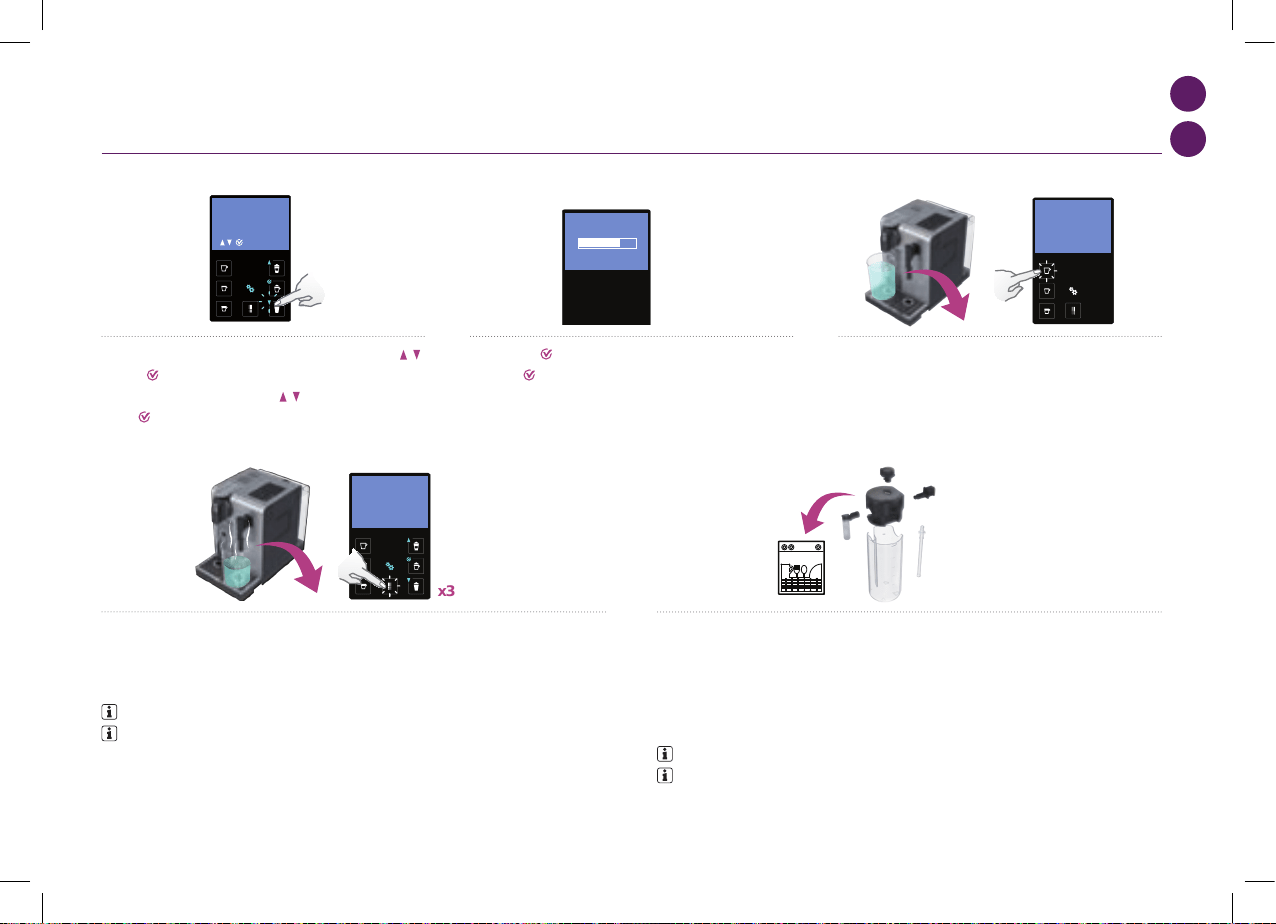
max
SET LANGUAGE
to continue
LANGUAGE
Actual value : EN
New value : [ ]
to select
05
max
First read the safety precautions to avoid risks of fatal electrical shock and fire
Remove the plastic films from grid,
lever and machine panels.
Remove the water tank, drip tray, and capsule
container. Adjust the cable length and store the
excess in the cable guide under the machine.
Put the machine in upright position,
plug machine into mains.
The water tank can be carried by
its cover.
Rinse the water tank before filling with
potable water up to maximum level.
Insert the hot water spout.
Switch machine ON
Set your preferred language.
Press to continue.
SET LANGUAGE
to continue
Select your language by scrolling the
options using up/down arrow. Press to
confirm.
LANGUAGE
Actual value : EN
New value : [ ]
to select
Coffee preparation
x3
x3
110 ml
40 ml
25 ml
05 06
CZ
HU
7. LANGUAGE: vyberte jazyk listováním v možnostech šipkami .
Stiskněte pro potvrzení.
7. LANGUAGE: válassza ki a nyelvet a
segítségével. Nyomja
meg az -t a jóváhagyáshoz.
PRVNÍ POUŽITÍ NEBO SPUŠTĚNÍ PO DELŠÍ DOBĚ NEČINNOSTI/
ELSŐ HASZNÁLATKOR, VAGY HA HOSSZABB IDEIG NEM HASZNÁLTA A KÉSZÜLÉKET
11. Rozmontujte Rapid Cappuccino Systém (R.C.S.) a umyjte všechny části v horním oddíle myčky nádobí.
V případě, že nemáte k dispozici myčku nádobí, postupujte podle instrukcí v sekci Ruční mytí Rapid
Cappuccino Systému (R.C.S.).
11. Szedje szét a Rapid Cappuccino System (R.C.S.) -et, és tisztítsa meg minden tartozékát a
mosogatógépének felső részében. Ha nincs mosogatógép, olvassa el a Rapid Cappuccino System (R.C.S.)
kézi tisztításáról szóló fejezetet
POZNÁMKA: viz sekce Smontování/Rozmontování Rapid Cappucino Systému.
INFORMÁCIÓ: részletek a Rapid Cappuccino System összeszerelése/szétszerelése fejezetben.
10. Vypláchnutí: opakujte třikrát přes trysku na horkou vodu. Poté trysku vyjměte a uložte do prostoru na
pravé straně kávovaru. Zavřete dvířka přípojky na páru.
10. Öblítés: ismételje meg háromszor a forróvíz-kifolyón keresztül. Amint kész, vegye le és tegye vissza a
gép jobb oldalán lévő tartóba. Zárja be a gőzcsatlakozás ajtaját.
POZNÁMKA: kávovary jsou na výstupu z výroby testovány. Ve vodě se mohou objevit stopy kávy.
INFORMÁCIÓ: a készülékeket a gyártás után teljesen letesztelik. Kávényomok előfordulhatnak
az öblítő vízben.
9. Vypláchnutí: postavte pod výpusť kávy vhodnou nádobu a
stiskněte tlačítko Lungo. Opakujte třikrát.
9. Öblítés: helyezzen egy edényt a kávékifolyó alá és nyomja meg a
lungo gombot. Ismételje meg háromszor.
8. Po stisknutí se kávovar nahřívá.
8. Amint a
jelet megnyomta, a készülék felfűt.
4°
15”
Assembling / disassembling of Rapid Cappuccino system (R.C.S)
07
63
6926_UM_LATTISSIMA_PREMIUM_Z2A.indb 63 17.10.13 19:58
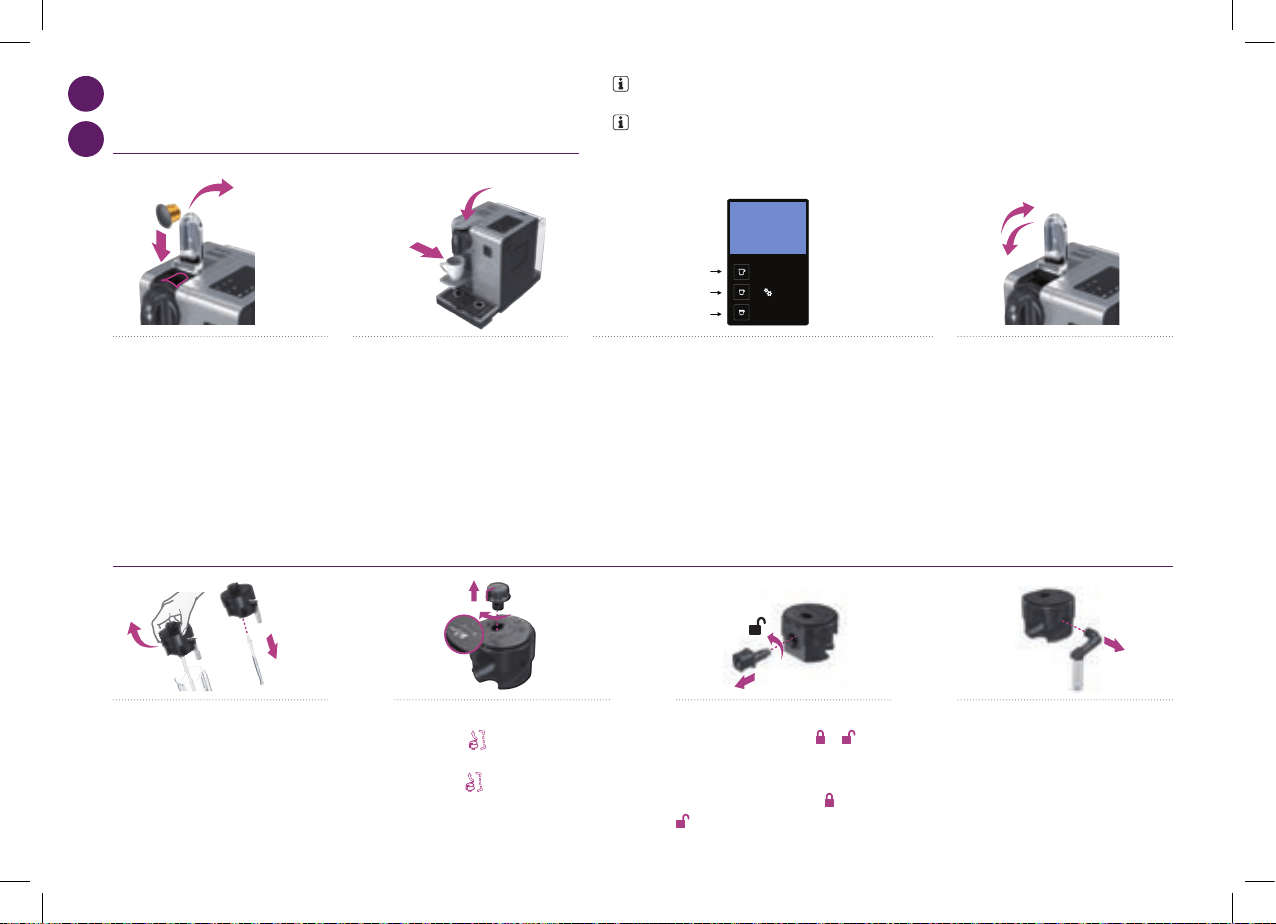
max
First read the safety precautions to avoid risks of fatal electrical shock and fire
Remove the plastic films from grid,
lever and machine panels.
Remove the water tank, drip tray, and capsule
container. Adjust the cable length and store the
excess in the cable guide under the machine.
Put the machine in upright position,
plug machine into mains.
The water tank can be carried by
its cover.
Rinse the water tank before filling with
potable water up to maximum level.
Insert the hot water spout.
Switch machine ON
Set your preferred language.
Press to continue.
SET LANGUAGE
to continue
Select your language by scrolling the
options using up/down arrow. Press to
confirm.
LANGUAGE
Actual value : EN
New value : [ ]
to select
Coffee preparation
x3
x3
110 ml
40 ml
25 ml
05 06
4°
15”
Assembling / disassembling of Rapid Cappuccino system (R.C.S)
07
CZ
HU
PŘÍPRAVA KÁVY/
KÁVÉKÉSZÍTÉS
SMONTOVÁNÍ/ROZMONTOVÁNÍ RAPID CAPPUCINO SYSTÉMU R.C.S./
RAPID CAPPUCCINO SYSTEM R.C.S. ÖSSZESZERELÉSE/SZÉTSZERELÉSE
1. Zvedněte zcela páku a vložte Nespresso
kapsli.
1. Emelje fel a kart teljesen, és helyezzen be
egy Nespresso kapszulát.
2. Zavřete páku a postavte pod výpusť kávy
šálek.
2. Zárja le a kart, és helyezzen egy csészét a
kávékifolyó alá.
3. Stiskněte tlačítko Ristretto (25 ml), Espresso (40 ml) nebo Lungo
(110 ml). Příprava kávy bude automaticky ukončena. Pro předčasné
zastavení průtoku kávy nebo doplnění šálku stiskněte tlačítko znovu.
3. Nyomja meg a Ristretto (25 ml), az Espresso (40 ml) vagy a Lungo
(110 ml) gombot. A kávékészítés automatikusan meg fog állni. Ha
hamarabb megállítaná, vagy még ráengedne, nyomja meg ismét.
4. Odeberte šálek. Zvedněte a zavřete páku,
použitá kapsle propadne do kontejneru na
použité kapsle.
4. Vegye el a csészét. Emelje, majd csukja
le a kart hogy a kapszula beleessen a
használtkapszula-tartóba.
1.Vyjměte víčko nádoby na mléko a odpojte
přívodní trubičku mléka.
1. Vegye le a tejtartály tetejét, és húzza ki a
tejfelszívó csövet.
4. Vyjměte mléčnou trysku vytažením.
4. Húzza ki és vegye le a tejkifolyót.
2. Vyjměte Regulátor mléčné pěny jeho
otočením až po
a vytažením nahoru.
2. Vegye le a tejhabszabályzó gombot úgy,
hogy elfordítja
, és kihúzza.
3. Vyjměte konektor Rapid Cappuccino
Systému jeho odemčením od
do a
vytažením.
3. Vegye le a Rapid Cappuccino System
csatlakozót úgy, hogy elfordítja
állásból
állásba, és kihúzza.
POZNÁMKA: během nahřívání kávovaru můžete stisknout tlačítko kávy. Příprava kávy se spustí
automaticky ihned po nahřátí kávovaru.
MEGJEGYZÉS: a felfűtés alatt már megnyomhatja bármelyik kávé gombot. A kávé így automatikusan
elindul, amint a készülék kész.
64
6926_UM_LATTISSIMA_PREMIUM_Z2A.indb 64 17.10.13 19:58

4°
15”
Assembling / disassembling of Rapid Cappuccino system (R.C.S)
07
4°
15”
Assembling / disassembling of Rapid Cappuccino system (R.C.S)
07
4°
15”
Assembling / disassembling of Rapid Cappuccino system (R.C.S)
07
4°
15”
Assembling / disassembling of Rapid Cappuccino system (R.C.S)
07
CZ
HU
PŘÍPRAVA CAPPUCCINA A LATTE MACCHIATA/
CAPPUCCINO ÉS LATTE MACCHIATO KÉSZÍTÉSE
1. Naplňte nádobu na mléko požadovaným
množstvím mléka.
1. Töltse fel a tejtartályt a kívánt mennyiségű
tejjel.
2. Nádobu na mléko uzavřete. Otevřete dvířka přípojky na
páru tahem doprava. Připojte Rapid Cappuccino Systém ke
kávovaru.
2. Zárja le a tejtartályt. Jobbra csúsztatva nyissa ki a
gőzcsatlakozó ajtaját. Csatlakoztassa a Rapid Cappuccino
System-et a géphez.
3. Kávovar se nahřívá přibližně 15 vteřin.
3. A készülék körülbelül 15 másodpercig
felfűt.
4. Zvedněte zcela páku a vložte Nespresso
kapsli.
4. Emelje fel a kart teljesen, és helyezzen be
egy Nespresso kapszulát.
POZOR: nepoužívejte nádobu na mléko na jiné tekutiny než
mléko a pitnou vodu. Nepoužívejte nepasterizované mléko a
nepoužívejte mléko po uplynutí doby použitelnosti vyznačené na
obalu.
FIGYELEM: ne használja a tejtartályt a tejen és ivóvízen
kívül máshoz. Ne használjon nyers, nem pasztörizált tejet, és ne
használja a tejet a csomagolásán jelzett lejárati dátum után.
POZNÁMKA: pro optimální mléčnou pěnu používejte plnotučné nebo polotučné vychlazené mléko
(o teplotě 4° C).
INFORMÁCIÓ: a legjobb tejhabhoz használjon alacsony zsírtartalmú, vagy félzsíros,
hűtőhideg (k.b. 4° C) tejet.
POZNÁMKA: prázdnou nádobu na
mléko i přívodní trubičku mléka před
naplněním vždy důkladně vypláchněte
pitnou vodou.
INFORMATION: amikor a tejtartály
üres, újratöltés előtt alaposan öblítse el ezt
és a tejfelszívó csövet ivóvízzel.
65
6926_UM_LATTISSIMA_PREMIUM_Z2A.indb 65 17.10.13 19:58
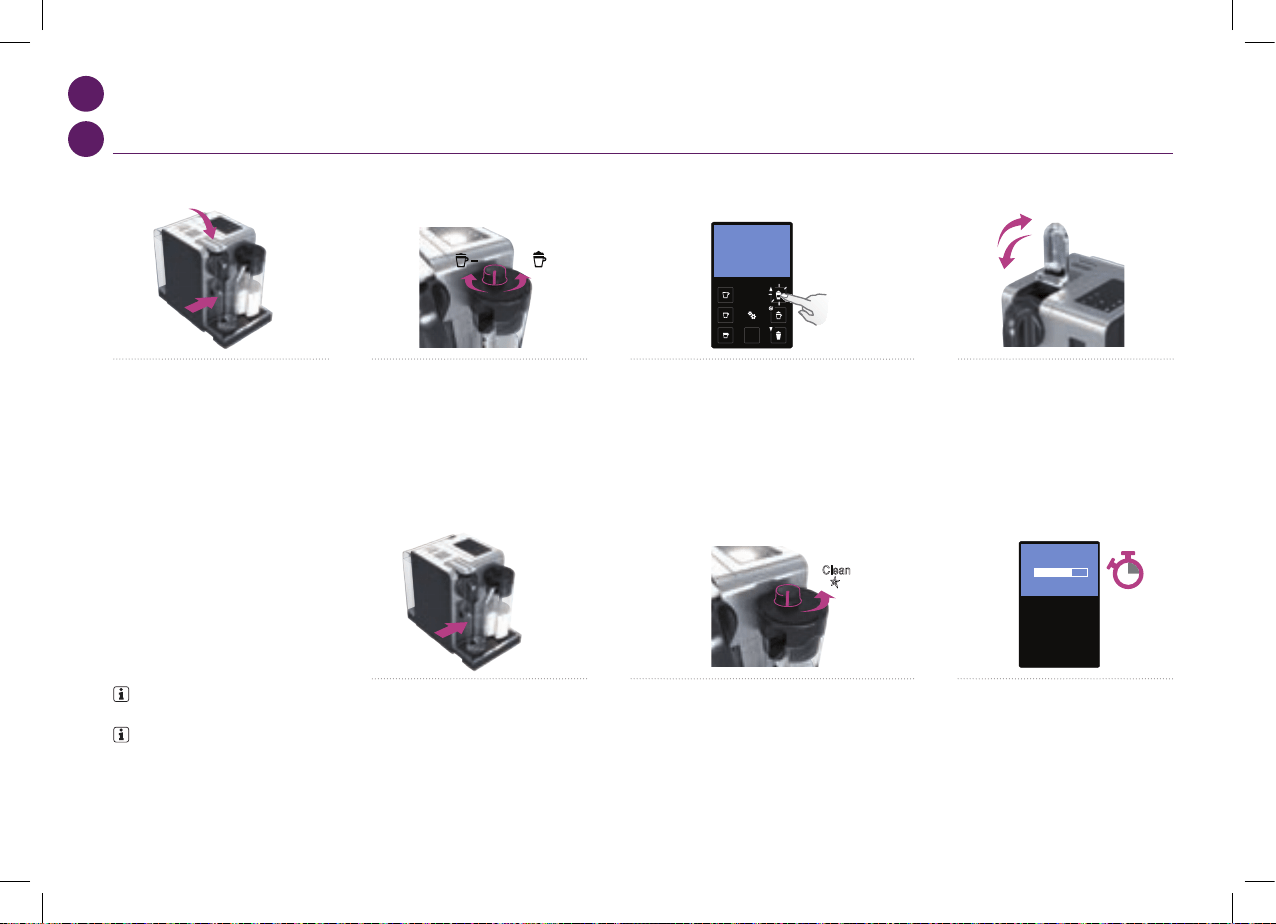
Preparing Cappuccino and Latte Macchiato
4°
i
When the milk container is empty, before refilling,
thoroughly rinse it and the milk aspiration tube
with potable water.
Close the milk container. Open the steam
connector door by sliding it to the right. Connect
the Rapid Cappuccino System to the machine.
15”
+
LATTE MACCHIATO
Clean
15”
i
Remove Rapid Cappuccino System
connector by unlocking it from (sign ) to
(sign) and pulling it off
Remove the milk container lid and
unplug milk aspiration tube.
Remove the milk froth regulator knob by
turning it until and pulling it up.
Remove the milk spout by pulling it off.
1 2 3 4
Assembling / disassembling of Rapid Cappuccino system (R.C.S)
RINSE MILK SYSTEM
07 08
CZ
HU
PŘÍPRAVA CAPPUCCINA A LATTE MACCHIATA/
CAPPUCCINO ÉS LATTE MACCHIATO KÉSZÍTÉSE
POZNÁMKA: vyčistěte mléčný
systém po každém použití.
INFORMÁCIÓ: öblítse át a
tejrendszert minden használat után.
9. Umístěte vhodnou nádobu pod mléčnou
trysku.
9. Tegyen egy edényt a tejkifolyó alá.
10. Nastavte regulátor mléčné pěny do pozice «CLEAN».
Spustí se proces čištění mléčného systému a z mléčné trysky
začne vytékat horká voda a vycházet pára.
10. Forgassa a tejhabszabályzó gombot «CLEAN» állásba.
A tejrendszer-öblítő folyamat elindul, és forró víz valamint
gőz folyik át a tejkifolyón keresztül.
11. Proces čištění trvá přibližně 15 vteřin a
bude automaticky ukončen.
11. Az öblítési folyamat körülbelül
15 másodperc, és automatikusan megáll.
5. Zavřete páku a postavte Cappuccino šálek
nebo Latte Macchiato sklenici pod výpusť
kávy a upravte pozici mléčné trysky.
5. Zárja le a kart, és helyezzen egy
Cappuccino csészét vagy Latte Macchiato
poharat a kávékifolyó alá, és állítsa be a
tejkifolyót.
6. Nastavte požadovanou hustotu mléčné
pěny regulátorem mléčné pěny.
6. Állítsa be a tejhabszabályzó gombot a
kívánt tejhabhoz.
7. Stiskněte tlačítko Cappuccino nebo Macchiato. Příprava
kávy se spustí po několika vteřinách (nejprve mléko a potom
káva) a bude automaticky ukončena.
7. Nyomja meg a Cappuccino vagy Macchiato gombot.
A főzés pár másodperc után indul (először tej, azután kávé),
és automatikusan megáll.
8. Nakonec zvedněte a zavřete páku, použitá
kapsle propadne do kontejneru na použité
kapsle.
8. A főzés után emelje fel és csukja le
a kart, hogy a kapszula beleessen a
használtkapszula-tartóba.
66
6926_UM_LATTISSIMA_PREMIUM_Z2A.indb 66 17.10.13 19:58

PRESS to confirm.
The discaling agent flows alternately
trough the coffee outlet, hot water nozzle
and drip tray.
Descaling
Descaling process: Empty the drip tray and
the used capsules container.
Rinsing process: Empty the drip
tray and the used capsules
container.
Refer to safety precautions
+
100 ml
500 ml
1 2 3
5
7 8
4
6
Lift and close the lever to eject any capsule
in the used capsule container.
Descaling process: Fill water tank with 100
ml of Nespresso descaling agent and 500ml
water.
Descaling process: Insert the hot
water spout.
Enter the Menu, browse the options and
select DESCALING. You will be guided
throughout the whole process. Follow
machine display instructions.
Descaling process: Place one container
of minimum 1 litre under both the coffee
outlet and the hot water spout.
4°
Volume factory settings
LANGUAGE
DESCALING
WATER HARDNESS
09 10
CZ
HU
PŘÍPRAVA CAPPUCCINA A LATTE MACCHIATA/
CAPPUCCINO ÉS LATTE MACCHIATO KÉSZÍTÉSE
12. Po ukončení čištění nastavte regulátor
mléčné pěny zpět do pozice «mléčná pěna».
12. Amikor az öblítés kész, forgassa a
tejhabszabályzó gombot vissza a tej állásba.
13. Odpojte R.C.S. od kávovaru a dejte do lednice. Zavřete
dvířka přípojky na páru.
13. Vegye le az R.C.S.-t a gépről, és tegye rögtön a hűtőbe.
Zárja be a gőzcsatlakozás ajtaját a gépen.
15. A umyjte všechny části v horním oddíle
myčky nádobí. V případě, že nemáte k
dispozici myčku nádobí, postupujte podle
instrukcí v sekci Ruční mytí Rapid Cappuccino
Systému (R.C.S.).
15. Tisztítsa meg minden tartozékát a
mosogatógépének felső részében. Ha nincs
mosogatógép, olvassa el a Rapid Cappuccino
System (R.C.S.) kézi tisztításáról szóló
fejezetet .
POZNÁMKA: viz sekce Smontování/Rozmontování
Rapid Cappucino Systému R.C.S.
INFORMÁCIÓ: részletek a Rapid Cappuccino System
(R.C.S) összeszerelése/szétszerelése fejezetben.
POZOR: mléko v nádobě doporučujeme v lednici skladovat max. 2 dny. V případě, že je nádoba na mléko
skladována mimo lednici déle než 2 hodiny, rozmontujte R.C.S. a vyčistěte všechny části (viz doporučení pro
mytí v myčce nádobí nebo ruční mytí).
FIGYELEM: a tejet ne tartsa 2 napnál tovább a hűtőben. Ha a tejtartályt több mint 2 órán keresztül a
hűtőn kívül tartotta, szedje szét az R.C.S.-t, és tisztítsa meg minden alkatrészét (részletek a mosogatógéppel
ill. kézi mosogatással kapcsolatos tanácsoknál).
14. Každý druhý den rozmontujte Rapid Cappuccino
Systém.
14. Két naponta szedje szét a Rapid Cappuccino System-et.
67
6926_UM_LATTISSIMA_PREMIUM_Z2A.indb 67 17.10.13 19:58
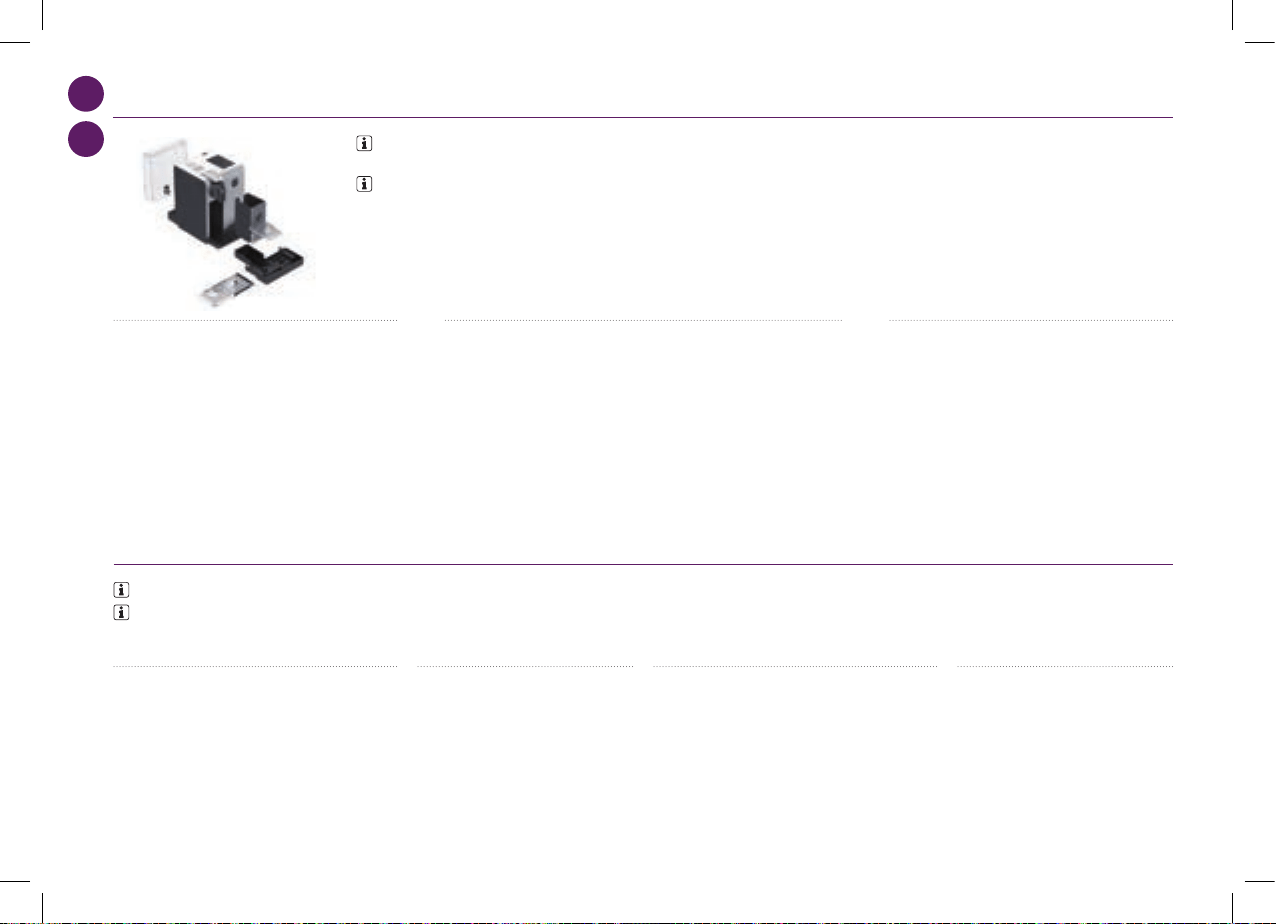
PRESS to confirm.
The discaling agent flows alternately
trough the coffee outlet, hot water nozzle
and drip tray.
Descaling
Descaling process: Empty the drip tray and
the used capsules container.
Rinsing process: Empty the drip
tray and the used capsules
container.
Refer to safety precautions
+
100 ml
500 ml
1 2 3
5
7 8
4
6
Lift and close the lever to eject any capsule
in the used capsule container.
Descaling process: Fill water tank with 100
ml of Nespresso descaling agent and 500ml
water.
Descaling process: Insert the hot
water spout.
Enter the Menu, browse the options and
select DESCALING. You will be guided
throughout the whole process. Follow
machine display instructions.
Descaling process: Place one container
of minimum 1 litre under both the coffee
outlet and the hot water spout.
4°
Volume factory settings
LANGUAGE
DESCALING
WATER HARDNESS
09 10
CZ
HU
2. Zvedněte a zavřete páku, použitá kapsle propadne do kontejneru na použité
kapsle. Postavte pod výpusť kávy vhodnou nádobu a stiskněte tlačítko Lungo. Otřete
výpusť kávy čistým vlhkým hadříkem.
2. Emelje, majd csukja le a kart hogy a kapszula beleessen a használtkapszula-
tartóba. Helyezzen egy edényt a kávékifolyó alá és nyomja meg a lungo gombot az
öblítéshez. Tisztítsa meg a kávékifolyót egy nedves ruhával.
3. Pod tekoucí pitnou vodou pečlivě opláchněte případné
nečistoty z trysky na horkou vodu. Otřete ji čistým vlhkým
hadříkem.
3. Az esetleges szennyeződést öblítse le ivóvízzel a forróvíz-
kifolyóról. Törölje meg egy tiszta ruhával.
1. Rozmontujte Rapid Cappuccino Systém. Viz sekce
«Smontování/Rozmontování Rapid Cappucino Systému
(R.C.S.)».
1. Szedje szét a Rapid Cappuccino System-et. Részletek
a Rapid Cappuccino System (R.C.S.) összeszerelése/
szétszerelése fejezetben.
2. Pod tekoucí pitnou vodou pečlivě
opláchněte případné zbytky mléka.
2. Öblítse le gondosan az esetleges
tejmaradékokat ivóvízzel.
3. Namočte všechny části alespoň na 30 minut do horké
vody (cca 40° C) s čisticím prostředkem.
3. Áztassa az alkatrészeket mosogatószeres meleg vízben
(körülbelül 40° C), legalább 30 percig.
4. Opláchněte je pod tekoucí pitnou vodou a
vysušte jemným hadříkem.
4. Öblítse el ivóvízzel, és szárítsa meg egy
tiszta ruhával.
KAŽDODENNÍ PÉČE/NAPI KARBANTARTÁS
POZNÁMKA: nepoužívejte žádný agresivní čisticí prostředek ani rozpouštědlo.Povrch kávovaru čistěte vlhkým hadříkem a jemným čisticím prostředkem.
Nemyjte žádné části kávovaru v myčce nádobí, s výjimkou Rapid Cappuccino Systému.
INFORMÁCIÓ: ne használjon erős tisztító vagy súrolószert. A gép külsejének tisztításához használjon egy nedves ruhát és enyhe tisztítószert. A gép
alkatrészeit, a Rapid Cappuccino System részeit kivéve, ne tegye mosogatógépbe.
RUČNÍ MYTÍ RAPID CAPPUCCINO SYSTÉMU R.C.S./
A RAPID CAPPUCCINO SYSTEM R.C.S. KÉZI TISZTÍTÁSA
POZNÁMKA: pokud nemáte k dispozici myčku nádobí, lze mýt části R.C.S. ručně. V tomto případě doporučujeme čištění provádět denně, aby bylo maximálně efektivní.
INFORMÁCIÓ: ha nincs mosogatógép, az R.C.S. alkatrészek kézel is tisztíthatók. Ebben az esetben ezt minden nap meg kell csinálni a maximális hatékonyság érdekében.
1. Vyjměte odkapávací misku a kontejner na použité
kapsle. Vyprázdněte je a vypláchněte. Vyjměte nádobu na
vodu. Vyprázdněte ji a vypláchněte předtím, než ji naplníte
čerstvou pitnou vodou.
1. Vegye ki a csepptálcát és a kapszulatárolót. Ürítse ki és
öblítse el. Vegye ki a víztartályt. Ürítse ki és újratöltés előtt
öblítse el friss ivóvízzel.
68
6926_UM_LATTISSIMA_PREMIUM_Z2A.indb 68 17.10.13 19:58

CZ
HU
POZNÁMKA: *kvalita mléčné pěny závisí na druhu použitého mléka, jeho teplotě a nastavení
regulátoru mléčné pěny.
MEGJEGYZÉS: *a tejhab mennyisége függ a használt tej fajtájától, hőmérsékletétől és a
tejhabszabályzó gomb állásától.
POZNÁMKA: doporučujeme dodržet tovární nastavení na Ristretto, Espresso a Lungo, pro
zachování dokonalé chuti a aroma v šálku.
MEGJEGYZÉS: javasoljuk a gyári beállítások megtartását a Ristretto, Espresso és Lungo gombokhoz a
legideálisabb kávéminőség elérése érdekében.
Objem vody lze naprogramovat na 50 až 400 ml.
Objem mléka lze naprogramovat na 30 až 200 ml.
Objem kávy lze naprogramovat na 25 až 200 ml.
A vízmennyiség 50 és 400 ml között programozható.
A tejmennyiség 30 és 200 ml között programozható.
A kávémennyiség 25 és 200 ml között programozható.
TOVÁRNÍ NASTAVENÍ/
MENNYISÉGEK GYÁRI BEÁLLÍTÁSA
Ristretto 25 ml
Ristretto 25 ml
Cappuccino Mléko*: 50 ml/Káva: 40 ml
Cappuccino Tej*: 50 ml/Kávé: 40 ml
Lungo 110 ml
Lungo 110 ml
Latte Macchiato Mléko*: 150 ml/Káva: 40 ml
Latte Macchiato Melk*: 150 ml/Kávé: 40 ml
Espresso 40 ml
Espresso 40 ml
Horká voda 125 ml
Forró víz 125 ml
Teplé Mléko* 120 ml
Meleg Tej* 120 ml
POZOR: pokud je objem kávy nastaven na více než 150 ml,
nechte kávovar 5 minut vychladnout, před přípravou další kávy.
Nebezpečí přehřátí!
FIGYELEM: ha 150ml-nél nagyobb kávémennyiséget állít be,
hagyja a gépet 5 percig hűlni mielőtt újra kávét főzne, különben
fennáll a túlmelegedés veszélye.
69
6926_UM_LATTISSIMA_PREMIUM_Z2A.indb 69 17.10.13 19:58
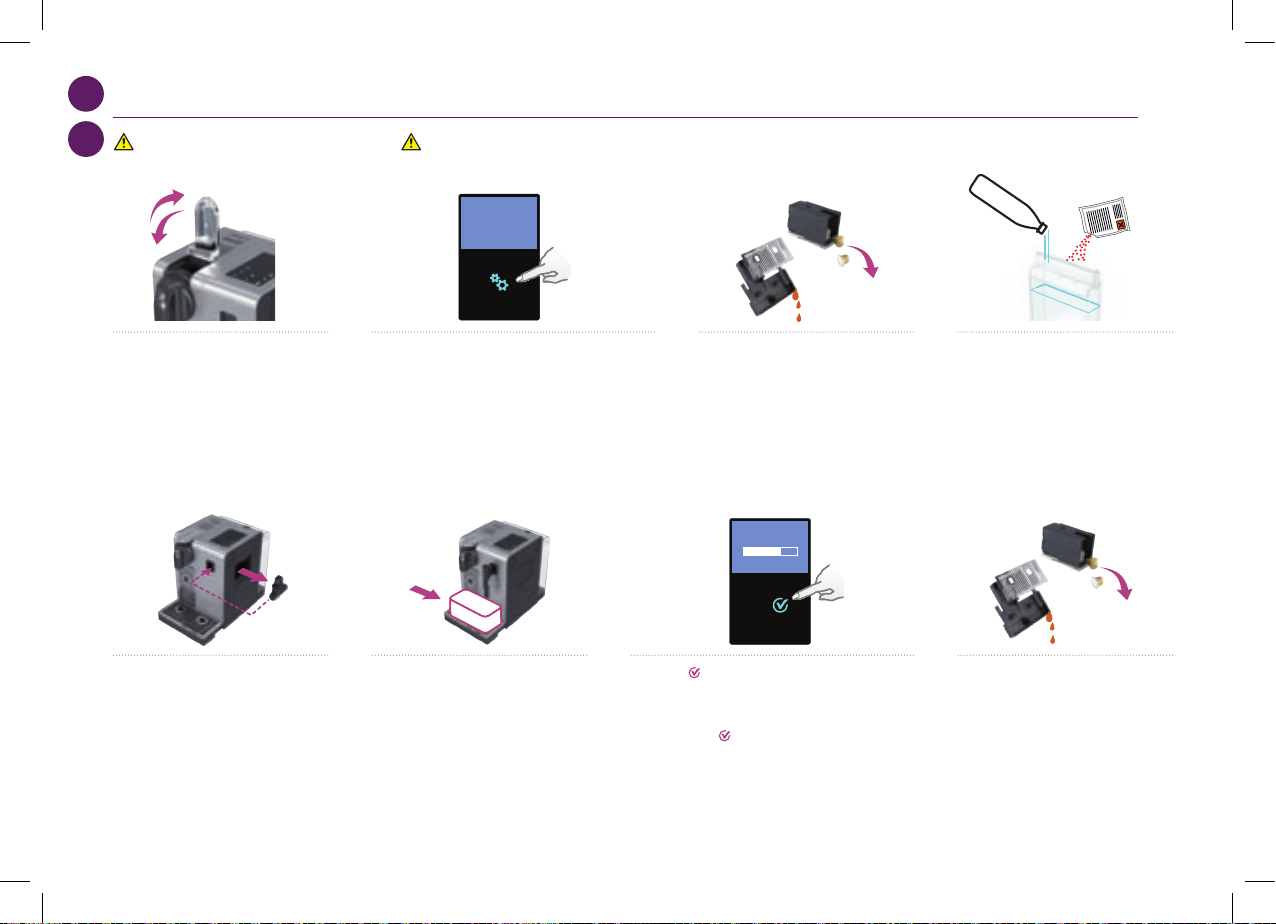
+
100 ml
500 ml
10
+
100 ml
500 ml
10
+
100 ml
500 ml
10
+
100 ml
500 ml
10
+
100 ml
500 ml
10
+
100 ml
500 ml
10
+
100 ml
500 ml
10
+
100 ml
500 ml
10
CZ
HU
ODVÁPNĚNÍ/VÍZKŐMENTESÍTÉS
1. Zvedněte a zavřete páku, použitá kapsle
propadne do kontejneru na použité kapsle.
1. Emelje, majd csukja le a kart hogy a
kapszula beleessen a használtkapszula-
tartóba.
2. Vstupte do Menu, projděte možnosti a vyberte
ODVÁPNĚNÍ. Budete provedeni procesem odvápnění.
Postupujte podle pokynů na displeji.
2. Lépjen be a menübe, és válassza ki a VÍZKŐTELENÍTÉS
opciót. A készülék végigvezeti Önt a beállításon. Kövesse a
gép utasításait.
POZOR: viz Bezpečnostní pokyny. FIGYELEM: olvassa el a biztonsági előírásokat.
7. Stiskněte pro potvrzení. Odvápňovací roztok vytéká
střídavě z výpusti kávy, trysky na horkou vodu a odkapávací
misky.
7. Nyomja meg az
-t a jóváhagyáshoz.
A vízkőmentesítő szer váltakozva folyik át a kávékifolyón a
forróvíz-kifolyón és a csepptálcába.
5. Proces odvápnění: nasaďte trysku na
horkou vodu.
5. Vízkőmentesítő folyamat: tegye fel a
forróvíz-kifolyót.
6. Proces odvápnění: postavte nádobu o
objemu min. 1 l pod výpusť kávy a trysku na
horkou vodu.
6. Vízkőmentesítő folyamat: tegyen egy
legalább 1 literes edényt mind a kávékifolyó,
mind a forróvíz-kifolyó alá.
3. Proces odvápnění: vyprázdněte
odkapávací misku a kontejner na použité
kapsle.
3. Vízkőmentesítő folyamat: ürítse ki a
csepptálcát és a használtkapszula-tartót.
4. Proces odvápnění: naplňte nádobu
na vodu 100 ml Nespresso odvápňovacího
prostředku a 500 ml pitné vody.
4. Vízkőmentesítő folyamat: töltsön
a víztartályba 100 ml-t a Nespresso
vízkőmentesítő szerből és 500 ml ivóvizet.
8. Proces odvápnění: vyprázdněte
odkapávací misku a kontejner na použité
kapsle. Vypláchněte je pitnou vodou.
8. Öblítési folyamat: ürítse ki a csepptálcát
és a használtkapszula-tartót. Öblítse át
ivóvízzel.
70
6926_UM_LATTISSIMA_PREMIUM_Z2A.indb 70 17.10.13 19:58

max
1”
1
2
3
4
5
11
max
1”
1
2
3
4
5
11
max
1”
1
2
3
4
5
11
max
1”
1
2
3
4
5
11
max
1”
1
2
3
4
5
11
max
1”
1
2
3
4
5
11
max
1”
1
2
3
4
5
11
max
1”
1
2
3
4
5
11
CZ
HU
ODVÁPNĚNÍ/VÍZKŐMENTESÍTÉS
2. Ponořte testovací proužek na 1 vteřinu
do vody.
2. Tegye a vízkeménység mérő csíkot
1 másodpercre víz alá.
11. Stiskněte pro potvrzení. Cyklus oplachování
pokračuje střídavě z výpusti kávy, trysky na horkou vodu a
odkapávací misky, dokud se nádoba na vodu nevyprázdní.
11. Nyomja meg az
-t a jóváhagyáshoz. Az öblítés
váltakozva folyik át a kávékifolyón a forróvíz-kifolyón
valamint a csepptálcába, amíg a víztartály ki nem ürül.
3. Počet červených políček udává stupeň
tvrdosti vody.
3. A piros négyzetek száma mutatja a
vízkeménység szintjét.
12. Jakmile je proces oplachování dokončen, kávovar
se vypne. Opláchněte trysku na horkou vodu a vysušte
ji jemným hadříkem. Dokončili jste odvápnění svého
kávovaru.
12. Amint az öblítési folyamatnak vége, a készülék
kikapcsol. Öblítse el majd törölje meg a kávékifolyót egy
nedves ruhával. A készülék vízkőmentesítése kész.
4. Nastavte tvrdost vody odpovídající
hodnoty.
4. Állítsa be az értéket ennek megfelelően.
NASTAVENÍ TVRDOSTI VODY/VÍZKEMÉNYSÉG BEÁLLÍTÁSA
1. Vstupte do Menu, projděte možnosti a vyberte
TVRDOST VODY. Budete provedeni nastavením tvrdosti
vody. Postupujte podle pokynů na displeji.
1. Lépjen be a menübe, és válassza ki a VÍZKEMÉNYSÉG
opciót. A készülék végigvezeti Önt a beállításon. Kövesse a
gép utasításait.
9. Proces odvápnění: vypláchněte nádobu
na vodu a naplňte ji pitnou vodou po rysku
MAX.
9. Öblítési folyamat: öblítse ki és töltse meg
a maximumig vízzel a víztartályt.
10. Proces odvápnění: postavte nádobu o
objemu min. 1 l pod výpusť kávy a trysku na
horkou vodu.
10. Öblítési folyamat: tegyen egy legalább
1 literes edényt mind a kávékifolyó, mind a
forróvíz-kifolyó alá.
71
6926_UM_LATTISSIMA_PREMIUM_Z2A.indb 71 17.10.13 19:58

CZ
HU
ODSTRAŇOVÁNÍ ZÁVAD
Displej nesvítí.
➔
Zkontrolujte připojení k síti, zástrčku, napětí a pojistky. Stiskněte tlačítko ON umístěné za
displejem. V případě problémů kontaktujte Nespresso Club.
Kávovar je přehřátý - zpráva na displeji.
➔
Za určitých podmínek dosahuje termostat kávovaru vysoké teploty (např. po vypuštění
vody z kávovaru). Počkejte, kávovar vychladne.
Káva vytéká velmi pomalu.
➔
Rychlost průtoku vody závisí na druhu zvolené kávy.
➔ Pokud je to nutné, kávovar odvápněte; viz sekce odvápnění.
Káva není dostatečně horká.
➔
Nahřejte šálek.
➔ Pokud je to nutné, kávovar odvápněte; viz sekce odvápnění.
Hlava kávovaru netěsní (voda v kontejneru na použité
kapsle).
➔
Vložte správně kapsli. Pokud problém přetrvává, kontaktujte Nespresso Club.
Kávovar nepravidelně bliká.
➔
Kontaktujte Nespresso Club.
Vytéká pouze voda (ačkoli je vložena kapsle).
➔
V případě problémů kontaktujte Nespresso Club.
Páku nelze zcela zavřít.
➔
Vyprázdněte kontejner na použité kapsle. Ujistěte se, že není zablokovaná kapsle v hlavě
kávovaru.
Kvalita mléčné pěny není obvyklá.
➔
Pro optimální mléčnou pěnu používejte plnotučné nebo polotučné vychlazené mléko (o
teplotě 4° C).
➔
Vyčistěte mléčný systém po každém použití. Umístěte vhodnou nádobu pod mléčnou
trysku. Nastavte regulátor mléčné pěny do pozice «CLEAN».
➔
Každý druhý den rozmontujte Rapid Cappuccino Systém a umyjte všechny části v horním
oddíle myčky nádobí.
Kávovar vyžaduje opravu - zpráva na displeji.
➔
Kontaktujte Nespresso Club.
72
6926_UM_LATTISSIMA_PREMIUM_Z2A.indb 72 17.10.13 19:58
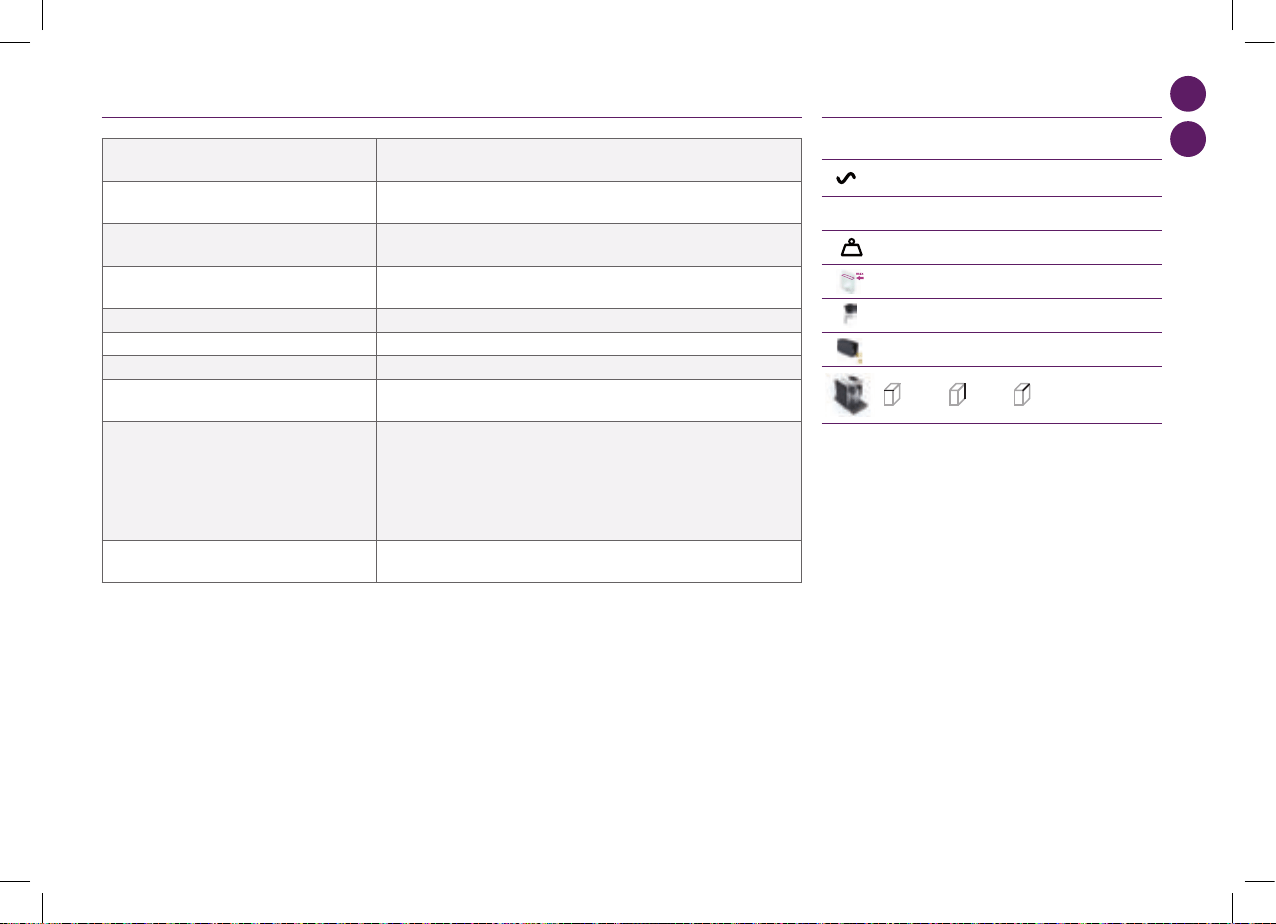
CZ
HU
HIBAELHÁRÍTÁS
Milk Premium
EUR,AUS,NZ: 220240 V, 50/60 Hz, 1300 W
US/CA: 120 V, 60 Hz, 1200 W
19 bar
6.5 kg
1,38 litre
500 ml
13-16 capsules
l=19,4 cm . L=33,2 cm . h=27,4 cm
Troubleshooting
Contact the Nespressso Club
For any additional information, in case of problems
or simply to seek advise, call the Nespresso Club.
Contact details of the Nespresso Club can be found
in the 'Welcome to Nespresso' folder in your
machine box or at nespresso.com
No light on display
Check the mains, plug, voltage, and fuse. In case of problems, call the Nespresso Club.
Coffee comes out very slowly.
Flow speed depends on the coffee variety.
Perform a self check of the machine. Enter the menu list and select Maintenance. Follow instruction
Coffee is not hot enough.
Preheat cup.
Perform a self check of the machine. Enter the menu list and select Maintenance. Follow instruction
Capsule area is leaking (water in capsule container).
Position capsule correctly. If leakages occur, call the Nespresso Club.
Irregular blinking.
Send appliance to repair or call the Nespresso Club.
No coffee, just water runs out (despite inserted capsule).
In case of problems, call the Nespresso Club.
Lever cannot be closed completely
Empty capsule container. Make sure that no capsule is blocked inside the capsule container.
Quality of milk froth is not up to standard
1) For a perfect milk froth, use skimmed or semi-skimmed milk at refrigerator temperature (about 4° C)
2) Rinse after each milk based preparation. Place a recipient under milk outlet, rotate the milk
regulator knob until “CLEAN” position.
3) Every two days, disassemble the R. C. S. and clean all components in the upper level of a
dishwasher
Warranty
Delonghi warrants this product against defects in materials and workmanship for a period of two years from the date of purchase. During this period, Delonghi will either repair or
replace, at its discretion, any defective product at no charge to the owner. Replacement products or repaired parts will be guaranteed for only the unexpired portion of the original
warranty or six months, whichever is greater. This limited warranty does not apply to any defect resulting from accident, misuse, improper maintenance, or normal wear and tear. Any
defect resulting from the usage of non genuine Nespresso capsules will not be covered by this warranty. Except to the extent allowed by applicable law, the terms of this limited warranty
do not exclude, restrict
or modify, and are in addition to, the mandatory statutory rights applicable to the sale of the product to you. If you believe your product is defective, contact Nespresso for instructions on
where to send or bring it for repair. Please visit our website at nespresso.com to discover more about Nespresso
Specifications
P
max
Once the rinsing process is finished, the
machine switches off. Clean the machine
using a damp cloth. You have now finished
descaling the machine.
9
10
11 12
Rinsing process Rinse and fill water with
fresh potable water up to MAX level.
Rinsing process Place one container of
minimum 1 litre under both the coffee
outlet and the hot water spout.
PRESS to confirm.
The rinsing cycle continues trough the coffee
outlet, hot water spout and drip tray until the
water tank is empty.
Water hardness setting
1
programmed buttons blinks 3 times: water hardness is set
i
1”
2 3 4
1
2
3
4
5
Place the water hardness sticker under
water for 1 second.
The number of red squares indicates
the water harness level.
Set the value accordinglyEnter the menu, browse the options and select
WATER HARDNESS.
You will be guided to set the value.
Follow machine display instructions.
max
max
Kg
11 12
EUR, AUS, NZ: 220-240 V, 50/60 Hz, 1400 W
EUR,AUS,NZ: 220240 V, 50/60 Hz, 1300 W
US/CA: 120 V, 60 Hz, 1200 W
19 bar
6.5 kg
1,38 litre
500 ml
13-16 capsules
l=19,4 cm . L=33,2 cm . h=27,4 cm
Troubleshooting
Contact the Nespressso Club
For any additional information, in case of problems
or simply to seek advise, call the Nespresso Club.
Contact details of the Nespresso Club can be found
in the 'Welcome to Nespresso' folder in your
machine box or at nespresso.com
No light on display
Check the mains, plug, voltage, and fuse. In case of problems, call the Nespresso Club.
Coffee comes out very slowly.
Flow speed depends on the coffee variety.
Perform a self check of the machine. Enter the menu list and select Maintenance. Follow instruction
Coffee is not hot enough.
Preheat cup.
Perform a self check of the machine. Enter the menu list and select Maintenance. Follow instruction
Capsule area is leaking (water in capsule container).
Position capsule correctly. If leakages occur, call the Nespresso Club.
Irregular blinking.
Send appliance to repair or call the Nespresso Club.
No coffee, just water runs out (despite inserted capsule).
In case of problems, call the Nespresso Club.
Lever cannot be closed completely
Empty capsule container. Make sure that no capsule is blocked inside the capsule container.
Quality of milk froth is not up to standard
1) For a perfect milk froth, use skimmed or semi-skimmed milk at refrigerator temperature (about 4° C)
2) Rinse after each milk based preparation. Place a recipient under milk outlet, rotate the milk
regulator knob until “CLEAN” position.
3) Every two days, disassemble the R. C. S. and clean all components in the upper level of a
dishwasher
Warranty
Delonghi warrants this product against defects in materials and workmanship for a period of two years from the date of purchase. During this period, Delonghi will either repair or
replace, at its discretion, any defective product at no charge to the owner. Replacement products or repaired parts will be guaranteed for only the unexpired portion of the original
warranty or six months, whichever is greater. This limited warranty does not apply to any defect resulting from accident, misuse, improper maintenance, or normal wear and tear. Any
defect resulting from the usage of non genuine Nespresso capsules will not be covered by this warranty. Except to the extent allowed by applicable law, the terms of this limited warranty
do not exclude, restrict
or modify, and are in addition to, the mandatory statutory rights applicable to the sale of the product to you. If you believe your product is defective, contact Nespresso for instructions on
where to send or bring it for repair. Please visit our website at nespresso.com to discover more about Nespresso
Specifications
P
max
Once the rinsing process is finished, the
machine switches off. Clean the machine
using a damp cloth. You have now finished
descaling the machine.
9
10
11 12
Rinsing process Rinse and fill water with
fresh potable water up to MAX level.
Rinsing process Place one container of
minimum 1 litre under both the coffee
outlet and the hot water spout.
PRESS to confirm.
The rinsing cycle continues trough the coffee
outlet, hot water spout and drip tray until the
water tank is empty.
Water hardness setting
1
programmed buttons blinks 3 times: water hardness is set
i
1”
2 3 4
1
2
3
4
5
Place the water hardness sticker under
water for 1 second.
The number of red squares indicates
the water harness level.
Set the value accordinglyEnter the menu, browse the options and select
WATER HARDNESS.
You will be guided to set the value.
Follow machine display instructions.
max
max
Kg
11 12
Max. 19 barů/bar
EUR,AUS,NZ: 220240 V, 50/60 Hz, 1300 W
US/CA: 120 V, 60 Hz, 1200 W
19 bar
6.5 kg
1,38 litre
500 ml
13-16 capsules
l=19,4 cm . L=33,2 cm . h=27,4 cm
Troubleshooting
Contact the Nespressso Club
For any additional information, in case of problems
or simply to seek advise, call the Nespresso Club.
Contact details of the Nespresso Club can be found
in the 'Welcome to Nespresso' folder in your
machine box or at nespresso.com
No light on display
Check the mains, plug, voltage, and fuse. In case of problems, call the Nespresso Club.
Coffee comes out very slowly.
Flow speed depends on the coffee variety.
Perform a self check of the machine. Enter the menu list and select Maintenance. Follow instruction
Coffee is not hot enough.
Preheat cup.
Perform a self check of the machine. Enter the menu list and select Maintenance. Follow instruction
Capsule area is leaking (water in capsule container).
Position capsule correctly. If leakages occur, call the Nespresso Club.
Irregular blinking.
Send appliance to repair or call the Nespresso Club.
No coffee, just water runs out (despite inserted capsule).
In case of problems, call the Nespresso Club.
Lever cannot be closed completely
Empty capsule container. Make sure that no capsule is blocked inside the capsule container.
Quality of milk froth is not up to standard
1) For a perfect milk froth, use skimmed or semi-skimmed milk at refrigerator temperature (about 4° C)
2) Rinse after each milk based preparation. Place a recipient under milk outlet, rotate the milk
regulator knob until “CLEAN” position.
3) Every two days, disassemble the R. C. S. and clean all components in the upper level of a
dishwasher
Warranty
Delonghi warrants this product against defects in materials and workmanship for a period of two years from the date of purchase. During this period, Delonghi will either repair or
replace, at its discretion, any defective product at no charge to the owner. Replacement products or repaired parts will be guaranteed for only the unexpired portion of the original
warranty or six months, whichever is greater. This limited warranty does not apply to any defect resulting from accident, misuse, improper maintenance, or normal wear and tear. Any
defect resulting from the usage of non genuine Nespresso capsules will not be covered by this warranty. Except to the extent allowed by applicable law, the terms of this limited warranty
do not exclude, restrict
or modify, and are in addition to, the mandatory statutory rights applicable to the sale of the product to you. If you believe your product is defective, contact Nespresso for instructions on
where to send or bring it for repair. Please visit our website at nespresso.com to discover more about Nespresso
Specifications
P
max
Once the rinsing process is finished, the
machine switches off. Clean the machine
using a damp cloth. You have now finished
descaling the machine.
9
10
11 12
Rinsing process Rinse and fill water with
fresh potable water up to MAX level.
Rinsing process Place one container of
minimum 1 litre under both the coffee
outlet and the hot water spout.
PRESS to confirm.
The rinsing cycle continues trough the coffee
outlet, hot water spout and drip tray until the
water tank is empty.
Water hardness setting
1
programmed buttons blinks 3 times: water hardness is set
i
1”
2 3 4
1
2
3
4
5
Place the water hardness sticker under
water for 1 second.
The number of red squares indicates
the water harness level.
Set the value accordinglyEnter the menu, browse the options and select
WATER HARDNESS.
You will be guided to set the value.
Follow machine display instructions.
max
max
Kg
11 12
~ 6.5 kg
1.3 litry/liter
0.5 litrů/liter
13-16 kapslí/kapszula
19.4 cm 27.4 cm 33.2 cm
SPECIFIKACE/MŰSZAKI ADATOK
Nincs fény a kijelzőn.
➔
Ellenőrizze az áramot, csatlakozót, feszültséget és a biztosítékot. Nyomja meg az ON
gombot a kijelző mögött. Probléma esetén hívja a Nespresso Club-ot.
«A készülék túl forró» üzenet a kijelzőn.
➔
Bizonyos esetekben (pl. a gép kiürítése után) a készülék felhevülhet. Várjon egy kicsit, a
készülék automatikusan le fog hűlni.
A kávé nagyon lassan folyik ki.
➔
A folyás sebessége függ a kávé fajtájától.
➔ Vízkőmentesítse ha szükséges; lásd a vízkőmentesítés fejezetet.
A kávé nem elég meleg.
➔
Melegítse elő a csészét.
➔ Vízkőmentesítse ha szükséges; lásd a vízkőmentesítés fejezetet.
A kapszula-terület ereszt (víz van a kapszulakukában).
➔
Helyezze be megfelelően a kapszulát. Ha szivárgást tapasztal, hívja a Nespresso Club-ot.
Rendszertelen villogás.
➔
Küldje a készüléket javításra, vagy hívja a Nespresso Club-ot.
Kávé nem, csak víz folyik ki (bár van behelyezve kapszula).
➔
Probléma esetén hívja a Nespresso Club-ot.
A kart nem lehet teljesen lezárni.
➔
Ürítse ki a használtkapszula-tartót. Ellenőrizze, hogy nem ragadt-e egy kapszula a
használtkapszula-tartóban.
A tejhab minősége nem megfelelő.
➔
A legjobb tejhabhoz használjon alacsony zsírtartalmú, vagy félzsíros, hűtőhideg
(k.b. 4° C) tejet.
➔
Öblítse el minden tejes recept készítése után. Tegyen egy edényt a tejkifolyó alá,
és forgassa a tejhabszabályzó gombot «CLEAN» állásba.
➔
Két naponta szedje szét az R.C.S.-t, és tisztítsa meg az alkatrészeket a mosogatógépének
felső részében.
«Készülék javításra szorul» üzenet a kijelzőn.
➔
Vegye fel a kapcsolatot a Nespresso Club-bal, vagy a Nespresso hivatalos képviselőjével a
bevizsgáláshoz, javításhoz vagy beállításhoz.
73
6926_UM_LATTISSIMA_PREMIUM_Z2A.indb 73 17.10.13 19:58

CZ
HU
Pokud požadujete jakékoli dodatečné informace, chcete využít poradenství, nebo v případě problémů, kontaktujte Nespresso Club.
Kontaktní údaje Nespresso Clubu jsou uvedeny v «Uvítacích deskách Nespresso» v krabici vašeho přístroje nebo na www.nespresso.com.
Bármilyen kiegészítő információért, tanácsért, vagy ha problémát tapasztal, hívja a Nespresso Club-ot.
A Nespresso Club elérhetőségeit a gép dobozában lévő, «Üdvözöljük a Nespresso Club-ban» mappában, vagy a nespresso.com honlapon találja.
KONTAKTUJTE NESPRESSO CLUB/LÉPJEN KAPCSOLATBA A NESPRESSO CLUBBAL
ZÁRUČNÍ PODMÍNKY/GARANCIA
LIKVIDACE ODPADU A OCHRANA ŽIVOTNÍHO PROSTŘEDÍ/
ÁRTALMATLANÍTÁSI ÉS KÖRNYEZETVÉDELMI ELŐÍRÁSOK
Likvidace odpadu a Ochrana životního prostředí
Váš přístroj je vyroben z hodnotných surovin, které mohou být obnoveny nebo recyklovány. Třídění odpadu na jednotlivé druhy usnadňuje recyklaci cenných surovin. Odevzdejte přístroj do sběrného místa. Informace o likvidaci
odpadu obdržíte od místních správních orgánů.
Ártalmatlanítás és környezetvédelem
A készülékben értékes, összegyűjthető vagy újrahasznosítható anyagok találhatók. A szelektív hulladékgyűjtés lehetővé teszi az értékes nyersanyagoknak az újrahasznosítását. Adja le a készüléket egy gyűjtőhelyen.
Az ártalmatlanítás módjáról a helyi hatóságoktól kaphat információkat.
De’Longhi poskytuje u tohoto produktu záruku na vady materiálu a práce po dobu dvou let od data nákupu. Během tohoto období vám společnost De’Longhi opraví nebo nahradí, dle vlastního uvážení, jakýkoli vadný produkt
bez dalších nákladů pro majitele. Náhradní produkty nebo opravené části budou mít záruku po dobu zbylé části původní záruky nebo po dobu šesti měsíců, podle toho, které období je delší. Tato záruka neplatí na vady
způsobené nehodou, špatným používáním, nevhodnou údržbou, nebo běžným opotřebením. Kromě rozsahu, denovaného platným zákonem, tyto záruční podmínky nevylučují, neomezují ani neupravují povinná statutární
práva, platná pro prodej produktu a jsou jejich rozšířením. Pokud jste přesvědčeni, že tento produkt je vadný, kontaktujte společnost De’Longhi ohledně pokynů pro zaslání nebo odevzdání přístroje do opravy. Na vady a
poruchy způsobené použitím jiných, než originálních Nespresso kapslí se tato záruka nevztahuje.
A De’Longhi készülékgaranciája anyaghibára és gyártási hibára terjed ki a vásárlásától számított két évig. A garancia ideje alatt a De’Longhi saját döntése szerint díjmentesen megjavítja vagy kicseréli a hibás termékeket.
A kijavított termék garanciája az eredeti garanciából hátralévő időre, vagy 6 hónapra érvényes (amelyik több). A korlátozott garancia nem érvényes akkor, ha a meghibásodás baleset, nem rendeltetésszerű használat, nem
megfelelő karbantartás vagy a rendeltetésszerű használatból fakadó elhasználódás miatt következik be. A korlátozott garancia feltételei nem zárják ki, korlátozzák vagy módosítják az Önre – a termék megvásárlásával
megszerzett – kötelező érvényű, törvényerejű jogokat, hanem azok kiegészítéseként szolgálnak. Ha úgy véli, hogy terméke hibás, forduljon a De’Longhi ügyfélszolgálatához, ahol tájékoztatják arról, hova küldje vagy vigye a
javítandó készüléket. Ez a garancia nem érvényes olyan kár esetén, mely nem eredeti Nespresso kapszula használatából eredeztethető.
74
6926_UM_LATTISSIMA_PREMIUM_Z2A.indb 74 17.10.13 19:58

CZ
HU
75
6926_UM_LATTISSIMA_PREMIUM_Z2A.indb 75 17.10.13 19:58

NL
GR
OVERZICHT/ΕΠΙΣΚΟΠΗΣΗ
Display (bereidingen)/
Οθόνη (δυνατότητε
παρασκευή)
13
Lungo/Lungo
14
Espresso/Espresso
15
Ristretto/Ristretto
16
Heet water/Ζεστό νερό
17
Warme melk/Ζεστό γάλα
18
Cappuccino/Cappuccino
19
Latte Macchiato/Latte Macchiato
Display (navigatie)/
Οθόνη (πλοήγηση)
20
Menu/Μενού
21
Omhoog scrollen als menu is ingeschakeld
/
Κύλιση πάνω όταν η λειτουργία Μενού
ενεργοποιείται
22
Opties selecteren als menu is ingeschakeld/
Επιλογή υνατοτήτων όταν η λειτουργία Μενού
ενεργοποιείται
23
Omlaag scrollen als menu is ingeschakeld
/
Κύλιση Κάτω όταν η λειτουργία Μενού
ενεργοποιείται
24
Tekst weergeven/Εφάνιση κειένου
Rapid Cappuccino System (R.C.S.)/
Σύστηα Ταχεία Παρασκευή
Cappuccino (R.C.S.)
25
Regelknop melkschuim/Περιστρεφόενο κουπί ρύθιση
Αφρού Γάλακτο
26
Invoegpositie voor regelknop melkschuim/
Επιλέξτε τη θέση για τον ιακόπτη ρύθιση αφρού γάλακτο
27
Min. schuim/Ελάχ. αφρό
28
Max. schuim/Μεγ. αφρό
29
«REINIGEN»: automatische reinigingsfunctie/
«ΚΑΘΑΡΙΣΜΟΣ»: aυτόατη λειτουργία ξεπλύατο
30
Klep melkreservoir/Καπάκι δοχείου γάλακτο
31
Melkuitloop/Στόιο εκροή γάλακτο
32
Melkreservoir/οχείο γάλακτο
33
Melkaanvoerbuisje/Σωλήνα απορρόφηση γάλακτο
34
R.C.S.-connector/Στοιχείο σύνδεση R.C.S.
Overzicht van de machine/
Επισκόπηση τη ηχανή
A
Machine in de conguratie voor alleen koe/
Μηχανή ε διάταξη όνο για παρασκευή καφέ
B
Machine met Rapid Cappuccino System (voor Cappuccino)/
Μηχανή ε Σύστηα Ταχεία Παρασκευή Cappuccino (για
Cappuccino)
C
Machine met heetwateruitloop/Μηχανή ε στόιο ζεστού νερού
1
Capsuleklem/Μοχλό
2
AAN/UIT-knop/Κουπί ON/OFF
3
Watertank/οχείο νερού
4
Koe-uitloop/Στόιο εκροή καφέ
5
Lekrooster/Σχάρα αποστράγγιση
6
Lekbak/ίσκο αποστράγγιση
7
Draaiende kopjesondersteuning (niet verwijderbaar)/
Κινούενη βάση κουπών (δεν αφαιρείται)
8
Reservoir voor gebruikte capsules/
οχείο χρησιοποιηένων καψουλών
9
Stoomaansluitingsklep/Θύρα συνδέσου ατού
10
Telescopische heetwateruitloop/Τηλεσκοπικό στόιο ζεστού
νερού
11
Heetwateruitloop opslag/Χώρο φύλαξη ζεστού νερού
12
Stoomaansluiting/Σύνδεσο ατού
76
6926_UM_LATTISSIMA_PREMIUM_Z2A.indb 76 17.10.13 19:58

NL
GR
INHOUD/ΠΕΡΙΕΧΟΜΕΝΑ
Nespresso, een exclusief systeem om keer op keer de perfecte Espresso te maken. Alle Nespresso machines zijn voorzien van een uniek gepatenteerd extractiesysteem met een gegarandeerde zeer hoge druk (tot 19 bar).
Elke parameter is met grote precisie berekend om ervoor te zorgen dat alle aroma’s van elke Grand Cru kunnen worden geëxtraheerd, waardoor ze body krijgen en een onvergelijkbaar dicht en romig crema wordt gevormd.
Nespresso, ένα αποκλειστικό σύστηα για να δηιουργείτε τον τέλειο Espresso, κάθε φορά. Όλε οι ηχανέ Nespresso είναι εξοπλισένε ε ένα αποκλειστικό σύστηα εκχύλιση που εγγυάται πίεση έω και 19 bar. Κάθε
παράετρο έχει υπολογιστεί ε εγάλη ακρίβεια εξασφαλίζοντα ότι όλα τα αρώατα κάθε Εκλεκτή Ποικιλία πορούν να απελευθερωθούν χαρίζοντα στον καφέ σώα και δηιουργώντα ία εξαιρετικά παχιά και βελούδινη
κρέα.
RAPID CAPPUCCINO SYSTEM R.C. S. MET DE HAND AFWASSEN/ΠΛΥΣΙΜΟ ΣΤΟ
ΧΕΡΙ ΤΟΥ ΣΥΣΤΗΜΑΤΟΣ ΤΑΧΕΙΑΣ ΠΑΡΑΣΚΕΥΗΣ CAPPUCCINO R.C.S. ..............
FABRIEKSINSTELLINGEN VOLUME/ΕΡΓΟΣΤΑΣΙΑΚΕΣ ΡΥΘΜΙΣΕΙΣ ΟΣΟΛΟΓΙΑΣ ..
ONTKALKEN/ΑΦΑΙΡΕΣΗ ΚΑΘΑΛΑΤΣΕΝ ......................................................
WATERHARDHEID INSTELLEN/ΡΥΘΜΙΣΗ ΣΚΛΗΡΟΤΗΤΑΣ ΝΕΡΟΥ ......................
STORINGEN OPSPOREN EN VERHELPEN/ΑΝΤΙΜΕΤΠΙΣΗ ΠΡΟΒΛΗΜΑΤΝ ........
SPECIFICATIES/ΤΕΧΝΙΚΑ ΧΑΡΑΚΤΗΡΙΣΤΙΚΑ ....................................................
AFVOEREN EN MILIEU/
ΙΑΘΕΣΗ ΑΠΟΡΡΙΜΜΑΤΝ ΚΑΙ ΠΕΡΙΒΑΛΛΟΝΤΙΚΗ ΜΕΡΙΜΝΑ ..........................
CONTACT OPNEMEN MET DE NESPRESSO CLUB/
ΕΠΙΚΟΙΝΝΙΑ ΜΕ ΤΟ NESPRESSO CLUB ...........................................................
GARANTIE/ΕΓΓΥΗΣΗ .....................................................................................
OVERZICHT/ΕΠΙΣΚΟΠΗΣΗ .................................................................................
INHOUD VERPAKKING/ΠΕΡΙΕΧΟΜΕΝΑ ΣΥΣΚΕΥΑΣΙΑΣ ..........................................
MENUNAVIGATIE/ΠΛΟΗΓΗΣΗ ΣΤΟ ΜΕΝΟΥ..........................................................
MENULIJST/ΛΙΣΤΑ ΜΕΝΟΥ .................................................................................
EERSTE GEBRUIK OF NA EEN LANGE PERIODE VAN NIETGEBRUIK/
ΠΡΤΗ ΧΡΗΣΗ ΜΕΤΑ ΑΠΟ ΜΕΓΑΛΗ ΠΕΡΙΟΟ ΑΧΡΗΣΙΑΣ ......................................
KOFFIE MAKEN/ΠΑΡΑΣΚΕΥΗ ΚΑΦΕ ....................................................................
RAPID CAPPUCCINO SYSTEM R.C.S. MONTEREN/DEMONTEREN/
ΣΥΝΑΡΜΟΛΟΓΗΣΗ/ΑΠΟΣΥΝΑΡΜΟΛΟΓΗΣΗ ΤΟΥ ΣΥΣΤΗΜΑΤΟΣ ΤΑΧΕΙΑΣ
ΠΑΡΑΣΚΕΥΗΣ CAPPUCCINO R.C.S. ...................................................................
CAPPUCCINO EN LATTE MACCHIATO BEREIDEN/
ΠΑΡΑΣΚΕΥΑΖΟΝΤΑΣ CAPPUCCINO ΚΑΙ LATTE MACCHIATO ...................................
DAGELIJKSE VERZORGING/ΚΑΘΗΜΕΡΙΝΗ ΦΡΟΝΤΙΑ ..........................................
86
87
88
89
90
91
92
92
92
GEVAAR: dit pictogram duidt op gevaar. Lees de veiligheidsmaatregelen om persoonlijk letsel en schade te voorkomen.
INFORMATIE: dit pictogram verwijst naar de instructies voor een correct en veilig gebruik van uw koemachine.
ΠΡΟΣΟΧΗ: όταν βλέπετε αυτό το σήμα, παρακαλούμε συμβουλευτείτε τις οδηγίες προφύλαξης για να αποφευχθούν πιθανοί κίνδυνοι και βλάβες.
ΠΛΗΡΟΦΟΡΙΕΣ: όταν βλέπετε αυτό το σήμα, παρακαλούμε λάβετε υπόψη σας τη συμβουλή που δίνεται για την ορθή και ασφαλή χρήση
της μηχανή σας καφέ.
76
78
78
79
80
82
82
83
86
77
6926_UM_LATTISSIMA_PREMIUM_Z2A.indb 77 17.10.13 19:58
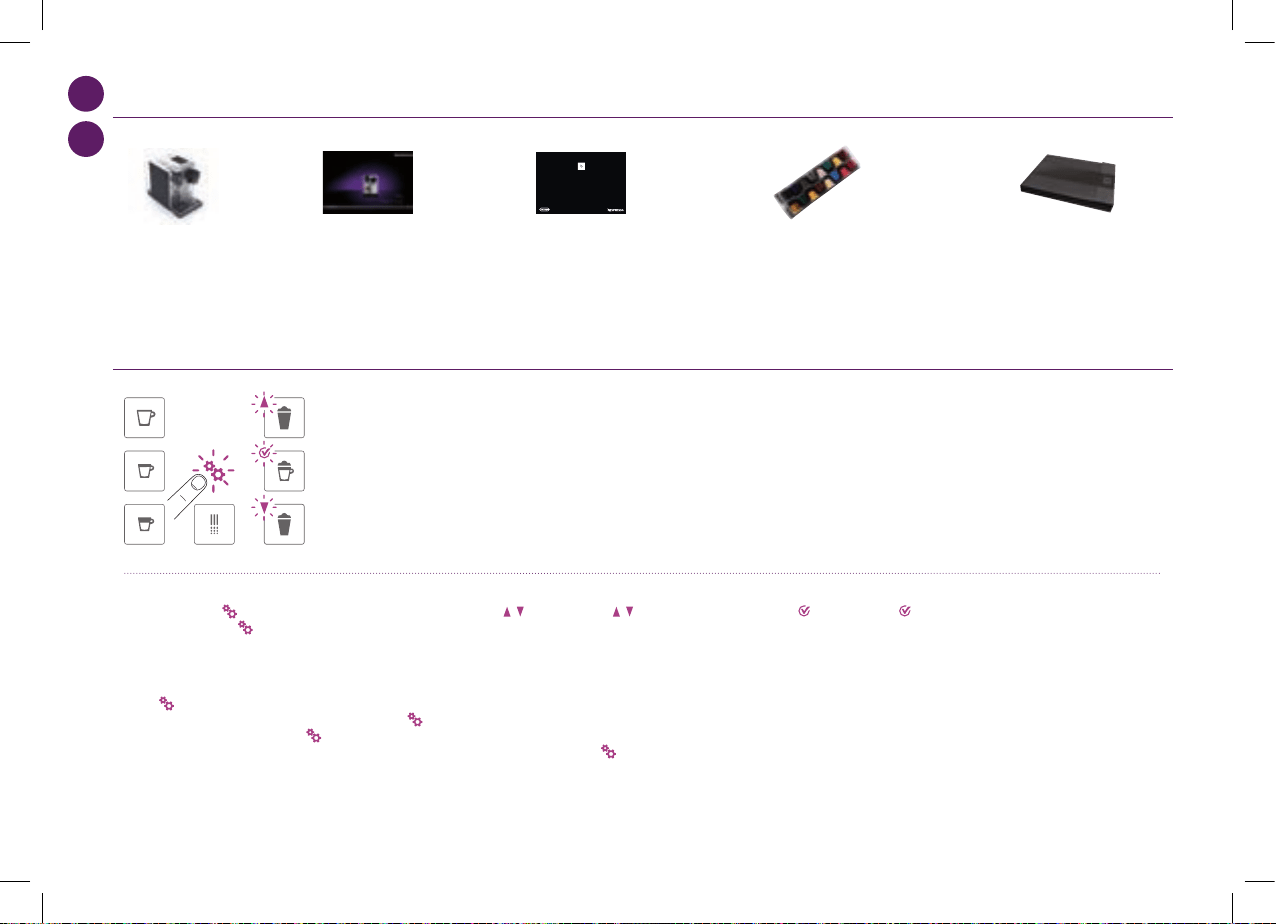
NL
GR
EN SA FETY PRECAUTI ONS ............................................................................. 2
FR CONSIGNES DE SECURITE ......................................................................... 4
DE SICHERHEITSHINWEISE ........................................................................... 7
IT PRECAUZIONI DI SICUREZ ZA .................................................................... 10
ES PRECAUCIONES DE SEGURIDAD ................................................................ 12
PT MEDIDAS DE SEGURANÇA......................................................................... 15
NL V EILIGHEIDSMAATREGELEN ..................................................................... 18
GR ΜΈΤ ΡΑ ΑΣΦΑΛΈΙΑ Σ .................................................................................. 20
HU BIZTONSÁGI ELŐÍRÁSOK .......................................................................... 22
CZ BEZPEČNOSTNÍ POKYNY .......................................................................... 25
PL ZASADY BEZPIECZEŃSTWA ....................................................................... 28
RU МЕРЫ ПРЕДОСТОР ОЖНОСТИ ................................................................. 31
MENUNAVIGATIE/ΠΛΟΗΓΗΣΗ ΣΤΟ ΜΕΝΟΥ
INHOUD VERPAKKING/ΠΕΡΙΕΧΟΜΕΝΑ ΣΥΣΚΕΥΑΣΙΑΣ
Koemachine
Μηχανή καφέ
«Folder ‘Welkom bij Nespresso
»
«Φάκελο Καλωσορίσατο Nespresso»
Gebruikershandleiding
Εγχειρίδιο χρήστη
Veiligheidsinstructies
Οδηγίε ασφαλού χρήση
Capsuleset
Σετ καψουλών
De menulijst openen/Μπείτε στη λίστα του Μενού
Symbool kort indrukken /
Πιέστε σύντοα το σύβολο
.
Bladeropties/Επιλογές αναζήτησης/περιήγησης
Pictogram indrukken /Πιέστε το σύβολο .
Selecteeroptie/Ενεργοποιήστε την επιλογή
Pictogram indrukken /Πιέστε το σύβολο .
De menulijst sluiten/
Έξοδος από τη λίστα Μενού
Optie scrollen naar [SLUITEN] en selecteren.
Of snel op drukken.
Κυλήστε ω την επιλογή [ΕΞΟΟΣ] κι επιλέξτε τη.
ιαφορετικά πατήστε γρήγορα το σύβολο
.
Optie afsluiten en terugkeren naar menulijst/
Έξοδος από την επιλογή και επιστροφή στη λίστα
μενού
Optie scrollen naar [SLUITEN] en selecteren. Of snel op
drukken.
Κυλήστε ω την επιλογή [ΕΞΟΟΣ] κι επιλέξτε τη.
ιαφορετικά πατήστε γρήγορα το σύβολο
.
78
6926_UM_LATTISSIMA_PREMIUM_Z2A.indb 78 17.10.13 19:58
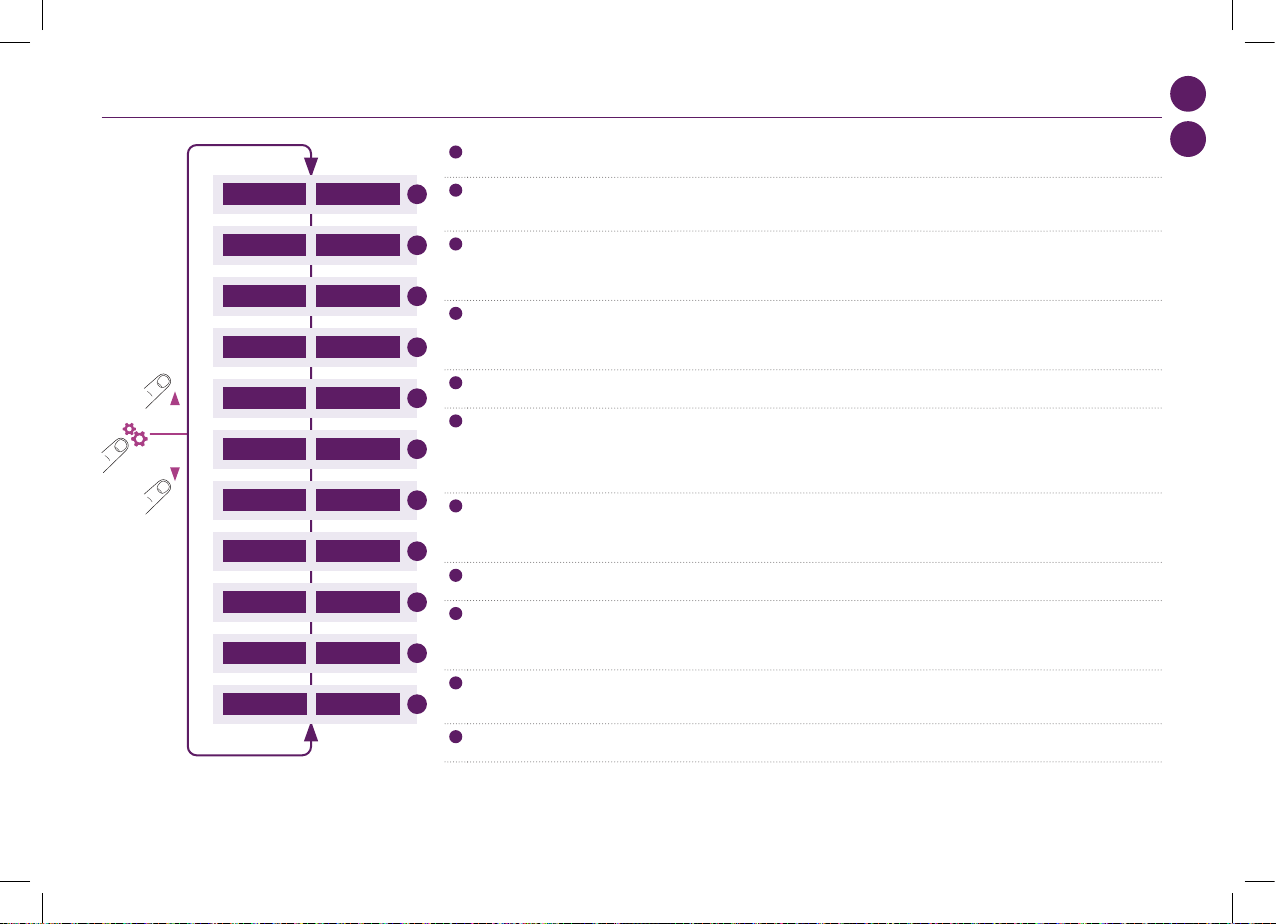
NL
GR
De menulijst openen/Μπείτε στη λίστα του Μενού
Symbool kort indrukken /
Πιέστε σύντοα το σύβολο
.
Bladeropties/Επιλογές αναζήτησης/περιήγησης
Pictogram indrukken /Πιέστε το σύβολο .
Selecteeroptie/Ενεργοποιήστε την επιλογή
Pictogram indrukken /Πιέστε το σύβολο .
De menulijst sluiten/
Έξοδος από τη λίστα Μενού
Optie scrollen naar [SLUITEN] en selecteren.
Of snel op drukken.
Κυλήστε ω την επιλογή [ΕΞΟΟΣ] κι επιλέξτε τη.
ιαφορετικά πατήστε γρήγορα το σύβολο
.
Optie afsluiten en terugkeren naar menulijst/
Έξοδος από την επιλογή και επιστροφή στη λίστα
μενού
Optie scrollen naar [SLUITEN] en selecteren. Of snel op
drukken.
Κυλήστε ω την επιλογή [ΕΞΟΟΣ] κι επιλέξτε τη.
ιαφορετικά πατήστε γρήγορα το σύβολο
.
MENULIJST/ΛΙΣΤΑ ΜΕΝΟΥ
1
Selecteer deze optie om de gewenste taal in te stellen. Volg de instructies voor de machine op het display.
Επιλέξτε αυτή τη δυνατότητα για να ορίσετε τη γλώσσα προτίησή σα. Ακολουθήστε τι οδηγίε στην οθόνη τη ηχανή.
2
Selecteer deze optie als de ontkalkingsmelding op het display verschijnt. Zie pagina 88. U wordt door het ontkalkingsproces geleid.
Επιλέξτε αυτή τη δυνατότητα όταν η ειδοποίηση αφαλάτωση εφανιστεί στην οθόνη. Συμβουλευτείτε τη σελίδα 88. Θα σα δοθούν οδηγίε για όλη τη διαδικασία
αφαλάτωση.
3
Selecteer deze optie om de waterhardheidsniveau in uw plaats in te stellen. Gebruik de bijgeleverde waterhardheidssticker om de hardheid te bepalen.
Hierdoor wordt de ontkalkingsfrequentie geoptimaliseerd. Zie pagina 89.
Επιλέξτε αυτή τη δυνατότητα για να ορίσετε το επίπεδο σκληρότητα νερού τη περιοχή σα. Για να άθετε τη σκληρότητα του νερού χρησιοποιήσετε το
αυτοκόλλητο που σα παρέχεται. Η επιλογή αυτή θα βελτιστοποιήσει τη συχνότητα αφαλατώσεων. Συμβουλευτείτε τη σελίδα 89.
4
Selecteer deze optie om de tijd in te stellen waarna het apparaat automatisch wordt uitgeschakeld. (Mogelijke opties zijn 9 minuten, 30 minuten, 2 uur, 8 uur).
Volg de instructies voor de machine op het display.
Επιλέξτε αυτή τη δυνατότητα για να ορίσετε ετά από πόσο χρόνο η ηχανή σα θα σβήνει αυτόατα. (Δυνατότητες επιλογής: ετά από 9 λεπτά, 30 λεπτά, 2 ώρε,
8 ώρε). Ακολουθήστε τι οδηγίε στην οθόνη τη ηχανή.
5
Selecteer deze optie om alle parameters van de machine terug te zetten op de fabrieksinstellingen.
Επιλέξτε αυτή τη δυνατότητα για να επαναφέρετε όλε τι παραέτρου τη ηχανή στι εργοστασιακέ ρυθίσει.
6
Selecteer deze optie om het water in de machine te verwijderen voor het geval u de machine ter reparatie moet verzenden of als u de machine een langere tijd niet
gebruikt. Volg de instructies voor de machine op het display. Na deze procedure kunt u de machine 10 minuten niet gebruiken.
Επιλέξτε αυτή τη δυνατότητα για να αδειάσετε το νερό που βρίσκεται έσα στη ηχανή, σε περίπτωση που θέλετε να την στείλετε για επισκευή ή θα την αφήσετε για
εγάλο χρόνο αχρησιοποίητη. Ακολουθήστε τι οδηγίε στην οθόνη τη ηχανή. εν θα πορείτε να χρησιοποιήσετε τη ηχανή για 10 λεπτά ετά από αυτή τη
διαδικασία.
7
Selecteer deze optie om het volume van uw dranken (kopjes koe, warm water en melkbereidingen) te programmeren. Volg de instructies voor de machine op het
display. Daarnaast kunt u alle volumes voor dranken terugzetten op de fabrieksinstellingen.
Επιλέξτε αυτή τη δυνατότητα για να προγραατίσετε τον όγκο/δοσολογία των ροφηάτων σα (κουπών καφέ, παρασκευασάτων ε βάση το ζεστό νερό και το
γάλα). Ακολουθήστε τι οδηγίε στην οθόνη τη ηχανή. Μπορείτε επίση να επαναφέρετε όλε τι δοσολογίε ροφηάτων στι εργοστασιακέ ρυθίσει.
8
Selecteer deze optie om alle machine-instellingen in een oogopslag te zien.
Επιλέξτε αυτή τη δυνατότητα για να έχετε πρόσβαση σε όλε τι ρυθίσει τη ηχανή ε ια ατιά.
9
Selecteer deze optie om de algehele status van uw machine te controleren. De verbruiksstatistieken zijn beschikbaar vanaf het eerste gebruik (absoluut) of sinds de
laatste ontkalking (relatief). Het serienummer van de machine wordt ook weergegeven.
Επιλέξτε αυτή τη δυνατότητα για να ελέγξετε τη γενική κατάσταση τη ηχανή σα. Τα στατιστικά στοιχεία κατανάλωση διατίθενται είτε από την πρώτη χρήση
(απόλυτα) είτε από την τελευταία αφαλάτωση (σχετικά). ίνεται επίση ο σειριακό αριθό τη ηχανή σα.
10
Selecteer deze optie voor het beste advies over een optimale melkschuimkwaliteit, elke dag weer. De internetlink verschijnt voor meer informatie over deze functie.
Επιλέξτε αυτή τη δυνατότητα για να έχετε τι καλύτερε συβουλέ στο πω θα επιτύχετε τη βέλτιστη ποιότητα αφρού γάλακτο κάθε ηέρα. Σα δίνετε και το
σχετικό link σε site για να γνωρίσετε περισσότερα για αυτό το χαρακτηριστικό.
11
De menulijst sluiten en terugkeren naar de gereedmodus van de machine.
Έξοδο από τη λίστα ενού και επιστροφή σε ετοιότητα λειτουργία ηχανή.
1
LANGUAGETAAL
2
DESCALINGONTKALKING
3
WATER HARDNESSHARDHEID WATER
4
AUTO POWER OFFAUTOM. UITSCHAK.
5
FACTORY SETTINGSFABRIEKSINST
6
EMPTY FLUID SYSTEMLEDIG CIRCUIT
7
VOLUME PROGR. PROGR. VOLUME
8
SETTINGS INFOINFO INSTELL.
9
MAINTENANCEONDERHOUD
10
HELPHELP
EXITEXIT
11
79
6926_UM_LATTISSIMA_PREMIUM_Z2A.indb 79 17.10.13 19:58
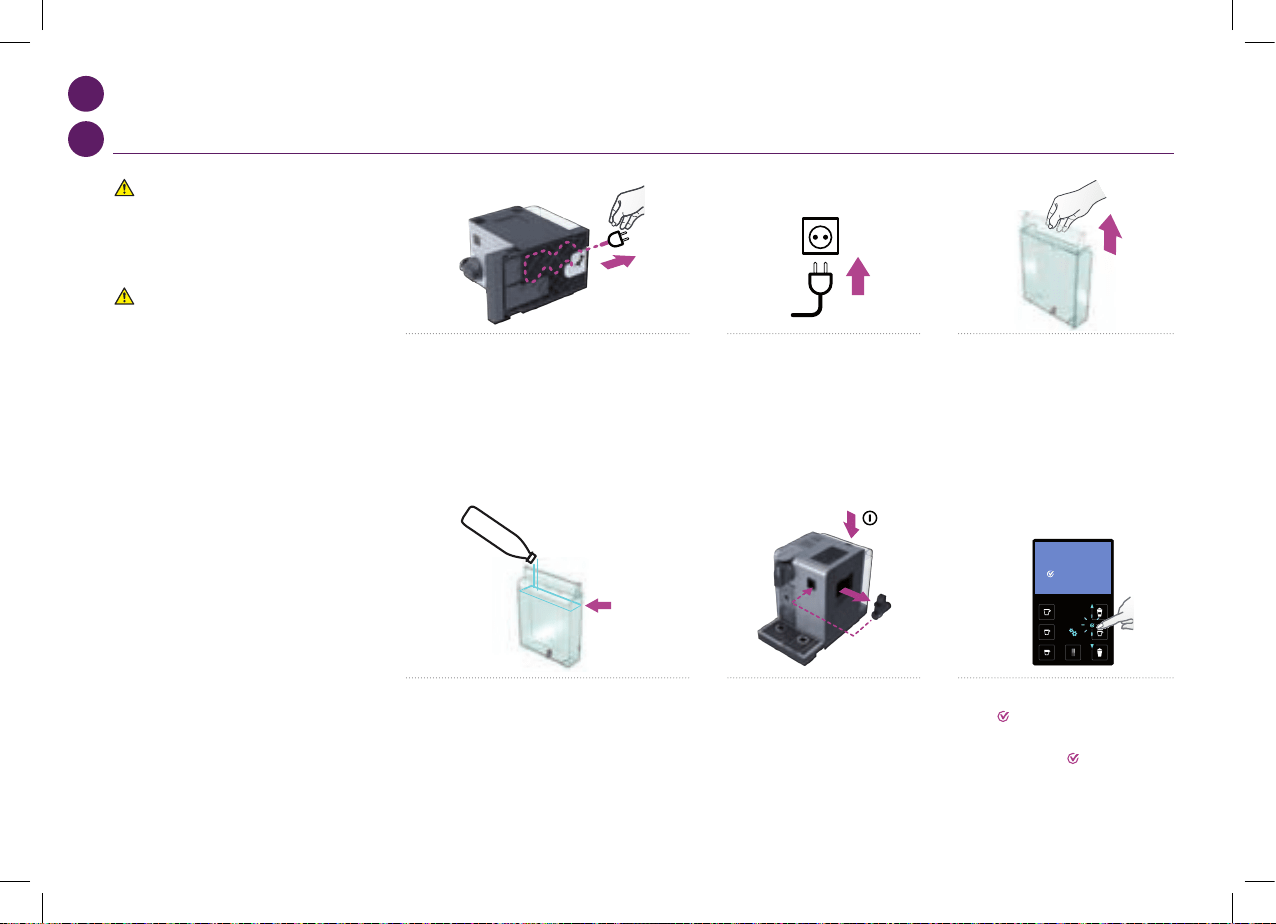
NL
GR
max
SET LANGUAGE
to continue
LANGUAGE
Actual value : EN
New value : [ ]
to select
05
max
SET LANGUAGE
to continue
LANGUAGE
Actual value : EN
New value : [ ]
to select
05
max
SET LANGUAGE
to continue
LANGUAGE
Actual value : EN
New value : [ ]
to select
05
max
SET LANGUAGE
to continue
LANGUAGE
Actual value : EN
New value : [ ]
to select
05
max
SET LANGUAGE
to continue
LANGUAGE
Actual value : EN
New value : [ ]
to select
05
max
SET LANGUAGE
to continue
LANGUAGE
Actual value : EN
New value : [ ]
to select
05
EERSTE GEBRUIK OF NA EEN LANGE PERIODE VAN NIETGEBRUIK/
ΠΡΤΗ ΧΡΗΣΗ ΜΕΤΑ ΑΠΟ ΜΕΓΑΛΗ ΠΕΡΙΟΟ ΑΧΡΗΣΙΑΣ
GEVAAR: lees eerst de
veiligheidsvoorschriften om de kans
op levensgevaarlijke elektrische
schokken en brand te vermijden.
ΠΡΟΣΟΧΗ: καταρχήν διαβάστε
τα μέτρα ασφάλειας για την αποφυγή
κινδύνων μοιραίας ηλεκτροπληξίας
και πυρκαγιάς.
1. Verwijder het waterreservoir, het lekrooster en het
capsulereservoir. Stel de snoerlengte af en berg het
overtollige snoer in de kabelgoot onder de machine op.
1. Αφαιρέστε το δοχείο νερού, τον δίσκο αποστράγγιση
και το δοχείο καψουλών. Ρυθίστε το ήκο του καλωδίου
και αποθηκεύστε αυτό που περισσεύει στον οδηγό του
καλωδίου κάτω από τη ηχανή.
5. Plaats de heetwateruitloop. Schakel
de machine in.
5. Προσθέστε το στόιο ζεστού νερού.
Ανάψτε τη ηχανή.
2. Zet de machine rechtop, steek
de stekker van de machine in het
stopcontact.
2. Βάλτε τη ηχανή σε όρθια θέση και
συνδέστε τη ε την παροχή ρεύατο.
6. SET LANGUAGE: stel de gewenste taal in.
Druk op
om verder te gaan.
6. SET LANGUAGE: ορίστε τη γλώσσα τη
επιλογή σα. Πατήστε
για να συνεχίσετε.
3. Het waterreservoir is voorzien van een
deksel met ingebouwde draaggreep.
3. Μπορείτε να εταφέρετε το δοχείο νερού
από το καπάκι του.
4. Spoel het waterreservoir voordat u dit vult met vers
drinkwater tot het maximumniveau.
4. Ξεπλύντε το δοχείο νερού πριν το γείσετε ε πόσιο
νερό έω την ένδειξη του ανώτατου επιπέδου.
80
6926_UM_LATTISSIMA_PREMIUM_Z2A.indb 80 17.10.13 19:58
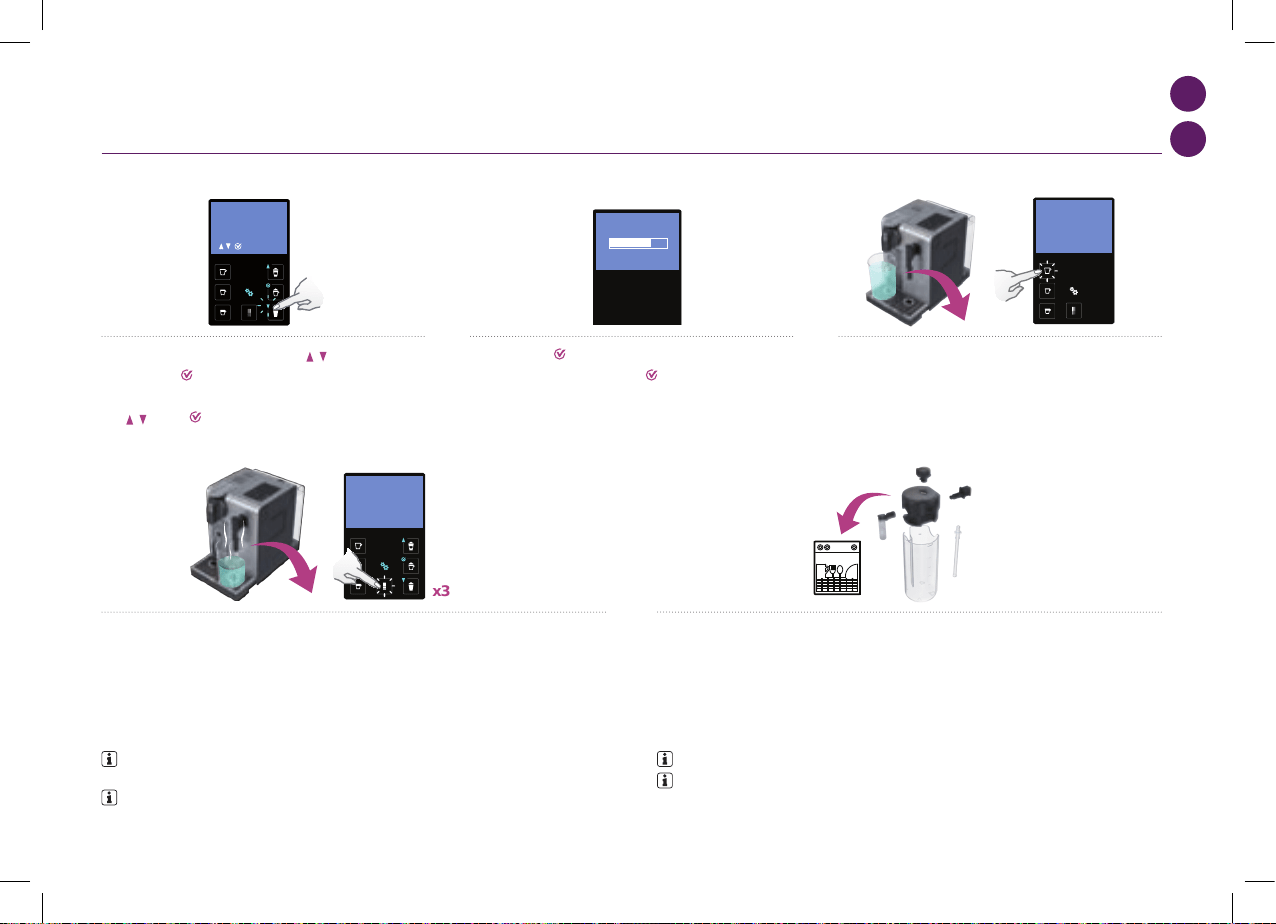
max
SET LANGUAGE
to continue
LANGUAGE
Actual value : EN
New value : [ ]
to select
05
max
First read the safety precautions to avoid risks of fatal electrical shock and fire
Remove the plastic films from grid,
lever and machine panels.
Remove the water tank, drip tray, and capsule
container. Adjust the cable length and store the
excess in the cable guide under the machine.
Put the machine in upright position,
plug machine into mains.
The water tank can be carried by
its cover.
Rinse the water tank before filling with
potable water up to maximum level.
Insert the hot water spout.
Switch machine ON
Set your preferred language.
Press to continue.
SET LANGUAGE
to continue
Select your language by scrolling the
options using up/down arrow. Press to
confirm.
LANGUAGE
Actual value : EN
New value : [ ]
to select
Coffee preparation
x3
x3
110 ml
40 ml
25 ml
05 06
NL
GR
7. LANGUAGE: kies uw taal door met de pijl
door de opties te
scrollen. Druk op
om uw keuze te bevestigen.
7. LANGUAGE: επιλέξτε τη γλώσσα που επιθυείτε χρησιοποιώντα τα
βέλη
Πατήστε για να επιβεβαιώσετε την επιλογή σα.
EERSTE GEBRUIK OF NA EEN LANGE PERIODE VAN NIETGEBRUIK/
ΠΡΤΗ ΧΡΗΣΗ ΜΕΤΑ ΑΠΟ ΜΕΓΑΛΗ ΠΕΡΙΟΟ ΑΧΡΗΣΙΑΣ
11. Demonteer het Rapid Cappuccino System (R.C.S.) en reinig alle onderdelen in het bovenste gedeelte van
uw vaatwasser. Als u geen vaatwasser tot uw beschikking hebt, raadpleegt u het gedeelte Rapid Cappuccino
System (R.C.S.) met de hand afwassen.
11. Αποσυναρολογήστε το Σύστηα Ταχεία Παρασκευή Cappuccino (R.C.S.) και πλύντε όλα τα κοάτια στο
πάνω επίπεδο του πλυντηρίου πιάτων σα. Σε περίπτωση που δεν διαθέτετε πλυντήριο πιάτων, συβουλευτείτε
την παράγραφο Πλύσιο ε το χέρι του Συστήατο Ταχεία Παρασκευή Cappuccino ( R.C.S.).
INFORMATIE: zie het gedeelte Rapid Cappuccino System monteren/demonteren.
ΠΛΗΡΟΦΟΡΙΕΣ: συμβουλευτείτε την παράγραφο Συναρμολόγηση/αποσυναρμολόγηση του
Συστήματος Ταχείας Παρασκευής Cappuccino (R.C.S.).
10. Spoelen: herhaal deze handeling 3 maal via de heetwateruitloop. Als u dit hebt gedaan, verwijdert u
de uitloop en bewaart deze in de opslagruimte, rechts van de machine. Sluit de stoomaansluitingsklep.
10. Ξέπλυμα: επαναλάβετε τρει φορέ έσω του στοίου ζεστού νερού. Αφού τελειώσετε, αφαιρέστε το
και φυλάξτε το στον χώρο αποθήκευση που βρίσκεται στη δεξιά πλευρά τη ηχανή. Κλείστε τη θύρα
σύνδεση ατού τη ηχανή. την παράγραφο Πλύσιο ε το χέρι του Συστήατο Ταχεία Παρασκευή
Cappuccino ( R.C.S.).
INFORMATIE: de machines worden na de productie volledig getest. In het spoelwater kunt u
sporen van koepoeder aantreen.
ΠΛΗΡΟΦΟΡΙΕΣ: οι μηχανές ελέγχονται πλήρως μετά την παραγωγή. Ορισμένα ίχνη σκόνης
καφέ μπορούν να βρεθούν στο νερό του ξεπλύματος.
9. Spoelen: plaats een bakje onder de koe-uitloop en druk op de
Lungo-knop. Herhaal deze handeling 3 maal.
9. Ξέπλυμα: τοποθετείστε ένα δοχείο κάτω από το στόιο εκροή
καφέ και πατήστε το κουπί Lungo. Επαναλάβετε τρει φορέ.
8. Nadat u op het hebt gedrukt, wordt de machine opgewarmd.
8. Από τη στιγή που θα πατήσετε το
, η ηχανή αρχίζει να
θεραίνεται.
4°
15”
Assembling / disassembling of Rapid Cappuccino system (R.C.S)
07
81
6926_UM_LATTISSIMA_PREMIUM_Z2A.indb 81 17.10.13 19:58

NL
GR
max
First read the safety precautions to avoid risks of fatal electrical shock and fire
Remove the plastic films from grid,
lever and machine panels.
Remove the water tank, drip tray, and capsule
container. Adjust the cable length and store the
excess in the cable guide under the machine.
Put the machine in upright position,
plug machine into mains.
The water tank can be carried by
its cover.
Rinse the water tank before filling with
potable water up to maximum level.
Insert the hot water spout.
Switch machine ON
Set your preferred language.
Press to continue.
SET LANGUAGE
to continue
Select your language by scrolling the
options using up/down arrow. Press to
confirm.
LANGUAGE
Actual value : EN
New value : [ ]
to select
Coffee preparation
x3
x3
110 ml
40 ml
25 ml
05 06
4°
15”
Assembling / disassembling of Rapid Cappuccino system (R.C.S)
07
KOFFIE MAKEN/
ΠΑΡΑΣΚΕΥΗ ΚΑΦΕ
RAPID CAPPUCCINO SYSTEM R.C.S. MONTEREN/DEMONTEREN/
ΣΥΝΑΡΜΟΛΟΓΗΣΗ/ΑΠΟΣΥΝΑΡΜΟΛΟΓΗΣΗ ΤΟΥ ΣΥΣΤΗΜΑΤΟΣ ΤΑΧΕΙΑΣ ΠΑΡΑΣΚΕΥΗΣ CAPPUCCINO R.C.S.
1. Plaats de capsuleklem helemaal
omhoog en leg een Nespresso capsule in de
klemhouder.
1. Ανασηκώστε τελείω τον οχλό και
εισάγετε την κάψουλα Nespresso.
2. Sluit de capsuleklem en plaats een kopje
onder de koe-uitloop.
2. Κλείστε τον οχλό και τοποθετήστε ία
κούπα κάτω από το στόιο εκροή του καφέ.
3. Druk op de knop Ristretto (25 ml), Espresso (40 ml) of Lungo
(110 ml). Na extractie stopt de machine automatisch. Druk nogmaals om
de doorstroming van de koe te stoppen of er koe aan toe te voegen.
3. Πατήστε το κουπί Ristretto (25 ml), Espresso (40 ml) ή Lungo
(110 ml). Η παρασκευή καφέ θα σταατήσει αυτόατα. Για να σταατήσετε
την εκροή του καφέ ή για να απογείσετε τον καφέ σα, πατήστε ξανά.
4. Neem het kopje van het rooster. Plaats de
capsuleklem omhoog en weer omlaag om de
capsule uit te werpen in het capsulereservoir.
4. Πάρτε την κούπα. Ανασηκώστε και
ξανακλείστε τον οχλό για να εξαχθεί η
κάψουλα έσα στο δοχείο χρησιοποιηένων
καψουλών.
1. Verwijder het deksel van het melkreservoir
en het melkaanvoerbuisje.
1. Αφαιρέστε το καπάκι του δοχείου γάλακτο
και αποσυνδέστε τον σωλήνα απορρόφηση
γάλακτο.
4. Verwijder de melkuitloop door deze eraf
te trekken.
4. Αφαιρέστε το στόιο εκροή γάλακτο
τραβώντα το έξω.
2. Verwijder de melkschuimregelknop door
deze tot het
te draaien en omhoog te
trekken.
2. Αφαιρέστε το διακόπτη ρύθιση αφρού
γάλακτο στρέφοντά το έχρι
και
τραβώντα το πάνω.
3. Verwijder de Rapid Cappuccino System-connector
door deze te ontgrendelen van
naar en deze eraf
te trekken.
3. Αφαιρέστε το στοιχείο σύνδεση του Συστήατο
Ταχεία Παρασκευή Cappuccino ξεκλειδώνοντά το
από τη θέση
στη θέση και τραβώντα το έξω.
OPMERKING: tijdens het opwarmen kunt u elke koetoets indrukken. De koe zal dan automatisch
uitlopen wanneer de machine klaar is.
ΣΗΜΕΙΣΗ: κατά τη διάρκεια της προθέρμανσης, μπορείτε να πατήσετε οποιοδήποτε κουμπί καφέ.
Ο καφές θα αρχίσει να ρέει αυτόματα όταν η μηχανή είναι έτοιμη.
82
6926_UM_LATTISSIMA_PREMIUM_Z2A.indb 82 17.10.13 19:58

4°
15”
Assembling / disassembling of Rapid Cappuccino system (R.C.S)
07
4°
15”
Assembling / disassembling of Rapid Cappuccino system (R.C.S)
07
4°
15”
Assembling / disassembling of Rapid Cappuccino system (R.C.S)
07
4°
15”
Assembling / disassembling of Rapid Cappuccino system (R.C.S)
07
NL
GR
CAPPUCCINO EN LATTE MACCHIATO BEREIDEN/
ΠΑΡΑΣΚΕΥΑΖΟΝΤΑΣ CAPPUCCINO ΚΑΙ LATTE MACCHIATO
1. Vul het melkreservoir met de gewenste
hoeveelheid melk.
1. Γείστε το δοχείο γάλακτο ε την
επιθυητή ποσότητα γάλακτο.
2. Sluit het melkreservoir. Open de stoomaansluitingsklep
door deze naar rechts te schuiven. Sluit het Rapid
Cappuccino System aan op de machine.
2. Κλείστε το δοχείο γάλακτο. Ανοίξτε τη θύρα σύνδεση
ατού σύροντά τη προ τα δεξιά. Συνδέστε το Σύστηα
Ταχεία Παρασκευή Cappuccino στη συσκευή.
3. De machine verwarmt circa 15 seconden
voor.
3.
Ο χρόνο θέρανση τη ηχανή διαρκεί
περίπου 15 δευτερόλεπτα.
4. Plaats de capsuleklem helemaal
omhoog en leg een Nespresso capsule in de
klemhouder.
4. Ανασηκώστε τελείω τον οχλό και
εισάγετε την κάψουλα Nespresso.
GEVAAR: gebruik het melkreservoir niet voor andere
vloeistoen dan melk of drinkwater. Gebruik geen melk waarvan de
vervaldatum is verstreken, zie verpakking, maar gebruik verse melk.
ΠΡΟΣΟΧΗ: μην χρησιμοποιείτε νωπό παστεριωμένο γάλα και
σιγουρευτείτε ότι για το γάλα που θα χρησιμοποιήσετε δεν έχει
περάσει η ημερομηνία λήξης που αναγράφεται στη συσκευασία του.
INFORMATIE: gebruik voor perfect melkschuim magere of halfvolle melk op koelkasttemperatuur
(ongeveer 4° C).
ΠΛΗΡΟΦΟΡΙΕΣ: για τον τέλειο αφρό γάλακτος χρησιμοποιείστε αποβουτυρωμένο ή ημι-
αποβουτυρωμένο γάλα σε θερμοκρασία ψυγείου (περίπου 4 βαθμούς C).
INFORMATIE: als het melkreservoir
leeg is spoelt u deze samen met het
melkaanvoerbuisje grondig met
drinkwater voordat u het reservoir
opnieuw vult.
ΠΛΗΡΟΦΟΡΙΕΣ: όταν το δοχείο
γάλακτος αδειάσει, πριν το ξαναγεμίσετε,
το ξεπλένετε καλά, όπως και τον σωλήνα
απορρόφησης γάλακτος, με πόσιμο νερό.
83
6926_UM_LATTISSIMA_PREMIUM_Z2A.indb 83 17.10.13 19:58

NL
GR
Preparing Cappuccino and Latte Macchiato
4°
i
When the milk container is empty, before refilling,
thoroughly rinse it and the milk aspiration tube
with potable water.
Close the milk container. Open the steam
connector door by sliding it to the right. Connect
the Rapid Cappuccino System to the machine.
15”
+
LATTE MACCHIATO
Clean
15”
i
Remove Rapid Cappuccino System
connector by unlocking it from (sign ) to
(sign) and pulling it off
Remove the milk container lid and
unplug milk aspiration tube.
Remove the milk froth regulator knob by
turning it until and pulling it up.
Remove the milk spout by pulling it off.
1 2 3 4
Assembling / disassembling of Rapid Cappuccino system (R.C.S)
RINSE MILK SYSTEM
07 08
CAPPUCCINO EN LATTE MACCHIATO BEREIDEN/
ΠΑΡΑΣΚΕΥΑΖΟΝΤΑΣ CAPPUCCINO ΚΑΙ LATTE MACCHIATO
INFORMATIE: reinig het
melksysteem na elk gebruik.
ΠΛΗΡΟΦΟΡΙΕΣ: ξεπλένετε το
σύστημα γάλακτος μετά από κάθε χρήση.
9. Zet een reservoir onder de melkuitloop.
9. Τοποθετείστε ένα δοχείο κάτω από το
στόιο εκροή γάλακτο.
10. Draai de melkschuimregelknop in de stand «REINIGEN».
De melksysteemreiniging wordt gestart en er stroomt
warm water in combinatie met stoom door de melkuitloop.
10. Περιστρέψτε τον διακόπτη ρύθιση (αφρού) γάλακτο
στη θέση «CLEAN» («ΚΑΘΑΡΙΣΜΟΣ»). Η διαδικασία
πλυσίατο του συστήατο γάλακτο ξεκινά και ζεστό νερό
αζί ε ατό τρέχει έσα από το στόιο γάλακτο.
11. Het reinigingsproces duurt ongeveer
15 seconden en stopt automatisch.
11. Η διαδικασία πλυσίατο διαρκεί περίπου
15 δευτερόλεπτα και σταατά αυτόατα.
5. Sluit de capsuleklem, zet een Cappuccino-
kopje of een Latte Macchiato-glas onder
de koe-uitloop en pas de positie van de
melkuitloop aan.
5. Ανασηκώστε τον οχλό, τοποθετήστε
ία κούπα Cappuccino ή ένα ποτήρι Latte
Macchiato κάτω από το στόιο εκροή
καφέ και προσαρόστε τη θέση του στοίου
εκροή γάλακτο.
6. Draai de melkschuimregelknop naar het
gewenste volume schuim.
6. Βάλτε το κουπί ρύθιση αφρού γάλακτο
στην ποσότητα αφρού που επιθυείτε.
7. Druk op de knop Cappuccino of Latte Macchiato.
De bereiding start na enkele seconden (eerst melk en dan
koe) en stopt automatisch.
7. Πατήστε το κουπί Cappucino ή Macchiato. Η παρασκευή
ξεκινά ετά από λίγα δευτερόλεπτα (πρώτα το γάλα και ετά
ο καφέ) και θα σταατήσει αυτόατα.
8. Na de bereiding plaatst u de capsuleklem
omhoog en weer omlaag om de capsule uit
te werpen in het capsuleresevoir.
8. Μετά το τέλο τη παρασκευή,
ανασηκώστε και ξανακλείστε τον οχλό
για να εξαχθεί η κάψουλα έσα στο δοχείο
χρησιοποιηένων καψουλών.
84
6926_UM_LATTISSIMA_PREMIUM_Z2A.indb 84 17.10.13 19:58

PRESS to confirm.
The discaling agent flows alternately
trough the coffee outlet, hot water nozzle
and drip tray.
Descaling
Descaling process: Empty the drip tray and
the used capsules container.
Rinsing process: Empty the drip
tray and the used capsules
container.
Refer to safety precautions
+
100 ml
500 ml
1 2 3
5
7 8
4
6
Lift and close the lever to eject any capsule
in the used capsule container.
Descaling process: Fill water tank with 100
ml of Nespresso descaling agent and 500ml
water.
Descaling process: Insert the hot
water spout.
Enter the Menu, browse the options and
select DESCALING. You will be guided
throughout the whole process. Follow
machine display instructions.
Descaling process: Place one container
of minimum 1 litre under both the coffee
outlet and the hot water spout.
4°
Volume factory settings
LANGUAGE
DESCALING
WATER HARDNESS
09 10
NL
GR
CAPPUCCINO EN LATTE MACCHIATO BEREIDEN/
ΠΑΡΑΣΚΕΥΑΖΟΝΤΑΣ CAPPUCCINO ΚΑΙ LATTE MACCHIATO
12. Na het reinigen zet u de
melkschuimregelknop weer in de melkstand.
12. Αφού ολοκληρωθεί το πλύσιο, γυρίστε
τον διακόπτη ρύθιση αφρού γάλακτο στη
θέση γάλα.
13. Koppel het R.C.S. los van de machine en plaats dit
direct in de koelkast. Sluit de stoomaansluitingsklep van
de machine.
13. Αποσυνδέστε το Σύστηα R.C.S. από τη ηχανή και
βάλτε το αέσω στο ψυγείο. Κλείστε τη θύρα σύνδεση
ατού τη ηχανή.
15. Reinig alle onderdelen in het bovenste
gedeelte van uw vaatwasser. Als u geen
vaatwasser tot uw beschikking hebt,
raadpleegt u het gedeelte Rapid Cappuccino
System (R.C.S.) met de hand afwassen.
15. και καθαρίστε όλα τα κοάτια του στο
πάνω επίπεδο του πλυντηρίου πιάτων σα.
Σε περίπτωση που δεν διαθέτετε πλυντήριο
πιάτων, συβουλευτείτε την παράγραφο
Πλύσιο ε το χέρι του Συστήατο Ταχεία
Παρασκευή Cappuccino ( R.C.S.).
INFORMATIE: zie het gedeelte «Rapid Cappuccino
System (R.C.S.) monteren/demonteren».
ΠΛΗΡΟΦΟΡΙΕΣ: συμβουλευτείτε την παράγραφο
«Συναρμολόγηση/Αποσυναρμολόγηση του Συστήματος
Ταχείας Παρασκευής Cappuccino (R.C.S.)».
GEVAAR: deze melk mag niet langer dan 2 dagen in de koelkast worden bewaard.
Als het melkreservoir langer dan 2 uur buiten koelkast wordt bewaard, demonteert u het R.C.S. en reinigt u
alle onderdelen (zie aanbevelingen voor vaatwasser of met de hand afwassen).
ΠΡΟΣΟΧΗ: δεν πρέπει να κρατήσετε το γάλα αυτό για περισσότερες από 2 ημέρες στο ψυγείο.
Σε περίπτωση που το δοχείο γάλακτος μείνει εκτός ψυγείου για περισσότερες από 2 ώρες, αποσυναρμολογήστε
το R.C.S. και καθαρίστε όλα τα κομμάτια του (συμβουλευτείτε τις συστάσεις για πλύσιμο στο πλυντήριο
πιάτων ή στο χέρι).
14. Demonteer het Rapid Cappuccino System om de twee
dagen.
14. Κάθε δύο ηέρε να αποσυναρολογείτε το Σύστηα
Ταχεία Παρασκευή cappuccino.
85
6926_UM_LATTISSIMA_PREMIUM_Z2A.indb 85 17.10.13 19:58

NL
GR
PRESS to confirm.
The discaling agent flows alternately
trough the coffee outlet, hot water nozzle
and drip tray.
Descaling
Descaling process: Empty the drip tray and
the used capsules container.
Rinsing process: Empty the drip
tray and the used capsules
container.
Refer to safety precautions
+
100 ml
500 ml
1 2 3
5
7 8
4
6
Lift and close the lever to eject any capsule
in the used capsule container.
Descaling process: Fill water tank with 100
ml of Nespresso descaling agent and 500ml
water.
Descaling process: Insert the hot
water spout.
Enter the Menu, browse the options and
select DESCALING. You will be guided
throughout the whole process. Follow
machine display instructions.
Descaling process: Place one container
of minimum 1 litre under both the coffee
outlet and the hot water spout.
4°
Volume factory settings
LANGUAGE
DESCALING
WATER HARDNESS
09 10
2. Plaats de capsuleklem omhoog en weer omlaag om de capsule uit te werpen in
het capsuleresevoir. Plaats een bakje onder de koe-uitloop en druk op de Lungo-
knop om te spoelen. Reinig de koe-uitloop met een zachte, vochtige doek.
2. Σηκώστε και ξανακλείστε τον οχλό για να εξαχθεί η κάψουλα έσα στο δοχείο
χρησιοποιηένων καψουλών. Τοποθετείστε ένα δοχείο κάτω από το στόιο εκροή
καφέ και πατήστε το κουπί Lungo. Καθαρίζετε τακτικά το στόιο εκροή καφέ ε
βρεγένο πανί.
3. Spoel met drinkwater zorgvuldig alle vuilresidu weg op
de heetwateruitloop. Reinig de uitloop met een zachte,
vochtige doek.
3. Ξεπλύνετε κάτω από τρεχούενο πόσιο νερό και
αποακρύνετε προσεκτικά οποιαδήποτε βρωιά από
το στόιο ζεστού νερού. Καθαρίστε το ε ένα καθαρό
υγρό πανί.
1. Demonteer het Rapid Cappuccino System.
Zie het gedeelte «Rapid Cappuccino System (R.C.S.)
monteren/demonteren».
1. Αποσυναρολογείστε το Σύστηα Ταχεία Παρασκευή
Cappuccino. Συβουλευτείτε την παράγραφο
«Συναρολόγηση/Αποσυναρολόγηση του Συστήατο
Ταχεία Παρασκευή Cappuccino (R.C.S)».
2. Spoel met drinkwater zorgvuldig alle
melkresidu weg.
2. Ξεπλύντε προσεκτικά οποιαδήποτε
υπολείατα γάλακτο ε πόσιο νερό.
3. Dompel alle onderdelen ten minste 30 minuten onder in
warm water (ongeveer 40° C) met afwasmiddel.
3. Αφήστε όλα τα κοάτια να ουλιάσουν σε ζεστό
νερό (περίπου 40° C) αζί ε καθαριστικό σαπούνι για
τουλάχιστον 30 λεπτά.
4. Spoel de onderdelen af met drinkwater en
droog ze af met een schone, vochtige doek.
4. Ξεπλύντε ε πόσιο νερό και σκουπίστε τα
ε καθαρό υγρό πανί.
DAGELIJKSE VERZORGING/ΚΑΘΗΜΕΡΙΝΗ ΦΡΟΝΤΙΑ
INFORMATIE: gebruik geen agressieve schoonmaakmiddelen of oplosmiddelen voor de reiniging van het apparaat. Gebruik een vochtige doek en een
mild schoonmaakmiddel om het oppervlak van de machine te reinigen. Plaats geen machineonderdelen in de vaatwasser, behalve de onderdelen van het
Rapid Capuccino System.
ΠΛΗΡΟΦΟΡΙΕΣ: μην χρησιμοποιείτε κανένα δυνατό καθαριστικό προϊόν ή διάλυμα καθαρισμού. Χρησιμοποιήστε ένα βρεγμένο πανί και ήπιο καθαριστικό
προϊόν για να καθαρίσετε τις επιφάνειες της μηχανής. Μην βάζετε στο πλυντήριο πιάτων κανένα τμήμα της μηχανής, εκτός από τα μέρη του Συστήματος Ταχείας
Παρασκευής Capuccino.
RAPID CAPPUCCINO SYSTEM R.C.S. MET DE HAND AFWASSEN/
ΠΛΥΣΙΜΟ ΣΤΟ ΧΕΡΙ ΤΟΥ ΣΥΣΤΗΜΑΤΟΣ ΤΑΧΕΙΑΣ ΠΑΡΑΣΚΕΥΗΣ CAPPUCCINO R.C.S.
INFORMATIE: als u geen vaatwasser tot uw beschikking hebt, kunnen de onderdelen van het Rapid Cappuccino System (R.C.S.) met de hand worden afgewassen. In dat geval moet de procedure
dagelijks worden uitgevoerd voor een maximale eciëntie.
ΠΛΗΡΟΦΟΡΙΕΣ: όταν δεν υπάρχει διαθέσιμο πλυντήριο πιάτων, το σύστημα R.C.S. μπορεί να πλυθεί στο χέρι. Σε αυτή την περίπτωση, η διαδικασία θα πρέπει να επαναλαμβάνεται καθημερινά για μέγιστη
αποτελεσματικότητα.
1. Verwijder het lekrooster en het capsulereservoir.
Maak deze leeg en reinig ze. Verwijder het waterreservoir.
Maak dit leeg en reinig dit voordat u dit met vers water vult.
1. Αφαιρέστε τον δίσκο αποστράγγιση, το δοχείο
(χρησιοποιηένων) καψουλών. Αδειάστε και ξεπλύντε.
Αφαιρέστε το δοχείο νερού. Αδειάστε και ξεπλύντε το πριν
το γείσετε ε φρέσκο πόσιο νερό.
86
6926_UM_LATTISSIMA_PREMIUM_Z2A.indb 86 17.10.13 19:58
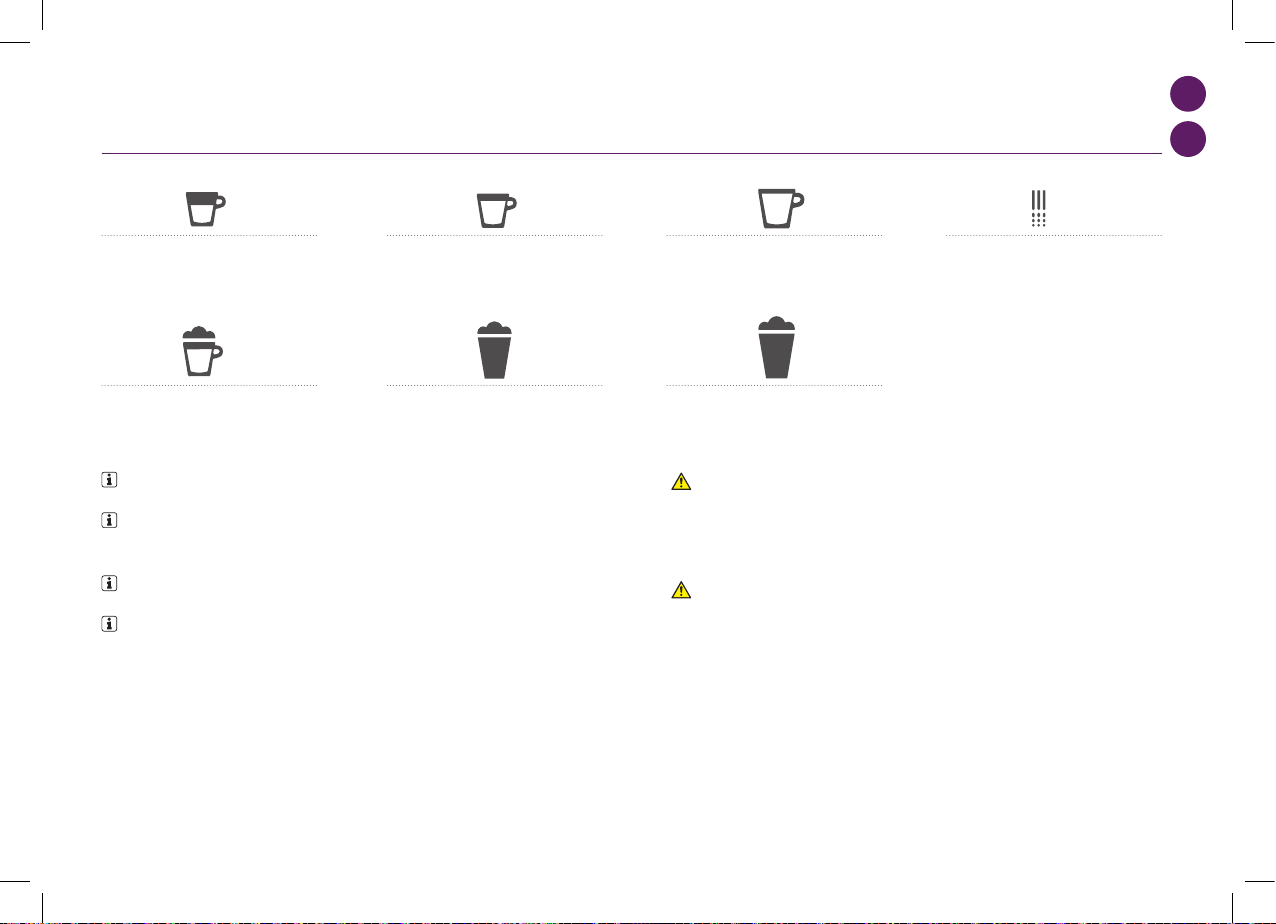
PRESS to confirm.
The discaling agent flows alternately
trough the coffee outlet, hot water nozzle
and drip tray.
Descaling
Descaling process: Empty the drip tray and
the used capsules container.
Rinsing process: Empty the drip
tray and the used capsules
container.
Refer to safety precautions
+
100 ml
500 ml
1 2 3
5
7 8
4
6
Lift and close the lever to eject any capsule
in the used capsule container.
Descaling process: Fill water tank with 100
ml of Nespresso descaling agent and 500ml
water.
Descaling process: Insert the hot
water spout.
Enter the Menu, browse the options and
select DESCALING. You will be guided
throughout the whole process. Follow
machine display instructions.
Descaling process: Place one container
of minimum 1 litre under both the coffee
outlet and the hot water spout.
4°
Volume factory settings
LANGUAGE
DESCALING
WATER HARDNESS
09 10
NL
GR
OPMERKING: *het melkschuimvolume hangt af van het type melk dat wordt gebruikt, de
temperatuur en de stand van de melkregelknop.
ΣΗΜΕΙΣΗ: *ο όγκος του αφρού γάλακτος εξαρτάται από το είδος του γάλακτος που χρησιμοποιείται,
τη θερμοκρασία του και τη θέση του διακόπτη ρύθμισης (αφρού) γάλακτος.
OPMERKING: wij raden u aan om de fabrieksinstellingen aan te houden voor Ristretto, Espresso
en Lungo om de beste resultaten te krijgen voor elk van onze koevariëteiten.
ΣΗΜΕΙΣΗ: σας συστήνουμε να κρατήσετε τις εργοστασιακές ρυθμίσεις για του καφέδες Ristretto,
Espresso και Lungo ώστε να εξασφαλίσετε τα καλύτερα αποτελέσματα ροφήματος για κάθε μία από τις
ποικιλίες καφέ μας.
Het watervolume kan worden geprogrammeerd tussen 50 en 400 ml.
Het melkvolume kan worden geprogrammeerd tussen 30 en 200 ml.
Het koevolume kan worden geprogrammeerd tussen 25 en 200 ml.
Ο όγκος του νερού μπορεί να προγραμματιστεί από τα 50 έως τα 400 ml.
Ο όγκος του γάλακτος μπορεί να προγραμματιστεί από τα 30 έως τα 200 ml.
Ο όγκος του καφέ μπορεί να προγραμματιστεί από τα 25 έως τα 200 ml.
FABRIEKSINSTELLINGEN VOLUME/
ΕΡΓΟΣΤΑΣΙΑΚΕΣ ΡΥΘΜΙΣΕΙΣ ΟΣΟΛΟΓΙΑΣ
Ristretto 25 ml
Ristretto 25 ml
Cappuccino Melk*: 50 ml/Koe: 40 ml
Cappuccino Γάλα*: 50 ml/Καφέ: 40 ml
Lungo 110 ml
Lungo 110 ml
Latte Macchiato Melk*: 150 ml/Koe: 40 ml
Latte Macchiato Γάλα*: 150 ml/Καφέ: 40 ml
Espresso 40 ml
Espresso 40 ml
Heet water 125 ml
Ζεστό νερό 125 ml
Warme Melk* 120 ml
Ζεστό Γάλα*: 120 ml
WAARSCHUWING: wanneer koevolumes van meer dan
150 ml worden geprogrammeerd moet u de machine 5 minuten
af laten koelen voordat u de volgende koe maakt i.v.m. het
risico op oververhitting.
ΠΡΟΣΟΧΗ: aν ο όγκος καφέ είναι προγραμματισμένος άνω
των 150 ml: αφήστε τη μηχανή να κρυώσει για 5 λεπτά πριν το
επόμενο καφέ. Κίνδυνος υπερθέρμανσης!
87
6926_UM_LATTISSIMA_PREMIUM_Z2A.indb 87 17.10.13 19:58
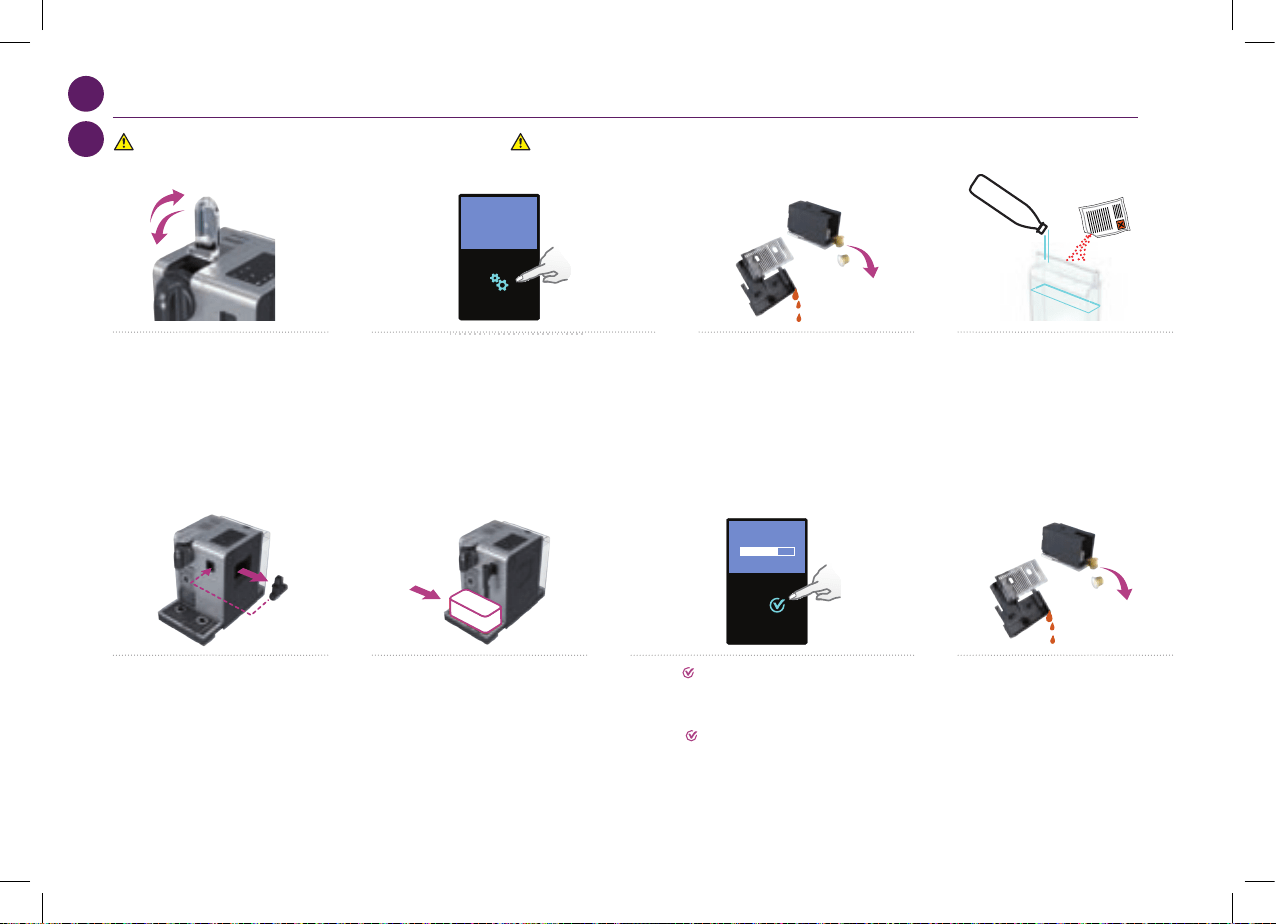
NL
GR
+
100 ml
500 ml
10
+
100 ml
500 ml
10
+
100 ml
500 ml
10
+
100 ml
500 ml
10
+
100 ml
500 ml
10
+
100 ml
500 ml
10
+
100 ml
500 ml
10
+
100 ml
500 ml
10
ONTKALKEN/ΑΦΑΙΡΕΣΗ ΚΑΘΑΛΑΤΣΕΝ
1. Plaats de capsuleklem omhoog en weer
omlaag om de capsule uit te werpen in het
capsuleresevoir.
1. Ανασηκώστε και ξανακλείστε τον οχλό
για να εξαχθεί η κάψουλα έσα στο δοχείο
χρησιοποιηένων καψουλών.
2. Open het menu, blader door de opties en selecteer
ONTKALKEN. U wordt door het hele proces geleid. Volg de
instructies voor de machine op het display.
2. Πηγαίνετε στο Μενού, περιηγηθείτε στι επιλογέ κι
επιλέξτε
ΑΦΑΛΑΤΣΗ. Θα σα δοθούν οδηγίε για όλη
τη διαδικασία. Ακολουθήστε τι οδηγίε στην οθόνη τη
ηχανή.
GEVAAR: raadpleeg de veiligheidsvoorschriften. ΠΡΟΣΟΧΗ: αναφερθείτε στα μέτρα ασφάλειας.
7. Druk op om uw keuze te bevestigen.
Het ontkalkingsmiddel stroomt afwisselend door de koe-
uitloop, het heetwatermondstuk en de lekbak.
7. Πατήστε
για να επιβεβαιώσετε την επιλογή σα.
Το υγρό αφαλάτωση ρέει εναλλάξ από το στόιο καφέ, το
ακροφύσιο ζεστού νερού και το δίσκο αποστράγγιση.
5. Ontkalkingsproces: plaats de
heetwateruitloop.
5. Διαδικασία αφαλάτωσης: προσθέστε το
στόιο ζεστού νερού.
6. Ontkalkingsproces: plaats een bak met
een inhoud van minimaal 1 liter onder zowel
de koe-uitloop als de heetwateruitloop.
6. Διαδικασία αφαλάτωσης: τοποθετήστε
ένα δοχείο ελάχιστη χωρητικότητα 1 λίτρου
κάτω από το στόιο εκροή καφέ και κάτω
από το στόιο ζεστού νερού.
3. Ontkalkingsproces: maak de lekbak en
het capsulereservoir leeg.
3. Διαδικασία αφαλάτωσης: αδειάστε
τον δίσκο αποστράγγιση και το δοχείο
χρησιοποιηένων καψουλών.
4. Ontkalkingsproces: vul het
waterreservoir met 100 ml Nespresso
ontkalkingsmiddel en 500 ml drinkwater.
4. Διαδικασία αφαλάτωσης: γείστε
το δοχείο νερού ε 100 ml από το προϊόν
καθαρισού καθαλατώσεων Nespresso και
500ml πόσιο νερό.
8. Spoelproces: maak de lekbak en het
capsulereservoir leeg. Spoel met drinkwater.
8. Διαδικασία πλύσης: αδειάστε τον
δίσκο αποστράγγιση και το δοχείο
χρησιοποιηένων καψουλών. Γείστε το ε
πόσιο νερό.
88
6926_UM_LATTISSIMA_PREMIUM_Z2A.indb 88 17.10.13 19:58

max
1”
1
2
3
4
5
11
max
1”
1
2
3
4
5
11
max
1”
1
2
3
4
5
11
max
1”
1
2
3
4
5
11
max
1”
1
2
3
4
5
11
max
1”
1
2
3
4
5
11
max
1”
1
2
3
4
5
11
max
1”
1
2
3
4
5
11
NL
GR
ONTKALKEN/ΑΦΑΙΡΕΣΗ ΚΑΘΑΛΑΤΣΕΝ
2. Houd de waterhardheidssticker gedurende
1 seconde onder water.
2. Τοποθετήστε το αυτοκόλλητο έτρηση
σκληρότητα νερού κάτω από νερό για 1
δευτερόλεπτο.
11. Druk op om uw keuze te bevestigen. De
spoelcyclus doorloopt afwisselend de koe-uitloop, het
heetwatermondstuk en de lekbak tot het waterreservoir leeg is.
11. Πατήστε
για να επιβεβαιώσετε την επιλογή σα.
Ο κύκλο ξεπλύατο συνεχίζει εναλλάξ έσα από το
στόιο καφέ, το ακροφύσιο ζεστού νερού και τον δίσκο
αποστράγγιση έχρι να αδειάσει το δοχείο νερού.
3. Het aantal rode vierkantjes geeft de
waterhardheid aan.
3.
Ο αριθό στο κόκκινο τετράγωνο δείχνει
τον βαθό σκληρότητα νερού.
12. Zodra het spoelproces is voltooid, wordt de machine
uitgeschakeld. Spoel de heetwateruitloop en reinig deze met
een vochtige doek. De machine is nu ontkalkt.
12. Όταν η διαδικασία ξεπλύατο ολοκληρωθεί, η ηχανή
σβήνει αυτόατα. Ξεπλύντε το στόιο ζεστού νερού και
καθαρίστε το ε υγρό πανί. Τώρα ολοκληρώσατε το
καθάρισα τη ηχανή από τι καθαλατώσει.
4. Stel de waarde navenant in.
4. Ρυθίστε τον βαθό στη ηχανή
αντίστοιχα.
WATERHARDHEID INSTELLEN/ΡΥΘΜΙΣΗ ΣΚΛΗΡΟΤΗΤΑΣ ΝΕΡΟΥ
1. Open het menu, blader door de opties en selecteer
WATERHARDHEID. U wordt bij het instellen van de waarde
geholpen. Volg de instructies voor de machine op het display.
1. Πηγαίνετε στο Μενού, περιηγηθείτε στι επιλογέ κι
επιλέξτε
ΣΚΛΗΡΟΤΗΤΑ ΝΕΡΟΥ.
θα σα δοθούν οδηγίε για να ορίσετε το βαθό.
Ακολουθήστε τι οδηγίε στην οθόνη τη ηχανή.
9. Spoelproces: spoel en vul het
waterreservoir met drinkwater tot aan het
MAX-niveau.
9. Διαδικασία πλύσης: ξεπλύντε και γείστε
ε πόσιο νερό στο έγιστο επίπεδο «MAX».
10. Spoelproces: plaats een bak met een
inhoud van minimaal 1 liter onder zowel de
koe-uitloop als de heetwateruitloop.
10. Διαδικασία πλύσης: τοποθετήστε ένα
δοχείο ελάχιστη χωρητικότητα 1 λίτρου
κάτω από το στόιο εκροή καφέ και κάτω
από το στόιο ζεστού νερού.
89
6926_UM_LATTISSIMA_PREMIUM_Z2A.indb 89 17.10.13 19:58

NL
GR
STORINGEN OPSPOREN EN VERHELPEN
Geen lampje op display.
➔
Controleer of de stekker goed in het stopcontact zit, of de spanning in orde is en de
zekering werkt. Druk op de AAN/UIT-knop achter het machinedisplay. Neem bij
problemen contact op met de Nespresso Club.
Bericht Machine te warm, aangegeven op display.
➔
Onder bepaalde omstandigheden wordt de machineverwarming heet, bijvoorbeeld
nadat het vloeistofsysteem is geleegd. Wacht, de machine koelt automatisch af.
Koe loopt heel traag uit de machine.
➔
De stroomsnelheid is afhankelijk van de koevariëteit. Voer een zelftest van de machine uit.
➔ Indien nodig ontkalken; zie het gedeelte Ontkalken.
Koe is niet warm genoeg.
➔
Verwarm de kopjes voor.
➔ Indien nodig ontkalken; zie het gedeelte Ontkalken.
Lekkage in het capsulegebied (water in capsulereservoir).
➔
Plaats de capsule op de juiste manier. Als de lekkage blijft bestaan, belt u de Nespresso
Club.
Lampje knippert onregelmatig.
➔
Stuur de machine ter reparatie of bel de Nespresso Club.
Er komt geen koe, maar alleen water uit de machine
(terwijl er wel een capsule geplaatst is).
➔
Neem bij problemen contact op met de Nespresso Club.
De capsuleklem sluit niet volledig.
➔
Leeg het capsulereservoir. Zorg ervoor dat er geen capsule wordt geblokkeerd in het
capsulereservoir.
De kwaliteit van het melkschuim is niet volgens de norm.
➔
Gebruik voor perfect melkschuim magere of halfvolle melk op koelkasttemperatuur
(ongeveer 4° C).
➔
Spoel na elke melkbereiding. Plaats een bakje onder de melkuitloop, draai de
melkschuimregelknop in de stand «REINIGEN».
➔
Demonteer het Rapid Cappuccino System (R.C.S.) om de dag en reinig alle onderdelen in
het bovenste gedeelte van uw vaatwasser.
Bericht Machine moet worden gerepareerd, aangegeven
op display.
➔
Neem contact op met de Nespresso Club of een gemachtigde vertegenwoordiger van
Nespresso voor onderzoek, reparatie of afstelling.
90
6926_UM_LATTISSIMA_PREMIUM_Z2A.indb 90 17.10.13 19:58
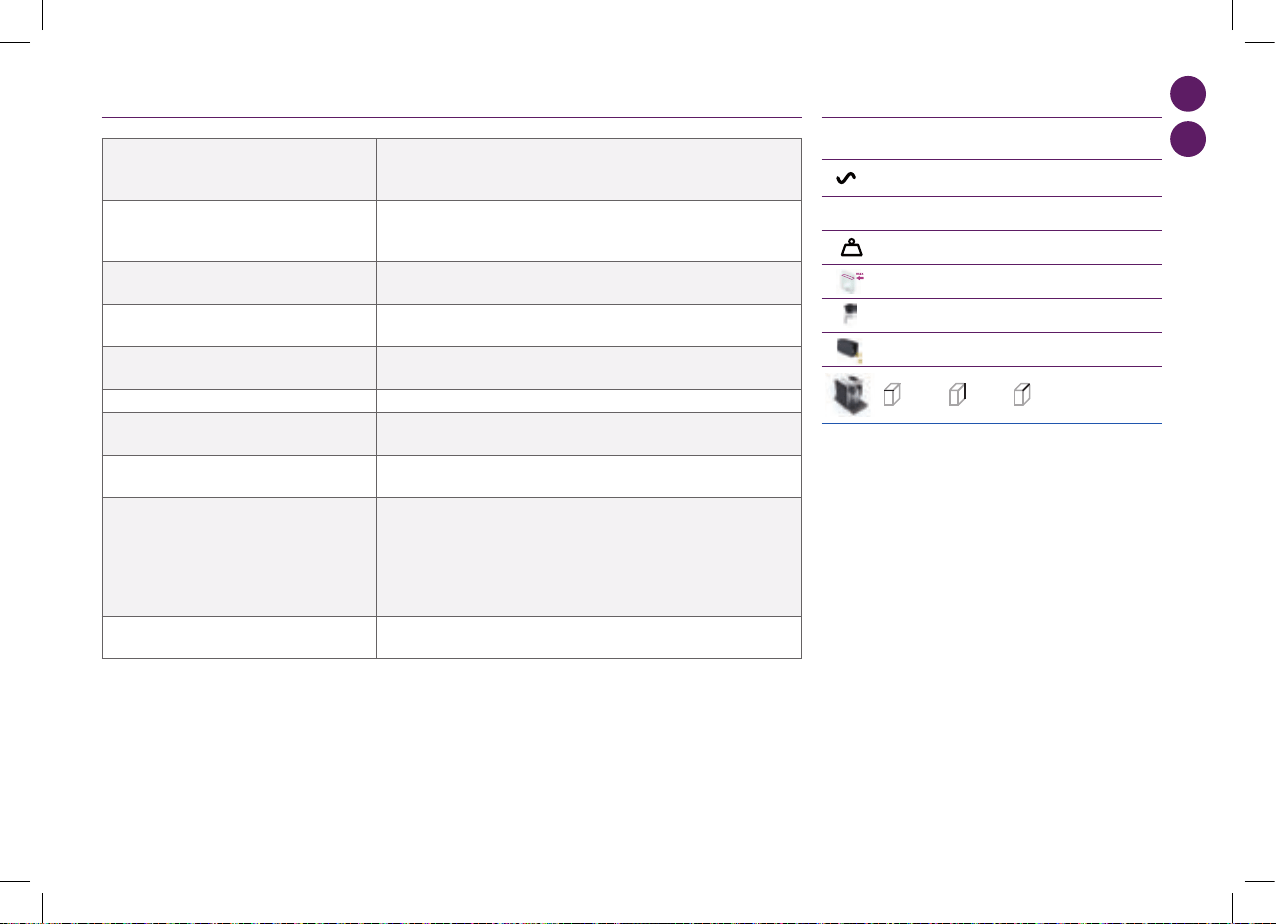
NL
GR
ΑΝΤΙΜΕΤΠΙΣΗ ΠΡΟΒΛΗΜΑΤΝ
Milk Premium
EUR,AUS,NZ: 220240 V, 50/60 Hz, 1300 W
US/CA: 120 V, 60 Hz, 1200 W
19 bar
6.5 kg
1,38 litre
500 ml
13-16 capsules
l=19,4 cm . L=33,2 cm . h=27,4 cm
Troubleshooting
Contact the Nespressso Club
For any additional information, in case of problems
or simply to seek advise, call the Nespresso Club.
Contact details of the Nespresso Club can be found
in the 'Welcome to Nespresso' folder in your
machine box or at nespresso.com
No light on display
Check the mains, plug, voltage, and fuse. In case of problems, call the Nespresso Club.
Coffee comes out very slowly.
Flow speed depends on the coffee variety.
Perform a self check of the machine. Enter the menu list and select Maintenance. Follow instruction
Coffee is not hot enough.
Preheat cup.
Perform a self check of the machine. Enter the menu list and select Maintenance. Follow instruction
Capsule area is leaking (water in capsule container).
Position capsule correctly. If leakages occur, call the Nespresso Club.
Irregular blinking.
Send appliance to repair or call the Nespresso Club.
No coffee, just water runs out (despite inserted capsule).
In case of problems, call the Nespresso Club.
Lever cannot be closed completely
Empty capsule container. Make sure that no capsule is blocked inside the capsule container.
Quality of milk froth is not up to standard
1) For a perfect milk froth, use skimmed or semi-skimmed milk at refrigerator temperature (about 4° C)
2) Rinse after each milk based preparation. Place a recipient under milk outlet, rotate the milk
regulator knob until “CLEAN” position.
3) Every two days, disassemble the R. C. S. and clean all components in the upper level of a
dishwasher
Warranty
Delonghi warrants this product against defects in materials and workmanship for a period of two years from the date of purchase. During this period, Delonghi will either repair or
replace, at its discretion, any defective product at no charge to the owner. Replacement products or repaired parts will be guaranteed for only the unexpired portion of the original
warranty or six months, whichever is greater. This limited warranty does not apply to any defect resulting from accident, misuse, improper maintenance, or normal wear and tear. Any
defect resulting from the usage of non genuine Nespresso capsules will not be covered by this warranty. Except to the extent allowed by applicable law, the terms of this limited warranty
do not exclude, restrict
or modify, and are in addition to, the mandatory statutory rights applicable to the sale of the product to you. If you believe your product is defective, contact Nespresso for instructions on
where to send or bring it for repair. Please visit our website at nespresso.com to discover more about Nespresso
Specifications
P
max
Once the rinsing process is finished, the
machine switches off. Clean the machine
using a damp cloth. You have now finished
descaling the machine.
9
10
11 12
Rinsing process Rinse and fill water with
fresh potable water up to MAX level.
Rinsing process Place one container of
minimum 1 litre under both the coffee
outlet and the hot water spout.
PRESS to confirm.
The rinsing cycle continues trough the coffee
outlet, hot water spout and drip tray until the
water tank is empty.
Water hardness setting
1
programmed buttons blinks 3 times: water hardness is set
i
1”
2 3 4
1
2
3
4
5
Place the water hardness sticker under
water for 1 second.
The number of red squares indicates
the water harness level.
Set the value accordinglyEnter the menu, browse the options and select
WATER HARDNESS.
You will be guided to set the value.
Follow machine display instructions.
max
max
Kg
11 12
EUR, AUS, NZ: 220-240 V, 50/60 Hz, 1400 W
EUR,AUS,NZ: 220240 V, 50/60 Hz, 1300 W
US/CA: 120 V, 60 Hz, 1200 W
19 bar
6.5 kg
1,38 litre
500 ml
13-16 capsules
l=19,4 cm . L=33,2 cm . h=27,4 cm
Troubleshooting
Contact the Nespressso Club
For any additional information, in case of problems
or simply to seek advise, call the Nespresso Club.
Contact details of the Nespresso Club can be found
in the 'Welcome to Nespresso' folder in your
machine box or at nespresso.com
No light on display
Check the mains, plug, voltage, and fuse. In case of problems, call the Nespresso Club.
Coffee comes out very slowly.
Flow speed depends on the coffee variety.
Perform a self check of the machine. Enter the menu list and select Maintenance. Follow instruction
Coffee is not hot enough.
Preheat cup.
Perform a self check of the machine. Enter the menu list and select Maintenance. Follow instruction
Capsule area is leaking (water in capsule container).
Position capsule correctly. If leakages occur, call the Nespresso Club.
Irregular blinking.
Send appliance to repair or call the Nespresso Club.
No coffee, just water runs out (despite inserted capsule).
In case of problems, call the Nespresso Club.
Lever cannot be closed completely
Empty capsule container. Make sure that no capsule is blocked inside the capsule container.
Quality of milk froth is not up to standard
1) For a perfect milk froth, use skimmed or semi-skimmed milk at refrigerator temperature (about 4° C)
2) Rinse after each milk based preparation. Place a recipient under milk outlet, rotate the milk
regulator knob until “CLEAN” position.
3) Every two days, disassemble the R. C. S. and clean all components in the upper level of a
dishwasher
Warranty
Delonghi warrants this product against defects in materials and workmanship for a period of two years from the date of purchase. During this period, Delonghi will either repair or
replace, at its discretion, any defective product at no charge to the owner. Replacement products or repaired parts will be guaranteed for only the unexpired portion of the original
warranty or six months, whichever is greater. This limited warranty does not apply to any defect resulting from accident, misuse, improper maintenance, or normal wear and tear. Any
defect resulting from the usage of non genuine Nespresso capsules will not be covered by this warranty. Except to the extent allowed by applicable law, the terms of this limited warranty
do not exclude, restrict
or modify, and are in addition to, the mandatory statutory rights applicable to the sale of the product to you. If you believe your product is defective, contact Nespresso for instructions on
where to send or bring it for repair. Please visit our website at nespresso.com to discover more about Nespresso
Specifications
P
max
Once the rinsing process is finished, the
machine switches off. Clean the machine
using a damp cloth. You have now finished
descaling the machine.
9
10
11 12
Rinsing process Rinse and fill water with
fresh potable water up to MAX level.
Rinsing process Place one container of
minimum 1 litre under both the coffee
outlet and the hot water spout.
PRESS to confirm.
The rinsing cycle continues trough the coffee
outlet, hot water spout and drip tray until the
water tank is empty.
Water hardness setting
1
programmed buttons blinks 3 times: water hardness is set
i
1”
2 3 4
1
2
3
4
5
Place the water hardness sticker under
water for 1 second.
The number of red squares indicates
the water harness level.
Set the value accordinglyEnter the menu, browse the options and select
WATER HARDNESS.
You will be guided to set the value.
Follow machine display instructions.
max
max
Kg
11 12
Max./Μέγ. 19 bar
EUR,AUS,NZ: 220240 V, 50/60 Hz, 1300 W
US/CA: 120 V, 60 Hz, 1200 W
19 bar
6.5 kg
1,38 litre
500 ml
13-16 capsules
l=19,4 cm . L=33,2 cm . h=27,4 cm
Troubleshooting
Contact the Nespressso Club
For any additional information, in case of problems
or simply to seek advise, call the Nespresso Club.
Contact details of the Nespresso Club can be found
in the 'Welcome to Nespresso' folder in your
machine box or at nespresso.com
No light on display
Check the mains, plug, voltage, and fuse. In case of problems, call the Nespresso Club.
Coffee comes out very slowly.
Flow speed depends on the coffee variety.
Perform a self check of the machine. Enter the menu list and select Maintenance. Follow instruction
Coffee is not hot enough.
Preheat cup.
Perform a self check of the machine. Enter the menu list and select Maintenance. Follow instruction
Capsule area is leaking (water in capsule container).
Position capsule correctly. If leakages occur, call the Nespresso Club.
Irregular blinking.
Send appliance to repair or call the Nespresso Club.
No coffee, just water runs out (despite inserted capsule).
In case of problems, call the Nespresso Club.
Lever cannot be closed completely
Empty capsule container. Make sure that no capsule is blocked inside the capsule container.
Quality of milk froth is not up to standard
1) For a perfect milk froth, use skimmed or semi-skimmed milk at refrigerator temperature (about 4° C)
2) Rinse after each milk based preparation. Place a recipient under milk outlet, rotate the milk
regulator knob until “CLEAN” position.
3) Every two days, disassemble the R. C. S. and clean all components in the upper level of a
dishwasher
Warranty
Delonghi warrants this product against defects in materials and workmanship for a period of two years from the date of purchase. During this period, Delonghi will either repair or
replace, at its discretion, any defective product at no charge to the owner. Replacement products or repaired parts will be guaranteed for only the unexpired portion of the original
warranty or six months, whichever is greater. This limited warranty does not apply to any defect resulting from accident, misuse, improper maintenance, or normal wear and tear. Any
defect resulting from the usage of non genuine Nespresso capsules will not be covered by this warranty. Except to the extent allowed by applicable law, the terms of this limited warranty
do not exclude, restrict
or modify, and are in addition to, the mandatory statutory rights applicable to the sale of the product to you. If you believe your product is defective, contact Nespresso for instructions on
where to send or bring it for repair. Please visit our website at nespresso.com to discover more about Nespresso
Specifications
P
max
Once the rinsing process is finished, the
machine switches off. Clean the machine
using a damp cloth. You have now finished
descaling the machine.
9
10
11 12
Rinsing process Rinse and fill water with
fresh potable water up to MAX level.
Rinsing process Place one container of
minimum 1 litre under both the coffee
outlet and the hot water spout.
PRESS to confirm.
The rinsing cycle continues trough the coffee
outlet, hot water spout and drip tray until the
water tank is empty.
Water hardness setting
1
programmed buttons blinks 3 times: water hardness is set
i
1”
2 3 4
1
2
3
4
5
Place the water hardness sticker under
water for 1 second.
The number of red squares indicates
the water harness level.
Set the value accordinglyEnter the menu, browse the options and select
WATER HARDNESS.
You will be guided to set the value.
Follow machine display instructions.
max
max
Kg
11 12
~ 6.5 kg
1.3 liter/λίτρα
0.5 liter/λίτρα
13-16 capsules/κάψουλε
19.4 cm 27.4 cm 33.2 cm
SPECIFICATIES/ΤΕΧΝΙΚΑ ΧΑΡΑΚΤΗΡΙΣΤΙΚΑ
εν υπάρχει φω στην οθόνη.
➔
Ελέγξτε την πρίζα, το φι, την τάση και την ασφάλεια. Πατήστε το κουπί ON που
βρίσκεται πίσω από την οθόνη τη ηχανή. Σε περίπτωση προβληάτων, καλέστε το
Nespresso Club.
Μήνυα «υπερθέρανση ηχανή», εφανίζεται στην
οθόνη.
➔
Σε ορισένε περιπτώσει, το σύστηα θέρανση τη ηχανή αγγίζει υψηλέ
θεροκρασίε, (δηλ. ετά το άδειασα του συστήατο υγρών). Απλά περιένετε και η
ηχανή θα κρυώσει αυτόατα.
Ο καφέ ρέει πολύ αργά.
➔ Η ταχύτητα τη ροή εξαρτάται από την ποικιλία του καφέ.
➔ Προχωρήστε σε αφαλατώση εάν είναι απαραίτητο; Βλ. ενότητα Αφαίρεση Καθαλατώσεων.
Ο καφέ δεν είναι αρκετά ζεστό.
➔ Προθεράνετε την κούπα.
➔ Προχωρήστε σε αφαλατώση εάν είναι απαραίτητο; Βλ. ενότητα Αφαίρεση Καθαλατώσεων.
Ο χώρο καψουλών έχει διαρροή (νερό στο δοχείο
καψουλών).
➔
Βάλτε την κάψουλα σωστά. Εάν υπάρχουν διαρροέ, καλέστε το Nespresso Club.
Ακανόνιστο αναβόσβηα.
➔
Στείλτε τη ηχανή για επισκευή ή καλέστε το Nespresso Club.
εν ρέει καφέ, όνο νερό (παρότι έχει τοποθετηθεί
κάψουλα καφέ).
➔
Σε περίπτωση δυσκολιών, καλέστε το Nespresso Club.
Ο οχλό δεν κλείνει τελείω.
➔ Αδειάστε το δοχείο καψουλών. Σιγουρευτείτε ότι δεν έχει πλοκάρει κάποια κάψουλα έσα
στο δοχείο καψουλών.
Η ποιότητα του αφρού γάλακτο δεν είναι η προβλεπόενη.
➔
Για τον τέλειο αφρό γάλακτο χρησιοποιείστε αποβουτυρωένο ή ηι-αποβουτυρωένο
γάλα σε θεροκρασία ψυγείου (περίπου 4 βαθού C).
➔
Ξεπλένετε ετά από κάθε παρασκευή ροφήατο ε γάλα. Τοποθετήστε ένα δοχείο κάτω
από το στόιο γάλακτο, στρέψτε το διακόπτη στη θέση «ΚΑΘΑΡΙΣΜΟΣ».
➔ Κάθε δύο ηέρε, αποσυναρολογήστε το σύστηα R.C.S. και καθαρίστε όλα τα κοάτια
του συστήατο στο πάνω επίπεδο του πλυντηρίου πιάτων.
Μήνυα «ανάγκη επισκευή ηχανή», εφανίζεται στην
οθόνη.
➔
Για οποιεσδήποτε επιπλέον πληροφορίε, σε περίπτωση προβληάτων ή απλά για να
ζητήσετε συβουλέ, καλέστε το Nespresso Club.
91
6926_UM_LATTISSIMA_PREMIUM_Z2A.indb 91 17.10.13 19:58

NL
GR
Bel de Nespresso Club voor aanvullende informatie, in geval van problemen of gewoon voor advies.
De contactgegevens van de Nespresso Club vindt u in de map «Welkom bij Nespresso» in de doos van uw machine of op nespresso.com.
Για οποιεσδήποτε επιπλέον πληροφορίε, σε περίπτωση προβληάτων ή απλά για να ζητήσετε συβουλέ, καλέστε το Nespresso Club.
Μπορείτε να βρείτε τα στοιχεία επικοινωνία του Nespresso Club στο ντοσιέ «Καλωσορίσατε στη Nespresso» που βρίσκεται στη συσκευασία τη ηχανή σα ή στη διεύθυνση www.nespresso.gr
CONTACT OPNEMEN MET DE NESPRESSO CLUB/ΕΠΙΚΟΙΝΝΙΑ ΜΕ ΤΟ NESPRESSO CLUB
AFVOEREN EN MILIEU/ΙΑΘΕΣΗ ΑΠΟΡΡΙΜΜΑΤΝ ΚΑΙ ΠΕΡΙΒΑΛΛΟΝΤΙΚΗ ΜΕΡΙΜΝΑ
Afvoeren en milieubescherming
Uw machine bevat waardevolle materialen die kunnen worden teruggewonnen of gerecycled. Door het scheiden van de resterende afvalstoen in verschillende typen is hergebruik van waardevolle grondstoen mogelijk.
Geef de machine af bij een verzamelpunt. U kunt informatie over de afvoer krijgen bij uw plaatselijke autoriteiten.
ιάθεση απορριάτων και Προστασία του περιβάλλοντο
Η συσκευή σα περιέχει πολύτια υλικά τα οποία πορούν να επαναχρησιοποιηθούν ή να ανακυκλωθούν. Ο διαχωρισό των εναποεινάντων απορριάτων σε διαφορετικέ κατηγορίε διευκολύνει την ανακύκλωση
πολύτιη πρώτη ύλη. Αφήστε τη συσκευή σα σε ένα σηείο συλλογή. Πληροφορίε σχετικά ε τη διάθεση απορριάτων πορείτε να έχετε από τι τοπικέ αρχέ.
GARANTIE/ΕΓΓΥΗΣΗ
De’Longhi garandeert eventuele materiaal- en productiefouten tot twee jaar na de aankoopdatum van dit apparaat. Gedurende deze periode zal De’Longhi naar eigen goeddunken defecte producten ofwel repareren, ofwel
vervangen, zonder dat daarvoor kosten aan de eigenaar in rekening worden gebracht. Vervangende apparaten of gerepareerde onderdelen vallen slechts onder de garantie voor de duur van de niet-verstreken termijn van
de oorspronkelijke garantie of voor de duur van zes maanden, waarbij de langste termijn als regel wordt gehanteerd. Deze beperkte garantie is niet van kracht voor eventuele storingen die te wijten zijn aan een ongeluk,
onoordeelkundig gebruik, gebrekkig onderhoud of normale slijtage. Eventuele storingen die het gevolg zijn van het gebruik van niet-originele Nespresso capsules vallen niet onder deze garantie. Behoudens de door de
wetgever toegestane uitzonderingen, houden de in deze beperkte garantie opgenomen voorwaarden geen uitsluitingen, beperkingen of wijzigingen in, en zijn ze een aanvulling op de verplichte statutaire rechten die van
toepassing zijn op de verkoop van een product aan u. Indien u van mening bent dat uw product een defect vertoont, neem dan contact op met Nespresso om te horen waar u uw product kunt aanbieden of naar welk adres u het
kunt sturen voor reparatie. Bezoek ook eens onze website www.nespresso.com voor meer informatie over Nespresso.
Η De’Longhi παρέχει εγγύηση για το συγκεκριένο προϊόν κατά σφαλάτων υλικών και εργασιών, για δύο έτη από την ηεροηνία αγορά. Κατά τη διάρκεια αυτή τη περιόδου, η De’Longhi θα επισκευάσει ή θα αντικαταστήσει,
κατά την κρίση τη, οποιοδήποτε ελαττωατικό προϊόν, ανεξόδω για τον αγοραστή. Τα αντικατασταθέντα προϊόντα ή τα επισκευασένα έρη καλύπτονται ε εγγύηση, η οποία θα έχει διάρκεια τον χρόνο που αποένει από την
αρχική εγγύηση ή έξι ήνε, όποιο διάστηα είναι εγαλύτερο. Η παρούσα περιορισένη εγγύηση δεν ισχύει για οποιοδήποτε ελάττωα οφείλεται σε ατύχηα, κακή χρήση, ακατάλληλη συντήρηση ή κανονική φθορά. Εκτό
από το βαθό που επιτρέπεται από την ισχύουσα νοοθεσία, οι όροι τη παρούσα περιορισένη ευθύνη δεν αποκλείουν, περιορίζουν ή τροποποιούν, αλλά ισχύουν επιπρόσθετα στα επιβεβληένα νόια δικαιώατα που
αφορούν την πώληση του προϊόντο σε εσά. Εάν πιστεύετε ότι το προϊόν που έχετε είναι ελαττωατικό, επικοινωνήστε ε την De’Longhi για οδηγίε σχετικά ε το που θα το στείλετε ή θα το φέρετε για επισκευή. Οποιοδήποτε
ελάττωα προκύψει ω αποτέλεσα τη χρήση η-γνήσιων καψουλών Nespresso, δεν καλύπτεται από την παρούσα εγγύηση.
92
6926_UM_LATTISSIMA_PREMIUM_Z2A.indb 92 17.10.13 19:58

NL
GR
93
6926_UM_LATTISSIMA_PREMIUM_Z2A.indb 93 17.10.13 19:58

PL
RU
OPIS/ОБЩИЕ СВЕДЕНИЯ
Wyświetlacz
(przygotowanie)/
13
Lungo/Лунго
14
Espresso/Эспрессо
15
Ristretto/Ристретто
16
Gorąca woda/Горячая вода
17
Ciepłe mleko/Теплое молоко
18
Cappuccino/Капучино
19
Latte Macchiato/Латте Макьято
Wyświetlacz (nawigacja)/
20
Menu/Меню
21
Przewiń do góry, gdy Menu jest aktywne/
Вверх по списку
22
Wybór opcji, gdy Menu jest aktywne/
Выбор опции при активном меню
23
Przewiń w dół, gdy Menu jest aktywne/
Вниз по списку
24
Tekst wyświetlacza/Сообщение на дисплее
Rapid Cappuccino System (R.C.S.)/
25
Pokrętło do regulacji wielkości piany/
Ручка регулятора молочной пенки
26
Miejsce na pokrętło do regulacji wielkości piany/
Позиция для извлечения ручки регулятора
молочной пенки
27
Min. wielkość piany/
Минимальный уровень молочной пенки
28
Max. wielkość piany/
Максимальный уровень молочной пенки
29
«CLEAN» do czyszczenia systemu Rapid Cappuccino/
Позиция «CLEAN» - система автоматической очистки
30
Pokrywka pojemnika na mleko/
Крышка контейнера для молока
31
Dysza mleczna/Насадка для молока
32
Pojemnik na mleko/Контейнер для молока
33
Rurka zasysająca mleko/Трубочка для забора молока
34
Konektor Systemu Rapid Cappuccino/
Коннектор Системы приготовления капучино
Opis urządzenia/
-
A
Urządzenie przeznaczone tylko do parzenia kawy/
Кофе-машина
B
Urządzenie z Systemem Rapid Cappuccino (do Cappuccino)/
Кофе-машина с контейнером для молока (Система
приго
товления капучино)
C
Urządzenie z dyszą gorącej wody/
Кофе-машина с насадкой для горячей воды
1
Dźwignia/Рычаг
2
Przycisk ON/OFF/Кнопка ВКЛ/ВЫКЛ
3
Pojemnik na wodę/Резервуар
4
Wylot kawy/Отверстие для выхода кофе
5
Kratka ociekowa/Решетка поддона
6
Tacka ociekowa/Поддон
7
Podstawka pod liżankę (zam
ontowana na stałe)/
Подставка для чашки
8
Pojemnik na zużyte kapsułki/
Контейне
р для использованных капсул
9
Osłonka konektora pary/Затвор отверстия для насадки для пара
10
Dysza gorącej wody/Насадка для горячей воды
11
Schowek na dyszę gorącej wody/
Отсек для хранения насадки для горячей воды
12
Konektor pary/Отверстие для насадки для пара
94
6926_UM_LATTISSIMA_PREMIUM_Z2A.indb 94 17.10.13 19:58
PL
RU
ZAWARTOŚĆ/СОДЕРЖАНИЕ
Nespresso to ekskluzywny system tworzenia perfekcyjnej kawy espresso za każdym razem. Wszystkie urządzenia Nespresso wyposażone są w wyjątkowy system ekstrakcji, gwarantujący wysokość ciśnienia do 19 barów.
Każdy z parametrów urządzenia został bardzo precyzyjnie obliczony tak, aby zapewnić moż liwoś
ć ekstrakcji wszystkich aromatów kawy Grands Crus i nadać kawie odpowiednią konsystencję a także stworzyć niezwykle gęstą
i delikatną piankę (crema).
Nespresso - это эксклюзивная система для приготовления идеального эспре
ссо. Все кофе-машины Nespresso оснащены уникальной системой экстракции, обеспечивающей давление 19 бар. Все параметры кофе-
машин были подобраны с величайшей точ
ностью, чтобы гарантировать Вам раскрытие всех ароматов сортов кофе Гран Крю от Nespresso.
USTAWIENIA FABRYCZNE/ . .
ODKAMIENIANIE/ ........................
USTAWIENIA TWARDOŚCI WODY/ .....
ROZWIĄZYWANIE PROBLEMÓW/ ..................
DANE TECHNICZNE/ ...................................
UTYLIZACJA I KWESTIE EKOLOGICZNE/
...
SKONTAKTUJ SIĘ Z KLUBEM NESPRESSO/ NESPRESSO
..............................
GWARANCJA/ ...............................................................................
OPIS/ ..................................................................................
ZAWARTOŚĆ OPAKOWANIA/ ......................................
NAWIGACJA MENU/ ........................................................
LISTA MENU/ ...........................................................................
PIERWSZE UŻYCIE LUB UŻYCIE PO DŁUGIM OKRESIE NIE UŻYWANIA/
......
PRZYGOTOWANIE KAWY/ ..............................................
MONTAŻ/DEMONTAŻ SYSTEMU RAPID CAPPUCCINO R.C.S./
/
...........................
PRZYGOTOWANIE CAPPUCCINO I LATTE MACCHIATO/
..............................................
CODZIENNE CZYSZCZENIE/ .................................................
MYCIE RĘCZNE SYSTEMU RAPID CAPPUCCINO SYSTEM R.C.S./
.
.............................
105
106
107
108
109
110
110
110
UWAGA: w przypadku pojawienia się tego symbolu należy zapoznać się z zasadami bezpieczeństwa, aby uniknąć ewentualnego uszkodzenia
ciała lub urządzenia.
INFORMACJA: w przypadku pojawienia się tego symbolu należy postępować zgodnie z instrukcją dotyczącą prawidłowego i bezpiecznego
użytkowania ekspresu z urządzenia.
: когда вы видите этот знак, обратитесь к инструкции по безопасности с тем, чтобы избежать возможных повреждений и травм.
: когда вы видите этот знак, ознакомьтесь с инструкцией по надлежащей и безопасной эксплуатации кофе-машины.
94
96
96
97
98
100
100
101
104
104
95
6926_UM_LATTISSIMA_PREMIUM_Z2A.indb 95 17.10.13 19:58
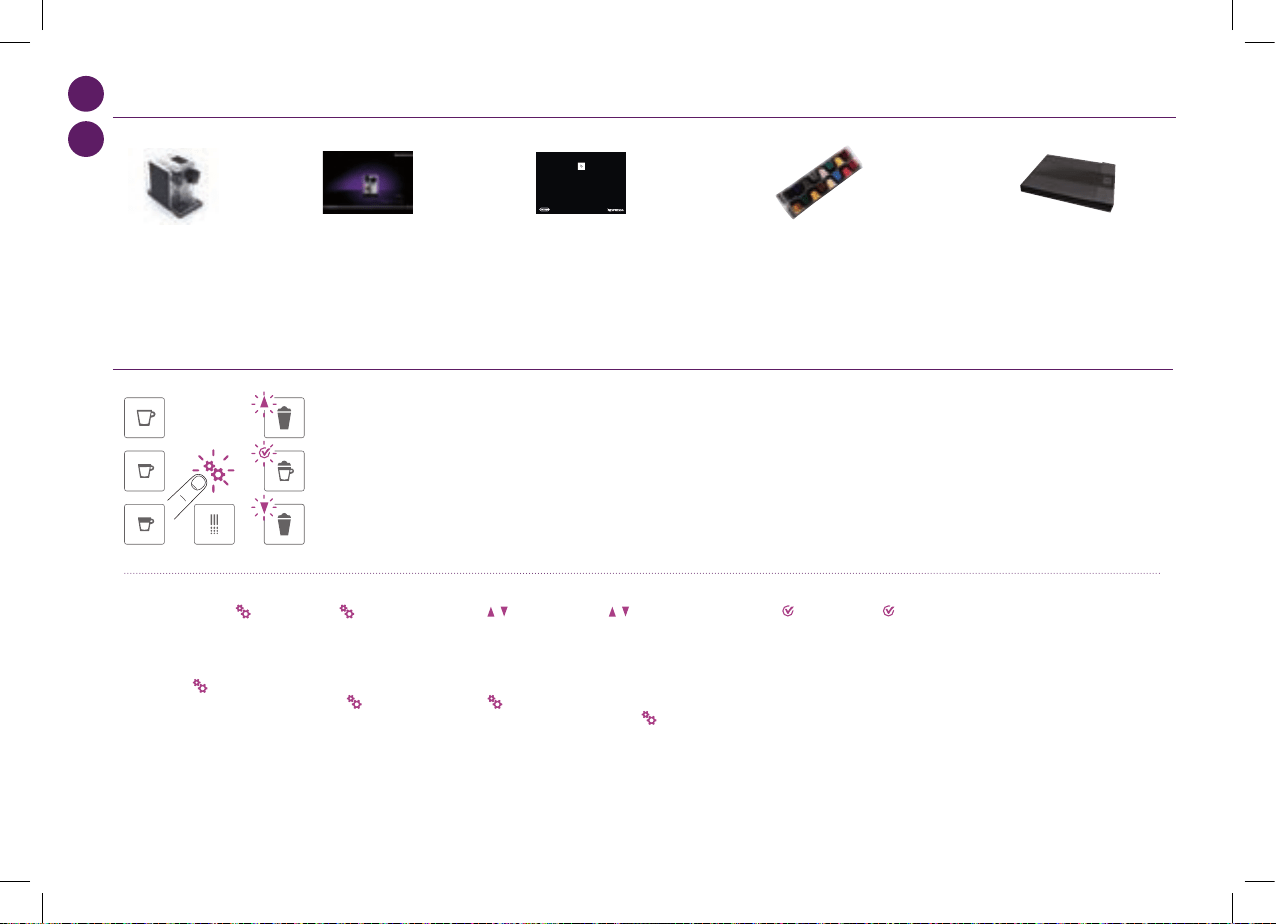
EN SA FETY PRECAUTI ONS ............................................................................. 2
FR CONSIGNES DE SECURITE ......................................................................... 4
DE SICHERHEITSHINWEISE ........................................................................... 7
IT PRECAUZIONI DI SICUREZ ZA .................................................................... 10
ES PRECAUCIONES DE SEGURIDAD ................................................................ 12
PT MEDIDAS DE SEGURANÇA......................................................................... 15
NL V EILIGHEIDSMAATREGELEN ..................................................................... 18
GR ΜΈΤ ΡΑ ΑΣΦΑΛΈΙΑ Σ .................................................................................. 20
HU BIZTONSÁGI ELŐÍRÁSOK .......................................................................... 22
CZ BEZPEČNOSTNÍ POKYNY .......................................................................... 25
PL ZASADY BEZPIECZEŃSTWA ....................................................................... 28
RU МЕРЫ ПРЕДОСТОР ОЖНОСТИ ................................................................. 31
PL
RU
NAWIGACJA MENU/НАВИГАЦИЯ ПО МЕНЮ
ZAWARTOŚĆ OPAKOWANIA/СОДЕРЖИМОЕ УПАКОВКИ
Ekspres do kawy
Кофе-машина
Brosz
ura «Witamy w Nespresso»
Буклет «Добро пожаловать в
Nespresso»
Instrukcja obsługi
Инструкция по экс
плуат
ации
Zasady bezpieczeństwa
Инструкция по безопасности
Zestaw degustacyjny kapsułek
Nespresso Grand Cru
Тестовый набор капсул Гран Крю
Nespresso
Wejdź do listy Menu/Вход в главное меню
Przytrzymaj krótko symbol /Нажмите символ
.
Wyświetl opcje/Просмотр опций
Przyciśnij symbol /Нажмите указатели .
Wybierz opcje/Выбор опции
Przyciśnij symbol /Нажмите символ .
Wyjdź z listy Menu/Выход из главного меню
Przewiń i wybierz opcję [WYJŚCIE] lub szybko
przyciśnij symbol
.
Выберите символ [ВЫХОД] или нажмите символ
.
Wyjdź z opcji i wróć do listy Menu/
Возвращение в главное меню
Przewiń i wybierz opcję [WYJŚCIE] lub szybko
przyciśnij symbol
.
Выберите символ [ВЫХОД] или нажмите символ
.
96
6926_UM_LATTISSIMA_PREMIUM_Z2A.indb 96 17.10.13 19:58

1
ЯЗЫК
JĘZYK
2
УДАЛЕНИЕ НАКИПИ
ODKAMIENIANIE
3
ЖЕСТКОСТЬ ВОДЫ
TWARDOŚĆ WODY
4
АВТ. ВЫКЛЮЧЕНИЕ
AUTOM. WYŁĄCZ.
5
ЗАВОДСКИЕ ПАРАМ.
UST. FABRYCZNE
6
СЛИТЬ ИЗ СИСТЕМЫ
OPRÓŻNIANIE SYSTEMU
7
ЗАПРОГР. ОБЪЕМ
ZAPROG. ILOŚĆ
8
ПАРАМЕТРЫ
USTAWIENIA
9
ПРОФИЛАКТИКА
SERWIS
10
ПОМОЩЬ
POMOC
ВЫХОД
WYJŚCIE
11
PL
RU
Wejdź do listy Menu/Вход в главное меню
Przytrzymaj krótko symbol /Нажмите символ
.
Wyświetl opcje/Просмотр опций
Przyciśnij symbol /Нажмите указатели .
Wybierz opcje/Выбор опции
Przyciśnij symbol /Нажмите символ .
Wyjdź z listy Menu/Выход из главного меню
Przewiń i wybierz opcję [WYJŚCIE] lub szybko
przy
ciśnij symbol
.
Выберите символ [ВЫХОД] или нажмите символ
.
Wyjdź z opcji i wróć do listy Menu/
Возвращение в главное меню
Przewiń i wybierz opcję [WYJŚCIE] lub szybko
przyciśnij symbol
.
Выберите символ [ВЫХОД] или нажмите символ
.
LISTA MENU/ГЛАВНОЕ МЕНЮ
1
Wybierz tę opcję, aby ustawić preferowany język obsługi. Postępuj zgodnie z instrukcjami wyświetlanymi na ekranie urządzenia.
Выберите опцию для настройки языка. Следуйте инструкциям на дисплее кофе
-машины.
2
Wybierz tę opcję, gdy na wyświetlaczu pojawi się informacja o potrzebie odkamieniania. Patrz strona 106. Zostaniesz przeprowadzony przez proces odwapniania.
Выберите опцию, если на дисплее загорелся индикатор очистки от накипи. См. страницу 106. Инструкция по очистке кофе
-машины от
накипи.
3
Wybierz tę opcję, aby ustawić poziom twardości wody. Skorzystaj z paska testowego, aby określić poziom twardości wody. Pozwoli to zoptymalizować
częstotliwość odwapniania. Patrz strona 107.
Выберите опцию для настройки уровня же
сткос
ти воды. Используйте полоску-индикатор уровня жесткости воды. Это поможет вам оптимизировать
частоту повтора процесса декальцинации. См. страницу 107.
4
Wybierz tę opcję, aby ustawić czas, po którym urządzenie wyłączy się automatycznie. (Możliwe opcje to 9 minut, 30 minut, 2 godziny, 8 godzin). Postępuj zgodnie
z instrukcjami wyświetlanymi na ekranie urządzenia.
Выберите опции для настройки времени автоматического отключения после использования. (Возможные настройки: 9 минут, 30 минут, 2 часа, 8
часов). Следуйте инструкциям на дисплее кофе
-машины.
5
Wybierz tę opcję, aby zresetować wszystkie parametry urządzenia do ustawień fabrycznych.
Выберите опцию, чтобы вернуться к заводским параметрам кофе
-машины.
6
Wybierz tę opcję, aby opróżnianić s
ystem z wody przed oddaniem ekspresu do naprawy, przed okresem dłuższego nie używania lub w celu ochrony przed
zamarznięciem. Postępuj zgodnie z instrukcjami wyświetlanymi na ekranie urządzenia. Po tym procesie, korzystanie z urządzenia nie będzie możliwe prz
ez 10 min.
Выберите опцию, чтобы вывести воду из системы, в случае, если Вы не собираетесь пользоваться кофе-машиной
в течение долгого времени, или Вам
необходимо сдать кофе-машину в
сервисный центр. Следуйте инструкциям на дисплее кофе-машины. Вы не сможете пользоваться коф е-машиной в
течение 10 минут после заверш ения про
цесса.
7
Wybierz tę opcję, aby zaprogramować ilość napojów (wody w liż ance kaw
y, gorącej wody i napojów na bazie mleka). Postępuj zgodnie z instrukcjami
wyświetlanymi na ekranie urządzenia. Dodatkowo możesz zre
setować wszystkie ustawienia ilości napojów do ustawień fabrycznych.
Выберите опцию, чтобы запрограммировать объем кофе, гор
ячей воды, молока или молочной пенки. Следуйте инструкциям на дисплее кофе-
машины. При желании Вы можете в
ернуть настройки к заводстким параметрам.
8
Wybierz tę opcję, aby uzyskać dostęp do wszystkich ustawień urządzenia.
Выберите опцию для быстрого просмотра всех возможн
ых наст
роек кофе-машины.
9
Wybierz tę opcję, aby uzyskać dostęp do informacji o ogólnym stanie technicznym urządzenia. Statystyki użytkowa
nia są dostępne zarówno od pierwszego użycia
(absolutne) lub od ostatniego odwapniania (względne). Dostępny jest również numer ser
yjny urządzenia.
Выберите опцию для проверки общего состояния вашей кофе-машины
. Статистика пользования кофе-машиной рассчитывается с момента первого
использования и обнуляется в момент проведения процесса очистки от накипи. Вы также можете узна
ть серийный номер Вашей кофе-машины.
10
Wybierz tę opcję, aby otrzymać porady na temat uzyskania optymalnej jakość piany mlecznej. W celu uzyskania większej ilości informacji, skorzystaj z linku.
Выберите опцию, чтобы узнать, как получить наилучше
е качест
во молочной пенки при ежедневном использовании. Пройдите по ссылке, чтобы узнать
больше об этой возможности.
11
Wyjście z listy Menu i powrót do trybu gotowości urządzenia.
Выход из главного меню и возвращение кофе
-машины в р
ежим готовности.
97
6926_UM_LATTISSIMA_PREMIUM_Z2A.indb 97 17.10.13 19:58
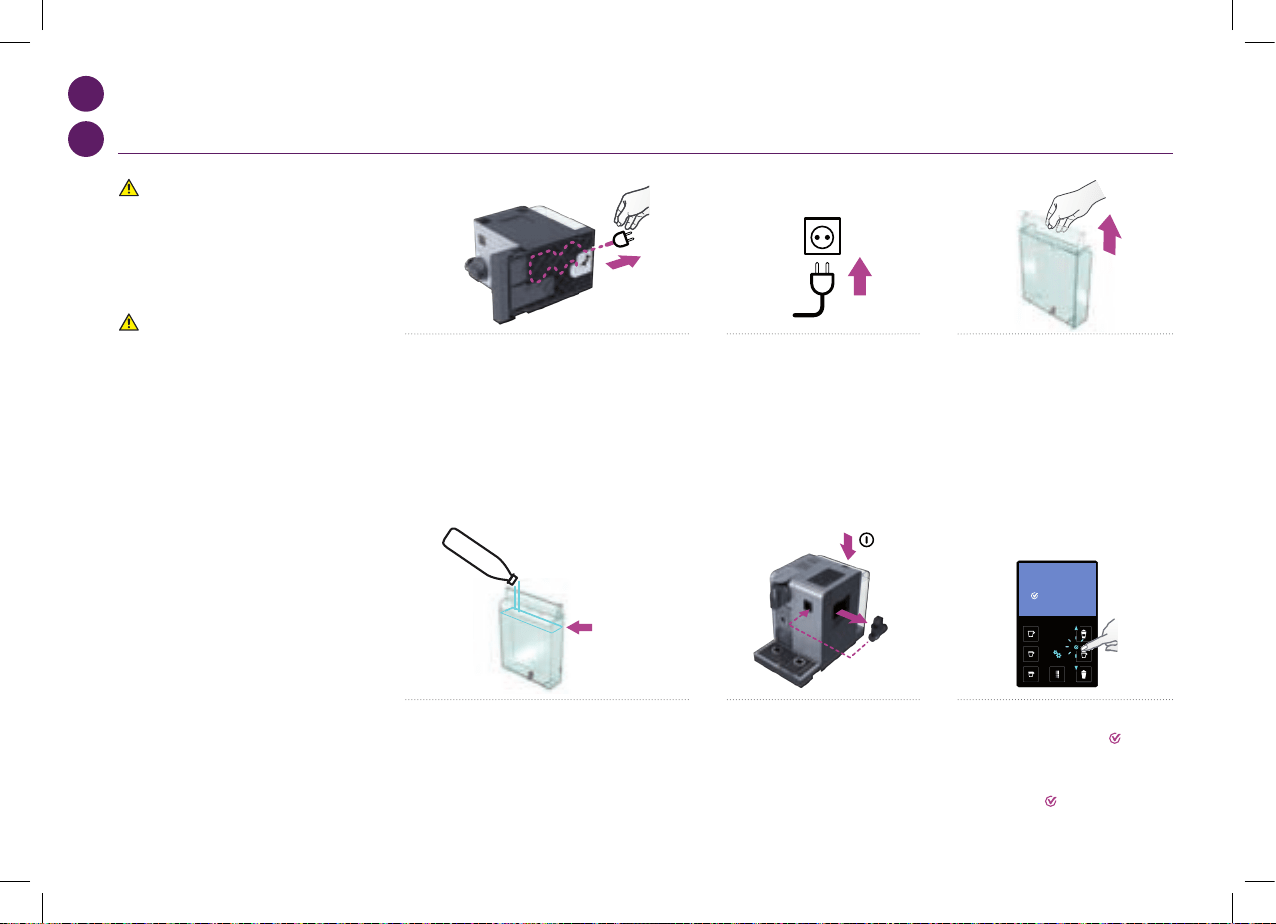
max
SET LANGUAGE
to continue
LANGUAGE
Actual value : EN
New value : [ ]
to select
05
max
SET LANGUAGE
to continue
LANGUAGE
Actual value : EN
New value : [ ]
to select
05
max
SET LANGUAGE
to continue
LANGUAGE
Actual value : EN
New value : [ ]
to select
05
max
SET LANGUAGE
to continue
LANGUAGE
Actual value : EN
New value : [ ]
to select
05
max
SET LANGUAGE
to continue
LANGUAGE
Actual value : EN
New value : [ ]
to select
05
max
SET LANGUAGE
to continue
LANGUAGE
Actual value : EN
New value : [ ]
to select
05
PL
RU
PIERWSZE UŻYCIE LUB UŻYCIE PO DŁUGIM OKRESIE NIE UŻYWANIA/
ПЕРВОЕ ИСПОЛЬЗОВАНИЕ ИЛИ ИСПОЛЬЗОВАНИЕ ПОСЛЕ ДЛИТЕЛЬНОГО ПРОСТОЯ
UWAGA: najpierw należy
zapoznać się z zasadami
bezpieczeństwa w celu uniknięcia
śmiertelnego porażenia prądem i
pożaru.
: в первую
очередь ознакомьтесь с мерами
безопасности во избежание
риска смертельного поражения
электрическим током или пожара.
1. Wyjąć zbiornik na wodę, tackę ociekową i pojemnik na
kapsułki. Dostosować długość przewodu, a jego nadmiar
umieścić w przeznaczonym do tego wgłębieniu pod
urządzeniem.
1. Снимите контейнер для воды, поддон для капель и
контейнер для использованных капсул. Отрегулируйте
длину сетевого шн
ура в отс
еке для хранения шнура под
кофе-машиной.
5. Podłącz dyszę gorącej wody. Włącz
urządzenie.
5. Вставьте насадку для горячей
воды. Включите кофе
-машину, нажав
н
а кнопку ON.
2. Umieścić urządzenie w pozycji
pionowej i podłączyć do sieci
elektrycznej.
2. Поставьте кофе
-машину
вер
тикально и подключите ее к сети.
6. SET LANGUAGE: wybierz preferowany
język obsługi. Przyciśnij symbol
, aby
zatwierdzić.
6. SET LANGUAGE: выберите язык.
Нажм
ите кнопку
, чтобы продолжить.
3. Zbiornik na wodę można przenosić
trzymając za pokrywę.
3. Резервуар для воды можн
о перен
осить
за ручку.
4. Przepłukać zbiornik na wodę. Następnie napełnić wodą
zdatną do picia do maksymalnego poziomu.
4. Промойте контейнер для воды и наполните его
питьевой водой до максимального уровня.
98
6926_UM_LATTISSIMA_PREMIUM_Z2A.indb 98 17.10.13 19:58
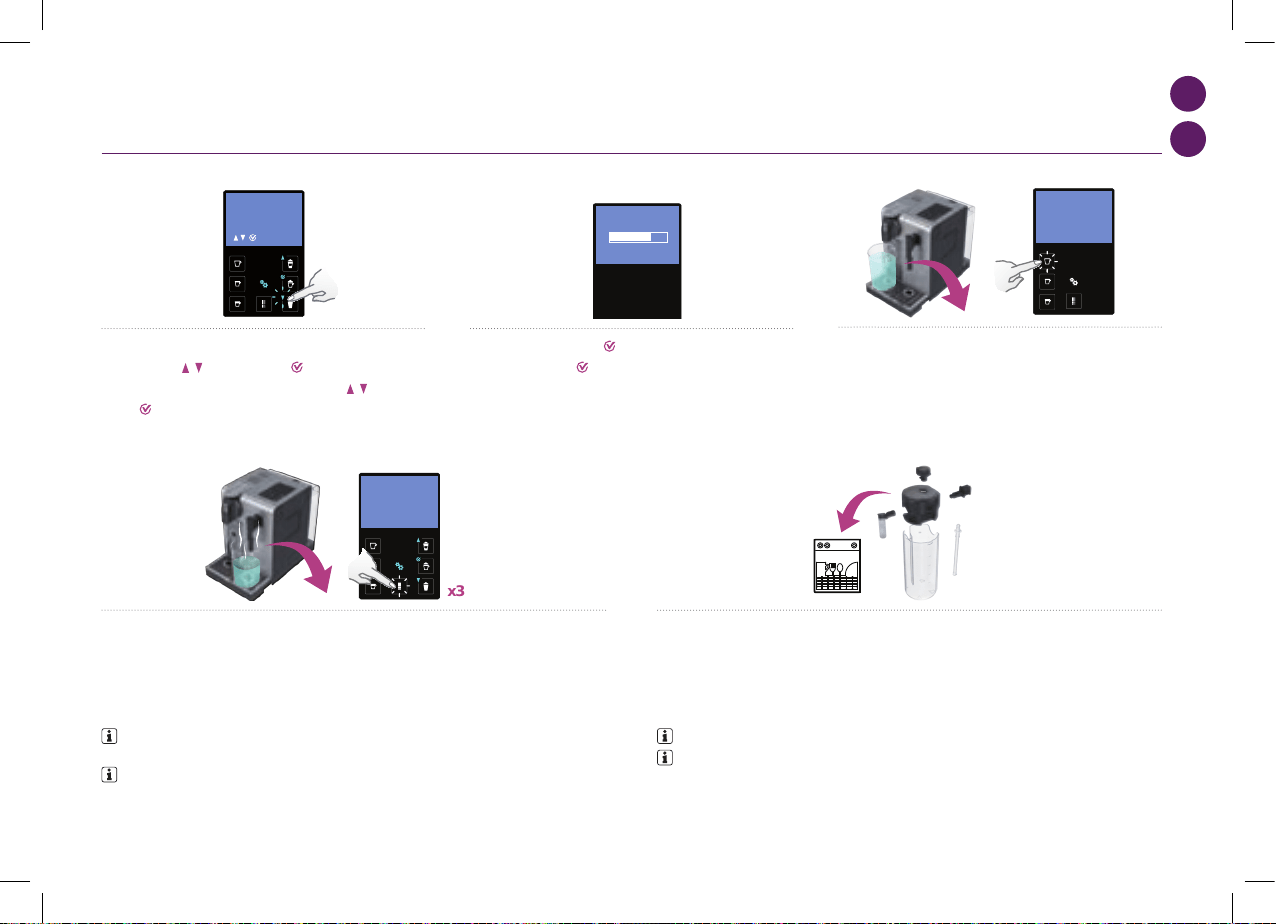
max
SET LANGUAGE
to continue
LANGUAGE
Actual value : EN
New value : [ ]
to select
05
max
First read the safety precautions to avoid risks of fatal electrical shock and fire
Remove the plastic films from grid,
lever and machine panels.
Remove the water tank, drip tray, and capsule
container. Adjust the cable length and store the
excess in the cable guide under the machine.
Put the machine in upright position,
plug machine into mains.
The water tank can be carried by
its cover.
Rinse the water tank before filling with
potable water up to maximum level.
Insert the hot water spout.
Switch machine ON
Set your preferred language.
Press to continue.
SET LANGUAGE
to continue
Select your language by scrolling the
options using up/down arrow. Press to
confirm.
LANGUAGE
Actual value : EN
New value : [ ]
to select
Coffee preparation
x3
x3
110 ml
40 ml
25 ml
05 06
PL
RU
7. LANGUAGE: wybierz język obsługi przewijając opcje przy uzyciu
symbolu strzałki
. Przyciśnij symbol , aby zatwierdzić.
7. LANGUAGE: выберите язык, используя стелки
. Нажмите
кнопку , чтобы подтвердить Ваш выбор.
PIERWSZE UŻYCIE LUB UŻYCIE PO DŁUGIM OKRESIE NIE UŻYWANIA/
ПЕРВОЕ ИСПОЛЬЗОВАНИЕ ИЛИ ИСПОЛЬЗОВАНИЕ ПОСЛЕ ДЛИТЕЛЬНОГО ПРОСТОЯ
11. Czyść System Rapid Cappuccino (R.C.S.) i myj pojemnik na mleko wraz z pozostałymi częściami na
górnej półce zmywarki. Jeśli mycie w zmywarce nie jest możliwe, po
stępuj zgodnie z rozdziałem Mycie
ręczne Systemu Rapid Cappuccino (R.C.S.).
11. Разберите Систему приготовления капучино и промойте все отдельные части. Молочный
контейнер можн
о мыть в посудомоечной машине или вр
учную.
INFORMACJA: więcej informacji w części Montaż/Demontaż Systemu Rapid Cappuccino (R.C.S.).
: см. инструкцию по «Сборке/Разборке Системы приготовления
капучино».
10. Płukanie: przepłucz trzy razy dyszę gorącej wody. Po zakończonym procesie należy odłączyć dyszę i
umieścić ją w schowku znajdującym się z prawej strony maszyny. Zasuń osłonkę konektora pary.
10. Очистка: повторите три раза, пропустив воду через насадку для горячей воды. После очистки,
снимите насадку для горячей воды и уберите ее в отсек для хранения на правой боковой панели
кофе
-машины. Закройте
задвижку.
INFORMACJA: urządzenia, po wyprodukowaniu są dokładnie testowane. Śladowe ilości
proszku kawowego można odnaleźć w wodzie użytej do przepłukania.
: все кофе-машины проходят тестирование перед продажей. Возможно
появление небольшого количества частиц кофе при проведении очистки кофе-машины
перед первым использованием.
9. Płukanie: umieścić pojemnik pod wylotem kawy i wcisnąć
przycisk Lungo. Powtórzyć trzy razy.
9. Очистка: поместите емкость под насадку для кофе и
нажмите кнопку Лунго. Повторите три раза.
8. Po przyciśnięciu symbolu , urządzenie nagrzewa się.
8. Как только кнопка
будет нажата, система кофе-машины
начнет прогреваться.
4°
15”
Assembling / disassembling of Rapid Cappuccino system (R.C.S)
07
99
6926_UM_LATTISSIMA_PREMIUM_Z2A.indb 99 17.10.13 19:58
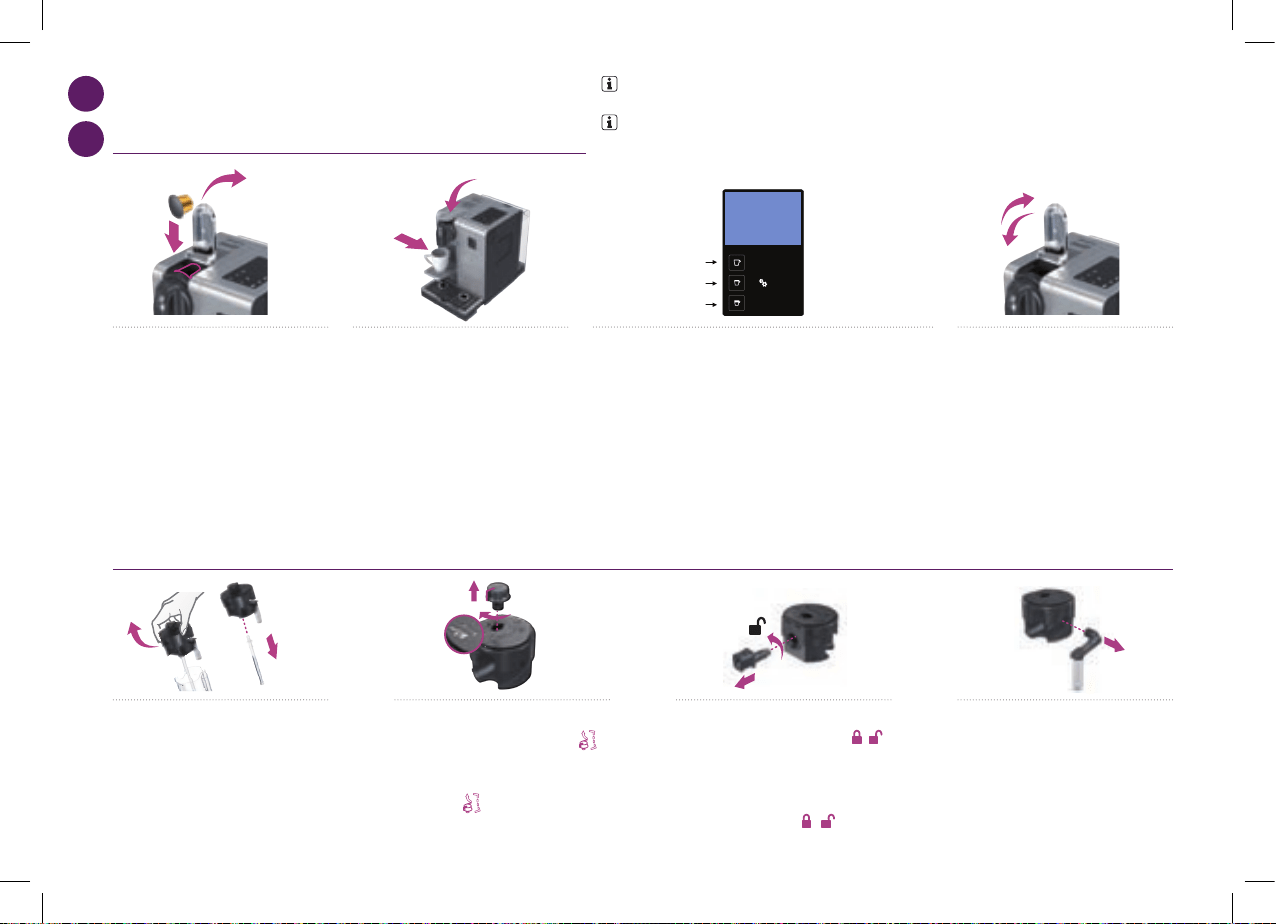
max
First read the safety precautions to avoid risks of fatal electrical shock and fire
Remove the plastic films from grid,
lever and machine panels.
Remove the water tank, drip tray, and capsule
container. Adjust the cable length and store the
excess in the cable guide under the machine.
Put the machine in upright position,
plug machine into mains.
The water tank can be carried by
its cover.
Rinse the water tank before filling with
potable water up to maximum level.
Insert the hot water spout.
Switch machine ON
Set your preferred language.
Press to continue.
SET LANGUAGE
to continue
Select your language by scrolling the
options using up/down arrow. Press to
confirm.
LANGUAGE
Actual value : EN
New value : [ ]
to select
Coffee preparation
x3
x3
110 ml
40 ml
25 ml
05 06
4°
15”
Assembling / disassembling of Rapid Cappuccino system (R.C.S)
07
PL
RU
PRZYGOTOWANIE KAWY/
ПРИГОТОВЛЕНИЕ КОФЕ
MONTAŻ/DEMONTAŻ SYSTEMU RAPID CAPPUCCINO R.C.S./
СБОРКА/РАЗБОРКА СИСТЕМЫ ПРИГОТОВЛЕНИЯ КАПУЧИНО
1. Unieść dźwignię i włożyć kapsułkę
Nespresso.
1. Полностью поднимите рычаг и вставьте
капсулу Nespresso.
2. Zamknąć dźwignię i umieścić liżankę pod
wylotem kawy.
2. За
кройте рычаг и подставьте чашку под
н
осик кофе-машины.
3. Wciśnij przycisk Ristretto (25 ml), Espresso (40 ml) lub Lungo
(110 ml). Proces parzenia zakończy się automatycznie. W celu dolania lub
zatrzymania strumienia kawy, należy
ponow
nie nacisnąć przycisk.
3. Нажмите кнопку Ристретто (25 мл), Эспрессо (40 мл) или Лунго
(110 м
л). Приготовление кофе остан
овится автоматически. Чтобы
закончить экстракцию раньше или про
должить ее, нажмите на
кнопку еще раз.
4. Usuń liżankę. Podnieś i zamknij dźwignię
w celu odrzucenia kapsułki.
4. Уб
ерите чашку. Поднимите и снова
закр
ойте рычаг, чтобы капсула упала в
контейнер для использованных капсул.
1. Zdjąć pokrywę ze zbiornika na mleko i
odłączyć rurkę zasysającą mleko.
1. Снимите крышк
у с контейнера для
молок
а и отсоедините трубочку для
забора молока.
4. Usunąć dyszę mleczną.
4. Отсоедините насадку для молока,
потянув за нее.
2. Wyjąć pokrętło do regulacji wielkości
piany przez przekręcenie go na symbol
i
pociągnięcie w górę.
2. Снимите регулятор молочной пенки,
повернув его
и потянув вверх.
3. Usunąć konektor systemu Rapid
Cappuccino przez przekręcenie go na
i
pociągnięcie w bok.
3. Отсоедините коннектор Системы
приготовления капучино, повернув в
нужн
ом направлении от
к и потянув
на себя.
UWAGA: podczas nagrzewania się urządzenia, możesz przycisnąć żądany przycisk do kawy. Proces
parzenia rozpocznie się automatycznie, gdy urządzenie będzie gotowe do pracy.
: во время разогрева Вы можете нажимать любые кнопки. Приготовление кофе
начнется автоматически после разогрева.
100
6926_UM_LATTISSIMA_PREMIUM_Z2A.indb 100 17.10.13 19:58
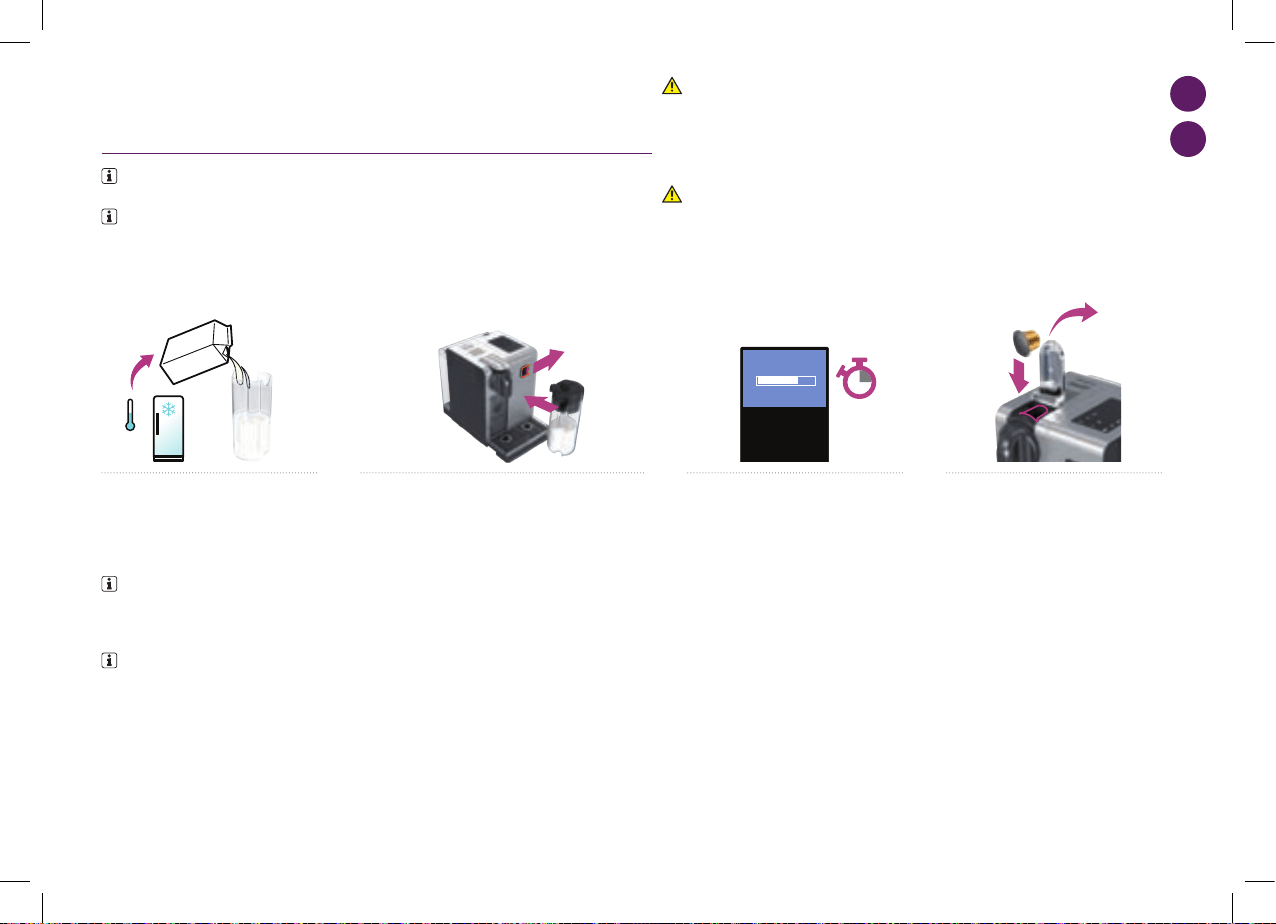
4°
15”
Assembling / disassembling of Rapid Cappuccino system (R.C.S)
07
4°
15”
Assembling / disassembling of Rapid Cappuccino system (R.C.S)
07
4°
15”
Assembling / disassembling of Rapid Cappuccino system (R.C.S)
07
4°
15”
Assembling / disassembling of Rapid Cappuccino system (R.C.S)
07
PL
RU
PRZYGOTOWANIE CAPPUCCINO I LATTE MACCHIATO/
ПРИГОТОВЛЕНИЕ КАПУЧИНО И ЛАТТЕ МАКЬЯТО
1. Napełnij pojemnik na mleko, odpowiednią
ilością mleka.
1. Наполните контейнер для молока
достаточным количеством молока.
2. Zamknąć pojemnik na mleko. Otworzyć osłonkę
konektora pary przesuwając go w prawo. Podłączyć System
Rapid Cappuccino do urządzenia.
2. За
кройте контейнер для молока. Откройте затвор
отверсти
я для насадки для пара, сдвинув его вправо.
Присоедините молочный контейнер к кофе
-машине.
3. Urządzenie nagrzewa się przez ok. 15 sek.
3. Разогрев кофе-машины будет
происходить в течение 15 секунд.
4. Unieść dźwignię i włożyć kapsułkę
Nespresso.
4. Полностью поднимите рычаг и вставьте
капсулу Nespresso.
UWAGA: w pojemniku na mleko nie przechowywać
płynów innych niż mleko lub woda pitna. Używać tylko mleka
pasteryzowanego lub UHT o ważnym terminie przydatności na
opakowaniu.
: не используйте контейнер для молока для
иных жидкостей, кроме молока или питьевой воды.
Не используйте парное молоко или стерилизованное молоко,
с истекшим сроком годности.
INFORMACJA: dla uzyskania idealnej piany, należy użyć tłustego lub półtłustego mleka,
schłodzonego w lodówce (temperatura ok. 4° C).
: для приготовления идеальной молочной пенки используйте полужирное,
охлажденное до температуры 4° C, стерилизованное молоко.
INFORMACJA: gdy pojemnik na
mleko jest pusty, przed ponownym
napełnieniem, należy przepłukać go
wodą pitną.
: перед тем как
наполнить пустой контейнер для
молока, тщательно промойте его и
трубочку для забора молока питьевой
водой.
101
6926_UM_LATTISSIMA_PREMIUM_Z2A.indb 101 17.10.13 19:58

Preparing Cappuccino and Latte Macchiato
4°
i
When the milk container is empty, before refilling,
thoroughly rinse it and the milk aspiration tube
with potable water.
Close the milk container. Open the steam
connector door by sliding it to the right. Connect
the Rapid Cappuccino System to the machine.
15”
+
LATTE MACCHIATO
Clean
15”
i
Remove Rapid Cappuccino System
connector by unlocking it from (sign ) to
(sign) and pulling it off
Remove the milk container lid and
unplug milk aspiration tube.
Remove the milk froth regulator knob by
turning it until and pulling it up.
Remove the milk spout by pulling it off.
1 2 3 4
Assembling / disassembling of Rapid Cappuccino system (R.C.S)
RINSE MILK SYSTEM
07 08
PL
RU
PRZYGOTOWANIE CAPPUCCINO I LATTE MACCHIATO/
ПРИГОТОВЛЕНИЕ КАПУЧИНО И ЛАТТЕ МАКЬЯТО
INFORMACJA: przepłukuj system
mleczny po każdym użyciu.
: промывайте кофе-
машину после каждого использования.
9. Umieść pojemnik pod dyszą mleczną.
9. Поместите емкость под насадку для
молока.
10. Przekręć pokrętło do regulacji wielkości piany na
pozycję «CLEAN». Płukanie systemu mlecznego rozpoczyna
się i ciepła woda wraz z parą wodną przepływa przez dyszę
do spieniania mleka.
10. Переключите регулятор в позицию «CLEAN».
Процесс очистки начнется автоматически.
11. Proces płukania trwa ok. 15 sek.
i zatrzymuje się automatycznie.
11. Процесс очистки занимает около
15 секунд и заверши
тся авт
оматически.
5. Zamknąć dźwignię, umieścić liżankę do
Cappuccino lub szklankę do Latte Macchiato
pod wylotem kawy i dostosować położe
nie
dys
zy mlecznej.
5. За
кройте рычаг, подставьте чашку для
к
апучино или стеклянный стакан для
латте макьято под отверстие для выхода
кофе и н
асадку для молока.
6. Dostosować pokrętło do porządanej
wielkości piany.
6. Выберите же
лаемое количество
молочной
пенки с помощью ручки
регулировки.
7. Wciśnąć przycisk Cappuccino lub Latte Macchiato.
Przygotowanie rozpocznie się po kilku sekundach (najpierw
mleko, potem kawa) i zakończy się automatycznie.
7. Нажм
ите кнопку Капучино или Макьято.
Приготов
ление начнется через несколько секунд
(сначала молочная пенка, затем кофе
) и остан
овится
автоматически.
8. Po zakończeniu przygotowania, podnieść
i zamknąć dźwignię w celu odrzucenia
kapsu
łki.
8. Когда приготовление будет закончено,
поднимите и снова закройте рычаг,
чтобы капсула упала в контейнер для
использованных капсул.
102
6926_UM_LATTISSIMA_PREMIUM_Z2A.indb 102 17.10.13 19:58

PRESS to confirm.
The discaling agent flows alternately
trough the coffee outlet, hot water nozzle
and drip tray.
Descaling
Descaling process: Empty the drip tray and
the used capsules container.
Rinsing process: Empty the drip
tray and the used capsules
container.
Refer to safety precautions
+
100 ml
500 ml
1 2 3
5
7 8
4
6
Lift and close the lever to eject any capsule
in the used capsule container.
Descaling process: Fill water tank with 100
ml of Nespresso descaling agent and 500ml
water.
Descaling process: Insert the hot
water spout.
Enter the Menu, browse the options and
select DESCALING. You will be guided
throughout the whole process. Follow
machine display instructions.
Descaling process: Place one container
of minimum 1 litre under both the coffee
outlet and the hot water spout.
4°
Volume factory settings
LANGUAGE
DESCALING
WATER HARDNESS
09 10
PL
RU
PRZYGOTOWANIE CAPPUCCINO I LATTE MACCHIATO/
ПРИГОТОВЛЕНИЕ КАПУЧИНО И ЛАТТЕ МАКЬЯТО
12. Po zakończeniu procesu przepłukiwania,
przekręć gałkę do regulacji na pozycję
speniania mleka.
12. Когда процесс очистки заверши
тся,
пе
реключите регулятор в положение
приго
товления молочной пенки.
13. Odłącz od urządzenia system R.C.S. i umieść pojemnik
na mleko w lodówce. Zasuń osłonkę konektora pary.
13. Отсоедините молочный контейнер и поставьте
его в холодильник. За
кройте за
движку отверстия
соединения молочного контейнера с кофе-машиной.
15. Myj pojemnik na mleko wraz z
pozostałymi częściami na górnej półce
zmywarki. Jeśli mycie w zmywarce nie jest
możl
iwe, postępuj zgodnie z rozdziałem
Mycie
ręczne systemu Rapid Cappuccino
System (R.C.S.).
15. Все части молочного контейнера
можн
о мыть в посудомоечной машине.
Вс
е части молочного контейнера можно
мыть вручную, если нет возможн
ости
испо
льзовать посудомоечную машину.
INFORMACJA: więcej informacji w części Montaż/
Demontaż Systemu Rapid Cappuccino (R.C.S.).
: следуйте инструкции «Сборка/
Разборка Системы приготовления капучино».
UWAGA: mleko w pojemniku nie powinno być przechowywane w lodówce dłużej niż 2 dni. W przypadku,
gdy pojemnik na mleko jest przechowywany poza lodówką dłużej niż 2 godziny, należy zdemontować cały
system R.C.S. i dokładnie go wyczyścić wraz z poszczególnymi częściami (więcej informacji w sekcji o myciu
systemu w zmywarce do naczyń lub myciu ręcznym).
: в случае, если молочный контейнер не был помещен в холодильник в течение двух
часов, снимите молочный контейнер и промойте все его части.
14. Raz na dwa dni, demontuj system R.C.S.
14. Разбирайте и очищайте Систему приготовления
капучино кажды
е два дня.
103
6926_UM_LATTISSIMA_PREMIUM_Z2A.indb 103 17.10.13 19:58

PRESS to confirm.
The discaling agent flows alternately
trough the coffee outlet, hot water nozzle
and drip tray.
Descaling
Descaling process: Empty the drip tray and
the used capsules container.
Rinsing process: Empty the drip
tray and the used capsules
container.
Refer to safety precautions
+
100 ml
500 ml
1 2 3
5
7 8
4
6
Lift and close the lever to eject any capsule
in the used capsule container.
Descaling process: Fill water tank with 100
ml of Nespresso descaling agent and 500ml
water.
Descaling process: Insert the hot
water spout.
Enter the Menu, browse the options and
select DESCALING. You will be guided
throughout the whole process. Follow
machine display instructions.
Descaling process: Place one container
of minimum 1 litre under both the coffee
outlet and the hot water spout.
4°
Volume factory settings
LANGUAGE
DESCALING
WATER HARDNESS
09 10
PL
RU
2. Podnieść i zamknąć dźwignię, aby odrzucić kapsułkę do pojemnika na zużyte
kapsułki. Umieścić pojemnik pod wylotem kawy i przycisnąć przycisk lungo, aby
przepłukać system. Regularnie czyścić wylot kawy wilgotną szmatką.
2. Поднимите и закройте рычаг. Уб
едитес
ь, что внутри капсулодержателя
нет капсулы. Подставьте пустую емкость под отверстие для выхода кофе и
нажмите кнопку Лунго. Протрите отверстие для кофе с п
омощ
ью влажной
тканевой салфетки.
3. Przepłukać dyszę gorącej wody. Przetrzyj wilgotną
szmatką.
3. Промойте насадку для горячей воды. Протрите ее с
помощью влажн
ой ткан
евой салфетки.
1. Demontaż Systemu Rapid Cappuccino. Więcej informacji
w części Montaż/Demontaż Syste
mu Rapid Cappuccino
(R.C.S.).
1. Отсоедините молочный контейнер. Следуйте
инструкции «Сборка/Разборка Системы приготовления
капучино».
2. Spłukać dokładnie resztki mleka wodą
pitną.
2. Уд
алите остатки молока или молочной
пенки.
3. Zanużyć wszystkie części systemu w ciepłej wodzie (ok.
40° C) z płynem do mycia naczyń na przynajmniej 30 min.
3. Промойте все части молочного контейнера в теплой
воде (40° C), используя мягкие моющие средства.
4. Przepłukać wodą pitną i przetrzeć czystą
szmatką.
4. Ополосните молочный контейнер
питьевой водой и насухо вытрите его.
CODZIENNE CZYSZCZENIE/ЕЖЕДНЕВНЫЙ УХОД
INFORMACJA: nie stosować silnych środków czyszczących ani środków na bazie rozpuszczalnika. Do czyszczenia powierzchni zewnętrznych urządzenia
stosować miękką wilgotną ściereczkę oraz łagodny środek czyszczący. Nie należy myć w zmywarce części urządzania z wyjątkiem Systemu Rapid Capuccino.
: не используйте сильные чистящие средства или растворители для очистки кофе-машины. Используйте влажную тканевую
салфетку и мягкие чистящие средства для очистки поверхности кофе-машины. Не мойте кофе-машину в посудомоечной машине (за исключением
молочного контейнера).
MYCIE RĘCZNE SYSTEMU RAPID CAPPUCCINO SYSTEM R.C.S./
РУЧНАЯ ОЧИСТКА СИСТЕМЫ ПРИГОТОВЛЕНИЯ КАПУЧИНО
INFORMACJA: gdy zmywarka do naczyń nie jest dostępna, system R.C.S. i jego części mogą być myte ręcznie. W tym wypadku, w celu zwiększenia skuteczności, czynność powinna być powtarzana
codziennie.
: все части молочного контейнера можно мыть вручную, если нет возможности использовать посудомоечную машину. Ручную очистку необходимо проводить ежедневно.
1. Wyjąć tackę ociekową i pojemnik na kapsułki. Opróżnić i
opłukać. Wyjąć zbiornik na wodę. Opróżnć, opłu
kać przed
napełnieniem go wodą zdatną do picia.
1. Снимите контейнер для сбора капсул, а также
контейнер для сбора капель. Опустоши
те их и про
мойте.
Снимите резервуар для воды. Опустошите и пром
ойте
его перед тем, как залить в него свежую питье
вую воду.
104
6926_UM_LATTISSIMA_PREMIUM_Z2A.indb 104 17.10.13 19:58
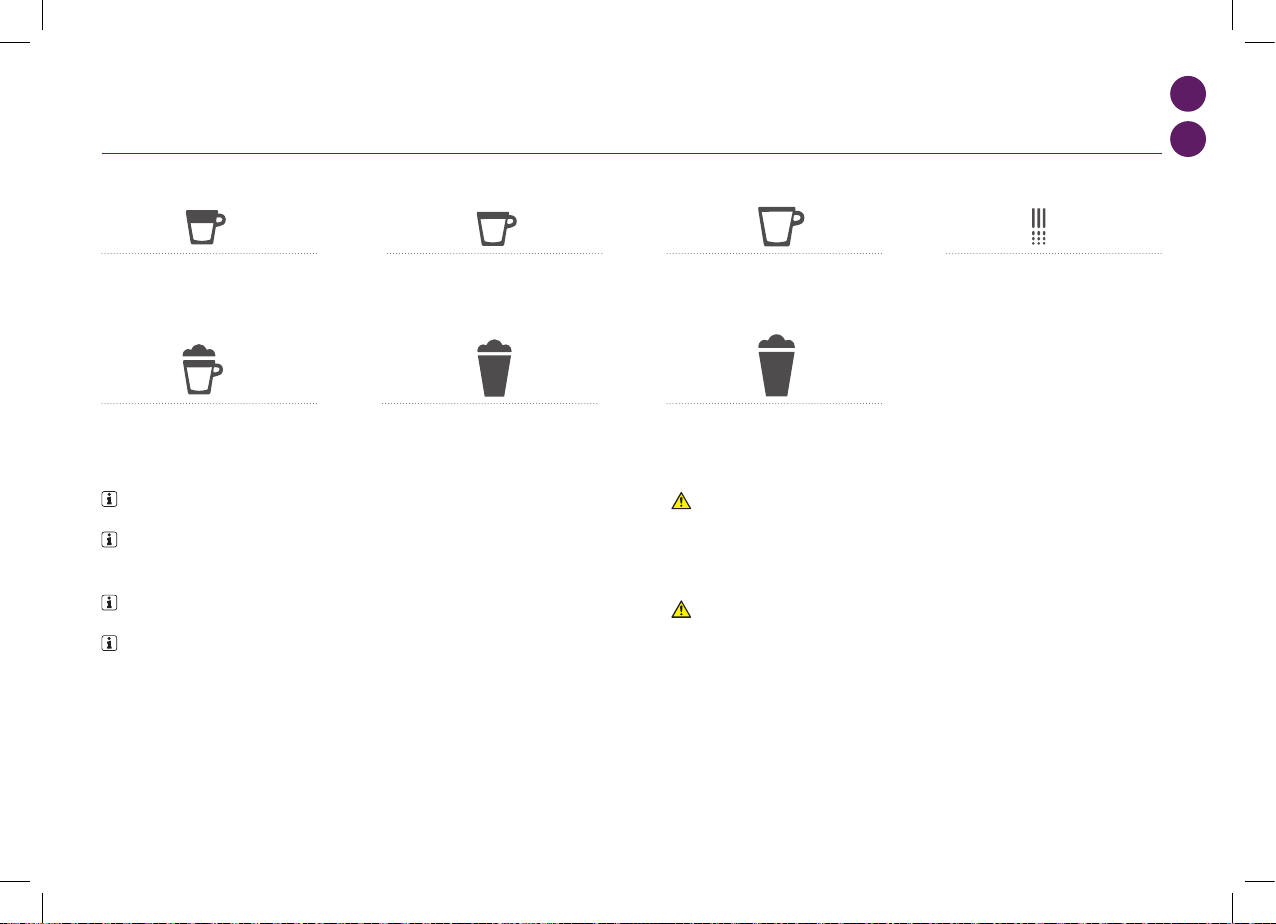
PRESS to confirm.
The discaling agent flows alternately
trough the coffee outlet, hot water nozzle
and drip tray.
Descaling
Descaling process: Empty the drip tray and
the used capsules container.
Rinsing process: Empty the drip
tray and the used capsules
container.
Refer to safety precautions
+
100 ml
500 ml
1 2 3
5
7 8
4
6
Lift and close the lever to eject any capsule
in the used capsule container.
Descaling process: Fill water tank with 100
ml of Nespresso descaling agent and 500ml
water.
Descaling process: Insert the hot
water spout.
Enter the Menu, browse the options and
select DESCALING. You will be guided
throughout the whole process. Follow
machine display instructions.
Descaling process: Place one container
of minimum 1 litre under both the coffee
outlet and the hot water spout.
4°
Volume factory settings
LANGUAGE
DESCALING
WATER HARDNESS
09 10
PL
RU
NOTATKI: *objętość mlecznej pianki może zależeć od rodzaju użytego mleka, jego temperatury i
położenia pokrętła do regulacji wielkości piany.
: *объем молочной пенки зависит от используемого молока, его температуры и
уровня, на котором установлен регулятор молочной пенки.
NOTATKI: rekomndowane jest zachowanie ustawień fabrycznych dla Ristretto, Espresso i Lungo w
celu wydobycia najlepszej jakości poszególnych rodzajów kawy.
: мы рекомендуем Вам использовать заводские параметры для Ристретто,
Эспрессо и Лунго для приготовления идеальной чашки кофе.
Ilość wody może być zaprogramowana w przedziale od 50 do 400 ml.
Ilość mleka może być zaprogramowana w przedziale od 30 do 200 ml.
Ilość kawy może być zaprogramowana w przedziale od 25 do 200 ml.
Объем воды может быть изменен от 50 до 400 мл.
Объем молока может быть изменен от 30 до 200 мл.
Объем кофе может быть изменен от 25 до 200 мл.
USTAWIENIA FABRYCZNE/
ПРОГРАММИРОВАНИЕ ЗАВОДСКИХ ПАРАМЕТРОВ
Ristretto 25 ml
Ристретто 25 мл
Cappuccino Mleko*: 50 ml/Kawa: 40 ml
Капучино Кофе*: 40 мл/
Молоч
ная пенка: 50 мл
Lungo 110 ml
Лунго 110 мл
Latte Macchiato Mleko*: 150 ml/Kawa: 40 ml
Латте Макьято Кофе*: 40 мл/
Молочна
я пенка: 150 мл
Espresso 40 ml
Эспрессо 40 мл
Gorąca woda 125 ml
Горячая вода 125 мл
Ciepłe Mleko* 120 ml
Теплое Молоко* 120 мл
UWAGA: jeśli wielkości liżanek zaprogramowano na
więcej niż 150 ml należy pozwolić maszynie ostygnąć czekając
przynajmniej 5 min przed przygotowaniem kolejnej kawy.
Występuje ryzyko przegrzania.
: если запрограммированный объем
кофе больше 150 мл, ожидайте не менее 5 секунд перед
приготовлением следующей чашки кофе. Возможен риск
перегрева системы.
105
6926_UM_LATTISSIMA_PREMIUM_Z2A.indb 105 17.10.13 19:59

+
100 ml
500 ml
10
+
100 ml
500 ml
10
+
100 ml
500 ml
10
+
100 ml
500 ml
10
+
100 ml
500 ml
10
+
100 ml
500 ml
10
+
100 ml
500 ml
10
+
100 ml
500 ml
10
PL
RU
ODKAMIENIANIE/ОЧИСТКА ОТ НАКИПИ ДЕКАЛЬЦИНАЦИЯ
1. Podnieść i zamknąć dźwignię, aby
odrzucić kapsułkę do pojemnika na zużyte
kap
sułki.
1. Поднимите и закройте рычаг,
чтобы капсула упала в контейнер для
использованных капсул.
2. Wejdź do listy Menu, wyświetl opcje i wybierz z listy
ODKAMIENIANIE. Zostaniesz przeprowadzony przez
proces odwapniania. Postępuj zgodnie z instrukcjami na
wyświetlaczu urządzenia.
2. Войдите в меню и выберите ОЧИС
ТКА ОТ НАКИПИ
и
з предложенных опций. С
ледуйте инструкциям на
дисплее кофе-машины.
UWAGA: należy zapoznać się z zasadami bezpieczeństwa. : см. инструкцию по безопасности.
7. Przyciśnij , aby zatwierdzić. Roztwór odkamieniacza
przepływa na przemian przez wylot kawy, dyszę gorącej
wody i odpływ tacy ociekowej.
7. Нажм
ите кнопку
, чтобы начать. Средство для
очистки от накипи пройдет через отверстие для выхода
кофе, насадку для очистки от накипи и поддон для
капел
ь.
5. Proces odkamieniania: podłącz dyszę
gorącej wody.
5. Процесс декальцинации: вставьте
насадку для очистки от накипи.
6. Proces odkamieniania: umieścić
pojemnik o objętości min. 1 litra pod
otworem wylotu kawy i dyszą gorącej wody.
6. Процесс декальцинации: подставьте
емкость объе
мом 1л под отверстие для
выход
а кофе и насадку для очистки от
накипи.
3. Proces odwapniania: opróżnić tackę
ociekową i pojemnik na zużyte kaps
ułki.
3. Процесс декальцинации: опустошите
поддо
н для капель и контейнер для
использованных капсул.
4. Proces odkamieniania: napełnić zbiornik
na wodę 100 ml płynu do odkamieniania
Nespresso i 500 ml wody pitnej.
4. Процесс декальцинации: заполните
резервуар для воды средством для
очистки от накипи Nespresso в объем
е
100 мл и до
бавьте 500 мл воды.
8. Proces płukania: opróżnić tackę
ociekową i pojemnik na zużyte kaps
ułki.
Przepłucz go wodą pitną.
8. Процесс очистки: опустоши
те
поддо
н для капель и контейнер для
использованных капсул. Промойте водой.
106
6926_UM_LATTISSIMA_PREMIUM_Z2A.indb 106 17.10.13 19:59
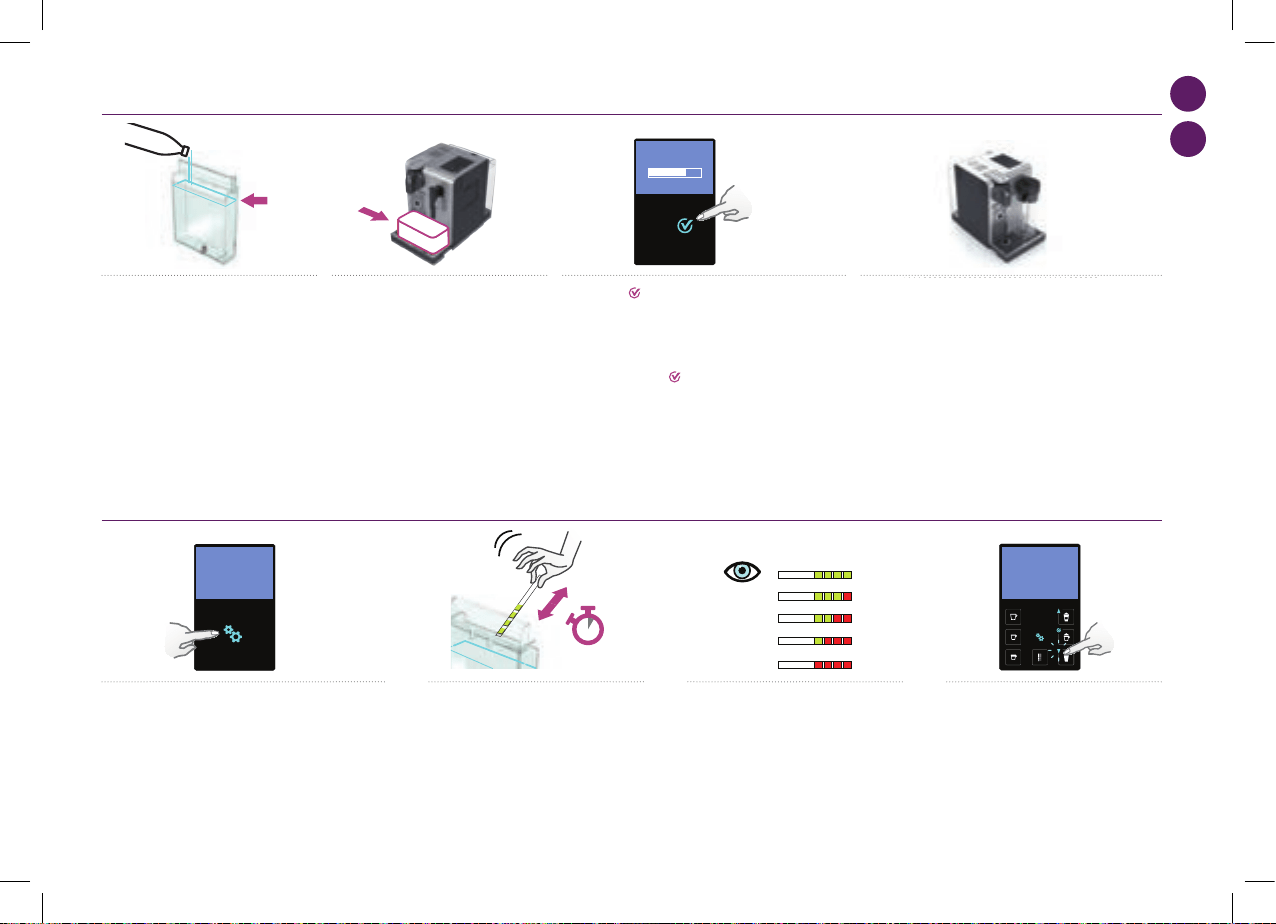
max
1”
1
2
3
4
5
11
max
1”
1
2
3
4
5
11
max
1”
1
2
3
4
5
11
max
1”
1
2
3
4
5
11
max
1”
1
2
3
4
5
11
max
1”
1
2
3
4
5
11
max
1”
1
2
3
4
5
11
max
1”
1
2
3
4
5
11
PL
RU
ODKAMIENIANIE/ОЧИСТКА ОТ НАКИПИ ДЕКАЛЬЦИНАЦИЯ
2. Umieść pasek testowy pod wodą na ok.
1 sek.
2. Поместите полоску-индикатор
же
сткости воды в воду на несколько
секунд
.
11. Przyciśnij , aby zatwierdzić. Płukanie odbywa się na
przemian przez wylot kawy, dyszę gorącej wody i odpływ
tacki ociekowej do momentu opróżnienia poj
emnika na
wodę.
11. Нажм
ите кнопку
, чтобы начать. Цикл промывки
продолжится и вода пройдет через отверстие для
выхода кофе, насадку для очистки от накипи и поддон
для ка
пель.
3. Ilość czerwonych kwadratów na pasku
testowym oznacza trwardość wody.
3. Количество красных квадратов укаже
т
урове
нь жесткости воды.
12. Po zakończeniu procesu odkamieniania, maszyna wyłącza
się. Odłącz dyszę gorącej wody i przetrzyj ją wilgotną szmatką.
Proces odkamieniania został zakończony.
12. Когда очистка закончится, кофе
-машина
автом
атически выключится. Снимите насадку для очистки
от накипи и протрите ее влажн
ой ткан
евой салфеткой.
Процесс очистки кофе-машины от нак
ипи завершен.
4. Ustaw twardość wody według wskazania
na pasku testowym.
4. Ус
тановите уровень жесткости
соответственно.
USTAWIENIA TWARDOŚCI WODY/НАСТРОЙКА УРОВНЯ ЖЕСТКОСТИ ВОДЫ
1. Wejdź do listy Menu, wyświetl opcje i wybierz z listy
TWARDOŚĆ WODY. Zosta
niesz poproszony o ustawienie
wartości. Postępuj zgodnie z instrukcjami na wyświetlaczu
urządzenia.
1. Войдите в меню и выберите [WATER HARDNESS] из
предложенны
х опций. Следуйте инструкции на дисплее
кофе-машины.
9. Proces płukania: wypłukać i napełnić
zbiornik na wodę do poziomu maksymalnego,
świeżą w
odą zdatną do picia.
9. Проце
сс очистки: заполните
резервуар для воды чистой питьевой
водой до максимального уровня.
10. Proces płukania: umieścić pojemnik o
objętości min. 1 litra pod otworem wylotu
kawy i dyszą gorącej wody.
10. Процесс очистки: подставьте
емкость объе
мом 1л под отверстие для
выход
а кофе и насадку для очистки от
накипи.
107
6926_UM_LATTISSIMA_PREMIUM_Z2A.indb 107 17.10.13 19:59

PL
RU
ROZWIĄZYWANIE PROBLEMÓW
Brak podświetlenia wyświetlacza.
➔
Sprawdzić sieć, wtyczkę, napięcie oraz bezpiecznik. Wciśnij przycisk ON, umieszony za
wyświetlaczem urządzenia. W razie problemów, skontaktuj się z Klubem Nespresso.
Wyświetlacz informuje o przegrzaniu maszyny.
➔
W pewnych warunkach, urządzenie może osiagać wysoką temperaturę (np.: po
przeprowadzeniu procesu opróźniania systemu z wody). Proszę czekać, urządzenie
automatycznie ostygnie.
Kawa wypływa bardzo wolno.
➔
Strumień zależy od gatunku kawy.
➔ Przeprowadź proces odkamieniania, patrz rozdział «Odkamienianie».
Kawa nie jest wystarczająco gorąca.
➔
Podgrzej liżankę.
➔ Przeprowadź proces odkamieniania, patrz rozdział «Odkamienianie».
Głowica parząca przecieka (woda w pojemniku na
kapsułki).
➔
Umieścić kapsułkę w prawidłowy sposób. Jeśli pojawi się wyciek, skontaktuj się z Klubem
Nespresso.
Przyciski migają nieregularnie.
➔
Skontaktuj się z Klubem Nespresso.
Zamiast kawy leci woda (pomimo włożonej ka
psułki).
➔
Skontaktuj się z Klubem Nespresso.
Nie da się zamknąć dźwigni do ko
ńca.
➔
Opróżnić pojemnik na kapsułki. Należy upewnić się, że w komorze na kapsułki nie ma
zablokowanej kapsułki.
Jakość pianki z mleka nie jest zadowalająca.
➔
Należy używać pełno- lub półtłustego mleka schłodzonego w lodówce (temperatura
ok. 4° C).
➔
Płukać po każdym przygotowaniu mleka. Umieść szklankę pod wylotem dyszy mlecznej,
przestaw pokrętło regulacji wielkości piany na pozycję «CLEAN».
➔
Czyść system Rapid Cappuccino System (R.C.S.) i myj pojemnik na mleko wraz z
pozostałymi częściami na górnej półce zmywarki.
Informacja na wyświetlaczu «Urządzenie wymaga
serwisu».
➔
Skontaktuj się z Klubem Nespresso.
108
6926_UM_LATTISSIMA_PREMIUM_Z2A.indb 108 17.10.13 19:59
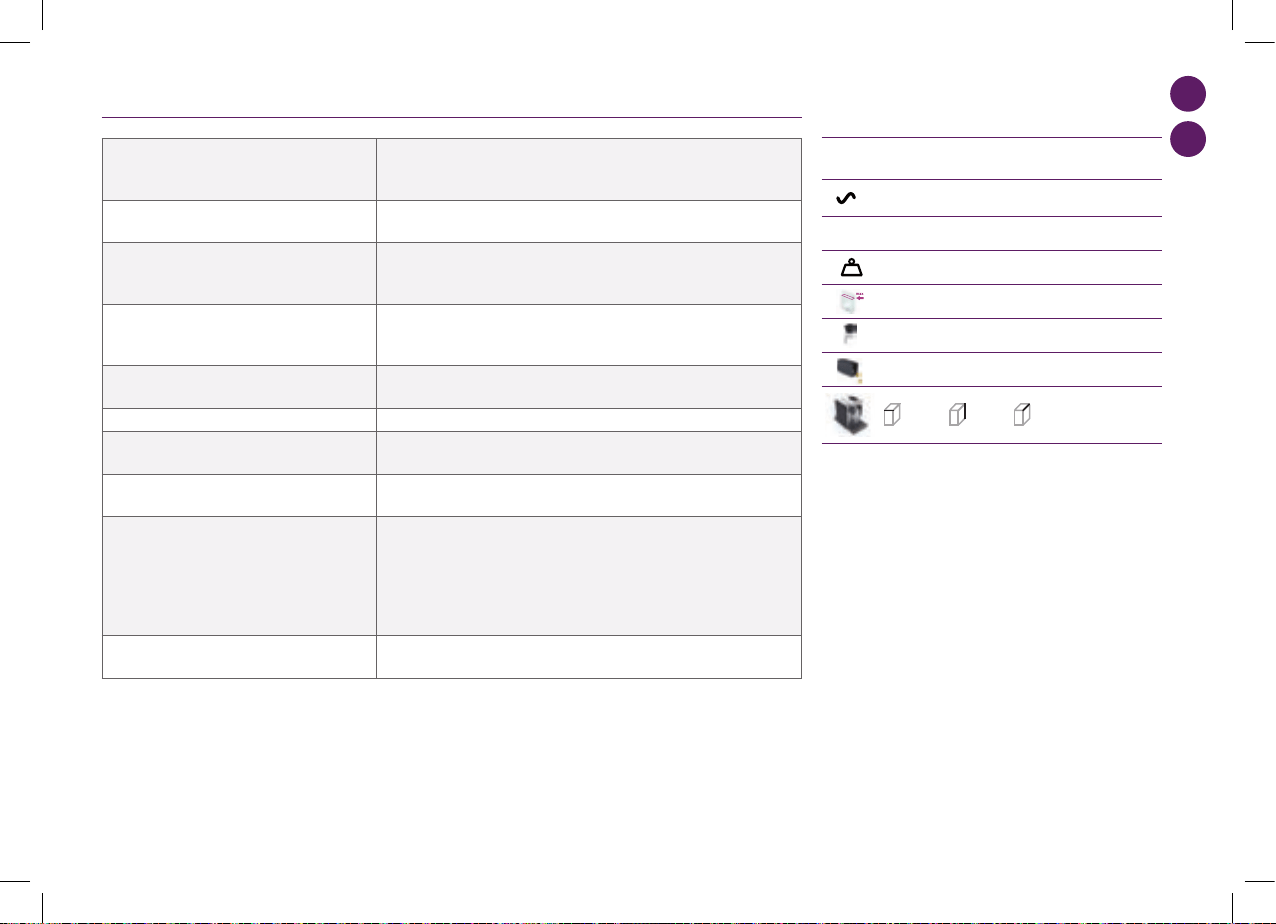
PL
RU
УСТРАНЕНИЕ НЕИСПРАВНОСТЕЙ
Milk Premium
EUR,AUS,NZ: 220240 V, 50/60 Hz, 1300 W
US/CA: 120 V, 60 Hz, 1200 W
19 bar
6.5 kg
1,38 litre
500 ml
13-16 capsules
l=19,4 cm . L=33,2 cm . h=27,4 cm
Troubleshooting
Contact the Nespressso Club
For any additional information, in case of problems
or simply to seek advise, call the Nespresso Club.
Contact details of the Nespresso Club can be found
in the 'Welcome to Nespresso' folder in your
machine box or at nespresso.com
No light on display
Check the mains, plug, voltage, and fuse. In case of problems, call the Nespresso Club.
Coffee comes out very slowly.
Flow speed depends on the coffee variety.
Perform a self check of the machine. Enter the menu list and select Maintenance. Follow instruction
Coffee is not hot enough.
Preheat cup.
Perform a self check of the machine. Enter the menu list and select Maintenance. Follow instruction
Capsule area is leaking (water in capsule container).
Position capsule correctly. If leakages occur, call the Nespresso Club.
Irregular blinking.
Send appliance to repair or call the Nespresso Club.
No coffee, just water runs out (despite inserted capsule).
In case of problems, call the Nespresso Club.
Lever cannot be closed completely
Empty capsule container. Make sure that no capsule is blocked inside the capsule container.
Quality of milk froth is not up to standard
1) For a perfect milk froth, use skimmed or semi-skimmed milk at refrigerator temperature (about 4° C)
2) Rinse after each milk based preparation. Place a recipient under milk outlet, rotate the milk
regulator knob until “CLEAN” position.
3) Every two days, disassemble the R. C. S. and clean all components in the upper level of a
dishwasher
Warranty
Delonghi warrants this product against defects in materials and workmanship for a period of two years from the date of purchase. During this period, Delonghi will either repair or
replace, at its discretion, any defective product at no charge to the owner. Replacement products or repaired parts will be guaranteed for only the unexpired portion of the original
warranty or six months, whichever is greater. This limited warranty does not apply to any defect resulting from accident, misuse, improper maintenance, or normal wear and tear. Any
defect resulting from the usage of non genuine Nespresso capsules will not be covered by this warranty. Except to the extent allowed by applicable law, the terms of this limited warranty
do not exclude, restrict
or modify, and are in addition to, the mandatory statutory rights applicable to the sale of the product to you. If you believe your product is defective, contact Nespresso for instructions on
where to send or bring it for repair. Please visit our website at nespresso.com to discover more about Nespresso
Specifications
P
max
Once the rinsing process is finished, the
machine switches off. Clean the machine
using a damp cloth. You have now finished
descaling the machine.
9
10
11 12
Rinsing process Rinse and fill water with
fresh potable water up to MAX level.
Rinsing process Place one container of
minimum 1 litre under both the coffee
outlet and the hot water spout.
PRESS to confirm.
The rinsing cycle continues trough the coffee
outlet, hot water spout and drip tray until the
water tank is empty.
Water hardness setting
1
programmed buttons blinks 3 times: water hardness is set
i
1”
2 3 4
1
2
3
4
5
Place the water hardness sticker under
water for 1 second.
The number of red squares indicates
the water harness level.
Set the value accordinglyEnter the menu, browse the options and select
WATER HARDNESS.
You will be guided to set the value.
Follow machine display instructions.
max
max
Kg
11 12
EUR, AUS, NZ: 220-240 V, 50/60 Hz, 1400 W
EUR,AUS,NZ: 220240 V, 50/60 Hz, 1300 W
US/CA: 120 V, 60 Hz, 1200 W
19 bar
6.5 kg
1,38 litre
500 ml
13-16 capsules
l=19,4 cm . L=33,2 cm . h=27,4 cm
Troubleshooting
Contact the Nespressso Club
For any additional information, in case of problems
or simply to seek advise, call the Nespresso Club.
Contact details of the Nespresso Club can be found
in the 'Welcome to Nespresso' folder in your
machine box or at nespresso.com
No light on display
Check the mains, plug, voltage, and fuse. In case of problems, call the Nespresso Club.
Coffee comes out very slowly.
Flow speed depends on the coffee variety.
Perform a self check of the machine. Enter the menu list and select Maintenance. Follow instruction
Coffee is not hot enough.
Preheat cup.
Perform a self check of the machine. Enter the menu list and select Maintenance. Follow instruction
Capsule area is leaking (water in capsule container).
Position capsule correctly. If leakages occur, call the Nespresso Club.
Irregular blinking.
Send appliance to repair or call the Nespresso Club.
No coffee, just water runs out (despite inserted capsule).
In case of problems, call the Nespresso Club.
Lever cannot be closed completely
Empty capsule container. Make sure that no capsule is blocked inside the capsule container.
Quality of milk froth is not up to standard
1) For a perfect milk froth, use skimmed or semi-skimmed milk at refrigerator temperature (about 4° C)
2) Rinse after each milk based preparation. Place a recipient under milk outlet, rotate the milk
regulator knob until “CLEAN” position.
3) Every two days, disassemble the R. C. S. and clean all components in the upper level of a
dishwasher
Warranty
Delonghi warrants this product against defects in materials and workmanship for a period of two years from the date of purchase. During this period, Delonghi will either repair or
replace, at its discretion, any defective product at no charge to the owner. Replacement products or repaired parts will be guaranteed for only the unexpired portion of the original
warranty or six months, whichever is greater. This limited warranty does not apply to any defect resulting from accident, misuse, improper maintenance, or normal wear and tear. Any
defect resulting from the usage of non genuine Nespresso capsules will not be covered by this warranty. Except to the extent allowed by applicable law, the terms of this limited warranty
do not exclude, restrict
or modify, and are in addition to, the mandatory statutory rights applicable to the sale of the product to you. If you believe your product is defective, contact Nespresso for instructions on
where to send or bring it for repair. Please visit our website at nespresso.com to discover more about Nespresso
Specifications
P
max
Once the rinsing process is finished, the
machine switches off. Clean the machine
using a damp cloth. You have now finished
descaling the machine.
9
10
11 12
Rinsing process Rinse and fill water with
fresh potable water up to MAX level.
Rinsing process Place one container of
minimum 1 litre under both the coffee
outlet and the hot water spout.
PRESS to confirm.
The rinsing cycle continues trough the coffee
outlet, hot water spout and drip tray until the
water tank is empty.
Water hardness setting
1
programmed buttons blinks 3 times: water hardness is set
i
1”
2 3 4
1
2
3
4
5
Place the water hardness sticker under
water for 1 second.
The number of red squares indicates
the water harness level.
Set the value accordinglyEnter the menu, browse the options and select
WATER HARDNESS.
You will be guided to set the value.
Follow machine display instructions.
max
max
Kg
11 12
Max. 19 bar/ 19
EUR,AUS,NZ: 220240 V, 50/60 Hz, 1300 W
US/CA: 120 V, 60 Hz, 1200 W
19 bar
6.5 kg
1,38 litre
500 ml
13-16 capsules
l=19,4 cm . L=33,2 cm . h=27,4 cm
Troubleshooting
Contact the Nespressso Club
For any additional information, in case of problems
or simply to seek advise, call the Nespresso Club.
Contact details of the Nespresso Club can be found
in the 'Welcome to Nespresso' folder in your
machine box or at nespresso.com
No light on display
Check the mains, plug, voltage, and fuse. In case of problems, call the Nespresso Club.
Coffee comes out very slowly.
Flow speed depends on the coffee variety.
Perform a self check of the machine. Enter the menu list and select Maintenance. Follow instruction
Coffee is not hot enough.
Preheat cup.
Perform a self check of the machine. Enter the menu list and select Maintenance. Follow instruction
Capsule area is leaking (water in capsule container).
Position capsule correctly. If leakages occur, call the Nespresso Club.
Irregular blinking.
Send appliance to repair or call the Nespresso Club.
No coffee, just water runs out (despite inserted capsule).
In case of problems, call the Nespresso Club.
Lever cannot be closed completely
Empty capsule container. Make sure that no capsule is blocked inside the capsule container.
Quality of milk froth is not up to standard
1) For a perfect milk froth, use skimmed or semi-skimmed milk at refrigerator temperature (about 4° C)
2) Rinse after each milk based preparation. Place a recipient under milk outlet, rotate the milk
regulator knob until “CLEAN” position.
3) Every two days, disassemble the R. C. S. and clean all components in the upper level of a
dishwasher
Warranty
Delonghi warrants this product against defects in materials and workmanship for a period of two years from the date of purchase. During this period, Delonghi will either repair or
replace, at its discretion, any defective product at no charge to the owner. Replacement products or repaired parts will be guaranteed for only the unexpired portion of the original
warranty or six months, whichever is greater. This limited warranty does not apply to any defect resulting from accident, misuse, improper maintenance, or normal wear and tear. Any
defect resulting from the usage of non genuine Nespresso capsules will not be covered by this warranty. Except to the extent allowed by applicable law, the terms of this limited warranty
do not exclude, restrict
or modify, and are in addition to, the mandatory statutory rights applicable to the sale of the product to you. If you believe your product is defective, contact Nespresso for instructions on
where to send or bring it for repair. Please visit our website at nespresso.com to discover more about Nespresso
Specifications
P
max
Once the rinsing process is finished, the
machine switches off. Clean the machine
using a damp cloth. You have now finished
descaling the machine.
9
10
11 12
Rinsing process Rinse and fill water with
fresh potable water up to MAX level.
Rinsing process Place one container of
minimum 1 litre under both the coffee
outlet and the hot water spout.
PRESS to confirm.
The rinsing cycle continues trough the coffee
outlet, hot water spout and drip tray until the
water tank is empty.
Water hardness setting
1
programmed buttons blinks 3 times: water hardness is set
i
1”
2 3 4
1
2
3
4
5
Place the water hardness sticker under
water for 1 second.
The number of red squares indicates
the water harness level.
Set the value accordinglyEnter the menu, browse the options and select
WATER HARDNESS.
You will be guided to set the value.
Follow machine display instructions.
max
max
Kg
11 12
~ 6.5 kg/
1.3 l/
0.5 l/
13-16 kampsułek/
19.4 cm 27.4 cm 33.2 cm
DANE TECHNICZNE/
Не горят индикаторы на дисплее.
➔
Проверьте розетку, вилку, напряжение и предохранитель. Нажмите кнопку ВКЛ,
расположенную над дисплеем. В случае каких-либо проблем свяжитесь с Клубом
Nespresso.
На дисплее появилось сообщение о перегреве кофе-
машины
.
➔
После опорожнения кофе-машина нагрелась и достигла максимальной
температуры. Ожидайте, кофе-машина охладится автоматически.
Приготовление кофе очень мед
ленное.
➔
Скорость приготовление кофе зависит от сорта кофе.
➔ Проведите процедуру очищения от накипи, если необходимо. См. Инструкцию по
очистке от накипи.
Кофе недостаточно горячий.
➔
Подогрейте чашку перед приготовлением кофе.
➔ Проведите процедуру очищения от накипи, если необходимо. См. Инструкцию по
очистке от накипи.
Вода подтекает из капсулодержателя (вод
а в
контейнере для капсул).
➔
Неправильно вставлена капсула. Если проблема не решена, обратитесь в Клуб
Nespresso.
Нерегулярное мигание кнопок.
➔
Обратитесь к Клуб Nespresso.
Нет подачи кофе, идет только вода (при вставленной
капсуле)
.
➔
Обратитесь к Клуб Nespresso.
Рычаг капсулодержателя не за
крывается полностью.
➔
Опустошите контейнер для сбора капсул. Убедитесь, что внутри капсулодержателя
не застряла капсула.
Объем молочной пенки не соответствует стандартам.
➔
Для приготовления идеальной молочной пенки используйте полужирное,
охлажденное до температуры 4° C, стерилизованное молоко.
➔
Промывайте молочный контейнер после каждого использования. Поместите
емкость под носик для молока и поверните регулятор в позицию «CLEAN».
➔
Каждые два дня полностью промывайте все части Системы приготовления
капучино.
На дисплее появилось сообщение о ремонте
кофе
-машины.
➔
Свяжитесь с Клубом Nespresso для осмотра, ремонта или регулировки.
109
6926_UM_LATTISSIMA_PREMIUM_Z2A.indb 109 17.10.13 19:59

PL
RU
W celu uzyskania dodatkowych informacji, porady lub w przypadku problemów technicznych prosimy o telefoniczne skontaktowanie się z Klubem Nespresso.
Dane kontaktowe Klubu Nespresso znajdują się w książeczce «Wi
tamy w Nespresso» dołączonej do ekspresu lub na stronie internetowej www.nespresso.com
За дополнительной информац
ией, в случае проблем или при необходимости получения совета Вы можете обратиться в Клуб Nespresso.
Контактную информаци
ю о Клубе Nespresso Вы можете найти в брошюре «Добро пож аловать в Nespresso» в папке, вложенной в коробку с Вашей кофе-машиной или на сайте www.nespresso.com
SKONTAKTUJ SIĘ Z KLUBEM NESPRESSO/КЛУБ NESPRESSO
GWARANCJA/ГАРАНТИЯ
UTYLIZACJA I KWESTIE EKOLOGICZNE/
ПРАВИЛЬНАЯ УТИЛИЗАЦИЯ И ВОПРОСЫ ОХРАНЫ ОКРУЖАЮЩЕЙ СРЕДЫ
Utylizacja i Ochrona Środowiska
Urządzenie zostało wyprodukowane przy wykorzystaniu cennych materiałów, które mogą zostać odzyskane i przetworzone. Segregacja odpadów ułatwia przetwarzanie cennych surowców. Należy pozost
awić urządzenie w
punkcie zbiórki odpadów. Informacje dotyczące utylizacji można otrzy
mać od władz lokalnych.
Ваша кофе-машина соде
ржит ценные материалы, которые могут быть восстановлены или вторично переработаны. Разделение утилизируемых отходов по типам облегчает повторную переработку ценного
сырья. Оставьте Вашу кофе-машину в пу
нкте сбора. Вы можете получить информацию об утилизации от локальных экологических организаций.
De’Longhi udziela gwarancji na niniejszy produkt w zakresie wad materiałowych i wykonania, na okres dwóch lat od daty zakupu. W ciągu tego okresu, De’Longhi, zgodnie z własnym uznaniem, dokona naprawy lub wymiany
wszelkich niesprawnych urządzeń bez kosztów dla właściciela. Wymiana produktu lub naprawionych części objęta jest gwarancją przez okres trwania oryginalnej gwarancji lub sześć miesięcy, w zależności od t
ego, który z
tych okresów jest dłuższy. Nini
ejsza ograniczona gwarancja nie ma zastosowania do jakichkolwiek usterek spowodowanych na wypadek, nieprawidłowego użytkowania, niewłaściwej konserwacji lub normalnego zużycia.
Za wyjątkiem sytuacji określonych przez przepisy prawa, warunki niniejszej ograniczonej gwarancji nie wyłączają, nie ograniczają i nie zmieniają wszelkich praw związanych z transakcją sprzedaży produkt
u. W przypadku
podejrzenia usterki urządzenia, proszę skontaktować się z Klubem Nespresso w celu uzyskania wskazówek, co do przesłania urządzenia do naprawy. Wszelkie uszkodzenia wynikające z użycia kaps
ułek innych niż Nespresso, nie
będą objęte gwarancją.
De’Longhi гарантирует отсутствие дефектов ма
териалов и сборки в течение двух лет с даты приобретения кофе-машины. В течение этого периода De’Longhi обязуется бесплатно отремонтировать или заменить
(по своему усмотрению) все неисправные детали. Гарантия на отремонтированные или замененные в процессе ремонта запчасти - 6 месяцев или до конца действия первоначального гарантийного периода.
Данная гарантия не распространяется на любые неисправности возникши
е в резу
льтате несчастных случаев, неправильной эксплуатации или обычного износа. За исключением законодательных норм,
условия данной гарантии не могут быть сокращены или изменены и соответствуют нормам «Закона о за
щите прав потребителей». Если Вы считаете, что Ваша кофе-машина неисправна свяжитесь с Клубом
De’Longhi. Гарантия не покрывает случаи неисправности, возникшие по пр
ичине использования капсул, не произведенных компанией Nespresso.
110
6926_UM_LATTISSIMA_PREMIUM_Z2A.indb 110 17.10.13 19:59

PL
RU
111
6926_UM_LATTISSIMA_PREMIUM_Z2A.indb 111 17.10.13 19:59
6926_UM_LATTISSIMA_PREMIUM_Z2A.indb 1 17.10.13 19:59