Loading ...
Loading ...
Loading ...
ENG - 2 ENG - 3
01 CHECKING THE COMPONENTS
Surround
VOL BASS
SOUNDBAR
SOUND
MODE
SMART
MODE
Soundbar Main Unit Remote Control / Batteries
Power Cord Holder-Cable Screw
• For Soundbar wall mounting components, see page 20.
• See page 22 for instructions on how to use the Holder-Cable.
• To purchase additional components or optional cables, contact a Samsung Service Centre or
Samsung Customer Care.
Inserting Batteries before using the Remote Control (AA batteries X 2)
Slide the battery cover in the direction of the arrow until it is completely removed. Insert 2 AA batteries
(1.5V) oriented so that their polarity is correct. Slide the battery cover back into position.
02
PRODUCT OVERVIEW
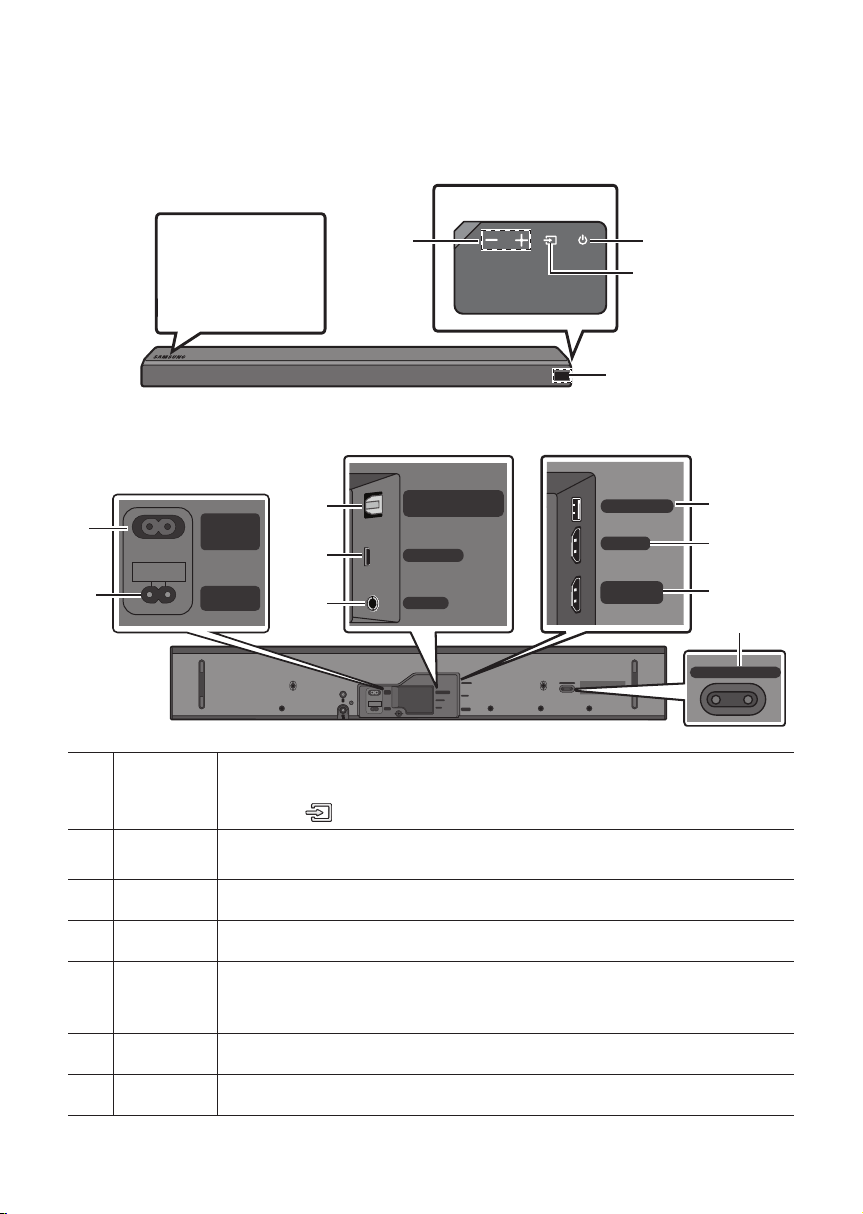
Front Panel / Right Side Panel of the Soundbar
Right Side of the Soundbar
Position the product
so that the
SAMSUNG logo is
located on the top.
Power
Volume
Display
Bottom Panel of the Soundbar
Wi-Fi SETUP SPK ADD
HDMI IN
USB (5V 0.5A)
HDMI OUT
(TV-ARC)
WIRELESS
AUX IN
DIGITAL AUDIO IN
(OPTICAL)
POWER
IN
POWER
OUT
(For TV)
WIRELESS
AUX IN
DIGITAL AUDIO IN
(OPTICAL)
HDMI IN
USB (5V 0.5A)
HDMI OUT
(TV-ARC)
Wi-Fi SETUP SPK ADD
POWER
IN
POWER
OUT
(For TV)
Source
Selects the source input mode. (D.IN / AUX / HDMI / WIFI / BT / USB)
• To turn on “BT PAIRING” mode, change the source to “BT” mode, and then press and
hold the
(Source) button for more than 5 seconds.
POWER OUT
(For TV)
Connect the power cord of a Samsung TV connected to the Soundbar and mounted on
the wall using a Wall Mount Kit (WMN300SB - not supplied).
POWER IN Connect the Soundbar's AC power cable.
D.IN Connect to the digital (optical) output of an external device.
WIRELESS
Attach the wireless dongle that connects the Soundbar to surround speakers and a
subwoofer wirelessly. (The surround speaker, subwoofer, and wireless dongle are sold
separately.)
AUX Connect to the Analogue output of an external device.
USB Connect a USB device here to play music les on the USB device through the Soundbar.
Loading ...
Loading ...
Loading ...