
www.lg.com
OWNER’S MANUAL
CINEMA 3D MONITOR
D237IPS
D2770P
Please read this manual carefully before operating
your set and retain it for future reference.
CINEMA 3D MONITOR MODEL
ENGLISH

2
ENG
ENGLISH
TABLE OF CONTENTS
CONTENTS
3 ASSEMBLINGANDPREPAR-
ING
3 Unpacking
4 Partsandbuttons
6 LiftingandmovingtheMonitorset
6 SettinguptheMonitor
6 - AttachingtheStandBase
6 - DetachingtheStandBaseandBody
7 - Mountingonatable
9 - Mountingonawall
11 USINGTHEMONITORSET
11 ConnectingtoaPC
11 - D-SUBconnection
12 - DVI-Dconnection
12 - HDMIconnection
14 CUSTOMIZINGSETTINGS
14 AccessingTheMainMenus
15 CustomizingSettings
15 - MenuSettings
16 - Thingsyouneedtocheckbeforeinstall-
ingTriDef3D
16 - 3DSettings(Onlywhilein3Dmode)
17 - VolumeSettings(Onlysupportedin
HDMI)
18 - SUPERENERGYSAVINGSettings
19 TROUBLESHOOTING
21 TROUBLESHOOTINGWHEN
USING3DMODE
22 SPECIFICATIONS
24 PresetModes(Resolution)
24 HDMI3DTIMING
24 HDMIVIDEOTIMING
24 Indicator
25 SAFETYPRECAUTIONS
25 - Precautionstotakewhenviewing3D
images
25 - Whenusing3DGlasses
26 PROPERPOSTURE
26 ProperpostureforusingtheMonitorset.
26 Precautionstotakewhenviewing3Dim-
ages
27 LICENSES
3
ENG
ENGLISH
ASSEMBLING AND PREPARING
ASSEMBLINGANDPREPARING
Unpacking
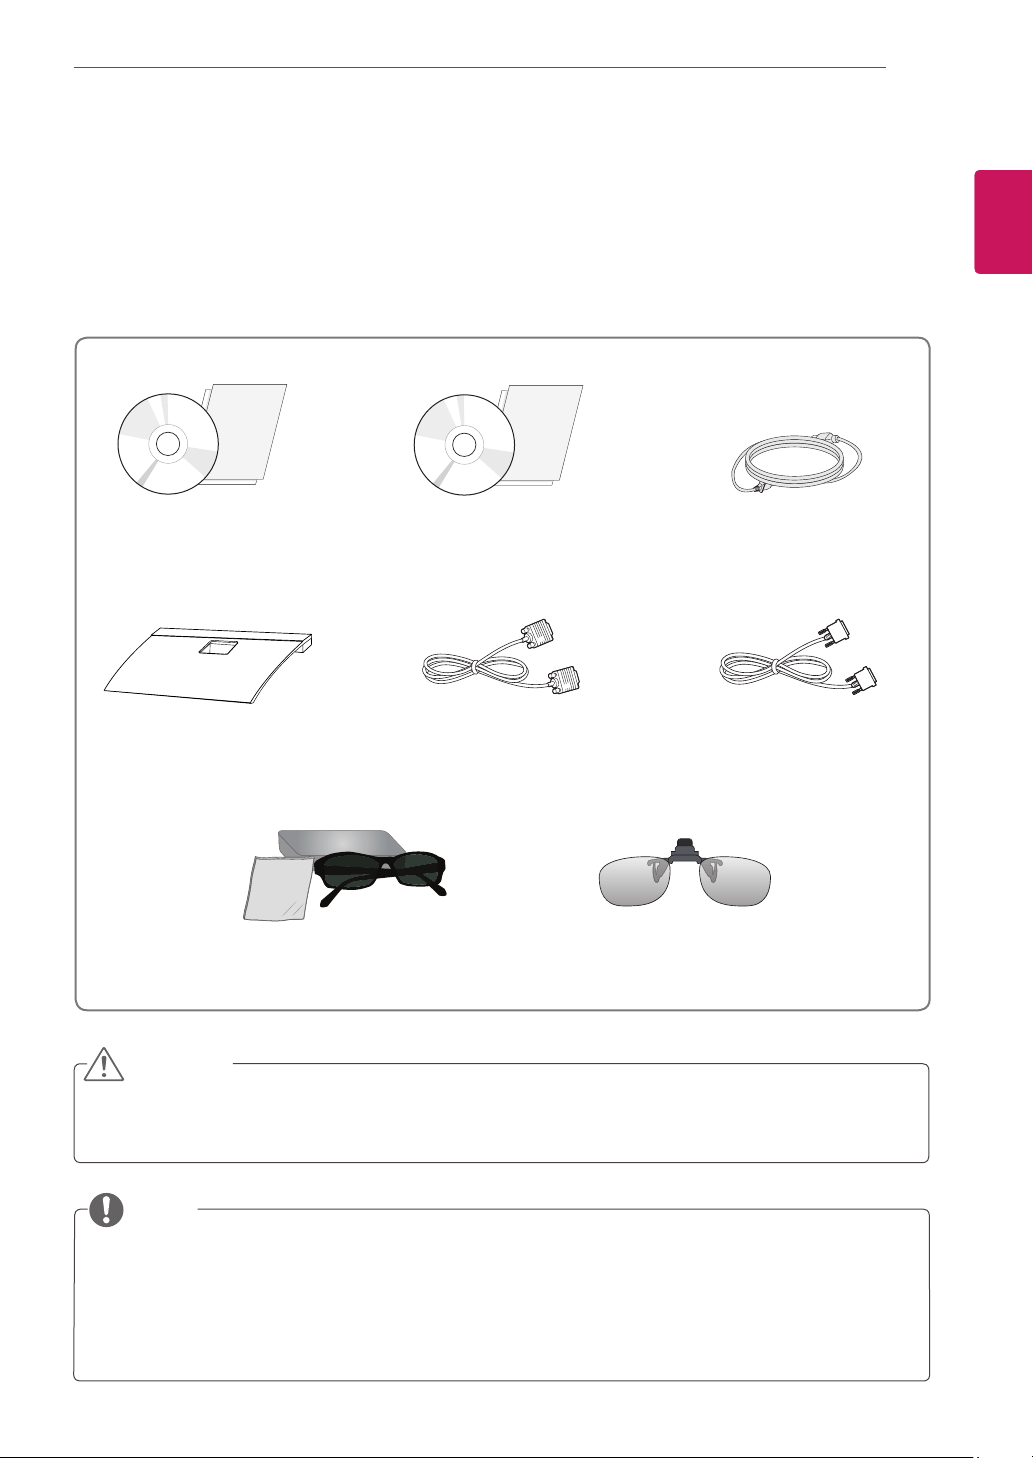
Checkyourproductboxforthefollowingitems.Ifthereareanymissingaccessories,contactthelocal
dealerwhereyoupurchasedyourproduct.Theillustrationsinthismanualmaydifferfromtheactualproduct
andaccessories.
Donotuseanyunapprovedaccessoriestoensurethesafetyandproductlifespan.
Anydamagesorinjuriesbyusingunapprovedaccessoriesarenotcoveredbythewarranty.
Theaccessoriessuppliedwithyourproductmayvarydependingonthemodel.
Productspecificationsorcontentsinthismanualmaybechangedwithoutpriornoticeduetoupgrade
ofproductfunctions.
Usershoulduseshieldedsignalinterfacecables(RGBcable/DVI-Dcable)withferritecoresto
maintainstandardcompliancefortheproduct.
CAUTION
NOTE
StandBase
PowerCord
CD(Owner'sManual)/
Card
TriDef3DsoftwareProgramCD/
QuickInstallationGuide
D-SUBCable
(Thissignalcablemaybeattached
tothisproductbeforeshippingout.)
DVI-DCable
(Thiscableisnotincludedinall
countries.)
3DGlasses
(Normaltype)
3DGlasses
(Clip-ontype)

5
ENG
ENGLISH
ASSEMBLING AND PREPARING
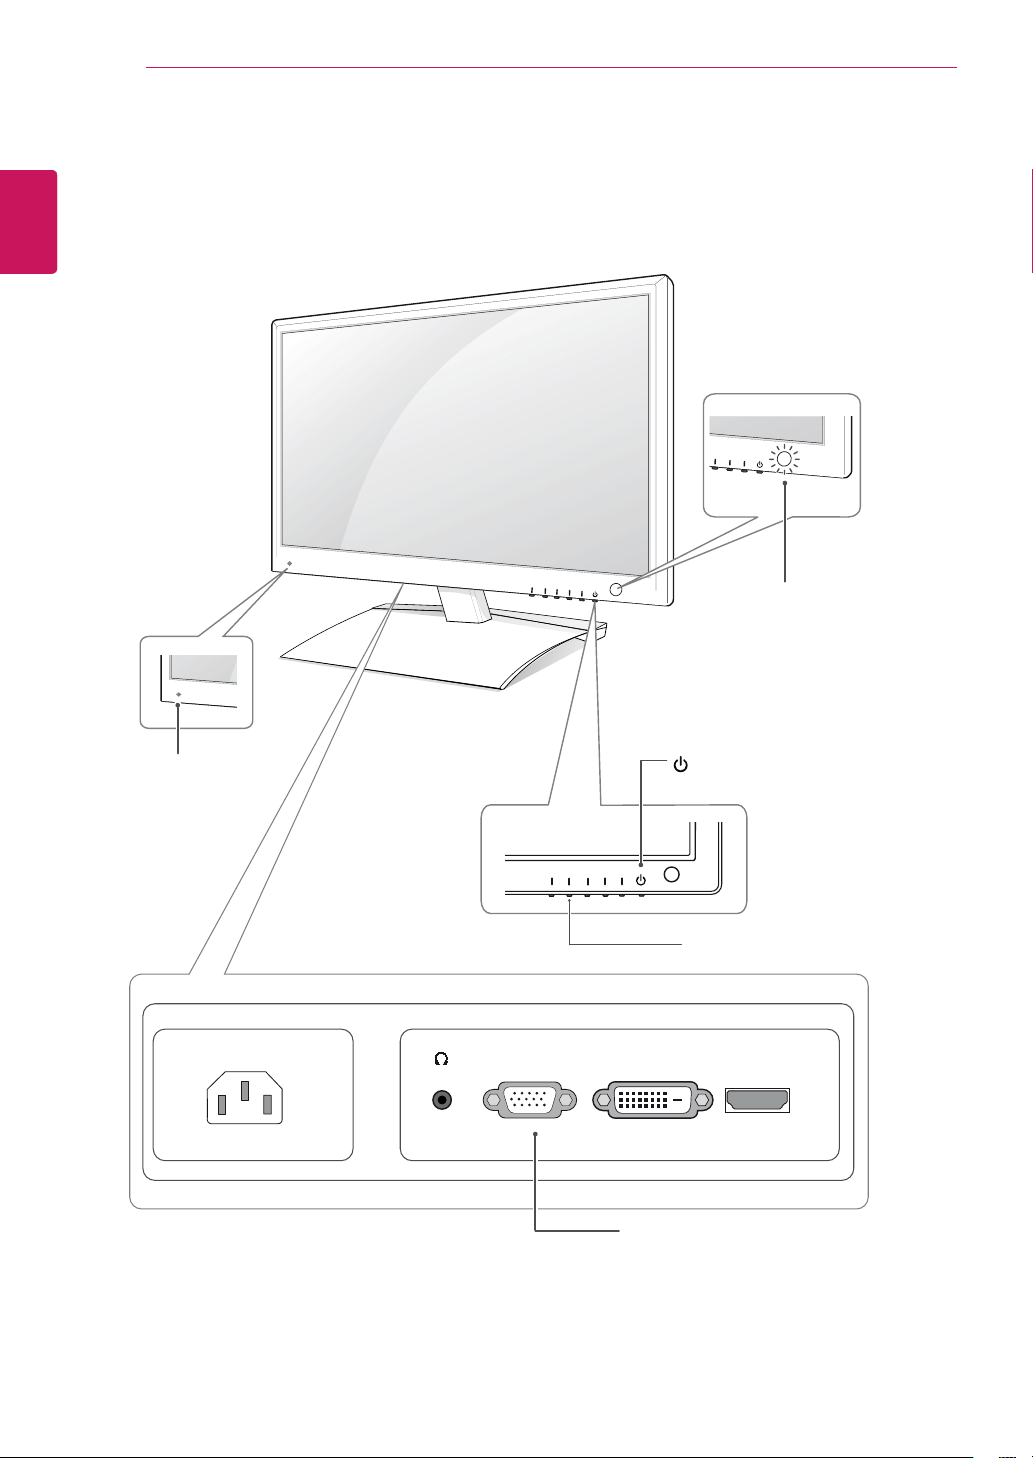
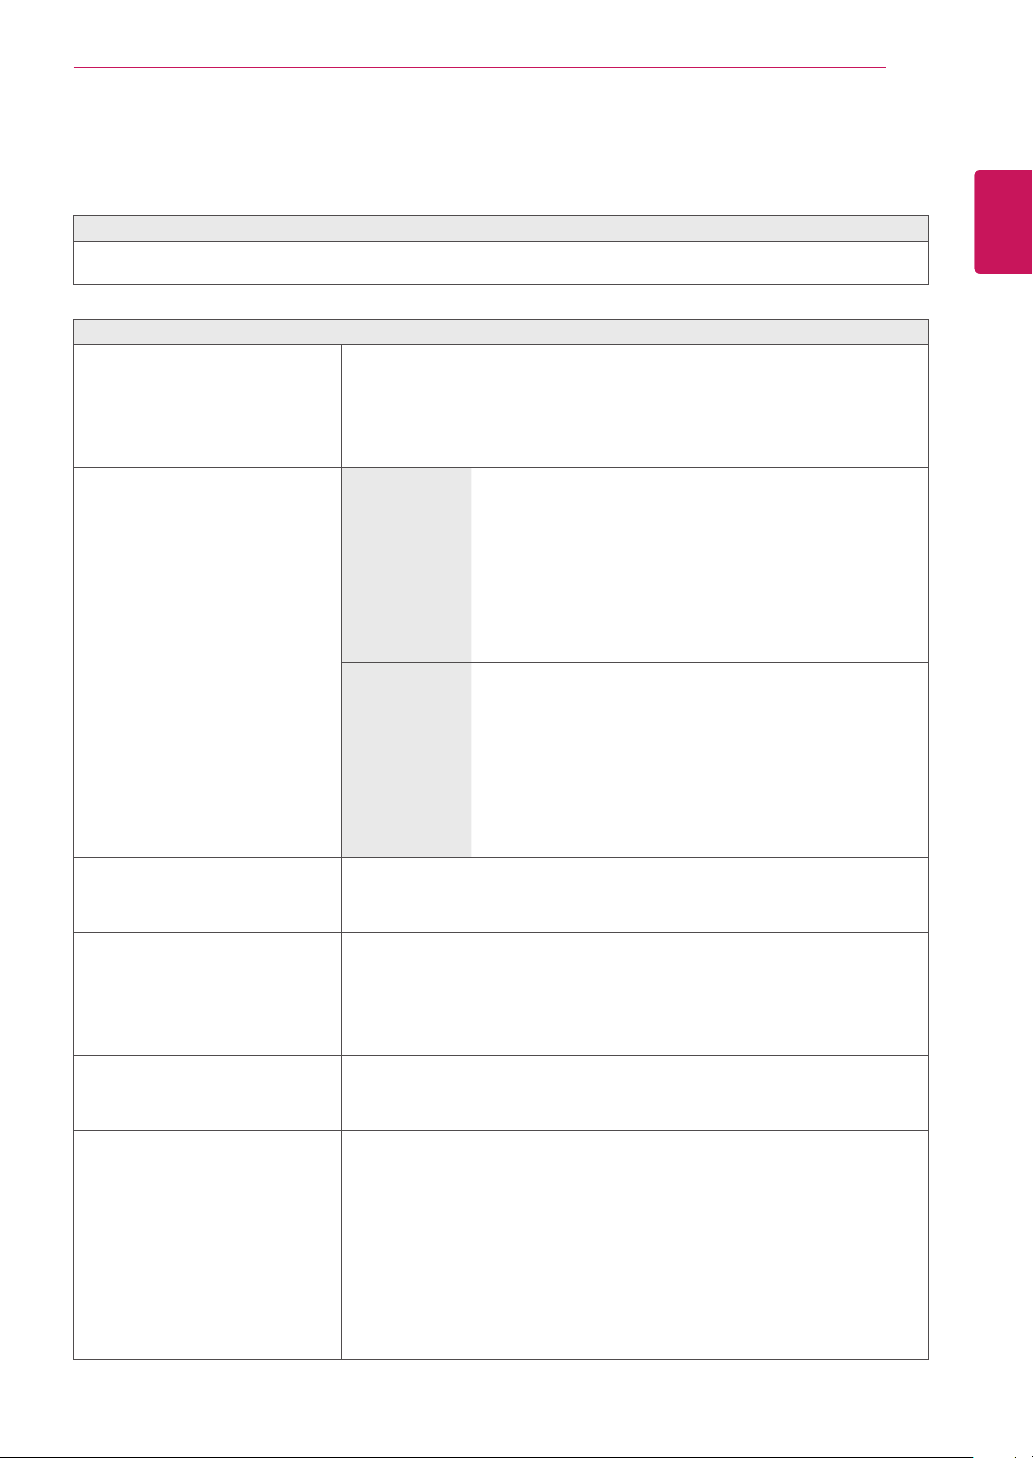
Button Description
MENU Accessesthemainmenus.(Seep.15)
OSDLOCKED/
UNLOCKED
Thisfunctionallowsyoutolockthecurrentcontrolsettings,so
thattheycannotbeinadvertentlychanged.
PressandholdtheMENUbuttonforseveralseconds.
Themessage"OSDLOCKED"shouldappear.
YoucanunlocktheOSDcontrolsatanytimebypushing
theMENUbuttonforseveralseconds.Themessage"OSD
UNLOCKED"shouldappear.
3D 3Ddisplaysettings.(Seep.16)
AUTO Whenadjustingyourdisplaysettings,alwayspresstheAUTObuttonontheMONITOR
SETUPOSD.(OnlysupportedinAnalogMode)
Thebestdisplaymode 1920x1080
VOLUME(OnlyHDMImode) AdjustthevolumeoftheMonitorset.(Seep.17)
INPUT Youcanchoosetheinputsignal.
Whentwoinputsignalsareatleastconnected,youcanselecttheinputsignal
(D-SUB/DVI/HDMI)youwant.
Whenonlyonesignalisconnected,itisautomaticallydetected.Thedefaultsetting
isD-SUB.
EXIT ExittheOSD(OnScreenDisplay).
(PowerButton)
Turnsthepoweronoroff.
PowerIndicator ThepowerindicatorstaysRedifthedisplayisrunning
properly(OnMode).IfthedisplayisinSleepMode,thepower
indicatorblinksRed.
6
ENG
ENGLISH
ASSEMBLING AND PREPARING
Liftingandmovingthe
Monitorset
WhenmovingorliftingtheMonitor,readthe
followingtopreventtheMonitorfrombeing
scratchedordamagedandforsafetransportation
regardlessofitstypeandsize.
Avoidtouchingthescreenatalltimes,asthis
mayresultindamagetothescreenorsome
ofthepixelsusedtocreateimages.
CAUTION
ItisrecommendedtomovetheMonitorsetin
theboxorpackingmaterialthattheMonitor
setoriginallycamein.
BeforemovingorliftingtheMonitorset,
disconnectthepowercordandallcables.
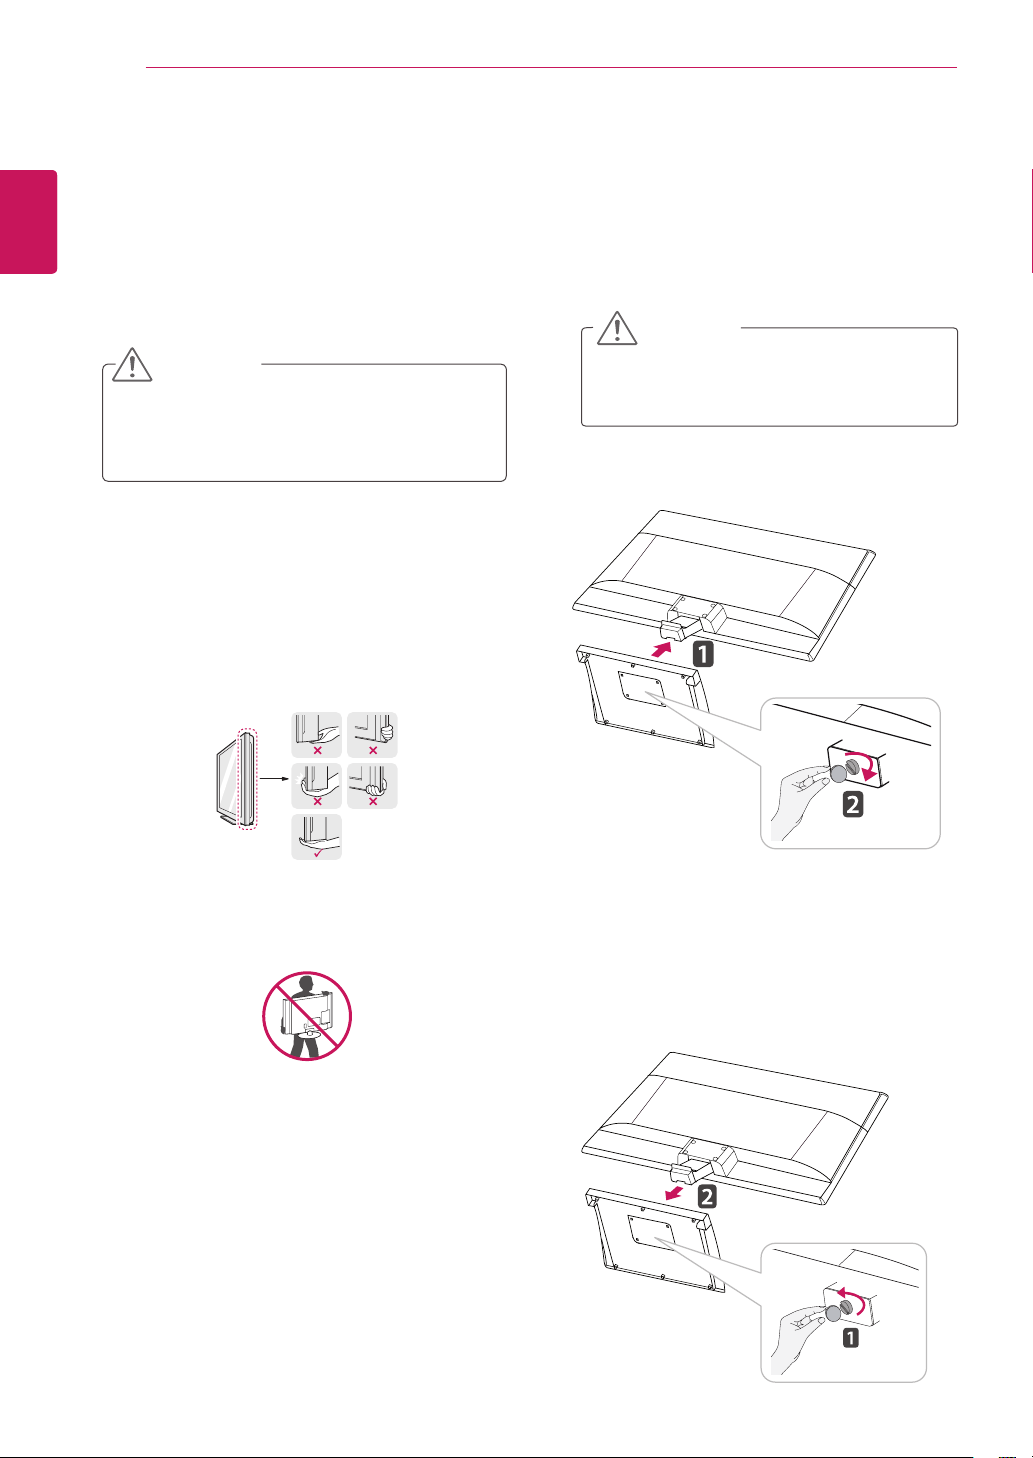
HoldthetopandbottomoftheMonitor
setframefirmly.Makesurenottoholdthe
transparentpartarea.
WhenholdingtheMonitorset,thescreen
shouldfaceawayfromyoutopreventthe
screenfromscratches.
WhentransportingtheMonitorset,donot
exposetheMonitorsettojoltsorexcessive
vibration.
WhentransportingtheMonitorset,keepthe
Monitorsetupright,neverturntheMonitor
setonitsside,ortilttowardstheleftorright.
SettinguptheMonitor
AttachingtheStandBase
1
PlacetheMonitorsetwiththescreenside
downonaflatandcushionedsurface.
Layafoammatorsoftprotectivecloth
onthesurfacetoprotectthescreenfrom
damage.
CAUTION
DetachingtheStandBaseandBody
1
PlacetheMonitorsetwiththescreenside
downonaflatandcushionedsurface.
2
Turnthescrewtotheleft,andthenpulloutthe
StandBasefromtheStandBody.
2
AttachtheStandBasetothesetbyturningthe
screwtotherightwithaCoin.
7
ENG
ENGLISH
ASSEMBLING AND PREPARING
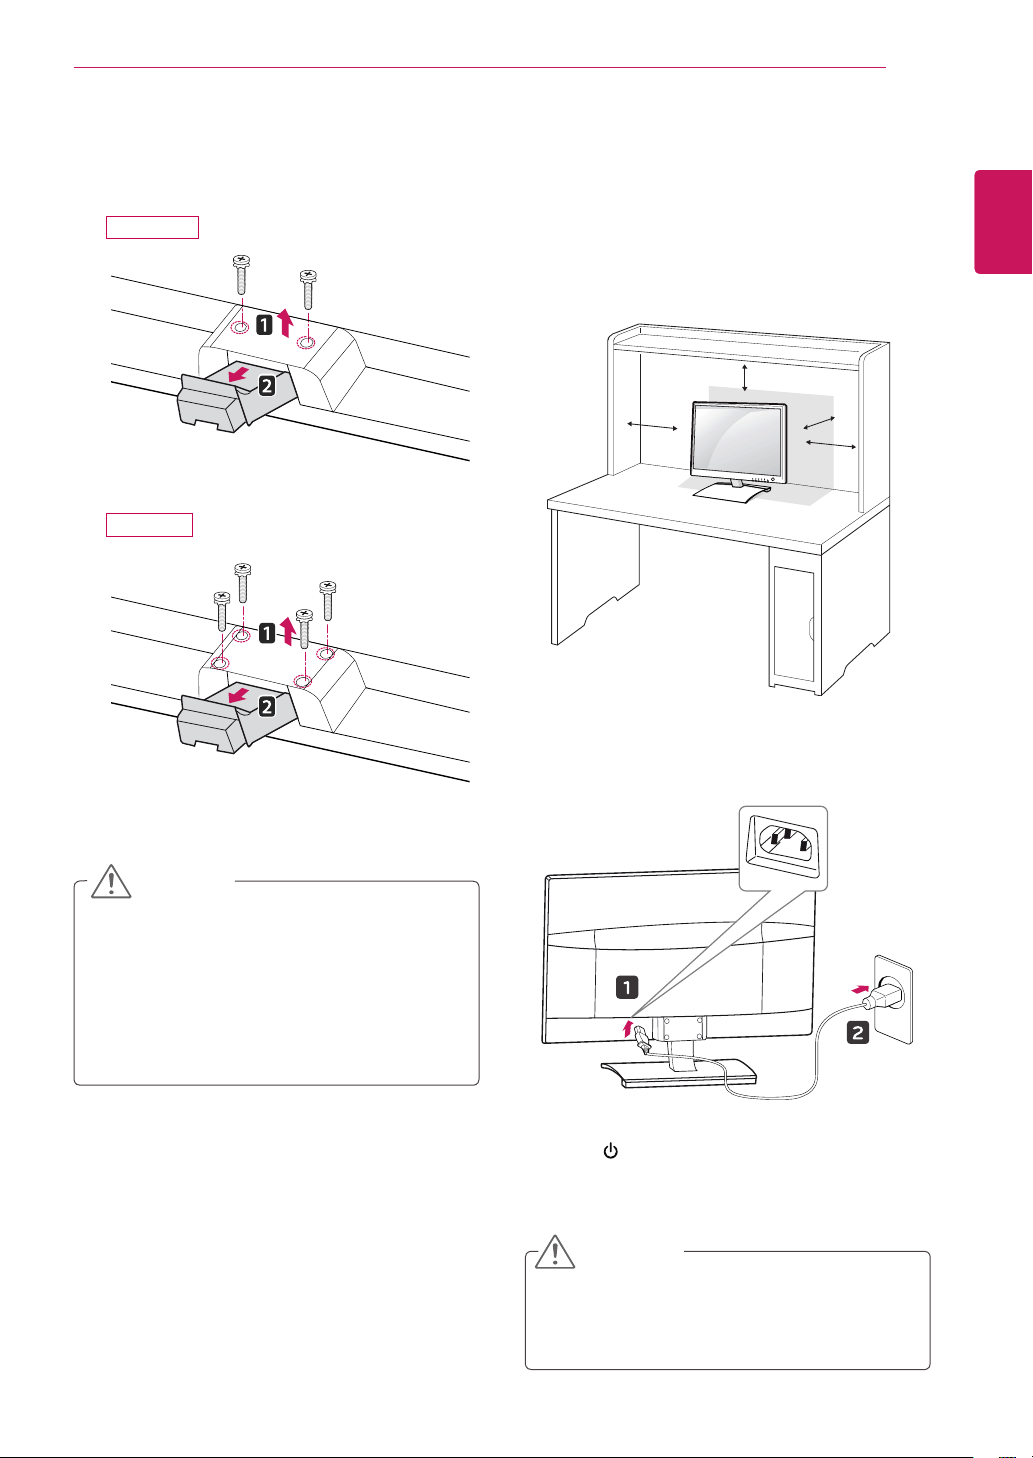
Mountingonatable
1
LiftandtilttheMonitorsetintoitsupright
positiononatable.
Leavea10cm(minimum)spacefromthewall
forproperventilation.
2
ConnectthePowerCordtoawalloutlet.
3
Press (Power)buttonontheMonitorsetto
turnthepoweron.
10 cm
10 cm
10 cm
10 cm
Thisillustrationdepictsthegeneralmodelof
connection.Yourmonitormaydifferfromthe
itemsshowninthepicture.
Donotcarrytheproductupsidedownholding
onlythestandbase.Theproductmayfall
andgetdamagedorinjureyourfoot.
CAUTION
Unplugthepowercordbeforemovingthe
Monitortoanotherlocation.Otherwiseelectric
shockmayoccur.
CAUTION
3
Loosen2or4screwsandremovethestand
bodyfromthemonitor.
D2770P
D237IPS
8
ENG
ENGLISH
ASSEMBLING AND PREPARING
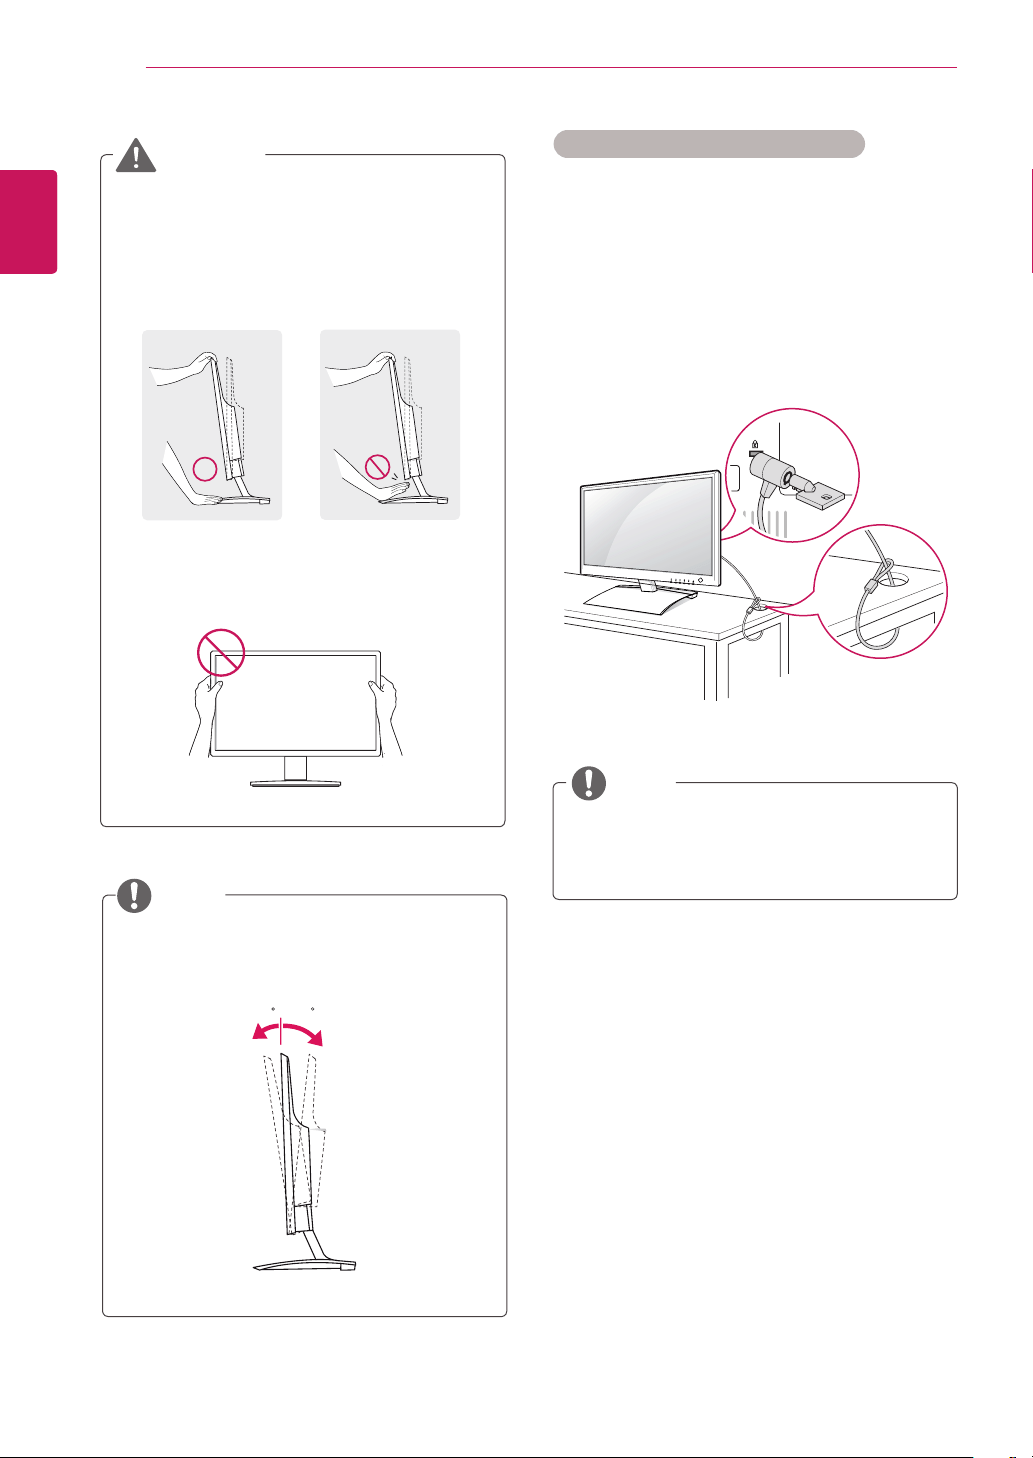
UsingtheKensingtonsecuritysystem
TheKensingtonsecuritysystemconnectoris
locatedatthebackoftheMonitorset.Formore
informationofinstallationandusing,refertothe
manualsuppliedwiththeKensingtonsecurity
systemorvisit
http://www.kensington.com
.
ConnecttheKensingtonsecuritysystemcable
betweentheMonitorsetandatable.
TheKensingtonsecuritysystemisoptional.
Youcanobtainitfrommostelectronicsstores.
NOTE
Theangleofthescreencanbeadjusted
forwardsorbackwardsfrom-5°to18°fora
comfortableviewingexperience.
NOTE
Front Rear
18- 5
Whenyouadjusttheangle,donotholdthe
bottomoftheMonitorsetframeasshownon
thefollowingillustration,asmayinjureyour
fingers.
Donottouchorpressthescreenwhen
adjustingtheangleofthemonitor.
WARNING
9
ENG
ENGLISH
ASSEMBLING AND PREPARING
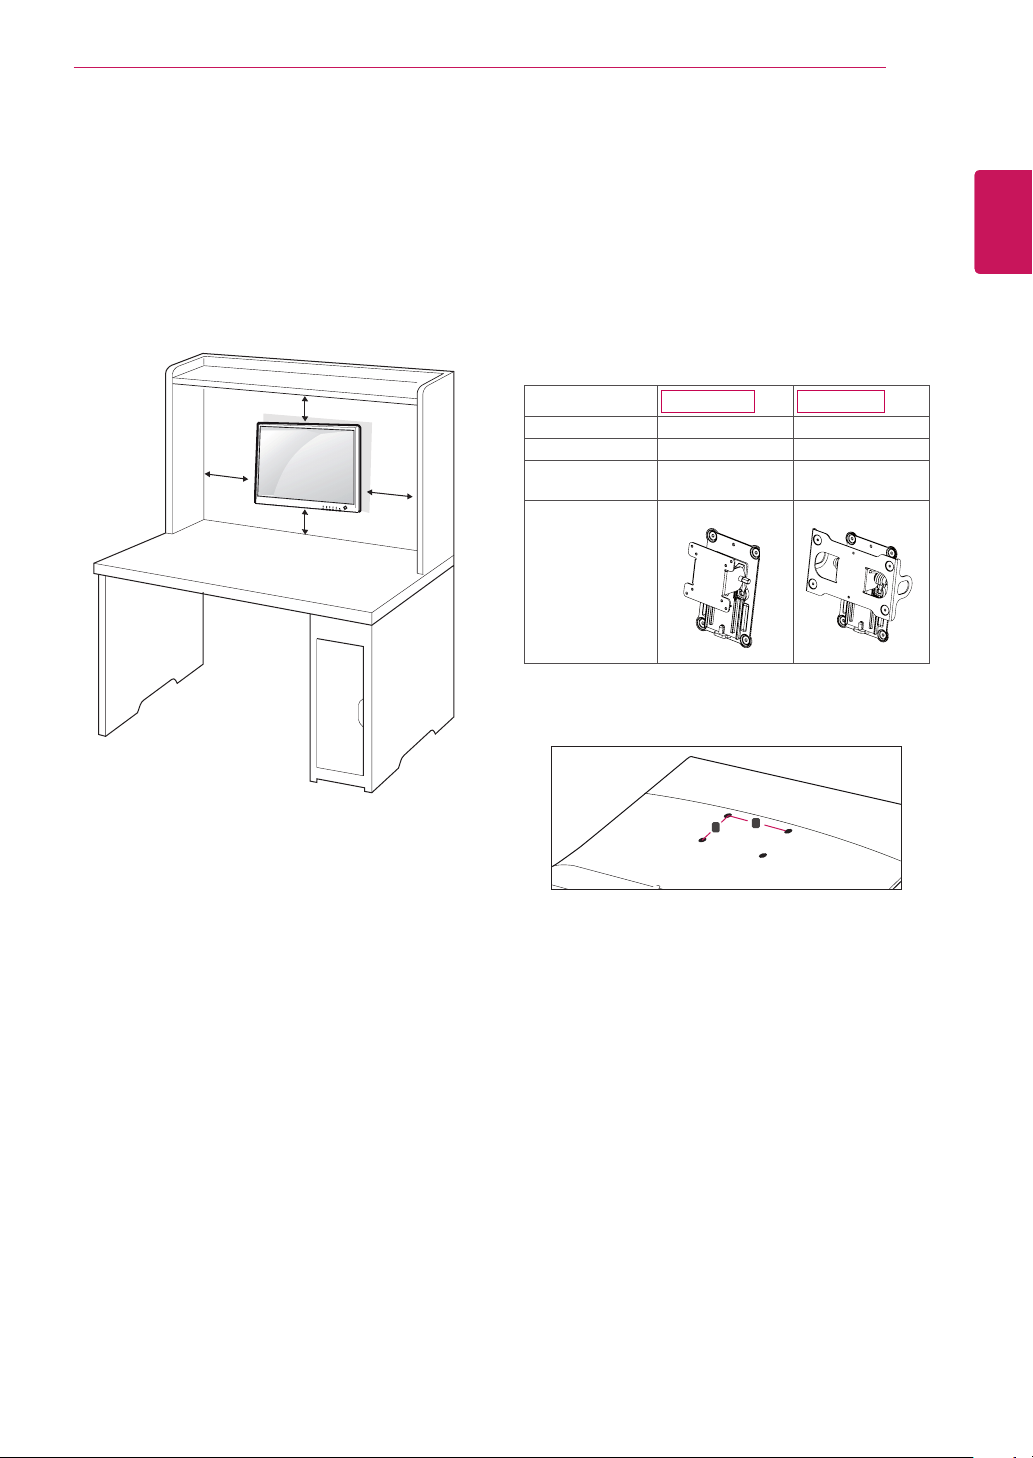
Mounting on a wall
For proper ventilation, allow a clearance of 10 cm
on each side and from the wall. Detailed
instructions are available from your dealer, see the
optional Tilt Wall Mounting Bracket Installation and
Setup Guide.
If you intend to mount the Monitor set to a wall,
attach Wall mounting interface (optional parts) to
the back of the set.
When you install the Monitor set using the wall
mounting interface (optional parts), attach it
carefully so it will not drop.
1
Please, Use the screw and wall mount interface
in accordance with VESA Standards.
2
If you use screw longer than standard, the
monitor might be damaged internally.
3
If you use improper screw, the product might be
damaged and drop from mounted position. In this
case, LG Electronics is not responsible for it.
4
VESA compatible only with respect to screw
mounting interface dimensions and mounting
screw specifications.
10 cm
10 cm
10 cm
10 cm
Model
D237IPS
D2770P
VESA (A x B) 100 x 100 200 x 100
Standard screw M4 M4
Number of
screws
4 4
Wall mount
bracket
(optional)
RW120 RW240
5
Please use VESA standard as below.
784.8 mm (30.9 inch) and under
* Wall Mount Pad Thickness : 2.6 mm
* Screw : Φ 4.0 mm x Pitch 0.7 mm x
Length 10 mm
787.4 mm (31.0 inch) and above
* Please use VESA standard wall mount pad
and screws.
VESA (A x B)
A
B
10
ENG
ENGLISH
ASSEMBLING AND PREPARING
Disconnectthepowercordfirst,andthen
moveorinstalltheMonitorset.Otherwise
electricshockmayoccur.
IfyouinstalltheMonitorsetonaceilingor
slantedwall,itmayfallandresultinsevere
injury.
UseonlyanauthorizedLGwallmount
andcontactthelocaldealerorqualified
personnel.
Donotovertightenthescrewsasthismay
causedamagetotheMonitorsetandvoid
yourwarranty.
Useonlyscrewsandwallmountsthat
meettheVESAstandard.Anydamages
orinjuriesbymisuseorusinganimproper
accessoryarenotcoveredbythewarranty.
CAUTION
UsethescrewsthatarelistedontheVESA
standardscrewspecifications.
Thewallmountkitwillincludeaninstallation
manualandnecessaryparts.
Thewallmountbracketisoptional.Youcan
obtainadditionalaccessoriesfromyourlocal
dealer.
Thelengthofscrewsmaydifferdepending
onthewallmount.Besuretousetheproper
length.
Formoreinformation,refertothe
instructionssuppliedwiththewallmount.
NOTE

11
ENG
ENGLISH
USING THE MONITOR SET
USINGTHEMONITORSET
ConnectingtoaPC
YourMonitorsetsupportsPlug&Play*.
*Plug&Play:Thisisthefunctionthatallows
aPCtousethemonitorwithoutinstallinga
driver.
Macadapter
ForAppleMacintoshuse,aseparateplug
adapterisneededtochangethe15pin
highdensity(3row)D-SUBVGAconnector
onthesuppliedcabletoa15pin2row
connector.
WhenusingaD-Subsignalinputcable
connectorforMacintosh
NOTE
H
D
MI
D-SUB
DVI
-D
RGB OUT
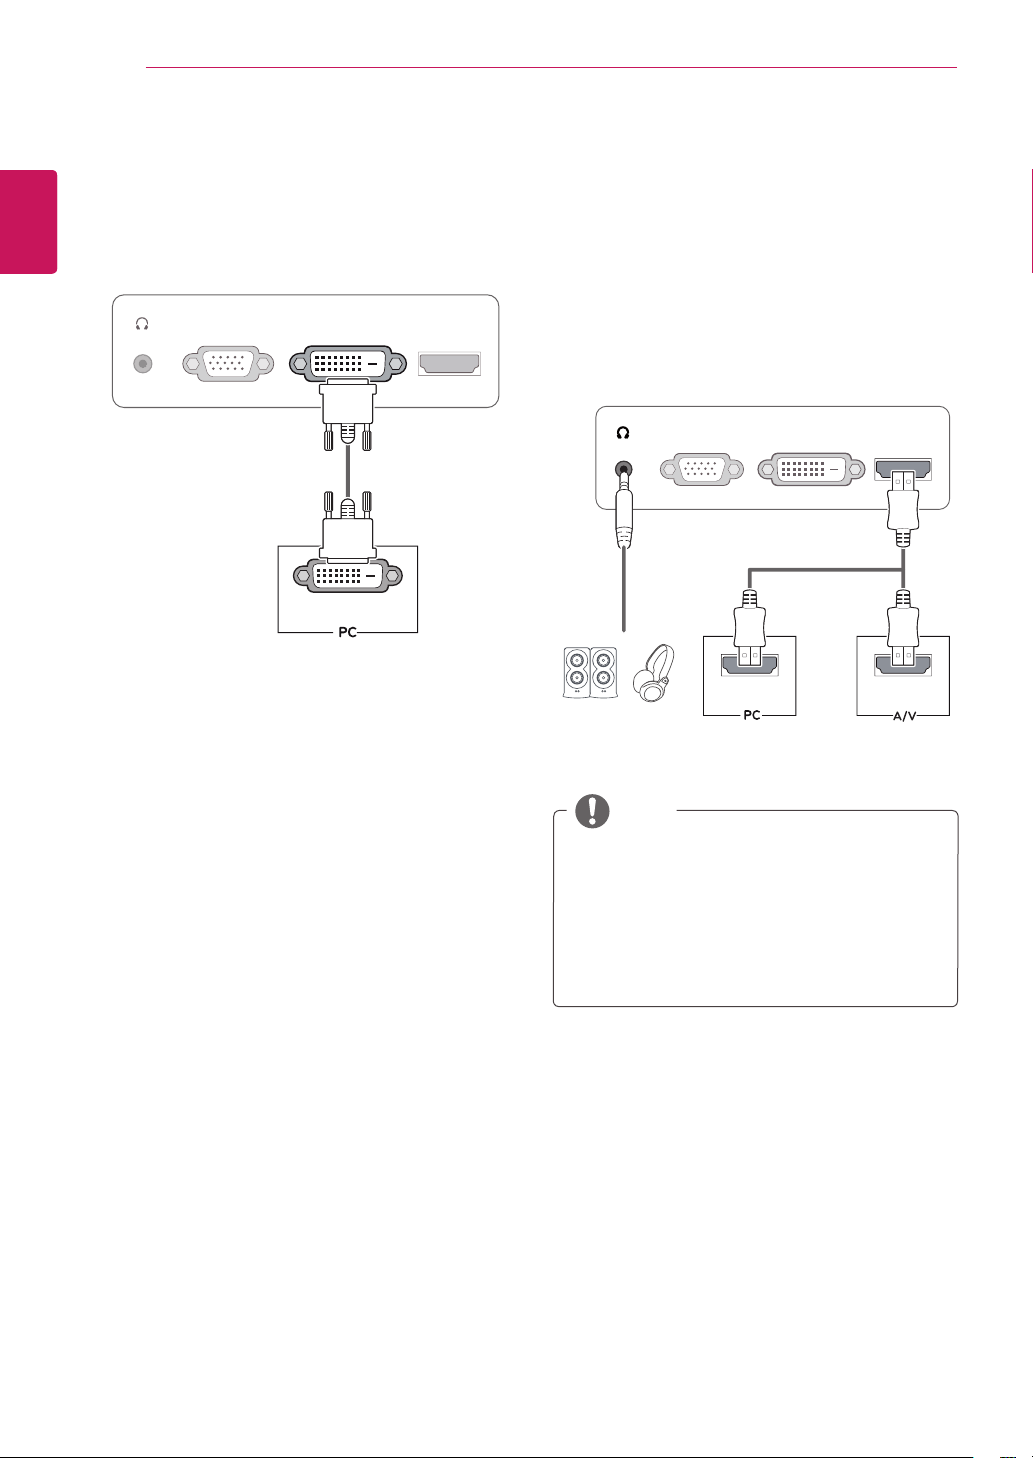
D-SUBconnection
TransmitsanalogvideofromyourPCtothe
Monitorset.ConnectthePCandtheMonitorset
withthesuppliedD-sub15pinsignalcableas
showninthefollowingillustrations.
12
ENG
ENGLISH
USING THE MONITOR SET
IfyouuseHDMIPC,itcancausecompatibility
problem.
SoundoutputisavailableonlyinHDMIinput
mode.Thequalityofthesoundmaybe
reduceddependingontheperformanceof
headphones,earphonesorexternalspeaker.
NOTE
H
D
MI
D
-
S
U
B
DVI OUT
DVI-D
HDMI
D
-
S
U
B
HDMI OUT
DVI
-D
HDMI OUT
DVI-Dconnection
TransmitsadigitalvideosignalfromyourPCto
theMonitorset.ConnectthePCandtheMonitor
setwithaDVIcableasshowninthefollowing
illustrations.
HDMIconnection
Transmitsthedigitalvideoandaudiosignalsfrom
yourPCorA/VtotheMonitorset.ConnectthePC
orA/VandtheMonitorsetwiththeHDMIcable
asshowninthefollowingillustrations.Whenthe
HDMIcableisconnected,youcanlistentothe
soundthroughheadphones,earphonesoran
externalspeaker.
13
ENG
ENGLISH
USING THE MONITOR SET
WhenyouwanttousetwoPCintheMonitor,
pleaseconnectthesignalcable(D-SUB/
DVI-D/HDMI)respectivelyintheMonitorset.
IfyouturntheMonitorsetonwhileitiscold,
thescreenmayflicker.Thisisnormal.
Somered,green,orbluespotsmayappear
onthescreen.Thisisnormal.
"SelfImageSetting"Function.
Thisfunctionprovidestheuserwithoptimal
displaysettings.Whentheuserconnects
themonitorforthefirsttime,thisfunction
automaticallyadjuststhedisplaytooptimal
settingsforindividualinputsignals.(Only
supportedinAnalogMode)
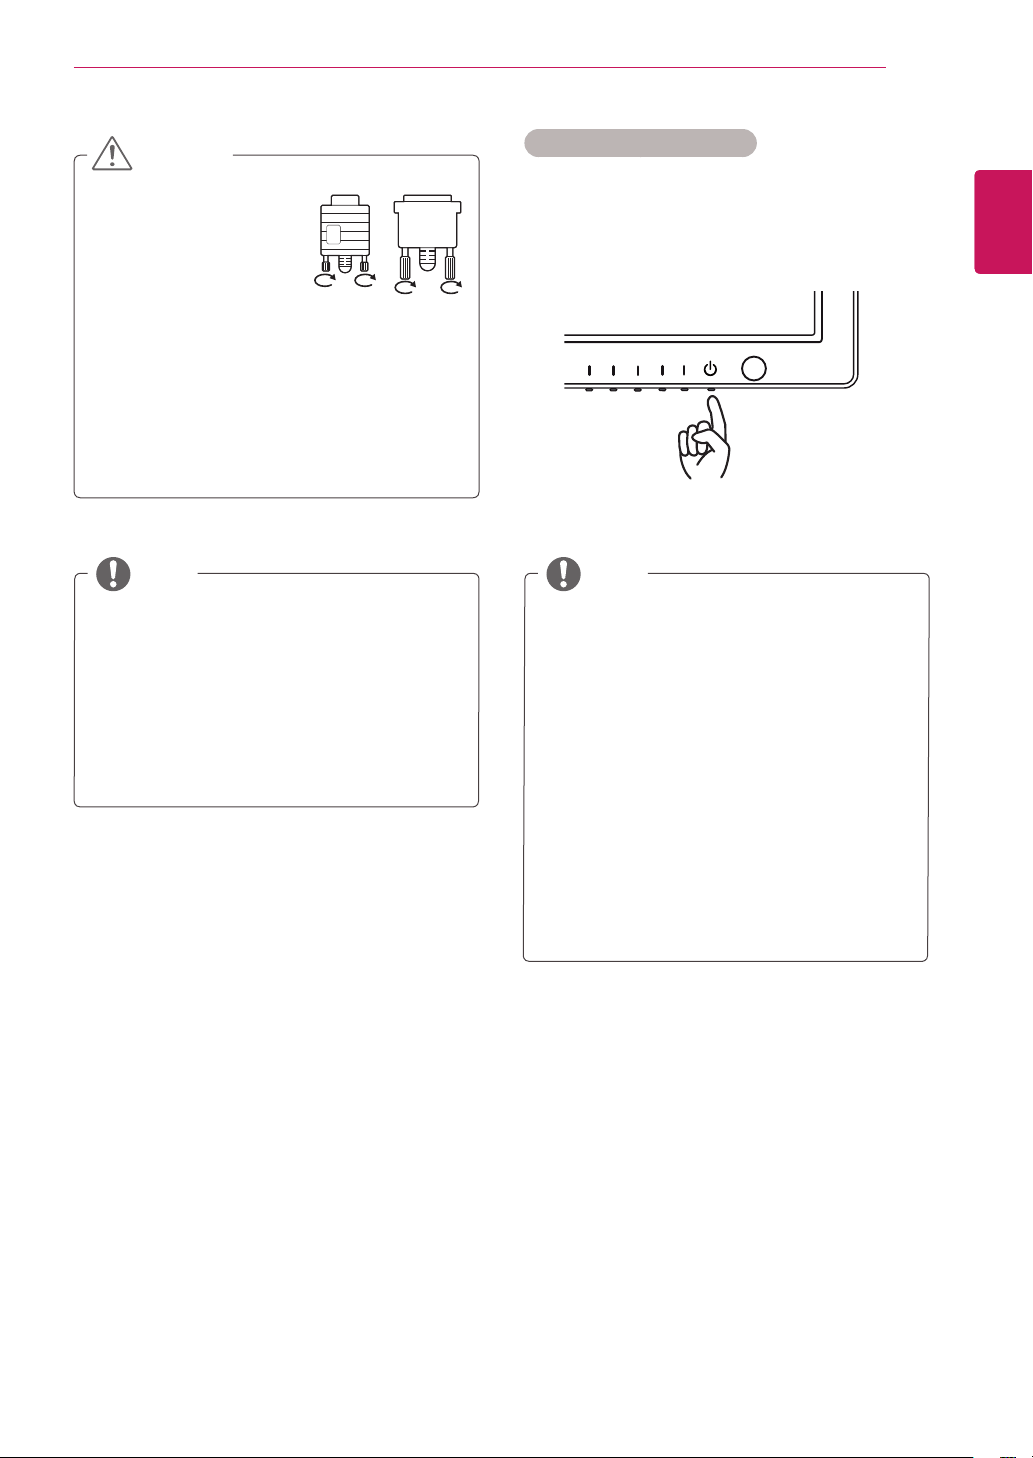
‘AUTO’Function.
Whenyouencounterproblemssuchas
blurryscreen,blurredletters,screenflicker
ortiltedscreenwhileusingthedeviceor
afterchangingscreenresolution,pressthe
AUTOfunctionbuttontoimproveresolution.
(OnlysupportedinAnalogMode)
NOTE NOTE
Connectthesignal
inputcableandtighten
itbyturningthescrews
clockwise.
Donotpressthescreenwithyourfingerfor
alongtimeasthismayresultintemporary
distortiononthescreen.
Avoiddisplayingafixedimageonthe
screenforalongperiodoftimetoprevent
imageburn.Useascreensaverifpossible.
CAUTION
SelfImageSettingFunction
Pressthepowerbuttontoturnthepoweron.
Whenmonitorpoweristurnedon,the"SelfImage
Setting"Functionisexecutedautomatically.(Only
supportedinAnalogMode)
14
ENG
ENGLISH
CUSTOMIZING SETTINGS
CUSTOMIZINGSETTINGS
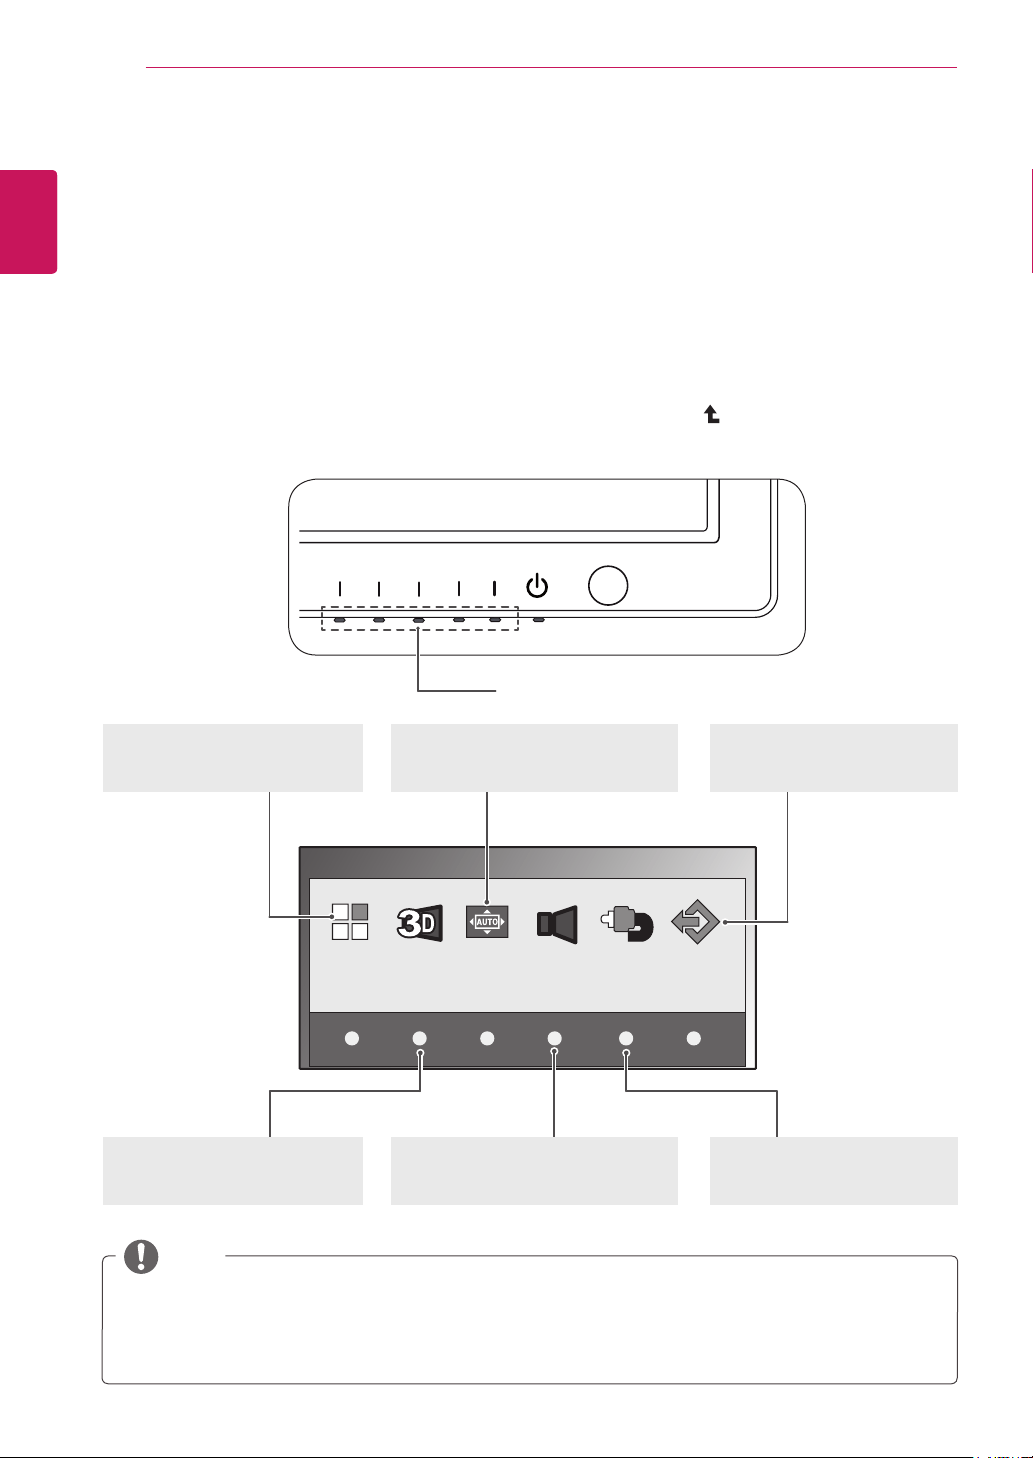
AccessingTheMainMenus
1
Pressanybutton(Exceptthepowerbutton)ontheMonitorsettodisplaytheMONITORSETUPOSD
menu.
2
Pressthedesiredmenuitem.
3
ChangethevalueofthemenuitembypressingthebuttonsontheMonitorset.
Toreturntotheuppermenuorsetothermenuitems,usetheuparrow( )button.
4
SelectEXITtoleavetheOSDmenu.
MonitorsetButtons
MONITOR SETUP
MENU AUTO VOLUME INPUT EXIT
3D
MENU(Seep.15)
Setsthescreenoptions.
AUTO(Seep.5)
Optimizestheresolution.
EXIT
ExitstheOSDmenu.
INPUT(Seep.5)
Setstheexternalinput.
3D(Seep.16)
Setsthe3Dmode.
VOLUME(Seep.17)
Setsthevolume.
Differentmenuitemsareenableddependingonthetypeofinputsignal.
D-SUB/DVIMode:MENU,3D,AUTO,INPUT,EXIT
HDMIMode:MENU,3D,VOLUME,INPUT,EXIT
NOTE

15
ENG
ENGLISH
CUSTOMIZING SETTINGS
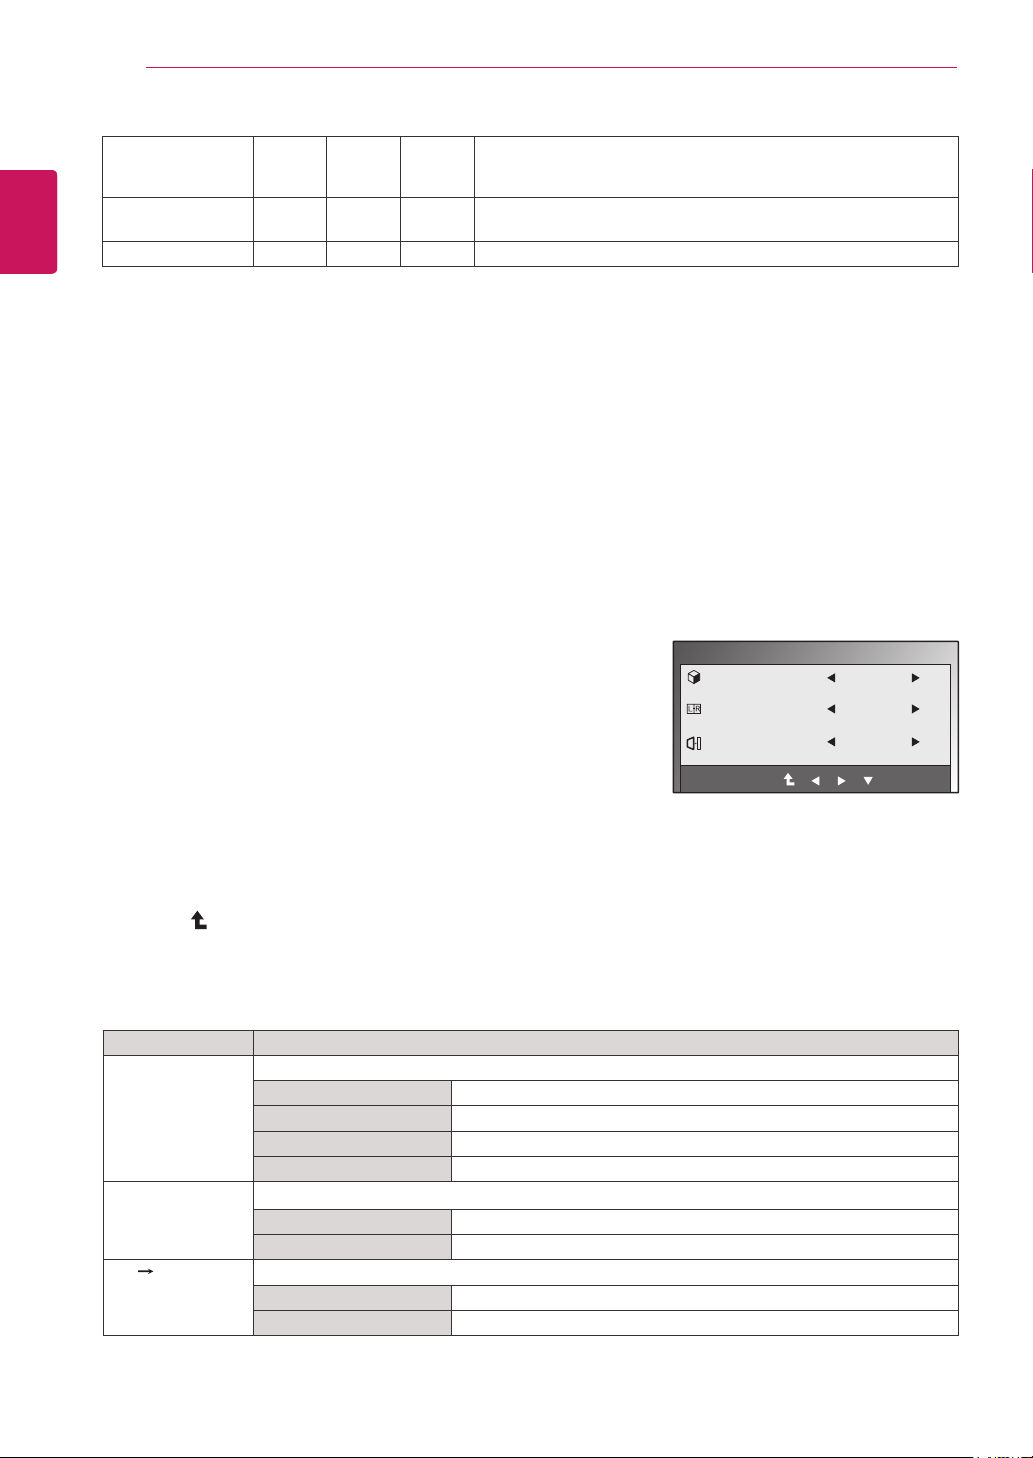
CustomizingSettings
MenuSettings
1
Pressanybutton(Exceptthepowerbutton)ontheMonitorset
todisplaytheMONITORSETUPOSDmenu.
2
PresstheMENUbuttontodisplaytheoptionsintheOSD
menu.
3
SettheoptionsbypressingthebuttonsontheMonitorset.
4
SelectEXITtoleavetheOSDmenu.
Toreturntotheuppermenuorsetothermenuitems,usethe
uparrow( )button.
Menu Analog Digital HDMI Description
BRIGHTNESS o o o Adjuststhebrightnessofthescreen.
ORIGINALRATIO
o o o
WIDE
Switchtofullscreenmodeaccordingtoinputimagesignal.
ORIGINAL
Changetheinputimagesignalratiotooriginal.
*ThisfunctionworksonlyifinputresolutionislowerthanMonitor
setratio(16:9).
3DCOLOR
EFFECT o o o
Thepicturequalityisoptimizedatthe3Dmode.
Dependingontheoperatingsystemorvideocard,requireto
turnonthe3DCOLOREFFECTmanually.
COLORTEMP
o o o
PRESET
Selectthescreencolor.
WARM:Setthescreentowarmcolortemperature(morered).
MEDIUM:Setthescreentomediumcolortemperature.
COOL:Setthescreentocoolcolortemperature(Moreblue).
USER
RED:Setyourownredcolorlevels.
GREEN:Setyourowngreencolorlevels.
BLUE:Setyourownbluecolorlevels.
CONTRAST
o o o
Adjuststhecontrastofthescreen.
BLACKLEVEL
(Onlysupported
inHDMImode)
x x o
Youcansettheoffsetlevel.Ifyouselect'HIGH',thescreenwillbe
brightandifyouselect‘LOW’,thescreenwillbedark.
Offset:Asthecriteriaforvideosignal,itisthedarkestscreen
themonitorcanshow.
LANGUAGE o o o Changesthemenulanguage.
MENU
EXIT
BRIGHTNESS
ORIGINAL RATIO
3D COLOR EFFECT
COLOR TEMP
PRESET
RED
GREEN
BLUE
CONTRAST
BLACK LEVEL
LANGUAGE
AUTO BRIGHT
SUPER ENEYGY SAVING
FACTORY RESET
WIDE
OFF
PRESET
WARM
HIGH
ENGLISH
OFF
NO
TheavailableMenusettingsaredescribedbelow.
100
50
50
50
70
16
ENG
ENGLISH
CUSTOMIZING SETTINGS
3DSettings(Onlywhilein3Dmode)
1
Pressanybutton(Exceptthepowerbutton)ontheMonitorto
displaytheMONITORSETUPOSDmenu.
2
Pressthe3DbuttontodisplaytheoptionsintheOSDmenu.
3
SettheoptionsbypressingthebuttonsontheMonitorset.
4
SelectEXITtoleavetheOSDmenu.
Toreturntotheuppermenuorsetothermenuitems,usetheup
arrow( )button.
Theavailable3Dsettingsaredescribedbelow.
Menu Description
3DMODE Selecttheformatof3Dvideodata.(EnabledonlyforHDMIVIDEOTIMING)
SIDEBYSIDE LeftandrightpicturesarearrangedinSidebySidelayout.
TOP&BOTTOM LeftandrightpicturesarearrangedinTopandBottomlayout.
LINEINTERLACED Leftandrightpicturesarearrangedinlinebyline.
OFF Turnsoff3DMode.
3DL/RCHANGE Changeswhichframeisshowntoeacheye.
R-L OddlinesareRightpictureandevenlinesareLeftpicture.
L-R OddlinesareLeftpictureandevenlinesareRightpicture.
3D 2D Converts3Dimagesinto2D.(EnabledonlyforHDMIVIDEOTIMING)
OFF Displaysimagesin3D.
ON Displaysimagesin2D.
3D
3D MODE
3D L/R CHANGE
3D - > 2D
OFF(1/4)
L-R(1/2)
OFF
EXIT
ThingsyouneedtocheckbeforeinstallingTriDef3D
BeforeyouinstalltheTriDef3Dprogram,connecttheLG3DmonitortoyourPCandreboot.
Ifyouareusingtwomonitorsorconnectingamonitortoyourlaptop,settheLG3Dmonitor
asthemain/defaultscreenoneandchangetheresolutionto1920*1080.
TorunaTriDefMoviefileonWindowsXP,youmustinstallWindowsMediaPlayer11for
WindowsXP.
AUTOBRIGHT
o o o
Ifthisoptionisenabled,thesensorthatdetectstheambient
brightnessadjuststhemonitorbacklightorthescreenbrightness
accordingtotheinputdatatooptimizethescreendisplay.
SUPERENERGY
SAVING
o o o
SetstheSUPERENERGYSAVINGfunction.
FACTORYRESET o o o Returnsthemonitortooriginalfactorysettings.
Analog:D-SUB(Analogsignal)input.
Digital:DVI-D(Digitalsignal)input.
HDMI:HDMI(Digitalsignal)input.
*The3DoptionOSDisenabledonlyforHDMIvideotiming.
17
ENG
ENGLISH
CUSTOMIZING SETTINGS
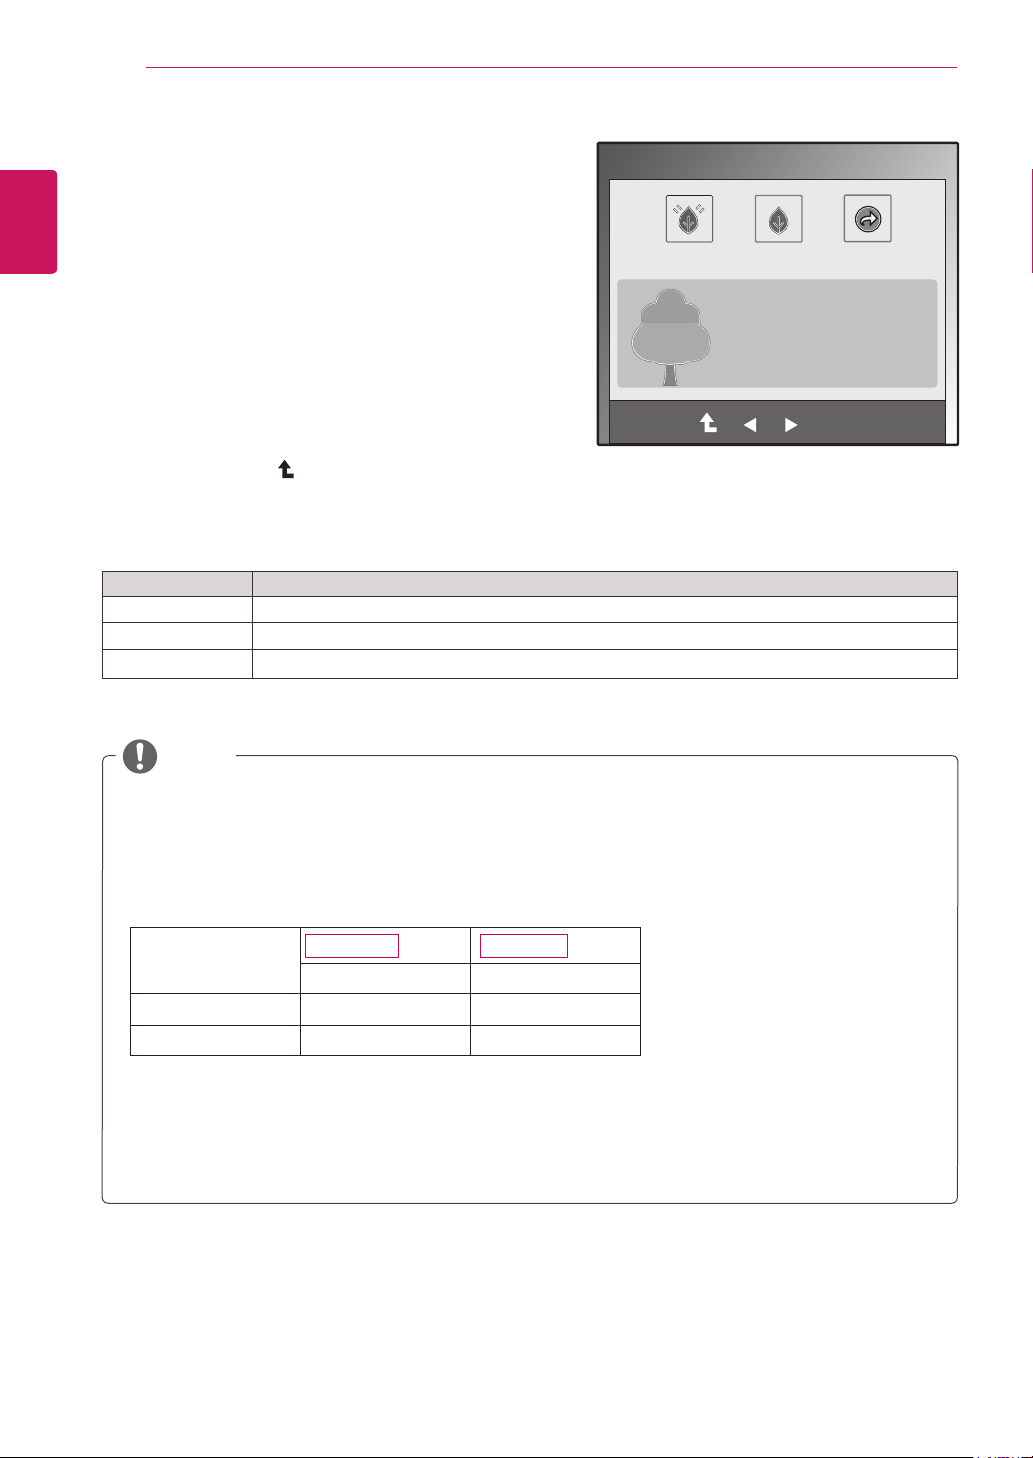
3DMode.
SIDEBYSIDE TOP&BOTTOM LINEINTERLACED
Selecttheappropriateformataccordingtothe3Dinputsignal.
Ifthe3Doptionselectedisincorrect,imagesmaynotbedisplayedproperly.
Towatch3Dimages,select3Dmode.
NOTE
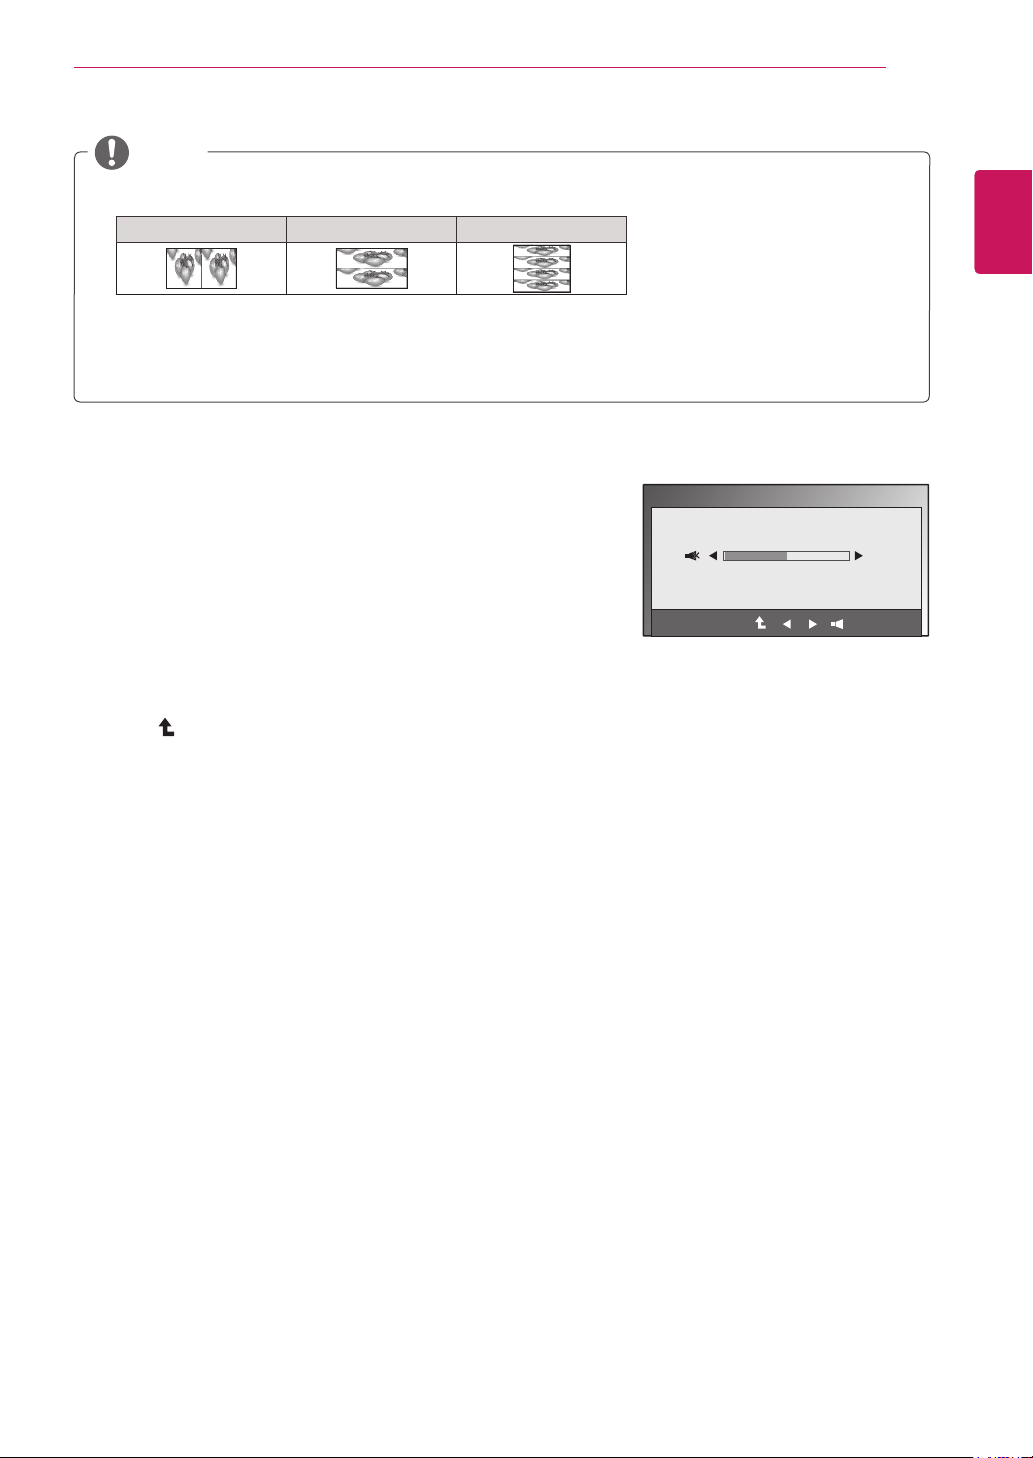
VolumeSettings(OnlysupportedinHDMI)
1
Pressanybutton(Exceptthepowerbutton)ontheMonitorsetto
displaytheMONITORSETUPOSDmenu.
2
PresstheVOLUMEbuttontodisplaytheoptionsintheOSDmenu.
3
SettheoptionsbypressingthebuttonsontheMonitorset.
4
SelectEXITtoleavetheOSDmenu.
Toreturntotheuppermenuorsetothermenuitems,usetheup
arrow( )button.
VOLUME
EXIT
50
18
ENG
ENGLISH
CUSTOMIZING SETTINGS
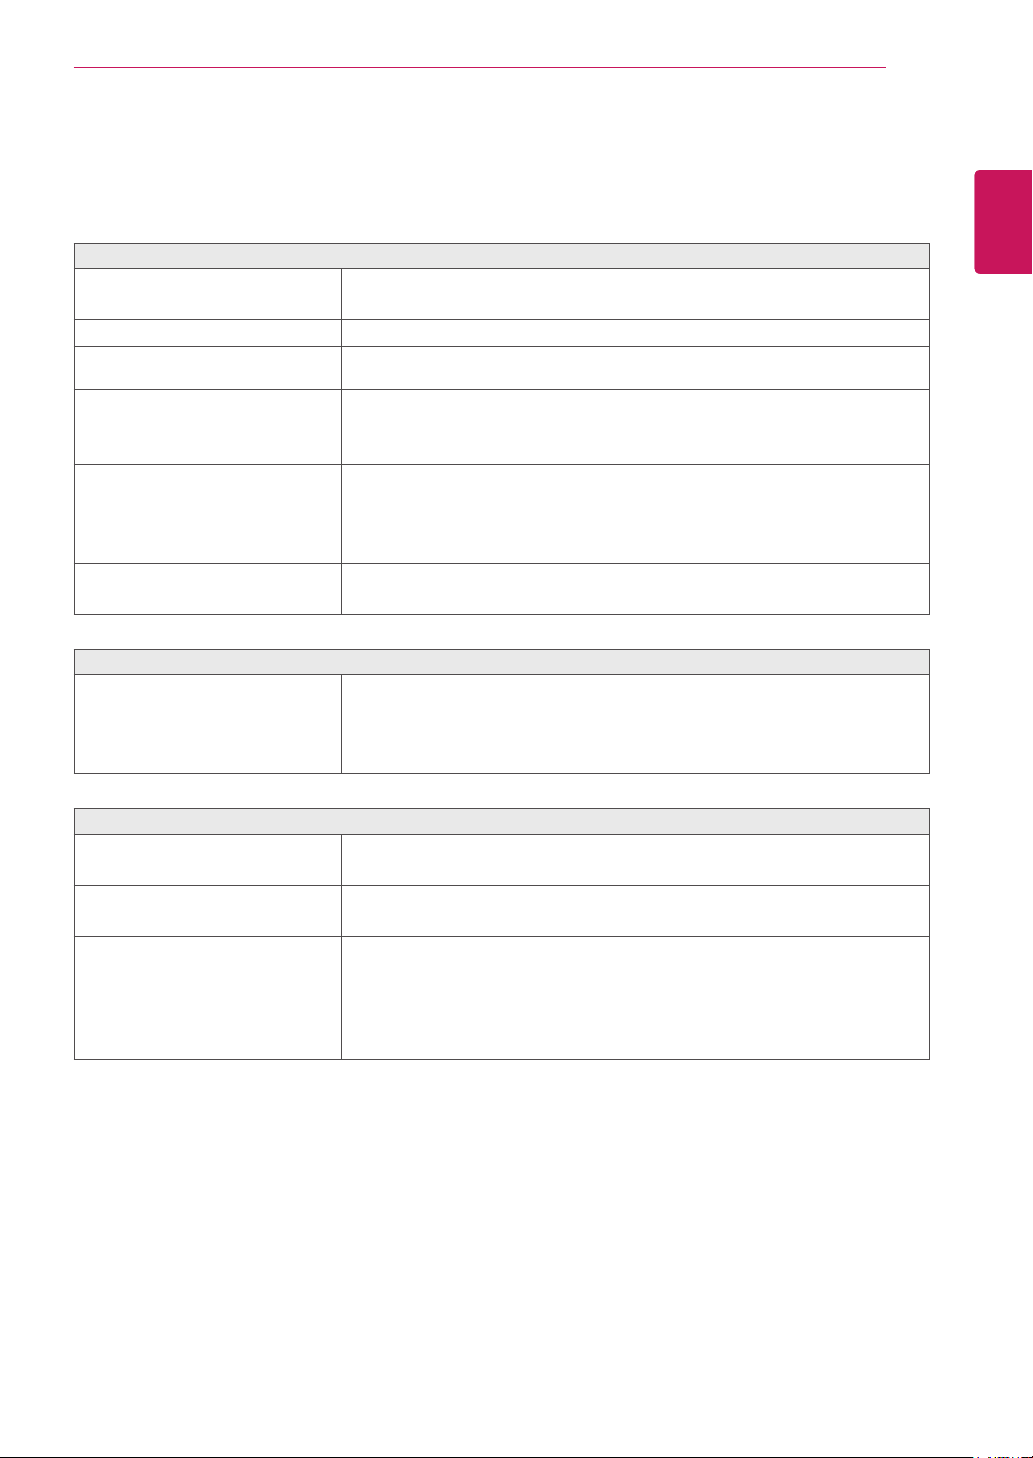
SUPERENERGYSAVINGSettings
1
Pressanybutton(Exceptthepowerbutton)onthe
MonitorsettodisplaytheMONITORSETUPOSD
menu.
2
PresstheMENUbuttontodisplaytheoptionsinthe
OSDmenu.
3
SelectSUPERENERGYSAVINGbypressingthe
buttonsontheMonitorsetandsettheoptions.
4
SelectEXITtoleavetheOSDmenu.
Toreturntotheuppermenuorsetothermenuitems,
usetheuparrow( )button.
TheavailableSUPERENERGYSAVINGsettingsaredescribedbelow.
Menu Description
ON EnablesSUPERENERGYSAVING.
OFF DisablesSUPERENERGYSAVING.
RESET ResetsthevaluesoftotalenergyconsumptionreductionandCO2emissionreductionestimates.
TOTALPOWERREDUCTION:Showstheapproximateamountofpowersavedbyusingtheenergysaver
function.
TOTALCO2REDUCTION:ShowstheapproximateCarbonDioxidesavedbyusingtheenergysaver
function.
SAVINGDATA(W/h)
584.2mm(23inch) 686mm(27inch)
SUPERSAVING 5W/h 6W/h
LEDSAVING 12W/h 10W/h
Thesevalueswillbedifferentfromeachpanelandpanelvendor.
LGcalculatedthesevalueswhileusinga“broadcastvideosignal”.
LEDSavingreferstohowmuchpowercanbesavedusingaWLEDPanelinsteadofaCCFLpanel.
SUPERSAVINGreferstohowmuchpowercanbesavedusingtheSUPERENERGYSAVINGfunction.
NOTE
EXIT
OK
ON OFF RESET
TOTAL POWER REDUCTION: 20 W
TOTAL CO2 REDUCTION: 16 g
SUPER
SAVING
: 6 W/h
LED
SAVING
: 10 W/h
SUPER ENERGY SAVING
D2770PD237IPS
19
ENG
ENGLISH
TROUBLESHOOTING
TROUBLESHOOTING
Checkthefollowingbeforecallingforservice.
Noimageappears
Isthepowercordofthedisplay
connected?
Checkandseeifthepowercordisconnectedproperlytothepower
outlet.
Isthepowerindicatorlighton?
PressthePowerbutton.
Isthepowerindicatordisplayingas
red?
Adjustthebrightnessandthecontrast.
Isthepowerindicatorflickering?
Ifthedisplayisinpowersavingmode,trymovingthemouseor
pressinganykeyonthekeyboardtobringupthescreen.
CheckthatyourPCisturnedon.
Doyouseean"OUTOFRANGE"
messageonthescreen?
ThismessageappearswhenthesignalfromthePC(videocard)is
outofhorizontalorverticalfrequencyrangeofthedisplay.Seethe
'Specifications'sectionofthismanualandconfigureyourdisplay
again.
Doyouseea"CHECKSIGNAL
CABLE"messageonthescreen?
ThismessageappearswhenthesignalcablebetweenyourPCand
yourdisplayisnotconnected.Checkthesignalcableandtryagain.
Doyouseea"OSDLOCKED"messageonthescreen?
Doyousee“OSDLOCKED”when
youpushMENUbutton?
Youcansecurethecurrentcontrolsettings,sothattheycannotbe
inadvertentlychanged.YoucanunlocktheOSDcontrolsatanytime
bypushingtheMENUbuttonforseveralseconds:themessage“OSD
UNLOCKED”willappear.
Displayimageisincorrect(Foranalog(D-SUB))
DisplayPositionisincorrect.
PresstheAUTObuttontoautomaticallyadjustyourdisplayimageto
theidealsetting.
Onthescreenbackground,vertical
barsorstripesarevisible.
PresstheAUTObuttontoautomaticallyadjustyourdisplayimageto
theidealsetting.
Anyhorizontalnoiseappearingin
anyimageorcharactersarenot
clearlyportrayed.
PresstheAUTObuttontoautomaticallyadjustyourdisplayimageto
theidealsetting.
CheckControlPanel►Display►Settingsandadjustthedisplay
totherecommendedresolutionoradjustthedisplayimagetothe
idealsetting.Setthecolorsettinghigherthan24bits(truecolor).
20
ENG
ENGLISH
TROUBLESHOOTING
Displayimageisincorrect
Thescreencolorismonoor
abnormal.
Checkifthesignalcableisproperlyconnectedandusea
screwdrivertofastenifnecessary.
Makesurethevideocardisproperlyinsertedintheslot.
Setthecolorsettinghigherthan24bits(truecolor)atControlPanel
►Settings.
Thescreenblinks.
Checkifthescreenissettointerlacemodeandifyes,changeitto
therecommendresolution.
Doyouseean"Unrecognizedmonitor,Plug&Play(VESADDC)monitorfound"message?
Haveyouinstalledthedisplay
driver?
BesuretoinstallthedisplaydriverfromthedisplaydriverCD(or
diskette)thatcomeswithyourdisplay.Or,youcanalsodownload
thedriverfromourwebsite:http://www.lg.com.
MakesuretocheckifthevideocardsupportsPlug&Playfunction.
CheckControlPanel►Display►Settingsandseeifthefrequencyortheresolutionwere
changed.Ifyes,readjustthevideocardtotherecommendresolution.
Iftherecommendedresolution(optimalresolution)isnotselected,lettersmaybeblurredandthe
screenmaybedimmed,truncatedorbiased.Makesuretoselecttherecommendresolution.
Theconfigurationproceduremaydifferdependingonyourcomputerand/oroperatingsystem(See
p.24).Inaddition,somevideocardsmaynotsupportcertainresolutions.Ifthisisthecase,contactthe
manufacturerofthecomputerorvideocardforassistance.
CAUTION
21
ENG
ENGLISH
TROUBLESHOOTING
TROUBLESHOOTINGWHENUSING3DMODE
Icanseeaswirlingoil-likepatternonthemonitorwhenthemonitoristurnedoff.
ThisiscausedbytheinterferenceofexternallightintheairlayerbetweentheLCDsurfaceand3Dfilter.
Thepatternbecomesalmostinvisiblewhenyouturnonthepoweragain.
Icannotsee3Dimageproperly
Ifyouarenotusingtheglasses
providedwiththemonitor,
Whenyouview3Dimageswiththismonitor,itisveryimportant
thatyouusetheglassesprovidedwiththemonitor.Theglassesare
designedtocompensateopticallyforthe3Dfilterattachedtothe
surfaceofthemonitor.Ifyouwearthird-partyglasses,youmaynot
see3Dimagesproperlyonthemonitor.
Ifyouview3Dimagesoutsidethe
optimalviewingangleordistance,
D237IPS
Theoptimalviewingangleofthemonitoris12°in
verticaldirectionwhile130°inhorizontaldirection;
themonitor3Dviewingrangeisbetween50cmto
150cmfromthemonitor.
Whenyouview3Dimagesoutsidetheoptimal
viewingangleorthemonitor3Dviewingrange,the
imagesmaylookoverlappedornotbedisplayed
properlyin3D.
D2770P
Theoptimalviewingangleofthemonitoris14°in
verticaldirectionwhile80°inhorizontaldirection;the
monitor3Dviewingrangeisbetween50cmto150
cmfromthemonitor.
Whenyouview3Dimagesoutsidetheoptimal
viewingangleorthemonitor3Dviewingrange,the
imagesmaylookoverlappedornotbedisplayed
properlyin3D.
Ifyouhavenotsettheresolution,
Pleasesettheresolutionofthemonitortothemaximum(1920x
1080@60Hz)inthedisplaysettings.The3Dsoftwaremaynot
workproperlyiftheresolutionisnotsettothemaximum.
Iftheimagesthatyourleftandright
eyesseearereversed,
Thestripeimagesintheodd-numberedlinesaretheonesthatyour
righteyeseesonthemonitor.Ifyouonlyseethestripeimages,not
3Dimages,settheimagesforyourrighteyetobedisplayedinthe
odd-numberedlinesbychangingtheplayerorvieweroptionofthe
3Dsoftware.
Icannotsee3Dbutonly2Dimages.
Thismonitorworksbothin2Dand3Dmode.Youcanviewavideoin
3Difitismadein3D.Ifyoutrytoview2Dimagesin3D,theymight
notbedisplayedproperlyoryoumayexperiencepoorpicturequality.
Ifthe‘TriDef3D’couldn’twork
properly
TheminimumsystemrequirementsonPCtorunthe‘TriDef3D’:
»
Intel®Core2DuoorAMDAthlon™64X2Dual-CoreCPUorbetter
»
1GBRAM
»
NVIDIA®GeForce®8600GTorATIX1650XT
»
500MBfreediskspace
»
Windows®XP(withthelatestservicepackat32-bitonly),Windows®Vista
(32bitonly)orWindows®7(32or64bit)
»
DirectX9.0ccompatiblesoundcard
»
Internetconnection
»
DVD-ROMdrive
»
Networkcard
»
DirectX9.0c
22
ENG
ENGLISH
SPECIFICATIONS
SPECIFICATIONS
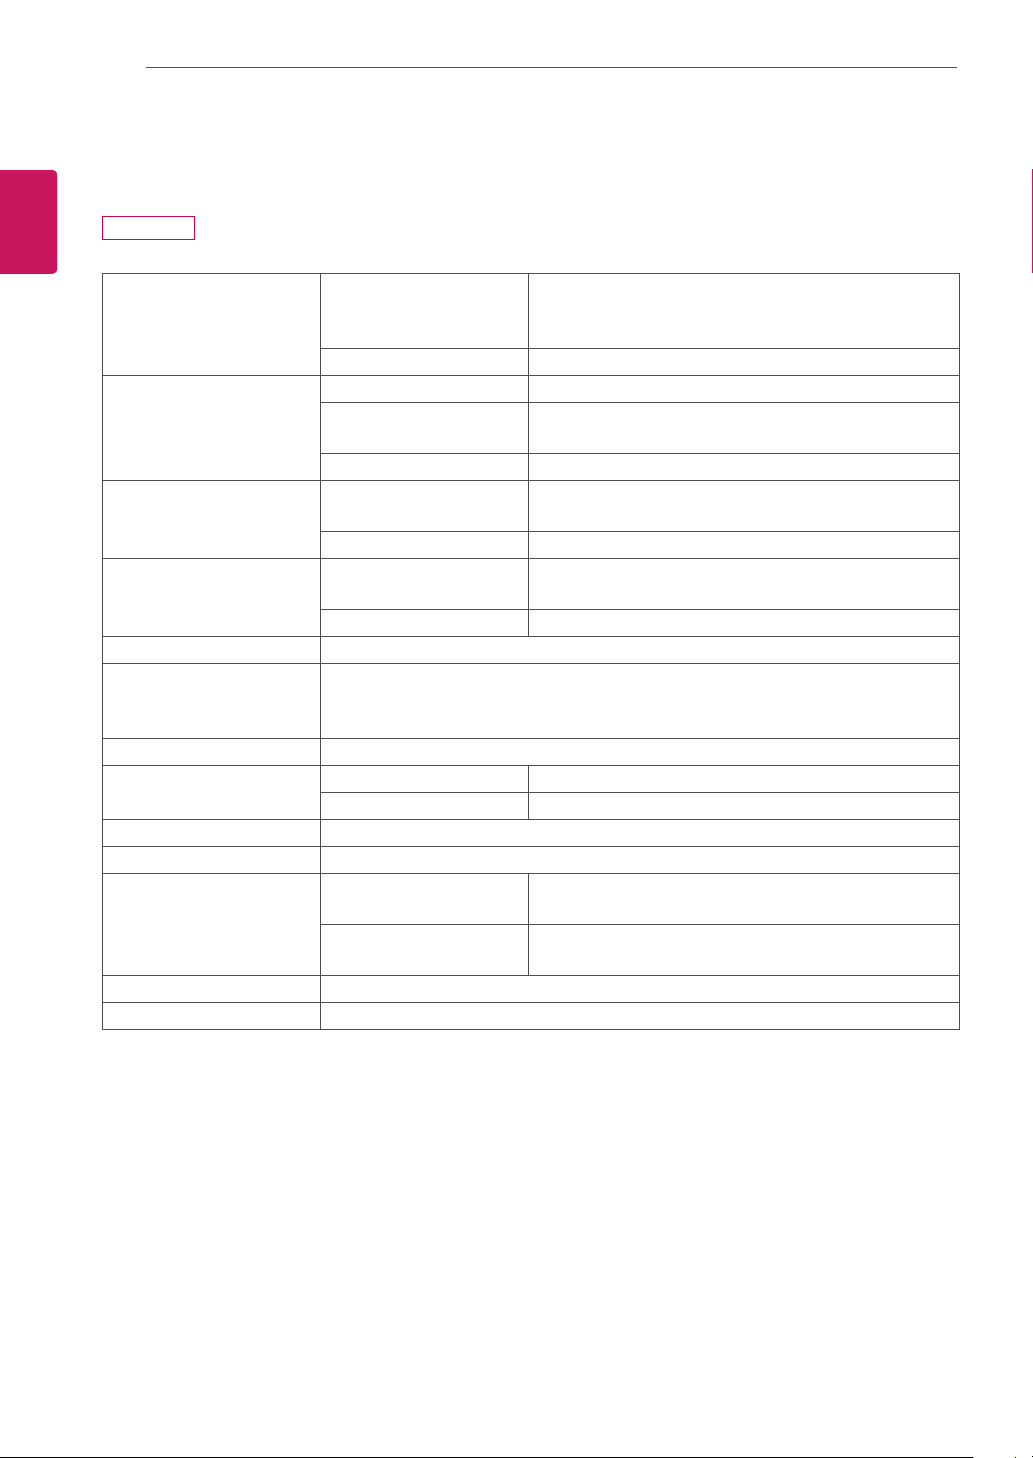
Display ScreenType 58.42cm(23inch)Hardcoating(3H)&Anti-Glare
treatmentofthefrontpolarizer
Visiblediagonalsize:58.42cm
PixelPitch 0.2652mmx0.2652mm(PixelPitch)
SyncInput HorizontalFrequency 30kHzto83kHz(Automatic)
VerticalFrequency 56Hzto75Hz(D-SUB,DVI-D)
56Hzto61Hz(HDMI)
InputForm SeparateSync.Digital
VideoInput SignalInput 15pinD-SUBConnector/DVI-DConnector(Digital)
HDMIConnector
InputForm RGBAnalog(0.7Vp-p/75ohm),Digital
Resolution Max D-SUB(Analog):1920x1080@60Hz
DVI/HDMI(Digital):1920x1080@60Hz
Recommend VESA1920x1080@60Hz
Plug&Play DDC2B(Analog,Digital,HDMI)
PowerConsumption OnMode:41W(Typ.)
SleepMode≤1W
OffMode≤1W
PowerInput AC100-240V~50/60Hz0.7A
Dimensions
(WidthxHeightxDepth)
WithStand 55.62cmx41.27cmx17.78cm
WithoutStand 55.62cmx34.51cmx6.04cm
Weight 4.86kg
TiltRange -5°to18°
Environmental
conditions
OperatingTemperature
OperatingHumidity
10°Cto35°C
10%to80%
StorageTemperature
StorageHumidity
-20°Cto60°C
5%to90%non-Condensing
StandBase Attached(),Detached(O)
Powercord Wall-outlettype
Productspecificationsshownabovemaybechangedwithoutpriornoticeduetoupgradeofproduct
functions.
D237IPS
23
ENG
ENGLISH
SPECIFICATIONS
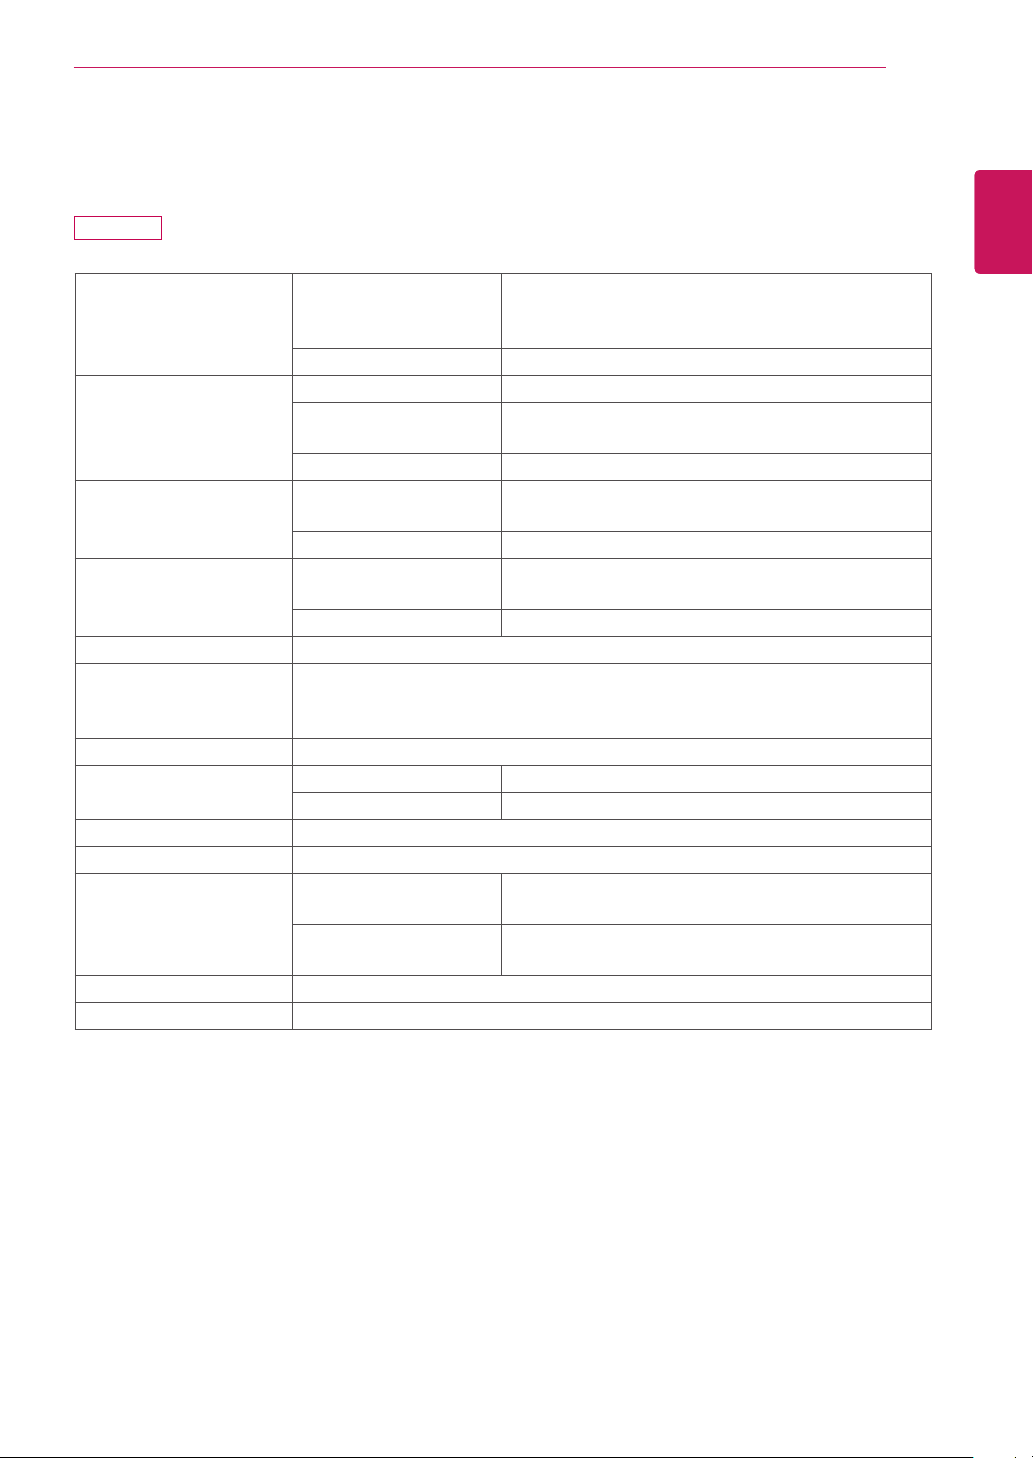
Display ScreenType 68.6cm(27inch)Hardcoating(3H)&Anti-Glare
treatmentofthefrontpolarizer
Visiblediagonalsize:68.6cm
PixelPitch 0.3114mmx0.3114mm(PixelPitch)
SyncInput HorizontalFrequency 30kHzto83kHz(Automatic)
VerticalFrequency 56Hzto75Hz(D-SUB,DVI-D)
56Hzto61Hz(HDMI)
InputForm SeparateSync.Digital
VideoInput SignalInput 15pinD-SUBConnector/DVI-DConnector(Digital)
HDMIConnector
InputForm RGBAnalog(0.7Vp-p/75ohm),Digital
Resolution Max D-SUB(Analog):1920x1080@60Hz
DVI/HDMI(Digital):1920x1080@60Hz
Recommend VESA1920x1080@60Hz
Plug&Play DDC2B(Analog,Digital,HDMI)
PowerConsumption OnMode:43W(Typ.)
SleepMode≤1W
OffMode≤1W
PowerInput AC100-240V~50/60Hz0.7A
Dimensions
(WidthxHeightxDepth)
WithStand 65.46cmx48.85cmx23.08cm
WithoutStand 65.46cmx40.45cmx6.04cm
Weight 5.73kg
TiltRange -5°to18°
Environmental
conditions
OperatingTemperature
OperatingHumidity
10°Cto35°C
10%to80%
StorageTemperature
StorageHumidity
-20°Cto60°C
5%to90%non-Condensing
StandBase Attached(),Detached(O)
Powercord Wall-outlettype
Productspecificationsshownabovemaybechangedwithoutpriornoticeduetoupgradeofproduct
functions.
D2770P
24
ENG
ENGLISH
SPECIFICATIONS
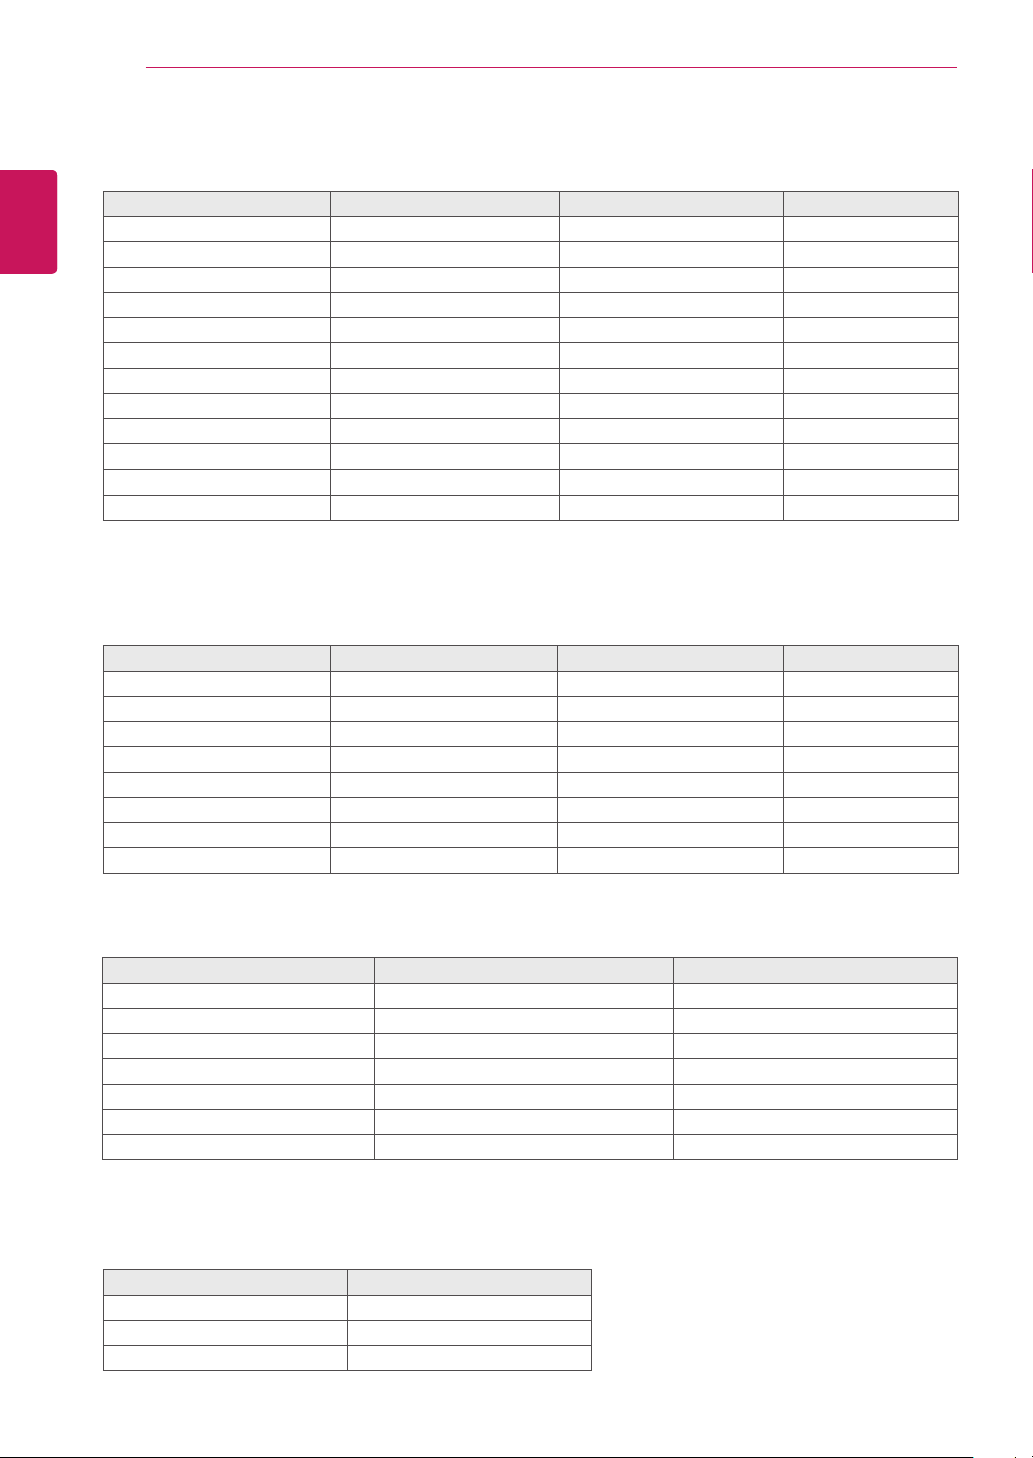
PresetModes(Resolution)
DisplayModes(Resolution) HorizontalFrequency(kHz) VerticalFrequency(Hz) Limitation
720x400 31.468 70.08 *
640x480 31.469 59.94
640x480 37.500 75 *
800x600 37.879 60.317
800x600 46.875 75 *
1024x768 48.363 60
1024x768 60.023 75.029 *
1152x864 67.500 75 *
1280x1024 63.981 60.02
1280x1024
79.976 75.035
*
1680x1050 65.290 59.954
1920x1080 67.500 60 RecommendMode
HDMI3DTIMING
3DFormat Resolution RefreshRate Limitation
FramePacking 1080p 24Hz
FramePacking 720p 50/60Hz
Side-by-Side(Half) 1080p 50/60Hz
Side-by-Side(Half) 1080i 50/60Hz
Side-by-Side(Half) 720p 50/60Hz
Top-and-Bottom 1080p 50/60Hz
Top-and-Bottom 1080p 24Hz
Top-and-Bottom 720p 50/60Hz
Indicator
Mode LEDColor
OnMode Red
SleepMode BlinkingRed
OffMode Off
HDMIVIDEOTIMING
DisplayModes(Resolution) HorizontalFrequency(kHz) VerticalFrequency(Hz)
576p 31.25 50
720p 37.5 50
720p 45 60
1080i 28.12 50
1080i 33.75 60
1080p 56.25 50
1080p 67.5 60
*HDMIPCmodenotsupported

25
ENG
ENGLISH
PRECAUTIONS TO TAKE WHEN VIEWING 3D IMAGES
Ifyouview3Dimagesfromtoocloseadistance,
youreyesightmaydeteriorate.
Ifyouviewimagesin3Dforalongperiodoftime,
youmayfeeldizzyorexperienceblurredvision.
Ifyouarepregnant,elderly,haveheartproblems,
experienceseverenauseaorifyouareunder
theinfluenceofalcohol,werecommendthatyou
donotview3Dimages.Thisisbecausethe3D
imagescancausedisorientationandconfusion.
Putfragileorbreakableobjectsawaywhenviewing
3Dimages.Suchobjectsmaybreak,orcause
personalinjurieswhenyouarestartledbythe
realistic3Dimages.
Parentsshouldpreventchildrenwhoare5years
oryoungerfromwatching3Dimagesbecause
viewing3Dimagescanbeharmfultovision
development.
Warningaboutphotosensitivityseizures
Someusersmayhaveaseizureorotherabnormal
reactionswhentheyareexposedtoaflashinglight
oraparticularpatterninavideogameorfilm.
Ifanyoneinyourfamilyhasahistoryofepilepsyor
haseverexperiencedanykindofseizure,please
consultyourdoctorbeforeviewing3Dimages.
Ifyouexhibitanyofthesymptomslistedbelow
whenviewing3Dimages,stopviewingimmediately
andhaveabreak.
Dizziness,blurredvisionorfacialtics,
involuntarymovements,twitching,blackouts,
confusionanddisorientation.Pleaseconsult
yourdoctorifsuchsymptomspersist.
Topreventaphotosensitivityseizure,pleasetake
thefollowingprecautions.
Havea5-to15-minutebreakeveryhour.
Ifyourleftandrighteyesightissignificantly
different,correctthesightdifferencefirst.
Youshouldbeabletoseeallofthescreenat
eyelevel.
Ifyouexperienceheadaches,fatigueor
dizziness,stopviewingandhavearest.
Donotview3Dimageswhenyouaretiredor
ill.
Precautionstotakewhen
viewing3Dimages
Precautionstotakewhen
viewing3Dimages
Whenusing3DGlasses
CAUTION
CAUTION
WARNING
Parents/guardiansshouldmonitorchildren’sviewingof3Dimagesbecausetheymaynotbeaccustomedto
the3Dviewingexperienceandlackknowledgeonhowtohandlepotentialrisks.
Donotusethe3Dglassesasregularglasses,sunglasses,orgoggles.Thismaycauseyourvisionto
getworse.
Donotkeepthe3Dglassesinanextremelyhotorcoldplace.Thismaycausedamagetotheshape.
Donotusethe3Dglassesiftheyaredamagedbecausethismaycauseyourvisiontogetworseor
dizziness.
Thelensesofthe3Dglasses(polarizingfilm)areeasilyscratched.Useasoftandcleanclothwhen
cleaningit.Donotuseanychemicals.
SAFETYPRECAUTIONS
26
ENG
ENGLISH
LICENSES
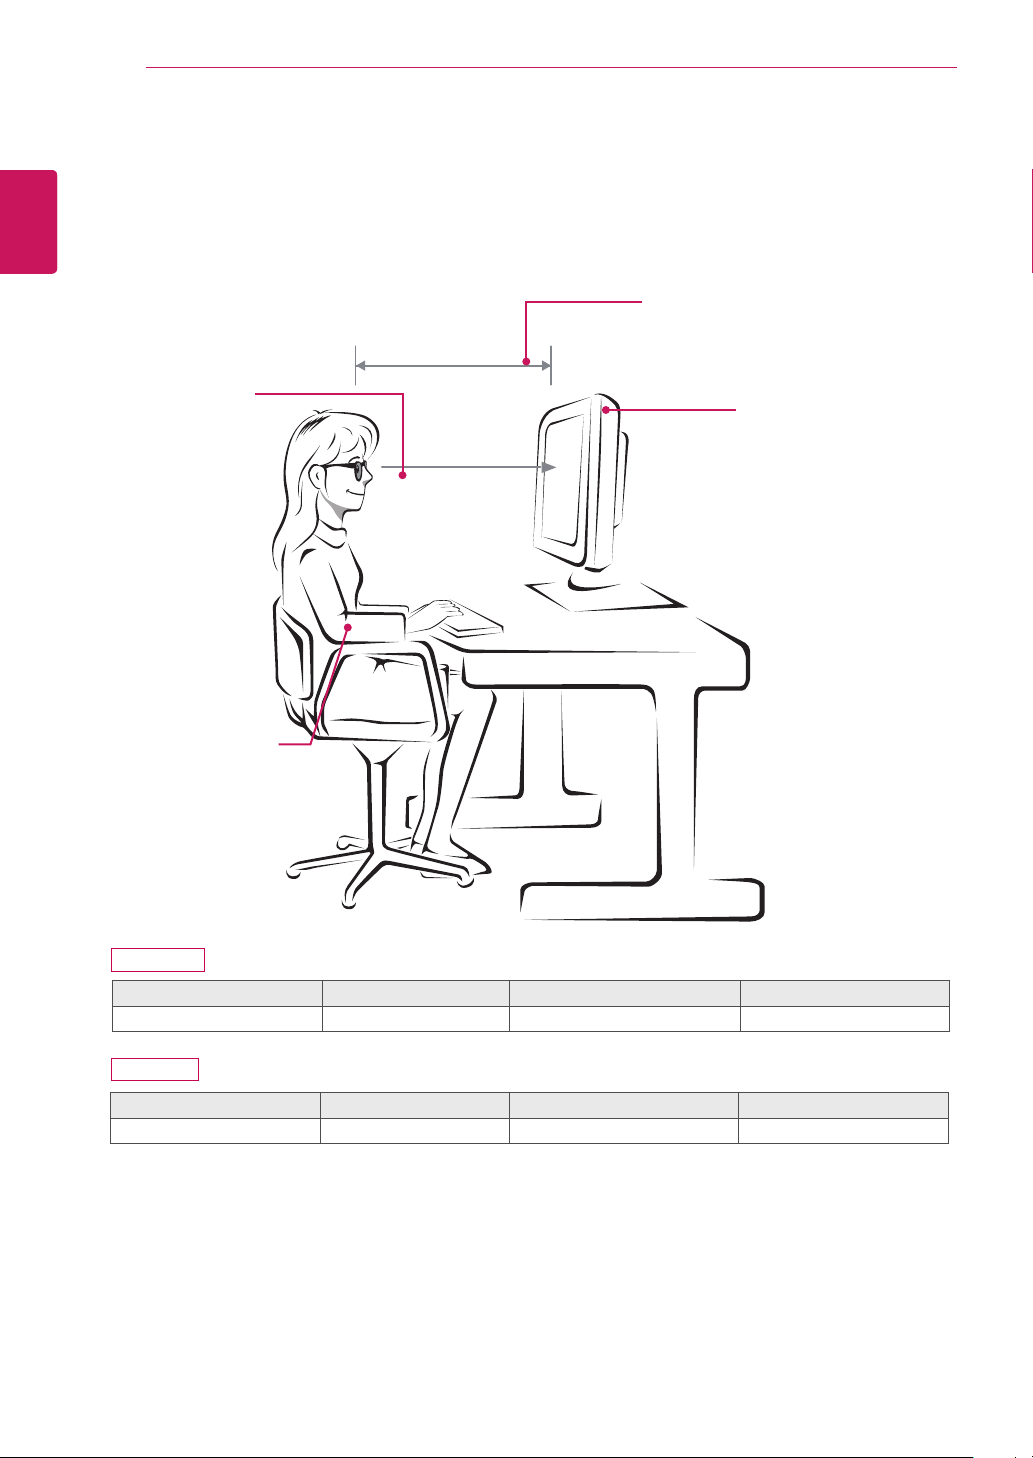
ProperpostureforusingtheMonitorset.
PROPERPOSTURE
Mode Size Monitor3Dviewingrange(L) Optimalviewingangle(D)
Whenviewing3Dimages 68.6cm 50cmto150cm 14°
Precautionstotakewhenviewing3Dimages
Wearthe3DglassesprovidedwiththeMonitorset.
Watchyourposture.
Remainattheoptimaldistanceandanglewhenviewing3Dimages.
(Viewing3Dimagestoocloselymaycauseyourvisiontoworsen,oryoumayexperiencedizziness.)
70cm
Adjustthe
Monitorsetand
yourpostureto
allowyoutoview
imagesatthe
optimalviewing
angle(D).
Placeyourhands
gentlyonthe
keyboard,keeping
yourarmsbentat
theelbowsand
horizontallyoutright.
AdjustyourdistancefromtheMonitor
settoallowyoutoviewimagesfrom
theoptimaldistance(L).
Adjustthelocationofthe
Monitorsettoavoidit
reflectinglight.
D237IPS
D2770P
Mode Size Monitor3Dviewingrange(L) Optimalviewingangle(D)
Whenviewing3Dimages 58.42cm 50cmto150cm 12°

27
ENG
ENGLISH
LICENSES
LICENSES
Supportedlicensesmaydifferbymodel.Formoreinformationofthelicenses,visitwww.lg.com.
HDMI,theHDMIlogoandHigh-DefinitionMultimediaInterfacearetrademarks
orregisteredtrademarksofHDMILicensingLLC.

Make sure to read the Safety Precautions before
using the product.
Keep the Owner’s Manual (CD) in an accessible
place for future reference.
The model and serial number of the SET is
located on the back and one side of the SET.
Record it below should you ever need service.
As an ENERGY STAR Partner LGE
U. S. A.,Inc. has determined that this
product meets the ENERGY STAR
guidelines for energy efficiency.
ENERGY STAR is a set of power-saving
guidelines issued by the U.S.Environmental
Protection Agency(EPA).
MODEL
SERIAL