www.lg.com
OWNER’S MANUAL
LCD MONITOR
IPS225P
IPS235P
Please read this manual carefully before operating
your set and retain it for future reference.
LCD MONITOR MODEL
ENGLISH

2
ENG
ENGLISH
TABLE OF CONTENTS
CONTENTS
3 ASSEMBLINGANDPREPAR-
ING
3 Unpacking
4 Partsandbuttons
6 SettinguptheMonitorset
6 - AttachingtheStandBase
6 - DetachingtheStandBase
7 - Mountingonatable
9 - UsingthePivotfunction
10 - Mountingonawall
11 USINGTHEMONITORSET
11 ConnectingtoaPC
11 - D-SUBconnection
11 - DVI-Dconnection
11 - HDMIconnection
13 CUSTOMIZINGSETTINGS
13 AccessingTheMainMenus
14 CustomizingSettings
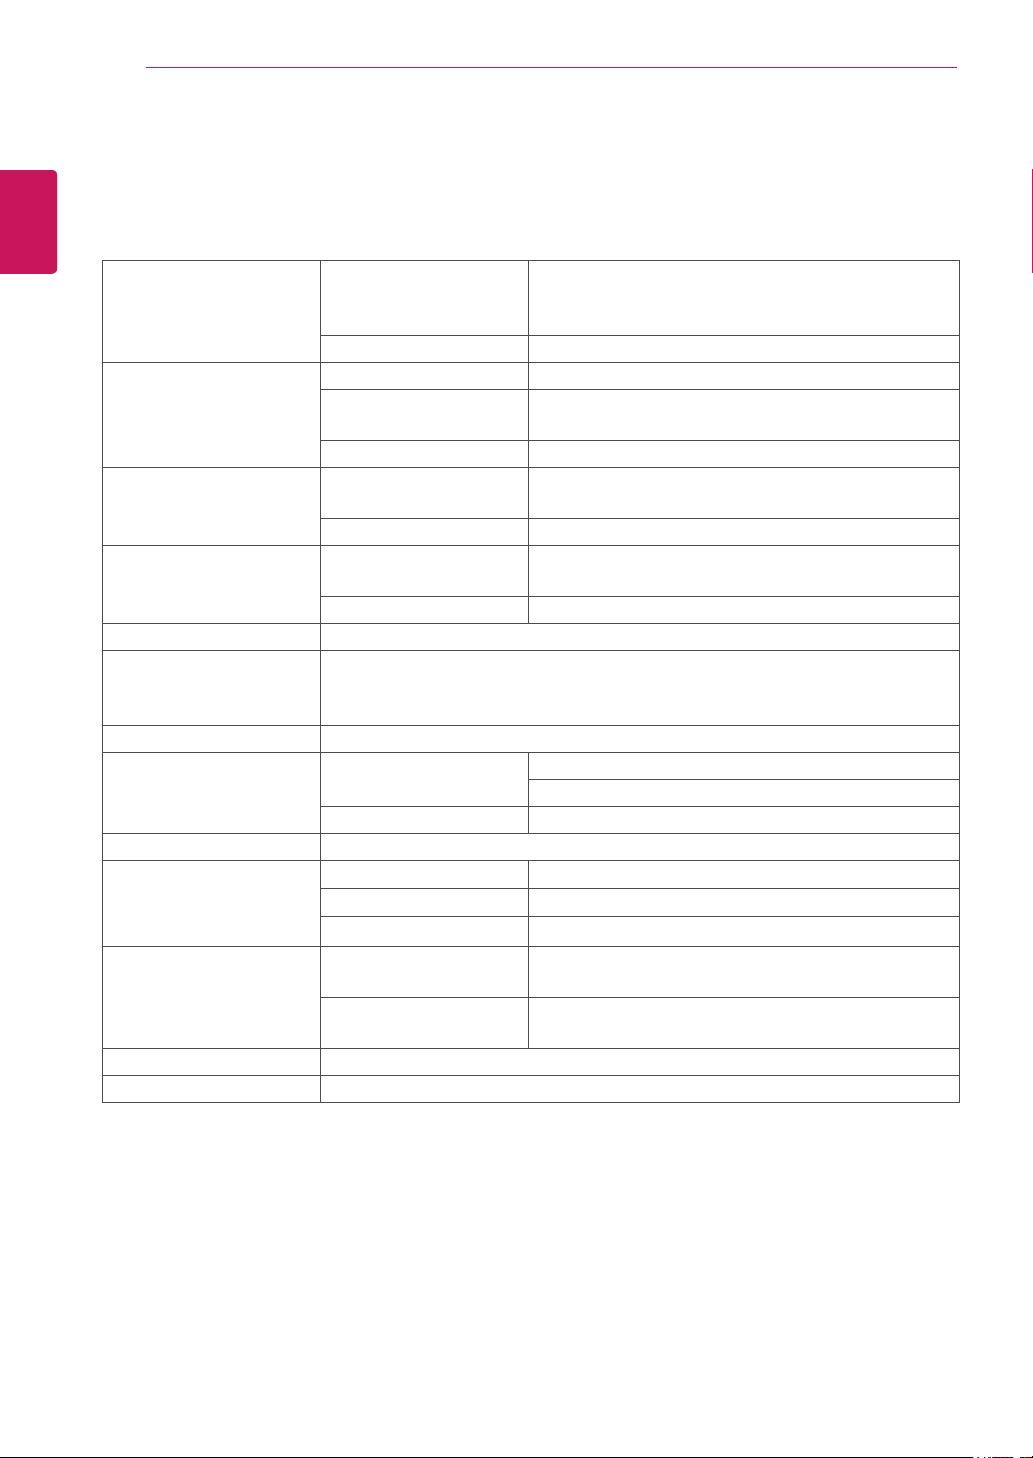
14 - MenuSettings
15 -PICTURE
16 -COLOR
17 -DISPLAY
17 -VOLUME
18 -OTHERS
19 MODESetting
20 DUALPACKAGESetting
21 TROUBLESHOOTING
23 SPECIFICATIONS
23 IPS225P
24 IPS235P
25 PresetModes(Resolution)
25 Indicator
3
ENG
ENGLISH
ASSEMBLING AND PREPARING
ASSEMBLINGANDPREPARING
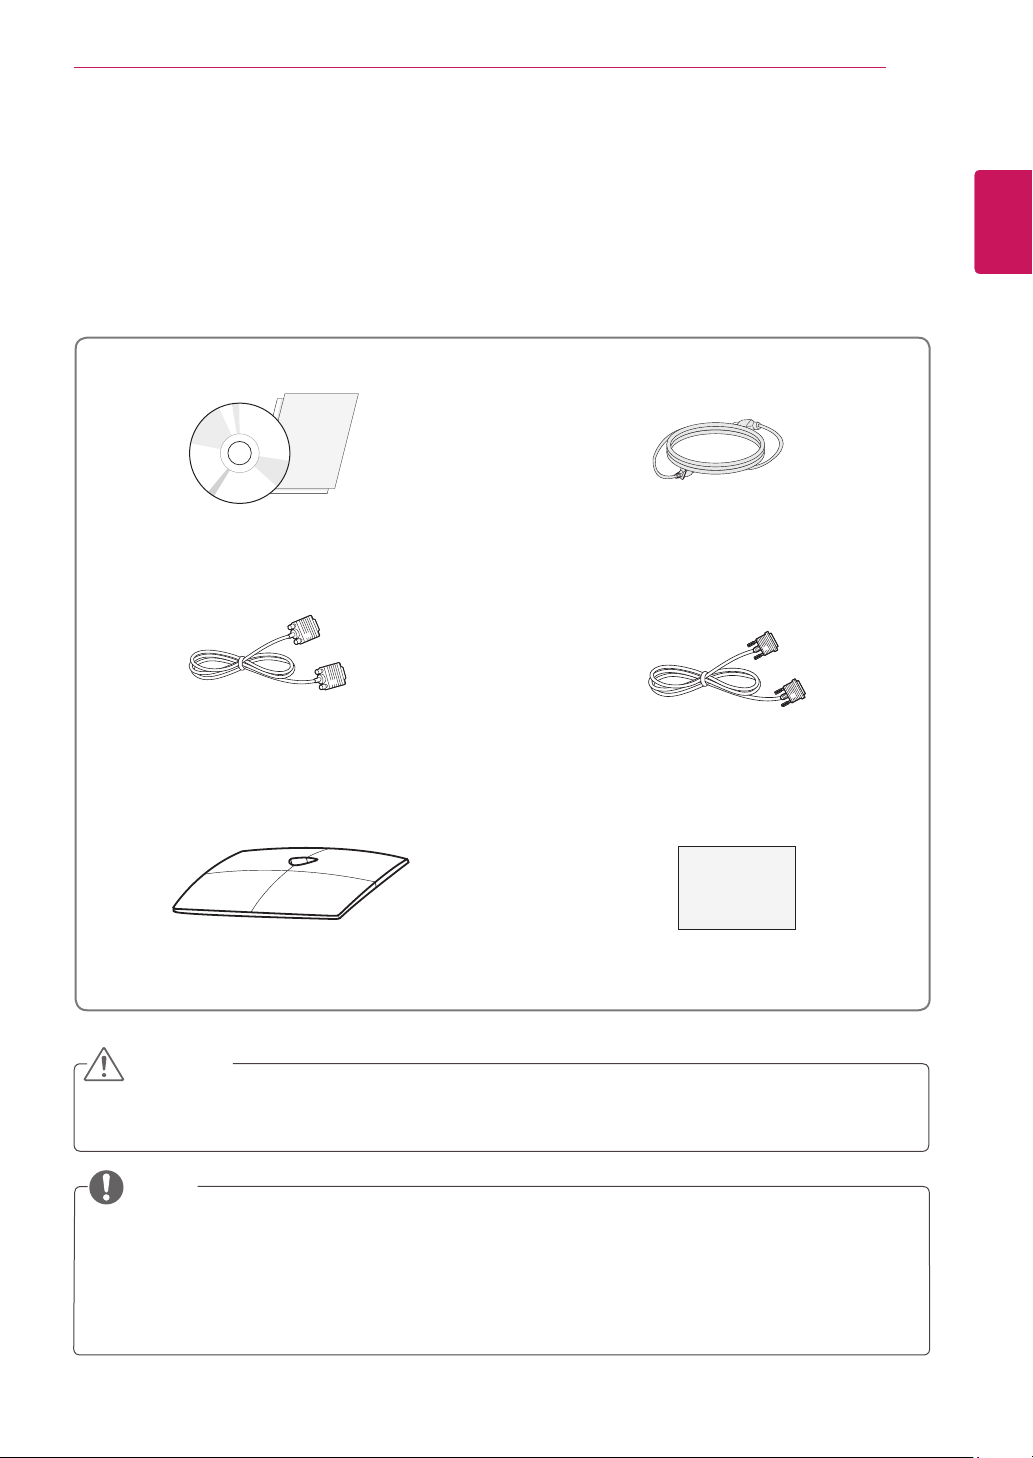
Unpacking
Checkyourproductboxforthefollowingitems.Ifthereareanymissingaccessories,contactthelocal
dealerwhereyoupurchasedyourproduct.Theillustrationsinthismanualmaydifferfromtheactualproduct
andaccessories.
Donotuseanyunapprovedaccessoriestoensurethesafetyandproductlifespan.
Anydamagesorinjuriesbyusingunapprovedaccessoriesarenotcoveredbythewarranty.
Theaccessoriessuppliedwithyourproductmayvarydependingonthemodel.
Productspecificationsorcontentsinthismanualmaybechangedwithoutpriornoticeduetoupgrade
ofproductfunctions.
Usermustuseshieldedsignalinterfacecables(D-sub15pincable,DVI-Dcable)withferritecores
(coreintheconnector)tomaintainstandardcompliancefortheproduct.
CAUTION
NOTE
StandBase
PowerCord
CD(Owner'sManual)/
Card
D-SUBCable
(Thissignalcablemaybeattached
tothisproductbeforeshippingout.)
DVI-DCable
(Thiscableisnotincludedinall
countries.)
DisplayQualityAssuranceReport
5
ENG
ENGLISH
ASSEMBLING AND PREPARING
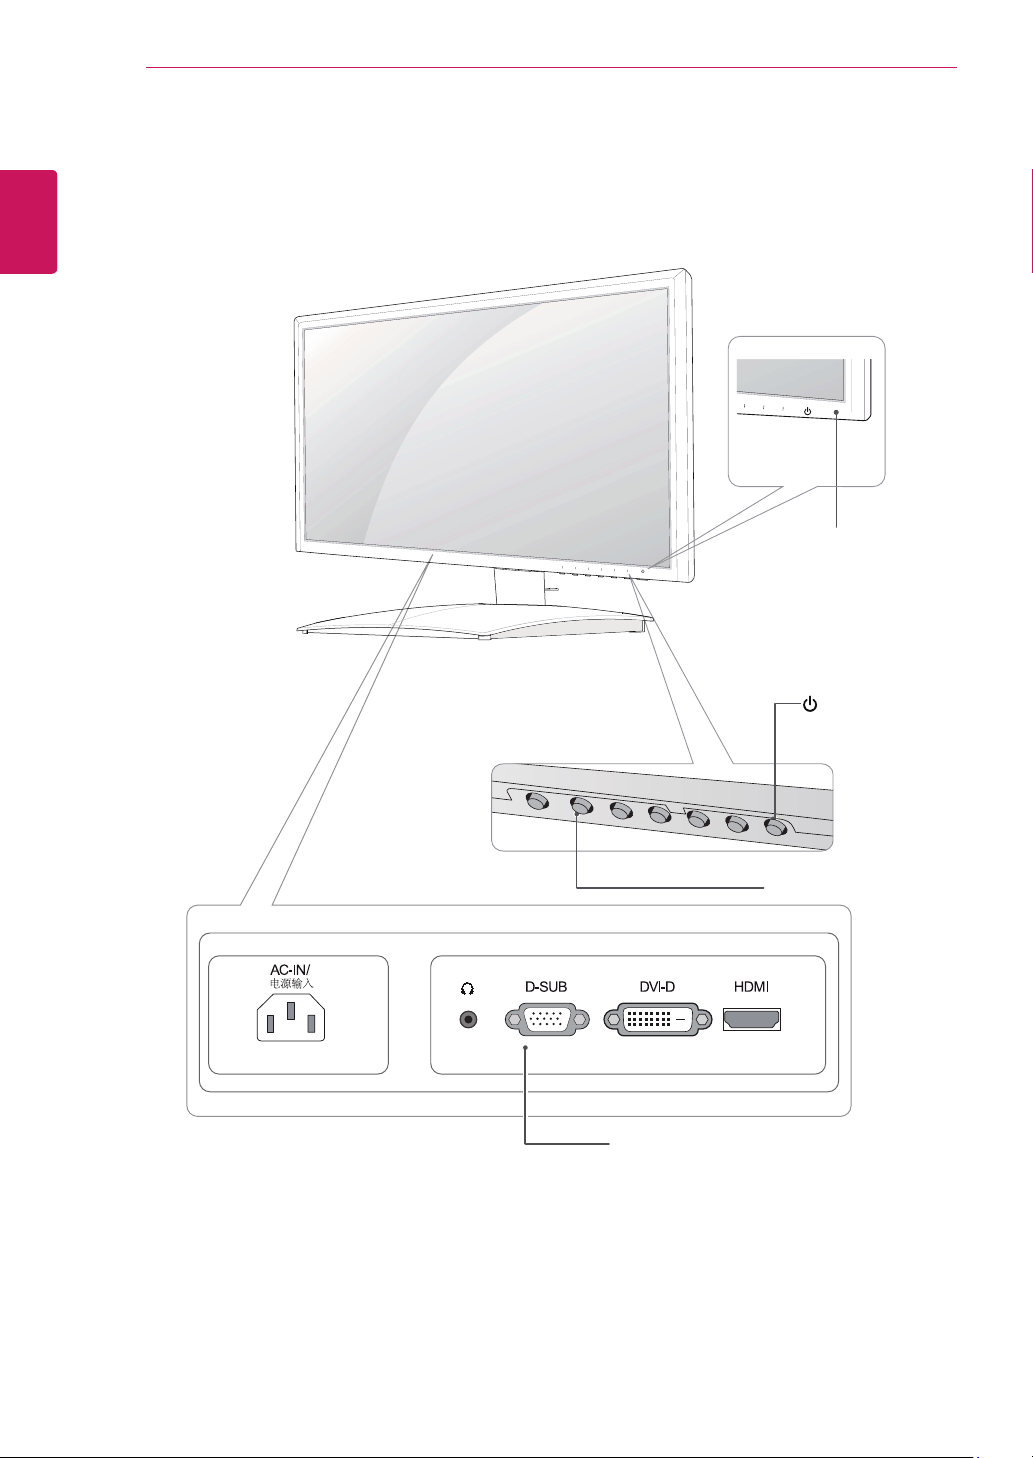
Button Description
MENU Accessesthemainmenus.(Seep.13)
OSDLOCKED/
UNLOCKED
Thisfunctionallowsyoutolockthecurrentcontrolsettings,so
thattheycannotbeinadvertentlychanged.
PressandholdtheMENUbuttonforseveralseconds.
Themessage"OSDLOCKED"shouldappear.
YoucanunlocktheOSDcontrolsatanytimebypushing
theMENUbuttonforseveralseconds.Themessage"OSD
UNLOCKED"shouldappear.
MODE UsethisbuttontoenterUSER,MOVIE,TEXT,PHOTO,sRGBmenus.(Seep.19)
DUAL UsethisbuttontoenterDUALMONITORandDUALWEBmenus.(Seep.20)
AUTO Whenadjustingyourdisplaysettings,alwayspresstheAUTObuttonontheMONITOR
SETUPOSD.(OnlysupportedinAnalogMode)
Thebestdisplaymode 1920x1080
INPUT Youcanchoosetheinputsignal.
• Whentwoinputsignalsareconnected,youcanselecttheinputsignal(D-SUB/DVI/
HDMI)youwant.
• Whenonlyonesignalisconnected,itisautomaticallydetected.Thedefaultsettingis
D-SUB.
EXIT ExittheOSD(OnScreenDisplay).
(PowerButton)
Turnsthepoweronoroff.
PowerIndicator Thepowerindicatorstaysblueifthedisplayisrunning
properly(OnMode).IfthedisplayisinSleepMode,thepower
indicatorblinksblue.
6
ENG
ENGLISH
ASSEMBLING AND PREPARING
Setting up the Monitor set
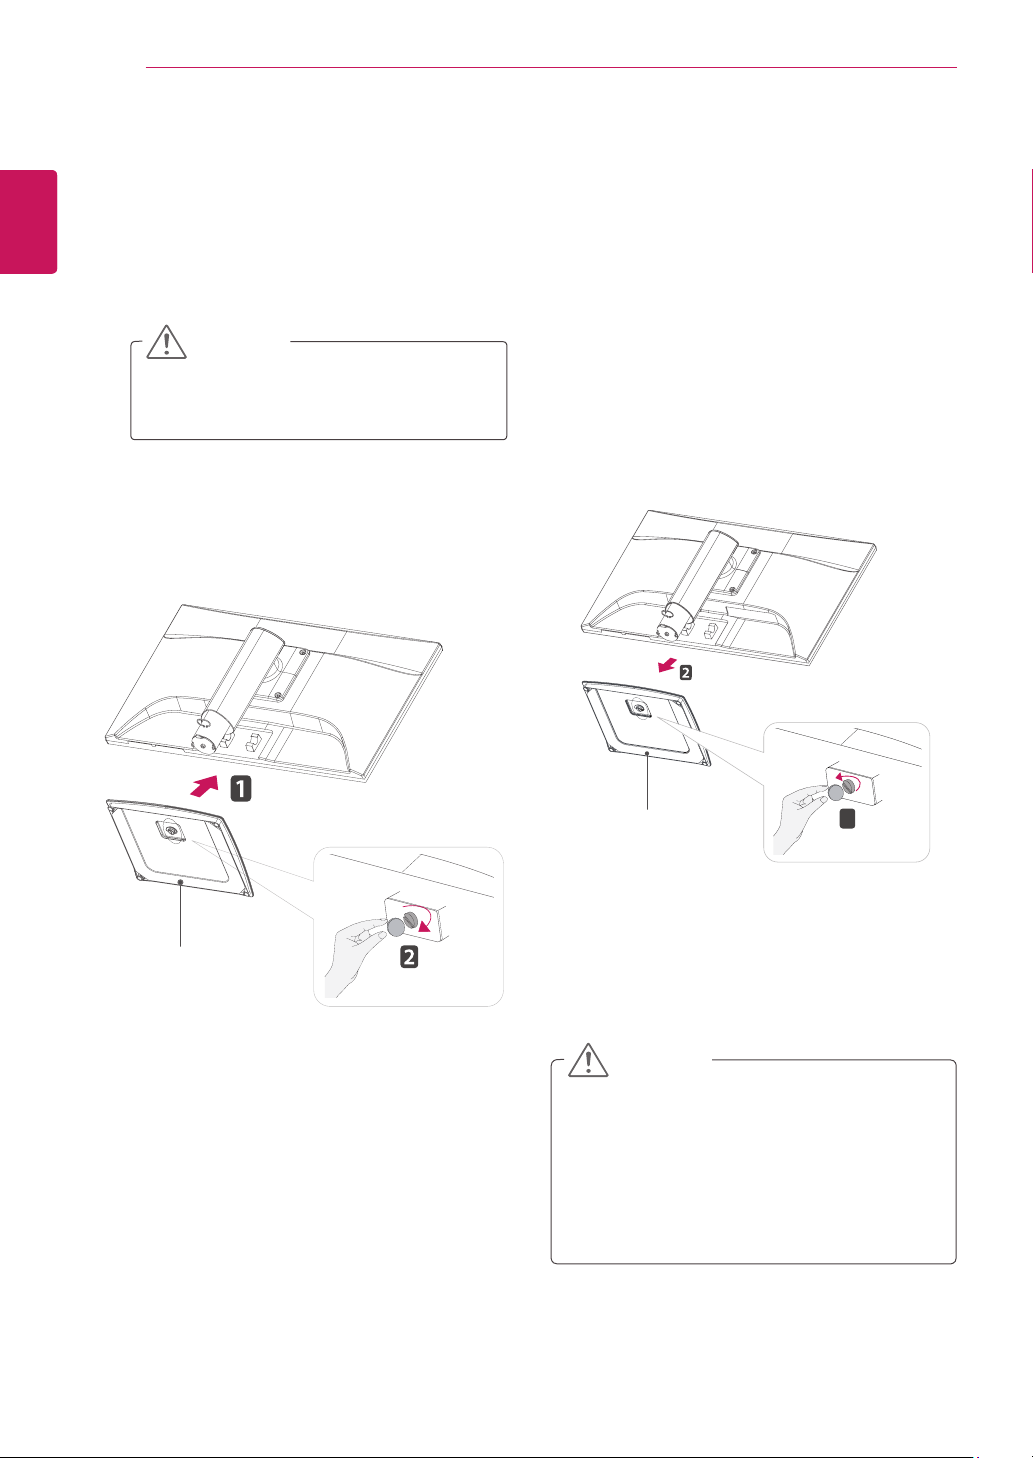
Attaching the Stand Base
1
PlacetheMonitorsetwiththescreenside
downonaflatandcushionedsurface.
Layafoammatorsoftprotectivecloth
onthesurfacetoprotectthescreenfrom
damage.
Thisillustrationdepictsthegeneralmodelof
connection.Yourmonitormaydifferfromthe
itemsshowninthepicture.
Donotcarrytheproductupsidedownholding
onlythestandbase.Theproductmayfall
andgetdamagedorinjureyourfoot.
CAUTION
CAUTION
Detaching the Stand Base
1
PlacetheMonitorsetwiththescreenside
downonaflatandcushionedsurface.
2
TurnthescrewtotheleftwithaCoin,andthen
pullouttheStand BasefromtheStand Body.
2
AttachtheStand Baseandthentightenthe
screwtotherightwithaCoin.
1
S
tand Base
S
tand Base

7
ENG
ENGLISH
ASSEMBLING AND PREPARING
Mountingonatable
1
LiftandtilttheMonitorsetintoitsupright
positiononatable.
Leavea10cm(minimum)spacefromthewall
forproperventilation.
2
ConnectthePowerCordtoawalloutlet.
3
Press (Power)buttononthebottomswitch
paneltoturnthepoweron.
10 cm
10 cm
10 cm
10 cm
Unplugthepowercordbeforemovingthe
Monitortoanotherlocation.Otherwiseelectric
shockmayoccur.
Tiltfrom+15to-5degreesupordowntoadjust
theangleoftheMonitorsettosuityourview.
CAUTION
NOTE
Front
Rear
5 - 51
•
SwivelRange:-45°~45°(+/-2°)
-45°~45°(+/-2°)
•
HeightRange:maximum5.12inch(130.0mm)
*Pleasebesureto
removetheLockingpin
toadjusttheheight.
130.0mm
8
ENG
ENGLISH
ASSEMBLING AND PREPARING
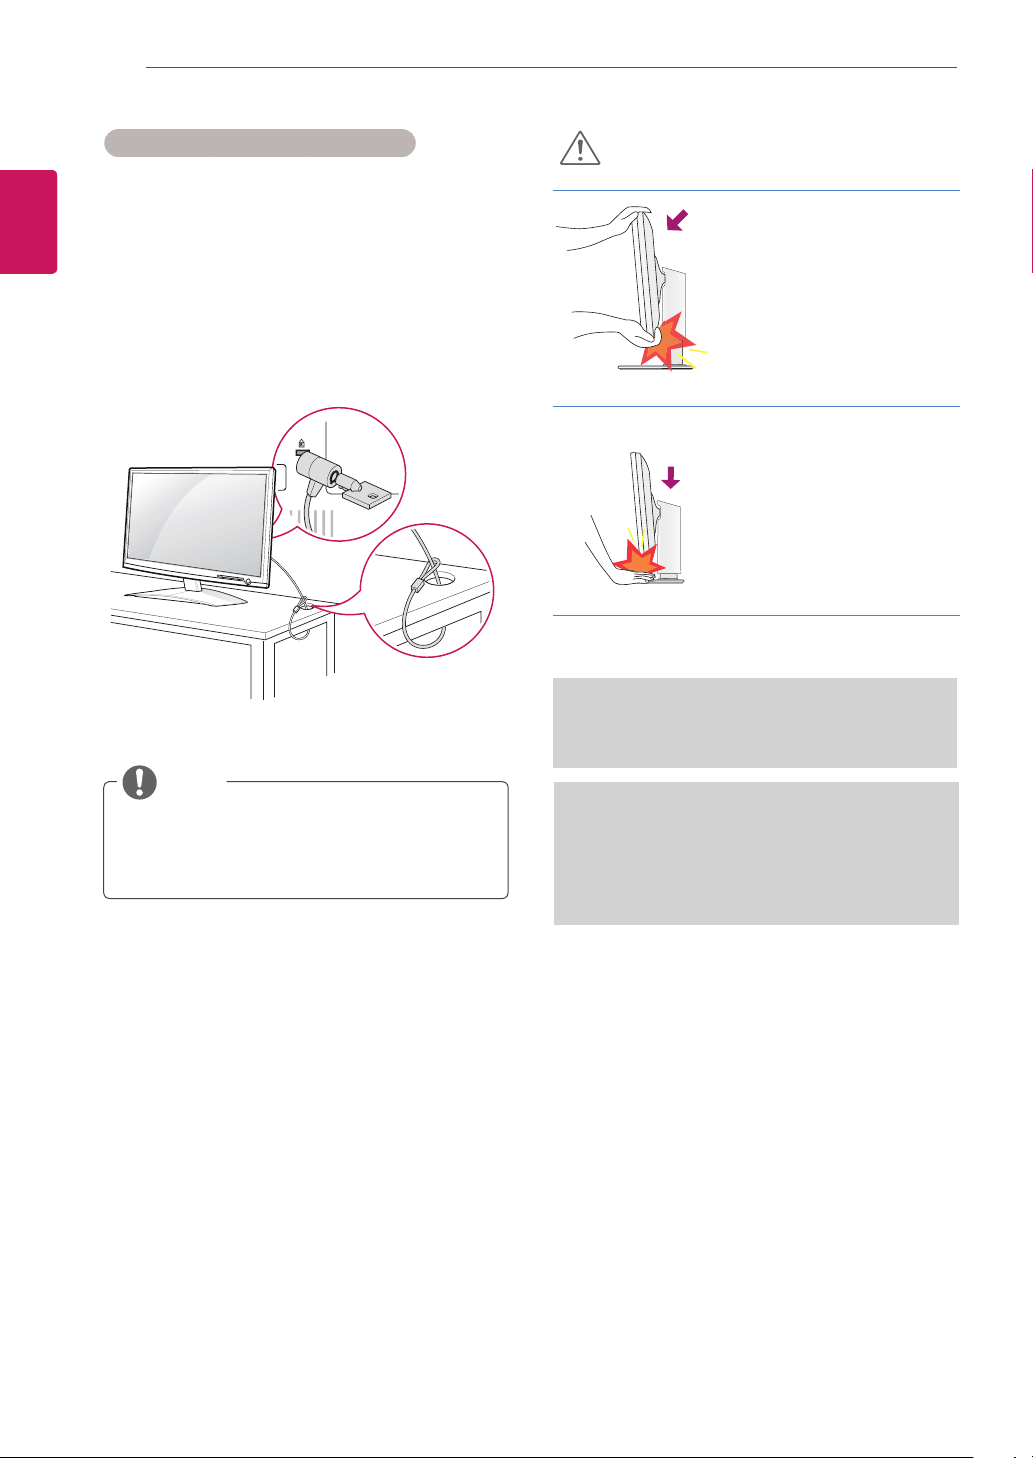
UsingtheKensingtonsecuritysystem
TheKensingtonsecuritysystemconnectoris
locatedatthebackoftheMonitorset.Formore
informationofinstallationandusing,refertothe
manualsuppliedwiththeKensingtonsecurity
systemorvisit
http://www.kensington.com
.
ConnecttheKensingtonsecuritysystemcable
betweentheMonitorsetandatable.
TheKensingtonsecuritysystemisoptional.
Youcanobtainitfrommostelectronicsstores.
NOTE
WARNING
•Whenadjustingtheangleof
thescreen,donotputyour
finger(s)inbetweenthehead
ofthemonitorandthestand
body.Youcanhurtyour
finger(s).
•Whenadjustingtheheight
ofthescreen,donotput
yourfinger(s)inbetweenthe
headofthemonitorandthe
standbase.Youcanhurtyour
finger(s).
ERGONOMIC
•Itisrecommendedthatinordertomaintainan
ergonomicandcomfortableviewingposition,
theforwardtiltangleofthemonitorshouldnot
exceed5degrees.
WARNING
•YoudonotneedtoreplacetheLockingpinafter
itisremoved,toadjustitsheight.
9
ENG
ENGLISH
ASSEMBLING AND PREPARING
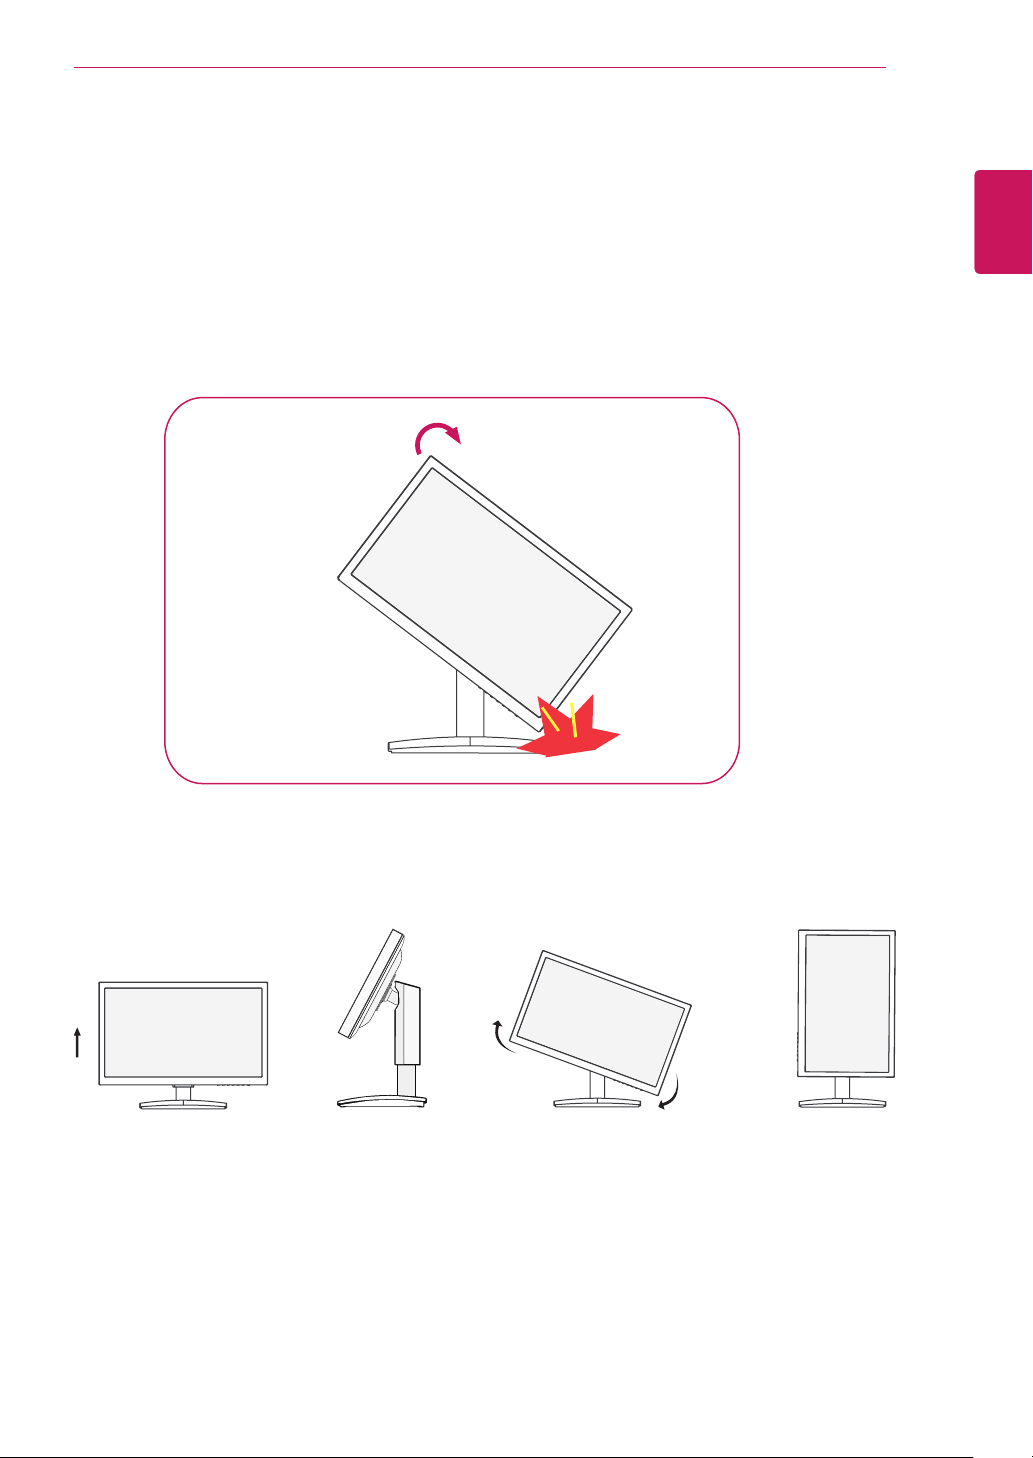
UsingthePivotfunction
-Thepivotfunctionallowsyoutorotatethescreen90degreesclockwise.
1.
LiftthemonitortoitshighestheighttoutilizethePivotfunction.
2.
Landscape&Portrait:
Youcanrotatethepanel90°clockwise.
PleasebecautiousandavoidcontactbetweenthemonitorheadandtheStandBasewhenrotating
thescreentoaccessthePivotfunction.IfthemonitorheadtouchestheStandBase,thentheStand
Basecouldcrack.
.......
.....
Headsection
Standsection
3.
Becarefulwiththecableswhenrotatingthescreen.
10
ENG
ENGLISH
ASSEMBLING AND PREPARING
Disconnect the power cord first, and then
move or install the Monitor set. Otherwise
electric shock may occur.
If you install the Monitor set on a ceiling or
slanted wall, it may fall and result in severe
injury.
Use only an authorized LG wall mount
and contact the local dealer or qualified
personnel.
Do not over tighten the screws as this may
cause damage to the Monitor set and void
your warranty.
Use only screws and wall mounts that
meet the VESA standard. Any damages
or injuries by misuse or using an improper
accessory are not covered by the warranty.
Use the screws that are listed on the VESA
standard screw specifications.
The wall mount kit will include an installation
manual and necessary parts.
The wall mount bracket is optional. You can
obtain additional accessories from your local
dealer.
The length of screws may differ depending
on the wall mount. Be sure to use the proper
length.
For more information, refer to the
instructions supplied with the wall mount.
CAUTION
NOTE
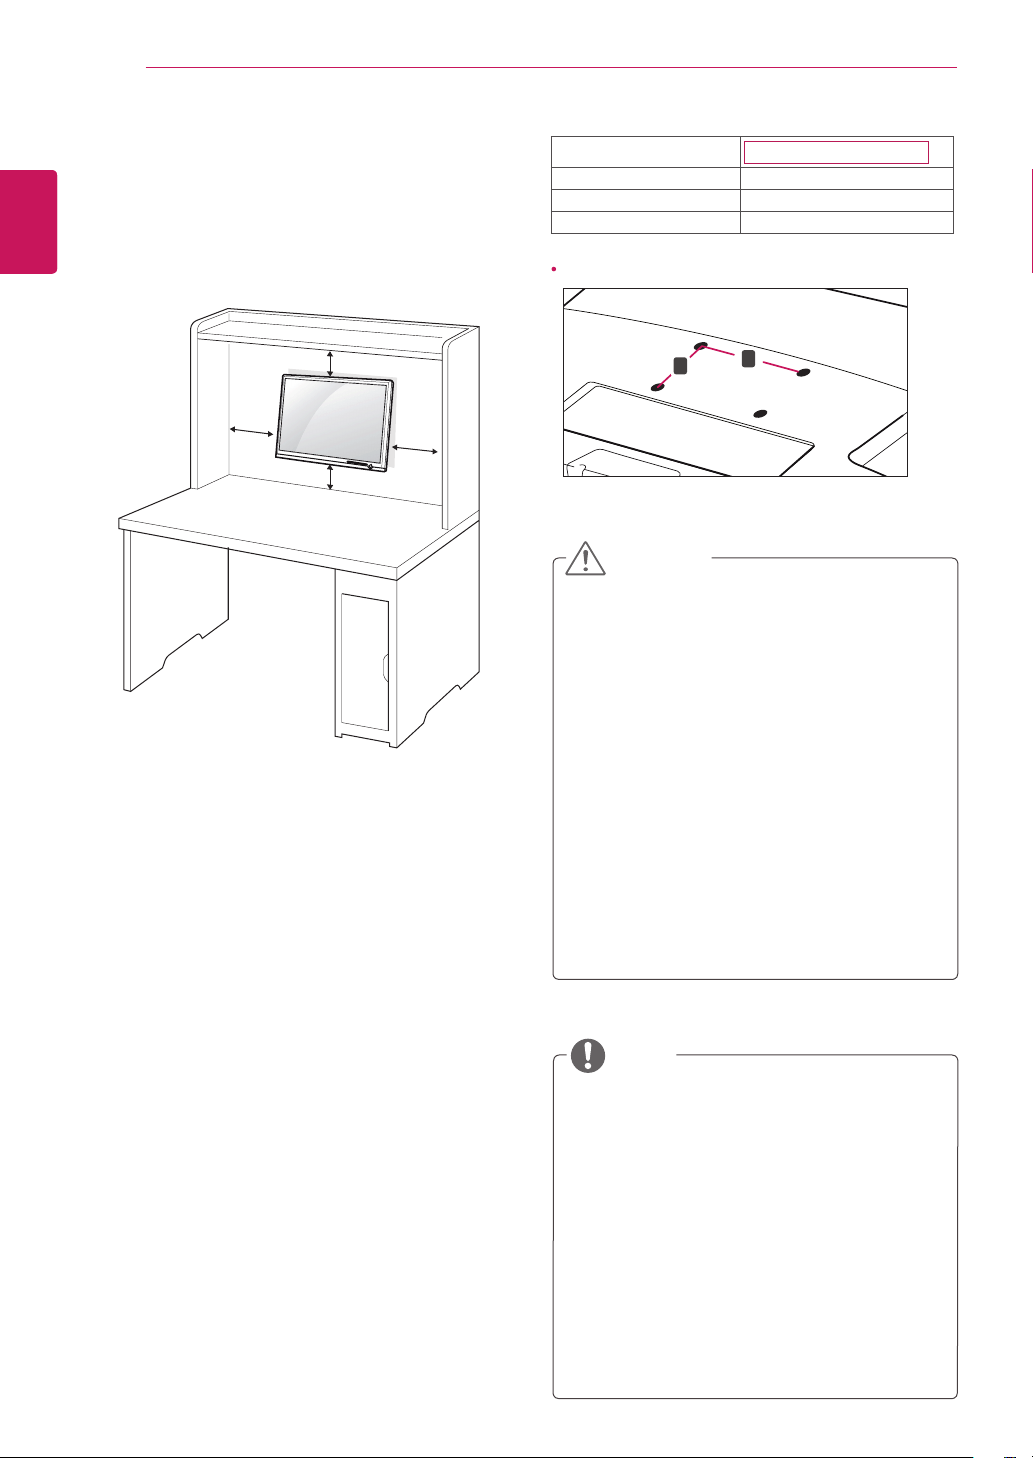
Model
IPS225P/IPS235P
VESA (A x B) 100 x 100
Standard screw M4
Number of screws 4
Mounting on a wall
For proper ventilation, allow a clearance of 10 cm
on each side and from the wall. Detailed
instructions are available from your dealer, see the
optional Tilt Wall Mounting Bracket Installation and
Setup Guide.
If you intend to mount the Monitor set to a wall,
attach Wall mounting interface (optional parts) to
the back of the set.
When you install the Monitor set using a wall
mounting interface (optional parts), attach it
carefully so it will not drop.
1
Please, Use the screw and wall mount interface
in accordance with VESA Standards.
2
If you use screw longer than standard, the
monitor might be damaged internally.
3
If you use improper screw, the product might be
damaged and drop from mounted position. In
this case, LG Electronics is not responsible for
it.
4
VESA compatible.
5
Please use VESA standard as below.
784.8 mm (30.9 inch) and under
* Wall Mount Pad Thickness : 2.6 mm
* Screw : Φ 4.0 mm x Pitch 0.7 mm x
Length 10 mm
787.4 mm (31.0 inch) and above
* Please use VESA standard wall mount pad
and screws.
10 cm
10 cm
10 cm
10 cm
A
B
VESA (A x B)
11
ENG
ENGLISH
USING THE MONITOR SET
USINGTHEMONITORSET
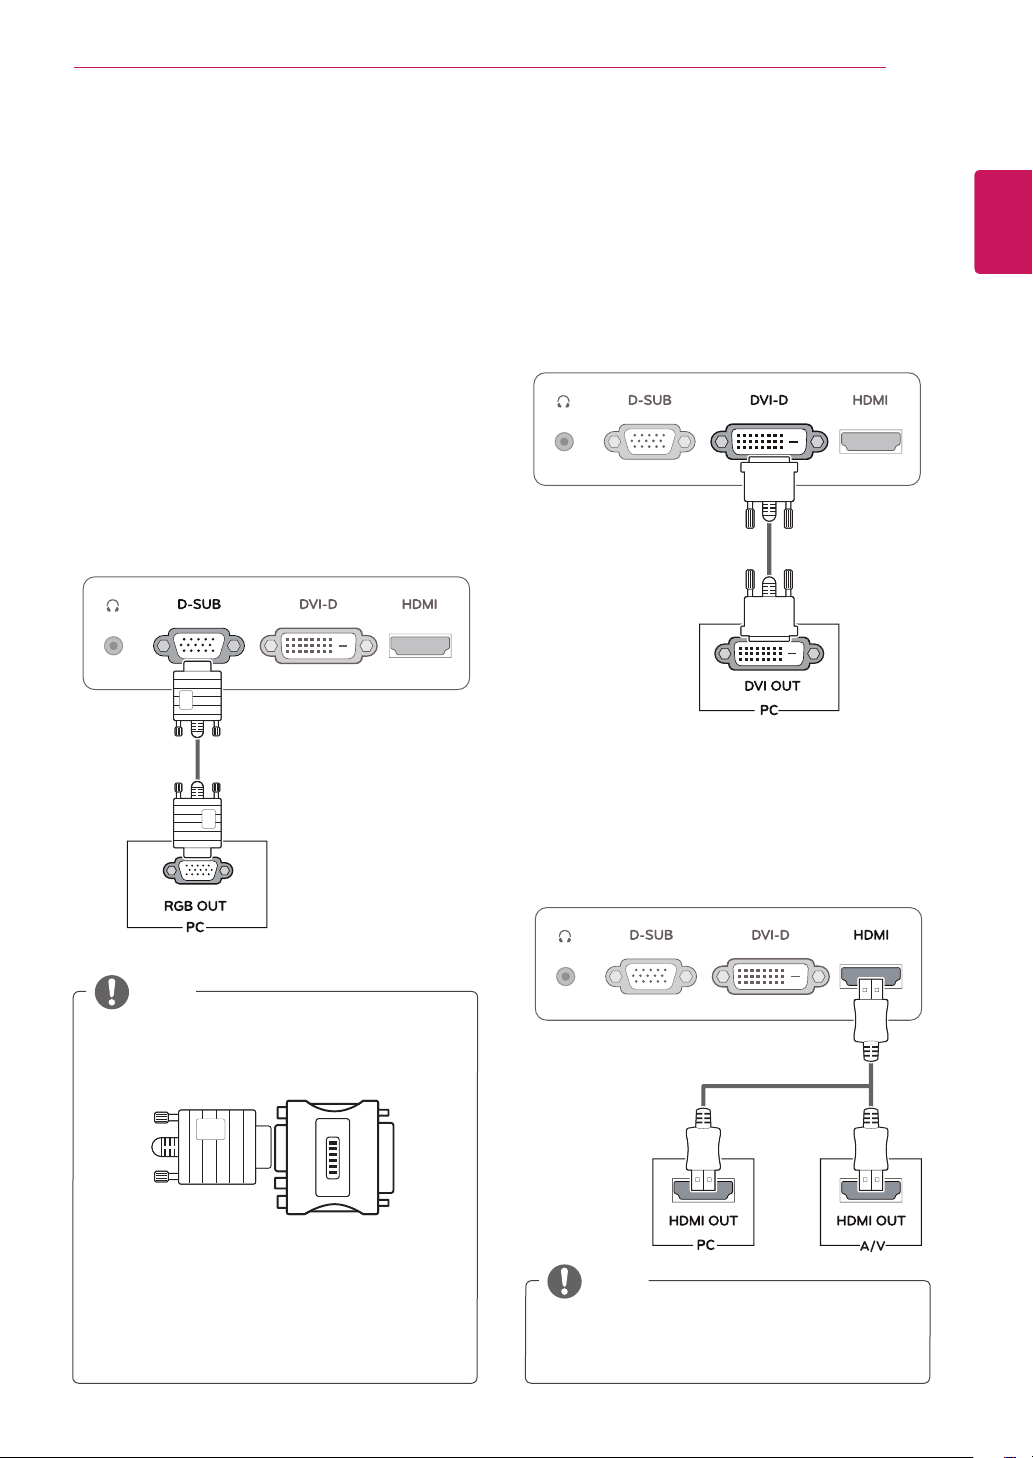
ConnectingtoaPC
YourMonitorsetsupportsPlug&Play*.
*Plug&Play:APCrecognizesaconnected
devicethatusersconnecttoaPCandturn
on,withoutdeviceconfigurationoruser
intervention.
D-SUBconnection
TransmitsanalogvideofromyourPCtothe
Monitorset.ConnectthePCandtheMonitorset
withthesuppliedD-sub15pinsignalcableas
showninthefollowingillustrations.
Macadapter
ForAppleMacintoshuse,aseparateplug
adapterisneededtochangethe15pin
highdensity(3row)D-SUBVGAconnector
onthesuppliedcabletoa15pin2row
connector.
WhenusingaD-Subsignalinputcable
connectorforMacintosh
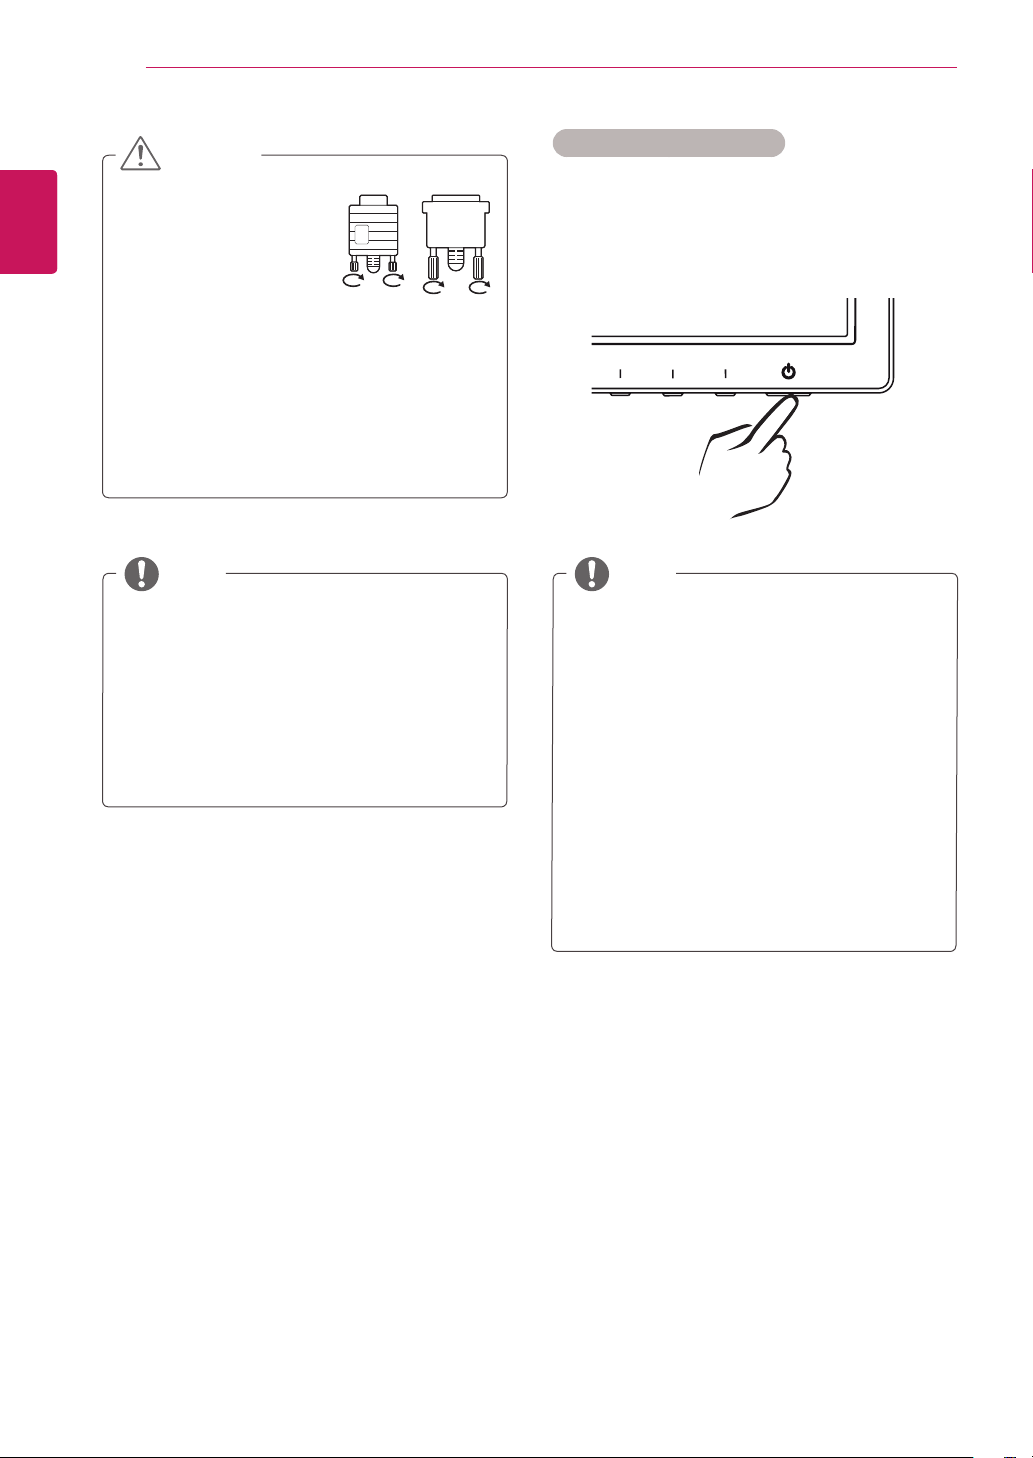
IfyouuseHDMIPC,itcancausecompatibility
problem.
NOTE
NOTE
DVI-Dconnection
TransmitsadigitalvideosignalfromyourPCto
theMonitorset.ConnectthePCandtheMonitor
setwithaDVIcableasshowninthefollowing
illustrations.
HDMIconnection
Transmitsthedigitalvideoandaudiosignalsfrom
yourPCorA/VtotheMonitorset.ConnectthePC
orA/VandtheMonitorsetwiththeHDMIcableas
showninthefollowingillustrations.
12
ENG
ENGLISH
USING THE MONITOR SET
WhenyouwanttousetwoPCinourMonitor,
pleaseconnectthesignalcable(D-SUB/
DVI-D/HDMI)respectivelyinMonitorset.
IfyouturntheMonitorsetonwhileitiscold,
thescreenmayflicker.Thisisnormal.
Somered,green,orbluespotsmayappear
onthescreen.Thisisnormal.
"SelfImageSetting"Function.
Thisfunctionprovidestheuserwithoptimal
displaysettings.Whentheuserconnects
themonitorforthefirsttime,thisfunction
automaticallyadjuststhedisplaytooptimal
settingsforindividualinputsignals.(Only
supportedinAnalogMode)
‘AUTO’Function.
Whenyouencounterproblemssuchas
blurryscreen,blurredletters,screenflicker
ortiltedscreenwhileusingthedeviceor
afterchangingscreenresolution,pressthe
AUTOfunctionbuttontoimproveresolution.
(OnlysupportedinAnalogMode)
NOTE NOTE
Connectthesignal
inputcableandtighten
itbyturningthescrews
clockwise.
Donotpressthescreenwithyourfingerfor
alongtimeasthismayresultintemporary
distortiononthescreen.
Avoiddisplayingafixedimageonthe
screenforalongperiodoftimetoprevent
imageburn.Useascreensaverifpossible.
CAUTION
SelfImageSettingFunction
Pressthepowerbuttononthebottompanelto
turnthepoweron.Whenmonitorpoweristurned
on,the"SelfImageSetting"Functionisexecuted
automatically.(OnlysupportedinAnalogMode)
13
ENG
ENGLISH
CUSTOMIZING SETTINGS
CUSTOMIZING SETTINGS
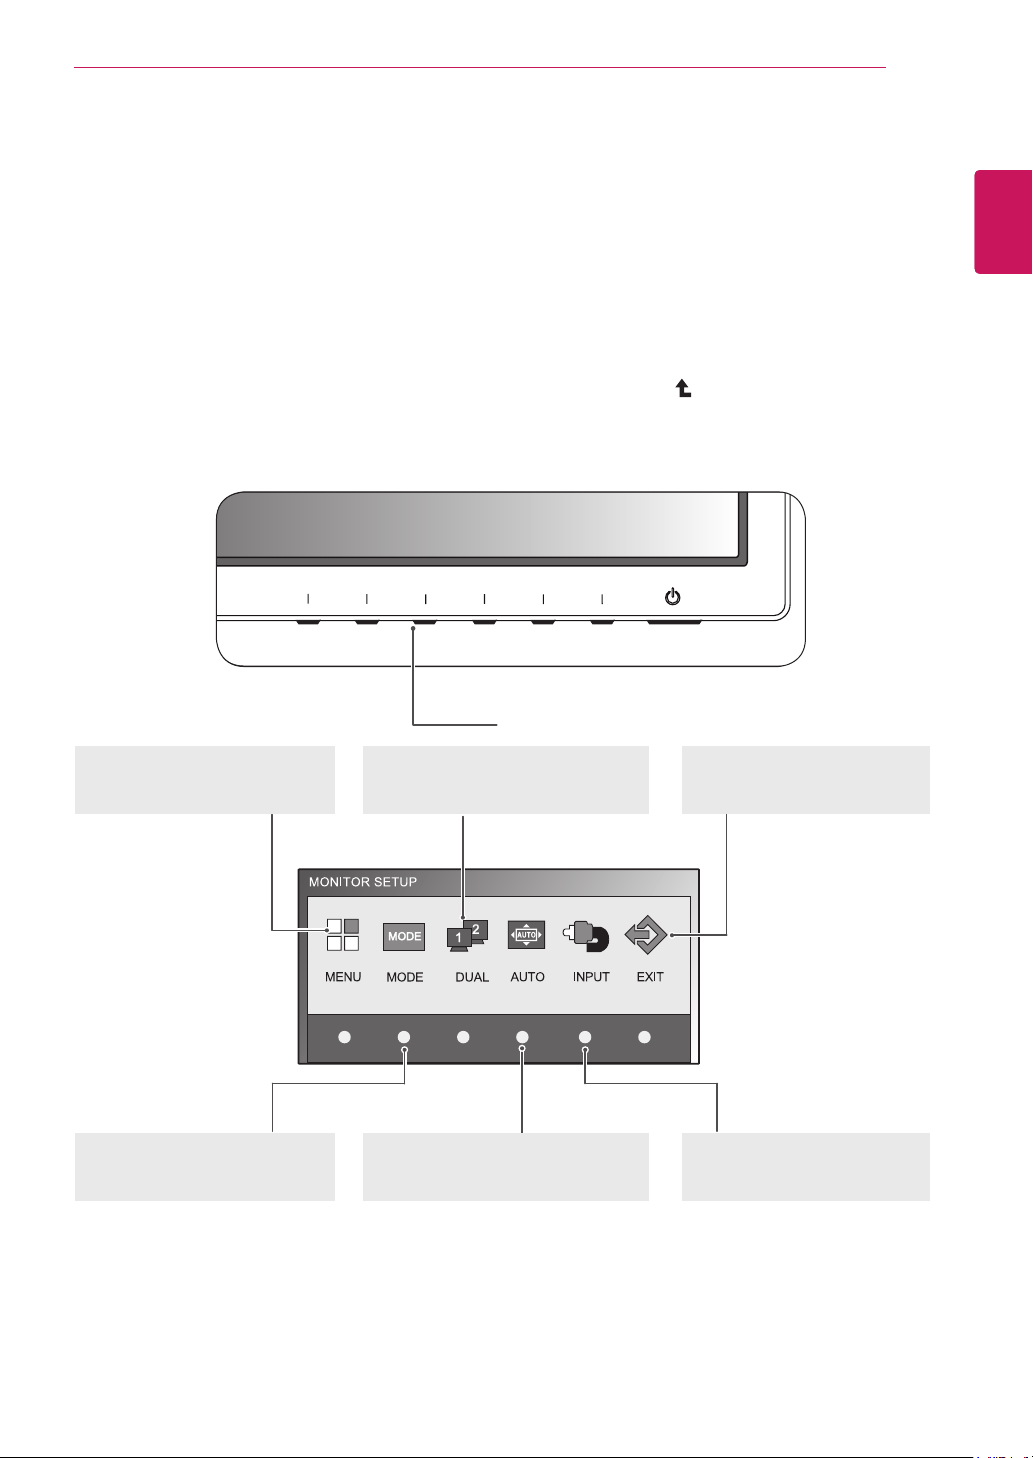
Accessing The Main Menus
1
Press any button on the bottom of the Monitor set to display the MONITOR SETUP OSD menu.
2
Press the desired menu item.
3
Change the value of the menu item by pressing the buttons on the bottom of the Monitor set.
To return to the upper menu or set other menu items, use the up arrow (
) button.
4
Select EXIT to leave the OSD menu.
Monitor set Buttons
MENU (See p.14)
Sets the screen options.
DUAL (See p.20)
Sets the screen.
EXIT
Exits the OSD menu.
INPUT
Sets the external input.
MODE (See p.19)
Sets the mode.
AUTO (See p.12)
Optimizes the resolution.
14
ENG
ENGLISH
CUSTOMIZING SETTINGS
CustomizingSettings
MenuSettings
1
PressanybuttononthebottomoftheMonitorsettodisplay
theMONITORSETUPOSDmenu.
2
PresstheMENUbuttontodisplaytheoptionsintheOSD
menu.
3
Settheoptionsbypressingthebuttonsonthebottomofthe
Monitorset.
4
SelectEXITtoleavetheOSDmenu.
Toreturntotheuppermenuorsetothermenuitems,usethe
uparrow( )button.
Theavailableprogramsettingsaredescribedbelow.
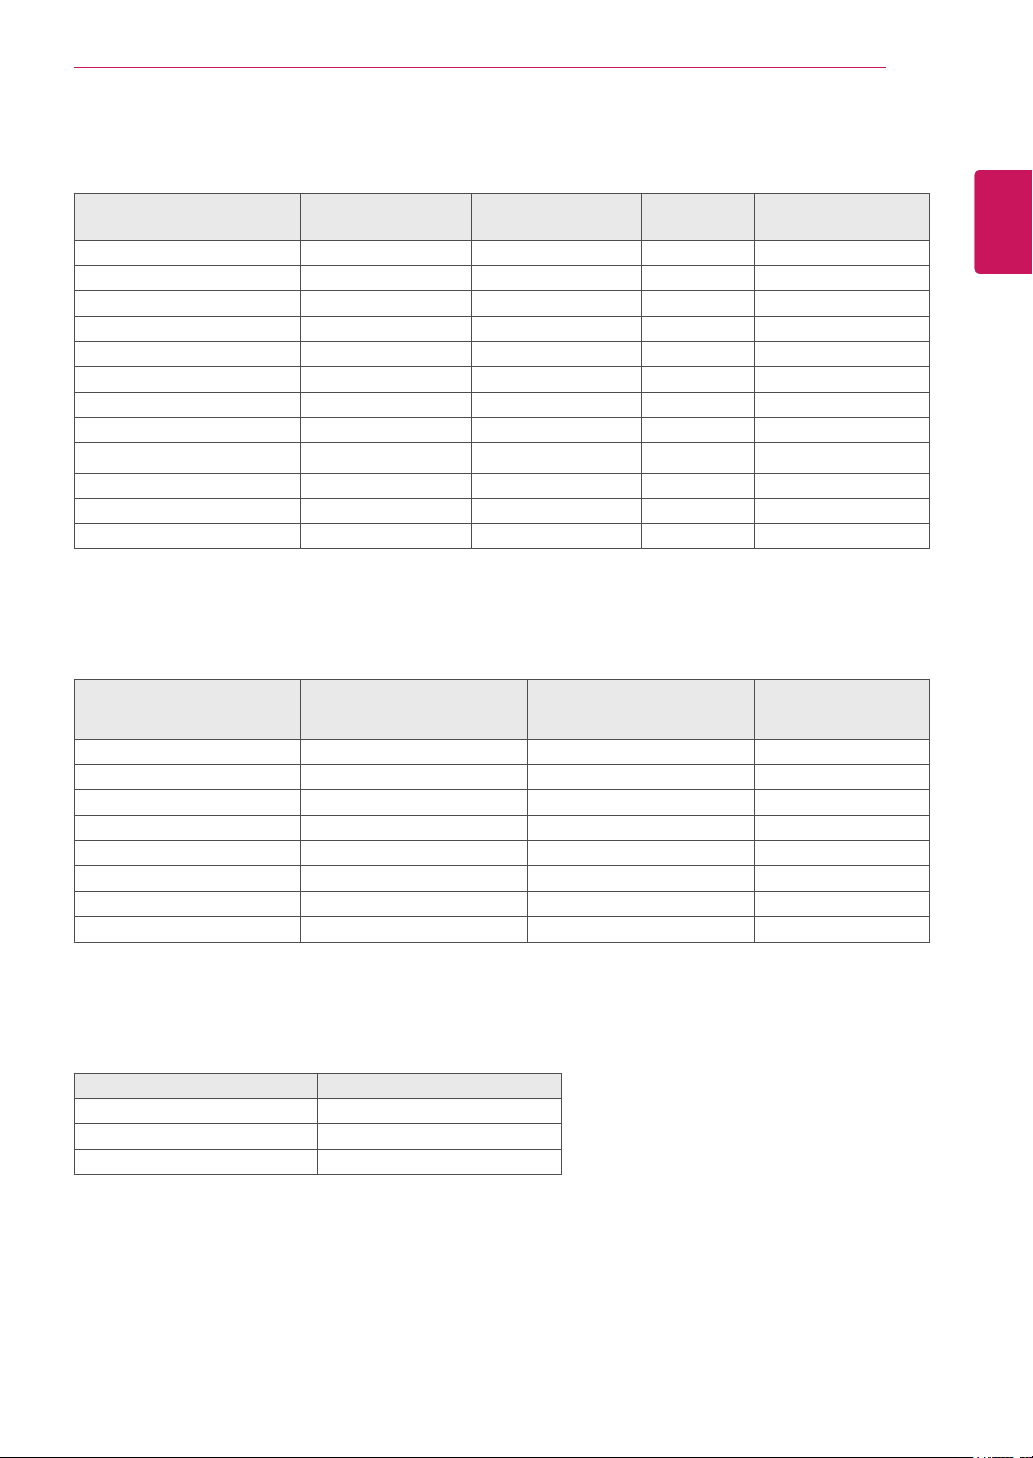
Menu Sub-menu Analog Digital HDMI Description
PICTURE BRIGHTNESS
CONTRAST
SHARPNESS
● ● ●
Toadjustthebrightness,contrastandsharpnessofthe
screen
BLACKLEVEL ● Tosetoffsetlevel
COLOR
COLORTEMP
(PRESET/USER)
● ● ● Tocustomizethecolorofthescreen
GAMMA
COLORRESET
DISPLAY HORIZONTAL
VERTICAL
● Toadjustthepositionofthescreen
CLOCKPHASE ●
Toimprovetheclarityandstabilityofthescreen
OVERSCAN ●
VOLUME
● Toadjustthevolume
OTHERS LANGUAGE
POWERINDICATOR
● ● ●
Tocustomizethescreenstatusforauser'soperating
environment
WHITEBALANCE ●
ORIGINALRATIO ● ● ●
SUPERENERGY
SAVING
● ● ●
FACTORYRESET ● ● ●
Analog:D-SUB(Analogsignal)input.
Digital:DVI-D(Digitalsignal)input.
HDMI:HDMI(Digitalsignal)input.
15
ENG
ENGLISH
CUSTOMIZING SETTINGS
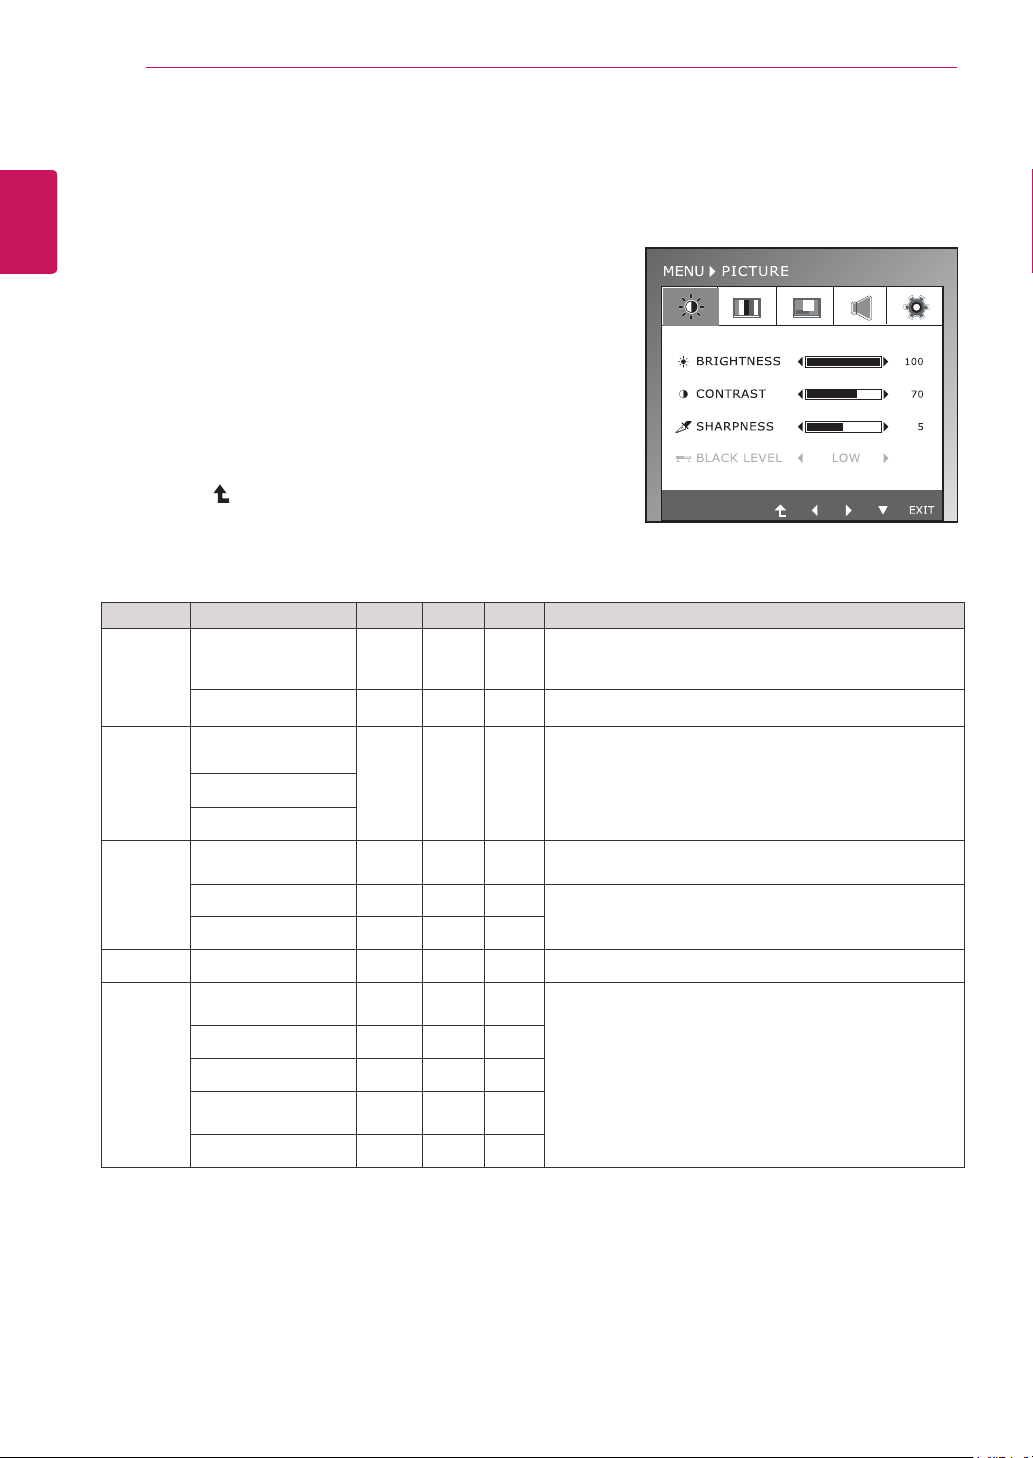
Theavailableprogramsettingsaredescribedbelow.
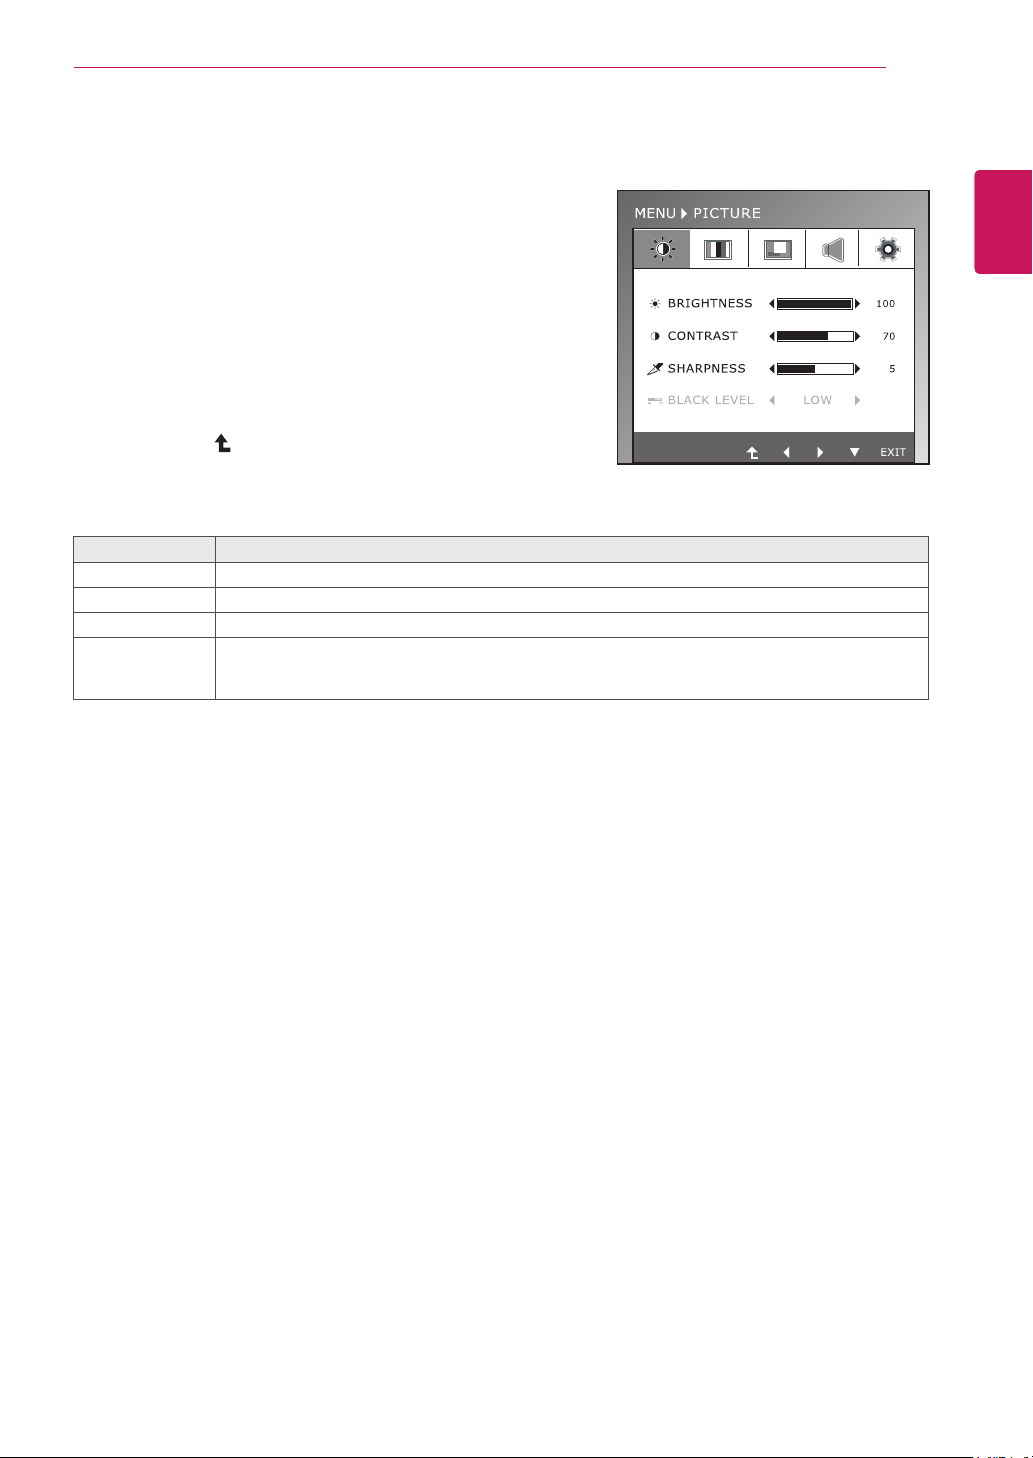
PICTURE
1
PressanybuttononthebottomoftheMonitorsettodisplay
theMONITORSETUPOSDmenu.
2
PresstheMENUbuttontodisplaytheoptionsintheOSD
menu.
3
SelectPICTUREbypressingthebuttonsonthebottomof
theMonitorsetandsettheoptions.
4
SelectEXITtoleavetheOSDmenu.
Toreturntotheuppermenuorsetothermenuitems,use
theuparrow( )button.
Theavailablepicturesettingsaredescribedbelow.
Menu Description
BRIGHTNESS Toadjustthebrightnessofthescreen.
CONTRAST Toadjustthecontrastofthescreen.
SHARPNESS Toadjusttheclearnessofthescreen.
BLACKLEVEL Youcansettheoffsetlevel.Ifyouselect'HIGH',thescreenwillbebrightandifyouselect‘LOW’,
thescreenwillbedark.(onlyforHDMIinput)
*Offset?Asthecriteriaforvideosignal,itisthedarkestscreenthemonitorcanshow.
16
ENG
ENGLISH
CUSTOMIZING SETTINGS
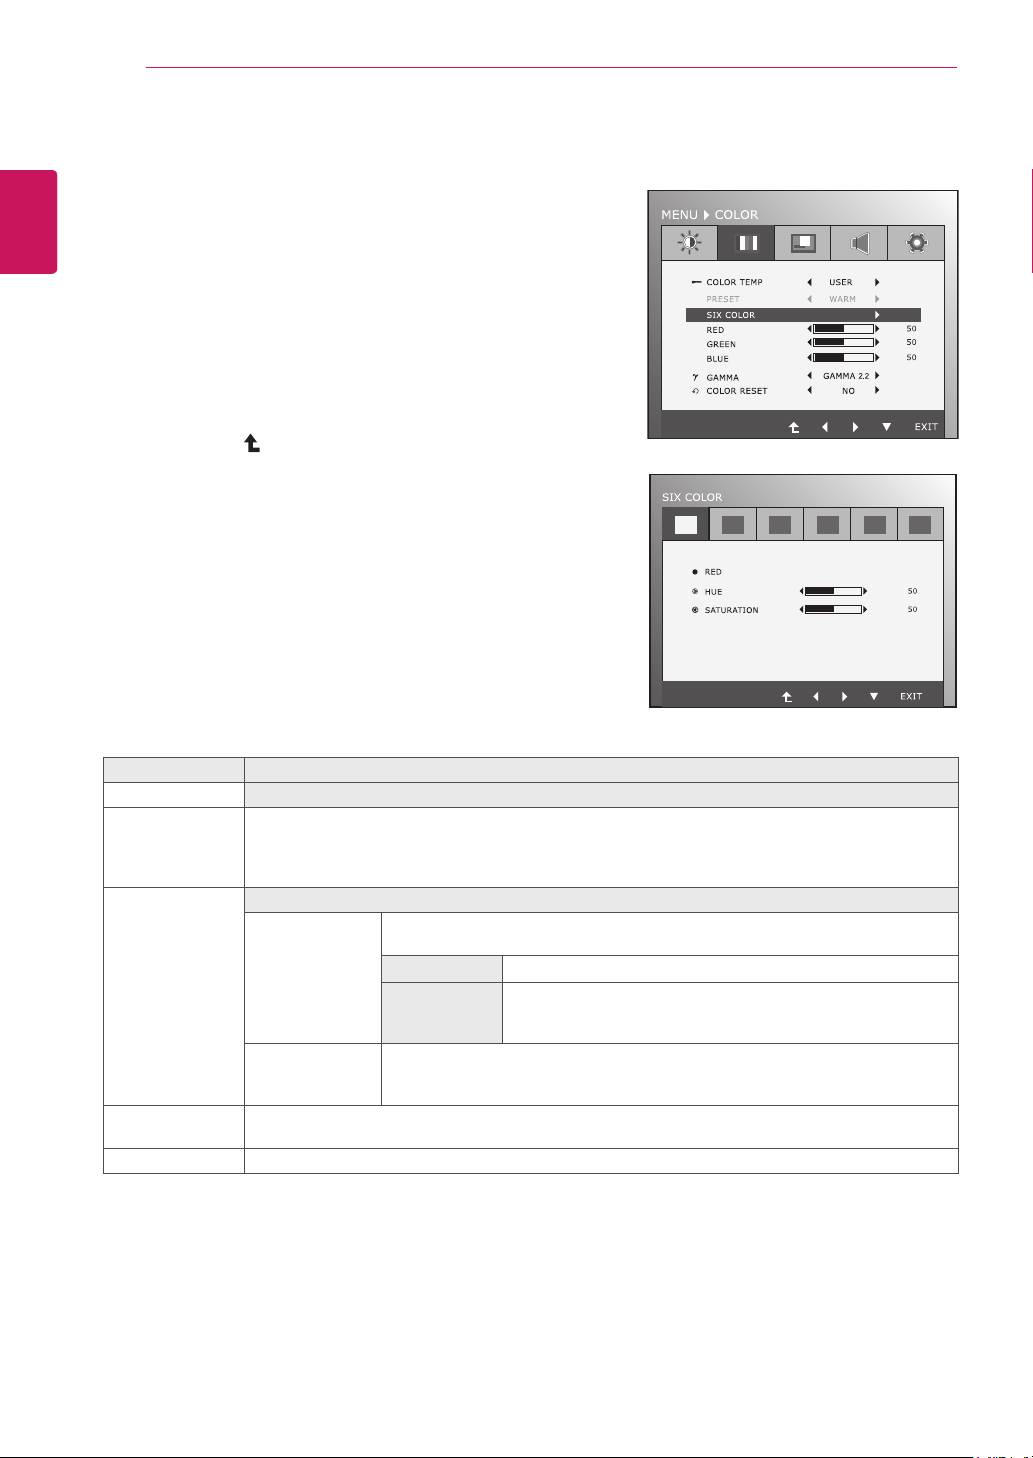
COLOR
1
PressanybuttononthebottomoftheMonitorsetto
displaytheMONITORSETUPOSDmenu.
2
PresstheMENUbuttontodisplaytheoptionsintheOSD
menu.
3
SelectCOLORbypressingthebuttonsonthebottomof
theMonitorsetandsettheoptions.
4
SelectEXITtoleavetheOSDmenu.
Toreturntotheuppermenuorsetothermenuitems,use
theuparrow( )button.
Theavailablepicturesettingsaredescribedbelow.
Menu Description
COLORTEMP PRESET
Selectthescreencolor.
•WARM:Setthescreentowarmcolortemperature(morered).
•MEDIUM:Setthescreentomediumcolortemperature.
•COOL:Setthescreentocoolcolortemperature(moreblue).
USER
•SIXCOLOR: Setsandstoresthehueandsaturationforsixcolors(RED/GREEN/BLUE/
CYAN/MAGENTA/YELLOW)tosatisfythecolorrequirementsofauser.
HUE
Adjuststhescreenhue.
SATURATION
Adjuststhecolorsharpnessonthescreen.Lowervaluesmake
thecolorsharpnessweakerandcolorslighterwhilehigher
valuesmakethecolorsharpnessstrongerandcolorsdark.
•RED:
•GREEN:
•BLUE:
Setyourownredcolorlevels.
Setyourowngreencolorlevels.
Setyourownbluecolorlevels.
GAMMA Setyourowngammavalue.:1.8/2.0/2.2/2.4/2.6Onthemonitor.Imageisadjustedaccordingto
differentgammacurve.
COLORRESET Resetsthecolorsettingstothefactorydefaultsettingsforthecurrentinputdevice.
17
ENG
ENGLISH
CUSTOMIZING SETTINGS
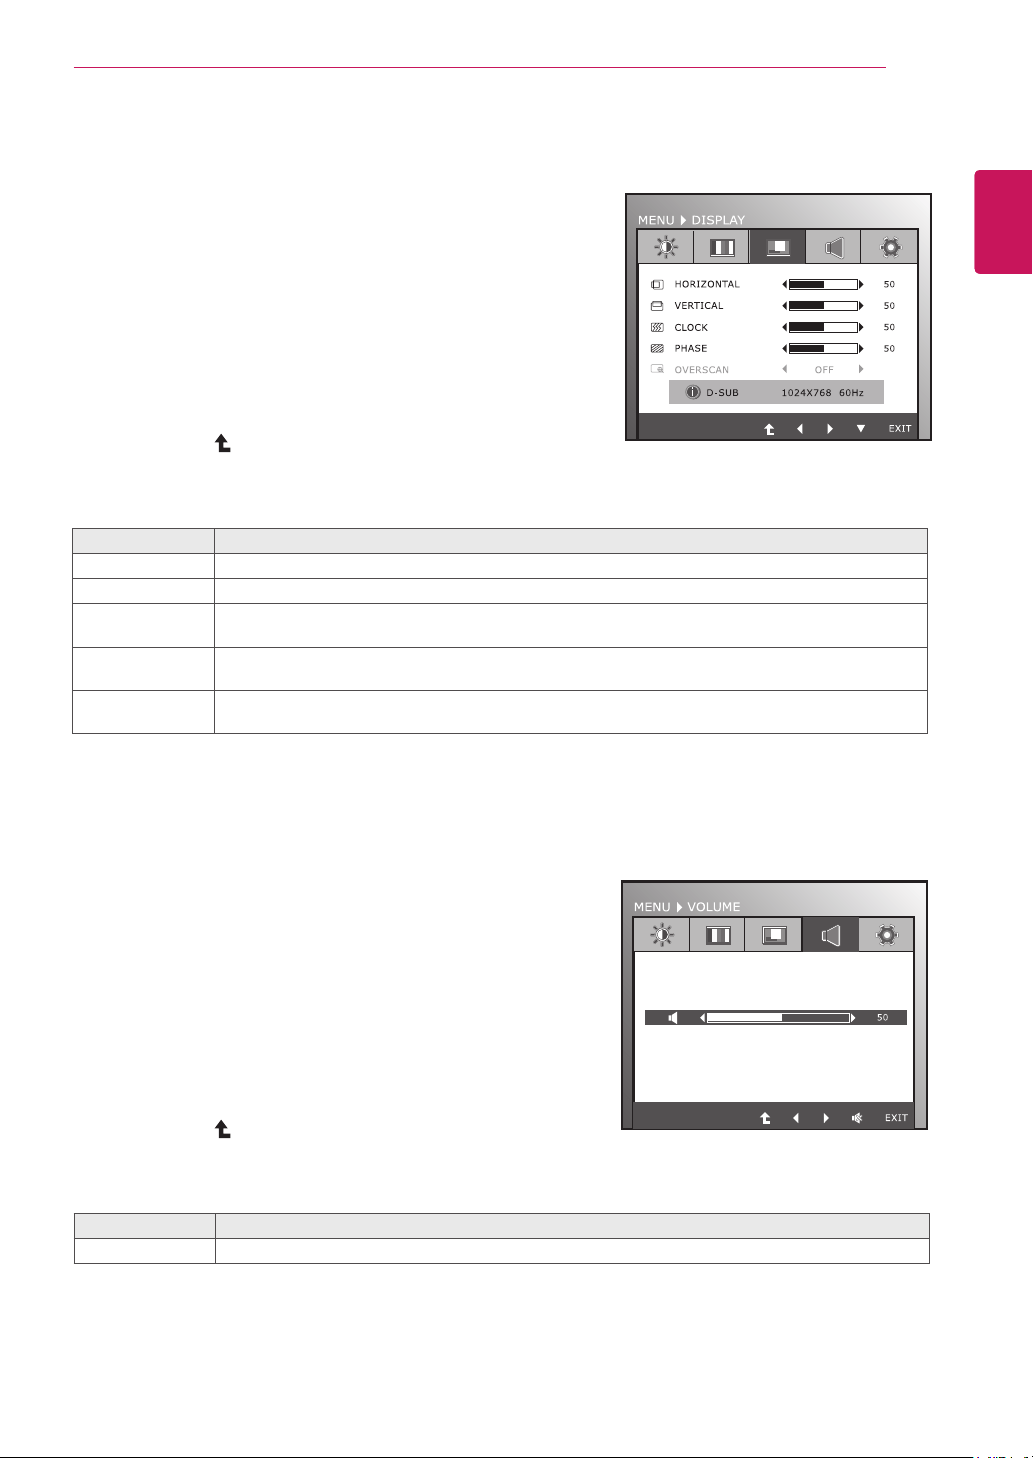
DISPLAY
1
PressanybuttononthebottomoftheMonitorsettodisplay
theMONITORSETUPOSDmenu.
2
PresstheMENUbuttontodisplaytheoptionsintheOSD
menu.
3
SelectDISPLAYbypressingthebuttonsonthebottomof
theMonitorsetandsettheoptions.
4
SelectEXITtoleavetheOSDmenu.
Toreturntotheuppermenuorsetothermenuitems,use
theuparrow( )button.
Theavailablepicturesettingsaredescribedbelow.
VOLUME
1
PressanybuttononthebottomoftheMonitorsettodisplay
theMONITORSETUPOSDmenu.
2
PresstheMENUbuttontodisplaytheoptionsintheOSD
menu.
3
SelectVOLUMEbypressingthebuttonsonthebottomof
theMonitorsetandsettheoptions.
4
SelectEXITtoleavetheOSDmenu.
Toreturntotheuppermenuorsetothermenuitems,use
theuparrow( )button.
Theavailablepicturesettingsaredescribedbelow.
Menu Description
HORIZONTAL Tomoveimageleftandright.
VERTICAL Tomoveimageupanddown.
CLOCK Tominimizeanyverticalbarsorstripesvisibleonthescreenbackground.Thehorizontalscreen
sizewillalsochange.
PHASE Toadjustthefocusofthedisplay.Thisitemallowsyoutoremoveanyhorizontalnoiseandclearor
sharpentheimageofcharacters.
OVERSCAN ToselecttherangeofoutputimageforDTVtiminginHDMIinput.(onlyforHDMIinput)Recommend
overscanfunctiontoturnonwhenconnectAVequipment.
Menu Description
VOLUME Toadjustthevolumeofheadphone/Earphone.(OnlyforHDMIinput)
18
ENG
ENGLISH
CUSTOMIZING SETTINGS
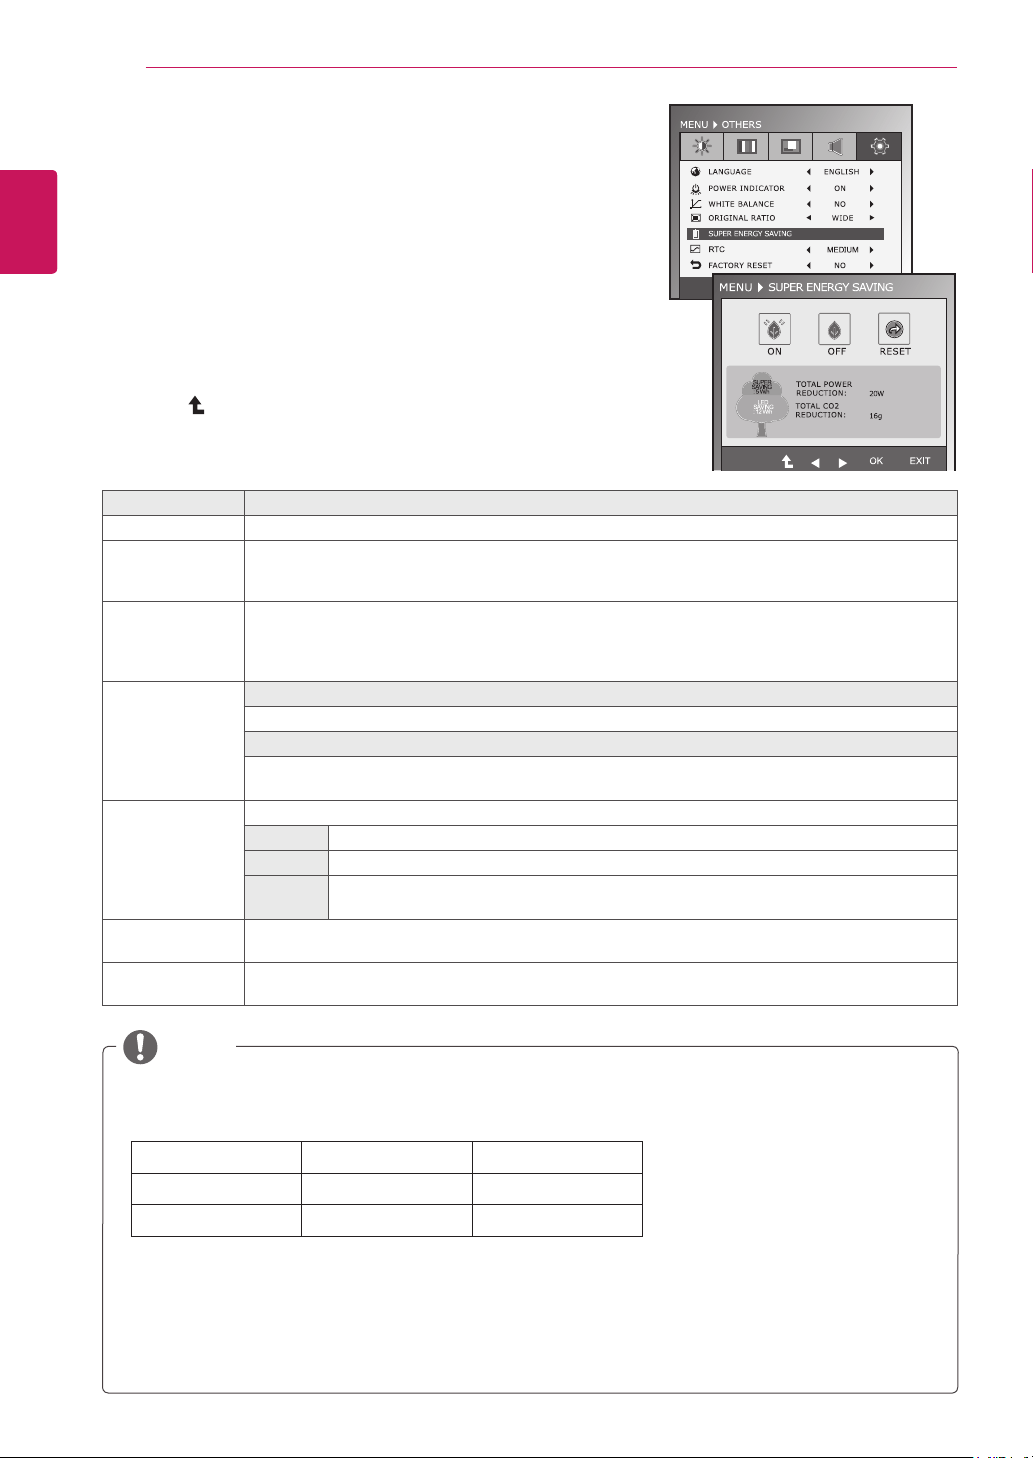
OTHERS
1
PressanybuttononthebottomoftheMonitorsettodisplaythe
MONITORSETUPOSDmenu.
2
PresstheMENUbuttontodisplaytheoptionsintheOSDmenu.
3
SelectOTHERSbypressingthebuttonsonthebottomofthe
Monitorsetandsettheoptions.
4
SelectEXITtoleavetheOSDmenu.
Toreturntotheuppermenuorsetothermenuitems,usetheup
arrow( )button.
Theavailablepicturesettingsaredescribedbelow.
Menu Description
LANGUAGE Tochoosethelanguageinwhichthecontrolnamesaredisplayed.
POWER
INDICATOR
UsethisfunctiontosetthepowerindicatoronthebottomsideofthemonitortoONorOFF.Ifyou
setOFF,itwillgooff.
IfyousetONatanytime,thepowerindicatorwillautomaticallybeturnedon.
WHITE
BALANCE
Iftheoutputofthevideocardisdifferenttherequiredspecifications,thecolorlevelmaydeteriorate
duetovideosignaldistortion.Usingthisfunction,thesignallevelisadjustedtofitintothestandard
outputlevelofthevideocardinordertoprovidetheoptimalimage.Activatethisfunctionwhen
whiteandblackcolorsarepresentinthescreen.
ORIGINALRATIO WIDE
Switchtofullscreenmodeaccordingtoinputimagesignal.
ORIGINAL
Changetheinputimagesignalratiotooriginal.
*ThisfunctionworksonlyifinputresolutionislowerthanMonitorsetratio(16:9).
SUPERENERGY
SAVING
SetstheSUPERENERGYSAVINGfunction.
ON
EnablesSUPERENERGYSAVINGyoucansaveenergywiththisenergy-efficientfunction
OFF DisablesSUPERENERGYSAVING.
RESET ResetsthevaluesoftotalenergyconsumptionreductionandCO2emissionreduction
estimates.
RTC
(Response
TimeCompensation)
IfyouenableRTCfunction,youcancontrolResponseTimeCompensationlevel.
IfyousetOFF,youdisenabletheResponseTimeCompensationfunction.
FACTORY
RESET
Restoreallfactorydefaultsettingsexcept"LANGUAGE."Pressthe◄,►buttonstoreset
immediately.
TOTALPOWERREDUCTION:Howmuchpowerissavedwhileusingthemonitor.
TOTALCO2REDUCTION:ChangetheTOTALPOWERREDUCTIONtoCO2.
SAVINGDATA(W/h)
545mm(21.5inch) 584mm(23inch)
SUPERSAVING 4W/h 5W/h
LEDSAVING 15W/h 12W/h
SavingDatadependsonthePanel.So,thosevaluesshouldbedifferentfromeachpanelandpanel
vendor.
LGcalculatedthesevaluesbyusing“broadcastvideosignal”.
LEDSavingreferstohowmuchpowercanbesavedusingaWLEDPanelinsteadofCCFLpanel.
SUPERSAVINGreferstohowmuchpowercanbesavedusingtheSUPERENERGYSAVING
function.
NOTE
19
ENG
ENGLISH
CUSTOMIZING SETTINGS
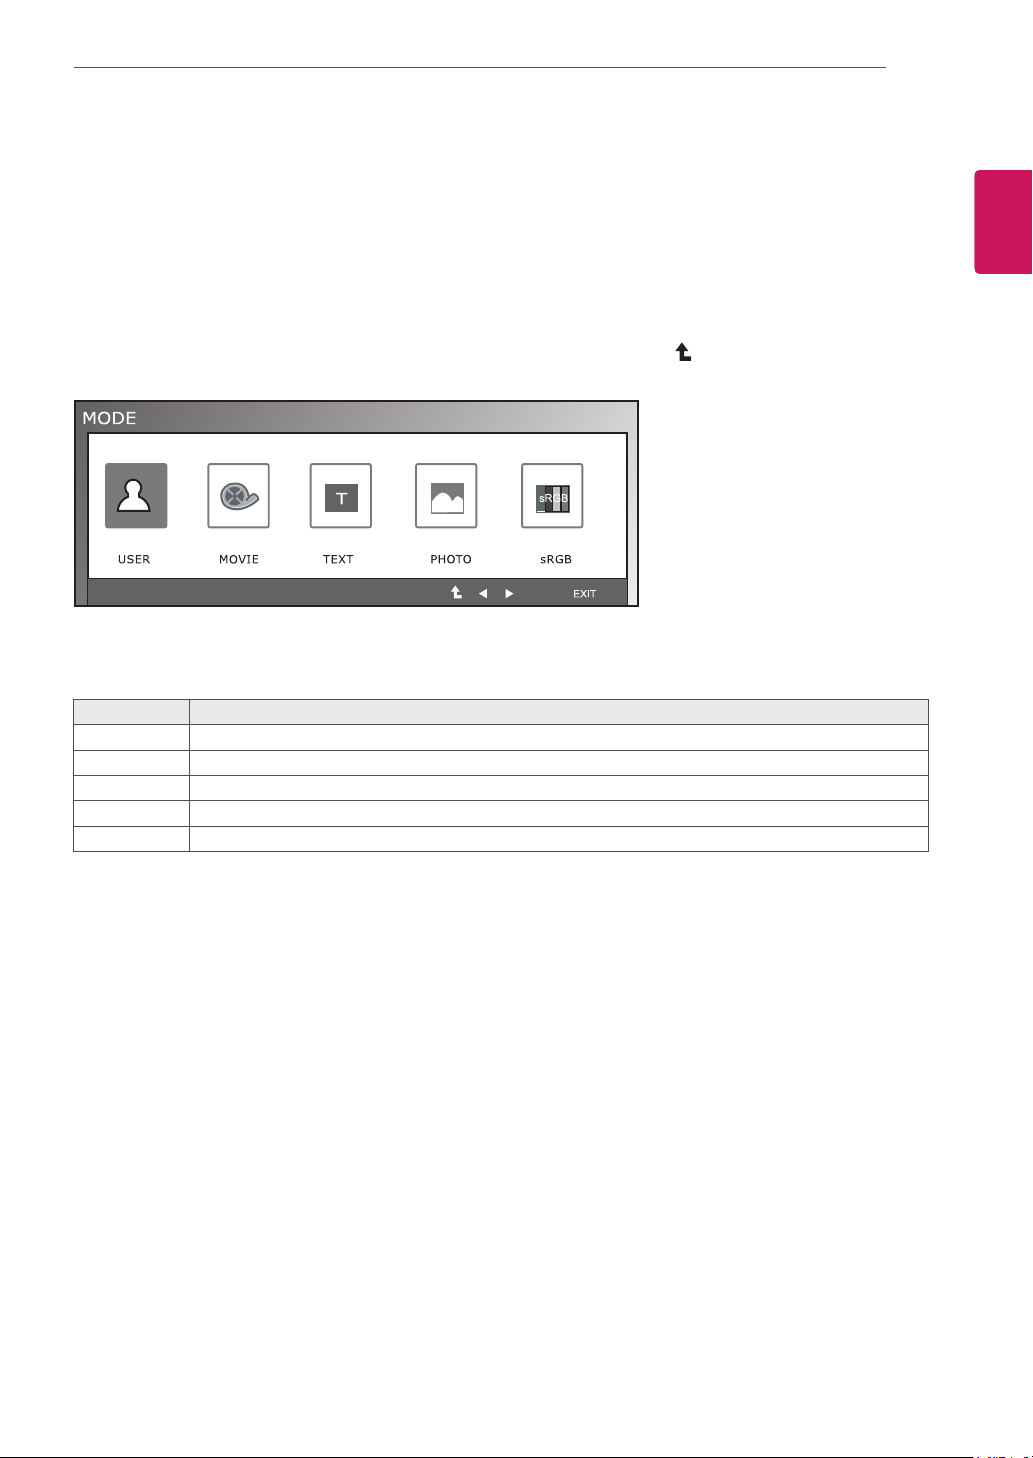
MODESetting
1
PressanybuttononthebottomoftheMonitorsettodisplaytheMONITORSETUPOSDmenu.
2
PresstheMODEbuttontodisplaytheoptionsintheOSDmenu.
3
SettheoptionsbypressingthebuttonsonthebottomoftheMonitorset.
4
SelectEXITtoleavetheOSDmenu.
Toreturntotheuppermenuorsetothermenuitems,usetheuparrow( )button.
Theavailablepicturesettingsaredescribedbelow.
Menu Description
USER Itisamodethattheusercanadjusteachelement.ItcanadjustthecolormodeoftheMainMenu.
MOVIE Itisamodethatthescreenisadjustedtothebesttoviewthevideos.
TEXT Itisamodethatthescreenisadjustedtothebestforthetextworks.
PHOTO Itisamodethatthescreenisadjustedtothebesttoviewpictures.
sRGB ItisamodethatthescreenisadjustedtothestandardsRGB.
20
ENG
ENGLISH
CUSTOMIZING SETTINGS
The available picture settings are described below.
NOTE
y
When monitor goes to Power Saving Mode with PC power saving option, on pressing any button and
selecting Dual option user can bring back monitor to normal mode.
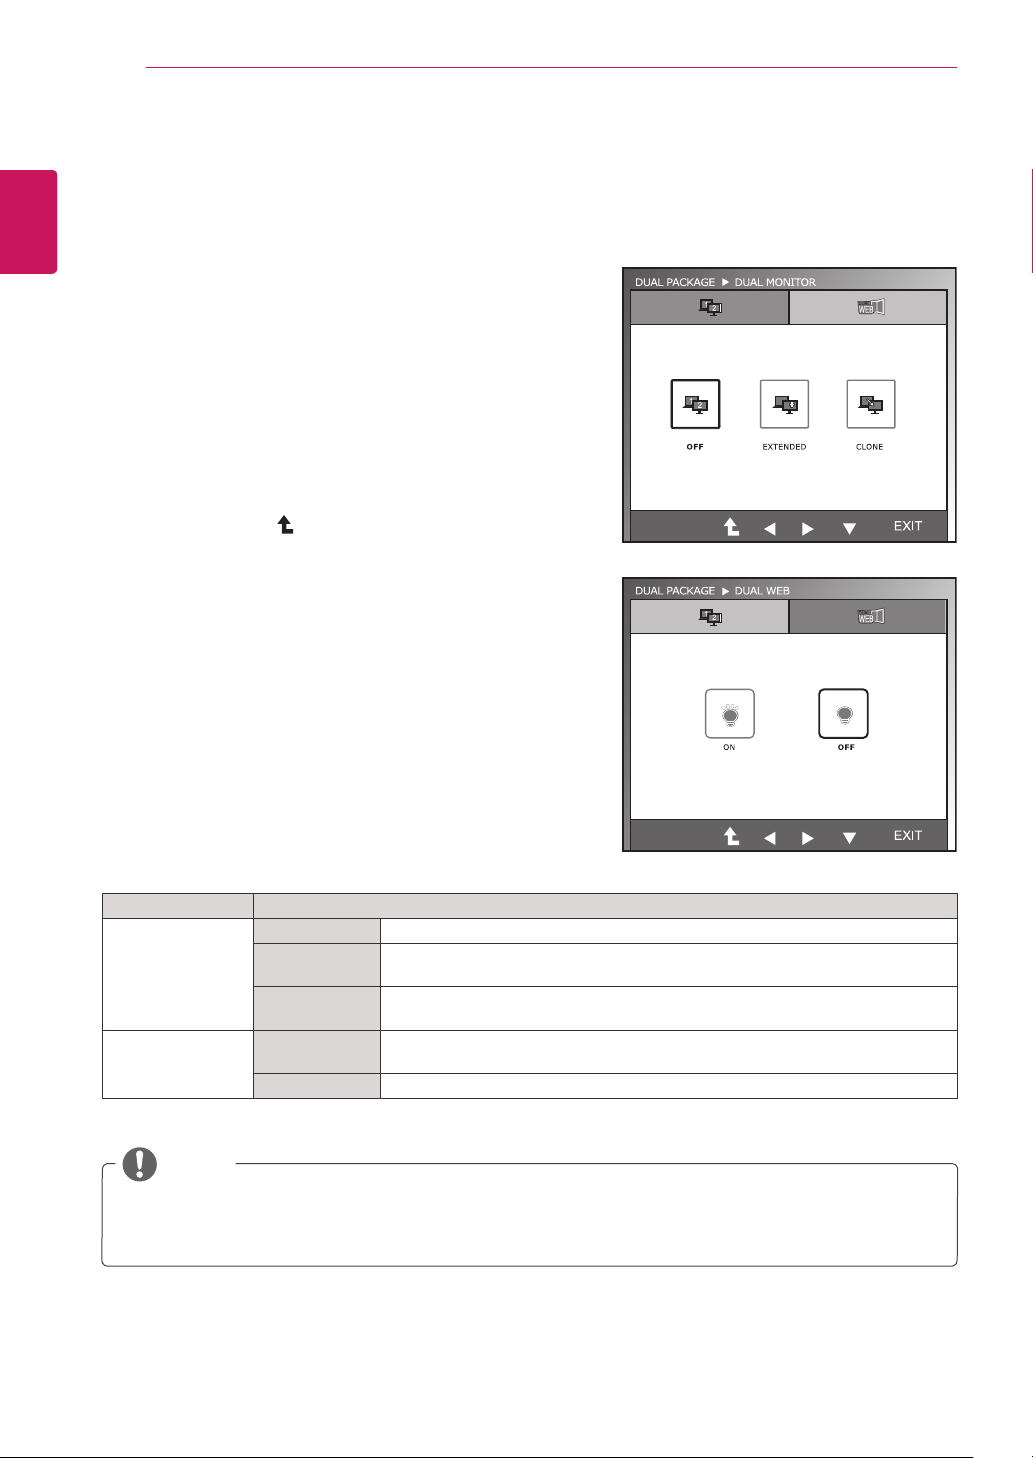
DUAL PACKAGE Setting
1
Press any button on the bottom of the Monitor set to
display the MONITOR SETUP OSD menu.
2
Press the DUAL button to display the options in the
OSD menu.
3
Set the options by pressing the buttons on the bottom
of the Monitor set.
4
Select EXIT to leave the OSD menu.
To return to the upper menu or set other menu items,
use the up arrow (
) button.
* Before using below functions, please install DUAL PACKAGE programme.
Menu Description
DUAL MONITOR OFF If select OFF,DUALMONITOR off
EXTENDED By selecting EXTENDED,user can use secondary monitor as extended mode of
primary monitor.
CLONE By selecting CLONE,user can use secondary monitor as done mode of primary
monitor.
DUAL WEB ON Help user to browse web efficiently by dividing in half. Help to arrange and
move windows on screen. Help user to control divided windows ratio.
OFF If select OFF,DUAL WEB is off.
21
ENG
ENGLISH
TROUBLESHOOTING
TROUBLESHOOTING
Checkthefollowingbeforecallingforservice.
Noimageappears
Isthepowercordofthedisplay
connected?
Checkandseeifthepowercordisconnectedproperlytothepower
outlet.
Isthepowerindicatorlighton?
PressthePowerbutton.
Isthepoweronandthepower
indicatorblueorgreen?
Adjustthebrightnessandthecontrast.
Isthepowerindicatorflickering?
Ifthedisplayisinpowersavingmode,trymovingthemouseor
pressinganykeyonthekeyboardtobringupthescreen.
TrytoturnonthePC.
Doyouseean"OUTOFRANGE"
messageonthescreen?
ThismessageappearswhenthesignalfromthePC(videocard)is
outofhorizontalorverticalfrequencyrangeofthedisplay.Seethe
'Specifications'sectionofthismanualandconfigureyourdisplay
again.
Doyouseea"CHECKSIGNAL
CABLE"messageonthescreen?
ThismessageappearswhenthesignalcablebetweenyourPCand
yourdisplayisnotconnected.Checkthesignalcableandtryagain.
Doyouseea"OSDLOCKED"messageonthescreen?
Doyousee“OSDLOCKED”when
youpushMENUbutton?
Youcansecurethecurrentcontrolsettings,sothattheycannotbe
inadvertentlychanged.YoucanunlocktheOSDcontrolsatanytime
bypushingtheMENUbuttonforseveralseconds:themessage“OSD
UNLOCKED”willappear.
Displayimageisincorrect
DisplayPositionisincorrect.
PresstheAUTObuttontoautomaticallyadjustyourdisplayimageto
theidealsetting.
Onthescreenbackground,vertical
barsorstripesarevisible.
PresstheAUTObuttontoautomaticallyadjustyourdisplayimageto
theidealsetting.
Anyhorizontalnoiseappearingin
anyimageorcharactersarenot
clearlyportrayed.
PresstheAUTObuttontoautomaticallyadjustyourdisplayimageto
theidealsetting.
CheckControlPanel►Display►Settingsandadjustthedisplay
totherecommendedresolutionoradjustthedisplayimagetothe
idealsetting.Setthecolorsettinghigherthan24bits(truecolor).
22
ENG
ENGLISH
TROUBLESHOOTING
Displayimageisincorrect
Thescreencolorismonoor
abnormal.
Checkifthesignalcableisproperlyconnectedanduseascrewdriver
tofastenifnecessary.
Makesurethevideocardisproperlyinsertedintheslot.
Setthecolorsettinghigherthan24bits(truecolor)atControlPanel
►Settings.
Thescreenblinks.
Checkifthescreenissettointerlacemodeandifyes,changeitto
therecommendresolution.
Doyouseean"Unrecognizedmonitor,Plug&Play(VESADDC)monitorfound"message?
Haveyouinstalledthedisplay
driver?
BesuretoinstallthedisplaydriverfromthedisplaydriverCD(or
diskette)thatcomeswithyourdisplay.Or,youcanalsodownloadthe
driverfromourwebsite:http://www.lg.com.
MakesuretocheckifthevideocardsupportsPlug&Playfunction.
CheckControlPanel►Display►Settingsandseeifthefrequencyortheresolutionwere
changed.Ifyes,readjustthevideocardtotherecommendresolution.
Iftherecommendedresolution(optimalresolution)isnotselected,lettersmaybeblurredandthe
screenmaybedimmed,truncatedorbiased.Makesuretoselecttherecommendresolution.
ThesettingmethodcandifferbycomputerandO/S(OperationSystem),andresolutionmentioned
abovemaynotbesupportedbythevideocardperformance.Inthiscase,pleaseasktothecomputer
orthevideocardmanufacturer.
CAUTION

23
ENG
ENGLISH
SPECIFICATIONS
SPECIFICATIONS
Display ScreenType 54.5cm(21.5inch)FlatPanelActivematrix-TFT
LCDAnti-Glarecoating
Visiblediagonalsize:54.5cm
PixelPitch 0.247mmx0.247mm(PixelPitch)
SyncInput HorizontalFrequency 30kHzto83kHz(Automatic)
VerticalFrequency 56Hzto75Hz(D-SUB,DVI-D)
56Hzto61Hz(HDMI)
InputForm SeparateSync.Digital
VideoInput SignalInput 15pinD-SUBConnector/DVI-DConnector(Digital)
HDMIConnector
InputForm RGBAnalog(0.7Vp-p/75ohm),Digital
Resolution Max D-SUB(Analog):1920x1080@60Hz
DVI/HDMI(Digital):1920x1080@60Hz
Recommend VESA1920x1080@60Hz
Plug&Play DDC2B(Analog,Digital,HDMI)
PowerConsumption OnMode:31W(Typ.)
SleepMode≤0.3W
OffMode≤0.3W
PowerInput AC100-240V~50/60Hz1.0A
Dimensions
(WidthxHeightxDepth)
WithStand 51.3cmx51.6cmx22.2cm(Max)
51.3cmx38.6cmx22.2cm(Min)
WithoutStand 51.3cmx31.2cmx5.9cm
Weight 5.45kg
Range Tilt -5°to15°
Swivel -45°~45°(+/-2°)
Height 130.0mm(5.12inch)
Environmental
conditions
OperatingTemperature
OperatingHumidity
10°Cto35°C
10%to80%
StorageTemperature
StorageHumidity
-20°Cto60°C
5%to90%non-Condensing
StandBase Attached(),Detached(O)
Powercord Wall-outlettype
Productspecificationsshownabovemaybechangedwithoutpriornoticeduetoupgradeofproduct
functions.
IPS225P
24
ENG
ENGLISH
SPECIFICATIONS
SPECIFICATIONS
Display ScreenType 58.4 cm (23 inch) Flat Panel Active matrix-TFT LCD
Anti-Glare coating
Visible diagonal size: 58.4 cm
PixelPitch 0.265 mm x 0.265 mm (Pixel Pitch)
SyncInput HorizontalFrequency 30 kHz to 83 kHz (Automatic)
VerticalFrequency 56Hz to 75Hz (D-SUB, DVI-D)
56Hz to 61Hz (HDMI)
InputForm Separate Sync. Digital
VideoInput SignalInput 15 pin D-SUB Connector /DVI-D Connector (Digital)
HDMI Connector
InputForm RGB Analog (0.7 Vp-p/ 75 ohm), Digital
Resolution Max D-SUB(Analog) : 1920 x 1080 @ 60 Hz
DVI / HDMI (Digital) : 1920 x 1080 @ 60 Hz
Recommend VESA 1920 x 1080 @ 60 Hz
Plug&Play DDC 2B(Analog,Digital,HDMI)
PowerConsumption On Mode : 35 W(Typ.)
Sleep Mode ≤ 0.3 W
Off Mode ≤ 0.3 W
PowerInput AC 100-240 V~ 50 / 60 Hz 1.0 A
Dimensions
(WidthxHeightxDepth)
WithStand 54.7 cm x 51.6 cm x 22.2 cm (Max)
54.7 cm x 38.6 cm x 22.2 cm (Min)
WithoutStand 54.7 cm x 33.1 cm x 5.9 cm
Weight 5.95 kg
Range
Tilt -5° to 15°
Swivel -45° ~ 45°(+/- 2°)
Height 130.0 mm(5.12 inch)
Environmental
conditions
OperatingTemperature
OperatingHumidity
10°C to 35 °C
10 % to 80 %
StorageTemperature
StorageHumidity
-20°C to 60 °C
5 % to 90 % non-Condensing
StandBase Attached ( ), Detached (O)
Powercord Wall-outlet type
Product specifications shown above may be changed without prior notice due to upgrade of product
functions.
IPS235P
25
ENG
ENGLISH
SPECIFICATIONS
PresetModes(Resolution)
DisplayModes(Resolution)
Horizontal
Frequency(kHz)
Vertical
Frequency(Hz)
Polarity(H/V)
720x400 31.468 70 -/+
640x480 31.469 60 -/-
640x480 37.500 75 -/-
800x600 37.879 60 +/+
800x600 46.875 75 +/+
1024x768 48.363 60 -/-
1024x768 60.123 75 -/-
1152x864 67.500 75 +/+
1280x1024 63.981 60 +/+
1280x1024 79.976 75 +/+
1680x1050 65.290 60 -/+
1920x1080 67.500 60 +/+ RecommendMode
HDMITIMING
DisplayModes(Resolution) HorizontalFrequency(kHz) VerticalFrequency(Hz)
480P 31.50 60
576P 31.25 50
720P 37.50 50
720P 45.00 60
1080i 28.12 50
1080i 33.75 60
1080P 56.25 50
1080P 67.50 60 RecommendMode
Indicator
Mode LEDColor
OnMode Blue
SleepMode BlinkingBlue
OffMode Off


Make sure to read the Safety Precautions before
using the product.
Keep the Owner’s Manual (CD) in an accessible
place for future reference.
The model and serial number of the SET is
located on the back and one side of the SET.
Record it below should you ever need service.
As an ENERGY STAR Partner LGE
U. S. A.,Inc. has determined that this
product meets the ENERGY STAR
guidelines for energy efficiency.
ENERGY STAR is a set of power-saving
guidelines issued by the U.S.Environmental
Protection Agency(EPA).
MODEL
SERIAL