Installation
Connect Devices to the Switch
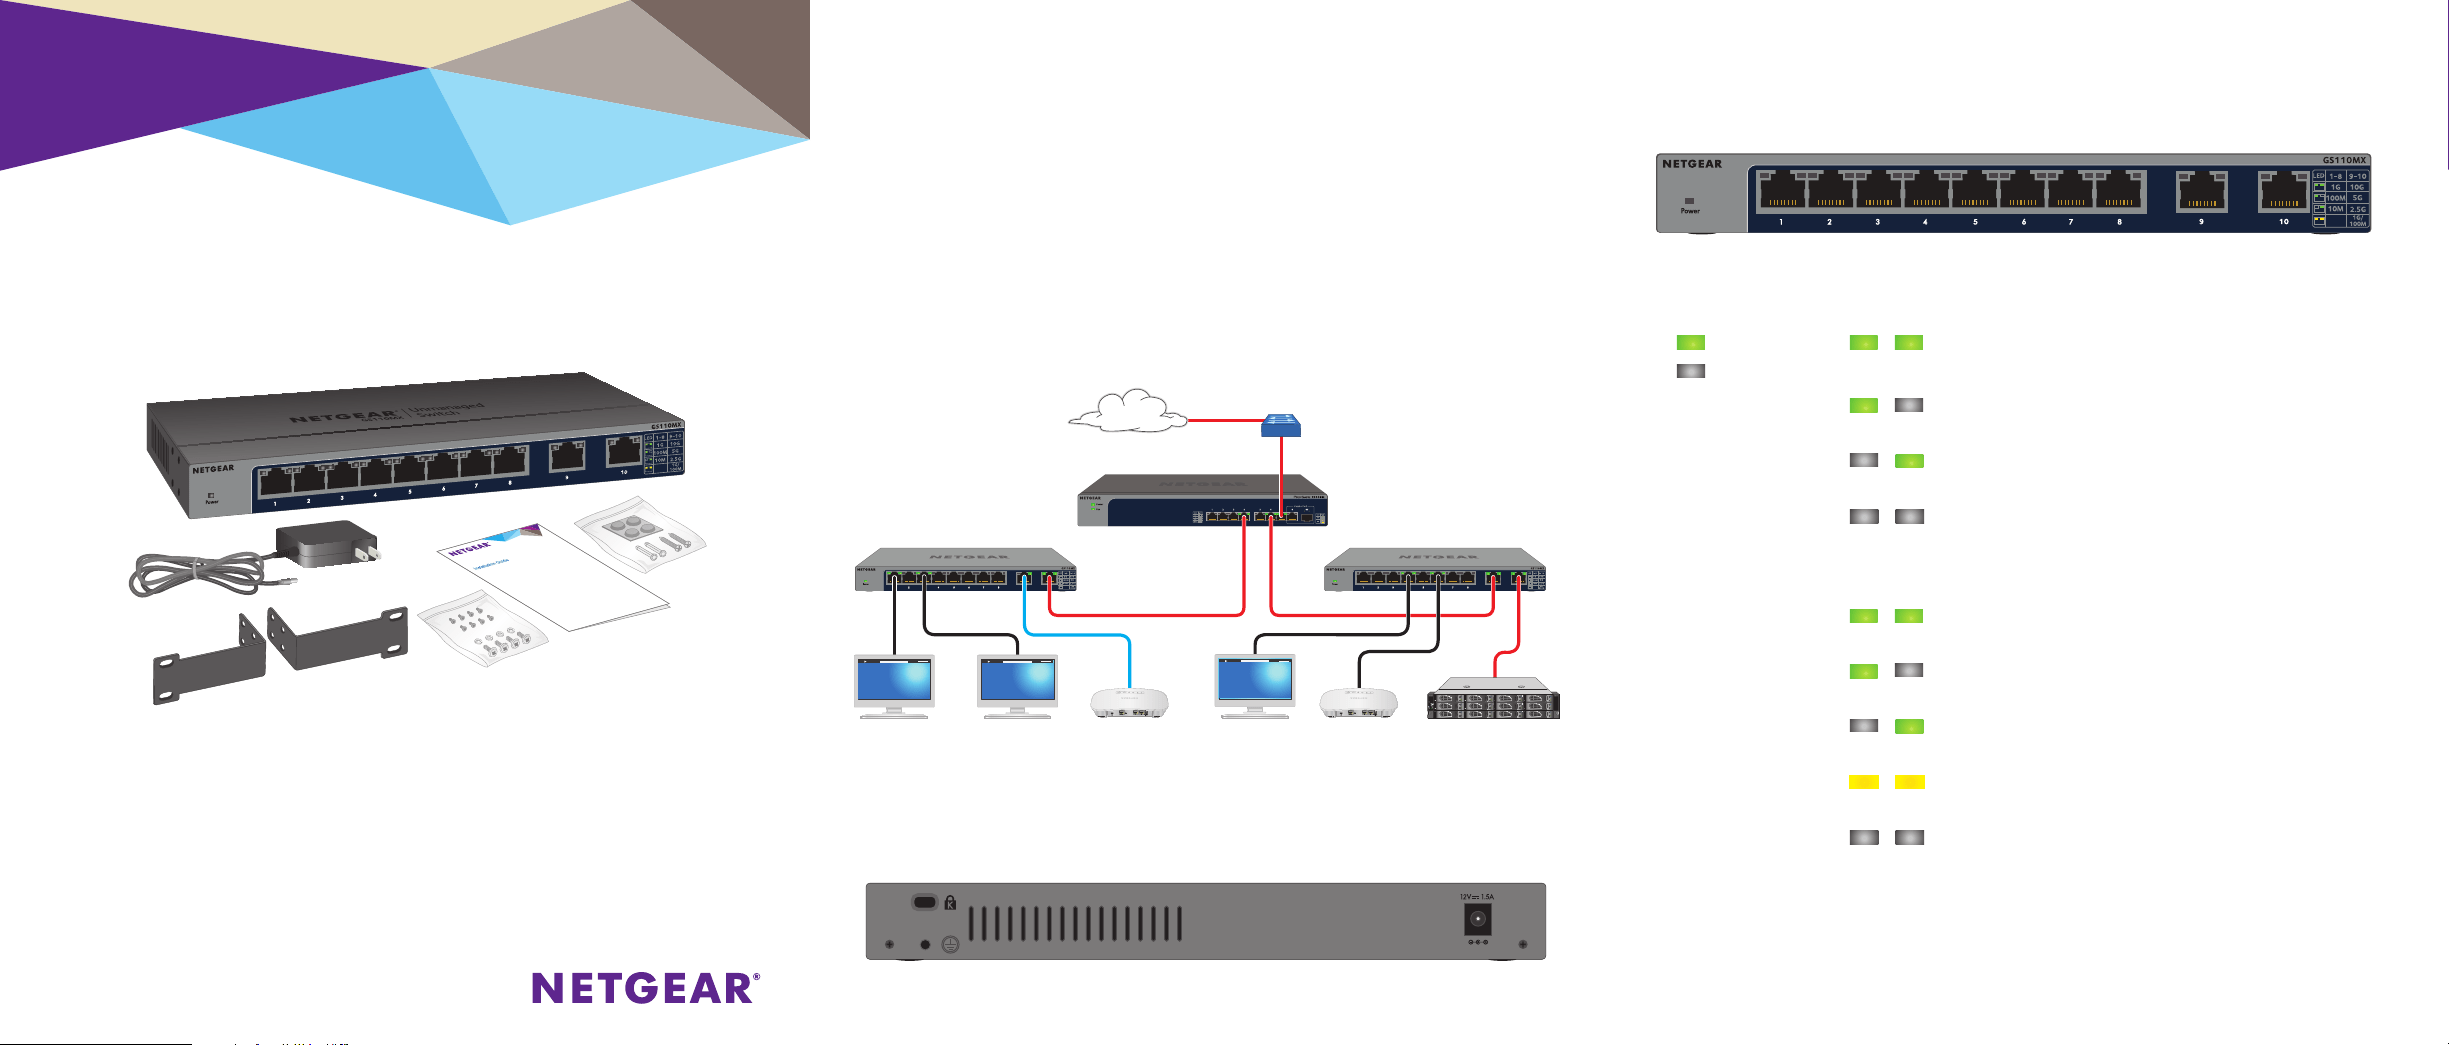
1. Connect devices to the RJ-45 network ports on the switch front panel.
Ports 1 through 8 support 1G, 100M, and 10M. Ports 9 and 10
support 10G, 5G, 2.5G, 1G, and 100M. Use the cables that we
recommend on the other side of this installation guide.
2. Connect one RJ-45 port on the switch to a network. In a high-speed
network, use port 9 or 10.
Note: In a small oce or home oce network, connect the switch to the LAN
port of a router that, in turn, is connected to an Internet modem.
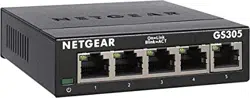
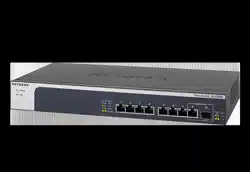
8-Port Gigabit Ethernet Unmanaged Switch
with 2-Port 10G/Multi-Gig Uplinks
Desktop Pro Series GS110MX
Connect the Power Adapter to the DC Input
Check the LED Status
Package Contents
• Switch
• Power adapter (localized to the country of sale)
• Rack-mount brackets and screws for rack installation
• Wall-mount screws for wall installation and rubber feet for desktop
installation (in one bag)
• Installation guide
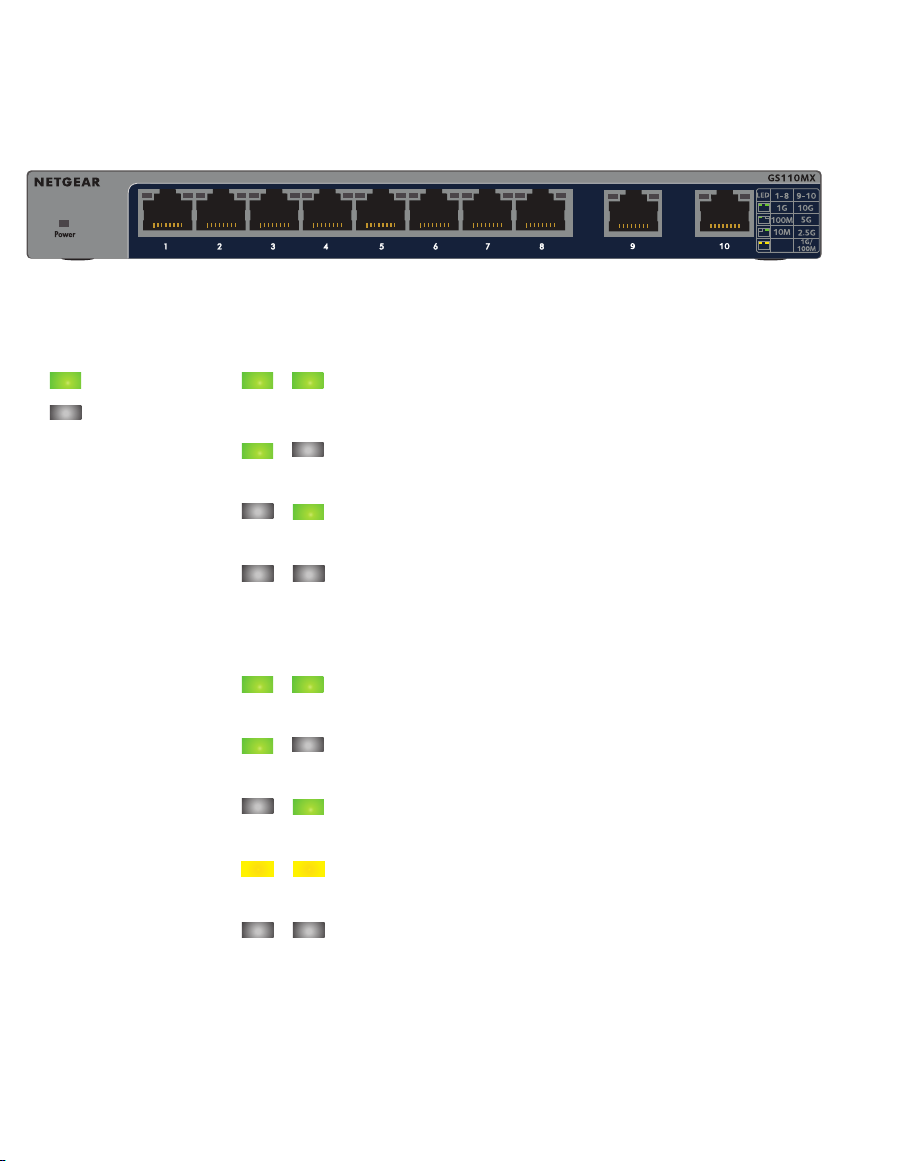
Power LED Gigabit Ethernet port LEDs for ports 1 through 8
On
O
1G link (both port LEDs on). Both port LEDs blinking
indicates trac activity.
100M link (le port LED on, right port LED o). Le
port LED blinking indicates trac activity.
10M link (le port LED o, right port LED on). Right
port LED blinking indicates trac activity.
No link (both port LEDs o).
Multi-Gigabit Ethernet port LEDs for ports 9 and 10
10G link (both port LEDs on). Both port LEDs blinking
indicates trac activity.
5G link (le port LED on, right port LED o). Le port
LED blinking indicates trac activity.
2.5G link (le port LED o, right port LED on). Right
port LED blinking indicates trac activity.
1G or 100M link (both port LEDs on). Both port LEDs
blinking indicates trac activity.
No link (both port LEDs o).
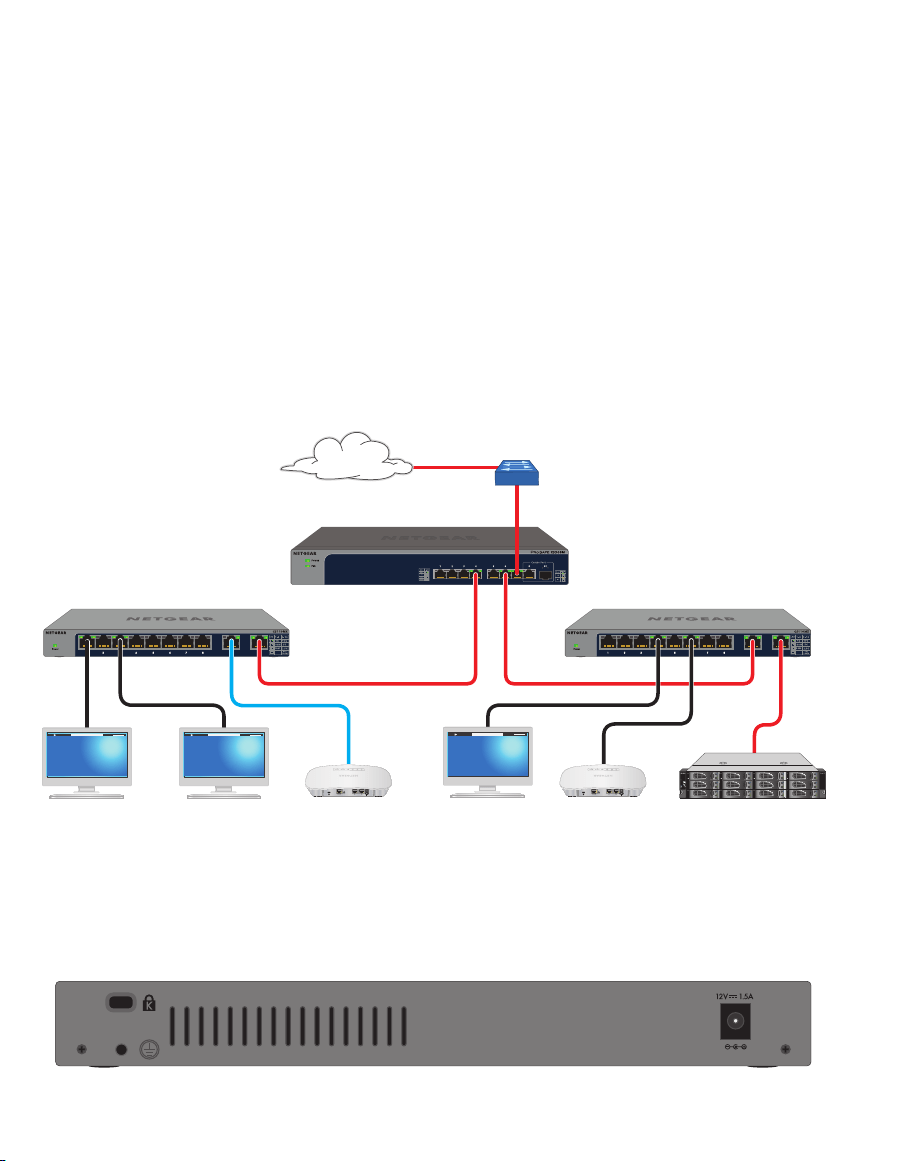
10G/Multi-Gig switch (XS508M)
Sample connections
10G link
to 10G NAS
Internet
10G link to
network router
1G link to
WAC740 AP
1G link to
computer
GS110MX switchGS110MX switch
2.5G link to
WAC740 AP
1G link to
computer
1G link to
computer
10G link 10G link
Installation
Connect Devices to the Switch
1. Connect devices to the RJ-45 network ports on the switch front panel.
Ports 1 through 8 support 1G, 100M, and 10M. Ports 9 and 10
support 10G, 5G, 2.5G, 1G, and 100M. Use the cables that we
recommend on the other side of this installation guide.
2. Connect one RJ-45 port on the switch to a network. In a high-speed
network, use port 9 or 10.
Note: In a small oce or home oce network, connect the switch to the LAN
port of a router that, in turn, is connected to an Internet modem.
8-Port Gigabit Ethernet Unmanaged Switch
with 2-Port 10G/Multi-Gig Uplinks
Desktop Pro Series GS110MX
Connect the Power Adapter to the DC Input
Check the LED Status
Package Contents
• Switch
• Power adapter (localized to the country of sale)
• Rack-mount brackets and screws for rack installation
• Wall-mount screws for wall installation and rubber feet for desktop
installation (in one bag)
• Installation guide
Power LED Gigabit Ethernet port LEDs for ports 1 through 8
On
O
1G link (both port LEDs on). Both port LEDs blinking
indicates trac activity.
100M link (le port LED on, right port LED o). Le
port LED blinking indicates trac activity.
10M link (le port LED o, right port LED on). Right
port LED blinking indicates trac activity.
No link (both port LEDs o).
Multi-Gigabit Ethernet port LEDs for ports 9 and 10
10G link (both port LEDs on). Both port LEDs blinking
indicates trac activity.
5G link (le port LED on, right port LED o). Le port
LED blinking indicates trac activity.
2.5G link (le port LED o, right port LED on). Right
port LED blinking indicates trac activity.
1G or 100M link (both port LEDs on). Both port LEDs
blinking indicates trac activity.
No link (both port LEDs o).
10G/Multi-Gig switch (XS508M)
Sample connections
10G link
to 10G NAS
Internet
10G link to
network router
1G link to
WAC740 AP
1G link to
computer
GS110MX switchGS110MX switch
2.5G link to
WAC740 AP
1G link to
computer
1G link to
computer
10G link 10G link
NETGEAR INT LTD
Building 3 University Technology Centre
Curraheen Road Cork Ireland
August 2017
© NETGEAR, Inc., NETGEAR and the NETGEAR Logo
are trademarks of NETGEAR, Inc. Any non‑NETGEAR
trademarks are used for reference purposes only.
NETGEAR, Inc.
350 East Plumeria Drive
San Jose, CA 95134, USA
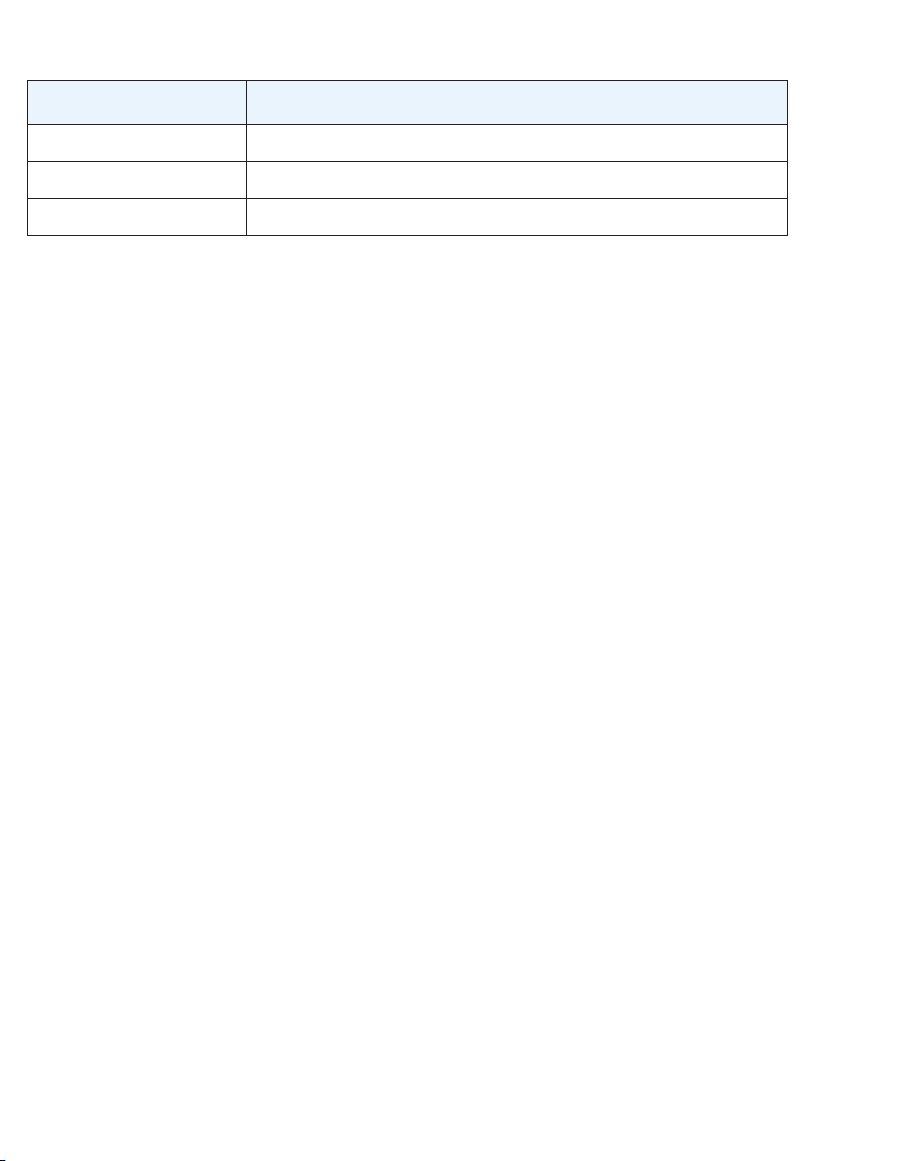
Cables and Speeds
The following table describes the network cables that you can use for the
switch connections and the speeds that these cables can support, up to
100 meters (328 feet).
Speed Cable Type
100 Mbps Category 5 (Cat 5) of higher rated
1 Gbps, 2.5 Gbps, or 5 Gbps Category 5e (Cat 5e) or higher rated
10 Gbps Category 6A (Cat 6A) or higher rated
Note: For speeds of 10 Gbps, if the cable length is shorter than 55 meters
(180 feet), you can use a Category 6 (Cat 6) cable.
Attach the Switch to a Wall
To attach the switch to a wall, you need the wall-mount screws that are
supplied with the switch.
¾ To attach the switch to a wall:
1. Locate the two mount holes on the bottom panel of the switch.
2. Mark and drill two mounting holes in the wall where you want to mount
the switch.
The two mounting holes must be at a precise distance of 108.4 mm
(4.27 in.) from each other.
3. Insert the supplied anchors into the wall and tighten the supplied screws
with a No. 2 Phillips screwdriver.
Leave about 4 mm (about 0.125 in.) of each screw protruding from
the wall so that you can insert the screws into the holes on the bottom
panel.
Specification Description
Operating temperature 32–104°F (0–40°C)
Operating humidity 10%–90% relative humidity, noncondensing.
Compliance CB, FCC class B, CE class B, VCCI class B, C-Tick/RCM class B
Support
Thank you for selecting NETGEAR products. You can visit
www.netgear.com/support to register your product, get help, access the latest
downloads and user manuals, and join our community. We recommend that you
use only ocial NETGEAR support resources.
For the current EU Declaration of Conformity, visit
http://support.netgear.com/app/answers/detail/a_id/11621/.
For regulatory compliance information, visit
http://www.netgear.com/about/regulatory/.
See the regulatory compliance document before connecting the power supply.
Si ce produit est vendu au Canada, vous pouvez accéder à ce document en
français canadien à http://downloadcenter.netgear.com/other/.
(If this product is sold in Canada, you can access this document in
Canadian-French at http://downloadcenter.netgear.com/other/.)
Install the Switch in a Rack
To install the switch in a rack, you need the rack-mount brackets and
screws that are supplied with the switch.
¾ To install the switch in a rack:
1. Attach the supplied mounting brackets to the side of the switch.
Insert the screws provided in the product package through each
bracket and into the bracket mounting holes in the switch.
2. Tighten the screws with a No. 2 Phillips screwdriver to secure each
bracket.
3. Align the mounting holes in the brackets with the holes in the rack, and
insert two pan-head screws with nylon washers through each bracket
and into the rack.
4. Tighten the screws with a No. 2 Phillips screwdriver to secure mounting
brackets to the rack.
Specifications
Specification Description
Network interfaces Eight Gigabit Ethernet RJ-45 ports that support 1G, 100M,
and 10M
Two Multi-Gigabit Ethernet RJ-45 ports that support 10G, 5G,
2.5G, 1G, and 100M
Power adapter input Power adapter is localized to the country of sale.
Power adapter output 12V @ 1.5A
Power consumption 13.2W
Dimensions (W x D x H) 9.3 x 4.0 x 1 in. (236 x 102 x 27 mm)
Weight 1.63 lb (0.74 kg)
NETGEAR INT LTD
Building 3 University Technology Centre
Curraheen Road Cork Ireland
August 2017
© NETGEAR, Inc., NETGEAR and the NETGEAR Logo
are trademarks of NETGEAR, Inc. Any non‑NETGEAR
trademarks are used for reference purposes only.
NETGEAR, Inc.
350 East Plumeria Drive
San Jose, CA 95134, USA
Cables and Speeds
The following table describes the network cables that you can use for the
switch connections and the speeds that these cables can support, up to
100 meters (328 feet).
Speed Cable Type
100 Mbps Category 5 (Cat 5) of higher rated
1 Gbps, 2.5 Gbps, or 5 Gbps Category 5e (Cat 5e) or higher rated
10 Gbps Category 6A (Cat 6A) or higher rated
Note: For speeds of 10 Gbps, if the cable length is shorter than 55 meters
(180 feet), you can use a Category 6 (Cat 6) cable.
Attach the Switch to a Wall
To attach the switch to a wall, you need the wall-mount screws that are
supplied with the switch.
¾ To attach the switch to a wall:
1. Locate the two mount holes on the bottom panel of the switch.
2. Mark and drill two mounting holes in the wall where you want to mount
the switch.
The two mounting holes must be at a precise distance of 108.4 mm
(4.27 in.) from each other.
3. Insert the supplied anchors into the wall and tighten the supplied screws
with a No. 2 Phillips screwdriver.
Leave about 4 mm (about 0.125 in.) of each screw protruding from
the wall so that you can insert the screws into the holes on the bottom
panel.
Specification Description
Operating temperature 32–104°F (0–40°C)
Operating humidity 10%–90% relative humidity, noncondensing.
Compliance CB, FCC class B, CE class B, VCCI class B, C-Tick/RCM class B
Support
Thank you for selecting NETGEAR products. You can visit
www.netgear.com/support to register your product, get help, access the latest
downloads and user manuals, and join our community. We recommend that you
use only ocial NETGEAR support resources.
For the current EU Declaration of Conformity, visit
http://support.netgear.com/app/answers/detail/a_id/11621/.
For regulatory compliance information, visit
http://www.netgear.com/about/regulatory/.
See the regulatory compliance document before connecting the power supply.
Si ce produit est vendu au Canada, vous pouvez accéder à ce document en
français canadien à http://downloadcenter.netgear.com/other/.
(If this product is sold in Canada, you can access this document in
Canadian-French at http://downloadcenter.netgear.com/other/.)
Install the Switch in a Rack
To install the switch in a rack, you need the rack-mount brackets and
screws that are supplied with the switch.
¾ To install the switch in a rack:
1. Attach the supplied mounting brackets to the side of the switch.
Insert the screws provided in the product package through each
bracket and into the bracket mounting holes in the switch.
2. Tighten the screws with a No. 2 Phillips screwdriver to secure each
bracket.
3. Align the mounting holes in the brackets with the holes in the rack, and
insert two pan-head screws with nylon washers through each bracket
and into the rack.
4. Tighten the screws with a No. 2 Phillips screwdriver to secure mounting
brackets to the rack.
Specifications
Specification Description
Network interfaces Eight Gigabit Ethernet RJ-45 ports that support 1G, 100M,
and 10M
Two Multi-Gigabit Ethernet RJ-45 ports that support 10G, 5G,
2.5G, 1G, and 100M
Power adapter input Power adapter is localized to the country of sale.
Power adapter output 12V @ 1.5A
Power consumption 13.2W
Dimensions (W x D x H) 9.3 x 4.0 x 1 in. (236 x 102 x 27 mm)
Weight 1.63 lb (0.74 kg)