© 2020 by Snow Joe
®
, LLC
All rights reserved. Original instructions.
1
A Division of Snow Joe
®
, LLC Model TRJ608E Form No. SJ-TRJ608E-880E-M
R
OPERATOR’S MANUAL
ELECTRIC GRASS TRIMMER
2.8-AMP | 10-INCH
SAVE THESE INSTRUCTIONS
IMPORTANT!
Safety Instructions
Read All Instructions
mWARNING! When using electric gardening appliances,
basic safety precautions should always be followed to reduce
the risk of re, electric shock, and personal injury, including the
following:
1. Avoid dangerous environments – Do not use appliances
in damp or wet locations. Do not use in rain.
2. Keep children and bystanders away – Children and
other spectators, including pets, should be kept at least
50 feet (15 meters) away from the work area. When the
grass is cut, stones and debris contained in the grass
can be picked up by the trimmer and dispersed into the
air. These ying projectiles can cause blindness or other
bodily injury.
3. Dress properly – Always wear suitable clothing when
using the trimmer to prevent head, hand, or feet injuries.
Do not wear loose clothing or jewelry. They can get caught
in moving parts.
4. Use safety glasses – Also use safety footwear, snug-
tting clothing, protective gloves, hearing and head
protection.
5. Use the right tools – Do not use tools for any job except
that for which they are intended.
6. Avoid unintentional starting – Do not carry plugged-in
tool with nger on the trigger. Make sure the switch is o
before plugging in the tool.
7. Do not abuse the cord – Never carry the tool by the cord
or yank the cord to disconnect it from the receptacle.
Keep the cord away from heat, oil, and sharp edges.
8. Do not force the tool – It will do the job better and with
less likelihood of injury if it is used at the rate for which it
was designed.
9. Do not overreach – Keep proper footing and balance at
all times.
10. Stay alert – Watch what you are doing. Use common
sense. Do not operate the trimmer when you are tired, or
under the inuence of alcohol or drugs.
11. Disconnect the tool – Turn the trimmer o and
disconnect the plug when: the unit is not in use; it is left
unattended; it is being examined because it is not working
correctly; the power supply cable is damaged; the trimmer
line is being removed or changed; or when the trimmer is
being moved from one place to another.
12. Store idle tools indoors – When not in use, tools should
be stored indoors in a dry and high or locked-up place out
of the reach of children.
13. Maintain tools with care – Keep cutting edges sharp
and clean for best performance and to reduce the risk
of injury. Follow instructions for lubricating and changing
accessories. Inspect the trimmer periodically and replace
if damaged. Repair the trimmer only at an authorized
service facility. Keep handle dry, clean, and free from oil
and grease.
14. Checked for damaged parts – Before continuing to use
the trimmer, a guard or other part that is damaged should
be carefully checked to determine that it will operate
properly and perform its intended function. Check for
the alignment of moving parts, binding of moving parts,
breakage of parts, mounting, and any other condition that
may aect the tool’s operation. A guard or other part that
is damaged should be properly repaired or replaced by an
authorized service center unless indicated elsewhere in
this manual.
mCAUTION! The safety guard is critical to the safety
of the operator and the safety of people standing within a
safe distance of the trimmer. The safety guard keeps the unit
in good working order and must always be in place during
operation. Failure to have the guard in place during operation
is dangerous and will void the warranty.
15. Keep away from the cutting line – It can seriously injure
the skin.
16. Do not try to stop the cutting device with your hands –
Always let it come to a stop by itself.
2
17. Inspect electrical cables – The insulation of the power
cord should be perfectly intact. If the power cord is
damaged or shows any signs of cracks, do not use the
trimmer. Contact your authorized Snow Joe
®
+ Sun Joe
®
dealer or call the Snow Joe
®
+ Sun Joe
®
customer service
center at 1-866-SNOWJOE (1-866-766-9563).
18. Keep guards in place and in working order.
mCAUTION! The trimmer line spool will continue to rotate
after turning the trimmer OFF. Wait until the trimmer line spool
has completely stopped before making contact.
19. Only use the same type of line originally provided with
the tool.
20. Do not use the unit to cut grass that is not in contact
with the ground.
21. Do not switch the grass trimmer ON in enclosed
or poorly ventilated spaces or in the presence of
ammable and/or explosive substances such as
liquids, gases, and powders.
22. The user of the trimmer is responsible for any damage
sustained by third parties that has been caused by
the grass trimmer within the working area.
23. Only cut during broad daylight or with adequate
articial light.
24. Do not cross roads or gravel paths while the unit is
still running.
25. When the trimmer is not in use, store it in a dry place
and out of the reach of children.
26. The trimmer must be operated in a vertical position,
perpendicular to the ground.
27. Check regularly that all screws are properly
secured.
Electrical Safety
1. Ground fault circuit interrupter (GFCI) protection should
be provided on the circuit(s) or outlet(s) to be used for this
electric grass trimmer. Receptacles are available having
built-in GFCI protection and may be used for this measure
of safety.
2. Make sure that the mains voltage matches that listed on
the unit's rating label. Using the improper voltage can
damage the motor and injure the user.
3. To reduce the risk of electric shock, this appliance has
a polarized plug (i.e. one blade is wider than the other).
Use this appliance only with a polarized UL-, CSA- or
ETL-listed extension cord recommended for outdoor, all-
weather use.
The appliance plug will t into a polarized extension
cord only one way. If the appliance plug does not t
fully into the extension cord, reverse the plug. If the plug
still does not t, obtain a correct polarized extension
cord. A polarized extension cord will require the use of a
polarized wall outlet. The extension cord plug will t into
the polarized wall outlet only one way. If the plug does
not t fully into the wall outlet, reverse the plug. If the plug
still does not t, contact a qualied electrician to install
the proper wall outlet. Do not modify the appliance plug,
extension cord receptacle, or extension cord plug
in any way.
4. To prevent electric shock, use only with an extension cord
suitable for outdoor use, such as SW-A, SOW-A, STW-A,
STOW-A, SJW-A, SJOW-A, SJTW-A, or SJTOW-A.
Before use, check that the extension cord is in good
condition. When using an extension cord, make sure to
use one heavy enough to carry the current your product
will draw. An undersized cord will cause a drop in line
voltage resulting in loss of power and overheating.
Additional Electrical Safety Rules
• The voltage must correspond to the one marked on the
technical data plate (120 V~60 Hz). Do not use other
sources of power.
• Never pass the grass trimmer over the extension cord when
the grass trimmer is in use as this could cut the cord. Make
sure you know where the cord is at all times.
• Never use the tool when it is raining or when excessively
moist and humid conditions are present. Do not cut damp
grass or leave the tool outside overnight.
• The power supply cable should be checked regularly to
make sure it is perfectly intact without any signs of wear or
damage. If the cable is not in good condition, do not use
the unit.
m WARNING m
Electric shock may cause SEVERE INJURY or
DEATH. Heed these warnings:
• Do not allow any part of the electric grass trimmer
to make contact with water while it is in operation. If
the appliance becomes wet while turned o, wipe dry
before starting.
• Use only a UL-, CSA-, or ETL-rated extension cord
for outdoor, all-weather use.
• Do not use an extension cord over 100 ft (30 m).
• Do not touch the appliance or its plug with wet hands
or while standing in water. Wearing rubber boots
oers some protection.
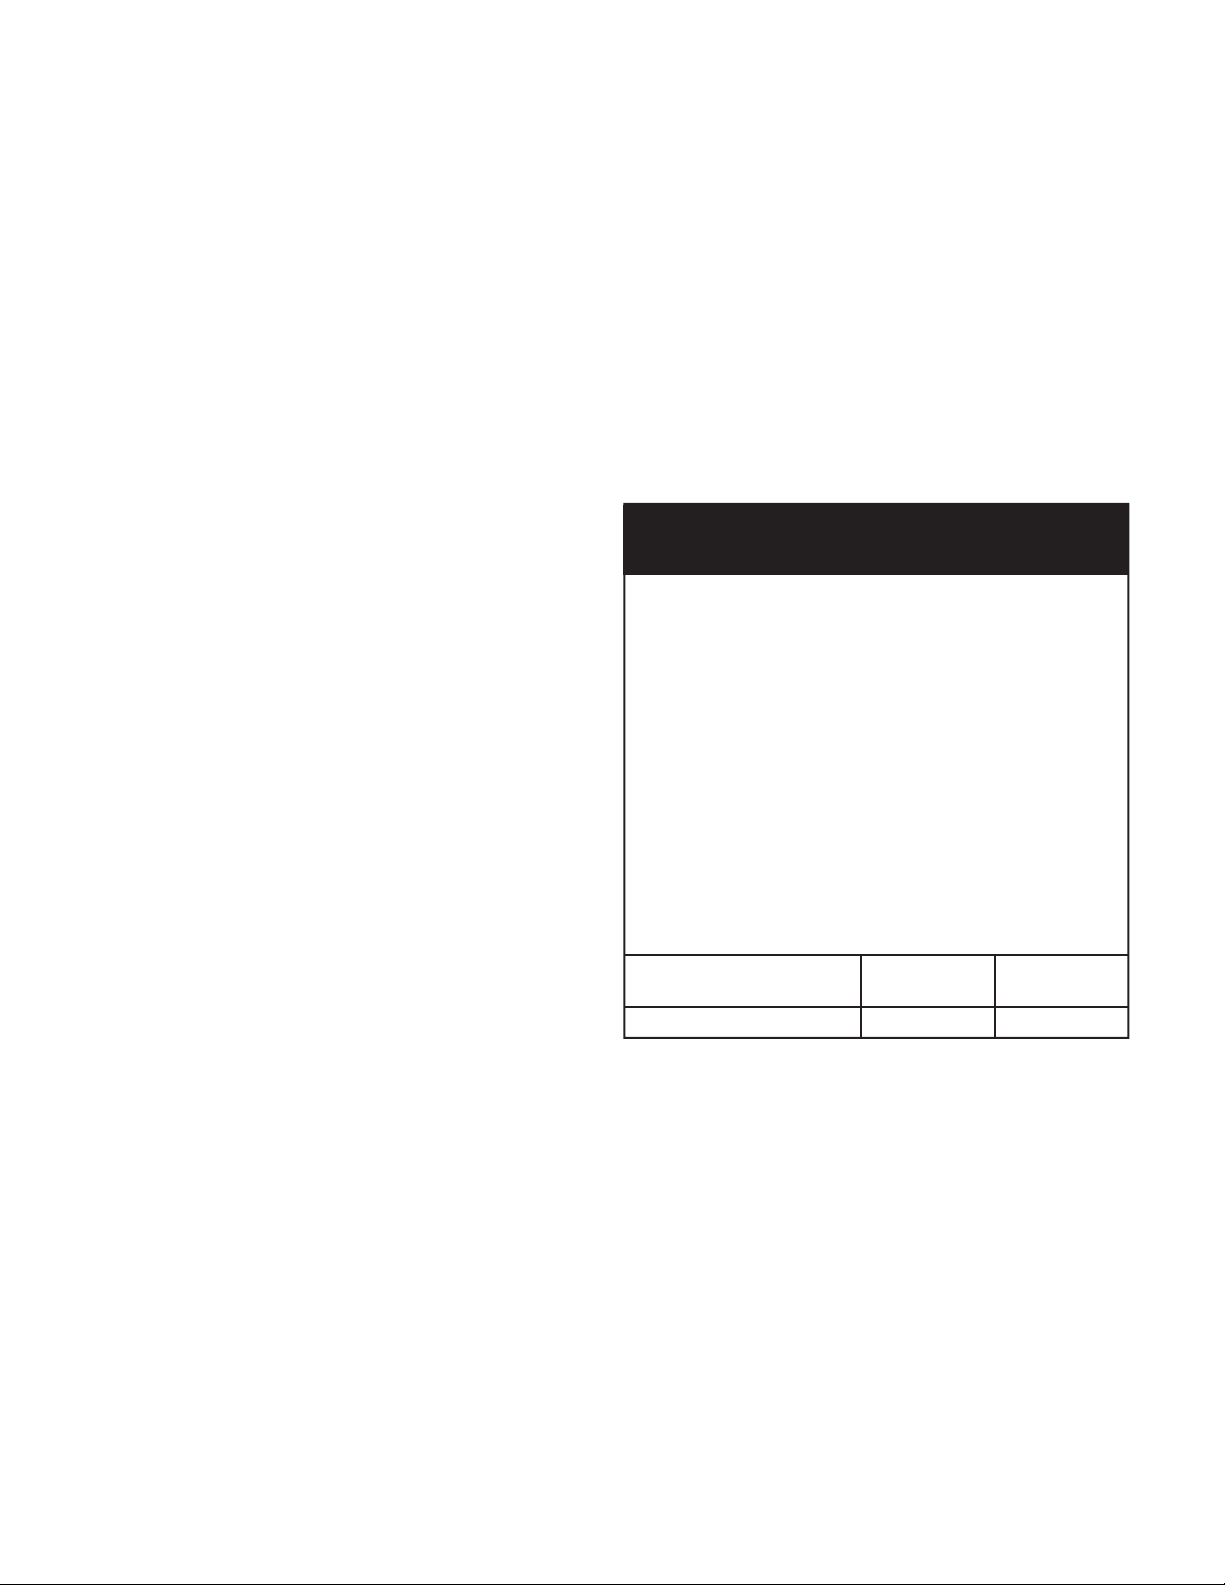
EXTENSION CORD CHART
Extension Cord
Length
Wire Gauge (A.W.G.):
Up to 50 ft
(15 m)
+50 ft - 100 ft
(+15 m - 30 m)
16 14

3
• Only use an extension cable that is rated for outdoor use.
Keep the extension cord away from the cutting area, sharp
edges, heat, fuels, damp areas, and oily surfaces.
• Damage to unit – If the trimmer strikes a foreign object
or becomes entangled with it, stop the tool immediately.
Unplug it, check for damage, and have any damage
repaired before proceeding with operation. Do not operate
the tool with a broken spool cover or spool. Contact
your authorized Snow Joe
®
+ Sun Joe
®
dealer or call
the Snow Joe
®
+ Sun Joe
®
customer service center at
1-866-SNOWJOE (1-866-766-9563).
• Damage to cord – Keep power cord away from the rotating
line. If you damage the cord, unplug it from the power
supply before moving the tool or examining the damage.
A damaged cord must be replaced before further use.
• Do not operate portable electric tools in gaseous or
explosive atmospheres – Motors in these tools normally
spark, and the sparks might ignite fumes.
• Maintain appliances with care – Follow instructions for
lubricating and changing accessories. Inspect extension
cords periodically and replace if damaged. Keep handle dry,
clean, and free from oil and grease.
Double-Insulated Appliances
In a double-insulated appliance, two systems of insulation
are provided instead of grounding. No grounding means is
provided on a double-insulated appliance, nor should a means
for grounding be added to the appliance. Servicing a double-
insulated appliance requires extreme care and knowledge
of the system, and should be performed only by qualied
service personnel at an authorized Snow Joe
®
+ Sun Joe
®
dealer. Replacement parts for a double-insulated appliance
must be identical to the parts they replace. A double-insulated
appliance is marked with the words “Double Insulation” or
“Double Insulated.” The symbol (square within a square)
may also be marked on the appliance.
DOUBLE-INSULATED: GROUNDING NOT
REQUIRED. WHEN SERVICING, USE ONLY
IDENTICAL REPLACEMENT PARTS.
This electric grass trimmer is double-insulated, eliminating
the need for a separate grounding system. Use only identical
replacement parts. Read the instructions before servicing
double-insulated appliances. Use this grass trimmer only as
described in this manual.
4
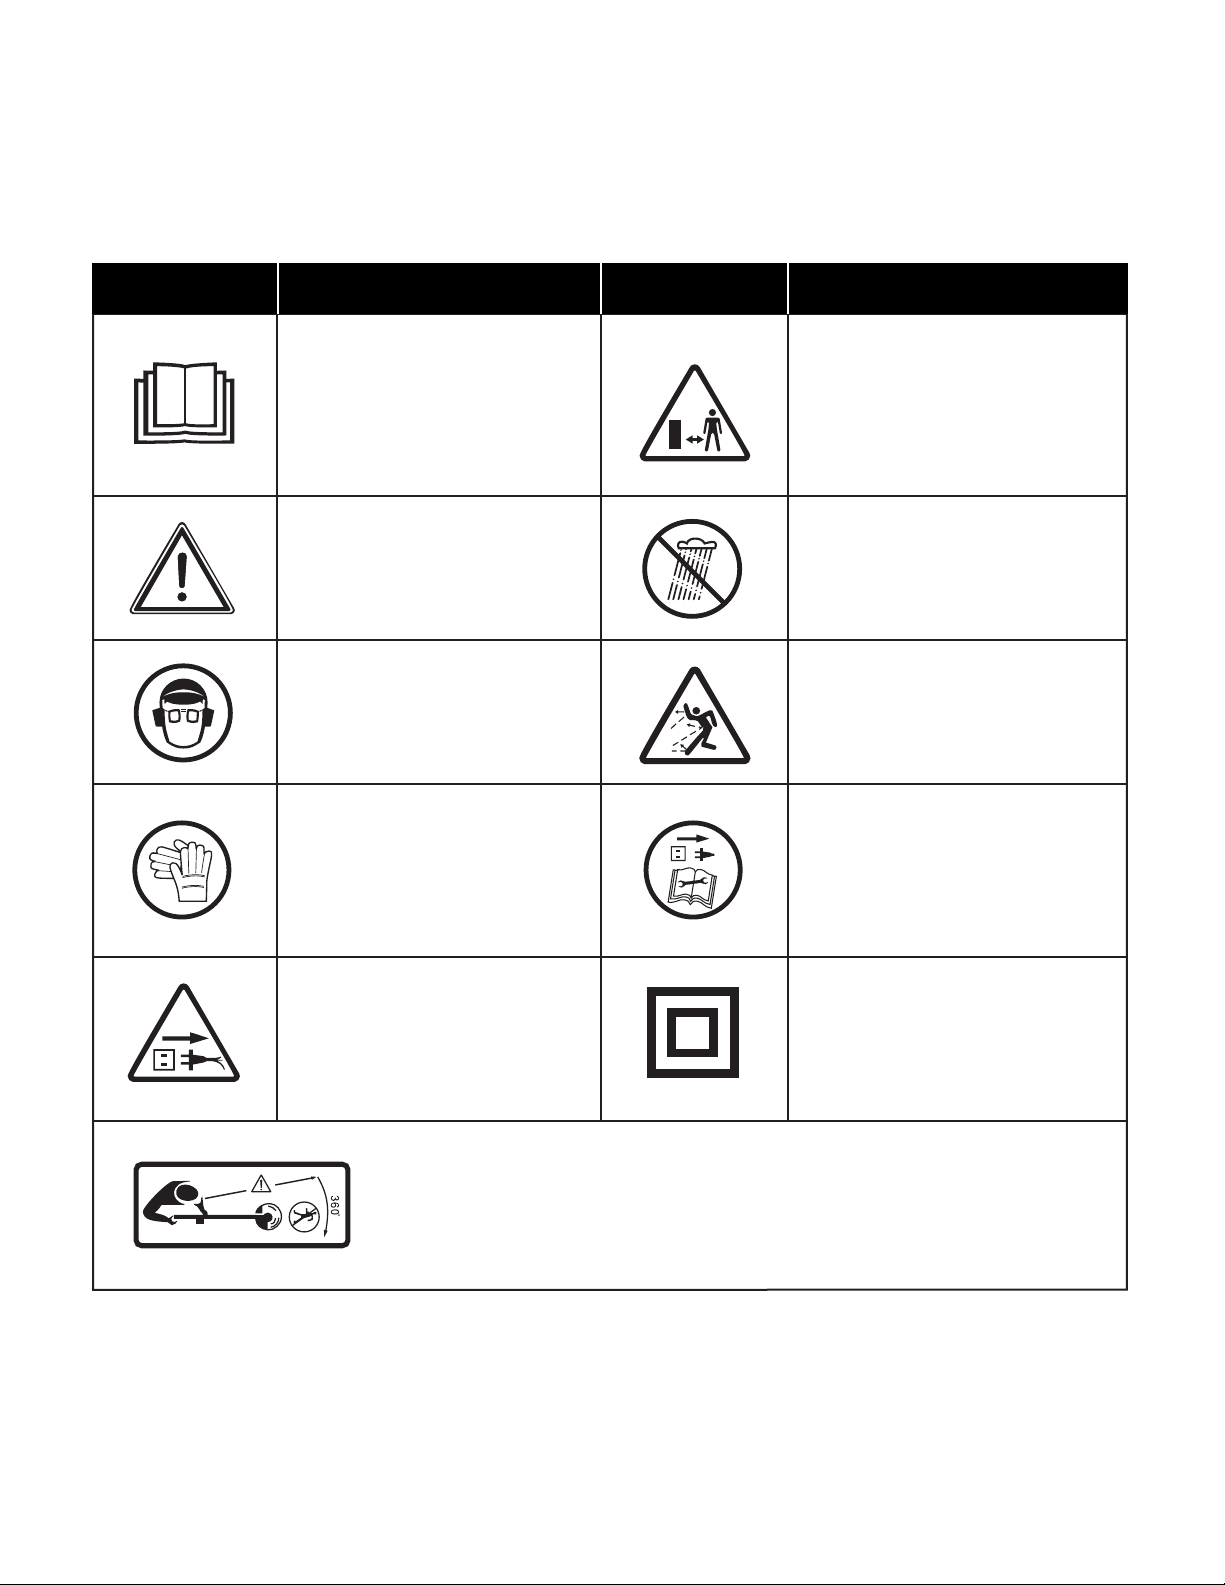
Safety Symbols
The following table depicts and describes safety symbols that may appear on this product. Read, understand, and follow all
instructions on the machine before attempting to assemble and operate.
READ THE OPERATOR'S
MANUAL(S) – Read,
understand, and follow
all instructions in the user
manual(s) before attempting to
assemble and operate.
SAFETY ALERT – Indicates
a precaution, a warning, or
a danger.
Immediately remove the plug
from the mains if the power
cable is damaged, frayed, or
entangled. Always keep the
power cable away from heat,
oil and sharp edges.
DANGER! Beware of thrown objects to bystanders. Keep bystanders
at least 50 ft (15 m) away from the machine.
DOUBLE INSULATION –
When servicing, use only
identical replacement parts.
WARNING! Do not expose the
unit to rain or wet conditions.
WEAR EYE AND HEARING
PROTECTION – For protection
against injury, wear ear
defenders and safety goggles.
Keep bystanders and children
a safe distance away.
Symbols SymbolsDescriptions Descriptions
Wear protective gloves when
using the machine and
handling debris.
Beware of ying objects
and debris.
WARNING! Turn the machine
OFF and disconnect it from the
power supply before inspecting,
cleaning, changing accessories,
or conducting any other
maintenance task.
5
Know Your Electric Grass Trimmer
Read the owner’s manual and safety instructions carefully before operating the electric grass trimmer. Compare the illustration
below to your electric grass trimmer in order to familiarize yourself with the location of the various controls and adjustments.
Save this manual for future reference.
Technical Data
Rated Voltage ..................................................... 120 V ~ 60 Hz
Motor ................................................................................ 2.8 A
No Load Speed ........................................... 12,500 ± 10% rpm
Cutting Diameter ................................................ 10 in. (25.4 cm)
Line Diameter .................................................0.063 in. (1.6 mm)
Trimming Line Length ............................................... 9.8 ft (3 m)
Spool Advance ................................................. Semi-auto feed
Net Weight ......................................................... 2.6 lbs (1.2 kg)
Gross Weight ..................................................... 3.7 lbs (1.7 kg)
1. Support bracket
2. Handle
3. ON/OFF trigger switch
4. Extension cord restraint
5. Pole shaft
6. Trimmer head shaft
7. Safety guard
8. Spool
9. Spool cover
10. Trimming line
11. Line trimming blade
12. Line feed button
13. Spool releasing tabs (2)
14. Appliance cord
1
2
3
4
5
6
7
8
9
14
Bottom
10
12
13
11
Hardware Pack
Support bracket screw
ST4 x 12 | Qty. 2
A
B
Shaft screw
ST4 x 16 | Qty. 4
C
Safety guard screw
ST4 x 18 partial thread
Qty. 1
6
Unpacking
Carton Contents
• Electric grass trimmer assembly (unconnected)
• Support bracket
• Safety guard
• ST4 x 18 partial thread screw (1)
• ST4 x 16 screws (4)
• ST4 x 12 screw (2)
• Manuals with registration card
1. Carefully remove the electric grass trimmer and check to
see that all of the above items are supplied.
2. Inspect the product carefully to make sure no breakage or
damage occurred during shipping. If you nd damaged or
missing parts, DO NOT return the unit to the store. Please
call the Snow Joe
®
+ Sun Joe
®
customer service center at
1-866-SNOWJOE (1-866-766-9563).
NOTE: Do not discard the shipping carton and packaging
material until you are ready to use the electric grass
trimmer. The packaging is made of recyclable materials.
Properly dispose of these materials in accordance with
local regulations.
IMPORTANT! The equipment and packaging material are not
toys. Do not let children play with plastic bags, foils, or small
parts. These items can be swallowed and pose a suocation
risk!
Assembly
mWARNING! Do not connect to power supply until
assembly is complete. Failure to comply could result in
accidental starting and possible serious personal injury.
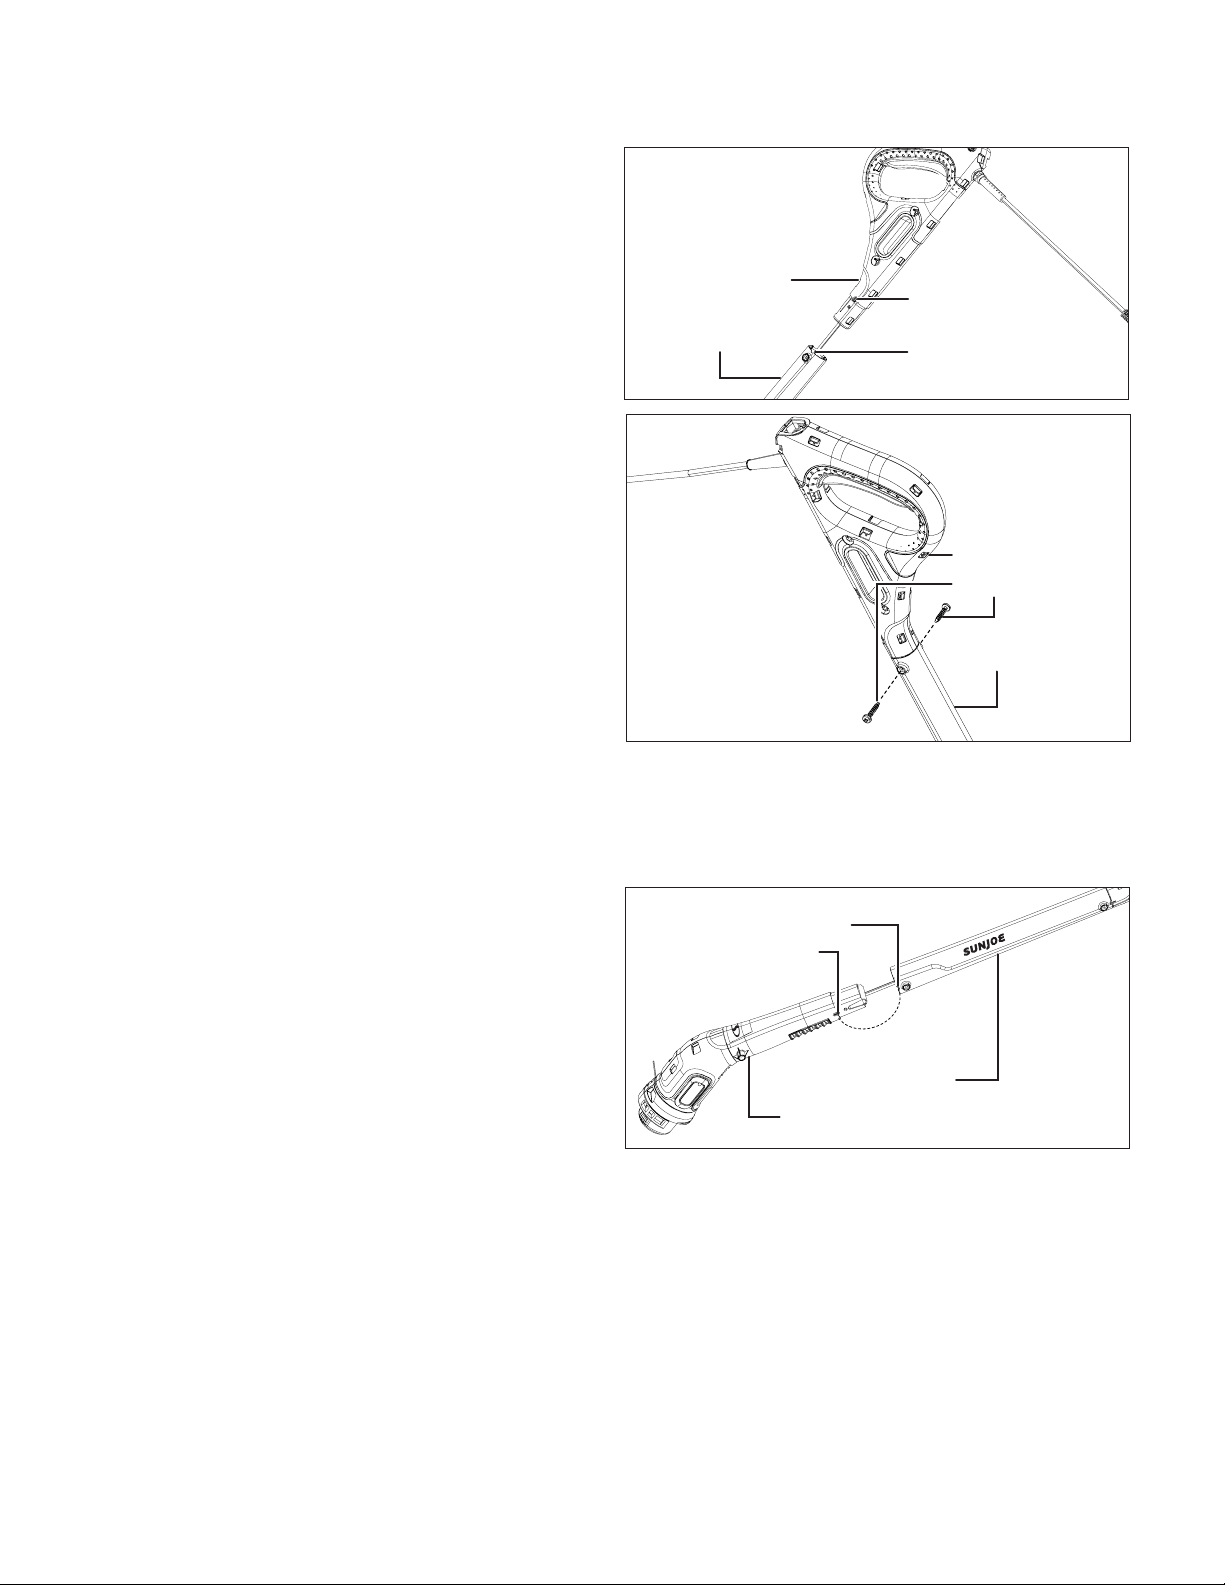
Fitting the Shafts
mWARNING! Make sure all the shafts are fully installed
before operating. Check the connection periodically during use
to avoid serious injury.
Standing in front of the trimmer to determine the right and left
side of the unit.
1. Aligning the round tab with arrow on right side of the
handle shaft with the groove on right side of the upper end
of the pole shaft, insert the handle shaft into the pole shaft
until it locks in place. Secure with two ST4 x 16 screws
provided (Figs. 1 - 2).
NOTE: You may have to carefully move the wiring inside
the pole to one side if it blocks the path of the screws.
2. Aligning the round tab with arrow on the right side of the
trimmer head shaft with the groove on the right side of the
lower end of the pole shaft, insert the trimmer head shaft
into the pole shaft until it locks securely in place. Secure
with two ST4 x 16 screws provided (Figs. 3 - 4).
Fig. 1
Handle shaft
Pole shaft
Tab
Groove
ST4 x 16 screws
Handle shaft
Fig. 2
Pole shaft
Fig. 3
Tab
Trimmer head shaft
Pole shaft
Groove
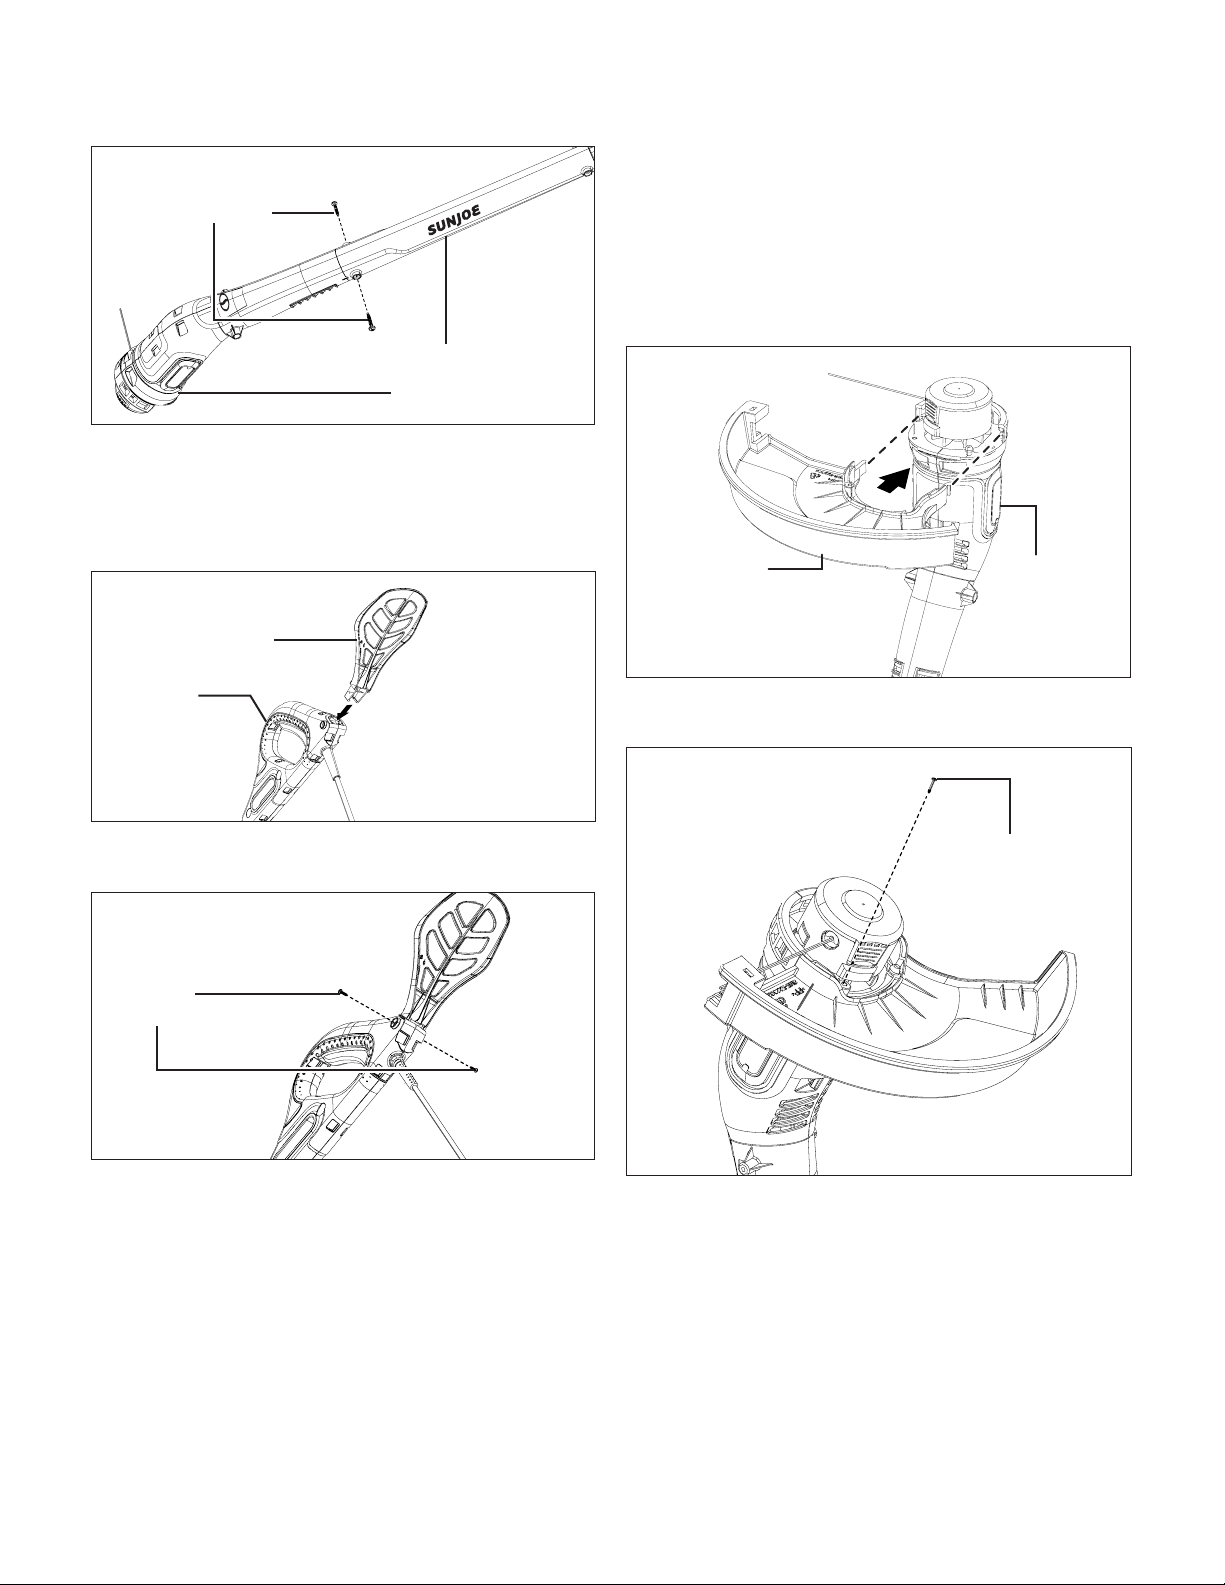
7
Fitting the Support Bracket
1. Hold the product steadily on the handle, and insert the
support bracket on top of the handle. Press until it locks
into place (Fig. 5).
2. Fix the assembly with provided two ST4 x 12 screws
(Fig. 6).
Fitting the Safety Guard
mWARNING! The safety guard must be properly
installed. The guard provides the operator and other
bystanders with some protection from thrown objects.
1. Fix the safety guard to the trimmer head, making sure the
sides are located along the grooves on the trimmer head,
as shown (Fig. 7).
2. Secure the safety guard onto the trimmer head with the
ST 4 x 18 partial thread screw provided (Fig. 8).
ST4 x 16 screws
Trimmer head shaft
Fig. 4
Pole shaft
Support bracket
Fig. 5
Handle
ST4 x 12
screws
Fig. 6
Trimmer
head
Safety Guard
Fig. 7
ST 4 x 18 partial
thread screw
Fig. 8
8
Operation
mWARNING! Do not allow familiarity with this product
to make you careless. Remember that a careless fraction of a
second is sucient to inict serious injury.
mWARNING! Always wear eye protection along with
hearing protection. Failure to do so could result in objects
being thrown into your eyes and other possible serious injuries.
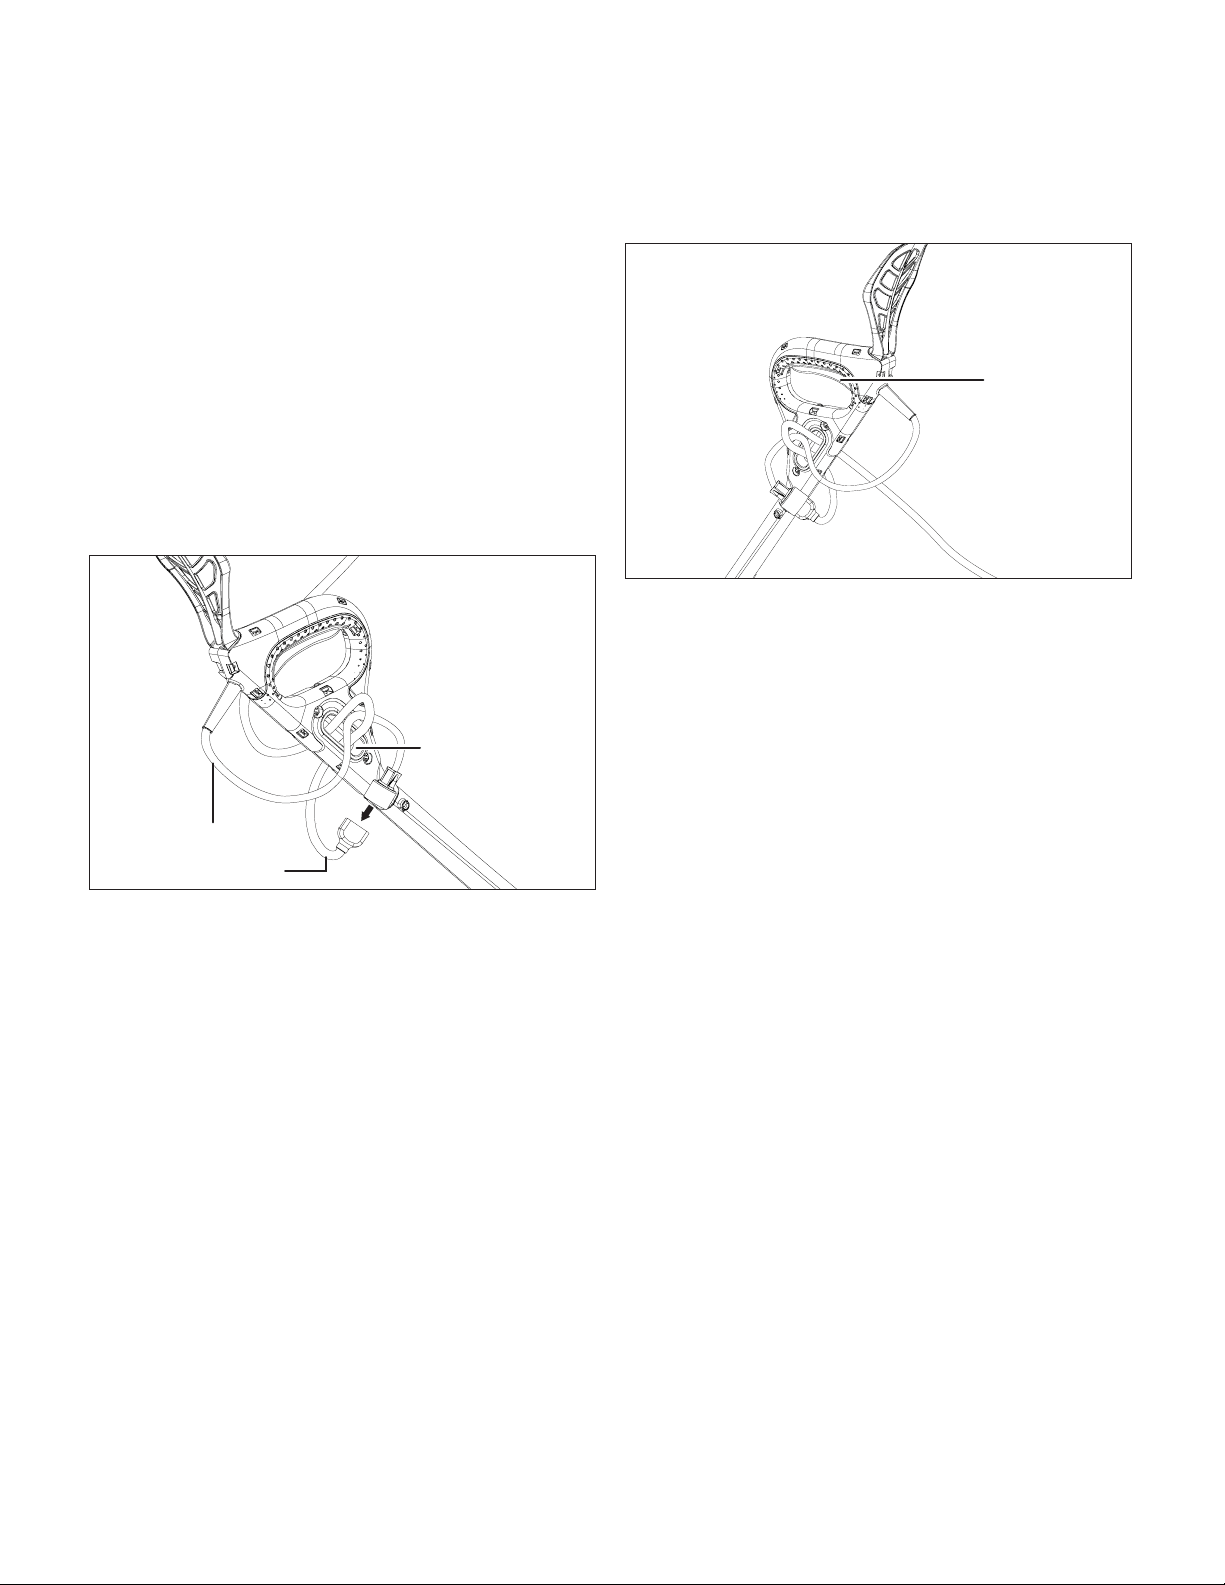
Securing the Extension Cord
1. To prevent the grass trimmer appliance cord and extension
cord from disconnecting during use, form the extension
cord into a loop and insert the loop into the extension cord
restraint. Insert the appliance cord into the loop (Fig. 9).
2. Connect the extension cord to the appliance cord (Fig. 9).
mWARNING! Remove stones, loose pieces of wood, and
other objects from the cutting area. The trimming line continues
to rotate for a few seconds after switching o the trimmer. Let
the motor come to a complete stop before resuming operation.
Do not rapidly switch the trimmer o and on.
mCAUTION! Always wear eye protection.
Starting + Stopping
1. To switch on the trimmer, press and hold the trigger
switch. Release the trigger to stop (Fig. 10).
Trimming
• Hold the grass trimmer with your right hand on the handle,
rest your arm on the support bracket and your left hand on
the trimmer pole. The grass trimmer should be held at a
comfortable position with the handle about hip height.
• Wear non-slip gloves for maximum grip and protection.
• For the best cutting action against walls, fences, and in high
grass, move the grass trimmer slowly so grass is cut with
the tip of the high speed nylon line.
• Avoid dragging the grass trimmer and string spool cover in
contact with the ground.
• Trim only when grass and weeds are dry.
NOTE: As the weather becomes cooler, the tendency for the
nylon line to break becomes greater. DO NOT USE WHEN
TEMPERATURE IS BELOW 50ºF (10ºC).
• Cut tall grass from top down. This will prevent grass from
wrapping around the shaft housing and string head which
may cause damage from overheating.
• If grass becomes wrapped around the string head:
– Stop the trimmer.
– Unplug the trimmer.
– Remove the grass.
mWARNING! Always hold the trimmer away from
body. Any contact with the grass trimmer cutting head while
operating can result in serious personal injury.
• The life of your nylon line is dependent upon following
instructions for proper use, as well as what is being cut, and
where the cutting is being done.
Appliance cord
Extension cord
Fig. 9
Extension cord
restraint
ON/OFF
Trigger
Switch
Fig. 10
9
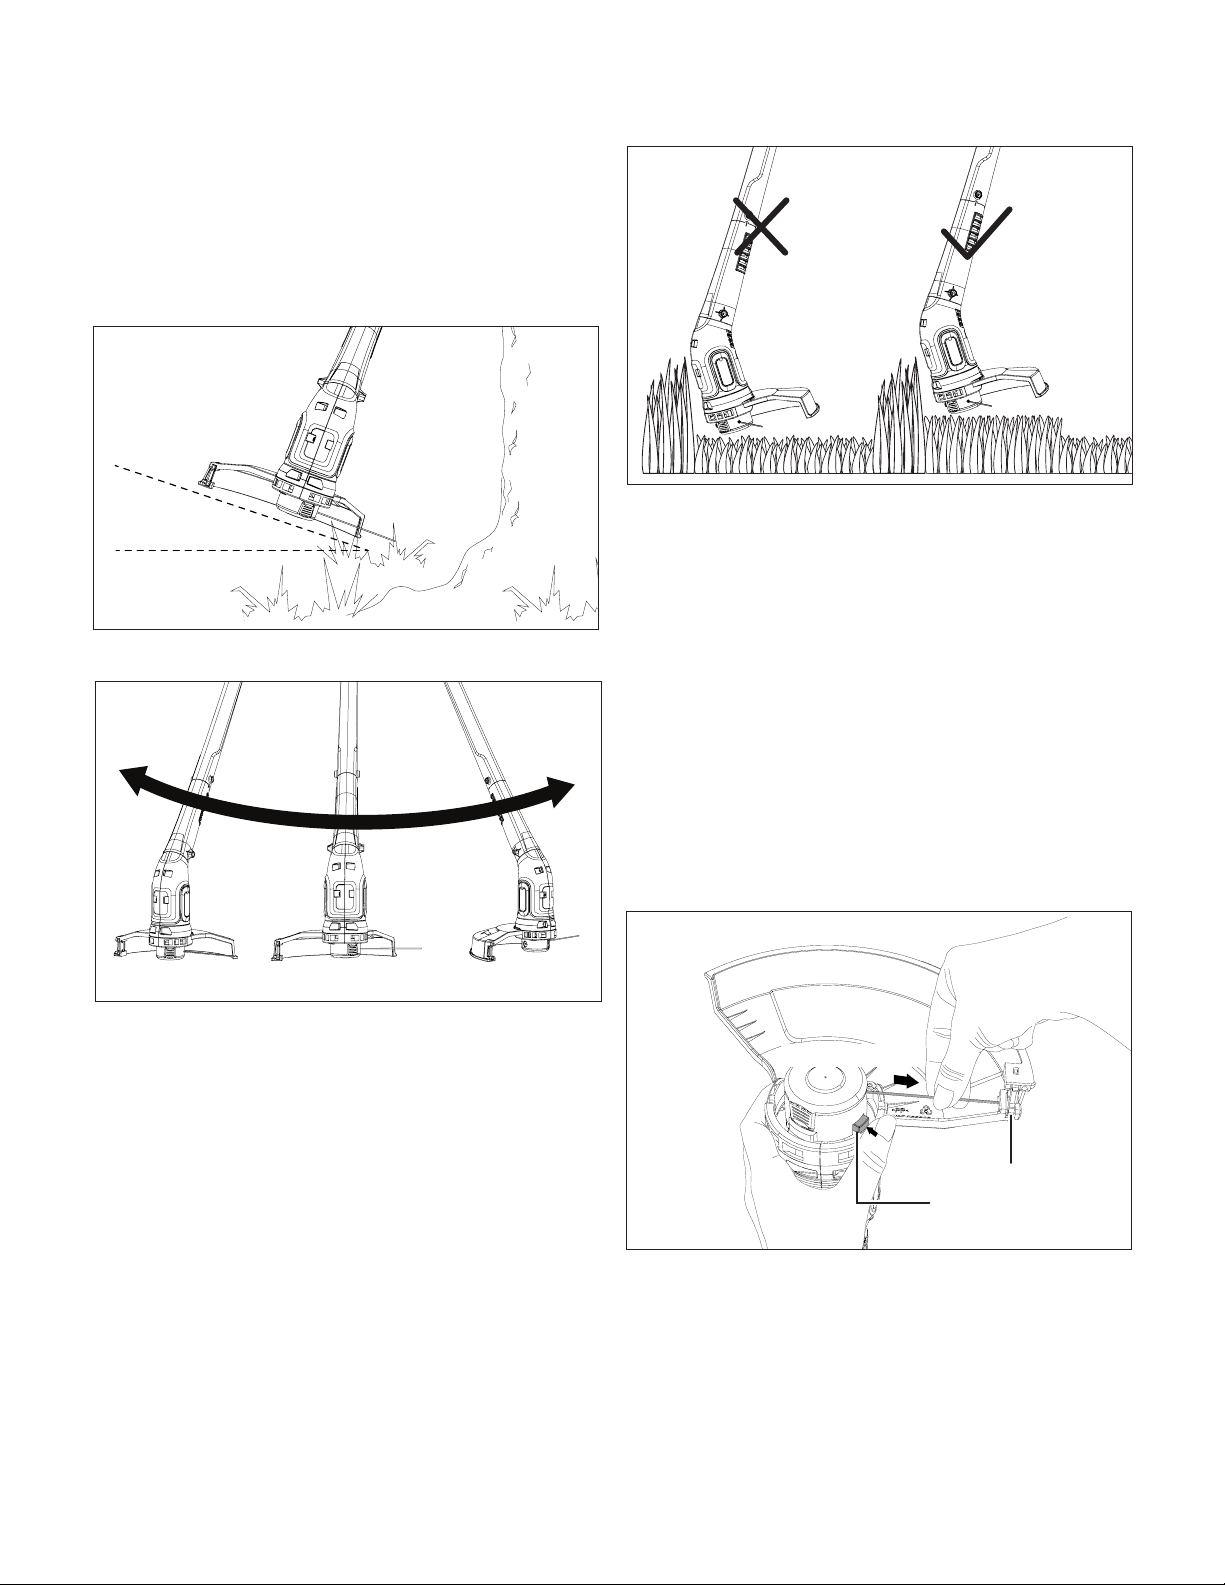
mWARNING! Do not operate the grass trimmer in a tree,
on a ladder, or on a scaold; this is extremely dangerous.
mCAUTION! Always wear eye protection.
1. For best cutting performance, hold the trimmer at an angle
of approximately 10 – 30 degrees to the work area
(Fig. 11).
2. Slowly swing the trimmer from side to side (Fig. 12).
3. Do not overload your trimmer; instead, take small “bites”
of grass, working from the top to the bottom. This will
keep the machine operating at high speed and will greatly
improve its cutting eciency (Fig. 13).
Advancing Trimmer Line
Your trimmer uses 0.063 in. (1.6 mm) diameter nylon line to
cut grass and weeds quickly and easily. For eciently feeding
the line, the trimmer is equipped with semi-auto line feeding
system, which will automatically advance the trimming line
every time the trimmer is stopped and restarted. The excess
line will be cut by the line trimming blade during operation.
Users can also manually advance the line using the line feed
button, following the instructions below.
1. Turn o the machine and unplug the appliance cord, wait
until the spool comes to a complete stop.
2. Turn over the trimmer. While gently pulling out the line,
keep pressing and releasing the line feed button until the
trimming line is long enough to reach the line trimming
blade (Fig. 14).
NOTE: The machine will release only 0.2 inch (5 mm)
trimmer line every time the line feed button is pressed. To
keep advancing the line, make sure to release the line feed
button and press again, until the line reached the desired
length.
NOTE: Make sure the end of the line won't pass the line
trimming blade. If too much line is fed out, remove the
spool cap and turn spool counter-clockwise until the line
is at the desired length.
3. Plug the appliance cord and resume working.
10° – 30°
Fig. 11
Fig. 12
Fig. 13
Fig. 14
Line feed button
Pull out the line
Line trimming blade

10
Maintenance
mWARNING! Always switch the product o, and let the
product cool down before performing inspection, maintenance
and cleaning work! Maintain this product regularly and
carefully! If the product is not maintained properly, it may fail at
its intended task, which may produce fatal consequences.
mWARNING! Only perform repairs and maintenance
work according to these instructions! All further works must be
performed by a qualied specialist!
mWARNING! Always wear protective gloves during
maintenance tasks. Do not carry out maintenance when the
motor is running or hot.
• Never use water or chemical cleaners to clean your grass
trimmer. Wipe it clean with a dry cloth.
• Plastic parts may be cleaned by using mild soap and a
damp rag.
• Always store your trimmer in a dry place. Do not allow any
liquid to get inside it.
• Your trimming line can dry out over time. To keep your line
in top condition, store spare pre-wound spools or bulk line
in a plastic resealable bag with a tablespoon of water.
IMPORTANT! To ensure product safety and reliability, repairs,
maintenance, and adjustments to this power tool should be
performed only with identical replacement parts. Contact your
authorized Snow Joe
®
+ Sun Joe
®
dealer or call the Snow Joe
®
+ Sun Joe
®
customer service center at 1-866-SNOWJOE
(1-866-766-9563) for assistance.
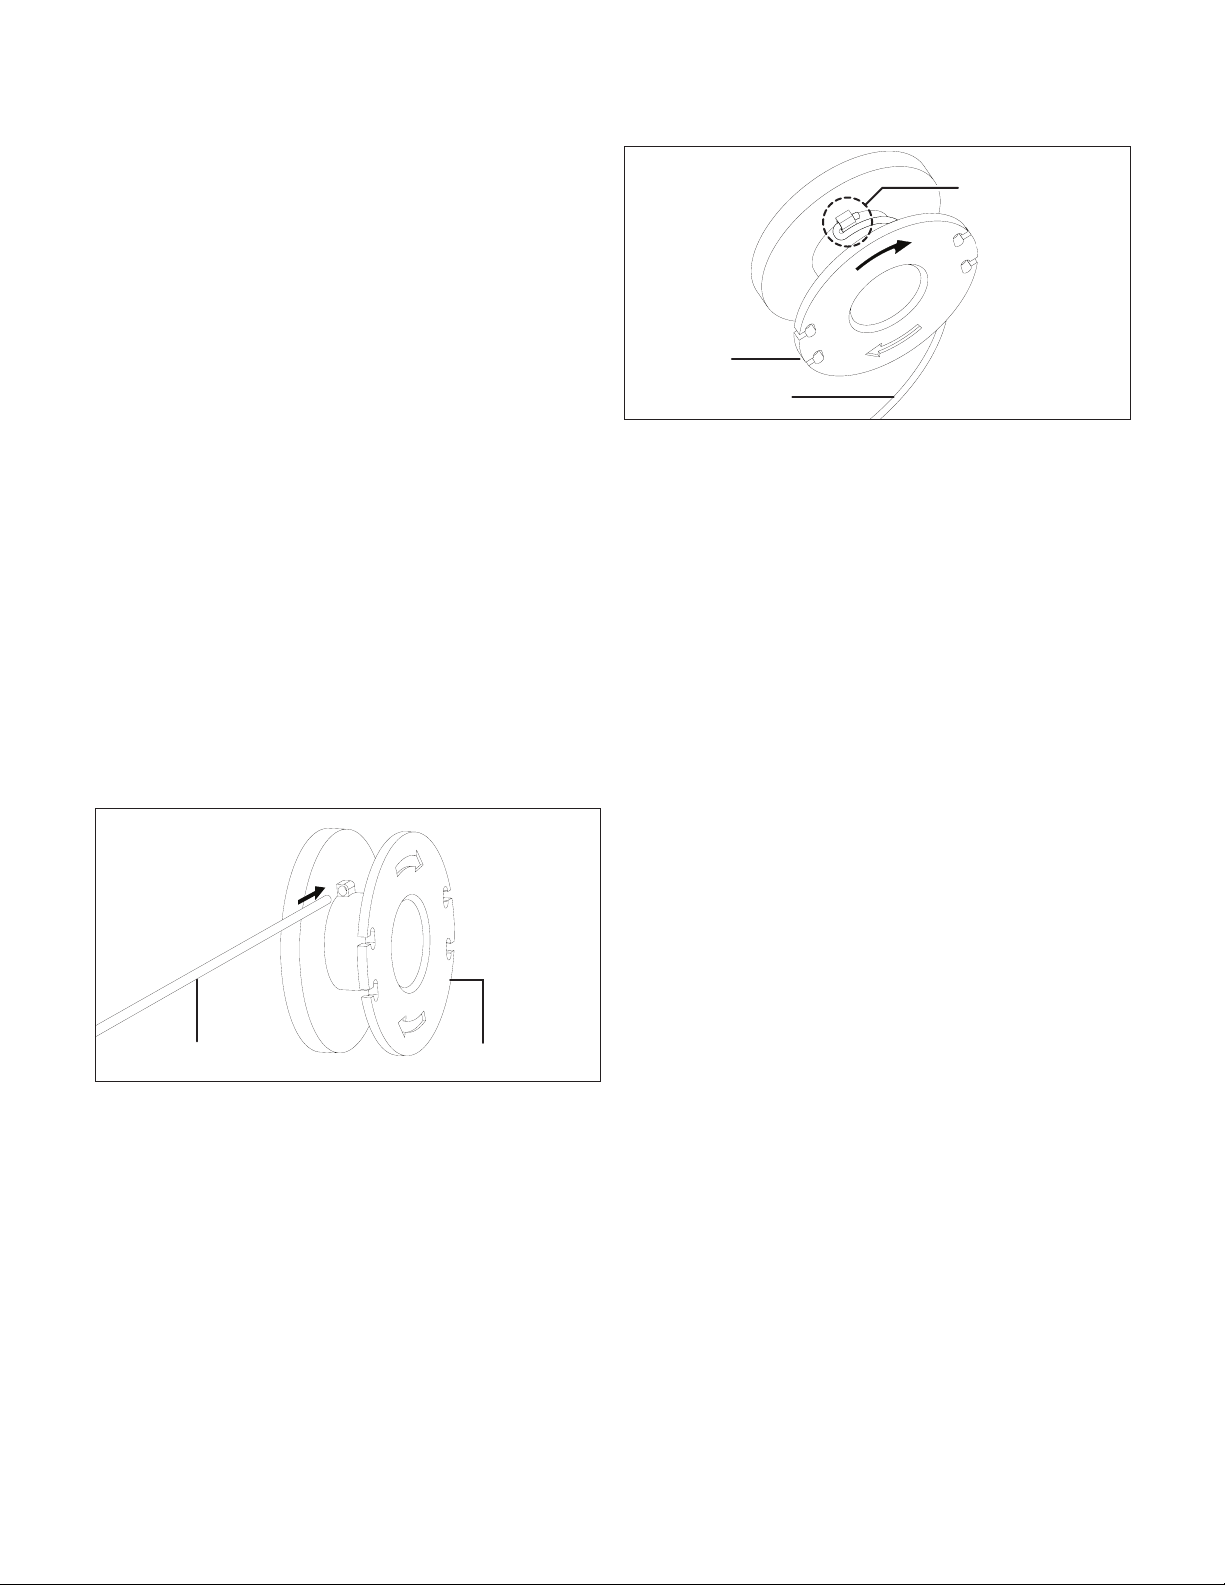
Replacing the Spool + Clearing Jams
and Tangled Lines
mWARNING! Unplug the extension cord from the mains
power plug before changing the trimming line.
1. Press together both release tabs on the line spool cover
to remove the cover and the spool by pulling them straight
o (Fig. 15 – 16).
2. Remove any broken trimming line, wind the remaining line
tight and re-insert the spool into the spool cover as follow,
or insert a new pre-wounded spool.
3. To use a new spool, rst unhook the end of the cutting
line from the spool, and insert the end of the cutting line
through the eyelet on the machine (Fig. 17).
4. Insert the spool inside the machine, press hard until it
clicks in place. Adjust the length of the trimming line
outside by pulling the trimming line to lengthen, or rotating
the spool counter-clockwise to shorten. Replace the spool
cover, make it sit securely to lock the assembly (Fig. 18).
IMPORTANT: Only use original replacement parts specied for
this machine.
Fig. 15
Spool cover
Spool cover
releasing
tab
Fig. 16
Spool cover
Spool
Fig. 17
Spool
Insert the end
of trimming line
through the eyelet
Fig. 18
Spool cover
11
You can purchase a 6-pack replacement pre-wound spool
(Model TRJ608E-RS-6PK) and other genuine replacement
parts by visiting us online at sunjoe.com or calling our toll-free
customer service helpline at 1-866-SNOWJOE
(1-866-766-9563). The use of parts that do not meet the original
equipment specications may lead to improper performance
of the grass trimmer, may compromise operator safety and will
void the manufacturer's warranty.
Winding the Line
NOTE: A 6-pk single-line factory wound spool (model
TRJ608E-RS-6PK) is available for easy spool replacement
on the TRJ608E electric grass trimmer. Visit sunjoe.com to
purchase this accessory online. Should you wish to wind the
line yourself, the instructions are provided below. Self-winding,
however, is NOT recommended because if the line is not wound
properly it can cause the trimmer’s semi-automatic feed system
to malfunction. For this reason, users are strongly urged to
purchase the pre-wound spool.
1. Turn o and unplug the grass trimmer. Make sure the
spool has come to a complete stop.
2. To remove the spool from the trimmer hub, follow steps
1 and 2 from the section "Replacing the Spool + Clearing
Jams and Tangled Lines" beginning on page 10.
3. Measure and cut a 9.8 ft (3 m) piece of new trimming
line. Insert the end of the trimming line into the small hole
located inside of the spool (Fig. 19).
4. Bend the trimming line 180 degree around the hole,
secure the bending part with your left hand thumb, and
use your right hand to wind the line according to the
arrows on the spool (Fig. 20). Use slight tension to make
sure the line is tight around the spool.
5. Re-install the spool as instructed in steps 3 to 4 of
"Replacing the Spool + Clearing Jams and Tangled Lines".
mCAUTION! Catapulted pieces of nylon line may cause
injury.
mWARNING! Pay attention to the winding direction.
NOTE: Always replace the spool with a new pre-wound spool.
Visit sunjoe.com to purchase the pre-wound spool
(model TRJ608E-RS-6PK) for this electric grass trimmer.
IMPORTANT: Keep all areas of the cutting head and cutting
head cover clean. Place the cap back by pushing it rmly
onto the cutting head. To ensure that the cutting head cover
is correctly tted, try to remove it without depressing the two
tabs. If it is correctly tted, it should not move.
Storage
Follow these recommendations for storing the trimmer.
• Clean the trimmer thoroughly before storing.
• Store the trimmer in a stable and safe position out of the
reach of children. Keep the trimmer in a dry place where the
temperature is not too hot or too cold.
• When storing the trimmer, do not rest it against the oor.
Hang it by the upper handgrip so that the guard does not
touch anything. If the guard rests against a surface, its
shape and dimensions could be permanently altered, and
could render the machine unsafe to use.
Fig. 19
Trimming line Spool
Fig. 20
Trimming line
Spool
Bend the line

12
Service + Support
If your Sun Joe
®
TRJ608E electric grass trimmer requires
service or maintenance, please call the Snow Joe
®
+ Sun Joe
®
customer service center at 1-866-SNOWJOE (1-866-766-9563).
Model + Serial Numbers
When contacting the company, reordering parts, or arranging
service from an authorized dealer, you will need to provide the
model and serial numbers, which can be found on the decal
located on the housing of the unit. Copy these numbers into
the space provided below.
Record the following numbers from the housing or handle of your
new product:
Model #:
Serial #:
T R J 6 0 8 E

13
Troubleshooting
Most diculties are easy to x. Consult the troubleshooting table for common problems and their solutions. If you continue
to experience problems or need repairs beyond these minor adjustments, please call 1-866-SNOWJOE (1-866-766-9563) for
assistance.
Problems Possible Cause Possible Solution
The motor does not
run or the tool runs
slowly
• Power failure/unit not plugged
into a working receptacle.
• Spool housing cannot rotate freely.
• Trimming line does not protrude.
• Check to make sure the unit is plugged into a working
outlet. Make sure the extension cord is not damaged.
• Remove the spool and clean the slots; carefully remove
any grass and weeds or other debris.
• Cut the spool line o so that it just reaches the line
trimming blade.
• Take the trimmer to an authorized service center if the
trimmer does not start after completing these checks.
• Stop the machine and clean the line trimming blade.
• Install a new spool of cutting line.
• Remove the spool cover and pull the trimming line until it
reaches the line trimming blade.
• Line trimming blade bound with
accumulated grass.
• The spool runs out of line.
• Spool bound up.
• Spool line twisted when relled.
• Not enough line is exposed.
Semi-auto line
feeding system does
not work
• Contact your authorized Snow Joe
®
+ Sun Joe
®
dealer
or call Snow Joe
®
+ Sun Joe
®
customer service center at
1-866-SNOWJOE (1-866-766-9563).
• Rewind or trim line to the line trimming blade
• Line trimming blade in guard is
covered, damaged, or missing.
• Line extends past guard.
Line fails to cut o
14
Optional Accessories
mWARNING! ALWAYS use only authorized Snow Joe
®
+ Sun Joe
®
replacement parts and accessories. NEVER use
replacement parts or accessories that are not intended for use with this electric grass trimmer. Contact Snow Joe
®
+ Sun Joe
®
if you are unsure whether it is safe to use a particular replacement part or accessory with your electric grass trimmer. The use of
any other attachment or accessory can be dangerous and could cause injury or mechanical damage.
NOTE: Accessories are subject to change without any obligation on the part of Snow Joe
®
+ Sun Joe
®
to provide notice of such
changes. Accessories can be ordered online at sunjoe.com or via phone by contacting the Snow Joe
®
+ Sun Joe
®
customer
service center at 1-866-SNOWJOE (1-866-766-9563).
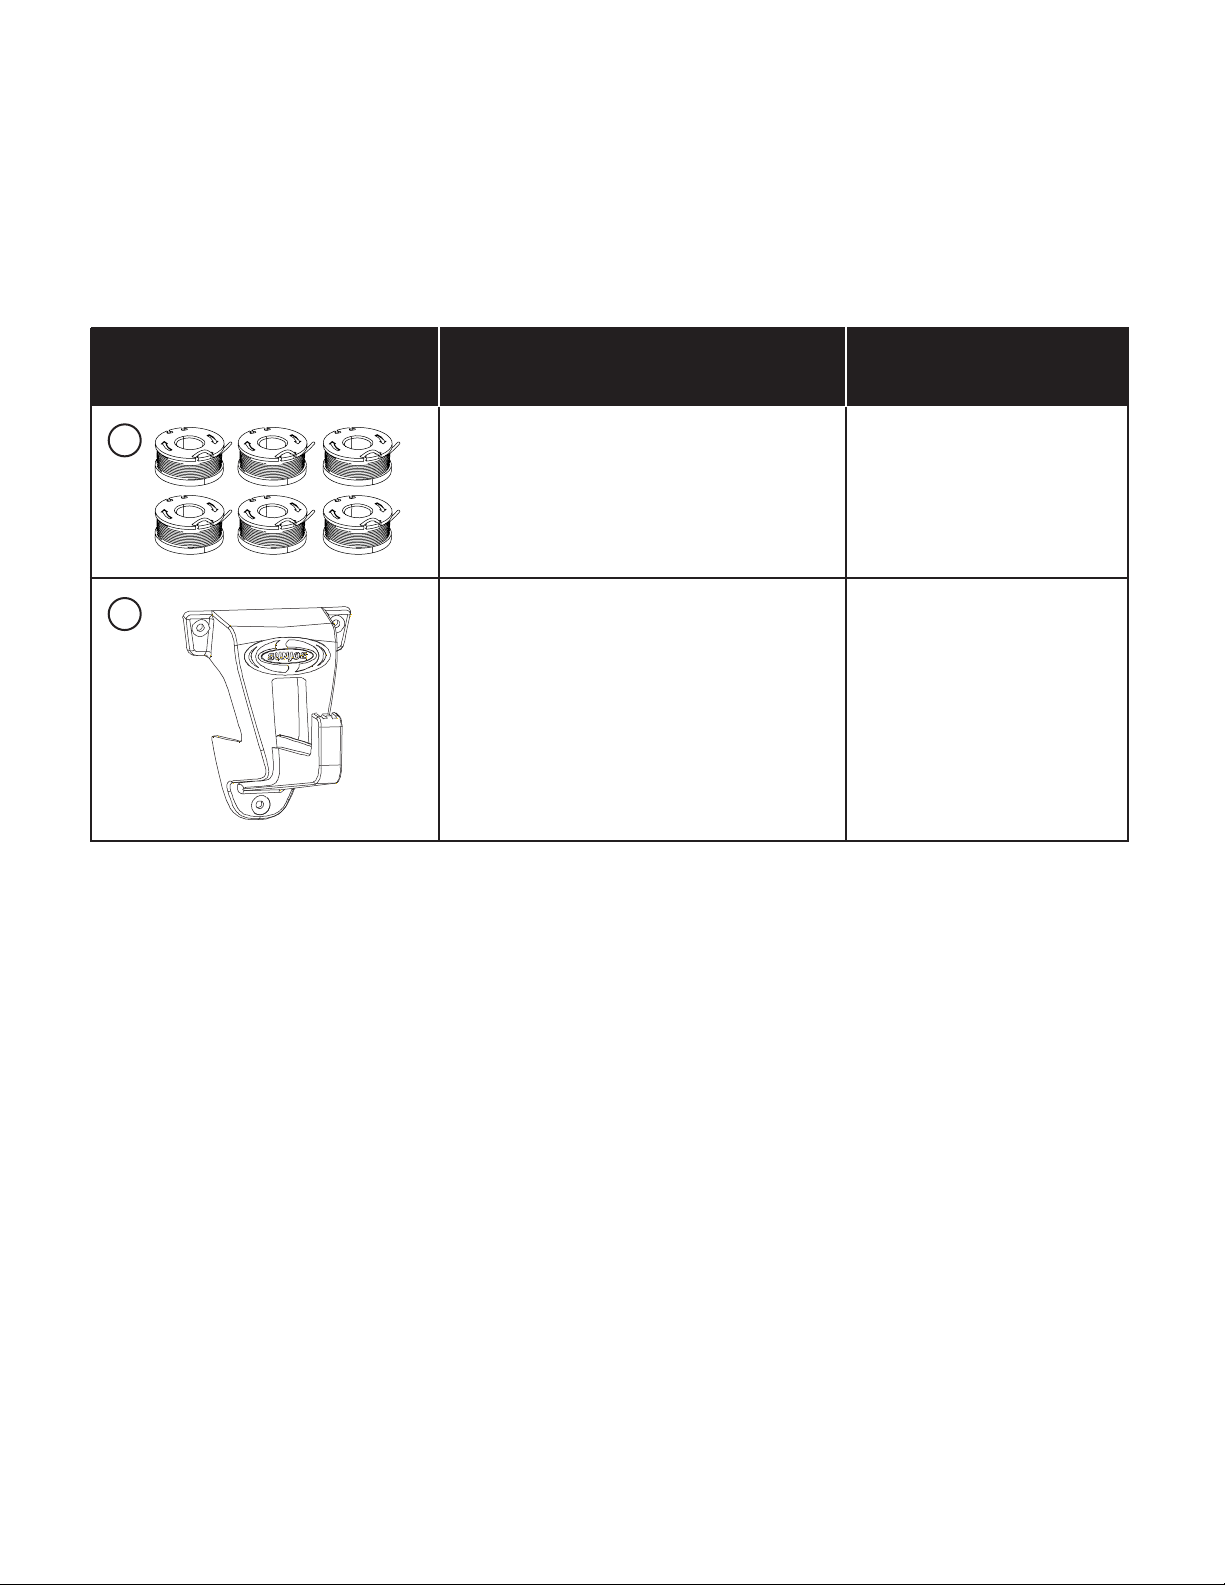
Single-line pre-wound spool (6-Pack)
Snow Joe
®
+ Sun Joe
®
universal wall bracket
TRJ608E-RS-6PK
SJWB
ModelAccessories Item
1
2

15
R4_01282020
SNOW JOE
®
+ SUN JOE
®
CUSTOMER PROMISE
OUR WARRANTY:
Snow Joe
warrants new, genuine, powered and non-powered Products to be free from defects in material or workmanship when used
for ordinary household use for a period of two years from the date of purchase by the original, end-user purchaser when purchased
from Snow Joe or from one of Snow Joe’s authorized sellers with proof of purchase. Because Snow Joe is unable to control the quality
of its Products sold by unauthorized sellers, unless otherwise prohibited by law, this Warranty does not cover Products purchased from
unauthorized sellers. If your Product does not work or there’s an issue with a specic part that is covered by the terms of this Warranty,
Snow Joe will elect to either (1) send you a free replacement part, (2) replace the Product with a new or comparable product at no
charge, or (3) repair the Product. How cool is that!
This Warranty gives you specific legal rights, and you may also have other rights which vary from State to State.
PRODUCT REGISTRATION:
Snow Joe strongly encourages you to register your Product. You can register online at snowjoe.com/register, or by printing and
mailing in a registration card available online from our website, or calling our Customer Service Department at 1-866-SNOWJOE
(1-866-766-9563), or by e-mailing us at [email protected]. Failure to register your Product will not diminish your warranty
rights. However, registering your Product will allow Snow Joe to better serve you with any of your customer service needs.
WHO CAN SEEK LIMITED WARRANTY COVERAGE:
This Warranty is extended by Snow Joe to the original purchaser and original owner of the Product.
WHAT IS NOT COVERED?
This Warranty does not apply if the Product has been used commercially or for non-household or rental applications. This Warranty also
does not apply if the Product was purchased from an unauthorized seller. This Warranty also does not cover cosmetic changes that do
not aect performance. Wearing parts like belts, augers, chains and tines are not covered under this Warranty, and can be purchased
at snowjoe.com or by calling 1-866-SNOWJOE (1-866-766-9563).
ABOVE ALL ELSE, Snow Joe, LLC (“Snow Joe”) is dedicated to you, our customer. We strive to make your experience as pleasant as
possible. Unfortunately, there are times when a Snow Joe
®
, Sun Joe
®
, or Aqua Joe
®
product (“Product”) does not work or breaks under
normal operating conditions. We think it’s important that you know what you can expect from us. That’s why we have a Limited Warranty
(“Warranty”) for our Products.

sunjoe.com