DSLR-A560/A580 4-207-863-13 (1)
Additional information on this product and
answers to frequently asked questions can be
found at our Customer Support Website.
A-mount
Instruction Manual
Interchangeable Lens
Digital Camera
Preparing the camera
Before your operation
Shooting images
Using the shooting function
Using the viewing function
Changing your setup
Viewing images on a
computer
Printing images
Others
Index

2
Owner’s Record
The model and serial numbers are located
on the bottom.
Record the serial number in the space
provided below.
Refer to these numbers whenever you call
upon your Sony dealer regarding this
product.
Model No. DSLR-A580/A560
Serial No. __________________________
To reduce fire or shock hazard, do
not expose the unit to rain or
moisture.
IMPORTANT SAFETY
INSTRUCTIONS
SAVE THESE
INSTRUCTIONS.
DANGER - TO
REDUCE THE RISK
OF FIRE OR
ELECTRIC SHOCK,
CAREFULLY
FOLLOW THESE
INSTRUCTIONS.
If the shape of the plug does not fit the
power outlet, use an attachment plug
adaptor of the proper configuration for the
power outlet.
Battery pack
If the battery pack is mishandled, the
battery pack can burst, cause a fire or even
chemical burns. Observe the following
cautions.
• Do not disassemble.
• Do not crush and do not expose the
battery pack to any shock or force such as
hammering, dropping or stepping on it.
• Do not short circuit and do not allow
metal objects to come into contact with
the battery terminals.
• Do not expose to high temperature above
60°C (140°F) such as in direct sunlight or
in a car parked in the sun.
• Do not incinerate or dispose of in fire.
• Do not handle damaged or leaking
lithium ion batteries.
• Be sure to charge the battery pack using a
genuine Sony battery charger or a device
that can charge the battery pack.
WARNING
Caution

3
• Keep the battery pack out of the reach of
small children.
• Keep the battery pack dry.
• Replace only with the same or equivalent
type recommended by Sony.
• Dispose of used battery pack promptly
described the instructions.
Battery charger
Even if the CHARGE lamp is not lit, the
battery charger is not disconnected from the
AC power source (mains) as long as it is
connected to the wall outlet (wall socket).
If some trouble occurs while using the
battery charger, immediately shut off the
power by disconnecting the plug from the
wall outlet (wall socket).
The supplied power cord can be used only
with this charger. The power cord cannot
be used with other devices.
RECYCLING LITHIUM-ION
BATTERIES
Lithium-Ion batteries are
recyclable.
You can help preserve
our environment by
returning your used
rechargeable batteries to
the collection and
recycling location nearest you.
For more information regarding recycling
of rechargeable batteries, call toll free
1-800-822-8837, or visit http://
www.rbrc.org/
Caution: Do not handle damaged or
leaking Lithium-Ion batteries.
Battery pack
This device complies with Part 15 of the
FCC Rules, Operation is subject to the
following two conditions:
(1) This device may not cause harmful
interference, and (2) this device must
accept any interference received, including
interference that may cause undesired
operation.
This Class B digital apparatus complies
with Canadian ICES-003.
UL is an internationally recognized safety
organization.
The UL Mark on the product means it has
been UL Listed.
For Customers in the U.S.A.
and Canada
For Customers in the U.S.A.

4
If you have any questions about this
product, you may call:
Sony Customer Information Services
Center
1-800-222-SONY (7669)
The number below is for the FCC related
matters only.
Regulatory Information
CAUTION
You are cautioned that any changes or
modifications not expressly approved in
this manual could void your authority to
operate this equipment.
Note:
This equipment has been tested and found
to comply with the limits for a Class B
digital device, pursuant to Part 15 of the
FCC Rules.
These limits are designed to provide
reasonable protection against harmful
interference in a residential installation.
This equipment generates, uses, and can
radiate radio frequency energy and, if not
installed and used in accordance with the
instructions, may cause harmful
interference to radio communications.
However, there is no guarantee that
interference will not occur in a particular
installation. If this equipment does cause
harmful interference to radio or television
reception, which can be determined by
turning the equipment off and on, the user
is encouraged to try to correct the
interference by one or more of the
following measures:
– Reorient or relocate the receiving
antenna.
– Increase the separation between the
equipment and receiver.
– Connect the equipment into an outlet
on a circuit different from that to which
the receiver is connected.
– Consult the dealer or an experienced
radio/TV technician for help.
The supplied interface cable must be used
with the equipment in order to comply with
the limits for a digital device pursuant to
Subpart B of Part 15 of FCC Rules.
Declaration of Conformity
Trade Name: SONY
Model No.: DSLR-A580
Responsible Party: Sony Electronics
Inc.
Address:16530 Via Esprillo,
San Diego, CA 92127 U.S.A.
Telephone No.: 858-942-2230
This device complies with Part 15 of the
FCC Rules. Operation is subject to the
following two conditions: (1) This
device may not cause harmful
interference, and (2) this device must
accept any interference received,
including interference that may cause
undesired operation.
Declaration of Conformity
Trade Name: SONY
Model No.: DSLR-A560
Responsible Party: Sony Electronics
Inc.
Address:16530 Via Esprillo,
San Diego, CA 92127 U.S.A.
Telephone No.: 858-942-2230
This device complies with Part 15 of the
FCC Rules. Operation is subject to the
following two conditions: (1) This
device may not cause harmful
interference, and (2) this device must
accept any interference received,
including interference that may cause
undesired operation.

5
Notice for the customers in the
countries applying EU Directives
The manufacturer of this product is Sony
Corporation, 1-7-1 Konan Minato-ku
Tokyo, 108-0075 Japan. The Authorized
Representative for EMC and product safety
is Sony Deutschland GmbH, Hedelfinger
Strasse 61, 70327 Stuttgart, Germany. For
any service or guarantee matters please
refer to the addresses given in separate
service or guarantee documents.
This product has been tested and found
compliant with the limits set out in the
EMC Directive for using connection cables
shorter than 3 meters (9.8 feet).
Attention
The electromagnetic fields at the specific
frequencies may influence the picture and
sound of this unit.
Notice
If static electricity or electromagnetism
causes data transfer to discontinue midway
(fail), restart the application or disconnect
and connect the communication cable
(USB, etc.) again.
Disposal of Old Electrical &
Electronic Equipment (Applicable in
the European Union and other
European countries with separate
collection systems)
This symbol on the product or on its
packaging indicates that this product shall
not be treated as household waste. Instead it
shall be handed over to the applicable
collection point for the recycling of
electrical and electronic equipment. By
ensuring this product is disposed of
correctly, you will help prevent potential
negative consequences for the environment
and human health, which could otherwise
be caused by inappropriate waste handling
of this product. The recycling of materials
will help to conserve natural resources. For
more detailed information about recycling
of this product, please contact your local
Civic Office, your household waste
disposal service or the shop where you
purchased the product.
For Customers in Europe

6
Disposal of waste batteries
(applicable in the European Union
and other European countries with
separate collection systems)
This symbol on the battery or on the
packaging indicates that the battery
provided with this product shall not be
treated as household waste.
On certain batteries this symbol might be
used in combination with a chemical
symbol. The chemical symbols for mercury
(Hg) or lead (Pb) are added if the battery
contains more than 0.0005% mercury or
0.004% lead.
By ensuring these batteries are disposed of
correctly, you will help prevent potentially
negative consequences for the environment
and human health which could otherwise be
caused by inappropriate waste handling of
the battery. The recycling of the materials
will help to conserve natural resources.
In case of products that for safety,
performance or data integrity reasons
require a permanent connection with an
incorporated battery, this battery should be
replaced by qualified service staff only.
To ensure that the battery will be treated
properly, hand over the product at end-of-
life to the applicable collection point for the
recycling of electrical and electronic
equipment.
For all other batteries, please view the
section on how to remove the battery from
the product safely. Hand the battery over to
the applicable collection point for the
recycling of waste batteries.
For more detailed information about
recycling of this product or battery, please
contact your local Civic Office, your
household waste disposal service or the
shop where you purchased the product.
A moulded plug complying with BS 1363
is fitted to this equipment for your safety
and convenience.
Should the fuse in the plug supplied need to
be replaced, a fuse of the same rating as the
supplied one and approved by ASTA or
BSI to BS 1362, (i.e., marked with an or
mark) must be used.
If the plug supplied with this equipment has
a detachable fuse cover, be sure to attach
the fuse cover after you change the fuse.
Never use the plug without the fuse cover.
If you should lose the fuse cover, please
contact your nearest Sony service station.
Notice for customers in the
United Kingdom
7
Notes on using your camera
Shooting procedure
• This camera has two modes for shooting:
the Live View mode using the LCD
monitor, and the viewfinder mode using
the viewfinder (OVF).
• There may be differences between an
image recorded in Live View mode and
an image recorded in viewfinder mode,
such as exposure, white balance, or D-
range optimizer, depending on the
method used of metering or the exposure
mode.
• In Live View or focus check Live View
mode, the recorded image may be
different from the image you monitored
with the LCD monitor.
Notes on the functions available with
the camera
• To check whether it is a 1080 60i-
compatible device or 1080 50i-
compatible device, check for the
following marks on the bottom of the
camera.
1080 60i-compatible device:60i
1080 50i-compatible device:50i
• You may feel uncomfortable symptoms
such as eyestrain, nausea, or a tired
feeling while watching 3D-images
recorded with the camera on 3D-
compatible monitors. When you watch
3D-images, we recommend that you take
a break at regular time intervals. Since
the need for or frequency of break times
varies between individuals, please set
your own standards. If you feel sick, stop
watching 3D-images, and consult a
doctor as needed. Also, refer to the
operating instructions of the connected
device or the software used with the
camera. A child’s vision is always
vulnerable (especially for children under
six years of age). Before allowing them
to watch 3D-images, please consult with
an expert, such as a pediatric or
ophthalmic doctor. Be sure to make sure
your children follow the precautions
above.
No compensation for contents of the
recording
The contents of the recording cannot be
compensated for if recording or playback is
not possible due to a malfunction of your
camera or a memory card, etc.
Back up recommendation
To avoid the potential risk of data loss,
always copy (back up) data to other
medium.
Notes on the LCD monitor and lens
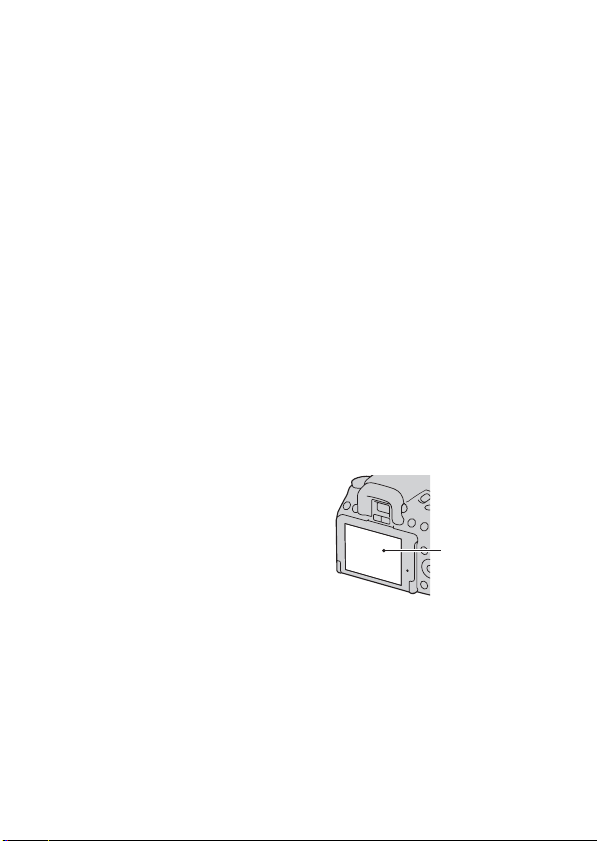
• The LCD monitor is manufactured using
extremely high-precision technology so
over 99.99% of the pixels are operational
for effective use. However, there may be
some tiny black points and/or bright
points (white, red, blue or green in color)
that constantly appear on the LCD
monitor. These points are normal in the
manufacturing process and do not affect
the images in any way.
To deal with such issues that may appear
in Live View mode, you may reduce the
effect by using the “Pixel mapping”
function (page 182).
• Do not hold the camera by taking hold of
the LCD monitor.
• Do not expose the camera to sunlight or
shoot sunward for a long time. The
internal mechanism may be damaged. If
sunlight is focused on a nearby object, it
may cause a fire.
Black, white, red,
blue and green
points

8
• Images may trail across on the LCD
monitor in a cold location. This is not a
malfunction. When turning on the camera
in a cold location, the LCD monitor may
become temporarily dark. When the
camera warms up, the monitor will
function normally.
• Do not press against the LCD monitor.
The monitor may be discolored and that
may cause a malfunction.
Notes on long-time recording
• When you continue to shoot for a long
time, the temperature of the camera rises.
If the temperature reaches above a certain
level, the mark is indicated on the
screen and the camera is turned off
automatically. If the power is turned off,
leave the camera for 10 minutes or longer
to allow the temperature inside the
camera to decrease to a safe level.
• Under high ambient temperatures, the
temperature of the camera rises quickly.
• When the temperature of the camera
rises, the image quality may deteriorate.
It is recommended that you wait until the
temperature of the camera drops before
continuing to shoot.
• The surface of the camera may get hot.
This is not a malfunction.
Notes when playing movies on other
devices
• This camera uses MPEG-4 AVC/H.264
High Profile for AVCHD format
recording. Movies recorded in AVCHD
format with this camera cannot be played
with the following devices.
– Other devices compatible with
AVCHD format that does not support
High Profile
– Devices incompatible with the
AVCHD format
This camera also uses MPEG-4 AVC/
H.264 Main Profile for MP4 format
recording. For this reason, movies
recorded in MP4 format with this camera
cannot be played on devices other than
those that support MPEG-4 AVC/H.264.
• Discs recorded with HD image quality
(high definition) can be played back only
on AVCHD format-compatible devices.
DVD-based players or recorders cannot
play back HD image quality discs, as
they are incompatible with the AVCHD
format. Also, DVD-based players or
recorders may fail to eject HD image
quality discs.
Warning on copyright
Television programs, films, videotapes, and
other materials may be copyrighted.
Unauthorized recording of such materials
may be contrary to the provisions of the
copyright laws.
The pictures used in this manual
The photographs used as examples of
pictures in this manual are reproduced
images, and are not actual images shot
using this camera.
On the data specifications described
in this Instruction Manual
The data on performance and specifications
is defined under the following conditions,
except as described in this Instruction
Manual: at an ordinary ambient
temperature of 25ºC (77°F), and using a
battery pack that is charged for about an
hour after the CHARGE lamp goes out.

9
Table of Contents
Notes on using your camera .............................................. 7
Preparing the
camera
Checking the accessories supplied .................................. 13
Identifying parts .............................................................. 14
Preparing the battery pack ............................................... 18
Attaching a lens ............................................................... 25
Inserting a memory card .................................................. 27
Preparing the camera ....................................................... 31
Using the accessories supplied ........................................ 33
Checking the number of recordable images .................... 35
Cleaning ........................................................................... 37
Before your
operation
Switching between the LCD monitor and viewfinder (OVF)
..................................................................................... 40
Adjusting the focus of the finder (diopter adjustment)
............................................................................ 40
The status of the screen in Live View mode ................... 42
Switching the status of the LCD monitor ................... 42
Recording information display ................................... 43
The status of the screen in viewfinder (OVF) mode ....... 45
Switching the status of the LCD monitor ................... 45
Recording information display on the LCD monitor
............................................................................ 46
Viewfinder .................................................................. 48
Selecting a function/setting ............................................. 49
Selecting a function with the Fn (Function) button ... 50
The functions selected by the Fn (Function) button ... 51
The functions selected by the MENU button ............. 52
Shooting images
Shooting an image without camera shake ....................... 58
Correct posture ........................................................... 58
Using the SteadyShot function ................................... 59
Using a tripod ............................................................. 60
Shooting with the automatic setting ................. 61
Shooting with a suitable setting for the subject ............... 63
Shooting with preset settings according to the scene
(Scene Selection) ............................................... 63
Shooting panoramic images (Sweep Panorama)
............................................................................ 66

10
Shooting 3D-panoramic images (3D Sweep
Panorama) ......................................................... 69
Shooting an image the way you want it (Exposure mode)
..................................................................................... 70
Shooting with program auto .................................. 71
Shooting by controlling the blur of the background
(Aperture priority) ............................................. 72
Shooting a moving subject with various expressions
(Shutter speed priority) ..................................... 75
Shooting with the exposure adjusted manually
(Manual exposure) ............................................ 77
Shooting trails with long exposure (BULB) .......... 79
Recording movies ............................................................ 81
Available recording time for a movie ........................ 83
Notes on continuous movie recording ........................ 84
Using the
shooting function
Selecting the focus method .............................................. 85
Using autofocus .......................................................... 85
Shooting with your desired composition (Focus-lock)
............................................................................ 87
Selecting the focus method to suit the movement of the
subject (Autofocus Mode) ................................. 88
Selecting the focus area (AF area) ............................. 89
Adjusting the focus manually (Manual focus) ........... 90
Composing your shot using the image sensor (Focus
check Live View) .............................................. 91
Checking the focus by enlarging the image ............... 93
Detecting faces ................................................................ 95
Using the Face Detection function ............................. 95
Capturing smiling faces (Smile Shutter) .................... 96
Using the flash ................................................................. 98
Performing wireless flash shooting .......................... 101
Adjusting the brightness of the image (Exposure, Flash
compensation, Metering) .......................................... 102
Shooting with fixed brightness (AE Lock) .............. 102
Using brightness compensation for the entire image
(Exposure compensation) ................................ 103
Adjusting the amount of flash light (Flash
Compensation) ................................................ 105

11
Selecting the flash control mode to set the amount of
flash light (Flash control) ................................ 106
Selecting the method for measuring the brightness of a
subject (Metering Mode) ................................. 107
Setting ISO .................................................................... 108
Compensating for the brightness and contrast automatically
(D-Range) ................................................................. 109
Correcting the brightness of the image (D-Range
Optimizer) ....................................................... 109
Compensating automatically with rich gradation (Auto
High Dynamic Range) .................................... 110
Image processing ........................................................... 112
Selecting your desired image processing (Creative Style)
.......................................................................... 112
Changing the range of color reproduction (Color Space)
.......................................................................... 113
Adjusting the color tones (White balance) .................... 114
Adjusting the white balance to suit a specific light source
(Auto/Preset white balance) ............................ 114
Setting the color temperature and a filter effect (Color
Temperature/Color Filter) ............................... 115
Registering the color tones (Custom white balance) 116
Selecting the drive mode .................................. 118
Shooting single shot ................................................. 118
Shooting continuously .............................................. 118
Using the self-timer .................................................. 119
Shooting images with the exposure shifted (Exposure
bracket) ............................................................ 120
Shooting with white balance shifted (WB bracket)
.......................................................................... 122
Shooting with the Wireless Remote Commander .... 122
Using the viewing
function
Playing back images ...................................................... 123
Checking the information of recorded images .............. 129
Protecting images (Protect) ........................................... 133
Deleting images (Delete) ............................................... 134
Viewing images on a TV screen .................................... 136

12
Changing your
setup
Setting image size and image quality ............................ 140
Setting the method for recording on a memory card ..... 144
Changing the noise reduction setting ............................ 148
Changing the function of the buttons ............................ 149
Changing other settings ................................................. 150
Setting the LCD monitor ............................................... 152
Confirming the version of the camera ........................... 154
Resetting to the default .................................................. 155
Viewing images
on a computer
Using with your computer ............................................. 158
Using the software ......................................................... 160
Connecting the camera to the computer ........................ 164
Creating a movie disc .................................................... 167
Printing images
Specifying DPOF ........................................................... 171
Others
Specifications ................................................................ 173
Troubleshooting ............................................................. 178
Warning messages ......................................................... 187
Precautions .................................................................... 190
AVCHD format ............................................................. 193
3D-shootings .................................................................. 194
Index .............................................................................. 195
Preparing the camera
13
Preparing the camera
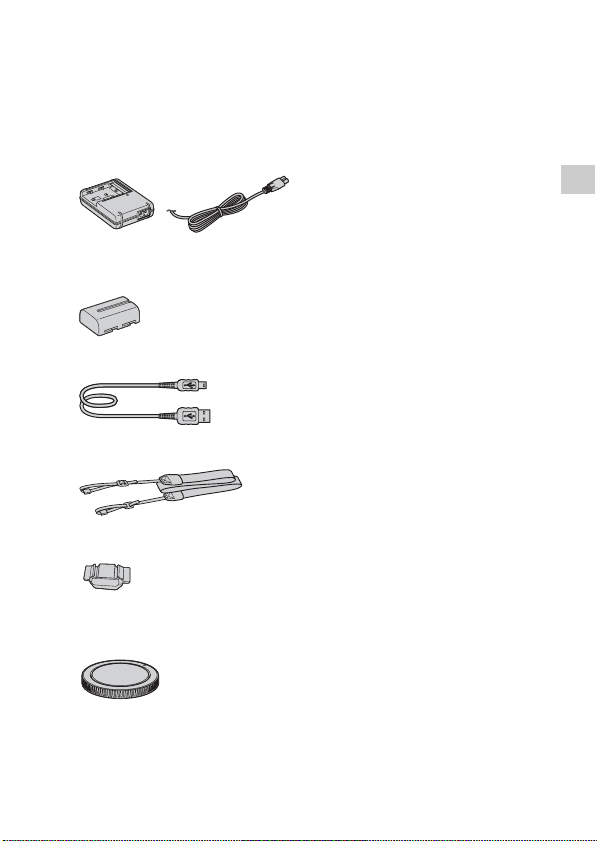
Checking the accessories supplied
The number in parentheses indicates the number of pieces.
• BC-VM10 Battery charger (1)/
Power cord (mains lead) (1)
• Rechargeable battery pack NP-
FM500H (1)
• USB cable (1)
• Shoulder strap (1)
• Eyepiece cover (1)
• Body cap (1) (Attached on the
camera)
• Eyecup (1) (Attached on the
camera)
• CD-ROM (Application Software
for α camera) (1)
• Instruction Manual (This manual)
(1)
14
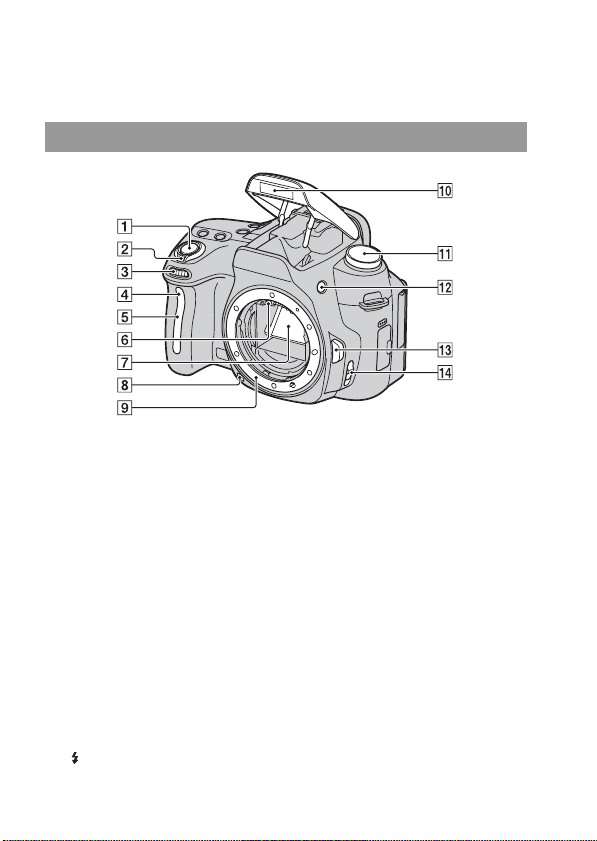
Identifying parts
See the pages in parentheses for details of operation.
A Shutter button (61)
B Power switch (31)
C Control dial (73)
D Self-timer lamp (119)
E Remote sensor
F Lens contacts*
G Mirror*
H Preview button (74)
I Mount
J Built-in flash* (98)
K Mode dial (61 – 80)
L (Flash pop-up) button (98)
M Lens release button (26)
N Focus mode switch (85, 90)
* Do not directly touch these
parts.
Front side

15
Preparing the camera
A Diopter-adjustment dial (40)
B Microphone**
C Auto-lock Accessory shoe
(101)
D Viewfinder* (40)
E Eyepiece sensors (41)
F MENU button (52)
G DISP (Display) button (42, 45,
123)
H MOVIE button (81)
I For shooting: (Exposure)
button (103)
For viewing: (Zoom out)
button (126)/ (Image index)
button (127)
J LCD monitor (42, 123, 129)
• You can adjust the angle of the
LCD monitor to meet various
shooting situations.
K Light sensor (152)
L (Playback) button (123)
M LIVE VIEW/OVF switch (40)
N FOCUS CHECK LV (Live
View) button (91, 93)
O D-RANGE (Dynamic range)
button (109)
P (Drive) button (118)
Rear side

16
Q ISO button (108)
R Image sensor position
mark (87)
S For shooting: AEL (AE lock)
button (78, 102)/Focus
Magnifier button (93, 149)
For viewing: (Zoom in)
button (126)
T For shooting: Fn (Function)
button (50, 51)
For viewing: (Image
rotation) button (125)
U Access lamp (28)
V Controller (v/V/b/B button)
(49)
W Controller (Enter) (49)/AF
button (89)
X (Delete) button (134)
* Do not directly touch these
parts.
** Do not cover this part
during movie recording.
17
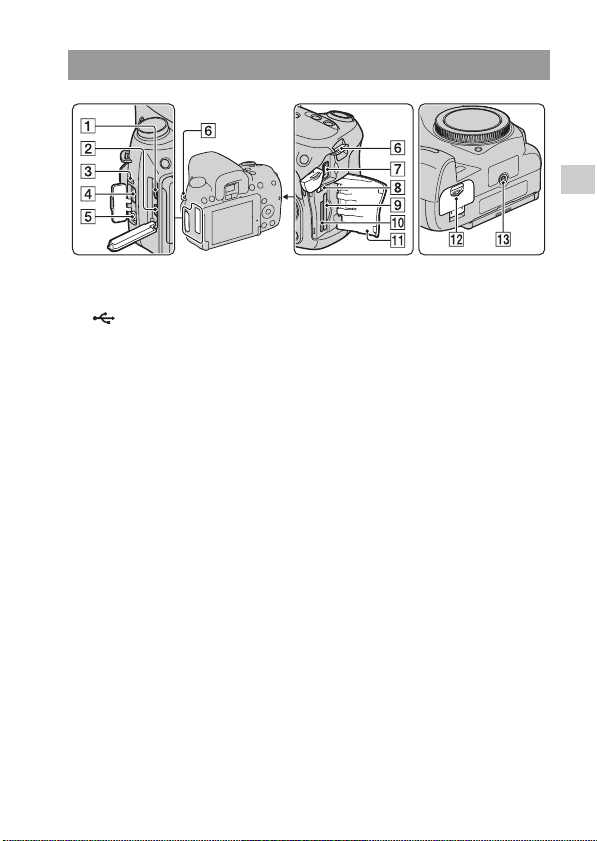
Preparing the camera
A HDMI terminal (136)
B (USB) terminal (164)
C Speaker
D REMOTE terminal
• When connecting the RM-
S1AM/RM-L1AM Remote
Commander (sold separately) to
the camera, insert the plug of
the Remote Commander into
the REMOTE terminal,
aligning the guide of the plug
with the guide of the REMOTE
terminal. Make sure that the
cord of the Remote Commander
faces forward.
E MIC (PLUG IN POWER) jack
• When an external microphone
is connected, the internal
microphone is turned off
automatically. When the
external microphone is a plug-
in-power type, the power of the
microphone is supplied by the
camera.
F Hooks for shoulder strap (33)
G DC IN terminal
• When connecting the AC-
PW10AM AC Adaptor (sold
separately) to the camera, turn
the camera off, then plug the
connector of the AC Adaptor to
the DC IN terminal on the
camera.
H Memory card switch
I SD memory card insertion slot
(27)
J “Memory Stick PRO Duo”
media insertion slot (27)
K Memory card cover
L Battery cover (22)
M Tripod receptacle
• Use a tripod with a screw length
of less than 5.5 mm (7/32 inch).
You will be unable to firmly
secure the camera to tripods
having screws longer than 5.5
mm (7/32 inch), and may
damage the camera.
Sides/Bottom
18
Preparing the battery pack
When using the camera for the first time, be sure to charge the NP-
FM500H “InfoLITHIUM” battery pack (supplied).
The “InfoLITHIUM” battery pack can be charged even when it has not
been fully depleted.
It can also be used when it has not been fully charged.
Notes
• The charging time differs depending on the remaining capacity of the battery back or
charging conditions.
• We recommend charging the battery pack in an ambient temperature of between
10°C to 30°C (50°F to 86°F). You may not be able to efficiently charge the battery
pack outside of this temperature range.
• Connect the battery charger to the nearest wall outlet (wall socket).
• Do not try to charge the battery pack again right after it has been charged, or when it
has not been used after being charged. Doing so will affect the performance of the
battery pack.
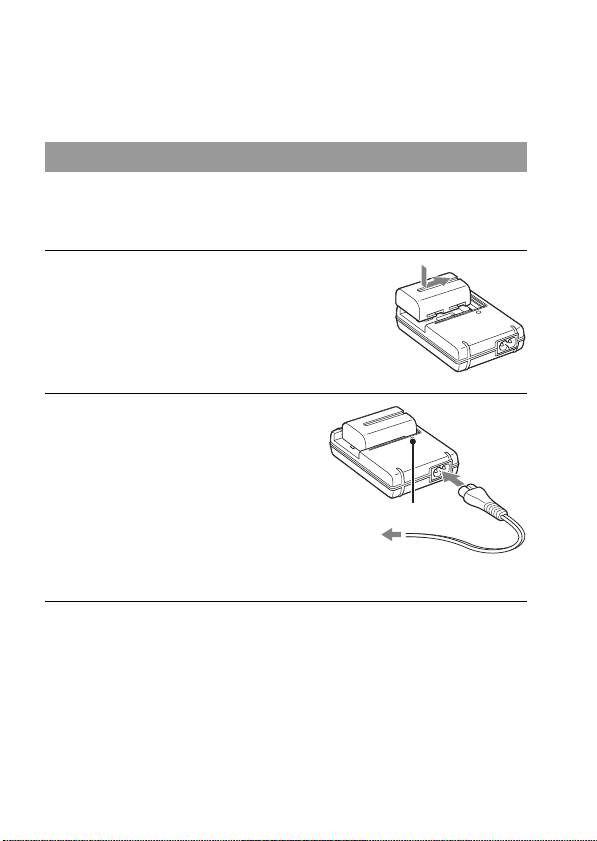
Charging the battery pack
1 Insert the battery pack on the
battery charger.
Push the battery pack until it clicks.
2 Connect the power cord (mains
lead).
Light on: Charging
Light off: Charge completed
• The CHARGE lamp turns off when
charging is finished.
• Time required to charge a fully
depleted battery pack at a temperature
of 25°C (77°F) is about 175 minutes.
CHARGE lamp
To a wall outlet
(wall socket)

19
Preparing the camera
• Do not charge any battery pack other than the “InfoLITHIUM” M series battery
pack in the battery charger (supplied) with your camera. Batteries other than the
specified kind may leak, overheat, or explode if you attempt to charge them, posing a
risk of injury from electrocution and burns.
• When the CHARGE lamp flashes, this may indicate a battery error or that a battery
pack other than the specified type has been installed. Check that the battery pack is
the specified type. If the battery pack is the specified type, remove the battery pack,
replace it with new one or another one and check if the battery charger operates
correctly. If the battery charger operates correctly, a battery error may have
occurred.
• If the battery charger is dirty, charging may not be performed successfully. Clean the
battery charger with dry cloth, etc.
To use your camera abroad — Power sources
You can use your camera and the battery charger and the AC-PW10AM
AC Adaptor (sold separately) in any country or region where the power
supply is within 100 V to 240 V AC, 50/60 Hz.
Note
• Do not use an electronic transformer (travel converter), as this may cause a
malfunction.

20
Representative plug of power supply cord of countries/regions around the
world.
The representative supply voltage and plug type are described in this chart.
Depend on an area, Different type of plug and supply voltage are used.
Attention: Power cord meeting demands from each country shall be used.
-For only the United States
Use a UL Listed, 1.5-3 m (5-10 ft.), Type SPT-2 or NISPT-2, AWG no. 18 power
supply cord, rated for 125 V 7 A, with a non-polarized NEMA 1-15P plug rated for
125 V 15 A.”
Europe
Asia
A Type
(American
Type)
B Type
(British
Type)
BF Type
(British
Type)
B3 Type
(British
Type)
C Type
(CEE
Type)
SE Type
(CEE
Type)
O Type
(Ocean
Type)
Countries/regions Voltage Frequency (Hz) Plug type
Austria 230 50 C
Belgium 230 50 C
Czech 220 50 C
Denmark 230 50 C
Finland 230 50 C
France 230 50 C
Germany 230 50 C
Greece 220 50 C
Hungary 220 50 C
Iceland 230 50 C
Ireland 230 50 C/BF
Italy 220 50 C
Luxemburg 230 50 C
Netherlands 230 50 C
Norway 230 50 C
Poland 220 50 C
Portugal 230 50 C
Romania 220 50 C
Russia 220 50 C
Slovak 220 50 C
Spain 127/230 50 C
Sweden 230 50 C
Switzerland 230 50 C
UK 240 50 BF
Countries/regions Voltage Frequency (Hz) Plug type
China 220 50 A
Hong Kong 200/220 50 BF
India 230/240 50 C
Indonesia 127/230 50 C
Japan 100 50/60 A
Korea (rep) 220 60 C
Malaysia 240 50 BF
Philippines 220/230 60 A/C

21
Preparing the camera
Oceania
North America
Central America
South America
Middle East
Africa
Singapore 230 50 BF
Taiwan 110 60 A
Thailand 220 50 C/BF
Vietnam 220 50 A/C
Countries/regions Voltage Frequency (Hz) Plug type
Australia 240 50 O
New Zealand 230/240 50 O
Countries/regions Voltage Frequency (Hz) Plug type
Canada 120 60 A
USA 120 60 A
Countries/regions Voltage Frequency (Hz) Plug type
Bahamas 120/240 60 A
Costa Rica 110 60 A
Cuba 110/220 60 A/C
Dominican (rep) 110 60 A
El Salvador 110 60 A
Guatemala 120 60 A
Honduras 110 60 A
Jamaica 110 50 A
Mexico 120/127 60 A
Nicaragua 120/240 60 A
Panama 110/220 60 A
Countries/regions Voltage Frequency (Hz) Plug type
Argentina 220 50 C/BF/O
Brazil 127/220 60 A/C
Chile 220 50 C
Colombia 120 60 A
Peru 220 60 A/C
Venezuela 120 60 A
Countries/regions Voltage Frequency (Hz) Plug type
Iran 220 50 C/BF
Iraq 220 50 C/BF
Israel 230 50 C
Saudi Arabia 127/220 50 A/C/BF
Turkey 220 50 C
UAE 240 50 C/BF
Countries/regions Voltage Frequency (Hz) Plug type
Algeria 127/220 50 C
Congo (dem) 220 50 C
Egypt 220 50 C
Ethiopia 220 50 C
Kenya 240 50 C/BF
Nigeria 230 50 C/BF
South Africa 220/230 50 C/BF
Tanzania 230 50 C/BF
Tunisia 220 50 C
22
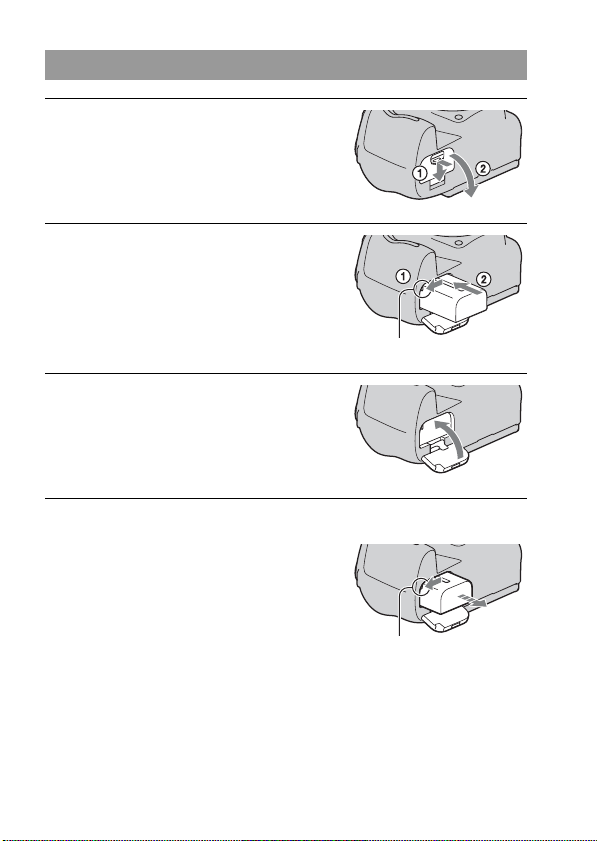
To remove the battery pack
Inserting the charged battery pack
1 While sliding the battery cover
open lever, open the battery
cover.
2 Firmly insert the battery pack all
the way while pressing the lock
lever with the tip of the battery.
Lock lever
3 Close the battery cover.
Turn off the camera and slide the lock
lever in the direction of the arrow. Be
careful not to drop the battery pack.
Lock lever
23
Preparing the camera
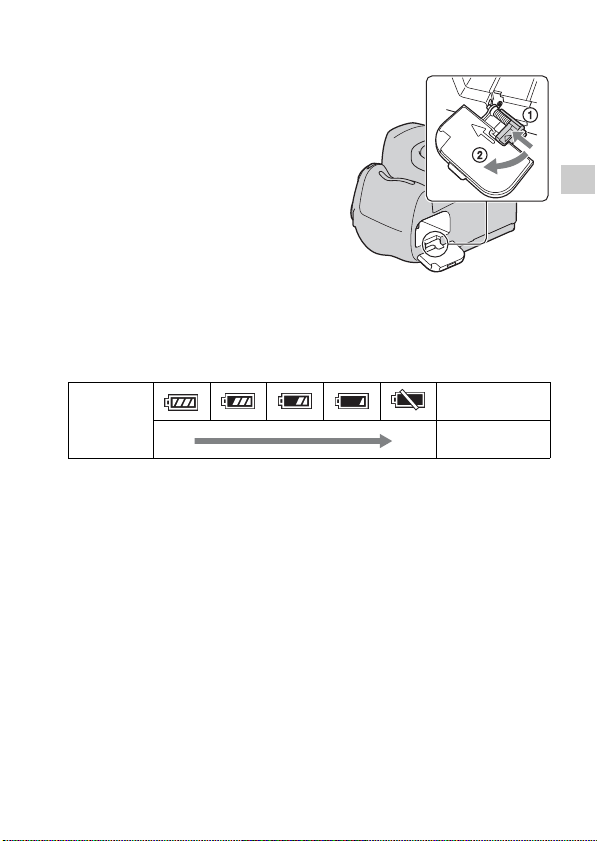
To remove the battery cover
To check the remaining battery level
Check the level with the following indicators and percent figures displayed
on the LCD monitor.
What is an “InfoLITHIUM” battery pack?
An “InfoLITHIUM” battery pack is a lithium-ion battery pack that has
functions for exchanging information related to operating conditions with
your camera. Using the “InfoLITHIUM” battery pack, the remaining
battery time in percent figures is displayed according to the operating
conditions of your camera.
Notes
• The displayed level may not be correct under certain circumstances.
• Do not expose the battery pack to water. The battery pack is not water-resistant.
• Do not leave the battery pack in extremely hot places, such as in a car or under direct
sunlight.
Available battery packs
Use only an NP-FM500H battery pack. Note that the NP-FM55H, NP-
FM50 and NP-FM30 cannot be used.
The battery cover can be removed to
attach the VG-B50AM Vertical Grip
(sold separately).
To remove the cover, push the lever in
the direction of the arrow and slide it out.
To attach the cover, put the knob in the
hole, pull down the lever, and slide it in.
Battery level
“Battery
exhausted.”
High Low
You cannot shoot
any more pictures.

24
Effective use of the battery pack
• Battery performance decreases in low temperature surroundings. So, the
time that the battery pack can be used is shorter in cold places and the
speed of continuous shooting slows down. We recommend that you put
the battery pack in a pocket close to your body to warm it up, and insert it
in your camera immediately before you start shooting.
• The battery pack will run out quickly if you use the flash frequently, use
continuous shooting often, or turn the camera on and off frequently.
• The time available in the Live View mode is shorter than that in the
viewfinder mode. When you feel that the battery consumption is too fast,
switch to the viewfinder mode. Doing so makes the battery last longer.
Battery life
• The battery life is limited. Battery capacity decreases little by little as you
use it more and more, and as time passes. If the battery operating time
seems shortened considerably, a probable cause is that the battery pack
has reached the end of its life. Buy a new battery pack.
• The battery life varies according to how it is stored and the operating
conditions and environment in which each battery pack is used.
How to store the battery pack
If the battery pack is not to be used for a long time, fully charge it and then
fully use it up once a year on your camera before storing the battery pack in
a dry, cool place to prolong the battery life.
25
Preparing the camera
Attaching a lens
Notes
• When attaching a lens, do not press the lens release button.
• Do not use force when attaching a lens.
• Use an A-mount lens. E-mount lenses are not compatible with this camera.
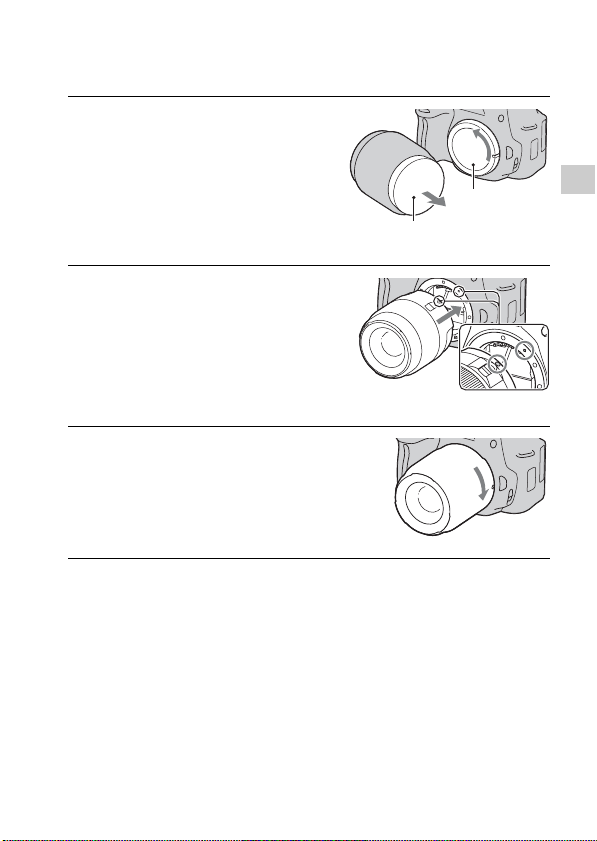
1 Remove the body cap from the
camera and the packaging lid
from the rear of the lens.
• When changing the lens, quickly
change the lens away from dusty
locations so as to keep dust or debris
from getting inside the camera.
Packaging lid
2 Mount the lens by aligning the
orange index marks on the lens
and camera.
Orange index marks
3 Turn the lens clockwise until it
clicks into the locked position.
• Be sure to put the lens on straight.
Body cap
26
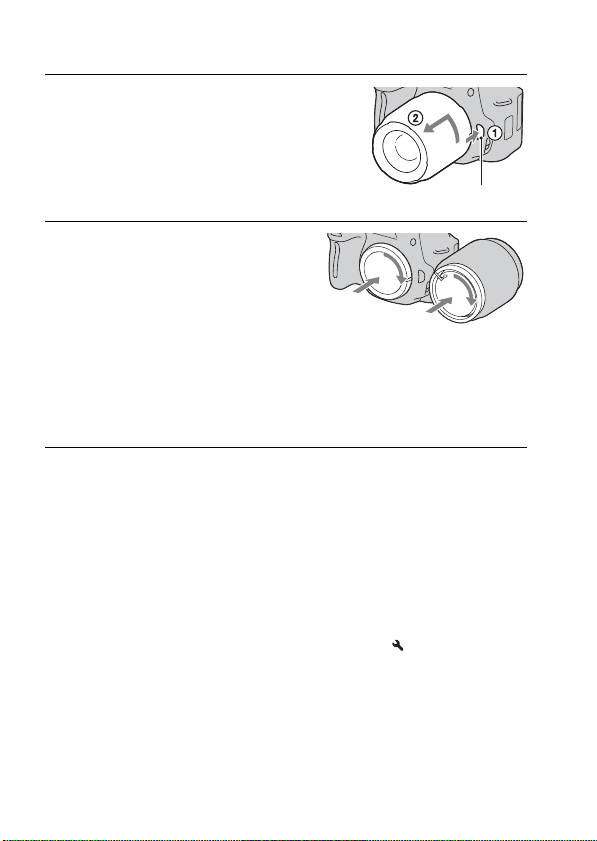
To remove the lens
Note on changing the lens
When changing the lens, if dust or debris gets inside the camera and lands
on the surface of the image sensor (the part that acts as the film), it may
appear on the image, depending on the shooting environment.
The camera is equipped with an anti-dust function to prevent dust from
landing on the image sensor. However, quickly change the lens away from
dusty locations when attaching/removing a lens.
If dust or debris lands on the image sensor
Clean the image sensor using [Cleaning Mode] in the Setup menu
(page 38).
1 Press the lens release button all
the way in and turn the lens
counterclockwise until it stops.
Lens release button
2 Replace the packaging lid on the
lens and attach the body cap to
the camera.
• Before you attach them, remove dust
from them.
• A rear lens cap is not supplied with the
DT 18-55mm F3.5-5.6 SAM Lens Kit.
When you store the lens without
attaching it to the camera, purchase the
Rear Lens Cap ALC-R55.
27
Preparing the camera
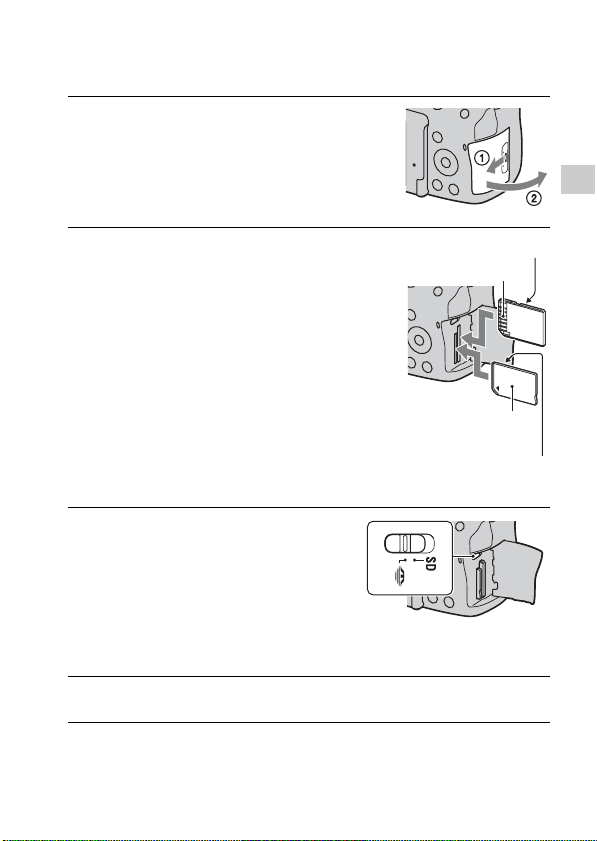
Inserting a memory card
1 Open the memory card cover.
2 Insert “Memory Stick PRO Duo”
media or an SD memory card.
• Insert the memory card until it clicks as
illustrated.
Face side (SD memory card)
Terminal part
3 Select the type of memory card
you want to use using the memory
card switch.
• If you switch the memory card while
the power is turned on, the LCD
monitor is turned off for a few seconds.
This is not a malfunction.
4 Close the memory card cover.
Terminal part
Face side (“Memory Stick PRO
Duo”)
28
Available memory cards
• Only “Memory Stick PRO Duo” media, “Memory Stick PRO-HG Duo”
media, SD memory cards, SDHC memory cards and SDXC memory
cards can be used with this camera. A MultiMediaCard cannot be used
with this camera. However, proper operation cannot be guaranteed for all
memory cards functions.
• The “Memory Stick PRO Duo” media and “Memory Stick PRO-HG
Duo” media are referred to as the “Memory Stick PRO Duo” media and
the SD memory card, SDHC memory card and SDXC memory card are
referred to as the “SD card” in this Instruction Manual.
• For recording movies, it is recommended that you use following memory
cards.
– (Mark2) (“Memory Stick PRO Duo” media
(Mark2))
– (“Memory Stick PRO-HG Duo” media)
– SD memory card, SDHC memory card, SDXC memory card (Class 4 or
more)
• Images recorded on an SDXC memory card cannot be imported to or
played on computers or AV devices that are not compatible with exFAT.
Make sure that the device is compatible with exFAT before connecting it
to the camera. If you connect your camera to an incompatible device, you
may be prompted to format the card. Never format the card in response to
this prompt, as doing so will erase all data on the card. (exFAT is the file
system used on SDXC memory cards.)
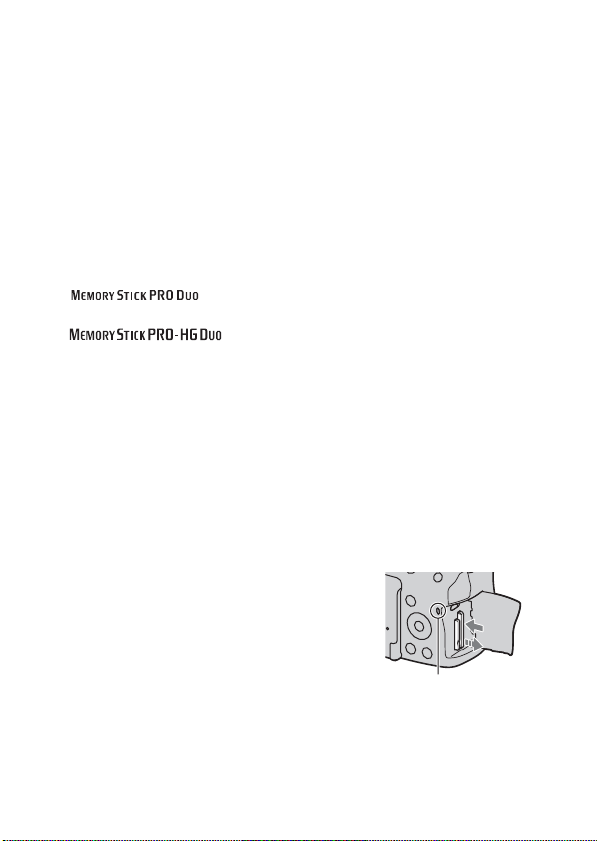
To remove the memory card
Check that the access lamp is not lit, then
open the memory card cover, and push
the memory card once.
Access lamp

29
Preparing the camera
• Do not strike, bend or drop the memory card.
• Do not use or store the memory card under the following conditions:
– High temperature locations such as the hot interior of a car parked in
direct sunlight.
– Locations exposed to direct sunlight.
– Humid locations or locations with corrosive substances present.
• The memory card may be hot just after it has been used for a long time.
Be careful when you handle it.
• When the access lamp is lit, do not remove the memory card or the
battery pack, or turn off the power. The data may be corrupted.
• Data may be damaged if you place the memory card near strongly-
magnetized material or use the memory card in a static-prone or
electrically noisy environment.
• We recommend backing up important data, such as to a hard disk of a
computer.
• When you carry or store the memory card, put it in the case supplied with
it.
• Do not expose the memory card to water.
• Do not touch the terminal section of the memory card with your hand or a
metal object.
• When the write-protect switch of a memory card is set to the LOCK
position, you cannot perform operations, such as recording or deleting
images.
• The memory cards formatted with a computer are not guaranteed to
operate with this camera. Be sure to format the memory cards using the
camera.
• Data read/write speeds differ depending on the combination of the
memory cards and the equipment used.
• Do not press down hard when you write down on the memo area.
• Do not attach a label on the memory cards themselves.
• Do not disassemble or modify the memory cards.
• Do not leave the memory cards within the reach of small children. They
might accidentally swallow it.
Notes on using memory cards

30
Notes on the “Memory Stick” media used with the camera
The types of “Memory Stick” media that can be used with this camera are
listed in the table below. However, proper operation cannot be guaranteed
for all “Memory Stick PRO Duo” media functions.
*1 This is equipped with MagicGate function. MagicGate is copyright protection
technology that uses encryption technology. Data recording/playback that requires
MagicGate functions cannot be performed with this camera.
*2 Supports high-speed data transfer using a parallel interface.
*3 When using “Memory Stick PRO Duo” media to record movies, only those
marked with Mark2 can be used.
Notes on using “Memory Stick Micro” media (sold separately)
• This product is compatible with “Memory Stick Micro” media (“M2”).
“M2” is an abbreviation for “Memory Stick Micro” media.
• To use a “Memory Stick Micro” media with the camera, be sure to insert
the “Memory Stick Micro” media into an “M2” Adaptor as large as of
Duo size. If you insert a “Memory Stick Micro” media into the camera
without an “M2” Adaptor as large as of Duo size, you might not be able
to remove it from the camera.
• Do not leave the “Memory Stick Micro” media within the reach of small
children. They might accidentally swallow it.
“Memory Stick PRO Duo”
media*
1
*
2
*
3
Available with your camera
“Memory Stick PRO-HG Duo”
media*
1
*
2
“Memory Stick Duo” media Unavailable with your camera
“Memory Stick” media and
“Memory Stick PRO” media
Unavailable with your camera

31
Preparing the camera
Preparing the camera
When you turn the camera on for the first time, the date/time setup screen
appears.
Setting up the date
1 Set the power switch to ON to turn
the camera on.
The screen used for setting date and time
appears.
• To turn the camera off, set it to OFF.
2 Verify that [Enter] is selected on
the LCD monitor, then press the
center of the controller.
3 Select your area with b/B on the controller, then press the
center of the controller.
4 Select each item with b/B and
set the numeric value with v/V.
[Daylight Svg.:]: Turns on or off the
daylight saving time setting.
[Date Format:]: Selects the format to
display date.
• Midnight is indicated as 12:00 AM, and
noon as 12:00 PM.

32
To cancel the date/time setting operation
Press the MENU button.
To set up the date/time again
When you turn the camera on for the first time, the date/time setup screen
appears automatically. The next time, set up the date and time from the
menu.
MENU button t 1 t [Date/Time Setup]
To set up the area again
You can set the area where you are using the camera. This allows you to set
the local area when you use the camera abroad.
MENU button t 1 t [Area Setting]
Maintaining the date and time setting
This camera has an internal rechargeable battery for maintaining the date
and time and other settings regardless of whether the power is on or off, or
the battery is installed or not. For details, see page 190.
5 Repeat step 4 to set other items, then press the center of the
controller.
6 Verify that [Enter] is selected, then press the center of the
controller.

33
Preparing the camera
Using the accessories supplied
This section describes how to use the shoulder strap, the eyepiece cover,
and eyecup. The other accessories are described in the following pages.
• Rechargeable battery pack (page 18)
• Battery charger, Power cord (mains lead) (page 18)
• USB cable (page 164)
•CD-ROM (page160)
Attaching the shoulder strap
Attach both ends of the strap onto
the camera.
• You can also attach the eyepiece cover
(page 34) on the strap.
Eyepiece cover
34
You can prevent light from entering through the viewfinder and affecting
the exposure. When the shutter is released without the use of the viewfinder
in viewfinder mode, as in shooting with the self-timer, attach the eyepiece
cover.
Note
• The eyepiece sensors located below the viewfinder may be activated depending on
the situation, and the focus may be adjusted or the LCD monitor may continue to
flash. In such cases, turn off both [Eye-Start AF] (page 41) and [Auto off w/ VF]
(page 153).
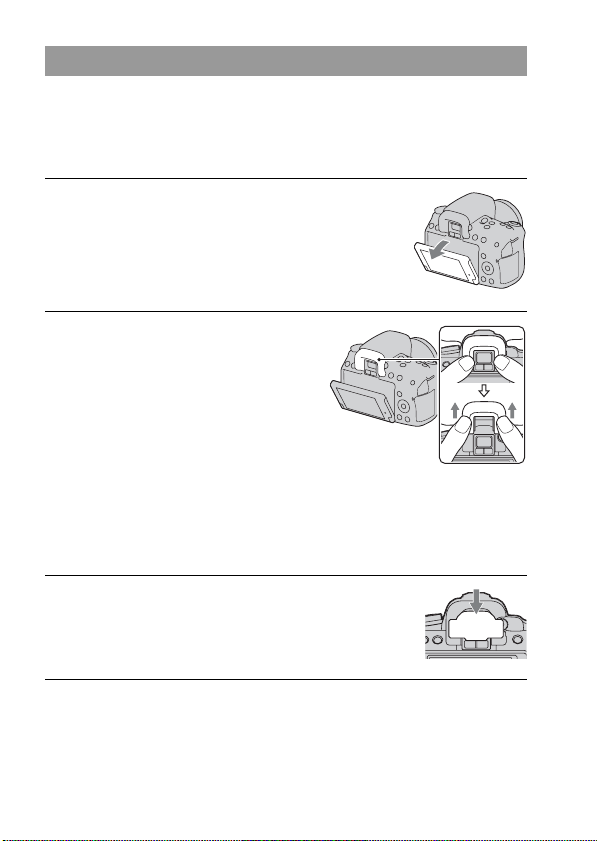
Using the eyepiece cover and eyecup
1 Tilt the LCD monitor downward.
2 Carefully slide the eyecup off by
pushing on each side of the
eyecup.
• Put your fingers under the eyecup, and
slide it upward.
• When attaching the FDA-M1AM
Magnifier (sold separately), the FDA-
A1AM Angle Finder (sold separately),
or the FDA-ME1AM Magnifying
Eyepiece (sold separately) to the
camera, remove the eyecup as
illustrated and attach them.
3 Slide the eyepiece cover over the
viewfinder.
35
Preparing the camera
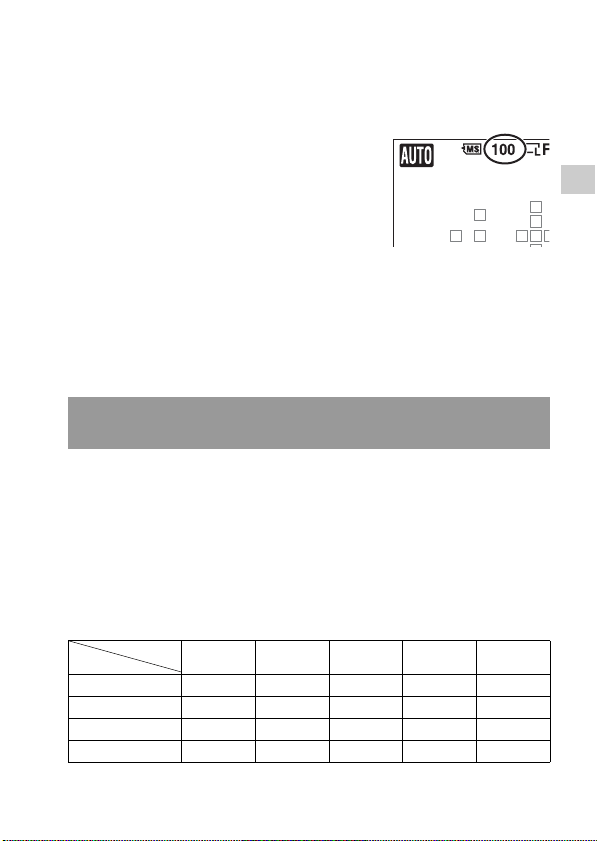
Checking the number of recordable
images
Notes
• When “0” (the number of recordable images) flashes in yellow, the memory card is
full. Replace the memory card with another one, or delete images in the current
memory card (page 134).
• When “NO CARD” (the number of recordable images) flashes in yellow, it means
no memory card has been inserted. Insert a memory card.
The table shows the approximate number of images that can be recorded on
a memory card formatted with this camera. The values are defined using
Sony standard “Memory Stick PRO Duo” media for testing. The values
may vary depending on the shooting conditions and the type of memory
card used.
Image: Size: L 16M (DSLR-A580)/L 14M (DSLR-A560)
Image: Aspect Ratio: 3:2*
DSLR-A580 (Units: Images)
Once you insert a memory card into the
camera and set the power switch to ON,
the number of images that can be
recorded (should you continue to shoot
using the current settings) is displayed on
the LCD monitor.
The number of images that can be recorded on a memory
card
Capacity
Size
2GB 4GB 8GB 16GB 32GB
Standard 386 781 1587 3239 6406
Fine 270 548 1116 2279 4510
RAW & JPEG 74 154 319 657 1304
RAW 106 220 452 928 1840

36
DSLR-A560 (Units: Images)
* When [Image: Aspect Ratio] is set to [16:9], you can record more images than the
numbers shown in the table above (except when [RAW] is selected).
The approximate number of images that can be recorded is as follows when
you use the camera with the battery pack (supplied) at full capacity.
Note that the actual numbers may be less than those indicated depending on
the conditions of use.
• The number is calculated with a battery pack at full capacity and in the
following situation:
– At an ambient temperature of 25°C (77°F).
– Using the battery pack that is charged for an hour after the CHARGE
lamp goes out.
– Using Sony “Memory Stick PRO Duo” media (sold separately).
– [Image: Quality] is set to [Fine].
– [Autofocus Mode] is set to [Automatic AF].
– Shooting once every 30 seconds.
– The flash strobes once every two times.
– The power turns on and off once every ten times.
• The measurement method is based on the CIPA standard.
(CIPA: Camera & Imaging Products Association)
Capacity
Size
2GB 4GB 8GB 16GB 32GB
Standard 433 875 1778 3626 7172
Fine 305 618 1258 2569 5083
RAW & JPEG 84 176 362 745 1478
RAW 122 251 514 1054 2089
The number of images that can be recorded using a battery
pack
DSLR-A580 DSLR-A560
Live View mode Approx. 560 images Approx. 560 images
Viewfinder mode Approx. 1050 images Approx. 1050 images

37
Preparing the camera
Cleaning
• Do not touch the inside of the camera, such as lens contacts, or the mirror.
Since dust on the mirror or around the mirror may affect the images or the
performance of the camera, blow the dust away using a commercially
available blower*. For details on cleaning the image sensor, see the next
page.
* Do not use a spray blower. Using one may cause a malfunction.
• Clean the camera surface with a soft cloth slightly moistened with water,
then wipe the surface with a dry cloth. Do not use the following as they
may damage the finish or the casing.
– Chemical products such as thinner, benzine, alcohol, disposable cloths,
insect repellent, sunscreen or insecticide, etc.
– Do not touch the camera with the above on your hand.
– Do not leave the camera in contact with rubber or vinyl for a long time.
• Do not use a cleaning solution containing organic solvents, such as
thinner, or benzine.
• When cleaning the lens surface, remove dust using a commercially
available blower. In case of dust that sticks to the surface, wipe it off with
a soft cloth or tissue paper slightly moistened with lens cleaning solution.
Wipe in a spiral pattern from the center to the outside. Do not spray lens
cleaning solution directly onto the lens surface.
Cleaning the camera
Cleaning the lens
38
If dust or debris enters the camera and lands on the image sensor (the part
that acts as the film), it may appear on the photo image, depending on the
shooting environment. If there is dust on the image sensor, use a
commercially available blower and clean the image sensor following the
steps below. You can easily clean the image sensor using only the blower
and the anti-dust function.
Notes
• Cleaning can be performed only when the battery level is 50% or more.
• Low battery power during cleaning can cause damage to the shutter. The cleaning
should be completed quickly. The use of an AC-PW10AM AC Adaptor (sold
separately) is recommended.
• Do not use a spray blower because it may scatter water droplets inside the camera
body.
Cleaning the image sensor
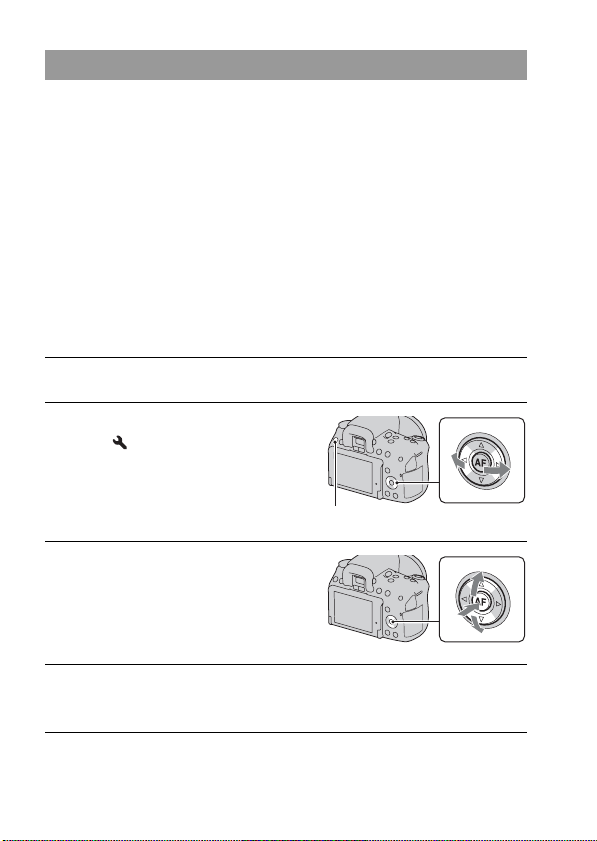
1 Confirm that the battery is fully charged (page 23).
2 Press the MENU button, then
select 2 with b/B on the
controller.
MENU button
3 Select [Cleaning Mode] with v/V,
then press the center of the
controller.
4 Select [Enter] with v, and press the center of the controller.
After the image sensor vibrates for a short time, the mirror in front is lifted.
5 Detach the lens (page 26).

39
Preparing the camera
Note
• The camera starts beeping if the battery pack becomes low during cleaning. Stop
cleaning immediately and turn the camera off.
6 Use the blower to clean the image
sensor surface and the
surrounding area.
• Do not touch the image sensor with the
tip of the blower. Complete the
cleaning quickly.
• Hold the camera's face downward to
prevent the dust from resettling in the
camera.
• When cleaning the image sensor, do not
put the tip of a blower into the cavity
beyond the mount.
7 Attach the lens and turn the camera off.
40
Before your operation
Switching between the LCD monitor and
viewfinder (OVF)
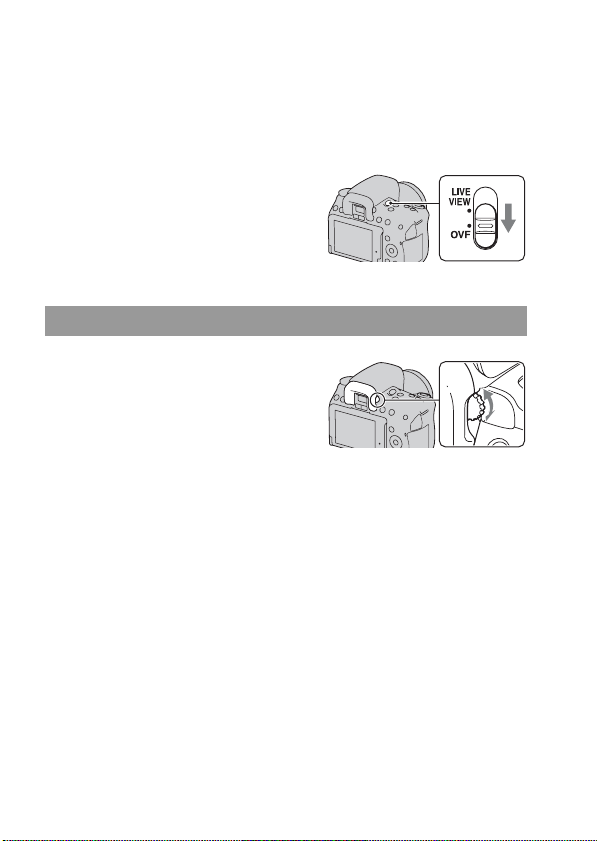
You can select either the LCD monitor (Live View) or the viewfinder
(OVF) to shoot images.
LIVE VIEW: Monitors subjects using the
LCD monitor.
OVF: Monitors subjects using the
viewfinder. On the LCD monitor, the
recording information is displayed
instead.
Adjusting the focus of the finder (diopter adjustment)
In viewfinder mode, adjust the
diopter-adjustment dial to your
eyesight until the display appears
clearly in the viewfinder.
• Training the camera on a light allows you to
adjust the diopter easily.
• When the indicators do not appear clearly,
even if you adjust the diopter, it is
recommended that you use a dioptic
adjustment attachment (sold separately).

41
Before your operation
When it is hard to rotate the diopter-adjustment dial
To focus on a subject quickly using the viewfinder
When you look into the viewfinder, the subject located in the AF area
comes into focus automatically (Eye-Start AF).
MENU button t 1 t [Eye-Start AF] t [On]
When the FDA-A1AM Angle Finder (sold separately) is attached to the
camera, setting [Eye-Start AF] to [Off] is recommended because the
eyepiece sensors located below the viewfinder may be activated.
Put your fingers under the eyecup, and
slide it upward to remove the eyecup,
then adjust the diopter.
42
The status of the screen in Live View
mode
Note
• In focus check Live View mode, the digital level gauge is displayed after “recording
information off” (page 91).
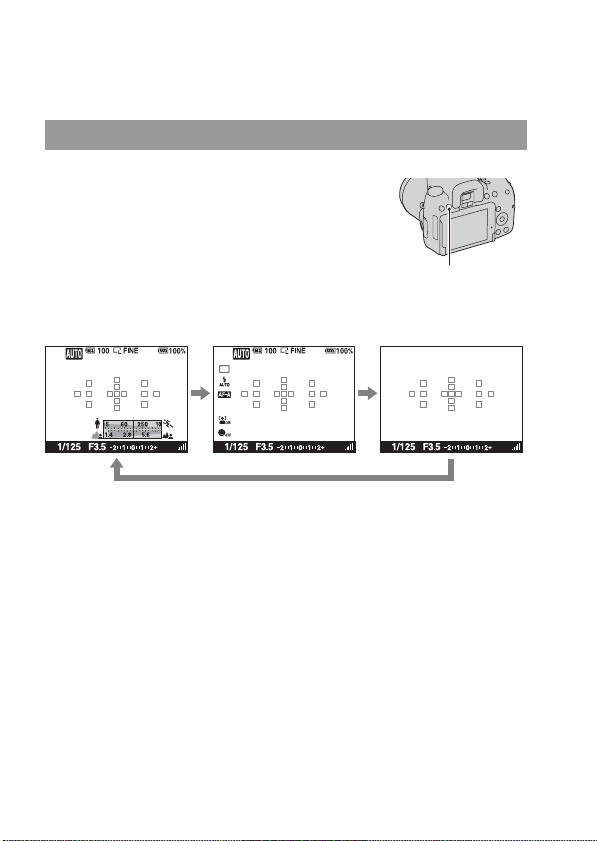
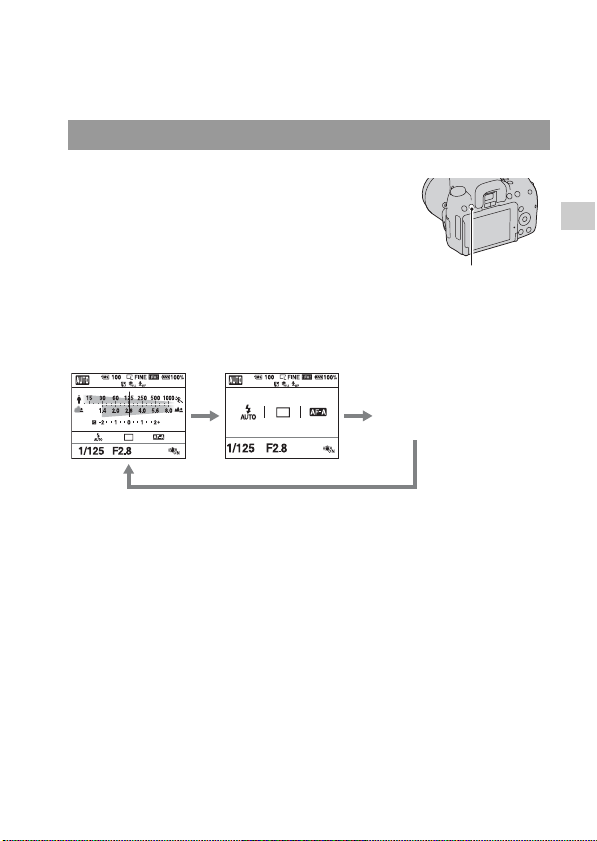
Switching the status of the LCD monitor
In Live View mode, each time you press
the DISP button, the recording
information display changes as follows.
DISP button
Recording information offRecording information on Graphic Display
43
Before your operation
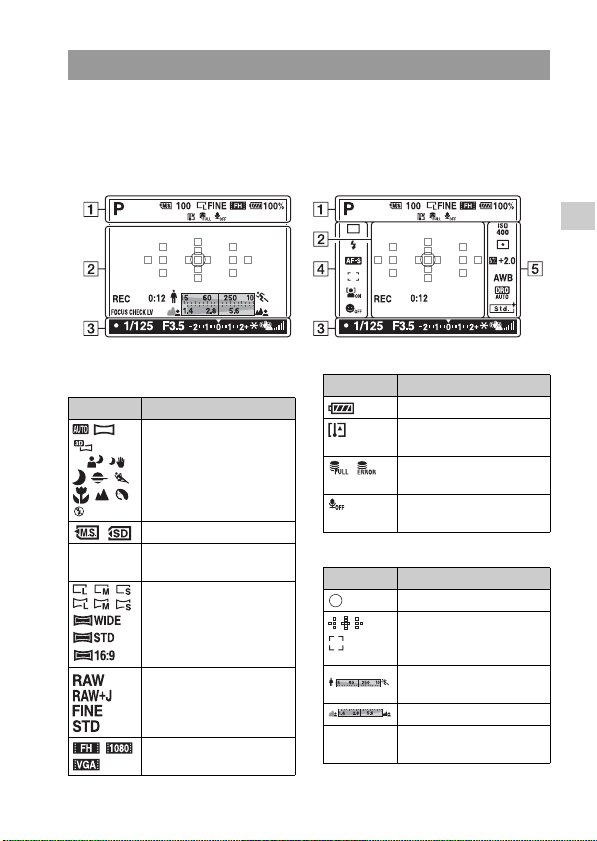
The Graphic Display graphically shows the shutter speed and aperture
value and clearly illustrates how the exposure works. See pages in
parentheses for details of operation.
A
B
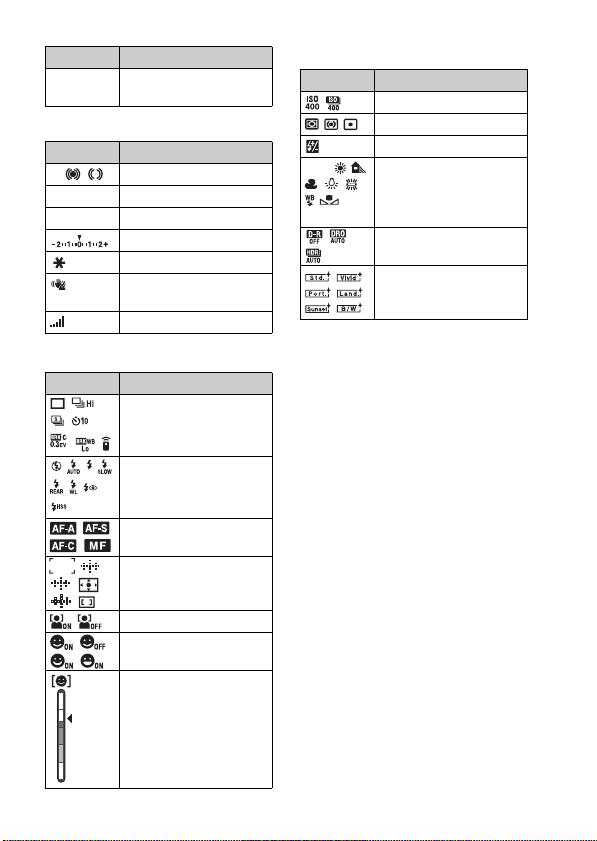
Recording information display
Graphic Display Recording information display
Display Indication
P A S
M
Exposure mode (61 – 80)
Memory card (27)
100 Remaining number of
recordable images (35)
Image size of still images
(140)/Aspect ratio of still
images (142)/Image size
of Sweep Shooting (141)
Image quality of still
images (142)
Image size of movies
(141)
100% Remaining battery (23)
Overheating warning
(188)
Database file full (188)/
Database file error (188)
No audio recording of
movies (83)
Display Indication
Spot metering area (107)
AF area (89)
Shutter speed indicator
(75)
Aperture indicator (72)
FOCUS
CHECK LV
Focus check Live View
(91)
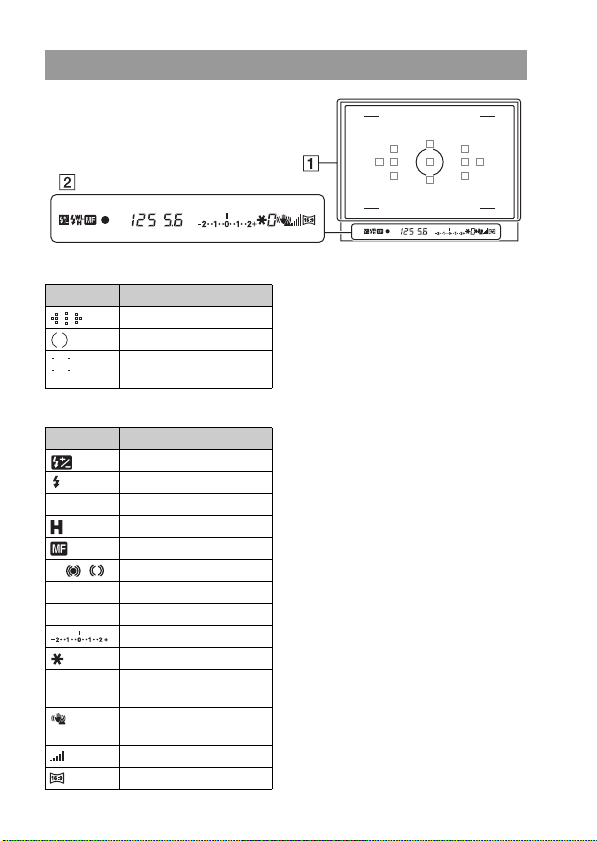
Display Indication
44
C
D
E
REC 0:12 Recording time of the
movie (m:s)
Display Indication
z Focus (86)
1/125 Shutter speed (75)
F3.5 Aperture (72)
EV scale (78, 121)
AE lock (102)
Camera shake warning
(59)
SteadyShot scale (59)
Display Indication
Drive mode (118)
Flash mode (98)/Red-eye
reduction (100)
Focus mode (88)
AF area (89)
Face Detection (95)
Smile Shutter (96)
Smile Detection
Sensitivity indicator (96)
Display Indication
Display Indication
ISO sensitivity (108)
Metering (107)
+2.0 Flash compensation (105)
AWB
7500K G9
White balance (Auto,
Preset, Custom, Color
temperature, Color filter)
(114)
D-Range Optimizer
(109)/Auto HDR (110)
Creative Style (112)
45
Before your operation
The status of the screen in viewfinder
(OVF) mode
Switching the status of the LCD monitor
In viewfinder mode, press the DISP
button to switch between the Graphic
Display and the Standard Display.
When you rotate the camera to a vertical
position, the display automatically rotates
to adjust to the camera position.
DISP button
No display
Standard Display
Graphic Display
(Default setting)
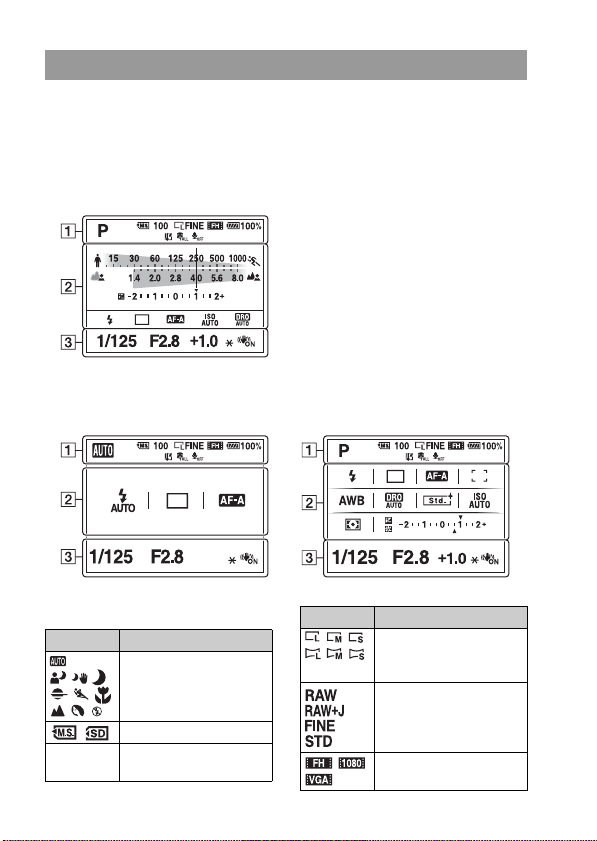
46
The Graphic Display graphically shows the shutter speed and aperture
value and clearly illustrates how the exposure works. In AUTO or Scene
Selection mode, only the items that can be set are displayed. See the pages
in parentheses for details of operation.
A
Recording information display on the LCD monitor
Graphic Display
Standard Display
(In AUTO or Scene Selection mode)
Standard Display
(In P/A/S/M mode)
Display Indication
P A S M
Exposure mode (61 – 80)
Memory card (27)
100 Remaining number of
recordable images (35)
Image size of still images
(140)/Aspect ratio of still
images (142)
Image quality of still
images (142)
Image size of movies
(141)
Display Indication
47
Before your operation
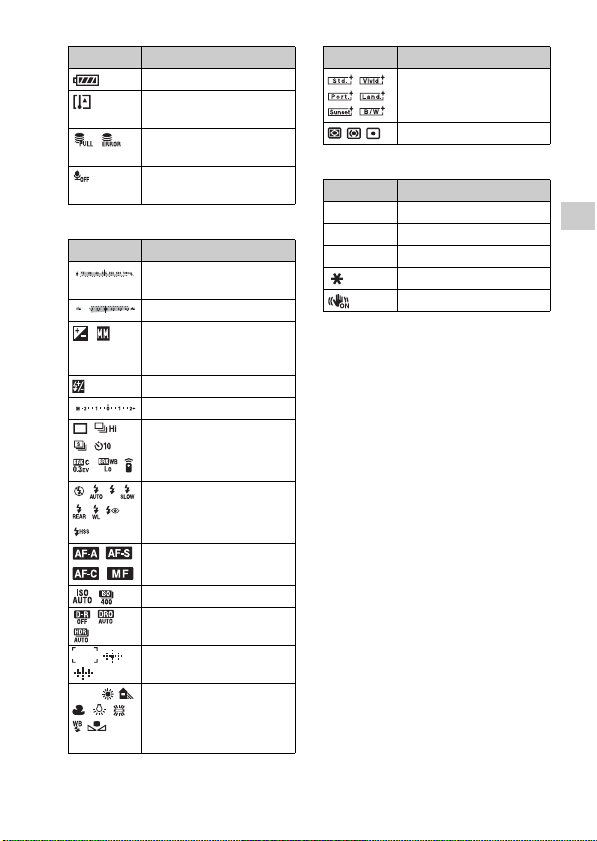
B
C
100% Remaining battery (23)
Overheating warning
(188)
Database file full (188)/
Database file error (188)
No audio recording of
movies (83)
Display Indication
Shutter speed indicator
(75)
Aperture indicator (72)
Exposure compensation
(103)/Metered Manual
(78)
Flash compensation (105)
EV scale (78, 121)
Drive mode (118)
Flash mode (98)/Red-eye
reduction (100)
Focus mode (88)
ISO sensitivity (108)
D-Range Optimizer
(109)/Auto HDR (110)
AF area (89)
AWB
7500K G9
White balance (Auto,
Preset, Custom, Color
temperature, Color filter)
(114)
Display Indication
Creative Style (112)
Metering mode (107)
Display Indication
1/125 Shutter speed (75)
F2.8 Aperture (72)
+1.0 Exposure (103)
AE lock (102)
SteadyShot (59)
Display Indication
48
A
B
Notes
• Fine lines may be seen from an AF
area in the viewfinder. This is not a
malfunction.
• When you press the shutter button
halfway down to focus on a dark
subject, AF areas may be lit in red
automatically. In such a case, a red
light is reflected on the right side in the
viewfinder. This is not a malfunction.
Viewfinder
Display Indication
AF area (89)
Spot metering area (107)
Shooting area for aspect
ratio 16:9 (142)
Display Indication
Flash compensation (105)
Flash charging (98)
WL Wireless flash (101)
High-speed sync
Manual focus (90)
z Focus
125 Shutter speed (75)
5.6 Aperture (72)
EV scale (78, 121)
AE lock (102)
0 “Shooting unavailable”
warning (118)
Camera shake warning
(59)
SteadyShot scale (59)
Aspect ratio 16:9 (142)
49
Before your operation
Selecting a function/setting
You can select a function for shooting or playback with the one of buttons,
such as the Fn (Function) button, or the MENU button.
In this Instruction Manual, the process of selecting a function with the
controller and the Fn button from the list displayed on the screen is
described as follows (we explain the process with the default icons.):
Example: Fn button t AWB (White Balance) t Select the
desired setting
The operation guide list
The operation guide also indicates operations other than the controller
operation. The indications of icons are as follows.
Help guide
The Help Guide shows the information on a function selected with the Fn
button, MENU button, mode dial, etc. You can also turn it off (page 150).
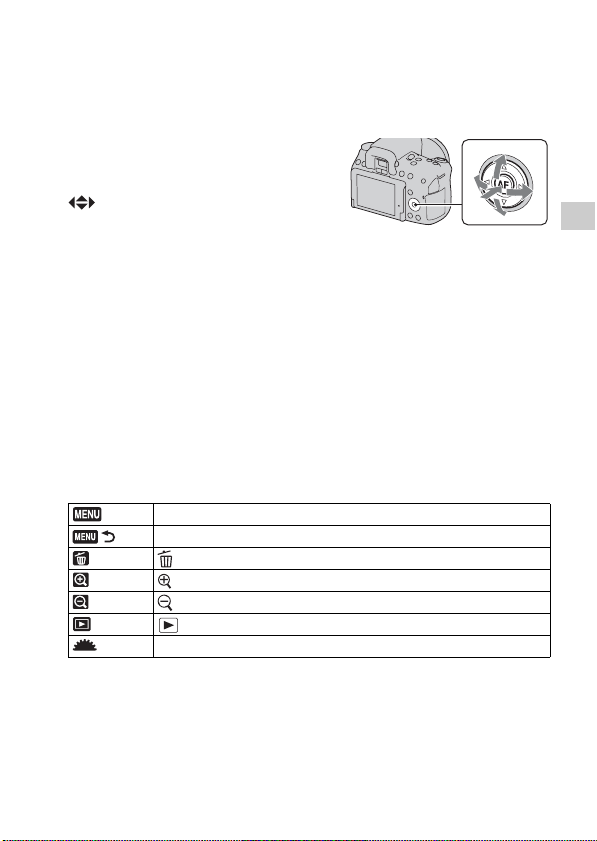
When you start an operation, an operation
guide of controller functions will be
displayed at the bottom of the screen.
: Press v/V/b/B on the controller to
move the cursor.
z: Press the center button to execute the
selection.
MENU button
Returns with MENU button
(Delete) button
(Zoom in) button
(Zoom out) button
(Playback) button
Control dial
50
This button is used for setting up or executing functions used frequently in
shooting.
To set up the camera directly from the recording information screen
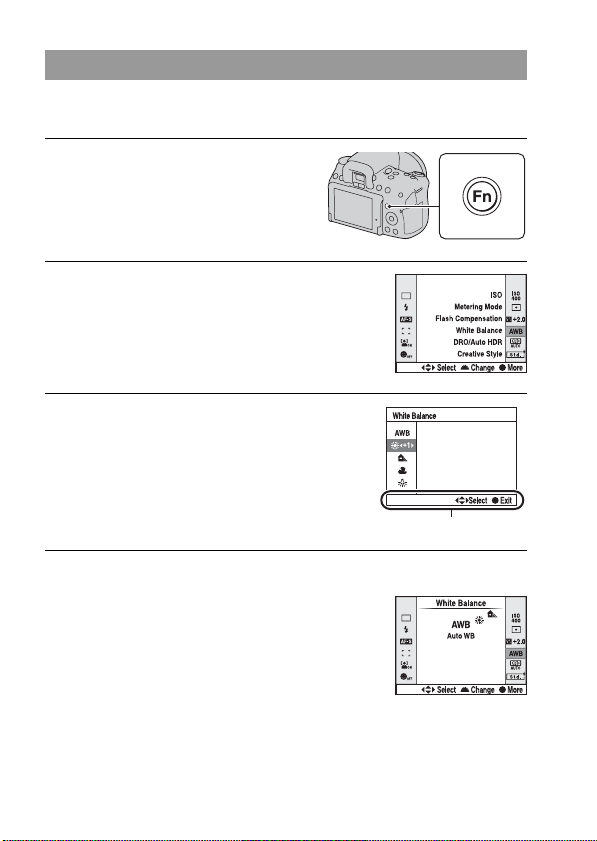
Selecting a function with the Fn (Function) button
1 Press the Fn button.
2 Select the desired item with v/V/
b/B on the controller, then press
the center z to execute.
The setup screen appears.
3 Following the operation guide,
select and execute the desired
function.
• For details on how to set up each item,
see the corresponding page.
Operation guide
Turn the control dial without pressing the
center z in step 2. You can set up the
camera directly from the recording
information screen.

51
Before your operation
The items that will be displayed depend on the position of the mode dial.
The functions selected by the Fn (Function) button
Scene Selection (63) Selects an appropriate mode from among the Scene Selection
preset settings to suit shooting conditions.
Sweep Shooting (66,
69)
Switches between Sweep Panorama and 3D Sweep
Panorama.
Drive Mode (118) Sets the shooting mode to single-shot adv., continuous adv.,
self-timer, bracket shooting, etc.
Flash Mode (98) Sets the flash mode to Autoflash, Fill-flash, Flash Off, etc.
Autofocus Mode (88) Selects the method for focusing according to movement of
the subject.
AF area (89) Selects the area of focus.
Face Detection (95) Automatically captures people’s face(s) with the optimal
focus and exposure.
Smile Shutter (96) Camera shoots when a smile is detected.
ISO (108) Sets the sensitivity to light. The larger the number, the faster
the shutter speed.
Metering Mode (107) Selects the method for measuring brightness.
Flash Compensation
(105)
Adjusts the intensity of flash output. + direction increases
brightness of subject, and the - direction increases darkness.
White Balance (114) Adjusts the color tone of images.
DRO/Auto HDR (109) Compensates for the brightness and contrast automatically.
Creative Style (112) Selects your desired image processing.
52
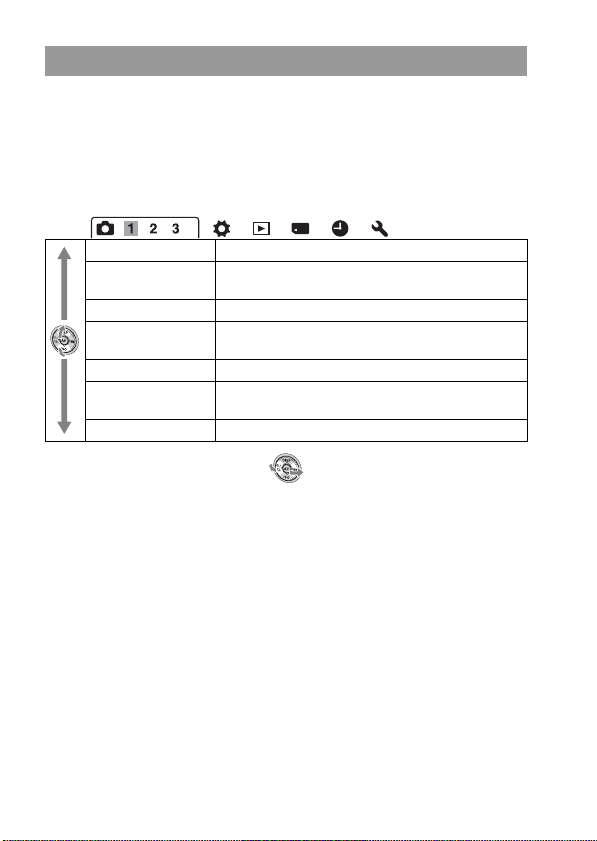
You can set up the basic settings for the camera as a whole or execute
functions such as shooting, playback, or other operations.
Press the MENU button, select the desired page with b/B on the controller,
and select the desired item with v/V.
Recording menu
The functions selected by the MENU button
Image: Size (140) Selects the size of still images.
Image: Aspect Ratio
(142)
Selects the aspect ratio for still images.
Image: Quality (142) Sets the images quality for still images.
Movie: File Format
(82)
Selects the movie file format.
Movie: Size (141) Selects the size of the recorded movie frame.
Movie: Audio Rec.
(83)
Sets whether or not to record audio when shooting a
movie.
SteadyShot (59) Sets SteadyShot.
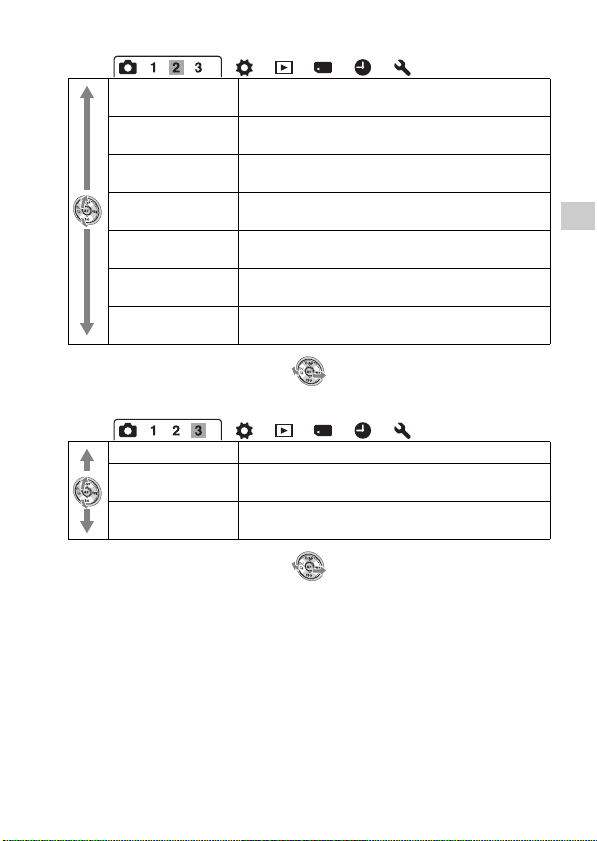
53
Before your operation
Panorama: Size
(141)
Selects the size of panoramic images.
Panorama: Direction
(68)
Sets the shooting direction for panoramic images.
3D Pan.: Image Size
(141)
Selects the size of 3D-images.
3D Pan.: Direction
(69)
Sets the shooting direction for 3D-images.
Flash control (106) Sets the method for determining the intensity of flash
output.
AF Illuminator (100) Sets the AF illuminator, which sheds light on a dark
scene to aid focusing.
AF method (91) Sets the autofocus system in focus check Live View
mode.
Color Space (113) Changes the range of reproducible colors.
Long Exposure NR
(148)
Sets noise reduction processing for shots in which
shutter speed will be 1 second or longer.
High ISO NR (148) Sets noise reduction processing for high-sensitivity
shooting.
54
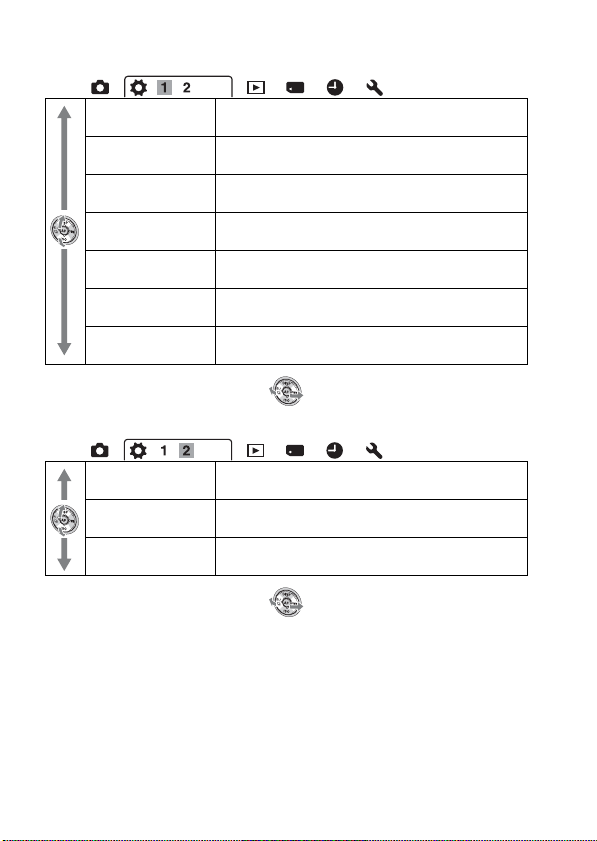
Custom menu
Eye-Start AF (41) Sets whether or not to use auto focus when you look
through viewfinder.
Func. of AEL button
(149)
Sets the function of the AEL button between AE lock
and Focus Magnifier in focus check Live View mode.
AEL (149) Sets the operation method of the AE lock button for
fixing exposure during shooting.
Focus Hold Button
(149)
Sets the function of the focus hold button of the lens.
Red Eye Reduction
(100)
Reduces the red-eye phenomenon during flash use.
Release w/oLens
(150)
Sets whether shutter can open when lens is not
attached.
Auto off w/ VF (153) Sets whether or not to turn off the LCD monitor when
you look through the viewfinder.
Grid Line (153) Sets a grid line display to enable alignment to a
structural outline.
Histogram (104) Sets whether or not to include the histogram display
when switching screen display.
Auto Review (152) Displays the captured image after shooting. Sets auto
review.
55
Before your operation
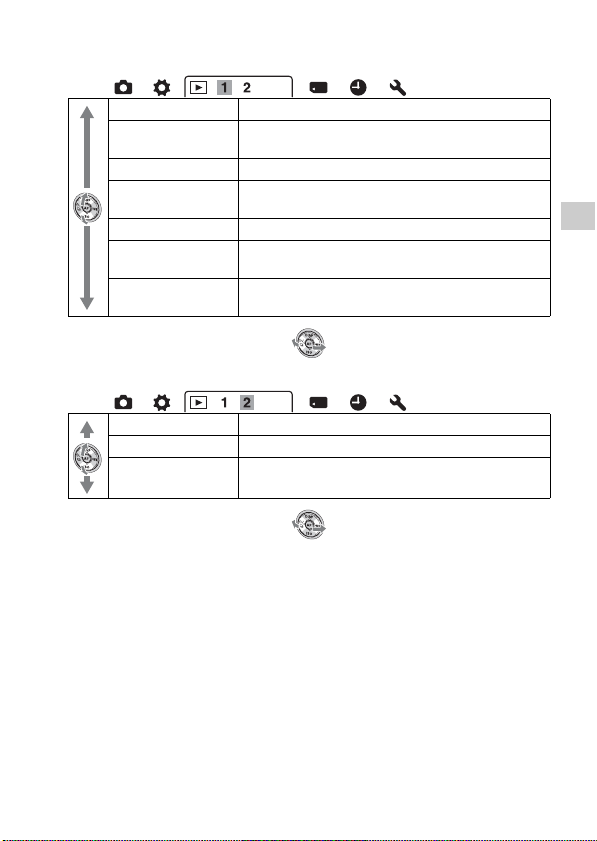
Playback menu
Delete (134) Deletes images.
Still/Movie Select
(124)
Switches between the still image playback screen and
the movie playback screen.
Slide Show (127) Shows a slide show.
3D Viewing (137) Plays back 3D-images using a 3D-compatible TV
connected to the camera.
Protect (133) Protects or cancels protection for an image.
Specify Printing
(171)
Specifies or unspecifies the images for DPOF.
Volume Settings
(124)
Sets the volume for movie playback.
Select Folder (123) Changes the folder for images to play back.
Select Date (125) Displays images from another date.
Playback Display
(123)
Sets how to play back an image recorded in portrait.

56
Memory Card Tool menu
Clock setup menu
Format (145) Formats the memory card.
File Number (144) Sets the method used to assign file numbers to still
images and movies.
Folder Name (144) Sets the folder format for still images.
Select REC Folder
(145)
Changes the selected folder for storing still images.
New Folder (145) Creates a new folder for storing still images and
movies.
Recover Image DB
(146)
Recovers the image database file for movies and
enables recording and playback.
Display Card Space
(146)
Displays the remaining recording time of movies and
the recordable number of still images on the memory
card.
Date/Time Setup (31) Sets date and time, and daylight savings.
Area Setting (32) Sets the location of use.
57
Before your operation
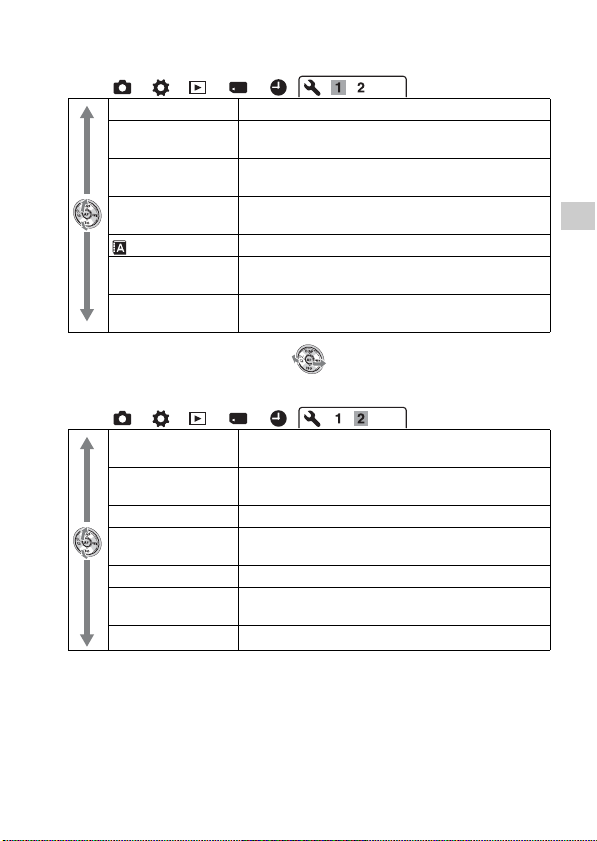
Setup menu
* Appears when an Eye-Fi card (sold separately) is inserted in the camera.
LCD Brightness (152) Sets the brightness of the LCD monitor.
Power Save (LV)
(150)
Sets the interval after which power save mode
engages in Live View mode.
Power Save (OVF)
(150)
Sets the interval after which power save mode
engages in viewfinder mode.
CTRL FOR HDMI
(137)
Operates the camera from a TV that support
“BRAVIA” Sync.
Language (151) Selects the language.
Help Guide Display
(150)
Sets the display of the help guide for explaining
functions displayed during operation.
USB Connection
(164)
Sets the USB connection method.
Upload Settings
(146)*
Sets the upload function of the camera when using an
Eye-Fi card.
Audio signals (150) Sets whether or not to use the beep sound when the
focus is achieved or the self-timer is working.
Cleaning Mode (38) Starts the cleaning mode to clean the image sensor.
Pixel mapping (182) Executes this function when dots appear and remain
on the LCD monitor in Live View mode.
Version (154) Displays the camera software version.
Demo Mode (151) Sets the demonstration playback of a movie to on or
off.
Reset Default (155) Restores the settings to their defaults.
58
Shooting images
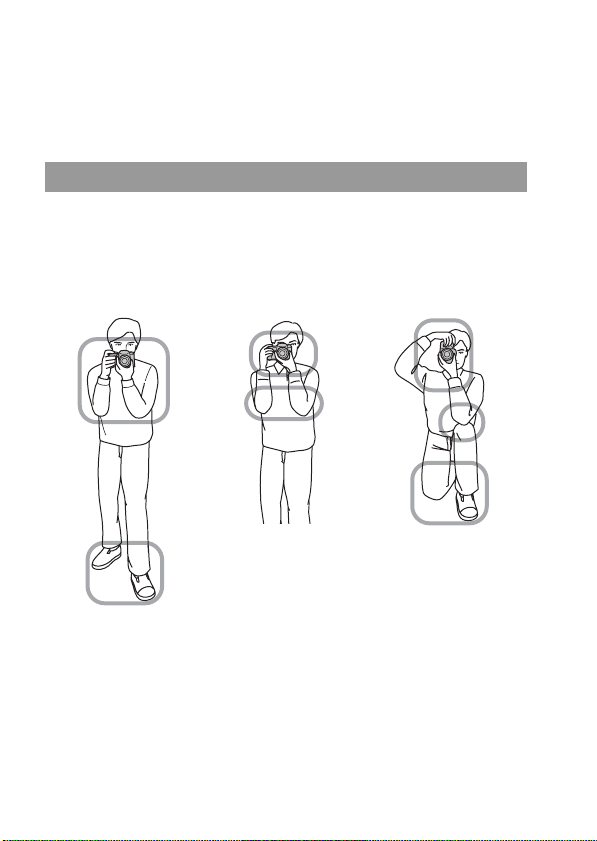
Shooting an image without camera shake
“Camera shake” refers to unwanted movement of the camera that occurs
after the shutter button has been pressed, resulting in a blurred image.
To reduce camera shake, follow the instructions below.
Stabilize your upper body and take a position that keeps the
camera from moving.
Point 1
One hand holds the grip of the camera, and the other hand supports the lens.
Point
2
Take a secure stance with your feet shoulder-width apart.
Correct posture
In Live View mode In viewfinder mode

59
Shooting images
Point 3
Lightly tuck your elbows against your body.
When shooting in a kneeling position, steady your upper body by placing
your elbow on your knee.
Camera shake warning indicator
Note
• The (Camera shake warning) indicator is displayed only in the modes that
automatically set the shutter speed. This indicator is not displayed in M/S modes.
The SteadyShot function can reduce the effect of camera shake by the
equivalent of approximately 2.5 Ev to 4 Ev in shutter speed.
The SteadyShot function is set to [On] in the default setting.
The SteadyShot scale indicator
To deactivate the SteadyShot function
MENU button t 1 t [SteadyShot] t [Off]
Due to potential camera shake, the
(Camera shake warning) indicator
flashes. In this case, use a tripod or the
flash.
(Camera shake warning) indicator
Using the SteadyShot function
The (SteadyShot scale) indicator
shows the camera shake status. Wait until
the scale becomes low, then start
shooting.
(SteadyShot scale) indicator

60
Note
• The SteadyShot function may not work optimally when the power has just been
turned on, right after you point the camera towards a subject, or when the shutter
button has been pressed all the way down without stopping halfway.
In the following cases, we recommend that you mount the camera on a
tripod.
• Shooting without a flash under dark conditions.
• Shooting with slow shutter speeds, which are typically used in night-time
shooting.
• Shooting a close subject, such as in macro shooting.
• Shooting with a telescopic lens.
Note
• When using a tripod, deactivate the SteadyShot function because there is a potential
for malfunction of the SteadyShot function.
Using a tripod
61
Shooting images
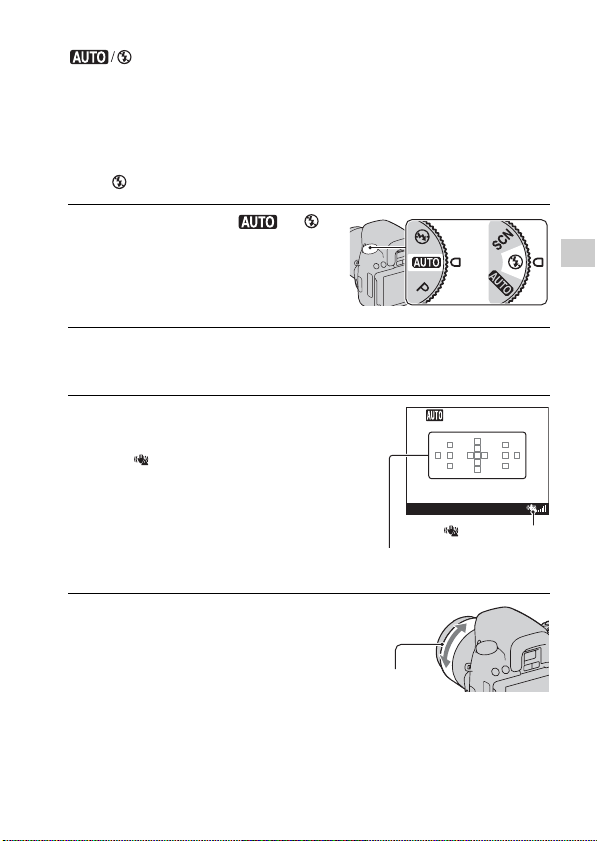
Shooting with the automatic
setting
The “AUTO” mode allows you to easily shoot any subject under any
conditions because the camera makes appropriate judgments on the
situation to adjust the settings.
Select when shooting in a location where the use of a flash is restricted.
1 Set the mode dial to or
(Flash Off).
2 Adjust the LCD monitor to an easily viewable angle and hold
the camera.
3 Overlay the AF area on the
desired subject.
• If the (Camera shake warning)
indicator flashes, carefully shoot the
subject, holding the camera steady, or
by using a tripod.
AF area
4 When using a zoom lens, turn the
zoom ring, then decide on your
shot.
or
(Camera shake
warning) indicator
Zoom ring
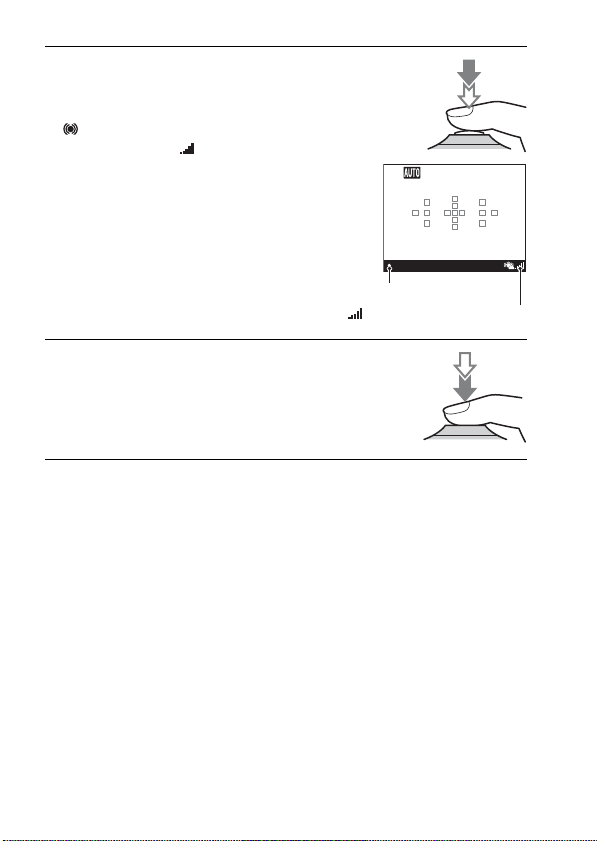
62
Note
• Since the camera turns on the automatic setting function, many features will be
unavailable, such as exposure compensation, ISO setting. If you want to adjust
various settings, set the mode dial to P, then shoot your subject.
5 Press the shutter button halfway
down to focus.
When the focus is confirmed, z or
(Focus indicator) lights up (page 86).
• Waiting until the (SteadyShot
scale) indicator is low makes the
SteadyShot function more effective.
(SteadyShot scale) indicator
6 Press the shutter button fully
down to shoot.
Focus indicator
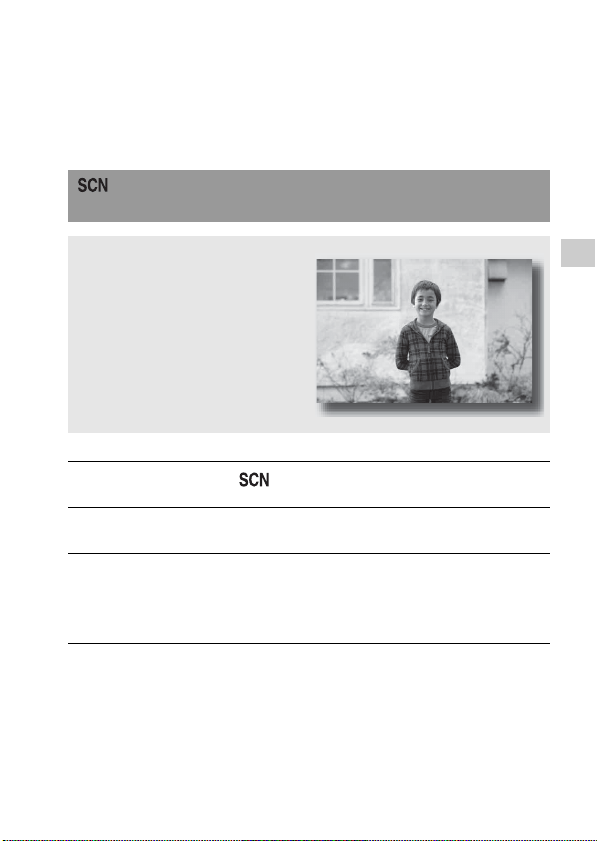
63
Shooting images
Shooting with a suitable setting for the
subject
Selecting an appropriate mode for the subject or the shooting conditions
allows you to shoot the image with a suitable setting for the subject.
Shooting with preset settings according to the scene
(Scene Selection)
This mode is suitable for
z Shooting with preset settings
according to the scene
1 Set the mode dial to (Scene Selection).
2 Press the center of the controller.
3 Select the desired mode with v/V, then press the center of the
controller.
• To change the scene, press the Fn button, then select another scene.
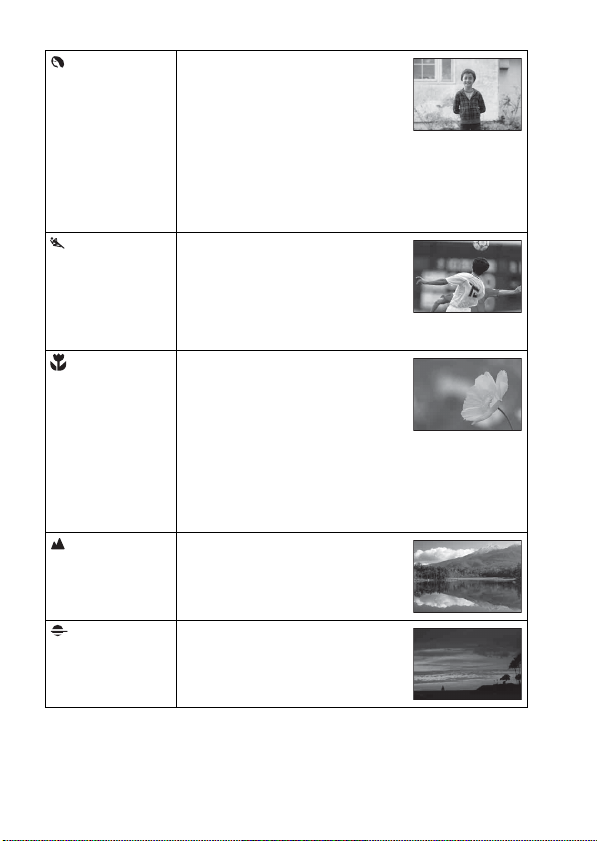
64
(Portrait) Blurs away backgrounds and sharpens
the subject. Expresses skin tones softly.
• To blur the background more, set the
lens to the telephoto position.
• You can shoot a vivid image by
focusing on the eye that is closer to
the lens.
• Use the lens hood (sold separately) to shoot backlit
subjects.
• Use the red-eye reduction function if the eyes of your
subject turn red from the flash (page 100).
(Sports Action) Shoots a moving subject at a fast
shutter speed so that the subject looks
as if it is standing still. The camera
shoots images continuously while the
shutter button is pressed.
• Press and hold the shutter button
halfway down until the right moment.
(Macro) Shoots close subjects such as flowers,
foods.
• You can shoot a closer subject using
a macro lens (sold separately).
• Set the flash mode to [Flash Off]
when you shoot a subject within 1 m
(3.3 feet).
• When shooting in macro mode, the SteadyShot function
will not be fully effective. Use a tripod to achieve better
results.
• The shortest focal distance does not change.
(Landscape) Shoots the entire range of scenery in
sharp focus with vivid colors.
• To accentuate the openness of the
scenery, set the lens to wide angle.
(Sunset) Shoots the red of the sunrise or sunset
beautifully.
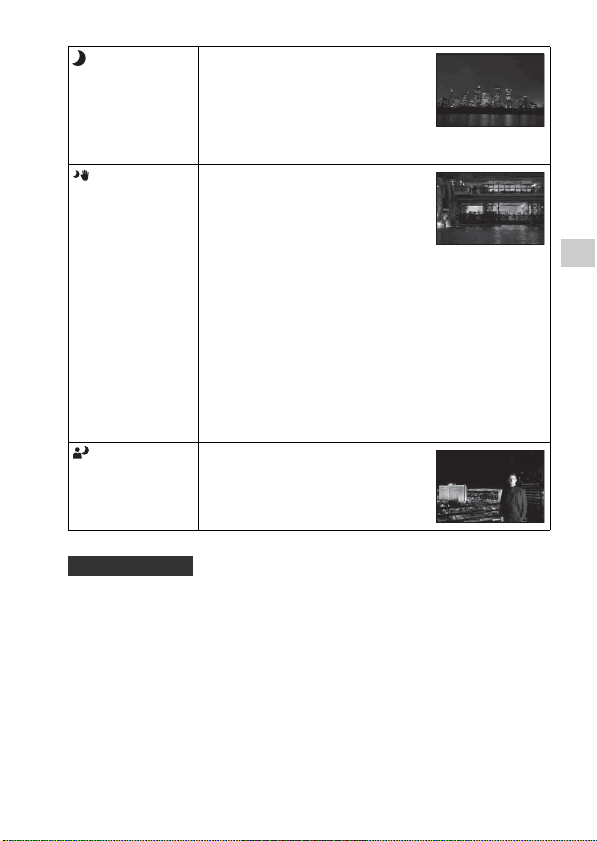
65
Shooting images
• When you want finer images, set the mode dial to P, A, S, or M and use
the creative style function (page 112). In such cases, you can adjust the
exposure, ISO, etc., even when you select a suitable setting for the
subject.
Notes
• Since the camera judges the settings automatically, many features will be
unavailable, such as exposure compensation, ISO setting.
• The flash is set to [Autoflash] or [Flash Off] for each Scene Selection mode. You can
change these settings (page 98).
(Night View) Shoots night scenes at a distance
without losing the dark atmosphere of
the surroundings.
• The shutter speed is slower, so using
a tripod is recommended.
• The picture may not be taken
properly when shooting a wholly dark night scene.
(Hand-held
Twilight)
Shoots night scenes with less noise and
blur without using a tripod. A burst of
shots are taken, and image processing
is applied to reduce subject blur,
camera shake, and noise.
• Reducing blur is less effective even
in [Hand-held Twilight] when shooting:
– Subjects with erratic movement
– Subjects are too close to the camera
– Subjects with a repeating pattern such as tiles, and
subjects with little contrast such as sky, sandy beach, or
lawn
– Subjects with constant change such as waves or water
falls
• In the case of [Hand-held Twilight], block noise may occur
when using a light source that flickers, such as fluorescent
lighting.
(Night Portrait) Shoots portraits in night scenes.
• The shutter speed is slower, so using
a tripod is recommended.
Shooting technique
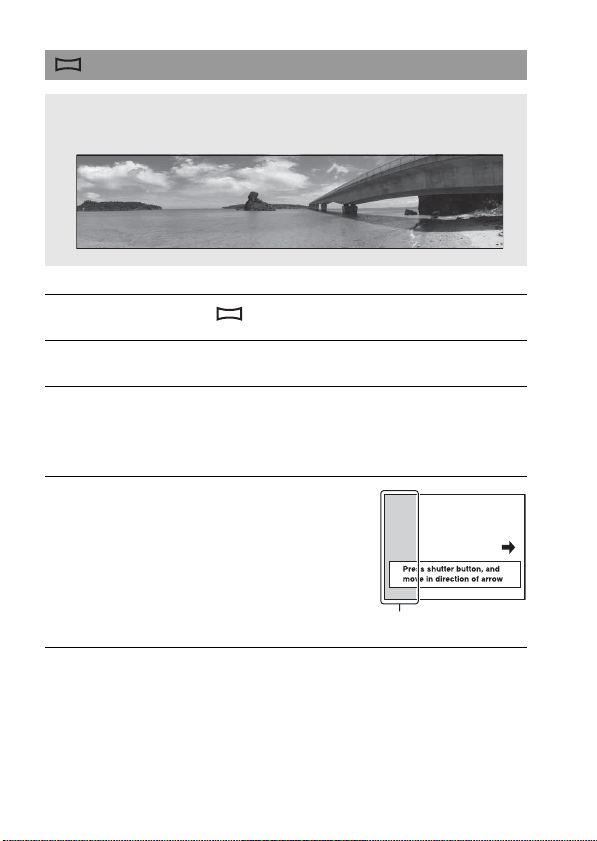
66
Shooting panoramic images (Sweep Panorama)
This mode is suitable for
z Shooting expansive scenery, or high-rise buildings with dynamic composition.
1 Set the mode dial to (Sweep Shooting).
2 Press the center of the controller.
3 Select [Sweep Panorama] with v/V, then press the center of
the controller.
• To select [3D Sweep Panorama], press the Fn button, then select it.
4 Point the camera at the edge of
the subject, then press the shutter
button halfway down to adjust the
focus.
This part will not be taken
5 Press the shutter button fully down.

67
Shooting images
Notes
• If you cannot pan or tilt the camera across the entire subject within the given time, a
gray area occurs in the composed image. If this happens, move the camera fast to
record a full panoramic image.
• Since several images are stitched together, the stitched part will not be recorded
smoothly. While shooting, do not tilt the camera back and forth, or right and left
when you swing the camera straight ahead.
• Under low light conditions, panoramic images may be blurred or not be recorded.
• Under lights that flicker such as fluorescent light, the brightness or color of the
combined image is not always the same.
• When the whole angle of panoramic shooting and the angle in which you fixed the
focus and exposure with AE/AF lock are extremely different in brightness, color and
focus, the shooting will not be successful. If this happens, change the lock angle and
shoot again.
• [Sweep Panorama] is not suitable when shooting:
– Subjects are moving.
– Subjects are too close to the camera.
– Subjects with a repeating pattern such as tiles, and subjects with little contrast such
as sky, sandy beach, or lawn.
– Subjects with constant change such as waves or water falls.
– Subjects with the sun or electric lights, etc. that are much brighter than
surroundings.
• [Sweep Panorama] recording may be discontinued in the following situations:
– You pan or tilt the camera too fast or too slow.
– There is too much camera shake.
• The camera continues shooting during [Sweep Panorama] recording, and the shutter
keeps clicking until the end of the shooting.
6 Pan or tilt the camera to the end,
following the guidance on the
screen.
Guidance bar

68
Tips for shooting a panoramic image
• In Sweep Panorama, it is recommended that you use a wide-angle lens.
• When you use a lens that has a long focal length, pan or tilt the camera
more slowly than when you use a wide-angle lens.
• Determine the scene and press the shutter button halfway, so that you can
lock the focus, exposure, and white balance.
• If a section with greatly varied shapes or scenery is concentrated along a
screen edge, the image composition may fail. In such case, adjust the
frame composition so that the section is in the center of the image, then
shoot again.
• You can select the image size: MENU button t 2 t [Panorama:
Size].
To set the direction in which to pan or tilt the camera
MENU button t 2 t [Panorama: Direction] t Select the
desired setting
Pan or tilt the camera in an arc with a
constant velocity and in the same
direction as the indication on the screen.
[Sweep Panorama] is better suited for
still subjects, rather than moving ones.
Radius as short as
possible
Vertical
direction
Horizontal direction
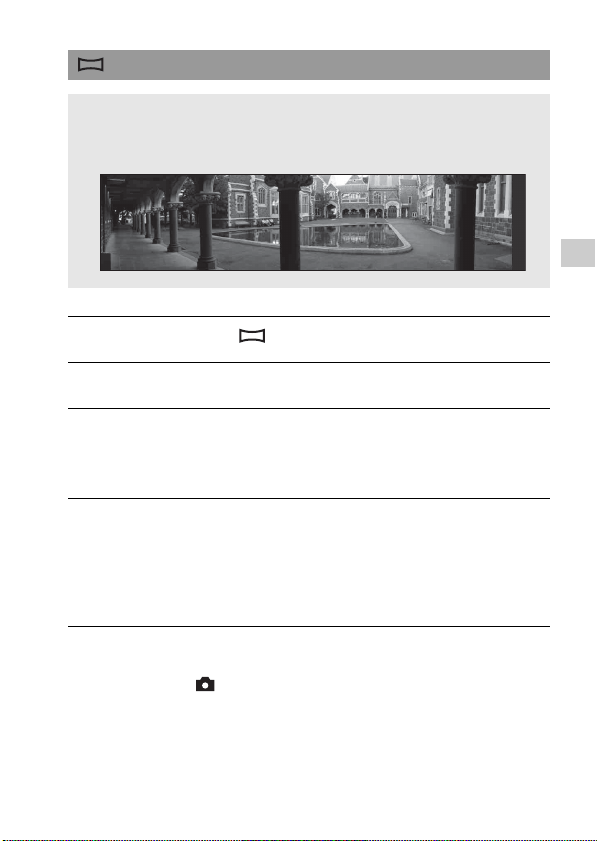
69
Shooting images
To set the direction in which to pan the camera
MENU button t 2 t [3D Pan.: Direction] t Select the
desired setting
Note
• The vertical direction is not provided with this function.
Shooting 3D-panoramic images (3D Sweep Panorama)
This mode is suitable for
z Shooting 3D-panoramic images and making the images seen alive on a 3D-
compatible TV screen.
1 Set the mode dial to (Sweep Shooting).
2 Press the center of the controller.
3 Select [3D Sweep Panorama] with v/V, then press the center
of the controller.
• To select [Sweep Panorama], press the Fn button, then select it.
4 Shoot a subject in the same way as that of [Sweep Panorama]
shooting (pages 66 to 68).
• For details on the notes and essential points on this kind of shooting, see the
details given for [Sweep Panorama] shooting.
• For details on 3D-shooting, see page 194.
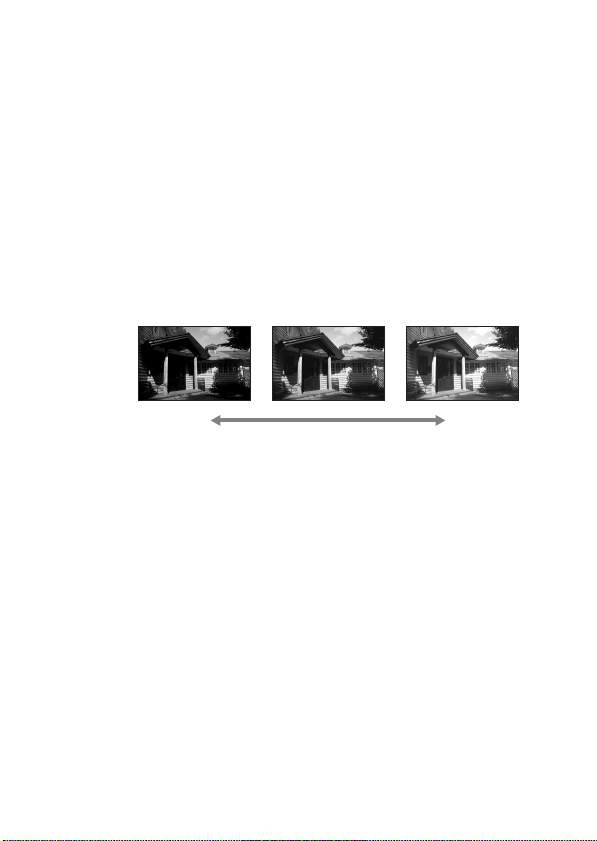
70
Shooting an image the way you want it
(Exposure mode)
With an Interchangeable Lens Digital Camera, you can adjust the shutter
speed (how long the shutter is open) and aperture (the range that is in focus:
depth of field) to enjoy a variety of photographic expressions.
Adjusting the shutter speed and aperture not only creates the photographic
effects of movement and focus, but also determines the brightness of the
image by controlling the amount of exposure (the amount of light the
camera takes in), which is the most important factor in photo shooting.
Changing the brightness of the picture by the amount of exposure
When using a faster shutter speed, the camera opens the shutter for a
shorter time. This means less time for the camera to take in light, resulting
in a darker picture. To take a brighter picture, you can open the aperture
(the hole through which the light passes) to some extent in order to adjust
the amount of light the camera takes in at one time.
The brightness of the picture adjusted by the shutter speed and aperture is
called “exposure.”
This section will show you how to adjust the exposure and enjoy various
photo expressions by the use of movement, focus, and light.
Amount of
exposure
low high
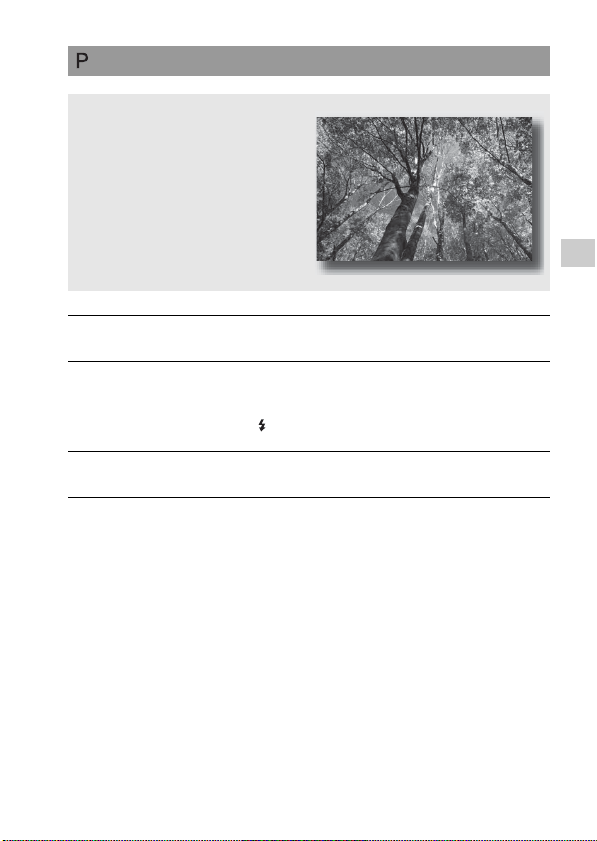
71
Shooting images
Shooting with program auto
This mode is suitable for
z Using the automatic exposure, while
keeping the custom settings for ISO
sensitivity, Creative Style, D-Range
optimizer, etc.
1 Set the mode dial to P.
2 Set the shooting functions to your desired settings (pages 85 to
122).
• To fire the flash, press the button.
3 Adjust the focus and shoot the subject.
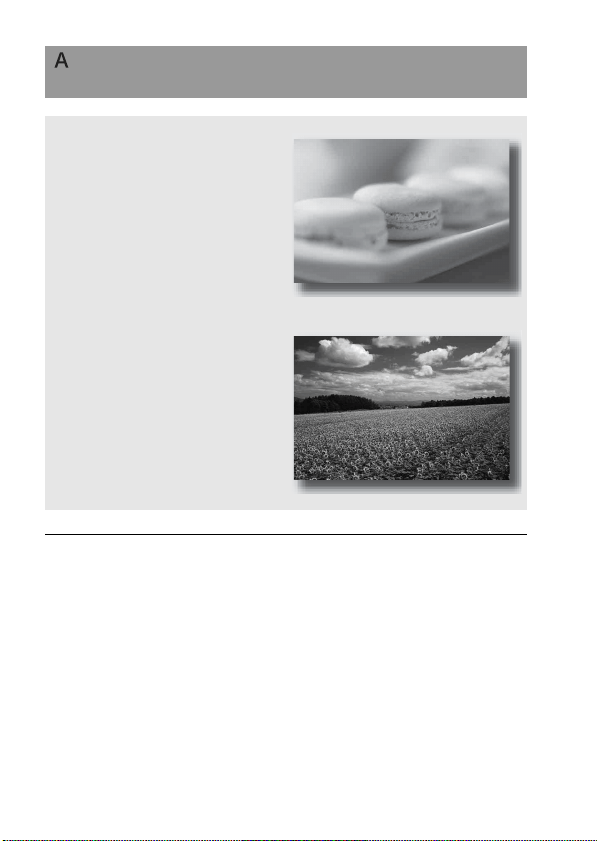
72
Shooting by controlling the blur of the background
(Aperture priority)
This mode is suitable for
z Putting the subject in sharp focus
and blur everything in front of and
beyond the subject. Opening the
aperture narrows the range that is in
focus. (Depth of field becomes
shallower.)
z Shooting the depth of the scenery.
Narrowing down the aperture widens
the range that is in focus. (Depth of
field becomes deeper.)
1 Set the mode dial to A.
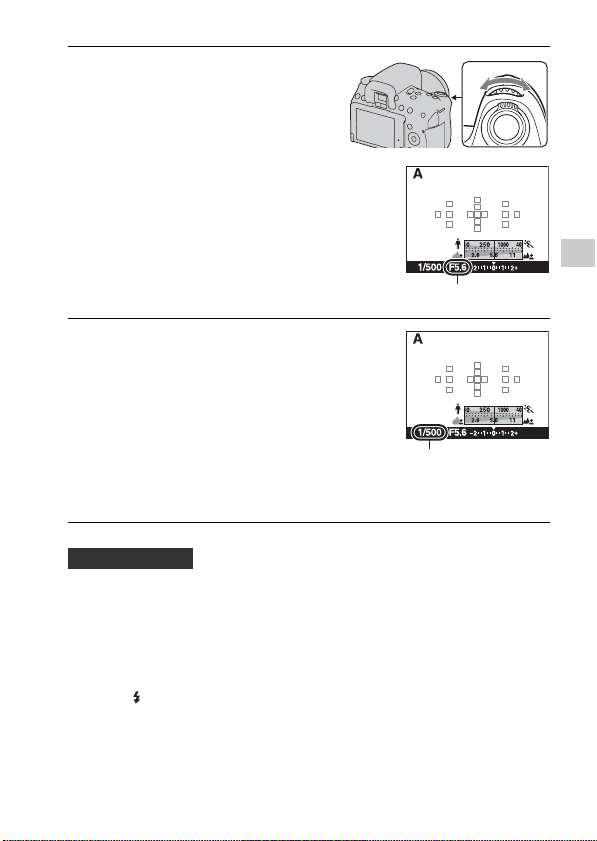
73
Shooting images
• The shutter speed may become slower depending on the aperture value.
When the shutter speed is slower, use a tripod.
• To blur the background more, use a telephoto lens or a lens that is
equipped with a smaller aperture value (bright lens).
Note
• Press the button when you shoot with the flash. However, the flash range differs
according to the aperture value. When you shoot with the flash, check the flash range
(page 100).
2 Select the aperture value (F-
number) with the control dial.
• Smaller F-number: The foreground and
background of the subject are blurred.
Larger F-number: The subject and its
foreground and background are all in
focus.
• You cannot check the blurring of an
image on the LCD monitor or in the
viewfinder. However, you can check
blurring of the background by pressing
the preview button.
Aperture (F-number)
3 Adjust the focus and shoot the
subject.
The shutter speed is automatically
adjusted to obtain correct exposure.
• When the camera judges that the proper
exposure is not obtained with the
selected aperture value, the shutter
speed flashes. In such cases, adjust the
aperture again.
Shutter speed
Shooting techniques

74
To check blurring of the background (Preview button)
Notes
• Press the preview button after you adjust the focus.
• In Live View mode, set the camera to the focus check Live View mode (page 91).
• In viewfinder mode, images displayed in the viewfinder become dark.
The LCD monitor and the viewfinder
shows an image captured with the widest
aperture. The change in aperture affects
the sharpness of the subject image,
creating a discrepancy between the
sharpness of the image before shooting
and that of the actual image.
While you are pressing the preview
button, you can see the image with the
aperture used in the actual shot so that
you can check the approximate sharpness
of the subject before shooting. You can
also adjust the aperture in preview mode.
Preview button
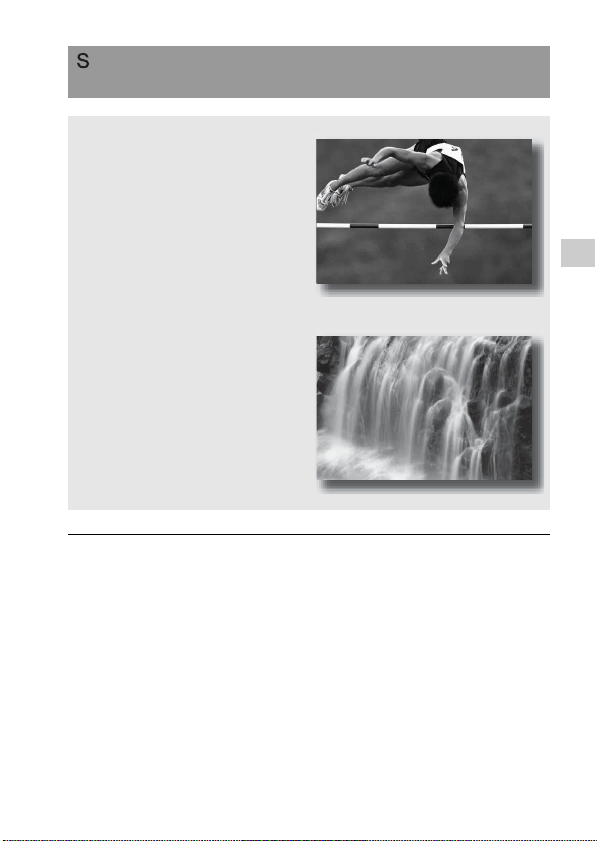
75
Shooting images
Shooting a moving subject with various expressions
(Shutter speed priority)
This mode is suitable for
z Shooting a moving subject at a
moment in time. Use a faster shutter
speed to crisply shoot an instant of
the movement.
z Tracing the movement to express the
dynamism and flow. Use a slower
shutter speed to shoot a trailing
image of the moving subject.
1 Set the mode dial to S.
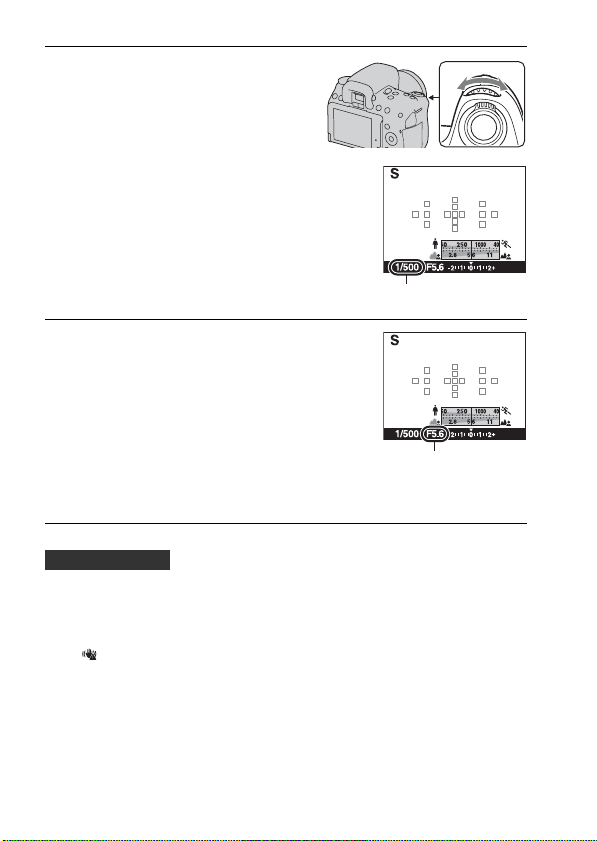
76
• When the shutter speed is slower, use a tripod.
• When shooting an indoor sport, select a higher ISO sensitivity.
Notes
• The (Camera shake warning) indicator is not indicated in shutter speed priority
mode.
• The higher the ISO sensitivity, the more conspicuous the noise.
• When the shutter speed is one second or more, noise reduction (Long Exposure NR)
will be done for the same amount of time that the shutter was released. You cannot
do any further shooting during the reduction.
2 Select the shutter speed with the
control dial.
Shutter speed
3 Adjust the focus and shoot the
subject.
The aperture is automatically adjusted to
obtain correct exposure.
• When the camera judges that the proper
exposure is not obtained with the
selected shutter speed, the aperture
value flashes. In such cases, adjust the
shutter speed again.
Aperture (F-number)
Shooting techniques

77
Shooting images
• Press the button when you shoot with the flash. However, when using the flash, if
you close the aperture (a larger F-number) by making the shutter speed slower, the
light of the flash will not reach distant subjects.
Shooting with the exposure adjusted manually (Manual
exposure)
This mode is suitable for
z Shooting with the desired exposure
setting by adjusting both the shutter
speed and aperture.
1 Set the mode dial to M.
2 Rotate the control dial to adjust
the shutter speed, and while
pressing the button, rotate the
control dial to adjust the aperture.
button
Shutter speed
Aperture (F-number)
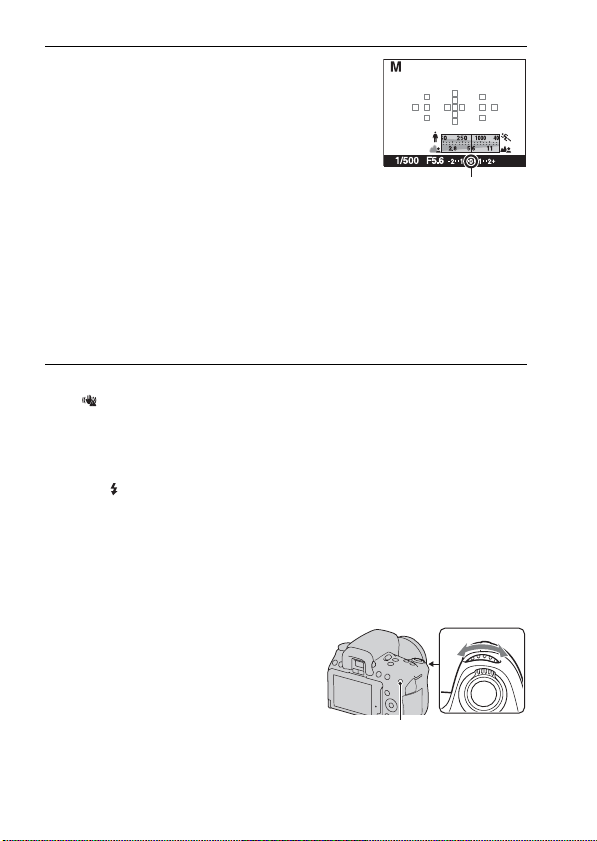
78
Notes
• The (Camera shake warning) indicator is not indicated in manual exposure
mode.
• When the mode dial is set to M, the ISO setting [AUTO] is set to [100]. In M mode,
the ISO setting [AUTO] is not available. Set the ISO sensitivity as necessary
(page 108).
• Press the button when you shoot with the flash. However, the flash range differs
according to the aperture value. When you shoot with the flash, check the flash range
(page 100).
Manual shift
You can change the shutter speed and aperture value combination without
changing the exposure you set.
3 Shoot the image after the
exposure is set.
• Check the exposure value on the EV
scale (Metered Manual*).
Toward +: Images become brighter.
Toward –: Images become darker.
The b B arrow appears if the set
exposure is beyond the range of the EV
scale. The arrow starts flashing if the
difference becomes greater.
* When the camera is in M mode, it will
show an under or over compensation
value based on the correct exposure
using the index on the exposure
compensation indicator.
Standard value
Rotate the control dial while pressing the
AEL button to select the shutter speed
and aperture value combination.
AEL button
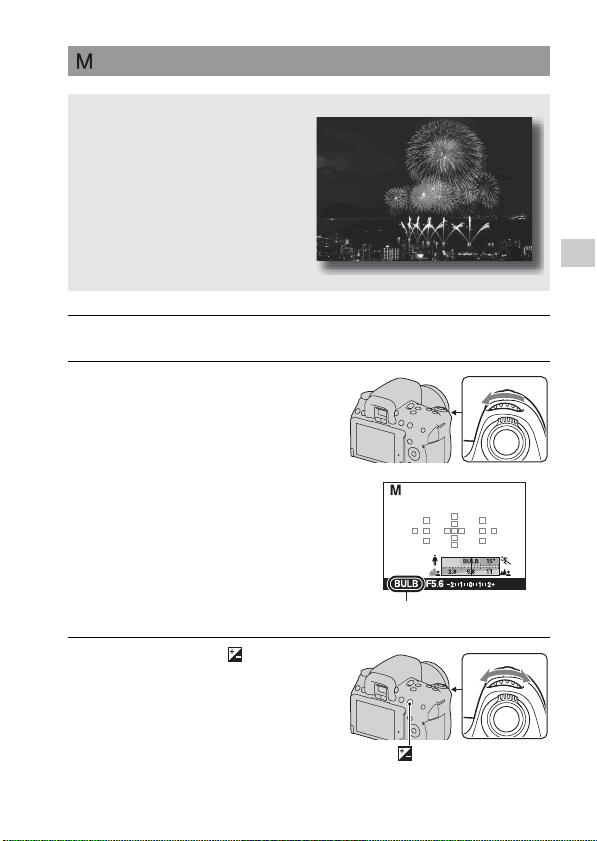
79
Shooting images
Shooting trails with long exposure (BULB)
This mode is suitable for
z Shooting trails of light, such as
fireworks.
z Shooting trails of stars.
1 Set the mode dial to M.
2 Rotate the control dial to the left
until [BULB] is indicated.
BULB
3 While pressing the button,
rotate the control dial to adjust
the aperture (F-number).
button

80
• Use a tripod.
• Set the focus to infinity in manual focus mode when shooting fireworks,
etc. When the infinity position of the lens is not known, first adjust the
focus on fireworks that is set off in the same general area, then shoot
them.
• Use the Wireless Remote Commander (sold separately) (page 122).
Pressing the SHUTTER button on the Wireless Remote Commander
triggers BULB shooting and pressing it again stops BULB shooting. You
do not need to press and hold the SHUTTER button on the Wireless
Remote Commander.
• If you use a Remote Commander that is equipped with a shutter button
lock function (sold separately), you can leave the shutter open using the
Remote Commander.
Notes
• When using a tripod, turn off the SteadyShot function (page 59).
• The longer the exposure time, the more conspicuous the noise on the image.
• After shooting, noise reduction (Long Exposure NR) will be done for the same
amount of time that the shutter was open. You cannot do any further shooting during
the reduction.
• When the Smile Shutter or Auto HDR function is activated, you cannot set the
shutter speed to [BULB].
• If the Smile Shutter or Auto HDR function is used with the shutter speed set to
[BULB], the shutter speed is temporarily set to 30 seconds.
• It is recommended that you start BULB shooting after the temperature of the camera
drops to prevent the quality of the image from deteriorating.
4 Press the shutter button halfway down to adjust the focus.
5 Press and hold the shutter button for the duration of the
shooting.
As long as the shutter button is pressed, the shutter remains open.
Shooting techniques

81
Shooting images
Recording movies
To obtain your desired aperture values
Set the mode dial to “A” and select the aperture value (F number) using the
control dial, then start recording your movie. You can record with the
selected aperture value. This is convenient when you have to adjust the
blurring of a background.
• The aperture value is not indicated and cannot be adjusted during movie
recording.
• The aperture value is changed if you rotate the zoom ring of the lens
during movie recording.
• The following settings that were set during still image shooting are used
without change.
– White Balance
– Creative Style
– Exposure compensation
– Metering mode
• Exposure compensation can be used during movie recording.
1 Adjust the focus.
2 Press the MOVIE button to start
recording.
• Movie recording can be started from
any exposure mode.
• The values relevant to the exposure,
such as the shutter speed and aperture,
are adjusted automatically.
MOVIE button
3 Press the MOVIE button again to stop recording.
Shooting techniques
82
Notes
• The autofocus cannot be used during movie recording. Adjust the focus using the
autofocus or manual focus before pressing the MOVIE button.
• The angle of view of movies is narrower than that of still images (DSLR-A560
only). After you press the MOVIE button, the camera shows the actual range to be
recorded.
• The Face Detection function cannot be used.
• Do not shoot a strong light source, such as the sun. The internal mechanism of the
camera may be damaged.
• When you import AVCHD movies to a computer, use “PMB” (page 164).
• When you continue to shoot for a long time, the temperature of the camera rises and
the image quality may deteriorate.
• When the mark is indicated, the temperature of the camera is too high. Turn the
camera off and wait until the temperature of the camera drops. If you continue to
shoot, the camera is turned off automatically.
• For details on movie playback, see page 124.
To change the movie file format
MENU button t 1 t [Movie: File Format] t Select the
desired format
AVCHD This file format is suitable for viewing smooth video images
on a high-definition TV.
Movies shot with this camera are recorded in AVCHD
format, approximately 60 fields/sec (1080 60i-compatible
devices) or 50 fields/sec (1080 50i-compatible devices), in
interlace mode, with Dolby Digital audio, AVCHD format.
• To check if your camera is a 1080 60i-compatible device or
1080 50i-compatible device, check for the following marks
on the bottom of the camera.
1080 60i-compatible device: 60i
1080 50i-compatible device: 50i
MP4 This file format is suitable for WEB uploads, e-mail
attachments or playing back on computers.
Movies shot with this camera are recorded in MPEG-4
format at approximately 30 frames/sec (1080 60i-compatible
devices) or approximately 25 frames/sec (1080 50i-
compatible devices), in progressive mode, with AAC audio,
mp4 format.

83
Shooting images
Audio recording
When you record movies, the operating noise of the camera or lens may be
recorded. You can reduce the noise of the camera by using a tripod, and
setting the SteadyShot function to off.
You can also record movies without audio.
MENU button t 1 t [Movie: Audio Rec.] t [Off]
To change the size
MENU button t 1 t [Movie: Size] t Select the desired
size
For details, see page 141.
The table below shows the approximate total recording times using a
memory card formatted with this camera. The values are defined using
Sony standard “Memory Stick PRO Duo” media for testing. The values
may vary depending on the shooting conditions and the type of memory
card used.
DSLR-A580 (Units: hour : minute : second)
Available recording time for a movie
Capacity
File
format/
Size
2GB 4GB 8GB 16GB 32GB
AVCHD 1920 ×
1080
0:14:00 0:28:30 0:58:10 1:58:50 3:55:20
MP4 1440 × 1080 0:20:40 0:41:40 1:24:40 2:52:30 5:41:00
MP4 VGA 1:15:10 2:31:10 5:06:20 10:23:50 20:33:00

84
DSLR-A560 (Units: hour : minute : second)
Note
• The values shown are not the continuous recording time.
• Each continuous recording time value indicated is depending on the temperature or
status of the camera.
• The recording time is longer when you disable the SteadyShot function that calls for
using a tripod or a similar device.
• Each continuous recording time limit indicated for a movie is available for about 14
minutes (DSLR-A580) or for about 24 minutes (DSLR-A560) at a room temperature
of 20°C (68°F). When you disable the SteadyShot function, it is still available for
continuous recording for about 29 minutes on both the DSLR-A580 and DSLR-
A560.
• If is indicated or the camera is turned off automatically since the temperature
inside the camera is too high, you can record movies again after turning off the
camera for several minutes.
• The maximum size of a movie file is about 2 GB. When the file size is about 2 GB,
the recording stops automatically when the file format is MP4, and a new movie file
is created automatically when the file format is AVCHD.
• The maximum continuous recording time is 29 minutes.
Capacity
File
format/
Size
2GB 4GB 8GB 16GB 32GB
AVCHD 1920 ×
1080
0:14:00 0:28:30 0:58:10 1:58:50 3:55:20
MP4 1440 × 1080 0:20:40 0:41:40 1:24:40 2:52:30 5:41:00
MP4 VGA 1:15:10 2:31:10 5:06:20 10:23:50 20:33:00
Notes on continuous movie recording
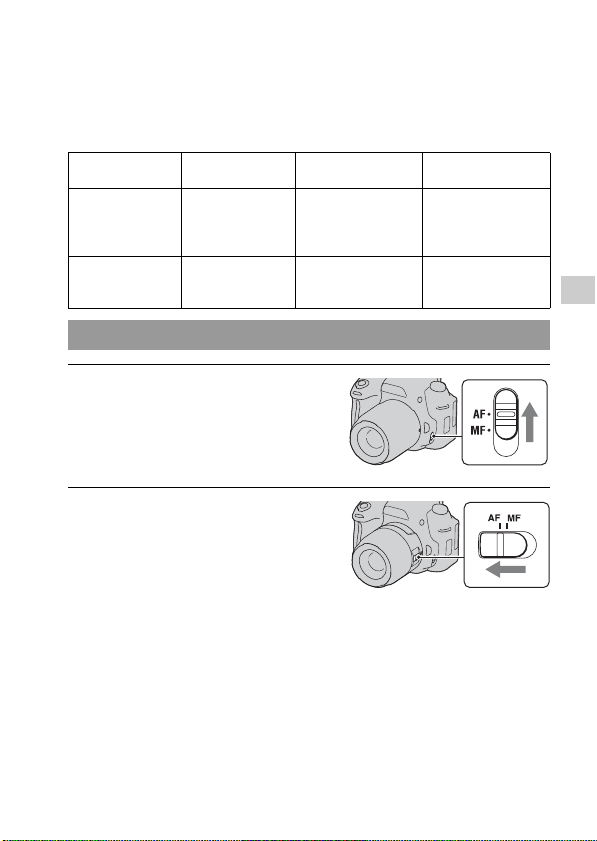
85
Using the shooting function
Using the shooting function
Selecting the focus method
There are two methods for adjusting the focus: autofocus and manual focus.
Depending on the lens, the method for switching between the auto focus
and manual focus is different.
The type of lens
The switch to be
used
To switch to auto
focus
To switch to manual
focus
The lens is
equipped with a
focus mode switch
Lens (Always set
the focus mode
switch on the
camera to AF.)
Set the focus mode
switch on the lens to
AF.
Set the focus mode
switch on the lens to
MF.
The lens is not
equipped with a
focus mode switch
Camera Set the focus mode
switch on the camera
to AF.
Set the focus mode
switch on the camera
to MF.
Using autofocus
1 Set the focus mode switch on the
camera to AF.
2 When the lens is equipped with
the focus mode switch, set it to
AF.
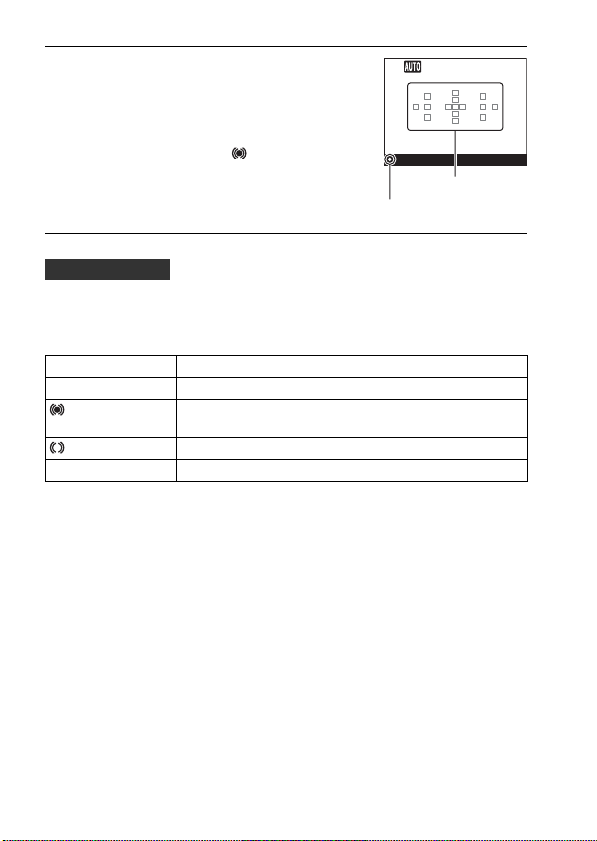
86
• To select the AF area used for focusing, set up [AF area] (page 89).
Focus indicator
Subjects that may require special focusing
Using the autofocus, it is hard to focus on the following subjects. In such
cases, use the focus lock shooting feature (page 87) or manual focus
(page 90).
• A subject that is low in contrast, such as blue sky or a white wall.
• Two subjects at different distances overlapping in the AF area.
• A subject that is composed of repeating patterns, such as the facade of a
building.
• A subject that is very bright or glittering, such as the sun, the body of an
automobile, or the surface of water.
• Ambient light is not sufficient.
3 Press the shutter button halfway
down to check the focus and shoot
the image.
• When the focus is confirmed, the focus
indicator changes to z or (below).
• The AF area where the focus has been
confirmed turns green.
Focus indicator
Shooting technique
Focus indicator Status
z lit Focus locked. Ready to shoot.
lit Focus is confirmed. Focal point moves following a moving
subject. Ready to shoot.
lit Still focusing. You cannot release the shutter.
z flashing Cannot focus. The shutter is locked.
AF area
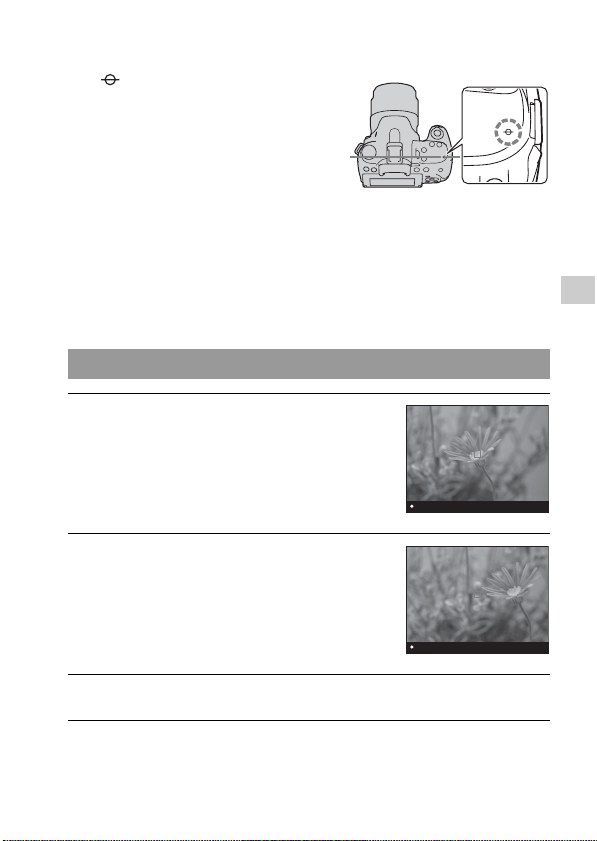
87
Using the shooting function
To measure the exact distance to the subject
Note
• If the subject is closer than the minimum shooting distance of the attached lens, the
focus cannot be confirmed. Make sure you put enough distance between the subject
and the camera.
The mark located on the top of the
camera shows the location of the image
sensor*. When you measure the exact
distance between the camera and the
subject, refer to the position of the
horizontal line.
* The image sensor is the part of the
camera that acts as the film.
Shooting with your desired composition (Focus-lock)
1 Place the subject within the AF
area and press the shutter button
halfway down.
The focus and exposure are fixed.
2 Keep the shutter button halfway
down, and put the subject back in
the original position to re-
compose the shot.
3 Press the shutter button fully down to take the picture.

88
Fn button t (Autofocus Mode) t Select the desired setting
• Use [Single-shot AF] when the subject is motionless.
• Use [Continuous AF] when the subject is in motion.
Notes
• [Automatic AF] is selected when the exposure mode is set to AUTO or one of the
following Scene Selection modes: [Portrait], [Landscape], [Sunset], [Night View],
[Night Portrait], or [Hand-held Twilight].
[Single-shot AF] is selected when the exposure mode is set to [Macro] in Scene
Selection.
[Continuous AF] is selected when the exposure mode is set to [Sports Action] in
Scene Selection.
• [Continuous AF] is selected when the Smile Shutter function is used.
Selecting the focus method to suit the movement of the
subject (Autofocus Mode)
(Single-shot
AF)
The camera focuses and the focus is locked when you press
the shutter button halfway down.
(Automatic AF) The [Autofocus Mode] is switched between Single-shot AF
and Continuous AF according to the movement of the
subject.
When you press and hold the shutter button halfway down, if
the subject is motionless, the focus is locked and if the
subject is in motion, the camera continues to focus.
(Continuous
AF)
The camera continues to focus while the shutter button is
pressed and held halfway down.
• The audio signals will not sound when the subject is in
focus.
• Focus-lock cannot be used.
Shooting techniques
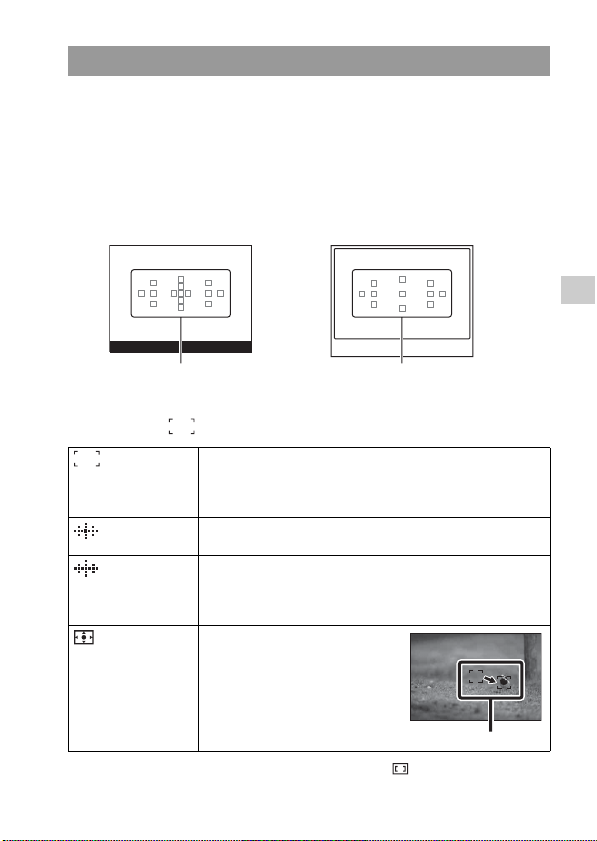
89
Using the shooting function
Select the desired AF area to suit the shooting conditions or your
preference. The AF area where the focus has been confirmed turns green
and the other AF areas disappear.
• In viewfinder mode, the AF areas that were not used to adjust the focus
will disappear.
Fn button t (AF area) t Select the desired setting
* When [Contrast AF] is selected, [Local] is indicated by .
Selecting the focus area (AF area)
LCD monitor Viewfinder
AF area AF area
(Wide) The camera determines which of the 15 AF areas (the 11 AF
areas in viewfinder mode) is used in focusing.
In viewfinder mode, four metering points are also used, in
addition to 11 AF areas.
(Spot) The camera uses the AF area located in the center area
exclusively.
(Local)* Choose the area for which you want to activate the focus
from among 15 AF areas (the 11 AF areas in viewfinder
mode) with the controller. Press the AF button to display the
setup screen and select the desired area.
(Flexible Spot) Moves the AF area to focus on a
small subject or narrow area with
v/V/b/B of the controller.
AF area
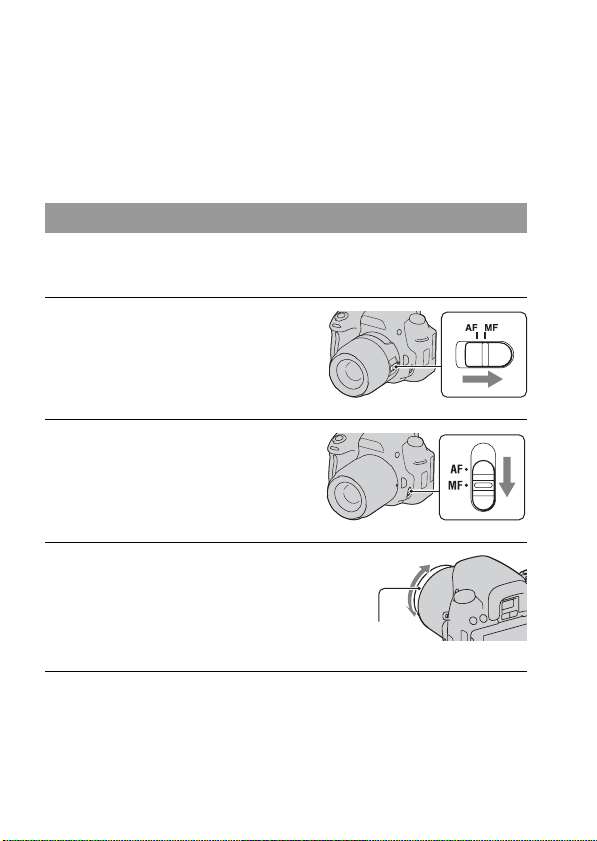
90
Notes
• The available AF area settings depend on the status of the [AF method] setting
(page 91). When [Contrast AF] is selected, [Spot] and [Flexible Spot] are available.
When [Phase-detect AF] is selected, [Wide], [Spot], and [Local] are available.
• When the exposure mode is set to AUTO or Scene Selection, or the Smile Shutter is
activated, [AF area] is fixed to [Wide] and you cannot select the other settings.
• The AF area may not be illuminated during continuous shooting or when the shutter
button is pressed all the way down without pause.
When it is difficult to get the proper focus in autofocus mode, you can
adjust the focus manually.
Notes
• In the case of a subject that can be focused in autofocus mode, the z indicator lights
up when the focus is confirmed. When the Wide AF area is used, the center area is
used, and when the Local AF area is used, the area that is selected with the controller
is used.
Adjusting the focus manually (Manual focus)
1 Set the focus mode switch on the
lens to MF.
2 When the lens is not equipped
with the focus mode switch, set
the focus mode switch on the
camera to MF.
3 Rotate the focusing ring of the
lens to achieve a sharp focus.
Focusing
ring
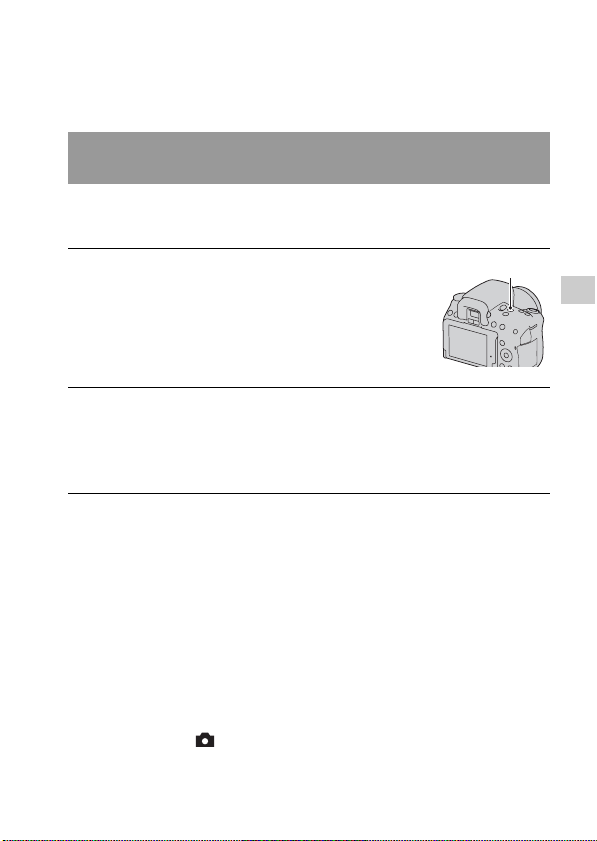
91
Using the shooting function
• When using a tele converter (sold separately), etc., rotation of the focusing ring may
not be smooth.
• The correct focus in the viewfinder is not achieved if the diopter is not adjusted
properly in viewfinder mode (page 40).
The image on the image sensor is displayed on the LCD monitor with
100% frame coverage.
Notes
• The image in the viewfinder is not visible in focus check Live View mode.
• When using the focus check Live View function in viewfinder mode, it is
recommend that you attach the eyepiece cover (page 34).
• When you perform continuous or exposure bracket shooting in focus check Live
View mode, the autofocus is set at the first shot.
To change the AF method
The AF method can be switched between [Contrast AF] (default setting)
and [Phase-detect AF] in focus check Live View mode. The phase-
detection AF is always used for focusing when the camera is not in focus
check Live View mode.
MENU button t 2 t [AF method] t Select the desired
setting
Composing your shot using the image sensor (Focus check
Live View)
1 Press the FOCUS CHECK LV
button.
The mirror is raised.
FOCUS CHECK LV button
2 Adjust the focus and shoot the image.
In autofocus mode: Press the shutter button halfway down or press the AF
button.
In manual focus mode: Rotate the focusing ring manually.

92
In focus check Live View mode, each AF method has the following
differences.
• When using [Contrast AF], attach the camera to a tripod because the
focus may be difficult to be adjusted properly.
Notes
• When using [Contrast AF], it may take time to adjust the focus, depending on the
subject or the lens attached.
• If you press the shutter button or AF button, the camera focuses on the subject again,
even if the proper focus has already been obtained.
• The brightness of the screen may change when the contrast AF is activated.
• AF illuminator light is not emitted.
Subjects that may require special focusing
Using the autofocus, it is hard to focus on the following subjects. In such
cases, use the focus lock shooting feature (page 87) or manual focus
(page 90).
• It is dark and the subject is distant.
• The contrast between the subject and the background is poor.
• The subject is seen through glass.
• The subject is moving quickly.
• The subject reflects light such as mirror, or has shiny surfaces.
• The subject is flashing.
• The subject is backlit.
The focus may hard to be achieved, depending on the lens attached, even if
you shoot the same subject.
Contrast AF Live View works even when the focus is being adjusted.
• Only when SAM lenses or SSM lenses are used.
• The Face Detection and Smile Shutter functions cannot be
used.
• The AF area setting can be selected from either [Spot] or
[Flexible Spot].
Phase-detect AF This shortens the time the focus is achieved, however, Live
View does not work when the focus is being adjusted.
• The AF area setting can be selected from either [Wide],
[Spot], or [Local].
Shooting technique
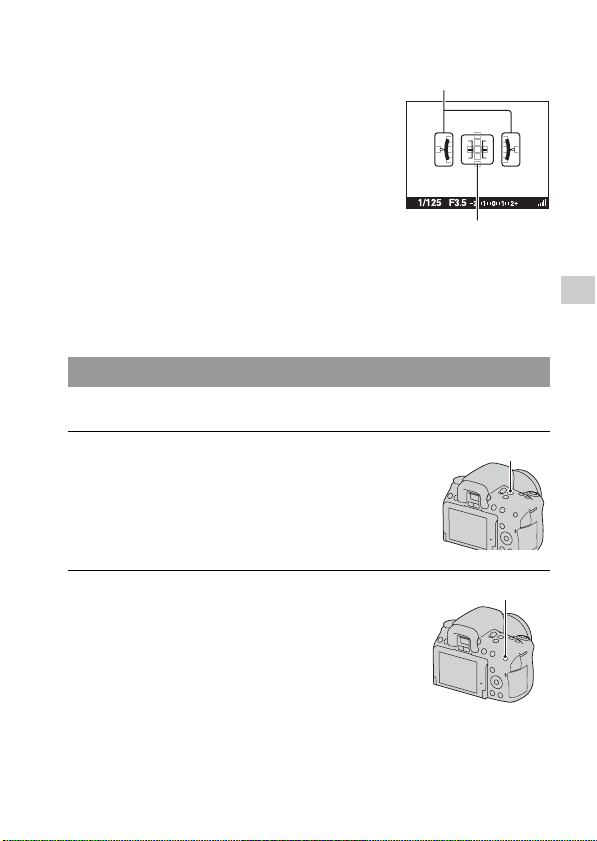
93
Using the shooting function
The digital level gauge of this camera
Notes
• The error of the digital level gauge is larger if you tilt the camera too far forward or
backward.
• A tilt of ±1° may be indicated even if the camera is almost level.
You can check the focus by enlarging the image before shooting.
In focus check Live View mode, press the
DISP button so that the digital level
gauge is displayed (page 42). The digital
level gauge indicates whether the camera
is level in both the horizontal and front-
back directions. When the camera is level
in both directions, the indicator turns to
green.
Horizontal direction
Front-back direction
Checking the focus by enlarging the image
1 Press the FOCUS CHECK LV
button.
FOCUS CHECK LV button
2 Press the AEL button.
AEL button
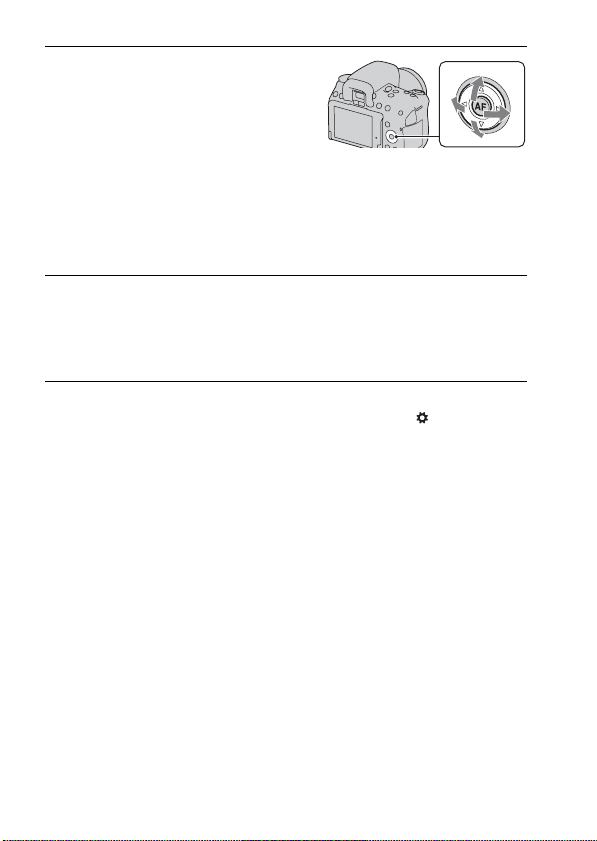
94
Note
• This function cannot be used when [Func. of AEL button] in the Custom menu is
set to [AEL].
3 Press the AEL button again to
enlarge the image and select the
portion you want to enlarge with
v/V/b/B on the controller.
• Each time you press the AEL button,
the zoom scaling changes as follows:
Full display t Approx. ×7.5 t
Approx. ×15 (DSLR-A580)/Full
display t Approx. ×7 t Approx. ×14
(DSLR-A560)
4 Adjust the focus and shoot the subject.
• You can record images when an image is enlarged, however the recorded
image is for full display.
• The Focus Magnifier function will be released after shooting.
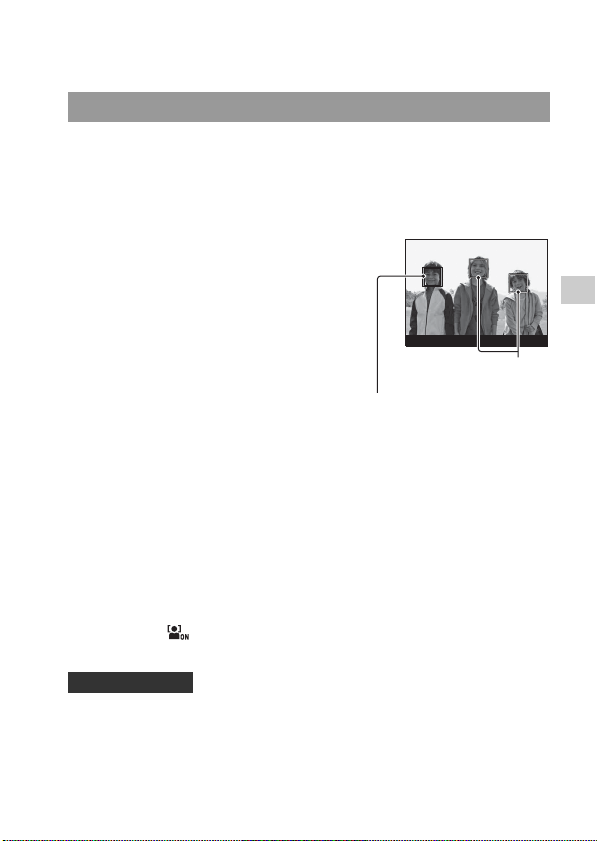
95
Using the shooting function
Detecting faces
The camera detects faces, adjusts the focus, exposure, performs image
processing, and adjusts flash settings. The Face Detection function is set to
[On] in the default setting.
The Face Detection frame
To deactivate the Face Detection function
Fn button t (Face Detection) t [Off]
• Compose to overlay the Face Detection frame and the AF area.
Notes
• When the exposure mode is Sweep Shooting or during movie recording, the Face
Detection function cannot be used in viewfinder mode.
Using the Face Detection function
When the camera detects faces, white
Face Detection frames appear. When the
camera judges that autofocus is possible,
the Face Detection frames turn orange.
When you press the shutter button
halfway down, the Face Detection frames
turn green.
• If a face is not positioned inside the AF
area available when you press the
shutter button halfway down, the AF
area that is used for focusing turns
green.
• When the camera detects multiple
faces, the camera automatically selects
a priority face and the single Face
Detection frame turns orange.
Face Detection frames (orange)
Shooting technique
Face Detection frames
(white)
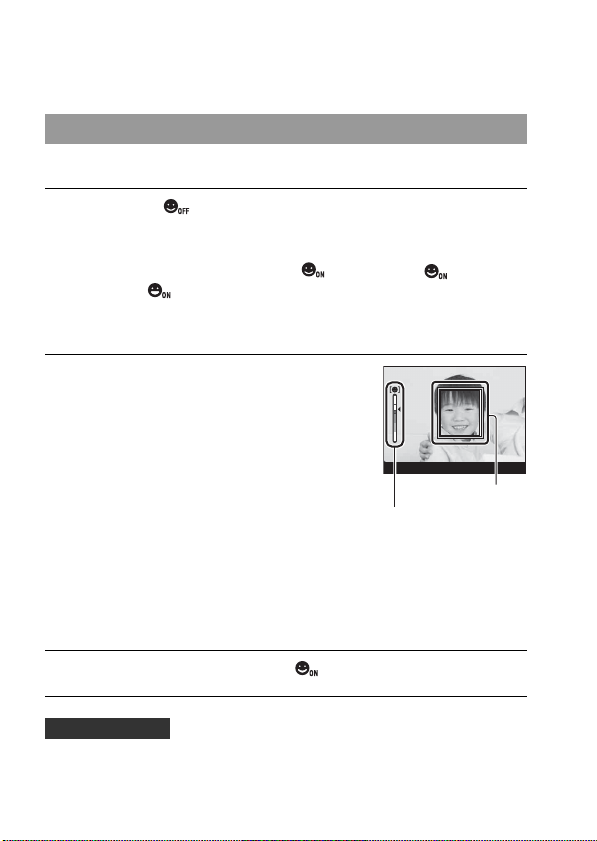
96
• Up to eight faces can be detected.
• The camera may not detect any faces, or may detect some other object, depending on
the shooting conditions.
When the camera detects a smile, the shutter is released automatically.
• To focus on the smile, overlay the Face Detection frame and AF area.
• Do not cover the eyes with bangs, etc. Keep the eyes narrowed.
Capturing smiling faces (Smile Shutter)
1 Fn button t (Smile Shutter) t [On] t Select the
desired Smile Detection Sensitivity mode
• You can set the sensitivity of the Smile Shutter function for detecting smiles
to one of the following three options: (Slight Smile), (Normal
Smile), and (Big Smile).
• When the Smile Shutter is activated, the Smile Detection Sensitivity
indicator appears on the screen.
2 Wait detecting a smile.
The camera detects a smile and the focus
is confirmed. When the smile level
exceeds the b point on the indicator, the
camera records images automatically.
• When the camera detects faces, orange
Face Detection frames appear around
the faces. The Face Detection frames
turn green when these subjects come
into focus.
• The smile level of the face surrounded
by the double Face Detection frame is
indicated on the Smile Detection
Sensitivity indicator.
Smile Detection Sensitivity indicator
3 To stop shooting, Fn button t (Smile Shutter) t [Off]
Shooting techniques
Face Detection frame

97
Using the shooting function
• Do not obscure the face with a hat, a mask, sunglasses, etc.
• Try to orient the face in front of the camera and keep it as level as
possible.
• Hold a clear smile with an open mouth. The smile is easier to detect when
the teeth are showing.
• If you press the shutter button while the Smile Shutter function is
activated, the camera shoots the image, and then returns to Smile Shutter.
Notes
• When the exposure mode is set to Sweep Shooting, the Smile Shutter function
cannot be used.
• The drive mode is automatically set to [Single-shot Adv.] or [Remote Cdr.].
• The AF illuminator does not work with the Smile Shutter function.
• If the camera does not detect a smile, change the settings for Smile Detection
Sensitivity.
• Smiles may not be detected correctly, depending on the shooting conditions.
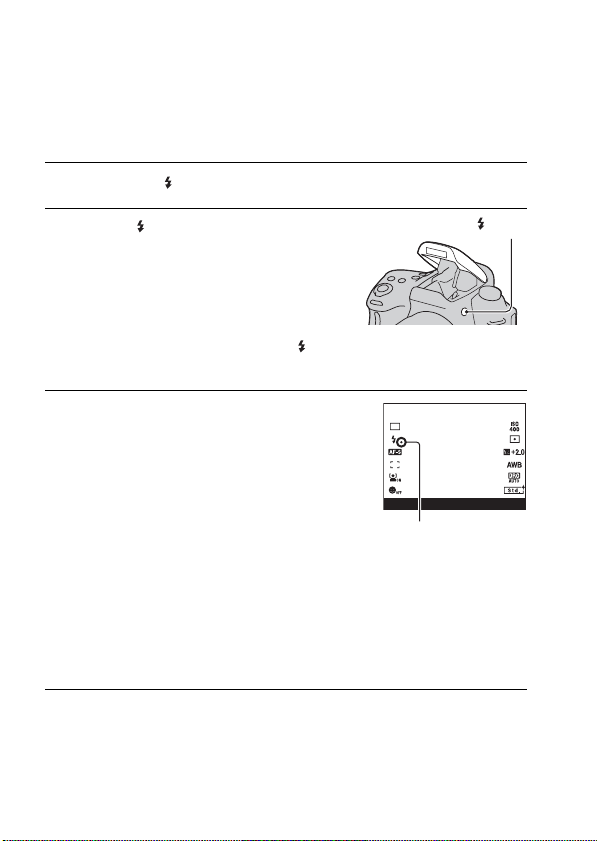
98
Using the flash
In a dark location, using the flash allows you to shoot the subject brightly,
and it also helps to prevent camera shake. When shooting into the sun, you
can use the flash to shoot a bright image of the backlit subject.
1 Fn button t (Flash Mode) t Select the desired setting
2 Press the button.
The flash pops up.
• In AUTO or Scene Selection mode, the
flash automatically pops up if the
amount of light is insufficient or the
subject is backlit. The built-in flash
does not pop up even if you press the
button.
button
3 After the flash has finished
charging, shoot the subject.
z Flashing: The flash is being charged.
When the indicator flashes, you cannot
release the shutter.
z Lit: The flash has been charged and is
ready to fire.
• When you press the shutter button
halfway down under dark lighting in
autofocus mode, the flash may be fired
to help focus on a subject (AF
Illuminator).
• z is indicated only in the recording
information display mode (page 43).
z (Flash charging) indicator
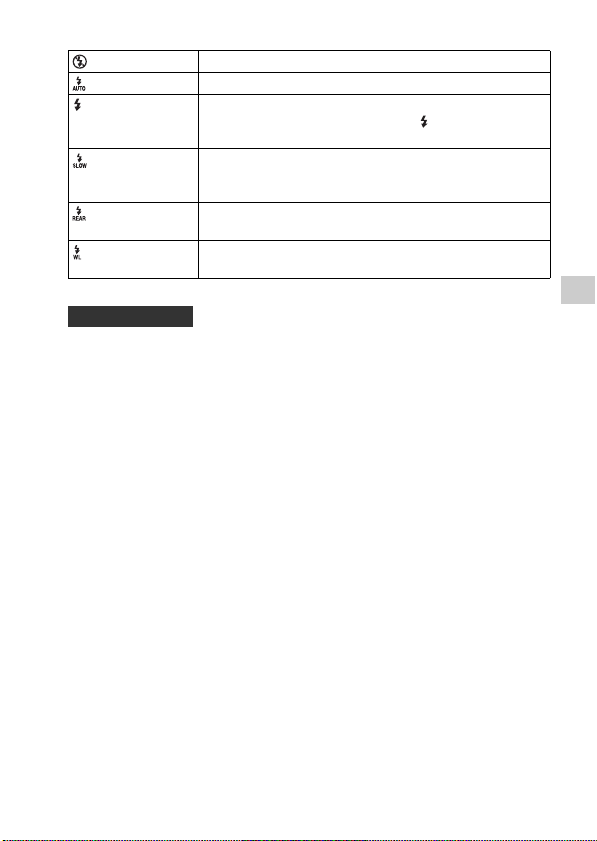
99
Using the shooting function
• The lens hood (sold separately) may block the light of the flash. Remove
the lens hood when using the flash.
• When using the flash, shoot the subject at a distance of 1 m (3.3 feet) or
greater.
• When shooting indoors or shooting nightscapes, you can use slow sync to
shoot a brighter image of people and backgrounds.
• You can use rear sync to shoot a natural image of the trail of a moving
subject such as a moving bicycle or a walking person.
• When using the HVL-F58AM/HVL-F42AM Flash (sold separately), you
can shoot with the High-speed sync feature at any shutter speed. For
details, refer to the operating instructions supplied with the flash.
Notes
• Do not hold the camera by grabbing the flash emitter.
• Shooting conditions required to prevent shadows from appearing on an image vary,
depending on the lens.
• When the exposure mode is set to AUTO or Scene Selection, the [Slow Sync.], [Rear
Sync.], and [Wireless] items cannot be selected.
• When the exposure mode is set to P, A, S, M, the [Flash Off] or [Autoflash] items
cannot be selected. If you do not want to use the flash, push the flash down.
• If you use the flash with a stereo microphone or similar device attached to the Auto-
lock Accessory shoe, the flash may not pop up to the correct position and recorded
images may have a shadow on their corners. Remove any device from the Auto-lock
Accessory shoe.
(Flash Off) Does not fire even the built-in flash pops up.
(Autoflash) Fires if it is dark or against light.
(Fill-flash) Fires every time you trigger the shutter. When the exposure
mode is set to P, A, S, or M, press the button to pop the
flash up before shooting.
(Slow Sync.) Fires every time you trigger the shutter. Slow sync shooting
allows you to shoot a clear image of both the subject and the
background by slowing the shutter speed.
(Rear Sync.) Fires right before the exposure is completed everytime you
trigger the shutter.
(Wireless) Fires an external flash (sold separately) that is off the camera
and away from it (Wireless flash shooting).
Shooting techniques
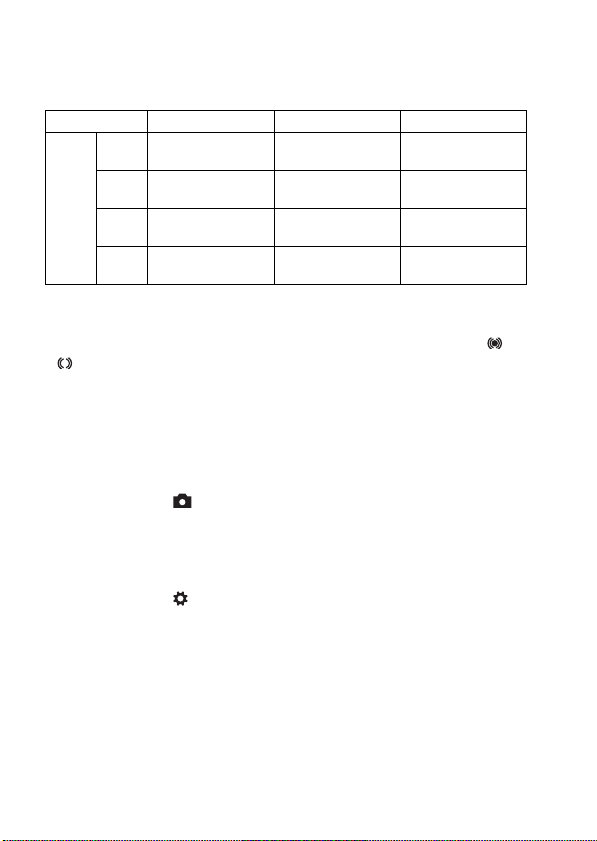
100
The flash range
The range of the built-in flash depends on the ISO sensitivity and aperture
value. Refer to the following table.
The AF illuminator
• AF illuminator does not operate when [Autofocus Mode] is set to
[Continuous AF] or the subject is moving in [Automatic AF]. (The or
indicator lights.)
• The AF illuminator may not operate with focal lengths of 300 mm or longer.
• When an external flash (sold separately) that is equipped with an AF
illuminator is attached, the AF illuminator of the external flash is used.
• AF illuminator does not operate when [Smile Shutter] is set to [On].
To deactivate the AF illuminator
MENU button t 2 t [AF Illuminator] t [Off]
To use the red-eye reduction
The red-eye reduction reduces the red-eye phenomenon by providing pre-
flash (low-flash light) a few times before shooting when using the flash.
MENU button t 1 t [Red Eye Reduction] t [On]
Aperture F2.8 F4.0 F5.6
ISO
setting
100 1 m– 4.3 m
(3.3 feet– 14 feet)
1 m– 3 m (3.3 feet–
9.8 feet)
1 m– 2.1 m (3.3 feet
– 6.9 feet)
200 1 m– 6 m (3.3 feet –
20 feet)
1 m– 4.3 m (3.3 feet
– 14 feet)
1 m– 3 m (3.3 feet –
9.8 feet)
400 1.4 m– 8.6 m
(4.6 feet – 28 feet)
1 m– 6 m (3.3 feet –
20 feet)
1 m– 4.3 m (3.3 feet
– 14 feet)
800 2 m– 12 m (6.6 feet
– 39 feet)
1.4 m– 8.6 m
(4.6 feet – 28 feet)
1 m– 6 m (3.3 feet –
20 feet)

101
Using the shooting function
With a flash that has a wireless shooting function (sold separately), you can
shoot with the flash without a cord, even when the flash is not attached to
the camera. By changing the position of the flash, you can shoot an image
with a three dimensional feel by highlighting the contrast of light and
shadow on the subject.
For the actual steps of shooting, refer to the operating instructions of the
flash.
Notes
• The camera cannot carry out the wireless lighting ratio control.
• Turn off the wireless flash mode after wireless flash shooting. If the built-in flash is
used while the wireless flash mode is still active, inaccurate flash exposures will
result.
• Change the channel of the external flash when another photographer is using a
wireless flash nearby and his/her built-in flash light causes your external flash to fire.
To change the channel of the external flash, refer to the operating instructions
supplied with it.
Setup of the AEL button
When using a wireless flash, it is recommended that you set [AEL] to
[Hold] in the Custom menu (page 149).
Performing wireless flash shooting
1 Attach the wireless flash to the Auto-lock Accessory shoe and
turn both the camera and the flash on.
2 Fn button t (Flash Mode) t (Wireless)
3 Remove the wireless flash from the Auto-lock Accessory shoe
and pop up the built-in flash.
• If you perform a test fire of the flash, press the AEL button.
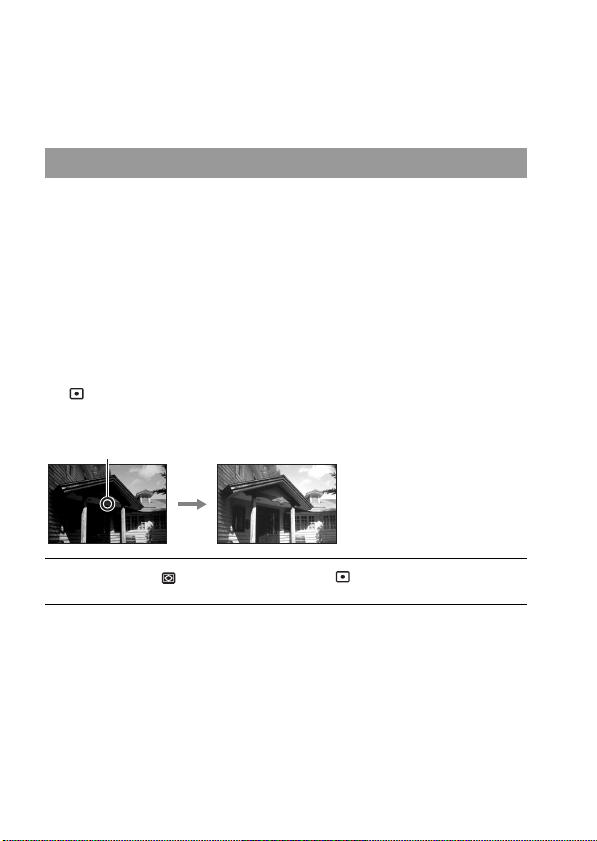
102
Adjusting the brightness of the image
(Exposure, Flash compensation,
Metering)
When shooting into the sun or by a window, the exposure may not be
appropriate for the subject because of the big difference in lighting between
the subject and the background. In such cases, use the light meter where the
subject is bright enough and lock the exposure before shooting. To reduce
the brightness of the subject, point the camera forwards a spot that is
brighter than the subject and use the light meter to lock the exposure of the
entire image. To make the subject brighter, point the camera forwards a
spot that is darker than the subject and use the light meter to lock the
exposure of the entire image.
This section describes how to shoot a brighter image of the subject using
the (Spot).
Shooting with fixed brightness (AE Lock)
1 Fn button t (Metering Mode) t (Spot)
2 Adjust the focus on the portion you want to lock the exposure.
The exposure is set when the focus is achieved.
The spot where you
lock the exposure.
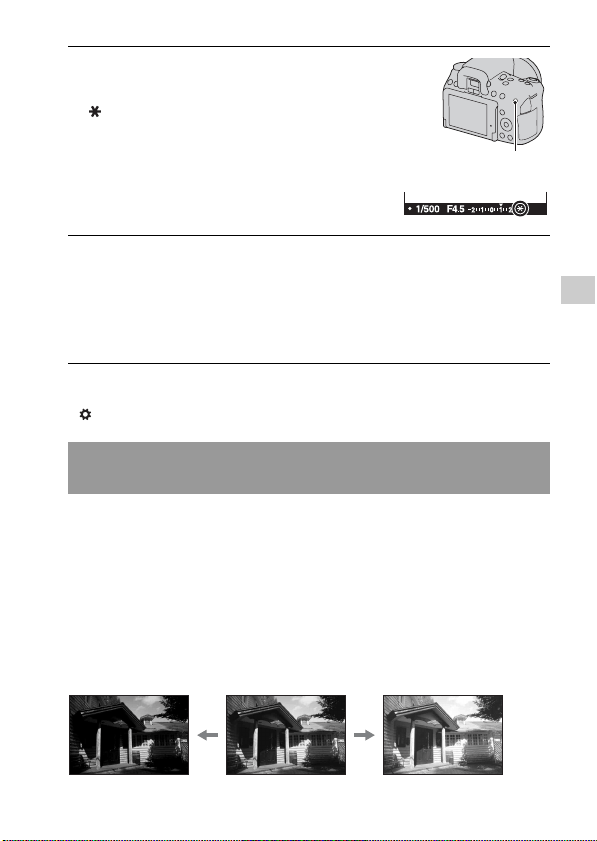
103
Using the shooting function
Note
• In focus check Live View mode (page 91), set [Func. of AEL button] to [AEL] in the
Custom menu.
Except for exposure mode M, the exposure is automatically selected
(Automatic exposure).
Based on the exposure acquired by the automatic exposure, you can
perform exposure compensation by shifting the exposure to either the +
side or the – side, depending on your preference. You can make the entire
image brighter by shifting to the + side. The entire image becomes darker
when you shift it to the – side.
3 Press the AEL button to lock the
exposure.
(AE lock mark) appears.
AEL button
4 While pressing the AEL button, focus on the subject, and shoot
the subject.
• If you continue to shoot with the same exposure value, press and hold the
AEL button after the shooting. The setting is canceled when the button is
released.
Using brightness compensation for the entire image
(Exposure compensation)
Adjust in the –
direction
Base exposure
Adjust in the +
direction
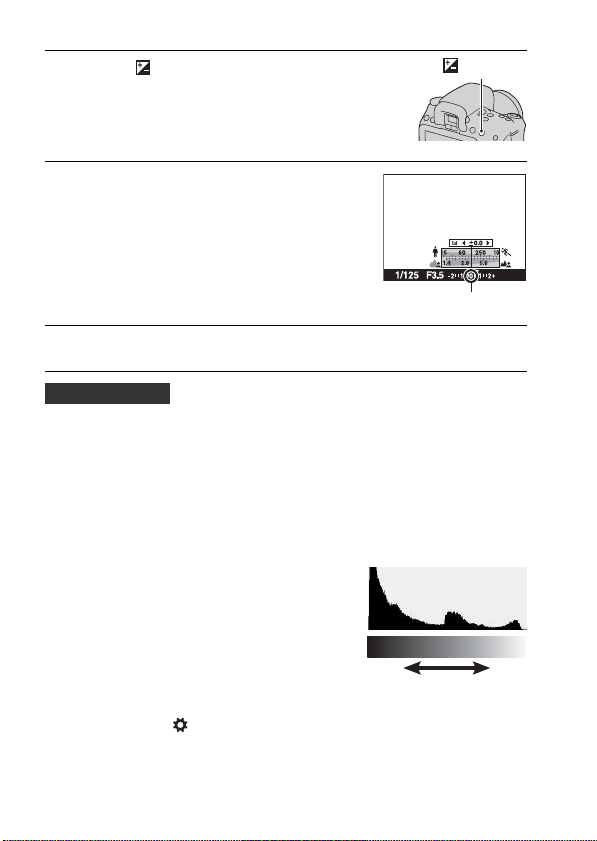
104
• Adjust the compensation level by checking the recorded image.
• Using bracket shooting, you can shoot multiple images with the exposure
shifted to the plus or minus sides (page 120).
Note
• This item cannot be set when the exposure mode is set to AUTO or Scene Selection.
To shoot while checking the screen using the histogram
1 Press the button.
• The exposure compensation screen is
displayed in the viewfinder mode.
button
2 Adjust the exposure with the
control dial.
Toward + (over): Brightens an image.
Toward – (under): Darkens an image.
Standard exposure
3 Adjust the focus and shoot the subject.
Shooting techniques
The histogram displays the luminance
distribution that shows how many pixels
of a particular brightness exist in the
picture.
MENU button t 2 t [Histogram] t [On]
• Instead of the Graphic Display, the histogram is displayed after you press
the DISP button several times (page 42).
Number of pixels
Dark Light

105
Using the shooting function
Notes
• The histogram displayed in Live View mode does not indicate the final recorded
image. It indicates the condition of the image just monitored on the screen. The
histogram will differ based on aperture setting, etc.
• The histogram differs between shooting and playback in the following situations:
– When firing the flash.
– When the subject has low intensity, such as night scenery.
When shooting with the flash, you can adjust the amount of flash light
alone, without changing the exposure compensation. You can only change
the exposure of a main subject which is within the flash range.
Fn button t (Flash Compensation) t Select the desired
setting
Toward +: Makes the flash level higher.
Toward –: Makes the flash level lower.
The exposure compensation will change
the histogram accordingly. The right
illustration is an example.
Shooting with the exposure
compensation on the positive side
brightens the whole picture, making the
entire histogram shift to the bright side
(right side). If the exposure compensation
is applied on the negative side, the
histogram will shift to the other side.
Both ends of the histogram show a high-
key or low-key portion. It is impossible to
restore these area with a computer later.
Adjust the exposure if necessary and
shoot again.
Adjusting the amount of flash light (Flash Compensation)
106
Notes
• This item cannot be set when the exposure mode is set to AUTO, Sweep Shooting,
or Scene Selection.
• If you have adjusted the flash level, appears in the viewfinder when the built-in
flash is pulled up. When you adjust it, be careful not to forget to reset the value.
• The higher flash effect may not be visible due to the limited amount of flash light, if
the subject is outside the maximum range of the flash. If the subject is very close, the
lower flash effect may not be visible.
Exposure compensation and flash compensation
Exposure compensation changes the shutter speed, aperture, and ISO sensitivity (when
[AUTO] is selected) to perform the compensation.
Flash compensation only changes the amount of flash light.
MENU button t 2 t [Flash control] t Select the desired
setting
ADI: Advanced Distance Integration
TTL: Through the lens
• When [ADI flash] is selected, using a lens that is provided with a distance
encoder feature can perform more accurate flash compensation by using
more accurate distance information.
Selecting the flash control mode to set the amount of flash
light (Flash control)
ADI flash This method controls the lighting of the flash, factoring in the
focus distance information and light metering data from the
pre-flash. This method enables an accurate flash
compensation with virtually no effect from the reflection off
the subject.
Pre-flash TTL This method controls the amount of flash light depending on
the data only from pre-flash light metering. This method is
susceptible to the reflection off the subject.

107
Using the shooting function
Notes
• When the distance between the subject and the external flash (sold separately)
cannot be determined (wireless flash shooting using an external flash (sold
separately), shooting with an off-camera flash using a cable, shooting with a macro
twin flash, etc.), the camera automatically selects Pre-flash TTL mode.
• Select [Pre-flash TTL] in the following cases, as the camera cannot perform flash
compensations with ADI flash.
– A wide panel is attached to the HVL-F36AM flash.
– A diffuser is used for flash shooting.
– A filter with an exposure factor, such as an ND filter, is used.
– A close-up lens is used.
• ADI flash is only available in combination with a lens that is provided with a
distance encoder. To determine if the lens is equipped with a distance encoder, refer
to the operating instructions supplied with the lens.
Fn button t (Metering Mode) t Select the desired mode
• Use [Multi segment] metering for general shooting.
• When there is a high contrast subject in the AF area, measure the light of
the subject you want to shoot with the optimal exposure using the spot
metering function and take advantage of an AE lock shooting (page 102).
Note
• When the exposure mode is set to AUTO or Scene Selection, [Metering Mode] is
fixed to [Multi segment] and you cannot select other modes.
Selecting the method for measuring the brightness of a
subject (Metering Mode)
(Multi segment) This mode measures light on each area after dividing the total
area into multiple areas and determines the proper exposure
of the entire screen.
(Center weighted) While emphasizing the central area of the screen, this mode
measures the average brightness of the entire screen.
(Spot) This mode measures light only in the spot metering circle
located in the center area.
Shooting techniques

108
Setting ISO
Sensitivity to light is expressed by the ISO number (recommended
exposure index). The larger the number, the higher the sensitivity.
Notes
• When the exposure mode is set to AUTO, Sweep Shooting, or Scene Selection, ISO
is fixed to AUTO and you cannot select other ISO numbers.
• When the exposure mode is set to P/A/S and ISO is set to [AUTO], ISO is
automatically set between ISO 100 and ISO 1600 (DSLR-A580)/ISO 200 and ISO
1600 (DSLR-A560).
• The [AUTO] setting is not provided in exposure mode M. If you change the
exposure mode to M with the [AUTO] setting, it is switched to the minimum ISO
sensitivity. Set the ISO according to your shooting conditions.
Multi frame noise reduction (Multi Frame NR)
The camera automatically shoots multiple images continuously, combines
the images, reduces the noise, and records one image. In Multi Frame NR,
you can select ISO numbers up to ISO 25600.
The image recorded is one combined image.
Notes
• Press and hold the shutter button until the continuous shooting stops.
• When [Image: Quality] is set to [RAW] or [RAW & JPEG], this function cannot be
used.
• The flash, D-Range optimizer, and [Auto HDR] cannot be used.
1 Press the ISO button to display
the ISO screen.
ISO button
2 Select the desired setting with v/V on the controller.
• The larger the number, the higher the noise level.
• If you select [Multi Frame Noise Reduct.], select the desired value with b/
B.
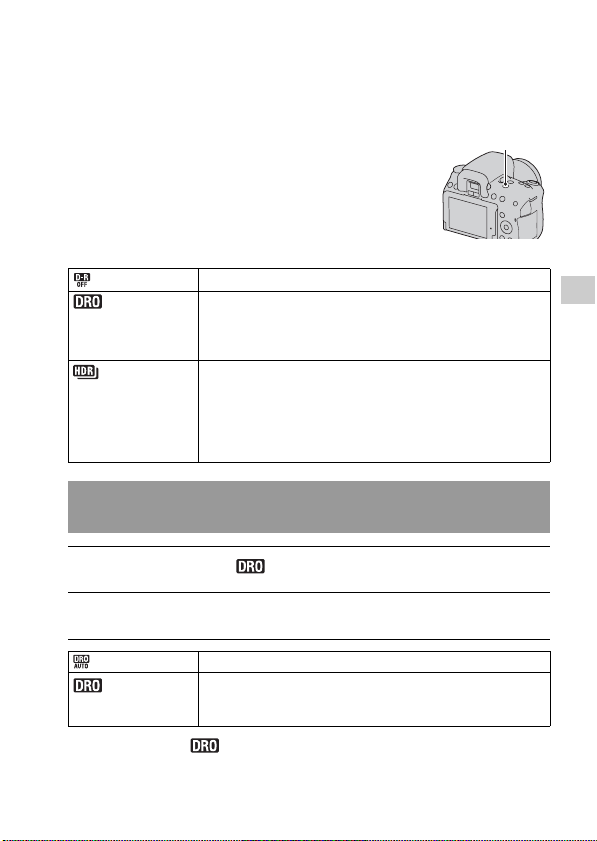
109
Using the shooting function
Compensating for the brightness and
contrast automatically (D-Range)
* Lv_ displayed with is the step currently selected.
D-RANGE button t Select the
desired setting
D-RANGE button
(Off) Does not use the DRO/Auto HDR functions.
(D-
RangeOptimizer)
By dividing the image into small areas, the camera analyses
the contrast of light and shadow between the subject and the
background, producing the image with the optimal brightness
and gradation.
(Auto HDR) Shoots three images with different exposures, and then
overlays correctly exposed image, the bright areas of an
under exposed image and the dark areas of an over exposed
image to create an image with rich gradation.
Two images are recorded: an image with the correct exposure
and an overlaid image.
Correcting the brightness of the image (D-Range
Optimizer)
1 D-RANGE button t (D-RangeOptimizer)
2 Select an optimal level with b/B on the controller.
(Auto) Corrects the brightness automatically.
(Level)* Optimizes the gradations of a recorded image in each area of
the image. Select the optimal level between Lv1 (weak) and
Lv5 (strong).
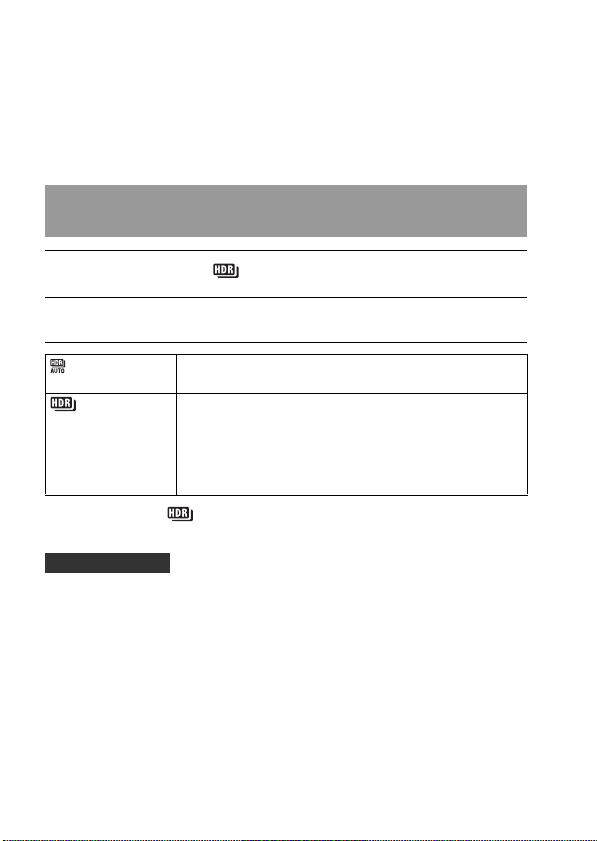
110
Notes
• The setting is fixed to [Off] when [Sunset], [Night View], [Night Portrait], or [Hand-
held Twilight] is selected in Scene Selection. The setting is fixed to [Auto] when
other modes are selected in Scene Selection.
• When shooting with the D-Range optimizer, the image may be noisy. Select the
proper level by checking the recorded image, especially when you enhance the
effect.
* _Ev displayed with is the step currently selected.
• Since the shutter is released three times for one shot, be careful about the
following:
– Use this function when the subject is motionless or does not blink.
– Do not recompose.
– When you photograph people, we recommend that you use the Live
View mode.
Notes
• When [Image: Quality] is set to [RAW] or [RAW & JPEG], this function cannot be
used.
Compensating automatically with rich gradation (Auto High
Dynamic Range)
1 D-RANGE button t (Auto HDR)
2 Select an optimal level with b/B on the controller.
(Auto Exposure
Diff.)
Corrects the exposure difference automatically.
(Exposure
Difference Level)*
Sets the exposure difference, based on the contrast of the
subject. Select the optimal level between 1.0Ev (weak) and
6.0Ev (strong).
For example: When 2.0Ev is selected, three images are
overlaid: an image with –1.0Ev, an image with the correct
exposure, and an image with +1.0Ev.
Shooting technique

111
Using the shooting function
• When the exposure mode is set to AUTO, Sweep Shooting, or Scene Selection, you
cannot select [Auto HDR].
• You cannot select [Auto HDR] during Smile Shutter. If you turn on the Smile
Shutter function with [Auto HDR] selected, the camera will temporarily use with the
DRO setting.
• You cannot start the next shoot until the capture process is completed after you
shoot.
• You may not obtain a desired effect depending on the luminance difference of a
subject and the shooting conditions.
• When the flash is used, this function has little effect.
• When the contrast of the scene is low or when camera shake or subject blur is
occurred, you may not obtain good HDR images. If the camera has detected a
problem, is indicated on the recorded image to inform you of this situation.
Shoot again, as necessary, paying attention to the contrast or blur.
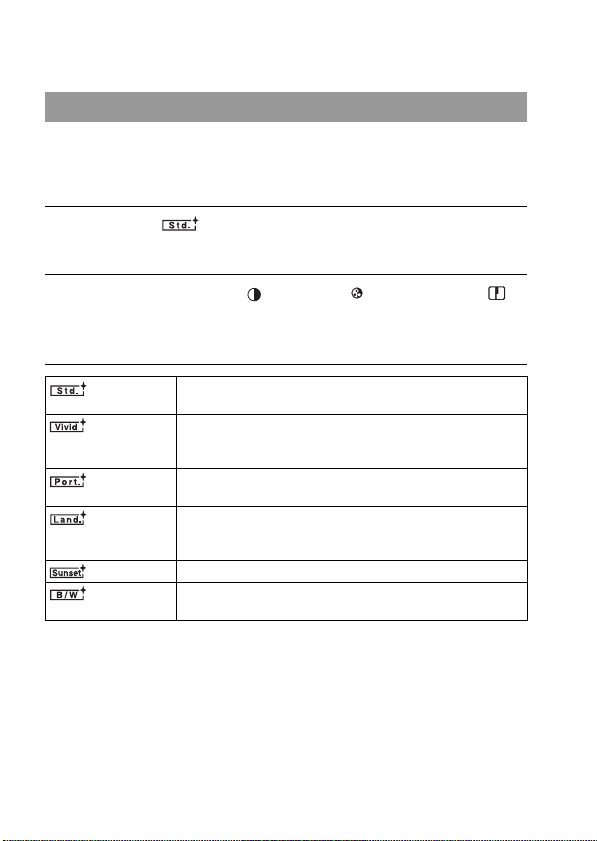
112
Image processing
In addition to the desired image processing, you can adjust the exposure
(shutter speed and aperture) as you like with [Creative Style], unlike Scene
Selection where the camera adjusts the exposure.
Selecting your desired image processing (Creative Style)
1 Fn button t (Creative Style) t Select the desired
setting
2 When you want to adjust (Contrast), (Saturation), or
(Sharpness), select the desired item with b/B on the
controller, then adjust the value with v/V.
(Standard) For shooting various scenes with rich gradation and beautiful
colors.
(Vivid) The saturation and contrast are heightened for shooting
striking images of colorful scenes and subjects such as
flowers, spring greenery, blue sky, or ocean views.
(Portrait) For shooting the skin color in a soft tone, ideally suited to
shooting portraits.
(Landscape) The saturation, contrast, and sharpness are heightened for
shooting vivid and crisp scenery. Distant landscapes also
stand out more.
(Sunset) For shooting the beautiful red of the setting sun.
(Black &
White)
For shooting images in black and white monotone.

113
Using the shooting function
(Contrast), (Saturation), and (Sharpness) can be adjusted for each
Creative Style item.
Notes
• When the exposure mode is set to AUTO or Scene Selection, [Creative Style] is
fixed to [Standard] and you cannot select other settings.
• When [Black & White] is selected, you cannot adjust the saturation.
The way colors are represented with combinations of numbers or the range
of color reproduction is called “color space.” You can change the color
space, depending on your purpose.
MENU button t 3 t [Color Space] t Select the desired
setting
Notes
• Adobe RGB is for applications or printers that support color management and
DCF2.0 option color space. Using some applications or printers that do not support
them may result in or print images that do not faithfully reproduce the color.
• When displaying images that were recorded with Adobe RGB on the camera or non-
Adobe RGB-compliant devices, the images are displayed with low saturation.
(Contrast) The higher the value selected, the more the difference of light
and shadow is accentuated, thus making an impact on an
image.
(Saturation) The higher the value selected, the more vivid the color. When
a lower value is selected, the color of the image is restrained
and subdued.
(Sharpness) Adjusts the sharpness. The higher the value selected, the
more the contours are accentuated, and the lower the value
selected, the more the contours are softened.
Changing the range of color reproduction (Color Space)
sRGB This is the standard color space of the digital camera. Use
sRGB in normal shooting, such as when you intend to print
out the images without any modification.
AdobeRGB This has a wide range of color reproduction. When a large
part of the subject is vivid green or red, Adobe RGB is
effective.
• The file name of the image starts with “_DSC.”
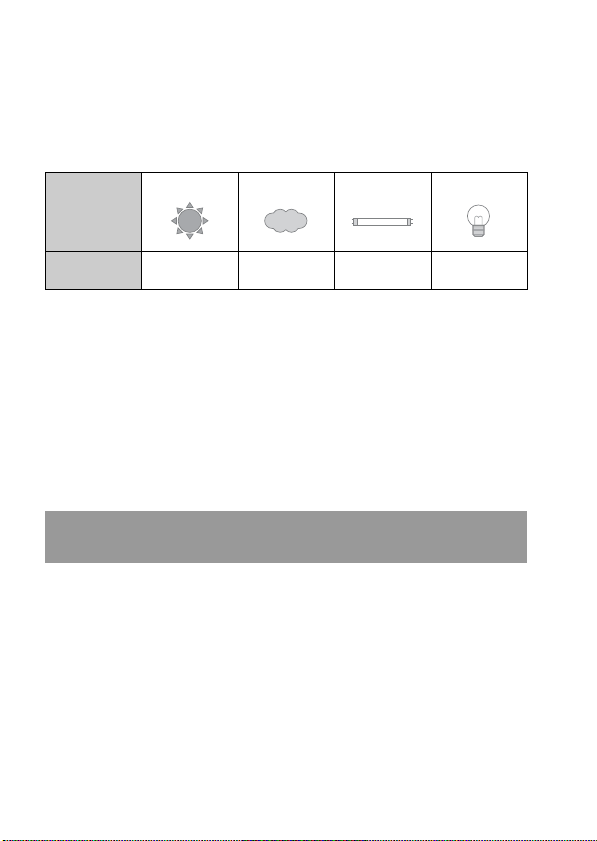
114
Adjusting the color tones (White balance)
The color tone of the subject changes depending on the characteristics of
the light source. The table below shows how the color tone changes based
on various light sources, compared with a subject that appears white under
the sunlight.
White balance is a feature that adjusts the color tone to approximate what
you see. Use this feature when the color tone of the image did not come out
as you expected, or when you want to change the color tone on purpose for
photographic expression.
Notes
• When the exposure mode is set to AUTO or Scene Selection, [White Balance] is
fixed to [Auto WB] and you cannot select other modes.
• If the only light source available is a mercury lamp or a sodium lamp, the camera
will not be able to acquire the accurate white balance because of the characteristics
of the light source. Use the flash in such cases.
Fn button t AWB (White Balance) t Select the desired setting
• When [AWB] is not selected, you can fine tune the color tone with b/B.
Adjusting it toward + turns the image reddish and adjusting it toward –
turns the image bluish.
Weather/
lighting
Daylight Cloudy Fluorescent Incandescent
Characteristics
of light
White Bluish Green-tinged Reddish
Adjusting the white balance to suit a specific light source
(Auto/Preset white balance)

115
Using the shooting function
• Use the white balance bracket function if you cannot get the desired color
in the selected option (page 122).
• When you select [5500K] (Color Temp.) or [0] (Color Filter), you can
adjust the value to the desired value (below).
• When you select [Custom], you can register your setting (page 116).
Fn button t AWB (White Balance) t [5500K] (Color Temp.) or
[0] (Color Filter)
• To set the color temperature, select the value with b/B.
• To set the color filter, select the compensation direction with b/B.
Note
• Since color meters are designed for film cameras, the values differ under fluorescent/
sodium lamp/mercury lamps. We recommend that you use the custom white balance
or do a test shooting.
AWB (Auto WB) The camera automatically detects a light source and adjusts
the color tones.
(Daylight) If you select an option to suit a specific light source, the color
tones are adjusted for the light source (preset white balance).
(Shade)
(Cloudy)
(Incandescent)
(Fluorescent)
(Flash)
Shooting techniques
Setting the color temperature and a filter effect (Color
Temperature/Color Filter)
116
*1 The value is the color temperature value currently selected.
*2 The value is the color filter value currently selected.
In a scene where the ambient light consists of multiple types of light source,
use of custom white balance is recommended in order to accurately
reproduce the whiteness.
5500K*
1
(Color
Temp.)
Sets the white balance by the color temperature. The higher
the number, the more reddish the image and the lower the
number, the more bluish the image.
0*
2
(Color Filter) Achieves the effect of CC (Color Compensation) filters for
photography.
Based on using the set color temperature as the standard, the
color can be compensated to G (Green) or M (Magenta).
Registering the color tones (Custom white balance)
1 Fn button t AWB (White Balance) t (Custom)
2 Select [ SET] with b/B on the controller, then press the
center of the controller.
3 Hold the camera so that the white area fully covers the AF area
located in the center, and then press the shutter button down.
The shutter clicks and the calibrated values (ColorTemperature and Color
filter) are displayed.
4 Press the center of the controller.
The monitor returns to the recording information display with the memorized
custom white balance setting retained.
• The custom white balance setting registered in this operation is effective
until a new setting is registered.

117
Using the shooting function
Note
• The message “Custom WB error” indicates that the value is beyond the expected
range. (When the flash is used on a subject in close proximity or a subject with a
bright color is in the frame.) If you register this value, the indicator turns yellow
on the recording information display on the LCD monitor. You can shoot at this
point, but it is recommended that you set the white balance again to get a more
correct white balance value.
To call the custom white balance setting
Fn button t AWB (White Balance) t (Custom)
Note
• If the flash is used when the shutter button is pressed, a custom white balance is
registered with the flash light taken into account. Take pictures with the flash in later
shootings.
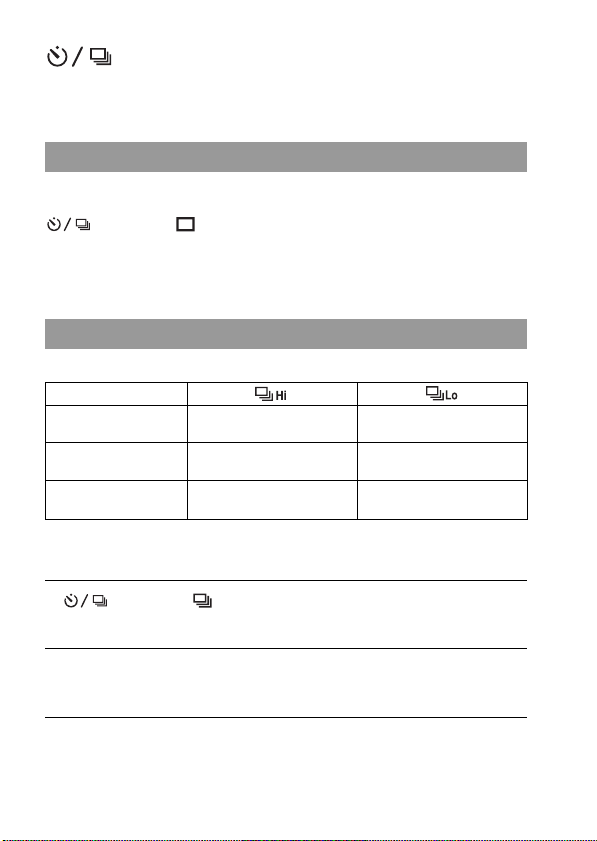
118
Selecting the drive mode
This camera has seven drive modes, such as single-shot advanced, and
continuous advanced. Use them to suit your purpose.
This mode is for normal shooting.
button t (Single-shot Adv.)
Note
• When the exposure mode is set to [Sports Action] in Scene Selection, you cannot
shoot single shot.
The camera records the images continuously at the following speeds*.
* Our measurement conditions. The speed of continuous shooting is slower,
depending on shooting conditions.
Shooting single shot
Shooting continuously
Live View mode –
Maximum 3 images per
second
Viewfinder mode
Maximum 5 images per
second
Maximum 3 images per
second
Focus check Live View
Maximum 5 images per
second
–
1 button t (Continuous adv.) t Select the desired
speed
2 Adjust the focus and shoot the subject.
• When you press and hold the shutter button, the recording continues.
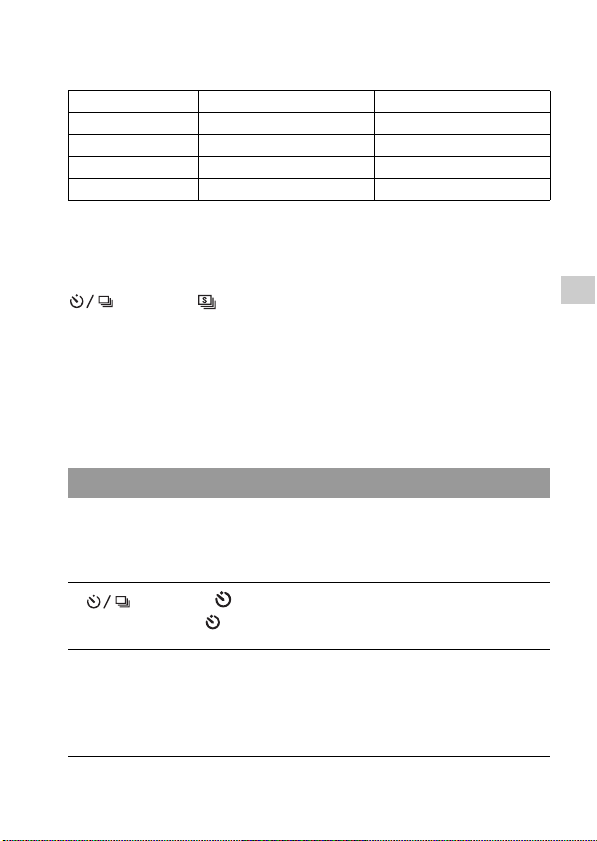
119
Using the shooting function
The maximum number of continuous shots
The number of continuous shooting images obtainable has an upper limit.
To shoot continuously at higher speeds
The camera shoots continuously at a maximum of seven images per second.
The exposure and focus are set at the first shot.
button t (Speed Priority Cont.)
Notes
• You cannot shoot images continuously when “0” flashes in the viewfinder. Wait
until the indicator disappears.
• You cannot shoot continuously when using Scene Selection modes other than
[Sports Action].
• When [Face Detection] is set to [On], the speed of continuous shooting may be
slower.
The 10-second self-timer is convenient when the photographer appears in a
photo and the 2-second self-timer is convenient to reduce the camera shake
because the mirror is raised first.
DSLR-A580 DSLR-A560
Fine 44 images 27 images
Standard 45 images 47 images
RAW & JPEG 20 images 7 images
RAW 22 images 7 images
Using the self-timer
1 button t (Self-timer) t Select the desired setting
• The number after is the number of seconds that is currently selected.
2 Adjust the focus and shoot the subject.
• When the self-timer is activated, audio signals and the self-timer lamp
indicate the condition. The self-timer lamp flashes quickly and the audio
signal sounds quickly right before the shooting.
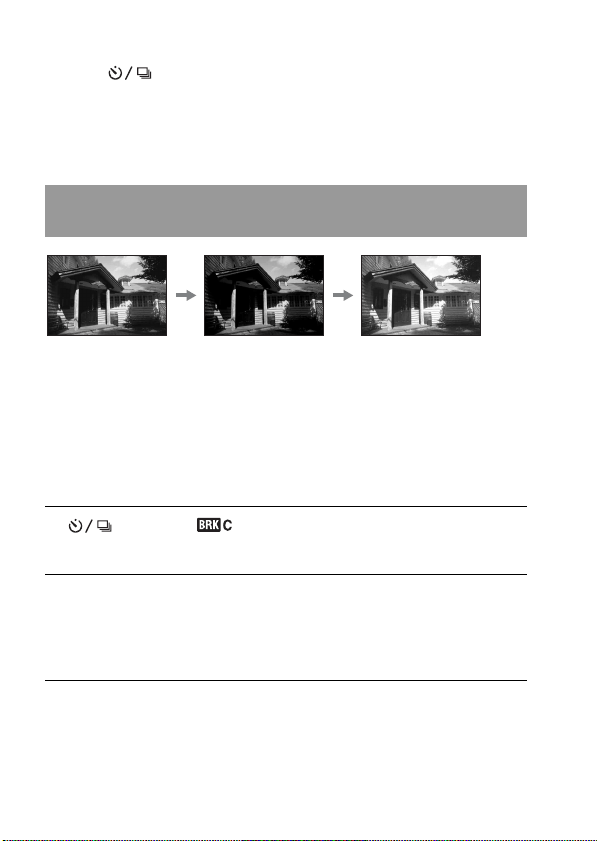
120
To cancel the self-timer
Press the button.
Notes
• When you shoot images using the viewfinder, use the eyepiece cover (page 34).
• Do not aim the lens at the sun during the 2-second self-timer. The heat of the sun
burns the shutter curtain and this results in shutter curtain damage.
Bracket shooting allows you to shoot several images, each with different
degrees of exposure. Specify the value of deviation (steps) from the base
exposure, and the camera shoots three images while automatically shifting
the exposure. Press and hold the shutter button until the shooting stops.
When the flash is fired, flash bracket shooting is used to shift the amount of
flash light. To shoot, press the shutter button shot by shot.
Shooting images with the exposure shifted (Exposure
bracket)
1 button t (Bracket: Cont.) t Select the desired
bracket step
2 Adjust the focus and shoot the subject.
The base exposure is set at the first shot in the bracket.
• Press and hold the shutter button until recording stops. In flash bracket
shooting, press the shutter button three times.
Base exposure
– direction
+ direction
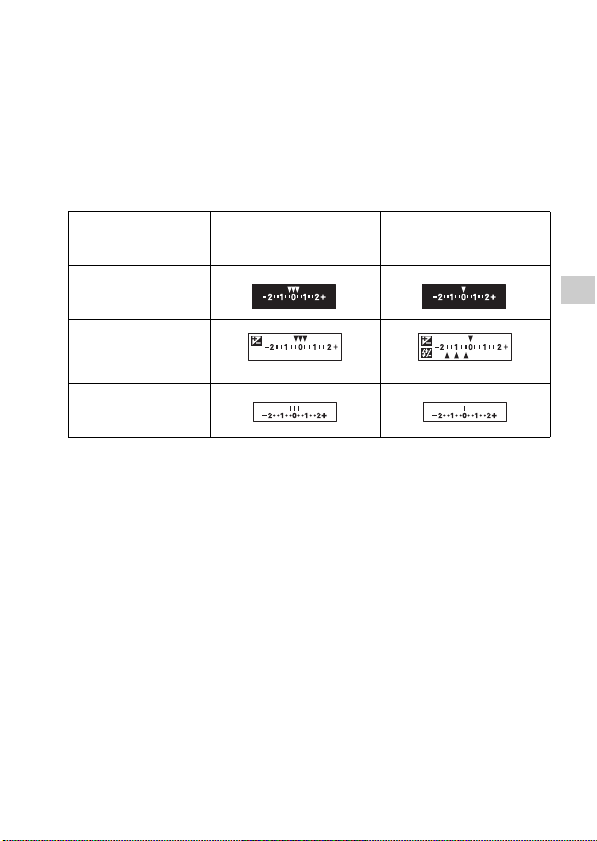
121
Using the shooting function
Notes
• When the mode dial is set to M, the exposure is shifted by adjusting the shutter
speed.
• When you adjust the exposure, the exposure is shifted based on the compensated
value.
• The bracket cannot be used when the exposure mode is set to AUTO or Scene
Selection.
The EV scale in bracket shooting
* Ambient light: Any light other than the flash light that shines on the scene
for an extended period of time, such as natural light, a light bulb, or a
fluorescent light.
• In bracket shooting, the same number of indices as the number of
recordable images is displayed on the EV scale. However, in flash bracket
shooting, the indices are not displayed in the viewfinder.
• When the bracket shooting starts, the indices that indicate already
recorded images start to disappear one by one.
Ambient light* bracket
0.3 steps, three shots
Exposure compensation 0
Flash bracket
0.7 steps, three shots
Flash compensation –1.0
LCD monitor (Live View
mode)
LCD monitor
(Viewfinder mode/
Standard Display)
Shown in the top row. Shown in the bottom row.
Viewfinder
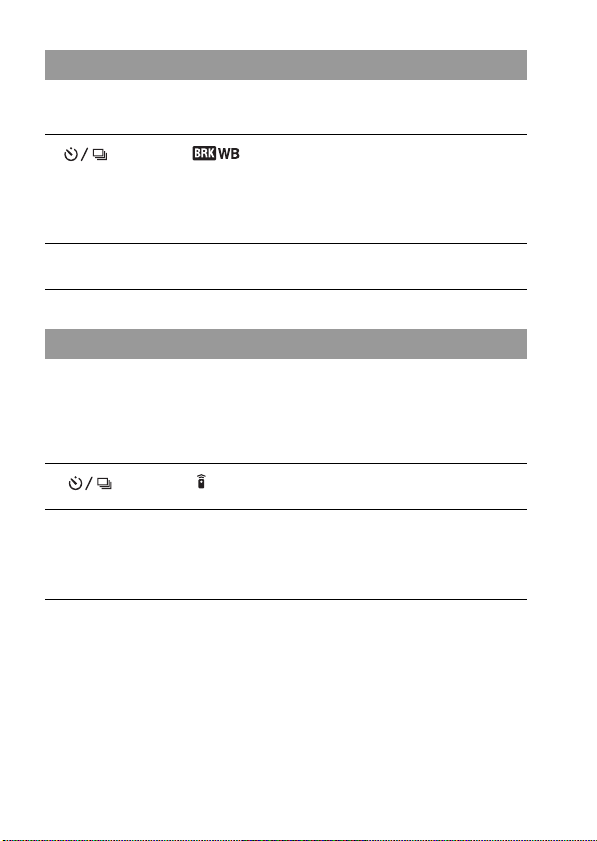
122
Based on the selected white balance, and the color temperature/color filter,
three images are recorded with the white balance shifted.
* Mired: a unit to indicate the color conversion quality in color temperature filters.
You can shoot using the SHUTTER and 2SEC (the shutter is released after
2 seconds) buttons on the RMT-DSLR1 Wireless Remote Commander
(sold separately). Also, refer to the operating instructions supplied with the
Wireless Remote Commander.
Note
• When you shoot images using the viewfinder, use the eyepiece cover (page 34).
Shooting with white balance shifted (WB bracket)
1 button t (WB bracket) t Select the desired
setting
• When Lo is selected, it is shifted by 10 mired*, and when Hi is selected, it is
shifted by 20 mired.
2 Adjust the focus and shoot the subject.
Shooting with the Wireless Remote Commander
1 button t (Remote Cdr.)
2 Focus on the subject, point the transmitter of the Wireless
Remote Commander to the remote sensor, and shoot the
image.
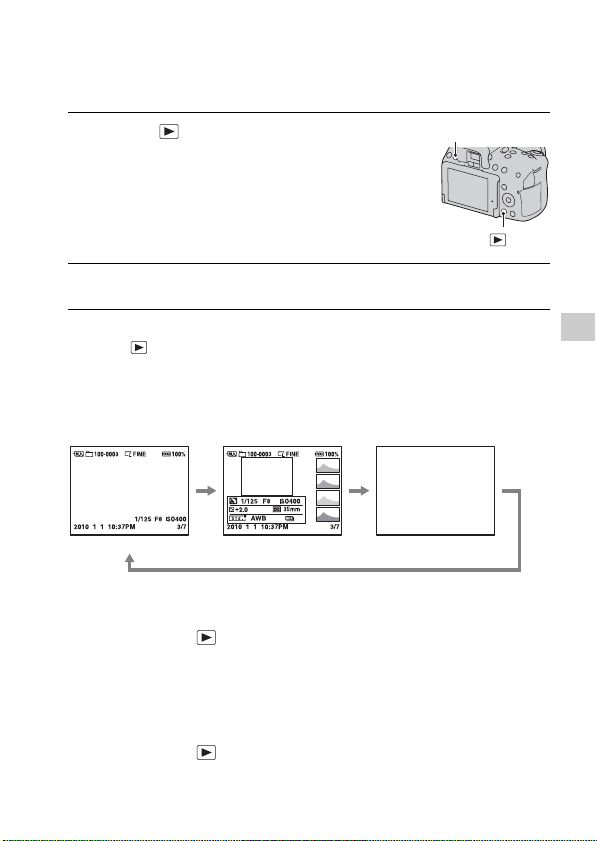
123
Using the viewing function
Using the viewing function
Playing back images
The last recorded image is displayed on the LCD monitor.
To return to the shooting mode
Press the button again.
To switch the recording data display
Press the DISP button.
Each time you press the DISP button, the screen changes as follows.
To select the folder to be played back
MENU button t 2 t [Select Folder] t Select the desired
folder
To select the orientation when playing back an image recorded in the
portrait position
MENU button t 2 t [Playback Display] t Select the
desired setting
1 Press the button.
DISP button
button
2 Select an image with b/B on the controller.
With recording data Histogram display
Without recording
data
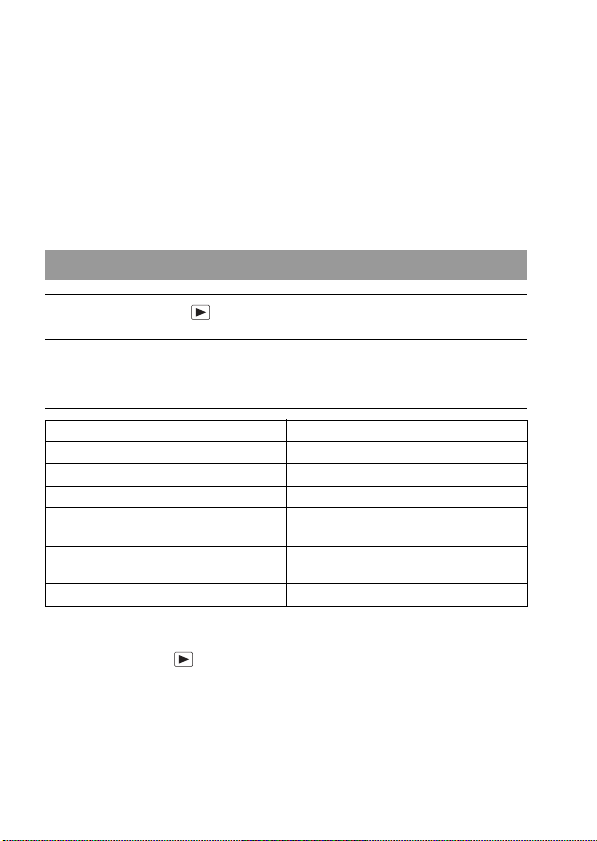
124
Note
• When you play back the image on a TV or a computer, the image will be displayed
in the portrait position even if [Manual Rotate] is selected.
To scroll panoramic images
Select a panoramic image, then press the center of the controller. Pressing it
again pauses the playback.
3D Sweep Panorama images cannot be scrolled. Scrolling playback is not
available for images that were recorded with [3D Pan.: Image Size] set to
[16:9].
To adjust the volume
MENU button t 1 t [Volume Settings] t Select the
desired valve
Playing back movies
1 MENU button t 1 t [Still/Movie Select] t [Movie]
2 Select the desired movie with b/B on the controller, then press
the center of the controller.
During movie playback Controller/control dial operation
To pause/resume z
To fast-forward B
To fast-rewind b
To slow-forward Rotate the control dial to the right during
pause
To slow-reverse Rotate the control dial to the left during
pause
To adjust sound volume v/V
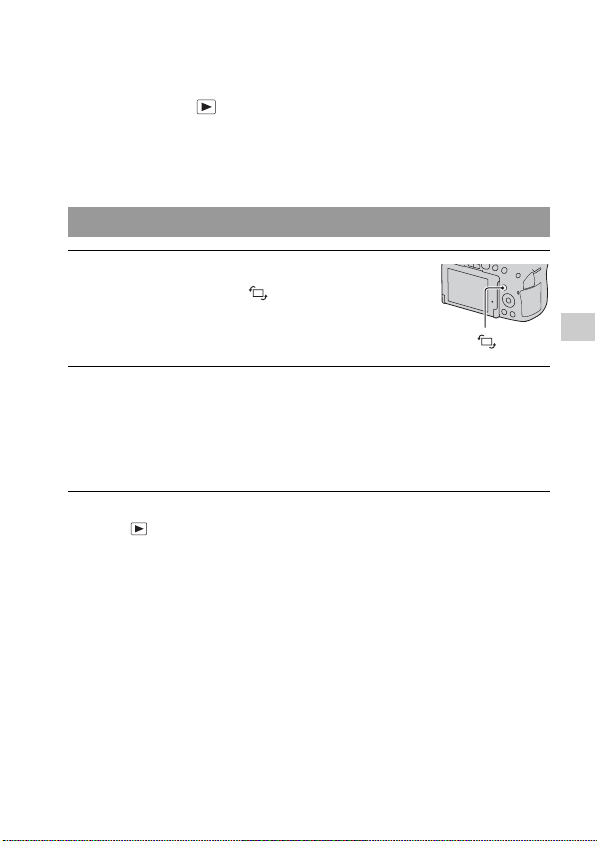
125
Using the viewing function
To select the date of movies to be played back
Movies are stored by date.
MENU button t 2 t [Select Date] t Select the desired
date
Note
• Movies recorded with other devices may not be played back on this camera.
To return to the normal playback screen
Press the button.
Notes
• You cannot rotate movies.
• When you copy rotated images to a computer, “PMB” contained on the CD-ROM
(supplied) can display the rotated images correctly. However, the images may not be
rotated depending on the software.
Rotating an image
1 Display the image you want to
rotate, then press the button.
button
2 Press the center of the controller.
The image is rotated counter-clockwise. When you want to do another
rotation, repeat step 2.
• Once you rotate the image, the image is played back in the rotated position,
even if you turn off the power.
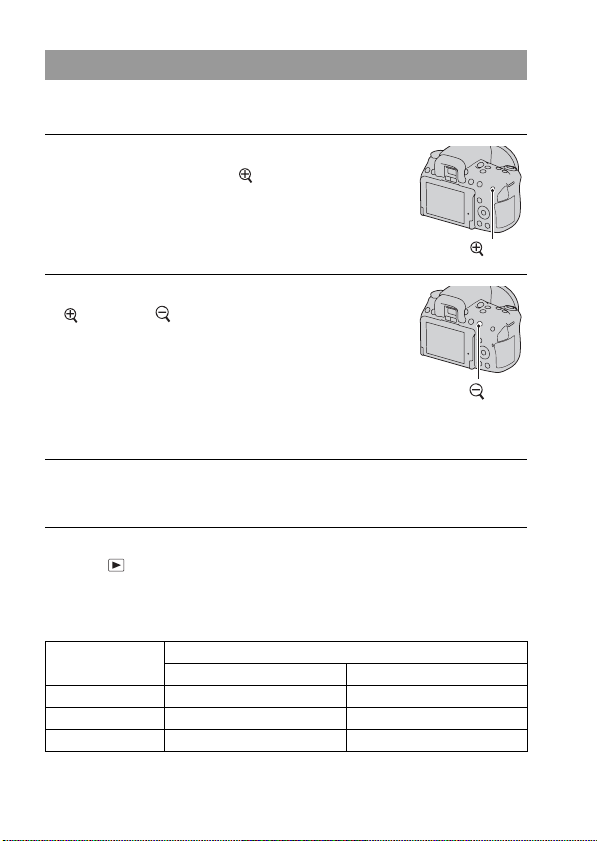
126
A still image can be enlarged for closer examination. This is convenient to
check the focus condition of a recorded image.
To cancel the enlarged playback
Press the button so that the image returns to the normal size.
Scaling range
The scaling range is as follows.
Enlarging images
1 Display the image you want to
enlarge, then press the button.
button
2 Zoom the image in or out with the
button or button.
• Rotating the control dial switches the
image at the same display
magnification. When you shoot
multiple images with the same
composition, you can compare their
focus conditions.
button
3 Select the portion you want to enlarge with v/V/b/B on the
controller.
Image size
Scaling range
DSLR-A580 DSLR-A560
L Approx. ×1.1 – ×11.8 Approx. ×1.1 – ×11.8
M Approx. ×1.1 – ×8.8 Approx. ×1.1 – ×8.0
S Approx. ×1.1 – ×6.0 Approx. ×1.1 – ×5.5

127
Using the viewing function
To return to the single-image screen
Press the button or the center of the controller when you select the
desired image.
To turn to the movie index screen
MENU button t 1 t [Slide Show]t [Enter]
Plays back recorded images in order (Slide show). The slide show
automatically stops after all the images have been played back.
• You can view the previous/next image with b/B on the controller.
• You cannot pause the slide show.
Switching to the display of the image list
1 Press the button.
The screen changes to the image index
screen.
button
2 Press the DISP button repeatedly
to select the desired screen
format.
• The screen changes in the following
order: 9 images t 4 images
DISP button
To display movies on the image index
screen, select (movie) on the tab with
b/B/v/V on the controller, then press the
center of the controller.
Still image/movie switching tab
Playing back images automatically (Slide show)

128
To end in the middle of the slide show
Press the center of the controller.
To choose the interval between the images in slide show
MENU button t 1 t [Slide Show] t [Interval] t Select
the desired number of seconds
To play back repeatedly
MENU button t 1 t [Slide Show] t [Repeat] t [On]
To play back movies
You cannot play back still images and movies in the same slide show.
Switch to a movie playback with [Still/Movie Select], then select the movie
type.
MENU button t 1 t [Slide Show] t [Movie Type] t
Select the desired movie type
To play back 3D-images only
If you connect the camera to a 3D-compatible TV using an HDMI cable
(sold separately), you can play back 3D-images recorded with the 3D
Sweep Panorama mode. For details on 3D-shooting, see page 194. Also
refer to the operating instructions supplied with the TV.
MENU button t 1 t [Slide Show] t [Image Type] t
[Display 3D Only]
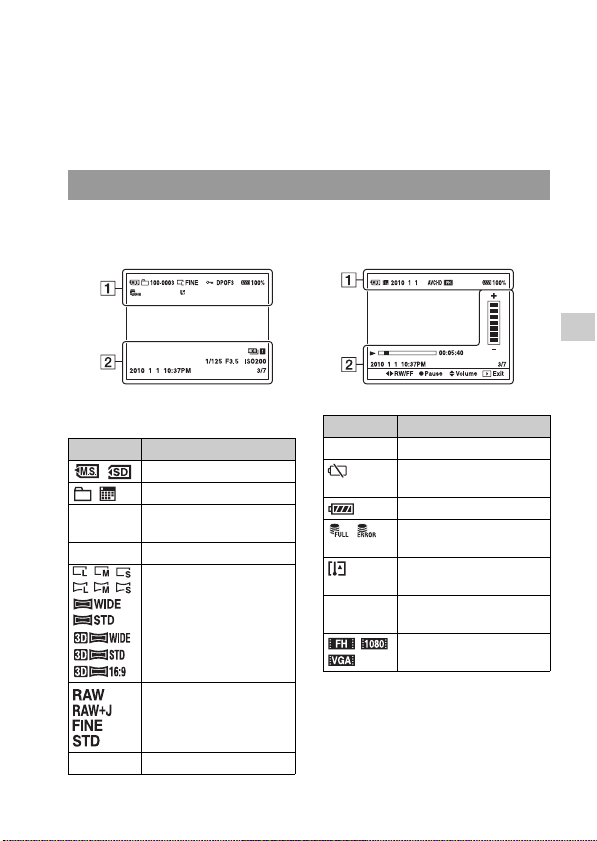
129
Using the viewing function
Checking the information of recorded
images
Each time you press the DISP button, the information display changes
(page 123).
A
Basic information display
Still image Movie
Display Indication
Memory card (27)
Still image/Movie
100-0003 Folder - file number
(165)
2010 1 1 Recording date
Image size of still images
(140)/Aspect ratio of still
images (142)/Image size
of Sweep Shooting (141)
Image quality of still
images (142)
- Protect (133)
DP OF3 D P O F s e t ( 1 7 1 )
Remaining battery
warning (23)
100% Remaining battery (23)
Database file full (188)/
Database file error (188)
Overheating warning
(188)
AVCHD
MP4
Movie file format (82)
Image size of movies
(141)
Display Indication
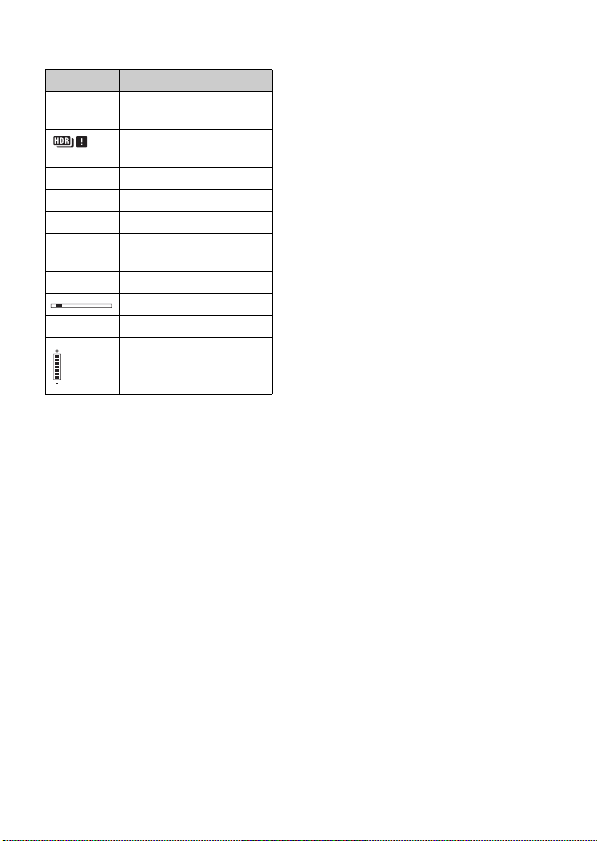

131
Using the viewing function
AB
Histogram display
Display Indication
Memory card (27)
Still image
100-0003 Folder - file number
(165)
Image size of still images
(140)/Aspect ratio of still
images (142)/Image size
of Sweep Shooting (141)
Image quality of still
images (142)
- Protect (133)
DPOF3 DPOF set (171)
Remaining battery
warning (23)
100% Remaining battery (23)
Database file full (188)/
Database file error (188)
Overheating warning
(188)
Display Indication
Histogram* (104)
P A S
M
Exposure mode (61 – 80)
1/125 Shutter speed (75)
F3.5 Aperture (72)
ISO200 ISO sensitivity (108)
–0.3 Exposure compensation
(103)
–0.3 Flash compensation (105)
Metering mode (107)
35mm Focal length (176)
Creative Style (112)
AWB +1
5500K M1
White balance (Auto,
Preset, Color
temperature, Color filter,
Custom) (114)
D-Range Optimizer
(109)/Auto HDR/Auto
HDR image warning
(110)

132
* When the image has a high-key or
low-key portion, that portion is flashed
on the histogram display (Luminance
limit warning).
2010 1 1
10:37AM
Date of recording
3/7 File number/total number
of images
Display Indication

133
Using the viewing function
Protecting images (Protect)
You can protect images against accidental erasure.
To cancel the protection of all the images or movies
You can cancel the protection of all the images in the folder currently
selected or of all the movies with the same date.
MENU button t 1 t [Protect] t [Cancel All Images] or
[Cancel All Movies]
Protecting selected images/canceling the protection of the
selected images
1 MENU button t 1 t [Protect] t [Multiple Img.]
2 Select the image you want to
protect with b/B on the
controller, then press the center
of the controller.
A - mark appears on the selected
image.
• To cancel a selection, press the center
again.
3 To protect other images, repeat step 2.
4 Press the MENU button.
5 Select [Enter] with v, then press the center of the controller.
-
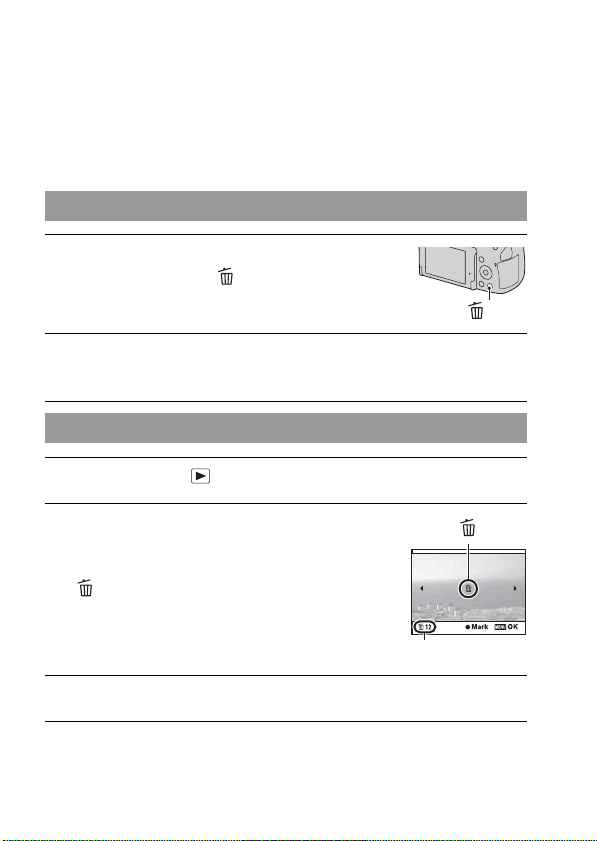
134
Deleting images (Delete)
Once you have deleted an image, you cannot restore it. Check whether to
delete the image or not beforehand.
Note
• Protected images cannot be deleted.
Deleting the image that is currently displayed
1 Display the image you want to
delete and press the button.
button
2 Select [Delete] with v on the controller, then press the center
of the controller.
Deleting the selected images
1 MENU button t 1 t [Delete] t [Multiple Img.]
2 Select the images you want to
delete with the controller, then
press the center of the controller.
A mark appears on the selected
image.
Total number
3 To delete other images, repeat step 2.
4 Press the MENU button.

135
Using the viewing function
Deletes all still images in the folder. This appears during still image
playback only.
Deletes all movies of that date. This appears during movie playback only.
5 Select [Delete] with v, then press the center of the controller.
Deleting all the images in the folder
1 MENU button t 1 t [Delete] t [All in Folder]
2 Select [Delete] with v on the controller, then press the center
of the controller.
Deleting all the movies with the same date
1 MENU button t 1 t [Delete] t [All in Date Rng.]
2 Select [Delete] with v on the controller, then press the center
of the controller.
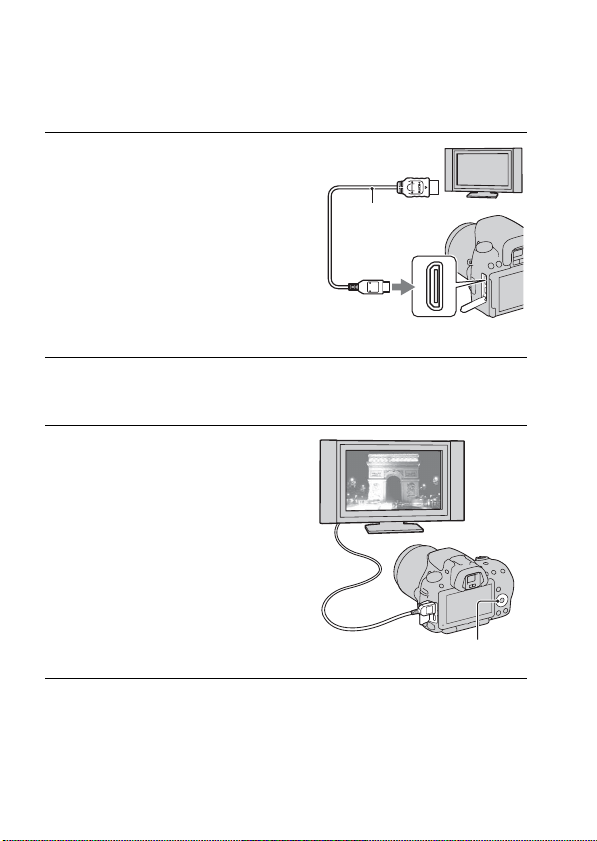
136
Viewing images on a TV screen
To view images recorded on the camera on a TV set, an HDMI cable (sold
separately) and an HD TV equipped with an HDMI connector are required.
Notes
• Use an HDMI cable with the HDMI logo.
• Use an HDMI mini connector on one end (for the camera), and a connector suitable
for connection to your TV on the other end.
• Some devices may not work properly.
1 Turn off both your camera and the
TV, and connect the camera to the
TV.
2 Turn on the TV and switch the input.
• See also the operating instructions supplied with the TV.
3 Turn on the camera.
Images shot with the camera appear on
the TV screen.
Select the desired image with b/B on the
controller.
• The LCD monitor on the camera does
not turned on.
Controller
1 To the HDMI
connector
HDMI cable
(sold separately)
2 To the
HDMI terminal

137
Using the viewing function
• Do not connect the output connector of the device with the HDMI terminal on the
camera. This may cause a malfunction.
On “PhotoTV HD”
This camera is compatible with the “PhotoTV HD” standard.
By connecting Sony’s PhotoTV HD-compatible devices using an HDMI
cable, a whole new world of photos can be enjoyed in breathtaking Full HD
quality.
“PhotoTV HD” allows for a highly-detailed, photo-like expression of
subtle textures and colors.
To view 3D-images with a 3D-compatible TV
When an image recorded with the 3D Sweep Panorama mode is being
played back, press V on the controller to play back the image with a 3D
effect on the TV screen.
To view 3D-images only
You can only play back images recorded with the 3D Sweep Panorama
mode.
MENU button t 1 t [3D Viewing]
By connecting the camera to a TV that supports “BRAVIA” Sync using an
HDMI cable, you can operate the camera with the TV Remote Control.
Using “BRAVIA” Sync
1 Connect a TV that supports “BRAVIA” Sync to the camera
(page 136).
The input is automatically switched and the image shot with the camera
appears on the TV screen.
2 Press the SYNC MENU button on the TV Remote Control.
3 Operate with the buttons on the TV Remote Control.

138
The items for Sync Menu
Notes
• The operations available are restricted when the camera is connected to a TV using
an HDMI cable.
• Only TVs that support “BRAVIA” Sync can provide these operations. The SYNC
Menu operations differ depending on the TV connected. For details, refer to the
operating instructions supplied with the TV.
• If the camera performs unnecessary operations in response to the TV Remote
Control when the camera is connected to another manufacturer’s TV using an HDMI
connection, set [CTRL FOR HDMI] in the Setup menu to [Off].
When you view images on a TV screen, the camera and TV must use the
same TV color system.
NTSC system (1080 60i)
Bahama Islands, Bolivia, Canada, Central America, Chile, Colombia, Ecuador,
Jamaica, Japan, Korea, Mexico, Peru, Surinam, Taiwan, the Philippines, the U.S.A.,
Venezuela, etc.
PAL system (1080 50i)
Australia, Austria, Belgium, China, Croatia, Czech Republic, Denmark, Finland,
Germany, Holland, Hong Kong, Hungary, Indonesia, Italy, Kuwait, Malaysia, New
Zealand, Norway, Poland, Portugal, Rumania, Singapore, Slovak Republic, Spain,
Sweden, Switzerland, Thailand, Turkey, United Kingdom, Viet Nam, etc.
PAL-M system (1080 50i)
Brazil
Slide Show Plays back images automatically (page 127).
1 Image Display Returns to the single-image screen.
Still/Movie Select Selects still images or movies to be played back.
Image Index Switches to the image index screen.
3D Viewing Plays back 3D-images when connected to a 3D-compatible
TV.
Select Folder Selects the folder of images to be played back.
Select Date Selects the date of movies to be played back.
Delete Deletes images.
To use your camera abroad

139
Using the viewing function
PAL-N system (1080 50i)
Argentina, Paraguay, Uruguay
SECAM system (1080 50i)
Bulgaria, France, Greece, Guiana, Iran, Iraq, Monaco, Russia, Ukraine, etc.

140
Changing your setup
Setting image size and image quality
MENU button t 1 t [Image: Size] t Select the desired
size
[Image: Aspect Ratio]: [3:2]
DSLR-A580
DSLR-A560
[Image: Aspect Ratio]: [16:9]
DSLR-A580
DSLR-A560
Note
• When you select a RAW image with [Image: Quality], the image size of the RAW
image corresponds to L. This size is not displayed on the screen.
Image: Size
Image size Usage guidelines
L:16M 4912 × 3264 pixels For prints up to A3+ size
M:8.4M 3568 × 2368 pixels For prints up to A4 size
S:4.0M 2448 × 1624 pixels For prints L/2L size
Image size Usage guidelines
L:14M 4592 × 3056 pixels For prints up to A3+ size
M:7.4M 3344 × 2224 pixels For prints up to A4 size
S:3.5M 2288 × 1520 pixels For prints L/2L size
Image size Usage guidelines
L:14M 4912 × 2760 pixels For viewing on a high-definition
TV
M:7.1M 3568 × 2000 pixels
S:3.4M 2448 × 1376 pixels
Image size Usage guidelines
L:12M 4592 × 2576 pixels For viewing on a high-definition
TV
M:6.3M 3344 × 1872 pixels
S:2.9M 2288 × 1280 pixels
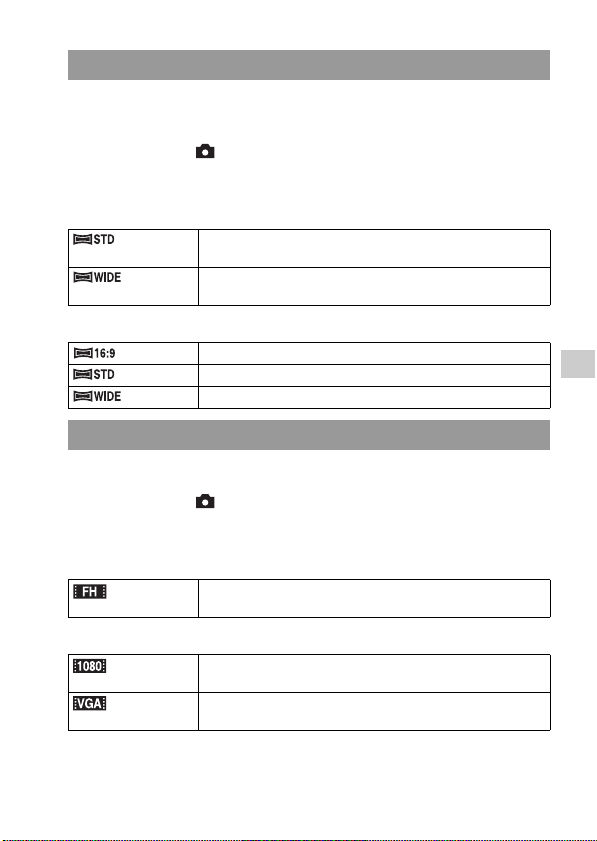
141
Changing your setup
You can set the image size of panoramic images. The image size varies
depending on the setting of the shooting direction (page 68).
MENU button t 2 t [Panorama: Size] or [3D Pan.: Image
Size] t Select the desired size
[Panorama: Size]
[3D Pan.: Image Size]
The larger the image size, the higher the image quality.
MENU button t 1 t [Movie: Size] t Select the desired
size
[AVCHD] mode
[MP4] mode
Note
• A telephoto image results except when the [VGA] image size is selected for movies
(DSLR-A560 only).
Setting the size of panoramic images
(Standard) Vertical: 3872 × 2160
Horizontal: 8192 × 1856
(Wide) Vertical: 5536 × 2160
Horizontal: 12416 × 1856
(16:9) Horizontal: 1920 × 1080
(Standard) Horizontal: 4912 × 1080
(Wide) Horizontal: 7152 × 1080
Movie: Size
(1920 × 1080) 17 Mbps: Records with the highest image quality for viewing
on a high-definition TV.
(1440 × 1080) 12 Mbps: Records with high image quality for viewing on a
high-definition TV.
(VGA) (640 ×
480)
3 Mbps: Records in the suitable size for WEB uploads.
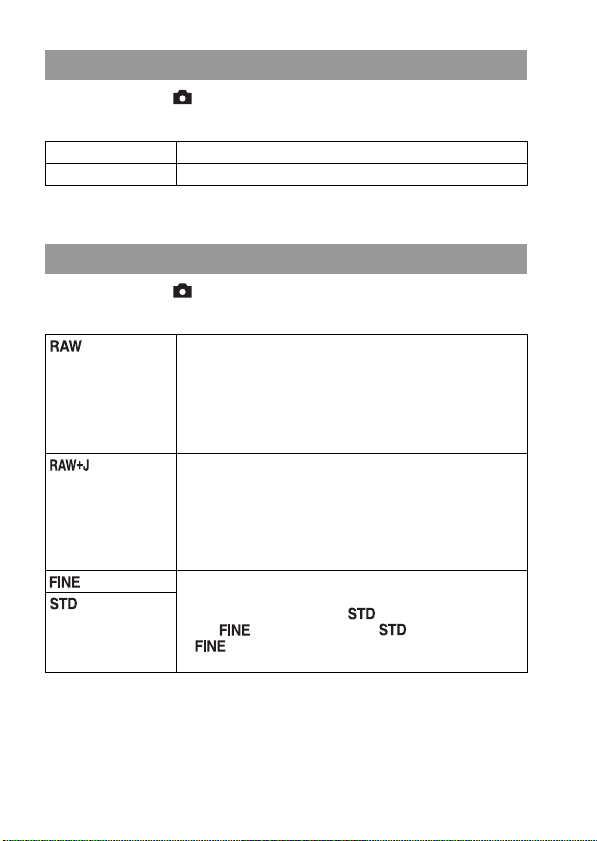
142
MENU button t 1 t [Image: Aspect Ratio] t Select the
desired ratio
Note
• This item cannot be set when the exposure mode is set to Sweep Shooting.
MENU button t 1 t [Image: Quality] t Select the desired
setting
Image: Aspect Ratio
3:2 A normal ratio.
16:9 An HDTV ratio.
Image: Quality
(RAW) File format: RAW (Records using the RAW compression
format.)
This format does not perform any digital processing on the
images. Select this format to process images on a computer
for professional purposes.
• The image size is fixed to the maximum size. The image
size is not displayed on the screen.
(RAW &
JPEG)
File format: RAW (Records using the RAW compression
format.) + JPEG
A RAW image and a JPEG image are created at the same
time. This is suitable when you need two image files, a JPEG
for viewing, and a RAW for editing.
• The image quality is fixed to [Fine] and the image size is
fixed to [L].
(Fine) File format: JPEG
The image is compressed in the JPEG format when recorded.
Since the compression rate of (Standard) is higher than
that of (Fine), the file size of is smaller than that
of . This will allow more files to be recorded on one
memory card, but the image quality will be lower.
(Standard)

143
Changing your setup
Notes
• This item cannot be set when the exposure mode is set to Sweep Shooting.
• For details on the number of images that can be taken when the image quality is
changed, see page 35.
About RAW images
You need the “Image Data Converter SR” software included on the CD-ROM
(supplied) in order to open a RAW image recorded on this camera. With this software,
a RAW image can be opened and converted to a common format, such as JPEG or
TIFF, and its white balance, color saturation, contrast, etc., can be readjusted.
• The RAW format image cannot be printed using a DPOF (print) designated printer.
• You cannot set [Auto HDR] on RAW format images.
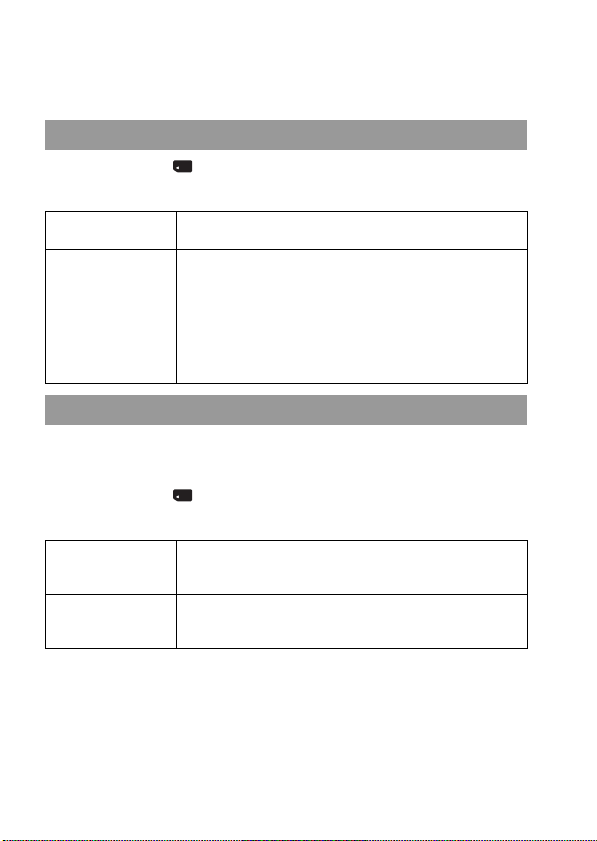
144
Setting the method for recording on a
memory card
MENU button t 1 t [File Number] t Select the desired
setting
The recorded still images are stored in automatically-created folders in the
DCIM folder of the memory card.
MENU button t 1 t [Folder Name] t Select the desired
setting
Note
• The movie folder form is fixed as “folder number + ANV01.”
Selecting the method for assigning file numbers to images
Series The camera does not reset numbers and assigns numbers to
files in sequence until the number reaches “9999.”
Reset The camera resets numbers in the following cases and assigns
numbers to files from “0001.” When the recording folder
contains a file, a number one higher than the largest number
is assigned.
– When the folder format is changed.
– When all the images in the folder are deleted.
– When the memory card is replaced.
– When the memory card is formatted.
Selecting the folder name format
Standard Form The folder name format is as follows: folder number +
MSDCF.
Example: 100MSDCF
Date Form The folder name format is as follows: folder number + Y (the
last digit)/MM/DD.
Example: 10000405 (Folder name: 100, date: 2010/04/05)

145
Changing your setup
You can create a folder in a memory card for recording images.
A new folder is created with a number incremented one higher than the
largest number currently used, and the folder becomes the current recording
folder. A folder for still images and a folder for movies are created at the
same time.
MENU button t 1 t [New Folder]
Notes
• When you insert a memory card that was used with other equipment into the camera
and shoot images, a new folder may be automatically created.
• Up to 4 000 images can be stored in a folder. When the folder capacity is exceeded, a
new folder is created automatically.
When a standard form folder is selected and there are two or more folders,
you can select the recording folder to be used to record images.
MENU button t 1 t [Select REC Folder] t Select the
desired folder
Notes
• You cannot select the folder when you select the setting [Date Form].
• Movie (MP4) files are stored in the folder that has the same folder number as the
folder you selected for still images.
Note that formatting irrevocably erases all data on a memory card,
including protected images.
MENU button t 1 t [Format] t [Enter]
Notes
• During the format, the access lamp lights up. Do not eject the memory card while the
lamp is lit.
• Format the memory card using the camera. If you format it on a computer, the
memory card may not be usable with the camera, depending on the format type used.
Creating a new folder
Selecting the recording folder
Formatting the memory card

146
• Formatting may take several minutes depending on the memory card.
When inconsistencies are found in the image database file of movies,
caused by processing movies on computers, etc., movies on the memory
card will not be played back in this form. If this happens, the camera repairs
the file.
MENU button t 1 t [Recover Image DB] t [Enter]
Note
• Use a sufficiently charged battery. Low battery power during repairing can cause
damage to data.
Displays the remaining recording time of movies and the number of
recordable still images on the memory card.
MENU button t 1 t [Display Card Space]
Sets whether or not you use the upload function when using an Eye-Fi card
(commercially available). This item appears when an Eye-Fi card is
inserted in the camera.
MENU button t 2 t [Upload Settings] t Select the desired
setting
The status indicators in communication
Recovering image database
Checking the remaining space of the card
Setting the upload function for an Eye-Fi card
Standby. No images are to be sent.
Upload standby.
Connecting.
Uploading.
Error

147
Changing your setup
Notes
• Before using an Eye-Fi card, set up the wireless LAN access point and forwarding
destination. For details, refer to the operating manual supplied with the Eye-Fi card.
• Eye-Fi cards are sold in the U.S.A, Canada, Japan, and some countries in the EU (as
of May in 2010).
• For more information, please contact the manufacturer or vendor directly.
• Eye-Fi cards can be used only in the countries/regions where they were purchased.
Use Eye-Fi cards in accordance with the law of the countries/regions where you
purchased the card.
• Eye-Fi cards include a wireless LAN function. Do not insert any Eye-Fi cards in the
camera when it is prohibited to do so, such as on an airplane. If there is an Eye-Fi
card inserted in the camera, set [Upload Settings] to [Off]. is displayed on the
screen when [Upload Settings] is set to [Off].
• When you use a brand-new Eye-Fi card for the first time, copy the install file of Eye-
Fi manager recorded on the card to your computer before formatting the card.
• Use an Eye-Fi card after updating the firmware to the latest version. For details, refer
to the manual that comes with the Eye-Fi card.
• The power save function of the camera does not work while it is uploading images.
• If (error) is displayed, remove the memory card and reinsert it, or turn off then
turn on the power again. If appears again, the Eye-Fi card may be damaged.
• Wi-Fi network communication may be influenced by other communication devices.
If the communication status is poor, move closer to the access point of the Wi-Fi
network.
• For details on the file types that can be uploaded, refer to the operating instructions
supplied with the Eye-Fi card.
• This product does not support the Eye-Fi “Endless Memory Mode.” Make sure that
Eye-Fi cards that you insert into this product have “Endless Memory Mode” turned
off.

148
Changing the noise reduction setting
When you set the shutter speed to a second or longer (Long exposure
shooting), noise reduction is turned on for the same duration that the shutter
is open.
This is to reduce the grainy noise typical in a long exposure. When noise
reduction is in progress, a message appears and you cannot take another
picture. Select [On] to prioritize the image quality. Select [Off] to prioritize
the timing of shooting.
MENU button t 3 t [Long Exposure NR] t [Off]
Notes
• When the exposure mode is set to Sweep Shooting, or continuous shooting,
continuous bracketing, [Hand-held Twilight] in Scene Selection, or ISO is set to
[Multi Frame Noise Reduct.], noise reduction is not performed even when it is set to
[On].
• When the exposure mode is set to AUTO or Scene Selection, you cannot turn off
noise reduction.
The camera reduces the noise that becomes more noticeable when the
camera sensitivity is high.
Select [Auto] to prioritize the image quality. Select [Weak] to prioritize the
timing of shooting.
MENU button t 3 t [High ISO NR] t Select the desired
setting
Notes
• [Weak] is selected automatically for continuous shooting or continuous bracketing
images, even when you set it to [Auto].
• When the exposure mode is set to AUTO, Sweep Shooting, or Scene Selection, you
cannot select [Weak].
• Noise reduction is not performed on RAW images.
Disabling the noise reduction during long exposure
shootings
Setting the noise reduction at high ISO sensitivity settings

149
Changing your setup
Changing the function of the buttons
The function of the AEL button can be selected from the following two
functions:
– Holding the locked exposure value by pressing the AEL button while
the button is held down ([Hold]).
– Holding the locked exposure value by pressing the AEL button until the
button is pressed again ([Toggle]).
MENU button t 1 t [AEL] t Select the desired setting
Notes
• While the exposure value is locked, appears on the LCD monitor and in the
viewfinder. Be careful not to reset the setting.
• The [Hold] and [Toggle] settings affect the manual shift (page 78) in the manual
exposure mode.
• When [Toggle] is selected, be sure to press the AEL button again to release the lock.
The function of the AEL button in focus check Live View mode can be
selected between [Focus Magnifier] (default setting) and [AEL].
MENU button t 1 t [Func. of AEL button] t Select the
desired setting
If you use a lens equipped with a focus hold button, you can change the
function of the button to preview a shot.
MENU button t 1 t [Focus Hold Button] t [D.O.F.Preview]
Changing the operation of the AEL button
Changing the function of the AEL button
Changing the function of a focus hold button to the preview
function

150
Changing other settings
Selects the sound produced when the shutter is locked, during self-timer
countdown, etc.
MENU button t 2 t [Audio signals] t Select the desired
setting
You can turn off the Help Guide that is displayed when you operate the
camera. This is convenient when you want to perform the next operation
quickly.
MENU button t 1 t [Help Guide Display] t [Off]
You can set different time intervals for the camera to switch to power save
mode (Power Save) for the Live View (LV) and viewfinder modes (OVF).
Pressing the shutter button halfway down returns the camera to the
shooting mode.
MENU button t 1 [Power Save (LV)] or [Power Save (OVF)]
t Select the desired time
Note
• Regardless of the setting here, the camera turns to power save mode after 30 minutes
when the camera is connected to a TV or the drive mode is set to [Remote Cdr.].
You can release the shutter when no lens is attached. Select this when you
attach the camera on an astronomical telescope, etc.
MENU button t 1 t [Release w/oLens] t [Enable]
Setting the sound on/off
Removing the Help Guide from the screen
Setting the time to turn the camera to the power save mode
Releasing the shutter when no lens is attached

151
Changing your setup
Note
• Correct metering cannot be achieved when you use lenses that do not provide a lens
contact, such as the lens of an astronomical telescope. In such cases, adjust the
exposure manually by checking it on the recorded image.
MENU button t 1 t [ Language] t Select the language
You can set the camera to start the demonstration playback of a movie if
you do not operate the camera for about one minute.
MENU button t 2 t [Demo Mode] t [On]
Selecting the language
Setting the demonstration playback of a movie

152
Setting the LCD monitor
The brightness of the LCD monitor is automatically adjusted to the
surrounding lighting conditions using the light sensor (page 15).
You can set the brightness of the LCD monitor manually.
MENU button t 1 t [LCD Brightness] t Select the desired
setting
Notes
• When it is set to [Auto], do not cover the light sensor with your hand and so on.
• When using the camera with the AC-PW10AM AC Adaptor (sold separately), the
brightness of LCD monitor is always set to the brightest setting even if you select
[Auto].
You can check the recorded image on the screen right after the shooting.
You can change the displayed time.
MENU button t 2 t [Auto Review] t Select the desired
setting
Note
• In auto review, the image will not be displayed in the vertical position even if
[Playback Display] is set to [Auto Rotate] (page 123).
Setting the brightness of the LCD monitor
Setting the displayed time of the image right after shooting
(Auto review)
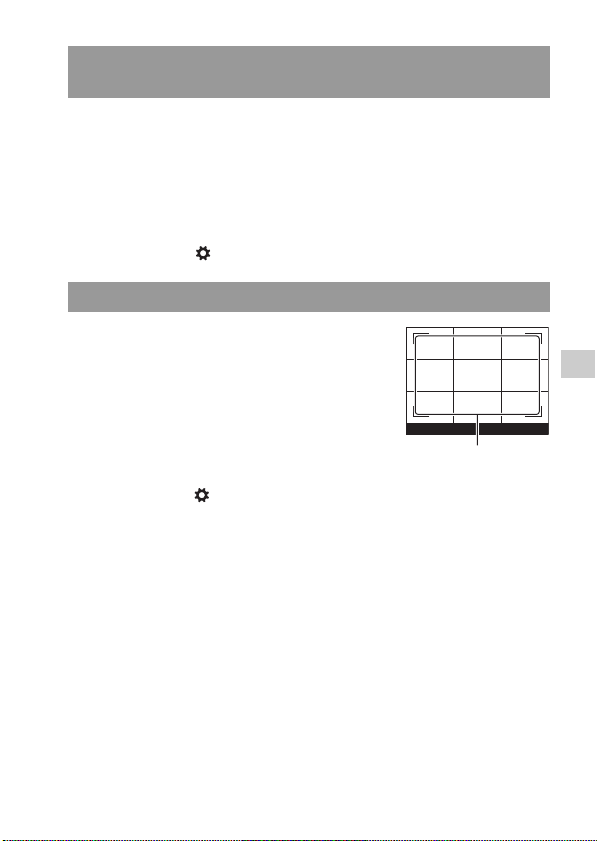
153
Changing your setup
When the LIVE VIEW/OVF switch is set to “OVF,” looking into the
viewfinder turns off the LCD monitor.
In the default setting, while looking into the viewfinder, the LCD monitor
is turned off to prevent the battery pack from wearing down.
If you want to turn on the LCD monitor while looking into the viewfinder,
select [Off].
MENU button t 1 t [Auto off w/ VF] t [Off]
MENU button t 2 t [Grid Line] t Select the desired setting
Note
• The grid line is displayed only when the camera is in the auto review (page 152) or
focus check Live View mode.
Keeping the LCD monitor tuned on while looking into the
viewfinder
Setting the grid line
The grid line is an auxiliary line for
shooting composition. You can set the
grid line to on/off or select the type of
grid line. The available range of movie
recording is also displayed.
Available range of movie recording

154
Confirming the version of the camera
Displays the version of your camera. Confirm the version when a firmware
update is released.
MENU button t 2 t [Version]
Note
• An update can be performed only when the battery level is 50% or more. We
recommend that you use a sufficient battery or the AC-PW10AM AC Adaptor (sold
separately).
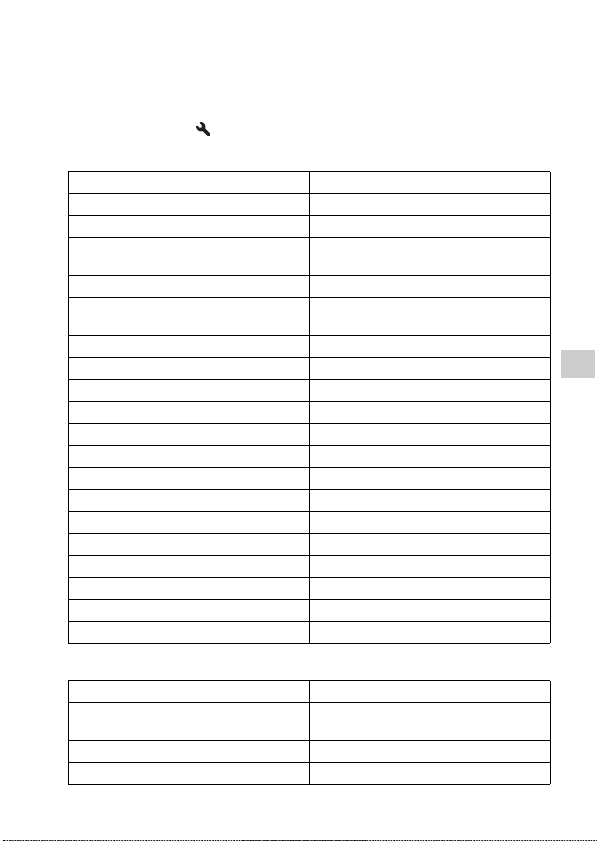
155
Changing your setup
Resetting to the default
You can reset the main functions of the camera.
MENU button t 2 t [Reset Default] t [Enter]
The items to be reset are as follows.
Recording menu
Items Reset to
Exposure compensation (103) ±0.0
Recording information display (42) Graphic Display
Playback display (123) Single-image screen (with recording
information)
Drive mode (118) Single-shot Adv.
Flash Mode (98) Fill-flash (differs based on whether the
built-in flash is open or not)
Autofocus Mode (88) AF-A
AF area (89) Wide
Face Detection (95) On
Smile Shutter (96) Off
ISO (108) AUTO
Metering Mode (107) Multi segment
Flash Compensation (105) ±0.0
White Balance (114) AWB (Auto white balance)
Color Temp./Color Filter (115) 5500K, Color Filter 0
Custom white balance (116) 5500K
DRO/Auto HDR (109) D-Range Optimizer: Auto
Creative Style (112) Standard
Scene Selection (63) Portrait
Sweep Shooting
(66) Sweep Panorama
Items Reset to
Image: Size (140) L:16M (DSLR-A580)/
L:14M (DSLR-A560)
Image: Aspect Ratio (142) 3:2
Image: Quality (142) Fine

156
Custom menu
Playback menu
Movie: Size (141) 1920 × 1080
Movie: File Format (82) AVCHD
Movie: Audio Rec. (83) On
SteadyShot (59) On
Panorama: Size (141) Standard
Panorama: Direction (68) Right
3D Pan.: Image Size (141) Standard
3D Pan.: Direction (69) Right
Flash control (106) ADI flash
AF Illuminator (100) Auto
AF method (91) Contrast AF
Color Space (113) sRGB
Long Exposure NR (148) On
High ISO NR (148) Auto
Items Reset to
Eye-Start AF (41) Off
Func. of AEL button (149) Focus Magnifier
AEL (149) Hold
Focus Hold Button (149) Focus Hold
Red Eye Reduction (100) Off
Release w/oLens (150) Disable
Auto off w/ VF (153) On
Grid Line (153) Off
Histogram (104) Off
Auto Review (152) Off
Items Reset to
Slide Show – Repeat (127) Off
Slide Show – Interval (127) 3 sec
Slide Show – Image Type (127) All
Items Reset to

157
Changing your setup
Memory Card Tool menu
Setup menu
Specify Printing – Date Imprint (172) Off
Volume Settings (124) 2
Playback Display (123) Auto Rotate
Items Reset to
File Number (144) Series
Folder Name (144) Standard Form
Items Reset to
LCD Brightness (152) Auto
Power Save (LV) (150) 1 Min
Power Save (OVF) (150) 10 Sec
CTRL FOR HDMI (137) On
Help Guide Display (150) On
USB Connection (164) Mass Storage
Upload Settings (146) On
Audio signals (150) On
Demo Mode (151) Off
Items Reset to

158
Viewing images on a computer
Using with your computer
Following applications are contained on the CD-ROM (supplied) to allow
more versatile use of images shot with your camera.
• Sony Image Data Suite
“Image Data Converter SR”
“Image Data Lightbox SR”
• “PMB” (Picture Motion Browser)
Note
• “PMB” is not compatible with Macintosh computers.
The following computer environment is recommended when using the
supplied software and importing images via a USB connection.
*1 64-bit editions and Starter (Edition) are not supported. Windows Image
Mastering API (IMAPI) Ver.2.0 or later is required to use the function
for creating discs.
*2 Starter (Edition) is not supported.
Recommended computer environment (Windows)
OS (pre-installed) Microsoft Windows XP
*1
SP3/Windows Vista
*2
SP2/
Windows 7
“PMB” CPU: Intel Pentium III 800 MHz or faster
(For playing/editing the High Definition movies: Intel Core
Duo 1.66 GHz or faster/Intel Core 2 Duo 1.66 GHz or faster)
Memory: 512 MB or more (For playing/editing the High
Definition movies: 1 GB or more)
Hard Disk: Disk space required for installation-
approximately 500 MB
Display: Screen resolution-1024 × 768 dots or more
“Image Data
Converter SR Ver.3”
“Image Data
Lightbox SR”
CPU/Memory: Pentium 4 or faster/1 GB or more
Display: 1024 × 768 dots or more

159
Viewing images on a computer
The following computer environment is recommended when using the
supplied software and importing images via a USB connection.
Notes
• Operation is not assured in an environment based on an upgrade of the operating
systems described above or in a multi-boot environment.
• If you connect two or more USB devices to a single computer at the same time, some
devices, including the camera, may not operate, depending on the types of USB
devices you are using.
• Connecting the camera using a USB interface that is compatible with Hi-Speed USB
(USB 2.0 compliant) allows advanced transfer (high speed transfer), as the camera is
compatible with Hi-Speed USB (USB 2.0 compliant).
• When your computer resumes activity from suspend or sleep mode, communication
between the camera and your computer may not recover at the same time.
Recommended computer environment (Macintosh)
OS (pre-installed) USB Connection: Mac OS X (v10.3, 10.4, 10.5, 10.6)
“Image Data Converter SR Ver.3”/“Image Data
Lightbox SR”: Mac OS X (v10.4, 10.5, 10.6 (Snow
Leopard))
“Image Data
Converter SR Ver.3”
“Image Data
Lightbox SR”
CPU: Power PC G4/G5 series (1.0 GHz or faster is
recommended)/Intel Core Solo/Core Duo/Core 2 Duo or
faster
Memory: 1 GB or more is recommended.
Display: 1024 × 768 dots or more

160
Using the software
Log on as Administrator.
Notes
• If “PMB” has already been installed on the computer, and the version number of the
previously installed “PMB” is lower than that of the “PMB” on the CD-ROM
(supplied), install “PMB” also from the CD-ROM (supplied).
Installing the software (Windows)
1 Turn on your computer, and insert the CD-ROM (supplied) into
the CD-ROM drive.
The installation menu screen appears.
• If it does not appear, double-click [Computer] (For Windows XP: [My
Computer]) t (SONYPMB) t [Install.exe].
• If the AutoPlay screen appears, select “Run Install.exe” and follow the
instructions that appear on the screen to proceed with the installation.
2 Click [Install].
Make sure that both “Sony Image Data Suite” and “PMB” are checked and
follow the instructions on the screen.
• Connect the camera to the computer during the procedure following the
instructions on the screen (page 164).
• When the restarting confirmation message appears, restart the computer
following the instructions on the screen.
• DirectX may be installed depending on the system environment of your
computer.
3 Remove the CD-ROM after the installation is complete.
The following software is installed and shortcut icons appear on the desktop.
“Image Data Converter SR”
“Image Data Lightbox SR”
“PMB”
“PMB Launcher”
“PMB Help”

161
Viewing images on a computer
• If “PMB” has already been installed on the computer, and the version of the
previously installed “PMB” is higher than that of the “PMB” on the CD-ROM
(supplied), installation is not required. The usable functions are activated when the
camera is connected to the computer using the USB cable.
• If a version of “PMB” under 5.0.00 has been installed on your computer, you may be
unable to use some functions of those “PMB” when installing the “PMB” from the
supplied CD-ROM. Also, “PMB Launcher” is installed from the supplied CD-ROM
and you can start “PMB” or other software by using the “PMB Launcher.” Double-
click the “PMB Launcher” short-cut icon on the computer screen to start “PMB
Launcher.”
Log on as Administrator.
With “Image Data Converter SR” you can do the following, etc.:
• To edit images recorded in RAW format with various corrections, such as
tone curve, and sharpness.
• To adjust images with white balance, exposure, and creative style, etc.
• To save the images displayed and edited on a computer.
• You can either save the image as RAW format or save it in the general
file format.
Installing the software (Macintosh)
1 Turn on your Macintosh computer, and insert the CD-ROM
(supplied) into the CD-ROM drive.
2 Double-click the CD-ROM icon.
3 Copy the [IDS_INST.pkg] file in the [MAC] folder to the hard
disk icon.
4 Double-click the [IDS_INST.pkg] file in the copy-to folder.
Follow the instructions on the screen to complete the installation.
Using “Image Data Converter SR”

162
To use “Image Data Converter SR,” refer to Help.
Click [Start] t [All Programs] t [Sony Image Data Suite] t [Help] t
[Image Data Converter SR Ver.3].
“Image Data Converter SR” support page (English only)
http://www.sony.co.jp/ids-se/
With “Image Data Lightbox SR” you can do the following, etc.:
• To display and compare RAW/JPEG images recorded with this camera.
• To rate the images on a scale of five.
• To set color labels and so on.
• To display an image with “Image Data Converter SR” and make
adjustments to it.
To use “Image Data Lightbox SR,” refer to Help.
Click [Start] t [All Programs] t [Sony Image Data Suite] t [Help] t
[Image Data Lightbox SR].
“Image Data Lightbox SR” support page (English only)
http://www.sony.co.jp/ids-se/
With “PMB” you can do the following, etc.:
• To set images shot with the camera and display them on the computer.
• To organize images on the computer on a calendar by shooting date to
view them.
• To retouch (red-eye reduction, etc.), print, and send still images as e-mail
attachments, change the shooting date.
• To print or save still images with the date.
• To create Blu-ray discs, AVCHD format discs or DVD discs from
AVCHD format movies imported to a computer. (An internet connection
environment is required when a Blu-ray disc/DVD disc is created for the
first time.)
Using “Image Data Lightbox SR”
Using “PMB”

163
Viewing images on a computer
Note
• “PMB” is not compatible with Macintosh computers.
To use “PMB,” refer to “PMB Help.”
Double-click the shortcut of (PMB Help) on the desktop. Or, click
[Start] t [All Programs] t [PMB] t [PMB Help].
“PMB” support page (English only)
http://www.sony.co.jp/pmb-se/
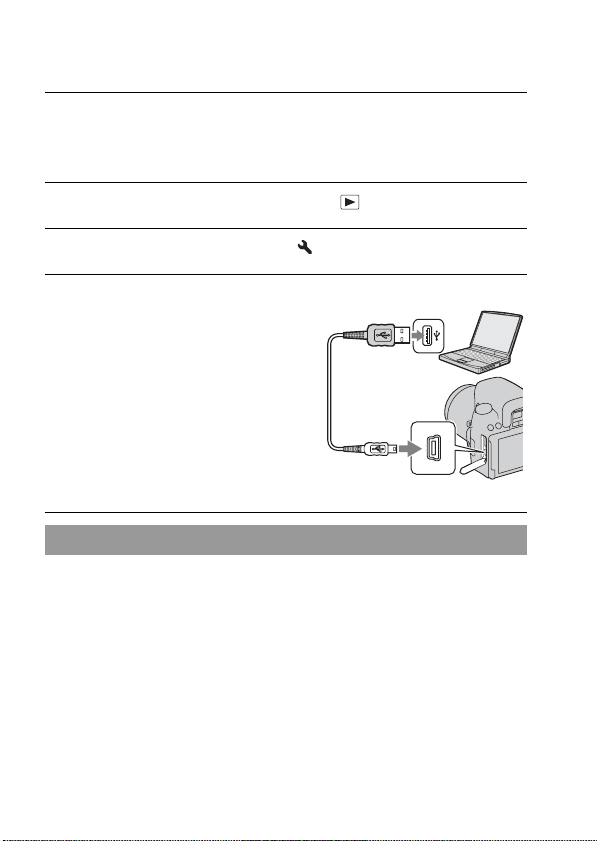
164
Connecting the camera to the computer
“PMB” allows you to easily import images.
For details on “PMB” functions, see the “PMB Help.”
Importing images to the computer without using “PMB”
When the AutoPlay Wizard appears after making a USB connection
between the camera and a computer, click [Open folder to view files] t
[OK] t [DCIM] or [MP_ROOT] t copy the desired images to the
computer.
1 Insert a sufficiently charged battery pack into the camera, or
connect the camera to a wall outlet (wall socket) using the AC-
PW10AM AC Adaptor (sold separately).
2 Turn on the computer, then press the (Playback) button.
3 Check that [USB Connection] in 1 is set to [Mass Storage].
4 Connect the camera to your
computer.
• When a USB connection is established
for the first time, your computer
automatically runs a program to
recognize the camera. Wait for a while.
Importing images to the computer (Windows)
1 To a USB terminal of the
computer
USB cable (supplied)
2 To the USB terminal

165
Viewing images on a computer
File name
• ssss (file number) stands for any number within the range of 0001 to
9999.
• When [Image: Quality] is set to [RAW & JPEG], the numerical portions
of the name of a RAW data file and its corresponding JPEG file are the
same.
Notes
• For operations such as importing AVCHD movies to the computer, use “PMB.”
• When the camera is connected to the computer, if you operate AVCHD format
movies or folders from the connected computer, images may be damaged or cannot
be played. Do not delete or copy AVCHD format movies on the memory card from
the computer. Sony is not held liable for consequences resulting from such
operations via the computer.
Folder The type of file File name
DCIM folder JPEG file DSC0ssss.JPG
JPEG file (Adobe RGB) _DSCssss.JPG
RAW file DSC0ssss.ARW
RAW file (Adobe RGB) _DSCssss.ARW
MP_ROOT folder MP4 file (1440 × 1080) MAH0ssss.MP4
MP4 file (VGA) MAQ0ssss.MP4
Importing images to the computer (Macintosh)
1 Connect the camera to your Macintosh computer first. Double-
click the newly recognized icon on the desktop t the folder
where the images you want to import are stored.
2 Drag and drop the image files to the hard disk icon.
The image files are copied to the hard disk.
3 Double-click the hard disk icon t the desired image file in the
folder containing the copied files.
The image is displayed.
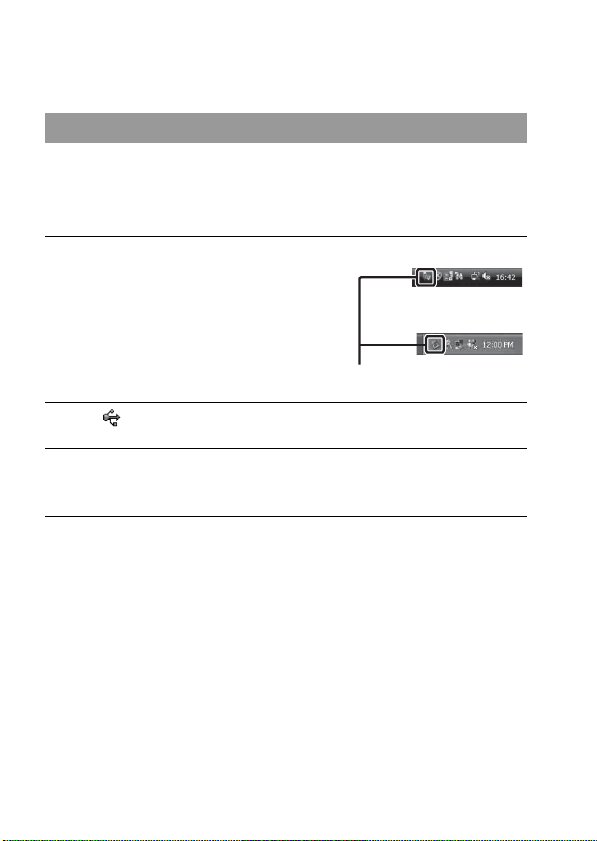
166
Note
• Use “iMovie” bundled with a Macintosh computer to import or operate AVCHD
format movies.
Perform the procedures from step 1 to 3 below before:
• Disconnecting the USB cable.
• Removing the memory card.
• Turning off the camera.
Note
• Drag and drop the icon of the memory card or the drive icon to the “Trash” icon
beforehand when you use a Macintosh computer, and the camera is disconnected
from the computer.
Deleting the USB connection
1 Double-click the disconnect icon
on the tasktray.
Disconnect icon
2 Click (USB Mass Storage Device) t [Stop].
3 Confirm the device on the confirmation window, then click
[OK].
Windows Vista
Windows XP
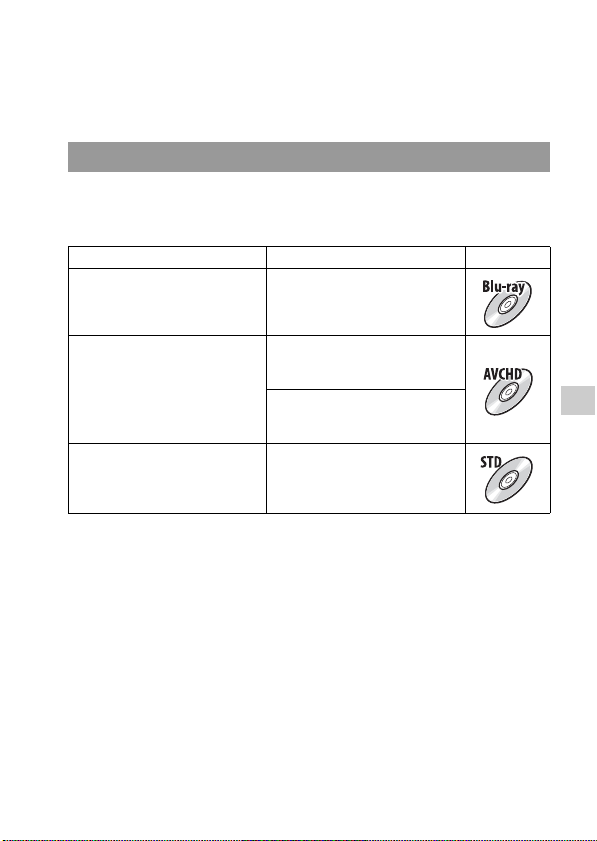
167
Viewing images on a computer
Creating a movie disc
You can create a disc from AVCHD format movies recorded on the
camera.
Select the method that best suits your disc player.
See “PMB Help” for details on creating a disc using “PMB.”
To import movies, see page 164.
Notes
• If you use a Sony DVDirect (DVD Writer), you can transfer data by inserting a
memory card into the memory card slot of the DVD writer, or connecting your
camera to the DVD writer with a USB cable.
• When you use Sony DVDirect (DVD writer), make sure that the version of DVD
writer’s firmware is the latest.
For details, refer to the following URL:
http://sony.storagesupport.com/
Selecting the method for creating a disc
Player Method Disc type
Blu-ray disc playback devices
(Blu-ray disc player,
PlayStation®3, etc.)
Create a Blu-ray disc of movies
and photos imported to a
computer using “PMB.”
AVCHD format playback devices
(Sony Blu-ray disc player,
PlayStation®3, etc.)
Create an AVCHD format disc of
movies and photos imported to a
computer using “PMB.”
Creating an AVCHD format disc
with a DVD writer/recorder other
than DVDirect Express.
Ordinary DVD playback devices
(DVD player, DVD playable
computer, etc.)
Create a standard definition
image quality (STD) disc of
movies and photos imported to a
computer using “PMB.”
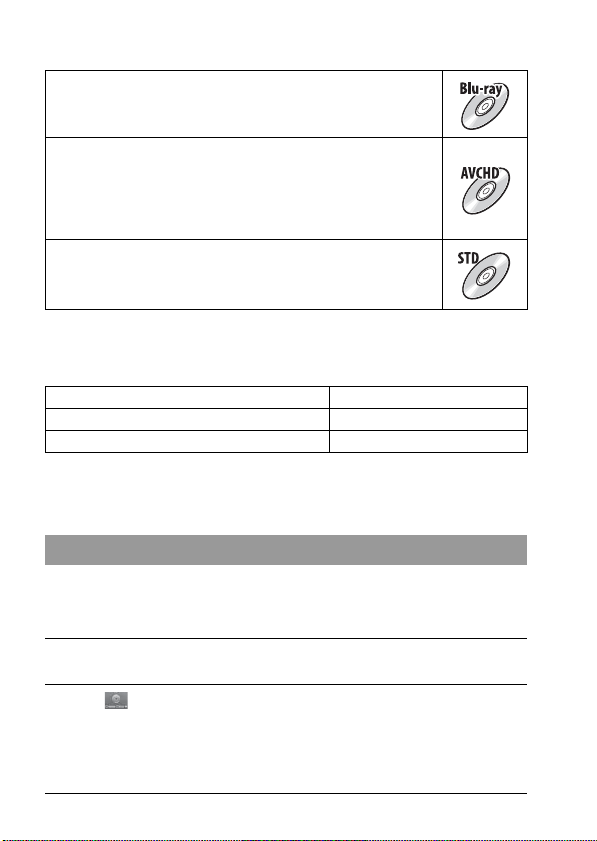
168
Characteristics of each type of disc
Discs you can use with “PMB”
You can use 12 cm discs of following type with “PMB.” For Blu-ray disc,
see page 169.
• Always maintain your PlayStation®3 to use the latest version of the
PlayStation®3 system software.
• The PlayStation®3 may not be available in some countries/regions.
You can create a high definition image quality (HD) AVCHD format disc
from AVCHD format movies imported to a computer using the supplied
software “PMB.”
A Blu-ray disc enables you to record high definition image quality
(HD) movies of a longer duration than DVD discs.
High definition image quality (HD) movie can be recorded on DVD
media, such as DVD-R discs, and a high definition image quality
(HD) disc is created.
• You can play a high definition image quality (HD) disc on AVCHD
format playback devices, such as a Sony Blu-ray disc player and a
PlayStation®3. You cannot play the disc on ordinary DVD players.
Standard definition image quality (STD) movie converted from high
definition image quality (HD) movie can be recorded on DVD media,
such as DVD-R discs, and a standard image quality (STD) disc is
created.
Disc type Features
DVD-R/DVD+R/DVD+R DL Unrewritable
DVD-RW/DVD+RW Rewritable
Creating an AVCHD format disc
1 Select the AVCHD format movies you want to write on “PMB.”
2 Click (Create Discs) to select [Create AVCHD Format Discs
(HD)].
The screen used for creating a disc appears.
• For details, see “PMB Help.”

169
Viewing images on a computer
Notes
• Install “PMB” beforehand.
• Still images and MP4 movie files cannot be recorded on the AVCHD format disc.
• It may take a long time to create a disc.
Playing AVCHD format disc on a computer
You can play back AVCHD format discs using “Player for AVCHD” that
is installed together with “PMB.”
To start the software, click on [Start] t [All Programs] t [PMB] t
[PMB Launcher] t [View] t [Player for AVCHD].
For detailed operations, see the Help for “Player for AVCHD.”
Note
• Movies may not be played smoothly depending on the computer environment.
Creating a Blu-ray disc
You can create a Blu-ray disc with AVCHD movies previously imported to
a computer. Your computer must support the creation of Blu-ray discs.
BD-R (non-rewritable) and BD-RE (rewritable) media can be used to create
Blu-ray discs. You cannot add contents to either type of disc once it has
been created.
Click [BD Add-on Software] on the installation screen of “PMB,” and
install this plug-in according to the on-screen instructions.
Connect your computer to the Internet when you install [BD Add-on
Software].
See “PMB Help” for details.

170
You can create a standard definition image quality (STD) disc from
AVCHD format movies imported to a computer using supplied software
“PMB.”
Notes
• Install “PMB” beforehand.
• MP4 movie files cannot be recorded on a disc.
• It will take a longer time to create a disc because AVCHD format movies are
converted to standard definition image quality (STD) movies.
• An Internet connection environment is required when creating a DVD-Video (STD)
disc for the first time.
Creating a standard definition image quality (STD) disc
1 Select the AVCHD format movies you want to write on “PMB.”
2 Click (Create Discs) to select [Create DVD-Video Format
Discs (STD)].
The screen used for creating a disc appears.
• For details, see “PMB Help.”
171
Printing images
Printing images
Specifying DPOF
Using the camera, you can specify the still images and the number of
images to print before you print images at a shop or with your printer.
Follow the procedure below.
DPOF specifications are left with images after printing. It is recommended
that you unspecify them after printing.
Notes
• You cannot specify DPOF on RAW data files.
• You can specify any number up to 9.
Specifying /unspecifying DPOF on selected images
1 MENU button t 1 t [Specify Printing] t [DPOF Setup]
t [Multiple Img.]
2 Select the image with b/B on the controller.
3 Select the number of sheets with the center of the controller.
• To unspecify DPOF, set the number to “0.”
4 Press the MENU button.
5 Select [Enter] with v, then press the center of the controller.

172
You can date images when printing them. The position of the date (inside
or outside the image, character size, etc.) depends on your printer.
MENU button t 1 t [Specify Printing] t [Date Imprint] t
[On]
Note
• This function may not be provided, depending on the printer.
Dating images

173
Others
Others
Specifications
Camera
[System]
Camera Type
Interchangeable Lens
Digital Camera
Lens A-mount lens
[Image sensor]
Image format
DSLR-A580
23.5 mm×15.6 mm (APS-
C format) “Exmor” CMOS
image sensor
DSLR-A560
23.4 mm×15.6 mm (APS-
C format) “Exmor” CMOS
image sensor
Total pixel number of image sensor
DSLR-A580
Approx. 16 700 000 pixels
DSLR-A560
Approx. 14 600 000 pixels
Effective pixel number of camera
DSLR-A580
Approx. 16 200 000 pixels
DSLR-A560
Approx. 14 200 000 pixels
[SteadyShot]
System Image sensor-shift
mechanism
Effect Approx. 2.5 EV to 4 EV in
shutter speed (depending
on shooting conditions and
the attached lens)
[Anti-Dust]
System Charge protection coating
on Low-Pass Filter and
image sensor-shift
mechanism
[Auto focus system]
System TTL phase-detection
system (Contrast AF
method is selectable in
focus check Live View
mode)
Metering points
15 points (3 points cross
type) (11 points in
viewfinder mode)
Sensitivity Range
–1 EV to 18 EV (at ISO
100 equivalent)
AF illuminator
Approx. 1 m to 5 m
(3.3 feet to 16.4 feet)
[Live View]
Type Pentamirror tilt mechanism
Image format
Exclusive image sensor for
Live View
Frame coverage
Approx. 90%
[Viewfinder]
Type Fixed eye-level penta-
Dach-mirror
Frame coverage
Approx. 95%
Magnification
0.80 × with 50 mm lens at
infinity, –1 m
–1
(diopter)
Eye Point Approximately 19 mm
from the eyepiece, 15 mm
from the eyepiece frame at
–1 m
–1
Dioptor Adjustment
–2.5 m
–1
to +1.0 m
–1

174
[Focus check Live View]
Image format
Image sensor for shooting
Frame coverage
Approx. 100%
[LCD monitor]
LCD panel 7.5 cm (3.0 type) TFT
drive
Total number of dots
921 600 (640 × 3 (RGB) ×
480) dots
[Exposure control]
Metering Cell
Live View
Exclusive image sensor for
Live View
Viewfinder
40-segment honeycomb-
pattern SPC
Focus check Live View
“Exmor” CMOS sensor
Metering method
Live View/Focus check
Live View
1200-zone evaluative
metering
Viewfinder
TTL shutter-open metering
Metering Range
Live View
1 EV to 17 EV on all
metering modes (ISO 100
equivalent with F1.4 lens)
Viewfinder
2 EV to 20 EV (4 EV to
20 EV on spot metering
mode) (ISO 100 equivalent
with F1.4 lens)
Focus check Live View
DSLR-A580
–2 EV to 17 EV on all
metering modes (ISO 100
equivalent with F1.4 lens)
DSLR-A560
–2 EV to 16 EV on all
metering modes (ISO 100
equivalent with F1.4 lens)
ISO sensitivity (Recommended
exposure index)
AUTO, ISO 100 to 12800
Exposure compensation
±2.0 EV (1/3 EV step)
[Shutter]
Type Electronically-controlled,
vertical-traverse, focal-
plane type
Speed range 1/4000 second to 30
seconds, bulb, (1/3 EV
step)
Flash sync speed
1/160 second
[Built-In-Flash]
Flash guide number
GN 12 (in meters at ISO
100)
Recycling time
Approx. 4 seconds
Flash coverage
Covering 18 mm lens
(focal length that the lens
indicates)
Flash compensation
±2.0 EV (1/3 EV step)

175
Others
[Recording format]
File format JPEG (DCF Ver. 2.0, Exif
Ver. 2.3, MPF Baseline)
compliant, DPOF
compatible
Movie (AVCHD format)
AVCHD Ver. 1.0
compliant
Video: MPEG-4 AVC/
H.264
Audio: Dolby Digital 2ch,
equipped with Dolby
Digital Stereo Creator
• Manufactured under
license from Dolby
Laboratories.
Movie (MP4 format)
Video: MPEG-4 AVC/
H.264
Audio: MPEG-4 AAC-LC
2ch
[Recording media]
“Memory Stick PRO Duo”
media, SD card
[Input/output terminals]
USB miniB
HDMI HDMI type C minijack
MIC Terminal
3.5 mm Stereo minijack
REMOTE Terminal
[Power, general]
Used battery pack
Rechargeable battery pack
NP-FM500H
[Others]
Exif Print Compatible
PRINT Image Matching III
Compatible
Dimensions Approx. 137 mm ×
104 mm × 84 mm
(5 1/2 inches × 4 1/8 inches
× 3 3/8 inches) (W/H/D,
excluding protrusions)
Mass Approx. 679 g (1 lb 7.9 oz)
(with battery and “Memory
Stick PRO Duo” media)
Approx. 599 g (1 lb 5.1 oz)
(body only)
Operating temperature
0°C to 40°C (32°F to
104°F)
USB communication
Hi-Speed USB (USB 2.0
compliant)
BC-VM10 Battery charger
Input rating 100 V - 240 V AC, 50/60
Hz, 9 W
Output rating
8.4 V DC, 0.75 A
Operating temperature range
0°C to 40°C (32°F to
104°F)
Storage temperature range
–20°C to +60°C (–4°F to
+140°F)
Maximum dimensions
Approx. 70 mm × 25 mm ×
95 mm (2 7/8 inches ×
1 inches × 3 3/4 inches)
(W/H/D)
Mass Approx. 90 g (3.2 oz)

176
Rechargeable battery pack
NP-FM500H
Used battery
Lithium-ion battery
Maximum voltage
DC 8.4 V
Nominal voltage
DC 7.2 V
Maximum charge voltage
DC 8.4 V
Maximum charge current
2.0 A
Capacity
Typical 11.8 Wh (1 650 mAh)
Minimum 11.5 Wh (1 600 mAh)
Maximum dimensions
Approx. 38.2 mm ×
20.5 mm × 55.6 mm
(1 9/16 inches × 13/16
inches × 2 1/4 inches) (W/
H/D)
Mass Approx. 78 g (2.8 oz)
Design and specifications are subject
to change without notice.
On focal length
The picture angle of this camera is
narrower than that of a 35 mm-format
film camera. You can find the
approximate equivalent of the focal
length of a 35 mm-format film
camera, and shoot with the same
picture angle, by increasing the focal
length of your lens by half.
For example, by using a 50 mm lens,
you can get the approximate
equivalent of a 75 mm lens of a 35
mm-format film camera.
On image data compatibility
• This camera conforms with DCF
(Design rule for Camera File
system) universal standard
established by JEITA (Japan
Electronics and Information
Technology Industries
Association).
• Playback of images recorded with
your camera on other equipment
and playback of images recorded or
edited with other equipment on
your camera are not guaranteed.
177
Others
Trademarks
• is a trademark of Sony
Corporation.
• “Memory Stick,” , “Memory
Stick PRO,” ,
“Memory Stick Duo,”
, “Memory Stick
PRO Duo,” ,
“Memory Stick PRO-HG Duo,”
, “Memory
Stick Micro,” “MagicGate,” and
are trademarks of
Sony Corporation.
• “InfoLITHIUM” is a trademark of
Sony Corporation.
• “PhotoTV HD” is a trademark of
Sony Corporation.
• “AVCHD” and “AVCHD”
logotype are trademarks of
Panasonic Corporation and Sony
Corporation.
• “Blu-ray Disc” and the logo are
trademarks.
• Dolby and the double-D symbol are
trademarks of Dolby Laboratories.
• Microsoft, Windows, DirectX, and
Windows Vista are either registered
trademarks or trademarks of
Microsoft Corporation in the
United States and/or other
countries.
• HDMI, the HDMI logo and High-
Definition Multimedia Interface are
trademarks or registered trademarks
of HDMI Licensing LLC.
• Macintosh and Mac OS are
trademarks or registered trademarks
of Apple Inc.
• PowerPC is a registered trademark
of IBM Corporation in the United
States.
• Intel, Intel Core, MMX, and
Pentium are trademarks or
registered trademarks of Intel
Corporation.
• SDXC, SDHC Logo are trademarks
of SD-3C, LLC.
• Eye-Fi is a trademark of Eye-Fi Inc.
• MultiMediaCard is a trademark of
MultiMediaCard Association.
• “PlayStation” is a registered
trademark of Sony Computer
Entertainment Inc.
• Adobe is a registered trademark or
a trademark of Adobe Systems
Incorporated in the United States
and/or other countries.
• In addition, system and product
names used in this manual are, in
general, trademarks or registered
trademarks of their respective
developers or manufacturers.
However, the ™ or ® marks are not
used in all cases in this manual.
178
Troubleshooting
If you experience trouble with your camera, try the following solutions.
Check the items on pages 178 to 186. Consult your Sony dealer or local
authorized Sony service facility.
The battery pack cannot be installed.
• As you insert the battery pack, use the tip of the battery pack to push the
lock lever (page 22).
• You can use an NP-FM500H battery pack only. Make sure that the battery
is NP-FM500H.
The remaining battery indicator is incorrect, or sufficient remaining
battery indicator is displayed but the power runs out too quickly.
• This phenomenon occurs when you use the camera in an extremely hot or
cold location (page 190).
• The battery pack is discharged. Install a charged battery pack (page 18).
• The battery pack is dead (page 24). Replace it with a new one.
Cannot turn on the camera.
• Install the battery pack correctly (page 22).
• The battery pack is discharged. Install a charged battery pack (page 18).
• The battery pack is dead (page 24). Replace it with a new one.
1
Check the following items.
2
Remove the battery pack, and insert the battery pack again after
about one minute, and turn on the power.
3
Reset the settings (page 155).
4
Consult your Sony dealer or local authorized Sony service facility.
Battery pack and power

179
Others
The power turns off suddenly.
• If you do not operate the camera for given period of time, the camera turns
to power saving mode and nearly shuts down. To cancel the power save,
operate the camera, such as pressing the shutter button halfway down
(page 150).
The CHARGE lamp flashes when charging the battery pack.
• You can use an NP-FM500H battery pack only. Make sure that the battery
is NP-FM500H.
• If you charge a battery pack that has not been used for a long time, the
CHARGE lamp may flash.
• The CHARGE lamp flashes in two ways, fast (about 0.15-second intervals)
and slow (about 1.5-second intervals). If it is flashing fast, remove the
battery pack and reattach the same battery pack securely. If the CHARGE
lamp flashes fast again, it suggests that there is something wrong with the
battery pack. Slow flashing indicates that charging is suspended because the
ambient temperature is outside the suitable range for charging the battery
pack. Charging will resume and the CHARGE lamp will be lit when the
ambient temperature returns to within the suitable temperature.
Charge the battery pack under the suitable temperatures between 10°C and
30°C (50°F and 86°F).
Nothing is displayed on the LCD monitor in viewfinder mode when the
power is turned on.
• If you do not operate the camera for given period of time, the camera turns
to power saving mode and nearly shuts down. To cancel the power save,
operate the camera, such as pressing the shutter button halfway down
(page 150).
The image is not clear in the viewfinder.
• Adjust the diopter scale properly using the diopter-adjustment dial
(page 40).
No images in the viewfinder.
• The LIVE VIEW/OVF switch is set to “LIVE VIEW.” Set it to “OVF”
(page 40).
Shooting images

180
The screen of the viewfinder is dark.
• The battery pack is discharged. Install a charged battery pack (page 18).
A red light is reflected on the right side in the viewfinder
• When you press the shutter button halfway down to focus on a dark subject,
AF areas may be lit in red automatically. In such a case, a red light is
reflected on the right side in the viewfinder. This is not a malfunction.
The shutter does not release.
• You are using a memory card with a write-protect switch, and the switch is
set to the LOCK position. Set the switch to the recording position.
• Check the free capacity of the memory card (page 35).
• You cannot record images while charging the built-in flash (page 98).
• The shutter cannot be released when the subject is out of focus.
• The lens is not attached properly. Attach the lens properly (page 25).
• When the camera is attached to another device, such as an astronomical
telescope, set [Release w/oLens] to [Enable] (page 150).
• The subject may require special focusing (page 86). Use the focus-lock or
manual focus function (pages 87, 90).
Recording takes a long time.
• The noise reduction function is turned on (page 148). This is not a
malfunction.
• You are shooting in RAW mode (page 142). Since the RAW data file is
large, the RAW mode shooting may take time.
• The Auto HDR is processing an image (page 109).
The same image is shot several times.
• The drive mode is set to [Continuous adv.] or [Bracket: Cont.]. Set it to
[Single-shot Adv.] (page 118).
The image is out of focus.
• The subject is too close. Check the minimum focal distance of the lens.
• You are shooting in manual focus mode, set the focus mode switch to AF
(autofocus) (page 85).
• When the focus mode switch is equipped with the lens, set it to AF.
• Ambient light is insufficient.

181
Others
Eye-Start AF does not work.
• Set [Eye-Start AF] to [On] (page 41).
• Press the shutter button halfway down.
The flash does not work.
• The flash mode is set to [Autoflash]. If you want to make sure the flash fires
without fail, set the flash mode to [Fill-flash] (page 98).
The flash takes too long to recharge.
• The flash has been fired in succession in a short period. When the flash has
been fired in succession, the recharging process may take longer than usual
to avoid overheating of the camera.
A picture taken with the flash is too dark.
• If the subject is beyond the flash range (the distance that the flash can
reach), the pictures will be dark because the flash light does not reach the
subject. If the ISO is changed, the flash range also changes with it
(page 100).
The date and time are recorded incorrectly.
• Set the correct date and time (page 31).
• The area selected with [Area Setting] is different from the actual area. Set
up [Area Setting] again (page 31).
The aperture value and/or shutter speed flashes when you press the
shutter button halfway down.
• Since the subject is too bright or too dark, it is beyond the available range of
the camera. Adjust the setting again.
The image is whitish (Flare).
Blurring of light appears on the image (Ghosting).
• The picture was taken under a strong light source, and excessive light has
entered the lens. Attach a lens hood (sold separately).
The corners of the picture are too dark.
• If any filter or hood is used, take it off and try shooting again. Depending on
the thickness of the filter and improper attachment of the hood, the filter or
the hood may partially appear in the image. The optical properties of some

182
lenses may cause the periphery of the image to appear too dark (insufficient
light).
The eyes of the subject come out red.
• Activate the red eye reduction function (page 100).
• Get close to the subject, and shoot the subject within the flash range using
the flash (page 100).
Dots appear and remain on the LCD monitor.
• This is not a malfunction. These dots are not recorded (page 7).
• You may reduce the effect of these issues using the “Pixel mapping”
function.
1 Set the LIVE VIEW/OVF switch to “LIVE VIEW.”
2 Attach the lens cap.
3 MENU button t 2 t [Pixel mapping] t [OK]
The image is blurred.
• The picture was taken in a dark location without the flash, resulting in
camera shake. The use of a tripod or the flash is recommended (pages 60,
98).
The EV scale b B is flashing on the LCD monitor or in the viewfinder.
• The subject is too bright or too dark for the metering range of the camera.
The color of an image recorded in Live View mode is strange.
• In Live View mode, carefully check the image displayed on the LCD
monitor before shooting. The camera may not be able to recognize the color
of the image right after switching to the Live View mode. In such cases, the
expected result may not be obtained.
Your camera cannot play back images.
• The folder/file name has been changed on your computer (page 164).
• When an image file has been processed by a computer or when the image
file was recorded using a model other than that of your camera, playback on
your camera is not guaranteed.
• Use “PMB” to play images stored on a PC with this camera.
• The camera is in USB mode. Delete the USB connection (page 166).
Viewing images

183
Others
Your camera cannot delete an image.
• Cancel the protection (page 133).
You have deleted an image by mistake.
• Once you have deleted an image, you cannot restore it. We recommend that
you protect images that you do not want to delete (page 133).
You cannot mark a DPOF mark.
• You cannot mark DPOF marks on RAW images.
You do not know if the OS of your computer is compatible with the
camera.
• Check “Using with your computer” (page 158).
Your computer does not recognize your camera.
• Check that the camera is turned on.
• When the battery level is low, install the charged battery pack (page 18), or
use the AC Adaptor (sold separately).
• Use the USB cable (supplied) (page 164).
• Disconnect the USB cable, and connect it again firmly.
• Set [USB Connection] to [Mass Storage] (page 164).
• Disconnect all equipment other than the camera, the keyboard and the
mouse from the USB jacks of your computer.
• Connect the camera directly to your computer without passing through a
USB hub or other device (page 164).
You cannot copy images.
• Make the USB connection by properly connecting the camera with your
computer (page 164).
• Follow the designated copy procedure for your OS (page 164).
• When you shoot images with a memory card formatted by a computer, you
may not be able to copy the images to a computer. Shoot using a memory
card formatted by your camera (page 145).
Deleting/Editing images
Computers

184
The image cannot be played back on a computer.
• If you are using “PMB,” refer to the “PMB Help.”
• Consult the computer or software manufacturer.
After making a USB connection, “PMB” does not start automatically.
• Make the USB connection after the computer is turned on (page 164).
Cannot insert a memory card.
• Insertion direction of the memory card is wrong. Insert it in the correct
direction (page 27).
Cannot record on a memory card.
• The memory card is full. Delete unnecessary images (page 134).
• An unusable memory card is inserted (page 28).
You have formatted a memory card by mistake.
• All the data on the memory card are deleted by formatting. You cannot
restore it.
Cannot print images.
• RAW images cannot be printed. To print RAW images first, convert them
to JPEG images using “Image Data Converter SR” on the supplied CD-
ROM.
The color of the image is strange.
• When you print the images recorded in Adobe RGB mode using sRGB
printers that are not compatible with Adobe RGB (DCF2.0/Exif2.21), the
images are printed at a lower intensity level (page 113).
Images are printed with both edges cut off.
• Depending on your printer, the left, right, top, and bottom edges of the
image may be cut off. Especially when you print an image shot with the
aspect ratio set to [16:9], the lateral end of the image may be cut off.
Memory card
Printing

185
Others
• When printing images using your own printer, cancel the trimming or
borderless settings. Consult the printer manufacturer as to whether the
printer provides these functions or not.
• When having images printed at a digital print shop, ask the shop whether
they can print the images without cutting off both edges.
Cannot print images with the date.
• Using “PMB,” you can print images with date (page 162).
• This camera does not have a feature for superimposing dates on images.
However, because the images shot with the camera include information on
the recording date, you can print images with the date superimposed if the
printer or the software can recognize Exif information. For compatibility
with Exif information, consult the manufacturer of the printer or the
software.
• When you print images at a shop, images can be printed with the date if you
ask them to do so.
The lens gets fogged.
• Moisture condensation has occurred. Turn off the camera and leave it for
about an hour before using it (page 190).
The message “Set Area/Date/Time.” appears when you turn on the
camera.
• The camera has been left unused for sometime with a low battery or no
battery pack. Charge the battery pack and set the date again (pages 31, 190).
If the date setting is lost every time the battery pack is charged, consult your
Sony dealer or local authorized Sony service facility.
The number of recordable images does not decrease or decreases two at
a time.
• This is because the compression rate and the image size after compression
change depending on the image when you shoot a JPEG image (page 142).
The setting is reset without the resetting operation.
• The battery pack was removed when the power switch was set to ON. When
removing the battery pack, make sure the camera is turned off and the
access lamp is not lit (pages 15, 22).
Others

186
The camera does not work properly.
• Turn off the camera. Remove the battery pack and insert it again. If the
camera is hot, remove the battery pack, and allow it to cool down before
trying this corrective procedure.
• If an AC Adaptor (sold separately) is used, disconnect the power plug.
Connect the power plug and turn on the camera again. If the camera does
not work after doing these solutions, consult your Sony dealer or local
authorized Sony service facility.
The five bars of the SteadyShot scale located on the lower-right corner
flashes.
• The SteadyShot function does not work. You can continue to shoot but the
SteadyShot function will not work. Turn the camera off and on. If the
SteadyShot scale continues to flash, consult your Sony dealer or local
authorized Sony service facility.
“--E-” is indicated on the screen.
• Remove the memory card, and insert it again. If this procedure does not turn
off the indication, format the memory card.

187
Others
Warning messages
If the following messages appear,
follow the instructions below.
Incompatible battery. Use correct
model.
• An incompatible battery pack is
being used.
Set Area/Date/Time.
• Set the area and date, time. If
you have not used the camera for
a long time, charge the internal
rechargeable battery (pages 31,
190).
Power insufficient.
• You tried to perform [Cleaning
Mode] when the battery level is
insufficient. Charge the battery
pack or use the AC Adaptor
(sold separately).
Unable to use “Memory Stick.”
Format?
Unable to use SD memory card.
Format?
•
The memory card was formatted
on a computer and the file format
was modified.
Select [Enter], then format the
memory card. You can use the
memory card again, however, all
previous data in the memory card
is erased. It may take a some time
to complete the format.
If the message still appears,
change the memory card.
Memory Card Error
• An incompatible memory card is
inserted or the format has failed.
Unable to read “Memory Stick”
properly. Reinsert “Memory
Stick.”
Unable to read SD memory card
properly. Reinsert SD memory
card.
• The inserted memory card
cannot be used in your camera.
• The memory card is damaged.
• The terminal section of the
memory card is dirty.
“Memory Stick” locked.
SD memory card locked.
• You are using a memory card
with a write-protect switch, and
the switch is set to the LOCK
position. Set the switch to the
recording position.
The “Memory Stick” may not be
capable of recording and playing
normally.
• The inserted memory card
cannot be used with the camera.

188
Processing...
• When Long exposure noise
reduction will be done for the
same amount of time that the
shutter was open. You cannot do
any further shooting during this
reduction.
Unable to display.
• Images recorded with other
cameras or images modified with
a computer may not be able to be
displayed.
Check the lens attachment. If the
lens is not supported, you can
permit use of the lens in the
custom menu.
• The lens is not attached properly,
or the lens is not attached.
• When attaching the camera to an
astronomical telescope or
something similar, set [Release
w/oLens] to [Enable].
Contains no still images.
Contains no movies.
• There is no image in the memory
card.
Image protected.
• You tried to delete protected
images.
Unable to print.
• You tried to mark RAW images
with a DPOF mark.
Camera overheating. Allow it to
cool.
• The camera has become hot
because you have been shooting
continuously.
Turn the power off. Cool the
camera and wait until the camera
is ready to shoot again.
• Because you have been
recording for a long time, the
temperature inside the camera
has increased to an unacceptable
level. Stop recording.
Recording is unavailable in this
movie format.
• Set [Movie: File Format] to
[MP4].
• The number of images exceeds
that for which date management
in a database file by the camera
is possible.
• Unable to register to the database
file. Import all the images to a
computer using “PMB” and
recover the memory card.

189
Others
Camera Error
System Error
• Turn the power off, remove the
battery pack, then re-insert it. If
the message appears frequently,
consult your Sony dealer or local
authorized Sony service facility.
Image Database File error.
Reboot.
• There is something wrong
occurred in the Image Database
File. Execute [Recover Image
DB] (page 146).
Image Database File error.
Recover?
• You cannot record or play back
AVCHD format movies because
the Image Database File is
damaged. Follow the on-screen
instructions to recover data.
Unable to magnify.
Unable to rotate image.
• Images recorded with other cameras
may not be enlarged or rotated.
No images changed
• You attempted to specified
DPOF without specifying
images.
Cannot create more folders.
• The folder with a name beginning
with “999” exists on the memory
card. You cannot create any
folders if this is the case.

190
Precautions
Do not use/store the camera in
the following places
• In an extremely hot, dry or humid
place
In places such as in a car parked in
the sun, the camera body may
become deformed and this may
cause a malfunction.
• Storing under direct sunlight or
near a heater
The camera body may become
discolored or deformed, and this
may cause a malfunction.
• In a location subject to rocking
vibration
• Near strong magnetic place
• In sandy or dusty places
Be careful not to let sand or dust get
into the camera. This may cause the
camera to malfunction, and in some
cases this malfunction cannot be
repaired.
On storing
Be sure to attach the lens cap or
body cap when not using the
camera. When attaching the body
cap, remove all the dust from the
cap before placing it on the camera.
When you purchase the DT 18 – 55
mm F3.5 – 5.6 SAM Lens Kit,
purchase the Rear Lens Cap ALC-
R55 also.
On operating temperatures
Your camera is designed for use
under the temperatures between 0°C
and 40°C (32°F and 104°F). Shooting
in extremely cold or hot places that
exceed this range is not
recommended.
On moisture condensation
If the camera is brought directly from
a cold to a warm location, moisture
may condense inside or outside the
camera. This moisture condensation
may cause a malfunction of the
camera.
How to prevent moisture
condensation
When bringing the camera from a
cold place to a warm place, seal the
camera in a plastic bag and allow it to
adapt to conditions at the new
location over about an hour.
If moisture condensation occurs
Turn off the camera and wait about an
hour for the moisture to evaporate.
Note that if you attempt to shoot with
moisture remaining inside the lens,
you will be unable to record clear
images.
On the internal rechargeable
battery
This camera has an internal
rechargeable battery for maintaining
the date and time and other settings
regardless of whether the power is on
or off, or the battery pack is charged
or discharged.

191
Others
This rechargeable battery is
continually charged as long as you
are using the camera. However, if you
use the camera for only short periods,
it discharges gradually, and if you do
not use the camera at all for about 3
months it becomes completely
discharged. In this case, be sure to
charge this rechargeable battery
before using the camera.
However, even if this rechargeable
battery is not charged, you can still
use the camera as long as you do not
record the date and time. If the
camera resets the settings to the
defaults each time you charge the
battery, the internal rechargeable
battery may be dead. Consult your
Sony dealer or local authorized Sony
service facility.
Charging method of the internal
rechargeable battery
Insert a charged battery pack in the
camera, or connect the camera to a
wall outlet (wall socket) using the AC
Adaptor (sold separately), and leave
the camera for 24 hours or more with
the power off.
On memory cards
Do not attach a label, etc. on a
memory card or a card adaptor. This
may cause a malfunction.
Notes on recording/playback
• When you use a memory card with
this camera for the first time, it is
recommended to format the card
using the camera for stable
performance of the memory card
before shooting. Note that
formatting permanently erases all
data on the memory card, and is
unrecoverable. Save precious data
on a computer, etc.
• If you repeatedly record/delete
images, fragmentation of data may
occur on the memory card. Movies
may not be able to be saved or
recorded. In such a case, save your
images to a computer or other
storage location, then format the
memory card (page 145).
• Before you record one-time events,
make a trial recording to make sure
that the camera is working
correctly.
• This camera is neither dust-proof,
nor splash-proof, nor water-proof.
• Do not look at the sun or a strong
light through a removed lens or the
viewfinder. This may cause
irrecoverable damage to your eyes.
Or it may cause a malfunction of
your camera.
• Do not use the camera near a
location that generates strong radio
waves or emits radiation. The
camera may not be able to record or
play back properly.
• Using the camera in sandy or dusty
locations may cause malfunctions.
• If moisture condensation occurs,
remove it before using the camera
(page 190).
• Do not shake or strike the camera.
In addition to malfunctions and an
inability to record images, this may
render the memory card unusable,
or cause image data breakdown,
damage or loss.

192
• Clean the flash surface before use.
The heat of flash emission may
cause dirt on the flash surface to
become discolored or to stick to the
flash surface, resulting in
insufficient light emission.
• Keep the camera, supplied
accessories, etc., out of the reach of
children. A memory card, etc., may
be swallowed. If such a problem
occurs, consult a doctor
immediately.

193
Others
AVCHD format
The AVCHD format is a high
definition digital video camera format
used to record a high definition (HD)
signal of either the 1080i
specification*
1
or the 720p
specification*
2
using efficient data
compression coding technology. The
MPEG-4 AVC/H.264 format is
adopted to compress video data, and
the Dolby Digital or Linear PCM
system is used to compress audio
data.
The MPEG-4 AVC/H.264 format is
capable of compressing images at
higher efficiency than that of the
conventional image compressing
format. The MPEG-4 AVC/H.264
format enables a high definition video
signal shot on a digital video camera
recorder to be recorded on 8 cm DVD
discs, hard disk drive, flash memory,
memory card, etc.
Recording and playback on
your camera
Based on the AVCHD format, your
camera records with the high
definition image quality (HD)
mentioned below.
Video signal*
3
:
1080 60i-compatible device
MPEG-4 AVC/H.264 1920 ×
1080/60i
1080 50i-compatible device
MPEG-4 AVC/H.264 1920 ×
1080/50i
Audio signal: Dolby Digital 2ch
Recording media: Memory card
*1 1080i specification
A high definition specification which
utilizes 1,080 effective scanning lines
and the interlace system.
*2 720p specification
A high definition specification which
utilizes 720 effective scanning lines
and the progressive system.
*3 Data recorded in AVCHD format
other than the above mentioned
cannot be played on your camera.

194
3D-shootings
Notes on recording
• [3D Panorama] is not suitable when
shooting:
– Subjects are moving.
– Subjects are too close to the
camera.
– Subjects with a repeating pattern
such as tiles, and subjects with
little contrast such as sky, sandy
beach, or lawn.
• [3D Panorama] recording may be
discontinued in the following
situations:
– You pan or tilt the camera too fast
or too slow.
– There is too much camera shake.
• If you cannot pan or tilt the camera
across the entire subject within the
given time, a black area occurs in
the composed image. If this
happens, move the camera fast to
record a full panoramic image.
• Since several images are stitched
together, the stitched part will not
be recorded smoothly.
• Under low light conditions, images
may be blurred.
• Under lights that flicker such as
fluorescent light, images may not
be recorded properly.
• When the whole angle of 3D
panoramic shooting and the angle
in which you fixed the focus and
exposure with AE/AF lock are
extremely different in brightness,
color and focus, the shooting will
not be successful. If this happens,
change the lock angle and shoot
again.
• The available shooting direction is
horizontal only.
• For details on the procedure used
for shooting 3D-images, see page
69.
Note on playback of 3D-
images
When you play back 3D-images on
the LCD monitor of the camera or on
a non-3D-compatible TV, the images
are played back without the 3D
effect.
Notes on 3D-image files
• A JPEG file and an MPO are
combined to create a 3D-image. If
you erase one of these files from the
computer, the 3D-image may not be
played back properly.
• For details on the procedure used
for viewing 3D-images, see pages
128 and 137.

195
Index
Index
Index
Numerics
3D....................................... 69, 194
A
Adobe RGB.............................. 113
AE Lock ................................... 102
AEL button .............................. 149
AF area....................................... 89
AF illuminator.......................... 100
Ambient light ........................... 121
Amount of exposure................... 70
Anti-dust function ...................... 38
Aperture ............................... 70, 72
Aperture priority ........................ 72
Aperture value............................ 72
Area Setting ............................... 32
Aspect ratio .............................. 142
Audio signals ........................... 150
Auto HDR ................................ 110
Auto review.............................. 152
Autoflash.................................... 98
Autofocus................................... 85
Autofocus mode ......................... 88
AVCHD ................................... 193
B
Battery pack ............................... 18
Bracket ..................................... 120
“BRAVIA” Sync...................... 137
BULB shooting .......................... 79
C
Center weighted ....................... 107
Charging battery pack ................ 18
Cleaning mode ........................... 38
Color filter................................ 115
Color Space .............................. 113
Color temperature .................... 115
Compression ratio .................... 142
Continuous AF ........................... 88
Continuous bracket .................. 120
Continuous shooting ................ 118
Contrast .................................... 112
Contrast AF ................................ 91
Control dial ................................ 73
Controller ................................... 49
Creative Style........................... 112
CTRL FOR HDMI ................... 137
Custom white balance .............. 116
D
Date imprint ............................. 172
Date/Time setup ......................... 31
DC IN terminal........................... 17
Delete ....................................... 134
Demo Mode.............................. 151
Depth of field ............................. 70
Digital level gauge ..................... 93
Diopter-adjustment..................... 40
Disc creation ............................ 167
DPOF setup .............................. 171

196
D-Range Optimizer ..................109
Drive mode ...............................118
E
Enlarged image .........................126
EV scale......................78, 103, 121
Exposure .....................................70
Exposure compensation............103
Exposure mode ...........................70
Eye-Fi .......................................146
Eyepiece sensors.........................41
Eye-Start AF ...............................41
F
Face Detection ............................95
File Number..............................144
Fill-flash .....................................98
Flash bracket.............................120
Flash compensation ..................105
Flash control .............................106
Flash mode..................................98
Flash Off ...............................61, 98
Flexible Spot...............................89
Fn button.....................................49
Focal length ..............................176
Focus...........................................85
FOCUS CHECK LV ..................91
Focus indicator ...........................86
Focus Magnifier..........................93
Focus mode.................................88
Focus-lock ..................................87
Folder Name .............................144
Format.......................................145
G
Grid line ................................... 153
H
Hand-held Twilight.................... 63
Help Guide disp. ...................... 150
High ISO NR ........................... 148
High-speed sync......................... 99
Histogram ................................ 104
I
Image Index ............................. 127
Image quality ........................... 142
Image size ................................ 140
ISO sensitivity ......................... 108
J
JPEG ........................................ 142
L
Landscape .................................. 63
Language.................................. 151
LCD brightness ........................ 152
LCD monitor...................... 42, 129
Lens............................................ 25
Live View .................................... 7
Long exp.NR............................ 148
M
Macro......................................... 63
Manual exposure........................ 77
Manual focus ............................. 90
Manual shift ............................... 78

197
Index
Memory card.............................. 27
“Memory Stick PRO Duo” ........ 27
Menu .......................................... 52
Metering mode ......................... 107
Moisture condensation ............. 190
Movie Audio Rec....................... 83
Movie File Format ..................... 82
Multi Frame Noise Reduct....... 108
Multi segment .......................... 107
N
New Folder .............................. 145
Night Portrait ............................. 63
Night View................................. 63
Noise reduction ........................ 148
Number of recordable images
......................................... 35, 36
P
Phase-detect AF ......................... 91
PlaybackDisplay ...................... 123
PMB ......................................... 162
PMB Launcher ......................... 161
Portrait ....................................... 63
Power Save .............................. 150
Preset white balance................. 114
Pressing halfway down .............. 62
Preview ...................................... 74
Print.......................................... 171
Program auto.............................. 71
Protect ...................................... 133
Q
Quality...................................... 142
R
RAW ........................................ 142
Rear sync.................................... 98
Recording movies ...................... 81
Recover Image DB................... 146
Red eye reduc........................... 100
Reducing camera shake.............. 58
Remote Commander .......... 17, 122
Reset......................................... 155
Rotate ....................................... 125
S
Saturation ................................. 112
Scene Selection .......................... 63
Select Folder ............................ 123
Select REC Folder.................... 145
Self-timer ................................. 119
Set the clock ............................... 31
Sharpness ................................. 112
Shooting ..................................... 61
Shoulder strap ............................ 33
Shutter speed ........................ 70, 75
Shutter speed priority ................. 75
Single-shot AF ........................... 88
Slide show ................................ 127
Slow sync. .................................. 98
Smile Shutter.............................. 96
Specifications ........................... 173
Sports Action.............................. 63

198
Spot...........................................107
SteadyShot function....................59
Sunset .........................................63
Sweep Panorama ................66, 141
Sweep Shooting ..........................66
U
USB connection........................164
V
Version .....................................154
Viewing image..........................123
Viewing images on a TV screen
..............................................136
W
White balance ...........................114
White balance bracket ..............122
Wireless flash ...........................101
Wireless Remote Commander
..............................................122

199
Notes on the License
“C Library”, “Expat”, “zlib”, “dtoa”,
“pcre”, and “libjpeg” software are
provided in the camera. We provide
this software based on license
agreements with their owners of
copyright. Based on requests by the
owners of copyright of these software
applications, we have an obligation to
inform you of the following. Please
read the following sections.
Read “license1.pdf” in the “License”
folder on the CD-ROM. You will find
licenses (in English) of “C Library”,
“Expat”, “zlib”, “dtoa”, “pcre” and
“libjpeg” software.
THIS PRODUCT IS LICENSED
UNDER THE AVC PATENT
PORTFOLIO LICENSE FOR THE
PERSONAL AND NON-
COMMERCIAL USE OF A
CONSUMER TO
(i) ENCODE VIDEO IN
COMPLIANCE WITH THE AVC
STANDARD (“AVC VIDEO”)
AND/OR
(ii) DECODE AVC VIDEO THAT
WAS ENCODED BY A
CONSUMER ENGAGED IN A
PERSONAL AND NON-
COMMERCIAL ACTIVITY AND/
OR WAS OBTAINED FROM A
VIDEO PROVIDER LICENSED TO
PROVIDE AVC VIDEO.
NO LICENSE IS GRANTED OR
SHALL BE IMPLIED FOR ANY
OTHER USE.
ADDITIONAL INFORMATION
MAY BE OBTAINED FROM
MPEG LA, L.L.C.
SEE
HTTP://WWW.MPEGLA.COM
On GNU GPL/LGPL applied
software
The software that is eligible for the
following GNU General Public
License (hereinafter referred to as
“GPL”) or GNU Lesser General
Public License (hereinafter referred
to as “LGPL”) are included in the
camera.
This informs you that you have a
right to have access to, modify, and
redistribute source code for these
software programs under the
conditions of the supplied GPL/
LGPL.
Source code is provided on the web.
Use the following URL to download
it.
http://www.sony.net/Products/Linux/
We would prefer you do not contact
us about the contents of source code.
Read “license2.pdf” in the “License”
folder on the CD-ROM. You will find
licenses (in English) of “GPL”, and
“LGPL” software.
To view the PDF, Adobe Reader is
needed. If it is not installed on your
computer, you can download it from
the Adobe Systems web page:
http://www.adobe.com/