
E savingtips p 4
use and care
Surface cooking p 5-8
d
Oven cooking p 10-14
Care of the
ContinuousCleaning Oven p fi7
SaveTime and Money.
Beforeyoucall for service,
usethe Problem Solver p fl$l
Head misEfoclk ?c;awhi!y
it is designed to help you operate and maintain
your new f+angeproperly.
Keepit handy for answers to your questions.
H you don’t understand something or need more
help. .
call, toll free:
The GEAnswer Center’”
800.626.2000
consumer information service
or Write: (include your phone number);
Consumor Affairs
Hotpoint
Appliance Park
Louisville, KY 40225
!Jjllqt@ Down the L.mk?l
and serial
You’ll find them on a label at the top of the oven
opening behind the door.
These numbers are also on the Consumer Product
Ownership Registration (lard that came with your
Range, Before sending in this card, please write
these numbers here:
Model No. —----------- -——————
Serial No. ._–.—.—
Use these numbers in any correspondence or ser-
vice calls concerning your Range.
!f You a Rangy?
Immediately contact the dealer (or builder) that
sold you the Range.
saveTime and . .
Before You Cal!
for$Mwic)e
Check the Problem Solver (page 19). It lists minor
causes of operating problems that you can correct
yourself.
It could save you an unnecessary service call.
Have it installed and properly grounded by a qualified installer.
Have the installer show you the location of the range circuit breaker or fuse,
and mark it for easy reference.
Don’t assume that you know how to operate all parts of the range. Some features
may work differently from those on your previous range.
Do take the time to read our suggestions for best use.
‘your e e e
.>
DO NOT TOUCH HEATING ELEMENTS OR INTERIOR SURFACE OF
OVEN. DO NOT TOUCH SURFACE UNITS OR AREAS NEAR UNITS OF
COOKTOP. Surface units and oven heating elements–also areas nearby–
may be hot enough to burn even though they are dark in color.
During ancl after use, do not touch, or let clothing or other flammable materials
contact surface units, areas nearby surface units or any interior area of oven
until all of these areas have had sufficient time to cool. Potentially hot sur-
faces included are:
Don”tallow anyone to dhmb, stand or hang on the door, drawer or top surface
of the range. They COUICIdamage the range ancl even tip it over.
~AUTIOI’i: i)() NOT STORE ITEMS OF IN’I’EREST TO CHILDREN IN CABINETS
ABOVE A RANGE OR ON BACKSPLASH OF A RANGE–CHILDREN CLIMBING
ON THE RANGE TO REACH ITEMS COULD BE SERIOUSLY IN,JURED.
h~evel- ~se
YOLN appliance for warming or heating the room.
Be sure reflector pans and vent ducts are unobstructed and in place. ‘13wir
absence during cooking. could damage components and wiring.
+!lseproperpan size—this appliance is equipped with one or more surface units
of different size. Select utensils having flat bottoms large enough to cover the
surface unit heating element. Use of undersized utensils will expose a portion
of the heating element to direct contact and may result in ignition of clothing+
Proper relationship of utensil to surface unit will also improve efficiency
~~al.ProPel. aPPareZ—loose fitting or hanging
garmentsShouldZ_EVer be WOrn
~~~hileusing the
appliance.
Never leave surface units unattended at high heat settings. 130ilover causes
smoking and greasy spi~lovers that may ignite.
onl’y dry potholders-moist or damp potholders on hot surfaces may
i
result in burns from steam. Do not let potholders touch hot heating elements.
Do not use a towel or other bulky cloth in place of potholder.
Glazed coohing zzitensik—only certain types of glass, glass/ceramic, ceramic,
earthenware, or other glazed utensils are suitable for range-top service without
breaking due to the sudden change in temperature.
Utensil hanclles shozzhi be turned inward and not extend over adjacent surface
units. TO minimize burns, ignition of flammable materials, and spillage due
to unintentional contact with the utensil, the handle of a utensil should be
positioned so that it is turned inward and does not extend over adjacent
surface units.
Turn of” ventilating hood and remove pan from range while “f[aming” liquors
or spirits on surface cooked foods.
The hood, if operating, could spread the
flames.
!Stand away from range when opening oven door to let hot air or steam escape
~)efol.e~.elnoV.ing or placing food inside”
P[ace oven rochs in desireclposition while oven is coo!. If racks must be handled
xhen hot, do not let potholder contact hot heating element in oven.
~~~[~ij~g~Z~t
,~j~~~f~[~~?~eway 60t!zeshe[f stop is a convenience in lifting heavy
fbocis. It is also a precaution against burns from touching hot surfaces of the
door or oven walls.
(
1
1
Don’t use idur-ninum foil z%line refkctorpans or fnzywhere in the own except
as clescribeiil in this booklet. Improper installation could result in a shock, fire
hazard, or damage to the range.
Keep hsod and grease fiiters chmm according to instructions to maintain good
venting and to avoid grease fires.
Don’t immerse or soak removable surface units. Don’t put them in a dish-
washer.
Do not store flammable materials in an oven or near the cooktop.
DO NOT USE WATER ON GREASE FIRES. NEVER PICK UP A FLAM-
ING PAN. Smother flaming pan on surface unit by covering pan completely
~Tithwell-fitting 1id, cookie sheet or flat tray.
Flaming grease
outside pan can be extinguished by baking soda or, if avail-
able, a multi-purpose dry chemical or foam type extinguisher.
When cooking in the oven, flame can be smothered by completely closing door
and turning OVEN SET to OFI?.
Also see frying tips, surface unit pages.
When cooking pork either conventionally or in the microwave oven, follow ou
directions exactly and always cook the meat to at least 170°. This assures that, in
the remote possibility that trichina may be present in the meat, it will be killed an
meat will be safe to eat.
..
.-
‘ Read “The Problem Solver” on page 19.
JDon’t attempt to repair or replace any part of your range unless it is specifically
recommended in this book. All other servicing should be referred to a qualified
-.
technician.
>Disconnect range at range circuit breaker or main fuse before performing any
service.
.—.”..u..-......-.aA—.-r%--
-,-,.., .,.-..,,,,,—..,..-..-k-..—,,..,=.,.=~s.,,..,”.,.....,,..-,q.m.mr--.=.r-.--.s..-.=,----.m--(.~b-,,----------
-—-=—-rm--. t.. .-.. -! —.. ”.=a>,
‘ Your range, like many other household items, is heavy and can settle into soft floor coverings i
J
such
as cushioned vinyl or carpeting. When moving the range on this type of flooring, use care, !
and it is recommended that these simple and inexpensive instructions be
.followed.
!,
i
The range should be installed on a sheet of plywood (or similar material) as follows: When the \
floorcovering exfencfsunder the range, a %“ thick piece of plywood should be installed under the j
range. When the floor covering is terminated at the
~ron~of ~~erange, the area that the range will ;
rest on should be built up with plywood to the same level or higher than the floor covering. This
will then allow the range to be moved for
cleaning or servicing.
:
.. -. ,. . .-.-——-,- -.,----.-
A.... .,----—.-..—=.--=-”—.-........... .......,,..!..,..=.-,-....w...-—-.-...-J&—.-LJ- -, .1. ., ....
CoIItrols,CookingHeats,Utensils. . ...........5,6
CookingChartandInformation.. . . . . . . .......6, ?
HomeCanningTips. . . . . . . . . . . . . . . . . . . . . . . . .f3
SafetyChecklistWhileFrying. . . . . . . . . . ........8
Baking,Chart. . .. . . . . . . . . . . . ~U•. . . . . . . . . . ..1 I
Broiling,Chart. . . . . . . . . . . . . . . . . . . . . . . .Is, 14
OtherRangeFeatures–MinuteTimer,Clock,
AutomaticOvenTimer. . . . . . . . . . . .......9, 10
Roasting,Chart. . . . . . . . . . . . . . . . . . . . . . . . . .~2
UsingYourOven... . . . . . . . . . . . . . . . . . . . . .. .10
CareofYourRange.. . . . . . . . . . 15, . . . . . . ... 16
CleaningCharts,Parts,All Finishes. . . . . . .......18
CleaningUndertheRange.. . . . . . . . . . . .......16
Lamp,Howto Replace.. . . . . . . . . . . . . . . .. ....16
LevelingtheRange. . . . . . . . . . . . . . . . . . . . ~‡•àQ. .” ~~
OvenCare. . . . . . . . . . . . . . . . . . . . . . . ... , .. .17
OvenThermostat,Adjusting. . . . . . . . . . . .......15
OvenVentDuct..... . . . . . . . . . . . . . . .......15
PorcelainEnamel. . . . . . . . . . . . . . . . . . .......15
SurfaceLfnitsjStand-lfPFe~ur?Removable
ReflectorPans/Rings,Stand-LJPFeature,
TrimRings. . . . . . . . . . . . . . . . . . . . . .......15
The problem Shiver . . . . . . . . . . .. ... ... .....~~
Energy-ConservdiOnT ips .. .. .. ... ... ......4
MACAPlnforma~on
,...,. . . . . . . . . . . . . . . . . .
21
.-
Safety Tips .. .. .. .. .. .. .. .. ... ...0000”oo 1-~
Use of AluminutTr FOfl .. .3, 12, 13,14, 15,16if9
~YouNeedService .. .. .. .. .. .. ... ... .....21
Warrant. . . .
Back Cover
. . . . . . . . . . . . . . . . . . .
7. Whenboilingwaterfortea or coffee, heaton~y
theamountneeded.~tisnot econmnicaltoboil
a containerfull of waterfor only one or two
cups.
Ei. OMEN!
l. Preheatthe oven only when necessary.Most
foods willcook satisfactorfiywithoutpreheat-
ing.If you find preheatingis necessary,keep
aneye on theindicatorlight,and put food in
theoven promptlyafterthe lightgoes out.
2. Alwaysturnoven OFFbefore removingfood.
3. Duringbaking,avoidfrequentdoor openings.
Keep door open as short a time as possible
whenit is opened.
4. Cook complete oven mealsinsteadof justone
fooditem.potatoes,othervegetabies, andsome
dessertswill cook together with a main-dish
casserole,
meat loaft Chickenor roast” ~~OOSe
foods thatcookatthe sametemperatureinap-
proximatelythesametime.
5. IJseresidualheatinoven wheneverpossibleto
iinishcookingcassero~es,ovenmeais,etc.Also,
addrollsor precooked dessertsto warmoven,
using residualheatto warm them.
4
00
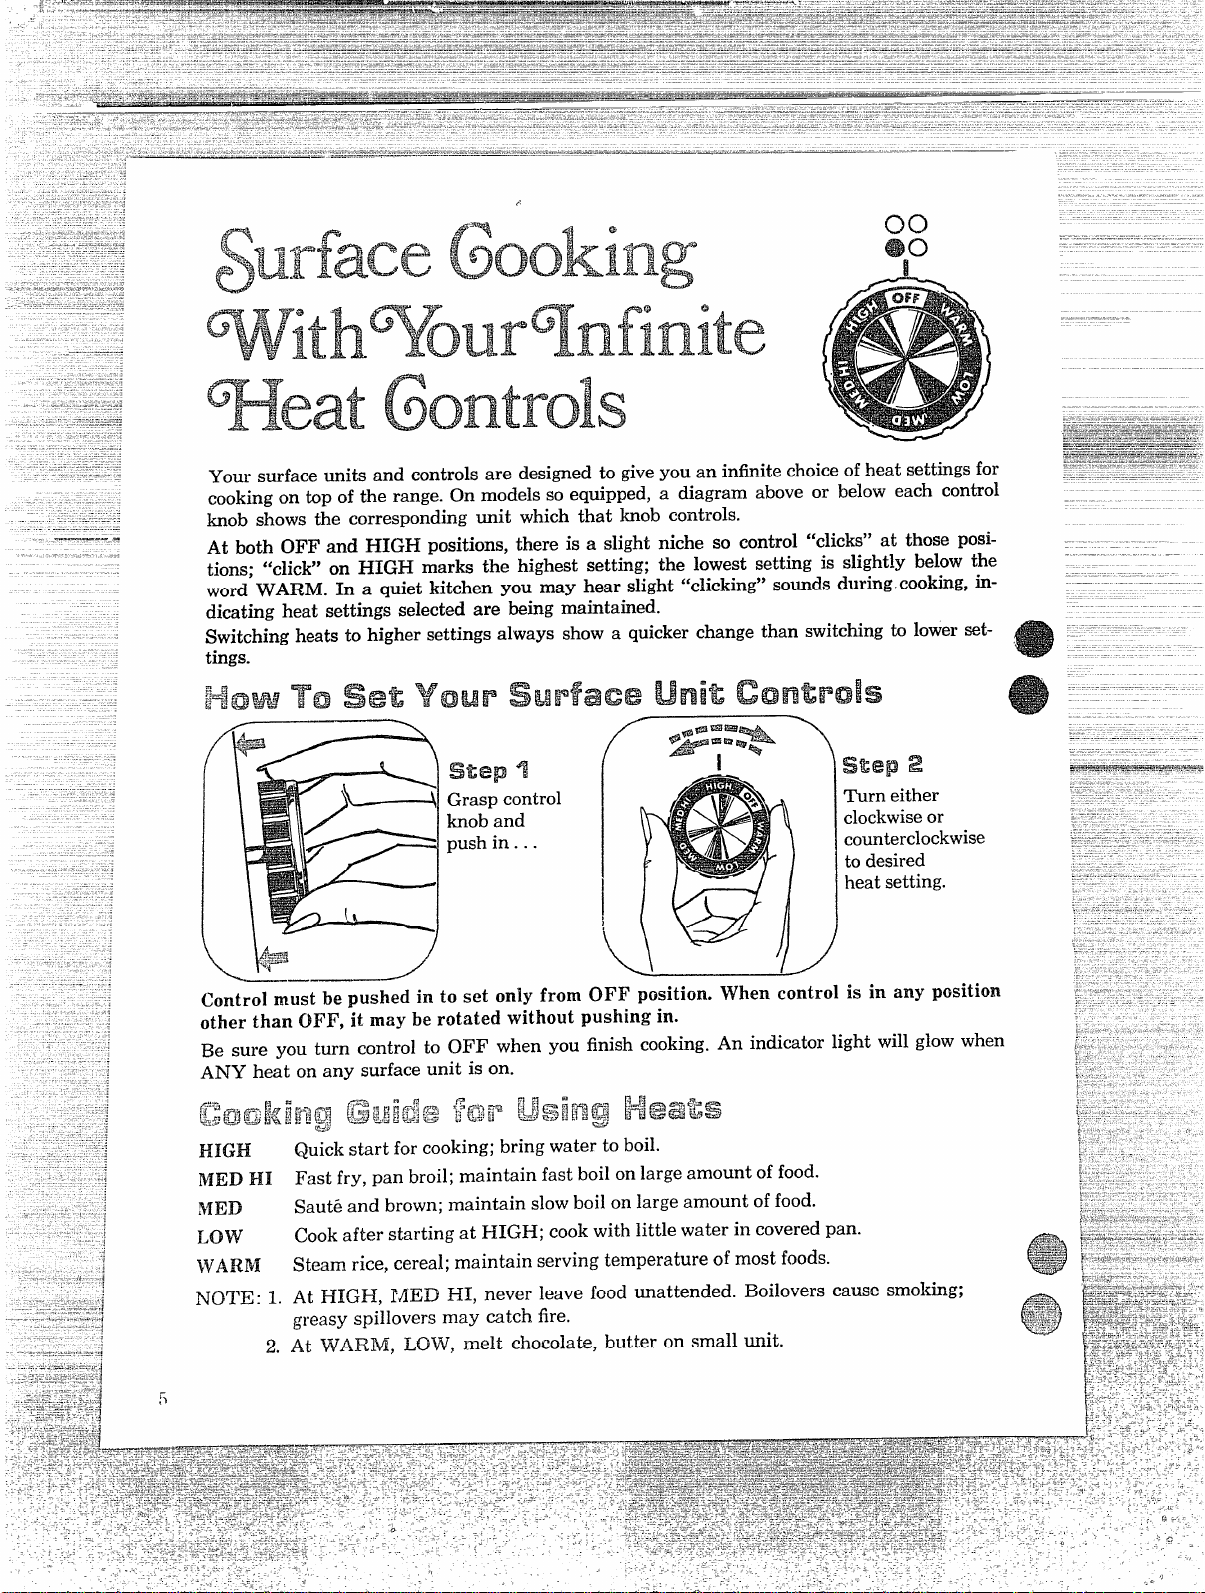
690
Your surfaceunitsandcontrolsaredesignedto giveyouaninfinitechoiceof heatsettingsfor
cookingon tip of
the range.Onmodelsso equipped,a diagramaboveor below each control
knob showsthe correspondingunit whichthatknob controls.
At both OFF and 131GJ3positions,thereis a slightniche so control “clicks” at those POSi-
tions;
“click” on 131GHmarksthe highestsetting;the lowestsettingis slightlybelowthe
wordWARM. In a quiet
kitchen YOU rnw hear slight “c~ickid’ so~ds duriwcookin% in-
dicating heatsettingsselectedare beingmaintained.
Switchingheatsto highersettingsalwaysshowa quickerchangethanswitchingto lowerset-
tings.
S$sfap9
Grasp control
knob and
push in. . .
step2
Turn either
clockwise or
counterclockwise
to desired
heat
setting.
Control must be pushed in to set only from OFF pmition. When control is in any position
HIGH
Mm m
Mm)
Low
WARM
NOTE: 1.
2.
Quickstartforcooking;bringwatertoboil.
Fastfry,panbroil;maintainfastboil onlargeamountof food.
Saut6andbrown;maintainslowboilon largeamountof food.
Cookafterstartingat131GH;cookwithlittlewaterincoveredpan.
Steamrice,cereal;maintainservingtemperatureof mostfoods.
At l-llGIZ,lti1313131,neverleavefood unattended.Boiloverscausesmoking;
greasyspilloversmay catchfire.
At WA13M, LOW,
melt chocolate, butteron smallunit.
1
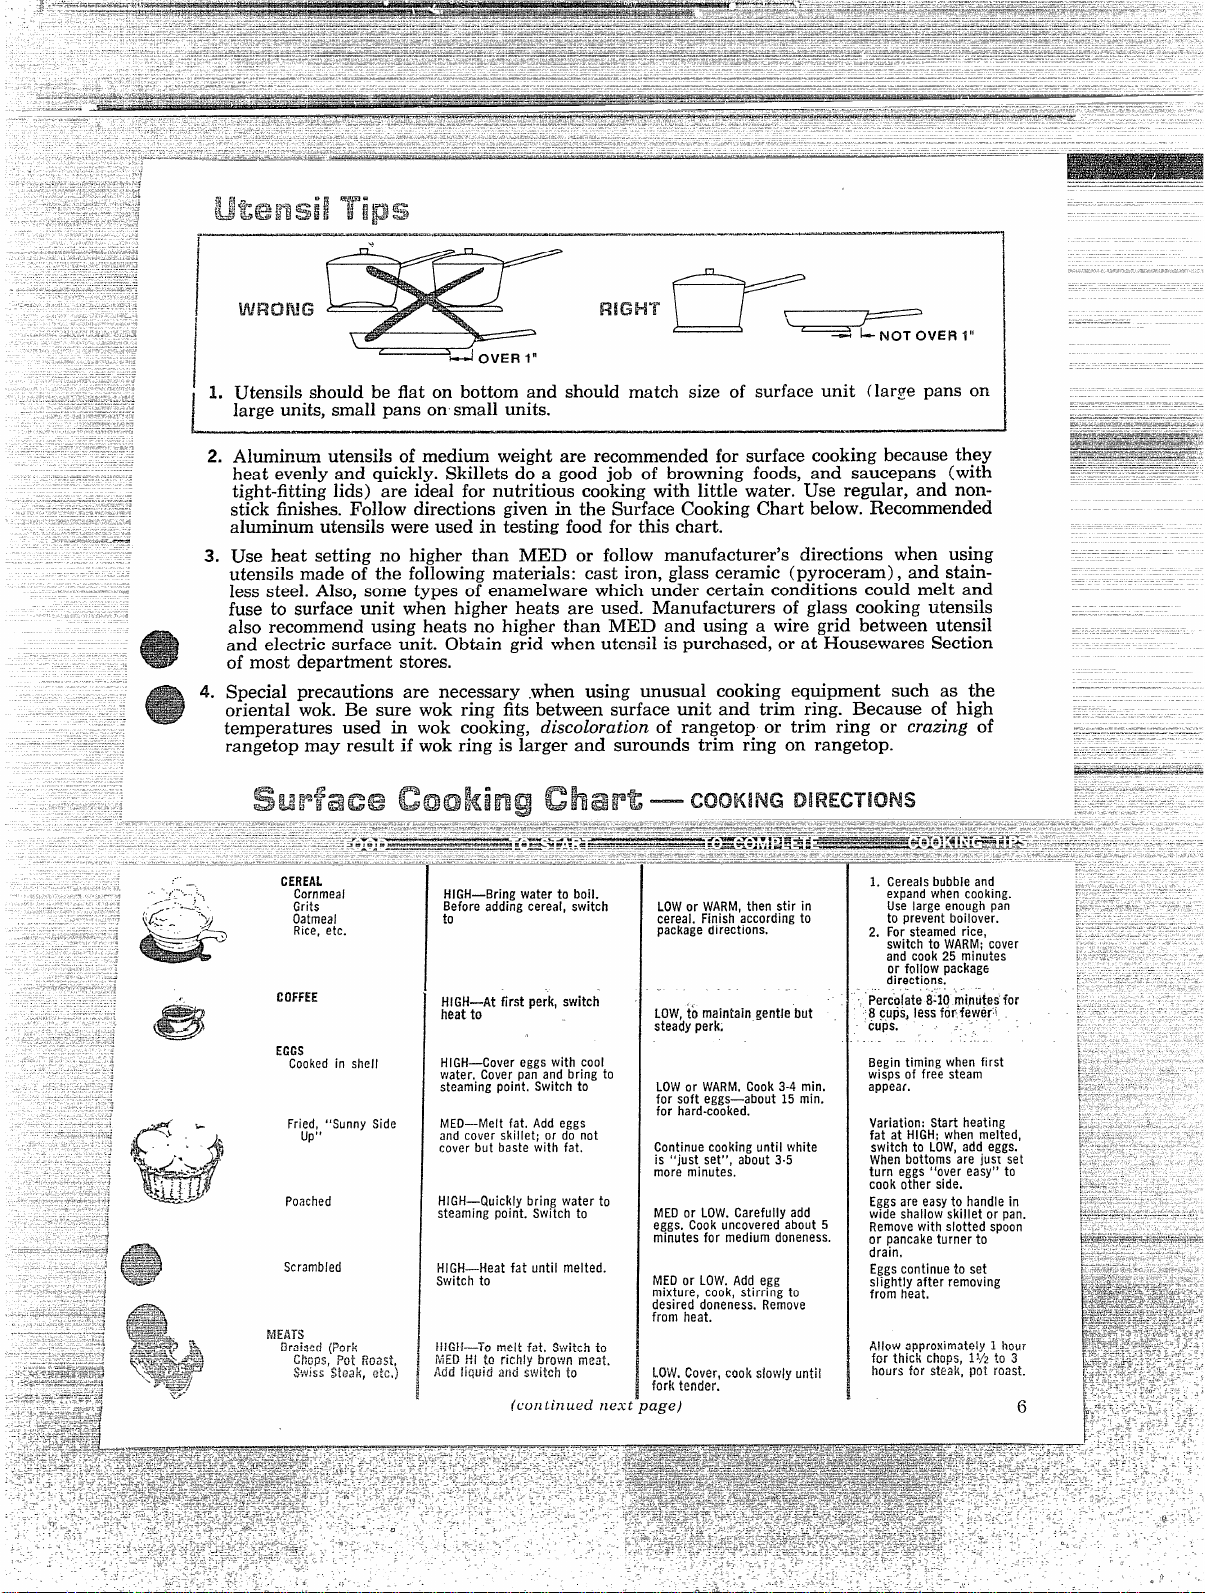
1. Utensilsshould be flat on bottom and should match size of surface unit (large pans on
!
11
arge units,small pans on small units.
I
1
I
2. Aluminum utensils of medium weight are recommended for surface cooking because they
heatevenlyandquickly.Skilletsd: a good job of browningfoods, and saficepans(with
tight-fittinglids) areidealfor nutritiouscookingwithlittlewater.Use regular,andnon-
stickfinishes.Followdirectionsgivenin theSurfaceCookingChartbelow.Recommended
aluminumutensilswereusedin testingfood forthischart.
Use heatsettingno higherthan ME13or follow manufacturer’sdirectionswhen using
utensilsmadeof thefollowingmaterials:castiron,glassceramic(pyroceram), andstain-
lesssteel.Also, sometypesof enamelwarewhichundercertainconditionscould meltand
fuseto surfaceunit whenhigherheatsareused.Manufacturersof glasscookingutensils
alsorecommendusingheatsno higherthanME13and usinga wire grid betweenutensil
andelectricsurfaceunit.Obtaingridwhenutensilispurchased,orat FlousewaresSection
of mostdepartmentstores.
3.
Special precautions are necessary when using unusual cooking equipment such as the
oriental
wok.Be surewok ring fitsbetweensurfaceunitand trim ring. Becauseof high
temperaturesused in wok cooking, disccdomtiorzof rangetopor trim ring or
crazing of
rangetopmayresultif wokringis largerand suroundstrim ring on rangetop.
CEREAL
Cornmeal
Grits
Oatmeal
Rice, etc.
HIGH—Bring water to boil.
Before adding cereal, switch
to
LOWor WARM, then stir in
cereal. Finish according to
package directions.
HiGH—At first perk, switch
hsat to
COFFEE
LOW,to maintain gentie but
steady perk.
Begin timing when first
wisos of free steam
EGGS
Cooked in shell
HIGH—Cover eggs with cool
water. Cover pan and bring to
steaming point. Switch to
LOWor WARM, Cook 3-4 min.
for soft eggs—about 15 min.
for hard-cooked.
app”ear.
Variation: Start heating
fat at HIGH; when melted,
switch to LOW, add eggs.
When bottoms are just set
turn eggs “over easy” to
cook other side.
Eggsare easy to handle in
wide shallow skillet or pan.
Remove with slotted spoon
or pancake turner to
drain,
Frif;,, “Sunny Side
MED—Melt fat, Add eggs
and cover skillet; or do not
cover but baste with fat.
Continue cooking until white
is ‘(just set”, about 3.5
more minutes.
Poached
HIGH—Quickly bring water to
steaming point. Switch to
MED or LOW. Carefully add
eggs. Cook uncovered about 5
minutes for medium doneness.
Scrambled
HIGH—14eat fat until melted.
Switch to
Eggs continue to set
slightly after removing
MED or LOW. Add egg
mixture, cook, stirring to
desired doneness. Remove
from heat.
LOW.
COVW,COO!(s!m’dyun~il
fork tender.
t
(continuednext
,,
..
.-.
MEATS~sont.)
pan fried (Larnb’-
Chof?s,TfiifiSteakS
(1+ to
3A,inch],
k?muw‘m-l%,
lhnbvrgers,
Sausage:Frank$,~tc
..
. Pan f3roiled?ac~n
, ..-
<\
Water Cooked
(Chicken, M?Ied
Beef, Smoked
Pork Shoulder,
- Tongue, etc.)
MELTING
Chocolate Squares,
Chocolate,
Butterscotch Bits,
Butter etc.
.—..
PA&Kxm
PASTA
Macaroni
Noodles
Spaghetti, etc.
SAUTE’
Breaded Meat
or Fish,
Sliced Onions,
Green PePPer,
Mushrooms, etC.
‘km”ifi~!vlel~and‘ieat/at. .”
Brown prepared ch~ci{?n
pieces. Thfm da~er sk\f!etJ and
switch to
.-
“HIGH—Pu!-sliCeSin
singie
layer h-iqlrl skiilet.-Wtren - “’:
just sizzfw, switch to ‘.
-i-HGH-GovW meat with
water;. cover kettie. When .
steammg frf-?eiy~switch to
,.
; . .—
. .
.. , -
WARM—Put in small saucePan
on smalj surface unit. Cover
for semi-sweet. chocolate or
butterscotch pieces.
..
. -.
MED—Heat skillet 8-10
minutes. Grease lightly.
HIGH—To bring salted water
to boil in covered utensil.
Add pasta slowly so boll!ng
doesn’t stop. Switch to
HIGH—To bring to pressure.
When first “jiggle” is heard,
switch to
HIGH—To melt fat. Switch to
itiGH-k@sLIre “with your
q%” about
1/2-% irrch water
into pan, then add sait and
prepared vegetable. Cow?r
van, bring to boil, switch to
.
—.-.,.——--—-.- ~,——--——.-,----.—
Low;COQkUI@ jUS~ten~e~. ~,, ’
Uncoverskillet-last, few
minutes to crisp chicken,
-.
MED. ~ook~tu~nir?g-oCCaSi~ri-
aliy to deswed donen!ss. :.
,.,
,,
“,.
,, ,
,.
‘1
LOWor MED, “sowater boils
SiOWIY.cook until fork
terrd.e%.
.
...
. . .. ... “
AIIOWabout 10-15 min. to
melt. Stir to blend.
. -—--
Cook pancakes 2-3 min.
each side. (Ailow.slightlY
ionget for thick ba~er.)
HIGH or MED Hi—Cook
uncovered untii tender.
,. ---
rfED iii Or MED. Begin
~lrning
food as soon as
“jiggies” begin reguiariy
again.
MED, add food. Cook to
desired doneness.
ME13Or ~~w tO cook 10-30
minutes, until just tender.
Time carefully to avoid
overcooking.
NOTE: some pressure
cooker manu.~acturers
recommehd ]iggiing of
control at rate of 2-3 per
min...
2-3 Jiggles is an approxi-
mate number; you may find
a few more or less
satisfactory.
Turnmeat or stir
vegetables occa.SiOnal!Y
to cook and brown evenly,
1) Covered pan is best for
cooking. In uncovered pan,
use more water and cook
longer.
2) vegetables cooi(edjust
tO ‘tcrlsp ~e,nder”are
most nutritious.
*.
f;$::.=l
Thick compact blocks &.,&&J
\/egetables may need
breaking up and/or
stirring once durilE ::;‘;%
ing for evc~ don:nec.- ‘j~i
-....7.
1
I
\
:.
,,
.
0
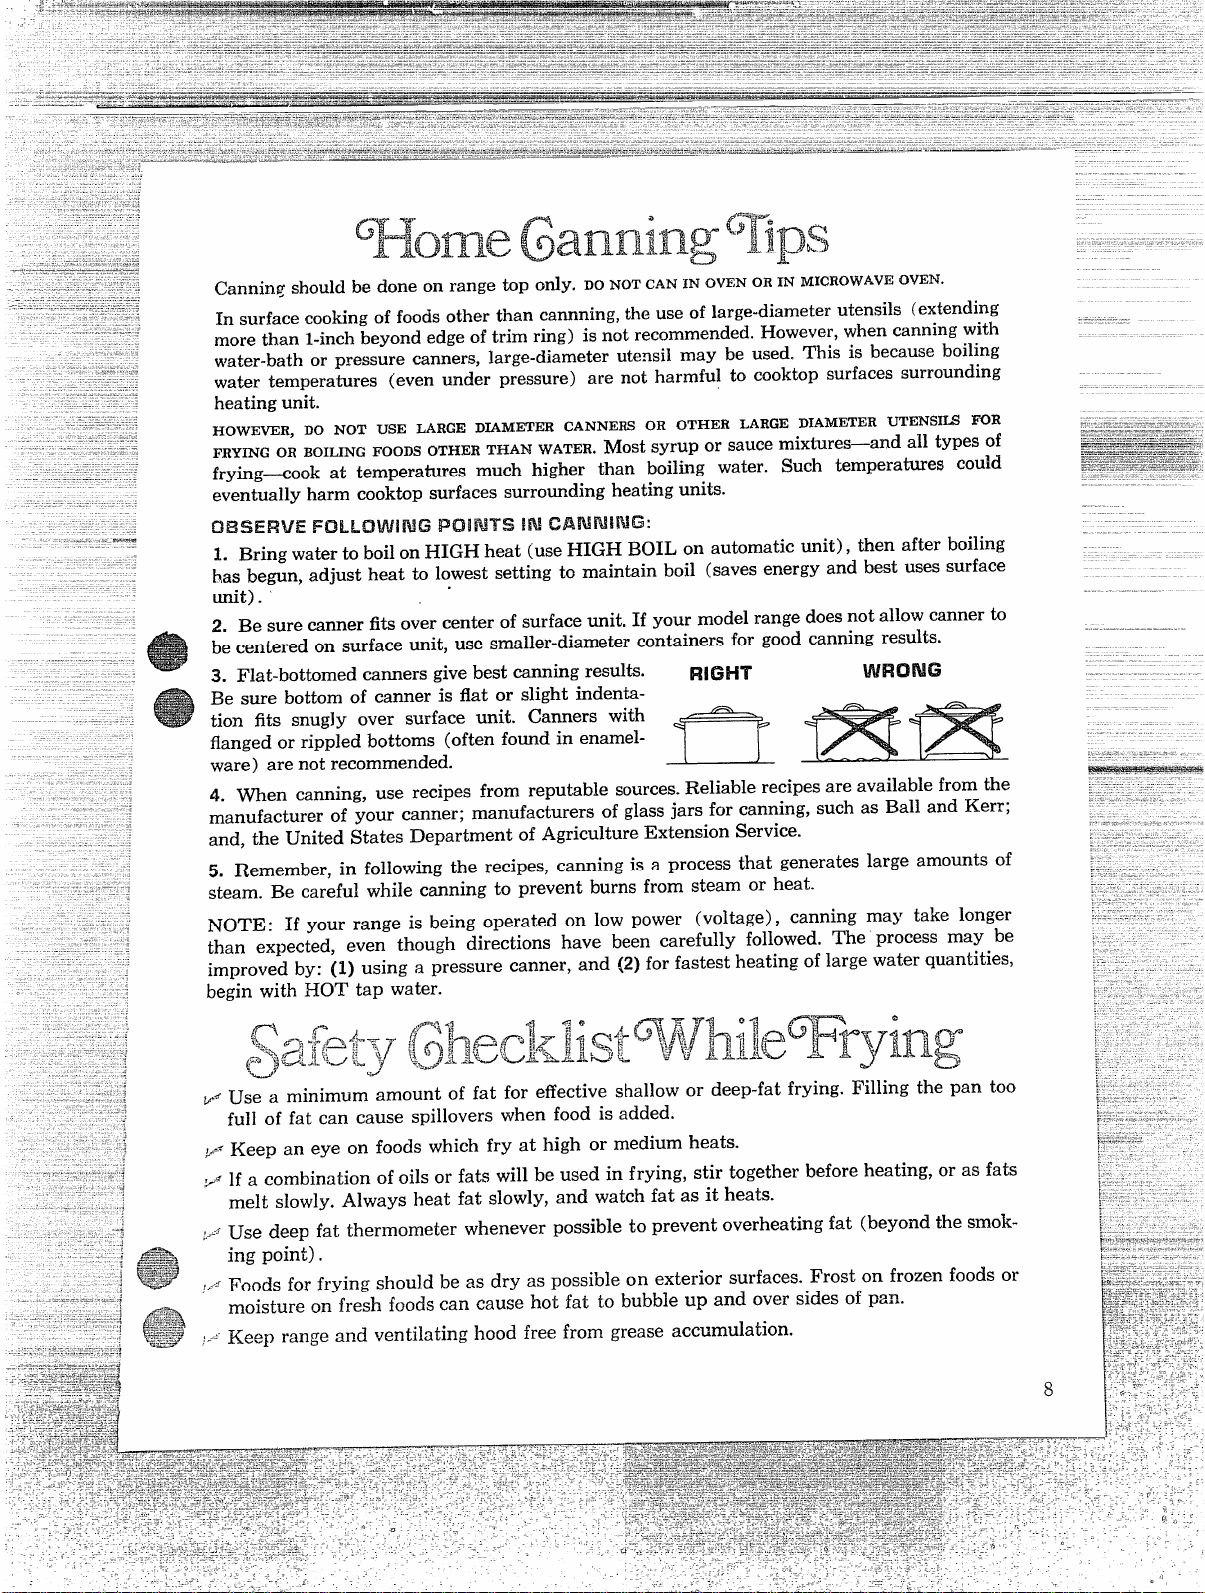
Canning should be done on range top ordy. DONOTCANIN OVENORIN IvHCROWAVEOVEN.
Insurface cooking of foods other than cannning,theuse of large-diameterutensils (extending
more than l-inch beyond edge of trim ring) is not recommended. However, when canning with
~,ater-ba~hor p~essurt?canners,
large-diameter utensil may be used. This is because boiling
water temperatures (even under pressure) are not harmful to cooktop surfaces surrounding
heatingunit.
HOWEVER, DO NOT USE LARGE DIAMETER CANNERS OR OTHER LARGEDIA~ETE~ tJTENs~~ I@R
FRYINGORBOILINGFOODSOTHERTHAN WATER.Most
syrupor saucemixt~res—~dalltYPes of
frying<ook at
temperaturesmuch higher than boiling water. Such tempera~es could
eventuallyharmcooktopsurfacessurroundingheatingunits.
OBSERVE !!$!
I. BringwatertoboilonFIIGHheat(use131GHBOIL on automaticunit), thenafterboiling
hasbegun,adjustheatto lowestsettingto maintainboil (savesenergyandbestusessurface
.
unit).
2. Be surecannerfitsovercenterof surfaceunit,If yourmodelrangedoesnotallowcannerto
becenteredon surfaceunit,usesmaller-diametercontainersfor goodcanningresults.
3. Flat-bottomedcannersgivebestcanningresults.
RIGHT
Be surebottomof canneris flat or slightindenta-
tion fits snugly over surfaceunit. Cannerswith
flangedorrippledbottoms (oftenfoundin enamel-
ware) arenotrecommended.
m
4. When canning,use recipesfrom reputablesources.Reliablerecipesareavailablefromthe
manufacturerof your canner;manufacturersof glassjarsfor canning,suchas BallandKerr;
and,theUnitedStatesDepartmentof AgricultureExtensionService.
5. Remember,in followingthe recipes,canningis a processthat generateslargeamountsof
steam.Be carefulwhilecanningto preventburnsfrom steamor heat.
NOTE: If your rangeis beingoperatedon low power
(voltage), canningmay take longer
than expected, even though directionshave been carefully followed”The process may be
improvedby: (1) usinga pressurecanner,
and (2)forfastestheatingof largewaterquantities,
begin with HOT’ tap water.
f--l
~
rjing
...
fl>f+f”yr fF:”~&-@?q--%~j7~~ ~F:‘ff
<~Gi”A”d“J
‘<;%*.>$:l-Uw’+d-ich.f-. ‘-J L.
‘&G
C&
~.:Use a minimumamountof fat for effectiveshallowor deep-fatfrying.Filling the pan too
full of fat can cause spilloverswhenfood is added.
.&=~
Keep an eye on foods whichfry at high or mediumheats.
;.*lf a combinationof oils or fatswillbe usedin frying, stirtogetherbeforeheating,orasfats
melt slowly.Mways heat fat slowly,and watchfatas it heats.
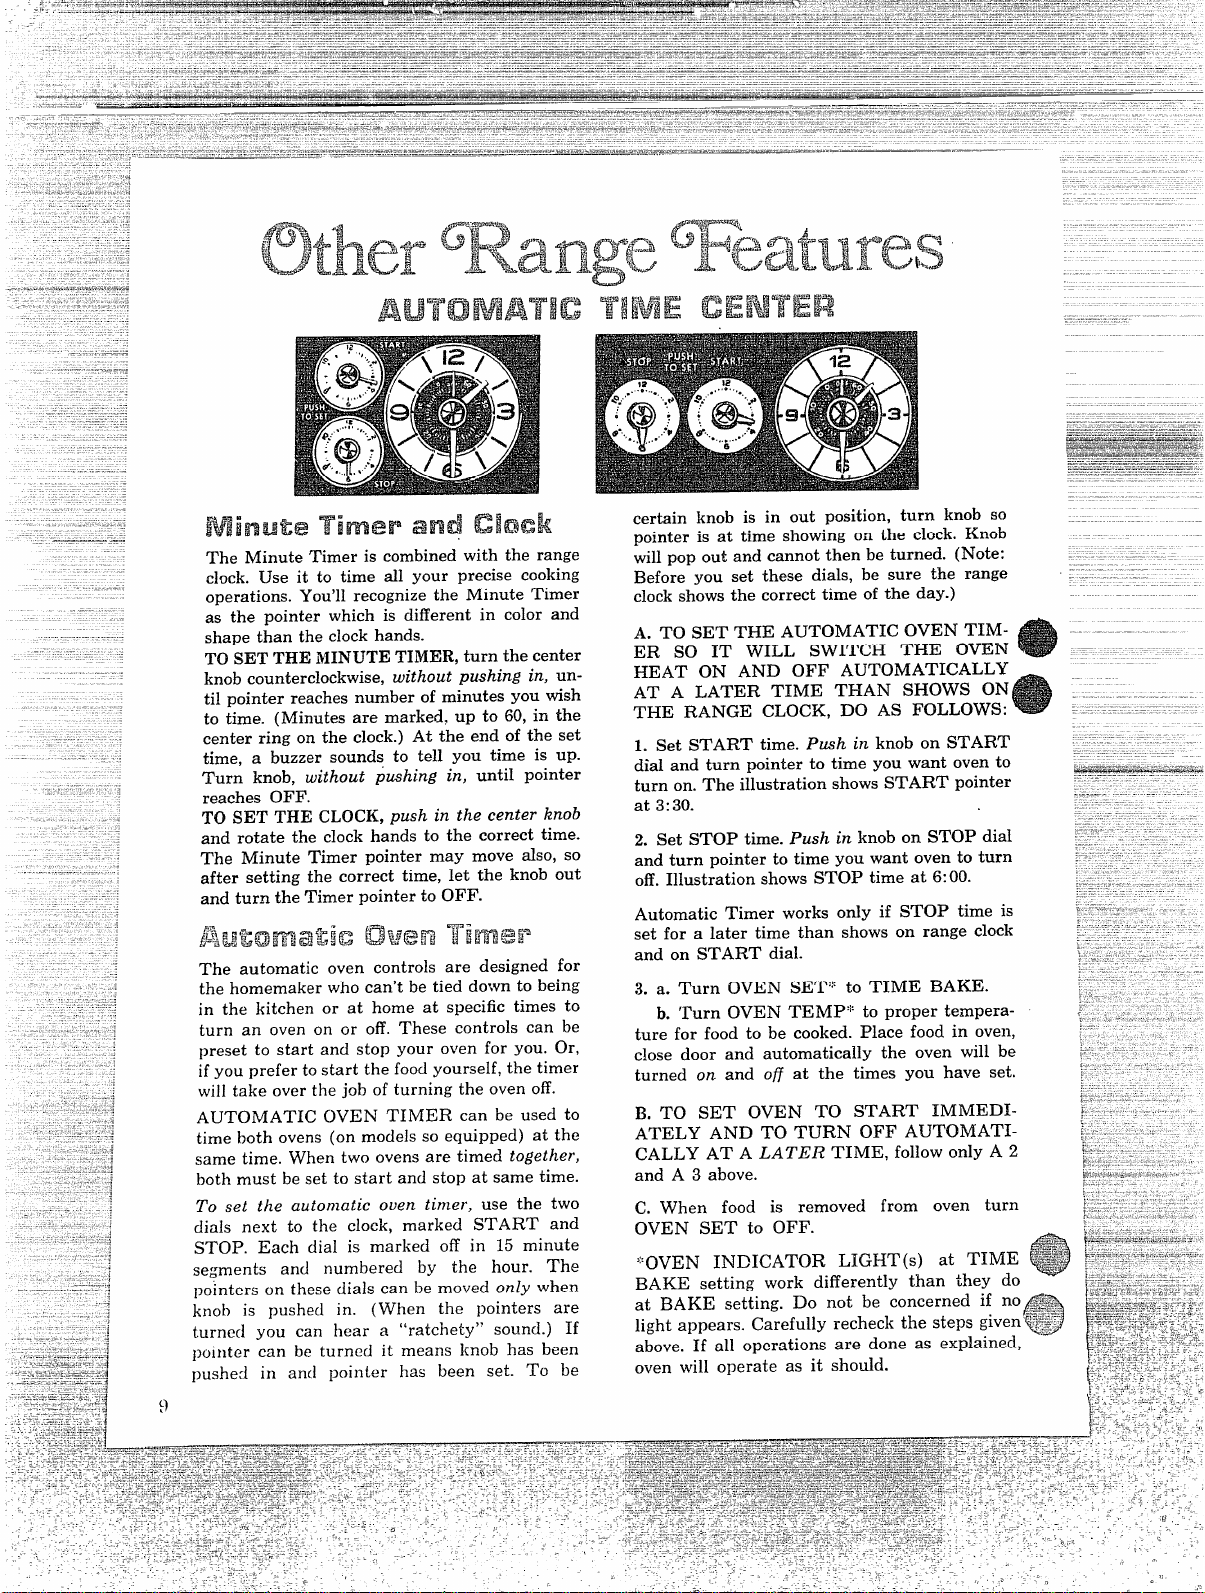
The Minute Timer is combined with the range
clock. Use it to time all your precise cooking
operations. You’ll recognize the Minute Timer
as the pointer which is different in color and
shape than the clock hands.
TO
SETT13Elll~IJTE?71&lEll,turnthecenter
knobcounterclockwise,
withoutpushingin, un-
til pointer reaches number of minutes you wish
to time. (Minutes
aremarked,UP to Go>in the
center ring on the clock.) At the end of the set
time, a buzzer sound: to tell you time is up.
Turn knob,
without pushing in, until pointer
reaches OFF.
TO SET THE CLOCK,push in the center knob
and rotate the clock hands to the correct time.
The Minute Timer pointer may move also, so
after setting the correct time, let the knob out
and turn the Timer pointer to OFF.
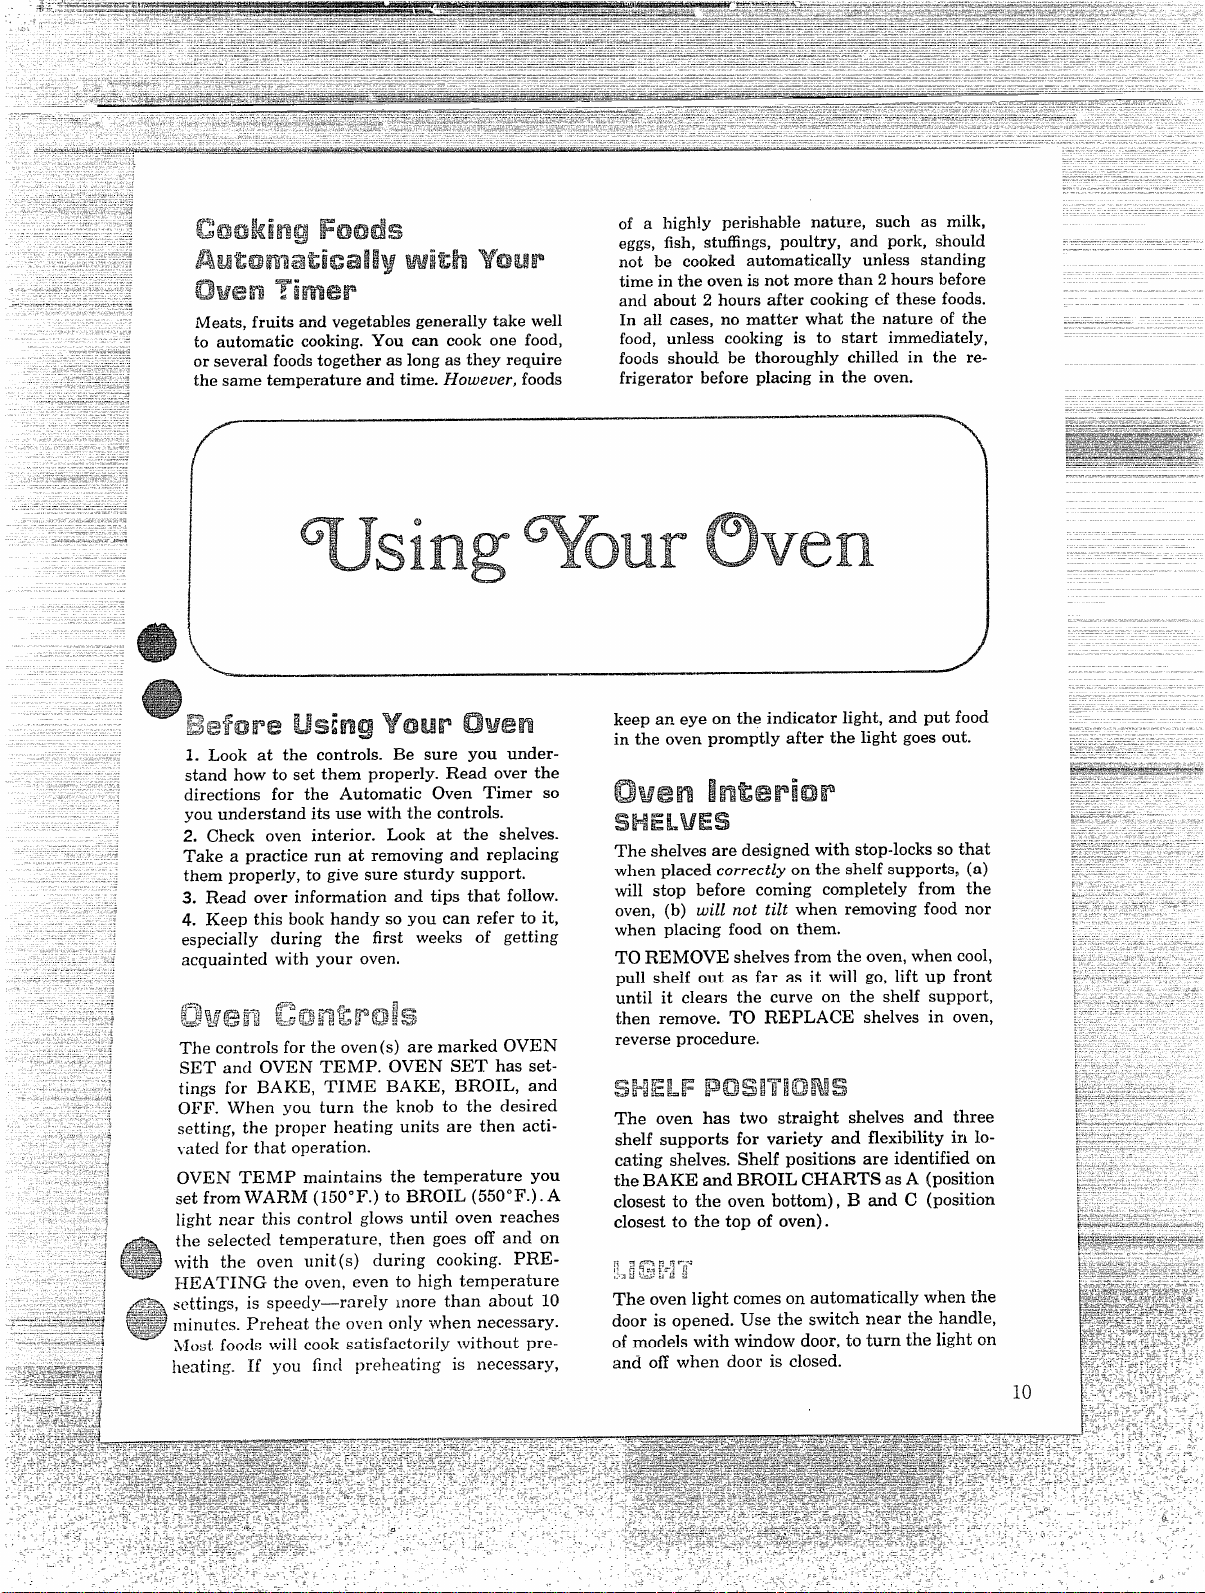
The automatic oven controls are designed for
the homemaker who can’t be tied down to being
in the kitchen or at home at specific times to
turn an oven on or off. These controls can be
preset to start and stop your oven for you. Or,
if you prefer to start the food yourself, the timer
will take over the job of turning the oven off.
AUTOMATIC OVEN TIMER can be used to
time both ovens (on models so equipped) at the
same time. When two ovens are timed
together,
both must be set to start and stop at same time.
To set the aufonzatic oven timer, use the two
dials next to the clock, marked START and
STOP. Each dial is marked off in 15 minute
segments and numbered by the hour. The
pointers on these dials can be moved
only when
knob is pushed in.
(When the pointers are
turned you can hear a “ratchety” sound. ) If
pointer can be turned it means knob has been
pushed in and pointer has been set. To be
certain knob is in out position, turn knob so
pointer is at time showing on the clock. Knob
will pop out and cannot then be turned. (Note:
Before you set these dials, be sure the range
clock shows the correct time of the day.)
A. TO SET THE AUTOMATIC OVEN TIM-
ER SO IT WILL SWITCH THE OVEN
HEAT ON AND OFF AUTOMATICALLY
AT A LATER TIME THAN SHOWS ON
THE RANGE CLOCK, DO AS FOLLOWS:
of a highly perishable nature, such as milk,
eggs, fish, stuffings, poultry, and pork, should
not be cooked automatically unless standing
time in the oven is not more than 2 hours before
and about 2 hours after cooking cf these foods.
~Meats,fruits and vegetables generally take well
In all cases, no matter what the nature of the
to automatic cooking. You can cook one food,
food, unless cooking is to start immediately,
or several foods together as long as they require
foods should be thoroughly chilled in the re-
the same temperature and time; However, ~oods
frigerator before placin~ in the oven.
f&2Jf$=J~ag3J~~~~g Yfnur C3hM3n
keep an eye on the indicator light, and put food
1. Look at the controls. Be sure you under-
in the oven promptly after the light goes out.
stand how to set them properly. Read over the
directions for the Automatic Oven Timer so
you understand its use with the controls.
2. Check oven interior. Look at the shelves.
Take a practice run at removing and replacing
them properly, to give sure sturdy support.
3. Read over information and tips that follow.
4. Keep this book handy so you can refer to it,
especially cluring the first weeks of getting
acquainted with your oven.
The controls for the oven(s) are marked OVEN
SET and OVEN TEMP. OVEN SET’ has set-
tings for BAKE, TIME BAKE, BROIL, and
OFF. When you turn the knob to the desired
setting, the proper heating units are then acti-
~ated for that operation.
OVEN TEMP maintains the temperature you
set from WARM (150°F.) to BROIL (550 °F.). A
]ight near this control
glOWS until oven reaches
the selected temperature, then goes off and on
with the oven unit(s) during cooking. PRE-
HEATING the oven, even to high temperature
settings, is speecly-—rarely more than about 10
minutes. Preheat the oven only when necessary.
Jfos{ foods will cook satisfactorily ~vithout pre-
heating. If you find preheating is necessary,
The shelves are designed with stop-locks so that
when placed
correctZyon the shelf supports, (a)
will stop before coming completely from the
oven, (b) will
not tilt when removing food nor
when placing food on them.
TO REMOVE shelves from the oven, when cool,
pull shelf out as far as it will go, lift up front
until it clears the curve on the shelf support,
then remove. TO REPLACE shelves in oven,
reverse procedure.
‘I’he oven has two straight shelves and three
shelf supports for variety and flexibility in lo-
cating shelves. Shelf positions are identified on
the BAKE and BROIL CHARTS as A (position
closest to the oven bottom), El and C (position
closest to the top of oven).
The oven light comes on automatically when the
door is opened. Use the switch near the handle,
of models with window door, to turn the light on
and ofi when door is closed.
,~l~~,,=,[,2e~$y1p,m
When cooking a food for the first time in your new oven, use time
“;D3CL:I..L ~,~%
given onrecipesasaguide. Oven thermostats,over aperiod ofyears,
may “drift” from the factory setting and differences
in timing kw-
tween an o!d and a new oven of 5 to 10 miimtes are not unusual and
you may be inclined to think that the new oven is not performing cor-
rectly. However, your new oven has been set correctly at the factory
and is more
thanapt to beaccuratethantheoven itreplaced.
1. It is recommended that you operate the
range for a number of weeks to become familiar
with your new oven’s performance. However,
if you find that your foods consistently brown
too little or too much, you may make a simple
adjustment in the thermostat (OVEN TEMP)
knob. See section titled
“Care o} Your New
Oven.”
2. Use tested recipes from reliable sources.
Measure ingredients accurately and combine
carefully. Use correct size baking utensil.
3. Place shelf at position suggested on chart
below.
4. Preheat the oven ordy when necessary, Most
foods will cook satisfactorily without preheat-
ing. If you find preheating is necessary, keep
an eye on the indicator light and put food in
the oven promptly after the light goes out.
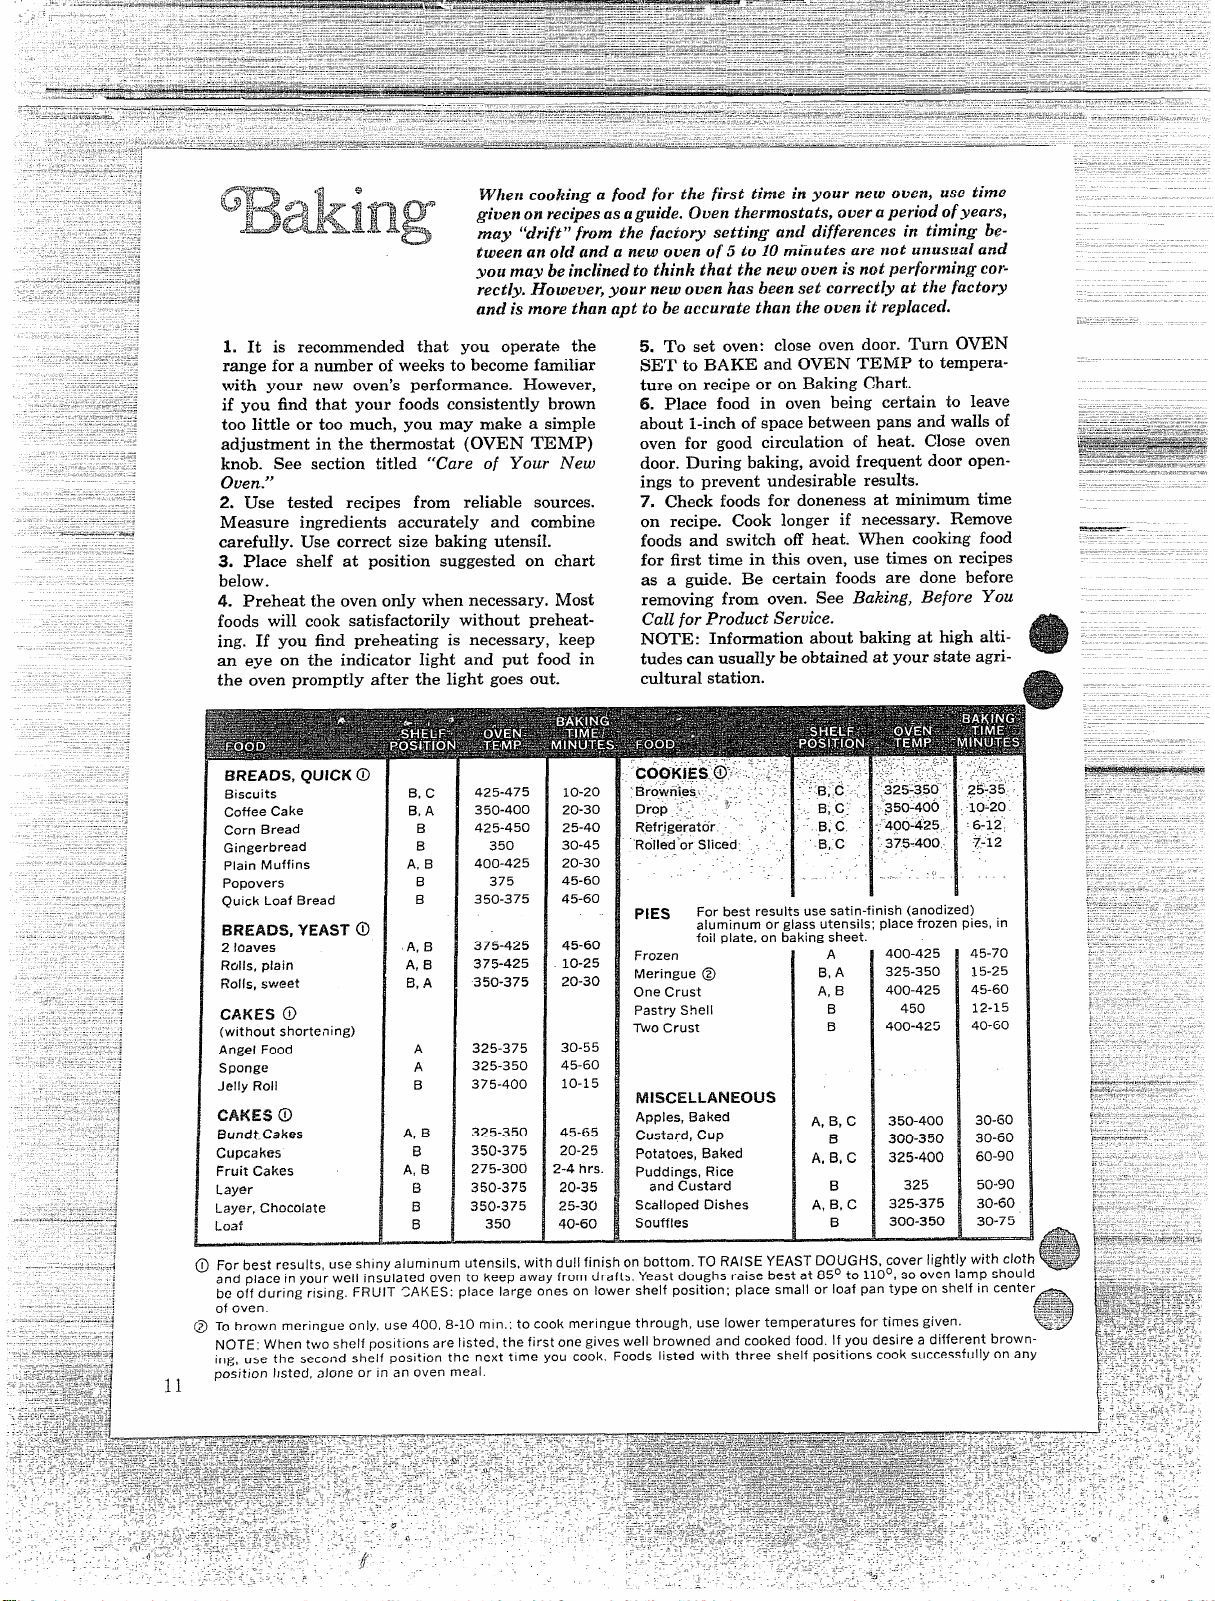
BREADS, QUICK @
Biscuits
Coffee Cake
Corn Bread
Gingerbread
Plain Muffins
Popovers
Quick Loaf Bread
EM?EXX, YEAST @
2 loaves
Rolls, plain
F/oils, sweet
CAKES @
(without shortening)
Angel
Food
Sponge
Jelly Roll
CAKES @
Burtcft Cakes
Cupcakes
Fruit Cakes
Layer
Layer, Chocolate
Lea?
B, C
B, A
B
B
A, B
B
B
A, B
A, B
B, A
A
A
B
A, B
a
A, B
B
B
B
425-475
350-400
425-450
350
400-425
375
350-375
375-425
375-425
350-375
325-375
325-350
375-400
325-350
350-375
275-300
350-375
350-375
350
10-20
20-30
25-40
30-45
20-30
45-60
45-60
45-60
10-25
20-30
30-55
45-60
10-15
45-65
20-25
?-4 hrs.
20-35
25-30
40-60
5. To set oven: close oven door. Turn OVEN
SET to BAKE and OVEN TEMP to tempera-
ture on recipe or on Baking Chart.
6. Place food in oven being certain to leave
about l-inch of space between pans and walls of
oven for good circulation of heat. Close oven
door. During baking, avoid frequent door open-
ings to prevent undesirable results.
7, Check foods for doneness at minimum time
on recipe. Cook longer if necessary. Remove
foods and switch off heat. When cooking food
-.
for first time in this oven, use times on recipes
as a guide. Be certain foods are done before
removing from oven. See
Baking, Before You
Callfor ProductService.
NOTE: Information about baking at high alti-
tudes can usually be obtained at your state agri-
cultural station.
11--
1’
,,,
.
-1
.
PIES
For best results use satin-finish (anodized)
aluminum or glass utensils; place frozen pies, in
foil plate, on baking sheet.
Frozen
Meringue @
One Crust
Pastry Shell
Two Crust
MI W2ELMNEOUS
Apples, Baked
Custard, Cup
Potatoes, Baked
Puddings, Rice
and Custard
Scalloped Dishes
Souffles
o
-..
...a~.-+.
W&
~ For best results, use shiny aluminum utensils, with dull finish on bottom. TO RAISE YEAST DOUGHS, cover lightly with cloth ‘-~~’-
=$-L?..=—A
and place in Your well insulated oven to keep away from drafts. Yeast doughs raise best at 85° to 110°, so oven lam P should
be off during rising. FRUIT CAKES: place large ones on lower shelf position: place small or loaf pan tYPe on shelf in center ..-.
of oven.
a
@ TO brown meringue only, use 400, 8-10 min.: to cook meringue through, use lower temperatures for times given.
r+3-i=3-E~
&
..,=-----
A
B, A
A, B
B
B
A, B, C
B
A, B, C
B
A, B, C
B
400-425
325-350
400-425
450
400-425
350-400
300-350
325-400
325
325-375
300-350
45-70
s5-25
45-60
12-15
40-60
30-60
30-60
60-90
50-90
30-60
30-75
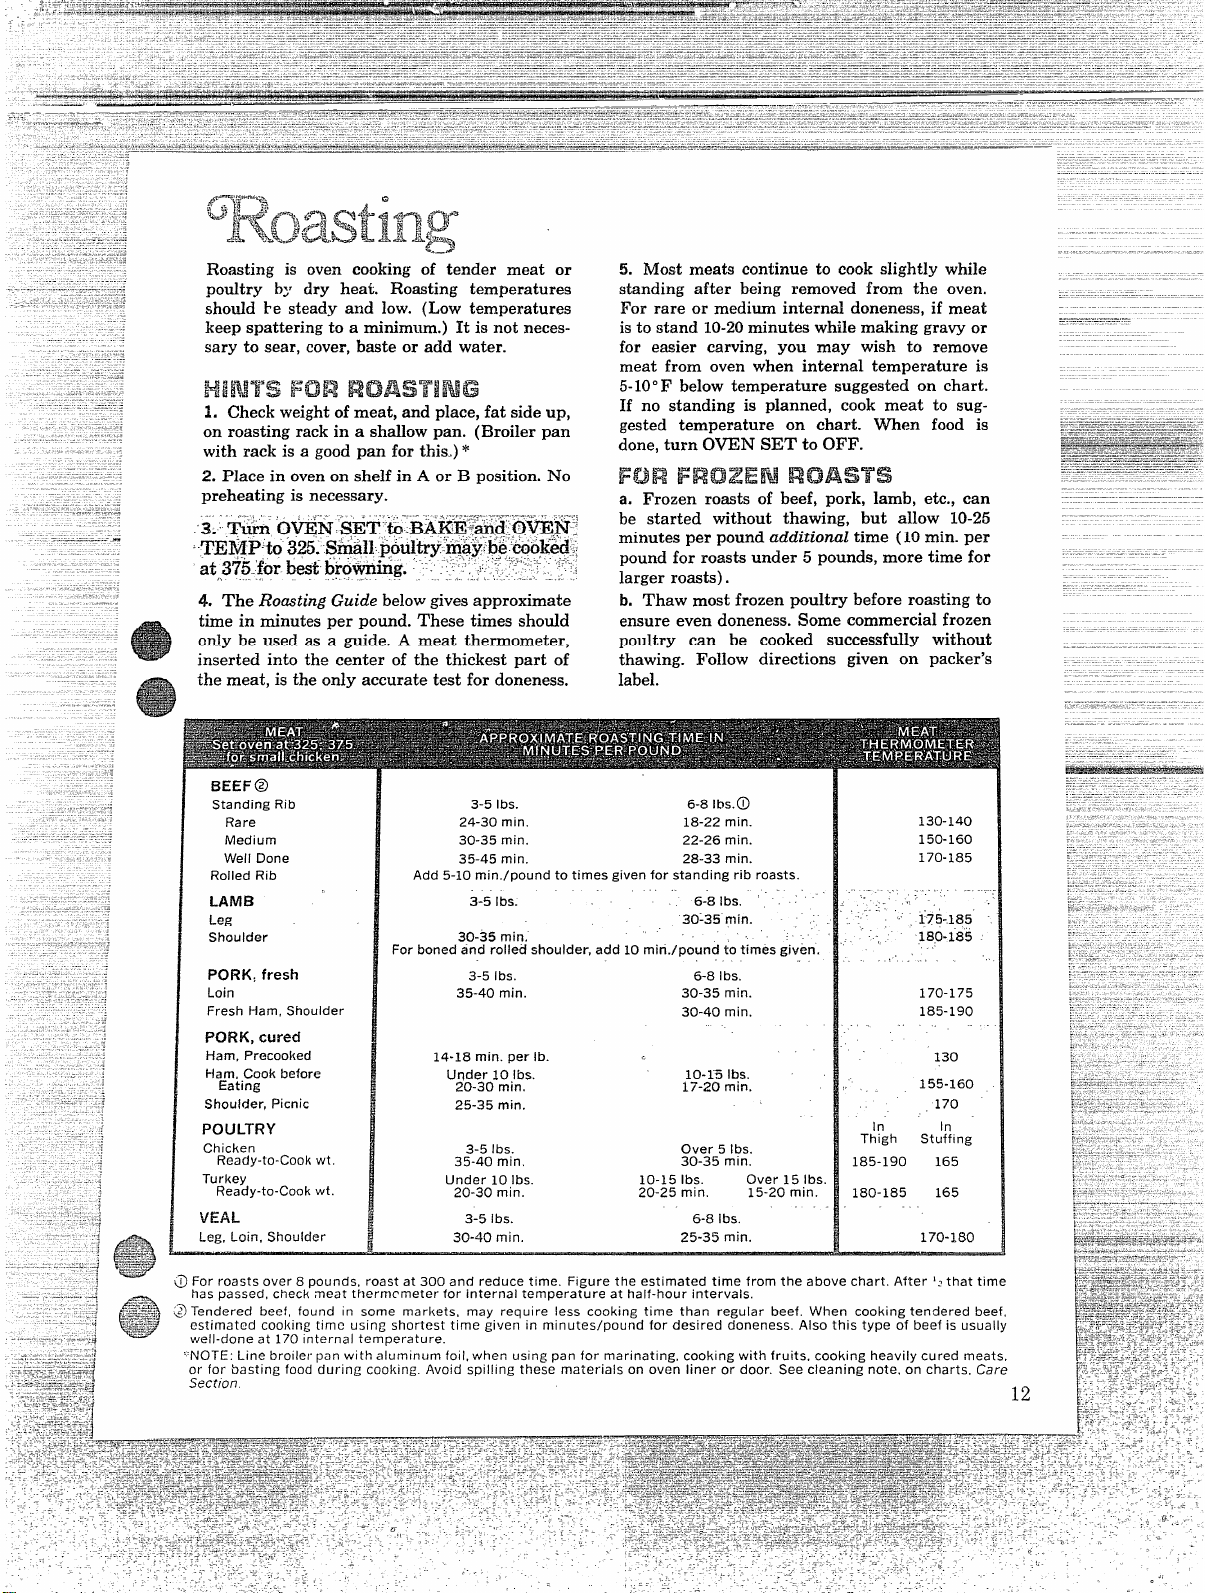
Roasting is oven cooking of tender meat or
poultry by dry heat. Roasting temperatures
should he steady and low. (Low temperatures
keep spattering to a minimum.) It is not neces-
sary to sear, cover, baste or add water.
1. Check weight of meat, and place, fat side up,
on roasting rack in a shallow
pan. (Broilerpan
withrack is a goodpan for this,)*
2. Placein oven on shelf in A or B position. No
preheating is necessary.
4. The RoastingGuidebelow gives approximate
time in minutes per pound. These times should
only be used as a guide. A meat thermometer,
inserted into the center of the thickest part of
the meat, is the only accurate test for doneness.
BEEF @
Standing
Rib
Rare
Medium
Well Done
Rolled Rib
LAMB
Leg
Shoulder
PORK, fresh
Loin
Fresh Ham, Shoulder
PORK, cured
Ham, Precooited
Ham, Cook before
Eating
Shoulder, Picnic
POULTRY
Chicken
Ready-to-Cook wt.
Turkey
Ready-to-Cook wt.
VEAL
Leg, Loin, Shoulder
% Most rneafx continueto cook slightlywhile
standingafter being removed from the oven.
For rareor mediuminternaldoneness,if meat
isto stand
10-20 minutes while making gravy or
for easier carving, you may wish to remove
meat from oven when internal temperature is
5-1OOFbelow temperature suggested on chart.
If no standing is planned, cook meat to sug-
gested temperature on chart. When food is
done, turn OVEN SET to OFF.
a. Frozen roasts of beef, pork, lamb, etc., can
be started without thawing, but allow 10-25
minutes per pound
additionaltime (10min. per
pound for roasts under 5 pounds, more time for
larger roasts).
b. Thaw most frozen poultry before roasting to
ensure even doneness. Some commercial frozen
poultry can be cooked successfully without
thawing. Follow directions given on packer’s
label.
3-5Ibs. 6-8 Ibs. o
24-30 min.
18-22 min.
30-35 min.
22-26 min.
35-45 min.
28-33 min.
Add 5-10 min./pound
to times given for standing rib roasts.
.
3-5 Ibs.
6-”8 Ibs. ‘ ‘
30~35 min.
30-35 min.
For boned and rolled shoulder, add 10 min./pound to times given.
3-5 tbs. 6-8 Ibs.
35-40 min.
30-35 min.
30-40 min.
14-18 min. per lb.
<,
Under 10 Ibs.
10-1?5 Ibs.
20-30 min.
17-20 min.
25-35 min.
3-5 Ibs.
Over 5 lbs.
35-40 mint
30-35 min.
Under 10 Ibs.
10-15 Ibs.
Over 15 Ibs.
20-30 min.
20-25 min. 15-20 min.
3-5 Ibs. 6-8 Ibs.
30-40 min. 25-35 min.
130-140
150-160
170-185
. . .
170-175
185-190
130
155-160
170
In
Tt!gh
Stuffing
185-190 165
180-185
165
170-180
(~ For roasts over 8 oou rids, roast at 300 and reduce time. Fi~u re the estimated time from the above chart. After 1~that time
----.+
has passed, check’ meat thermrrneter for internal tempera~ure at half-hour intervals.
@–.:+r&
.-
: (!
A==+=-l. @
Tendered beef, found in some markets, may require less cooking time than regular beef. When cooking tendered beef,
-—<
;~:::z-~-’$;+:
...=-----
estimated cook!ng tlmc us Infj shortest time given in minutes/pound for desired doneness. Also this type of beef is usually
. ..... .—.
well-done at 170 Interna I tcmperatu re.
—;
..7-T . . ....
. .-s.,,,..——- ,
‘ NOTE: Line broiler pan with aluminum foil, when using pan for marinating, cooking with fruits, cooking heavily cured meats,
. .- —.-.... ,
. ....-—
f
... .. .,..- . .
or for basting food durinc cook!ng. Avoid spilllng these materials on oven liner or door. See cleaning note, on charts, Care
Broiling is cooking foods by intense radiant
heat from the upper unit in the oven. Most
fish and tender cuts of meat can be broiled.
Follow these steps to keep spattering and
smoking toaminimmm.
1. If meat has fat or gristle near edge, cut
vertical slashes through both about 2-in.
apart. If desired fat may be trimmed, leaving
a layer about %-in. thick.
2. Place meat on broiler rack in broiler pan
which comes with range. Always use rack so
fat drips into broiler pan; otherwise juices
may become hot enough to catch fire. Alumi-
num foil may be used to line broiler pan and
rack.
But, beCERTAIN to cut openingsin
3. Letterson chart on followingpage indi-
catewhere to positionshelffor best brown-
ing while cooking inside of food to desired
doneness.
Placing food closer to top of oven increases
smoking, spattering, exterior brown on meat
and the possibility of fats on foods catching
fire.
4. LEAVE DOOR
AJAR about3 inchee---
doorstaysopenby itself,andkeepsheating
unitatpropertemperatureforbroiling.
5. SWITCH OVEN SET and IOVEN
TEMP CONTROLS TO BROIL. Preheat-
ingunitisnotnecessary.*
6. Turn food only once during cooking.
Time foods for firstside as on chart.Turn
food,thenusetimesgivenforsecondsideas
a guideto preferreddoneness.(Wheretwo
thicknessesandtimesaregiventogether,use
firsttimesgivenforthinnestfood.)
7. Turn oven off, serve food immediately,
leavepan
outside oven to cool during meal
for easiest cleaning.
Cookingtimesgivenareapproximateandshouldbeusedonly asa guide;
theyarebasedon meatat refrigeratortemperaturewhenplacedin oven.
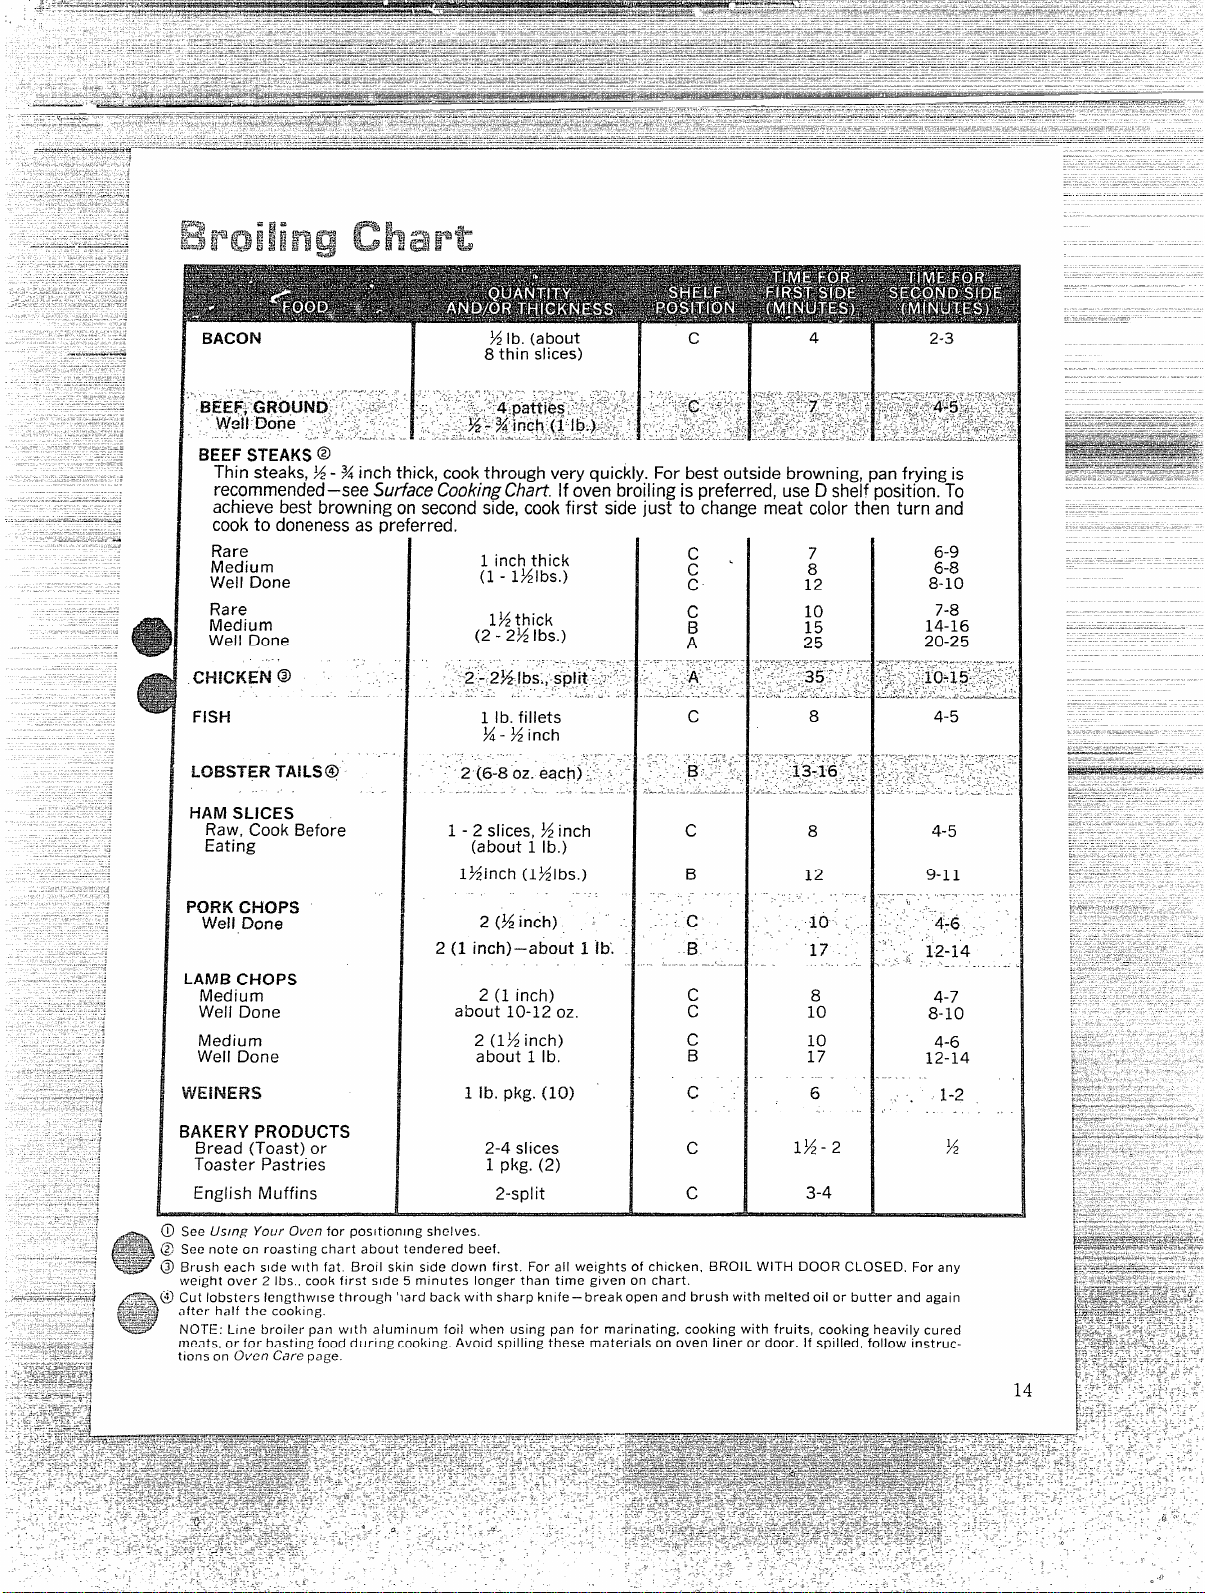
BACON
%
lb. (about
8 thin slices)
Thin steaks,%- %inch thick, cookthrough very quickly.
For best outside browning, pan frying is
recommended—seeSurtaceCookingChart If oven broiling is preferred, useD shelf position.To
achieve best browning on secondside,cookfirst side just to changemeat color then turn and
cookto donenessas preferred.
Rare
Medium
Well Done
Rare
Medium
Well Done
CHICKEN @
FIS#-i
6-9
6-8
8-10
1 inch thick
(1 - lfilbs.)
lfi thick
(2 -2% Ibs.)
1
1 lb. fillets
~ - % inch
4-5
.
LCI13STER TAiLS@
HAM SLICES
1
Raw, Cook Before
Eating
PORK tx’+oP!5
Well Done
I
1-2 slices, %inch
(about 1 lb.)
4-5
lfiinch (l%lbs.)
. .,
9-11
2 (%inch)
2 {1 inch)–about 1 lb.
LAMB CHOPS
Medium
Well Done
2 (1 inch)
about 10-12 oz.
2 (1X inch)
about 1 lb.
4-7
8-10
Medium
Well Done
4-6
12-14
1 lb. pkg. (10)
6
15-2
3-4
BAKERY PRODUCTS
Bread (Toast) or
Toaster Pastries
2-4 slices
1 pkg. (2)
2-split
~ English Muffins
%%&- @ BI”USh eacb side with fat. Broil skin side dov~n first. For all weights of chicken. BROIL WITH DOOR CLOSED. For any
\velgh t over 2 Ibs,, cook fl rst s Ide
5 m Inutes longer than time given on chart.
a@ ‘~~er ~,llf *,C
.~o~,ng,
t
lobsters Iengthvvlse through ‘lard back with sharp knife – break open and brush with melted oil or butter and again
Eg%$$
NOTE: Line broiler pan with aluminum foil when using pan for marinating, cooking with fruits, cooking heavily cured
meats, or for bastl ng food d
LIrl ng cookI ng, Avoid SPIIIing these materia Is on oven IIner or door. if SPIiled, follow instruc-
tlons on (-)vcn Care page.
14

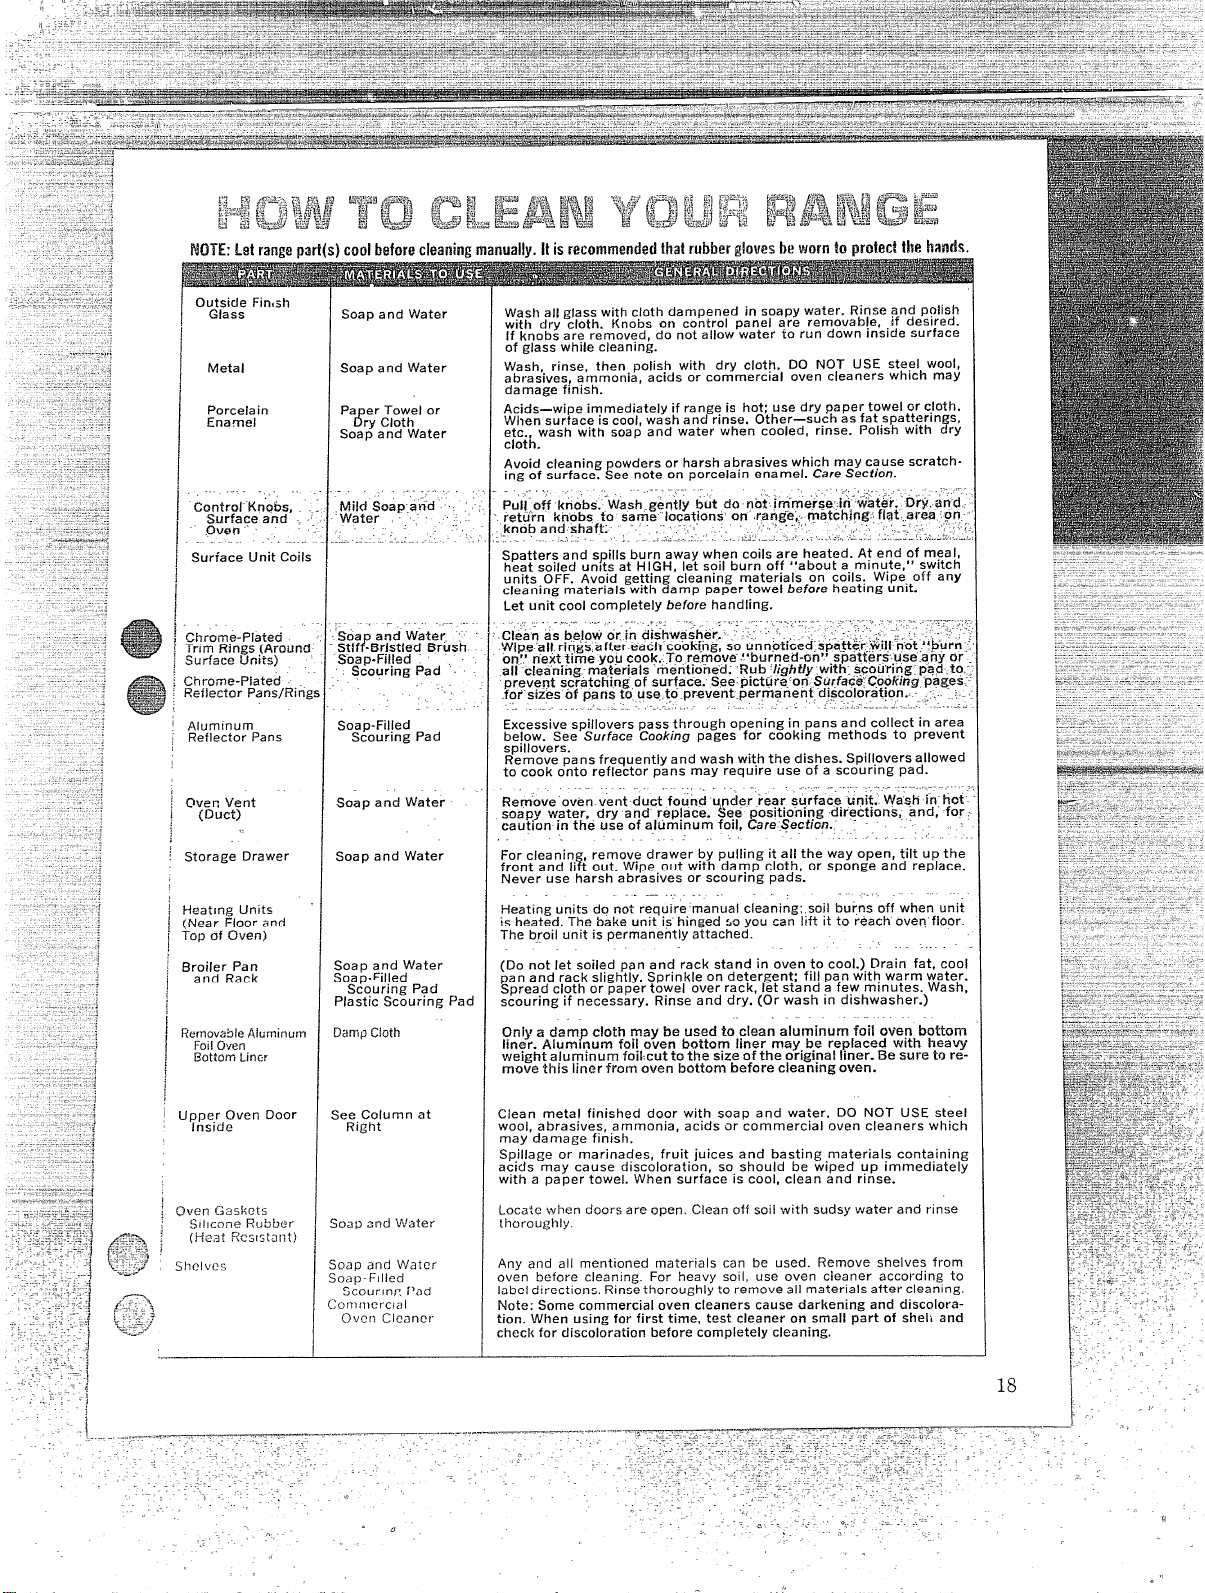
Proper care and cleaning procedures are cs-
serkial for a long and satisfactory life for your
range. Included in this section are directions
and
Cleaning?Chartsfor cleaning all parts of
the range. When cleaning range, wearing of
rub-
~Prglovesis
recommended to protect the hands.
The porcelain enamel finish is essentially glass
fused on steel at high temperature and is break-
able if misused. This finish is acid resistant.
However, any acid foods spilled (such as lemon
or other citrus fruit juices, dr mixtures contain-
ing tomato or vinegar) should be wiped up im-
mediately. See chart for cleaning suggestions.
lmmd”up LmEa
;q~e~~~’~b[e Ghmhme TE+m $isl/inlg
Stand-up surface units can be lifted and locked
in a stand-up position for cleaning under units.
It is recommended that the user clean the area
under reflector pans frequently, to avoid accu-
mulation of soil, especially grease, that may
catch fire.
To clean area under Stand-Up unit, lift cool
surface unit until it snaps into its raised posi-
tion—it will stay there until you lower it. Lift
off trim ring, remove reflector pan.
Clean trim ring as directed in
Use of Ah.minunz
Foil, Care Section.
If aluminum foil is used to
line reflector pan, follow directions given on
Surface Cooking pages. To prevent damage to
the surface unit, NEVER COVER opening in
reflector pan with foil. Wipe around edges of
unit recess with clamp cloth or sponge, then
replace clean reflector pan, then trim ring.
TO REPOSITION
THE STAND-UP
SURFACE UNIT: a.
Replace the reflector
pan into the recess in
the cooktop. b. Put the
trim ring in place over
the reflector pan. e.
Guide the surface unit
into place so it fits evenly into trim ring. Unless
the reflector pan is
under the trim ring, the
surface unit cannot be returned to proper hori-
zontal position.
The oven is
vented
througha ductwhichis
locatedunder the right
rearsurfaceunit.Clean
KJ
this duct frequently. To ‘ ‘
))
‘!\
remove, lift right rear
surface unit, remove re-
flector pan, and lift out
duct.
To reposition, place solid part of duct over
round opening under the cooktop. Then posi-
tion hole in duct so it rests directly under round
opening in reflector pan. Duct must be in cor-
rect position so moisture and vapors from oven
can be vented during use.
NEVER COVER HOLE in oven vent duct with
aluminum foil or any other material. To do so
prevents the oven vent from functioning prop-
erly during cooking.
QWe%l
When cooking a food for the first time in your
new oven, use time given on recipe as a guide.
Oven thermostats, over a period of years, may
“drift” from the factory setting and differences
in timing between an old and a new oven of 5
to 10 minutes are not unusual. Your new oven
has been set correctly at the factory and is
more apt to be accurate than the oven which it
replaced. However, if you find that your foods
consistently brown too little or too much, you
may make a simple adjustment in the thermos-
tat (Oven Temp) knob.
PULL KNOB OFF 0%’
SHAFT. NOTE
EX-
ISTING SETTING
ON BACK OF KNOB
BEFORE MAKING
ANY ADJUSTMENT.
SEE SKETCH.
1. Hold knob in one hand so pointer is at to
‘P.
2. With other hand turn knob, on other models
loosen !2screws, to move pointer one notch in
the desired direction.
Adjust pointer toward
—...—.-—
———..———
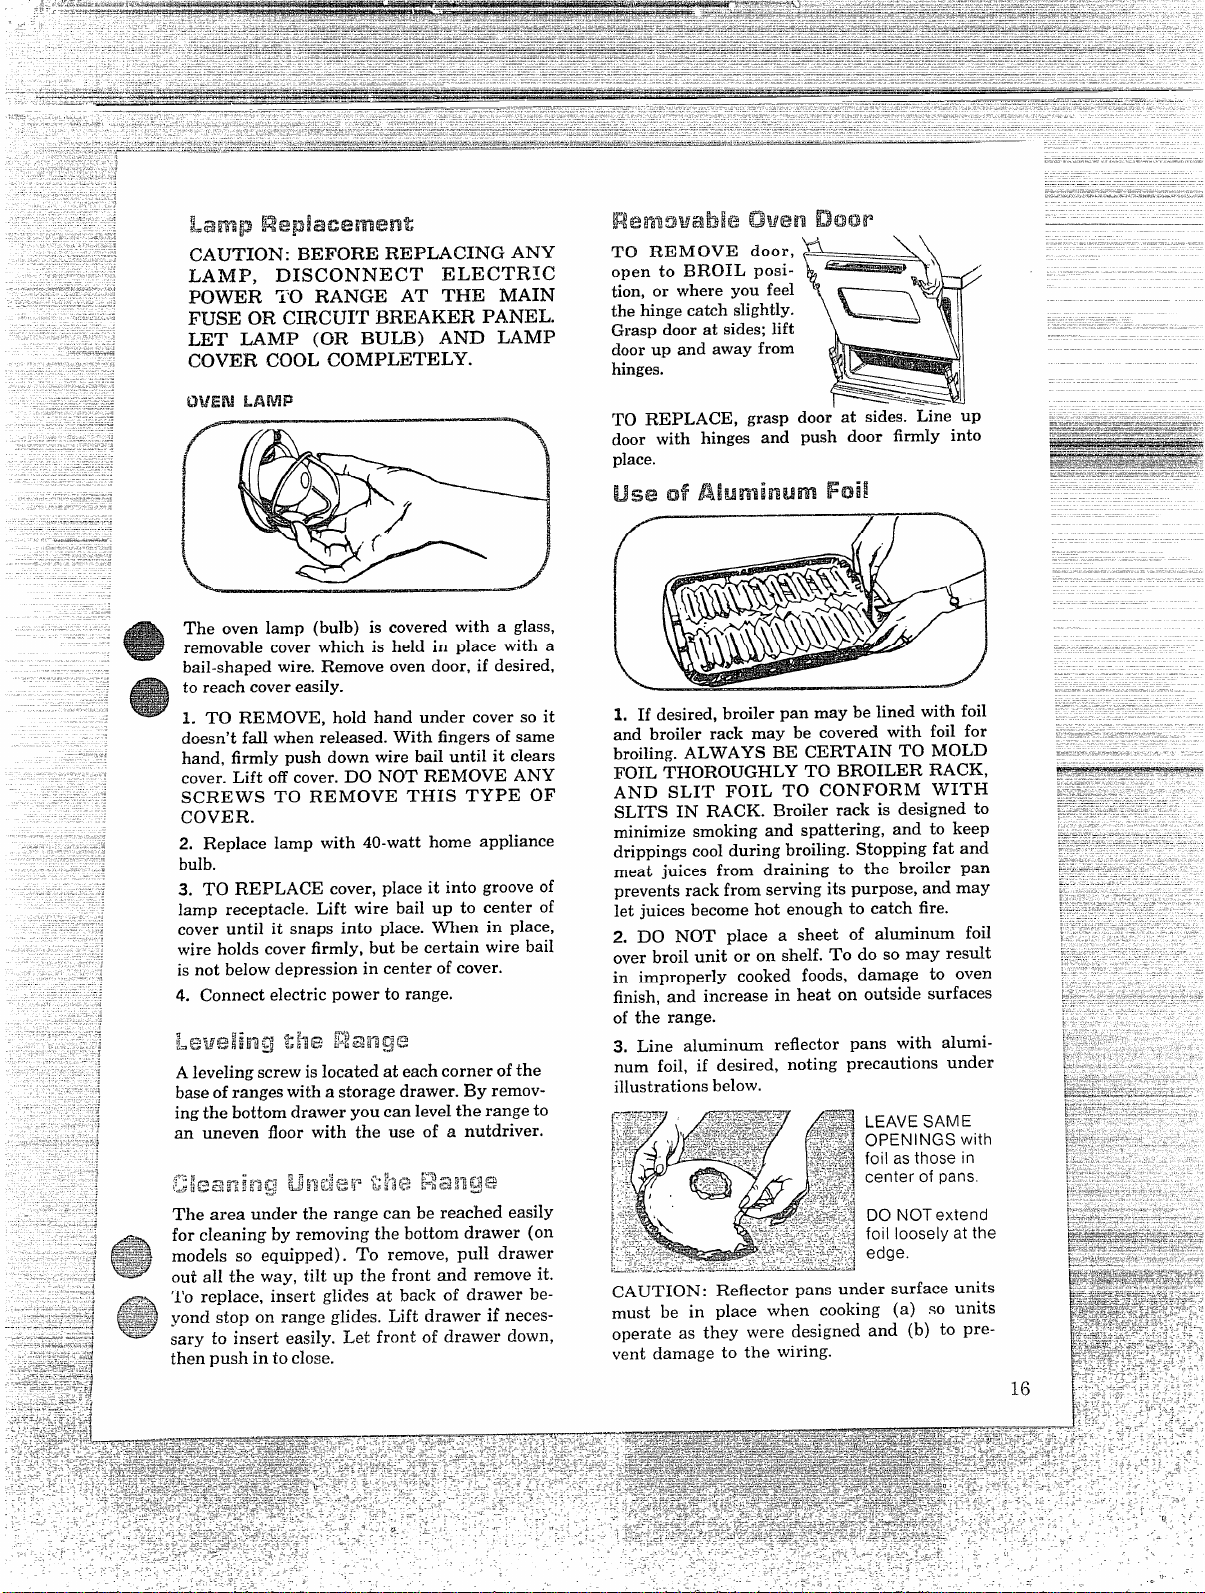
CAWI’ION:BEFORE REPLACING ANY
LAMP, DISCONNECT ELECTRIC
POWER TO RANGE AT THE MAIN
FUSE OR CIRCUIT BREAKER PANEL.
LET LAMP (OR BULB) AND LAMP
COVER COOL COMPLETELY.
.—
The oven lamp (bulb) is covered with a glass,
removable cover which is held in place with a
bail-shaped wire. Remove oven door, if desired,
to reach cover easily.
1. TO REMOVE, hold hand under cover so it
doesn’t fall when released. With fingers of same
hand, firmly push down wire bail until it clears
cover. Lift off cover. DO NOT REMOVE ANY
SCREWS TO REMOVE THIS TYPE OF
COVER.
2. Replace lamp with 40-watt home appliance
bulb.
3. TO REPLACE cover, place it into groove of
lamp receptacle. Lift wire bail up to center of
cover until it snaps into place. When in place,
wire holds cover firmly, but be certain wire bail
is not below depression in center of cover.
4. Connect electric power to range.
7
!.ekl$!lin g ‘Z1-le Z%223ge
A leveling screw is 1ocated at each corner of the
base of ranges with a storage drawer. By remov-
ing the bottom drawer you can level the range to
an uneven floor with the use of a nutdriver.
, ~~~~~~,~~+~*-~f-j 5~ ~>~.~.$x;* - B ~~~“~~~ P
..,-;#
‘$;;’; & .=-p%* ,
~,e...,,1-- G....*.u.-+.
tuJi:~&.i+:2 -
-.+
The area under the range can be reached easily
for cleaning by removing the bottom drawer (on
models so equipped). TO remove, pull drawer
out all the way, tilt up the front and remove it.
To replace, insert glides at back of drawer be-
yond stop on range glides. Lift drawer if neces-
sary to insert easily. Let front of drawer down,
then push into close.
TO REMOVE door,
open to BROIL posi-
tion, or where you feel
the hinge catch slightly.
Grasp door at sides; lift
cloor up and away from
hinges.
TO REPLACE, grasp door’ at sides. Line up
door with hinges and push door firmly into
place.
1. If desired, broiler pan maybe lined with foil
and broiler rack may be covered with foil for
broiling. ALWAYS BE CERTAIN TO MOLD
FOIL THOROUGHLY TO BROILER RACK,
AND SLIT FOIL TO CONFORM WITH
SLITS IN RACK. Broiler rack is designed to
minimize smoking and spattering, and to keep
drippings cool during broiling. Stopping fat and
meat juices from draining to the broiler pan
prevents rack from serving its purpose, and may
let juices become hot enough to catch fire.
2. DO NOT place a sheet of aluminum foil
over broil unit or on shelf. To do so may result
in improperly cooked foods, damage to oven
finish, and increase in heat on outside surfaces
of the range.
3. Line aluminum reflector pans with alumi-
num foil, if desired, noting precautions under
illustrations below.
LEAVE SAME
OPENINGS with
foil as those in
center of pans.
DO NOT extend
foil loosely at the
edge.
CAUTION: Reflector pans under surface units
must be in place when cooking (a) so units
or>erateas they were designed and (b) to pre-
vent damage to the wiring.

The top, bottom, sides, and back of the oven
liner, and door inner liner on lower oven only
are finished with a
special coatingwhich cannot
be cleaned in the usual manner with soap, deter-
gents, commercial oven cleaners, coarse abrasive
pads or coarse brushes. Their use and/or the
use of oven sprays will cause permanent damage.
The
special coatingis a porousceramicmaterial
which is dark in color and feels slightly rough to
the touch. If magnified, the surface would ap-
pear as peaks, valleys, and sub-surface “tun-
nels.” This rough finish tends to prevent grease
spatters from forming little beads or droplets
which run down the side walls of a hard-surface
oven liner leaving unsightly streaks that require
hand cleaning. Instead, when spatter hits the
porous finishit is dispersed and is partially ab-
sorbed. This dispersal action increases the ex-
posure of oven soil to heated air, which results
in oxidation of soil. This finish also reduces the
visual effect of residual soil, It may not dis-
appear completely and at some time after ex-
tended usage, stains may appear. See “To C1ean
Oven” at right to minimize this effect.
The
special coatingworksbest on small amounts
of spatter. It does not work well with larger spills,
especially sugars, egg, or dairy mixtures. For this
reason, the oven is equipped with a removable, re-
placeable aluminum foil oven bottom liner which
protects the
porous finish on the bottom of the
oven from spillovers. Avoid spills on inside surface
of the oven door. The special oven liner finish is
not used on oven shelves. Shelves are removable
and can be taken to the sink for cleaning. They
clean easiest when soil is still moist, before it has
carbonized or burned on. Also, they can be
cleaned with abrasive and commercial oven
cleaners. Follow the manufacturer’s directions re-
garding use of gloves and eye protection when us-
ing oven cleaners. Also, these materials must be
used with the parts outside the oven to avoid dam-
age to the
specialcoating.
1,
Let rangepartsget cool beforehandling.It is
recommendedthat rubber glovesbe worn when
cleaning rangeparts manuaHy.
2. Remove all cooking utensils including the
broilerpan andrack.
3. Remove oven shelves and clean them man-
uallywith scouringpads or mild abrasive.
To remove shelves from the oven, when cool,
lift up rear of shelf, pull forward with stop-locks
along top of shelf supports. To replace shelves
in oven, reverse procedure.
4. I?emoL’eexcessspills and boilovem from alumi-
num foil oven bottom liner before removing liner
from o[’en. This
is to prevent excess liquids from
spilling onto the porous
finish. Then
remove
aluminum foil bottom
liner and clean man-
ually. (Before cleaning
or removing the alumi-
num foil liner, lift bake
unit out of the way,)
5. Clean oven window (on models so equipped).
Use mild non-scratching cleanser and damp
cloth. Avoid spilling water or cleaner on porous
surface.
6. Soil visibility may be reduced by operating
oven at 4000F. Close door; set oven switch to
bake and oven temperature control to 4000F.
Time for at least 4 hours. Repeated cycles may
be necessary before improvement in appearance
is apparent, particularly on oven door. For mod-
erate to heavy soiling of oven door, use method
described in item (7) below before running
4000F. cycle. The oven timer can be used
to con-
trol the cycle automatically at a time convenient
for you. Some slight smoking may occur, similar
to that which may occur during other Time
13akecooking.
REMEMBER: DURING THl!l OPERATION OF
THE OVEN, THE DOOR, WINDOW AND
OTHER RANGE SURFACES WILL GET HOT
ENOUGH TO CAUSEBURNS. IJONOT TOUCH.
LET THE RANGE COOL BEFORE REPLACING
ALUMINUM FOIL OVEN BOTTOM LINER AND
OVEN SHELVES IF THEY WERE REMOVED.
7. If a spillover or heavy soiling occurs on the
porous
surface, as soon as practical after the
oven has cooled, remove as much of the soil as
possible using a small amount of water and a
stiff bristle nylon brush. When using water, use
it sparingly and change it frequently, keeping it
as clean as possible, and be sure to blot it up
with paper towels, cloths, or sponges. Do
not rub
or scrub
with paper towels, cloths or sponges,
since these will leave unsightly lint on the oven
finish. If water ;eaves a white ring on the fiinish
as it dries, apply water again and blot it with a
clean sponge, starting at the edge of the ring and
working toward the center.
Use care in removing and replacing aluminum foil
oven bottom liner and shelves and in placing and
removing dishes and food to avoid scratching, rub-
bing or othelwise damaging the
porous finish on
the ovenwalk+and door.
Do not use soa~. detergent, commercial oven
L
c)
I
I
Porceia in
Enamel
Control Kn@L,
Surface and
Oven “.
.-
Surface Unit Coils
~hrom~-pia~ecj
Trim Rings (Arouncf
Surface Units)
Chrome-Plated
Reflector Pans/Ring:
Alum!num
Reflector Pans
Oven Vent
(Duct)
Storage Drawer
Heating Urrits “
(Near Floor and
Top of Oven)
Broiler Pan
and Rack
Removfible Aluminum
FOII(km
Bottom Lirwr
Soap and Water
Soap and Water
‘a&%%ii’‘r
Soap and Water
. - ---
Sea amf Water
‘?
St!f -Brist{ec! Brush
Soap-Filled
Scouring Pad ~
. .
Soap-Filled
Scouring Pad
Soap and Water
Soap and Water
Soap and Water
Soap-Gilled
Scouring Pad
Plastic Scouring
Pad
Dam? Cloth
See Column at
Right
(
[
5oap and Water
Sodp- FIIled
Scourlnc Pad
;orn me rcIa I
Oven Clcanef
Wash all glass with cloth dampened in soapy water. Rinse and polish
with dry cloth. Knobs on control panel are remova b!e, if desired.
If knobs are removed, do not allow water tO run down Inside surface
of glass while cleaning.
Wash,. rinse, then polish with dry cloth. DO NOT USE steel WOOI,
abrasives, ammonia, acids or commercial oven cleaners which may
damage f!nlsh.
Acids—wipe immediately if range is hot; use dry paper towel or cloth.
When surface is cool, wash and rinse. Other—such as fat smatterings,
@~~k wash with soap and water when cooled, rinse, Polish with dry
Avoid cleaning powders or harsh abrasives which may cause scratch-
ing of surface. See note on porcelain ena reel. Care Sectionj
Spatters and spills burn away when coils are heated. At end of mea 1,
heat soiled units at HIGH, let soIl burn off “about a minute, ” switch
units OFF. Avoid getting cleaning materials on coils. Wipe off any
cleaning materials with da rnp paper towel before heating unit.
Let unit cool completely before handling.
. .. .- , .- - ,. -.
- .... ., . . . .,- , . . .-,--.—..-
,,.
c~ea~ as below or in di~hwasher~ “’.’ ‘.- “~i~hwasher~.“‘: ;, ‘ :. “‘ . .; ‘- ‘.
Wipe ‘ail rings after each cooking, so unno~iced spaftw.lv!l,l ‘not “burn
Onrr next time Yt?u COOK
To remove- a4btirned-On** .S~atterS.,USe any or
all
cleaning ma~erials mentioned. Rub :Iighfly with. :courmg pad to.-
prevent scratctung of surface. See. fxcture. on Sytface. Gopkiog pages’
for sizes of pans to use to prevent permanent discoloration.. ,. ,.
.- J . -. ~. , .
.“ :. - .. ..>.- - . .-.!.
Excessive spillovers pass through opening in pans and collect in area
below. See Surface Cooking pages for cooking methods to prevent
spillovers.
Remove pans frequently and wash with the dishes. Spillovers allowed
to cook onto reflector pans may require use of a scouring pad.
.. . . , . -..-
.... .
Remove oven vent duct found u der’rear surface urti$ Wash in hot
soapy water, dry and replace. {ee positioning directmns, and, for
caution in the use of aluminum foil, Care $ection.
.,
. ~>
For cleaning, remove drawer by pulling it all the way open, tilt up the
front and lift out. Wipeout with damp cloth, or sponge and replace.
Never use harsh abraswes or scouring pads.
.
Heating units do not require manual cleaning; soil burns off when unit
is heated. The bake unit is hinged LO you can lift it to reach oven floor.
The broil unit is permanently attached.
(Do not let soiled pan and rack stand in oven to cool.) Drain fat, cool
pan and rack slightly. Sprinkle on detergent; fill pan with warm water.
Spread cloth or paper towel over rack, let stand a few minutes. Wash,
scouring if necessary. Rinse and dry. (Or wash in dishwasher.)
Only a clamp ctoth may
be used to clean aiuminwn foil oven bottom
liner. Aluminum fod oven bottom liner may be replaced wth heavy
wei@t aJuminum foil, cut to the size of the Original liIIW. Eb3SUW h H9
mow this liner Wornoven bottom before cleaning own.
Clean metal finished door with soap and water. DO NOT USE steel
wool, abrasives, ammonia, acids or commercial oven cleaners which
may damage finish.
Spillage or marinades, fruit juices and basting material: containing
acids may cause discoloration, so should be wiped up immediately
with a paper towel. When surface is cool, clean and rinse.
Locate when doors are Qpen, Clean off soil with sudsy water and rinse
thoroughly
Any and all mentioned materials can be used. Remove shelves from
oven before cleaning. For heavy soi 1, use oven cleaner according to
label directions. Rinse thoroughly to remove all materials after cleanlng.
Note: Some commercial oven cleaners cause darkening and discolora-
tion. When using for first time, test cleaner on small part of shell and
check for discoloration before completely cleaning.
.’
g~~ Rzmg$% is
%5!!%2tu-w istftiifth
IFeatMPE%s:
Ehml’1Tirmir
Check to be certain step-by-step directions
were followed correctly.
m.
~=I~~~
~;~i%“.
Check material and size of baking utensil;
placement of shelf and food in oven. If the
oven was used for broiling, just before it is
used for baking of food, turn the oven com-
iFu$3E
The difficulty might also be caused by a
blown range circuit fuse, or (depending on
the nature of fuse arrangement) a tripped
main circuit breaker. If circuit breaker is
involved,resetit. If the control box employs
fuses, range fuse (a cartridge-type) should
be changed. BUT ONLY BY SONIEO
FAMILIAR WITH ELECTRICAL CI
CUITS.
Apartmenttenantsandcondominium own
should requesttheirbuildingmanagementto
performthischeck beforecallingfor service.
pletely off and-open the door wide so it can
cool (5 to 10 minutes).
~;
g-g-J~~~~ g
Be sure OVEN TEMP and OVEN SET are
set at BROIL. If there was excessivesmok-
ing and spattering: Were shelf and broiIer
pan at position suggested on broiling chart?
If aluminum foil was used on broil rack, was
it handled according to directions?
1flightson rangeareworking but theoven
or
surfaceunitsdo not heat,call for service.
If oven and surface units do not heat, and
lights on the range are not working, check
firstto see that the three-pronged plug con-
nected on back of range is fully inserted in
wall receptacle.
If after replacing the range circuit fuse or
resettingthecircuitbreaker,thefuseblowsor
circuit breaker trips open again, call for
service.
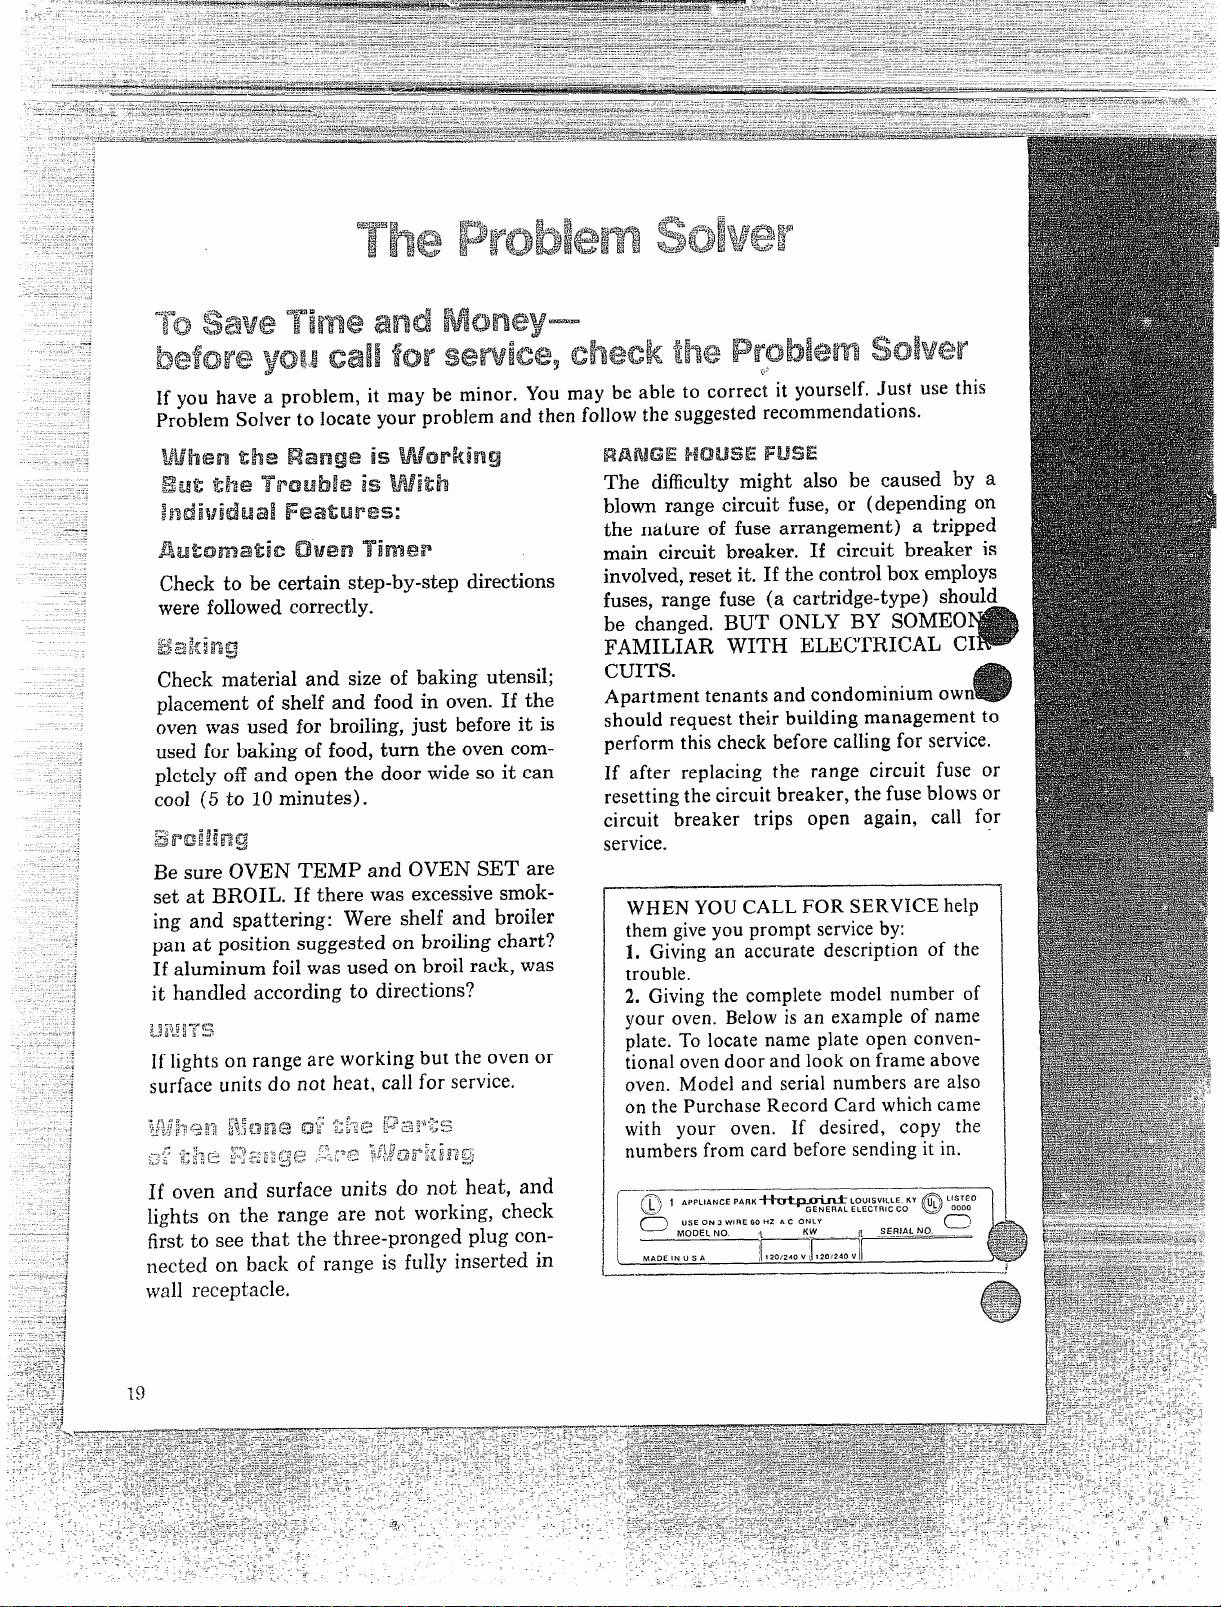
WHENYOUCALL FOR SERVICEhelp
themgiveyou promptserviceby:
1, Giving an accuratedescriptionof the
trouble.
2. Givingthecompletemodel numberof
your oven. Belowisan exampleof name
plate.To locatenameplateopenconven-
tionalovendoor andlook onframeabove
oven. Model and serialnumbersarealso
onthePurchaseRecord Cardwhichcame
with your oven.
If desired, copy the
numbersfrom cardbeforesendingitin.
——..
—.
I
@)1 ‘ppL’ANc’pARK~
Q
LOUISVILLE KY I+) ‘$$::0
GE NEflAL ELECTRIC CO
~ c1 ;;:::;;’’’’:;’ “c O:;”
L
MADE IN U S A
.
..>-.——-.,!
jf y$fjgj! Need !39rwi$.x2
in many cities, there’s a Hotpoint
Factory Service Center. Call, and
a radio-dispatched truck will come
to your hon;e by appointment-
morning or afternoon. Charge the
work, if you like. All the centers
accept both MasterCard and Visa
cards.
check the White
pages fOr
“HOTPOINT FACTORYSERVICE.”
Or look for Hotpoint franchised
Customer Care@servicers. You’ll
find them in the Yellow Pages
under “HOTPOINT CUSTOMER
CARE@SERVICE”
or “GENERAL
ELECTRIC—HOTpOINT CUS-
TOMER CARE@SERVICE.”
Hyou need serviceliterature, parts
lists,parts or accessories,contact
one of the Factory Service Cen-
ters, a franchised Customer Care@
servicer or your dealer.
If vcmare dissatl$fiedwiththe ser-
vi~eyoureceived,hereare three
stepsyou shouldfobv:
First,contact the people who ser-
viced your appliance, Explain why
you are dissatisfied. In most cases,
this will solve the problem.
Next, if you are still dissatisfied,
write all the details—including
your phone number—to:
Manager, Consumer Relations
Hotpoint
Appliance Park
Louisville, Kentucky 40225
Finally, if your problem is still not
resolved, write:
Major Appliance
Consumer Action Panel
20 North Wacker Drive
Chicago, Illinois 60606
This panel, known as MACAP, is a
group of independent consumer
experts under the sponsorship of
several industry associations. Its
purpose is to study practices and
advise the industry of ways to im-
prove customer service. Because
MACAP is free of industry control
and influence, it is able to make
impartial recommendations and
consider each case individually.
:1
.-l
Yournew appliance is a well
designed and en~!neered product,
Before it left the factory, it
Weni
through rigorous tests, to detect
manufacturing defects. And you
have a written, one-year
full war-
ranty to protect you against any
manufacturing defects. (See back
page of this book for warranty
details.)
Now you can haVethe same
troubie-free and surprise-free
service beyond the warranty
period, You can buy a Hotpoint
Service Contract. For one low fee
usually just pennies a day. . .
Hotpoint will take care of any
operating repairs your appliance
needs—both parts and labor. You
are protected for the length of your
contract. Even when costs go up,
you pay nothing more.
ant more information?There’s
o obligation. Youcan get infor-
mation on Service Contracts any
“me.Just write your name and
dress, date of installation, and
~hemode! and serial number of
. your appliance and send to:
Manager, Service Contracts
Hotpoint
Appliance Park
!-ouisviiie, Kentucky 40225
the
If you’re the kind of person who
Fteplm.3emen$Parts
likes to do-it-yourself—or if you’re
When repairing your appliance, we
interested in saving money on out-
recommend using authorized
of-warranty repairs—Hotpoint now Hotpoint replacement parts. Each
offers some real help:
part is packaged in a color coded
Step-by-Step Repair Manual
box with:
You can use this manual to solve
e ea$y parts identjfi~ation
your manual contains-important
@step-by-step instructions
do-it-yourself information:
~ recommendedtools
e chartsto help you diagnose
. . 1
Yto understandinstructions Repair
iVianUals and i%~ts” “
~
ste~-bv-ste~ ~hotos with renair
You can purchase Hotpoint repair
I
~ a skill levelindex
your appliance from authorized
participating Hotpoint dealers.
QJthe recommendedtools needed “ - ‘
to perform repairs
NOTE: Of course, repairs should
be attempted only by individuals
possessing adequate backgrounds
of electrical, electronic and
mechanical experience. Any
attempt to repair a major appliance
may result in personal injury and
property damage.
Save proof of original purchasedate such asyour salesslip or cancelled checkto establishwart-antyperiod.
—
$&Jp~jt$~”!f$
FULL ONE-WEAR
This warranty is extended to the
Forone year from dateof original
original purchaserandany
succeed-
purchase, we will provide, free of
ing owner for products purchased
charge, parts and
servicelabor in
for ordinary homeusein the 48
your hometo repair or replaceany ‘ain’and ‘tatesI ‘awaii and
partot the rangethat fails because ‘ashlngton~ ‘“c. ‘n ‘Iaska ‘he
of a manufacturing defect.
warranty @the sameexceptthat it
is LIMITED becauseyou mustpay
to ship the product to the service
shopor for the servicetechnician’s
travel coststo your home,
All warranty servicewill beprovided
by our FactoryServiceCentersor
by out’franchised CustomerCare@
servicersduring normal working
hours. Checkthe White Pagesfor
HOTPOINTFACTORYSERVICE.
Lookin the YellowPagesfor
HOTPOINTCUSTOMERCARE@
SERVICEor GENERALELiXTRIC-
HOTP(31NTCUSTOMERCARE@
SERVICE.
~$j$jilj~ ~~ ~~~ s Service trips to your hometo
e
Replacement of housefUSeS
teach you how to use the product.
or
resetting of circuit breakers.
Readyour Useand Carematerial.
@Faiiureof the product if it is
If you then haveany questions
usedfor other than its intended
about operating the product,
purposeor usedcommercially.
please6ontact your dealeror our
~
Damagetoproduct caused
Consumer Affairs
office at the
by accident, fire, floods or acts
address below,
of God.
or call, toll free;
WARRANTORIS NOT RESPON-
The GE Answer Center’”
SIBLE
FOR CONSEQUENTIAl-
800.626.2000
DAMAGES.
consumer information service
* improper installation.
If you havean installation problem,
contact your dealer or installer.
Youare responsible for providing
adequate electrical, exhausting
and other connecting facilities.
Some states do not allow the exclusion or limitation of incidental or consequential damages, so the above limitation
or exclusion may not apply to you. This warranty gives you specific legal rights, and you may also haveother rights
which vary from state to state. To know what your legal rights are in your state, consult your local or state consumer
affatrs office or your state’s Attorney General.
Warrantoc General Electric Company
if fdwr help is needed concerning this warranty, contact:
Q
;$g~<
NW9ager–(kmx.mer Affairs, General Ekctric Company, Appliance Park, Louisville,KY
40225
.“*+gzz
(
Part IUO. 862A724 P29 Rev. 1
PIJh. No. 39-4454”1

