www.klarstein.com
PAOLO
Dunstabzugshaube
Range Hood
Campana extractora
Hotte aspirante
Cappa aspirante
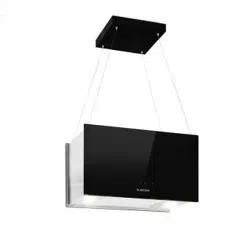
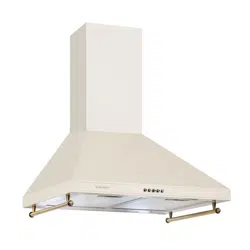
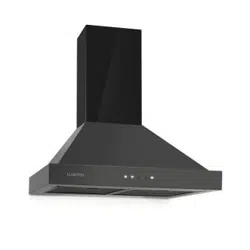
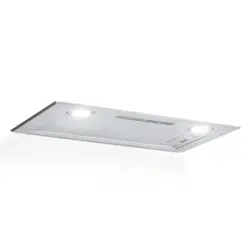
10032841 10033748 10033749 10033750

3
DE
Sehr geehrter Kunde,
wir gratulieren Ihnen zum Erwerb Ihres Gerätes. Lesen Sie
die folgenden Hinweise sorgfältig durch und befolgen Sie
diese, um möglichen Schäden vorzubeugen. Für Schäden,
die durch Missachtung der Hinweise und unsachgemäßen
Gebrauch entstehen, übernehmen wir keine Haftung. Scannen
Sie den folgenden QR-Code, um Zugriff auf die aktuellste
Bedienungsanleitung und weitere Informationen rund um das
Produkt zu erhalten.
INHALTSVERZEICHNIS
Sicherheitshinweise4
Installation6
Tastenfunktionen8
Reinigung und Pege9
Fehlersuche und Fehlerbehebung10
Hinweise zum Umweltschutz11
Produktdatenblatt12
Hinweise zur Entsorgung14
Hersteller & Importeur (UK)14
Safety Instructions16
TECHNISCHE DATEN
Artikelnummer
10032841, 10033748, 1033749,
10033750
Stromversorgung 220-240 V ~ 50/60 Hz
Hinweis: Zu dieser Dunstabzugshaube können Sie unter der Artikelnummer
10032843 zusätzlich einen Aktivkohlelter erwerben. Besuchen Sie dafür unsere
Webseite: www.elektronik-star.de
English 15
Español 27
Français 39
Italiano 51

4
DE
SICHERHEITSHINWEISE
• Lesen Sie sich alle Hinweise vor der Benutzung sorgfältig durch und bewahren Sie
die Bedienungsanleitung zum späteren Nachschlagen gut auf.
• Die Montagearbeiten dürfen nur von einer Elektrofachkraft oder einer qualizierten
Person durchgeführt werden. Bevor Sie die Dunstabzugshaube verwenden, stellen
Sie sicher, dass die Spannung (V) und die auf der Dunstabzugshaube angegebene
Frequenz (Hz) der Spannung und Frequenz der Stromversorgung in Ihrem Haushalt
entsprechen.
• Für Schäden, die durch unsachgemäßen Gebrauch und unsachgemäße Installation
entstehen, übernehmen wir keine Haftung.
• Kinder unter 8 Jahren dürfen die Dunstabzugshaube nicht benutzen.
• Das Gerät ist nicht für den kommerziellen Gebrauch, sondern nur für Gebrauch im
Haushalt und in ähnlichen Umgebungen vorgesehen.
• Reinigen Sie das Gerät und den Filter regelmäßig, damit das Gerät immer efzient
arbeitet.
• Ziehen Sie vor der Reinigung immer den Stecker aus der Steckdose.
• Reinigen Sie das Gerät genau wie in der Bedienungsanleitung angegeben.
• Verwenden Sie unter der Abzugshaube kein offenes Feuer.
• Falls das Gerät nicht normal funktioniert, wenden Sie sich an den Hersteller oder
einen Fachbetrieb.
• Kinder ab 8 Jahren, psychisch, sensorisch und körperlich eingeschränkte Menschen
dürfen das Gerät nur benutzen, wenn sie vorher von einer für sie verantwortlichen
Aufsichtsperson ausführlich mit den Funktionen und den Sicherheitsvorkehrungen
vertraut gemacht wurden und die damit verbundenen Risiken verstehen.
• Falls das Netzkabel oder der Stecker beschädigt sind, müssen sie vom Hersteller,
einem autorisierten Fachbetrieb oder einer ähnlich qualizierten Person ersetzt
werden.
• Wenn die Dunstabzugshaube mit Herden verwendet wird, die Gas oder andere
Brennstoffe verbrennen, muss eine ausreichende Belüftung des Raumes vorhanden
sein.
• Flambieren Sie nicht unter der Abzugshaube.
• Achtung: Die Geräteoberäche kann während des Betriebs heiß werden.
Wichtige Hinweise zur Installation
• Die Luft darf nicht in einen Abzug abgeleitet werden, der zum Absaugen von
Rauchgasen von Gas- oder anderen Brennstoffen verwendet wird (gilt nicht für
Geräte, die nur die Luft in den Raum zurückführen).
• Beachten Sie alle regionalen Vorschriften zum Einbau von Entlüftungsanlagen.

5
DE
Wichtige Hinweise zum Abluftbetrieb
WARNUNG
Vergiftungsgefahr durch zurückgesaugte Abgase! Betreiben Sie das
Gerät nicht im Abluftbetrieb, wenn es zusammen mit einer
raumluftabhängigen Feuerstätte betrieben wird und keine
ausreichende Luftzirkulation garantiert wird.
Raumluftabhängige Feuerstätten wie Gas-, Öl-, Holz- oder Kohleheizungen, Boiler oder
Durchlauferhitzer beziehen die Luft aus dem Raum und führen sie durch ein Abluftrohr
oder einen Kamin ins Freie. Im Abluftbetrieb wird der Küche und den benachbarten
Räumen Luft entzogen. Ohne ausreichende Zuluft entsteht ein Unterdruck. Giftige
Gase aus dem Kamin oder Abluftrohr können dabei in die Wohnräume zurückgesaugt
werden.
• Achten Sie darauf, dass ausreichend Frischluftzufuhr garantiert ist und die Luft
zirkulieren kann.
• Ein Zuluft-/Abluftmauerkasten reicht nicht aus, um die Einhaltung des Grenzwertes
sicherzustellen.
Ein gefahrloser Betrieb ist nur dann möglich, wenn der Unterdruck am Standort der
Feuerstätte 4 Pa (0,04 mbar) nicht überschreitet. Das erreichen Sie, wenn durch nicht-
verschließbare Öffnungen in Türen und Fenstern in Verbindung mit einem Zuluft-/
Abluftmauerkasten die zur Verbrennung benötigte Luft nachströmen kann. Lassen
Sie sich in jedem Fall von einem Schornsteinfegermeister beraten und den gesamten
Lüftungsverbund des Hauses beurteilen. Er kann ihnen gegebenenfalls die nötigen
Maßnahme zur Belüftung nennen.
Wird die Dunstabzugshaube ausschließlich im Umluftbetrieb eingesetzt, ist der Betrieb
ohne Einschränkung möglich.
Wichtige Hinweis zur Demontage des Geräts
• Die Demontage gleicht der Installation/Montage in umgekehrter Reihenfolge.
• Nehmen Sie sich bei der Demontage eine zweite Person zu Hilfe, um Verletzungen
zu vermeiden.
6
DE
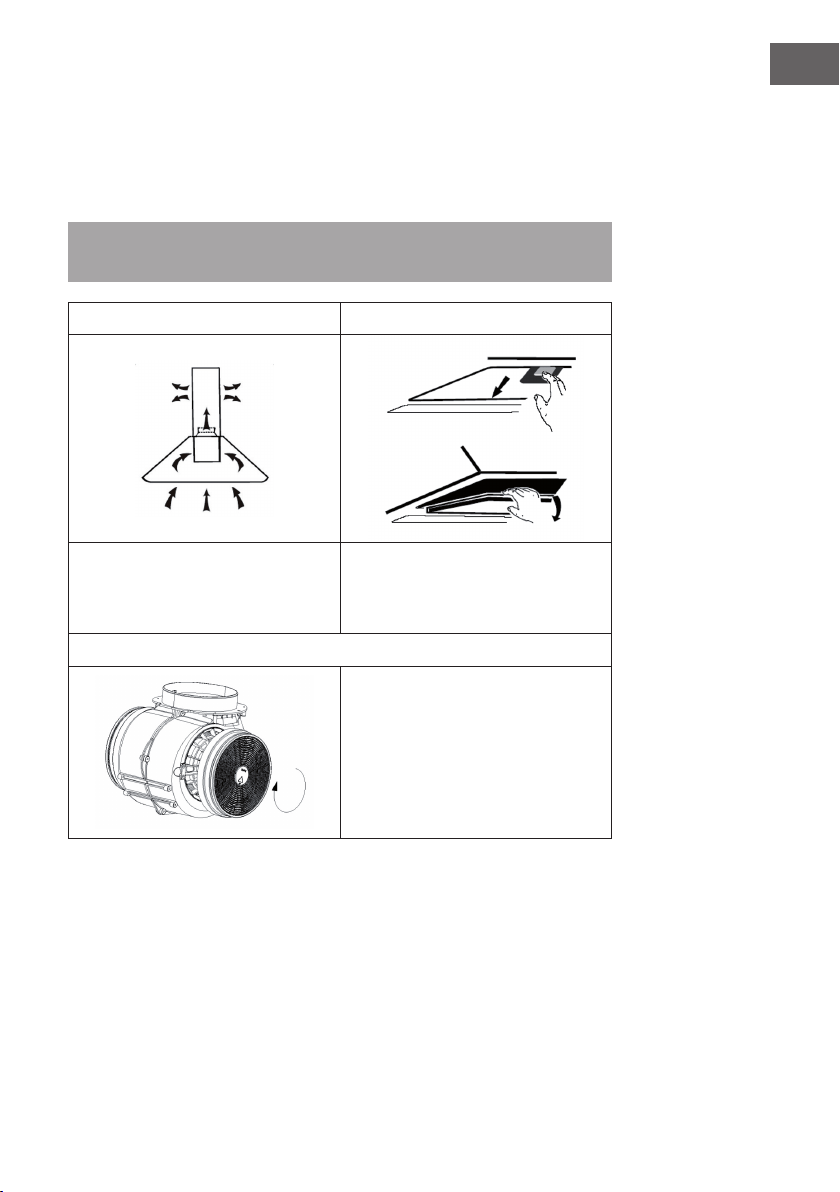
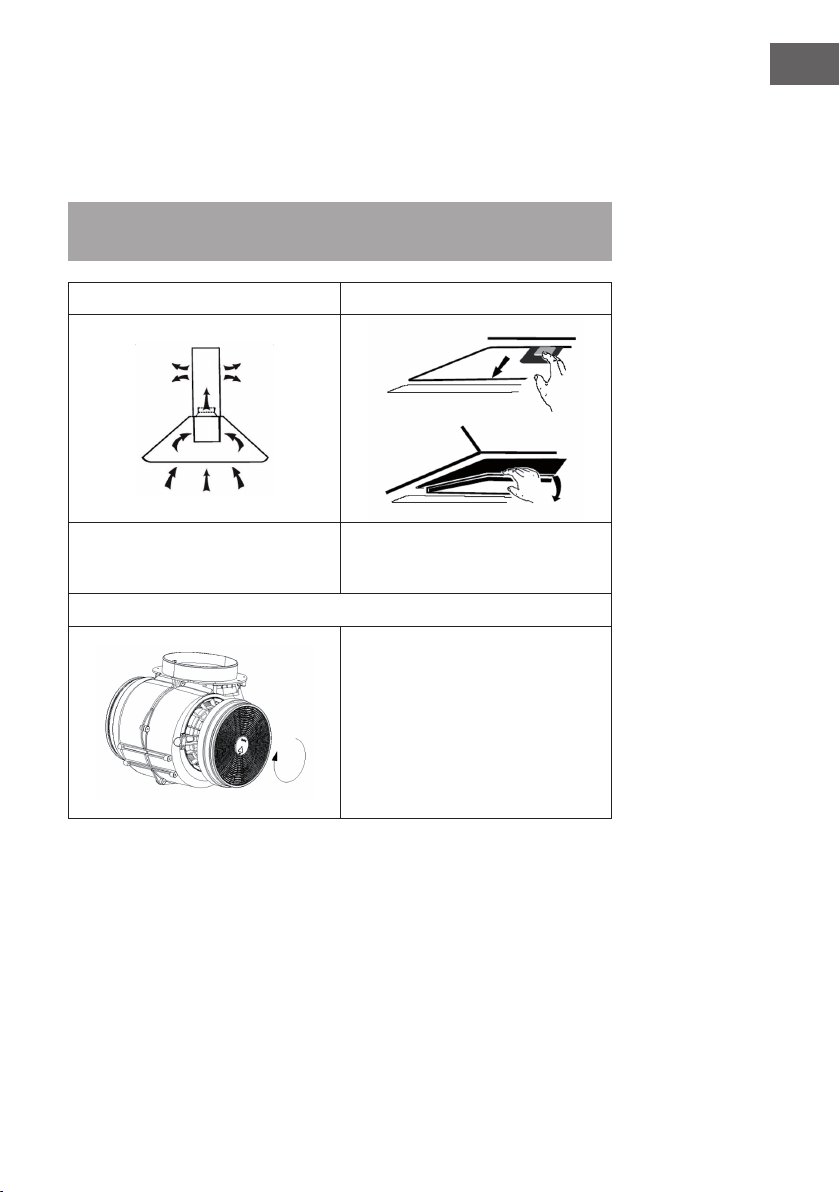
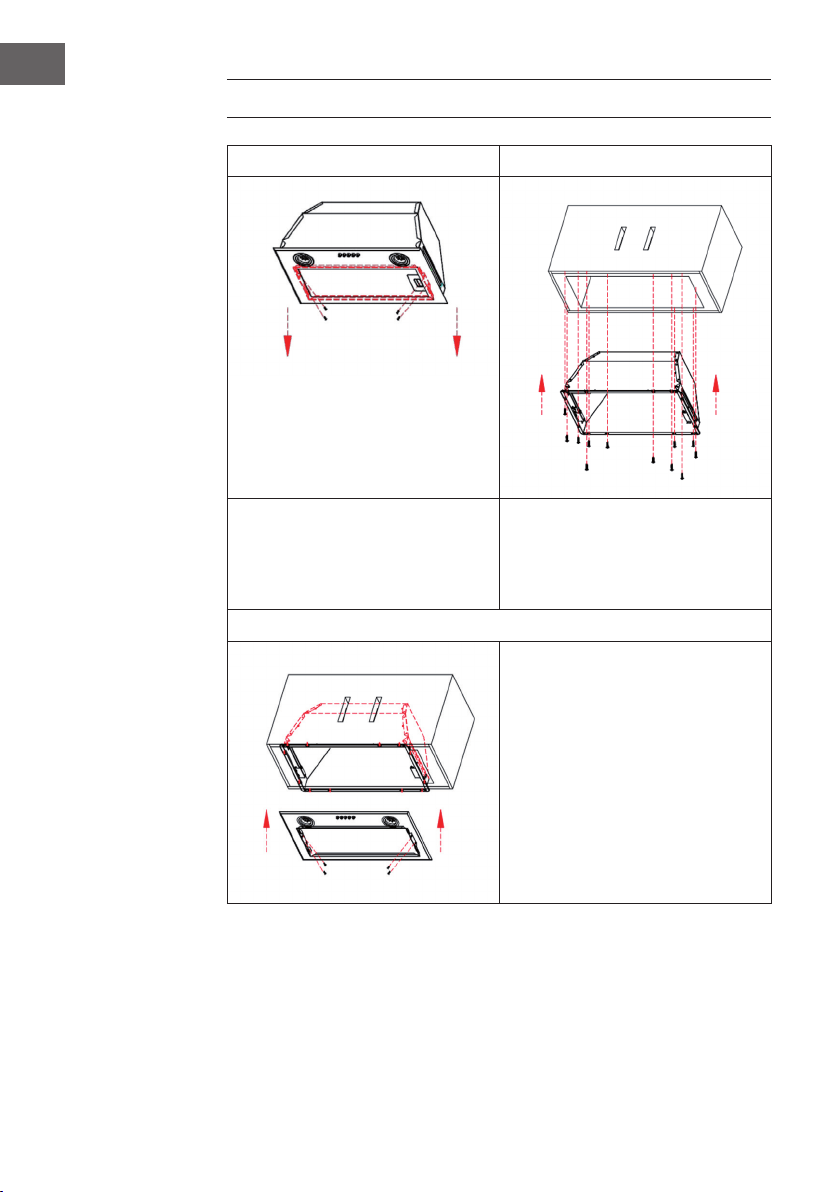
INSTALLATION
1 2
Drücken Sie den Filterverschluss, um
den Filter zu entfernen. Lösen Sie die
Schrauben in den beiden Seiten der
Platte und nehmen Sie die Platte ab.
Bereiten Sie die entsprechenden
Einbaulöcher im Schrank. Setzen Sie
die Dunstabzugshaube unten an den
Schrank und befestigen Sie sie mit 12
Kreuzschlitz-Blechschrauben aus der
Zubehörtasche.
3
Montieren Sie nach dem Befestigen
der Dunstabzugshaube die Platte
mit Schraube und befestigen Sie
anschließend die Filter.
7
DE
Installation mit Innenentlüftung
Falls Sie nicht über einen Außenabzug verfügen, benötigen Sie kein Abluftrohr. Die
Installation entspricht der Installation mit Außenentlüftung.
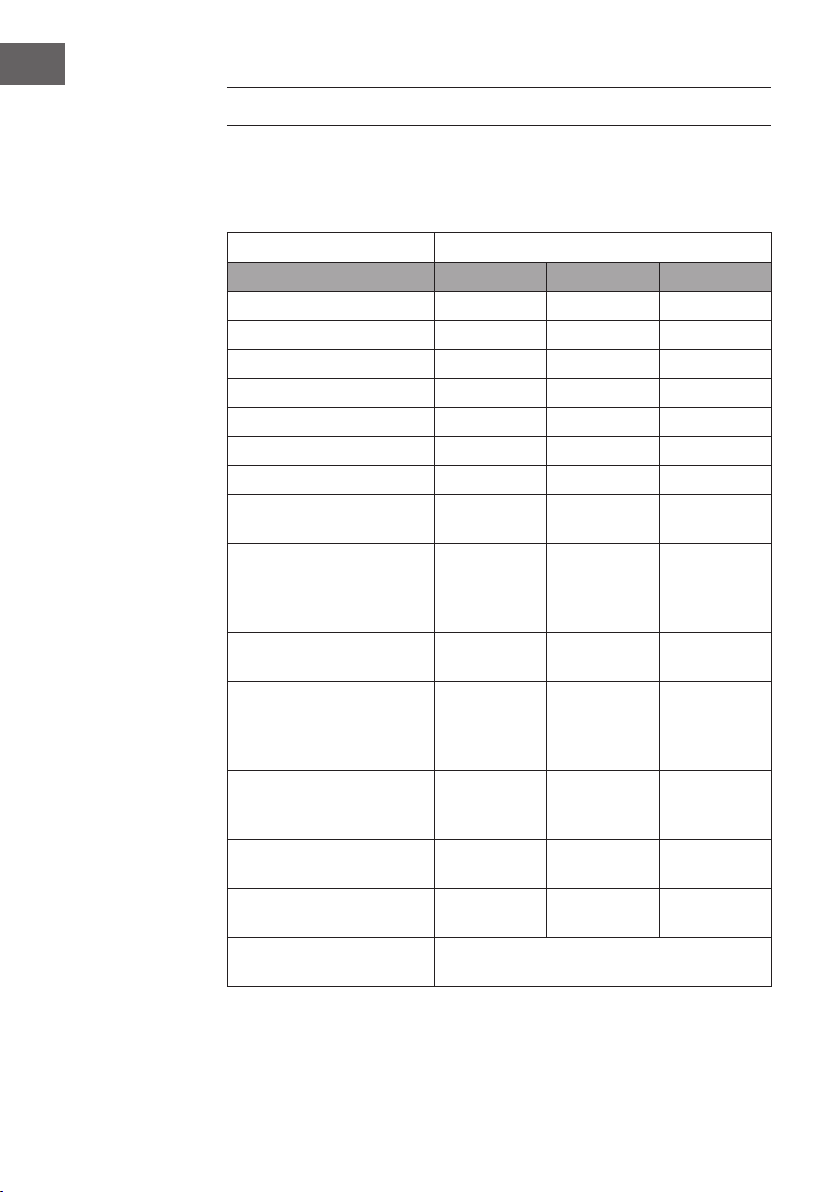
Aktivkohlelter einbauen
Hinweis: Ein Aktivkohlelter (Artikelnummer 10032843) gehört nicht zum
Lieferumfang. Sie können ihn aber zur Abzugshaube dazukaufen.
1 2
Mit einem Aktivkohlelter lassen sich
bei innenentlüfteten Abzugshauben
unangenehme Essensgerüche aus der
Luft ltern.
Um den Filter installieren zu können,
müssen sie zuerst den Fettlter entfernen.
Drücken Sie auf den Verschluss und
ziehen Sie ihn herunter.
3
Stecken Sie den Aktivkohlelter auf
den Lüfter und drehen Sie ihn im
Uhrzeigersinn fest. Wiederholen
die Prozedur auf der anderen Seite.
Versichern Sie sich, dass der Filter fest
sitzt, andernfalls könnte er sich lösen
und eine Gefahr darstellen. Hinweis: Bei
installiertem Aktivkohlelter nimmt die
Absaugleistung etwas ab.
8
DE
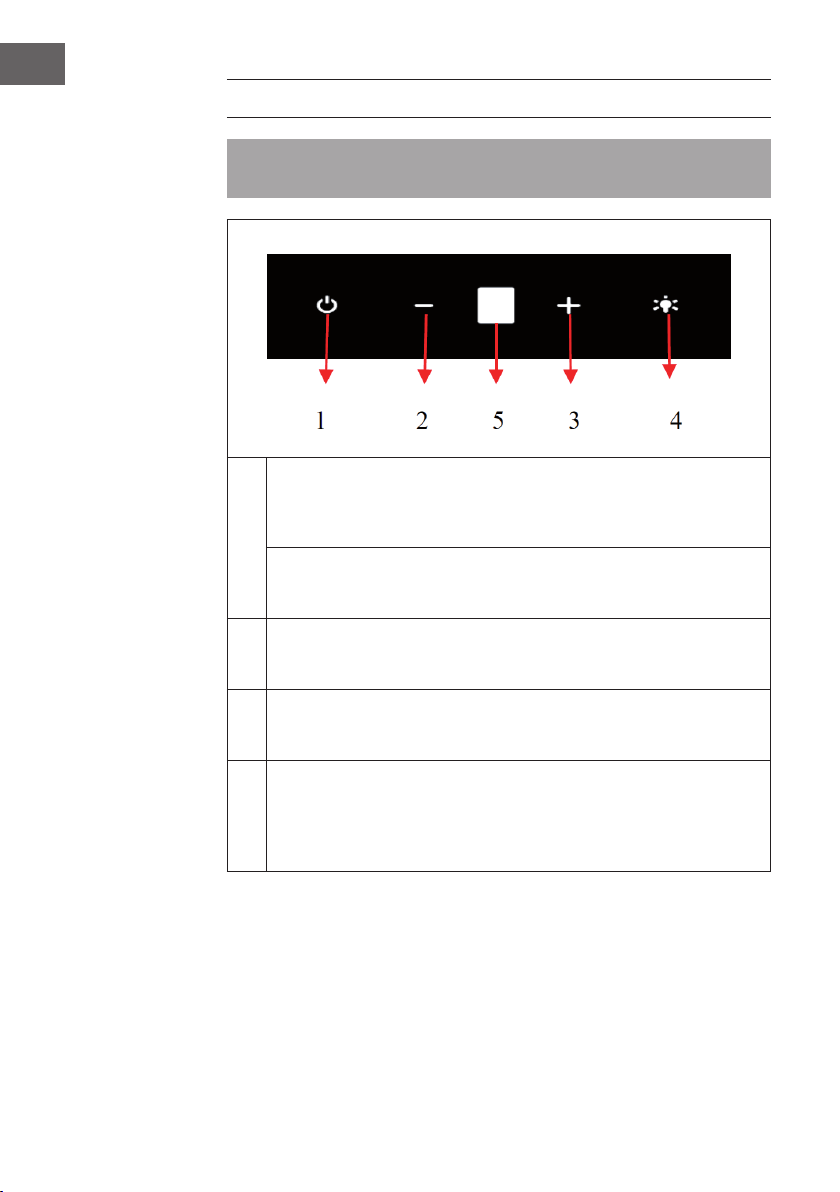
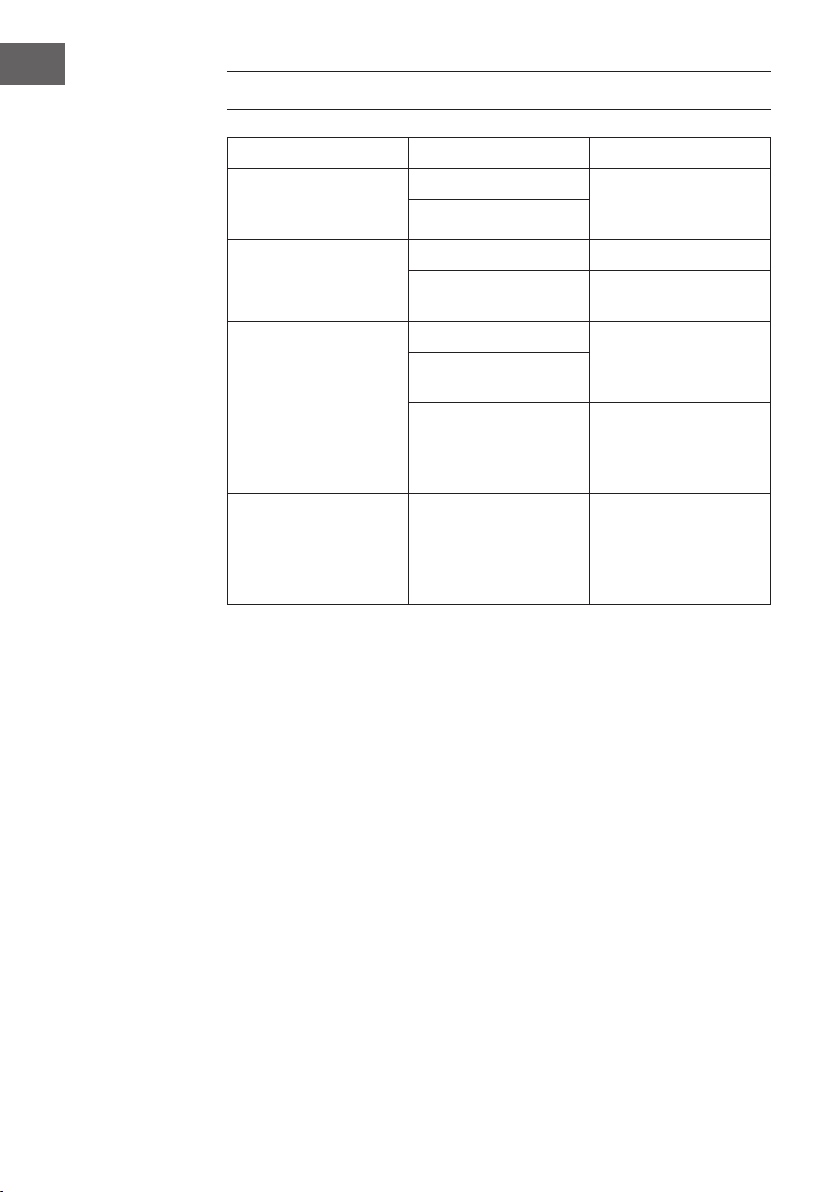
TASTENFUNKTIONEN
Hinweis: Um das Gerät einzuschalten, drücken Sie lang auf die Taste (3) oder (4)
und wählen Sie dann die gewünschte Funktion aus.
1
Nach dem Einschalten leuchten alle Anzeigen auf und erlöschen dann,
begleitet von einem Piepton. Im eingeschalteten Zustand leuchtet Taste (1)
und das Display ist an. Jedes Mal, wenn eine Taste gedrückt wird, ertönt ein
Summer. Das Licht leuchtet weiß.
Drücken Sie im Standby-Modus kurz auf die Taste, um den Motor auf
Stufe 1 zu starten. Drücken Sie erneut auf die Taste, um den Motor wieder
auszuschalten.
2
Drücken Sie im eingeschalteten Zustand kurz auf die Taste (-), um die
Geschwindigkeit zu reduzieren. Die Geschwindigkeit kann maximal auf Stufe 1
reduziert werden.
3
Drücken Sie im eingeschalteten Zustand kurz auf die Taste (+), um die
Geschwindigkeit zu erhöhen. Die Geschwindigkeit kann maximal auf Stufe 3
erhöht werden.
4
Drücken Sie im Standby-Modus oder im eingeschalteten zustand auf die
Licht-Taste, um das Licht ein- und auszuschalten. Halten Sie die Taste im
eingeschalteten Zustand gedrückt, das Display blinkt und das Gerät geht mit
einer Verzögerung von 5 Minuten aus. Wenn Sie in dieser Zeit die (+) oder (-)
Taste drücken, wird die Abschaltung automatisch aufgehoben.

9
DE
REINIGUNG UND PFLEGE
Monatliche Reinigung der Fettlter
Reinigen Sie den Filter jeden Monat, um Brandgefahr zu vermeiden. Der Filter sammelt
Fett, Rauch und Staub und beeinusst somit die Efzienz der Dunstabzugshaube. Wenn
der Filter nicht gereinigt wird, sammeln sich dort Fettreste. Reinigen Sie den Filter mit
Wasser und etwas Spülmittel und lassen Sie ihn hinterher an der Luft trocknen.
Jährlicher Wechsel der Aktivkohlelter
Wenn das Gerät als Umluftgerät genutzt wird (nicht nach außen entlüftet), muss der
Aktivkohlelter mindestens einmal im Jahr ausgetauscht werden, je nachdem, wie häug
die Dunstabzugshaube verwendet wird.
Lampe austauschen
1 Schalten Sie das Gerät aus und ziehen Sie den Stecker aus der Steckdose.
2 Schrauben Sie die 2 Schrauben der Lampenabdeckung heraus und nehmen Sie sie ab.
3 Schrauben Sie die Lampe heraus und ersetzen Sie sie durch eine des selben Typs.
10
DE
FEHLERSUCHE UND FEHLERBEHEBUNG
Fehler Mögliche Ursache Lösung
Das Licht geht an aber der
Lüfter arbeitet nicht.
Das Lüfterblatt ist kaputt. Schalten Sie das Gerät
aus und lassen Sie es
von einem Fachbetrieb
untersuchen.
Der Motor ist beschädigt.
Das Licht und der Lüfter
funktionieren nicht.
Die Birne ist
durchgebrannt.
Ersetzen Sie die Birne
durch eine gleichwertige.
Stecker nicht eingesteckt. Stecken Sie den Stecker
ein.
Das Gerät vibriert stark. Das Lüfterblatt ist kaputt. Schalten Sie das Gerät
aus und lassen Sie es
von einem Fachbetrieb
untersuchen.
Motor nicht richtig
angebracht.
Das Gerät hängt nicht
sicher an der Wand.
Nehmen Sie das Gerät ab
und versichern Sie sich,
dass die Aufhängung gut
sitzt.
Die Absaugleistung ist
schlecht.
Zu großer Abstand
zwischen Abzugshaube
und Herd.
Hängen Sie die
Abzugshaube so auf, dass
der Abstand zwischen
Herd und Abzug 65-75
cm beträgt.

11
DE
HINWEISE ZUM UMWELTSCHUTZ
• Achten Sie während des Kochens auf eine ausreichende Luftzufuhr, damit die
Dunstabzugshaube efzient und mit einem geringen Betriebsgeräusch arbeiten kann.
• Passen Sie die Gebläsedrehzahl an die beim Kochen entstehende Dampfmenge
an. Verwenden Sie den Intensivmodus nur bei Bedarf. Je niedriger die
Gebläsedrehzahl ist, desto weniger Energie wird verbraucht.
• Wenn beim Garen große Mengen Dampf entstehen, wählen Sie rechtzeitig eine
höhere Gebläsedrehzahl. Wenn sich der Kochdampf bereits in der Küche verteilt
hat, muss die Dunstabzugshaube länger betrieben werden.
• Schalten Sie die Dunstabzugshaube aus, wenn Sie sie nicht mehr benötigen.
• Schalten Sie die Beleuchtung aus, wenn Sie diese nicht mehr benötigen.
• Reinigen Sie den Filter in regelmäßigen Abständen und tauschen Sie ihn ggf. aus,
um die Effektivität des Lüftungssystems zu erhöhen und Brandgefahr zu vermeiden.
• Setzen Sie beim Kochen immer den Deckel auf, um Kochdampf und Kondenswasser
zu reduzieren.
12
DE
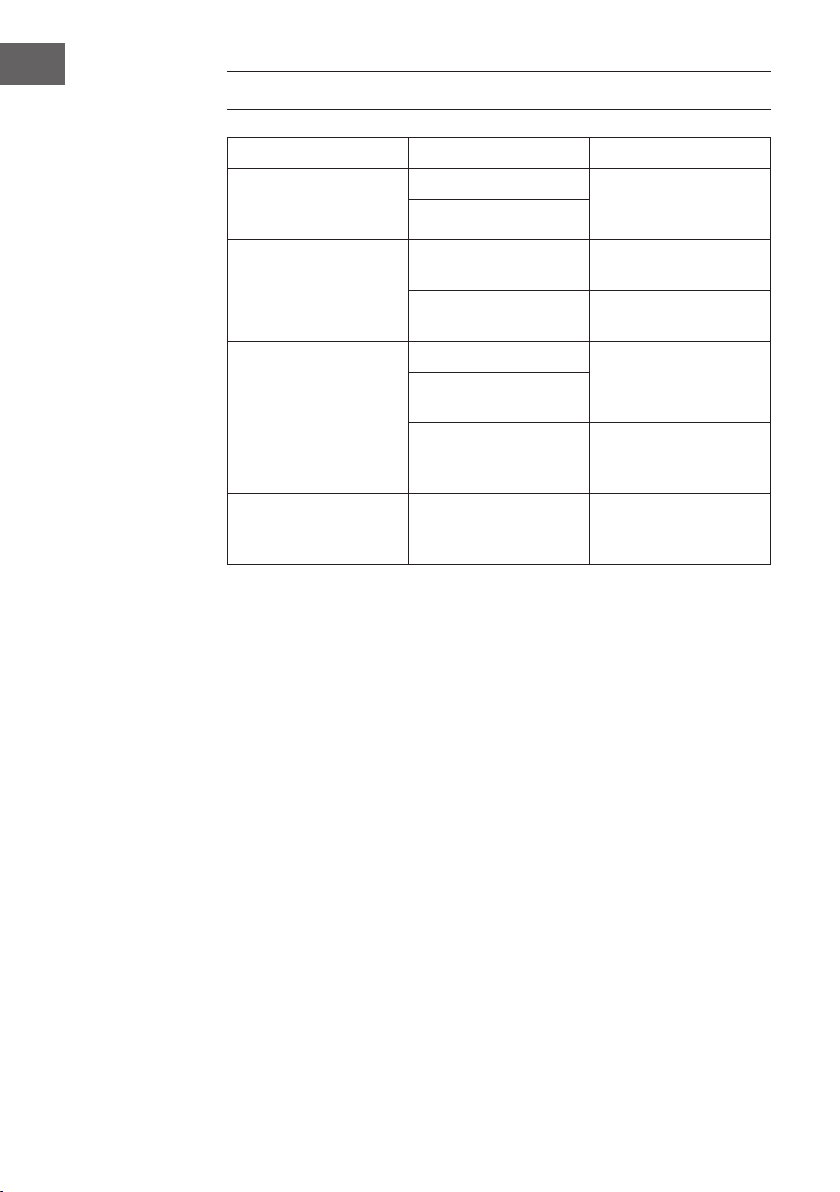
PRODUKTDATENBLATT
Angaben nach Verordnung (EU) Nr. 65/2014
Mess- und Berechnungsmethoden nach EN 61591:1997+A1:2006+A2:2011+A11:201
4+A12:2015
Artikelnummer
10033750 10033748 10033749 10032841
Bezeichnung Symbol Wert Einheit
Jährlicher Energieverbrauch AEC
hood
42,9 kWh/Jahr
Energieefzienzklasse A
uiddynamische Efzienz FDE
hood
28,5
Klasse für die uiddynamische
Efzienz
A
Beleuchtungsefzienz LE
hood
48,6 Lux/W
Beleuchtungsefzienzklasse A
Fettabscheidegrad GFE
hood
79,7 %
Klasse für den Fettabscheidegrad C
Luftstrom bei minimaler und bei
maximaler Geschwindigkeit im
Normalbetrieb, ausgenommen den
Betrieb auf der Intensivstufe oder
Schnelllaufstufe
399,0 / 592,7 m³/h
Luftstrom im Betrieb auf der
Intensivstufe oder Schnelllaufstufe
- m³/h
A-bewertete Luftschallemissionen
bei minimaler und maximaler
verfügbarer Geschwindigkeit im
Normalbetrieb
60 / 72 dB
A-bewertete Luftschallemissionen
im Betrieb auf der Intensivstufe
oder Schnelllaufstufe
- dB
Leistungsaufnahme im Aus-Zustand P
o
0,44 W
Leistungsaufnahme im
Bereitschaftszustand
P
s
- W
Kontaktangaben Chal-Tec GmbH, Wallstraße 16, 10179, Berlin,
Deutschland
13
DE
Angaben nach Verordnung (EU) Nr. 66/2014
Mess- und Berechnungsmethoden nach EN 61591:1997+A1:2006+A2:2011+A11:201
4+A12:2015
Artikelnummer
10033750 10033748 10033749 10032841
Bezeichnung Symbol Wert Einheit
Jährlicher Energieverbrauch AEC
hood
42,9 kWh/Jahr
Zeitverlängerungsfaktor f 1,0
Fluiddynamische Efzienz FDE
hood
28,5
Energieefzienzindex EEI
hood
53,7
Gemessener Luftvolumenstrom im
Bestpunkt
Q
BEP
342,7 m³/h
Gemessener Luftdruck im Bestpunkt P
BEP
341 Pa
Maximaler Luftstrom Q
max
592,7 m³/h
Gemessene elektrische
Eingangsleistung im Bestpunkt
W
BEP
114,2 W
Nennleistung des
Beleuchtungssystems
W
L
3 W
Durchschnittliche
Beleuchtungsstärke des
Beleuchtungssystems auf der
Kochoberäche
E
middle
146 Lux
Gemessene Leistungsaufnahme im
Bereitschaftszustand
P
o
- W
Gemessene Leistungsaufnahme im
Aus-Zustand
P
s
0,44 W
Schallleistungspegel L
WA
72 dB
Kontaktangaben Chal-Tec GmbH, Wallstraße 16, 10179, Berlin,
Deutschland

14
DE
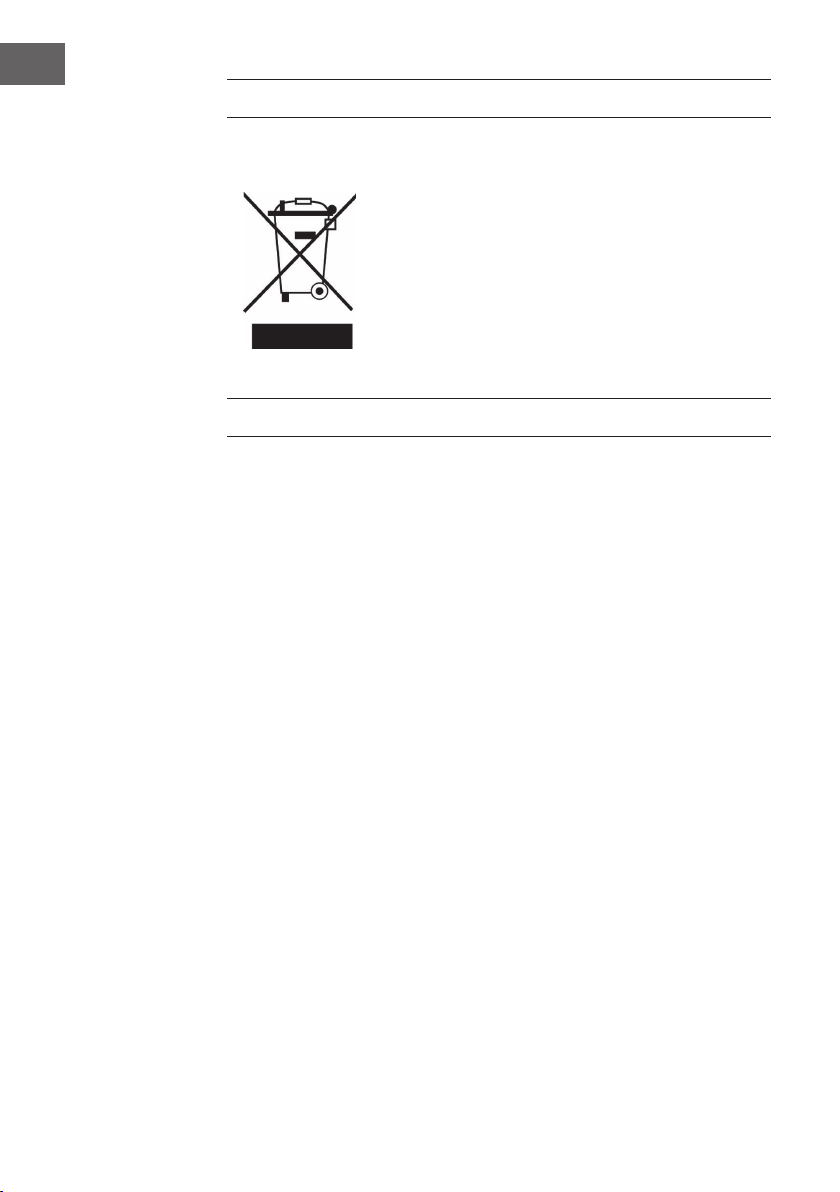
HINWEISE ZUR ENTSORGUNG
Wenn es in Ihrem Land eine gesetzliche Regelung zur
Entsorgung von elektrischen und elektronischen Geräten
gibt, weist dieses Symbol auf dem Produkt oder auf der
Verpackung darauf hin, dass dieses Produkt nicht im
Hausmüll entsorgt werden darf. Stattdessen muss es zu
einer Sammelstelle für das Recycling von elektrischen
und elektronischen Geräten gebracht werden. Durch
regelkonforme Entsorgung schützen Sie die Umwelt und die
Gesundheit Ihrer Mitmenschen vor negativen Konsequenzen.
Informationen zum Recycling und zur Entsorgung dieses
Produkts, erhalten Sie von Ihrer örtlichen Verwaltung oder
Ihrem Hausmüllentsorgungsdienst.
HERSTELLER & IMPORTEUR (UK)
Hersteller:
Chal-Tec GmbH, Wallstraße 16, 10179 Berlin, Deutschland.
Importeur für Großbritannien:
Chal-Tec UK limited
Unit 6 Riverside Business Centre
Brighton Road
Shoreham-by-Sea
BN43 6RE
United Kingdom
15
EN
Dear Customer,
Congratulations on purchasing this device. Please read the
following instructions carefully and follow them to prevent
possible damages. We assume no liability for damage caused
by disregard of the instructions and improper use. Scan the QR
code to get access to the latest user manual and more product
information.
CONTENT
Installation18
Key Functions20
Cleaning and Care21
Troubleshooting22
Notes on Environmental Protection23
Product Data Sheet24
Disposal Considerations26
Manufacturer & Importer (UK)26
TECHNICAL DATA
Item number
10032841, 10033748, 1033749,
10033750
Power supply 220-240 V ~ 50/60 Hz
Note: You can purchase an activated carbon lter separately for this cooker hood
under item number 10032843. Please visit our website: www.hi-tower.co.uk

16
EN
SAFETY INSTRUCTIONS
• Thank you for purchasing this cooker hood. Please read the instruction manual
carefully before you use the cooker hood, and keep it in a safe place.
• The installation work must be carried out by a qualied electrician or competent
person. Before you use the cooker hood, make sure that the voltage (V) and the
frequency (Hz) indicated on the cooker hood are exactly the same as the voltage
and the frequency in your home.
• The manufacturer and the agent will not bear any responsibility for the damage
caused by inappropriate installation and usage.
• Children under the age of 8 must not use the cooker hood.
• The appliance is not intended for commercial use, but only for household and
similar environments.
• The cooker hood and its lter mesh should be cleaned regularly in order to keep it
in good working order.
• Before cleaning, switch the power off at the main supply.
• Clean the cooker hood according to the instruction manual and keep the cooker
hood from the danger of burning.
• Prohibit putting the cooker hood by re.
• If the appliance does not function normally, contact the manufacturer or a specialist
company.
• This device may be only used by children 8 years old or older and persons with
limited physical, sensory and mental capabilities and / or lack of experience
and knowledge, provided that they have been instructed in use of the device by a
responsible person who understands the associated risks.
• If the supply cord is damaged, it must be replaced by the manufacturer, its service
agent or similarly qualied persons in order to avoid a hazard.
• If the range hood is used at the same time as appliances burning gas or other fuels,
the room must be adequately ventilated.
• Do not ambé under the range hood. Accessible parts may become hot when used
with cooking appliances.
Important hints on installation
• The air must not be discharged into a ue that is used for exhausting fumes from
appliances burning gas or other fuels (not applicable to appliances that only
discharge the air back into the room).
• Regulations concerning the discharge of air have to be fullled.
17
EN
Important notes about the extraction mode
WARNING
Risk of poisoning from exhaust gases sucked back. Never operate
the device in extraction mode simultaneously with an open flue
appliance when there is not adequate airflow guaranteed.
Open ue combustion equipment (for example, gas, oil, wood or coal- red heaters,
tankless water heaters, water heaters) pulls combustion air from the room and runs
it through an exhaust pipe or chimney to the outside. In the extraction mode, indoor
air is removed from the kitchen and the adjacent rooms - without suf cient air intake
this creates a vacuum. Toxic gases from the chimney or extraction ue can thereby be
sucked back into the living spaces.
• Always ensure that a suf cient supply of fresh air is guaranteed and that the air can
circulate.
• An air supply / extractor box alone does not ensure compliance with the limit
value.
Safe operation is only possible when the negative pressure in the room where the
appliance is located does not exceed 4 Pa (0.04 mbar). This can be achieved when
the air required for combustion can ow through openings that are not closable, for
example in doors, windows, in conjunction with an air supply / extractor box or
through other technical measures. In any case, consult a quali ed chimney sweep who
can assess the entire ventilation of your house and propose appropriate measures for
adequate ventilation.
If the hood is used exclusively in the recirculation mode, unrestricted operation is
possible.
Important note on disassembly of the device
• Disassembly is similar to installation/assembly in reverse order.
• Take a second person to help you during disassembly to avoid injuries.

18
EN
INSTALLATION
1 2
Push the lter lock to remove the lter,
lose the screws in the 2 sides of
panel and take off the panel.
Preparing the corresponding size
installation holes in the cabinet. Put the
range hood into the cabinet and x it
with 12 Cross slot countersunk head
tapping screws from the accessories bag.
3
After xing the range hood, install the
panel with screw and then x the lters.
19
EN
Installation (Vent inside)
If you do not have an outlet to the outside, exhaust pipe is not required and the
installation is similar to the one show in section “Installation (Vent outside)”.
Installing the Carbon Filter
Note: An activated carbon lter (item number 10032843) is not included. But you
can buy it as an extractor hood.
1 2
Activated carbon lter can be used to
trap odours.
In order to install the activated carbon
lter, the grease lter should be
detached rst. Press the lock and pull it
downward.
3
Plug the activated carbon lter into the
unit and turn it in clockwise direction.
Repeat the same on the other side.
Make sure the lter is securely locked.
Otherwise, it would loosen and cause
dangerous. When activated carbon
lter attached, the suction power will
be lower.

20
EN
KEY FUNCTIONS
Note: To turn on the unit, press and hold button (3) or (4), then select the desired
function.
1
After switching on, all indicators light up and then go out, accompanied by a
beep. When switched on, key (1) lights up and the display is on. Each time a
key is pressed, a buzzer sounds. The light is white.
In standby mode, briey press the button to start the engine at level 1. Press the
button again to stop the engine.
2
When the engine is switched on, briey press the (-) button to reduce the
speed. The speed can be reduced to a maximum of level 1.
3
Press the (-) button briey to increase the speed when the unit is switched on.
The speed can be increased to a maximum of level 3.
4
Press the light button in standby mode or in the on state to switch the light on
and off. Press and hold the button while the unit is switched on, the display will
ash and the unit will switch off with a delay of 5 minutes. If you press the (+) or
(-) button during this time, the shutdown is automatically cancelled.

21
EN
CLEANING AND CARE
Monthly Cleaning for Grease Filter
Clean the lter every month can prevent any risk of re. The lter collects grease,
smoke and dust, so the lter is directly affecting the efciency of the cooker hood. If not
cleaned, the grease residue (potential ammable) will saturate on the lter. Clean it with
household cleaning detergent.
Annual Cleaning for Activated Filter
Apply solely to unit that installed as a recirculation unit (not vented to the outside).
This lter traps odours and must be replaced at least once a year depending on how
frequent the cooker hood used.
Replacing Bulbs
1 Switch the unit off and unplug the appliance.
2 Remove the lamp cover by unscrewing the 2 screws.
3 Unscrew the incandescent bulb. Replace with the same type and rated bulb.
22
EN
TROUBLESHOOTING
Fault Cause Solution
Light on, but fan does not
work
The fan blade is jammed. Switch of the unit and
repair by qualied service
personnel only.
The motor is damaged.
Both light and fan do not
work
light bulb burn. Replace the bulb with
correct rating.
Power cord looses. Plug in to the power
supply again.
Serious Vibra-tion of the
unit
The fan blade is damaged. Switch of the unit and
repair by qualied service
personnel only.
The fan motor is not xed
tightly.
The unit is not hung
properly on the bracket.
Take down the unit and
check whether the bracket
is in proper location.
Suction per-formance not
good
Too long distance
between the unit and the
cooking plane
Readjust the distance to
65-75cm

23
EN
NOTES ON ENVIRONMENTAL PROTECTION
• During cooking, make sure that there is sufcient air supply so that the cooker hood
can operate efciently and with low operating noise.
• Adjust the fan speed to the amount of steam produced during cooking. Use the
intensive mode only when necessary. The lower the fan speed, the less energy is
consumed.
• If large amounts of steam are produced during cooking, select a higher fan speed
in good time. If the cooking steam has already dispersed in the kitchen, the cooker
hood must be operated longer.
• Switch off the cooker hood when you no longer need it.
• Switch off the lighting when you no longer need it.
• Clean the lter at regular intervals and replace it if necessary to increase the
effectiveness of the ventilation system and prevent re hazards.
• Always put the lid on when cooking to reduce cooking steam and condensation.
24
EN
PRODUCT DATA SHEET
Information according to Regulation (EU) No. 65/2014
Measurement and calculation methods according to EN 61591:1997+A1:2006+A2:20
11+A11:2014+A12:2015
Item number
10033750 10033748 10033749 10032841
Description Symbol Value Unit
Annual Energy Consumption AEC
hood
42,9 kWh/Year
Energy Efciency class A
Fluid Dynamic Efciency FDE
hood
28,5
Fluid Dynamic Efciency class A
Lighting Efciency LE
hood
48,6 Lux/W
Lighting Efciency class A
Grease Filtering Efciency GFE
hood
79,7 %
Grease Filtering Efciency class C
air ow at minimum and maximum
speed in normal use, intensive or
boost excluded
399,0 / 592,7 m³/h
air ow at intensive or boost setting - m³/h
airborne acoustical A-weighted
sound power emissions at minimum
and maximum speed available in
normal use
60 / 72 dB
airborne acoustical A-weighted
sound power emissions at intensive
or boost setting
- dB
power consumption in off mode P
o
0,44 W
power consumption in standby
mode
P
s
- W
Contact details Chal-Tec GmbH, Wallstraße 16, 10179, Berlin, Germany
25
EN
Information according to Regulation (EU) No. 66/2014
Measurement and calculation methods according to EN 61591:1997+A1:2006+A2:20
11+A11:2014+A12:2015
Item number
10033750 10033748 10033749 10032841
Description Symbol Value Unit
Annual Energy Consumption AEC
hood
42,9 kWh/Year
Time increase factor f 1,0
Fluid Dynamic Efciency FDE
hood
28,5
Energy Efciency Index EEI
hood
53,7
Measured air ow rate at best
efciency point
Q
BEP
342,7 m³/h
Measured air pressure at best
efciency point
P
BEP
341 Pa
Maximum air ow Q
max
592,7 m³/h
Measured electric power input at
best efciency point
W
BEP
114,2 W
Nominal power of the lighting
system
W
L
3 W
Average illumination of the lighting
system on the cooking surface
E
middle
146 Lux
Measured power consumption in
standby mode
P
o
- W
Measured power consumption
off mode
P
s
0,44 W
Sound power level L
WA
72 dB
Contact details Chal-Tec GmbH, Wallstraße 16, 10179, Berlin, Germany

26
EN
DISPOSAL CONSIDERATIONS
If there is a legal regulation for the disposal of electrical
and electronic devices in your country, this symbol on the
product or on the packaging indicates that this product must
not be disposed of with household waste. Instead, it must be
taken to a collection point for the recycling of electrical and
electronic equipment. By disposing of it in accordance with
the rules, you are protecting the environment and the health of
your fellow human beings from negative consequences. For
information about the recycling and disposal of this product,
please contact your local authority or your household waste
disposal service.
MANUFACTURER & IMPORTER (UK)
Manufacturer:
Chal-Tec GmbH, Wallstrasse 16, 10179 Berlin, Germany.
Importer for Great Britain:
Chal-Tec UK limited
Unit 6 Riverside Business Centre
Brighton Road
Shoreham-by-Sea
BN43 6RE
United Kingdom

27
ES
Estimado cliente,
Le felicitamos por la adquisición de este producto. Lea
atentamente las siguientes instrucciones y sígalas para evitar
posibles daños. No asumimos ninguna responsabilidad por los
daños causados por el incumplimiento de las instrucciones y el
uso inadecuado. Escanee el siguiente código QR para obtener
acceso a la última guía del usuario y más información sobre el
producto.
ÍNDICE DE CONTENIDOS
Indicaciones de seguridad28
Instalación30
Funciones de los botones32
Limpieza y mantenimiento33
Detección y resolución de problemas34
Notas para cuidar del medio ambiente35
Ficha técnica del producto36
retirada del aparato38
Fabricante e importador (Reino Unido)38
DATOS TÉCNICOS
Número de artículo
10032841, 10033748, 1033749,
10033750
Fuente de alimentación 220-240 V ~ 50/60 Hz
Nota: Para esta campana extractora puede adquirir un ltro de carbón activo con el
número de artículo 10032843. Para ello, visite nuestra página web:
www.elektronik-star.es

28
ES
INDICACIONES DE SEGURIDAD
• Lea atentamente todas las indicaciones y conserve este manual para consultas
posteriores.
• Los trabajos de montaje deben ser realizados solamente por un electricista u otro
profesional. Antes de utilizar la campana extractora, asegúrese de que la tensión
(V) y la frecuencia indicada en la campana extractora (Hz) coinciden con la
tensión (V) y frecuencia (Hz) de su suministro eléctrico.
• La empresa no se responsabiliza de los daños ocasionados por un uso o
instalación indebida del producto.
• Los niños menores de 8 años no deben utilizar la campana extractora.
• Este aparato no ha sido concebido para un uso comercial, sino doméstico o para
entornos similares.
• Limpie el aparato y el ltro con regularidad para que el aparato funcione siempre
de manera eciente. Desconecte el enchufe antes de limpiar el aparato.
• Limpie el aparato solamente según se describe en estas instrucciones.
• No utilice fuentes de ignición bajo la campana extractora.
• Si el aparato no funciona correctamente, contacte inmediatamente con el
fabricante.
• Este aparato puede ser utilizado por niños mayores de 8 años y personas con
discapacidades físicas, sensoriales y mentales y/o con falta de experiencia y
conocimientos, siempre y cuando hayan sido instruidos sobre el uso del aparato y
comprendan los peligros y riesgos asociados.
• Si el cable de alimentación o el enchufe están dañados, deberán ser sustituidos por
el fabricante, un servicio técnico autorizado o una persona igualmente cualicada.
• Si utiliza la campana extractora con hornillos y entren en combustión el gas u otras
sustancias combustibles, deberá garantizar una buena ventilación de la sala.
• No amee nada bajo la campana extractora.
• Advertencia: La supercie del aparato puede alcanzar temperaturas muy elevadas
durante el funcionamiento.
Indicaciones importantes de instalación
• El aire no puede desviarse a un tiro de salida que se emplee para evacuar humos
de gases u otras sustancias inamables (no se aplica para aparatos que solo
desvíen el aire a la sala).
• Siga todas las disposiciones locales para montar las instalaciones de ventilación.
29
ES
Notas importantes acerca del modo de extracción
ADVERTENCIA
Peligro de muerte, riesgo de intoxicación provocado por gases en
combustión aspirados. Nunca ponga en funcionamiento la función
de extracción simultáneamente con un dispositivo que genere calor
en una estancia estanca si no se ha garantizado una ventilación
su ciente.
Los dispositivos no estancos que generan calor (por ejemplo, radiadores que funcionan
con gas, aceite, madera o carbón, calentadores, calentadores de agua) extraen el aire
de combustión de la estancia correspondiente y canalizan el aire de salida por medio
de un tiro (por ejemplo una chimenea) hacia el exterior. Al encender simultáneamente
una campana extractora, el aire de la cocina y de las estancias colindantes se extrae
y sin su ciente aire adicional se produce el fenómeno de presión hipoatmosférica. Los
gases nocivos de la chimenea o del ori cio de salida retornan a la estancia.
• Siempre debe proveer de su ciente aire adicional a la estancia.
• Un conducto de ventilación y evacuación no garantiza en su totalidad que se
cumpla el valor límite.
Solo se garantizará un funcionamiento sin riesgos cuando presión hipoatmosférica en la
estancia del dispositivo generador de calor no supere los 4 Pa (0,04 mbar). Esto podrá
conseguirse cuando el aire necesario para la combustión pueda circular por ori cios
sin cierre, como puertas o ventanas, junto con un conducto de ventilación o evacuación
o a través de otros medios técnicos. En cualquier caso, siga el consejo del constructor
de chimeneas autorizado que pueda evaluar la conexión de ventilación general de su
hogar y tomar las medidas necesarias.
Si pone en funcionamiento la campana extractora en modo circulación de aire, puede
utilizarla sin ninguna limitación.
Nota importante sobre el desmontaje del aparato
• El desmontaje es igual que el montaje pero en orden inverso.
• Al desmontar el aparato, pida ayuda a una segunda persona para evitar lesiones.

30
ES
INSTALACIÓN
1 2
Presione el cierre del ltro para quitarlo.
Aoje los tornillos en ambos lados de la
placa y retire la placa.
Prepare los agujeros de montaje
correspondientes en el armario. Coloque
la campana extractora en la parte
de abajo del gabinete y fíjela con 12
tornillos autorroscante en cruz de la
bolsa de accesorios.
3
Después de colocar la campana
extractora, monte la placa con un tornillo
y luego je los ltros.

31
ES
Instalación con ventilación interior
Si no tiene un conducto de humos externo, no necesitará un tubo de escape. La
instalación corresponde a la instalación con ventilación externa.
Instalación del ltro de carbón activado
Atención: No está incluido un ltro de carbón activado (número de artículo
10032843). Pero usted lo puede comprar con la campana extractora.
1 2
Con un ltro de carbón activado
instalado en las campanas con
ventilación interna, es posible ltrar los
olores desagradables de los alimentos.
Para poder instalar el ltro, primero
debe quitar el ltro de grasa. Presione
el cierre y tírelo hacia abajo.
3
Coloque el ltro de carbón activado
en el ventilador y gírelo en el sentido
de las agujas del reloj. Repita el
procedimiento en el otro lado.
Asegúrese de que el ltro esté bien
sujeto, ya que de lo contrario podría
aojarse y ser peligroso. Nota: Con
el ltro de carbón activado instalado,
la capacidad de extracción disminuye
ligeramente.

32
ES
FUNCIONES DE LOS BOTONES
Nota: para encender el aparato, mantenga pulsado el botón (3) o (4) y, a
continuación, seleccione la función que desee.
1
Después de encender el aparato, se iluminan todos los indicadores y luego se
apagan, acompañados de un pitido. Con el aparato encendido, el botón (1)
se ilumina y se enciende la pantalla. Cada vez que pulse un botón, suena un
zumbido. La luz se enciende en color blanco.
En modo reposo, pulse el botón para iniciar el motor a nivel de velocidad 1.
Pulse de nuevo para apagarlo.
2
Con el aparato encendido, pulse el botón (-) para reducir la velocidad. La
velocidad se puede reducir como máximo al nivel 1.
3
Con el aparato encendido, pulse el botón (+) para aumentar la velocidad. La
velocidad se puede aumentar como máximo hasta el nivel 3.
4
Con el aparato en reposo o encendido, pulse el botón de la luz para apagar
y encender la luz. Mantenga pulsado el botón con el aparato encendido y la
pantalla parpadea para indicar que el aparato se apagará con un retardo de
5 minutos. Si en ese momento pulsa los botones (+) o (-), se anulará el aparato
automático.

33
ES
LIMPIEZA Y MANTENIMIENTO
Limpieza mensual de los ltros de grasa
Limpie el ltro todos los meses para evitar el riesgo de incendio. El ltro acumula grasa,
humo y polvo e inuye así en la eciencia de la campana extractora. Si el ltro no
se limpia, se acumularán residuos de grasa. Limpie el ltro con agua y un poco de
detergente y déjelo secar al aire después.
Cambio anual de ltros de carbón activado
Si la unidad se utiliza como unidad de recirculación (no ventilada hacia el exterior), el
ltro de carbón activado debe sustituirse al menos una vez al año, dependiendo de la
frecuencia de uso de la campana extractora.
Cambio de la lámpara
1. Apague la unidad y desenchúfela de la toma de corriente.
2. Desatornille y retire los 2 tornillos de la tapa de la lámpara.
3. Desenrosque la lámpara y sustitúyala por una del mismo tipo.
34
ES
DETECCIÓN Y RESOLUCIÓN DE PROBLEMAS
Problema Posible causa Solución
La luz se enciende pero el
ventilador no funciona.
La hoja del ventilador está
averiada.
Apague el aparato y
contacte con un servicio
técnico.
El motor está averiado.
La luz y el ventilador no
funcionan.
La bombilla está fundida. Sustituya la bombilla por
otra del mismo modelo.
El aparato no está
enchufado.
Conecte el aparato.
El aparato emite fuertes
vibraciones.
La hoja del ventilador está
averiada.
Apague el aparato y
contacte con un servicio
técnico.
El motor no se ha
instalado correctamente.
El aparato no se ha
instalado correctamente
en la pared.
Descuelgue el aparato
y asegúrese de que está
colocado correctamente
sobre el soporte.
La potencia extractora es
insuciente.
Demasiada distancia entre
la campana y la cocina.
Cuelgue la campana entre
65-75 cm por encima de
la supercie de cocción.

35
ES
NOTAS PARA CUIDAR DEL MEDIO AMBIENTE
• Durante la cocción, asegúrese de que haya un ujo de aire suciente para que la
campana extractora funcione ecazmente y con poco ruido de funcionamiento.
• Ajuste la velocidad del ventilador a la cantidad de vapor producida durante la
cocción. Utilice el modo intensivo sólo cuando sea necesario. Cuanto menor sea la
velocidad del ventilador, menos energía consume.
• Si se producen grandes cantidades de vapor durante la cocción, seleccione una
velocidad de ventilador más alta. Si el vapor de la cocción ya se ha extendido por
toda la cocina, la campana extractora debe funcionar durante más tiempo.
• Apague la campana extractora cuando ya no la necesite.
• Apaga la iluminación cuando ya no la necesites.
• Limpie el ltro a intervalos regulares y sustitúyalo si es necesario, para aumentar la
ecacia del sistema de ventilación y prevenir los riesgos de incendio.
• Ponga siempre la tapa cuando cocine para reducir el vapor de la cocción y la
condensación.

36
ES
FICHA TÉCNICA DEL PRODUCTO
Información según el Reglamento (UE) nº 65/2014
Métodos de medición y cálculo según EN 61591:1997+A1:2006+A2:2011+A11:2014
+A12:2015
Número de artículo
10033750 10033748 10033749 10032841
Descripción Símbolo Valor Unidad
Consumo anual de energía AEC
hood
42,9 kWh/Año
Clase de eciencia energética A
eciencia uidodinámica FDE
hood
28,5
Clase de eciencia uidodinámica A
Eciencia de la iluminación LE
hood
48,6 Lux/W
Clase de eciencia lumínica A
Ecacia de la separación de la
grasa
GFE
hood
79,7 %
Clase de eciencia de separación
de grasas
C
Flujo de aire al mínimo y
a la máxima velocidad en
funcionamiento normal, excepto
para el funcionamiento en el nivel
de velocidad intensivo o rápido
399,0 / 592,7 m³/h
Flujo de aire durante el
funcionamiento en el nivel de
velocidad intensivo o rápido
- m³/h
Emisiones de ruido aéreo con
ponderación A a la velocidad
mínima y máxima disponible
durante el funcionamiento normal
60 / 72 dB
Emisiones de ruido aéreo
ponderadas A durante el
funcionamiento en la fase intensiva
o de alta velocidad
- dB
Consumo de energía en modo
apagado
P
o
0,44 W
Consumo de energía en modo de
espera
P
s
- W
Datos de contacto Chal-Tec GmbH, Wallstraße 16, 10179, Berlin, Alemania

37
ES
Datos según el Reglamento (UE) nº 66/2014
Métodos de medición y cálculo según EN 61591:1997+A1:2006+A2:2011+A11:2014
+A12:2015
Número de artículo
10033750 10033748 10033749 10032841
Descripción Símbolo Valor Unidad
Consumo anual de energía AEC
hood
42,9 kWh/Año
Factor de extensión temporal f 1,0
eciencia uidodinámica FDE
hood
28,5
Índice de eciencia energética EEI
hood
53,7
Caudal de aire medido en el punto
óptimo
Q
BEP
342,7 m³/h
Presión de aire medida en el mejor
punto
P
BEP
341 Pa
Flujo de aire máximo Q
max
592,7 m³/h
Potencia eléctrica de entrada
medida en el mejor punto
W
BEP
114,2 W
Potencia nominal del sistema de
iluminación
W
L
3 W
Iluminación media del sistema de
iluminación en la supercie de
cocción
E
middle
146 Lux
Consumo de energía medido en
modo de espera
P
o
- W
Consumo de energía medido en
estado apagado
P
s
0,44 W
Nivel de potencia sonora L
WA
72 dB
Datos de contacto Chal-Tec GmbH, Wallstraße 16, 10179, Berlin, Alemania
38
ES
RETIRADA DEL APARATO
Si en su país existe una disposición legal relativa a la
eliminación de aparatos eléctricos y electrónicos, este
símbolo estampado en el producto o en el embalaje
advierte que no debe eliminarse como residuo doméstico.
En lugar de ello, debe depositarse en un punto de recogida
de reciclaje de aparatos eléctricos y electrónicos. Una
gestión adecuada de estos residuos previene consecuencias
potencialmente negativas para el medio ambiente y la salud
de las personas. Puede consultar más información sobre el
reciclaje y la eliminación de este producto contactando con
su administración local o con su servicio de recogida de
residuos.
FABRICANTE E IMPORTADOR (REINO UNIDO)
Fabricante:
Chal-Tec GmbH, Wallstraße 16, 10179 Berlín, Alemania.
Importador para Gran Bretaña:
Chal-Tec UK limited
Unit 6 Riverside Business Centre
Brighton Road
Shoreham-by-Sea
BN43 6RE
United Kingdom
39
FR
Chère cliente, cher client,
Toutes nos félicitations pour l’acquisition de ce nouvel appareil.
Veuillez lire attentivement et respecter les instructions de ce mode
d’emploi an d’éviter d’éventuels dommages. Nous ne saurions
être tenus pour responsables des dommages dus au non-respect
des consignes et à la mauvaise utilisation de l’appareil. Scannez
le QR-Code pour obtenir la dernière version du mode d‘emploi
et des informations supplémentaires concernant le produit.
SOMMAIRE
Consignes de sécurité40
Installation42
Fonctions des touches44
Nettoyage et entretien45
Résolution des problèmes46
Informations sur la protection de l‘environnement47
Fiche de données produit48
Informations sur le recyclage50
Fabricant et importateur (UK)50
FICHE TECHNIQUE
Numéro d'article
10032841, 10033748, 1033749,
10033750
Source d'alimentation 220-240 V ~ 50/60 Hz
Remarque : Vous pouvez également acheter un ltre à charbon actif pour cette hotte
aspirante sous le numéro d‘article 10032843. Pour cela, consultez notre site Web :
www.elektronik-star.fr

40
FR
CONSIGNES DE SÉCURITÉ
• Lisez attentivement toutes les consignes avant d’utiliser l’appareil et conservez ce
mode d’emploi pour vous y référer ultérieurement.
• Les travaux de montage doivent être effectués uniquement par électricien
professionnel ou un spécialiste. Avant d‘utiliser la hotte aspirante, assurez-vous que
la tension (V) et la fréquence indiquée sur la hotte aspirante (Hz) correspondent à
la tension (V) et à la fréquence (Hz) de votre alimentation.
• Le fabricant ne saurait être tenu responsable des dégâts occasionnés par le non-
respect des consignes d‘utilisation et d‘installation.
• Les enfants de moins de 8 ne doivent pas utiliser la hotte aspirante.
• L’appareil n’est pas destiné à une utilisation commerciale mais au cadre domestique
et dans des conditions similaires.
• Nettoyez l‘appareil et le ltre régulièrement pour que l‘appareil fonctionne toujours
de manière efcace.
• Avant le nettoyage, débranche toujours la che de la prise.
• Nettoyez l‘appareil exactement comme il est indiqué dans le mode d‘emploi.
• N‘utilisez aucune amme libre sous la hotte aspirante.
• Si l‘appareil ne fonctionne pas normalement, adressez-vous au fabricant ou à un
spécialiste.
• Cet appareil peut être utilisé par des enfants de 8 ans ou plus et des personnes
ayant des capacités physiques, sensorielles et mentales limitées et / ou
dénuées d‘expérience et de connaissances, à condition d‘avoir été instruits au
fonctionnement de l‘appareil par une personne responsable et d‘en comprendre les
risques associés.
• Si le câble secteur ou la che sont endommagés, faites-les remplacer par le
fabricant un service professionnel agréé ou une personne de qualication
équivalente.
• Si la hotte aspirante est utilisée avec une cuisinière à gaz ou utilisant d‘autres
combustibles, une ventilation sufsante de la pièce doit être assurée.
• Ne faites pas de ambée sous la hotte aspirante.
• Attention : la surface de l‘appareil peu devenir très chaude pendant le
fonctionnement.
Conseils importants pour l‘installation
• L‘air ne doit pas être dirigé vers une conduite déjà utilisée pour aspirer les gaz de
combustion provenant d‘une cuisinière à gaz ou utilisant d‘autres combustibles
(valable même pour les appareils qui ne renvoient pas l‘air dans la pièce).
• Respectez les règlementations locales concernant l‘installation de dispositifs
d‘extraction d‘air.
41
FR
Remarques importantes concernant le mode d‘extraction
MISE EN GARDE
Danger de mort, risques d‘intoxication ! Par la ré-aspiration de gaz
de combustion. Ne jamais utiliser la fonction d’aspiration de l’appareil
en même temps qu’un foyer dépendant de l’air ambiant si l’air frais
est insuf sant.
Les foyers dépendants de l’air ambiant (par ex. les systèmes de chauffage au gaz, au
fuel, au bois ou au charbon, les chauffe-eaux électriques, les chaudières) extraient
l’air de combustion de la pièce où l’appareil est installé et rejettent les gaz résiduaires
à l’extérieur en les faisant passer par un conduit d’évacuation des gaz (par ex. une
cheminée). Lorsque la hotte aspirante est en marche, la cuisine et les pièces adjacentes
extraient l’air ambiant – une dépressurisation se produit si le volume d’air frais n’est pas
suf sant. Les gaz toxiques d’une cheminée ou d’un foyer seront ré-aspirés dans la pièce
d’habitation.
• Ainsi, il est toujours nécessaire de veiller à ce qu’il y ait une quantité suf sante d’air frais.
• Un caisson mural d’aspiration/d’évacuation ne peut pas garantir à lui seul le
respect des valeurs limites.
Un fonctionnement sans risque est uniquement possible si la dépressurisation de la pièce
où est installé le foyer ne dépasse pas 4 Pa (0,04 mbar). Ceci n’est possible que si l’air
nécessaire à la combustion peut circuler par des ouvertures permanentes, par ex. dans
des portes, fenêtres associées à un caisson mural d’aspiration/d’évacuation ou par
d’autres dispositifs techniques. Dans tous les cas, demander conseil auprès du ramoneur
responsable de la circulation de l’air pour l’ensemble du bâtiment, il sera à même de
proposer les mesures à prendre pour une aération appropriée.
Si la hotte aspirante est utilisée exclusivement en mode ventilation tournante, son
fonctionnement n’est soumis à aucune restriction.
Remarques importantes pour le démontage de l’appareil
• Pour le démontage, suivez les mêmes étapes que l’installation / montage dans
l’ordre inverse.
• Faites-vous aider par une deuxième personne lors du démontage pour éviter les
blessures.

42
FR
INSTALLATION
1 2
Appuyez sur le verrouillage du ltre pour
le retirer. Desserrez les vis des deux côtés
de la plaque et retirez-la.
Préparez les trous d'installation
correspondants dans le coffrage. Placez
la hotte au fond du coffrage et xez-la
avec 12 vis cruciformes du sachet
d'accessoires.
3
Après avoir xé la hotte, montez la
plaque avec la vis, puis xez les ltres.
43
FR
Installation en recirculation d‘air
Si vous n‘avez pas d‘évacuation externe, vous n‘avez pas besoin d‘un tuyau
d‘extraction. Le reste de l‘installation correspond à l‘installation avec extraction.
Installation de ltres à charbon actif
Remarque : le ltre à charbon actif (article numéro 10032843) ne fait pas partie de
la livraison. Vous pouvez toutefois l‘acheter en complément de votre hotte.
1 2
Le ltre à charbon actif permet à la
hotte de ltrer et d'éliminer les odeurs
désagréables de cuisine.
Pour installer le ltre, vous devez
d'abord démonter le ltre à graisse.
Appuyez sur la fermeture et abaissez-la.
3
Placez le ltre à charbon actif sur le
ventilateur et tournez-le dans le sens
des aiguilles d‘une montre. Répétez
la procédure de l‘autre côté. Assurez-
vous que le ltre est bien serré, sinon
il pourrait se détacher et présenter un
danger. Remarque : lorsque le ltre à
charbon actif est installé, la puissance
d‘aspiration diminue légèrement.

44
FR
FONCTIONS DES TOUCHES
Remarque : pour allumer l‘appareil, appuyez sur la touche (3) ou (4) puis
sélectionnez la fonction souhaitée.
1
Au démarrage de l'appareil, tous les voyants s'allument puis s'éteignent,
accompagnés d'un bip. Lorsque l'appareil est allumé, la touche (1) s'allume
ainsi que l'écran. Un buzzer retentit à chaque pression sur une touche.
L'éclairage est blanc.
En mode veille, appuyez brièvement sur la touche pour démarrer le moteur au
niveau 1. Appuyez à nouveau sur la touche pour arrêter le moteur.
2
En mode allumé, appuyez brièvement sur la touche (-) pour réduire la vitesse.
Vous pouvez réduire la vitesse au niveau 1 au maximum.
3
En mode allumé, appuyez brièvement sur la touche (+) pour augmenter la
vitesse. Vous pouvez augmenter la vitesse jusqu'au niveau 3 au maximum.
4
En mode veille ou allumé, appuyez sur la touche d'éclairage pour allumer
et éteindre l'éclairage. Quand l'appareil est allumé, appuyez sur la touche
et maintenez-la. L'écran clignote et l'appareil s'éteint avec un délai de 5
minutes. Si vous appuyez sur la touche (+) ou (-) pendant ce temps, l'arrêt est
automatiquement annulé.

45
FR
NETTOYAGE ET ENTRETIEN
Nettoyage mensuel du ltre à graisse
Nettoyez le ltre tous les mois pour éviter un risque d‘incendie. Le ltre recueille la
graisse, la fumée et la poussière et réduit ainsi l‘efcacité de la hotte. Si le ltre n‘est pas
nettoyé, les restes de graisse s‘y accumulent. Nettoyez le ltre avec de l‘eau et un peu
de liquide vaisselle et faites-le ensuite sécher à l‘air
Remplacement annuel du ltre à charbon actif
Si l‘appareil est utilisé en mode de circulation d‘air (non ventilée vers l‘extérieur), le ltre
à charbon actif doit être remplacé au moins une fois par an, en fonction de la fréquence
d‘utilisation de la hotte.
Remplacement d‘une ampoule
1 Mettez l‘appareil hors tension et débranchez la che de la prise.
2 Dévissez et retirez les 2 vis du couvercle de l‘ampoule.
3 Dévissez l‘ampoule et remplacez-la par une neuve de même type.
46
FR
RÉSOLUTION DES PROBLÈMES
Problème Cause possible Solution
L’éclairage s’allume
mais le ventilateur ne
fonctionne pas.
Les pales de ventilation
sont cassées.
Éteindre l’appareil et
le faire réviser par une
entreprise spécialisée.
Le moteur est
endommagé.
L’éclairage et le ventilateur
ne fonctionnent pas.
L’ampoule est usagée. Remplacer l’ampoule par
une autre équivalente.
L’appareil est débranché. Brancher l’appareil.
L’appareil produit de fortes
vibrations.
Les pales de ventilation
sont cassées.
Éteindre l’appareil et
le faire réviser par une
entreprise spécialisée.
Ne moteur n’est pas bien
positionné
L’appareil n’est pas bien
xé au mur.
Décrocher l’appareil et
s’assurer que les xations
sont correctement
installées.
L’aspiration est mauvaise. Écart trop important entre
la hotte et la cuisinière.
Monter la hotte aspirante
de telle manière à ce que
l’écart avec la cuisinière
soit compris entre 65 et
75 cm.

47
FR
INFORMATIONS SUR LA PROTECTION DE
L‘ENVIRONNEMENT
• Assurez-vous qu‘il y a une ventilation sufsante pendant la cuisson pour que la
hotte aspirante puisse fonctionner efcacement et avec un faible niveau sonore.
• Ajustez la vitesse du ventilateur à la quantité de vapeur produite pendant la
cuisson. Utilisez le mode intensif uniquement lorsque cela est nécessaire. Plus la
vitesse du ventilateur est basse, moins la consommation d‘énergie est réduite.
• Si de grandes quantités de vapeur sont produites pendant la cuisson, sélectionnez
une vitesse de ventilation plus élevée en temps utile. Si la vapeur de cuisson est
déjà répartie dans la cuisine, la hotte aspirante devra fonctionner plus longtemps.
• Éteignez la hotte aspirante lorsque vous n‘en avez plus besoin.
• Éteignez l‘éclairage lorsque vous n‘en avez plus besoin.
• Nettoyez le ltre à intervalles réguliers et remplacez-le si nécessaire an
d‘augmenter l‘efcacité du système de ventilation et d‘éviter les risques d‘incendie.
• Mettez toujours le couvercle pendant la cuisson pour réduire la vapeur et la condensation.

48
FR
FICHE DE DONNÉES PRODUIT
Informations selon le règlement (UE) n ° 65/2014
Méthodes de mesure et de calcul selon EN 61591:1997+A1:2006+A2:2011+A11:201
4+A12:2015
Numéro d‘article
10033750 10033748 10033749 10032841
Description Symbole Valeur Unité
Consommation annuelle d'énergie AEC
hood
42,9 kWh/Année
Classe d'efcacité énergétique A
Efcacité dynamique des uides FDE
hood
28,5
Classe d'efcacité dynamique des
uides
A
Efcacité lumineuse LE
hood
48,6 Lux/W
Classe d'efcacité lumineuse A
Efcacité de séparation des
graisses
GFE
hood
79,7 %
Clase d'efcacité de capture des
graisses
C
Débit d'air à vitesse minimale
et maximale en fonctionnement
normal, à l'exception du
fonctionnement au niveau intensif
ou au niveau haute vitesse
399,0 / 592,7 m³/h
Flux d'air pendant le
fonctionnement au niveau intensif
ou au niveau haute vitesse
- m³/h
Niveau sonore de classe A aux
vitesses minimale et maximale
disponibles en fonctionnement
normal
60 / 72 dB
Niveau sonore de classe A en
fonctionnement au niveau intensif
ou au niveau haute vitesse
- dB
Consommation d'énergie appareil
éteint
P
o
0,44 W
Consommation électrique en veille P
s
- W
Coordonnées de contact Chal-Tec GmbH, Wallstraße 16, 10179, Berlin, Allemagne
49
FR
Informations selon le règlement (UE) n ° 66/2014
Méthodes de mesure et de calcul selon EN 61591:1997+A1:2006+A2:2011+A11:201
4+A12:2015
Numéro d‘article
10033750 10033748 10033749 10032841
Description Symbole Valeur Unité
Consommation annuelle d'énergie AEC
hood
42,9 kWh/Année
Facteur d'extension de temps f 1,0
Efcacité dynamique des uides FDE
hood
28,5
Indice d'efcacité énergétique EEI
hood
53,7
Débit d'air mesuré au meilleur point Q
BEP
342,7 m³/h
Pression d'air mesurée au meilleur
point
P
BEP
341 Pa
Débit d'air maximal Q
max
592,7 m³/h
Puissance électrique d'entrée
mesurée au meilleur point
W
BEP
114,2 W
Puissance nominale du système
d'éclairage
W
L
3 W
Puissance moyenne du système
d'éclairage sur la surface de
cuisson
E
middle
146 Lux
Consommation électrique mesurée
en mode veille
P
o
- W
Consommation d'énergie mesurée
appareil éteint
P
s
0,44 W
Niveau sonore L
WA
72 dB
Coordonnées de contact Chal-Tec GmbH, Wallstraße 16, 10179, Berlin, Allemagne
50
FR
INFORMATIONS SUR LE RECYCLAGE
S‘il existe une réglementation pour l‘élimination ou le recyclage
des appareils électriques et électroniques dans votre pays,
ce symbole sur le produit ou sur l‘emballage indique que cet
appareil ne doit pas être jeté avec les ordures ménagères. Vous
devez le déposer dans un point de collecte pour le recyclage
des équipements électriques et électroniques. La mise au
rebut conforme aux règles protège l‘environnement et la santé
de vos semblables des conséquences négatives. Pour plus
d‘informations sur le recyclage et l‘élimination de ce produit,
veuillez contacter votre autorité locale ou votre service de
recyclage des déchets ménagers.
FABRICANT ET IMPORTATEUR (UK)
Fabricant :
Chal-Tec GmbH, Wallstraße 16, 10179 Berlin, Allemagne.
Importateur pour la Grande Bretagne :
Chal-Tec UK limited
Unit 6 Riverside Business Centre
Brighton Road
Shoreham-by-Sea
BN43 6RE
United Kingdom
51
IT
Gentile cliente,
La ringraziamo per aver acquistato il dispositivo. La preghiamo
di leggere attentamente le seguenti istruzioni per l’uso e di
seguirle per evitare possibili danni. Non ci assumiamo alcuna
responsabilità per danni scaturiti da una mancata osservazione
delle avvertenze di sicurezza e da un uso improprio del
dispositivo. Scansionare il codice QR seguente, per accedere
al manuale d’uso più attuale e per ricevere informazioni sul
prodotto.
INDICE
Avvertenze di sicurezza52
Installazione54
Funzione dei tasti56
Pulizia e manutenzione57
Ricerca e risoluzione dei problemi58
Indicazioni per la tutela dell’ambiente59
Scheda dati del prodotto60
Avviso di smaltimento62
Produttore e importatore (UK) 62
DATI TECNICI
Numero di articolo
10032841, 10033748, 1033749,
10033750
Rete elettrica 220-240 V ~ 50/60 Hz
Nota: con questa cappa aspirante è possibile acquistare opzionalmente un ltro ai
carboni attivi con il codice articolo 10032843. A tal proposito si prega di visitare il
sito web: www.elektronik-star.it

52
IT
AVVERTENZE DI SICUREZZA
• Leggere attentamente tutte le istruzioni prima dell´uso e conservare il manuale per
consultazioni future.
• Il montaggio può essere eseguito solo da un tecnico qualicato. Prima di utilizzare
la cappa aspirante, accertarsi che la tensione (V) e la frequenza (Hz) indicate
corrispondano alla tensione (V) e alla frequenza (Hz) domestiche.
• Si declina ogni responsabilità per danni derivati da un utilizzo improprio e da
un´installazione errata della cappa aspirante.
• I bambini minori di 8 anni non possono utilizzare la cappa aspirante.
• La cappa aspirante non è per un uso commerciale bensì domestico e in ambienti
simili.
• Pulire regolarmente la cappa aspirante e il ltro per un corretto funzionamento.
• Staccare la spina dalla presa prima di eseguire la pulizia.
• Pulire la cappa aspirante come indicato nel manuale di istruzioni. Non utilizzare
amme vive sotto la cappa aspirante.
• Se la cappa aspirante non funziona correttamente, rivolgersi al produttore o ad un
tecnico competente.
• Questo dispositivo può essere utilizzato da bambini a partire da 8 anni e da
persone con limitate capacità siche e psichiche o con conoscenza ed esperienza
limitate, solo se sono stati istruiti sulle modalità d’uso e comprendono i rischi e i
pericoli connessi.
• Se il cavo di alimentazione o la spina sono danneggiati, farli sostituire dal
produttore o da un tecnico qualicato.
• Se la cappa aspirante viene utilizzata insieme ad apparecchi che bruciano gas o
combustibili, è necessario che la stanza sia ben ventilata.
• Non cucinare alimenti alla amma (ambé) sotto la cappa aspirante.
• Attenzione: le superci della cappa aspirante possono diventare molto calde
durante l´uso.
Note importanti per l´installazione
• L´aria non deve essere condotta in uno scarico utilizzato per aspirare gas di
combustione o altri combustibili (ciò non si applica per dispositivi che emettono
solo aria nella stanza).
• Osservare tutte le disposizioni regionali relative all´incasso di dispositivi di
ventilazione.

53
IT
Note importanti circa la modalità di estrazione
AVVERTENZA
Pericolo di morte, pericolo di intossicazione da gas di scarico! Non
azionare l´apparecchio con funzione di scarico mentre è attivo un
impianto di riscaldamento che utilizza l´aria ambiente, se
l´areazione non è suf ciente.
Gli impianti di riscaldamento che sfruttano l´aria ambiente (ad es. stufe a gas, ad
gasolio, a legna o a carbone, scalda-acqua istantanei, scaldabagno), usano l´aria
ambiente per la combustione ed espellono all´esterno i gas di scarico attraverso un
sistema di scarico (ad es. camino). Con la cappa aspirante accesa viene sottratta
aria dalla cucina e dalle stanze adiacenti. Se l´areazione è insuf ciente si forma una
depressione. I gas tossici del camino vengono riaspirati negli ambienti domestici.
• Pertanto è necessario che ci sia sempre un´areazione suf ciente.
• La cassetta a muro per areazione o s ato da sola non garantisce un´areazione
suf ciente.
Un utilizzo sicuro è possibile solo se la depressione nella stanza dove è installato
l´impianto di riscaldamento non supera i 4 Pa (0,04 mbar). Ciò è possibile solo se
l´aria necessaria per la combustione può af uire nella stanza attraverso aperture
permanenti come porte, nestre, in combinazione con una cassetta a muro per
areazione o s ato o con altre misure tecniche. In ogni caso rivolgersi ad un esperto di
impianti di areazione il quale fornirà indicazioni sulle misure da intraprendere per una
corretta areazione.
Se la cappa aspirante viene impiegata esclusivamente con funzione di ricircolo
dell´aria, l´utilizzo è possibile senza limiti.
Informazioni importanti per smontare il dispositivo
• Lo smontaggio avviene seguendo i passaggi relativi a installazione/montaggio in
ordine inverso.
• Chiedere l’aiuto di una seconda persona per smontare il dispositivo, in modo da
evitare lesioni.
54
IT
INSTALLAZIONE
1 2
Premere il blocco del ltro per
rimuoverlo. Allentare le viti su entrambi i
lati del pannello e rimuoverlo.
Preparare i relativi fori di montaggio
nell’armadio. Posizionare la cappa
aspirante sotto al mobile e ssarla con
12 viti a croce contenute nel sacchetto
degli accessori.
3
Dopo aver ssato la cappa aspirante,
montare il pannello con le viti e ssare
il ltro.
55
IT
Installazione con scarico dell’aria interno
Se non si dispone di uno scarico dell’aria verso l’esterno, non è necessario un tubo di
scarico. L’installazione corrisponde a quella con scarico verso l’esterno.
Montaggio del ltro ai carboni attivi
Avvertenza: un ltro ai carboni attivi (numero articolo 10032842) non è incluso nel
volume di consegna. Può essere però acquistato separatamente.
1 2
Con un ltro ai carboni attivi è possibile
eliminare odori spiacevoli in cappe
aspiranti con scarico interno.
Per installare il ltro, è necessario prima
di tutto rimuovere il ltro antigrasso.
Premere sulla chiusura e rimuoverlo.
3
Posizionare il ltro ai carboni attivi
sulla ventola e ruotare in senso orario.
Ripetere la procedura sull’altro lato.
Assicurarsi che il ltro sia ssato
stabilmente, altrimenti potrebbe
staccarsi e presentare un pericolo.
Avvertenza: montando un ltro ai
carboni attivi, l’efcacia di aspirazione
diminuisce leggermente.

56
IT
FUNZIONE DEI TASTI
Avvertenza: per accendere il dispositivo premere a lungo il tasto (3) o (4) e
selezionare poi la funzione desiderata.
1
Dopo l’accensione tutte le spie lampeggiano e si spengono con un bip. In
modalità attiva il tasto (1) brilla e il display è acceso. Ogni volta che si preme
un tasto si sente un sibilo. La luce è bianca.
In modalità standby premere brevemente il tasto per avviare il motore sul livello
1. Premere nuovamente il tasto per spegnere il motore.
2
Premere brevemente il tasto (-) in modalità attiva per ridurre la velocità. E’
possibile ridurre la velocità no al livello 1.
3
Premere brevemente il tasto (-) in modalità spenta per aumentare la velocità. E’
possibile aumentare la velocità no al livello 3.
4
Premere in modalità standby o attiva il tasto luce, per accendere o spegnere
la luce. In modalità attiva tenere premuto il tasto, il display lampeggia e il
dispositivo si spegne con un ritardo di 5 minuti. Se in questo lasso di tempo si
preme il tasto (+) o (-), lo spegnimento viene automaticamente annullato.

57
IT
PULIZIA E MANUTENZIONE
Pulizia mensile del ltro antigrasso
Pulire il ltro ogni mese per evitare rischi d’incendio. Il ltro accumula grasso, fumo e
polvere, inuenzando l’efcienza della cappa aspirante. Se il ltro non viene pulito, si
accumulano residui di grasso. Pulire il ltro con acqua e un po’ di detersivo per piatti e
lasciarlo asciugare all’aria.
Sostituzione annuale del ltro ai carboni attivi
Se il dispositivo viene utilizzato in funzione di ricircolo dell’aria (non scaricata
all’aperto), il ltro ai carboni attivi deve essere sostituito almeno una volta all’anno, in
base alla frequenza di utilizzo della cappa aspirante.
Sostituzione della lampadina
1. Spegnere il dispositivo e staccare la spina.
2. Svitare le 2 viti della copertura della lampada e rimuoverla.
3. Svitare la lampadina e sostituirla con una dello stesso tipo.
58
IT
RICERCA E RISOLUZIONE DEI PROBLEMI
Problema Causa possibile Soluzione
La luce si accende ma la
ventola non si aziona.
La ventola è rotta. Spegnere il dispositivo e
farlo riparare da un centro
assistenza specializzato.
La ventola è danneggiata.
La luce e la ventola non
funzionano.
La lampadina è bruciata. Sostituire la lampadina.
Non è stata inserita la
spina nella presa.
Inserire la spina nella
presa.
Forti vibrazioni. La ventola è rotta. Spegnere il dispositivo e
farlo riparare da un centro
assistenza specializzato.
La ventola non è installata
correttamente.
Il dispositivo non è
installato correttamente
alla parete.
Rimuovere il dispositivo
e assicurarsi che la staffa
di montaggio sia ssata
correttamente.
La potenza aspirante è
ridotta.
Troppa distanza tra la
cappa e il fornello.
Installare la cappa in
modo tale che la distanza
tra il fornello e la cappa
sia compresa tra i 65 e i
75 cm.

59
IT
INDICAZIONI PER LA TUTELA DELL’AMBIENTE
• Mentre si cucina, assicurare un sufciente usso d’aria, in modo che la cappa
aspirante possa funzionare in modo efciente e con bassa rumorosità operativa.
• Regolare la velocità della ventola in base alla quantità di vapore generato durante
la cottura. Utilizzare la modalità di funzionamento intenso solo se necessario.
Minore la velocità della ventola, minori i consumi energetici.
• Se durante la preparazione di grandi quantità di alimenti si forma molto vapore,
selezionare per tempo una velocità maggiore della ventola. Se il vapore si è già
diffuso nella cucina, sarà necessario lasciare in funzione più a lungo la cappa
aspirante.
• Spegnere la cappa quando non è più necessaria.
• Spegnere la luce quando non è più necessaria.
• Pulire il ltro a intervalli regolari e sostituirlo secondo necessità, in modo da
incrementare l’efcacia del sistema di ventilazione e da evitare il rischio di incendi.
• Mettere sempre il coperchio sulle pentole quando si cucina, per ridurre vapore e
condensa.
60
IT
SCHEDA DATI DEL PRODOTTO
Indicazioni conformi alla direttiva (UE) N° 65/2014
Metodi di misurazione e calcolo conformi a EN 61591:1997+A1:2006+A2:2011+A11:
2014+A12:2015
Numero articolo
10033750 10033748 10033749 10032841
Denizione Simbolo Valore Unità
Consumo energetico annuale AEC
hood
42,9 kWh/Anno
Classe di efcienza energetica A
Efcienza uidodinamica FDE
hood
28,5
Classe di efcienza uidodinamica A
Efcienza luminosa LE
hood
48,6 Lux/W
Classe di efcienza luminosa A
Grado di separazione del grasso GFE
hood
79,7 %
Classe relativa al grado di
separazione del grasso
C
Flusso d’aria a velocità minima in
funzionamento normale, escluso il
funzionamento a livello intenso o
ad alta velocità.
399,0 / 592,7 m³/h
Flusso d’aria in funzionamento
intenso o ad alta velocità.
- m³/h
Livello di emissioni sonore
ponderato A, nelle velocità
massima e minima disponibili in
funzionamento normale.
60 / 72 dB
Livello di emissioni sonore
ponderato A, in funzionamento
intenso o ad alta velocità.
- dB
Potenza assorbita a dispositivo
spento
P
o
0,44 W
Potenza assorbita a dispositivo in
standby
P
s
- W
Informazioni di contatto Chal-Tec GmbH, Wallstraße 16, 10179, Berlino,
Germania

61
IT
Indicazioni conformi alla direttiva (UE) N° 66/2014
Metodi di misurazione e calcolo conformi a EN 61591:1997+A1:2006+A2:2011+A11:
2014+A12:2015
Numero articolo
10033750 10033748 10033749 10032841
Denizione Simbolo Valore Unità
Consumo energetico annuale AEC
hood
42,9 kWh/Anno
Fattore di incremento nel tempo f 1,0
Efcienza uidodinamica FDE
hood
28,5
Indice di efcienza energetica EEI
hood
53,7
Volume del usso d’aria misurato
nel punto di massima efcienza
Q
BEP
342,7 m³/h
Pressione dell’aria misurata nel
punto di massima efcienza
P
BEP
341 Pa
Flusso d’aria massimo Q
max
592,7 m³/h
Potenza elettrica in entrata
misurata nel punto di massima
efcienza
W
BEP
114,2 W
Potenza nominale del sistema di
illuminazione
W
L
3 W
Intensità luminosa media del
sistema di illuminazione sul piano
cottura
E
middle
146 Lux
Potenza assorbita misurata a
dispositivo in standby
P
o
- W
Potenza assorbita misurata a
dispositivo spento
P
s
0,44 W
Livello di rumorosità L
WA
72 dB
Informazioni di contatto Chal-Tec GmbH, Wallstraße 16, 10179, Berlino,
Germania
62
IT
AVVISO DI SMALTIMENTO
Se nel proprio paese si applicano le regolamentazioni
inerenti lo smaltimento di dispositivi elettrici ed elettronici,
questo simbolo sul prodotto o sulla confezione segnala che
questi prodotti non possono essere smaltiti con i riuti normali
e devono essere portati a un punto di raccolta di dispositivi
elettrici ed elettronici. Grazie al corretto smaltimento dei
vecchi dispositivi si tutela il pianeta e la salute delle persone
da possibili conseguenze negative. Informazioni riguardanti il
riciclo e lo smaltimento di questi prodotti si ottengono presso
l’amministrazione locale oppure il servizio di gestione dei
riuti domestici.
PRODUTTORE E IMPORTATORE (UK)
Produttore:
Chal-Tec GmbH, Wallstraße 16, 10179 Berlino, Germania.
Importatore per la Gran Bretagna:
Chal-Tec UK limited
Unit 6 Riverside Business Centre
Brighton Road
Shoreham-by-Sea
BN43 6RE
United Kingdom