®
USER MANUAL

2
GB
INSTRUCTIONS FOR SAFE USE
This appliance should only be used for private household use, as described in this user guide.
Please ensure that this guide is fully understood before operating the appliance and keep for
future reference.
Always switch off and remove the plug from the socket after use, or before cleaning the appliance
or any maintenance task.
This appliance can be used by children aged from 8 years and above and persons with reduced
physical, sensory or mental capabilities or lack of experience and knowledge if they have been
given supervision or instruction concerning use of the appliance in a safe way and understand
the hazards involved. Children shall not play with the appliance.
Cleaning and user maintenance shall not be made by children without supervision.
If the power cord is damaged stop using the appliance immediately. To avoid a safety hazard,
an authorised HOOVER service engineer must replace the power cord.
Use only attachments, consumables or spares recommended or supplied by HOOVER.
Do not remove the plug by pulling on the power cord.
Do not continue to use your appliance if it appears faulty.
Place and use the product only on a dry, stable, level horizontal surface, so that tipping over is
excluded.
Keep the product dry.
Never tilt or empty the product during operation.
Lay the supply cord so nobody will step on or trip over it.
Do not place the product on hot surfaces, near hot surfaces, near an open re or in direct
sunlight.
Do not let water or any other liquid or ammable detergent enter the appliance to avoid electric
shock and/ or a re hazard.
Do not clean the appliance with water, any other liquid, or a (ammable) detergent to avoid
electric shock and/ or a re hazard.
Do not spray any ammable materials such as insecticides or fragrance around the appliance.
Check if the voltage and ratings indicated on the label of the appliance corresponds to the local
power voltage before you connect the appliance.
Do not block the air inlet or air outlet.
This appliance is not a substitute for proper ventilation, regular vacuum cleaning, or use of an
extractor hood or fan while cooking.
Do not place anything on top of the appliance.
Do not place the appliance directly below an air conditioner to prevent condensation from
dripping onto the appliance.
Make sure all lters are properly installed before you switch on the appliance.
Only use the original HOOVER lters specially intended for this appliance. Do not use any other
lters.
Avoid knocking against the appliance (the air inlet and outlet in particular) with hard objects.
Do not insert your ngers or objects into the air outlet or the air inlet to prevent physical injury or
malfunctioning of the appliance.
Do not use this appliance when you have used indoor smoke-type insect repellents or in places
with oily residues, burning incense, or chemical fumes.
Do not use the appliance near gas appliances, heating devices or replaces.
Do not use the appliance in a room with major temperature changes.
To prevent interference, place the appliance at least 2m away from electrical appliances that
use airborne radio waves such as TVs, radios, and radio-controlled clocks.
When the appliance is not used for a long time, bacteria may grow on the lters. Check the lters
after a long period of disuse. If the lters are very dirty, replace them.
Do not use the appliance in wet surroundings or in surroundings with high ambient temperatures,
such as the bathroom, toilet, or kitchen.

333
GB
The appliance does not remove carbon monoxide (CO) or radon (Rn). It cannot be used a safety
device in case of accidents with combustion processes and hazardous chemicals.
The CO Monitor function is not to be used as, nor implied to be used as a substitute for an EN
50291-1 UL-2034, CSA-6.19 or any other recognized standard certied carbon monoxide alarm
where Local or Regional Codes or legislation mandate their use. The CO Monitor function is
a supplemental carbon monoxide monitoring device only. Use of this device is at the user’s
discretion and implies the understanding and acceptance of its limitations to adhere to codes or
legislation where applicable.
Do not place the appliance in any of the following locations:
• In a bathroom or other areas where the Alarm may be exposed to water splashes, dripping or
condensation (e.g. above an electric kettle).
• Next to or directly above heaters or air conditioning vents, doors, windows, extractor fans or
anywhere that it would be affected by draughts.
• Directly above a sink or cooker.
• In an area where the temperature could drop below –20°C or rise above 50°C.
• In an enclosed space (e.g. in or below a cupboard).
• In a damp or humid area.
• Where it would be obstructed, e.g. by curtains or furniture.
• Where dirt or dust could block the sensor.
• Near paint, thinners, solvent fumes or air fresheners..
If CO alarm is activated, you should open all windows and doors (if safe to do so). Turn off all
fuel burning appliances if possible and then evacuate the property leaving the windows and
doors open. Get immediate medical help for anyone suffering the effects of carbon monoxide
poisoning. Do not re-enter the property until the alarm stops. The alarm will stop once the CO
has cleared. Do not use fuel burning appliances again until the CO source has been located
and rectied by a qualied technician.
To activate the CO monitor, connect the plug to a socket outlet. The CO Sensor Condition Lamp
will display green. When the CO monitor detects unsafe level of CO, the CO alarm will ring
loudly and the CO Alert button and O ring lamp will blink in red colour. The alarm will continue
to indicate until the detected CO reduces to a safe level.
Avoid using paint, thinners, solvent fumes, air fresheners, aerosol sprays or chemical cleaners
near the appliance. This may affect functioning of CO monitor.
Do not allow small children to press the CO Alert button for 3 seconds as they could be subject
to excessive noise when the alarm rings.
Touch [CO Alert] button for 3 seconds to test the CO Alarm function and the alarm will ring
loudly for 5 seconds.Test the alarm monthly and after prolonged absence from the building (Eg
Holidays). If the alarm fails to ring after touching the [CO Alert] button for 3 seconds, please
contact the Hoover customer care centre to arrange a qualied technician to repair the fault.
If the display indicates that the CO sensor is faulty or end of life has been reached, please
contact the Hoover customer care centre to arrange a qualied technician to replace the CO
sensor.The expected lifetime of the CO sensor is 5 years and must be replaced after this time.
Operating Humidity: 15 – 90% RH
Operating Temperature: 0°C to + 40°C
When the detected level of CO reaches a high level, the [CO Alert] button and the [Air Quality
LED Ring] blink in red color (2Hz), at the same time, alarm rings loudly (85~110dB(A)) and
continuously, the alarm will not stop until the intensity of CO falls back from the alarm level.
Carbon Monoxide affects the body by starving (suffocating) critical organs of oxygen.
When CO is inhaled it attaches to the hemoglobin in the blood that normally carries oxygen
throughout the body. CO permanently displaces the ability for oxygen molecules to attach
to the hemoglobin, thus reducing oxygen to vital organs. The concentration level and time
exposed to CO can vary its effects on the body, but experts agree even low levels of carbon
monoxide exposure over prolonged periods can have serious and lasting affects to anyone’s
overall health.
4
WARNING: THE CO ALARM IS DESIGNED TO PROTECT INDIVIDUALS FROM THE
ACUTE EFFECTS OF CARBON MONOXIDE EXPOSURE OR PREVENT THE CHRONIC
EFFECTS OF CARBON MONOXIDE EXPOSURE. IT WILL NOT FULLY SAFEGUARD
INDIVIDUALS WITH SPECIFIC MEDICAL CONDITIONS. IF IN DOUBT CONSULT A
MEDICAL PRACTITIONER.
This appliance should not be used as a substitute for proper installation, use and maintenance
of fuel burning appliances including appropriate ventilation and exhaust systems.
The CO monitor mobile and tablet notications require a functional Wi-Fi connection to
operate. They are not a substitute for a third-party emergency monitoring service.
Only use aroma oil recommended or supplied by HOOVER.
Avoid using stand-alone humidier next to the air purier when using Diffuser function of
H-Essence.
Wipe any spillage of H-Essence immediately. Make sure to clean every corner of the product
that had contact with H-Essence.
HOOVER service: To ensure the continued safe and efcient operation of this appliance
we recommend that any servicing or repairs are only carried out by an authorised HOOVER
service engineer.
The Environment
This appliance is marked according to the European directive 2011/65/EC on Waste Electrical and Electronic Equipment (WEEE). By ensuring
this product is disposed of correctly, you will help prevent potential negative consequences for the environment and human health, which could
otherwise be caused by inappropriate waste handling of this product.
The symbol on this appliance indicates that this appliance may not be treated as household waste. Instead it must be handed over to
the applicable collection point for the recycling of electrical and electronic equipment. Disposal must be carried out in accordance with
local environmental regulations for waste disposal. For more detailed information about treatment, recovery and recycling
of this appliance, please contact your local city ofce, your household and waste disposal service or the shop where you purchased the
appliance.
Frequency bands 2400Mhz ~2483.5Mhz
Maximum RF power transmitted in the frequency band 18.9 dBm
This appliance complies with the European Directives 2014/53/EU and 2011/65/EU. To receive a copy of the declaration of conformity,
please contact the manufacturer at: www.candy-group.com
CANDY HOOVER GROUP S.r.l. Via Privata Eden Fumagalli, 20861 Brugherio (MB) Italy
GB
555
GETTING TO KNOW YOUR H-PURIFIER
GB
1 Control Panel / Display
2 Air Outlet
3 Product Carry Handle
4 Filter Assembly
5 Air Inlet Cover Handle
6 Filter Release Switch
7 Air Inlet Cover
8 Diffuser Window
9 Diffuser Cover
10 Diffuser Outlet
11 Diffuser Unit
12 H-Essence Bottle (Green)
13 H-Biotics Bottle (Brown)
14 Power Cord & Plug
15 Storage Hook
16 Transportation Location
66
GB
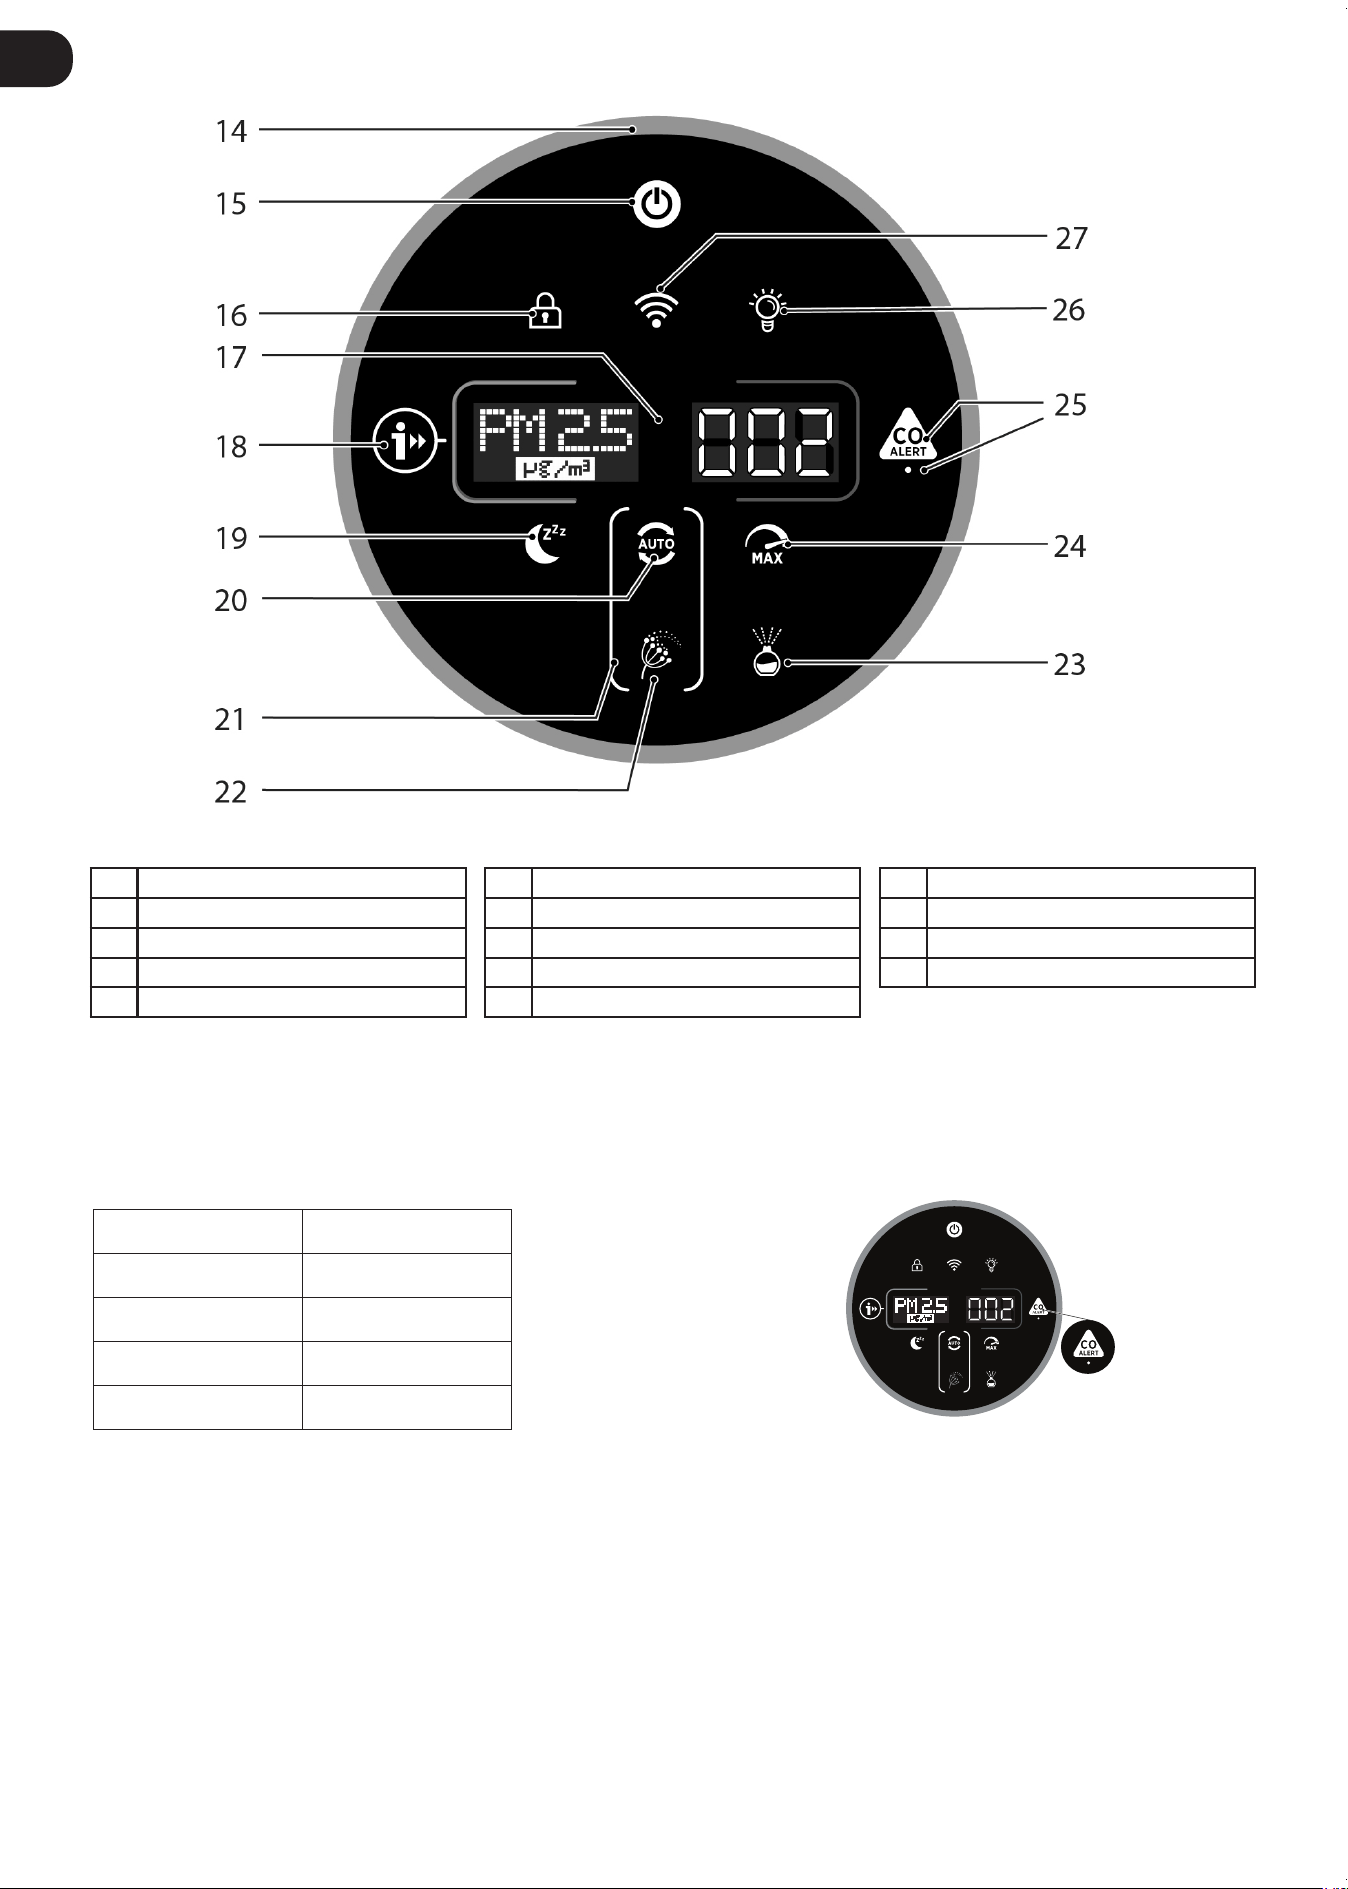
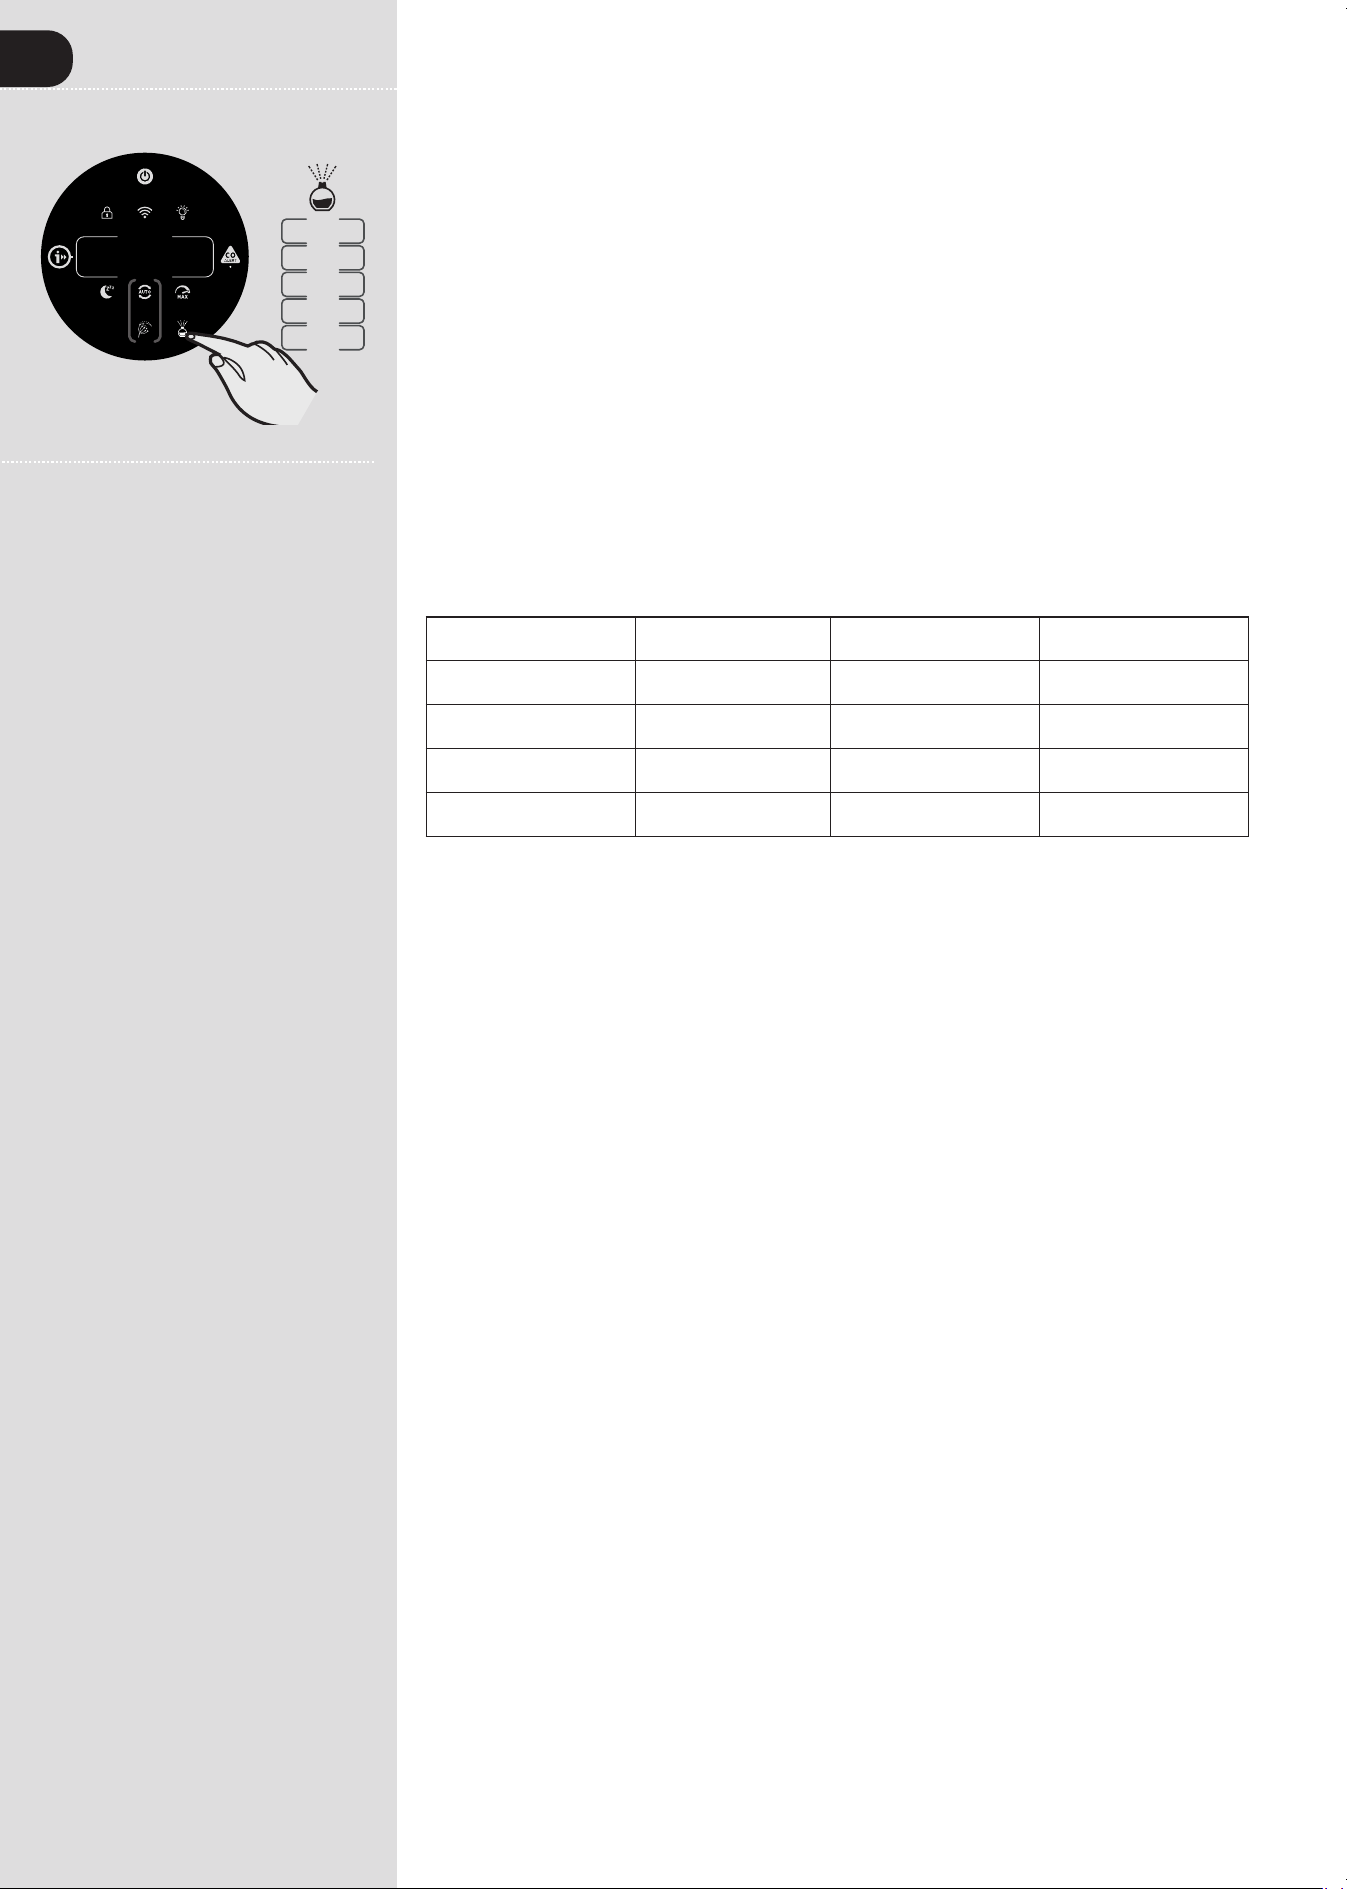
14 Air Quality LED Ring
15 Power Button
16 Child Lock Button
17 Digital Display
18 Information Button
19 Sleep Mode Button
20 Auto Mode Button
21 Pollen Allergy Circle Lamp
22 Pollen Allergy Lamp
23 Diffuser Button
24 Max Mode Button
25 CO Alert Button & LED
26 Light Control Button
27 Wi-Fi Button
Multi Sensor Monitoring System
Thanks to the Multi Sensor Monitoring System your product will continuously monitor the indoor air condition in terms of PM10, PM2.5, Volatile
Organic Compounds (GAS), and Carbon Monoxide concentration (CO).
Each time you switch your product on, the Multi Sensor Monitoring system will start analyzing the indoor air and the Air Quality LED Ring will
illuminate with different colors representing real time air quality conditions.
Carbon Monoxide Concentration Monitoring and Alarm
The H-Purier will constantly monitor the indoor air for Carbon Monoxide (CO). The product is equipped with an alert system
When the Carbon Monoxide alarm is activated, the AIR Quality LED Ring, Infomation & CO Alert button will ash red simultaniously and an
audible alarm will sound. The alarm will remain in operation until the Carbon Monoxide (CO) concentration has reduced to below 50 ppm unless
silenced manually by pressing the CO Alert Button for 3 seconds.
This CO Alert LED shows the working condition of the CO sensor. It appears in green color when the CO sensor is in normal condition, in yellow
color when the sensor is malfunctioning or exceeds its working life.
You can test if the alarm is working properly by pressing the CO Alert Button for 3 seconds, and a loud buzzer sound will last for 5 seconds if the
alarm works properly.
Air Quality
LED Ring Colour
Indoor
Air Quality
GREEN EXCELLENT
YELLOW SATISFACTORY
ORANGE POOR
RED VERY POOR
777
PREPARING YOUR H-PURIFIER
GB
Fig.1
Fig.2
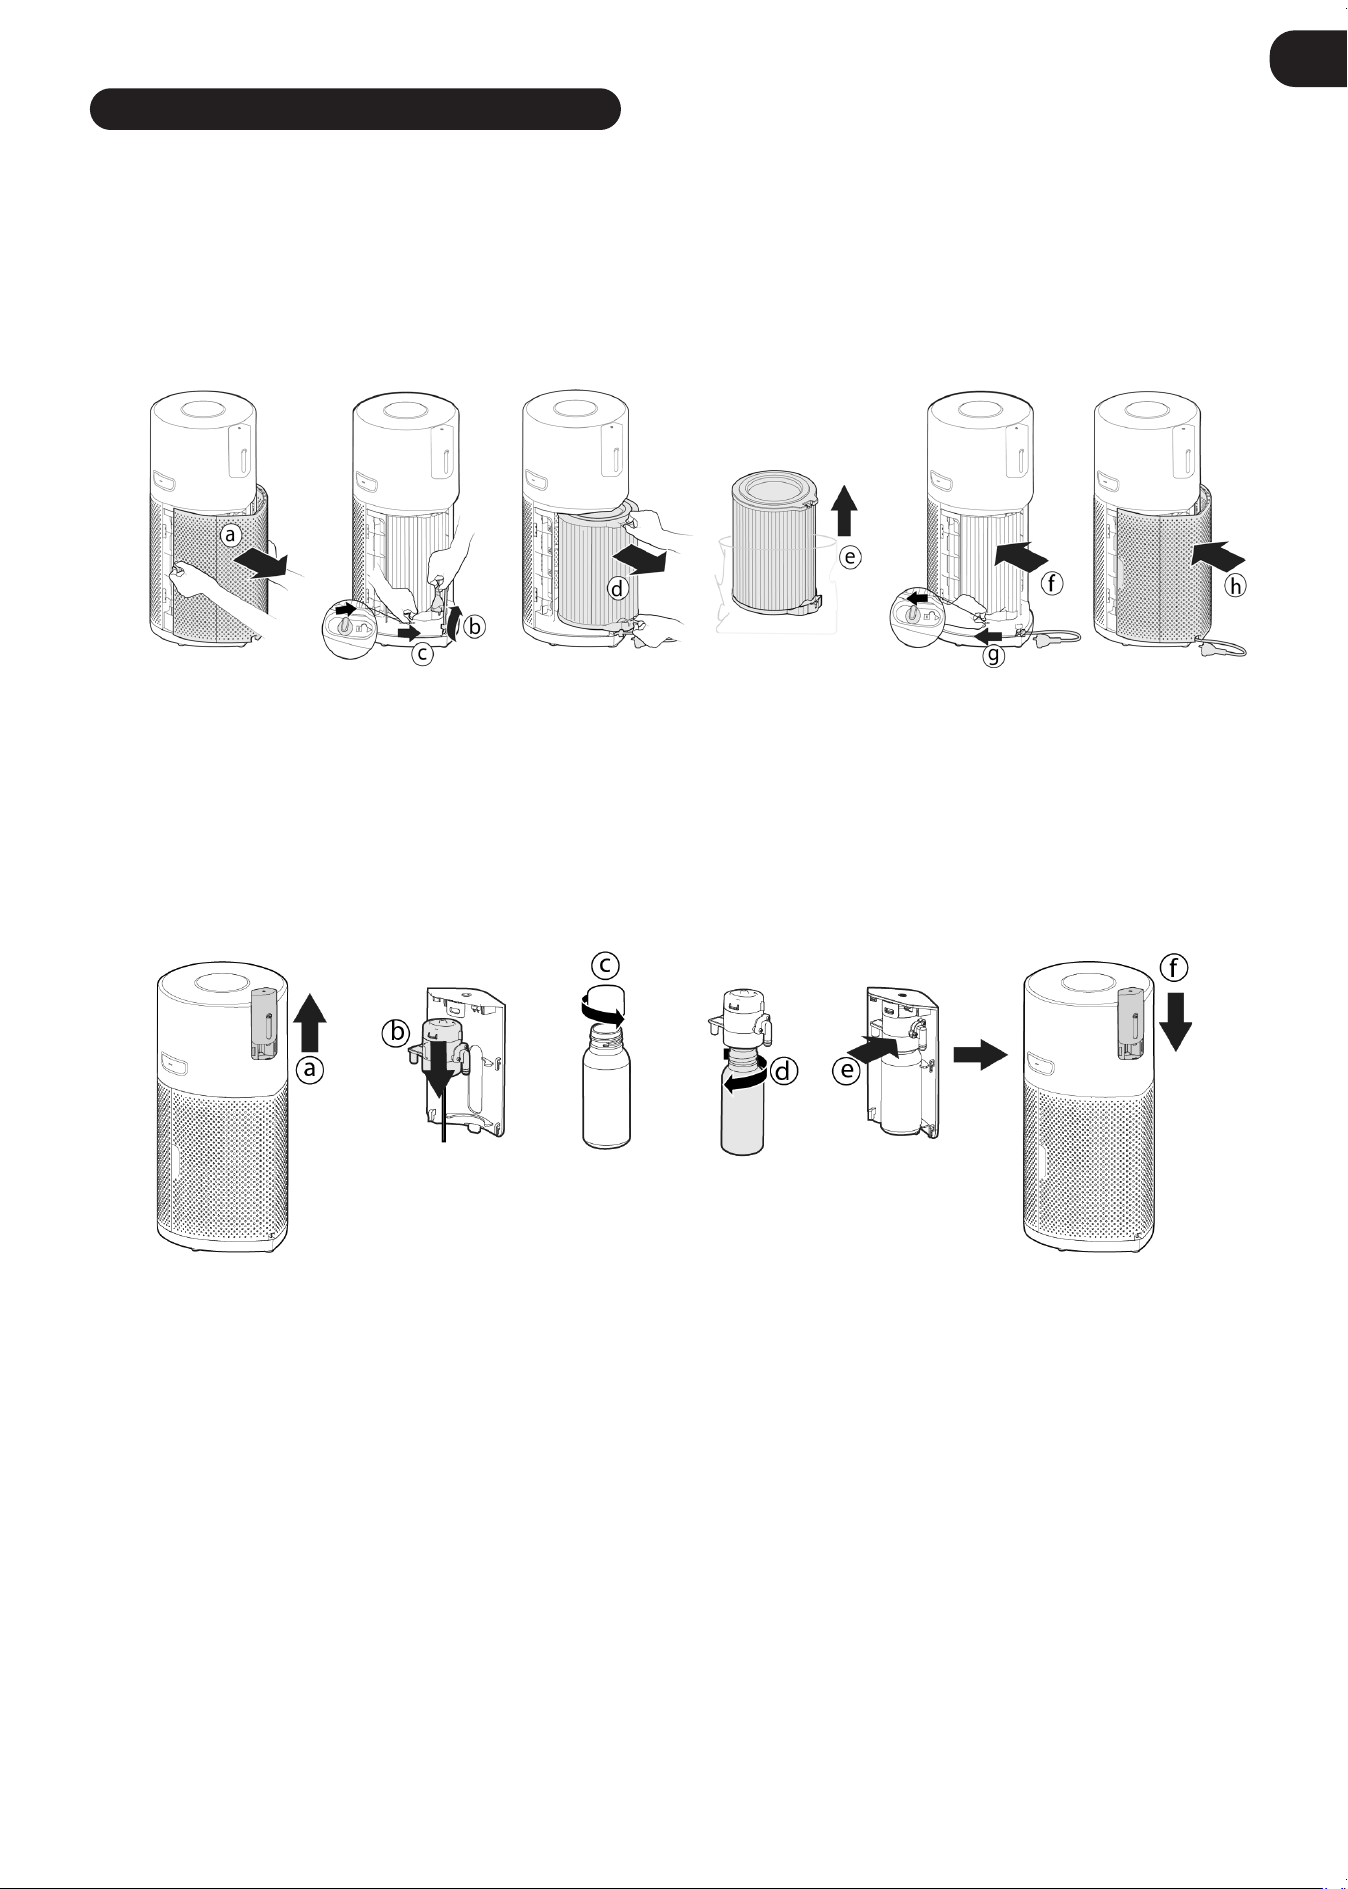
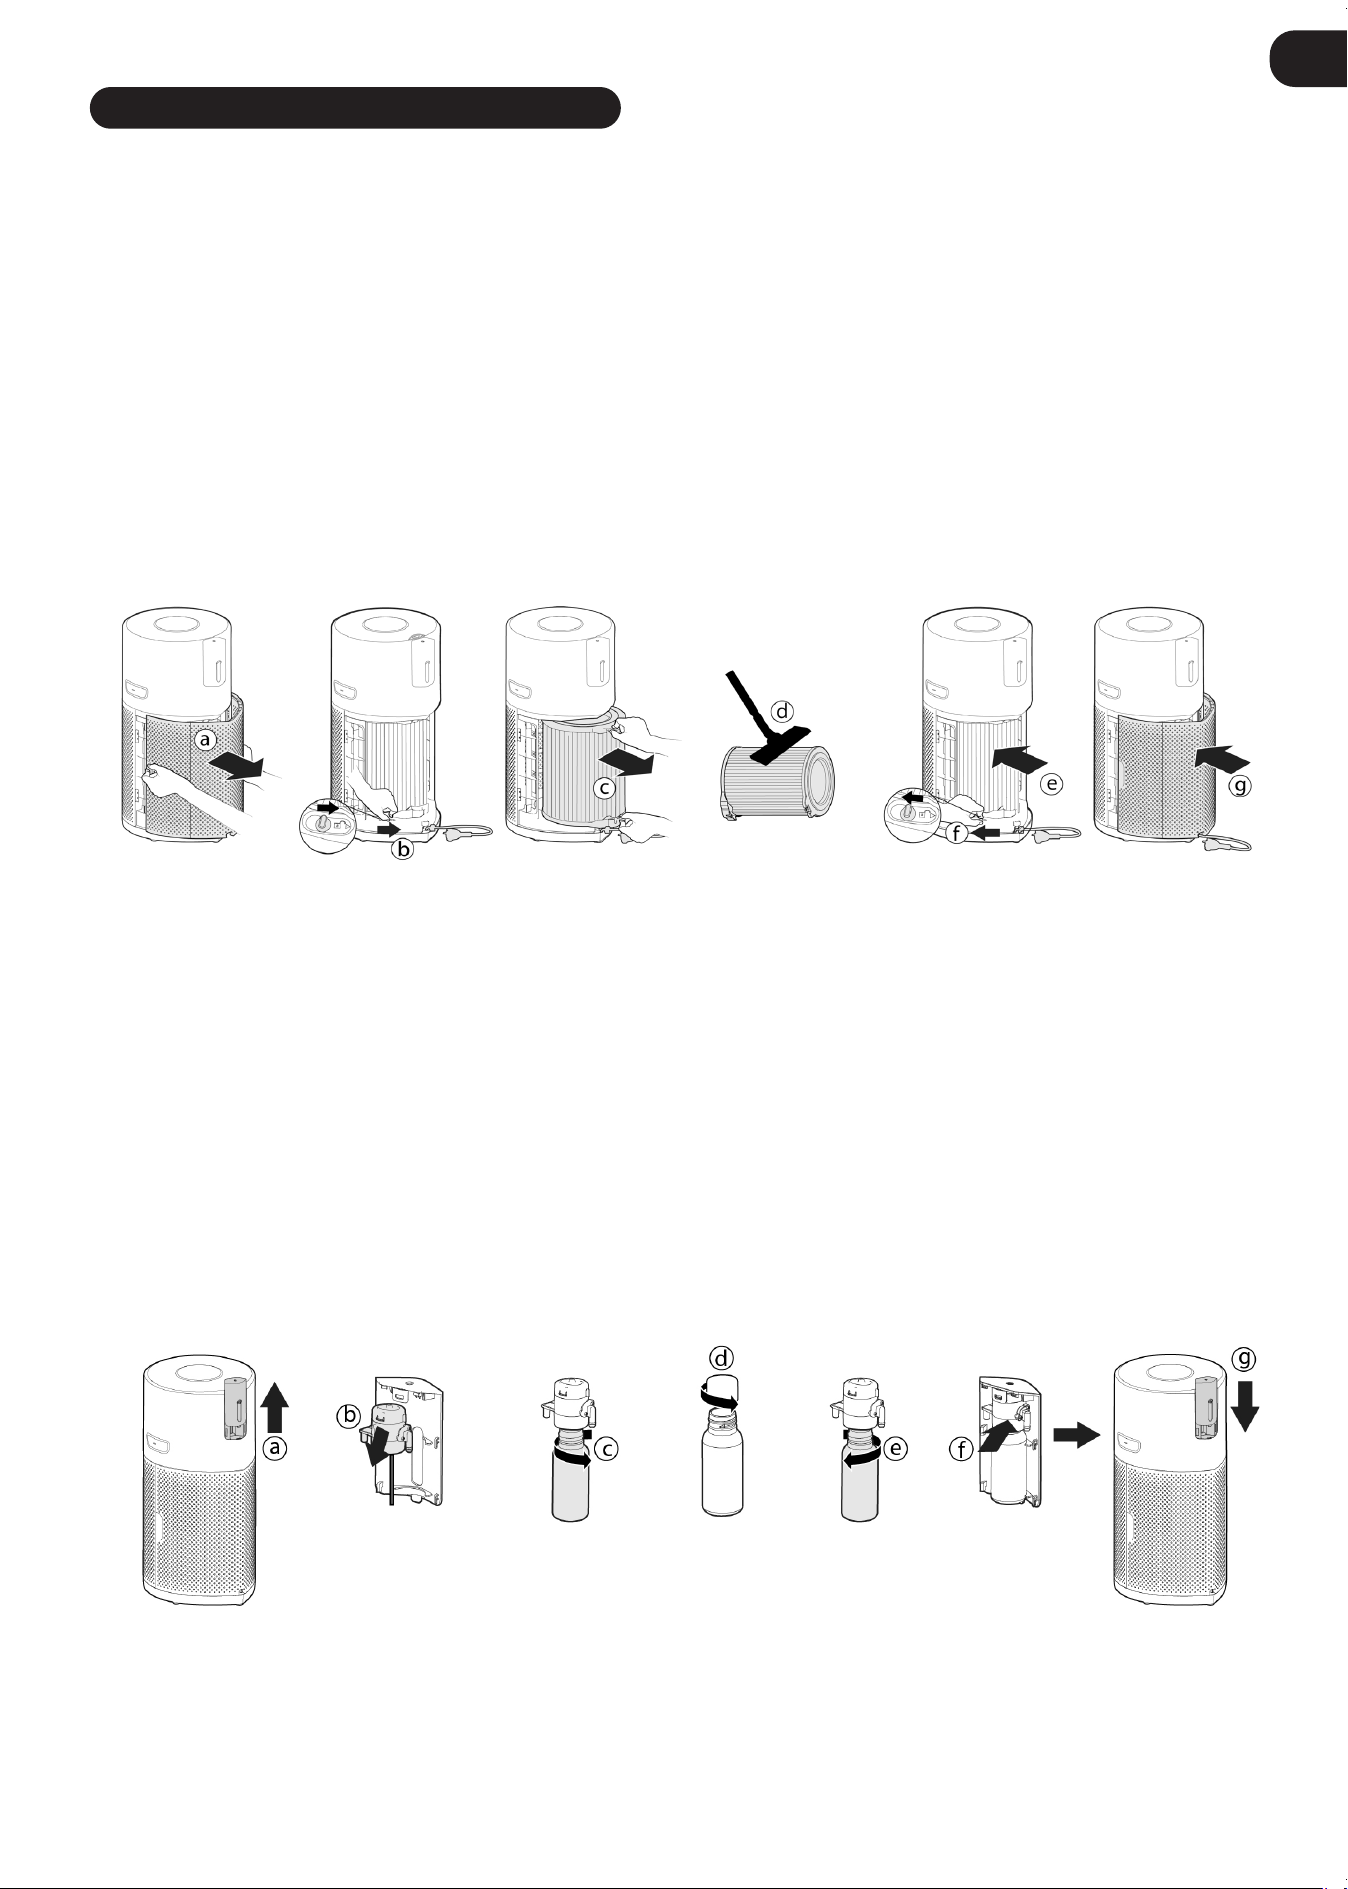
2. Install the Diffuser Bottle [Fig. 2]
To prepare your H-Purier product for the Diffuser function:
• Remove the Diffuser Cover from the product. [Fig. 2a]
• Remove the Diffuser Unit from the Diffuser Cover. [Fig. 2b]
• Remove the bottle of H-Essence or H-Biotics from the packaging and remove the cap [Fig. 2c]
• Tightly screw the bottle on the Diffuser unit.[Fig. 2d]
• Ret the Diffuser Unit into the Diffuser Cover. [Fig. 2e]
• Ret the Diffuser Cover into the product. [Fig. 2f]
1. Filter Assembly [Fig. 1]
Before using your H-Purier product you will need to remove the lter from it’s protective packaging:
•
Remove the Air Inlet Cover from your product, grip the two Air inlet cover handles and pull from the product.
[Fig. 1a]
• Remove the plug from the transport location and release the cord from the Storage Hook. [Fig. 1b]
• Unlock the Filter release switch. [Fig. 1c]
• Remove the lter from your product and remove the outer packaging. [Fig. 1d,e]
• Ret the lter into your product. [Fig. 1f]
• Lock the lter release switch. [Fig. 1g]
• Ret the Air Inlet Cover to your product. [Fig. 1h]
8
X1
PM10 017
X1 PM10 090
X2 PM2.5 065
X3 L3GAS
X4 16TEMP
X5 36
HUMIDITY
X6 -
FILTER LIFE
GB
Fig. 3
Fig. 4
Fig. 6
Fig. 5
Fig. 7
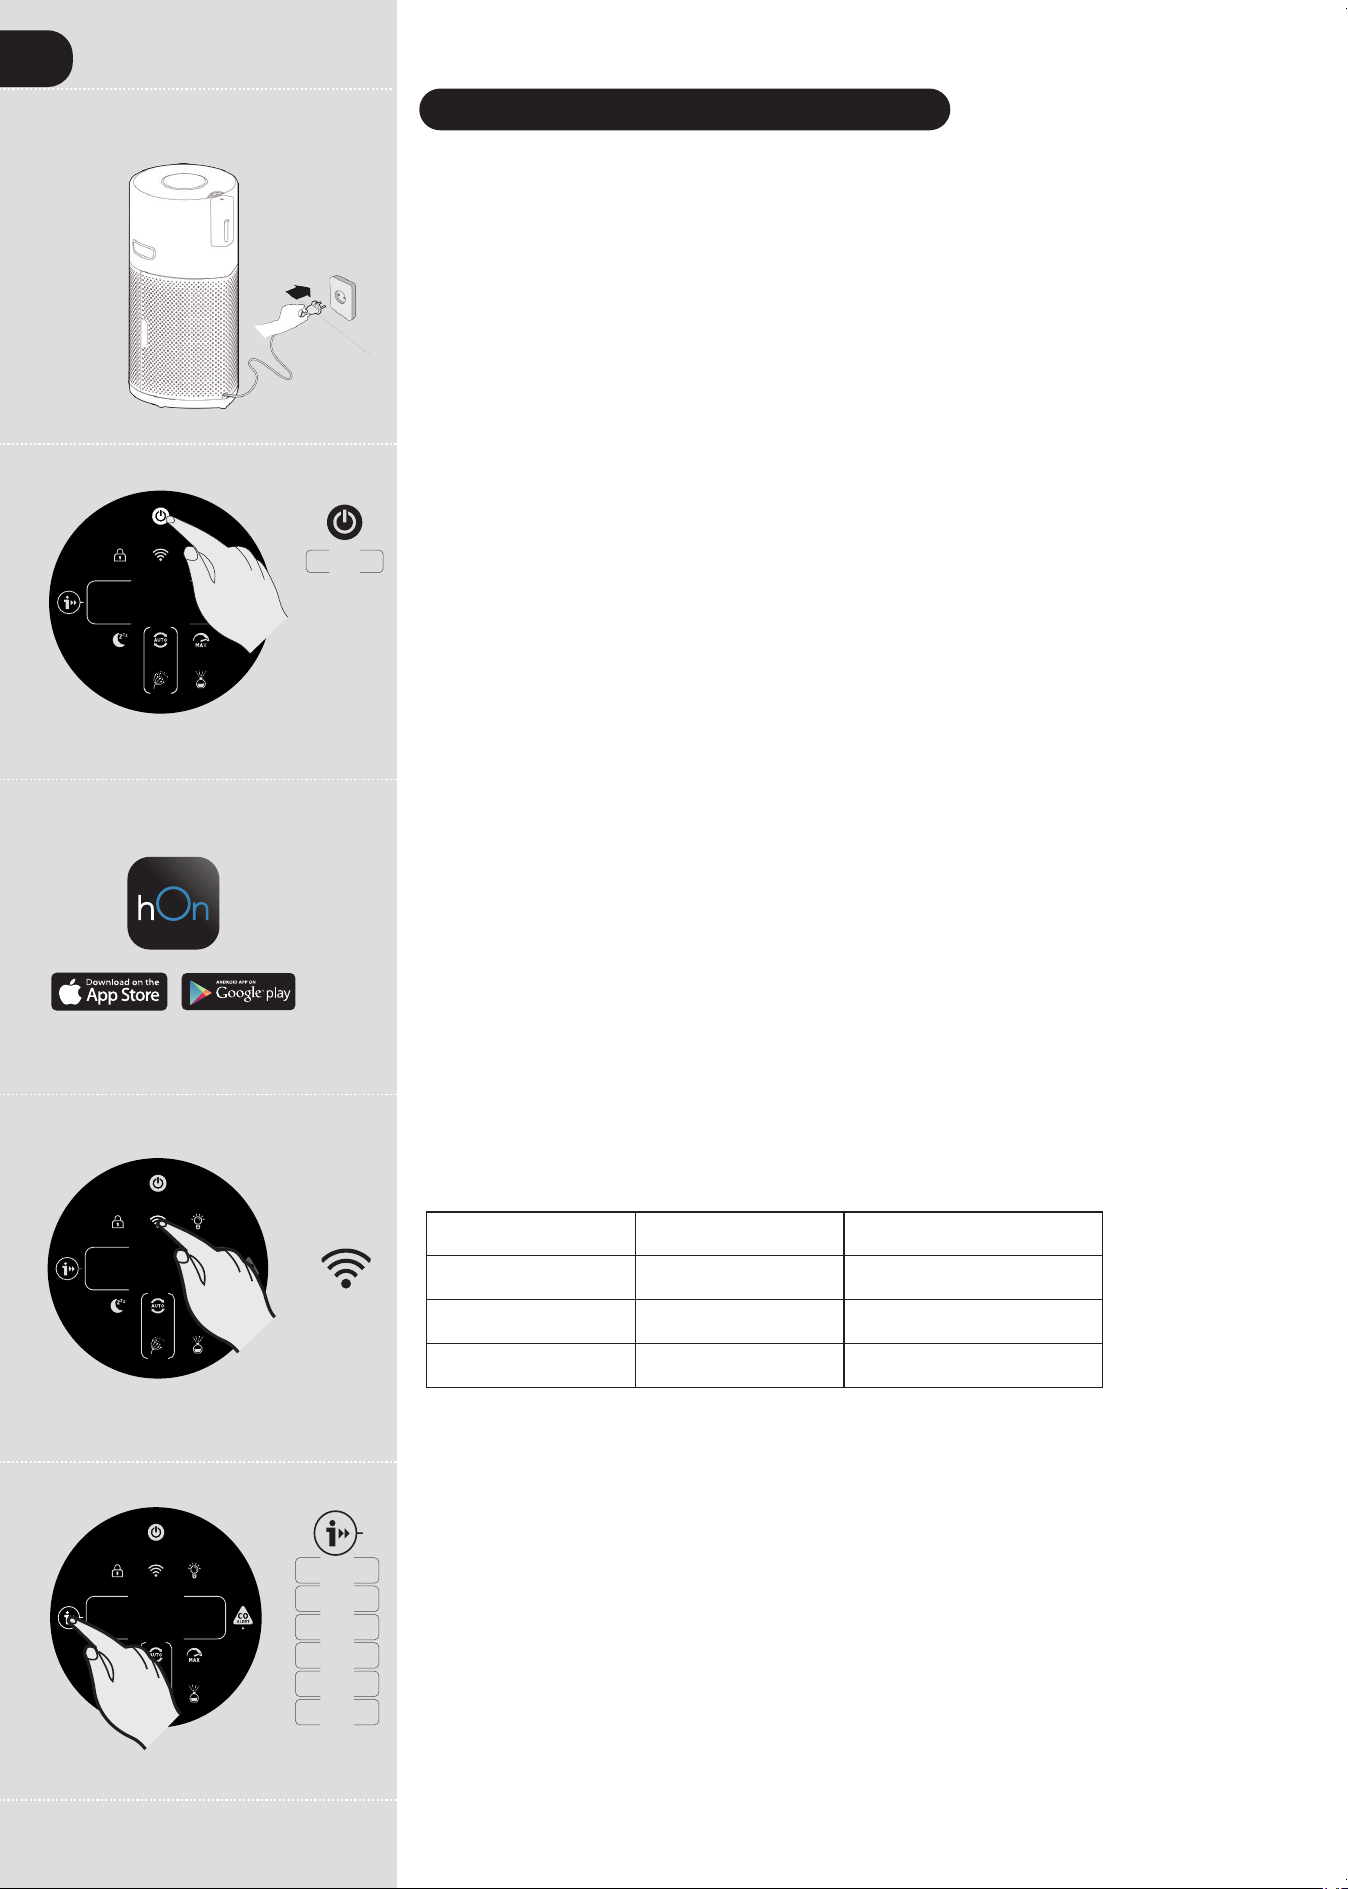
Plug in the Product [Fig. 3]:
Pull out the power cord from the cord reel and plug into a power supply.
All lights on the Control Panel / Display will fully illuminate for approximately 1 second to indicate a
succesful plug in.
The POWER button will be dimly lit and the CO sensor light will be ON to indicate that the Multi Sensor
Monitoring System has started working to monitor the indoor Carbon Monoxide level.
Switching on the Product [Fig. 4]:
To switch on your product, press the POWER button on the display.
The Air Quality LED Ring will illuminate through all colours in sequence whilst the sensors are analysing
the realtime air condition. After a few seconds, the Air Quality LED ring will select the appropriate colour
for the air quality at that time.
Your H-Purier product will immediately enter AUTO MODE and begin to purify the indoor air.
The AUTO MODE button, INFORMATION button, LIGHT CONTROL button and PM10 information on
the Display will illuminate.
The following functions are available via the Display buttons:
Press the Wi-Fi button to turn on/off remote access.
Press the INFORMATION button to see all the monitored data data.
Press the AUTO, MAX or SLEEP buttons to select a purifying mode.
Press the LIGHT CONTROL button to set the brightness of the display lights.
Press the CHILD LOCK button to inactivate all the buttons on the Control Panel / Display.
Press the DIFFUSER button to activate the function
Press the POWER button to switch off the air purier.
Pairing to Wi-Fi:
In order to access all the H-Puriers functions from anywhere, it is suggested to download the hOn App.
You will be able to control your product in the most efcient way.
Instructions:
1. Download the hOn application from the App Store or Google Play [Fig. 5]
2. Open the APP, create an account with your e-mail and a password.
3. Conrm login.
4. Ensure your mobile device is connected to Wi-Fi.
5. Log into the hOn app.
6. Press and hold the Wi-Fi button on the display for 5 seconds, there will an audible beep and the
Wi-Fi button will start ashing to indicate it is waiting for a connection. [Fig. 6]
7. Follow the in app instructions to connect your mobile device to your product.
8. When successfully paired, the Wi-Fi button on the product will remain illuminated.
9. To reset the Wi-Fi, press & hold the Wi-Fi button for 5 Secs.
Wireless Parameters for Pairing
INFORMATION Function [Fig. 7]:
There are 6 different data sets available to monitor:
PM10, PM2.5, GAS, Temperature, Humidity, and Filter Status.
To monitor each value simply press consecutively the INFORMATION button.
By default the display will show the PM10 data, the machine will remember user’s last selection and
maintain this selection the next time the product is switched on.
The GAS data will show spinning cursor during the initial 3 minutes after product is switched on, while
the GAS sensor is performing a calibration cycle.
More info on PM 2.5, PM 10 and GAS:
PM indicates ne particles (not visible to the human eye) deriving mainly from outdoor pollution such as
vehicles and industrial emissions and potentially dangerous to our health in case of prolonged exposure.
PM 10 have a size up to 10 µm and are capable of penetrating the upper respiratory tract (nose,
trachea, pharynx).
PM 2.5 have a size up to 2.5 µm and, given their small dimension, they can reach our lungs, thus
Technology Wi-Fi Bluetooth
Standard IEE 802.11 b/g/n Bluetooth v4.2, BR/EDR, BLE
Frequency Band(s) (MHz)
2401 ~ 2483 2402 ~ 2480
Maximum Power (mW)
100 10
USING YOUR H-PURIFIER
9
b
a
c
GB
Fig. 11
Fig. 10
Fig. 9
Fig. 8
Fig. 12
Fig. 13
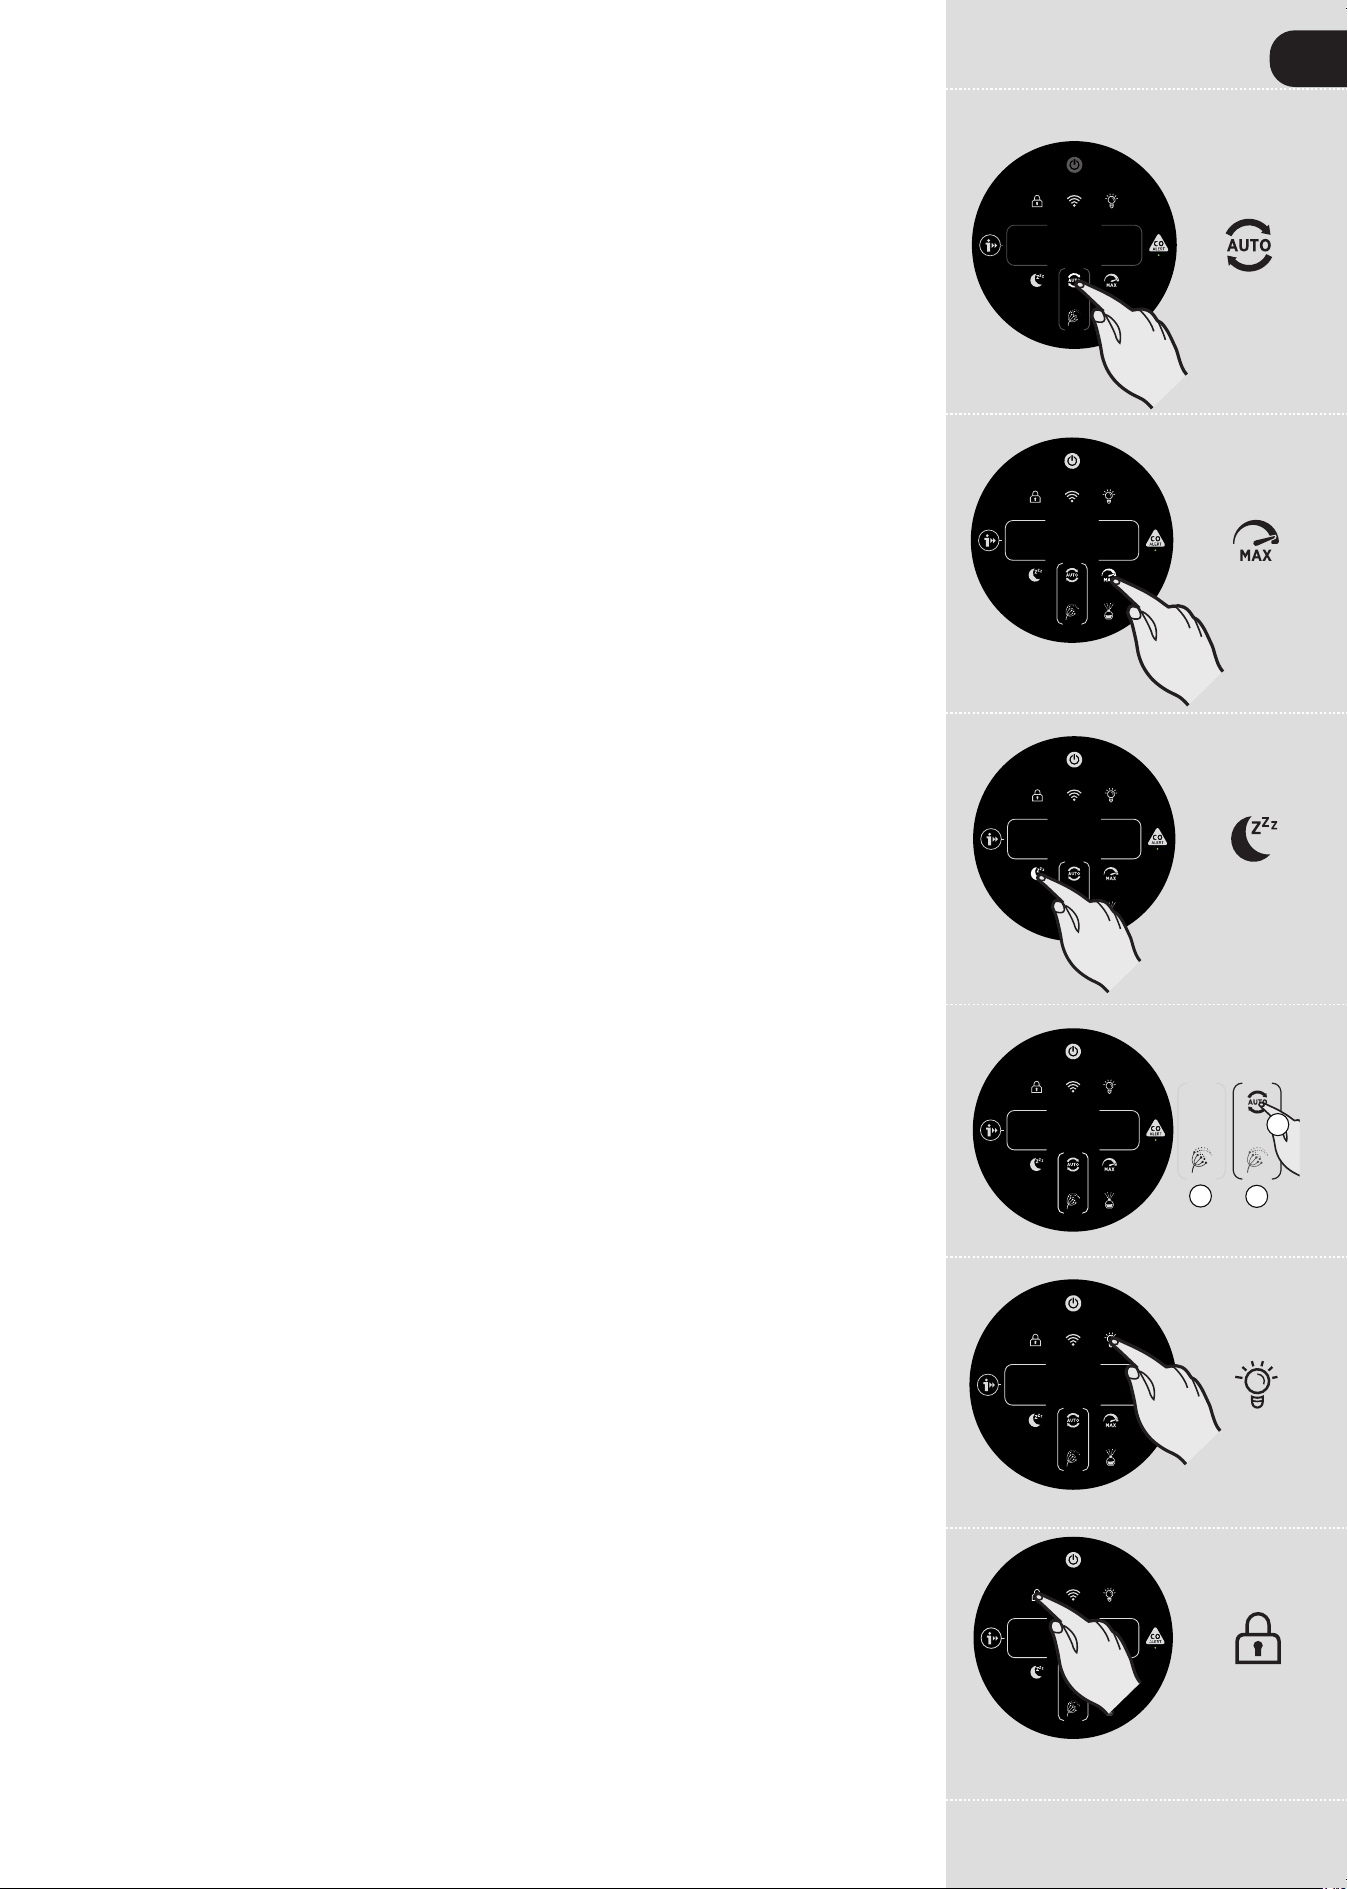
MODE Functions:
There are 3 available air purifying modes via the display: AUTO MODE, MAX MODE & SLEEP MODE
Auto mode is the default setting for your product when switched on, all modes can be selected manually
by pressing the related button on the display.
POLLEN ALLERGY mode can be activated via the hOn APP.
AUTO MODE [Fig. 8]:
This is the default mode of your H-Purier product when rst switched on. In Auto Mode, the H-Purier
automatically adjust its fan speed to the actual indoor air quality level to always guarantee an optimal air
purication.
This is the recommended setting for your product.
In AUTO mode, after 30 minutes of excellent air quality, your product will enter an ECO mode by
pausing the purifying function, the Multi Sensor Monitoring System will continue to analyse the indoor air
and automatically switch on the purifying function when required.
MAX MODE [Fig. 9]:
Press the MAX mode button on the display to activate air purifying at maximum power setting. To exit
MAX mode simply select AUTO mode or SLEEP mode.
SLEEP MODE [Fig. 10]:
Press the SLEEP mode button to activate air purifying at the lowest silent power setting. The SLEEP
mode button will be dimly lit and all other display lights will be off. This can be modied by pressing the
LIGHT CONTROL button.
POLLEN ALLERGY MODE: [Fig. 11]
The Pollen Allergy mode can only be activated via the hOn APP. You will rst be required to activate
and register a prole in the app, in order to create your Pollen Allergy Prole.
The Pollen Allergy mode works only when AUTO MODE is selected. [Fig. 11c]
In Pollen Allergy mode, the appliance continuously receives real time data from the APP about
the monitored pollen concentration outdoor, and works automatically to maximize pollen capturing
performance.
Once pollens are captured, they are inactivated to help alleviate allergic symptoms.
When Pollen Allergy mode is activated in the App, there are 2 possible notication lamps on the product
display:
- The Pollen Allergy Lamp is WHITE [Fig. 11a]: The appliance and the App are monitoring the presence
of pollens outdoor and there is no risk.
- The Pollen Allergy Lamp turns YELLOW [Fig. 11b] and the Pollen Allergy Circle lamp is WHITE [Fig.
11a]: The appliance and the APP have detected risk.
If the product is manually put into SLEEP mode or MAX mode whilst Pollen Allergy mode is activated,
the Pollen Allergy mode will stop.
LIGHT CONTROL Function: [Fig. 12]
There are 3 settings available for the display lighting, On, Dim & Off.
To adjust the brightness of the display lighting simply press the LIGHTING button on the display to cycle
through the 3 available options. ON is the default setting.
If OFF is selected, any other button will need to be pressed twice to activate, after one press, the lights
will become DIM, on second press the action will be activated.
CHILD LOCK Function: [Fig. 13]
Press and hold the CHILD LOCK button for 3 seconds to activate, an audible sound will be heard when
it has been activated and the CHILD LOCK button will remain illuminated. No other buttons will work
when activated.
To exit, simply press and hold the CHILD LOCK button for 3 seconds, an audible sound will be heard
conrm it is off and the button will no longer be illuminated.
penetrating deeper into our body.
GAS VOC (volatile organic compounds) are volatile chemical compounds with the ability to evaporate
easily in the air at room temperature. Deodorants, detergents, glues, adhesives, cosmetics,
formaldehyde are just some of the VOCs that could be present in our homes but potentially harmful to
our health in case of prolonged exposure.
10
GB
Fig. 14
X1
X2
X3
X4
X5
SOFT
MEDIUM
CUSTOM
H-BIOTICS
OFF
X1
MIN 40
X2
X3
X4
MED 55
70
MAX
OFF
Diffuser Function :[Fig. 14]
The diffuser spreads into the air of the room H-Essence or H-Biotics. H-Essence is the Hoover collection
of essential oils to release into the air enjoyable fragrances.
H-Biotics is a natural blend based on probiotics that keeps the room bio-hygenized by inhibiting the
growth of microorganims such as bacteria or microbes.
There are 4 different settings for the DIFFUSER function, SOFT, MEDIUM, CUSTOM & H-BIOTICS.To
activate this function simply press the Diffuser button on the Display, the default setting for this function
is SOFT, to select any of the other settings simply consecutively press the button to change to the
desired selection. The button will illuminate white when switched on.
It is recommended to use SOFT & MEDIUM settings for H-Essence.
Custom setting can be created within the hOn app for your H-Essence.
When Using H-Biotics, the setting MUST be set to H-Biotics. Once user activates H-Biotics using the
APP, this will give an alert of “ACTIVATE H-BIOTICS” after 120 hours to ensure the H-biotics usage of
every 5 days
The Diffuser function can only be used in AUTO & MAX modes and cannot be used in SLEEP
mode.
When activating Diffuser function in AUTO mode, the main fan will work with a specic speed to
help to spread the H-Essence or the H-Biotics to the room.
Setting Pump On Pump Off Cycle
SOFT 10 secs 300 secs Shutdown after 6 Hours
MEDIUM 90 secs 120 secs Shutdown after 6 Hours
CUSTOM User Dened User Dened Shutdown after 6 Hours
H-BIOTICS 120 secs 120 secs Shutdown after 6 Hours
To switch off the function, press the diffuser button until the button light switches off.
After each use of the Diffuser function, use a dry soft cloth to clean any residue from the product
surfaces.
To change the bottle in the diffuser unit, see ‘Maintaining your H-Purier’ section.
111111
MAINTAINING YOUR H-PURIFIER
Fig.15
Fig.16
GB
IMPORTANT: ALWAYS UNPLUG YOUR APPLIANCE FROM THE POWER SUPPLY WHEN PERFORMING MAINTENANCE TASKS.
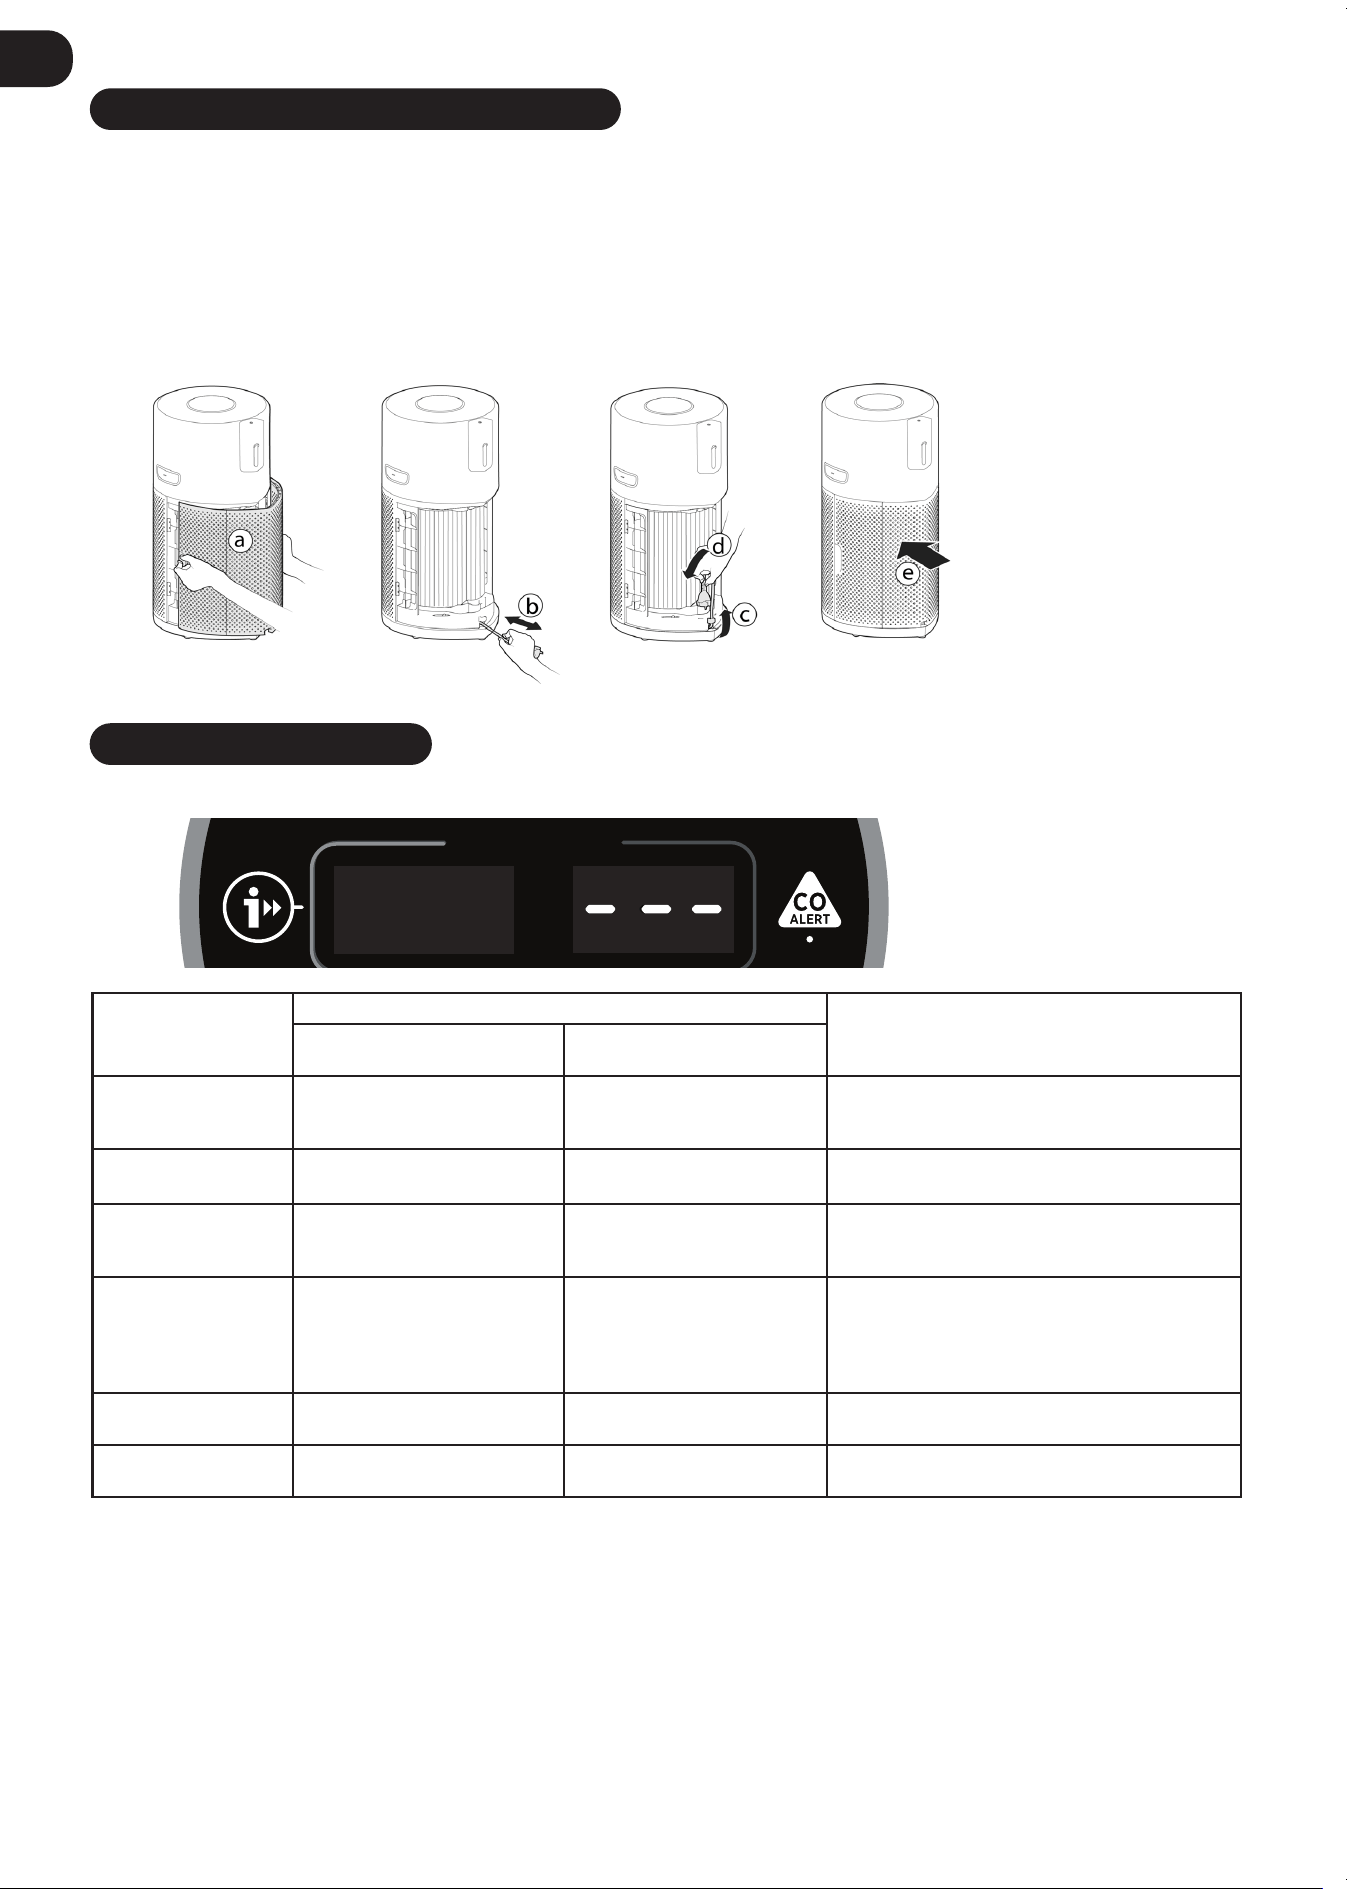
FILTER CLEANING / REPLACEMENT
Your H-Purier will monitor the condition of your lter. A CLEAN FILTER OR REPLACE FILTER alert will appear on the left side of the display
and Flash indicating action is required to clean or change the lter.
Cleaning / Replacing the Filter:
[Fig. 15]
• Remove the Air Inlet Cover from your product. [Fig. 15a]
• Unlock the Filter release switch. [Fig. 15b]
• Remove the lter from your product. [Fig. 15c]
• Use a Vacuum Cleaner to clean the external mesh on the Filter Assembly or Replace with a NEW lter. [Fig. 15d]
• Re-Fit the Filter assembly into the product. [Fig. 15e]
• Lock the lter release switch. [Fig. 15f]
• Ret the Air Inlet Cover to your product. [Fig. 15g]
• Plug in your appliance to the power supply and switch on. [Fig. 4]
• Press the INFORMATION button and follow the instructions to reset the Filter Clean function by holding the button for 3 secs, an audible alert
will be heard to indicate a successful reset. [Fig. 7]
DIFFUSER MAINTENANCE.
After each use of the Diffuser function, use a dry soft cloth to clean any residue from the product surfaces.
Diffuser Bottle Replacement:[Fig. 16]
The volume of liquid remaining in the bottle can be checked through the Diffuser Window, when required the bottle should be replaced.
• Remove the diffuser cover from the product. [Fig. 16a]
• Remove the Diffuser Unit & Bottle from the diffuser cover. [Fig. 16b]
• Unscrew & remove the empty bottle and discard. [Fig. 16c]
• Remove the new bottle of H-Essence or H-Biotics from the packaging and remove the cap. [Fig. 16d]
• Tightly screw the new bottle on to the diffuser unit. [Fig. 16e]
• Ret the diffuser unit into the diffuser cover. [Fig. 16f]
• Ret the Diffuser cover into the H-Purier. [Fig. 16g]
12
GB
STORAGE OF YOUR H-PURIFIER
Fig.17
1. Switch off the Air Purier and unplug the socket.
2. Clean all internal & external surfaces of the Air Purier and the external mesh of the Filter.
3. Remove the bottle from the diffuser. Ret the original cap onto the bottle and store it to protect from direct light. Clean the surfaces of diffuser
unit and Diffuser Cover. Make sure there is no residual of H-Essence on any surface of the Air Purier.
4. Ensure all components are dry.
5. Remove the Air Inlet Cover [Fig. 17a] and Reel in the power cord by pulling on the cord [Fig. 17b] and t the cord into the storage hook and
t the plug into the transport location. [Fig. 17c,d] Ret the air inlet cover [Fig. 17e]
6. Store the Air Purier in a cool dry place.
Fig.18
ALERTS & SOLUTIONS
The following codes may appear during use. [Fig. 18]
Error Description
Error Description
Error SolutionAlert on product Control
Panel / Display
Alert on APP
Outer Layer’s Filter
cleaning Alert
Alert of "CLEAN FILTER" blinks
on display
Filter cleaning Alert
1.Follow the instructions in I/M to clean the Outer
Layer’s Filter.
2.Reset the alert.
Filter replacement
Alert
Alert of "REPLACE FILTER"
blinks on display
Filter replacement Alert
1.Follow the guidence in I/M to replace the lter.
2.Reset the alert.
Filter not present or
lter has not been
locked
Alert of "FILTER MISSING"
blinks on display
Filter not present or lter has
not been locked
1.If lter is not present, put it back.
2.If lter is in position, check whether the Filter
Tab has been switched to LOCK status.
Dust sensor
malfunctioning: no
signal from sensor or
output voltage exceeds
the limit value
/
Dust sensor malfunctioning: no
signal from sensor or output
voltage exceeds the limit value
Dust sensor failure or dust sensor wire has not
been connected well, please call service center
to x.
Motor no speed
/
Motor no speed feedback
Motor failure or motor wire has not been
connected well, please call service center to x.
CO sensor
malfunctioning
CO sensor status lamp is on in
yellow
CO sensor malfunctioning Alert: need call service.
ATTENTION: If any of these failures persist, contact your local Hoover representative. DO NOT try to disassemble the H-Purier by yourself.
REPLACE
FILTER

131313
GB
TROUBLESHOOTING
The following is a list of commonly encountered problems and solutions.
If any of these problems persist contact your local Hoover representative.
The Fan does not work
(Control Panel / Display
Lights on)
• Check the alert showing on the display or in the app.
• Check if there are any obstructions in the fan.
• Check if the H-Purifier is switched on.
• Check if the filter is incorrectly installed.
• Check if the H-Purifier is in a completely upright vertical position and not leaning.
The Fan does not work
(Control Panel / Display
Lights off)
• Check if the H-Purifier is plugged in and switched on.
• Check if there are any obstructions in the fan.
No Lights on Control Panel /
Display (Fan Working)
• Check if the lights have not been switched off by pressing the Light Control button on the control Panel
/ Display.
Buttons on the control panel
/ Display do not operate
• Check if Child lock has been activated by pressing and holding the Child Lock Button for 3 secs.
Air Flow is Weak
• Check if the protective packaging has been removed from the filter.
• Check if there are any obstructions in the Air Intake Cover or Air outlet.
• Check the Filter staus on the Control Panel / Display or in App for clean or replace warning.
• Check if the H-Purifier is in sleep mode. The fan operates on reduced power in this mode.
Air Purier is operating
loudly
• Check if there are any obstructions in the Air Outlet or the fan.
• Check if the H-Purifier is running in MAX mode, the air flow is at maximum power in this mode.
Air Purier makes a loud
buzzer sound all of a
sudden.
• The testing function of CO Alert button is activated by mis-operation. The sound will automatically stop
after 5 seconds.
IMPORTANT INFORMATION
Hoover Spares and Consumables
Always replace parts with genuine Hoover spares. These are available from your local Hoover dealer or direct from Hoover. When ordering parts
always quote your model number.
Quality
Hoover’s factories have been independently assessed for quality. Our products are made using a quality system which meets the requirements of
ISO 9001.
Your Guarantee
The guarantee conditions for this appliance are as dened by our representative in the country in which it is sold. Details regarding these conditions
can be obtained from the dealer from whom the appliance was purchased. The bill of sale or receipt must be produced when making any claim
under the terms of this guarantee.
Subject to change without notice.

®
PRINTED IN P.R.C.
48032692/02