
Write the model and serial
numbers here:
Model # _________________
Serial # _________________
Find these numbers on a label
inside the oven.
GE is a trademark of the General Electric Company. Manufactured under trademark license.
ESPAÑOL
Para consultar una version en
español de este manual de
instrucciones, visite nuestro sitio de
internet GEAppliances.com.
OWNER’S MANUAL
ADVANTIUM
®
OVEN
49-40687-4 12-16 GEA
SAFETY INFORMATION .........3
ADVANTIUM
Getting to Know Advantium? ............8
Features ..............................9
Controls .............................10
SPEEDCOOKING
Power Level .......................... 11
Cookware ............................12
Custom ..............................12
Menu Guide ..........................13
Recipe Features ......................15
Things That Are Normal ...............16
BAKING, BROILING,
AND TOASTING .................17
WARMING AND PROOFING ....19
MICROWAVING ................. 20
Cookware ........................... 20
Pre-Set Selections ................... 20
Cook By Time ........................21
Cooking Tips .........................21
Power Levels .........................21
Defrost ..............................22
Sensor Cooking ......................23
Things That Are Normal .............. 24
OTHER FEATURES ..............25
CARE AND CLEANING
Inside ...............................27
Turntable ............................27
Cooking Trays and Baking Sheets .......27
Outside ..............................28
Stainless Steel ........................28
TROUBLESHOOTING ........... 29
WARRANTY ......................31
CONSUMER SUPPORT ..........32
PSB9120
http://geadvantium.com

2 49-40687-4
THANK YOU FOR MAKING GE APPLIANCES A PART OF YOUR HOME.
Whether you grew up with GE Appliances, or this is your first, we’re happy to have you in the family.
We take pride in the craftsmanship, innovation and design that goes into every GE Appliances
product, and we think you will too. Among other things, registration of your appliance ensures that we
can deliver important product information and warranty details when you need them.
Register your GE appliance now online. Helpful websites and phone numbers are available in the
Consumer Support section of this Owner’s Manual. You may also mail in the pre-printed registration
card included in the packing material.

49-40687-4 3
READ AND SAVE THESE INSTRUCTIONS
SAFETY INFORMATION
WARNING
To reduce the risk of burns, electric shock, fire, injury to persons, or exposure to
excessive microwave energy:
When using electrical appliances, basic safety precautions should be followed, including the following:
Ŷ 5HDGDOOLQVWUXFWLRQVEHIRUHXVLQJWKLVDSSOLDQFH
Ŷ 5HDGDQGIROORZWKHVSHFLILFSUHFDXWLRQVLQWKH
PRECAUTIONS TO AVOID POSSIBLE EXPOSURE
TO EXCESSIVE MICROWAVE ENERGY section on
page 7.
Ŷ 8VHWKLVDSSOLDQFHRQO\IRULWVLQWHQGHGXVHDV
described in this manual. Do not use corrosive
chemicals or vapors in this appliance. This oven is
specifically designed to heat, dry or cook food, and is
not intended for laboratory or industrial use.
Ŷ 7KLVDSSOLDQFHPXVWRQO\EHVHUYLFHGE\TXDOLILHG
service personnel. Contact nearest authorized
service facility for examination, repair or adjustment.
INSTALLATION
Ŷ ,QVWDOORUORFDWHWKLVDSSOLDQFHRQO\LQDFFRUGDQFH
with the provided installation instructions.
Ŷ This appliance must be grounded. Connect only
to properly grounded outlet. See “GROUNDING
INSTRUCTIONS” found on page 7.
Ŷ 7KLVPLFURZDYHLV8/OLVWHGIRUVWDQGDUGZDOO
installation. See installation instructions for approved
appliances to mount over and under the microwave.
Ŷ Do not operate this appliance if it has a damaged
power cord or plug, if it is not working properly, or if it
has been damaged or dropped.
Ŷ .HHSFRUGDZD\IURPKHDWHGVXUIDFHV
Ŷ Do not let cord hang over the edge of the table or
counter
Ŷ 'RQRWLPPHUVHFRUGRUSOXJLQZDWHU
Ŷ 'RQRWFRYHURUEORFNDQ\RSHQLQJVRQWKH
appliance.
Ŷ 'RQRWVWRUHWKLVDSSOLDQFHRXWGRRUV'RQRWXVHWKLV
product near water—for example, in a wet basement,
near a swimming pool, near a sink or in similar
locations.
Ŷ 'RQRWPRXQWWKLVDSSOLDQFHRYHUDVLQN
TO REDUCE THE RISK OF FIRE IN THE CAVITY:
Ŷ Do not overcook food. Carefully attend appliance
when paper, plastic or other combustible materials
are placed inside the oven
to facilitate cooking.
Ŷ 5HPRYHZLUHWZLVWWLHVDQGPHWDOKDQGOHVIURP
paper or plastic containers before placing them in
the oven.
Ŷ ,IPDWHULDOVLQVLGHWKHRYHQLJQLWHNHHSWKHRYHQ
door closed, turn the oven off and disconnect the
power cord or shut off power at the fuse or circuit
breaker panel.
Ŷ 'RQRWVWRUHDQ\PDWHULDOVLQWKLVRYHQZKHQQRWLQ
use. Do not leave paper products, cooking utensils
or food in the cavity when not in use. All racks
should be removed from oven when not in use.
Ŷ 'RQRWRSHUDWHWKHPLFURZDYHIHDWXUHZLWKRXWIRRGLQ
the oven.
Ŷ 'RQRWXVHWKH6HQVRU)HDWXUHVWZLFHLQVXFFHVVLRQ
on the same food portion. If food is undercooked
DIWHUWKHILUVWFRXQWGRZQXVH&22.%<7,0(IRU
additional cooking time.
Ŷ 7KHZLUHRYHQUDFNVKRXOGQRWEHXVHGIRU
speedcook or microwave cooking to prevent arcing
TO REDUCE THE RISK OF BURNS:
Ŷ %HFDUHIXOZKHQRSHQLQJFRQWDLQHUVRIKRWIRRG8VH
pot holders and direct steam away from face and
hands.
Ŷ 9HQWSLHUFHRUVOLWFRQWDLQHUVSRXFKHVRUSODVWLF
bags to prevent build-up of pressure.
Ŷ %HFDUHIXOZKHQWRXFKLQJWKHWXUQWDEOHGRRUUDFNV
or walls of the oven which may become hot during
use.
Ŷ /LTXLGVDQGFHUWDLQIRRGVKHDWHGLQWKHPLFURZDYH
oven can present a risk of burn when removing
them from the microwave. The potential for a burn is
greater in young children, who should not be allowed
to remove hot items from the microwave.
IMPORTANT SAFETY INFORMATION
READ ALL INSTRUCTIONS BEFORE USING THE APPLIANCE

4 49-40687-4
SAFETY INFORMATION
READ AND SAVE THESE INSTRUCTIONS
WARNING
Arcing can occur during both speedcooking and microwave cooking. If you see arcing,
press the CANCEL/OFF pad and correct the problem.
Arcing is the microwave term for sparks in the oven.
Arcing is caused by:
Ŷ 0HWDORUIRLOWRXFKLQJWKHVLGHRIWKHRYHQ
Ŷ )RLOQRWPROGHGWRIRRGXSWXUQHGHGJHVDFWOLNH
antennas).
Ŷ 8VHIRLORQO\DVUHFRPPHQGHGLQWKLVPDQXDO
Ŷ 0HWDOFRRNZDUHXVHGGXULQJHLWKHUVSHHGFRRNRU
PLFURZDYHFRRNLQJH[FHSWIRUWKHSDQVSURYLGHG
with the oven).
Ŷ 0HWDOVXFKDVWZLVWWLHVSRXOWU\SLQVRU
gold-rimmed dishes, in the oven.
Ŷ 5HF\FOHGSDSHUWRZHOVFRQWDLQLQJVPDOOPHWDO
pieces being used in the oven.
IMPORTANT SAFETY INFORMATION
READ ALL INSTRUCTIONS BEFORE USING THE APPLIANCE
WARNING
Continued
OPERATING
Ŷ $VZLWKDQ\DSSOLDQFHFORVHVXSHUYLVLRQLV
necessary when used by children.
Ŷ 'RQRWRSHUDWHWKHRYHQZLWKRXWWKHWXUQWDEOHLQ
place. The turntable must be unrestricted so it can
turn.
Ŷ 'RQRWVWRUHDQ\WKLQJGLUHFWO\RQWRSRIWKH
microwave oven surface when the microwave oven
is in operation.
Ŷ 2YHUVL]HGIRRGVRURYHUVL]HGPHWDOXWHQVLOVVKRXOG
not be inserted in a microwave/convection oven as
they may create a fire or risk of electric shock.
Ŷ Do not use paper products in oven when appliance
is operating in any cooking mode except microwave.
Ŷ 6RPHSURGXFWVVXFKDVZKROHHJJVDQGVHDOHG
containers—for example, closed jars—are able to
explode and should not be heated in this oven.
Ŷ 'RQRWRYHUFRRNSRWDWRHV7KH\FRXOGGHK\GUDWHDQG
catch fire, causing damage to your oven.
Ŷ 'RQRWFRYHUUDFNVRUDQ\RWKHUSDUWRIWKHRYHQZLWK
meal foi. This will cause overheating of the oven.
Ŷ &RRNPHDWDQGSRXOWU\WKRURXJKO\²
PHDWWRDWOHDVWDQ,17(51$/WHPSHUDWXUHRI)
and poultry to at least an INTERNAL temperature
RI)&RRNLQJWRWKHVHWHPSHUDWXUHVXVXDOO\
protects against foodborne illness.
Ŷ 7KLVRYHQLVQRWDSSURYHGRUWHVWHGIRUPDULQHXVH
CLEANING
Ŷ .HHSWKHRYHQIUHHIURPJUHDVHEXLOGXS
Ŷ 'RQRWFOHDQZLWKPHWDOVFRXULQJSDGV3LHFHVFDQ
burn off the pad and touch electrical parts involving a
risk of electric shock.
Ŷ :KHQFOHDQLQJVXUIDFHVRIGRRUDQGRYHQWKDW
comes together on closing the door, use only mild,
nonabrasive soaps, or detergents applied with a
clean sponge or soft cloth. Rinse well.
SUPER HEATED WATER
Ŷ /LTXLGVVXFKDVZDWHUFRIIHHRUWHDDUHDEOHWR
be overheated beyond the boiling point without
appearing to be boiling. Visible bubbling or boiling
when the container is removed from the microwave
oven is not always present. THIS COULD RESULT
IN VERY HOT LIQUIDS SUDDENLY BOILING
OVER WHEN THE CONTAINER IS DISTURBED
OR A SPOON OR OTHER UTENSIL IS INSERTED
INTO THE LIQUID.
Ŷ 7RUHGXFHWKHULVNRILQMXU\WRSHUVRQV
'RQRWRYHUKHDWWKHOLTXLG
6WLUWKHOLTXLGERWKEHIRUHDQGKDOIZD\WKURXJK
heating it.
- Do not use straight-sided containers with narrow
necks.
- After heating, allow the container to stand in the
microwave oven for a short time before removing
the container.
- Use extreme care when inserting a spoon or other
utensil into the container.
49-40687-4 5
READ AND SAVE THESE INSTRUCTIONS
IMPORTANT SAFETY INFORMATION
READ ALL INSTRUCTIONS BEFORE USING THE APPLIANCE
SAFETY INFORMATION
WARNING
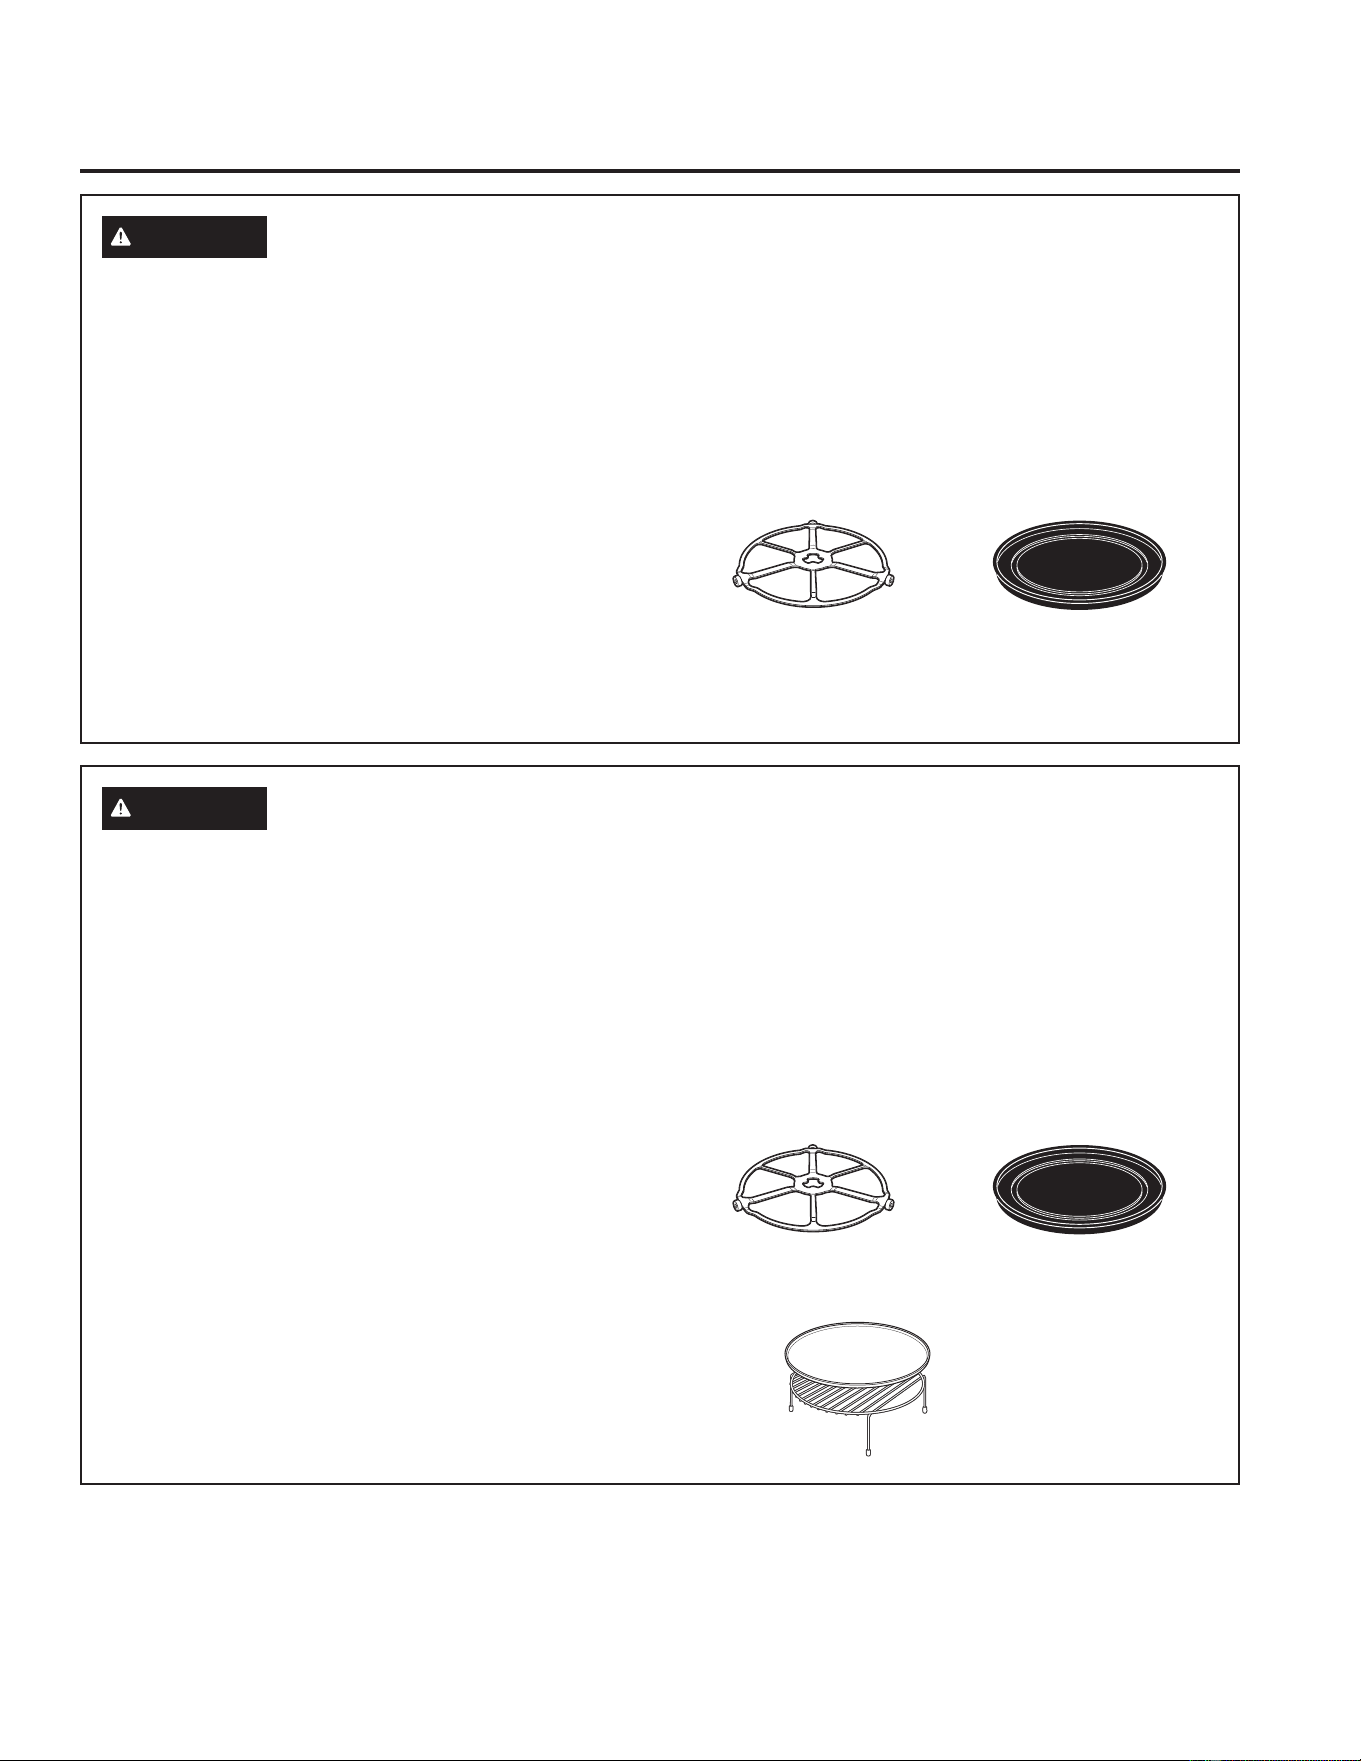
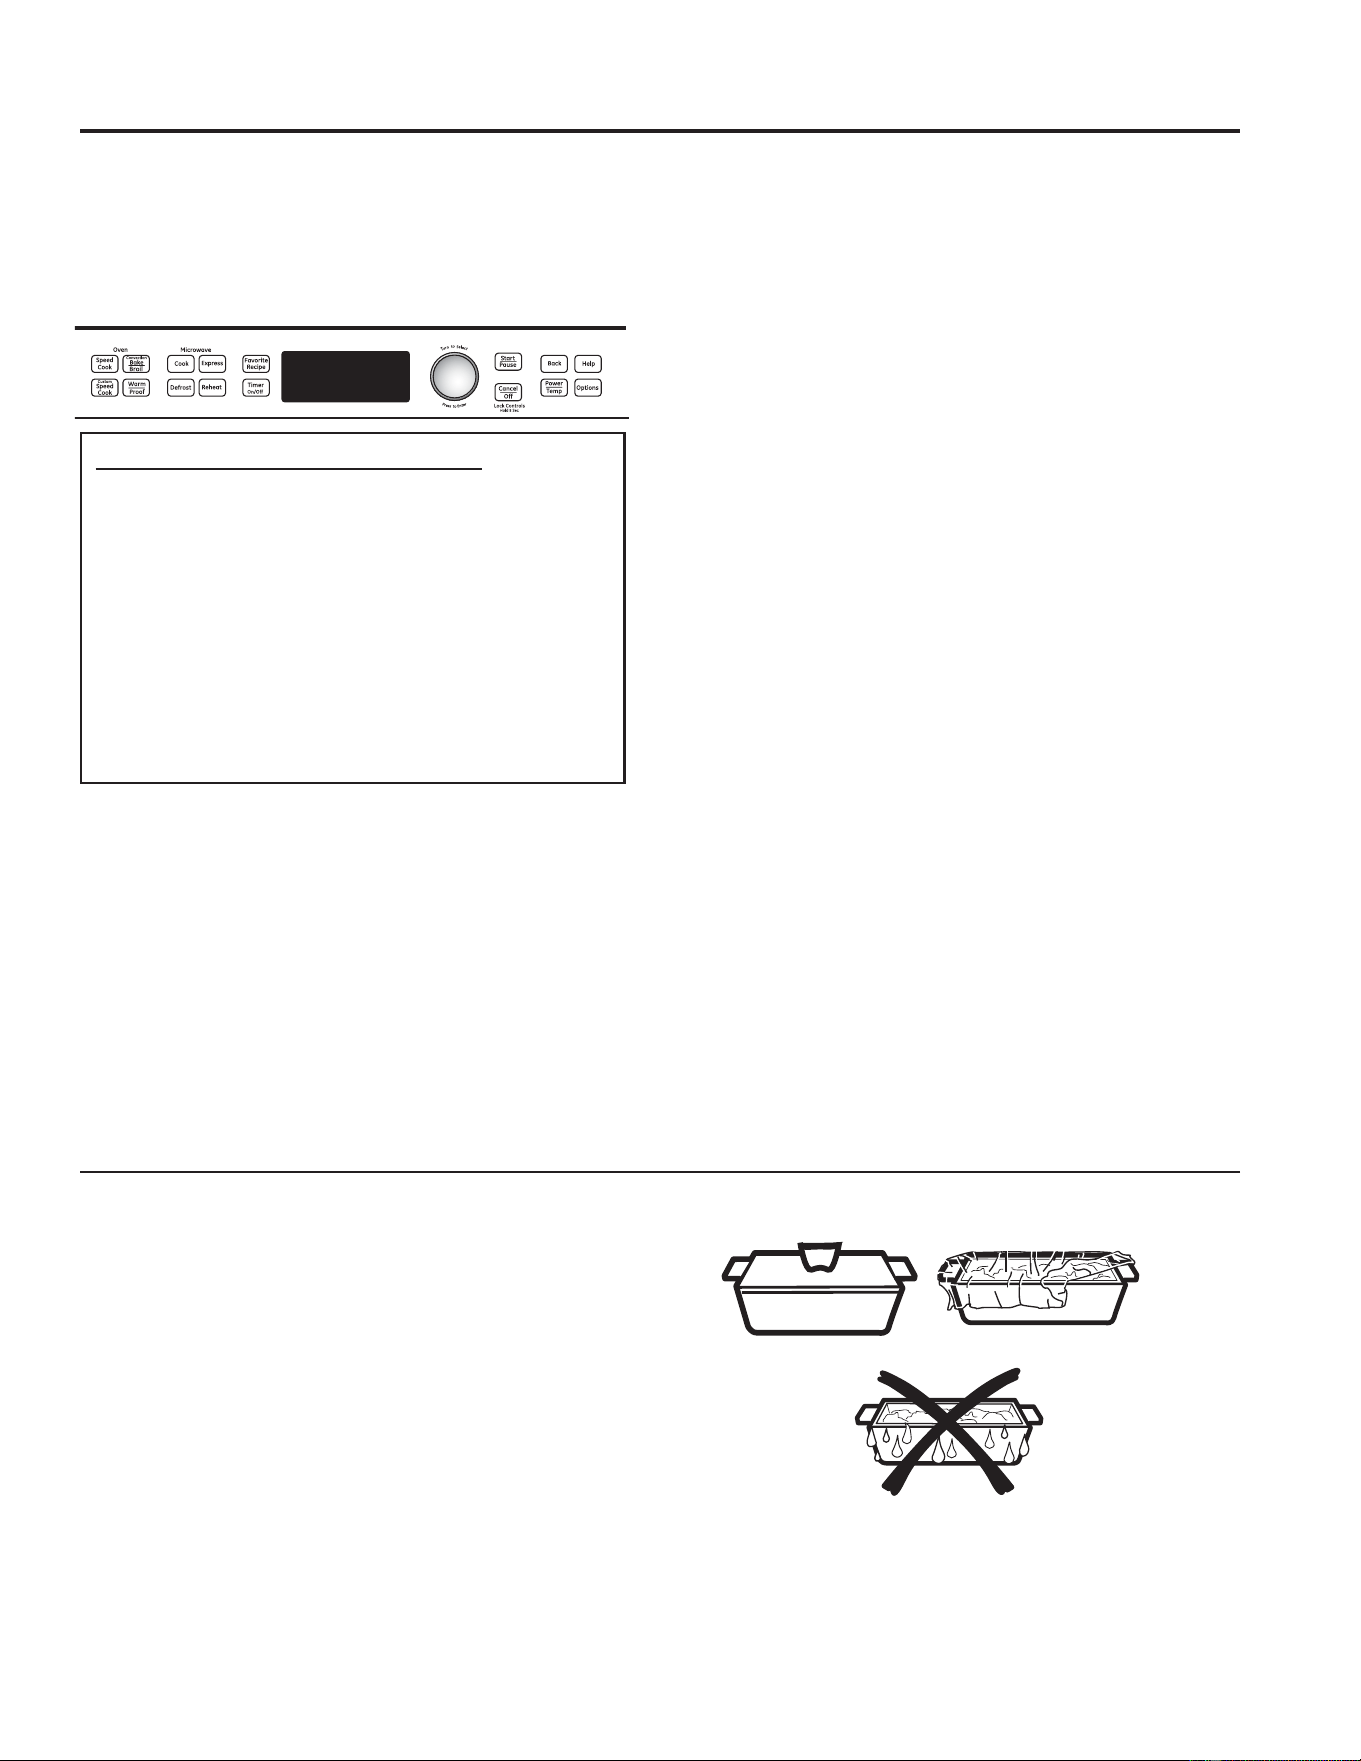
SPEEDCOOK OVEN-SAFE COOKWARE
Ŷ The oven and door will get very hot when
speedcooking.
Ŷ Cookware will become hot because of heat
transferred from the heated food. Oven mitts will be
needed to handle the cookware.
Ŷ 'RQRWXVHFRYHULQJVFRQWDLQHUVRUFRRNLQJ
roasting bags made of foil, plastic, wax or paper
when speedcooking.
Ŷ 'RQRWFRYHUWKHWXUQWDEOHZLUHRYHQUDFNWUD\VRU
any part of the oven with metal foil. This will cause
arcing in the oven.
Ŷ 8VHWKHQRQVWLFNPHWDOWUD\LQWKHVDPHZD\\RX
would use a shallow baking pan or baking tray.
Ŷ 3ODFHIRRGGLUHFWO\RQWKHWUD\VZKHQFRRNLQJ
unless prompted by the oven to do otherwise.
Ŷ $Q\RYHQVDIHGLVKFDQEHXVHGLQ\RXURYHQ
Recipes in the Advantium Cookbook were tested in
Pyrex
®
glass cookware and Corningware
®
ceramic
casseroles. Cook times and results may vary when
using other types of oven-safe dishes. Place them
directly on the trays.
Ŷ 8VHRIWKHFOHDUJODVVWUD\ZKHQVSHHGFRRNLQJZLOO
result in inferior cooking performance.
WARNING
OVEN-SAFE COOKWARE FOR BAKING, BROILING, WARMING,
PROOFING & TOASTING
Ŷ The oven and door will get very hot when
baking, broiling, warming, proofing or toasting.
Ŷ Cookware will become hot. Oven mitts will be
needed to handle the cookware.
Ŷ 'RQRWFRYHUGLVKHVRUXVHSODVWLFFRQWDLQHUV
plastic cooking/roasting bags, plastic wrap, wax
paper or paper when broiling or toasting.
Ŷ 8VHWKHQRQVWLFNPHWDOWUD\LQWKHVDPHZD\\RX
would use a shallow baking pan or baking tray.
Ŷ 8VHWKHDOXPLQXPEDNLQJVKHHWRQWKHZLUHRYHQ
rack, and place them on the non-stick metal tray
when baking on two levels, broiling or toasting
foods.
Ŷ 3ODFHIRRGGLUHFWO\RQWKHWUD\VZKHQFRRNLQJ
unless prompted by the oven to do otherwise.
Ŷ $Q\RYHQVDIHGLVKFDQEHXVHGLQ\RXURYHQ
Recipes in the Advantium Cookbook were tested in
Pyrex
®
glass cookware and Corningware
®
ceramic
casseroles. Cook times and results may vary when
using other types of oven-safe dishes. Place them
directly on the trays.
Ŷ 8VHRIWKHFOHDUJODVVWUD\ZKHQEDNLQJEURLOLQJ
warming, proofing or toasting will result in inferior
cooking performance.
The turntable must always
be in place when using the
oven.
The turntable must always
be in place when using the
oven.
Put food directly on the non-
stick metal tray to speedcook.
Put food directly on the non-
stick metal tray to bake on
one level.
Put food directly on the
aluminum baking sheet on the
wire oven rack, and place them
on the non-stick metal tray,
when baking on two levels,
broiling or toasting foods.
6 49-40687-4
READ AND SAVE THESE INSTRUCTIONS
SAFETY INFORMATION
WARNING
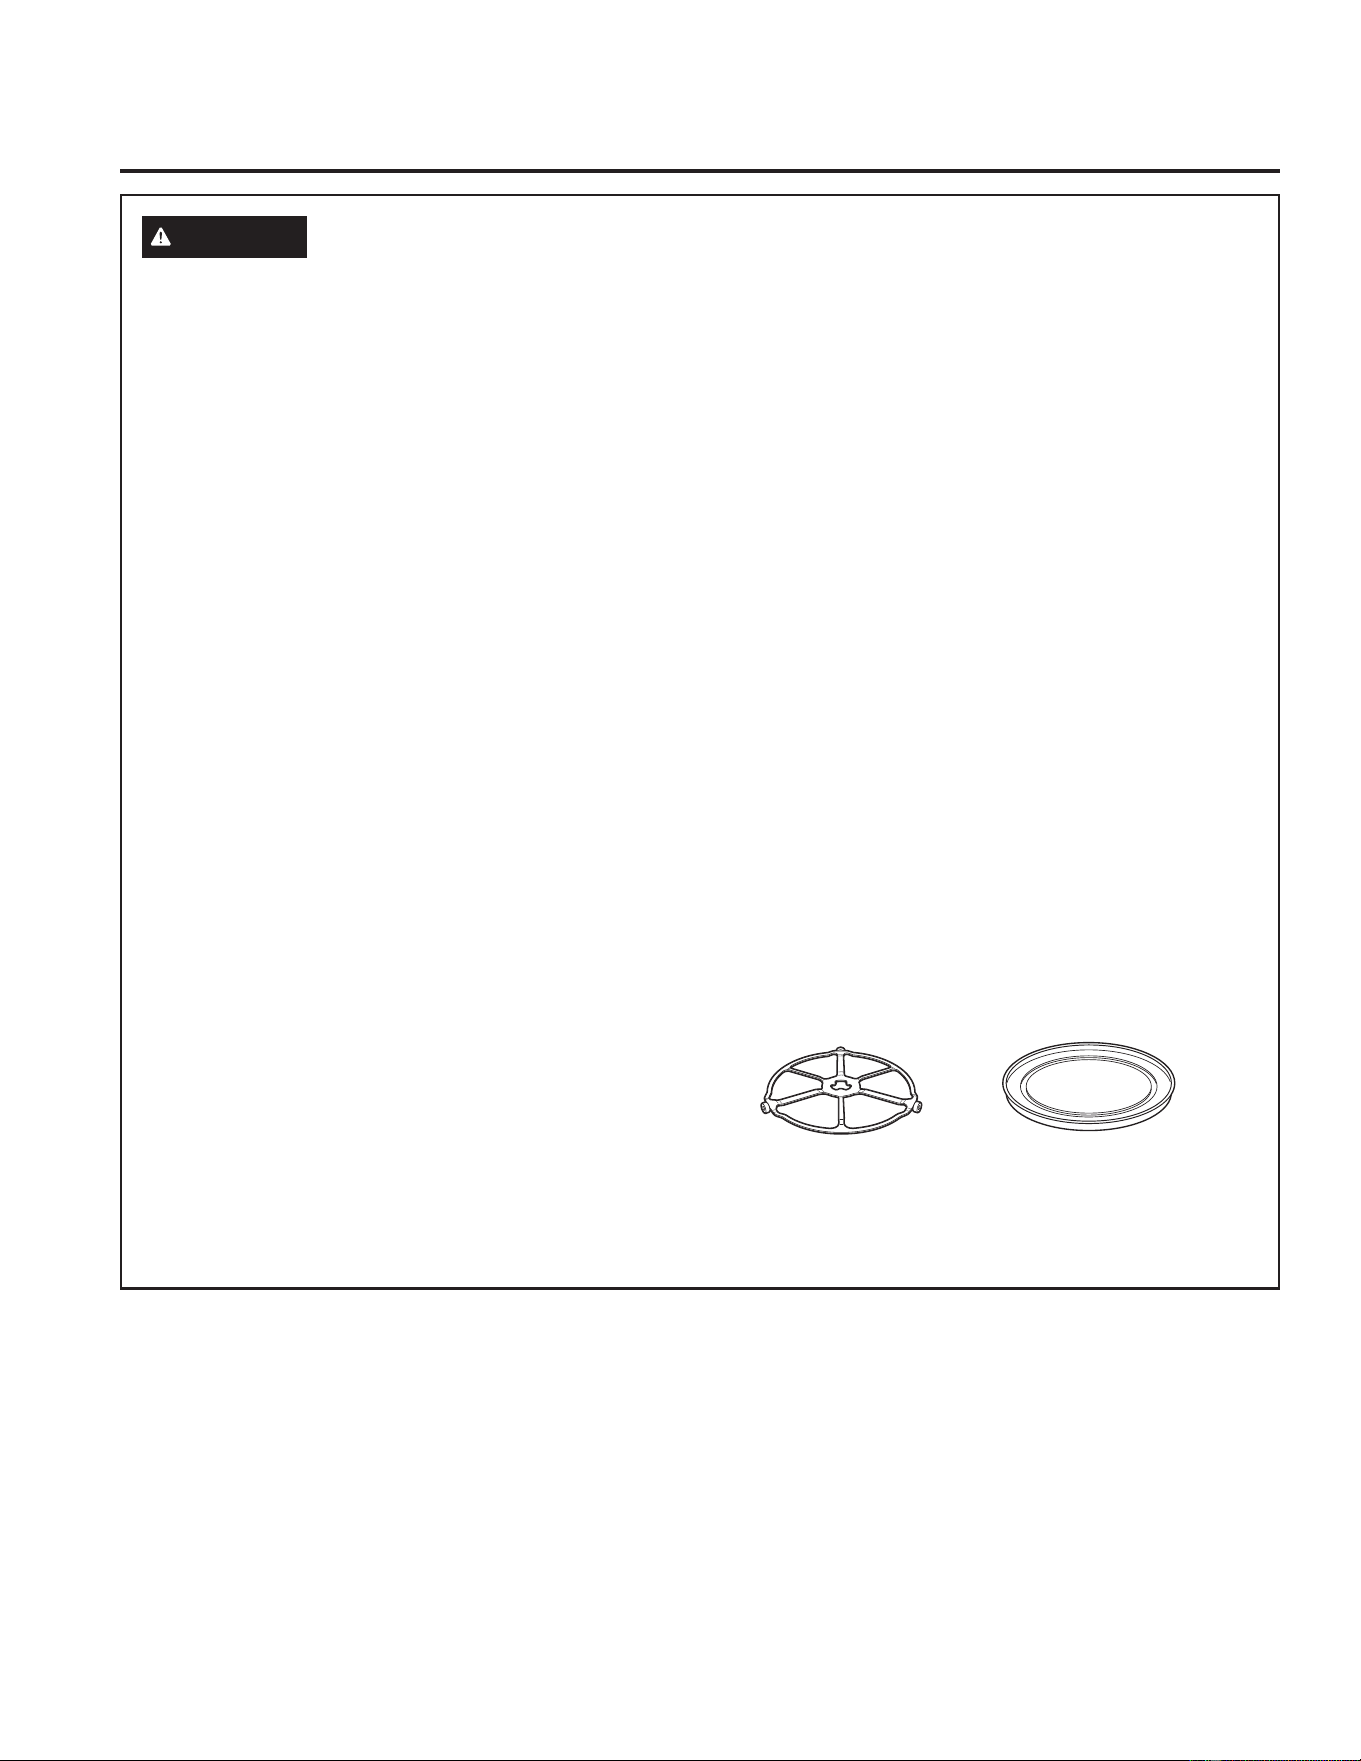
MICROWAVE-SAFE COOKWARE
Make sure to use suitable cookware during microwave
cooking. Most glass casseroles, cooking dishes,
measuring cups, custard cups, pottery or china
dinnerware which does not have metallic trim or glaze
with a metallic sheen can be used. Some cookware is
labeled “suitable for microwaving.”
Ŷ 3ODFHIRRGRUPLFURZDYDEOHFRQWDLQHUGLUHFWO\RQ
the clear glass tray to cook your food.
Ŷ 8VHRIWKHQRQVWLFNPHWDOWUD\GXULQJPLFURZDYH
cooking will result in inferior cooking performance.
Ŷ &RRNZDUHPD\EHFRPHKRWEHFDXVHRIKHDW
transferred from the heated food. Oven mitts may
be needed to handle the cookware.
Ŷ 'RQRWXVHUHF\FOHGSDSHUSURGXFWV5HF\FOHG
paper towels, napkins and waxed paper may
contain metal flecks which could cause arcing or
ignite. Paper products containing nylon or nylon
filaments should be avoided, as they may also
ignite.
Ŷ 8VHIRLORQO\DVGLUHFWHGLQWKLVPDQXDO:KHQXVLQJ
IRLOLQWKHRYHQNHHSWKHIRLODWOHDVWƎDZD\IURP
the sides of the oven.
Ŷ ,I\RXXVHDPHDWWKHUPRPHWHUZKLOHFRRNLQJPDNH
sure it is safe for use in microwave ovens.
Ŷ 6RPHIRDPWUD\VOLNHWKRVHWKDWPHDWLVSDFNDJHG
on) have a thin strip of metal embedded in the
bottom. When microwaved, the metal can burn the
floor of the oven or ignite a paper towel.
Ŷ 3DSHUWRZHOVZD[HGSDSHUDQGSODVWLFZUDSFDQEH
used to cover dishes in order to retain moisture and
prevent spattering. Be sure to vent plastic wrap so
steam can escape.
Ŷ 1RWDOOSODVWLFZUDSLVVXLWDEOHIRUXVHLQPLFURZDYH
ovens. Check the package for proper use.
Ŷ ³%RLODEOH´FRRNLQJSRXFKHVDQGWLJKWO\FORVHGSODVWLF
bags should be slit, pierced or vented as directed by
package. If they are not, plastic could burst during
or immediately after cooking, possibly resulting in
injury. Also, plastic storage containers should be at
least partially uncovered because they form a tight
seal. When cooking with containers tightly covered
with plastic wrap, remove covering carefully and
direct steam away from hands and face.
Ŷ 3ODVWLFFRRNZDUH²3ODVWLFFRRNZDUHGHVLJQHGIRU
microwave cooking is very useful, but should be
used carefully. Even microwave-safe plastic may
not be as tolerant of overcooking conditions as are
glass or ceramic materials and may soften or char if
subjected to short periods of overcooking. In longer
exposures to overcooking, the food and cookware
could ignite.
Ŷ 'RQRWXVHWKHZLUHRYHQUDFNIRUPLFURZDYLQJ
)ROORZWKHVHJXLGHOLQHV
1. Use microwave-safe plastics only and use them in
strict compliance with the cookware manufacturer’s
recommendations.
2. Do not microwave empty containers.
3. Do not permit children to use plastic cookware
without complete supervision.
IMPORTANT SAFETY INFORMATION
READ ALL INSTRUCTIONS BEFORE USING THE APPLIANCE
The turntable must
always be in place when
using the oven.
The clear glass tray
should always be in place
when microwaving.
49-40687-4 7
NOTICE: PACEMAKERS
Most pacemakers are shielded from interference from electronic products, including microwaves. However,
patients with pacemakers may wish to consult their physicians if they have concerns.
STATE OF CALIFORNIA PROPOSITION 65 WARNINGS
WARNING
This product contains one or more chemicals known to the State of California to cause cancer,
and birth defects or other reproductive harm.
PRECAUTIONS TO AVOID POSSIBLE EXPOSURE
TO EXCESSIVE MICROWAVE ENERGY
(a) Do Not Attempt to operate this oven with the
door open since open-door operation can result
in harmful exposure to microwave energy. It is
important not to defeat or tamper with the safety
interlocks.
(b) Do Not Place any object between the oven front
face and the door or allow soil or cleaner residue to
accumulate on sealing surfaces.
(c) Do Not Operate the oven if it is damaged.
It is particularly important that the oven door close
properly and that there is no damage to the:
GRRUEHQW
KLQJHVDQGODWFKHVEURNHQRUORRVHQHG
GRRUVHDOVDQGVHDOLQJVXUIDFHV
(d) The Oven Should Not be adjusted or repaired by
DQ\RQHH[FHSWSURSHUO\TXDOLILHGVHUYLFHSHUVRQQHO
IMPORTANT SAFETY INFORMATION
READ ALL INSTRUCTIONS BEFORE USING THE APPLIANCE
SAFETY INFORMATION
READ AND SAVE THESE INSTRUCTIONS
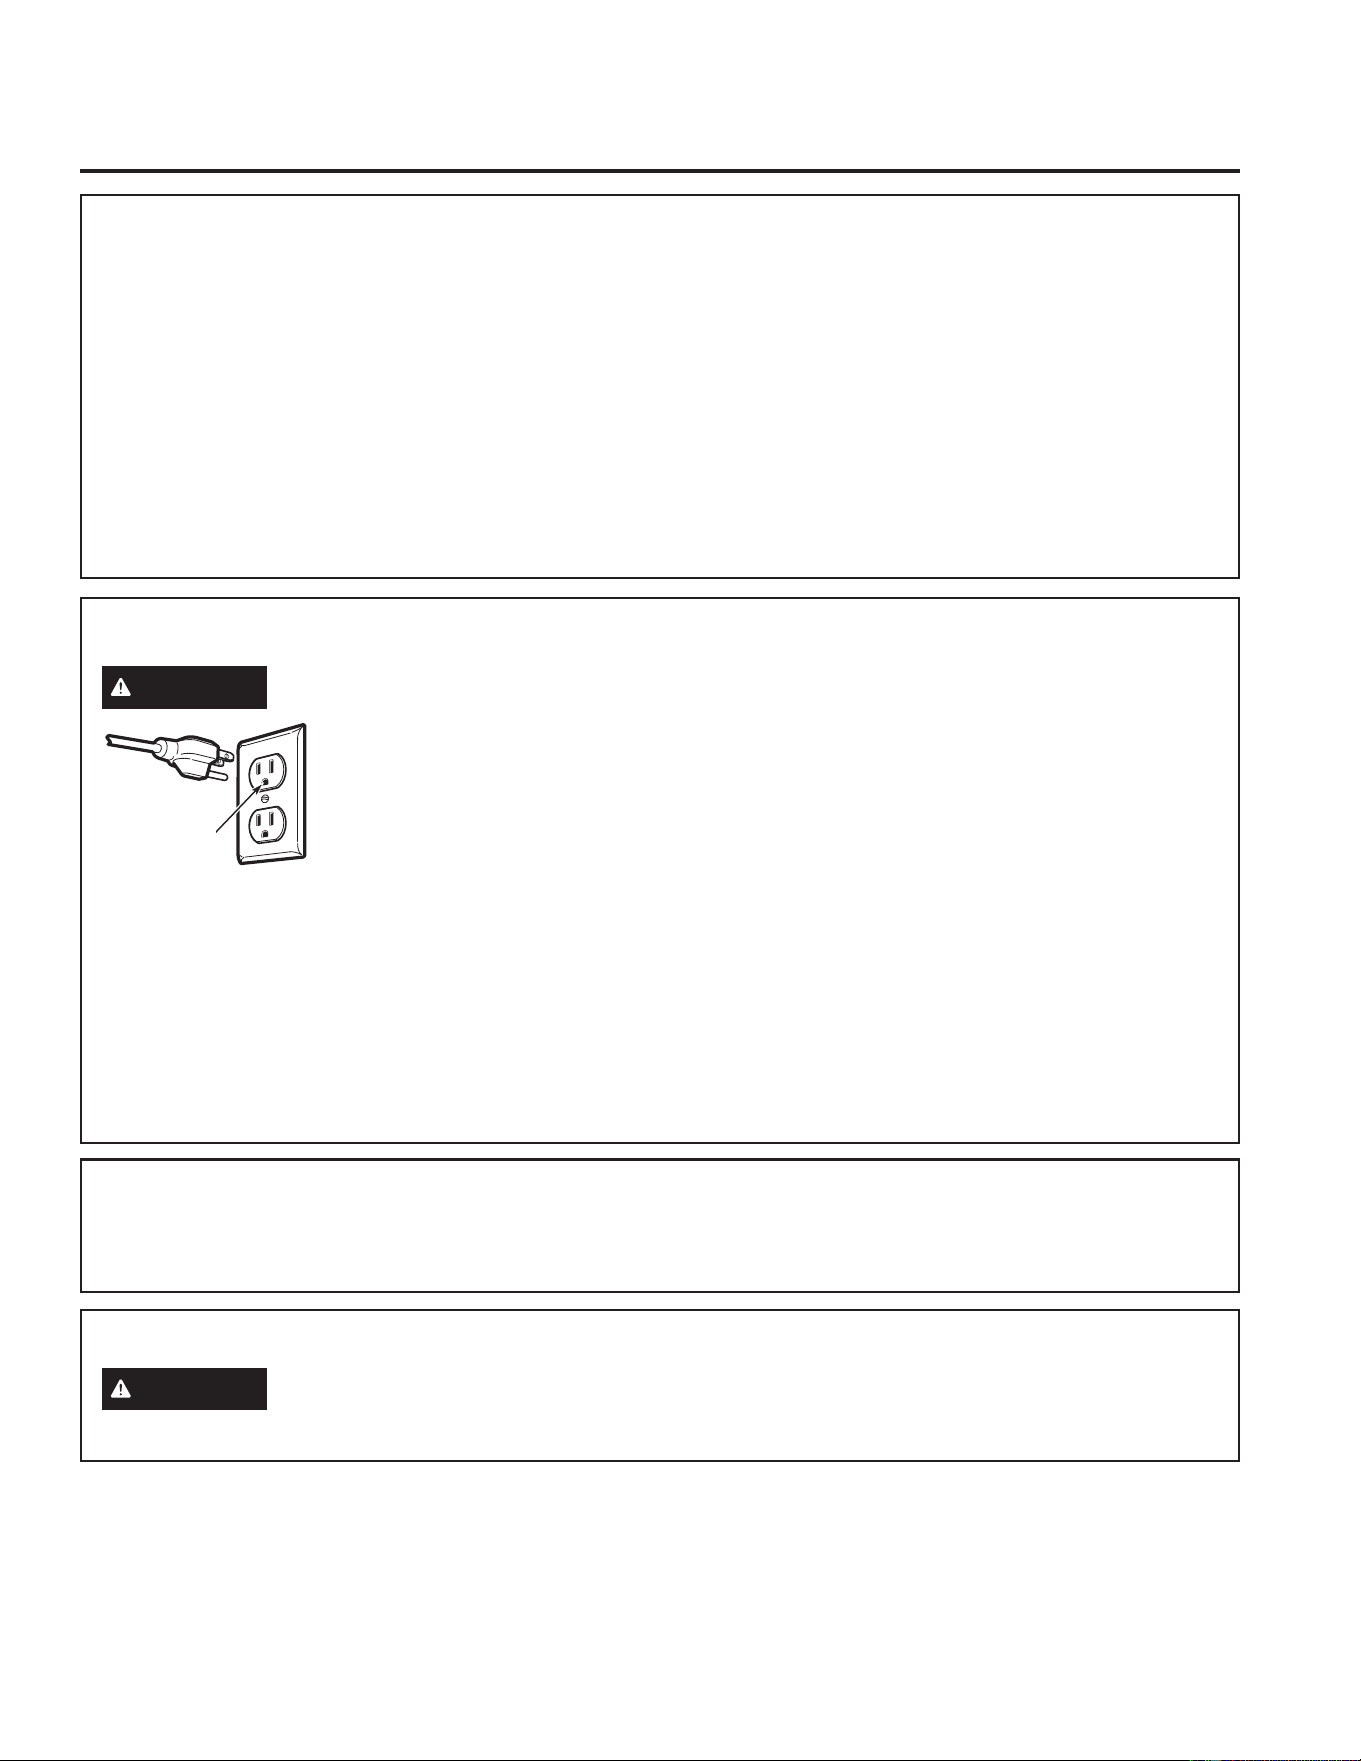
GROUNDING INSTRUCTIONS
WARNING
Improper use of the grounding plug can result in a risk of electric shock.
This appliance must be
grounded. In the event of
an electrical short circuit,
grounding reduces the risk of
electric shock by providing an
escape wire for the electric
current.
7KLVDSSOLDQFHLVHTXLSSHGZLWKDSRZHUFRUGKDYLQJD
grounding wire with a grounding plug. The plug must
be plugged into an outlet that is properly installed and
grounded.
&RQVXOWDTXDOLILHGHOHFWULFLDQRUVHUYLFHWHFKQLFLDQLI
the GROUNDING INSTRUCTIONS are not completely
understood, or if doubt exists as to whether the
appliance is properly grounded.
If the outlet is a standard 2-prong wall outlet, it is
your personal responsibility and obligation to have it
replaced with a properly grounded 3-prong wall outlet.
Do not under any circumstances cut or remove the
WKLUGJURXQGSURQJIURPWKHSRZHUFRUG
Do not use an extension cord. If the power cord is too
VKRUWKDYHDTXDOLILHGHOHFWULFLDQRUVHUYLFHWHFKQLFLDQ
install an outlet near the appliance.
)RUEHVWRSHUDWLRQSOXJWKLVDSSOLDQFHLQWRLWVRZQ
electrical outlet to prevent flickering of lights, blowing
of fuse or tripping of circuit breaker.
Ensure proper
ground exists
before use.
8 49-40687-4
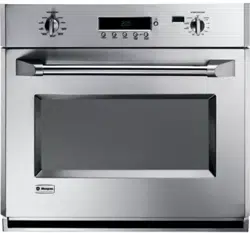
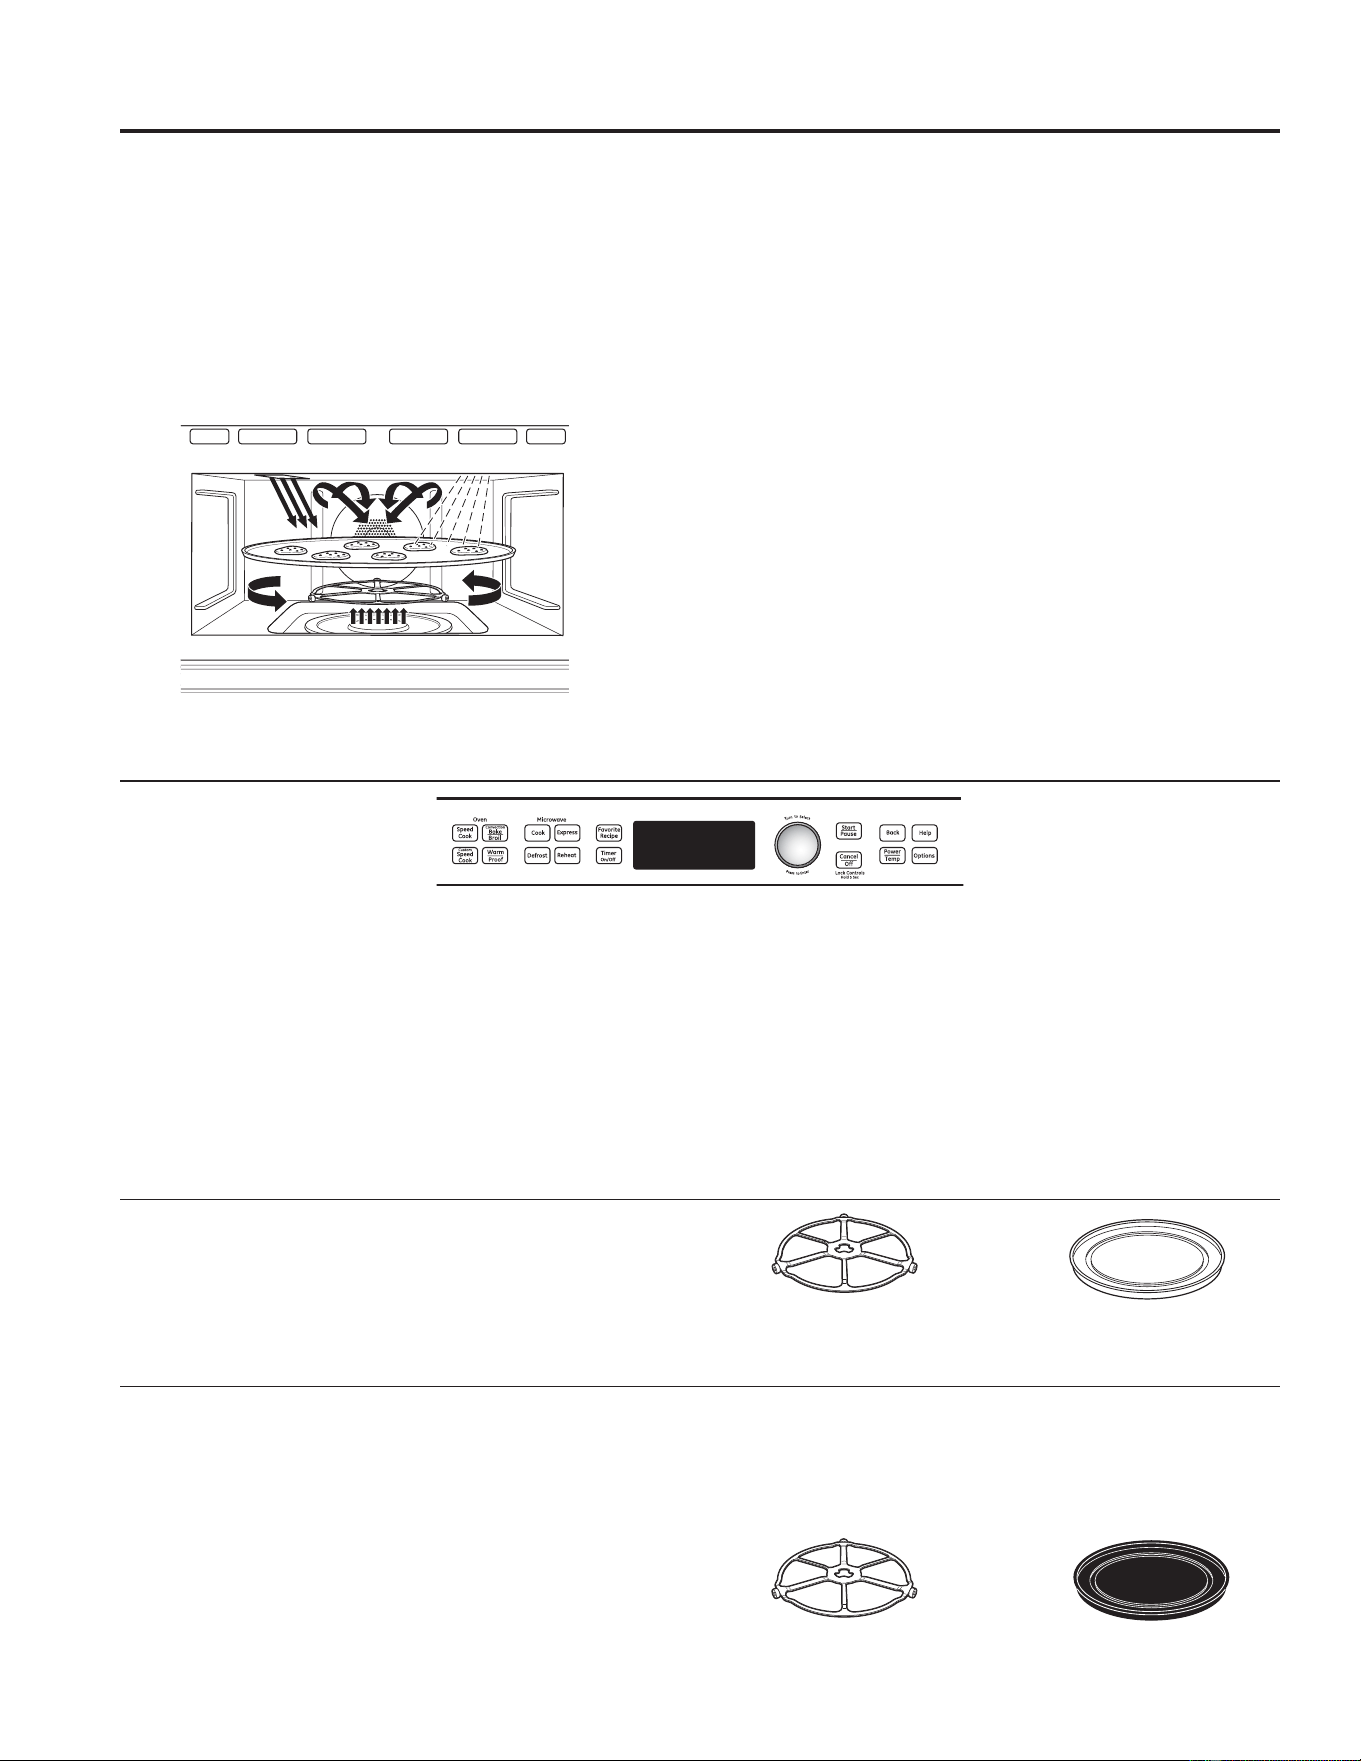
Getting to Know Advantium
Advantium Quick Start
Set the Clock
When you first plug in the oven or after a power outage:
1. Turn the selector dial to set the hour. Press the
dial to enter.
2. Turn the dial to set the minute. Press the dial to enter.
3. Turn the dial to select AM or PM. Press the
dial to enter.
To change the time:
1. Press the OPTIONS pad.
2. Turn the dial to 6(7&/2&.. Press the dial to enter
and follow the display directions to set.
The clock is designed to turn off when unit is idle for
30 seconds to minimize the standby power usage.
The clock will turn on when unit is in use or the door is
opened. There is not an override option available based
RQWKH'2(HQHUJ\UHTXLUHPHQWV
Microwaving with Express
Press EXPRESS repeatedly for 30-second increments of
microwave cooking time.
The oven starts immediately.
Speedcooking
3UHVVWKH63(('&22.SDG
7XUQWKHGLDOWR)22'0(183UHVVWKHGLDOWRHQWHU
3. Turn the dial to select the type of food category you
want. Press the dial to enter.
4. Turn the dial to select the specific food. Press the dial
to enter.
5. Turn the dial to select the amount, size, and/or
GRQHQHVVLIUHTXLUHGWKHRYHQZLOOSURPSW\RX
Press the dial after each selection.
6. Once the display shows ADJUST TIME OR START,
either press the dial or start pad to start cooking.
ŶPress CANCEL/OFF at any time to stop cooking.
What is Advantium?
The new Advantium oven uses breakthrough Speedcook
technology to harness the power of light. The Advantium
oven cooks the outside of foods much like conventional
radiant heat, while also penetrating the surface so the
inside cooks simultaneously. While halogen light is the
primary source of power, a “microwave boost” is added
ZLWKFHUWDLQIRRGV)RRGVFRRNHYHQO\DQGIDVWUHWDLQLQJ
their natural moisture.
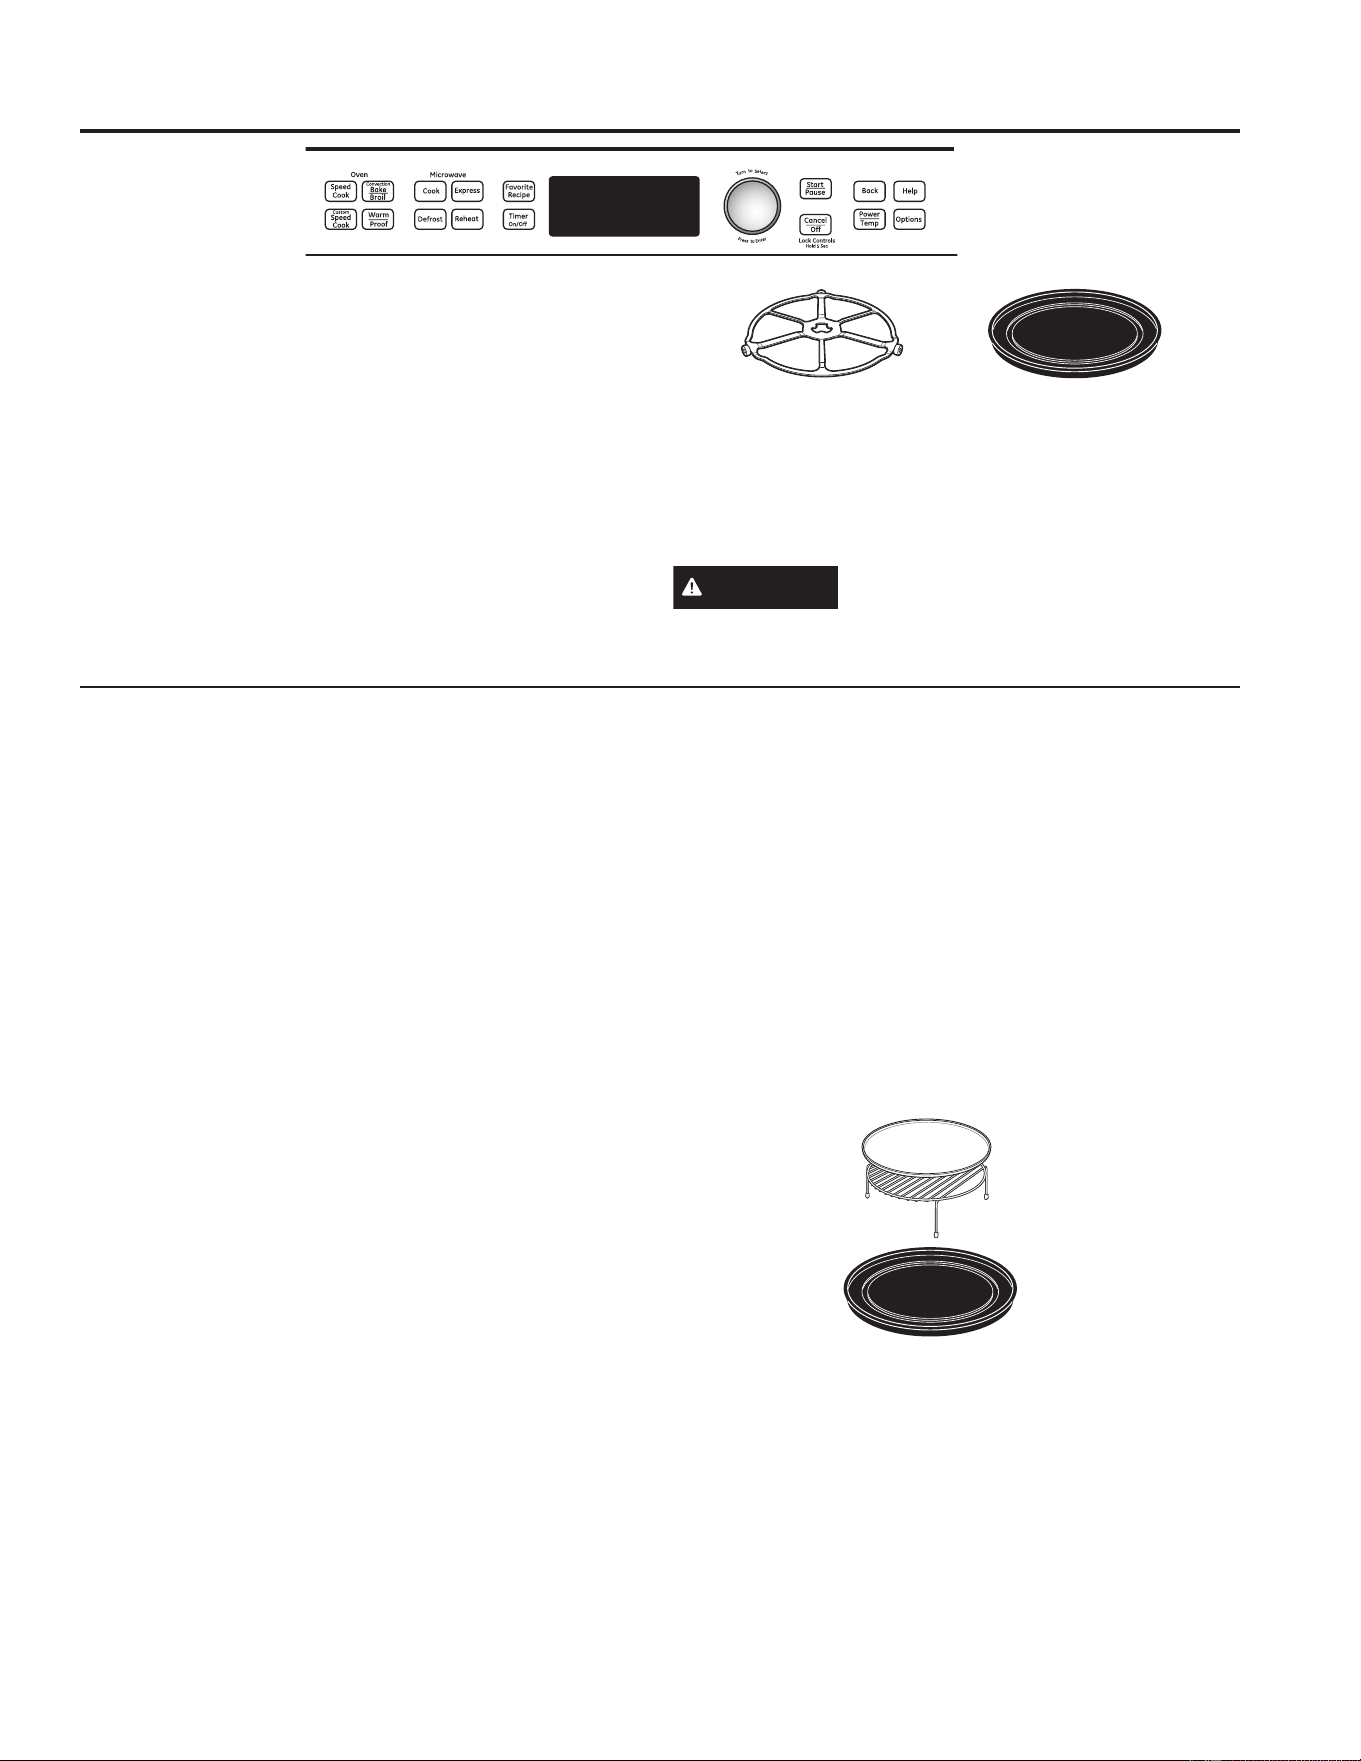
Turntable
Ŷ7KHWXUQWDEOHURWDWHVWRHQVXUHHYHQFRRNLQJ
Controls
Ŷ7KHRYHQFRQWUROFRQWDLQVSUHVHWUHFLSHV
Ŷ7XUQDQGSUHVVGLDOPDNHVPHQXVHOHFWLRQHDV\
Halogen Lamp and Ceramic Heaters
Ŷ2QHZDWWKDORJHQEXOEDQGRQHZDWWFHUDPLF
heater cook food from above.
Ŷ2QHZDWWFHUDPLFKHDWHUFRRNVIRRGIURPEHORZ
Rear Convection Heat Element
Ŷ2SHUDWHVZKHQXVLQJEDNH
Microwave
Ŷ$PLFURZDYH³ERRVW´LVDXWRPDWLFDOO\DGGHGZLWK
certain foods.
Ŷ7KHRYHQFDQDOVREHXVHGDVDZDWWPLFURZDYH
oven.
The turntable must
always be in place when
using the oven.
The clear glass tray
should always be in place
when microwaving.
The turntable must always be
in place when using the oven.
Put food directly on the non-stick
metal tray to speedcook.
ADVANTIUM: *HWWLQJWR.QRZ$GYDQWLXP
49-40687-4
ADVANTIUM: )HDWXUHV
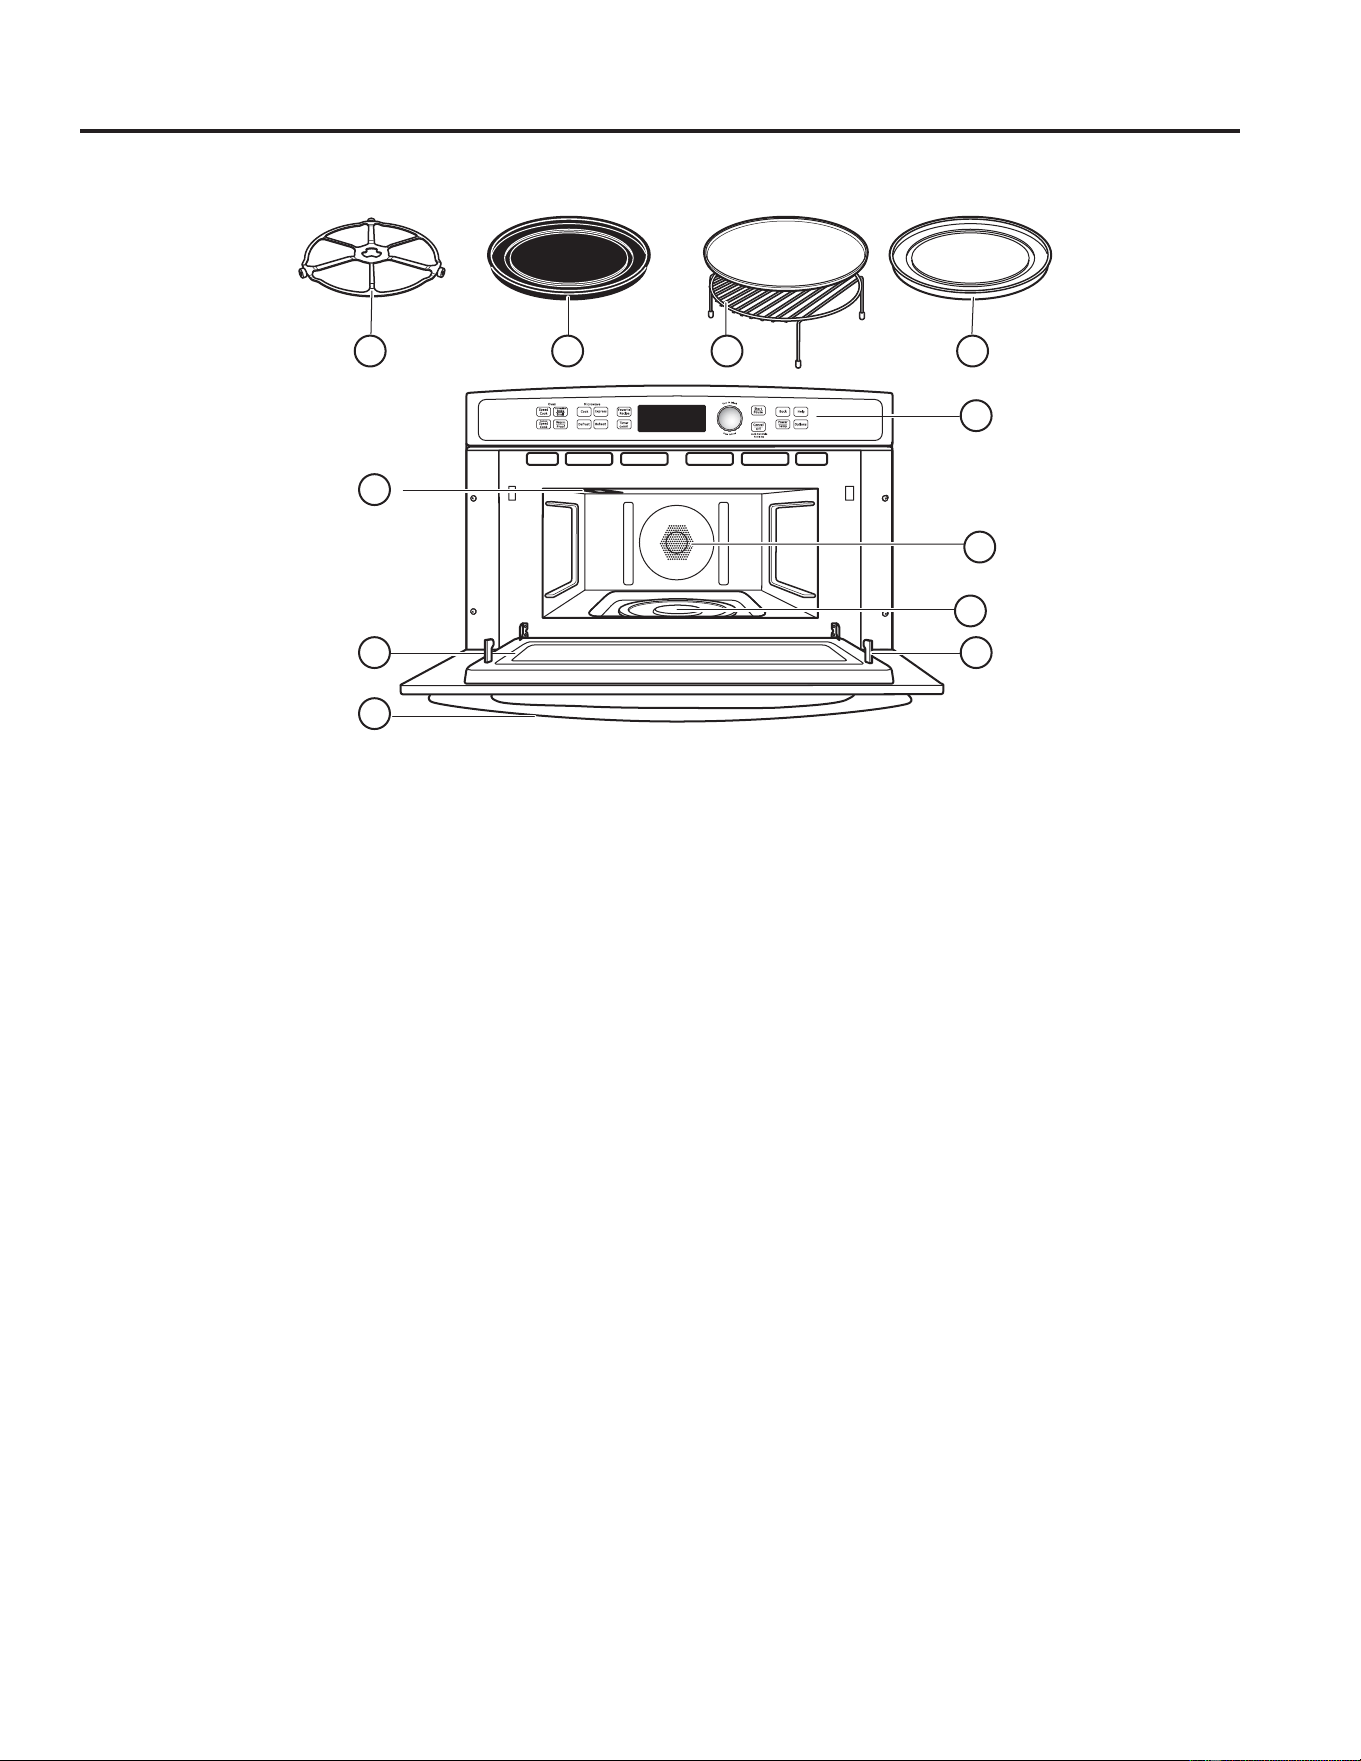
Features
1. Turntable
The turntable must always be in place, on the oven
floor, for all cooking. Be sure the turntable is seated
securely over the spindle in the center of the oven.
2. Non-stick Metal Tray
Put food directly on the non-stick metal tray and place
on the turntable when using the speedcook and bake
features.
3. Wire Oven Rack and Aluminum Baking Sheet
Put food directly on the aluminum baking sheet on the
wire oven rack, and place them on the non-stick metal
tray, when baking on two levels, broiling or toasting
foods.
4. Clear Glass Tray
Place on the turntable when using the microwave
features. Place food or microwave-safe cookware
directly on the tray.
5. Upper Halogen Lamp/Ceramic Heater
Operates when using speedcook or broil.
6. Window
Allows cooking to be viewed while keeping
microwaves confined in the oven.
7. Door Handle
Pull to open the door. The door must be securely
latched for the oven to operate.
8. Door Latches
9. Lower Ceramic Heater
Operates when using speedcook.
10. Control Panel
The pads used to operate the oven are located on
the control panel.
11. Rear Convection Heat Element
Operates when using bake.
Throughout this manual, features and appearance may vary from your model.
1
5
6 8
9
11
10
7
2 3 4
NOTE: Handle appearance may differ on some models.

10 49-40687-4
1. SPEEDCOOK/Repeat Last
Press this pad to access the pre-set speedcook
menu. Press and hold for 3 seconds to repeat the
last cooking selection.
2. CONV BAKE/BROIL
Press this pad to bake, broil or toast.
3. CUSTOM SPEEDCOOK
Press this pad to set your own speedcook program.
4. WARM/PROOF
Select WARM to keep hot, cooked foods at serving
temperature.
6HOHFW3522)WRVHWIRUDZDUPHQYLURQPHQWXVHIXO
for rising yeast-leavened products.
5. COOK (Microwave)
Press this pad to microwave food that is not in the
)$925,7(5(&,3(VHFWLRQ
6. EXPRESS (Microwave)
Press for 30 seconds of microwave cooking time.
Each time the pad is pressed adds an additional 30
seconds to the remaining cooking time. The oven
starts immediately.
7. DEFROST (Microwave)
Press this pad to defrost, soften or melt frozen foods.
8. REHEAT (Microwave)
Press this pad to reheat servings of previously
cooked foods or a plate of leftovers.
9. FAVORITE RECIPE
3UHVVWKLVSDGWRDGGHGLWFKDQJHRUUHPRYHD
recipe from the memory.
10. TIMER
Press this pad to set the minute timer.
11. DISPLAY
Shows and instructs the use of all features on the
oven.
12. Selector Dial–Turn to select, Press to enter
)LUVWWXUQWKHQSUHVVWKHGLDOWRPDNHRSWLRQIRRG
power level or temperature selections. Also use the
GLDOWRLQFUHDVHWXUQFORFNZLVHRUGHFUHDVHWXUQ
counterclockwise) cooking times.
13. START/PAUSE
Press this pad to start or pause any cooking
function.
14. CANCEL/OFF
Press this pad to cancel ALL oven programs except
the clock and timer.
15. BACK
Press this pad to step back one or more levels in
the program process, such as when entering custom
recipes.
16. HELP
Press this pad to find out more about your oven’s
features.
17. POWER/TEMP
During cooking, press this pad and turn/press the
selector dial to change the microwave power level,
the convection bake temperature or the speedcook
temperature by adjusting the upper and lower lamp
and heater settings.
18. OPTIONS
Press this pad to set the Clock and access the
Beeper Volume, Display Scroll Speed, Delay Start
and Reminder features.
Controls
With your Advantium oven, you can cook with high-intensity halogen lights, ceramic heaters and
convection heating element, and/or conventional microwave energy.
1 2 5 6
3 4 7 8
9
10
11 12 13 15 16
14 17 18
ADVANTIUM: Controls

49-40687-4 11
SPEEDCOOKING
Speedcooking
Speedcook Power Level
Advantium uses power from a high intensity halogen
light, ceramic heaters, and microwaves to cook food from
the top, bottom, and interior simultaneously to seal in
moisture and flavor.
When using the pre-set speedcook recipes on the food
menu, the power levels are already selected for you.
However, these power levels can be adjusted before
or during cooking. See POWER/TEMP in the Controls
section. The custom speedcook feature allows you
to speedcook items not on the pre-set food menu by
selecting your own cook time and power level settings.
Each power level gives you heater power and microwave
energy for a certain percentage of the time.
833(532:(58FRQWUROVERWKWKHXSSHUKHDWHUDQG
microwave power. A higher UPPER POWER setting will
utilize more upper heater power, browning food faster
on top. A lower UPPER POWER setting utilizes more
microwave power, causing food to cook more evenly
throughout.
Select a higher setting for foods such as pizza and
baked goods. Select a lower setting for foods such as
casseroles, meat and fish.
/2:(532:(5/FRQWUROVWKHORZHUKHDWHU
Select a higher setting to brown foods more on the
bottom. Select a lower setting for less browning on the
bottom.
3UHVVWKH63(('&22.SDGDQGWXUQWKHGLDOWR
VHOHFW)22'0(18RU)$925,7(5(&,3(RUSUHVV
&8672063(('&22.WRPDQXDOO\VHWSRZHUOHYHO
and timer. Press the dial to enter.
2. Turn the dial to select a food, time or power level as
prompted. Press the dial to enter.
3. To change the power level when prompted by
the display, turn the dial clockwise to increase or
counterclockwise to decrease the upper power level.
Press the dial to enter.
4. Microwave levels are set automatically based on the
upper and lower lamp settings.
5. Press the START/PAUSE pad or the selector dial to
start cooking.
If you do not want to change one of the settings, just
press the dial to move to the next selection.
NOTE: Be careful when adjusting power levels so that
you do not over- or undercook food.
Follow these general guidelines when selecting the
best U= and L= settings for your favorite recipes.
8 6HOHFWDKLJKHUVHWWLQJIRUWKLQIRRGVUHTXLULQJ
DJROGHQEURZQWRSH[DPSOHILVKILOOHWVWRDVW
boneless chicken breasts). Select a lower setting for
thicker foods and foods with high sugar or fat content
H[DPSOHFDNHVURDVWV
L = Select a higher setting for thick or dense foods
WKDWPD\QRWFRRNTXLFNO\LQWKHFHQWHUH[DPSOH
casseroles). Select a lower setting for thin foods
H[DPSOHFRRNLHVDQGIRRGVFRQWDLQLQJKLJKIDWRU
VXJDUFRQWHQWH[DPSOHSDVWU\FDNHV
WARNING
When using speedcook programs, remember that the oven, door and dishes will
be very hot!
Prior to the first use of your oven, the clock must be set.
See the Advantium Quick Start section.
Before you begin, make sure the turntable is in place.
Use the non-stick metal tray and your own glass or
ceramic cookware, if needed.
12 49-40687-4
Speedcooking
Cooking Tips
To ensure consistent and even browning when cooking
foods directly on the non-stick metal tray, arrange food
as shown below.
Foods can touch but should not overlap.
)UHVKPHDWFKLFNHQILVKRUVHDIRRGWKDWKDVEHHQIUR]HQ
VKRXOGEHWKDZHGEHIRUHFRRNLQJWKHPLFURZDYHGHIURVW
IHDWXUHFDQEHXVHG)RURWKHUIUR]HQSUHSDFNDJHG
foods, follow package directions.
Custom Speedcook
Advantium gives you the flexibility to cook your favorite dishes.
If you want to cook a food item that s not among the
pre-set selections, use custom speedcook.
3UHVVWKH&8672063(('&22.SDG
If no entries are made within 15 seconds, the display
will retun to blank.
2. Turn the selector dial to select the cooking time.
Press the dial to enter.
The display will prompt you to select the power
OHYHOV
3. Turn the dial clockwise to increase or
counterclockwise to decrease the upper power level.
Press the dial to enter.
4. Turn the dial to change the lower power level. Press
the dial to enter.
5. Press the START/PAUSE pad or press the selector
dial to start cooking.
)RUSRZHUOHYHODQGFRRNLQJWLPHVXJJHVWLRQVXVH\RXU
cooking guide or cook book.
Speedcook Cookware
Ŷ )ROORZFRRNZDUHVXJJHVWLRQVRQWKHRYHQGLVSOD\RU
in the Cookbook or Cooking guide.
Ŷ &RRNZDUHZLOOEHFRPHKRWEHFDXVHRIKHDW
transferred from the heated food. Oven mitts will be
needed to handle the cookware.
Ŷ 3ODFHIRRGGLUHFWO\RQWKHQRQVWLFNPHWDOWUD\
when cooking, unless prompted by the oven to do
otherwise.
Ŷ 8VHWKHQRQVWLFNPHWDOWUD\LQWKHVDPHZD\\RX
would use a shallow baking pan or baking tray.
Ŷ ,QDGGLWLRQWRWKHFRRNZDUHSURYLGHG\RXFDQXVH
non-metal casserole
dishes, pie plates and
other heat-safe cookware.
Place them directly on the
turntable.
Ŷ %HVXUHWRVHOHFWDVL]HWKDWZLOOURWDWHHDVLO\
Ŷ 3ODFHWKHQRQVWLFNPHWDOWUD\RQWKHWXUQWDEOH3ODFH
glass or ceramic cookware on the tray.
Ŷ 'RQRWXVHFRRNZDUHRUFRYHULQJVPDGHRISDSHU
plastic, or foil when cooking during a speedcook
cycle.
Circular pattern
([DPSOHELVFXLWVFRRNLHV
Spoke pattern
([DPSOHFUHVFHQW
rolls, breadsticks)
Single layer
([DPSOHDSSHWL]HUV
Side by side pattern
([DPSOHPHDWVDQGSRXOWU\
Repeat Last
Use this time saving feature for cooking repetitive items
like cookies or appetizers.
NOTE: The last program used is stored for two hours.
3UHVVDQGKROGWKH63(('&22.SDGIRUVHFRQGV
2. The last pre-set food will be displayed.
3. Press the START/PAUSE pad or the selector dial to
start cooking.
Resume
1. If your food needs to cook a bit longer, you can
restart the oven by pressing the START/PAUSE pad
or selector dial.
5(680(&22.,1*ZLOOEHGLVSOD\HGDQGWKHRYHQ
will restart immediately at 10% of the original time.
The program stays in memory for 10 minutes. After that
you will need to begin the program again. See To use a
pre-set speedcook menu.
SPEEDCOOKING
49-40687-4 13
SPEEDCOOKING
Speedcooking
SPEEDCOOK PRE-SET FOOD SELECTIONS:
Ŷ$SSHWL]HUV Ŷ'HVVHUWV Ŷ3L]]D Ŷ6DQGZLFK
Ŷ%UHDGV Ŷ(QWUHHV Ŷ3RWDWRHV Ŷ6HDIRRG
Ŷ%UHDNIDVW Ŷ0HDWV Ŷ3RXOWU\ Ŷ6LGH'LVK
Pre-set Speedcook Menu
Advantium is already pre-set to cook over 175 popular dishes.
3UHVVWKH63(('&22.SDG
If no selection is made within 15 seconds, the display
will return to blank.
2. Turn the selector dial to select the type of food
category you want. Press the dial to enter.
3. Turn the selector dial to select the specific food
PHQXVHOHFWLRQ3UHVVWKHGLDOWRHQWHU
4. Turn the selector dial to select amount, size, and/
RUGRQHQHVVLIUHTXLUHGWKHRYHQZLOOSURPSW\RX
Press the dial after each selection.
5. Once the display shows ADJUST TIME or START,
press start or the selector dial to start cooking.
Turn the food over when the oven signals
7851)22'29(5IRUFHUWDLQIRRGV
:KHQWKHRYHQVLJQDOV&+(&.IRU'21(1(66FKHFN
WRVHHLI\RXUIRRGLVGRQHWR\RXUOLNLQJIRUFHUWDLQ
foods).
To review settings during cooking, press the selector dial.
If you enter an undesired selection at any time, simply
SUHVVWKH%$&.SDGDQGUHHQWHUWKHGHVLUHGVHOHFWLRQV
Ŷ(DUO\LQDVSHHGFRRNSURJUDP\RXZLOOVHH
237,0,=,1*&22.7,0(RQWKHGLVSOD\7KHRYHQ
automatically senses the electrical voltage level in your
home and adjusts the cooking time up or down for
proper cooking.
Ŷ,IWKHGRRULVRSHQHGGXULQJFRRNLQJWKHRYHQZLOOVWRS
and PAUSE will appear in the display. Close the door
and press the START/PAUSE pad to resume cooking.
Ŷ$WDQ\WLPHGXULQJFRRNLQJ\RXFDQWXUQWKHVHOHFWRU
dial to change the cooking time. You can change
power levels by pressing POWER/TEMP.
Ŷ7RDVVXUHFRQVLVWHQWFRRNLQJUHVXOWVWKHRYHQPD\
adjust power levels downward if the oven is hot at the
beginning of a program.
Ŷ$WWKHHQGRIFRRNLQJWKHDXWRPDWLFIDQPD\FRQWLQXH
to run for a short time to cool internal components.
Ŷ7RFRRNIRUDGGLWLRQDOWLPHDIWHUDFRRNLQJF\FOHKDV
been completed, use the resume feature.
The turntable must always be in
place when using the oven.
Put food directly on the
non-stick metal tray to
speedcook.
14 49-40687-4
Display Prompts
Pre-Set Speedcook Menu Selections
$IWHUSUHVVLQJWKH63(('&22.SDGWKHRYHQZLOOSURPSW\RXWRPDNHVHYHUDOVHOHFWLRQVVXFKDVWKHH[DPSOH
below.
7XUQWKHGLDOXQWLO)22'0(18DSSHDUV3UHVVWKH
dial to enter.
2. Turn the dial until POULTRY appears.Press the dial
to enter.
7XUQWKHGLDOXQWLO&+,&.(1%21(/(66DSSHDUV
Press the dial to enter.
7XUQWKHGLDOWR6HOHFW6,=(0(',80±R]HDFK
Press the dial to enter.
5. Turn the dial to Select amount: 1–2 pieces
Press the dial to enter.
8VH12167,&.0(7$/75$<LVGLVSOD\HG
Ŷ $IWHUDFRRNLQJF\FOHKDVEHHQFRPSOHWHGXVHWKH
Resume feature to cook for additional time.
Ŷ 7RUHYLHZVHWWLQJVGXULQJFRRNLQJSUHVVWKH
selector dial.
Speedcooking
NOTE: When
speedcooking, use the
non-stick metal tray.
Food Category Menu Selection
Appetizers Bagel Bites
Cheese Sticks
(JJ5ROOV)UR]HQ
+RW'LS±&XSV
Jalapeno Poppers
0HDW%DOOV)UR]HQ
Nachos
Nuts Roasted
Onion Rings
Pizza Rolls
6RIW3UHW]HOV)UR]HQ
%UHDGV %DJHOVIUR]HQ
Biscuits
Bread Sticks
Cheese Bread
Crescent Rolls
Dinner Rolls
Garlic Bread
4XLFN%UHDG[
Sweet Rolls/Danish
7DFR6KHOOVER[HG
Texas Toast
%UHDNIDVW %DJHOVIUR]HQ
Belgian Waffles
Breakfast Pizza
&DVVHUROHHJJ[
Coffee Cake
)UHQFK7RDVW
3DQFDNHVIUR]HQ
Hashbrown Patties
5ROOVUHIULJHUDWHG
Sausage Biscuit
Sausage
6WUXGHOIUR]HQ
Sweet Rolls/Danish
Turnovers
:DIIOHVIUR]HQ
Desserts Brownies
&DNHVPL[[
&REEOHUIUHVK[
Coffee Cake
Cookies
3LHIUHVKIUXLW
5ROOVUHIULJHUDWHG
Turnovers
Food Category Menu Selection
(QWUHH %XUULWRVIUR]HQ
Chimichanga
Casserole
(JJ5ROOVIUR]HQ
(QFKLODGDIUHVK
Lasagna
0HDWORDI[
4XHVLGLOODVIUHVK
6WXIIHG3HSSHUV
0HDWV )LOHW0LJQRQ
Hamburger
Lamb Chops
Pork Chops
Roast – Pork
Roast – Beef
Ribeye Steak
Sirloin Steak
Strip Steak
T-Bone Steak
Tenderloin
3L]]D 'HOL)UHVK
Use Precooked Crust
)UR]HQ3L]]D
Potatoes Baked Potato
Hashbrown Patties
)UR]HQ)ULHV
)UR]HQ1XJJHW
Sweet Potato/Yam
Poultry Chicken, Bone-In
Chicken, Boneless
&KLFNHQ)LOOHWIUR]HQ
&KLFNHQ)LQJHUIUR]HQ
&KLFNHQ)ULHGIUR]HQ
&KLFNHQ1XJJHWIUR]HQ
&KLFNHQ3DWW\IUR]HQ
&KLFNHQ7HQGHUIUR]HQ
&KLFNHQ:LQJVIUR]HQ
Chicken, Whole
Turkey
6DQGZLFK &RUQ'RJIUR]HQ
Crescent Roll Hot Dog
Grilled Sandwich
Hot Dog in a Bun
Pocket Sandwich
7DTXLWRVIUR]HQ
Food Category Menu Selection
6HDIRRG &RG)LOOHWV
)LVK6WLFNVIUR]HQ
)UR]HQ%UHDGHG
Lobster Tails
2UDQJH5RXJK\)LOOHW
Salmon
Sea Bass
Shellfish
Swordfish Steak
Tilapia
Tuna Steaks
Whitefish
6LGH'LVK 5HIULHG%HDQVR]
Roasted Asparagus
Roasted Bell Pepper
5RDVWHG&KLOLV
Roasted Corn
Roasted Garlic
Roasted Mixed Vegetables
6WXIILQJPL[
Stuffed Mushrooms
Stuffed Tomatoes
SPEEDCOOKING

49-40687-4 15
SPEEDCOOKING
Favorite Recipe
To Enter and Save
Add and save up to 30 of your own Speedcook or
microwave recipes, or pre-set Speedcook menu recipes
DVDIDYRULWHUHFLSH2QFHLW¶VGRQH\RXFDQTXLFNO\
recall your favorite so that your food cooks just the way
you want it every time!
3UHVVWKH)$925,7(5(&,3(RUWKH63(('&22.
pad.
7XUQWKHGLDOXQWLO)$925,7(5(&,3(DSSHDUV
3UHVVWKHGLDOWRHQWHU6NLSWKLVVWHSLIWKH
)$925,7(5(&,3(SDGZDVSUHVVHGLQVWHS
3. Turn the dial until ADD RECIPE appears. Press the
dial to enter.
4. Turn the dial to COPY SPEED RECIPE or to ADD
NEW RECIPE. Press the dial to enter.
If COPY SPEED RECIPE was selected, turn dial to
IRRGW\SHVDQGSUHVVWKH)$925,7(5(&,3(SDG
to enter and save the recipe.
If ADD NEW RECIPE was selected, turn the dial to
VHOHFW63(('&22.RU0,&52:$D9(UHFLSH3UHVV
the dial to enter and continue with these steps.
6(/(&7&22.7,0(DSSHDUV7XUQWKHGLDOWRVHOHFW
the cooking time. Press the dial to enter.
7KHGLVSOD\ZLOOSURPSW\RXWRVHOHFWWKHSRZHUOHYHOV
6. Turn the dial clockwise to increase or
FRXQWHUFORFNZLVHWRGHFUHDVHWKHSRZHUOHYHOV
Press the dial to enter.
)RUSRZHUOHYHODQGFRRNLQJWLPHVXJJHVWLRQVXVH\RXU
cooking guide or cook book.
63(//7+()22'1$0(DSSHDUV7XUQWKHGLDOWR
the first letter of your food description and press the
dial to enter. Continue this process to spell the rest of
the food name. Press the START/PAUSE pad to save
the recipe and its name.
To Find and Use
To find and use stored favorite recipes:
3UHVVWKH)$925,7(5(&,3(RUWKH63(('&22.
pad.
7XUQWKHGLDOXQWLO)$925,7(5(&,3(DSSHDUV
Press the dial to enter.
7XUQGLDOWR86()$925,7(5(&,3(DQGSUHVVWR
enter.
4. The recipe names you entered will appear.
5. Turn dial until the recipe you want is displayed and
press the dial to enter.
6. Press the START/PAUSE pad or press the selector
dial to start cooking.
To Adjust or Change
To adjust or change stored custom speedcook recipes:
3UHVVWKH)$925,7(5(&,3(RUWKH63(('&22.
pad.
7XUQWKHGLDOXQWLO)$925,7(5(&,3(DSSHDUV
Press the dial to enter.
3. Turn the dial until EDIT RECIPE appears. Press the
dial to enter.
4. Turn the dial to the recipe you want to change. Press
the dial to enter. Current settings appear.
5. Press the dial to edit.
6. The display will prompt you to select the power
OHYHOVDQGHGLWWKHQDPH7XUQWKHGLDODQGSUHVVWR
enter the appropriate settings.
)RUSRZHUOHYHODQGFRRNLQJWLPHVXJJHVWLRQVXVH\RXU
cooking guide or cook book.
To Delete
To delete stored custom speedcook recipes:
3UHVVWKH)$925,7(5(&,3(RUWKH63(('&22.
pad.
7XUQWKHGLDOXQWLO)$925,7(5(&,3(DSSHDUV
Press the dial to enter.
3. Turn the dial until DELETE RECIPE appears and
press the dial to enter.
4. Turn dial to the recipe you want to delete and press
the dial to enter.
Speedcooking

16 49-40687-4
Things that are Normal
Cooking Times
Ŷ :KHQVSHHGFRRNLQJSUHSURJUDPPHGIRRGV\RXPD\
VHH237,0,=,1*&22.7,0(LQWKHGLVSOD\VHYHUDO
seconds after you press START/PAUSE. The oven
automatically senses the electrical voltage level in
your home and adjusts the cooking time up or down
for proper cooking.
Fan/Vent
Ŷ 7KHIDQZLOOEHRQGXULQJFRRNLQJ$WWKHHQGRI
cooking, the automatic fan may continue to run for a
short time, and the display will read Oven is Cooling.
The fan will automatically shut off when the internal
parts of the oven have cooled.
Ŷ 7KHRYHQYHQWZLOOHPLWZDUPDLUZKLOHWKHRYHQLVRQ
Lights
Ŷ :KHQWKHRYHQLVRQOLJKWPD\EHYLVLEOHDURXQGWKH
door or outer case.
Ŷ 7KHKDORJHQOLJKWVZLOOGLPDQGF\FOHRQDQGRII
during a speedcook cycle, sometimes even at full
power levels. This is normal. The oven senses the
heat level and adjusts automatically.
Oven Heat
Ŷ 1RSUHKHDWLQJWLPHLVUHTXLUHGGXULQJ6SHHGFRRN
cycles. The oven begins cooking immediately.
Ŷ 7KHGRRUDQGLQVLGHRIWKHRYHQZLOOEHYHU\KRW8VH
caution when opening the door and removing food.
Ŷ 'RQRWXVHFRRNZDUHRUFRYHULQJVPDGHRISDSHU
plastic, or foil when cooking during a speedcook
cycle.
Ŷ :KHQFRRNLQJIRUDQH[WHQGHGSHULRGRIWLPHWKH
oven may automatically reduce the power levels to
maintain the appropriate level of oven heat.
Sounds
Ŷ &OLFNVDQGDIDQEORZLQJDUHQRUPDOVRXQGVGXULQJ
cooking. The relay board is turning components on
and off.
Speedcooking
SPEEDCOOKING
49-40687-4 17
BAKING, BROILING, AND TOASTING
Baking, Broiling, and Toasting
Baking allows you to cook foods the same way as a
conventional oven, using a heating element to raise
the temperature of the air inside the oven. Any oven
WHPSHUDWXUHIURP)WR)PD\EHVHW
Broiling allows you to broil foods in the same way as a
conventional oven.
Toasting allows you to toast foods the same way as a
conventional oven.
A fan gently circulates heated air throughout the oven,
over and around the food. Because the heated air is kept
constantly moving, not permitting a layer of cooler air to
develop around the food, some foods cook slightly faster
than in regular oven cooking.
Before you begin, make sure the turntable is in place.
Use the non-stick metal tray at all times when baking.
WARNING
When baking, remember that the
oven, door and dishes will be very hot!
The turntable must
always be in place when
using the oven.
Put food or oven-safe
cookware directly on the
non-stick metal tray to
bake.
How to Bake
3UHVVWKH&219%$.(%52,/SDG
3UHVVWKHGLDOWRVHOHFW%$.(
3. Turn the dial to set the oven temperature and press
to enter.
To bypass preheating:
1. When the prompt shows PREHEAT THE OVEN?
turn the dial to NO. Press the dial or press START/
PAUSE to begin cooking.
2. Place the food in the oven, turn the dial to set the
cook time and press to enter.
The oven starts cooking immediately. When cooking
is complete, the oven will signal and turn off.
To preheat:
1. When the prompt shows PREHEAT THE OVEN?
turn the dial to YES. Press the dial or press START/
PAUSE to begin cooking.
The oven starts preheating immediately. Do not place
WKHIRRGLQWKHRYHQ<RXZLOOEHSURPSWHGWRHQWHU
the cook time, after the oven is preheated.)
2. When the oven is finished preheating, it will signal. If
you do not open the door within 1 hour, the oven will
turn off automatically. Open the oven door and, using
caution, place the food in the oven.
3. Close the oven door. Turn the dial to set the cook
time and press to enter and start cooking. When
cooking is complete, the oven will signal and turn off.
You may change the oven temperature during preheating
by pressing the POWER/TEMP pad and turning the dial
to select the new temperature.
If the oven door is opened during cooking, PAUSE will
appear in the display. Close the door and press start/
pause.
Cook times are shown in minutes and can be a
PD[LPXPRIPLQXWHV7LPHFDQEHFKDQJHGGXULQJ
cooking by turning the dial.
)RUWZROHYHOEDNLQJSODFHIRRGLQDPHWDO
baking dish or directly on the non-stick metal
tray. Place the aluminum baking sheet or your
baking dish with food on top of the wire rack.
Stand the rack with food on the metal tray.

18 49-40687-4
Baking, Broiling, and Toasting
How to Broil or Toast
3UHVVWKH&219%$.(%52,/SDG
2. Turn the dial to BROIL or TOAST and press to enter.
To bypass preheating:
1. When the prompt shows PREHEAT THE OVEN?
turn the dial to NO. Press the dial or press START/
PAUSE to begin cooking.
2. Place the food in the oven, turn the dial to set the
cook time and press to enter.
Press the dial to start cooking. When cooking is
complete, the oven will signal and turn off.
To preheat:
1. When the prompt shows PREHEAT THE OVEN?
turn the dial to YES. Press the dial or press START/
PAUSE to begin cooking.
The oven starts preheating immediately. Do not place
WKHIRRGLQWKHRYHQ<RXZLOOEHSURPSWHGWRHQWHU
the cook time, after the oven is preheated.)
2. When the oven is finished preheating, it will signal. If
you do not open the door within 1 hour, the oven will
turn off automatically. Open the oven door and, using
caution, place the food in the oven.
3. Close the oven door. Turn the dial to set the cook
time and press to ente r and start cooking. When
cooking is complete, the oven will signal and turn off.
If the oven door is opened during cooking, PAUSE will
appear in the display. Close the door and press START/
PAUSE.
Put food directly on the
aluminum baking sheet on the
wire oven rack, and place them
on the non-stick metal tray,
when broiling or toasting foods.
WARMING AND PROOFING
49-40687-4
BAKING, BROILING, AND TOASTING
Warming and Proofing
Warming
The WARM feature will keep hot, cooked foods at
serving temperature. Always start with hot food. Use
cookware and utensils that can withstand temperatures
XSWRÛ)
3UHVVWKH:$503522)SDG
7XUQWKHGLDOWRVHOHFW+2/')22':$503UHVV
the dial to enter.
3. Turn the dial to select the oven temperature. See the
chart and tips below. Press the dial to enter.
/2: ±)
0(',80 ±)
+,*+ ±)
4. Turn the dial to select the level of moisture you want.
See the chart and tips below. Press the dial to enter.
If the oven door is opened during warming, PAUSE will
appear in the display. Close the door and press START/
PAUSE.
To Crisp Stale Items:
Ŷ 3ODFHIRRGRUGLVKHVGLUHFWO\RQWKHEODFNPHWDOWUD\
Ŷ 3UHKHDWRQ/2:VHWWLQJDQGVHOHFW&5,63
Ŷ &KHFNFULVSQHVVDIWHUPLQXWHV$GGWLPHDV
needed.
Tips for Crisp Foods.
Ŷ /HDYHIRRGXQFRYHUHG
Ŷ 'RQRWXVHSODVWLFFRQWDLQHUVRUSODVWLFZUDS
Ŷ 3UHKHDWSULRUWRXVHDFFRUGLQJWRUHFRPPHQGHG
times.
Tips for Moist Foods:
Ŷ &RYHUIRRGZLWKOLGRUDOXPLQXPIRLO
Ŷ 'RQRWXVHSODVWLFFRQWDLQHUVRUSODVWLFZUDS
Ŷ 3UHKHDWSULRUWRXVHDFFRUGLQJWRUHFRPPHQGHG
times.
Proofing
The proofing feature automatically provides the optimum
temperature for the proofing process, and therefore does
not have a temperature adjustment.
3UHVVWKH:$503522)SDG
7XUQWKHGLDOWRVHOHFW3522)%5($'3UHVVWKHGLDO
to enter. The oven starts proofing immediately and
shows the amount of proofing time completed.
Ŷ 7RDYRLGORZHULQJWKHRYHQWHPSHUDWXUHDQG
lengthening proofing time, do not open the oven door
unnecessarily.
Ŷ &KHFNEUHDGSURGXFWVHDUO\WRDYRLGRYHUSURRILQJ
NOTES:
Ŷ 'RQRWXVHWKHSURRILQJPRGHIRUZDUPLQJIRRGRU
keeping food hot. The proofing oven temperature is
not hot enough to hold foods at safe temperatures.
Use the WARM feature to keep food warm.
Ŷ 3URRILQJZLOOQRWRSHUDWHLIWKHRYHQLVWRRKRW$OORZ
the oven to cool before proofing.
The turntable must always be in
place when using the oven.
The turntable must always be in
place when using the oven.
Put food directly on the non-stick
metal tray to warm.
Put bread dough in a bowl/bread
pan and place on the non-stick
metal tray to proof.
)RRG7\SH Control
Setting
Moisture
Setting
Bread, hard rolls MEDIUM CRISP
Bread, soft rolls MEDIUM MOIST
Casseroles MEDIUM MOIST
)ULHGIRRGV HIGH CRISP
Meats* and fish MEDIUM CRISP
Pancakes, waffles HIGH CRISP
Pizza HIGH CRISP
Potatoes, baked HIGH CRISP
Potatoes, mashed MEDIUM MOIST
Poultry HIGH MOIST
Tortilla Chips LOW CRISP
Vegetables MEDIUM MOIST
86'$)6,6UHFRPPHQGVDQLQWHUQDOWHPSHUDWXUHRI)
as the minimum doneness for beef.
Use a portable meat thermometer to check internal
temperatures.
Temperature and Moisture Selection Chart
20 49-40687-4
Microwaving
Make sure the turntable and clear glass tray are in place.
Place food or microwavable container directly on the
clear glass tray to cook your food.
Cookware
Ŷ0DNHVXUHWKDWFRRNZDUHLVVXLWDEOHIRUPLFURZDYLQJ
Ŷ3ODFHIRRGRUPLFURZDYDEOHFRQWDLQHUGLUHFWO\RQWKH
clear glass tray to cook your food.
The turntable must always
be in place when using the oven.
The clear glass tray should always
be in place when microwaving.
Microwave Pre-Set Selections
3UHVVWKHPLFURZDYH&22.'()5267RU5(+($7
pad. If no selection is made within 15 seconds, the
display will return to blank.
2. Turn the dial to find the food you want to cook, de-
frost or reheat. Press the dial to enter.
3. Turn the selector dial to select the type, amount,
ZHLJKWDQGRUVL]H$VUHTXLUHGWKHRYHQZLOOSURPSW
you.) Press the dial after each selection.
4. Press the dial or the START/ PAUSE pad to start
cooking.
To review settings during cooking, press the selector dial.
If the door is opened during cooking, the oven will stop
and PAUSE will appear in the display. Close the door and
press START/ PAUSE to resume cooking.
If you enter an undesired selection at any time, simply
SUHVVWKH%$&.SDGDQGUHHQWHUWKHGHVLUHGVHOHFWLRQV
Ŷ Cook
±%\)RRG7\SH
–By Time
–By Time 1 & 2
–Delay Start
–Heat/Reheat
Beverage
–Melt
–Slow Cook
–Soften
ŶDefrost
–1.0 lb Quick
–By Time
±%\)RRG7\SH
–By Weight
–Delay Start
–Melt
–Soften
ŶReheat
–Beverage
–Casserole
–Chicken
–Pasta
–Pizza
±3ODWHRI)RRG
–Rice
–Soup
–Steaks/Chops
–Vegetables
MICROWAVING

49-40687-4 21
MICROWAVING
Microwaving
Cook By Time / Cook By Time 1 & 2
8VH&22.%<7,0(DQG&22.%<7,0(WR
microwave food that is not in the recipe section and at
WKHWLPHV\RXVHW
Ŷ 7KHSRZHUOHYHOLVDXWRPDWLFDOO\VHWDWKLJKEXW\RX
can change it for more flexibility.
3UHVVWKH&22.SDG
7XUQWKHGLDOWRVHOHFW&22.%<7,0(RU&22.%<
TIME 1 & 2 and press the dial to enter.
3. Turn the dial to set the cook time and press the dial
to enter.
,I\RXVHOHFWHG&22.%<7,0(WXUQWKHGLDOWRVHW
the second cook time and press the dial to enter.
NOTE: To change the power level if you don’t want
full power, press the POWER/TEMP pad after entering
WKHWLPHV7XUQWKHGLDOWRVHOHFWDQGSUHVVWKHGLDOWR
enter.
4. Press the dial or the START/ PAUSE pad to start
cooking.
<RXPD\RSHQWKHGRRUGXULQJ&22.%<7,0(DQG
&22.%<7,0(WRFKHFNWKHIRRG&ORVHWKHGRRU
and press START/PAUSE to resume cooking.
Express
Press EXPRESS repeatedly for 30 second increments of
microwave cooking time. Oven starts immediately.
Favorite Recipe
6HHWKH)DYRULWHUHFLSHVHFWLRQVLQWKH6SHHGFRRN
section of this book for instructions on how to save, use,
change or delete a favorite recipe.
Cooking Tips
Ŷ:KHQFRRNLQJEDFRQOD\HUVWULSVRQDSODWH&RYHU
each layer with a paper towel.
Ŷ:KHQFRRNLQJYHJHWDEOHVXVHDPLFURZDYHVDIH
casserole or bowl. Cover with a microwave-safe lid or
vented plastic wrap.
Ŷ )RUIUR]HQYHJHWDEOHVIROORZWKHSDFNDJHLQVWUXFWLRQV
for adding water.
Ŷ )RUIUHVKYHJHWDEOHVDGGWDEOHVSRRQVRIZDWHUIRU
each serving.
Microwave Power Level(s)
)LUVWIROORZGLUHFWLRQVIRU&22.%<7,0(&22.%<
7,0('()5267%<7,0(RU(;35(66
2. Press the POWER/TEMP pad.
3. Turn the dial clockwise to increase and
counterclockwise to decrease the power level. Press
the dial to enter.
4. Press the dial or the START/ PAUSE pad to start
cooking.
Ŷ<RXFDQFKDQJHWKHSRZHUOHYHOEHIRUHRUGXULQJD
cooking program.
Here are some examples of uses for various power
levels:
High 10: )LVKEDFRQYHJHWDEOHVERLOLQJOLTXLGV
Med-High 7: Gentle cooking of meat and poultry;
baking casseroles and reheating.
Medium 5: Slow cooking and tenderizing for stews and
less tender cuts of meat.
Low 2 or 3: Defrosting; simmering; delicate sauces.
Warm 1: .HHSLQJIRRGZDUPVRIWHQLQJEXWWHU

22 49-40687-4
Microwaving
Defrost By Food Type
Auto Defrost automatically sets the defrosting times and
power levels to give even defrosting results for meats,
poultry and fish weighing up to 6 pounds.
1. Remove food from the package and place it on a
microwave-safe dish.
3UHVVWKH'()5267SDG
7XUQWKHGLDOWR'()5267%<)22'7<3(3UHVV
the dial to enter.
4. Turn the dial to select food type. Press the dial to
enter.
5. Turn the dial to the food weight, using the Conversion
*XLGHDWULJKW)RUH[DPSOHGLDOIRUSRXQGV
SRXQGR]3UHVVWKHGLDOWRHQWHU
6. Press the dial or START/PAUSE pad to start
defrosting.
7. Turn the food over when the oven signals TURN
)22'29(5
Ŷ 5HPRYHGHIURVWHGPHDWRUVKLHOGZDUPDUHDVZLWK
small pieces of foil for even defrosting.
Ŷ $IWHUGHIURVWLQJPRVWPHDWVQHHGWRVWDQGPLQXWHV
to complete defrosting. Large roasts should stand for
about 30 minutes.
Conversion Guide
If the weight of food is stated in pounds and ounces, the
RXQFHVPXVWEHFRQYHUWHGWRWHQWKVRIDSRXQG
Weight of Food
in Ounces
Enter Food Weight
(tenths of a pound)
1-2 .1
3.2
4-5 .3
6-7 .4
8.5
.6
11 .7
12-13 .8
14-15
Defrost By Time
Use Time Defrost to defrost for a selected length of time.
3UHVVWKH'()5267SDG
7XUQWKHVHOHFWRUGLDOWR'()5267%<7,0(3UHVV
the dial to enter.
3. Turn the dial to select the time you want. Press the
dial to enter.
4. Press the dial or START/PAUSE pad to start
defrosting.
5. Turn the food over when the oven signals TURN
)22'29(5
Power level is automatically set at 3, but can be
changed. To change the power levels, see the
0LFURZDYH3RZHU/HYHOVVHFWLRQ<RXFDQGHIURVW
VPDOOLWHPVTXLFNO\E\UDLVLQJWKHSRZHUOHYHODIWHU
entering the time. Power level 7 cuts the total defrosting
time in about half; power level 10 cuts the total time to
about 1/3. When defrosting at high power levels, food
ZLOOQHHGPRUHIUHTXHQWDWWHQWLRQWKDQXVXDO
Defrosting Tips
8VH'()5267%<)22'7<3(IRUPHDWSRXOWU\DQG
ILVK8VH'()5267%<7,0(IRUPRVWRWKHUIUR]HQ
foods.
Ŷ)RRGVIUR]HQLQSDSHURUSODVWLFFDQEHWLPHGHIURVWHG
in the package, but foods should be taken out of the
SDFNDJHZKHQXVLQJ'()5267%<)22'7<3(
Closed packages should be slit, pierced or vented
after food has partially defrosted. Plastic storage
containers should be partially uncovered.
Ŷ)DPLO\VL]HSUHSDFNDJHGIUR]HQGLQQHUVFDQEH
defrosted and microwaved. If the food is in a foil
container, transfer it to a microwave-safe dish.
Ŷ)RRGVWKDWVSRLOHDVLO\VKRXOGQRWEHDOORZHGWRVLW
out for more than one hour after defrosting. Room
temperature promotes the growth of harmful bacteria.
Ŷ)RUPRUHHYHQGHIURVWLQJRIODUJHUIRRGVVXFKDV
URDVWVXVH'()5267%<7,0(%HVXUHODUJHPHDWV
are completely defrosted before cooking.
Ŷ:KHQGHIURVWHGIRRGVKRXOGEHFRROEXWVRIWHQHGLQ
all areas. If still slightly icy, return to the microwave
very briefly, or let it stand a few minutes.
MICROWAVING
49-40687-4 23
MICROWAVING
Microwaving
Sensor Cooking Cookware
The proper containers and covers are essential for best
sensor cooking.
Ŷ$OZD\VXVHPLFURZDYHVDIHFRQWDLQHUVDQGFRYHUWKHP
with lids or vented plastic wrap. Never use tight sealing
plastic containers—they can prevent steam from
escaping and cause food to overcook.
Ŷ%HVXUHWKHRXWVLGHRIWKHFRRNLQJFRQWDLQHUVDQG
the inside of the oven are dry before placing food in
the oven. Beads of moisture turning into steam can
mislead the sensor.
Ŷ%HYHUDJHVDUHEHVWKHDWHGXQFRYHUHG
Sensor Cooking
Advantium’s microwave mode features sensor cooking.
The oven automatically senses when food is done and
shuts itself off - eliminating the need to program cook
times and power levels. The oven automatically adjusts
the cooking time to various types and amounts of food.
1. Press tKH&22.SDGDQGWXUQWKHGLDOWR&22.%<
)22'7<3(3UHVVWKHGLDOWRHQWHU2USUHVVWKH
REHEAT pad.
2. Turn the dial to select the food you want. Press the
dial to enter.
3. Press the dial or press the START/ PAUSE pad to
start cooking.
Do not open the oven door until time is counting down
in the display. If the door is opened, close it and press
START/PAUSE immediately. If the food is not done
HQRXJKXVH&22.%<7,0(LQWKHPLFURZDYHVHOHFWRU
to cook for more time.
NOTE: Do not use the sensor features twice in
succession on the same food portion—it may result
in severely overcooked or burnt food. If food is
XQGHUFRRNHGDIWHUWKHILUVWFRXQWGRZQXVH&22.%<
TIME for additional cooking time.
Ŷ ,I\RXKDYHEHHQVSHHGFRRNLQJDQGWKHRYHQLV
already hot, it may indicate that it is too hot for sensor
cooking. Of course, you can always continue with
&22.%<7,0(RU63(('&22.
NOTE: If the oven is too hot then it will automatically
change to time cooking.
Ŷ 7RVKRUWHQRUOHQJWKHQWKHFRRNWLPHZDLWXQWLOWKH
time countdown shows in the display. Then turn the
dial to add or subtract time.
Ŷ ,I\RXRSHQWKHGRRUZKLOHVHQVRUFRRNLQJ6(1625
ERROR will appear. Close the door, press START/
PAUSE to begin again.
Notes About the Reheat Program:
Reheated foods may have wide variations in
temperature. Some areas may be extremely hot.
,WLVEHVWWRXVH&22.%<7,0(DQGQRW5(+($7IRU
these foods:
Ŷ %UHDGSURGXFWV
Ŷ )RRGWKDWPXVWEHUHKHDWHGXQFRYHUHG
Ŷ )RRGVWKDWQHHGWREHVWLUUHGRUWXUQHG
Ŷ )RRGVFDOOLQJIRUDGU\ORRNRUFULVSVXUIDFHDIWHU
reheating.
Covered
Vented
Dry off dishes so they
don’t mislead the sensor.
MICROWAVE SENSOR PROGRAMS:
Ŷ*URXQG0HDW
Ŷ3RSFRUQ±3UHSDFNDJHGPLFURZDYHSRSFRUQ
R]WRR]
Ŷ6RXS
Ŷ5LFH
Ŷ9HJHWDEOHV&DQQHG)UHVK)UR]HQ
Ŷ&KLFNHQ5HKHDW
Ŷ3DVWD5HKHDW
Ŷ3ODWHRI)RRG5HKHDW
Ŷ6RXS5HKHDW
Ŷ9HJHWDEOH5HKHDW

24 49-40687-4
Microwaving
Things that are Normal
Interference
Ŷ79UDGLRLQWHUIHUHQFHPLJKWEHQRWLFHGZKLOHXVLQJ
the microwave. Similar to the interference caused by
other small appliances, it does not indicate a problem
with the microwave. Move the radio or TV as far away
from the microwave as possible, or check the position
of the TV/radio antenna.
Lights
Ŷ7KHRYHQFDYLW\OLJKWZLOOFRPHRQGXULQJDPLFURZDYH
cooking cycle.
Oven Heat
Ŷ&RRNZDUHPD\EHFRPHKRWEHFDXVHRIKHDW
transferred from the heated food. Oven mitts may be
needed to handle the cookware.
Ŷ6WHDPRUYDSRUPD\HVFDSHIURPDURXQGWKHGRRU
MICROWAVING

49-40687-4 25
OTHER FEATURES
Other Features
Cook Time Completed
To remind you that you have food in the oven, the oven
ZLOOGLVSOD\&22.7,0(&203/(7('DQGEHHSRQFHD
minute until you either open the oven door or press the
&$1&(/2))SDG
Review
Use this feature to review the current cooking selections
you have set.
Press the selector dial during speedcooking or
microwave cooking.
Options
Clock:
The clock must be set before you can use your oven for
WKHILUVWWLPHVHH4XLFN6WDUWIRULQVWUXFWLRQV
1. To change the clock time, press the OPTIONS pad
DQGWXUQWKHGLDOWR&/2&.3UHVVWKHGLDOWRHQWHU
2. Turn the dial to set hours. Press the dial to enter.
3. Turn the dial to set minutes. Press the dial to enter.
4. Turn the dial to select AM or PM. Press the dial to
enter.
The clock is designed to turn off when unit is idle for
30 seconds to minimize the standby power usage. The
clock will turn on when unit is in use or door is opened.
There is not an override option available based on the
'2(HQHUJ\UHTXLUHPHQWV
Delay Start:
Delay Start allows you to set the oven to delay cooking
up to 24 hours. Press the OPTIONS pad, turn the dial to
VHOHFW'(/$<67$57DQGSUHVVWKHGLDOWRHQWHU)ROORZ
the display directions to set the Delay Start time and
feature you wish to delay.
Beeper Volume:
Use this feature to adjust the volume of the beeper. You
can even turn it off. Press the OPTIONS pad, turn the
dial to select BEEPER VOLUME, press the dial to enter,
and follow the display directions.
Scroll Speed:
Is the message scroll too slow or too fast? Change it!
Press the OPTIONS pad, turn the dial to select DISPLAY
SCROLL SPEED, press the dial to enter, and follow the
display directions.
Reminder:
Use this feature to set an alarm beep to sound at a
specific the time of day. Press the OPTIONS pad, turn
the dial to SET/CLEAR REMINDER and press the dial to
enter. Turn the dial to select the hour and press to enter.
Turn the dial to select the minute and press to enter.
Turn the dial to select AM or PM and press to enter.
To review the setting, turn the dial to SET/CLEAR
REMINDER and press the dial to enter. Turn the dial to
REVIEW and press to enter.
To cancel the setting, turn the dial to SET/CLEAR
REMINDER and press the dial to enter. Turn the dial to
CLEAR and press to enter.

26 49-40687-4
Other Features
Help
Use this feature to find out more about your oven and its
features.
1. Press the HELP pad.
2. Turn the dial to select the feature name. Press the
dial to enter.
The display will show a description for the program you
have chosen.
Child Lock-Out
You may lock the control panel to prevent the oven from
being accidentally started or used by children.
3UHVVDQGKROG&$1&(/2))IRUVHFRQGVWRORFNDQG
unlock.
:KHQWKHFRQWUROSDQHOLVORFNHG&RQWUROLV/2&.('
will be displayed briefly anytime a pad or dial is pressed.
Automatic Fan
An automatic fan protects the oven from too much heat
inside the oven cavity.
It automatically turns on at low speed if it senses too
much heat.
The fan will automatically turn off when the internal parts
are cool. It may stay on for 30 minutes or more after the
oven control is turned off.
Timer
Use this feature anytime you need a general purpose
timer. It can even be used while cooking in the oven.
1. Press the TIMER pad.
2. Turn the dial to select the hours. Press the dial to
enter.
3. Turn the dial to select the minutes. Press the dial to
enter.
To cancel, press TIMER.
Features found in the HELP function.
Adding time Defrost by Weight Set Beeper Volume
Back Delay Start Set Clock
Bake Express Cook Set Display Speed
Beverage Heat )DYRULWH5HFLSH Set/Clear Reminder
Broil Help Slow Cook
Child Lockout +ROG)RRG:DUP Soften/Melt
Cancel/Off Options Speed Cook
Cook Power/Temp Start/Pause
Cook by Time Proof Bread Time Cook 1 & 2
&RRNE\)RRG7\SH Reheat Timer On/Off
Custom Speed Cook Repeat Last Toast
Defrost Resume Warm/Proof
'HIURVWE\)RRG7\SH Review
Defrost by Time Sensor Cooking
OTHER FEATURES
49-40687-4 27
CARE AND CLEANING
Care and Cleaning
Helpful Hints
An occasional thorough wiping with a solution of baking
soda and water keeps the inside fresh.
Be certain the oven control is turned off before
cleaning any part of this oven.
Inside
Clean the inside of the oven often for proper heating
performance.
Some spatters can be removed with a paper towel,
RWKHUVPD\UHTXLUHDZDUPVRDS\FORWK5HPRYHJUHDV\
spatters with a sudsy cloth, then rinse with a damp cloth.
Do not use abrasive cleaners or sharp utensils on oven
walls.
Never use a commercial oven cleaner on any part of
your oven.
Do not clean the inside of the oven with metal scouring
pads. Pieces can break off the pad, causing electrical
shock.
Removable Turntable
The area underneath the turntable should be cleaned
IUHTXHQWO\WRDYRLGRGRUVDQGVPRNLQJGXULQJDFRRNLQJ
cycle.
The turntable can be broken if dropped. Wash carefully
in warm, sudsy water. Dry completely and replace.
To replace the turntable, place its center over the
spindle in the center of the oven and turn it until it seats
LQWRSODFH0DNHVXUHWKHVPRRWKVLGHRIWKHWXUQWDEOH
is facing up and that its center seats securely on the
spindle.)
Cooking Trays and Baking Sheet
To prevent breakage, allow the trays to cool completely
before cleaning. Wash carefully in warm, sudsy water or
in the dishwasher.
Do not use metal scouring pads or abrasives, as they
may damage the finish. A soap-filled scouring pad may
be used to clean the trays.
:DOOV)ORRU,QVLGH:LQGRZ0HWDO
and Plastic Parts on the Door
Do not use the oven without
the turntable in place.
Turntable
Put food directly on the
aluminum baking sheet on the
wire oven rack, and place them
on the non-stick metal tray,
when baking on two levels,
broiling or toasting foods.
Clear glass tray for microwaving
Non-stick metal tray for
speedcooking

28 49-40687-4
Outside
We recommend against using cleaners with ammonia
or alcohol, as they can damage the appearance of
the oven. If you choose to use a common household
cleaner, first apply the cleaner directly to a clean cloth,
then wipe the soiled area.
Case
Clean the outside with a sudsy cloth. Rinse and then dry.
Wipe the window clean with a damp cloth.
Glass Control Panel and Door
Wipe with a clean damp sponge. Dry thoroughly. Do not
use cleaning sprays, large amounts of soap and water,
abrasives or sharp objects on the panel—they can
damage it.
Door Seal
It’s important to keep the area clean where the door
seals against the oven. Use only mild, non-abrasive
detergents applied with a clean sponge or soft cloth.
Rinse well.
Stainless Steel RQVRPHPRGHOV
To clean the stainless steel surface, use warm sudsy
water or a stainless steel cleaner or polish. Always
ZLSHWKHVXUIDFHLQWKHGLUHFWLRQRIWKHJUDLQ)ROORZ
the cleaner instructions for cleaning the stainless steel
surface.
7RLQTXLUHDERXWSXUFKDVLQJVWDLQOHVVVWHHODSSOLDQFH
cleaner or polish, or to find the location of a dealer
nearest you, please call our toll-free number,
800.626.2005 or visit GEAppliances.com.
Care and Cleaning
CARE AND CLEANING
FEDERAL COMMUNICATIONS COMMISSION RADIO FREQUENCY
INTERFERENCE STATEMENT (U.S.A. ONLY)
7KLVHTXLSPHQWJHQHUDWHVDQGXVHV,60IUHTXHQF\
energy and if not installed and used properly, that is in
strict accordance with the manufacturer’s instructions,
may cause interference to radio and television
reception. It has been type tested and found to comply
ZLWKOLPLWVIRU,60(TXLSPHQWSXUVXDQWWRSDUWRI
)&&5XOHVZKLFKDUHGHVLJQHGWRSDUWRI)&&
Rules, which are designed to provide residential
installation.
However, there is no guarantee that interference will not
RFFXULQDSDUWLFXODULQVWDOODWLRQ,IWKLVHTXLSPHQWGRHV
cause interference to radio or television reception, which
FDQEHGHWHUPLQHGE\WXUQLQJWKHHTXLSPHQWRIIDQGRQ
the user is encouraged to try to correct the interference
by one or more of the following:
Ŷ5HRULHQWWKHUHFHLYLQJDQWHQQDRIWKHUDGLRRU
television.
Ŷ5HORFDWHWKH0LFURZDYH2YHQZLWKUHVSHFWWRWKH
receiver.
Ŷ0RYHWKHPLFURZDYHRYHQDZD\IURPWKHUHFHLYHU
Ŷ3OXJWKHPLFURZDYHRYHQLQWRDGLIIHUHQWRXWOHWVRWKDW
the microwave oven and the receiver are on different
branch codes.
The manufacturer is not responsible for any radio of TV
interference caused by unauthorized modification to this
microwave oven. It is the responsibility of the user to
correct such interference.

49-40687-4
TROUBLESHOOTING TIPS
Problem Possible Cause What To Do
LIGHTS
Light during a speedcook
cycle dims and cycles on
and off, even at full power
levels
This is normal. Power level has
been automatically reduced
because the oven is hot.
This is normal. The oven senses the heat level
and adjusts automatically. Power level has been
automatically reduced because the oven is hot.
Light visible around the
door and outer case while
speedcooking
This is normal. When the oven is on, light may be visible around the
door and outer case.
FAN
Fan continues to run after
cooking stops
The oven is cooling. The fan will automatically shut off when the internal
parts of the oven have cooled.
Oven vent emits warm air
while oven is on
This is normal.
Fan comes on automatically
when using the microwave
This is normal.
COOKING
The oven makes unusual
sounds while cooking
Clicks and fans blowing are
normal. The relay board is turning
the components on and off.
These sounds are normal.
Smoke comes out of the
oven when I open the door
Food is high in fat content.
Aerosol spray used on the pans.
Smoke is normal when cooking high-fat foods.
Food is not fully cooked
or browned at the end of a
cooking program
Programmed times may not match
WKHVL]HRUDPRXQWRIIRRG\RXDUH
cooking.
Adjust time for doneness or adjust the upper or lower
lamps for browning and doneness.
SENSOR ERROR displayed
along with an oven signal
Food amount or type placed in the
oven does not match the program
that was set.
3UHVVWKH&$1&(/2))SDG6HWWKHRYHQSURJUDP
WRPDWFKWKHIRRGRUOLTXLGWREHFRRNHGRUKHDWHG
Steam was not sensed by the
oven because plastic wrap was
not vented, a lid too tight was on
the dish or a liquid was covered.
9HQWSODVWLFZUDSXVHDORRVHUOLGRUXQFRYHUOLTXLGV
when cooking or heating.
DISPLAY
The display is blank The clock is designed to turn off when unit is idle for
30 seconds to minimize the standby power usage.
6HH&ORFNVHFWLRQ
“Control is LOCKED”
appears in display
The control has been locked. 3UHVVDQGKROG&$1&(/2))IRUVHFRQGVWR
unlock the control.
Control display is lighted yet
oven will not start
Clock is not set. Set the clock.
Door not securely closed. Open the door and close securely.
START/PAUSE pad not pressed
after entering cooking selection.
Press START/PAUSE.
Another selection already entered
in oven and CANCEL/OFF pad not
pressed to cancel it.
3UHVV&$1&(/2))
6L]HTXDQWLW\RUFRRNLQJWLPHQRW
entered after final selection.
Make sure you have entered cooking time after
selecting.
CANCEL/OFF was pressed
accidentally.
Reset cooking program and press START/PAUSE.
OTHER PROBLEMS
The door and inside of the
oven feels hot
The heat lamps produce intense
heat when ready.
This is normal. Use oven mitts to remove food when
in a small space.
Oven will not start A fuse in your home may be blown
or the circuit breaker tripped.
Replace fuse or reset circuit breaker.
Troubleshooting Tips... Before you call for service
Save time and money! Review the charts on the following pages first and you may not need to call for service.

30 49-40687-4
Notes
NOTES

49-40687-4 31
Staple your receipt here. Proof of the original purchase
date is needed to obtain service under the warranty.
GEAppliances.com
$OOZDUUDQW\VHUYLFHLVSURYLGHGE\RXU)DFWRU\6HUYLFH&HQWHUVRUDQDXWKRUL]HG&XVWRPHU&DUH
®
technician. To schedule
service online, visit us at www.geappliances.com/service_and_support/, or call GE Appliances at 800.GE.CARES
3OHDVHKDYH\RXUVHULDOQXPEHUDQG\RXUPRGHOQXPEHUDYDLODEOHZKHQFDOOLQJIRUVHUYLFH
What GE Appliances will not cover:
Ŷ6HUYLFHWULSVWR\RXUKRPHWRWHDFK\RXKRZWRXVHWKH
product.
Ŷ,PSURSHULQVWDOODWLRQGHOLYHU\RUPDLQWHQDQFH
Ŷ3URGXFWQRWDFFHVVLEOHWRSURYLGHUHTXLUHGVHUYLFH
Ŷ)DLOXUHRIWKHSURGXFWRUGDPDJHWRWKHSURGXFWLILWLV
DEXVHGPLVXVHGIRUH[DPSOHFDYLW\DUFLQJIURPZLUH
rack or metal/foil), or used for other than the intended
purpose or used commercially.
Ŷ5HSODFHPHQWRIKRXVHIXVHVRUUHVHWWLQJ
of circuit breakers.
Ŷ5HSODFHPHQWRIWKHFRRNWRSOLJKWEXOEV
Ŷ'DPDJHWRWKHSURGXFWFDXVHGE\DFFLGHQWILUHIORRGV
or acts of God.
Ŷ,QFLGHQWDORUFRQVHTXHQWLDOGDPDJHFDXVHGE\
possible defects with this appliance.
Ŷ'DPDJHFDXVHGDIWHUGHOLYHU\
WARRANTY
Advantium Oven Warranty
EXCLUSION OF IMPLIED WARRANTIES
Your sole and exclusive remedy is product repair as provided in this Limited Warranty. Any implied warranties,
including the implied warranties of merchantability or fitness for a particular purpose, are limited to one year or
the shortest period allowed by law.
This warranty is extended to the original purchaser and any succeeding owner for products purchased for home use
within the USA. If the product is located in an area where service by a GE Appliances Authorized Servicer is not available,
\RXPD\EHUHVSRQVLEOHIRUDWULSFKDUJHRU\RXPD\EHUHTXLUHGWREULQJWKHSURGXFWWRDQ$XWKRUL]HG*($SSOLDQFHV
Service location for service. In Alaska, the warranty excludes the cost of shipping or service calls to your home.
6RPHVWDWHVGRQRWDOORZWKHH[FOXVLRQRUOLPLWDWLRQRILQFLGHQWDORUFRQVHTXHQWLDOGDPDJHV7KLVZDUUDQW\JLYHV\RX
specific legal rights, and you may also have other rights which vary from state to state. To know what your legal rights
are, consult your local or state consumer affairs office or your state’s Attorney General.
Warrantor: GE Appliances
For the period of GE Appliances will replace
One year
)URPWKHGDWH
of the original
purchase
Any part of the oven which fails due to a defect in materials or workmanship. During this
limited one-year warranty, GE Appliances will also provide, free of charge, all labor and
related service costs to replace the defective part.
Five years
)URPWKHGDWH
of the original
purchase
The magnetron tube, if the magnetron tube fails due to a defect in materials or workmanship.
During this five-year limited warranty, you will be responsible for any labor or in-home
service costs.

32 49-40687-4
3ULQWHGLQWKH.RUHD
Consumer Support
CONSUMER SUPPORT
GE Appliances Website
+DYHDTXHVWLRQRUQHHGDVVLVWDQFHZLWK\RXUDSSOLDQFH"7U\WKH*($SSOLDQFHV:HEVLWHKRXUVDGD\DQ\GD\
of the year! You can also shop for more great GE Appliances products and take advantage of all our on-line support
services designed for your convenience. In the US: GEAppliances.com
Register Your Appliance
Register your new appliance on-line at your convenience! Timely product registration will allow for enhanced
communication and prompt service under the terms of your warranty, should the need arise. You may also mail in
the pre-printed registration card included in the packing material. In the US: GEAppliances.com/register
Schedule Service
Expert GE Appliances repair service is only one step away from your door. Get on-line and schedule your service at
your convenience any day of the year. In the US: GEAppliances.com/ge/service-and-support/service.htm
or call 800.432.2737 during normal business hours.
Extended Warranties
Purchase a GE Appliances extended warranty and learn about special discounts that are available while your
warranty is still in effect. You can purchase it on-line anytime. GE Appliances Services will still be there after your
warranty expires. In the US: GEAppliances.com/ge/service-and-support/shop-for-extended-service-plans.htm
or call 800.626.2224 during normal business hours.
Remote Connectivity
)RUDVVLVWDQFHZLWKZLUHOHVVQHWZRUNFRQQHFWLYLW\IRUPRGHOVZLWKUHPRWHHQDEOH
visit our website at GEAppliances.com/ge/connected-appliances/RUFDOOLQWKH86
Parts and Accessories
,QGLYLGXDOVTXDOLILHGWRVHUYLFHWKHLURZQDSSOLDQFHVFDQKDYHSDUWVRUDFFHVVRULHVVHQWGLUHFWO\WRWKHLUKRPHV
9,6$0DVWHU&DUGDQG'LVFRYHUFDUGVDUHDFFHSWHG2UGHURQOLQHWRGD\KRXUVHYHU\GD\
In the US: GEApplianceparts.comRUE\SKRQHDWGXULQJQRUPDOEXVLQHVVKRXUV
Instructions contained in this manual cover procedures to be performed by any user. Other servicing
generally should be referred to qualified service personnel. Caution must be exercised, since improper
servicing may cause unsafe operation.
Contact Us
If you are not satisfied with the service you receive from GE Appliances, contact us on our Website with all the
details including your phone number, or write to:
,QWKH86*HQHUDO0DQDJHU&XVWRPHU5HODWLRQV_*($SSOLDQFHV$SSOLDQFH3DUN_/RXLVYLOOH.<
GEAppliances.com/ge/service-and-support/contact.htm

Anote aquí los números de modelo
y de serie:
Modelo número __________
Número de serie __________
Los encontrará en una etiqueta
dentro del horno.
GE es una marca registrada de General Electric Company. Fabricado bajo licencia de marca.
MANUAL DEL USUARIO
HORNO ADVANTIUM®
49-40687-4 12-16 GEA
PSB9120
http://geadvantium.com
INFORMACIÓN DE SEGURIDAD ....3
ADVANTIUM
Familiarícese con Advantium ................7
Funciones ................................8
Controles .................................9
COCCIÓN RÁPIDA
Nivel de potencia .........................10
Recipientes .............................. 11
Cocción rápida personalizada .............. 11
Menú de preestablecido ...................12
Receta ..................................14
Cosas que son normales ...................15
CÓMO HORNEAR, ASAR
Y TOSTAR ............................16
CALENTAMIENTO Y ACTIVACIÓN
..18
COCCIÓN POR MICROONDAS
Recipientes de cocina .....................19
Selecciones de Microondas Preprogramadas
...19
Cocinar por tiempo ...................... 20
Consejos de cocina ...................... 20
Nivel(es) de potencia del horno
microondas ............................. 20
Descongelación ..........................21
Cocción por sensor .......................22
Cosas que son normales ...................23
OTRAS FUNCIONES .................24
MANTENIMIENTO Y LIMPIEZA
Interior ..................................26
Base giratoria desmontabl .................26
Bandejas para cocinar y lámina
de hornea ................................26
Exterior .................................27
Acero inoxidable .........................27
CONSEJOS PARA LA SOLUCIÓN
DE PROBLEMAS .....................28
GARANTÍA ...........................29
SOPORTE PARA EL CONSUMIDOR
..32

2 49-40687-4
GRACIAS POR HACER QUE GE APPLIANCES SEA PARTE DE SU HOGAR.
Ya sea que haya crecido usando GE Appliances, o que ésta es su primera vez, nos complace
tenerlo en la familia.
Sentimos orgullo por el nivel de arte, innovación y diseño de cada uno de los electrodomésticos de
GE Appliances, y creemos que usted también. Entre otras cosas, el registro de su electrodoméstico
asegura que podamos entregarle información importante del producto y detalles de la garantía
cuando los necesite.
Registre su electrodoméstico GE ahora a través de Internet. Sitios Web y números telefónicos útiles
están disponibles en la sección de Soporte para el Consumidor de este Manual del Propietario.
También puede enviar una carta en la tarjeta de inscripción preimpresa que se incluye con
el material embalado.

49-40687-4 3
INFORMACIÓN DE SEGURIDAD
LEA Y GUARDE ESTAS INSTRUCCIONES
INFORMACIÓN IMPORTANTE DE SEGURIDAD
LEA TODAS LAS INSTRUCCIONES ANTES DE USAR
ADVERTENCIA
Para reducir el riesgo de quemaduras, descargas eléctricas, incendio, lesiones o
exposición a energía de microondas excesiva:
Cuando utilice aparatos eléctricos, se deben seguir las precauciones de seguridad básicas, entre las que se incluyen las
siguientes:
Ŷ /HDWRGDVODVLQVWUXFFLRQHVDQWHVGHXWLOL]DUHVWHDSDUDWR
Ŷ /HD\VLJDODVSUHFDXFLRQHVHVSHFtILFDVGHVFULWDVHQOD
VHFFLyQ35(&$8&,21(63$5$(9,7$5/$326,%/(
EXPOSICIÓN A ENERGÍA DE MICROONDAS EXCESIVA
de la página 7.
Ŷ 8WLOLFHHVWHDSDUDWRVRODPHQWHSDUDHOILQSUHYLVWR
como se describe en este manual. No utilice químicos
ni vapores corrosivos en este aparato. Este horno está
específicamente diseñado para calentar, secar o cocinar
alimentos y bebidas y no está diseñado para usarse en n
laboratorio ni para uso industrial.
Ŷ 6yORSHUVRQDOFXDOLILFDGRGHEHUHSDUDUHVWHDSDUDWR
Póngase en contacto con el centro de mantenimiento
autorizado más cercano en caso de necesitar revisión,
reparación o ajuste.
INSTALLATION
Ŷ ,QVWDOHRXELTXHHVWHDSDUDWR~QLFDPHQWHGHDFXHUGRDODV
instrucciones de instalación suministradas.
Ŷ Este aparato debe contar con una conexión a tierra.
Conecte sólo a un tomacorriente con adecuada conexión a
tierra. Ver la sección Instrucciones de conexión a tierra de
la página 7.
Ŷ (VWHKRUQRHVWiOLVWDGRSRU8/SDUDDLQVWDODFLyQGHSDUHG
estándar. Consulte las instrucciones de instalación para
que electrodomésticos aprobados se puedan montar sobre
y debajo del microondas.
Ŷ No utilice este aparato si tiene el cable eléctrico o el
enchufe dañados, si no funciona bien o si ha sufrido una
avería o una caída.
Ŷ 0DQWHQJDHOFDEOHDOHMDGRGHVXSHUILFLHVFDOLHQWHV
Ŷ 1RSHUPLWDTXHHOFDEOHHOpFWULFRFXHOJXHVREUHHOERUGH
de la mesa o del mostrador de encimera.
Ŷ 1RVXPHUMDHOFDEOHHOpFWULFRRHOHQFKXIHHQDJXD
Ŷ 1RFXEUDQLEORTXHHQLQJXQDDSHUWXUDGHHVWHDSDUDWR
Ŷ 1RDOPDFHQHHVWHDSDUDWRDODLUHOLEUH1RXWLOLFHHVWH
producto cerca del agua; por ejemplo, en un sótano
húmedo, cerca de una piscina, cerca de un lavabo o
lugares similares.
Ŷ 1RPRQWHHVWHDSDUDWRVREUHHOIUHJDGHUR
PARA REDUCIR EL RIESGO DE INCENDIO DENTRO DEL
HORNO:
Ŷ 1RFRFLQHH[FHVLYDPHQWHORVDOLPHQWRV9LJLOH
cuidadosamente el aparato cuandose coloque papel,
plástico u otros materiales combustibles dentro del
microondas para facilitar la cocción.
Ŷ 4XLWHODVWLULWDVGHVHJXULGDGWZLVWWLHV\DVDVPHWiOLFDV
de los recipientes de papel o plástico antes de colocarlos
dentro del microondas.
Ŷ 6LORVPDWHULDOHVTXHVHHQFXHQWUDQGHQWURGHOKRUQR
prenden fuego, mantenga cerrada la puerta del horno,
apáguelo y desconecte el cable eléctrico, o corte la
energía desde el panel de fusibles o del interruptor de
circuitos.
Ŷ No utilice el horno para almacenar elementos. No deje
productos de papel, utensilios de cocina o alimentos en
el horno cuando no lo esté usando. Todos los estantes
deberán ser retirados del horno cuando no se encuentren
en uso
Ŷ No opere el horno sin alimentos adentro.
Ŷ 1RXWLOLFHODVIXQFLRQHVGHOVHQVRUGRVYHFHV
sucesivamente en la misma porción de alimento. Si el
alimento no se cocina completamente después del primer
FRQWHRUHJUHVLYRXWLOLFHODIXQFLyQ&22.%<7,0(
&2&,1$53257,(032SDUDSHUPLWLUWLHPSRGHFRFFLyQ
adicional.
Ŷ Para evitar chispas no se debe utilizar la parrilla de
alambre del horno para el cocimiento rápido o cocimiento
con microonda.
A FIN DE REDUCIR RIESGOS DE QUEMADURAS:
Ŷ 7HQJDFXLGDGRDODEULUHQYDVHVFRQFRPLGDFDOLHQWH8VH
manijas y aleje el vapor del rostro y las manos.
Ŷ 9HQWLOHSHUIRUHRFRUWHHQYDVHVEROVDVREROVDV
plásticas para evitar la acumulación de presión.
Ŷ 7HQJDFXLGDGRDOWRFDUHOSODWRJLUDWRULRODSXHUWD
estantes o paredes del horno, los cuales se podrán
calentar durante el uso.
Ŷ /RVOtTXLGRV\FLHUWDVFRPLGDVFDOHQWDGDVHQHOKRUQR
microondas pueden presentar riesgos de quemaduras,
DOVHUUHWLUDGRVGHOKRUQRPLFURRQGDV/DSRVLELOLGDGGH
quemaduras es mayor en niños pequeños, a los cuales
no se les deberá permitir retirar ítems calientes del horno
microondas.

4 49-40687-4
LEA Y GUARDE ESTAS INSTRUCCIONES
INFORMACIÓN DE SEGURIDAD
INFORMACIÓN IMPORTANTE DE SEGURIDAD
LEA TODAS LAS INSTRUCCIONES ANTES DE USAR
ADVERTENCIA
El arqueo voltaico puede ocurrir tanto durante la cocción rápida (speedcooking) y de
microondas. Si nota que ocurre arqueo voltaico, apriete el botón táctil CANCEL/OFF
(BORRAR/APAGAR) y corrija el problema.
El arqueo voltaico es el término técnico que define las
chispas en el horno. El arqueo voltaico es causado por:
Ŷ 0HWDOROiPLQDGHPHWDOHQFRQWDFWRFRQHOFRVWDGRGHO
horno.
Ŷ /iPLQDGHPHWDOPROGHDGDDODOLPHQWRORVERUGHV
GREODGRVKDFLDDUULEDDFW~DQFRPRDQWHQDV
Ŷ 8WLOLFHODOiPLQDGHPHWDOVHJ~QODVUHFRPHQGDFLRQHVGH
este manual.
Ŷ 8WHQVLOLRVGHFRFLQDGHPHWDOXWLOL]DGRVGXUDQWHODFRFFLyQ
UiSLGDRGHPLFURRQGDVH[FHSWRROODVVXPLQLVWUDGDVFRQ
HOKRUQR
Ŷ 0HWDOWDOFRPRWLULWDVPHWiOLFDVGHVHJXULGDGVXMHWDGRUHV
para carne de ave o platos con borde de oro en el horno.
Ŷ 7RDOODVGHSDSHOUHFLFODGRTXHFRQWHQJDQSHGD]RVGH
metal pequeños que se utilizan en el horno.
ADVERTENCIA
Continuado
USO
Ŷ &RPRFRQFXDOTXLHUDSDUDWRFXDQGRVHDXWLOL]DGRSRU
niños es necesaria una estrecha vigilancia.
Ŷ 1RKDJDIXQFLRQDUHOKRUQRVLQWHQHUFRORFDGDHQVXOXJDU
ODEDVHJLUDWRULD/DEDVHJLUDWRULDGHEHHVWDUOLEUHGH
bloqueos para poder girar.
Ŷ 1RDOPDFHQHQLQJ~QHOHPHQWRGLUHFWDPHQWHVREUHOD
superficie del horno de microondas cuando éste se
encuentre en funcionamiento.
Ŷ /DVFRPLGDVRXWHQVLOLRVPHWiOLFRVGHWDPDxRH[FHVLYR
no deberán ser insertados en un horno microondas/
convección, ya que podrán generar un incendio o riesgos
de descargas eléctricas.
Ŷ No utilice productos de papel cuando el aparato se utiliza
en modos diferentes al microondas.
Ŷ $OJXQRVSURGXFWRVWDOHVFRPRKXHYRVHQWHURV\
FRQWHQHGRUHVVHOODGRVSRUHMHPSORIUDVFRVVHOODGRVVRQ
propensos a explotar y no deben calentarse en este horno.
Tal uso del horno puede resultar en lesiones personales.
Ŷ 1RFRFLQHODVSDSDVH[FHVLYDPHQWH3XHGHQ
deshidratarse y provocar fuego, causando daños al horno
Ŷ No cubra las parrillas u otra parte del horno con papel
metálico. Esto puede sobrecalentar el horno.
Ŷ &RFLQHDIRQGRODFDUQHGHUHVRDYHODFDUQHGHUHVDSRU
los menos una temperatura INTERNA de 160° F y carne
de ave a por lo menos una temperatura INTERNA de 180°
F. Cocinar a estas temperaturas generalmente protege
contra enfermedades causadas por los alimentos.
Ŷ (VWHKRUQRQRKDVLGRDSUREDGRQLSUREDGRSDUDXWLOL]DFLyQ
marina.
LIMPIEZA
Ŷ 0DQWHQJDHOKRUQROLEUHGHDFXPXODFLyQGHJUDVD
Ŷ 1ROLPSLHFRQHVSRQMLOODVGHPHWDO3XHGHQGHVSUHQGHUVH
pedazos de la esponjilla y tocar partes eléctricas,
provocando un riesgo de descarga eléctrica.
Ŷ $OOLPSLDUVXSHUILFLHVGHSXHUWDV\KRUQRTXHVHXQHQDO
cerrar la puerta, sólo use detergentes suaves no abrasivos
aplicados con una esponja limpia o un paño suave.
Enjuague bien.
AGUA SOBRECALENTADA
Ŷ /tTXLGRVWDOHVFRPRDJXDFDIpRWpVRQFDSDFHV
de sobrecalentarse más allá del punto de ebullición
sin parecer que estén hirviendo. No siempre hay
burbujeo o hervor visible cuando se saca el recipiente
GHOKRUQRPLFURRQGDV(67238('(5(68/7$5(1
/$(%8//,&,Ï15(3(17,1$'(/Ë48,'2608<
&$/,(17(6&8$1'26(08(9((/5(&,3,(17(26(
,16(57$81$&8&+$5$8275287(16,/,2'(1752
'(//Ë48,'2
Ŷ 3DUDUHGXFLUHOULHVJRGHOHVLyQItVLFD
1RVREUHFDOLHQWHHOOtTXLGR
5HYXHOYDHOOtTXLGRDQWHV\DODPLWDGGHOWLHPSRGH
calentamiento.
1RXWLOLFHUHFLSLHQWHVFRQFRVWDGRVUHFWRV\FXHOORV
angostos.
'HVSXpVGHFDOHQWDUHOUHFLSLHQWHGpMHORHQHOKRUQR
microondas por un período corto de tiempo antes de
sacarlo.
7HQJDH[WUHPDSUHFDXFLyQFXDQGRLQWURGX]FDXQD
cuchara u otro utensilio en el recipiente.
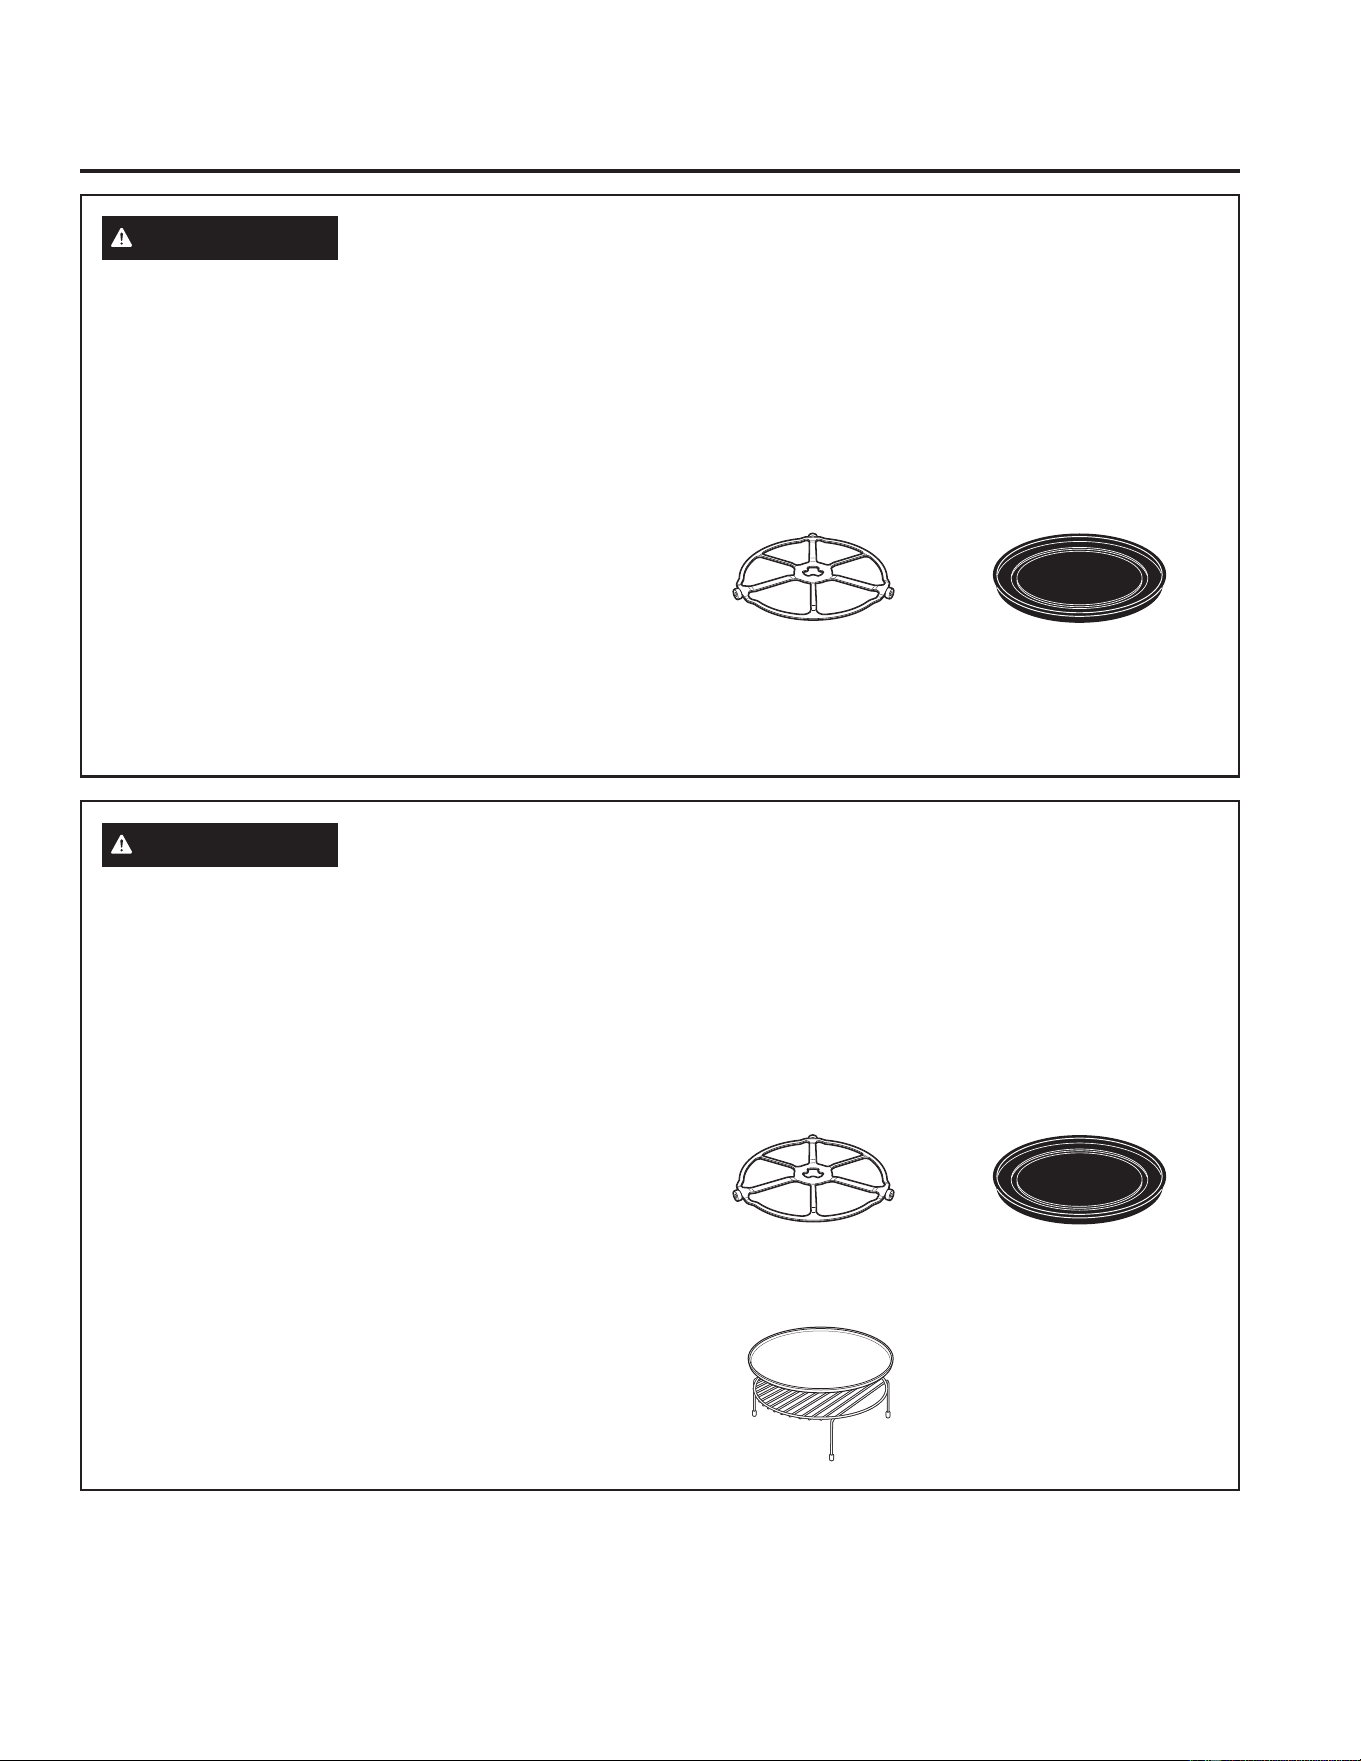
49-40687-4 5
INFORMACIÓN IMPORTANTE DE SEGURIDAD
LEA TODAS LAS INSTRUCCIONES ANTES DE USAR
INFORMACIÓN DE SEGURIDAD
LEA Y GUARDE ESTAS INSTRUCCIONES
ADVERTENCIA
RECIPIENTES DE COCINA SEGUROS DISEÑADOS PARA HORNEAR, ASAR,
CALENTAR, ACTIVAR Y TOSTAR
Ŷ El horno y la compuerta se tornarán muy calientes
cuando se hornea, asa, calienta, activa o tuesta algo.
Ŷ Los recipientes de cocina se tornarán muy calientes.
Se requerirán guantes de cocina protectores para
manipular los recipientes de cocina.
Ŷ 1RXWLOLFHWDSDVUHFLSLHQWHVQLEROVDVGHFRFFLyQDVDGR
fabricadas de láminas de metal, plástico, cera o papel
cuando cocine con la función de cocción rápida.
Ŷ 8WLOLFHODEDQGHMDPHWiOLFDDQWLDGKHUHQWHGHODPLVPD
forma que utilizaría una bandeja o charola para hornear
plana.
Ŷ 8WLOLFHODOiPLQDGHKRUQHDUGHDOXPLQLRHQODSDUULOODGH
alambre del horno y colóquela en la bandeja metálica
antiadherente cuando hornee en dos niveles, ase o
tueste alimentos.
Ŷ &RORTXHORVDOLPHQWRVGLUHFWDPHQWHHQODVEDQGHMDV
cuando cocine, a menos que el horno le indique hacer
otra cosa.
Ŷ 3XHGHXWLOL]DUHQHOKRUQRFXDOTXLHUSODWRGLVHxDGRSDUD
PLFURRQGDV/DVUHFHWDVGHO/LEURGHFRFLQD$GYDQWLXP
se probaron en recipientes de cocina de vidrio Pyrex
®
\FDFHURODVGHFHUiPLFD&RUQLQJZDUH
®
/RVWLHPSRV\
resultados de cocción pueden variar cuando se utilizan
otros tipos de recipientes diseñados para hornos
microondas. Colóquelos directamente en las bandejas.
Ŷ 8WLOL]DUODEDQGHMDGHYLGULRWUDQVSDUHQWHFXDQGRKRUQHD
asa, calienta, activa o tuesta puede producir resultados
insatisfactorios.
ADVERTENCIA
UTENSILIOS PARA COCCIÓN RÁPIDA SEGUROS PARA MICROONDAS
Ŷ El horno y la compuerta se tornarán muy calientes
cuando se utiliza la función de cocción rápida.
Ŷ Los utensilios de cocina se tornarán muy calientes
debido a la transferencia de calor proveniente de los
alimentos calentados. Se requerirán guantes de cocina
protectores para manipular los recipientes de cocina.
Ŷ 1RXWLOLFHWDSDVUHFLSLHQWHVREROVDVGHFRFFLyQDVDGR
fabricadas de láminas de metal, plástico, cera o papel
cuando cocine con la función de cocción rápida.
Ŷ 1RFXEUDODEDVHJLUDWRULDSDUULOODGHDODPEUHEDQGHMDV
ni ninguna pieza del horno con lámina de metal. Esto
provocará arqueo voltaico en el horno.
Ŷ 8WLOLFHODEDQGHMDGHPHWDODQWLDGKHUHQWHHODPLVPD
forma que utilizaría una bandeja o charola para hornear
plana.
Ŷ &RORTXHORVDOLPHQWRVGLUHFWDPHQWHHQODVEDQGHMDV
cuando cocine, a menos que el horno le indique otra
cosa.
Ŷ 3XHGHXWLOL]DUHQHOKRUQRFXDOTXLHUSODWRGLVHxDGRSDUD
PLFURRQGDV/DVUHFHWDVGHO/LEURGHFRFLQD$GYDQWLXP
se probaron en recipientes de cocina de vidrio Pyrex
®
\FDFHURODVGHFHUiPLFD&RUQLQJZDUH
®
/RVWLHPSRV\
resultados de cocción pueden variar cuando se utilizan
otros tipos de recipientes diseñados para hornos
microondas. Colóquelos directamente en las bandejas.
Ŷ 8WLOL]DUODEDQGHMDGHYLGULRWUDQVSDUHQWHPLHQWUDVXWLOL]D
la función de cocción rápida puede producir resultados
insatisfactorios.
/DEDVHJLUDWRULDVLHPSUH
debe estar colocada en su
lugar cuando se utiliza el
horno.
/DEDVHJLUDWRULDVLHPSUH
debe estar colocada en su
lugar cuando se utiliza el
horno.
Coloque la comida
directamente en la bandeja
antiadherente de metal para
realizar la cocción rápida.
Coloque los alimentos
directamente en la bandeja
antiadherente de metal para
hornear a un solo nivel.
Coloque los alimentos directamente
en la hoja para hornear de aluminio
en la parrilla de alambre del horno
y colóquelos en la bandeja metálica
antiadherente cuando hornee a dos
niveles, ase o tueste alimentos.

6 49-40687-4
LEA Y GUARDE ESTAS INSTRUCCIONES
INFORMACIÓN DE SEGURIDAD
INFORMACIÓN IMPORTANTE DE SEGURIDAD
LEA TODAS LAS INSTRUCCIONES ANTES DE USAR
ADVERTENCIA
RECIPIENTES DE COCINA SEGUROS DISEÑADOS PARA
MICROONDAS
Asegúrese de utilizar recipientes de cocina adecuados durante
la cocción a microondas. Se pueden utilizar la mayoría de
las cacerolas, platos para cocinar, tazas de medir, tazas
normales, cerámica o loza que no tengan bordes metálicos o
vidriados con un recubrimiento metálico. Algunos recipientes
de cocina se encuentran marcados como adecuados para
microondas.
Ŷ &RORTXHORVDOLPHQWRVRUHFLSLHQWHSDUDPLFURRQGDV
directamente en la bandeja de vidrio transparente para
cocinar sus alimentos.
Ŷ /DXWLOL]DFLyQGHODEDQGHMDPHWiOLFDDQWLDGKHUHQWH
durante la cocción en microondas puede producir
resultados insatisfactorios.
Ŷ /RVXWHQVLOLRVGHFRFLQDSXHGHQWRUQDUVHPX\FDOLHQWHV
debido a la transferencia de calor proveniente de los
alimentos calentados. Podrían requerirse guantes de
cocina para manipular los recipientes de cocina.
Ŷ 1RXWLOLFHSURGXFWRVGHSDSHOUHFLFODGR/DVWRDOODV
servilletas y papel encerado fabricados de material
reciclado pueden contener partículas metálicas que
pueden causar arqueo voltaico o prender fuego. Se deben
evitar los productos de papel que contienen nylon o
filamentos de nylon, ya que también pueden incendiarse.
Ŷ 8WLOLFHODVOiPLQDVPHWiOLFDV~QLFDPHQWHFRPRVHLQGLFD
en este manual. Cuando utilice la lámina de metal en el
KRUQRPDQWHQJDODOiPLQDSRUORPHQRVƎDOHMDGDGHORV
costados del horno.
Ŷ 6LXWLOL]DXQWHUPyPHWURGHFDUQHPLHQWUDVFRFLQD
asegúrese que sea seguro para utilizarse en hornos
microondas.
Ŷ $OJXQDVEDQGHMDVGHHVSXPDFRPRDTXHOODVHQODVTXH
VHHPSDFDODFDUQHWLHQHQXQDWLULWDGHPHWDOGHOJDGD
empotrada en la parte inferior. Cuando se cocinan con
microondas, el metal puede quemar el fondo del horno o
hacer que arda una toalla de papel.
Ŷ 6HSXHGHXWLOL]DUWRDOODVGHSDSHOSDSHOHQFHUDGR\ODV
envolturas plásticas para cubrir los platos con el propósito
de mantener la humedad y prevenir los salpicones.
Asegúrese de ventilar cortando la envoltura plástica para
que pueda escapar el vapor.
Ŷ 1RWRGDVODVFXELHUWDVSOiVWLFDVVRQDGHFXDGDVSDUD
KRUQRVPLFURRQGDV/HDHQODFDMDODVLQVWUXFFLRQHV
correspondientes.
Ŷ 6HGHEHQFRUWDUSHUIRUDURYHQWLODUFRPRVHLQGLFDHQOD
caja las bolsas de cocina “hervibles” y bolsas plásticas
cerradas herméticamente. De lo contrario, el plástico
puede reventarse durante o inmediatamente después de
la cocción, resultando en una posible lesión. También,
los recipientes de almacenamiento plásticos deben al
menos estar parcialmente descubiertos debido a que
forman un sello muy ajustado. Al cocinar con recipientes
cubiertos con envoltura plástica de manera muy ajustada,
quite cuidadosamente la cubierta y dirija el vapor fuera y
alejado de manos y rostro.
Ŷ 5HFLSLHQWHVGHFRFLQDSOiVWLFRV²/RVUHFLSLHQWHVGH
cocina diseñados para microondas son muy útiles, pero
deben utilizarse con cuidado. Incluso el plástico diseñado
para microondas podría no tolerar condiciones de sobre
cocción, así como los materiales de vidrio o cerámica
y podrían suavizarse o carbonizarse si se exponen a
períodos cortos de sobre cocción. En exposiciones
más prolongadas a la sobrecocción, los alimentos y los
recipientes de cocina podrían coger fuego.
Ŷ 1RXWLOLFHODSDUULOODGHDODPEUHGHOKRUQRSDUDFRFLQDUFRQ
microonda.
Siga las siguientes pautas:
1. Utilice plásticos seguros para microondas únicamente y
utilícelos estrictamente según las especificaciones del
fabricante.
2. No cocine en el microondas recipientes vacíos.
3. No permita que los niños utilicen recipientes de plástico
sin vigilarlos bien.
La base giratoria siempre
debe estar colocada en su
lugar cuando se utiliza el
horno.
La bandeja de cristal
transparente siempre deberá
estar en su lugar cuando se
cocina con microondas.
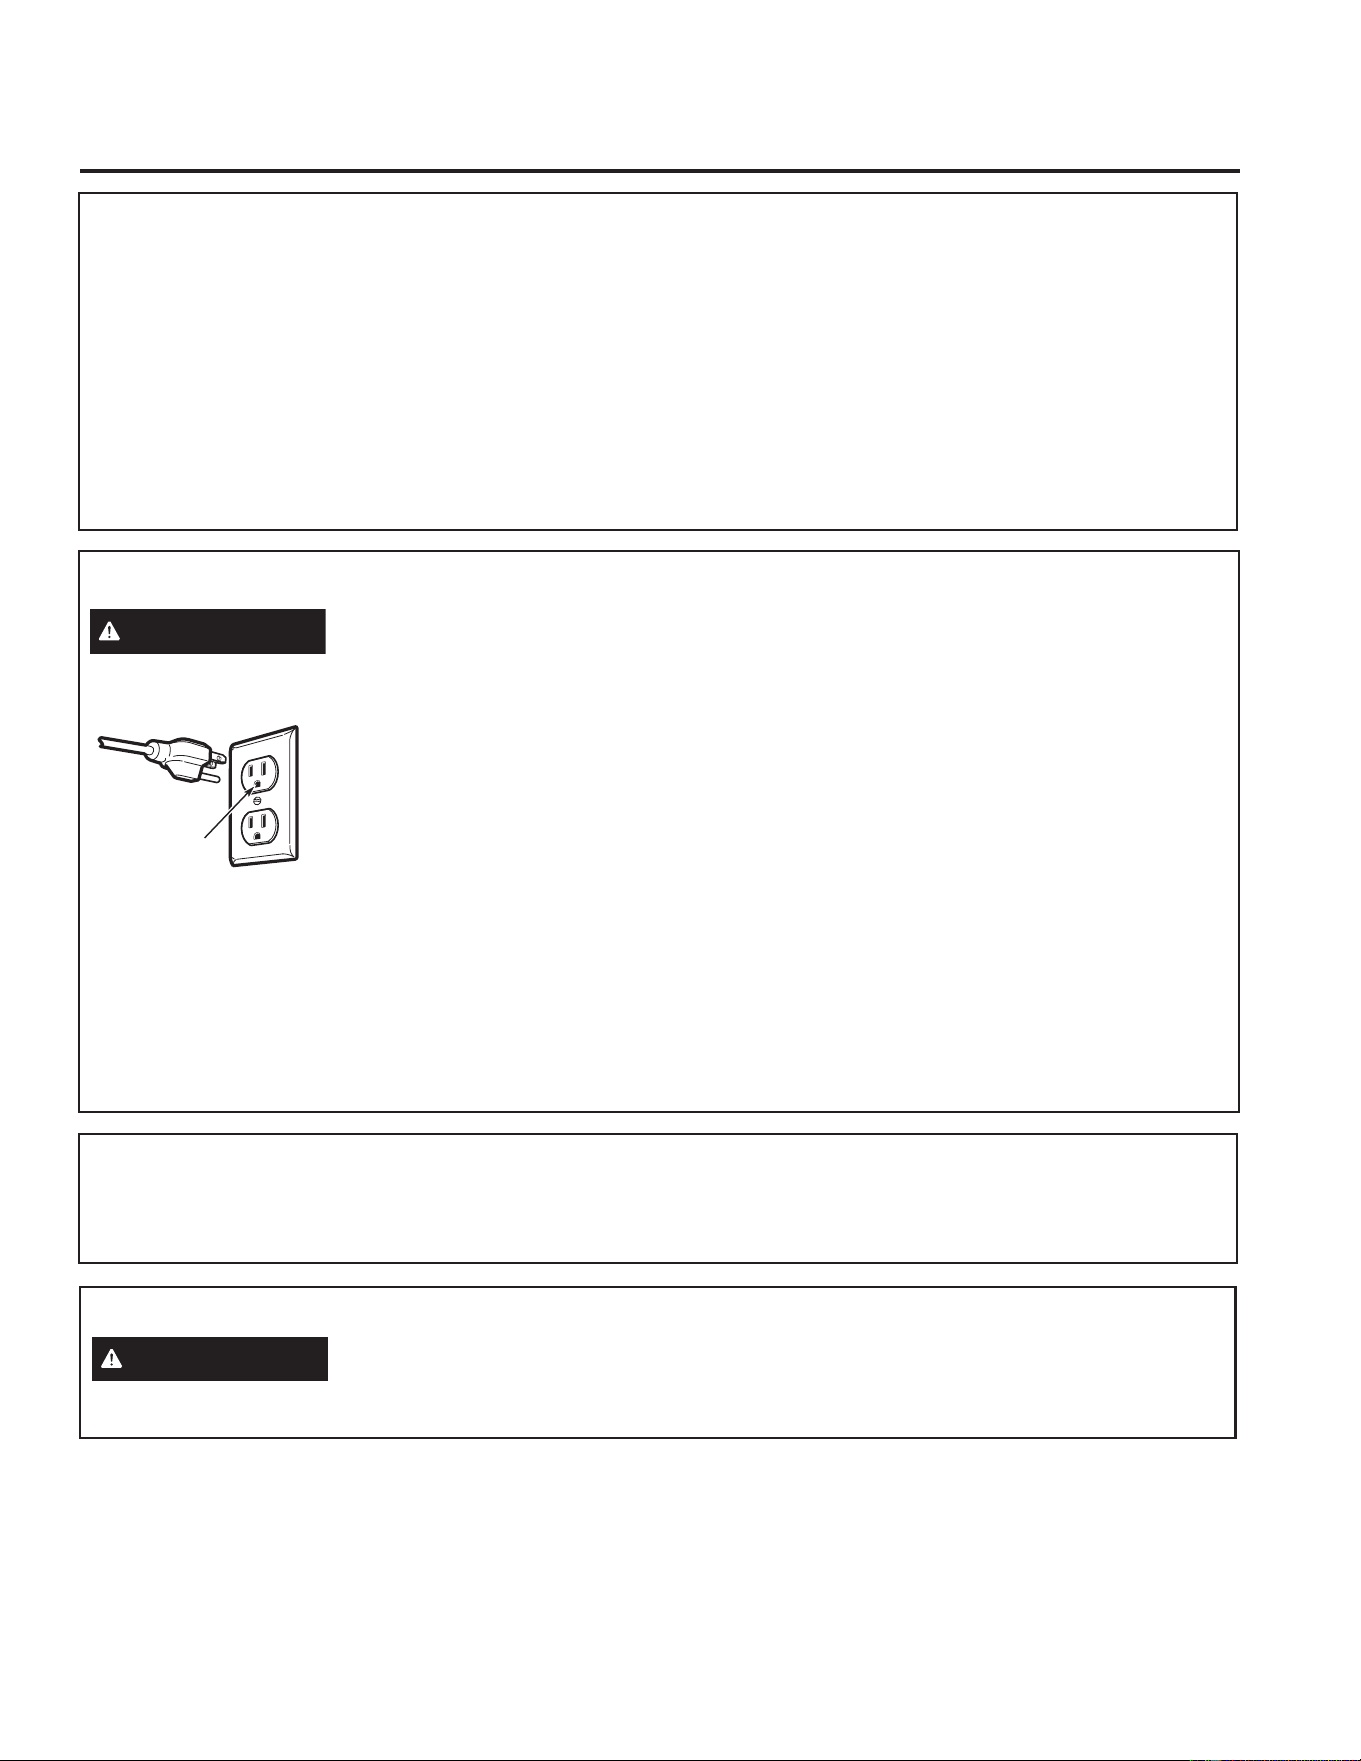
49-40687-4 7
INFORMACIÓN DE SEGURIDAD
LEA Y GUARDE ESTAS INSTRUCCIONES
INFORMACIÓN IMPORTANTE DE SEGURIDAD
LEA TODAS LAS INSTRUCCIONES ANTES DE USAR
PRECAUCIONES PARA EVITAR LA POSIBLE
EXPOSICIÓN A ENERGÍA DE MICROONDAS EXCESIVA
(a) No intente hacer funcionar el horno con
la compuerta abierta ya que ésto puede provocar
exposición peligrosa a la energía de microondas. Es
importante no forzar ni dañar los seguros.
(b) No coloque ningún objeto entre la parte frontal del horno
y la compuerta, ni permita que se acumulen residuos de
producto limpiador o detergente, suciedad o polvo en las
superficies de sellado.
(c) No haga funcionar el horno si se encuentra dañado. Es
particularmente importante cerrar bien la compuerta
ODFRPSXHUWDGREODGDRFXUYDGD
ODVELVDJUDV\SHVWLOORVURWRVRIORMRV
VHOORVGHODFRPSXHUWD\VXSHUILFLHVGHVHOODGR
(d) El horno no debe ser ajustado o reparado por ninguna
persona, excepto por personal de mantenimiento
calificado.
INSTRUCCIONES DE CONEXIÓN A TIERRA
ADVERTENCIA
El uso inadecuado del enchufe de conexión a tierra puede provocar un riesgo de
descarga eléctrica.
Tste aparato debe contar con una conexión a tierra. En caso
de un cortocircuito, la conexión
a tierra reduce el riesgo de una
descarga eléctrica al brindar un
cable de escape para la corriente
eléctrica.
Este aparato se encuentra
equipado con un cable eléctrico
que contiene un cable de
conexión a tierra con un
enchufe de conexión a tierra. El
enchufe debe conectarse en un tomacorriente con adecuada
instalación y conexión a tierra.
Consulte a un electricista o técnico calificado si no comprende
por completo las instrucciones de conexión a tierra, o si no
sabe si el aparato cuenta con una adecuada conexión a
tierra.
Para el uso de este aparato, es su responsabilidad y
obligación cambiar un tomacorriente de pared estándar de 2
clavijas por uno de 3 clavijas con adecuada conexión a tierra.
%DMRQLQJXQDFLUFXQVWDQFLDFRUWHRTXLWHODFODYLMDDWLHUUDGHO
cable eléctrico.
No utilice un enchufe adaptador con este aparato.
No utilice un cable de extensión con este aparato. Si el
cable eléctrico es demasiado corto, solicite a un electricista o
técnico calificado la instalación de un tomacorriente cerca del
aparato.
Para un mejor funcionamiento, enchufe este aparato en su
propio circuito eléctrico para evitar que las luces parpadeen,
que el fusible se queme o que el interruptor de circuitos salte.
Asegúrese de
contar con una
conexión a
tierra adecuada
antes de usar.
AVISO: MARCAPASOS
/DPD\RUtDGHORVPDUFDSDVRVVHHQFXHQWUDQSURWHJLGRVFRQWUDODLQWHUIHUHQFLDGHSURGXFWRVHOHFWUyQLFRVLQFOX\HQGRORV
microondas. Sin embargo, los pacientes que tengan marcapasos deberían consultar a sus médicos si tienen alguna duda.
ADVERTENCIAS DE LA PROPOSICIÓN 65 DEL ESTADO DE CALIFORNIA
ADVERTENCIA
Este producto contiene uno o más químicos que el Estado de California entiende que
producen cáncer, y defectos en el nacimiento u otros daños reproductivos.
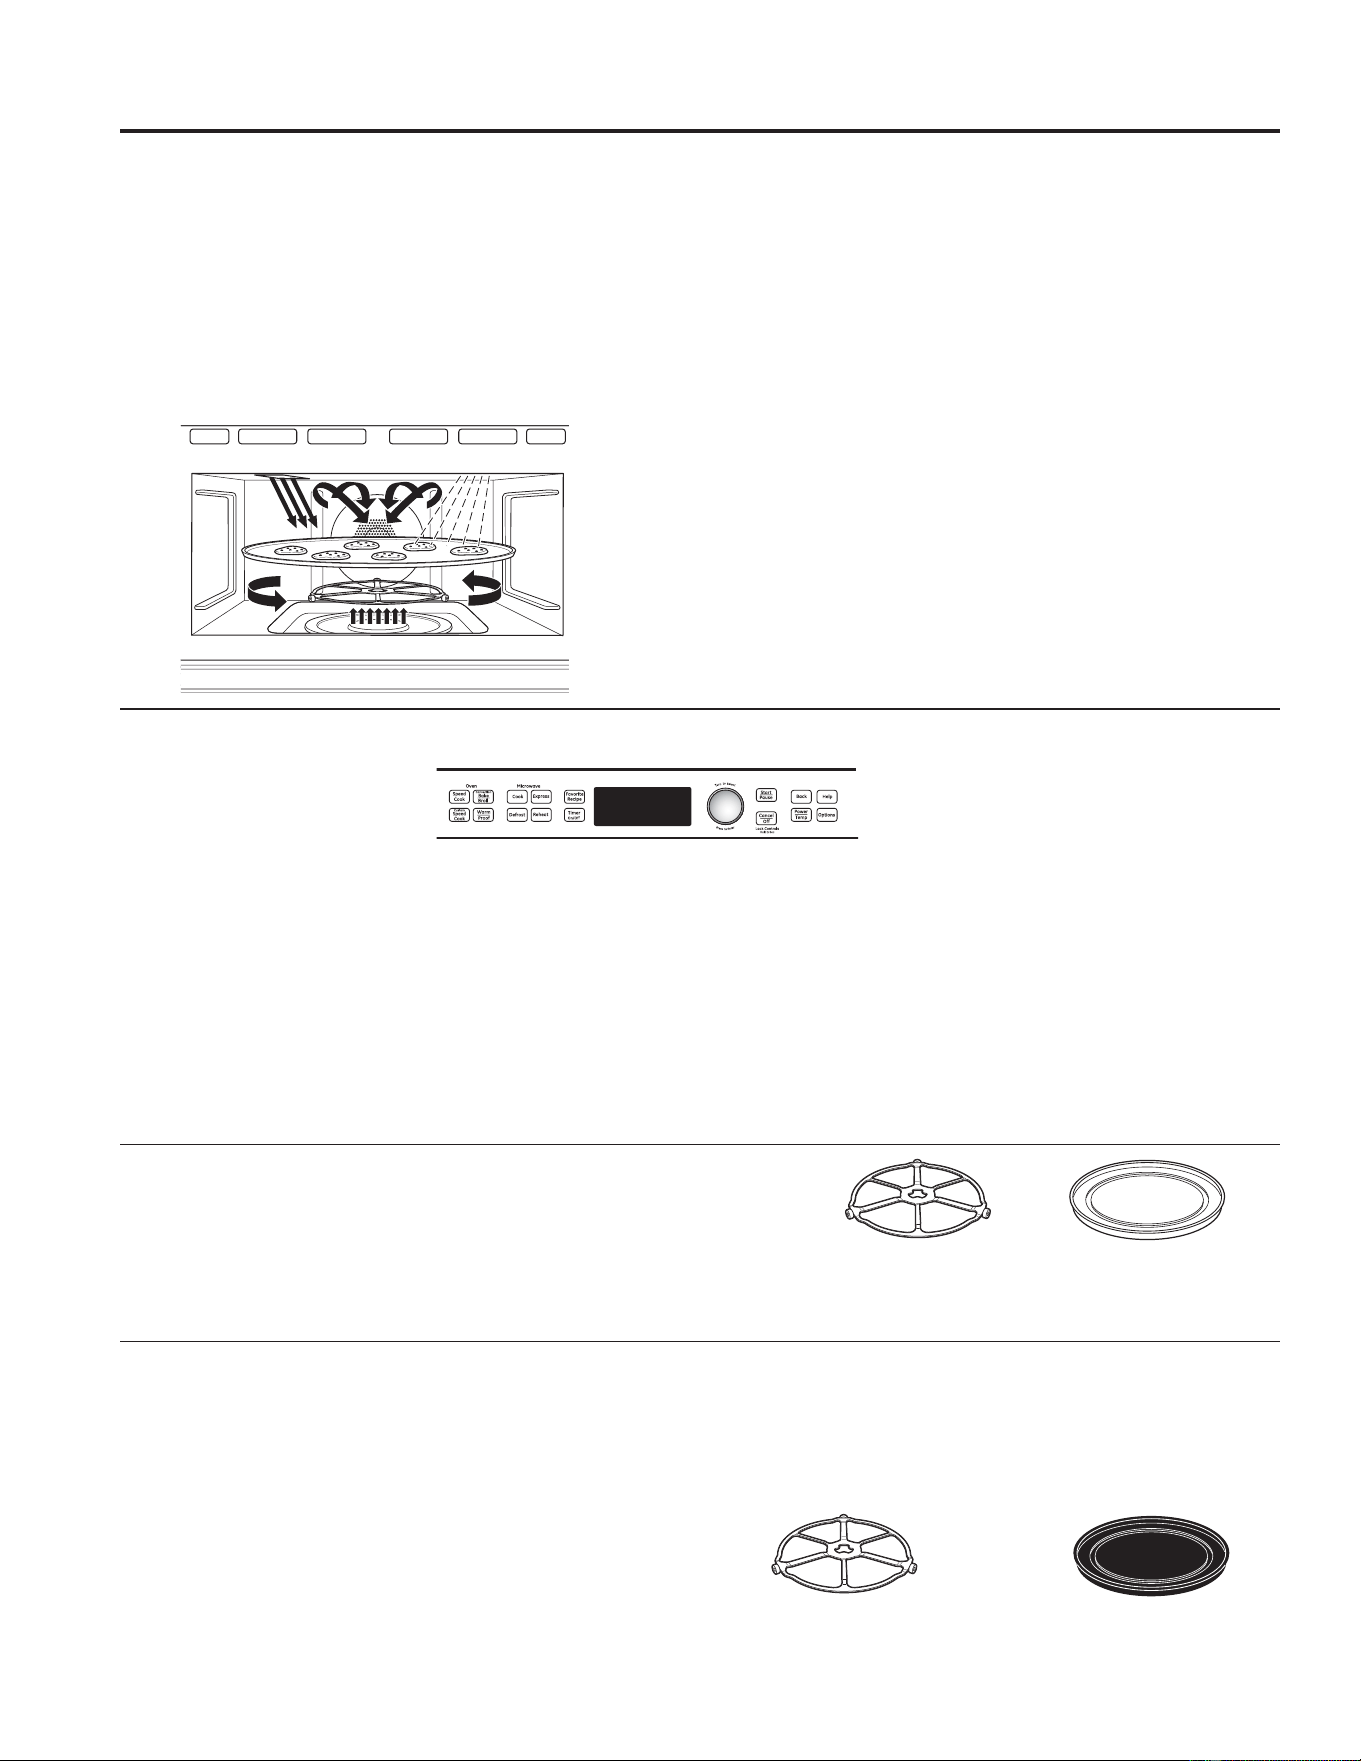
8 49-40687-4
Familiarícese con Advantium
Inicio rápido Advantium
Poner el reloj
Cuando conecte por primera vez el horno después de una
interrupción eléctrica:
1. Gire el dial seleccionador para poner la hora. Apriete el dial
para ingresar.
2. Gire el dial seleccionador para ajustar los minutos. Apriete
el dial para ingresar.
3. Gire el dial para seleccionar AM o PM. Apriete el dial para
ingresar.
Para cambiar la hora:
1. Apriete el botón OPTIONS.
*LUHHOGLDOVHOHFFLRQDGRUSDUDSRQHUHOUHORM6(7&/2&.
Apriete el dial e ingrese y siga las instrucciones de la
pantalla para ajustar.
El reloj fue diseñado para apagar la unidad cuando quede
inactiva durante 30 segundos, a fin de minimizar el uso de
la energía en suspensión. El reloj se encenderá cuando la
unidad se encuentre en uso, la puerta sea abierta, la tecla
&$1&(/2))&DQFHODU$SDJDUVHDSUHVLRQDGDRHOGLDOVHD
presionado. No hay una opción de anulación disponible basada
en los requisitos de energía DOE.
Uso del microondas con la función EXPRESS (RÁPIDA)
Apriete EXPRESS repetidamente para incrementos de 30
segundos de tiempo de cocción con microondas.
El horno empezará a funcionar inmediatamente.
Para iniciar la cocción rápida
$SULHWHHOERWyQ63(('&22.&RFFLyQUiSLGD
*LUHHOGLDOD)22'0(180HQ~GHDOLPHQWRV$SULHWHHO
dial para ingresar.
3. Gire el dial para seleccionar el tipo de categoría de
alimentos que desee. Apriete el dial para ingresar.
4. Gire el dial para seleccionar el alimento específico. Apriete
el dial para ingresar.
5. Gire el dial para seleccionar la cantidad, tamaño y/o estado
GHFRFFLyQVLVHQHFHVLWDHOKRUQROHSUHJXQWDUi$SULHWH
el dial después de cada selección.
6. Una vez que la pantalla indique ADJUST TIME OR START
$-867((/7,(0322,1,&,(DSULHWHHOGLDORHOERWyQ
VWDUWLQLFLRSDUDFRPHQ]DUDFRFLQDU
Ŷ Presionar CANCEL/OFF (BORRAR/APAGAR) en
cualquier momento para detener la cocción.
¿Qué es Advantium?
El nuevo horno Advantium utiliza la tecnología punta de
cocción rápida para aprovechar la energía luminosa. El
horno Advantium cocina el exterior de los alimentos como la
mayoría de los hornos convencionales de calor radiante, pero
a la vez penetra la superficie para que el interior se cueza
simultáneamente. Si bien la luz halógena es la fuente principal
de energía, se añade un “refuerzo de microondas” con ciertos
DOLPHQWRV/RVDOLPHQWRVVHFXHFHQXQLIRUPH\UiSLGDPHQWH
reteniendo su humedad natural.
Base giratoria
Ŷ/DEDVHJLUDWRULDURWDSDUDDVHJXUDUODFRFFLyQXQLIRUPH
Controles
Ŷ(OFRQWUROGHOKRUQRFRQWLHQHUHFHWDVSUHSURJUDPDGDV
Ŷ(OGLDOGHJLUR\SUHVLyQIDFLOLWDODVHOHFFLyQGHPHQ~
Lámpara de halógeno y calentadores de cerámica
Ŷ8QDERPELOODKDOyJHQDGH:\XQFDOHQWDGRUGH
cerámica de 700W cocinan los alimentos desde la parte
superior.
Ŷ8QFDOHQWDGRUGHFHUiPLFDGH:FRFLQDORVDOLPHQWRV
desde abajo.
Elemento de calentamiento de convección trasera
Ŷ)XQFLRQDFXDQGRVHXWLOL]DODIXQFLyQGHKRUQHDU
Microondas
Ŷ6HDxDGHDXWRPiWLFDPHQWHXQ³UHIXHU]RGHPLFURRQGDV´
con ciertos alimentos.
Ŷ(OKRUQRSXHGHXWLOL]DUVHWDPELpQFRPRXQKRUQR
microondas de 975W.
/DEDVHJLUDWRULDVLHPSUH
debe estar colocada en su
lugar cuando se utiliza el
horno.
/DEDQGHMDGHFULVWDO
transparente siempre deberá
estar en su lugar cuando se
cocina con microondas.
/DEDVHJLUDWRULDVLHPSUHGHEH
estar colocada en su lugar
cuando se utiliza el horno.
Coloque la comida directamente
en la bandeja antiadherente de
metal para realizar la cocción
rápida.
ADVANTIUM: Familiarícese con Advantium

49-40687-4 9
Funciones del horno
ADVANTIUM: Funciones del Horno
1. Base giratoria
/DEDVHJLUDWRULDVLHPSUHGHEHHVWDUFRORFDGDHQODSDUWH
inferior del horno, para efectuar todo tipo de cocción.
Asegúrese que la base giratoria se encuentre bien asentada
sobre el rotor situado en el centro del horno.
2. Bandeja antiadherente de metal
Coloque los alimentos directamente en la bandeja metálica
antiadherente en la base giratoria cuando utilice las
funciones de cocción rápida y de hornear.
3. Parrilla del horno y lámina de hornear de aluminio
Coloque los alimentos directamente en la hoja para hornear
de aluminio en la parrilla de alambre del horno y colóquelos
en la bandeja metálica antiadherente cuando hornee a dos
niveles, ase o tueste alimentos.
4. Bandeja de vidrio transparente
Colóquela en la base giratoria cuando utilice las funciones
de microondas. Coloque los alimentos o recipientes
de cocina diseñados para microondas directamente
en la bandeja.
5. Bombilla halógena superior/Calentador cerámico
Funciona cuando se utiliza la función de cocción rápida o
cuando se asa a la parrilla.
6. Ventana
Permite visualizar los alimentos y a la vez mantiene las
microondas confinadas dentro del horno.
7. Manilleta de la Puerta
Jálela para abrir la puerta/DFRPSXHUWDGHEHHVWDU
asegurada apropiadamente para que funcione
el horno.
8. Pestillos de la compuerta
9. Calentador cerámico inferior
Funciona cuando se usa la función de cocción rápida.
10. Panel de Control
/DVWHFODVXWLOL]DGDVSDUDRSHUDUHOKRUQRHVWiQXELFDGDV
en el panel decontrol.
11. Elemento de calentamiento de convección trasera
Funciona cuando se utiliza la función de hornear.
En este manual, las funciones y la apariencia física pueden variar según su modelo.
1
5
6 8
9
11
10
7
2 3 4
NOTA: La apariencia de la manija puede variar en algunos modelos.
10 49-40687-4
1. SPEEDCOOK/Repeat Last
(COCCIÓN RÁPIDA/Repetir última)
Apriete este botón para acceder al menú de cocción
rápida preprogramado. Apriételo y manténgalo presionado
por el plazo de 3 segundos para repetir la última selección
de cocción.
2. CONV BAKE/BROIL (HORNEAR POR CONV/ASAR)
Apriete este botón para hornear, asar o tostar.
3. CUSTOM SPEEDCOOK (COCCIÓN RÁPIDA
PERSONALIZADA)
Apriete este botón para programar su propio programa de
cocción rápida.
4. WARM/PROOF CALENTAR/ACTIVAR)
6HOHFFLRQH:$50&$/,(17(SDUDPDQWHQHUORV
alimentos cocinados calientes a temperatura de servir.
6HOHFFLRQH3522)$&7,9$5SDUDSURJUDPDUXQ
entorno caliente útil para que se inflen los productos de
levadura.
5. COOK (COCINAR) (Microondas)
Apriete este botón para cocinar con microondas alimentos
que no se encuentran en la sección de FAVORITE
5(&,3(5(&(7$6)$925,7$
6. EXPRESS (FUNCIÓN RÁPIDA) (Microondas)
3UHVVIRUVHFRQGVRIPLFURZDYHFRRNLQJWLPH(DFK
time the pad is pressed adds an additional 30 seconds to
WKHUHPDLQLQJFRRNLQJWLPH7KHRYHQVWDUWVLPPHGLDWHO\
7. DEFROST (DESCONGELAR) (Microondas)
Press this pad to defrost, soften or melt frozen foods.
8. REHEAT (RECALENTAR) (Microondas)
Apriete este botón para recalentar porciones de alimentos
cocinados previamente o un plato de restos.
9. FAVORITE RECIPE (RECETAS FAVORITA)
Apriete este botón para añadir, cambiar o borrar una
receta de la memoria.
10. TIMER
(CRONÓMETRO)
Apriete este botón para programar el cronómetro de
minutos.
11. PANTALLA
Muestra e instruye sobre la utilización de todas las
funciones del horno.
12. DIAL DE SELECCIÓN: – Gírelo para seleccionar,
Apriételo para ingresar
Primero gire, luego apriete el dial para seleccionar la
opción, el nivel de potencia del alimento o la temperatura.
7DPELpQXWLOLFHHOGLDOSDUDDXPHQWDUJLUHKDFLDHOVHQWLGR
GHODVPDQHFLOODVGHOUHORMRGLVPLQXLUJLUHKDFLD
HOVHQWLGRRSXHVWRGHODVPDQHFLOODVGHOUHORMORVWLHPSRV
de cocción.
13. START/PAUSE (INICIAR/PAUSAR)
Apriete este botón para iniciar o pausar cualquier función
de cocción.
14. CANCEL/OFF (BORRAR/APAGAR)
Apriete este botón para cancelar TODOS los programas
del horno excepto el reloj y cronómetro
15. BACK (REGRESAR)
Apriete este botón para regresar uno o más niveles en el
proceso de programación tal como cuando se ingresan
recetas personalizadas.
16. HELP (AYUDA)
Apriete este botón para conocer más detalles sobre las
funciones de su horno.
17. POWER/TEMP (POTENCIA/TEMPERATURA)
Durante la cocción, apriete este botón y gire/apriete el dial
selector para cambiar el nivel de potencia del microondas,
la temperatura de hornear de convección o la temperatura
de cocción rápida, ajustando la intensidad de las lámparas
superior e inferior y del calentador.
18. OPTIONS (OPCIONES)
Apriete este botón para programar el Reloj
y acceder a las funciones Volumen de la alarma sonora
(indicador sonoro), Velocidad de la búsqueda (scroll)
de la pantalla, Inicio demorado y Recordatorio.
Controles
ADVANTIUM: Controles
Con su horno Advantium, puede cocinar con luces halógenas de alta intensidad, calentadores de
cerámica y elemento de calentamiento de convección y/o energía de microondas convencional.
1 2 5 6
3 4 7 8
9
10
11 12 13 15 16
14 17 18

49-40687-4 11
Cocción rápida
COCCIÓN RÁPIDA
ADVERTENCIA
Cuando utilice los programas de cocción rápida, recuerde que el horno,
compuerta y los platos se ¡encontrarán muy calientes!
Antes de utilizar su horno por primera vez, se debe programar el reloj. Consulte la sección de Inicio rápido de Advantium.
Antes de empezar, asegúrese que se encuentre colocada la base giratoria. Si es necesario, utilice la bandeja de metal
antiadherente y sus propios recipientes de cocina de cerámica o vidrio.
Nivel de potencia de la función de cocción rápida
Advantium utiliza el poder de una luz halógena de alta
intensidad, calentadores de cerámica y microondas para
cocinar la parte superior, inferior e interior de los alimentos
simultáneamente para sellar la humedad y el sabor.
Cuando utiliza las recetas de cocción rápida preprogramadas
en el menú de alimentos, los niveles de potencia ya han sido
seleccionados para usted.
Sin embargo, estos niveles de potencia pueden ajustarse
DQWHVRGXUDQWHODFRFFLyQ9HU32:(57(03327(1&,$
7(03(5$785$HQODVHFFLyQGH&RQWUROHVGHFRFFLyQ/D
función de cocción rápida personalizada le permite cocinar
rápidamente alimentos que no se encuentran en el menú
preprogramado de alimentos, seleccionando su propio tiempo
de cocción y nivel de potencia.
Cada nivel de potencia le brinda potencia de calentamiento y
energía de microondas durante cierto porcentaje de tiempo.
/DIXQFLyQ833(532:(58>327(1&,$683(5,258@
controla el calentador superior y la potencia de microondas. Un
DMXVWHPiVDOWRGH833(532:(5327(1&,$683(5,25
utilizará más potencia de calentamiento superior, dorando más
la comida en la parte superior. Un ajuste más bajo de UPPER
32:(5327(1&,$683(5,25XWLOL]DUiPiVSRWHQFLDGH
microondas, permitiendo que los alimentos se cocinen más
uniforme y completamente.
Seleccione un ajuste más alto para alimentos tales como pizza
y alimentos horneados. Seleccione un ajuste más bajo para
alimentos tales como guisados, carne de res y pescado.
/2:(532:(5/>327(1&,$,1)(5,25/@FRQWURODHO
calentador inferior.
Seleccione un ajuste más alto para dorar alimentos más en el
lado inferior. Seleccione un ajuste más bajo para dorar menos
la parte inferior.
$SULHWHHOERWyQGH63(('&22.&2&&,Ï15È3,'$\
JLUHHOGLDOSDUDVHOHFFLRQDUHO)22'0(180(1Ò'(
&20,'$R)$925,7(5(&,3(5(&(7$6)$925,7$
RDSULHWHHOERWyQ&8672063(('&22.&2&&,Ï1
5È3,'$3(5621$/,=$'$SDUDDMXVWDUHOQLYHOGH
potencia y el cronómetro manualmente. Apriete el dial para
ingresar.
2. Gire el dial para seleccionar un alimento, hora o nivel de
potencia como se le indica. Apriete el dial para ingresar.
3. Para cambiar el nivel de potencia cuando la pantalla lo
indica, gire el dial en sentido de las manecillas del reloj
para aumentar o en sentido opuesto de las manecillas del
reloj para disminuir el nivel de potencia superior. Apriete el
dial para ingresar.
/RVQLYHOHVGH0LFURRQGDVVHSURJUDPDQDXWRPiWLFDPHQWH
en base a los ajustes de las lámparas superiores e
inferiores.
$SULHWHHOERWyQ67$573$86(,1,&,$53$86$5RHO
dial selector para iniciar la cocción.
Si no desea cambiar uno de los ajustes, simplemente apriete
el dial para pasar a la siguiente selección.
NOTA: Tenga cuidado al ajustar los niveles de potencia de
modo que no cocine demasiado o muy poco los alimentos.
Siga las siguientes pautas cuando selecciona los mejores
ajustes U (superior) = y L (inferior) = para sus recetas
favorita:
U = Seleccione un ajuste más alto para alimentos delgados
TXHUHTXLHUHQGHXQDFXELHUWDGRUDGDSRUHMHPSORILOHWHV
GHSHVFDGRSDQWRVWDGRSHFKXJDGHSROORGHVKXHVDGD
Seleccione un ajuste más bajo para alimentos o comidas
más gruesas con un contenido de grasa o azúcar más alto
SRUHMHPSORSDVWHOHVDVDGRV
/ 6HOHFFLRQHXQDMXVWHPiVDOWRSDUDORVDOLPHQWRVJUXHVRVR
densos que quizás no se cocinen rápidamente en el centro
SRUHMHPSORJXLVDGRV6HOHFFLRQHXQDMXVWHPiVEDMR
SDUDDOLPHQWRVGHOJDGRVSRUHMHPSORJDOOHWDV\FRPLGDV
FRQFRQWHQLGRGHJUDVDRD]~FDUDOWRSRUHMHPSOREROORV
SDVWHOHV
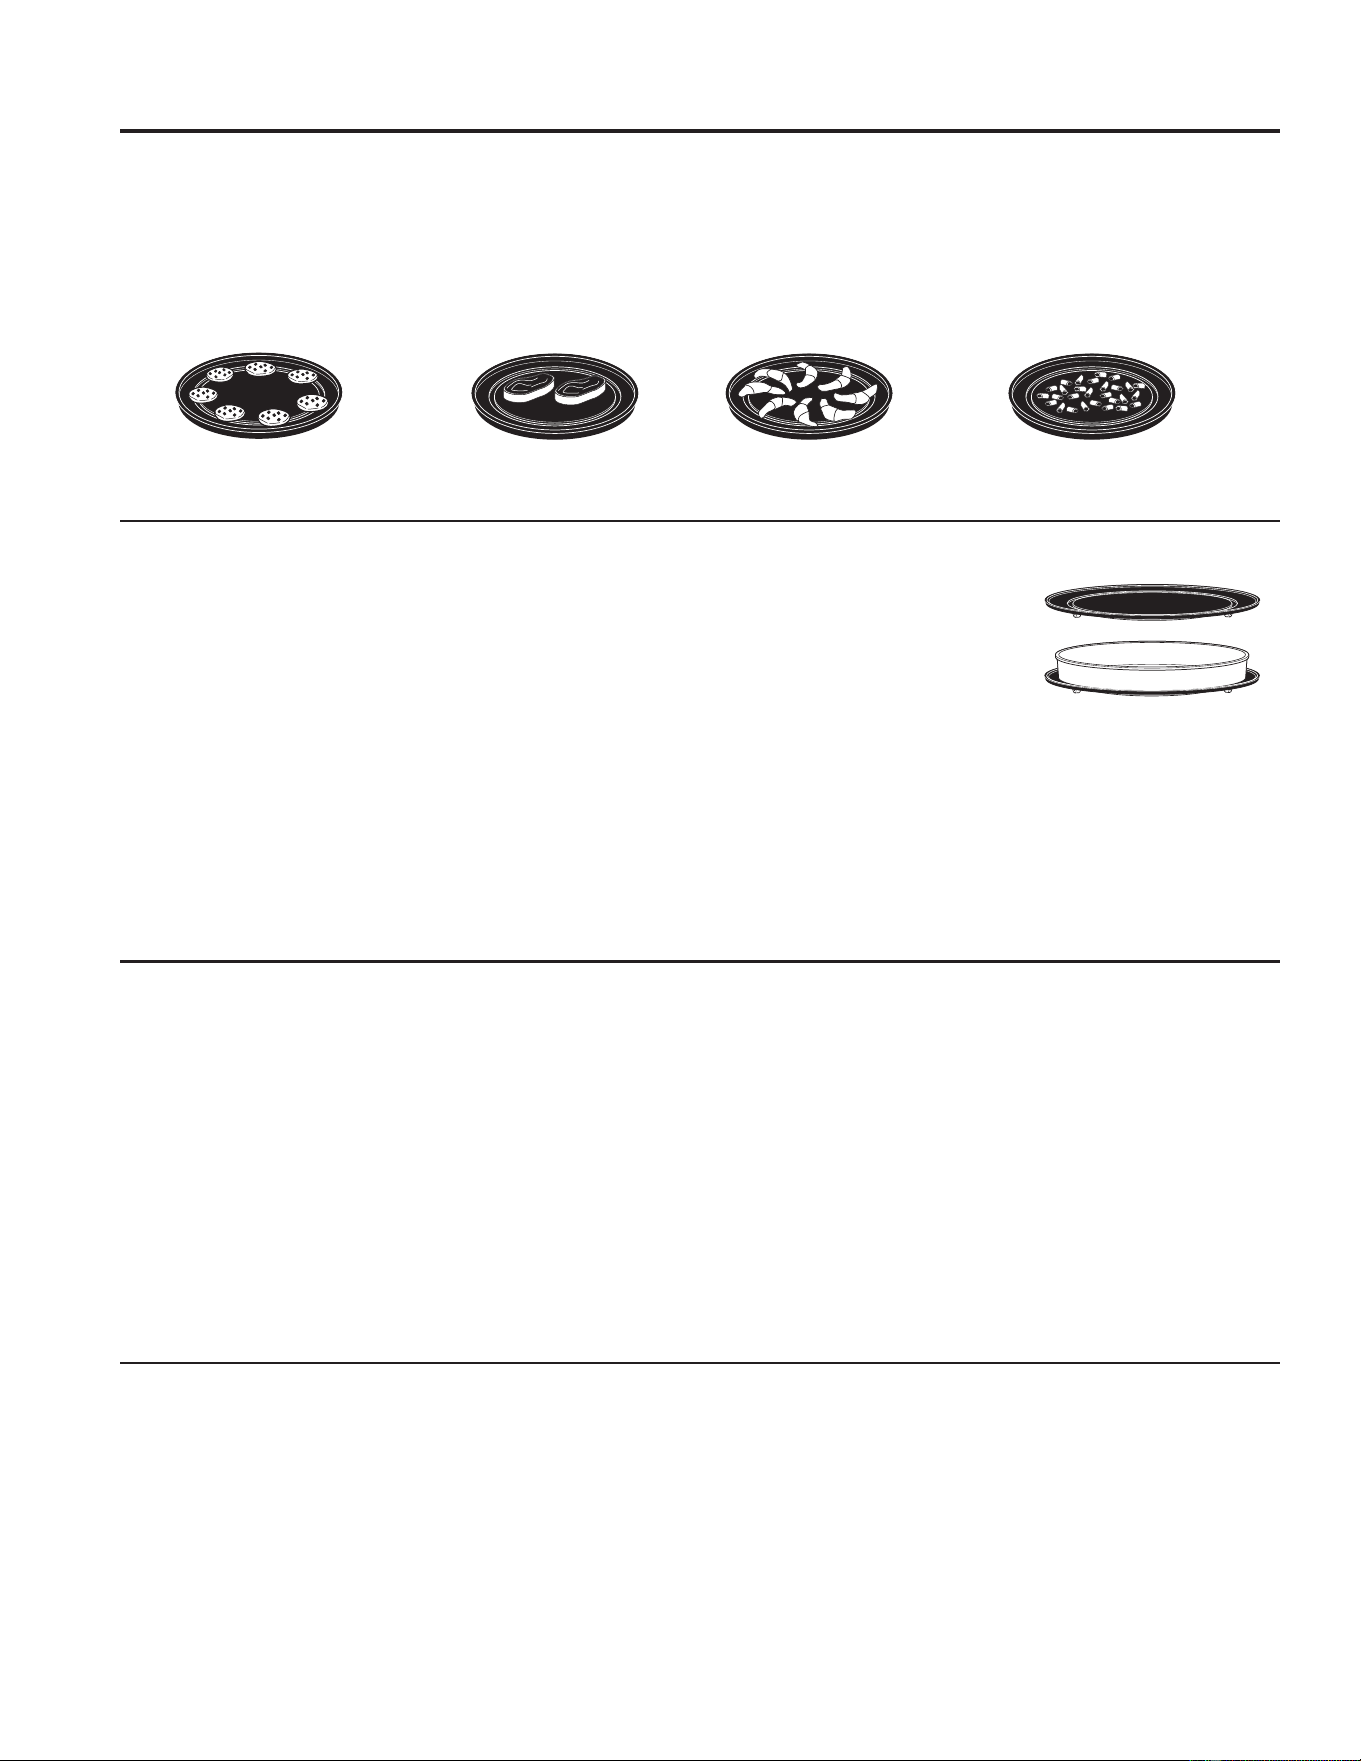
12 49-40687-4
Cocción rápida
Consejos de cocción
Para asegurar un dorado uniforme y constante cuando
cocine los alimentos directamente en la bandeja de metal
antiadherente, coloque los alimentos como se indica a
continuación.
Los alimentos pueden estar juntos pero no se deben
montar unos sobre otros.
Se deben descongelar antes de cocinar la carne fresca, pollo,
SHVFDGRRPDULVFRVTXHKDQVLGRFRQJHODGRVVHSXHGHXWLOL]DUOD
IXQFLyQGHGHVFRQJHODFLyQGHPLFURRQGDV3DUDRWURVDOLPHQWRV
preempacados congelados, siga las instrucciones de la caja.
Cocción rápida personalizada
Advantium le brinda la flexibilidad de cocinar sus platillos
favoritos.
Si desea cocinar un alimento que no se encuentra listado en
las selecciones preprogramadas, utilice la función de cocción
rápida personalizada.
$SULHWHHOERWyQ&8672063(('&22.&RFFLyQUiSLGD
SHUVRQDOL]DGD
Si no se realiza ninguna entrada durante 15 segundos, la
pantalla volverá a quedar en blanco.
2. Gire el dial seleccionador para seleccionar el tiempo de
cocción. Apriete el dial para ingresar.
/DSDQWDOODOHSHGLUiTXHVHOHFFLRQHHOQLYHOGHSRWHQFLD
3. Gire el dial en sentido de las manecillas del reloj para
incrementar o en sentido contrario a las manecillas del reloj
para disminuir el nivel de potencia superior. Apriete el dial
para ingresar.
4. Gire el dial para cambiar el nivel de potencia inferior.
Apriete el dial para ingresar.
$SULHWHHOERWyQ67$573$86(,1,&,$53$86$5RHO
dial selector para iniciar la cocción.
Para obtener sugerencias sobre el nivel y tiempo de
cocción, utilice su guía o libro de cocina.
Recipientes para cocción rápida
Ŷ 6LJDODVVXJHUHQFLDVLQGLFDGDVHQODSDQWDOODGHOKRUQRR
HQHO/LEURGHFRFLQDR*XtDGHFRFLQD
Ŷ /RVUHFLSLHQWHVGHFRFLQDVHWRUQDUiQPX\FDOLHQWHVGHELGR
a la transferencia de calor proveniente de los alimentos
calentados. Se requerirán guantes de cocina protectores
para manipular los recipientes de cocina.
Ŷ &RORTXHORVDOLPHQWRVGLUHFWDPHQWHHQODEDQGHMDGHPHWDO
antiadherente cuando cocine, a menos que el horno le
indique realizar otra cosa.
Ŷ 8WLOLFHODEDQGHMDGHPHWDODQWLDGKHUHQWHGHODPLVPD
manera que utilizaría una charola o bandeja de hornear
plana.
Ŷ $GHPiVGHORVUHFLSLHQWHV
facilitados, puede utilizar
platos no metálicos para
guisados, platos para tartas y
otros recipientes resistentes
y seguros contra el calor.
Colóquelos directamente en la
base giratoria.
Ŷ $VHJ~UHVHGHVHOHFFLRQDUXQWDPDxRTXHURWHIiFLOPHQWH
Ŷ &RORTXHODEDQGHMDGHPHWDODQWLDGKHUHQWHHQODEDVH
giratoria. Coloque los recipientes de vidrio o cerámica en la
bandeja.
Ŷ 1RXWLOLFHORVUHFLSLHQWHVGHFRFLQDRFXELHUWDVWDSDV
hechas de papel, plástico o láminas de aluminio cuando
cocine utilizando un ciclo de cocción rápida.
Patrón circular
(MHPSORELVFRFKRVJDOOHWDV
Patrón radial
(MHPSORUROOLWRVGH
PHGLDOXQD>FUHVFHQW@
Capa sencilla
(MHPSORDSHULWLYRV
Patrón de lado a lado
(MHPSORFDUQHV\DYHV
Repeat Last (Repetir último)
Utilice esta función de ahorro de tiempo para cocinar alimentos
repetitivos como galletas o entradas.
NOTA: El último programa utilizado se almacena durante dos
horas.
1. Apretar y mantener apretado el botón SPEEDCOOK
&2&&,Ï15È3,'$GXUDQWHVHJXQGRV
2. Se mostrará el último alimento preprogramado.
$SULHWHHOERWyQ67$573$86(,1,&,$53$86$5RHOGLDO
selector para iniciar la cocción.
Continuar función
1. Si sus alimentos necesitan cocinarse por un poco más
de tiempo, puede reiniciar el horno apretando el botón
67$573$86(,1,&,$53$86$5RHOGLDOVHOHFWRU
(OPHQVDMH5(680(&22.,1*&217,18$5
&2&,1$1'2VHPRVWUDUi\HOKRUQRUHLQLFLDUi
inmediatamente al 10% del tiempo original.
El programa se mantiene en la memoria durante 10 minutos.
Después de ello necesitará iniciar el programa nuevamente.
Consulte el menú de Cómo utilizar el menú de cocción rápida
preprogramado.
COCCIÓN RÁPIDA
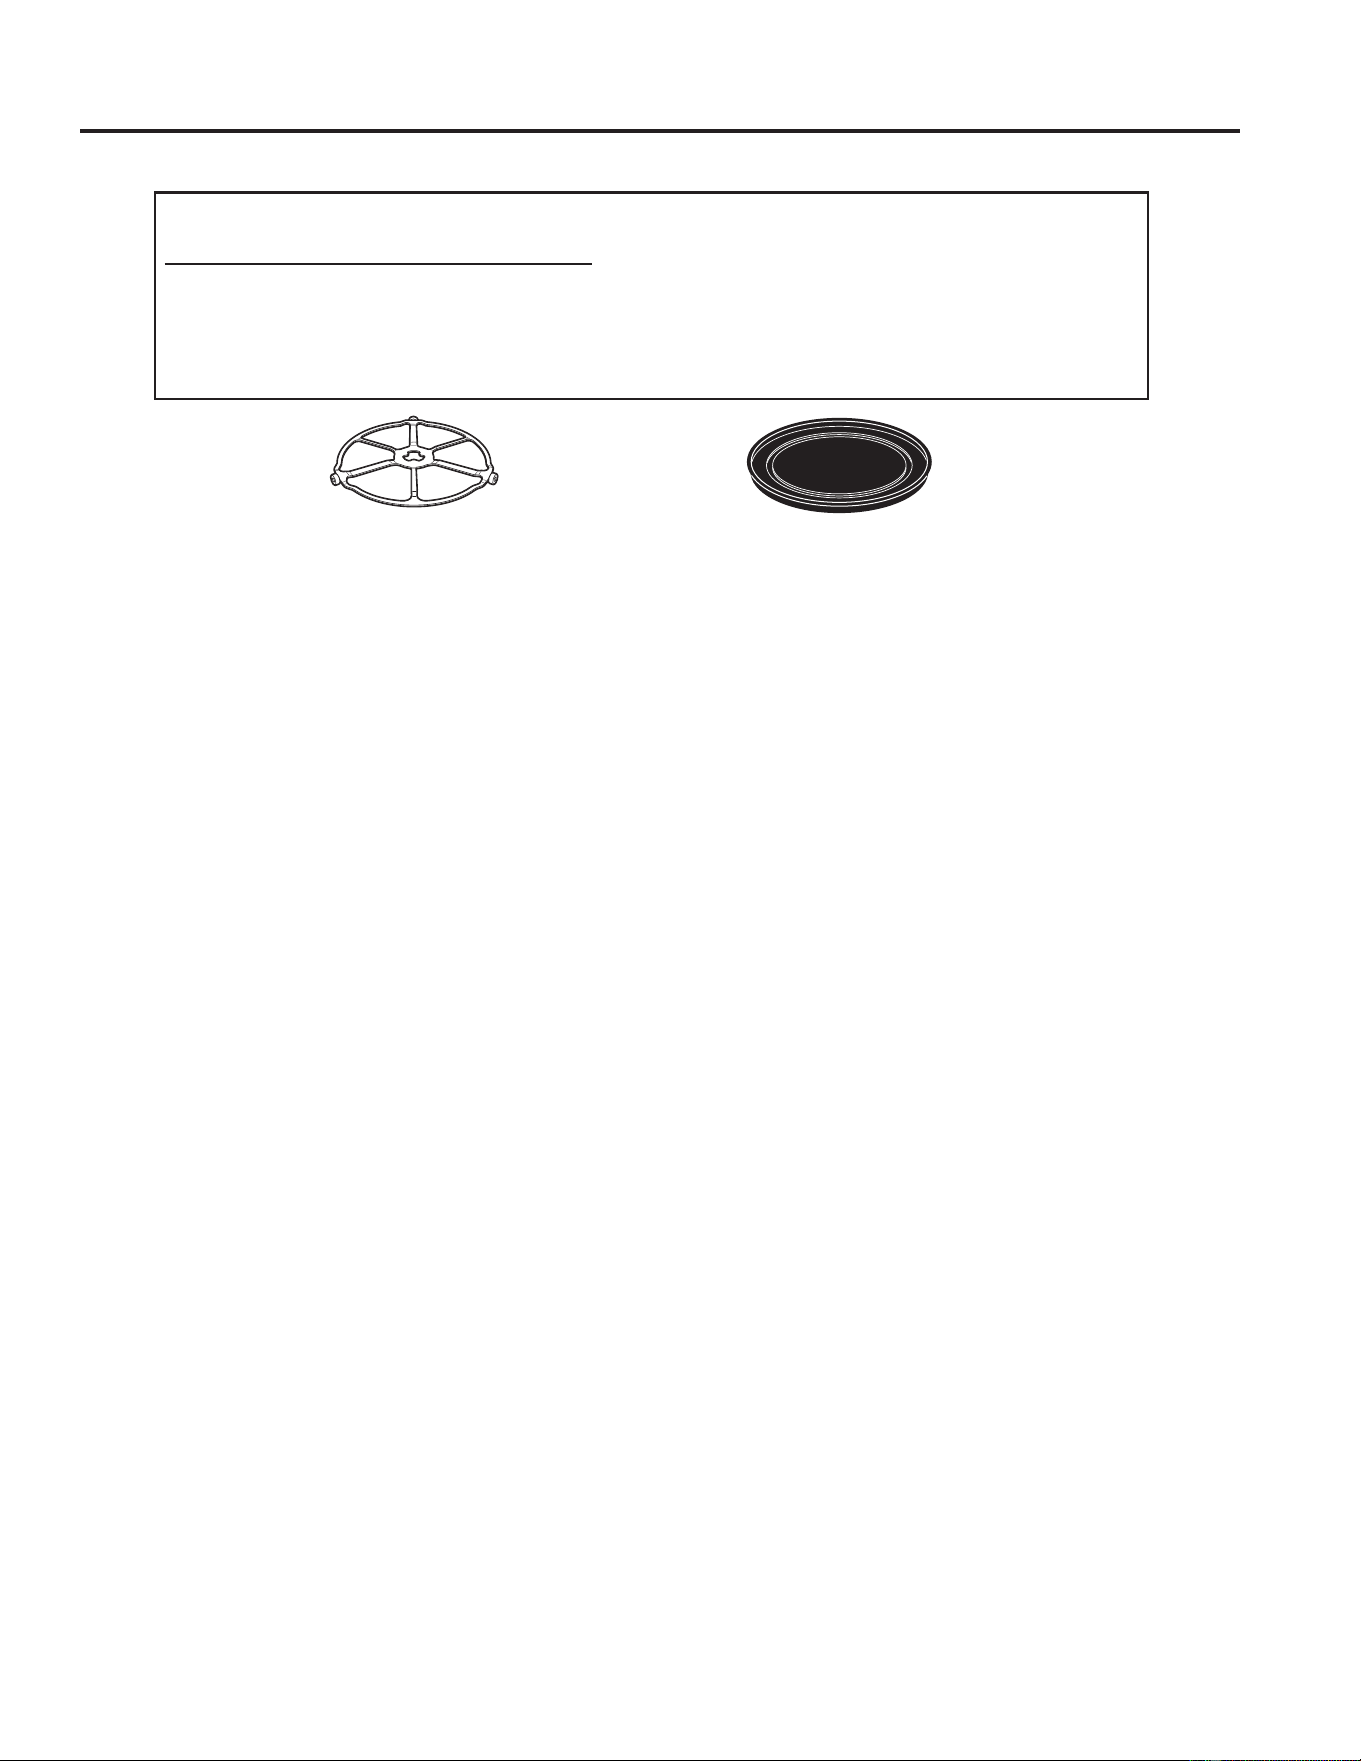
49-40687-4 13
COCCIÓN RÁPIDA
Cocción rápida
Selecciones de PRE-set FOOD seLEctions (Selecciones de ALIMENTOS
preprogramados) de cocción rápida:
Ŷ$SHULWLYRV Ŷ'HVD\XQR Ŷ*XDUQLFLRQHV Ŷ3HVFDGRV\PDULVFRV
Ŷ$YHV Ŷ(PSDUHGDGR Ŷ3DQHV Ŷ3L]]D
Ŷ&DUQHV Ŷ(QWUDQWHV Ŷ3DSDV Ŷ3RVWUHV
Menú de cocción rápida preestablecido
Advantium se encuentra preprogramado para cocinar más de 175 platos populares.
$SULHWHHOERWyQ6SHHGFRRN&RFFLyQUiSLGD
Si no se realiza ninguna entrada durante 15 segundos, la
pantalla volverá a quedar en blanco.
2. Gire el dial para seleccionar el tipo
de categoría de alimentos que desee. Apriete el dial para
ingresar.
3. Gire el dial para seleccionar alimentos específicos
VHOHFFLyQGHOPHQ~$SULHWHHOGLDOSDUDLQJUHVDU
4. Gire el dial para seleccionar la cantidad, tamaño y/o estado
GHFRFFLyQVLVHQHFHVLWDHOKRUQROHSUHJXQWDUi$SULHWH
el dial después de cada selección.
8QDYH]TXHODSDQWDOODPXHVWUH$'-8677,0($-867$5
+25$R67$57,1,&,$5DSULHWHLQLFLDURHOGLDOVHOHFWRU
para empezar a cocinar.
Gire los alimentos cuando el horno le indique TURN FOOD
29(5'e98(/7$$/26$/,0(1726SDUDFLHUWRV
DOLPHQWRV
&XDQGRHOKRUQRLQGLFD&+(&.IRU'21(1(665(9,6$5
1,9(/'(&2&&,Ï1UHYLVHSDUDYHUVLVXVDOLPHQWRV
VHHQFXHQWUDQOLVWRVGHOPRGRTXHSUHILHUHSDUDFLHUWRV
DOLPHQWRV
Para revisar los ajustes durante la cocción, apriete el dial
selector.
Si ingresa una selección incorrecta en cualquier momento,
VLPSOHPHQWHDSULHWHHOERWyQ%$&.5(*5(6$5\UHLQJUHVH
las selecciones deseadas.
Ŷ$OLQLFLDUVHXQSURJUDPDGHFRFFLyQUiSLGDODSDQWDOOD
PRVWUDUi237,0,=,1*&22.7,0(237,0,=$1'2
7,(032'(&2&&,Ï1(OKRUQRGHWHFWDDXWRPiWLFDPHQWH
el nivel de voltaje eléctrico en su hogar y aumenta y
disminuye el tiempo de cocción para la cocción adecuada.
Ŷ6LVHDEUHODFRPSXHUWDGXUDQWHODFRFFLyQHOKRUQRVH
GHWHQGUiDXWRPiWLFDPHQWH\VHPRVWUDUi3$86(3$86$
en la pantalla. Cierre la compuerta y apriete el botón START/
3$86(,1,&,$53$86$5SDUDFRQWLQXDUFRFLQDQGR
Ŷ(QFXDOTXLHUPRPHQWRGXUDQWHODFRFFLyQSXHGHJLUDUHOGLDO
selector para cambiar el tiempo de cocción. Usted puede
cambiar los niveles de potencia apretando el botón POWER/
7(03327(1&,$7(03(5$785$
Ŷ3DUDDVHJXUDUUHVXOWDGRVGHFRFFLyQFRQVWDQWHVHOKRUQR
puede ajustar los niveles de potencia a menor nivel si el
horno se encuentra caliente al inicio de un programa.
Ŷ$OILQDOGHODFRFFLyQHOYHQWLODGRUDXWRPiWLFRSXHGH
continuar funcionando por un período corto de tiempo para
enfriar los componentes internos.
Ŷ3DUDFRFLQDUGXUDQWHXQWLHPSRDGLFLRQDOGHVSXpVGHTXHVH
ha completado el ciclo de cocción, utilice la función Resume
FRQWLQXDU
/DEDVHJLUDWRULDVLHPSUHGHEH
estar colocada en su lugar cuando
se utiliza el horno.
Coloque la comida directamente en
la bandeja antiadherente de metal
para realizar la cocción rápida.
14 49-40687-4
Indicaciones de la pantalla
Selecciones de menú de cocción rápida preprogramados
'HVSXpVGHSUHVLRQDUHOERWyQ63(('&22.&2&&,Ï15È3,'$HOKRUQROHLQGLFDUiTXHUHDOLFHYDULDVVHOHFFLRQHVWDOFRPR
el ejemplo indicado a continuación.
*LUHHOGLDOKDVWDTXHDSDUH]FD)22'0(180(1Ò'(
$/,0(1726$SULHWHHOGLDOSDUDLQJUHVDU
*LUHHOGLDOKDVWDTXHDSDUH]FD328/75<&$51('(
$9($SULHWHHOGLDOSDUDLQJUHVDU
*LUHHOGLDOKDVWDTXHDSDUH]FD&+,&.(1%21(/(66
&$51('($9(6,1+8(62$SULHWHHOGLDOSDUD
ingresar.
*LUHHOGLDOSDUDVHOHFFLRQDU6,=(7$0$²20(',80
0(',2±R]FDGDXQR
Apriete el dial para ingresar.
*LUHHOGLDOSDUD6HOHFFLRQDUODFDQWLGDGSLH]DV
Apriete el dial para ingresar.
6HPRVWUDUDHOPHQVDMH12167,&.0(7$/75$<
%$1'(-$0(7È/,&$$17,$'+(5(17(
Ŷ 'HVSXpVTXHVHKDFRPSOHWDGRXQFLFORGHFRFFLyQXWLOLFH
ODIXQFLyQ5HVXPH&RQWLQXDUSDUDFRFLQDUSRUWLHPSR
adicional.
Ŷ 3DUDUHYLVDUORVDMXVWHVGXUDQWHODFRFFLyQSUHVLRQHHOGLDO
de selección.
Cocción rápida
NOTA: Cuando se utiliza
la función de cocción
rápida, utilice la bandeja
antiadherente.
Categoría
de alimentos Selección de menú
$SHULWLYRV $OEyQGLJDV0HDW%DOOV
&RQJHODGDV
Anillos de cebolla
%HVRVGHMDODSHxR
-DODSHxR3RSSHUV
%ROORV%DJHO%LWHV
Nachos
Nueces tostadas
Palitos de queso
&KHHVH6WLFNV
Pretzels suaves
&RQJHODGRV
Rollitos de huevo
(JJ5ROOV&RQJHODGRV
Rollitos de pizza
6DOVDFDOLHQWH+RW'LS
7D]DV
&DUQHV %LVWHFGHOFXDUWRWUDVHUR
GHUHV6LUORLQ
%LVWHFWLSRULEH\H
%LVWHFWLSR6WULS
%LVWHFWLSR7%RQH
Carne asada
Chuletas de cordero
Chuletas de puerco
Filet Mignon
Hamburguesa
/RPR
Puerco asado
&DUQHGHDYH $OLWDVGHSROORFRQJHODGDV
)LOHWHGHSROORFRQJHODGR
Nugget de pollo
FRQJHODGR
Pastelito de pollo
FRQJHODGR
Pavo
Pollo, con hueso
Pollo entero
3ROORIULWRFRQJHODGR
Pollo, sin hueso
7LUDGHSROORFRQJHODGD
Tiritas de pollo
FRQJHODGDV
'HVD\XQR %LVFRFKRGHVDOFKLFKD
6DXVDJH%LVFXLW
%RFDGLWRV7XUQRYHUV
%ROORV%DJHOV
&RQJHODGRV
Categoría
de alimentos Selección de menú
Desayuno Chorizo
*XLVDGRKXHYR[
3DQTXHTXHV&RQJHODGRV
Pan tostado a la francesa
Pastel de café
Pastel de hoja relleno
FRQJHODGR
Pastelitos de patata
+DVKEURZQ3DWWLHV
Pizza de desayuno
5ROOLWRVUHIULJHUDGRV
Rollitos dulces/Pan danés
:DIIOHVFRQJHODGRV
Wafles belgas
(PSDUHGDGR &RUQ'RJFRQJHODGR
Emparedado asado
a la parrilla
Emparedado de bolsillo
SRFNHW
Hot Dog con rollito
GHPHGLDOXQD&UHVFHQW
Hot Dog en bollo
7DTXLWRVFRQJHODGRV
Guarniciones Ajo asado
Champiñones rellenos
&KLOHVDVDGRV
Espárragos asados
)ULMROHVUHIULWRVR]
Maíz asado
Pimiento asado
5HOOHQRPH]FOD
Tomates rellenos
Verduras mixtas asadas
3DQHV %ROORV%DJHOV
&RQJHODGRV
%ROORVGHFHQD
'LQQHU5ROOV
Palitos de pan
%UHDG6WLFNV
Pan de ajo
Pan de queso
&KHHVH%UHDG
3DQUiSLGR[
3DQHFLOORV%LVFXLWV
Rollitos de media luna
&UHVFHQW5ROOV
Rollitos dulces/Pan danés
7DFRVHQFDMD
Categoría
de alimentos Selección de menú
Panes Tostada tejana
7H[DV7RDVW
3DSDV &DPRWH²DPH
Nugget congelado
Papa al horno
Papas fritas congeladas
Pastelitos de patata
+DVKEURZQ3DWWLHV
Pescado Colas de langosta
y mariscos Congeladas empanizadas
Filetes de atún
Filetes de bacalao
Filete de pez espada
Filete Orange Roughy
/XELQD
Mariscos
Pescado blanco
Salmón
Tilapia
Tiritas de pescado
FRQJHODGDV
Pizza Deli/Fresca
Pizza congelada
Utilizar masa precocida
3ODWRVIXHUWHV %XUULWRVFRQJHODGRV
&KLOHVUHOOHQRV
Chimichanga
(QFKLODGDIUHVFD
Guisado
/DVDxD
Pastel de carne
0HDWORDI[
4XHVLGLOODVIUHVFDV
Rollitos de huevo
FRQJHODGRV
3RVWUHV %RFDGLWRV7XUQRYHUV
%URZQLHV
Galletas
3DVWHOIUHVFR[
Pastel de café
3DVWHOHVPH]FOD[
5ROOLWRVUHIULJHUDGRV
7DUWDIUXWDIUHVFD
COCCIÓN RÁPIDA

49-40687-4 15
COCCIÓN RÁPIDA
Receta favorita
Para ingresar y almacenar
Agregue y almacene hasta 30 de sus propias recetas de
microondas o de cocción rápida como sus recetas favoritas.
¡Una vez que lo haya hecho, podrá acceder a su receta
favorita rápidamente de modo que sus comidas se cocinen
justo de la manera que le gusta todo el tiempo!
$SULHWHHOERWyQ)$925,7(5(&,3(5(&(7$6
)$925,7$R63(('&22.&2&&,Ï15È3,'$
2. Gire el dial hasta que aparezca FAVORITE RECIPE
5(&(7$6)$925,7$$SULHWHHOGLDOSDUDLQJUHVDU
2PLWDHVWHSDVRVLVHDSUHWyHOERWyQ)$925,7(5(&,3(
5(&(7$6)$925,7$HQHOSDVR
3. Gire el dial hasta que aparezca ADD RECIPE
$²$',55(&(7$$SULHWHHOGLDOSDUDLQJUHVDU
*LUHHOGLDOKDVWDYHU&23<63(('5(&,3(&23,$5
/$5(&(7$'(&2&&,Ï15È3,'$RSDUD$''1(:
5(&,3($²$',581$5(&(7$18(9$$SULHWHHOGLDO
para ingresar.
6LVHVHOHFFLRQy&23<63(('5(&,3(&23,$5
/$5(&(7$'(&2&&,Ï15È3,'$JLUHHOGLDO
para seleccionar el tipo de alimento y apriete el botón
)$925,7(5(&,3(5(&(7$6)$925,7$SDUDLQJUHVDU
y almacenar la receta.
6LVHVHOHFFLRQy$''1(:5(&,3($²$',55(&(7$
18(9$JLUHHOGLDOSDUDVHOHFFLRQDU63(('&22.
&2&&,Ï15È3,'$RUHFHWD0,&52:$9('(
0,&5221'$6$SULHWHHOGLDOSDUDLQJUHVDU\FRQWLQ~H
con estos pasos.
$SDUHFHUi6(/(&7&22.7,0(6(/(&&,21$5(/
7,(032'(&2&&,Ï1*LUHHOGLDOSDUDVHOHFFLRQDUHO
tiempo de cocción. Apriete el dial para ingresar.
/DSDQWDOODOHSHGLUiTXHVHOHFFLRQHHOQLYHOGHSRWHQFLD
6. Gire el dial en sentido de las manecillas del reloj para
incrementar o en sentido contrario a las manecillas del
reloj para disminuir el nivel de potencia. Apriete el dial para
ingresar.
Para obtener sugerencias sobre el nivel y tiempo de cocción,
utilice su guía o libro de cocina.
$SDUHFHUi63(//7+()22'1$0('(/(75($5(/
120%5('(/$&20,'$*LUHHOGLDOSDUDLQJUHVDUOD
primera letra de su descripción de comida y apriete el dial
para ingresar. Continúe este proceso para deletrear el resto
del nombre de la comida. Apriete el botón START/PAUSE
,1,&,$53$86$5SDUDDOPDFHQDUODUHFHWD\VXQRPEUH
Para encontrar y utilizar
Para encontrar y utilizar las recetas favoritas almacenadas:
$SULHWHHOERWyQ)$925,7(5(&,3(5(&(7$6
)$925,7$R63(('&22.&2&&,Ï15È3,'$
2. Gire el dial hasta que aparezca FAVORITE RECIPE
5(&(7$6)$925,7$$SULHWHHOGLDOSDUDLQJUHVDU
*LUHHOGLDOKDVWDYHU86()$925,7(5(&,3(87,/,=$5
/$5(&(7$)$925,7$\DSULHWHSDUDLQJUHVDU
4. Aparecerán los nombres de las recetas que ingresó.
5. Gire el dial hasta que se muestre la receta que desea y
apriete el dial para ingresar.
$SULHWHHOERWyQ67$573$86(,1,&,$53$86$5RHO
dial selector para iniciar la cocción.
Para ajustar o cambiar
Para ajustar o cambiar las recetas de cocción rápida personalizadas almacenadas:
$SULHWHHOERWyQ)$925,7(5(&,3(65(&(7$6
)$925,7$R63(('&22.&2&&,Ï15È3,'$
2. Gire el dial hasta que aparezca FAVORITE RECIPE
5(&(7$6)$925,7$$SULHWHHOGLDOSDUDLQJUHVDU
*LUHHOGLDOKDVWDTXHDSDUH]FD(',75(&,3((',7$5
5(&(7$$SULHWHHOGLDOSDUDLQJUHVDU
4. Gire el dial para escoger la receta que desea cambiar.
Apriete el dial para ingresar. Aparecerán los ajustes
actuales.
5. Apriete el dial para ingresar.
/DSDQWDOODOHSHGLUiTXHVHOHFFLRQHHOQLYHOGHSRWHQFLD
y edite el nombre. Gire el dial y apriételo para ingresar los
ajustes correspondientes.
Para obtener sugerencias sobre el nivel y tiempo de cocción,
utilice su guía o libro de cocina.
Para borarlas
Para borrar las recetas de cocción rápida personalizadas
almacenadas:
$SULHWHHOERWyQ)$925,7(5(&,3(65(&(7$6
)$925,7$R63(('&22.&2&&,Ï15È3,'$
2. Gire el dial hasta que aparezca FAVORITE RECIPE
5(&(7$6)$925,7$$SULHWHHOGLDOSDUDLQJUHVDU
*LUHHOGLDOKDVWDTXHDSDUH]FD'(/(7(5(&,3(
%255$55(&(7$\DSULHWHHOGLDOSDUDLQJUHVDU
4. Gire el dial para escoger la receta que desea y apriete el
dial para ingresar.
Cocción rápida

16 49-40687-4
Cosas que son normales
Tiempos de cocción
Ŷ &XDQGRFRFLQHFRQODIXQFLyQGHFRFFLyQUiSLGDODV
comidas preprogramadas, puede que vea el mensaje
237,0,=,1*&22.7,0(237,0,=$&,Ï1'(/7,(032
'(&2&&,Ï1HQODSDQWDOODGXUDQWHDOJXQRVVHJXQGRV
GHVSXpVGHDSUHWDU67$573$86(,1,&,$53$86$5(O
horno detecta automáticamente el nivel de voltaje eléctrico
en su hogar y ajusta el tiempo de cocción, aumentándolo o
disminuyéndolo para cocinar adecuadamente.
Ventilador/Ventilación
Ŷ (OYHQWLODGRUHVWDUiHQFHQGLGRGXUDQWHODFRFFLyQ$OILQDO
de la cocción, el ventilador automático puede continuar
funcionando por un período corto de tiempo y se indicará
HQODSDQWDOODHOPHQVDMH2YHQLV&RROLQJ+RUQR
HQIULiQGRVH(OYHQWLODGRUVHDSDJDUiDXWRPiWLFDPHQWH
cuando se hayan enfriado las piezas internas del horno.
Ŷ /DUHMLOODGHYHQWLODFLyQGHOKRUQRHPLWLUiDLUHFDOLHQWH
mientras el horno se encuentra encendido.
Luces
Ŷ &XDQGRHOKRUQRHVWiHQFHQGLGRVHSRGUiYHUODOX]
alrededor de la compuerta o de la cubierta externa.
Ŷ /DVOXFHVKDOyJHQDVVHRSDFDUiQ\FLFODUiQHQFHQGLpQGRVH
y apagándose durante un ciclo de cocción rápida, algunas
veces incluso a niveles de potencia más altos. Esto es
normal. El horno percibe el nivel de calor y se ajusta
automáticamente.
Calor del horno
Ŷ 1RVHQHFHVLWDWLHPSRGHSUHFDOHQWDPLHQWRGXUDQWHORV
ciclos de Cocción rápida. El horno comienza a cocinar
inmediatamente.
Ŷ /DFRPSXHUWD\HOLQWHULRUGHODFRPSXHUWDGHOKRUQR
se encuentran muy calientes. Tenga cuidado al abrir la
compuerta y sacar la comida del interior.
Ŷ 1RXWLOLFHUHFLSLHQWHVGHFRFLQDQLFXELHUWDVWDSDVKHFKDV
de papel, plástico o láminas de aluminio cuando cocina
utilizando un ciclo de cocción rápida.
Ŷ &XDQGRFRFLQDSRUXQSHUtRGRSURORQJDGRGHWLHPSR
el horno puede reducir los niveles de potencia
automáticamente para mantener el nivel apropiado de
calor.
Sonidos
Ŷ /RVFKDVTXLGRV\HOVRQLGRGHYHQWLODGRUIXQFLRQDQGRVRQ
sonidos normales durante la cocción. El tablero de relé y
sus componentes se apagan y se encienden.
Cocción rápida
COCCIÓN RÁPIDA
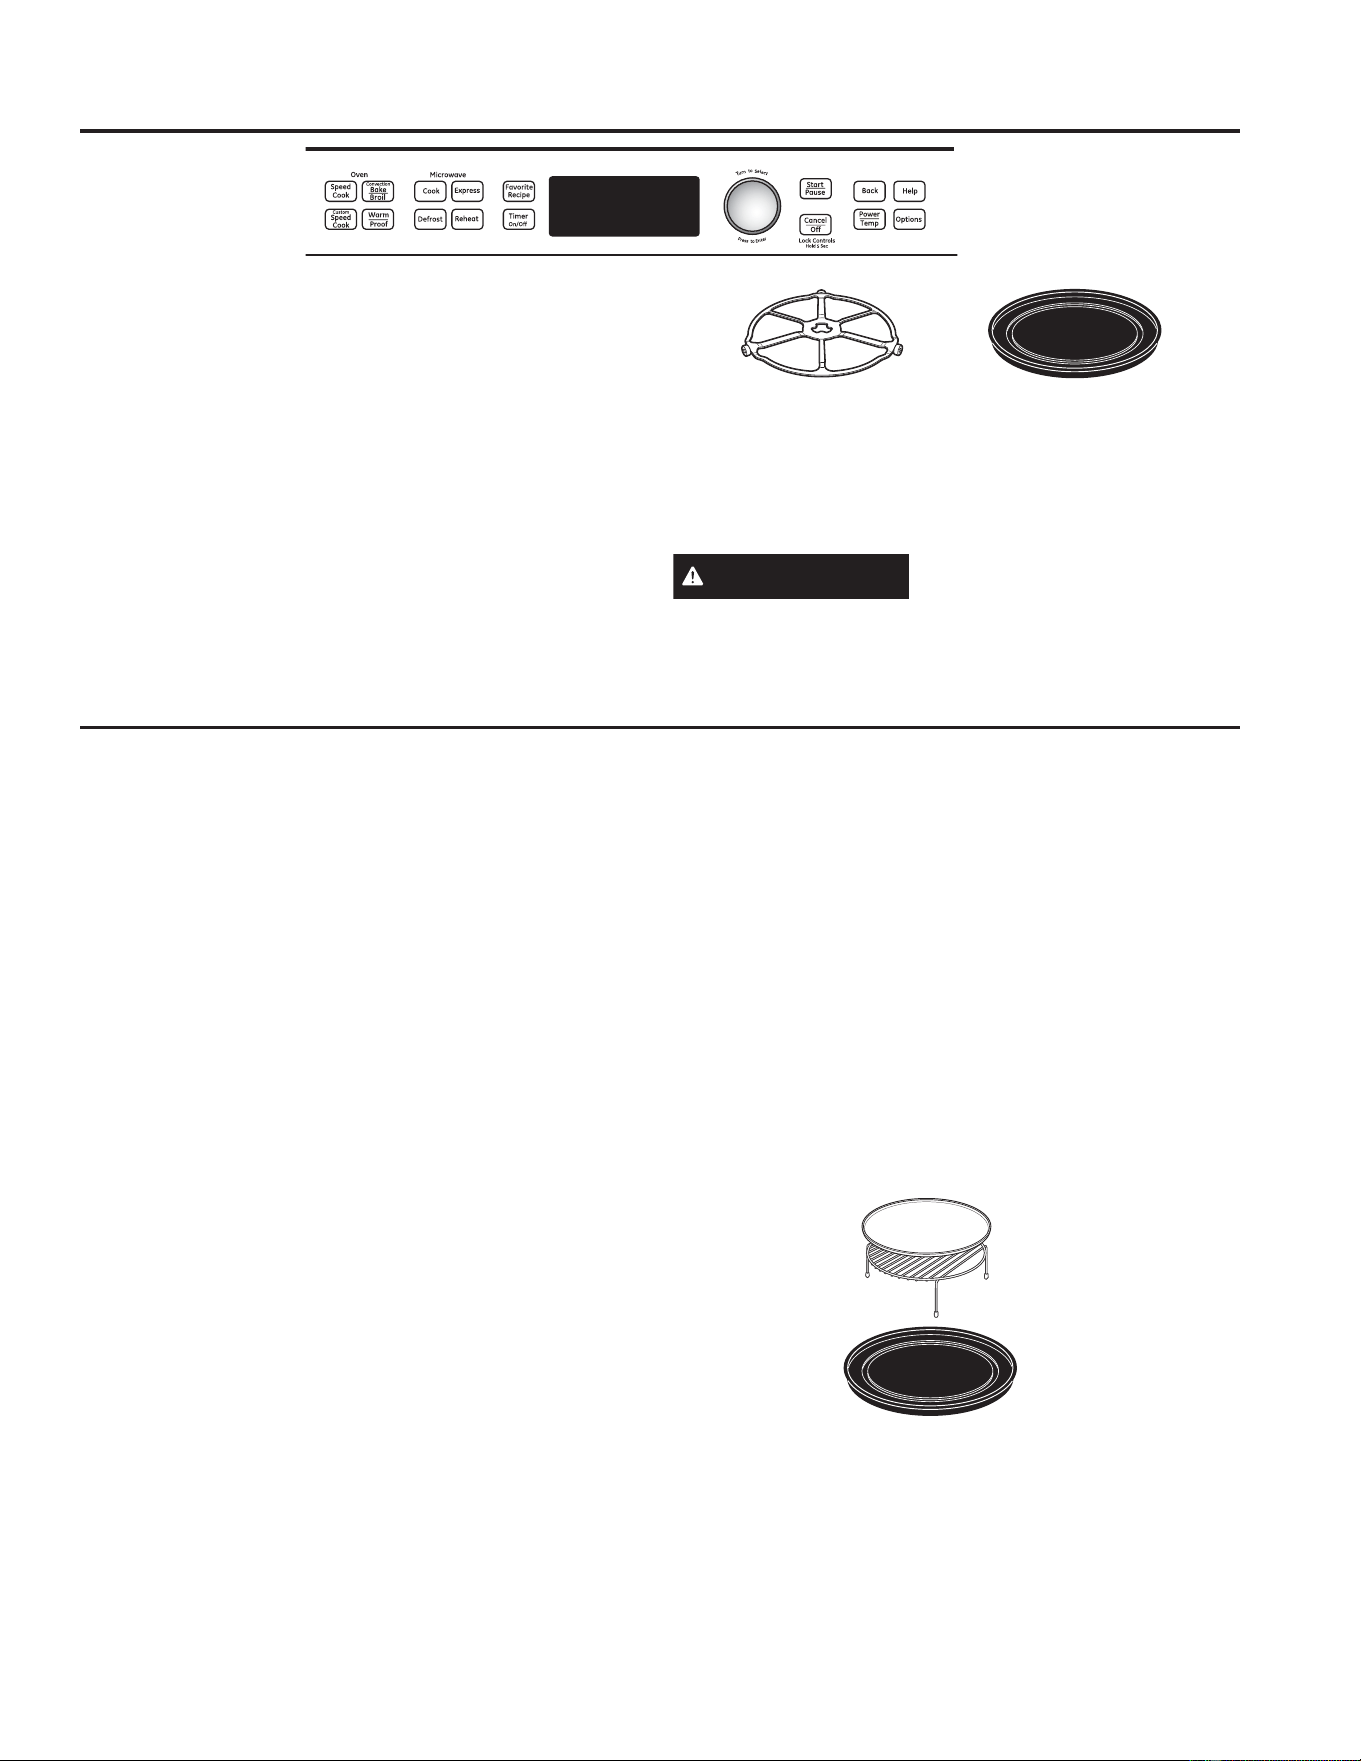
49-40687-4 17
CÓMO HORNEAR, ASAR Y TOSTAR
Cómo hornear, asar y tostar
/DIXQFLyQGHKRUQHDUOHSHUPLWHFRFLQDUORVDOLPHQWRVGH
la misma forma que un horno convencional, utilizando un
elemento de calentamiento para incrementar la temperatura del
aire dentro del horno. Se puede ajustar cualquier temperatura
de horno de 250 a 450° F.
/DIXQFLyQ%URLOLQJDVDUOHSHUPLWHDVDUDOLPHQWRVGHOD
misma manera que un horno convencional.
/DIXQFLyQ7RDVWLQJWRVWDUOHSHUPLWHWRVWDUDOLPHQWRVGHOD
misma manera que un horno convencional.
Un ventilador circula aire caliente suavemente dentro del
horno, sobre y alrededor de los alimentos. Debido a que el aire
caliente se mantiene en constante movimiento, no permitiendo
que se desarrolle una capa de aire más frío alrededor de los
alimentos, algunos alimentos se cocinarán levemente más
rápido que la cocción realizada en horno regular.
Antes de empezar, asegúrese de que se encuentra colocada
la base giratoria. Utilice la bandeja de metal antiadherente en
todo momento cuando hornee.
PRECAUCIÓN
¡Cuando hornee, recuerde que el
horno, compuerta y los platos estarán muy calientes!
/DEDVHJLUDWRULDVLHPSUH
debe estar colocada en
su lugar cuando se utiliza
el horno.
Coloque los recipientes
adecuados para hornear
directamente en la bandeja
antiadherente de metal para
hornear.
Cómo hornear
$SULHWHHOERWyQ&219%$.(%52,/+251($5325
&219$6$5
$SULHWHHOGLDOSDUDVHOHFFLRQDU%$.(+251($5
3. Gire el dial para ajustar la temperatura del horno y apriételo
para ingresarla.
Para omitir el proceso de precalentamiento:
1. Cuando aparezca el mensaje PREHEAT THE OVEN?
¢35(&$/(17$5(/+2512"JLUHHOGLDOD12$SULHWH
HOGLDORDSULHWH67$573$86(,1,&,$53$86$5SDUD
iniciar la cocción.
2. Coloque los alimentos en el horno, gire el dial para ajustar
el tiempo de cocción y apriételo para ingresar.
El horno comienza a cocinar inmediatamente. Cuando se
ha completado la cocción, el horno indicará una señal y se
apagará.
Para precalentar:
1. Cuando aparezca el mensaje PREHEAT THE OVEN?
¢35(&$/(17$5(/+2512"JLUHHOGLDOD<(6$SULHWH
HOGLDORDSULHWH67$573$86(,1,&,$53$86$5SDUD
iniciar la cocción.
El horno empieza a funcionar inmediatamente. No coloque
DOLPHQWRVHQHOKRUQR6HOHLQGLFDUiTXHLQJUHVHHOWLHPSR
GHFRFFLyQGHVSXpVTXHVHKD\DSUHFDOHQWDGRHOKRUQR
2. Cuando el horno termine el precalentamiento, emitirá una
señal. Si no abre la puerta en el plazo de una hora, el
horno se apagará automáticamente. Abra la compuerta
del horno y, con cuidado, coloque los alimentos dentro del
horno.
3 Cierre la compuerta del horno. Gire el dial para ajustar el
tiempo de cocción y apriételo para comenzar a cocinar.
Cuando se ha completado la cocción, el horno indicará una
señal y se apagará.
Puede cambiar la temperatura del horno durante el
precalentamiento apretando el botón POWER/TEMP
327(1&,$7(03(5$785$\JLUDQGRHOGLDOSDUD
seleccionar la nueva temperatura.
Si la compuerta del horno se encuentra abierta durante la
FRFFLyQDSDUHFHUi3$86(3$86$HQODSDQWDOOD&LHUUHOD
FRPSXHUWD\DSULHWHVWDUWSDXVHLQLFLDUSDXVDU
/RVWLHPSRVGHFRFFLyQVHPXHVWUDQHQPLQXWRV\SXHGHQVHU
de 179 minutos como máximo. Se puede cambiar el tiempo
durante la cocción dando vuelta al dial.
Para hornear a dos niveles, coloque los
alimentos en un plato de hornear metálico
o directamente en la bandeja metálica
antiadherente. Coloque la lámina de hornear de
aluminio o su plato de hornear con alimentos
sobre la parte superior de la parrilla de alambre.
Coloque la parrilla con alimentos en la bandeja
de metal.

18 49-40687-4
CÓMO HORNEAR, ASAR Y TOSTAR
Cómo hornear, asar y tostar
Cómo asar o tostar
$SULHWHHOERWyQ&219%$.(%52,/+251($5
325&219$6$5
*LUHHOGLDOD%52,/$6$5R72$677267$5\
apriételo para ingresar.
Para omitir el proceso de precalentamiento:
1. Cuando aparezca el mensaje PREHEAT THE OVEN?
¢35(&$/(17$5(/+2512"JLUHHOGLDOD12$SULHWH
HOGLDORDSULHWH67$573$86(,1,&,$53$86$5SDUD
iniciar la cocción.
2. Coloque los alimentos en el horno, gire el dial para ajustar
el tiempo de cocción y apriételo para ingresar. Apriete el
dial para empezar la cocción. Cuando se ha completado la
cocción, el horno indicará una señal y se apagará.
Para precalentar:
1. Cuando aparezca el mensaje PREHEAT THE OVEN?
¢35(&$/(17$5(/+2512"JLUHHOGLDOD<(6$SULHWH
HOGLDORDSULHWH67$573$86(,1,&,$53$86$5
para iniciar la cocción. El horno empieza a funcionar
LQPHGLDWDPHQWH1RFRORTXHDOLPHQWRVHQHOKRUQR6HOH
indicará que ingrese el tiempo de cocción, después que se
KD\DSUHFDOHQWDGRHOKRUQR
2. Cuando el horno termine el precalentamiento, emitirá una
señal. Si no abre la compuerta en el plazo de una hora, el
horno se apagará automáticamente. Abra la compuerta
del horno y, con cuidado, coloque los alimentos dentro del
horno.
3. Cierre la compuerta del horno. Gire el dial para ajustar el
tiempo de cocción y apriételo para ingresarlo y empezar
a cocinar. Cuando se ha completado la cocción, el horno
indicará una señal y se apagará.
Si se abre la compuerta del horno durante la cocción,
DSDUHFHUi3$86(3$86$HQODSDQWDOOD&LHUUHODFRPSXHUWD
\DSULHWHVWDUWSDXVH,1,&,$53$86$5
Coloque los alimentos directamente
en la hoja para hornear de aluminio
en la parrilla de alambre del horno
y colóquelos en la bandeja metálica
antiadherente cuando hornee a dos
niveles, ase o tueste alimentos.
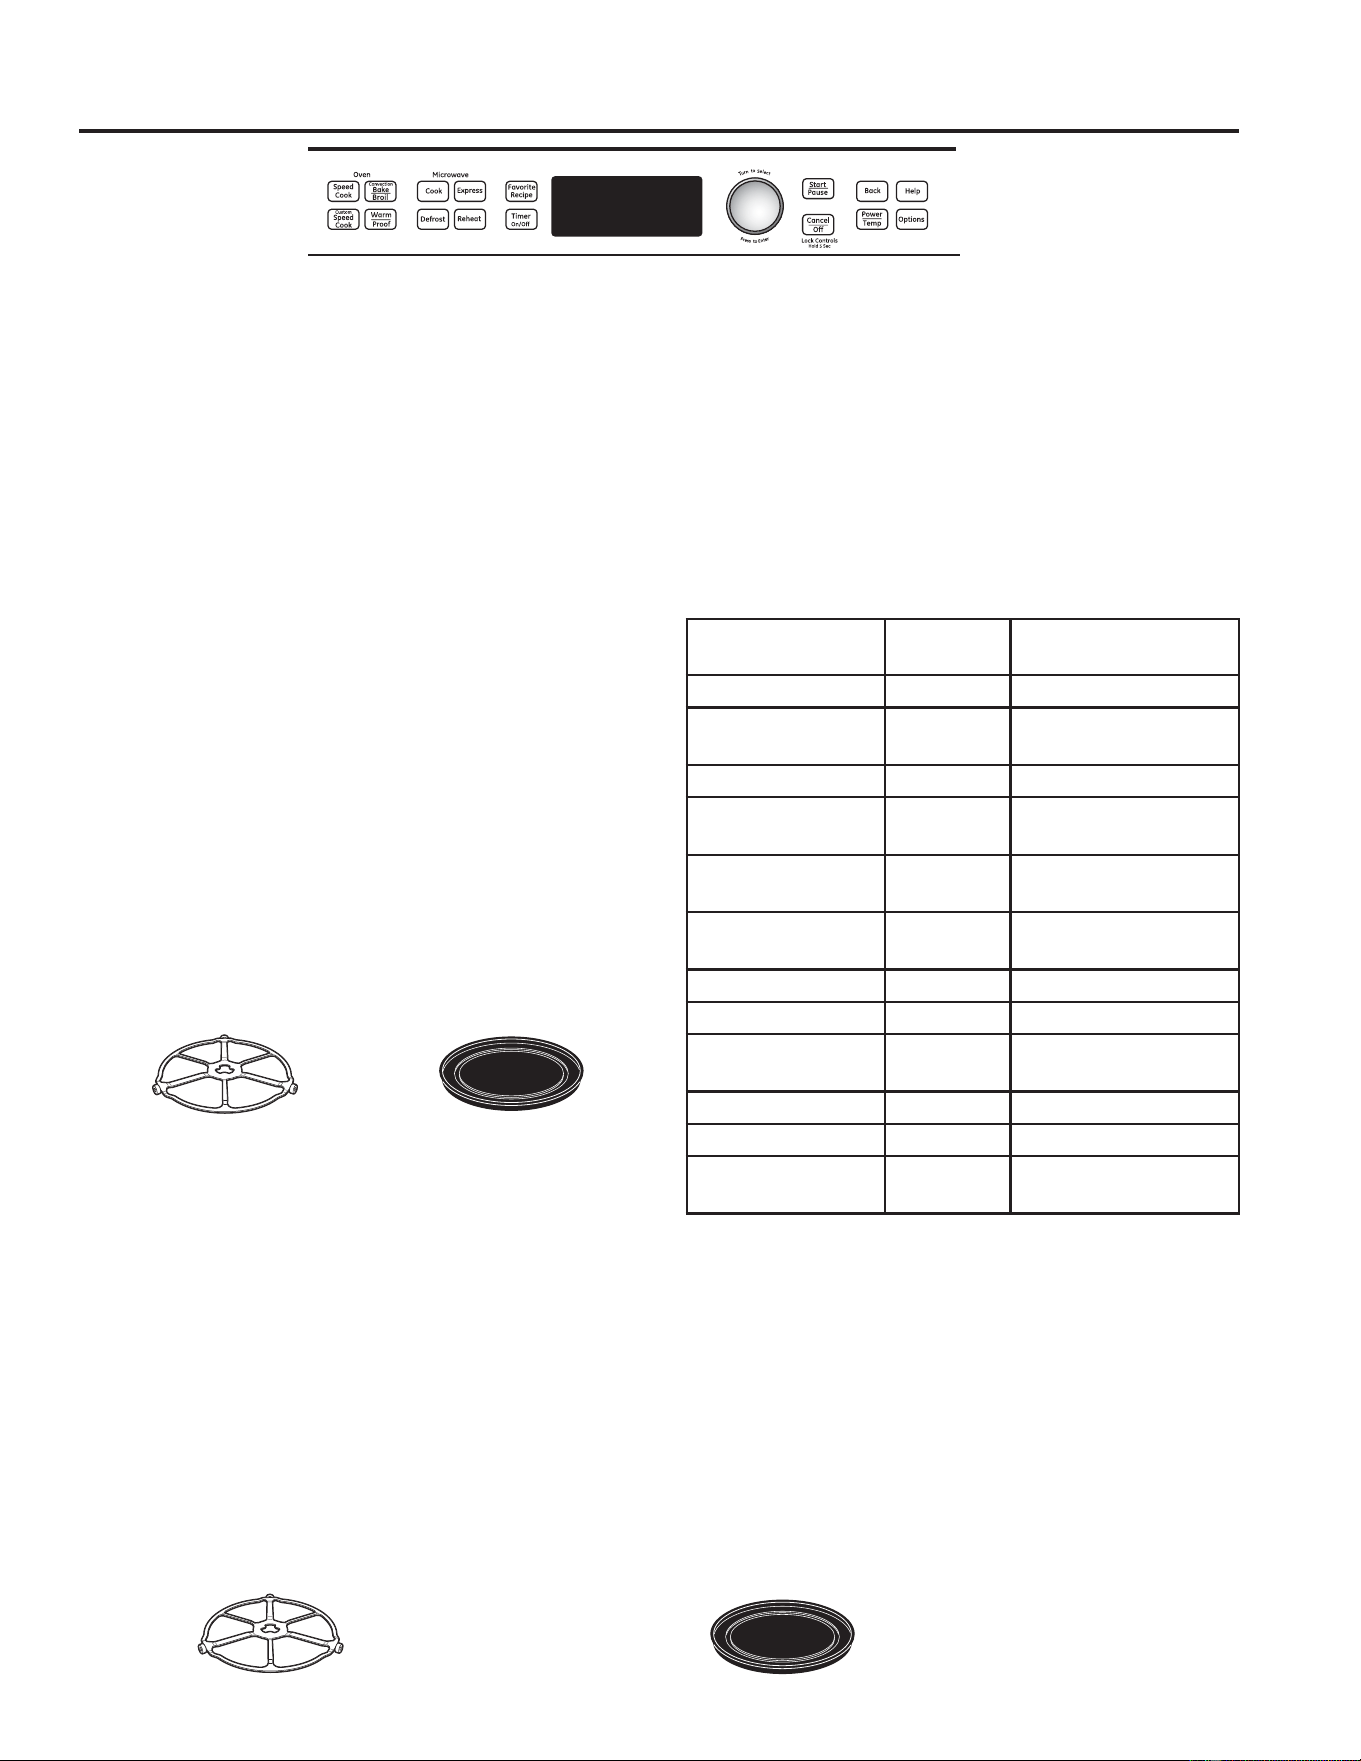
49-40687-4 19
Calentamiento
/DIXQFLyQ:$50&$/,(17(PDQWHQGUiFDOLHQWHVORV
alimentos cocinados a una temperatura de servir. Empiece
siempre con comida caliente. Utilice recipientes de cocina y
utensilios que puedan soportar temperaturas de hasta 230° F.
$SULHWHHOERWyQ:$503522)&$/(17$5$&7,9$5
*LUHHOGLDOSDUDVHOHFFLRQDU+2/')22':$50
0$17(1(5/$&20,'$&$/,(17($SULHWHHOGLDOSDUD
ingresar.
3. Gire el dial para seleccionar la temperatura del horno. Ver
el cuadro y los consejos indicados a continuación. Apriete
el dial para ingresar.
%$-$ ±)
MEDIA 160–195°F
$/7$ ±)
4. Gire el dial para seleccionar el nivel de humedad
que desea. Vea el cuadro y los consejos indicados a
continuación. Apriete el dial para ingresar.
Si se abre la compuerta del horno durante el calentamiento,
DSDUHFHUi3$86(3$86$HQODSDQWDOOD&LHUUHODFRPSXHUWD
\DSULHWH67$573$86(,1,&,$53$86$5
Para hacer que los alimentos secos estén crujientes:
Ŷ &RORTXHORVDOLPHQWRVRSODWLOORVGLUHFWDPHQWHHQOD
bandeja metálica negra.
Ŷ 3UHFDOLHQWHHQ/2:%$-2\VHOHFFLRQH&5,63
&58-,(17(
Ŷ 5HYLVHTXpWDQFUXMLHQWHVHHQFXHQWUDHODOLPHQWRGHVSXpV
de 45 minutos. Añada tiempo tanto como sea necesario.
Consejos para alimentos crujientes:
Ŷ 'HMHORVDOLPHQWRVGHVFXELHUWRV
Ŷ 1RXWLOLFHUHFLSLHQWHVGHSOiVWLFRRHQYROWXUDSOiVWLFD
Ŷ 3UHFDOLHQWHDQWHVGHXWLOL]DUGHDFXHUGRDORVWLHPSRV
recomendados.
Consejos para alimentos húmedos:
Ŷ &XEUDORVDOLPHQWRVFRQXQDWDSDROiPLQDSDSHOGH
aluminio.
Ŷ 1RXWLOLFHUHFLSLHQWHVGHSOiVWLFRRHQYROWXUDSOiVWLFD
Ŷ 3UHFDOLHQWHDQWHVGHXWLOL]DUGHDFXHUGRDORVWLHPSRV
recomendados.
Calentamiento y activación (Proofing)
CALENTAMIENTO Y ACTIVACIÓN (PROOFING)
Activación (Proofing)
/DIXQFLyQGHDFWLYDFLyQSURRILQJSURYHHDXWRPiWLFDPHQWHOD
temperatura óptima para el proceso de activación, por lo que
no tiene ajuste de temperatura.
$SULHWHHOERWyQ:$503522)&$/(17$5$&7,9$5
*LUHHOGLDOSDUDVHOHFFLRQDU3522)%5($'$&7,9$5
(/3$1$SULHWHHOGLDOSDUDLQJUHVDU(OKRUQRHPSLH]DD
activar inmediatamente y muestra la cantidad de tiempo de
activación completado.
Ŷ 3DUDHYLWDUUHGXFLUODWHPSHUDWXUDGHOKRUQR\SURORQJDU
el tiempo de activación, no abra la compuerta del horno
cuando no sea necesario.
NOTAS:
Ŷ 1RXWLOLFHODPRGDOLGDGGHDFWLYDFLyQSDUDFDOHQWDU
DOLPHQWRVRPDQWHQHUORVDOLPHQWRVFDOLHQWHV/D
temperatura de activación del horno es lo suficientemente
caliente como para mantener los alimentos a temperaturas
VHJXUDV8WLOLFHODIXQFLyQ:$50&$/(17$5SDUD
mantener los alimentos calientes.
Ŷ /DIXQFLyQGHDFWLYDFLyQQRIXQFLRQDUiVLHOKRUQRHVWiPX\
caliente. Permita que el horno se enfríe antes de usar la
función de activación.
/DEDVHJLUDWRULDVLHPSUHGHEH
estar colocada en su lugar
cuando se utiliza el horno.
/DEDVHJLUDWRULDVLHPSUHGHEH
estar colocada en su lugar
cuando se utiliza el horno.
Coloque la comida directamente
en la bandeja antiadherente de metal
para calentar.
Coloque una masa de pan en un tazón/
charola para pan y colóquela en la bandeja
de metal antiadherente para efectuar la
activación.
Tipo de alimento Ajuste de
control
Ajuste de humedad
Carne de aves
+,*+$/72
02,67+Ò0('2
Carnes* y pescado
MEDIUM
0(',2
&5,63&58-,(17(
Comidas fritas
+,*+$/72
&5,63&58-,(17(
Guisados
MEDIUM
0(',2
02,67+Ò0('2
Pan, rollitos duros
MEDIUM
0(',2
&5,63&58-,(17(
Pan, rollitos suaves
MEDIUM
0(',2
02,67+Ò0('2
3DQTXHTXHVZDIOHV
+,*+$/72
&5,63&58-,(17(
Papas, horneadas
+,*+$/72
&5,63&58-,(17(
3DSDVSXUp
MEDIUM
0(',2
02,67+Ò0('2
Pizza
+,*+$/72
&5,63&58-,(17(
Trozos de tortilla
/2:%$-2
&5,63&58-,(17(
Verduras
MEDIUM
0(',2
02,67+Ò0('2
/D86'$)6,6UHFRPLHQGDXQDWHPSHUDWXUDLQWHUQDGH)FRPR
el nivel de cocción mínimo para carne de res. Utilice un termómetro
portátil de carne para revisar las temperaturas internas.
Tabla de selección de temperatura y humedad
20 49-40687-4
Cocción por microondas
Asegúrese de que la base giratoria y la bandeja de vidrio
transparente se encuentran colocadas.
Coloque los alimentos o recipiente para microondas
directamente en la bandeja de vidrio transparente para cocinar
sus alimentos.
Recipientes de cocina
Ŷ$VHJ~UHVHTXHVXVUHFLSLHQWHVGHFRFLQDVHDQDGHFXDGRV
para utilizarlos en un horno microondas.
Ŷ&RORTXHORVDOLPHQWRVRUHFLSLHQWHSDUDPLFURRQGDV
directamente en la bandeja de vidrio transparente para
cocinar sus alimentos.
/Dbase giratoria siempre
debe estar colocada en su lugar
cuando se utiliza el horno.
/Dbandeja de cristal transparente
siempre deberá estar en su lugar
cuando se cocina con microondas.
Cómo utilizar las selecciones de microondas preprogramadas
$SUHWDUHOERWyQ&22.&2&,1$5'()5267'(6
&21*(/$5R5(+($75(&$/(17$5GHOPLFURRQGDV
Si no se realiza ninguna entrada durante 15 segundos, la pan
talla volverá a quedar en blanco.
2. Gire el dial para encontrar los alimentos que desea cocinar,
descongelar o recalentar. Apriete el dial para ingresar.
3. Gire el dial para seleccionar el tipo, cantidad, peso y/o
WDPDxR(OKRUQROHFRQVXOWDUiHQODPHGLGDTXHVHDQHF
HVDULR$SULHWHHOGLDOGHVSXpVGHFDGDVHOHFFLyQ
$SULHWHHOGLDORDSULHWH67$573$86(,1,&,$53$86$5
para iniciar la cocción.
Para revisar los ajustes durante la cocción, apriete el dial selec
tor.
Si se abre la compuerta durante la cocción, el horno se deten
GUi\VHPRVWUDUi3$86(3$86$HQODSDQWDOOD&LHUUHOD
FRPSXHUWD\DSULHWHHOERWyQ67$573$86(,1,&,$53$8
6$5SDUDFRQWLQXDUFRFLQDQGR
Si ingresa una selección no deseada
HQFXDOTXLHUPRPHQWRVLPSOHPHQWHDSULHWHHOERWyQ%$&.
5(*5(6$5\UHLQJUHVHODVVHOHFFLRQHVGHVHDGDV
Ŷ Cocinar
–Calentar/Recalentar
bebidas
–Cocción lenta
–Derretir
–Inicio demorado
–Por tiempo
–Por tiempo 1 y 2
–Por tipo de alimento
–Suavizar
ŶDescongelar
–1,0 lb. Rápido
–Derretir
–Inicio demorado
–Por peso
–Por tiempo
–Por tipo de alimento
–Suavizar
ŶRecalentar
–Arroz
±%HELGDV
±%LVWHFV&KXOHWDV
–Guisado
–Pasta
–Pizza
–Plato de comida
–Pollo
–Sopa
–Verduras
COCCIÓN POR MICROONDAS

49-40687-4 21
COCCIÓN POR MICROONDAS
Cocción por microondas
Cook By Time (Cocinar por tiempo) y Cook By Time 1 & 2 (Cocinar por tiempo 1 y 2)
8WLOLFHODVIXQFLRQHVGH&22.%<7,0(&2&,1$5325
7,(032\&22.%<7,0(SDUDFRFLQDUSRUPLFURRQGDV
los alimentos que no se encuentran en la sección de recetas y
en el tiempo que programó.
Ŷ (OQLYHOGHSRWHQFLDVHHQFXHQWUDDMXVWDGR
DXWRPiWLFDPHQWHHQ+LJK$OWRSHURSXHGHFDPELDUOR
para dar mayor flexibilidad.
$SULHWHHOERWyQ&22.&2&,1$5
*LUHHOGLDOSDUDVHOHFFLRQDU&22.%<7,0(&2&,1$5
3257,(032R&22.%<7,0(&2&,1$5325
7,(032\DSULHWHHOGLDOSDUDLQJUHVDU
3. Gire el dial para ajustar el tiempo de cocción y apriete el
dial para ingresar.
6LVHOHFFLRQy&22.%<7,0(&2&,1$53257,(032
JLUHHOGLDOSDUDDMXVWDUHOWLHPSRGHFRFFLyQ1\
apriete el dial para ingresar.
NOTA: Para cambiar el nivel de potencia si no desea potencia
Pi[LPDDSULHWHHOERWyQ32:(57(03327(1&,$
7(03(5$785$GHVSXpVGHLQJUHVDUHOWLHPSR*LUHHOGLDO
para seleccionar y apriete el dial para ingresar.
$SULHWHHOGLDORDSULHWH67$573$86(,1,&,$53$86$5
para iniciar la cocción.
'XUDQWHODVIXQFLRQHVGH&22.%<7,0(&2&,1$5325
7,(032R&22.%<7,0(&2&,1$53257,(032
SXHGHDEULUODFRPSXHUWDSDUDUHYLVDUODFRPLGD&LHUUH
ODFRPSXHUWD\DSULHWHHOERWyQ67$573$86(,1,&,$5
3$86$5SDUDFRQWLQXDUFRFLQDQGR
Express (Rápido)
$SULHWH(;35(665È3,'2UHSHWLGDPHQWHSRULQFUHPHQWRV
de 30 segundos de tiempo de cocción con microondas. El
horno empieza a funcionar inmediatamente.
Recetas favorita
Consultar las secciones de Recetas favorita en la sección de
Cocción rápida de este libro para obtener instrucciones de
cómo almacenar, utilizar, cambiar o borrar
una receta favorita.
Consejos de cocina
Ŷ&XDQGRFRFLQHWRFLQRFRORTXHODVWLUDVHQXQSODWR
Cubra cada capa con una toalla de papel.
Ŷ&XDQGRFRFLQHYHUGXUDVXWLOLFHXQDFDFHURODRWD]yQ
adecuados para microondas. Cúbralas con una tapa
adecuada para microondas o envoltura de plástico
ventilada.
Ŷ3DUDYHUGXUDVFRQJHODGRVVLJDODVLQVWUXFFLRQHVGHOD
caja para añadir agua.
Ŷ3DUDYHUGXUDVIUHVFDVDxDGDFXFKDUDGDVGHDJXD
para cada porción.
Nivel(es) de potencia del horno microondas
3ULPHURVLJDODVLQVWUXFFLRQHVGH&22.%<7,0(
&2&,1$53257,(032&22.%<7,0(
&2&,1$53257,(032'()5267%<7,0(
'(6&21*(/$53257,(032R(;35(665È3,'2
$SULHWHHOERWyQ32:(57(03327(1&,$
7(03(5$785$
3. Gire el dial en sentido de las manecillas del reloj para
incrementar o en sentido contrario a las manecillas del reloj
para disminuir el nivel de potencia. Apriete
el dial para ingresar.
$SULHWHHOGLDORDSULHWH67$573$86(,1,&,$53$86$5
para iniciar la cocción.
Ŷ 3XHGHFDPELDUHOQLYHOGHSRWHQFLDDQWHVRGXUDQWHXQ
programa de cocción.
Aquí se presentan algunos ejemplos de utilizaciones para
varios niveles de potencia:
High (Alto) 10: Pescado, tocino, verduras, líquidos hirvientes.
Med (Medio) - High (Alto) 7: Cocción moderada de carne de
res y pollo; hornear guisados y recalentamiento.
Med (Medio) 5: Cocción lenta y ablandamiento para guisados
y cortes de carne de res menos suaves.
Low (Bajo) 2 o 3: Descongelación; hervir a fuego lento;
salsas delicadas.
Warm (Caliente) 1: Mantener comidas calientes; suavizar
mantequilla.

22 49-40687-4
Cocción por microondas
Descongelación por tipo de alimento
/DIXQFLyQ$XWR'HIURVW'HVFRQJHODFLyQDXWRPiWLFDDMXVWD
los tiempos de descongelación y los niveles de potencia para
ofrecer resultados de descongelación uniformes para carnes
de res, pollo y pescado de hasta 6 libras de peso.
1. Saque los alimentos de la caja y colóquelos en un plato
adecuado para microondas.
$SULHWHHOERWyQ'()5267'(6&21*(/$5
*LUHHOGLDOSDUDVHOHFFLRQDU'()5267%<)22'7<3(
'(6&21*(/$53257,32'(&20,'$$SULHWHHOGLDO
para ingresar.
4. Gire el dial para seleccionar el tipo de comida. Apriete el
dial para ingresar.
5. Gire el dial para seleccionar el peso de los alimentos,
utilizando la Guía de conversión de la derecha. Por
HMHPSORVHOHFFLRQHSDUDOLEUDVOLEUDRQ]DV
Apriete el dial para ingresar.
$SULHWHHOGLDORHOERWyQ67$573$86(,1,&,$5
3$86$5SDUDFRPHQ]DUDGHVFRQJHODU
7. Gire los alimentos cuando el horno le indique TURN FOOD
29(5'$598(/7$$/26$/,0(1726
Ŷ 6DTXHODFDUQHGHVFRQJHODGDRFXEUDODViUHDVFDOLHQWHV
con pedazos pequeños de lámina de aluminio para lograr
una descongelación uniforme.
Ŷ 'HVSXpVGHGHVFRQJHODUODPD\RUtDGHODVFDUQHV
necesitan dejarse en reposo durante 5 minutos para
completar la descongelación. Asados de mayor tamaño
deben permanecer en reposo por cerca de 30 minutos.
Guía de conversión
Si se indica el peso de los alimentos en libras y onzas, se
GHEHQFRQYHUWLUODVRQ]DVDGpFLPRVGHOLEUD
Descongelación por tiempo
8WLOL]DUODIXQFLyQ7LPH'HIURVW'HVFRQJHODUSRUWLHPSRSDUD
un período seleccionado de tiempo.
$SULHWHHOERWyQ'()5267'(6&21*(/$5
*LUHHOGLDOSDUDVHOHFFLRQDU'()5267%<7,0(
'(6&21*(/$53257,(032$SULHWHHOGLDOSDUD
ingresar.
3. Gire el dial para seleccionar el tiempo que desea. Apriete
el dial para ingresar.
$SULHWHHOGLDORHOERWyQ67$573$86(,1,&,$5
3$86$5SDUDFRPHQ]DUDGHVFRQJHODU
5. Gire los alimentos cuando el horno le indique TURN FOOD
29(5'$598(/7$$/26$/,0(1726
El nivel de potencia se ajusta automáticamente a 3, pero
puede cambiarse. Para cambiar los niveles de potencia,
consulte la sección Nivel de potencia del microondas. Puede
descongelar alimentos pequeños aumentando el nivel de
potencia después de ingresar el tiempo. El nivel de potencia 7
corta el tiempo de descongelación total a cerca de la mitad; el
nivel de potencia 10 corta el tiempo total de descongelación a
cerca de un tercio. Cuando descongela a niveles de potencia
más altos, los alimentos necesitarán atención más frecuente
de la normal.
Consejos para descongelar
Utilice la función DEFROST BY FOOD TYPE
(DESCONGELACIÓN POR TIPO DE COMIDA) para carne
de res, pollo y pescado. Utilice la función DEFROST BY TIME
(DESCONGELACIÓN POR TIEMPO) para la mayoría de los
demás alimentos congelados.
Ŷ6HSXHGHQGHVFRQJHODUDOLPHQWRVFRQJHODGRVHQSDSHO
o plástico en el paquete cuando se utiliza la función
'()5267%<)22'7<3('(6&21*(/$53257,32
'(&20,'$6HGHEHQFRUWDUSHUIRUDURYHQWLODUORV
paquetes cerrados después de que se hayan descongelado
los alimentos parcialmente. Se deben descubrir
parcialmente los recipientes de almacenamiento plásticos.
Ŷ6HSXHGHQGHVFRQJHODU\FRFLQDUFRQPLFURRQGDVODV
meriendas preempacadas, de tamaño familiar, congeladas.
Si el alimento se encuentra en un recipiente de lámina de
aluminio, transfiéralo a un plato adecuado para microondas.
Ŷ/RVDOLPHQWRVTXHVHHFKDQDSHUGHUIiFLOPHQWHQRVH
deben dejar fuera del refrigerador durante más de una
KRUDGHVSXpVGHVFRQJHODUVH/DWHPSHUDWXUDDPELHQWH
promueve el crecimiento de bacterias nocivas.
Ŷ3DUDXQDGHVFRQJHODFLyQPiVXQLIRUPHGHDOLPHQWRVPiV
grandes, tales como asados, utilice la función DEFROST BY
TIME (DESCONGELACIÓN POR TIEMPO). Asegúrese que
las carnes se encuentran completamente descongeladas
antes de cocinarlas.
Ŷ&XDQGRORVDOLPHQWRVVHHQFXHQWUDQGHVFRQJHODGRV
deben encontrarse fríos pero suaves en todas las áreas. Si
aún se encuentran restos de hielo, vuélvalos a colocar en
el microondas pero por un período muy corto de tiempo o
déjelos reposar durante un par de minutos
Peso de la
Comida en Onzas
Ingrese el Peso de la Comida
(décimas de una libra)
.1
3.2
.3
.4
8.5
.6
11 .7
.8
.9
COCCIÓN POR MICROONDAS
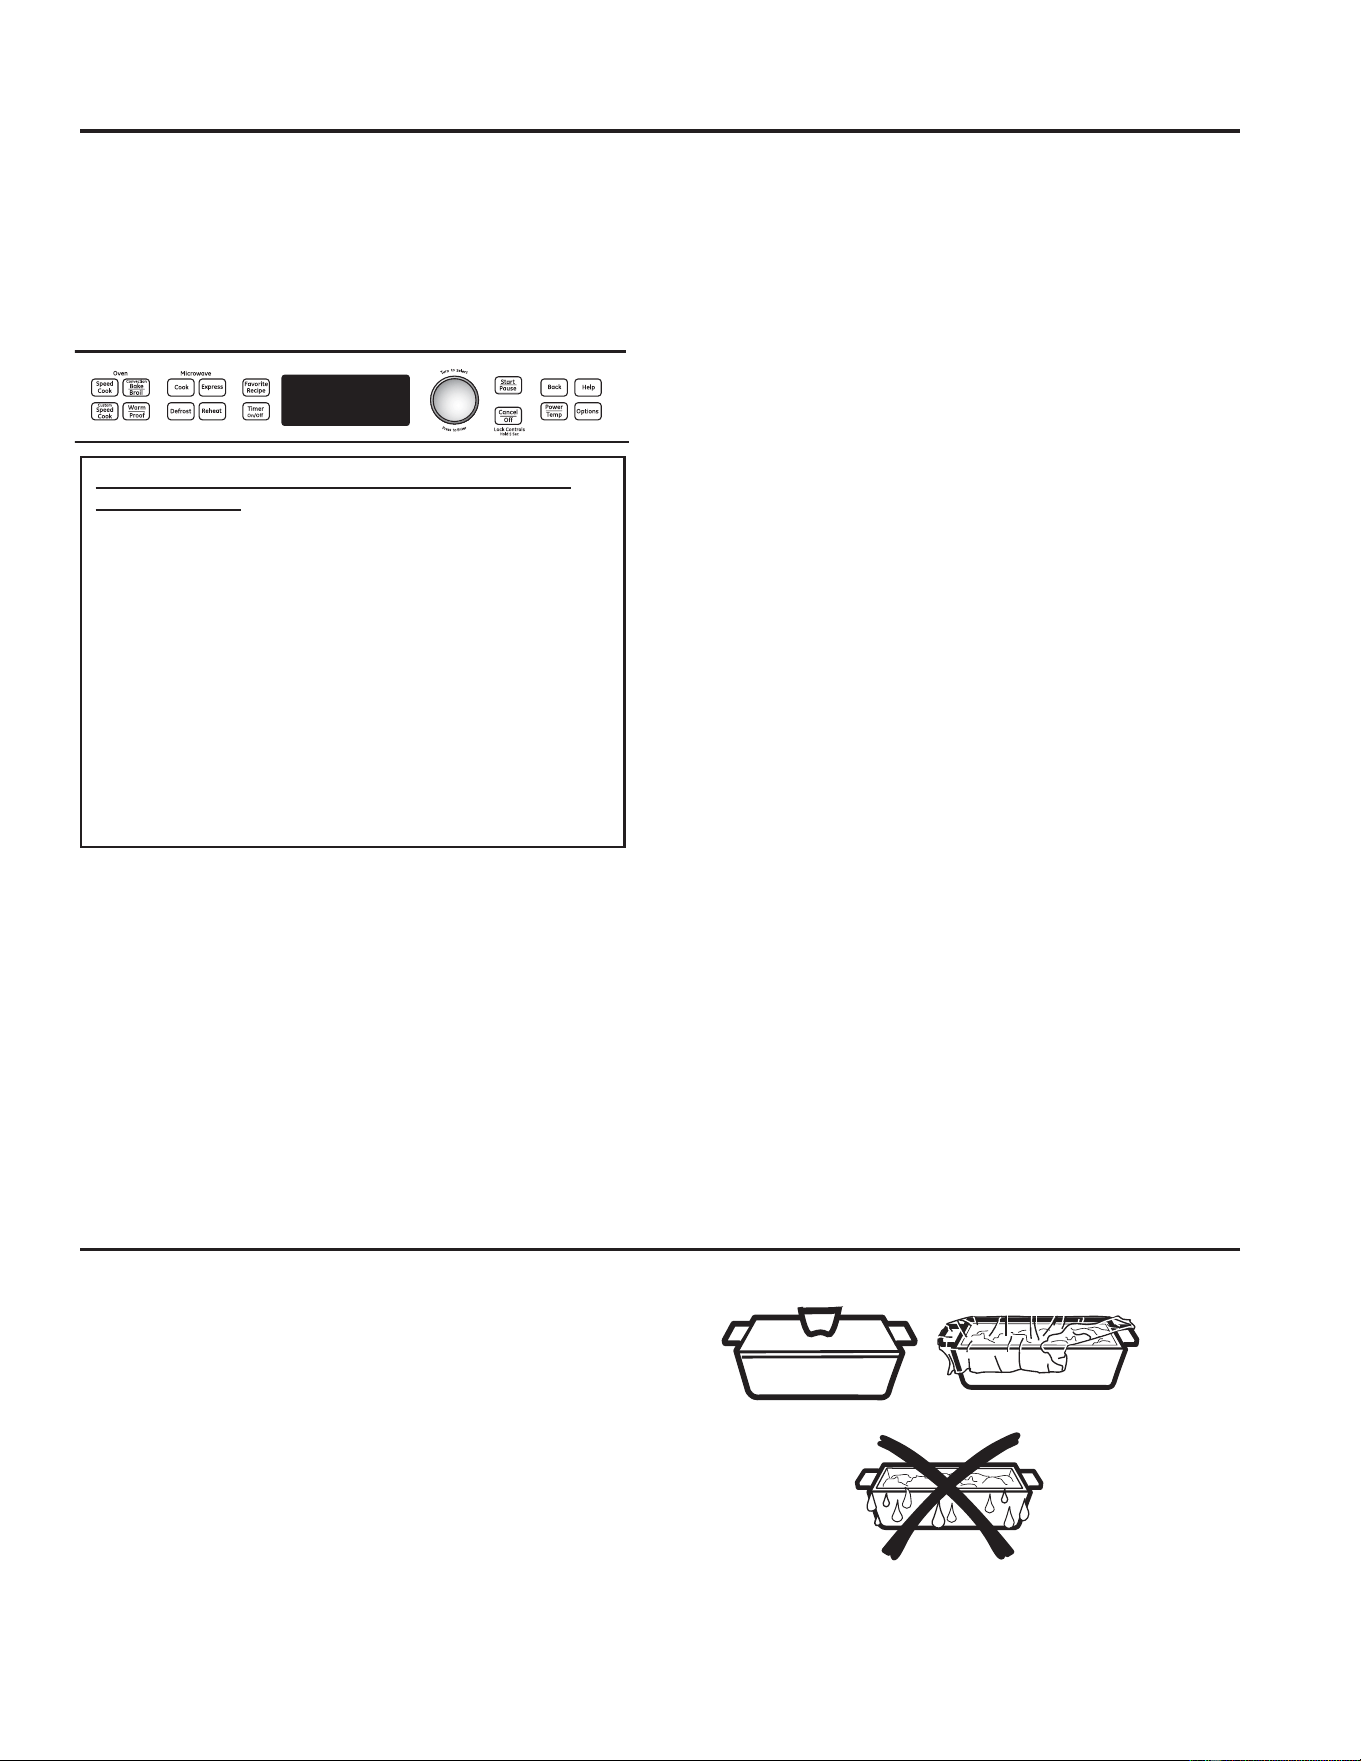
49-40687-4 23
COCCIÓN POR MICROONDAS
Cocción por microondas
Cocción de microondas por sensor
/RVUHFLSLHQWHV\WDSDVRFXELHUWDVDSURSLDGDVVRQHVHQFLDOHV
para obtener los mejores resultados con la cocción por sensor.
Ŷ8WLOLFHVLHPSUHUHFLSLHQWHVDGHFXDGRVSDUDPLFURRQGDV\
cúbralos con tapas o envoltura plástica ventilada. Nunca
utilice recipientes de plástico con sellado ajustado ya que
pueden prevenir que el vapor escape ocasionando que se
sobrecocinen los alimentos.
Ŷ$VHJ~UHVHGHTXHHOH[WHULRUGHORVUHFLSLHQWHVGHFRFLQD\
el interior del horno se encuentren secos antes de colocar
ORVDOLPHQWRVHQHOKRUQR/DVJRWDVGHKXPHGDGTXHVH
convierten en vapor pueden dar lecturas incorrectas al
sensor.
Ŷ/DVEHELGDVVHFDOLHQWDQPHMRUGHVFXELHUWDV
Cocción por sensor
/DPRGDOLGDGGHPLFURRQGDV$YDQWLXPWLHQHODIXQFLyQ
de cocción por sensor. El horno detecta automáticamente
cuándo están cocinados los alimentos y se apaga solo,
eliminando la necesidad de programar tiempos de cocción
y niveles de potencia. El horno ajusta el tiempo de cocción
automáticamente a los diferentes tipos y cantidades de
comida.
$SULHWHHOERWyQ&22.&2&,1$5\JLUHHOGLDOD&22.
%<)22'7<3(&2&&,Ï13257,32'($/,0(172
Apriete el dial para ingresar. O apriete el botón REHEAT
5(&$/(17$5
2. Gire el dial para seleccionar los alimentos que desea.
Apriete el dial para ingresar.
$SULHWHHOGLDORDSULHWH67$573$86(,1,&,$53$86$5
para iniciar la cocción.
No abra la compuerta del horno hasta que el tiempo se
encuentre en conteo regresivo en la pantalla. Si la compuerta
se encuentra abierta, ciérrela y apriete START/PAUSE
,1,&,$53$86$5LQPHGLDWDPHQWH6LORVDOLPHQWRVD~QQR
se encuentran lo suficientemente cocinados, utilice la función
&RRN%<7LPH&2&&,Ï13257,(032HQHOVHOHFWRUGH
microondas para cocinar por más tiempo.
NOTA: No utilice las funciones de sensor dos veces en
sucesión en la misma porción de comida ya que puede
dar como resultado comida severamente sobrecocinada o
quemada. Si el alimento no se cocina completamente después
GHOSULPHUFRQWHRUHJUHVLYRXWLOLFHODIXQFLyQGH&22.%<
7,0(&2&,1$53257,(032SDUDSHUPLWLUWLHPSRGH
cocción adicional.
Ŷ 6LKDHVWDGRXWLOL]DQGRODIXQFLyQGHFRFFLyQUiSLGD\HO
horno se encuentra caliente, esto puede ser una indicación
de que está demasiado caliente como para cocinar por
sensor. Por supuesto, siempre puede proceder a cocinar
FRQODIXQFLyQ&22.%<7,0(&2&&,Ï13257,(032
o Cocción rápida.
NOTA: Si el horno se encuentra demasiado caliente, cambiará
automáticamente a cocción por tiempo.
Ŷ 3DUDGLVPLQXLURDXPHQWDUHOWLHPSRGHFRFFLyQHVSHUH
hasta que se muestre el conteo de tiempo regresivo en la
SDQWDOOD/XHJRJLUHHOGLDOSDUDDxDGLURUHVWDUWLHPSR
Ŷ 6LDEUHODFRPSXHUWDPLHQWUDVVHHQFXHQWUDXWLOL]DQGR
ODIXQFLyQ6(1625&RRNLQJ&RFFLyQSRU6(1625
DSDUHFHUiHOPHQVDMH6(1625(5525(5525'(
6(1625&LHUUHODFRPSXHUWD\DSULHWHHOERWyQ67$57
3$86(,1,&,$53$86$5SDUDFRPHQ]DUQXHYDPHQWH
Notas sobre el programa de Recalentamiento:
/RVDOLPHQWRVUHFDOHQWDGRVSRGUtDQWHQHUDPSOLDVYDULDFLRQHV
de temperatura. Algunas áreas se pueden encontrar
extremadamente calientes.
(VPHMRUXWLOL]DUODIXQFLyQ&RRN%<7LPH&RFFLyQSRUWLHPSR
y no Recalentar estos alimentos:
Ŷ 3URGXFWRVGHSDQ
Ŷ /RVDOLPHQWRVTXHGHEHQUHFDOHQWDUVHFXELHUWRV
Ŷ /RVDOLPHQWRVTXHQHFHVLWDQUHYROYHUVHRYROWHDUVH
Ŷ /RVDOLPHQWRVTXHQHFHVLWDQWHQHUXQDVSHFWRVHFRR
superficie crujiente después del recalentamiento.
PROGRAMAS DE SENSOR PARA COCCIÓN POR
MICROONDAS:
Ŷ&DUQHPROLGD
Ŷ3DORPLWDVGHPDt]±3DORPLWDVGHPDt]SDUD
microondas preempacadas, de 3,0 onzas. a
3,5 onzas.
Ŷ6RSD
Ŷ$UUR]
Ŷ9HUGXUDVHQODWDGDVIUHVFDVFRQJHODGDV
Ŷ5HFDOHQWDPLHQWRGHSROOR
Ŷ5HFDOHQWDPLHQWRGHSDVWD
Ŷ3ODWRGHUHFDOHQWDPLHQWRGHFRPLGD
Ŷ5HFDOHQWDPLHQWRGHVRSD
Ŷ5HFDOHQWDPLHQWRGHYHUGXUDV
Cubiertas
Ventiladas
Seque los platos de modo
que no den lecturas
incorrectas al sensor.

24 49-40687-4
Cocción por microondas
COCCIÓN POR MICROONDAS
Cosas que son normales
Interferencia
Ŷ4XL]iVQRWHODLQWHUIHUHQFLDGH79UDGLRPLHQWUDVXWLOL]DHO
microondas. Al igual que la interferencia causada por otros
aparatos pequeños, no indica que haya un problema con el
microondas. Mueva la radio o TV a un lugar lo más alejado
posible del microondas o compruebe la posición de la
antena de radio o TV.
Luces
Ŷ/DOX]GHOLQWHULRUGHOKRUQRVHHQFHQGHUiGXUDQWHXQFLFOR
de cocción por microondas.
Calor del horno
Ŷ/RVUHFLSLHQWHVGHFRFLQDSXHGHQWRUQDUVHPX\FDOLHQWHV
debido a la transferencia de calor proveniente de los
alimentos calentados. Se requerirán guantes de cocina para
manipular los recipientes de cocina.
ŶPodría escapar vapor del rededor de la compuerta.

49-40687-4 25
Otras funciones
OTRAS FUNCIONES
“COOK TIME COMPLETED” (Tiempo de cocción completo)
Para recordarle que tiene comida en el horno, el horno
LQGLFDUiHOPHQVDMH&22.7,0(&203/(7('7,(032'(
&2&&,Ï1&203/(72\SLWDUiXQDYH]SRUPLQXWRKDVWDTXH
DEUDODFRPSXHUWDGHOKRUQRRDSULHWHHOERWyQ&$1&(/2))
%255$5$3$*$5
Revisión
Utilice esta función para revisar las selecciones de cocción
actuales que ha seleccionado.
Apriete el dial selector durante la función de cocción rápida o
la función de cocción por microondas.
OPTIONS (opciones)
Reloj:
Se debe programar el reloj antes que pueda utilizar el horno
SRUSULPHUDYH]FRQVXOWH4XLFN6WDUW,QLFLRUiSLGRSDUDREWHQHU
LQVWUXFFLRQHV
1. Para cambiar el tiempo del reloj, apriete el botón OPTIONS
23&,21(6\JLUHHOGLDOD&/2&.5(/2-$SULHWHHO
dial para ingresar.
2. Gire el dial para ajustar las horas. Apriete el dial para
ingresar.
3. Gire el dial para ajustar los minutos. Apriete el dial para
ingresar.
4. Gire el dial para seleccionar AM o PM. Apriete el dial para
ingresar.
El reloj fue diseñado para apagar la unidad cuando quede
inactiva durante 30 segundos, a fin de minimizar el uso de
la energía en suspensión. El reloj se encenderá cuando la
unidad se encuentre en uso, la puerta sea abierta, la tecla
&$1&(/2))&DQFHODU$SDJDUVHDSUHVLRQDGDRHOGLDOVHD
presionado. No hay una opción de anulación disponible basada
en los requisitos de energía DOE.
Delay Start (Inicio demorado):
/DIXQFLyQ'HOD\6WDUW,QLFLRGHPRUDGROHSHUPLWHSURJUDPDU
el horno para que inicie la cocción más tarde hasta un
tiempo máximo de 24 horas. Apriete el botón OPTIONS
23&,21(6JLUHHOGLDOSDUDVHOHFFLRQDU'(/$<67$57
,1,&,2'(025$'2\DSULHWHHOGLDOSDUDLQJUHVDU6LJDODV
instrucciones de la pantalla para ajustar el tiempo de Delay
6WDUW,QLFLRGHPRUDGR\ODIXQFLyQTXHGHVHDGHPRUDU
Beeper Volume (Volumen del indicador sonoro):
Utilice esta función para ajustar el volumen del indicador
sonoro. Incluso lo puede apagar. Apriete el botón OPTIONS
23&,21(6JLUHHOGLDOSDUDVHOHFFLRQDU%((3(592/80(
92/Ò0(1'(/,1',&$'25621252DSULHWHHOGLDOSDUD
ingresar y siga las instrucciones de la pantalla.
Scroll Speed (Velocidad del avance
del texto):
¢(VHODYDQFHGHOPHQVDMHPX\OHQWRRPX\UiSLGR"
£&iPELHOR$SULHWHHOERWyQ237,21623&,21(6JLUHHO
GLDOSDUDVHOHFFLRQDU',63/$<6&52//63(('9(/2&,'$'
'(/$9$1&('(/7(;72'(/$3$17$//$DSULHWHHOGLDO
para ingresar y siga las instrucciones de la pantalla.
Recordatorio:
Utilice esta función para programar que suene un pitido
de alarma a una hora específica del día. Apriete el botón
237,21623&,21(6JLUHHOGLDOSDUDVHOHFFLRQDU6(7
&/($55(0,1'(5$-867$5%255$55(&25'$725,2
y apriete el dial para ingresar. Gire el dial para seleccionar la
hora y apriételo para ingresarla. Gire el dial para seleccionar el
minuto y apriételo para ingresarlo. Gire el dial para seleccionar
AM o PM y apriételo para ingresarlo.
3DUDUHYLVDUHODMXVWHJLUHHOGLDO\VHOHFFLRQH6(7&/($5
5(0,1'(5$-867$5%255$55(&25'$725,2\
apriete el dial para ingresar. Gire el dial y seleccione REVIEW
5(9,6$5\DSULpWHORSDUDLQJUHVDU
3DUDFDQFHODUHODMXVWHJLUHHOGLDO\VHOHFFLRQH6(7&/($5
5(0,1'(5$-867$5%255$55(&25'$725,2\
DSULHWHHOGLDOSDUDLQJUHVDU*LUHHOGLDO\VHOHFFLRQH&/($5
%255$5\DSULHWHSDUDLQJUHVDU

26 49-40687-4
Otras funciones
OTRAS FUNCIONES
Ayuda
Utilice esta función para saber más sobre su horno y sus
funciones.
$SULHWHHOERWyQ+(/3$<8'$
2. Gire el dial para seleccionar el nombre de la función.
Apriete el dial para ingresar.
/DSDQWDOODPRVWUDUiXQDGHVFULSFLyQGHOSURJUDPDTXHKD
seleccionado.
Seguro contra niños
Puede bloquear el panel de control para prevenir que los niños
inicien accidentalmente o utilicen el horno.
$SULHWH\PDQWHQJDDSUHWDGR&$1&(/2))%255$5
$3$*$5GXUDQWHVHJXQGRVSDUDEORTXHDU\GHVEORTXHDU
las funciones.
Cuando el panel de control se encuentra bloqueado, se
PRVWUDUiHOPHQVDMH&RQWUROLV/2&.('(OFRQWUROVH
HQFXHQWUDEORTXHDGREUHYHPHQWHHQFXDOTXLHUPRPHQWRTXH
un botón o el dial es apretado o tocado.
Ventilador automático
Un ventilador automático protege al horno contra la
acumulación excesiva de calor en el interior.
Se cambia automáticamente a velocidad baja si detecta
demasiado calor.
El ventilador se apagará automáticamente cuando las piezas
internas se hayan enfriado. Puede permanecer encendido
durante 30 minutos o más después que se ha apagado el
control del horno.
Cronómetro
Utilice esta función siempre que necesite un cronómetro
multipropósito. Puede ser utilizado inclusive mientras se
encuentra el horno en funcionamiento.
$SULHWHHOERWyQ7,0(5&521Ï0(752
2. Gire el dial para seleccionar las horas. Apriete el dial para
ingresar.
3. Gire el dial para seleccionar los minutos. Apriete el dial
para ingresar.
3DUDFDQFHODUDSULHWH7,0(5&521Ï0(752
Funciones que se encuentran en la función HELP (AYUDA).
$GGLQJWLPH$xDGLUWLHPSR 'HIURVWE\:HLJKW'HVFRQJHODFLyQSRUSHVR 6HW%HHSHU9ROXPH$MXVWDUHOYROXPHQGHO
LQGLFDGRUVRQRUR
%DFN5HJUHVDU 'HOD\6WDUW,QLFLRGHPRUDGR 6HW&ORFN3RQHUHOUHORM
%DNH+RUQHDU ([SUHVV&RRN&RFFLyQ([SUHVV 6HW'LVSOD\6SHHG$MXVWDUYHORFLGDGGH
SDQWDOOD
%HYHUDJH+HDW&DOHQWDPLHQWRGHEHELGDV )DYRULWH5HFLSH5HFHWDVIDYRULWD Set/Clear Reminder $MXVWDUERUUDU
UHFRUGDWRULR
%URLO$VDU +HOS$\XGD 6ORZ&RRN&RFFLyQOHQWD
Seguro contra niños +ROG)RRG:DUP0DQWHQHUFDOLHQWHOD
FRPLGD
6RIWHQ0HOW6XDYL]DU'HUUHWLU
&DQFHO2II%RUUDU$SDJDU 2SWLRQV2SFLRQHV 6SHHG&RRN&RFFLyQUiSLGD
&RRN&RFLQDU 3RZHU7HPS3RWHQFLD7HPSHUDWXUD 6WDUW3DXVH,QLFLDU3DXVDU
&RRNE\WLPH&RFFLyQSRUWLHPSR 3URRI%UHDG$FWLYDUSDQ 7LPH&RRN7LHPSRGHFRFFLyQ\
&RRNE\)RRG7\SH&RFLQDUSRUWLSRGH
DOLPHQWR
5HKHDW5HFDOHQWDU 7LPHU2Q2II&URQyPHWUR(QFHQGLGR
$SDJDGR
&XVWRP6SHHG&RRN&RFFLyQUiSLGD
SHUVRQDOL]DGD
5HSHDWODVW5HSHWLU~OWLPR 7RDVW7RVWDU
'HIURVW'HVFRQJHODU 5HVXPH5HDQXGDU :DUP3URRI&DOHQWDU$FWLYDU
'HIURVWE\)RRG7\SH'HVFRQJHODFLyQSRUWLSR
GHDOLPHQWR
5HYLHZ5HYLVDU
'HIURVWE\7LPH'HVFRQJHODFLyQSRUWLHPSR 6HQVRU&RRNLQJ&RFFLyQSRUVHQVRU

49-40687-4 27
Mantenimiento y limpieza
MANTENIMIENTO Y LIMPIEZA
Consejos útiles
Una limpieza minuciosa ocasional con un trapo empapado de
bicarbonato sódico y agua mantendrá el interior fresco.
Asegúrese que se encuentre apagado el control del horno
antes de limpiar cualquier pieza del horno.
Interior
/LPSLHHOLQWHULRUGHOKRUQRFRQIUHFXHQFLDSDUDTXHFDOLHQWH
bien.
Se pueden remover algunas partículas con una toalla de
papel; otras pueden requerir un trapo caliente con una
solución jabonosa. Elimine las partículas de grasa con un trapo
humedecido con agua jabonosa, luego enjuague con un trapo
húmedo.
No utilice limpiadores abrasivos o utensilios puntiagudos en las
paredes del horno.
Nunca utilice un limpiador de horno comercial en ninguna
pieza del horno.
No limpie el interior del horno con esponjillas metálicas para
fregar. Pueden desprenderse piezas de la esponjilla metálica,
ocasionando una descarga eléctrica.
Base giratoria desmontable
Se debe limpiar con frecuencia el área localizada debajo de
la base giratoria para evitar olores y humo durante un ciclo de
cocción.
Si se deja caer, la base giratoria se puede romper.
/iYHODFXLGDGRVDPHQWHHQDJXDWLELDMDERQRVD6pTXHOD
completamente y vuelva a colocarla.
Para colocar la base giratoria, coloque su centro sobre el rotor
ubicado en el centro del horno y gírela hasta que se asiente
HQVXOXJDU$VHJ~UHVHGHTXHODVXSHUILFLHOLVDGHODEDVH
giratoria se encuentre colocada hacia arriba y que el centro se
HQFXHQWUHDVHQWDGRGHPDQHUDVHJXUDHQHOURWRU
Bandejas para cocinar y lámina de
hornear
Para evitar que se rompan las bandejas, deje que se enfríen
FRPSOHWDPHQWHDQWHVGHOLPSLDUODV/DYHODVEDQGHMDVHQDJXD
jabonosa tibia o en la máquina lavaplatos.
No utilice esponjillas metálicas para fregar o limpiadores
abrasivos, ya que pueden dañar el acabado. Se puede utilizar
una esponjilla cubierta de jabón para limpiar las bandejas.
Paredes, piso, ventanilla interna,
piezas de metal y plástico en la compuerta
No haga funcionar el horno sin tener
colocada en su lugar la base giratoria.
%DVHJLUDWRULD
Coloque los alimentos
directamente en la hoja para
hornear de aluminio en la
parrilla de alambre del horno
y colóquelos en la bandeja
metálica antiadherente cuando
hornee a dos niveles, ase o
tueste alimentos.
%DQGHMDGHYLGULRWUDQVSDUHQWH
para la función de microondas
%DQGHMDDQWLDGKHUHQWHGHPHWDO
para cocción rápida

28 49-40687-4
Exterior
No recomendamos utilizar limpiadores compuestos por
amoníaco o alcohol, ya que pueden dañar la apariencia del
horno. Si desea utilizar un limpiador casero común, primero
aplique el limpiador directamente sobre un trapo limpio y luego
limpie el área sucia.
Cubierta
/LPSLHHOH[WHULRUFRQXQWUDSR\DJXDMDERQRVD(QMXiJXHOD\
VpTXHOD/LPSLHODYHQWDQDFRQXQWUDSRK~PHGR
Panel de control de vidrio y compuerta
/tPSLHORVFRQXQDHVSRQMDK~PHGDOLPSLD6pTXHORVELHQ1R
utilice limpiadores en aerosol, grandes cantidades de agua
y jabón u objetos puntiagudos en el panel, ya que lo pueden
dañar.
Sello de la compuerta
Es importante mantener el área limpia en el lugar donde
la compuerta se sella contra el horno. Utilice únicamente
detergentes de acción mediana, no abrasivos aplicados con
una esponja o trapo húmedo. Enjuáguela bien.
Acero inoxidable HQDOJXQRVPRGHORV
Para limpiar la superficie de acero inoxidable, utilice agua
jabonosa templada o un limpiador o pulimento para acero
LQR[LGDEOH/LPSLHVLHPSUHODVXSHUILFLHHQODGLUHFFLyQGHO
grano. Siga las instrucciones del producto limpiador para
limpiar la superficie de acero inoxidable.
Para consultas relacionadas con la adquisición de un limpiador
o pulimento para electrodomésticos de acero inoxidable o para
conocer la ubicación del distribuidor más cercano, llame a
nuestro número gratuito, 800.626.2005 o visite GEAppliances.
com.
Mantenimiento y limpieza
MANTENIMIENTO Y LIMPIEZA
DECLARACIÓN DE INTERFERENCIA POR RADIOFRECUENCIA DE LA
FEDERAL COMMUNICATIONS COMMISSION (COMISIÓON FEDERAL DE
COMUNICACIONES) (EE.UU. ÚNICAMENTE)
Este equipamiento genera y utiliza energía de
frecuencia ISM y si no es instalado y usado de forma
adecuada, estando en estricto cumplimiento con las
instrucciones del fabricante, podrá generar interferencia
en la recepción de radio y televisión. Fue evaluado de
forma específica y se comprobó que cumple con los
límites de Equipamientos ISM, de acuerdo con la parte
18 de las Reglas de la FCC, que fueron diseñadas para
brindar una instalación residencial.
Sin embargo, no se garantiza que no se presenten
interferencias en una instalación en particular. Si este
equipamiento genera interferencias en la recepción
de radio o televisión, lo que se puede comprobar
encendiendo y apagando el equipo, se aconseja al
usuario que intente corregir la interferencia a través de
una de las siguientes medidas:
Ŷ5HRULHQWHODDQWHQDUHFHSWRUDGHODUDGLRRHO
televisor.
Ŷ5HXELTXHHO+RUQR0LFURRQGDVHQUHODFLyQDO
receptor.
Ŷ$OHMHHOKRUQRPLFURRQGDVGHODSRVLFLyQGHOUHFHSWRU
Ŷ(QFKXIHHOKRUQRPLFURRQGDVHQXQWRPDFRUULHQWH
diferente, de modo que el horno microondas y el
receptor estén en diferentes recepciones de códigos.
El fabricante no es responsable por ninguna
interferencia de radio o TV generada por modificaciones
no autorizadas sobre este horno microondas. Es
responsabilidad del usuario corregir tales interferencias.

49-40687-4 29
Problema Causas posibles Qué hacer/Explicación
LUCES
La luz durante un ciclo de
cocción rápida se atenúa y se
cicla incluso a máximos niveles
de potencia
Esto es normal. El nivel de potencia ha sido se
reduce automáticamente debido a que el horno
se encuentra caliente.
Esto es normal. El horno detecta el nivel de calor
y se ajusta automáticamente.
Luz visible alrededor la
compuerta y cubierta externa
mientras cocción rápida
Esto es normal. Cuando el horno se encuentra encendido la luz
sea visible alrededor de la compuerta y cubierta
externa.
VENTILADOR
El ventilador continúa
funcionando después de terminar
de cocinar
El horno se está enfriando. El ventilador se apagará automáticamente cuando
las piezas internas del horno se hayan enfriado.
El ventilador del horno irradia
aire caliente mientras el horno se
encuentra encendido
Esto es normal.
El ventilador se enciende
automáticamente cuando
utilizando el microondas
Esto es normal.
COCCIÓN
El horno hace sonidos inusuales
mientras se cocina
Chasquidos y ventiladores soplando son normales.
El tablero de relés está encendiendo y apagando los
componentes.
Estos sonidos son normales.
Se expulsa humo del horno
cuando abro la compuerta
/RVDOLPHQWRVWLHQHQDOWRFRQWHQLGRGHJUDVD
Pulverizador en aerosol utilizado en las bandejas.
El humo es normal cuando se cocina alimentos
con alto contenido de grasa.
La comida no está
completamente cocinada o
dorada al finalizar un programa
de cocción
/RVWLHPSRVSURJUDPDGRVSRGUtDQQRFRUUHVSRQGHUDO
tamaño o cantidad de comida que está cocinando.
Ajustar el tiempo para nivel de cocción o ajuste
las luces superiores o inferiores para asar y para
el nivel de cocción.
SENSOR ERROR (ERROR DE
SENSOR) mostrado junto con
una señal del horno
Cantidad o tipo de comida colocado en el horno no
corresponde con la programación que fue elegido.
$SULHWHHOERWyQ&$1&(/2))%255$5
$3$*$5$MXVWHHOSURJUDPDGHOKRUQR
corresponda con la comida o líquido a ser
cocinado o calentado.
Vapor no detectado por el horno porque la envoltura
plástico no se ventiló, una tapa muy ajustada estaba
sobre el plato o se cubrió un líquido.
Ventile la envoltura de plástico, utilice una tapa
más floja o destape los líquidos cuando los cocine
o caliente.
PANTALLA
La pantalla se encuentra en
blanco
El reloj fue diseñado para apagar la unidad
cuando quede inactiva durante 30 segundos,
a fin de minimizar el uso de la energía en
VXVSHQVLyQ9HUODVHFFLyQGHOUHORM
“Control is LOCKED (Control
BLOQUEADO)” aparece en la
pantalla
El control ha sido bloqueado. $SULHWH\PDQWHQJDSUHVLRQDGR&$1&(/
2))%255$5$3$*$5SDUDVHJXQGRV
para desbloquearel control.
La pantalla de control se
enciende pero el horno no
funciona
No se ha programado el reloj. Programe el reloj.
Compuerta no cerrada bien. Abra la compuerta y ciérrela bien.
%RWyQ67$573$86(QRSUHVLRQDGRGHVSXpV
de ingresar la selección de cocción.
$SULHWH67$573$86(,1,&,$53$86$5
Ya se ha ingresado otra selección en el horno
\QRVHKDDSUHWDGRHOERWyQ&$1&(/2))
%255$5$3$*$5SDUDFDQFHODUOD
$SULHWH&$1&(/2))%255$5$3$*$5
Tamaño, cantidad o tiempo de cocción no
ingresado después de la selección final.
Asegúrese que ha ingresado el tiempo
después de seleccionar.
6HDSUHWy&$1&(/2))%255$5$3$*$5
accidentalmente.
Reinicializar el programa de cocción y
DSUHWDU67$573$86(,1,&,$53$86$5
OTROS PROBLEMAS
La compuerta y el interior del
horno e sienten calientes
/DVOiPSDUDVWpUPLFDVSURGXFHQFDORULQWHQVR
en un espacio reducido.
Esto es normal. Use guantes térmicos de
cocina para sacar la comida cuando esté
lista.
El horno no enciende Un fusible en su hogar puede haberse fundido
o el interruptor de circuitos fue activado.
Reemplace el fusible o reinicie sus
interruptores de circuitos.
Consejos para la Solución de Problemas... Antes de solicitar el servicio
técnico
CONSEJOS PARA LA SOLUCIÓN DE PROBLEMAS
¡Ahorre tiempo y dinero! Primero revise los cuadros que aparecen en las siguientes páginas y es posible que no
necesite solicitar reparaciones.

30 49-40687-4
Abroche su recibo aquí. Para acceder al servicio técnico de acuerdo con
la garantía deberá contar con la prueba de la fecha original de compra.
GEAppliances.com
Todo el servicio de garantía es provisto por nuestros Centros de Servicio de Fabricación, o un técnico autorizado de Customer Care®.
Para programar una visita del servicio técnico a través de Internet, visítenos en www.geappliances.com/service_and_support/, o
OODPHDO*(&$5(6&XDQGROODPHSDUDVROLFLWDUHOVHUYLFLRWHQJDORVQ~PHURVGHVHULH\PRGHORGLVSRQLEOHV
Lo que GE Appliances no cubrirá:
Ŷ9LVLWDVGHVHUYLFLRDGRPLFLOLRSDUDHQVHxDUOHDXWLOL]DUHVWH
producto.
Ŷ,QVWDODFLyQHQWUHJDRPDQWHQLPLHQWRLQDGHFXDGRV
Ŷ3URGXFWRQRDFFHVLEOHSDUDIDFLOLWDUHOVHUYLFLRUHTXHULGR
Ŷ)DOORVGHOSURGXFWRVLKD\DEXVRPDOXVRSRUHMHPSOR
chispas dentro de horno microondas del estante metálico/
SDSHOGHDOXPLQLRRXVRSDUDRWURVSURSyVLWRVTXHORV
propuestos, o si se usa con fines comerciales.
Ŷ5HHPSOD]RGHIXVLEOHVGHOKRJDURUHLQLFLDOL]DFLyQGH
interruptores de circuitos.
Ŷ5HHPSOD]RGHERPELOODVGHODOX]GHODHVWXID
Ŷ'DxRVRFDVLRQDGRVDOSURGXFWRSRUPRWLYRGHDFFLGHQWH
incendio, inundaciones o actos fortuitos.
Ŷ'DxRVLQFLGHQWDOHVRLQGLUHFWRVFDXVDGRVSRUSRVLEOHV
defectos de este aparato.
Ŷ'DxRVFDXVDGRVGHVSXpVGHODHQWUHJD
GARANTÍA
Garantía del horno Advantium
EXCLUSIÓN DE GARANTÍAS IMPLÍCITAS
6X~QLFD\H[FOXVLYDDOWHUQDWLYDHVODUHSDUDFLyQGHOSURGXFWRFRPRVHLQGLFDHQOD*DUDQWtD/LPLWDGD/DVJDUDQWtDV
implícitas, incluyendo garantías implícitas de comerciabilidad o conveniencia sobre un propósito particular, se limitan a un
año o al período más corto permitido por la ley.
Esta garantía se extiende al comprador original y a cualquier dueño subsiguiente de productos comprados para uso hogareño dentro
de EE.UU. Si el producto está en un área donde no se encuentra disponible un Proveedor Autorizado del Servicio Técnico de GE
Appliances, usted será responsable por el costo de un viaje o se podrá requerir que traiga el producto a una ubicación del Servicio
7pFQLFRGH*($SSOLDQFHVDXWRUL]DGRSDUDUHFLELUHOVHUYLFLR(Q$ODVNDODJDUDQWtDH[FOX\HHOFRVWRGHHQYtRROODPDGDVGHOVHUYLFLRD
su hogar.
Algunos estados no permiten la exclusión o limitación de daños fortuitos o consecuentes. Esta garantía le da derechos legales
específicos y es posible que tenga otros derechos legales que varían entre un estado y otro. Para conocer cuáles son sus derechos
legales, consulte a la oficina de asuntos del consumidor local o estatal o al Fiscal de su estado.
Garante: GE Appliances
Por el período de GE Appliances Reemplazará:
Un año
Desde la fecha de
compra original
Cualquier parte del horno que falle debido a un defecto en los materiales o mano de obra.
Durante esta garantía limitada de un año, GE Appliances también proveerá, gratis, toda la
mano de obra y servicio relacionado para reemplazar la pieza defectuosa.
Un año
Desde la fecha de
compra original
El tubo magnetrón, si el tubo magnetrón falla debido a un defecto de materiales o mano de
obra. Durante esta garantía limitada de un año, usted será responsable de toda mano de
obra o costos de la reparación a domicilio.

49-40687-4 31
Notas
NOTAS

32 49-40687-4
Impreso en Corea
Soporte para el Consumidor
SOPORTE PARA EL CONSUMIDOR
Sitio Web de GE Appliances
¢'HVHDUHDOL]DUXQDFRQVXOWDRQHFHVLWDD\XGDFRQVXHOHFWURGRPpVWLFR"£,QWHQWHDWUDYpVGHO6LWLR:HEGH*($SSOLDQFHVODV
24 horas del día, cualquier día del año! Usted también puede comprar más electrodomésticos maravillosos de GE Appliances y
aprovechar todos nuestros servicios de soporte a través de Internet, diseñados para su conveniencia.
En EE.UU.: GEAppliances.com
Registre su Electrodoméstico
¡Registre su electrodoméstico nuevo a través de Internet, según su conveniencia! Un registro puntual de su producto permitirá
una mejor comunicación y un servicio más puntual de acuerdo con los términos de su garantía, en caso de surgir la necesidad.
También puede enviar una carta en la tarjeta de inscripción preimpresa que se incluye con el material embalado.
En EE.UU.: GEAppliances.com/register
Servicio Programado
El servicio de reparación de expertos de GE Appliances está a sólo un paso de su puerta. Conéctese a través de Internet y programe
su servicio a su conveniencia cualquier día del año. En EE.UU.: GEAppliances.com/ge/service-and-support/service.htm
o comuníquese al 800.432.2737 durante el horario de atención comercial.
Garantías Extendidas
Adquiera una garantía extendida de GE Appliances y conozca los descuentos especiales que están disponibles mientras su
JDUDQWtDD~QHVWiYLJHQWH/DSXHGHDGTXLULUHQFXDOTXLHUPRPHQWRDWUDYpVGH,QWHUQHW/RVVHUYLFLRVGH*($SSOLDQFHVD~Q
estarán allí cuando su garantía caduque.
En EE.UU.: GEAppliances.com/ge/service-and-support/shop-for-extended-service-plans.htm
o comuníquese al 800.626.2224 durante el horario de atención comercial.
Conectividad Remota
3DUDVROLFLWDUDVLVWHQFLDSDUDODFRQHFWLYLGDGGHUHGLQDOiPEULFDSDUDPRGHORVFRQDFFHVRUHPRWR
YLVLWHQXHVWURVLWLRZHEHQGEAppliances.com/ge/connected-appliances/ o comuníquese al 800.220.6899 en EE.UU.
Piezas y Accesorios
Aquellos individuos calificados para realizar el servicio técnico de sus propios electrodomésticos podrán solicitar el envío de
SLH]DVRDFFHVRULRVGLUHFWDPHQWHDVXVKRJDUHVVHDFHSWDQODVWDUMHWDV9,6$0DVWHU&DUG\'LVFRYHU2UGHQHKR\DWUDYpVGH
Internet durante las 24 horas, todos los días. En EE.UU.: GEApplianceparts.com o de forma telefónica al 877.959.8688 durante
el horario de atención comercial.
Las instrucciones que figuran en este manual cubren los procedimientos que serán realizados por cualquier usuario.
Otros servicios técnicos generalmente deben ser derivados a personal calificado del servicio. Se deberá tener cuidado,
ya que una reparación indebida podrá hacer que el funcionamiento no sea seguro.
Contáctenos
Si no se encuentra satisfecho con el servicio que recibió de GE Appliances, comuníquese con nosotros a través de nuestro sitio
Web con todos los detalles, incluyendo su número telefónico, o escriba a:
(Q((88*HQHUDO0DQDJHU&XVWRPHU5HODWLRQV_*($SSOLDQFHV$SSOLDQFH3DUN_/RXLVYLOOH.<
GEAppliances.com/ge/service-and-support/contact.htm