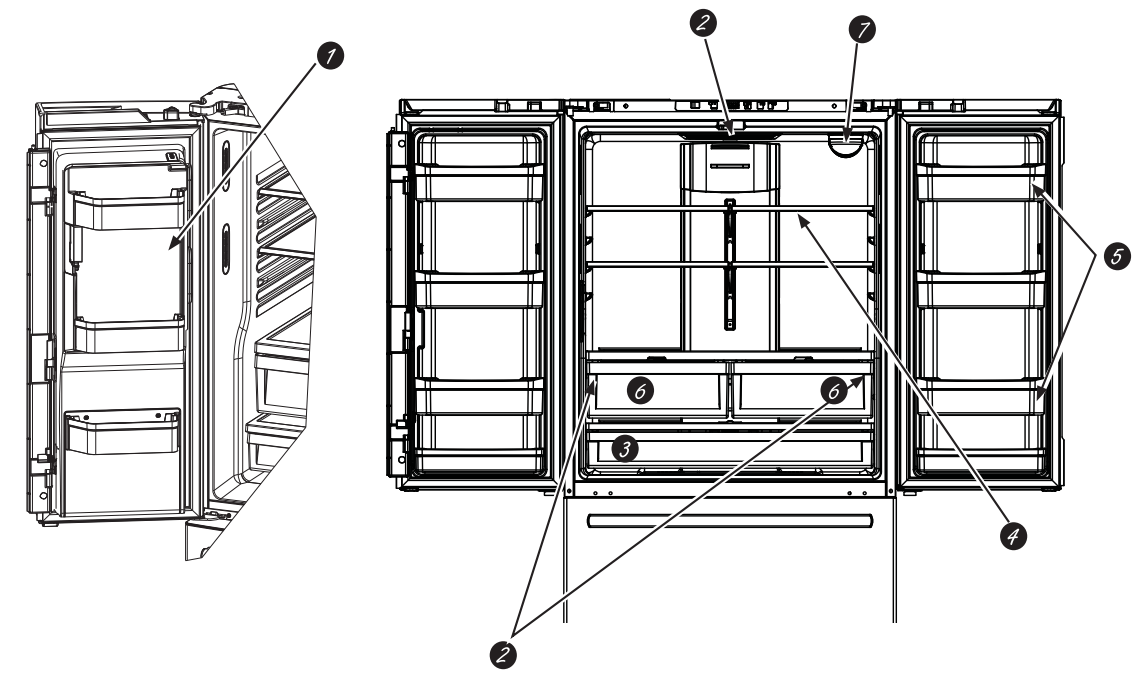
1. Space-saving icemaker (on some models) Icemaker and bin are located on the door creating more usable storage space.
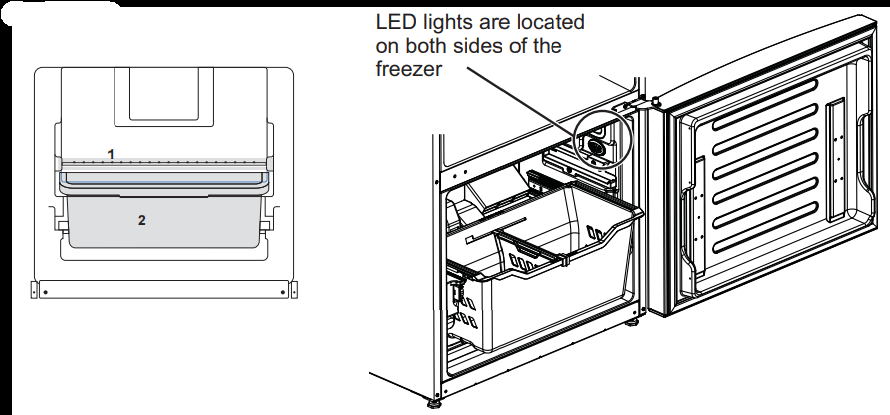
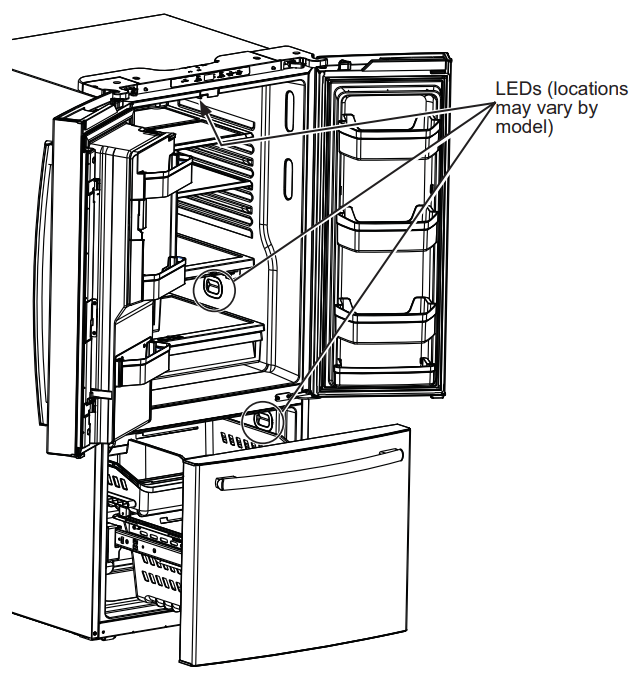
2. LED lighting
LED lights in the fresh food compartment are located at the top center and on the left and right sides of
located in the freezer; see pages 17 and 18.
3. Full-width drawer
A full-width drawer that can accommodate larger items is located at the bottom of the fresh food compartment.
4. QuickSpace™ shelf (on some models)
Functions as a normal full-sized shelf when needed and easily slides back to store tall items below.
5. Removable/adjustable door bins
Can be moved up or down to accommodate your needs.
6. Climate zone drawers
Separate pans for produce storage.
7. Water filter
Accessible for easy replacement.
Controls
Top Control (some models)
1. Freezer Compartment Temperature Control
Adjust freezer compartment temperature. The freezer temperature is preset in the factory at 0°F (-17.8°C). Allow 24 hours for temperature to stabilizeto the preset recommended setting.
2. Fresh Food Compartment Temperature Control
Adjust fresh food compartment temperature. The fresh food temperature is preset in the factory at 37°F (2.8°C). Allow 24 hours for temperature to stabilize to the preset recommended setting.
3. Water Filter
Press and hold 3 seconds to reset the Water Filter.
4. Turbo Cool
To set the TurboCool™, press the Turbo Cool pad for 3 seconds. The display will show tc. TurboCool™ rapidly cools the refrigerator compartment in order to more quickly cool foods. Use TurboCool™ when adding a large amount of the food to the refrigerator compartment, putting away foods after they have been sitting out at room temperature, or when putting away warm leftovers. It can also be used if the refrigerator has been without power for an extended period.
NOTE: The refrigerator temperature cannot be changed during TurboCool™ temperature is not affected during Turbo Cool. When opening the refrigerator door during TurboCool™, the fans will continue to run if they have cycled on.
5. Door Alarm
To set the alarm, press the Door Alarm pad. This alarm will sound if either door is open for more than 2 minutes. The beeping stops when you close the door.
NOTE: To put the refrigerator control in the OFF position, simultaneously touch the words Freezer and Fridge for 3 seconds. Power to the refrigerator cannot be disconnected by any setting on the control panel.
Changing °F to °C or °C to °F: Press and hold the "DOOR ALARM" and "FREEZER" buttons simultaneously for 5 seconds to set °C to °F or °F to °C.
Sabbath Modes
Activate Sabbath Mode to turn off the temperature control and advanced features (ex. door alarm). Depending on the model, the interior lights will be off, or on low brightness regardless of whether the door is open or closed. The compressor will run on a timed defrost when in Sabbath mode.
Depending on the model, press and hold the Alarm and Water Filter or the Alarm and Filter Status simultaneously for 5 seconds to enter and exit the Sabbath mode
The icemaker must be turned off manually during Sabbath mode. To turn off the icemaker, set the switch to the OFF position. To turn the icemaker on, set the switch to the ON position.
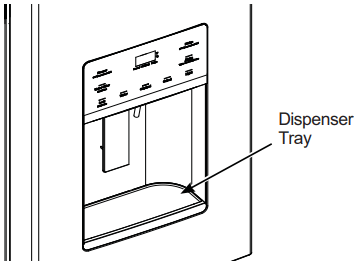
Dispenser (on some models)
Water & Ice Dispenser
Press the glass gently against the dispenser cradle. The spill shelf is not self-draining. To reduce water spotting, the shelf should be cleaned regularly.
If no water is dispensed when the refrigerator is first installed, there may be air in the water line system. Press the dispenser paddle for at least five minutes to remove trapped air from the water line and to fill the water system. To flush out impurities in the water line, throw away the first six full glasses of water.
CAUTION Laceration Hazard
Never put fingers or any other object into ice crusher discharge opening. Doing so can result in contacting the ice crushing blades and lead to serious injury or amputation
Use a sturdy glass when dispensing ice. A delicate glass may break and result in personal injury.
To remove Dispenser Tray
Pull Dispenser Tray out.
To reinstall Dispenser Tray
Push in until it is firmly in place.
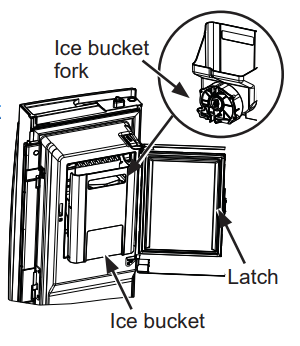
Door Ice Bin
Open left fresh food door.
Pull down latch to release bin door.
Using handhold, lift ice bucket up and out to clear locators in bottom of bin.
To replace the ice bucket, set it on the guide brackets and push until the ice bucket seats properly.
If bucket cannot be replaced, rotate the Ice Bucket Fork 1/4 turn clockwise.
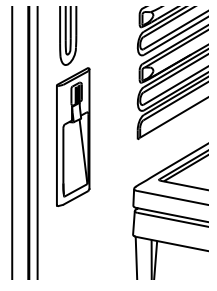
Internal Water Dispenser (on some models)
The water dispenser is located on the left wall inside the refrigerator compartment.
To dispense water:
Hold the glass against the recess
Push the water dispenser button.
Hold the glass underneath the dispenser for 2-3 seconds after releasing the dispenser button. Water may continue to dispense after the button is released.
If no water is dispensed when the refrigerator is first installed, there may be air in the water line system. Press the dispenser button for at least 5 minutes to remove trapped air from the water line and to fill the water system. During this process, the dispenser noise may be loud as the air is purged from the water line system. To flush out impurities in the water line, throw away the first 6 glassfuls of water.
NOTE: To avoid water deposits, the dispenser should be cleaned periodically by wiping with a clean cloth or sponge
Important Facts About Your Dispensers
Do not add ice from trays or bags to the door icemaker bucket. It may not crush or dispense.
Avoid overfilling glass with ice and use of narrow glasses. Backed-up ice can jam the chute or cause the door in the chute to freeze shut. If ice is blocking the chute remove the ice bucket, poke it through with a wooden spoon.
Beverages and foods should not be quick-chilled in the door icemaker bin. Cans, bottles or food packages in the storage drawer may cause the icemaker or auger to jam.
To keep dispensed ice from missing the glass, put the glass close to, but not touching, the dispenser opening.
Some crushed ice may be dispensed even though you selected CUBED ICE. This happens occasionally when a few cubes accidentally get directed to the crusher
After crushed ice is dispensed, some water may drip from the chute.
Sometimes a small mound of frost will form on the door in the ice chute. This condition is normal and usually occurs when you have dispensed crushed ice repeatedly.
Water Filter Cartridge - MWF (on some models)
Water Filter Cartridge
The water filter cartridge is located in back upper right corner of the refrigerator compartment.
When to replace the filter on models with a replacement indicator light
There is a replacement indicator light for the water filter cartridge on the dispenser. A red light will start blinking to tell you that you need to replace the filter soon.
The filter cartridge should be replaced when the replacement indicator light turns red or if the flow of water to the dispenser or icemaker decreases.
When to replace the filter on models without a replacement indicator light
The filter cartridge should be replaced every six months or earlier if the flow of water to the dispenser or icemaker decreases.
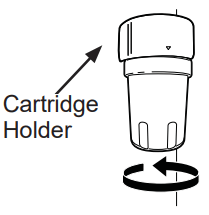
Removing the filter cartridge
If you are replacing the cartridge, first remove the old one by slowly turning it to the left. Do not pull down on the cartridge. A small amount of water may drip down.
NOTE: To reduce the risk associated with property damage due to water leakage, read and follow instructions before installation and use of this system. Installation and use MUST comply with all sate and local plumbing codes.
CAUTION If air has been trapped in the system,the filter cartridge may be ejected as it is removed. Use caution when removing.
Installing the Filter Cartridge
1. Fill the replacement cartridge with water from the tap to allow for better flow from the dispenser immediately after installation.
2. Line up the arrow on the cartridge and the cartridge holder. Place the top of the new cartridge up inside the holder. Do not push it up into the holder.
3. Slowly turn it to the right until the filter cartridge stops. DO NOT OVERTIGHTEN. As you turn the cartridge, it will automatically raise itself into position. The cartridge will move about a 1/2 turn.
4. For dispenser-only models - Run water from the dispenser for 1-1/2 gallons (about three minutes) to clear the system and prevent sputtering.
For icemaker-only models - Discard the first bin of ice to allow air to purge from the system. A newly installed filter cartridge will cause water to spurt into the icemaker body, which could lead to ice droplets around the icemaker area. NOTE: these droplets and initial ice production to appear discolored during the initial system flush. Ice color will return to normal after the first bin of ice production.
5. Press and hold the RESET WATER FILTER pad (on some models) on the dispenser for three seconds.
NOTE: A newly installed water filter cartridge may cause water to spurt from the dispenser.
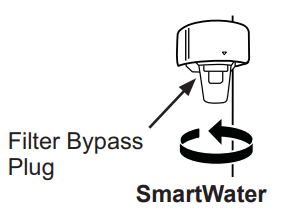
Filter Bypass Plug
You must use the filter bypass plug when a replacement filter cartridge is not available. The dispenser and the icemaker will not operate without the filter or filter bypass plug.
WARNING!
To reduce the risk associated with choking, do not allow children under 3 years of age to have access to small parts during the installation of this product. The disposable filter cartridge should be replaced every 6 months at the rated capacity, or sooner if a noticeable reduction in flow rate occurs.
For the maximum benefit of your filtration system, GE Appliances recommends the use of GE Appliances-branded filters only. Using GE-branded filters in GE Appliances and Hotpoint® refrigerators provides optimal performance and reliability. GE Appliances filters meet rigorous industry NSF standards for safety and quality that are important for products that are filtering your water. GE Appliances has not qualified non-GE-branded filters for use in GE Appliances and Hotpoint refrigerators and there is no assurance that non-GE-branded filters meet GE's standards for quality, performance and reliability.
Water Filter Cartridge - XWFE (on some models)
WATER FILTER CARTRIDGE
The water filter cartridge holder is located in the back upper-right corner of the fresh food refrigerator compartment.
WHEN TO REPLACE THE FILTER
If there is a replacement indicator light for the water filter cartridge on the dispenser, the red filter light will start blinking to tell you that you need to replace the filter soon.
- For external control models, the filter light will blink while you are dispensing until the filter is replaced.
- For top control models, the filter light will blink while the door is open until the filter is replaced.
For models that don’t have the indicator light, the filter cartridge should be replaced every six months, or earlier if the flow of water to the dispenser or icemaker decreases.
REMOVING THE FILTER
If you are replacing the filter, first remove the previous one:
Open the filter cartridge housing by squeezing the 2 front tabs and gently pulling down.
Rotate the filter down.
Gently grasp the filter and slowly turn it counterclockwise about a % turn. The filter should automatically release itself when you have rotated it far enough to the left. A small amount of water may drip down.
CAUTION If air has been trapped in the system the filter cartridge may be ejected as it is removed. Use caution when removing.
FILTER BYPASS PLUG
To reduce the risk of property damage due to water leakage, you MUST use the filter bypass plug when a replacement filter cartridge is not available. Some models do not come equipped with the filter bypass plug. The dispenser and icemaker will not operate without either the filter or bypass plug installed. The bypass plug is installed in the same way as a filter cartridge.
INSTALLING THE FILTER IN A BOTTOM FREEZER REFRIGERATOR
1. Open the filter cartridge housing by squeezing the 2 front tabs and gently pulling down.
2. Line up the ports on the filter with the ports on the filter cartridge holder, and gently insert the filter.
3. Slowly turn the filter to the right until it stops. DO NOT OVERTIGHTEN. As you turn the filter, it will automatically adjust itself into position. The filter will move about a % turn or 90 degrees, until the arrow on the filter aligns with the arrow on the filter cartridge holder.
4. Slowly push the filter up into the clips.
5. Close the filter cartridge housing by gently pushing the lid upwards until the tabs lock into place.
6. For dispenser-only models - Run water from the dispenser for 2 gallons (7.6 liters) or approximately 5 minutes to clear the system. Water may spurt out and air bubbles may be visible during this process. If water is not flowing, check to make sure the filter has been fully rotated to the right.
For icemaker-only models - Discard the first bin of ice to allow air to purge from the system. A newly installed filter cartridge will cause water to spurt into the icemaker body, which could lead to ice droplets around the icemaker area. NOTE: It is normal for these droplets and initial ice production to appear discolored during the initial system flush. Ice color will return to normal after the first bin of ice production.
7. Press and hold the RESET WATER FILTER button on the dispenser for 3 seconds. On select models, filter reset will be automatic when a new filter is installed.
Shelves and Bins
Rearranging the Refrigerator Shelves
Shelves in the refrigerator compartment are adjustable.
To remove the shelves:
Remove all items from the shelf.
Tilt the shelf up at the front.
Lift the shelf up at the back and bring the shelf out.
To replace the shelves:
While tilting the shelf up, insert the top hook at the back of the shelf in a slot on the track.
Lower the front of the shelf until the bottom of the shelf locks into place.
Quick Space Shelf (on some models)
This shelf splits in half and slides under itself for storage of tall items on the shelf below.
This shelf can be removed and replaced or relocated.
NOTE: The back half of the Quick Space Shelf is not adjustable.
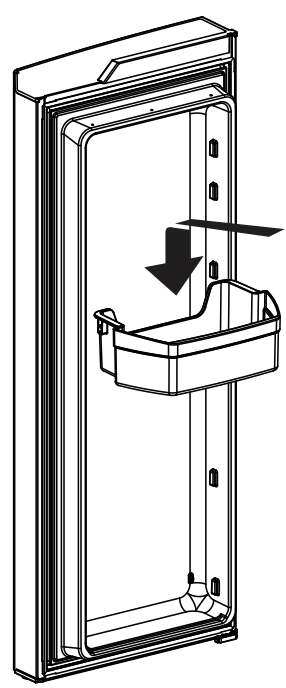
Adjustable Door Bins (on some models)
To remove: Lift the bin straight up; then pull out
To replace: Engage the bin in the molded supports on the door and push down to lock in place.
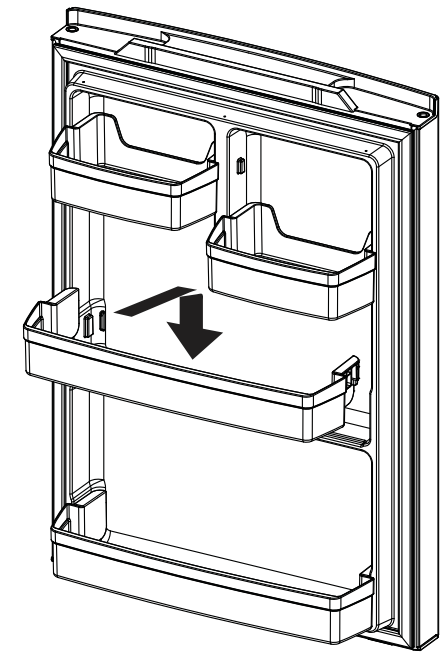
Non-Adjustable Gallon Door Bins (on some models)
To remove: Lift the bin straight up; then pull out.
To replace: Engage the bin in the molded supports on the door and push down to lock in place.
Pans
Climate Zone Pans
Keep fruits and vegetables organized in separate compartments for easy access. Excess water that may accumulate in the bottom of the drawers or under the drawers should be wiped dry.
To remove pan:
Slide the pan out to the stop position, lift the pan up and past the stop position and pull forward.
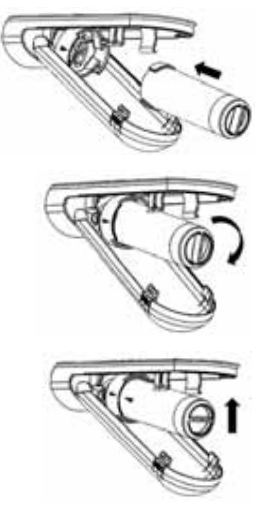
Full -Width Pan (on some models)
To remove pan:
Pull the pan out to the stop position.
Lift the front of the drawer up and out.
To replace pan:
Place back of the drawer in first and rotate drawer front down to seat it on the slides.
Push the drawer in to the closed position.
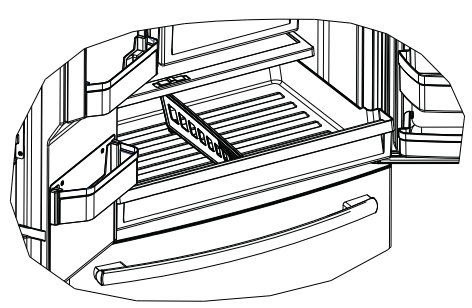
How to Remove and Replace Drawer Divider
To remove:
1. Pull the drawer out to the stop position.
2. Slide pan divider to right to release it from pan.
To replace:
Reverse steps 1 and 2 to replace drawer divider.
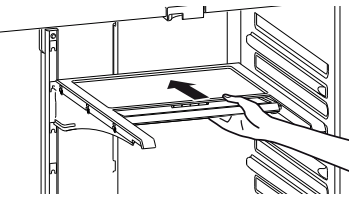
Floating Snack Pan (on some models)
This pan can be moved to the most useful location for your family's needs.
To remove, slide the pan out to the stop position, lift the pan up and past the stop position and lift it
out.
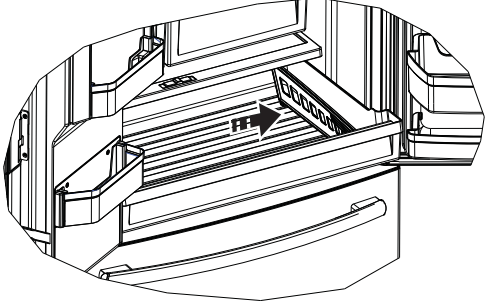
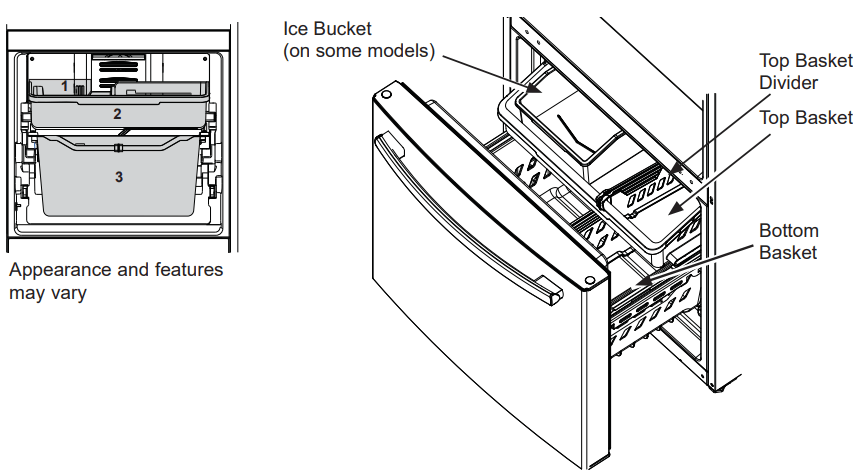
Freezer Drawer (on some models)
FREEZER BASKETS
An ice bucket in the top basket (on some models).
A top full-width basket.
A bottom full-width basket (with divider - in some models).
NOTE: Do not fill baskets higher than the rim of the basket. This may cause baskets to stick or jam when opening or closing.
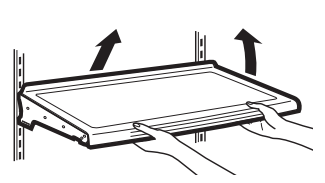
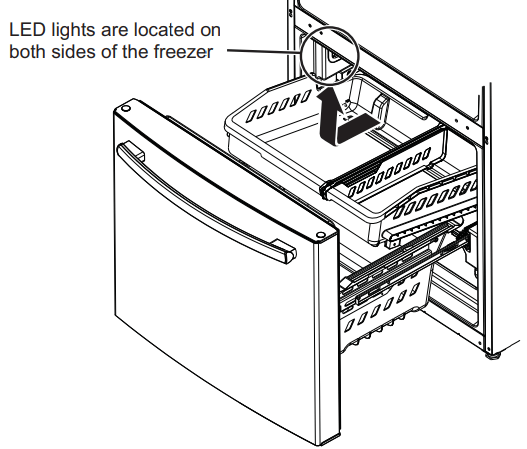
Top Basket Removal
To remove the top full-width basket on freezer drawer models:
Pull the basket out to the stop location.
Lift basket up to release it from the slides.
When replacing the basket, make sure that the basket remains mounted on the side rails and over the slides of the bottom basket.
NOTE: Always be sure to fully close this basket.
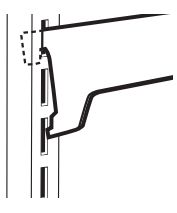
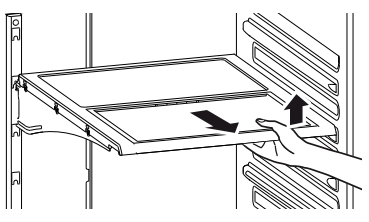
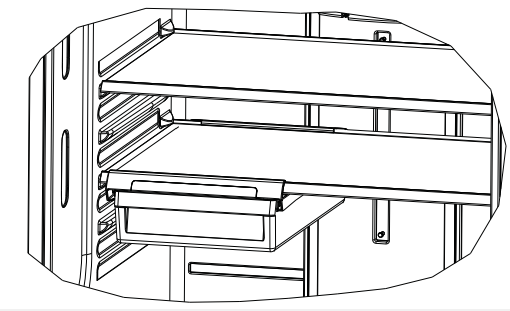
Bottom Basket Removal
To remove the bottom full-width basket on freezer drawer models:
Open the bottom freezer drawer until it stops.
Remove the top freezer basket.
The bottom freezer basket rests on the inside tabs on the drawer slides.
4ift the front of the basket and pull forward.
Release the pin from the slot to remove the basket. When replacing the bottom full-width basket, tilt the basket back and lower it into the drawer. Rotate the basket to a horizontal position and press down. Make sure to place the pin back into the slot.
NOTE: Always be sure that the basket is seated on the bracket tabs before sliding the drawer back into the freezer.
Freezer Compartment
FREEZER SHELF AND BASKET
A full-width fixed wire shelf
A full-width sliding plastic basket
NOTE higher than the rim. This may cause basket to stick or jam when opening or closing.
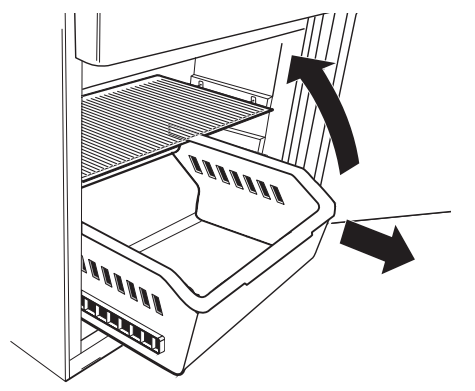
Basket Removal
To remove the full-width sliding basket on freezer door models:
Open the basket out to its full extension.
Lift up the front of the basket and pull straight out to remove.
When replacing the basket, insert the plastic basket into the lower liner rails and push back into place.
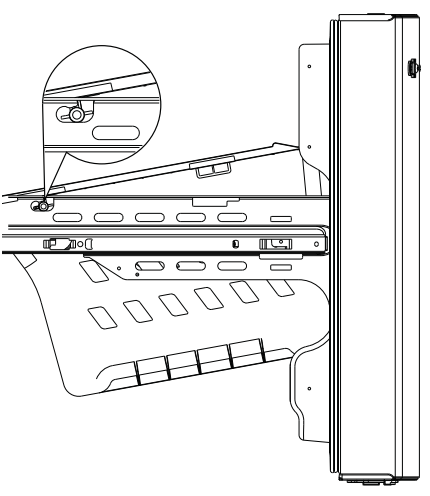
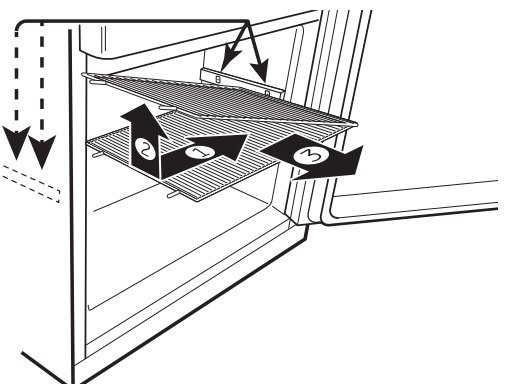
Fixed Shelf Removal
NOTE: The full-width wire shelf is not intended to slide.
To remove for cleaning, push the shelf to one side while then pull up on the opposite side and out to remove.
To replace the full-width wire shelf, insert one side of the shelf into the supports, pushing the shelf to that side until the opposite side will fit into its supports.
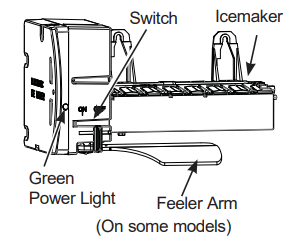
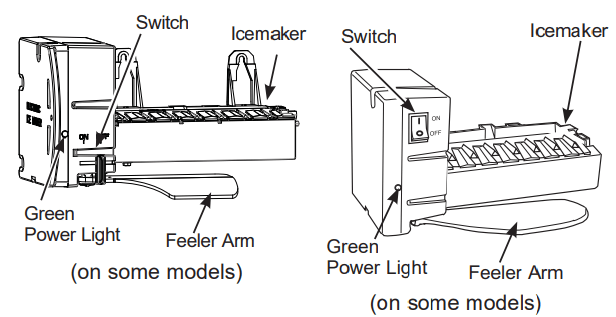
Automatic Icemaker
Automatic Icemaker (on some models)
The icemaker will produce seven cubes per cycle approximately 100-130 cubes in a 24-hour period, depending on freezer compartment temperature, room temperature, number of door openings and other use conditions.
If the refrigerator is operated before the water connection is made to the icemaker, set the switch in the OFF position.
When the refrigerator has been connected to the water supply, set the switch to the ON position.
The icemaker will fill with water when it cools to 15°F (-10°C). A newly installed refrigerator may take 12 to 24 hours to begin making ice cubes.
You may hear a buzzing sound each time the icemaker fills with water.
Throw away the first few batches of ice to allow the water line to clear.
Be sure nothing interferes with the sweep of the feeler arm.
When the bin fills to the level of the feeler arm, the icemaker will stop producing ice. It is normal for several cubes to be joined together.
If ice is not used frequently, old ice cubes will become cloudy, taste stale and shrink.
NOTE: In homes with lower-than-average water pressure, you may hear the icemaker cycle multiple times when making one batch of ice.
CAUTION To minimize the risk of personal injury, avoid contact with the moving parts of the ejector mechanism, or with the heating element that releases the cubes. Do not place fingers or hands on the automatic ice making mechanism while the refrigerator is plugged in.
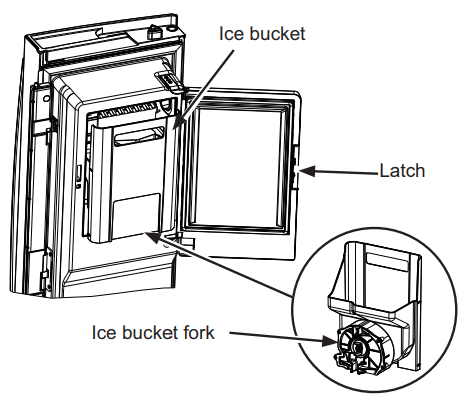
For Refrigerator Models with Icemaker in the Door
Ice Bucket and Dispenser
Open the ice box door on inside of the left door.
Pull up and out on the ice bucket in the left hand door to remove it from the compartment.
To replace the ice bucket, set it on the guide brackets and push until the ice bucket seats properly.
If bucket cannot be replaced, rotate the ice bucket fork 1/4 turn clockwise.
Icemaker can be turned on and off using this display
Care and Cleaning
Cleaning the Outside
FINGERPRINT RESISTANT STAINLESS STEEL, BLACK STAINLESS, SLATE, DARK SLATE, PAINTED - Outside surfaces, door handles, and trim
NOTE: DO NOT use Stainless Steel cleaners on the door surfaces.
IMPORTANT: The use of incorrect products may damage the outer finish of Fingerprint Resistant Stainless and Black Stainless models. Please follow these instructions and use only the appropriate items below to clean your appliance surfaces.
Clean interior/exterior surfaces with warm water, mild soap or detergent, and a soft or microfiber cloth to avoid damage
Wipe the appliance surface dry with a soft clean cloth or microfiber towel to avoid streaking or water spotting.
DO USE
DO NOT USE
Soft, clean cloth or sponge Microfiber cloth
Abrasive cloths, paper towels, scrubbing sponges (with or without soap), scouring or steel wool pads
Mild detergent mixed with warm water
Abrasive powders, liquids, or sprays
Window sprays, ammonia, or bleach
Citrus or plant oil-based cleaners
Acidic or vinegar-based cleaners
Oven cleaners
Alkaline cleaners
Stainless steel cleaners
STAINLESS STEEL - Outside surfaces, door handles, and trim
NOTE: DO NOT allow stainless steel cleaner to come in contact with any plastic parts such as trim pieces, handle hardware and liners. If unintentional contact of cleaners with plastic parts does occur, clean plastic part with a sponge and mild detergent mixed with warm water.
DO USE
DO NOT USE
Soft, clean cloth or sponge
Abrasive cloths, scrubbing sponges (with or without soap), scouring or steel wool pads
Mild detergent mixed with warm water
Approved stainless steel cleaners
Appliances parts store for approved stainless steel cleaners:
Cleaner with oxalic acid such as Bar Keepers Friend Folf
Cleanser™ can be used to remove surface rust, tarnish and small blemishes on stainless steel surfaces only
Abrasive powders or sprays
Window Sprays or Ammonia
Citrus or plant oil-based cleaners
Acidic or vinegar-based cleaners
Oven cleaners
Cleaners containing acetone (propanone)
Cleaning the Inside
Unplug the refrigerator before cleaning.
If this is not practical, wring excess moisture out of sponge or cloth when cleaning around switches, lights or controls.
Use an appliance wax polish on the inside surface between the doors.
Use warm water and baking soda solution—about a tablespoon (15 ml) of baking soda to a quart (1 liter) of water. This both cleans and neutralizes odors. Rinse and wipe dry.
CAUTION: Do not clean glass shelves or covers with warm water when they are cold. Glass shelves and covers may break if exposed to sudden temperature changes or impact such as bumping or dropping. Tempered glass is designed to shatter into many small pieces if it breaks.
Behind the Refrigerator
Be careful when moving the refrigerator away from the wall. All types of floor coverings can be damaged, particularly cushioned coverings and those with embossed surfaces.
Raise the leveling legs located at the bottom front of the refrigerator.
Pull the refrigerator straight out and return it to position by pushing it straight in. Moving the refrigerator in a side direction may result in damage to the floor covering or refrigerator.
Lower the leveling legs until they touch the floor.
When pushing the refrigerator back, make sure you don’t roll over the power cord or water supply line.
Preparing for Vacation
For long vacations or absences, remove food and unplug the refrigerator. Clean the interior with a baking soda solution of one tablespoon (15 ml) of baking soda to one quart (1 liter) of water. Leave the doors open.
If the temperature can drop below freezing, have a qualified service technician drain the water supply system to prevent serious property damage due to flooding.
Turn refrigerator off or unplug the refrigerator.
Empty ice bucket
Turn water supply off
If you cut the water supply off, turn off the icemaker.
Upon returning from vacation:
Replace the water filter.
Run 2 gallons of water through the cold water dispenser (about 5 minutes) to flush the system.
Preparing to Move
Secure all loose items such as shelves and drawers by taping them securely in place to prevent damage.
When using a hand truck to move the refrigerator, do not rest the front or back of the refrigerator against the hand truck. This could damage the refrigerator.
Handle only from the sides of the refrigerator.
Be sure the refrigerator stays in an upright position during moving.
Replacing the Lights
There is LED lighting in the fresh food compartment at the top center and on the left and right sides above the climate zone pans on the french door models.
LED lighting is located at the top of the fresh food compartment on the single door models.
LED lights are also located at the top of the left and right sides of the freezer in all models.
An authorized technician will need to replace the LED light.
Troubleshooting
Problem
Possible Causes
What to Do
Refrigerator does not operate
Refrigerator in defrost cycle.
Wait about 30 minutes for defrost cycle to end
Either or both controls set to OFF
Set the controls to a lower temperature setting.
Refrigerator is unplugged.
Push the plug completely into the outlet.
The fuse is blown/circuit breaker is tripped.
Replace fuse or reset the breaker
Refrigerator is in showroom mode.
Unplug the refrigerator and plug it back in.
Vibration or rattling (slight vibration is normal)
Leveling legs need adjusting.
See Level the refrigerator
Motor operates for long periods or cycles on and off frequently. (Modern refrigerators with more storage space operating time. They start and stop often to maintain even temperatures.)
Normal when refrigerator is first plugged in.
Wait 24 hours for the refrigerator to completely cool down
Often occurs when large amounts of food are placed in refrigerator
This is normal.
Door left open
Check to see if package is holding door open
Hot weather or frequent door openings.
This is normal.
Temperature controls set at the coldest setting.
See Controls section
Refrigerator or freezer compartment too warm
Temperature control not set cold enough.
See Controls section
Warm weather or frequent door openings.
Set the temperature control one step colder.
See Controls section
Door left open
Check to see if package is holding door open
Frost or ice crystals on frozen food (frost within package is normal)
Door left open
Check to see if package is holding door open
Too frequent or too long door openings.
This is normal
Divider between refrigerator and freezer compartments feels warm
Automatic energy saver system circulates warm liquid around front edge of freezer compartment
This helps prevent condensation on the outside
Automatic icemaker does not work
Icemaker switch is in the OFF position.
Set the switch to the ON position.
Water supply turned off or not connected.
Installing the water
Freezer compertment too warm
Wait 24 hours for the refrigerator to completely cool down.
Piled up cubes in the storage bin cause the icemaker to shut off.
Level cubes by hand.
Ice cubes stuck in icemaker
Turn off the icemaker, remove cubes, and turn the icemaker back on.
Filter is not properly installed
Filter water leak
Replace filter or make sure the water filter is properly installed
Freezer cooling, fresh food not coolingcooling
Normal, when refrigerator first plugged in or after extended power outage
Wait 24 hours for temperature in both compartments to reach selected temperatures
Ice dispenser opens after closing freezer drawer
Normal
The ice dispenser door may open after closing freezer door to allow access
Ice cubes hhave ordor/taste
Ice storage bin needs cleaning
Empty and wash bin. Discard old cubes
Food translitting odor/taste to ice cubes
Wrap foods well.
Interior of refrgerator needs cleaning
See Care and Cleaning section
Small or hollow cubes
Water filter clogged.
Replace filter cartridge with new cartridge or with plug.
Slow ice cube freezing
Door left open
Check to see if package is holding door open
Temperature control not set cold enough.
See Controls section
Frequent “buzzing sound”
Icemaker switch is in the on position but the water supply to the refrigerator has not been connected.
See the switch to the off position. Keeping it in the on position will damage the water valve
Orange glow in the freezer
Defrost heater is on
This is normal.
Water has poor taste/odor
Water dispenser has not been used for a long time.
Dispense water intil all water in system is replenished
Water in first glass is warm
Normal when refrigerator is first installed.
Wait 24 hours for the refrigerator to completely cool down
Water dispenser has not been used for a long time.
Dispense water until all water in system is replenished
Water system has been drained.
Allow several hours for replenished supply to chill
Water dispenser does not work
Water supply line turned off or not connected.
Installing the water
Water filter clogged
Replace filter cartridge or remove filter and install plug.
Air may be trapped in the water system.
Press the dispenser arm for at least two minutes.
Dispenser is LOCKED
Press and hold the LOCK pad for 3 seconds
Water spurting from dispense
Newly-installed filter cartridge.
Run water from the dispenser for 3 minutes (about one and a half gallons)
Water is not dispensed but icemaker is working
Water in reservior is frozen
Call for service.
Refrigerator control setting is too cold.
Set to a warmer setting.
No water or ice cube production
Supply line or shutoff valve is clogged.
Call a plumber
Water filter clogged.
Replace filter cartridge or remove filter and install plug
Filter is not properly installed
Filter water leak
Replace filter or make sure the water filter is properly installed
Refrigerator has odor
Foods transmitting odor to refrigeator
Foods with strong odors should be tightly wrapped. Keep an open box of baking soda in the refrigerator; replace every three months
Interior needs cleaning
See care and cleaning section
Moisture forms on outside of refrigerator
Not unusual during periods of high humidity.
Wipe surface dry.
Moisture collects inside (in humid weather, air carries moisture into refrigerator when doors are opened)
Too frequent or too long door openings.
This is normal.
Due to the higher humidity in the refrigerator, you may on occasion experience fog or small amounts of moisture in the refrigerator compartment.
This is normal and may come and go as different food loads and environmental conditions change.
Wipe dry with a paper towel if desired.
Interior light does not work
No power at outlet.
Replace fuse or reset the breaker
LED lights are out
Call Service
Hot air from bottom of refrigerator
Normal air flow cooling motor. In the refrigeration process, it is normal that heat be expelled in the area under the refrigerator. Some floor coverings are sensitive and will discolor at these normal and safe temperatures.
This is normal.
Refrigerator never shuts off but the temperatures are OK
Adaptive defrost keeps compressor running during door openings.
This is normal. The refrigerator will cycle off after the door remains closed for 2 hours.
Refrigerator is beeping
Close door.
Door not closing properly
Door gasket on hinge side sticking or folding over.
Apply paraffin wax to the face of the gasket.
Actual temperature not equal to Set temperature
Unit just plugged in.
Allow 24 hours for system to stablilize
Door open for too long
Allow 24 hours for system to stablilize
Warm food added to refrigerator.
Allow 24 hours for system to stablilize
Defrost cycle is in process
Allow 24 hours for system to stablilize
Door/drawer does not close by itself
Leveling legs need adjusting.
See level the refrigerator
Freezer door/drawer pops open when refrigerator door is closed
This is normal if, after popping open, the freezer door/drawer closed on its own.
This indicates that there a good seal on the freezer door/drawer. If the freezer door/drawer does not automatically close after popping open, then see the Problem: Door/drawer does not close by itself, above
Food freezing in the refrigerator
the back of the refrigerator.
Move the food away from the air vent
Refrigerator control is set too cold.
Move the refrigerator control to a warmer temperature setting one increment at a time
Water is leaking from dispenser
Glass not being held under the dispenser long enough after button is released.
Hold the glass underneath the dispenser for 2–3 seconds after releasing the dispenser button. Water may continue to dispense after the button is released
Air may be present in the water line system, causing water to drip after being dispensed
Dispense water for at least 2 munites to remove air from system.
My display is showing tc
Turbo Cool function is activated.
See Controls section
Water filter indicator light changed color
This is normal.
See Water Filter Cartridge Section
Water filter indicator light remains red even after replacing the water filter
Improperly installed filter
Leak is detected
Using expired filter
Verify you have the XWFE filter and not XWF
Verify no scratches or damage to filter label. Replace filter if label shows damage
Water filter indicator must be reset (on some models).
Press and hold the WATER FILTER pad for 3 seconds
Water filter indicator light is not lit
This is normal. The filter cartridge should be replaced when the replacement indicator light turns red
See Water Filter Cartridge - MWF or XWFE
Handle is loose / handle has a gap
Handle needs adjusting.
Attach handle
Refrigerator doors are not even
Door needs realiging
See Level
Baskets stick or jam when opening or closing
Baskets are too full
To open: remove some of the products from the basket when opened as far as possible. Readjust the products left in the basket and try to open the basket again.
To close: readjust products in the basket or remove any product that is above the rim of the basket and close the basket
Filter Status Indicator LED turns red
Filter reaching expired state or expired
Press the Filter Status pad to show remaining filter life.
If the display shows 0%, the filter needs to be replaced.
When the unit has detected a new filter (a filter has been replaced) the Filter Status LED will flash 3 times and then remain off to indicate the filter was successfully replaced
LEAK or scrolling “LEAK” on the display
Water is disable
Filter Status indicator LED flashing red
Buzzer sound
Filter leak detected
Replace filter.
Wipe off the filter/surrounding area if there is any water from filter replacement.
“Err” on the display
Water is disable
Filter Status indicator LED flashing red
Buzzer sound
Filter is not detected
No communication with filter
Verify you have the XWFE filter and not the XWF.
Verify there are no scratches or filter label damage.
Replace filter if filter label shows damage.
Refrigerator beeps when pressing dispenser paddle
Filter is not properly installed
Filter water leak
Replace filter or make sure the water filter is properly installed