User Manual
INSTALLATION & ASSEMBLY INSTRUCTIONS
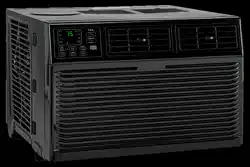
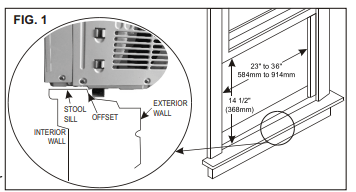
USED FOR 8K
Some assembly is required for your new air conditioner. Please read and follow these instructions carefully.
- This air conditioner is designed to be installed in a standard double-hung window with a window width between 23” and 36” (584 mm - 914 mm).
- The air conditioner can be installed without the accordion panels to fit in a narrow window opening. See the window dimensions.
- The Lower Sash (the lower part of the window that moves up and down) must allow for 14.5” of vertical clearance when open. (See FIG. 1).
- All supporting parts must be secured to firm wood, masonry, or metal.
- The electrical outlet must be within reach of the power cord.
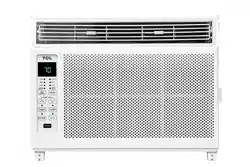
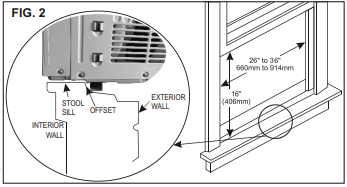
USED FOR 10K/12K
Some assembly is required for your new air conditioner. Please read and follow these instructions carefully.
- This air conditioner is designed to be installed in a standard double-hung window with a window width between 26” and 36” (660 mm - 914 mm).
- The air conditioner can be installed without the accordion panels to fit in a narrow window opening. See the window dimensions.
- The Lower Sash (the lower part of the window that moves up and down) must allow for 16” of vertical clearance when open. (See FIG. 2).
- All supporting parts must be secured to firm wood, masonry, or metal.
- The electrical outlet must be within reach of the power cord.
NOTE: Save the product packaging and installation instructions for future reference. Store the air conditioner in the product box when not in use for an extended period of time.
Top Rail Assembly (Only used for 8K)
The top rail must be assembled prior to installing the air conditioner in the window.
Tools Needed: Phillips Screw Driver
Attaching the Top Rail to the Air Conditioner
- Remove the air conditioner from the box and place on a hard flat surface.
- Remove top rail from the bottom of the packaging material as shown in FIG. A.
- Align the hole in the top rail with those in the top of the unit as shown in FIG. B.
- Secure the top rail to the unit with the 3/8" screws as shown in FIG. C.
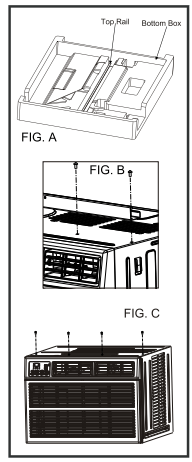
NOTE: For safety reasons, all 4 screws must be used to attach the top rail.
How to Install
Top Rail and Sliding Panels at each side are offset to provide the proper pitch of 5/16" to the rear of the air conditioner.
1 Place unit on floor, a bench or a table. There is a Left and Right Window Filler Panel - be sure to use the proper panel for each side.When installed the flange for securing the panel in place to the window sill will be facing into the room.
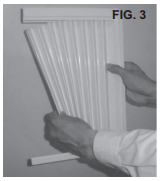
A. Hold the Accordion Panel in one hand and gently pull back the center to free the open end. See Figure 3.
B. Slide the free end of the panel into the cabinet as shown in Figures 4. Slide the panel down. Be sure to leave enough space to slip the top and bottom of the frame into the rails on the cabinet.

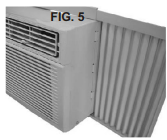
C. Once the panel has been installed on the side of the cabinet, make sure it sits securely inside the frame channel by making slight adjustments. Slide the top and bottom ends of the frame into the top and bottom rails of the cabinet. Figure 5.
D. Slide the panel all the way in and repeat on the other side.
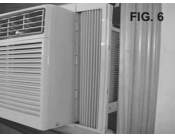
2 Keeping a firm grip on the air conditioner, carefully place the unit into the window opening so the bottom of the air conditioner frame is against the window sill (FIG. 6). Carefully close the window behind the top rail of the unit. (It is suggested to keep a downward angle so accumulated rain water can drain out from the backside of the unit.)
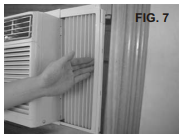
3 Extend the side panels out against the window frame (FIG. 7).
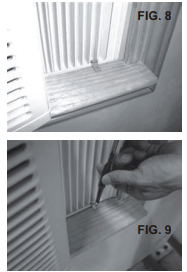
4 Place the frame lock between the frame extensions and the window sill as shown (ig. 8). Drive 3/4” (19 mm) locking screws through the frame lock and into the sill (FIG. 9). NOTE: To prevent window sill from splitting, drill 1/8” (3 mm) pilot holes before driving screws.
5 Drive 1/2” (12.7mm) locking screws through frame holes into window sash (FIG. 10/11).
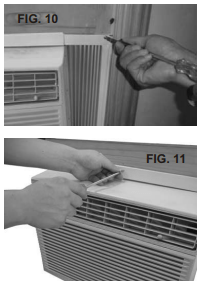
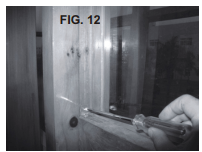
6 To secure lower sash in place, attach right angle sash lock with 3/4” 19 mm) screw as shown (FIG. 12).
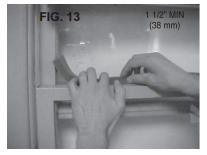
7 Cut foam seal and insert in the space between the upper and lower sashes (FIG. 13).
If AC is Blocked by Storm Window
Add wood as shown in FIG. 14, or remove storm window before air conditioner is installed.
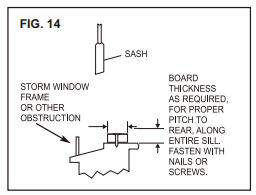
If storm window frame must remain,be sure the drain holes or slots are not caulked or painted shut. Accumulated rain water or condensation must be allowed to drain out.
Removing AC From Window
- Turn AC off, and disconnect power cord.
- Remove sash seal from between windows and unscrew Safety lock.
- Remove screws installed through frame and frame lock.
- Close (slide) side panels into frame.
- Keeping a firm grip on air conditioner, raise sash and carefully “rock” air conditioner backward to drain any condensate water in base of unit. Be careful not to spill any remaining water while lifting unit from window. Store parts WITH air conditioner.
AIR CONDITIONER USE
Operating your air conditioner properly helps you to obtain the best possible results.
This section explains proper air conditioner operation.
IMPORTANT:
- lf you turn off the air conditioner, wait at least 3 minutes before turning it back on. This prevents the air conditioner from blowing a fuse or tripping a circuit breaker.
- Do not try to operate your air conditioner in the cooling mode when outside temperature is below 65°F (18°C). The inside evaporator coil will freeze up, and the air conditioner will not operate properly.
NOTE: In the event of a power failure, your air conditioner will operate at the previous settings when the power is restored.
USING YOUR AIR CONDITIONER
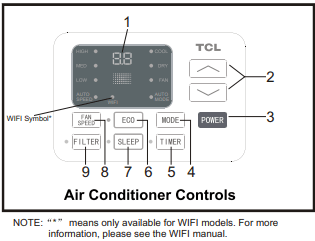
Electronic Control Panel & Remote Control
NOTE: This display always shows the room temperature in Fan Mode except when setting the Timer.
Normal Operating Sounds
- You may hear a pinging noise caused by water hitting the condenser, on rainy days, or when the humidity is high. This design feature helps re- move moisture and improve efficiency.
- You may hear the thermostat click when the com- pressor cycles on and off.
- Water will collect in the base pan during rain or days of high humidity. The water may overflow and drip from the outside part of the unit.
- The fan may run even when the compressor is not on.
1 Digital Display: When the timer is not in use, the operation mode and the set temperature will be displayed. Time will be displayed under the timer setting.
2  Button: Use these buttons on the control panel and remote to increase or decrease the Set Temperature or Timer.
Temperature range: 61°F ~88°F or 16°C~31°C.
3 Power Button: Turn the air conditioner on and off.
4 Mode Button: Press the mode button to cycle through the various modes: Cool, Dry, Fan and Auto.
Cool Mode: The cooling function allows the air conditioner to cool the room and at the same time reduces air humidity. Press the MODE button to activate the cooling function. To optimize the function of the air conditioner, adjust the temperature and the speed by pressing the button indicated.
Dry Mode: This function reduces the humidity of the air to make the room more comfortable. Press the MODE button to set the DRY mode. An automatic function of alternating cooling cycles and air fan is activated.
Fan Mode: This function only works when the air conditioner is vented. Press the MODE button to set the FAN mode. With pressing the FAN SPEED button, the speed changes in the following sequence: Hi, Med and Lo in FAN mode.
Auto Mode: In AUTO mode the unit automatically chooses the mode of operation (COOL,DRY or FAN).In this mode the temperature will be set according to the room temperature (tested by the temperature sensor which is incorporated in the indoor unit.).
5 Timer Button: Use these buttons onthe control panel and remote to set the Timer.
Timer Off: The timed stop is programmed by pressing TIMER button. Set the rest time by pressing the button until the rest time displayed is to your demand then press TIMER button again.
Timer On: When the unit is off, press TIMER button at the first time, set the temperature with pressing the button . Press TIMER button at the second time, set the rest time with pressing the button. Press TIMER button at the third time, confirm the setting, then it will show on the display.
Note: It can be set to automatically turn off or on in 0.5-24 hours. Each press of the buttons will increase or decrease the timer. The Timer can beset in 0.5 hours increment below 10 hours and 1 hourincrement for 10 hours or above. The SET light will turn on while setting. To cancel the set function, press the TIMER button again.
6 Eco Button: When the unit isin ECO mode, the light will turn on. In ECO mode, the unit will turn off once the room is cooled to the user-set temperature.
The unit will turn back on when the room temperature rises above the user-set temperature. Before the compressor starts, the fan motor will run for a while, then it will stop for a while, and will repeat to provide amuch more comfortable feeling and save energy.
7 Sleep Button: Press the SLEEP button, all of the display lights will turn off after a while, but the Sleep light is always on. In SLEEP mode, the air conditioner will automatically adjust the temperature and fan speed to make the room more comfortable during the night. The set temperature will automatically raise every 30-60 minutes, and at most change six times until the set temperature is 81 or 82°F.
8 Fan Speed Button: Press the FAN SPEED button to choose the fan speed options. You can choose Hi, Med, Lo or auto speed in COOL mode and choose Hi, Med, Loin FAN mode.
9 Filter Button: When the Filter Check light is off, it is not necessary to press the Filter Check button. When the Filter Check lightis on, you can turn off the light by pressing the Filter Check button. After the fan motor works for 500 total hours, the Filter Check light will turn on to remind the user to clean the filter.
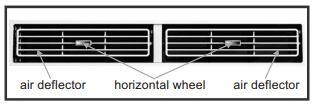
10 Directional Louvers: To direct the airflow, use the horizontal wheel to control the horizontal direction, and use the air deflectors to control the vertical direction.
OPERATING YOUR AIR CONDITIONER
REMOTE CONTROL
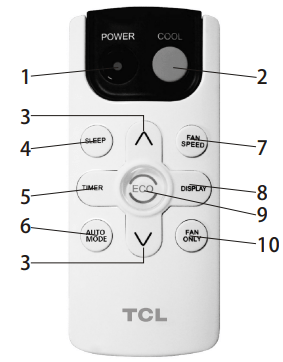
1 Power: Turn the air conditioner on and off. incorporated in the indoor unit.).
2 Cool: Press the COOL button to COOL mode. choose the fan speed options. You can choose
3 : Use these buttons on the control panel and remote to increase or decrease the Set Temperature or Timer. Temperature range: 61°F~88F or 16°C ~31°C.
4 Sleep: Press the SLEEP button, all of the display lights will turn off after a while, but the Sleep light is always on. In SLEEP mode, the air- conditioner will automatically adjust the tempera- ture and fan speed to make the room more comfor- table during the night. The set temperature will automatically raise every 30-60 minutes and at most change six times until the set temperature is 81 or 82°F.
5 Timer: Use these buttons on the control panel and remote to set the Timer.
Timer Off: The timed stop is programmed by pressing TIMER button. Set the rest time by pressing the button “ until the rest time displayed is to your demand then press TIMER button again.
Timer On: When the unit is off, press TIMER button at the first time, set the temperature with pressing the button or “ ”. Press“
  ” TIMER button at the second time, set the rest time with pressing the button or “”. Press“” TIMER button at the third time, confirm the setting, then the rest time to next automatical switching-on could be read on the display of the machine.
Note: It can be set to automatically turn off or on in 0.5-24 hours. Each press of the “” “” buttons will increase or decrease the timer. The Timer can be set in 0.5 hours increment below 10 hours and 1 hour increment for 10 hours or above. The SET light will turn on while setting. To cancel the set function, press the TIMER button again.
6 Auto Mode: In AUTO mode the unit automatically chooses the mode of operation(COOL,DRY or FAN). In this mode the temperature will be set automatically according to the room temperature (tested by the temperature sensor which is incorporated in the indoor unit.).
7 Fan Speed: Press the FAN SPEED button to Hi, Med, Lo or auto speed in COOL mode and choose Hi, Med, Lo in FAN mode.
8 Display: To press the DISPLAY button, it can switch off/on all lights or LED display.
9 Eco: When the unit is in ECO mode, the light will turn on. In ECO mode, the unit will turn off once the room is cooled to the user set temperature. The unit will turn back on when the room temperature rises above the user set temperature. Before the compressor starts, the fan motor will run for a while, then it will stop for a while, and will repeat to provide a much more comfortable feeling and save energy.
10 Fan Only: Press the Fan Only button to FAN ONLY mode.
CARE AND CLEANING
Clean your air conditioner to keep it looking new and to minimize dust build up.
Air Filter Cleaning
The air filter should be checked at least once every month to see if it needs cleaning. Trapped particles and dust can build up in the filter and may decrease airflow as well as cause the cooling coils to accumulate frost. To clean the air filter:
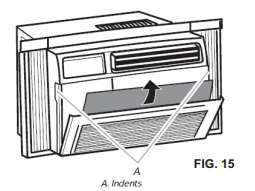
- Remove the filter by pulling down on the in- dents of the filter door on the front of the unit. (See FIG. 15)
- Wash the filter using liquid dish soap and warm water. Rinse the filter thoroughly. Gently shake the filter to remove excess water.
- Let the filter dry completely before placing it into the air conditioner.
- If you do not wish to wash the filter, you may vacuum the filter to remove the dust and other particles.
Wear and Tear
To minimize wear and tear on the air condi- tioner, always wait at least 3 minutes before changing modes. This will help prevent the compressor from overheating and the circuit breaker from tripping.
Cabinet Cleaning
- To clean the air conditioner cabinet: e Unplug the air conditioner to prevent shock or a fire hazard. The cabinet and front panel of the air conditioner may be dusted with an oil- free cloth or washed with a cloth dampened in a solution of warm water and mild liquid soap. Rinse thoroughly with a damp cloth and wipe dry.
- Never use harsh cleaners, wax or polish on the cabinet front.
- Be sure to wring excess water from the cloth before wiping around the controls. Excess water in or around the controls may cause damage to the air conditioner.
Winter Storage
To store the air conditioner when it is not in use for an extended period of time, remove it care- fully from the window according to the installation instructions and cover it with plastic or place it in the original box.
TROUBLESHOOTING
The Air Conditioner will not start
- The air conditioner is unplugged
- Make sure the air conditioner plug is pushed completely into the outlet
- The fuse is blown/circuit breaker is tripped
- Check the house fuse/circuit breaker box and replace the fuse or reset the breaker
- Power failure
- The unit will automatically restart when power is restored
- There is a protective time delay (approx. 3 minutes) to prevent tripping of the compressor overload. For this reason, the unit may not start normal cooling for 3 minutes after it is turned back on.
- The current interrupter device is tripped
- Press the RESET button located on the power cord plug
- If the RESET button will not stay engaged, discontinue use of the air conditioner and contact a qualified service technician
The Air Conditioner does not cool as it should
- Airflow is restricted
- Make sure there are no curtains, blinds, or furniture blocking the front of the air conditioner
- The temperature control may not be set correctly
- Lower the set thermostat tempera- ture
- The air filter is dirty
- Clean the filter. See the Cleaning and Care Section of the manual
- The room may be too warm
- Please allow time for the room to cool down after turning on the air conditioner
- Cold air is escaping
- Check for open furnace registers and cold air returns
- The cooling coils are frozen
- See “Air Conditioner Freezing Up” below
The Air Conditioner is freezing up
- Ice blocks the air flow and stops the air conditioner from cooling the room
- Set the MODE dial to HIGH FAN or HIGH COOL and set the ther- mostat to a higher temperature
The Remote Control is not working
- The batteries are inserted incorrectly
- Check the position of the batteries
- The batteries may be dead
Water is dripping outside
Water is dripping inside the room
- The air conditioner is not correctly tilted outside
- For proper water drainage, make sure the air conditioner is slightly tilted downward from the front of the unit to the rear
Water collects in the base pan
- Moisture removed from the air is draining into the base pan.
- This is normal for a short period in areas with low humidity and nor- mal for a longer period in areas with high humidity
Digital Display reads “E1”, “E2”