Loading ...
Loading ...
3
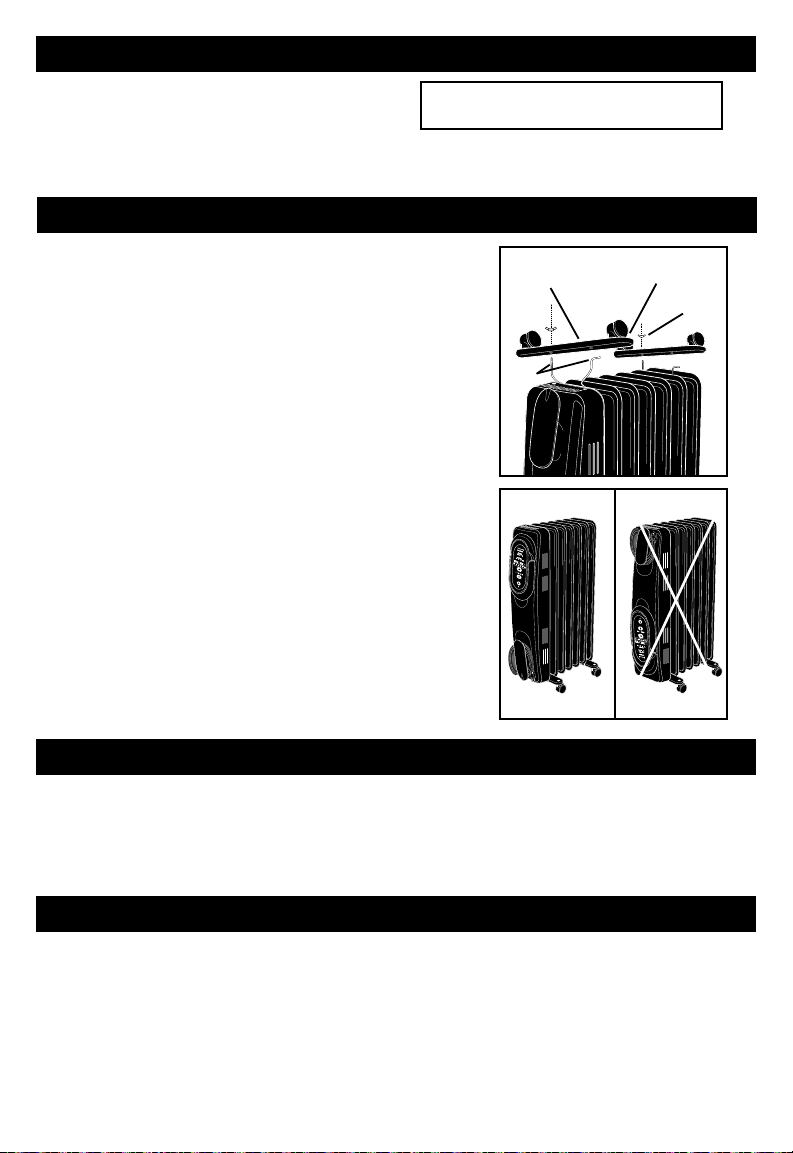
WHEEL BASE ASSEMBLY
NOTE: DO NOT OPERATE THE HEATER WITHOUT THE WHEEL BASE
ASSEMBLIES IN PLACE. THE HEATER MUST ALWAYS BE USED IN AN
UPRIGHT POSITION. DO NOT OPERATE THE HEATER IF THE WHEELS
ARE NOT ASSEMBLED CORRECTLY.
• Make sure the heater is unplugged and in the OFF position.
• Turn the heater upside down to install wheels.
• Push wheels into each wheel base pin, until you hear them snap into
position.
• While the heater is still upside-down, position the wheel base assemblies
between the end ns. Attach them to the U-bolts on the heater and
tighten using the wing nuts provided (Fig. 2).
• Turn heater right-side up. Your heater is now ready for use.
If the controls are located at the bottom and the Honeywell logo
is upside down you have installed the wheels incorrectly (Fig. 3).
NOTE: These heaters contain oil that is permanently
sealed and will never require relling or replacing.
NOTE: THESE MODELS MAY TAKE UP TO SEVERAL MINUTES TO REACH NORMAL OPERATIONAL TEMPERATURE.
Be sure the heater is not in a position where it may be tripped over by children or pets.
ABOUT OIL FILLED TECHNOLOGY
Electric Radiators generate heat by passing warmed oil inside
sealed metal columns. Air passes over and through the large
surface area of the metal columns, circulating steady, long-term
heat throughout the room. This type of convection heating
technology is quiet and provides gradual, ecient heating.
For best results, place heater on the oor to create
warming room convection and allow heater to run for
10-15 minutes to reach maximum heat output.
SET UP
Place the heater on a rm, level surface free from obstructions, and at least 3ft. (0.9m) away from any wall or combustible material.
Do NOT use on an unstable surface such as bedding or deep carpeting.
MOVING THE HEATER
• Turn o the heater.
• Allow it to cool for ten minutes.
• This heater is equipped with a large luggage-style handle and easy glide caster wheels for your convenience.
• Unplug heater and simply push the handle up in an upright position and pull to move.
• Place the heater on a rm, level surface free from obstructions, and at least 3ft. (0.9m) away from any wall
or combustible material.
Fig. 2
(Bottom of Unit)
Wheel Base
Wheel Base Pin
Wing Nuts
U-bolts
Fig. 3
Correct Incorrect
Loading ...
Loading ...
Loading ...