GIGA 6 Instructions for Use
K
For your safety: read and understand manual before use.
E

2
Table of contents
Your GIGA 6
IMPORTANT SAFEGUARDS 4
Control elements 8
1 Preparing and using for the first time 10
JURA on the Internet ....................................................................................................................................
10
Operation with touchscreen display and Rotary Switch .......................................................................10
Setting up the machine ...............................................................................................................................11
Filling the bean container ............................................................................................................................11
Determining the water hardness ...............................................................................................................11
First-time use ................................................................................................................................................12
Connecting milk ...........................................................................................................................................14
Connect accessory (with wireless connection) .......................................................................................15
2 Preparation 16
Ways of preparing a beverage ...................................................................................................................
17
Preparing specialty coffees .........................................................................................................................17
Preparing two specialty coffees .................................................................................................................17
Preparing specialty coffees with milk .......................................................................................................18
Caffè Barista and Americano ......................................................................................................................18
Ground coffee ...............................................................................................................................................19
Hot water ......................................................................................................................................................20
3 Daily operation 21
Filling the water tank ...................................................................................................................................
21
Switching on the machine ..........................................................................................................................21
Daily maintenance ......................................................................................................................................22
Regular maintenance .................................................................................................................................23
Switching off the machine .........................................................................................................................23
4 Permanent settings in programming mode 24
Product settings ..........................................................................................................................................
25
Setting the consistency of grind ..............................................................................................................27
Automatic switch-off ..................................................................................................................................28
Time and date ..............................................................................................................................................29
Setting the water hardness .......................................................................................................................29
Timer .............................................................................................................................................................30
Unit for amount of water / time format ..................................................................................................30
Energy-saving mode ...................................................................................................................................31
Language ...................................................................................................................................................... 32
Display brightness .......................................................................................................................................32
Restore factory settings ............................................................................................................................. 33
Smart mode ................................................................................................................................................. 33
Displaying product names ........................................................................................................................34
Query counter readings and version .......................................................................................................34
3
Table of contents
5 Maintenance 35
Rinsing the machine ...................................................................................................................................
36
Automatic milk system rinsing .................................................................................................................36
Cleaning the milk system ..........................................................................................................................36
Dismantling and rinsing the dual spout .................................................................................................38
Inserting/changing the filter ......................................................................................................................40
Cleaning the machine .................................................................................................................................41
Descaling the machine ..............................................................................................................................42
Cleaning the bean container .....................................................................................................................44
Descaling the water tank ...........................................................................................................................45
6 Display messages 46
7 T
roubleshooting 48
8 Transport and environmentally friendly disposal 50
Transport/ Emptying the system .............................................................................................................
50
Disposal .........................................................................................................................................................50
9 Technical data 51
10 Index 52
11
JURA contact details/ Legal information 56
Symbol description
Warnings
This is the safety alert symbol. lt is used to alert you to potential personal injury
hazards. Obey all safety messages that follow this symbol to avoid possible injury
or death.
DANGER indicates a hazardous situation which, if not avoided, will result in death
or serious injury.
WARNING indicates a hazardous situation which, if not avoided, could result in
death or serious injury.
J CAUTION
CAUTION, used with the safety alert symbol, indicates a hazardous situation
which, if not avoided, could result in minor or moderate injury.
NOTICE NOTICE is used to address practices not related to personal injury.
Symbols used
T
Prompt to take action. This symbol means that you are being prompted to
perform some action.
E
Information and tips to make it even easier to use your GIGA.
‘Coffee’ Display message
J
J DANGER
J WARNING

4
IMPORTANT SAFEGUARDS
IMPORTANT SAFEGUARDS
SAVE THESE INSTRUCTIONS.
Pass them on to any subsequent user.
When using electrical appliances, basic safety precautions shall
always be followed, to reduce the risk of fire, electric shock, and/or
injury to persons, including the following:
Z Read all instructions.
Z Do not touch hot surfaces. Use handles or knobs.
Z To protect against fire, electric shock and injury to persons, do
not immer
se power cord, plugs, or body of machine in water
or other liquid.
Z Close supervision is necessary when any appliance is used by
or near c
hildren.
Z Unplug from outlet when not in use and before cleaning.
Allo
w to cool before putting on or taking off parts, and before
cleaning the appliance.
Z Do not operate any appliance with a damaged cord or plug or
af
ter the appliance malfunctions, or has been damaged in any
manner. Return appliance to the nearest authorized service
facility for examination, repair or adjustment.
Z The use of an accessory attachment not recommended by the
applianc
e manufacturer may result in fire, electric shock, or
injury to persons.
Z Do not use outdoors.
Z Do not let the cord hang over the edge of a table or counter,
or t
ouch hot surfaces.
Z Do not place on or near a hot gas or electric burner, or in a
heat
ed oven.
Z To disconnect, turn any control to ‘OFF’ then remove plug
from w
all outlet.
Z Do not use appliance for other than intended use.
Z Use extreme caution when dispensing hot steam, hot water
or hot c
offee.
Follow the basic safety
precautions

5
IMPORTANT SAFEGUARDS
The appliance is designed and intended for household use only. It
shall only be used for coffee preparation and to heat milk and water,
according to these instructions. Use for any other purpose will be
deemed improper. JURA Elektroapparate AG cannot accept any
responsibility for the consequences of improper use.
People, including children, who
Z do not have the physical, sensory or mental capabilities to use
the applianc
e safely or
Z are inexperienced or lack knowledge in how to use the
applianc
e safely
must be supervised by a responsible person when using it, or must
be instructed in how to use it correctly.
Z A short power-supply cord is to be provided to reduce risks
resulting from bec
oming entangled in or tripping over a
longer cord.
Z The cord shall be arranged so that it will not drape over the
c
ounter top or table top where it can be pulled on by children
or tripped over.
Z This appliance has a 3-pin grounded plug.
Z Do not modify the plug in any way.
Ex
tension cords are available an may be used if care is exercised in
their use.
If the user chooses to use an extension cord,
Z the marked electrical rating of the extension cord should be
at least as great as the elec
trical rating of the appliance, and
Z if the appliance is of the grounded type, the extension cord
should be a grounding t
ype 3-wire cord, and
Z the longer cord should be arranged so that it will not drape
o
ver the counter top or tabletop where it can be pulled on by
children or tripped over.
To reduce the risk of fire or electric shock, DO NOT remove any
service covers. DO NOT modify the appliance in any way that is not
described in these instructions. NO user serviceable parts included.
Repair MUST be done by authorized personnel only.
In the event of signs of damage, for example if there is a smell of
burning, unplug the machine immediately from outlet and contact
JURA customer service.
Intended use
Special power cord set
instructions
J WARNING
6
IMPORTANT SAFEGUARDS
This appliance is for household use. Any servicing other than
cleaning and user maintenance shall be performed by an authorized
service representative:
Z Do not immerse base in water or try to disassemble.
Z Do not put the appliance or any individual parts in the
dishw
asher.
Z Check voltage to be sure that the voltage indicated on the
name plat
e complies with your voltage. The name plate is
located on the underside of the appliance.
Z Never use warm or hot water to fill the water container. Use
c
old water only.
Z Keep your hands and the cord away from hot parts of the
applianc
e during operation.
There is a risk of scalds or burns on the spouts and the cappuccino
frother / nozzle.
Z Keep children away.
Z Do not touch any hot parts. Use the handles or knobs
pro
vided.
Z Ensure that the cappuccino frother / nozzle is correctly fitted
and c
lean. If incorrectly fitted or if they become blocked, the
cappuccino frother or its parts might come off.
Z Never clean with scouring powders or hard implements.
Z Ensure that the ventilation slots are not covered.
Z Never pull out the drip tray during the brewing process. Only
pull the drip tr
ay when the display instructs you or when the
appliance is ready for use.
J CAUTION
NOTICE

7
IMPORTANT SAFEGUARDS
Z Never fill instant coffee, chocolate mix etc. into the bean
container or ground coffee funnel (filler funnel for ground
coffee). It will damage the functioning of the brewing
chamber.
Z Never fill sugar coated coffee beans into the bean container.
In case of doubt, call y
our dealer.
Z Never fill anything other than coffee beans into the bean
c
ontainer (no chocolate, no rice, no nuts, no spices, nothing
other than roasted coffee beans).
Z Never fill frozen beans into the bean container. If you store
beans in the freez
er, let them thaw 3 to 4 hours before filling
them into the bean container.
Z Never fill anything but fresh, cold and clean water into the
w
ater tank, except when decalcifying.
Z Never use mineral or carbonated water. You can use tap water,
bottled w
ater, spring water and reverse osmosis water.
Z Never do anything with the machine which is not described in
these instruc
tions. In case of doubt, call your dealer.
NEVER DO
(or you will void your
warranty protection):
8
Control elements
Control elements
2
8
10
14
13
11
3
12
16
15
7
6
1
9
4
5
J HOT
J HOT
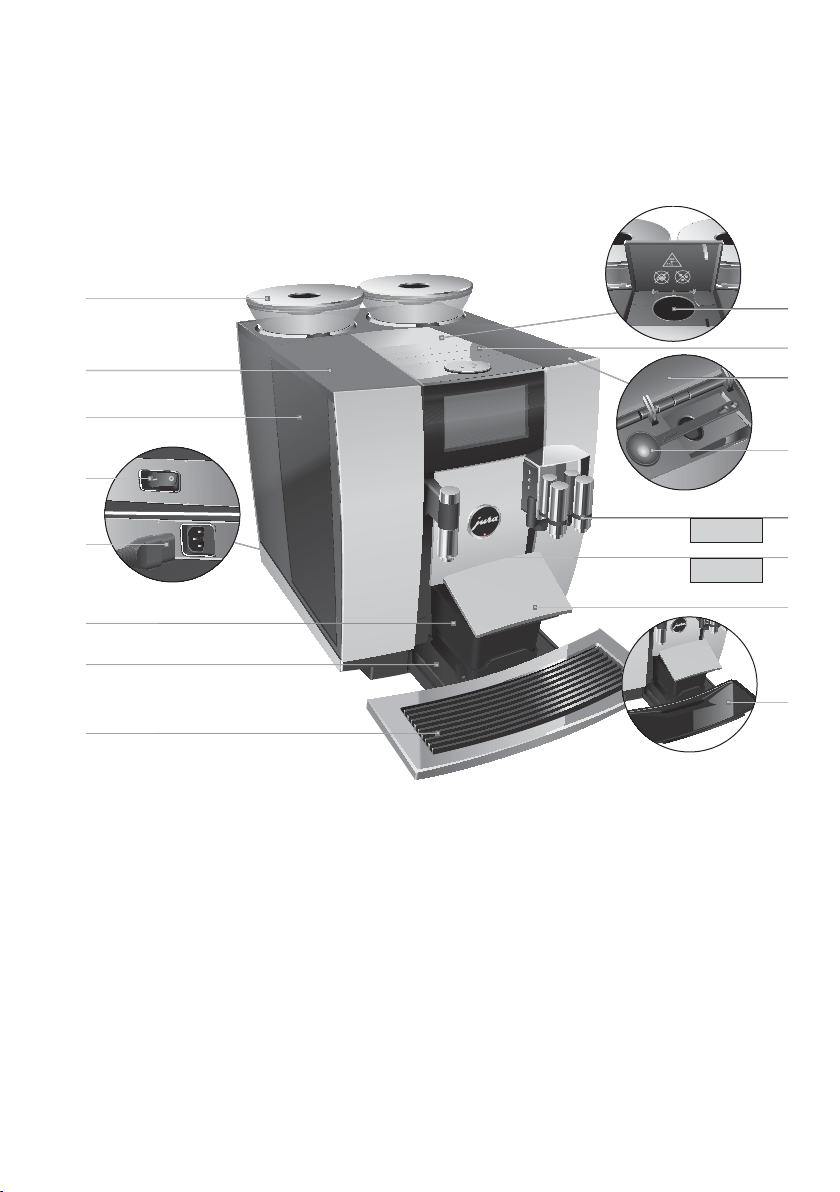
1 Bean container with aroma preservation
cover
2 Water tank cover
3 Water tank
4 Power switch (back of the machine)
5 Plug-in power cord (back of the machine)
6 Coffee grounds container
7 Drip tray
8 Cup platform
9 Filler funnel for ground coffee
10 Ventilation slats (Venti Ports)
11 Storage compartment cover
12 Measuring spoon for ground coffee
13 Height- and width-adjustable dual spout
14 Height-adjustable hot-water spout
15 Drip tray cover (pivoting)
16 Insert for drip tray
9
Control elements
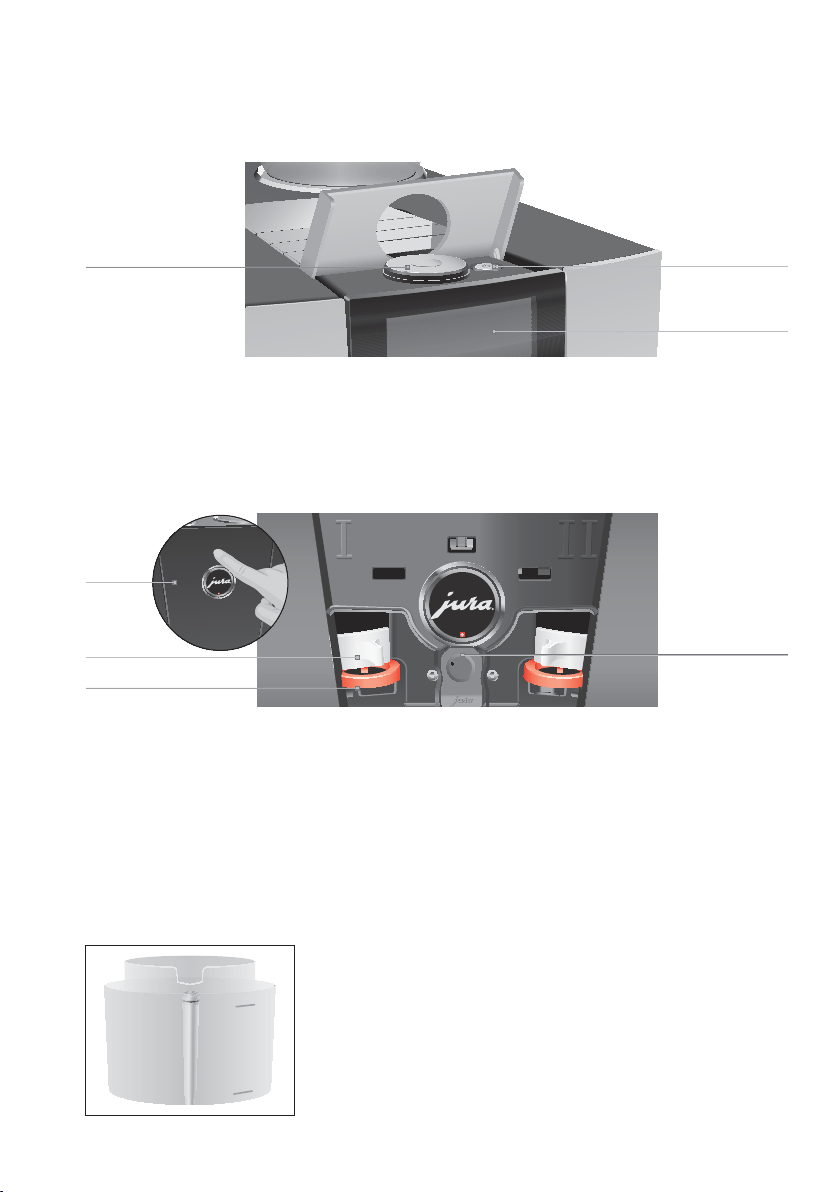
1
2
3
1 Rotary Switch
2 On/Off button Q (under cover)
3 Touchscreen display
1
2
3
4
Back of the machine
1 Service cover (open by pressing with your finger)
2 Locking device
3 Sliding catch
4 Service socket with
JURA Smart Connect
Accessories
Container for milk system cleaning
6
10
1 Preparing and using for the first time
1 Preparing and using for the first time
Visit us on the Internet (www.jura.com). You will find interesting and
up-to-date information on your GIGA and on every aspect of coffee.
If you need assistance with using your machine, you can find this at
www.jura.com/service.
The touchscreen display and Rotary Switch combine to provide an
intuitive and convenient way of operating your GIGA:
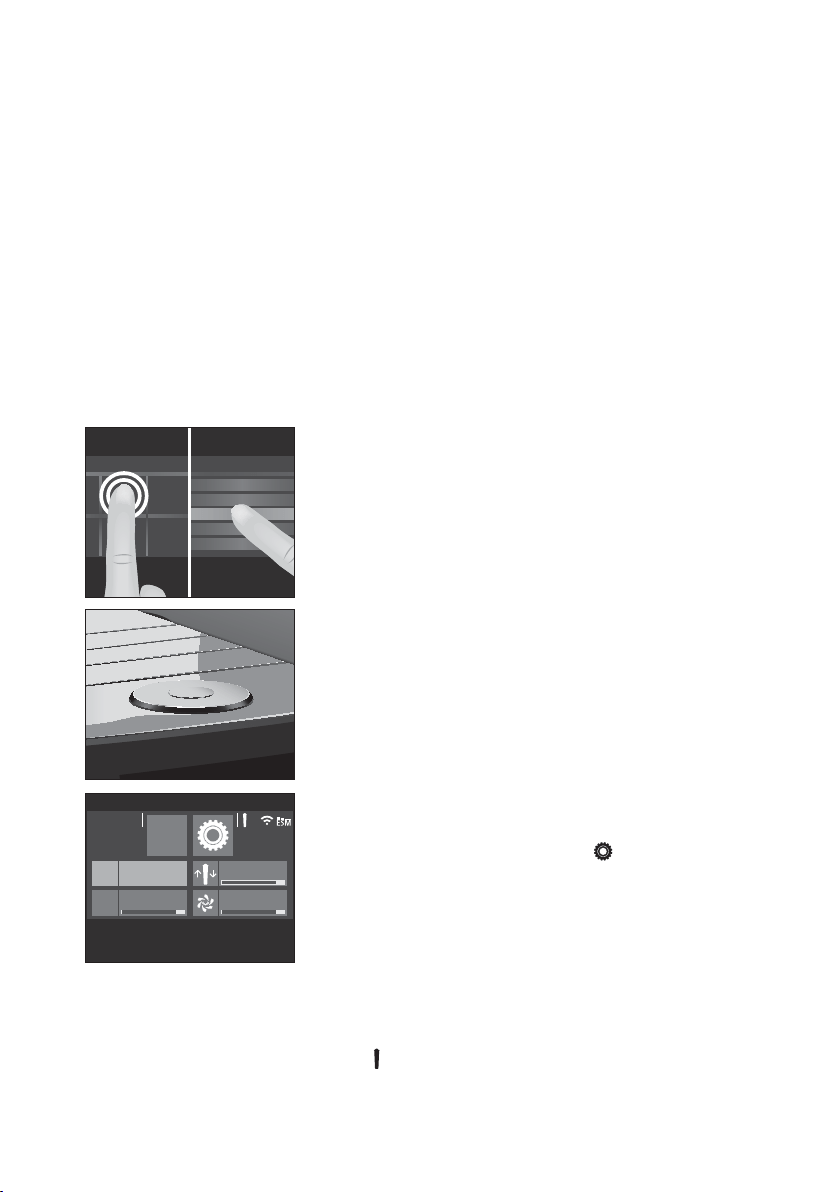
U
Touchscreen display: Touch/swipe
Touch the display with your finger, for example to start coffee
preparation or undertake various settings in programming
mode. Move your finger across the display from left to right
or from top to bottom (or vice versa). You can change
quantities whilst your coffee is being prepared, for example,
or switch between program items in programming mode.
U
Programming with Rotary Switch: Also use the Rotary Switch.
As soon as you turn it, the product selector view is displayed.
Also navigate through the program items in programming
mode and change various settings.
U
Press the Rotary Switch to open the cockpit of your GIGA:
U
The cockpit is divided into two sections: ‘Maintenance
status’ c and ‘Machine setting’
.
U
If a maintenance program needs to be initiated, a message
with a red background appears on the cockpit. You can go
straight to the maintenance program you need by touching
this message or pressing the Rotary Switch. Maintenance
programs that are due imminently are indicated on your
GIGA by means of a bar display within the message.
U
Other symbols on the cockpit:
U
: Filter mode
U
: ‘Smart mode’ is activated (see Chapter 4 ‘Permanent
settings in programming mode – Smart mode’).
JURA on the Internet
Operation with
touchscreen display and
Rotary Switch
>>
>>
>>
>>
Ì
c
7
&

11
1 Preparing and using for the first time
U
: Your GIGA is connected to the Cool Control milk cooler
(available as an optional accessory).
U
: Energy-saving mode is active.
When setting up your GIGA, please note the following:
U
Place the GIGA on a horizontal surface that is not sensitive to
water.
U
Choose a spot for your GIGA which protects the machine
against overheating. Ensure that the ventilation slats are not
covered.
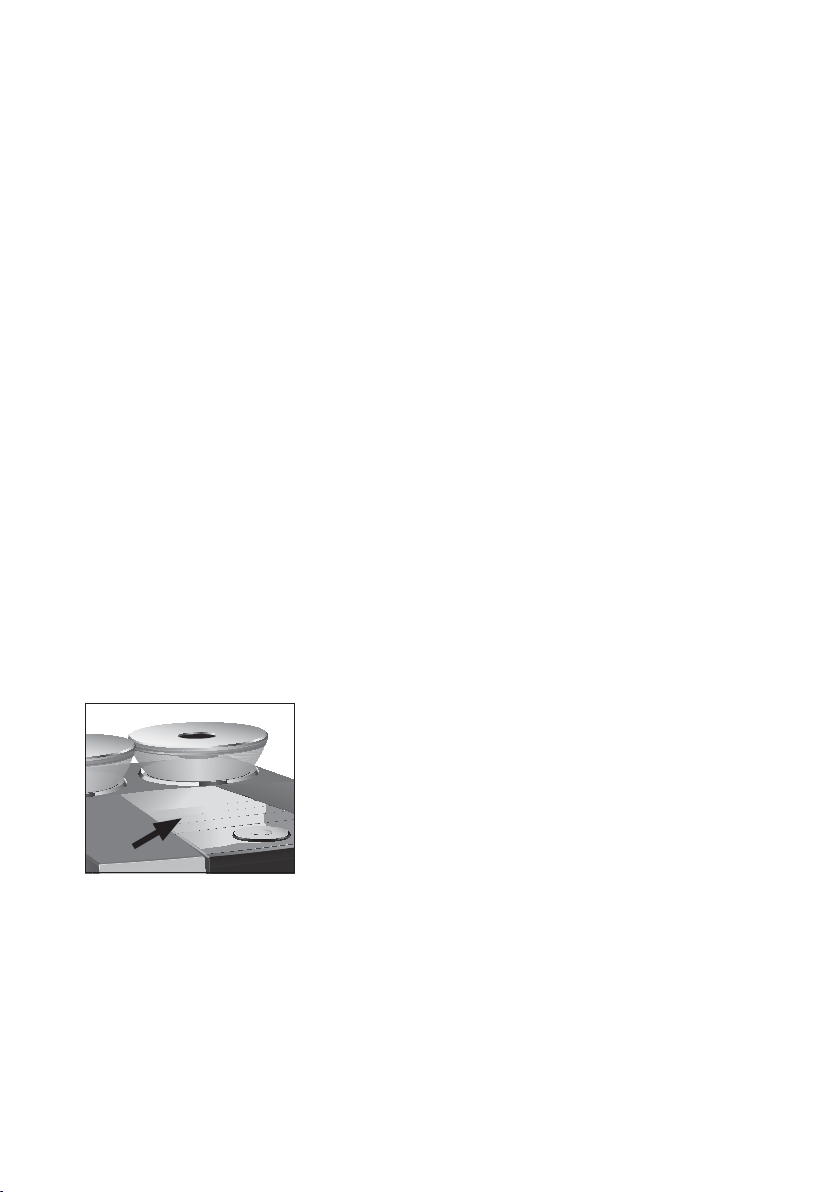
Coffee beans which have been treated with additives (e.g. sugar),
ground coffee or freeze-dried coffee will damage the grinder.
T Only use roasted, untreated coffee beans to fill the bean
container.
T Remove the aroma preservation cover.
T Remove any dirt or foreign objects from inside the bean
container.
T Fill the bean container with coffee beans and close the
aroma preservation cover.
When you use the machine for the first time, you must set the water
hardness. If you do not know the hardness of your water, you can
find this out first. Use the Aquadur® test strips supplied with the
machine.
T Hold the test strip briefly (for 1second) under flowing water.
Shake off the water.
T Wait for about 1minute.
Setting up the machine
Filling the bean container
NOTICE
Determining the water
hardness

12
1 Preparing and using for the first time
T You will then be able to read the degree of water hardness
from the discoloration of the Aquadur® test strip and the
description on the packaging.
Level Display German
Degree (°dH)
Degrees of general
hardness (°dGH)
Parts per
million (ppm)
Indicator Strip number
of ‘reddish’ fields
Not active – – – –
Very soft water <3 <3 < 53.4 None
Soft water > 4 > 4 > 71 1
Hard water > 8.4 > 8.4 > 150 2
Very hard water > 14 > 14 > 250 3
If the machine is operated with a defective power cord, there is a
danger of potentially fatal electric shock.
T Never use a machine which is damaged.
T Never use a machine which has a defective power cord.
Milk, sparkling mineral water or other liquids can damage the water
tank or the machine.
T Only fill the water tank with fresh, cold water.
E The water volume is given as standard in ‘oz’. You can change
this setting to ‘ml’ in programming mode (see Chapter 4
‘Permanent settings in programming mode – Unit for amount
of water’).
Precondition:The bean containers have been filled.
T Connect the power cord to the machine.
T Insert the power plug into a power socket.
T Switch on the GIGA using the power switch on the back of
the machine.
First-time use
J WARNING
NOTICE

13
1 Preparing and using for the first time
T Open the cover of the On/Off button.
T Press the On/Off button Q to switch the GIGA on.
‘Choose language’ / ‘English’
E T
o display more languages, move your finger either
downwards or upwards in the selection list until the
desired language comes into focus.
T Touch ‘Save’.
‘Saved’ appears briefly on the display to confirm the setting.
‘Date’
T
Enter the current date (format YYYY/MM/DD).
T Touch ‘Save’.
‘Saved’
‘T
ime format’
T
Select the time format (‘24 hrs.’ or ‘AM / PM’).
T Touch ‘Save’.
‘Saved’
‘T
ime’
T
Enter the current time.
T Touch ‘Save’.
‘Saved’
‘
Water hardness’
E If y
ou do not know the hardness of your water, you must find
this out first (see Chapter 1 ‘Preparing and using for the first
time – Determining the water hardness’).
T Move your finger across the display to change the water
hardness setting, e.g. to ‘25°dH’.
T T
ouch ‘Save’.
‘Saved’
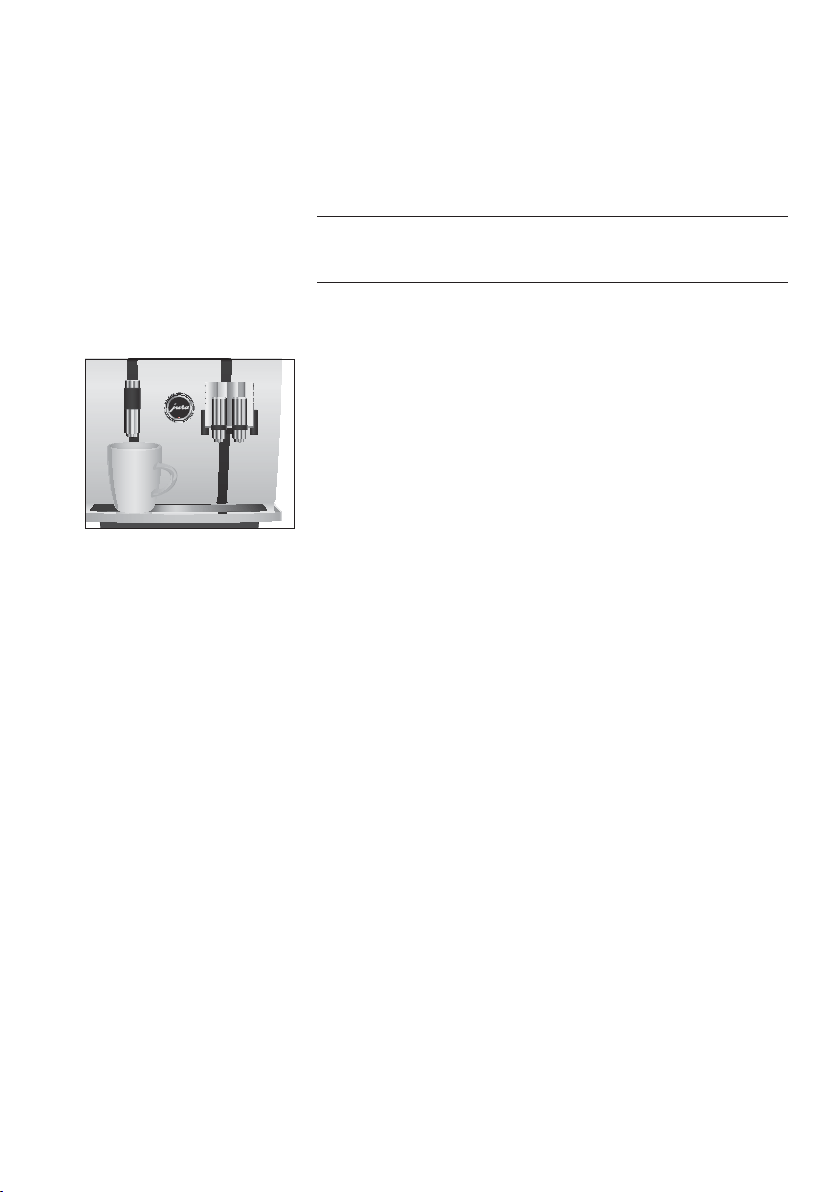
‘Inser
t filter’
T
Place one receptacle under the dual spout and another
under the hot-water spout.
T Remove the water tank and rinse it with cold water.
T Open the filter holder.
T Fit the filter cartridge extension supplied on top of the
CLEARYL Smart filter cartridge.
14
1 Preparing and using for the first time
T Insert the filter cartridge with its extension into the water
tank.
T Close the filter holder. It will click into place audibly.
T Fill the water tank with fresh, cold water and reinsert the
tank.
E The machine automatically detects that you have just inserted
the filter cartridge.
‘Filter operation’ / ‘Saved’
‘Filt
er is being rinsed’, the filter is rinsed. Water flows directly
int
o the drip tray.
‘System is filling’, water flows out of the dual spout and the
hot
-water spout.
‘Empty drip tray’
T
Empty the drip tray and put it back into the machine.
T Place a receptacle under the dual spout.
‘Machine is heating’
‘Mac
hine is rinsing’, ‘Milk system is being rinsed’. The rinse
st
ops automatically. The start screen is displayed. Your GIGA
is ready for use.
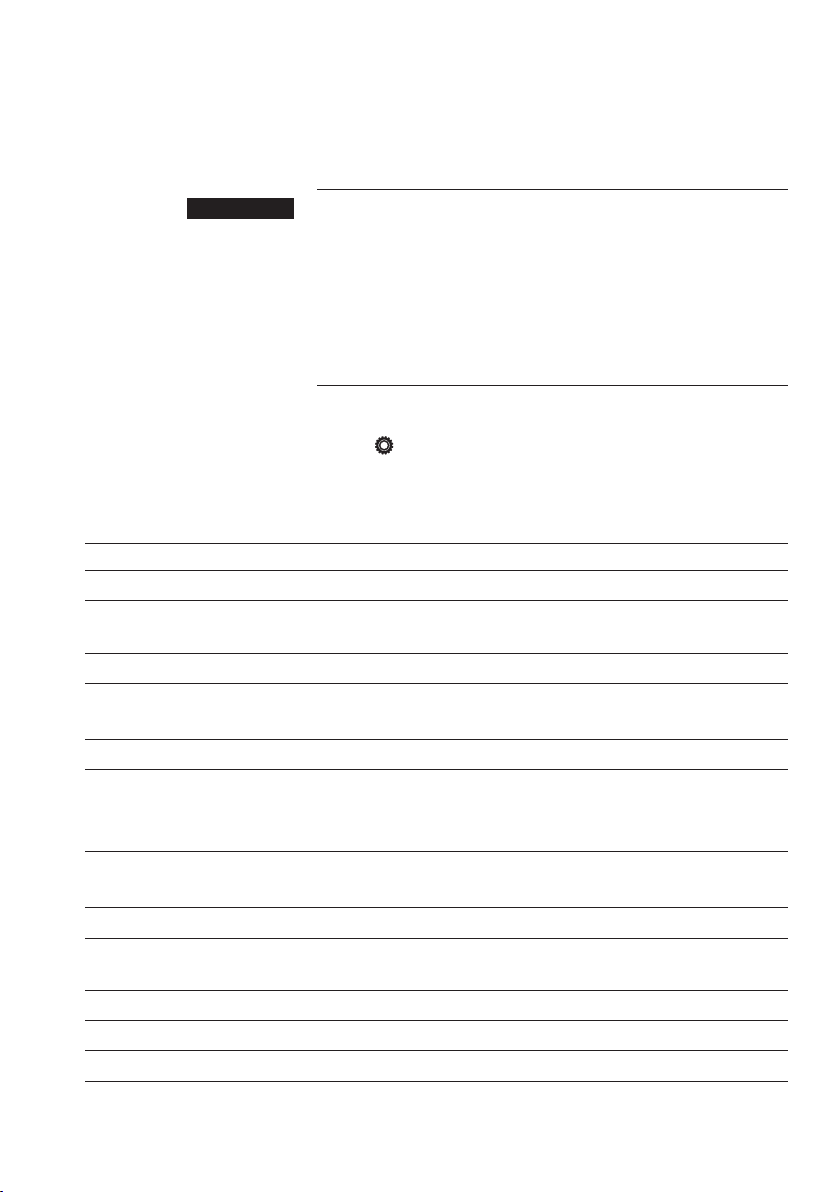
Your GIGA creates fine, creamy, feather-light milk foam with a
perfect consistency. The most important requirement for frothing
milk is a milk temperature of 39–46 °F (4–8 °C). We would
therefore recommend using a milk cooler or a milk container.
T Connect the milk pipe to the dual spout.
T Connect the other end of the milk pipe to a milk container
or a milk cooler.
Connecting milk

15
1 Preparing and using for the first time
Your GIGA is equipped with the JURA Smart Connect. This allows you
to connect the machine wirelessly to a compatible JURA accessory
(e.g. the Cool Control milk cooler).
E The Smart Connect can be protected against unauthorized
access using a PIN. Activate the PIN function via J.O.E.
®
– your
JURA app. You will find more information at www.jura.com/
smartconnect.
E Please note that you can only connect either the accessory or
J.O.E.
®
to the coffee machine via Smart Connect and not both
at the same time.
Precondition:The start screen is displayed.
T Press the Rotary Switch.
T Touch the ‘Machine settings’ symbol.
‘Switch off after’
T
Turn the Rotary Switch until ‘Connect accessory’ is
displayed.
T Touch ‘Connect accessory’.
‘Connect accessory’
T
Now follow the instructions on the display to connect the
accessory to the GIGA.
Connect accessory (with
wireless connection)

16
2 Preparation
2 Preparation
Hot coffee, hot steam and hot water can cause scalding. Scalding is
a serious burn.
T Use extreme care when handling hot liquid or steam.
T Allow liquid to cool down before drinking.
T In the event of scalding, rinse affected area with cold water
and seek medical attention.
T Keep children AWAY.
Basic information about preparing drinks:
U
During the grinding operation you can change the coffee
strength of single products. To do this, move your finger
across the display or turn the Rotary Switch.
U
During preparation you can change the preset amounts (e.g.
amount of water or milk foam). To do this, move your finger
across the display or turn the Rotary Switch.
U
You can stop preparation at any time. To do this, press the
‘Cancel’ button or the Rotary Switch.
U
You can move any of the standard products programmed in
your GIGA to your preferred position on the start screen and
make it one of your favorites. You can duplicate and
personalize your favorite specialty coffees by giving them
a new product name and individual settings (e.g. amount
and coffee strength) (see Chapter 4 ‘Permanent settings in
programming mode – Adjusting the product settings’). Please
note that the descriptions provided in the following sections
always refer to the default settings.
U
Your GIGA has a ‘Smart mode’. If this mode is activated, the
products on the start screen will be rearranged according to
the frequency of preparation after some time. The number of
products displayed on the start screen will vary according to
your personal preferences. The star on the cockpit indicates
that the ‘Smart mode’ is activated.
Coffee tastes best served hot. A cold porcelain cup cools the
beverage – and impairs the taste. We therefore recommend
prewarming the cups. The full coffee aroma can develop only in
prewarmed cups. You can purchase a JURA cup warmer from your
specialized dealer.
J WARNING
17
2 Preparation
The GIGA offers various ways of preparing a specialty coffee, milk or
hot water.
Preparation using the start screen: Simply touch the desired
product on the start screen (page ‘’ or ‘’).
Preparation using the product selector view: Only some of the
products you can prepare are shown on the start screen. As soon as
you turn the Rotary Switch, more products are displayed in a
product selector view. Turn the Rotary Switch or move your finger
across the display to bring the desired product into focus. Touch
the product or press the Rotary Switch to start preparation.
E The product selector view disappears automatically after
10seconds if no preparation is started.
E The last product selected always appears first in the product
selector view.
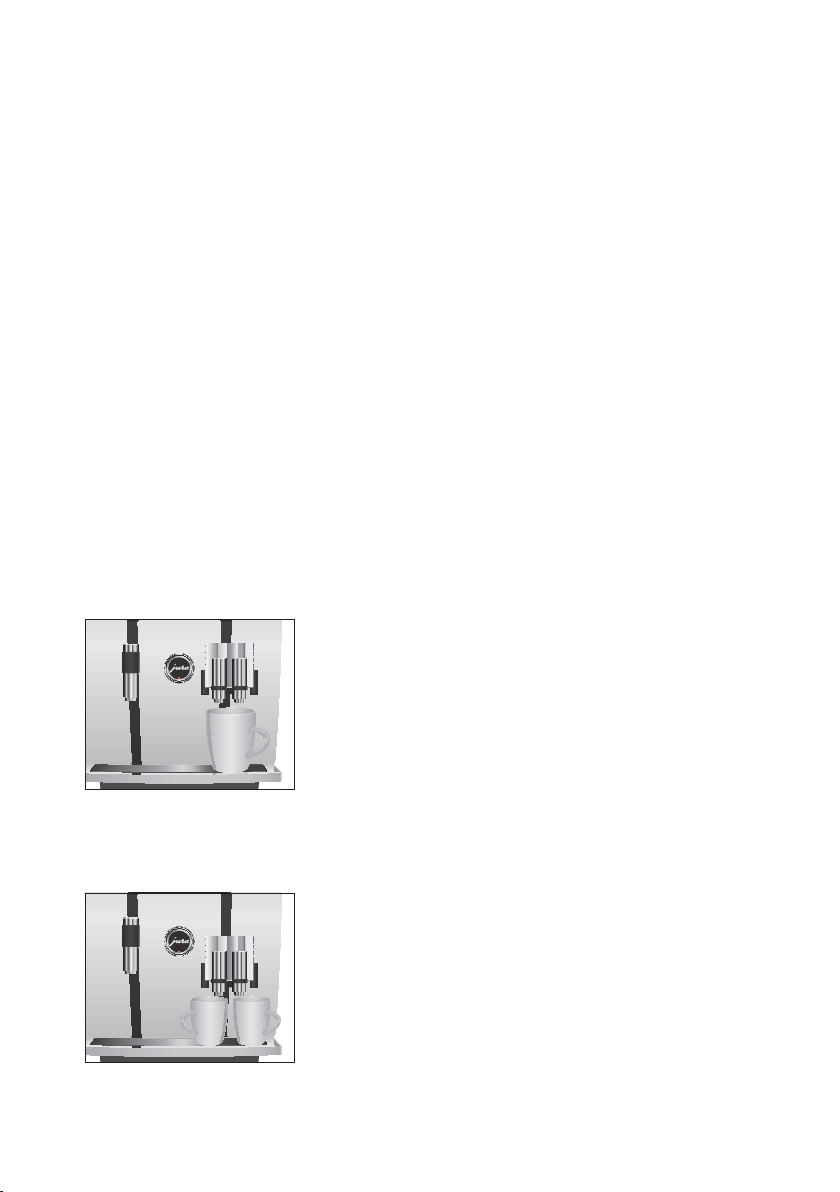
Example:Proceed as follows to prepare one coffee.
Precondition:The start screen is displayed.
T Place a cup under the dual spout.
T Touch ‘Coffee’.
Preparation starts. The preset amount of water for coffee
flows into the cup.
Preparation stops automatically. Your GIGA is once more
ready for use.
Example:Proceed as follows to prepare two espressi.
Precondition:The start screen is displayed (page ‘’).
T Place two cups under the dual spout.
T Touch ‘2x espresso’ to start preparation.
Preparation starts. The preset amount of water for coffee
flows into the cups. Preparation stops automatically. Your
GIGA is once more ready for use.
Ways of preparing a
beverage
Preparing specialty
coffees
Preparing two specialty
coffees
18
2 Preparation
Your GIGA prepares latte macchiato, cappuccino, flat white and
other specialty coffees with milk at the touch of a button. There is
no need to move the glass or cup.
Example:Proceed as follows to prepare one latte macchiato.
Precondition:The start screen is displayed. Milk is connected to the
dual spout.
T Place a glass under the dual spout.
T Touch ‘Latte macchiato’.
‘Latte macchiato’, the preset amounts of milk and milk foam
flo
w into the glass.
E There is a short interval while the hot milk separates from the
milk foam. This allows the typical layers of a latte macchiato
to form.
Coffee preparation starts. The preset amount of water for
espresso flows into the glass. Preparation stops
automatically. Your GIGA is once more ready for use.
E 15 minutes after preparation, the milk system is automatically
rinsed (see Chapter 5 ‘Maintenance – Automatic milk system
rinsing’). Therefore always place a receptacle under the dual
spout after preparing milk.
To ensure that the milk system in the dual spout always works
properly, you must clean it daily (see Chapter 5 ‘Maintenance –
Cleaning the milk system’).
For the ‘caffè Barista’ and ‘Americano’, the GIGA blends the coffee
with hot water using a special preparation method. This results in a
full-bodied specialty coffee which is particularly easy to digest.
You can change the amount of this additional water (see Chapter 4
‘Permanent settings in programming mode – Adjusting the product
settings’).
E The bypass amount of water cannot be changed during the
preparation process.
E Products with a bypass amount of water setting are marked
with a red speedometer symbol in the start screen and in the
product selector.
Preparing specialty
coffees with milk
Caffè Barista and
Americano

19
2 Preparation
You can choose to use another coffee variety, for example decaffein-
ated coffee, with the filter funnel for ground coffee.
Basic information about ground coffee:
U
Never add more than two level measuring spoons of ground
coffee.
U
Use ground coffee which is not ground too finely. Very fine
coffee can block up the system so that the coffee only comes
out in drips.
U
If you did not fill the machine with a sufficient amount of
ground coffee, ‘Not enough ground coffee’ is displayed and
the G
IGA stops the operation.
U
The desired specialty coffee must be prepared within
approximately one minute after filling with the ground
coffee. Otherwise the GIGA stops the operation and is
once more ready for use.
U
All specialty coffees with ground coffee are always prepared
following the same model.
Example:Proceed as follows to prepare one coffee using ground
coffee.
Precondition:The start screen is displayed.
T Place a cup under the dual spout.
T Open the cover of the filler funnel for ground coffee.
‘Please add ground coffee’
T
Place one level measuring spoon of ground coffee into the
filler funnel.
T Close the cover of the filler funnel.
The specialty coffees you can prepare with ground coffee are
displayed.
T Touch ‘Coffee’.
Preparation starts. ‘Coffee’ and the fill volume are displayed.
The preset amount of w
ater for coffee flows into the cup.
Preparation stops automatically. Your GIGA is once more
ready for use.
Ground coffee
20
2 Preparation
The GIGA allows you to prepare different variants of hot water:
U
‘Hot water’
U
‘Hot water for green tea’
There is a danger of scalding from hot water splashes.
T
Avoid direct contact with the skin.
Example:Proceed as follows to prepare hot water for green tea.
Precondition:The start screen is displayed (page ‘’).
T Place a cup under the hot-water spout.
T Touch ‘Hot water for green tea’.
‘Hot water for green tea’, the preset amount of water flows
int
o the cup.
Preparation stops automatically. Your GIGA is once more
ready for use.
Hot water
J
CAUTION
21
3 Daily operation
3 Daily operation
Daily maintenance of the machine and hygiene when handling milk,
coffee and water are key to a perfect coffee result in the cup every
time. You should therefore change the water daily.
Milk, sparkling mineral water or other liquids can damage the water
tank or the machine.
T Only fill the water tank with fresh, cold water.
T Open the water tank cover.
T Remove the water tank and rinse it with cold water.
T Fill the water tank with fresh, cold water and reinsert the
tank.
T Close the water tank cover.
Precondition:Your GIGA is switched on at the power switch.
T Place a receptacle under the dual spout.
T Open the cover of the On/Off button.
T Press the On/Off button Q to switch the GIGA on.
‘Welcome to JURA’.
‘Machine is heating’.
‘Machine is rinsing’, the system is rinsed. The rinse stops
aut
omatically. Your GIGA is ready for use.
Filling the water tank
NOTICE
Switching on the
machine
22
3 Daily operation
To ensure that you get many years of reliable service out of your
GIGA and to guarantee the optimum coffee quality, the machine
requires daily maintenance.
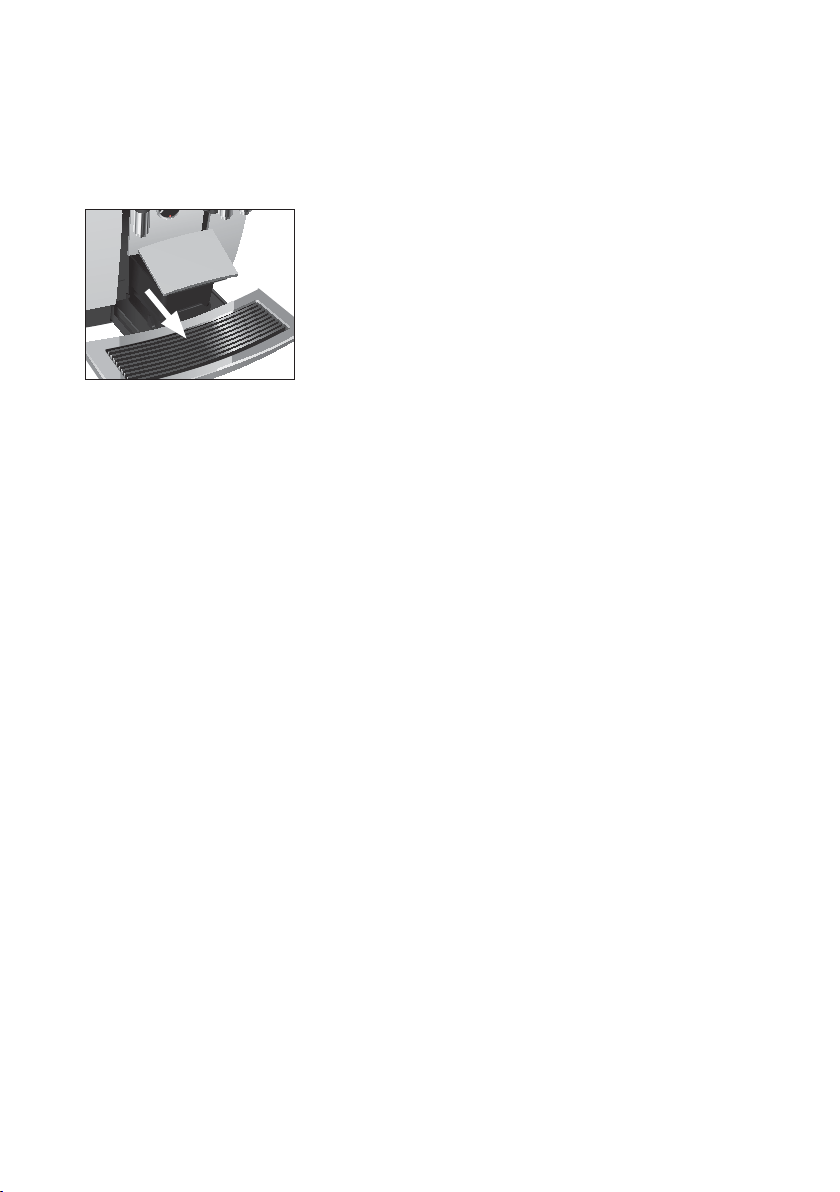
T Pull out the drip tray.
T Empty the coffee grounds container and the drip tray. Rinse
them both with warm water.
E Always empty the coffee grounds container when the machine
is switched on. This is the only way of resetting the coffee
grounds counter.
E The insert for the drip tray, including the drip tray itself, and
the coffee grounds container are dishwasher-safe.
T Refit the coffee grounds container and the drip tray.
T Rinse the water tank with clean water.
T Clean the milk system in the dual spout (see Chapter 5
‘Maintenance – Cleaning the milk system’).
T Remove the milk pipe and rinse it thoroughly under running
water.
T Dismantle and rinse the dual spout (see Chapter 5
‘Maintenance – Dismantling and rinsing the dual spout’).
T Wipe the surface of the machine with a clean, soft, damp
cloth (e.g. microfiber cloth).
E In order to clean the display without any problems, you can
disable it in the ‘Maintenance status’ c area under
‘Lock
displa
y’.
Y
ou will find more information about caring for your GIGA in
programming mode in the ‘Maintenance status’ area under
‘Maintenance information’.
Daily maintenance
23
3 Daily operation
Carry out the following maintenance actions regularly or as
required:
U
In the interests of hygiene, we recommend changing the milk
pipe and interchangeable milk spout on a regular basis
(approximately every 3 months). Replacements are available
from specialized dealers. Your GIGA is equipped with the HP2
milk system.
U
Clean the inside of the water tank, e.g. with a brush. Further
information about the water tank is provided in these
instructions for use (see Chapter 5 ‘Maintenance – Descaling
the water tank’).
U
Traces of milk and coffee may stick to the top and bottom of
the cup platform. If this happens, clean the cup platform.
When the GIGA is switched off, the system is automatically rinsed if
a specialty coffee has been prepared.
E If milk has been prepared, you will also be prompted to clean
the milk system. If this happens, follow the instructions on the
display.
Precondition:The start screen is displayed.
T Place a receptacle under the dual spout.
T Open the cover of the On/Off button.
T Press the On/Off button Q.
‘Machine is rinsing’, the system rinses itself. The operation
st
ops automatically. Your GIGA is switched off.
Regular maintenance
Switching off the
machine
24
4 Permanent settings in programming mode
4 Permanent settings in programming mode
Hot coffee, hot steam and hot water can cause scalding. Scalding is
a serious burn.
T Use extreme care when handling hot liquid or steam.
T Allow liquid to cool down before drinking.
T In the event of scalding, rinse affected area with cold water an
seek medical attention.
T Keep children AWAY.
Press the Rotary Switch to open the cockpit. In the ‘Machine
setting’
section , you will find a wide range of settings for your
GIGA. Move your finger across the display or turn the Rotary Switch
to navigate through the program items and permanently save the
desired settings. The following settings can be made:
Program item Explanation
‘Switch off after’
T Set the time af
ter which the GIGA should switch off automatically.
‘Time’,
‘Date’
T Set the time and dat
e to use the timer function on your GIGA.
‘Timer’
T Spec
ify a switch-on and switch-off time for each weekday.
‘Set consistency of
grind
’
T Adjust the consistency of grind for both grinders to the coffee beans
used.
‘Save energy’
T A
ctivate energy-saving mode.
‘Smart mode’
T Ha
ve the products arranged on the start screen according to how often
they are prepared. The number of products displayed on the start screen
will vary according to your personal preferences.
‘Product name’
T Define whether the produc
t names or just the product images should
be shown on the start screen.
‘Factory setting’
TR
eset the machine to its factory setting.
‘Unit’,
‘Time format’
T Selec
t the unit for the amount of water and the time format.
‘Display’
TC
hange the display brightness.
‘Water hardness’
T Y
ou can set the water hardness of the water used.
‘Choose language’
T Selec
t your language.
J WARNING

25
4 Permanent settings in programming mode
Program item Explanation
‘Connect accessory’,
‘Disconnect
acc
essories’
(Only displayed if the
JURA Smar
t Connect
is being used.)
T Connect the GIGA wirelessly to a JURA accessory or disconnect the
connection again.
‘Empty system’
T Empt
y the system to protect it from frost during transport.
‘Product counter’,
‘Maintenance counter’
T K
eep track of all products prepared and view the number of
maintenance programs performed.
‘Version’ Software version
T
ouch a product on the start screen for about 2 seconds to view the
list of settings:
U
‘Product settings’: Specify individual settings such as coffee
strength, amount of water, etc.
U
‘Initials’ (or ‘Product name’): Change the initials (or the name)
of the product.
U
‘Delete’: Delete the product from the start screen.
U
‘Replace product’: Replace the products on the start screen
with your favorites.
U
‘Copy product’: Duplicate any product, for example to create
a variant with a new product name and individual settings.
U
‘Double product’ (not for hot water): Create a double product
of the desired specialty.
Hot coffee, hot steam and hot water can cause scalding. Scalding is
a serious burn.
T Use extreme care when handling hot liquid or steam.
T Allow liquid to cool down before drinking.
T In the event of scalding, rinse affected area with cold water an
seek medical attention.
T Keep children AWAY.
Product settings
Adjusting the product
settings
J WARNING

26
4 Permanent settings in programming mode
The following settings can be set permanently for all specialty
coffees, milk and hot water:
Product Amount More settings
‘Espresso’ Water: 0.5 oz – 2.5 oz
(1
5ml–80ml)
Coffee strength (10 levels), temperature (low,
normal, high), left and/or right grinder (in %),
product name, delete/replace/copy/double
product
‘Coffee’,
‘Special coffee’
Water: 0.5oz–8.0oz
(25 ml – 240 ml)
Coff
ee strength (10 levels), temperature (low,
normal, high), left and/or right grinder (in %),
product name, delete/replace/copy/double
product
‘Caffè Barista’,
‘Americano’
(red speedometer
symbol)
W
ater: 0.5oz–8.0oz
(25 ml – 240 ml)
Bypass water: 0.5oz–8.0oz
(25 ml – 240 ml)
Coffee strength (10 levels), temperature (low,
normal, high), left and/or right grinder (in %),
product name, delete/replace/copy/double
product
‘Espresso doppio’ Water: 1 oz – 5 oz
(30ml–1
60ml)
(2 strokes)
Coffee strength (10 levels), temperature (low,
normal, high), left and/or right grinder (in %),
product name, delete/replace/copy product
‘Jug of coffee’
(red speedometer
symbol)
W
ater: 0.5oz–8.0oz
(25 ml – 240 ml)
Bypass water: 0.5oz–8.0oz
(25 ml – 240 ml)
Coffee strength (10 levels), number of strokes
(1–5), temperature (low, normal, high), left
and/or right grinder (in %), product name,
delete/replace/copy product
‘Cappuccino’ Water: 0.5oz–8.0oz
(25 ml – 240 ml)
Milk f
oam: 0sec.–120sec.
Coffee strength (10 levels), milk foam
temperature, temperature (low, normal,
high), left and/or right grinder (in %), product
name, delete/replace/copy/double product
‘Latte macchiato’ Water: 0.5oz–8.0oz
(25 ml – 240 ml)
Milk f
oam: 0sec.–120sec.
Milk: 0sec.–120sec.
Interval: 0sec.–60sec.
Coffee strength (10 levels), milk and milk
foam temperature, temperature (low, normal,
high), left and/or right grinder (in %), product
name, delete/replace/copy/double product
‘Macchiato’,
‘Cortado’
Water: 0.5 oz – 2.5 oz
(1
5ml–80ml)
Milk foam: 0sec.–120sec.
Coffee strength (10 levels), milk foam
temperature, temperature (low, normal,
high), left and/or right grinder (in %), product
name, delete/replace/copy/double product

27
4 Permanent settings in programming mode
Product Amount More settings
‘Flat White’,
‘Caffè latte’
Water: 0.5oz–8.0oz
(25 ml – 240 ml)
Milk f
oam: 0sec.–120sec.
Milk: 0sec.–120sec.
Coffee strength (10 levels), milk and milk
foam temperature, temperature (low, normal,
high), left and/or right grinder (in %), product
name, delete/replace/copy/double product
‘Portion milk’,
‘Portion milk
f
oam’
Milk foam: 0sec.–120sec.
Milk
: 0sec.–120sec.
Milk and milk foam temperature, product
name, delete/replace/copy/double product
‘Hot water’,
‘Hot water for
green t
ea’
Water: 0.5oz–15.0oz
(25 ml – 450 ml)
T
emperature (low, normal, high), product
name, delete/replace/copy product
Double products The amounts set for the
single product are doubled.
Temperature (as for single product), left and/
or right grinder (in %), product name, delete/
replace/copy product
Permanent settings in programming mode always follow the same
model.
Example:Proceed as follows to change the coffee strength for one
espresso.
Precondition:The start screen is displayed.
T Touch ‘Espresso’ for approximately 2 seconds until the list
of possible settings is displayed.
T Touch ‘Product settings’.
‘Espresso’
T
Move your finger across the display until ‘Coffee strength’ is
displayed in the center.
T Now move your finger to the left or right to change the set-
ting for the coffee strength.
T Touch ‘Save’.
‘Saved’ appears briefly on the display.
T T
ouch ‘Back’ to return to the start screen.
In the progr
am item ‘Set consistency of grind’ you can adjust both
grinder
s separately to the degree of roast of your coffee.
The consistency of grind is correct if the coffee flows regularly from
the dual spout. In addition a fine, thick crema forms.
Setting the consistency
of grind

28
4 Permanent settings in programming mode
Example:Proceed as follows to change the consistency of grind for
the grinder on the right.
Precondition:The start screen is displayed.
T Press the Rotary Switch.
T Touch the ‘Machine setting’
symbol.
‘Switch off after’
T
Turn the Rotary Switch until ‘Set consistency of grind’ is
displayed.
T Press the Rotary Switch.
‘Mahlwerk links’
T T
ouch ‘Save’.
‘Mahlwerk rechts’
T
Turn the Rotary Switch to change the setting.
T Touch ‘Save’.
‘Saved’ appears briefly on the display.
‘Set consistency of grind’
T T
ouch ‘Back’ the number of times needed to display the start
screen again.
By instruc
ting your GIGA to automatically switch itself off, you can
cut down your energy consumption. If this function is activated,
your GIGA switches off automatically after the preset time following
the last action on the machine.
You can set the automatic switch-off to 15minutes, 30minutes or
1–9hours.
Precondition:The start screen is displayed.
T Press the Rotary Switch.
T Touch the ‘Machine setting’
symbol.
‘Switch off after’
T T
ouch ‘Switch off after’.
T Now move your finger to the left or right to change the
switch-off time.
T Touch ‘Save’.
‘Saved’ appears briefly on the display.
‘Switch off after’
T T
ouch ‘Back’ the number of times needed to display the start
screen again.
Automatic switch-off

29
4 Permanent settings in programming mode
You already set the time and date during first-time use. You can
change this setting in the machine settings (program item ‘Time’
and ‘Date’).
E F
or the time format, you can choose between ‘24 hrs’ and
‘AM/ PM’ (see Chapter 4 ‘Permanent settings in programming
mode – Unit for amount of water / time format’).
Example:Proceed as follows to change the time.
Precondition:The start screen is displayed.
T Press the Rotary Switch.
T Touch the ‘Machine setting’
symbol.
‘Switch off after’
T
Turn the Rotary Switch until ‘Time’ is displayed.
T Touch ‘Time’.
‘Time’
T
Enter the current time.
T Touch ‘Save’.
‘Saved’ appears briefly on the display.
‘Time’
T T
ouch ‘Back’ the number of times needed to display the start
screen again.
The harder the w
ater is, the more frequently the GIGA needs to
be descaled. It is therefore important to set the water hardness
accurately.
The water hardness was set when the machine was first used. You
can change this setting at any time.
The water hardness can be adjusted on a continuous scale between
1 °dH and 30 °dH.
Precondition:The start screen is displayed.
T Press the Rotary Switch.
T Touch the ‘Machine setting’
symbol.
‘Switch off after’
T
Turn the Rotary Switch until ‘Water hardness’ is displayed.
T Touch ‘Water hardness’.
‘Water hardness’
T
Now move your finger to the left or right to change the
setting.
Time and date
Setting the water
hardness

30
4 Permanent settings in programming mode
T Touch ‘Save’.
‘Saved’ appears briefly on the display.
‘Water hardness’
T T
ouch ‘Back’ the number of times needed to display the start
screen again.
In the progr
am item ‘Timer’ you can set a switch-on and
swit
ch-off time for every weekday.
E For the time format, you can choose between ‘24hrs’ and
‘AM/ PM’ (see Chapter 4 ‘Permanent settings in programming
mode – Unit for amount of water / time format’).
Example: Proceed as follows to set the GIGA to switch on on
Mondays at a time defined by you.
Precondition:The start screen is displayed.
T Press the Rotary Switch.
T Touch the ‘Machine setting’
symbol.
‘Switch off after’
T
Turn the Rotary Switch until ‘Timer’ is displayed.
T Touch ‘Timer’.
‘Timer’
T T
ouch ‘Monday’.
‘Switch machine on’
T
Enter the desired switch-on time.
T Touch ‘Save’.
‘Switch machine off’
T T
ouch ‘Back’ the number of times needed to display the start
screen again.
In the mac
hine settings, you can change the unit for the amount of
water as well as the time format:
U
‘Unit’ (‘ml’ / ‘oz’)
U
‘Time format’ (‘24 hrs.’ / ‘AM / PM’)
Example:Proceed as follows to change the unit for the amount of
water from ‘ml’ to ‘oz’.
Prec
ondition:The start screen is displayed.
T Press the Rotary Switch.
Timer
Unit for amount of
water / time format

31
4 Permanent settings in programming mode
T Touch the ‘Machine setting’ symbol.
‘Switch off after’
T
Turn the Rotary Switch until ‘Unit’ is displayed.
T Touch ‘Unit’.
‘Unit’
T
Now move your finger to the left or right to change the
setting to ‘oz’.
T T
ouch ‘Save’.
‘Saved’ appears briefly on the display.
‘Unit’
T T
ouch ‘Back’ the number of times needed to display the start
screen again.
In the progr
am item ‘Save energy’ you can set an energy-saving
mode
:
U
‘1’
U
Soon after the last preparation, the GIGA stops heating up.
After approximately 5 minutes, the ‘ESM’ symbol
(energy-saving mode, E.S.M.
©
) is displayed on the cockpit.
U
Before you can prepare a specialty coffee, specialty coffee
with milk, or hot water, the machine must heat up.
U
‘0’
U
All specialty coffees, specialty coffees with milk and hot
water can be prepared without having to wait.
Example:Proceed as follows to switch energy-saving mode off.
Precondition:The start screen is displayed.
T Press the Rotary Switch.
T Touch the ‘Machine setting’
symbol.
‘Switch off after’
T
Turn the Rotary Switch until ‘Save energy’ is displayed.
T Touch ‘Save energy’.
‘Save energy’
T
Now move your finger across the controller and set it to ‘0’.
T Touch ‘Save’.
‘Saved’ appears briefly on the display.
‘Save energy’
T T
ouch ‘Back’ the number of times needed to display the start
screen again.
Energy-saving mode

32
4 Permanent settings in programming mode
In this program item you can set the language used by your GIGA.
Example:Proceed as follows to change the language from ‘English’
to
‘Français’.
Prec
ondition:The start screen is displayed.
T Press the Rotary Switch.
T Touch the ‘Machine setting’
symbol.
‘Switch off after’
T
Turn the Rotary Switch until ‘Choose language’ is displayed.
T Touch ‘Choose language’.
‘Choose language’
T
Move your finger across the display until the desired
language, e.g. ‘Français’, is displayed in the center.
T T
ouch ‘Enregistrer’.
‘Enregistré’ appears briefly on the display.
‘Langue’
T T
ouch ‘Retour’ the number of times needed to display the
start screen again.
In the program item ‘Display’ you can set the display brightness (as
a perc
entage).
Precondition:The start screen is displayed.
T Press the Rotary Switch.
T Touch the ‘Machine setting’
symbol.
‘Switch off after’
T
Turn the Rotary Switch until ‘Display’ is displayed.
T Touch ‘Display’.
‘Display’
T
Now move your finger to the left or right to change the
setting.
T Touch ‘Save’.
‘Saved’ appears briefly on the display.
‘Display’
T T
ouch ‘Back’ the number of times needed to display the start
screen again.
Language
Display brightness

33
4 Permanent settings in programming mode
In the program item ‘Factory setting’ the machine can be reset to its
factory setting: All user settings (apart from the ‘water hardness’)
are reset to factory settings. Your GIGA then switches off.
Precondition:The start screen is displayed.
T Press the Rotary Switch.
T Touch the ‘Machine setting’
symbol.
‘Switch off after’
T
Turn the Rotary Switch until ‘Factory setting’ is displayed.
T Touch ‘Factory setting’.
‘Factory setting’ / ‘Reset the machine to the factory setting?’
T T
ouch ‘Yes’.
‘Saved’ appears briefly on the display.
Y
our GIGA is switched off.
Your GIGA has a ‘Smart mode’. If this mode is activated, the
products on the start screen will be rearranged according to the
frequency of preparation after some time. The number of products
displayed on the start screen will vary according to your personal
preferences.
E The star on the cockpit indicates that the ‘Smart mode’ is
activated.
Example:Proceed as follows to deactivate the ‘Smart mode’.
Precondition:The start screen is displayed.
T Press the Rotary Switch.
T Touch the ‘Machine setting’
symbol.
‘Switch off after’
T
Turn the Rotary Switch until ‘Smart mode’ is displayed.
T Touch ‘Smart mode’.
‘Smart mode’
T
Now move your finger across the controller and set it to ‘0’.
T Touch ‘Save’.
‘Saved’ appears briefly on the display.
‘Smart mode’
T T
ouch ‘Back’ the number of times needed to display the start
screen again.
Restore factory settings
Smart mode

34
4 Permanent settings in programming mode
Define whether the product names or just the product images
should be shown on the start screen.
Example:Proceed as follows to activate the product names on the
start screen.
Precondition:The start screen is displayed.
T Press the Rotary Switch.
T Touch the ‘Machine setting’
symbol.
‘Switch off after’
T
Turn the Rotary Switch until ‘Product name’ is displayed.
T Touch ‘Product name’.
‘Product name’
T
Now move your finger across the controller and set it to ‘1’.
T Touch ‘Save’.
‘Saved’ appears briefly on the display.
‘Product name’
T T
ouch ‘Back’ the number of times needed to display the start
screen again.
In progr
amming mode, you can view the following information:
U
‘Product counter’: Number of prepared specialty coffees and
hot water
U
‘Maintenance counter’: Number of maintenance programs
performed (cleaning, descaling etc.)
U
‘Version’: Software version
Example: Proceed as follows to view the number of specialty
coffees prepared.
Precondition:The start screen is displayed.
T Press the Rotary Switch.
T Touch the ‘Machine setting’
symbol.
‘Switch off after’
T
Turn the Rotary Switch until ‘Product counter’ is displayed.
T Touch ‘Product counter’.
‘Product counter’
T T
ouch ‘1/3’ or turn the Rotary Switch to view the number of
other products.
T Touch ‘Back’ the number of times needed to display the start
screen again.
Displaying product
names
Query counter readings
and version

35
5 Maintenance
5 Maintenance
Use of maintenance products that are harmful to health and
discharge of liquids during maintenance program. Harmful if
swallowed. Irritating to eyes and skin.
T Keep children AWAY.
T Keep children away from the machine while it is performing a
maintenance program.
T Avoid contact with skin and eyes.
T Avoid generation of dust. Do not inhale dust.
T When using do not eat or drink.
T Keep maintenance products away from food, drink and
animal food.
T Keep container tightly closed and dry. Keep in a cool place.
Basic information about maintenance:
U
Press the Rotary Switch to open the cockpit. This area consists
of a ‘Maintenance status’ c section and a ‘Machine setting’
section. You can manage the maintenance of your GIGA in the
‘Maintenance status’ c section.
U
If a maintenance program needs to be initiated, a message
with a red background appears on the cockpit. You can go
straight to the relevant maintenance program by touching
this message or pressing the Rotary Switch. If several
maintenance programs are pending, several messages with a
red background will appear. Maintenance programs that are
due imminently are indicated on your GIGA by means of a
bar display within the message.
U
The c symbol on the start screen informs you that a cleaning
operation, descaling operation or filter change is pending. To
start the maintenance program, touch the c symbol or press
the Rotary Switch.
E Carry out each maintenance program when you are prompted
to do so.
E In the interests of hygiene, you should clean the milk system
daily when you have been preparing milk.
J WARNING
36
5 Maintenance
You can initiate the rinse operation manually at any time.
Precondition:The start screen is displayed.
T Place a receptacle under the dual spout.
T Press the Rotary Switch.
T Touch the c symbol.
T Turn the Rotary Switch until ‘Rinse’ is displayed in the center.
T T
ouch ‘Rinse’ to start the rinse operation.
‘Machine is rinsing’, ‘Milk system is being rinsed’, water
flo
ws out of the dual spout.
The rinse stops automatically. Your GIGA is once more
ready for use.
15 minutes after milk preparation, the milk system is automatically
rinsed. Therefore, always place a receptacle under the dual spout
after preparing milk.
To ensure that the milk system in the dual spout always works
properly, you must clean it daily when you have been preparing
milk.
Non-recommended cleaning agents will not optimally remove milk
residues. This may cause the cappuccino frother to become blocked
and fly off the machine. Discharge of hot steam.
T Use only original JURA milk system cleaner.
Harmful and irritating cleaning agent. Harmful if swallowed.
Irritating to eyes and skin.
T Keep children AWAY.
T Avoid contact with skin and eyes.
T After contact with skin, wash immediately with plenty of
water. In case of skin irritation, seek medical advice.
T After eye contact, immediately flush eyes with plenty of water
and seek medical advice.
T If swallowed, rinse mouth immediately and drink large
quantities of water. Do not induce vomiting. Seek medical
advice immediately and show label.
E JURA milk system cleaner is available from specialized dealers.
E To clean the milk system, use the container supplied.
Rinsing the machine
Automatic milk system
rinsing
Cleaning the milk system
J WARNING
J WARNING
37
5 Maintenance
Precondition:The start screen is displayed.
T Press the Rotary Switch.
T Touch ‘Clean the milk system’.
T T
ouch ‘Next’.
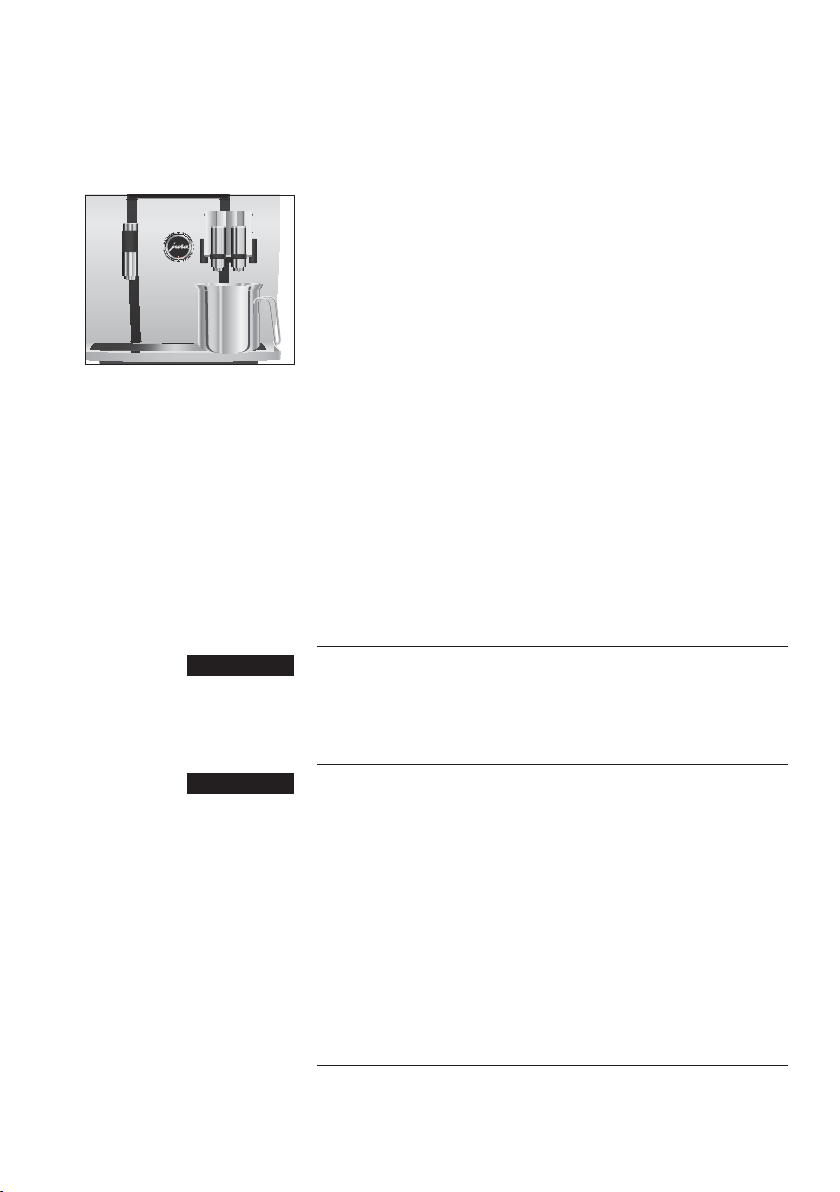
‘Cleaning agent for milk system’ / ‘Connect the milk tube’
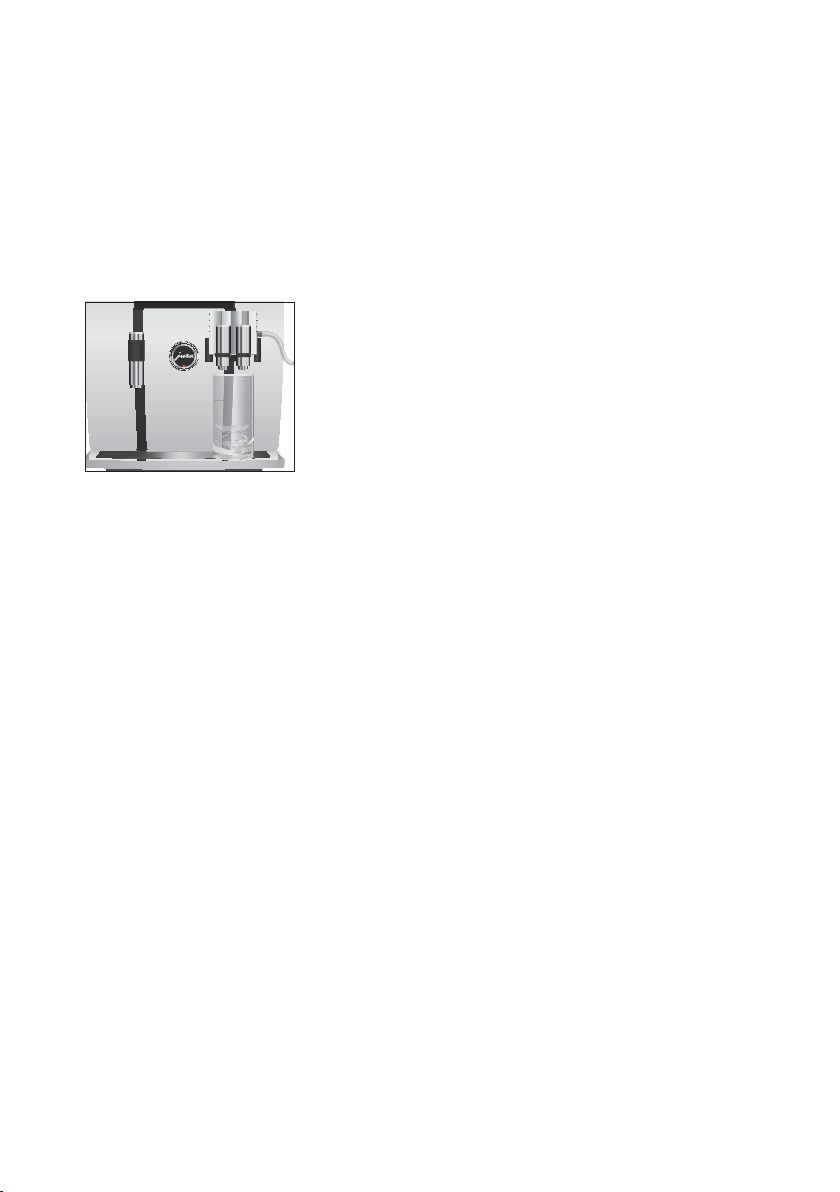
T
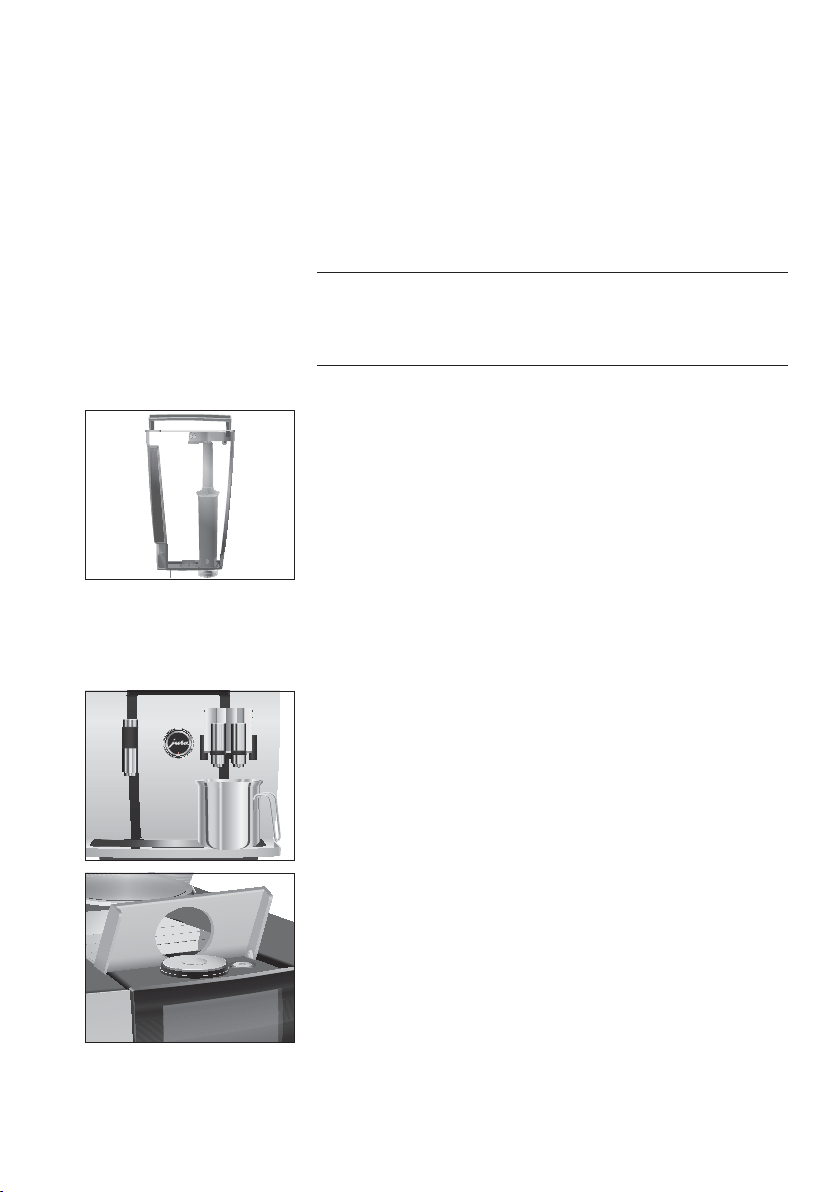
Remove the milk pipe from the milk container or milk cooler.
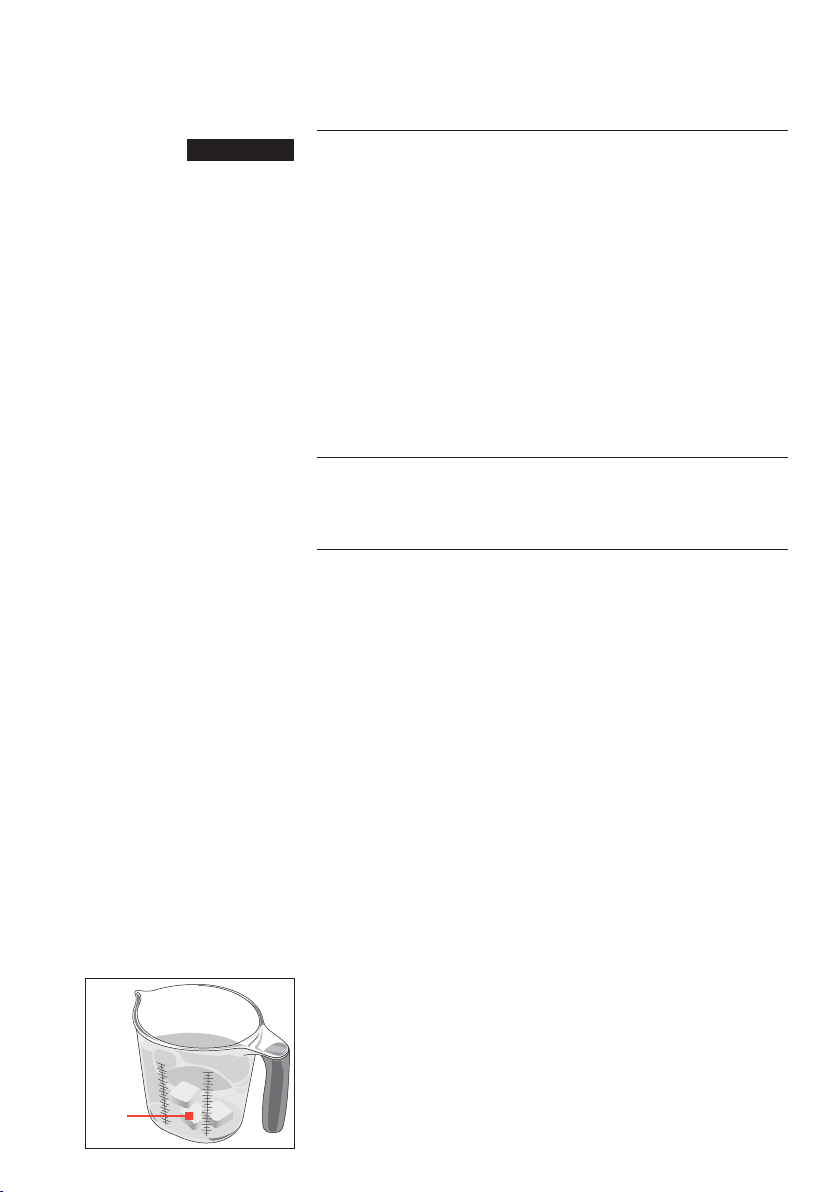
T Add milk system cleaner to the front part of the container
up to the bottom mark (indicated by 6).
T Then fill with water up to the upper mark.
T Place the container under the dual spout and connect the
milk pipe with the container.
E To connect the milk pipe to the container correctly, the pipe
must be fitted with a connector.
T Touch ‘Start’.
‘Milk system is being cleaned’, the dual spout and the milk
pipe are c
leaned.
The operation is interrupted, ‘Water for cleaning milk
syst
em’ / ‘Connect the milk tube’
T
Rinse the container thoroughly and fill the front part with
fresh water up to the upper mark.
T Place the container under the dual spout and connect the
milk pipe with the container.
T Touch ‘Next’.
‘Milk system is being cleaned’
The operation stops automatically. Your GIGA is once more
ready f
or use.
6
38
5 Maintenance
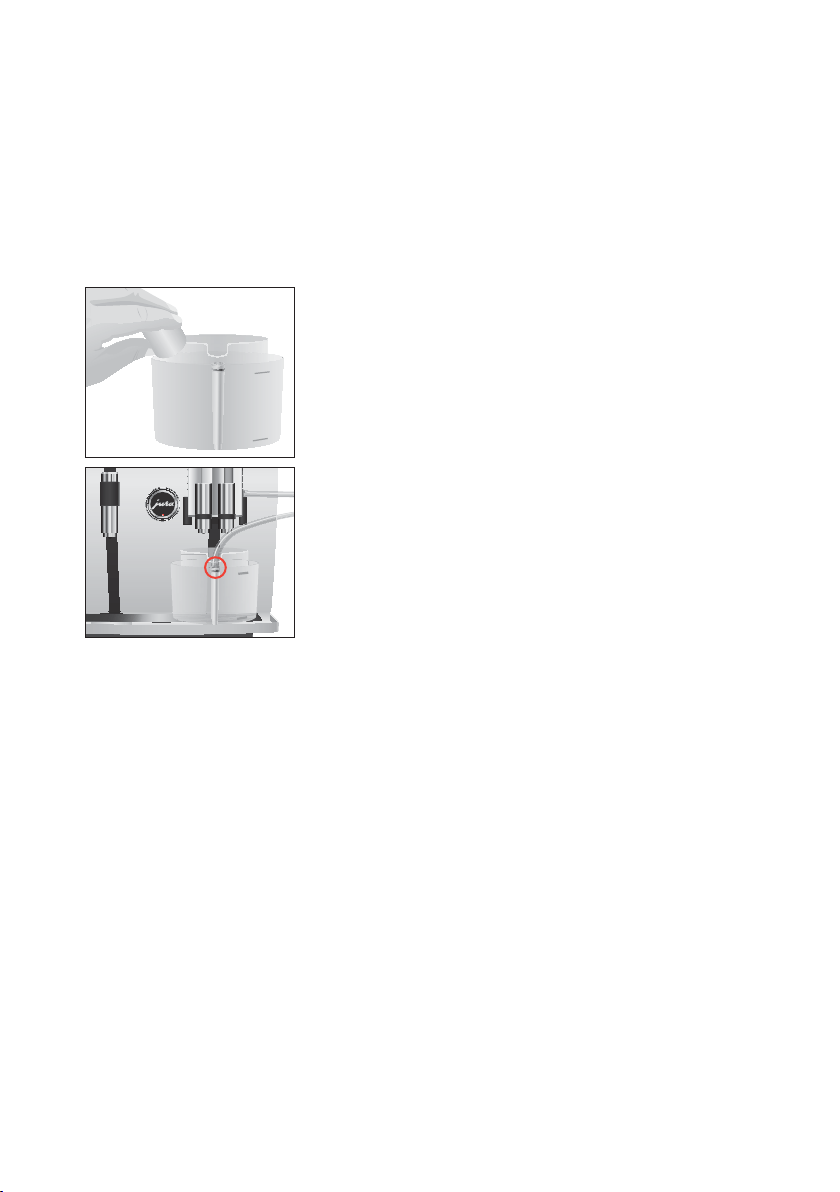
The dual spout must be dismantled and rinsed daily if milk has been
prepared to make sure it functions perfectly and in the interests of
hygiene.
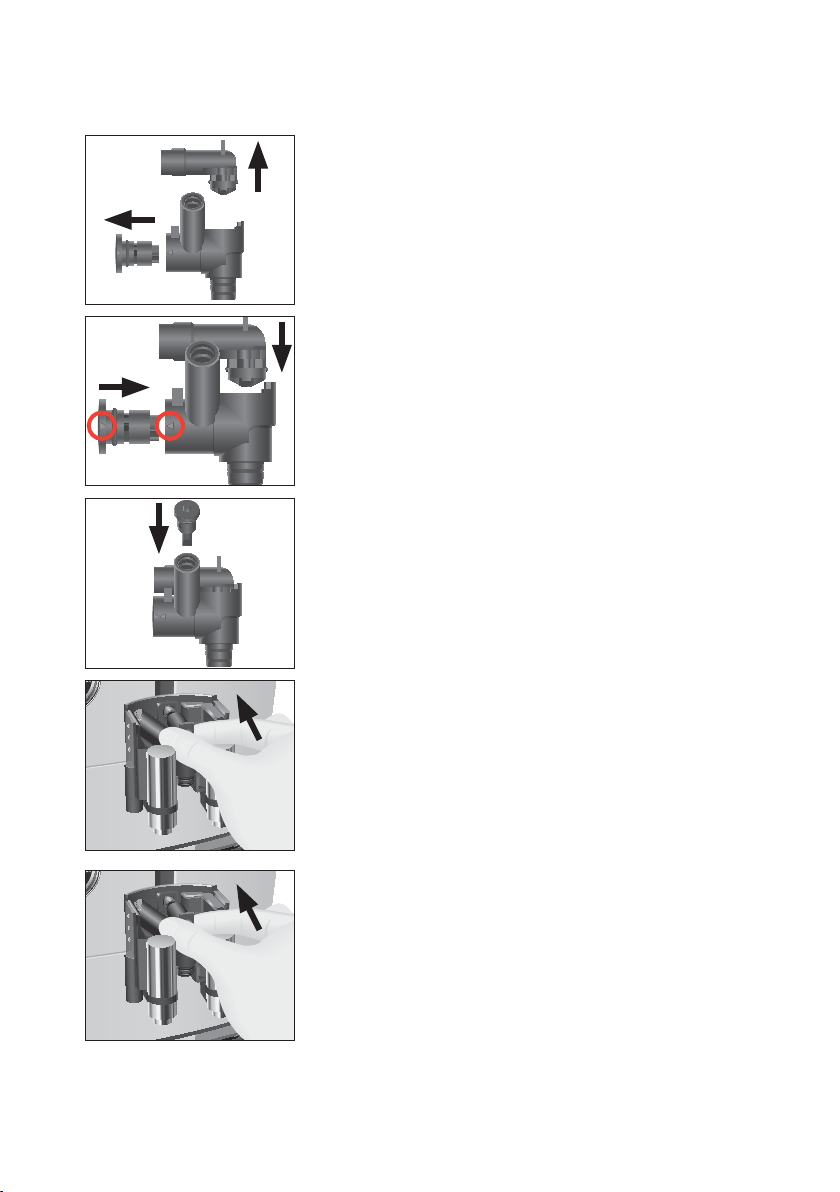
T Remove the milk pipe and rinse it thoroughly under running
water.
T Press the releasing devices and pull the cover of the dual
spout up and off.
T Carefully pull the bottom part of the milk system down and
off.
T Remove the milk system from the dual spout.
T Remove the air intake pipe.
Dismantling and rinsing
the dual spout
39
5 Maintenance
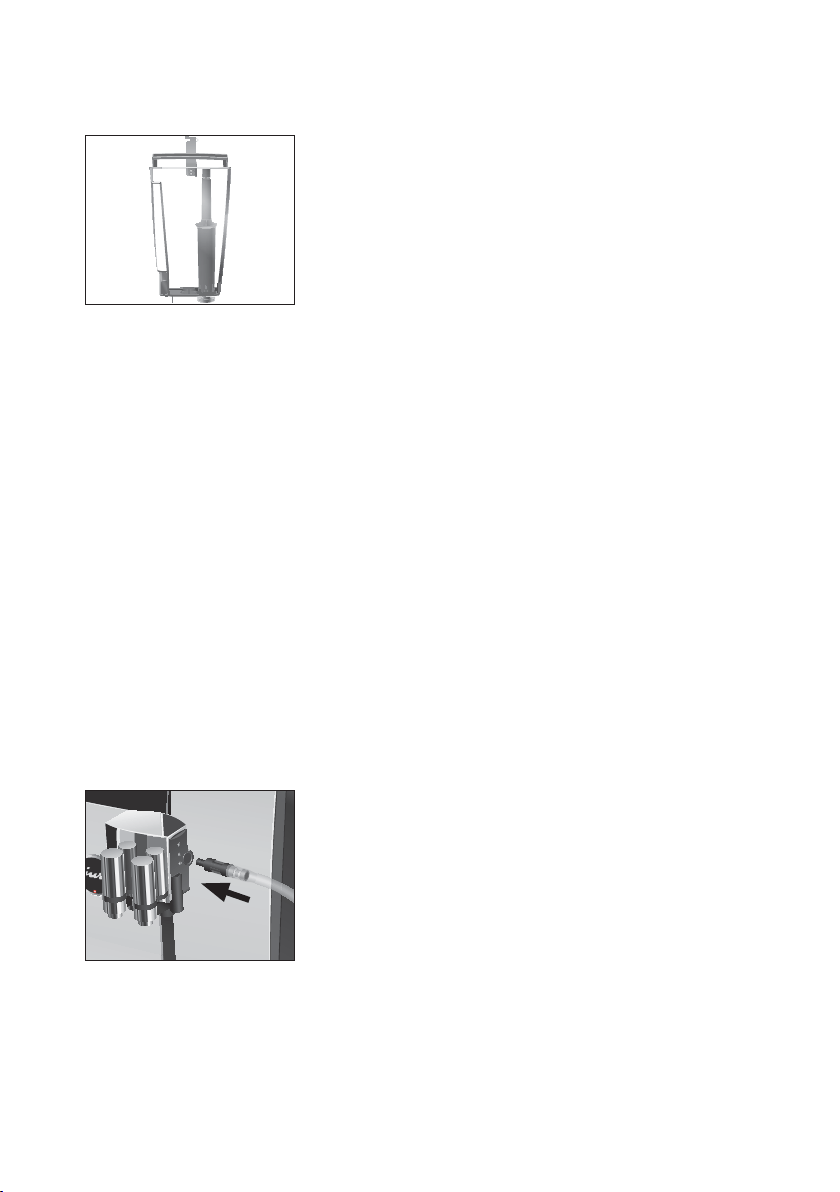
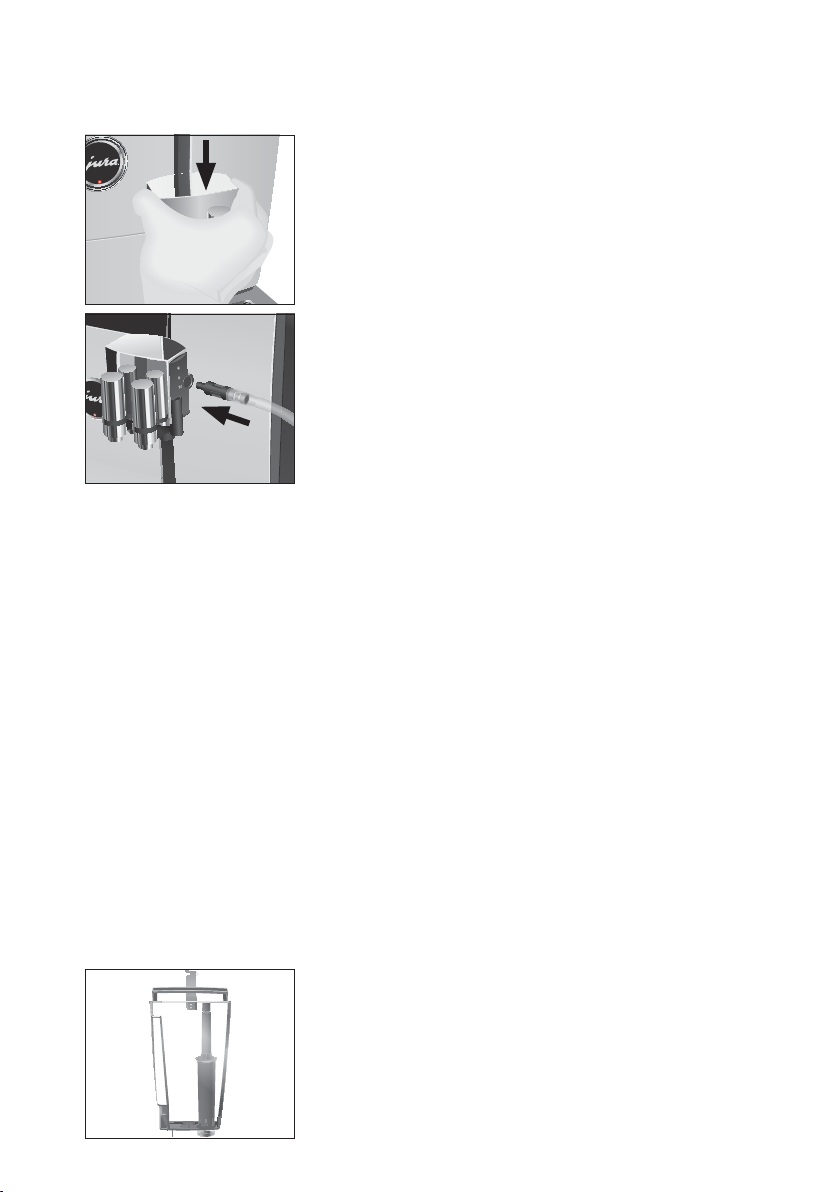
T Dismantle the milk system into its individual parts.
T Rinse all the parts under running water. If there are severely
dried-on milk residues, firstly immerse the individual parts
in a solution of 8.5 oz (250ml) cold water and 1 capful of JURA
milk system cleaner. Then rinse the parts thoroughly.
T Reassemble the milk system. When doing this, note the
arrows on the individual parts (circled in red in the picture).
T Fit the air intake pipe.
T Fit the assembled individual parts back in the dual spout and
press it firmly.
T Attach the bottom part of the milk system to the part
already inserted from below.
40
5 Maintenance
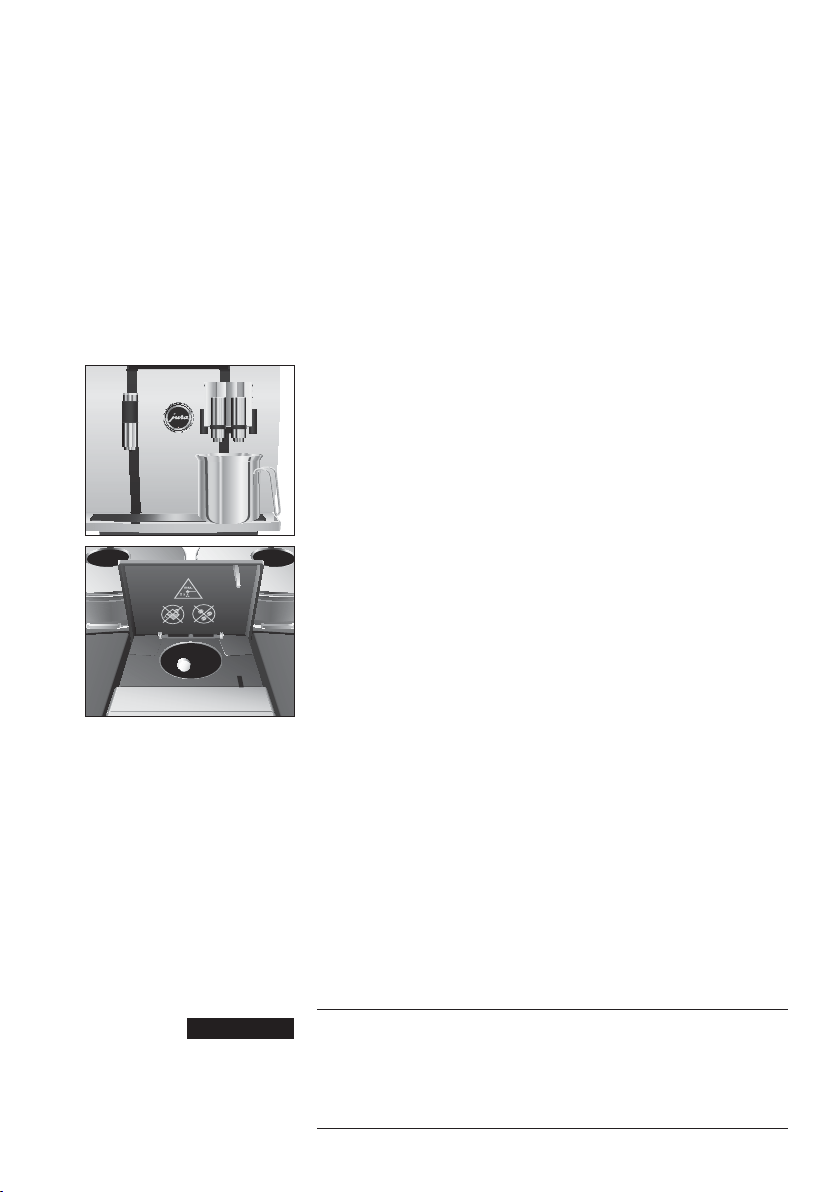
T Fit the cover of the dual spout. It will click into place audibly.
T Connect the milk pipe to the dual spout.
Your GIGA no longer has to be descaled if you are using the CLEARYL
Smart filter cartridge.
E Once the filter cartridge stops working (depending on the
water hardness setting), the GIGA will prompt you to change
the filter.
E CLEARYL Smart filter cartridges are available from specialized
dealers.
Precondition:The c symbol is displayed on the start screen (if you
are already using a filter).
T Press the Rotary Switch.
The
‘Change the filter’ message lights up red.
T
Remove and empty the water tank.
T Open the filter holder and remove the old CLEARYL Smart
filter cartridge and filter extension.
T Fit the filter cartridge extension on top of a new CLEARYL
Smart filter cartridge.
T Insert the filter cartridge with its extension into the water
tank.
T Close the filter holder. It will click into place audibly.
Inserting/changing the
filter

41
5 Maintenance
T Fill the water tank with fresh, cold water and reinsert the
tank.
E The machine automatically detects that you have just inserted/
changed the filter cartridge.
‘Filter operation’ / ‘Saved’
‘Filt
er is being rinsed’, the filter is rinsed. The water flows
direc
tly into the drip tray.
‘Empty drip tray’
T
Empty the drip tray and coffee grounds container and put
them back into the machine.
The start screen is displayed. Your GIGA is once more ready
for use.
After 180preparations or 80switch-on rinses, the GIGA will prompt
you to clean it.
Non-recommended (e.g. liquid) cleaning agents may contain
substances that could damage the machine or leave residues.
T Use only original JURA cleaning tablets. These are specially
formulated for your machine.
Harmful and irritating cleaning agent. Harmful if swallowed.
Irritating to eyes and skin.
T Keep children AWAY.
T Avoid contact with skin and eyes.
T Avoid generation of dust. Do not inhale dust.
T After contact with skin, wash immediately with plenty of
water. In case of skin irritation, seek medical advice.
T After eye contact, immediately flush eyes with plenty of water
and seek medical advice.
T If swallowed, rinse mouth immediately and drink large
quantities of water. Do not induce vomiting. Seek medical
advice immediately and show label.
E The cleaning program lasts approximately 20 minutes.
E Do not interrupt the cleaning program. The quality of cleaning
will be impaired if you do so.
E JURA cleaning tablets are available from specialized dealers.
Cleaning the machine
J WARNING
J WARNING
42
5 Maintenance
Precondition:The c symbol is displayed on the start screen.
T Press the Rotary Switch.
The ‘Clean’ message lights up red.
T T
ouch ‘Clean’.
T T
ouch ‘Start’.
‘Empty coffee grounds container’
T
Empty the drip tray and coffee grounds container and put
them back into the machine.
‘Press the Rotary Switch’
T
Place a receptacle under the dual spout.
T Press the Rotary Switch.
‘Machine is being cleaned’, water flows out of the dual spout.
The oper
ation is interrupted, ‘Add cleaning tablet’.
T
Open the cover of the filler funnel for ground coffee.
T Insert a JURA cleaning tablet into the filler funnel.
T Close the cover of the filler funnel.
‘Press the Rotary Switch’
T
Press the Rotary Switch.
‘Machine is being cleaned’, water flows out of the dual spout
repeat
edly.
The operation stops automatically.
‘Empty coffee grounds container’
T
Empty the drip tray and coffee grounds container and put
them back into the machine.
Cleaning is now complete. The start screen is displayed.
The GIGA builds up deposits of limescale over time and
automatically prompts you to descale it when necessary. The
degree of calcification depends on the hardness of your water.
E If you are using a CLEARYL Smart filter cartridge, you will not
be prompted to descale.
Non-recommended descaling agents (e.g. vinegar) may contain
substances that could damage the machine or leave residues.
T Use only original JURA descaling tablets. These are specially
formulated for your machine.
Descaling the machine
J WARNING
43
5 Maintenance
Harmful and irritating descaling agent. Harmful if swallowed.
Irritating to eyes and skin.
T Keep children AWAY.
T Avoid contact with skin and eyes.
T Avoid generation of dust. Do not inhale dust.
T After contact with skin, wash immediately with plenty of
water. In case of skin irritation, seek medical advice.
T After eye contact, immediately flush eyes with plenty of water.
Remove contact lenses. Seek medical advice.
T If swallowed, rinse mouth immediately and drink large
quantities of water. Do not induce vomiting. Seek medical
advice immediately and show label.
If the descaling operation is interrupted, there may be damage to
the machine.
T Allow the descaling program to run to the end.
E The descaling program lasts approximately 40minutes.
E JURA descaling tablets are available from specialized dealers.
E If the descaling agent comes into contact with sensitive
surfaces (e.g. marble), damage cannot be ruled out. Clean up
any splashes immediately.
Precondition:The c symbol is displayed on the start screen.
T Press the Rotary Switch.
The
‘Descale’ message lights up red.
T T
ouch ‘Descale’.
T T
ouch ‘Start’.
‘Empty drip tray’
T
Empty the drip tray and coffee grounds container and put
them back into the machine.
‘Pour descaling agent into water tank’
T
Remove and empty the water tank.
T Completely dissolve 3JURA descaling tablets in a receptacle
holding 20 oz (600 ml) of water. This may take several
minutes.
T Pour the solution into the empty water tank and insert it
into the machine.
‘Press the Rotary Switch’
J WARNING J WARNING
NOTICE
3x

44
5 Maintenance
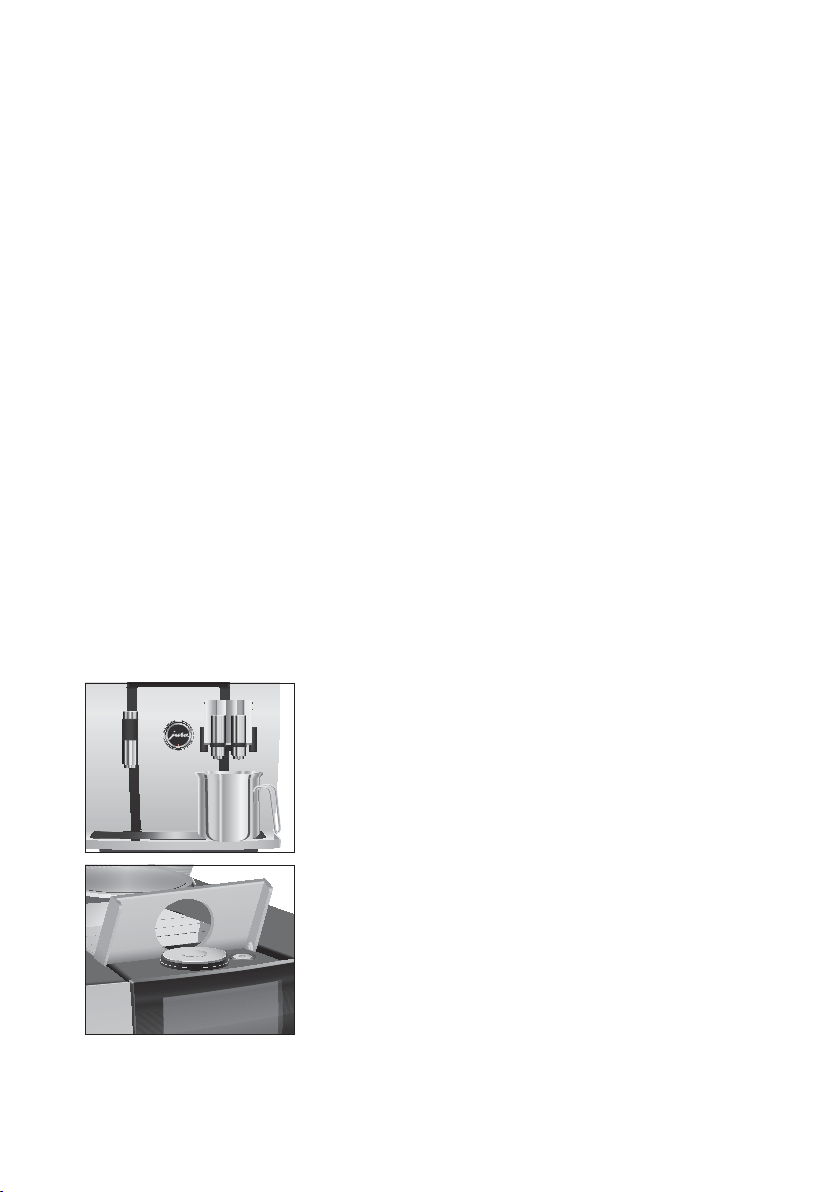
T Place one receptacle under the dual spout and another
under the hot-water spout.
T Press the Rotary Switch.
‘Machine is being descaled’, water flows straight into the
drip tr
ay and out of the hot-water spout and dual spout
repeatedly.
The operation is interrupted, ‘Empty drip tray’.
T
Empty the drip tray and coffee grounds container and put
them back into the machine.
‘Fill water tank’
T
Empty the receptacles and place them back under the dual
spout and the hot-water spout.
T Remove the water tank and rinse it thoroughly.
T Fill the water tank with fresh, cold water and reinsert the
tank.
‘Press the Rotary Switch’
T
Press the Rotary Switch.
‘Machine is being descaled’, the descaling operation is
c
ontinued. Water flows straight into the drip tray and out of
the hot-water spout and dual spout repeatedly.
‘Empty drip tray’
T
Empty the drip tray and coffee grounds container and put
them back into the machine.
Descaling is now complete. The start screen is displayed.
E If the descaling operation stops unexpectedly, rinse the water
tank thoroughly.
Coffee beans may be covered with a slight oil film which remains on
the walls of the bean containers. These traces may negatively affect
the coffee results. For this reason, clean the bean containers from
time to time.
T Press the On/Off button Q to switch the GIGA off.
T Switch the machine off at the power switch.
Cleaning the bean
container
45
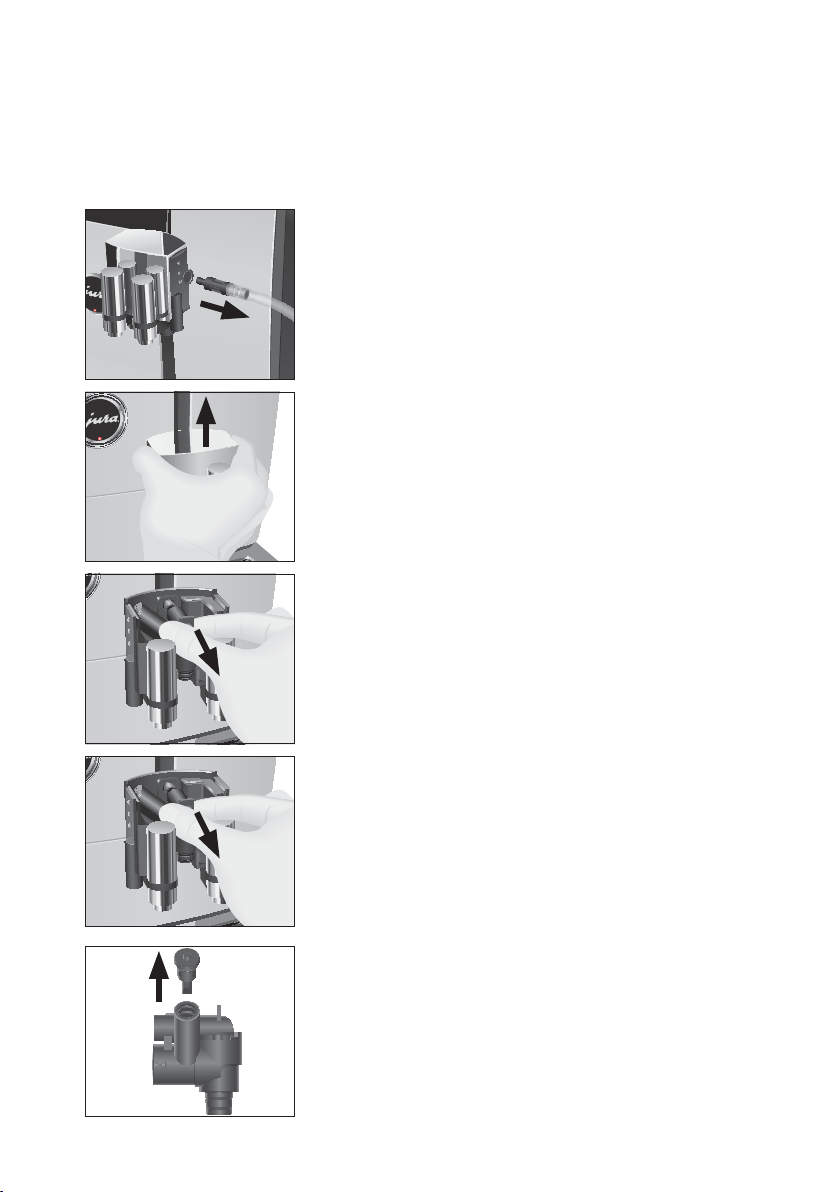
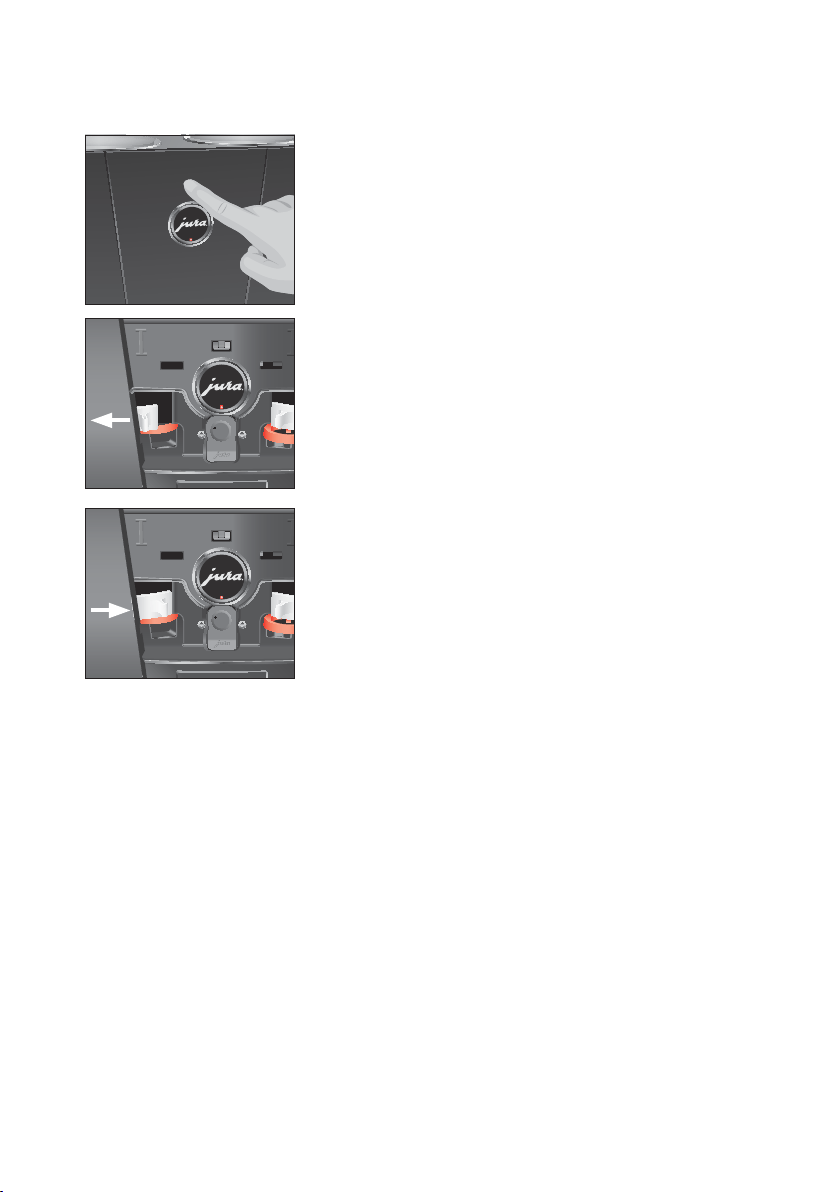
5 Maintenance
T Open the service cover on the back of the machine by
pressing above the JURA logo.
T Push the red sliding catch completely to the rear to close the
bean container.
T Turn the blue locking device outwards.
T Remove the bean container.
T Remove the aroma preservation cover.
T Empty the bean container.
T Clean the bean container with a soft, dry cloth.
T Fit the bean container.
T Turn the blue locking device inwards.
T Pull the red sliding catch completely forwards.
T Refit the service cover and fix it by pressing above the JURA
logo. It will click into place audibly.
T Fill the bean container with coffee beans and close the
aroma preservation cover.
Limescale deposits may form in the water tank. To ensure correct
function of the machine, descale the water tank from time to time.
T Remove the water tank.
T If you use a CLEARYL Smart filter cartridge, remove this.
T Completely fill the water tank and dissolve 3 JURA descaling
tablets in it.
T Leave the water tank with the descaling solution for several
hours (e.g. overnight).
T Empty the water tank and rinse it thoroughly.
T If you use a CLEARYL Smart filter cartridge, insert this again.
T Fill the water tank with fresh, cold water and reinsert the
tank.
Descaling the water tank

46
6 Display messages
6 Display messages
Message Cause/Result Action
‘Fill water tank’ The water tank is empty. You cannot
prepare an
y products.
T Fill the water tank (see Chapter 3
‘Daily operation – Filling the
water tank’).
‘Empty coffee
grounds c
ontainer’ /
‘Empty drip tray’
The coffee grounds container is full. /
The drip tr
ay is full. You cannot
prepare any products.
T Empty the coffee grounds
container and the drip tray (see
Chapter 3 ‘Daily operation – Daily
maintenance’).
‘Close front cover’ The coffee grounds container cover is
open. Y
ou cannot prepare any
products.
T Close the cover.
‘Drip tray not fitted’ The drip tray is not inserted correctly
or is not inser
ted at all. You cannot
prepare any products.
T Fit the drip tray.
‘Fill left bean
c
ontainer’ /
‘Fill right bean
c
ontainer’
One of the bean containers is empty.
Y
ou cannot prepare any specialty
coffees for which coffee beans are
required from this bean container.
You can prepare hot water or milk.
T Fill the bean container (see
Chapter 1 ‘Preparing and using for
the first time – Filling the bean
container’).
‘Clean the milk
syst
em’
The GIGA prompts you to clean the
milk system.
T Perform milk system cleaning
(see Chapter 5 ‘Maintenance –
Cleaning the milk system’).
‘Change the filter’ The filter cartridge no longer works.
The G
IGA is prompting a filter
change.
T Replace the CLEARYL Smart
filter cartridge (see Chapter 5
‘Maintenance – Inserting/
changing the filter’).
‘Clean’ The GIGA is prompting you to clean
it.
T P
erform cleaning (see Chapter 5
‘Maintenance – Cleaning the
machine’).
‘Descale’ The GIGA is prompting you to
descale it.
T P
erform descaling (see Chapter 5
‘Maintenance – Descaling the
machine’).

47
6 Display messages
Message Cause/Result Action
‘Not enough ground
c
offee’
There is insufficient ground coffee in
the machine; the GIGA stops the
operation.
T The next time you prepare a
beverage, add more ground
coffee (see Chapter 2
‘Preparation – Ground coffee’).
‘Service cover is not
fitt
ed’
The service cover on the back of the
machine is not fitted. You cannot
prepare any products.
T Fit the service cover.
‘Spout is not fitted’ The cover of the dual spout has not
been fitt
ed.
T Correctly fit the cover of the
dual spout.

48
7 Troubleshooting
7 Troubleshooting
Problem Cause/Result Action
Insufficient foam is
produced when the milk
is frothed or milk sprays
from the dual spout.
The dual spout is dirty.
T Clean the milk system in the dual spout
(see Chapter 5 ‘Maintenance – Cleaning
the milk system’).
T Dismantle and rinse the dual spout (see
Chapter 5 ‘Maintenance – Dismantling
and rinsing the dual spout’).
The milk and milk foam
temperature is set too
high.
T Set a lower milk and milk foam
temperature for the product.
Coffee only comes out in
drips when it is being
prepared.
Coffee or ground coffee
has been ground too
finely and is blocking the
system. The water
hardness may not have
been correctly set.
T Put the grinder on a coarser setting or
use coarser ground coffee (see Chapter 4
‘Permanent settings in programming
mode – Setting the consistency of
grind’).
T Perform descaling (see Chapter 5
‘Maintenance – Descaling the machine’).
‘Fill bean container’ is not
displa
yed although the
bean container is empty.
The bean monitor is dirty.
T Clean the bean container (see Chapter 5
‘Maintenance – Cleaning the bean
container’).
Preparation stops, ‘Fill
bean c
ontainer’ is briefly
displa
yed although the
bean container has been
filled.
The sliding catch for the
bean container has not
been pulled out or has
not been pulled out
completely.
T Open the service cover on the back
of the machine and pull the sliding
catch all the way out (see Chapter 5
‘Maintenance – Cleaning the bean
container’).
‘Fill water tank’ is
displa
yed although the
water tank is full.
The water tank float is
trapped.
T Descale the water tank (see Chapter 5
‘Maintenance – Descaling the water
tank’).
‘Empty drip tray’ is
alw
ays displayed.
The metal contacts of the
drip tray are dirty or wet.
T Clean and dry the metal contacts on
the back of the drip tray.
‘Error2’ or ‘Error5’ is
displa
yed.
If the machine has been
exposed to the cold for a
long period of time,
heating may be disabled
for safety reasons.
T Warm the machine at room
temperature.

49
7 Troubleshooting
Problem Cause/Result Action
Other ‘Error’ messages
are displa
yed.
–
T Contact customer support in your
country (see Chapter 11 ‘JURA contact
details/ Legal information’).
E If you were unable to solve the problem, contact customer
support in your country (see Chapter 11 ‘JURA contact details/
Legal information’).
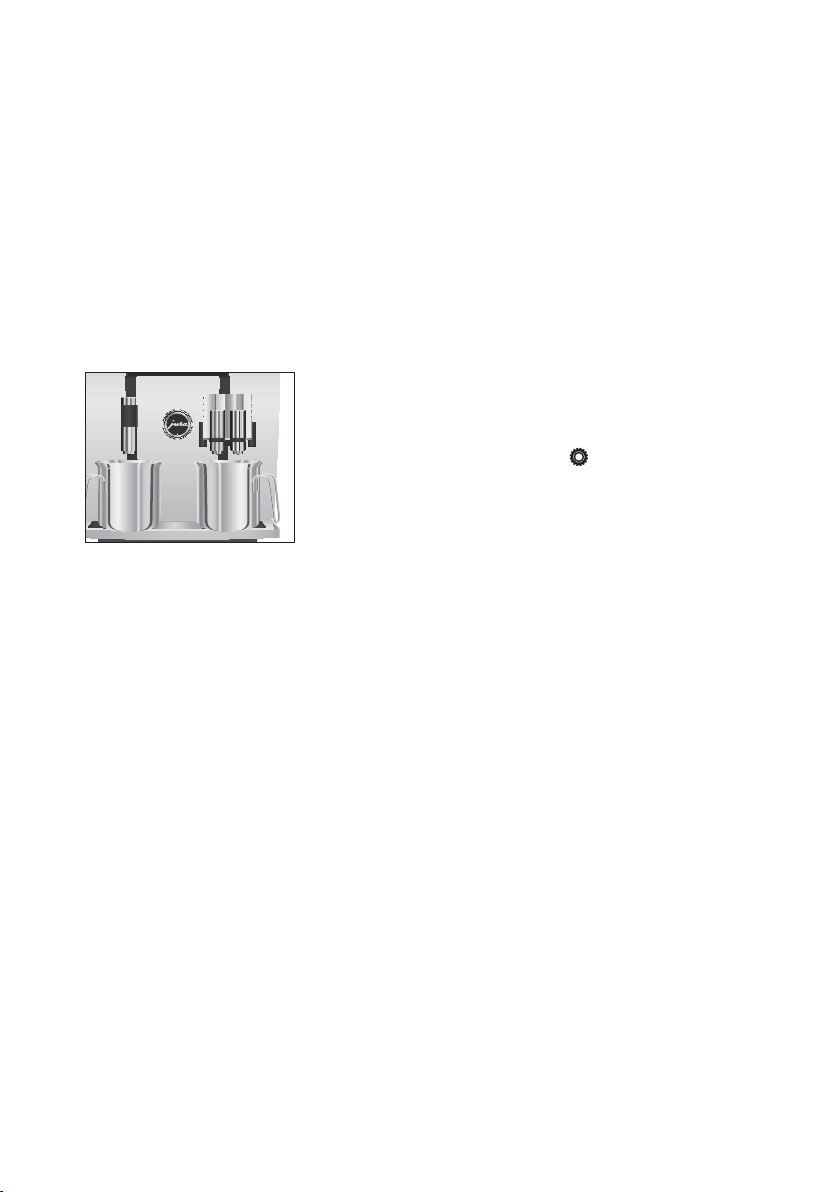
50
8 Transport and environmentally friendly disposal
8 Transport and environmentally friendly disposal
Keep the packaging for your GIGA. It should be used to protect the
machine during transport.
To protect the GIGA from frost during transport, the system must be
emptied.
Precondition:The start screen is displayed.
T Remove the milk pipe from the dual spout.
T Place one receptacle under the dual spout and another
under the hot-water spout.
T Press the Rotary Switch.
T Touch the ‘Machine setting’
symbol.
‘Switch off after’
T
Turn the Rotary Switch until ‘Empty system’ is displayed.
T Touch ‘Empty system’.
‘Empty system’ / ‘Remove the water tank’
T
Remove and empty the water tank.
‘Press the Rotary Switch’
T
Press the Rotary Switch.
Water and steam will continue to be discharged from the
dual spout and the hot-water spout until the system is
empty.
Your GIGA is switched off.
Please dispose of old machines in an environmentally neutral way.
H
Transport/ Emptying the
system
Disposal

51
9 Technical data
9 Technical data
Voltage 120V~, 60Hz
Power 1500W
Conformity mark
Energy consumption
‘Save energy’/ ‘1’
approx. 8Wh
Energy consumption
‘Save energy’/ ‘0’
approx. 26Wh
Pump pressure
static, max. 15bar
Holding capacity of water tank 88 oz (2.6l)
Holding capacity of bean container 2 × 10 oz (2 × 280g)
Holding capacity of coffee grounds container max. 20portions
Cord length approx. 47 in. (1.2 m)
Weight approx. 39.7 lbs (18 kg)
Dimensions (W×H×D) 12.6 × 16.3 × 19.6 in.
(32×41.5×49.7cm)
The machine complies with the following directives:
U
Standard UL 1082
U
Canadian Standard CSA C22.2 No. 64
Directives

52
10 Index
10 Index
A
Addresses 56
Adjusting the product settings 25
Aroma preservation cover
Bean container with aroma preservation
cover 8
Automatic switch-off 28
Timer 30
Automatic switch-on
Timer 30
B
Bean container
Bean container with aroma preservation
cover 8
Cleaning 44
Filling 11
Bus bar
Technical data 51
Button
On/Off button 9
Bypass amount of water 18
C
Caffè Barista 18
Caffè latte 18
Cappuccino 18
Cappuccino frother cleaning
Cleaning the milk system 36
Cleaning
Bean container 44
Machine 41
CLEARYL Pro Smart filter cartridge
Changing 40
Inserting 40
Cockpit 10, 24, 35
Coffee 17
Two coffees 17
Coffee grounds container 8
Configuration area 24
Connect accessory 15
Consistency of grind
Setting the consistency of grind 27
Contact details 56
Cover
Service cover 9
Storage compartment 8
Water tank 8
Cup platform 8
Customer support 56
D
Daily maintenance 22
Date 29
Descaling
Machine 42
Water tank 45
Display
Touchscreen display 9, 10
Display brightness 32
Displaying product names 34
Display messages 46
Disposal 50
Double product 17
Drip tray 8
Insert 8
Dual spout
Dismantling and cleaning 38
Height- and width-adjustable dual spout
8
E
Emptying the system 50
Energy-saving mode 31
Errors
Troubleshooting 48
Espresso 17
Two espressi 17
Espresso macchiato 18
F
Factory settings
Restore factory settings 33
Filler funnel
Filler funnel for ground coffee 8
Filling
Bean container 11
Water tank 21

53
10 Index
Filter
Changing 40
Inserting 40
First-time use 12
Flat white 18
G
Green tea 20
Grinder
Setting the consistency of grind 27
Ground coffee 19
Measuring spoon for ground coffee 8
H
Homepage 10
Hotline 56
Hot water 20
Hot-water spout
Height-adjustable hot-water spout 8
I
Important safeguards
Safety 4
Insert for drip tray 8
Instant coffee
Ground coffee 19
Internet 10
J
JURA
Contact details 56
Internet 10
L
Language 32
Latte macchiato 18
Locking device 9
M
Machine
Cleaning 41
Daily maintenance 22
Descaling 42
Regular maintenance 23
Rinsing 36
Setting up 11
Switching off 23
Switching on 21
Maintenance 35
Daily maintenance 22
Regular maintenance 23
Maintenance counter 34
Measuring spoon for ground coffee 8
Messages, display 46
Milk
Connecting milk 14
Milk system
Cleaning 36
Milk system rinsing 36
N
Number
Maintenance programs 34
Preparations 34
P
Permanent settings in programming mode
24
Pot of coffee 17
Power cord 8
Power switch 8
Preparation 16, 18
Americano 18
At the touch of a button 17
Caffè latte 18
Cappuccino 18
Coffee 17
Espresso 17
Espresso macchiato 18
Flat white 18
Green tea 20
Ground coffee 19
Hot water 20
Latte macchiato 18
Pot of coffee 17
Two coffees 17
Two espressi 17
Two specialty coffees 17
Using the product selector 17
Preparation options 17
Problems
Troubleshooting 48
Product counter 34
Product selector view 17
Product settings 25
Adjusting 25

54
10 Index
Programming mode 24
Automatic switch-off 28
Counter readings and version 34
Display brightness 32
Displaying product names 34
Energy-saving mode 31
Language 32
Product settings 25
Restore factory settings 33
Setting the consistency of grind 27
Setting the water hardness 29
Smart mode 33
Time and date 29
Timer 30
Unit for amount of water / time format
30
R
Regular maintenance 23
Rinsing
Machine 36
Rotary Switch 9, 10
S
Safety
Important safeguards 4
Service cover 9
Service socket 9
Settings
Permanent settings in programming
mode 24
Setting up
Setting up the machine 11
Sliding catch 9
Smart Connect 9, 15
Smart mode 33
Spout
Height-adjustable hot-water spout 8
Height- and width-adjustable dual spout
8
Switching off 23
Timer 30
Switching on 21
Timer 30
Switch-off
Automatic switch-off 28
Switch-off time 30
Switch-on time 30
Symbol description 3
T
Technical data 51
Tel 56
Time 29
Time format
Programming mode 30
Timer 30
Touchscreen display 9, 10
Transport 50
Troubleshooting 48
Two products 17
U
Unit for amount of water
Programming mode 30
Use, First-time 12
V
Ventilation slats 8
Venti Ports
Ventilation slats 8
Version 34
W
Water hardness
Determining the water hardness 11
Setting the water hardness 29
Water tank 8
Descaling 45
Filling 21
Website 10
Wireless connection 15

55

56
11 JURA contact details/ Legal information
11 JURA contact details/ Legal information
JURA Elektroapparate AG
Kaffeeweltstrasse 10
CH-4626 Niederbuchsiten
Switzerland
USA: JURA Inc.
Canada: FAEMA
Customer Service
Phone
E-Mail
1-800-220-5701
1-(855)-544-8600
info@juracanada.ca
Opening Hours (EST) Mon – Thu 9 am – 9 pm,
Fri 9 am – 8 pm,
Sat 9 am – 5 pm
Distributor Address
Phone
Fax
20 Craig Road
Montvale, NJ 07645
001 (201) 767-3999
001 (201) 767-9684
115 Matheson Boulevard East
Mississauga, Ontario, L4Z 1X8
1-(905)-501-8600
Internet www.us.jura.com www.ca.jura.com
@ You will find additional contact details for your country at
www.jura.com.
We reserve the right to make technical changes. The diagrams used
in these instructions for use are for illustration purposes only and do
not represent the original colors of the machine. Some details of
your GIGA may vary.
Your opinion is important to us! Use the contact details at
www.jura.com.
The instructions for use contain information which is protected by
copyright. It is not permitted to photocopy these instructions for use
or translate them into another language without the prior written
consent of JURA Elektroapparate AG.
Technical changes
Feedback
Copyright
J74170/GIGA 6/US-en/201902