Features and appearance will vary. Lights next to the buttons on the air conditioner control panel indicate the selected settings.
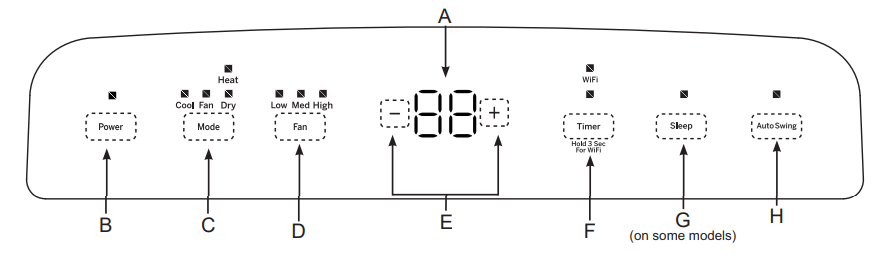
A. Control Panel Display
Displays the Set Temperature in degrees Fahrenheit or degrees Celsius, or the hours remaining in a Time Delay.
B. Power Button
Turns the air conditioner on or off.
NOTE: Turning off power by pressing the Power button does NOT disconnect the appliance from the power supply.
Press the Power button. The Power indicator will illuminate and the AC will turn on.
C. Mode Button
Press the Mode button to toggle among the operating options. The corresponding indicator will illuminate:
Cool - Cools the room to the set temperature
Fan - Circulates the air in the room without cooling
Dry - Reduces the humidity in the room
Heat (on some models) - Heats the room to the set
temperature
D. Fan Speed Button
The fan speed can be adjusted from Low, Medium, to High speed when the air conditioner is in operation. NOTE: The fan speed cannot be adjusted when the unit is in Dry or Sleep modes.
Press the Fan speed button to toggle among the three speeds. The corresponding fan speed indicator will illuminate.
E. Timer / Temperature Set Controls
Adjusts the Temperature or Hours in Time Delay.
To Set the Temperature:
Press the Mode button until the Cool mode is selected.
Press the Up Arrow or Down Arrow buttons to select the desired temperature.
NOTE: The temperature cannot be set when the air conditioner is in either Fan or Dry mode.
A.NOTE: The Up Arrow and Down Arrow buttons, when pressed at the same time, allow you to select between displaying the temperature in °F or °C.
F. Timer Button
Program a time from (1-hour to 24-hours) for the air conditioner to turn Off or On. When a Time Delay is programmed, the Timer indicator light will illuminate. While the air conditioner is operating:
Press the Timer button.
Press the Up/Down Arrow buttons to select the number of hours you want the air conditioner to continue to operate before turning Off.
NOTE: Wait approximately 5 seconds for the Turn-Off time to be saved.
While the air conditioner is off:
Press the Timer button.
Press the Up/Down Arrow buttons to select the number of hours you want the air conditioner to remain off before turning On.
NOTE: Wait approximately 5 seconds for the Turn-On time to be saved.
To cancel the timer:
Press the Timer button once, the hours remaining will flash, press the timer button again and the timer will be canceled.
To turn on WiFi:
Press and hold the Timer button for 3 seconds to turn on the WiFi function.
Refer to the “WiFi Set up” section for more information on how to connect your Portable AC to your router and installing the HQ App.
G. Sleep
Press the Sleep button to activate sleep mode, press again to cancel.
The fan speed will automatically change to low speed and cannot be adjusted. The temperature will rise after 2 and 4 hours to ensure your comfort overnight.
H. Auto Swing
The louver on your portable air conditioner will open automatically when you turn it on (do not pry it open or
push it shut).
When your AC is turned on, the louver will swing up and down.
You can press the Auto Swing button to fix the louver in your desired position
Cool Mode
Use the Cool mode for cooling.
To set the Cool mode:
Press the MODE button until the Cool indicator light is lit.
Press the FAN button to set HIGH, MEDIUM, or LOW fan speed.
Press + or - to set the desired temperature.
After settings have been made, the display will change back to show the room temperature.
The temperature control is used to maintain the room temperature. The compressor will cycle on and off to keep the room at the set level of comfort. Set the temperature control at a lower number and the indoor air will become cooler. Set the temperature control at a higher number and the indoor air will become warmer
NOTE: If the air conditioner is off and is then turned on while set to Cool, it will take approximately 3 minutes for the compressor to start and cooling to begin.
Cooling Descriptions
For Normal Cooling—Select the Cool mode and HIGH, MEDIUM, or LOW fan speed with a middle set temperature.
For Maximum Cooling—Select the Cool mode and HIGH fan speed with a lower set temperature.
For Quieter & Nighttime Cooling—Select the Cool mode and LOW fan speed with a middle set temperature.
NOTE: If you switch from Cool, Dry or Heat mode setting to OFF, wait 3 minutes before restarting
Dry Mode—Dehumidification
Use the Dry mode to provide dehumidification only.
The fan will run at a fixed speed at this setting, so a fan speed cannot be set. Keep windows and doors closed for the best dehumidifying effects.
To set the Dry mode:
Press the MODE button until the Dry indicator light is lit.
In the Dry mode, a set temperature will not be displayed. After Dry mode has been set, the display will change back to show the room temperature.
NOTE: If you switch from a Dry setting to OFF or to a fan setting, wait at least 3 minutes before switching back to a Dry setting.
FAN Mode
Use the FAN mode to provide air circulation and filtering without cooling.
To set the FAN mode:
Press the FAN button until the desired indicator light for high, medium, or low fan speed is lit.
Since fan only settings do not provide cooling, a set temperature will not be displayed. After FAN speed has been set, the display will change back to show the room temperature. The exhaust hose and window kit do not need to be installed when operating in fan mode.”
HEAT Mode (for Heat/Cool models only)
Use the Heat mode at Low, Med, or High Speed for An electronic thermostat is used to maintain the room heating. Use the Temperature Increase (+) /Decrease (-) buttons to set the desired temperature. temperature. The heater will cycle on and off to keep the room at the set level of comfort.
Power Outage Recovery Feature
In the case of a power outage or interruption, the unit will automatically re-start in the settings last used after the power is restored.
NOTE: If the TIMER was set before the power outage, it will need to be reset after power is restored.
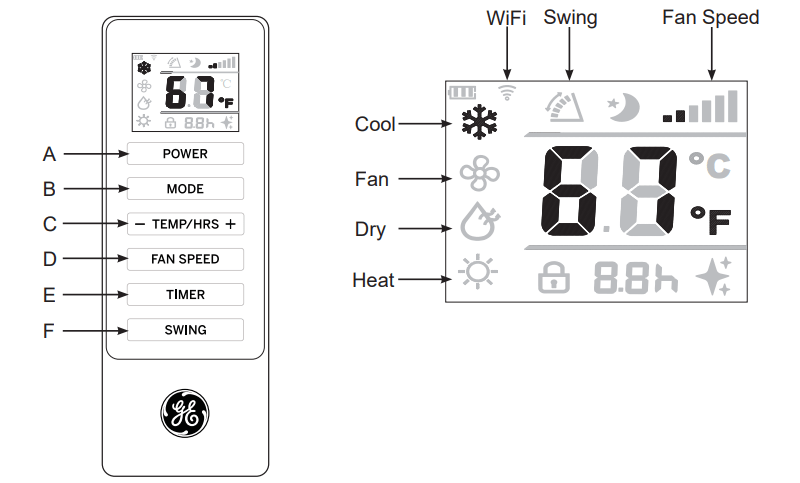
REMOTE CONTROL
Insert the two batteries (provided).
Aim the remote control at the signal receiver on the control panel to operate the air conditioner.
A. POWER
Turns the air conditioner on or off.
NOTE: Turning off power by pressing the POWER button does NOT disconnect the appliance from the power supply.
Press the POWER button. The Power indicator will illuminate.
B. MODE
Press the MODE button to toggle among the operating options. The corresponding indicator will illuminate:
Cool - Cools the room to the set temperature
Dry - Reduces the humidity in the room
Fan - Circulates the air in the room without cooling
Heat (on some models) - Heats the room to the set temperature
C. Temperature
Adjusts the Temperature or Hours in Time Delay.
To Set the Temperature:
Press the MODE button until the Cool mode is selected.
Press the + or - buttons to select the Temperature.
NOTE: The temperature cannot be set when the air conditioner is in either Fan or Dry mode.
To Set the Timer:
Press the + or - buttons to select the desired hours to turn on or off.
D. FAN SPEED
The FAN SPEED can be adjusted from Low, Medium, to High speed when the air conditioner is in operation.
NOTE: The fan speed cannot be adjusted when the unit is in Dry mode.
Press the FAN SPEED button to toggle among the three speeds. The corresponding fan speed indicator will illuminate.
E. TIMER
Program a time from (1-hour to 24-hours) for the air conditioner to turn Off or On. When a Time Delay is programmed, the Timer indicator light will illuminate.
F. SWING
The louver on your portable air conditioner will open automatically (do not pry it open or push it shut).
When your AC is turned on, the louver will swing up and down.
Press the auto swing button to fix the louver in your desired position.
Care and Cleaning
CLEANING
Unplug or disconnect power.
Use only a soft cloth dampened with water to clean the cabinet. NOTE:
Do not use a liquid or spray cleaner to clean the air conditioner.
DO NOT use chemicals, abrasives, ammonia, chlorine bleach, concentrated detergents, solvents or scouring pads. Some of these chemicals/items may damage and/or discolor your air conditioner.
Dry thoroughly with a soft cloth.
Plug in or reconnect power.
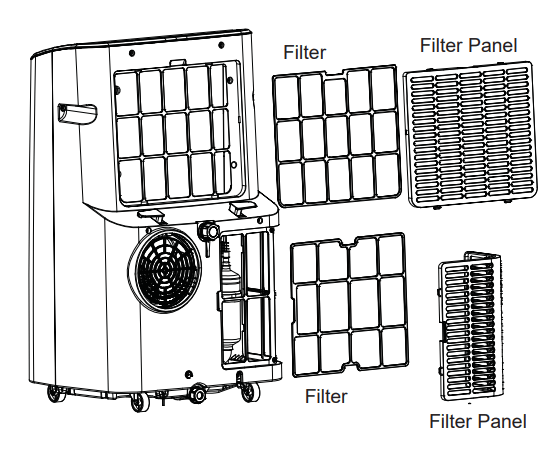
Air Filter
The air filters should be cleaned at least every two weeks for your unit to operate at optimum efficiency.
To remove:
Unplug or disconnect power.
Pull to remove the filter panels.
Remove the filters from the panels.
Wash or vacuum the dust from the air filters. NOTE: If washed, gently shake the filter to remove the excess water and dust particles trapped in the filter.
Reinstall the filters onto the panels.
Replace both filter panels
Plug in or reconnect power
Internal Water Tank
The Water Full indicator (“FL” on the control panel display) illuminates when the internal water tank has filled with condensed water. The unit will not cool until the tank has been emptied to prevent overflow and possible damage to the floor under the AC.
To Empty the Internal Water Tank:
Unplug or disconnect power.
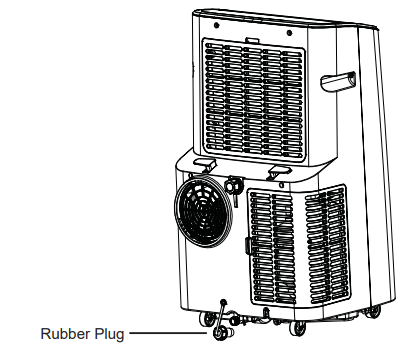
Place a shallow 1 1/2 quart or larger pan (not included) below the lower drain located on the back (near the bottom) of the air conditioner.
Remove the cap and the rubber plug and drain the water tank.
Re-insert the drain plug and screw the cap snugly into place.
Plug in or reconnect power.
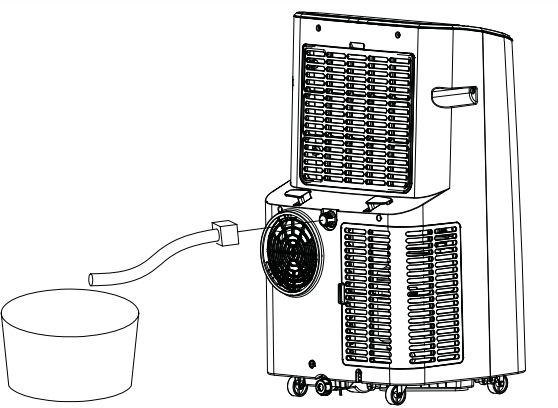
Continuous Draining (optional and only in dry mode)
Remove the top drain cap.
Connect a hose with a garden hose connection to the outlet.
Route the drain hose to a suitably sized container* or a floor drain.
* Be sure to use a large container (3 gallons or larger is recommended) and monitor the water level in the container continuously. The unit will not shut off when the container is full. An overflowing container can cause flooding and damage to the floor.”
Storage
If the unit is not being used for a long period of time:
To Empty the Internal Water Tank:
Unplug or disconnect power.
Drain the water from the water tank. (See “Internal Water Tank section” above.)
Use the original packaging to repack the unit to avoid a buildup of dust or dirt.
Store the air conditioner in a cool, Dry location.
How to Insert the Batteries in the Remote Control
Remove the battery cover by sliding it according to the arrow direction.
Insert new batteries, making sure that the (+) and (-) of battery are installed correctly.
Reattach the cover by sliding it back into position.
NOTES:
Use 2 “AAA” (1.5 volt) alkaline batteries. Do not use rechargeable batteries.
Remove the batteries from the remote control if the system is not going to be used for a long time.
Do not mix old and new batteries. Do not mix alkaline standard (carbon-zinc) or rechargeable (ni-cad, ni-mh; etc) batteries.
Troubleshooting Tips
Problem
Possible Causes
Solution
Unit does not start or operate
Power supply cord is not plugged into an outlet.
Plug the power cord into a grounded 3 prong outlet.
Power supply cord has tripped.
Press and release the RESET button on the power supply cord.
The Power button has not been pressed.
Press the POWER button on the Control Panel or Remote Control to turn ON the air conditioner.
There is no power to the electrical outlet.
Plug a working lamp into the outlet to check for power.
A household fuse has blown or a circuit breaker has tripped.
Replace the fuse or reset the circuit breaker.
The control was programmed for a Time Delay.
Cancel the Time Delay. See “Control Panel.”
The batteries in the remote control are dead.
Replace the batteries.
The internal water tank is full.
NOTE: The air conditioner automatically turns off, and the Water Full indicator (“FL” on the control panel display) illuminates to alert you of this condition.
Empty the water tank. See “Air Conditioner Care.”
Remote control is not working
Batteries are dead.
Replace the batteries.
Batteries are installed incorrectly.
Make sure the batteries are inserted in the correct position.
Air conditioner is working but the room is not cooling.
The room temperature is hot.
NOTE: On extremely hot and humid days,the air conditioner will take longer to cool the room.
Allow time for the room to cool when you first turn on the unit.
Make sure the air conditioner has an adequate BTU rating for the size of the room being cooled.
The control is set incorrectly to Fan or Dry mode.
Set the Mode to Cool and the Fan Speed to High.
Airflow is restricted.
Remove any obstacles to the airflow and redirect airflow for uniform cooling.
Temperature set too high.
Lower the set temperature.
Air filters are dirty or restricted.
Clean the air filter. See “Air Conditioner Care.”
Air conditioner installed incorrectly
Check the exhaust hose and window panel for proper installation.
Doors and windows are open.
Close the doors and windows to the room being cooled to prevent cooled air from escaping.
Error Codes
Error Codes
Meaning
E1
Abnormal room temperature sensor
E2
Abnormal refrigeration system sensor
FL
The internal water tank is full, refer to draining instructions on page 8
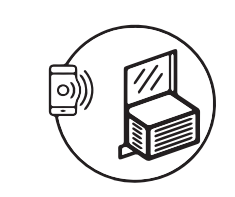
WiFi Setup (on some models)
GE Appliances SmartHQ (for customers in the United States)
GE Appliances SmartHQ Enabled*. If your Air Conditioner (AC) has a Connected Appliance Information label located on the outside as shown below, your AC is GE Appliances SmartHQ Enabled. A WiFi communication card is built into the product allowing it to communicate with your smart phone for remote monitoring, control and notifications. Please visit GEAppliances/connect to learn more about connected appliance features, and to learn what connected appliance apps will work with your smart phone. Please call 800.220.6899 for assistance.
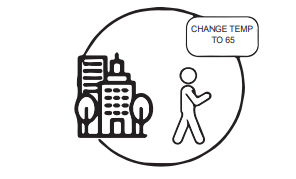
How it Works
Download the SmartHQ app
Use the app to connect your room air conditioner to WiFi
Once connected, use the app to turn down your air conditioner as you leave work.
Getting Started '
To connect your room air conditioner, you’ll need the GE Appliances App. The app will walk you through the connection process. Download the app from iTunes or Google Play.
Questions about SmartHQ
Get answers you need about setting up WiFi appliances and connecting to your home network in our support articles.