Loading ...
INTRODUCTION & WARRANTY
Thank you for selecting and buying V-TAC product. V-TAC will serve you the best. Please read these
instructions carefully before starting the installing and keep this manual handy for future reference. If you
have any another query, please contact our dealer or local vendor from whom you have purchased the
product. They are trained and ready to serve you at the best. The warranty is valid for 3 years from the date
of purchase. The warranty does not apply to damage caused by incorrect installation or abnormal wear and
tear. The company gives no warranty against damage to any surface due to incorrect removal and installation
of the product. The products are suitable for 10-12 Hours Daily operation. Usage of product for 24 Hours a
day would void the warranty. This product is warranted for manufacturing defects only. The LED tube can be
used in hotels, offices, factories, conference rooms, meeting rooms, commercial complexes, residential
buildings, schools, colleges, universities, hospitals, etc.
WARNINGS!
• Installation should only be done by a certified electrician
• Operation environment temperature: from -20°C to +45°C
• Do not use DC electricity
• Do not use with electronic ballasts.
• Do not modify the fitting to be used with the LED Tube.
• V-TAC LED Tubes are NOT designed to be used in emergency operations.
• Switch Off the power.
• Installation should only be done by a certified electrician
• Installation should only be done by a
certified electrician.
• Remove the fluorescent tube and starter.
• Bypass/rewire the circuit as per guidelines
and the wiring diagram.
• Insert V-TAC LED Tube.
• Switch On the power to test the light.
• Please refer to the wiring diagram for replacing
fluorescent tube on a single magnetic ballast circuit
with V-TAC LED Tube.
• It is recommended to power the product directly, without electrical ballast. If the components are powered
through ballast, we cannot guarantee their long-term durability, therefore the warranty will be void.
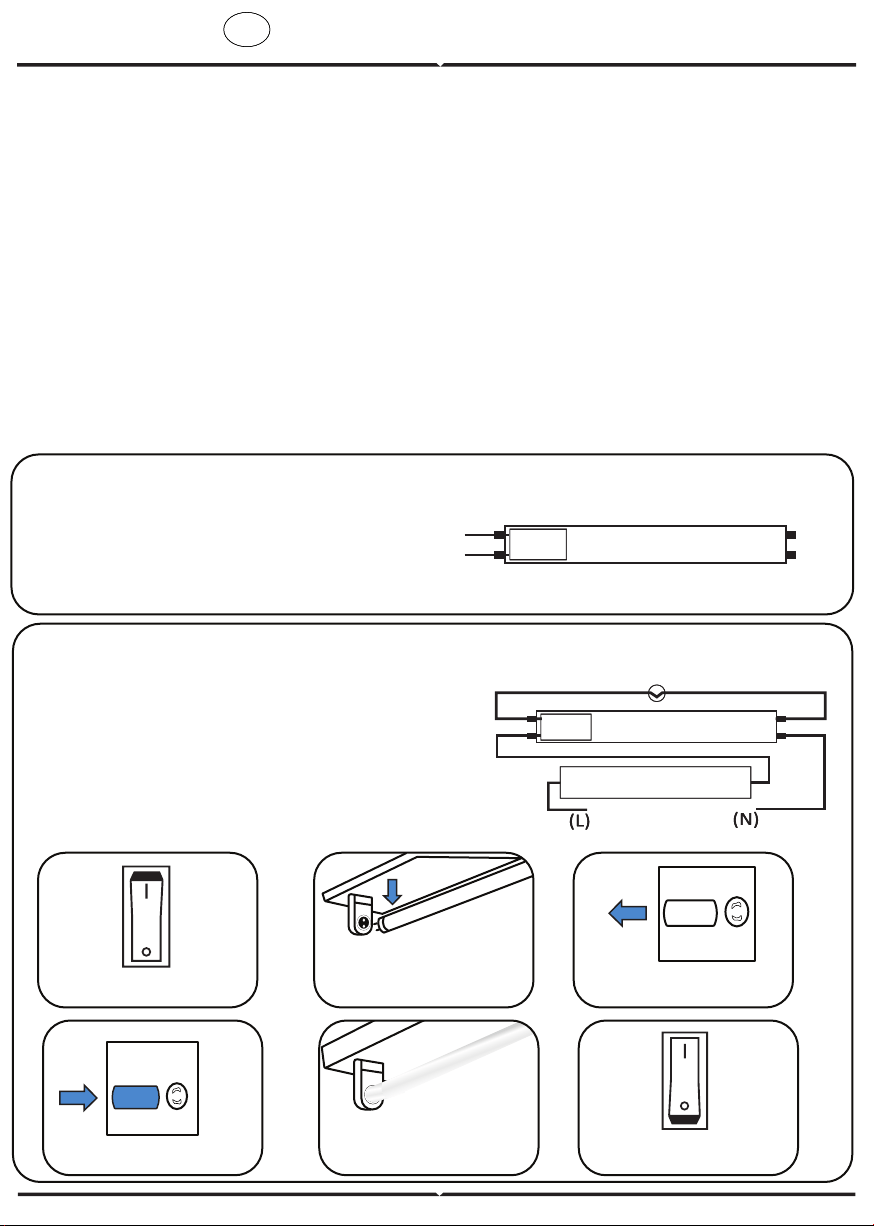
Installation & Replacement of Fluorescent Lamp(Single Magnetic Ballast Ciruit)
Installation (New Fitting/Electronic Ballast replacement)
Single Side Power Only
Wiring Diagram
Wiring Diagram
PACKING:
• LED Tube (1PC)
• Instruction Manual (1PC)
• Dummy Starer (1PC)
1. Switch off the power
2. Remove the existing
fluorescent lamp
3. Remove the existing
fluorescent starter
4. Insert LED T8 starter 6. Switch ON the power
5. Insert V-TAC LED Tube
LED
Left
Right
LED TUBE
Inductance Ballast
LED Starter
Left
Right
(L)
(N)
V-TAC
INPUT
V-TAC
INPUT
LED TUBE
INSTALLATION INSTRUCTION
EN
INSTALLATION INSTRUCTION
EN
AC:220-240V
50Hz
AC:220-240V
50Hz
Loading ...
Loading ...
Loading ...