
Questions or Concerns?
Please contact us Mon-Fri 9:00AM-5:00PM PST
at (888) 726-8520 or email support@levoit.com
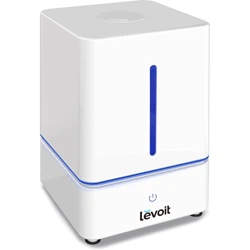
Ultrasonic Cool Mist Humidifier
Model No.: LV455CH
Questions or Concerns?
Please contact us Monday - Friday 9:00 am - 5:00 pm PT
at [email protected] or at (888)-726-8520.
Downloaded from www.ManualsFile.com manuals search engine

Should you have any questions or concerns regarding your
new humidier, please contact us at [email protected].
We hope you enjoy your new humidier!
THANK YOU FOR
PURCHASING THE
LV455CH ULTRASONIC
COOL MIST HUMIDIFIER
BY LEVOIT.
GET STYLE INSPIRATION
Find @LevoitLifestyle on social media for wellness + style
inspiration. We make every space mindful and chic.
@LevoitLifestyle
#LevoitLove • #LevoitLifestyle
Downloaded from www.ManualsFile.com manuals search engine

3
Specications
Package Contents
Safety Information
Getting to Know Your Humidier
Display
Getting Started
Operation
ɧ General Operation
Using the Aroma Box
Preventing Water Leaks
Keeping Things Clean
ɧ General Cleaning
ɧ Cleaning the Aroma Pad
ɧ Disinfecting the Humidifier
Troubleshooting
Warranty Information
Customer Support
4
4
5
7
8
10
12
12
13
15
17
17
18
18
19
21
22
TABLE OF CONTENTS
Downloaded from www.ManualsFile.com manuals search engine

4
Voltage:
Rated Power:
Eective Range:
Water Tank Capacity:
Moisture Output:
ɧ Mode 1:
ɧ Mode 2:
ɧ Mode 3:
ɧ Mode 4:
Operation Times:
ɧ Mode 1:
ɧ Mode 2:
ɧ Mode 3:
ɧ Mode 4:
AC 120V, 60Hz
30W
430.5 - 538.2 ft² (40 - 50 m²)
1.1 gal (4.5 L)
100 mL/h
150 mL/h
200 mL/h
250 mL/h
40 hours
25 hours
20 hours
15 hours
1 x Ultrasonic Cool Mist Humidier
1 x Cleaning Brush (Attached)
3 x Aroma Pads (1 Pre-Installed)
1 x User Manual
SPECIFICATIONS
PACKAGE CONTENTS
Downloaded from www.ManualsFile.com manuals search engine

5
SAFETY INFORMATION
To reduce the risk of re, electric shock, or other injury, follow all instructions and safety
guidelines.
Only use this humidier as described in this manual.
• Place the humidier and cord so that the humidier will not be knocked over.
• Ensure that the plug ts properly into a polarized power socket.
• When not in use, turn the machine o and disconnect from a power source by removing
the plug from the outlet.
• Do not overll the water tank as it may cause electric shock.
• Do not handle the power cord or plug with wet hands. Keep the power cord and plug
away from liquids.
• Do not use this humidier in wet environments.
• Keep the humidier out of reach from children.
• Do not open the base or remove the water level sensor for self-servicing. Doing so will
void your warranty and may increase the risk of electric shock, injury, or damage to the
humidier.
• Always unplug your humidier from the power outlet before cleaning your humidier or
detaching the water tank from the humidier base.
General Safety
• Direct the nozzle so that the mist is at least 40 inches (102 cm) from walls.
• Only ll the water tank with clean water. Never ll the water tank with any other liquids.
• Do not place the humidier near sources of heat, such as stovetops, ovens, or radiators.
• Do not place the humidier directly on oors, carpets, or rugs.
• Do not cover the nozzle while the humidier is on. Doing so may damage the humidier.
Use & Care
Downloaded from www.ManualsFile.com manuals search engine
6
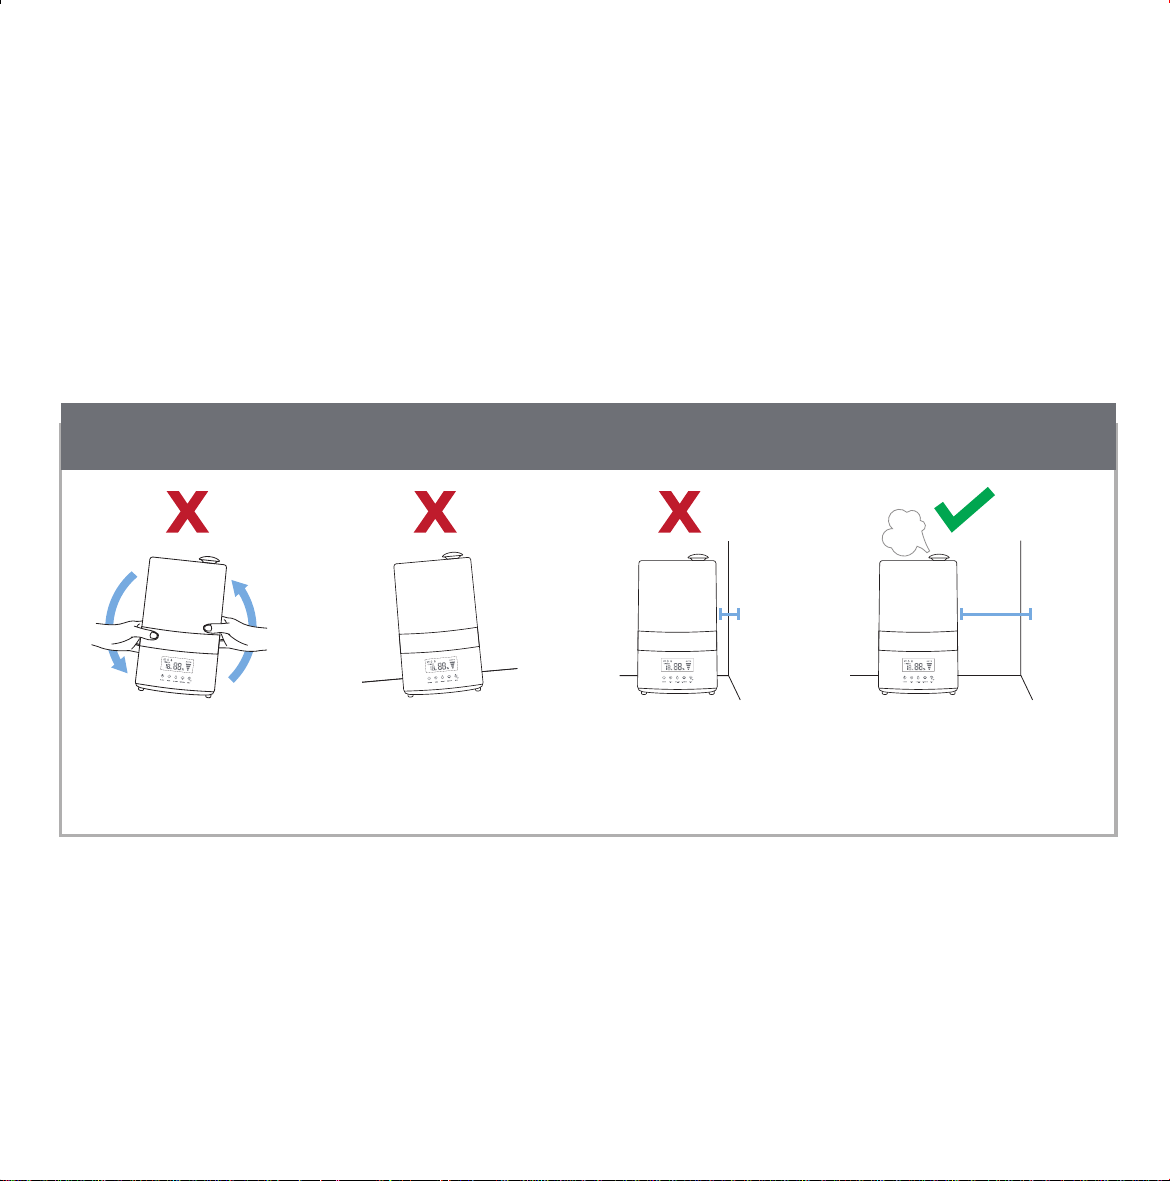
Do not shake
the humidier.
Do not place
humidier on an
inclined surface.
Do not place
humidier directly
against walls.
Always make sure there
is a 10-inch (25 cm)
clearance from walls.
IMPORTANT
• If the relative humidity in your room exceeds 68%, turn o the device or use the low mist
setting.
• Remove the water tank from the base before moving the humidier.
• Do not immerse the humidier base, power cord, or plug in water.
• Always clean the humidier as instructed in this manual (see Keeping Things Clean,
page 16).
• If the humidier is damaged or is not functioning properly, stop using it and contact
Customer Support immediately (page 22).
READ AND SAVE THESE
INSTRUCTIONS
Downloaded from www.ManualsFile.com manuals search engine
7
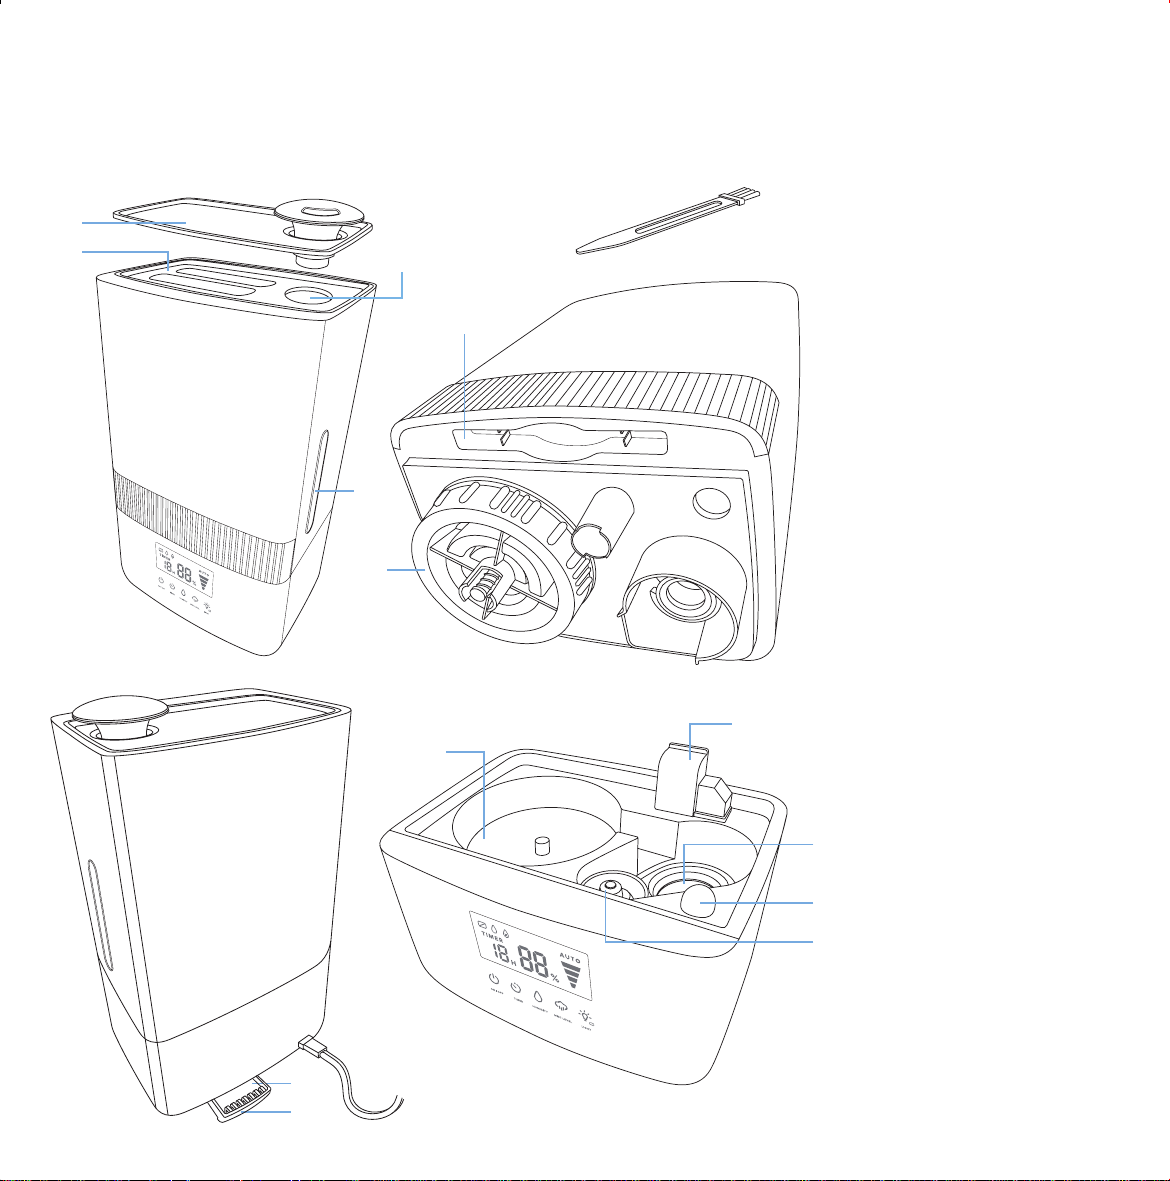
GETTING TO KNOW YOUR HUMIDIFIER
1. Nozzle
2. Top Cover
3. Water Tank
Handle
4. Mist Tube
5. Water Tank
6. Water Tank
Window
7. Water Tank Cap
8. Cleaning Brush
9. Cleaning Brush
Storage
10. Base
11. Inner Chamber
12. Air Vent
13. Transducer
14. Water Level
Sensor
15. Blue Night Light
16. Display &
Control Panel
17. Aroma Box
18. Aroma Pad
19. Power Cord
1
2
3
5
4
6
7
8
9
17
18
19
13
12
14
15
10
16
11
Downloaded from www.ManualsFile.com manuals search engine
8
GETTING STARTED
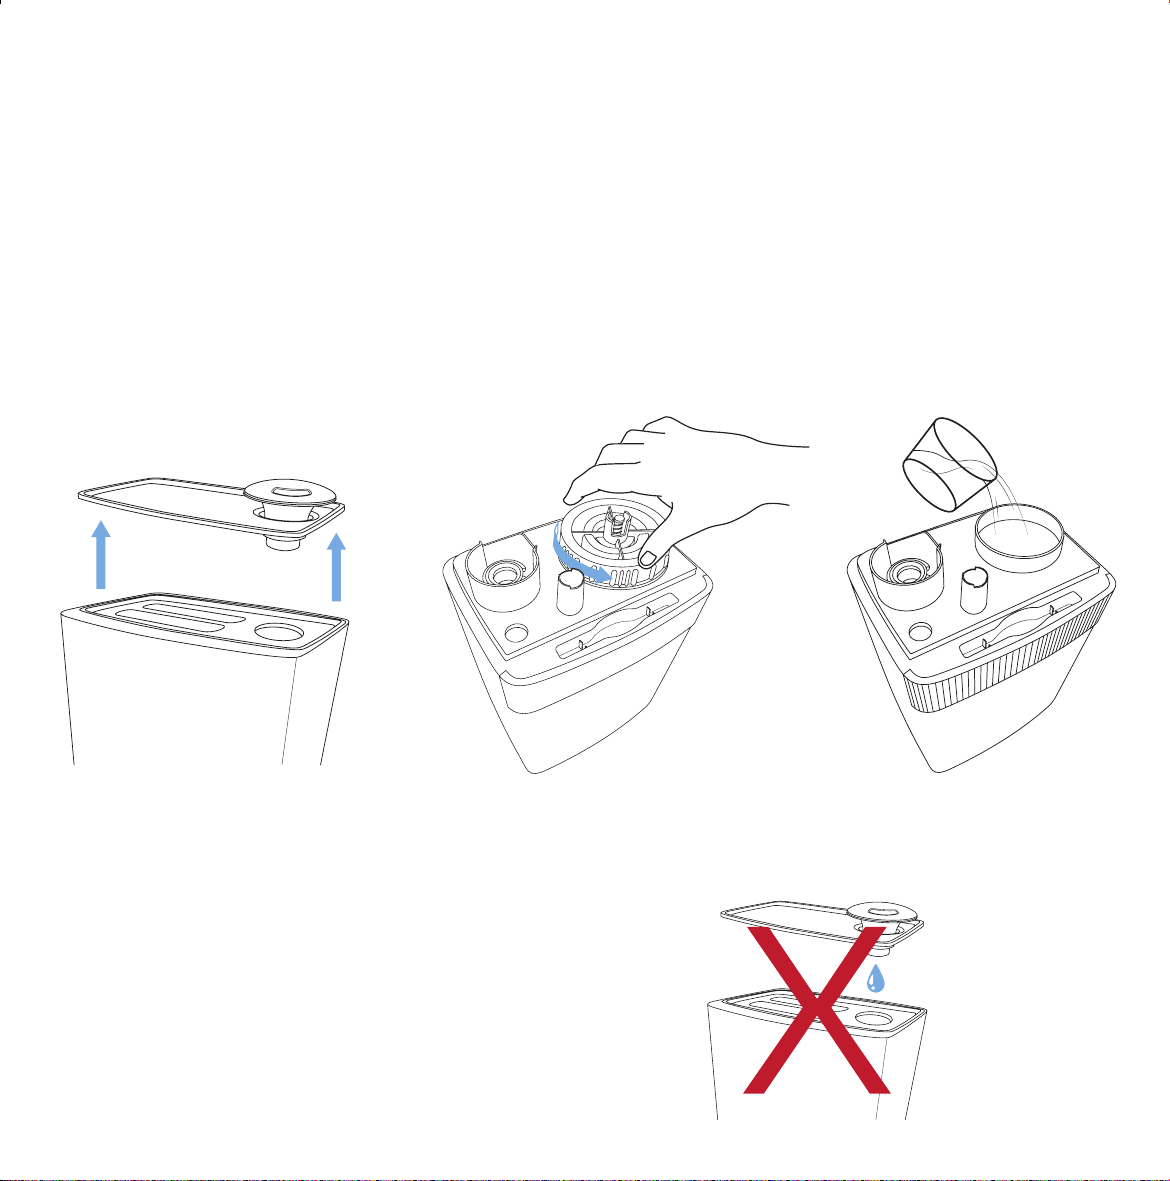
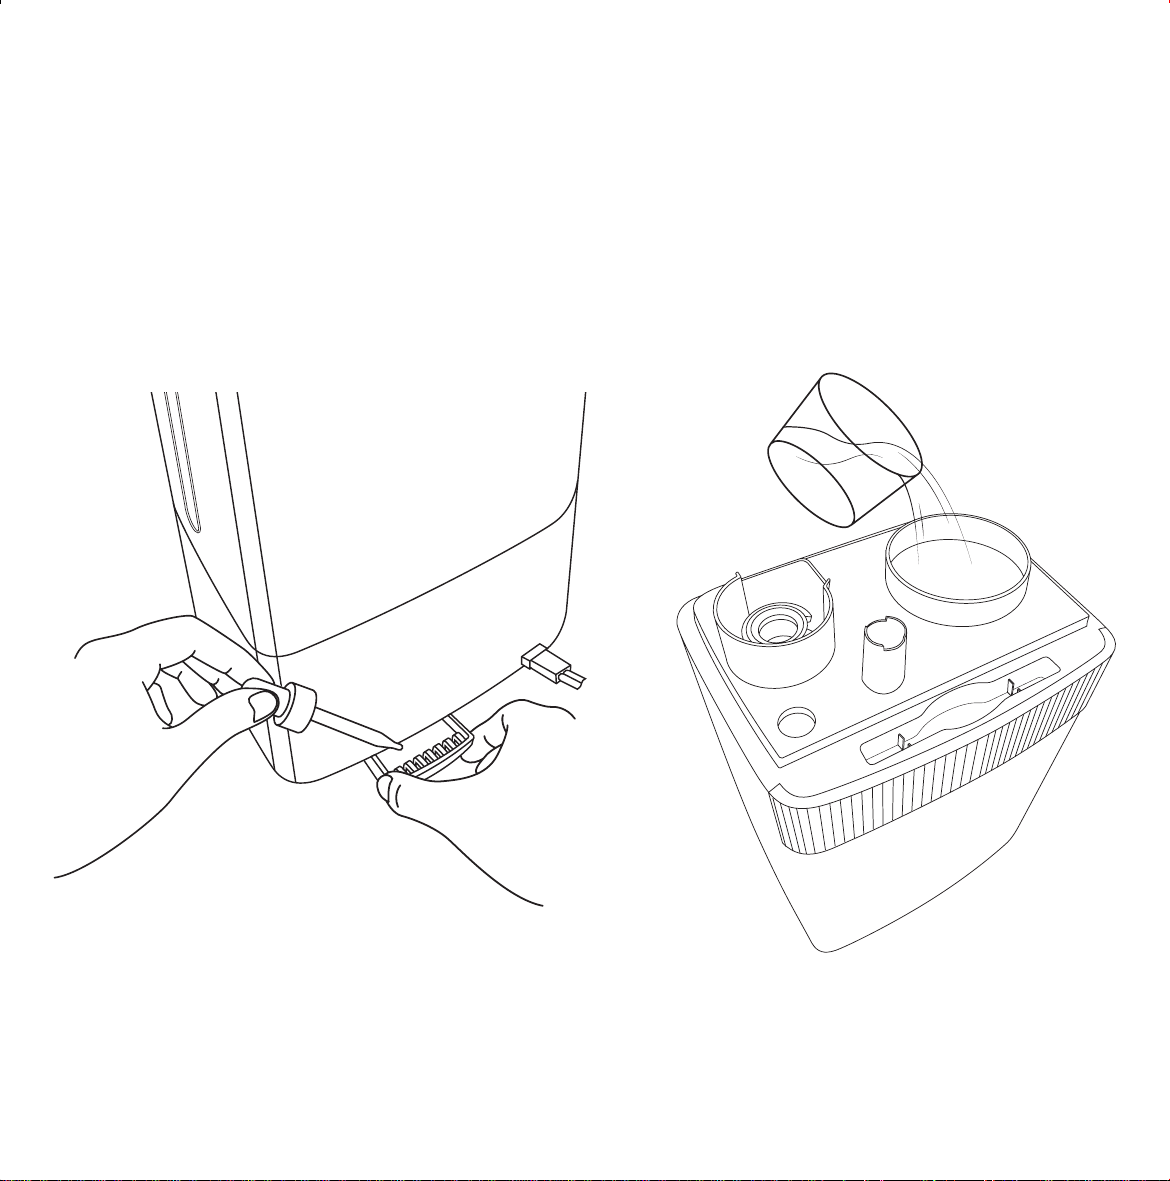
1. Remove the top cover from the water
tank and set it aside. [Figure 1.1] Carefully
lift the water tank handle to detach the
water tank from the base.
2. Flip the water tank over and twist open
the water tank cap. [Figure 1.2]
NOTE:
• Fill the water tank with at least 2 cups of distilled water.
• Do not fill the water tank with hot water.
• Do not add water through the nozzle or mist tube.
• Do not lift the entire humidifier by the water tank handle.
3. Fill the water tank with cold or room
temperature water. You can check
the water level in the tank by looking
through the water tank window. The
maximum capacity of the water tank is 1.1
gallons (4.5 L). [Figure 1.3]
Figure 1.1
Figure 1.2 Figure 1.3
Downloaded from www.ManualsFile.com manuals search engine
9
4. Once you have lled the water tank,
replace the cap, and secure it tightly.
[Figure 1.4]
5. Carefully place the water tank back onto
the base, aligning the water tank cap
with the inner chamber. [Figure 1.5]
Figure 1.4
Figure 1.5
Downloaded from www.ManualsFile.com manuals search engine

10
1. Place the humidier on a level surface
that is elevated, such as a table and a
nightstand. Make sure the room is well-
ventilated.
2. Plug the humidier into an electrical
outlet.
3. Tap once to turn on the humidier.
a. If there is no water in the tank,
will light up. Unplug the humidier
and rell the water tank. See Getting
Started (page 10).
b. If the last humidity setting is lower
than the humidity level of the
environment, it will release mist for a
few seconds and then stop misting.
4. Tap and hold and for 3 seconds
clear all previous settings.
5. When the water level is low, your
humidier will stop misting.
OPERATION
General Operation
NOTE:
• The nozzle can rotate 360° to diuse mist in
any direction.
• The night light will remain on if the humidifier
shuts o due to low water level.
• The humidifier will stop misting if the water tank
is detached from the base.
• When turned on, if there is water in the tank,
the humidifier has a memory function that will
recall the last setting used before it was turned
o or unplugged.
• If this is the first use, the default mist setting is
mode 4 ( ).
NOTE: Make sure to position the humidifier at least 10 inches away from walls, and direct the nozzle so
that the produced mist is at least 40 inches away from walls.
Downloaded from www.ManualsFile.com manuals search engine
11
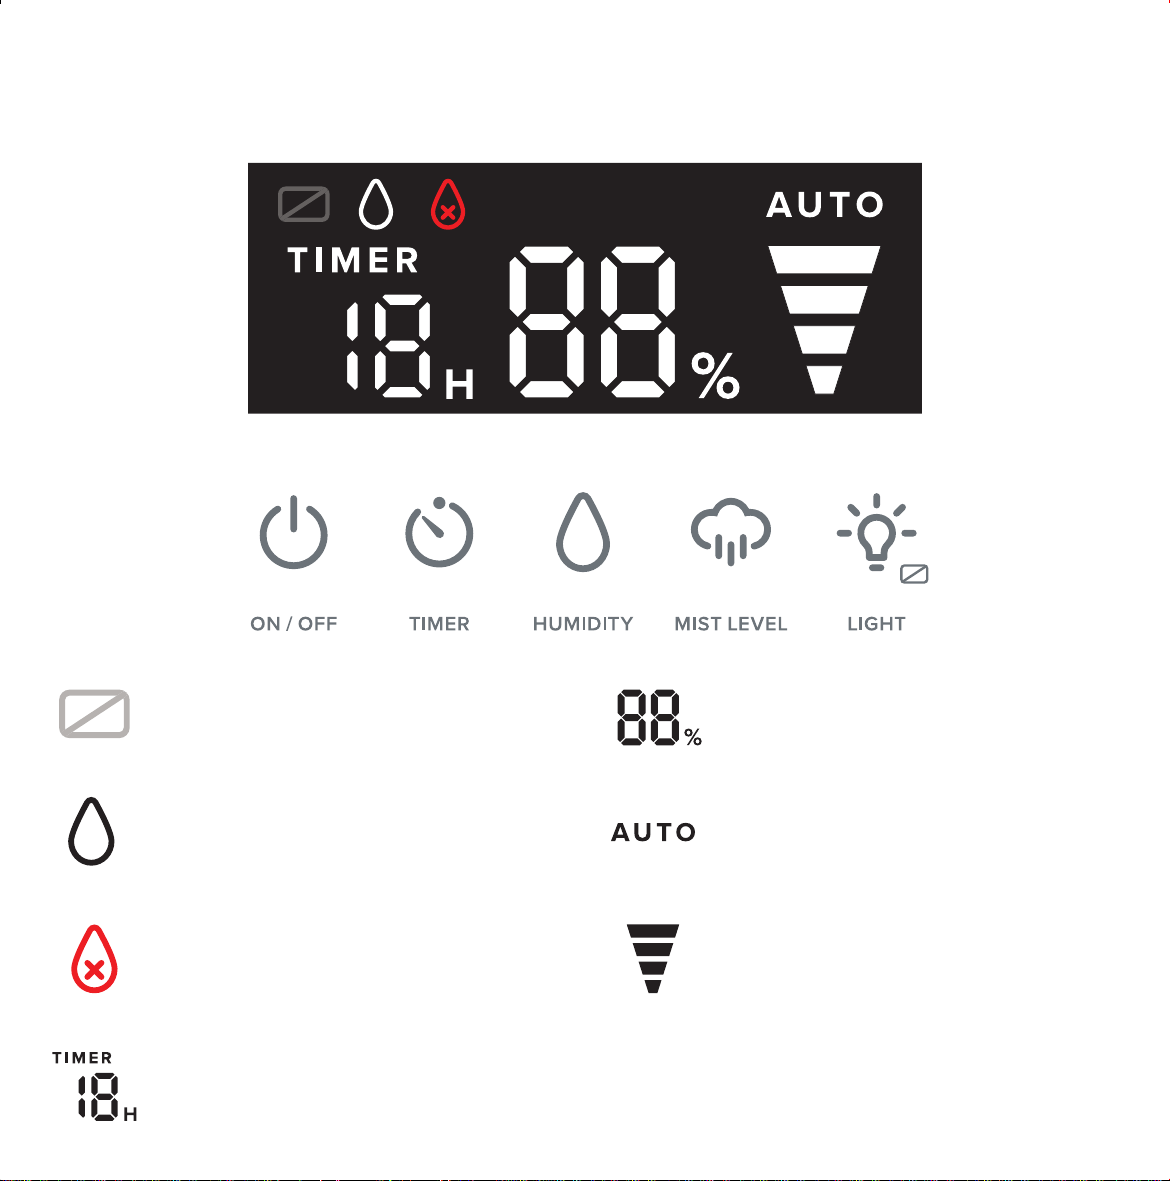
Lights up when Auto Mode is selected.
The humidier will produce mist as
needed to maintain the relative humidity
(RH) at a comfortable level.
Lights up when humidity mode is being
changed.
DISPLAY
Lights up dimly when the display is
turned o.
The time will count down every hour
when the timer has been set.
Shows the humidity percentage.
Lights up when the water tank needs to
be relled.
Shows the mist level
Downloaded from www.ManualsFile.com manuals search engine
12
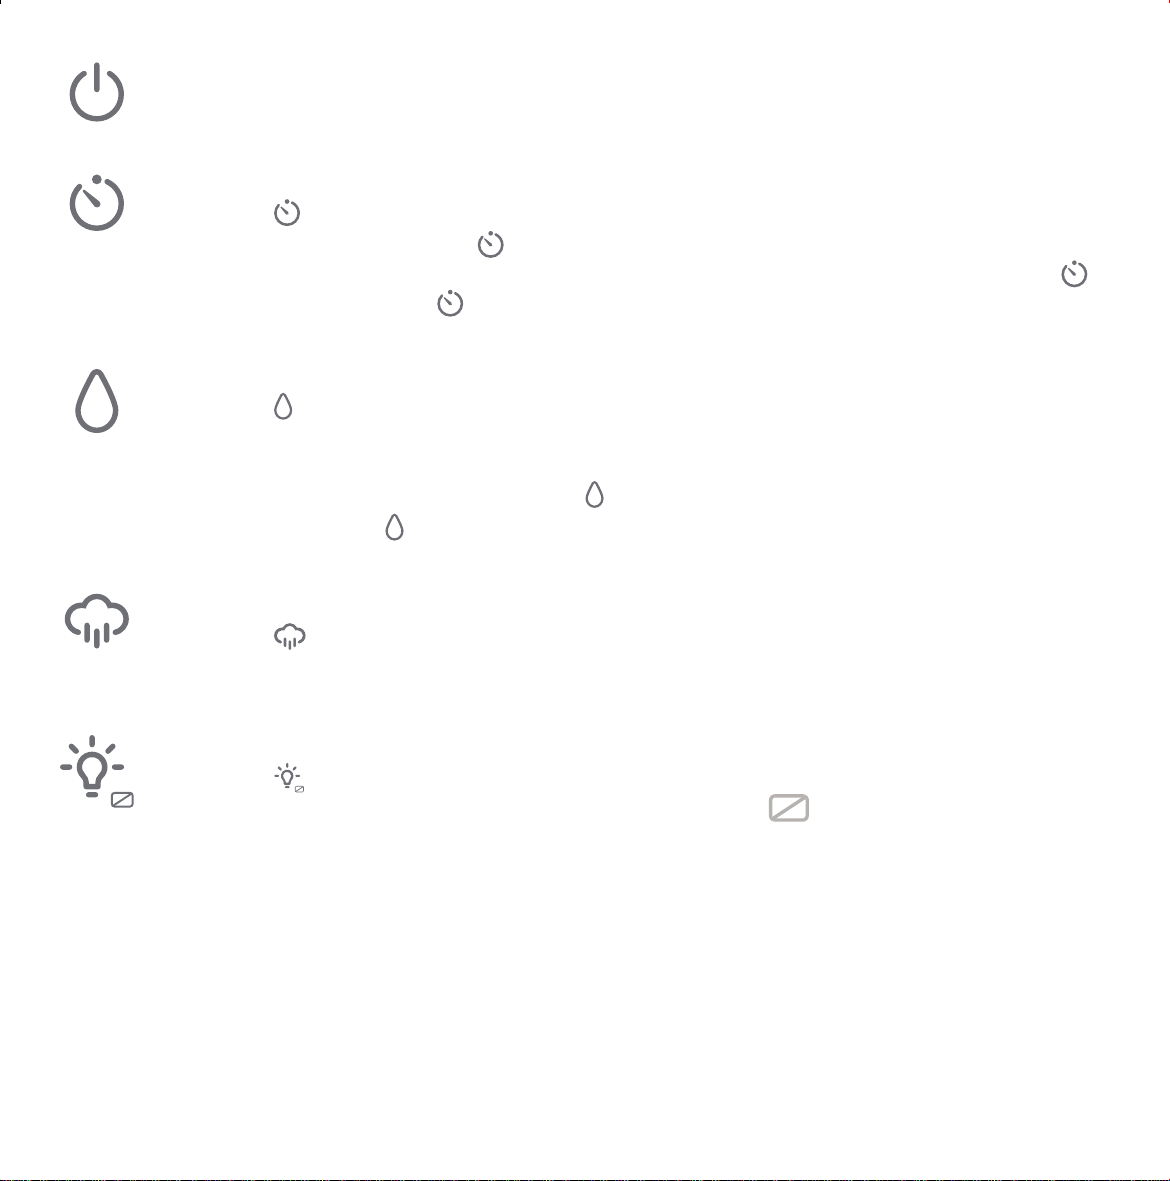
ON/OFF
• Tap to turn your humidier on or o.
TIMER – You can set a timer between 1 and 12 hours.
• Tap repeatedly to choose a time.
• When you stop pressing , the display will ash 3 times and the timer will start.
• The humidier will automatically power o once the timer is nished. Press and hold
for 2 seconds or tap repeatedly until it shows “-H” to exit the timer function.
HUMIDITY – You can set the humidity level between 30% and 80%.
• Tap repeatedly to change the humidity level, which increases by 5% each tap.
• Once the humidity level of the environment reaches the set humidity level, the mist will
automatically turn o.
• To cancel the humidity function, tap repeatedly until “Co” appears on the display or
press and hold for 2 seconds. The humidier will enter auto mode after cancellation.
MIST LEVEL – You can choose between mist levels 1 through 4 or auto mode.
• Tap repeatedly to choose
mist level.
LIGHT
• Tap to turn the water tank night light on or o.
• Tap and hold for 2 seconds to turn o the display. The will be dimly lit when the
display is o.
Downloaded from www.ManualsFile.com manuals search engine
13
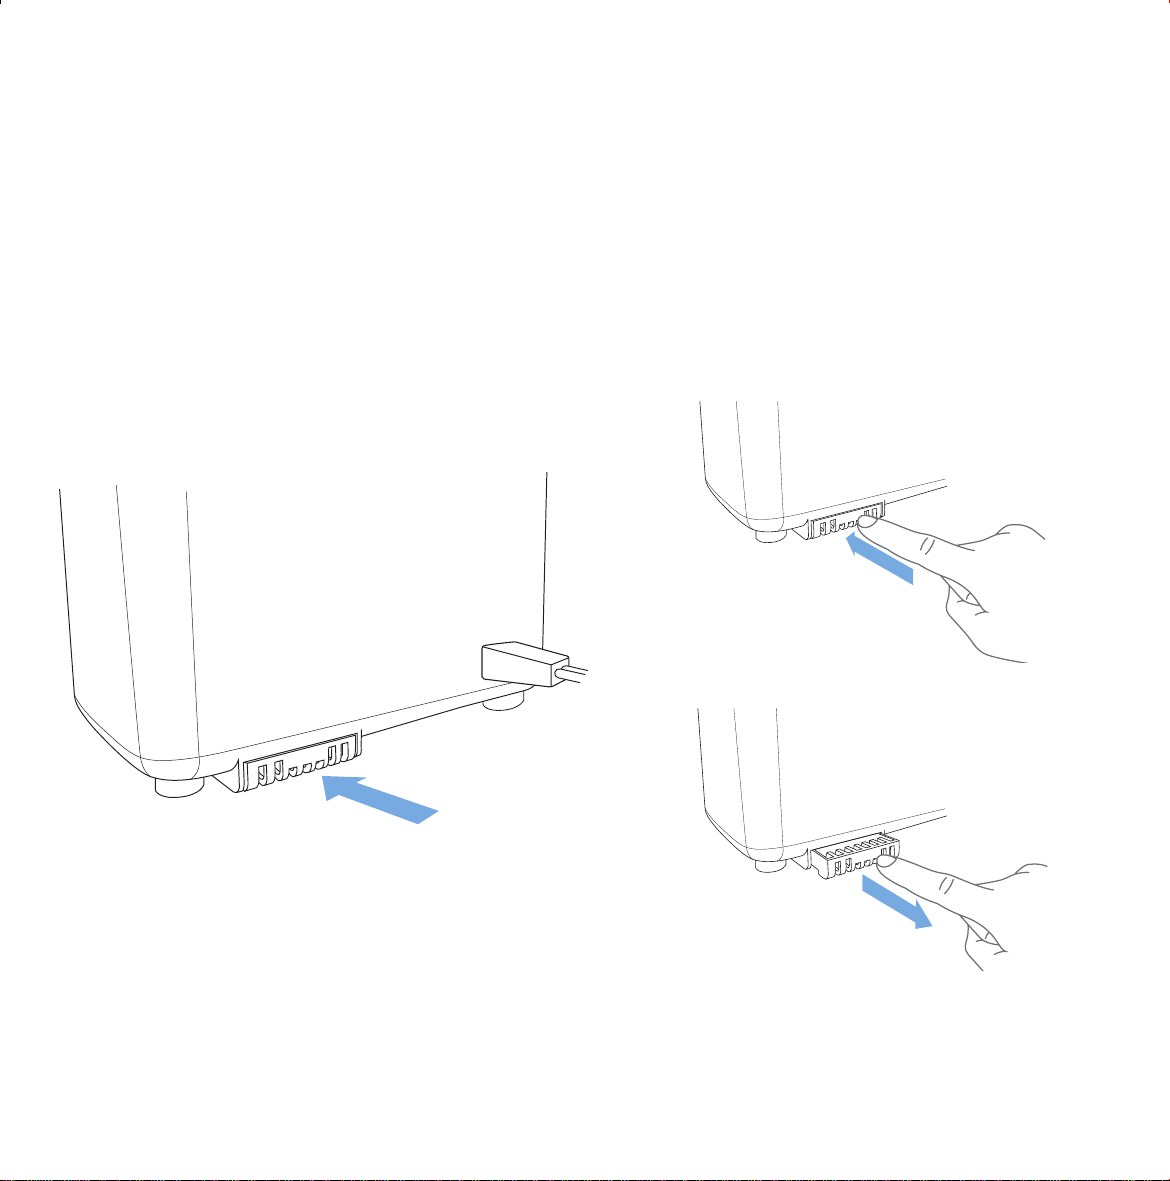
USING THE AROMA BOX
Your humidier can be used as an aroma diuser to provide added comfort in your home.
1. Turn o and unplug the humidier.
2. Locate the aroma box at the back of the
base. [Figure 3.1]
3. Push the aroma box to release it from
the base, then pull it out.
[Figures 3.2 & 3.3]
Figure 3.1
Figure 3.2
Figure 3.3
Downloaded from www.ManualsFile.com manuals search engine
14
4. Put 2-3 drops of essential oil on the
aroma pad. [Figure 3.4]
5. Replace the aroma box. Fill the water
tank with water and place it back on the
base (see Getting Started, page 10).
[Figure 3.5]
6. Plug in and turn on the humidier.
Figure 3.4
Figure 3.5
NOTE:
• You can also add medicated vaporizing steam liquid to the aroma pad.
• The aroma pad can be cleaned and reused after diusing essential oils (see page 18).
Downloaded from www.ManualsFile.com manuals search engine
15
PREVENTING WATER LEAKS
If not placed properly, the water tank on your humidier may leak. The following tips will
ensure that your humidier operates smoothly.
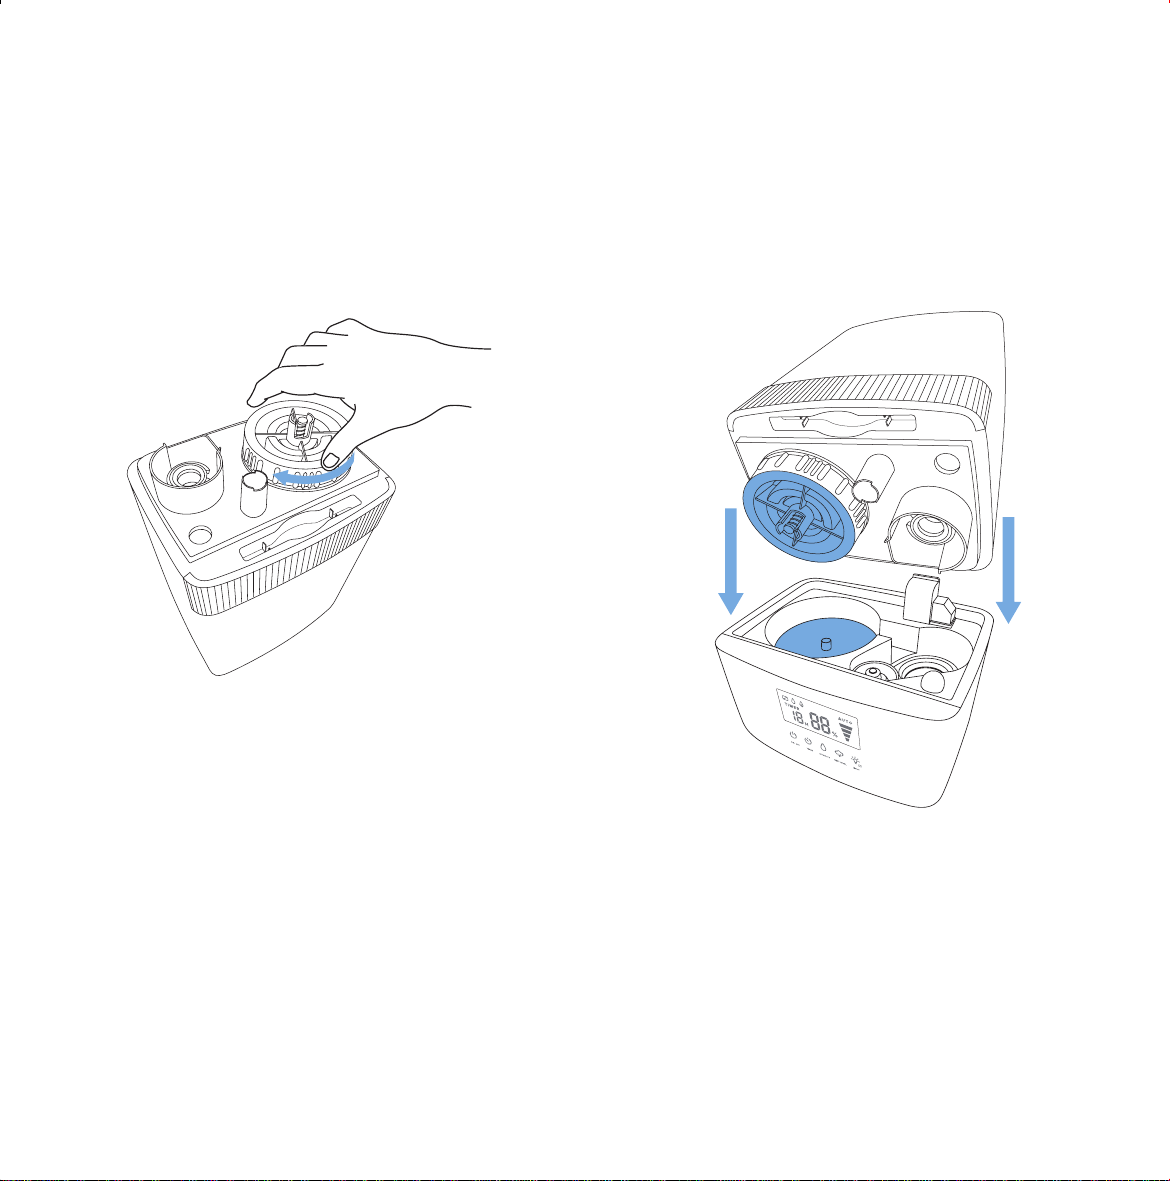
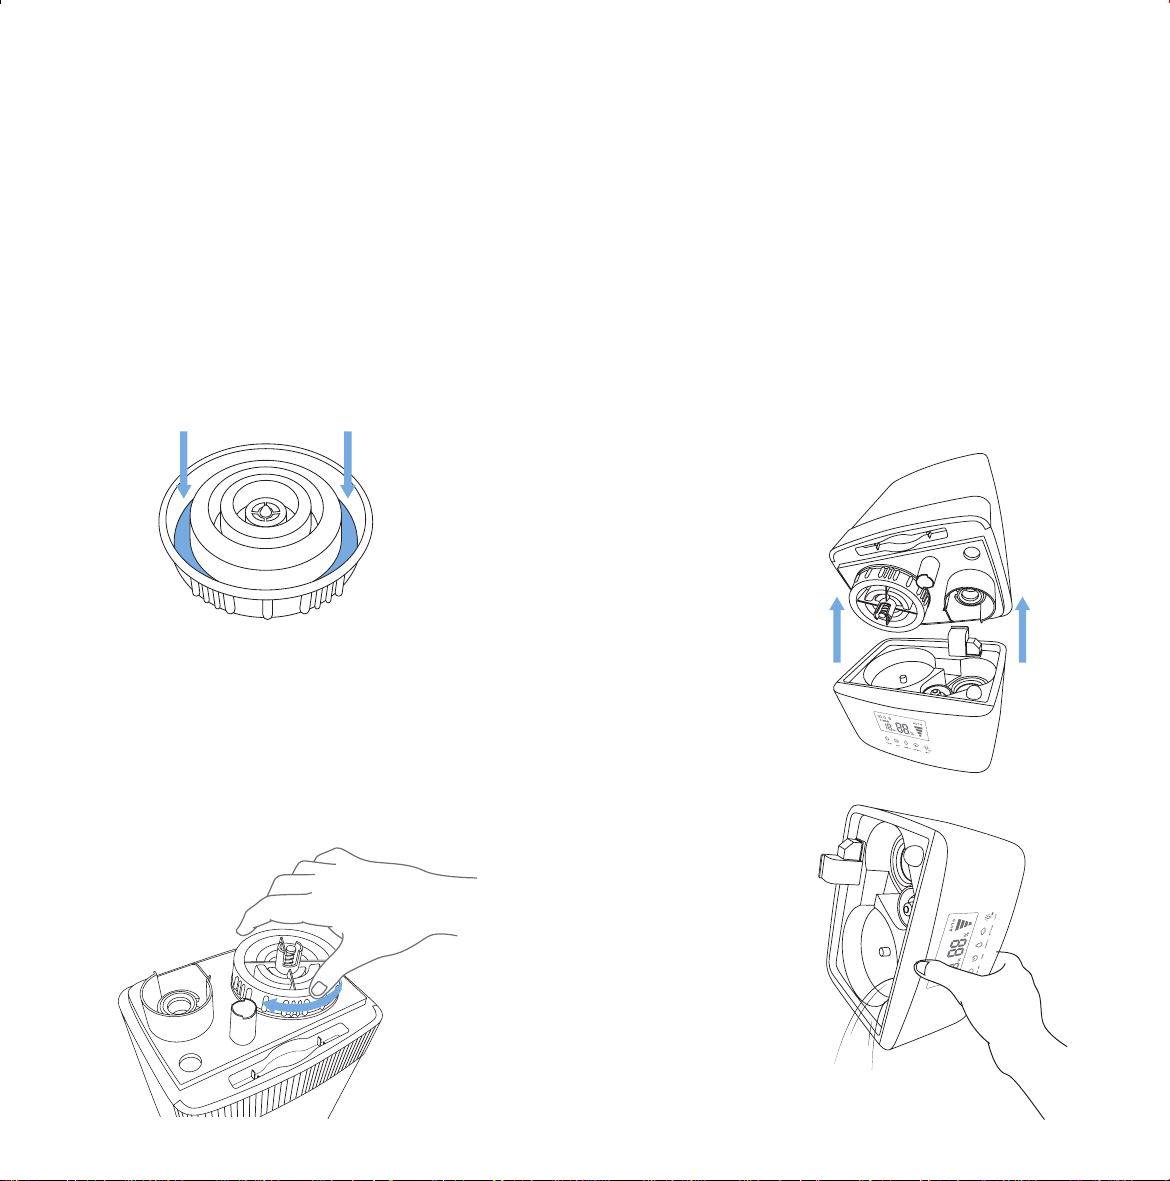
1. Make sure the blue silicone ring around
the water tank cap is secured at all
times. [Figure 4.1]
Inside of water tank cap
2. Twist and secure the cap tightly onto the
water tank. [Figure 4.2]
3. Before moving the humidier, remove
the tank from the base and empty any
excess water inside the inner chamber.
[Figures 4.3 & 4.4]
Figure 4.1
Figure 4.2
Figure 4.3
Figure 4.4
NOTE: A small gap between the cap and the
tank is normal.
Downloaded from www.ManualsFile.com manuals search engine
16
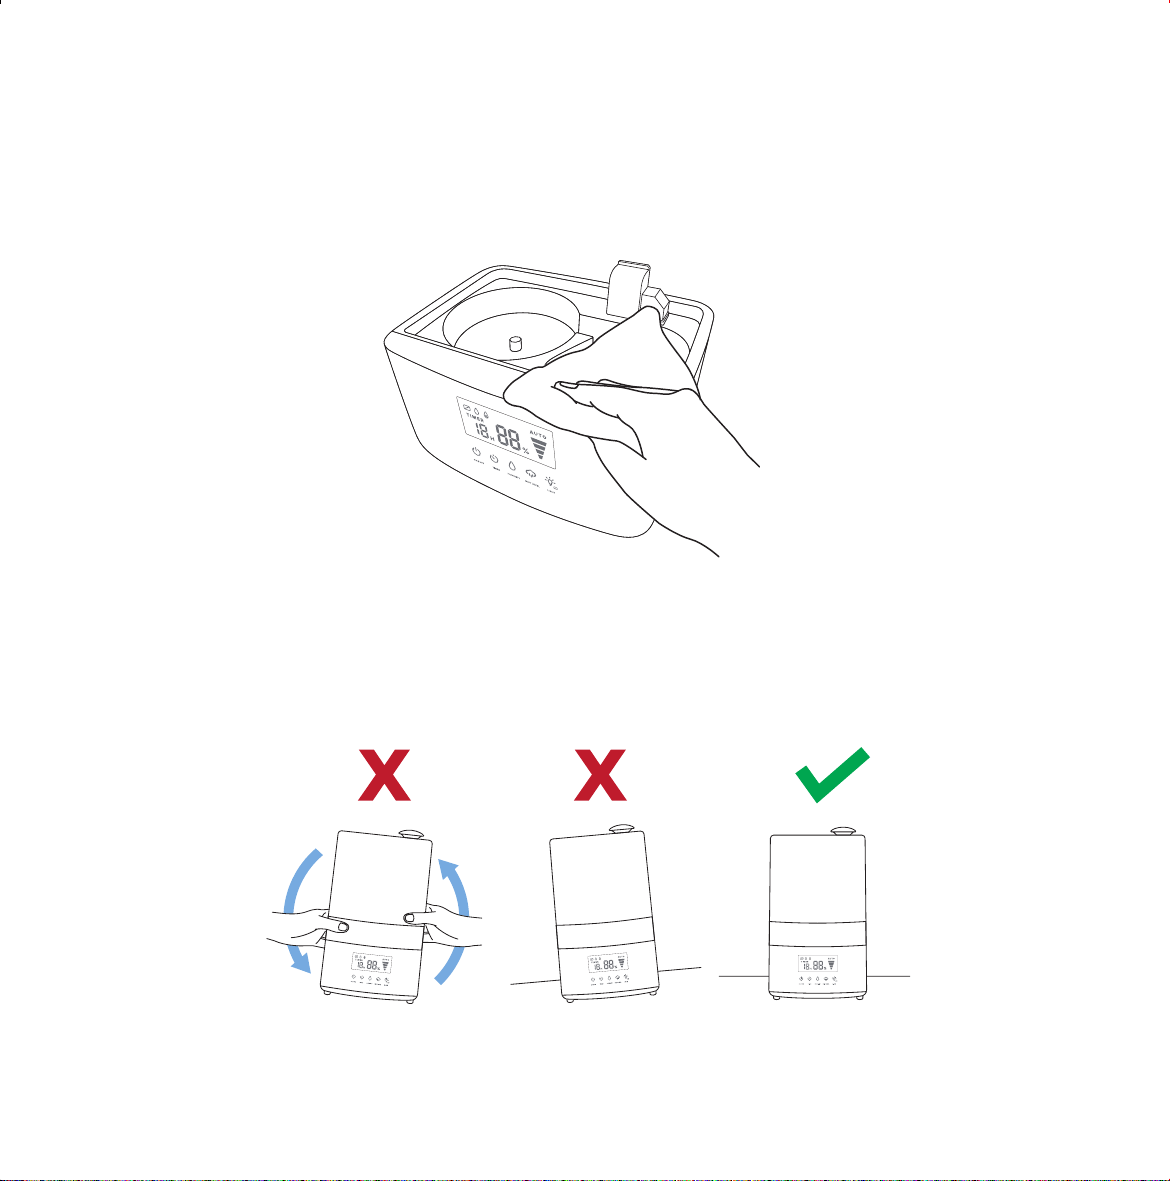
4. Wipe o any excess water on the top and bottom of the base. [Figure 4.5]
5. Do not shake the humidier or place it on an inclined surface. Make sure to place the
humidier on a at, level surface. [Figure 4.6]
Figure 4.5
Figure 4.6
Downloaded from www.ManualsFile.com manuals search engine
17
KEEPING THINGS CLEAN
General Cleaning
CAUTION:
• Always make sure the humidier is unplugged from any power source
when cleaning.
• The water in the inner chamber near the transducer may still be warm
after turning o the humidier. Use caution when pouring out the water.
1. Unplug the humidier.
2. Remove the top cover from the water tank.
Rinse the nozzle and the cover under
clean, running water. Then set it aside to
air dry.
3. Remove the water tank from the base and
pour out any excess water. Fill the tank
with 2 cups of distilled white vinegar and 2
cups of water. Replace the cap and gently
shake to coat all sides of the water tank.
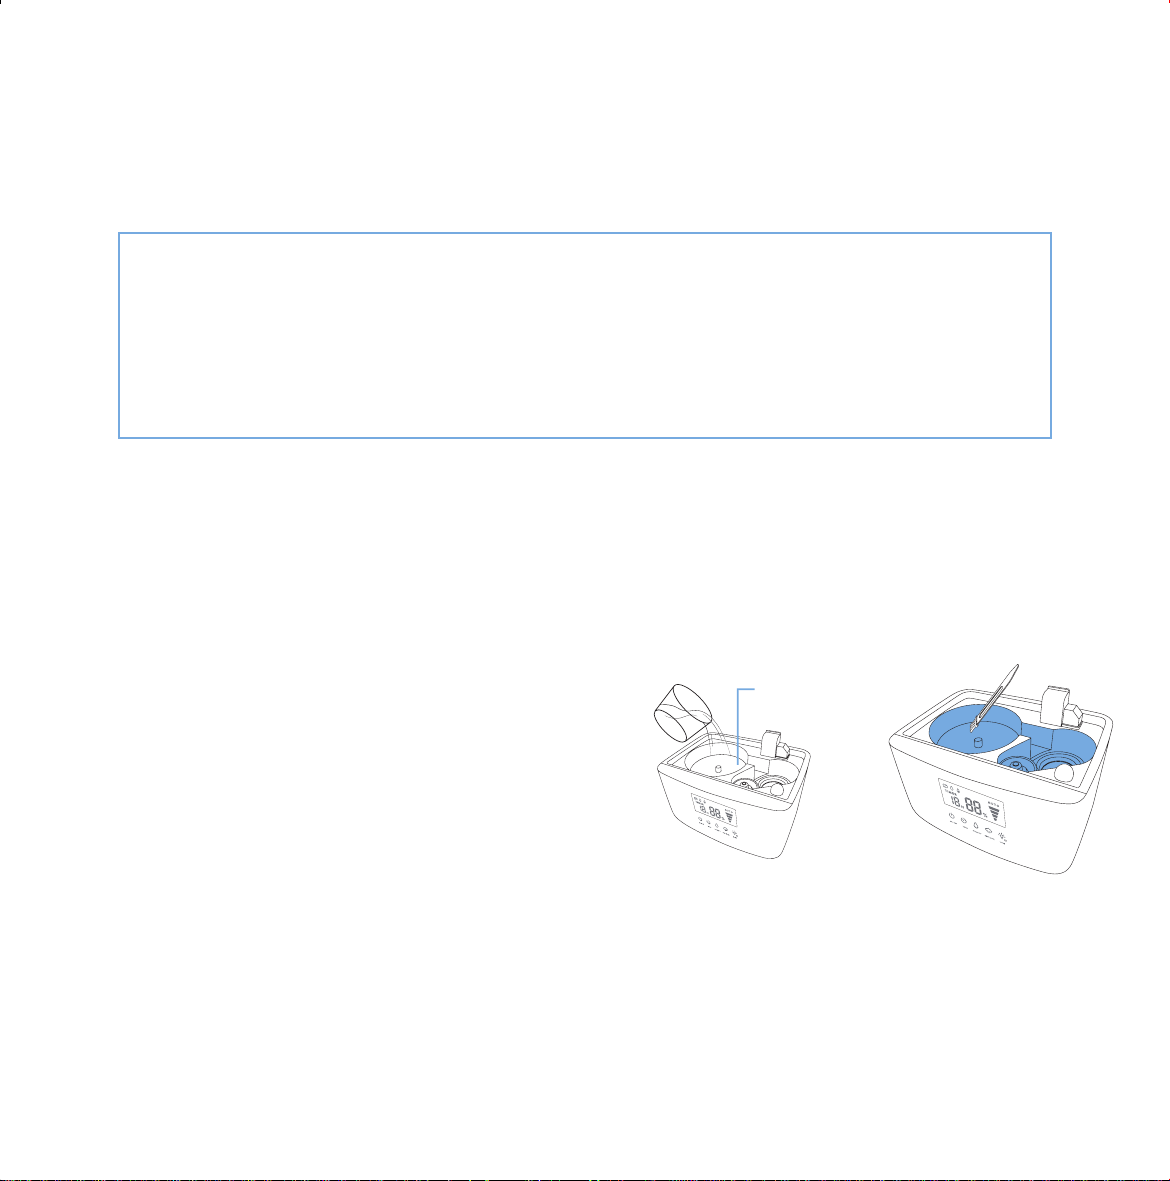
4. Fill the inner chamber with 1 cup of distilled
vinegar. [Figure 5.1]
5. Allow the vinegar to soak inside both
the water tank and inner chamber for 30
minutes.
6. Use the included cleaning brush to remove
any scale buildup inside the water tank or
in the inner chamber. [Figure 5.2]
7. Pour out the vinegar from both parts of the
humidier and thoroughly rinse with warm
water.
8. Dry all parts with a clean, dry cloth.
Make sure all parts of the humidier are
completely dry before reassembling or
storing.
Figure 5.1 Figure 5.2
Inner
chamber
Downloaded from www.ManualsFile.com manuals search engine

18
Cleaning the Aroma Pad Disinfecting the Humidier
1. Press the aroma box to release it from
the base, then pull it out.
2. Remove the aroma pad from the aroma
box.
3. Rinse the pad under warm, running
water.
4. Dry with a clean cloth and place it back
into the aroma box.
NOTE: .
• Do not pour liquid cleaners or detergents into
the aroma box.
• Do not use liquid cleaners or detergents to
wash the aroma pad.
1. Clean the water tank (see General
Cleaning, page 17).
2. Fill the water tank with 1 teaspoon of
bleach along with 1 gallon of clean
water. Reseal the water tank, then gently
shake the water tank to ensure all of the
sides are coated with the mixture.
3. Add ¼ teaspoon of bleach along with 1
cup of clean water into the base.
4. Allow the solutions in both parts to sit
for 30 minutes.
5. Pour out the mixtures from both the
water tank and base. Rinse both parts
thoroughly under clean, running water.
6. Allow the water tank and base to
completely air dry before reassembling
the humidier.
NOTE:
• Always wear gloves to protect your hands
while using bleach.
• A 3% hydrogen peroxide solution may also be
used to disinfect the humidifier.
• Do not use the humidifier immediately after
disinfecting, doing so may pose a potential
health hazard.
Disinfect the water tank before or after
storing the humidier for long periods of
time. You should also disinfect if there is any
mold buildup inside the water tank.
Downloaded from www.ManualsFile.com manuals search engine

19
TROUBLESHOOTING
Problem Cause Solution
No mist coming out
of nozzle.
Humider is not plugged in.
Plug the humidier into a powered
electrical outlet.
Humider is not turned on.
Tap the power button to turn on the
humider.
No water in tank.
Add at least 2 cups of clean water into
the water tank.
Water level is low.
Humidier produces
an unusual smell.
Humider is new.
Rinse the water tank and allow the
humidier to air dry.
Residual smell from diusing
essential oil on the aroma pad.
Clean the water tank (see Keeping
Things Clean, page 17).
Water has been in tank for too long.
Humidier makes
a loud or unusual
noise.
Water tank does not t properly.
Align the water tank cap with its
respective port inside the inner
chamber.
Water level is low.
Add at least two cups of clean water
into the water tank.
Humider is not level. Place humider on a at, level surface.
Humider is malfunctioning.
Turn o and unplug the humidier.
Discontinue use and contact Customer
Support (page 22).
Downloaded from www.ManualsFile.com manuals search engine

20
Problem Cause Solution
White dust appears
around the humidier
after operation.
Water being used has a high mineral
content.
Use distilled, puried, or ltered water
with the humidier. Remember to clean
your water tank at least once a month.
Puddle of water
forms below the
base.
Mist setting is too high.
Switch the humidier to a lower mist
setting.
Room is not well-ventilated.
Open a window to ensure proper
airow for your humidier, or move the
humidier to a more well-ventilated
room.
Excess water that has spilled from
lling the water tank or replacing the
water tank back onto the base.
Wipe o excess water from the top and
bottom of the base before replacing the
water tank.
Humidier base is leaking.
Unplug the humidier immediately and
stop using it (see Preventing Water
Leaks, page 14) before using it again. If
your humidier continues to leak, contact
Customer Support (page 22).
Some of the buttons
are unresponsive.
Humidier is malfunctioning. Contact Customer Support (page 22).
Downloaded from www.ManualsFile.com manuals search engine

21
WARRANTY INFORMATION
TERMS & POLICY
Levoit warrants all products to be of the highest quality in
material, craftsmanship, and service, eective from the date
of purchase to the end of the warranty period.
Levoit will replace any product found to be defective due
to manufacturer aws based on eligibility. Refunds are
available within the rst 30 days of purchase. Refunds
are only available to the original purchaser of the
product. This warranty extends only to personal use and
does not extend to any product that has been used for
commercial, rental, or any other use in which the product
is not intended for. There are no warranties other than the
warranties expressly set forth with each product.
This warranty is non-transferrable. Levoit is not responsible
in any way for any damages, losses, or inconveniences
caused by equipment failure by user negligence, abuse, or
use noncompliant with the user manual or any additional
safety, use, or warnings included in the product packaging
and manual.
This warranty does not apply to the following:
• Damage due to abuse, accident, alteration, misuse,
tampering or vandalism.
• Improper or inadequate maintenance.
• Damage in return transit.
• Unsupervised use by children under 18 years of age.
Levoit and its subsidiaries assume no liability for damage
caused by the use of the product other than for its
intended use or as instructed in the user manual. Some
states do not allow this exclusion or limitation of incidental
or consequential losses so the foregoing disclaimer may
not apply to you. This warranty gives you specic legal
rights and you may also have other rights which may vary
from state to state.
ALL EXPRESSED AND IMPLIED WARRANTIES,
INCLUDING THE WARRANTY OF MERCHANTABILITY,
ARE LIMITED TO THE PERIOD OF THE
LIMITED WARRANTY.
Additional 1-Year Warranty
You can extend your 1-year warranty by an additional year.
Log onto www.levoit.com/warranty and enter your order
number (for example, from Amazon or Houzz) to register
your new product for the extended warranty.
If you are unable to provide the order number for your
product, please type a short note in the order number eld
along with the date you received your product.
Defective Products & Returns
If your product proves defective within the specied
warranty period, please contact Customer Support via
[email protected] with your order number. Do not
dispose of your product before contacting us. Once
Customer Support has approved your request, please
return the unit with a copy of the invoice or your order
number.
Product Name Ultrasonic Cool Mist Humidier
Model Number LV455CH
Default Warranty Period 1 year
For your own reference, we strongly recommend that you
record your order number and date of purchase.
Date of Purchase
Order Number
Downloaded from www.ManualsFile.com manuals search engine

22
CUSTOMER SUPPORT
If you encounter any issues or have any questions regarding your new product, feel free to
contact our helpful Customer Support Team. Your satisfaction is our goal!
Customer Support
Arovast Corporation
1202 N. Miller St., Suite A
Anaheim, CA 92806
Email: [email protected]
Toll-Free: (888) 726-8520
Support Hours
Monday - Friday 9:00 am - 5:00 pm PT
*Please have your invoice and order number ready before contacting Customer Support.
Downloaded from www.ManualsFile.com manuals search engine

23
Connect with us @LevoitLifestyle
Downloaded from www.ManualsFile.com manuals search engine

Levoit.com
Downloaded from www.ManualsFile.com manuals search engine