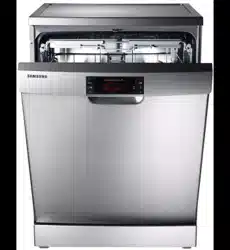
DW60M5060BB
DW60M5060FS
DW60M5060FW
DW60M5030FS
DW60M5010FS
DW60M5040FS
DW60M5040FW
DW60M5030FW
DW60M5010FW
DW60M5040BB
Dishwasher
user manual
imagine the possibilities
Thank you for purchasing this Samsung product.
DW4000KM-00000A-00_EN (Basic)_160323.indd 1

2_ Contents
Contents
SAFETY INFORMATION
3
5 Hydrogen gas is explosive
5 Proper use
6 Disposal
6 Instruction about the WEEE mark
OPERATION INSTRUCTION
7
7 Control panel
13 Displays
18 Dishwasher features
PRIOR USING FOR THE FIRST TIME
20
20 Set the water softener
21 Loading the salt into the softener
22 Fill the rinse aid dispenser
22 Rinse aid dispenser
23 Function of detergent
LOADING THE DISHWASHER RACKS
26
26 Loading the upper basket
27 Loading the lower basket
29 Cutlery basket and fork shelf
30 For washing in the dishwasher the following
cutlery/dishes
STARTING A WASHING PROGRAMME
32
32 Wash cycle table
36 Turning on the appliance
37 Change the programme
37 Forget to add dish
37 Unloading the dishwasher
MAINTENANCE AND CLEANING
38
38 Filtering system
38 Filter assembly
39 Cleaning the spray arms
39 Caring for the dishwasher
39 Protect against freezing
39 Cleaning the door
40 How to keep your dishwasher in shape
INSTALLATION INSTRUCTION
41
41 Positioning and leveling
42 Connecting the water and electricity supplies
44 Built-in dishwasher
49 Start of dishwasher
TROUBLESHOOTING TIPS
50
50 Information codes
51 Before calling for service
APPENDIX
53
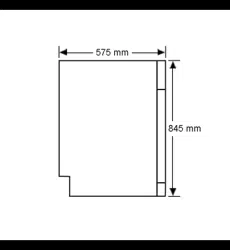
53 Specifications
53 Product dimension
DW4000KM-00000A-00_EN (Basic)_160323.indd 2

Safety information _3
01 SAFETY INFORMATION
READ AND FOLLOW THIS SAFETY INFORMATION
CAREFULLY SAVE THESE INSTRUCTIONS
Safety information
Please read this User Information carefully and keep it to refer to at a later date.
Pass it on to any subsequent owner of the appliance.
This manual contains sections of Safety Instructions, Part and Features,
Installation your dishwasher and Troubleshooting etc.
Carefully reading it before using the dishwasher will help you to use and maintain
the dishwasher properly.
The manufacturer, following a policy of constant development and up-dating of the product, may make
modifications without giving prior notice.
WARNING: When using your dishwasher, follow the below basic precautions including the following:
1. This appliance is not to be used by persons (including
children) with reduced physical, sensory or mental
capabilities, or lack of experience and knowledge,
unless they have been given supervision or instruction
concerning use of the appliance by a person responsible
for their safety.
2. For use in Europe: This appliance can be used by
children aged from 8 years and above and persons
with reduced physical, sensory or mental capabilities
or lack of experience and knowledge if they have been
given supervision or instruction concerning use of the
appliance in a safe way and understand the hazards
involved. Children shall not play with the appliance.
Cleaning and user maintenance shall not be made by
children without supervision.
3. Children should be supervised to ensure that they do not
play with the appliance.
4. If the supply cord is damaged, it must be replaced by
the manufacturer, its service agent or similarly qualifi ed
persons in order to avoid a hazard.
DW4000KM-00000A-00_EN (Basic)_160323.indd 3
4_
Safety information
READ AND FOLLOW THIS SAFETY INFORMATION
CAREFULLY SAVE THESE INSTRUCTIONS
5. The new hose-sets supplied with the appliance are to be
used and that old hose-sets should not be reused.
6. For appliances with ventilation openings in the base, that
a carpet must not obstruct the openings.
7. For use in Europe: Children of less than 3 years should
be kept away unless continuously supervised.
8. CAUTION: In order to avoid a hazard due to inadvertent
resetting of the thermal cut-out, this appliance must not
be supplied through an external switching device, such
as a timer, or connected to a circuit that is regularly
by the utility.
9. This appliance is intended to be used in household and
similar applications such as:
ces and other working
environments;
– farm houses;
– by clients in hotels, motels and other residential type
environments;
– bed and breakfast type environments.
10. The door should not be left in the open position since
12. Please do not overload your dishwasher. There is only
space for 13/14 standard dishes. Do not use dish that is not
suitable for dishwashers. This is important for good results
and for reasonable energy consumption.
this could present a tripping hazard.
11. WARNING: Knives and other utensils with sharp points
must be loaded in the basket with their points down or
placed in a horizontal position.
Safety information
DW4000KM-00000A-00_EN (Basic)_160323.indd 4

Safety information _5
01 SAFETY INFORMATION
READ AND FOLLOW THIS SAFETY INFORMATION
CAREFULLY SAVE THESE INSTRUCTIONS
Hydrogen gas is explosive
Under certain conditions, Hydrogen gas may be produced in a hot-water system that has not been used for
two weeks or more. HYDROGEN GAS IS EXPLOSIVE. If the hot-water system has not been used for such
a period, before using the dishwasher turn on all hot-water faucets and let the water flow from each for
several minutes. This will release any accumulated hydrogen gas. As the gas is flammable, do not smoke or
use an open flame during this time.
Proper use
• Do not abuse, sit on, or stand on the door or dish rack of the dishwasher.
• Do not operate your dishwasher unless all enclosure panels are properly in place. Open the door very
carefully if the dishwasher is operating. There is a risk of water squirting out.
• Do not place any heavy objects of stand on the door when it is open. The appliance could tip forward.
• When loading items to be washed:
- Locate sharp items so that they are not likely to damage the door seal;
- Load sharp knives with the handles up to reduce the risk of cut-type injuries;
• Warning : knives and other utensils with sharp points must be loaded in the basket with their points
down or placed in a horizontal position.
• Check that the detergent receptacle is empty after completion of the wash cycle.
• Do not wash plastic items unless they are marked dishwasher safe or the equivalent. For plastic items
not so marked, check the manufacturer’s recommendations.
• Use only detergent and rinse additives designed for an automatic dishwasher. Never use soap, laundry
detergent, or hand washing detergent in your dishwasher.
• Other means for disconnection from the supply must be incorporated in the fixed wiring with at least
3 mm contact separation in all poles.
• Keep children away from detergent and rinse aid, keep children away from the open door of the
dishwasher, there could still be some detergent left inside.
• Young children should be supervised to ensure that they do not play with the appliance.
• The appliance is not intended for use by young children or infirm persons without supervision.
• Dishwasher detergents are strongly alkaline. They can be extremely dangerous if swallowed. Avoid
contact with skin and eyes and keep children away from the dishwasher when the door is open.
• The door should not be left in the open position since this could present a tripping hazard.
• If the supply cord is damaged, it must be replaced by the manufacturer or its service agent or a similarly
qualified person in order to avoid a hazard.
• Please dispose of packing materials properly.
• Use the dishwasher only for its intended function.
• During installation, the power supply must not be excessively or dangerously bent or flattened.
• Do not tamper with controls.
• The appliance is to be connected to the water mains using new hose sets and the old hose-sets should
not be reused.
DW4000KM-00000A-00_EN (Basic)_160323.indd 5
6_ Safety information
READ AND FOLLOW THIS SAFETY INFORMATION
CAREFULLY SAVE THESE INSTRUCTIONS
Disposal
Dispose of the dishwasher packaging material correctly.
All packaging materials can be recycled.
Plastic parts are marked with the standard international abbreviations:
PE for polyethylene, e.g. sheet wrapping material
PS for polystyrene, e.g. padding material
POM polyoxymethylene, e.g. plastic clips
PP polypropylene, e.g. Salt filler
ABS Acrylonitrile Butadiene Styrene, e.g. Control Panel.
WARNING: Packaging material could be dangerous for children!
power supply cable and make the door closing device unusable.
Cardboard packaging is manufactured from recycled paper and should be disposed in the waste
paper collection for recycling.
By ensuring this product is disposed of correctly, you will help prevent potential negative
consequences for the environment and human health, which could otherwise be caused by
inappropriate waste handling of this product.
your household waste disposal service.
Instruction about the WEEE mark
Correct Disposal of This Product
(Waste Electrical & Electronic Equipment)
(Applicable in countries with separate collection systems)
This marking on the product, accessories or literature indicates that the product and its
electronic accessories (e.g. charger, headset, USB cable) should not be disposed of with other
household waste at the end of their working life. To prevent possible harm to the environment or
human health from uncontrolled waste disposal, please separate these items from other types of
waste and recycle them responsibly to promote the sustainable reuse of material resources.
Household users should contact either the retailer where they purchased this product, or
environmentally safe recycling.
Business users should contact their supplier and check the terms and conditions of the
purchase contract. This product and its electronic accessories should not be mixed with other
commercial wastes for disposal.
For information on Samsung’s environmental commitments and product specific regulatory obligations e.g.
REACH visit: samsung.com/uk/aboutsamsung/samsungelectronics/corporatecitizenship/data_corner.html
Safety information
DW4000KM-00000A-00_EN (Basic)_160323.indd 6
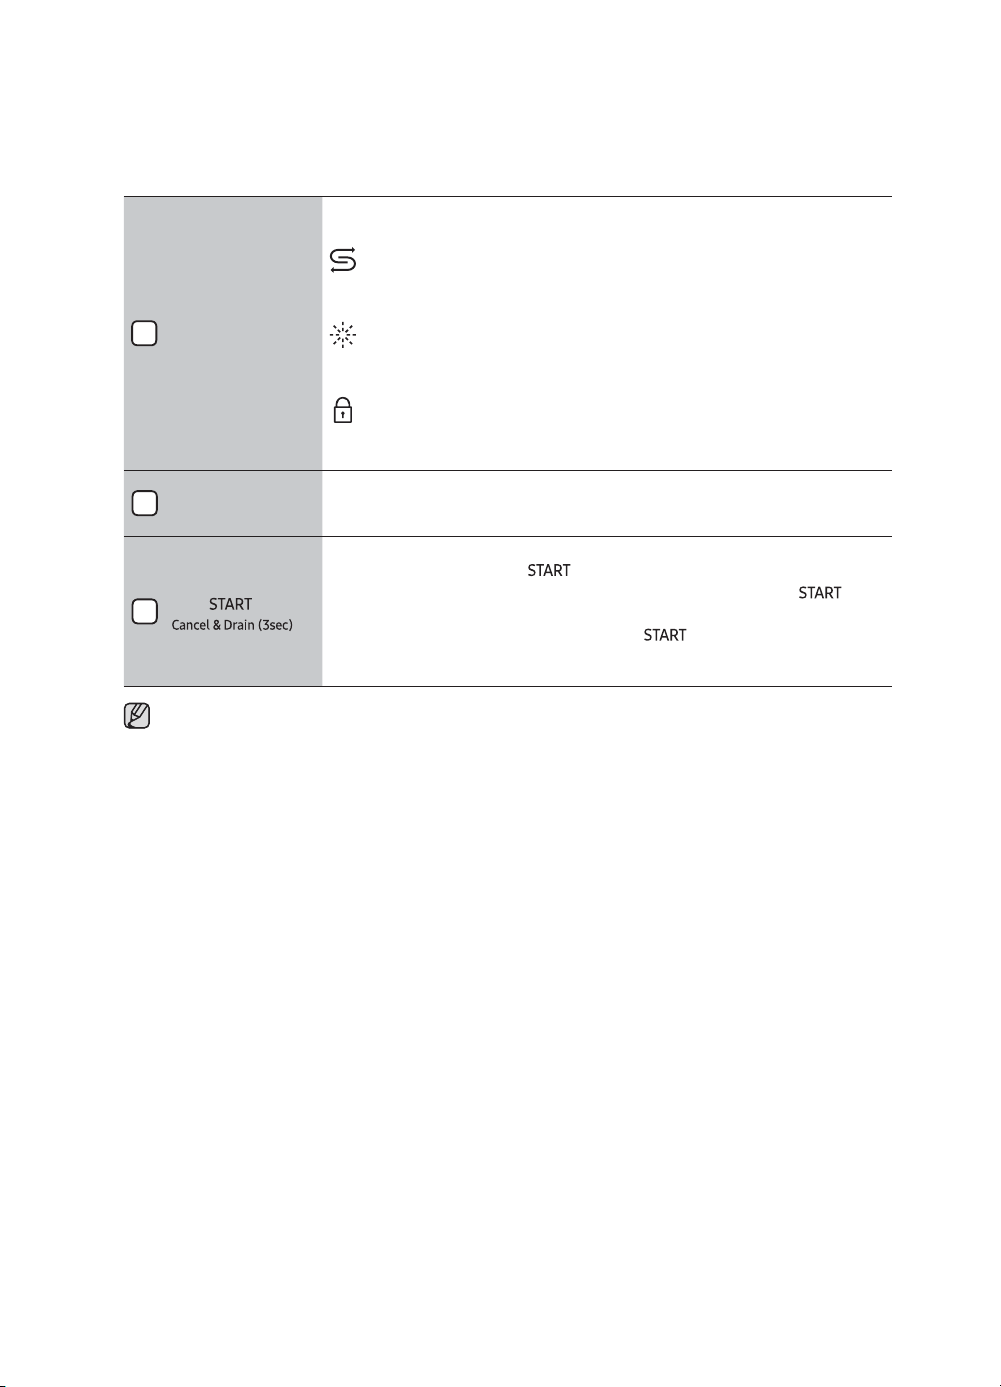
the button for 3 seconds.
Operation Instruction _7
02 OPERATION INSTRUCTION
Operation instruction
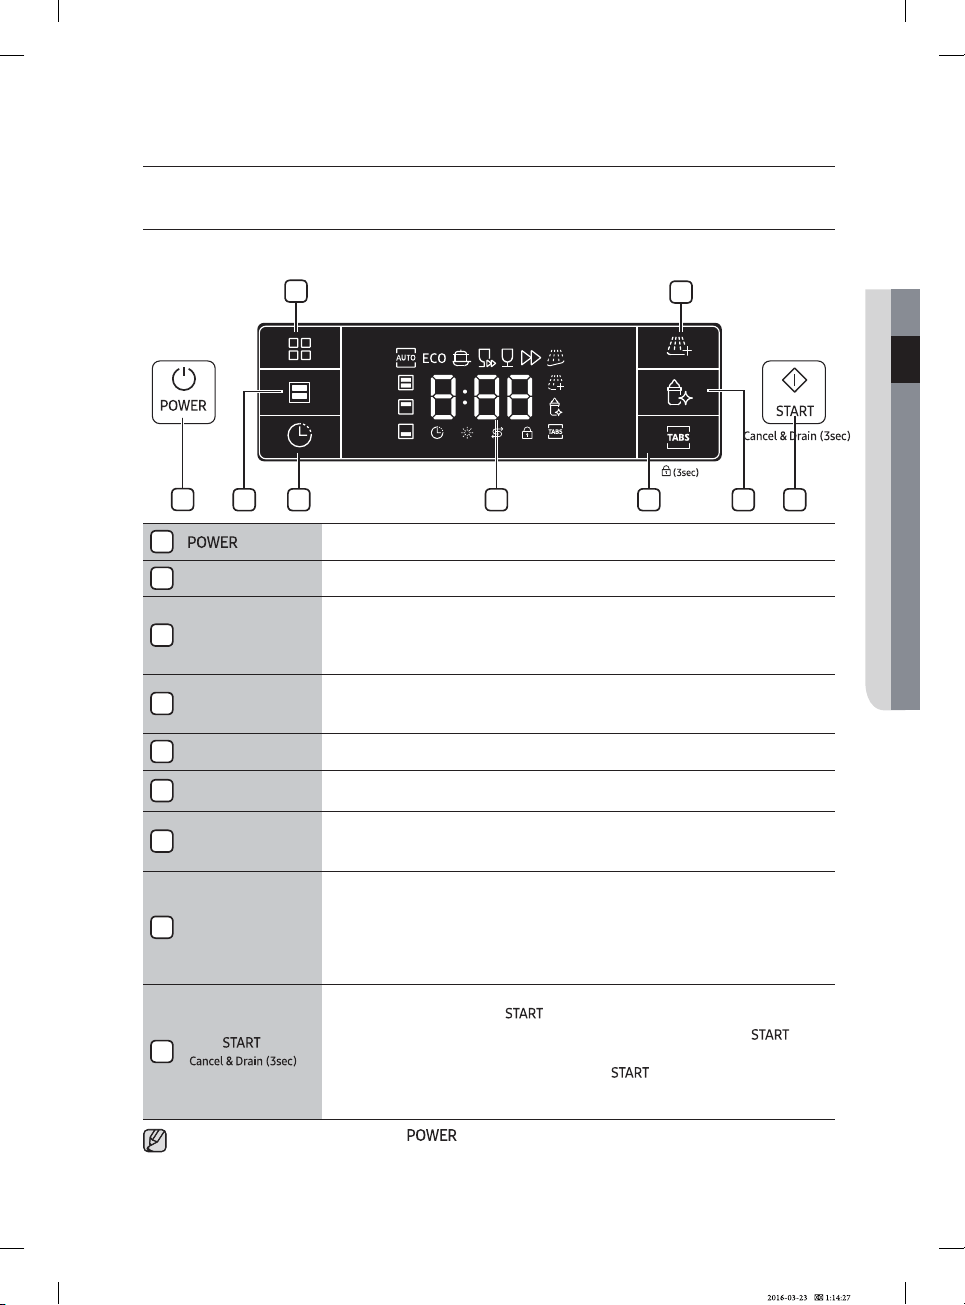
Control panel
DW60M5060FS/DW60M5060FW
1
5 94 8
2
6
73
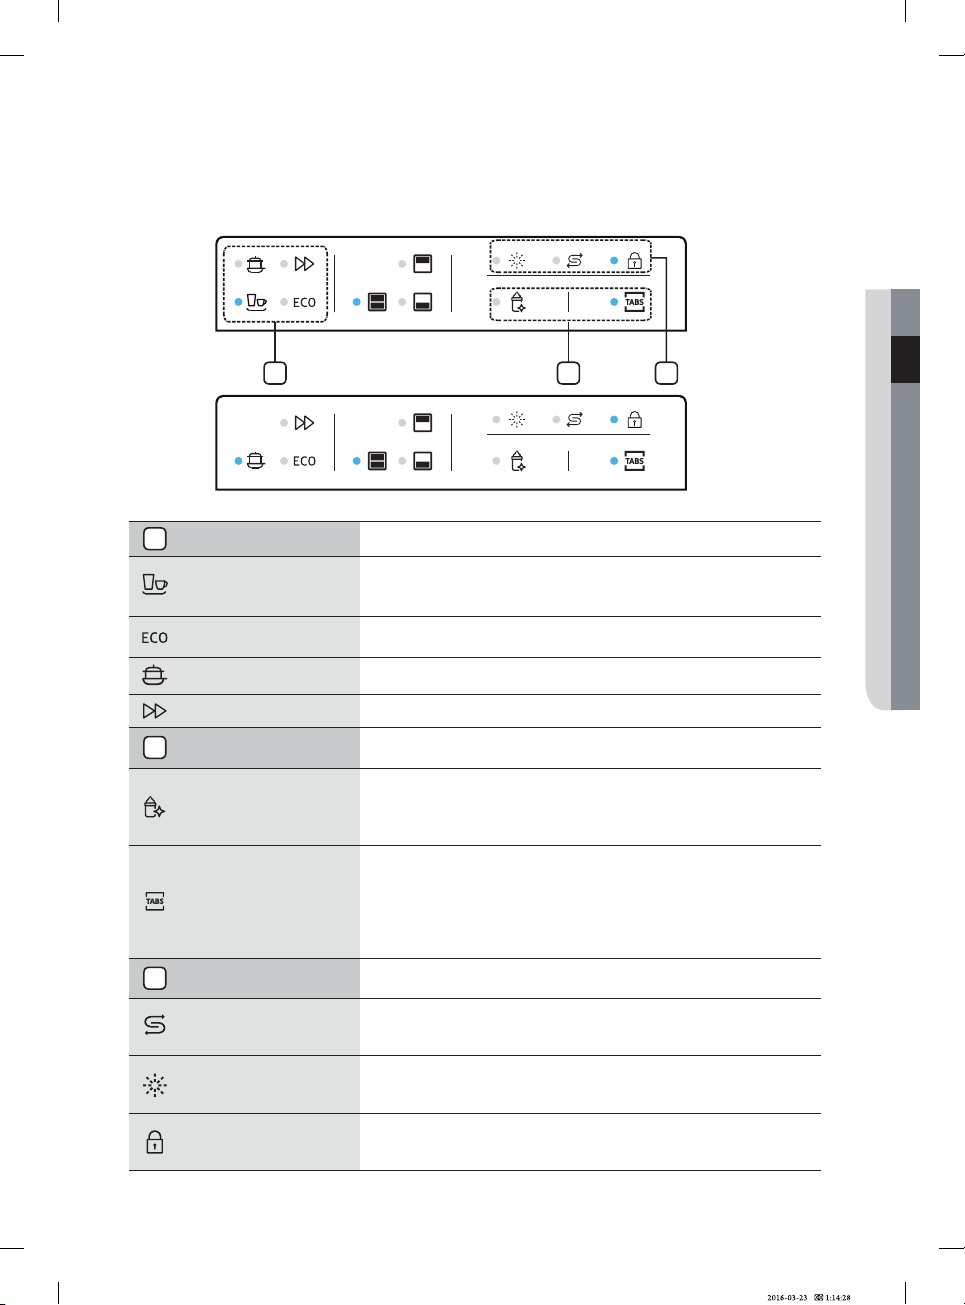
1 Press this button to turn on your dishwasher : the screen lights up.
2 Program To select washing program press this button.
3 Half load
To select Half load function. With this Half load function you can only use it
to wash either basket, and you will see less water and energy consumption.
It can only be used with all program expect Pre Wash.
4 Delay start
Press this button to set the delayed hours for washing. You can delay the
start of washing up to 24 hours. One press on this button delays the start of
washing by one hours.
5 Display Running indicator, delay time, information codes and etc.
6 Rinse Add
To select Rinse Add function, you can use it when you want to add once
rinse after the program. It can be used with all program expect Pre Wash.
7 Hygiene
Push the Hygiene button for the best possible hygiene in your dishwasher.
At the final rinse it heat up to 70 °C and hold this temperature for a several
minutes. This function is available with all program except Pre Wash.
8
Multi tab
(Control lock)
To select Multi in 1 option which needs salt and rinse aid but a Multi in 1
tablet. This option can be used with other programme ( Intensive、Eco )
Another option allows you to lock the buttons on the control panel so
children cannot accidentally start the dishwasher by pressing the buttons
on the panel. To lock and unlock the buttons on the control panel, hold down
Multi in 1
9
In power on condition, close the dishwasher door and select the cycle and
desired options. Press the button to begin the cycle.
When you want to pause the dishwasher while running, press the
button and make sure to open the door slowly and carefully.
You can reset the machine by pressing the button for 3 seconds
during washing. After reset, the dishwasher goes to the initial state except salt
consumption setting of water softener.
• When the door is open only the
• You can select options (Multi in 1, Delay start, Half load, Hygiene and Rinse Add) before
starting a cycle.
DW4000KM-00000A-00_EN (Basic)_160323.indd 7
button will operate.
8_ Operation Instruction
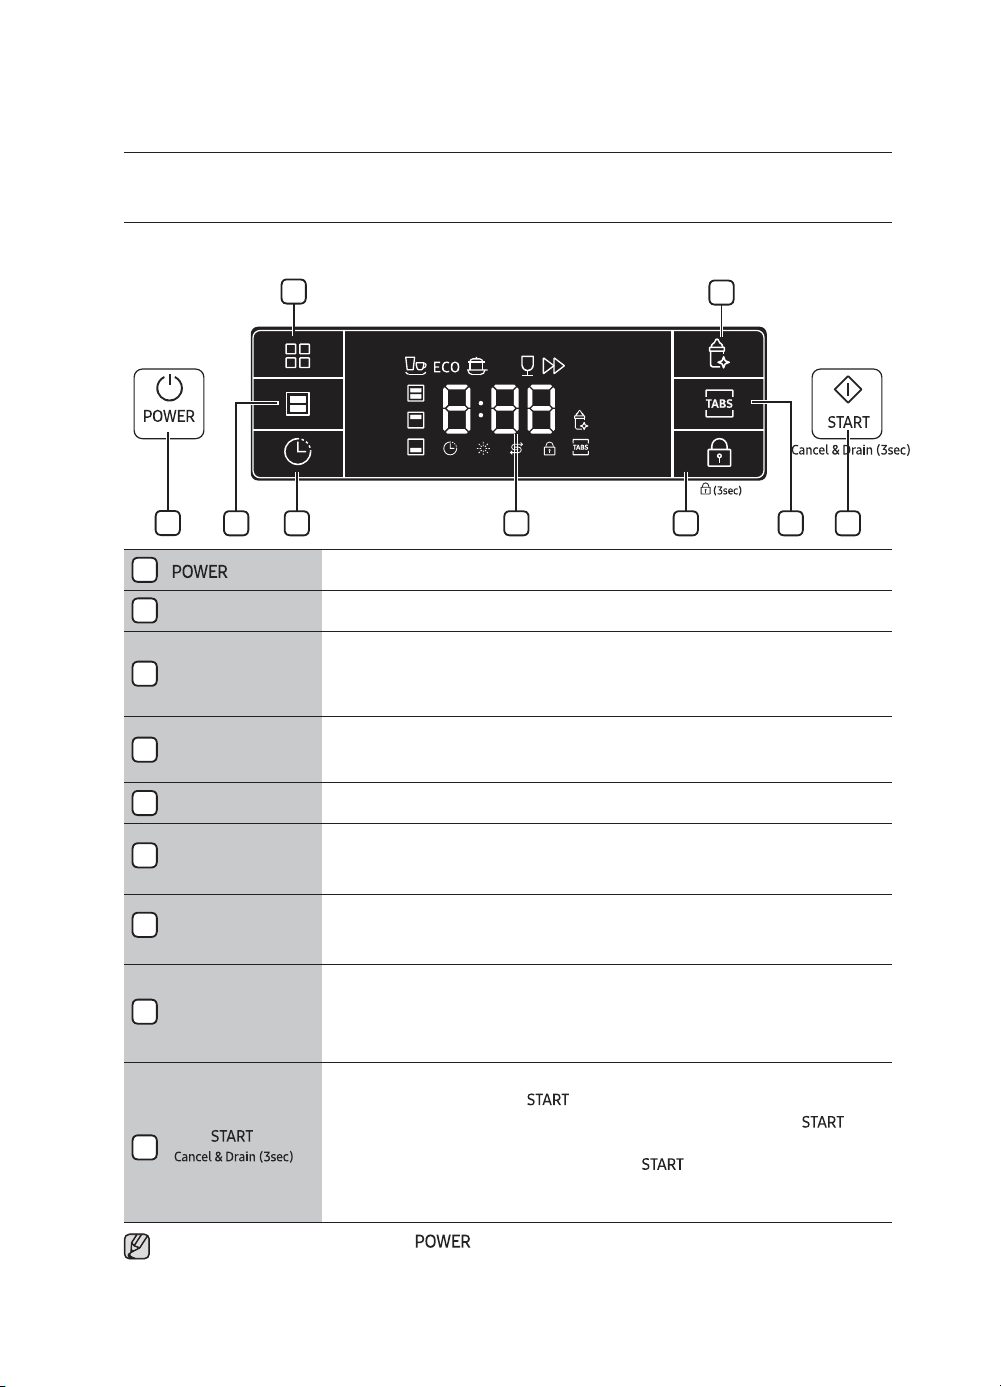
Operation instruction
Control panel
DW60M5040FS/DW60M5040FW
1
5 94 8
2
6
73
1 Press this button to turn on your dishwasher : the screen lights up.
2 Program To select washing program press this button.
3 Half load
4 Delay start
Press this button to set the delayed hours for washing. You can delay the
start of washing up to 24 hours. One press on this button delays the start of
washing by one hours.
5 Display Running indicator, delay time, information codes and etc.
6 Hygiene
7 Multi tab
Push the Hygiene button for the best possible hygiene in your dishwasher.
At the final rinse it heat up to 70 °C and hold this temperature for a several
minutes. This function is available with all program except Pre Wash.
8
Control lock
To select Multi in 1 option which needs salt and rinse aid but a Multi in 1
tablet. This option can be used with other programme ( Intensive, Eco and
normal).
To lock and unlock the buttons on the control panel, hold down the
Control lock
button for 3 seconds.
9
In power on condition, close the dishwasher door and select the cycle and
desired options. Press the button to begin the cycle.
When you want to pause the dishwasher while running, press the
button and make sure to open the door slowly and carefully.
You can reset the machine by pressing the button for 3 seconds
during washing. After reset, the dishwasher goes to the initial state except salt
consumption setting of water softener.
• When the door is open only the
button will operate.
• You can select options (Multi in 1, Delay start, Half load, Hygiene and Rinse Add) before
starting a cycle.
DW4000KM-00000A-00_EN (Basic)_160323.indd 8
Control lock option allows you to lock the buttons on the control panel so
children cannot accidentally start the dishwasher by pressing the buttons on
the panel.
To select Half load function. With this Half load function you can only use it
to wash either basket, and you will see less water and energy consumption.
It can only be used with all program except Pre Wash.

Operation Instruction _9
02 OPERATION INSTRUCTION
Operation instruction
Control panel
DW60M5030FS/DW60M5030FW
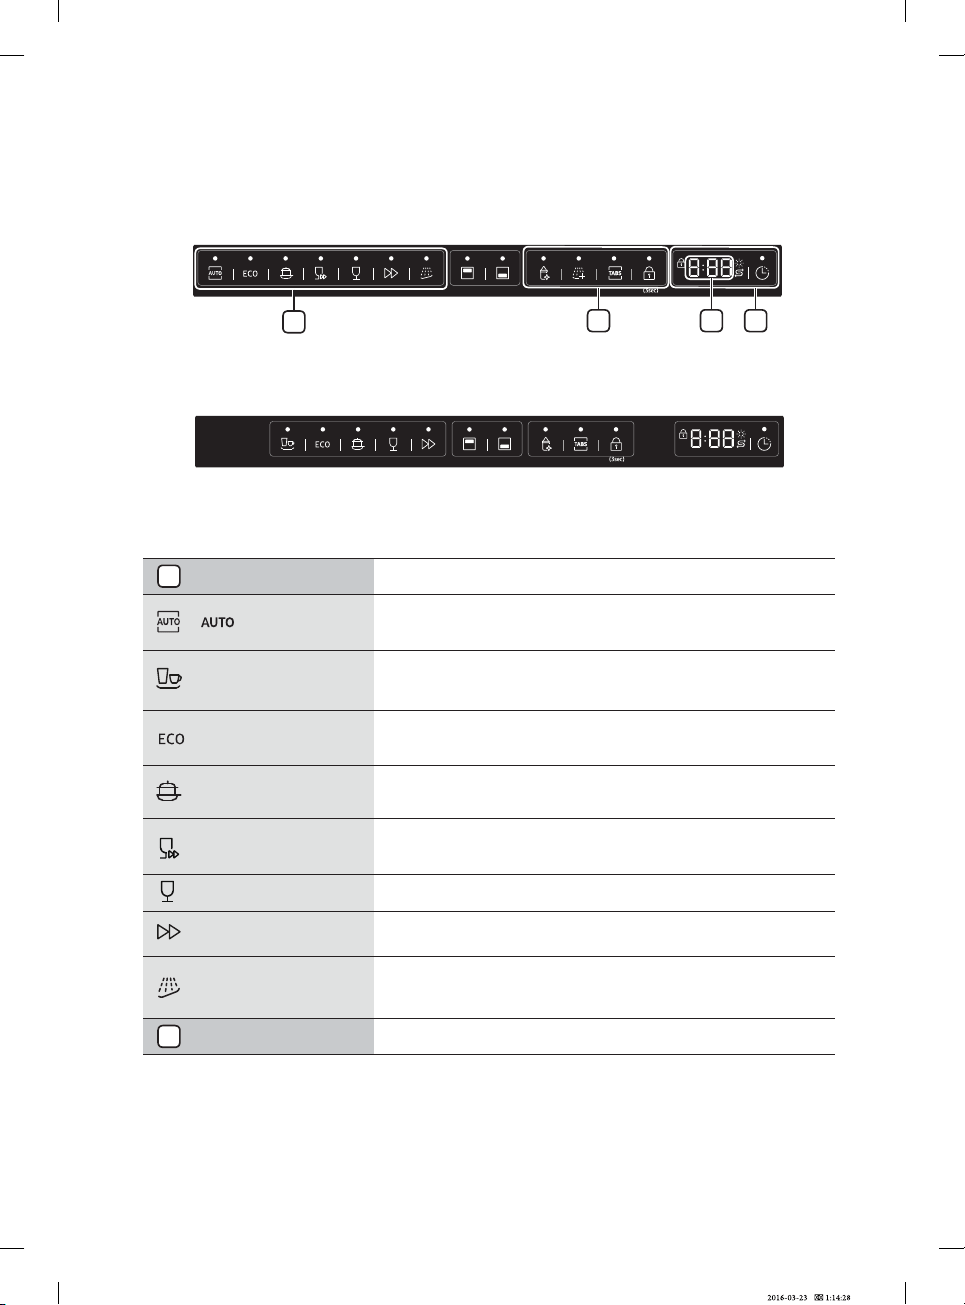
1 Press this button to turn on your dishwasher : the screen lights up.
2 Program To select washing program press this button.
3 Half load
4 Hygiene
Push the Hygiene button for the best possible hygiene in your dishwasher.
At the final rinse it heat up to 70 °C and hold this temperature for a several
minutes. This function is available with all program except Pre Wash.
5
Multi tab
(Control lock)
To select Multi in 1 option which needs salt and rinse aid but a Multi in 1
tablet. This option can be used with other programme ( Intensive, Eco and
normal ). Another option allows you to lock the buttons on the control panel
so children cannot accidentally start the dishwasher by pressing the buttons
on the panel. To lock and unlock the buttons on the control panel, hold down
the button for (3) seconds.
6
In power on condition, close the dishwasher door and select the cycle and
desired options. Press the button to begin the cycle.
When you want to pause the dishwasher while running, press the
button and make sure to open the door slowly and carefully.
You can reset the machine by pressing the button for 3 seconds
during washing. After reset, the dishwasher goes to the initial state except salt
consumption setting of water softener.
• When the door is open only the
• You can select options (Multi in 1, Delay start, Half load, Hygiene and Rinse Add) before
starting a cycle.
DW4000KM-00000A-00_EN (Basic)_160323.indd 7
button will operate.
1 6
2 3 4 5
Multi in 1
To select Half load function. With this Half load function you can only use it
to wash either basket, and you will see less water and energy consumption.
It can only be used with all program except Pre Wash.

Operation instruction
Control panel
DW60M5010FS/DW60M5010FW
1 Press this button to turn on your dishwasher : the screen lights up.
2 Program To select washing program press this button.
3 Half load
4 Hygiene
Push the Hygiene button for the best possible hygiene in your dishwasher.
At the final rinse it heat up to 70 °C and hold this temperature for a several
minutes. This function is available with all program except Pre Wash.
5
Multi tab
(Control lock)
6
In power on condition, close the dishwasher door and select the cycle and
desired options. Press the button to begin the cycle.
When you want to pause the dishwasher while running, press the
button and make sure to open the door slowly and carefully.
You can reset the machine by pressing the button for 3 seconds
during washing. After reset, the dishwasher goes to the initial state except salt
consumption setting of water softener.
• When the door is open only the
• You can select options (Multi in 1, Delay start, Half load, Hygiene and Rinse Add) before
starting a cycle.
DW4000KM-00000A-00_EN (Basic)_160323.indd 7
button will operate.
1 6
2 3 4 5
10_ Operation Instruction
To select Multi in 1 option which needs salt and rinse aid but a Multi in 1
tablet. This option can be used with other programme ( Intensive、Eco )
Another option allows you to lock the buttons on the control panel so
children cannot accidentally start the dishwasher by pressing the buttons
on the panel. To lock and unlock the buttons on the control panel, hold down
the button for (3) seconds.
Multi in 1
To select Half load function. With this Half load function you can only use it
to wash either basket, and you will see less water and energy consumption.
It can only be used with all program except Pre Wash.

Operation Instruction _11
DW60M5060BB
DW60M5040BB
1 Press this button to turn on your dishwasher : the screen lights up.
2 Cycle To select washing program press this button.
3 Upper
When you select Upper, only the upper rack nozzle is activated.
The lower nozzle will not operate.
Use this feature to wash a small load of dishes or glasses placed in the upper
rack.
When you select Upper, place dishes, glasses, etc. in the upper rack
only. The dishwasher will not wash items placed in the lower rack.
Selecting Upper reduces both the cycle time and the amount of electricity
consumed.
4 Lower
When you select Lower, only the lower rack nozzle is activated. The upper
nozzle will not operate.
Use this feature to wash a small load of dishes or glasses placed in the lower
rack.
When you select Lower, place items, glasses, etc. in the lower rack
only. The dishwasher will not wash items placed in the upper rack.
Selecting Lower reduces both the cycle time and the amount of electricity
consumed.
5 Hygiene
Push the Hygiene button for the best possible hygiene in your dishwasher.
At the final rinse it heat up to 70 °C and hold this temperature for a several
minutes. This function is available with all program except Pre Wash.
6 Rinse Add
To select Rinse Add function, you can use it when you want to add once
rinse after the program. It can be used with all program expect Pre Wash.
7 Multi tab
To select Multi in 1 option which needs salt and rinse aid but a Multi in 1
tablet. This option can be used with other programme ( Intensive, Eco and
normal ).
8 Control lock
Control lock option allows you to lock the buttons on the control panel so
children cannot accidentally start the dishwasher by pressing the buttons on
the panel.
Operation instruction
DW4000KM-00000A-00_EN (Basic)_160323.indd 11
3 4 5 10 116 8 971 2
02 OPERATION INSTRUCTION
Control panel
9 Indicator
If Rinse Refill or Salt Refill indicator is lit, it means rinse or salt is needed to
refill.
Salt Refill Indicator
• If the “Salt Refill” indicator is lit, it means the dishwasher is low on
dishwasher salt and needs to be refilled.
Rinse Refill Indicator
• If the “Rinse Refill” indicator is lit, it means the dishwasher is low on
dishwasher rinse aid and requires a refill.
Control lock Indicator
• If the “Control lock” indicator id fit, it means the dishwasher is
locked, you cannot do any operate.
10 Delay start
Press this button to set the delayed hours for washing. You can delay the
start of washing up to 24 hours. One press on this button delays the start of
washing by one hours.
11
In power on condition, close the dishwasher door and select the cycle and
desired options. Press the button to begin the cycle.
When you want to pause the dishwasher while running, press the
button and make sure to open the door slowly and carefully.
You can reset the machine by pressing the button for 3 seconds
during washing. After reset, the dishwasher goes to the initial state except salt
consumption setting of water softener.
• You can select options (Multi tab, Half load, Delay, Hygiene and Rinse Add) before starting a
cycle.
DW4000KM-00000A-00_EN (Basic)_160323.indd 12
12_ Operation Instruction
Quick Wash
Delicate
Displays
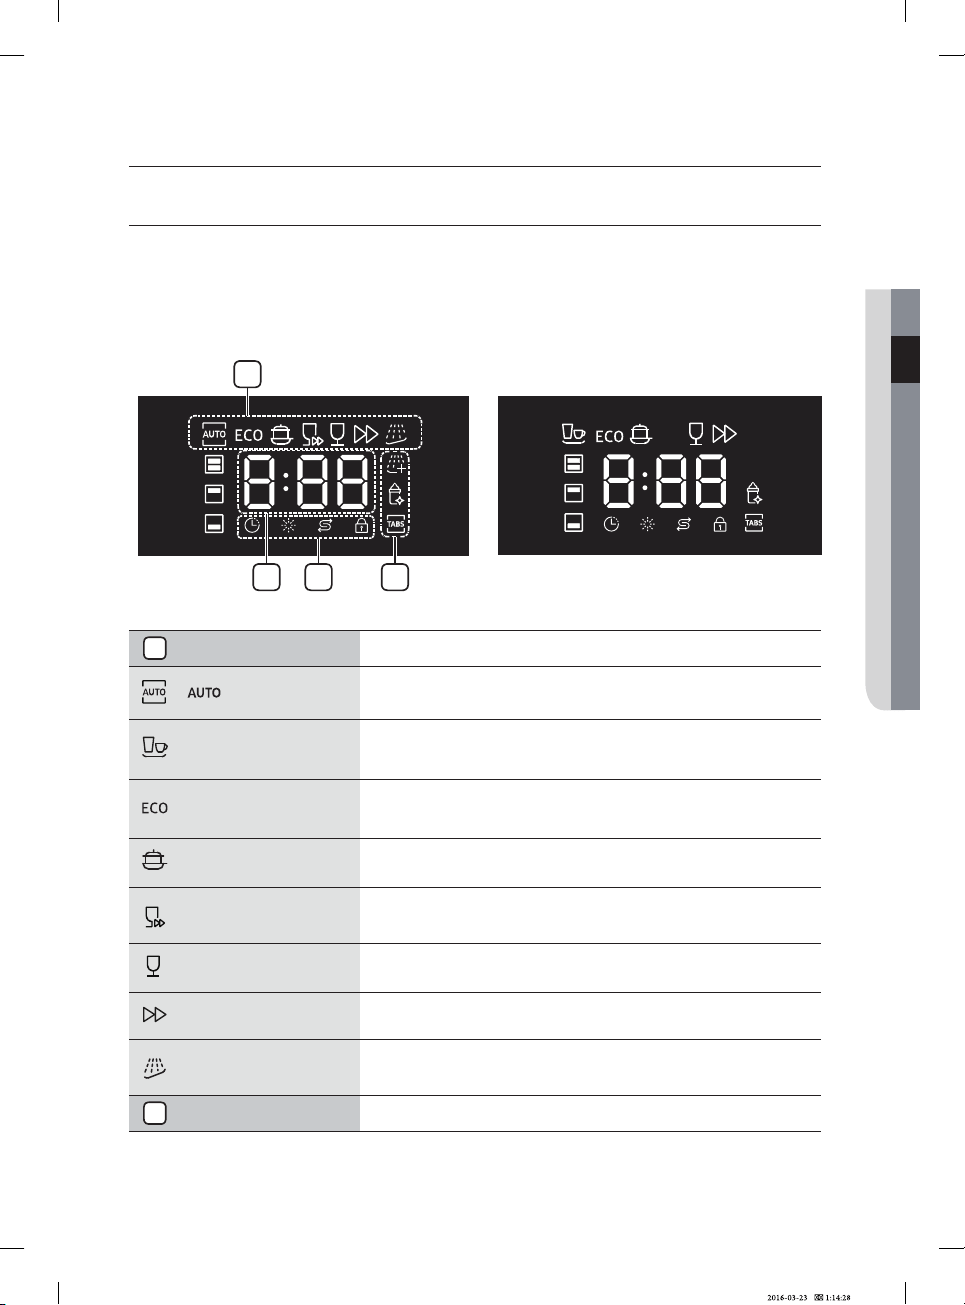
DW60M5060FS/DW60M5060FW/DW60M5040FS/DW60M5040FW
1 PROGRAM ICONS When press the
Program button, each program is selected.
Eco
Normally soiled daily using items, with reduced energy and water
consumptions.
Intensive Heavily soiled items include pots and pans.
Lightly soiled with very short cycle time.
Lightly soiled delicate items.
Express Normally soiled daily using items, with short cycle time.
Pre Wash
Cold rinse for remove only dirt on dishes stored for a long time or
soaking dishes which are dried up before other programme running.
2 3*8 SEGMENT Display the remaining time, information code, or delay time.
Operation instruction
DW4000KM-00000A-00_EN (Basic)_160323.indd 13
34
1
2
Operation Instruction _13
Normal
For normally soiled loads, such as pots, plates, glasses, and lightly
Is optimiz according to the soiled loads, such as pots, pans, utensils
and cutlery, with the aid of sensors.
soiled pans. Standard daily cycle.
(DW60M5060FS)
(DW60M5060FW)
(DW60M5060FS)
(DW60M5060FW)
(DW60M5060FS)
(DW60M5060FW)
(DW60M5040FS)
(DW60M5040FW)
02 OPERATION INSTRUCTION
In below market, the Eco program is the one which is tested when getting the certification, same as Eco program:
ed

DW4000KM-00000A-00_EN (Basic)_160323.indd 12
14_ Operation Instruction
SALT REFILL
INDICATOR
If the “Salt Refill” indicator is lit, it means the dishwasher is low on
dishwasher salt and needs to be refilled.
RINSE REFILL
INDICATOR
If the “Rinse Refill” indicator is lit, it means the dishwasher is low on
dishwasher rinse aid and requires a refill.
CONTROL LOCK
INDICATOR
If the “Control lock” indicator id fit, it means the dishwasher is locked,
you cannot do any operate.
DELAY START
INDICATOR
If the “Delay Start” indicator is fit, it means the dishwasher start will
delay several hours which you setup.
3 OPTION ICONS
When pressing the option icons, the corresponding option function
is selected.
4 INDICATORS
When the indicator is on, it reminds of that client has chosen delay
function, client need to add salt and etc.
Rinse Add
To select Rinse Add function, you can use it when you want to add
once rinse after the program. It can be used with all program expect
Pre Wash.
Hygiene
Push the Hygiene button for the best possible hygiene in your
dishwasher. At the final rinse it heat up to 70 °C and hold this
temperature for a several minutes. This function is available with all
program except Pre Wash.
Multi tab
(Control lock)
To select Multi in 1 option which needs salt and rinse aid but a Multi in 1
tablet. This option can be used with other programme ( Intensive, Eco
and normal ). Another option allows you to lock the buttons on the
control panel so children cannot accidentally start the dishwasher by
pressing the buttons on the panel. To lock and unlock the buttons on
the control panel, hold down both the Multi in 1 button for (3) seconds.
(DW60M5060FS)
(DW60M5060FW)
SALT REFILL
INDICATOR
If the “Salt Refill” indicator is lit, it means the dishwasher is low on
dishwasher salt and needs to be refilled.
RINSE REFILL
INDICATOR
If the “Rinse Refill” indicator is lit, it means the dishwasher is low on
dishwasher rinse aid and requires a refill.
CONTROL LOCK
INDICATOR
If the “Control lock” indicator id fit, it means the dishwasher is locked,
you cannot do any operate.
DW60M5030FS/DW60M5030FW/DW60M5010FS/DW60M5010FW
DW4000KM-00000A-00_EN (Basic)_160323.indd 14
Operation Instruction _15
1 PROGRAM ICONS When press the Program button, each program is selected.
Eco
Normally soiled daily using items, with reduced energy and water
consumptions.
Intensive Heavily soiled items include pots and pans.
Express Normally soiled daily using items, with short cycle time.
2 OPTION ICONS
When pressing the option icons, the corresponding option function
is selected.
3 INDICATORS
When the indicator is on, it reminds of that client has chosen delay
function, client need to add salt and etc.
Hygiene
Push the Hygiene button for the best possible hygiene in your
dishwasher. At the final rinse it heat up to 70 °C and hold this
temperature for a several minutes. This function is available with all
program except Pre Wash.
Multi tab
(Control lock)
Normal
For normally soiled loads, such as pots, plates, glasses, and lightly
soiled pans. Standard daily cycle.
(DW60M5030FS)
(DW60M5030FW)
1 2 3
To select Multi in 1 option which needs salt and rinse aid but a Multi in 1
tablet. This option can be used with other programme ( Intensive, Eco
and normal ). Another option allows you to lock the buttons on the
control panel so children cannot accidentally start the dishwasher by
pressing the buttons on the panel. To lock and unlock the buttons on
the control panel, hold down both the Multi in 1 button for (3) seconds.
02 OPERATION INSTRUCTION
Quick Wash
Delicate
1 PROGRAM ICONS When press the Program button, each program is selected.
Normally soiled daily using items, with reduced energy and water
consumptions.
Intensive Heavily soiled items include pots and pans.
Lightly soiled with very short cycle time.
Lightly soiled delicate items.
Express Normally soiled daily using items, with short cycle time.
Pre Wash
Cold rinse for remove only dirt on dishes stored for a long time or
soaking dishes which are dried up before other programme running.
Normal
For normally soiled loads, such as pots, plates, glasses, and lightly
soiled pans. Standard daily cycle.
(DW60M5060BB)
(DW60M5060BB)
(DW60M5060BB)
(DW60M5040BB)
DW60M5060BB
DW60M5040BB
2 3*8 SEGMENT Display the remaining time, information code, or delay time.
DW4000KM-00000A-00_EN (Basic)_160323.indd 15
1
43 2
16_ Operation Instruction
Eco
Is optimiz according to the soiled loads, such as pots, pans, utensils
and cutlery, with the aid of sensors.
ed
02 OPERATION INSTRUCTION
DW4000KM-00000A-00_EN (Basic)_160323.indd 12
Operation Instruction _17
SALT REFILL
INDICATOR
If the “Salt Refill” indicator is lit, it means the dishwasher is low on
dishwasher salt and needs to be refilled.
RINSE REFILL
INDICATOR
If the “Rinse Refill” indicator is lit, it means the dishwasher is low on
dishwasher rinse aid and requires a refill.
CONTROL LOCK
INDICATOR
If the “Control lock” indicator id fit, it means the dishwasher is locked,
you cannot do any operate.
DELAY START
INDICATOR
If the “Delay Start” indicator is fit, it means the dishwasher start will
delay several hours which you setup.
3 OPTION ICONS
When pressing the option icons, the corresponding option function
is selected.
4 INDICATORS
When the indicator is on, it reminds of that client has chosen delay
function, client need to add salt and etc.
Rinse Add
To select Rinse Add function, you can use it when you want to add
once rinse after the program. It can be used with all program expect
Pre Wash.
Hygiene
Push the Hygiene button for the best possible hygiene in your
dishwasher. At the final rinse it heat up to 70 °C and hold this
temperature for a several minutes. This function is available with all
program except Pre Wash.
Multi tab
(Control lock)
To select Multi in 1 option which needs salt and rinse aid but a Multi in 1
tablet. This option can be used with other programme ( Intensive, Eco
and normal ). Another option allows you to lock the buttons on the
control panel so children cannot accidentally start the dishwasher by
pressing the buttons on the panel. To lock and unlock the buttons on
the control panel, hold down both the Multi in 1 button for (3) seconds.
(DW60M5060BB)
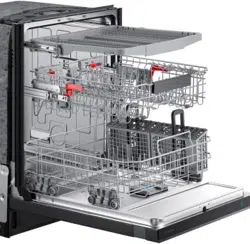
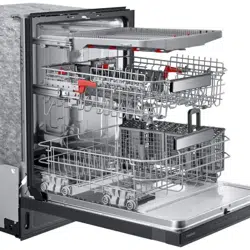
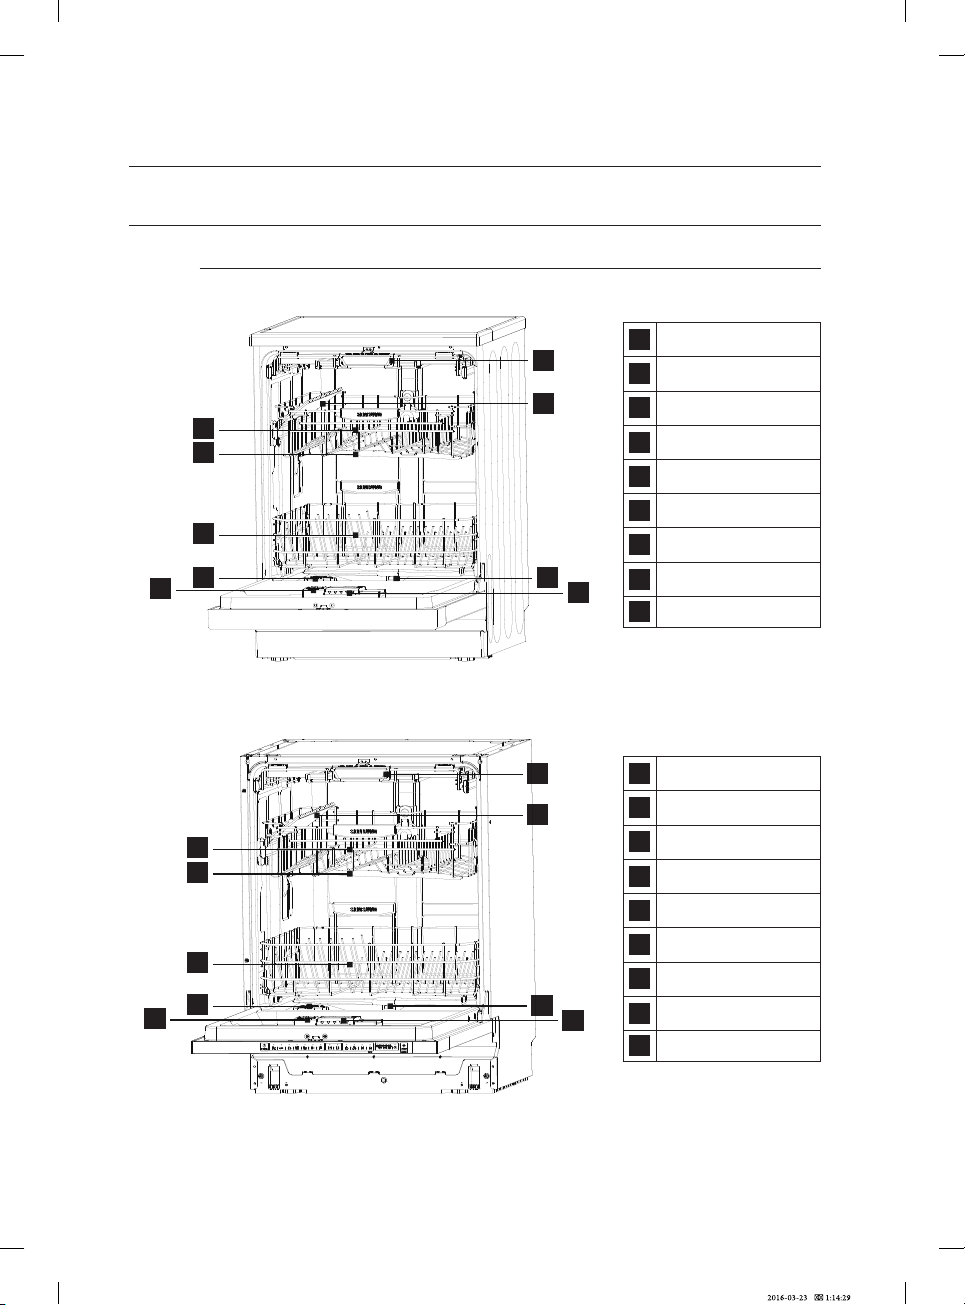
Dishwasher features
Front & Rear View
Free standing Dishwasher ( 13 place setting )
DW60M5040FS/DW60M5040FW/DW60M5030FS/DW60M5030FW
DW60M5010FS/DW60M5010FW
DW60M5040BB
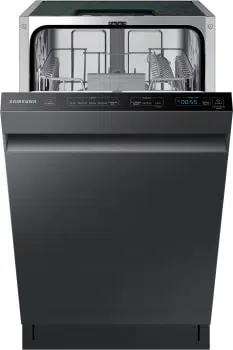
Full built in Dishwasher ( 13 place setting )
1 Upper Basket
2 Spray Arms
3 Lower Basket
4 Water Softener
5 Filters
6 Detergent Dispenser
7 Rinse Aid Dispenser
8
9
Cutlery basket
Fork shelf
1 Upper Basket
2 Spray Arms
3 Lower Basket
4 Water Softener
5 Filters
6 Detergent Dispenser
7 Rinse Aid Dispenser
8
9
Cutlery basket
Fork shelf
Operation instruction
DW4000KM-00000A-00_EN (Basic)_160323.indd 16
18_ Operation Instruction
1
1
2
2
3
3
4
4
5
5
6
6
7
7
8
8
9
9
Dishwasher features
Front & Rear View
1 Upper Basket
2 Spray Arms
3 Lower Basket
4 Water Softener
5 Filters
6 Detergent Dispenser
7 Rinse Aid Dispenser
8
9
Cutlery Tray
Cup Holder
1 Upper Basket
2 Spray Arms
3 Lower Basket
4 Water Softener
5 Filters
6 Detergent Dispenser
7 Rinse Aid Dispenser
8
9
Cutlery Tray
Cup Holder
Operation instruction
DW4000KM-00000A-00_EN (Basic)_160323.indd 16
Operation Instruction _19
Free standing Dishwasher ( 14 place setting )
DW60M5060FS/DW60M5060FW
DW60M5060BB
Full built in Dishwasher ( 14 place setting )
1
2
3
7
4
9
8
5
6
1
2
3
7
4
9
8
5
6
Prior using for the first time
Before using your dishwasher for the first time:
A. Set the water softener
B. Loading the salt into the softener
C. Fill the rinse aid dispenser
D. Fill in detergent
Set the water softener
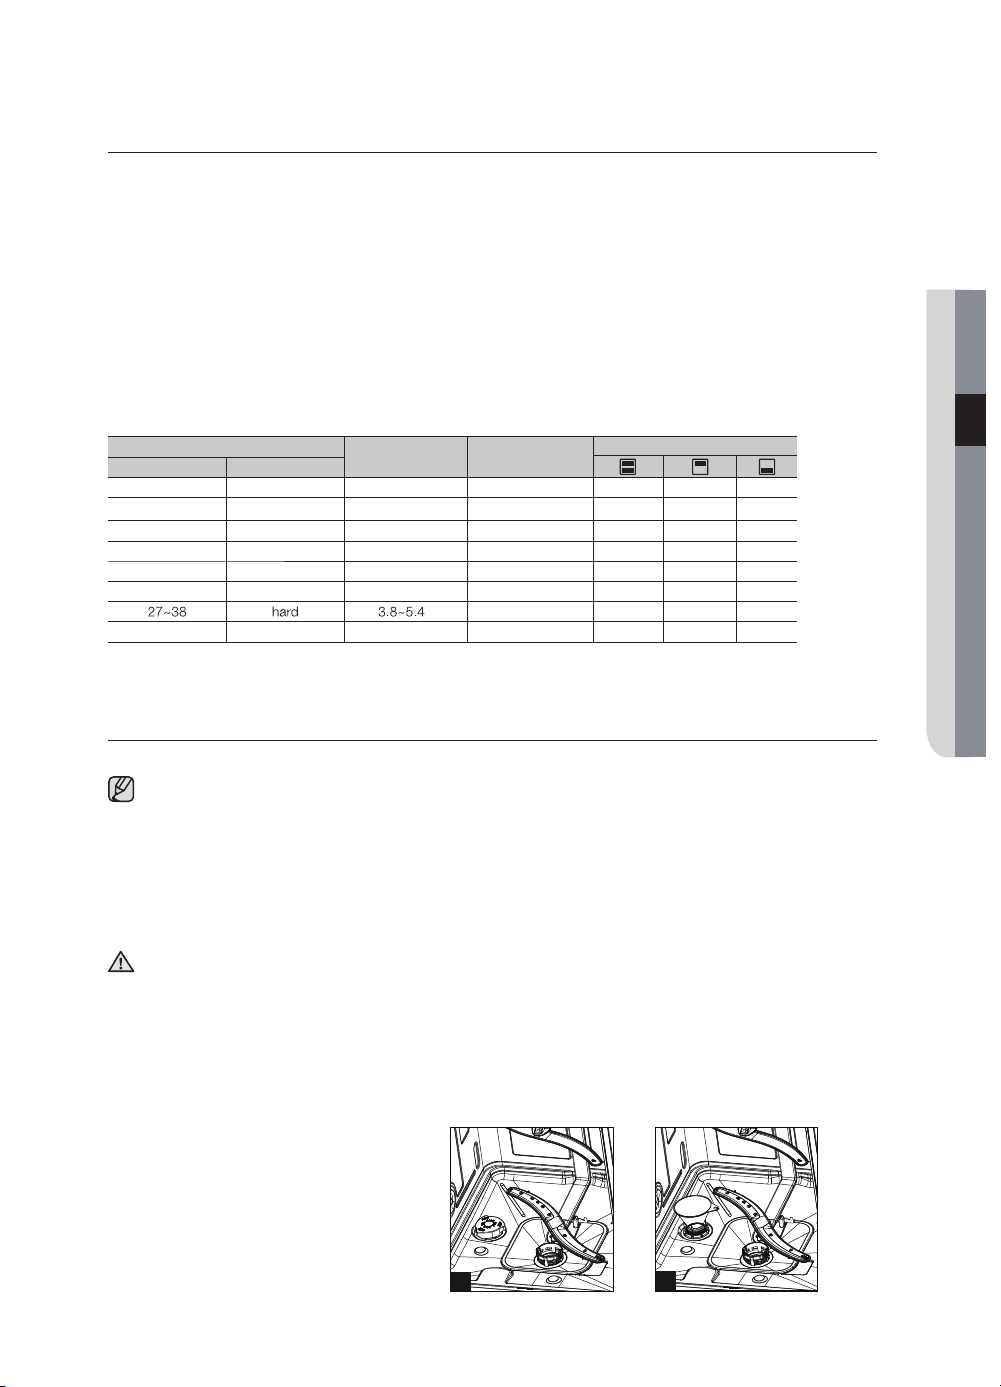
The water softener is designed to remove minerals and salts from the water, which would have a detrimental
harder the water is. The softener should be adjusted according to the hardness of the water in your area.
Your local Water Authority can advise you on the hardness of the water in your area.
Setting
The amount of salt dispensed can be set from H0 to H7.
Salt is not required at the set value H0.
1. Find out about the hardness value of your tap water. Your water utility company will help you
with this.
2. Set value can be found in the water hardness table.
3. Close the door.
4. Switch on "Power" switch.
5. Hold down "Delay" button and then press "Program" button (for freestanding dishwasher) or
"Start" button (for full built-in dishwasher) for 5 seconds. The buzzer rings one time and H.
fl ashes on the digital display. (factory setting is H4)
To change the setting:
1. Press "Delay" button.
Water hardness adjusting scheme ( DW60M5060FS/DW60M5060FW/DW60M5060BB/
DW60M5040FS/DW60M5040FW/DW60M5040BB )
Each time the button is pressed, the set value increases by one level; when the value of H7
2. Press "Program" or "Start" button. The chosen setting has now been stored.
Contact your local water board for information on the hardness of your water supply.
Water hardness table
WATER HARDNESS
mmol/l Value setting
°Clark Range
0H1.1~0 tfos8~0
1H 4.1~2.1 tfos01~9
2H 8.1~5.1 muidem21~11
3H 1.2~9.1 muidem51~31
4H 9.2~2.2 muidem02~61
5H 7.3~0.3drah62~12
27~38 hard 3.8~5.4 H6
7H 9.8~5.5drah26~93
DW4000KM-00000A-00_EN (Basic)_160323.indd 17
20_ Prior Using for the First Time
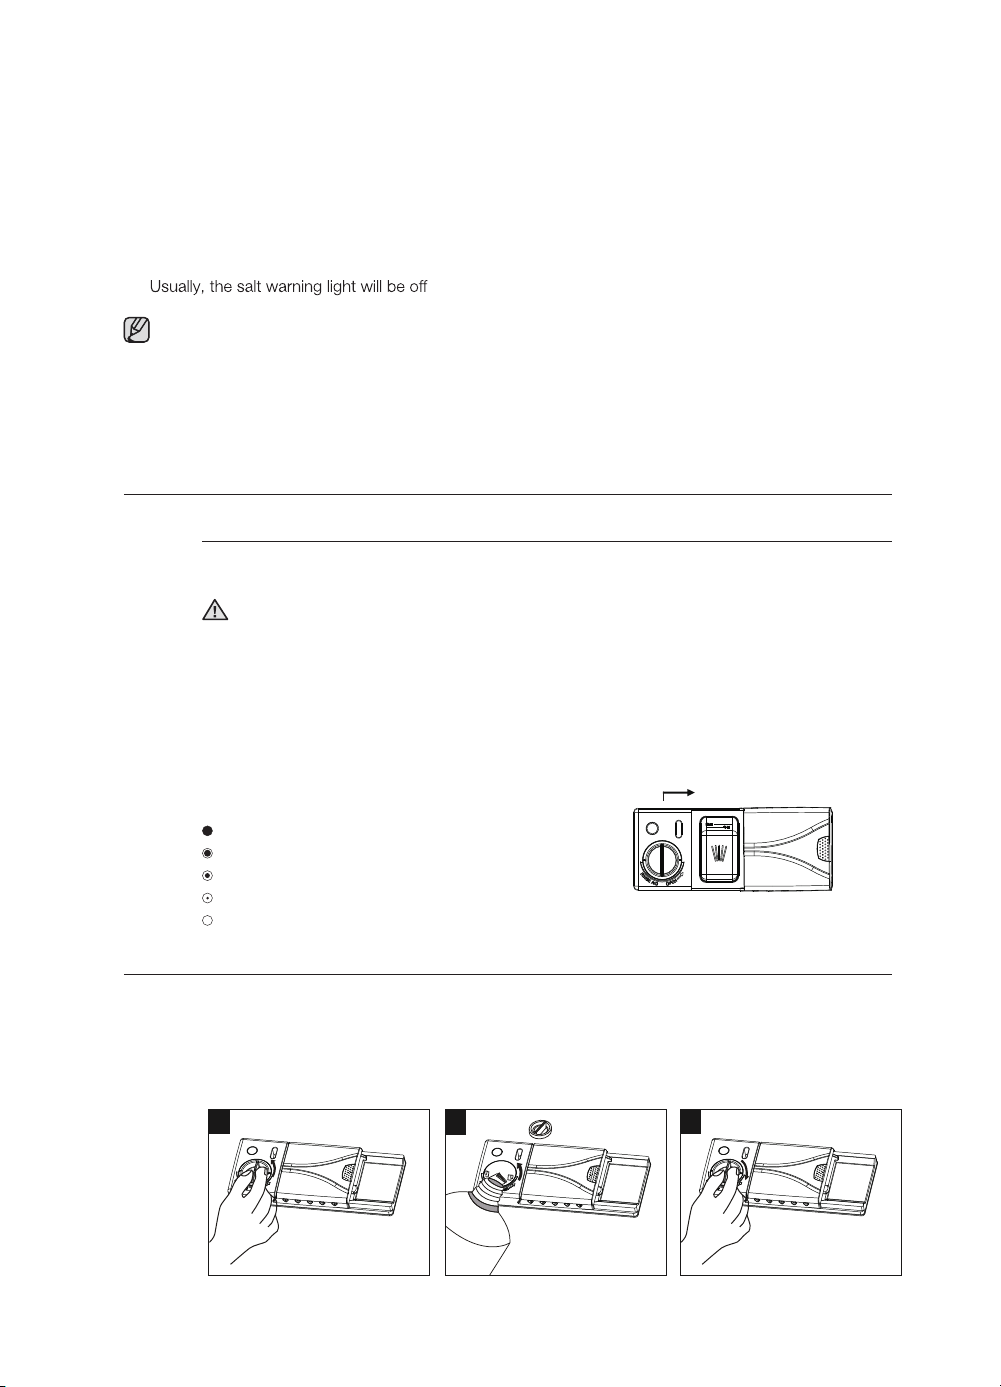
Loading the salt into the softener
Always use salt intended for use with dishwasher.
If your model has no water softener, you may skip this section
WATER SOFTENER
The hardness of the water varies from place to place. If hard water is used in the dishwasher, deposits will
form on the dishes and utensils.
The appliance is equipped with a special softener that uses salts specifically designed to eliminate lime and
minerals from the water.
The salt container is located beneath the lower basket and should be filled as follows:
CAUTION: Only use salt specifically designed for use in dishwashers! All other types of salt not
specifically designed for use in a dishwasher, especially table salt, will damage the water softener. In
case of damages caused by the use of unsuitable salt the manufacturer does not give any warranty
nor is liable for any caused damages.
Only fill with salt just before starting one of the complete washing programmes.
This will prevent any grains of salt or salty water, which may have been split, remaining on the bottom
of the machine for any period of time, which may cause corrosion.
After the first wash cycle the control panel light expires.
Prior using for the first time
DW4000KM-00000A-00_EN (Basic)_160323.indd 18
1. Remove the lower basket and then
unscrew and remove the cap from the
salt container.
1
2
Prior Using for the First Time _21
03 PRIOR USING FOR THE FIRST TIME
water hardness adjusting scheme
1.
Water hardness adjusting scheme ( DW60M5030FS/DW60M5030FW/
DW60M5010FS/DW60M5010FW )
When dishwasher is in standby mode, press the program button and the start button for 5s
(at the same time), then with a buzzle sound, the LED will show the water hardness spec setting,
release the button.
2.
Each time pressing the Delay button, the setting value will add "1" with a buzzle sound.
The value can be set from H0 to H7 repeatedly.
After setting, press the start button, the chosen value will be saved and the dishwasher will operate
according to the setting.
For the indicator of the water hardness value setting, please refer to below table:
WATER HARDNESS
mmol/l Value setting
Indicator
°Clark Range
on on on
on Flash on
on Flash Flash
Flash on on
Flash on Flash
Flash Flash on
Flash Flash Flash
on on Flash
1.1~0 tfos8~0
1H
0H
4.1~2.1 tfos01~9
2H 8.1~5.1 muidem21~11
3H 1.2~9.1 muidem51~31
4H 9.2~2.2 muidem02~61
5H 7.3~0.3drah62~12
H6
7H 9.8~5.5drah26~93
Fill the rinse aid dispenser
Function of rinse aid
Rinse aid is automatically added during the last rinse, ensuring thorough rinsing, spot and streak
free drying.
CAUTION: Only use branded rinse aid for dishwasher. Never fill the rinse aid dispenser
with any other substances (e.g. dishwasher cleaning agent, liquid detergent). This would
damage the appliance.
When to Refill the Rinse Aid Dispenser
If there is no rinse-aid warning light on the control panel, you can judge the amount of rinse-
aid by the color of the optical level indicator "D" located next to the cap. When the rinse-aid
container is full, the whole indicator will be dark. As the rinse aid diminishes, the size of the dark
dot decreases. You should never let the rinse aid get below 1/4 full.
As the rinse aid diminishes, the size of the black dot
on the rinse aid level indicator changes, as illustrated
below.
Full
3/4 full
1/2 full
1/4 full : Should refill to eliminate spotting
Empty
D (Rinse-Aid indicator)
Rinse aid dispenser
1. To open the dispenser, turn the cap to the "open" (left) arrow
and lift it out.
1
2. Pour the rinse aid into the dispenser, be careful not to overfi ll.
2
3. Replace the cap by inserting it aligned with "open" arrow
and turning it to the "closed" (right) arrow.
DW4000KM-00000A-00_EN (Basic)_160323.indd 19
3
22_ Prior Using for the First Time
2. If you are fi lling the container for the fi rst time, fi ll 2/3 of its volume with water (around 500ml).
3. Place the end of the funnel (supplied) into the hole and introduce about 2kg of salt. It is normal for a
small amount of water to come out of the salt container.
4. Carefully screw the cap back on.
5.
in 2-6 days after the salt container is fi lled with salt.
• The salt container must be refilled when the salt warning light in the control panel comes on.
Though the salt container is filled enough, the indicator light may not black out before the salt
fully dissolve. If there is no salt warning light in the control panel (for some models), you can judge
when to load the salt into the softener by the cycles that the dishwasher had run (see the following
schema).
• If there are spills of the salt, a soak program could be run to wipe them out.
The rinse aid is released during the final rinse to prevent water from forming droplets on your
the dishes. Your dishwashers are designed to use liquid rinse aids. The rinse aid dispenser is
located inside the door next to the detergent dispenser.
To fill the dispenser, open the cap and pour the rinse aid into the dispenser until the level
indicator turns completely black. The volume of the rinse aid container is about 130ml.
Be careful not to overfill the dispenser, because this could cause over sudsing. Wipe away any
spills with a damp cloth. Don't forget to replace the cap before you close dishwasher door.
CAUTION: Clean up any rinse aid split during filling with an absorbent cloth to avoid excess
foaming during the next wash.
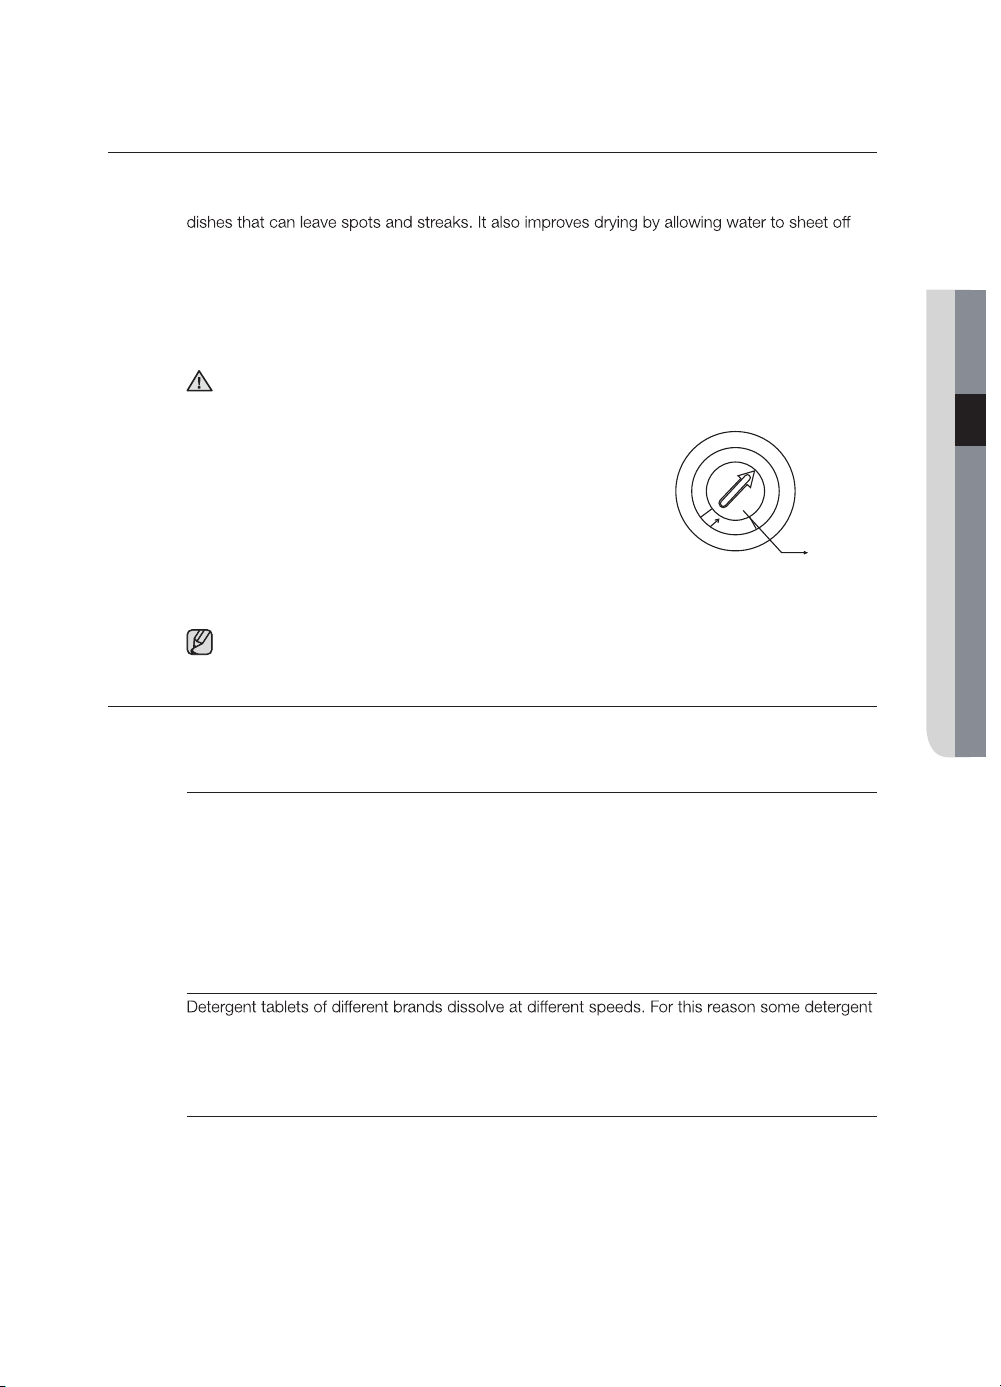
Adjusting Rinse Aid Dispenser
Adjust the amount of rinse aid released during the rinse
operation.
You can choose one of six levels (1-6). The higher the number,
the larger the amount of rinse aid released. The factory default
is 5.
The use of a rinse aid greatly improves the drying performance after the final rinse.
Function of detergent
Detergents with its chemical ingredients are necessary to remove dirt, crush dirt and transport it out of the
dishwasher. Most of commercial quality detergents are suitable for this purpose.
Concentrated detergent
Based on their chemical composition, dishwasher can be split in two basic types:
• conventional, alkaline detergents with caustic components
• low alkaline concentrated detergents with natural enzymes
The use of “normal” washing programmes in conjunction with concentrated detergents reduces
pollution and is good for your dishes; these wash programmes are specially matched to the
dirt-dissolving properties of the enzymes of the concentrated detergent. For this reason “normal”
wash programmes in which concentrated detergents are used can achieve the same results that
can otherwise only be achieved using “intensive” programmes.
Detergent tablets
cannot dissolve and develop their full cleaning power during short programmes. Therefore
please use long programmes when using detergent tablets, to ensure the complete removal of
detergent residuals.
Detergent dispenser
The dispenser must be refilled before the start of each washing cycle following the instructions
provided in the Wash Cycle Table. Your dishwashers use less detergent and rinse aid than
conventional dishwashers. Generally, only one tablespoon of detergent is needed fora normal
wash load. Also, more heavily soiled items need more detergent. Always add the detergent just
before starting dishwasher, otherwise it could get damp and will not dissolve properly.
Prior using for the first time
DW4000KM-00000A-00_EN (Basic)_160323.indd 20
Prior Using for the First Time _23
1
2
3
4
5
6
M A X
Adjust lever
(Rinse)
03 PRIOR USING FOR THE FIRST TIME
Amount of detergent to use
1. If the lid is closed: press release
button. The lid springs open.
2. Always add the detergent just
before starting each wash cycle.
Only use branded detergent aid for
dishwasher.
1
2
WARNING: When using your dishwasher, follow the basic precautions including the
following:
Use only detergent specifically made for use in dishwashers. Keep your detergent fresh and dry.
Don't put powder detergent into the dispenser until you're ready to wash dishes.
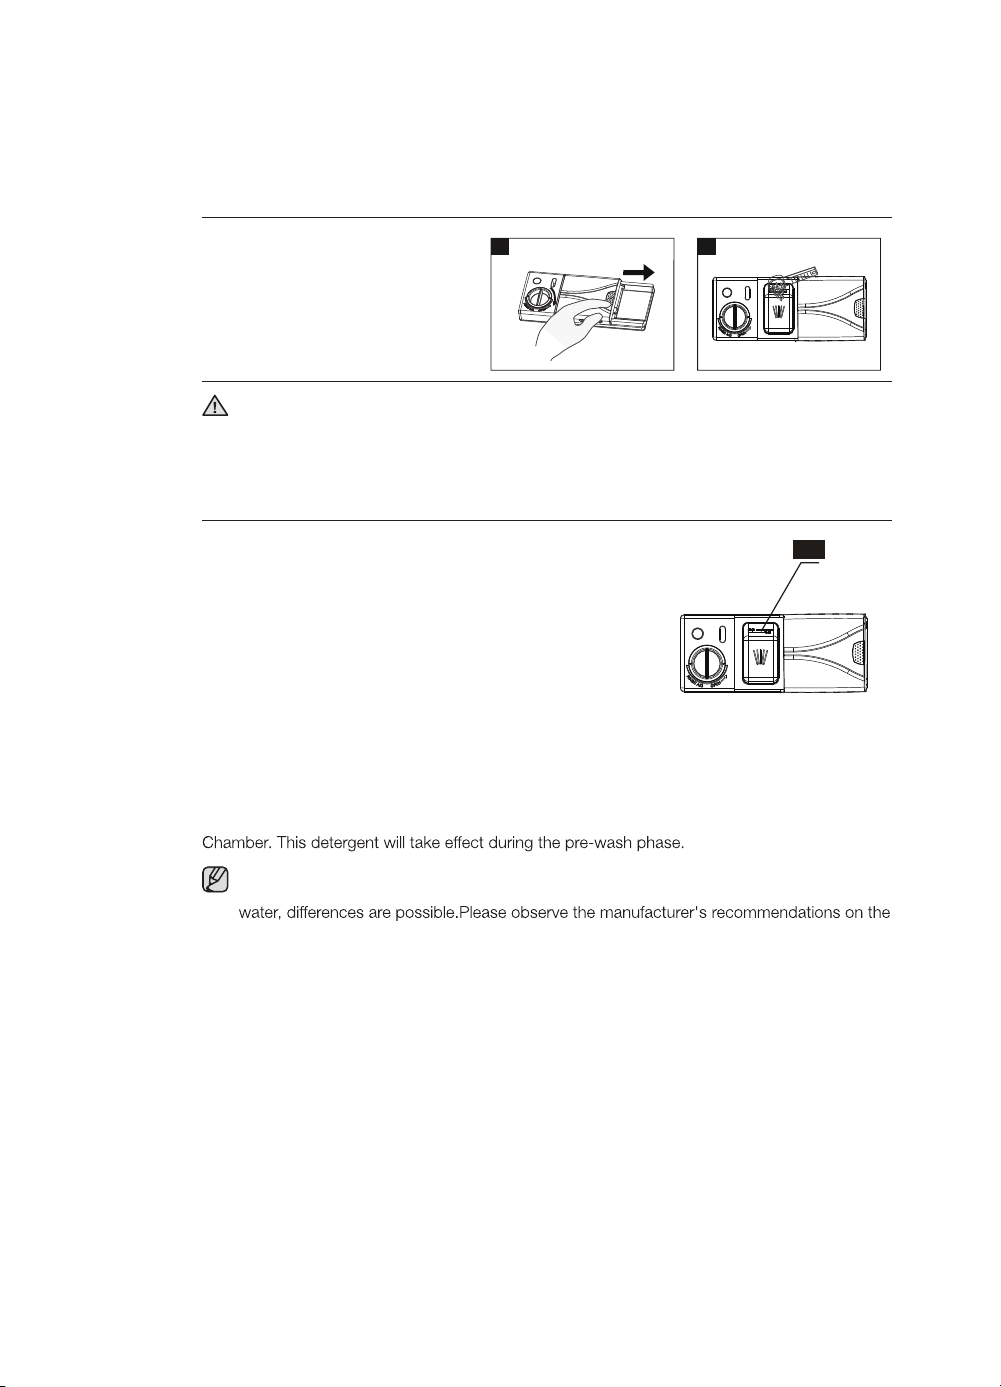
Fill in the detergent
Fill the detergent dispenser with detergent. The marking
indicates the dosing levels, as illustrated on the right:
1. The place of main wash cycle detergent placed, which
has dosing level in the interior of it.
2. For the pre-wash cycle detergent, add it into the
dishwasher directly, approximately 5g of detergent.
1
Please observe the manufacturer's dosing and storage recommendations as stated on the
detergent packaging.
Close the lid and press until it locks in place.
If the dishes are heavily soiled, place an additional detergent dose in the pre-wash detergent
You find information about the amount of detergent for the single programme on the last
page. Please be aware that according to the level soiling and the specific hardness of
detergent packaging.
DW4000KM-00000A-00_EN (Basic)_160323.indd 21
24_ Prior Using for the First Time

Use of Multi in 1 Detergent Tablets
General Advice
1. Before using these products you should fi rst check that the water hard-ness in your supply
is compatible with the use of these products as per the detergent manufacturers instructions
(on the product packaging).
2. These products should be strictly used according to the detergent manufacturers
instructions.
3.
contact the detergent manufacturers care line (the telephone number is given on the product
packaging). These products are detergents with integrated and combined detergent/rinse
aid and salt functions. Before using these products you should fi rst check that the water
hardness in your supply is compatible with the use of these products as per the detergent
manufacturers (on the product packaging).
Special Advice
When using combination products, the rinse-aid and salt lights are no longer useful. It may be
helpful to select the lowest possible setting for water hardness.
To select "Multi in 1" function:
1.
2.
To cancel "Multi in 1" function:
To cancel "Multi in 1" function by pressing the "Multi tab" button or follow the "Cancelling a
programme in progress" instruction.
If you decide to switch to the use of a standard detergent system we advise that you:
1. Refi ll both the salt and rinse aid compartments.
2. Switch the water hardness setting to the highest possible position and run for three normal
cycles without load.
3. Readjust the water hardness setting again according to the conditions for your region (For
more information please refer to your instruction manual).
Multi in 1 washing cycle is additional function, they must be used with other programme
(Intensive, Eco and Normal).
Prior using for the first time
DW4000KM-00000A-00_EN (Basic)_160323.indd 22
Prior Using for the First Time _25
03 PRIOR USING FOR THE FIRST TIME
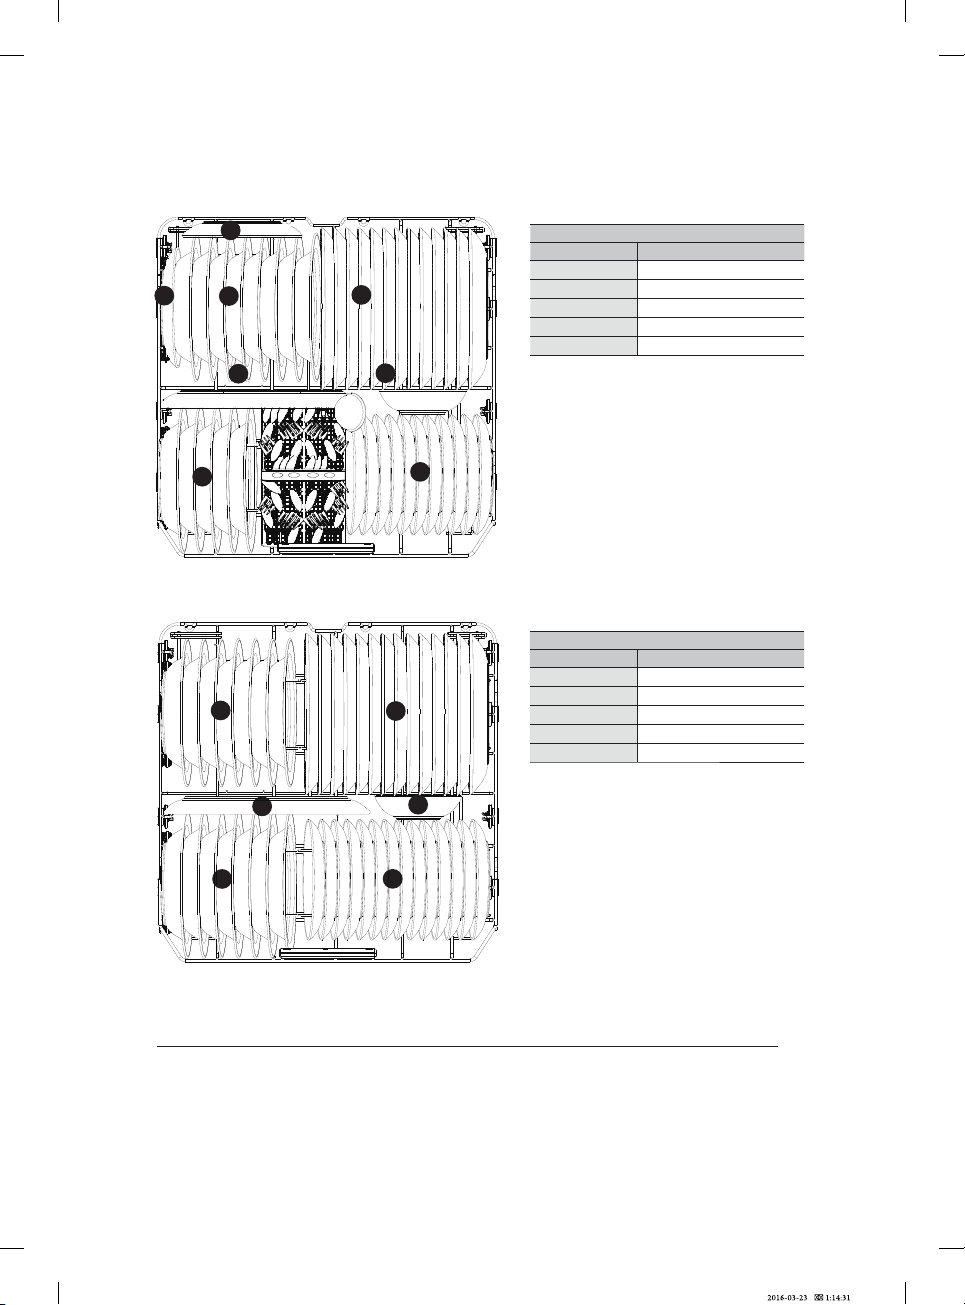
Loading the dishwasher racks
For best performance of the dishwasher, follow these loading guidelines.
Features and appearance of baskets and silverware baskets may vary from your
model.
Attention before or after Loading the Dishwasher Baskets
water. Place objects in the dishwasher in the following way:
1. Items such as cups, glasses, pots/pans, etc. are stood upside down.
2.
3. They are stacked securely and can not tip over.
4. They do not prevent the spray arms from rotating while washing takes place.
Very small items should not be washed in the dishwasher as they could easily fall out of the baskets.
Removing the Dishes
To prevent water dripping from the upper basket into the lower basket, we recommend that you empty
the lower basket first and then the upper basket.
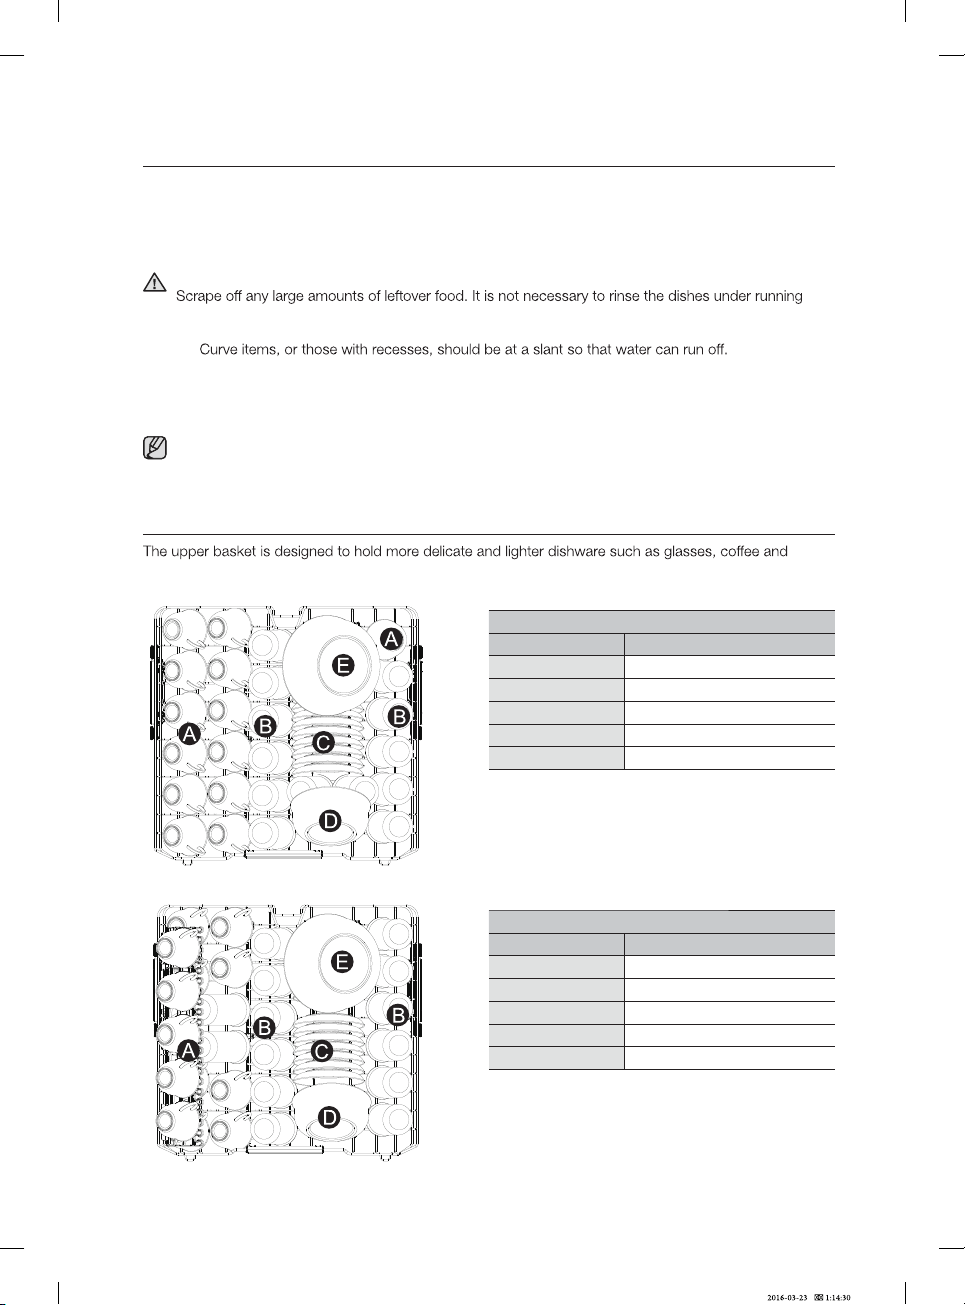
Loading the upper basket
tea cup and saucers, as well as plates, small bowls and shallow pans (as long as they are not too dirty).
Position the dishes and cookware so that they do not get moved by the spray of water.
Upper basket
(13 Place setting)
Type Item
puCA
ssalGB
C Saucer
D Serving bowl
E Serving bowl
Upper basket
(14 Place setting)
Type Item
puCA
ssalGB
C Saucer
D Serving bowl
E Serving bowl
DW4000KM-00000A-00_EN (Basic)_160323.indd 23
( DW60M5060BB/DW60M5060FS/DW60M5060FW )
( DW60M5040BB/DW60M5040FS/
DW60M5040FW/DW60M5030FS/
DW60M5030FW/DW60M5010FS/
DW60M5010FW )
26_ Loading the dishwasher racks
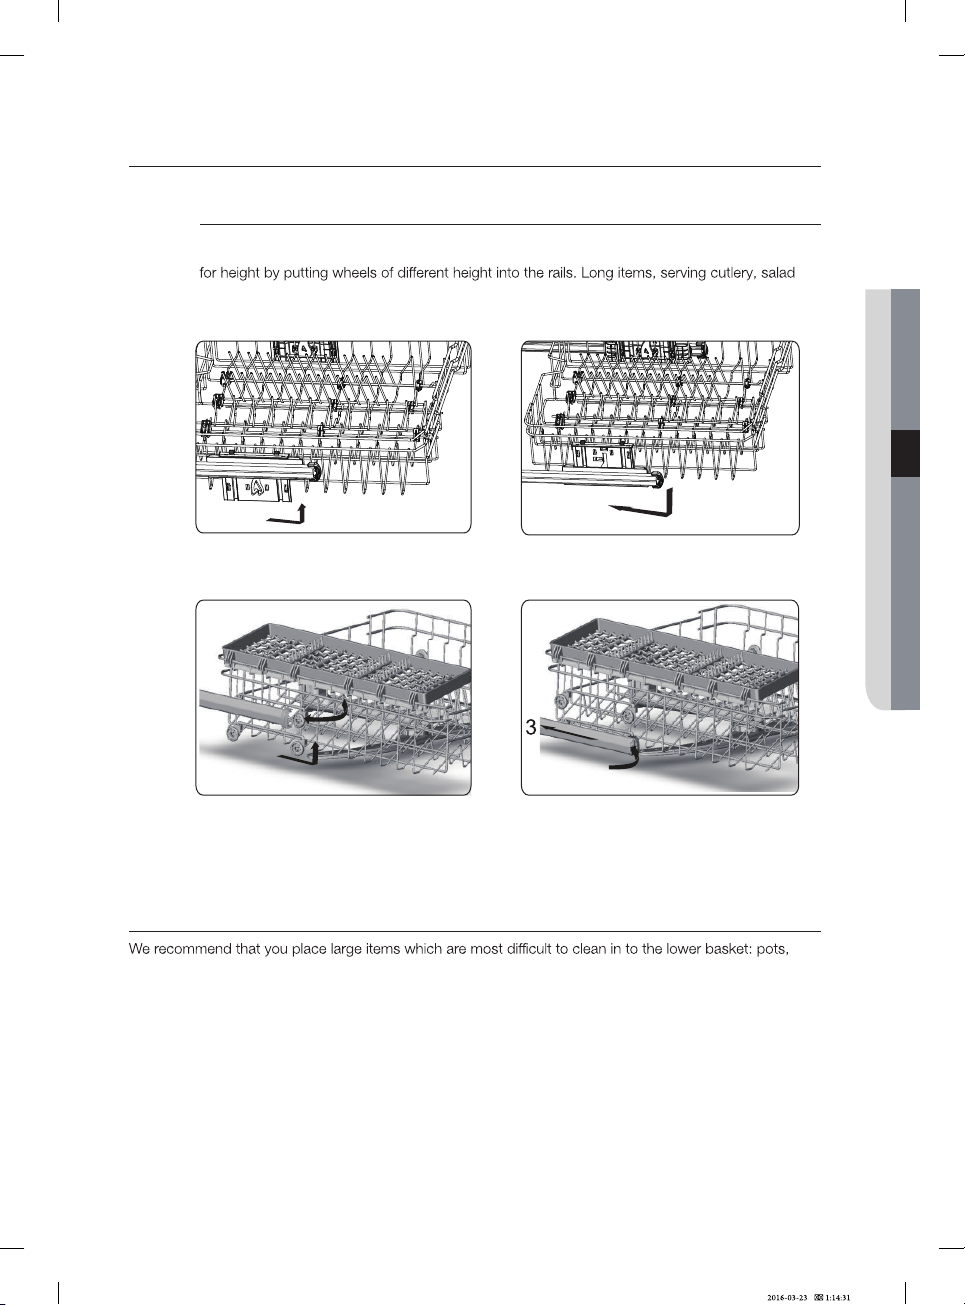
Adjusting the upper basket
If required, the height of the upper basket can be adjusted in order to create more space for
large utensils either in the upper basket or lower basket. The upper basket can be adjusted
servers or knives should be placed on the shelf so that they do not obstruct the rotation of the
spray arms. The shelf can be folded back or removed when not be required for use.
Loading the lower basket
pans, lids, serving dishes and bowls, as shown in the figure below.
It is preferable to place serving dishes and lids on the side of the baskets in order to avoid blocking the
rotation of the top spray arm.
Pots, serving bowls, etc. must always be placed top down.
Deep pots should be slanted to allow water to flow out.
The bottom basket features fold down tine rows so that larger or more pots and pans can be loaded.
Loading the dishwasher racks
DW4000KM-00000A-00_EN (Basic)_160323.indd 24
1
2
( DW60M5060BB/DW60M5060FS/DW60M5060FW/DW60M5040BB/DW60M5040FS/DW60M5060FW )
( DW60M5030FS/DW60M5030FW/DW60M5010FS/DW60M5010FW )
Loading the dishwasher racks _27
2
1
4
04 LOADING THE DISHWASHER RACKS
Upper and lower basket folding racks
Folding racks consisting of two parts that are located on the lower basket of your machine are
designed in order to let you place big items easier as pots, pans, etc. If requested, each part
can be folded separately, or all of them can be folded and larger can be obtained. You can use
folding racks by raising then upwards, or by folding.
DW4000KM-00000A-00_EN (Basic)_160323.indd 25
Lower basket (14 Place setting)
( DW60M5060BB/DW60M5060FS
DW60M5060FW )
Type Item
F Serving bowl
G Soup plate
H Dinner plate
I Dessert plate
J Oval plate
G
J
I
G
H
F
28_ Loading the dishwasher racks
( DW60M5040BB/DW60M5040FS
DW60M5040FW/DW60M5030FS
DW60M5030FW/DW60M5010FS
DW60M5010FW )
Lower basket (13 Place setting)
Type Item
F Serving bowl
G Soup plate
H Dinner plate
I Dessert plate
J Oval plate
H
G
G
J
I
I
I
F
1 2
4
6
7 8
5
3
DW4000KM-00000A-00_EN (Basic)_160323.indd 26
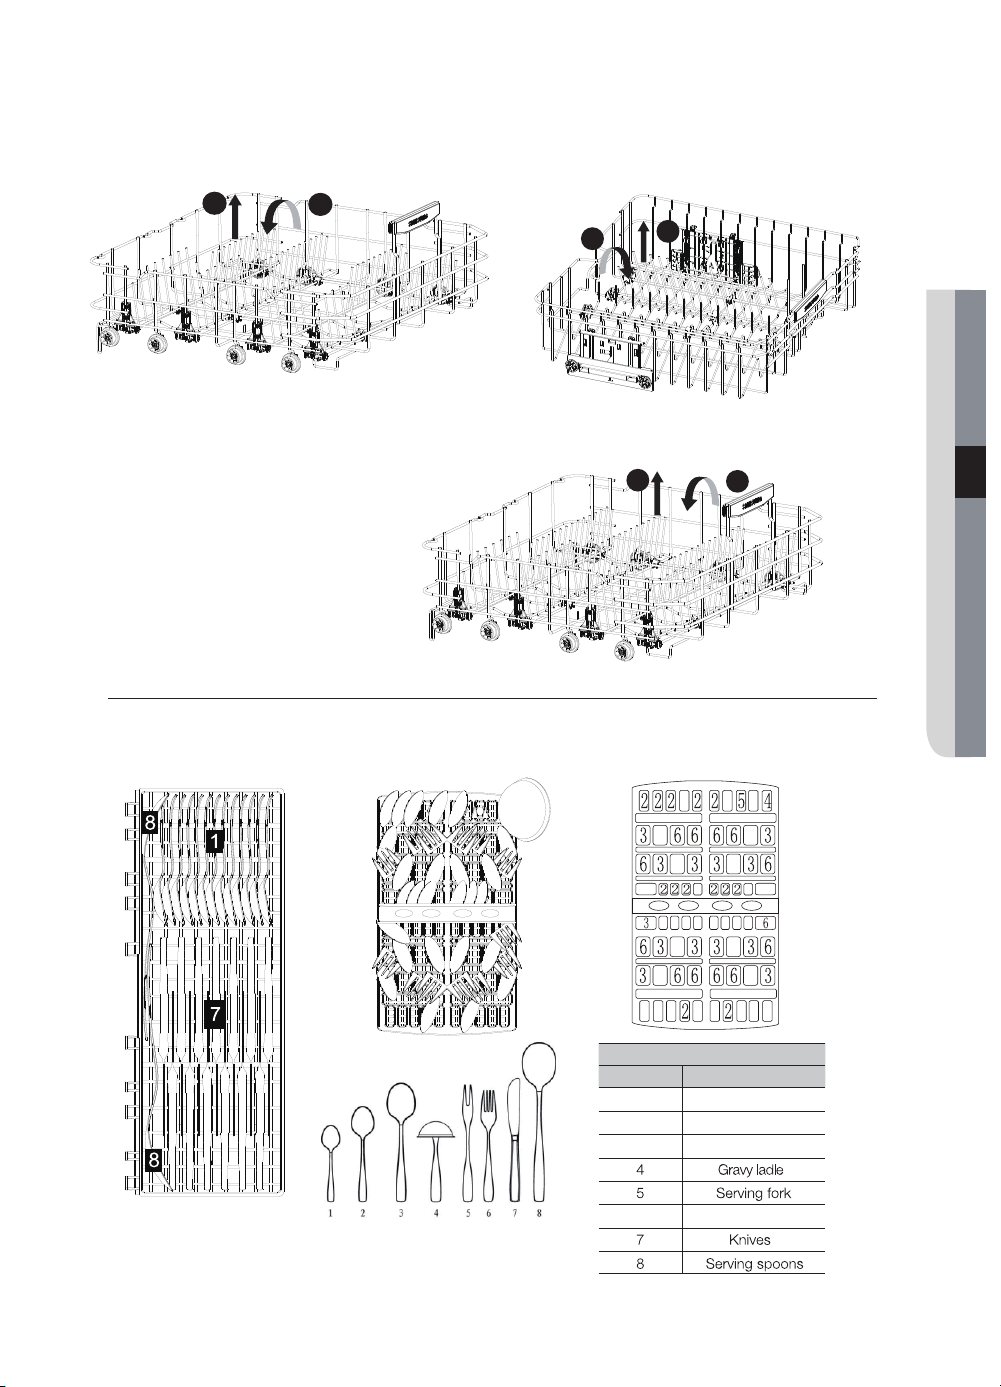
Cutlery basket and fork shelf
Cutlery should be placed in the cutlery basket with handles at the bottom: If the basket has side baskets,
the spoon should be loaded individually into the appropriate slots, especially long utensils should be placed
in the horizontal position at the front of the upper basket.
Door side
Fork shelf
Cutlery basket
(13 Place setting)
Type Item
1 Tea spoons
2 Dessert spoons
3 Soup spoons
6 Forks
( DW60M5040BB/DW60M5040FS/DW60M5040FW/DW60M5030FS
DW60M5030FW/DW60M5010FS/DW60M5010FW )
Loading the dishwasher racks _29
Lower basket (14 Place setting)
Upper basket (13/14 Place setting)
Lower basket (13 Place setting)
( DW60M5060BB/DW60M5060FS
DW60M5060FW )
( DW60M5040BB/DW60M5040FS
DW60M5040FW/DW60M5030FS
DW60M5030FW/DW60M5010FS
DW60M5010FW )
2
1
1
2
1
2
04 LOADING THE DISHWASHER RACKS
DW4000KM-00000A-00_EN (Basic)_160323.indd 27
For washing in the dishwasher the following cutlery/dishes
ytilibatius detimil fo erAelbatius ton erA
Cutlery with wooden, horn china or mother-of-pearl
handles.
Plastic items that are not heat resistant
Older cutlery with glued parts that is not
temperature resistant
Bonded cutlery items or dishes
Pewter or cooper items
Lead crystal glass
Steel items subject to rusting
Wooden platters Items made from synthetic fibres.
WARNING: Do not let any item extend
through bottom
Some types of glasses can become dull after a
large number of washes.
Silver and aluminium parts have a tendency to
discolour during washing.
Glazed patterns may fade if machine washed
frequently.
30_ Loading the dishwasher racks
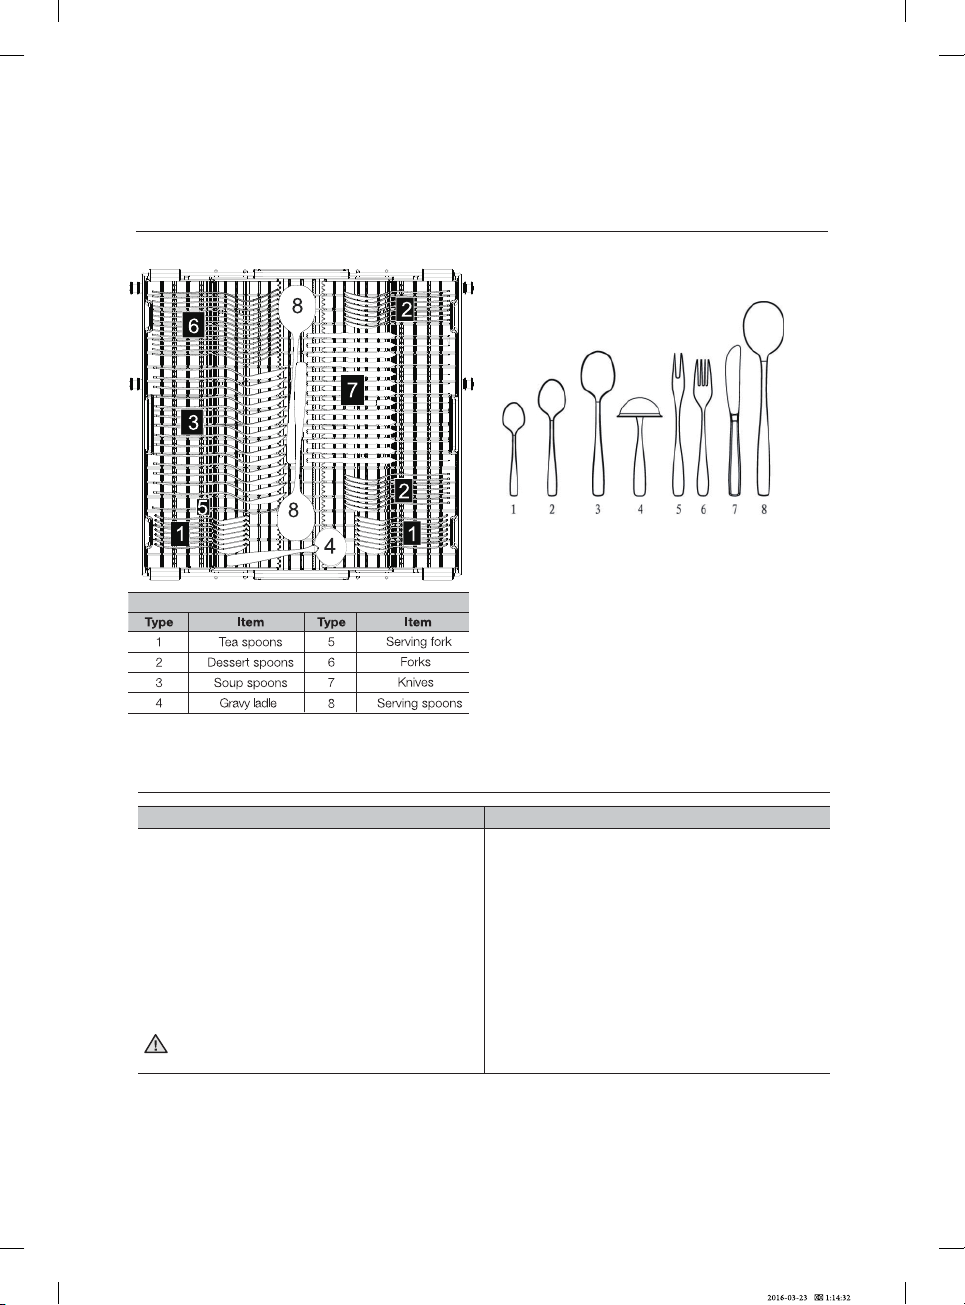
Cutlery tray
Arrange the cutlery in the tray as shown. Cutlery should be placed to ensure that water runs o freely.
( DW60M5060BB/DW60M5060FS/DW60M5060FW )
Cutlery basket
(14 Place setting)

04 LOADING THE DISHWASHER RACKS
Damage to glassware and other dishes
:ydemer detsegguS:sesuac elbissoP
• Type of glass or manufacturing process.
Chemical composition of detergent.
• Water temperature and duration of
dishwasher programme.
• Use glassware or porcelain dishes that
have been marked dishwasher-proof by
the manufacturer.
• Use a mild detergent that is described as
kind of dishes. If necessary, seek further
information from detergent manufacturers.
• Select a programme with a low
temperature.
• To prevent damage, take glass and cutlery
out of the dishwasher as soon as possible
after the programme has ended.
At the end of the wash
When the working cycle has finished, the buzzer of dishwasher will ring for 6 times, then stop.
of the dishwasher. Wait a few minutes before unloading the dishwasher to avoid handling the
dishes and utensils while they are still hot and more susceptible to breakage. They will also dry
better.
DW4000KM-00000A-00_EN (Basic)_160323.indd 27
Loading the dishwasher racks _31
Do not put in items that are dirty of cigarette ash, candle wax, lacquer or paint. If you buy new dishes
please make sure that they are suitable for dishwashers.
Please do not overload your dishwasher. There is only space for 9 standard dishes. Do not use dish
that is not suitable for dishwashers. This is important for good results and for reasonable energy
consumption.
Loading cutlery and dishes
Before loading the dishes, you should:
Remove large left-over
Soften remnants of burnt food in pans.
When loading the dishes and cutlery, please note
Dishes and cutlery must not impede the rotation of the spray arms.
Load hollow items such as cups, glasses, pans etc. with the opening downwards so that water
cannot collect in the container or a deep base.
Dishes and items of cutlery must not lie inside one another, or cover each other
Dishes and items of cutlery must not lie inside one another, or cover each other.
• To avoid damage to glasses, they must not touch.
• The upper basket is designed to hold more delicate and lighter dishware such as
ATTENTION
Long bladed knives stored in an upright position are a potential hazard!
Long and/or sharp items of cutlery such as carving knives must be positioned horizontally in
the upper basket.
32_
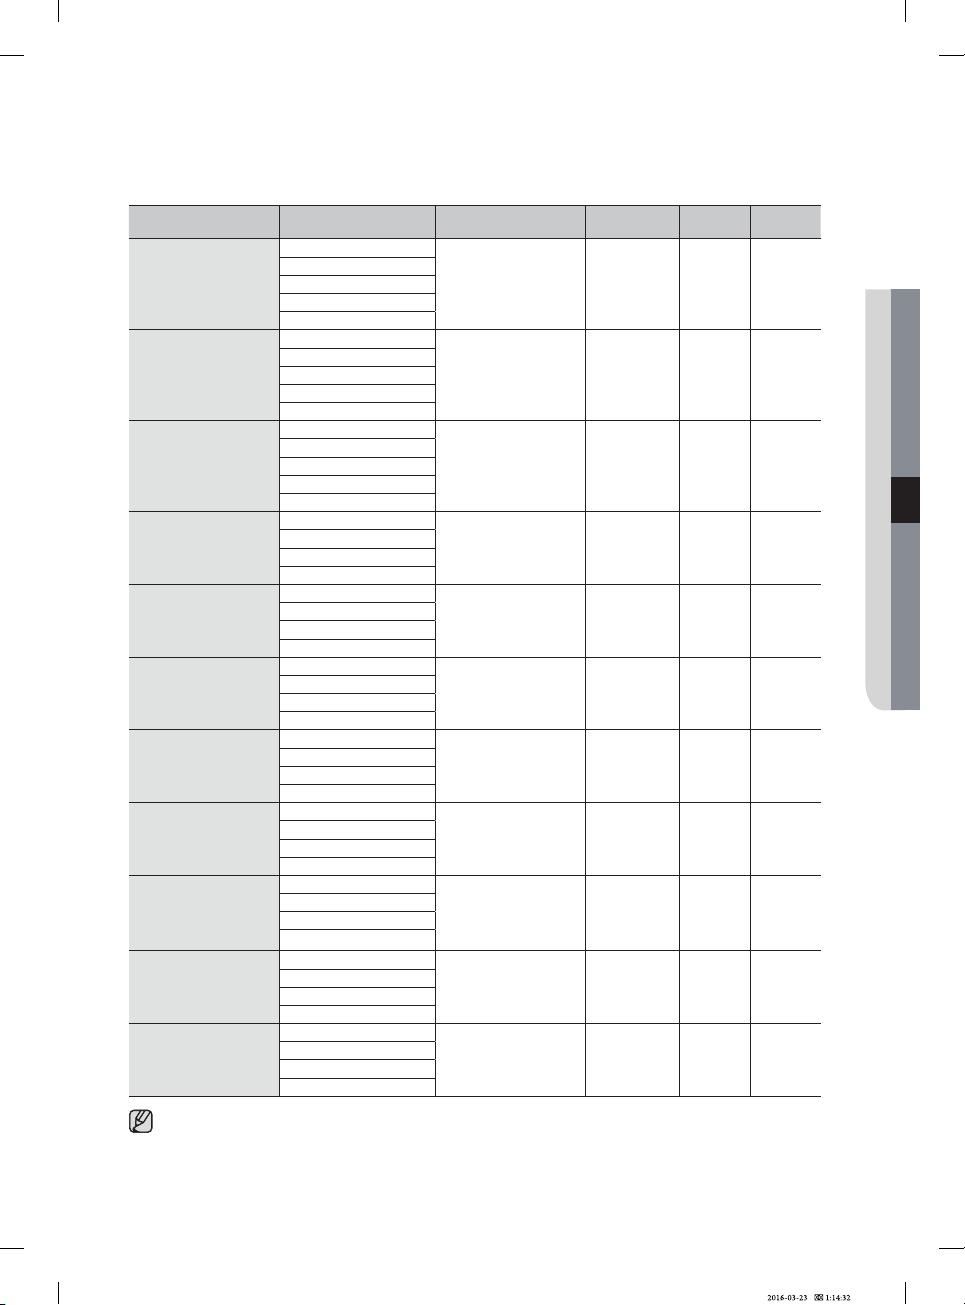
Starting a Washing Programme
Starting a washing programme
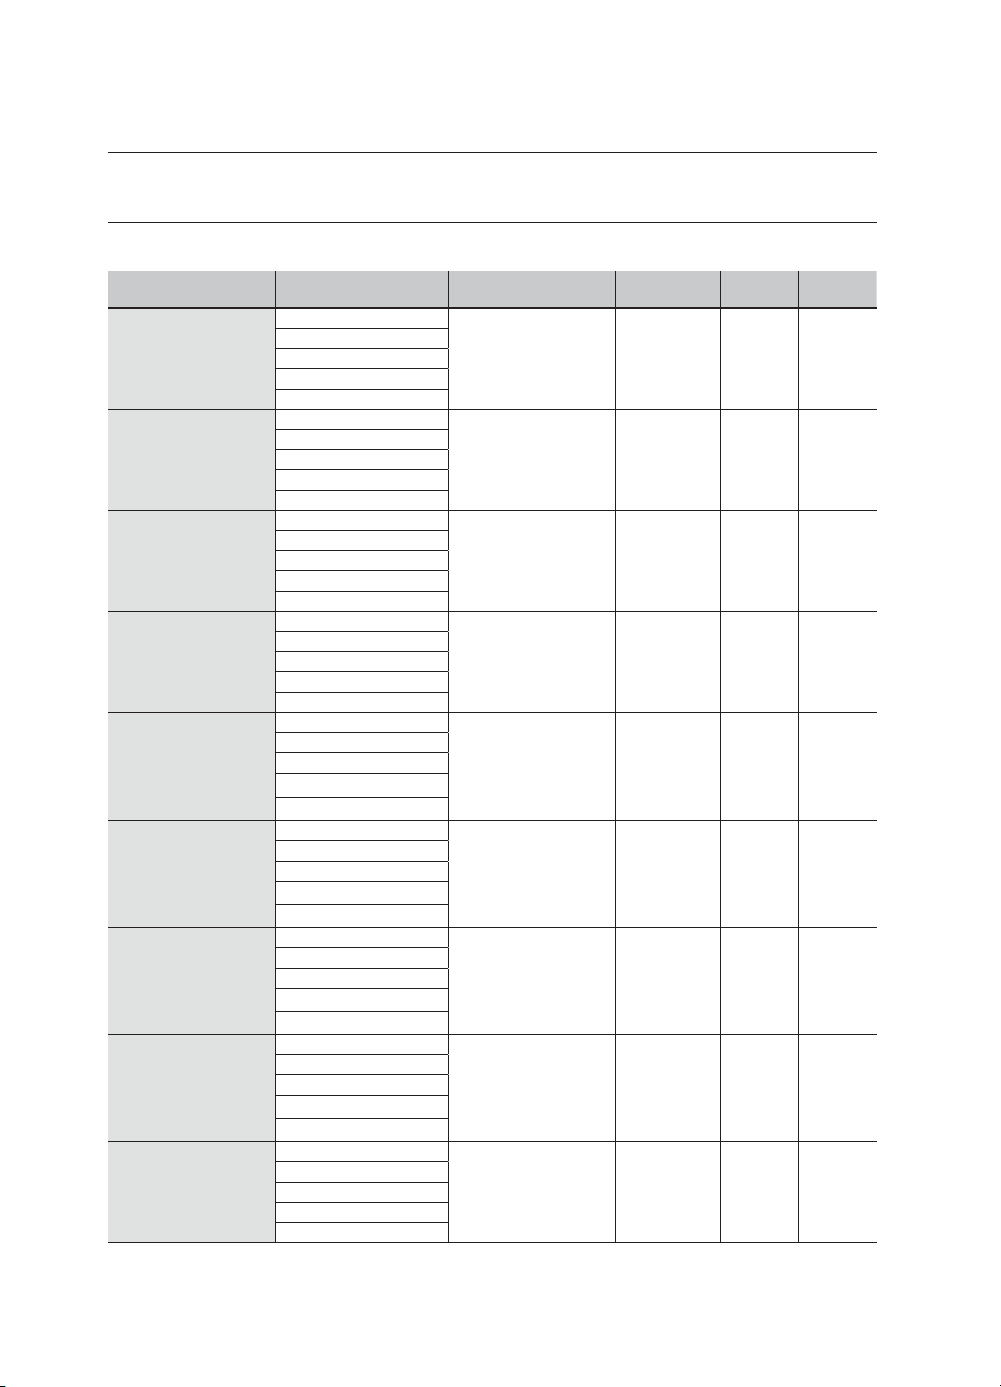
Wash cycle table(13 Place setting)
Program Description of cycle
Detergent (g)
(Pre wash / Main wash)
Running time
(min)
Energy
(KWh)
Water (L)
Intensive
Pre Wash 40 °C
5/27.5 213 1.65 15.3
Main Wash 60 °C
Rinse
Hot Rinse 65 °C
Drying
Intensive + Hygiene
Pre Wash 40 °C
5/27.5 213 1.65 15.3
Main Wash 60 °C
Rinse
Hot Rinse 70 °C
Drying
Intensive + Half load
Pre Wash 40 °C
5/27.5 213 1.35 15.3
Main Wash 60 °C
Rinse
Hot Rinse 65 °C
Drying
Intensive + Rinse Add
Pre Wash 40 °C
5/27.5 251 1.85 18.0
Main Wash 60 °C
Rinse
Hot Rinse 65 °C
Drying
Eco
Pre Wash
5/27.5 211 12
1.03
12
12
12.5
Main Wash 45 °C
Rinse
Hot Rinse 63 °C
Drying
DW4000KM-00000A-00_EN (Basic)_160323.indd 24
( DW60M5040BB/DW60M5040FS
/DW60M5040FW/DW60M5030FS/DW60M5030FW/DW60M5010FS/DW60M5010FW )
Pre Wash
5/27.5 216 1.10
Main Wash 45 °C
Rinse
Hot Rinse 70 °C
Drying
Pre Wash
5/27.5 211 0.80
Main Wash 45 °C
Rinse
Hot Rinse 63 °C
Drying
Eco + Rinse Add
Pre Wash
5/27.5 229 1.10 14.3
Main Wash 45°C
Rinse
Hot Rinse 63 °C
Drying
Eco + Hygiene
Eco + Half load
Normal
Pre Wash
5/20 158 1.0
Main Wash 46 °C
Rinse
Hot Rinse 55 °C
Drying
(DW60M5040BB/DW60M5040FS)
(DW60M5040FW/DW60M5030FS)
(DW60M5030FW)
Starting a Washing Programme _33
Program Description of cycle
Detergent (g)
(Pre wash / Main wash)
Running time
(min)
Energy
(KWh)
Water (L)
Normal + Hygiene
Pre Wash
5/20 164 1.20 12.5
Main Wash 46 °C
Rinse
Hot Rinse 70 °C
Drying
Normal + Half load
Pre Wash
5/20 158 0.80 12.5
Main Wash 46 °C
Rinse
Hot Rinse 55 °C
Drying
Normal + Rinse Add
Pre Wash
5/20 175 1.15 15.2
Main Wash 46 °C
Rinse
Hot Rinse 55 °C
Drying
Delicate
Main Wash 46 °C
5/20 124 0.80 9.5
Rinse
Hot Rinse 55 °C
Drying
Delicate + Hygiene
Main Wash 46 °C
5/20 133 1.10 9.5
Rinse
Hot Rinse 70 °C
Drying
Delicate + Half load
Main Wash 46 °C
5/20 124 0.70 9.5
Rinse
Hot Rinse 55 °C
Drying
Delicate + Rinse Add
Main Wash 46 °C
5/20 139 1.0 12.2
Rinse
Hot Rinse 55 °C
Drying
DW4000KM-00000A-00_EN (Basic)_160323.indd 25
05 STARTING A WASHING PROGRAMME
Express + Hygiene
Pre Wash 50 °C
5/20 66 1.20 9.6
Main Wash 50 °C
Hot Rinse 70 °C
Drying
Express + Half load
Pre Wash 50 °C
5/20 60 0.90 9.6
Main Wash 50 °C
Hot Rinse 60 °C
Drying
Express + Rinse Add
Pre Wash 50 °C
5/20 73 1.15 12.3
Main Wash 50 °C
Hot Rinse 60 °C
Drying
* EN 50242: The information for comparability test in accordance with EN50242,as follows:
• Capacity: 13 settings
• Position of upper basket: Lower position
• Rinse aid setting: 6
Express
Pre Wash 50 °C
5/20 60 1.03 9.6
Main Wash 50 °C
Hot Rinse 60 °C
Drying
(DW60M5040BB/DW60M5040FS)
(DW60M5040FW/DW60M5030FS)
(DW60M5030FW)
(DW60M5040BB/DW60M5040FS)
(DW60M5040FW/DW60M5030FS)
(DW60M5030FW)
(DW60M5040BB/DW60M5040FS)
(DW60M5040BB/DW60M5040FS)
(DW60M5040FW)
(DW60M5040BB/DW60M5040FS)
(DW60M5040FW)
(DW60M5040BB/DW60M5040FS)
(DW60M5040FW)
(DW60M5040BB/DW60M5040FS)
(DW60M5040FW)
(DW60M5040FW/DW60M5030FS)
(DW60M5030FW)
Wash cycle table(14 Place setting)
Program Description of cycle
Detergent (g)
(Pre wash / Main wash)
Running time
(min)
Energy
(KWh)
Water (L)
AUTO
Pre Wash 40 °C
5/30
5/30
5/30
140-228 0.93-1.95 6.5-18
145-238 1.03-2.05 6.5-18
140-228 1.52-1.95 9.2-18
Main Wash 40°C-60 °C
Rinse
Hot Rinse 65 °C
Drying
( DW60M5060BB/DW60M5060FS
/DW60M5060FW )
34_ Starting a Washing Programme
DW4000KM-00000A-00_EN (Basic)_160323.indd 24
The wash time varies depending on the pressure and temperature of the supplied water.
Quick Wash, Express, Pre Wash: Continuous use of the Quick Wash, Express, Pre Wash cycles for an
extended time is not recommended. This may reduce the performance of the water softener.
Intensive
Pre Wash 40 °C
5/30 213 1.68 15.3
Main Wash 60 °C
Rinse
Hot Rinse 65 °C
Drying
Intensive + Hygiene
Pre Wash 40 °C
5/30 213 1.68 15.3
Main Wash 60 °C
Rinse
Hot Rinse 70 °C
Drying
Intensive + Half load
Pre Wash 40 °C
5/30 213 1.38 15.3
Main Wash 60 °C
Rinse
Hot Rinse 65 °C
Drying
Intensive + Rinse Add
Pre Wash 40 °C
5/30 251 1.88 18.0
Main Wash 60 °C
Rinse
Hot Rinse 65 °C
Drying
Pre Wash
5/30 216 1.20
Main Wash 45 °C
Rinse
Hot Rinse 70 °C
Drying
Eco + Hygiene
Eco
Pre Wash
5/30 211
12
121.06
Main Wash 45 °C
Rinse
Hot Rinse 63 °C
Drying
AUTO+ Hygiene
Pre Wash 40 °C
Main Wash 40°C-60 °C
Rinse
Hot Rinse 70 °C
Drying
AUTO+ Rinse Add
Pre Wash 40 °C
Main Wash 40°C-60 °C
Rinse
Hot Rinse 65 °C
Drying
211 0.90
Starting a Washing Programme _35
Program Description of cycle
Detergent (g)
(Pre wash / Main wash)
Running time
(min)
Energy
(KWh)
Water (L)
Pre Wash
5/30 12
Main Wash 45 °C
Rinse
Hot Rinse 63 °C
Drying
Eco + Rinse Add
Pre Wash
5/30 229 1.20 14.3
Main Wash 45°C
Rinse
Hot Rinse 63 °C
Drying
Delicate
Main Wash 46 °C
5/20 124 0.80 9.5
Rinse
Hot Rinse 55 °C
Drying
Delicate + Hygiene
Main Wash 46 °C
5/20 133 1.20 9.5
Rinse
Hot Rinse 70 °C
Drying
DW4000KM-00000A-00_EN (Basic)_160323.indd 25
Eco + Half load
12.2
Express + Hygiene
Pre Wash 50 °C
5/20 66 1.20 9.6
Main Wash 50 °C
Hot Rinse 70 °C
Drying
Express
Pre Wash 50 °C
5/20 60 1.05 9.6
Main Wash 50 °C
Hot Rinse 60 °C
Drying
Delicate + Half load
Main Wash 46 °C
5/20 124 0.70 9.5
Rinse
Hot Rinse 55 °C
Drying
Delicate + Rinse Add
Main Wash 46 °C
5/20 139 1.0
Rinse
Hot Rinse 55 °C
Drying
Express + Half load
Pre Wash 50 °C
5/20 60 0.90 9.6
Main Wash 50 °C
Hot Rinse 60 °C
Drying
Express + Rinse Add
Pre Wash 50 °C
5/20 73 1.16 12.3
Main Wash 50 °C
Hot Rinse 60 °C
Drying
05 STARTING A WASHING PROGRAMME
36_ Starting a Washing Programme
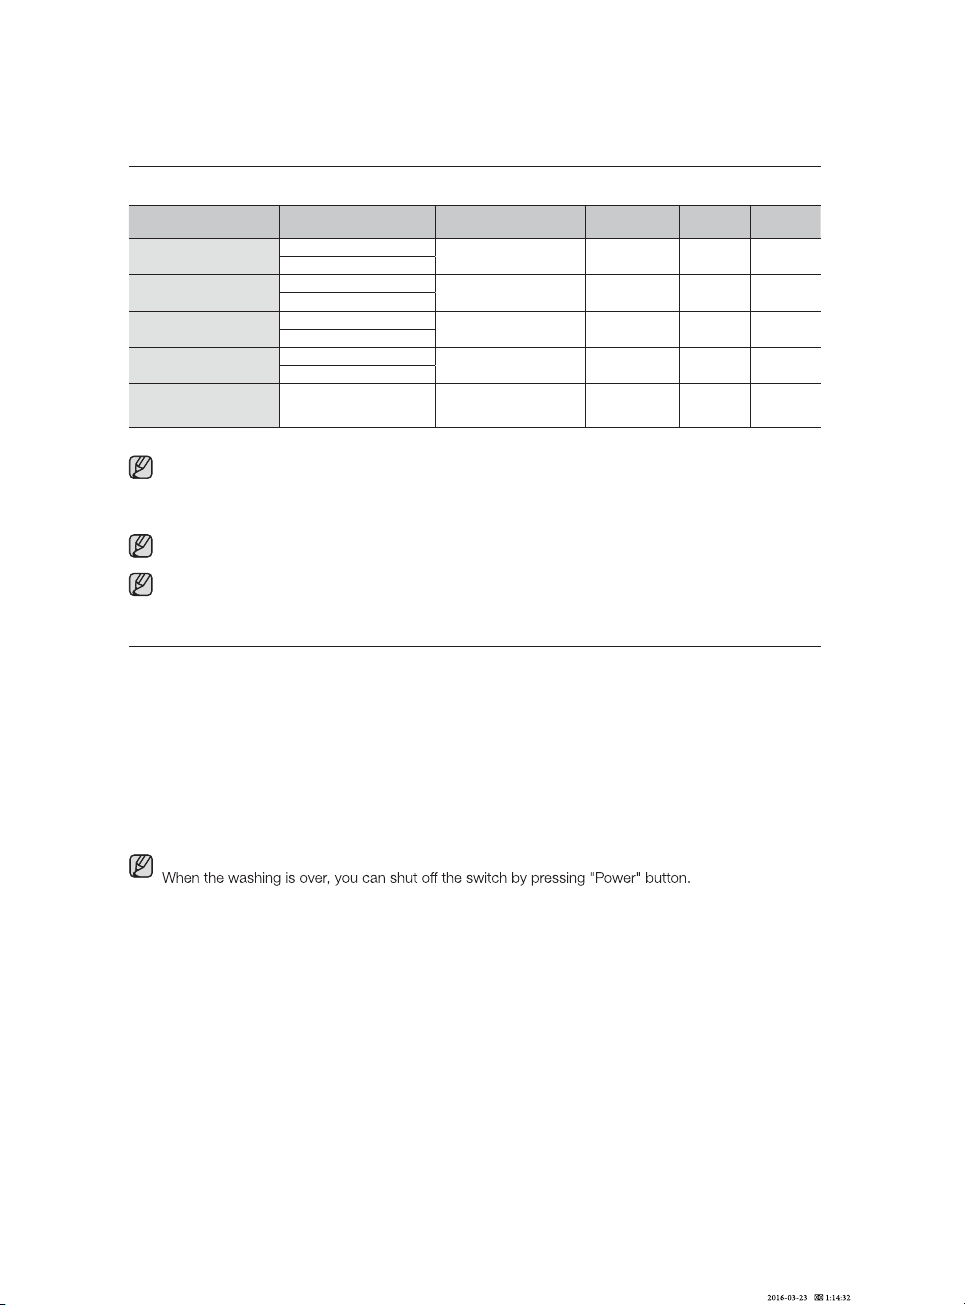
Program Description of cycle
Detergent (g)
(Pre wash / Main wash)
Running time
(min)
Energy
(KWh)
Water (L)
5/15
5/15
5/15
5/15
Quick Wash
Main Wash 40 °C
40 0.60 6.6
Hot Rinse 50 °C
Quick Wash + Hygiene
Main Wash 40 °C
49 0.95 6.6
Hot Rinse 70 °C
Quick Wash + Half load
Main Wash 40 °C
40 0.50 6.6
Hot Rinse 50 °C
Quick Wash + Rinse Add
Main Wash 40 °C
53 0.78 9.3
Hot Rinse 50 °C
9.310.021-hsaW erP
hsaW
erP
* EN 50242: The information for comparability test in accordance with EN50242,as follows:
• Capacity: 14 settings
• Position of upper basket: Lower position
• Rinse aid setting: 6
The wash time varies depending on the pressure and temperature of the supplied water.
Quick Wash, Express, Pre Wash: Continuous use of the Quick Wash, Express, Pre Wash cycles for an
extended time is not recommended. This may reduce the performance of the water softener.
Starting a washing programme
DW4000KM-00000A-00_EN (Basic)_160323.indd 26
Turning on the appliance
Starting a wash cycle...
1. Draw out the lower and upper basket, load the dishes and push them back.
It is recommended to load the lower basket fi rst, then the upper one (see the section entitled "Loading
the dishwasher racks").
2. Pour in the detergent (see the section entitled "Loading the Salt into the Softener").
3. Insert the plug into the socket. The power supply is 220-240 V AC 50 Hz, the specifi cation of the socket
is 10 A 250 VAC. 50 Hz.
4. Make sure that the water supply is turned on to full pressure. Close the door, press the "Power" button,
Press the "Program” button to select a desired "Wash cycle". (See the section entitled "Wash Cycle
Table"). With a little force to ensure the door is properly closed.
A click could be heard when the door is closed perfectly.
Starting a Washing Programme _37
DW4000KM-00000A-00_EN (Basic)_160323.indd 27
05 STARTING A WASHING PROGRAMME
Change the programme
Premise:
1. A cycle that is underway can only be modifi ed if it has only been running for a short time. Otherwise,
the detergent may have already been released, and the appliance may have already drained the wash
water. If this is the case, the detergent dispenser must be refi lled (see the section entitled "Fill in the
Detergent").
2. Press ”Power” button or "reset" button 3 seconds to cancel the programme, and turn on it again, then
you can change the programme to the desired cycle setting (see the section entitled "Starting a wash
cycle...") or press programme button while you press "reset" button.
If you open the door when washing, the machine pauses and warning alarm rings, the display appears
E1. When you close the door, the machine will keep on working after 10 seconds.
These programme lights show the state of the dishwasher:
a) One of the programme lights on --> cycle running
b) One of the programme lights blinking --> pause
power and water supply before calling a service.
Forget to add dish
Switch o the Dishwasher
A forgotten dish can be added any time before the detergent cup opens
1. Open the door a little to stop the washing.
2. After the spray arms stop working, you can open the door completely.
3. Add forgotten dishes.
4. Close the door, the dishwasher will work after ten seconds.
WARNING: It is dangerous to open the door when washing, because the hot water may scald you.
The digital display appears "---" and the buzzer rings 6 times, only in this case the programme has
ended.
1.
the dishwasher by pressing the "Power" button.
2.
the water tap!
Open the door carefully. Hot steam may escape when the door is opened!
• Hot dishes are sensitive to knocks. The dishes should therefore be allowed to cool down around
15 minutes before removing from the appliance.
• Open the dishwasher's door, leave it ajar and wait a few minutes before removing the dishes. In
this way they will be cooler and the drying will be improved.
Unloading the dishwasher
It is normal that the dishwasher is wet inside.
Empty the lower basket first and then the upper one. This will avoid water dripping from the upper basket
onto the dishes in the lower one.
38 _
Maintenance and cleaning
Maintenance and cleaning
Filtering system
The filter is used to avoid the big remnants and other sundries getting inside the pump. The residue can
obstruct the filter in sometime.
The filter system consists of a coarse filter, a flat (Main filter) and a micro filter (fine filter).
1. Fine fi lter: Food and debris will be trapped by a special jet on the
lower spray arm.
2. Coarse fi lter: Big debris, such as bone and glass that could clog the
drain will be trapped in the coarse fi lter.
To remove an item caught in this fi lter, gently squeeze the taps on the
top of this fi lter and lift it out.
3. Micro fi lter: This fi lter holds soil and food residue in the sump area
and prevents it from being redeposit on the dishes during a cycle.
- Inspect the filters for obstructions every time the dishwasher has
been used.
- By unscrewing the coarse filter, you can remove the filter system.
Remove any food remnants and clean the filters under running
water.
1
2
3
Step 1 Contrarotate the Coarse filter ,and then lift it up;
Step 2 L ift the Flat filter up
If operate from step 1 to step 2, the filter system will be removed; while operate from step 2 to step 1,
the filter system will be installed.
Filter assembly
particles from the wash water, allowing it to be recirculated during the cycle. For this reason, it is a good
idea to remove the larger food particles trapped in the filter after each wash cycle by rinsing the semicircular
filter and cup under running water. To remove the filter assembly, pull on the cup handle in the upward
direction. The entire filter assembly should be cleaned once a week. To clean the coarse filter and the micro
filter, use a cleaning brush. Then, reassemble the filter parts as shown in the figures above and reinsert the
entire assembly in the dishwasher, positioning in its seat and pressing downward. The dishwasher must
never be used without the filters. Improper replacement of the filter may reduce the performance level of the
appliance and damage dishes and utensils.
WARNING: Never run the dishwasher without the filters in place. When cleaning the filters, don't
knock on them. Otherwise, the filters could be contorted and the performance of dishwasher could be
debased.
DW4000KM-00000A-00_EN (Basic)_160323.indd
28
1
2
Maintenance and cleaning _39
Cleaning the spray arms
It is necessary to clean the spray arms regularly for hard water chemicals
will clog the spray arm jets and bearings. To remove the spray arms, screw
remove the arm. Wash the arms in soapy and warm water and use a soft
brush to clean the jets. Replace them after rinsing thoroughly.
Caring for the dishwasher
To clean the control panel, use a lightly dampened cloth then dry thoroughly.
To clean the exterior, use a good appliance polish wax. Never use sharp objects, scouring pads or harsh
cleaners on any part of the dishwasher.
Protect against freezing
If your dishwasher is left in an unheated place during the winter, ask a service technical to:
1.
electrical power to the dishwasher.
2.
the water supply and disconnect the water inlet pipe from the water valve.
3. Drain water from the inlet pipe and water valve. (Use a pan to catch the water)
4. Reconnect the water inlet pipe to the water valve.
5. Remove the fi lter in the tub and the bottom and use a sponge to use up water in sump.
Cleaning the door
To clean the edge around the door, you should use only a soft warm, damp rag. To prevent penetration of
water into the door lock and electrical components, do not use a spray cleaner of any kind.
Also, never use abrasive cleaners or scouring pads on the outer surfaces because they will scratch the
finish. Some papers towels can also scratch or leave marks on the surface.
WARNING: Never use a spray cleaner to clean the door panel for it could damage the door lock and
electrical components. It is not allowed to use the abrasive agent or some paper towel because of the
risk of scratching or leaving spots on the stainless steel surface.
DW4000KM-00000A-00_EN (Basic)_160323.indd 29
06 MAINTENANCE AND CLEANING
40_ Maintenance and cleaning
How to keep your dishwasher in shape
• After Every Wash
moisture and odors are not trapped inside.
• Remove the Plug
Before cleaning or performing maintenance, always remove the plug from the socket. Do not run risks.
• No Solvents or Abrasive Cleaning
To clean the exterior and rubber parts of the dishwasher, do not use solvents or abrasive cleaning
products. Use only a cloth and warm soapy water. To remove spots or stains from the surface of
the interior, use a cloth dampened with water and a little white vinegar, or a cleaning product made
specifically for dishwashers.
• When You Go on holiday
When you go on holiday, it is recommended that you run a wash cycle with the dishwasher empty and
slightly ajar. This will help the seals last longer and prevent odors from forming in the appliance.
• Moving the Appliance
If the appliance must be moved, try to keep it in the vertical position. If absolutely necessary, it can be
positioned on its back.
• Seals
One of the factors that cause odors to form in the dishwasher is food that remains trapped in the seals.
Periodic cleaning with a damp sponge will prevent this.
Maintenance and cleaning
DW4000KM-00000A-00_EN (Basic)_160323.indd 30
Installation Instruction
_41
07 INSTALLATION INSTRUCTION
Installation instruction
WARNING : Electrical Shock Hazard!
Disconnect electrical power before installing dishwasher.
Failure to do so can result in death or electrical shock.
CAUTION: The installation of the pipes and electrical equipment should be done by professionals.
• Keep this instruction manual in a safe place for future reference. If the appliance is sold, given away
or moved, please ensure the manual is kept with the machine, so that the new owner may benefit
from the advice contained within it.
• Please read this instruction manual carefully: it contains important information regarding the safe
installation, use and maintenance of the appliance.
• If the appliance must be moved at any time, keep it in an upright position; if absolutely necessary, it
may be tilted onto its back.
Positioning and leveling
1. Remove the appliance from all packaging and check that it has not been damaged during
transportation. If it has been damaged, contact the retailer and do not proceed and further with the
installation process.
2. Check the dishwasher by placing it so that its sides or back panel are in contact with the adjacent
cabinets or even with the wall. This appliance can also be recessed under a single worktop (see the
Assembly instruction sheet).
3. Position the dishwasher on a level and sturdy fl oor. If the fl oor is uneven, the front feet of the appliance
may be adjusted until it reaches a horizontal position (the angle of inclination must not exceed 2
degrees). If the appliance is levelled correctly, it will be more stable and much less likely to move or
cause vibrations and noise while it is operation.
Connecting the water and electricity supplies
• Connection to the water and electricity supplies should only be performed by a qualified technician.
• The dishwasher should not stand on top of the water hoses or the electricity supply cable.
• The appliance must be connected to the water supply network using new piping. Do not use old
piping.
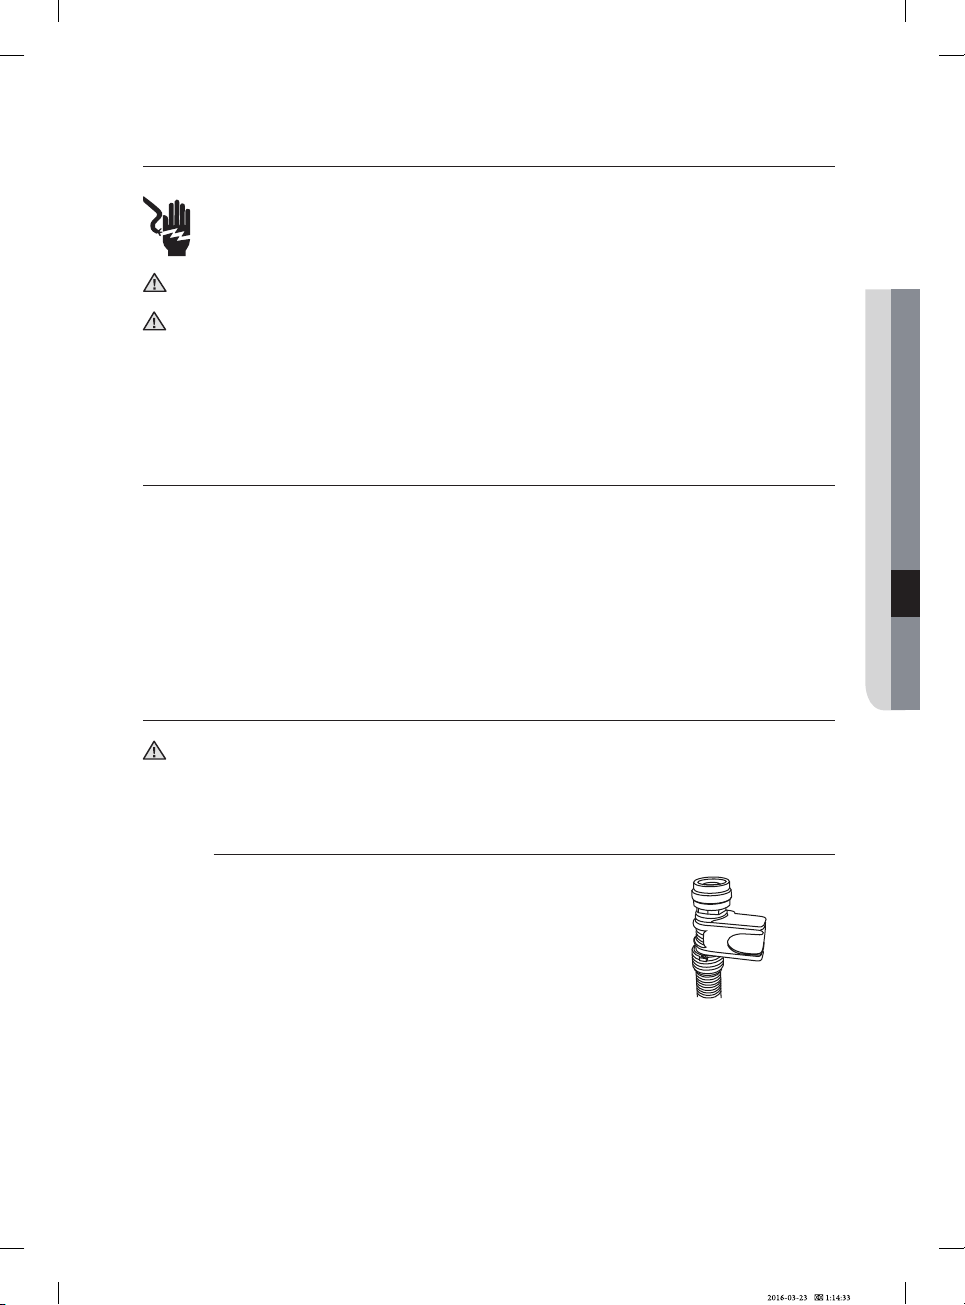
Connecting the water inlet hose
Connect the cold water supply hose to a threaded 3/4(inch)
connector and make sure that it is fastened tightly in place. If
the water pipes are new or have not been used for an extended
period of time, let the water run to make sure that the water is
clear and free of impurities. If this precaution is not taken, there
is a risk that the water inlet can get blocked and the appliance
could be damaged.
DW4000KM-00000A-00_EN (Basic)_160323.indd 31
42_
Installation Instruction
Connecting the water outlet hose
Fit the drainage hose of your machine to the drainage pipe
without bending.
authorized service for an extension made from the same
material as the original. Remember that the length of the hose
should not exceed 4meters even when with an extension.
If the drainage hose is longer the 4 m. the dishes will not be
cleaned properly secure your hose firmly to the drainage pipe
Max 1000 mm
Min 400 mm
Min 120 mm
Min ø40 mm
Electrical connection
Before inserting the plug into the electrical socket, make sure that:
• the socket is earthed and complies with current regulations;
• the socket can withstand the maximum load of the appliance, which is indicated on the data
plate located on the inside of the door(see description of the appliance);
• the power supply voltage falls within the values indicated on the data plate on the inside of
the door;
• the socket is compatible with the plug of the appliance. If this is not the case, ask an
authorized technician to replace the plug (see assistance); do not use extension cables or
multiple sockets.
• Once the appliance has been installed, the power supply cable and the electrical socket
should be easily accessible.
• The cable should not be bent or compressed.
• If the power supply cable is damaged, it must be replaced by the manufacturer or its
Technical Assistance Service in order to prevent all potential hazards.(See Assistance)
• The company shall not be held responsible for any incidents that occur if these
regulations are not observed.
Installation instruction
DW4000KM-00000A-00_EN (Basic)_160323.indd 32
Installation Instruction
_43
07 INSTALLATION INSTRUCTION
Advice regarding the first wash cycle
After the appliance has been installed, immediately before running the first wash cycle,
completely fill the salt dispenser with and add approximately 1.2 Kg of salt (see Rinse aid and
refined salt). The water may overflow: this is normal and is not a cause for concern. It is also
normal that the LOW SALT indicator light continues to flash for a few cycles after the salt has
been loaded.
Positioning the appliance
Position the appliance in the desired location. The back should rest against the wall behind it,
and the sides, along the adjacent cabinets or wall. The dishwasher is equipped with water supply
and drain hoses that can be positioned to the right or the left to facilitate proper installation.
Leveling the appliance
Once the appliance is positioned, adjust the feet (screwing them in or out) to adjust the height of
the dishwasher, making it level. In any case, the appliance should not be inclined more than 2.
The maximum adjustment height of the feet is 20 mm.
How to drain excess water from hoses
If the sink is 1000mm higher from the floor, the excess water in hoses cannot be drained directly
into the sink. It will be necessary to drain excess water from hoses into a bowl or a suitable
container that is held outside and lower than the sink.
Water outlet
Connect the water drain hose. The drain hose must be correctly fitted to avoid water leaks.
Ensure that the water inlet hose is not kinked or squashed.
Extension hose
If you need a drain hose extension, observe to use a similar drain hose.
reduced.
Syphon connection
The waste connection must be at a height of between 50cm (minimum) and 100cm (maximum)
from the bottom of the dish. The water drain hose should be fixed by a hose clip.
DW4000KM-00000A-00_EN (Basic)_160323.indd 33
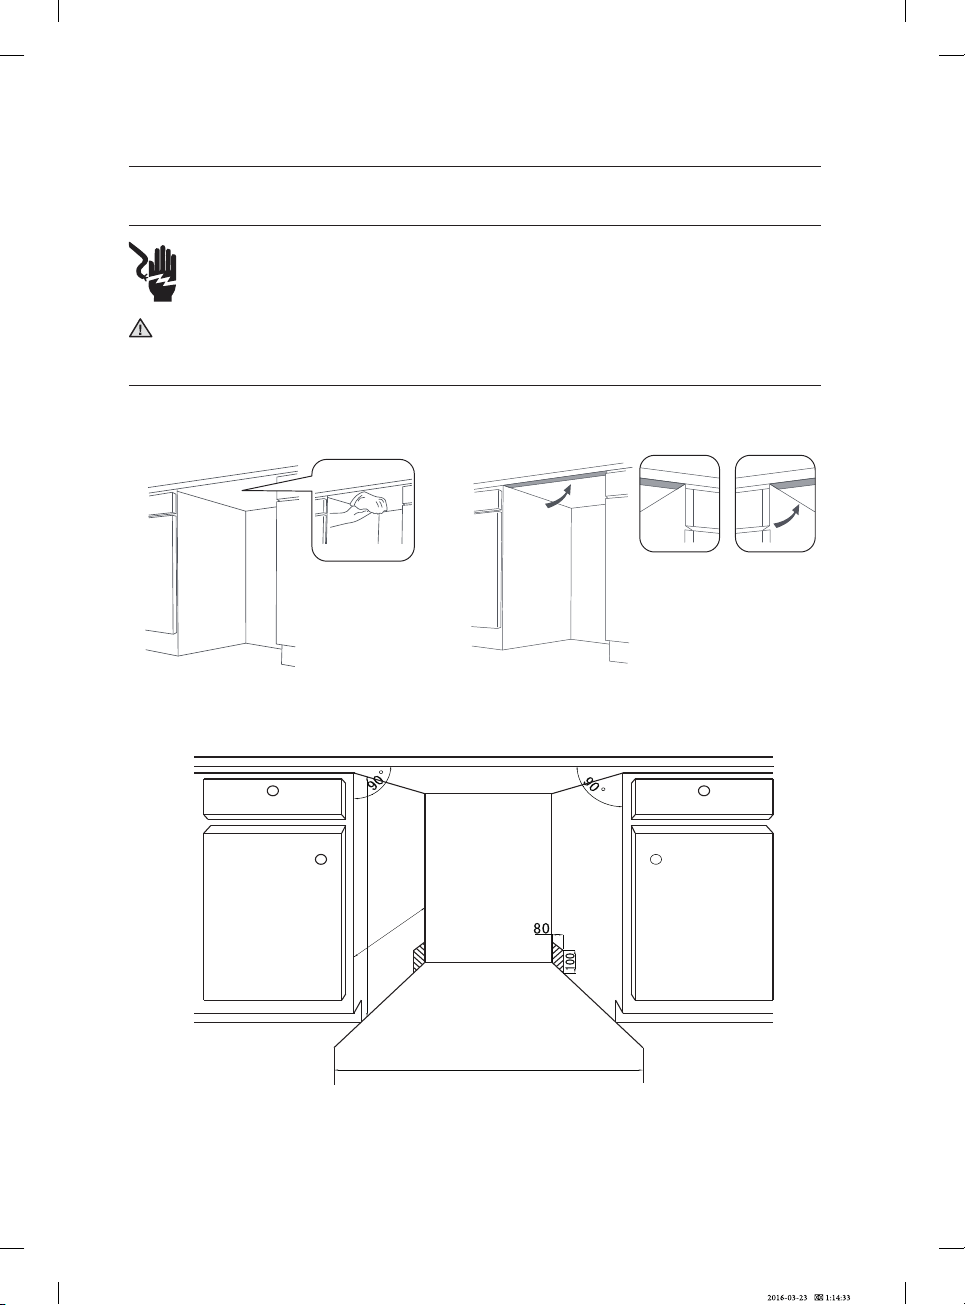
44_
Installation Instruction
Built-in dishwasher
WARNING : Electrical Shock Hazard!
Disconnect electrical power before installing dishwasher.
Failure to do so can result in death or electrical shock.
CAUTION: Water pipe and electric device should be installed by professionals
Step 1. Before installation
• Dishwasher place requirement. The back of dishwasher should face to the wall, and the dishwasher has
inlet and outlet pipe, which can be connected on the right or left side conveniently.
• To protect the cabinet from steam, attach the protective film under the cabinet as shown.
• The dimensions of installation Cabinet.
Installation instruction
DW4000KM-00000A-00_EN (Basic)_160323.indd 34
Install the dishwasher into
the cabinet
The connectors
for power cord
and inlet/outlet
hose
580mm(Min.)
600mm(Min.)
810-880mm
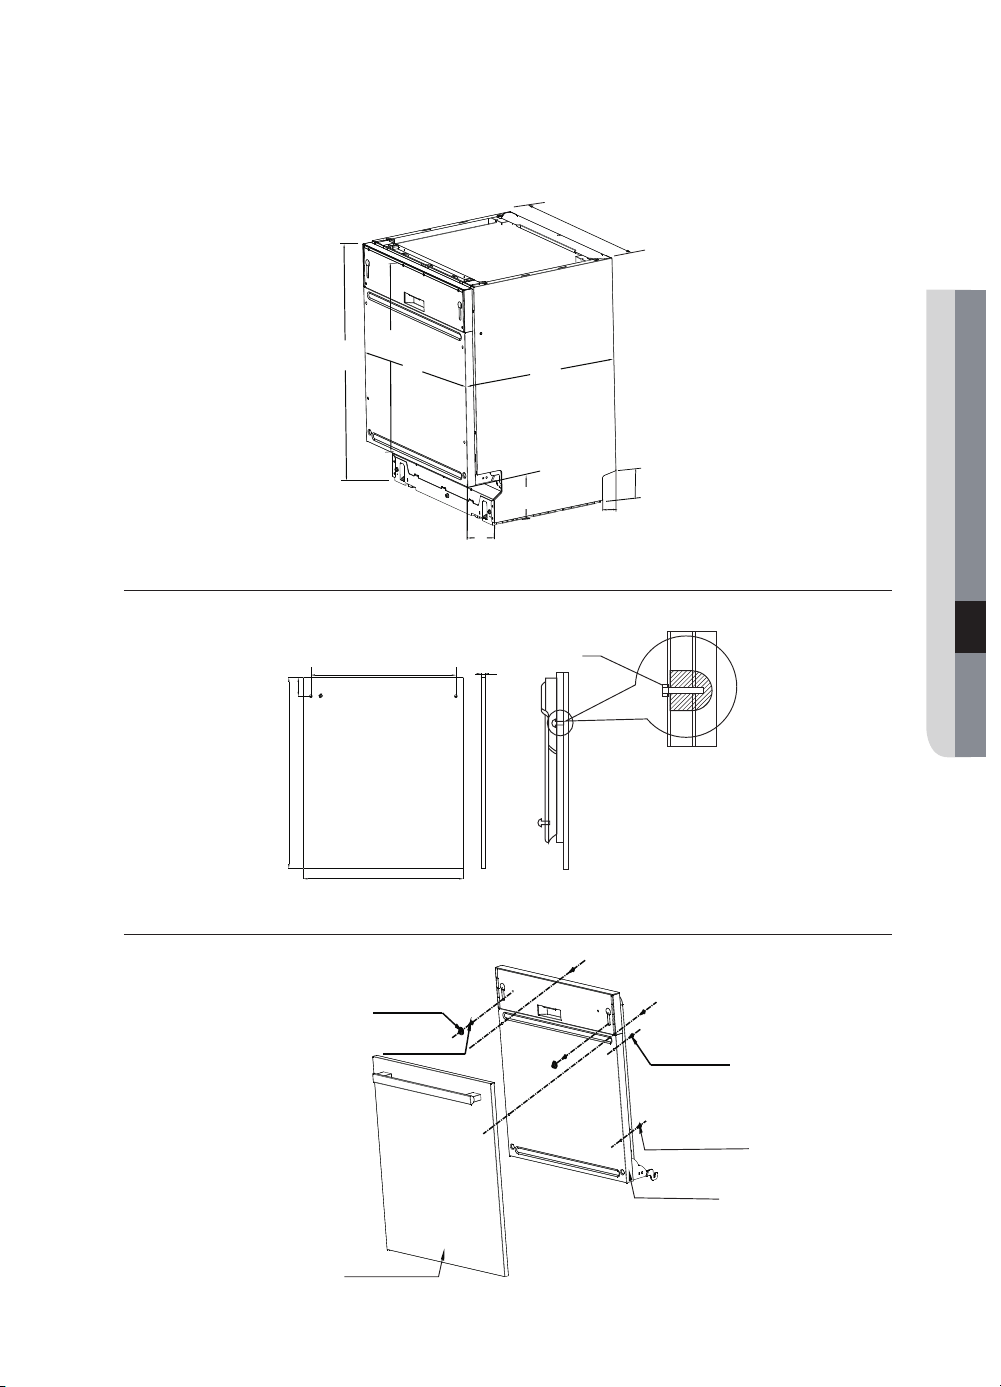
Installation Instruction _45
07 INSTALLATION INSTRUCTION
Step 2. The dimension of the front ornamental plate
Step 3. Fix the ornamental plate
DW4000KM-00000A-00_EN (Basic)_160323.indd 35
15
the hol e wit h 10 mm de pt h
540
2- 2
594
658mi n
708ma x
92
4-4x44wooden
screws
4-4×44 wo od en screw
The pl ug w it h T shape
2-4×26 wo od en screw
① remo ve 2 -S T4X10
② ST 4-4×44woode n sc rew
the do or o f di shwasher
enta l pl at e (3~7KG)
4
1
5
654
594
558
95
805
596
52
99
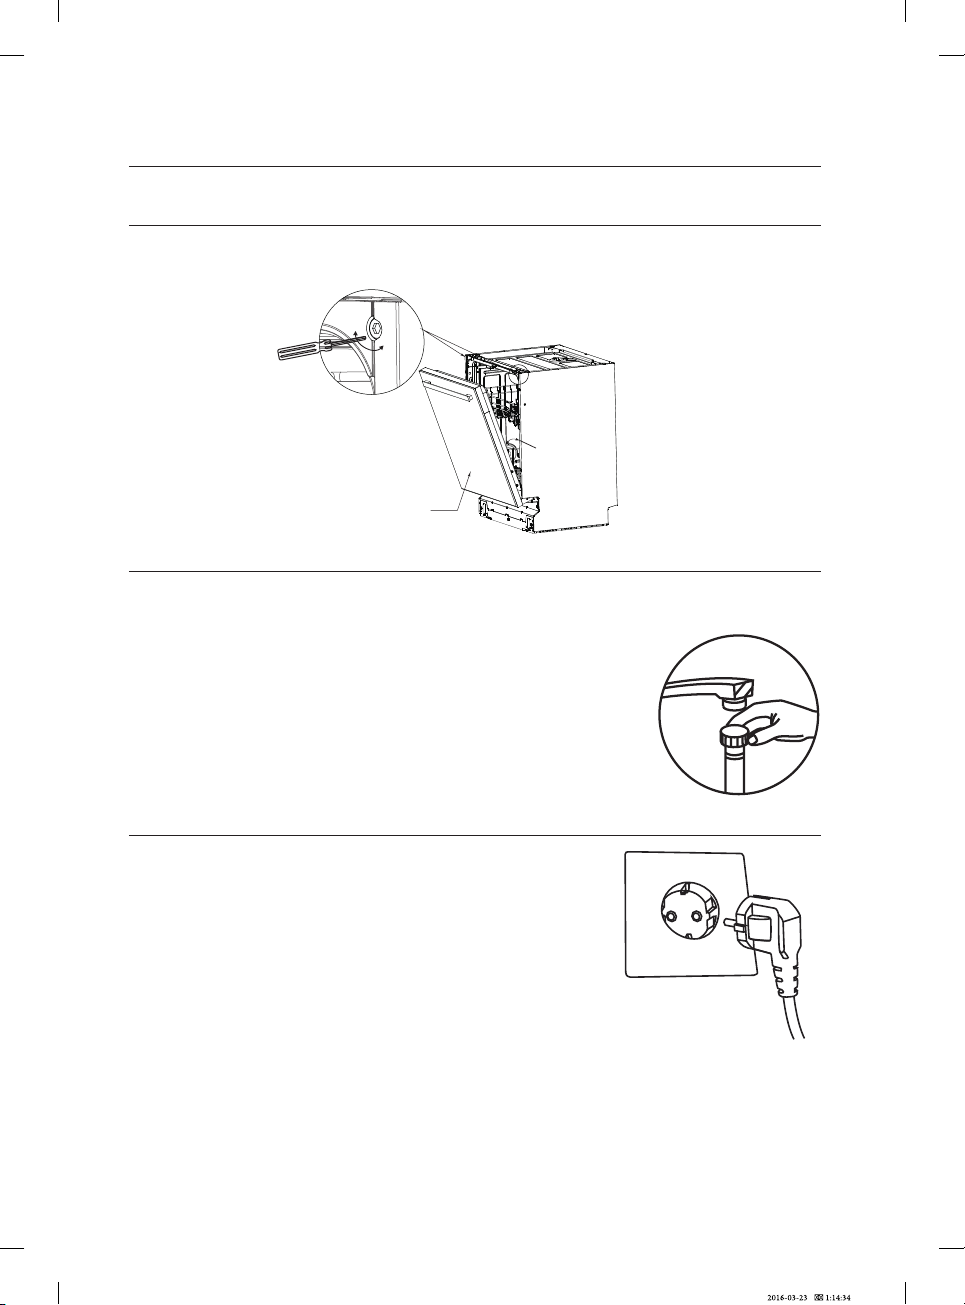
46_
Installation Instruction
Step 4. Tension adjustment of the door spring
After placed the panel on the dishwasher, please try open and close the door to test the balance to check
out whether the door can remain a same place. If not, please adjusting the screw in the direction of
clockwise or counter-clockwise to adjust the balance of the door. Or it has been adjusted.
Step 5. Connecting the water inlet hose (for cold water)
After placed the panel on the dishwasher, please try open and close the door to test the balance to check
out whether the door can remain a same place. If not, please adjusting the screw in the direction of
clockwise or counter-clockwise to adjust the balance of the door. Or it has been adjusted.
Connection the cold water supply hose to a threaded 3/4(inch) connector
and make sure that it is fastened tightly in place.
If the water hoses are new or have not been used for an extended period
of time, let the water run to make sure that the water is clear and free of
impurities, If this precaution is not taken, there is a risk that the water inlet
can get blocked and the appliance could be damaged.
Step 5-1. Electrical connection
Make sure the socket is compatible with the plug of the appliance, The
socket must have ground wire and can hold 250V/10A, otherwise damage
or accidence may occur,Other electric appliance with big power
can not use the same socket with the dishwasher.
Installation instruction
DW4000KM-00000A-00_EN (Basic)_160323.indd 36
+
-
Hexnut tools
CR-V 4mm
30°~90°balance
3~7KG

Installation Instruction _47
07 INSTALLATION INSTRUCTION
Step 6. Connecting the water outlet hose
Put the hose into drainage hose which diameter is more than 40 mm or into the sink, both should make
sure the outlet pipe is straight ,and the height of the end of pipe should be less than 1000 mm.
Note: The connector of the outlet pipe should be tight.
Step 7. Level adjustment
Allowable slope under entire dishwasher is 2 degree. Adjust the height by turning the feet to make sure the
dishwasher is level.
DW4000KM-00000A-00_EN (Basic)_160323.indd 37
Drain hose hook
sink
Max:1000mm
Min:400mm
outlet hose
Min:40mm
+
-
Adjust the back feet
Adjust the front feet
+ - + -
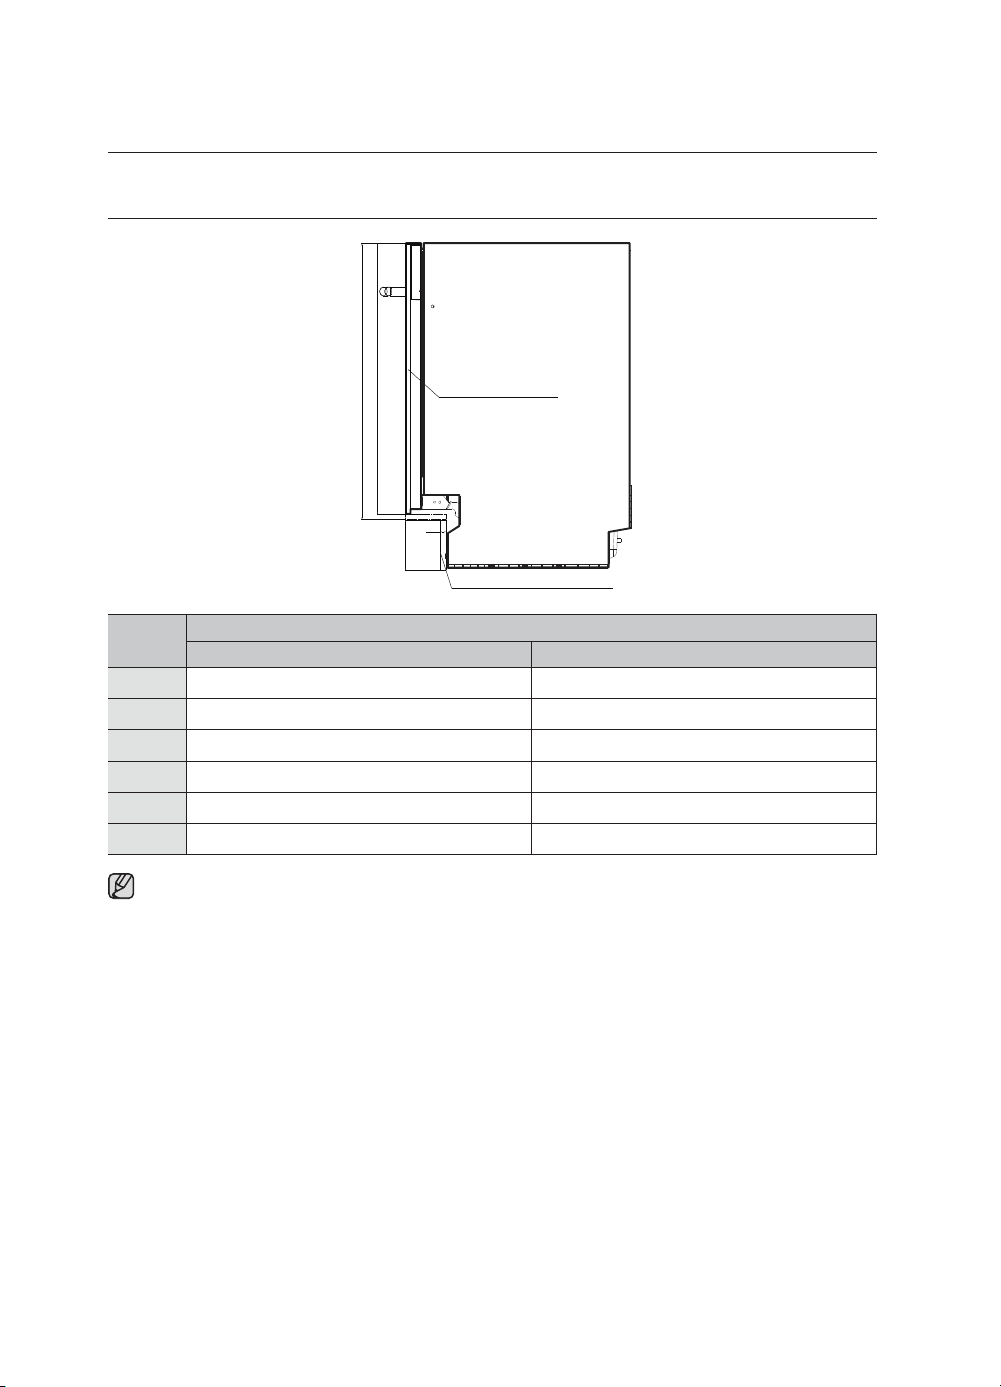
48_ Installation Instruction
Step 8. Installation of skirting board
ornamental plate
125 max
plate the skirting board
75 min
15
708 max
658 min
Serial
number
Referenced dimension(Fully built in)
ornamental plate Plate to ornament the skirting board
1 mm 57mm 807
2
mm 58mm 896
3
mm 59mm 886
4
mm 501mm 876
5
mm 511mm 866
6
mm 521mm 856
Note: The required height of the skirting board is as per the principle of aesthetic and opening closing
the door smoothly, Please check the suggested chart for the reference.
Installation instruction
DW4000KM-00000A-00_EN (Basic)_160323.indd 38
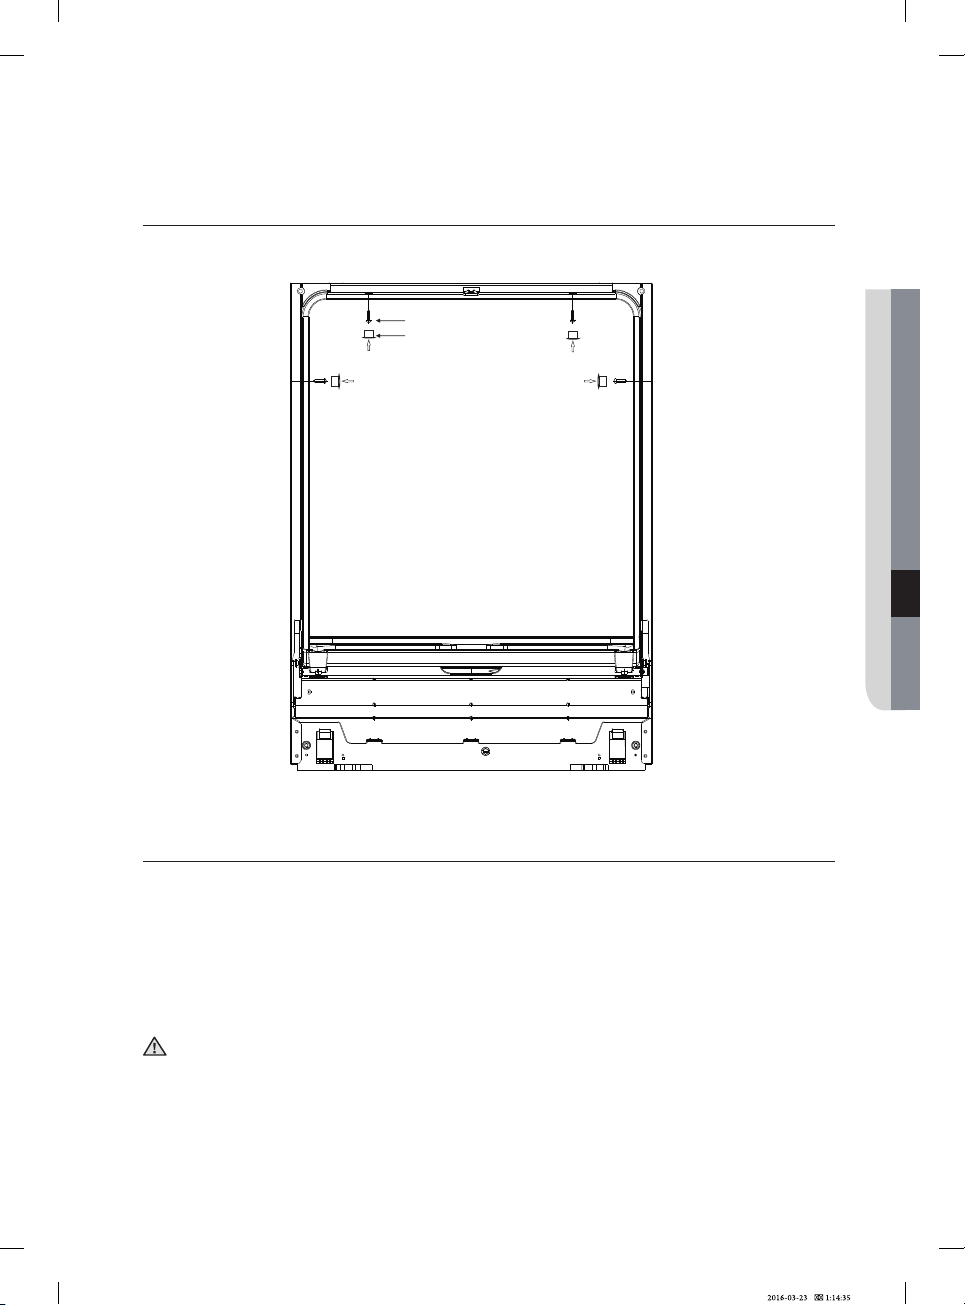
Installation Instruction
_49
07 INSTALLATION INSTRUCTION
Step 9. Fixation of dishwasher
1. Fixing the dishwasher with the cabinet by turning the screws.
2. Plug the four hole plugs into the holes in the sketch map.
Dishwasher liner right and left side and the top 4 holes, use wood screws ST4*26 dishwasher fixed on the
cabinet. (Self-tapping screws were matching.)
Start of dishwasher
1. The followings should be checked before starting the dishwasher:
2. Whether the dishwasher is level and fi xed
3. Whether the inlet valve is opened
4. Whether there is leakage at the connections of the conducts
5. Whether the wires are tightly connected
6. Whether the power is switched on
7. Whether the inlet and drain hoses are knotted
8. All packing materials and printings should be taken out from the dishwasher
CAUTION: After installation, please put this manual into the bags of printings. The content of this
manual is very helpful to the user
DW4000KM-00000A-00_EN (Basic)_160323.indd 39
S T 4 * 2 6
hole plug
50_
Troubleshooting Tips
Troubleshooting tips
Information codes
When some malfunctions happen, the appliance will display information codes to warn you.
sesuaC elbissoPsgninaeMsedoC
dC Door open The door is opened when the dishwasher is operating
4C Water inlet
Water inlet malfunction
5C Water drainage
Water drainage malfunction
Temperature sensor malfunction
oC Overflow/leakage
Overflow occurs/Water leakage occurs
LC Water leakage
Water leakage occurs
HC Heating element
Abnormal heating
WARNING
in the base pan because of an overfill or small leak, the water should be removed before restarting the
dishwasher.
DW4000KM-00000A-00_EN (Basic)_160323.indd 40
( DW60M5060BB DW60M5060FS/W DW60M5040BB DW60M5040FS/W )
Information codes
When some malfunctions happen, the appliance will display information codes to warn you.
sesuaC elbissoPsgninaeMsedoC
Door open The door is opened when the dishwasher is operating
LED1+LED2 flashing
LED1+LED20 flashing
LED2+LED20 flashing
LED25+ LED18 flashing
LED25+ LED19 flashing
LED1+LED2+LED18 flashing
LED1+LED2+LED19 flashing
Water inlet
Water inlet malfunction
Water drainage
Water drainage malfunction
Temperature sensor malfunction
Overflow/leakage
Overflow occurs/Water leakage occurs
Water leakage
Water leakage occurs
Heating element
Abnormal heating
( DW60M5030FS/W DW60M5010FS/W )
LED1 LED2
LED3 LED20 LED18
LED7 LED8 LED17
LED19 LED21 LED14LED25
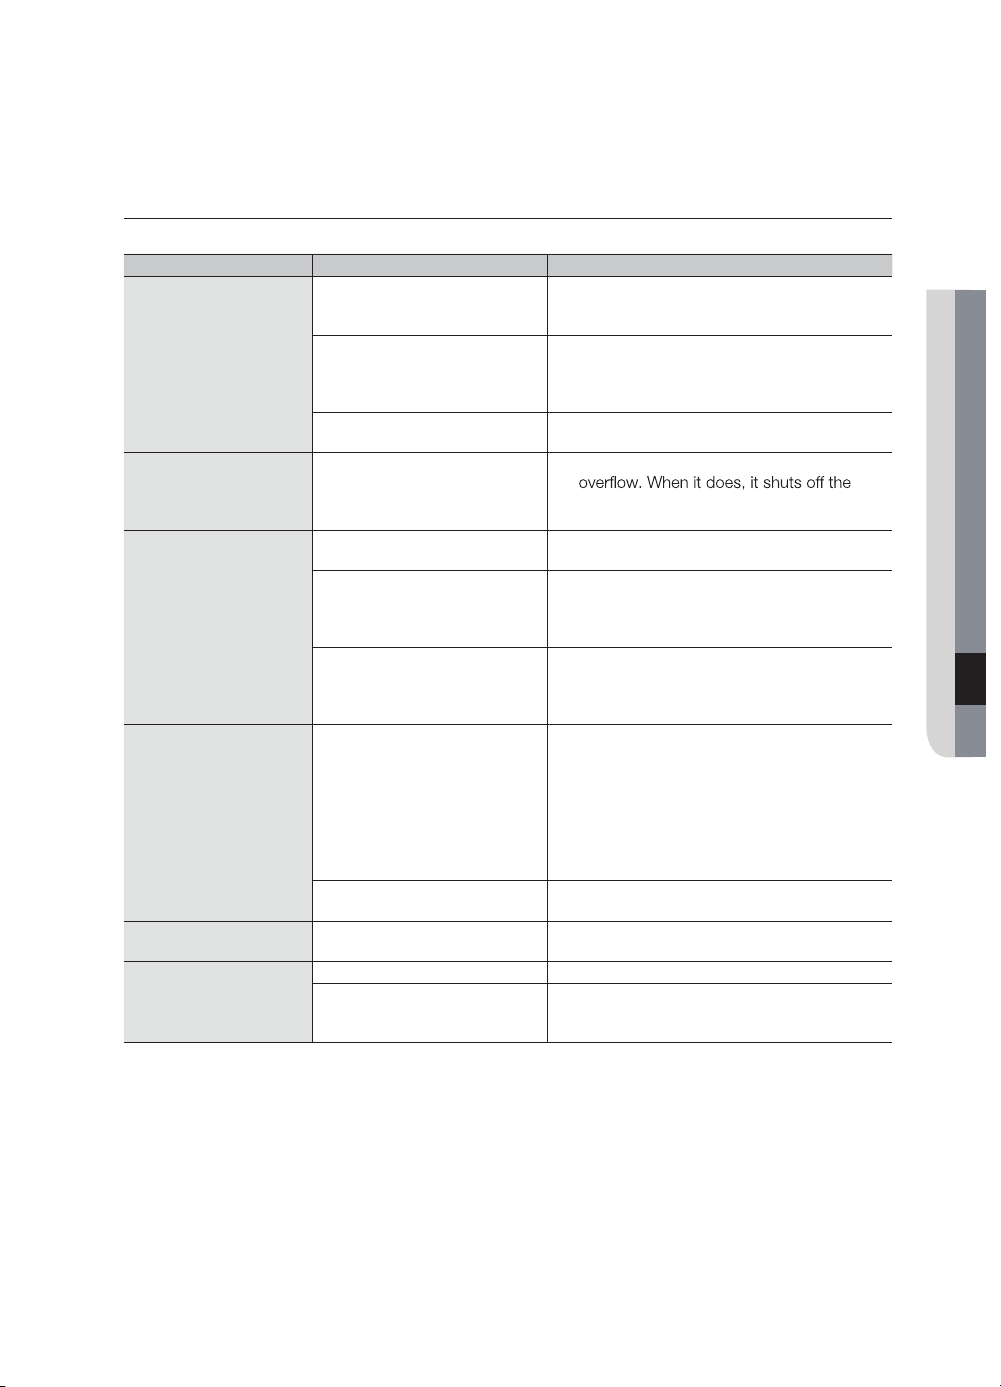
Troubleshooting Tips _51
08 TROUBLESHOOTING TIPS
Before calling for service
Reviewing the charts on the following pages may make you be free of calling for service.
oD oT tahWsesuaC elbissoPmelborP
Dishwasher doesn’t
run
• Fuse blown or the circuit
breaker acted.
• Replace fuse or reset circuit breaker.
Remove any other appliances sharing the
same circuit with the dishwasher.
• Power supply is not turned
on.
• Make sure the dishwasher is turned on and
the door is closed securely. Make sure the
power cord is properly plugged into the
wall socket.
• Water pressure is low. • Check that the water supply is connected
properly and the water is turned on.
Drain pump doesn’t
stop
• Overflow. • The system is designed to detect an
circulation pump and turns on the drain
pump.
Noise • Some audible sounds are
normal.
• Sound from soft food shredding action and
detergent cup opening.
• Utensils are not secure in
the baskets or something
small has dropped into the
basket.
• To ensure everything is secured in the
dishwasher.
• Motor hums. • Dishwasher has not been used regularly. If
you do not use it often, remember to set it
to fill and pump out every week, which will
help keep the seal moist.
Suds in the tub • Improper detergent. • Use only the special dishwasher detergent
to avoid suds.
• If this occurs, open the dishwasher and let
suds evaporate.
• Add 1 gallon of cold water to the tub.
Close and latch the dishwasher, then start
the “soak” wash cycle to drain out the
water. Repeat if necessary.
• Spilled rinse agent. • Always wipe up rinse agent spills
immediately.
Stained tub interior • Detergent with colorant
was used.
• Make sure that the detergent is the one
without colorant.
Dishes and flatware
not clean
• Improper program. • Select a more intensive wash program.
• Improper rack loading. • Make sure that the action of the detergent
dispenser and spray arms are not blocked
by large dishware.
DW4000KM-00000A-00_EN (Basic)_160323.indd 41

52_ Troubleshooting Tips
oD oT tahWsesuaC elbissoPmelborP
Spots and filming on
glasses and flatware
1. Extremely hard water.
2. Low inlet temperature.
3. Overloading the
dishwasher.
4. Improper loading.
5. Old or damp powder
detergent.
6. Empty rinse agent
dispenser.
7. Incorrect dosage of
detergent.
To remove spots from glassware:
1. Take out all metal utensils out of the
dishwasher.
2. Do not add detergent.
3. Choose the longest cycle.
4. Start the dishwasher and allow it to run for
about 18 to 22 minutes, then it will be in
the main wash.
5. Open the door to pour 2 cups of white
vinegar into the bottom of the dishwasher.
6. Close the door and let the dishwasher
complete the cycle. If the vinegar does not
work: Repeat as above, except use 1/4
cup (60 ml) of citric acid crystals instead of
vinegar.
Cloudiness on
glassware
• Combination of soft water
and too much detergent.
• Use less detergent if you have soft water
and select a shortest cycle to wash the
glassware and to get them clean.
Yellow or brown film
on inside surfaces
3 cups warm water to remove the stains
by hand.
WARNING: You have to wait for
20 minutes after a cycle to let the heating
elements cool down before cleaning
interior; Failing to follow this instruct may
result in the risk of burns.
• Iron deposits in water can
cause an overall film.
• You have to call a water softener company
for a special filter.
White film on inside
surface
• Hard water minerals. • To clean the interior, use a damp sponge
with dishwasher detergent and wear
rubber gloves. Never use any other cleaner
than dishwasher detergent for the risk of
foaming or suds.
The Detergent
dispenser lid cannot
be closed properly
• Clogged detergent re
-sidue is blocking the catch
• Clean the detergent from the catch.
Detergent left in
dispenser cups
• Dishes block detergent
cups.
• Re-loading the dishes properly.
Steam • Normal phenomenon. • There is some steam coming through the
vent by the door latch during drying and
water draining.
Black or gray marks on
dishes
• Aluminum utensils have
rubbed against dishes.
• Use a mild abrasive cleaner to eliminate
those marks.
Water standing in the
bottom of the tub
• This is normal. • A small amount of clean water around the
outlet on the tub bottom keeps the water
seal lubricated.
Dishwasher leaks • Overfill dispenser or rinse
aid spills.
• Be careful not to overfill the rinse aid
dispenser.
Spilled rinse aid could cause overusing and
lead to overflowing.
Wipe away any spills with a damp cloth.
• Dishwasher isn't level. • Make sure the dishwasher is level.
Troubleshooting tips
DW4000KM-00000A-00_EN (Basic)_160323.indd 42
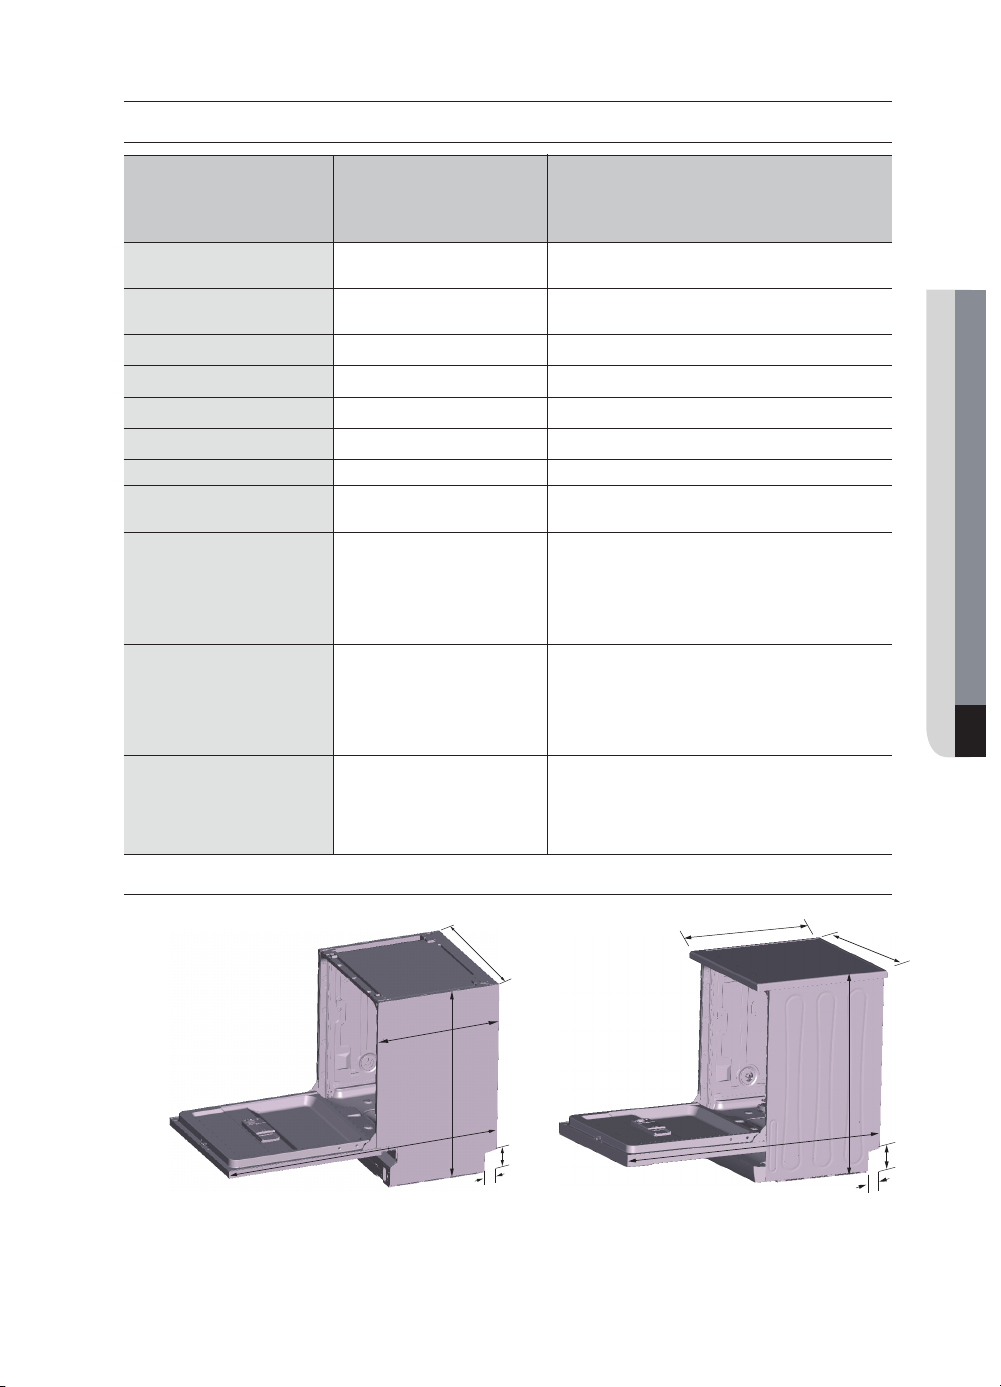
Appendix
_53
09 APPENDIX
Appendix
Specifications
Model
DW60M5040
FS
DW60M5040
FW
DW60M5060
FS
DW60M5060
FW
DW60M5030
FS
DW60M5030
FW
DW60M5010
FS
DW60M5010
FW
DW60M5040
FS
DW60M5040
FW
DW60M5060
FS
DW60M5060
FW
DW60M5030
FS
DW60M5030
FW
DW60M5010
FS
DW60M5010
FW
DW60M5040BB
DW60M5060BB
DW60M5060BB DW60M5040BB
Type Built-in Dishwasher
Free standing
Dishwasher
Power
220-240 V /
50 Hz AC only
220-240 V /
50 Hz AC only
Water pressure 0.04-1.0 Mpa 0.04-1.0 Mpa
Rated power usage 1750-2000 W 1750-2000 W
Hot water connection Max 60 °C Max 60 °C
Dry type Condensed dry system Condensed dry system
Wash type Rotating nozzle spray Rotating nozzle spray
Dimensions (mm)
(Width x Depth x Height)
596 x 558 x 805 596 x 600 x 835
Wash capacity
13 place setting
(DW60M5040BB)
(DW60M5060BB)
14 place setting
13 place setting
(DW60M5010FS/DW60M5010FW/DW60M5030FS
DW60M5030FW/DW60M5040FS/DW60M5040FW)
(DW60M5060FS/DW60M5060FW)
14 place setting
Weight (Unpacked)
Weight (Packed)
Product dimension
DW4000KM-00000A-00_EN (Basic)_160323.indd 43
1175
52
99
596
600
835
596
558
805
1150
52
99
44.5Kg
(DW60M5010FS/DW60M5010FW/DW60M5030FS
DW60M5030FW/DW60M5040FS/DW60M5040FW)
47Kg
(DW60M5060FS/DW60M5060FW)
50Kg
(DW60M5010FS/DW60M5010FW/DW60M5030FS
DW60M5030FW/DW60M5040FS/DW60M5040FW)
52.5Kg
(DW60M5060FS/DW60M5060FW)
37.5Kg
(DW60M5040BB)
40Kg
(DW60M5060BB)
43Kg
(DW60M5040BB)
44.5Kg
(DW60M5060BB)
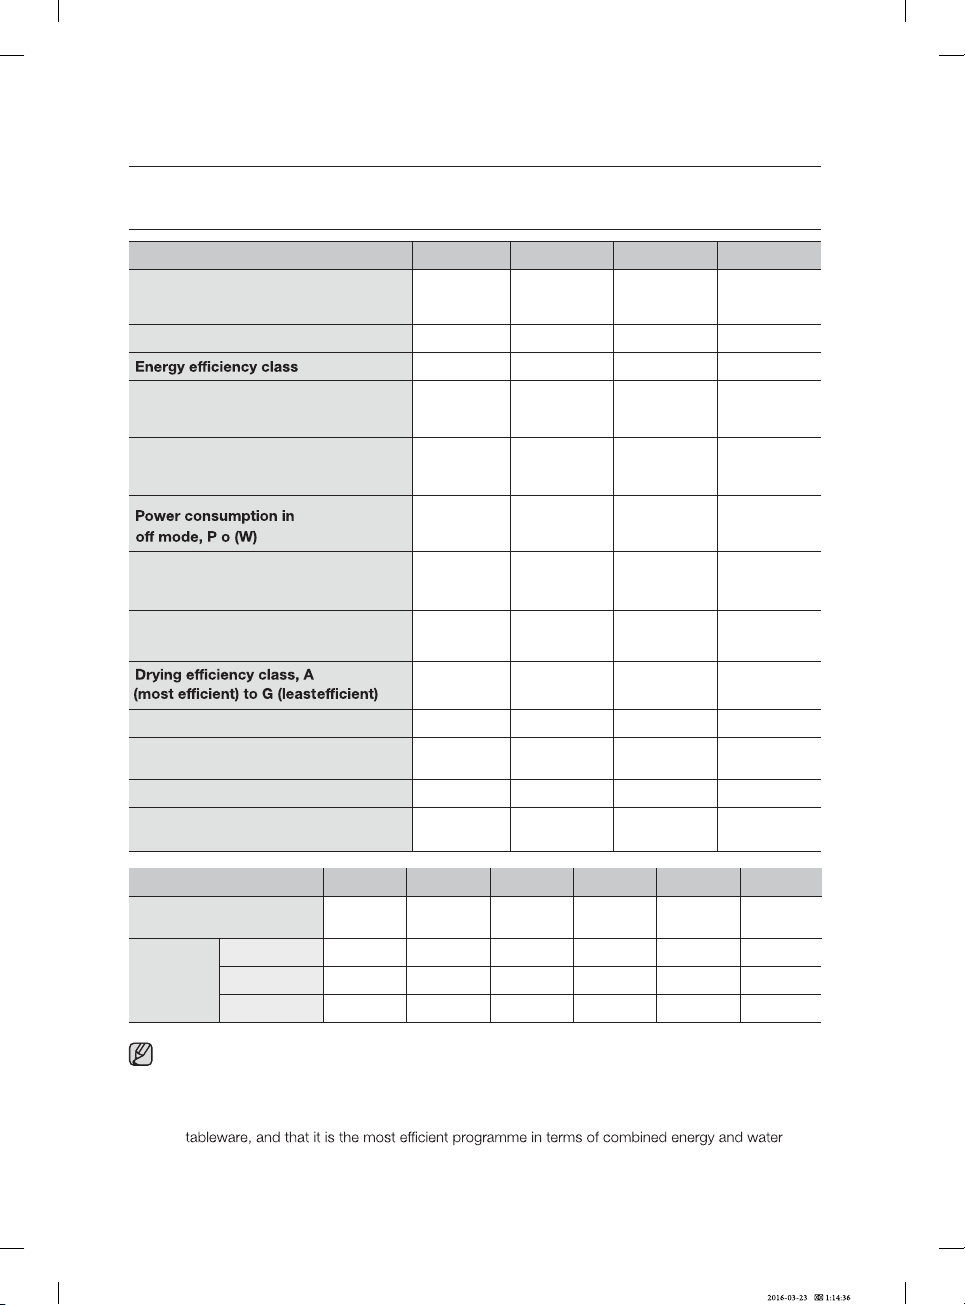
Built-in
Built-under
Free standing
54_
Product fiche
Product fiche
REGULATION (EU) No 1059/2010
Supplier
G SAMSUNG SAMSUNG
Model name
DW60M5060BB
DW60M5060BB DW60M5040BB
DW60M5060FS
DW60M5060FW
DW60M5040FS
DW60M5040FW
DW60M5060FS
DW60M5060FW
DW60M5040BB
DW60M5040FS
DW60M5040FW
DW60M5030FS
DW60M5030FW
DW60M5010FS
DW60M5010FW
Rated Capacity (place setting)
13 13 13
A++ A+ A+
Annual energy consumption,
1)
295 295 295
Standard cycle energy consumption,
1.03 1.03 1.03
0.49 0.40 0.40
Power consumption in left-on
0.9 0.49 0.49
Annual water consumption,
2)
3360 3360 3920
A A A
Standard programme
3)
Eco Eco Eco
Programme time for the standard
211 211 211
Duration of the left-on mode, (T l) (min)
Unlimited Unlimited Unlimited
Airborne acoustical noise emissions
re 1pW)
4846 48 52
Installation
14
A
299
1.06
0.49
0.9
3360
A
Eco
211
Unlimited
Yes
-
-
Yes
-
-
-
Yes
Yes
-
Yes
Yes
DW60M5030FS
DW60M5030FW
-
Yes
Yes
DW60M5010FS
DW60M5010FW
-
Yes
Yes
1) based on 280 standard cleaning cycles using cold water fill and the consumption of the low power
modes. Actual energy consumption will depend on how the appliance is used.
2) based on 280 standard cleaning cycles. Actual water consumption will depend on how the
appliance is used.
3) ‘Standard programme’ is the standard cleaning cycle which is suitable to clean normally soiled
consumption.
4) The wash time varies depending on the pressure and temperature of the supplied water.
DW4000KM-00000A-00_EN (Basic)_160323.indd 44
SAMSUNSAMSUN
Supplier
Model name
SAMSUNG
(AE c) (kWh/year)
(E t) (kWh)
mode, P l (W)
(AW c) (L/year)
cycle, (min)
(dBA
GG
SAMSUNG SAMSUNG SAMSUNG SAMSUNG SAMSUNG
Terminology for dishwasher
_55
Terminology for dishwasher
1. Circulation Motor
A motor that sucks the water remaining on the floor of the dishwater and
infects water using high pressure through the internal water passages to
the top Middle and lower nozzles.
2. Drain Pump
The pump that drains the polluted water from the dishwater generated
while the dishwater is running.
3. Heater
The healer is located on the water passages inside the dishwasher. It heats
4. Flow Meter
Measure the amount of supplied water by counting the pulses of the hall IC
located at the next of the inlet valve.
5. Distributor
Located at the output end of the sump inside the dishwasher. It turns the
(This model does not have this part)
6. Dispenser
The location where the detergent and rinse aids are stored so they can be
used by the dishwasher.
The dispenser automatically supplies detergent and rinse aids to the inside
of the dishwasher when they are needed.
7. Tub Assy
An internal case mode of stainless steel that makes up the basic
framework of the dishwasher.
8. Sump Assy
The place inside the dishwasher where water is collected. The injected
water gathers here after circulation.
The sump Assy is connected to the circulation motor and drain pump.
9. Tub Front Assy
An internal case made of stainless steel that makes up internal part of the
front door.
10. Base Assy A plastic part that makes up the basic bottom framework.
11. Basket Assy The upper and lower racks where dishes can be loaded.
12.
Top/Middle/Lower Nozzles
Washes dishes by rotating and injecting the supplied water through the
water passage at high pressure.
13. Case Brake
A passage that adjusts the air pressure by connecting the pressure of the
inside air which is expanded at high temperature during wash and rinse
cycles and the outside air pressure.
14. Door Lock Switch
Detects whether the door of the dishwasher is open or closed if the door is
open while the dishwasher is running the cycle is temporary stopped.
DW4000KM-00000A-00_EN (Basic)_160323.indd 45

Note
DW4000KM-00000A-00_EN (Basic)_160323.indd 46DW4000KM-00000A-00_EN (Basic)_160323.indd 46 2016-03-23 1:14:362016-03-23 1:14:36

Note
DW4000KM-00000A-00_EN (Basic)_160323.indd 47DW4000KM-00000A-00_EN (Basic)_160323.indd 47 2016-03-23 1:14:362016-03-23 1:14:36

Note
DW4000KM-00000A-00_EN (Basic)_160323.indd 46DW4000KM-00000A-00_EN (Basic)_160323.indd 46 2016-03-23 1:14:362016-03-23 1:14:36

Note
DW4000KM-00000A-00_EN (Basic)_160323.indd 47DW4000KM-00000A-00_EN (Basic)_160323.indd 47 2016-03-23 1:14:362016-03-23 1:14:36
QUESTIONS OR COMMENTS
COUNTRY CALL OR VISIT US ONLINE AT
Code No.:
DW4000KM-00000A-00_EN (Basic)_160323.indd 48DW4000KM-00000A-00_EN (Basic)_160323.indd 48 2016-03-23 1:14:362016-03-23 1:14:36
DD81-02171E-00
UK
0330 SAMSUNG (7267864)
www.samsung.com/uk/support
IRELAND (EIRE)
0818 717100
www.samsung.com/ie/support
SOUTH AFRICA
0860 SAMSUNG (726 7864)
ZAMBIA
0211 350 370
MAURITIUS
800 2550
ANGOLA
917 267 864
MOZAMBIQUE
847267864
www.samsung.com/support