Loading ...
Loading ...
Loading ...
12
→
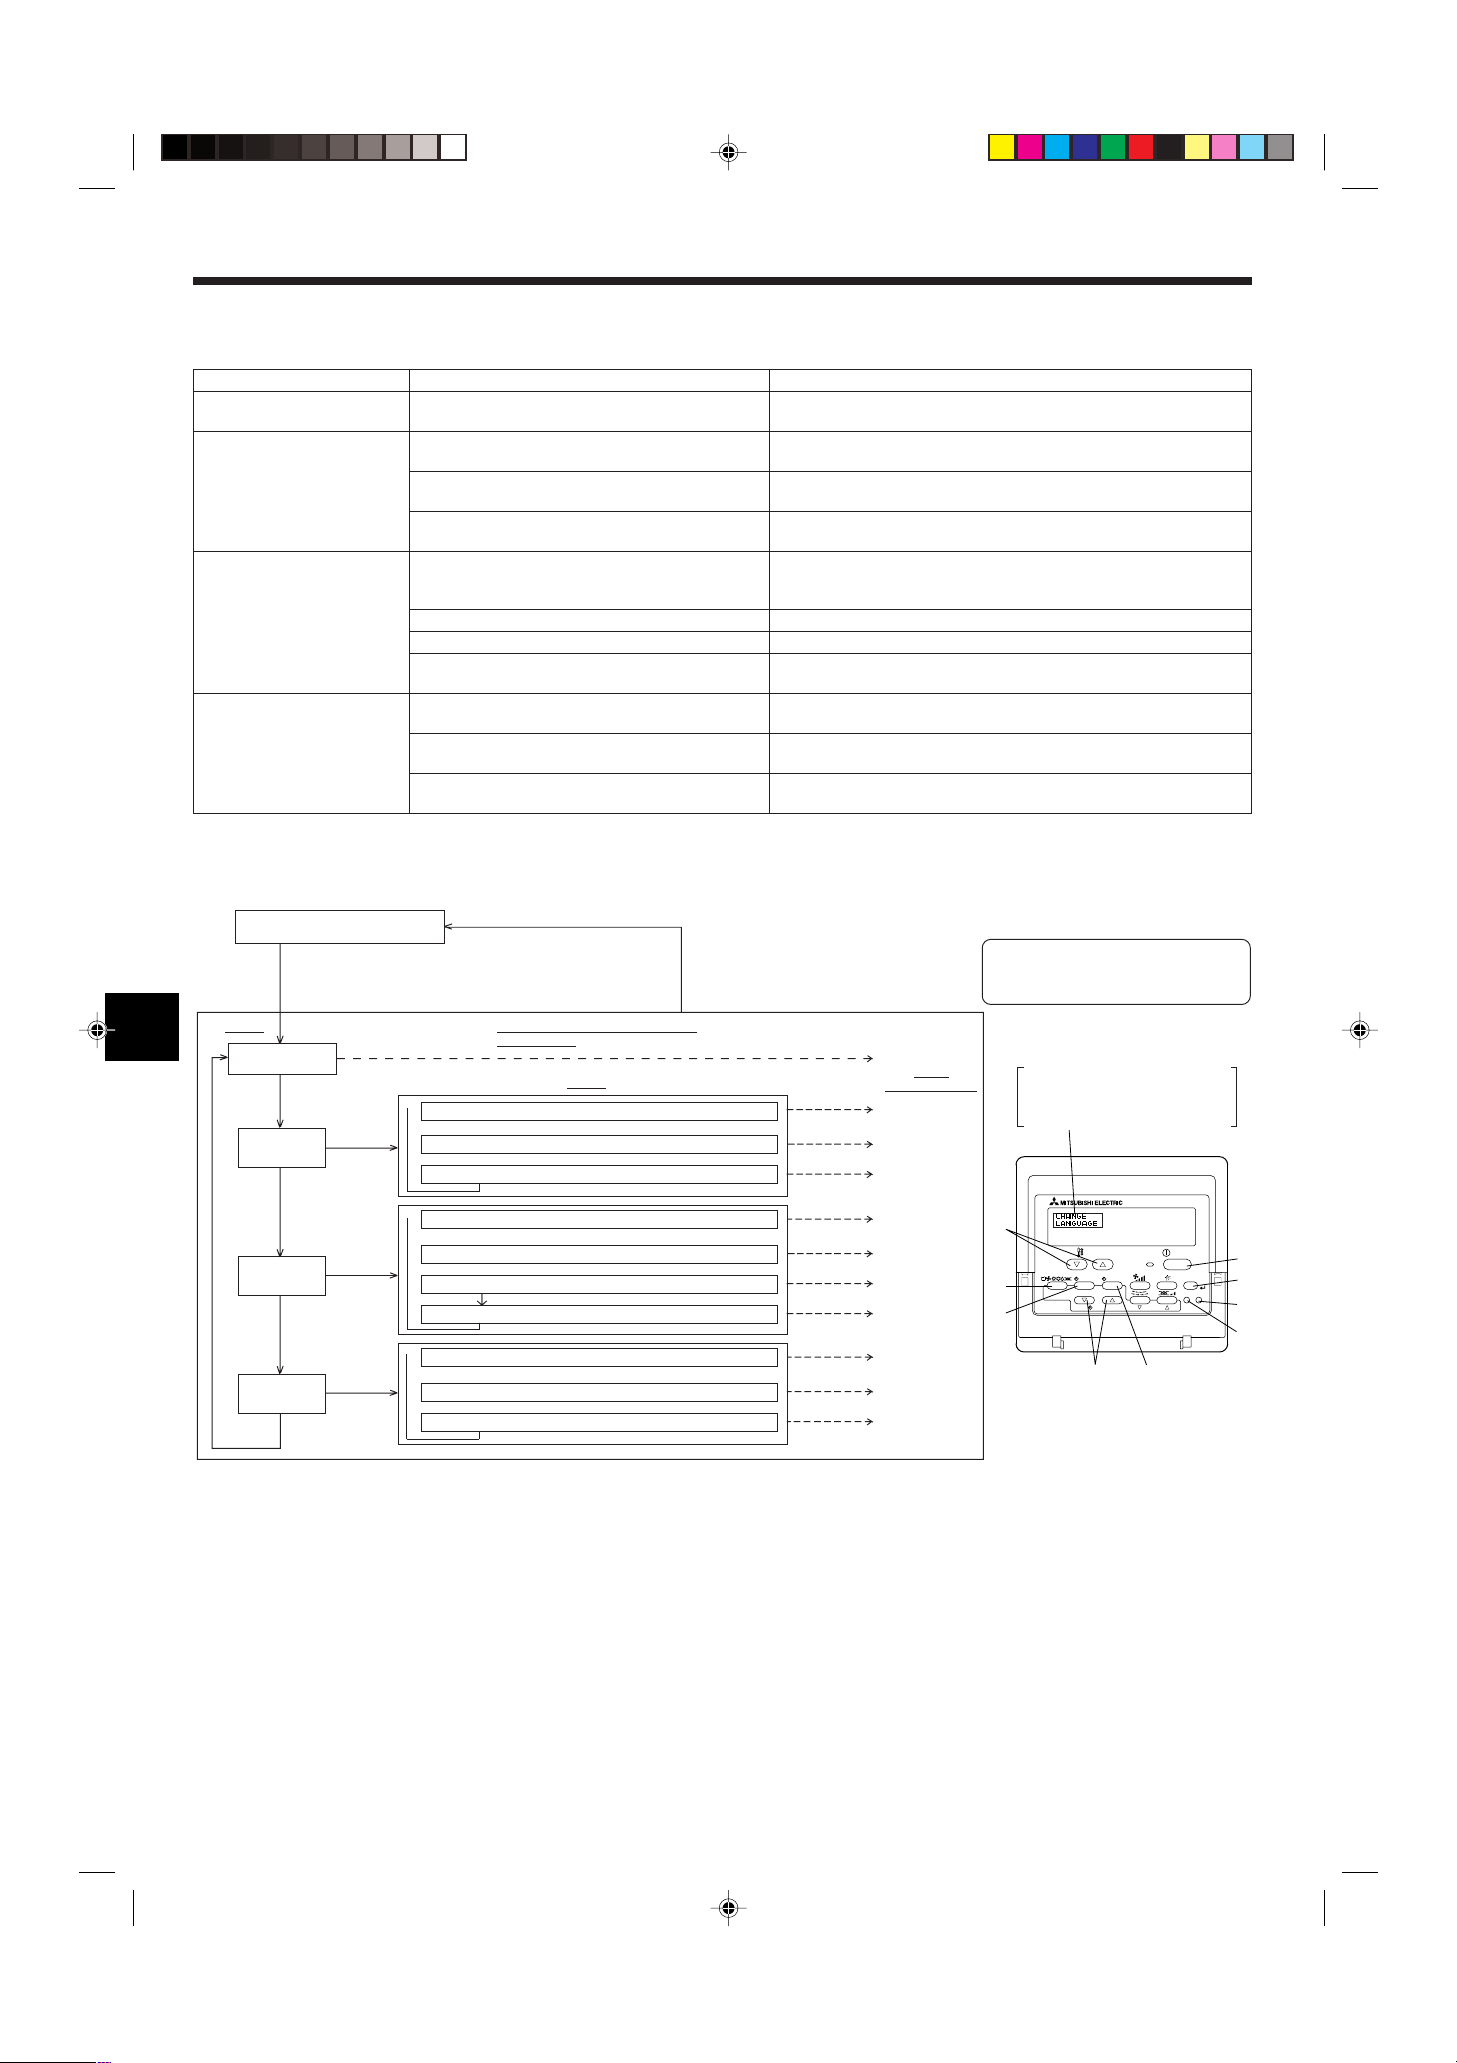
Item 1
1. Change Language
(“CHANGE LANGUAGE”)
2. Function limit
(“FUNCTION SELEC-
TION”)
3. Mode selection
(“MODE SELECTION”)
4. Display change
(“DISP MODE SETTING”)
Item 2
Language setting to display
(1) Operation function limit setting (operation lock)
(“LOCKING FUNCTION”)
(2) Use of automatic mode setting (“SELECT AUTO
MODE”)
(3) Temperature range limit setting (“LIMIT TEMP
FUNCTION”)
(1) Remote controller main/sub setting (“CON-
TROLLER MAIN/SUB”)
(2) Use of clock setting (“CLOCK”)
(3) Timer function setting (“WEEKLY TIMER”)
(4) Contact number setting for error situation
(“CALL.”)
(1) Temperature display °C/°F setting (“TEMP
MODE °C/°F”)
(2) Suction air temperature display setting (“ROOM
TEMP DISP SELECT”)
(3) Automatic cooling/heating display setting
(“AUTO MODE DISP C/H”)
Item 3 (Setting content)
• Display in multiple languages is possible.
• Setting the range of operation limit (operation lock)
• Setting the use or non-use of “automatic” operation mode
• Setting the temperature adjustable range (maximum, minimum)
• Selecting main or sub remote controller
* When two remote controllers are connected to one group, one
controller must be set to sub.
• Setting the use or non-use of clock function
• Setting the timer type
• Contact number display in case of error
• Setting the telephone number
• Setting the temperature unit (°C or °F) to display
• Setting the use or non-use of the display of indoor (suction) air
temperature
• Setting the use or non-use of the display of “Cooling” or “Heat-
ing” display during operation with automatic mode
2. Operation
2.13. Function selection of remote controller [For wired remote controller]
The setting of the following remote controller functions can be changed using the remote controller function selection mode. Change the setting when
needed.
2.13.1. Function selection flowchart
[1] Stop the air conditioner to start remote controller function selection mode. → [2] Select from item 1. → [3] Select from item 2. → [4] Make the setting. (Details are specified
in item 3) → [5] Setting completed. → [6] Change the display to the normal one. (End)
(Hold down the E button and press the D button for two
seconds.)
* The display cannot be changed during the unit function
selection, the test run and the self diagnosis.
(Hold down the E button and press
the D button for two seconds.)
* The remote controller records the
setting that is made in this way.
Press the
G button.
See [4]–1
Item 3
(Setting content)
See [4]–2. (1)
See [4]–2. (2)
See [4]–2. (3)
See [4]–3. (1)
See [4]–3. (2)
See [4]–3. (3)
See [4]–3. (4)
See [4]–4. (1)
See [4]–4. (2)
See [4]–4. (3)
Item 1 Remote Controller Function Se-
lection Mode
Item 2
Mode selection
(“MODE
SELECTION”)
Normal display (Display when
the air condition is not running)
PAR-21MAA
ON/OFF
FILTER
CHECK
OPERATION
CLEAR
TEST
TEMP.
MENU
BACK DAY
MONITOR/SET
CLOCK
ON/OFF
F
G
C
D
B
I
A
H
E
Change Language
(“CHANGE LANGUAGE”)
Function limit
(“FUNCTION
SELECTION”)
Display change
(“DISP MODE
SETTING”)
NOTE
Timer operation stops when the display for
remote controller function selection is
changed to the normal one.
Press the G button.
Press the
E button.
Press the
E button.
Press the
E button.
Press the
E button.
Press the
G button.
Press the
G button.
Press the
D button.
Press the
D button.
Press the
D button.
→→→→→
→
→
Operation function limit setting (“LOCKING FUNCTION”)
Press the G button.
Temperature range limit setting (“LIMIT TEMP FUNCTION”)
Use of automatic mode setting (“SELECT AUTO MODE”)
→
Temperature display °C/°F setting (“TEMP MODE °C/°F”)
Press the G button.
Automatic cooling/heating display setting (“AUTO MODE DISP C/H”)
Suction air temperature display setting (“ROOM TEMP DISP SELECT”)
→
Remote controller main/sub setting (“CONTROLLER MAIN/SUB”)
Press the G button.
Timer function setting (“WEEKLY TIMER”)
Use of clock setting (“CLOCK”)
Contact number setting for error situation (“CALL.”)
Dot display
The language that is selected in
CHANGE LANGUAGE mode ap-
pears on this display. English is
set in this manual.
Loading ...
Loading ...
Loading ...