OwneYs Manual
Manual dei Propietario
®
ROOM AIR CONDITIONER
ACONDICIONADOR DE AIRE DE VENTANA
Model, Modelo 580.76t 00
Distributed by Sears, Roebuck and Co., Hoffman Estates, IL 60179
wv_f, seal_com
TABLE OF CONTENTS ........................2
WARRANTY ..............................................2
SAFETY, .....................................................3
ImportantSafety Instructions...................... 3
ELECTRICAL REQUIREMENTS .......4
INSTALLING THE POWER CORD .......4
iNSTALLATION ........................................5
Installation Requirements ......................... 5
Installation ................................................ 6
How to Install ............................................ 6
Removal from Window................................. 8
OPERATION .............................................9
How and Why........................................... 9
Normal Sounds ........................................ 9
Capacity and Running Time ..................... 9
Features ..................................................I0
Us{ngthe Air Conditioner ....................... .t0
ControlPanel..........................................11
Remote Control ...................................... 12
MAINTENANCE .....................................13
Air Filter Cleaning ................................... 13
Air Conditioner Cleaning ........................ 13
Howto Remove the Front Grille.................. 13
How to Replacethe Front Grille.................. 13
TROUBLESHOOTING .........................14
BeforeCallingforService......................14
ESPAI_OL ................................................15
MASTER PROTECTION
AGREEMENTS ......................................30
SERVICE NUMBERS ............Back Cover
FULL ONE YEAR WARRANTY ON
ROOM AIR CONDITIONER
For oneyear from the dateof purchase, whenthis
airconditioneris operatedand maintained for
normal room cooling accordingto theinstructions
inthis owner'smanual, Searswillrepair thisair
conditioner, free of charge,if defective in material or
workmanship.
FULL FIVE-YEAR WARRANTY ON
SEALED REFRIGERATION SYSTEM
For five years from the date of purchase, when this
air conditioner is operated and maintained for
normal room cooling according to the instructions
in this owners manual, Sears wilt repair the seated
refrigeration system (consisting of refrigerant,
connecting tubing, and compressor), free of charge.
if defective in material or workmanship.
WARRANTY SERVICE IS AVAILABLE BY
CONTACTING SEARS SERVICE AT
1-800-4-MY-HOME e.
Warranty coverage applies only to air condiSoners
used for non-commercial, private household
purposes.
This warranty applies only while this product is in
use in the United States.
This warranty gives you specific legal dghts, and
you may aLso have other right which vary from state
to state.
Distributedby Seam, Roebuckand Co,,
Hoffn"ranEstates, IL80179
-2-
IMPORTANT SAFETY INSTRUCTIONS
The safetyinstructionsbelowwilltellyou howto useyour roomair conditionertoavoidharmto yourselfor
damage toyour ROOMAlR CONDITIONER.
FOR YOUR SAFETY
Do netstoreor use gasolineorotherflammable
vaporsand liquids in thevicinityofthisor anyether
appliance,Readproductlabelsfor flammability and
otherwarnings.
PREVENT ACCIDENTS
To reducethe riskof fire,electr_c,al shock,or injury
to personswhenusingyourairconditioner,follow
basicprecautions,includingthe following:
• Besurethe electrica!serviceisadequate forthe
modelyou havechosen.
. tfthe air conditioneristo be installed in a window,
youwillprobablywant tocleanboth sidesof the
glassfirst. Ifthe windowisatriple-tracktypewitha
screenpanelincluded,you may want to remove
the screencompletelybefore instaUation.
• Be surethe airconditionerhasbeen securelyand
correctlyinstalledaccordingto the separate
installation instructionsprovidedwiththis manual.
Save this manual and insta{lationinstructionsfor
possiblefuture use inremoving orreinstallingthis
unit.
- Use gloves whenhandlingtheair conditioner.
Be carefultoavoidcutSfrom sharpmetalfinson
frontandrear coils.
ELECTRICAL INFORMATION
The completeelectrical rat}ngofyour new room air
conditionerisstatedon the serialplate, Referto the
rating whencheckingthe electricalrequirements.
. Be surethe air conditioner isproperly grounded.
To minimizeshockandfire hazards, proper
groundingisimportant.The power cordis
equipped withathree-pronggroundingplug for
protectionagainstshockhazards.
• Your airconditionermust be pluggedintoa
propedygroundedwall receptacle,Ifthe wall
receptacleyou intendtouseis notadequately
grounded orprotectedbya time delay fuse or
circuitbreaker,have aqualified alectrielan install
the properreceptacle.
, Do not runair conditionerwitha protective
covering.Thiscouldresult in mechanical damage
withinthe airconditioner.
, Do not use an extension cord or an adapter
plug.
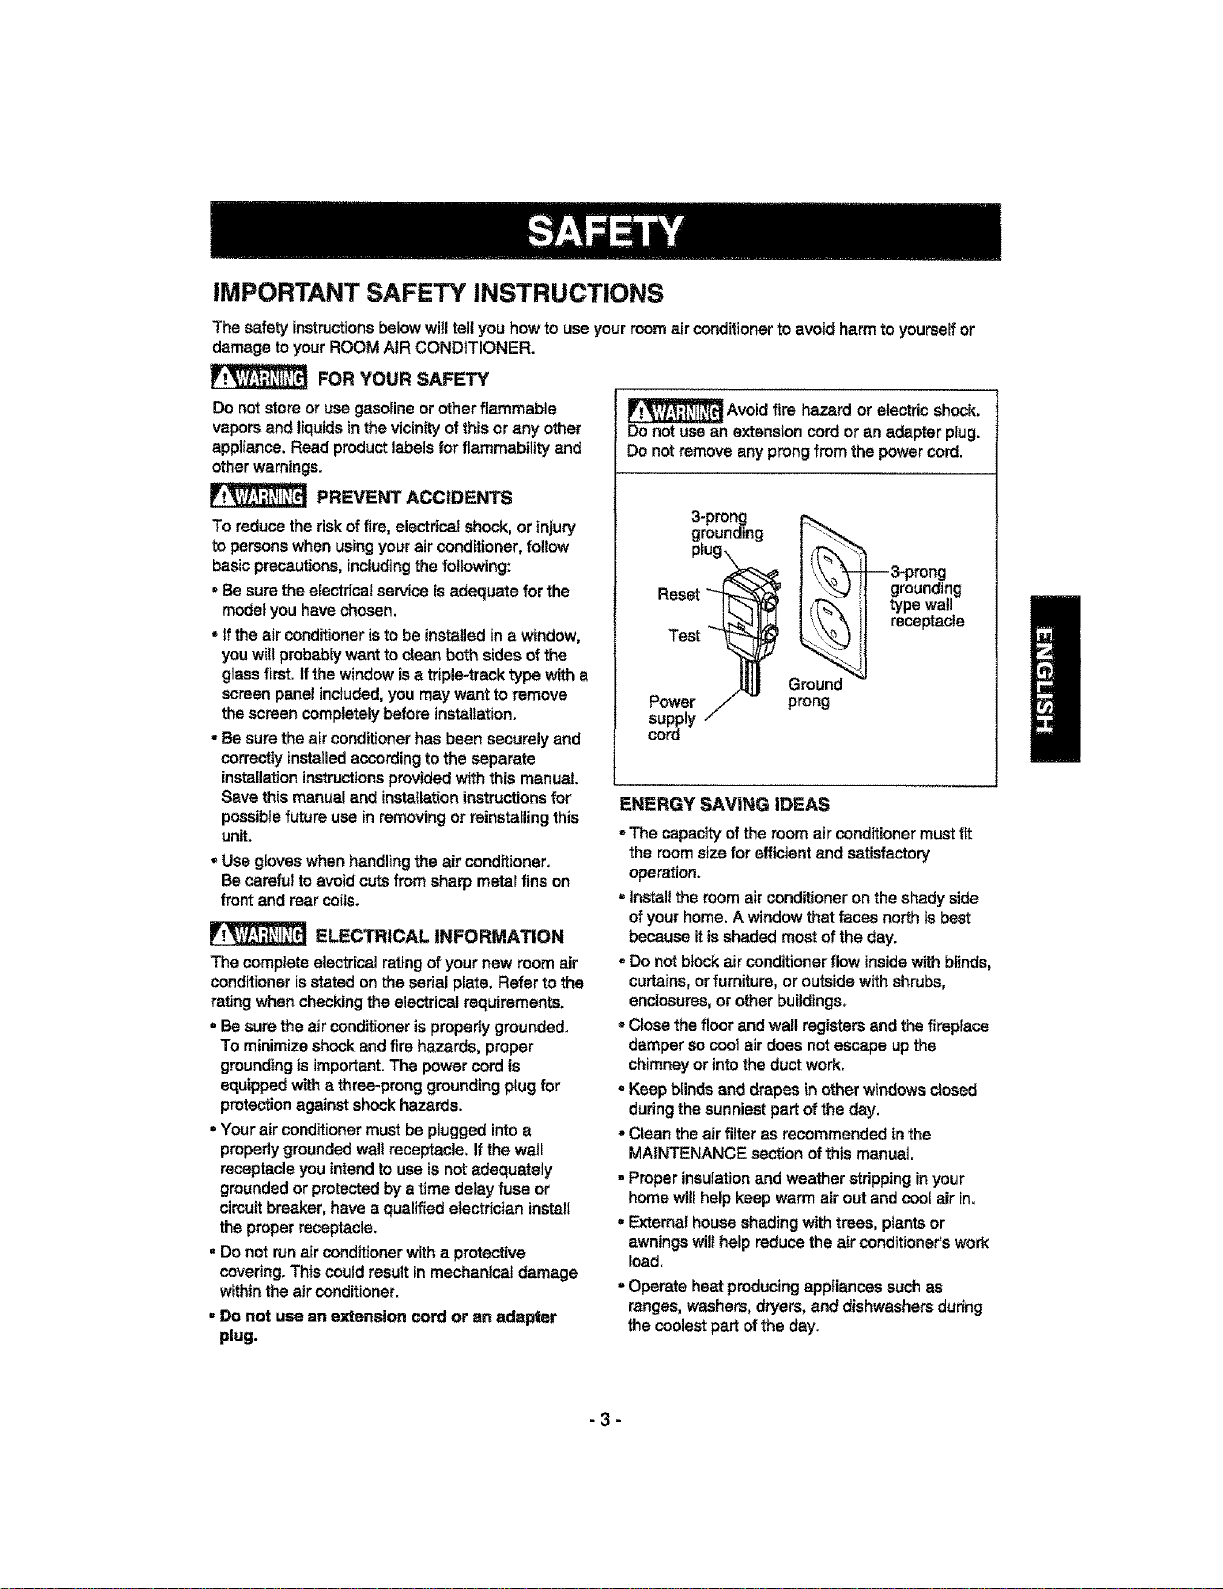
Avoid fire hazard or electric shock.
Do not use an extension cord or an adapterplug.
Do notremoveanyprongfrom the powercord.
Test _ _
--3-prong
grounding
type wall
receptacle
ENERGY SAVINGIDEAS
=The capacityof the room air conditionermust fit
the room size forefficientand satisfactory
operation.
=Installthe room airconditioneronthe shadyside
ofyourhome,A windowthatfaces northis best
becauseitisshadedmostofthe day.
- Do not block air conditionerflowinsidewithblinds,
curtains,or furniture, or outside withshrubs,
enclosures,or otherbuildings_
- Closethe floor and wall registersand thefireplace
damperso cootair does notescape upthe
chimneyorintotheductwork.
oKeepblinds and drapes inother windows closed
duringthe sunniestpartof the day.
• Cleantheair filteras recommendedin the
MAINTENANCE sectionof thismanual
. Properinsulationand weather strippinginyour
homewillhelpkeep warmair out and cool air in,
,,External house shadingwithtrees, plantsor
awningswilthelp reduce the air conditioce¢swork
load.
•Operateheat producingappliances suchas
ranges,washers,dryers, and dishwashers durfng
the coolest part of the day.
-3-
OBSERVE ALL LOCAL CODES AND
ORDINANCES.
DO NOT, UNDER ANY CIRCUMSTANCES,
REMOVE TH_ POWER SUPPLY CORD
GROUND PRONG.
ELECTRICAL GROUND iS REQUIRED ON
THiS APPLIANCE.
k 250-volt 60 Hz, kC onty, 20A fused and
properly grounded e_ectrica_ supply is required.
A time detay fuse or time deiay circuit breaker
is recommended. Use a dedicated circuit,
serving only this appliance.
DO NOT USE AN EXTENSION CORD.
RECOMMENDED GROUNDING METHOD
For your personal safety, this appliance must
be grounded. This appliance has a power
supply cord with a 3-prong grounding plug, To
minimize possible shock hazard, the cord must
be plugged into a mating grounding type wall
receptacle and grounded in accordance with
the National Electrical Code (ANSI/NFPA 70)
latest edition and all loca!codes and
ordinances, if a mating wail receptacle is not
available, it is the personal responsibility and
obligation of the customer to have a property
grounded 3-prong wall receptacle installed by a
qualified electrician.
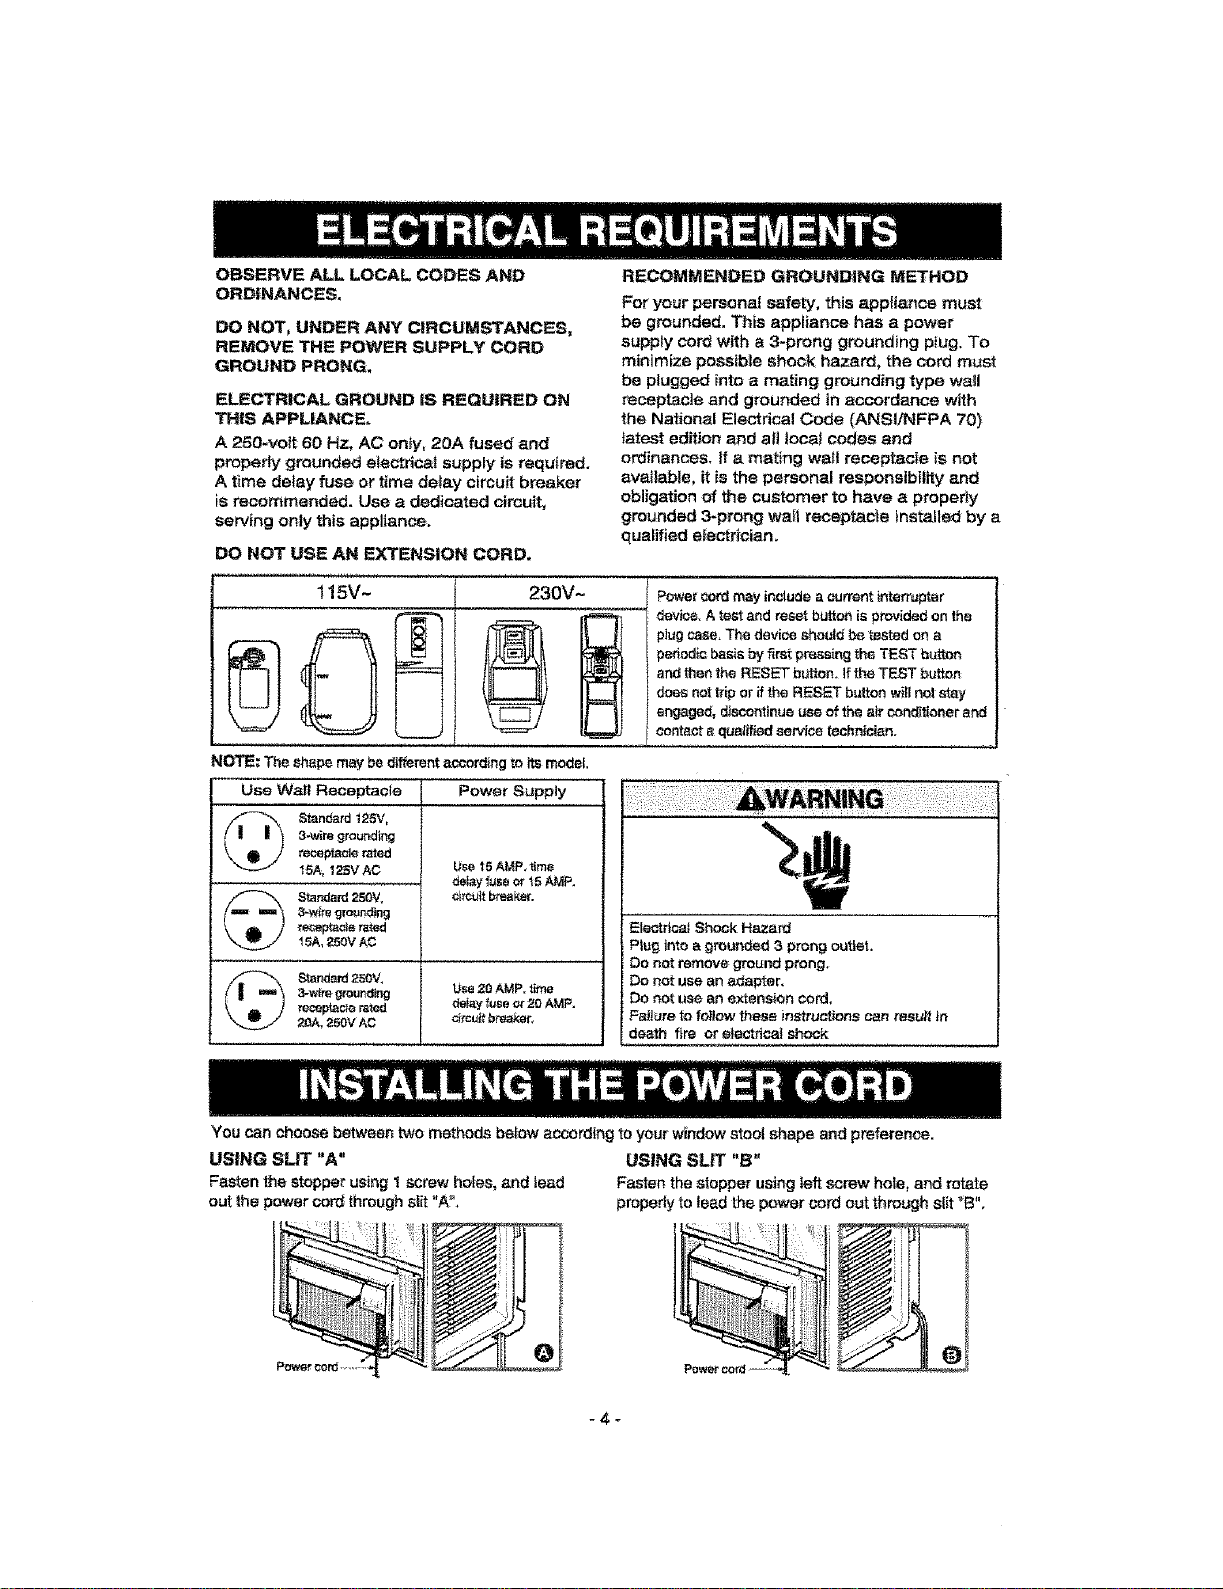
115V~
2aOV~
Powercordmayinc|ude a currentinterrupter
dev*_.._.A test and reset buttot_is providedon the
plug_, The device shouldb_ tested on a
ped_dicbasis by f_rstpressing _heTEST butt_m
and_en the RESET"b_tton.Ifthe TEST button
does nott_ipor ifMe RESET buttonwill notstay
engaged, discontinue use of the air condIlionerand
contact0qu0#fied service techn_cien.
NOTE: The shape may be d;fferentaccording _eitsmodel
Use Wail Receptacle Power Supply
_I ,_ 5_andardt25V,
3-_re grouttdtng
receptaclerated
15A, 125VAC UseJ5AMP,_me
.................. de_y fLIse Or_5AMP,
Standard 250V, ,circuitbreaker.
a-w_m grounding
Ie_pt_t_ r_d
15A,?_50VAC
St_r_ord25or.
3-w_re grounding
_cept_c_on_ted
2:0_.._OV AC
Use;20AMP.t_e
de_ay_uBeor20AMP.
Electr|ca_ Shock Haza_
Plugintoa grounded 3 prong outlet.
Do notremove ground prong,
De notuse an adapter.
Do not use an extension cord,
Failure to f_low these inStruclJone can result tn
death fire or aieetdca_ shock
You canchoose between two methods below according toyour windowstool shape and preference.
USING SLIT "A"
Fastenthe stopperusing I screwholes,and tead
out the power cordthroughslit "A",
USING SLIT "B"
Fastenthe stopper using leftscrewhole, and rotate
prc_perfyto lead the power cord outthrough slit"B".
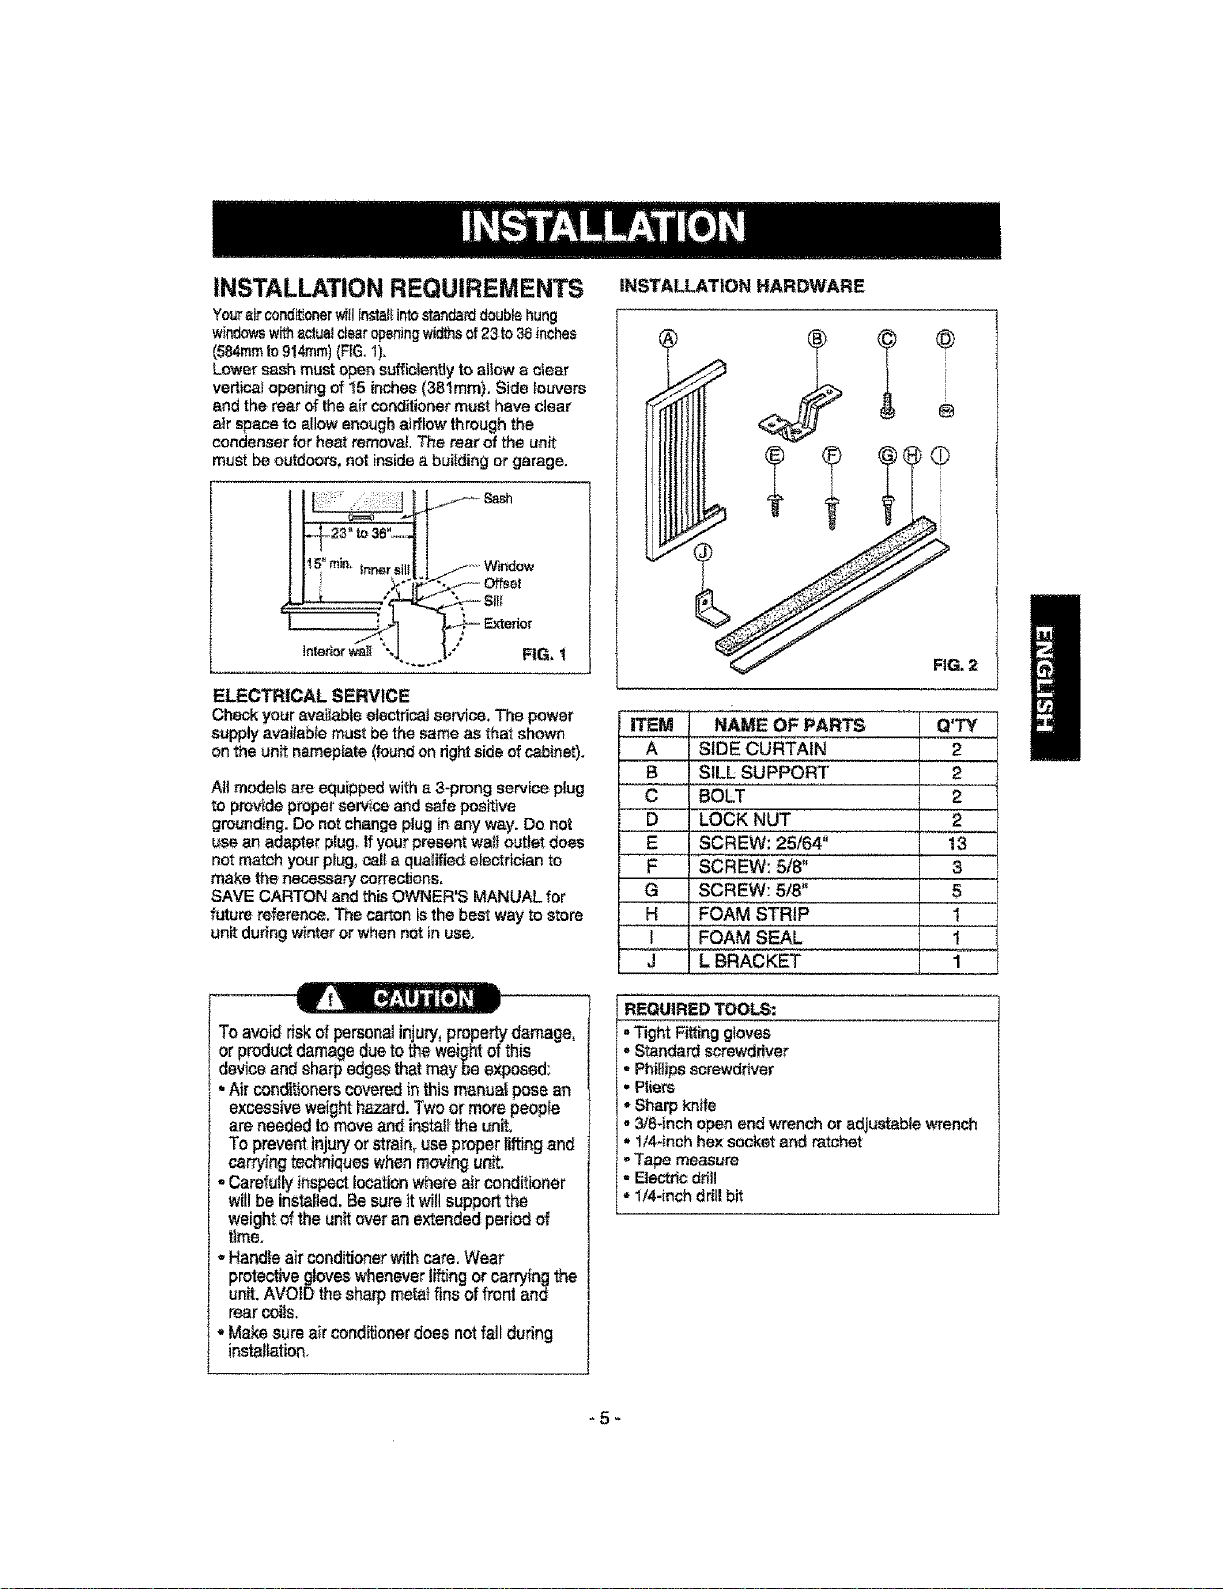
INSTALLATION REQUIREMENTS
Yoursir conditionerwillirrstalintostandarddoublehung
w_ndowswith_ctuatclearopeningwidthsof23to38inches
(584mmto914mm)(FIG,1),
Lowersashmust open sufficientlyto allow a e_eer
verticalopening of t_5inches(381mm), Side louvers
andthe rear ofthe alr conditionermust have clear
air spacetoallow enoughairflow throughthe
condenserfor heatremoval.The rear of the unit
must beoutdoors,not insideabuilding or garage,
I I /_-- Sash
,_ Exterior
lnlet_orw_1%J ..... ," RG, t
ELECTRICAL SERVICE
Check your availableelectrical service. The power
st@plyavalabte must bethe same as thatshown
on the unit nameplate (foundon dghtsideof Pab_net).
All models are equipped with a 3-prong service plug
to provide proper service and safe positive
grounding. Do not change plug in any w_y. Do not
use an adapter plug, if your present wal outlet does
not match your plug, c81 a qualfied electrician to
make the necessart correc4_ons,
SAVE CARTON and this OWNER'S MANUAL for
future reference. The Patton Is the best way to store
unit during wfnter or when not in use.
Toavoid riskof personal injury,property damage,
or product damage due tothe weightofthis
device and sharpedgesthat may be exposed:
• Air conditioners coveredin thismanual posean
excessive weighthazard. Two or more peopfe
are needed to move and install the unit
To prevent injuryor strain, use proper lifting and
car_ing techniques when moving unit
. Carefu|ly inspect iocalonwhere air conditioner
willbe instaled. Be sure tt willsupport the
weightof the unt over an extended period of
time,
- Handle air conditioner withcare,Wear
protective gloves wheneverliftingor carryingthe
unit. AVOID the sharp motetfins of front and
rear coils.
, Makesure air conditioner does not fall during
installation.
INSTALLATION HARDWARE
NAME OF PARTS
A SIDE CURTAIN
B SILL SUPPORT
C BOLT
D LOCK NUT
E
F
G
H
I
J
2
2
2
2
SCREW: 25164" 13
SCREW: 5/8" 3
SCREW: 5/8" 5
FOAM STRIP 1
-- FOAM SEAL i......................
L BRACKET t 1
REQUIRED TOOLS:
=Tight Filing gloves
,' Standard screwdrive_
- Phillips screwdriver
, Pliers
- Sharp knife
• 3tSAnch open end wrench or adjustable wrench
. lt4-inch he× socket and ratchet
Tape measure
- Bectric drill
• ll4-mch drill bit
-5-
INSTALLATION
Pick a location wh_h wi_lallow you to blow the cold
air into the area you want, Windows used for
installation must be strong enough to support the
weight of the air conditioner_ Gcod installation with
special attention to the proper position of the unit
wilt tessen the chance that service wi_tbe needed,
When cooling more than one room, instalta_on
location is very important. To coo! your morns, cold
sir must be blown from the sir conditioner in a
straight path.
HOW TO INSTALL
if the air conditioner is blacked by a storm
window frame, see step 19 o_npage 8 befo_e
bsglnnlng to install
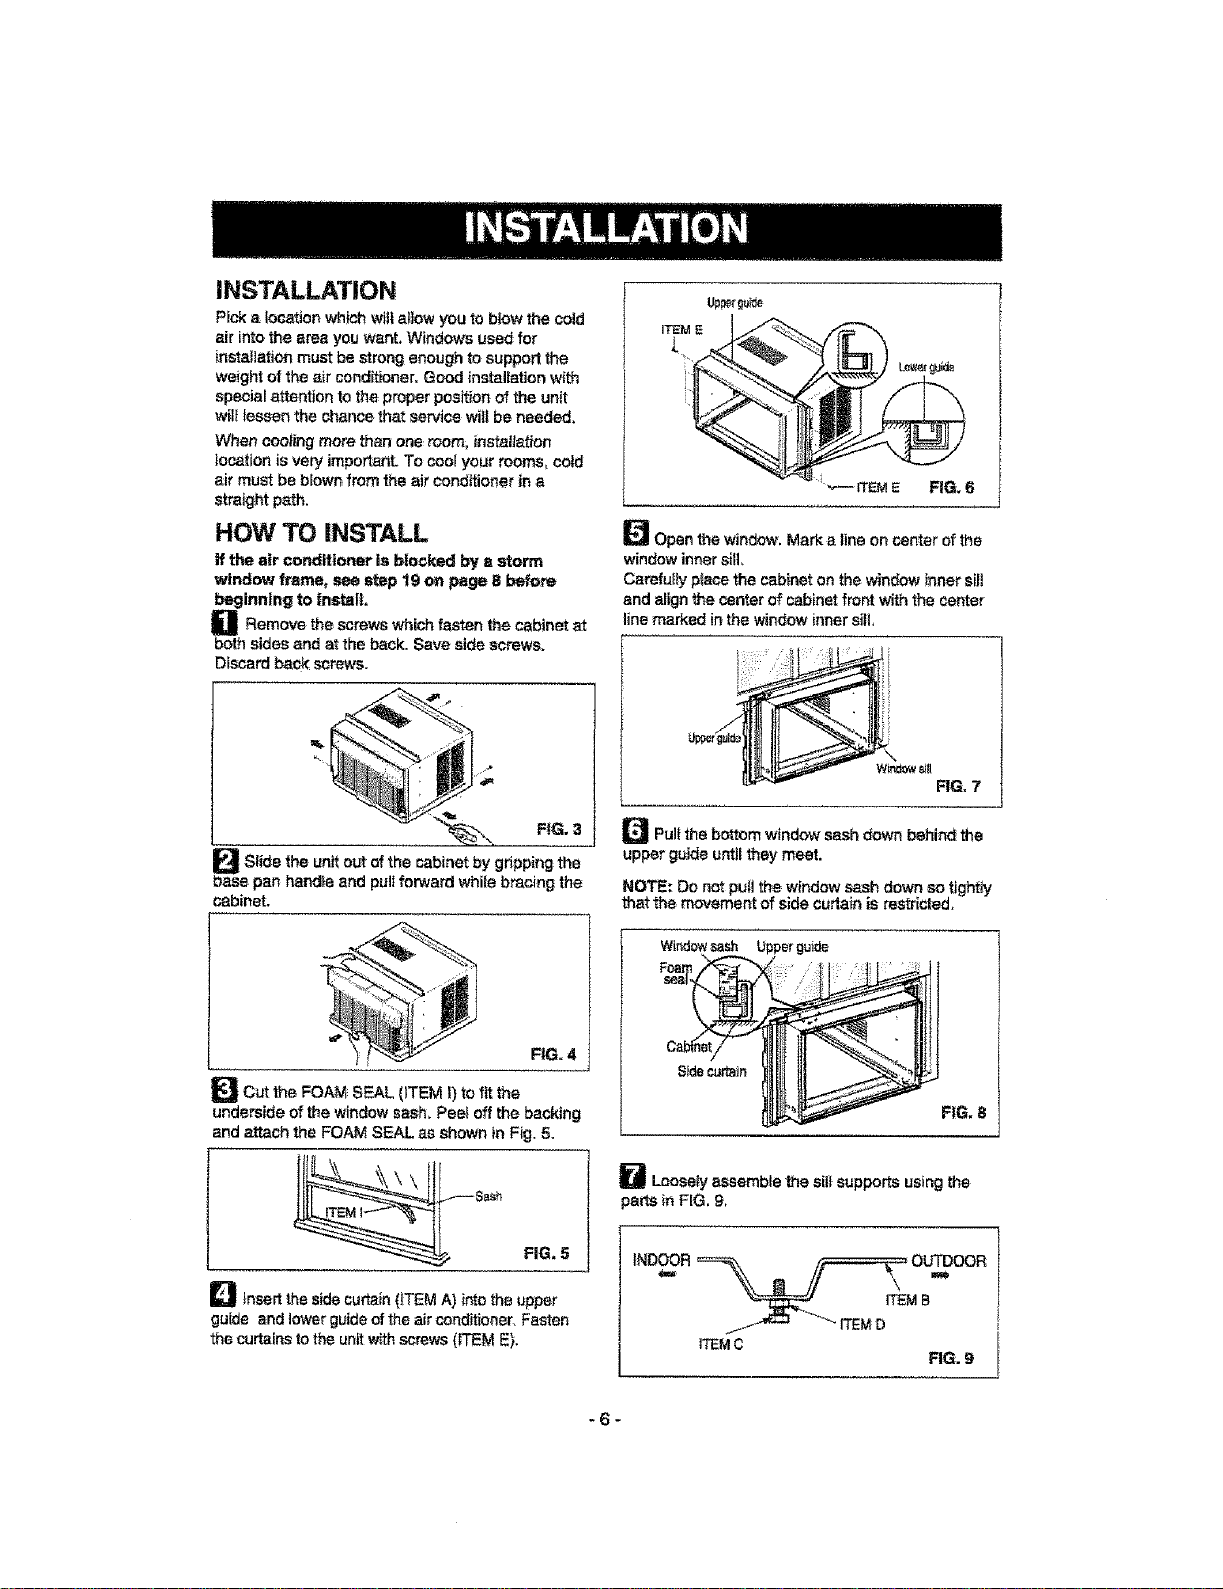
_]1 Flemove the screws which fasten the cabinet at
both sides and at the back. Save side screws.
Discard b_ck screws.
p S_ide the unit out of the _abit'rat by gdpping the
ass pan handle and pull forward while bracing the
cabinet.
FiG. 4
_Cut the FOAM SEAL {iTEM 1)to fit the
underside of the window st,sh, Pee_ off the backing
and attach the FOAM SEAL as shown in Fig. 5.
FIG, 5
D insert the side curtain {ITEM A) into the upper
guide and towsr guide of the air cond_oner, Fasten
the curtains to the unit w_h screws (tTEM E},
ITEM5" RG. 6
_Open the window. Mark a line on cen_er of the
window inner sill,
Carefuliy place the cabinet on the window tuner sill
and align the center of cabinet front with the center
line marked in the window inner sill,
D PulI the bottom window sash down behin_ the
upper g_ide until they meet.
NOTE: Do not pull the window sash down so tightly
that the movement of side curla_nis restricted=
F_G. 8
_ Loosely assemble the silt supports using the
parts in FIG, 9,
_TEMB
ITEMC
FIG. 9
-6-
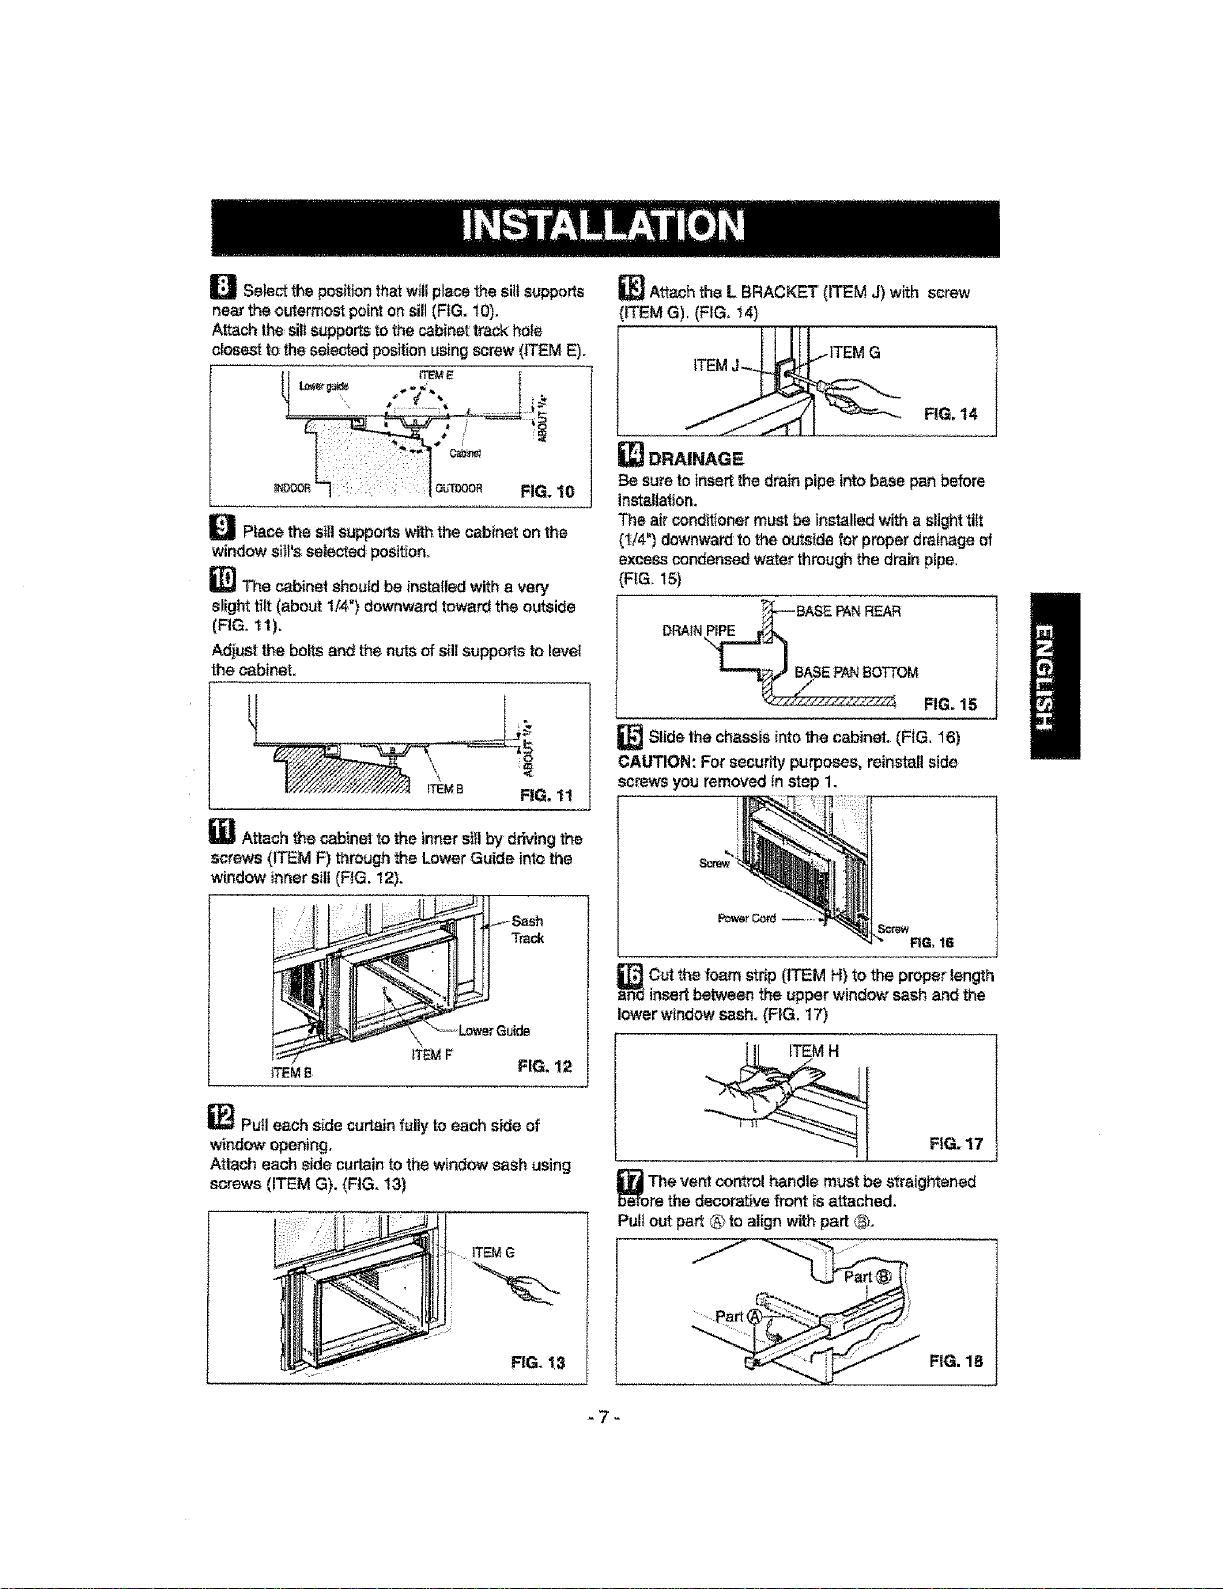
Q Select the pcsition that wifl place the silt supports
near the outermost point on sill(FIG. 10).
Attach the:sitl supports tothe cabinet track hole
ctosest to the selected position using screw (ITEM E).
O Place the s}i! supports with the cabinet on;the
window sill's selected position.
[]The cabinet should be inSt_lted with a very
slight tilt (about 1!4") downward toward the outside
(FIG. tl).
Adjust the bolts end the nuts of s_llsupports to leve_
the cabinet.
_TEMB F_G, 11
W Attach _ cabinet tothe inner sill by driving the
screws (ITEM F) through the Lower Guide i_o the
window inner sili (FIG. 12).
f _ _-_ kow0rGuide
_TEMB FIG. 12
_Pull each sidecurtainfully to each sideof
window opening,
Attach each side curtaintothe windowsash using
screws (ITEM G). (FIG. 13)
_ Attach the L BRACKET (ITEM J) with screw
(iTEM G). (F_G. _4)
FiG. 14
_ DRAINAGE
Be sure to Insert the drain pipe into base pan before
Instatlat_on.
The air conditfoner must be installed with a slightUtt
(_/4 ") downward to the outside for proper drainage of
excess condensed water t-}rough the drain pipe.
(FtG,is)
D'N_ -BASEPA'"EA" ]
_OTTOM F'G'" 1
_ Slide the chassis into the cabinet.
(F}G.
1
6)
CAUTION: For security purposes, reinstall side
screws you removed In step 1.
l
RG, 16
a_Out the:foam strip {ITEM H) to the proper length
insert between t_ upper window sash and the
lower window sash. (FIG. 17}
FIG. 17
_oThe vent control handle must be
straightened
re the decoretive front is attached.
Puli out part _ to align with part _3.
FiG. 1B
-7-

_ FRONT INSTALLATION
Instali the front grille(packed separately) onto. f_e
cabinet as follows:
• Hook upper tabs of front grille intoslots on the
cabins top_ (FIG, 19}
= Push front gdlWs tips towards the cabinet in order
to snap side tabs intothe cabinet. {FIG. 19)
, Open the inlet grille. (FIG. 20)
, Install the ecr_t_ (ITEM E) through the front gri|te.
(FIG, 20>
- Close inletgrille. (FIG. 2i}
Front tnetatlatlo_
RG. 19
tl'£M -?_.
FrontInstallation
FIG, 20
Front installation
FIG. 21
_IF AIR CONDITIONER IS BLOCKED ;BY
STORM WINDOW FP,_ME
• tf storm windowpresentsinterference,f_sten a 2"
widewoodstriptotheinnerwindowsillacrossthefull
widthofthesill Thewoodstripshouldbe thick
enoughto raise the heightof the windowsiilso that
the unit can beinstalledwithoutinterferencefrom the
thestormwindowframe.See FtG.P2.
Top of wood stripshould be approximately 3/4"
higher than the storm wir_ow frame to help
condensation to drain properly to the outside,
, Install a second wood strip (approximately 6° long by
1V2_wide and same thickness as first strip) in the
center ofthe outer sill _h against the back ofthe
inner sill Screw the L brackets intothis strip.
This will raise the L bracket as shown in FIG. 22.
11F,#mlr_.
WOODSTRIPMOUNTED {38mm_
ON TOP OF INNE-3'_SILL _ _ E3_,__,_
"I" I / #_"'_ WINDOW
_NNER ILBRACKET/ L FRAME
k I
J"=_l I ou_mE
FIG. 22
REMOVAL FROM WINDOW
• Turn offand unplug the air conditioner.
• Removethe front _Iie_ See HOW TO REMOVE THE
FROI'_ GF_ILLE,Refer to page t3,
• Unscrew thesidescrewsthatyou installedinSt_,,p15.
•Slide the air conditione_outof_e cabinet.
BE CAREFUL NOT TO DROP iT, Hold onto it _im_Iythe
_,vholewayslidingit ou_:.Once removed, set it safetyout
of theway,
• Remove the L bracket from window frame and the sash
sealfrom betweenthewir_Iows.
- Unscrew thes,idecurtains from thewindowframe. Fold
thsm back to the s_es of thecabinet.
, Remove screws attaching cabinetto inner sill Be carefuI
not tolet cabinet fall once screws ate remo_,
• Removecabinet from window opening.
• Piece air conditioner intocabinet. Reinsta]_sidescrews
and FrontGrilie.
, Place unit _nd allassembly hardware in air conditioner
s_ipping carton, and store in ck_an,dr/piece.
, Air conditionerscovered in this m_nua_pose_n
excessiveweight hazard.Two or more people
are neededto moveand instal/the unit,
To preventinjury orstrain,use proper filling and
caring techniqueswhenmoving unit,
=Whenhandling the air conditioner, be carefu_to
avoid cutsf_omsharp metal fins on front and
rear colts,
• Make sure air conditioner does not _il during
removal.
-8-
HOW AND WHY
Your room air conditioner provides the following
functions to make hot weather I]ving more
comfortable:
• Cools and circu{ates room sir,
- Lowers humidity by removing excess moisture.
, Fiite_ out aumtr_rtime dust, dirt, and some
airborne impurities,
The air conditioner performs these fun_ons by
drawing room air through a filter which traps dust
and dirt particles_ The air then passes over a
cooling coil which refrigerates the air and removes
excess moisture, The same air is then returned to
the room- cooter_ drier, and cleaner. Moisture
removed from the room air is carried to the outside
and evaporated_
Your sir conditioner is designed to be easy to
operate and to provide plenty of cooling power,
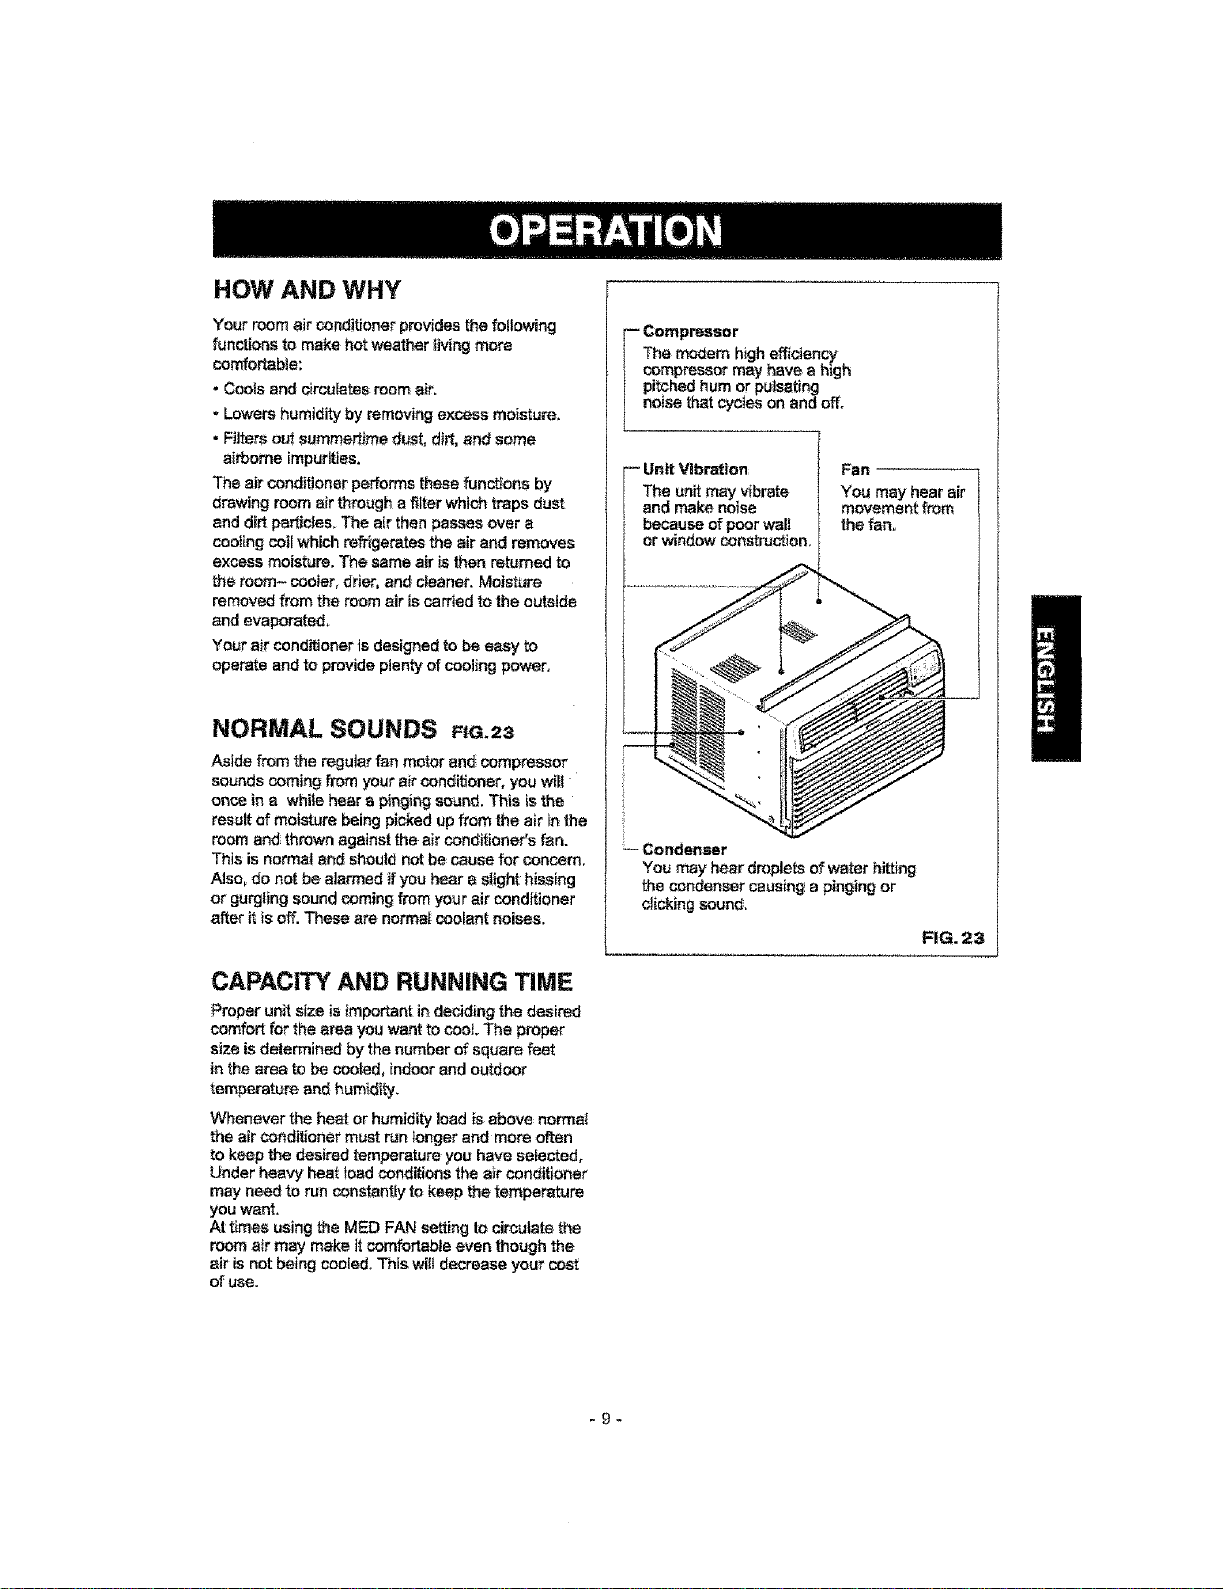
NORMAL SOUNDS FtG. ,3
Aside from the regular fan motor and:compn_ssor
sounds coming from your air conditioner, you will
once in s white hear a pinging sound. This is the
result of moisture being picked up from the air in the
room an_ thrown against the air conditioners fan,
This is normal and should not be cause for concern,
Also_ do not be alarmed if you hear a slight hissing
or gurgling sound coming from your air conditioner
after it is off. These are normal coolant noises.
CAPACITY AND RUNNING TIME
Proper unit size is important in deciding the desired
comfort for the area you want to cool The proper
size is determined by the number of square feet
in the area to be cooled, indoor and outdoor
temperature and hum{dlty.
Whenever the heat or humidity load is above: norms}
the air conditioner must run longer and more olten
to keep the desired temperature you have selected,
Under heavy heat icad conditions the a_rcenc_itioner
may need to run constantly to keep the temperature
you want,
At times using the MED FAN setting to circulate
room air may make it comfortable even though the
air is not being ccoied. This wdti decrease your cost
of use.
--Compressor
The mo_em high efficiency
compressor may have a high
pitched hum or pulsating
noise that cycles on andoff,
-- Unit Vibration
The unitmay vibrate
and make noise
because of poor wall
orwindow construction,
Fan
You may hear air
movement from
the fan,
-- Condenser
You may hear droplets ofwater hitting
the condenser causing a pinging or
clicklng sound,
FIG. 23
-9-
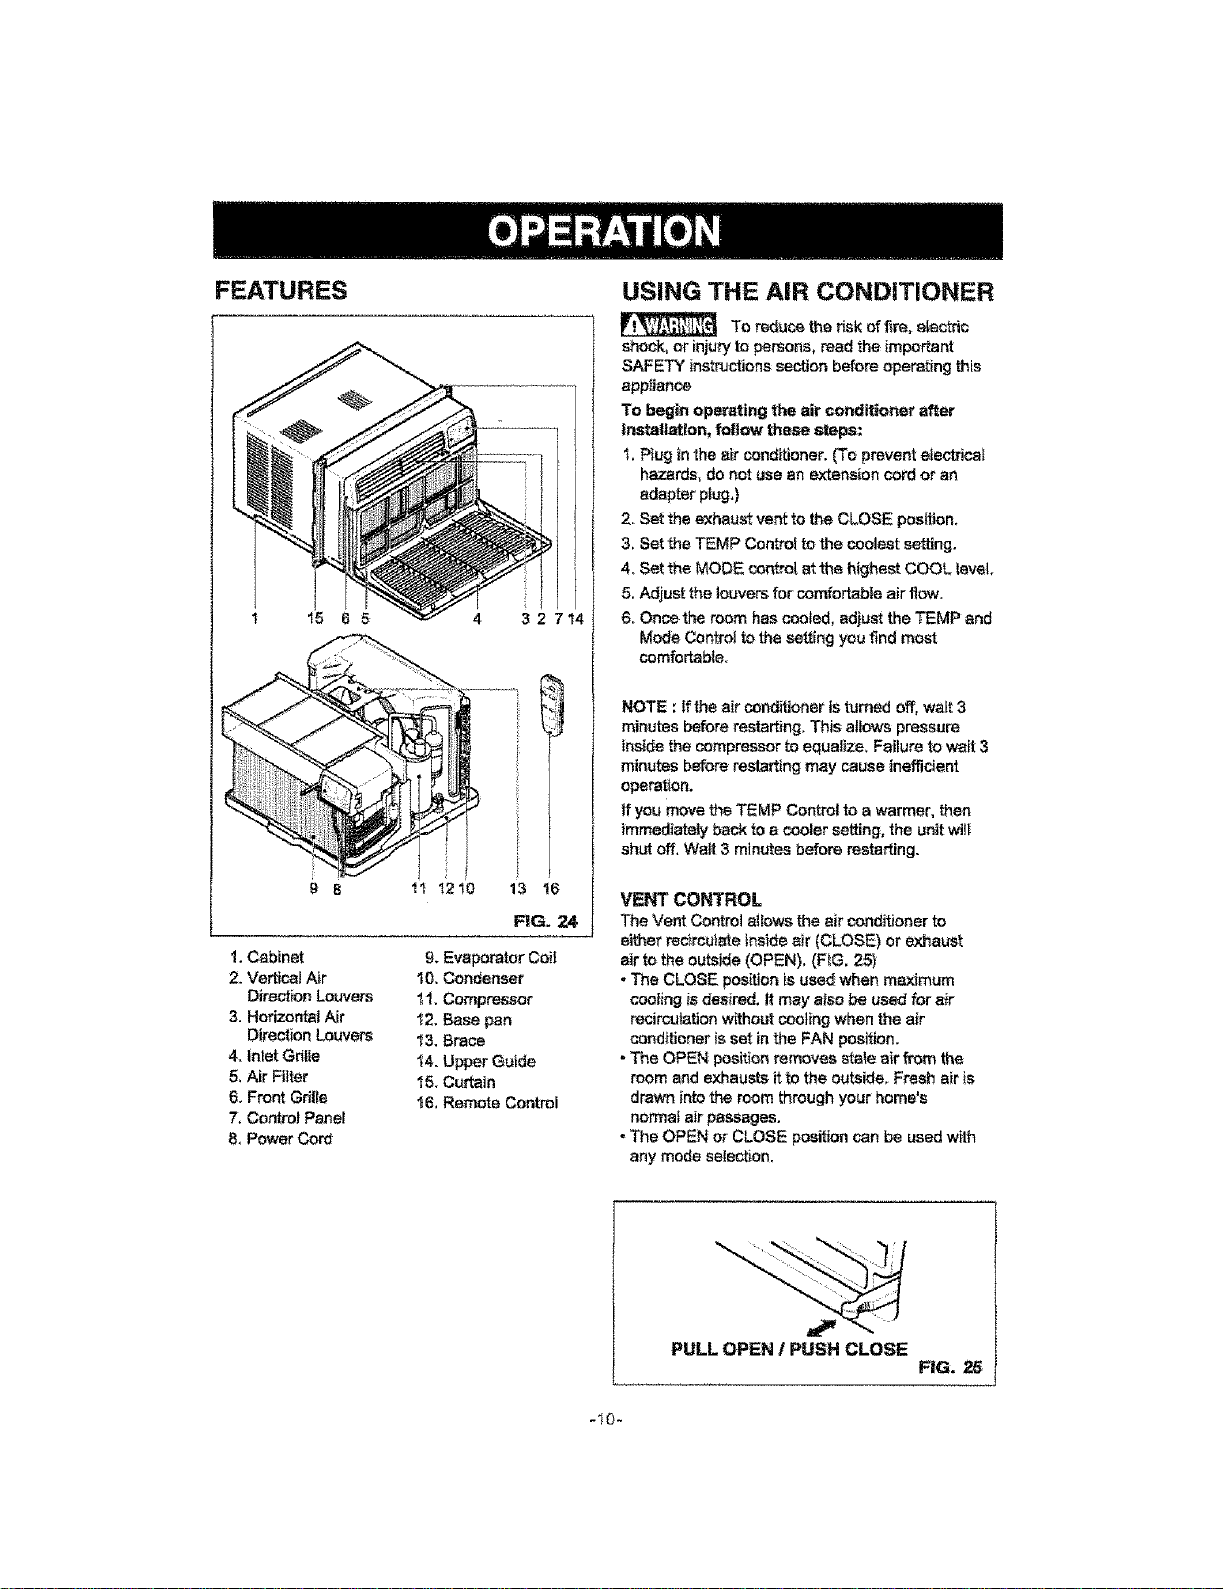
FEATURES
1 15 6 5 4 32714
F_G. 24,
1. Cabinet
2. Vertical Air
Direction Louvers
3. Horizontal Air
Direction Louvers
4. thtef Grille
5. Air FHter
6. Front Gdlle
7. Control Panel
8, Power Cord
9. EvaporatorCoiI
10, Condenser
11. Compressor
'_2.5ass pan
_3, Brace
"_4.Upper Guide
I5. Curtain
16, Remote Control
USING THE AIR CONDITIONER
To r_duce the r_k of fire, elec_c
shock, or injury to persons, read the important
SAFETY instructions sectionbefore operating this
applianos
To begin operating the air condltlorterafter
installation, foJ!ow these steps:
t. Plug in the air conditioner. (To prevent eiectrica_
hazards, do not use an extension cord or an
adapter piucj.)
2. Set the exhaust vent to the CLOSE position.
3. Set the TEMP Control to the coolest setting.
4. Set the MODE con+rot at the highest COOL level.
5. Adjust the louvers for comfortable air flow.
6. Once the room has cooled, adjust the TEMP and
Mode Control to the setting you find most
comfortable.
NOTE : If the air conditioner isturned off, wait 3
minutes before resta_ng. This attows prassurs
|r_6e the compressor to equalize. Failure to wait 3
minutes before restarting may cause inefficient
operation.
if you move the TEMP Control to a warmer, then
fmmediate_y back to a cooler setting, the unit will
shut off. WaN 3 minutes before restarting.
VENT CONTROL
The Vent Control aitows the air cottdltioner to
either r_c_rcuiz_e inside air (CLOSE) or exhaust
air to the outside (OPEN), (F_G, 25)
- The CLOSE position Ssused when maximum
coo|ing is desired, tt may also be us_d for a_r
recirculetton without cooling when the air
conditioner is set in the FAN position.
* The OPEN position removes sta_e air from the
room and exhausts it to the outside. Fresh air is
dr_wn into the room through your home's
norrna_ air passages.
* The OPEN or CLOSE position can be used with
any mode setsc_Jon.
PULL OPEN / PUSH CLOSE
FIG. 25
-_0-
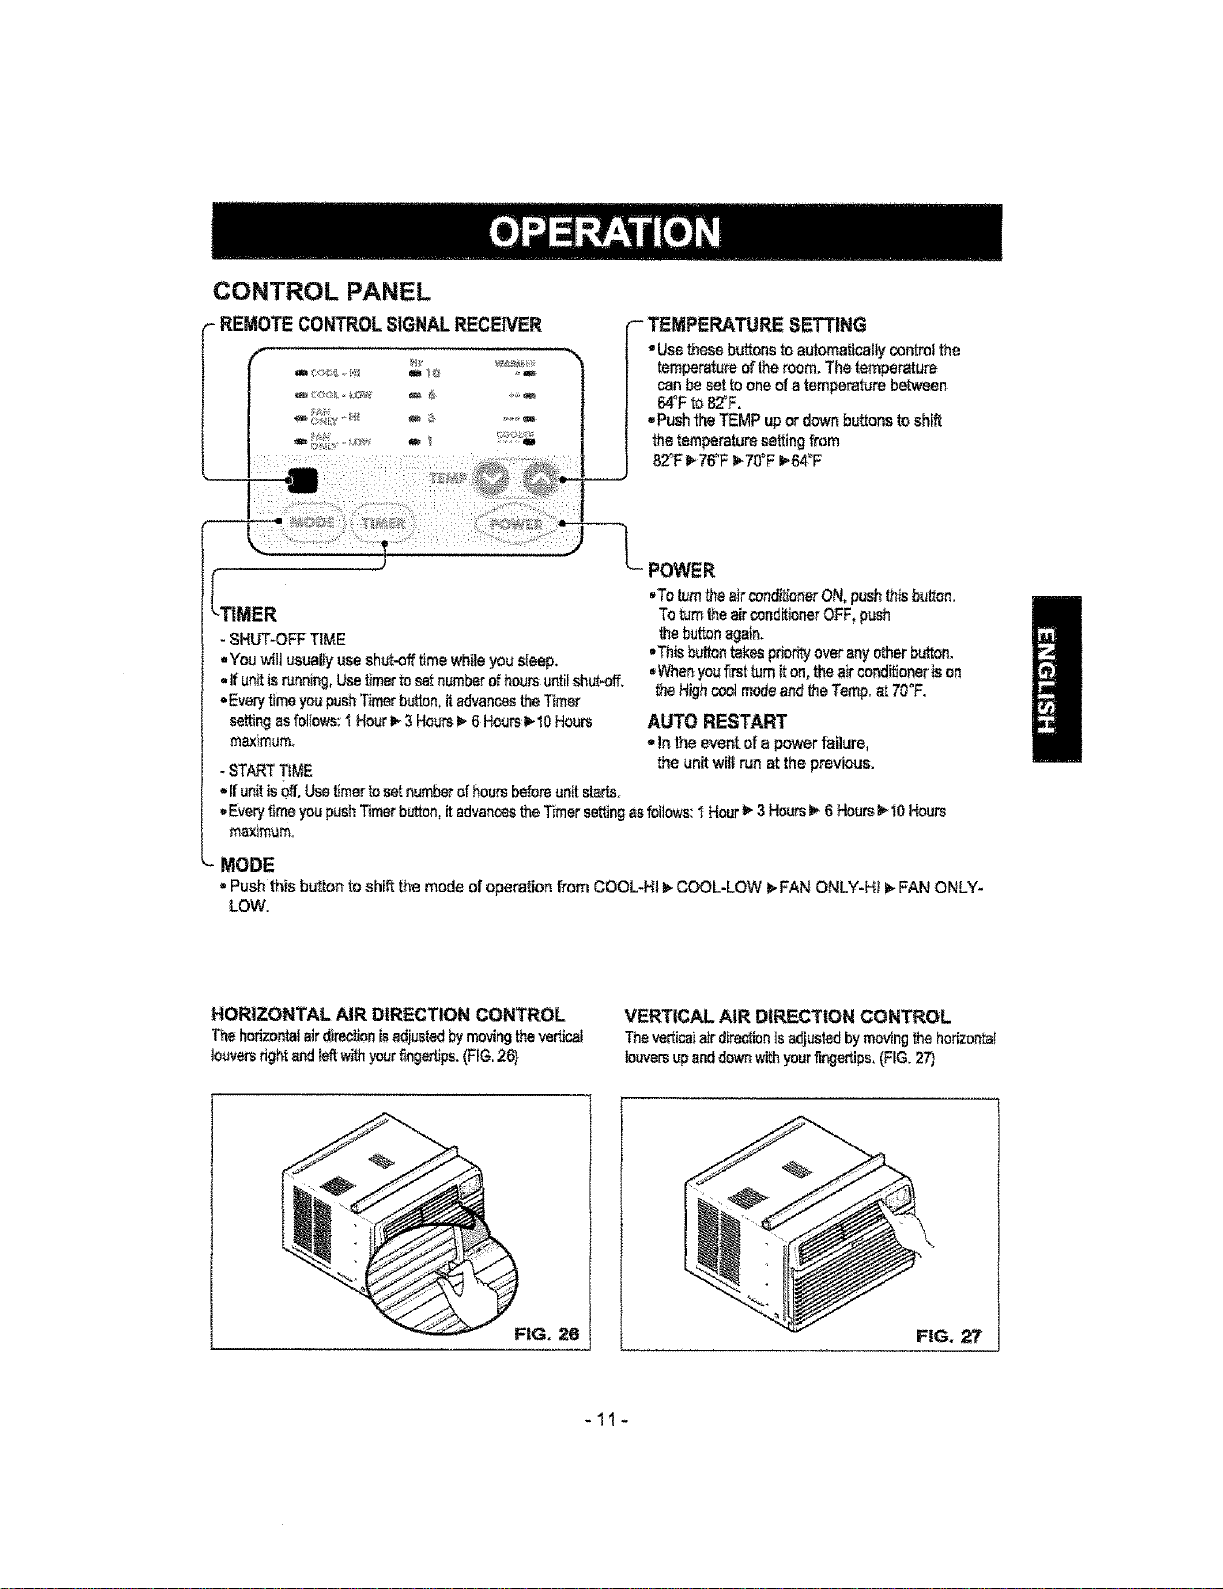
CONTROL PANEL
- REMOTECONTROLSIGNALRECEIVER
J
T|MER
- SHUT-OFF TIME
- You w_llusuallyuse shut-offtime while you sleep,
- If unit isrunny, Uset_merto se_n_-nberof hoursuntilshut*off,
=Everytime youpushTimer bt_on, it advancesthe Timer
setting as foitows: 1Hourt_ 3 HoursF 6 Hours _,-I0 Hours
maximum.
- TEMPERATURE SETTING
"Use these buttons toautomatically controlthe
ternpera_ure ofthe room. The temperature
can be set to one of a temperature between
64°F to 82_F.
,,Push the TEMP up or down bettons to shi_t
the temperature settingfrom
B2_F_ 76"F _70"_F_64_F
--_- POWER
,,To t_m the airc_n_ner ON, pushthisbutton.
To turn theair conditioner OFF, push
_e button again.
,,Tt_s button takes prtedtyover arty other button.
,_Whe_y_ first turn}ton, the a_rco_enei" }son
the High coolmo_eand the Temp.a_70°F.
- STARTTIM_
oif unit_soff,Usetimertosetnumberof#oursbeforeunits_rts.
AUTO RESTART
,,Inthe ever_tof a powerfailure,
the unitwit{runatthe previous.
*,EverytimeyoupushT_merb_n, itadvancestheTimersettingasfollows:'_Hour_ 3Hours_ 6 H_rs _ 10Hours
m_Jm_m.
MODE
=Pushthis buttonto shiftthe mode ofoperation from COOL-HI_.COOL-LOWI_FAN ONLY-H!_ FANONLY-
LOW.
HORIZONTAL AIR DIRECTION CONTROL
Theh_dzo,nta_sirdirec_nisadjustedbymovingtheverticat
]curetstighta_ teftw_ your_gertips.(FIG.26}
VERTICAL AIR DIRECTION CONTROL
The vet'ticaiatrd_rsc_ionis adjusted bymoving thehodzun[a_
louversupsad dov_ withyour_r_rtips, (F_G.27)
-11 -
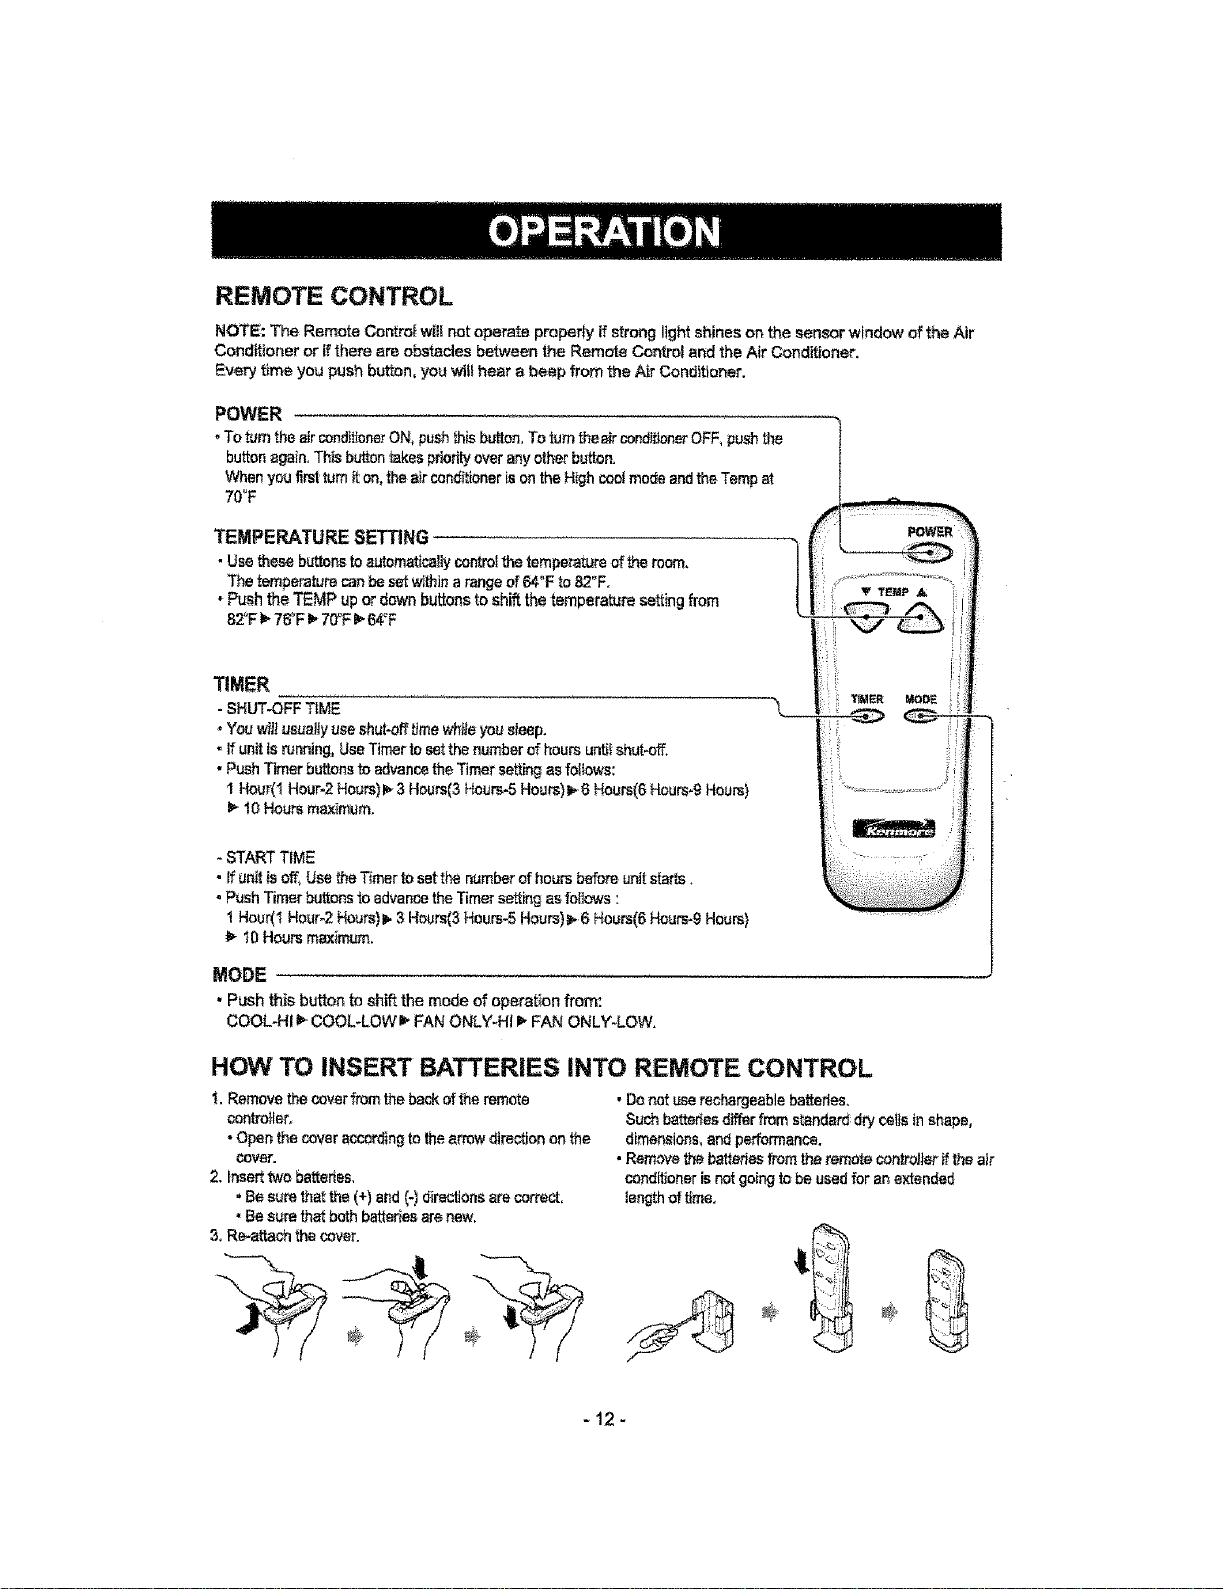
REMOTE CONTROL
NOTE: The Remote Control wi(_not operate properly if strong light shines on the sensor window of the Air
Conditioner or if there are obstaoles between the Remote Control and the Air Conditioner:
Ever/t_me you push but_n, you wil!hear a beep from the Air Conditioner.
POWER
°To turn the air cond_ormrON, push _Ls button. To turn theair condi_onerOFF_push the
button aga_n.Th_ button _kes _otity overanyother button.
When yo_ first turn _tan,the a_rconditioneris on the H_gh cool mo_ endthe Temp at
70"F
TEMPERATURE SETTING
• Usethesebuttonstoau_maticalfycontrolthetemperatureof _ room,
Thetemperaturecanbesetwtthinarangeof64_Fto 82"F,
• Pushthe TEMP upor down buttonstoshift the temperaturesettingfrom
8ZF I_76"FI_70"F_.6#F
TIMER
- SHUT-OFF TIME
* You willusualtyuse shuFoff _imewh_eyou sleep.
- If unit is running, Use Timer toset the number of hours untffshut-oil.
• Push Timer bbttons to advancethe Timer settingas foi_ws:
I Hour('_ Hour-2 Hours)I_ 3 Hsers(3 Hout_ Hours)_ 6 Hours(6 Hours.9 Hours}
_" 10Hours max_n_m.
- START TiME
• If unit isef_ Use De Timer to set the number of hours before unit starts.
, Push Timer buttons to advansethe "rimer settingas follows :
1 Hour('_Hour-2 Hours)_. 3 H_rs(3 Hours-5 Hours)t_-6 Hours(6 Hours-9 Hours}
10 Hours maximum.
MODE
Push this button to ehi_ the mode of operation from:
COOL-HI I_COOL-LOW I_ FAN ONLY-HI I_FAN ONLY-LOW.
HOW TO INSERT BATTERIES INTO REMOTE CONTROL
'!. Remove the coverfrom the back ofthe remote
contreIler.
- Open the cover according to the arrow direction on the
cover.
2. Inserttwo batteries.
=Be sure that the (+) and (-) direol_onsere correct.
, Be s_re that both batistes are t_v.
3. Re-attach the cover.
• Donot use rechargeable batteries.
Such batteries differ from standard dr/cetis in shape,
dimensions, ancIpedormance.
•Remove _ batteries from the remote controller if t_mair
cond_oner isnotgoingto be used for an extended
tength of time.
-12-

AiR FILTER CLEANING
The Air F_ltar will become dir_y as it removes dust
from the inside air. _tshould be washed at teast
every 2 weeks. If the A_rFt_ter remains fuU of dust,
the airflow will decrease arid the cooJingcapacity
witi be reduced, possthiy damagin_ the unit.
• Pult the inlet gr_tfeforward, graspfng both l_bs,
then pull out the air fiJter. (FIG, 28)
- Wash the Air Fi_terunder the faucet with warm
water. Be sure to shake off all the water before
replacing the filter. (FIG.29)
FIG. 29
HOWTOREMOVETHEFRONTGRILLE
=Open the tnle_ gdlte,downward.
, Remove the screw securing the Front Grl_a.
- Push the grii_e up from the bo_tam and pu_lthe top
of the gdite away from the case to lift the tap tabs
out oftheir stats.
\
AIR CONDITIONER CLEANING
Cteanthe front gdlleand inletgrii_ebywipingwi_he
cloth dampened in a mild detsrgent sO_ion_(FIG30)
The cabinetmay be washed withmildsoap or
detergentand _ukewarmwater,then pe_ishedwith
liquid appliancewax.
To ensurecontinued peakemciency,the condenser
coils(outdoorsideat the unit)shouldbe checked
periodically and cieaned ifthey becomeclogged
with sootor dirtfrom theatmosphere,Brush or
vacuumexterior coils toremovedebds from fins,
HOW TO REPLACE THE
FRONT GRILLE
Attach the front gdlle to the cabinet by inser_jng the
tabs on the griIle into the s}ots on the front of the
cabinet. Push the gritte in un_l it snaps into p_ace.
FiG. 32
FIG. 30
-13-
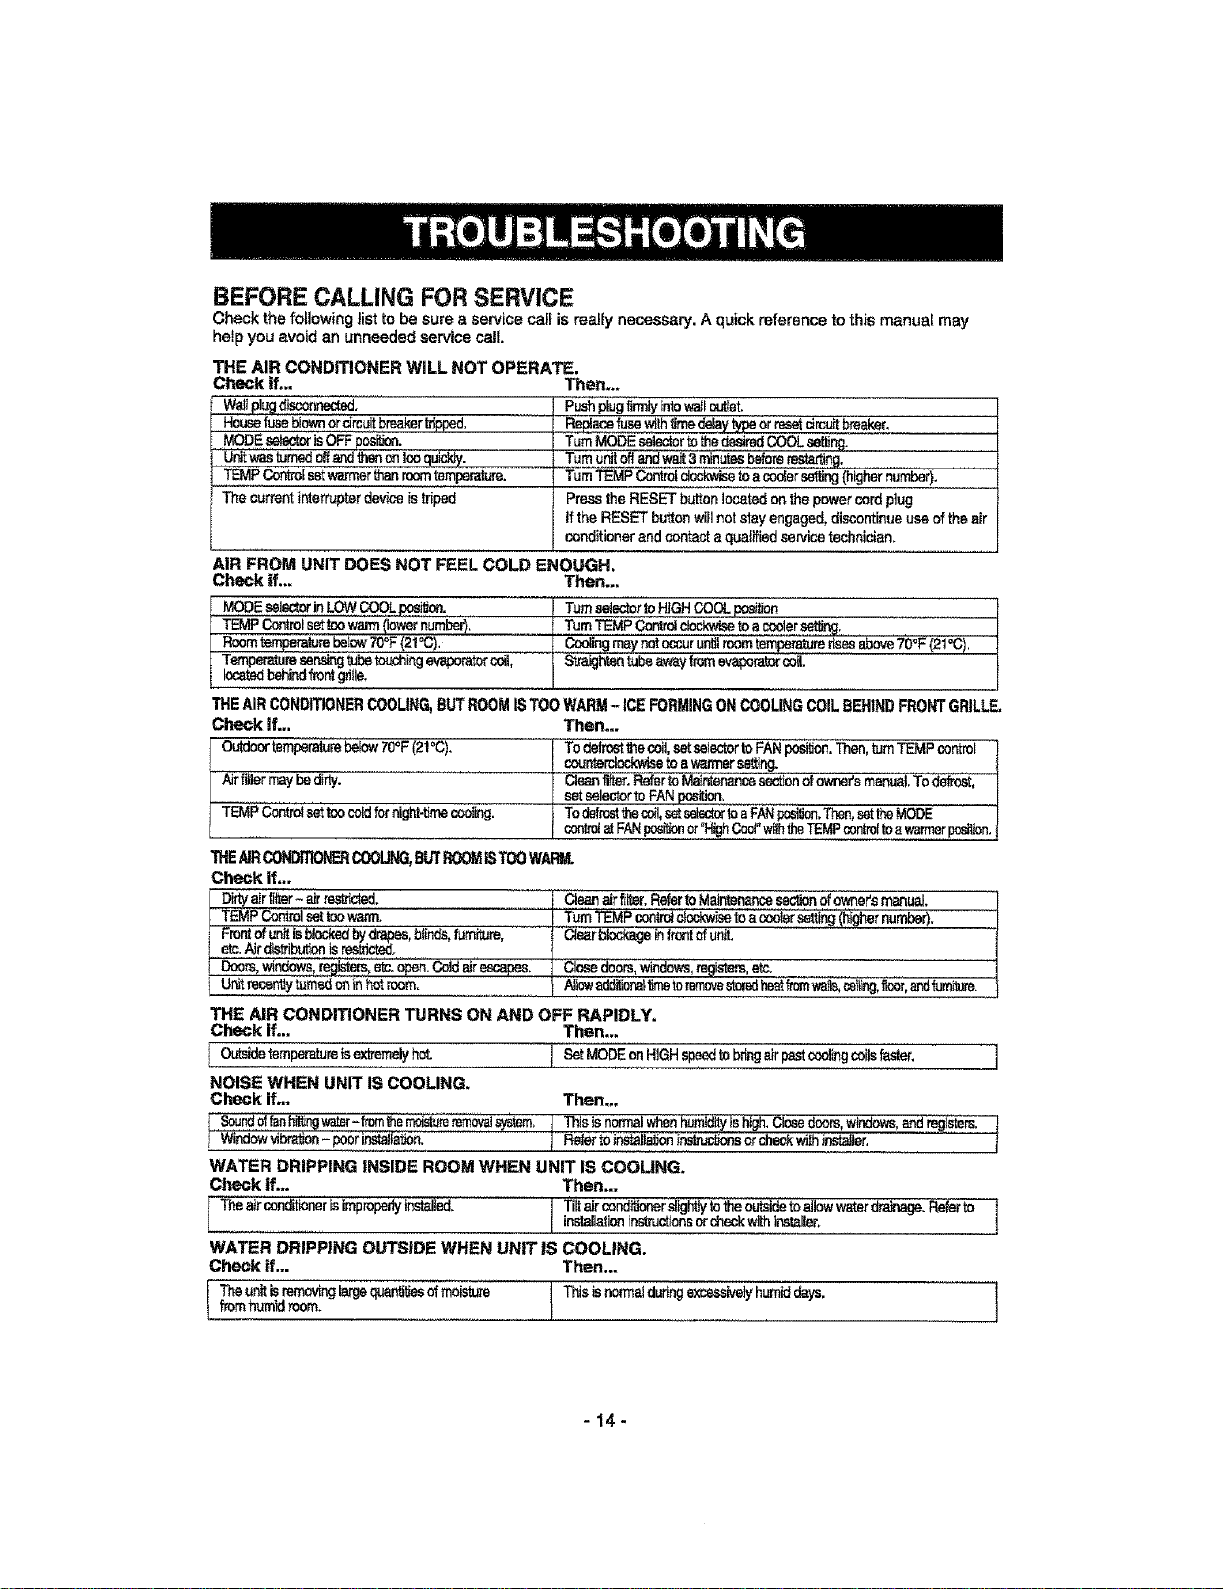
BEFORE CALLING FOR SERVICE
Check the following list to be sure a service cal! is really necessary. A quick reference to this manual may
help you avoid an unneeded service call.
THE AIR CONDITIONER WiLL NOT OPERATE.
Check if..,
W=dtp!ug_ne_ed.
Housefuseblownorcircuitbreakertr;pped,
MODEselectorisOFFposlliorL
U_wasturnedoffand_ _ iceq_.
TEMP _l Ss_w'_rmer_ roomtamp_ratum.
Thecurrentinterrupterdeviceistripod
TherL..
Pushplugfirmlyintawallcutiet,
Re,ace fusewithtimedelaytypeorresetdrcu_breaker.
"rumMODEsetectertothedesiredCOOLsetgng.
Turnurdt_ be_orerestartir_g.
TurnI_MP Controtclockwisetoa coolersetting(highernumber).
Pressthe RESET buttonlocatedonthe power cordplug
if the RESET buttonwill not slay engaged,discontinue usa ofthe =dr
conditionerand contacta qualified servicetechnician,
AIR FROM UNIT DOES NOT FEEL COLD ENOUGH,
Check if... Then...
I MODEselectorinLOWCOOLpos_on. TurnsalectortoHIGHC_
I' TEMP _! settoowan'n(lowernumber)! I TurnTEMp_rd _ toa cooler_
....._ing rn_ notcocuruntilroomtempe _ above70_F(2193),
_ow 70oF(2! °0). Str_igh_ tube_wayfromevapom_rcoil.
I Temperaturasensingtubetouchingevaporatorcoil,
i locatedbehindfrontgdlle,
THEAIR CONDITIONERCOOLING,BUTROOMIS TOO WARM- ICEFORMINGON COOLING COILBEHINDFRONT GRILLF.
Check if.,. Then...
Outdcortemperaturebe_v 70_F(21°C). To defrostMecoil,setselectortoFAN_on. Then,turnTEMPcorf¢ol
counterclockwiseto awarmersetting,
Airfillermay bedirty. __'o-_M_se_'t ionofownersmanu=d,To_t,
setselectorto FANposition,
TEMPControlsetmoocoidfornight-timecor_ing. Todefrosttheco_,setsek_ortoaFANposiilon,Then,settheMODE
..... contmtatFANpos_onor9-_gh_ w_n_ TEMPcontroltoa vmrmerposi_on.
1HEAIRCONDIllONERCOOUNG'Bb'TR00ML_TO0 WAP_
Check if...
_ai[ ,res_cted, , ,_ airfilter,Referto Maintenancesectionofownersmanu=d.
I TEMP.Co_t__ttco.w,r_.
Frontofu_ js .[_ bydrapes,btinds,f_miture, '"{ Clear_e infret ofunit.
etc.Air_stribution_srestricted,
1 13oO=iwindows,registers,'e'm,open.Coktairescapes. Closedoors,windows,registers,etc.
I Unitrecopyturnedon nhotroom. Ali_additionst_metoremovestored__f_
THE AIR CONDITIONER TURNS ON AND OFF RAPIDLY.
Check if... Then,.,
L _ieml:_mtum isex_emelyhot j SetMODEonHK_Hspeedtobringairpastcoo_ingcoilsFaVor, j
NOISE WHEN UNIT IS COOLING,
Check if,, Then,,,
! Windowwbratior_-poorinstalla_n. I Raierto_s_ll_on _sttucttonsor checkwi_ J_r.
WATER DRIPPING INSIDE ROOM WHEN UNiT IS COOLING.
Check if... Then...
i The=dr_on_tionsrisimpmpedy_i,_d. Ti[tairc_ndi'i_'_ers_ig_ytotheoutsidetoallowweterd_. Referto ]
inst_ation[nstru_onsorcheckw_ installer,
J
WATER DRIPPING OUTSIDE WHEN UNIT IS COOLING.
Check If... Then...
Theunitisremov_ _ge quantitiesofme_e
fremh_.zmklrcom. 1 Thisisn°m'mldL_ngexcessivelyhumlddays' ]
-14-
INDfCE DE MATERIAS ............................. 15
GARANTfA ................................................ 15
SEGURiI_AD .............................................. 16
tmportantesinstruccionesde seguridad...... 16
REQUERIMIENTOS ELECTRICOS ......... 17
INSTALACi(_N DEL CABLE ELI_CTRICA ...... 17
INSTALACI6N ........................................... 18
Requedmientos para instataci6n .......... 18
Installacibn ............................................ 19
C6mo instalarlo ..................................... 19
La eliminacion de la ventana ................. 21
OPERACI6N .............................................. 22
Cbmo y per qu6 .................................... 22
Son|dos normales .................................. 22
Capacidad y tiempo de funcionamiento ...22
Caracterfsticas ..................................... 23
Use det equips de aim acondicionado-. 23
Panel de control .................................... 24
Control remote ...................................... 25
MANTENIMIENTO .................................... 26
Limpieza del fUtro del alre ...................... 26
Limpiezadelequipsdo airsacondicionado-.. 26
Cdmo sacar la rejilta frontal ................... 26
CSmo a reemplaza e! gdlte anterior ...... 26
CORRECCiON DE FALLAS ...................... 27
AntesdoUamarpareservicio...................... 27
ACUERDOS DE PROTECCI6N
ESPECIALIZADA ...................................... 30
PARA PEDIR SERVIC10 .......Cubierta Trasem
GARANTiA DE UN ANO PeR EL
EQU|PO DE AIRE ACONDICIONADO
DE HABITACION
Duranteun aP,o completea partirde la fecha de
compra, siesto equipsde airs acondicionadoroe|be
mantenimiento y se utitizapare elenfdamiento
normaide habitacidn segdnlas instrucclones
indicadason este manualdel prop|star|o,Sears
reparar_gratuitamenteeste equipsde airs
acondicionado,ei tieneelgin defectsen meteria]ee
o fabricacibn.
GARANT[A TOTAL DE CINCO ANO$
PeR EL SISTEMA DE REFRIGERACION
HERM_TICAMENTE SELLADO
Durantecincoariesa partirdo lafecha de compra,
si este equipsde airs acondicionadorecibs
mantentmiento y se utilize pare e!enfriamiento
normal dehabitaci6n seg_n|as fnstrucctones
indicadason este manual del propietarie, Seats
reparar_ gratuitamentsel sistemado refrigeraci6n
hermit|cementssellado(ClUeconsistsen el agents
refrigerants, los tubes de eonoxidny el compresor),
sitiene aigdn defects en matedales o fabdcaciSn.
EL SERVlCIO DE GARANTfA ES
DtSPONtBLE CONTACTANDO AL SERVICIO
SEARS AL 1-800-4-MY-HOME _
La proteccionde garantiacubm unicamente s los
equipos de aJreacondic{onado usados pare use
demestico y no pareuse comerciaL
Este garanties6!otienevatidez mientras e_products
se est_ usandoen losEstados Unides.
Estagarant a_e da detaches logalesespecfficosy
usted puecletenerotrosdetachesqua varfande
estado en estado.
Distributed by Sears, Roebuck and Co.,
HoffmanEstate, IL 60179
-15-
IMPORTANTES INSTRUCCIONES DE SEGURIDAD
Las sigutentesinstrucciones de seguddadle indicar_,nc,6mousarsu equipo de aim acondicionadode
habitac|bnpareevitar da5os pareustedmismo y para su EQUIPO DE A_R1EACONDICIONADO.
POR SU SEGURIDAD
No atmacene niuse gasolinau otrosvaporesy
lfquidosinflamables cema de _sta e cualquierotro
electrodemestico.Lea lea etiquetasde los
productospara versi contienenadvertencias sobm
elcar,_ter lnflamabie de losmismosy otras
advertenciam
PARA PREVENIR ACCtDENTIES
Pare reducire! desgo de incendios, descargas
eldctricaso lesionespersonalesal usersu equipo
de aire acondiclonado, tome lasprecauctones
bdsicas,entrelasqua estdn]assiguientes:
- Aseg_msede qua taalimentaciSnel&_tricasea fa
aproptada pareel modatoqua ustadhaelegido.
- Siel equipode aire acondicionado debe instalarse
en una ventana, a ustedprobabiementele
convienelimpiarprimeroambos lades del viddo.
Sita ventanaes del tipode tins pansiescon un
panelincluidodepantalta,leconvienesacar la
ventanacompletamenteantes de la insta|acidn.
=AsegL_resede qua elequipode aim
acondicionadohasideinstaLadocorrectamentey
conseguridadseg_nsesatiate an las
instrucciones separedas de instalacidnque vienen
en esta manual.Conserveeste manualy lea
tnstruCcionesde instalaci6npare usados
posiblementeen elfuture atsacarovotvera
instafar esta unidad.
• Utilice guantes al manejar el equipode aire
acondicionado, tenga cuidado pareevitar cortadas
con ias afiiadas aietas met_ilicasqua se hallan en
tosserpentinesfrontales y posteriores.
INFORMACIION ELECTRICA
En laplace de serie delfabdcante ae indicacu_,les
lacapacldadel&_tricanominalcompletedesunuevo
equlpodeaireacondicionadoparehabitaci6n.Conau]te
estaplacecuandorays averifk_rtosrequerimientos
ell'trices.
• AsegOresedequaetaquipodeaimacondicionade
tengaunaconaxidnco_ atierra.Parereducirai
mlhimotosdesgosdedescarc_asei_ctricaseincendio,
esimportanteconeciarelequ_i0ocorrectamenteatierre.
EIcorddndeaiimantaci6nel_ctricaest&equipadocon
unenchufedeiresespigasconconaxi6natierrapare
protegeriecentredesgosdedescargase(&_'icas.
, Suequipodeaimacondidonadodebeenchufarseen
unatomedecorrientedeparedquatengaunacon_
correctaa tierra.Si latomedecorrientedeparedqua
ustBdpiensausernoestdconectadacorrectamentea
lierrao no_ protegidaconunfusibledeacci6n
retardadeo conuninterrupterdecircuito,hagaquaun
efect_sta caiJficado[einstaietatomedecorrientede
paredenformacorrecta.
, Nopongaafuncionarelequipodeaire_ondlcionado
conunacubiertaprotectoraexteriorencima.Estopodda
ocasionardehosrnec_nicosdenimde1aim
acondtcionado.
• NouseuncabledeextensldnnlunenChL,,fe
adaptador.
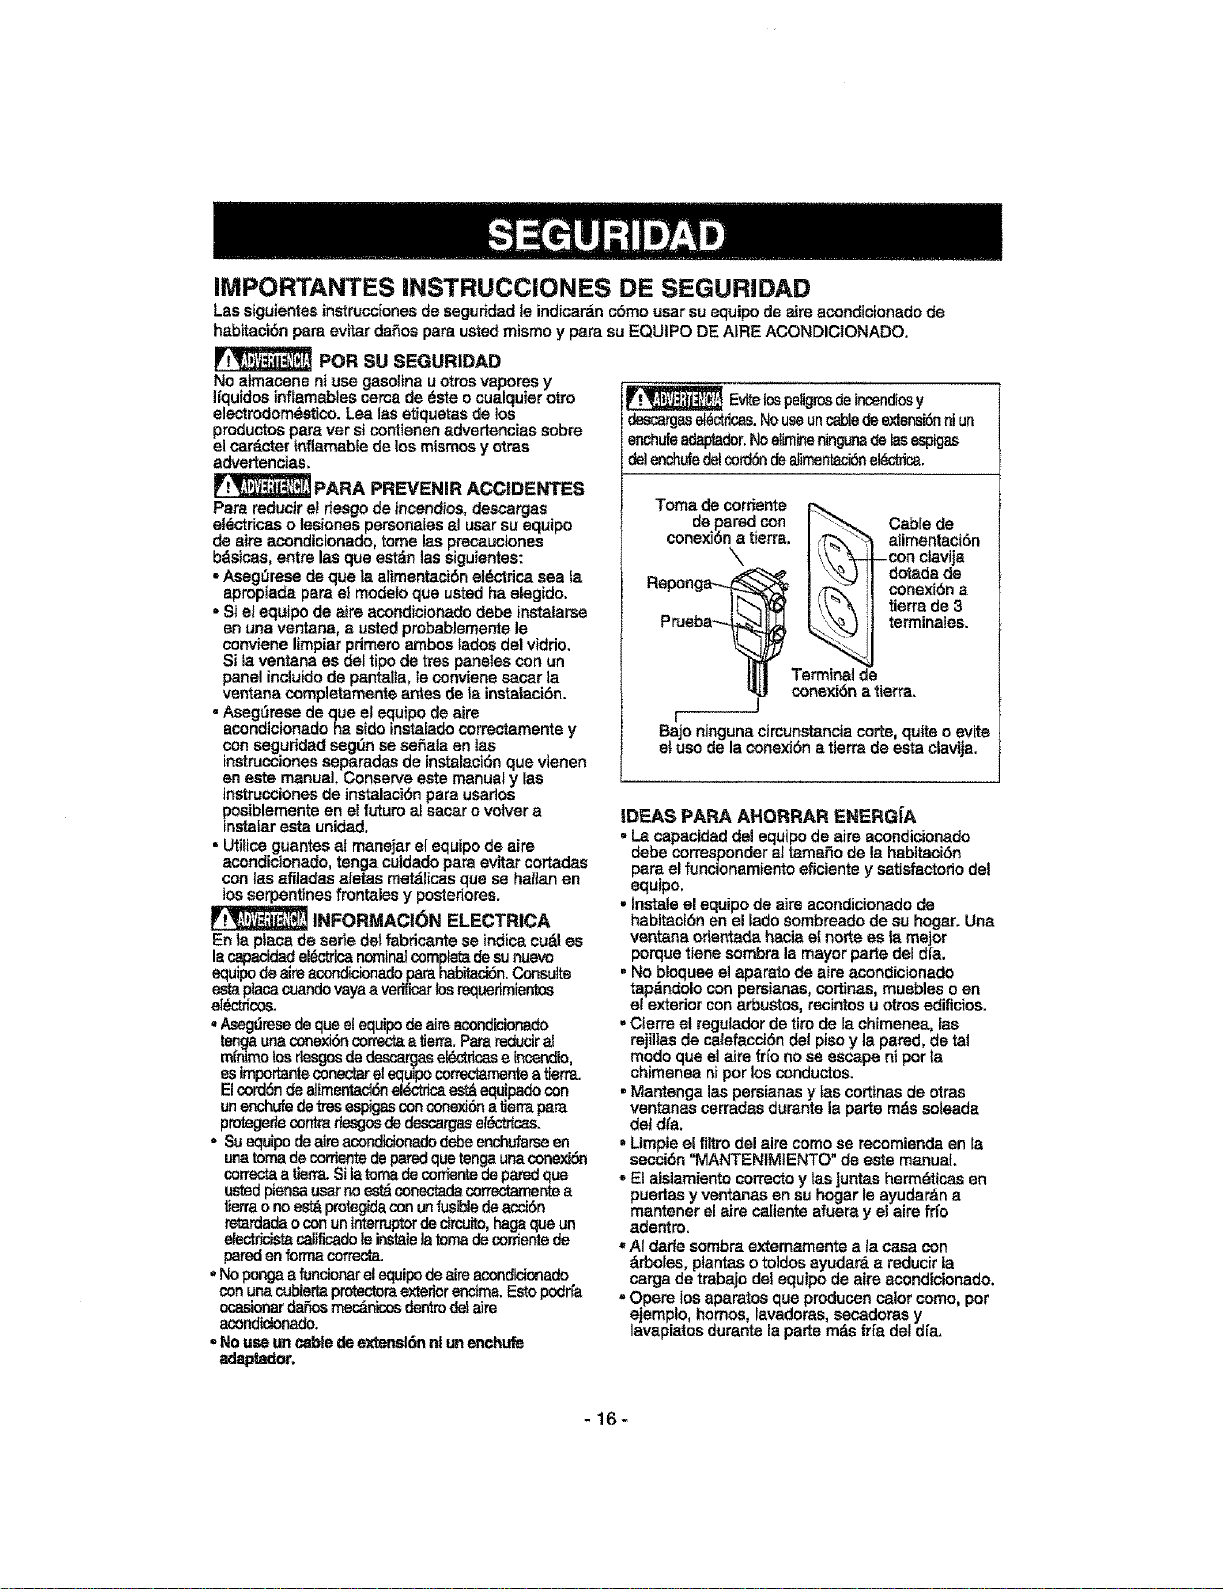
Evttetospeligrosdetncendiosy
descargaset_ctdcas.Nouseuncabledeexlansk_lniun
enchuleadaptador.No elimine_ngunadeIas_,pigas
delenchufedelcord6ndeatimentac_Snal_--tri_.
Tome de corriente _-.,.
deparedcon I _ Cable de
conexi6na tierre. I ,?'_ _ alirnentaciSn
x I l-conc avije
o _ I \_"_) ii dotadade
Rap ng_ j_T._._" il conexI6na
RESPETE TODOS LOS C_DIGOS Y
REGLAMENTOS.
BAJO N|NGUNA C|RCUNSTANCIA CORTE,
QUITE O EVITE EL USe DE LA CON_t6N
A TIERRA DE ESTA CLAV|JA.
ESTE APARATO NECESITA SER
CONECTADO A TiERRA,
Se requiere una alimentaci6n e{_c_rica CA,
adecuadamente conectada e tierra con un
fusible de 20 A, de 60 Hz y de 250 V.
Se recomienda un fusible de retards o un
disyuntor de circuito que aliments solamente a
este aparato.
NO USE CABLE ELI_CTRICO DE
EXTENSi6N,
MI_TODO RECOMENDADO DE CONEXI6N A
TtERRA
Per su propia seguridad este aparato debe
conectarse a tierra. Este aparate viene
equipado con un cable de alimenteci6n y una
c[avija de tree term|hales, Pars rectucir al
m_dmo e{ petigro de cheque el_'_ctrico, el cable
debe ester cerise|ado a una conexibn de pared
con conexi6n a tierra, y esta cone×ibn debe
h_cerse de acuerdo con ta _tltima sdici6n del
C6digo Else|rico Nacional (ANSIINFPA 70), _f
come con los G6digos y reglamentos tocaies. S|
no extste uns conexi6n de pared edecuada, el
cliente tfene ta responsabHidad y la ebligasi6n
de mender instalar, con un electrieista
ceJificado, una conexi6n de pared edecuada de
tree terminates con conexi6n a tierra.
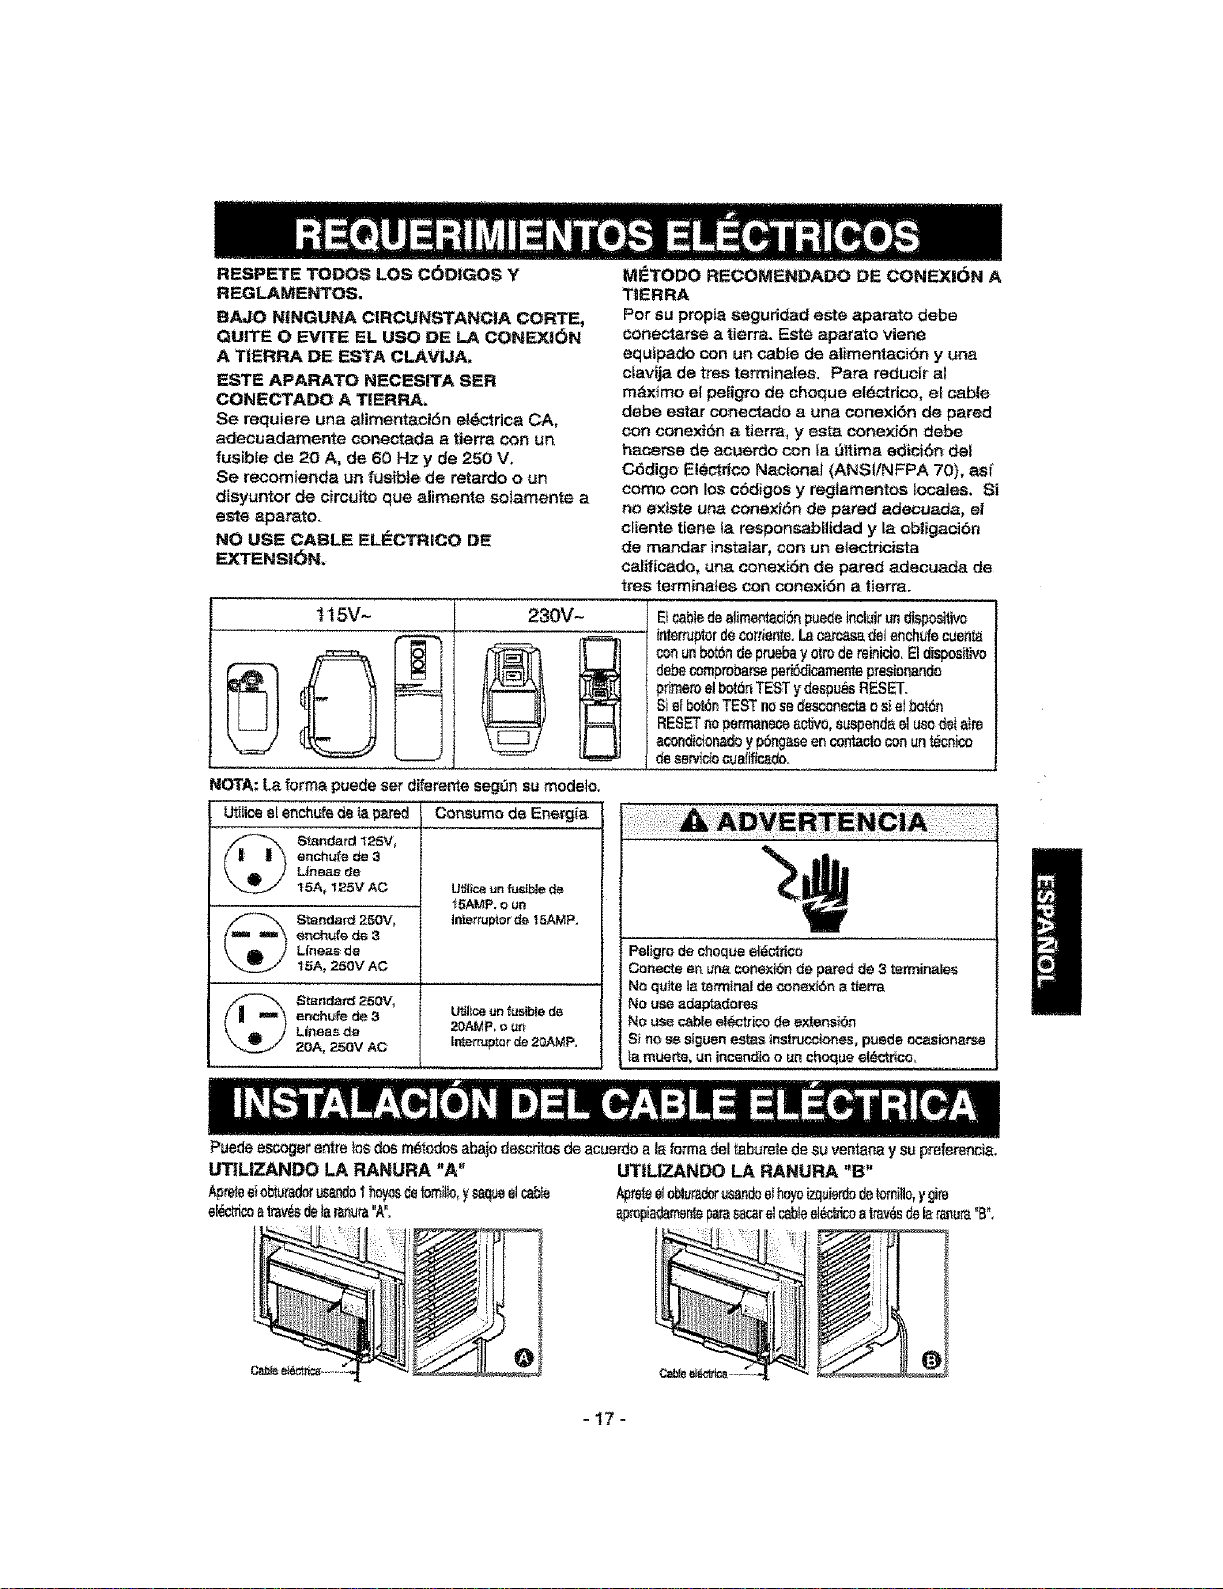
230V-
Etcabiedeatimentad6n puedeincl_ir un_sttivo
int_,uFtorde¢orr{ent_.Lacarcasedetenchufecuen_a
con unbot6n depruebay ottode reinido. El disposi_o
debecomprobars_pef_dicamenteprestonando
pr}meroelbotdnTESTy de_pu6sRESET.
Sie{ boronTEST nose _esconectaosi eI bot6n
RESETno_rmanec_ active,suepend_elusedet_re
acondioion_ yp6ngaseencon|acreconunt_cnico
dese_vidocualificado.
NOTA: La forms puede set diferente sedan su modelo,
Ut_iiceel er_chufede fa p_red Consume de Energia
Standard 125V,
ench_e de.3
L_neasde
5A_1_:5VAC Uttliceunfusibled_
"_SAMP.o un
Standard250V, Interrupterda_15AMP.
enchufe de 3
L{ne_.sde
t5A, 250V AC
Standard 250V,
en_h_fe de 3 U_I_ un fus_ de
Linea_d_ 2OAMP,o _n
2OA.250V AC tn_rmptorde2_AMP.
Peligr_ de cheque e_ct_co
Conecteen _na conexi_nde paredde 3 terminales
No quitela terminal deconexi6na t_rta
No use adap_dores
No use cable el_trice de extert_;_n
Si no 8eslguenestas instrucctones_puede ec,asieners_
_amUerte,un inc_ndioo uncheque et_'tt_co_
Puede escogerentre les dos m_todosabajo descritosde acuerdo ala forms del taburete de su,ventana y su preference.
UTIUZANDO LA RANURA "A"
Apreteefob_urador_do I_oyos_e_omi_ y.saq_el_
e_c_ce a trav6sdet_ranura"A"
LITILIZANDO LA RANURA "B"
Apref_elo_a_or u_ndoelhoyo_uierdodetomillo,y9ire
_pro_adarn_n_e_ _c_ elca_ _ctHco atray,sdelara_u_'B',
-t7-
REQUERIMI.ENTOS PARA
|NSTALACION
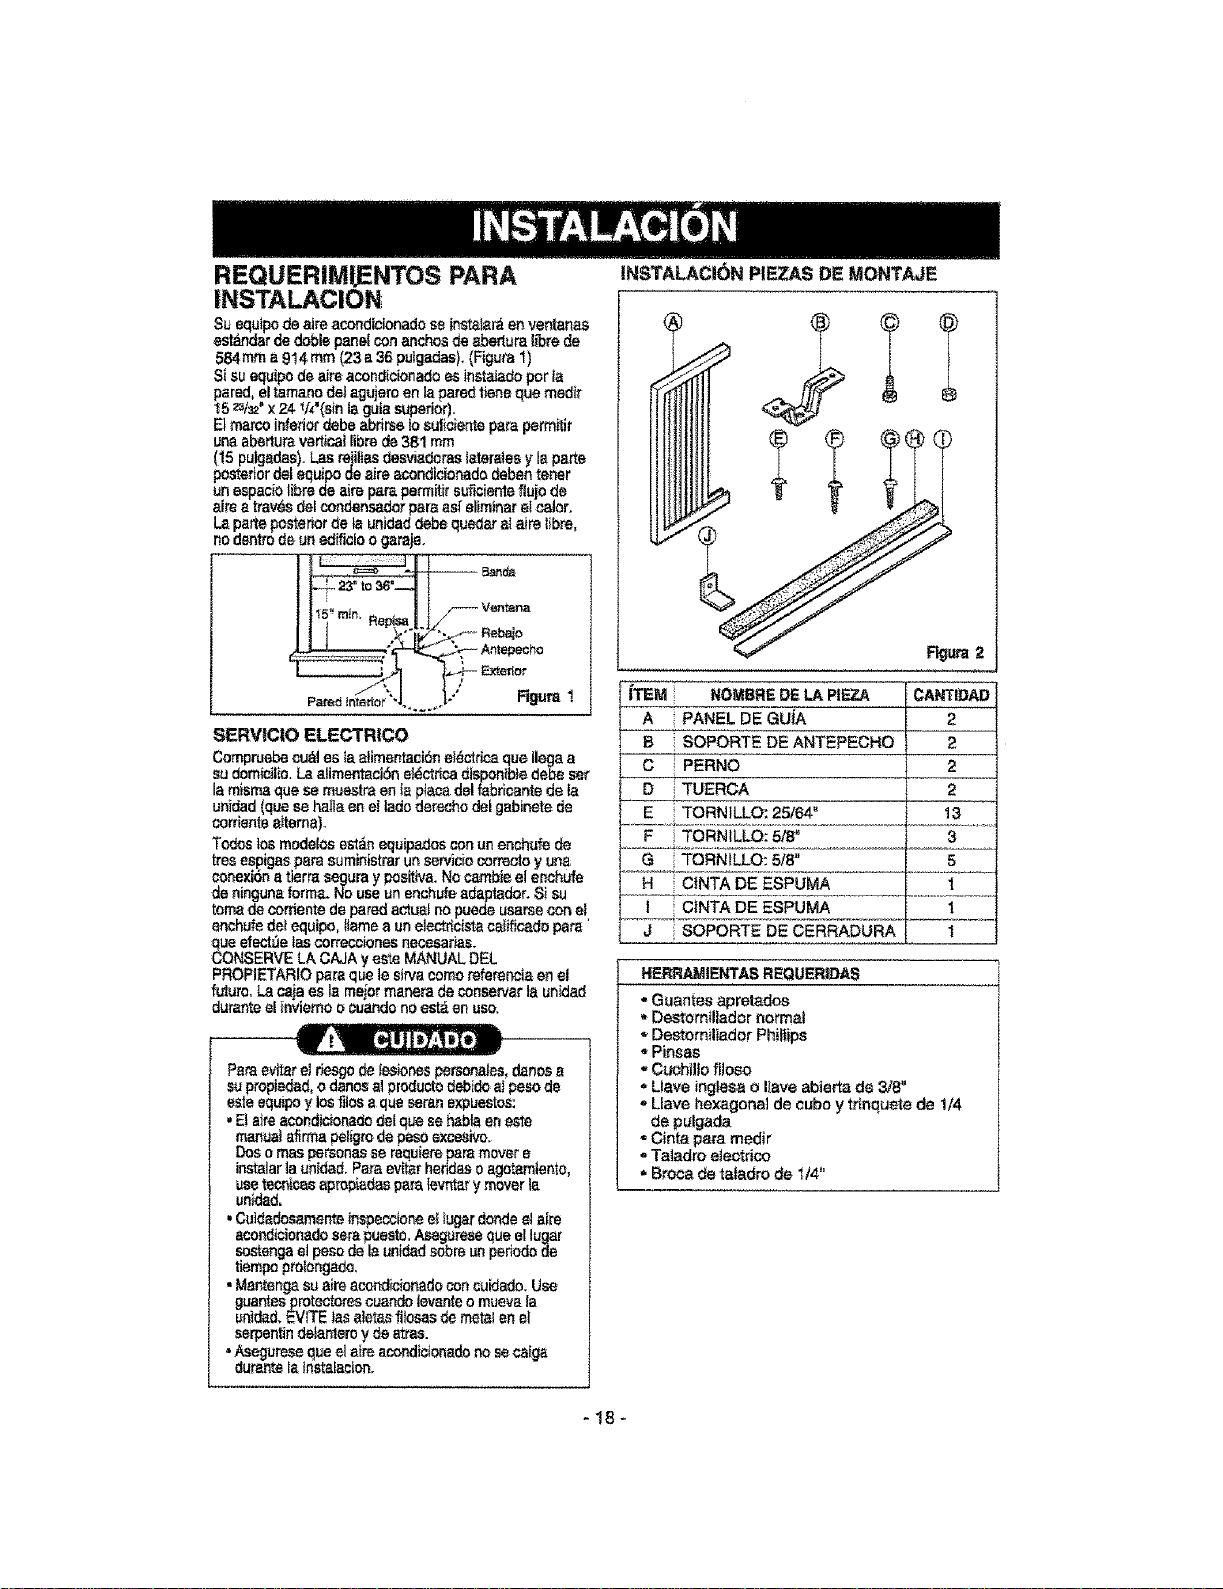
Su equipode aim acondicionadose _st_tar_ enventanas
est,_tderde doblepanelcon anchos de abertura I_re de
584mm a9!4 mm (23 a 36 putgadas).(Figure1)
Si suequipo de aire acondioionado esinstelado per ta
pared, el tamano de! agujero en lapared _ne que medir
15 z_t_' x 24 V£(sin la guiasuperior).
El marco inferior debe abrirse tosu|icientepare perrnffir
una abertura vertical {ibrede 381 mm
(15 pulgedas). Las rejiltas desviadoras tateraies y la porte
posterior del equipo de #,ireacondlcionado deben tenor
un aspac_olibre de aire pare permitirsuflcienteflu o de
efre e traY,s del condensaderpars asf eliminar el cater.
La parte posterfor de la unidaddebe quedar sIaim libre,
no dentre de un edificloo garaje.
.o'1" Figure !
SERVtCtO ELECTR|CO
Compmebecu_l es Is alimentaciEn el_ctdca que llegs a
su domicilie. La alimentaciSn e{_ctrica dispontbie debe set'
la rnisrnaque se mueslra en l_ piece del fabrlcanta de la
un_dad(que se hails en el tado derechodel gabinete de
corrientee_tema).
Todos los modelos est_.nequipadoscon une.nchufe de
treeespigaspare suministrar ut_servicio corre_o y
conexidn e tierra seggra y pesitiv& No eatable el enchufe
de ninguns forma. No use un enchu_ sdaptader. 8i su
tern8 de corrientede pared ectu_f no puedeL_sarseoon el
enchufe del equipe, Itame sun electricista catfficado pare'
Queefec_e tas correcoiones necesapas.
CONSERVE LA CAJA y es_ MANUAL DEL
PROPIETARIO pare que le sirra come refetencia en el
f_uro. La caja es ta meier mar,era de conserver la un_dad
durantee!inviemo o ouando noest,. en use,
Pate ever'el r_sgo de tesiones pe_s, denosa
supt'ople#ad, e danes aiproducto debido aI pesode
es_eequipoy losfilesa que saran expuestos:
• El aireacond_edo dotque se habla eneste
manual _rrna peiigtede pesoexcesivo.
Dos o mas personasse requiet'epare movere
instalarta untdad. Pat'sever hertdas o agstemtenta,
use terraces ep_p{adas papa levntar ymover Ia
un_da&
• Cuidedosamente inspecoionee; lugar_e el aire
acondicionade sere puest0. Aseg_reseque e_lugsr
sostengeel peso de la unided sobre un periodede
tiempe prolongsdo.
• Mantenga su aire a_cionado con cuidado. Use
guantasprotectoresc_ando levanteo mueva la
un_da&EVR'E tas aletas fitosas de metal en el
serpentindetanlero y de arras.
• Asegurese que el aire acondici_ade no secafga
du_nta _ tnstalaclon.
INSTALACI_N PIEZAS D_ MONTAJE
A PANEL DE GUIA 2
B SOPORTE DE ANTEPECHO 2
......€ :!PERNO ' 2
O TUERCA 2
F TORNILLO: 518_ 3
"-°'_ TORN LLO: 5/8" 5
H CINTA DE ESPUMA 1
J SOPORTE DE CERRADURA t
HERRAMIENTAS REQUER_DAS
"Guan_es ap_etadoe
* Destorntllador normal
* Destorniltador Phittips
P_sae
'*Cuchllfo flloso
- Llave inglesa o Ilave abierta de 3/8"
Llave hexagonal de cube y ttinquete de !/4
de pulgada
- Cinta psra medir
,,Tatadro etectdeo
,, Broca de taladro de 1/4"
-18-
INSTALACI6N
Escojaunluga_quale permits Ilevarel sire lifo _ area
quadesea. Lasventanasquase usen parsta
tnstslack_ndebentarterlaresistensiasufir,_ntepars
seportare|pesodetequipodesire ac_ldicior',ado.Una
buena instalaci6nconatanci6_especiala _acorrects
posici6nde iaurt_d disminuirdlapmbabilidaddequa
sea necesarfoefectuarreparaciones.
Cuandose d6seaenlriarm6s de unahabi_d6n,la
instalad6nesmuy importantepuestoquael airsfrfono
doblaesquin_s. P_ enfriarsushab_cienes, el aim
frfodebe despfazarsedesdeetequipode site
acondicionadoen ur_ trayectortarecta.
COMe iNSTALARLO
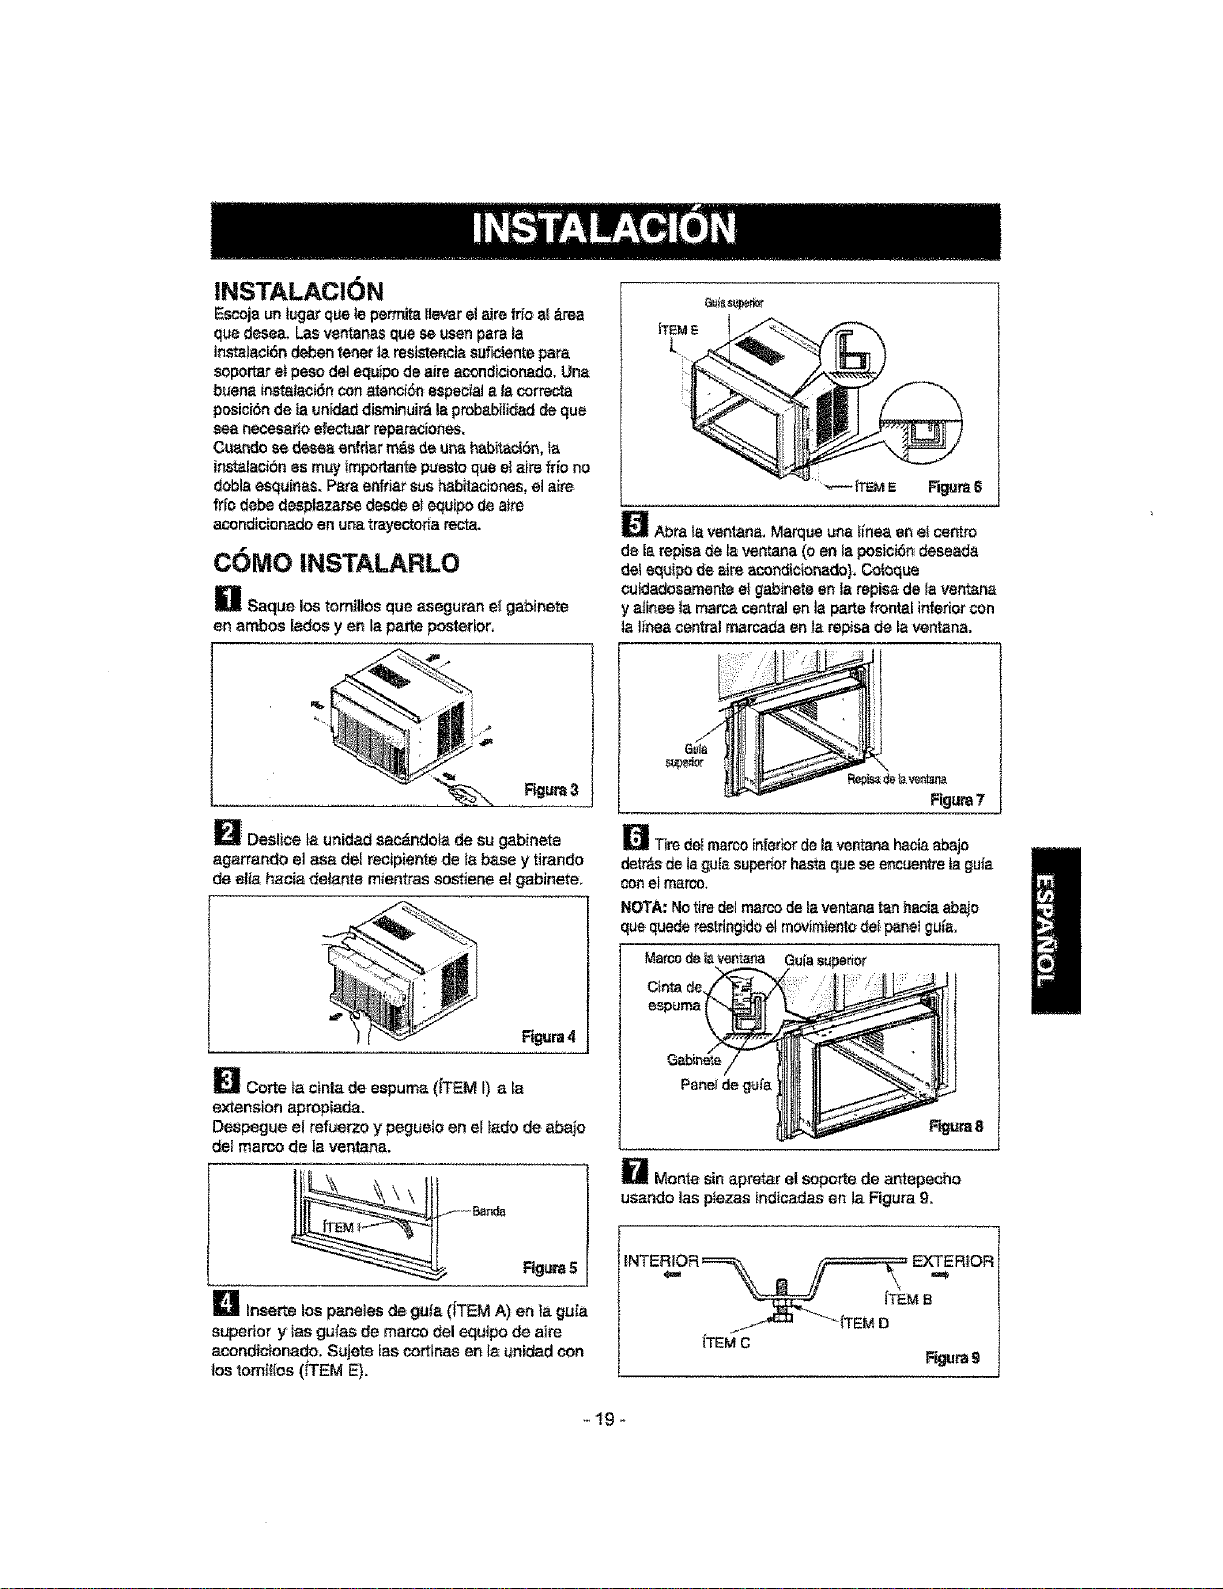
ii]l Saque los tom,los que aseguran e! gabinete
e_ ambos lades y et_ la parle posterior.
[] Desiice ta unidad sac_ndota de su gabinete
agarrando el ass det rectpieme de ta base y tirando
de alia hacia de,ante m_entras sostiene et gabinete.
_gum 4
B Oorte la cinta de espuma (ITEM I) a la
extension apropiada.
Despegue el refuerzo y pegueIo en el {ado de abajo
del marco de Ia ventana.
__d_ Figura 5
[] Insette los paneies de gufa (_TEM A) en Taguts
supedor y tas gut'as de marco del equipo de ait'e
acondicionado. Sujet_ tas cottinae en la urtidad con
los total{los (iTEM E).
L
",_I_M E Figures
D Abra ta ventana, Marque una _inea en el centre
de la repisa de la ventana (o en {aposici6n deseada
det equips de airs acondic{onado). Cotoque
cuidadosarnente el gabinete en ta repisa de {aventana
y a_inee la marca central en ta parle frontal inferior con
la lines central rnarcada en la repisa de la ventana.
Gula
]Tire deI msrce inferb_ de iaven_na hacia abajo
detr_sde la _u_aaupe_r h_s_aq_e se encuentre ta gu{a
c-o_e_matoo_
NOTA: No tire det marco de la ventana _n hada able
qua quede restringido et movimlento de_pardi gu_a.
Marcode_ ventana Gulasuperior
Pane_de g_Ji'a
F_a8
_ Monte sin apret_r e| soporte de antepecho
usando las piezas indic_das en la Figura 9.
{TEM C
Figu_a9
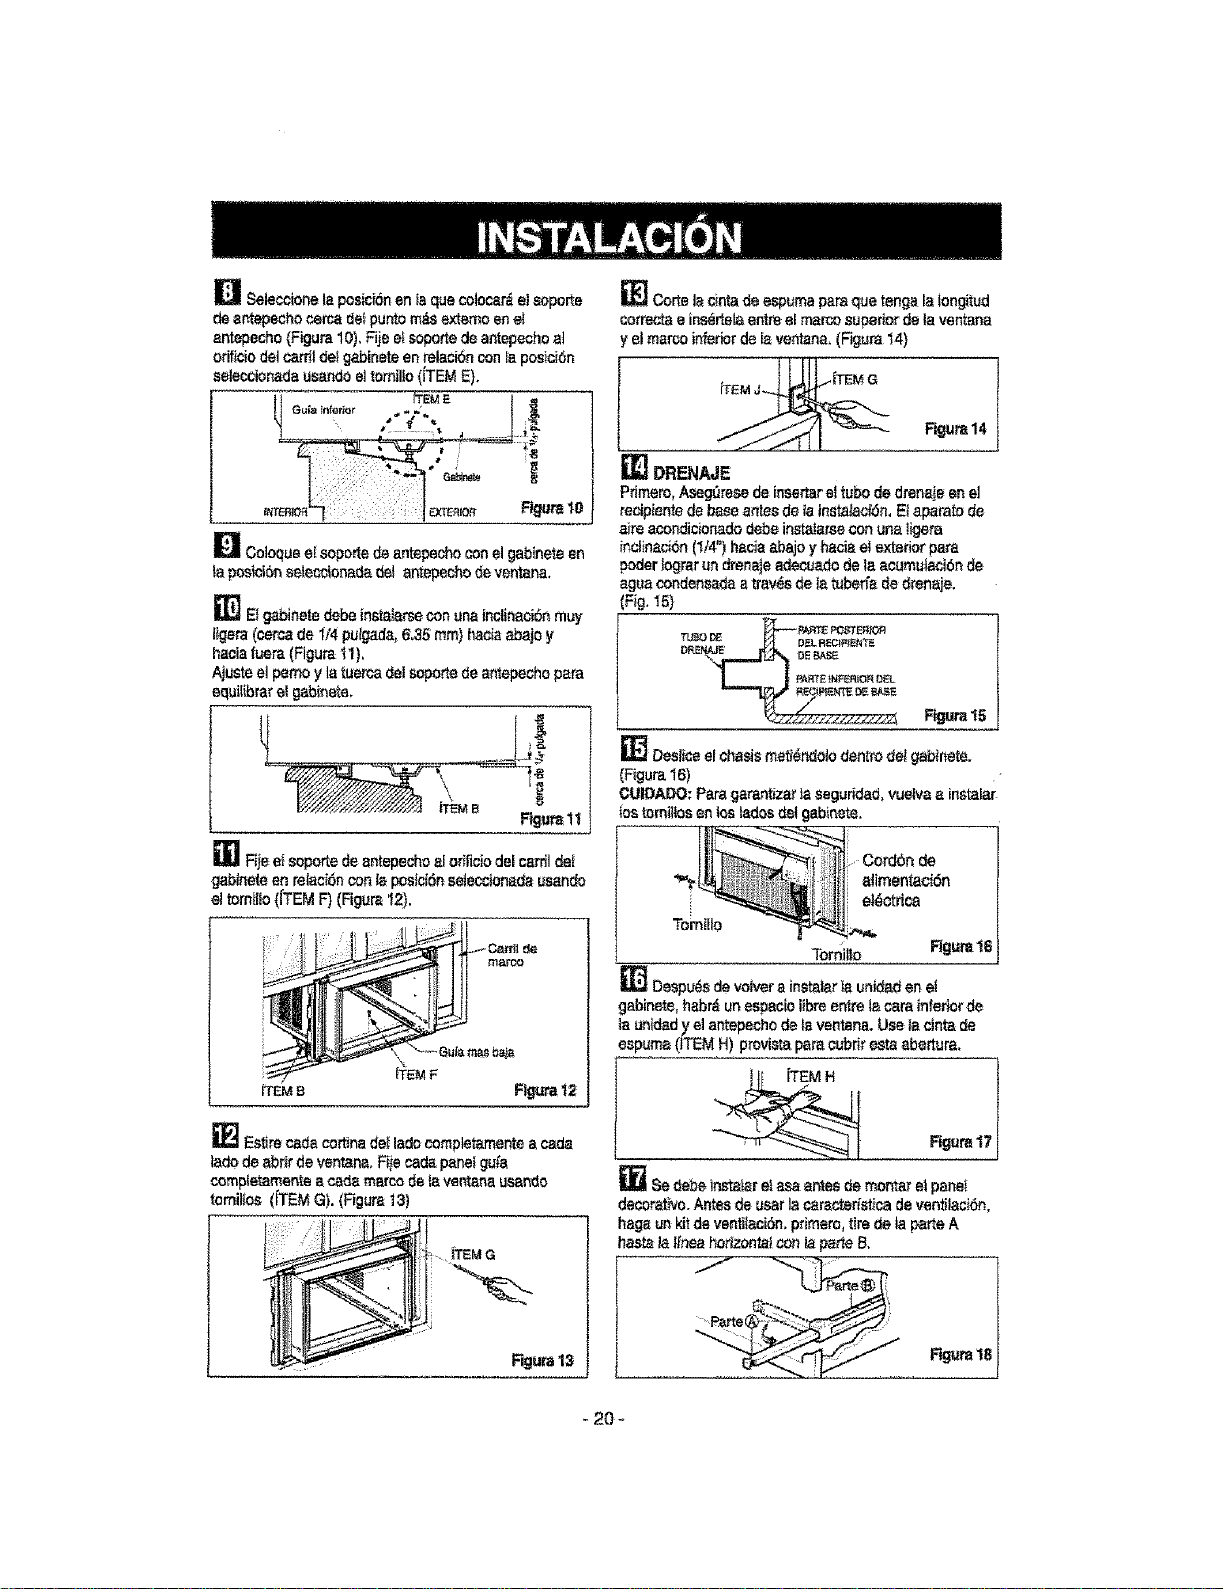
O Seleccione iaposiciSn en Ia quecolocar_ el seporte
de antepecho cerc_ dsf purrtem_ ex_emoen e_
antepecho (Figure 10), Fije et sopottede antepecho al
orif_o de] ca_t de_ge_bineteen .relaci6ncon la pesicJ6n
eeleccionada usando e_tomilio (ITEM E)°
h-RE
II ou_ ,n,,r,o, . . _ . I
_ Ooloque e_sopott_ de antepechocon el gabineteen
la pos'_on sele_ionada dei antepe_o d_ verona.
[]El; _nete debe ins_rse con una in_lina_Sn mw
ligera(cer_de 1/4 pulgada,&35 ram) hada abaje y
hacla luera (Figure t 1),
Ajuste et paine y la tuerca del soportede entepecho para
equil[brer el gabinete,
_ Estire ea_a corona cleflads completamente a cada
lade de abr_rde vent_naoF_e cada panel gu_a
completamente a carla marco de ta vert_a _sande
tarnitk_e 0TEM G). (Figure 13)
_M G
Rgura13
W Cort_ tacintade espume pare q_e tenga la iongitud
corre_ e ins_rteta entre el marco su_rior de ia ventena
y el mar_ inferior de faventana, (Figure 14)
F_ur_ 14
[] DRENAJE
Primero, Aseg_mse de inserterel tu_ de dr_efe en el
recipiente de base antes de latnstatact6n,E_aparato de
airs acondicionade_b_ i_arse con una ligeta
inclinamOn(1t4") hacia abajo y hacia et exterior pare
p_ler _ograrun drena]e ade_tado de la acumutacibn de
ague con_eneada a travee de la tuberfa de dmnaje,
DF_ENt,J_ DELRECf_f_
f)E BABE
[ Desire el eh_sis metl_ndoto dentin det gabinete.
{Figure 16)
CUIDADO: Pare garan_at ta segur_ad, vuetva a instaiar
_ostomiltosen tee lades del gabinme,
i
t . CordO_ de
i _='_*- _imentaci6n
Tomillo _p,_.
Tornilto Figure16
[ Despu_s de velvet a inst_larIauni_ en ei
gebinete, habr_ unespacie iibreer_re ts cam inferiorde
la unid_dy el antepecho de iaventana. Use t_ cint_ de
esp_rr._ (ITEM H) p_revia_',,apare cubrk _ta abertura.
F'_j_mm17
_Se _e_ lnsta_areiasa antes r_ereenter et pane_
decorate. Antes de user la caracteriefieade ven_ilaci6n,
haga un kit de vent_ciSn, p_imere,tire d_ ta parte A
hast_ la t,_neahor_entet con laparte B,
......._arte >_<_? _11_ 18
- 20-
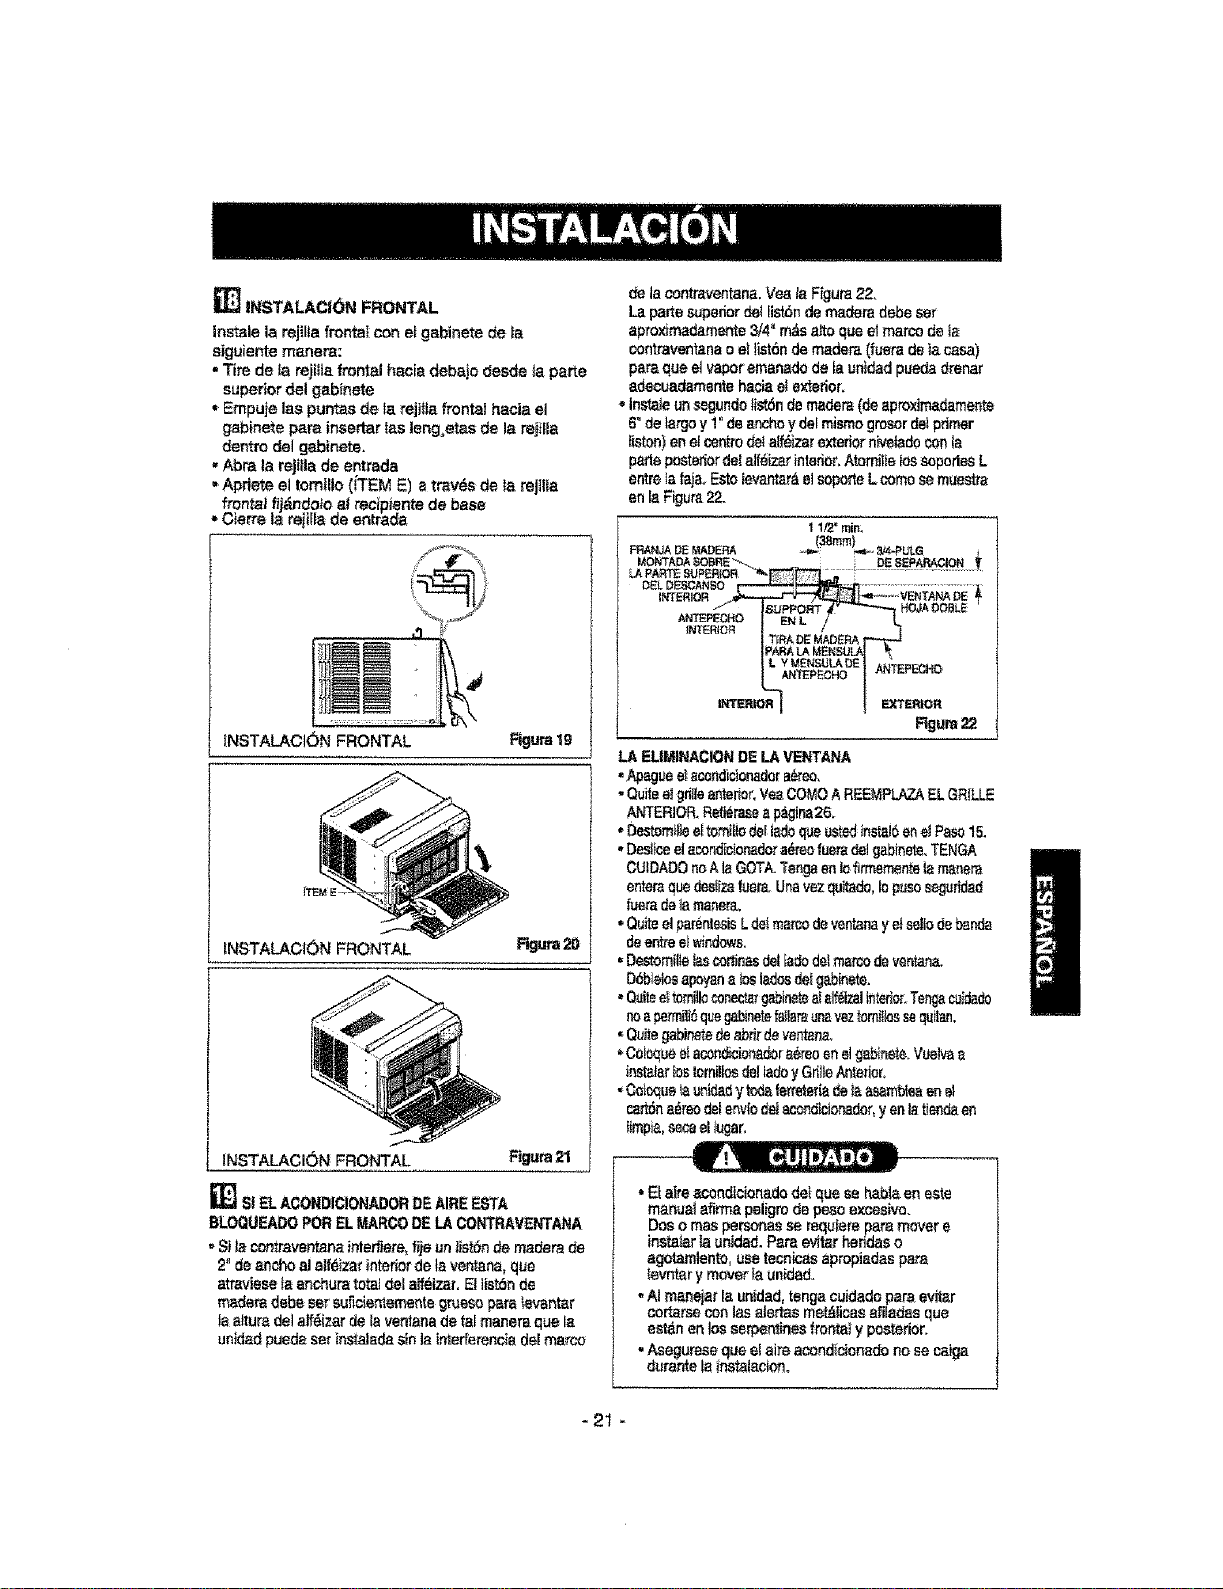
[] INSTALACt(_N FRONTAL
Instalelarejilta frontal con elgabinete de ia
siguientemanera:
.Tire de Iarejilia frontal hacia debajo desde ta parte
superiordelgabinete
• Empuje las puntasde larejtltafrontal hacia el
gabinete pars inserlarlas ieng,etas de la rej_fia
dentin del gabinete,
=Abra la reJillade entrada
=Apdete eltomHlo(fTEM E) atray,s de _areJtlIa
frontal fij_ndo_oal recipients de base
• Cierre lareiiIlade ant(a@
iNSTALACI6N FRONTAL Figure Ig
INSTALACi(_N FRONTAL
Figure20
iNSTALACI(_N FRONTAL Figure 21
[_]Sl ELACONDiCIONADORDE AIRE ESTA
BLOQUEADOPOR EL MARCODE LA CONTRAVENTANA
. Sita contravent_naintegers, fije un listSn de rnadera de
2" de anohoai alV_izarinteriorde tavent_na, qua
atraviese _ anchum total del alfeizar. El listSn de
rnadaradebe setSufiuHen_nente gruesopars tevantar
fa attura del alf_izar de la venlana de tel maners qua la
unkiad pueda se_instalada sin la interferencia del rr_co
de la contraventana. Veata Figure22,
La parts supedor del list6n de madam debe set
aprox_rnadamente3/4" m_s atto qua el marco de ta
contraventana o el !ist6nde readers (fuera de _acase)
pars que el vaporemanado de taunidad pueda _renar
adecuadamente hac'_ e_exterior,
- Ins_e un segundo list6n de readers(de aproximadamente
6" de largo y 1°de anchoy del rnismo gmsor_t primer
_ston)en e_centredei a{f_m" ext_or nivetadocon ta
pa_e pestererdei alf_izazinterior, Atamille k_ssoportesL
entretalaja. Esto_evantar_,ei supers Lcomo se muestta
en _ Fk3um22.
1 I/2' min_
FRANJA DE _ZV_J_ERA .,, (38mm_ _,-PULG
MO_TADA SO'RE _-_ DE SEPAP,ACION
eEL DESCANSO r--,.-,,_-,__ ........................................ -=
F_um
LA ELIMI_ACION DE LA _ANA
•Apague el _condiclonaders_re_,
- Quite_ griil_anterior,VeBCOMOAREEMPLAZAEL GRILLE
ANTERIOR.Rsfl_raseap_gina26.
• Destomit_ eltomiliode[ladequausledinstal6 end Paso15.
. Desiiceela_nd_{or_dora_,,reofueradeigab_nete_TENGA
CUIDADOnoAla GOT_ Ten_ enIofirmamentsla rn_nera
entemquadesliza!ger_ Una vezqu_de, Iop_soseguridad
_-_erade_amane._,
• QuiteelparenlesisLde_marcodeventanayei setlodebands
deentre e_wind_s.
, Destomil_etasco_n_s del_adodeln_rco deventana,
D6bl_tosapoyana losladesdetgab_n_e,
• Quiteeltomillo_nec_ gablr_ afai_zal interior,Tangsc_d0
noapenni_6qua_nete f_ra _navez_omii_osssqmtan,
• Quitegabir_,edeabrirdeventana_
• Coloq_ e_acondic_onador_reo enel g_bin_te,Vue]vaa
i_ar to_torni!losde]ladey Gr_ite/_ntedo_,
,,Cot_ue _aunidady t_8 fen'eter_de_.asambl_ sn el
cattSna_modei envlodele_ond_Jor_dor,yen _atiaras en
{impia,seoaeltugar.
• El aim acondicionado delqua se habt_ en este
manual afirma peligm de peso excesiw.
Dos omas personasse requl_re pars mover e
insta_ la unidad. Pare evitar hendas o
agetamlento, use tecn_casapropiadas papa
_vntar y mover [a un_dad.
•At mane _r la un_ad, tenga cuidadopars ever
cortsrse con las alsrtas met_iicas afiadas qua
asian err los serpen_nes fronts! y posteti_.
.Asegumse qua elairsacondic_ensdono se caiga
_urante la instatacion_
-21
C6MO Y POR QUE
Su equipo de sire acond_cionado de habitaci6n
bdnda la.s sigutentes func_ones para hacer qua la
vida en climas c&lidos sea m_s confortab}a:
,,Enfda y hace circula_'el sire pot la habitacl6n
° D_sminuye Ia humadad eliminande _ahumedad
excesiva,
. Filtm el polvo, el sucio y atgunas impurazas
transportadas en el sire de{ ciim_ veraniegoo
El equipo de sire acondicionado raafiza estas
funciones haciendo pe.sar et aire dot medio
ambiente a ttavd_s de un filtro qua straps tas
partfcuias de poivo y sucio. Et sire pa,_a entonces
pot un serpentfn de enfriamiento que refrigera el
aJre y elim_na el exceso de humedad. Ef mismo sire
regress entonCes al enfdador, secador y llmptador
dot sire de! ambiente, La humedad axtratde, dei sire
ambiente es ttevade aAexterior y evaporada.
Su airs acondicionado est& diseSado pars operar y
suministrar una enorrna potencia de enfriamiento.
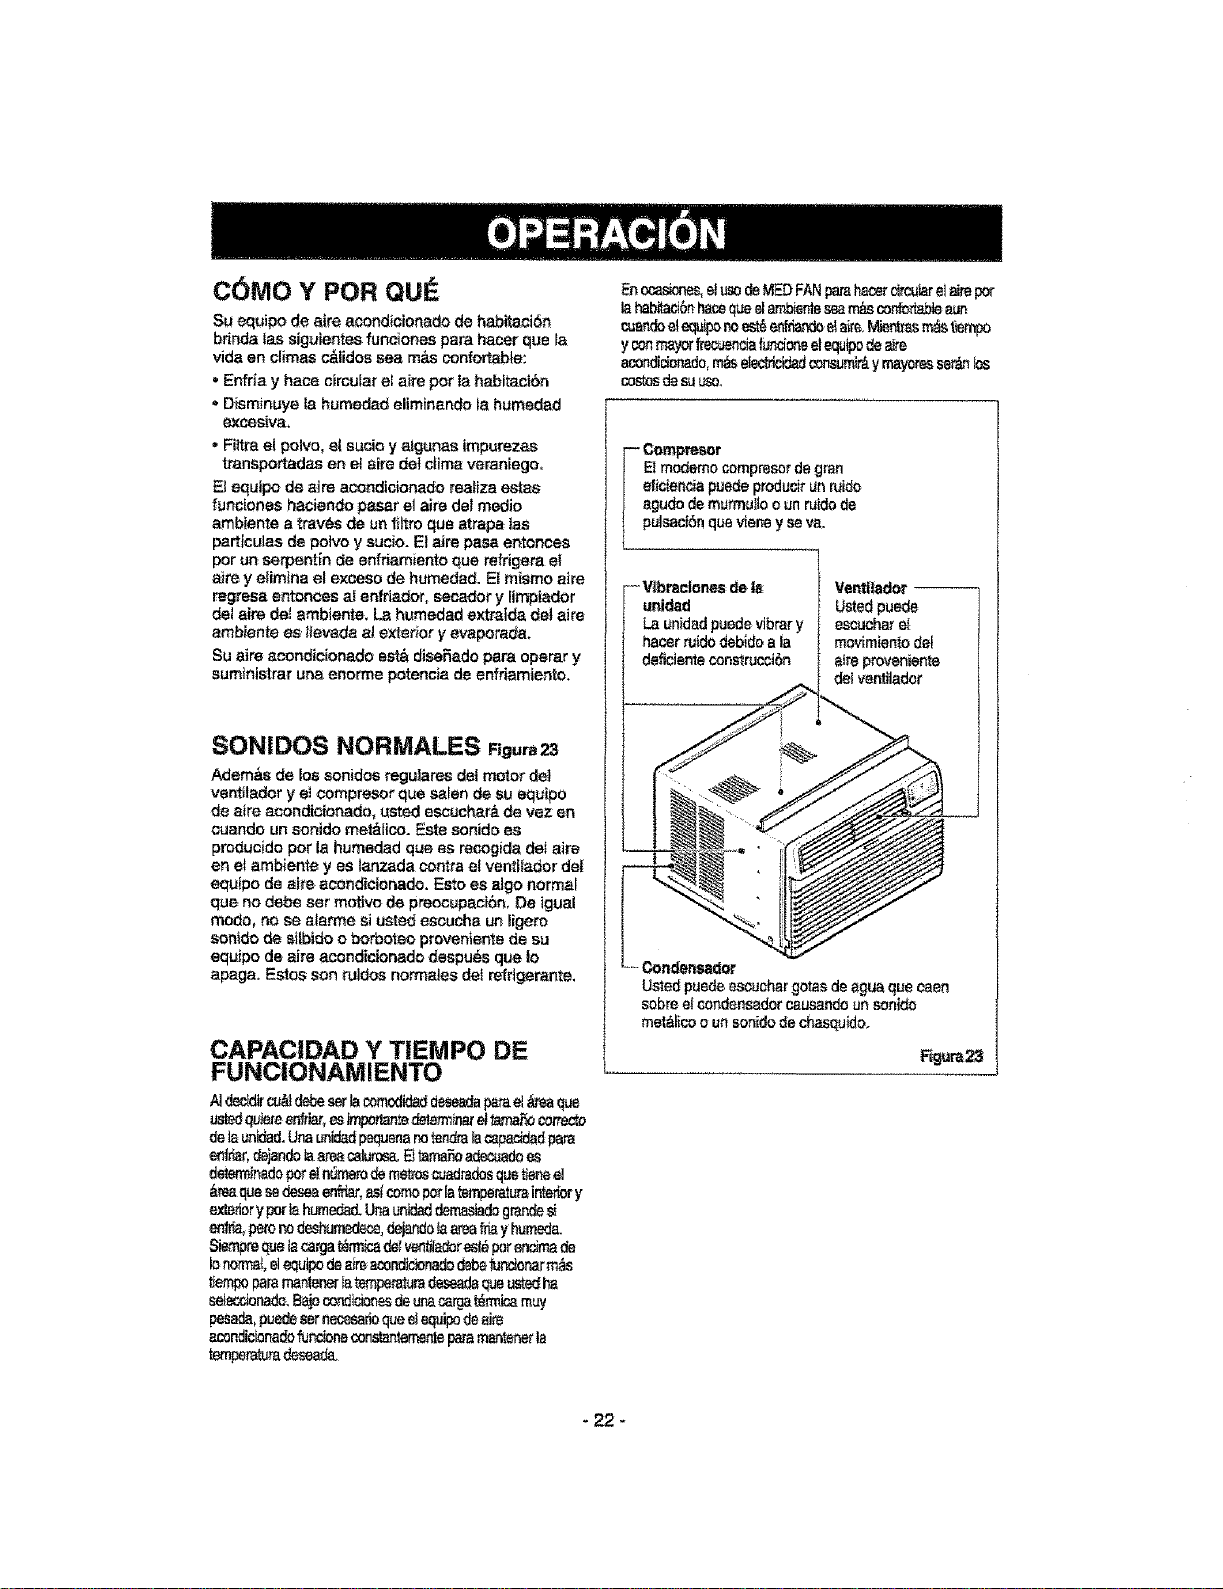
SONtDOS NORMALES F gura23
Ademas de los sonidos regulates del motor de]
ven|ilador y e_(x)rnpresor qua salon de su equfpo
de sire scondicionado, usted escuchara de vez on
cuando un sonido met_,lico. Este sonido es
producido pot la humedad qua as rocogida del sire
en el ambiente yes tanzada con_ta e! ventilador de{
equlpo de aide acondIcfonado, Esto es _dgo normal
q_J_no debe set motivo de preocupaci6n, De igual
modo, no se alarme si usted escucha un Iigero
san_do de. silbido o borboteo proveniente de su
equipo de sireacondicionade despues qua Io
apaga. Estos son tuldos normales dei refrtgerante,
CAPACtlDAD Y TIEMPO DE
FUNCIONAMIENTO
AJde_ir cu_ debesetta¢omcdideddessadap_-ael_a qua
q_ete utfriar,es tmpotlan_determina/eltamaSo_tre_o
de_ unidad.Unaunidadpaqu_a notendra_ ¢apac_dadpars
entr;ar,_nd0 taareacatu_, Eltama_ ade_ado es
det_q_nadopotelntJmemde _ _adrados qua t_na el
(_reaquasedese_enf'nat,_sicomopo_[atemperatureintef_ry
ex_rtory potl_hum_ U_ urttdad_siado gra_des_
er_, peronodeshum_ex_, dejandotaarea_ y humeda.
Siet_re qua:tacargat@m_adeIvsn_a_r est_potencirr_ de
b non.i,elequipodeatre_icbnado d_ _nc_onarm_s
_mpo par_mantene__._rnpemt_radeseadaq_euste_ha
selec_onado._ con_iu"ior,esdeun_cargat_rmlcarnuy
pesad_,puedesernecesarioquaeteq_ipode_it_
acondicb_adefur_ona constanterr_nteparsr_n_e_ la
ternpe_a_uradeseada.
Enocas_, s{u_odeMED FANparehater_rcu_elsirepot
lahab_cibntracequaela,'T_ienteseam_ conf_lesun
c_sndoeleq_o no_ enfr_ndoelsire.IvlJentr_sm_st_
y_n m_or frecuer_atundoneel_lutpodea_e
acondicionado,_ electrJck_dconsu_ yrn_yoresse_ _s
costosdesuuso.
i ompmsor
Et modemo compresorde gran
eficier_a puede producir un r_i_o
_gudo de murmutio o un r_ido de
pu_saciSnqua vier_ y sevs.
--Vlbraclonea de I_
unidad
La unidadpusdevtbrar y
hater ru_o debldo a la
deficisnte cons_rucci6n
Vent|tador --
Usted puede
escuchar e_
movimie_o dat
site provenier_e
del vantilador
......Condens_dot
Ustedpuedeescuchargotasde_guaquacaen
sobmelcondensadorc_usandounsoni_:_o
met_licooun sonidode_quido.
Rgura23
-22-

CARACTER CAS
i 15 6 5
9 8 11 1210 13 18
Figure 24,
1, Gab|note
2. Deflecto_vertical
de aJre
3, Deflecto_horizontal
deaide
4,Tome de aire
5. F_ttrodot aire
6, Parri]_afrontal
7+Tablero decontrol
B.Cordbn de
a|tmentacibn
oleo{rice
9, Evaporadot
to. Condensador
"_1,Compresor
I2, Recipiente de base
I3. Punta_
14. Guta superior
"_5.Cortina
"_8.Controlremote
use DEL EQUIPO DE AIRE
ACONDICIONADO
_Para reducir el riesgo de incendio,
descargas e!dctrice o teeiones persona_es, lea tas
IMPORTANTES tNSTRLICC_ONES DE
SEGURSDAD antes de op_rar este aparato.
Pars oomenzar a uti|izar 8! equtpo de =,ire
acondicionado, stgs estos pesos:
1. Enchufe e! equipo de aire acondicionado, (Pare
preven_r desgos de descargas el_ctr_cas, no use
un cable de extens_6n ni un enchufe adapt_der_)
2_Aiuste et extractor de aJre en ta poskcibn CLOSE.
3. Ajuste el controt de MODE a| mas alto nivel
fresco,
4. Ajuste el co.re| dot vent}lador al m&s alto hive[.
5. Ajuste |as foibles desviaderas pare Iograr un ftujo
conferrable de air_,
6. Un_ vez queta habitael6n se haya e_iado,
ajuste el centre| de temperature TEMPa ta
grad_aci6n que us_ considere m_ts conferrable.
NOTA; Sise apaga el aire acondicionado, espere 3
minutes antes de voPcera encendedo. Esto permite
que ee est_bifico _ presi6n dentro de| compresor.
Si no sigue estas ins_'ucciones, e} equipu podria
func'_nar con poca eficiencia_
Si usted mueve el TEMP el control a un warmer,
en_onces inmediatamente espalda a una colocac_Sn
m&e fresca, la unidad apegar&. Espere 3 rninutos,
CONTROL DE VENTILACION
El contret de ver_ta_6n permite que el equip_ de a_
acorv'Jicionado haga re=circulare! aire en el interior de la
habRaci&_ (CLOSE} o saque el aim hacie e! exterior
(OPEN_. (Figure 25)
. La posici_ CLOSE sirvecuando se dese_ un
enfr_amient_ m_imo, Tambien puede use.tee p_r_
h_cer recircu_ar et aire sinenfdar la habitaci6n cuande
el equipo de a_reacondicionado se _ust_ en la
posk_n FAN.
• L_ pc_sicibnOPEN ex_ el aim es_ncado de la
hab_laci_1y Ioexpulsa hacia luera. Elaire fresco eS
Ilevado hacia el interbr de la habitacibn a |raves de
lospasajes norma_es de aire que se hallanen los
hog,ms.
=La posiciSnOPEN o CLOSE puede usarse con
cualquier setecct_ de ventllad_r.
PULL OPEN / PUSH CLOSE
......
- 23 -
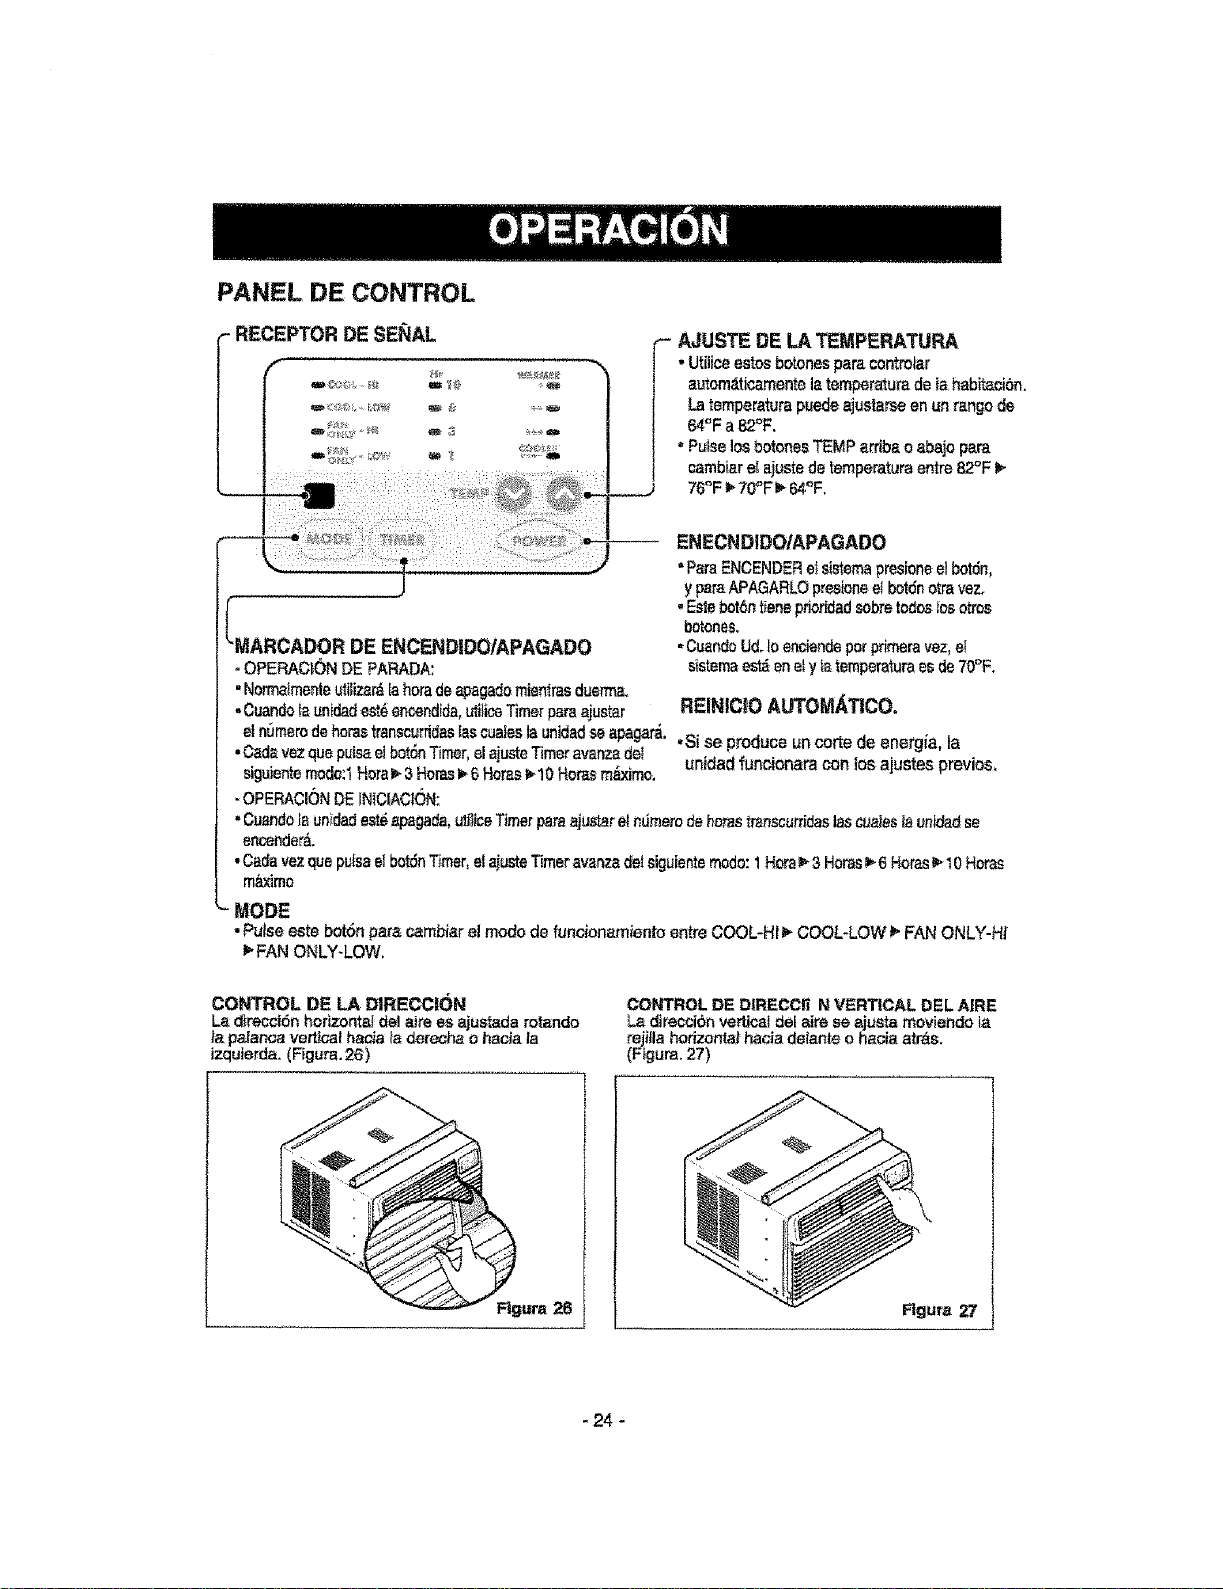
PANEL DE CONTROL
RECEPTOR DE SE_IAL
_- AJUSTE DE LA TEMPERATURA
, Utiticeestos botchesparecontrotar
autorn_ticamentelatemperaturede tahab_ci_.
La temperaturepuedeajus|arseen un rangede
64°F a822F.
*PWselosbotonesTEMP arribao abajopara
cambiarel ajustede temperatureentre82°F i,-
76_Ft_70"F _,-64'_F.
MARCADOR DE ENCENDIDO/APAGADO
- OPERAC_6NDEPARADA:
, Normalmentet.vdlizar_laheradeapegadomien_rasdu_rrna.
,,Cuandolaunidadest_encendida,u_i}iceTimerpareajustar
ENECNDIDO/APAGADO
• PareENCENDERe_sistemapresioneelbotdn,
y pareAPAGARLOpresioneetbetdnotravez_
, Estebot_=_f_ensprtorWadsobreredes_ otros
botones.
•CusndoUdoIoenciendepotpdmeravez,el
sistemaest_enely _atemperatureesde70°F.
REINIC!O AUTOM_TICO.
etn_merodehorsettanscurrWaslescuatesla unidadeeapagar_..,Si se produce un corte de energia, la
•Csd_vezquepulseelbot_nTimer,elajusteTimeravenzadel
sigu_ntemedo:tHoraCe Horas_ BHorse_10 Hor_sm_imo_ unidad funcionara con los ajustes previos.
-OPERACI6NDEINICIACION:
"CuandoIs unidadeste_paga{W,u_tceTimerpareajus_are!ndmerodehorsetranscurridaslascuWes_ untriedBe
erc_ender&.
•Cadsvezque p_seetbotSnTimer,e{eiusteTime_avanz_delsigwentemode:1Hem_ 3 Hems_.6 Horas_*10Horse
m_imo
MODE
• Pulse es_eboronpar_c_mbiare] mode de fundon_Jniento entre COOL-HI_ COOL-LOW _ FAN ONLY-HI
_'FAN ONLY-LOW.
CONTROL D_ LA DIRECC|ON
La d_recciOnhorizontaldelairs esajust_darot_ndo
la palarzcaverticalhada la derecha o hacia la
izquierda.(Figure.26)
CONTROL DE DIRECCI_ NVERTICAL DEL AIRE
La direcciOnvedica!del aJreseajusta moviendo I_
rejilla horizont_t haclade{anteo haoleatrds.
(Figure,_7)
Rgura 27
- 24 -
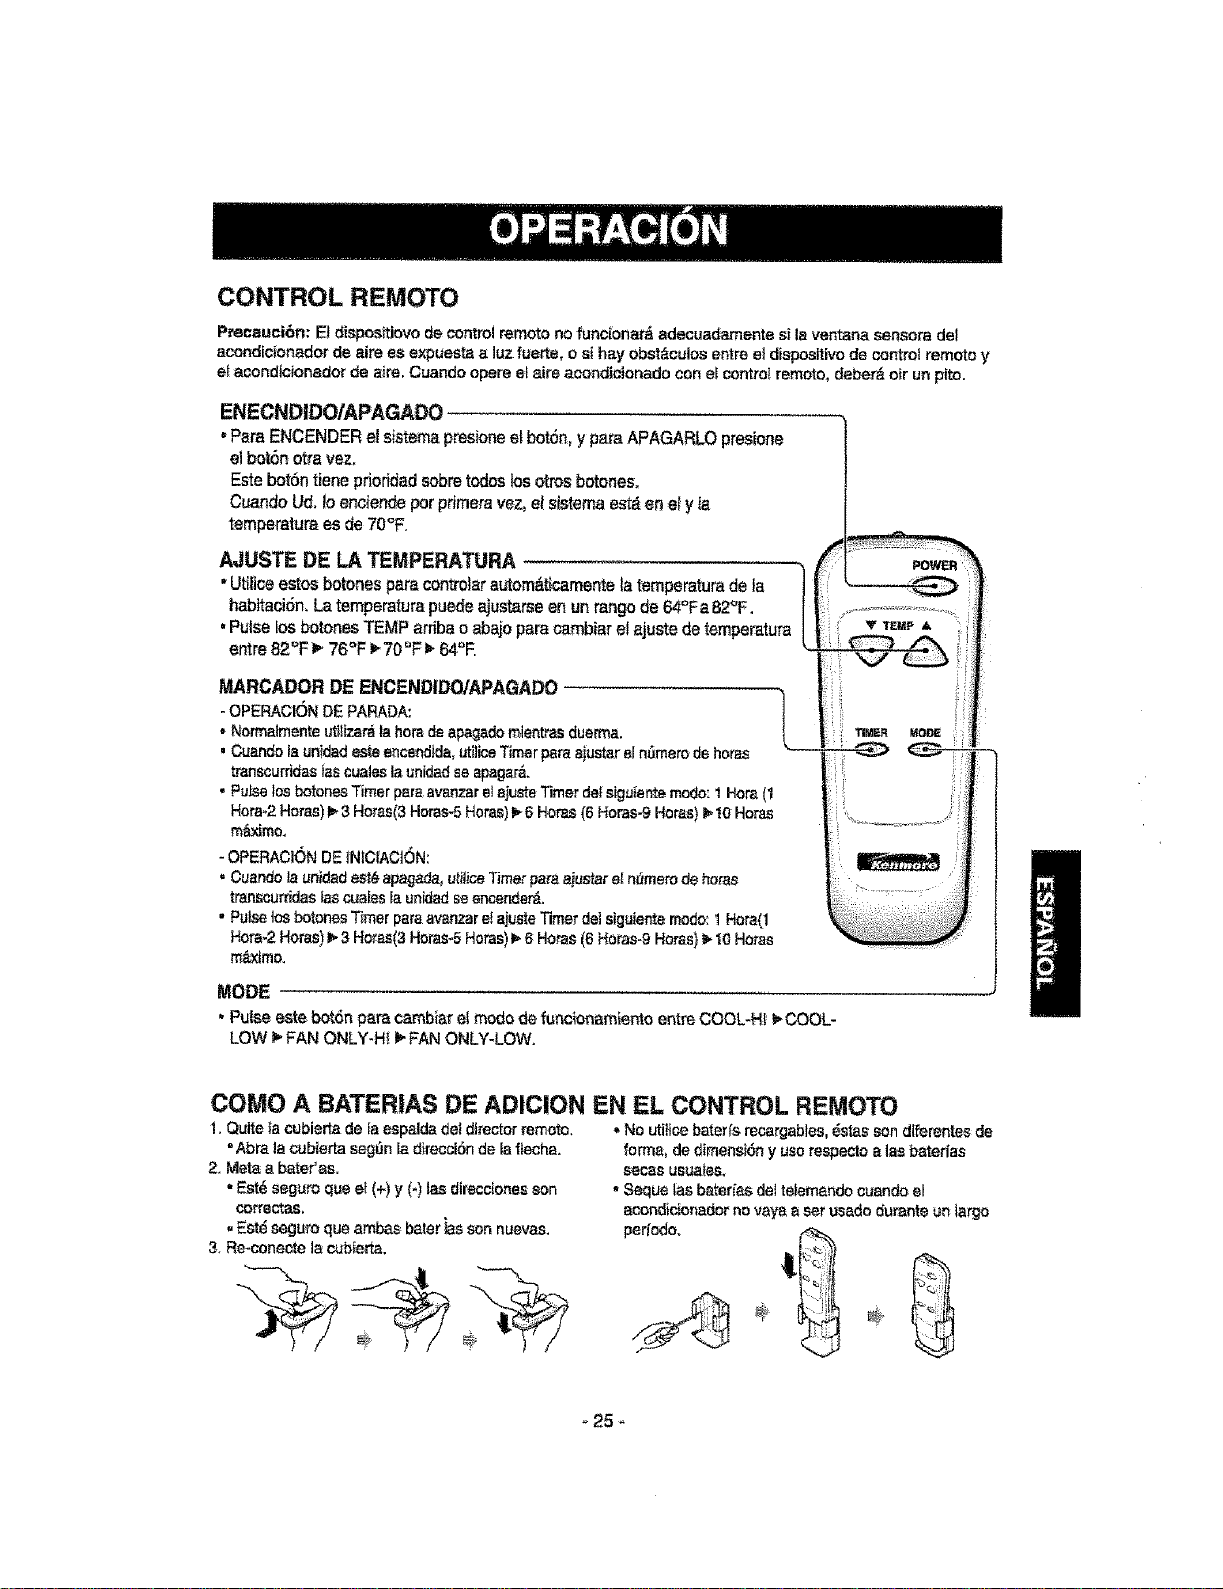
CONTROL REMOTe
Ptecaucibn: Etdispce_iovo de control remote nofunctonar_ edecuadamente sile ventana sensorade!
ac_ndicienadorde aire es expuesta a luz fuerte,o sihay obst_,culesentreel disposttivo de contretremote y
elacondtcionador de aim, Cuando opere et aire acondicionadocon e_control remote, deber_ o}runp}to.
ENECNDIDO/APAGA_
=PareENGENDERetsistemapresioneel bot_n,ypareAPAGARLOpresione
el bot6notravez.
EstebotSntieneprioridadsobretodoslosotrosbotones.
CuandoUd.loencien_ perprtmeravez,e!sistemaest_en etyIa
temperatureesde70°F.
AJUSTE DE LA TEMPERATURA
• Utilice estos botones pare controlar a_om_ticamente ta temperatura de la
habitaci6n. La temperature puede ajustarse on un range de 64°Fa 82°F.
• Pulse los botones TEMP ardba o _ajo pare cambiar el ejuste de temperature
entre 82'_F _- 76°F _ 70 =F _-64'_E
MARCADOR DEENCENDIDOIAPAGADO
- OPERACI(_N DE PARADA:
* Normalmente utilizara la hem de apag_do mient_s duerma.
, Cuan_ la unidad es_ ence_ida, utiiice Timer pare _ustar el nSmero de bores
transcurrtdas Ias cuates la unidad se apag_.
. Pulse los botones Timer pare avanzer etajuste Timer de}eiguiente mode: 1 Hera (1
Hera-2 Horas) _-3 Horas(3 HoraS-5Horas) I_6 Horas (6 Horas-9 Hor_s) i_IO Horas
m_imo,
- OPERACION DE ]:NICrACi6N:
= Ouando la unidadest_ apagada, u_iticeTimer pare e,ius_are! n_mero de hora_
transcurddas lascuaiesla un_ad seencender_.
. PUlsetosbotones T_merpare avanzar ef ajuste Timer dei siguiente mode: 1Hera(1
Hera-2 Horas)t_ 3 Horas(3 Horas-5 Horas)l_ 6 Horas (6 Horae-9 Horas) _ !0 Horas
tr_Y.tmo.
MODE
PUtS_este bot6n p_racambiarel modede funcionam_ento entreCOOL*HI _ COOL-
LOW _ FAN ONLY-H_I_FAN ONLY-LOW.
COMe A BATERIAS DE ADICION EN EL CONTROL REMOTe
1. Quits |a cubiert_ de }a esp_lda det director remote.
"Abre la c_Jbiertaseg_n la direccl6n de Is _techa.
2. Met_ a.ba_er'_s.
• Est_ seg_ro que e{ (÷) y (.) tas di_ccior_es son
correct_,
. Est_ seguro que ambas b_ter bs son nuevas,
3, Re-conec_e le c_b_rta.
* No utitice beter_s recargables, 6stas son diferentes de
form_, de dimension y use respecto e las batedas
secae usua_es.
* Sequelas bater_s dei telemendo cuando el
acondicionador no vay_ a set usado durante ut_targo
o25 -
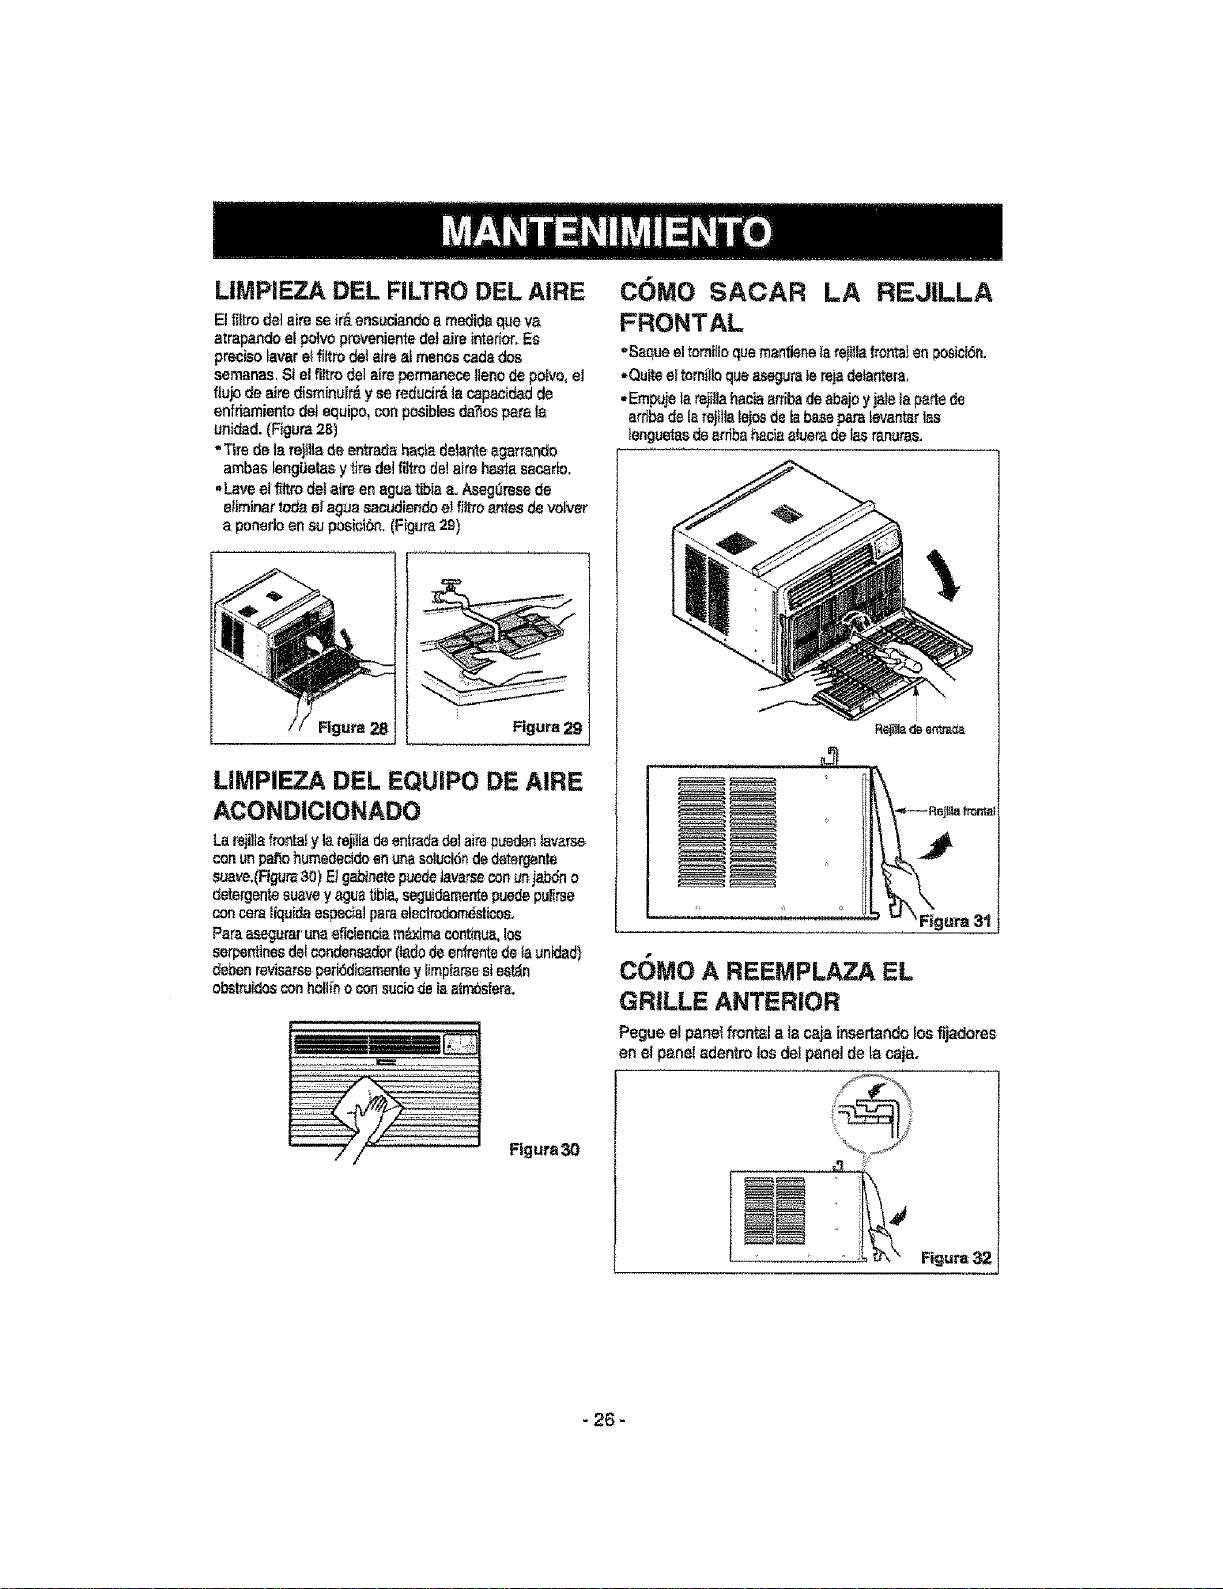
LIMPIEZA DEL FILTRO DEL AIRE
Elnitrode}airsseir_ensuciar:_oa medidequava
atrapandoeIpolvoproveniencedeIsireinterior,Es
preciselavaratfiltrodetaimatmanescadsdos
semsnas,Sielflltrodela{repermanecelie_ depo_o,eI
flujodeaidedisminuir_y sereducir_la capa_d de
enfrtamientodetequips,conpOSiblesdai_espapala
unidad.(Figure28)
-Tiredela _jilta deer_radahaciadeta_ea_rrando
ambaslengbetasy t_redetfilt_ de!airshas_asacarto.
- Laveei_fiitrodelairsenaguatibiaasAseg_ressde
eliminartogas!aguesacudiendoel flirtsantesdevelvet
aponedoen_ pos'tci6n.(Figura291
Figura 29
LIMPIEZA DEL EQUIPS DE AIRE
ACONDICIONADO
Lareji!lafronta_yla r_JIadeentradade]airspueden_avarse
canunpingshumedec_doanunasoluctdndedetergents
suavs.(Fig_ra30) E,_gantletspuedeJavarsecon_r_jabdno
detergente suavey aguatibia,segui_mentepuedepulirse
concerafiquidaespec_lparselectrodom_sticos,
Pars_rar unaeficienciarn_t.imacon_n_los
serpe_ne._delcondensa_(tadedeentrantsdetaunldad}
gebenrevi_se peri6dicarr_nteylimp{aressiest_n
obs_idosconhell_noconsuciodeisatmbsfera.
COMe SACAR LA REJtLLA
FRONTAL
_Saquseltsmi{Ioqueman,shetare,iliaf_,X_.a_enposici6n.
-Quitseltorniltaquaaseg_raierejadecanters,
,,Empujelarejiflahacia_rribadeabajeyjalelapartsde
arabsdelatejt_ialejosdelabas_parstevantarlas
tenguetasdearribahacksatueradeiasmnuras,
FtgBta 3_
COMO A REEMPLAZA EL
GRILLE ANTERIOR
Pegueelpans!frontala tacajainsertandofosfijadoreS
en elp_neladentro _osdelpanetde1_ca_a.
Figura 30
Figur_
- 26 -
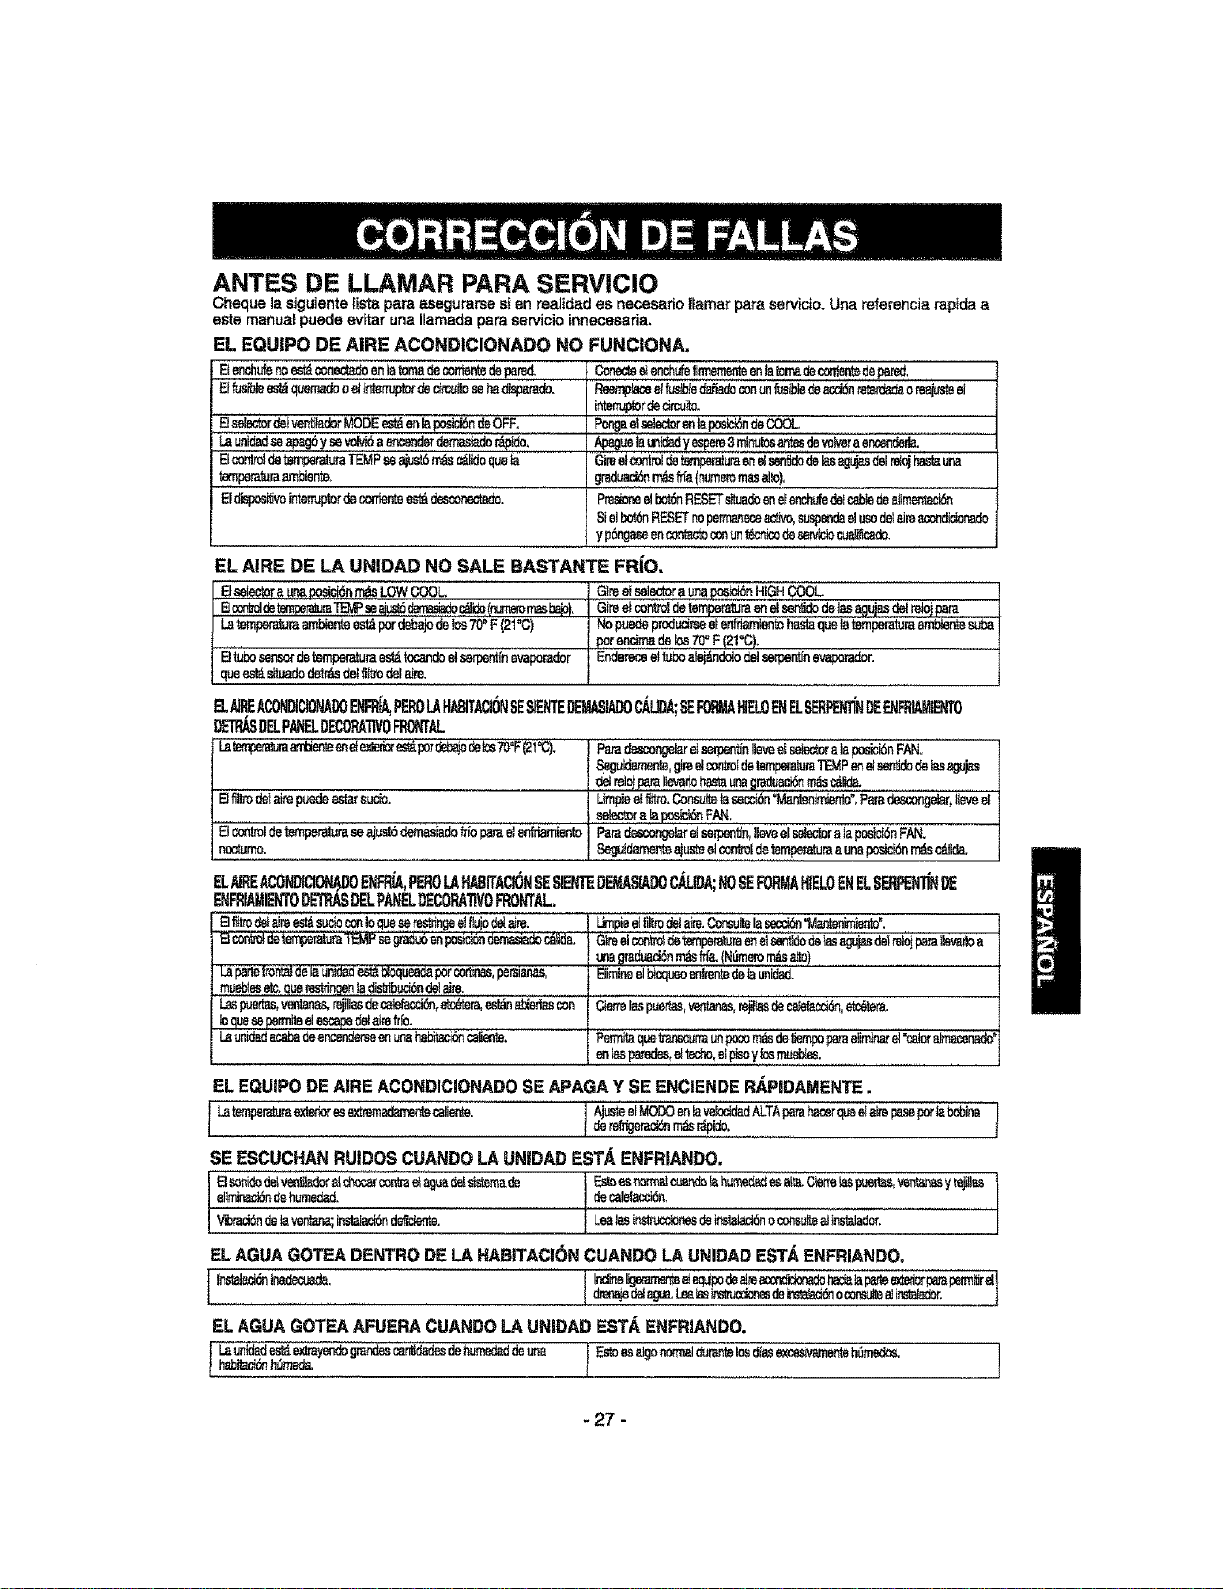
ANTES DE LLAMAR PARA SERVICIO
Cheque la siguiente lista pare asegurarse si en realidad es necesario namar para servicto. Una refe_ncia rap_daa
este manual puede evitar una Ilamada para ssrvicio innecesaria,
EL EQUIPO DE AIRE ACONDICIONADO NO FUNCiONA,
E1fuel_est_querr'._looei_rr_tu deci¢u_sehad_parado.
E!_ del_!_or MODEest_e_laposid6ndeOFF,
Laun_dseap_y_,_ _,__,r_p_o, ......
Elcontn_de_ TEMPsea_s_n_ ¢_o qua_
tampomtumam_ienm,
EIdis_i_ _mrr.,_p_rdacorrier__-t_desk.
Reenko__ _ d_fadoconunfusi_de_n _ ore_jus_ai
_r decirc_to.
Apaguelaun_Jye_pem3ml_s antesdeyouraenoe_,ed_.
gr_uad6nn'_fr_ (num_,ornasa_o),
Pres_eelbot_RE.SETs_adeenelsr_vJfedeI_ de_im_tac_
Sielbot_RESETnopermanece_ suspendad usod_elmam_:lid_de
yp6ngaseen_c_o cm_ t_n_ desstv_cio_tcade.
ELAIRE DE LA UNIDAD NO SALE BASTANTE FR{O.
I__ec_ora _r_ DoelciO__ LOWCOOL, G}reel selac_ora_napos_io'nHIGHCOOL
E_oootn__etemper_um_ se_us__enmsim_c_i_oInm_mrresba_@_Giree_col_ detemper_ra_ else,_dedet_sagujas_ r_o_para
Latwndera_ur__ est_potdebajode_ 70"F{21°C) NopueSsp_ducirsse_enfrlamlen_hastaquetatemperat_ra_mbientesu_
_r_r_ d_bs70_F(2_°C).
Btubosensordetemperaturaes_tocandoelserpe_'nevapo_tor Endare_ell_bo_ndoIo delsetper_nsvaporador.
quee,s_situadodetr_ del_o delaire,
EL/_REACONDIC_DOPt'tl_ PER{)LAHt_ITACI(]_SESFJ_EI_EM_tO CAL!DA;8E_ HF..L0EHELS_R_i_N BEF..HFRL_IEHTO
OETRA8DELPANELDECO_T'NO_AL
Segu_wner_,g_ el_m_Idstemperelu_TE_Pe_els_,_Jd_delas_tu_m
_ i _ rel__ _ hBstaunagraduaci_rn_1_ ................................
Etfilitodelaitepuede@starsuc{o. L_pieelfittrO,Co_s_ I__=k_n"t,/',ar_te_J_o',Par_ de_corlgelar,IieveeI
selec_alaposici_FN,_,
"'Ei"'_t_=_t_._r_tu_=_ d_do e_o_ ei_to 'Par__W el_,_l_l _iaiap_i_, F_I
] no_un'_. I _darnerte ajus_elc_[ d_tempetaturaaunapos_k_nrn_sc_llde,
ELNREACOI_CION_O ENF_A,PEROLAHA,81TAC_NSESI_'E OF.A_._,OOCkU_A;NOSEFOR_AF_ELOENELS_T_ OE
-27 -

_28 _

_29_
Master Protection Agreements
Congratulations on making a smart purd'_asa.
Your new Kenmore ®product is designed and
manufactured for years of dependable operation.
But like at[ products, it may require preventive
maintenance or repair from time to time.
That's when having a Master Protection Agreement
can save you money and aggravation.
Purchase a Maser Protection Agreement now and
protect yourseff from unexpected hassle and
expense.
The Master Protection Agreement also helps extend
the life of your new product, Here's what's included
in the Agreement:
E_ Expert service by our 12,000 professional
repair spectalists
[_ Unlimited service =nd no charge for parts and
labor on aft covered repairs
[] "No=lemon" guarentce -replacement of your
covered product if four or more product failures
occur within twelve months
j_ Pier,duct replacement if your covered product
can't be fixed
[] Annual Preventive Maintenance Cheek at your
request - no extra charge
[_ Fast help by phone - phone support from a
Sears technician on products requiring in-home
repair, plus convenient repair scheduling
[]Power surge protection against electrical
damage due to power fluctuations
[_ Rental reimbursement if repair of your covered
product takes longer than premised
Once you purchase the Agreement, a simple phone
call is all that it takes for you to schedule service,
You can carl anytime day or night, or schedule a
service appointment online.
Sears has over I2,000 professional repair
specialists, who have access to over 4.5 million
quality parts and accessories. That's the kind of
professionalism you can count on to he;p prolong
the life of your new purchase for years to come.
Purchase your Master Protection Agreement today!
Some limitations and exclusions apply.
For prices and additions! information calf
1-800-827-665;5.
Sears Installation Service
For Sears professional installation of home
appliances, garage door openers, water
heaters, and other major home items, in the
U.S.A. call 1-600-4_MY-HOME ®
Acuerdos de Ptoteccibn Especiatit.ada
tEnhorabuenal Ha realizado one compraintellgonte.
Su nuavo aparsto Kenmore® est&dissuadey fabricado
paraofrecedeaPicsde bushfuncionamiento.
Sinembargo, a]iguatque todoslos productos,puede
precisar un rnantenimiento preventiveo inclusoalguna
reparaci_n de vez en cuando.En esasocas_,onee,un
Master ProteCtionAgreement puede ayudarloaaborter
dineroe inconvenientes.
Adquiera un Maser ProtectionAgreement ahora,y
pmt6jase a s! mismo de mo!es#as y gastos inesparados.
E1Master ProteCtionAgreement le ayudar_tambtdn a
prolonger favide de su nuevo aparato. Los siguientee
serviciosestdn incluidos:
[] Servlote experto per parts de cualqutera de
nuealtos ! 2.000 t&onicosprofesicnales espec_atistas
de Sears.
[_ Prestaci6n de sarvicios sin timltaciones y sin
eargarte tas plazaso ]amane de obrs an todaslas
reparaclonescubier_s par st acuerdo.
[] Garantfa saris de sust_uclbn de ias plazas del
productocubierto parel acuerdo,si cuatro o ads
piezas se mostrasen defactuosasen unperiodode
doce mesas,
[] Sustituoidn dsl producto per otto naevo, si et
defectuosono pudieser_pararse.
[] Control de mantenimienta anual preventive,
siempre qua Io deses y singustoadicienal aiguna.
[] Aeistencia talefbnica inmediats de un tdc_co
espec_atistaen productos qua hen de set reparadcs a
domicilio, adem&sde una progrsmact6nadecuada de
le reparsc'_n.
Pmt_'ci6n centre aublda_ de tensi6n qua
provoquendefies ei_ctricosdebidosalas
fluc'_acioneeen et suministm.
[] Reintegro del alqulier sila reparaci6nde{pmducto
Ileva m_s tiempo de1promtetido
Una vaz qua haya adquiddo et Agreement, no nacesitar&
rods queuna simplelfamada parasolicitore} servicio de
su aparato. Adam,s, pod_ hacerloan cualquier memento
dotdie o de ia noche, o sellout una cite pareprestaci6n
de serviciosonline.
Sears cuen_acon m_s de 12.000 t_cnicosprefesionales
aspecialistasan rsparaciones, con acceso a m_Lsde 4,5
miltones de plazas de sustituci6ny accesoriesde csiidad,
_ste ser_ elripede profesional_dady servic'_ con e_que
podr_ canterpareprolongerlavide de su nuevo producto
partouches a_. iAdquierahey mtsmo su Master
ProtectionAgreemenLP
Se aplicar_n algunas lim_taciones y
restrieclenas.
Sf desce hecar alguna consults sobre los
precios u otra infon'nacibn adiolonal, te rogareos
Ilame a! te|6fone 1-800_27_55,
Servicios de Instalacibn Sears
Pare so!foiler servicios de insta/acidn profesionales
de Sears de eiectrodom#.sticos, mandos de aperture
de puertas de garajes, calentadores de ague y arras
uparatos en ice Estados Unidos, puede flarnar a
1-800-4-MY-HOME ®
-30 -


_i:i:ii::i_i,ii:
!_i:_ii_ii_iiI_I:_:
:::,_:
_i_i:ii,il
: i'il i: !ilil¸
Your Home ':::
For repair- in your home-of all major brand appliances,
lawn and garden equipment, or heating and cooling systems,
no matter who made it, no matter who sold it!
For the replacement parts, accessories and
owner's manuals that you need to do-it-yourseE.
For Sears professional installation of home appliances
and items like garage door openers and water heaters.
1-800o4-MY-HOME _ (I-_00-4_.4r_3)
Call anytime, day or night (U,S.A. and Canada)
Our Home
For repair of carry-in items like vacuums, lawn equipment,
and electronics, call or go on-line for the location of your nearest
Sears Parts & Repair Center.
1=800-488-!222
Cal! anytime, day or night (U.S.A, only)
www.s_zrs,com
To purchase a protection agreement(U.S.A.)
or maintenance agreement(Canada) on a product serviced by Sears:
:_iii:i_i!i'
iiI
_"I,LL
i:,iiii!i_!,_,
1-800-827=6655 (U.S.A.) 1-800-361-6665 (Canada)
Para pedirservicio de reparaci6_ AU Canada pour service en fran_ais:
a dornicitio, y para ordenar plazas: 1.800.LE.FOYER_C
: ; 1-8B8=SU-HOGAR _ (_800-533-6937) :: :
!
(!,_88_784-6427) www_sears._a :
® Ra_te_ed Tradenlark I T_ Tmdats_ I _ Service M_ _ S_,,__. R_eb_k and _.
® M_rc.a _agist tad a ! T_ Mat__,ade F&btics ! s_ Mats_, de, ,Servicio de: Sears, Roebue, k and C_
_¢ Marque de cm_tnen_e / _ Ma_L_ d_po8_ de Seats. RoebuP._ and Co, © SeaP_ Brands. L_C
Part No_: 3828_210073

