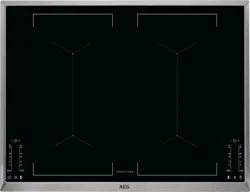
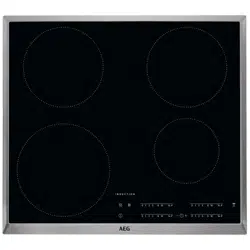
AEG IKE74451FB 68 cm Induction Hob
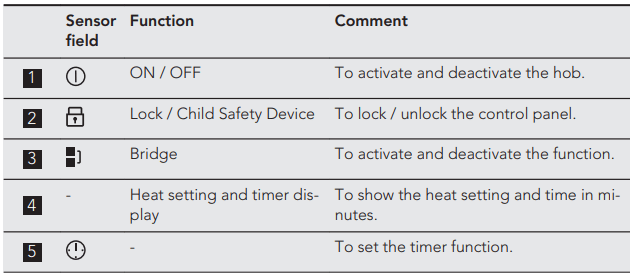
Product's Documents
Below are documents related to this product, you can read online or download:
- Owner's manual - (English) Read Online | Download pdf
User manual Induction Hob

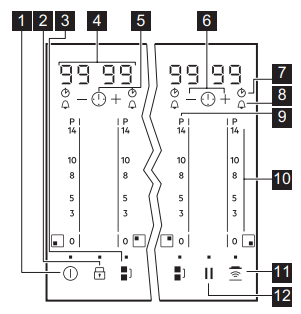
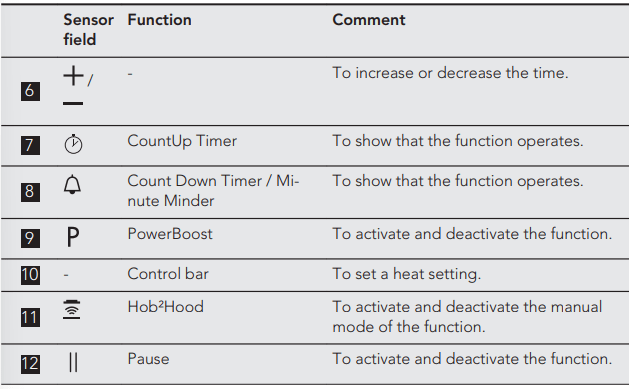
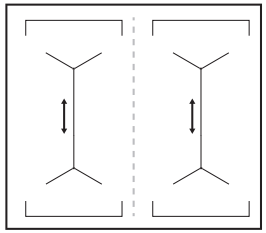
Use the sensor fields to operate the appliance. The displays, indicators and sounds tell which functions operate.
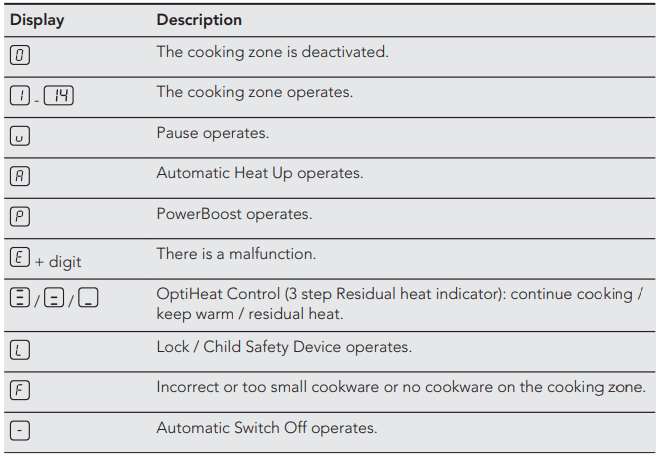
WARNING!
 There is a risk of burns from residual heat. The indicator shows the level of the residual heat.
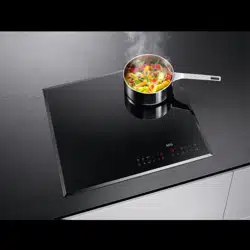
The induction cooking zones make the heat necessary for cooking process directly in the bottom of the cookware. The glass ceramic is heated by the heat of the cookware.
WARNING! Refer to Safety chapters.
Touch  for 1 second to activate or deactivate the hob.
The function deactivates the hob automatically if:
• all cooking zones are deactivated,
• you do not set the heat setting after you activate the hob,
• you spill something or put something on the control panel for more than 10 seconds (a pan, a cloth, etc.). An acoustic signal sounds and the hob deactivates. Remove the object or clean the control panel.
• the hob gets too hot (e.g. when a saucepan boils dry). Let the cooking zone cool down before you use the hob again.
• you use incorrect cookware. The symbol  comes on and the cooking zone deactivates automatically after 2 minutes.
• you do not deactivate a cooking zone or change the heat setting. After some time  comes on and the hob deactivates.
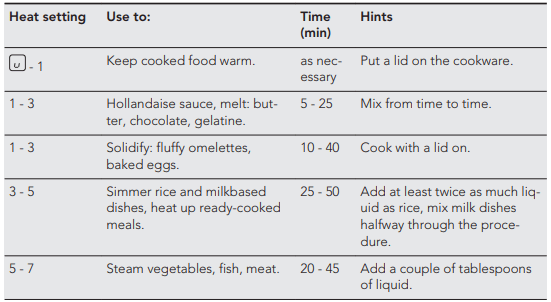
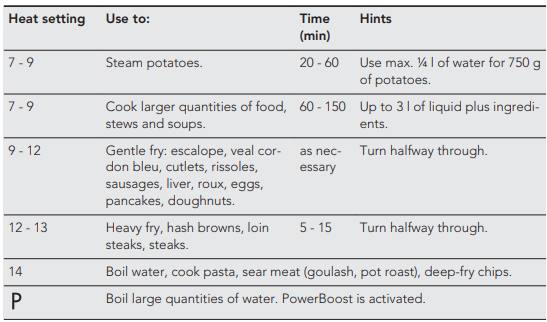
The relation between the heat setting and the time after which the hob deactivates:

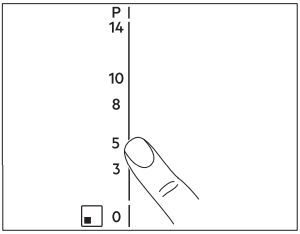
To set or change the heat setting:
Touch the control bar at the correct heat setting or move your finger along the control bar until you reach the correct heat setting.
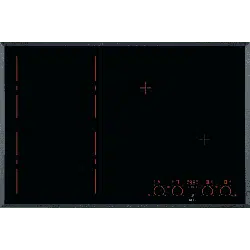
Place the cookware in the centre of the selected zone. Induction cooking zones adapt to the dimension of the bottom of the cookware automatically.
You can cook with large cookware placed on two cooking zones at the same time. The cookware must cover the centres of both zones but not go beyond the area marking.
If the cookware is located between the two centres, the bridge function will not be activated.
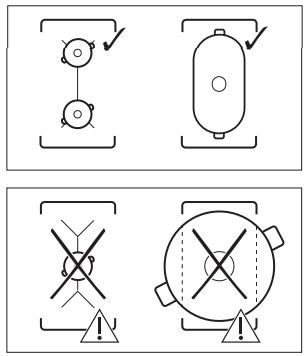
 The function operates when the pot covers the centres of the two zones.
This function connects two cooking zones and they operate as one.
First set the heat setting for one of the cooking zones.
To activate the function for left / right cooking zones: touch  . To set or change the heat setting touch one of the left / right control sensors.
To deactivate the function: touch . The cooking zones operate independently.
Activate this function to get a desired heat setting in a shorter time. When it is on, the zone operates on the highest setting in the beginning and then continues to cook at the desired heating setting.
To activate the function the cooking zone must be cold.
To activate the function for a cooking zone: touch  (
( comes on). Immediately touch a desired heat setting. After 3 seconds
  comes on.
To deactivate the function: change the heat setting.
This function makes more power available to the induction cooking zones. The function can be activated for the induction cooking zone only for a limited period of time. After this time the induction cooking zone automatically sets back to the highest heat setting.
Refer to “Technical data” chapter.
To activate the function for a cooking zone: touch . comes on.
To deactivate the function: change the heat setting.
You can set one timer function for each cooking zone separately. To set a timer function for the zones on the left side use the timer on the left, for the zones on the right, the timer on the right.
 Count Down Timer
Use this function to specify how long a cooking zone should operate during a single cooking session.
First set the heat setting for the cooking zone and then set the function.
To activate the function or change the time: touch  quickly again and again until the indicator of a given zone lights up on the display. Then touch
  or
or  to set the time (00 - 99 minutes). The function starts automatically after 4 seconds. comes on the display.
To activate the timer function for the second zone in a pair touch 3 times quickly.
When the time comes to an end, a signal sounds and 00 flashes. Touch to stop the signal.
To see the remaining time: touch .
To deactivate the function: choose the desired zone touching and then touch . The remaining time counts back to 00. The symbol goes out.
 CountUp Timer (The count up timer)
You can use this function to monitor how long a cooking zone operates.
To activate the function: for the first zone in a pair touch twice quickly. The function starts automatically when lights up. To activate the function for the second zone in a pair touch 4 times quickly.
To see how long the cooking zone operates: touch . The display shows the time, at first in seconds then in minutes.
To deactivate the function: choose the desired zone touching and then touch . The symbol goes out.
Minute Minder
You can use this function as a Minute Minder when the hob is activated but the cooking zones do not operate.
To activate the function: touch quickly again and again until the indicator of a given zone lights up on the display.
Touch or to set the time. The function starts automatically after 4 seconds. comes on the display.
When the time comes to an end, a signal sounds and 00 flashes. Touch to stop the signal.
The function has no effect on the operation of the cooking zones.
This function sets all cooking zones that operate to the lowest heat setting.
When the function operates, all other symbols on the control panels are locked.
When the function is active,  and
and  symbols can be used. The function does not stop the timer functions: and .
Touch to activate the function.  comes on. The heat setting is lowered to 1.
To deactivate the function, touch . The previous heat setting comes on.
You can lock the control panel while cooking zones operate. It prevents an accidental change of the heat setting.
Set the heat setting first.
To activate the function: touch  .
.  comes on for 4 seconds. The Timer stays on.
To deactivate the function: touch . The previous heat setting comes on.
When you deactivate the hob, you also deactivate this function.
This function prevents an accidental operation of the hob.
To activate the function: activate the hob with . Do not set the heat setting. Touch for 4 seconds. comes on. Deactivate the hob with .
To deactivate the function: activate the hob with . Do not set the heat setting. Touch for 4 seconds.  comes on. Deactivate the hob with .
To override the function for only one cooking time: activate the hob with . comes on. Touch for 4 seconds.
Set the heat setting in 10 seconds. You can operate the hob. When you deactivate the hob with the function operates again.
Deactivate the hob. Touch for 3 seconds. The display comes on and goes out. Touch for 3 seconds.  or
or  comes on. Touch
  of the timer to choose one of the following:
• - the sounds are off
• - the sounds are on
To confirm your selection wait until the hob deactivates automatically.
When the function is set to you can hear the sounds only when:
• you touch 
• Minute Minder comes down
• Count Down Timer comes down
• you put something on the control panel.
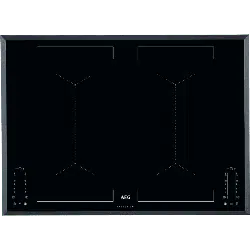
• Cooking zones are grouped according to the location and number of the phases in the hob. See the illustration.
• Each phase has a maximum electricity loading of 3700 W.
• The function divides the power between cooking zones connected to the same phase.
• The function activates when the total electricity loading of the cooking zones connected to a single phase exceeds 3700 W.
• The function decreases the power to the other cooking zones connected to the same phase.
• The heat setting display of the reduced zones alternates between the chosen heat setting and the reduced heat setting. After some time the heat setting display of the reduced zones stays on the reduced heat setting.
 WARNING! Refer to Safety chapters.
For induction cooking zones a strong electro-magnetic field creates the heat in the cookware very quickly.
Use the induction cooking zones with correct cookware.
Cookware material
• correct: cast iron, steel, enamelled steel, stainless steel, the bottom made of multi-layer (with correct mark from a manufacturer).
• not correct: aluminium, copper, brass, glass, ceramic, porcelain.
Cookware is correct for an induction hob if:
• some water boils very quickly on a zone set to the highest heat setting.
• a magnet pulls on to the bottom of the cookware.
The bottom of the cookware must be as thick and flat as possible.
Cookware dimensions
Induction cooking zones adapt to the dimension of the bottom of the cookware automatically to some limit.
The cooking zone efficiency is related to the diameter of the cookware. The cookware with a smaller diameter than the minimum receives only a part of the power generated by the cooking zone.
Refer to “Technical data” chapter.
If you can hear:
• crack noise: cookware is made of different materials (sandwich construction).
• whistle sound: you use the cooking zone with high power level and the cookware is made of different materials (sandwich construction).
• humming: you use high power level.
• clicking: electric switching occurs.
• hissing, buzzing: the fan operates.
The noises are normal and do not refer to hob malfunction.
To save energy, the heater of the cooking zone deactivates before the count down timer sounds. The difference in the operation time depends on the heat setting level and the length of the cooking operation.
The correlation between the heat setting of a zone and its consumption of power is not linear. When you increase the heat setting, it is not proportional to the increase of the consumption of power. It means that a cooking zone with the medium heat setting uses less than a half of its power.
The data in the table is for guidance only.
When you operate the hob with the function:
• Protect the hood panel from direct sunlight.
• Do not spot halogen light on the hood panel.
• Do not cover the hob panel.
• Do not interrupt the signal between the hob and the hood (for example with a hand or a cookware handle). See the picture.
Hood in the picture is only exemplary.
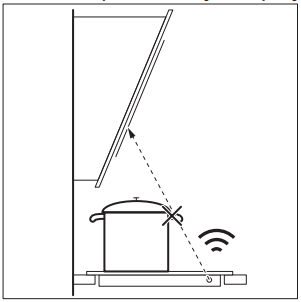
It may happen that other remote controlled appliances may block the signal. To avoid it do not operate the remote of the appliance and the hob at the same time.
Cooker hoods with the Hob²Hood function
To find the full range of cooker hoods which work with this function refer to our consumer website. The AEG cooker hoods that work with this function must have the symbol  .
.
 WARNING! Refer to Safety chapters.
• Clean the hob after each use.
• Always use cookware with clean bottom.
• Scratches or dark stains on the surface have no effect on how the hob operates.
• Use a special cleaner applicable for the surface of the hob.
• Use a special scraper for the glass.
• Remove immediately: melted plastic, plastic foil, sugar and food with sugar. If not, the dirt can cause damage to the hob. Take care to avoid burns. Put the special scraper on the glass surface at an acute angle and move the blade on the surface.
• Remove when the hob is sufficiently cool: limescale rings, water rings, fat stains, shiny metallic discoloration. Clean the hob with a moist cloth and non-abrasive detergent. After cleaning, wipe the hob dry with a soft cloth.
• Remove shiny metallic discoloration: use a solution of water with vinegar and clean the glass surface with a moist cloth.
WARNING! Refer to Safety chapters.
| Problem | Possible cause | Remedy |
| You cannot activate or operate the hob. | The hob is not connected to an electrical supply or it is connected incorrectly. | Check if the hob is correctly connected to the electrical supply. Refer to the connection diagram. |
| The fuse is blown. | Make sure that the fuse is the cause of the malfunction. If the fuse is blown again and again, contact a qualified electrician. | |
| You do not set the heat setting for 10 seconds. | Activate the hob again and set the heat setting in less than 10 seconds. | |
| You touched 2 or more sensor fields at the same time. | Touch only one sensor field. | |
| Pause operates. | Refer to "Daily use". | |
| There is water or fat stains on the control panel. | Clean the control panel. | |
| An acoustic signal sounds and the hob deactivates. An acoustic signal sounds when the hob is deactivated. | You put something on one or more sensor fields. | Remove the object from the sensor fields. |
| The hob deactivates. | You put something on the sensor field . | Remove the object from the sensor field. |
| Residual heat indicator does not come on. | Residual heat indicator does not come on. | If the zone operated sufficiently long to be hot, speak to an Authorised Service Centre. |
| Hob²Hood does not work. | You covered the control panel. | Remove the object from the control panel. |
| Automatic Heat Up does not operate. | The zone is hot. | Let the zone become sufficiently cool. |
| The highest heat setting is set. | The highest heat setting has the same power as the function. | |
| The heat setting changes between two levels. | Power management operates. | Refer to "Daily use". |
| The sensor fields become hot. | The cookware is too large or you put it too near to the controls. | Put large cookware on the rear zones if possible. |
| There is no sound when you touch the panel sensor fields. | The sounds are deactivated. | Activate the sounds. Refer to "Daily use". |
| comes on. | Child Safety Device or Lock operates. | Refer to "Daily use". |
| comes on. | There is no cookware on the zone. | Put cookware on the zone. |
| The cookware is unsuitable. | Use suitable cookware. Refer to "Hints and tips". | |
| The diameter of the bottom of the cookware is too small for the zone. | Use cookware with correct dimensions. Refer to "Technical data". | |
 and a number come on. and a number come on. | There is an error in the hob. | Deactivate the hob and activate it again after 30 seconds. If comes on again, disconnect the hob from the electrical supply. After 30 seconds, connect the hob again. If the problem continues, speak to an Authorised Service Centre. |
| You can hear a constant beep noise. | The electrical connection is incorrect. | Disconnect the hob from the electrical supply. Ask a qualified electrician to check the installation. |