On-line owner's handbook
Referring to the owner's handbook on-line also gives you
access to the latest information available, easily identifi ed by
the bookmark, associated with this symbol:
If the "MyCitroën" function is not available on the CITROËN public
website for your country, you can fi nd your handbook at the following
address:
http://service.citroen.com
Select:
You can fi nd your handbook on the CITROËN website, under
"MyCitroën".
This personal and customisable space allows you to establish direct
and special contact with CITROËN.
The Vehicle documentation link in the home page (no registration is
needed),
the language,
the vehicle, its body style,
the print edition of your handbook appropriate for the date of registration
of your vehicle.
You have access to your handbook on line, together with the latest
information, identifi ed by the symbol:

CITROËN has a presence on every continent,
a complete product range,
bringing together technology and a permanent spirit of innovation,
for a modern and creative approach to mobility.
We thank you and congratulate you on your choice.
Your vehicle is fitted with onl
y
some of the
e
quipment described in this document,
dependin
g
on the trim level, version and the
s
peci
f
ications
f
or the countr
y
in which it is sold.
The
f
ittin
g
o
f
electrical equipment or
accesso
r
ies
w
hich
a
r
e
n
o
t r
eco
mm
e
n
ded
by
C
ITROË
N
may result in a
f
ailure o
f
your
vehicle's electronic s
y
stem. Please note this
s
pecific warnin
g
and contact a CITROË
N
dea
l
e
r t
o
be
s
h
o
wn th
e
r
eco
mm
e
n
ded
e
quipment and accessories.
At the wheel of your new vehicle,
getting to know each system,
each control, each setting,
makes your trips, your journeys
more comfortable and more enjoyable.
Happy motoring!
We draw your attention to the following...
Contents
Contents
6
FAMILIARISATION
34
8
ALPHABETICAL
INDEX
35
3
VISUAL
SEARCH
K
e
y
sa
f
ety warning
add
iti
o
n
a
l in
fo
rm
a
ti
o
n
contributes to the protection of the environment
pro
g
rammin
g
a
f
unction with the
c
on
f
i
g
uration menu
re
f
er to the pa
g
e indicated
58
Instrument
p
an
e
l
59
Indicator and warning lam
p
s
6
8
G
au
g
es and indicator
s
72
Adj
ustment
b
utto
n
s
74
Settin
g
the date and tim
e
7
4
C
lo
c
k
7
6
Trip comput
e
r
8
0 Electronic ke
y
- remote
co
ntr
o
l
81
"Ke
y
less Entr
y
and
S
tartin
g
"
88
Boo
t
8
9 Al
ar
m
9
1
El
ec
tri
c
win
do
w
s
9
3
Cockpit
g
lass roo
f
9
5 F
ue
l t
an
k
96
Mis
f
uel prevention
(
Diesel
)
100 Fr
o
nt
seat
s
10
5
R
ea
r
seat
s
10
8
Mi
rr
o
r
s
10
9
S
teerin
g
wheel ad
j
ustmen
t
110 Interior fi ttin
g
s
11
4
Boot fi ttin
g
s
115 Trian
g
le
(
stowin
g
)
11
6
Heating and Ventilati
o
n
11
8
D
ua
l
-zone
digi
ta
l
a
i
r
co
n
di
t
io
n
in
g
122
R
ea
r
sc
r
ee
n
de
mi
s
t -
def
r
os
t
28
Pr
ese
nt
a
ti
o
n
31
S
tarting
/
switching o
f
f
3
5
R
ea
dy
l
am
p
3
5
Hyb
r
id4
mo
d
e se
l
ecto
r
38
Ener
gy
consumption /
g
eneration indicat
o
r
4
0 Displa
y
of h
y
brid power fl
o
w
43
H
y
brid4
f
requentl
y
asked
q
uestio
n
s
46
E
co
of
f
47
Eco
-
d
r
i
v
in
g
49
Consumpti
o
n
50 Hi
g
h volta
g
e batter
y
5
4
Car washin
g
machine or
t
u
nn
e
l
55 V
e
hi
c
l
e
r
eco
v
e
r
y
001
001
002
002
003
003 COMFORTACCESSMONITORINGHYBRID SYSTEM
SAFETYCHILD
SAFETY
VISIBILITY
1
5
2
Li
g
htin
g
control
s
1
5
5
Daytime running lam
p
s
1
5
6
A
u
t
o
m
a
ti
c
ill
u
min
a
ti
o
n
of
h
ea
dl
am
p
s
1
5
7
Automatic headlamp dippi
n
g
1
60 Headlamp ad
j
ustme
n
t
1
6
1
Directional li
g
htin
g
1
6
3
Wi
p
er contro
l
s
1
65
Au
t
o
m
a
t
ic
r
ai
n
se
n
si
t
i
v
e
wi
pe
r
s
1
67
C
ourtes
y
lam
p
s
1
6
8
Interior mood li
g
hti
n
g
17
2
C
hild sea
t
s
17
8
I
SO
FIX child sea
t
s
18
1
C
hil
d
l
oc
k
1
8
4 Dir
ec
ti
o
n in
d
i
ca
t
o
r
s
1
8
5 Emergency or assistance ca
l
l
185
Hor
n
18
6
T
y
re under-in
fl
ation detectio
n
18
7
ESC s
y
st
e
m
190
S
eat bel
t
s
193 Airba
g
s
DRIVING
1
2
6
Electric parkin
g
bra
k
e
1
34 Hill
s
t
a
rt
ass
i
s
t
1
35 6-speed electronic
g
earbo
x
1
39
L
ane
d
eparture warn
i
n
g
sy
st
e
m
1
40 Head-up displa
y
1
4
3
Speed limit
e
r
1
45
C
ruise contro
l
1
4
7
P
ar
ki
n
g
senso
r
s
1
49
R
evers
i
n
g
came
r
a
005
005
006
006
007
007
004
004
CHECKSPRACTICAL
INFORMATION
TECHNICAL
DATA
AUDIO AND
TELEMATICS
2
0
0
Temporar
y
puncture repai
r
ki
t
2
0
6
C
han
g
in
g
a whe
e
l
2
13
S
now chain
s
214
Chan
g
in
g
a bul
b
2
22 Chan
g
in
g
a fus
e
2
2
5
12
V
ba
tt
e
r
y
2
2
8
Ener
gy
econom
y
mo
d
e
2
2
9
C
han
g
in
g
a wiper bla
d
e
2
2
9
R
ecover
i
n
g
t
h
e ve
hi
c
l
e
2
3
1
Vehicle
r
eco
v
e
r
y
2
3
1
Towin
g
a trail
e
r
2
3
3
Fittin
g
roof ba
r
s
2
3
4
A
ccesso
ri
e
s
2
3
9
O
penin
g
the bonn
e
t
2
40 Diesel engi
n
e
241
Runnin
g
out o
f
f
uel
(
Diese
l
)
242
C
heckin
g
level
s
2
45
C
heck
s
25
0
El
ec
tri
c
m
o
t
o
r
25
1
Diesel engi
n
e
252
Di
ese
l
we
ight
s
25
3
Di
m
e
n
sion
s
25
4
Identifi cation markin
g
s
2
5
8
Emer
g
enc
y
or assistanc
e
2
6
1
eMyWa
y
3
1
5
A
u
di
o s
y
st
e
m
008
008
009
009
010
010
011
011

Familiarisation
Familiarisation
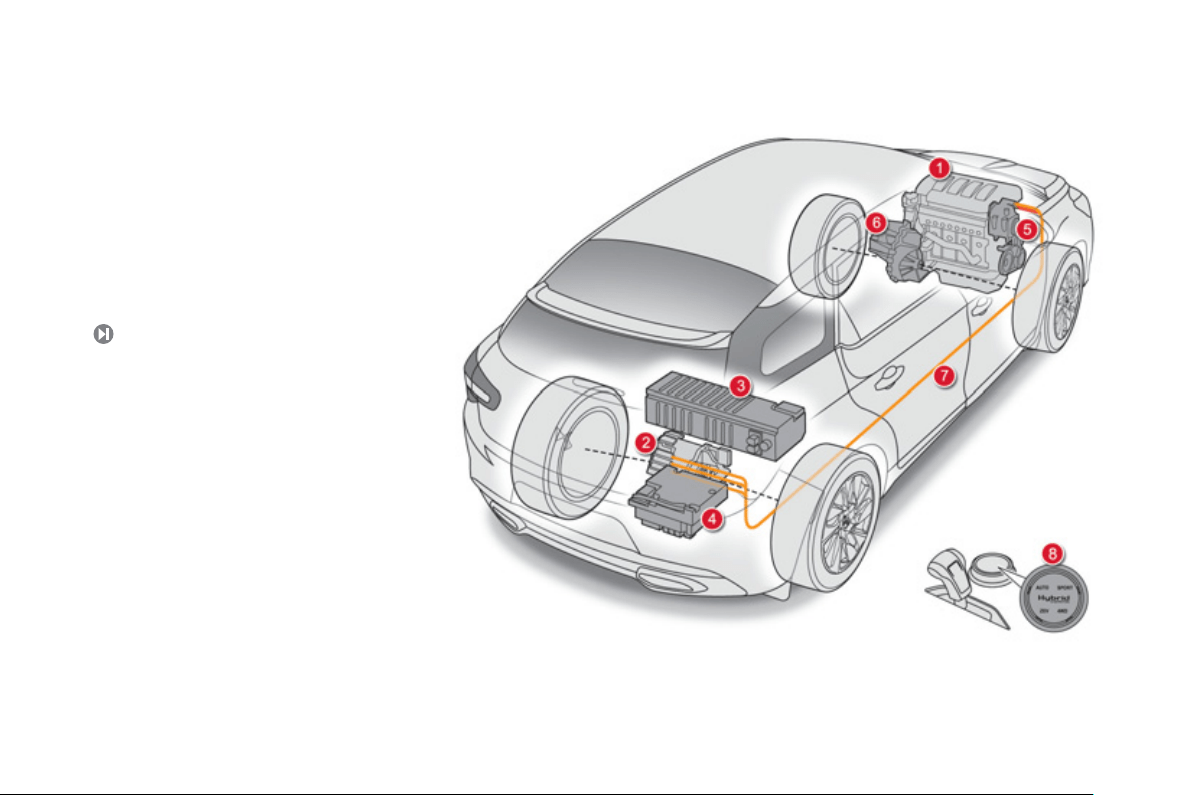
Presentation of the Hybrid4 system
Thank
y
ou
f
or choosin
g
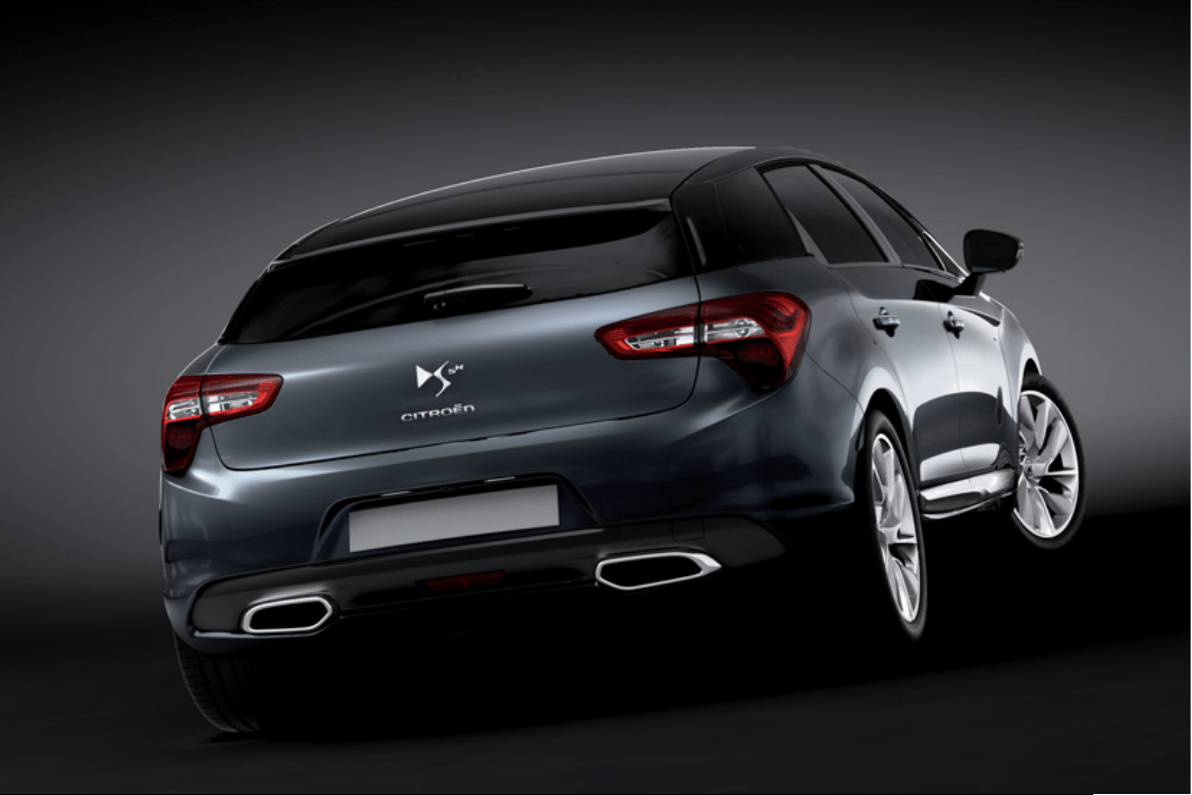
a D
S
5 H
y
brid4; this
v
e
hi
c
l
e
h
as
c
h
a
r
ac
t
e
ri
s
ti
cs
th
a
t
a
r
e
d
i
ffe
r
e
nt
f
r
o
m
co
nv
e
nti
o
n
a
l v
e
hi
c
l
es
.
Stud
y
this handbook to learn about the specific
hy
brid functions and for more information, refer
to the "H
y
brid s
y
stem" section.
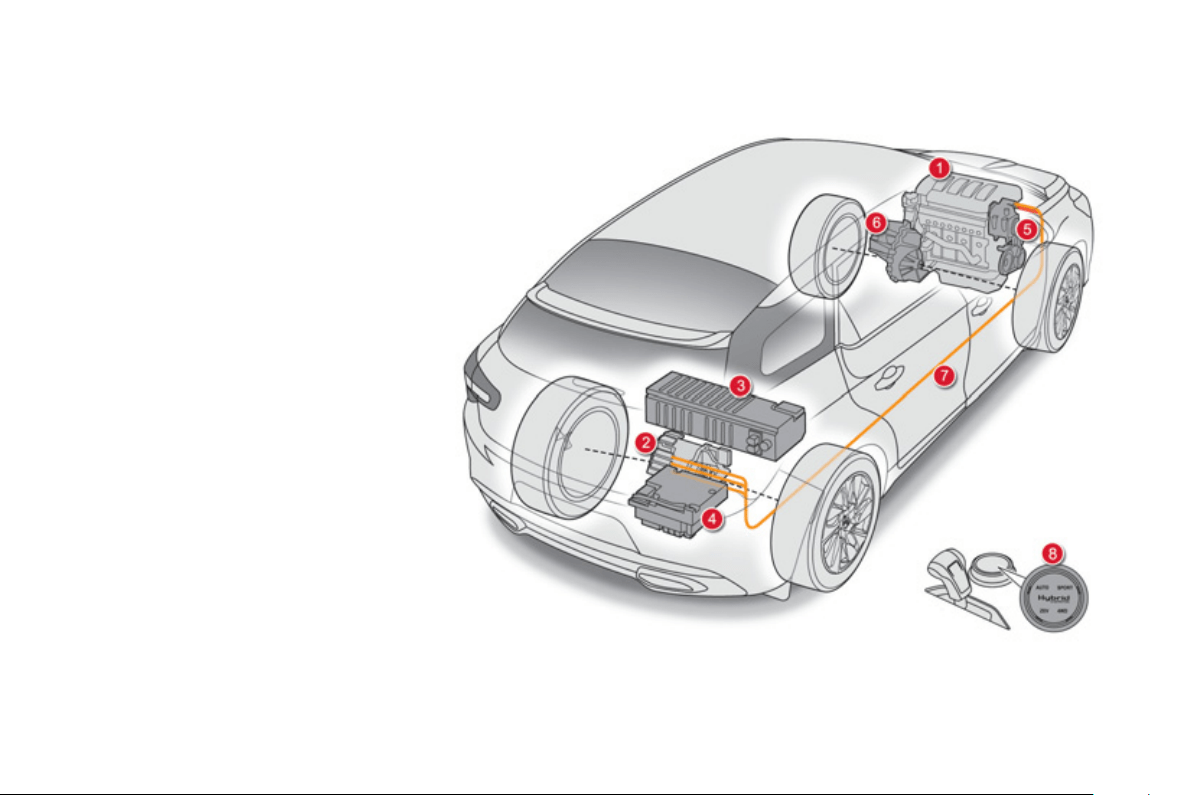
1
.
Diesel HDi en
g
ine
(f
ront wheel drive
)
.
2
.
Electric motor
(
rear wheel drive
)
.
3.
200
V batter
y
.
4.
Electronic power supervisor.
5
.
Stop & Start s
y
stem.
6
.
6
-speed electronic
g
earbox.
7
.
El
ec
tri
ca
l fl
o
w.
8.
H
y
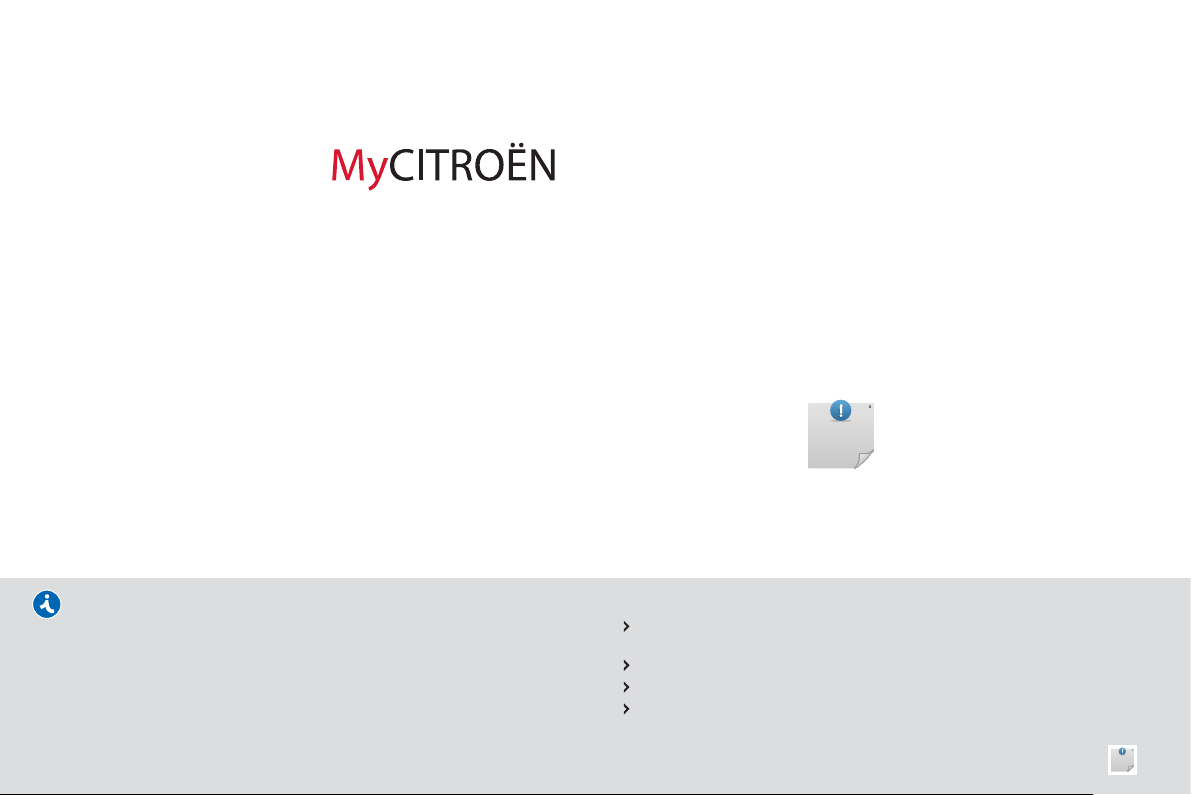
brid4 mode selector.
26
The H
y
brid4 technolo
gy
allows two sources o
f
e
ner
gy
to be associated in an effective manner:
the Diesel HDi en
g
ine, which drives the front
wheels and the electric motor
,
which drives the
rea
r wh
ee
l
s
.
Th
ese two motors can operate a
l
ternate
ly
or
si
mu
l
taneous
ly
, accor
di
n
g
to t
h
e
hyb
r
id
mo
d
e
s
e
l
ecte
d
an
d
t
h
e
d
r
i
v
i
n
g
con
di
t
i
ons.
The electric motor alone
p
rovides
p
ower
f
or
the vehicle in "ZEV"
(
Zero Emissions Vehicle
)
m
ode, and in "Auto" mode for runnin
g
at slow
s
peed and low load. It also assists the Diesel
e
n
g
ine when movin
g
off, acceleratin
g
and
c
han
g
in
g
g
ear.
Th
e
b
atter
y
t
h
at powers t
h
e e
l
ectr
i
c motor
i
s
r
echar
g
ed durin
g
phases o
f
deceleration and
s
tores the ener
gy
f
or subsequent use.
9
Familiarisation
For economical driving, caring for the environment
Th
e
fue
l
c
onsumption
of
a
v
e
hi
c
l
e
varies greatl
y
:
- accordin
g
to the driver's st
y
le of drivin
g
(
moderate, a
gg
ressive,
f
ast, ...
)
,
- accordin
g
to the
ty
pe of
j
ourne
y
s made
(
urban, main road, motorwa
y
, flowin
g
, heav
y
traffic, …
)
and the speed.
Main recommendations for drivin
g
economicall
y
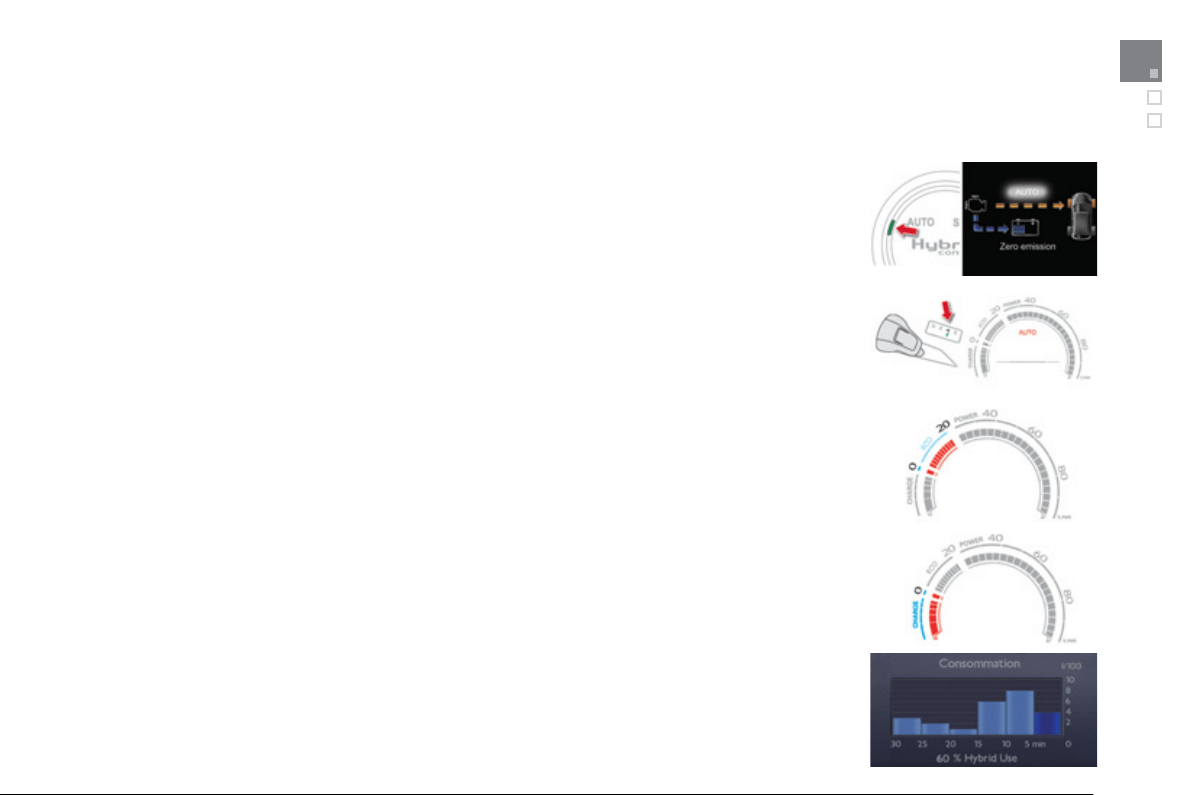
Hyb
r
id
mo
d
e se
l
ector
To o
p
timise
f
uel consum
p
tion, use the
A
ut
o
m
o
de
o
f
the selector whenever possible
(
the mode is activated
automatically when starting
)
including
f
or urban journeys.
This mode optimises the use o
f
the ener
gy
sources
(
internal combustion en
g
ine and
/
or electric
)
contrar
y
to other
m
odes, which are for use in particular cases.
Gear lever
U
se the
a
utomatic m
ode
A
as much as possible as this optimises
g
ear chan
g
es to suit the requirements.
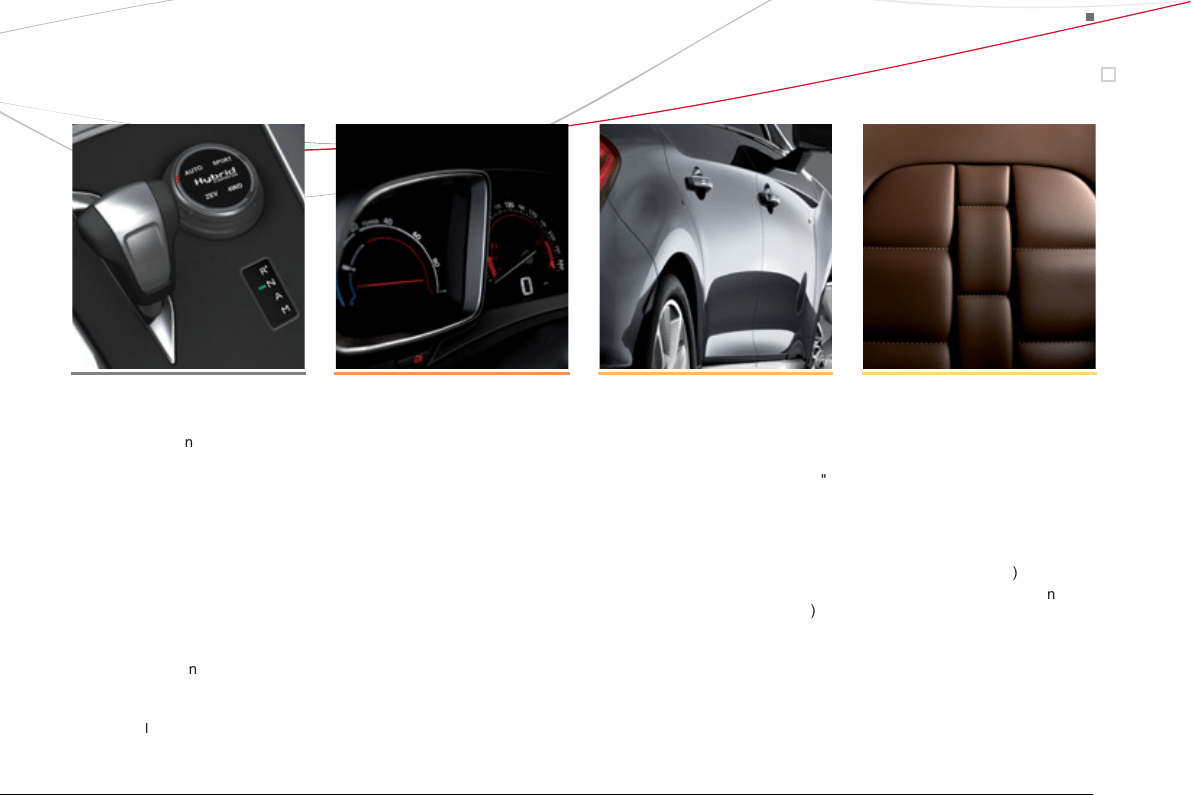
Causes of hi
g
h consumption and checks
A
s with an
y
vehicle, limit overloadin
g
, wind resistance
(
windows open above 30 mph
(
50 km
/
h
)
, roo
f
bars, loaded o
r
n
ot, …
)
, the use of power consumers
(
air conditionin
g
, heated seats, heated rear screen, …
)
.
O
bserve the recommendations on checks
(
re
g
ular check of t
y
re pressures, correct t
y
re pressures, …
)
and routine
s
ervicin
g
.
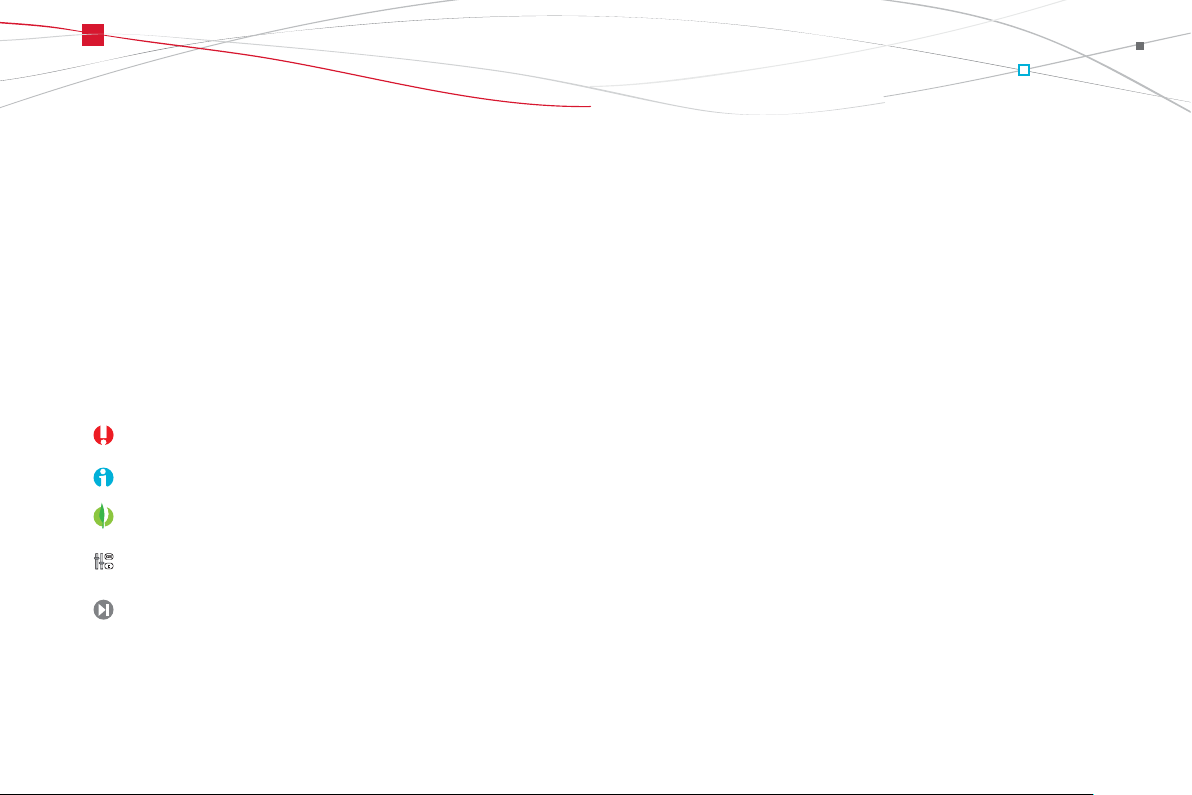
Drive smoothl
y
Sta
y
in the "eco" zon
e
displa
y
ed in the ener
gy
consumption
/
g
eneration indicator: accelerate
g
entl
y
, drive at stead
y
s
peeds usin
g
the speed limiter or cruise control as soon as possible.
U
se the "char
g
e" z
one
: anticipate the need to slow down b
y
takin
g
y
our foot off the accelerator rather than brakin
g
.
The movement of the ener
gy
consumption /
g
eneration indicator needle
(
into the "char
g
e" zone
)
, shows the level o
f
energy
reco
v
ery
.
Consumption histor
y
S
ee the impact o
f
y
our st
y
le o
f
drivin
g
and the t
y
pe o
f
j
ourne
y
b
y
reviewin
g
the histor
y
o
f
y
our ener
gy
consumption.
Re
f
e
r t
o
th
e
"M
u
ltif
u
n
c
ti
o
n
sc
r
ee
n
s
"
sec
ti
o
n.
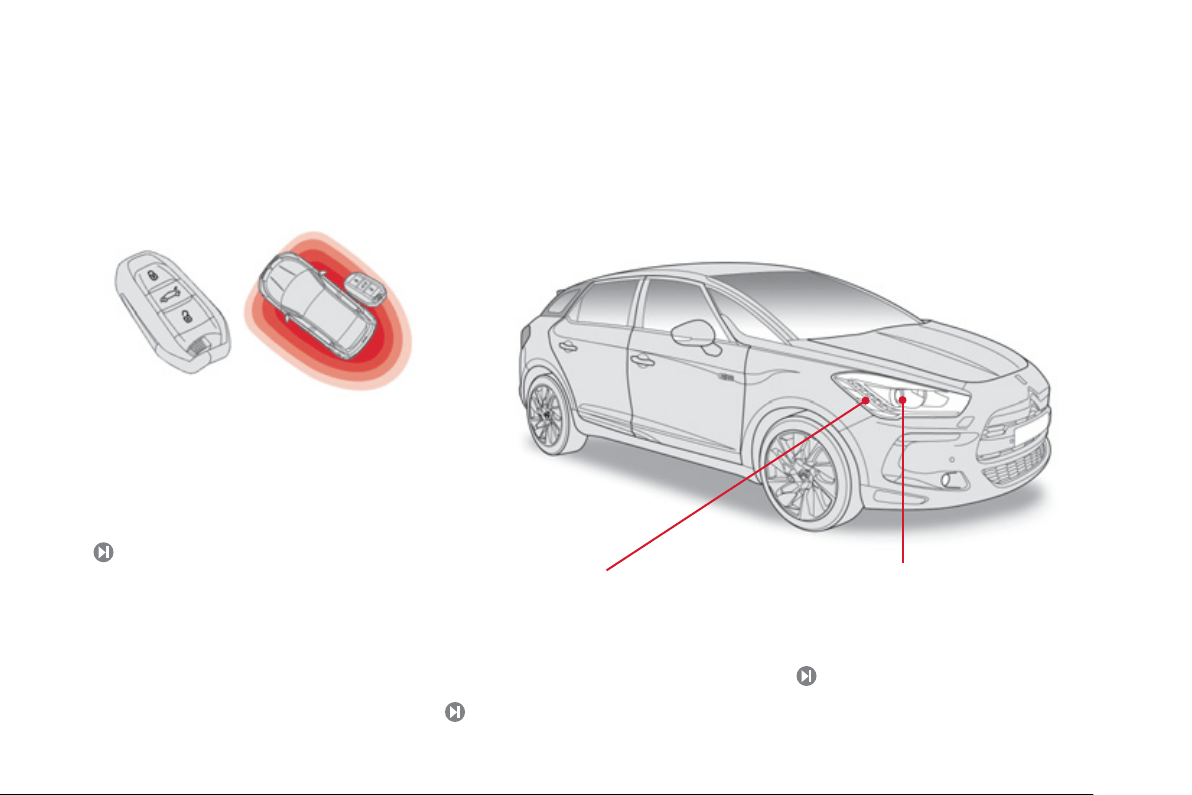
Electronic ke
y
: Ke
y
less Entr
y
a
nd Startin
g
This s
y
stem allows
y
ou to unlock, lock and start
y
our vehicle while keepin
g
the ke
y
on
y
our person
a
n
d
in th
e
de
fin
ed
z
o
n
e
a
r
ou
n
d
th
e
v
e
hi
c
l
e
.
81
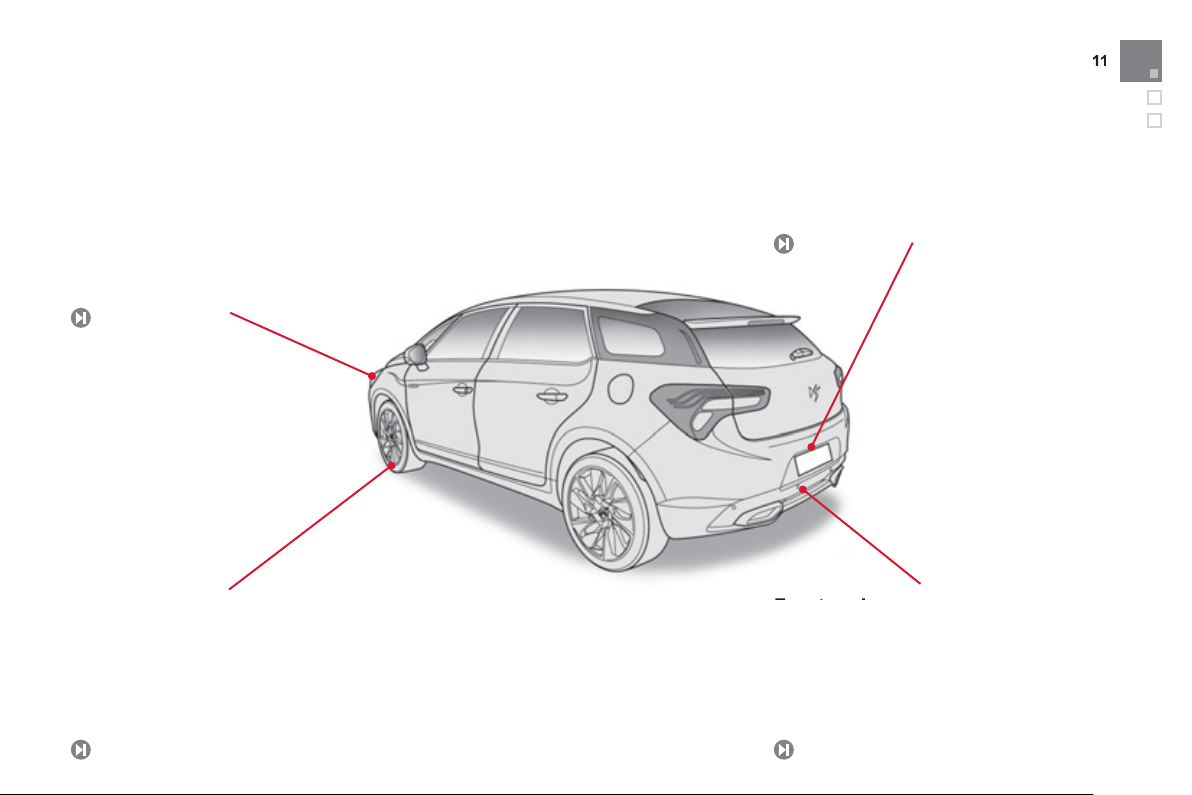
Exterior
Di
rect
i
ona
l
ligh
t
i
n
g
Thi
s
ligh
t
i
n
g
automat
i
ca
lly
prov
id
es a
ddi
t
i
ona
l
f
orward visibility when cornering.
16
1
D
a
y
t
i
me runn
i
n
g
l
amps
Thi
s
ligh
t
i
n
g
, sw
i
tc
h
e
d
on automat
i
ca
lly
w
h
en
starting the engine, makes your vehicle more
vi
s
i
b
l
e
t
o
o
th
e
r r
oad
use
r
s
.
1
5
5
Familiarisation
Automatic headlamp dippin
g
This s
y
stem automaticall
y
chan
g
es between
dipped and main beam, dependin
g
on the
drivin
g
conditions, usin
g
a camera located in
th
e
int
e
ri
o
r r
ea
r vi
e
w mirr
o
r.
157
Front and rear parking sensors
This s
y
stems warns
y
ou of the presence o
f
obs
t
ac
l
es
l
oca
t
ed
in fr
o
nt
o
f
o
r
be
hin
d
th
e
vehicle durin
g
parkin
g
manoeuvres.
147
T
emporar
y
puncture repa
i
r
ki
t
This kit is a complete s
y
stem consistin
g
o
f
a
c
ompressor an
d
a sea
l
ant cartr
idg
e, to a
ll
ow
the temporary repair o
f
a tyre.
20
0
Exterior
R
evers
i
n
g
camera
This s
y
stem, available onl
y
with satellite
nav
ig
at
i
on,
i
s act
i
vate
d
automat
i
ca
lly
on
e
n
g
a
gi
n
g
reverse
g
ear an
d
prov
id
es an
i
ma
g
e
i
n t
he
colou
r
sc
r
ee
n.
149
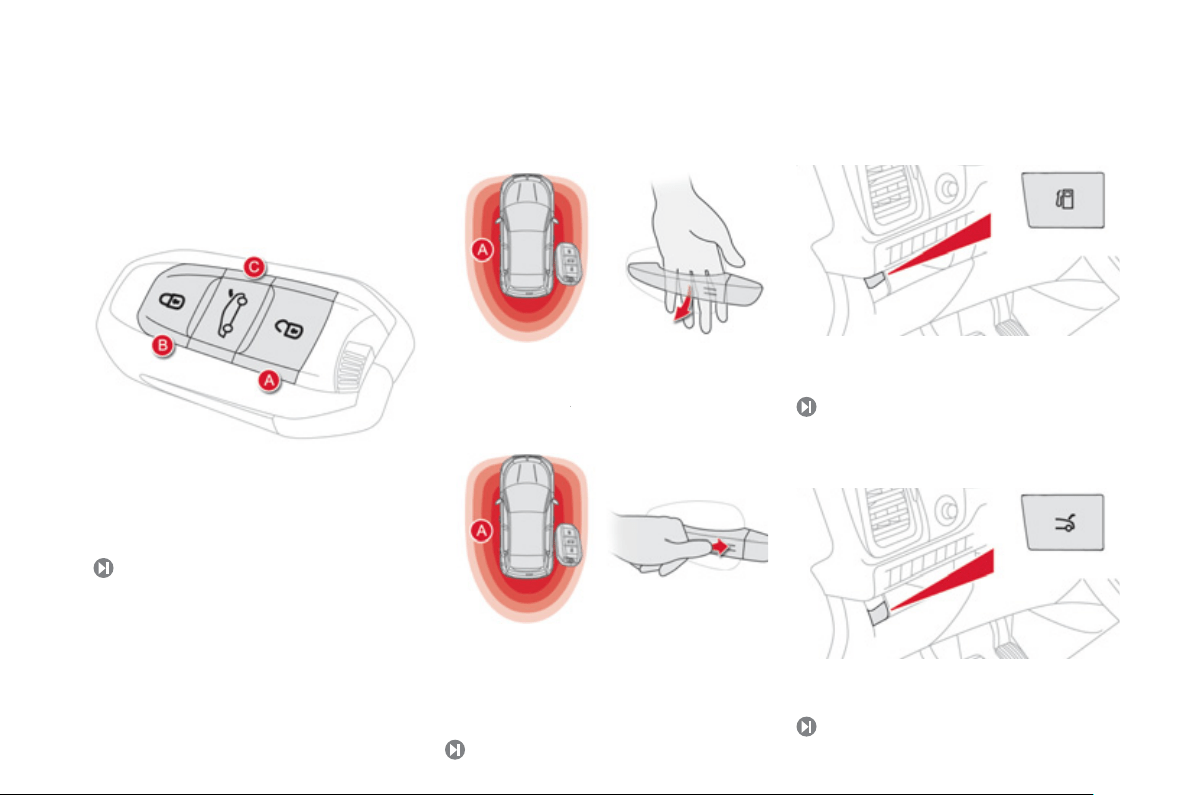
Access
1.
O
penin
g
the fuel filler flap.
Tank capacit
y
: approximatel
y
60 litres.
Fuel tank
95
U
n
l
oc
ki
n
g
With the electronic ke
y
on
y
our person and in
th
e
def
in
ed
z
o
n
e
A
around the vehicle, pass
A
y
our
h
an
d
b
e
hi
n
d
t
h
e
d
oor
h
an
dl
e to un
l
oc
k
t
h
e
ve
hi
c
l
e, t
h
en
p
u
ll
on t
h
e
h
an
dl
e to o
p
en t
h
e
d
oor.
Lockin
g
With the electronic ke
y
in the defined zone
A
around the vehicle, press with a fin
g
er on
the door handle
(
at the markin
g
s
)
to lock the
v
e
hi
c
l
e
.
Electronic ke
y
80
A.
Unlockin
g
the vehicle.
B.
Normal lockin
g
of the vehicle
C.
Unlockin
g
the boot and complete unlockin
g
of
th
e
v
e
hi
c
l
e
.
Ke
y
less Entr
y
and Startin
g
81
Boot
1.
Unlockin
g
the boot from inside: maintain
p
ressure unt
il
t
h
e
b
oot
i
s
h
ear
d
to un
l
oc
k
.
88
13
Familiarisation
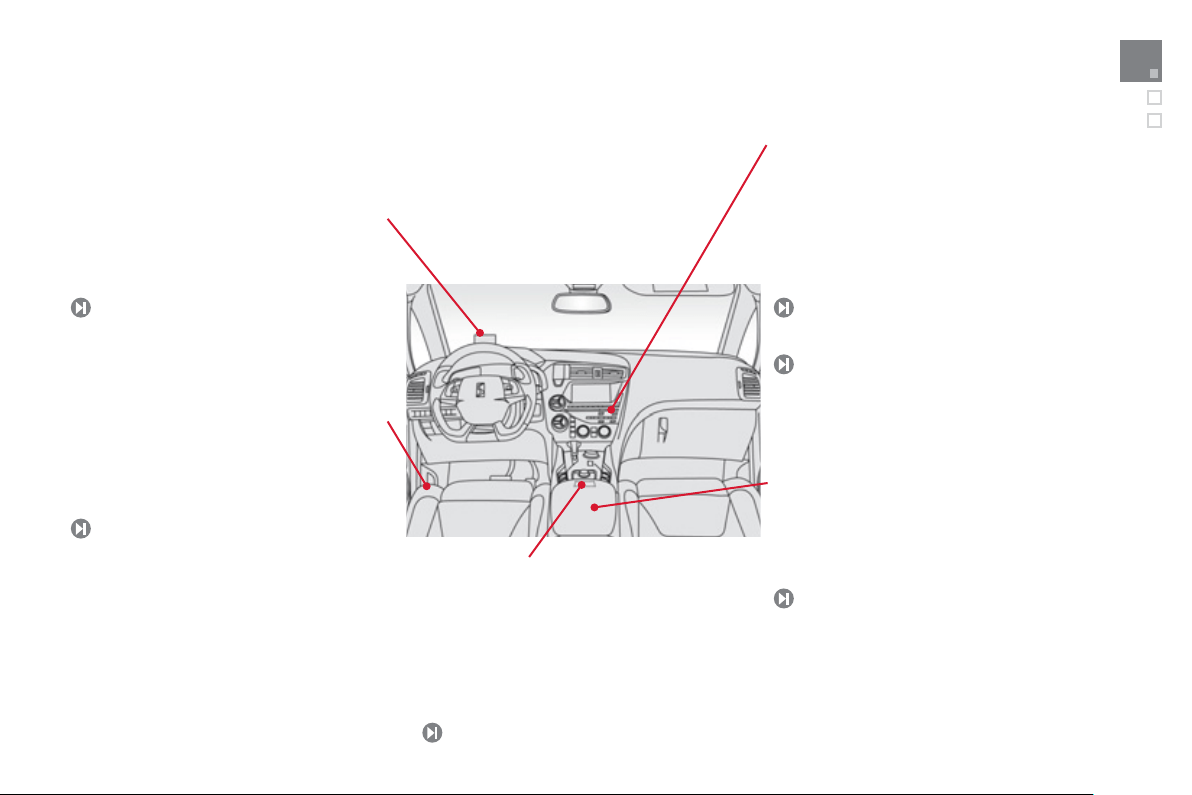
Interior
Head-up displa
y
This s
y
stem pro
j
ects speed and cruise control/
s
peed limiter information onto a smoked strip
in the driver's field of vision, so that the
y
do not
n
eed to take their e
y
es off the road.
Central stora
g
e containin
g
various s
y
stems
It is illuminated, cooled and provides stora
g
e
and locations for s
y
stems and loose items
(
USB Pla
y
er, location for a bottle, ...
)
.
A
u
di
o an
d
commun
i
cat
i
on
s
y
stems
These s
y
stems bene
f
it
f
rom the latest
technolo
gy
: MP3 compatible audio s
y
stems,
US
B pla
y
er, Bluetooth hands-
f
ree s
y
stem,
s
atellite navigation system with colour screen,
auxiliar
y
inputs, Hi-Fi audio s
y
stem, ...
e
M
y
Wa
y
14
0
112
3
1
5
26
1
Audio s
y
stem
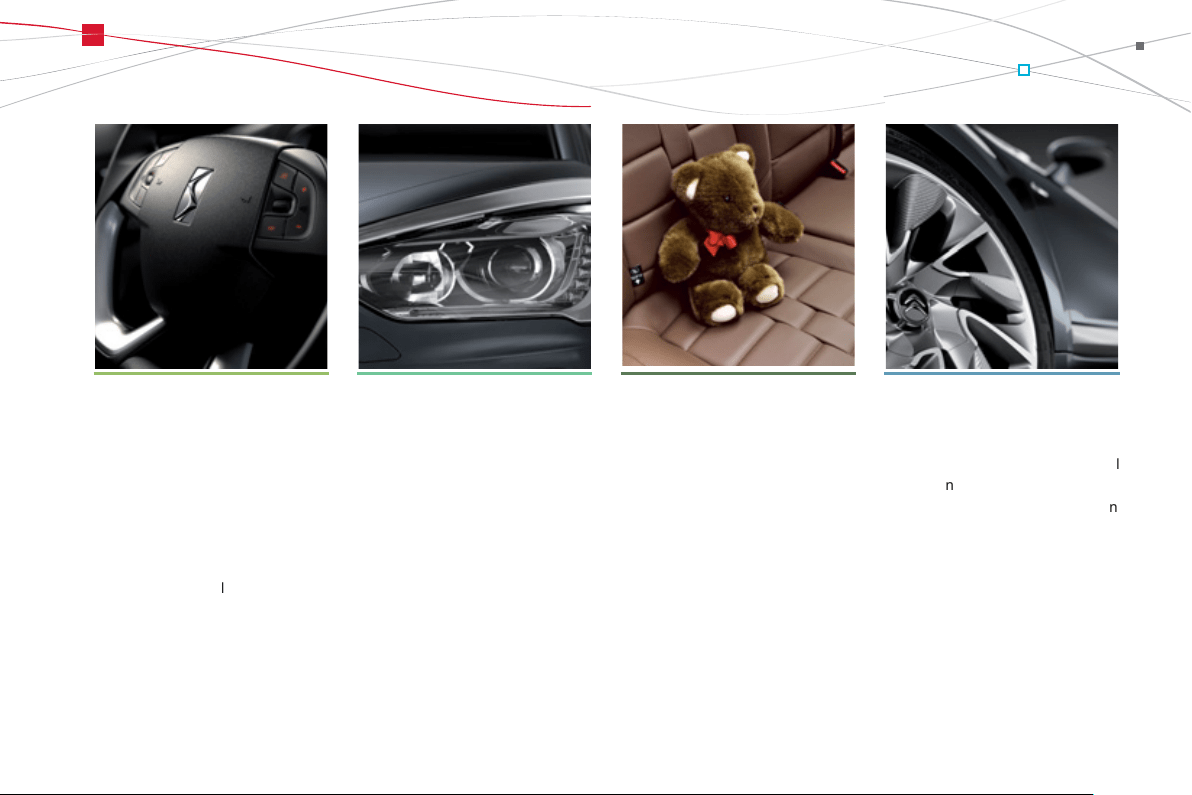
Massa
g
e function
This s
y
stem provides a lumbar massa
g
e
f
or a
p
eriod of about 60 minutes. The massa
g
e is
done in 6 c
y
cles of 10 minutes.
10
4
Electric parkin
g
brake
It
co
m
b
in
es
th
e
f
u
n
c
ti
o
n
s
o
f
au
t
o
m
a
ti
c
a
pplication on switchin
g
o
ff
the en
g
ine and
a
utomatic release when movin
g
o
ff
. Manual
appli
cat
i
on an
d
re
l
ease rema
i
ns
p
oss
ibl
e.
1
2
6
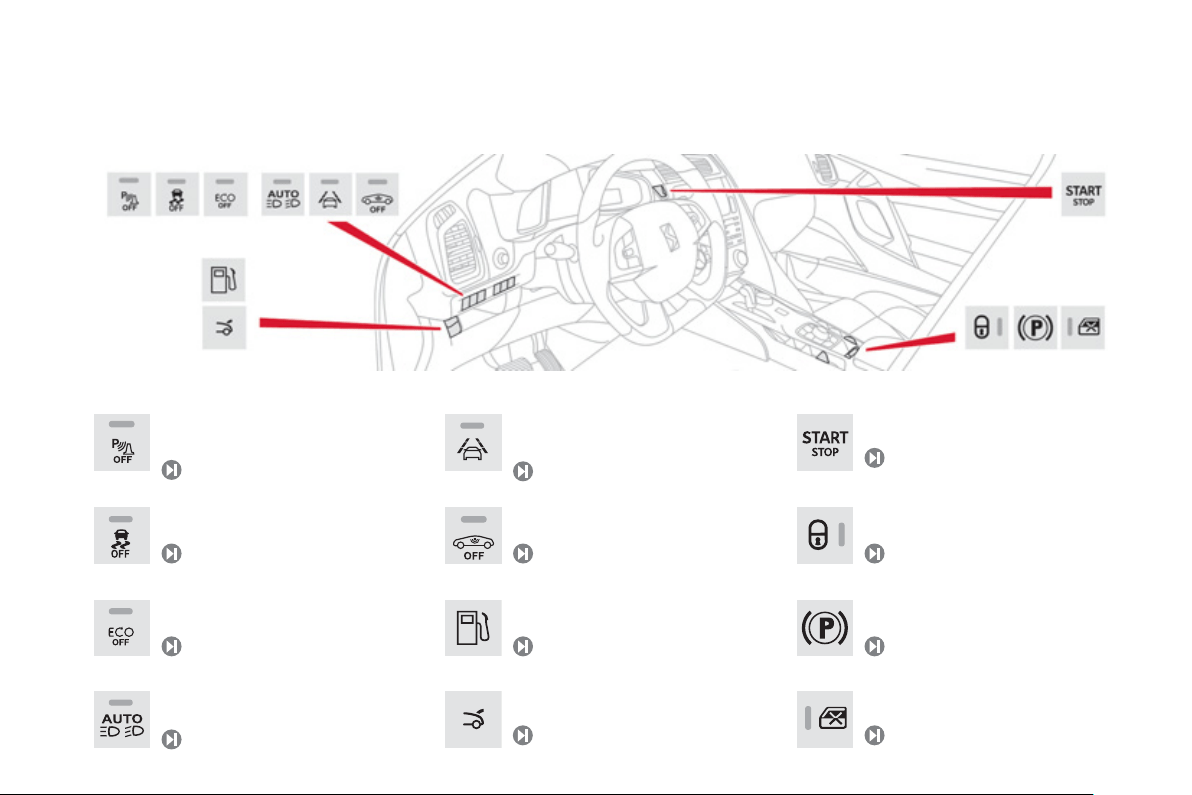
Illumination o
f
the indicator lamp indicates the state o
f
the correspondin
g
f
unction.
Switch panels
O
penin
g
the fuel filler flap.
O
penin
g
the boot.
95
89
D
eac
tiv
a
ti
o
n
of
th
e
a
l
a
rm.
88
Electric parkin
g
brake activated.
1
2
6
Push button startin
g
/stoppin
g
.
31, 3
5
Forced operation of the Diesel en
g
ine.
46
Deactivation of parkin
g
sensors.
1
4
8
Elec
tr
ic
child
lock
.
1
8
1
Deactivation o
f
the D
SC/
A
S
R s
y
stem.
189
Activation
f
or Automatic headlam
p
dipping.
1
57
13
9
A
ctivation of lane departure warnin
g
sy
stem.
8
7
Lockin
g/
unlockin
g
the passen
g
er
c
ompartment.
1
5
Familiarisation
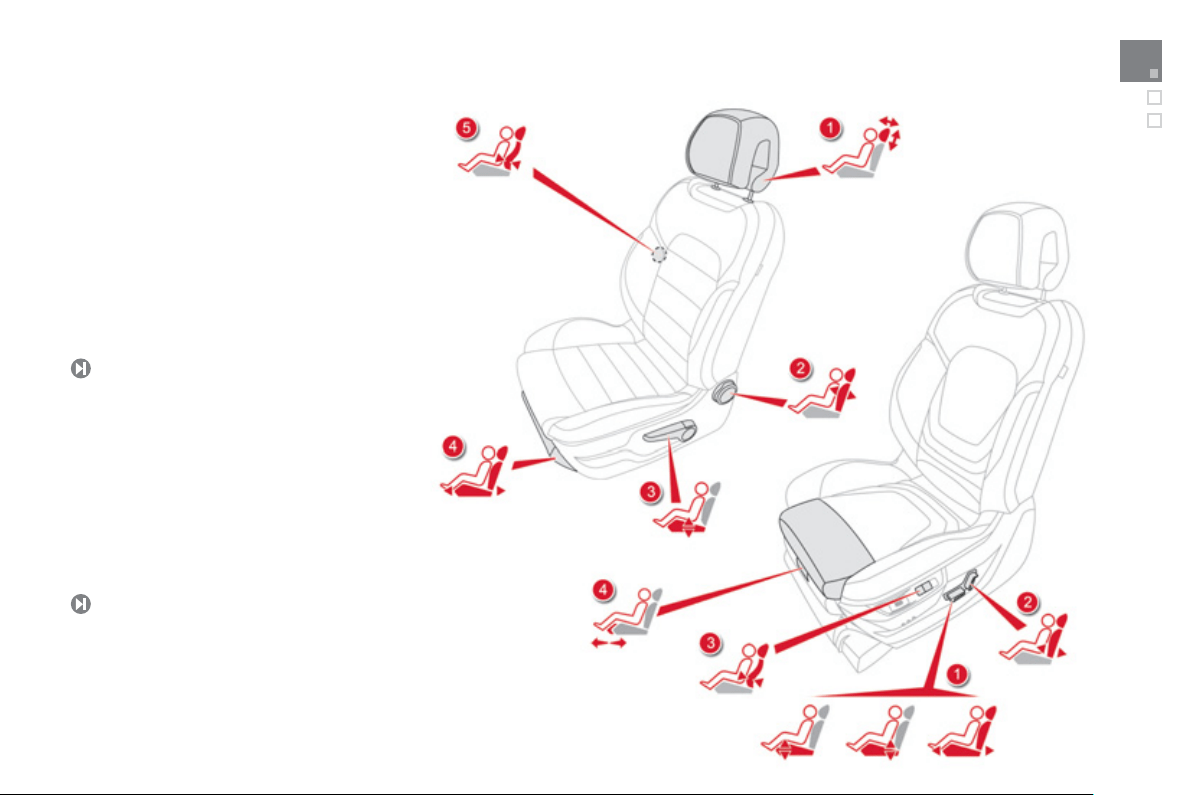
Sitting comfortably
Front seats
10
0
Manual
1.
Head restraint height and angle
a
d
j
ustment.
2.
Backrest an
g
le ad
j
ustment.
3.
Seat cushion hei
g
ht ad
j
ustment.
4.
Seat forwards-backwards ad
j
ustment.
5
.
D
river's lumbar support ad
j
ustment.
Electric
1.
An
g
le, seat hei
g
ht and seat forwards-
backwards ad
j
ustment.
2.
Backrest an
g
le ad
j
ustment.
3.
D
river's lumbar support ad
j
ustment.
4.
M
anua
l
cus
hi
on a
dj
ustment.
10
1

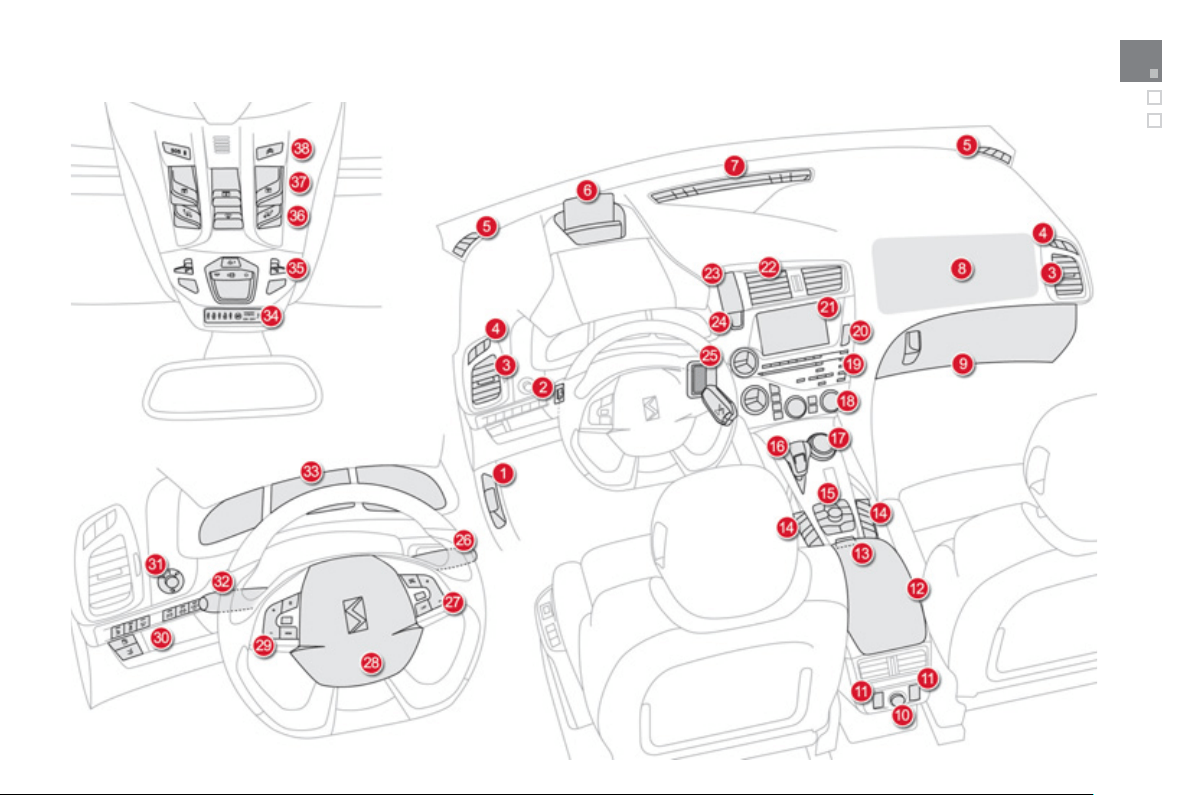
14.
Co
ntr
o
l
s
fo
r
e
l
ec
tri
c
win
do
w
s
/
e
l
ec
tri
c
c
hil
d
l
ock
/
central locking.
15
.
eM
y
Wa
y
controls.
16
.
Gear selector.
17
.
H
y
brid4 mode selector.
18
.
Heatin
g
/ air conditionin
g
controls.
19
.
Audio s
y
stem.
20
.
H
azar
d
warn
i
n
g
l
amps.
21.
M
u
lti
fu
n
c
ti
o
n
sc
r
ee
n.
22.
C
entral ad
j
ustable air vents.
23
.
C
lock.
24
.
S
tartin
g
with the
S
TART
/S
T
O
P button.
25
.
Electronic ke
y
reader.
26
.
Wiper / screenwash / trip computer stalk.
Instruments and controls
1.
Bo
nn
e
t r
elease
le
v
e
r.
2.
Headlamp height adjustment.
3.
S
ide ad
j
ustable air vents.
4.
Front door window demistin
g
/defrostin
g
v
e
nt
s
.
5.
Q
uarter li
g
ht demistin
g
windows.
6
.
Head-up displa
y
.
7.
Windscreen demistin
g/
de
f
rostin
g
vent.
8.
P
assen
g
er
'
s a
i
r
b
a
g
.
9.
G
love box
/
Passen
g
er's airba
g
deac
tiv
a
ti
o
n in
s
i
de
.
1
0
.
12
V accessor
y
socket.
1
1
.
R
ea
r
e
l
ec
tri
c
win
do
w
co
ntr
o
l
s
.
1
2
.
Central armrest with stora
g
e.
USB port / auxiliar
y
socket.
1
3
.
Electric parkin
g
brake.
27.
A
u
di
o equ
i
pment steer
i
n
g
mounte
d
co
ntr
o
l
s
.
2
8
.
Driver's airba
g
.
H
o
rn.
2
9
.
Cruise control / speed limiter controls.
3
0
.
Switch panel
(
see previous pa
g
e
)
.
3
1
.
Door mirror ad
j
ustment.
3
2
.
Ligh
t
i
n
g
an
d
di
rect
i
on
i
n
di
cator sta
lk
3
3
.
I
nstrument pane
l
.
3
4
.
S
eat belt and airba
g
warnin
g
lamps.
3
5
.
C
ourtesy lamp.
3
6
.
Head-up displa
y
controls.
3
7
.
Controls for cockpit
g
lass roof blind.
3
8
.
CITROËN Localised Emer
g
enc
y
Call -
C
ITR
O
ËN Localised Assistance
C
all.
17
Familiarisation
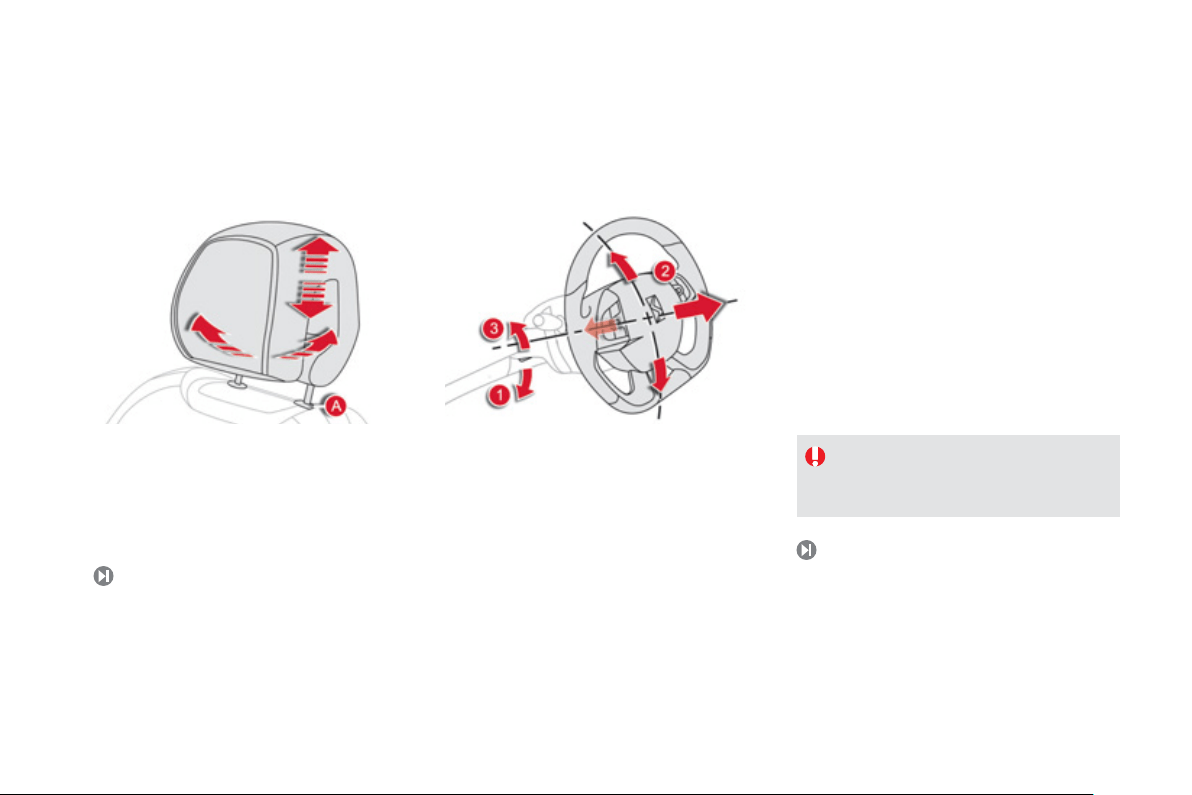
Sitting comfortably
Head restraint ad
j
ustment
10
3
1
.
Release the ad
j
ustment mechanism.
2
.
Ad
j
ust for hei
g
ht and reach.
3.
Lock the ad
j
ustment mechanism.
Steerin
g
wheel ad
j
ustment
10
9
For reasons of safet
y
, these operations
must onl
y
be carried out with the
vehicle stationar
y
.
To lower it, simultaneousl
y
press button
A
a
n
d
p
ush down on the head restraint.
To raise it,
g
uide the head restraint upwards to
t
h
e
d
es
i
re
d
pos
i
t
i
on.
T
o
i
nc
li
ne
i
t, sw
i
ve
l
t
h
e
l
ower part
b
ac
k
war
d
s o
r
fo
rw
a
r
ds
.
19
Familiarisation
Sitting comfortably
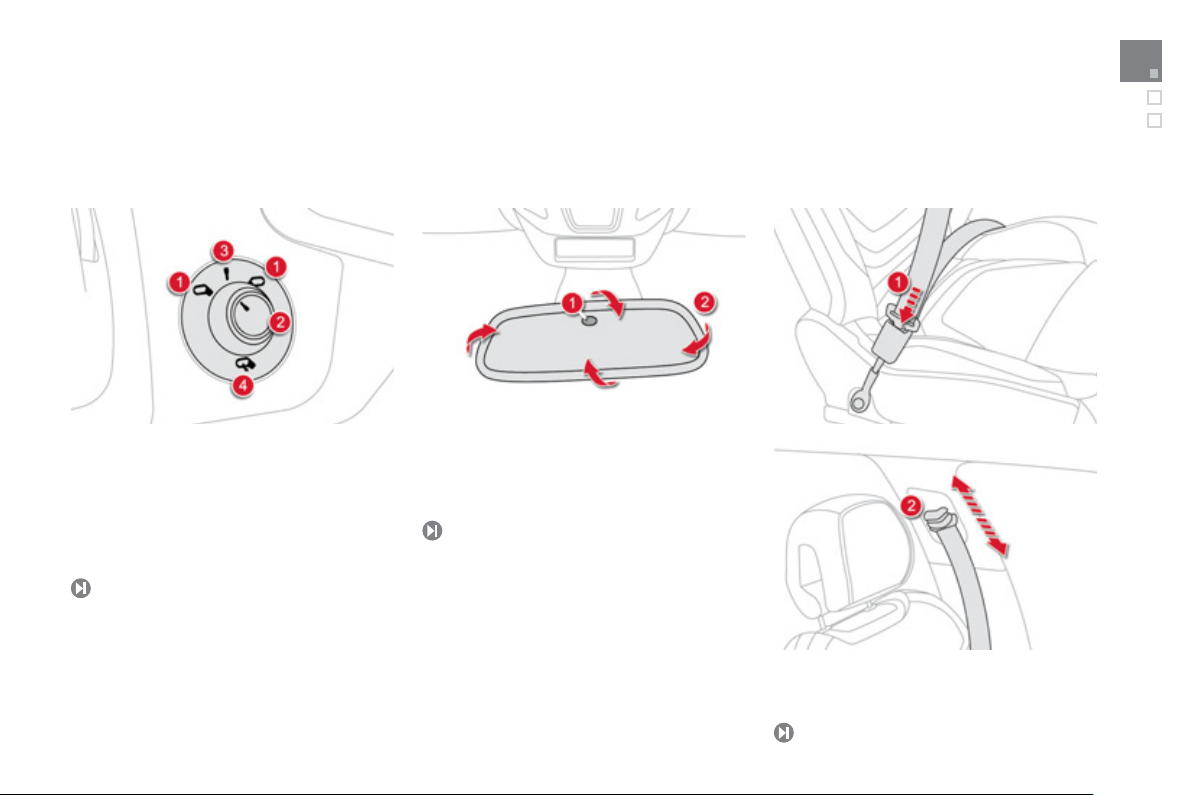
Door mirrors
Adj
ustment
1.
Selection of the left or ri
g
ht mirror.
2.
Ad
j
ustin
g
the position of the mirror
g
lass.
3.
D
ese
l
ec
ti
o
n
o
f th
e
mirr
o
r.
4.
Foldin
g
the mirror.
10
8
Rear view mirror
1
0
9
1
.
Automatic detection of da
y
/ni
g
ht mode.
2
.
Rear view mirror ad
j
ustment.
Front seat belts
190
1.
Fastenin
g
.
2.
Ad
j
ustin
g
f
or hei
g
ht.
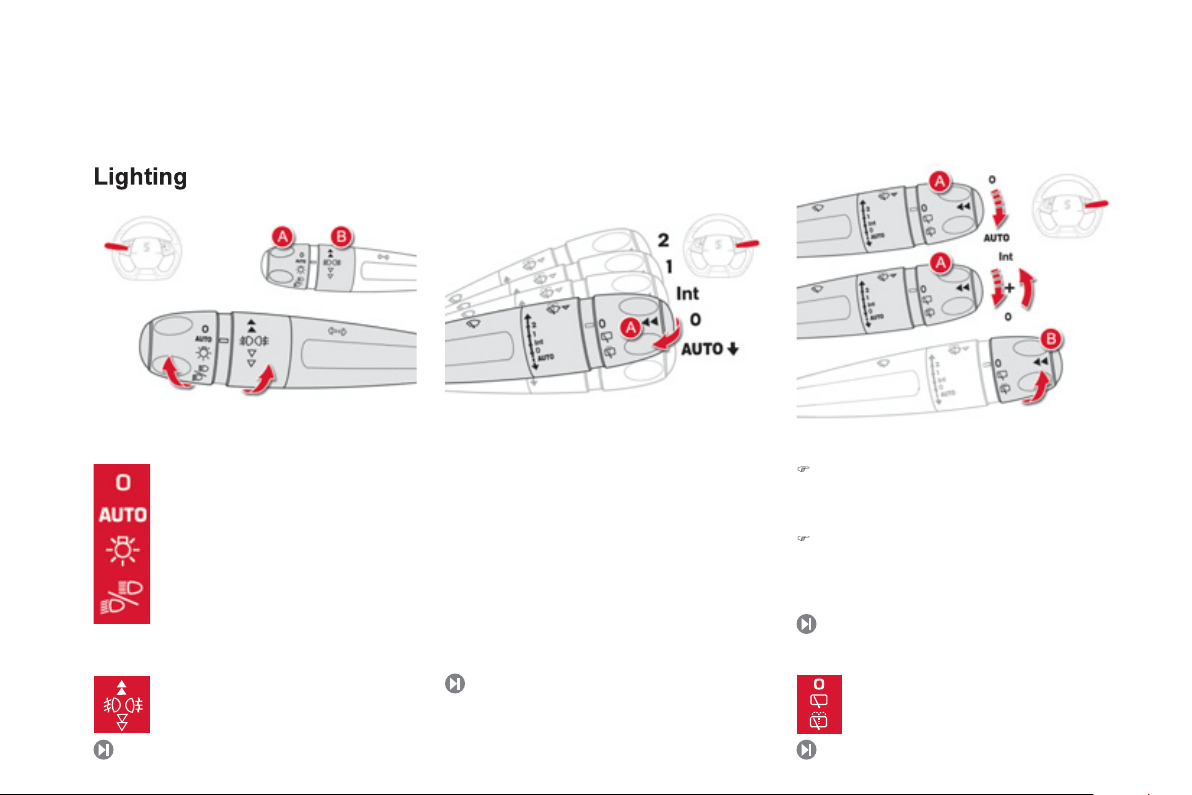
Seeing clearly
Rin
g
A
Ri
n
g
B
Wi
p
ers
153
Control stalk A: windscreen
wi
p
ers
2.
Fast wipe.
1.
N
orma
l
w
i
pe.
I
nt
.
I
nterm
i
ttent w
i
pe.
0
.
Pa
r
k
.
AUT
O
Automatic wiping.
È
Sin
g
le wipe: Brief pull on the stalk towards.
Screenwash: Lon
g
pull on stalk towards
y
ou.
1
6
3
Switchin
g
on "AUTO" mode
)
Brie
f
l
y
push the stalk downwards.
Switchin
g
off "AUTO" mode
)
Brie
f
l
y
push the stalk downwards or place
the stalk in another
p
osition: Int, 1 or 2.
Ri
n
g
B
: rear w
i
per
165
16
4
Li
g
htin
g
o
ff
.
Automatic illumination o
f
headlamps.
S
idelam
p
s.
Dipped
/
main beam headlamps.
Front and rear
f
o
g
lamps.
P
a
rk.
Intermittent wipe.
S
creenwash.
21
Familiarisation
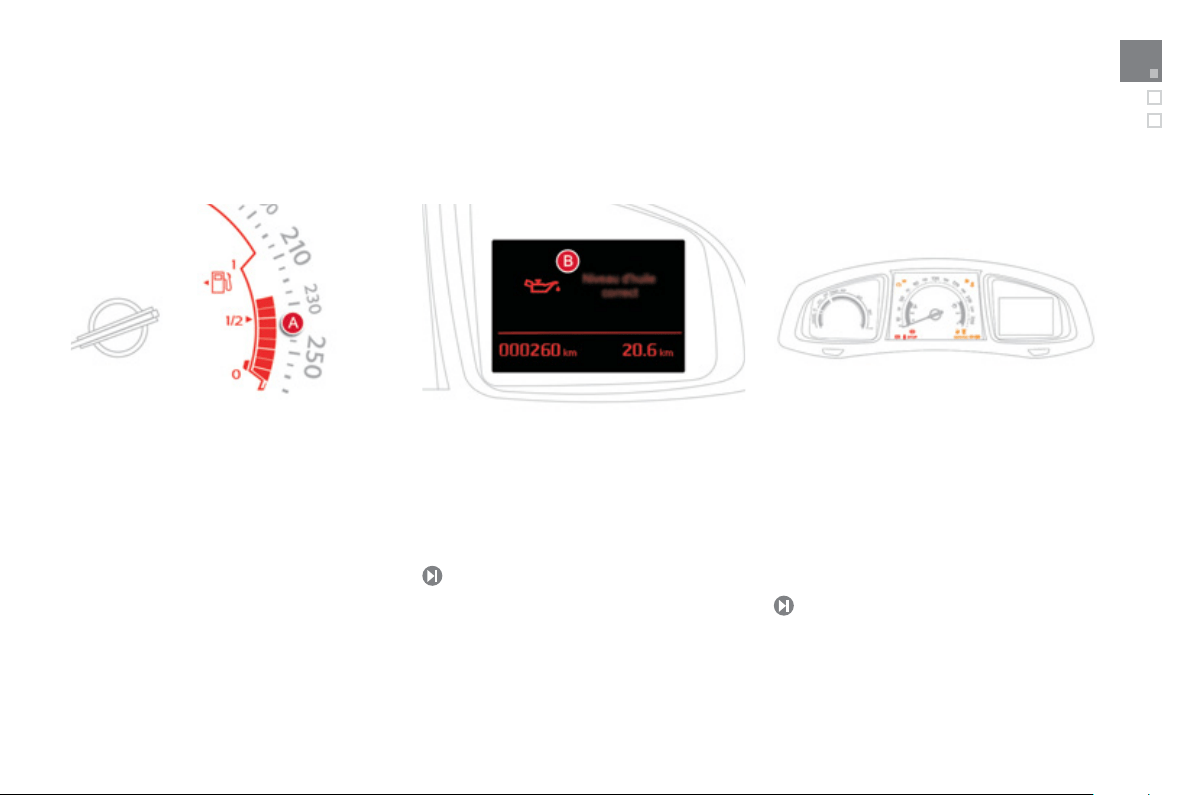
Monitoring
O
n switchin
g
on, the dial needles
g
o to the
e
xtent o
f
their travel then return to 0.
A
.
With the i
g
nition on, the bars indicate the
fuel remainin
g
.
Instrument
p
anel
1.
Wi
t
h
t
h
e
ig
n
i
t
i
on on, t
h
e oran
g
e an
d
re
d
warning lamps come on.
2.
With the h
y
brid s
y
stem active, these
warnin
g
lamps should
g
o off.
If a warnin
g
lamp remains on, refer to the
c
orrespondin
g
section.
Warnin
g
lamps
5
9
B.
Wi
t
h
t
h
e
ig
n
i
t
i
on on, t
h
e
i
nstrument pane
l
sc
r
ee
n
s
h
ou
l
d
in
d
i
ca
t
e
th
e
o
il l
e
v
e
l.
I
f
the levels are not correct, top up the level
w
hi
c
h i
s
l
o
w.
58
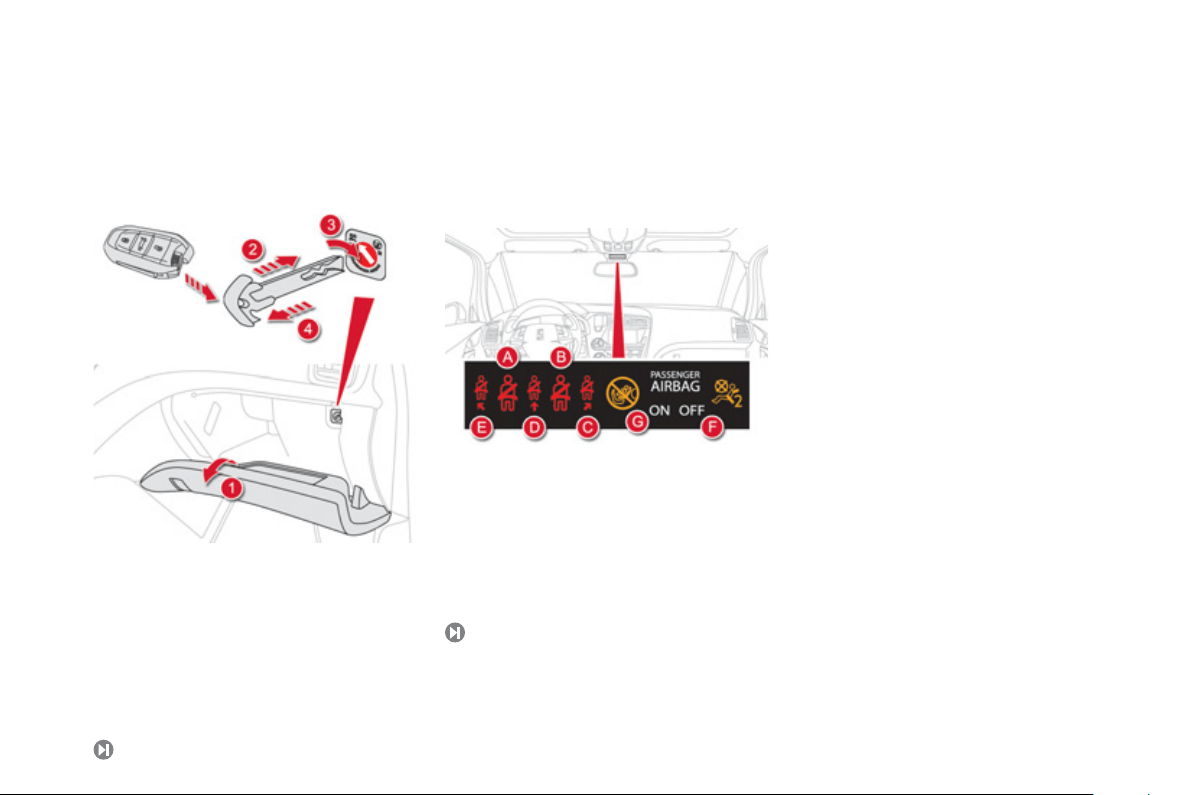
Passenger safety
1.
O
pen the
g
love box.
2.
Insert the ke
y
(
inte
g
ral with the electronic ke
y)
.
3.
Select position:
"ON"
(
activation
)
, with
f
ront passen
g
er or
"f
orwards
f
acin
g
" child seat,
"OFF"
(
deactivation
)
, with "rear
f
acin
g
"
c
hil
d
sea
t.
4.
Remove the ke
y
keepin
g
the switch in the
n
ew position.
Front passen
g
er's airba
g
19
4
Front seat belts and
p
assen
g
er's front airba
g
A
.
L
e
ft h
a
n
d
fr
o
nt
sea
t
be
lt n
o
t f
as
t
e
n
ed
or
u
nfastened warnin
g
lamp.
B.
Ri
g
ht hand
f
ront seat belt not
f
astened or
u
n
f
astened warnin
g
lamp.
C.
Ri
g
ht hand rear seat belt not
f
astened or
u
n
f
astened warning lamp.
D.
C
entre rear seat belt not
f
astened or
u
nfastened warnin
g
lamp.
1
9
1
E.
L
e
ft h
a
n
d
r
ea
r
sea
t
be
lt n
o
t f
as
t
e
n
ed
o
r
unfastened warnin
g
lamp.
F.
F
ront passen
g
er
'
s a
i
r
b
a
g
d
eact
i
vate
d
warn
i
n
g
l
amp.
G.
F
ront passen
g
er
'
s a
i
r
b
a
g
act
i
vate
d
warn
i
n
g
lam
p
.
23
Familiarisation
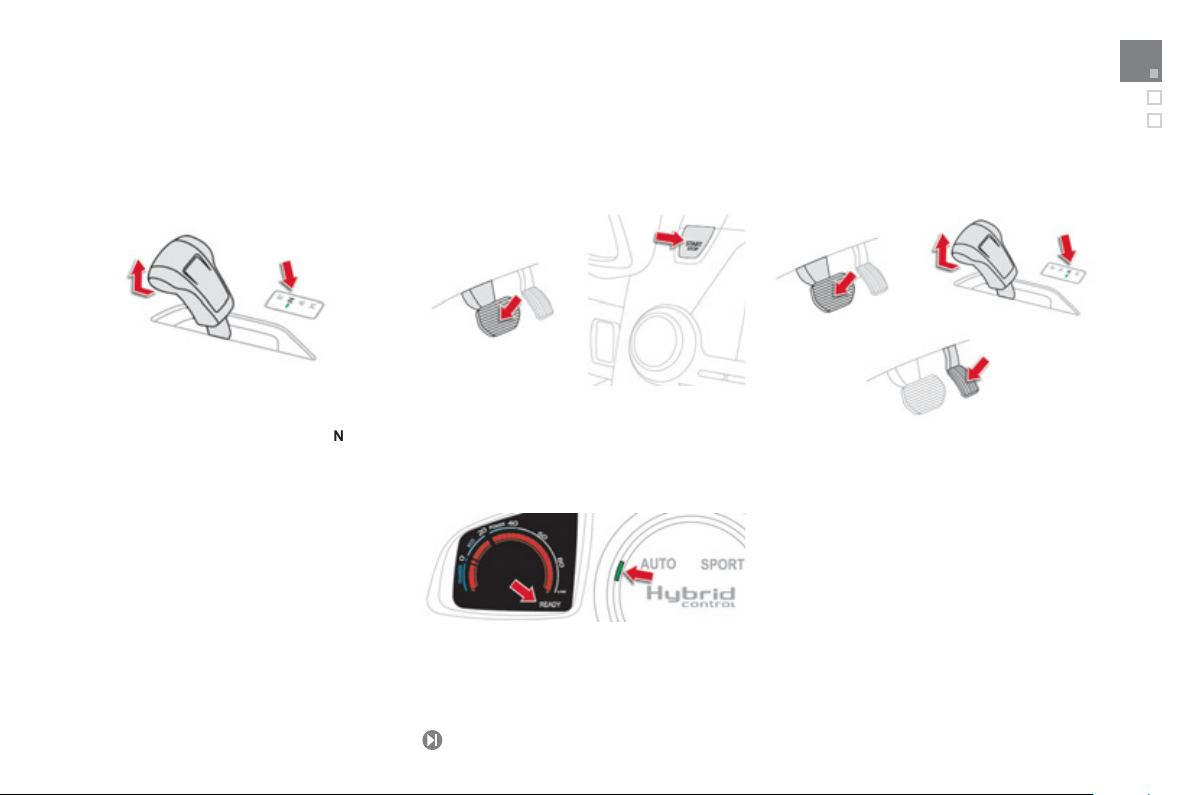
Startin
g
- stoppin
g
the en
g
ine
Driving safely
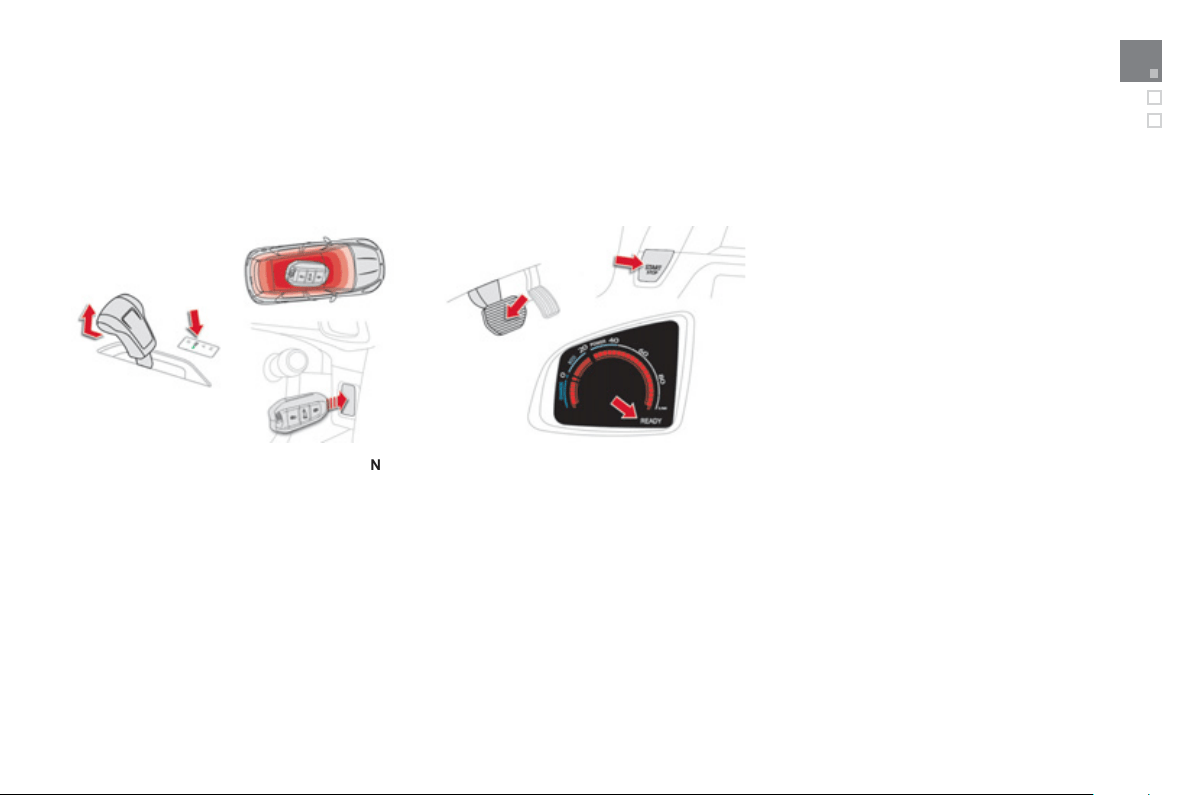
Before startin
g
31
Startin
g
- The instrument panel and the Read
y
lamp
c
ome on, confirmed b
y
an audible si
g
nal.
- Th
e
d
i
a
l in th
e
ce
ntr
e
co
n
so
l
e
i
s
in
A
UTO
m
ode
.
- Place the
g
ear selector in position
N
.
-
I
nsert t
h
e e
l
ectron
i
c
k
e
y
i
n t
h
e rea
d
er o
r
k
eep t
h
e e
l
ectron
i
c
k
e
y
i
ns
id
e t
h
e ve
hi
c
l
e.
- Press the brake pedal.
- Make sin
g
le short press
(
about 1 second
)
o
n t
he
START/STO
P
bu
tt
o
n.
Movin
g
off
-
Whil
e ma
i
nta
i
n
i
n
g
pressure on t
h
e
b
ra
k
e
p
e
d
a
l
, move t
h
e
g
ear se
l
ector to pos
i
t
i
on
A
to go
f
orwards or
R
fo
r r
e
v
e
r
se
.
- Take
y
our
f
oot o
ff
the brake pedal,
y
ou can
th
e
n m
o
v
e
o
ff.
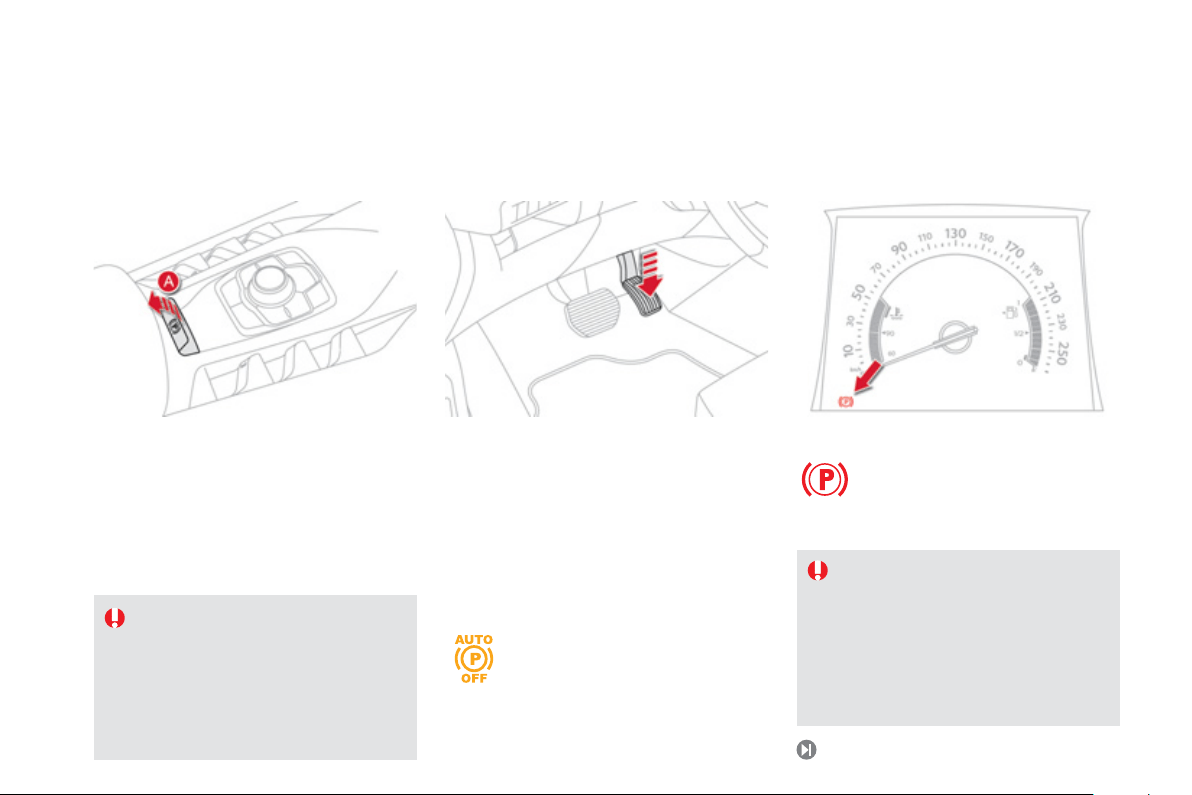
I
f
this warnin
g
lamp comes on in
t
h
e
i
nstrument
p
ane
l
, automat
i
c
a
pplication
/
releas
e
i
s
deactivated. The parkin
g
brake must
be applied and released
manually
.
y
Before leavin
g
the vehicle, check that
the the brake warnin
g
lamp and the
P
w
arn
i
n
g
l
amp
i
n t
h
e contro
l
l
ever
A
are
on fixed
(
not flashin
g)
.
12
6
I
f
towin
g
a trailer or caravan or i
f
the
s
lope mi
g
ht var
y
(
transport b
y
boat or
l
orr
y
, recover
y
o
f
the vehicle...
)
make
a maximum application o
f
the parking
brake - b
y
makin
g
a lon
g
pull on the
co
ntr
o
l l
e
v
e
r
A
- t
o
imm
ob
ili
se
th
e
v
e
hi
c
l
e
.
Driving safely
Electric parkin
g
brake
Manual A
pp
lication
/
Release
M
anual a
pp
lication of the parkin
g
brake is
p
ossible b
y
pullin
g
th
e
co
ntr
o
l l
e
v
e
r
A
.
Wi
t
h
t
h
e
ig
n
i
t
i
on on,
m
anua
l
re
l
eas
e
of
th
e
p
ar
ki
n
g
b
ra
k
e
i
s poss
ibl
e
by
p
ress
i
n
g
t
h
e
b
ra
k
e pe
d
a
l
a
n
d
pu
lli
n
g
t
he
n
r
e
l
eas
i
n
g
t
he
co
ntr
o
l l
e
v
e
r A .
If an audible si
g
nal is heard on openin
g
the driver's door with the h
y
brid
sy
stem act
i
ve, app
ly
t
h
e par
ki
n
g
b
ra
k
e
m
anua
lly
.
Do
n
o
t
lea
v
e
a
child
alo
n
e
i
n t
he
v
ehicle
with the ignition on; they might release
the parkin
g
brake.
Automatic A
pp
lication
/
Release
Press the accelerator pedal, the parkin
g
brake
is released automaticall
y
and pro
g
ressivel
y
as
y
ou move o
ff
.
Wi
t
h
t
h
e ve
hi
c
l
e stat
i
onar
y
, t
h
e par
ki
n
g
b
ra
k
e
is applied automaticall
y
on switchin
g
o
ff
the
ignition
(
Read
y
lamp o
ff)
.
2
5
Familiarisation
Driving safely
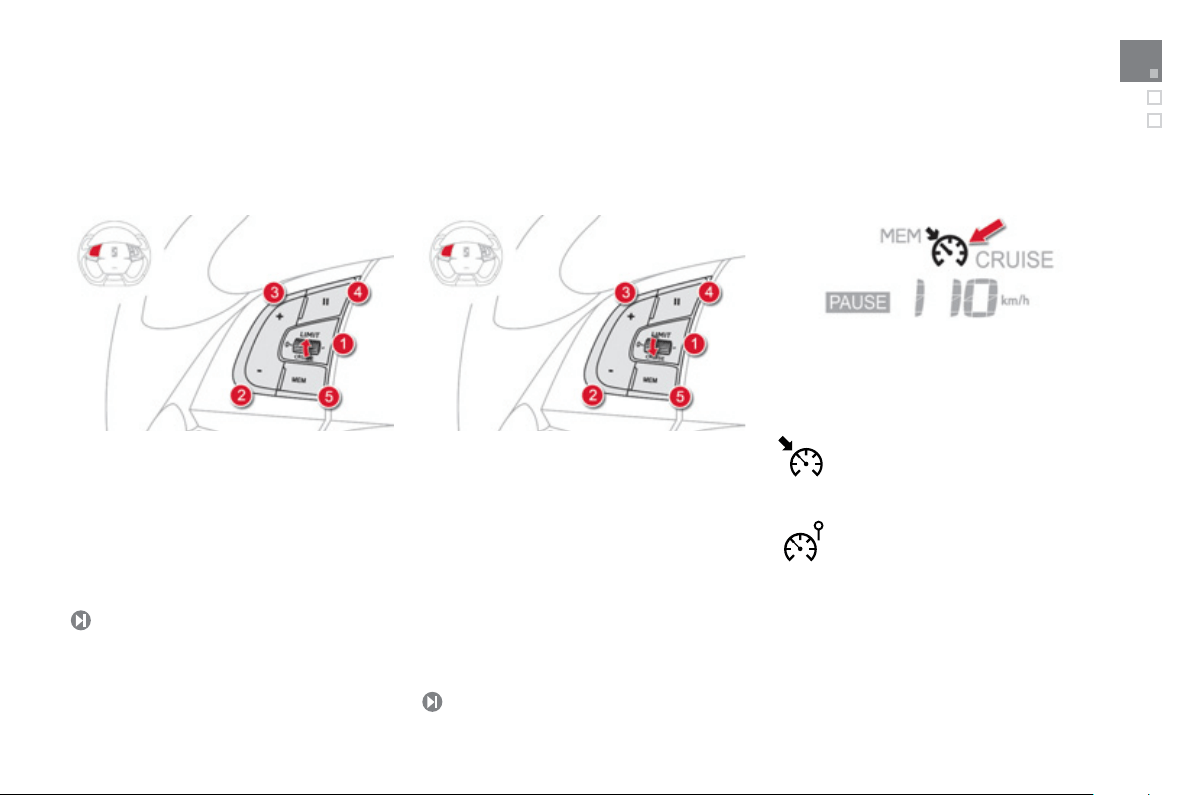
S
p
eed limiter "LIMIT"
1.
S
electing speed limiter mode.
2.
Decrease the pro
g
rammed value.
3.
Increase the pro
g
rammed value.
4.
Pause/resume speed limiter.
5
.
Displa
y
of the memorised speeds
(
b
y
the
a
udio s
y
stem memor
y)
.
Th
ese va
l
ues must
b
e set w
i
t
h
t
h
e
hyb
r
id
sy
stem act
i
ve.
143
1
45
Cruise control "CRUISE"
1
.
S
electing cruise control mode.
2
.
Pro
g
rammin
g
a speed
/
Decrease the
pro
g
rammed value.
3.
Pro
g
rammin
g
a speed / Increase the
pro
g
rammed value.
4.
Pause
/
resume cruise control.
5
.
Displa
y
o
f
the memorised speeds
(
b
y
the
audio s
y
stem memor
y)
.
I
n or
d
er to
b
e pro
g
ramme
d
or act
i
vate
d
, t
h
e
vehicle speed must be higher than 25 mph
(
40 km
/
h
)
, with at least 2
n
d
g
ear en
g
a
g
ed.
Displa
y
in the instrument panel
Cruise contro
l
S
p
eed limiter
The cruise control or s
p
eed limiter mode
appears in the instrument panel when selected.
Hybrid system
Hybrid system
Presentation
The H
y
brid4 technolo
gy
allows two sources o
f
e
nergy to be associated in an e
ff
ective manner:
the Diesel HDi en
g
ine, which drives the
f
ront
wheels and the electric motor, which drives the
rea
r wh
ee
l
s
.
These two motors can operate alternatel
y
or
s
imultaneousl
y
, accordin
g
to the h
y
brid mode
s
e
l
ecte
d
an
d
t
h
e
d
r
i
v
i
n
g
con
di
t
i
ons.
The electric motor alone provides power
f
or
the vehicle in "ZEV"
(
Zero Emissions Vehicle
)
m
ode, and in "Auto" mode
f
or running at slow
s
peed and low load. It also assists the Diesel
e
n
g
ine when movin
g
off, acceleratin
g
and
c
han
g
in
g
g
ear.
The batter
y
that powers the electric motor is
r
echar
g
ed durin
g
phases of deceleration and
s
tores the ener
gy
f
or subsequent use.
1
.
Diesel HDi engine
(f
ront wheel drive
)
.
2
.
Electric motor
(
rear wheel drive
)
.
3.
200
V batter
y
.
4.
Electronic power supervisor.
5
.
Stop & Start s
y
stem.
6
.
6-speed electronic gearbox.
7
.
El
ec
tri
ca
l
f
l
o
w.
8.
H
y
brid4 mode selector.
29
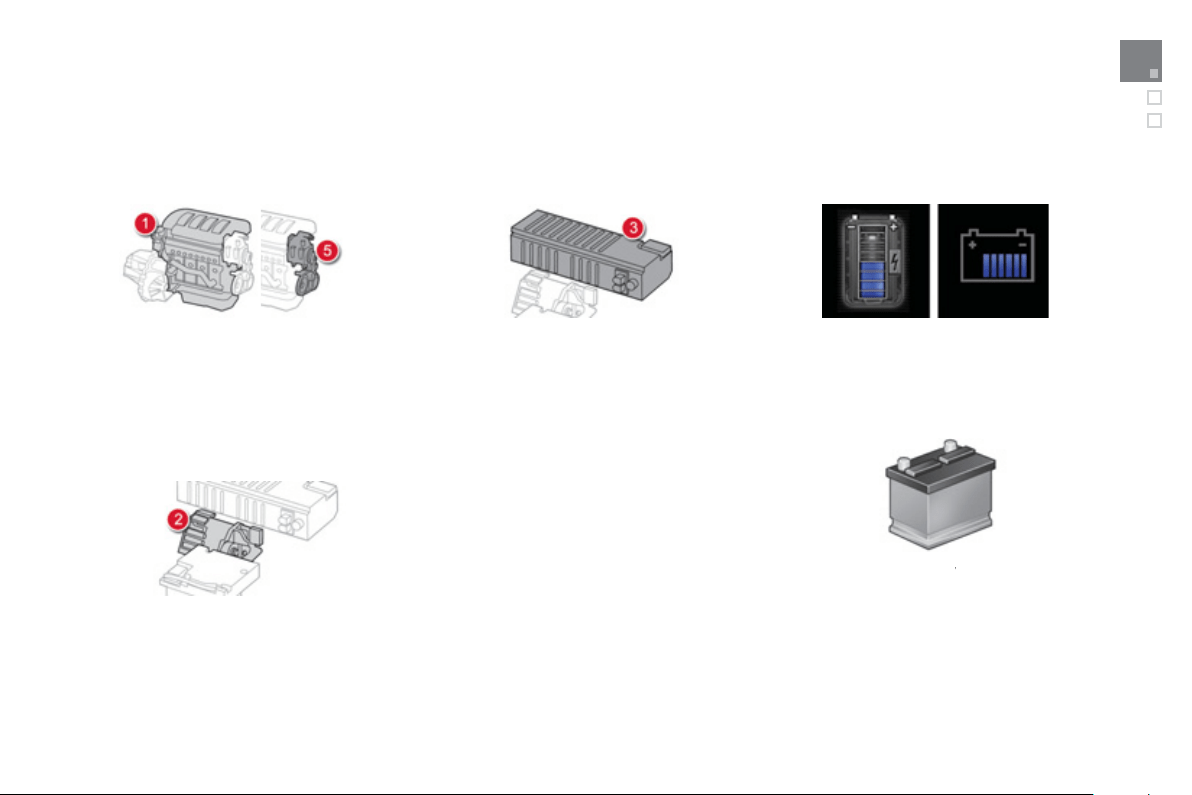
Hybrid system
M
ain parts of the H
y
brid4 s
y
stem
Th
e
HDi Diesel en
g
ine -
1
, located at the
f
ront,
drives the front wheels and provides most o
f
the power needed to drive the vehicle.
It i
s
fitt
ed
with th
e
Sto
p
& Star
t
s
y
s
t
em
-
5
which rechar
g
es the batteries and provides
additional power when needed
(
in 4x4 mode
)
.
Th
e
electric motor -
2
, located at the
rear, drives the rear wheels on its own, or
s
upplements the Diesel en
g
ine, accordin
g
to
the h
y
brid mode selected.
It recovers ener
gy
and char
g
es the batteries
durin
g
phases o
f
deceleration o
f
the vehicle
and is active up to 70 mph
(
120 km
/
h
)
.
A 200 V NI-MH hi
g
h volta
g
e batter
y
- 3,
p
rovides a source of ener
gy
for the rear electric
m
o
t
o
r.
Its char
g
in
g
rate is mana
g
ed automaticall
y
b
y
the vehicle durin
g
phases of deceleration.
I
t
i
s
l
ocate
d
i
n a compartment
i
n t
h
e
b
oot,
access
t
o
w
hich
is
r
es
tr
ic
t
ed
t
o
tr
ai
n
ed
se
rv
ice
t
ech
n
icia
n
s
.
The batter
y
state of char
ge
i
s
in
d
i
ca
t
ed
b
y
8 horizontal or vertical bars
(
dependin
g
on
the screen
)
.
Th
e
conventional battery
, located under the
y
bonnet, powers the vehicle's 12 V s
y
stems. It
i
s rec
h
ar
g
e
d
automat
i
ca
lly
by
t
h
e
high
vo
l
ta
g
e
n
e
tw
o
r
k
.
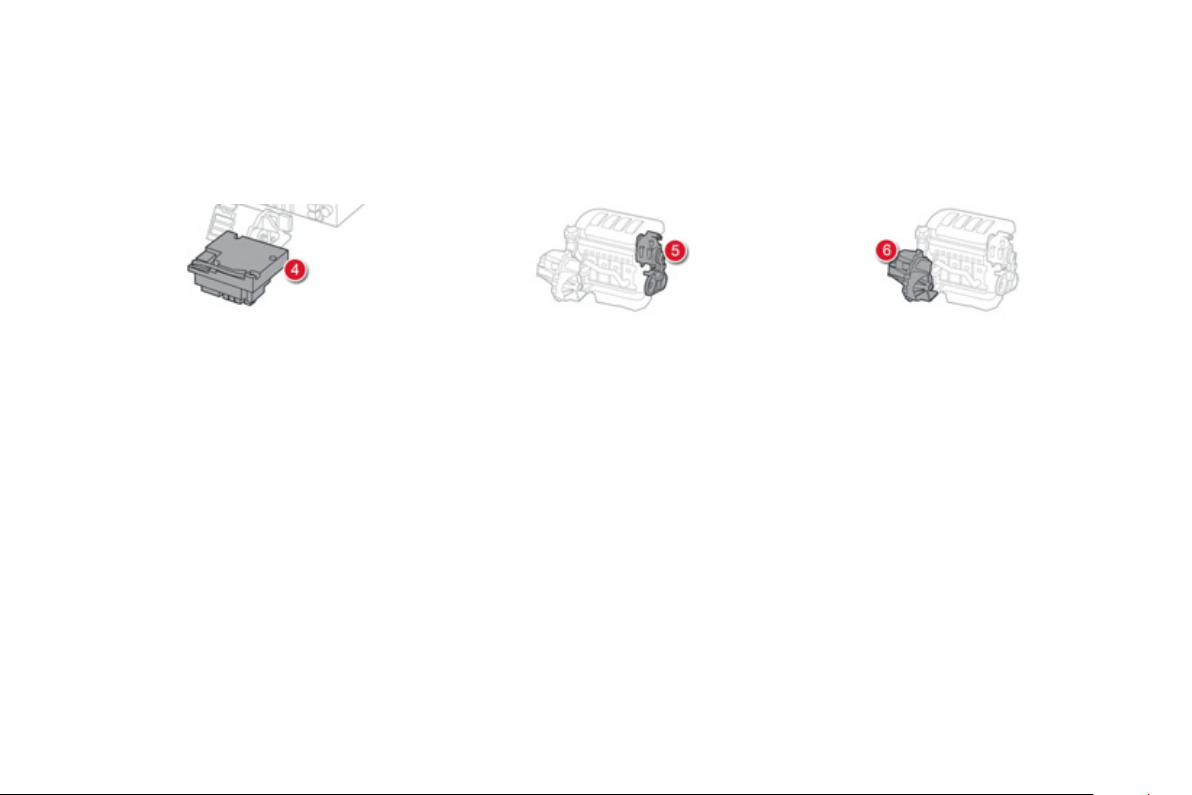
The
e
lectronic
p
ower su
p
ervisor -
4
a
utomaticall
y
mana
g
es the operation o
f
the two
p
ower units
(
Diesel and electric
)
to provide the
lowest consum
p
tion.
A
n inv
e
rt
e
r
a
n
d
a
tr
a
n
s
f
o
rm
e
r
a
r
e
n
eeded
t
o
m
ana
g
e the electric power.
The inverter acts on the torque of the electric
m
otor, b
y
re
g
ulatin
g
the current comin
g
from
t
h
e
high
vo
l
ta
g
e
b
atter
y
pac
k
.
I
ts operat
i
n
g
r
an
g
e is between 150 and 270 volts.
Th
e
tr
a
n
sfo
rm
e
r
co
nv
e
rt
s
th
e
2
00
V
of
th
e
battery pack to 12 V, to power the vehicle's
a
ncillar
y
s
y
stems.
The
Stop & Start s
y
stem -
5
allo
w
s
t
he
Diesel
e
n
gi
ne to
b
e put
i
nto stan
dby
d
ur
i
n
g
stops
(
tra
ff
ic lights, a stop, or in a tra
ff
ic jam,
f
o
r
e
xample
)
or durin
g
phases o
f
runnin
g
in all-
e
l
ec
tri
c
m
ode
.
The stoppin
g
and restartin
g
of the Diesel
e
n
g
ine is done in a wa
y
that is instantaneous
and transparent for the driver.
The
electronic
g
earbox -
6
prov
id
es,
i
n
automatic mode, si
g
ni
f
icant savin
g
s in
f
uel
c
onsum
p
tion com
p
ared to a conventional
m
anual
g
earbox, thanks to its electronic control
sy
stem.
It also offers improved drivin
g
pleasure with
the possibilit
y
at an
y
time of choosin
g
the
g
ear
c
han
g
in
g
mode: automatic or manual, usin
g
the
p
a
ddl
es
l
ocate
d
b
e
hi
n
d
t
h
e steer
i
n
g
w
h
ee
l
.
3
1
Hybrid system
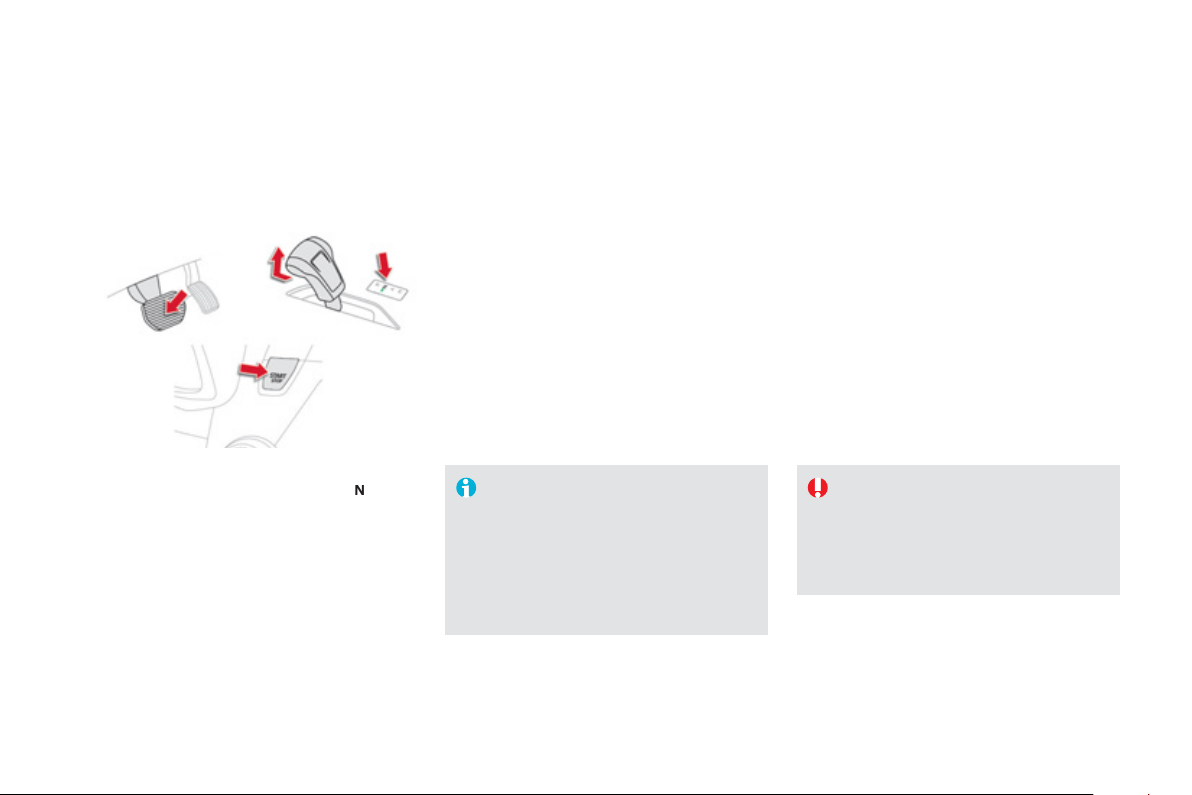
Before startin
g
- Place the
g
ear selector lever in position
N
.
- I
f
y
our vehicle has Ke
y
less Entr
y
and
S
tartin
g
, simpl
y
havin
g
the ke
y
inside the
v
e
hi
c
l
e
i
s
su
ffi
c
i
e
nt.
- If not, place the electronic ke
y
in the
reade
r.
- Press the brake
p
edal.
- Make a sin
g
le short press
(
about a second
)
o
n th
e
START/STO
P
bu
tt
o
n.
- The steerin
g
column locks
(
noticeable
noise and movement of the steerin
g
wheel
)
.
- Keep
y
our
f
oot on the brake pedal until the
Hy
brid4 s
y
stem starts up
(
the instrument
p
ane
l
an
d
t
h
e
R
ea
dy
l
am
p
come on,
c
on
f
irmed b
y
an audible si
g
nal
)
.
Startin
g
the H
y
brid4 s
y
stem
Starting - switching off the engine
The h
y
brid s
y
stem determines whether it is
necessar
y
to start the Diesel en
g
ine.
Switchin
g
off the H
y
brid4
s
y
stem
- Be
f
ore switchin
g
o
ff
the H
y
brid4 s
y
stem,
p
lace the gear selector in position
N
.
- Make a short press on the START/STO
P
bu
tt
o
n.
- The s
y
stem shuts down and the steerin
g
co
l
u
mn l
oc
k
s
.
When
y
our vehicle vehicle moves off
i
n e
l
ectr
i
c mo
d
e,
i
t ma
k
es no no
i
se.
Be very careful of pedestrians as
t
he
y
will not hear
y
ou comin
g.
For more in
f
ormation, see the section on
"Underbonnet precautions
/
warnin
g
s".
When stationar
y
, switch o
ff
the i
g
nition
a
n
d
check
t
ha
t t
he
R
ea
dy
lam
p
is o
ff
be
f
ore leaving the vehicle, otherwise
the h
y
brid s
y
stem will still be active.

3
3
Hybrid system
Anti-theft protection
Electronic en
g
ine immobilise
r
The ke
y
s contain an electronic chip which has
a
secret code. When the i
g
nition is switched
on, this code must be reco
g
nised in order for
startin
g
to be possible.
Thi
s e
l
ectron
i
c en
gi
ne
i
mmo
bili
ser
l
oc
k
s t
h
e
en
g
ine mana
g
ement s
y
stem a
f
ew minutes
af
ter the i
g
nition is switched o
ff
and prevents
starting o
f
the engine by anyone who does not
h
ave the ke
y
.
In the event of a malfunction,
y
ou are informed
b
y
a messa
g
e in the instrument panel screen.
In this case,
y
our vehicle does not start; contact
a
CITROËN dealer as soon as possible.
I
g
nition on without startin
g
t
h
e en
gi
ne
(
accessor
y
position
)
With the electronic ke
y
in the reader or the
Ke
y
less Entr
y
and Startin
g
ke
y
inside the
vehicle, pressin
g
the "START/ST
O
P" button,
with no action on the pedals, allows the i
g
nition
to
b
e sw
i
tc
h
e
d
on an
d
so act
i
vate t
h
e anc
ill
ar
y
e
qu
i
pment.
)
Press the "START/STOP" button
,
t
h
e
i
nstrument pane
l
comes on
b
ut t
h
e en
gi
ne
d
oes not start.
)
P
ress t
h
e
b
utton a
g
a
i
n to sw
i
tc
h
o
ff
the ignition and so allow the
v
e
hi
c
l
e
t
o
be
l
oc
k
ed
.
I
f
you use the accessory position
f
or too
lon
g
, the s
y
stem automaticall
y
g
oes into
e
conom
y
mode to avoid the risk of a flat
batter
y
.
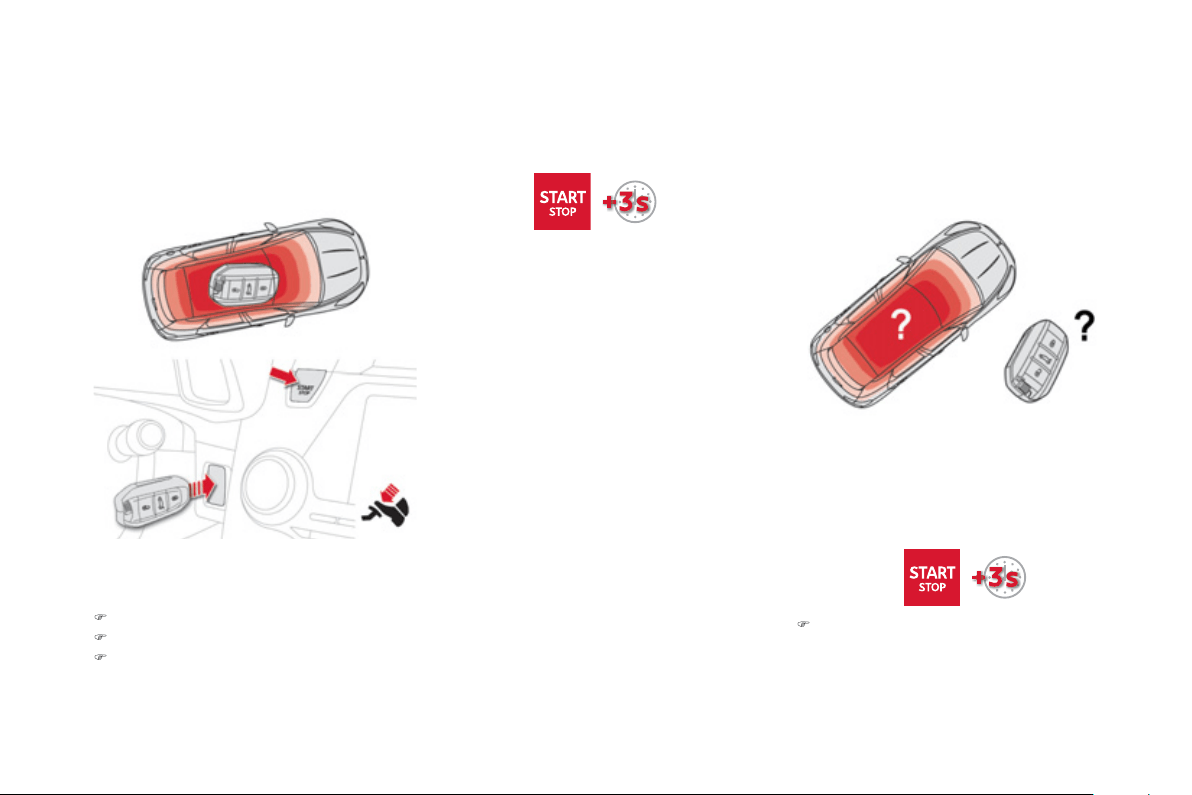
B
ac
k
-up start
i
n
g
w
i
t
h
t
h
e
K
e
y
less Entr
y
and Startin
g
s
y
stem
When the electronic ke
y
is in the defined zone
a
nd
y
our vehicle does not start after pressin
g
the "
S
TART
/S
T
O
P" button:
)
I
nsert t
h
e e
l
ectron
i
c
k
e
y
i
n t
h
e rea
d
er.
)
P
ress t
h
e
b
ra
k
e pe
d
a
l
.
)
Pr
ess
th
e
"
S
TART
/S
T
O
P"
bu
tt
o
n.
The hybrid system is active.
Back-u
p
switch-off
In the event of an emer
g
enc
y
onl
y
, the en
g
ine
c
an be switched of without an
y
conditions. To
do this, press and hold the "
S
TART
/S
T
O
P"
bu
tt
o
n
fo
r
abou
t
3
seco
n
ds
.
I
n t
hi
s case t
h
e steer
i
n
g
co
l
umn
l
oc
k
s as soon
as the vehicle sto
p
s.
El
ectron
i
c
k
e
y
not reco
g
n
i
se
d
by
t
he "Ke
y
less Entr
y
and Startin
g
"
s
y
stem
I
f
the electronic ke
y
is no lon
g
er in the de
f
ined
zone when drivin
g
or when
y
ou
(
later
)
request
s
witching o
ff
o
f
the hybrid system, a message
a
pp
ears in the instrument
p
anel.
)
Press and hold the "
S
TART
/S
T
O
P" button
f
or about 3 seconds i
f
y
ou want to
f
orce
s
witchin
g
o
ff
o
f
the h
y
brid s
y
stem
(
note that
r
estarting will not be possible without the
e
lectronic ke
y
in the de
f
ined zone
)
.
The electronic ke
y
must alwa
y
s remain inside
th
e
v
e
hi
c
l
e
wh
e
n in
use
.
35
Hybrid system
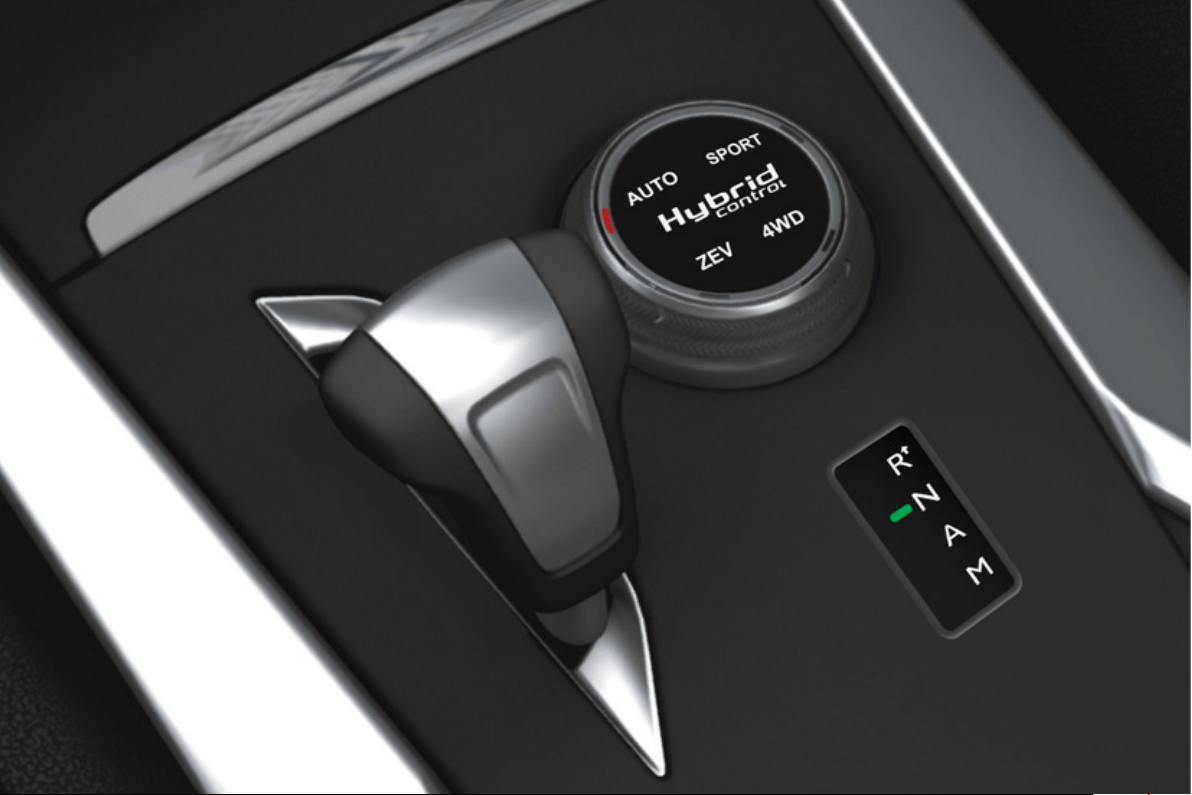
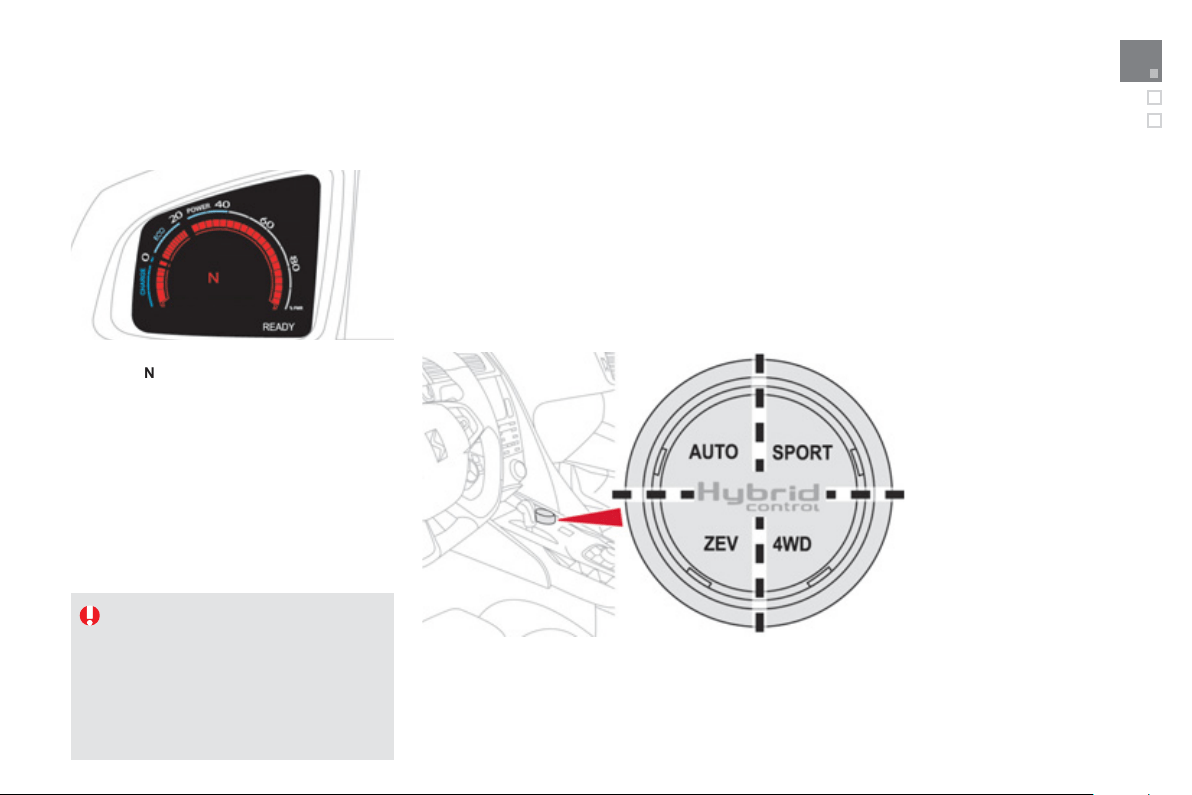
Hybrid4 mode selector
Th
e
se
l
ec
t
o
r
a
ll
o
w
s
th
e
use
r t
o
c
h
oose
be
tw
ee
n 4
d
riv
e
m
odes
fo
r th
e
v
e
hi
c
l
e
.
Turn the dial to the ri
g
ht or le
f
t; the mode selected is con
f
irmed b
y
illumination o
f
the correspondin
g
i
n
d
i
ca
t
o
r.
ZEV mode, to force electric runnin
g
.
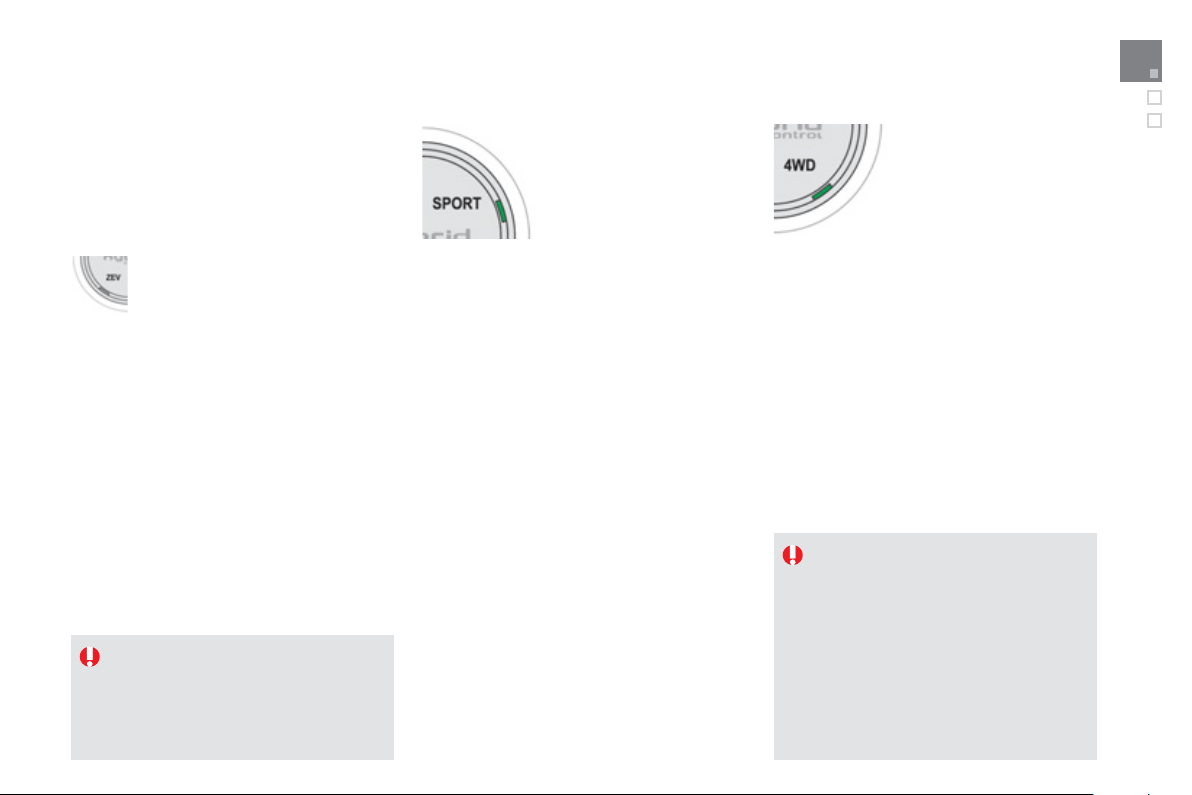
Spor
t
mode, to make use o
f
the maximum
per
f
ormance o
f
the vehicle.
4
W
D
mode, to force the vehicle into 4x4 mode.
A
UTO mode,
f
or normal use and o
p
timised
f
uel
c
onsumption.
O
n startin
g
the vehicle: with the
g
ear selector
i
n pos
i
t
i
on
N
, press t
h
e
b
ra
k
e pe
d
a
l
an
d
press
the
S
TART
/S
T
O
P button to activate the h
y
brid
sy
stem.
Thi
s
l
amp comes on w
h
en t
h
e ve
hi
c
l
e
i
s rea
dy
to move o
ff
(
"Auto" mode is on b
y
de
f
ault
)
and
s
o t
h
e
d
r
i
ver can press t
h
e acce
l
erator.
Thi
s
l
amp comes on more or
l
ess
i
nstant
ly
b
ut
m
a
y
take a
f
ew seconds in some cases
(
in
p
articular, the time needed
f
or pre-heatin
g
the
Diesel en
g
ine in cold weather or,
f
or example,
in ener
gy
econom
y
mode, ...
)
.
Ready lamp
With the vehicle stationar
y
, press the
S
TART
/S
T
O
P
bu
tt
o
n
a
n
d
c
h
ec
k th
a
t
th
e
Read
y
lamp is o
ff
when leavin
g
the
vehicle, otherwise the h
y
brid s
y
stem will
s
till
be
ac
tiv
e
.
For more in
f
ormation, re
f
er to the section
o
n "Underbonnet precautions
/
warnin
g
s".
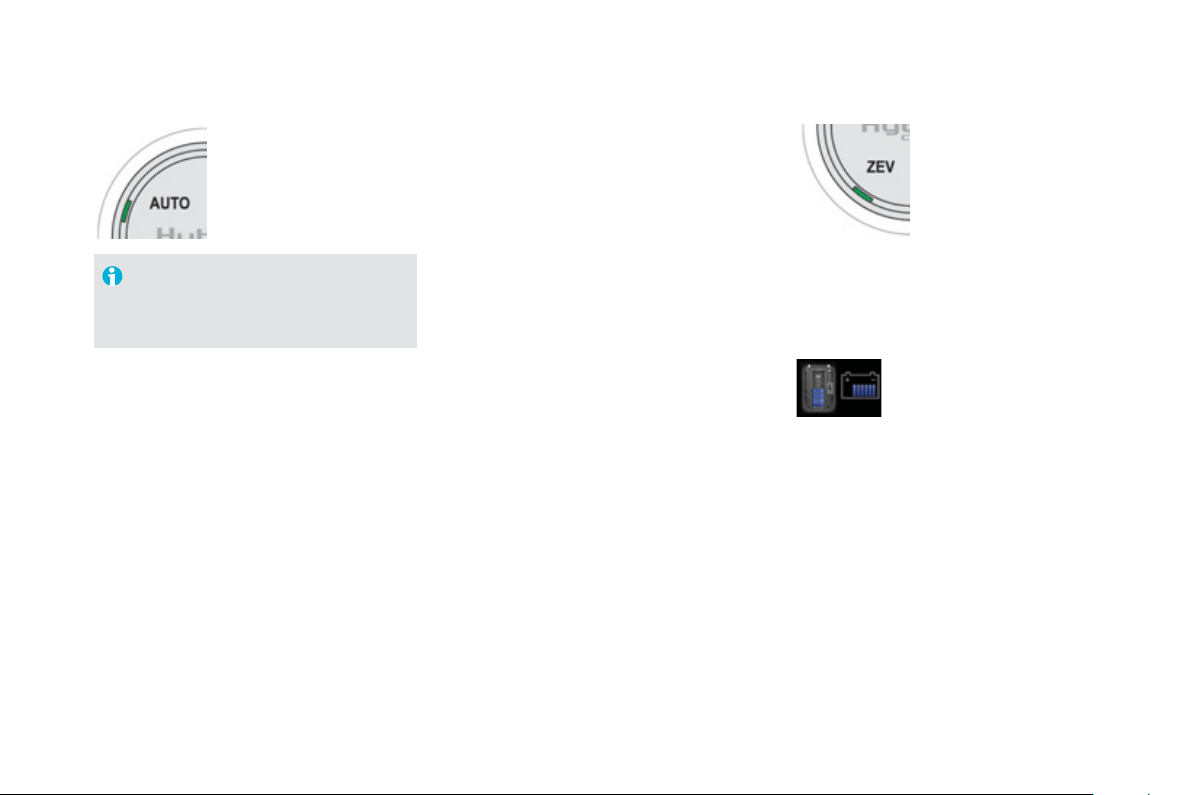
ZEV mode *
(
all electric
)
Z
ero em
i
ss
i
ons ve
hi
c
l
e operat
i
on
i
s assure
d
100
%
b
y
electric drive.
This
m
ode
forces silent runnin
g
a
t m
ode
r
a
t
e
sp
eeds.
It
ca
n
be
ac
tiv
a
t
ed
wh
e
n th
e
requ
i
re
d
con
di
t
i
ons are met,
p
articularl
y
i
f
the state o
f
c
har
g
e o
f
hi
g
h volta
g
e batter
y
is
s
u
ff
icient
(f
rom 4 bars
)
.
Auto mode
It automaticall
y
mana
g
es the operation o
f
the
Di
ese
l
en
gi
ne an
d
t
h
e e
l
ectr
i
c motor, accor
di
n
g
to inherent vehicle
p
arameters, tra
ff
ic
c
onditions and driving style so as to optimise
the vehicle's fuel consum
p
tion.
In particular, this mode activates
"
zero
e
missions" electric runnin
g
wh
e
n th
e
co
n
d
iti
o
n
s
a
ll
o
w.
I
n auto mo
d
e, t
h
e
el
ectr
i
c moto
r
:
- can
d
r
i
ve t
h
e ve
hi
c
l
e on
i
ts own up to
around 36 mph
(
60 km
/
h
)
in
"
zero emissions" electric running,
dependin
g
on the state o
f
char
g
e o
f
the
batter
y
, if the conditions specific to the
v
e
hi
c
l
e
a
r
e
m
e
t
a
n
d
if
acce
l
e
r
a
ti
o
n i
s
moderate
,
-
supplements the Diesel en
g
in
e
wh
e
n
movin
g
o
ff
and chan
g
in
g
g
ear, durin
g
acce
l
e
r
a
ti
o
n
a
n
d
wh
e
n tr
ac
ti
o
n
f
r
o
m th
e
f
ront wheels is inadequate
(
it automaticall
y
a
dd
s
4
wheel driv
e
)
,
- is no lon
g
er active above 70 mph
(
120 km/h
)
.
* ZEV: Z
e
r
o
Emi
ss
i
o
n
s
V
e
hi
c
l
e
.
Thi
s
standard m
ode
t
o
use
in
p
referenc
e
i
s
ac
tiv
a
t
ed
automaticall
y
on startin
g
the h
y
brid s
y
stem.
37
Hybrid system
S
p
ort mode
(
Diesel and
e
lectric
)
4WD mode
**
(
Diesel and
e
lectric
)
Thi
s mo
d
e a
ll
ows more
dy
nam
i
c
d
r
i
v
i
n
g
by
p
rov
idi
n
g
a
dditional
p
erformanc
e
.
V
e
hi
c
l
e acce
l
erat
i
on an
d
pi
c
k
-u
p
are
maximised b
y
usin
g
the capacit
y
o
f
the electric
motor, supplementin
g
the power o
f
the Diesel
en
g
ine.
This mode mana
g
es the pro
g
ressiveness of the
a
ccelerator, the electronic
g
earbox and the use
o
f th
e
e
l
ec
tri
c
m
o
t
o
r.
In
S
port mode:
-
Th
e e
l
ectr
i
c motor can
b
e use
d
up to
7
0 mph
(
120 km
/
h
)
.
Thi
s mo
d
e prov
id
es a
ddi
t
i
ona
l
tract
i
on
***
a
t
low speed b
y
drivin
g
all 4 wheels o
f
the vehicle
c
ontinuousl
y
: the Diesel en
g
ine
(f
ront wheel
drive
)
and the electric motor
(
rear wheel drive
)
o
perate s
i
mu
l
taneous
ly
an
d
permanent
ly
.
Th
e
i
r coup
li
n
g
i
s mana
g
e
d
e
l
ectron
i
ca
lly
to
o
ptimise traction on slipper
y
sur
f
aces.
I
n
4WD
m
ode
:
- Power
f
or the electric motor is provided,
i
f
needed, b
y
the alternator-starter motor
o
f
the
f
ront en
g
ine. The Diesel en
g
ine
operates cont
i
nuous
ly
.
- Th
e
add
iti
o
n
a
l tr
ac
ti
o
n
f
r
o
m th
e
e
l
ec
tri
c
m
otor is available up to 75 mph
(
120 km
/
h
)
.
In ZEV m
ode
:
- Ran
g
e and acceleration capacit
y
are
limited. The maximum speed possible is
a
round 36 mph
(
60 km
/
h
)
.
-
U
n
d
er
high
l
oa
d
or a pr
i
or
i
t
y
requ
i
rement
c
ausin
g
the start o
f
the Diesel en
g
ine, the
s
ystem changes automatically to AUT
O
mode
.
I
f
th
e
co
n
d
iti
o
n
s
do
n
o
t
a
ll
o
w thi
s
m
o
d
e, a messa
g
e t
h
at t
h
e
"
e
l
ectr
i
c
m
o
d
e
i
s not current
ly
ava
il
a
bl
e
"
app
ears in the screen. The ZEV
warnin
g
lamp
f
lashes
f
or a
f
ew seconds then
g
oes off and the selector comes on in AUT
O
.
Thi
s
m
ode
s
h
ou
l
d
be
used
o
n
s
n
o
w
co
v
e
r
ed
roads or difficult
g
round
(
mud, sand, ...
)
.
In this mode, in severe conditions and if the
c
ircumstances allow, it is recommended
that
y
ou accelerate stron
g
l
y
to ensure that
y
ou move off and avoid an
y
risk of
g
ettin
g
s
t
uc
k.
Th
e
add
iti
o
n
o
f 4WD tr
ac
ti
o
n i
s
a
v
a
il
ab
l
e
wh
a
t
e
v
e
r:
- the state of char
g
e of the traction
batter
y
,
- th
e
a
ltit
ude
.
F
o
r m
o
r
e
in
fo
rm
a
ti
o
n
o
n "A
u
t
o
m
a
ti
c
r
estartin
g
o
f
the Diesel en
g
ine or
ZEV mode not available", re
f
er to the
c
orresponding section.
**
4WD: 4 Wh
ee
l Driv
e
.
*** Thi
s
m
ode
will
be
e
v
e
n m
o
r
e
e
ff
ec
tiv
e
i
f
s
uitable t
y
res are fitted
(
winter t
y
res in
particular
)
.
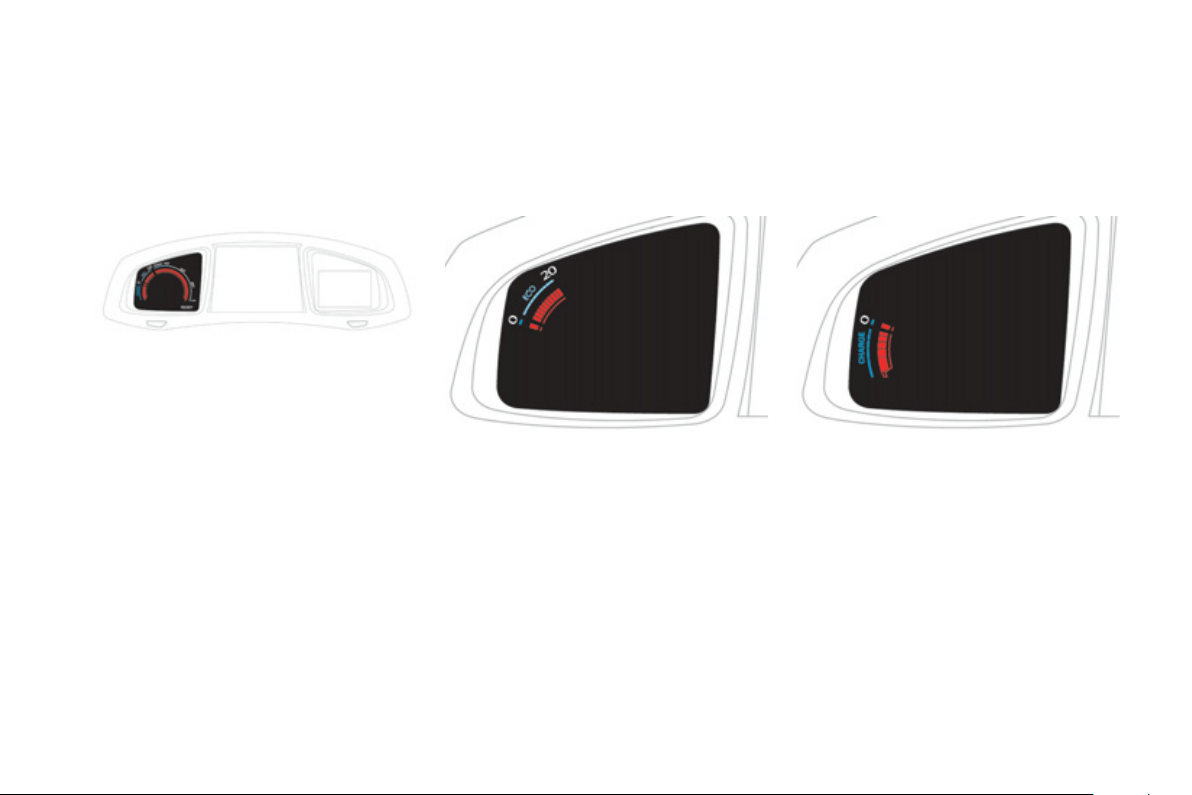
Energy consumption / generation indicator
The indicator dial
p
rovides real time in
f
ormation
on the total power used, combinin
g
electric and
Di
ese
l.
It comprises three main zones.
Z
o
n
e
whi
c
h in
d
i
ca
t
es
th
a
t th
e
v
e
hi
c
l
e
i
s
o
pt
i
m
i
s
i
n
g
i
ts ener
gy
consumpt
i
on , e
l
ectr
i
c,
D
i
ese
l
o
r
a
co
m
b
in
a
ti
o
n
of
bo
th.
This zone corres
p
onds to
p
hases o
f
electric
r
unning as well as to phases o
f
optimum use o
f
the Diesel en
g
ine, which are easil
y
accessible
with a suitable drivin
g
st
y
le
(
smooth "eco-citizen"
drivin
g)
.
Z
o
n
e
whi
c
h in
d
i
ca
t
es
th
a
t th
e
v
e
hi
c
l
e
i
s
i
n
elec
tr
ical
energy
reco
v
ery
p
h
ase: on
deceleration, brakin
g
(
partiall
y
or particularl
y
with
y
our
f
oot o
ff
the accelerator
(
to use
in pre
f
erence as this gives better energy
recover
y)
.
This allows the hi
g
h volta
g
e batter
y
to be
rechar
g
ed usin
g
"
free" ener
gy
whi
c
h
ca
n th
e
n
be
reused for future ener
gy
requirements.
ECO zone CHARGE zone

3
9
Hybrid system
Z
o
n
e
whi
c
h in
d
i
ca
t
es
a
n in
c
r
eased
cu
m
u
l
a
tiv
e
p
ower
d
eman
d
f
rom
y
our h
y
brid vehicle,
takin
g
account o
f
the combined power available
f
rom the Diesel en
g
ine and the electric motor.
POWER zone
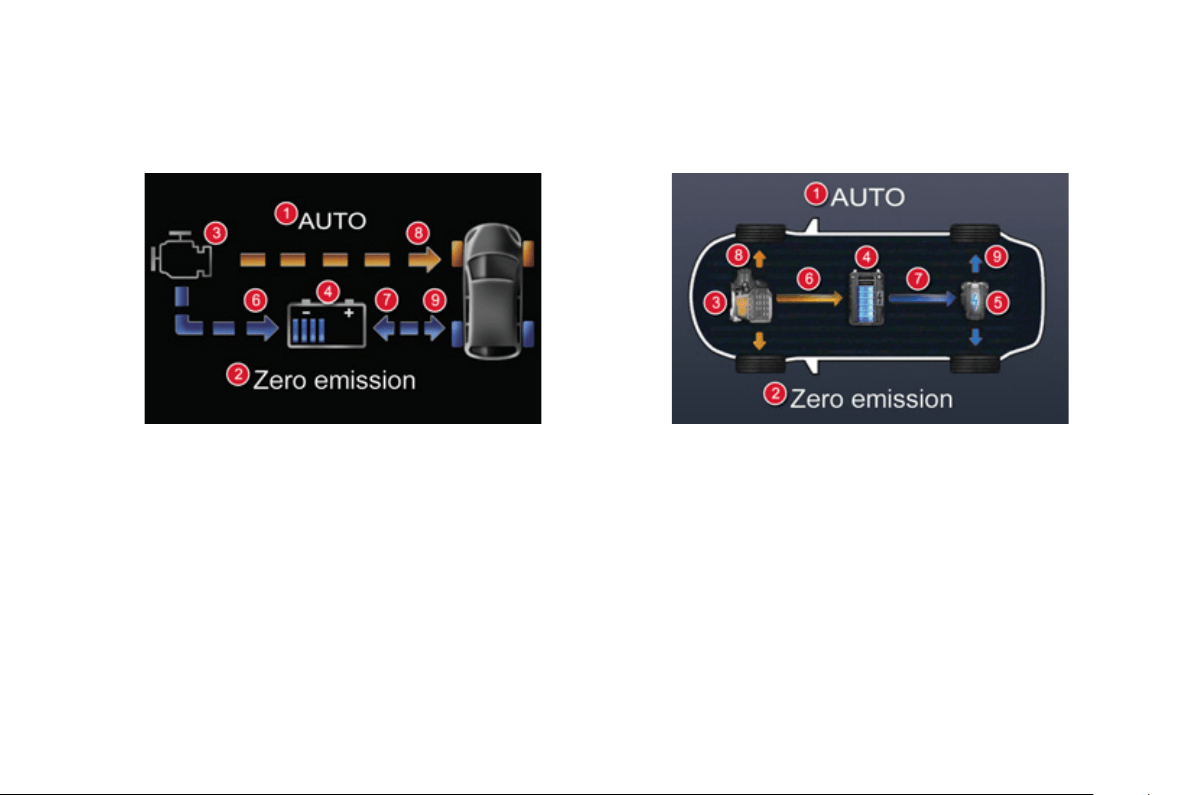
View hybrid fl ow information
Hyb
r
id
mo
d
es
1.
H
y
brid mode selected
(
AUT
O
, ZEV,
S
P
O
RT, 4WD
)
.
2.
Messa
g
es, e.
g
.: "Zero Emission" i
f
the Diesel en
g
ine is o
ff
(
0 g
/
km
CO
2
)
.
Operation / Ener
gy
flows
6
.
The Diesel en
g
ine supplies the batter
y
(
i
f
needed
)
.
7.
Arrow
f
rom le
f
t to ri
g
ht: the batter
y
powers the electric motor
(
when
the electric motor is operating
)
.
Arrow
f
rom ri
g
ht to le
f
t: the electric motor
/g
enerator rechar
g
es the
batter
y
(
ener
gy
recover
y
phases
)
.
8.
The Diesel en
g
ine drives the front wheels.
9.
Th
e
e
l
ec
tri
c
m
o
t
o
r
d
riv
es
th
e
r
ea
r wh
ee
l
s
.
V
ehicle infrastructure
3.
Diesel en
g
ine.
4.
Traction batter
y
state of char
g
e.
5.
Electric Motor
/G
enerator.
Information on the active h
y
brid mode, arrows for ener
gy
flows and the state of char
g
e of the batter
y
, is displa
y
ed in the instrument panel screen or the
sc
r
ee
n.
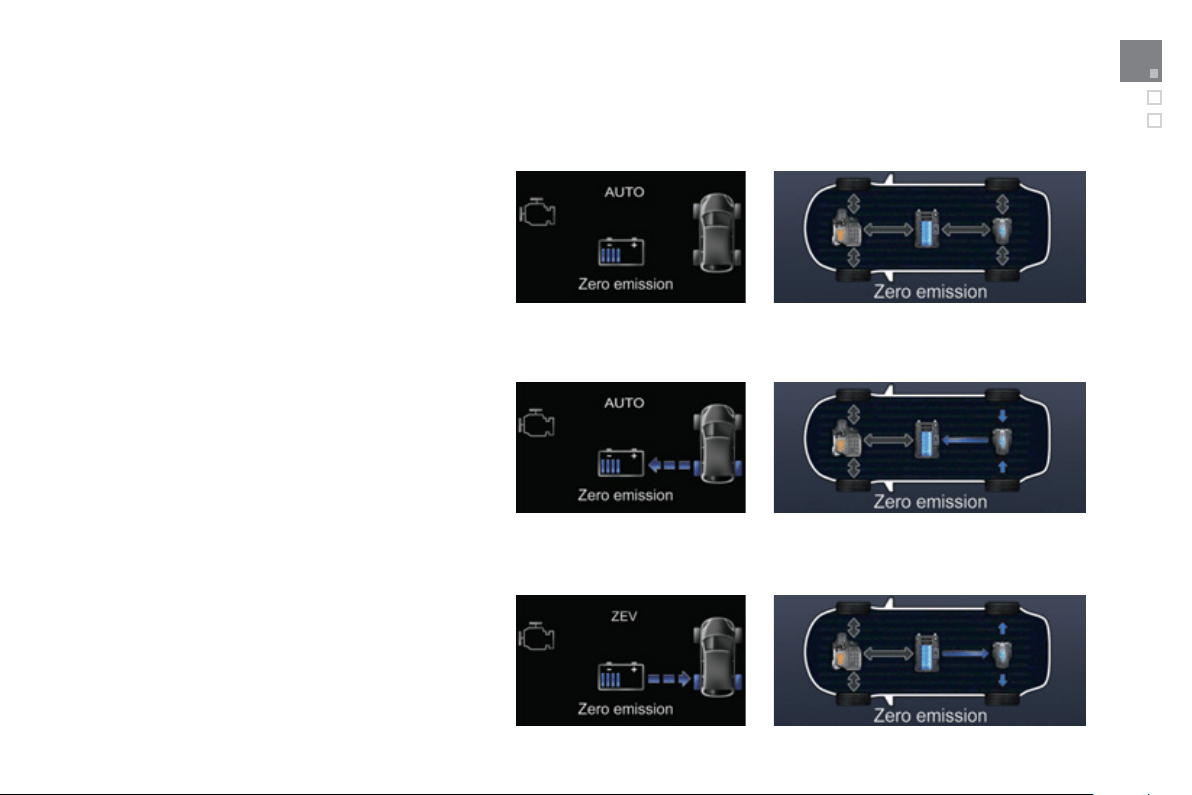
41
Hybrid system
Examples of displa
y
s
On startin
g
and when stationar
y
There is no flow of ener
gy
(
the Stop & Start s
y
stem stops and
restarts the Diesel en
g
ine automaticall
y)
.
E
ner
gy
recover
y
Durin
g
this phase
(
deceleration, brakin
g
,
f
oot o
ff
the
accelerator, … all modes
)
, the batter
y
is rechar
g
ed b
y
the
e
lectric motor
/
generator, then being driven by the rear wheels.
You can maximise this ener
gy
recover
y
b
y
takin
g
y
our
f
oot o
ff
the accelerator pedal, deceleration will then be less marked
th
a
n with
a
co
nv
e
nti
o
n
a
l v
e
hi
c
l
e
.
100% electric
In all electric runnin
g
(
AUT
O
or ZEV modes
)
, onl
y
the electric
m
otor, powered b
y
the batter
y
, drives the rear wheels.
The displa
y
of "Zero Emission" indicates that the Diesel en
g
ine
is o
ff
and the vehicle is producin
g
no
CO
2
.

Automatic restartin
g
of the Diesel en
g
ine or ZEV mode NOT available
Maintainin
g
the performance
o
f the s
y
stem
- When the vehicle exceeds
18
mph
(
30 km/h
)
after movin
g
off
(
if the internal
c
ombustion en
g
ine has not alread
y
s
tarted since the vehicle was last started
)
.
- I
f
the hi
g
h volta
g
e batter
y
is not
s
u
ff
icientl
y
char
g
ed. A minimum o
f
4 bars
i
n
ZEV
mo
d
e so as to ensure o
p
erat
i
on
o
ver a certain distance
(
in AUT
O
, electric
o
peration is accessible
f
or a shorter
period with a lower level of char
g
e
)
.
- Wh
e
n th
e
f
ue
l l
e
v
e
l
e
nt
e
r
s
th
e
r
ese
rv
e
z
one
(
where rate of consumption o
f
t
hi
s reserve
i
s
high
,
ZEV
i
n
hibi
t
i
on ma
y
c
ontinue
f
or some time a
f
ter re
f
uellin
g)
.
- Durin
g
re
g
eneration o
f
the particle
e
missions
f
ilter, which occurs
automatically
f
or 5 to 10 minutes,
approximatel
y
ever
y
300 miles
(
500 kms
)
(
or less in extended urban runnin
g)
.
Th
e
i
nterna
l
com
b
ust
i
on en
gi
ne ma
y
restart or
ZEV mode may not be available in the various
c
onditions
p
resented below.
The internal combustion en
g
ine can be
s
witched off automaticall
y
as soon as these
co
n
d
iti
o
n
s
a
r
e
lift
ed
.
Wh
e
n th
e
co
n
d
iti
o
n
s
desc
ri
bed
be
l
o
w
cause
th
e
v
e
hi
c
l
e
t
o
co
m
e
ou
t
of
ZEV m
ode
a
n
d
t
h
e
Di
ese
l
en
gi
ne to restart, t
h
e ve
hi
c
l
e
a
utomaticall
y
chan
g
es to AUT
O
mode.
Y
ou
r v
e
hi
c
l
e
i
s
fitt
ed
with th
e
m
os
t
e
ff
ec
tiv
e
e
missions control s
y
stems, in particular the
Particle Emissions Filter
(
PEF
)
.
At re
g
ular intervals
y
our Diesel en
g
ine will
p
roduce ener
gy
for the self-cleanin
g
of this
filt
e
r.
Durin
g
this PEF re
g
eneration phase, electric
r
unnin
g
is purposel
y
made unavailable and
is accompanied b
y
a messa
g
e "
E
lectric
mode not available: PEF re
g
eneration in
progress
".
A
ction b
y
the driver
- Movin
g
the
g
ear selector to position
M
.
- Action on steerin
g
mounted control
p
addles to chan
g
e
g
ear.
- Sustained and sharp acceleration.
- Use of demistin
g
.
- Use o
f
air conditionin
g
.
Diffi cult weather conditions and
c
ircumstances
- I
f
certain conditions or en
g
ine temperature
requirements make it necessar
y
(
such as
an en
g
ine temperature that is too low
f
o
r
the ambient conditions
)
.
- When the batter
y
is close to maximum
c
har
g
e
(f
or example: when
g
oin
g
down
a lon
g
hill
)
, because en
g
ine recover
y
bein
g
no lon
g
er possible, the internal
c
ombustion en
g
ine restarts automaticall
y
j
ust to provide en
g
ine brakin
g
.
- I
f
the vehicle encounters a steep slope
(
car park ramp, ...
)
.
- I
f
the vehicle has been parked in the sun
f
or a prolon
g
ed period.
- When drivin
g
in mountainous conditions
(
altitude
)
.

43
Hybrid system
Hybrid4 frequently asked questions
ZEV
(
Zero Emissions Vehicle
)
mode
Question
A
nswer
Why is it not always possible
f
or me to put the
vehicle into ZEV
(
Zero Emissions Vehicle
)
mode
e
ven thou
g
h the batter
y
is well char
g
ed?
This situation is temporary.
C
ertain conditions will occasionall
y
prevent the chan
g
e to ZEV mode, even i
f
the batter
y
has
s
ufficient char
g
e, such as, for example, ver
y
cold conditions, altitude, demistin
g
, hi
g
h demand for
h
eatin
g
or air conditionin
g
, re
g
eneration of the particle emissions filter
(
PEF
)
.
Wh
y
do I sometimes see an alert messa
g
e
"
Electric mode not available: PEF re
g
eneration
in pro
g
ress"?
This is an messa
g
e relatin
g
to the re
g
eneration of the particle emissions filter
(
PEF
)
. This is a
c
ompletel
y
normal process that takes place ever
y
240 or 300 miles
(
400 or 500 km
)
(
or more
frequentl
y
in prolon
g
ed urban use
)
, as on a conventional HDi vehicle.
Thi
s process
i
s not
g
enera
lly
not
i
ce
d
by
t
h
e
d
r
i
ver.
O
n the other hand, in the case o
f
a h
y
brid, this phenomenon ma
y
be noticeable
(
in urban use
)
as temporar
ily
t
h
e
HDi
en
gi
ne w
ill
not stop an
d
t
hi
s messa
g
e w
ill
b
e
di
sp
l
a
y
e
d
at
i
nterva
l
s w
hil
e
regeneration is in progress.
Wh
y
is it not possible for me to put the vehicle
into ZEV mode, even thou
g
h I had
j
ust been
r
unnin
g
electricall
y
in Auto mode?
The mana
g
ement of ZEV is different from Auto mode.
Chan
g
in
g
to ZEV mode is onl
y
possible with a batter
y
char
g
e of at least 4 bars, in order to assure
s
ufficient ran
g
e.
In Auto mode, the s
y
stem alone mana
g
es the conditions
f
or chan
g
in
g
temporaril
y
to electric
m
ode,
f
or shorter periods and with a lower state o
f
char
g
e o
f
the batter
y
.
Wh
y
is the ran
g
e in ZEV
(
Zero Emissions
Vehicle
)
mode lower when climbin
g?
The vehicle needs more ener
gy
when climbin
g
than when runnin
g
on the level.
S
o it is better to sta
y
in Auto mode, which will
f
avour operation o
f
the Diesel en
g
ine.
Why is it that the system makes me come out o
f
ZEV
(
Zero Emissions Vehicle
)
mode; it does not
r
eturn to ZEV automaticall
y
when the conditions
a
ll
o
w?
It is not intended to give pre
f
erence to ZEV running at any cost, as it is not always the most
eco
n
o
mi
ca
l m
ode
.
So the s
y
stem returns automaticall
y
to Auto mode.

Reducin
g
consumption - Fuel
Q
uestion
A
nswer
How can I optimise m
y
f
uel consumption
?
G
ive pre
f
erence to Auto mode as it selects in the best wa
y
the "drivin
g
ener
gy
source" to use in
order to reduce
f
uel consum
p
tion.
You should also adapt
y
our drivin
g
st
y
le to the characteristics o
f
h
y
brid vehicles to
g
et the best
out of it, for example b
y
takin
g
y
our foot off the accelerator pedal rather than brakin
g
and b
y
anticipatin
g
decelerations
(
enterin
g
a built-up area, stop at traffic li
g
hts, stop at halt si
g
ns, ...
)
.
Wh
y
do I not mana
g
e to reduce m
y
f
uel
c
onsumption even thou
g
h I often drive in ZEV
(
Zero Emissions Vehicle
)
mode?
It is not ZEV mode but Auto mode that is the most appropriate
f
or reducin
g
f
uel consumption, as it
s
elects the best "drivin
g
ener
gy
source".
ZEV mode
(
100% electric operation
)
can reduce fuel consumption in some cases. However,
rechar
g
in
g
the traction batter
y
has an ener
gy
cost.
This is wh
y
we recommend usin
g
Auto mode more often.
Wh
y
does the trip computer sometimes displa
y
the bars for 28 mp
g
(
10 litres
)
consumption in
t
o
wn?
The current fuel consumption displa
y
ed ma
y
appear hi
g
h when the distance covered is ver
y
low,
but this
g
enerall
y
has ver
y
little impact and the true avera
g
e fuel consumption will remain low.
In town,
y
our h
y
brid retains ver
y
g
ood fuel econom
y
(
of the order of 35% better than a non-h
y
brid
vehicle
)
.
Wh
y
is m
y
batter
y
rarel
y
full
y
char
g
ed?
A
partl
y
char
g
ed batter
y
is normal operation
(
4 to 5 bars on avera
g
e in Auto mode
)
.
This allows some capacit
y
to be left free for the recover
y
for ener
gy
when
g
oin
g
downhill or takin
g
when
y
our
f
oot o
ff
the accelerator.
Wh
y
are there so ma
y
f
uel alert messa
g
es when
s
tartin
g
to use the reserve
?
To encoura
g
e
y
ou to re
f
uel as soon as possible and avoid the loss o
f
h
y
brid
f
unctions.

4
5
Hybrid system
Air conditionin
g
Question
A
nswer
I
t
see
m
s
t
o
m
e
t
ha
t t
he
v
ehicle
r
u
n
s
less
o
n
e
lectric when the heating or air conditioning is
operatin
g
, is that ri
g
ht
?
The demand
f
or heatin
g
or air conditionin
g
ma
y
require the startin
g
o
f
the Diesel en
g
ine until the
des
ir
ed
l
e
v
e
l
of
co
m
fo
rt i
s
a
tt
a
in
ed
.
Normal h
y
brid operation is simpl
y
put back. The period can be lon
g
er under low or ver
y
hi
g
h
ambient temperatures.
It seems to me that when it is ver
y
hot and the
air conditionin
g
is workin
g
, the vehicle runs on
e
lectric for shorter periods. Is that ri
g
ht?
When it is hot, the periods when the Diesel en
g
ine is put on standb
y
and the vehicle runs on
e
lectric are necessaril
y
restricted in order to limit the difference between the temperature in the
v
e
hi
c
l
e
a
n
d
th
e
l
e
v
e
l
o
f
co
mf
o
rt
se
l
ec
t
ed
.
In ver
y
hot weather, it is alwa
y
s possible to press the Eco OFF button
(
which brin
g
s the vehicle
o
ut o
f
ZEV mode and prevents electric runnin
g
or the stoppin
g
o
f
the en
g
ine
)
to
g
ive pre
f
erence to
temperature control
(
keeps the air conditionin
g
runnin
g)
.
Special H
y
brid4 features
Question Answer
Can I tow with m
y
h
y
brid vehicle and how much?
A
H
y
brid4 vehicle can tow between 500 k
g
and 800 k
g
(
see the "Towin
g
" section
)
.
This allows a
j
et ski or two-wheeler on a trailer to be towed, for example.
The "technical" reason
f
or the limit is related to maintainin
g
adequate coolin
g
capacit
y
f
or the
i
nterna
l
com
b
ust
i
on en
gi
ne as we
ll
as t
h
e
hyb
r
id
components t
h
at are a
l
so coo
l
e
d
by
t
h
e en
gi
ne
'
s
c
oo
li
n
g
s
y
stem.
Wh
y
does en
g
ine brakin
g
seem so stron
g?
When
y
ou take
y
our
f
oot o
ff
the accelerator, the en
g
ine brakin
g
results mainl
y
f
rom the ener
gy
recover
y
by
t
h
e e
l
ectr
i
c motor.
This leads to a hi
g
her level o
f
deceleration than a conventional vehicle and so allows the recover
y
of
f
ree energy.
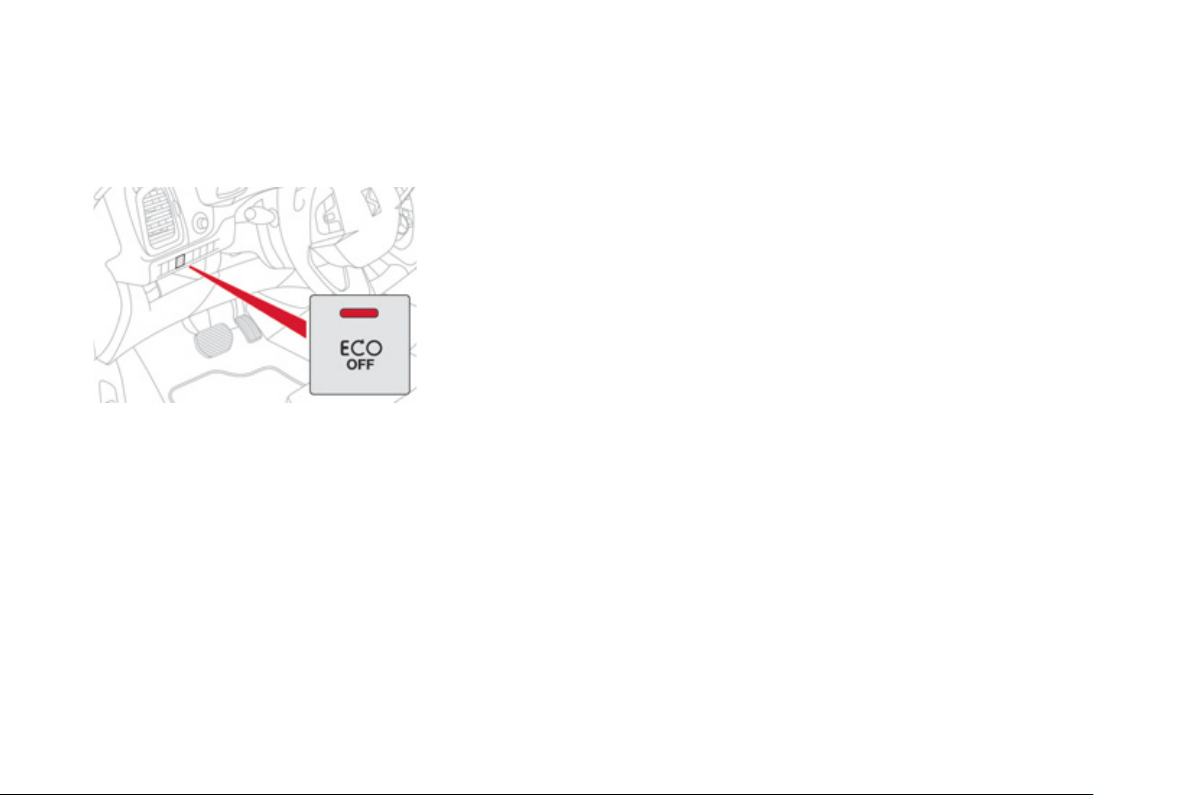
ECO OFF switch
This
f
unction prevents the Diesel en
g
ine
bein
g
switched o
ff
and so ensures that a
c
om
f
ortable tem
p
erature can be maintained in
the passenger compartment
(
air conditioning
r
unnin
g
continuousl
y)
.
O
n pressin
g
the switch, the en
g
ine restarts
immediatel
y
.
To return to normal operation, press the switch
ag
ain.
Af
ter switchin
g
o
ff
the i
g
nition, the vehicle will
r
eturn to normal operation
(
lamp in the switch o
ff)
.
*
Except in ZEV mode, which
f
avours electric
runnin
g
over assurin
g
a com
f
ortable
tem
p
erature.
D
ur
i
n
g
e
l
ectr
i
c runn
i
n
g
an
d
w
h
en t
h
e en
gi
ne
i
s
stoppe
d
, t
h
e
hyb
r
id
s
y
stem mana
g
es restart
i
n
g
automatically to assure com
f
ort levels in the
passen
g
er compartment
*
.
However, variations in temperature ma
y
still
b
e felt in ver
y
hot climates. To avoid an
y
discomfort in these conditions
y
ou can operate
the E
CO
O
FF switch.

47
Hybrid system
Eco-driving
Eco-drivin
g
is a ran
g
e of ever
y
da
y
practices that allow the motorist to optimise their fuel consumption and C
O
2
e
mi
ss
i
o
n
s
.
E
co-
d
r
i
v
i
n
g
su
i
te
d
to
y
ou
r
H
y
brid4 vehicle
Use
g
ear selector position A
,
as this
optimises
g
ear chan
g
es to suit the
ci
rcumstances, an
d
t
h
e
A
UTO m
ode
of
th
e
Hyb
r
id4
mo
d
e se
l
ector.
When movin
g
o
ff
, accelerate normall
y
up to
the desired speed
(
POWER z
o
n
e
be
tw
ee
n
20 and 40
%)
.
A
t stead
y
speeds, drive
g
entl
y
with small
m
ovements of the accelerator pedal
(
E
C
O
or
CHARG
E
zone
)
, run in electric mode as often
as possible when drivin
g
at low speed.
A
nt
i
c
i
pate t
h
e nee
d
to s
l
ow
d
own an
d
use
e
n
g
ine brakin
g
(
CHARG
E
zone
)
, so as to
m
ake use o
f
f
ree ener
gy
recover
y
while
keeping light pressure on the accelerato
r
p
edal.
Be
f
ore moving o
ff
, i
f
the passenge
r
c
ompartment is too warm, ventilate it b
y
openin
g
the windows and air vents before
u
sin
g
the air conditionin
g
.
Above 30 mph
(
50 km/h
)
, close the windows
a
nd leave the air vents open.
Remember to make use o
f
equipment
t
h
at can
h
e
l
p
k
eep t
h
e temperature
i
n t
h
e
p
assen
g
er compartment down
(
sun roo
f
and
w
indow blinds...
)
.
S
witch o
ff
the air conditionin
g
, unless it has
a
utomatic di
g
ital re
g
ulation, as soon as the
desired temperature is attained.
Switch off the demistin
g
and defrostin
g
c
ontrols
,
if not automatic.
S
witch o
ff
the heated seat as soon as
p
oss
ibl
e.
S
witch o
ff
the headlamps and
f
ront
f
o
g
lamps
w
hen the level of li
g
ht does not require their
use
.
A
void runnin
g
the Diesel en
g
ine when
s
tationar
y
, particularl
y
in winter;
y
our vehicle
will warm up much faster while drivin
g
.
A
s a passen
g
er, if
y
ou avoid connectin
g
y
our multimedia devices
(f
ilm, music, video
g
ame...
)
,
y
ou will contribute towards limitin
g
the consumption o
f
electrical ener
gy
, and so
of
fue
l.
Disconnect
y
our portable devices be
f
ore
leavin
g
the vehicle.
Control the use of
y
our electrical equipment

Observe the recommendations
on maintenance
Check the t
y
re pressures re
g
ularl
y
, when
c
old, referrin
g
to the label in the door
aperture, driver's side.
Carr
y
out this check in particular:
- be
f
ore a lon
g
j
ourne
y
,
- at each chan
g
e o
f
season,
- a
f
ter a lon
g
period out o
f
use.
Have
y
our vehicle serviced re
g
ularl
y
(
en
g
ine
oil, oil
f
ilter, air
f
ilter...
)
and observe the
schedule o
f
operations recommended b
y
the
m
a
n
ufac
t
u
r
e
r.
When refuellin
g
, do not continue after the
3
r
d
cut-off of the nozzle to avoid an
y
overflow.
A
t the wheel o
f
y
our new vehicle, it is onl
y
after the first 1 800 miles
(
3 000 kilometres
)
that
y
ou will see the fuel consumption settle
down to a consistent avera
g
e.
At the end of winter, remove snow t
y
res and
r
e
f
it
y
our summer t
y
res.
Spread loads throu
g
hout the vehicle; place
the heaviest items in the bottom of the boot,
a
s close as possible to the rear seats.
Limit th
e
l
oads
ca
rri
ed
in th
e
v
e
hi
c
l
e
a
n
d
r
educe wind resistance
(
roo
f
bars, roo
f
rack,
bic
y
cle carrier, trailer...
)
. Use a roo
f
box in
p
re
f
erence.
R
e
m
o
v
e
r
oof
ba
r
s
a
n
d
r
oof
r
ac
k
s
af
t
e
r
use
.
Limit the causes of excess
c
onsum
p
t
i
on
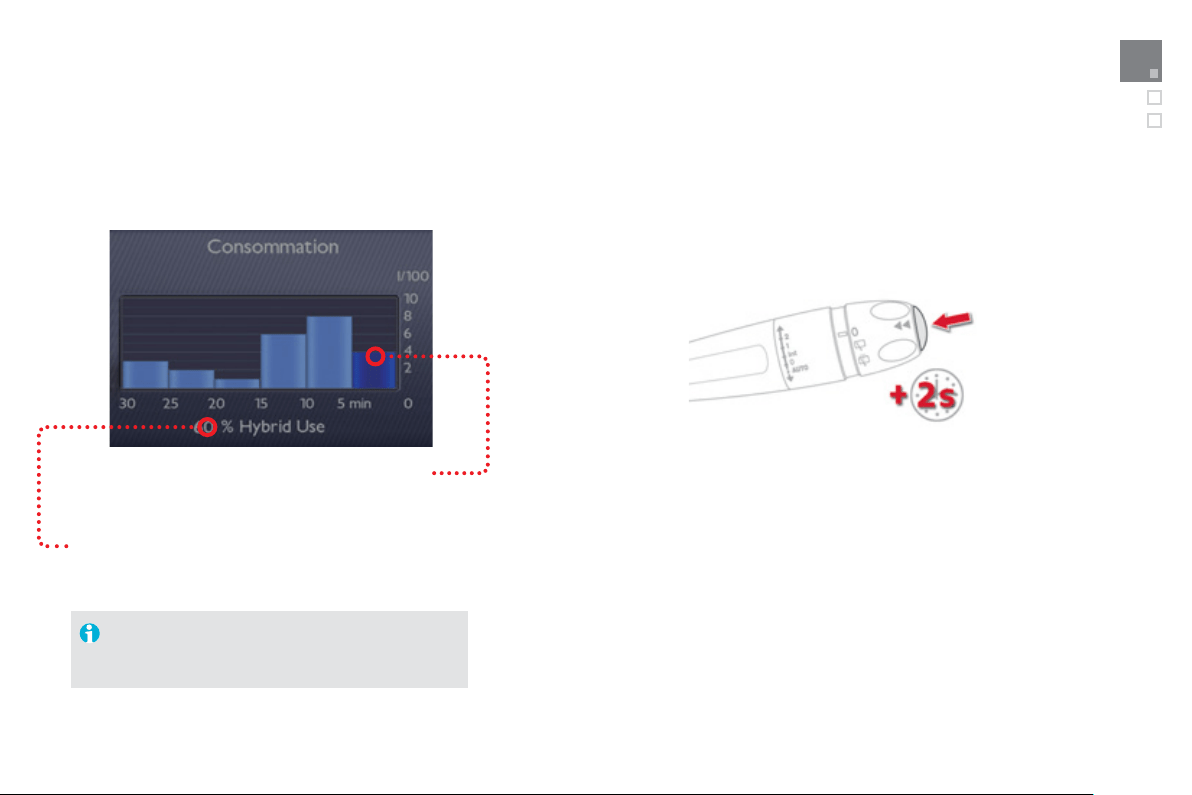
49
Hybrid system
Consumption of your hybrid in the screen
A
vera
g
e consumption over the last 5 minutes.
"60 % H
y
brid Use" corresponds to 60 % of the cumulative
runnin
g
time with the addition o
f
the h
y
brid s
y
stem and
40
%
o
f
the time with the Diesel en
g
ine onl
y
(
with no
c
ontribution
f
rom the h
y
brid s
y
stem
)
.
For more in
f
ormation on the trip computer, re
f
er to
t
h
e correspon
di
n
g
sect
i
on.
Resettin
g
the histor
y
With the h
y
brid s
y
stem active, when trip 2 displa
y
ed, press
the control for 2 seconds to reset the histor
y
to zero.
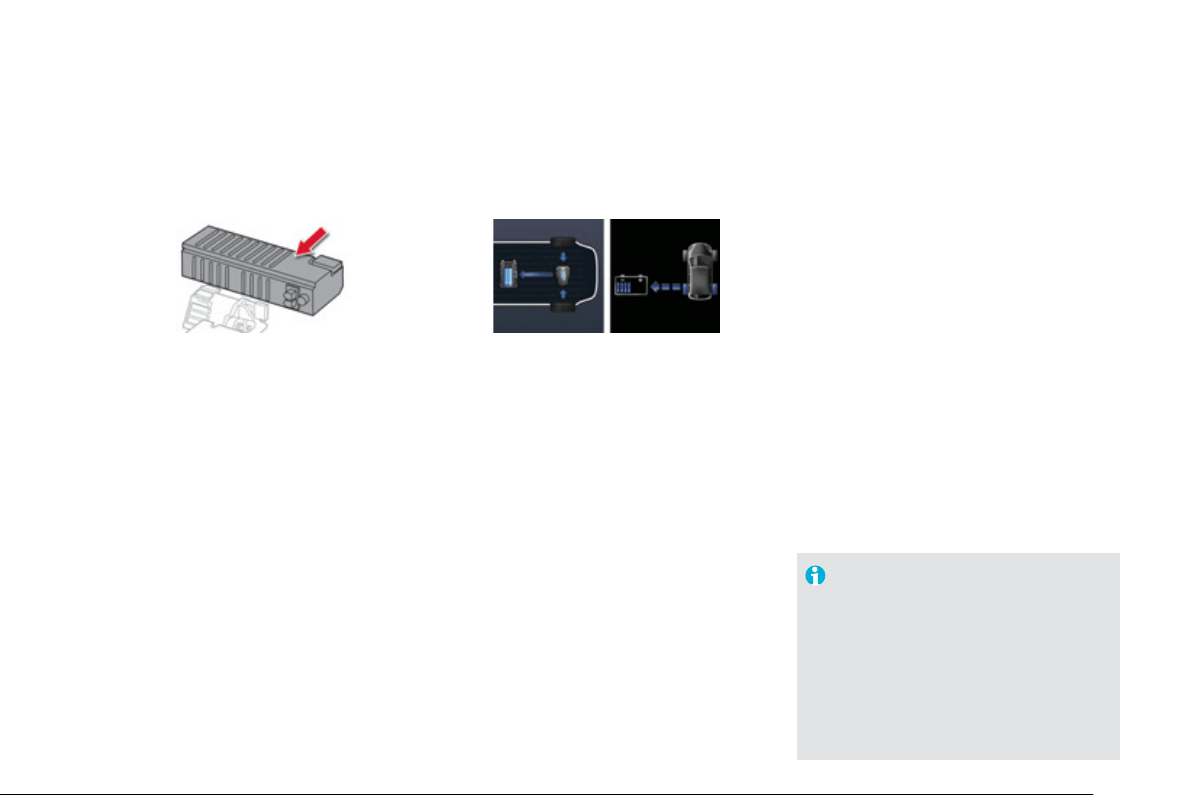
200 V high voltage battery
The
200
V hi
g
h volta
g
e batter
y
cannot be
r
echar
g
ed from a mains suppl
y
.
The batter
y
is Ni-MH
(
Nickel Metal H
y
dride
)
a
nd is located below the boot floor
,
close to the
elec
tr
ic
m
o
t
o
r.
Char
g
in
g
The batter
y
is char
g
ed when the vehicle
decelerates, the electric motor then becomes
a
g
enerator and converts kinetic ener
gy
into
e
lectrical ener
gy
(
except if the speed of the
vehicle is above 70 mph
(
120 km
/
h
))
.
The batter
y
is not rechar
g
ed
f
rom a mains
supp
ly
.
The battery may also be charged automatically
when required b
y
the
S
top
&
S
tart s
y
stem o
f
the Diesel en
g
ine.
This recover
y
allows the use of "free" ener
gy
.
The batter
y
char
g
in
g
time is ver
y
short and is
co
nt
i
n
uous
.
A
dischar
g
ed batter
y
(
followin
g
ZEV runnin
g
or
h
i
g
h load,
f
or example
)
will quickl
y
return to a
s
tate of char
g
e sufficient for full operation of the
di
ff
erent h
y
brid modes.
Th
e
c
har
g
in
g
takes place automaticall
y
when drivin
g
.
The ener
gy
recover
y
can be faster durin
g
dece
l
e
r
a
ti
o
n.
The avera
g
e state o
f
char
g
e is 4 to 5 bars, so
p
reservin
g
a mar
g
in for ener
gy
recover
y
when
deceleration o
f
g
oin
g
downhill
(f
ree ener
gy)
.
To preserve the service life of the
batter
y
, the level o
f
char
g
e never
f
alls
below 20 %, even if a level of 0 bars is
displa
y
ed a
f
ter ZEV runnin
g
.
Where the batter
y
is close to maximum,
vehicle deceleration with your
f
oot o
ff
the accelerator pedal will be at a lowe
r
le
v
e
l.
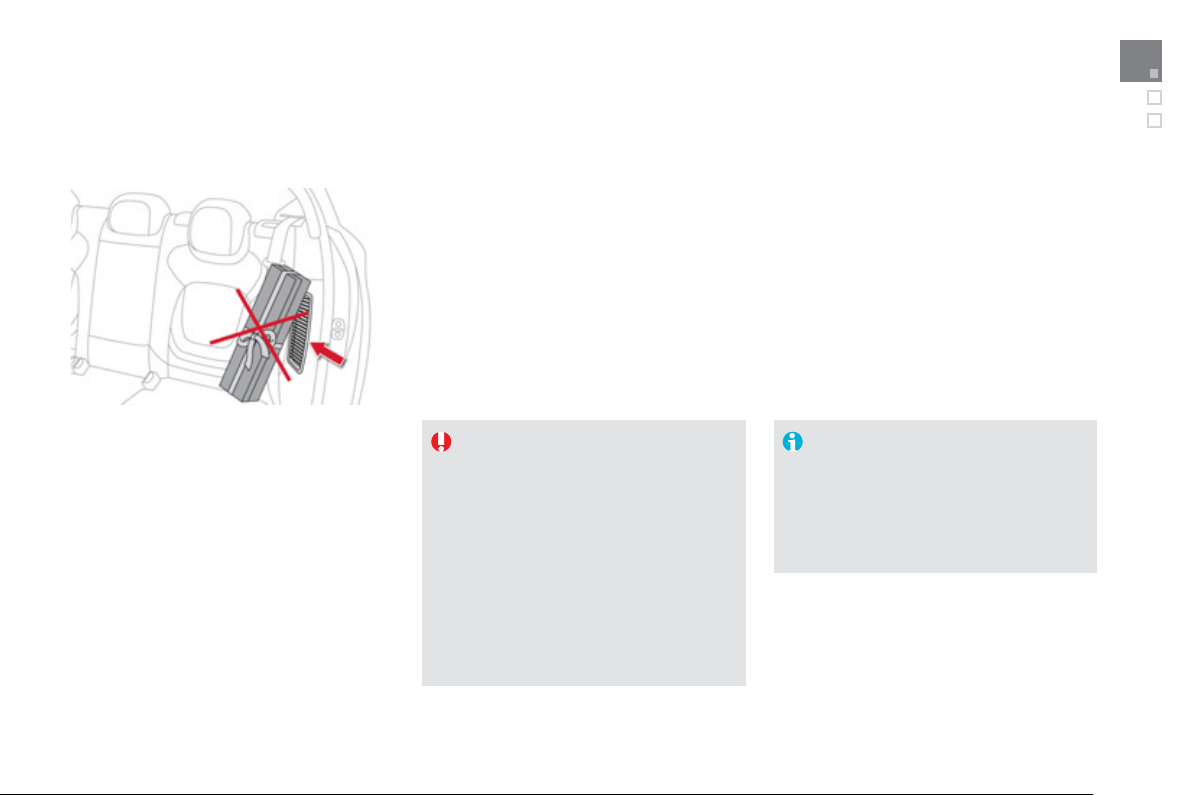
5
1
Hybrid system
This s
y
stem does not work continuousl
y
,
but adapts the force of the fan coolin
g
to the
requirements of the batter
y
.
Its operation can be heard at the rear, even i
f
the vehicle is stopped a
f
ter a run.
I
f
the air intake is blocked, the batter
y
ma
y
over
h
eat,
d
ama
gi
n
g
t
h
e
b
atter
y
an
d
caus
i
n
g
a
loss o
f
per
f
ormance o
f
the hybrid system.
Fan cooling of the high voltage battery
For the best use o
f
the hi
g
h volta
g
e
batter
y
, please follow these
r
eco
mm
e
n
da
ti
o
n
s
:
-
do
n
o
t
obs
tr
uc
t th
e
a
ir int
a
k
e
with
loose articles
,
otherwise
,
the
b
atter
y
ma
y
over
h
eat, caus
i
n
g
a
loss o
f
per
f
ormance o
f
the h
y
brid
sy
stem
- do not spill
f
luids, as this may cause
dama
g
e to the batter
y
.
The hi
g
h volta
g
e batter
y
has an ai
r
c
oolin
g
s
y
stem, comprisin
g
an air intake
(
located on the side of the left hand rear
s
eat
)
and a fan
(
located behind the left
h
and boot trim panel
)
.
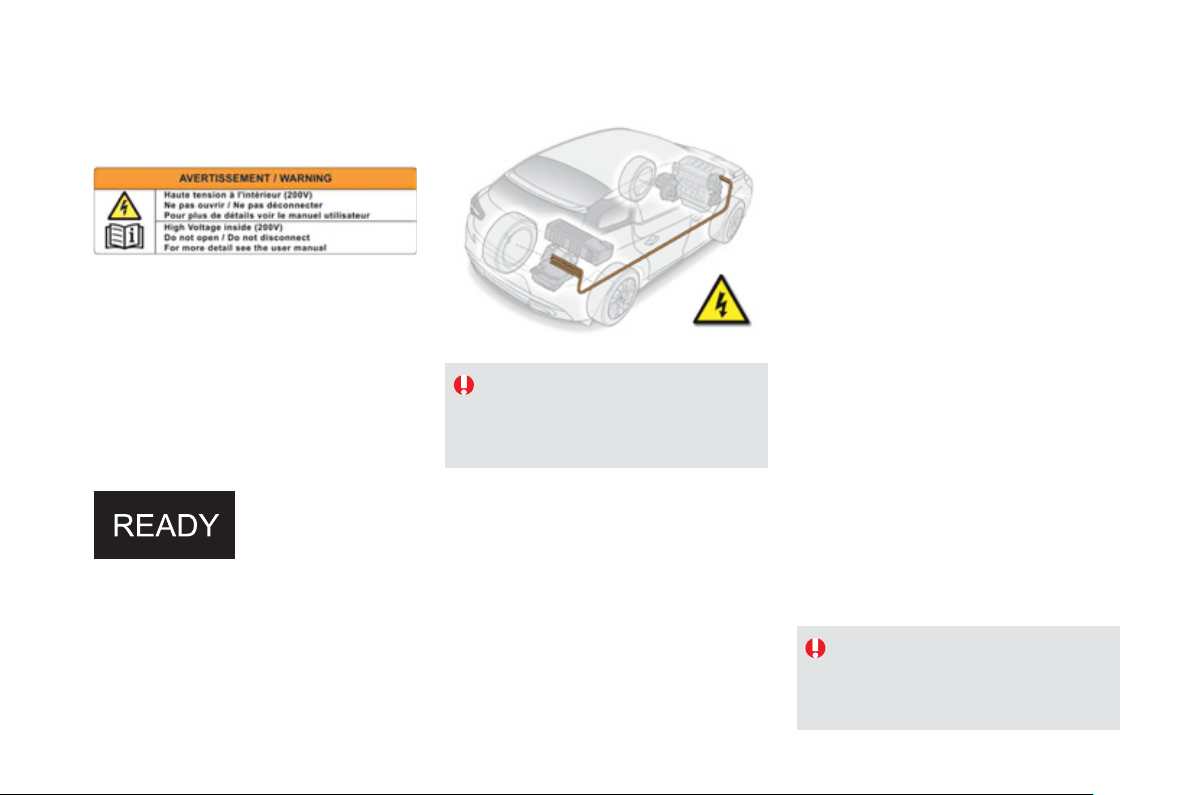
The hi
g
h volta
g
e batter
y
must not in an
y
c
ircumstances be char
g
ed from an external
s
ource and must onl
y
be handled b
y
a
workshop technician.
There is the risk o
f
serious burns, as well as
el
ectr
i
c arcs t
h
at cou
ld
cause ser
i
ous
i
n
j
ur
y
or
e
v
e
n
dea
t
h
.
A
used Ni-MH
(
Nickel Metal Hydride
)
type
h
i
g
h volta
g
e batter
y
must be removed in an
appropriate manner b
y
a repair workshop,
s
o that its rec
y
clin
g
presents no risk to the
e
nvir
o
nm
e
nt.
Hi
g
h volta
g
e
The volta
g
e used
f
or the operation o
f
the
e
lectric motor is in the range 150 to 270 Volts.
Be sure to take account o
f
the warnin
g
labels
fitt
ed
t
o
th
e
v
e
hi
c
l
e
.
Take
g
reat care re
g
ardin
g
the hi
g
h volta
g
e and
h
i
g
h temperatures of components carr
y
in
g
the
cu
rr
e
nt.
Emer
g
enc
y
cut-off
In the event of an accident, a cut-off s
y
stem
b
locks the hi
g
h volta
g
e current and cuts of
f
the fuel pump;
y
our vehicle can no lon
g
er be
s
t
a
rt
ed
.
T
o restart t
h
e
hyb
r
id
s
y
stem, contact a
C
ITR
OË
N
dea
l
e
r.
High
vo
l
ta
g
e ca
bl
es are route
d
un
d
er t
h
e
vehicle
(
sills
)
; take care not to damage them
when the vehicle is used
f
or o
ff
-road activit
y
(
such as coverin
g
rou
g
h
g
round
)
.
Be
f
ore doin
g
an
y
work
o
n t
h
e ve
hi
c
l
e, sw
i
tc
h
off
the ignition
(
Read
y
lamp o
ff)
.
Batter
y
precautions
Hi
g
h volta
g
e cables
Take care to position li
f
tin
g
equipment
(j
ack, hoist, ...
)
at the locations provided
to avo
id
d
ama
gi
n
g
t
h
e ca
bl
es.
Never touch
,
dismantle
,
remove o
r
rep
l
ace t
h
e
high
vo
l
ta
g
e parts, oran
g
e
c
a
bl
es or connectors, even
i
n t
h
e event
of
a
n
acc
i
de
nt.
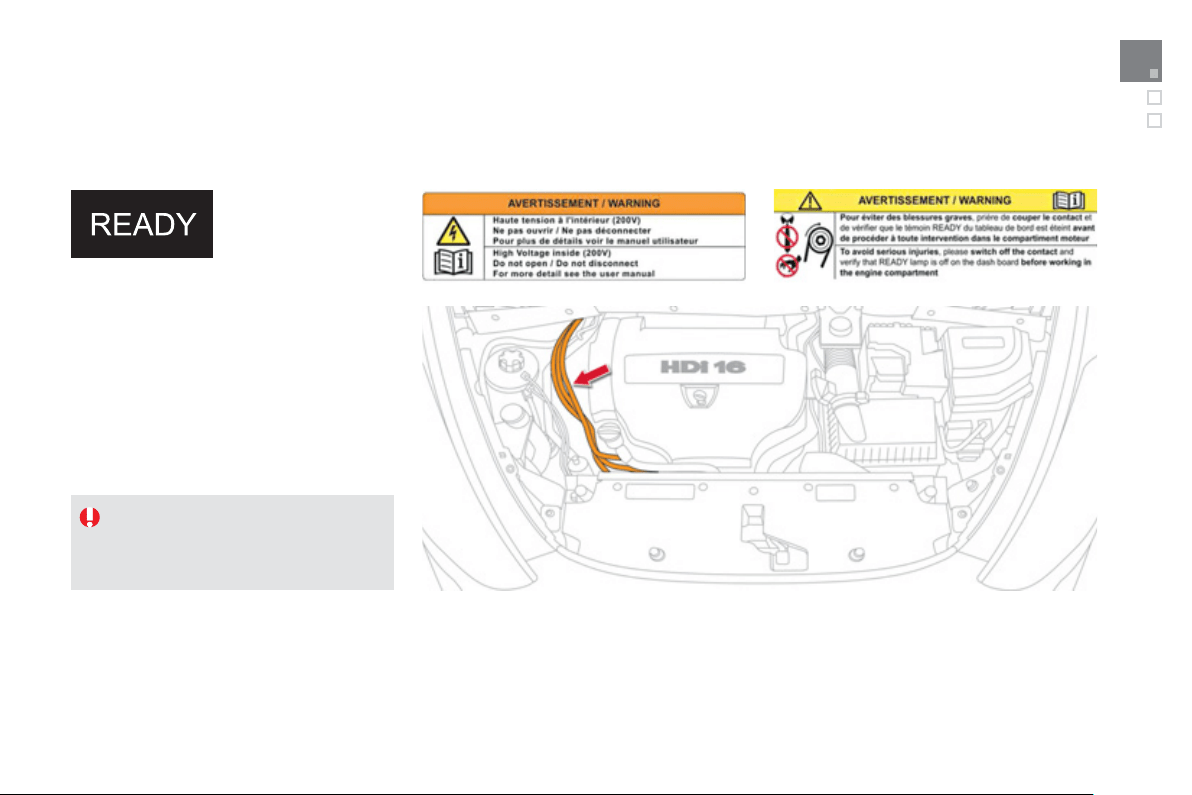
5
3
Hybrid system
Underbonnet precautions / warnings
The alternator-starter motor o
f
y
our h
y
brid
vehicle is also supplied at high voltage. I
f
the
vehicle i
g
nition has not been switched o
ff
, there
is a risk of the en
g
ine restartin
g
at an
y
time.
Alwa
y
s ensure that the
i
g
nition is switched of
f
(
Read
y
lamp off
)
before
open
i
n
g
t
h
e
b
onnet.
Al
so ensure t
h
at t
h
e
ig
n
i
t
i
on
i
s sw
i
tc
h
e
d
o
ff
when re
f
uellin
g
to avoid the en
g
ine
r
estart
i
n
g
.
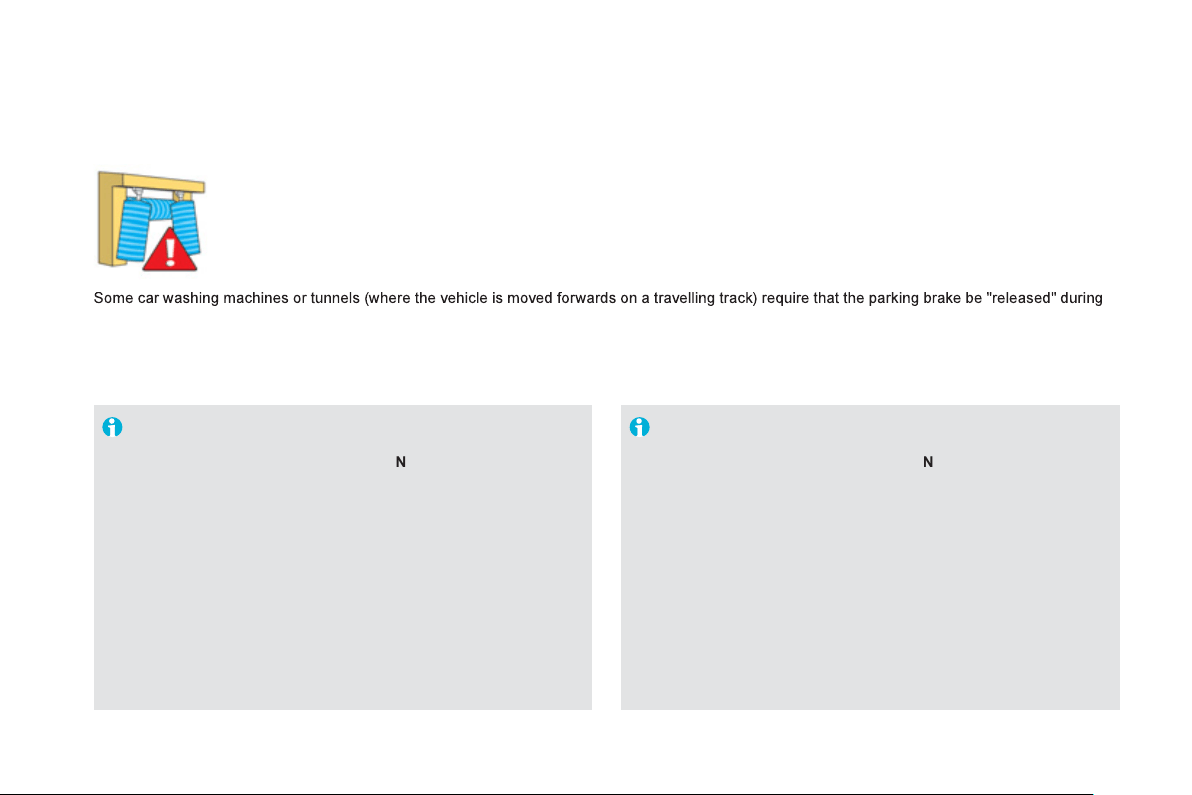
Car washing machine or tunnel
t
he
w
ash
.
Wi
t
h
t
h
e
hyb
r
id
s
y
stem act
i
ve,
R
ea
dy
l
amp on, par
ki
n
g
b
ra
k
e
released
:
-
Pl
ace t
h
e
g
ear se
l
ector
i
n pos
i
t
i
on
N
.
-
S
witch o
ff
the engine
(
press on
S
TART
/S
T
O
P
)
. The parking
b
rake is applied automaticall
y
and the Read
y
lamp
g
oes o
ff
in
the instrument panel.
- Switch on the i
g
nition a
g
ain
(
press on START/ST
O
P
)
without
y
our foot on the brake pedal. The
R
ead
y
lamp remains off.
- Release the parkin
g
brake usin
g
the manual control on the
c
entre console, while keepin
g
y
our
f
oot on the brake pedal.
-
S
witch o
ff
the i
g
nition
(
press on
S
TART
/S
T
O
P without
y
our
f
oot on the brake pedal
)
checkin
g
that the parkin
g
brake
re
m
a
in
s
r
e
l
eased
.
I
f
the Diesel en
g
ine is not runnin
g
, it restarts.
I
f
the Diesel en
g
ine is runnin
g
, it remains runnin
g
without time
li
m
it
.
Wi
t
h
t
h
e
hyb
r
id
s
y
stem act
i
ve,
R
ea
dy
l
amp on, par
ki
n
g
b
ra
k
e
r
eleased
:
-
Pl
ace t
h
e
g
ear se
l
ector
i
n pos
i
t
i
on
N
(
Auto or
S
port mode
)
.
- Press the brake
p
edal then the E
CO
O
FF button.
Car washin
g
machines or tunnels in which the
D
iesel en
g
ine must be switched off.
Car washin
g
machines or tunnels in which the
D
iesel en
g
ine must not be switched off.
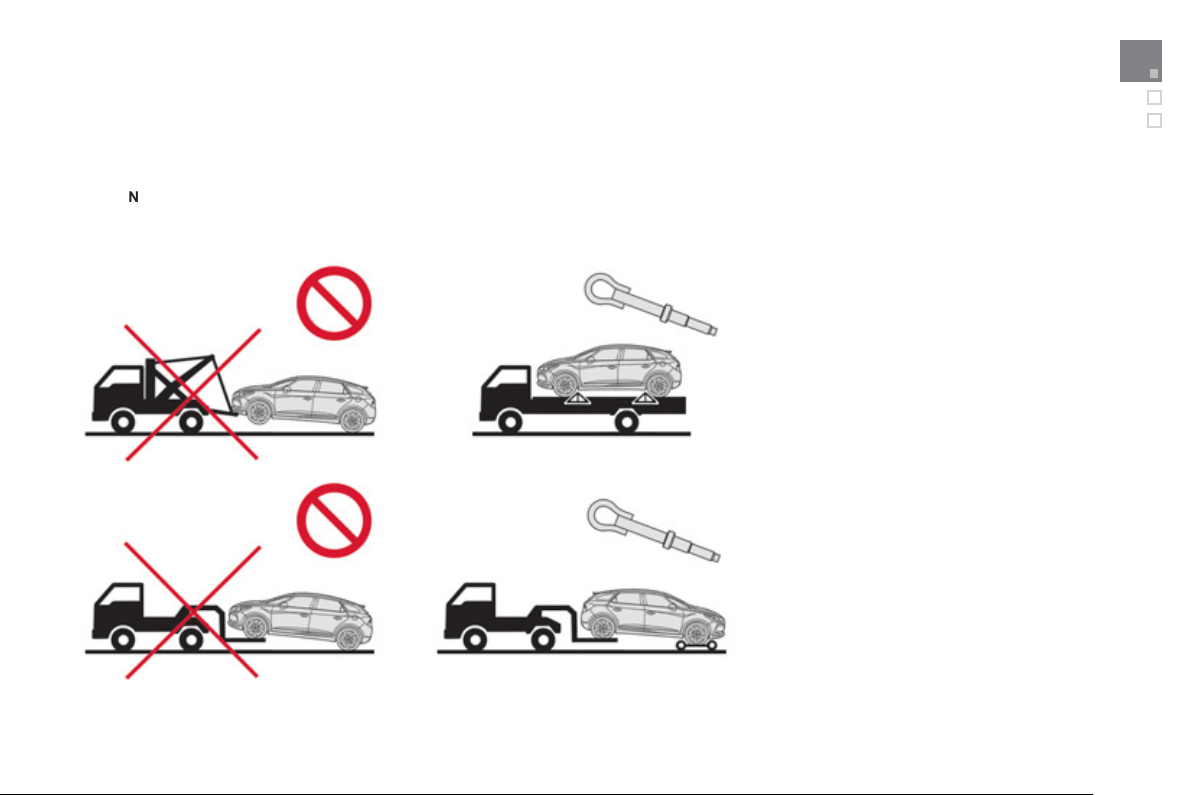
55
Hybrid system
Vehicle recovery
Be
f
ore doin
g
an
y
work, with the i
g
nition on, press the brake pedal and put the
g
ear selector to
p
os
i
t
i
on
N
, then switch o
ff
the h
y
brid s
y
stem.
I
f
necessar
y
because access to the vehicle is di
ff
icult, it can be moved a
f
ew dozen metres at a
s
peed not exceeding 6 mph
(
10 km
/
h
)
.
U
se t
h
e tow
i
n
g
e
y
es on
ly
to pu
ll
a ve
hi
c
l
e out or
to pull it onto a
f
lat-bed.
Th
e
f
r
o
nt
o
r r
ea
r wh
ee
l
s
m
us
t n
o
t
be
o
n th
e
g
round, use a
f
lat-bed lorr
y
or trailer to recove
r
t
he
v
ehicle
.

001
Instruments and controls
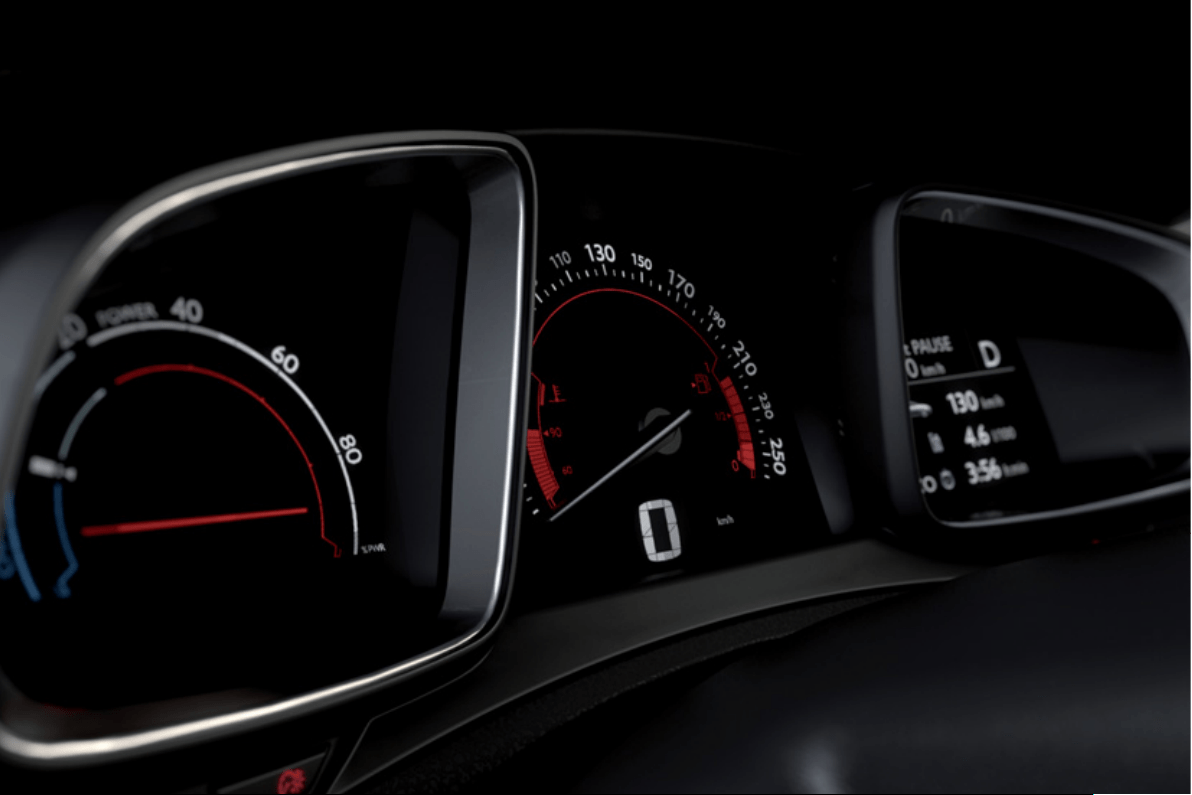
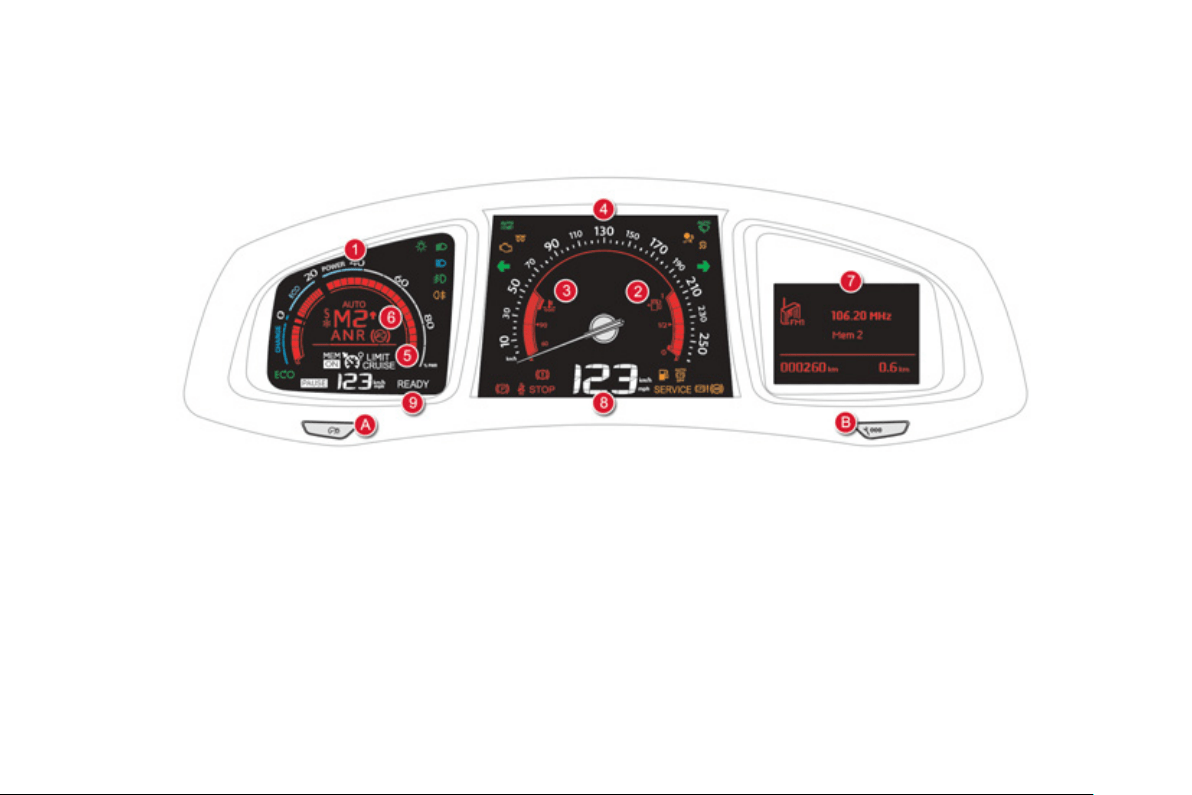
Instrument panel
1.
Energy consumption
/
generation indicator
(
available power as a percenta
g
e
)
.
For more information refer to the "H
y
brid
s
y
stem" section.
2.
Fuel
g
au
g
e.
3.
En
g
ine coolant temperature
g
au
g
e.
4.
S
peedometer
(
mph or km
/
h
)
.
5.
C
ruise control or speed limiter
sett
i
n
g
s.
A
.
Main lighting and controls dimmer.
B
.
-
S
uccessive short
p
resses: under-in
f
lation
detection, recall servicin
g
information, alert
lo
g
.
- Lon
g
press: reset the function selected to
zero
(
service indicator or trip recorder
)
.
6
.
G
ear engaged.
7
.
Instrument
p
anel screen: electrical
f
low,
trip recorder, alert messa
g
es or state o
f
f
unctions
(
e.
g
.: oil pressure, batter
y
, door
o
pen, ...
)
, trip computer, media, satellite
navi
g
ation.
8.
Di
g
ital speedometer
(
mph or km
/
h
)
.
9.
R
ea
dy
l
amp:
i
n
di
cates t
h
at t
h
e ve
hi
c
l
e
i
s
rea
dy
to
d
r
i
ve.
Di
a
l
s an
d
screens Control buttons
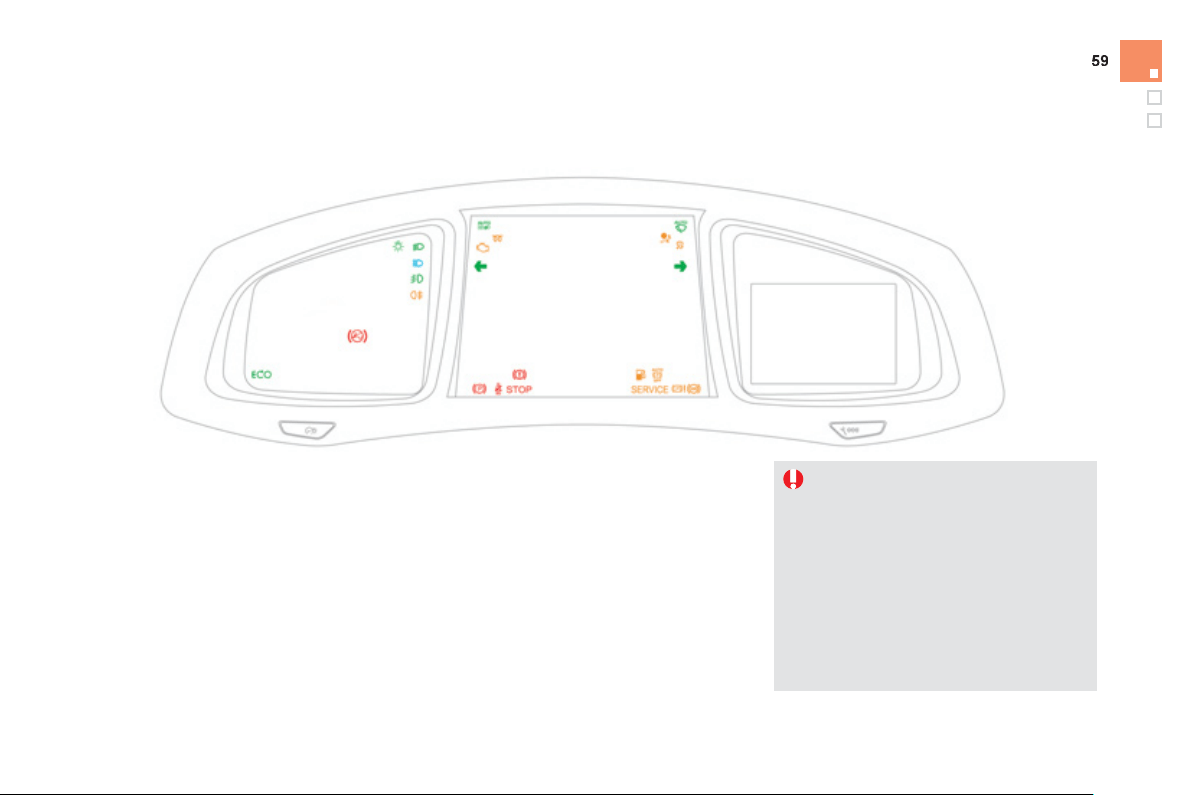
Monitoring
Indicator and warnin
g
lamps
Wh
en t
h
e en
gi
ne
i
s starte
d
, t
h
ese same
w
arnin
g
lamps should
g
o o
ff
.
I
f
the
y
remain on, be
f
ore movin
g
o
ff
, re
f
er to the
i
n
f
ormation on the warning lamp concerned.
A
ssoc
i
ate
d
warn
i
n
g
s
The switchin
g
on o
f
certain warnin
g
lamps ma
y
be accompanied by an audible signal and a
messa
g
e in the instrument panel screen.
The warnin
g
lamps ma
y
come on continuousl
y
(
fixed
)
or flash.
C
ertain warnin
g
lamps ma
y
come on in
one of two modes: fixed
(
continuous
)
or
flashin
g
.
O
nl
y
b
y
relatin
g
the t
y
pe of illumination
to the operation of the vehicle can it
be
de
t
e
rm
i
n
ed
w
he
t
he
r t
he
si
t
ua
t
io
n
is
n
o
rm
a
l
o
r
a
fau
lt h
as
occu
rr
ed
.
Re
f
er to the tables on the
f
ollowin
g
pages
f
or more in
f
ormation.
Visual indicators in
f
ormin
g
the driver that a
sy
stem is in operation, switched o
ff
or has a
fau
lt.
Wh
en t
h
e
ig
n
i
t
i
on
i
s sw
i
tc
h
e
d
on
C
ertain warnin
g
lamps come on
f
or a
f
ew
s
econds in the instrument
p
anel and
/
o
r
instrument
p
anel screen when the vehicle's
i
g
nition is switched on.

Warning
/
indicator lam
p
S
tat
e
Caus
e
A
ction / Observations
L
eft-hand
di
rect
i
on
i
n
di
cat
o
r
f
lashin
g
with buzzer.
Th
e
ligh
t
i
n
g
sta
lk
i
s pus
h
e
d
d
own.
R
i
g
ht-hand
direction indicator
flashin
g
with buzzer. The li
g
htin
g
stalk is pushed up.
Sidelam
ps
fix
ed
.The li
g
htin
g
stalk is in the
"
S
idelamps" position.
D
i
pp
ed beam
headlam
p
s
fix
ed
.The li
g
htin
g
stalk is in the "Dipped
beam headlamps" position.
M
ain beam
headlam
p
s
f
ix
ed
. The lighting stalk is pulled towards
yo
u.
Pull the stalk to return to di
pp
ed beam headlam
p
s.
Front
f
o
g
lamps
f
ix
ed
.The
f
ront
f
o
g
lamps are switched on. Turn the rin
g
on the stalk rearwards twice to switch o
ff
the front fo
g
lamps.
For more in
f
ormation on the li
g
htin
g
controls, re
f
er to the correspondin
g
section.
A
utomat
i
c
h
ea
dl
amp
di
pp
i
n
g
f
ix
ed
.
Th
e
ligh
t
i
n
g
sta
lk
h
as
b
een pu
ll
e
d
towards
y
ou and the button
(
located
to the le
f
t o
f
the steerin
g
wheel
)
has
been
p
ressed.
Its indicator lamp is on.
Th
e camera,
l
ocate
d
i
n t
h
e
i
nter
i
or rear v
i
ew m
i
rror,
aut
h
or
i
ses or not sw
i
tc
hi
n
g
b
etween ma
i
n an
d
di
ppe
d
b
eam,
d
epen
di
n
g
on t
h
e am
bi
ent
ligh
t
l
eve
l
an
d
t
h
e
driving conditions.
Pullin
g
the li
g
htin
g
stalk to return to dipped beam.
R
ead
y
fix
ed
. The vehicle is read
y
to move off;
y
ou
c
an press the accelerator.
It comes on once hi
g
h volta
g
e is established in the
v
e
hi
c
l
e
.
Operation indicator lamps
If one of the followin
g
indicator lamps comes on in the instrument panel and/or instrument panel screen, this confirms that the correspondin
g
s
y
stem has come into operation.

6
1
Monitoring
Rear fo
g
lamps fix
ed
. The rear fo
g
lamps are switched on. Turn the rin
g
on the stalk rearwards to switch off the
rear fo
g
lamps.
Warnin
g
/ indicator lamp Stat
e
Caus
e
Action / Observations
Di
ese
l
en
gi
ne
p
re-heating
f
ix
ed
.
The
S
TART/
S
TO
P
s
w
i
t
ch
has
bee
n
p
ressed
(
ignition on
)
.
Wait until the warnin
g
lamp
g
oes o
ff
be
f
ore startin
g
.
The period o
f
illumination o
f
the warning lamp is
determined b
y
the ambient conditions
(
up to about
thirt
y
seconds in extreme conditions
)
.
If the en
g
ine does not start, switch the i
g
nition off and
then on, wait until the warnin
g
lamp
g
oes off a
g
ain,
then start the en
g
ine.
El
ectr
i
c par
ki
n
g
b
ra
ke
f
ix
ed
.
Th
e e
l
ectr
i
c par
ki
n
g
b
ra
k
e
i
s app
li
e
d
. Release the electric parkin
g
brake to switch o
ff
the
warnin
g
lamp: with
y
our
f
oot on the brake pedal, pull
the electric parking brake control lever.
O
bserve the sa
f
et
y
recommendations.
For more information on the electric parkin
g
brake,
refer to the correspondin
g
section.
D
eactivation of
th
e automat
i
c
f
unctions of the
e
lectric parkin
g
b
rak
e
f
ix
ed
. The "automatic application"
(
on
s
witchin
g
o
ff
the en
g
ine
)
and
"
au
t
o
m
a
ti
c
r
e
l
ease
"
fu
n
c
ti
o
n
s
a
r
e
deactivated or
f
ault
y
.
A
ctivate the
f
unction
(
accordin
g
to countr
y)
via the
vehicle confi
g
uration menu or contact a CITRO
Ë
N
dealer or a
q
uali
f
ied worksho
p
i
f
automatic
a
pp
lication
/
release is not
p
ossible.
The parkin
g
brake can be released manuall
y
usin
g
the
e
mer
g
enc
y
release procedure.
For more information on the electric parkin
g
brake,
refer to the correspondin
g
section.

Warnin
g
/ indicator lam
p
Stat
e
Caus
e
A
ction / Observations
A
utomatic
wipin
g
f
ix
ed
.The wi
p
er control is
p
ushed
do
wnw
a
r
ds
.
A
utomatic
f
ront wiping is activated.
To deactivate automatic wipin
g
, operate the control
s
talk downwards or put the stalk into another position.
P
assen
g
er's
a
irba
g
s
y
stem
fix
ed
in th
e
sea
t
be
lt
a
nd passen
g
er's front
a
irba
g
warnin
g
lamps
displa
y
.
The control switch, located in the
g
love
box, has been placed in the "ON"
position.
The passen
g
er's front airba
g
is activated.
In this case, do not install a "rear
f
acin
g
"
child
sea
t.
M
o
v
e
th
e
co
ntr
o
l
s
wit
c
h t
o
th
e
"OFF" position to
deactivate the passen
g
er's front airba
g
.
In this case,
y
ou can install a "rear facin
g
" child seat.
Foot on the
b
rake
p
edal
fix
ed
. The brake pedal is not pressed. Press the brake pedal to start the h
y
brid s
y
stem
(g
ear
s
elector in position
N
)
.
I
f
y
ou wish to release the parkin
g
brake without
p
ress
i
n
g
t
h
e
b
ra
k
e pe
d
a
l
, t
hi
s warn
i
n
g
l
amp w
ill
r
e
m
ai
n
o
n.
f
lashin
g
.I
f
y
ou hold the vehicle on a risin
g
incline usin
g
the accelerator
f
or too
l
on
g
, t
h
e c
l
utc
h
over
h
eats.
Use the brake pedal and
/
or the electric parkin
g
brake.

6
3
Monitoring
D
eact
i
vat
i
on
i
n
di
cator
l
am
p
s
If one of the followin
g
indicator lamps comes on, this confirms that the correspondin
g
s
y
stem has been switched off intentionall
y
.
Thi
s
i
s ma
y
b
e accompan
i
e
d
by
an au
dibl
e s
ig
na
l
an
d
a messa
g
e
i
n t
h
e
i
nstrument pane
l
screen.
Warnin
g
/
indicator lamp Stat
e
Caus
e
Action / Observations
P
assen
g
er
'
s
a
irbag system
f
ix
ed
in th
e
in
s
tr
u
m
e
nt
p
anel and
/
or seat belt
and
f
ront passen
g
er's
airba
g
warnin
g
lamps
displa
y
.
Th
e contro
l
sw
i
tc
h
,
l
ocate
d
i
n t
h
e
glove box, is set to the OFF
p
osition.
The passen
g
er's
f
ront airba
g
is
deac
tiv
a
t
ed
.
Se
t th
e
co
ntr
o
l t
o
th
e
"
ON"
p
os
i
t
i
on to act
i
vate t
h
e
p
assenger's
f
ront airbag.
In this case, do not
f
it a child seat in the rear-
f
acin
g
p
osition.
Dy
namic
sta
bili
t
y
contro
l
(
DSC/ASR
)
fix
ed
. The button
,
located at the bottom
le
f
t o
f
the dashboard, is pressed. Its
i
n
di
cator
l
amp
i
s on.
Th
e
D
SC/
A
S
R i
s
deac
tiv
a
t
ed
.
D
SC
: dynamic stability control.
AS
R: anti-slip re
g
ulation.
Press the button to activate the D
SC/
A
S
R. Its indicator
lamp
g
oes o
ff
.
The D
SC/
A
S
R s
y
stem is activated automaticall
y
when
t
he
v
ehicle
is
s
t
a
rt
ed
.
I
f
deactivated, the system is reactivated automatically
f
rom around 30 mph
(
50 km
/
h
)
.

With the h
y
brid s
y
stem active or when the vehicle is bein
g
driven, illumination of one of the followin
g
warnin
g
lamps indicates a fault which requires
a
ction on the part o
f
the driver.
A
n
y
f
ault resultin
g
in the illumination o
f
a warnin
g
lamp must be investi
g
ated
f
urther b
y
readin
g
the associated messa
g
e in the instrument panel screen.
If
y
ou encounter an
y
problems, contact a CITRO
Ë
N dealer or a qualified workshop.
Warnin
g
/ indicator lam
p
Stat
e
Caus
e
A
ction / Observations
STO
P
fixed, associated with
a
nother warnin
g
lamp,
a
ccompanied b
y
an
a
u
dibl
e s
ig
na
l
an
d
a
m
essa
g
e
i
n t
h
e screen.
It is associated with a punctured wheel,
the brakin
g
s
y
stem, the power steerin
g
,
the en
g
ine oil pressure, the en
g
ine
c
oo
l
ant temperature, t
h
e
hyb
r
id
s
y
stem
or a ma
j
or electrical
f
ault.
Stop as soon as it is safe to do so as the en
g
ine ma
y
cut
out
.
Park, switch off the i
g
nition and call a CITROËN
dealer or a quali
f
ied workshop.
S
ervic
e
on temporaril
y
. A min
o
r
fau
lt h
as
occu
rr
ed
fo
r whi
c
h
there is no specific warnin
g
lamp.
Identi
fy
the
f
ault b
y
readin
g
the messa
g
e shown in the
s
creen, such as, for example:
- the closin
g
o
f
the doors, boot or bonnet,
- the en
g
ine oil level,
- the screenwash level
,
- t
h
e remote contro
l
b
atter
y
,
- the t
y
re pressures,
- saturation of the particle emission filter
(
Diesel
)
.
- ...
For an
y
other faults, contact a CITROËN dealer or a
qualified workshop.
f
ix
ed
. A ma
j
or
f
ault has occurred
f
or which
there is no speci
f
ic warning lamp.
Identify the fault by reading the message shown
on the screen and contact a CITROËN dealer or a
yyg g
quali
f
ied workshop.
P
EF:
p
article
e
missions filter
,
Di
ese
l
fixed
,
associated
temporaril
y
with a
m
essa
g
e on the risk o
f
blocka
g
e o
f
the PEF.
Thi
s
in
d
i
ca
t
es
th
e
s
t
a
rt
o
f
sa
t
u
r
a
ti
o
n
of the particle emissions filter.
A
s soon as traffic conditions allow, re
g
enerate the
filter b
y
drivin
g
at a speed of at least 35 mph
(
60 km/h
)
until the service warnin
g
lamp
g
oes off.
f
ix
ed
.
This
i
n
dica
t
es
t
he
lo
w
le
v
el
i
n t
he
Diesel
addi
t
i
v
e
r
ese
rv
oi
r.
Have the level topped up b
y
a CITRO
Ë
N dealer or a
quali
f
ied workshop as soon as possible.

65
Monitoring
Warnin
g
/
indicator lamp
S
tat
e
Caus
e
Action / Observations
El
ectr
i
c par
ki
n
g
b
ra
ke
f
lashin
g
.
Th
e e
l
ectr
i
c par
ki
n
g
b
ra
k
e
i
s not
app
li
e
d
automat
i
ca
lly
.
The application
/
release is
f
aulty.
You must stop as soon as it is sa
f
e to do so.
Park on
f
lat level
g
round, switch o
ff
the i
g
nition and
c
ontact a CITROËN dealer or a
q
ualified worksho
p
.
E
lectric parking
b
rake faul
t
f
ix
ed
. The electric parking brake has a
f
ault. Contact a CITROËN dealer or a
q
ualified worksho
p
without dela
y
.
The parkin
g
brake can be released manuall
y
usin
g
the
e
mer
g
enc
y
release procedure.
For more information on the electric parkin
g
brake,
refer to the correspondin
g
section.
D
eactivation of
th
e automat
i
c
f
unctions of the
el
ectr
i
c par
ki
n
g
b
rak
e
fix
ed
. The "automatic application"
(
on
s
witchin
g
o
ff
the en
g
ine
)
and
"
au
t
o
m
a
ti
c
r
e
l
ease
"
fu
n
c
ti
o
n
s
a
r
e
deactivated or
f
ault
y
.
A
ctivate the function
(
accordin
g
to countr
y)
via the
vehicle confi
g
uration menu or contact a CITRO
Ë
N
dealer or a quali
f
ied workshop i
f
automatic
a
pp
lication
/
release is not
p
ossible.
The parking brake can be released manually using the
e
mer
g
enc
y
release procedure.
For more information on the electric parkin
g
brake,
refer to the correspondin
g
section.

Warnin
g
/ indicator lam
p
Stat
e
Caus
e
A
ction / Observations
Dy
nam
i
c
sta
bili
t
y
contro
l
(
DSC/ASR
)
f
lashin
g
.The D
SC/
A
S
R re
g
ulation is
operat
i
n
g
.
Th
e s
y
stem opt
i
m
i
ses tract
i
on an
d
i
mproves t
h
e
directional stabilit
y
o
f
the vehicle.
fix
ed
. Unless it has been deactivated
(
button pressed and its indicator lamp
on
)
the DSC/ASR s
y
stem has a fault.
Have it checked b
y
a CITROËN or a qualified
workshop.
E
n
gi
ne
a
uto
di
a
g
nos
i
s
s
y
ste
m
f
lashin
g
.
Th
e en
gi
ne mana
g
ement s
y
stem
h
as
a
fau
lt.
R
isk o
f
destruction o
f
the catal
y
tic converter.
Have it checked b
y
a CITRO
Ë
N dealer or a qualified workshop.
fix
ed
. The emission control s
y
stem has a
fau
lt.
The warnin
g
lamp should
g
o off when the en
g
ine is started.
If it does not
g
o off, contact a CITRO
Ë
N dealer or qualified
wor
k
s
h
op w
i
t
h
out
d
e
l
a
y
.
A
nti-lock
B
rakin
g
S
y
stem
(
ABS
)
fix
ed
. The anti-lock brakin
g
s
y
stem has a
f
au
lt.
The vehicle retains conventional brakin
g
.
Drive carefull
y
at reduced speed and contact a
C
ITROËN dealer or a qualified workshop without
d
e
l
a
y
.
B
raking
f
ix
ed
. The braking system
f
luid level has
dropped si
g
ni
f
icantl
y
.
You must sto
p
as soon as it is sa
f
e to do so.
Top up with brake fluid listed b
y
CITROËN.
If the problem persists, have the s
y
stem checked b
y
a
C
ITROËN dealer or a qualified workshop.
+ fixed, associated
with the ABS warnin
g
lamp.
Th
e
e
l
ec
tr
o
ni
c
b
r
a
k
e
f
o
r
ce
d
i
s
tri
bu
ti
o
n
(
EBFD
)
s
y
stem has a fault.
You must stop as soon as it is safe to do so.
Have it checked b
y
a CITROËN dealer or a qualified
workshop.
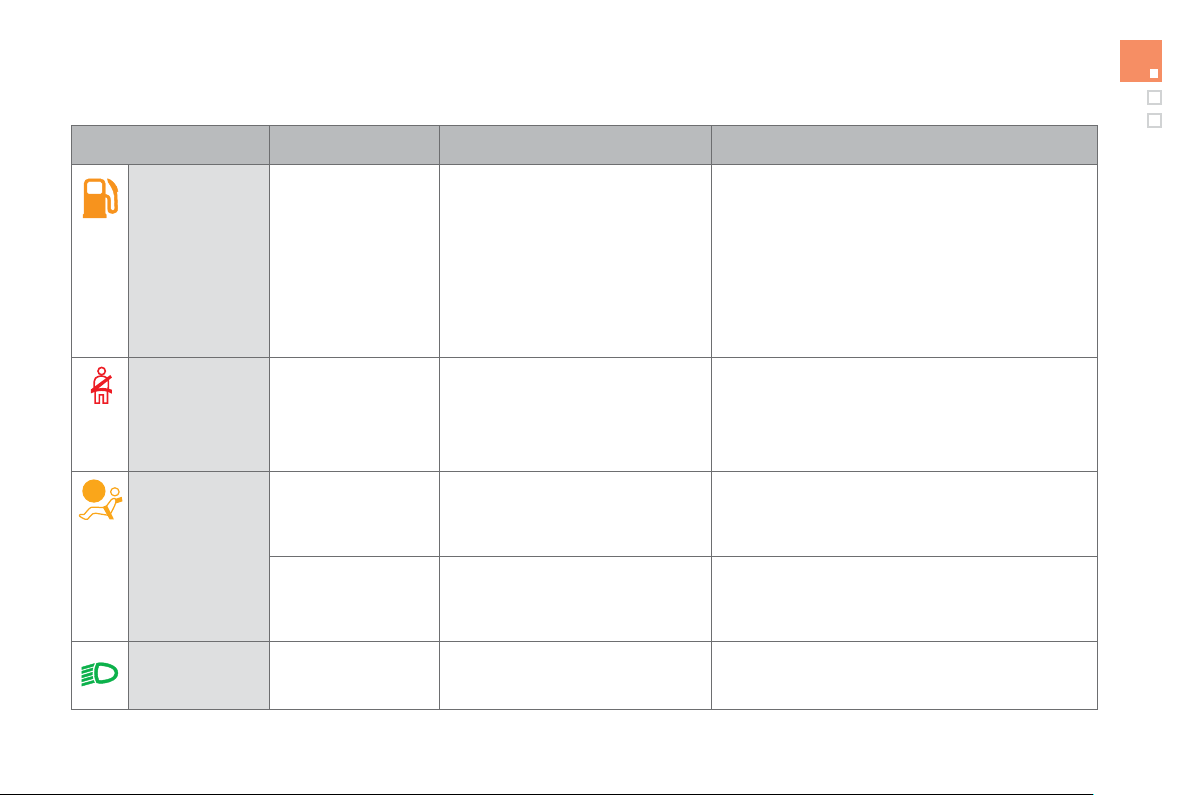
67
Monitoring
L
ow fuel leve
l
f
ix
ed
with th
e
tw
o
l
as
t
bars
f
lashin
g
.
Wh
e
n it
f
ir
s
t
co
m
es
o
n th
e
r
e
r
e
m
a
in
s
approximately 6 litres of
f
f
uel
i
n t
he
t
a
n
k
.
You must re
f
uel as soon as possible to avoid runnin
g
ou
t
of
fue
l.
Thi
s warn
i
n
g
l
amp w
ill
come on ever
y
t
i
me t
h
e
ig
n
i
t
i
on
is switched on, until a su
ff
icient addition o
f
f
uel is
made
.
Fuel tank capacit
y
: approximatel
y
60
litres.
Never continue to drive until
y
ou run out of fuel as
this could dama
g
e the emission control and in
j
ection
sy
stems.
Warnin
g
/ indicator lamp Stat
e
Caus
e
Action / Observations
Airba
g
s on temporaril
y
. This lamp comes on for a few
s
econ
d
s w
h
en
y
ou turn on t
h
e
i
g
nition, then
g
oes o
ff
.
This lamp should
g
o off when the en
g
ine is started.
If it does not
g
o off, contact a CITRO
Ë
N dealer or a
q
uali
f
ied workshop.
f
ix
ed
.
O
ne o
f
the airbag or seat belt
p
retensioner s
y
stems has a
f
ault.
Have it checked by a CITROËN dealer or a qualified
worksho
p
.
D
irectional
headlam
p
s
flashin
g
. The directional headlamps s
y
stem
has
a
f
au
lt.
Have it checked b
y
a CITROËN dealer or a qualified
workshop.
Seat belt
(
s
)
not fastened
/
u
nfastened
f
ix
ed
o
r flashin
g
accompanied b
y
an
audible si
g
nal.
A
sea
t
be
lt h
as
n
o
t
bee
n
fas
t
e
n
ed
o
r
has
bee
n
u
nf
as
t
e
n
ed
.
Pull the strap then insert the ton
g
ue in the buckle.
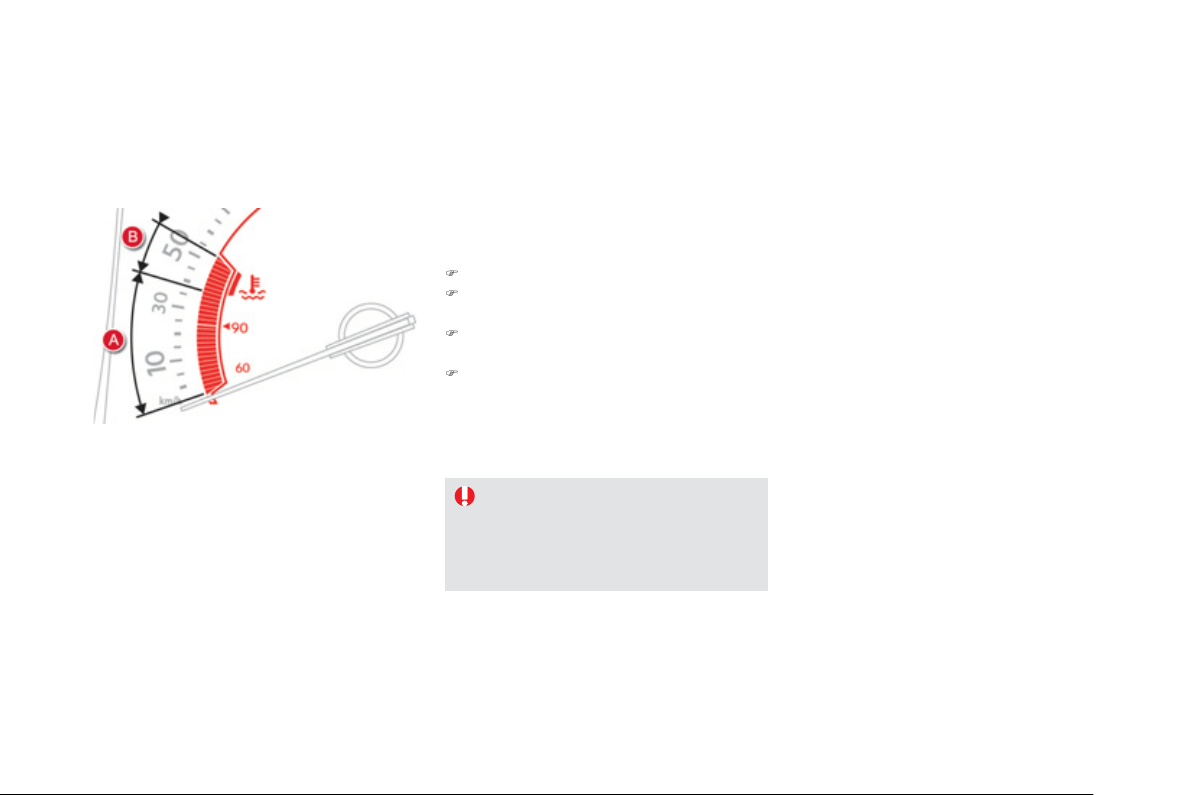
C
oolant tem
p
erature
g
au
g
e
With the hybrid system active:
- in z
o
n
e
A
, the tem
p
erature is correct,
- in z
o
n
e
B
, the temperature is too hi
g
h; the
ce
ntr
a
l STOP warnin
g
lamp comes on,
a
ccompanied b
y
an audible si
g
nal and a
m
essa
g
e in the instrument panel screen.
Y
ou must sto
p
as soon as it is safe to do so
.
Wait a
f
ew minutes be
f
ore switchin
g
o
ff
the
e
n
gi
ne.
Contact a CITROËN dealer or a
q
ualified
worksho
p
.
A
f
ter drivin
g
f
or a
f
ew minutes, the temperature
and pressure in the cooling system increase.
To top up the level:
)
wait for the en
g
ine to cool,
)
unscrew the cap b
y
two turns to allow the
pressure to drop,
)
when the pressure has dropped, remove
t
h
e cap,
)
top up t
h
e
l
eve
l
to t
h
e
"MAX"
mar
k
.
B
e
a
w
a
r
e
of
th
e
ri
s
k
of
bu
rn
s
wh
e
n
toppin
g
up the coolin
g
s
y
stem. Do not
fill above the maximum level
(
indicated
on the reservoir
)
.

Monitoring
Service indicator
More than 1 800 miles
(
3 000 km
)
remain before the next service is due
Wh
en t
h
e
ig
n
i
t
i
on
i
s sw
i
tc
h
e
d
on, no serv
i
ce
i
n
f
ormation appears in the screen.
S
y
stem which informs the driver when the
n
ext service is due, in accordance with the
m
anufacturer's servicin
g
schedule.
Th
e po
i
nt at w
hi
c
h
t
h
e serv
i
ce
i
s
d
ue
i
s
ca
l
cu
l
a
t
ed
f
r
o
m th
e
l
as
t in
d
i
ca
t
o
r z
e
r
o
r
ese
t. It
i
s
d
eterm
i
ne
d
by
two parameters:
- t
h
e
di
stance trave
ll
e
d
,
- the time ela
p
sed since the last service.
Between 600 miles
(
1 000 km
)
a
nd 1 800 miles
(
3 000 km
)
remain
b
efore the next service is due
For 5 seconds a
f
ter the i
g
nition is switched on, the
spanner s
y
m
b
o
li
s
i
n
g
t
h
e serv
i
ce operat
i
ons comes
on.
Th
e
di
stance recor
d
er
di
sp
l
a
y
li
ne
i
n
di
cates t
h
e
distance remaining be
f
ore the next service is due.
Exam
p
le: 1 700 miles
(
2 800 km
)
remain be
f
ore
th
e
n
e
xt
se
rvi
ce
i
s
due
.
For 5 seconds after the i
g
nition is switched on, the
sc
r
ee
n in
d
i
ca
t
es
:
5 seconds a
f
ter the i
g
nition is switched on,
the spanner goes off
; t
h
e
di
stance recor
d
er
f
r
esumes its normal o
p
eration. The screen then
i
ndicates the total and tri
p
distances.
Less than 600 miles
(
1 000 km
)
remain before the next service is due
E
xam
pl
e: 560 miles
(
900 km
)
remain be
f
ore
t
he
n
e
xt
se
rv
ice
is
due
.
For 5 seconds a
f
ter the i
g
nition is switched on,
th
e
sc
r
ee
n in
d
i
ca
t
es
:
5 seconds after the i
g
nition is switched on,
th
e
d
i
s
t
a
n
ce
r
eco
r
de
r r
esu
m
es
it
s
n
o
rm
a
l
operation.
T
he s
p
anner remains on t
o
in
d
i
ca
t
e
th
a
t
a
se
rvi
ce
m
us
t
be
ca
rri
ed
ou
t
soo
n.
Illumination o
f
the ke
y
is accompanied
by
a messa
g
e
i
n t
h
e
i
nstrument pane
l
screen
.
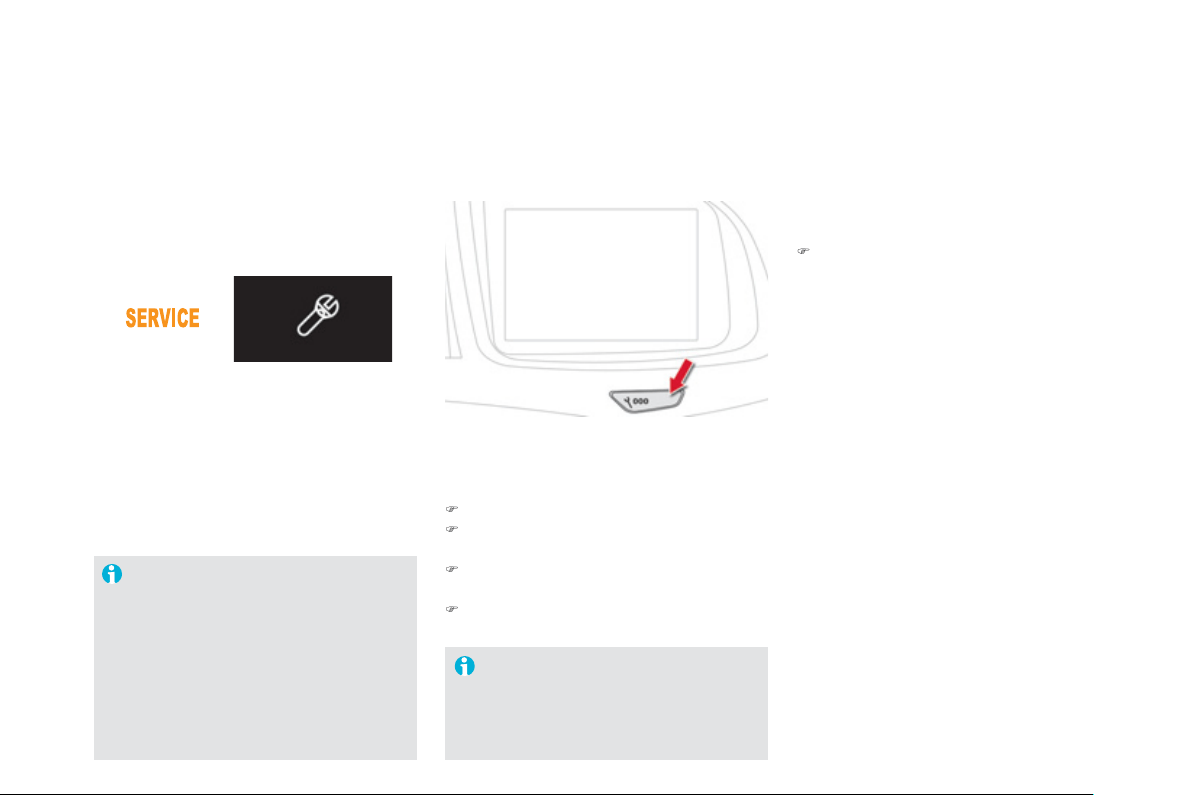
Service overdue
Ever
y
time the i
g
nition is switched on, an
over
d
ue serv
i
ce
i
s
i
mme
di
ate
ly
s
ig
na
l
e
d
b
y
f
lashin
g
o
f
the spanner and the
f
ixed
ill
u
min
a
ti
o
n
of
th
e
S
ervic
e
warn
i
n
g
l
amp.
The distance remainin
g
ma
y
be
wei
g
hted b
y
the time factor, dependin
g
o
n t
h
e
d
r
i
v
i
n
g
con
di
t
i
ons.
There
f
ore, the spanner ma
y
also come
o
n i
f
y
ou have exceeded the period
s
ince the last service, indicated in the
m
aintenance and warrant
y
g
uid
e
.
Followin
g
this operation, i
f
y
ou wish to
disconnect the batter
y
, lock the vehicle
a
n
d
w
a
it
a
t l
eas
t fiv
e
min
u
t
es
f
o
r th
e
ze
r
o
r
ese
t t
o
be
t
a
k
e
n int
o
accou
nt.
5 seconds a
f
ter the i
g
nition is switched on,
t
he
dis
t
a
n
ce
r
eco
r
de
r r
esu
m
es
i
t
s
n
o
rm
al
o
p
erat
i
on.
Th
e spanner rema
i
ns on
.
Service indicato
r
zero reset
A
f
ter each service, the service indicator must
be
r
ese
t t
o
z
e
r
o
.
The procedure for resettin
g
to zero is as
f
o
ll
o
w
s
:
)
switch off the i
g
nition,
)
press an
d
h
o
ld
t
h
e tr
i
p
di
stance recor
d
er
zero reset
b
utton,
)
sw
i
tc
h
on t
h
e
ig
n
i
t
i
on; t
h
e
di
stance recor
d
e
r
display begins a countdown,
)
when the displa
y
indicates
"
=0", release
the button; the spanner disappears.
R
etr
i
ev
i
n
g
t
h
e serv
i
ce
i
nformation
Y
ou
ca
n
access
th
e
se
rvi
ce
in
fo
rm
a
ti
o
n
a
t
an
y
t
i
me.
)
P
ress t
h
e tr
ip
di
stance recor
d
er zero reset
bu
tt
o
n.
The service in
f
ormation is displa
y
ed
f
or a
f
ew
s
econds, then disappears.
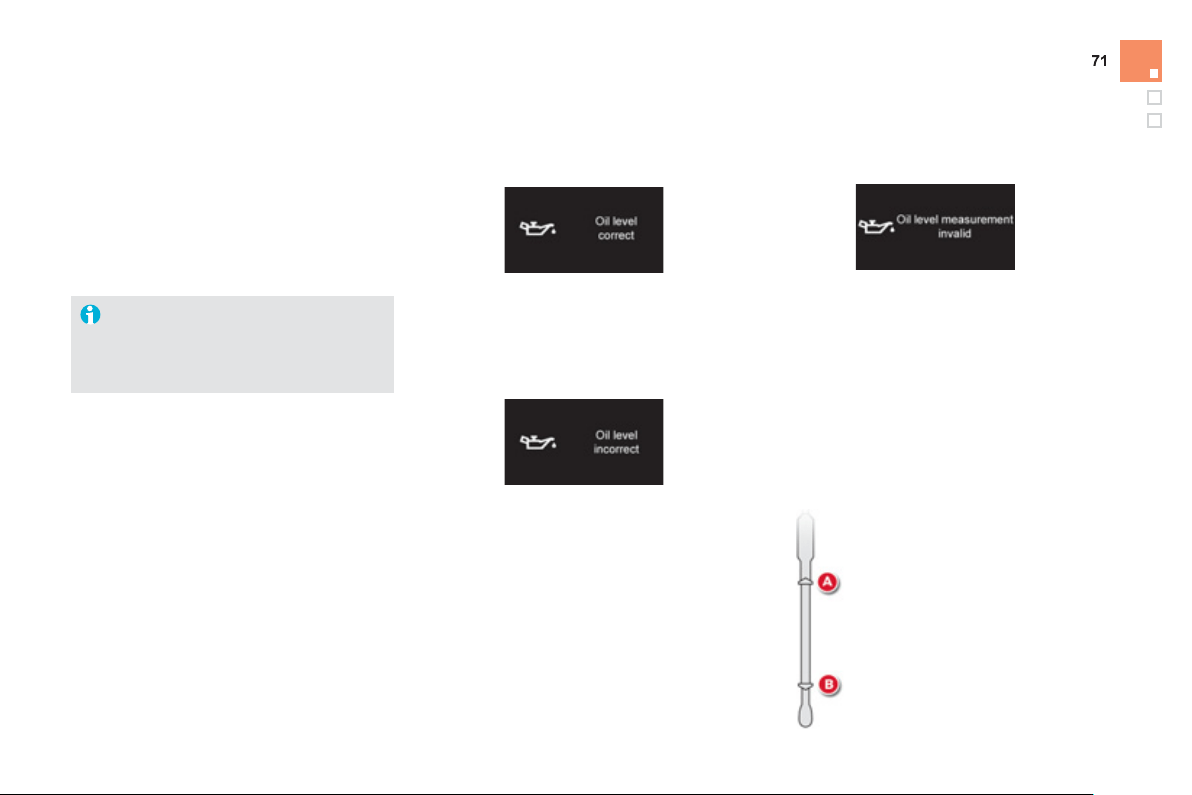
Monitoring
En
g
ine oil level indicato
r
Oil level incorrect
Thi
s
i
s
i
n
di
cate
d
by
a messa
g
e
i
n t
h
e
i
nstrument
p
ane
l
screen.
I
f
the low oil level is con
f
irmed by a check using
the di
p
stick, the level must be to
pp
ed u
p
to
a
void dama
g
e to the en
g
ine.
Oil level indicator fault
This is indicated by a message in the
instrument
p
anel screen. Contact a CITROËN
dealer or a qualified workshop.
Di
p
stick
R
efe
r t
o
th
e
"
C
h
ec
k
s
"
sec
ti
o
n t
o
l
oca
t
e
th
e
dipstick and the oil
f
iller cap on your engine.
Sy
stem which in
f
orms the driver whether the
e
n
gi
ne o
il
l
eve
l
i
s correct or not.
Thi
s
in
fo
rm
a
ti
o
n i
s
in
d
i
ca
t
ed
fo
r
a
fe
w
seco
n
ds
when the i
g
nition is switched on, a
f
ter the
se
rvi
ce
inf
o
rm
a
ti
o
n.
The level read will only be correct i
f
the vehicle is on level
g
round and the
e
n
g
ine has been off for more than
30
minutes.
There are
2
marks on the di
p
stick:
-
A
= max; never exceed this
level,
-
B
= min; top up the level via
the oil filler cap, usin
g
the
g
rade o
f
oil suited to
y
our
e
n
gi
ne.
Oil level correct
This is indicated b
y
a messa
g
e in the
i
nstrument pane
l
screen.
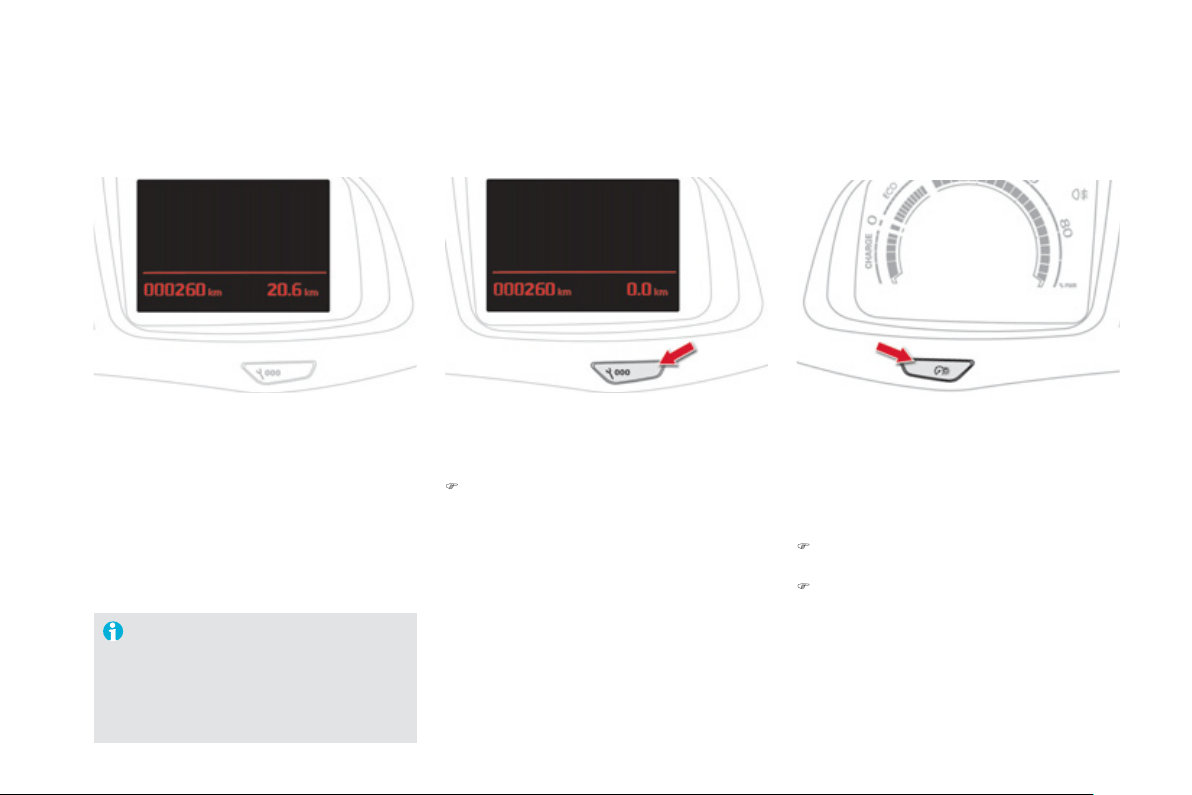
Sy
stem
f
or manual ad
j
ustment o
f
the bri
g
htness
of
th
e
in
s
tr
u
m
e
nt
s
a
n
d
co
ntr
o
l
s
in r
e
l
a
ti
o
n t
o
th
e
e
xter
i
or
b
r
igh
tness.
L
i
g
htin
g
dimme
r
Activation
When the li
g
htin
g
is on:
)
press the button to chan
g
e the bri
g
htness
o
f
the instruments and controls,
)
when the level o
f
bri
g
htness required is
r
eac
h
e
d
, re
l
ease t
h
e
b
utton.
Deactivation
When the li
g
htin
g
is off, or in da
y
mode on
vehicles fitted with da
y
time runnin
g
lamps,
p
ressin
g
the button does not have an
y
effect.
Sy
stem which measures the total distance
travelled b
y
the vehicle durin
g
its li
f
e.
The total and trip distances are displa
y
ed
f
or
thirty seconds when the ignition is switched o
ff
,
when the driver's door is o
p
ened and when the
v
e
hi
c
l
e
i
s
l
oc
k
ed
o
r
u
nl
oc
k
ed
.
T
otal distance recorder
Sy
stem which measures a distance travelled
d
ur
i
n
g
a
d
a
y
or ot
h
er per
i
o
d
s
i
nce
i
t was reset
to zero
by
t
h
e
d
r
i
ver.
)
With the ignition on, press the button until
z
eros
appear
.
Trip distance recorder
To con
f
orm to legislation in the country
y
ou are crossin
g
, chan
g
e the units
of distance
(
miles or km
)
via the
c
onfi
g
uration menu.
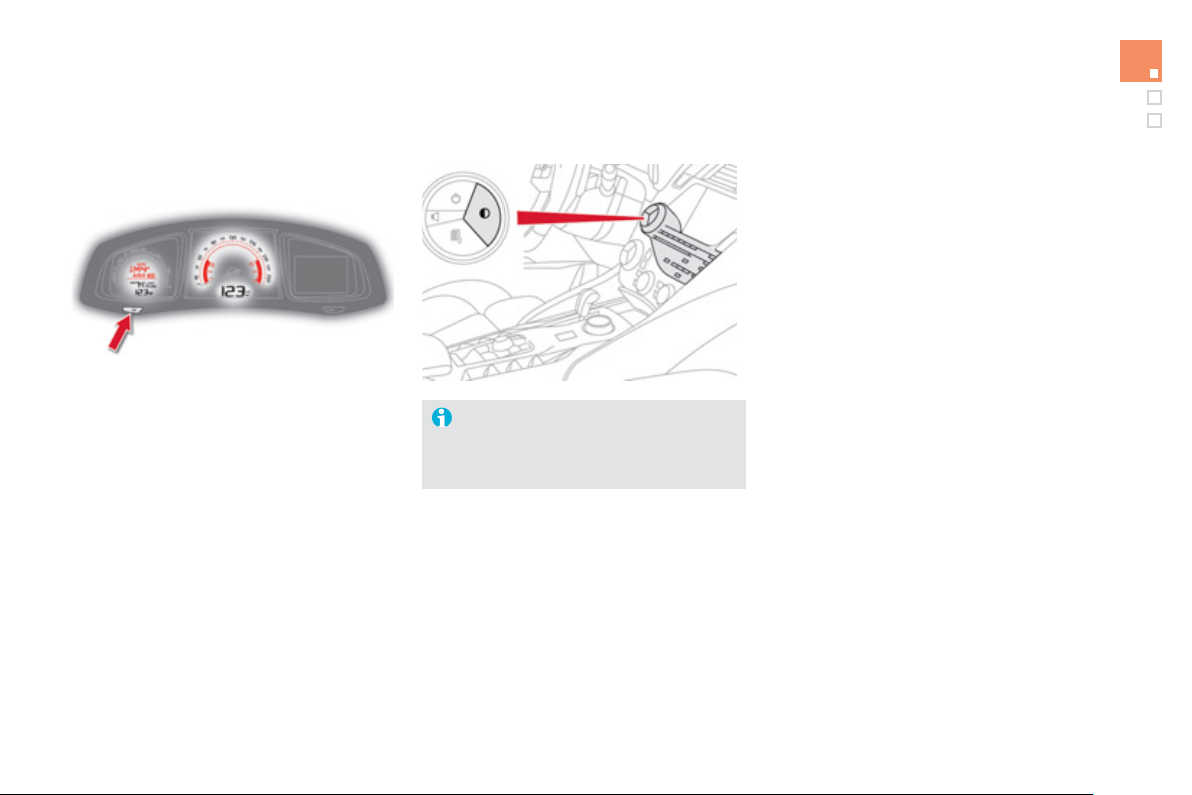
7
3
Monitoring
S
y
stem allowin
g
certain screens to be switched
o
ff
f
or ni
g
ht drivin
g
(
available onl
y
with
e
M
y
Wa
y)
.
Th
e
i
nstrument
p
ane
l
rema
i
ns on w
i
t
h
t
h
e
vehicle speed, electronic gearbox gear
s
elected, cruise control or s
p
eed limiter
information, if in use, and the low fuel alerts i
f
necessary
.
If there is an alert or a chan
g
e in a function
or to a settin
g
, the black panel mode is
i
nterrupte
d
.
Black panel
(
black screen
)
w
i
t
h
e
MyW
a
y
For more in
f
ormation, re
f
er to the
e
MyWay part o
f
the "Audio and
t
e
l
e
m
a
ti
cs
"
sec
ti
o
n.
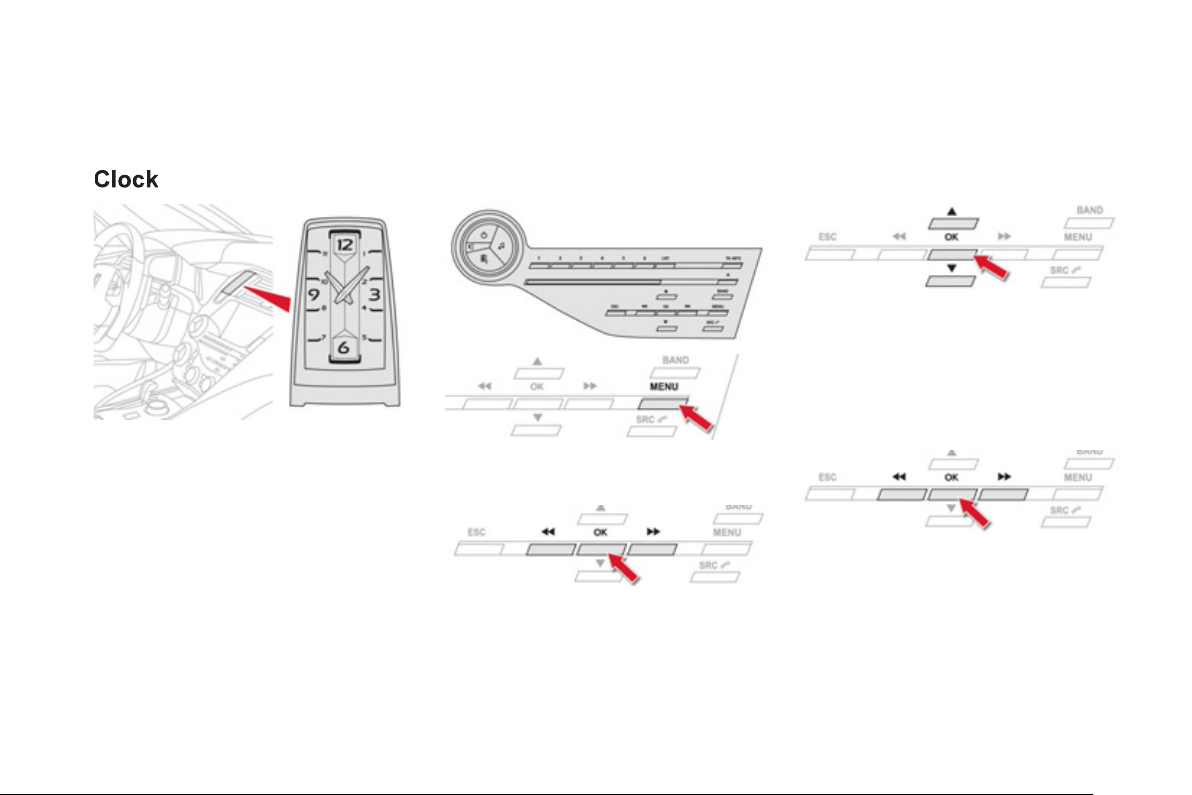
The analo
g
ue clock does not have an
a
d
j
ustment button.
To set the time, refer to the section relatin
g
to
the screen
(
audio s
y
stem
)
confi
g
uration menu.
The clock is s
y
nchronised with the screen time;
once the the settin
g
has been con
f
irmed in
t
h
e screen, t
h
e
h
an
d
s w
ill
turn to s
y
nc
h
ron
i
se
w
i
t
h
t
h
e screen, an
d
eac
h
t
i
me t
h
e
ig
n
i
t
i
on
i
s
s
wit
c
h
ed
o
n.
Setting the date and time
Audio s
y
stem
/
Bluetooth
P
r
ess
MENU
.
Usin
g
the arrows, select "
P
ersonalisation-
confi
g
uration "
a
n
d
co
nfirm.
Usin
g
the arrows, select "
D
ispla
y
c
onfi
g
uration"
a
n
d
co
nfirm.
Usin
g
the arrows, select "
D
ate and time
a
d
j
ustmen
t
"
a
n
d
co
nfirm.
Select the settin
g
to be modified. Confirm
b
y
pressin
g
O
K
, then make the chan
g
e and
c
onfirm a
g
ain to save the modification.
A
d
j
ust the settin
g
s one b
y
one, con
f
irmin
g
b
y
p
ress
i
n
g
t
h
e OK
bu
tt
o
n.
Ne
xt
selec
t t
he
"
O
K
"
t
ab
o
n th
e
sc
r
ee
n th
e
n
co
n
f
irm t
o
e
xit
f
r
o
m th
e
"
D
ate an
d
t
i
me a
dj
ustmen
t
"
m
e
n
u
.
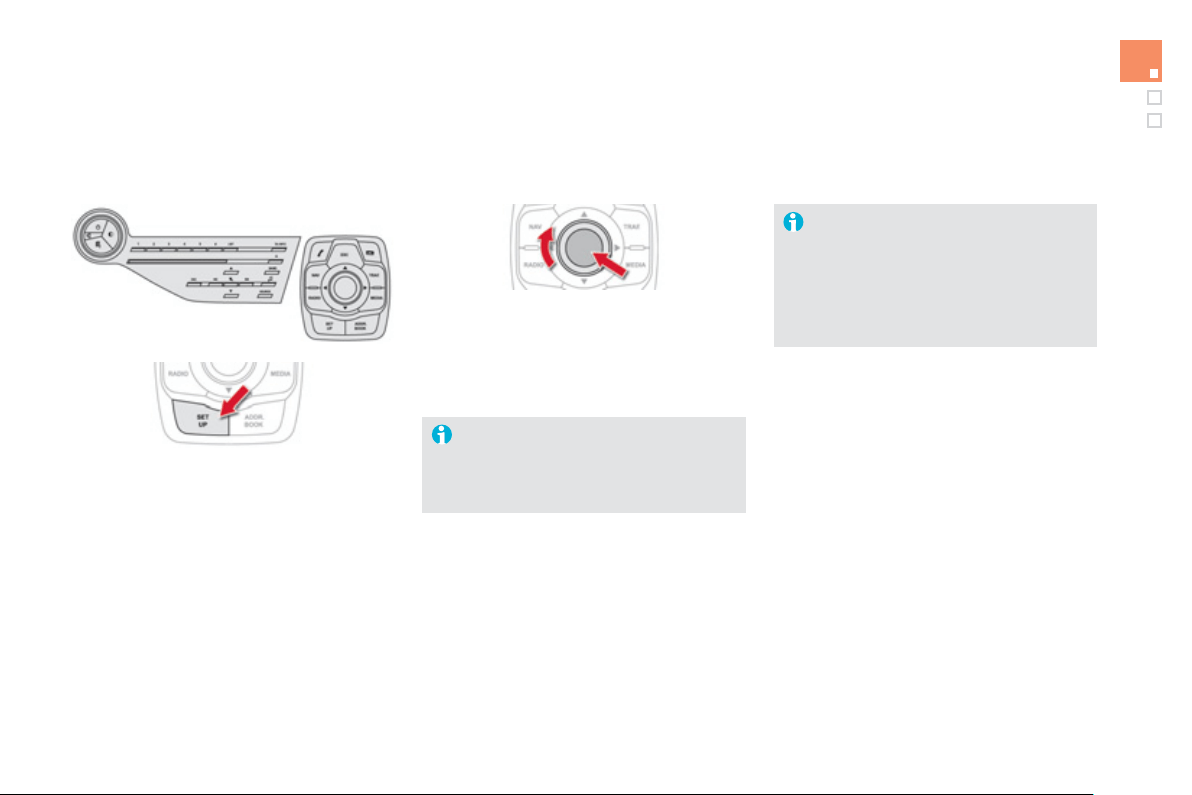
75
Monitoring
e
M
y
Wa
y
P
r
ess
S
ETU
P
to
di
sp
l
a
y
t
h
e
"
Confi
g
uration
"
m
e
n
u
.
Se
l
ec
t "
D
ispla
y
confi
g
uration "
a
n
d
co
n
f
irm.
Se
l
ec
t " Set date and tim
e
"
a
n
d
co
n
f
irm.
S
elect "S
y
nchronize the minutes with
G
P
S
" so that settin
g
the minutes is done
a
utomaticall
y
b
y
satellite reception.
Adj
ust t
h
e sett
i
n
g
s one
by
one.
Th
e
n
se
l
ec
t "
O
K"
o
n th
e
sc
r
ee
n
a
n
d
co
n
f
irm t
o
save the settin
g
s.
T
he clock, located in the dashboard, is
sy
nchronised with the time in the screen.
It is set once the time is ad
j
usted usin
g
t
he
"
SETUP
"
menu an
d
ever
y
t
i
me t
h
e
ig
n
i
t
i
on
i
s sw
i
tc
h
e
d
on.
Select the settin
g
to ad
j
ust.
C
on
f
irm b
y
pressin
g
OK , t
h
en a
dj
ust t
h
e sett
i
n
g
a
nd con
f
irm a
g
ain to save the modi
f
ication.
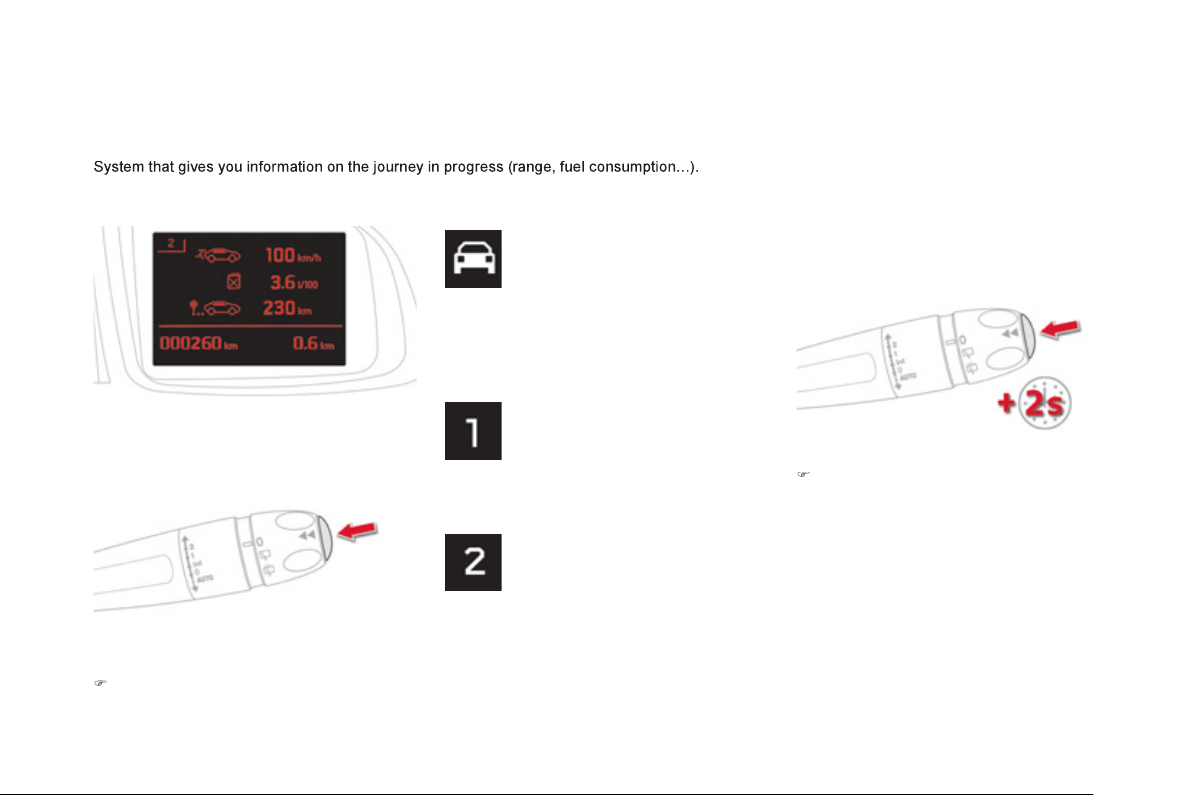
Trip computer
)
Wh
en t
h
e tr
i
p requ
i
re
d
i
s
di
sp
l
a
y
e
d
, press
th
e
co
ntr
o
l
fo
r m
o
r
e
th
a
n tw
o
seco
n
ds
o
r
use
th
e
l
ef
t h
a
n
d
th
u
m
b
wh
ee
l
of
th
e
s
teering mounted controls.
I
nstrument panel screen
Information displa
y
)
Pr
ess
th
e
bu
tt
o
n
o
n th
e
e
n
d
o
f th
e
wi
p
e
r
c
ontrol stal
k
to displa
y
the various tabs in
success
i
o
n.
- Th
e
cu
rr
e
nt inf
o
rm
a
ti
o
n t
ab
with:
● t
h
e ran
g
e,
● the current
f
uel consumption,
-
T
r
i
p
"1
" w
ith
:
● t
h
e avera
g
e spee
d
,
f
or the
f
irst tri
p
.
● the avera
g
e
f
uel consumption,
-
T
r
i
p
"2
" w
i
t
h
:
● t
h
e avera
g
e spee
d
,
f
or the second tri
p
.
● the consumption history
(
with
16
/
9 colour screen
)
,
● the avera
g
e fuel consumption,
Reset trip
- R
ad
i
o
o
r m
ed
i
a
.
- Satellite navi
g
ation.
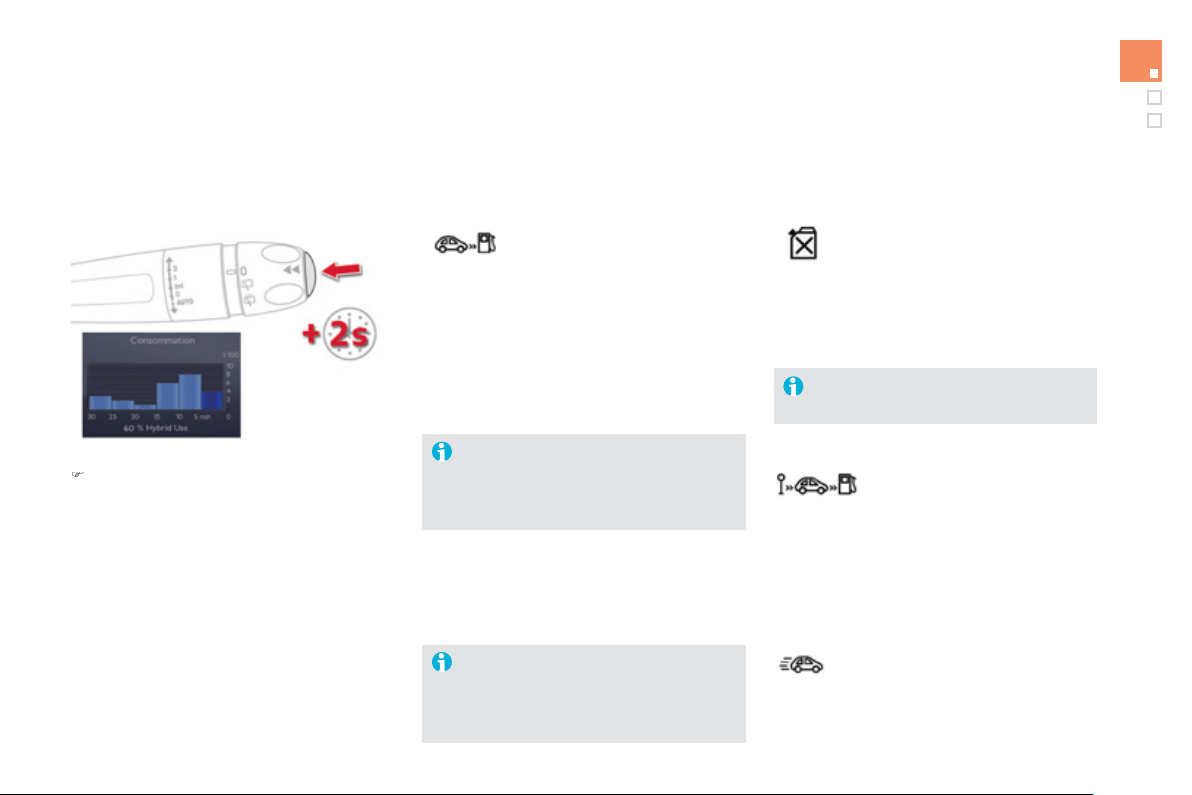
77
Monitoring
I
f
dashes are displa
y
ed continuousl
y
while drivin
g
in place of the di
g
its,
c
ontact a
C
ITR
O
ËN dealer or a
qualified workshop.
This value ma
y
var
y
f
ollowin
g
a chan
g
e
in the st
y
le o
f
drivin
g
or the relie
f
,
r
esulting in a signi
f
icant change in the
c
urrent
f
uel consumption.
T
ri
p
com
p
uter, a few definitions…
Ran
g
e
(
miles or km
)
Thi
s
in
d
i
ca
t
es
th
e
d
i
s
t
a
n
ce
whi
c
h
ca
n
s
till
be
tr
a
v
e
ll
ed
with
the fuel remainin
g
in the tank
in relation to the avera
g
e fuel
c
onsumption over the last
f
ew
miles
(
kilometres
)
travelled.
When the ran
g
e
f
alls below 20 miles
(
30 km
)
,
dashes are displa
y
ed. After fillin
g
with at least
5
litres of fuel, the ran
g
e is recalculated and is
displa
y
ed when it exceeds 60 miles
(
100 km
)
.
This
f
unction is onl
y
displa
y
ed
f
rom
20 mph
(
30 km
/
h
)
.
Current fuel consum
p
tion
(
mp
g
or l/100 km or km/l
)
This is the avera
g
e fuel consumption
durin
g
the last few seconds.
Avera
g
e fuel
c
onsum
p
tion
(
mp
g
or l/100 km or km/l
)
This is the avera
g
e fuel
c
onsumpt
i
on s
i
nce t
h
e
l
ast tr
i
p
c
omputer zero reset.
A
vera
g
e speed
(
mph or km
/
h
)
This is the avera
g
e speed calculated
since the last trip computer zero reset
(
i
g
nition on
)
.
Reset histor
y
)
With trip 2 displa
y
ed, press the button
(
on
the end o
f
the wiper stalk
)
f
or more than
two secon
d
s to reset t
h
e
hi
stor
y
to zero.
Trips
"
1"
a
n
d
"
2" are independent but their use
i
s
i
de
nti
ca
l.
For example, trip
"1
" can be used for dail
y
f
i
g
ures, and trip "
2
"
f
or monthl
y
f
i
g
ures.

002
Access
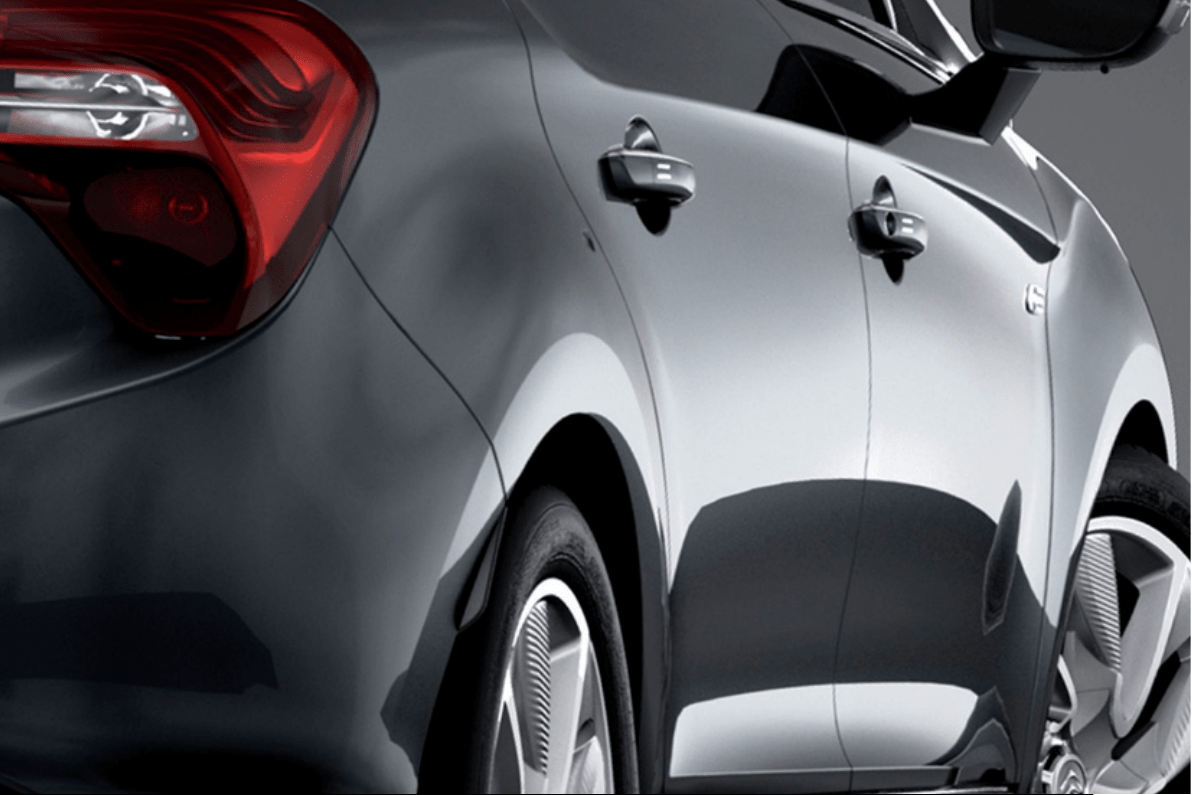
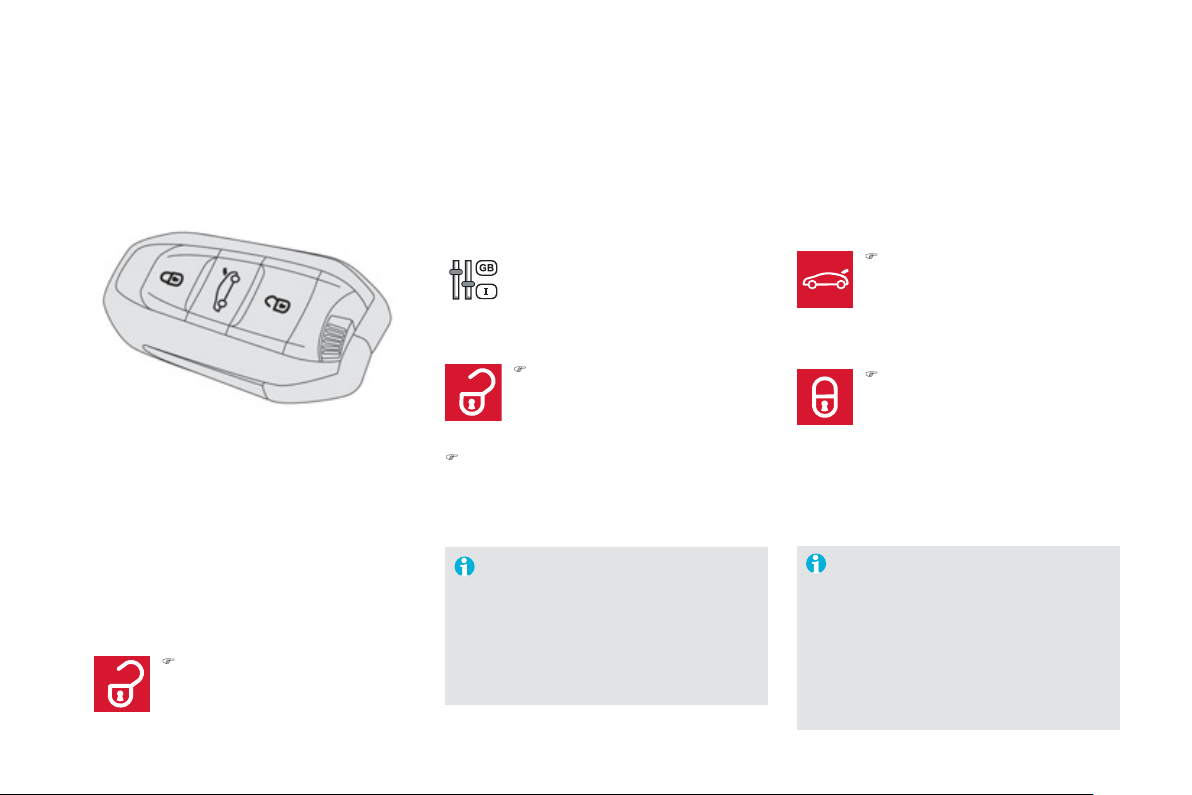
Electronic key
remote control
Unlockin
g
the vehicle
Complete unlockin
g
Selective unlockin
g
U
nlockin
g
the boot
S
ystem which permits central unlocking or
lockin
g
o
f
the vehicle usin
g
the lock or
f
rom a
d
i
s
t
a
n
ce
. It i
s
a
l
so
used
t
o
l
oca
t
e
a
n
d
s
t
a
rt th
e
vehicle, as well as providin
g
protection a
g
ainst
th
e
ft.
This settin
g
is done in the
c
onfi
g
uration menu.
Complete unlockin
g
is activated b
y
de
f
au
lt.
Unlockin
g
is con
f
irmed b
y
rapid
f
lashin
g
of
th
e
d
ir
ec
ti
o
n in
d
i
ca
t
o
r
s
fo
r
a
r
ou
n
d
tw
o
seco
n
ds
.
At the same time, depending on
version, the door mirrors un
f
old.
L
ockin
g
the vehicle
Lockin
g
is confirmed b
y
fixed
l
i
g
htin
g
of the direction indicators for
approximatel
y
two seconds.
Th
e
doo
r mirr
o
r
s
fo
l
d
a
t th
e
sa
m
e
tim
e
.
)
To unlock onl
y
the driver's door,
p
ress the open padlock once.
)
Press the closed padlock to lock
the vehicle completel
y
.
Hold
t
he
bu
tt
o
n
do
wn
u
nt
il
t
he
w
i
n
d
ows c
l
ose comp
l
ete
ly
.
)
Press this button until
y
ou hear
th
e
boo
t
u
nl
oc
k.
Be aware of children when operatin
g
th
e
win
do
w
s
.
)
Press the open padlock to unlock
th
e
v
e
hi
c
l
e
.
)
To unlock the other doors and the boot,
press the open padlock a
g
ain.
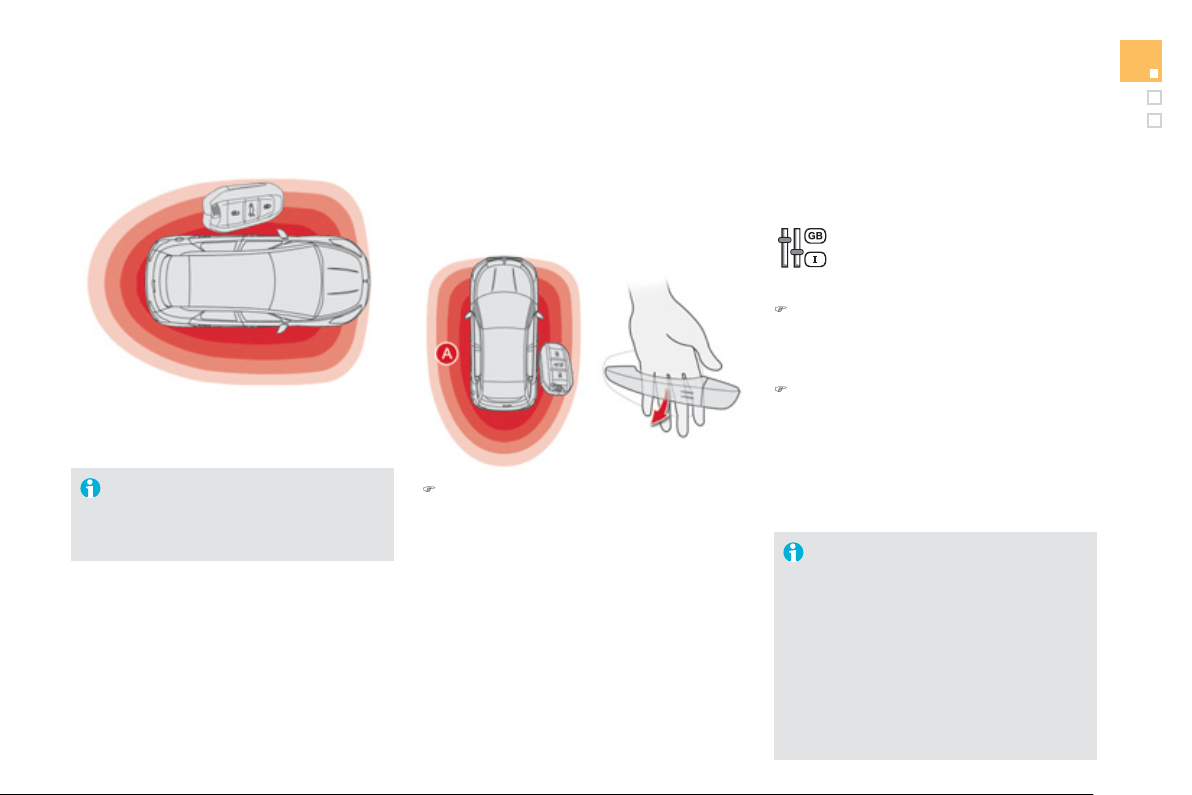
81
Access
U
n
l
oc
ki
n
g
t
h
e ve
hi
c
l
e
"Keyless Entry and Starting" system
S
y
stem that allows the openin
g
, closin
g
and startin
g
of the vehicle while keepin
g
the
e
lectronic ke
y
on
y
our person.
Complete unlockin
g
)
With the electronic ke
y
on
y
our person
a
n
d
in th
e
def
in
ed
z
o
n
e
A
,
pass
yo
u
r
ha
n
d
behi
n
d
t
he
doo
r
ha
n
dle
t
o
u
n
lock
t
he
ve
hi
c
l
e, t
h
en
p
u
ll
on t
h
e
h
an
dl
e to o
p
en t
h
e
doo
r.
Your passen
g
ers can also open their doors,
as soon as the electronic ke
y
is in the
de
fin
ed
z
o
n
e
a
r
ou
n
d
th
e
v
e
hi
c
l
e
.
Selective unlockin
g
Thi
s sett
i
n
g
i
s
d
one v
i
a t
h
e
c
on
f
i
g
uration menu.
B
y
de
f
ault, complete unlockin
g
is
ac
tiv
a
t
ed
.
)
T
o un
l
oc
k
on
ly
t
h
e
d
r
i
vers
d
oor, w
i
t
h
t
h
e
e
lectronic ke
y
on
y
our person, pass
y
our
ha
n
d
be
hin
d
th
e
d
riv
e
r'
s
doo
r h
a
n
d
l
e
th
e
n
p
ull on the door handle to open.
)
To unlock the complete vehicle, pass
y
our
h
and behind one of the passen
g
er door
ha
n
d
l
es
o
n th
e
sa
m
e
s
i
de
o
f th
e
v
e
hi
c
l
e
as
t
h
e e
l
ectron
i
c
k
e
y
i
s
l
ocate
d
, t
h
en pu
ll
on
t
h
e
d
oor
h
an
dl
e to open.
Unlockin
g
is con
f
irmed b
y
rapid
f
lashin
g
o
f
the direction indicators
f
or
approximately two seconds.
Th
e
doo
r mirr
o
r
s
u
n
fo
l
d
a
t th
e
sa
m
e
tim
e
.
If the alarm is on, the audible warnin
g
when openin
g
a door with the ke
y
(
inte
g
ral with the remote control
)
, will
s
top on start
i
n
g
t
h
e en
gi
ne.
A
ccumulations
(
water, dust,
g
rime, salt...
)
on
the inner surface if the door handle ma
y
affect
de
t
ec
ti
o
n.
If cleanin
g
the inner surface of the door handle
usin
g
a cloth does not resolve the problem,
c
ontact a CITROËN dealer or a qualified
workshop.
A
sudden splash of water
(
stream of water, hi
g
h
p
ressure
j
et washer, …
)
ma
y
be identified b
y
the s
y
stem as the desire to open the vehicle.
It can also be used as a remote control
;
s
ee the "Electronic ke
y/
remote control"
sec
t
io
n.
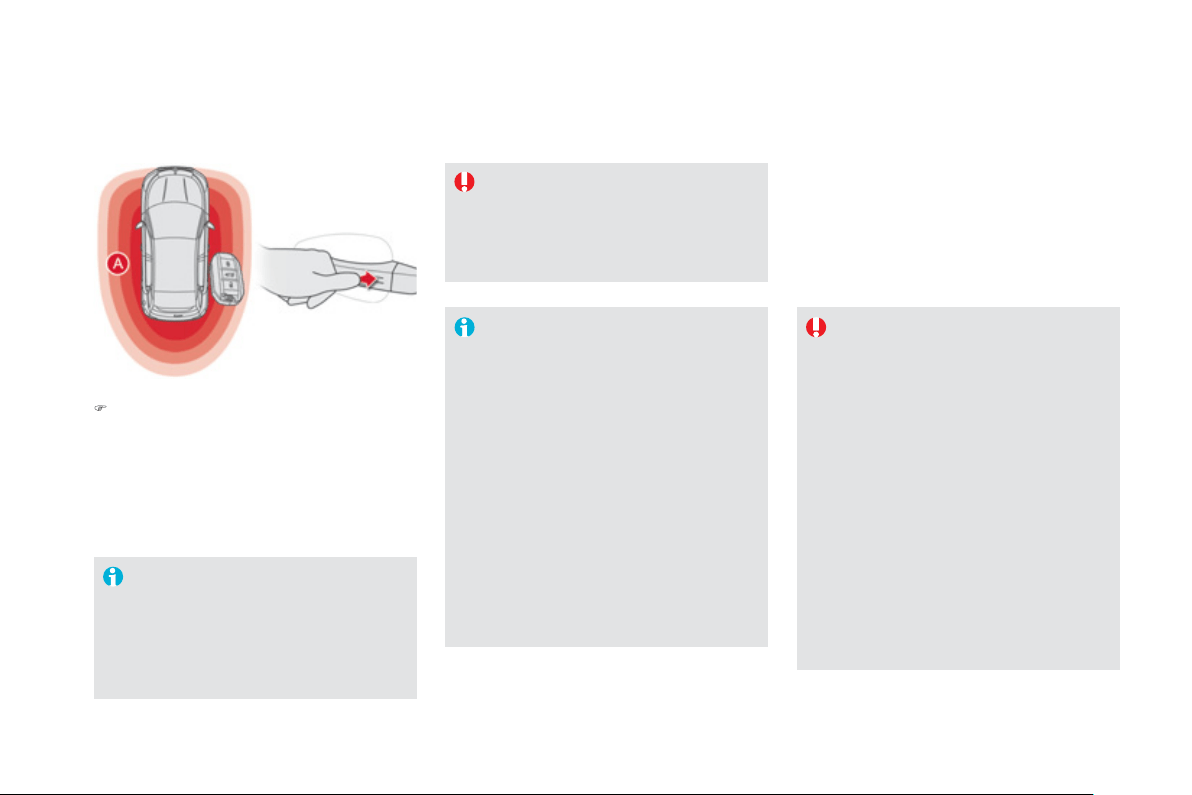
Lockin
g
the vehicle
)
With the electronic ke
y
in the de
f
ined
zone
A
, press with a fin
g
er on one of the
door handles
(
at the markin
g
s
)
to lock the
v
e
hi
c
l
e
.
Maintain pressure with
y
our fin
g
er until the
w
i
n
d
ows c
l
ose comp
l
ete
ly
.
Lockin
g
is confirmed b
y
fixed
li
g
htin
g
o
f
the direction indicators
f
or
a
pprox
i
mate
ly
two secon
d
s.
Th
e
doo
r mirr
o
r
s
fo
l
d
a
t th
e
sa
m
e
tim
e
.
If
o
n
e
o
f th
e
doo
r
s
o
r th
e
boo
t i
s
s
till
open or if the ke
y
for Ke
y
less Entr
y
and
S
tartin
g
has been left inside the vehicle,
t
h
e centra
l
l
oc
ki
n
g
d
oes not ta
k
e p
l
ace.
When the vehicle is locked, i
f
it is
u
nlocked inadvertentl
y
, it will lock itsel
f
again automatically a
f
ter about thirty
s
econds unless a door is o
p
ened.
The foldin
g
and unfoldin
g
of the door
mirrors b
y
the remote control can be
deactivated b
y
a CITROËN dealer or a
q
ualified workshop.
A
s a safet
y
measure
(
children on
board
)
, never leave the vehicle without
takin
g
the ke
y
for the Ke
y
less Entr
y
and
S
tartin
g
s
y
stem, even
f
or a short period.
G
uard a
g
ainst the
f
t when the ke
y
f
or
the Ke
y
less Entr
y
and
S
tartin
g
s
y
stem
i
s
in th
e
def
in
ed
z
o
n
e
with th
e
v
e
hi
c
l
e
u
nl
oc
k
ed
.
In order to preserve the char
g
e of the
c
ell batter
y
in the remote control, the
"hands-free" functions
g
o into extended
s
tand-b
y
after 21 da
y
s of non-use. To
restore these
f
unctions, press one o
f
t
he
r
e
m
o
t
e
co
ntr
ol
bu
tt
o
n
s
o
r
s
t
a
rt t
he
e
n
gi
ne w
i
t
h
t
h
e e
l
ectron
i
c
k
e
y
i
n t
h
e
r
eade
r.
Ensure that no one prevents the correct
operation of the windows.
Be aware o
f
children when operatin
g
t
he
w
i
n
do
w
s
.
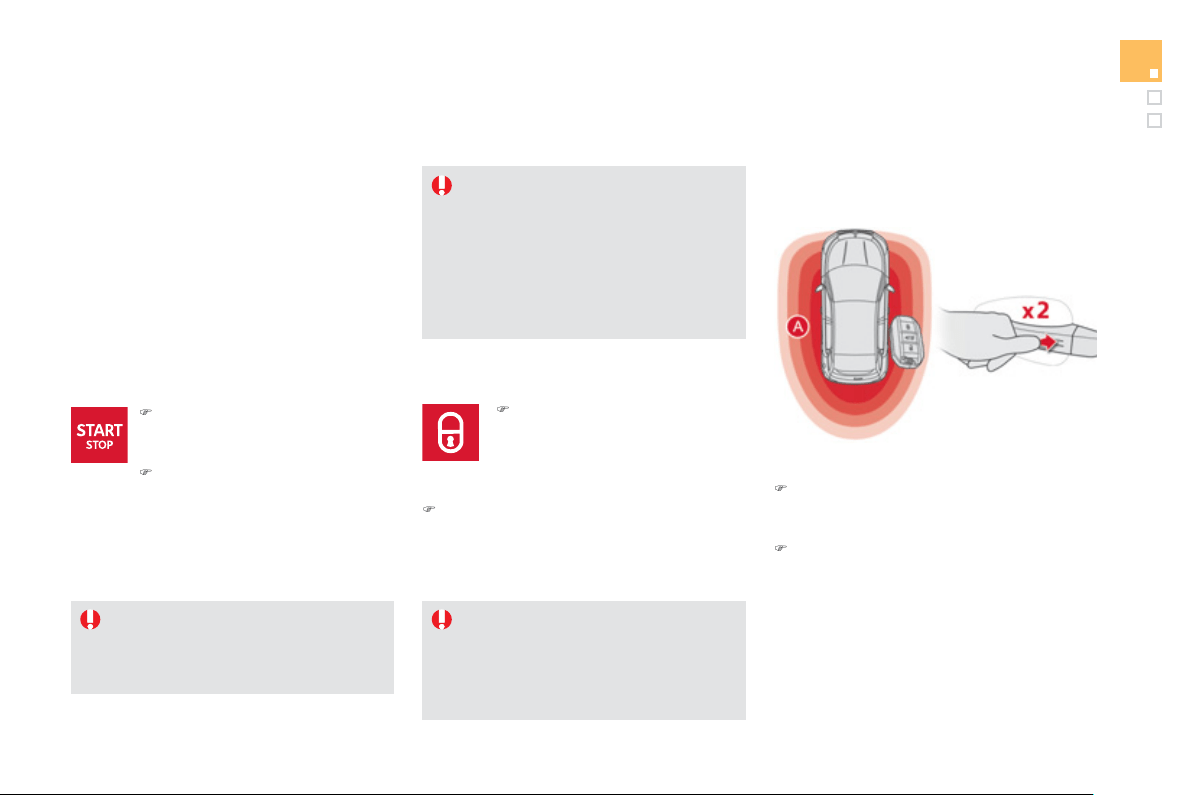
83
Access
D
eadlockin
g
Deadlockin
g
renders the exterior and
i
nterior door controls inoperative.
I
t
also
deac
t
i
v
a
t
es
t
he
m
a
n
ual
ce
ntr
al
co
ntr
ol
bu
tt
o
n.
There
f
ore, never leave an
y
one inside
th
e
v
e
hi
c
l
e
wh
e
n it i
s
dead
l
oc
k
ed
.
U
s
i
n
g
t
h
e remote contro
l
)
P
ress t
h
e c
l
ose
d
p
a
dl
oc
k
to
l
oc
k
the vehicle completely.
Maintain pressure with
y
our
f
in
g
er for more than two
seco
n
ds
t
o
c
l
ose
th
e
win
do
w
s
.
)
Press the closed padlock a
g
ain within five
seco
n
ds
t
o
dead
l
oc
k th
e
v
e
hi
c
l
e
.
With the electronic ke
y
in the reader or the
Ke
y
less Entr
y
and
S
tartin
g
ke
y
inside the
vehicle, pressin
g
the "
S
TART
/S
T
O
P" button,
w
i
t
h
no act
i
on on t
h
e pe
d
a
l
s, a
ll
ows t
h
e
ig
n
i
t
i
on
to be switched on and so activate the ancillary
eq
ui
p
ment.
I
g
nition on without startin
g
t
h
e en
gi
ne
(
accessor
y
position
)
)
Press the "
S
TART
/S
T
O
P" button,
the instrument
p
anel comes on
but the en
g
ine does not start.
)
Press the button a
g
ain to switch
off the i
g
nition and so allow the
v
e
hi
c
l
e
t
o
be
l
oc
k
ed
.
If
y
ou use the accessor
y
position for too
l
on
g
, the s
y
stem automaticall
y
g
oes into
e
conom
y
mode to avoid the risk o
f
a
f
lat
b
atter
y
.
With the Ke
y
less Entr
y
and
Startin
g
s
y
stem
B
y
the doors:
)
With the electronic ke
y
in the defined
z
o
n
e
A
, press a fin
g
er on the door handle
(
at the markin
g
s
)
to lock the vehicle.
)
Within
f
ive seconds, press the door handle
a
g
a
i
n to
d
ea
dl
oc
k
t
h
e ve
hi
c
l
e.
Ensure that no one is preventin
g
the
c
orrect closin
g
of the windows.
Be aware o
f
children when operatin
g
t
he
w
i
n
do
w
s
.
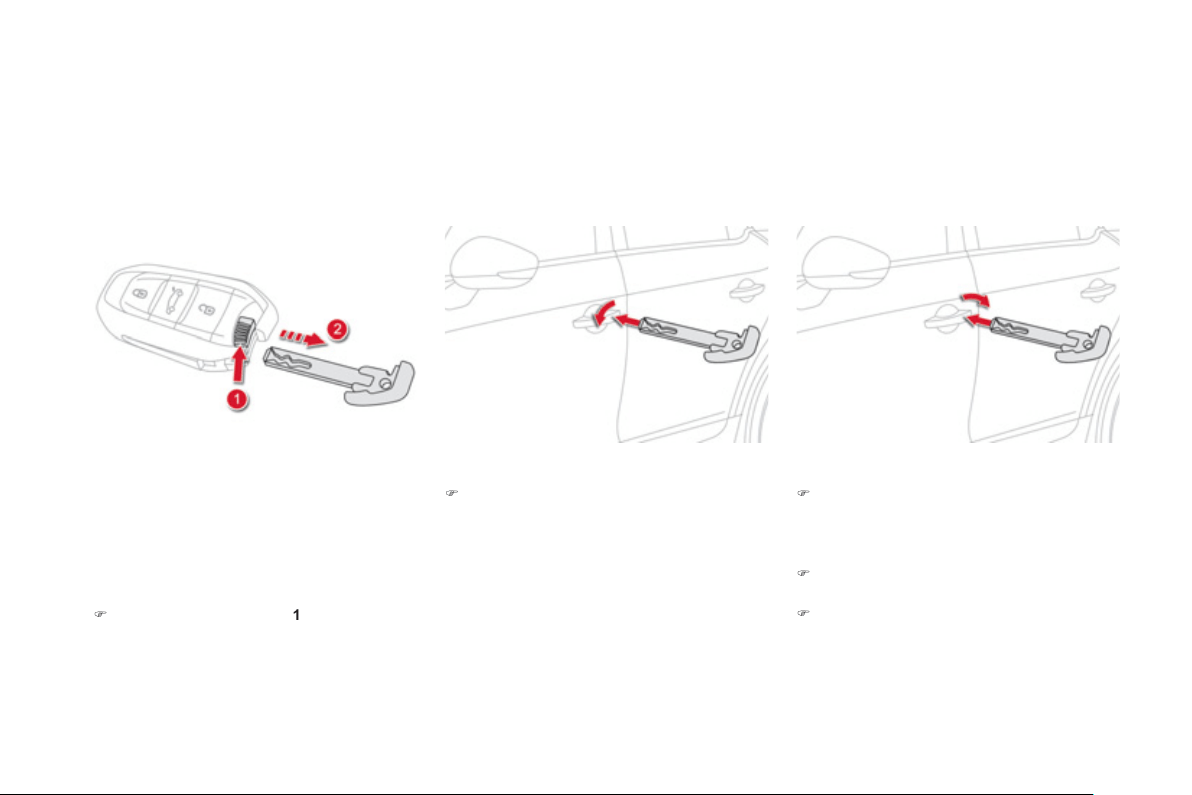
Back-up control
Unlockin
g/
lockin
g
usin
g
the inte
g
ral ke
y
Th
e
i
nte
g
ra
l
k
e
y
i
s use
d
to
l
oc
k
an
d
un
l
oc
k
t
h
e
ve
hi
c
l
e w
h
en t
h
e e
l
ectron
i
c
k
e
y
cannot operate:
- cell battery
f
lat, vehicle battery discharged
or disconnected, ...
- vehicle located in an area with stron
g
electroma
g
netic si
g
nals.
)
Maintain a pull on button
1
, to extract the
i
nte
g
ral ke
y
2
.
Complete unlockin
g
)
Turn the ke
y
towards the front of the vehicle
t
o
u
nl
oc
k th
e
v
e
hi
c
l
e
.
Normal lockin
g
)
Turn the ke
y
towards the rear of the vehicle
to lock the vehicle completel
y
.
Deadlockin
g
)
Turn the ke
y
towards the rear in the driver's
d
oor
l
oc
k
to
l
oc
k
t
h
e ve
hi
c
l
e comp
l
ete
ly
.
)
T
urn t
h
e
k
e
y
towar
d
s t
h
e rear a
g
a
i
n w
i
t
hi
n
f
iv
e
seco
n
ds
t
o
dead
l
oc
k th
e
v
e
hi
c
l
e
.
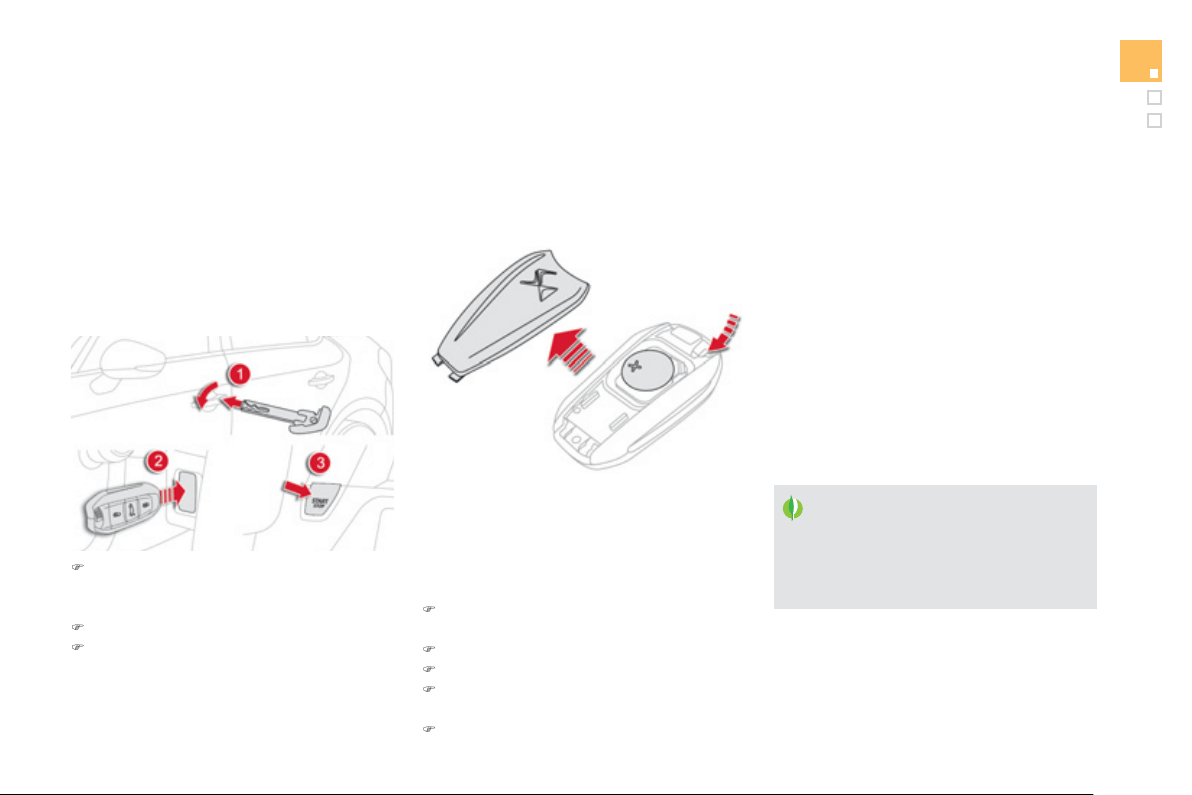
8
5
Access
D
o
n
o
t thr
o
w th
e
r
e
m
o
t
e
co
ntr
o
l
batteries awa
y
, the
y
contain metals
whi
c
h
a
r
e
h
a
rmf
u
l t
o
th
e
e
nvir
o
nm
e
nt.
Take them to an approved collection
point.
Chan
g
in
g
the batter
y
of the
e
lectronic ke
y
Batter
y
ref.: CR2032 / 3 volts.
This replacement batter
y
is available from a
CITROËN dealer or a qualified workshop.
A messa
g
e appears in the instrument panel
screen when replacement o
f
the batter
y
is
needed
.
)
U
nc
li
p t
h
e cover us
i
n
g
a sma
ll
screw
d
r
i
ver
a
t th
e
cu
t
ou
t.
)
Li
f
t
off
th
e
co
v
e
r.
)
Remove the flat batter
y
from its location.
)
Fit the new batter
y
into its location
observin
g
the ori
g
inal direction of fitment.
)
Clip the cover onto the casin
g
.
Remote control
p
roblem -
r
einitialisation
Followin
g
disconnection of the vehicle batter
y
,
replacement of the remote control batter
y
o
r
in the event of a remote control malfunction
,
y
ou can no
l
on
g
er un
l
oc
k
,
l
oc
k
or
l
ocate
y
our
v
ehicle
.
)
Place the mechanical ke
y
(
inte
g
ral with the
r
emote control
)
in the lock to unlock
y
our
v
e
hi
c
l
e
.
)
Pl
ace t
h
e e
l
ectron
i
c
k
e
y
i
n t
h
e rea
d
er.
)
S
witch on the i
g
nition b
y
pressin
g
S
TART
/
S
T
O
P.
The electronic ke
y
is
f
ull
y
operational a
g
ain.
If the
p
roblem
p
ersists, contact a CITROËN
dealer or a qualified workshop as soon as
p
ossible.

L
ost electronic ke
y
Visit a CITROËN dealer with the vehicle's registration document and your personal identification documents and if possible the key code label.
The CITROËN dealer will be able to retrieve the ke
y
code and the transponder code required to order a new ke
y
.
El
ectron
i
c
k
e
y
Th
e e
l
ectron
i
c
k
e
y
i
s a sens
i
t
i
ve s
y
stem;
d
o not operate
i
t w
hil
e
i
t
i
s
i
n
y
our poc
k
et as t
h
ere
i
s a poss
ibili
t
y
t
h
at
i
t ma
y
un
l
oc
k
t
h
e ve
hi
c
l
e, w
i
t
h
out
y
ou being aware o
f
it.
Do not repeatedl
y
press the buttons o
f
y
our electronic ke
y
out o
f
ran
g
e and out o
f
si
g
ht o
f
y
our vehicle. You run the risk o
f
stoppin
g
it
f
rom
w
orkin
g
and the remote control would have to be reinitialised.
The electronic ke
y
cannot operate as a remote control when it is in the reader or even when the i
g
nition is switched on.
Loc
ki
n
g
t
h
e ve
hi
c
l
e
Drivin
g
with the doors locked ma
y
make access to the passen
g
er compartment b
y
the emer
g
enc
y
services more di
ff
icult in an emer
g
enc
y
.
As a sa
f
et
y
precaution
(
with children on board
)
, take the Ke
y
less Entr
y
and
S
tartin
g
electronic ke
y
when
y
ou leave the vehicle, even
f
or a short
tim
e
.
Electrical interference
The Ke
y
less Entr
y
and
S
tartin
g
electronic ke
y
ma
y
not operate i
f
close to certain electronic devices: telephone, laptop computer, stron
g
ma
g
netic
f
ields, ...
A
nti-theft
p
rotection
Do not make an
y
modi
f
ications to the electronic en
g
ine immobiliser s
y
stem; this could cause mal
f
unctions.
Don't
f
or
g
et to turn the steerin
g
to en
g
a
g
e the steerin
g
lock.
When purchasin
g
a second-hand vehicle
Have all of the ke
y
s in
y
our possession paired b
y
a CITROËN dealer, to ensure that onl
y
y
our ke
y
s allow
y
our vehicle to be unlocked and started.
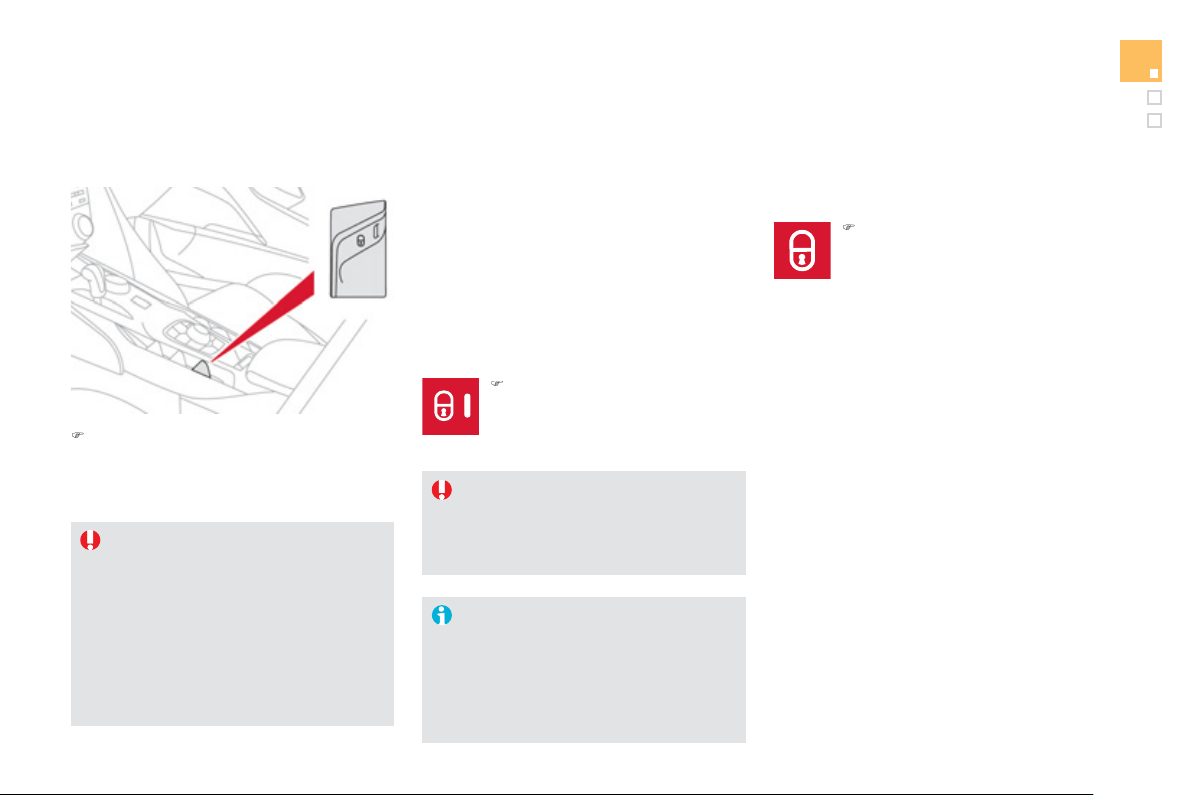
8
7
Access
Central locking control
A
utomatic central lockin
g
of the
doors
(
anti-intrusion securit
y)
The doors and boot can lock automaticall
y
w
hile drivin
g
(
speed above 6 mph
(
10 km
/
h
))
.
To activate or deactivate this
f
unction
(
activated
b
y
de
f
ault:
I
f
th
e
v
e
hi
c
l
e
i
s
dead
l
oc
k
ed
o
r l
oc
k
ed
f
rom the outside, the button is not
active. In this case, use the remote
c
ontrol to unlock the vehicle or pull an
interior door handle to open a door.
If one of the doors is open, central
l
ockin
g
f
rom the inside does not take
p
l
ace.
Drivin
g
with the doors locked ma
y
make
a
ccess to the passen
g
er compartment
b
y
the emer
g
enc
y
services more
di
ff
icult in an emer
g
enc
y
.
)
P
ress t
h
e c
l
ose
d
pa
dl
oc
k
to
l
ocate
y
our
l
oc
k
e
d
ve
hi
c
l
e
i
n a
c
ar
p
ar
k
.
L
ocatin
g
y
our vehicle
)
Op
erate the button.
Thi
s
a
ll
o
w
s
th
e
doo
r
s
a
n
d
th
e
boo
t t
o
be
l
oc
k
ed
o
r
u
nl
oc
k
ed
.
This is indicated b
y
li
g
htin
g
of the courtes
y
lamps and flashin
g
of the direction indicators
fo
r
a
f
e
w
seco
n
ds
.
)
Operate this button until a
m
essa
g
e appears
i
n t
h
e
i
nstrument pane
l
screen.
T
ransport
i
n
g
l
on
g
or vo
l
um
i
nous
objects
I
f
y
ou want to drive with the boot open,
p
ress the central lockin
g
control button
t
o
l
oc
k th
e
doo
r
s
.
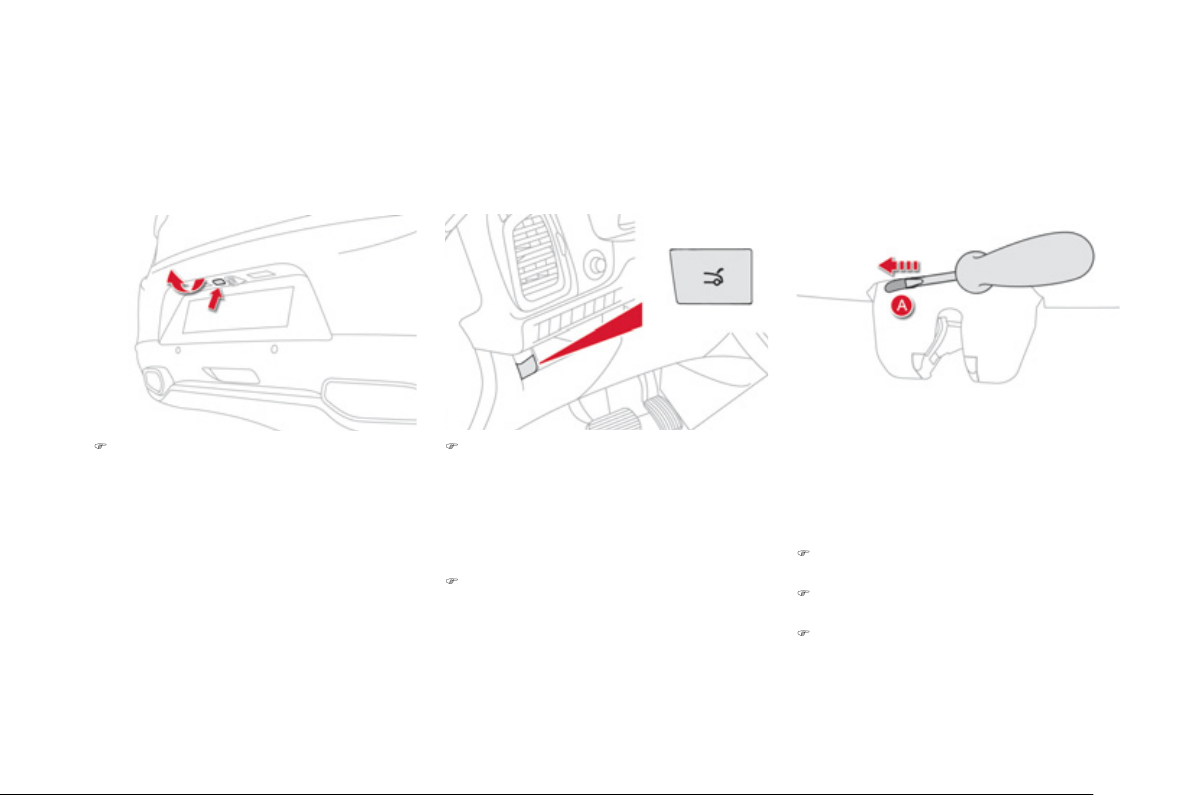
Boot
)
A
f
ter unlockin
g
the boot or the vehicle
u
sing the electronic key - remote control,
p
ress the openin
g
control then raise the
tail
g
ate.
Openin
g
from outside
)
Pr
ess
thi
s
bu
tt
o
n
u
ntil th
e
boo
t i
s
h
ea
r
d
t
o
u
nl
oc
k.
T
ail
g
ate release
S
y
stem allowin
g
the mechanical unlockin
g
o
f
the boot in the event of a batter
y
or central
lockin
g
s
y
stem malfunction.
If the tail
g
ate is not closed correctl
y
, with
th
e
h
y
brid s
y
stem activ
e
o
r th
e
vehicle
m
ovin
g
(
speed above 6 mph
(
10 km/h
))
, a
messa
g
e appears in the instrument panel
sc
r
ee
n
fo
r
a
fe
w
seco
n
ds
.
Lockin
g
after closin
g
I
f
the
f
ault persists a
f
ter closin
g
a
g
ain, the boot
w
ill
r
e
m
ai
n
locked
.
U
n
l
oc
ki
n
g
)
F
o
ld
b
ac
k
t
h
e rear seats to
g
a
i
n access to
th
e
l
oc
k
f
r
o
m in
s
i
de
th
e
boo
t.
)
In
se
rt
a
s
m
a
ll
sc
r
e
w
d
riv
e
r int
o
h
o
l
e
A
of
th
e
lock to unlock the tail
g
ate.
)
M
o
v
e
th
e
l
a
t
c
h t
o
th
e
l
e
ft.
Closin
g
)
Lower the tail
g
ate usin
g
the interior
g
rab
ha
n
dle
.
Openin
g
from inside
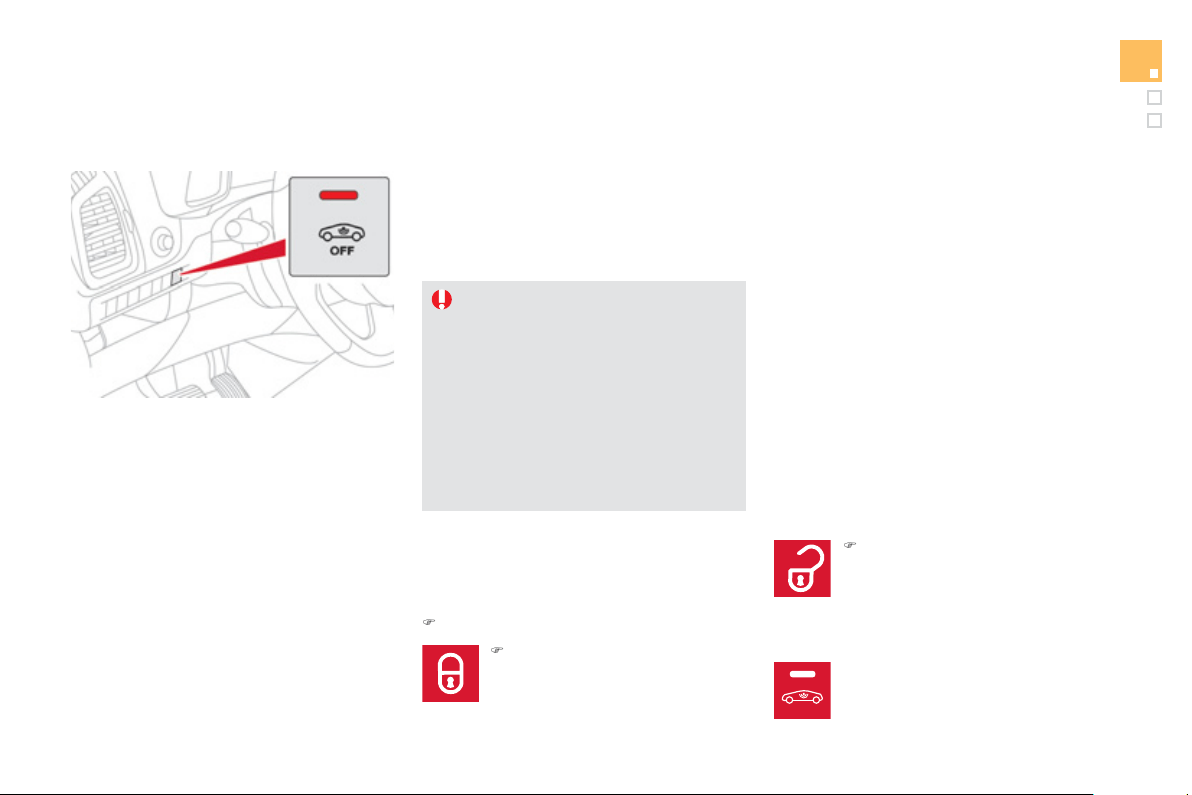
OFF
89
Access
S
y
stem which protects and provides a deterrent
a
g
ainst theft and break-ins. It provides the
followin
g
t
y
pes of monitorin
g
:
Alarm
- Exterior
p
erimeter
The s
y
stem checks for openin
g
of the vehicle.
The alarm is tri
gg
ered i
f
an
y
one tries to open a
d
oor, t
h
e
b
oot or t
h
e
b
onnet...
-
I
nter
i
or vo
l
umetr
i
c
The s
y
stem checks
f
or an
y
variation in the
vo
l
ume
i
n t
h
e passen
g
er compartment.
The alarm is triggered i
f
anyone breaks a
window, enters the passen
g
er compartment o
r
mo
v
es
in
s
i
de
th
e
v
e
hi
c
l
e
.
- Tilt
The s
y
stem checks for an
y
chan
g
e in the
a
ttit
ude
o
f th
e
v
e
hi
c
l
e
.
The alarm is tri
gg
ered if the vehicle is lifted,
m
o
v
ed
o
r
k
n
ocked
.
Self-protection function
The s
y
stem checks for the puttin
g
out of
s
ervice of its components.
The alarm is tri
gg
ered if the batter
y
, the
button or the wires of the siren are put
out o
f
service or dama
g
ed.
For all work on the alarm s
y
stem,
c
ontact a
C
ITR
OË
N dealer or a
q
uali
f
ied workshop.
Lockin
g
the vehicle with full
a
larm s
y
stem
A
ct
i
vat
i
on
)
S
witch o
ff
the i
g
nition and
g
et out o
f
the vehicle.
)
P
ress t
h
e
l
oc
ki
n
g
b
utton on t
h
e
r
e
m
o
t
e
co
ntr
ol
o
r
lock
t
he
v
ehicle
usin
g
the Ke
y
less Entr
y
and
S
tartin
g
s
y
stem.
The monitoring system is active: the indicator
lam
p
in the button
f
lashes once
p
er second.
A
fter the lockin
g
button on the remote control
is pressed or the vehicle locked usin
g
the
Ke
y
less Entr
y
and Startin
g
s
y
stem, the exterior
perimeter monitorin
g
is activated after a dela
y
of
5 seconds, the interior volumetric monitorin
g
af
t
e
r 4
5
seco
n
ds
a
n
d
th
e
a
nti-tilt
af
t
e
r
o
n
e
min
u
t
e
a
n
d
30
seco
n
ds
.
I
f
an opening
(
door, boot...
)
is not closed
f
ull
y
, the vehicle is not locked but the exterio
r
perimeter monitorin
g
will be activated after a
dela
y
of 45 seconds.
)
Press the unlocking button on
th
e
r
e
m
o
t
e
co
ntr
o
l
o
r
u
nl
oc
k th
e
vehicle usin
g
the Ke
y
less Entr
y
and Startin
g
s
y
stem.
Deactivation of the volumetric
m
onitorin
g
Th
e vo
l
umetr
i
c protect
i
on s
y
stem
i
s
d
eact
i
vate
d
: t
h
e
i
n
di
cator
l
am
p
i
n t
h
e
b
utton goes o
ff
.
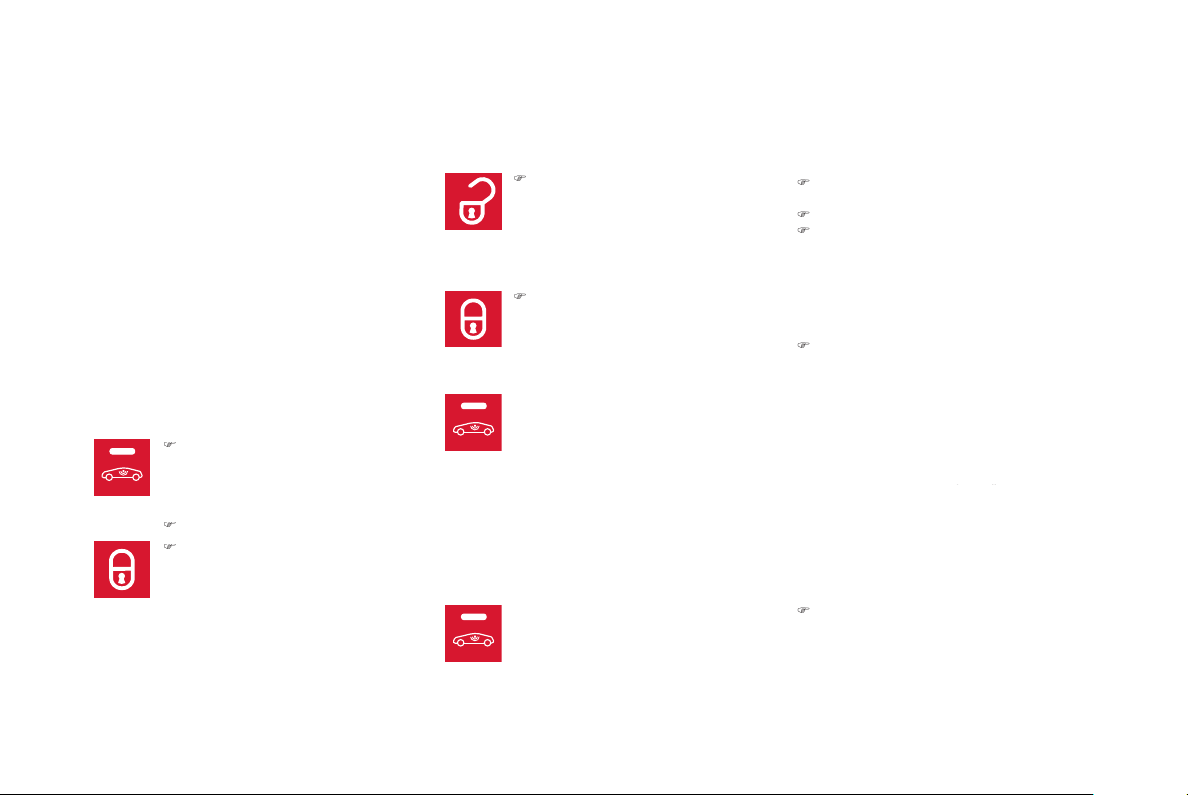
OFF
OFF
OFF
Lockin
g
the vehicle
w
i
t
h
exter
i
or
p
er
i
mete
r
m
onitorin
g
onl
y
D
eac
tiv
a
t
e
th
e
int
e
ri
o
r v
o
l
u
m
e
tri
c
a
n
d
a
nti-li
f
t
m
onitorin
g
to avoid unwanted tri
gg
erin
g
o
f
the
a
l
a
rm in
ce
rt
a
in
cases
suc
h
as
:
- leavin
g
a window partiall
y
open,
- washin
g
y
our vehicle,
- chan
g
in
g
a wheel,
-
h
av
i
n
g
y
our ve
hi
c
l
e towe
d
,
- transportat
i
on
by
sea.
Deactivation of the interior
v
o
l
umetr
i
c an
d
ant
i
-t
il
t mon
i
tor
i
n
g
)
Switch of the i
g
nition and within
ten seconds, press this button
until the indicator lamp is on
c
ont
i
nuous
ly
.
)
Ge
t
ou
t
of
th
e
v
e
hi
c
l
e
.
)
P
ress t
h
e
l
oc
ki
n
g
b
utton on
t
h
e remote contro
l
i
mme
di
ate
ly
or lock the vehicle using the
K
e
y
less Entr
y
and
S
tartin
g
sy
stem.
The exterior perimeter monitorin
g
alone is
a
ctivated: the indicator lamp in the button
f
lashes once per second.
To be e
ff
ective, this deactivation must be
c
arr
i
e
d
out eac
h
t
i
me t
h
e
ig
n
i
t
i
on
i
s sw
i
tc
h
e
d
off
.
Reactivation of the interior
vo
l
umetr
i
c an
d
ant
i
-t
il
t mon
i
tor
i
n
g
Tri
gg
erin
g
of the alarm
This is indicated by sounding o
f
the siren
and
f
lashing o
f
the direction indicators
f
o
r
thirty seconds.
The monitoring
f
unctions remain active until
the alarm has been triggered eleven times in
success
i
o
n.
)
Press the unlockin
g
button on
th
e
r
e
m
o
t
e
co
ntr
o
l
o
r
u
nl
oc
k th
e
vehicle using the Keyless Entry
a
nd
S
tartin
g
s
y
stem to deactivate
t
h
e exter
i
or per
i
meter mon
i
tor
i
n
g
.
)
P
ress t
h
e
l
oc
ki
n
g
b
utton on t
h
e
re
m
o
t
e
co
ntr
o
l
o
r l
oc
k th
e
v
e
hi
c
l
e
usin
g
the Ke
y
less Entr
y
and
S
tartin
g
s
y
stem to activate all the
m
onitorin
g
functions.
Th
e
i
n
di
cator
l
am
p
i
n t
h
e
b
utton
again
f
lashes once per second.
When the vehicle is unlocked usin
g
th
e
r
e
m
o
t
e
co
ntr
o
l
o
r
u
nl
oc
k
ed
usin
g
the Ke
y
less Entr
y
and
S
tartin
g
sy
stem, rapid
f
lashin
g
o
f
the indicator
l
amp in the button in
f
orms
y
ou that the alarm
was triggered during your absence. When
the i
g
nition is switched on, this
f
lashin
g
stops
immediatel
y
.
Failure of the remote control
To deactivate the monitorin
g
functions:
)
Unlock the vehicle usin
g
the ke
y
(
inte
g
ral with
the remote control
)
in the driver's door lock.
)
O
pen the door; the alarm is tri
gg
ered.
)
S
witch on the i
g
nition; the alarm stops. The
indicator lamp in the button goes o
ff
.
Lockin
g
the vehicle without
a
ctivatin
g
the alarm
)
L
oc
k
or
d
ea
dl
oc
k
t
h
e ve
hi
c
l
e us
i
n
g
t
h
e
k
e
y
(
inte
g
ral with the remote control
)
in the
d
riv
e
r'
s
doo
r l
oc
k.
Operatin
g
fault
When the i
g
nition is switched on,
f
ixed
illumination of the indicator lamp in the button
indicates a fault in the s
y
stem.
Have it checked by a CITROËN dealer or a
y
q
ualified workshop.
*
Accordin
g
to countr
y
.
Automatic activation
*
2 min
u
t
es
af
t
e
r th
e
l
as
t
doo
r
o
r th
e
boo
t i
s
cl
ose
d
, t
h
e s
y
stem
i
s act
i
vate
d
automat
i
ca
lly
.
)
T
o avo
id
tr
igg
er
i
n
g
t
h
e a
l
arm on enter
i
n
g
the vehicle,
f
irst press the unlockin
g
button
o
n t
he
r
e
m
o
t
e
co
ntr
ol
o
r
u
n
lock
t
he
v
ehicle
usin
g
the Ke
y
less Entr
y
and
S
tartin
g
sy
stem.
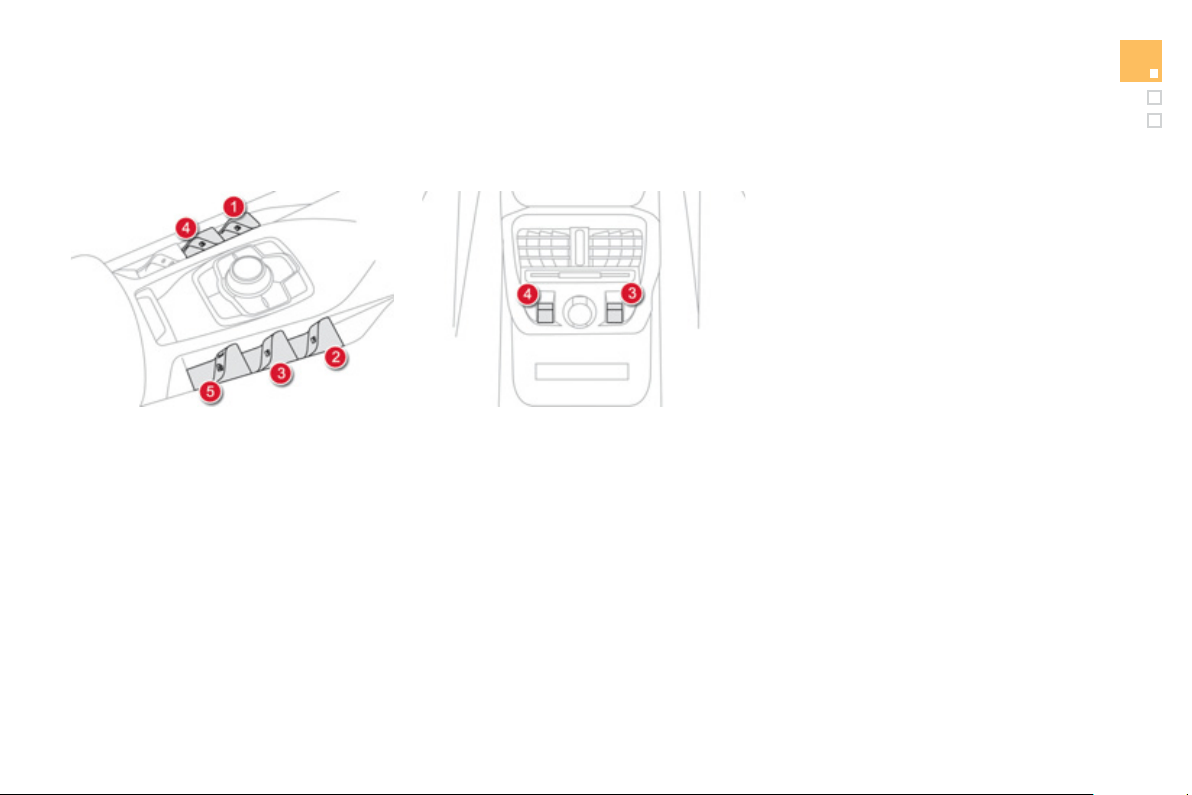
91
Access
Electric windows
1.
L
eft hand front electric window switch
.
2.
R
i
g
ht hand front electric window
switch
.
3.
R
i
g
ht hand rear electric window switch
.
M
anua
l
o
p
erat
i
on
T
o o
p
en or c
l
ose t
h
e w
i
n
d
ow,
p
ress or
p
u
ll
t
h
e
s
witch gently. The window stops as soon as the
s
wit
c
h i
s
r
e
l
eased
.
Automatic o
p
eration
To open or close the window, press or pull
s
witch full
y
: the window opens or closes
c
ompletel
y
when the switch is released.
Pressin
g
the switch a
g
ain stops the movement
of
th
e
win
do
w.
The
elec
tr
ic
w
i
n
do
w
s
w
i
t
ches
r
e
m
ai
n
o
perational
f
or approximatel
y
45 seconds a
f
ter
s
witching o
ff
the ignition.
O
nce this time has elapsed, the electric
windows will not operate. To reactivate them,
s
witch the i
g
nition on a
g
ain.
4
.
L
eft hand rear electric window switch
.
5
.
D
eact
i
vat
i
n
g
t
h
e rear e
l
ectr
i
c w
i
n
d
ow
s
w
i
tc
h
es
,
l
oc
ki
n
g
t
h
e rear
d
oors
(
child lock
).

Safet
y
anti-pinch
When the window rises and meets an obstacle
,
i
t stops an
d
i
mme
di
ate
ly
part
i
a
lly
l
owers a
g
a
i
n.
In the event o
f
unwanted openin
g
o
f
the
w
i
n
d
ow on c
l
os
i
n
g
, press t
h
e sw
i
tc
h
unt
il
t
h
e
window opens completely, then pull the switch
immediatel
y
until the window closes.
C
ontinue
to hold the switch for approximatel
y
one second
a
ft
e
r th
e
win
do
w h
as
c
l
osed
.
The safet
y
anti-pinch function is not active
durin
g
this operation.
Deactivatin
g
the rear window
c
ontro
l
s
Reinitialisation of the
e
lectric windows
In the event o
f
contact during operation
of
the windows,
y
ou must reverse the
movement of the window. To do this,
press the switch concerned.
When operatin
g
the passen
g
er electric
window switches
,
the driver must
e
nsure t
h
at no one
i
s prevent
i
n
g
correct
c
losin
g
o
f
the windows.
The
d
r
i
v
e
r m
us
t
e
n
su
r
e
t
ha
t t
he
passengers use the electric windows
c
orrectl
y
.
Be aware of children when operatin
g
th
e
win
do
w
s
.
Be aware of passen
g
ers or other
persons present when closin
g
the
w
i
n
d
ows us
i
n
g
t
h
e t
h
e e
l
ectron
i
c
k
e
y
o
r
the "Access and
S
tartin
g
Hands Free"
sy
stem.
Followin
g
reconnection of the batter
y
, the
sa
f
et
y
anti-pinch
f
unction must be reinitialised.
T
he sa
f
et
y
anti-pinch
f
unction is not active
d
ur
i
n
g
t
h
ese operat
i
ons:
- lower the window completely, then raise
it, it will rise in ste
p
s o
f
a
f
ew centimetres
e
ach time the switch is pressed. Repeat
the operation until the window closes
c
ompletel
y
,
- continue to press the switch for at least
o
ne second a
f
ter reachin
g
this position,
w
i
n
do
w
closed
.
For the sa
f
et
y
o
f
y
our children, press
s
w
i
t
ch
5 to prevent operation o
f
the
r
ear windows irres
p
ective o
f
their
p
osition.
The warnin
g
lamp in the button comes on,
a
ccompanied b
y
a messa
g
e confirmin
g
a
ctivation. It remains on, as lon
g
as the child
l
oc
k i
s
ac
tiv
a
t
ed
.
Th
e
int
e
ri
o
r
co
ntr
o
l
s
f
o
r th
e
r
ea
r
doo
r
s
a
r
e
a
l
so
deac
t
i
v
a
t
ed
.
O
penin
g
the doors
f
rom the outside and
o
p
eration o
f
the rear electric windows
f
rom the
driver's controls remain
p
ossible.
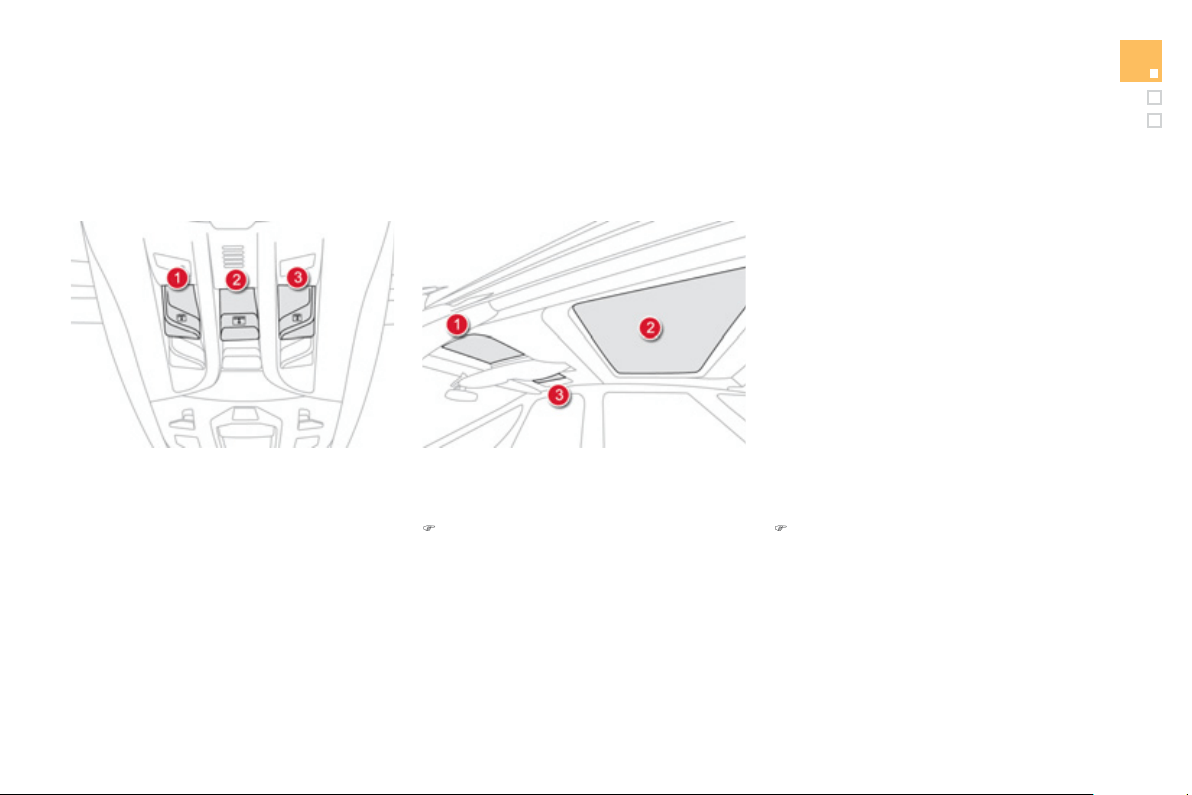
93
Access
Cockpit glass roof
A
tinted
g
lass panoramic surface to increase
the li
g
ht and visibilit
y
in the passen
g
e
r
c
ompartment.
Fi
tte
d
w
i
t
h
t
h
ree e
l
ectr
i
c
bli
n
d
s to
i
mprove
tem
p
erature and noise related com
f
ort.
There are two options for openin
g
and closin
g
:
Electric blinds
)
Pull or press control,
g
oin
g
be
y
ond the
p
oint of resistance.
One press opens or closes the blind
c
omp
l
ete
ly
.
A
f
ter a new action on the the control, the
blind continues movin
g
f
or around 2 cm,
then sto
p
s.
)
Pull or press the control without
g
oin
g
b
e
y
ond the point of resistance
(
forwards to
c
lose and rearwards to open
)
.
Wh
en
y
ou re
l
ease t
h
e contro
l
, t
h
e
bli
n
d
c
ontinues movin
g
f
or around 2 cm, then
s
to
p
s.

Safet
y
anti-pinch
In automatic mode and at the end o
f
its travel,
i
f
the blind meets an obstacle while closin
g
it
s
tops and moves back sli
g
htl
y
.
If the blind stops and immediatel
y
opens a
g
ain
durin
g
a closin
g
manoeuvre:
)
operate the control until the blind is
f
ull
y
open
,
)
t
h
en o
p
erate t
h
e contro
l
unt
il
t
h
e
bli
n
d
i
s
f
ully closed.
T
he safet
y
anti-pinch function is not
o
perational durin
g
these operations
.
If the blind meets an obstacle durin
g
o
peration,
y
ou must reverse the
movement o
f
the blind. To do this, press
t
he
co
ntr
ol
co
n
ce
rn
ed
.
Wh
en t
h
e
d
r
i
ver operates t
h
e
bli
n
d
c
ontro
l
, t
h
e
y
must ensure t
h
at no one
i
s
preventing correct closing o
f
the blind.
The driver must ensure that passen
g
ers
use the blind correctl
y
.
Be aware of children when operatin
g
th
e
b
lin
d
.
R
e
i
n
i
t
i
a
li
sat
i
on
I
f
power to the blind is cut o
ff
while it is movin
g
,
the sa
f
et
y
anti-pinch must be reinitialised:
)
operate the control until the blind is
f
ully
c
losed,
)
continue to press for at least 3 seconds.
A sli
g
ht movement of the blind will then be
n
oticeable, confirmin
g
the reinitialisation.
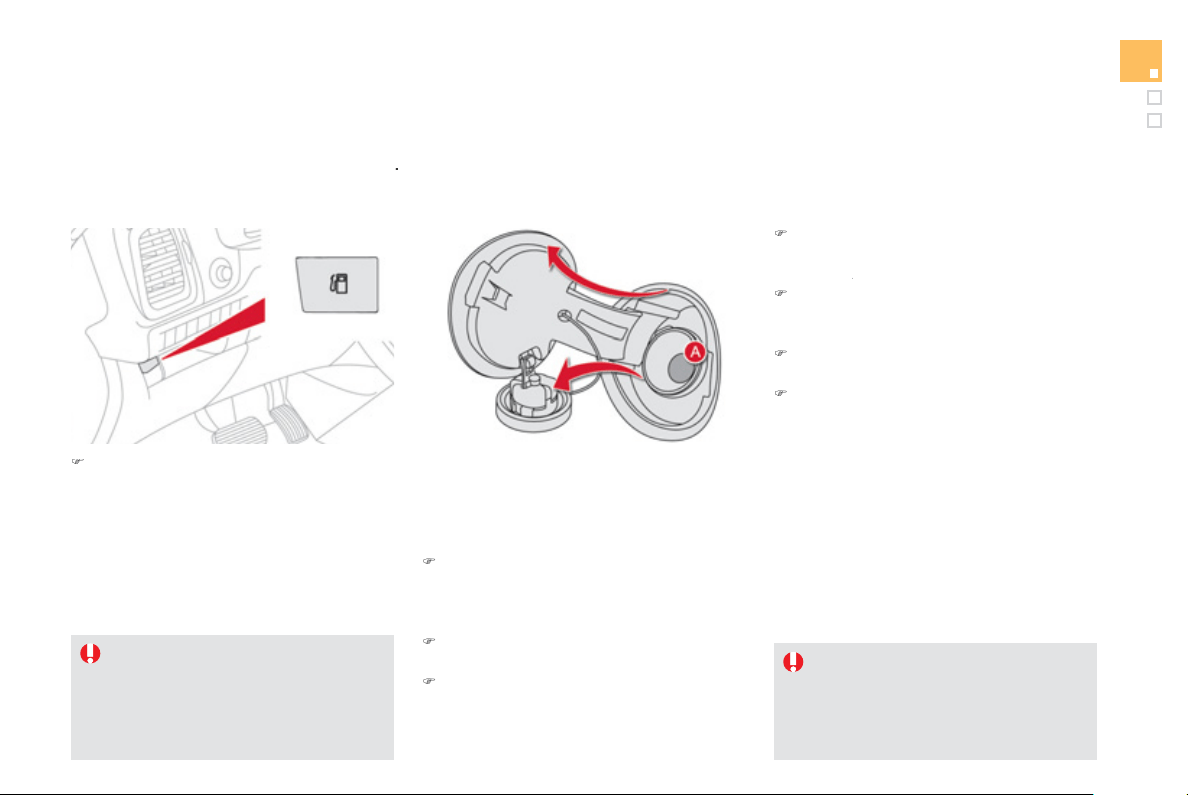
9
5
Access
Fuel tank
Capacit
y
of the tank: approximatel
y
60 litres
.
Additions of fuel must be of at least
5
litres to
be re
g
istered b
y
the fuel
g
au
g
e.
O
penin
g
the
f
iller cap ma
y
result in an inrush o
f
ai
r.
Thi
s vacuum
i
s ent
i
re
ly
norma
l
an
d
resu
l
ts
f
rom the sealin
g
o
f
the
f
uel s
y
stem.
)
Take care to select the
p
um
p
that delivers
the correct
f
uel t
y
pe
f
or
y
our vehicle's
e
n
g
ine
(
reminder on a label on the inside o
f
the filler flap
)
.
)
O
pen the filler cap b
y
turnin
g
it a 1/4 turn to
th
e
l
e
ft.
)
Remove the
f
iller cap and han
g
it on its
c
arrier
(
on the
f
iller
f
lap
)
.
Openin
g
If
y
ou have put in the wron
g
fuel fo
r
y
our ve
hi
c
l
e,
y
ou must
h
ave
h
ave
t
he tank drained and refilled with
t
he correct fuel before
y
ou start the
e
n
g
ine
.
With Stop & Start, never refuel with the
sy
stem in ST
O
P mode;
y
ou must switch
o
ff the i
g
nition with the START/ST
O
P
bu
tt
o
n.
Refuellin
g
)
Introduce the nozzle and push it in
f
ull
y
(
pushin
g
open the metal non-return
v
a
lv
e
A
).
A
)
Fill the tank
(
don't continue past the third
c
ut-off of the nozzle, as this ma
y
cause
m
alfunctions
)
.
)
Refit the filler cap turnin
g
it a 1/4 turn to the
ri
g
ht.
)
Push the
f
iller
f
lap to close it.
Your vehicle is
f
itted with a catal
y
tic converte
r
th
a
t r
educes
th
e
l
e
v
e
l
s
of
h
a
rm
fu
l
subs
t
a
n
ces
in
the exhaust
g
as.
)
Pr
ess
th
e
s
wit
c
h
Thi
s
s
wit
c
h r
e
m
a
in
s
ac
tiv
e
f
o
r
a
f
e
w min
u
t
es
after switchin
g
off the i
g
nition. If necessar
y
,
s
w
i
tc
h
t
h
e
ig
n
i
t
i
on on a
g
a
i
n to react
i
vate
i
t.
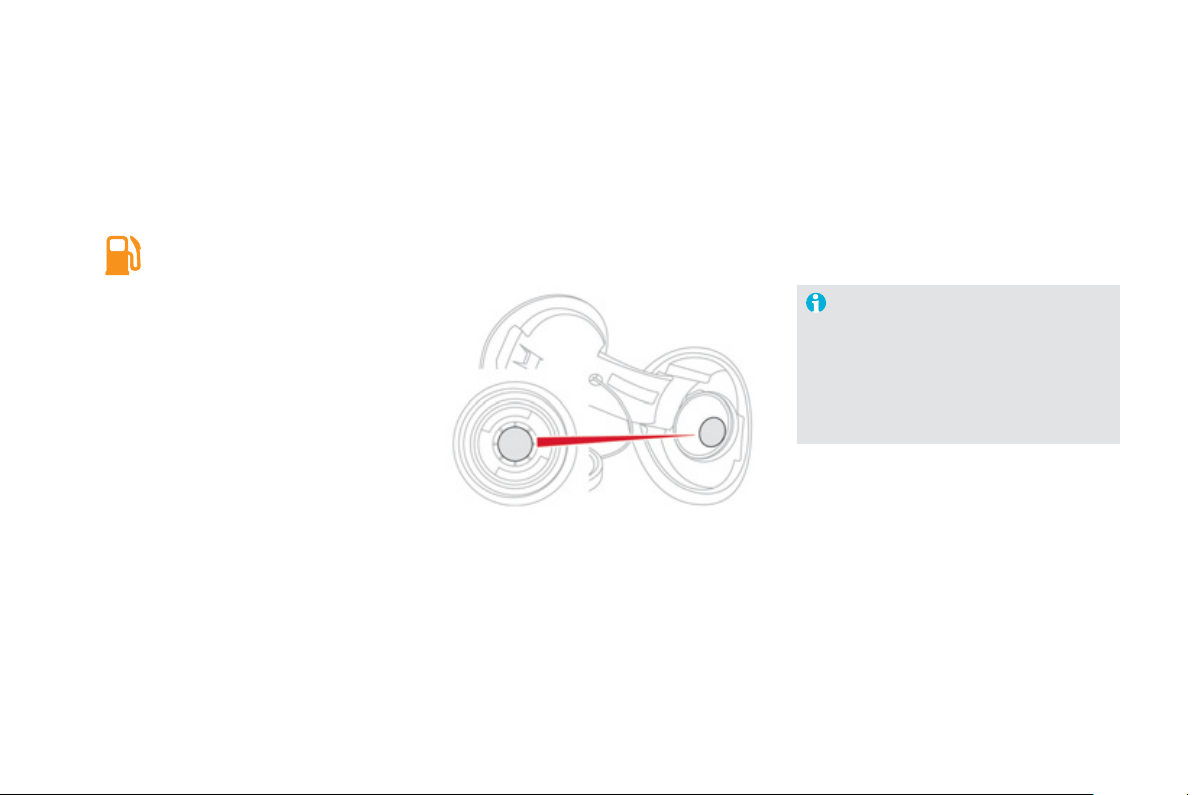
Low fuel level
Wh
e
n th
e
l
o
w f
ue
l l
e
v
e
l in th
e
t
a
nk i
s
r
eached, this warnin
g
lamp comes on
in the instrument panel, accompanied
by
an audible warnin
g
and a messa
g
e
i
n t
h
e
i
nstrument pane
l
screen.
When it
f
irst comes on, around 6 litres o
f
f
uel
re
m
ai
n
i
n t
he
t
a
n
k
.
You must re
f
uel as soon as
p
ossible to avoid
r
unnin
g
out.
Fuel suppl
y
cut-off
Your vehicle is equipped with a sa
f
et
y
device
which cuts o
ff
the
f
uel suppl
y
in the event o
f
a
collisio
n.
It remains
p
ossible to use a
f
uel can to
f
ill th
e
t
a
nk.
I
n order to ensure a
g
ood flow of fuel,
do not place the nozzle of the fuel can
in direct contact with the flap of the
misfuel prevention device and pour
sl
ow
ly
.
Misfuel prevention (Diesel) *
Mechanical device which prevents
f
illin
g
the tank o
f
a Diesel vehicle with petrol. It avoids the risk o
f
e
ngine damage that can result
f
rom
f
illing with the wrong
f
uel.
Located in the filler neck, the misfuel prevention device appears when the filler cap is removed.
When a
p
etrol
f
iller nozzle is introduced into the
f
uel
f
iller neck o
f
y
our Diesel vehicle, it comes
into contact with the flap. The s
y
stem remains
c
losed and prevents fillin
g
.
D
o not persist but introduce a Diesel t
y
pe
filler nozzle
.
Operation
Travellin
g
abroad
A
s Diesel
f
uel pump nozzles ma
y
be di
ff
erent
in other countries, the presence of the misfuel
p
revention device ma
y
make refuellin
g
impossible.
Before travellin
g
abroad, we recommend that
y
ou check with the CITRO
Ë
N dealer network,
whether
y
our vehicle is suitable
f
or the
f
uel
p
umps
i
n t
h
e countr
y
i
n w
hi
c
h
y
ou want to
tr
a
v
e
l.
* Accordin
g
to countr
y
of sale.

Access
Qualit
y
of the fuel used fo
r
D
iesel en
g
ines
The Diesel en
g
ines are per
f
ectl
y
compatible
with
b
i
ofue
l
s
whi
c
h
co
n
fo
rm t
o
cu
rr
e
nt
a
n
d
f
uture European standards
(
Diesel
f
uel which
c
omplies with standard EN 5
90
mixed with a
biofuel which complies with standard EN 14214
)
available at the pumps
(
containin
g
up to 7 %
Fatt
y
Acid Meth
y
l Ester
)
.
The B
30
bio
f
uel can be used in certain Diesel
e
n
gi
nes;
h
owever, t
hi
s use
i
s su
bj
ect to str
i
ct
application o
f
the special servicin
g
conditions.
C
ontact a CITROËN dealer or a
q
ualified
worksho
p
.
The use of an
y
other t
y
pe of
(
bio
)
fuel
(
ve
g
etable or animal oils, pure or diluted,
domestic fuel...
)
is strictl
y
prohibited
(
risk o
f
dama
g
e to the en
g
ine and fuel s
y
stem
)
.

003
Comfort
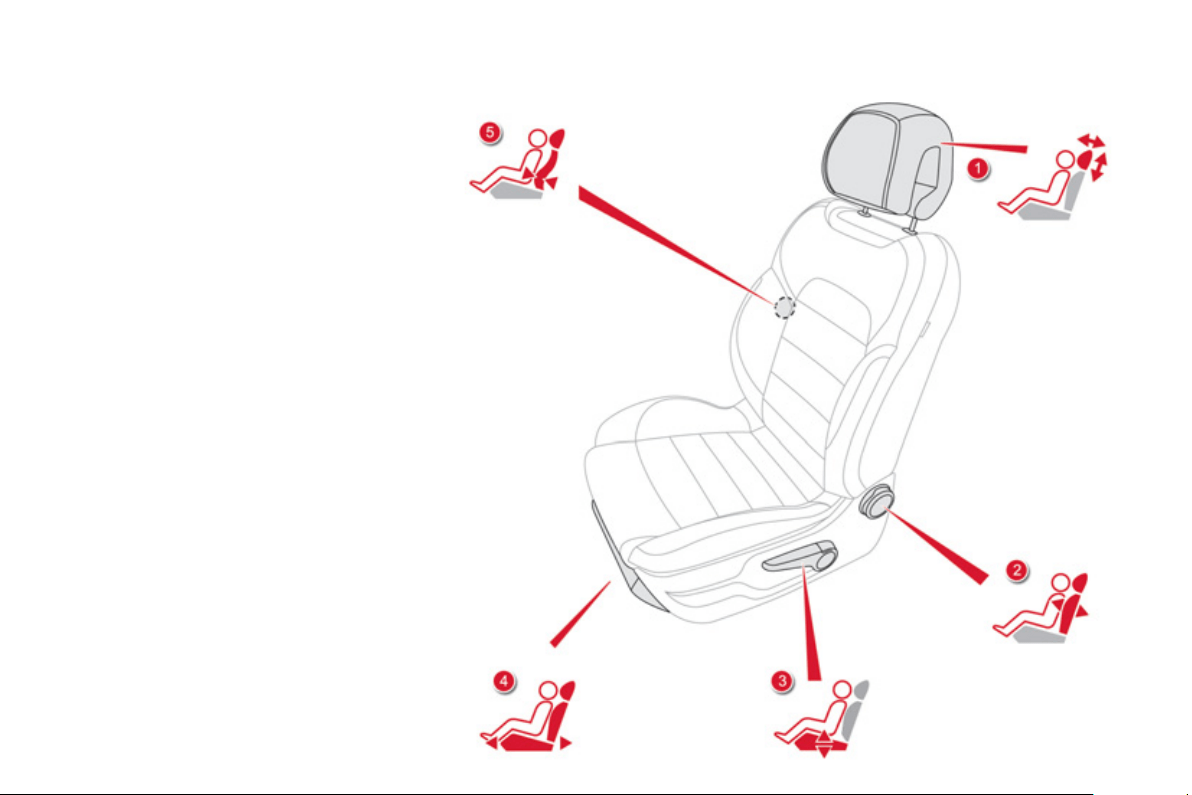
Front seats
Manual
1.
A
djustments to the height and angl
e
o
f
the head restrain
t
To raise it, pull upwards.
To lower it, press on the lu
g
and the head
res
tr
a
int
a
t th
e
sa
m
e
tim
e
.
2.
A
d
j
ustment of the backrest an
g
l
e
Turn the wheel to ad
j
ust the an
g
le o
f
the
back
r
es
t.
3.
A
d
j
ustment of the seat hei
g
h
t
R
a
i
se
o
r l
o
w
e
r th
e
co
ntr
o
l l
e
v
e
r th
e
n
u
m
ber
o
f
times re
q
uired to obtain the desired
p
osition.
4.
Forwards-backwards ad
j
ustment of the
seat
p
osition
Lift th
e
co
ntr
o
l
ba
r
a
n
d
s
li
de
th
e
sea
t
fo
rw
a
r
ds
o
r
bac
kw
a
r
ds
.
5.
A
d
j
ustment of the driver's lumba
r
suppor
t
T
u
rn th
e
wh
ee
l t
o
ob
t
a
in th
e
des
ir
ed
l
e
v
e
l
of
l
umbar su
pp
ort.
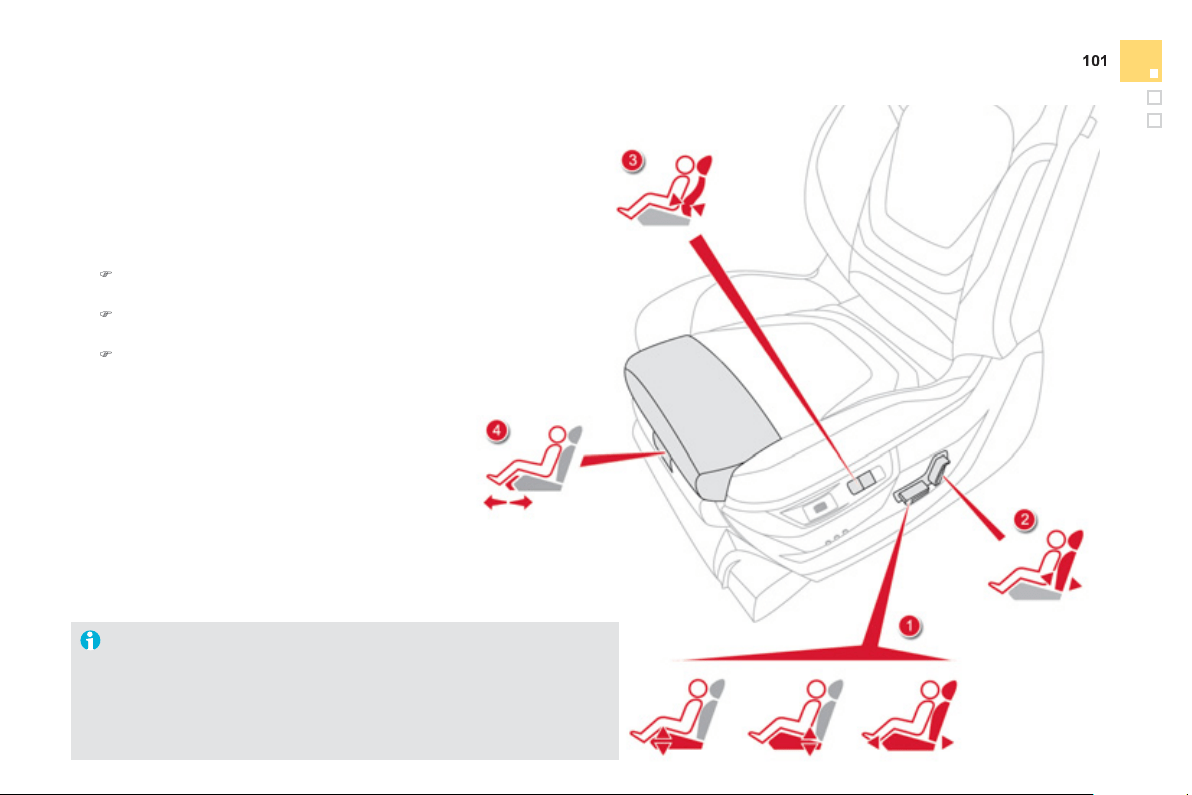
Comfort
S
witch on the ignition or start the engine i
f
the vehicle has gone into
e
conom
y
mode.
The electric functions of the driver's seat are active for about 45 seconds
after openin
g
the front door. The
y
are deactivated about 45 seconds after
s
witchin
g
off the i
g
nition and in econom
y
mode.
To reactivate them, switch on the i
g
nition.
Electric
1.
A
d
j
ustment of the seat cushion an
g
le
a
nd hei
g
ht, and forwards-backwards
adj
ustmen
t
)
R
a
i
se
o
r l
o
w
e
r th
e
f
r
o
nt
of
th
e
co
ntr
o
l t
o
a
d
j
ust the seat cushion an
g
le.
)
R
a
i
se
o
r l
o
w
e
r th
e
r
ea
r
o
f th
e
co
ntr
o
l t
o
ra
i
se
o
r l
o
w
e
r th
e
sea
t.
)
Simultaneousl
y
raise or lower the front
a
n
d
r
ea
r
o
f th
e
co
ntr
o
l in
o
r
de
r t
o
r
a
i
se
or
lo
w
e
r t
he
e
nt
i
r
e
sea
t.
2.
A
d
j
ustment of the backrest an
g
l
e
M
o
v
e
th
e
co
ntr
o
l
fo
rw
a
r
ds
o
r
bac
kw
a
r
ds
t
o
a
djust the backrest angle.
3.
A
d
j
ustment of driver's lumbar suppor
t
Pr
ess
th
e
co
ntr
o
l
s
wit
c
h
es
t
o
ob
t
a
in th
e
desired level of lumbar support.
4
. Manual ad
j
ustment of the cushion
Pull on the
g
rip to ad
j
ust the len
g
th o
f
the
cus
hi
o
n.
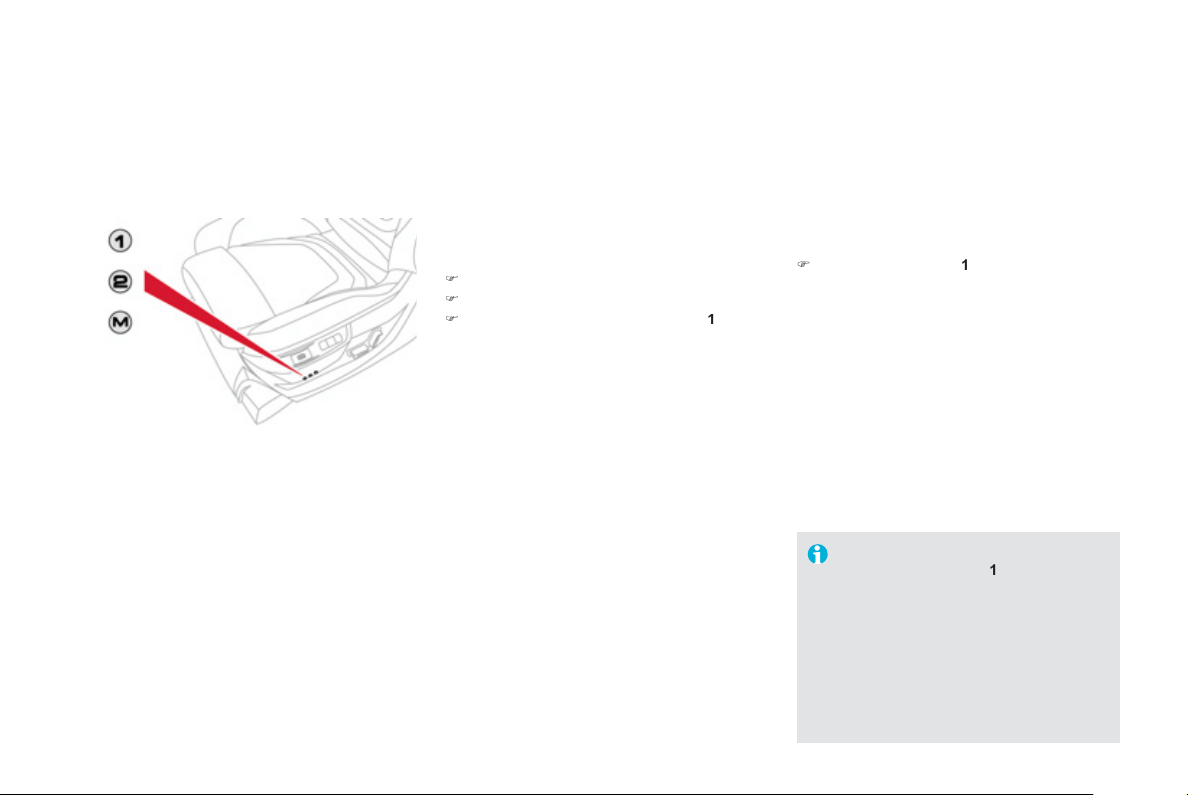
Storin
g
drivin
g
positions
S
y
stem which stores the electrical settin
g
s
of the driver's seat and the head-up displa
y
s
ettin
g
s. It enables
y
ou to store up to two
p
ositions usin
g
the buttons on the side o
f
the
d
r
i
v
e
r
's
sea
t.
Storin
g
a position usin
g
b
uttons M / 1 / 2
)
S
witch on the ignition.
)
Ad
j
ust
y
our seat and the head-up displa
y
.
)
Pr
ess
bu
tt
o
n
M
, then press button
1
or
2
within f
ou
r
seco
n
ds
.
An audible si
g
nal indicates that the position
has
bee
n
s
t
o
r
ed
.
S
torin
g
a new position cancels the previous
pos
i
t
i
on.
Recallin
g
a stored position
)
Brie
f
ly press button
1
or
2
t
o
r
eca
ll th
e
c
orrespondin
g
position.
A
n audible si
g
nal indicates the end of the
ad
j
ustment.
You can interrupt the current movement
b
y
pressin
g
button
M
,
1
o
r
2
or b
y
usin
g
o
n
e
o
f th
e
sea
t
co
ntr
o
l
s
.
A
store
d
pos
i
t
i
on cannot
b
e reca
ll
e
d
w
hil
e
d
r
i
v
i
n
g
.
R
eca
lli
n
g
store
d
pos
i
t
i
ons
i
s
deactivated 45 seconds a
f
ter switching
off
the i
g
nition.
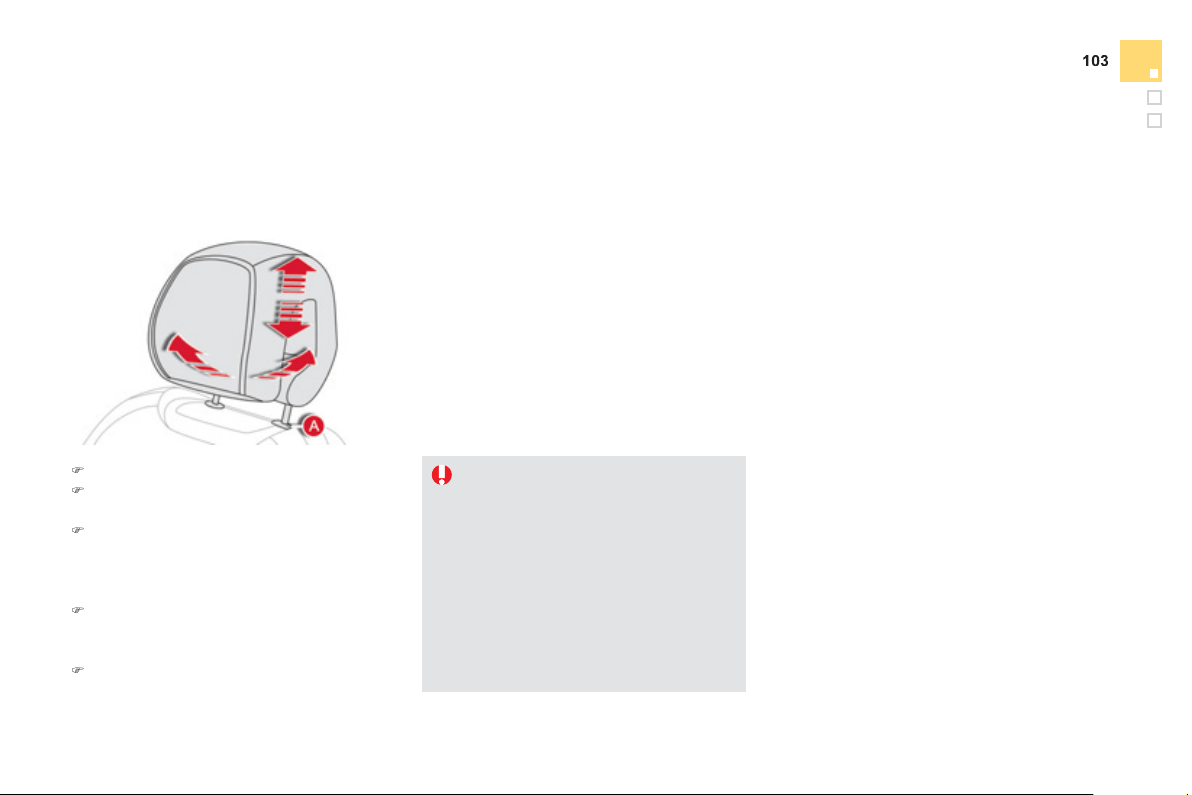
Comfort
Th
e
h
ead
r
es
tr
a
int i
s
f
itt
ed
with
a
f
r
a
m
e
with notches which
p
revents it
f
rom
lowerin
g
; this is a sa
f
et
y
device in case
of impact.
T
he ad
j
ustment is correct when the
u
pper ed
g
e of the head restraint is
l
evel with the to
p
of the head
.
Ne
v
e
r
d
r
i
v
e
w
i
t
h
t
he
head
r
es
tr
ai
nt
s
r
emove
d
; t
h
e
y
must
b
e
i
n p
l
ace an
d
adj
uste
d
correct
ly
.
Head restraint hei
g
ht and
a
n
g
le ad
j
ustment
)
T
o ra
i
se a
h
ea
d
restra
i
nt, pu
ll
i
t upwar
d
s.
)
T
o remove t
h
e
h
ea
d
restra
i
nt, press t
h
e
l
u
g
A
an
d
p
u
ll
t
h
e
h
ea
d
restra
i
nt u
p
war
d
s.
)
To
p
ut the head restraint back in
p
lace,
e
n
g
a
g
e the head restraint stems in the
openin
g
s keepin
g
them in line with the seat
bac
k.
)
To lower the head restraint, press the lu
g
A
a
n
d
pus
h
d
own on t
h
e
h
ea
d
restra
i
nt at t
h
e
sa
m
e
t
i
m
e
.
)
To ad
j
ust the an
g
le o
f
the head restraint, tilt
its lower
p
art
f
orwards or rearwards.

M
assa
g
e function
T
his function provides the driver with a back
massa
g
e.
I
t on
ly
operates w
h
en t
h
e
hyb
r
id
s
y
stem is active or in
S
T
O
P mode o
f
the
S
top
&
S
tart s
y
stem.
A
ct
i
vat
i
on
)
P
r
ess
t
his
s
w
i
t
ch
.
Its indicator lamp comes on and the massa
g
e
function is activated for a period of 1 hour.
Durin
g
this time, massa
g
e is performed in
6
c
y
cles of 10 minutes
(
6 minutes of massa
g
e
followed b
y
4 minutes break
)
.
Af
ter one hour, the
f
unction is deactivated, the
indicator lamp
g
oes o
ff
.
Deactivation
You can deactivate the massa
g
e
function at an
y
time b
y
pressin
g
this
switch, its indicator lamp
g
oes off.
Heated seats control
With the h
y
brid s
y
stem active, the front seats
c
an
b
e
h
eate
d
i
n
di
v
id
ua
lly
.
)
Use the ad
j
ustment wheel to switch on and
select the level of heatin
g
required:
0
:
O
ff.
1
: L
o
w.
2
: M
ed
i
u
m.
3
:
High
.
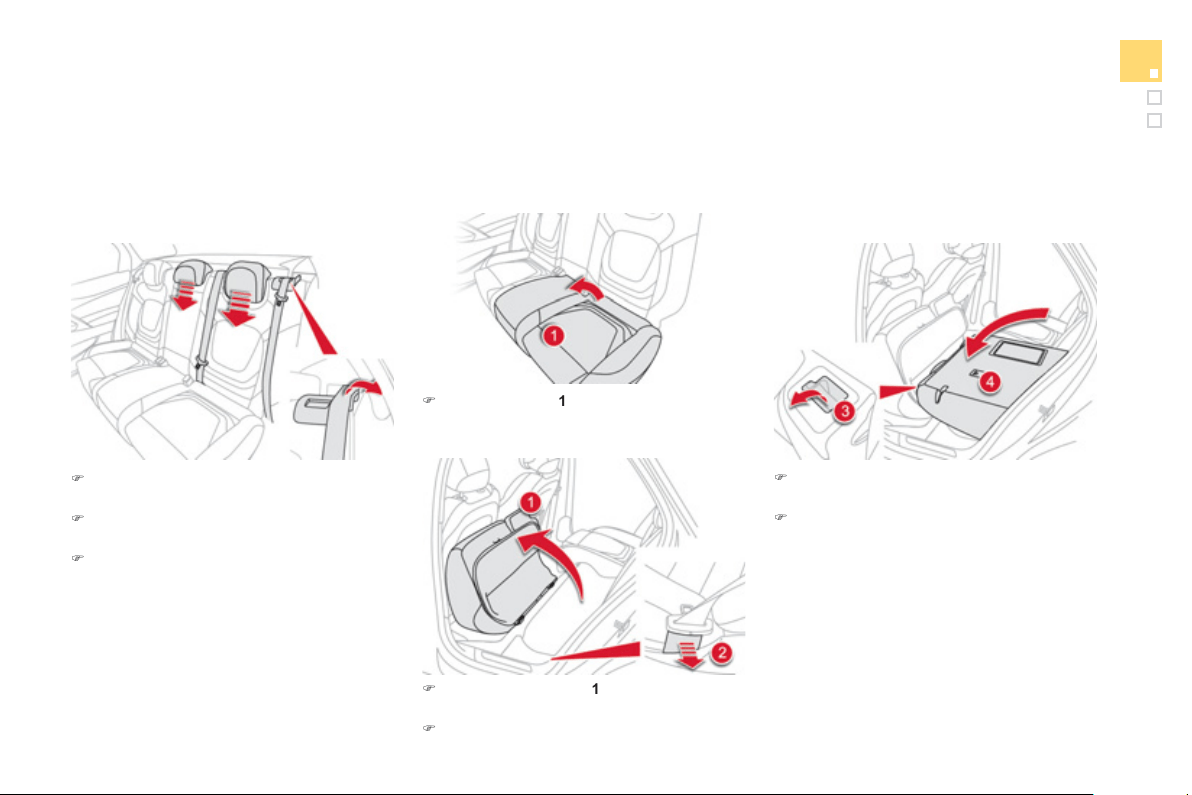
1
05
Comfort
Rear seats
Bench seat with split cushion and backrest
(
le
f
t hand 2
/
3, ri
g
ht hand 1
/
3
)
which can be
f
olded individuall
y
to adapt the load space in the boot.
)
Move the correspondin
g
f
ront seat
f
orward
i
f
necessar
y
.
)
Pl
ace t
h
e
h
ea
d
restra
i
nts
i
n t
h
e
l
ow
p
os
i
t
i
on
o
r r
e
m
o
v
e
th
e
m.
)
Remove the seat belt
f
rom its
g
uide.
F
o
ldi
n
g
t
h
e cus
hi
on
a
nd backrest
)
Lift th
e
cus
hi
o
n
1
b
y
hand, liftin
g
from the
rear
.
)
Tip the seat cushion
1
full
y
a
g
ainst the front
seat
.
)
Keep the seat belt
g
uide
2
held a
g
ainst the
v
ehicle
.
)
Pull
co
ntr
ol
3
fo
rw
a
r
ds
t
o
r
e
l
ease
th
e
sea
t
back
4
.
)
Fold
t
he
sea
t
back
r
es
t
4
.
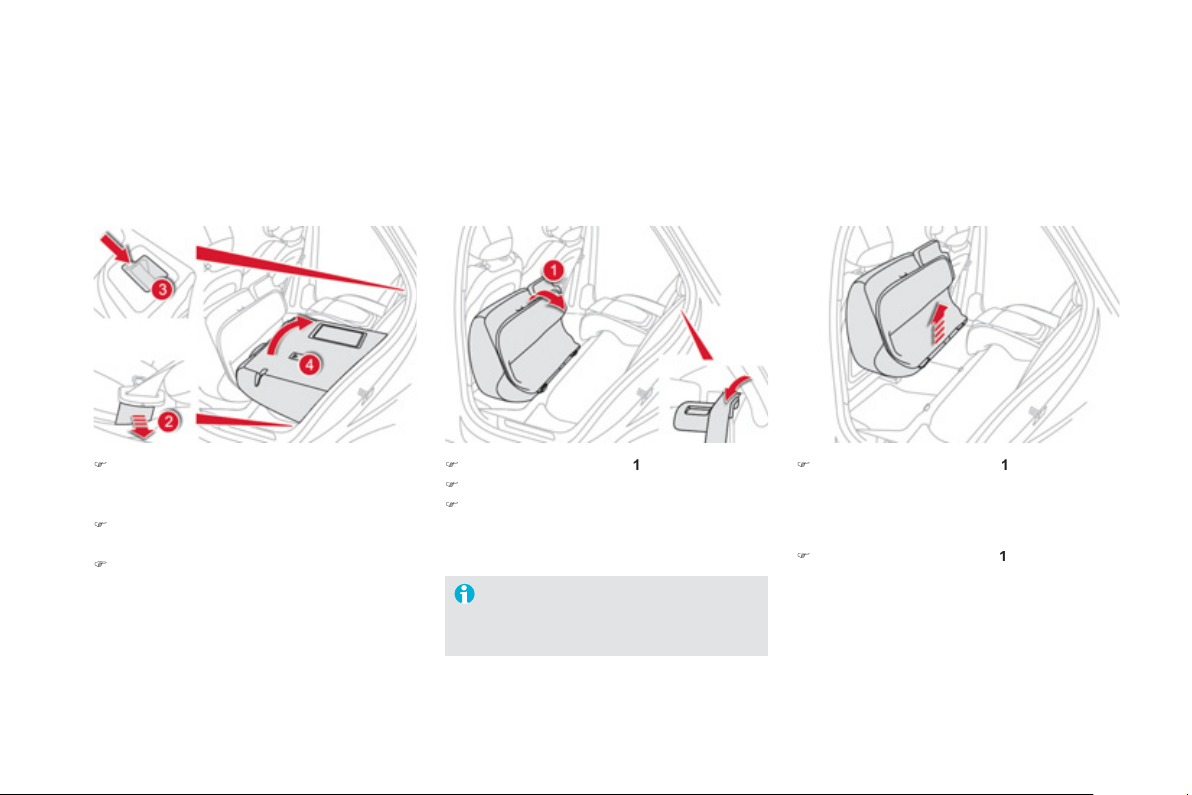
Repositionin
g
the seat
b
ackrest and cushion
)
K
eep t
h
e seat
b
e
l
t
g
u
id
e
2
h
e
ld
a
g
a
i
nst t
h
e
ve
hi
c
l
e to avo
id
trapp
i
n
g
t
h
e seat
b
e
l
t w
h
en
r
epositioning the seat.
)
S
trai
g
hten the seat back
4
while re
f
ittin
g
th
e
h
ead
r
es
tr
a
int
s
a
n
d
secu
r
e
it.
)
Check that the red indicator, located next to
th
e
co
ntr
o
l
3
, is no lon
g
er visible.
)
R
epos
i
t
i
on t
h
e cus
hi
on
1
.
)
R
e
l
ease t
h
e seat
b
e
l
t
g
u
id
e
2
.
)
Put the seat belt back in place in the guide.
When repositionin
g
the seat backrest,
take care not to trap the seat belts.
)
Re
m
o
v
e
t
he
sea
t
cushio
n
1
f
rom its
f
ixin
g
s
by
pu
lli
n
g
upwar
d
s.
Removin
g
the seat cushion
Refittin
g
the seat cushion
)
Posi
t
io
n t
he
sea
t
cushio
n
1
vert
i
ca
lly
i
n
i
ts
f
ixin
g
s.
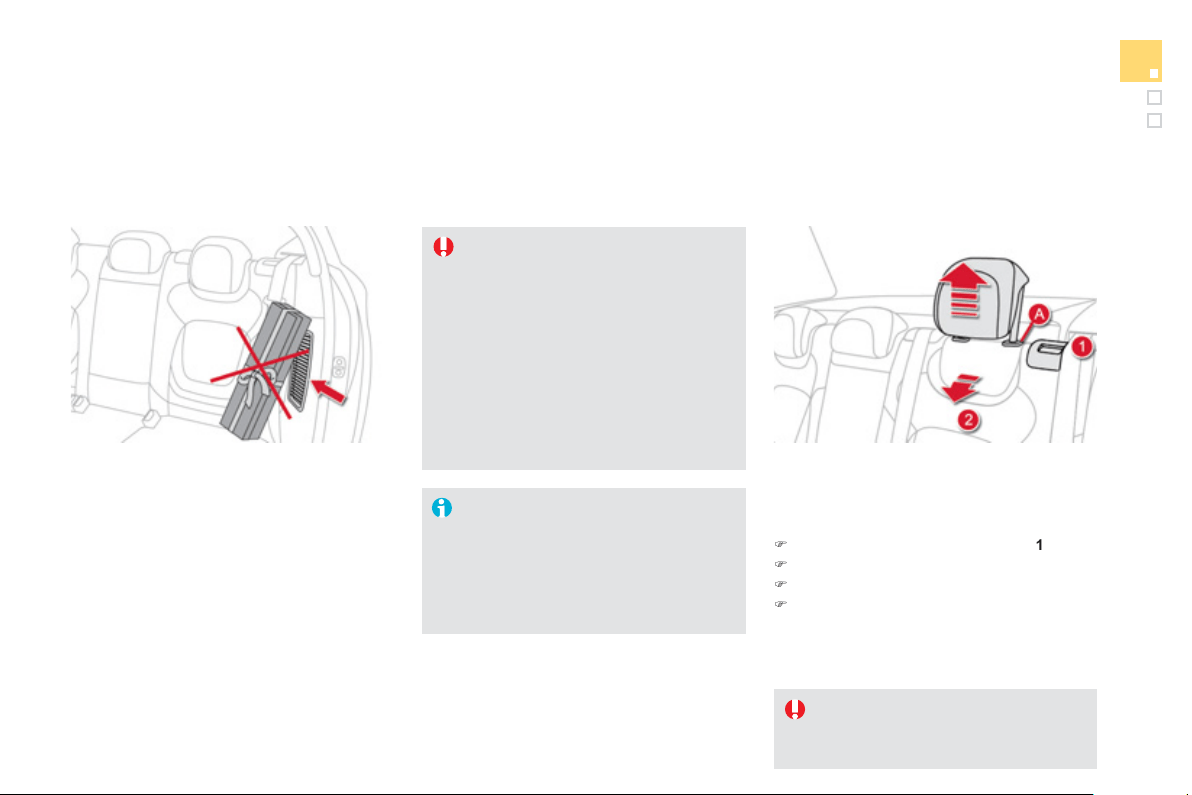
1
07
Comfort
These have one position
f
or use
(
up
)
and a
s
towed position
(
down
)
.
The
y
can also be removed.
T
o
r
e
m
o
v
e
a
h
ead
r
es
tr
a
int:
)
release the backrest usin
g
control
1
,
)
tilt th
e
bac
kr
es
t
2
sli
g
htl
y
forwards,
)
pu
ll
t
h
e
h
ea
d
restra
i
nt upwar
d
s to t
h
e stop,
)
t
h
en, press t
h
e
l
u
g
A
.
Rear head restraints
N
e
v
e
r
d
riv
e
with th
e
h
ead
r
es
tr
a
int
s
remove
d
; t
h
e
y
must
b
e
i
n p
l
ace an
d
c
orrect
ly
a
dj
uste
d
.
Fan cooling of the high voltage battery
This system does not work continuously,
but adapts the
f
orce o
f
the
f
an coolin
g
to the
requirements of the batter
y
.
Its operation can be heard at the rear, even i
f
the vehicle is stopped after a run.
If the air intake is blocked, the batter
y
ma
y
over
h
eat,
d
ama
gi
n
g
t
h
e
b
atter
y
an
d
caus
i
n
g
a
loss o
f
per
f
ormance o
f
the h
y
brid s
y
stem.
For the best use o
f
the hi
g
h volta
g
e
batter
y
, please
f
ollow these
reco
mm
e
n
da
ti
o
n
s
:
-
do
n
o
t
obs
tr
uc
t th
e
a
ir int
a
k
e
with
l
oose articles, otherwise, the batter
y
m
a
y
overheat, causin
g
a loss of
p
erformance of the h
y
brid s
y
stem
- do not spill fluids, as this ma
y
cause
d
ama
g
e to t
h
e
b
atter
y
.
Th
e
high
vo
l
ta
g
e
b
atter
y
h
as an a
i
r
c
oo
li
n
g
s
y
stem, compr
i
s
i
n
g
an a
i
r
i
nta
k
e
(
located on the side o
f
the le
f
t hand rear
s
eat
)
and a
f
an
(
located behind the le
f
t
h
and boot trim panel
)
.
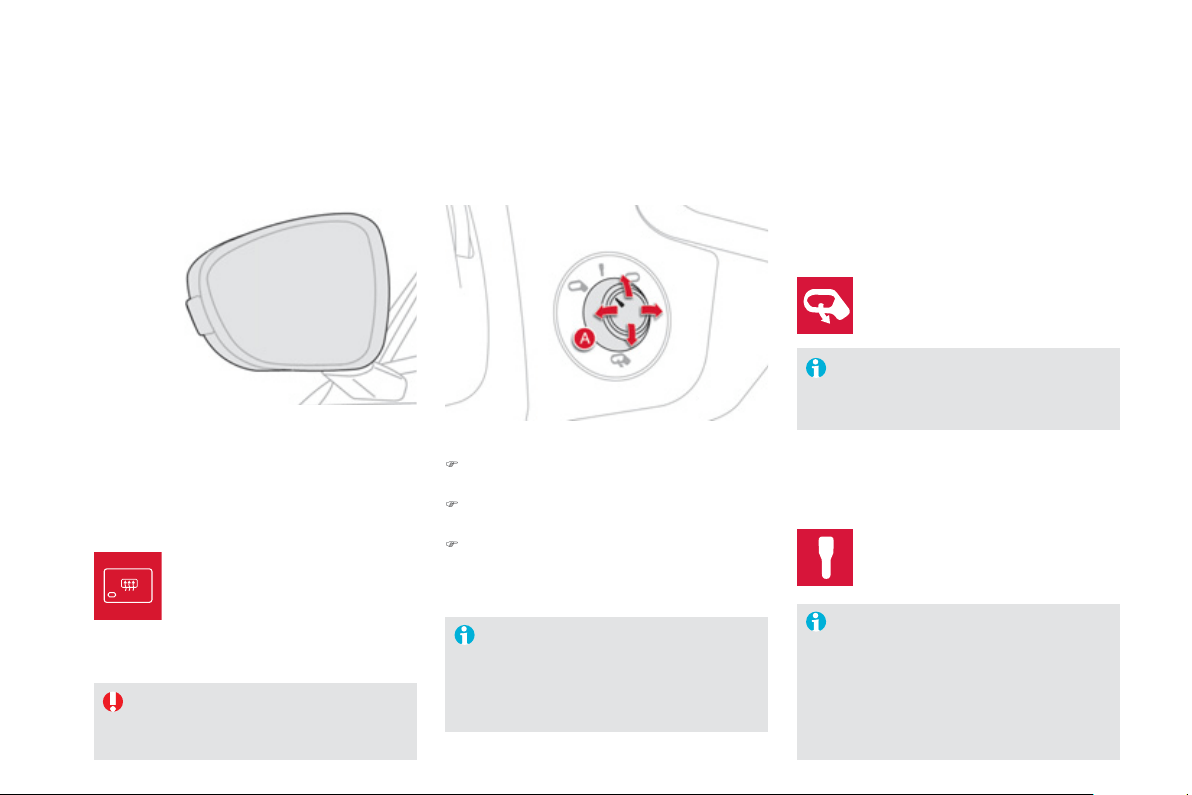
Mirrors
Each fitted with an ad
j
ustable mirror
g
lass
p
rovidin
g
the lateral rearward vision necessar
y
for overtakin
g
or parkin
g
. The
y
can also be
folded for parkin
g
in confined spaces.
Door mirrors
I
f
the mirrors are
f
olded usin
g
control
A
,
the
y
will not un
f
old when the vehicle is
u
n
locked
.
The
f
oldin
g
and un
f
oldin
g
o
f
the door
m
i
rrors us
i
n
g
t
h
e e
l
ectron
i
c
k
e
y
can
b
e
deactivated b
y
a CITRO
Ë
N dealer or a
q
uali
f
ied worksho
p
.
Fold the mirrors when puttin
g
y
our
vehicle throu
g
h an automatic car wash.
Th
e o
bj
ects o
b
serve
d
are,
i
n rea
li
t
y
,
cl
oser t
h
an t
h
e
y
appear.
T
a
k
e
thi
s
int
o
accou
nt in
o
r
de
r t
o
c
orrectl
y
j
ud
g
e the distance o
f
vehicles
a
pproachin
g
from behind.
Demistin
g
- Defrostin
g
Ad
j
ustment
)
T
u
rn
co
ntr
o
l
A
to the ri
g
ht or to the left to
s
elect the correspondin
g
mirror.
)
Mo
v
e
co
ntr
ol
A
in
a
ll
fou
r
d
ir
ec
ti
o
n
s
t
o
a
dj
ust.
)
Re
t
u
rn
co
ntr
ol
A
to t
h
e centra
l
p
os
i
t
i
on.
F
o
ldi
n
g
A
utomat
i
c:
l
oc
k
t
h
e ve
hi
c
l
e us
i
n
g
t
h
e e
l
ectron
i
c
k
e
y
.
Unfoldin
g
A
utomatic: unlock the vehicle usin
g
the
e
lectronic ke
y
.
M
anua
l
: w
i
t
h
t
h
e
ig
n
i
t
i
on on, move
co
ntr
ol
A
do
wnw
a
r
ds
.
Manual: with the i
g
nition on, move
co
ntr
ol
A
upwar
d
s.
Demisting-de
f
rosting o
f
the door
mirrors operates b
y
switchin
g
on
th
e
h
ea
t
ed
r
ea
r
sc
r
ee
n.
The rear screen demistin
g
- defrostin
g
c
an onl
y
operate when the h
y
brid
sy
stem is active.
For more in
f
ormation, re
f
er to the "Rear screen
de
mi
s
t-
def
r
os
t"
sec
ti
o
n.
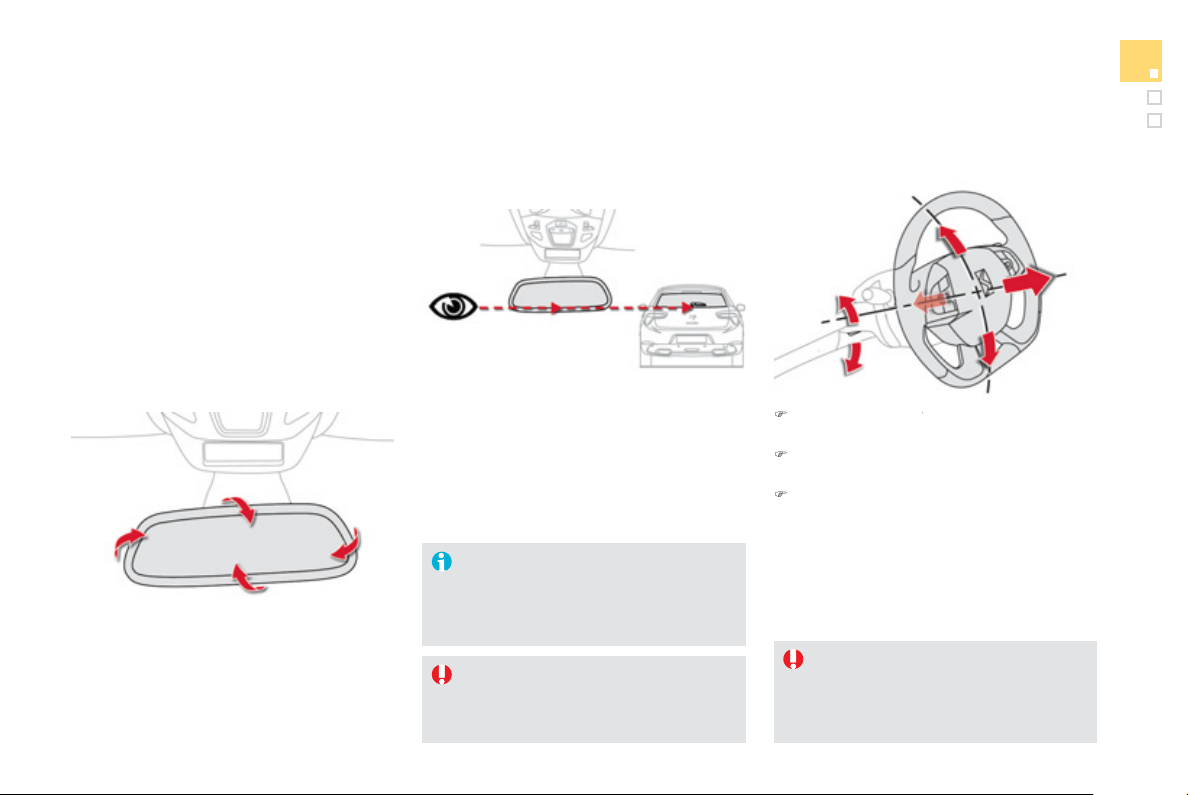
1
0
9
Comfort
Automatic da
y
/ni
g
ht model
B
y
means o
f
a sensor, which measures the
li
g
ht
f
rom the rear o
f
the vehicle, this s
y
stem
automat
i
ca
lly
an
d
pro
g
ress
i
ve
ly
c
h
an
g
es
between the day and night uses.
Adj
usta
bl
e m
i
rror prov
idi
n
g
a centra
l
rearwar
d
v
ie
w.
E
qu
i
ppe
d
w
i
t
h
an ant
i
-
d
azz
l
e s
y
stem, w
hi
c
h
darkens the mirror glass and reduces the
n
uisance to the driver caused b
y
the sun,
h
eadlamps from other vehicles...
Rear view mirror
I
n or
d
er to ensure opt
i
mum v
i
s
ibili
t
y
d
ur
i
n
g
y
our manoeuvres, t
h
e m
i
rro
r
lightens automatically when reverse
g
ear is en
g
a
g
ed.
Steering wheel adjustment
)
When stationary
, pull the control lever to
y
re
l
ease t
h
e a
dj
ustment mec
h
an
i
sm.
)
Adj
ust t
h
e
h
e
igh
t an
d
reac
h
to su
i
t
y
our
d
r
i
v
i
n
g
pos
i
t
i
on.
)
P
us
h th
e
co
ntr
o
l l
e
v
e
r t
o
l
oc
k th
e
ad
j
ustment mechanism.
As a sa
f
et
y
precaution, these
operations should onl
y
be carried out
while the vehicle is stationar
y
.
A
s a safet
y
measure, the mirrors should
b
e a
dj
uste
d
to re
d
uce t
h
e
"bli
n
d
spot
"
.
Seein
g
clearl
y
For better rear vision, ali
g
n the bottom o
f
the
rea
r vi
e
w mirr
o
r with th
e
bo
tt
o
m
o
f th
e
r
ea
r
screen
.
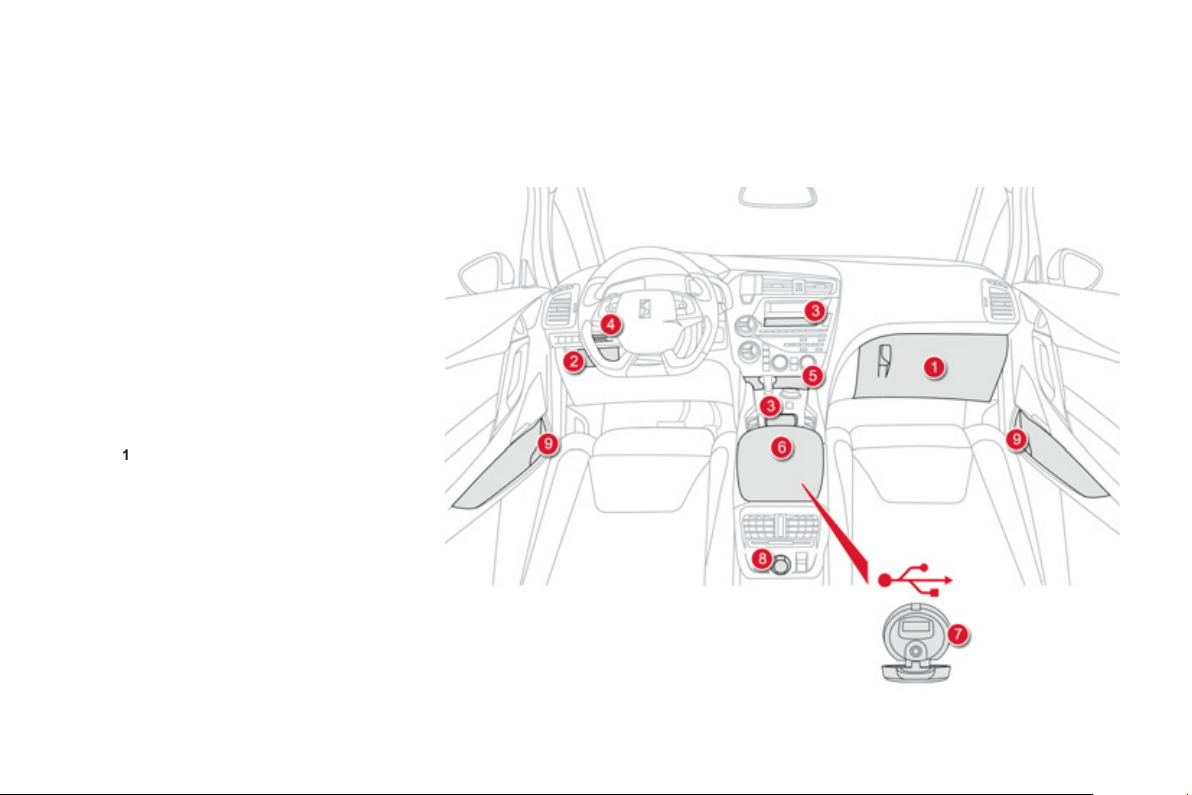
Interior fi ttings
1.
G
love bo
x
2.
Stora
ge
3.
Storage (according to version)
4.
T
icket holder
(
accordin
g
to version
)
5.
Removable ashtra
y
/ 12 V accessor
y
socket
(
120 W
)
Press the lid to open the ashtra
y
.
To empt
y
the ashtra
y
, remove it b
y
pullin
g
it
u
pwar
d
s.
6
.
F
ront armres
t
an
d
stora
ge
I
t
i
s
ill
um
i
nate
d
, coo
l
e
d
an
d
conta
i
ns
storage space
(
1.5 litre bottle, ...
)
.
7
.
U
SB Pla
y
er
8.
1
2 V accessor
y
socke
t
(
120 W
)
O
bserve the maximum power ratin
g
to
a
void dama
g
in
g
y
our accessor
y
9.
Cup holder
r
i
n the door
p
anel
.
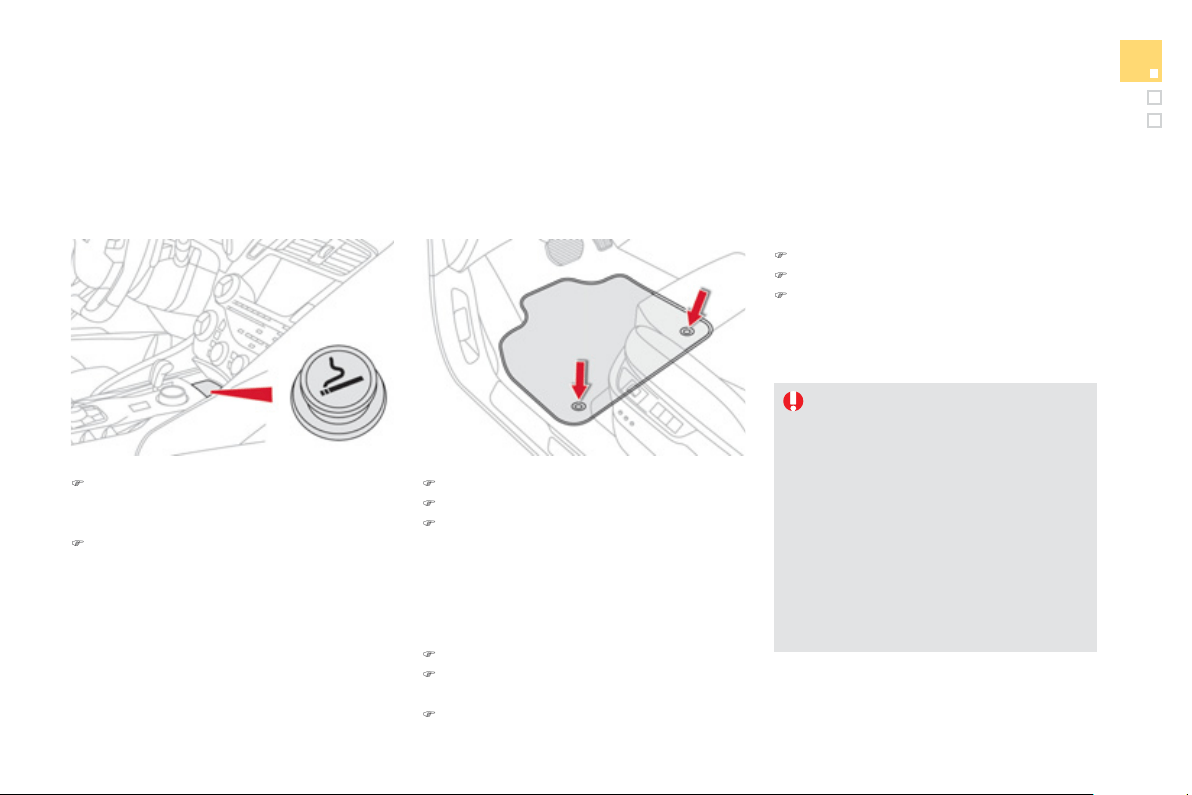
111
Comfort
Mats
R
emova
bl
e carpet protect
i
on.
)
move the seat full
y
back,
)
fit the mat in place,
)
en
g
a
g
e the fixin
g
s b
y
pressin
g
down on
t
he
m.
Fi
tt
i
n
g
Removal
T
o
r
e
m
o
v
e
th
e
m
a
t
o
n th
e
d
riv
e
r'
s
s
i
de
:
)
move the seat full
y
back,
)
disen
g
a
g
e the fixin
g
s, leavin
g
the fixin
g
pins in the floor carpet,
)
r
e
m
o
v
e
th
e
m
a
t.
Refittin
g
T
o
r
ef
it th
e
m
a
t
o
n th
e
d
riv
e
r'
s
s
i
de
:
)
pos
i
t
i
on t
h
e mat correct
ly
,
)
re
f
it the
f
ixings by pressing,
)
check that the mat is secured correctl
y
.
To avoid an
y
risk of
j
ammin
g
of the
pedals:
- on
ly
use mats w
hi
c
h
are su
i
te
d
to
the
f
ixin
g
s alread
y
present in the
vehicle; these
f
ixin
g
s must be used,
- never
f
it one mat on to
p
o
f
another.
The use o
f
mats not approved b
y
C
ITROËN ma
y
interfere with access to
the pedals and hinder the operation of
the cruise control / speed limiter.
)
To use the ci
g
arette li
g
hter, press it in
a
nd wait a few seconds until it pops out
a
utomaticall
y
.
)
To connect a 12 V accessor
y
(
max power:
120 W
)
, remove the ci
g
arette li
g
hter and
c
onnect a su
i
ta
bl
e a
d
a
p
tor.
You can use this socket to connect a tele
p
hone
c
har
g
er, a bottle warmer...
A
fter use, put the ci
g
arette li
g
hter back into
p
lace strai
g
ht awa
y
.
Cigarette lighter /
12 V accessory
socket
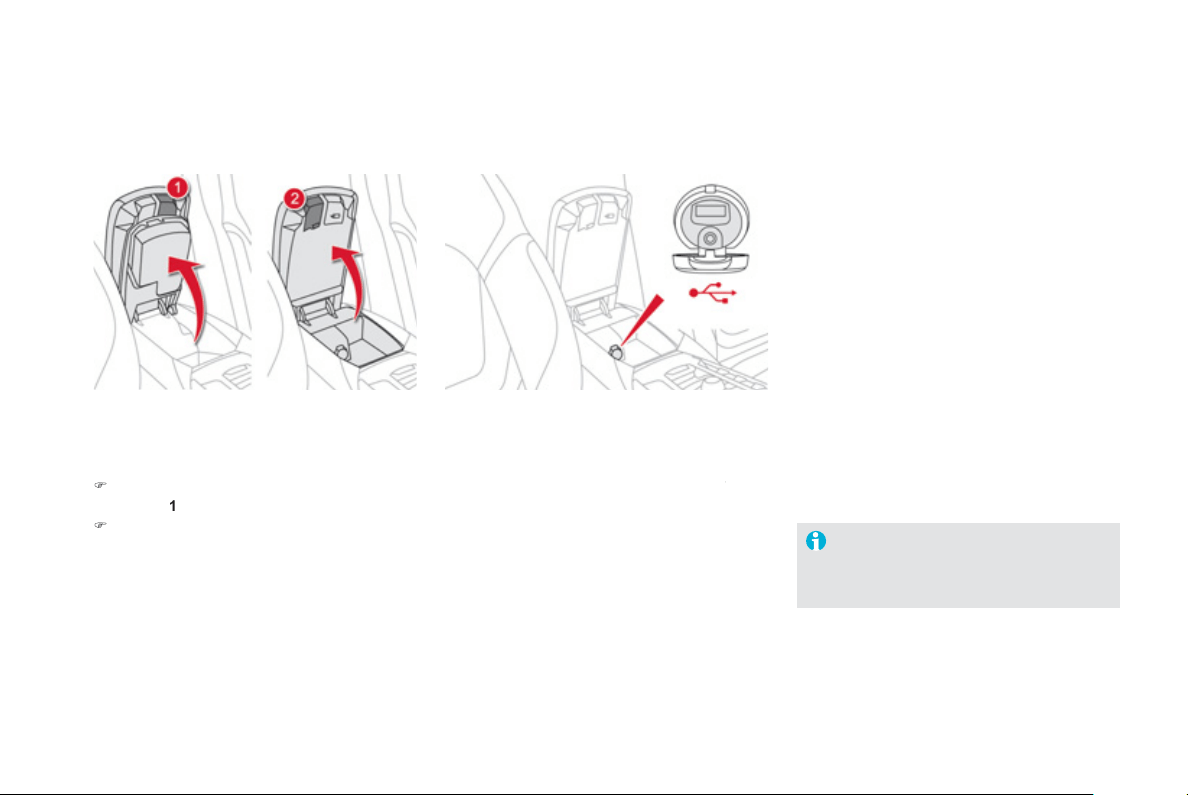
USB Player
This connection box, consistin
g
o
f
a JA
C
K
auxiliary socket and a U
S
B port, is located in
the
f
ront armrest
(
under the cover
)
.
It permits the connection of portable device,
such as a di
g
ital audio pla
y
er of the iPod
®
type
®
or a USB memor
y
stick.
It reads the audio file formats
(
MP3, OGG,
WMA, WAV, ...
)
which are transmitted to
y
our
au
di
o equ
i
pment an
d
p
l
a
y
e
d
v
i
a t
h
e ve
hi
c
l
e
'
s
s
p
ea
k
ers.
You can manage these
f
iles using the steering
mounted controls or the audio s
y
stem control
panel and displa
y
them in the instrument panel
screen
.
When the U
S
B port is used, the portable device
ch
ar
g
es automat
i
ca
lly
.
F
o
r m
o
r
e
in
fo
rm
a
ti
o
n
o
n th
e
use
of
this system, re
f
er to the "Audio and
t
e
l
e
m
a
ti
cs
"
sec
ti
o
n.
C
om
f
ort and stora
g
e s
y
stem
f
or the driver and
f
ront passen
g
er.
Centre armrest
Stora
g
e
)
For access to the lar
g
e stora
g
e box, press
bu
tt
o
n
1
th
e
n lift th
e
co
v
e
r.
)
For access to the small stora
g
e box
(
below
the armrest cover
)
press button
2
th
e
n lift
th
e
co
v
e
r.
These can be used
f
or portable devices
(
mobile
p
hone, MP3 pla
y
er...
)
which can be connected
to the U
S
B port
/
auxiliar
y
socket.
A
n air vent
(
with adjustable opening
)
delivers
c
ooled air into the lar
g
e stora
g
e box.
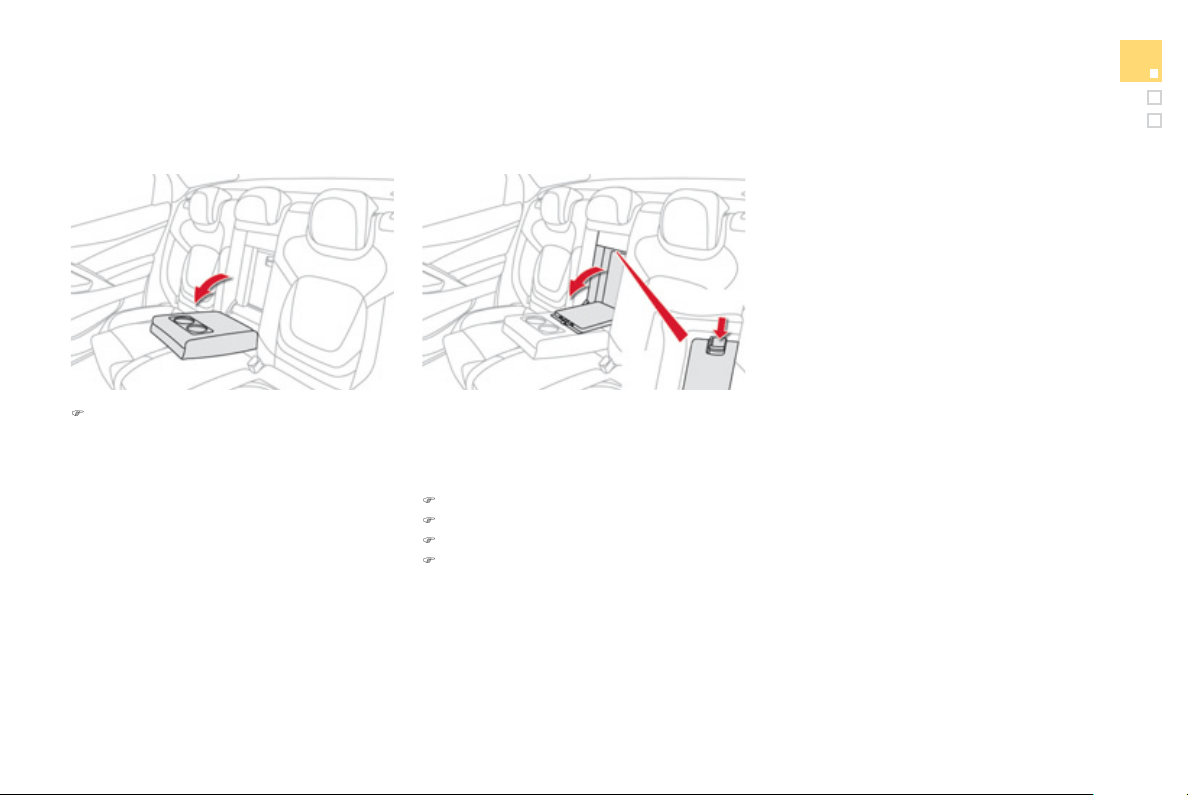
1
1
3
Comfort
Ski fl ap
Facilit
y
for storin
g
and transportin
g
lon
g
ob
j
ects.
)
L
o
w
e
r th
e
r
ea
r
a
rmr
es
t
fo
r
a
m
o
r
e
c
omfortable position.
It ma
y
be fitted with cup holders and also
g
ives
access to the ski flap.
Rear armrest
Openin
g
)
L
o
w
e
r th
e
a
rmr
es
t.
)
Press the flap openin
g
control.
)
Lower the flap.
)
Load the ob
j
ects from inside the boot.
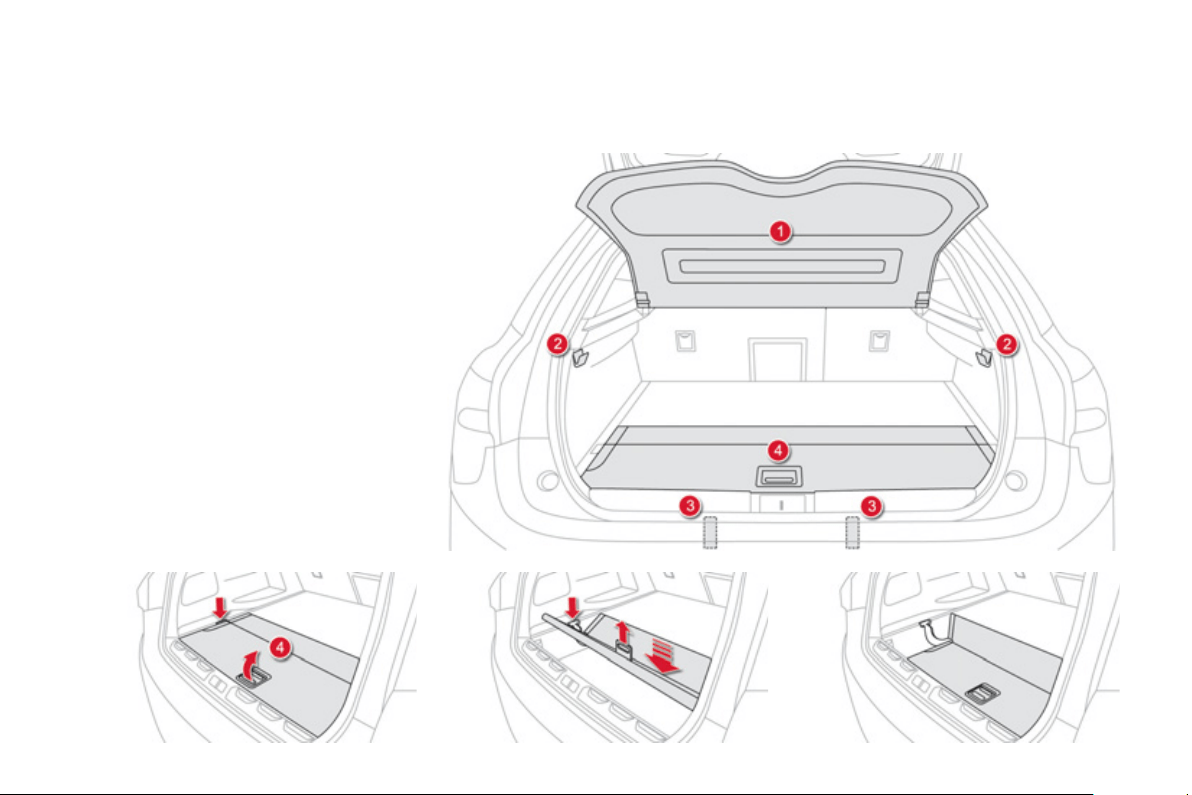
Boot fi ttings
1.
Rear parcel shelf
f
It can be removed
f
or carr
y
in
g
lar
g
e
o
bj
ects.
2.
Bag hook
s
3.
Warnin
g
trian
g
le retainin
g
strap
s
4.
Removable boot floor
Lift the floor usin
g
the
g
rip and follow the
g
uides.
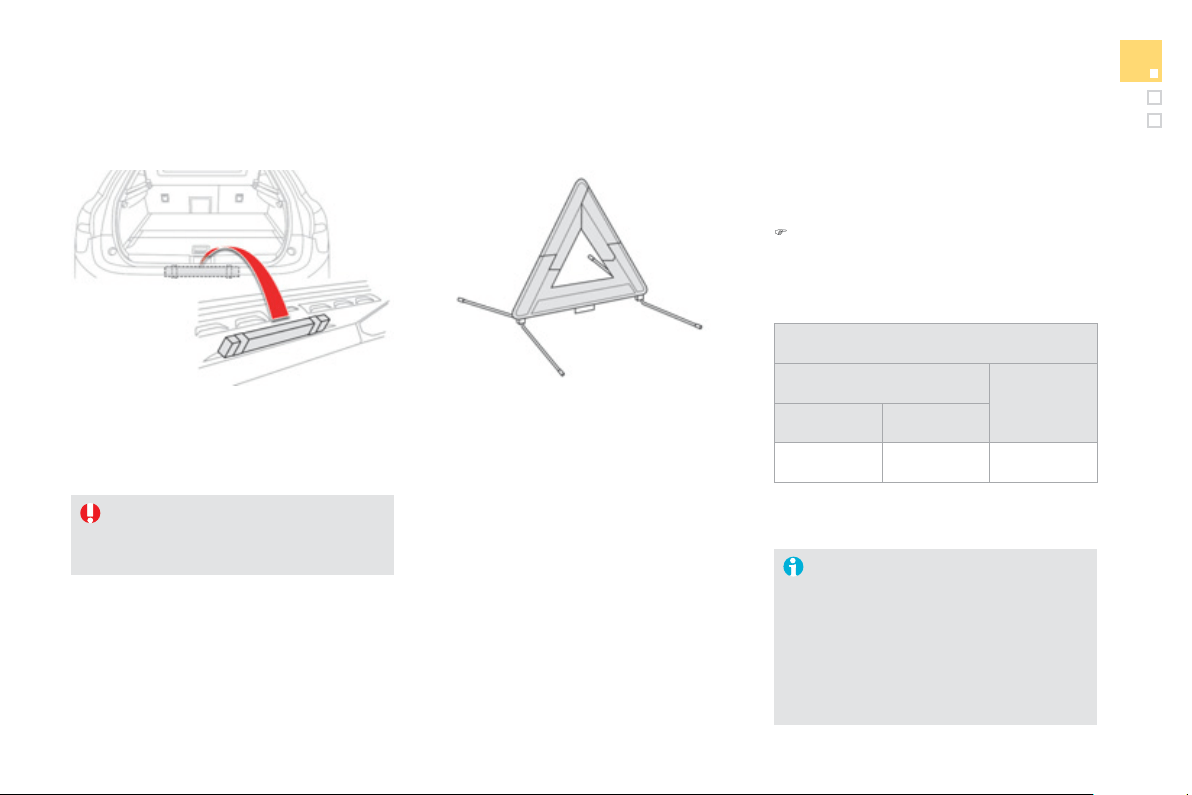
1
15
Comfort
Warning triangle (stowing)
U
se t
h
e straps on t
h
e
i
nter
i
or
b
oot tr
i
m to stow
the
f
olded trian
g
le or its stora
g
e box.
B
efore
g
ettin
g
out of
y
our vehicle to
a
ssemble the trian
g
le and place it on
the road, put on
y
our hi
g
h visibilit
y
vest.
Th
e tr
i
an
gl
e
i
s ava
il
a
bl
e as an
accessor
y
, contact a CITRO
Ë
N deale
r
or a
q
uali
f
ied worksho
p
.
R
e
f
e
r t
o
th
e
m
a
n
u
f
ac
t
u
r
e
r'
s
in
s
tr
uc
ti
o
n
s
f
o
r
use
of the trian
g
le.
Placin
g
the trian
g
le in the
road
)
Place the trian
g
le at a distance behind
the vehicle
,
as shown in the table below
,
accordin
g
to the t
y
pe of road and the level
o
f
ambient li
g
ht.
D
istance from
y
our vehicle
(
in metres
)
R
oa
d
M
otorway
D
a
y
Ni
g
h
t
50 m 80 m 150 m
These are the internationall
y
reco
g
nised
v
a
l
ues
.
Use the trian
g
le in line with local drivin
g
re
g
ulations.
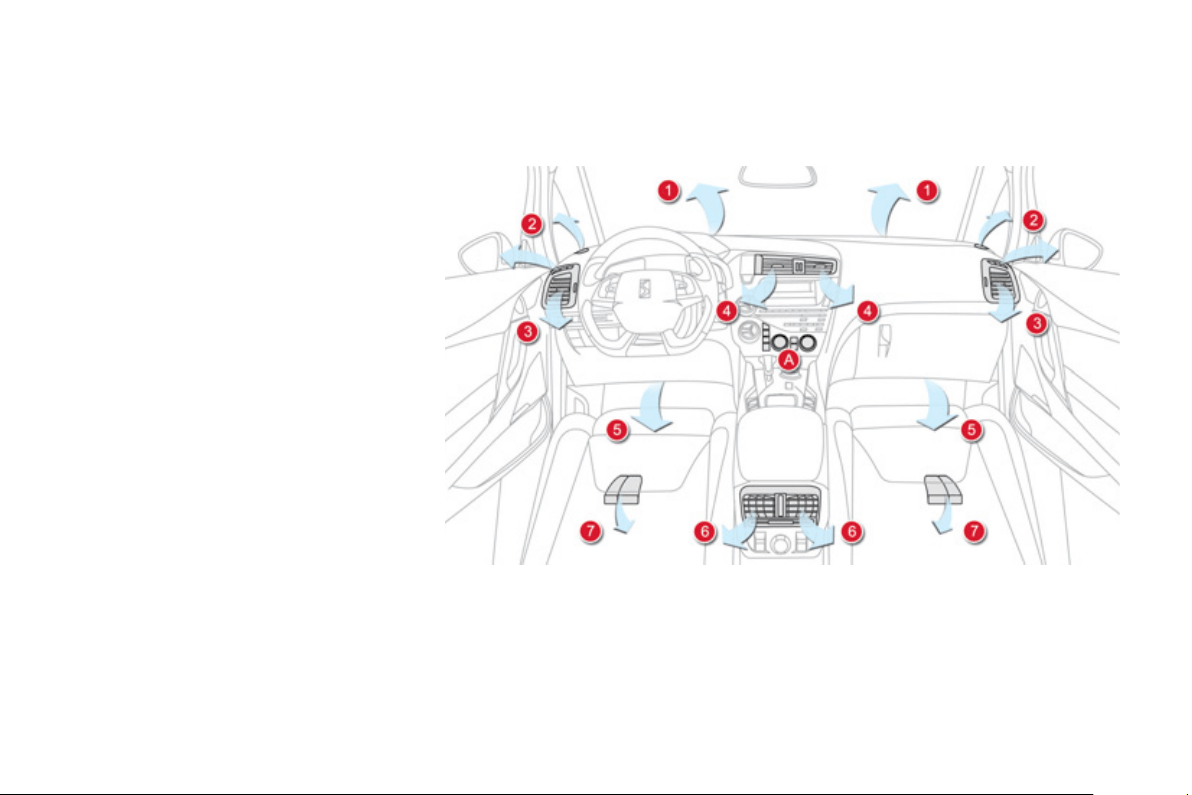
Heating and Ventilation
Controls
The incomin
g
air
f
ollows various routes
d
epen
di
n
g
on t
h
e contro
l
s se
l
ecte
d
by
the driver, the
f
ront passenger and rear
passengers
.
The temperature control enables
y
ou to obtain
the level of comfort required b
y
mixin
g
the air
o
f th
e
v
a
ri
ous
c
ir
cu
it
s
.
The air distribution control enables
y
ou to
s
e
l
ect t
h
e a
i
r vents use
d
i
n t
h
e passen
g
er
c
ompartment b
y
the combined use o
f
the
associa
t
ed
bu
tt
o
n
s
.
The air
f
low control enables you to increase
or reduce the s
p
eed o
f
the ventilation
f
an.
These controls are
g
rouped to
g
ether on control
p
anel
A
o
n th
e
ce
ntr
e
co
n
so
l
e
.
1.
Windscreen demistin
g/
de
f
rostin
g
vents.
2
.
Front side quarter light window demisting
/
de
f
rostin
g
vents.
3.
Side ad
j
ustable air vents.
4.
Central ad
j
ustable air vents.
S
y
stem which creates and maintains
g
ood
c
onditions o
f
com
f
ort and visibilit
y
in the
ve
hi
c
l
e
'
s passen
g
er compartment.
5
.
Air outlets to the driver and
f
ront passen
g
e
r
foo
tw
e
ll
s
.
6
.
Ad
j
ustable air vents
f
or the rea
r
passengers
.
7
.
Air
ou
tl
e
t
s
t
o
th
e
r
ea
r f
oo
tw
e
ll
s
.
Air distribution

117
Comfort
In order
f
or these s
y
stems to be
f
ull
y
e
ff
ective,
f
ollow the operation and maintenance
g
uidelines below:
)
To obtain an even air distribution, take care not to obstruct the exterior air intake
g
rilles
located at the base of the windscreen
,
the nozzles
,
the vents and the air outlets
,
as well
as
th
e
a
ir
e
xtr
ac
t
o
r l
oca
t
ed
in th
e
boo
t.
)
Do not cover the sunshine sensor, located on the dashboard; this is used
f
or re
g
ulation
of
the di
g
ital air conditionin
g
s
y
stem.
)
O
perate the air conditionin
g
s
y
stem
f
or at least 5 to 10 minutes, once or twice a month
to keep it in per
f
ect working order.
)
Ensure that the passen
g
er compartment
f
ilter is in
g
ood condition and have the
f
ilte
r
e
lements replaced re
g
ularl
y
(
refer to the "Checks" section
)
.
We recommend the use of a combined passen
g
er compartment filter. Thanks to its
s
pecial active additive, it contributes to the purification of the air breathed b
y
the
o
ccupants and the cleanliness of the passen
g
er compartment
(
reduction of aller
g
ic
sy
mptoms, bad odours and
g
reas
y
deposits
)
.
)
To ensure correct operation o
f
the air conditionin
g
s
y
stem,
y
ou are also advised to have
i
t c
h
ec
k
e
d
re
g
u
l
ar
ly
as recommen
d
e
d
i
n t
h
e serv
i
c
i
n
g
an
d
warrant
y
b
oo
kl
et.
)
If the system does not produce cold air, switch it off and contact a CITROËN dealer
o
r a quali
f
ied workshop.
You can switch off the air conditionin
g
(
AC button
)
and sta
y
in Automatic mode in order
to limit fuel consumption. If mistin
g
appears while in this mode,
y
ou can switch the air
c
onditionin
g
back on temporaril
y
to improve the situation.
When towin
g
the maximum load on a steep
g
radient in hi
g
h temperatures, switchin
g
off the
a
i
r con
di
t
i
on
i
n
g
i
ncreases t
h
e ava
il
a
bl
e en
gi
ne power an
d
so
i
mproves t
h
e tow
i
n
g
a
bili
t
y
.
Recommendations for ventilation and air conditioning
I
f
a
f
ter an extended sto
p
in sunshine,
the interior temperature is very high,
f
irst
ventilate the passen
g
er compartment
f
o
r
a
f
e
w m
o
m
e
nt
s
.
P
ut the air flow control at a settin
g
hi
g
h
e
nou
g
h to quickl
y
chan
g
e the air in the
passen
g
er compartment.
Th
e a
i
r con
di
t
i
on
i
n
g
s
y
stem
d
oes not
c
onta
i
n c
hl
or
i
ne an
d
d
oes not present
an
y
d
an
g
er to t
h
e ozone
l
a
y
er.
The condensation created b
y
the ai
r
c
on
di
t
i
on
i
n
g
resu
l
ts
i
n a
di
sc
h
ar
g
e
of
w
a
t
e
r
u
n
de
r th
e
v
e
hi
c
l
e
whi
c
h i
s
per
f
ectl
y
normal.
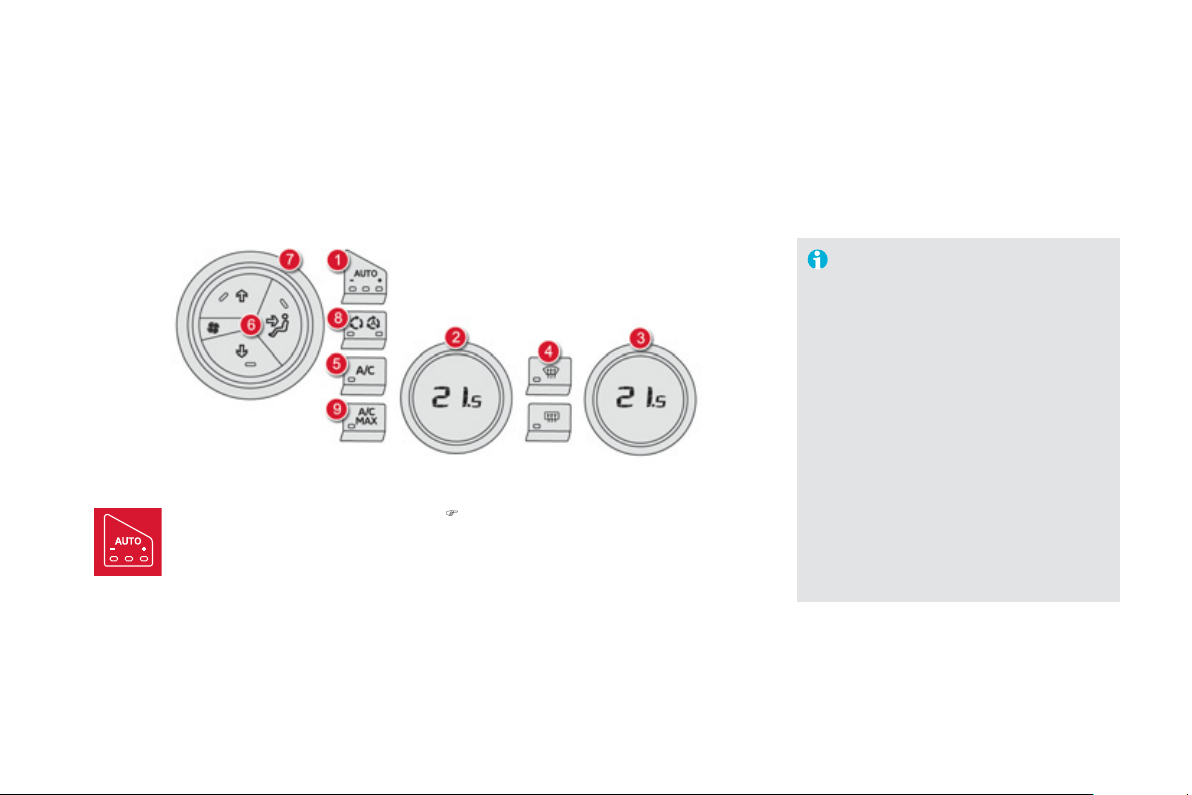
Dual-zone digital air conditioning
1. Automatic comfort pro
g
ramme
W
e
r
eco
mm
e
n
d
th
e
use
of
o
n
e
of
th
e
thr
ee
A
U
T
O
m
odes
a
v
a
il
ab
l
e
:
the
y
provide optimised re
g
ulation o
f
the temperature in the passen
g
e
r
c
ompartment accordin
g
to the com
f
ort value
that
y
ou have chosen.
These three modes automaticall
y
control the
sy
stem, accordin
g
to the desired settin
g
, while
a
lso maintainin
g
the desired comfort value.
)
Pr
ess
th
e
"
AUTO" button repeatedl
y
:
- a first indicator lamp comes on; the "low"
s
ett
i
n
g
mo
d
e
i
s se
l
ecte
d
,
- a secon
d
i
n
di
cator
l
amp comes on; t
h
e
"
me
di
um
"
sett
i
n
g
mo
d
e
i
s se
l
ecte
d
,
- a third indicator lam
p
comes on; the
"hi
g
h" mode settin
g
is selected.
Use the "medium" and "hi
g
h" settin
g
s in
preference to maintain the comfort level at the
rea
r.
When the en
g
ine is cold, the air
f
low will reach its optimum level
pro
g
ressivel
y
, takin
g
account o
f
the
w
ea
th
e
r
a
n
d
th
e
des
ir
ed
co
m
fo
rt l
e
v
e
l
s
o as to avo
id
too
g
reat a
di
str
ib
ut
i
on
of
co
l
d
a
ir.
O
n enterin
g
the vehicle, i
f
the interior
temperature is much colder or warmer
than the comfort value, there is no
need to chan
g
e the value displa
y
ed in
o
rder to obtain the comfort required. In
a
ll
seasons, w
i
t
h
t
h
e w
i
n
d
ows c
l
ose
d
the s
y
stem corrects the di
ff
erence
i
n temperature automat
i
ca
lly
an
d
as
q
uickly as possible.
This s
y
stem is desi
g
ned to operate effectivel
y
in all seasons
,
with the windows closed.
A
utomatic o
p
eration
The air conditioning can only operate when the hybrid system is active
(
Ready lamp on
)
.
Its effectiveness will be reduced when in electric mode
(
see the EC
O
O
FF section
)
.
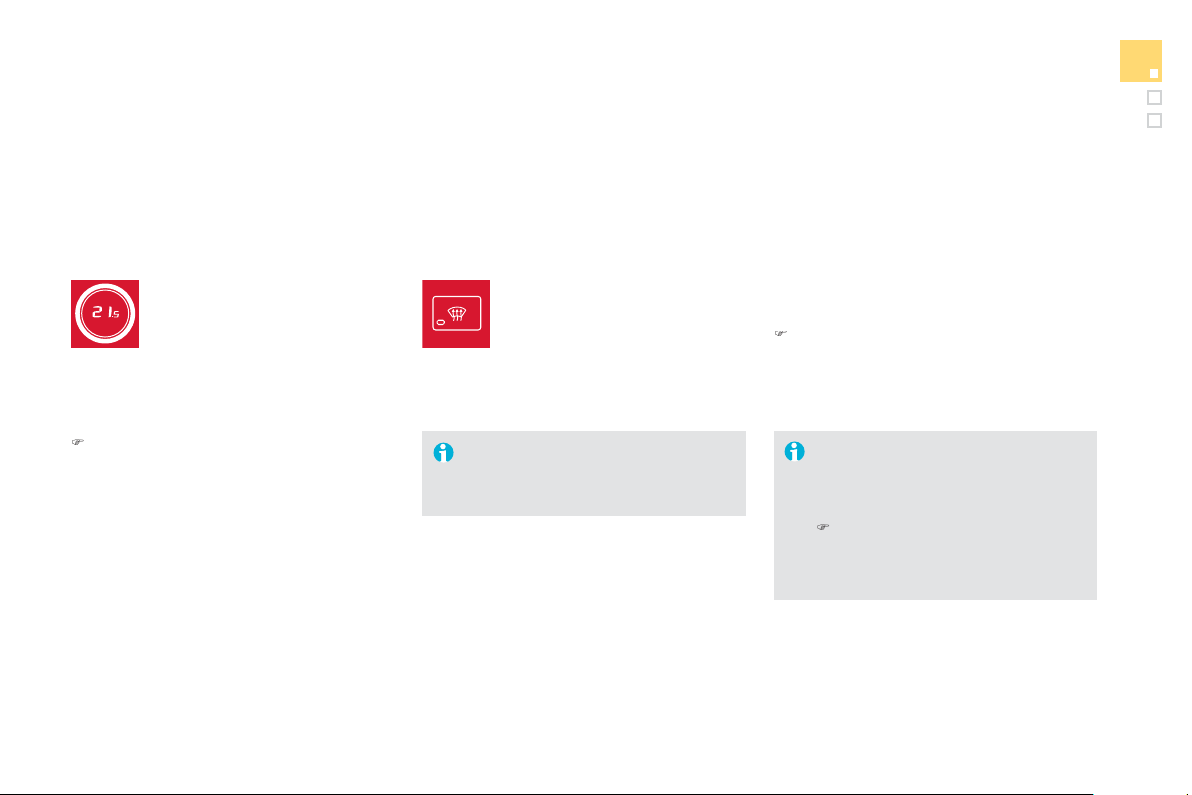
1
1
9
Comfort
4. Automatic visibilit
y
programme
For maximum coolin
g
or heatin
g
o
f
the
passen
g
er compartment, it is possible
t
o
e
x
ceed
th
e
minim
u
m v
a
l
ue
1
4
o
r th
e
maximum value 2
8
.
)
T
u
rn
co
ntr
o
l
2
o
r
3
t
o
th
e
l
e
ft
u
ntil
"
LO"
i
s
di
sp
l
a
y
e
d
or to t
h
e r
igh
t
u
nt
il
"HI"
i
s
di
sp
l
a
y
e
d
.
See "Front demistin
g
- defrostin
g
".
2-3. Driver's-passen
g
er's side
settin
g
s
The driver and front passen
g
er can
e
ach ad
j
ust the temperature to their
r
equ
i
rements.
Th
e va
l
ue
i
n
di
cate
d
on t
h
e
di
sp
l
a
y
c
orres
p
onds to a level o
f
com
f
ort and not to a
temperature in degrees
C
elsius or Fahrenheit.
)
Tu
rn
co
ntr
ol
2
or
3
to the le
f
t or to the ri
g
ht
r
espectively to decrease or increase this
v
a
l
ue
.
A
setting around the value 21 provides
optimum com
f
ort. However, dependin
g
on
y
our
requirements, a settin
g
between
18
and
2
4 is
no
rm
a
l.
You are advised to avoid a left / ri
g
ht settin
g
difference of more than
3
.
M
anua
l
o
p
erat
i
on
If
y
ou wish,
y
ou can make a different choice
f
rom that o
ff
ered b
y
the s
y
stem b
y
chan
g
in
g
a
s
ett
i
n
g
.
Th
e
"
AUTO" indicator lamps
g
o o
ff
; the
o
ther
f
unctions, except the air conditionin
g
, will
s
till be controlled automatically.
)
Pressin
g
the
"
AUTO"
bu
tt
o
n r
e
t
u
rn
s
th
e
sy
stem to completel
y
automatic operation.
W
ith
S
top
&
S
tart, when demistin
g
has
been switched on, the Diesel en
g
ine
does not stop.
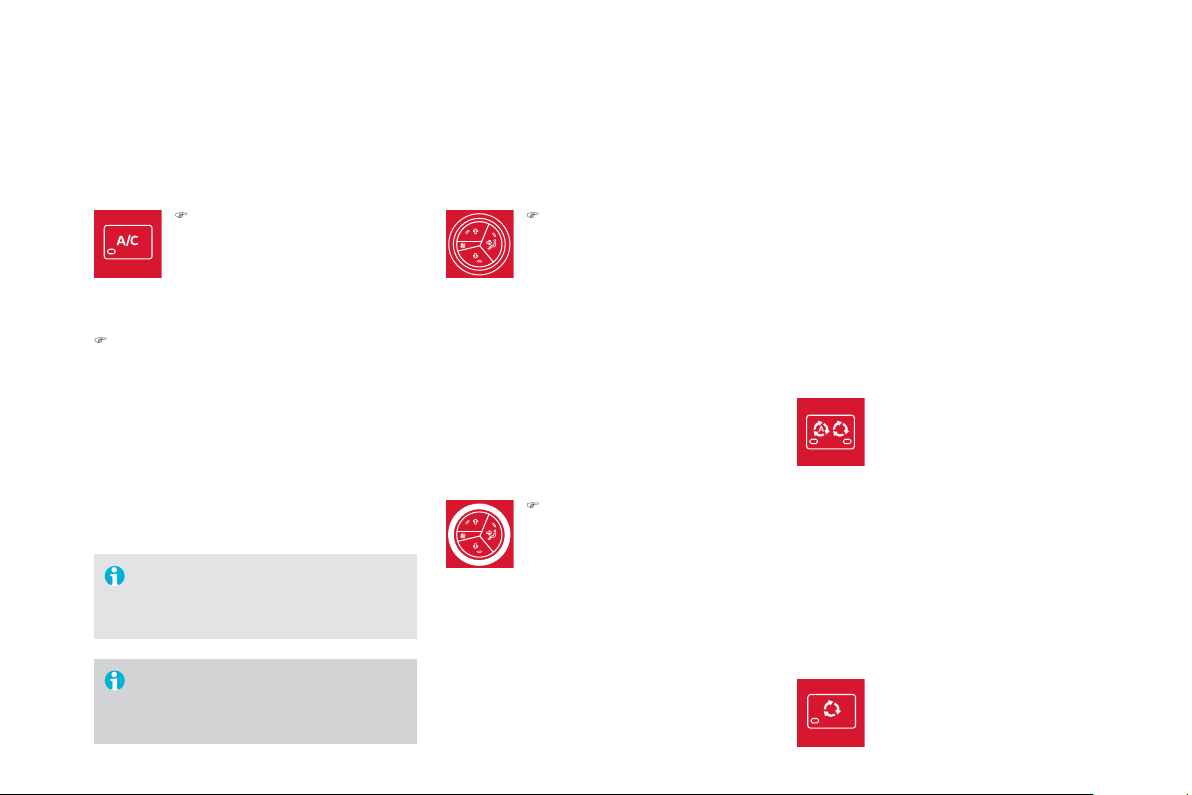
5. Air conditionin
g
On / Off
)
Pr
ess
thi
s
bu
tt
o
n t
o
s
wit
c
h
o
f
f
t
h
e a
i
r con
di
t
i
on
i
n
g
.
Switchin
g
the s
y
stem off could result in
discomfort
(
humidit
y
, condensation
)
.
)
Press this button a
g
ain to return to
a
utomatic operation o
f
the air conditionin
g
.
Th
e
i
n
di
cator
l
amp
i
n t
h
e "A
/C
"
bu
tt
o
n
comes
on
.
To obtain cool air more quickly, you can use
rec
ir
cu
l
a
ti
o
n
of
th
e
int
e
ri
o
r
a
ir
fo
r
a
fe
w m
o
m
e
nt
s
.
Th
e
n r
e
v
e
rt t
o
th
e
int
a
k
e
o
f
e
xt
e
ri
o
r
a
ir.
6. Air distribution ad
j
ustment
)
Pr
ess
o
n
e
o
r m
o
r
e
bu
tt
o
n
s
t
o
d
ir
ec
t th
e
a
ir fl
o
w t
o
w
a
r
ds
:
- t
h
e w
i
n
d
screen an
d
s
id
e w
i
n
d
ows,
- the outer and centre air vents,
- th
e
foo
tw
e
ll
s
.
Y
ou
ca
n
co
m
b
in
e
th
e
thr
ee
o
ri
e
nt
a
ti
o
n
s
t
o
ob
t
a
in th
e
des
ir
ed
a
ir
d
i
s
tri
bu
ti
o
n.
7. Air fl ow ad
j
ustment
)
T
u
rn thi
s
co
ntr
o
l t
o
th
e
l
e
ft t
o
dec
r
ease
th
e
a
ir fl
o
w
o
r t
o
th
e
r
i
g
ht to increase the air
f
low.
The air flow indicator lamps, between the two
fans, come on pro
g
ressivel
y
in relation to the
value requested.
8. Air intake
/
Air recirculation
Ai
r rec
i
rcu
l
at
i
on ena
bl
es t
h
e passen
g
er
c
ompartment to be isolated
f
rom exterior odours
and smoke when external pollution is detected
(
i
f
your vehicle is
f
itted with a pollution sensor
)
.
It is activated automaticall
y
on operation o
f
the
sc
r
ee
nw
as
h.
It is inactive when the ambient temperature is
below 5 °C to avoid the risk of mistin
g
in the
v
e
hi
c
l
e
.
- The indicator lamp with "A" on
in
d
i
ca
t
es
th
a
t r
ec
ir
cu
l
a
ti
o
n i
s
c
ontro
ll
e
d
automat
i
ca
lly
.
-
Th
e
i
n
di
cator
l
amp w
i
t
h
out
"A"
o
n
i
n
dica
t
es
t
ha
t r
eci
r
cula
t
io
n
is
f
orced manuall
y
.
- Both indicator lam
p
s o
ff
in
d
i
ca
t
es
th
a
t r
ec
ir
cu
l
a
ti
o
n i
s
c
ontrolled automaticall
y
without
takin
g
account of the detection
of pollution.
Wi
t
h
out
p
o
ll
ut
i
on sensor
If
y
our vehicle is not fitted with a
pollution sensor, press this button
to force recirculation manuall
y
.
In ZEV mode, the h
y
brid s
y
stem ma
y
temporaril
y
inhibit operation of the air
c
on
di
t
i
on
i
n
g
.
The
ZEV
mode
g
ives pre
f
erence to
el
ectr
i
c
d
r
i
v
i
n
g
rat
h
er t
h
an ma
i
nta
i
n
i
n
g
a com
f
ortable tem
p
erature.

121
Comfort
Switchin
g
the s
y
stem off
)
T
u
rn th
e
a
ir
f
l
o
w
co
ntr
o
l t
o
th
e
lef
t
u
ntil
a
ll
of
th
e
in
d
i
ca
t
or
l
amps
g
o o
ff
.
A
void prolon
g
ed operation in interior
a
ir recirculation mode or drivin
g
for
lon
g
periods with the s
y
stem off
(
risk o
f
co
n
de
n
sa
ti
o
n
a
n
d
de
t
e
ri
o
r
a
ti
o
n
o
f
a
ir
qualit
y)
.
This action switches o
ff
the air conditionin
g
and
t
he
v
e
nt
ila
t
io
n.
Temperature related com
f
ort is no longer
a
ssured but a sli
g
ht
f
low o
f
air, due to the
movement of the vehicle, can still be felt.
)
Modif
y
the settin
g
s
(
temperature, air flow or
air distribution
)
or press the
"
AUTO"
bu
tt
o
n
to reactivate the s
y
stem with the values set
befo
r
e
it w
as
s
wit
c
h
ed
off
.
9. Maximum air conditionin
g
)
I
f
y
ou want to quickl
y
cool
t
h
e a
i
r
i
n t
h
e passen
g
er
c
om
p
artment,
p
ress t
hi
s
button;
"
LO" is displayed.
T
o return to t
h
e prev
i
ous sett
i
n
g
s, press t
h
e
b
utton a
g
a
i
n.
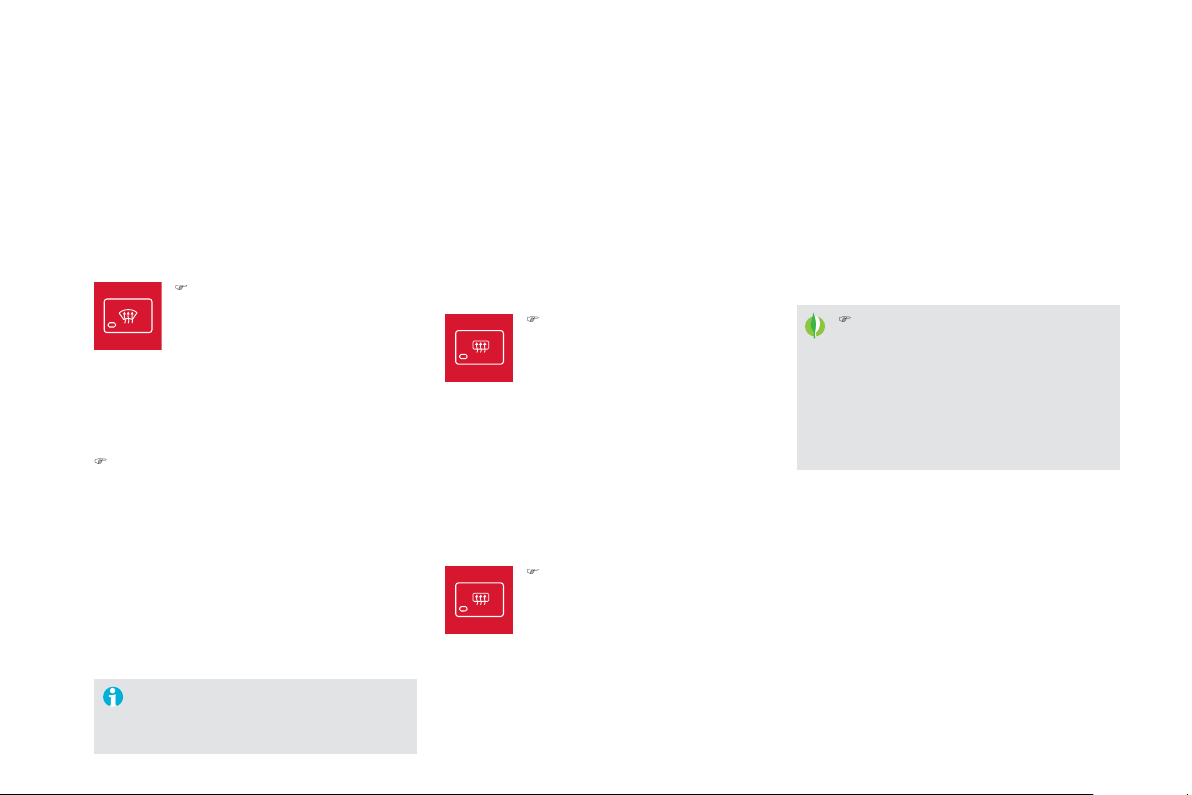
)
Switch off the demistin
g
/defrostin
g
of
th
e
r
ea
r
sc
r
ee
n
a
n
d
doo
r mirr
o
r
s
as soon as appropr
i
ate, as
l
ower
c
urrent consum
p
t
i
on resu
l
ts
i
n
reduced
f
uel consum
p
tion.
Front Demist -
Defrost
Rear screen and door mirrors demist -
defrost
)
It is possible to stop the
demistin
g/
de
f
rostin
g
operation
befo
r
e
it i
s
s
wit
c
h
ed
off
automat
i
ca
lly
by
press
i
n
g
t
h
e
b
utton again. The indicato
r
l
am
p
associated with the
b
utton
g
oes off.
A
utomatic visibilit
y
pro
g
ramme
Switchin
g
on
With
S
top
&
S
tart, when demistin
g
has
been activated, the
S
T
O
P mode is not
a
v
a
il
ab
l
e
.
Switchin
g
off
The demistin
g/
de
f
rostin
g
switches o
ff
automaticall
y
to prevent an excessive consumption of current.
)
S
elect this programme
t
o
de
mi
s
t
o
r
def
r
os
t th
e
win
dsc
r
ee
n
a
n
d
s
i
de
win
do
w
s
as quickl
y
as possible.
Th
e s
y
stem automat
i
ca
lly
mana
g
es t
h
e a
i
r
c
onditionin
g
, air
f
low and air intake, and
p
rovides o
p
timum distribution towards the
win
dsc
r
ee
n
a
n
d
s
i
de
win
do
w
s
.
)
To stop the pro
g
ramme, press either the
"visibilit
y
" button a
g
ain or
"
AUTO"
,
the
i
ndicator lamp in the button
g
oes off and
t
h
e
i
n
di
cator
l
amp
i
n t
h
e "AUTO"
bu
tt
o
n
comes
on
.
Th
e s
y
stem starts a
g
a
i
n w
i
t
h
t
h
e va
l
ues
i
n
use be
f
ore it was overridden by the visibility
programme
.
)
Press this button
(
located on
t
h
e a
i
r con
di
t
i
on
i
n
g
s
y
stem
c
ontrol panel
)
to demist
/
de
f
rost
th
e
r
ea
r
sc
r
ee
n
a
n
d
th
e
doo
r
mirrors. The indicator lamp
assoc
i
a
t
ed
with th
e
bu
tt
o
n
co
m
es
o
n.
T
he rear screen demistin
g
- defrostin
g
can onl
y
operate when the h
y
brid s
y
stem is active.
1
2
3
Comfort

004
Driving
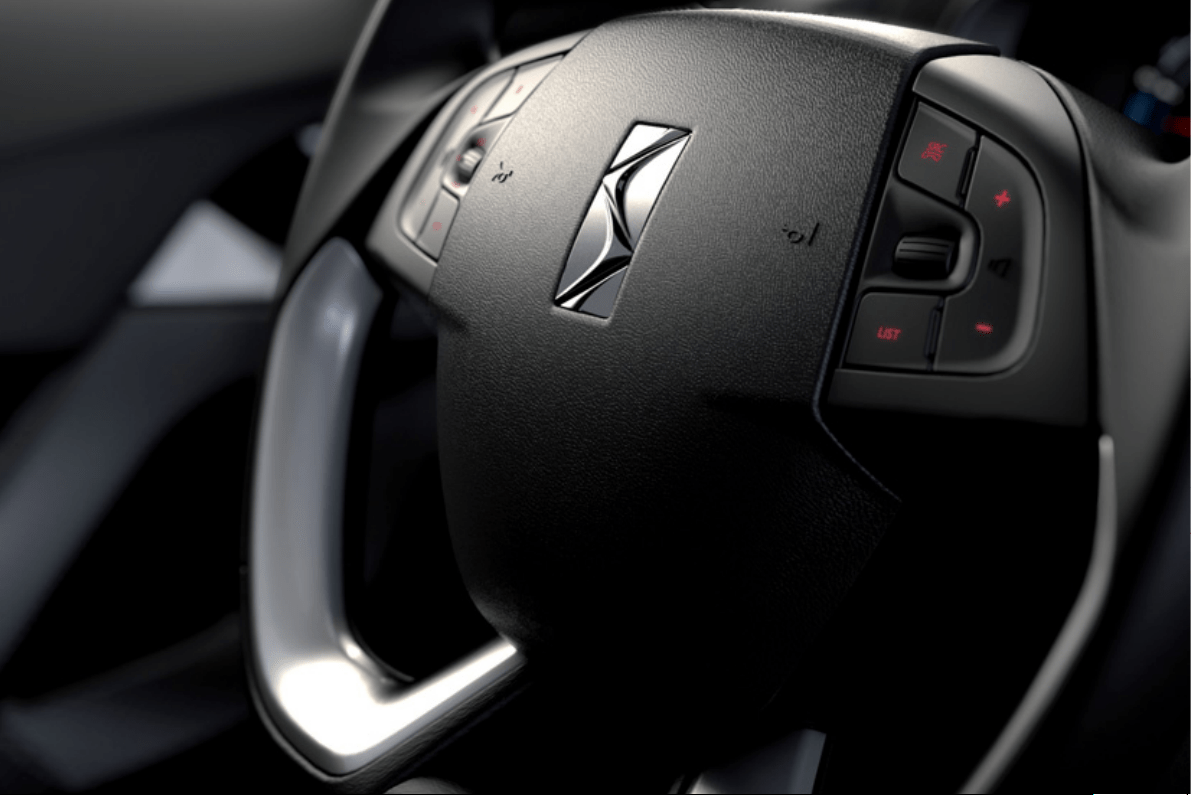
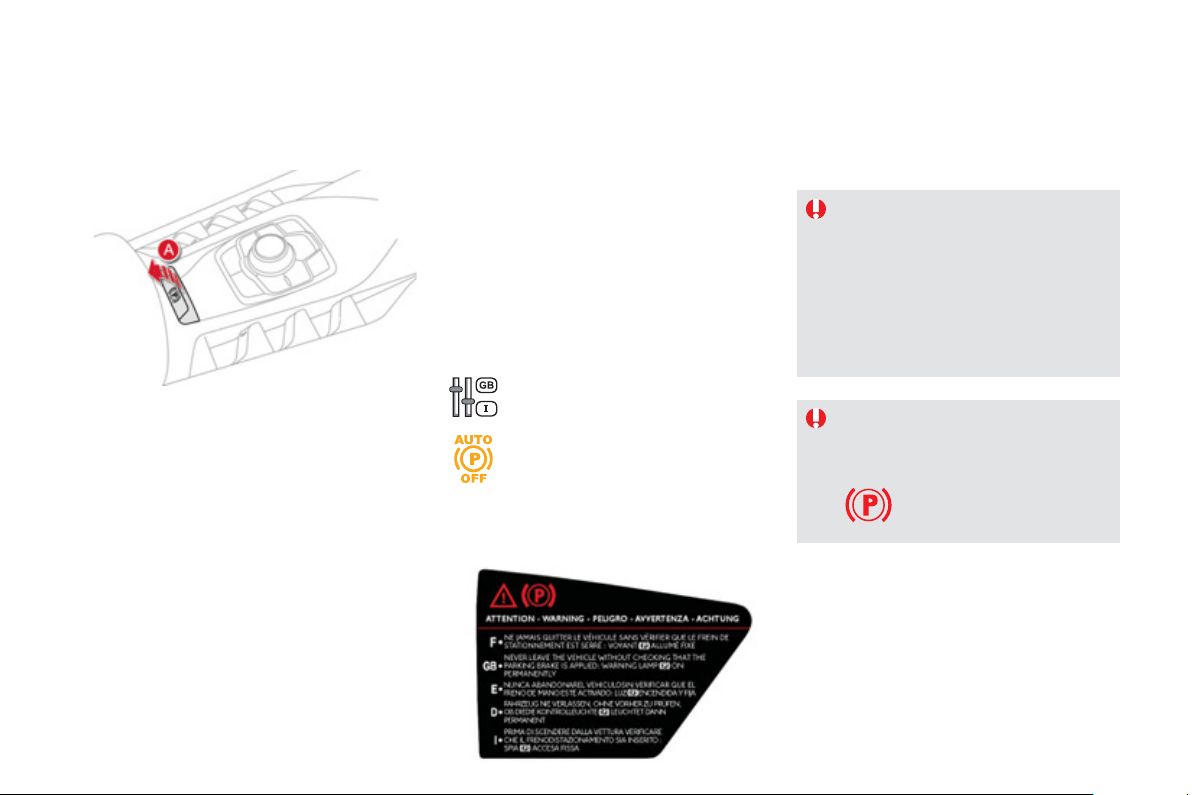
It is recommended that
y
ou do not
appl
y
the parkin
g
brake in ver
y
cold
c
onditions
(
ice
)
and durin
g
towin
g
(
recover
y
...
)
.
T
o
d
o t
hi
s, re
l
ease t
h
e par
ki
n
g
b
ra
k
e
manua
lly
, se
l
ect pos
i
t
i
on
A
or
R
, t
h
en
p
ress the
S
TART
/S
T
O
P switch to sto
p
the engine.
Th
e e
l
ectr
i
c par
ki
n
g
b
ra
k
e com
bi
nes
2 operatin
g
modes:
-
A
utomatic Application
/
Releas
e
Application is automatic when the en
g
ine
stops, release is automatic on use of the
a
ccelerator
(
this mode is activated b
y
default
)
,
-
M
anual A
pp
lication/Releas
e
Manual application o
f
the parkin
g
brake is
d
one
by
pu
lli
n
g
contro
l
l
ever
A
.
M
anua
l
re
l
ease
i
s
d
one
by
pu
lli
n
g
t
he
n
r
eleasing the control lever, while pressing
the brake
p
edal
When the driver's door is opened, there is an
a
udible si
g
nal and a messa
g
e is displa
y
ed if the
brake is not applied.
Pro
g
rammin
g
the automatic
m
ode
Dependin
g
on the countr
y
of sale of the vehicle,
the automatic application when the en
g
ine is
s
wit
c
h
ed
o
ff
a
n
d
th
e
au
t
o
m
a
ti
c
r
e
l
ease
wh
e
n
y
ou press t
h
e acce
l
erator can
b
e
d
eact
i
vate
d
.
Y
ou
ca
n
co
nt
ac
t
a
C
ITR
OË
N
dea
l
e
r
o
r
a
q
uali
f
ied worksho
p
to have it activated.
I
n t
hi
s case, pro
g
ramm
i
n
g
i
s
d
one v
i
a
the con
f
i
g
uration menu.
Electric parking brake
If deactivated, the parkin
g
brake must
be applied and released manuall
y
.
I
f
this warnin
g
lamp comes on in
t
h
e
i
nstrument pane
l
, t
h
e automat
i
c
mode
is
deac
t
i
v
a
t
ed
.
N
e
v
e
r l
ea
v
e
th
e
v
e
hi
c
l
e
with
ou
t
c
heckin
g
that the parkin
g
brake is on.
Thi
s warn
i
n
g
l
amp comes on
f
ixed
(
not
f
lashin
g)
.
La
b
e
l
on
d
oor
p
ane
l
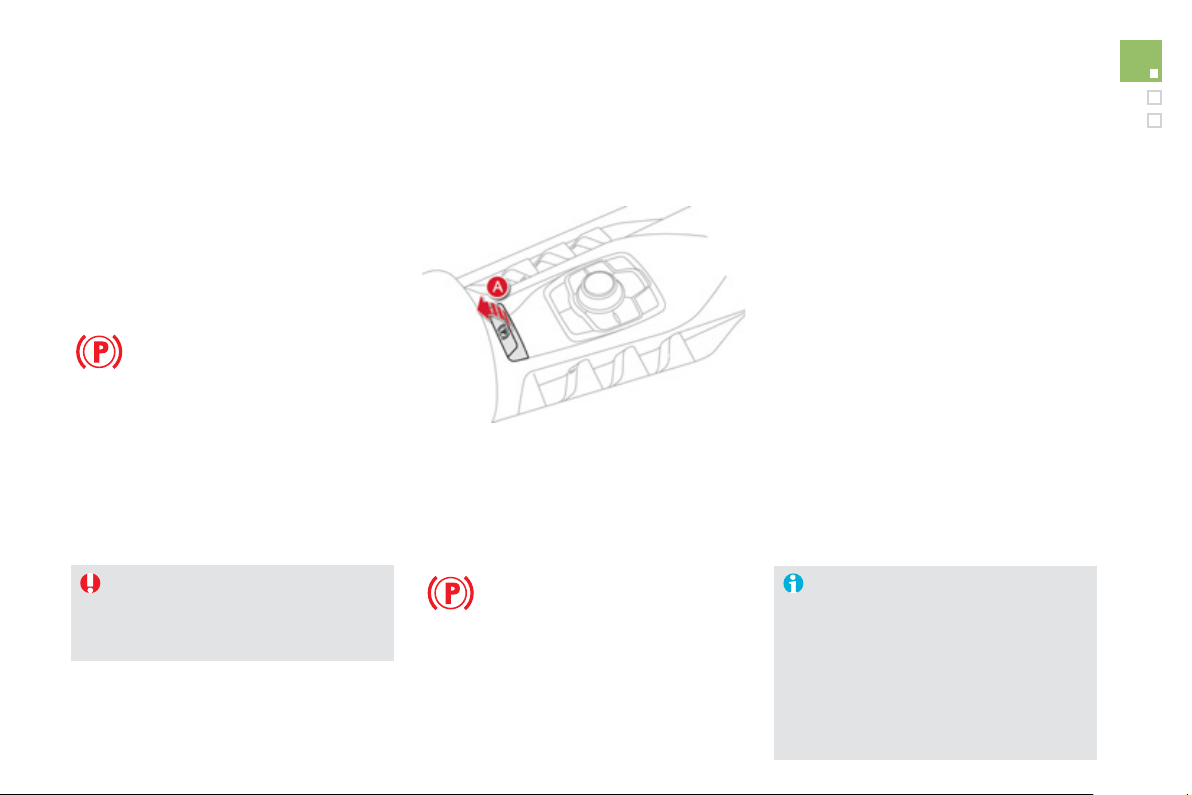
127
Driving
Wi
t
h
t
h
e
ig
n
i
t
i
on on or t
h
e
hyb
r
id
s
y
stem act
i
ve,
to re
l
ease t
h
e par
ki
n
g
b
ra
k
e,
press
t
he
b
ra
ke
pe
d
a
l
, pu
ll
t
he
n r
elease
co
ntr
ol
le
v
e
r
A
.
The
f
ull release o
f
the parking brake is
c
on
f
irmed b
y
:
Manual release
- the braking warning lamp and
th
e
P
warnin
g
lamp in the control
le
v
e
r A
g
oin
g
off,
- the displa
y
of a messa
g
e.
I
f
you pull the control lever A without pressing
the brake pedal, the parkin
g
brake will not
be released and a messa
g
e appears in the
i
nstrument panel.
If necessar
y
,
y
ou can make a
m
aximum
app
lication of the parkin
g
brake. It is obtained
b
y
means o
f
a
l
on
g
pu
ll
o
n
co
ntr
ol
le
v
e
r
A
,
unt
il
y
ou see a messa
g
e an
d
an au
dibl
e s
ig
na
l
is
hea
r
d
.
Maximum application is essential
:
- in the case o
f
a vehicle towin
g
a trailer,
if th
e
au
t
o
m
a
ti
c
f
u
n
c
ti
o
n
s
a
r
e
ac
tiv
a
t
ed
but
y
ou are appl
y
in
g
the parkin
g
brake
m
anuall
y
,
- when the slope
y
ou are parked on ma
y
var
y
(
e.
g
. on a
f
err
y
, on a lorr
y
, durin
g
towin
g)
.
Maximum a
pp
lication
In the case o
f
towin
g
, a loaded vehicle
or par
ki
n
g
on a
g
ra
di
ent, ma
k
e a
maximum application o
f
the parkin
g
b
r
a
k
e
th
e
n t
u
rn th
e
f
r
o
nt wh
ee
l
s
t
o
w
a
r
ds
the pavement and en
g
a
g
e a
g
ear when
y
ou park.
After a maximum application, the
release time will be lon
g
er.
Be
f
ore leavin
g
the vehicle, check that
par
ki
n
g
b
ra
k
e warn
i
n
g
l
amps
i
n t
h
e
i
nstrument
p
ane
l
an
d
t
h
e contro
l
l
ever
A
are on
f
ixed, not
f
lashing.
With the vehicle stationar
y
, to appl
y
the parkin
g
brake whether the h
y
brid s
y
stem is active or
n
o
t,
p
ull
co
ntr
o
l l
e
v
e
r
A
.
Manual a
pp
lication
The application o
f
the parkin
g
brake is
c
on
f
irmed b
y
:
- illumination of the brakin
g
warnin
g
lamp and of the
P
warnin
g
lamp in
t
he
co
ntr
ol
le
v
e
r
A
,
- the displa
y
o
f
a messa
g
e.
When the driver
’
s door is opened with the
hyb
r
id
s
y
stem act
i
ve, t
h
ere
i
s an au
dibl
e s
ig
na
l
and a messa
g
e is displa
y
ed i
f
the parkin
g
brake
h
as not been a
pp
lied.
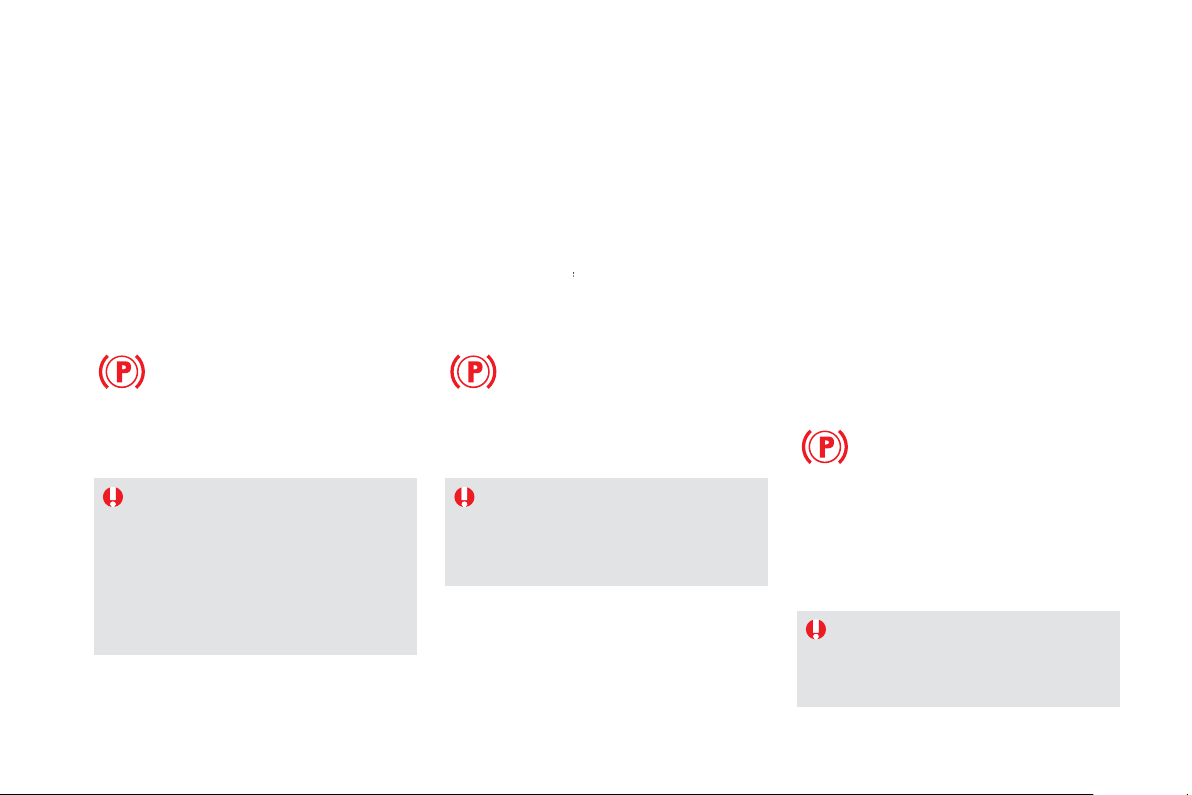
Before leavin
g
the vehicle, check that
p
arkin
g
brake warnin
g
lamps in the
instrument panel and in the control
l
e
v
e
r
A
are on fixed
(
not flashin
g)
.
Ne
v
e
r
lea
v
e
a
child
alo
n
e
i
n
side
t
he
ve
hi
c
l
e w
i
t
h
t
h
e
ig
n
i
t
i
on on, as t
h
e
y
c
ou
ld
re
l
ease t
h
e par
ki
n
g
b
ra
k
e.
A
utomatic a
pp
lication,
e
n
g
ine off
- illumination of the brakin
g
warnin
g
lamp and of the
P
warnin
g
lamp in the control
le
v
e
r
A
,
- the displa
y
o
f
a messa
g
e.
With the vehicle stationar
y
, the parkin
g
brake
i
s automat
i
ca
lly
app
li
e
d
w
h
en t
h
e en
gi
ne
i
s
switched off
.
The application o
f
the parkin
g
brake is
c
on
f
irmed by:
Automatic release
Full release of the parkin
g
brake is
c
onfirmed b
y
:
- the brakin
g
warnin
g
lamp and
th
e
P
warnin
g
lamp in the control
le
v
e
r
A
g
oin
g
o
ff
,
- the displa
y
o
f
a messa
g
e.
When stationar
y
, with the h
y
brid s
y
stem
a
ctivated, do not press the accelerator
p
edal unnecessaril
y
, as
y
ou ma
y
r
elease the parkin
g
brake.
Before leavin
g
the vehicle, check that
par
ki
n
g
b
ra
k
e warn
i
n
g
l
amps
i
n t
h
e
i
nstrument pane
l
an
d
t
h
e contro
l
l
ever
A
are on
f
ixed, not
f
lashin
g
.
I
mmo
bili
s
i
n
g
t
h
e ve
hi
c
l
e,
hyb
r
id
s
y
stem act
i
ve
Wi
t
h
t
h
e
hyb
r
id
s
y
stem act
i
ve an
d
t
h
e ve
hi
c
l
e
s
tationary, in order to immobilise the vehicle
it i
s
esse
nti
a
l t
o
m
anuall
y
appl
y
the parkin
g
brake b
y
p
ullin
g
co
ntr
o
l l
e
v
e
r A .
The application of the parkin
g
brake is
c
onfirmed b
y
:
- illumination of the brakin
g
warnin
g
l
amp and of the
P
warnin
g
lamp in
t
he
co
ntr
ol
le
v
e
r
A
,
- the displa
y
o
f
a messa
g
e.
When the driver’s door is opened, a loud beep
is heard and a messa
g
e is displa
y
ed if the
p
arkin
g
brake has not been applied.
The electric parkin
g
brake
r
eleases
automat
i
ca
lly
an
d
pro
g
ress
i
ve
ly
as t
h
e
vehicle moves off
, select position
f
A
,
M
or
R
an
d
t
h
en
p
ress t
h
e acce
l
erator.
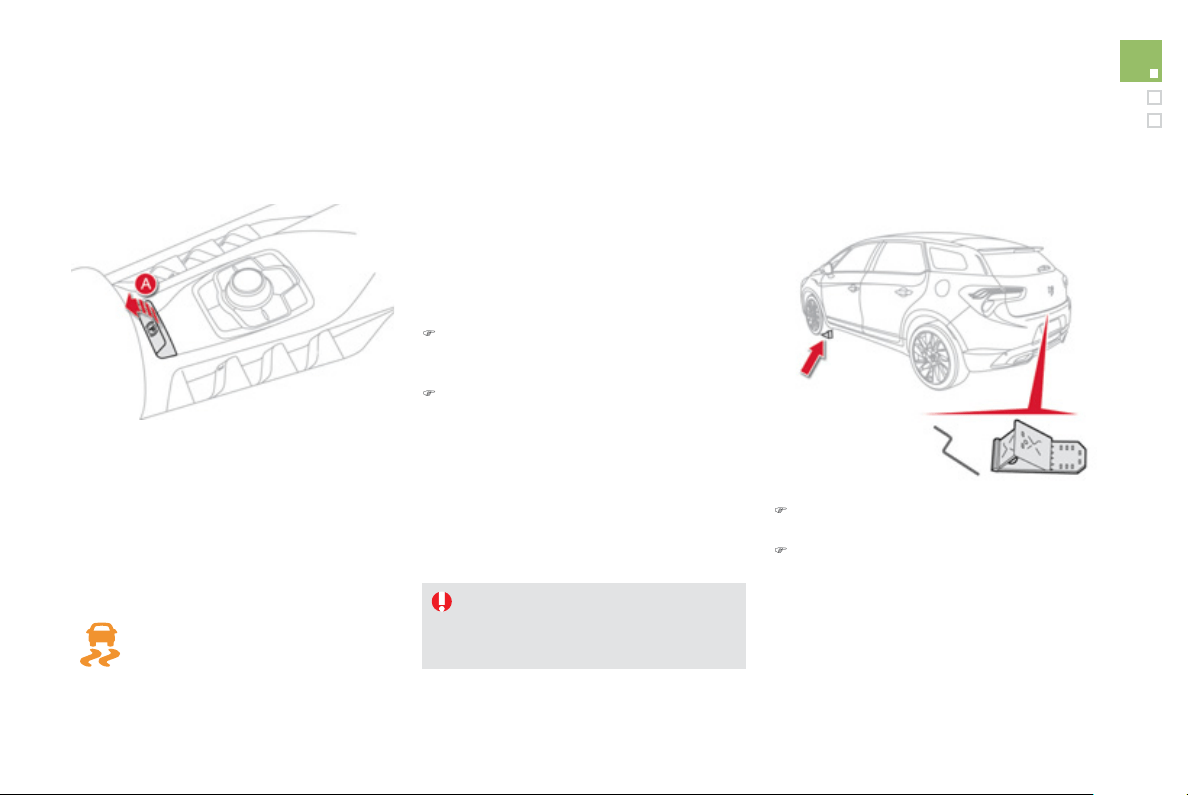
1
2
9
Driving
Emer
g
enc
y
brakin
g
In th
e
e
v
e
nt
of
a
fa
il
u
r
e
of
th
e
m
a
in
se
rvi
ce
brake or in an exceptional situation
(
e.
g
. driver
taken ill, under instruction, etc
)
a continuous
p
ull on the control lever
A
will sto
p
the vehicle.
The D
y
namic
S
tabilit
y
C
ontrol s
y
stem provides
s
tabilit
y
durin
g
emer
g
enc
y
brakin
g
.
If the emer
g
enc
y
brakin
g
malfunctions, a
m
essa
g
e is displa
y
ed.
E
mer
g
enc
y
re
l
ease
)
T
a
k
e
th
e
v
e
hi
c
l
e
b
l
oc
k
s
a
n
d
th
e
r
e
l
ease
device, located under the boot carpet.
)
O
n slopin
g
g
round, secure the vehicle b
y
p
lacin
g
chocks in
f
ront or behind the
f
ront
wheels, on the
f
allin
g
side o
f
the slope.
In the event of the electric parkin
g
brake
malfunctionin
g
or the batter
y
runnin
g
flat, an
emer
g
enc
y
manual device can release the
p
arkin
g
brake.
)
I
mmo
bili
se t
h
e ve
hi
c
l
e an
d
w
i
t
h
t
h
e
hyb
r
id
sy
stem act
i
ve, p
l
ace t
h
e
g
ear se
l
ector
i
n
p
os
i
t
i
on
M
or
R
.
)
S
witch o
ff
the engine then switch the
i
g
nition back on
(
press the
S
TART
/
S
T
O
P switch twice
)
. If it is impossible to
immobilise the vehicle, do not operate the
c
ontrol and contact a
C
ITR
O
ËN dealer o
r
a qualified workshop ur
g
entl
y
.
The emergency braking must only be
used in exceptional circumstances.
I
f
a
f
ailure o
f
the D
SC
s
y
stem is
si
g
nalled b
y
the illumination o
f
this
w
arnin
g
lamp, then brakin
g
stabilit
y
is
n
ot
g
uaranteed.
In this event, stabilit
y
must be assured b
y
the
driver b
y
repeatin
g
alternate "pull-release"
ac
t
io
n
s
o
n t
he
co
ntr
ol
le
v
e
r
A
.
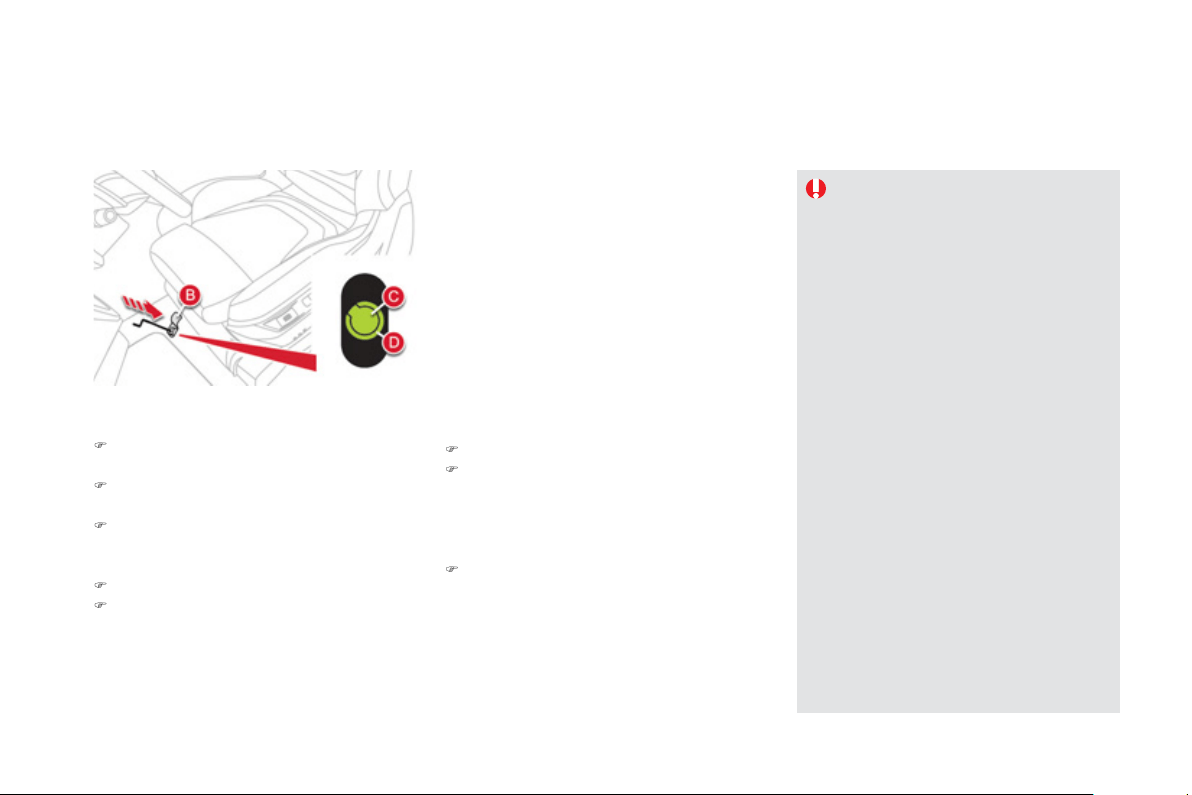
For safet
y
reasons,
y
ou must contact a
C
ITROËN dealer as soon as possible to
rep
l
ace t
h
e protect
i
ve cover.
Take
ca
r
e
n
o
t t
o
allo
w m
ois
t
u
r
e
o
r
dus
t
in the proximit
y
o
f
the protective cover.
Followin
g
an emer
g
enc
y
unlockin
g
,
imm
ob
ili
sa
ti
o
n
of
th
e
v
e
hi
c
l
e
i
s
n
o
lon
g
er
g
uaranteed once the manual
e
mer
g
enc
y
release has been deplo
y
ed
a
n
d
th
e
m
a
n
ua
l
co
ntr
o
l
does
n
o
t
a
ll
o
w
the re-application of
y
our parkin
g
brake.
T
a
k
e no act
i
on, e
i
t
h
er on t
h
e contro
l
le
v
e
r
A
, or stopp
i
n
g
or start
i
n
g
t
h
e
e
n
gi
ne w
hil
e t
h
e re
l
ease
d
ev
i
ce
i
s
e
n
g
a
g
ed.
To re-en
g
a
g
e the electric parkin
g
brake
(
a
f
ter correction o
f
the
f
ault or batter
y
problem
)
, make a lon
g
pull on the
co
ntr
o
l l
e
v
e
r
A
until the parkin
g
brake
warnin
g
lamp in the instrument panel
f
lashes then make a second lon
g
pull
until this warnin
g
lamp comes on
f
ixed.
Front left seat moved back full
y.
)
S
li
de
th
e
f
r
o
nt l
ef
t-h
a
n
d
sea
t
bac
k
as
fa
r
as
p
ossible.
)
Raise the
p
re-cut zone
B
in the car
p
et
u
n
de
r th
e
sea
t.
)
Pierce the protective cover
C
o
n th
e
t
ube
D
with the release device
(
located in
the boot
)
.
)
Place
t
he
r
elease
de
v
ice
i
n t
he
t
ube
D
.
)
Tu
rn t
he
r
elease
de
v
ice
cl
oc
k
w
i
s
e
ma
ki
n
g
se
v
e
r
al
do
z
e
n t
u
rn
s
For safety reasons, it is
e
ssentia
l
t
o
c
ontinue turnin
g
the device as
f
ar as it will
g
o. The parkin
g
brake is released.
)
R
e
m
o
v
e
th
e
r
e
l
ease
de
vi
ce
a
n
d
s
t
o
w it.
)
The operation of the parkin
g
brake
reinitialises after the i
g
nition is switched of
f
then on a
g
ain. If the reinitialisation of the
parkin
g
brake proves impossible, contact a
C
ITRO
Ë
N dealer or a qualified workshop.
)
The
(
subsequent
)
time required
f
o
r
app
li
cat
i
on ma
y
b
e
l
on
g
er t
h
an
d
ur
i
n
g
normal o
p
eration.
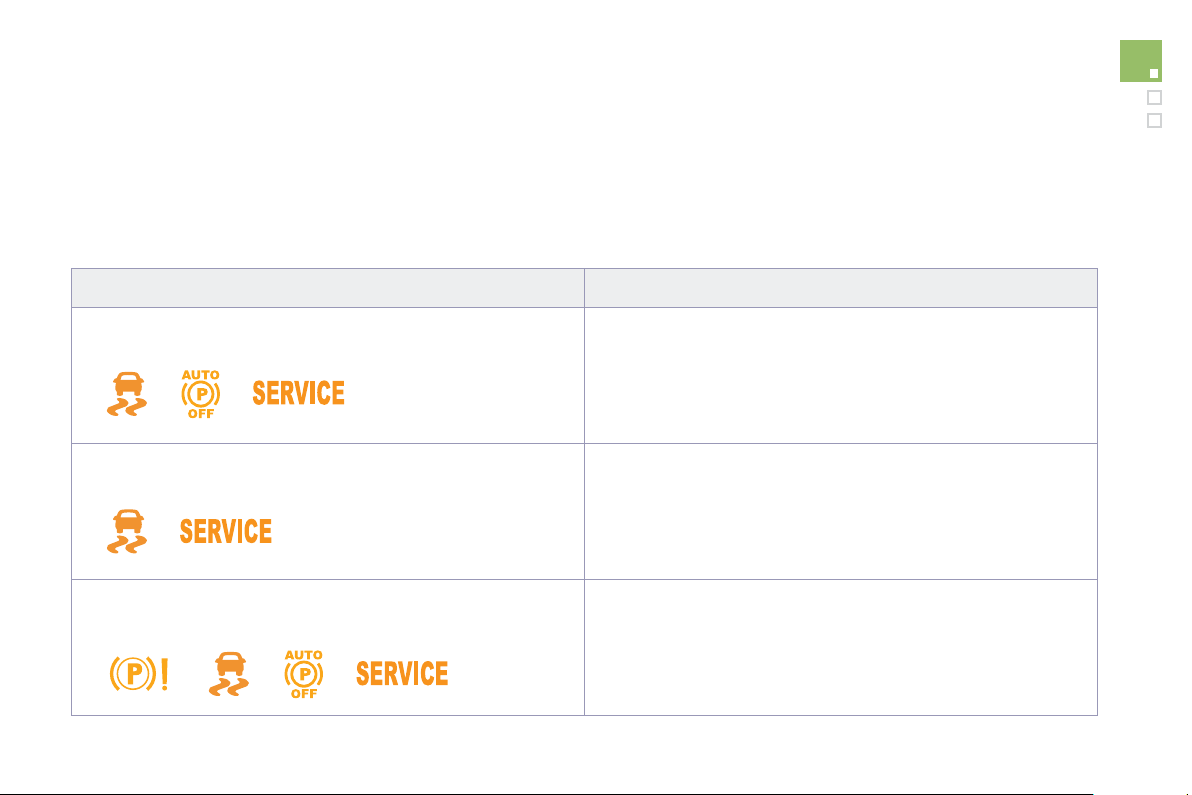
1
3
1
Driving
Operatin
g
faults
I
f
the electric parking brake
f
ault warning lamp comes on together with one or more o
f
the warning lamps presented in these tables, place the vehicle in
a safe condition
(
on level
g
round,
g
ear en
g
a
g
ed
)
and contact a CITROËN dealer or a qualified workshop without dela
y
.
S
ituation
s
Consequence
s
Displa
y
of the messa
g
e "
P
arkin
g
brake faul
t
" and of the followin
g
w
arn
i
n
g
l
amps:
- Th
e
au
t
o
m
a
ti
c
f
u
n
c
ti
o
n
s
a
r
e
deac
tiv
a
t
ed
.
-
Hill
s
t
a
rt
assis
t
is
n
o
t
a
v
ailable
.
-
Th
e e
l
ectr
i
c par
ki
n
g
b
ra
k
e can on
ly
b
e use
d
manua
lly
.
Displa
y
o
f
the messa
g
e "
P
arkin
g
brake faul
t
" and o
f
the
f
ollowin
g
w
arn
i
n
g
l
amps:
- Manual release o
f
the electric parkin
g
brake is onl
y
possible b
y
press
i
n
g
t
h
e acce
l
erator pe
d
a
l
an
d
pu
lli
n
g
t
h
e contro
l
l
ever.
-
Hill
s
t
a
rt
assis
t
is
n
o
t
a
v
ailable
.
- The automatic
f
unctions and the manual a
pp
lication are still
a
v
a
il
ab
l
e
.
Displa
y
o
f
the messa
g
e "
P
arkin
g
brake faul
t
" and o
f
the
f
ollowin
g
w
arn
i
n
g
l
amps:
- Th
e
au
t
o
m
a
ti
c
fu
n
c
ti
o
n
s
a
r
e
deac
tiv
a
t
ed
.
-
Hill
s
t
a
rt
assis
t
is
n
o
t
a
v
ailable
.
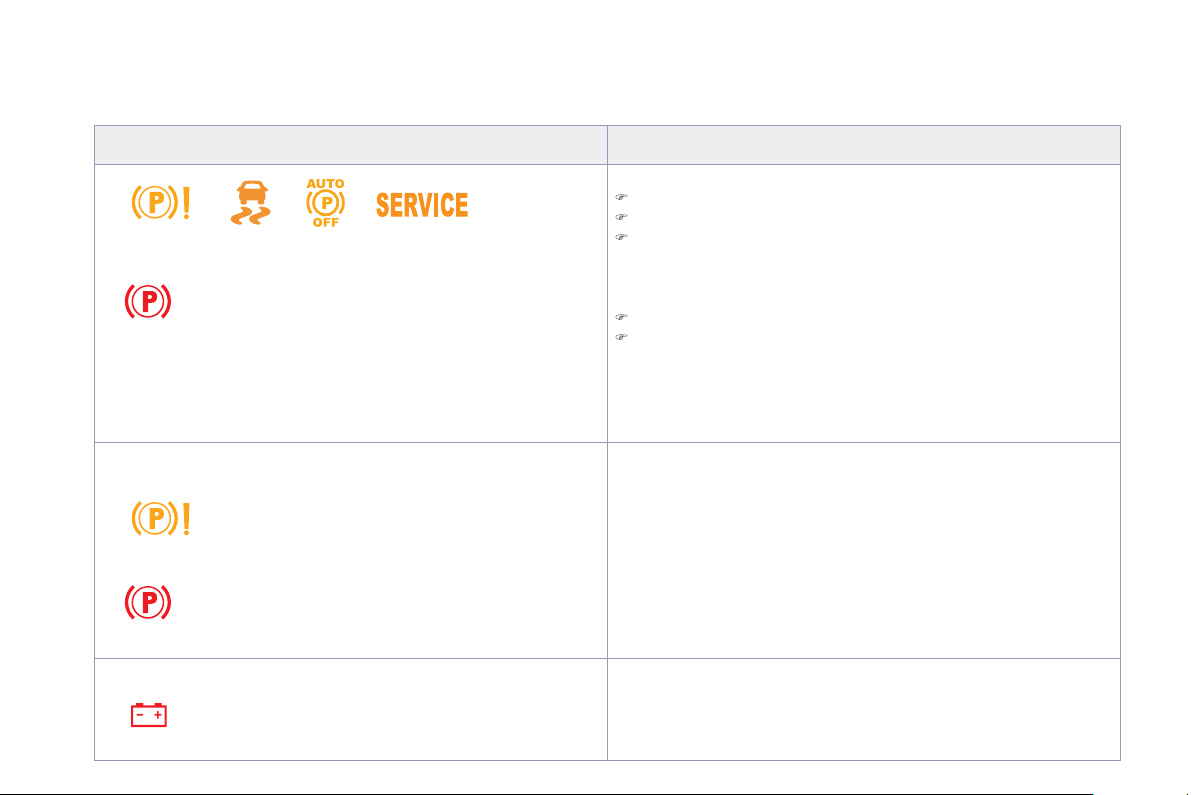
S
ituation
s
C
onsequences
T
o app
ly
t
h
e e
l
ectr
i
c par
ki
n
g
b
ra
k
e:
)
immobilise the vehicle and switch o
ff
the i
g
nition.
)
pull the control
f
or at least 5 seconds or until application is complete.
)
sw
i
tc
h
on t
h
e
ig
n
i
t
i
on an
d
c
h
ec
k
t
h
at t
h
e e
l
ectr
i
c par
ki
n
g
b
ra
k
e
warning lamps come on.
The application is slower than durin
g
normal operation.
To release the electric parkin
g
brake:
)
switch on the i
g
nition.
)
p
ull the control lever and hold it for approximatel
y
3 seconds then release it.
I
f
the brakin
g
warnin
g
lamp is
f
lashin
g
or i
f
the warnin
g
lamps do not
c
ome on w
i
t
h
t
h
e
ig
n
i
t
i
on on, t
h
ese proce
d
ures w
ill
not wor
k
.
Pl
ace t
h
e
vehicle on level
g
round and have it checked b
y
a CITRO
Ë
N dealer or a
q
uali
f
ied worksho
p
.
an
d
poss
ibly
flashin
g
Displa
y
o
f
the messa
g
e "
P
arkin
g
brake faul
t
" and o
f
the
f
ollowin
g
warn
i
n
g
l
amps:
-
O
nl
y
the automatic application on switchin
g
o
ff
the en
g
ine and
au
t
o
m
a
ti
c
r
e
l
ease
o
n
acce
l
e
r
a
ti
o
n
fu
n
c
ti
o
n
s
a
r
e
a
v
a
il
ab
l
e
.
- The manual application
/
release o
f
the electric parkin
g
brake and the
e
mergency braking are not available.
and possibly
flashin
g
Displa
y
of the messa
g
e "Batter
y
char
g
e faul
t
". - You must stop as soon as it is safe to do so. Switch off and
immobilise
y
our vehicle
(
if necessar
y
, place the a chock under a
wheel
)
.
- Appl
y
the electric parkin
g
brake before switchin
g
of
f
the en
g
ine.

1
3
3
Driving
S
p
ecial situations
In the event of a malfunction of the parkin
g
b
r
ake
i
n t
h
e on
p
os
i
t
i
on or a batter
y
f
ailure,
manua
l
re
l
ease rema
i
ns poss
ibl
e.
T
o ensure correct o
p
erat
i
on, an
d
so
y
our sa
f
ety, the number o
f
successive
applications and releases o
f
the parkin
g
b
rake is limited to ei
g
ht c
y
cles.
If used excessivel
y
,
y
ou are alerted b
y
the messa
g
e "parkin
g
brake fault
y
" and a
flashin
g
warnin
g
lamp.
In some circumstances
(
en
g
ine start...
)
,
the parkin
g
brake ma
y
ad
j
ust the level o
f
application itsel
f
. This is normal operation.
To move
y
our vehicle a
f
ew centimetres
without starting the engine, with the ignition
o
n,
p
ress the brake
p
edal and release the
parkin
g
brake b
y
pullin
g
th
e
n
r
eleasin
g
th
e
co
ntr
o
l l
e
v
e
r
A
. Complete release of the
parkin
g
brake is indicated b
y
the warnin
g
l
amps in the control lever
A
a
n
d
in th
e
instrument panel
g
oin
g
o
ff
and b
y
the displa
y
of
the messa
g
e "Parkin
g
brake o
ff
".
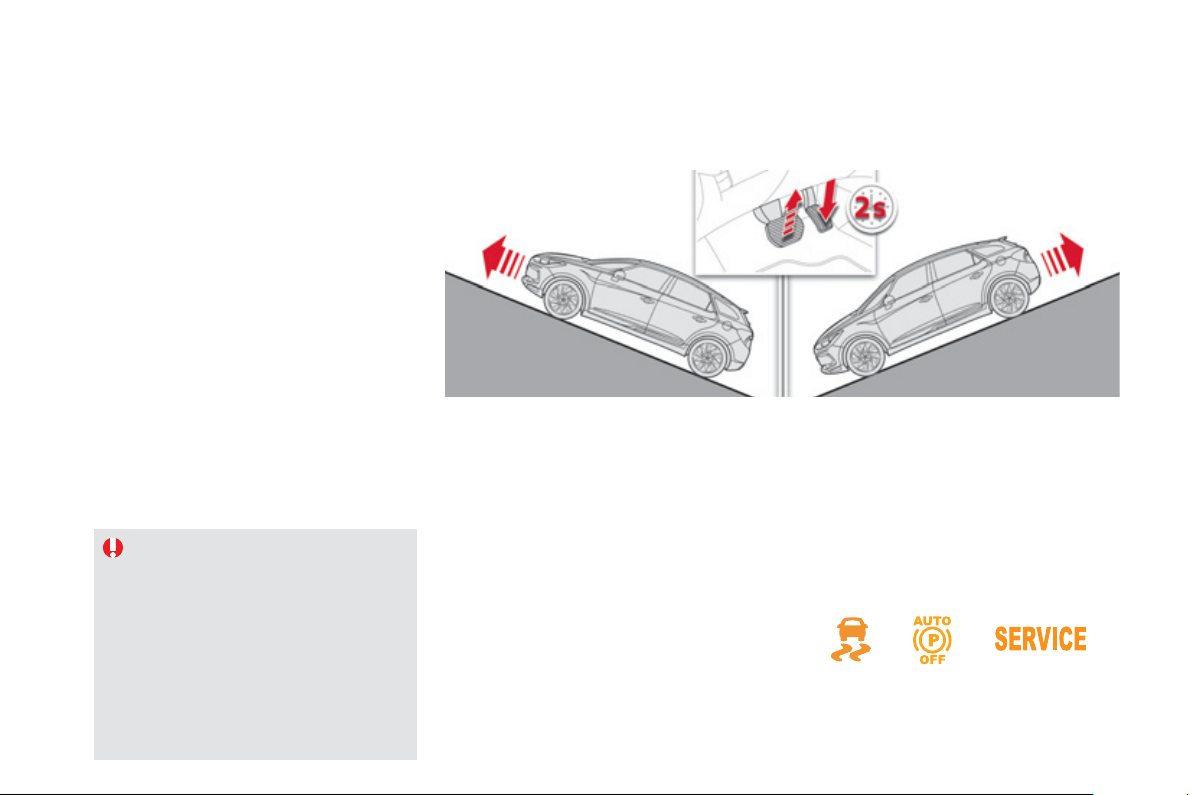
Hill start assist
S
ystem which keeps your vehicle immobilised
temporaril
y
(
approximatel
y
2 seconds
)
when
s
tartin
g
on a
g
radient, the time it takes to
m
ove
y
our foot from the brake pedal to the
a
ccelerator pedal.
This function is onl
y
active when:
- t
h
e ve
hi
c
l
e
i
s comp
l
ete
ly
stat
i
onar
y
, w
i
t
h
y
our
f
oot on the brake pedal,
-
i
n
p
art
i
cu
l
ar con
di
t
i
ons on a s
l
o
p
e,
- with th
e
d
riv
e
r
’s
doo
r
c
l
osed
.
Th
e
hill
s
t
a
rt
ass
i
s
t
fu
n
c
ti
o
n
ca
nn
o
t
be
deac
tiv
a
t
ed
.
On an ascendin
g
slope, with the vehicle
s
tationar
y
, the vehicle is held for a brief
m
oment when you release the brake pedal
,
i
f
the
g
ear selector is in position A
or
M
.
On a descendin
g
slope, with the vehicle
stat
i
onar
y
an
d
reverse
g
ear en
g
a
g
e
d
, t
h
e
v
ehicle is held for a brief moment when you
r
elease the brake
p
edal
.
Do not exit the vehicle while it is bein
g
h
eld in the hill start assist phase.
If
y
ou need to exit the vehicle with the
hy
brid s
y
stem active, appl
y
the parkin
g
b
ra
k
e manua
lly
t
h
en ensure t
h
at t
h
e
p
ar
ki
n
g
b
ra
k
e warn
i
n
g
l
amp an
d
t
h
e
warn
i
n
g
l
amp
P
on the lever
(
o
f
the
e
lectric brake
)
are permanentl
y
on.
Operatin
g
fault
I
f
a mal
f
unction o
f
the s
y
stem occurs, these
warnin
g
lamps come on. Contact a CITROËN
dealer or a qualified workshop to have the
sy
stem checked.
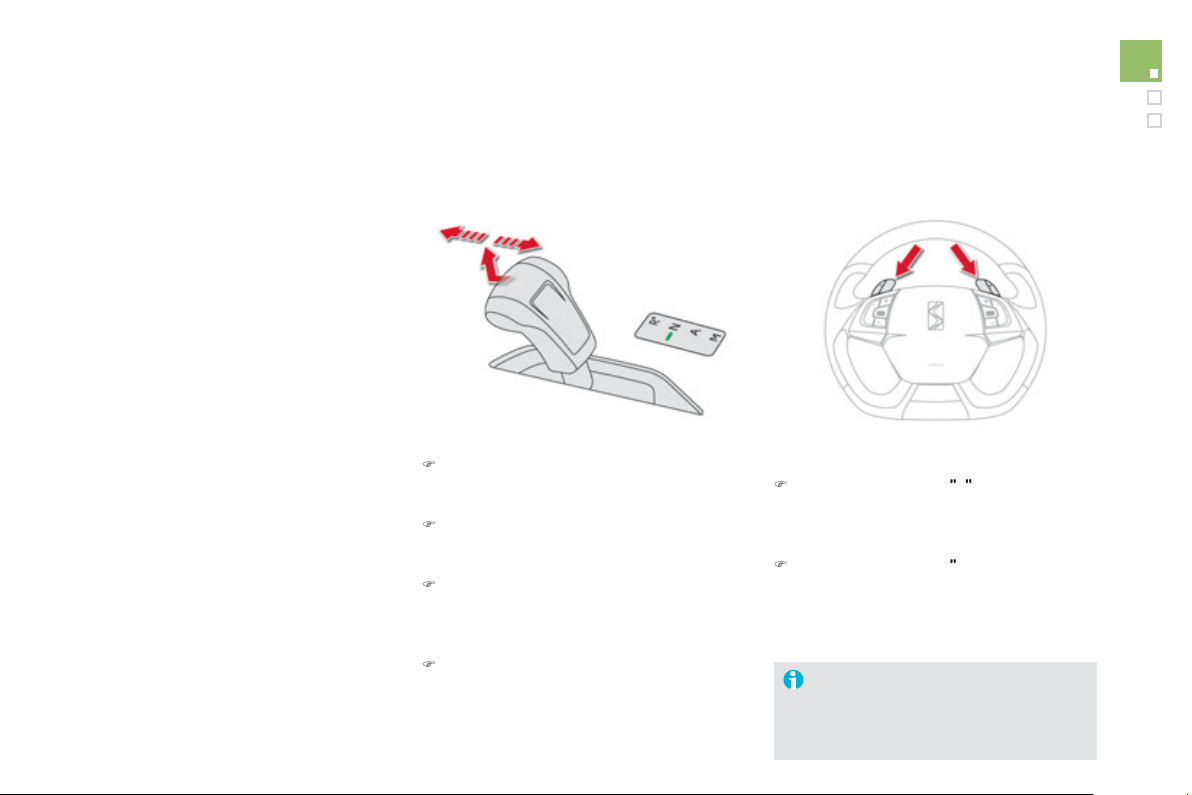
1
35
Driving
6-speed electronic gearbox
S
ix-speed electronic gearbox which o
ff
ers a
c
hoice between the com
f
ort o
f
f
ull
y
automatic
operation or the pleasure of manual
g
ear
c
han
g
in
g
.
R.
R
e
v
e
r
se
.
)
With
y
our
f
oot on the brake, li
f
t the selector
and push
f
orwards.
N.
Neu
tr
al
.
)
With your
f
oot on the brake, select this
position to start.
A.
A
u
t
o
m
a
t
ed
m
ode
.
)
M
o
v
e
th
e
se
l
ec
t
o
r
bac
kw
a
r
ds
t
o
se
l
ec
t thi
s
m
ode
.
M.
Manual mode with sequential
g
ear
ch
an
gi
n
g
.
)
Li
f
t th
e
se
l
ec
t
o
r th
e
n m
o
v
e
it
bac
kw
a
r
ds
to se
l
ect t
hi
s mo
d
e, t
h
en use t
h
e steer
i
n
g
mounted control paddles to change gear.
Gear selector
+.
Chan
g
e up paddle to the ri
g
ht of the
s
teer
i
n
g
w
h
ee
l
.
)
Pr
ess
th
e
bac
k
of
th
e
"
+
"
steer
i
n
g
mounte
d
p
a
ddl
e to c
h
an
g
e up a
g
ear.
-.
C
hange down paddle to the le
f
t o
f
the
s
teerin
g
wheel.
)
Pr
ess
th
e
bac
k
o
f th
e
"
-" steerin
g
mounted
p
addle to chan
g
e down a
g
ear.
Steerin
g
mounted control paddles
The steering mounted paddles cannot
be used to select neutral or to en
g
a
g
e
or disen
g
a
g
e reverse
g
ear.
This
g
earbox provides additional
f
unctions:
-
hill
start ass
i
st,
- creep
f
unction
(
the vehicle moves on
its own on releasing the brake pedal
)
in
au
t
o
m
a
t
ed
m
ode
o
r in r
e
v
e
r
se
.
There are two drivin
g
modes:
-
a
utomated m
ode
f
o
r
au
t
o
m
a
ti
c
co
ntr
o
l
of
t
h
e
g
ears
by
t
h
e
g
ear
b
ox,
-
manua
l
mode
f
or sequential
g
ear chan
g
in
g
by
t
h
e
d
r
i
ver.
In automated mode, it remains
p
ossible to
c
han
g
e
g
ear manuall
y
b
y
usin
g
the steerin
g
m
ounted control paddles as desired, when
overtakin
g
, for example.
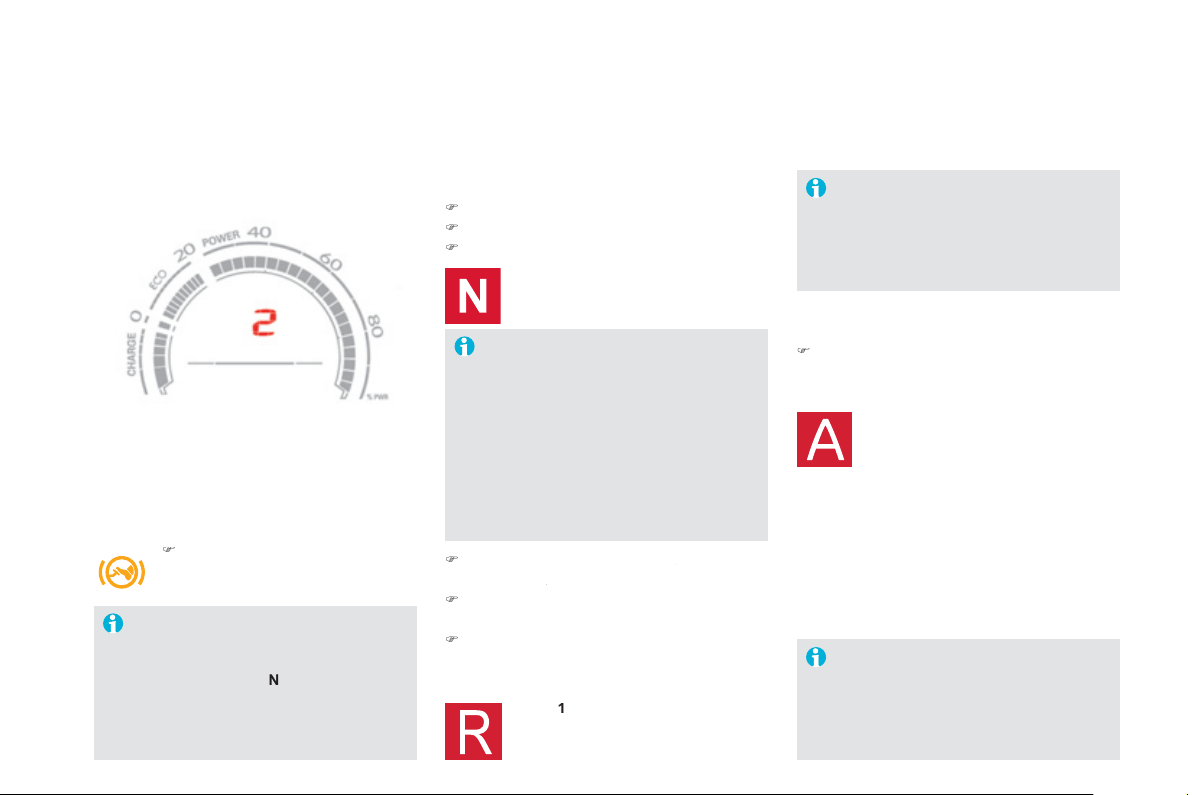
En
g
a
g
ement of reverse
g
ear is
accompanied b
y
an audible si
g
nal.
If
y
ou leave the vehicle, place the
g
ea
r
s
e
l
ector
i
n pos
i
t
i
on
N
an
d
t
h
en
y
ou must
s
top the h
y
brid s
y
stem b
y
switchin
g
o
ff
the i
g
nition
(
R
ea
dy
lamp o
ff)
.
If the
g
ear selector is not in position N
on startin
g
, N fl
as
h
es
in th
e
in
s
tr
u
m
e
nt
p
anel, accompanied b
y
an audible
s
ig
na
l
an
d
a messa
g
e
i
n t
h
e
i
nstrument
p
ane
l
screen.
F
oot on
b
ra
ke
f
l
as
h
es
o
n th
e
i
nstrument pane
l
, accompan
i
e
d
by
an
a
udible signal and a message in the
i
nstrument panel screen, i
f
the brake
p
edal is not pressed on startin
g
.
Wh
en t
h
e en
gi
ne
i
s
idli
n
g
w
i
t
h
t
h
e
brakes o
ff
, i
f
position
R
,
A
or
M
is
s
elected, the vehicle will move o
ff
o
n its own without any action on the
acce
l
e
r
a
t
o
r.
Displa
y
s in the instrument panel
N N
eu
tr
a
l
R
Re
v
e
r
se
1
, 2, 3, 4, 5,
6
G
ears in manual mode
A
This
co
m
es
o
n w
he
n
au
t
o
m
a
t
ed
m
ode
is
selected. It
g
oes o
ff
on chan
g
in
g
to manual
mode
.
)
Place
y
our
f
oot on the brak
e
when a messa
g
e appears in the
instrument panel screen.
Movin
g
off
)
S
elect
p
osition N .
)
Press the brake pedal down full
y
.
)
Start the h
y
brid s
y
stem.
N appears in the instrument panel
screen
.
)
S
elect a
g
ear
(
position
M
or
A
) or reverse
A
(
position
R
).
R
)
Release the parking brake unless it is
pro
g
rammed to automatic mode.
)
Take
y
our foot off the brake pedal, then
acce
l
e
r
a
t
e
.
A
a
n
d
1
o
r R appear in the instrument
p
anel screen.
Automatic mode
)
After startin
g
the vehicle, select position
A
f
o
r
e
nt
e
r
au
t
o
m
a
ti
c
m
ode
.
A
appears in the instrument panel
screen
.
The
g
earbox is then operatin
g
in auto-active
m
ode, without an
y
action on the part o
f
the
d
r
i
ver.
I
t cont
i
nuous
ly
se
l
ects t
h
e most su
i
ta
bl
e
g
ear,
d
epen
di
n
g
on t
h
e:
- style o
f
driving,
-
p
ro
f
ile o
f
the road.
For o
p
timum acceleration,
f
or exam
p
le
when overtakin
g
another vehicle, press
the accelerator pedal firml
y
past the
point of resistance.
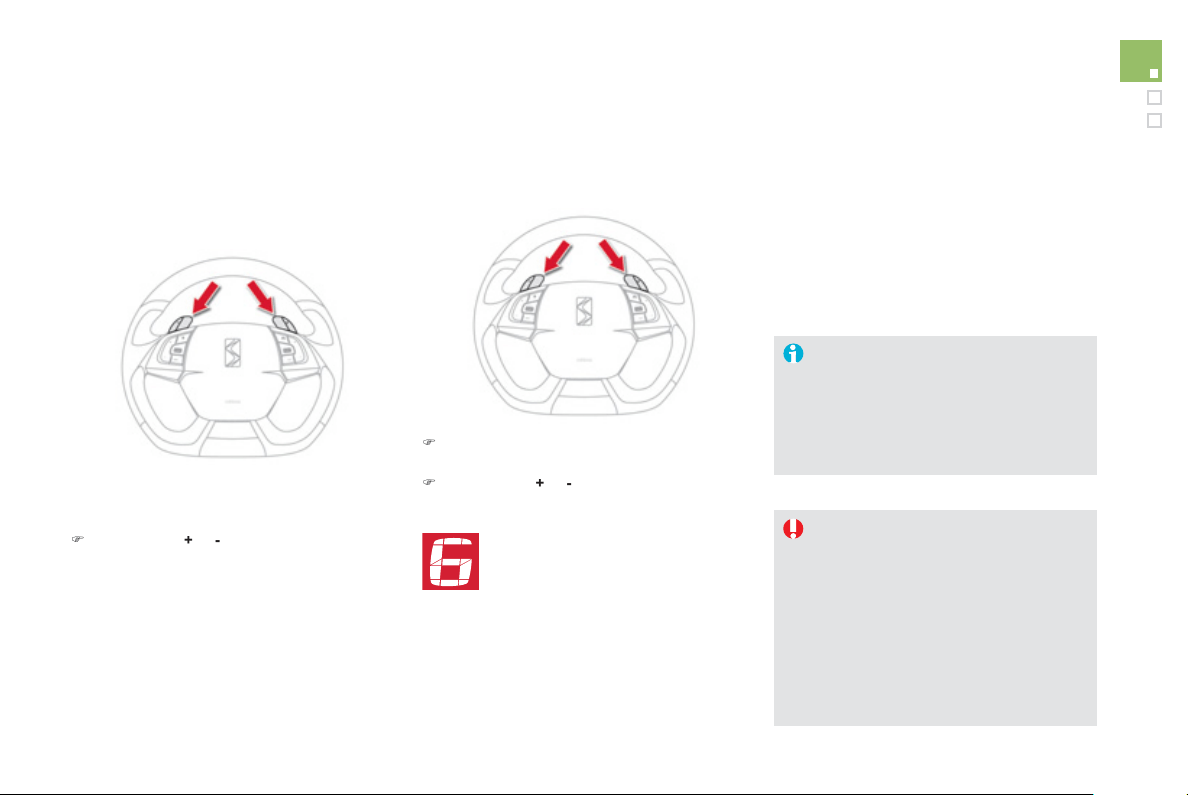
1
37
Driving
Manual
g
ear chan
g
in
g
)
When the vehicle has moved o
ff
, select
p
osition
M
to change to manual mode.
)
O
perate the
+
or
-
steerin
g
mounted control
paddles.
A
disappears and the
g
ears en
g
a
g
ed
appear successivel
y
in the instrument
pane
l
screen.
Wh
en
b
ra
ki
n
g
or s
l
ow
i
n
g
d
own, t
h
e
g
ear
b
ox
c
hanges down automatically to permit
acceleration in the correct
g
ear.
This selective
g
ear chan
g
e mode enables
y
ou
to overtake, for example, while still remainin
g
in
au
t
o
m
a
ti
c
m
ode
.
)
O
perate the
+
o
r
-
steerin
g
mounted control
p
addle.
The
g
earbox en
g
a
g
es the
g
ear requested i
f
the
e
n
gi
ne spee
d
perm
i
ts.
A
i
s st
ill
di
sp
l
a
y
e
d
i
n t
h
e
i
nstrument
p
ane
l
.
Af
ter a
f
ew moments without any action on
the controls, the
g
earbox resumes automatic
c
ontrol of the
g
ears.
Manual mode
At very low speed, i
f
reverse gear is
requested, this will onl
y
be taken into
accou
nt wh
e
n th
e
v
e
hi
c
l
e
i
s
imm
ob
ili
sed
(
foot on the brake
)
. A warnin
g
lamp
appears in the instrument panel screen.
O
n shar
p
acceleration in manual mode,
the
g
earbox will not chan
g
e up unless
the driver acts on the
g
ear lever or the
s
teerin
g
mounted paddles.
N
e
v
e
r
se
l
ec
t n
eu
tr
a
l N whil
e
th
e
v
e
hi
c
l
e
is movin
g
.
O
nl
y
en
g
a
g
e reverse
g
ear
R
w
he
n t
he
v
ehicle
is
i
mm
obilised
w
i
t
h
t
he
b
r
ake
p
e
d
a
l
p
resse
d
.
Th
e
g
ear c
h
an
g
e comman
d
s are on
ly
carr
i
e
d
out i
f
the en
g
ine speed permits. The internal
c
ombustion engine is still running.
It is not necessar
y
to release the accelerator
durin
g
g
ear chan
g
es.
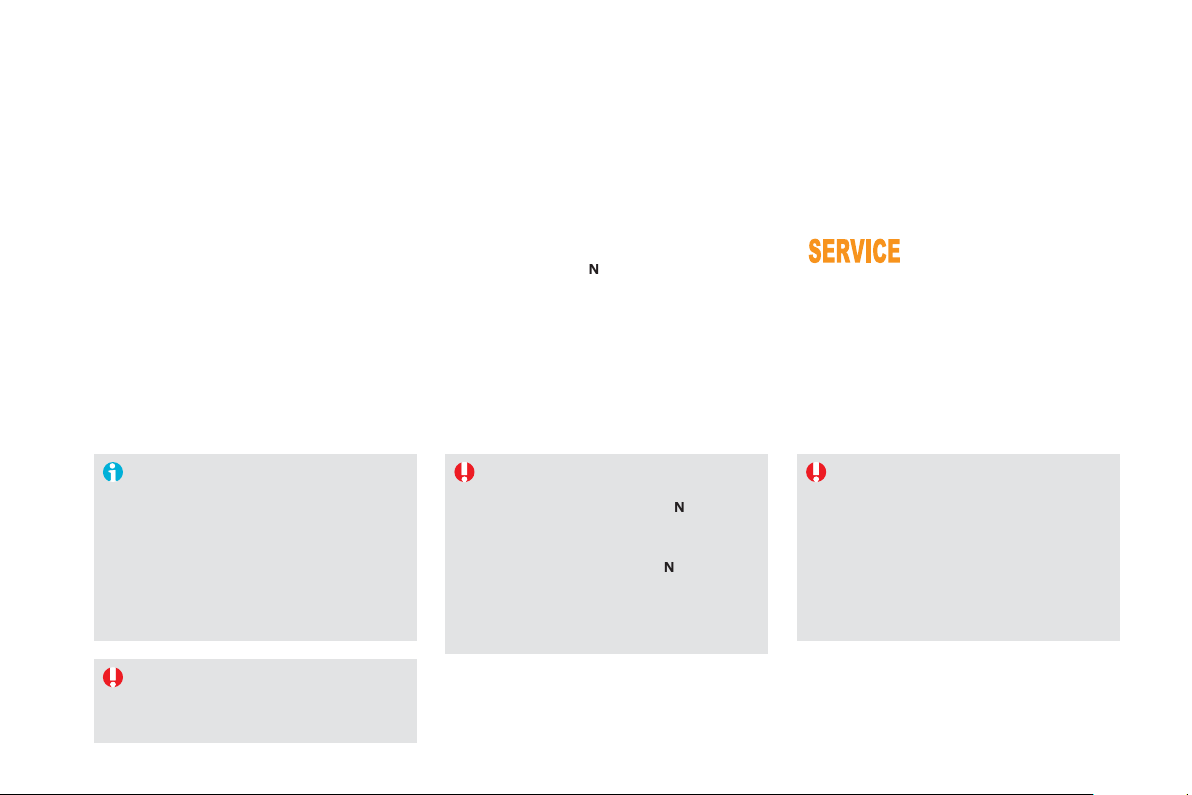
When immobilisin
g
the vehicle, with the
hy
brid s
y
stem active,
y
ou must place
t
h
e
g
ear se
l
ector
i
n neutra
l
N
.
Be
f
ore carr
y
in
g
out an
y
work in the
en
gi
ne compartment, c
h
ec
k
t
h
at t
h
e
gear selector is in neutral
N
a
n
d
th
a
t th
e
p
arkin
g
brake is applied.
Stoppin
g
the vehicle
With the ignition on, the
f
lashin
g
o
f
this warnin
g
lamp,
accompanied b
y
an audible
s
i
g
nal and a messa
g
e
in the instrument panel screen, indicates a
m
alfunction of the
g
earbox.
Have it checked b
y
a CITRO
Ë
N dealer or a
q
uali
f
ied workshop.
Be
f
ore switchin
g
o
ff
the en
g
ine,
y
ou can
c
h
oose
t
o
:
- move to position
N
to en
g
a
g
e neutral,
- leave the
g
ear en
g
a
g
ed; in this case, it will
not be possible to move the vehicle.
I
n
b
ot
h
cases,
y
ou s
h
ou
ld
app
ly
t
h
e par
ki
n
g
b
r
ake
t
o
i
mm
obilise
t
he
v
ehicle
.
Operatin
g
fault
Y
ou must
p
ress t
h
e
b
ra
k
e
p
e
d
a
l
w
h
en
s
tarting the engine.
Whatever the circumstances,
y
ou must
manuall
y
appl
y
the parkin
g
brake when
parkin
g
, unless the parkin
g
brake is
pro
g
rammed in automatic mode.
Never leave children unsu
p
ervised
in the vehicle with the h
y
brid s
y
stem
ac
tiv
e
.
For
y
our safet
y
, this function will onl
y
be activated if
y
ou press the brake
p
edal when en
g
a
g
in
g
f
orward drive o
r
re
v
erse
.
Thi
s
fu
n
c
ti
o
n i
s
deac
tiv
a
t
ed
i
f
th
e
driver's door is o
p
ened. To reactivate it,
c
lose the door and then
p
ress the brake
o
r accelerator pedal.
Creep function
(
movin
g
without the accelerator
)
This
f
unction
f
acilitates manoeuvrin
g
o
f
the
vehicle at low speed
(
when parkin
g
, in traffic
j
ams, …
)
.
With the h
y
brid s
y
stem active and the parkin
g
brake released, if position
A
,
M
o
r
R
i
s
s
e
l
ecte
d
, t
h
e ve
hi
c
l
e moves as soon as
y
ou
take
y
our
f
oot o
ff
the brake pedal
(
even without
a
n
y
action on the accelerator
)
.
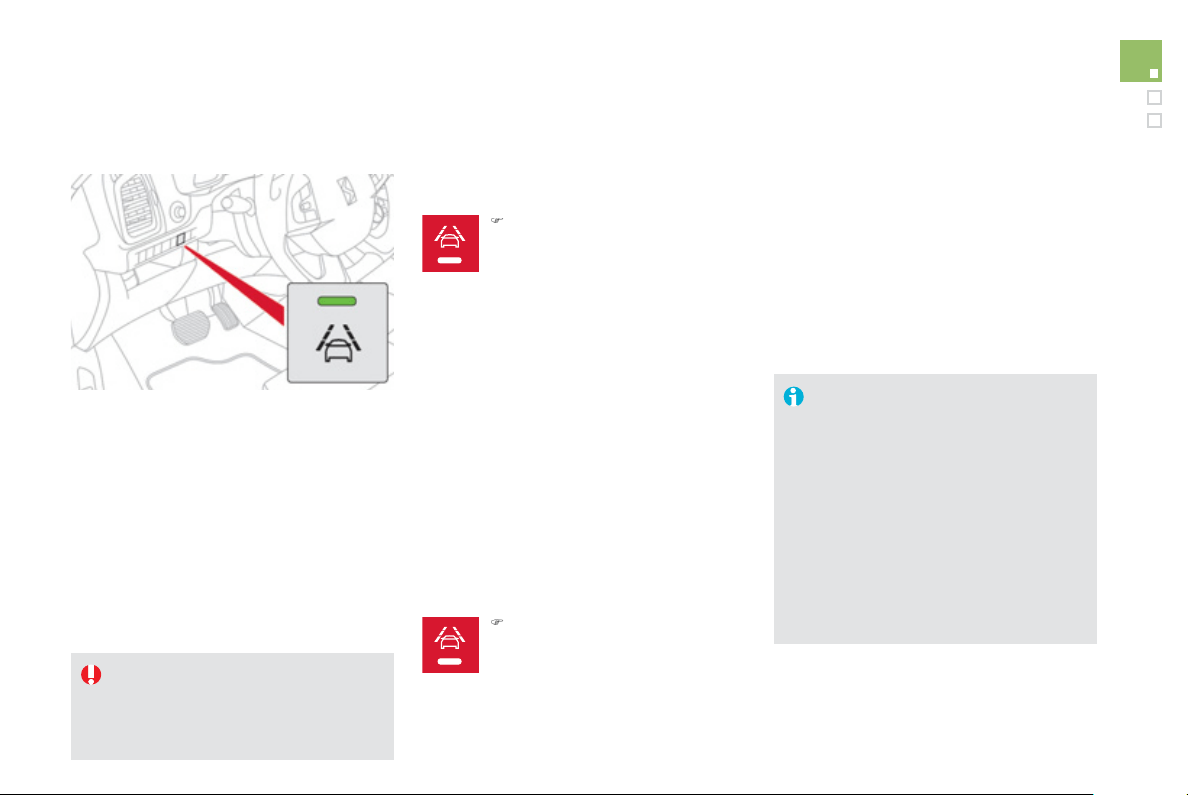
1
3
9
Driving
Lane departure warning system
Sy
stem which, usin
g
a camera which
reco
g
n
i
ses so
lid
or
b
ro
k
en
li
nes,
d
etects t
h
e
involuntary crossing o
f
longitudinal tra
ff
ic lane
m
arkin
g
s on the
g
round.
To provide safe drivin
g
, the camera anal
y
ses
the ima
g
e then, if the driver's attention drops,
tri
gg
ers a warnin
g
if the vehicle drifts over a
lane markin
g
(
speed hi
g
her than 50 mph
(
80 km
/
h
))
.
This s
y
stem is particularl
y
use
f
ul on motorwa
y
s
a
n
d
m
ai
n r
oads
.
A
ctivation
)
Press this button
,
the indicator
lamp comes on.
The lane departure warnin
g
s
y
stem
c
annot, in an
y
circumstances, replace
the need for vi
g
ilance and responsibilit
y
o
n the part of the driver.
Deactivation
You are warned b
y
the vibration o
f
the driver's
sea
t
cushio
n:
- on the right-hand side, i
f
the marking on the
g
round has been crossed on the ri
g
ht,
- on the left-hand side, if the markin
g
on the
g
round has been crossed on the left.
No warnin
g
is transmitted while the direction
i
ndicator is active and for approximatel
y
20
seconds a
f
ter the direction indicator is
s
wit
c
h
ed
off
.
Detection - alert
Operatin
g
fault
Th
e
d
etect
i
on ma
y
b
e
i
mpe
d
e
d
:
- i
f
the markings on the ground are
w
orn
,
- if th
e
r
e
i
s
littl
e
co
ntr
as
t
be
tw
ee
n th
e
markin
g
s on the
g
round and the road
s
urface,
- if the windscreen is dirt
y
,
-
i
n
ce
rt
ai
n
se
v
e
r
e
w
ea
t
he
r
co
n
di
t
io
n
s
:
f
o
g
, heav
y
rain, snow, bri
g
ht sunli
g
ht
o
r direct exposure to the sun
(
low
s
un, leaving a tunnel, ...
)
and shade.
)
P
ress t
hi
s
b
utton a
g
a
i
n, t
h
e
indicator lamp goes o
ff
.
In the event of a fault, the indicator lamp in the
bu
tt
o
n fl
as
h
es
.
Contact a CITROËN dealer or a qualified
workshop.
The status of the s
y
stem remains in the
memor
y
when the i
g
nition is switched off.

Head-up display
transparent strip in the field of vision of the
driver so that the
y
do not have to take their
ey
es o
ff
the road.
Thi
s s
y
stem operates w
h
en t
h
e
hyb
r
id
s
y
stem
i
s act
i
ve an
d
t
h
e sett
i
n
g
s are store
d
w
h
en t
h
e
ignition is switched o
ff
.
1
.
Head-up displa
y
on / off.
2
.
Displa
y
hei
g
ht ad
j
ustment.
3.
Bri
g
htness ad
j
ustment.
O
nce the s
y
stem has been activated, the
in
f
ormation projected in the head-up display is:
A
.
The speed o
f
y
our vehicle.
B
.
Cruise control/speed limiter information.
Displa
y
s durin
g
operation
C
.
Navi
g
ation information
(
dependin
g
on
version
)
which appears in blue while in
e
l
ec
tri
c
m
ode
.
For more information on the navi
g
ation
sy
stem, re
f
er to the "Audio and
t
ele
m
a
t
ics"
sec
t
io
n.
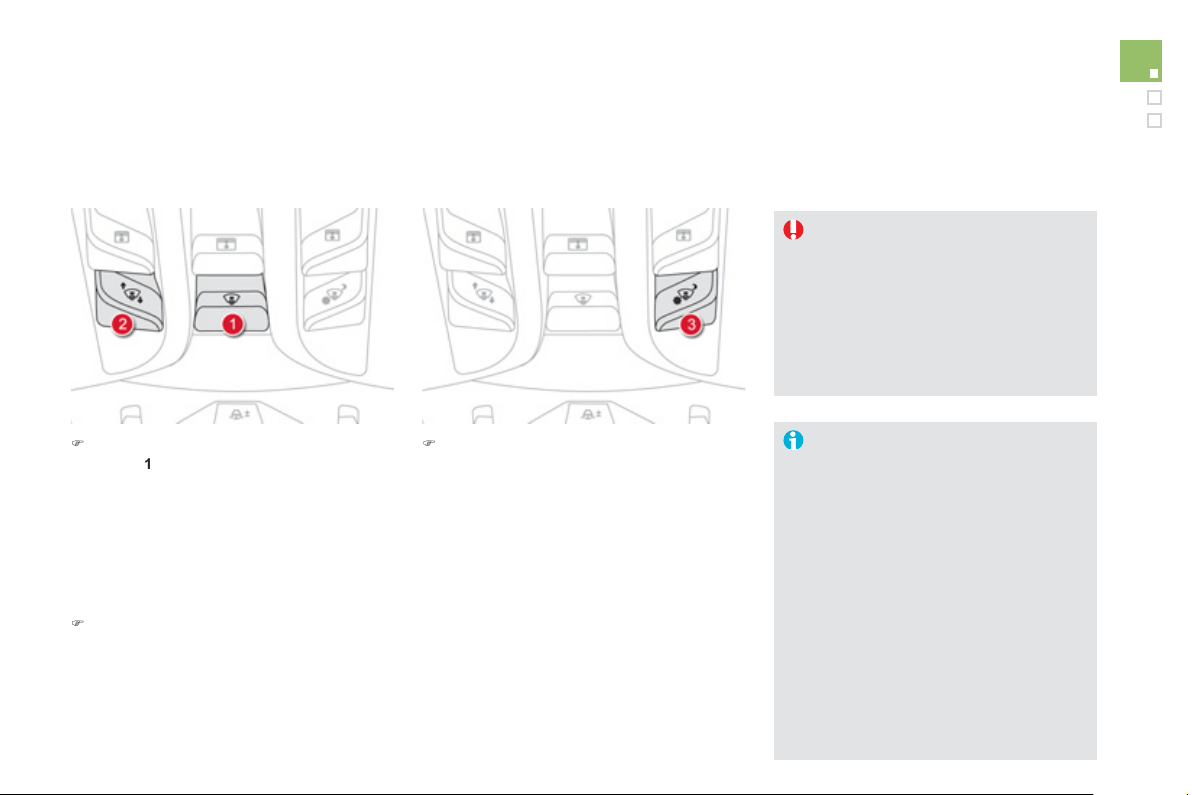
141
Driving
)
Wi
t
h
t
h
e
hyb
r
id
s
y
stem act
i
vate
d
, press
bu
tt
o
n
1
. The activated
/
deactivated status
when the en
g
ine was switched o
ff
is retained
when the en
g
ine is switched on a
g
ain.
The strip retracts automaticall
y
3 seconds afte
r
s
witchin
g
off the en
g
ine except in ST
O
P mode
of Stop & Start.
Activation
/
Deactivation
)
Wi
t
h
t
h
e
hyb
r
id
s
y
stem act
i
ve, a
dj
ust
the brightness o
f
the in
f
ormation using
bu
tt
o
n
3
:
- t
o
w
a
r
ds
th
e
r
ea
r t
o
in
c
r
ease
th
e
bri
g
htness,
- t
o
w
a
r
ds
th
e
fr
o
nt t
o
dec
r
ease
th
e
bri
g
htness.
Bri
g
htness ad
j
ustment
W
e recommen
d
t
h
at a
dj
ustments are
only made using these buttons when
the vehicle is stationar
y
.
When stationar
y
or while drivin
g
, no
ob
j
ects should be placed around the
transparent strip
(
or on its cover
)
to
avoid blockin
g
the strip output and
prevent
i
n
g
i
ts correct operat
i
on.
I
n
ce
rt
ai
n
e
xtr
e
m
e
w
ea
t
he
r
co
n
di
t
io
n
s
(
rain and
/
or snow, bright sunshine, ...
)
the head-up displa
y
ma
y
not be le
g
ible
or ma
y
suffer temporar
y
interference.
Some sun
g
lasses ma
y
hamper readin
g
o
f th
e
inf
o
rm
a
ti
o
n.
To clean the transparent strip, use a
c
lean, so
f
t cloth
(
such as a spectacles
c
loth or micro
f
ibre cloth
)
. Do not use
a
d
r
y
or a
b
ras
i
ve c
l
ot
h
or
d
eter
g
ent or
s
olvent
p
roducts as these could scratch
the strip or dama
g
e the anti-re
f
lection
c
oatin
g
.
H
e
igh
t a
dj
ustment
)
Wi
t
h
t
h
e
hyb
r
id
s
y
stem act
i
ve, a
dj
ust
the display to the required height using
bu
tt
o
n
2
:
- towards the rear to move the displa
y
up,
- towards the front to move the displa
y
do
wn.
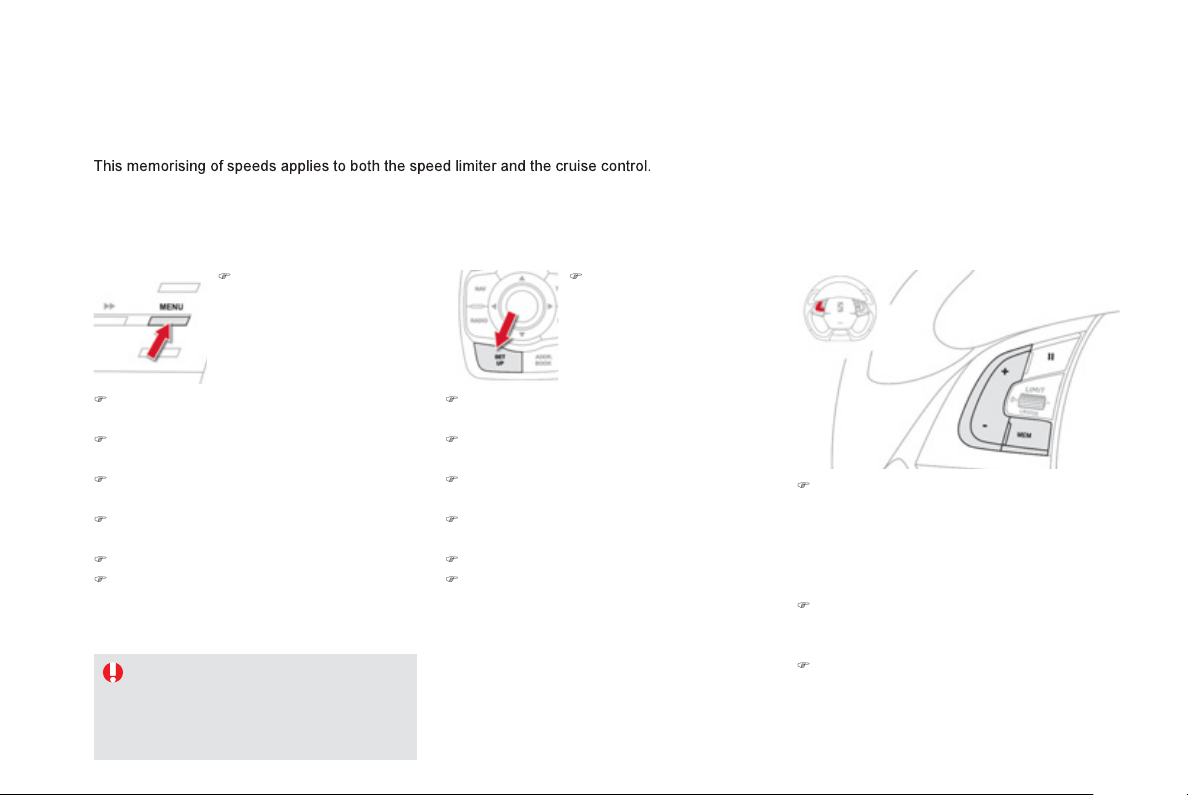
Memorising speeds
)
G
o to the main menu b
y
press
i
n
g
t
h
e
"MENU"
bu
tt
o
n.
You can memorise up to 5 speeds in the s
y
stem.
B
y
de
f
ault, some speeds are alread
y
memorised.
For safet
y
reasons, the driver must onl
y
c
arr
y
out these operations usin
g
the
audio s
y
stem screen when stationar
y
.
)
G
o to the main menu b
y
p
ress
i
n
g
"S
ET UP"
.
With the Audio S
y
stem
Wi
t
h
e
MyW
a
y
)
Select the "Personalisation-confi
g
uration"
me
n
u
a
n
d
co
nfirm.
)
Select "Vehicle parameters" menu and
co
nfirm.
)
S
elect the "Drivin
g
assistance" line and
co
n
fo
rm.
)
S
elect the "
Sp
eeds memorised" line and
co
n
f
irm.
)
Modi
fy
the speed.
)
Select "OK "
a
n
d
co
nfirm t
o
sa
v
e
th
e
mod
ifi
ca
ti
o
n
s
.
)
S
elect the "
C
on
f
i
g
uration" menu and
co
nfirm.
)
Select the "Vehicle parameters" menu and
co
nfirm.
)
S
elect the "Drivin
g
assistance" line and
co
n
f
irm.
)
S
elect the "
S
peeds memorised" line and
co
n
f
irm.
)
Modi
f
y the speed.
)
S
elect "
O
K"
a
n
d
co
n
f
irm t
o
sa
v
e
th
e
m
od
ifi
ca
ti
o
n
s
.
A
ccess
)
press the steerin
g
mounted
"
MEM"
bu
tt
o
n
to displa
y
the list of memorised speeds.
S
election
To select a memorised speed:
)
P
ress an
d
h
o
ld
t
h
e
"
+
"
or
"
-
"
b
utton; t
h
e
sy
stem stops at t
h
e nearest memor
i
se
d
sp
ee
d
.
)
Press and hold the "+" or "-" button again to
s
elect another memorised speed.
A
reminder of the speed and the state of the
sy
stem
(
active / inactive
)
is displa
y
ed in the
instrument panel.
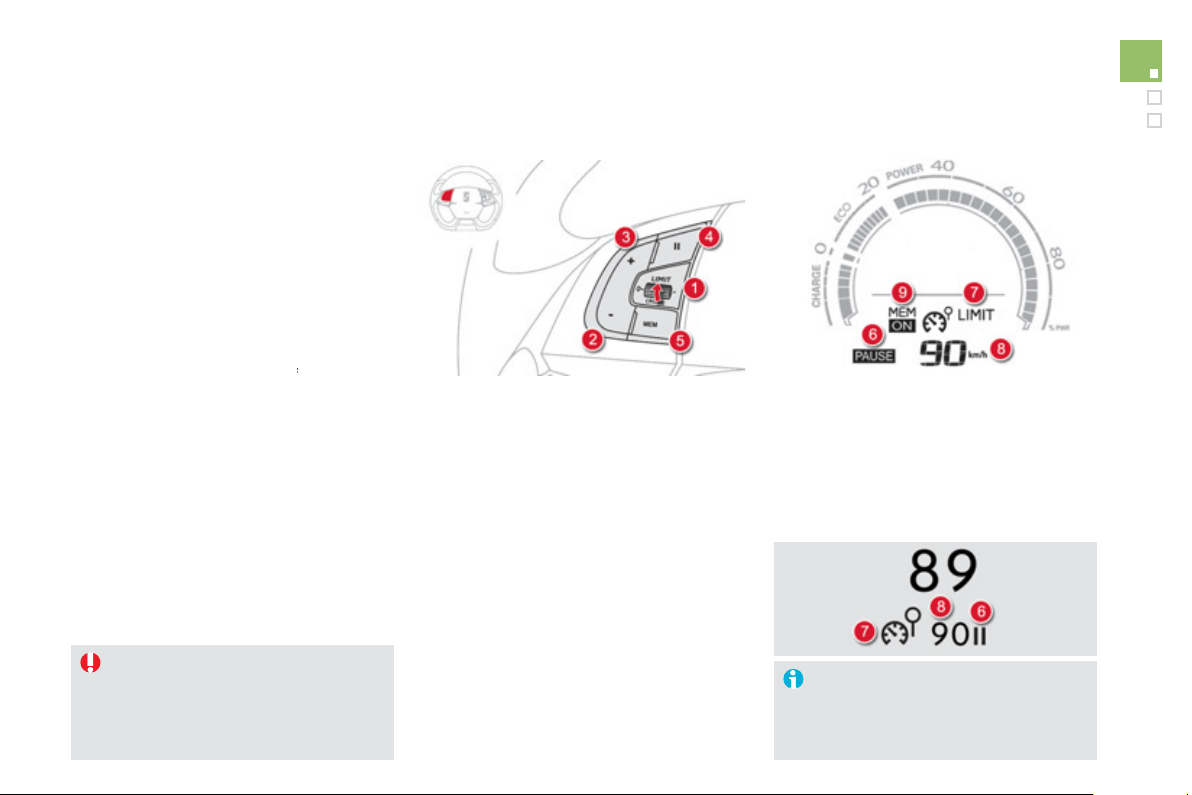
1
4
3
Driving
The pro
g
rammed information is
g
rouped
to
g
ether in the instrument panel screen.
6
.
S
peed limiter on
/
o
ff
indication.
7.
S
peed limiter mode selection indication.
8.
P
ro
g
ramme
d
spee
d
va
l
ue.
9.
S
election o
f
a memorised s
p
eed.
(
see "Memorisin
g
speeds"
)
Displa
y
s in the instrument panel
Speed limiter
Sy
stem which prevents the vehicle
f
rom
e
xcee
di
n
g
t
h
e spee
d
pro
g
ramme
d
by
t
h
e
d
r
i
ver.
Wh
en t
h
e pro
g
ramme
d
spee
d
li
m
i
t
i
s reac
h
e
d
,
p
ressing the accelerator pedal no longer has
an
y
e
ff
ect.
The speed limiter cannot, in an
y
c
ircumstances, replace the need to
r
espect speed limits, nor can it replace
the need for vi
g
ilance and responsibilit
y
on the part of the driver.
The functions of this s
y
stem are
g
rouped
to
g
ether on the steerin
g
mounted controls.
1.
S
peed limiter mode selection wheel.
2.
P
ro
g
ramme
d
va
l
ue
d
ecrease
b
utton.
3.
P
ro
g
ramme
d
va
l
ue
i
ncrease
b
utton.
4
.
Sp
eed limiter on
/
o
ff
button.
5
.
List o
f
memorised speeds displa
y
button.
(
see "Memorisin
g
speeds"
)
Steerin
g
mounted controls
O
p
eration
The speed limiter is switched on manuall
y
:
it requires a pro
g
rammed speed of at least
20 mph
(
30 km
/
h
)
.
Th
e spee
d
li
m
i
ter
i
s
switched off
by manual
f
op
eration o
f
the control.
The programmed speed can be exceeded
temporaril
y
b
y
pressin
g
the accelerator
f
irml
y
be
y
ond the point of resistance.
To return to the pro
g
rammed speed, simpl
y
release the accelerator pedal.
The pro
g
rammed speed remains in the memor
y
when the i
g
nition is switched o
ff
.
This in
f
ormation also appears in the
h
ea
d
-up
di
sp
l
a
y
.
For more in
f
ormation, re
f
er to the
"
Head-up display" section.

Pro
g
rammin
g
)
T
u
rn
d
i
a
l
1
t
o
th
e
"
LIMIT" position: the
speed limiter mode is selected but is not
switched on
(
Pause
)
.
Y
ou
d
o not
h
ave to sw
i
tc
h
t
h
e spee
d
li
m
i
ter on
i
n or
d
er to set t
h
e spee
d
.
)
S
et the speed value b
y
pressin
g
button
2
or
3
(
e.g.: 55 mph
(
90 km
/
h
))
.
Exceedin
g
the pro
g
rammed speed
Pressin
g
the accelerator pedal to exceed the pro
g
rammed speed will not have
a
n
y
effect unless
y
ou press the pedal
firmly
past the
y
p
oint of resistanc
e
.
The speed limiter is deactivated temporaril
y
and the pro
g
rammed speed,
which is still displa
y
ed, flashes.
Returnin
g
to the pro
g
rammed speed, b
y
means of intentional or unintentional
deceleration o
f
the vehicle, automaticall
y
cancels the
f
lashin
g
o
f
the
p
ro
g
ramme
d
spee
d
.
Exitin
g
the speed limiter
m
o
d
e
)
Tu
rn
dial
1
t
o
t
he
"
0" pos
i
t
i
on: t
h
e spee
d
li
m
i
ter mo
d
e
i
s
d
ese
l
ecte
d
.
I
t
di
sa
pp
ears
f
r
o
m th
e
sc
r
ee
n.
Operatin
g
fault
In the event of a fault with the speed limiter,
the speed is cleared resultin
g
in flashin
g
of the
das
h
es
.
Have it checked b
y
a CITRO
Ë
N dealer or a
q
uali
f
ied workshop.
O
n a steep descent or in the event o
f
s
harp acceleration, the speed limiter will
not be able to prevent the vehicle
f
rom
e
xcee
di
n
g
t
h
e pro
g
ramme
d
spee
d
.
To avoid an
y
risk o
f
j
ammin
g
o
f
the
p
e
d
a
l
s:
- ensure that the mat is
p
ositioned
c
orrectl
y
,
- do not fit one mat on top of another.
)
Switch the speed limiter back on b
y
pressin
g
button
4
a
g
ain.
Y
ou can t
h
en c
h
an
g
e t
h
e pro
g
ramme
d
spee
d
us
i
n
g
b
uttons
2
a
n
d
3
:
- b
y
+ or - 1 mph
(
km
/
h
)
= short press,
- in steps o
f
+ or - 5 mph
(
km
/
h
)
= maintained press.
I
f
speed memorisation is available and activated on
y
our vehicle, the
p
ro
g
rammed speed will stop at the closest memorised speed; refer to the
c
orrespondin
g
para
g
raph.
)
Switch the speed limiter on b
y
pressin
g
button
4
.
)
Switch the speed limiter off b
y
pressin
g
button
4
: the displa
y
c
on
f
irms that it has been switched o
ff
(
Pause
)
.
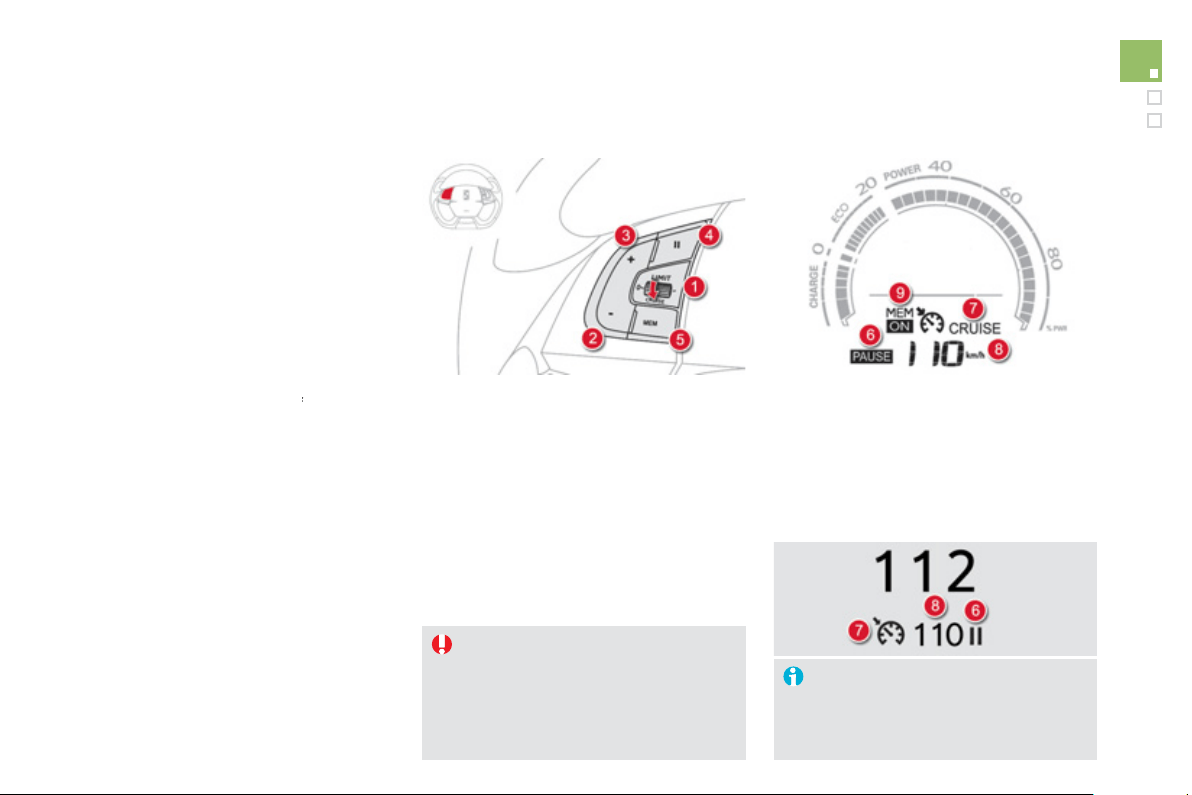
1
45
Driving
The cruise control system cannot, in any
c
ircumstances, re
p
lace the need to res
p
ect s
p
eed
l
imits, nor can it replace the need for vi
g
ilance and
responsibilit
y
on the part of the driver.
You are advised to keep
y
our feet near the pedals
a
t
a
ll tim
es
.
Cruise control
Sy
stem which automaticall
y
maintains the
s
peed o
f
the vehicle at the value pro
g
rammed
by the driver, without any action on the
accelerator
p
edal.
The functions of this s
y
stem are
g
rouped
to
g
ether on the steerin
g
mounted controls.
1.
C
ruise control mode selection dial.
2.
S
peed pro
g
rammin
g
/
value decrease
bu
tt
o
n.
3.
S
peed programming
/
value increase
bu
tt
o
n.
4.
Cruise control off / resume button.
5
.
Stored speeds displa
y
button.
(
see "Storin
g
speeds"
)
Steerin
g
mounted controls
The pro
g
rammed information is
g
rouped
to
g
ether in the instrument panel screen.
6
.
C
ruise control o
ff
/
resume indication.
7.
C
r
u
i
se
co
ntr
o
l m
ode
se
l
ec
ti
o
n in
d
i
ca
ti
o
n.
8.
P
ro
g
ramme
d
spee
d
va
l
ue.
9.
S
electing a stored speed.
(
see "
S
torin
g
speeds"
)
Displa
y
s in the instrument panel
O
p
eration
The
c
r
uise
co
ntr
ol
is
sw
i
tc
h
e
d
on manua
lly
:
i
t
requires a minimum vehicle speed o
f
25 mph
(
40 km
/
h
)
and the en
g
a
g
ement o
f
second
g
ear
with sequential gear changing
(
position
M
)
.
Th
e
c
r
u
i
se
co
ntr
o
l i
s
switched off
manually or
f
b
y
pressin
g
the brake pedal or on tri
gg
erin
g
o
f
the "electronic stabilit
y
pro
g
ramme" s
y
stem for
s
afet
y
reasons.
It is possible to exceed the pro
g
rammed speed
temporar
ily
by
press
i
n
g
t
h
e acce
l
erator pe
d
a
l
.
T
o return to t
h
e pro
g
ramme
d
spee
d
, s
i
mp
ly
re
l
ease t
h
e acce
l
erator
p
e
d
a
l
.
S
witching o
ff
the ignition cancels any
p
ro
g
rammed speed value.
This in
f
ormation also appears in the
head-up displa
y
.
For more information, refer to the
"
Head-up displa
y
" section.
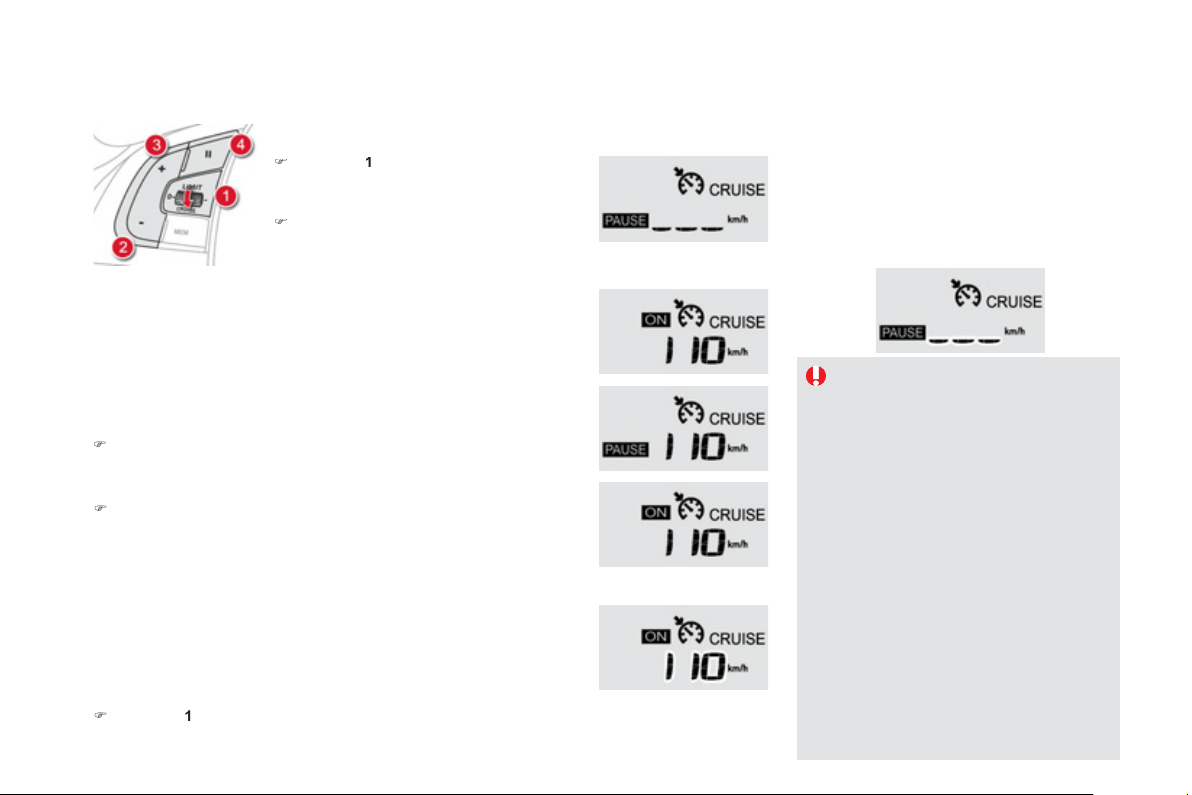
Wh
en t
h
e cru
i
se contro
l
i
s sw
i
tc
h
e
d
on
,
be care
f
ul i
f
y
ou maintain the pressure
o
n one o
f
the pro
g
rammed speed
ch
an
gi
n
g
b
uttons: t
hi
s ma
y
resu
l
t
i
n a
very rapid change in the speed o
f
your
v
e
hi
c
l
e
.
Do not use the cruise control on slipper
y
roads or in heav
y
traffic.
O
n a steep descent, the cruise control
w
ill
not
b
e a
bl
e to prevent t
h
e ve
hi
c
l
e
f
rom exceedin
g
the pro
g
rammed speed.
O
n steep climbs or when towin
g
, the
pro
g
ramme
d
spee
d
ma
y
not
b
e reac
h
e
d
o
r m
a
int
a
in
ed
.
To avoid an
y
risk o
f
j
ammin
g
o
f
the
pedals:
- ensure that the mat is positioned
c
orrectl
y
,
- never fit one mat on top of another.
Pro
g
rammin
g
)
T
u
rn
d
i
a
l
1
t
o
th
e
"
CRUISE" position: the
c
r
u
i
se
co
ntr
o
l m
ode
i
s
se
l
ec
t
ed
bu
t i
s
n
o
t
s
witched on
(
Pause
)
.
)
S
et the pro
g
rammed speed b
y
acceleratin
g
to t
h
e re
q
u
i
re
d
s
p
ee
d
, t
h
en
p
ress
b
utton
2
or
3
(
e.g.: 70 mph
(
110 km
/
h
))
; the cruise
c
ontrol s
y
stem is activated
(O
N
)
.
Exceedin
g
the pro
g
rammed speed
Intentional or unintentional exceedin
g
o
f
the pro
g
rammed speed results in
f
lashing o
f
this speed in the screen.
Return to the pro
g
rammed speed, b
y
means o
f
intentional or unintentional
deceleration of the vehicle, automaticall
y
cancels the flashin
g
of the speed.
Exitin
g
cruise control mode
)
T
u
rn
d
i
a
l
1
t
o
th
e
"0" position: the cruise control mode is deselected.
It disappears
f
rom the screen.
)
Switch on the cruise control a
g
ain with another press on button
4
.
Operatin
g
fault
In the event of a cruise control malfunction,
the speed is cleared resultin
g
in flashin
g
of the
das
h
es
.
Have it checked b
y
a CITRO
Ë
N dealer or a
q
uali
f
ied workshop.
Y
ou can t
h
en c
h
an
g
e t
h
e pro
g
ramme
d
spee
d
us
i
n
g
b
uttons
2
a
n
d
3
:
- by + or - 1 mph
(
km
/
h
)
= short press,
- in steps o
f
+ or - 5 mph
(
km
/
h
)
= maintained press.
If storin
g
speeds is available and activated on
y
our vehicle, the
pro
g
rammed speed will stop at the closest stored speed; refer to the
c
orrespondin
g
section.
)
Stop the cruise control s
y
stem b
y
pressin
g
button
4
: thi
s
i
s
co
nfirm
ed
in the screen
(
Pause
)
.
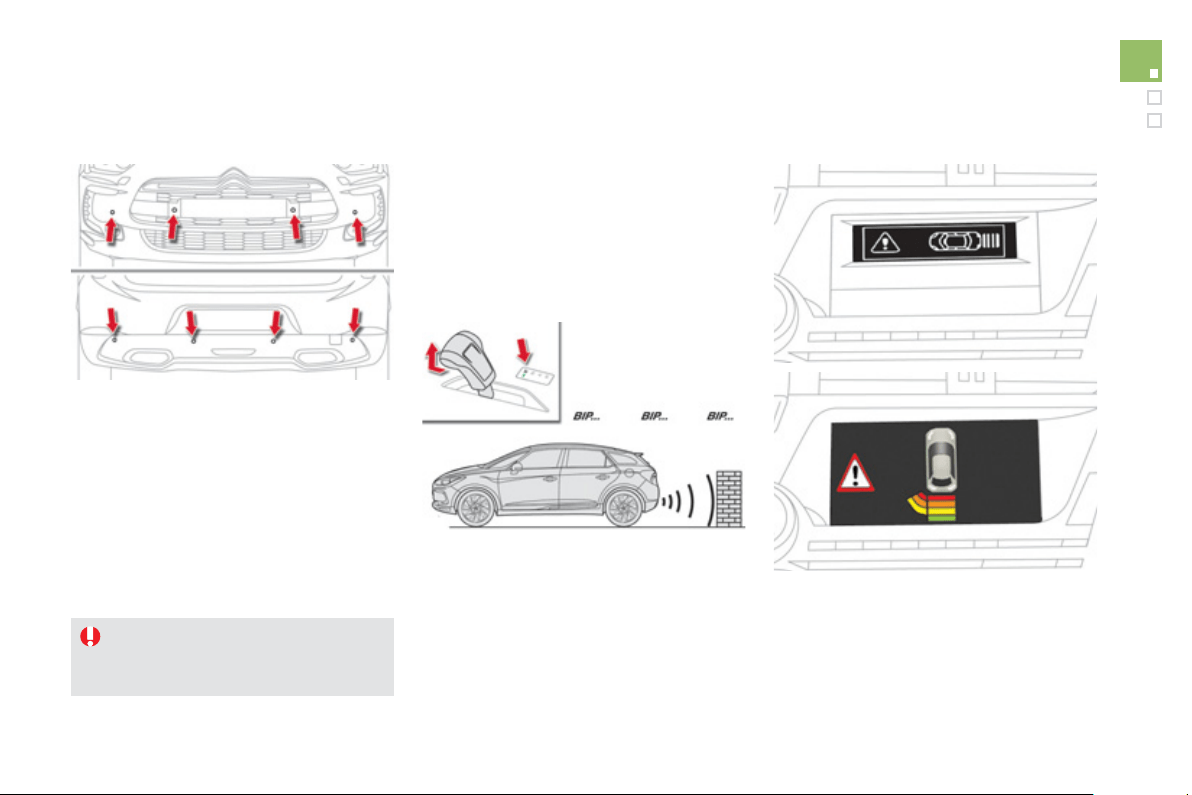
147
Driving
This s
y
stem indicates the proximit
y
of an
obstacle
(
person, vehicle, tree,
g
ate, etc.
)
which
co
m
es
within th
e
f
i
e
l
d
of
de
t
ec
ti
o
n
of
se
n
so
r
s
l
ocate
d
i
n t
h
e
b
umper.
C
ertain t
y
pes o
f
obstacle
(
stake, roadworks
c
one, etc.
)
detected initially will no longer be
de
t
ec
t
ed
a
t th
e
e
n
d
of
th
e
m
a
n
oeu
vr
e
due
t
o
the presence of blind spots.
Parking sensors
This function cannot, in an
y
c
ircumstances, take the place of the
vi
g
ilance and responsibilit
y
of the driver.
Rear parkin
g
sensors
The s
y
stem is switched on b
y
en
g
a
g
in
g
reverse
g
ear. This is accompanied b
y
an audible si
g
nal.
The s
y
stem is switched o
ff
when
y
ou exit
re
v
erse
gear
.
A
u
dibl
e ass
i
stance
The proximit
y
in
f
ormation is
g
iven b
y
an
i
ntermittent audible si
g
nal, the
f
requenc
y
o
f
which
i
ncreases as t
h
e ve
hi
c
l
e a
pp
roac
h
es t
h
e o
b
stac
l
e.
The sound emitted by the speaker
(
right or le
f
t
)
i
n
d
i
ca
t
es
th
e
s
i
de
o
n whi
c
h th
e
obs
t
ac
l
e
i
s
l
oca
t
ed
.
Wh
e
n th
e
d
i
s
t
a
n
ce
be
tw
ee
n th
e
v
e
hi
c
l
e
a
n
d
the obstacle becomes less than approximatel
y
thirt
y
centimetres, the audible si
g
nal becomes
co
nt
i
n
uous
.
V
isual assistance
This supplements the audible si
g
nal b
y
displa
y
in
g
bars in the multifunction screen
w
hi
c
h
move pro
g
ress
i
ve
ly
nearer to t
h
e ve
hi
c
l
e.
Wh
en t
h
e o
b
stac
l
e
i
s near, t
h
e
"D
an
g
er
"
sy
m
b
o
l
i
s
di
sp
l
a
y
e
d
i
n t
h
e screen.
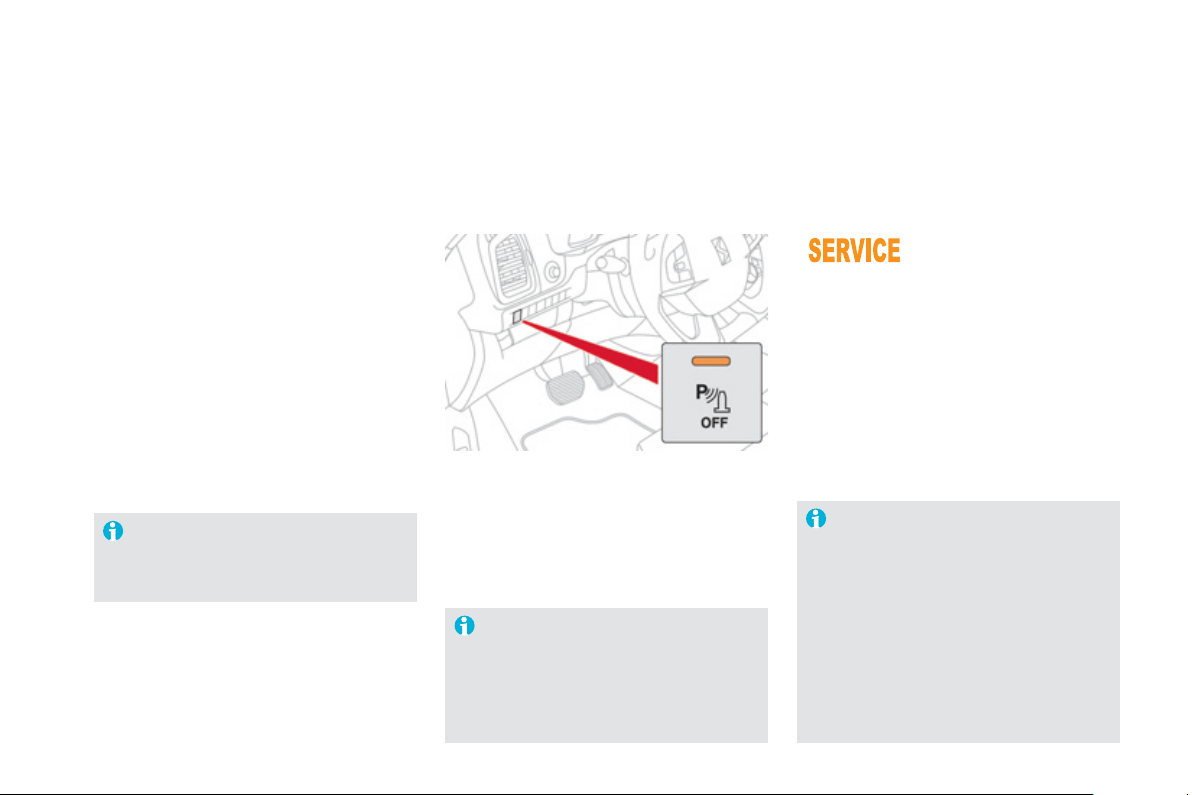
In bad weather or in winter, ensure
th
a
t th
e
se
n
so
r
s
a
r
e
n
o
t
co
v
e
r
ed
with
mud, ice or snow. When reverse
g
ear is
e
n
g
a
g
ed, an audible si
g
nal
(
lon
g
beep
)
i
n
di
cates t
h
at t
h
e sensors ma
y
b
e
di
rt
y
.
C
ertain sound sources
(
motorc
y
cle,
lorry, pneumatic drill, etc.
)
may trigger
the audible si
g
nals o
f
the parkin
g
s
ensor s
y
stem.
In th
e
e
v
e
nt
o
f
a
m
a
lf
u
n
c
ti
o
n
of
the s
y
stem, when reverse
g
ear
i
s en
g
a
g
e
d
t
hi
s warn
i
n
g
l
amp
i
s
di
sp
l
a
y
e
d
i
n t
h
e
i
nstrument pane
l
and
/
or a message appears in the screen,
accompanied b
y
an audible si
g
nal
(
short beep
)
.
Contact a CITROËN dealer or a qualified
workshop.
Operatin
g
fault
In addition to the rear parkin
g
sensors, the
f
ront
p
ar
ki
n
g
sensors are tr
igg
ere
d
w
h
en an o
b
stac
l
e
is detected in
f
ront and the s
p
eed o
f
the vehicle
is still below 6 mph
(
10 km
/
h
)
.
The
f
ront parkin
g
sensors are interrupted i
f
the vehicle stops for more than three seconds
in forward
g
ear, if no further obstacles are
detected or when the speed of the vehicle
e
xceeds 6 mph
(
10 km/h
)
.
Front parkin
g
sensors
Th
e
fu
n
c
ti
o
n will
be
deac
tiv
a
t
ed
a
utomaticall
y
if a trailer is bein
g
towed
or a bic
y
cle carrier is fitted
(
vehicle
fitted with a towbar or bic
y
cle carrie
r
r
ecommended b
y
CITROËN
)
.
Deactivation / Activation
o
f the front and rear parkin
g
sensors
The
f
unction is deactivated b
y
pressin
g
this
b
utton. The indicator lam
p
in the button
comes
on
.
Pressin
g
this button a
g
ain reactivates the
function. The indicator lamp in the button
g
oes off.
The sound emitted b
y
the speaker
(
front
o
r rear
)
indicates whether the obstacle
i
s
in fr
o
nt
o
r
be
hin
d
.
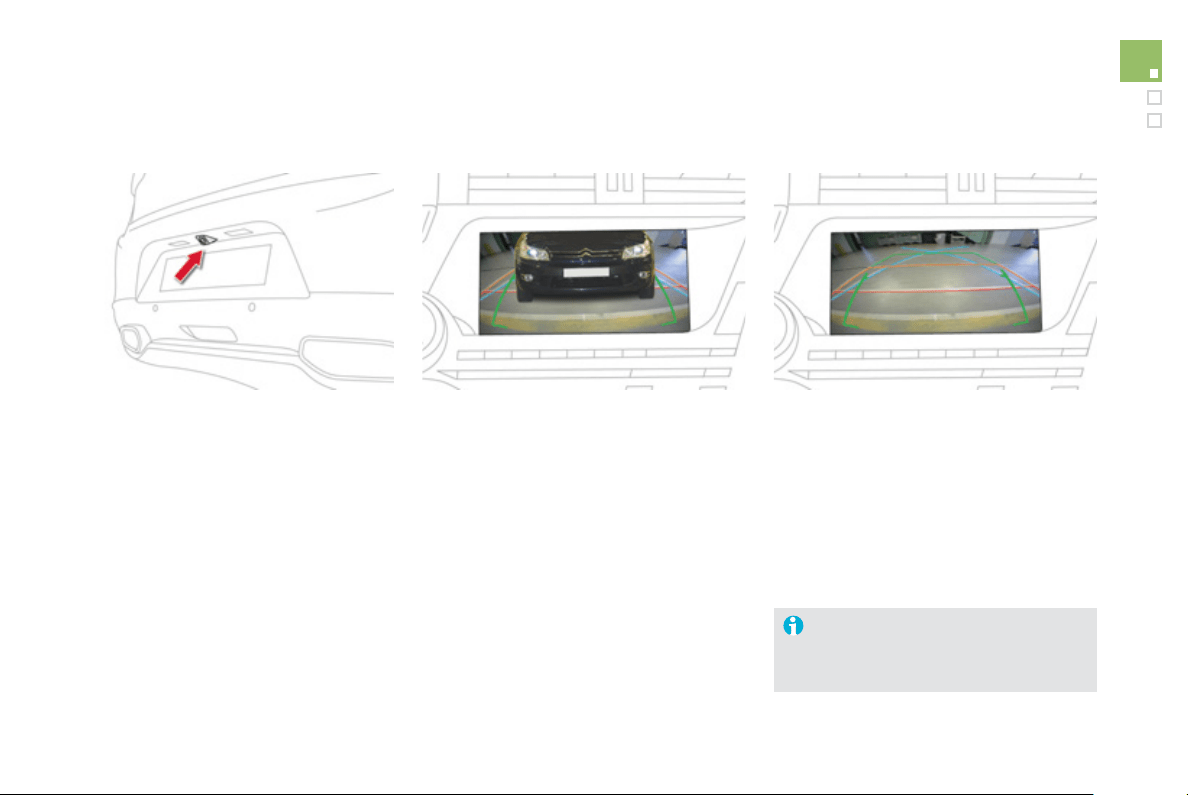
1
4
9
Driving
Reversing camera
A
reversin
g
camera is activated automaticall
y
w
h
en reverse
g
ear
i
s en
g
a
g
e
d
.
Th
e co
l
our
i
ma
g
e
i
s prov
id
e
d
i
n t
h
e nav
ig
at
i
on
screen
.
The
g
reen lines represent the
g
eneral direction
o
f th
e
v
e
hi
c
l
e
.
The red lines represent around 30 cm be
y
ond
the limit of
y
our vehicle's rear bumper. The
audible si
g
nal becomes continuous
f
rom this
li
m
it
.
Th
e
bl
ue
li
nes represent t
h
e max
i
mum turn
i
n
g
c
ir
c
l
e
.
C
lean the reversin
g
camera re
g
ularl
y
u
sin
g
a spon
g
e and a soft cloth.

005
Visibility


Lighting controls
Sy
stem
f
or selection and control o
f
the various
f
ront and rear lamps providin
g
the vehicle's li
g
htin
g
and si
g
nallin
g
.
M
a
i
n
ligh
t
i
n
g
Th
ere are var
i
ous
l
am
p
s on t
h
e ve
hi
c
l
e:
- sidelam
p
s, to be seen,
- di
pp
ed beam headlam
p
s to see without
dazzlin
g
other drivers,
- main beam headlamps to see clearl
y
when
the road is clear
,
- directional headlamps for improved
v
i
s
ibili
t
y
w
h
en corner
i
n
g
.
Addi
t
i
ona
l
ligh
t
i
n
g
O
ther lam
p
s are installed to
f
ul
f
il the
r
equirements o
f
particular driving conditions:
- rear
f
o
g
lamps to better si
g
nal the presence
o
f the vehicle in fo
ggy
conditions,
- front fo
g
lamps for better visibilit
y
in fo
ggy
c
onditions and to improve li
g
htin
g
at
intersections and when parkin
g
,
-
d
a
y
t
i
me runn
i
n
g
l
amps to
b
e seen
d
ur
i
n
g
t
h
e
d
a
y
.
Automatic li
g
htin
g
functions
Various automatic li
g
htin
g
f
unctions are also
available depending on options:
-
g
uide-me-home li
g
htin
g
,
- directional headlamps,
- welcome li
g
htin
g
,
- da
y
time runnin
g
lamps,
- automatic illumination of headlamps,
- automat
i
c
h
ea
dl
amp
di
pp
i
n
g
.
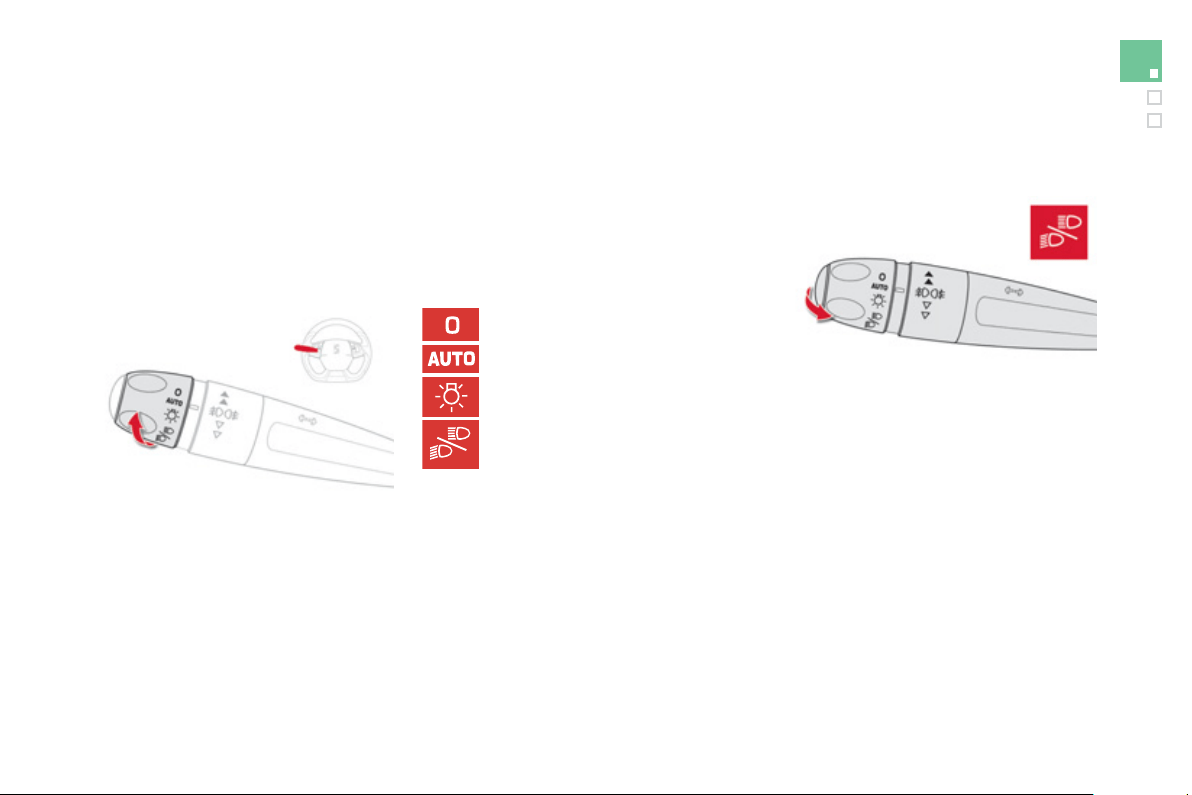
1
5
3
Visibility
Selection rin
g
for main li
g
htin
g
m
ode
Turn the rin
g
to position the s
y
mbol required
facin
g
the mark.
Lighting o
ff
.
A
utomatic illumination o
f
headlamps.
Sidelamps onl
y
.
Dipped or main beam headlamps.
Dippin
g
the headlamps
Pull the stalk to switch the li
g
htin
g
between
dipped / main beam headlamps.
In the li
g
htin
g
o
ff
and sidelamps modes, the
driver can switch on the main beam headlam
p
s
temporaril
y
(
"headlamp
f
lash"
)
b
y
maintainin
g
a
pull on the stalk.
Displa
y
s
Illumination of the correspondin
g
indicator lamp
in the instrument panel confirms the li
g
htin
g
s
w
i
t
ched
o
n.
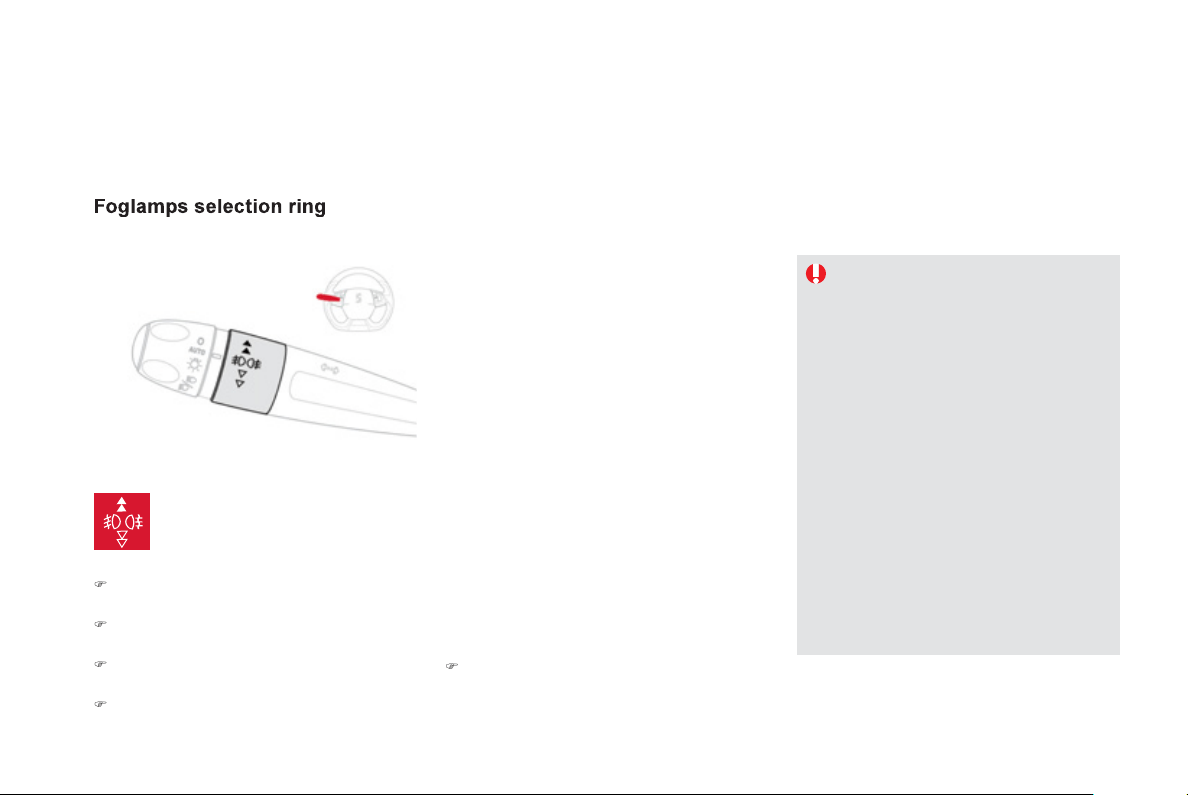
The
f
o
g
lamps operate with dipped and main beam headlamps.
Front and
r
ear fo
g
lamps
Rotate and release the ring:
)
fo
rw
a
r
ds
a
f
ir
s
t tim
e
t
o
s
wit
c
h
o
n th
e
f
r
o
nt
fo
g
lamps,
)
f
o
rw
a
r
ds
a
seco
n
d
tim
e
t
o
s
wit
c
h
o
n th
e
r
ear fo
g
lamps,
)
r
ea
rw
a
r
ds
a
fir
s
t tim
e
t
o
s
wit
c
h
o
ff th
e
r
ea
r
f
o
g
lamps,
)
r
ea
rw
a
r
ds
a
seco
n
d
tim
e
t
o
s
wit
c
h
of
th
e
f
ront
f
o
g
lamps.
When the headlamps switch off with automatic
illumination of headlamps
(
AUT
O
model
)
or
when the dipped beam headlamps are switched
off manuall
y
, the fo
g
lamps and sidelamps
re
m
ai
n
o
n.
)
Turn the rin
g
rearwards to switch o
ff
the
f
o
g
lamps, the sidelamps will then switch
off
.
I
n
g
oo
d
or ra
i
n
y
weat
h
er,
b
ot
h
d
a
y
and ni
g
ht, the
f
ront
f
o
g
lamps and the
rear
f
oglamps are prohibited. In these
s
ituations, the power o
f
their beams
ma
y
dazzle other drivers. The
y
should
o
nl
y
be used in fo
g
or snow.
In these weather conditions, it is
y
our
responsibilit
y
to switch on the fo
g
lamps
an
d
di
ppe
d
h
ea
dl
amps manua
lly
as t
h
e
s
unshine sensor ma
y
detect su
ff
icient
ligh
t.
Do not
f
orget to switch o
ff
the
f
ront
f
o
g
lamps and the rear
f
o
g
lamps when
the
y
are no lon
g
er needed.
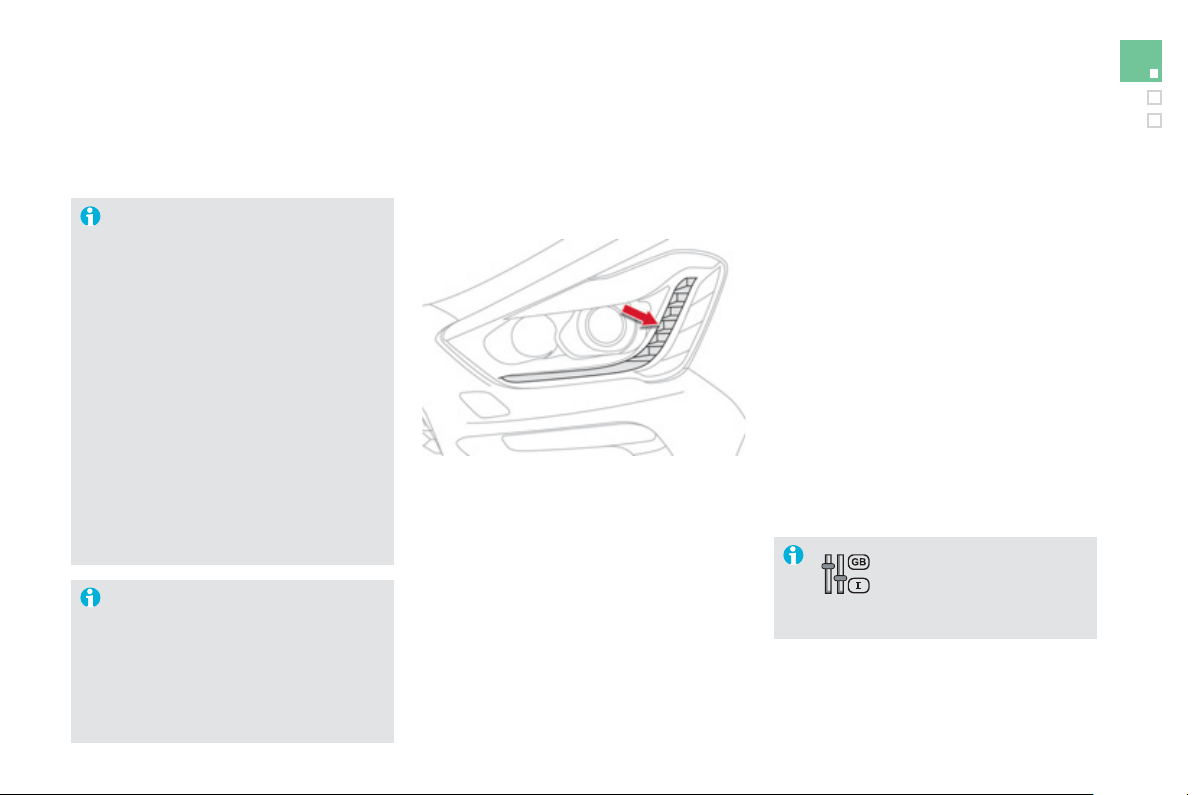
1
55
Visibility
Li
g
htin
g
left on audible
si
g
nal
A
n audible si
g
nal when a front door
is opened warns the driver that the
vehicle's exterior li
g
htin
g
is on, with the
i
g
nition o
ff
and in manual li
g
htin
g
mode.
In this case, switchin
g
o
ff
the li
g
htin
g
s
tops t
h
e au
dibl
e s
ig
na
l
.
With the ignition o
ff
, i
f
the dipped
headlamps remain on, the vehicle
g
oes
into "EC
O
" mode to avoid dischar
g
in
g
the batter
y
.
In some weather conditions
(
e.g. low
temperature or humidit
y)
, the presence
o
f mistin
g
on the internal surface of the
g
lass of the headlamps and rear lamps
is normal; it disappears after the lamps
h
a
v
e
bee
n
o
n
fo
r
a
fe
w min
u
t
es
.
The da
y
time runnin
g
lamps can be activated
a
n
d
deac
tiv
a
t
ed
vi
a
th
e
c
on
f
i
g
uration menu.
The li
g
htin
g
g
oes o
ff
when
y
ou switch
off
the i
g
nition, but
y
ou can alwa
y
s
s
witch it on again using the lighting
co
ntr
o
l
s
t
a
lk.
D
a
y
time runnin
g
lamps
(
LEDs
)
Th
e
y
come on w
h
en t
h
e en
gi
ne
i
s starte
d
.
Dependin
g
on the countr
y
o
f
sale or where
r
equired by regulations, they are used
f
or:
- da
y
time runnin
g
lamps in da
y
mode and
s
idelamps in ni
g
ht mode
(
the
y
are bri
g
hter
when da
y
time runnin
g
lamps
)
,
o
r
- s
id
e
l
amps
i
n
d
a
y
an
d
n
igh
t mo
d
e.

s
w
i
tc
h
e
d
on automat
i
ca
lly
, w
i
t
h
out an
y
act
i
on on
the part o
f
the driver, when a low level o
f
external
li
g
ht is detected or in certain cases o
f
activation o
f
the windscreen wi
p
ers.
A
s soon as the bri
g
htness returns to a su
ff
icient
level or after the windscreen wipers are switched
off, the lamps are switched off automaticall
y
.
A
utomatic illumination of headlam
p
s
A
ctivation
)
Turn the rin
g
to the "AUTO" position,
a
utomatic illumination of headlamps is
a
ctivated and a messa
g
e is displa
y
ed in the
screen
.
D
eact
i
vat
i
on
)
T
urn t
h
e r
i
n
g
to anot
h
er pos
i
t
i
on.
D
eact
i
vat
i
on
i
s accompan
i
e
d
by
a messa
g
e
i
n th
e
sc
r
ee
n.
A
ssoc
i
at
i
on w
i
t
h
t
h
e automat
i
c
"
Guide-me-home" li
g
htin
g
Association with the automatic lighting provides
the "
g
uide-me-home" li
g
htin
g
with the
f
ollowin
g
additional options after the i
g
nition is switched
o
ff:
- selection of the li
g
htin
g
duration of 15, 30
o
r 60 seconds in the vehicle parameters in
the vehicle con
f
i
g
uration menu,
- automatic activation o
f
"
g
uide-me-home"
l
i
g
htin
g
when automatic illumination o
f
headlam
p
s is in o
p
eration.
Operatin
g
fault
In th
e
e
v
e
nt
of
a
m
a
l
fu
n
c
ti
o
n
of
the sunshine sensor,
the li
g
htin
g
comes on, this
warnin
g
lamp is displa
y
ed in the instrument
p
anel and/or a messa
g
e appears in the screen,
accompanied b
y
an audible si
g
nal.
Contact a CITROËN dealer or a qualified
wor
k
s
h
op.
In
f
og or snow, the sunshine sensor may
detect su
ff
icient li
g
ht. In this case, the
li
g
htin
g
will not come on automaticall
y
.
Do not cover the sunshine sensor,
c
oupled with the rain sensor and
l
oca
t
ed
in th
e
ce
ntr
e
o
f th
e
win
dsc
r
ee
n
b
e
hi
n
d
t
h
e rear v
i
ew m
i
rror; t
h
e
associated
f
unctions would no lon
g
er
be
co
ntr
olled
.
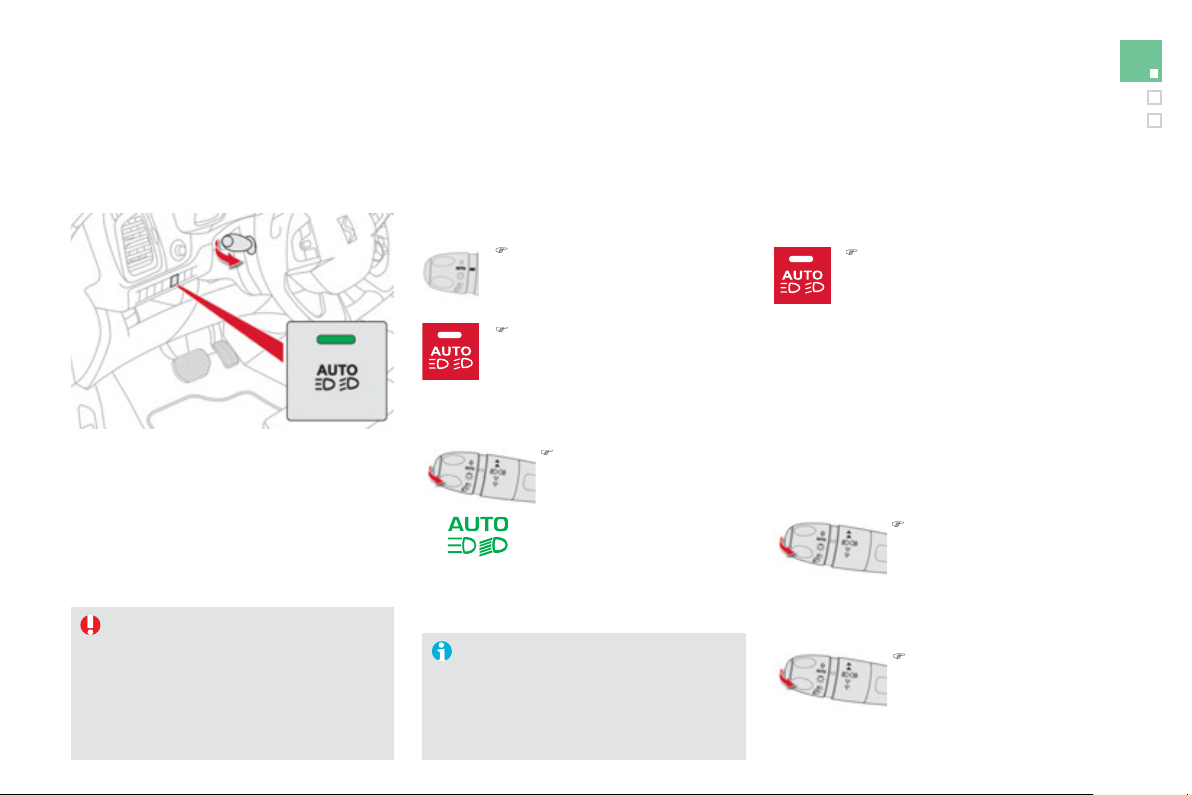
1
57
Visibility
Automatic headlamp dippin
g
Switchin
g
on
Sy
stem which automaticall
y
chan
g
es between
dipped and main beam accordin
g
to the traffic
c
onditions, usin
g
a camera in the rear view
m
irr
o
r.
)
Put the lighting control stalk ring
in the "AUT
O
"
p
osition.
A
ct
i
vat
i
on
Thi
s automat
i
c
h
ea
dl
amp
di
pp
i
n
g
sy
stem
i
s a
d
r
i
v
i
n
g
a
id
.
Th
e
d
r
i
ver
remains responsible
f
or the vehicle's
l
i
g
htin
g
, its correct use
f
or the prevailin
g
c
onditions o
f
light, visibility and tra
ff
ic
and observation o
f
drivin
g
and vehicle
re
g
ulations.
)
Flash the headlamps
(
pull
the stalk be
y
ond the stif
f
p
oint
)
, which causes a
ch
an
g
e
b
etween
di
ppe
d
a
n
d
ma
i
n
b
eam, t
h
e
i
n
di
cator
l
am
p
i
n t
h
e
instrument
p
anel comes
o
n t
o
co
n
f
irm
ac
tiv
a
ti
o
n.
)
P
ress t
h
e
b
utton,
i
ts
i
n
di
cator
l
amp comes on.
Switchin
g
off
)
Press the button, the indicator
lamp
g
oes off, the headlamps
remain in their current position
P
ause
If the situation requires a chan
g
e of headlamp
b
eam,
d
r
i
ver can ta
k
e over at an
y
t
i
me:
)
Flash the headlamps
(
pull the stalk be
y
ond the
sti
ff
point
)
to temporaril
y
d
eact
i
vate t
h
e s
y
stem
(
pause
)
, this changes the
h
eadlamps to dipped beam.
)
Flash the headlamps to
r
eactivate the s
y
stem.
The s
y
stem will be operational as
s
oon as
y
ou have exceeded 15 mph
(
25 km
/
h
)
.
I
f
the speed drops below 9 mph
(
15 km
/
h
)
,
t
h
e s
y
stem c
h
an
g
es to
di
ppe
d
b
eam.
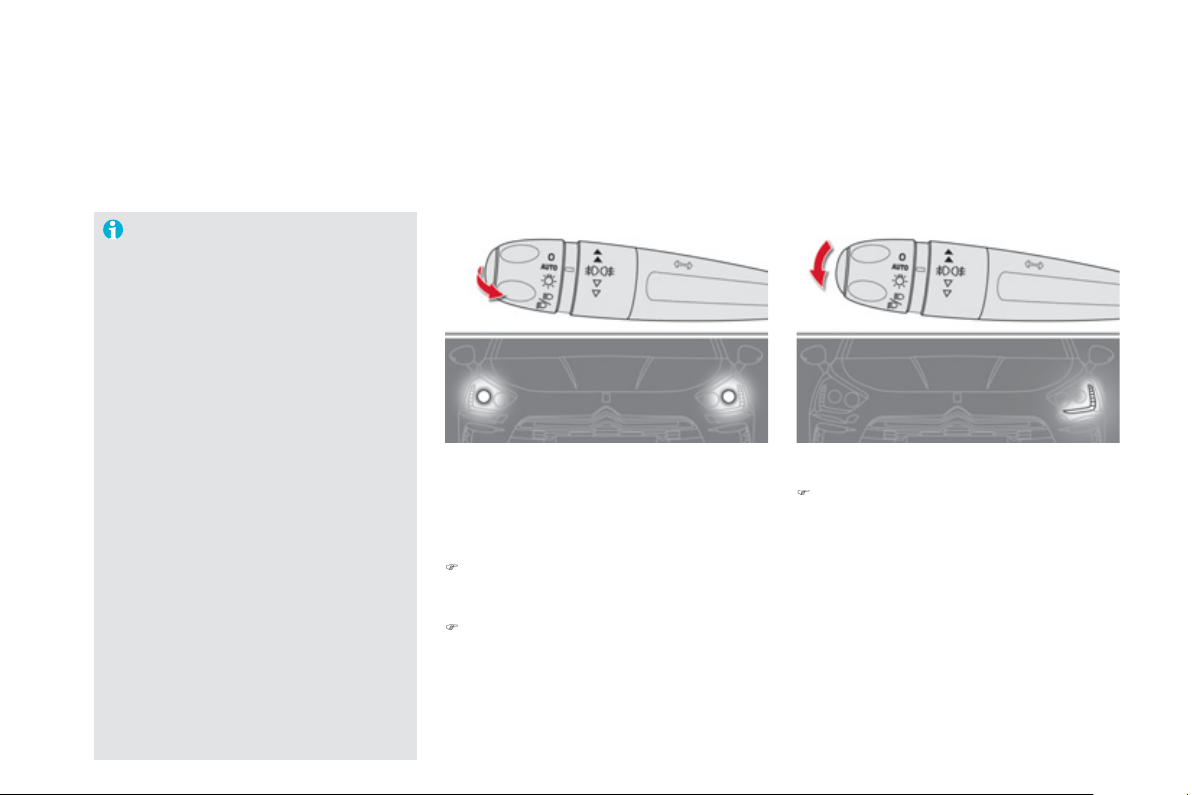
Parkin
g
lamps
S
ide markers
f
or the vehicle by illumination o
f
the sidelamps on the tra
ff
ic side onl
y
.
)
Within one minute of switchin
g
off the
i
g
nition, operate the li
g
htin
g
control stalk up
or down dependin
g
on the traffic side
(
fo
r
e
xample: when parkin
g
on the left; li
g
htin
g
c
ontro
l
sta
lk
upwar
d
s; t
h
e r
igh
t
h
an
d
s
idelamps are on
)
.
This is con
f
irmed b
y
an audible si
g
nal and
illumination o
f
the corresponding direction
indicator warnin
g
lamp in the instrument panel.
To switch off the parkin
g
lamps, return the
li
g
htin
g
control stalk to the middle position or
s
witch on the i
g
nition.
Temporarily keeping the dipped beam headlamps
on a
f
ter the vehicle's i
g
nition has been switched
off makes the exit of the vehicle's occupants easier
when the li
g
ht is poor.
M
anual
g
uide-me-home
li
g
htin
g
Switchin
g
on
)
Within one minute a
f
ter switchin
g
o
f
the
i
g
nition, "
f
lash" the headlamps usin
g
the
l
ighting stalk.
)
A
f
urther "headlam
p
f
lash" switches the
fu
n
c
ti
o
n
o
ff.
Switchin
g
off
The manual
g
uide-me-home li
g
htin
g
switches
off automaticall
y
after a set time
(
this time is
pro
g
rammable in the confi
g
uration menu
)
.
The s
y
stem ma
y
su
ff
er inter
f
erence o
r
n
ot work correctly:
- under conditions o
f
poor visibilit
y
(
for example, snowfall, heav
y
rain
or thick fo
g
, ...
)
,
- if the windscreen is dirt
y
, misted or
obscured
(
b
y
a sticker, ...
)
in front of
t
h
e camera,
- i
f
the vehicle is
f
acin
g
hi
g
hl
y
r
e
f
lective si
g
ns.
Th
e s
y
stem
i
s not a
bl
e to
d
etect:
- r
oad
use
r
s
th
a
t
do
n
o
t h
a
v
e
th
e
ir
own li
g
htin
g
, such as pedestrians,
- road users whose li
g
htin
g
is
obscured, such as vehicles runnin
g
behind a safet
y
barrier
(
on a
m
otorwa
y
, for example
)
,
- road users at the top or bottom o
f
a
steep s
l
ope, on tw
i
st
y
roa
d
s, on
c
r
oss
r
oads
.

Visibility
Exterior welcome
lighting
The remote switchin
g
on o
f
the li
g
htin
g
makes
y
our approac
h
to t
h
e ve
hi
c
l
e eas
i
er
i
n poor
light. It is activated according to the level o
f
li
g
ht detected b
y
the sunshine sensor.
Switchin
g
on
Switchin
g
off
The exterior welcome li
g
htin
g
switches of
f
automaticall
y
after a set time, when the i
g
nition
i
s sw
i
tc
h
e
d
on or on
l
oc
ki
n
g
t
h
e ve
hi
c
l
e.
Pro
g
rammin
g
The lighting duration is selected via
the vehicle con
f
i
g
uration menu.
The duration o
f
the welcome li
g
htin
g
is
assoc
i
a
t
ed
with
a
n
d
i
de
nti
ca
l t
o
th
a
t
of
the automatic
g
uide-me-home li
g
htin
g
.
)
P
ress t
h
e o
p
en
p
a
dl
oc
k
on t
h
e
r
e
m
o
t
e
co
ntr
o
l
o
r th
e
doo
r h
a
n
d
l
e
with Ke
y
less Entr
y
and
S
tartin
g
.
Door mirror
spotlamps
Switchin
g
on
The spotlamps come on:
- when
y
ou unlock the vehicle,
- when
y
ou switch o
ff
the i
g
nition,
- w
h
en
y
ou open a
d
oor,
- w
h
en
y
ou use t
h
e remote contro
l
to
l
ocate
t
he
v
ehicle
.
Switchin
g
off
The
y
are timed to
g
o o
ff
automaticall
y
.
To make
y
our approach to the vehicle easier,
th
ese
ill
u
min
a
t
e
:
- the zones facin
g
the driver’s and
p
assen
g
er
’
s doors,
- th
e
z
o
n
es
fo
rw
a
r
d
of
th
e
doo
r mirr
o
r
s
a
n
d
r
ea
rw
a
r
d
of
th
e
f
r
o
nt
doo
r
s
.
Th
e
di
ppe
d
b
eam
h
ea
dl
amps an
d
t
h
e
sid
e
l
amps come on;
y
our ve
hi
c
l
e
i
s a
l
so
u
nl
oc
k
ed
.
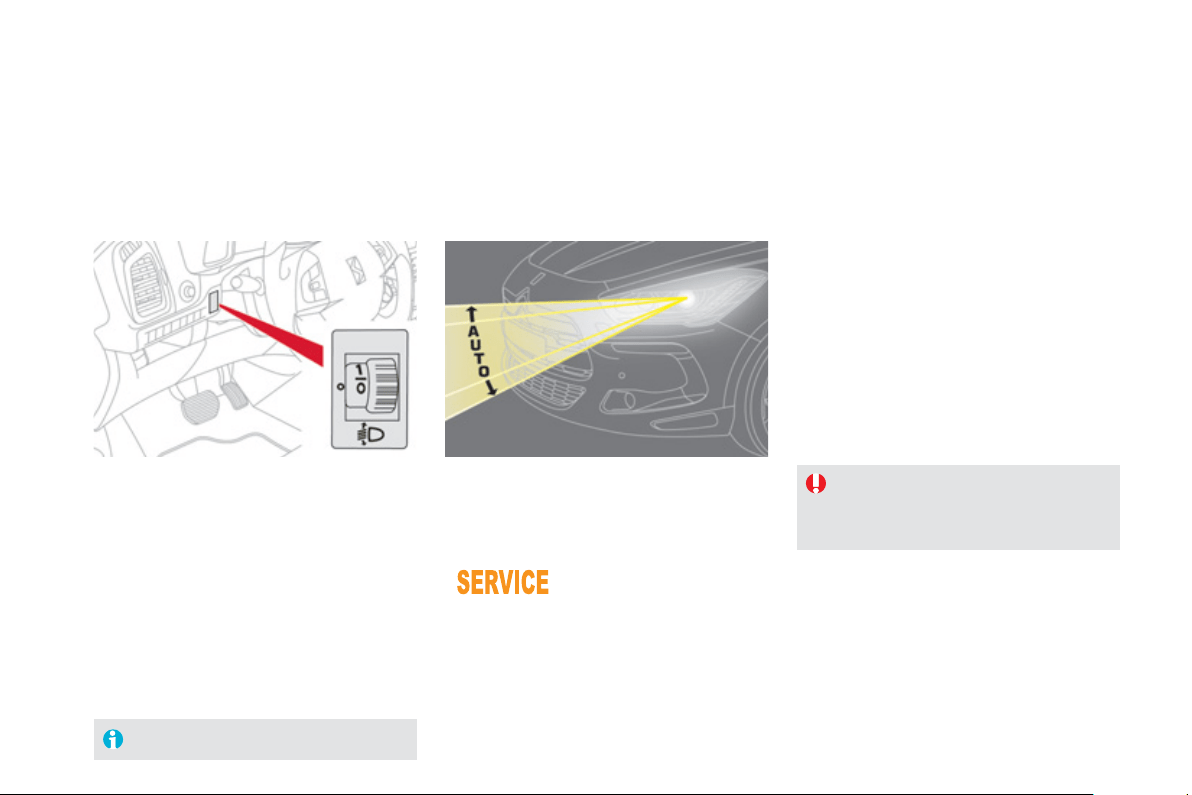
Manual adjustment
of halogen
headlamps
Automatic adjustment of xenon headlamps
T
o avo
id
caus
i
n
g
a nu
i
sance to ot
h
er roa
d
users, the hei
g
ht o
f
the halo
g
en headlamps
sh
ou
ld
b
e a
dj
uste
d
accor
di
n
g
to t
h
e
l
oa
d
i
n t
h
e
v
ehicle
.
0.
1 or 2 people in the
f
ront seats.
-.
I
nterme
di
ate sett
i
n
g
.
1.
5 peop
l
e + max
i
mum aut
h
or
i
se
d
l
oa
d
.
-.
I
nterme
di
ate sett
i
n
g
.
2.
D
r
i
v
e
r + m
a
x
i
m
u
m
au
t
ho
r
ised
load
.
-.
I
nterme
di
ate sett
i
n
g
.
3.
5 peop
l
e + max
i
mum
l
oa
d
i
n t
h
e
b
oot.
Th
e
i
n
i
t
i
a
l
sett
i
n
g
i
s pos
i
t
i
on
"
0"
.
If a fault occurs
,
this
w
arn
i
n
g
l
amp
i
s
di
sp
l
a
y
e
d
i
n t
h
e
i
nstrument pane
l
,
accompan
i
e
d
by
an au
dibl
e s
ig
na
l
an
d
a
message in the instrument panel screen.
The s
y
stem then places
y
our headlamps in the
l
owest position.
I
n or
d
er to avo
id
caus
i
n
g
a nu
i
sance to ot
h
e
r
r
oad users, this s
y
stem corrects the hei
g
ht o
f
the
xenon
h
ea
dl
amps
b
eam automat
i
ca
lly
an
d
w
h
en
stationary, in relation to the load in the vehicle.
If a fault occurs, do not touch the xenon
bulbs.
C
ontact a
C
ITR
O
ËN dealer or a
q
ualified workshop.
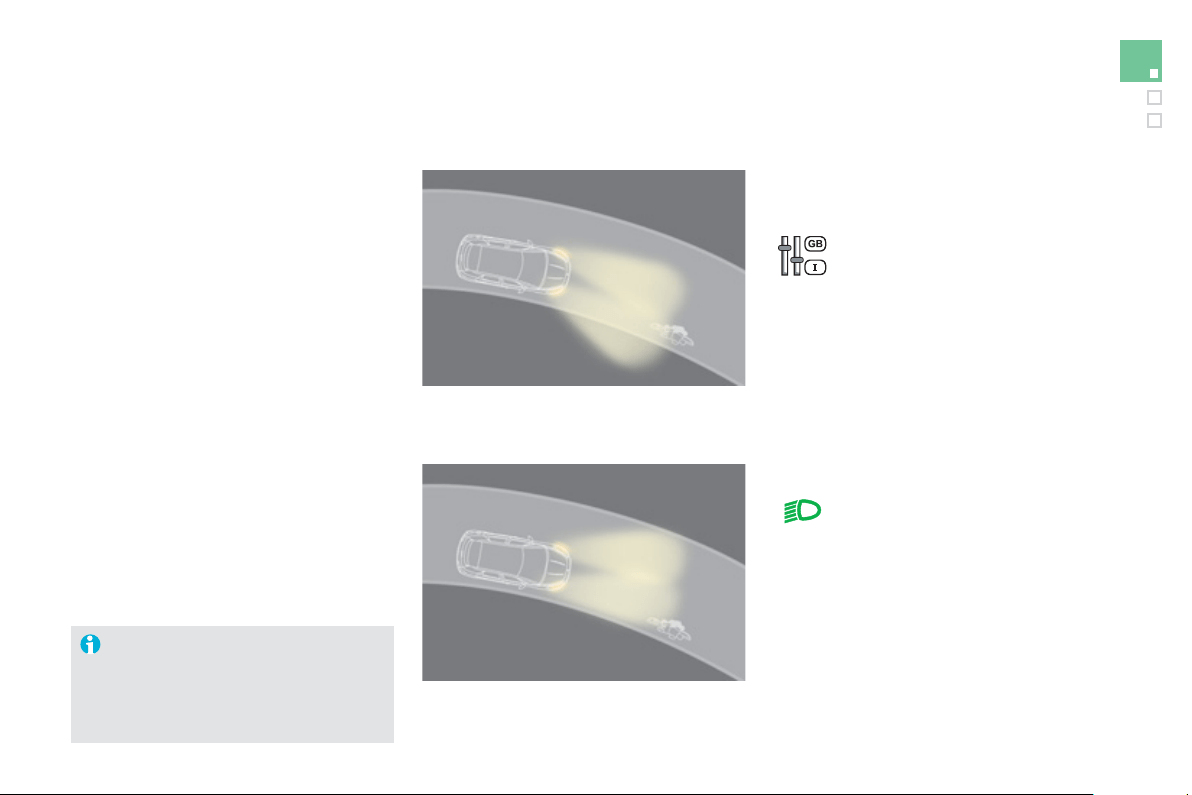
1
6
1
Visibility
Wh
en t
h
e
dipp
e
d
or ma
i
n
b
eam
h
ea
dl
am
p
s
are on, this
f
unction, allows the li
g
ht beams to
be
tt
e
r f
o
ll
o
w th
e
r
oad
.
The use of this function, coupled with the
xenon headlamps and the cornerin
g
li
g
htin
g
,
c
onsiderabl
y
improves the qualit
y
of
y
ou
r
ligh
t
i
n
g
roun
d
b
en
d
s.
Directional lighting
with directional li
g
htin
g
without directional li
g
htin
g
Pro
g
rammin
g
Operatin
g
fault
The s
y
stem is activated or
deac
tiv
a
t
ed
in th
e
v
e
hi
c
l
e
c
onfi
g
uration menu.
The s
y
stem is activated b
y
default.
The state o
f
the s
y
stem sta
y
s in
m
emor
y
on switchin
g
o
ff
the i
g
nition.
Thi
s
f
u
n
c
ti
o
n i
s
in
ac
tiv
e
:
- when stationar
y
or at low speeds,
- w
h
en reverse
i
s en
g
a
g
e
d
.
If a fault occurs, this warnin
g
lamp
flashes in the instrument panel,
a
ccompan
i
e
d
by
a messa
g
e
i
n t
h
e
screen
.
Co
nt
ac
t
a
C
ITR
OË
N
dea
l
e
r
o
r
a
q
uali
f
ied worksho
p
.
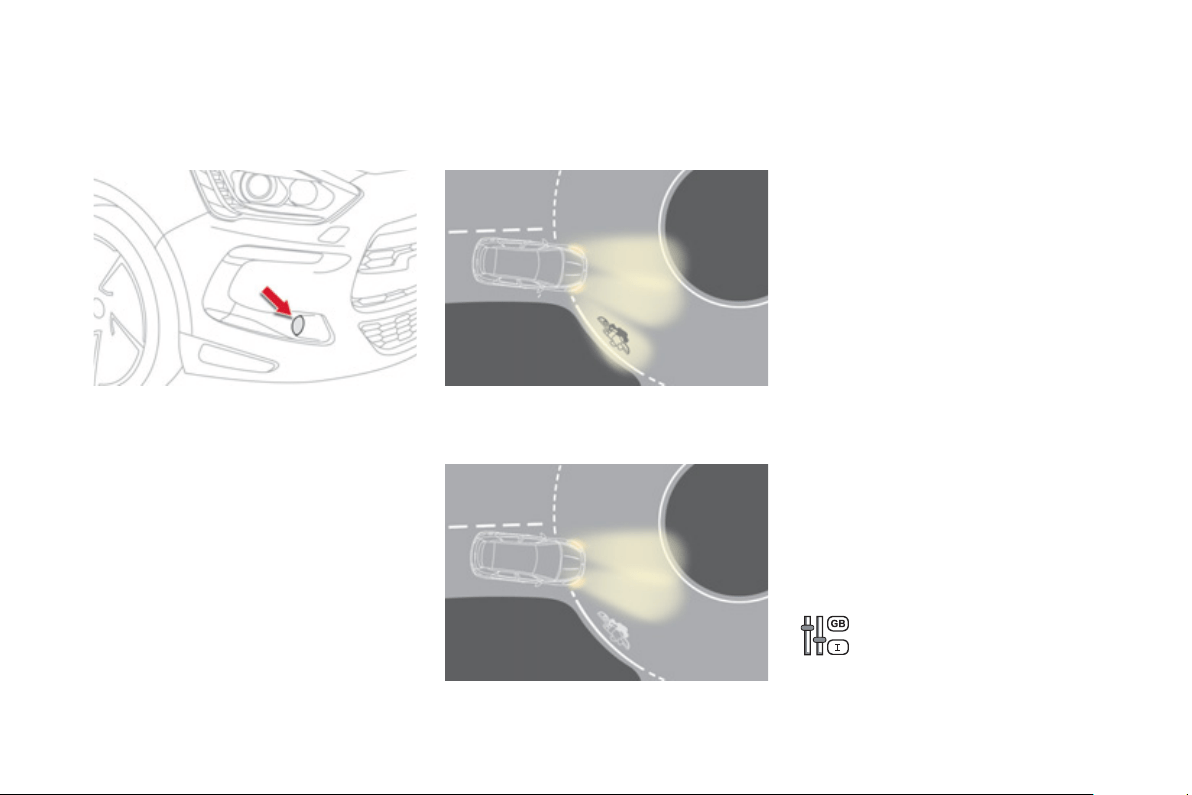
Cornering lighting
With di
pp
ed or main beams, this
f
unction
m
akes use of the beam from a front fo
g
lamp to
illuminate the inside of a bend, when the vehicle
s
peed is below 25 mph
(
approximatel
y
40 km/h
)
(
urban drivin
g
, windin
g
road, intersections,
p
arkin
g
manouevres...
)
.
w
i
t
h
corner
i
n
g
ligh
t
i
n
g
without cornerin
g
li
g
htin
g
Switchin
g
on
Thi
s
f
u
n
c
ti
o
n
s
t
a
rt
s
:
- when the correspondin
g
direction indicato
r
is switched on,
o
r
-
f
rom a certain an
g
le o
f
rotation o
f
the
s
teer
i
n
g
w
h
ee
l
.
Switchin
g
off
Th
e s
y
stem
d
oes not operate:
- below a certain angle o
f
rotation o
f
the
s
teerin
g
wheel,
- above 25 mph
(
40 km/h
)
,
- when reverse
g
ear is en
g
a
g
ed.
P
ro
g
ramm
i
n
g
Th
e s
y
stem
i
s act
i
vate
d
o
r
deac
tiv
a
t
ed
in th
e
v
e
hi
c
l
e
c
on
f
i
g
uration menu.
The s
y
stem is activated b
y
default.
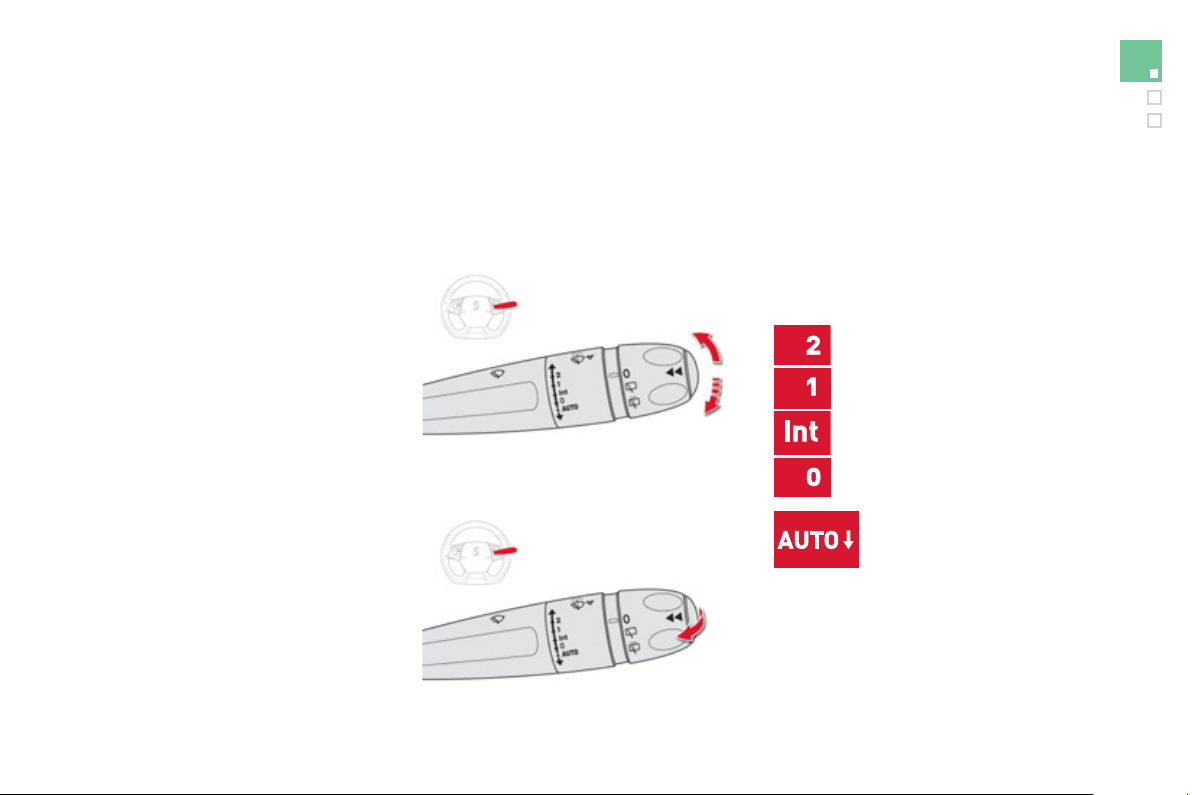
1
6
3
Visibility
Wiper controls
Pro
g
rammin
g
Various automatic wiper control modes are also
available accordin
g
to the followin
g
options:
- automatic rain sensitive windscreen wipers,
- rear w
i
p
i
n
g
on en
g
a
gi
n
g
reverse
g
ear.
Manual controls
The wipers are controlled directly by the driver.
The vehicle's
f
ront and rear wi
p
ers are
designed to improve the driver's visibility
p
ro
g
ressivel
y
accordin
g
to the climatic
co
n
d
iti
o
n
s
.
Windscreen wi
p
ers
Wipin
g
speed:
fast
(
heav
y
rain
)
,
normal
(
moderate rain
)
,
intermittent
(
proportional to the
speed of the vehicle
)
,
park,
automatic
(
press down and
r
elease
)
,
single wipe
(
pull the stalk brie
f
ly towards you
)
.
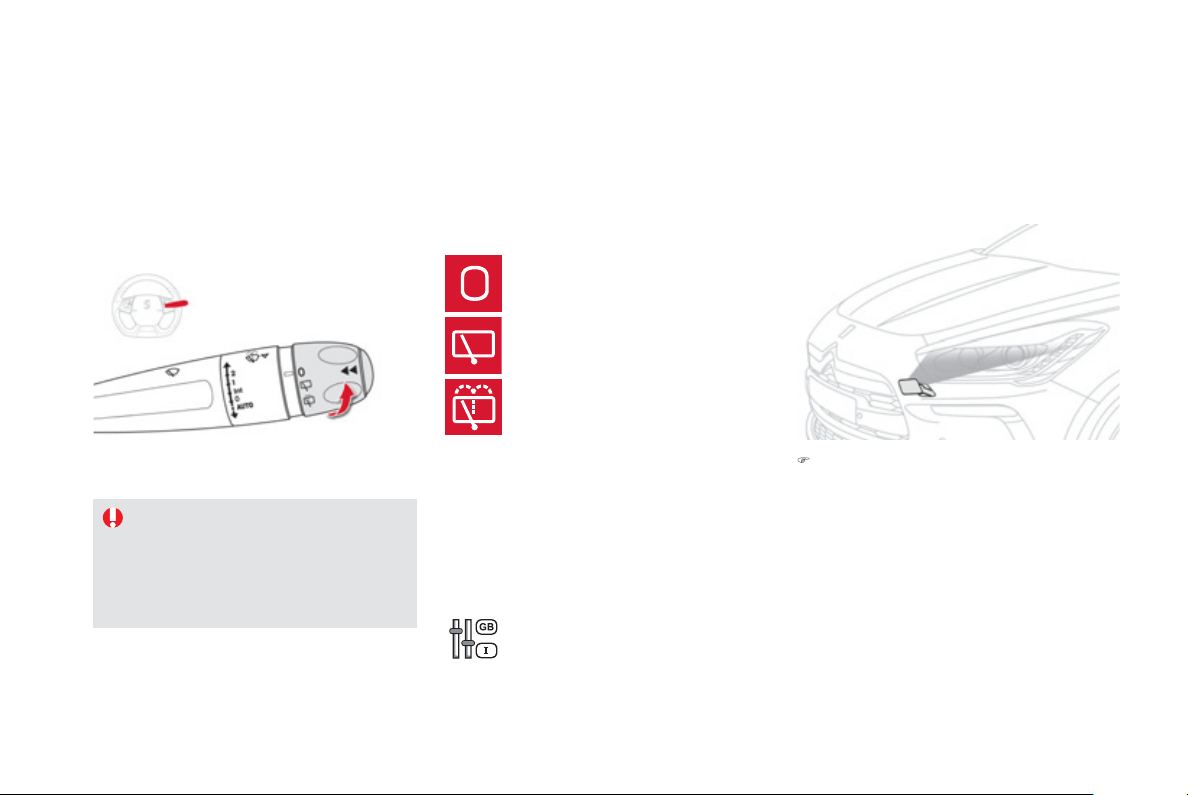
R
ear w
ip
e
r
I
f
a si
g
ni
f
icant accumulation o
f
snow
or ice is present, or when using a
bic
y
cle carrier on the boot, deactivate
the automatic rear wiper via the
c
onfi
g
uration menu.
park,
i
nterm
i
ttent w
ip
e,
wash-wipe
(
set duration
)
.
Reverse
g
ear
When reverse
g
ear is en
g
a
g
ed, the rear wiper
will come into operation if the windscreen
wipers are operatin
g
.
Th
e
fu
n
c
ti
o
n i
s
ac
tiv
a
t
ed
or
deactivated via the con
f
i
g
uration
menu
.
This
f
unction is activated by de
f
ault.
Pro
g
rammin
g
)
Pull the windscreen wiper stalk towards
y
ou. The windscreen wash then the
windscreen wipers operate for a fixed
p
eriod.
Th
e
h
ea
dl
amp was
h
ers on
ly
operate w
h
en t
h
e
di
ppe
d
b
eam
h
ea
dl
amps are on
.
Windscreen and headlam
p
wash
R
ear w
i
per se
l
ect
i
on r
i
n
g
:
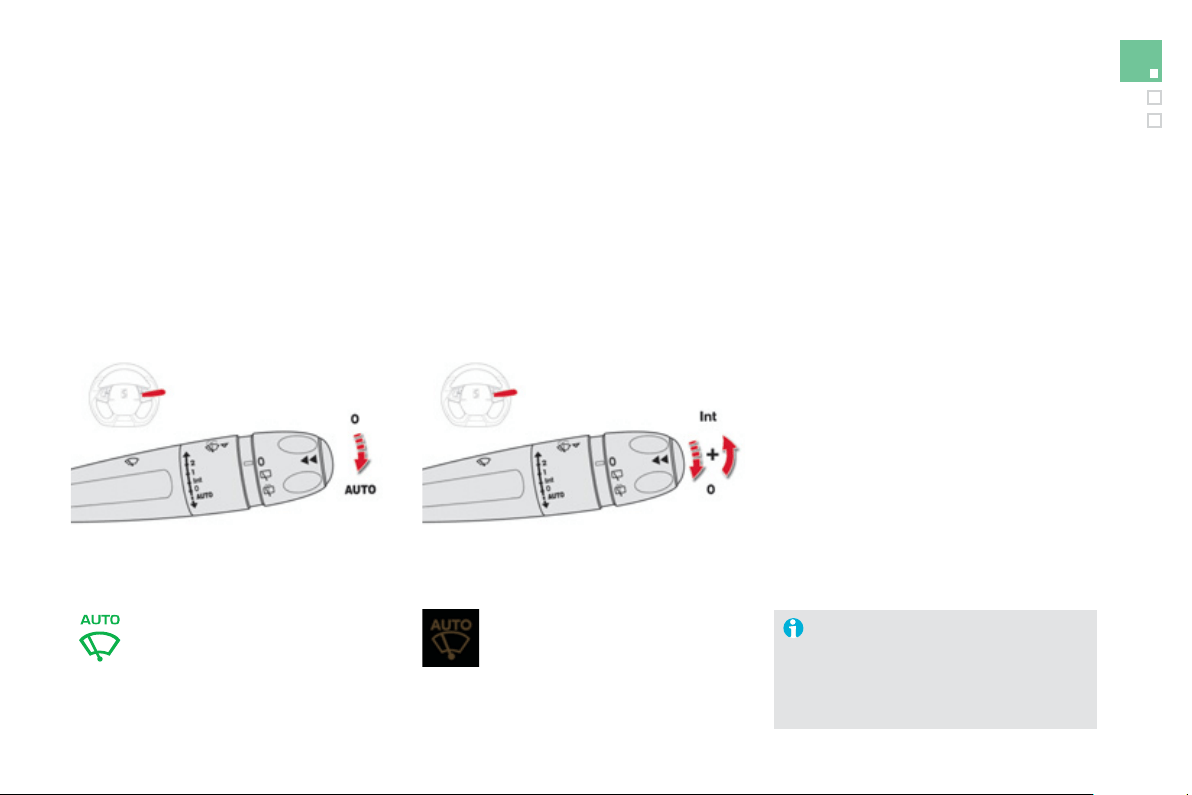
1
65
Visibility
Automatic rain sensitive
windscreen wipers
The windscreen wipers operate automaticall
y
,
without an
y
action on the part of the driver, i
f
rain is detected
(
sensor behind the rear view
m
irror
)
, adaptin
g
their speed to the intensit
y
o
f
th
e
r
a
in
fa
ll.
Switchin
g
on
Brie
f
l
y
push the control stalk
do
wnw
a
r
ds
.
This warning lamp comes on in the
instrument panel and a messa
g
e is
displa
y
ed.
Brie
f
l
y
push the control stalk
d
ownwar
d
s a
g
a
i
n, or p
l
ace t
h
e
c
ontrol stalk in another position
(
Int,
1 or 2
)
.
This warnin
g
lamp
g
oes off in the instrument
p
anel and a messa
g
e is displa
y
ed.
Switchin
g
off
Th
e
au
t
o
m
a
ti
c
r
a
in
se
n
s
itiv
e
win
dsc
r
ee
n
wipers must be reactivated b
y
pushin
g
the control stalk downwards, if the
i
g
nition has been off for more than
o
n
e
min
u
t
e
.
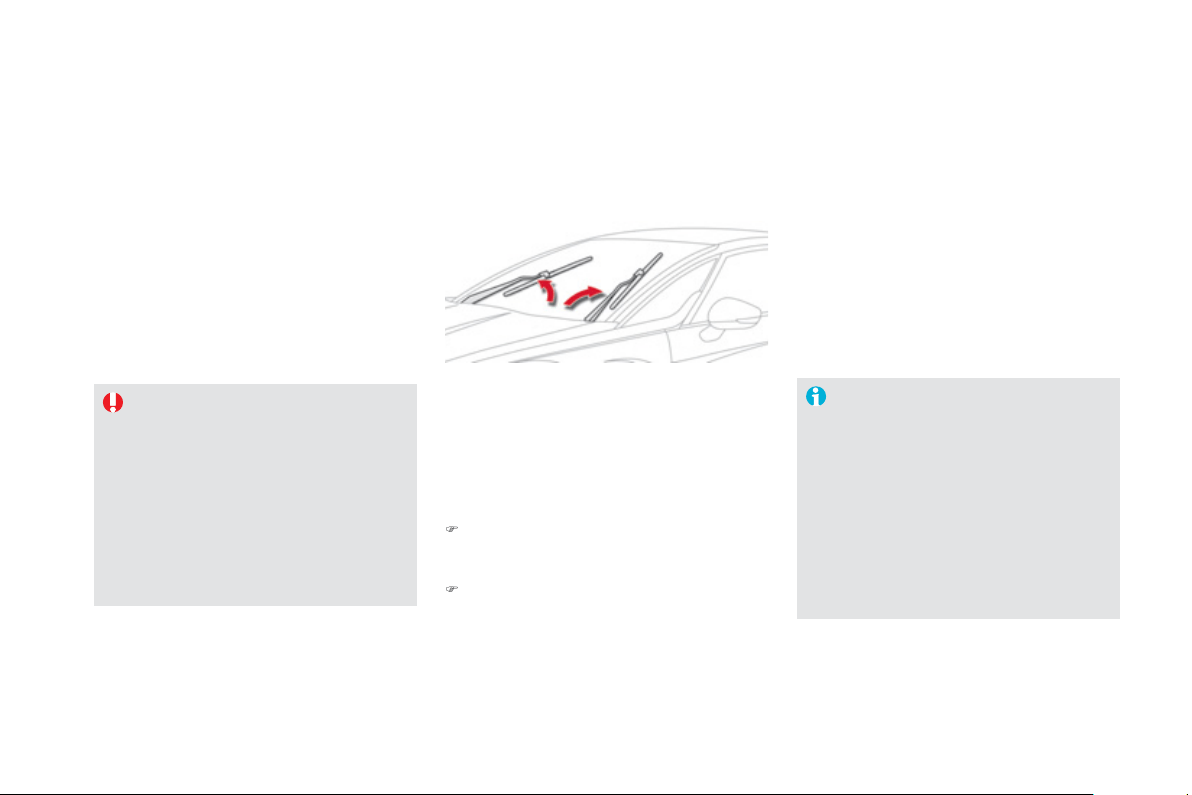
D
o not cover t
h
e ra
i
n sensor,
li
n
k
e
d
w
i
t
h
t
he
su
n
shi
n
e
se
n
so
r
a
n
d
loca
t
ed
i
n t
he
ce
ntr
e
of
th
e
win
dsc
r
ee
n
be
hin
d
th
e
r
ea
r
vi
e
w mirr
o
r.
S
witch o
ff
the automatic rain sensitive
wipers when usin
g
an automatic car wash.
In winter, it is advisable to wait until the
windscreen is completel
y
clear of ice
before activatin
g
the automatic rain
s
ens
i
t
i
ve w
i
pers.
Operatin
g
fault
I
f
a
fau
lt
occu
r
s
with th
e
au
t
o
m
a
ti
c
r
a
in
s
ens
i
t
i
ve w
i
pers, t
h
e w
i
pers w
ill
operate
i
n
i
nt
e
rm
i
tt
e
nt m
ode
.
Have it checked by CITROËN dealer or a
q
uali
f
ied worksho
p
.
S
p
ecial
p
osition of the
windscreen wipers
This position permits release o
f
the windscreen
w
ip
er
bl
a
d
es.
It is used
f
or cleaning or replacement o
f
the
b
lades. It can also be use
f
ul, in winter, to
de
t
ac
h th
e
b
l
ades
fr
o
m th
e
win
dsc
r
ee
n.
T
o
m
a
int
a
in th
e
effec
tiv
e
n
ess
of
th
e
"
f
lat-blade" t
y
pe o
f
wiper blades, it is
ad
vi
sab
l
e
t
o
:
- handle them with care,
- clean them re
g
ularl
y
usin
g
soap
y
water
,
- avo
id
us
i
n
g
t
h
em to reta
i
n
c
ar
db
oar
d
on t
h
e w
i
n
d
screen,
- replace them at the
f
irst si
g
ns o
f
w
ear
.
)
An
y
action on the wiper stalk in the minute
after switchin
g
off the i
g
nition places the
blades verticall
y
on the screen.
)
To park the blades a
g
ain, switch on the
ig
n
i
t
i
on an
d
operate t
h
e w
i
per sta
lk
.
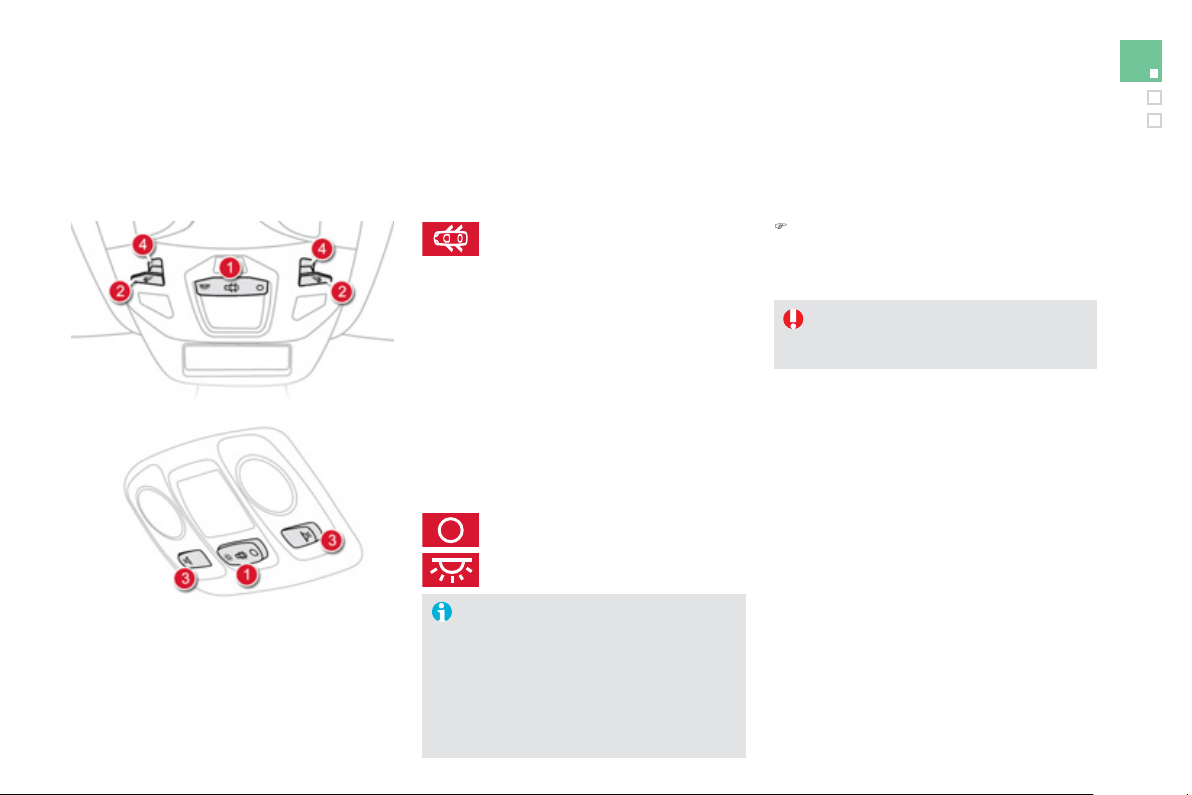
1
67
Visibility
1.
F
ront - rear courtes
y
l
amp
2.
F
ront map rea
di
n
g
l
amp
s
3.
R
ear map reading lamp
s
4.
Interior mood LEDs
Courtesy lamps
I
n t
hi
s pos
i
t
i
on, t
h
e courtes
y
l
amp
c
omes on
g
ra
d
ua
lly
:
Front - rear courtes
y
lamps
Take care to avoid leavin
g
an
y
thin
g
in
c
ontact w
i
t
h
t
h
e courtes
y
l
amps.
Wi
t
h
t
h
e
"
permanent
ligh
t
i
n
g"
mo
d
e, t
h
e
ligh
t
i
n
g
t
i
me var
i
es accor
di
n
g
to t
h
e c
i
rcumstances:
- with the i
g
nition o
ff
, approximatel
y
ten minutes,
- in ener
gy
econom
y
mode,
a
pproximatel
y
thirt
y
seconds,
-
with the h
y
brid s
y
stem active, unlimited.
- when the vehicle is unlocked,
- when the electronic ke
y
is removed from
the reader
,
- w
h
en open
i
n
g
a
d
oor,
- w
h
en t
h
e remote contro
l
l
oc
ki
n
g
b
utton
i
s
act
i
vate
d
,
i
n or
d
er to
l
ocate
y
our ve
hi
c
l
e.
It switches o
ff
g
raduall
y
:
- when the vehicle is locked,
- when the i
g
nition is switched on,
-
30
seconds after the last door is closed.
Permanentl
y
off.
Permanent lighting.
Front - rear map readin
g
l
amps
)
With the i
g
nition on, press the
c
orrespondin
g
switch.
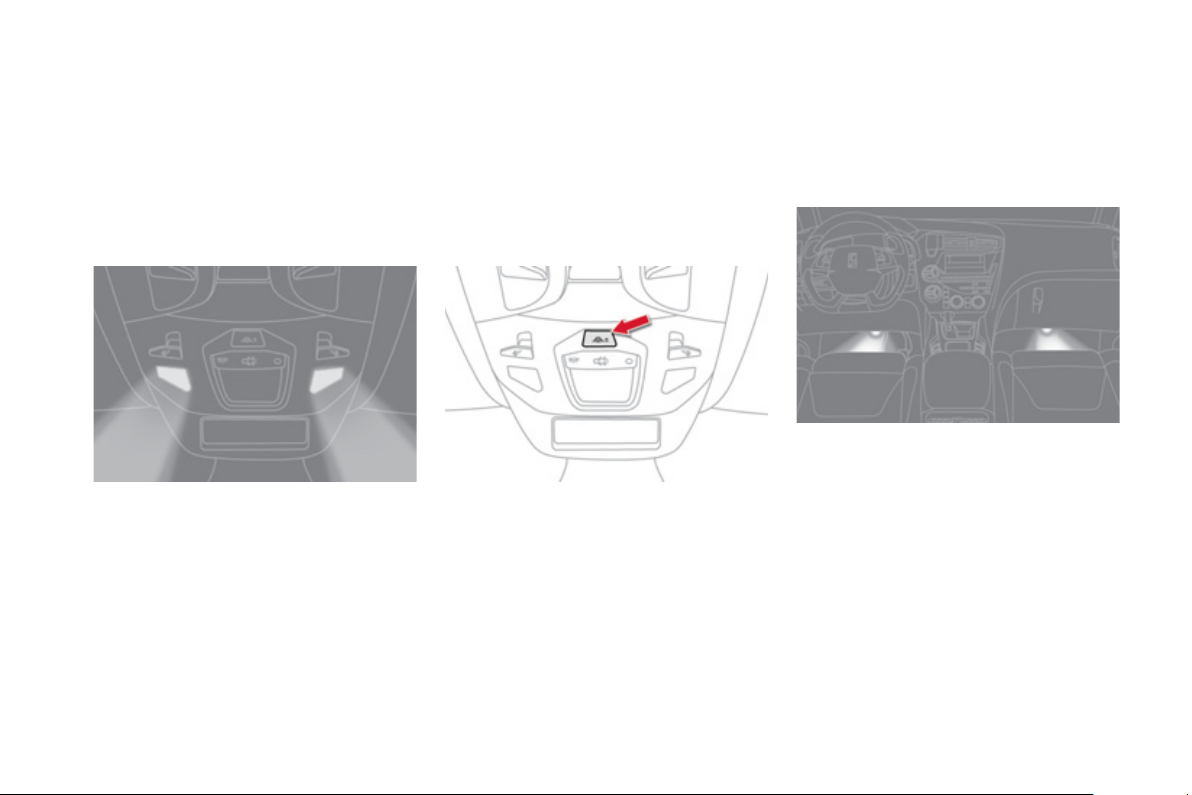
Interior mood lighting
Th
e
di
mme
d
passen
g
er compartment
ligh
t
i
n
g
i
mproves v
i
s
ibili
t
y
i
n t
h
e ve
hi
c
l
e w
h
en t
h
e
ligh
t
i
s
poor
.
A
t n
igh
t, t
h
e
i
nter
i
or moo
d
ligh
t
i
n
g
comes on
a
utomat
i
ca
lly
w
h
en t
h
e s
id
e
l
amps are sw
i
tc
h
e
d
on
(
f
or example, a source o
f
li
g
ht in the roo
f
co
n
so
l
e
ill
u
min
a
t
es
th
e
mi
dd
l
e
of
th
e
ce
ntr
e
c
onsole
)
.
The interior mood li
g
htin
g
switches of
f
a
utomaticall
y
when the sidelamps are switched
o
ff.
Lamps on: there are 7 levels o
f
bri
g
htness.
The level o
f
bri
g
htness increases pro
g
ressivel
y
with each press o
f
the button, returnin
g
to zero
af
t
e
r th
e
m
a
xim
u
m l
e
v
e
l i
s
r
eac
h
ed
.
A lon
g
press
g
ives maximum bri
g
htness.
This ad
j
ustment is used to set the mood li
g
htin
g
l
evel for the interior lamp, as well as for the
door openin
g
controls and the stora
g
e locations
(
dependin
g
on version
)
.
Footwell lighting
Activation
Its operation is identical to that of the courtes
y
lamps. The li
g
htin
g
comes on when one of the
doors is opened.
The so
f
t li
g
htin
g
provided b
y
the
f
ootwell lamps
improves visibilit
y
in the vehicle when the li
g
ht
is poor.
Switchin
g
on Ad
j
ustin
g
the bri
g
htness of
the courtes
y
lamp
1
6
9
Visibility

006
Child safety

General points relating to child seats
For maximum safet
y
, please observe the
f
ollowin
g
recommendations:
-
i
n accor
d
ance w
i
t
h
E
uropean re
g
u
l
at
i
ons,
a
ll children under the a
g
e of 12 or less
than one and a half metres tall must
travel in a
pp
roved child seats suited to
their wei
g
h
t
, on seats fitted with a seat
belt or IS
O
FIX mountin
g
s * ,
-
statisticall
y
, the safest seats in
y
ou
r
vehicle for carr
y
in
g
children are the
r
ear seats
,
-
a
child wei
g
hin
g
less than 9 k
g
must
travel in the "rearwards-facin
g
" position
b
oth in the front and in the rear
.
CITROËN recommend
s
t
ha
t
child
r
e
n
should
tr
a
v
el
i
n t
he
outer
r
rear seats
of
y
our vehicle:
-
"rearwards-facin
g
" up to the a
g
e o
f
2,
- "forwards-facin
g
" over the a
g
e of 2.
A
lthough one of CITRO
Ë
N's main criteria when designing your vehicle, the safety of your children
a
lso depends on
y
ou.
*
The rules
f
or carr
y
in
g
children are speci
f
ic to
e
ach countr
y
. Refer to the le
g
islation in force
in
y
our countr
y
.
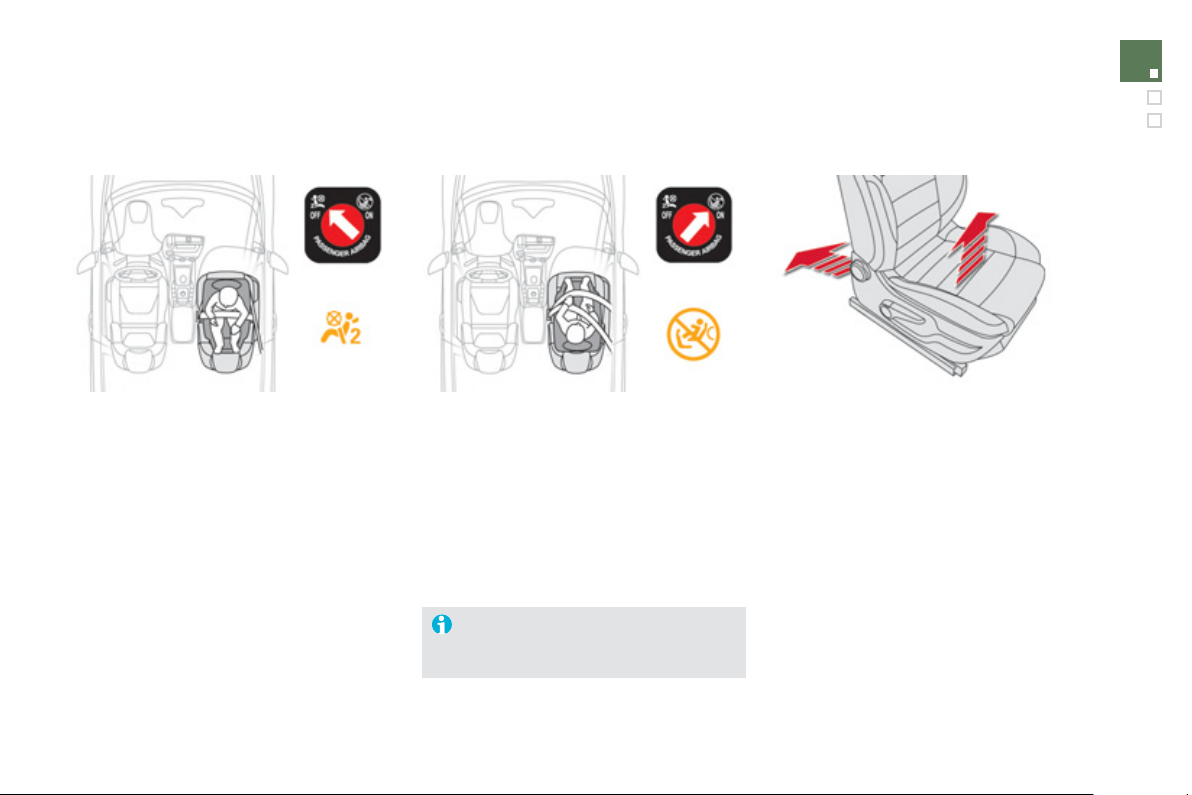
1
7
3
Child safety
Child seat in the front
"Rearwards-facin
g
"
When a "rearwards-
f
acin
g
" child seat is
i
n
s
t
alled
o
n t
he
f
ront passen
g
er sea
t
,
i
t
i
s essent
i
a
l
t
h
at t
h
e passen
g
er a
i
r
b
a
g
i
s
deactivated.
O
therwise,
t
he child would
r
isk bein
g
seriousl
y
in
j
ured or killed if the
a
irba
g
were to inflat
e
.
"Forwards-facin
g
"
When a "
f
orwards-
f
acin
g
" child seat is installed
o
n t
he
f
ront passen
g
er sea
t
, a
dj
ust t
h
e
vehicle's seat to the
f
ull
y
back and hi
g
hest
p
osition with the seat back upright and leave
the passen
g
er's airba
g
activated.
P
assen
g
er seat in the full
y
back and
hi
g
hest position
.
Ensure that the seat belt is correctl
y
t
e
n
s
i
o
n
ed
.
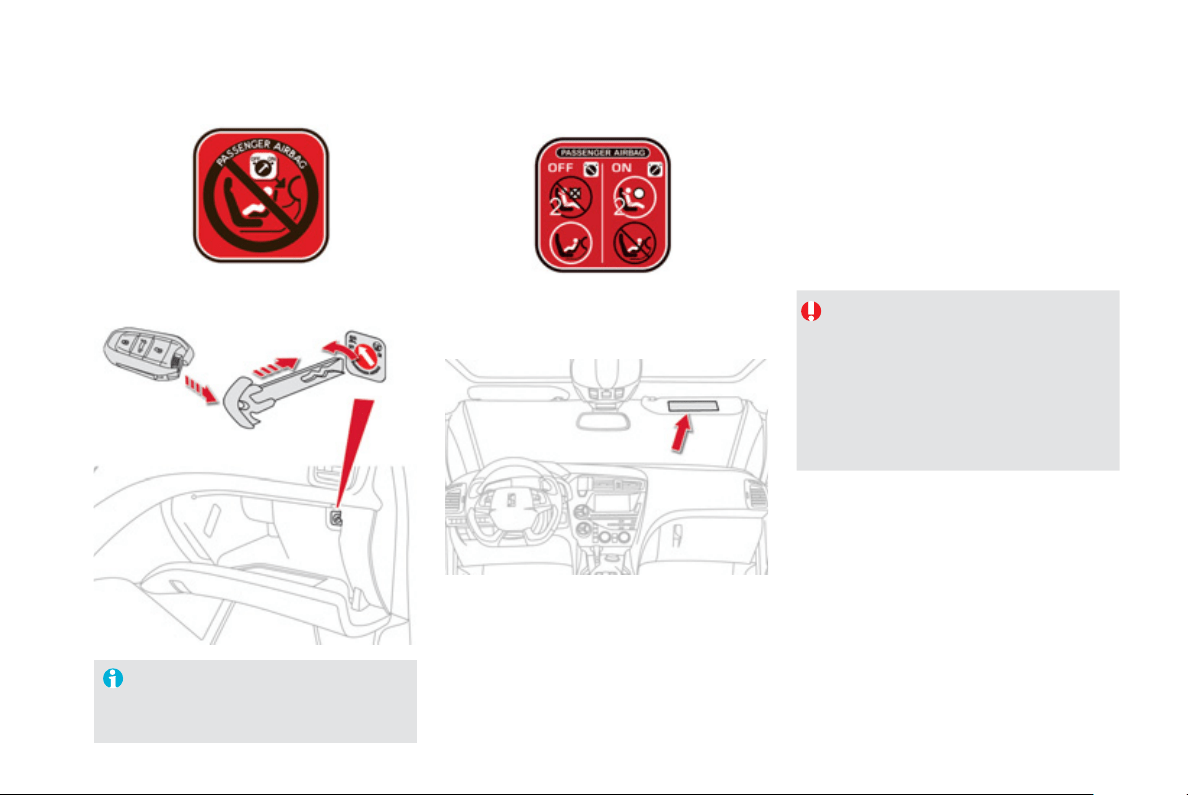
Passen
g
er airba
g
OFF
For more information on deactivatin
g
the airba
g
, refer to the "Safet
y
" section
then "Airba
g
s".
Re
f
er to the advice
g
iven on the label present
on both sides of the passen
g
er's sun visor.
To assure the sa
f
ety o
f
your child, you
m
ust deactivate the passen
g
er's
f
ront
a
irba
g
when
y
ou install a child seat in
the rearwards facin
g
position on the front
p
assen
g
er's seat.
O
therwise
,
there is a risk that the child
c
ould be seriousl
y
in
j
ured or killed i
f
the
ai
r
b
a
g
were
d
ep
l
o
y
e
d
.
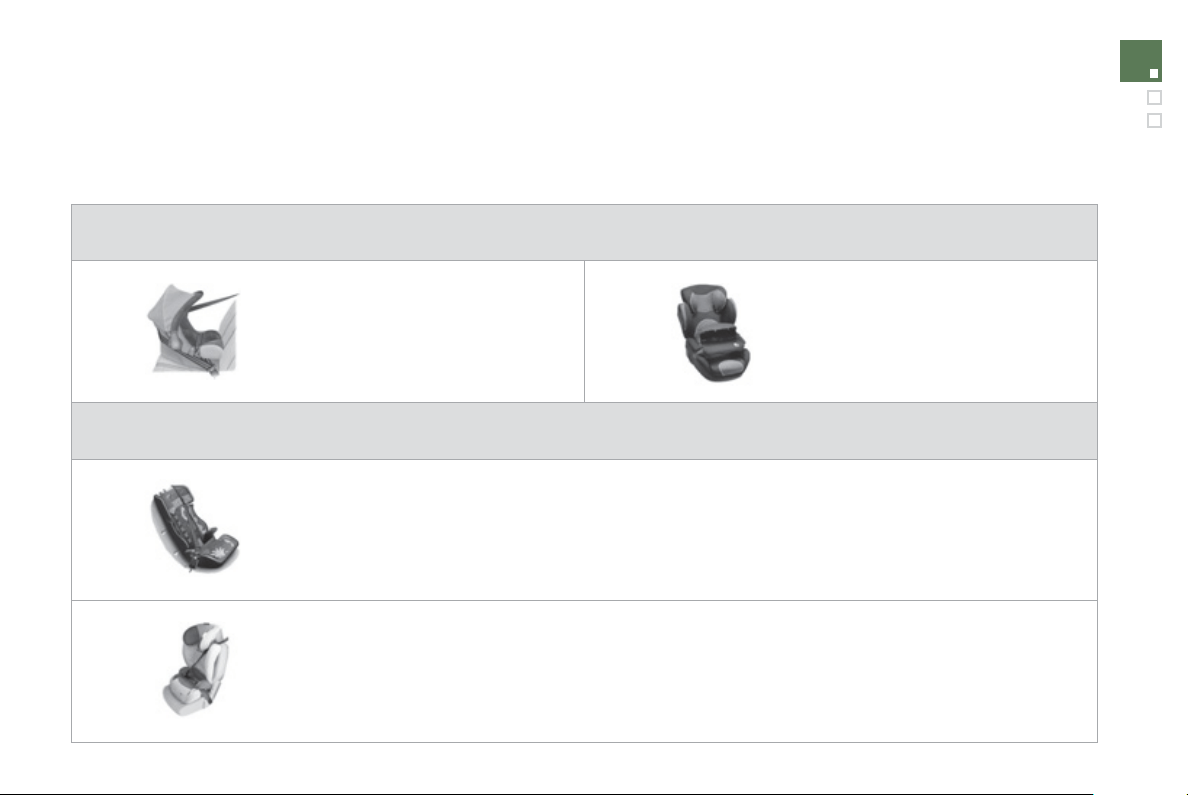
1
75
Child safety
Group 0+: from birth to 13 k
g
G
roups 1, 2 and 3: from 9 to 36 k
g
L1
"
RÖMER Bab
y
-Safe Plus"
Installed in the rearwards-facin
g
p
osition.
L2
"KIDDY
C
om
f
ort Pro"
The impact shield must be used
f
or
c
arr
yi
n
g
y
oun
g
c
hild
ren
(f
rom 9 to 18 kg
)
.
G
roups 2 and 3: from 15 to 36 k
g
L4
"
KLIPPAN
O
ptima"
From the a
g
e of 6
y
ears
(
approximatel
y
22 k
g)
, the booster is used on its own.
L5
"
R
Ö
MER KIDFIX"
C
an be
f
itted to the vehicle's I
SO
FIX mountin
g
s.
The child is restrained by the seat belt.
Child seats recommended by CITROËN
CITROËN offers a complete ran
g
e of recommended child seats which are secured usin
g
a three
p
oint seat bel
t
:
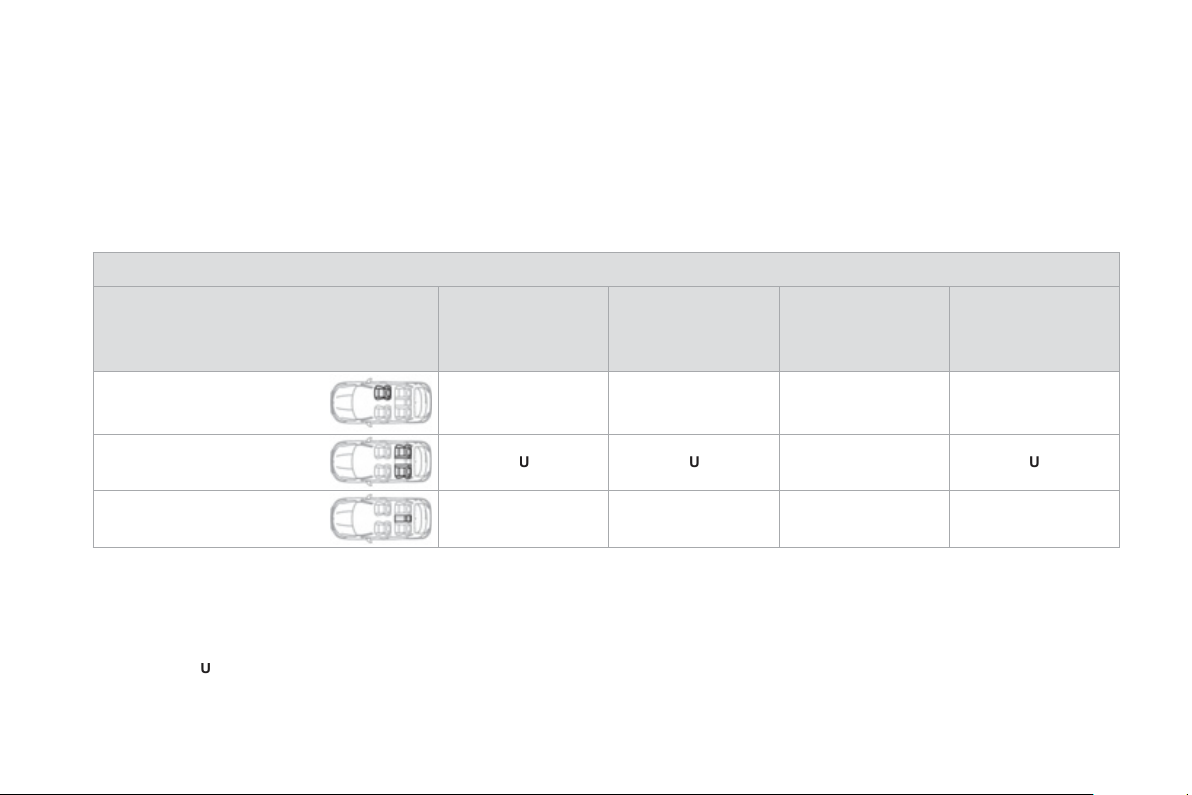
Installing child seats attached using the seat belt
In accordance with European re
g
ulations, this table indicates the options
f
or installin
g
child seats secured usin
g
a seat belt and universall
y
approved
(
a
)
in accordance with the wei
g
ht o
f
the child and the seat in the vehicle:
Wei
g
ht of the child and indicative a
ge
Sea
t
U
nder 13 k
g
(g
roups 0
(
b
)
and 0+
)
U
p to approx 1
y
ea
r
From 9 to 18 k
g
(g
roup 1
)
1 to 3
y
ears approx
From 15 to 25 k
g
(g
roup 2
)
3
to 6
y
ears approx
From 22 to 36 k
g
(g
roup 3
)
6 to 10
y
ears approx
Front passen
g
er seat
(
c
)
with
hei
g
ht ad
j
ustment
U
(
R
)
U
(
R
)
U
(
R
)
U
(
R
)
O
uter rear seats
U
U
U
U
C
entre rear seat
X
X
X
X
a:
universal child seat, child seat that can be installed in all vehicles usin
g
a seat belt.
b:
g
roup 0,
f
rom birth to 10 k
g
.
S
hells seats and bab
y
carriers cannot be installed in the
f
ront passen
g
er seat.
c:
consult the le
g
islation in
f
orce in
y
our countr
y
be
f
ore installin
g
y
our child on this seat.
U
: seat suitable
f
or the installation o
f
a child seat secured usin
g
a seat belt and universall
y
approved, "rearwards-
f
acin
g
" and
/
or "
f
orwards-
f
acin
g
".
U
(
R
):
same
as
U
, with the passenger seat adjusted to the highest position and as
f
ar back as possible.
X:
seat position not suitable
f
or installation o
f
a child seat
f
or the wei
g
ht class indicated.

177
Child safety
Th
e
in
co
rr
ec
t in
s
t
a
ll
a
ti
o
n
o
f
a
c
hil
d
sea
t in
a
vehicle compromises the child's protection in
th
e
e
v
e
nt
of
a
n
acc
i
de
nt.
E
n
su
r
e
t
ha
t t
he
r
e
is
n
o
sea
t
bel
t
o
r
sea
t
bel
t
b
uc
kl
e un
d
er t
h
e c
hild
seat, as t
hi
s cou
ld
des
t
ab
ili
se
it.
R
e
m
e
m
be
r t
o
fas
t
e
n th
e
sea
t
be
lt
s
o
r th
e
c
hild seat harnesses keepin
g
the slack
relative to the child's bod
y
to a minimum,
e
ven for short
j
ourne
y
s.
When installin
g
a child seat usin
g
the seat
b
e
l
t, ensure t
h
at t
h
e seat
b
e
l
t
i
s t
igh
tene
d
c
orrect
ly
on t
h
e c
hild
seat an
d
t
h
at
i
t secures
the child seat
f
irml
y
on the seat o
f
y
our
vehicle. I
f
y
our passen
g
er seat is ad
j
ustable,
move it
f
orwards i
f
necessar
y
.
A
t rear seatin
g
positions, alwa
y
s leave
s
ufficient space between the front seat and:
- a "rearwards facin
g
" child seat,
- th
e
c
hil
d
'
s
f
ee
t f
o
r
a
c
hil
d
sea
t fitt
ed
"
f
orwards
f
acin
g
".
Advice on child seats
I
nsta
lli
n
g
a
b
ooster seat
The chest part o
f
the seat belt must be
p
os
i
t
i
one
d
on t
h
e c
hild'
s s
h
ou
ld
er w
i
t
h
out
touc
hi
n
g
t
h
e nec
k
.
Ensure that the la
p
p
art o
f
the seat belt
p
asses correctl
y
over the child's thi
g
hs.
CITROËN recommends the use of a booste
r
seat which has a back, fitted with a seat belt
g
uide at shoulder level.
As a safet
y
precaution, do not leave:
-
a
child
o
r
child
r
e
n
alo
n
e
a
n
d
u
nsuperv
i
se
d
i
n a ve
hi
c
l
e,
-
a
child
o
r
a
n
a
n
i
m
al
i
n
a
v
ehicle
w
hich
is ex
p
osed to the sun, with the windows
c
losed,
- the ke
y
s within reach of children inside
th
e
v
e
hi
c
l
e
.
To prevent accidental openin
g
of the doors
a
nd rear windows
,
use the "Child lock".
T
a
k
e care not to open t
h
e rear w
i
n
d
ows
by
mo
r
e
t
ha
n
o
n
e
t
hi
r
d
.
To protect
y
oun
g
children
f
rom the ra
y
s o
f
the sun,
f
it side blinds on the rear windows.
To do this, move the front seat forwards
and, if necessar
y
, move its backrest into the
u
pr
igh
t pos
i
t
i
on.
For optimum installation o
f
the "
f
orwards-
f
acin
g
" child seat, ensure that the back o
f
the
c
hil
d
sea
t i
s
in
co
nt
ac
t with th
e
bac
k
of
th
e
v
e
hi
c
l
e
'
s
sea
t
a
n
d
r
e
m
o
v
e
th
e
h
ead
r
es
tr
a
int.
En
su
r
e
th
a
t th
e
h
ead
r
es
tr
a
int i
s
s
t
o
r
ed
o
r
attached securel
y
to prevent it from bein
g
thr
o
wn
a
r
ou
n
d
th
e
v
e
hi
c
l
e
in th
e
e
v
e
nt
of
sharp brakin
g
. Refit it if an adult uses the
seat
i
n
g
pos
i
t
i
on.
C
hildren under the a
g
e o
f
10 must not travel
in the "
f
orwards-
f
acin
g
" position on the
f
ront
passen
g
er seat, unless the rear seats are
alread
y
occupied b
y
other children, cannot
be
used
o
r
a
r
e
abse
nt.
Deactivate the passen
g
er airba
g
when a
"
rearwards-facin
g
" child seat is installed on
th
e
fr
o
nt
sea
t.
O
therwise, the child would risk bein
g
seriousl
y
in
j
ured or killed i
f
the airba
g
were
t
o
in
f
l
a
t
e
.

Your vehicle has been approved in accordance
with th
e
l
ates
t
I
SO
FIX
r
e
g
ulation
s
.
The seats, represented below, are fitted with
r
e
g
ulation ISOFIX mountin
g
s.
"ISOFIX" mountings
There are three rin
g
s for each seat.
- Two rin
g
s
A
, located between the vehicle
s
eat back and cushion, indicated b
y
a label.
This IS
O
FIX mountin
g
s
y
stem provides fast,
reliable and safe fittin
g
of the child seat in
y
our
v
e
hi
c
l
e
.
Th
e
ISOFIX child seats
a
r
e
fitt
ed
with tw
o
l
atc
h
es w
hi
c
h
are eas
ily
secure
d
on t
h
e two
r
i
n
g
s
A
.
So
m
e
a
l
so
h
a
v
e
a
n
u
pper strap w
hich
is
attached to ring
B
.
Th
e
in
co
rr
ec
t in
s
t
a
ll
a
ti
o
n
of
a
c
hil
d
sea
t
i
n a ve
hi
c
l
e comprom
i
ses t
h
e c
hild'
s
p
rotection in the event o
f
an accident.
For in
f
ormation re
g
ardin
g
the I
SO
FIX child
s
eats which can be installed in
y
our vehicle,
refer to the table showin
g
the locations for
installin
g
IS
O
FIX child seats.
- A rin
g
B
, behind the seat, referred to as the
T
OP TETHER for fixin
g
the upper strap.
T
o attac
h
t
hi
s strap, ra
i
se t
h
e ve
hi
c
l
e seat
'
s
h
ea
d
restra
i
nt t
h
en pass t
h
e
h
oo
k
b
etween
i
ts
rods. Then
f
ix the hook on rin
g
B
an
d
t
igh
ten
the u
pp
er stra
p
.

1
7
9
Child safety
ISOFIX child seat
This child seat can also be used on seats which are not fitted with ISOFIX mountin
g
s. In this case, it must be attached to the vehicle seat usin
g
t
h
e t
h
ree po
i
nt seat
b
e
l
t.
Follow the instructions for fittin
g
the child seat
g
iven in the seat manufacturer's installation
g
uide
.
Recommended b
y
CITROËN and approved for
y
our vehicle
RÖME
R
D
uo Plus I
S
OFI
X
(
size cate
g
or
y
B1
)
G
roup 1: from 9 to 18 k
g
Installed onl
y
in the forwards-facin
g
position.
Fi
tte
d
w
i
t
h
an upper strap to
b
e secure
d
on t
h
e upper r
i
n
g
B
,
referred to as the TOP TETHER.
Th
ree seat
b
o
dy
an
gl
es: s
i
tt
i
n
g
, rec
li
n
i
n
g
,
lyi
n
g
.
Ad
j
ust the
f
ront seat o
f
the vehicle so that the child's
f
eet do not touch the back o
f
the seat.
C
an be installed
f
orwards-
f
acin
g
b
y
attachin
g
it to the seat usin
g
a three-point seat belt.
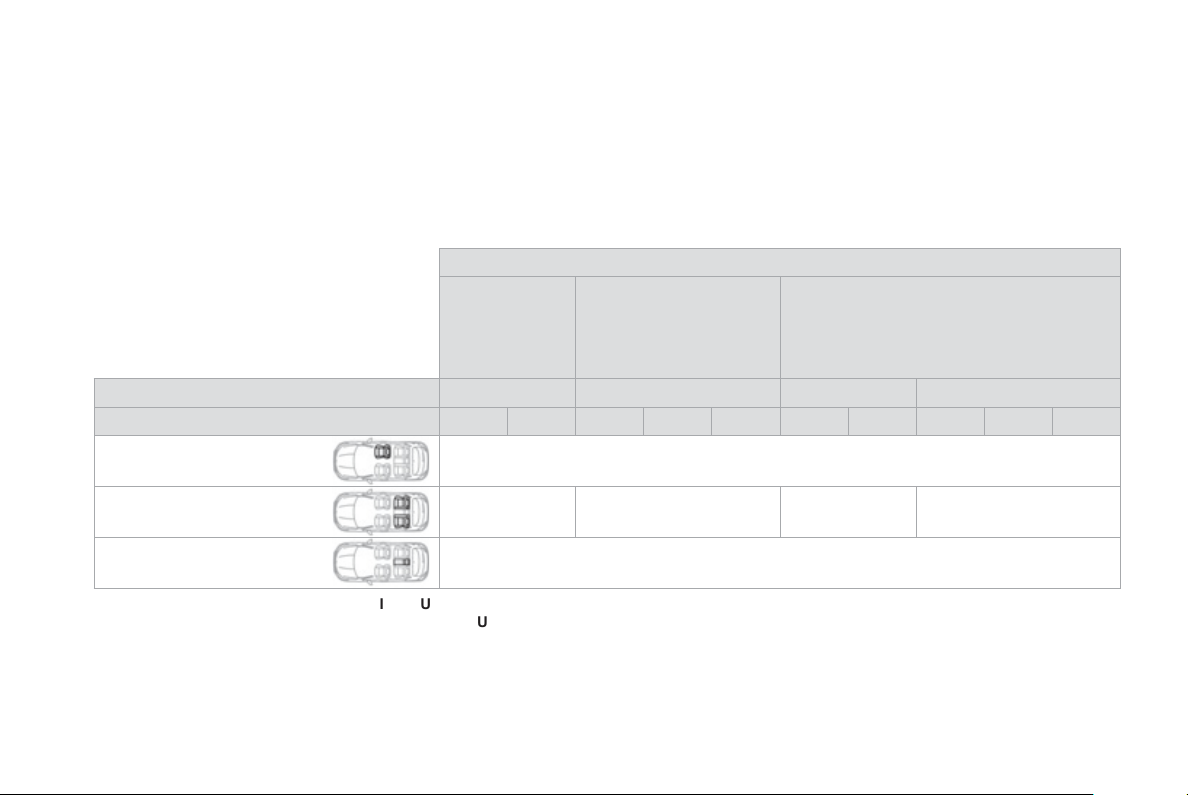
Locations for installing ISOFIX child seats
In accordance with European Regulations, this table indicates the options
f
or installing I
SO
FIX child seats on seats in the vehicle
f
itted with I
SO
FIX
m
ountin
g
s.
In the case of universal and semi-universal IS
O
FIX child seats, the IS
O
FIX size cate
g
or
y
, determined b
y
a letter from
A
t
o
G
, is indicated on the child
s
eat next to the IS
O
FIX lo
g
o.
W
ei
g
ht of the child
/
indicative a
g
e
L
ess than 10 k
g
(g
roup 0
)
U
p to approx.
6
months
Less than 10 k
g
(g
roup 0
)
L
ess than 13 k
g
(g
roup 0+
)
U
p to approx. 1 year
From 9 to 18 k
g
(g
roup 1
)
F
rom approx.
1
to
3
y
ears
Ty
pe of ISOFIX child sea
t
Sleeper co
t
*
"
rearwards-facin
g
"
"rearwards-facin
g
"
"forwards-facin
g
"
ISOFIX size cate
g
or
y
F
G
C
D
E
C
D
A
B
B1
Front passen
g
er seat
X
O
uter rear seats
IL-
SU
**
IL-
SU
IL-
SU
I
UF
IL-S
U
C
entre rear seat
X
I
UF
:
sea
t
su
it
ab
l
e
fo
r th
e
in
s
t
a
ll
a
ti
o
n
of
a
n
I
sof
ix
U
niversal seat, "F orwards-
f
acing" secured using the top belt.
I
L-
S
U
:
sea
t
su
it
ab
l
e
fo
r th
e
in
s
t
a
ll
a
ti
o
n
of
a
n I
sof
ix
S
e
mi-
U
niv
e
r
sa
l
sea
t
e
ith
e
r:
- "rearwards-
f
acing"
f
itted with a top belt or a stay,
- "
f
orwards-
f
acing"
f
itted with a stay,
- a sleeper cot
f
itted with an upper strap or a stay.
For advice on securing o
f
the top belt, re
f
er to the paragraph "Iso
f
ix mountings".
X:
seat not suitable
f
or the installation o
f
a child seat or shell
f
or the weight group indicated.
*
S
leeper cots cannot be
f
itted to the
f
ront passen
g
er's seat.
** The IS
O
FIX sleeper cot, fixed to the lower IS
O
FIX rin
g
s, occupies all of the rear seats.
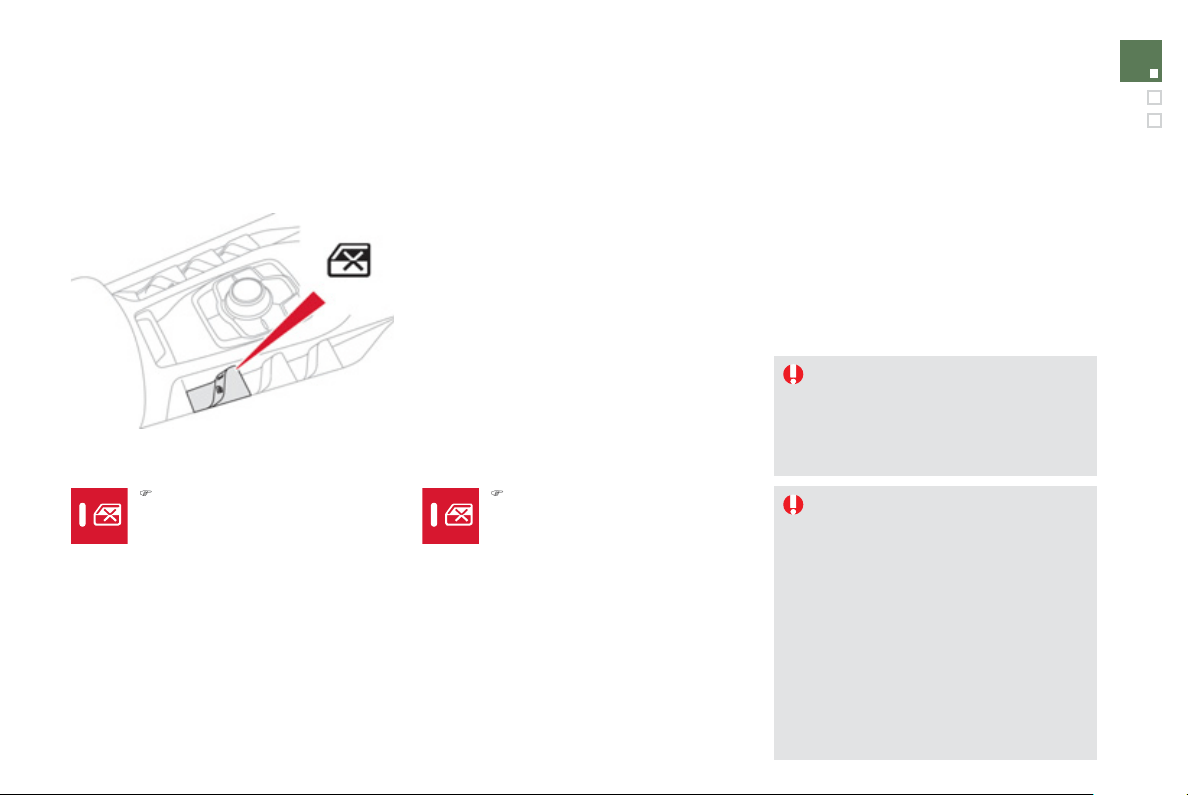
1
8
1
Child safety
Electric child lock
Remote control system to prevent opening o
f
the rear doors using their interior controls and use o
f
the rear electric windows.
Switchin
g
on Switchin
g
off
An
y
other status of the indicator lamp
in
d
i
ca
t
es
a
f
au
lt with th
e
e
l
ec
tri
c
c
hil
d
loc
k.
Have it checked b
y
a CITRO
Ë
N dealer
or a quali
f
ied workshop.
This s
y
stem is independent and in no
c
ircumstances does it take the place o
f
t
h
e centra
l
l
oc
ki
n
g
contro
l
.
C
h
ec
k th
e
s
t
a
t
us
of
th
e
c
hil
d
l
oc
k
eac
h
t
i
me
y
ou sw
i
tc
h
on t
h
e
ig
n
i
t
i
on.
Always remove the key
f
rom the ignition
when leavin
g
the vehicle, even
f
or a
s
h
o
rt tim
e
.
In the event of a serious impact, the
e
l
ec
tri
c
c
hil
d
l
oc
k i
s
s
wit
c
h
ed
o
f
f
automaticall
y
to permit the exit of the
rear
passengers
.
)
With the i
g
nition on, press this
bu
tt
o
n.
)
With the i
g
nition on, press this
b
utton a
g
a
i
n.
The indicator lam
p
in the button comes on,
accompanied b
y
a messa
g
e to confirm that the
c
hil
d
l
oc
k i
s
o
n.
This indicator lamp remains on until the child
l
oc
k i
s
s
wit
c
h
ed
o
ff.
It is still possible to open the doors
f
rom the
outs
id
e an
d
operate t
h
e rear e
l
ectr
i
c w
i
n
d
ows
f
rom the driver's control
p
anel.
The indicator lamp in the button
g
oes o
ff
,
a
ccompanied b
y
a messa
g
e to confirm that the
c
hil
d
l
oc
k i
s
o
ff.
This indicator lamp remains off while the child
loc
k i
s
s
wit
c
h
ed
o
ff.

007
Safety

Direction indicators
)
Lower the li
g
htin
g
control stalk
f
ull
y
when
m
ovin
g
to the le
f
t.
)
Raise the li
g
htin
g
control stalk
f
ull
y
when
m
oving to the right.
"Motorwa
y
" function
Move the stalk brie
f
ly upwards or downwards,
without
g
oin
g
be
y
ond the point o
f
resistance;
the correspondin
g
direction indicators will flash
3
times.
I
f
y
ou
f
or
g
et to cancel the direction
indicators
f
or more than twent
y
s
econds, the volume o
f
the audible
s
i
g
nal will increase i
f
the speed is above
40 mph
(
60 km/h
)
.
Hazard warning lamps
Press the button, the direction indicators
f
lash.
They can operate with the ignition o
ff
.
Automatic o
p
eration of
hazard warnin
g
lamps
When brakin
g
in an emer
g
enc
y
, dependin
g
on
the rate of deceleration
,
as well as when the
A
B
S
re
g
ulation is invoked or in the event o
f
an
i
mpact, t
h
e
h
azar
d
warn
i
n
g
l
amps come on
automat
i
ca
lly
.
They switch o
ff
automatically the
f
irst time you
acce
l
e
r
a
t
e
.
)
You can also switch them off b
y
pressin
g
th
e
bu
tt
o
n.
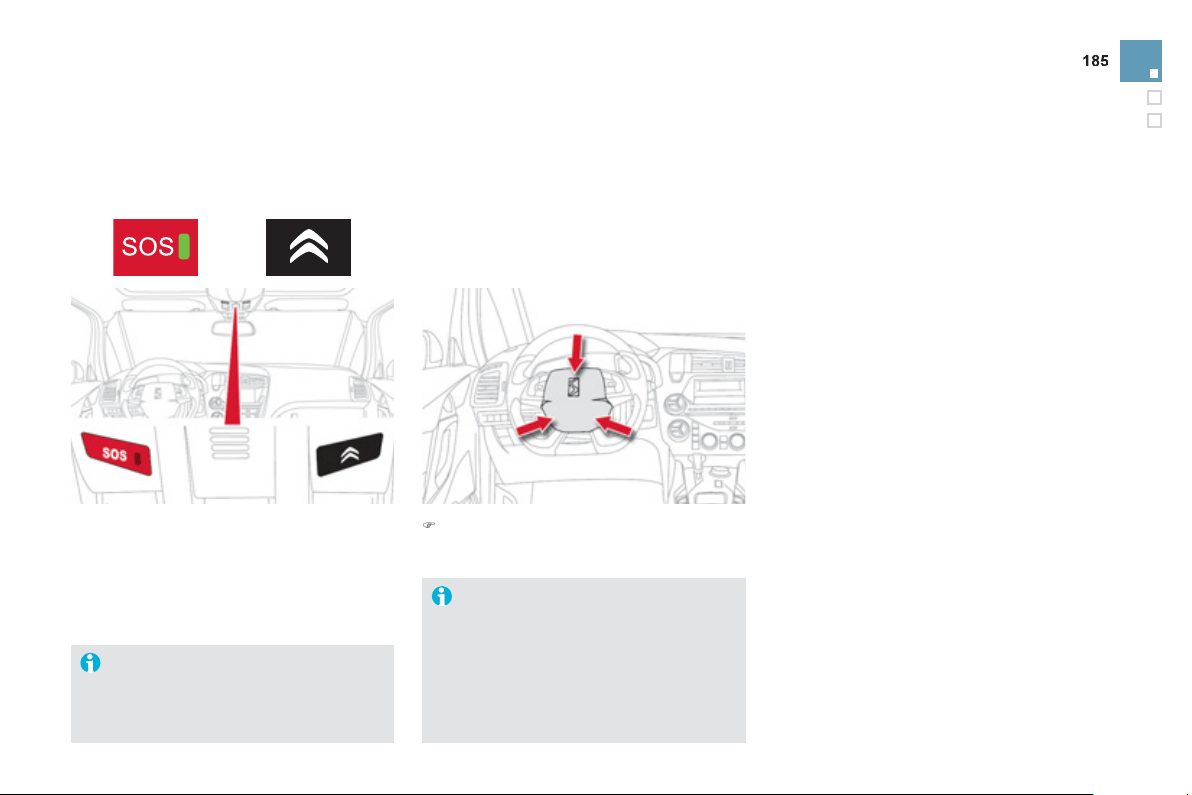
Safety
Horn Emergency or
assistance call
Thi
s s
y
stem a
ll
ows
y
ou to ma
k
e an emer
g
enc
y
or ass
i
stance ca
ll
to t
h
e emer
g
enc
y
serv
i
ces o
r
to the dedicated CITROËN service.
A
u
dibl
e warn
i
n
g
s
y
stem to a
l
ert ot
h
er roa
d
u
sers to an
i
mm
i
nent
d
an
g
er.
)
Press the central part of the multifunction
s
teer
i
n
g
w
h
ee
l
.
Use the horn moderately and only in the
f
ollowin
g
circumstances:
- immediate dan
g
er,
- overtakin
g
a c
y
clist or pedestrian,
- approachin
g
a location lackin
g
visibilit
y
.
F
o
r m
o
r
e
in
fo
rm
a
ti
o
n
o
n th
e
use
of
this function, refer to the "Audio and
t
e
l
e
m
a
ti
cs
"
sec
ti
o
n.
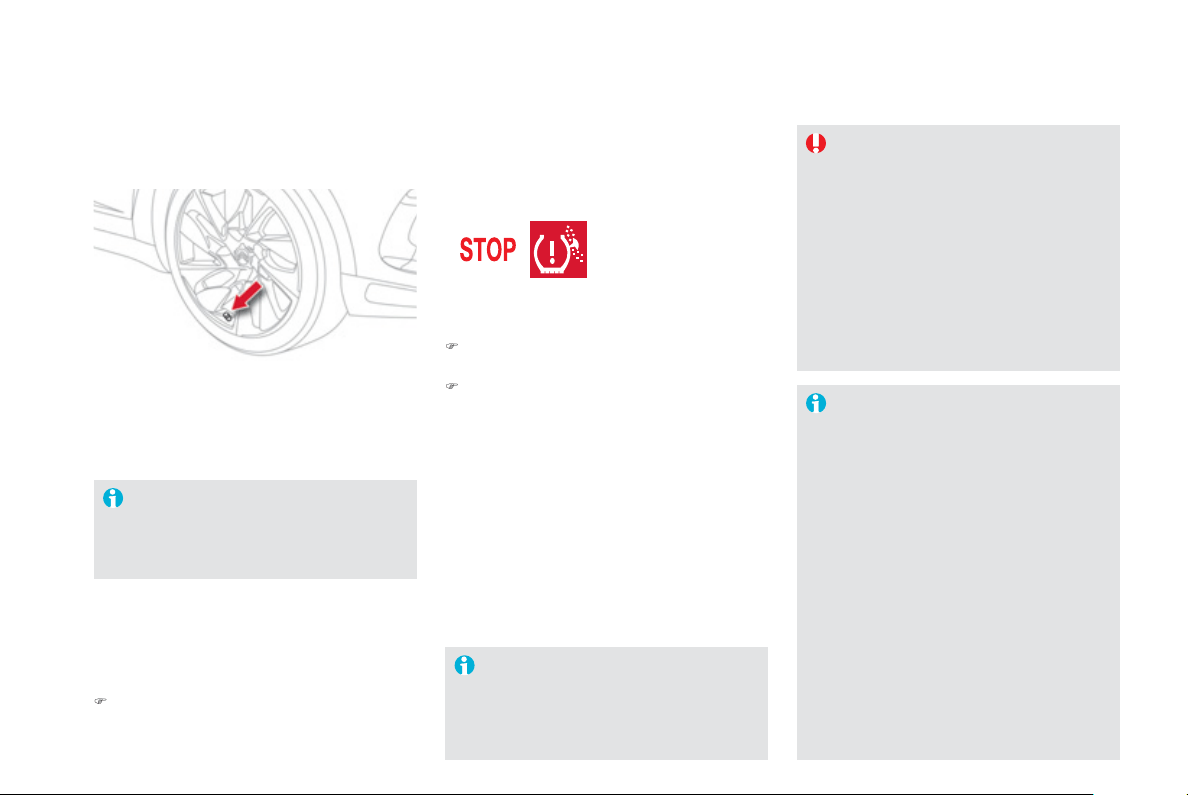
Tyre under-infl ation detection
Sy
stem which automaticall
y
checks the pressure o
f
the t
y
res while drivin
g
.
S
ensors
f
itted in each valve tri
gg
er a warnin
g
in
the event of malfunction
(
speed above 12 mph
(
20 km/h
))
.
The spare wheel is not fitted with a sensor.
All repairs and chan
g
in
g
of t
y
res on a
wheel fitted with this s
y
stem must be
c
arried out b
y
a CITROËN dealer or a
q
ualified workshop.
I
f
, when chan
g
in
g
a t
y
re,
y
ou install a
w
h
ee
l
w
hi
c
h
i
s not
d
etecte
d
by
y
our
vehicle
(
example:
f
ittin
g
o
f
snow t
y
res
)
,
you must have the system reinitialised
b
y
a CITROËN dealer or a qualified
workshop.
Thi
s messa
g
e
i
s a
l
so
di
sp
l
a
y
e
d
w
h
en
one o
f
the wheels is awa
y
f
rom the
vehicle
(
being repaired
)
or when one o
r
mo
r
e
wh
ee
l
s
with
ou
t
a
se
n
so
r
a
r
e
f
itt
ed
.
The t
y
re under-inflation detection
sy
stem
i
s an a
id
to
d
r
i
v
i
n
g
w
hi
c
h
d
oes
n
ot replace the need
f
or the driver to be
v
igil
ant or to
d
r
i
ve respons
ibly
.
Thi
s s
y
stem
d
oes not avo
id
t
h
e nee
d
to have the tyre pressures checked
re
g
ularl
y
(
re
f
er to "Identi
f
ication
markin
g
s"
)
to ensure that the optimum
d
y
namic performance of the vehicle
is maintained and prevent premature
wear of the t
y
res, particularl
y
in arduous
drivin
g
conditions
(
heav
y
load, hi
g
h
s
peed
)
.
Th
e t
y
re pressures must
b
e c
h
ec
k
e
d
c
old, at least once a month. Remembe
r
to check the
p
ressure o
f
the s
p
are
wh
ee
l.
The t
y
re under-inflation detection
sy
stem ma
y
experience temporar
y
interference due to electroma
g
netic
s
i
g
nals on a
f
requenc
y
close to that
use
d
by
t
h
e s
y
stem.
A
messa
g
e appears in the instrument panel
s
creen, accompan
i
e
d
by
an au
dibl
e s
ig
na
l
, to
identi
fy
the wheel concerned.
Under-infl ated t
y
re
Thi
s warn
i
n
g
l
amp an
d
t
he
STO
P
warn
i
n
g
l
amp
c
ome on, accompan
i
e
d
by
an au
dibl
e s
ig
na
l
an
d
a messa
g
e
i
n t
h
e
instrument panel screen identi
f
ying the wheel
co
n
ce
rn
ed
.
)
S
top immediatel
y
, avoidin
g
an
y
sudden
m
ovement of the steerin
g
wheel and the brakes.
)
Chan
g
e the dama
g
ed wheel
(
punctured
o
r ver
y
deflated t
y
re
)
, and have the t
y
re
pressure c
h
ec
k
e
d
as soon as poss
ibl
e.
P
uncture
A messa
g
e appears in the instrument panel
screen, accompan
i
e
d
by
an au
dibl
e s
ig
na
l
,
to identi
fy
the wheel or wheels which are not
detected or to indicate a
f
ault in the s
y
stem.
Contact a CITROËN dealer or a
q
ualified
workshop to replace the
f
ault
y
sensor
(
s
)
.
Sensor
(
s
)
not detected or fault
y
)
C
heck the t
y
re pressures as soon as possible.
Thi
s c
h
ec
k
must
b
e carr
i
e
d
out w
h
en t
h
e t
y
res
a
r
e
co
l
d
.

1
87
Safety
Electronic
S
tabilit
y
Pro
g
ramme incorporatin
g
the
f
ollowin
g
s
y
stems:
- the anti-lock brakin
g
s
y
stem
(
AB
S)
and the
e
lectronic brake force distribution
(
EBFD
)
,
- the emer
g
enc
y
brakin
g
assistance,
- the anti-slip re
g
ulation
(
ASR
)
or traction
c
ontrol
,
- the d
y
namic stabilit
y
control
(
D
SC)
.
Electronic stability programme (ESC)
Definitions
A
nti-lock brakin
g
s
y
stem
(
ABS
)
a
nd electronic brake force
distribution
(
EBFD
)
This s
y
stem improves the stabilit
y
and
manoeuvrabilit
y
of
y
our vehicle when brakin
g
a
nd provides improved control in corners, in
p
articular on poor or slipper
y
road surfaces.
The ABS prevents wheel lock in the event o
f
emer
g
enc
y
b
ra
ki
n
g
.
The electronic brake
f
orce distribution s
y
stem
mana
g
es t
h
e
b
ra
ki
n
g
pressure w
h
ee
l
by
w
h
ee
l
.
Emer
g
enc
y
brakin
g
assistance
In an emer
g
enc
y
, this s
y
stem enables
y
ou to
r
each the optimum brakin
g
pressure more
q
uickl
y
and therefore reduce the stoppin
g
d
i
s
t
a
n
ce
.
I
t
i
s tr
igg
ere
d
i
n re
l
at
i
on to t
h
e spee
d
at w
hi
c
h
the brake pedal is pressed. This is
f
elt b
y
a
r
eduction in the resistance o
f
the
p
edal and an
i
ncrease in the e
ff
ectiveness o
f
the braking.
Anti-slip re
g
ulation
(
ASR
)
The A
S
R s
y
stem
(
also known as Traction
C
ontrol
)
optimises traction in order to avoid
wheel slip b
y
actin
g
on the brakes o
f
the drivin
g
wheels and on the en
g
ine. It also improves
the directional stabilit
y
of the vehicle on
acce
l
e
r
a
ti
o
n.
D
y
namic stabilit
y
control
(
DSC
)
If there is a difference between the path
f
ollowed b
y
the vehicle and that required b
y
the driver, the DSC monitors each wheel and
automaticall
y
acts on the brake of one or more
w
h
ee
l
s an
d
on t
h
e en
gi
ne to return t
h
e ve
hi
c
l
e
to the required path, within the limits o
f
the laws
of
ph
y
sics.

I
ntelli
g
ent traction control
s
y
stem
(
"Snow motion"
)
Your vehicle has a s
y
stem to help drivin
g
on
sno
w:
i
ntelli
g
ent traction control
.
This s
y
stem detects situations of difficult
su
rf
ace
ad
h
es
i
o
n th
a
t
cou
l
d
m
a
k
e
it
d
iffi
cu
lt t
o
m
ove o
ff
or make pro
g
ress on deep
f
resh snow
or compacte
d
snow.
I
n t
h
ese s
i
tuat
i
ons, t
h
e
i
nte
llig
ent tract
i
on
c
ontrol limits the amount o
f
wheel sli
p
to
p
rovide the best traction and tra
j
ector
y
control
for
y
our vehicle.
In extremel
y
severe conditions
(
deep snow,
m
ud, ...
)
, when it proves impossible to move off,
it ma
y
be useful to temporaril
y
deactivate the
ES
P
/
A
S
R s
y
stems to allow the wheels to spin
f
reel
y
and so allow movement o
f
the vehicle.
O
p
eration
Anti-lock brakin
g
s
y
stem
(
ABS
)
and electronic brake force
distribution
(
EBFD
)
I
n emer
g
enc
y
b
ra
ki
n
g
, press
v
er
y
firml
y
without releasin
g
the
press
u
re.
When chan
g
in
g
wheels
(
t
y
res and rims
)
,
make sure that these are approved
f
o
r
y
our ve
hi
c
l
e.
Normal operation o
f
the AB
S
may make
itsel
f
f
elt b
y
sli
g
ht vibrations o
f
the brake
pedal.
When this warnin
g
lamp comes on,
accompanied b
y
an audible si
g
nal
and a messa
g
e, it indicates that
there is a fault with the ABS, which
cou
l
d
cause
l
oss
o
f
co
ntr
o
l
o
f th
e
v
e
hi
c
l
e
wh
e
n
b
rakin
g
.
When this warnin
g
lamp comes on,
c
oupled with the STO
P
warnin
g
lamp,
accompanied b
y
an audible si
g
nal
and a messa
g
e, it indicates that
th
e
r
e
i
s
a
fau
lt with th
e
e
l
ec
tr
o
ni
c
b
r
a
k
e
fo
r
ce
distribution
(
EBFD
)
, which could cause loss o
f
c
ontrol o
f
the vehicle when brakin
g
.
You must stop as soon as it is safe to do so
.
In both cases, contact a CITROËN dealer or a
q
ualified workshop.
The use of snow t
y
res is stron
g
l
y
recommended on surfaces offerin
g
low
l
e
v
e
l
s
o
f
ad
h
es
i
o
n.
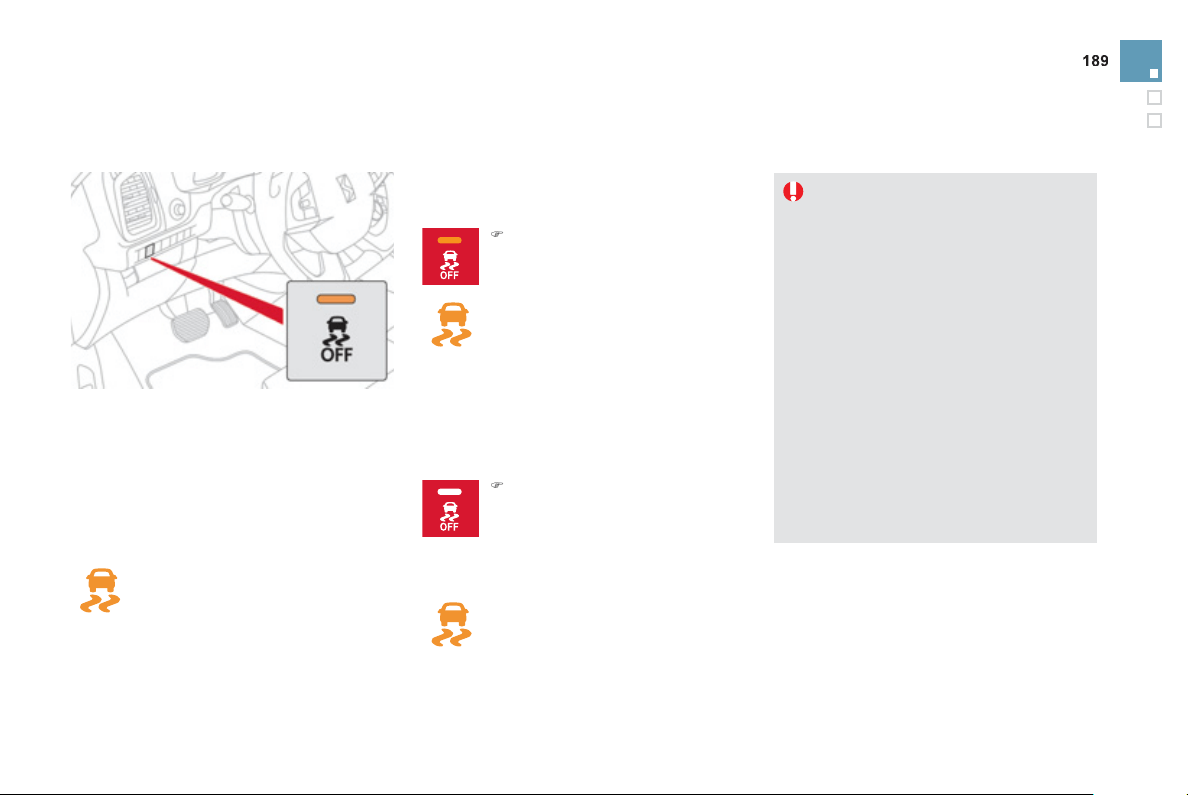
Safety
Dy
namic stabilit
y
control
(
DSC
)
A
ct
i
vat
i
on
Thi
s s
y
stem
i
s act
i
vate
d
automat
i
ca
lly
eac
h
t
i
m
e
t
he
v
ehicle
is
s
t
a
rt
ed
.
It comes into operation in the event o
f
a grip o
r
tra
j
ector
y
problem.
This is indicated by
f
lashing o
f
this
w
arnin
g
lamp in the instrument panel.
D
eact
i
vat
i
on
In exceptional conditions
(
startin
g
a vehicle
which is bo
gg
ed down, stuck in snow, on so
f
t
g
round...
)
, it ma
y
be advisable to deactivate
the D
SC
s
y
stem, so that the wheels can move
f
reely and regain grip.
The D
SC
s
y
stem o
ff
ers exceptional
s
a
f
ety in normal driving, but this should
not encoura
g
e the driver to take extra
risks or drive at hi
g
h speed.
The correct operation of the s
y
stem
depends on observation of the
m
a
n
u
f
ac
t
u
r
e
r'
s
r
eco
mm
e
n
da
ti
o
n
s
re
g
ardin
g
the wheels
(
t
y
res and rims
)
,
t
h
e
b
ra
ki
n
g
components, t
h
e e
l
ectron
i
c
c
om
p
onents and the CITRO
Ë
N
assembly and operation procedures.
A
f
ter an impact, have the s
y
stem
c
hecked b
y
a CITROËN dealer or a
q
ualified workshop.
Operatin
g
fault
I
f
this warnin
g
lamp comes on,
accompanied b
y
an audible si
g
nal
and a messa
g
e in the instrument
panel screen, this indicates a fault
with the s
y
stem.
Contact a CITRO
Ë
N dealer or a qualified
w
or
k
s
h
op to
h
ave t
h
e s
y
stem c
h
ec
k
e
d
.
Reactivation
The s
y
stem is reactivated automaticall
y
each
time the i
g
nition is switched back on or from
3
0 mph
(
50 km/h
)
.
)
P
r
ess
t
he
bu
tt
o
n.
This warnin
g
lamp and the indicator
lamp in the button come on: the
DSC s
y
stem no lon
g
er acts on the
o
peration of the en
g
ine.
)
P
ress t
h
e
b
utton a
g
a
i
n to
react
i
vate
i
t manua
lly
.
But it is recommended that the s
y
stem be
r
eactivated as soon as possible.
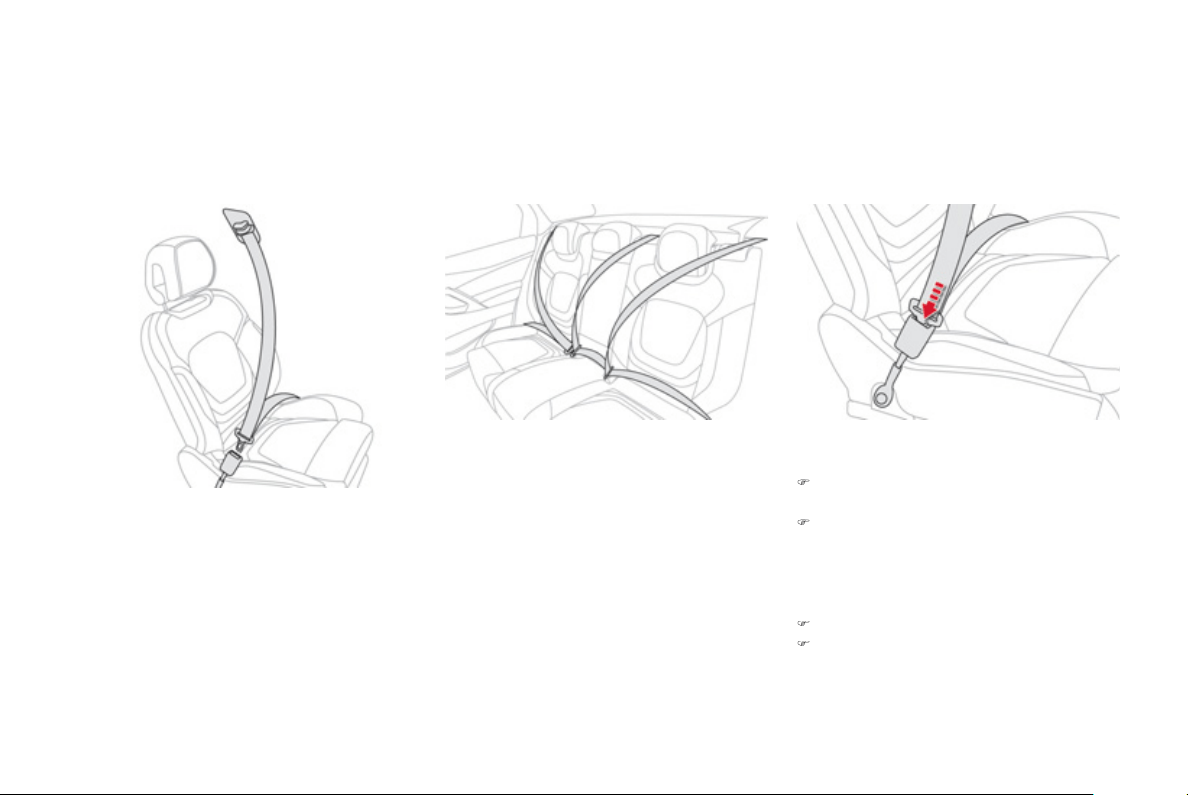
Seat belts
Front seat belts Rear seat belts
The rear seats are each
f
itted with a seat belt,
three-point anchora
g
es with inertia reel and
force limiter
(
except for the centre rear seat
)
.
Fastenin
g
)
Pull the strap, then insert the ton
g
ue in the
buc
kl
e
.
)
C
heck that the seat belt is fastened
c
orrect
ly
by
pu
lli
n
g
t
h
e strap.
Unfastenin
g
)
Pr
ess
th
e
r
ed
bu
tt
o
n
o
n th
e
buc
kl
e
.
)
G
uide the seat belt as it reels in.
Th
e
fr
o
nt
sea
t
be
lt
s
a
r
e
fitt
ed
with
a
p
retensionin
g
and force limitin
g
s
y
stem.
This s
y
stem improves sa
f
et
y
in the
f
ront
s
eats in the event o
f
a
f
ront or side impact.
Dependin
g
on the severit
y
o
f
the impact, the
p
retensioning system instantly tightens the seat
belts a
g
ainst the bod
y
o
f
the occupants.
The pretensionin
g
seat belts are active when
the i
g
nition is on.
The force limiter reduces the pressure of the
s
eat belt on the chest of the occupant, so
i
mprov
i
n
g
t
h
e
i
r protect
i
on.
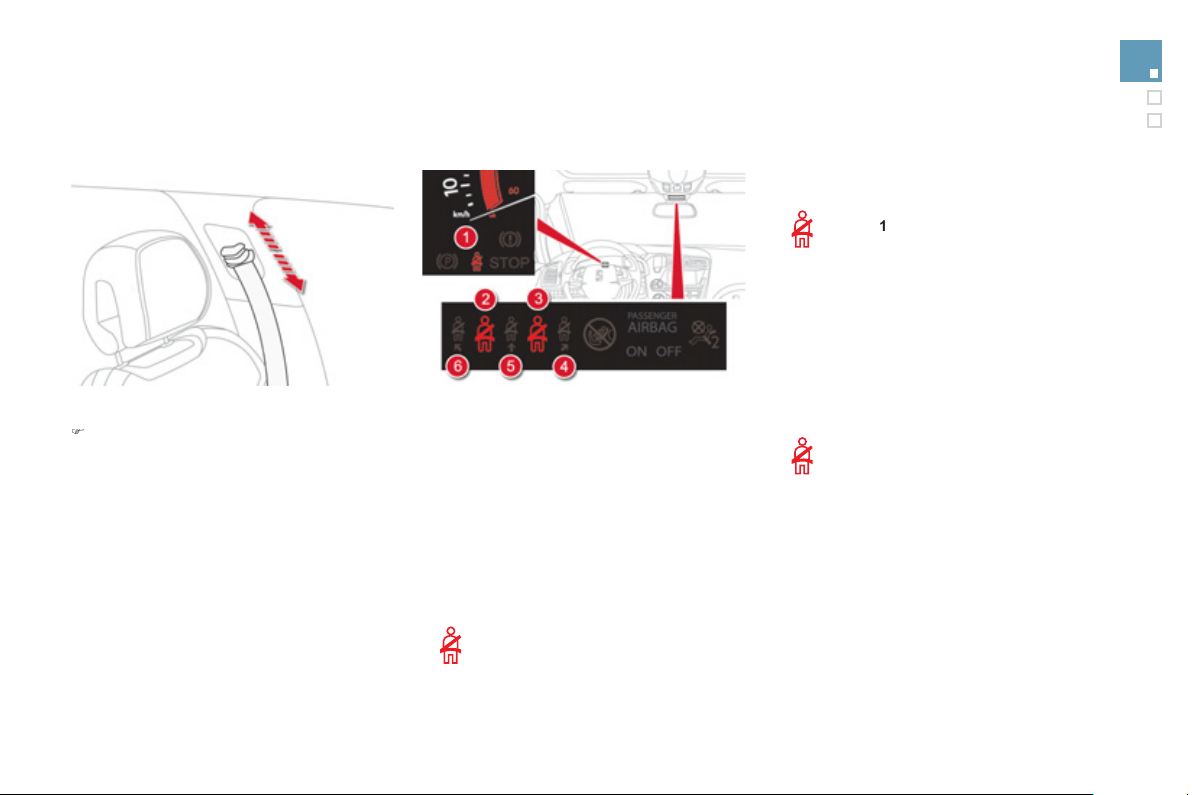
1
9
1
Safety
Front seat belt hei
g
ht ad
j
ustment
)
T
o a
dj
ust t
h
e anc
h
ora
g
e po
i
nt, squeeze t
h
e
c
ontrol and slide it until you
f
ind a notch.
From approximatel
y
12 mph
(
20 km/h
)
,
the warnin
g
lamp
(
s
)
flash for two
m
i
nutes accompan
i
e
d
by
an au
dibl
e
s
i
g
nal.
O
nce these two minutes have
elapsed, the warnin
g
lamp
(
s
)
remain on until the
driver or one or more passengers
f
asten their
sea
t
be
lt.
Seat belt not fastened /
u
nfastened warnin
g
lamps *
1
.
Front and
/
or rear seat belts not
f
astened
/
u
n
f
astened warnin
g
lamp in the instrument
panel.
2
.
Front left seat belt warnin
g
lamp.
3.
Front ri
g
ht seat belt warnin
g
lamp.
4.
R
ear r
igh
t seat
b
e
l
t warn
i
n
g
l
amp.
5
.
R
ear centre seat
b
e
l
t warn
i
n
g
l
amp.
6.
Rear le
f
t seat belt warnin
g
lamp.
Front seat belt warnin
g
lamps
O
n switchin
g
on the i
g
nition, warnin
g
l
am
p
1
co
m
es
o
n
i
n t
he
i
n
s
tr
u
m
e
nt
p
anel and the corresponding warning
l
am
p
2
and
/
or
3
come
(
s
)
on in red
in the passen
g
er's seat belt and front airba
g
warnin
g
lamp displa
y
if the correspondin
g
seat
be
lt i
s
n
o
t f
as
t
e
n
ed
o
r i
s
u
nf
as
t
e
n
ed
.
R
ear seat
b
e
l
t warn
i
n
g
l
amps
O
n switchin
g
on the i
g
nition, the
c
orrespondin
g
warnin
g
lamps
4
,
5
a
n
d
6
co
m
e
o
n in r
ed
f
o
r
abou
t
30
seconds if a seat belt is not
fas
t
e
n
ed
.
A
bove 12 mph
(
20 km
/
h
)
, the correspondin
g
warn
i
n
g
l
amps
4
,
5
or
6
comes on
i
n re
d
,
accompanied by an audible signal and a
messa
g
e in the instrument panel screen, when
a rear passen
g
er has unbuckled their seat belt.
* Accordin
g
to version and/or countr
y
of sale.

The driver must ensure that passen
g
ers use
t
h
e seat
b
e
l
ts correct
ly
an
d
t
h
at t
h
e
y
are a
ll
restrained securel
y
be
f
ore settin
g
o
ff
.
Wh
erever
y
ou are seate
d
i
n t
h
e ve
hi
c
l
e,
always
f
asten your seat belt, even
f
or short
j
ourne
y
s.
Do not interchan
g
e the seat belt buckles as
the
y
will not fulfil their role full
y
.
Th
e
sea
t
be
lt
s
a
r
e
fitt
ed
with
a
n in
e
rti
a
r
ee
l
p
ermittin
g
automatic ad
j
ustment of the len
g
th
of
the strap to
y
our size. The seat belt is
s
towe
d
automat
i
ca
lly
w
h
en not
i
n use.
Be
f
ore and a
f
ter use, ensure that the seat
belt is reeled in correctly.
The lower part o
f
the strap must be
p
ositioned as low as possible on the pelvis.
The upper part must be positioned in the
ho
ll
o
w
o
f th
e
s
h
ou
l
de
r.
Th
e
in
e
rti
a
r
ee
l
s
a
r
e
fitt
ed
with
a
n
au
t
o
m
a
ti
c
l
oc
ki
n
g
d
ev
i
ce w
hi
c
h
comes
i
nto operat
i
on
i
n
the event o
f
a collision, emer
g
enc
y
brakin
g
o
r i
f
th
e
v
e
hi
c
l
e
r
o
ll
s
o
v
e
r. Y
ou
ca
n r
e
l
ease
the device by pulling
f
irmly on the strap and
releasin
g
it so that it reels in sli
g
htl
y
.
Recommendations for children
Use a suitable child seat i
f
the passen
g
er is
l
ess than 12 years old or shorter than one
a
n
d
a
h
a
l
f
m
e
tr
es
.
N
e
v
e
r
use
th
e
sa
m
e
sea
t
be
lt t
o
secu
r
e
m
o
r
e
than one person.
Never allow a child to travel on
y
our lap.
In order to be effective
,
a seat belt must:
-
b
e t
igh
tene
d
as c
l
ose to t
h
e
b
o
dy
as
poss
ibl
e,
- be pulled in
f
ront o
f
y
ou with a smooth
movement, checking that it does not
twist,
- be used to restrain onl
y
one person,
- not bear an
y
trace of cuts or fra
y
in
g
,
- n
o
t
be
co
nv
e
rt
ed
o
r m
od
ifi
ed
t
o
a
v
o
i
d
affectin
g
its performance.
In accordance with current sa
f
et
y
re
g
ulations,
f
or all repairs on
y
our vehicle,
g
o to a quali
f
ied workshop with the skills
and e
q
ui
p
ment needed, which a CITROËN
dealer is able to provide.
Have
y
our seat belts checked re
g
ularl
y
b
y
a CITROËN dealer or a qualified workshop,
particularl
y
if the straps show si
g
ns o
f
dama
g
e.
C
lean the seat belt straps with soap
y
water or a text
il
e c
l
ean
i
n
g
pro
d
uct, so
ld
by
C
ITR
OË
N
dea
l
e
r
s
.
A
f
ter
f
olding or moving a seat or rear bench
s
eat, ensure that the seat belt is positioned
and reeled in correctl
y
.
In the event of an im
p
act
D
epen
di
n
g
on t
h
e nature an
d
seriousness of the impac
t
, t
h
e
p
retensioning device may be deployed
be
f
ore and independentl
y
o
f
the airba
g
s.
D
eplo
y
ment of the pretensioners is
a
ccompanied b
y
a sli
g
ht dischar
g
e o
f
h
armless smoke and a noise, due to the
a
ctivation of the p
y
rotechnic cartrid
g
e
i
ncorporate
d
i
n t
h
e s
y
stem.
I
n a
ll
cases, t
h
e a
i
r
b
a
g
warn
i
n
g
l
amp comes
on
.
Following an impact, have the seat belts
s
y
stem checked, and i
f
necessar
y
replaced,
b
y
a CITROËN dealer or a qualified
w
orkshop.
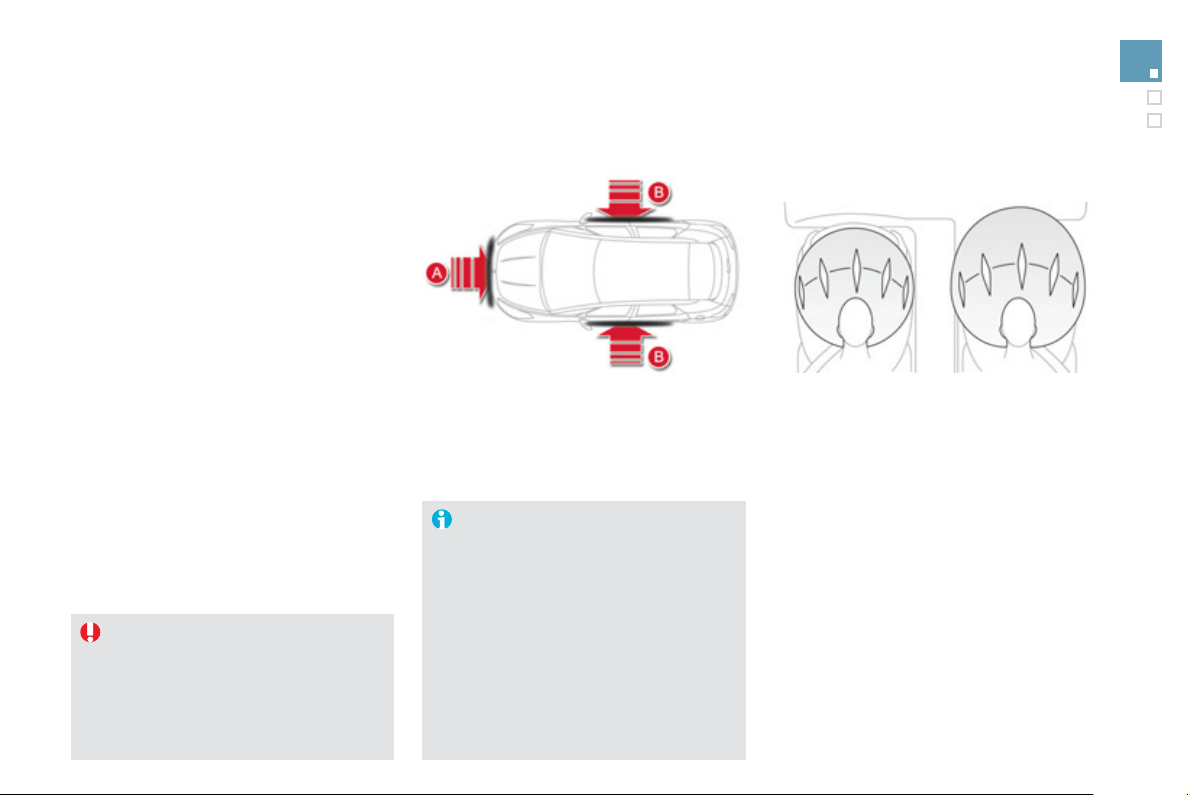
1
9
3
Safety
Airbags
S
ystem designed to maximise the sa
f
ety o
f
the
occupants
(
with the exception o
f
the rear centre
p
assen
g
er
)
in the event of violent collisions.
The airba
g
s supplement the action of the force-
limitin
g
seat belts
(
with the exception of the
c
entre rear passen
g
er
)
.
I
f
a collision occurs, the electronic detectors
record and anal
y
se the
f
ront and side impacts
s
usta
i
ne
d
i
n t
h
e
i
m
p
act
d
etect
i
on zones:
- in the case o
f
a serious impact, the airbags
a
re deplo
y
ed instantl
y
and contribute
towards better protection of the occupants
of the vehicle
(
with the exception of the rear
c
entre passen
g
er
)
; immediatel
y
after the
impact, the airba
g
s deflate rapidl
y
so that
the
y
do not hinder visibilit
y
or the exit o
f
the
occupants,
- in the case o
f
a minor or rear im
p
act
or in certain roll-over conditions, the
a
irba
g
s will not be deplo
y
ed; the seat belt
a
lone contributes towards ensurin
g
y
ou
r
p
rotection in these situations.
T
he airba
g
s do not operate when the
i
g
nition is switched off
.
This equipment will onl
y
deplo
y
once.
I
f a second impact occurs
(
durin
g
the
s
ame or a subsequent accident
)
, the
a
i
r
b
a
g
w
ill
not
b
e
d
ep
l
o
y
e
d
a
g
a
i
n.
Deplo
y
ment of the airba
g(
s
)
is
a
ccompan
i
e
d
by
a s
ligh
t em
i
ss
i
on
o
f
smoke and a noise, due to the
a
ctivation o
f
the p
y
rotechnic cartrid
g
e
incorporated in the system.
This smoke is not harm
f
ul, but sensitive
individuals ma
y
experience sli
g
ht
irrit
a
ti
o
n.
The noise of the detonation ma
y
result
in a sli
g
ht loss of hearin
g
for a short
t
i
m
e
.
I
m
p
act
d
etect
i
on zones
A.
Front impact zone.
B.
S
ide impact zone.
Front airba
g
s
Deplo
y
ment
The airba
g
s are deplo
y
ed simultaneousl
y
, unless
the passen
g
er's front airba
g
is deactivated, in the
e
vent of a serious front impact to all or part of the
f
ront impact zone
A
, in the lon
g
itudinal centreline o
f
the vehicle on a horizontal plane and directed
f
rom
th
e
f
r
o
nt t
o
th
e
r
ea
r
of
th
e
v
e
hi
c
l
e
.
The
f
ront airbag in
f
lates between the thorax and
head o
f
the
f
ront occupant o
f
the vehicle and the
s
teerin
g
wheel, driver's side, and the dashboard,
passen
g
er's side to cushion their forward
m
o
v
e
m
e
n
t
.
S
y
stem which protects the driver and front
passen
g
er in the event of a serious front impact
in order to limit the risk of in
j
ur
y
to the head and
t
ho
r
a
x.
The driver's airba
g
is
f
itted in the centre o
f
the
s
teerin
g
wheel; the
f
ront passen
g
er's airba
g
is
f
itted in the dashboard above the glove box.
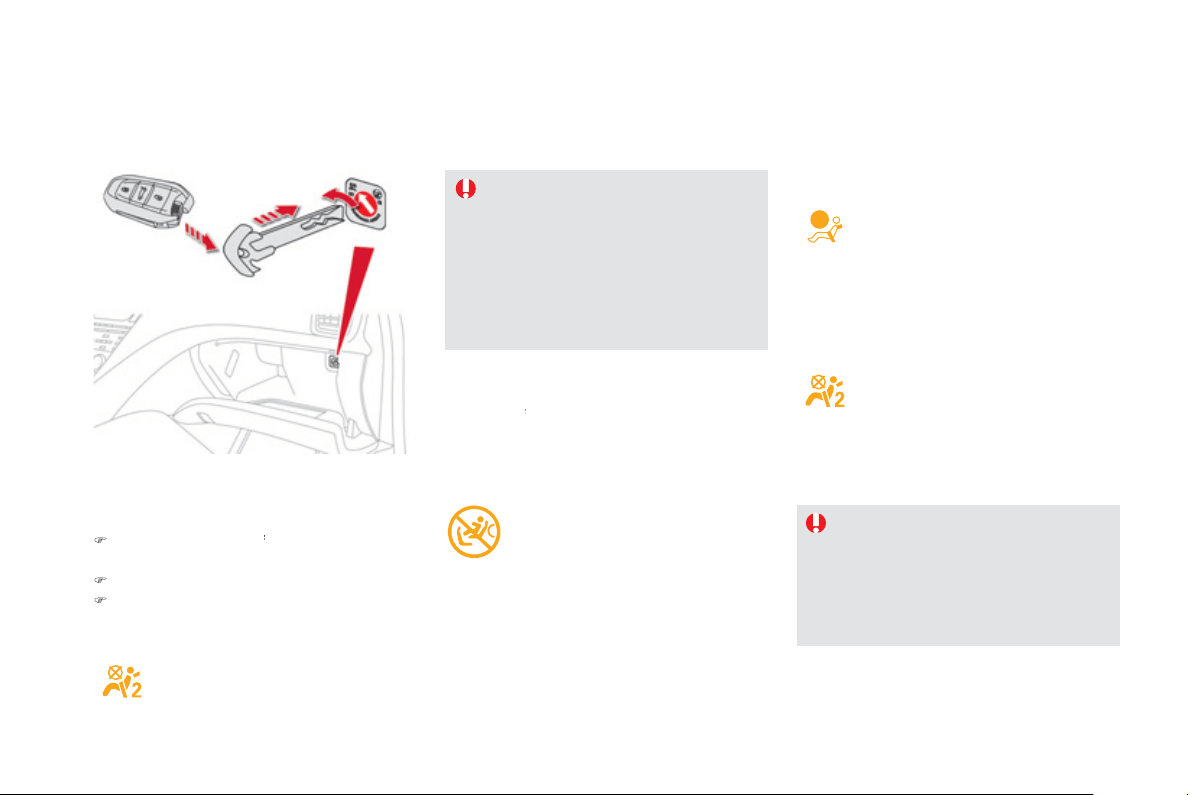
D
eact
i
vat
i
on
O
nl
y
the passen
g
er's
f
ront airba
g
can be
deac
t
i
v
a
t
ed
:
)
with the ignition off
, insert the key in the
f
p
assenger airbag deactivation switch,
)
t
u
rn it t
o
th
e
"
OFF" position,
)
then, remove the ke
y
keepin
g
the switch in
the new position.
Accordin
g
to version, this warnin
g
lamp
c
omes on either in the instrument panel
or in the seat belt and passen
g
er's front
a
i
r
b
a
g
warn
i
n
g
l
amp
di
sp
l
a
y
w
h
en t
h
e
ig
n
i
t
i
on
i
s on an
d
unt
il
t
h
e a
i
r
b
a
g
i
s react
i
vate
d
.
To assure the safet
y
of
y
our child,
the passen
g
er's front airba
g
must be
deactivated when
y
ou install a "rear
f
acin
g
" child seat on the
f
ront passen
g
e
r
sea
t.
O
therwise, the child would risk bein
g
seriously injured or killed i
f
the airbag
w
ere deplo
y
ed.
I
f
even one o
f
the two airbag warning
lamps comes on continuousl
y
, do
n
o
t in
s
t
a
ll
a
c
hil
d
sea
t
o
n th
e
fr
o
nt
passen
g
er seat.
Have it checked b
y
a CITROËN dealer
o
r quali
f
ied workshop.
Reactivation
When
y
ou remove the child seat,
w
ith the
ignition off
,
turn the switch to the
f
"
ON"
pos
i
t
i
on to react
i
vate t
h
e a
i
r
b
a
g
an
d
so assure
the sa
f
et
y
o
f
y
our
f
ront passen
g
er in the event
o
f
an im
p
act.
Wi
t
h
t
h
e
ig
n
i
t
i
on on, t
hi
s warn
i
n
g
l
amp comes on
i
n t
h
e seat
b
e
l
t an
d
p
assen
g
er's
f
ront airba
g
warnin
g
lamp display
f
or approximately one
m
inute, i
f
the passen
g
er's
f
ront
airba
g
is activated.
Operatin
g
fault
If this warnin
g
lamp comes on in the
i
nstrument pane
l
, accompan
i
e
d
by
an
au
dibl
e warn
i
n
g
an
d
a messa
g
e
i
n t
h
e
i
nstrument
p
ane
l
screen, contact a
C
ITROËN dealer or a
q
ualified worksho
p
to have
the s
y
stem checked. The airba
g
s ma
y
no lon
g
er
be deplo
y
ed in the event of a serious impact.
If this warnin
g
lamp flashes, contact
a CITRO
Ë
N dealer or a qualified
w
orkshop. The passen
g
er's
f
ront
a
i
r
b
a
g
ma
y
no
l
on
g
er
b
e
d
ep
l
o
y
e
d
i
n
the event o
f
a serious im
p
act.
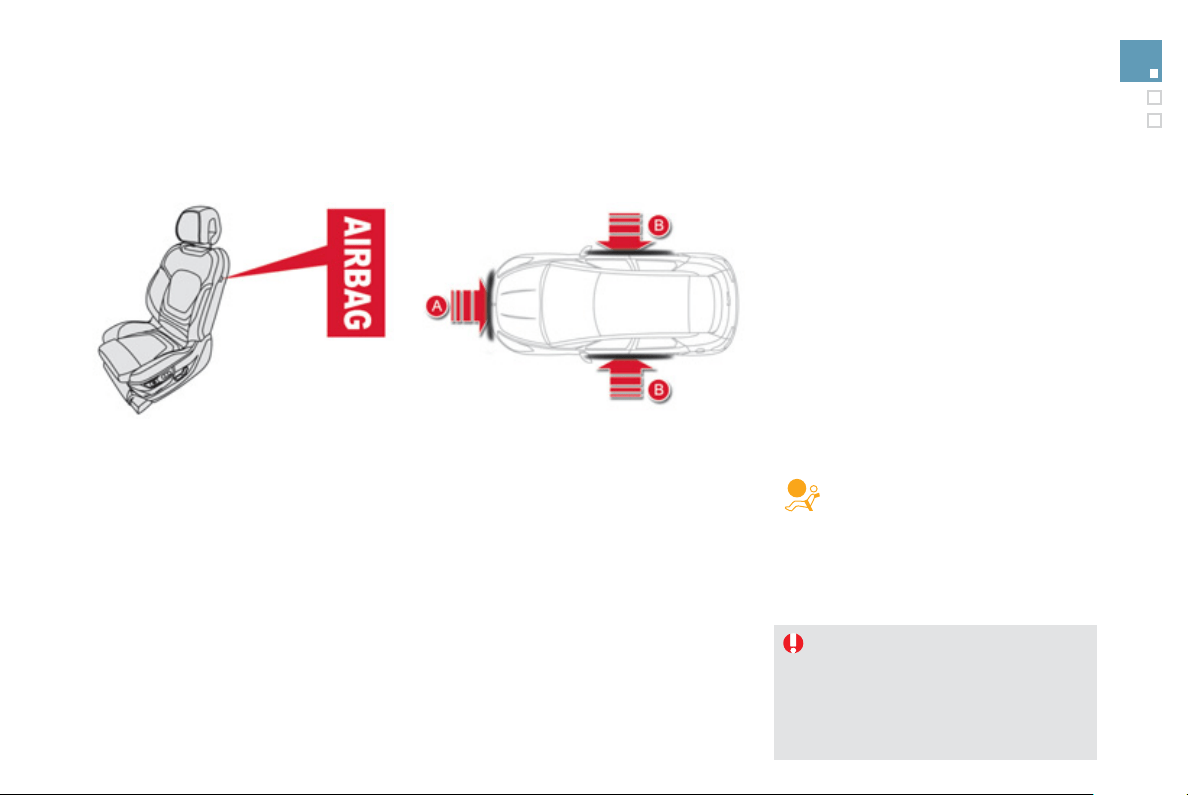
1
95
Safety
L
ateral airba
g
s
Deplo
y
ment
The lateral airba
g
s are deplo
y
ed unilaterall
y
in the event
of a serious side impact applied to all or part of the side
i
mpact zone
B
, perpen
di
cu
l
ar to t
h
e
l
on
gi
tu
di
na
l
centre
li
ne
o
f
the vehicle on a horizontal plane and directed
f
rom the
ou
t
s
i
de
t
o
w
a
r
ds
th
e
in
s
i
de
of
th
e
v
e
hi
c
l
e
.
The lateral airbag in
f
lates between the hip and shoulder
o
f
the
f
ront occupant o
f
the vehicle and the correspondin
g
door trim panel.
Sy
stem which protects the driver and
f
ront
p
assen
g
er in the event o
f
a serious side impact
in order to limit the risk o
f
injury to the chest,
between the hip and the shoulder.
Each lateral airba
g
is fitted in the seat backrest
frame, door side.
Im
p
act detection zones
A.
Front im
p
act zone.
B
.
Side impact zone.
Curtain airba
g
s
S
y
stem which protects the driver and
p
assen
g
ers
(
with the exception of the rear
c
entre passen
g
er
)
in the event of a serious side
i
mpact in order to limit the risk of in
j
ur
y
to the
s
i
de
of
th
e
h
ead
.
E
ac
h
curta
i
n a
i
r
b
a
g
i
s
b
u
il
t
i
nto t
h
e p
ill
ars an
d
t
h
e upper passen
g
er compartment area.
In the event of a minor impact or bump
o
n th
e
s
i
de
o
f th
e
v
e
hi
c
l
e
o
r if th
e
vehicle rolls over, the airba
g
ma
y
not be
deplo
y
ed.
In the event o
f
a rear or
f
ront collision,
t
h
e curta
i
n a
i
r
b
a
g
i
s not
d
ep
l
o
y
e
d
.
Deplo
y
ment
The curtain airba
g
is deplo
y
ed at the same
time as the correspondin
g
lateral airba
g
in the
e
vent of a serious side impact applied to all o
r
part of the side impact zone
B
, perpendicular
to the lon
g
itudinal centreline o
f
the vehicle on a
horizontal plane and directed
f
rom the outside
t
o
w
a
r
ds
th
e
in
s
i
de
of
th
e
v
e
hi
c
l
e
.
The curtain airbag in
f
lates between the
f
ront o
r
rear occupant o
f
the vehicle and the windows.
If this warnin
g
lamp comes on in the
instrument panel, accompanied b
y
an
a
udible si
g
nal and a messa
g
e in the
i
nstrument pane
l
screen, contact a
C
ITRO
Ë
N dealer or a qualified workshop to have
t
h
e s
y
stem c
h
ec
k
e
d
.
Th
e a
i
r
b
a
g
s ma
y
no
l
on
g
er
be deplo
y
ed in the event o
f
a serious impact.
Operatin
g
fault

Sit in a normal upri
g
ht position.
Wear a correctl
y
ad
j
usted seat belt.
Do not leave an
y
thin
g
between the
o
ccupants and the airba
g
s
(
a child, pet,
o
b
j
ect...
)
. This could hamper the operation o
f
t
h
e a
i
r
b
a
g
s or
i
n
j
ure t
h
e occupants.
Af
t
e
r
a
n
acc
i
de
nt
o
r i
f
th
e
v
e
hi
c
l
e
h
as
bee
n
s
tolen or broken into, have the airbag
sy
stems checked.
A
ll work on the airba
g
s
y
stem must be
c
arried out b
y
a CITROËN dealer or a
q
ualified workshop.
Even if all of the precautions mentioned
are observed, a risk o
f
in
j
ur
y
or o
f
minor
b
urns to t
h
e
h
ea
d
, c
h
est or arms w
h
en an
a
i
r
b
a
g
i
s
d
ep
l
o
y
e
d
cannot
b
e ru
l
e
d
out.
Th
e
bag in
f
lates almost instantly
(
within a
f
ew
m
illiseconds
)
then de
f
lates within the same
time dischar
g
in
g
the hot
g
as via openin
g
s
p
rovided for this purpose.
Latera
l
a
i
r
b
a
g
s
Use onl
y
approved covers on the seats,
c
ompat
ibl
e w
i
t
h
t
h
e
d
ep
l
o
y
ment t
h
e
l
atera
l
a
irba
g
s. For in
f
ormation on the ran
g
e o
f
seat
c
overs suitable
f
or
y
our vehicle,
y
ou can
c
ontact a CITROËN dealer.
R
efe
r t
o
th
e
"A
ccesso
ri
es
"
sec
ti
o
n.
Do not fix or attach an
y
thin
g
to the seat
backs
(
clothin
g
...
)
. This could cause in
j
ur
y
to the chest or arms if the lateral airba
g
is
deplo
y
ed.
Do not sit with the upper part o
f
the bod
y
an
y
n
earer to t
h
e
d
oor t
h
an necessar
y
.
F
ront a
i
r
b
a
g
s
Do not drive holdin
g
the steerin
g
wheel b
y
its
s
po
k
es or rest
i
n
g
y
our
h
an
d
s on t
h
e centre
part o
f
the wheel.
Passen
g
ers must not place their
f
eet on the
das
h
boa
r
d
.
I
f
possible, do not smoke as deplo
y
ment o
f
the airba
g
s can cause burns or the risk o
f
in
j
ur
y
from a ci
g
arette or pipe.
Never remove or pierce the steerin
g
wheel or
hit it violentl
y
.
For the airba
g
s to be full
y
effective, observe the followin
g
safet
y
rules:
Curtain airba
g
s
Do not fix or attach an
y
thin
g
to the roof. This
c
ould cause in
j
ur
y
to the head i
f
the curtain
a
i
r
b
a
g
i
s
d
ep
l
o
y
e
d
.
I
f
f
itted on
y
our vehicle, do not remove the
g
rab handles installed on the roo
f
, they play
a part in securin
g
the curtain airba
g
s.
1
97
Safety

008
Practical information
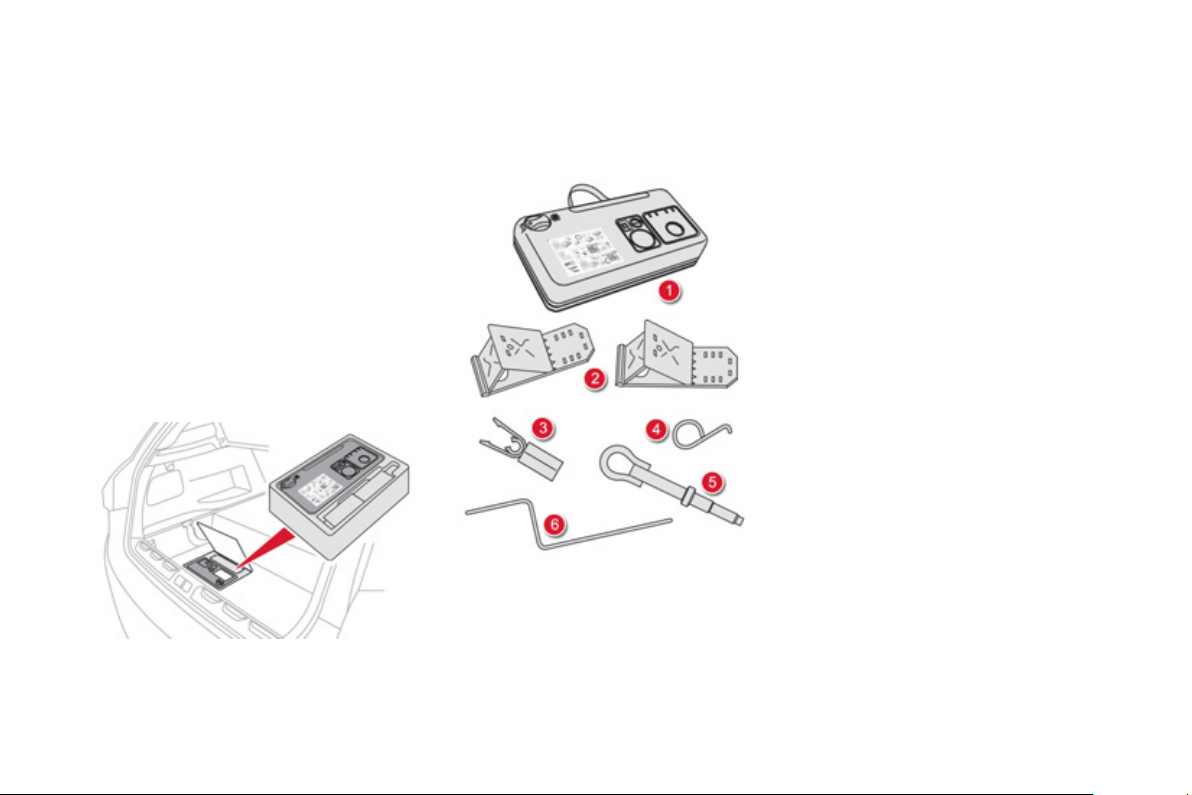
This kit is installed in the stora
g
e box, under the
boo
t
f
l
oo
r.
C
omplete system consisting o
f
a compressor
a
nd a sealant cartrid
g
e which permits
temporar
y
repai
r
of a tyre so that you can
r
drive to the nearest
g
ara
g
e.
It is desi
g
ned to repair most punctures which
c
ould affect the t
y
re, located on the t
y
re tread
o
r
shoulde
r.
Temporary puncture repair kit
A
ccess to the kit
List of tools
A
ll of these tools are specific to
y
our vehicle
and can var
y
accordin
g
to equipment. Do not
use them for other purposes.
1.
12 V compressor.
C
ontains a sealant cartrid
g
e
f
or the
temporar
y
repair o
f
a t
y
re and can also be
used
f
or ad
j
ustin
g
t
y
re pressures.
2.
C
hocks
*
to block the wheels o
f
the vehicle.
3.
B
o
lt "
co
v
e
r
s
*
" t
oo
l.
For removin
g
the wheel bolt protectors
(
covers
)
on allo
y
wheels.
4.
Wh
ee
l fini
s
h
e
r r
e
m
o
v
e
r.
For removin
g
the wheel finishers on allo
y
w
heels
.
5
.
R
emova
bl
e tow
i
n
g
e
y
e.
S
ee "Towin
g
the vehicle".
6
.
Electric parking brake emergency release
co
ntr
o
l.
See "Electric parkin
g
brake" then
"Emer
g
enc
y
brakin
g
".
* Dependin
g
on countr
y
of sale or equipment.
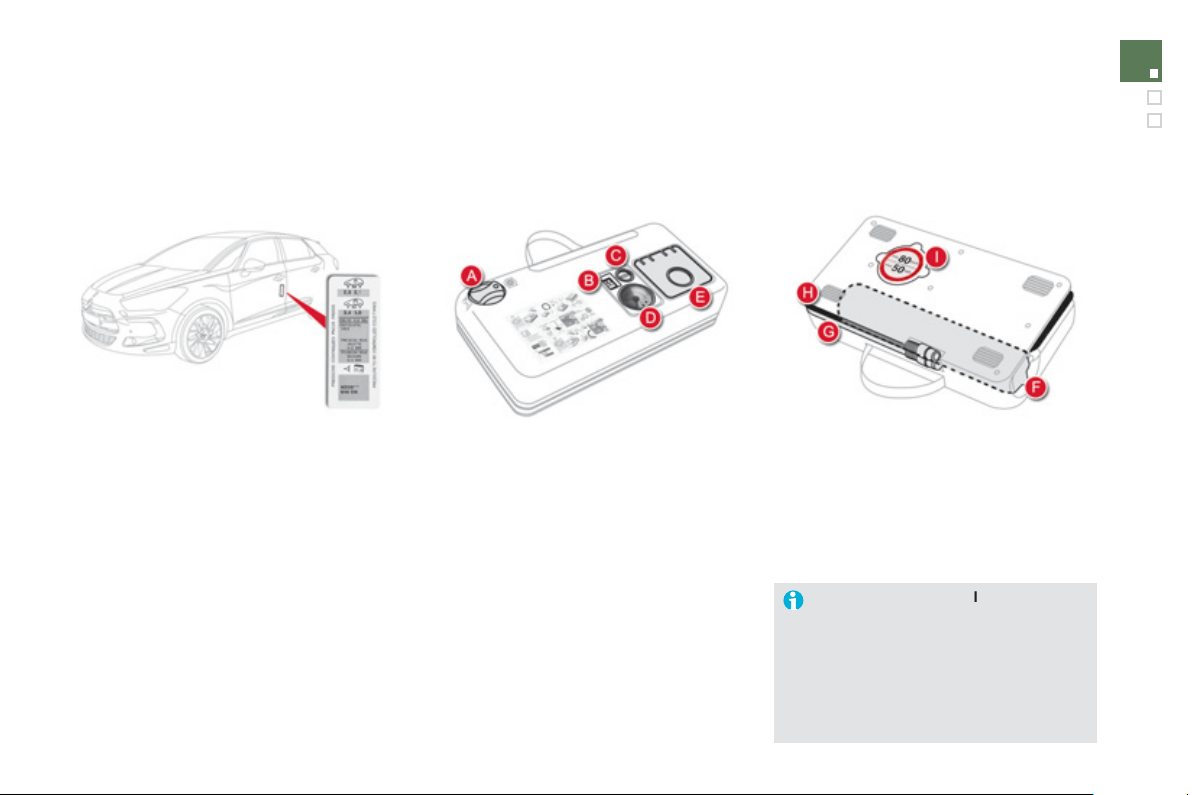
2
0
1
Practical information
A.
"
S
ealant" or "Air"
p
osition selector.
B
.
O
n
"
I" / off
"
O"
s
wit
c
h.
C.
D
e
fl
a
ti
o
n
bu
tt
o
n.
D.
Pressure
g
au
g
e
(
in bar or p.s.i.
)
.
E.
Compartment housin
g
:
- a cable with adaptor
f
or 12 V socket,
- various in
f
lation adaptors
f
or
accessor
i
es, suc
h
as
b
a
ll
s,
bi
c
y
c
l
e
tyres...
Descri
p
tion of the kit
F
.
S
ealant cartrid
g
e.
G.
White pipe with cap for repair.
H
.
Black pipe for inflation.
I
.
Speed limit sticker.
The speed limit sticker
I
m
us
t
be
a
ffix
ed
to t
h
e ve
hi
c
l
e
'
s steer
i
n
g
w
h
ee
l
to rem
i
n
d
y
ou t
h
at a w
h
ee
l
i
s
i
n temporar
y
use.
Do not exceed a s
p
eed o
f
50 m
p
h
(
80 km
/
h
)
when driving with a tyre
repaired usin
g
this t
y
pe o
f
kit.
The t
y
re inflation pressures are
g
iven on this
l
abe
l.
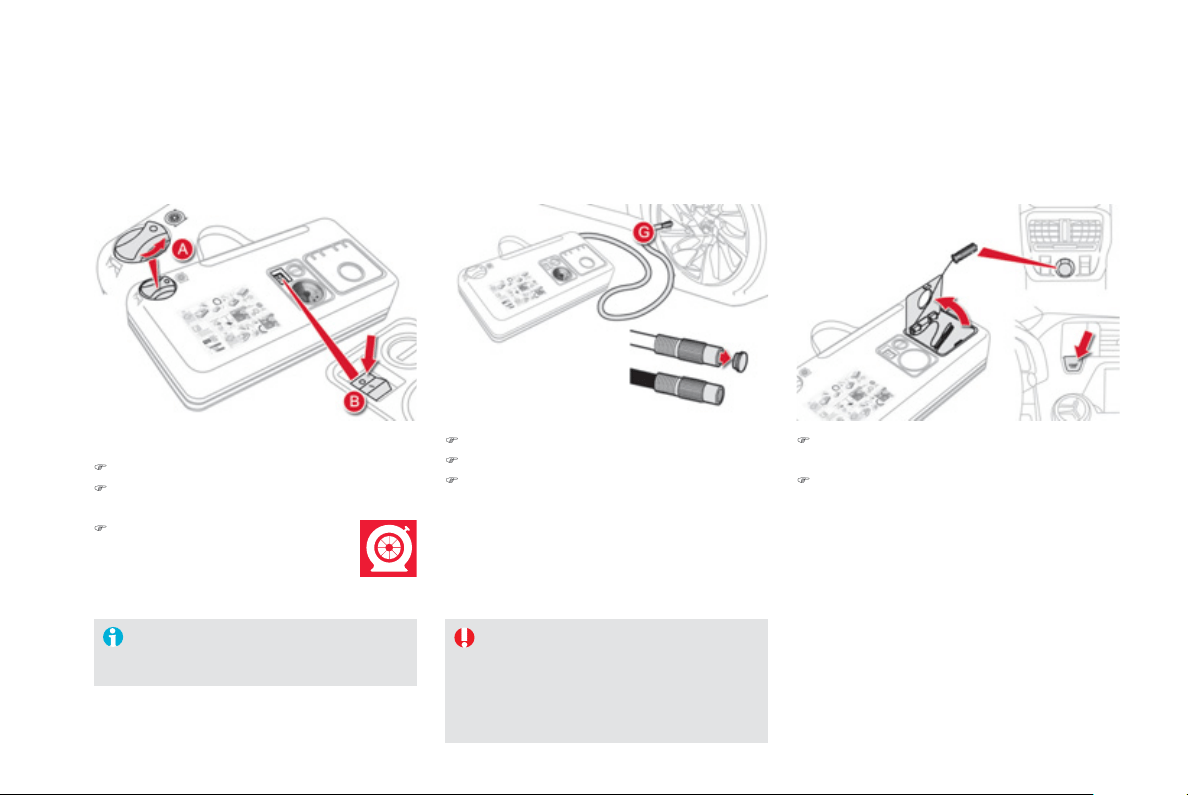
Re
p
air
p
rocedure
)
Switch off the i
g
nition.
)
Uncoil the white pipe
G
full
y
.
)
Unscrew the cap from the white pipe.
)
C
onnect the white pipe to the valve o
f
the
t
y
re to
b
e repa
i
re
d
.
)
Connect the compressor's electric plu
g
to
th
e
v
e
hi
c
l
e
'
s
12 V
soc
k
e
t.
)
S
tart the vehicle and leave the en
g
ine
r
unn
i
n
g
.
Take care, this product is harmful
(
e.
g
.
eth
y
lene-
g
l
y
col, colophon
y
...
)
if swallowed
a
nd causes irritation to the e
y
es.
Keep this product out o
f
the reach o
f
child
r
e
n.
A
void removing any
f
oreign bodies
which have penetrated into the t
y
re.
1. Sealin
g
)
T
u
rn th
e
se
l
ec
t
o
r
A
t
o
th
e
"
sea
l
a
nt"
p
os
i
t
i
on.
)
C
h
ec
k th
a
t th
e
s
wit
c
h
B
is
i
n
p
os
i
t
i
on
"
O"
.

2
0
3
Practical information
Do not start the com
p
ressor be
f
ore
c
onnectin
g
the white pipe to the t
y
re
valve: the sealant product would be
e
xpelled throu
g
h the pipe.
)
Switch on the compressor b
y
movin
g
th
e
s
wit
c
h
B
to position
"I
" until the t
y
re
p
ressure reaches 2.0 bars.
Th
e sea
l
ant
i
s
i
n
j
ecte
d
i
nto t
h
e t
y
re un
d
e
r
p
ressure; do not disconnect the
p
i
p
e
f
rom
the valve during this operation
(
risk o
f
s
plashin
g)
.
)
Remove the kit and screw the cap back on
the white pipe.
T
a
k
e care to avo
id
sta
i
n
i
n
g
y
our ve
hi
c
l
e
with traces o
f
f
luid. Keep the kit to hand.
)
Drive immediatel
y
f
or approximatel
y
three
miles
(f
ive kilometres
)
, at reduced speed
(
between 15 and 35 mph
(
20 and 60 km
/
h
))
,
to plu
g
the puncture.
)
Stop to check the repair and the t
y
re
pressure usin
g
the kit.
T
y
re under-infl ation detection
I
f
the vehicle is
f
itted with t
y
re under-
in
f
lation detection, the under-in
f
lation
warnin
g
lamp will remain on a
f
ter the
wheel has been re
p
aired until the
sy
stem is reinitialised b
y
a CITROËN
dealer or a qualified workshop.
I
f
a
f
ter around
5
to 7 minutes the
pressure
i
s not atta
i
ne
d
, t
hi
s
i
n
di
cates
t
h
at t
h
e t
y
re
i
s not repa
i
ra
bl
e; contact
a CITROËN dealer or a
q
ualified
worksho
p
f
or assistance.
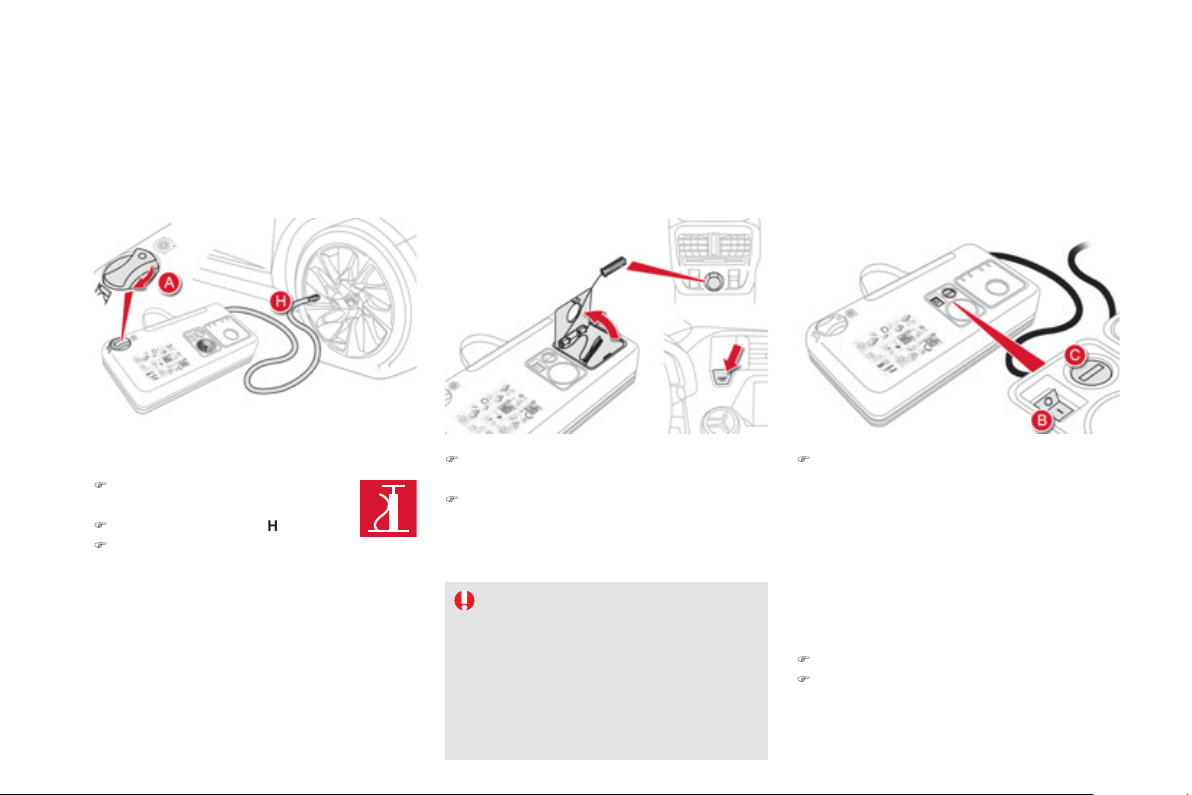
2. Infl ation
)
C
onnect the compressor's electric plu
g
to
th
e
v
e
hi
c
l
e
'
s
12 V
soc
k
e
t.
)
S
tart the vehicle again and leave the
e
n
g
ine runnin
g
.
)
Adj
ust t
h
e pressure us
i
n
g
t
h
e compressor
(
to in
f
late: switch
B
i
n
p
os
i
t
i
on
"I"
; to
def
l
a
t
e
:
s
wit
c
h
B
in
p
osition "O" and
p
ress
bu
tt
o
n C
)
, in accordance with the vehicle's
t
y
re pressure label
(
located on the left hand
door aperture
)
.
A loss of pressure indicates that the
p
uncture has not been full
y
plu
gg
ed;
c
ontact a CITRO
Ë
N dealer or qualified
workshop
f
or assistance.
)
Re
m
o
v
e
a
n
d
s
t
o
w t
he
ki
t.
)
Drive at reduced speed
(
50 mph [80 km
/
h]
m
ax
)
limitin
g
the distance travelled to
a
pproximatel
y
120 miles
(
200 km
)
.
As soon as possible,
g
o to a CITROËN
dealer or a qualified workshop.
You must inform the technician that
y
ou
h
ave used this kit. A
f
ter inspection, the
tec
h
n
i
c
i
an w
ill
a
d
v
i
se
y
ou on w
h
et
h
e
r
the t
y
re can be repaired or i
f
it must be
r
e
p
laced.
)
Tu
rn t
he
selec
t
o
r
A
t
o
t
he
"ai
r
"
p
os
i
t
i
on.
)
U
nco
il
t
h
e
bl
ac
k
pip
e
H
f
ull
y
.
)
C
onnect the black
p
i
p
e to the
v
a
lv
e
of
th
e
wh
ee
l.
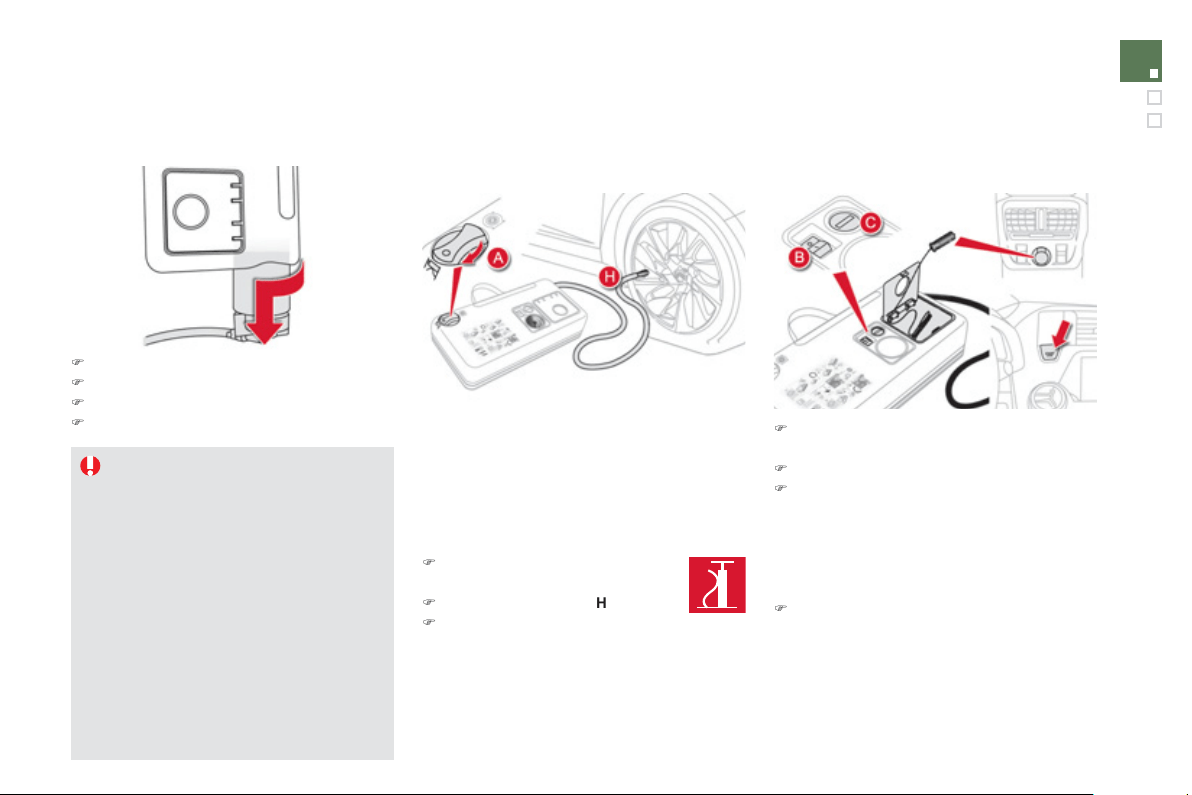
2
05
Practical information
Removin
g
the cartrid
g
e
)
Stow the black pipe.
)
Detach the an
g
led base from the white pipe.
)
S
upport the compressor verticall
y
.
)
Unscrew the cartrid
g
e
f
rom the bottom.
Beware o
f
discharges o
f
f
luid.
The expir
y
date o
f
the
f
luid is indicated
o
n the cartrid
g
e.
The sealant cartrid
g
e is desi
g
ned fo
r
s
in
g
le use; even if onl
y
partl
y
used, it
must be replaced.
Af
ter use, do not discard the cartrid
g
e
i
nto t
h
e env
i
ronment, ta
k
e
i
t to an
aut
h
or
i
se
d
waste
di
s
p
osa
l
s
i
te or a
C
ITROËN dealer.
Do not
f
or
g
et to obtain a new sealant
c
artrid
g
e, available from CITROËN
dealers or from a qualified workshop.
Checkin
g
t
y
re pressures /
i
nflatin
g
accessories
Y
ou can a
l
so use t
h
e compressor, w
i
t
h
out
i
n
j
ect
i
n
g
an
y
pro
d
uct, to:
- check or ad
j
ust the pressure o
f
y
our t
y
res,
- in
f
late other accessories
(
balls, bicycle
t
y
res...
)
.
)
T
u
rn th
e
se
l
ec
t
o
r
A
t
o
th
e
"Air"
position.
)
Uncoil the black pipe
H
full
y
.
)
Connect the black pipe to the
valve of the wheel or accessor
y
.
I
f
necessar
y
,
f
it one o
f
the adaptors
s
upplied with the kit
f
irst.
)
Connect the compressor's electrical
co
nn
ec
t
o
r t
o
th
e
v
e
hi
c
l
e
'
s
12 V
soc
k
e
t.
)
S
tart the vehicle and let the en
g
ine run.
)
Adj
ust t
h
e pressure us
i
n
g
t
h
e compressor
(
to in
f
late: switch
B
i
n
p
os
i
t
i
on
"I"
; to
def
l
a
t
e
:
s
wit
c
h B in
p
osition
"
O" and
p
ress
bu
tt
o
n
C
)
, accordin
g
to the vehicle's t
y
re
p
ressure label or the accessor
y
's pressure
l
abe
l.
)
R
e
m
o
v
e
th
e
kit th
e
n
s
t
o
w it.
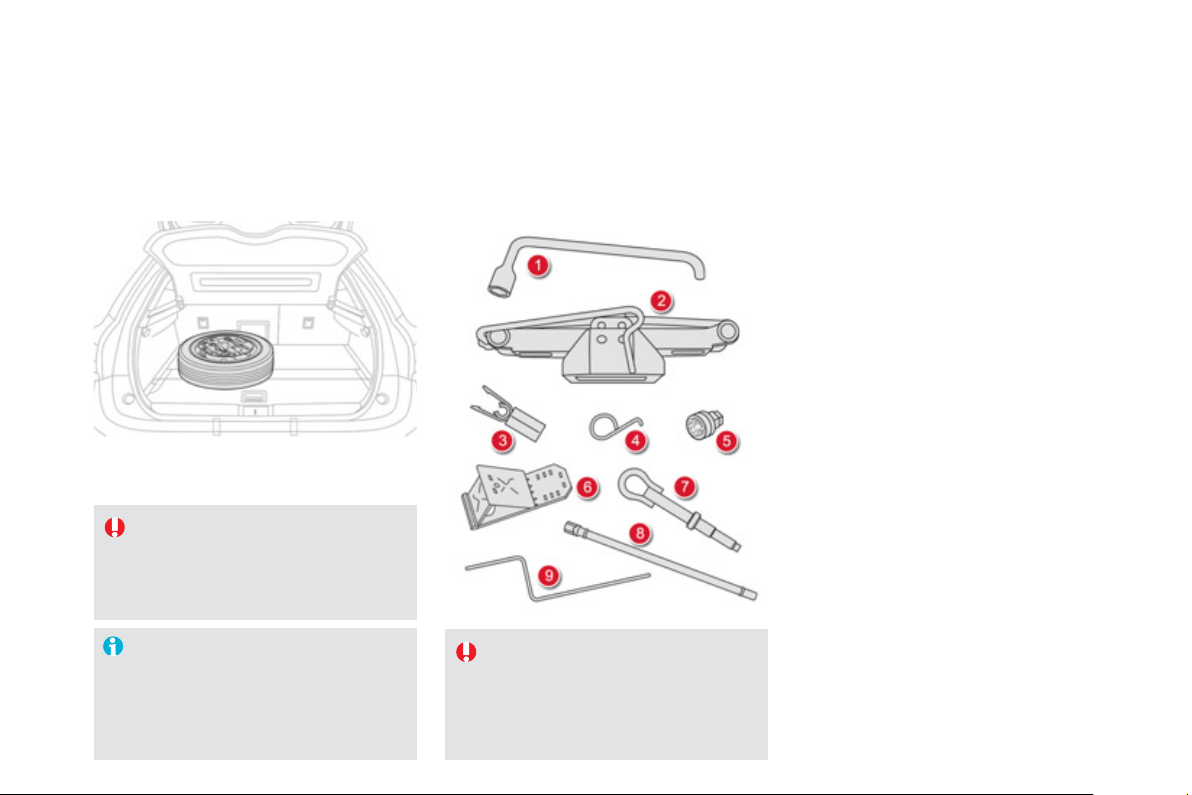
Changing a wheel
Procedure
f
or chan
g
in
g
a
f
ault
y
wheel
f
or the spare wheel usin
g
the tools provided with the vehicle
*
.
Th
e
t
oo
l
s
a
r
e
in
s
t
a
ll
ed
in th
e
boo
t
u
n
de
r
th
e
f
l
oo
r.
A
ccess to the tools
List of tools *
T
y
re under-infl ation detection
The s
p
are wheel is not
f
itted with a
s
ensor. The punctured wheel must be
repaired b
y
a CITROËN dealer or a
q
ualified workshop.
Before doin
g
an
y
work on
y
our vehicle,
switch off the i
g
nition
(
R
ead
y
lamp off
)
to avoid an
y
risk of in
j
ur
y
resultin
g
from
a
utomatic operation of the en
g
ine.
When usin
g
liftin
g
equipment
(
a
j
ack
f
or example
)
, take care to use the
j
ac
ki
n
g
po
i
nts prov
id
e
d
, so as to avo
id
d
ama
gi
n
g
t
h
e
high
vo
l
ta
g
e ca
bl
es.
A
ll o
f
these tools are speci
f
ic to
y
our vehicle and
c
an var
y
accordin
g
to the level o
f
equipment.
Do not use them
f
or other
p
ur
p
oses.
1.
Wheelb
r
ace
.
F
or remov
i
n
g
t
h
e w
h
ee
l
tr
i
m an
d
remov
i
n
g
t
he
w
heel
bol
t
s
.
2.
J
ac
k
w
i
t
h
i
nte
g
ra
l
h
an
dl
e.
F
or ra
i
s
i
n
g
t
h
e ve
hi
c
l
e.
3.
"Bol
t
co
v
e
r
"
t
ool
.
For removin
g
the bolt protectors
(
covers
)
on a
ll
o
y
w
h
ee
l
s.
4.
Wheel
tr
i
m r
e
m
o
v
e
r.
For removin
g
the allo
y
wheel
f
inishers.
5
.
S
ocket
f
or the securit
y
bolts
(
located in the
g
love box
)
.
F
or a
d
apt
i
n
g
t
h
e w
h
ee
lb
race to t
h
e spec
i
a
l
"
secur
i
t
y"
b
o
l
ts.
6
.
Wheel chocks
f
or blockin
g
the vehicle's
w
heels
.
7.
T
ow
i
n
g
e
y
e.
S
ee the "Towin
g
the vehicle" section.
8.
E
xtens
i
on s
p
anner.
For slackenin
g/
ti
g
htenin
g
the spare wheel
ca
rr
ie
r n
u
t.
9.
Emer
g
enc
y
release control
f
or the electric
p
ar
ki
n
g
b
ra
k
e.
S
ee the "Electric parkin
g
brake" section,
"E
mer
g
enc
y
b
ra
ki
n
g"
.
*
Accordin
g
to countr
y
o
f
sale.
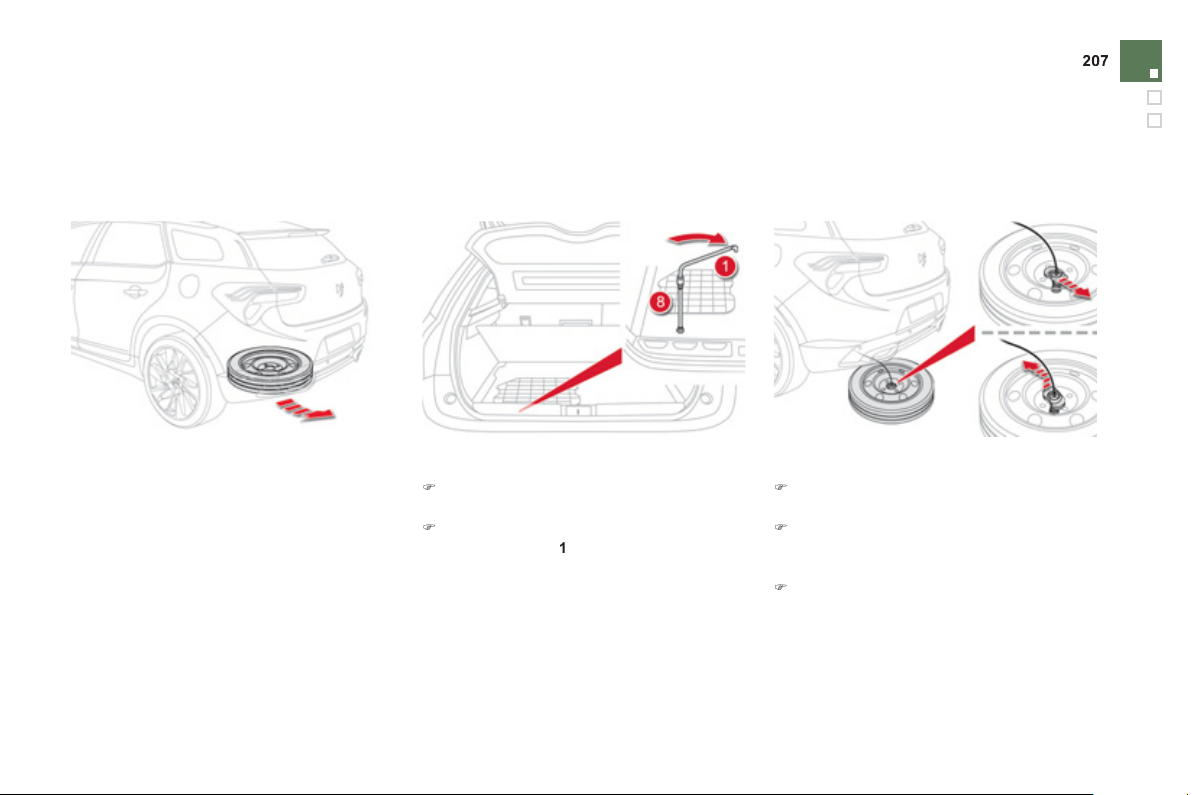
Practical information
Access to the s
p
are wheel
The spare wheel is supported by a cable-driven
ca
rri
e
r
u
n
de
rn
ea
th th
e
v
e
hi
c
l
e
.
Takin
g
out the wheel
)
Raise the
f
loor to reveal the spare wheel
ca
rr
ie
r
d
r
i
v
e
n
u
t.
)
Turn this drive nut
f
ull
y
cl
oc
k
w
i
s
e
, us
i
n
g
th
e
wh
ee
l
b
r
ace
1
a
n
d
th
e
e
xt
e
n
s
i
o
n
8
, to
u
nwin
d
th
e
ca
rri
e
r
cab
l
e
.
)
D
e
t
ac
h th
e
wh
ee
l fr
o
m th
e
r
ea
r
o
f th
e
v
ehicle
.
)
R
emove t
h
e
h
oo
k
w
i
t
h
i
ts connect
i
on p
l
ate
to re
l
ease t
h
e w
h
ee
l
, as s
h
own
i
n t
h
e
ill
us
tr
a
ti
o
n.
)
P
u
ll
ou
t th
e
wh
ee
l.
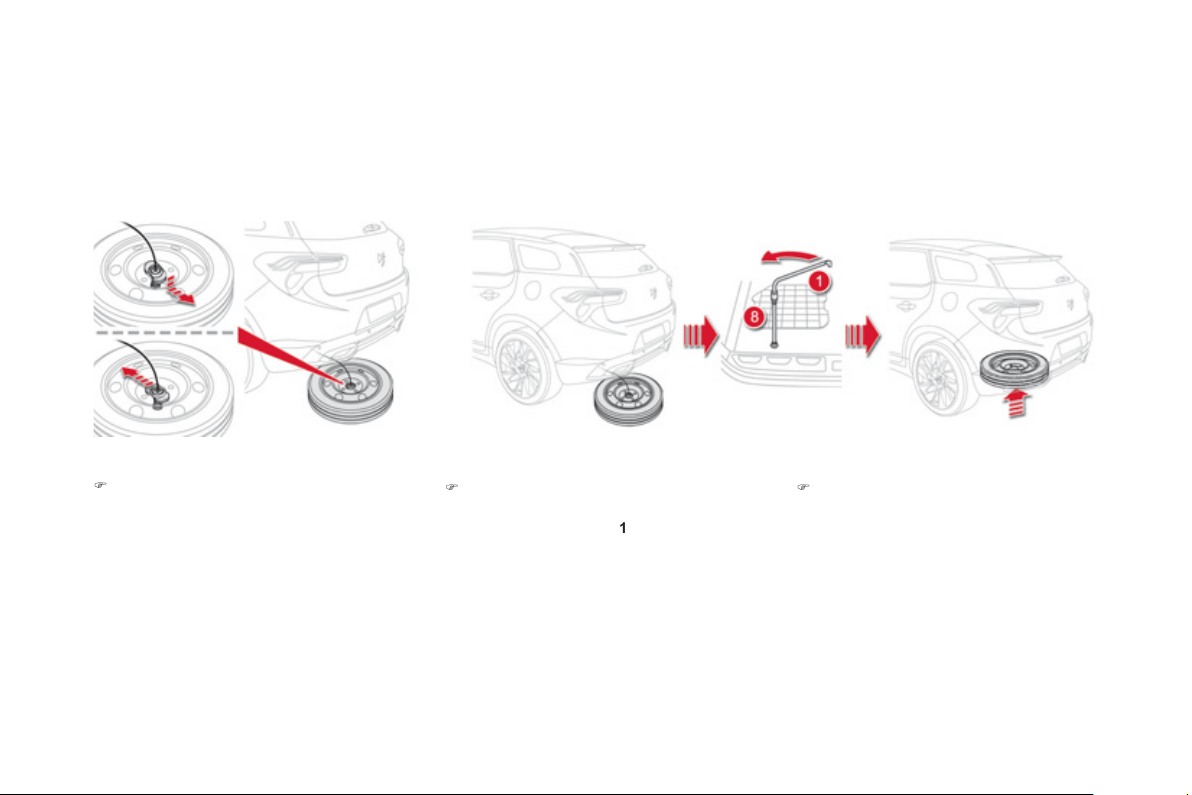
Puttin
g
the wheel back in place
)
Pass the hook with its connection plate into
the wheel, as illustrated.
)
R
a
i
se t
h
e w
h
ee
l
un
d
erneat
h
t
h
e ve
hi
c
l
e
by
turn
i
n
g
t
h
e carr
i
er
d
r
i
ve nut
a
nt
i
c
l
oc
k
w
i
s
e
u
s
i
n
g
t
h
e w
h
ee
lb
race
1
a
n
d
t
he
e
xt
e
n
sio
n
8
.
)
Ti
g
hten full
y
and check that the wheel is
h
orizontall
y
f
lush a
g
ainst the
f
loor.
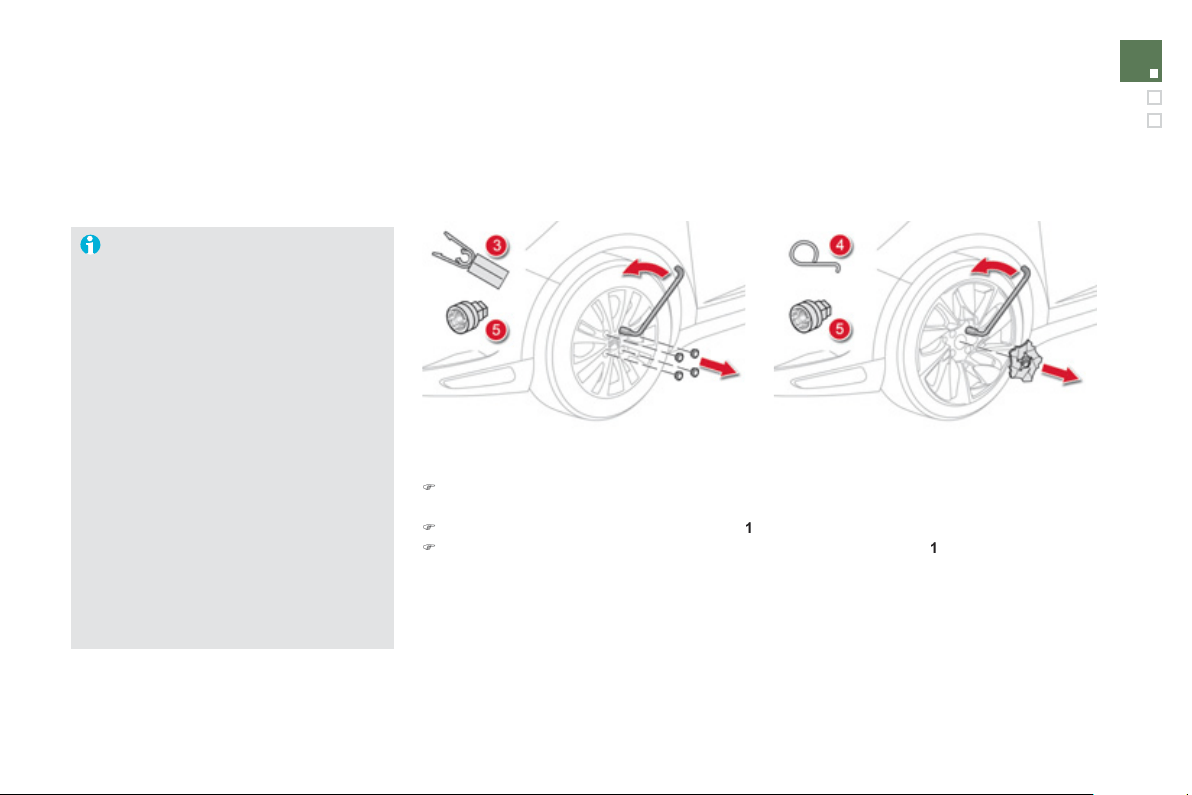
2
0
9
Practical information
Removin
g
a wheel
Parkin
g
the vehicle
Imm
ob
ili
se
th
e
v
e
hi
c
l
e
wh
e
r
e
it
does
n
o
t
block traffic: the
g
round must be level,
s
table and not slipper
y
.
A
ppl
y
the parkin
g
brake unless it has
been pro
g
rammed to automatic mode,
s
witch o
ff
the i
g
nition and en
g
a
g
e
f
irst
g
ear
*
to block the wheels.
C
heck that the brakin
g
warnin
g
lamp
a
n
d
th
e
P
warnin
g
lamp in the parkin
g
b
r
a
k
e
co
ntr
o
l l
e
v
e
r
co
m
e
o
n.
The occupants must
g
et out of the
vehicle and wait where the
y
are safe.
Never
g
o underneath a vehicle raised
u
sin
g
a
j
ack; use an axle stand.
)
Dependin
g
on equipment, remove the cover from from each of bolts usin
g
the tool
3
o
r r
e
m
o
v
e
t
h
e
h
u
b
cap us
i
n
g
too
l
4
.
)
Fi
t t
h
e secur
i
t
y
soc
k
et
5
o
n t
he
w
heelb
r
ace
1
to slacken the securit
y
bolt
(
i
f
f
itted
)
.
)
S
lacken the other bolts
(
no more than a 1
/
4 turn
)
usin
g
the wheelbrace
1
on
ly
.
* position R for the electronic
g
earbox s
y
stem;
P
for the automatic
g
earbox.
List of operations
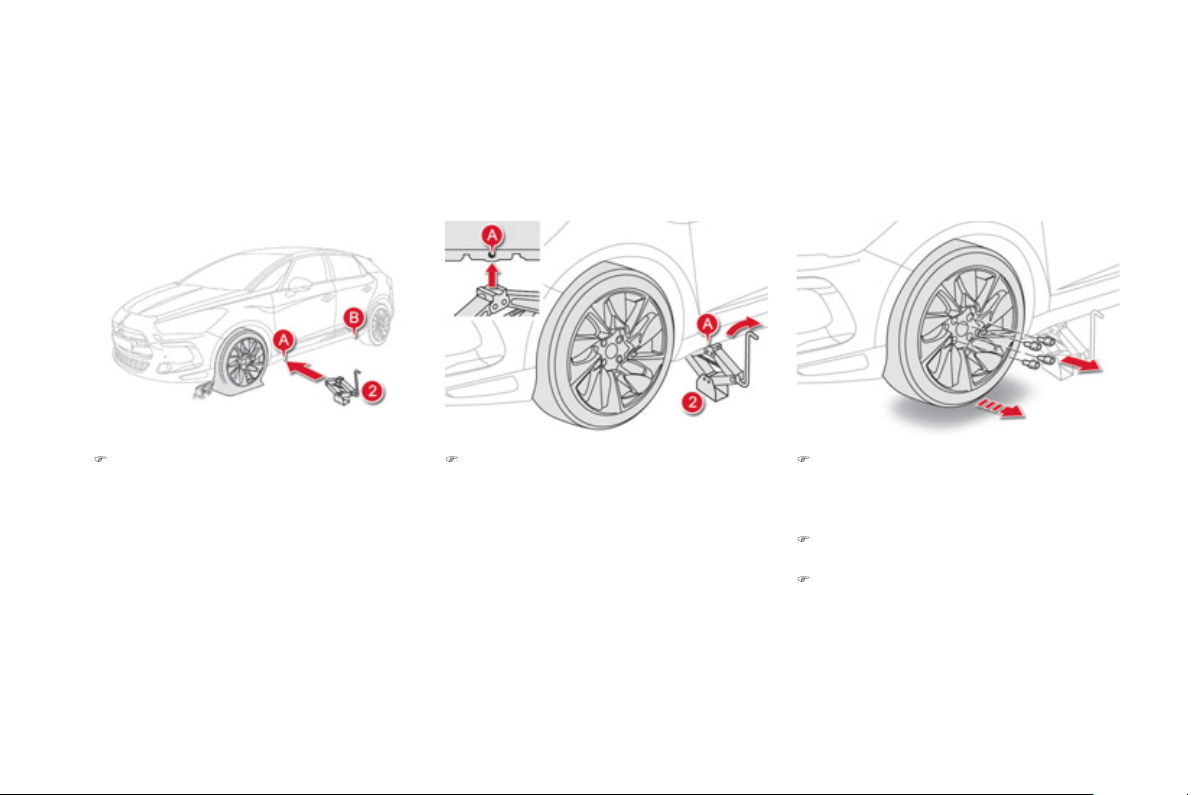
)
Pl
ace t
h
e
j
ac
k
2
in
co
nt
ac
t with
o
n
e
of
th
e
tw
o
f
r
o
nt
A
or
rear
B
l
ocat
i
ons
p
rov
id
e
d
on
the underbody, whichever is closest to the
wheel to be chan
g
ed.
)
R
a
i
se
th
e
v
e
hi
c
l
e
u
ntil th
e
r
e
i
s
suff
i
c
i
e
nt
s
pace
b
etween t
h
e w
h
ee
l
an
d
t
h
e
g
roun
d
to admit the spare
(
not punctured
)
wheel
e
asil
y
.
)
R
e
m
o
v
e
th
e
bo
lt
s
a
n
d
s
t
o
r
e
th
e
m in
a
c
l
ea
n
p
lace.
)
R
e
m
o
v
e
th
e
wh
ee
l.
)
E
xten
d
t
h
e
j
ac
k
2
unt
il
i
ts
b
ase p
l
ate
i
s
i
n
c
ontact w
i
t
h
t
h
e
g
roun
d
.
E
nsure t
h
at t
h
e
c
entreline o
f
the jack base plate is directly
be
l
o
w th
e
l
oca
ti
o
n
A
or
B
used
.
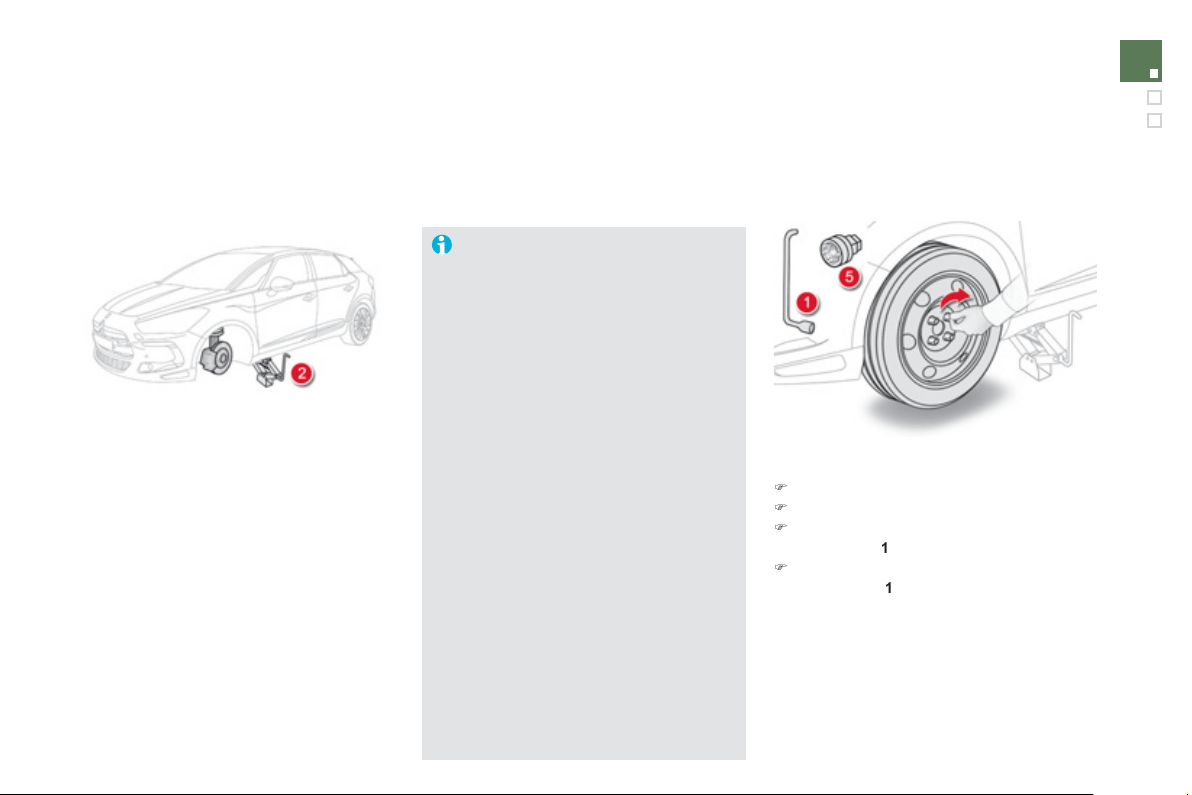
211
Practical information
Fittin
g
a wheel
Fittin
g
the "space-saver"
spare wheel
I
f
y
our vehicle is
f
itted with allo
y
wheels,
when ti
g
htenin
g
the bolts on fittin
g
, it
i
s
n
o
rm
a
l t
o
n
o
ti
ce
th
a
t th
e
w
as
h
e
r
s
do
n
o
t
co
m
e
int
o
co
nt
ac
t with th
e
"space-saver" spare wheel. The wheel
is secured b
y
the conical sur
f
ace o
f
each
bol
t.
A
fter chan
g
in
g
a wheel
To correctl
y
store the punctured wheel
in the boot
(
not in the location of the
s
p
ace-saver whee
l
)
, first remove the
ce
ntr
a
l
co
v
e
r.
When usin
g
the "space-saver" t
y
pe
s
pare wheel, do not exceed 50 mph
(
80 km
/
h
)
.
Have the ti
g
htenin
g
o
f
the bolts and the
p
ressure o
f
the s
p
are wheel checked
b
y
a CITROËN dealer or a qualified
workshop without dela
y
.
Have the punctured wheel repaired
a
n
d
r
e
fitt
ed
t
o
th
e
v
e
hi
c
l
e
as
soo
n
as
p
ossible.
List of operations
)
Put the wheel in place on the hub.
)
Screw in the bolts full
y
b
y
hand.
)
Pre-ti
g
hten the securit
y
bolt usin
g
the
w
heelb
r
ace
1
f
itted with the securit
y
socket
5
.
)
P
re-t
igh
ten t
h
e ot
h
er
b
o
l
ts us
i
n
g
t
h
e
w
heelb
r
ace
1
on
ly
.
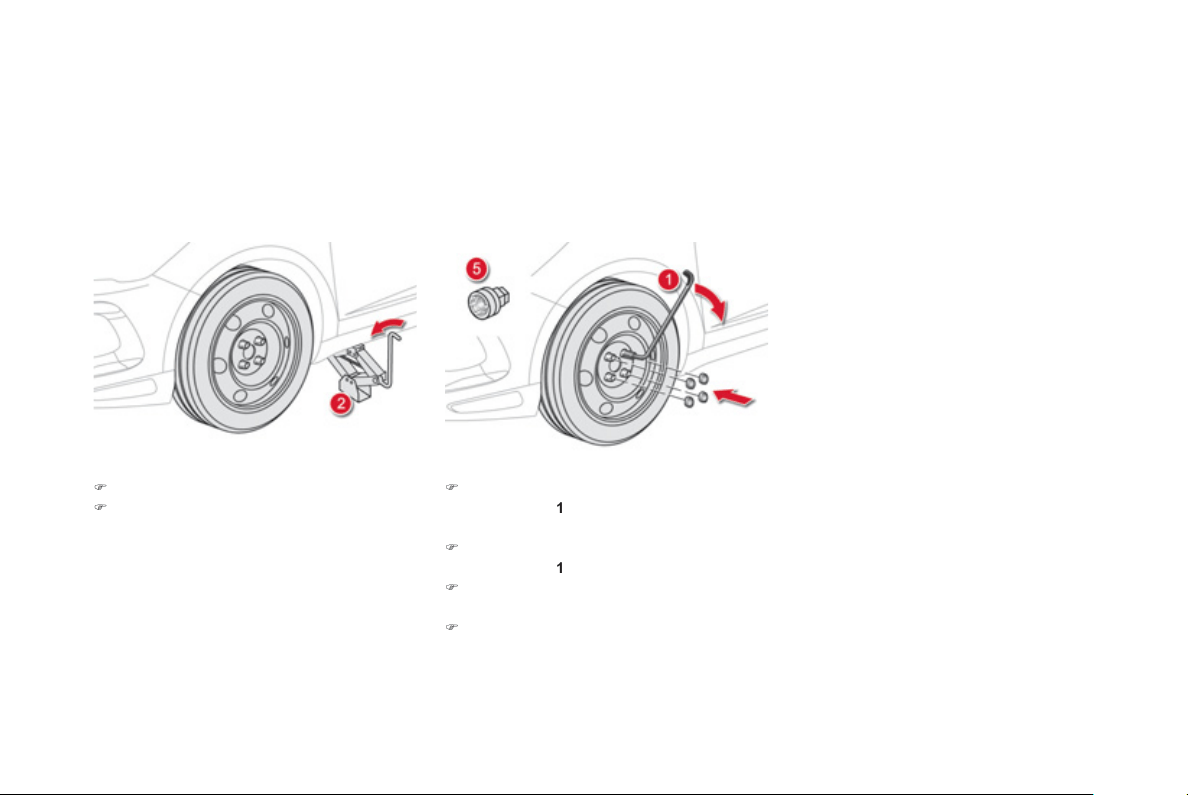
)
Lower the vehicle full
y
.
)
F
o
ld
t
h
e
j
ac
k
2
a
n
d
de
t
ach
i
t.
)
Ti
g
hten the securit
y
bolt usin
g
the
w
heelb
r
ace
1
f
itted with the securit
y
socke
t
5
.
)
Tigh
ten t
h
e ot
h
er
b
o
l
ts us
i
n
g
t
h
e
wh
ee
l
b
r
ace
1
only.
)
R
ef
it th
e
bo
lt
co
v
e
r
s
o
n
eac
h
of
th
e
bo
lt
s
o
r
the hub cap
(
dependin
g
on equipment
)
.
)
S
tore the tools in the box.
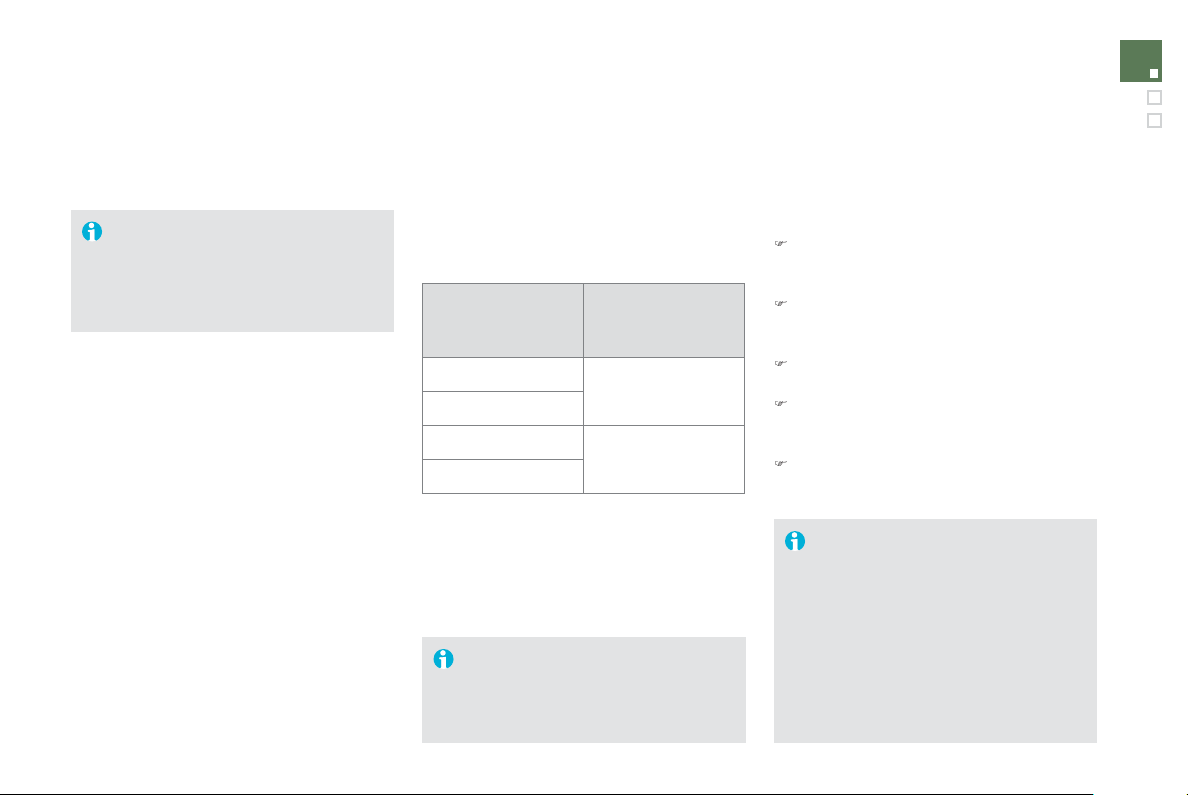
2
1
3
Practical information
Snow chains
In wintry conditions, snow chains improve traction as well as the behaviour o
f
the vehicle when braking.
The snow chains must be fitted onl
y
to the
f
ront wheels. The
y
must never
be
f
itted to "space-saver" t
y
pe spare
w
heels
.
Take account o
f
the le
g
islation in
f
orce
in
y
our countr
y
on the use o
f
snow
ch
a
i
ns an
d
t
h
e max
i
mum runn
i
n
g
spee
d
au
th
o
ri
sed
.
Avoid drivin
g
on roads that have been
c
leared of snow, to avoid dama
g
in
g
y
our
vehicle's t
y
res and the road sur
f
ace. It
is recommended that be
f
ore
y
ou leave,
y
ou practise
f
ittin
g
the snow chains on
a level and dry sur
f
ace. I
f
your vehicle
is
f
itted with allo
y
wheels, check that
no part of the chain or its fixin
g
s is in
co
nt
ac
t with th
e
wh
ee
l rim.
Advice on installation
)
I
f
you have to
f
it the chains during a
j
ourne
y
, stop the vehicle on a
f
lat sur
f
ace
o
n th
e
s
i
de
o
f th
e
r
oad
.
)
Appl
y
the parkin
g
brake and position an
y
wheel chocks to prevent movement of
y
our
v
e
hi
c
l
e
.
)
Fit the chains
f
ollowin
g
the instructions
p
rovided b
y
the manu
f
acturer.
)
Move o
ff
g
entl
y
and drive
f
or a
f
ew
m
oments, without exceeding 30 mph
(
50 km
/
h
)
.
)
Stop
y
our vehicle and check that the snow
c
hains are correctl
y
ti
g
htened.
Use onl
y
the chains desi
g
ned to be
f
itted to the
t
y
pe o
f
wheel
f
itted to
y
our vehicle:
O
riginal tyre size M
a
xim
u
m link
s
iz
e
.
215/60 R16
9 mm
22
5/50
R17
2
35/
4
5
R1
8
n
o
t
c
h
a
in
ab
l
e
2
35/
4
0
R1
9
For more information on snow chains, contact a
CITROËN dealer or a qualified workshop.
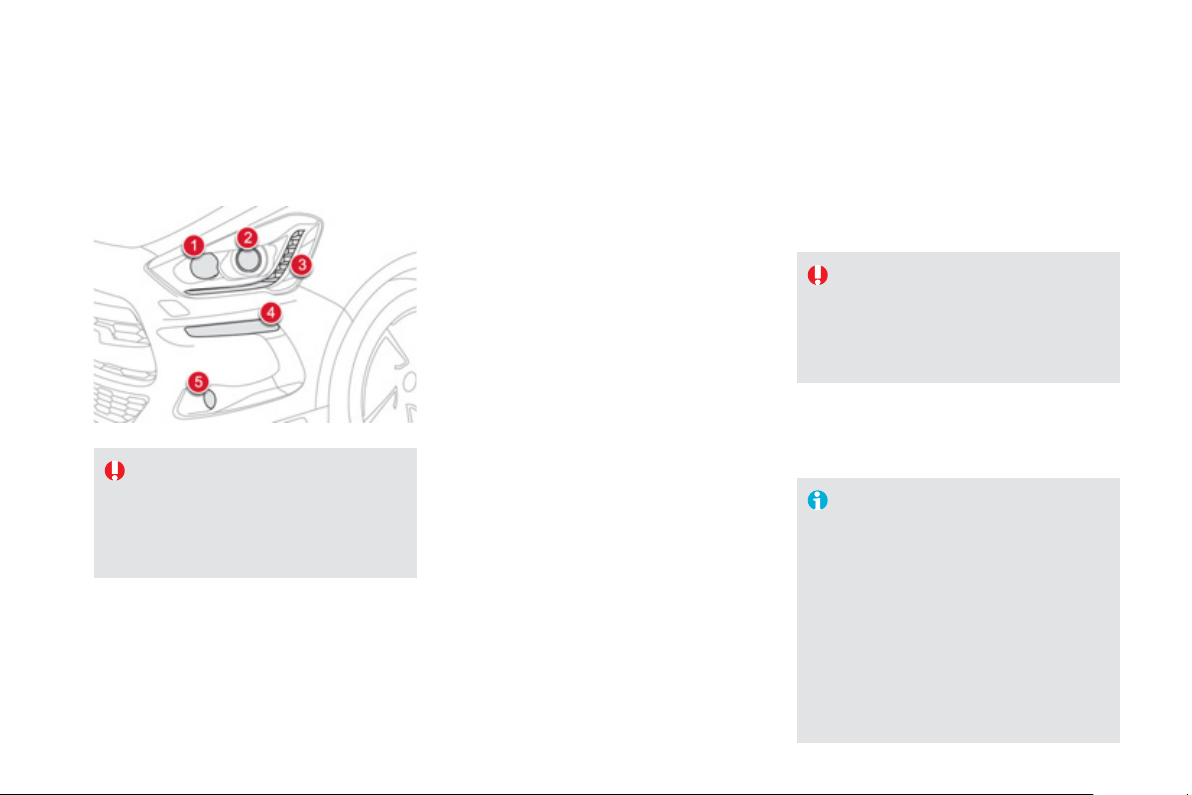
Changing a bulb
Front lam
p
s
Model with xenon headlam
p
s
1.
Main beam headlamps
(
H1-35W
).
2.
D
irectional di
pp
ed
/
directional
h
ea
dl
am
ps
(
D1S-35W
).
3.
D
aytime running lamps
/
sidelamps
(
li
g
ht emittin
g
diodes - LEDs
).
4.
D
irection indicators
(
HY21-21W
).
5
.
D
irectional fo
g
lamps
(
H11
).
Model with halo
g
en headlamps
1
.
Main beam headlamps
(
H1-55W
).
2
.
D
ipped beam headlamps
(
H7-55W
).
3.
D
a
y
time runnin
g
lamps/sidelamps
(
Li
g
ht emittin
g
diodes - LEDs
).
4.
D
irection indicators
(
HY21-21W
).
5
.
D
irectional fo
g
lamps
(
H11
).
F
or
H
7 t
y
pe
b
u
lb
s w
i
t
h
l
u
g
s... ta
k
e care
t
o
obse
rv
e
t
hei
r
co
rr
ec
t
i
n
s
t
alla
t
io
n
s
o as to ensure the best lighting
p
er
f
ormance.
In some weather conditions
(
e.
g
. low
temperature or humidit
y)
, the presence
of
mistin
g
on the internal sur
f
ace o
f
the
g
lass o
f
the headlamps and rear lamps
is normal; it disa
pp
ears a
f
ter the lam
p
s
h
a
v
e
bee
n
o
n
fo
r
a
fe
w min
u
t
es
.
Risk of electrocution
Xenon bulbs
(
D1
S
-35W
)
must be
replaced b
y
a CITROËN dealer or a
q
ualified workshop.
Be
f
ore doing any work on your vehicle,
s
witch o
ff
the i
g
nition
(
Read
y
lamp o
ff)
to avoid an
y
risk of in
j
ur
y
resultin
g
from
automatic operation of the en
g
ine.
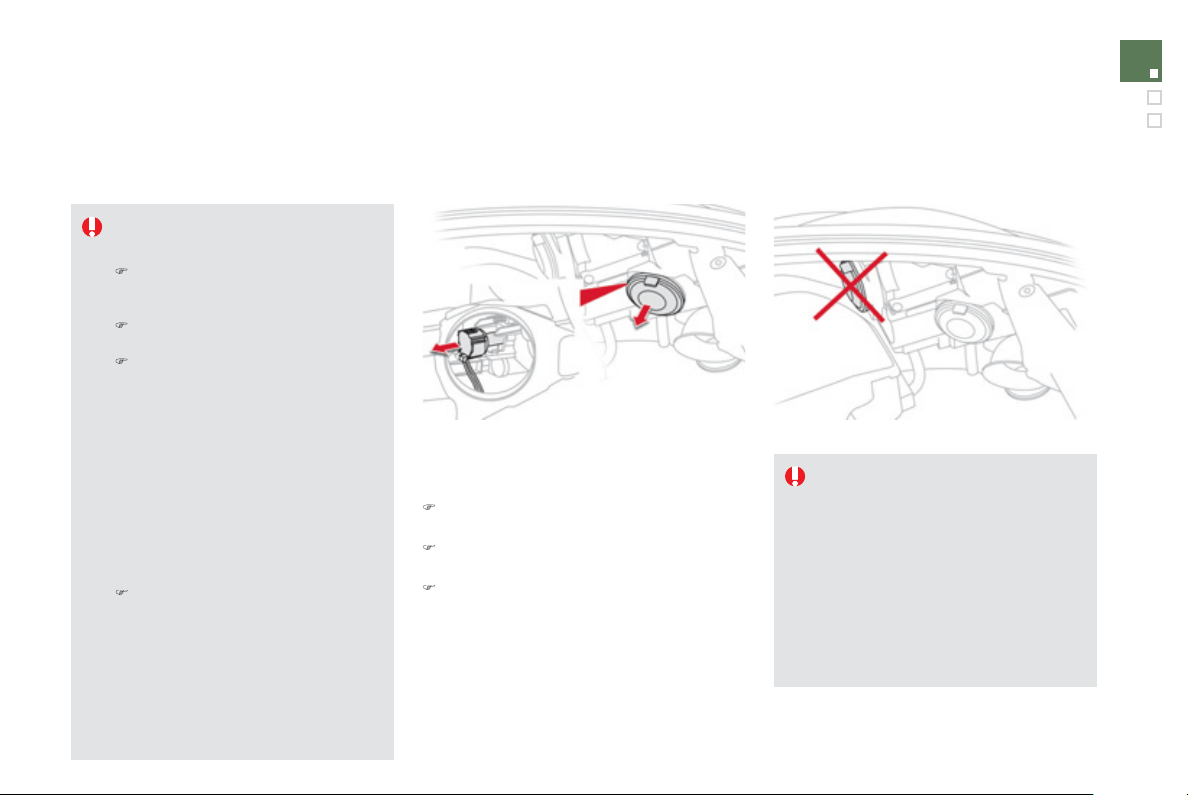
2
15
Practical information
Main beam headlamps
(
xenon
m
odel
)
)
Remove the protective plastic cover b
y
pullin
g
on the tab.
)
R
emove t
h
e connector w
i
t
h
t
h
e
b
u
lb
by
press
i
n
g
on t
h
e
l
u
g
at t
h
e
b
ottom.
)
R
emove t
h
e
b
u
lb
an
d
c
h
an
g
e
i
t.
F
or reassem
bly
, carr
y
out t
h
ese operat
i
ons
i
n
re
v
e
r
se
o
r
de
r.
The headlamps are fitted with
pol
y
carbonate
g
lass with a protective
c
oatin
g
:
)
do not clean them usin
g
a dr
y
or abrasive cloth, nor with a
deter
g
ent or solvent product
,
)
use a spon
g
e and soap
y
water or a
p
H neutral product,
)
when usin
g
a hi
g
h pressure washer
o
n persistent marks, do not keep
th
e
l
a
n
ce
d
ir
ec
t
ed
t
o
w
a
r
ds
th
e
lamps or their ed
g
es for too lon
g
,
s
o as not to dama
g
e their protective
c
oatin
g
and seals.
D
i
pp
ed beam headlam
p
s
(
xenon model
)
D1S xenon bulbs must be chan
g
ed
b
y
a CITRO
Ë
N dealer or a qualified
workshop, as there is a risk o
f
elec
tr
ocu
t
io
n.
It is recommended that the D1
S
bulbs
are chan
g
ed at the same time when one
o
f th
e
m f
a
il
s
.
Chan
g
in
g
a bulb should onl
y
be done
after the headlamp has been switched
off for a few minutes
(
risk of serious
burns
)
.
)
Do not touch the bulb directl
y
with
y
our fin
g
ers, use a lint-free cloth.
It is imperative to use onl
y
anti-
ultraviolet
(
UV
)
t
y
pe bulbs to avoid
dama
g
in
g
the headlamp.
A
lwa
y
s replace a failed bulb with a
n
ew bulb with the same t
y
pe and
s
pecification.
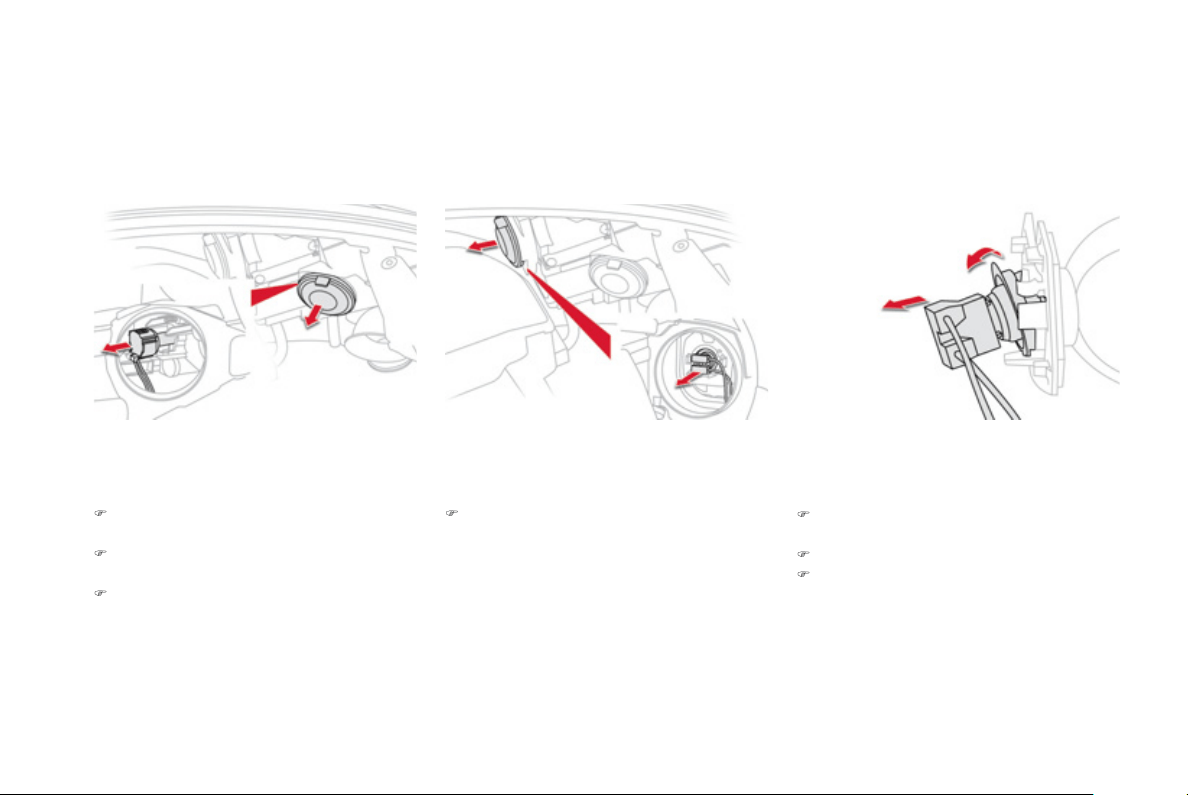
D
ipped beam headlamps
(
halo
g
en model
)
)
Remove the protective plastic cover b
y
pullin
g
on the tab.
Main beam headlamps
(
halo
g
en model
)
)
Remove the protective plastic cover b
y
p
ullin
g
on the tab.
)
Remove the connector with the bulb b
y
p
ress
i
n
g
on t
h
e
l
u
g
at t
h
e
b
ottom.
)
R
emove t
h
e
b
u
lb
an
d
c
h
an
g
e
i
t.
F
or reassem
bly
, carr
y
out t
h
ese operat
i
ons
i
n
re
v
e
r
se
o
r
de
r.
)
Press on the top of the connector then
p
ivot the assembl
y
downwards.
)
Re
m
o
v
e
t
he
co
nn
ec
t
o
r w
i
t
h
t
he
bulb
.
)
R
emove t
h
e
b
u
lb
an
d
c
h
an
g
e
i
t.
F
or reassem
bly
, carr
y
out t
h
ese operat
i
ons
i
n
reverse order, but engaging the bottom o
f
the
bu
l
b
f
ir
s
t.
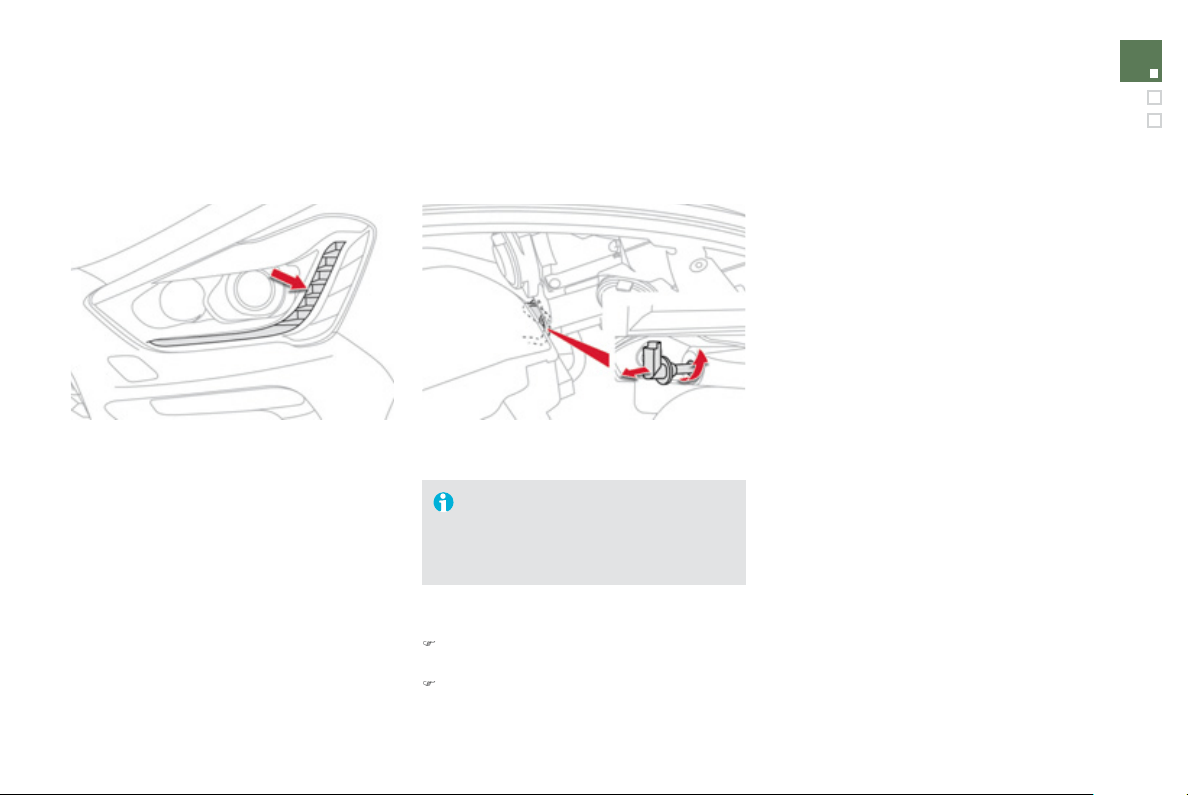
217
Practical information
D
a
y
time runnin
g
lamps
/
sidelamps
For the replacement o
f
this type o
f
LED lamp
and li
g
htin
g
g
uides, contact a CITROËN deale
r
or a qualified workshop.
A
replacement kit for the LEDs is available from
C
ITR
O
ËN dealers.
D
irection indicators
Faster
f
lashin
g
o
f
a direction indicator
warnin
g
lamp
(
le
f
t or ri
g
ht
)
indicates a
fa
il
ed
bu
l
b
o
n th
a
t
s
i
de
.
The
di
r
ec
t
io
n
i
n
dica
t
o
r
bulb
is
loca
t
ed
belo
w t
he
f
ront lam
p
.
)
Turn the bulb holder a quarter turn and pull
it
ou
t.
)
Remove the bulb and chan
g
e it.
F
or reassem
bly
, carr
y
out t
h
ese operat
i
ons
i
n
r
e
v
e
r
se
o
r
de
r.
You can also contact a CITROËN dealer or a
q
uali
f
ied workshop
f
or the replacement o
f
these
bu
l
bs
.
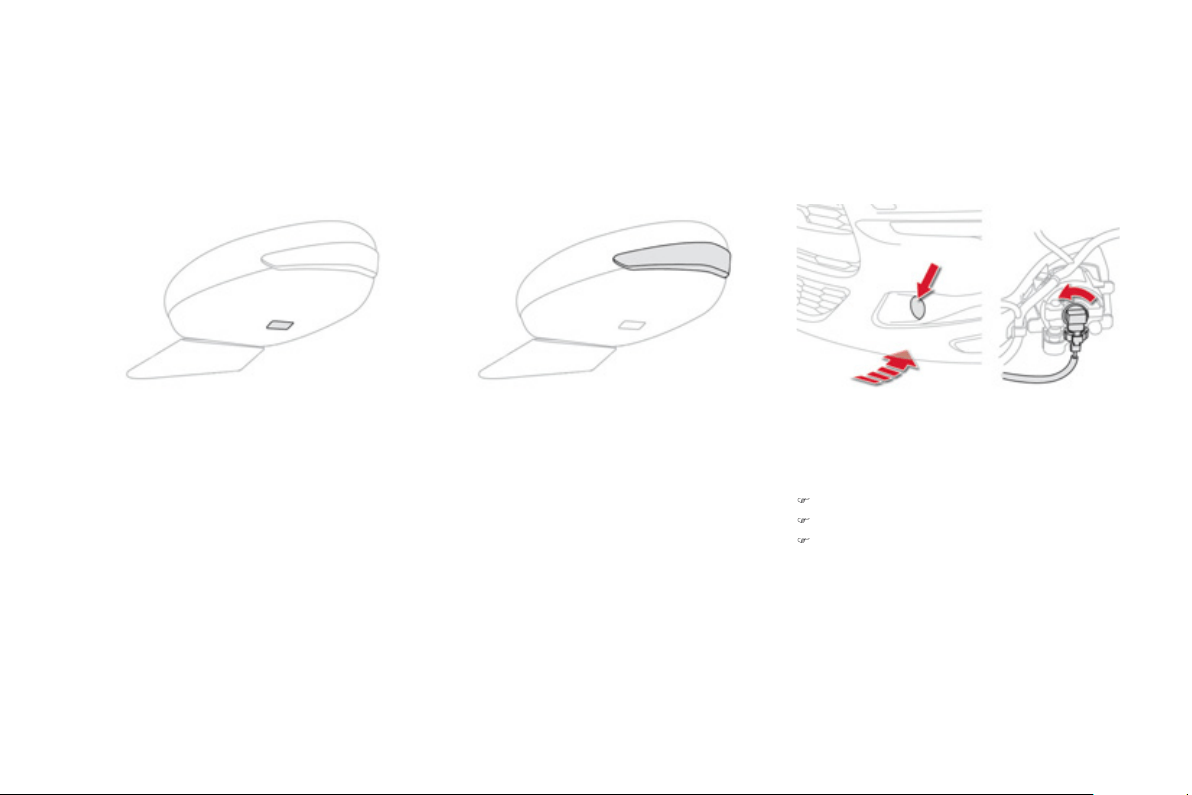
Front fo
g
lamps
)
Remove the de
f
lector under the bod
y
.
)
Disco
nn
ec
t t
he
bulb
co
nn
ec
t
o
r.
)
Turn the bulb a
q
uarter o
f
a turn, withdraw
a
nd chan
g
e it.
To refit, carr
y
out these operations in reverse
o
r
de
r.
To replace these bulbs
y
ou ma
y
also contact a
C
ITROËN dealer or a qualified workshop.
I
nte
g
rate
d
di
rect
i
on
i
n
di
cator
side re
p
eaters
You should contact a CITROËN dealer or a
q
uali
f
ied worksho
p
f
or the re
p
lacement o
f
these
bu
l
bs
.
D
oor mirror s
p
otlam
p
s
You should contact a
C
ITR
OË
N dealer or a
quali
f
ied workshop
f
or the replacement o
f
the
ligh
t em
i
tt
i
n
g
di
o
d
e -
LED
.
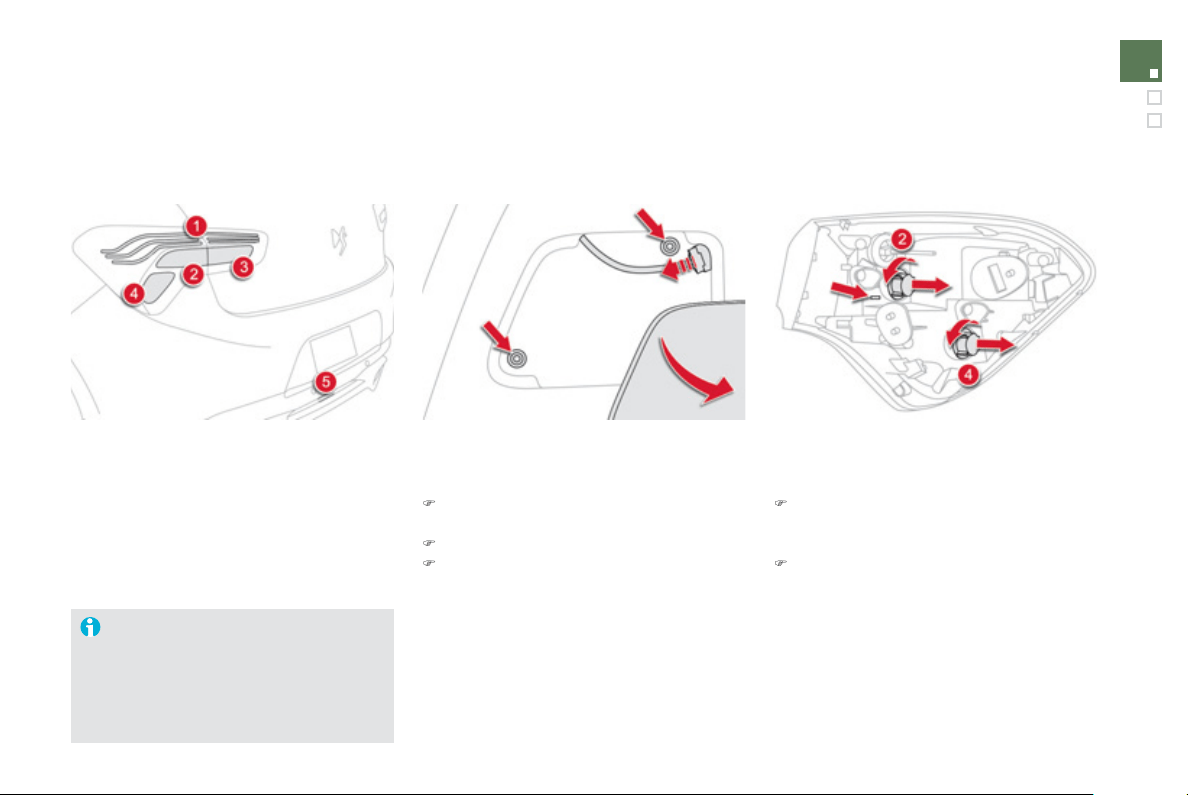
2
1
9
Practical information
1.
Sidelamp
s
(
li
g
ht emittin
g
diodes - LEDs
).
2.
D
irection indicators
(
PY21W amber
).
3.
R
eversin
g
lamps
(
P21W
).
4.
B
rake lamps
(
P21W
).
5
.
Fo
g
lamps
(
P21W
).
Rear lam
p
s
D
irection indicators and brake
l
amps
(
on the win
g
s
)
)
O
pen the boot then remove the access
co
v
er
.
)
Disconnect the lam
p
connector.
)
Remove the two lamp
f
ixin
g
nuts.
)
C
are
f
ull
y
remove the lamp unit
f
rom
outs
id
e.
Th
e reta
i
n
i
n
g
c
li
ps unc
li
p
automatically.
)
Turn the bulb holder a
q
uarter o
f
a turn and
c
han
g
e the bulb.
For reassembl
y
, carr
y
out these operations in
r
e
v
e
r
se
o
r
de
r.
Chan
g
in
g
the li
g
ht emittin
g
d
iode-LED lamps
For replacement, contact a CITROËN
dealer or qualified workshop.
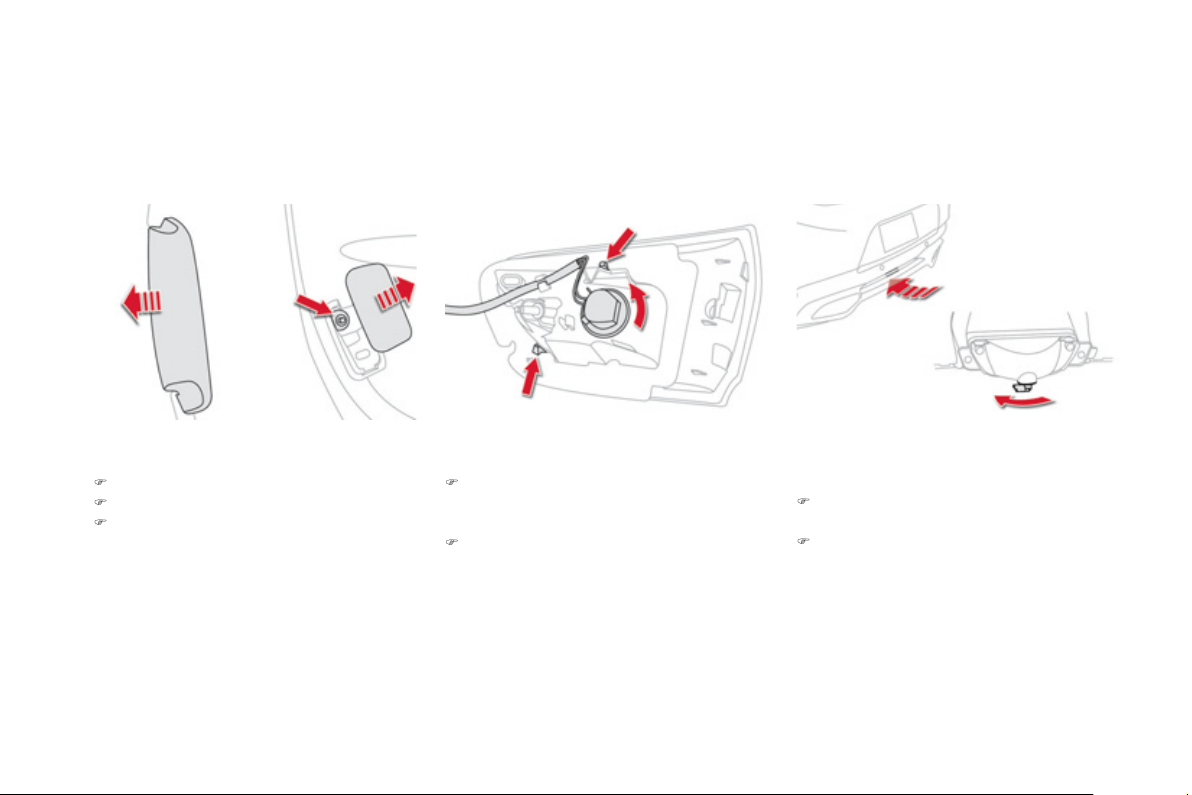
Reversin
g
lamp
(
tail
g
ate
)
)
O
pen the tail
g
ate.
)
Unclip the skirt of the lamp.
)
Remove the access cover and the lamp
f
ixin
g
nut.
)
C
are
f
ull
y
remove the lamp
f
rom the
o
uts
id
e.
Th
e reta
i
n
i
n
g
c
li
ps unc
li
p
automat
i
ca
lly
.
)
Turn the bulb holder a
q
uarter o
f
a turn and
re
p
lace the bulb.
For reassembl
y
, carr
y
out these operations in
re
v
e
r
se
o
r
de
r.
Fo
g
lamp
A
ccess is by passing a hand under the bumper.
)
Turn the bulb holder a quarter o
f
a turn and
p
ull it out.
)
Chan
g
e the bulb.
To refit, carr
y
out these operations in reverse
o
r
de
r.
You can also contact a
C
ITR
OË
N dealer or a
q
uali
f
ied workshop
f
or the replacement o
f
these
bulbs
.
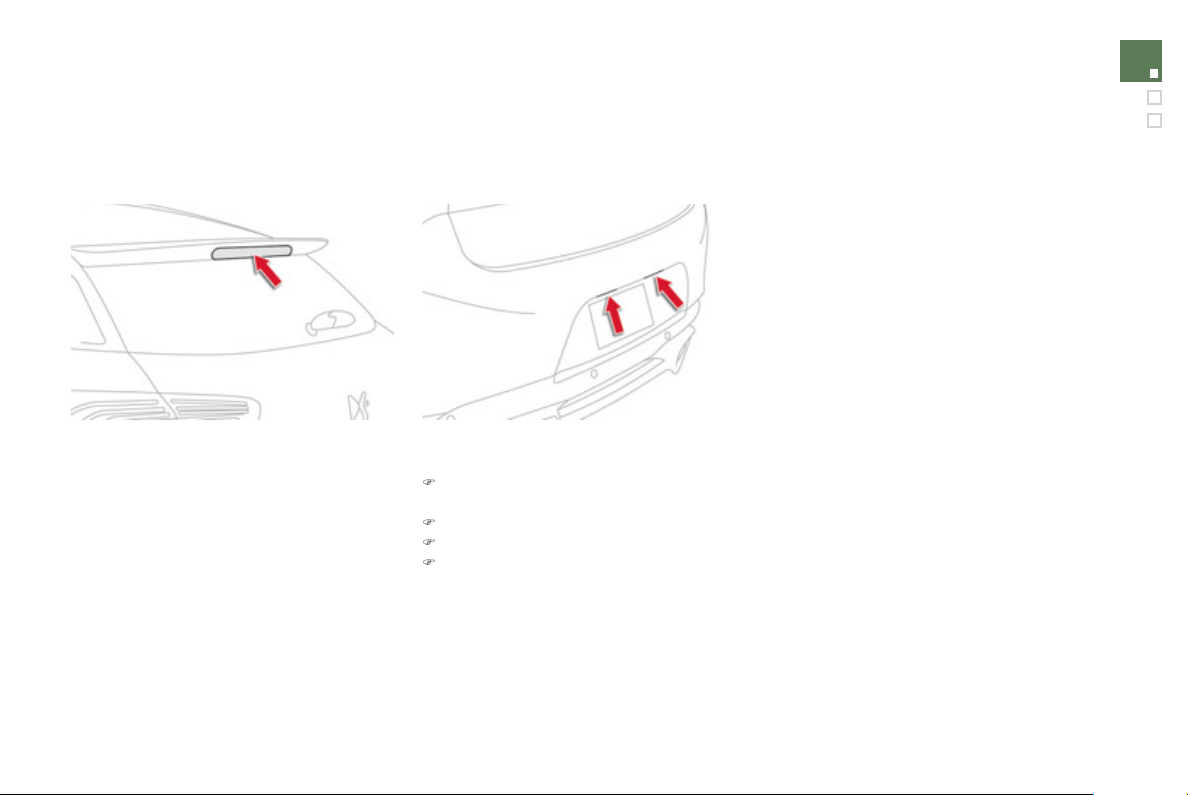
221
Practical information
Number plate lamps
)
In
se
rt
a
thin
sc
r
e
w
d
riv
e
r int
o
th
e
s
l
o
t in th
e
le
n
s
.
)
Push it outwards to unclip it.
)
Re
m
o
v
e
t
he
le
n
s
.
)
P
u
ll
t
h
e
b
u
lb
out an
d
c
h
an
g
e
i
t.
T
hird brake lamp
(
li
g
ht emittin
g
d
iodes - LEDs
)
Contact a CITROËN dealer or qualified
workshop.
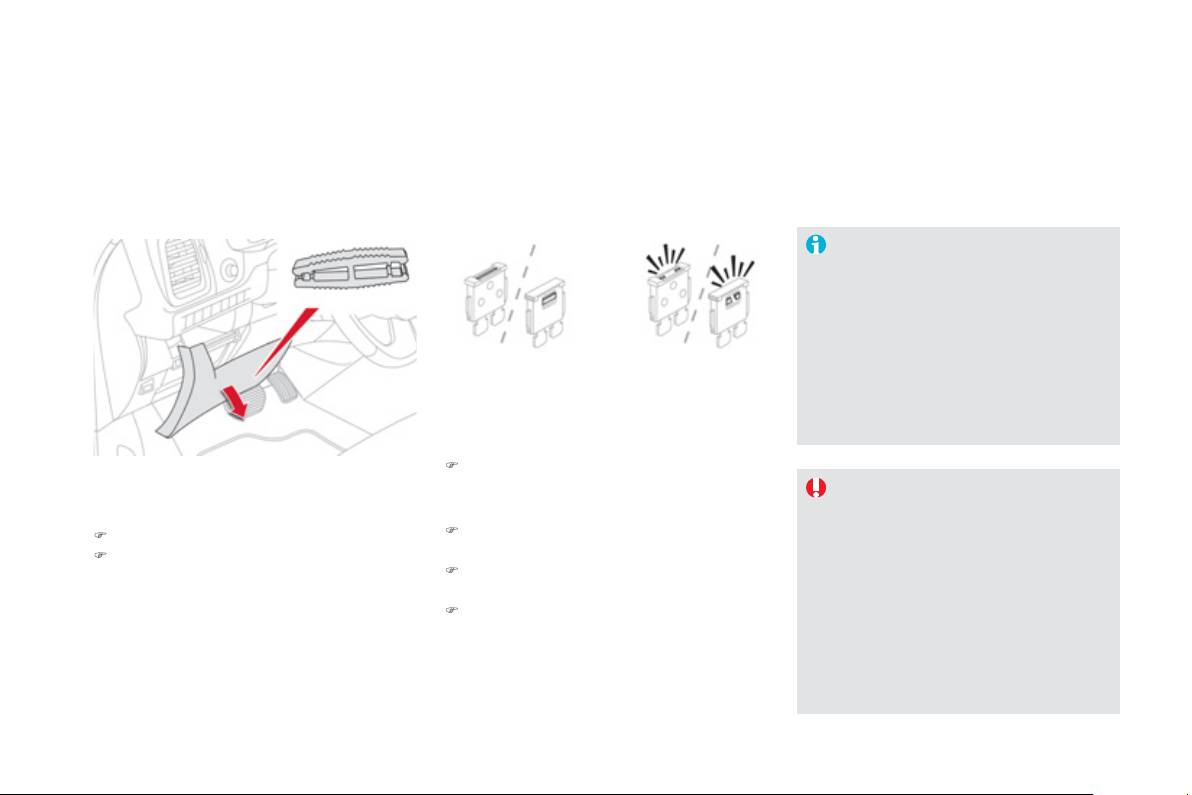
Changing a fuse
Procedure
f
or replacin
g
a
f
ailed
f
use with a new
f
use to recti
fy
a
f
ailure o
f
the correspondin
g
f
unction.
Th
e
fuse
e
xtr
ac
ti
o
n tw
ee
z
e
r i
s
f
itt
ed
t
o
th
e
bac
k
of
th
e
das
h
boa
r
d
fusebo
x
co
v
e
r.
F
o
r
access
t
o
it:
)
remove the cover completel
y
,
)
r
e
m
o
v
e
th
e
tw
ee
z
e
r.
A
ccess to toolin
g
Before chan
g
in
g
a fuse, the cause of the failure
m
us
t
be
i
de
ntifi
ed
a
n
d
r
ec
tifi
ed
.
)
Identif
y
the failed fuse b
y
checkin
g
the
co
n
d
iti
o
n
o
f it
s
fil
a
m
e
nt.
Chan
g
in
g
a fuse
G
ood Failed
)
Use the special tweezer to extract the fuse
f
rom its housin
g
.
)
Alwa
y
s replace the failed fuse with a fuse
of
the same ratin
g
.
)
C
h
ec
k th
a
t th
e
n
u
m
be
r m
a
rk
ed
o
n th
e
f
usebox, the ratin
g
marked on the
f
use and
the
f
ollowing tables all agree.
CITROËN will not accept responsibilit
y
f
or the cost incurred in repairin
g
y
ou
r
vehicle or
f
or recti
fy
in
g
mal
f
unctions
resultin
g
f
rom the installation o
f
accessories not su
pp
lied and not
recommended b
y
CITROËN and
n
o
t in
s
t
a
ll
ed
in
acco
r
da
n
ce
with it
s
instructions, in particular when the
c
ombined consumption of all of the
additional equipment connected
e
xceeds 10 milliamperes.
Installin
g
electrical
a
ccessories
Your vehicle's electrical s
y
stem is
desi
g
ned to operate with standard or
o
ptional equipment.
Before installin
g
other electrical
e
qu
i
pment or accessor
i
es on
y
ou
r
vehicle, contact a CITRO
Ë
N dealer or a
q
uali
f
ied worksho
p
.
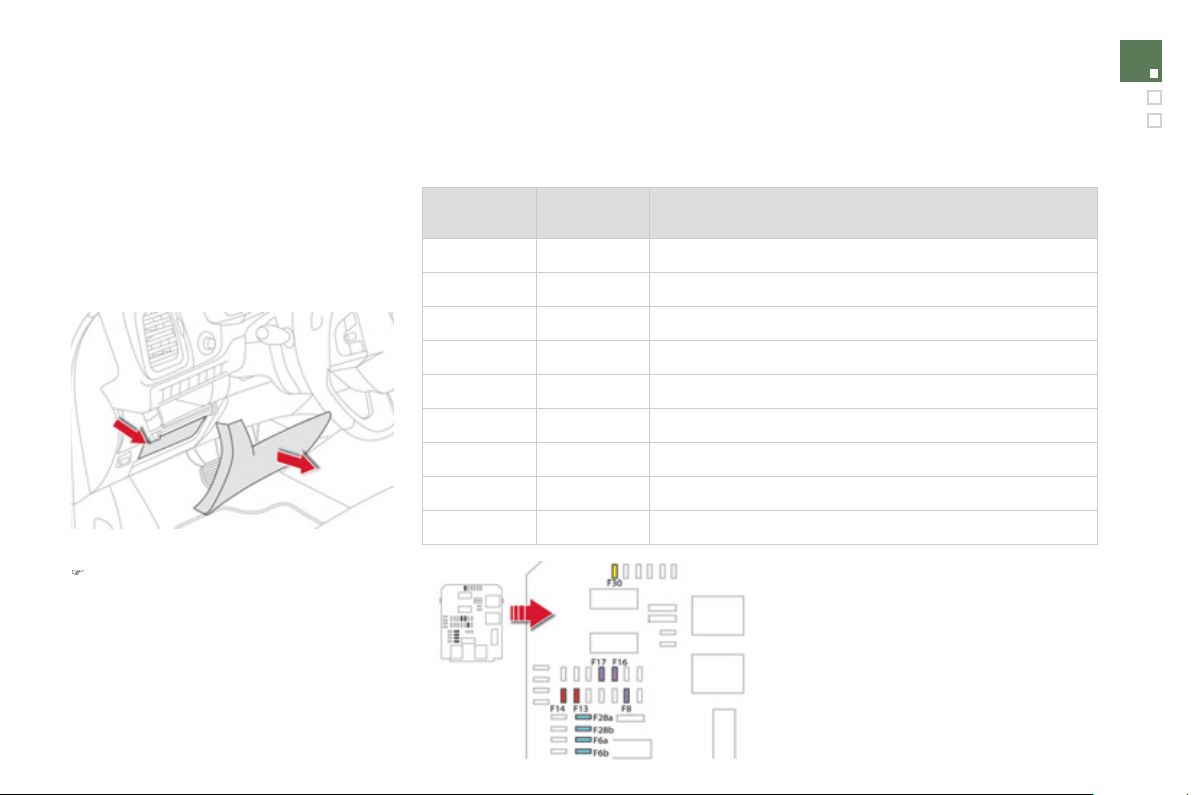
2
2
3
Practical information
Dashboard fuses
The
f
usebox is
p
laced in the lower dashboard
(
le
f
t-hand side
)
.
Access to the fuses
)
Re
m
o
v
e
t
he
co
v
e
r.
Fuse
N°
Ratin
g
(
A
)
F
unct
i
ons
F6 A or B 15 Audio system.
F
8
3
Ala
rm.
F1
3
10 Front ci
g
arette li
g
hter, front 12 V socket.
F14 10 R
ea
r
12
V
soc
k
e
t.
F1
6
3
Rear map readin
g
lamps.
F17
3
C
ourtes
y
mirror.
F28 A or B
15
A
u
di
o s
y
stem.
F3
0
2
0
Rear wiper.
F32 10 Audio ampli
f
ier.
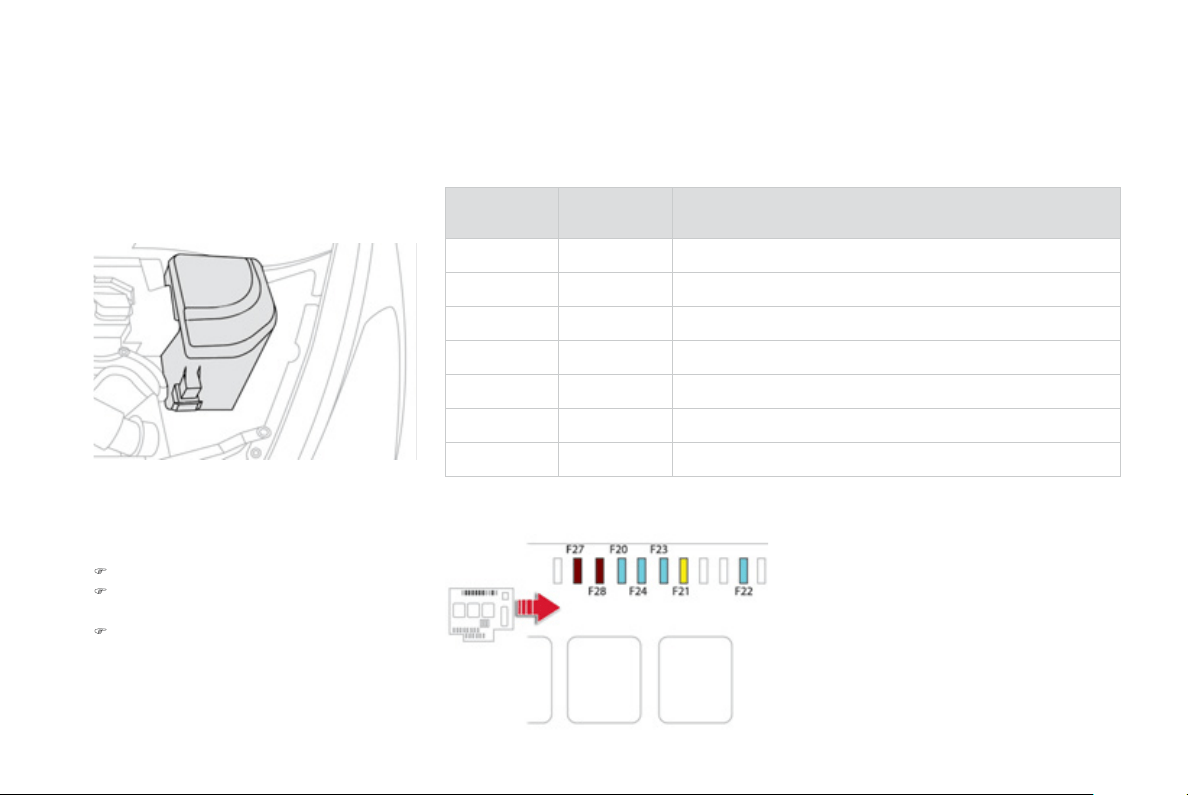
En
g
ine compartment fuses
The
f
usebox is placed in the en
g
ine
c
ompartment near the batter
y
.
A
ccess to the fuses
)
U
nc
li
p t
h
e cover.
)
C
han
g
e the
f
use
(
see correspondin
g
p
aragraph
)
.
)
When
y
ou have
f
inished, close the cover
c
arefull
y
to ensure correct sealin
g
of the
f
usebo
x.
Fuse
N°
Ratin
g
(
A
)
F
unct
i
ons
F20
15
Front
/
rear screenwash
p
um
p
.
F21
20
H
ea
dl
amp was
h
pump.
F22
15
H
o
rn.
F2
3
15
Ri
g
ht-hand main beam headlamp.
F2
4
15
Le
f
t-hand main beam headlam
p
.
F27
5 Le
f
t hand lam
p
mask.
F2
8
5
Righ
t
h
an
d
l
amp mas
k
.
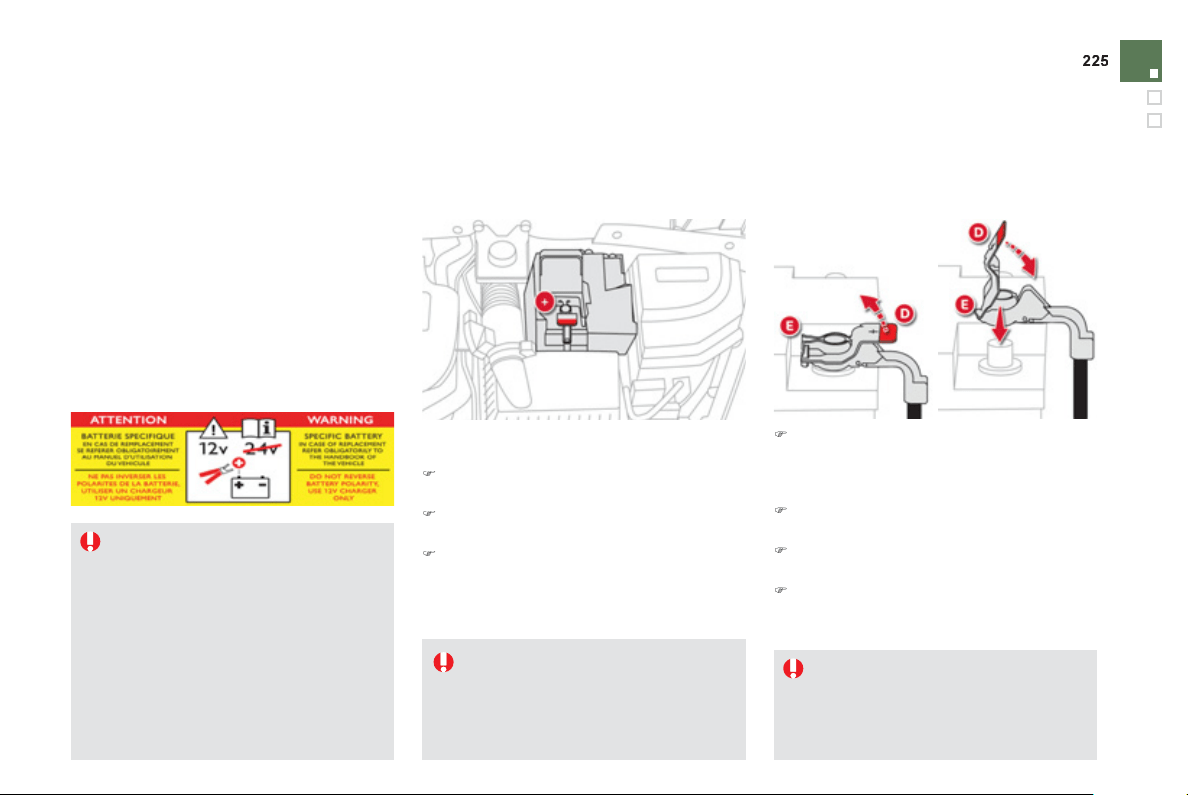
Practical information
12 V battery
The presence o
f
this label indicates
the use o
f
a 12 V lead-acid batter
y
with
s
pecial technolo
gy
and speci
f
ication,
f
or
which the involvement of a CITROËN
dealer or quali
f
ied workshop is required
when replacin
g
or disconnectin
g
the
batter
y
.
F
a
il
u
r
e
t
o
obse
rv
e
thi
s
r
eco
mm
e
n
da
ti
o
n
ma
y
cause premature wear of the
b
atter
y
.
The battery is located under the bonnet.
To
g
ain access to it:
)
open the bonnet usin
g
the interior release
l
ever, then the exterior safet
y
catch,
)
remove the plastic cover on the
(
+
)
terminal
,
)
i
f
necessar
y
, unclip the
f
usebox to remove
t
h
e
b
atter
y
.
A
ccess to the batter
y
)
R
a
i
se t
h
e
l
oc
ki
n
g
ta
b
D
f
ull
y
to release the
c
able terminal clam
p
E
.
Reconnectin
g
the
(
+
)
cable
)
Position the open clamp
E
o
f th
e
cab
l
e
o
n
the positive post
(
+
)
of the batter
y
.
)
Press verticall
y
on the clamp E to position
it correctl
y
on the batter
y
.
)
L
oc
k
t
h
e c
l
amp
by
sprea
di
n
g
t
h
e
p
os
i
t
i
on
i
n
g
l
u
g
an
d
t
h
en
l
ower
i
n
g
t
h
e ta
b
D
.
Do not appl
y
excessive
f
orce on the
tab as lockin
g
will not be possible if the
c
lamp is not positioned correctl
y
; start
the procedure a
g
ain.
Be
f
ore doin
g
an
y
work on
y
our vehicle,
s
witch off the i
g
nition
(
R
ead
y
lamp off
)
to avoid an
y
risk of in
j
ur
y
resultin
g
from
a
utomatic operation of the en
g
ine.
Y
ou
r v
e
hi
c
l
e
i
s
f
itt
ed
with
a
co
nv
e
nti
o
n
a
l 12 V
battery, located under the bonnet, in addition
to the hi
g
h volta
g
e batter
y
used b
y
the h
y
brid
sy
stem.
In certain conditions, if the 12 V batter
y
is
too dischar
g
ed to activate the h
y
brid s
y
stem,
rechar
g
in
g
from another conventional 12 V
b
atter
y
i
s poss
ibl
e.
Do not carr
y
out this rechar
g
e i
f
the
R
ea
dy
l
am
p
i
s on.
Procedure
f
or starting the engine using another battery or charging a discharged battery.
Disconnectin
g
the
(
+
)
cable
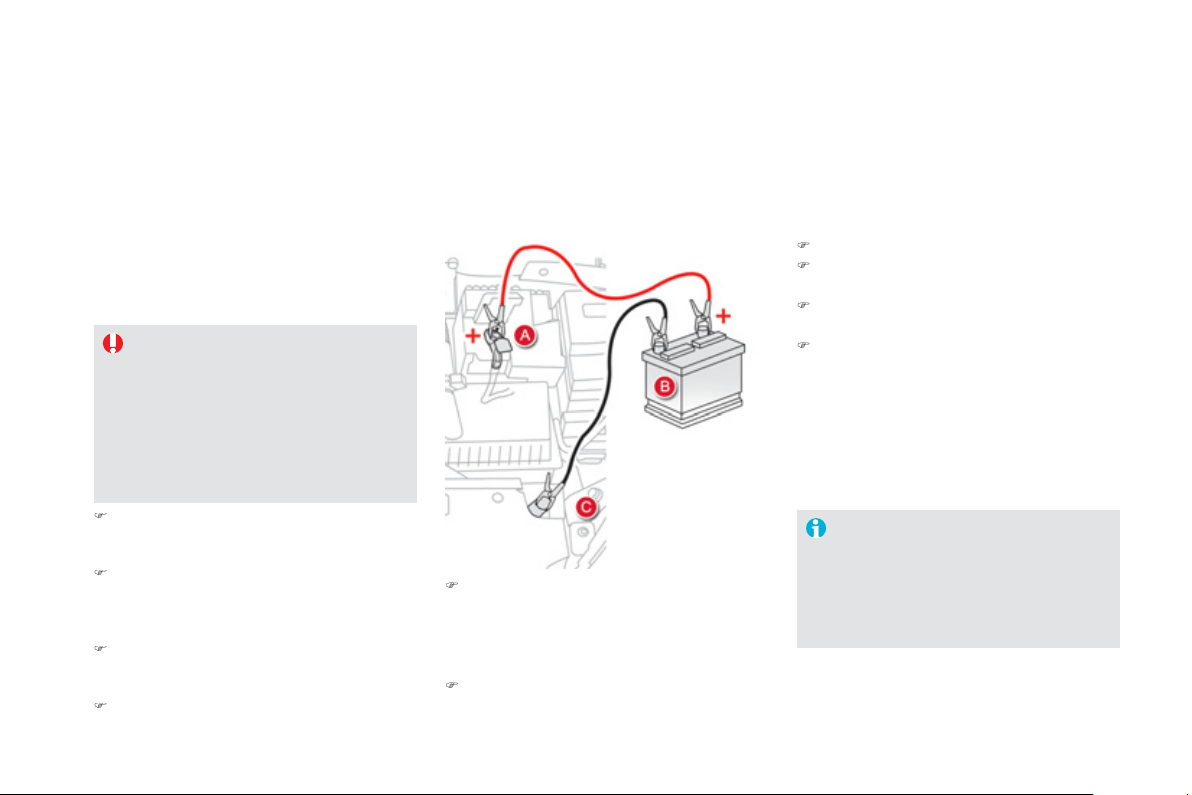
A
f
ter re
f
ittin
g
the batter
y
, the
S
top
&
S
tart s
y
stem will onl
y
be active
a
f
ter several hours depending on
th
e
c
lim
a
ti
c
co
n
d
iti
o
n
s
a
n
d
th
e
s
t
a
t
e
o
f char
g
e of the batter
y
(
up to about
8
hours
)
.
When
y
our vehicle's batter
y
is dischar
g
ed, the
e
n
g
ine can be started usin
g
a slave batter
y
(
external or on another vehicle
)
and
j
ump lead
cab
l
es
.
Startin
g
usin
g
another
b
atter
y
First check that the slave batter
y
has a
nominal volta
g
e of 12 V and a capacit
y
at least equal to that of the dischar
g
ed
b
atter
y
.
D
o not tr
y
to start t
h
e en
gi
ne
by
c
onnect
i
n
g
a
b
atter
y
c
h
ar
g
er.
Do not disconnect the
(
+
)
terminal when
the en
g
ine is runnin
g
.
)
Connect the red cable to the positive
terminal
(
+
)
o
f
the
f
lat batter
y
A
, t
h
en to t
h
e
p
ositive terminal
(
+
)
of the slave batter
y
B
.
)
C
onnect one end o
f
the green or black
c
able to the ne
g
ative terminal
(
-
)
of the
slave batter
y
B
(
or earth point on the other
vehicle
)
.
)
Connect the other end of the
g
reen or black
c
a
bl
e to t
h
e eart
h
po
i
nt
C
o
n t
he
b
r
oke
n
down vehicle
(
or on the en
g
ine mountin
g)
.
)
S
tart the en
g
ine o
f
the vehicle with the
g
ood batter
y
and leave it runnin
g
for a few
m
in
u
t
es
.
)
O
perate the starter on the broken down
ve
hi
c
l
e an
d
l
et t
h
e en
gi
ne run
I
f
the en
g
ine does not start strai
g
ht awa
y
,
s
witch o
ff
the ignition and wait a
f
ew
moments be
f
ore tr
y
in
g
a
g
ain.
)
Wait until the en
g
ine returns to idle then
disconnect the
j
ump lead cables in the
r
e
v
e
r
se
o
r
de
r.
)
Disconnect the battery
f
rom the vehicle.
)
Follow the instructions
f
or use provided b
y
the manufacturer of the char
g
er.
)
Connect the batter
y
startin
g
with the
n
e
g
ative terminal
(
-
)
.
)
C
heck that the terminals and connectors
a
re clean. I
f
the
y
are covered with sulphate
(
whitish or
g
reenish deposit
)
, remove them
a
n
d
clea
n t
he
m.
Char
g
in
g
the batter
y
usin
g
a
batter
y
char
g
e
r
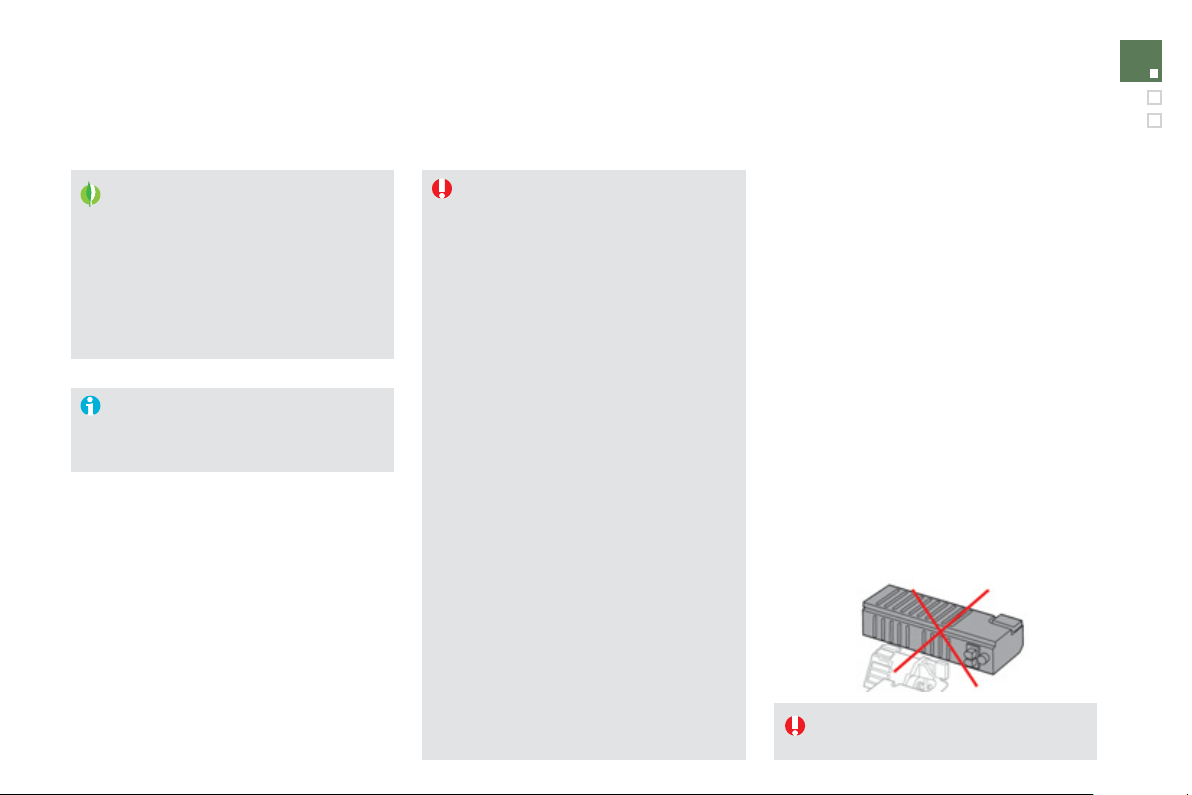
227
Practical information
Do not attempt to char
g
e the hi
g
h
volta
g
e batter
y
.
Th
e
ba
tt
e
ri
es
co
nt
a
in h
a
rm
fu
l
subs
t
a
n
ces
suc
h
as su
l
p
h
ur
i
c ac
id
an
d
l
ea
d
.
Th
e
y
must
be disposed o
f
in accordance with regulations
and must not, in an
y
circumstances, be
d
i
sca
r
ded
with h
ouse
h
o
l
d
w
as
t
e
.
T
a
k
e
used
r
e
m
o
t
e
co
ntr
o
l
ba
tt
e
ri
es
a
n
d
vehicle batteries to a special collection
p
o
i
nt.
It is advisable to disconnect the batter
y
if th
e
v
e
hi
c
l
e
i
s
t
o
be
l
e
ft
u
n
used
f
or
mo
r
e
th
a
n
o
n
e
m
o
nth.
Protect
y
our e
y
es and
f
ace be
f
ore
h
an
dli
n
g
t
h
e
b
atter
y
.
All
operat
i
ons on t
h
e
b
atter
y
must
b
e
ca
rr
ied
ou
t
i
n
a
w
ell
v
e
nt
ila
t
ed
a
r
ea
a
n
d
awa
y
f
rom naked
f
lames and sources
o
f
sparks, so as to avoid the risk o
f
e
xplosion or
f
ire.
Do not tr
y
to char
g
e a
f
rozen batter
y
;
the batter
y
must
f
irst be thawed out to
avoid the risk o
f
explosion. I
f
the batter
y
has been
f
rozen, be
f
ore char
g
in
g
have
it checked b
y
a CITRO
Ë
N dealer or a
q
uali
f
ied workshop who will check that
t
h
e
i
nterna
l
components
h
ave not
b
een
d
ama
g
e
d
an
d
t
h
e cas
i
n
g
i
s not crac
k
e
d
,
whi
c
h
cou
l
d
cause
a
l
ea
k
of
t
o
xi
c
a
n
d
co
rr
osi
v
e
acid
.
D
o not reverse t
h
e po
l
ar
i
t
y
an
d
use on
ly
a 12 V char
g
er.
Do
n
o
t
disco
nn
ec
t t
he
t
e
rm
i
n
als
w
hile
t
h
e en
gi
ne
i
s runn
i
n
g
.
D
o not c
h
ar
g
e t
h
e
b
atter
i
es w
i
t
h
out
disconnectin
g
the terminals
f
irst.
Wash
y
our hands a
f
terwards.
D
o not pus
h
t
h
e ve
hi
c
l
e to start t
h
e
e
n
g
ine i
f
the vehicle is
f
itted with the
el
ectron
i
c
g
ear
b
ox.
Before disconnectin
g
the batter
y
Wait 2 minutes after switchin
g
off the i
g
nition
before disconnectin
g
the batter
y
.
C
lose the windows and the doors before
disconnectin
g
the batter
y
.
Followin
g
reconnection of the batter
y
Followin
g
reconnection o
f
the batter
y
, switch on
the i
g
nition and wait 1 minute be
f
ore startin
g
to
permit initialisation o
f
the electronic s
y
stems.
H
owever, i
f
problems remain
f
ollowin
g
this
o
peration, contact a CITRO
Ë
N dealer or a
q
uali
f
ied workshop.
Re
f
errin
g
to the correspondin
g
section,
y
ou
must
y
oursel
f
reinitialise
(
dependin
g
on
version
)
:
- t
h
e remote contro
l
k
e
y
,
- the electric blind
(
s
)
,
- ...
D
o not
p
us
h
t
h
e ve
hi
c
l
e to start
the engine.

Sy
stem which mana
g
es the duration o
f
use o
f
certain
f
unctions to conserve a su
ff
icient level o
f
c
har
g
e in the batter
y
.
After the en
g
ine has stopped,
y
ou can still use functions such as the audio and telematics
s
y
stem, windscreen wipers, dipped beam headlamps, courtes
y
lamps, etc. for a maximum
c
ombined duration of about fort
y
minutes.
Energy economy mode
Switchin
g
to econom
y
mode
A
messa
g
e t
h
en appears
i
n t
h
e
i
nstrument
panel screen indicating that the vehicle has
switched to econom
y
mode and the active
functions are put on standb
y
.
If a telephone call is bein
g
made at this time, it
will be maintained for around 1
0
minutes with
the Bluetooth hands-
f
ree s
y
stem o
f
y
our audio
s
y
stem.
Exitin
g
econom
y
mode
These
f
unctions are reactivated automatically
ne
xt tim
e
th
e
v
e
hi
c
l
e
i
s
d
riv
e
n.
In
o
r
de
r t
o
r
es
t
o
r
e
th
e
use
o
f th
ese
f
u
n
c
ti
o
n
s
immediatel
y
, start the en
g
ine and let it run:
- for less than ten minutes, to use the
e
quipment for approximatel
y
five minutes,
-
f
or more than ten minutes, to use the
e
quipment
f
or up to approximatel
y
t
hi
rt
y
m
i
nutes.
Let the engine run
f
or the duration speci
f
ied to
e
nsure that the batter
y
char
g
e is su
ff
icient.
Do not repeatedl
y
and continuousl
y
restart the
e
n
g
ine in order to char
g
e the batter
y
.
A
flat batter
y
prevents the en
g
ine from startin
g
(
refer to the "Batter
y
" section
)
.
In this ener
gy
econom
y
mode and when
startin
g
up the h
y
brid s
y
stem, it ma
y
t
a
k
e
a
f
e
w
seco
n
ds
be
f
o
r
e
th
e
Read
y
l
amp comes on.
Load reduction mode
Sy
stem which mana
g
es the use o
f
certain
f
unctions according to the level o
f
charge
r
emainin
g
in the batter
y
.
When the vehicle is bein
g
driven, the load
r
eduction function temporaril
y
deactivates
c
ertain functions, such as the air conditionin
g
,
th
e
h
ea
t
ed
r
ea
r
sc
r
ee
n...
Th
e
deac
tiv
a
t
ed
fu
n
c
ti
o
n
s
a
r
e
r
eac
tiv
a
t
ed
a
utomat
i
ca
lly
as soon as con
di
t
i
ons perm
i
t.
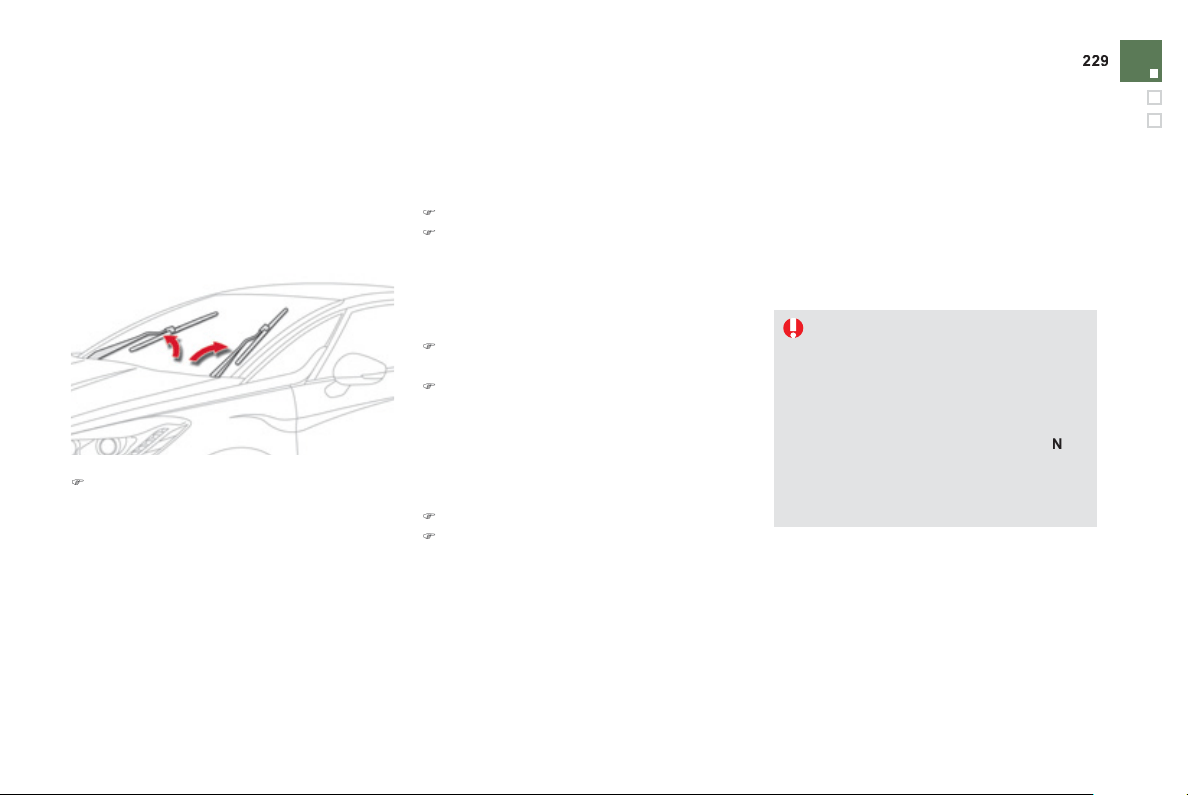
Practical information
Changing a wiper blade
Before removin
g
a front
wi
p
er blade
Removin
g
)
R
a
i
se t
h
e correspon
di
n
g
w
i
per arm.
)
Uncli
p
the wi
p
er blade and remove it.
Fittin
g
)
Put the correspondin
g
new wiper blade in
p
l
ace an
d
c
li
p
i
t.
)
Fold down the wiper arm care
f
ull
y
.
A
fter fittin
g
a front wiper
b
lade
)
Switch on the i
g
nition.
)
O
perate the wiper stalk a
g
ain to park the
wiper blades.
Recovering the
vehicle on a fl at-bed
Procedure
f
or havin
g
y
our vehicle recovered on
a
f
lat bed lorry or trailer.
Alwa
y
s recover the vehicle on a flat
bed lorr
y
or trailer
.
N
e
v
e
r t
o
w th
e
v
e
hi
c
l
e
with th
e
f
ou
r
wheels on the
g
round
(
or the front or
rear wheels onl
y)
,
y
ou risk dama
g
in
g
t
he
tr
a
n
s
m
issio
n.
Pl
ace t
h
e
g
ear se
l
ector
i
n pos
i
t
i
on
N
and switch o
ff
the en
g
ine
(
R
ea
dy
l
am
p
off)
.
)
Within one minute a
f
ter switchin
g
o
ff
the i
g
nition, operate the wiper stalk to
p
osition the wiper blades verticall
y
on the
win
dsc
r
ee
n.

From the front From the rea
r
A
ccess to the tools
The towin
g
e
y
e is installed in the boot under
th
e
f
l
oo
r.
T
o
g
a
i
n access to
i
t:
)
o
p
en t
h
e
b
oot,
)
remove the towing eye, located in the tool
bo
x.
)
O
n the front bumper, unclip the cover b
y
pressin
g
at the bottom to disen
g
a
g
e the
s
ecurin
g
lu
g
s.
)
S
crew the towin
g
e
y
e in
f
ull
y
.
)
I
nsta
ll
t
h
e tow
i
n
g
s
y
stem.
)
S
witch on the hazard warnin
g
lamps.
)
O
n the rear bumper, unclip the cover b
y
leverin
g
at the left with the point of the
towin
g
e
y
e.
)
S
crew the towin
g
e
y
e in
f
ull
y
.
)
I
nsta
ll
t
h
e tow
i
n
g
s
y
stem.
)
S
witch on the hazard warnin
g
lamps.
)
Pl
ace t
h
e
g
ear se
l
ector
i
n
neutra
l
-
p
os
i
t
i
on
N
.
Failure to observe this s
p
ecial condition
c
ould result in dama
g
e to certain
brakin
g
components and the absence
of brakin
g
assistance the next time the
en
g
ine is started.
When towin
g
with the en
g
ine o
ff
, there
is no longer any braking or steering
ass
i
s
t
a
n
ce
.
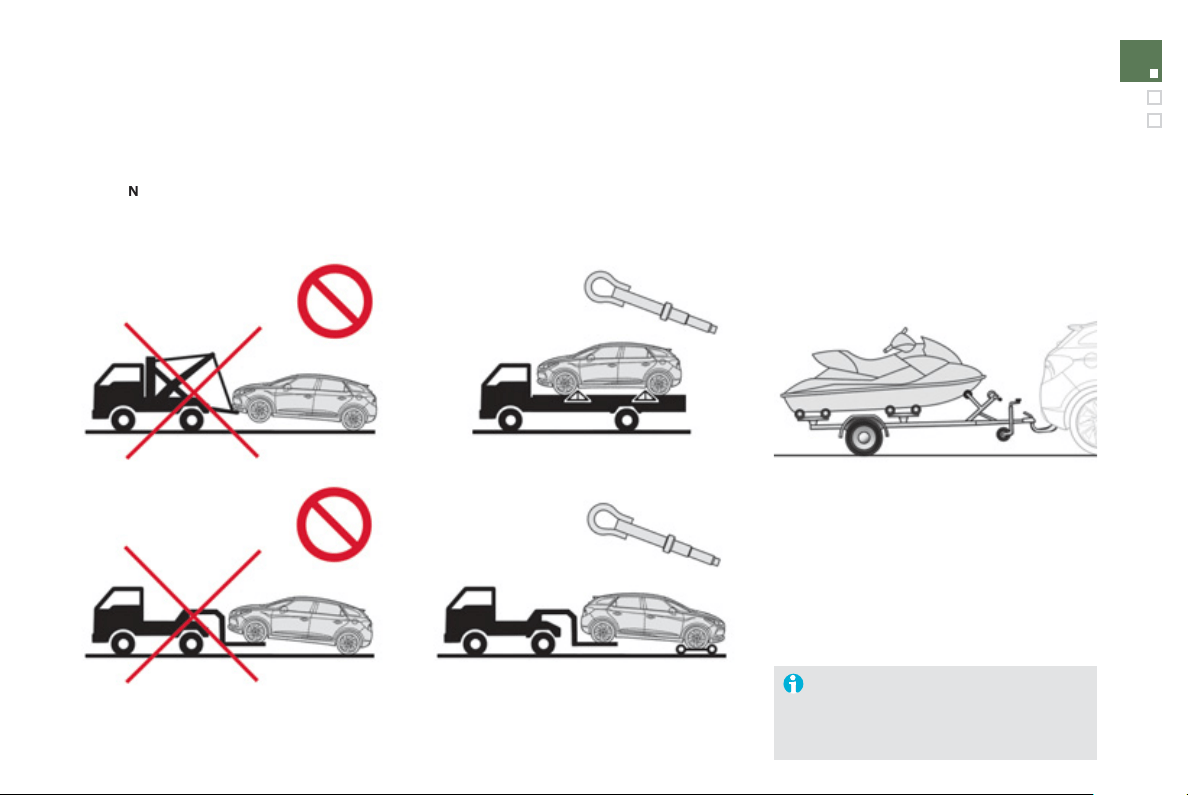
2
3
1
Practical information
Towing a trailer
T
o
w
ba
r
su
it
ab
l
e
f
o
r th
e
a
tt
ac
hm
e
nt
o
f
a
trailer or installation of a bic
y
cle carrier, with
additional li
g
htin
g
and si
g
nallin
g
.
When not towin
g
a trailer, remove the
q
uickl
y
-detachable tow ball be
f
ore
d
r
i
v
i
n
g
, so as to avo
id
mas
ki
n
g
t
h
e
c
entra
l
rear
l
am
p
.
M
aximum trailer wei
g
ht
The towin
g
wei
g
ht is limited: refer to the
"T
ec
hni
ca
l
da
t
a
"
sec
ti
o
n.
Vehicle recovery
Be
f
ore doin
g
an
y
work, with the i
g
nition on, press the brake pedal and put the
g
ear selector to
p
os
i
t
i
on
N
, then switch o
ff
the h
y
brid s
y
stem.
I
f
necessary because access to the vehicle is di
ff
icult, it can be moved a
f
ew dozen metres at a
s
peed not exceedin
g
6 mph
(
10 km
/
h
)
.
Th
e
f
r
o
nt
o
r r
ea
r wh
ee
l
s
m
us
t n
o
t
be
o
n th
e
g
round, use a
f
lat-bed lorr
y
or trailer to recove
r
th
e
v
e
hi
c
l
e
.
Use the towing eyes only to pull a vehicle out or
to
p
ull it onto a
f
lat-bed.
Your vehicle is primaril
y
desi
g
ned for
transportin
g
people and lu
gg
a
g
e, but it ma
y
also be used for towin
g
a trailer.
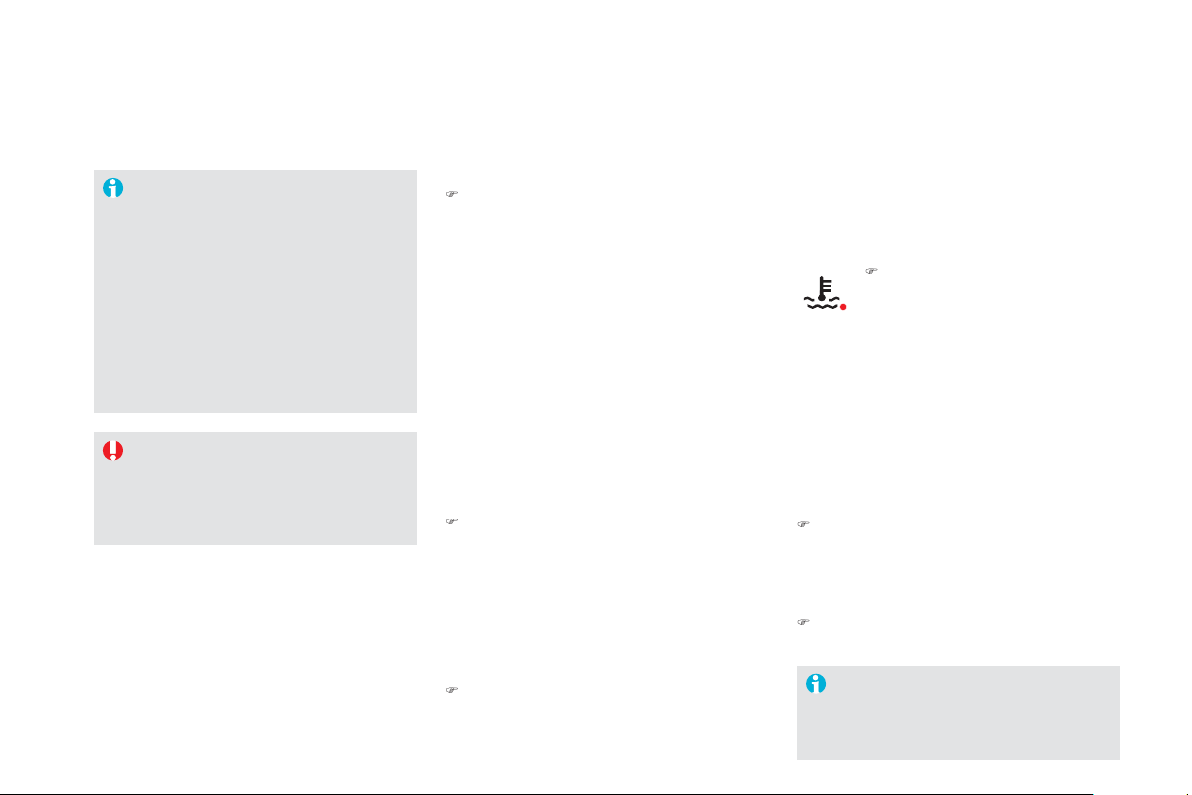
We recommend the use of
g
enuine
C
ITR
O
ËN towbars and their harnesses
that have been tested and approved
from the desi
g
n sta
g
e of
y
our vehicle,
and that the
f
ittin
g
o
f
the towbar is
e
ntr
us
t
ed
t
o
a
C
ITR
OË
N
dea
l
e
r
o
r
a
q
uali
f
ied worksho
p
.
If the towbar is not fitted by a CITROËN
dealer, it is im
p
erative that it is
fitt
ed
in
acco
r
da
n
ce
with th
e
v
e
hi
c
l
e
ma
n
u
f
ac
t
u
r
e
r'
s
in
s
tr
uc
ti
o
n
s
.
Drivin
g
advice
Distribution of loads
)
Di
s
tri
bu
t
e
th
e
l
oad
in th
e
tr
a
il
e
r
so
th
a
t th
e
heaviest items are as close as possible to
t
h
e ax
l
e an
d
t
h
e nose we
igh
t approac
h
es t
h
e
max
i
mum perm
i
tte
d
w
i
t
h
out excee
di
n
g
i
t.
Ai
r
d
ens
i
t
y
d
ecreases w
i
t
h
a
l
t
i
tu
d
e, t
h
us
r
educing engine per
f
ormance. Above
1 000 metres, the maximum towed load must
b
e reduced b
y
10 % for ever
y
1 000 metres o
f
a
ltit
ude
.
Side wind
)
Take into account the increased sensitivit
y
t
o
s
i
de
win
d
.
Coolin
g
Towin
g
a trailer on a slope increases the
temperature of the coolant.
As the
f
an is electricall
y
controlled, its coolin
g
c
apac
i
t
y
i
s not
d
epen
d
ent on t
h
e en
gi
ne spee
d
.
)
T
o
l
ower t
h
e en
gi
ne spee
d
, re
d
uce
y
our
sp
eed.
)
I
f
the warnin
g
lamp and the
S
TOP warning lamp come on,
s
top the vehicle and switch o
ff
the en
g
ine as soon as possible.
Brakin
g
Towin
g
a trailer increases the brakin
g
distance.
To avoid overheatin
g
of the brakes on a lon
g
m
ountain t
y
pe of descent, the use of en
g
ine
b
ra
ki
n
g
i
s recommen
d
e
d
.
Ty
res
)
C
heck the t
y
re pressures o
f
the towin
g
vehicle and o
f
the trailer, observin
g
the
r
ecommen
d
e
d
p
ressures.
Li
g
htin
g
)
Check the electrical li
g
htin
g
and si
g
nallin
g
o
n th
e
tr
a
il
e
r.
The rear parkin
g
sensors will be
deactivated automaticall
y
i
f
a
g
enuine
C
ITR
OË
N t
o
w
ba
r i
s
used
.
Drivin
g
with a trailer places
g
reate
r
d
eman
d
s on t
h
e tow
i
n
g
ve
hi
c
l
e an
d
t
h
e
d
r
i
ver must ta
k
e part
i
cu
l
ar care.
Th
e max
i
mum towe
d
l
oa
d
on a
l
on
g
i
nc
li
ne
d
epen
d
s on t
h
e
g
ra
di
ent an
d
t
h
e am
bi
ent
tem
p
erature.
In all cases, keep a check on the coolant
temperature.
R
e
f
e
r t
o
th
e
"T
ec
hni
ca
l
da
t
a
"
sec
ti
o
n f
o
r
de
t
a
il
s
of the wei
g
hts and towed loads which appl
y
to
y
our ve
hi
c
l
e.
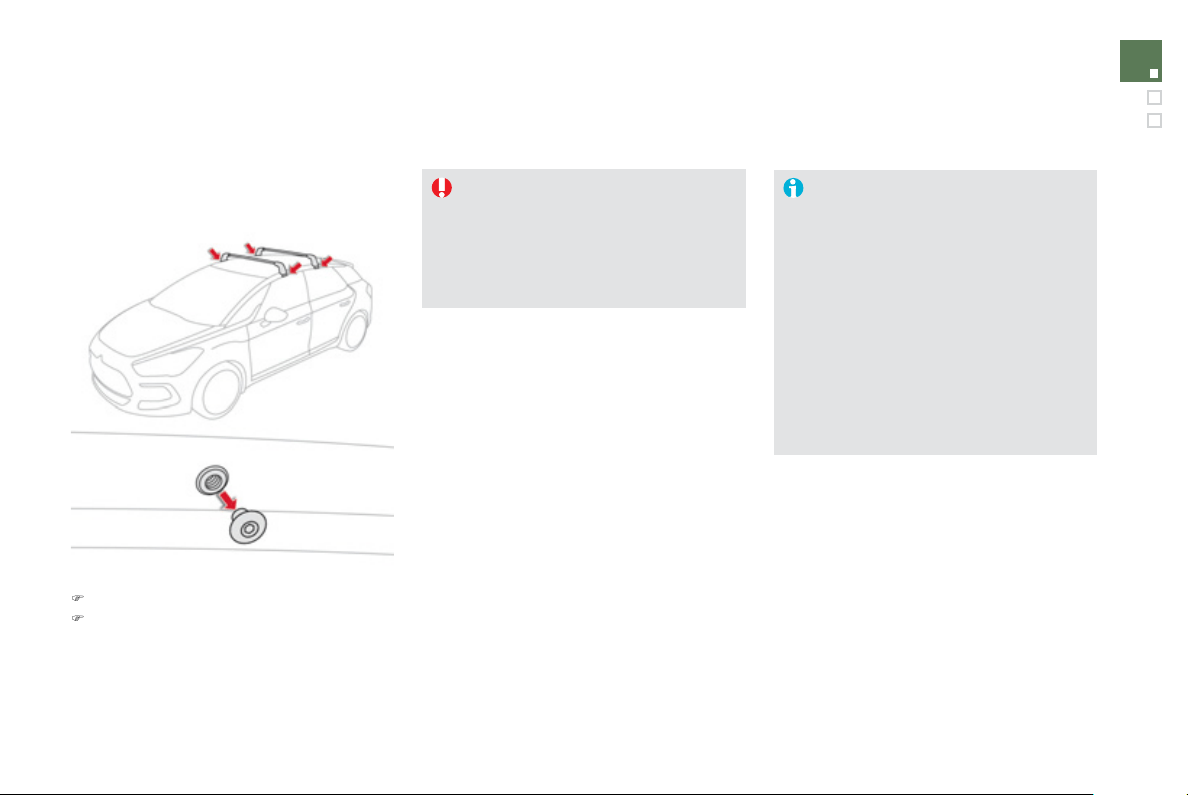
2
3
3
Practical information
Fitting roof bars
Maximum authorised load evenl
y
distributed on the roof bars, for a loadin
g
hei
g
ht not exceedin
g
40 cm
(
with the
e
xception of bic
y
cle carriers
)
: 7
0
k
g
.
I
f
the hei
g
ht exceeds 40 cm, adapt the
s
peed o
f
the vehicle to the pro
f
ile o
f
the
road to avoid dama
g
in
g
the roo
f
bars
and the
f
ixings on the roo
f
.
Be sure to re
f
er to national le
g
islation in
order to compl
y
with the re
g
ulations for
transportin
g
ob
j
ects which are lon
g
er
th
a
n th
e
v
e
hi
c
l
e
.
When
f
itting transverse roo
f
bars, take care to
p
osition them correctl
y
:
U
se accessor
i
es recommen
d
e
d
by
CITROËN observing the manufacturer's
r
ecommendations and
f
ittin
g
in
s
tr
uc
ti
o
n
s
so
as
t
o
a
v
o
i
d
th
e
ri
s
k
of dama
g
in
g
the bod
y
(
deformation,
s
cratches, ...
)
.
)
R
emove t
h
e cap us
i
n
g
an a
ll
en
TM
k
e
y
.
)
Put the bars into
p
osition then
f
it and
ti
g
hten the securin
g
screws.

Accessories
A
wide ran
g
e of accessories and
g
enuine parts is available from the CITRO
Ë
N dealer network.
These accessories and parts have been tested and approved
f
or reliability and sa
f
ety.
The
y
are all adapted to
y
our vehicle and benefit from CITROËN's recommendation and warrant
y
.
"Comfort":
door deflectors
,
side window blinds
,
rear
s
creen blind, isotherm module, coat han
g
er
f
ixed to head restraint, mobile readin
g
lamp,
m
irror
f
or caravan, parkin
g
sensors...
"Transport s
y
stems":
child seats and booster cushions, boot car
p
et,
boot liner, boot net, boot spacers, transverse
r
oof bars, bic
y
cle carrier, ski carrier, roof boxes,
towbars, wirin
g
harnesses...
If a towbar and wirin
g
harness are fitted
outside the CITRO
Ë
N dealer network, the
i
nsta
ll
at
i
on must
b
e
d
one us
i
n
g
t
h
e ve
hi
c
l
e
'
s
e
lectrical pre-equipment and
f
itted
f
ollowin
g
the
ma
n
ufac
t
u
r
e
r'
s
r
eco
mm
e
n
da
ti
o
n
s
.
"St
y
lin
g
":
g
ear lever knobs, aluminium foot rest, allo
y
wheels
,
chrome mirror shells
,
chrome door
aperture
f
inishers...
* To avoid an
y
risk of
j
ammin
g
the pedals:
- ensure that mats are correctl
y
positioned
a
nd secured,
- never fit one mat on top of another.
"Securit
y
and safet
y
":
anti-intrusion alarm, anti-tilt unit, stolen
vehicle trackin
g
s
y
stem, child seats and
b
ooster cushions, breathal
y
ser, first aid kit, fire
e
xtin
g
uisher, warnin
g
trian
g
le, hi
g
h visibilit
y
vest, wheel securit
y
bolts, snow chains, non-
s
li
p covers...
"Protection":
mats * , seat covers compatible with lateral
airba
g
s, mud flaps, door protective mouldin
g
s,
b
umper protect
i
on str
i
ps, ve
hi
c
l
e cover...
Th
e rear
b
o
dy
wor
k
h
as
b
een
d
es
ig
ne
d
to avo
id
spray
.

2
35
Practical information
The
f
ittin
g
o
f
electrical equipment
o
r
accesso
r
ies
w
hich
a
r
e
n
o
t
recommended b
y
CITRO
Ë
N ma
y
result
in a
f
ailure o
f
your vehicle's electronic
sy
stem and excessive electrical
c
onsumption.
Please note this precaution. You
are advised to contact a
C
ITR
O
ËN
representat
i
ve to
b
e s
h
own t
h
e ran
g
e
o
f
recommended equipment and
accesso
r
ies
.
Installation of radio
c
ommunication
transmitters
Before installin
g
an
y
after-market radio
c
ommunication transmitter,
y
ou can
c
ontact a
C
ITR
O
ËN dealer for the
s
pecification of transmitters which can
be
f
itted
(f
requenc
y
, maximum power,
aerial position, speci
f
ic installation
requirements
)
, in line with the Vehicle
Electromagnetic
C
ompatibility Directive
(
2004
/
104
/
E
C)
.
Dependin
g
on the le
g
islation in force
in the countr
y
, it ma
y
be compulsor
y
to have a hi
g
h visibilit
y
sa
f
et
y
vest,
warn
i
n
g
tr
i
an
gl
e an
d
spare
b
u
lb
s an
d
fuses
a
v
a
il
ab
l
e
in th
e
v
e
hi
c
l
e
.
B
y
visitin
g
a CITRO
Ë
N dealer
y
ou can also
obtain cleaning and maintenance products
(
interior and exterior
)
- includin
g
ecolo
g
ical
p
roducts in the "TECHNATURE" ran
g
e,
p
roducts for toppin
g
up
(
screenwash...
)
, paint
touch-up pens and aerosols for the exact colour
of
y
our vehicle, refills
(
sealant cartrid
g
e for the
temporar
y
puncture repair kit...
)
, ...
"Multimedia":
audio s
y
stems, steerin
g
mounted audio
c
ontrols, speakers, Hi-Fi module, Bluetooth
h
ands-free s
y
stem, portable satellite navi
g
ation
sy
stem, semi-inte
g
ral support bracket fo
r
p
ortable navi
g
ation s
y
stem, drivin
g
assistance
sy
stems, U
S
B Box, reversin
g
camera, portable
v
id
eo screen, porta
bl
e v
id
eo support
b
rac
k
et,
230 V
/
50 Hz socket, 230 V
/
12 V ada
p
tor, Wi-Fi
o
n
boa
r
d
...

009
Checks

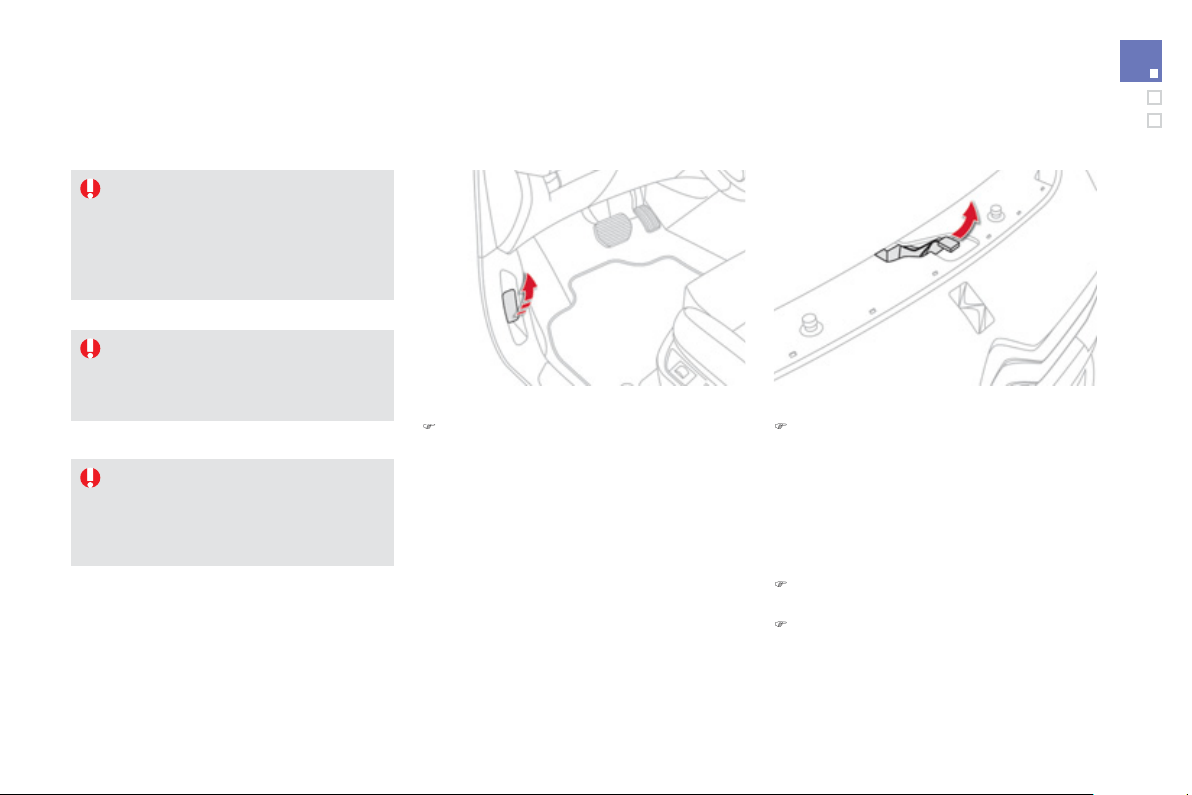
2
3
9
Checks
Opening the bonnet
Openin
g
)
From insid
e
: pull the release lever, located
on the left below the dashboard
,
towards
yo
u.
Before doin
g
an
y
thin
g
under the bonnet,
s
witch off the i
g
nition
(
Read
y
lamp off
)
to avoid an
y
risk o
f
in
j
ur
y
resultin
g
f
rom
automatic operation o
f
the en
g
ine.
Closin
g
)
Lo
w
e
r t
he
bo
nn
e
t
a
n
d
r
elease
i
t
a
t t
he
e
n
d
of
it
s
tr
a
v
e
l.
)
C
heck that it is latched correctl
y
.
)
F
rom t
h
e outs
ide
: li
f
t the sa
f
et
y
catch and
r
aise
t
he
bo
nn
e
t.
A
bonnet strut o
p
ens the bonnet and holds it
open
.
N
ever touch, handle or remove the
o
ran
g
e "hi
g
h volta
g
e" cables.
The use of a hi
g
h pressure
j
et wash
u
nder the bonnet is strictl
y
prohibited,
i
n or
d
er to avo
id
d
ama
g
e to t
h
e e
l
ectr
i
c
c
omponents.
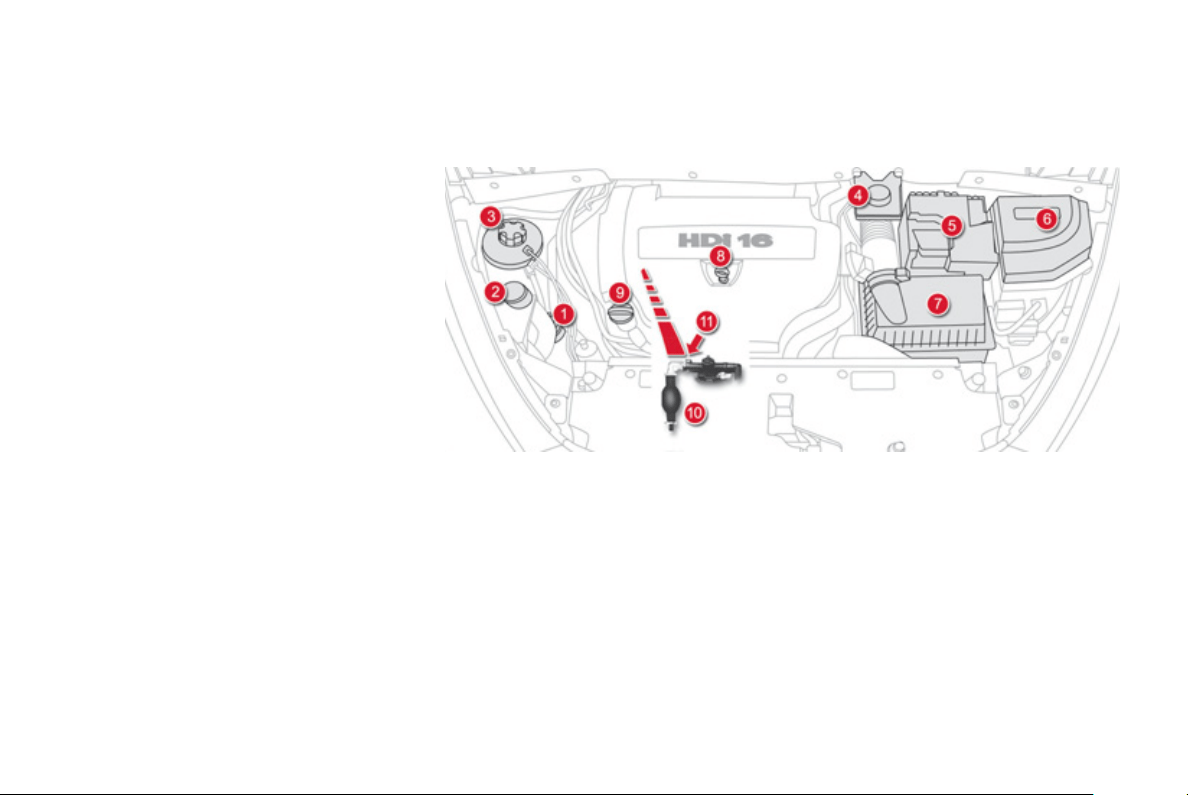
The various ca
p
s and covers allow access
f
or
c
heckin
g
the levels o
f
the various
f
luids,
f
or
r
eplacin
g
certain components and for primin
g
the fuel s
y
stem.
Diesel engine
1.
Power steerin
g
reservoir.
2.
Screenwash and headlamp wash reservoir.
3.
C
oolant reservoir.
4.
Br
a
k
e
f
l
u
i
d
r
ese
rv
o
ir.
5.
Batter
y
/
Fuses.
6
.
Fusebo
x.
7
.
Air
f
ilt
e
r.
8.
En
g
ine oil dipstick.
9.
En
g
ine oil filler cap.
1
0
.
Primin
g
pump.
1
1
.
Bl
eed
sc
r
e
w.
HDi 160 PEF 6-
S
PEED ELECTRONIC GEARBOX
241
Checks
O
n vehicle
f
itted with HDi engines, the
f
uel
sy
stem must be primed i
f
y
ou run out o
f
f
uel;
refer to the correspondin
g
en
g
ine compartment
vi
e
w.
Running out of fuel (Diesel)
I
f
the tank on
y
our vehicle is
f
itted with
a mis
f
uel prevention device, re
f
er to the
"
Mis
f
uel prevention
(
Diesel
)
" section.
)
Fill th
e
f
ue
l t
a
nk with
a
t l
eas
t fiv
e
litr
es
of
Diesel
.
)
O
pen the bonnet.
)
I
f
necessar
y
, unclip the st
y
le cover
f
or
access to the priming pump.
)
S
lacken the bleed screw.
)
Squeeze and release the primin
g
pump
repeatedl
y
until fuel appears in the
transparent pipe.
)
Ti
g
hten the bleed screw.
)
O
perate the starter until the en
g
ine starts
(
i
f
the en
g
ine
f
ails to start at the
f
irst
attem
p
t, wait around 15 seconds be
f
ore
trying again
)
.
)
I
f
the en
g
ine
f
ails to start a
f
ter a
f
ew
attempts, operate the primin
g
pump a
g
ain,
th
e
n th
e
s
t
a
rt
e
r.
)
Put the st
y
le cover back in position and
c
lip it in place, ensurin
g
that it has clipped
c
orrect
ly
.
)
C
l
ose
th
e
bo
nn
e
t.
2 litre HDi en
g
ine
I
f
the engine does not start
f
irst time,
don't keep tr
y
in
g
.
S
tart the procedure
a
g
ain from the be
g
innin
g
.
B
efore doin
g
an
y
thin
g
under the bonnet,
s
witch off the i
g
nition
(
R
ead
y
lamp off
)
to avoid an
y
risk of in
j
ur
y
resultin
g
from
a
utomatic operation of the en
g
ine.

Checking levels
Take care when workin
g
under the
bonnet, as certain areas of the en
g
ine
m
a
y
be extremel
y
hot
(
risk of burns
)
and
the coolin
g
fan could start at an
y
time
(
even with the i
g
nition off
)
.
Oil level
Th
e
c
h
ec
k i
s
ca
rri
ed
ou
t
e
ith
e
r wh
e
n
the i
g
nition is switched on usin
g
the
oil
le
v
el
i
n
dica
t
o
r
i
n t
he
i
n
s
tr
u
m
e
nt
p
ane
l
, or us
i
n
g
t
h
e
di
pst
i
c
k
.
It is normal to top up the oil level
between two services
(
or oil chan
g
es
)
.
CITRO
Ë
N recommends that
y
ou check
the level, and top up i
f
necessar
y
, ever
y
3
000 miles
(
5 000 kms
)
.
A
f
ter topping up the oil, the check when
switchin
g
on the i
g
nition with the oil
l
evel indicator in the instrument panel
i
s not valid durin
g
the 30 minutes afte
r
toppin
g
up.
If a level drops significantly, have the corresponding system checked by a CITRO
Ë
N dealer or a qualified workshop.
C
heck all o
f
these levels re
g
ularl
y
, in line with the servicin
g
booklet and the requirements o
f
the warranties. Top them up i
f
necessar
y
, unless otherwise indicated.
Before doin
g
an
y
thin
g
under the bonnet,
s
witch off the i
g
nition
(
Read
y
lamp off
)
to avoid an
y
risk of in
j
ur
y
resultin
g
from
automatic operation of the en
g
ine.
En
g
ine oil chan
g
e
Refer to the servicin
g
and warrant
y
booklet fo
r
details of the interval for this operation.
In order to maintain the reliabilit
y
o
f
the en
g
ine
and emission control s
y
stem, the use o
f
a
ddi
t
i
ves
i
n t
h
e en
gi
ne o
il
i
s pro
hibi
te
d
.
Oil s
p
ecifi cation
The oil must be the correct
g
rade for
y
ou
r
e
n
g
ine and con
f
orm to the manu
f
acturer's
r
eco
mm
e
n
da
t
io
n
s
.
It will onl
y
be correct i
f
the vehicle is on level
ground and the engine has been o
ff
f
or more
than
3
0 minutes.
2
4
3
Checks
Be
f
ore doin
g
an
y
thin
g
under the bonnet,
s
witch o
ff
the i
g
nition
(
R
ea
dy
lamp o
ff)
to avoid an
y
risk o
f
in
j
ur
y
resultin
g
f
rom
automatic operation o
f
the engine.
Th
e
b
r
a
k
e
fl
u
i
d
l
e
v
e
l
s
h
ou
l
d
be
c
l
ose
to the "MAX" mark. I
f
it is not, check
t
h
e
b
ra
k
e pa
d
wear.
Brake fluid level
Chan
g
in
g
the fl uid
Refer to the servicin
g
and warrant
y
booklet fo
r
details of the interval for this operation.
Fluid specifi cation
Th
e
b
r
a
k
e
fl
u
i
d
m
us
t
co
nf
o
rm t
o
th
e
ma
n
u
f
ac
t
u
r
e
r'
s
r
eco
mm
e
n
da
ti
o
n
s
a
n
d
m
ee
t th
e
D
O
T
3
or D
O
T4 standard.
The power steerin
g
fluid level should
be
c
l
ose
t
o
th
e
"MAX" m
a
rk. With
t
h
e en
gi
ne co
ld
, unscrew t
h
e cap to
check
t
he
le
v
el
.
Power steerin
g
fluid level
Coolant level
Th
e
coo
l
a
nt l
e
v
e
l
s
h
ou
l
d
be
c
l
ose
t
o
t
he
"MAX"
m
a
r
k
bu
t
should
n
e
v
e
r
e
x
ceed
i
t.
When the en
g
ine is warm, the temperature o
f
the coolant is re
g
ulated b
y
the
f
an. This can
operate with the ignition o
ff
.
On vehicles which are fitted with a
p
article
emission filter, the fan ma
y
operate afte
r
the vehicle has been switched off, even if
the en
g
ine is cold
.
I
n a
ddi
t
i
on, as t
h
e coo
li
n
g
s
y
stem
i
s
p
ressurised, wait at least one hour a
f
ter
s
witching o
ff
the engine be
f
ore carrying
out an
y
work.
To avoid an
y
risk of scaldin
g
, unscrew
the cap b
y
two turns to allow the
p
ressure to drop. When the pressure
h
as dropped, remove the cap and top up
t
he
le
v
el
.
Chan
g
in
g
the coolant
Th
e coo
l
ant
d
oes not
h
ave to
b
e c
h
an
g
e
d
.
Fluid specifi cation
Th
e
coo
l
a
nt m
us
t
co
nf
o
rm t
o
th
e
m
a
n
u
f
ac
t
u
r
e
r'
s
r
eco
mm
e
n
da
ti
o
n
s
.
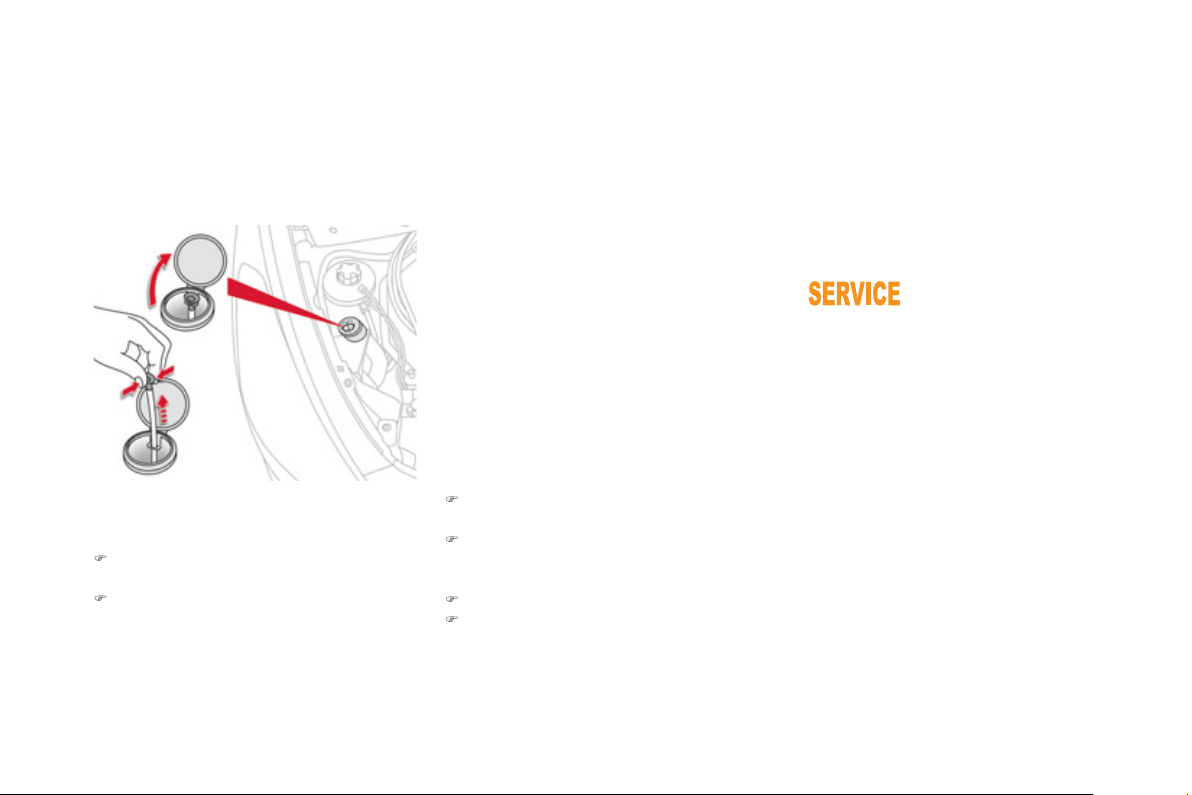
Screenwash / headlam
p
wash level
To check the level or top up the fluid on vehicle
fitted with headlamp washers, immobilise the
vehicle and switch of the en
g
ine.
)
Before openin
g
the bonnet, ensure that the
en
gi
ne
h
as comp
l
ete
ly
stoppe
d
.
)
O
pen the screenwash reservoir
f
iller cap.
Toppin
g
up
This additive must be topped up b
y
a CITROËN
dealer or a qualified workshop without dela
y
.
D
iesel additive level
(
Diesel en
g
ine with particle
e
mission filter
)
A
l
o
w
add
itiv
e
l
e
v
e
l i
s
indicated b
y
illumination o
f
the service warnin
g
lamp,
accompan
i
e
d
by
an au
dibl
e warn
i
n
g
an
d
a
m
essa
g
e
i
n t
h
e
i
nstrument pane
l
screen.
S
p
ecifi cation of the fl uid
T
o ensure opt
i
mum c
l
ean
i
n
g
an
d
to avo
id
f
reezing, the
f
luid should never be topped up or
r
eplaced b
y
plain water.
)
Take and pinch the level gauge to block its
b
r
ea
th
e
r.
)
Remove the
g
au
g
e completel
y
from
th
e
r
ese
rv
o
ir t
o
r
ead
th
e
l
e
v
e
l in th
e
transparent section.
)
Top up if necessar
y
.
)
Re
f
it the
f
iller cap to the reservoir and
close
t
he
bo
nn
e
t.
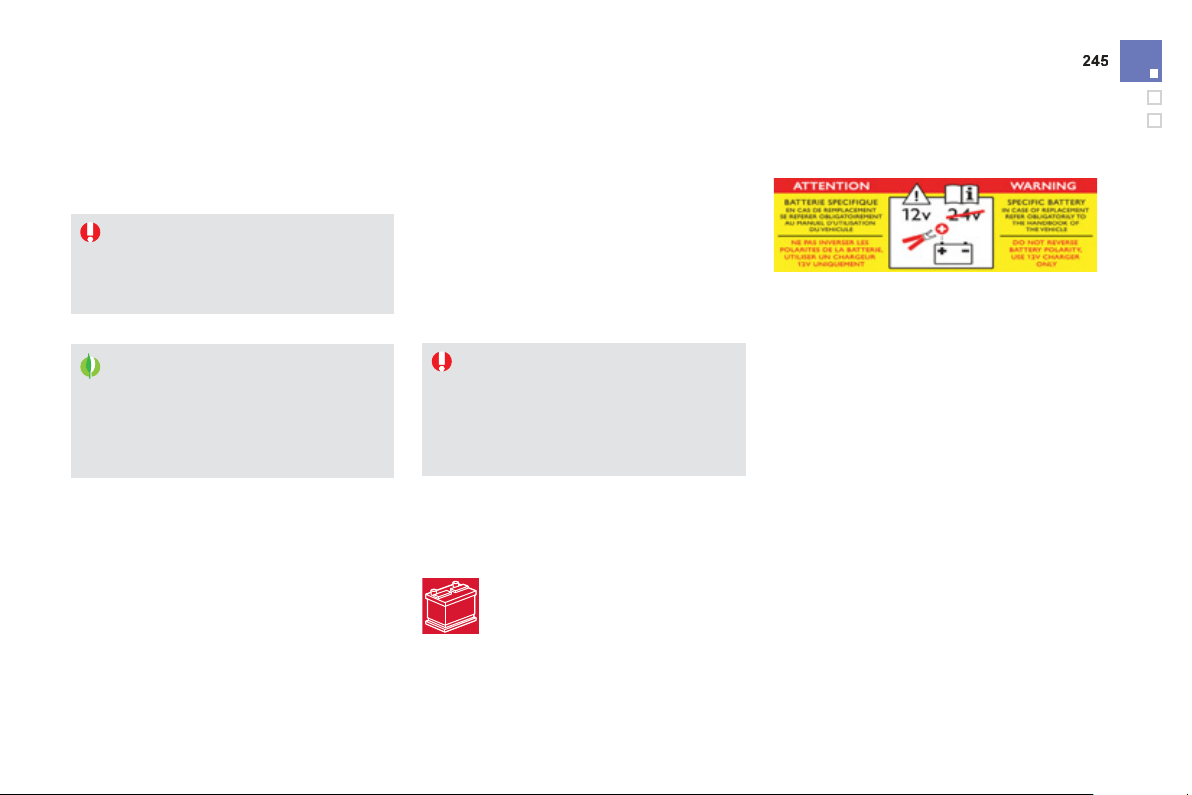
Checks
A
void prolon
g
ed contact o
f
used oil or
f
l
u
i
ds
with th
e
s
kin.
M
os
t
of
th
ese
f
l
u
i
ds
a
r
e
h
a
rm
fu
l t
o
health or indeed ver
y
corrosive.
D
o
n
o
t
d
i
sca
r
d
used
o
il
o
r fl
u
i
ds
int
o
s
ewers or onto the
g
round.
Take used oil to a
C
ITR
O
ËN dealer or
a qualified workshop
(
France
)
or to an
aut
h
or
i
se
d
waste
di
sposa
l
s
i
te.
U
sed
p
roducts
Checks
U
n
l
ess ot
h
erw
i
se
i
n
di
cate
d
, c
h
ec
k
t
h
ese
c
omponents in accordance with the servicing
a
nd warrant
y
booklet and accordin
g
to
y
our
en
g
ine.
Otherwise, have them checked b
y
a CITROËN
dealer or a qualified workshop.
Be
f
ore doin
g
an
y
thin
g
under the bonnet,
s
witch o
ff
the i
g
nition
(
R
ea
dy
lamp o
ff)
to avoid an
y
risk o
f
in
j
ur
y
resultin
g
f
rom
a
utomatic operation o
f
the engine.
The presence o
f
this label, in particular with
the
S
top
&
S
tart s
y
stem, indicates the use o
f
a speci
f
ic 12 V lead-acid batter
y
with special
technology and speci
f
ication. The involvement
o
f a CITROËN dealer or a
q
ualified worksho
p
is
e
ssential when replacin
g
or disconnectin
g
the
batter
y
.
12 V batter
y
Th
e
b
atter
y
d
oes not requ
i
re an
y
ma
i
ntenance.
H
owever, c
h
ec
k
t
h
at t
h
e term
i
na
l
s are c
l
ean
an
d
correct
ly
t
igh
tene
d
, part
i
cu
l
ar
ly
i
n summer
a
n
d
wint
e
r.
When carr
y
in
g
out work on the batter
y
, refer
to the "12 V batter
y
" section for details of the
p
recautions to be taken before disconnectin
g
the batter
y
and
f
ollowin
g
its reconnection.
P
article emission filter
(
Diesel
)
Th
e
s
t
a
rt
of
sa
t
u
r
a
ti
o
n
of
th
e
p
article
f
ilter is indicated b
y
the temporar
y
illumination o
f
this warnin
g
lamp accompanied b
y
a messa
g
e
in th
e
m
u
lti-f
u
n
c
ti
o
n
sc
r
ee
n.
As soon as the traffic conditions permit,
re
g
enerate the filter b
y
drivin
g
at a
s
peed o
f
at least 40 mph
(
60 km
/
h
)
until
the warnin
g
lamp
g
oes o
ff
.
I
f
the warnin
g
lamp sta
y
s on, this
in
d
i
ca
t
es
a
l
o
w
add
itiv
e
l
e
v
e
l.
On a new vehicle, the first particle
f
ilter re
g
eneration operations ma
y
be
accompan
i
e
d
by
a
"b
urn
i
n
g"
sme
ll
,
which is per
f
ectl
y
normal.
Following prolonged operation o
f
the
vehicle at ver
y
low speed or at idle,
y
ou ma
y
, in exceptional circumstances,
notice the emission of water vapour at
th
e
e
xh
aus
t
o
n
acce
l
e
r
a
ti
o
n. Thi
s
does
n
o
t
a
ff
ec
t th
e
be
h
a
vi
ou
r
o
f th
e
v
e
hi
c
l
e
o
r
t
he
e
nv
i
r
o
nm
e
nt.
The 100
%
electric mode is not available
durin
g
re
g
eneration of the particle
e
mi
ss
i
o
n
s
filt
e
r.
A
ir filter and passen
g
er compartment filter
Oil filter
Replace the oil
f
ilter each time the
e
n
gi
ne o
il
i
s c
h
an
g
e
d
.
Re
f
er to the servicin
g
and warrant
y
b
ooklet
f
or details o
f
the re
p
lacement
interval
f
or this component.
Re
f
er to the servicing and warranty
b
ooklet
f
or details o
f
the re
p
lacement
intervals for these components.
Dependin
g
on the environment
(
e.
g
. dust
y
a
tmosphere
)
and the use o
f
the vehicle
(
e.g.
c
it
y
drivin
g)
, re
p
lace them twice as often if
necessary
.
y
A
clo
gg
ed passen
g
er compartment filter ma
y
h
ave an adverse effect on the performance
of the air conditionin
g
s
y
stem and
g
enerate
u
n
desi
r
able
odou
r
s
.
247
Checks
6-speed electronic
g
earbox
Th
e
g
ear
b
ox
d
oes not requ
i
re an
y
maintenance
(
no oil chan
g
e
)
.
Re
f
er to the servicing and warranty
booklet
f
or details o
f
the checkin
g
i
nterval for this component.
Brake wear depends on the st
y
le
of drivin
g
, particularl
y
in the case
of vehicles used in town
,
over short
di
stances.
I
t ma
y
b
e necessar
y
to
h
ave the condition o
f
the brakes checked, even
be
tw
ee
n v
ehicle
se
rv
ices
.
U
n
l
ess t
h
ere
i
s a
l
ea
k
i
n t
h
e c
i
rcu
i
t, a
d
ro
p
i
n
th
e
b
r
a
k
e
f
l
u
i
d
l
e
v
e
l in
d
i
ca
t
es
th
a
t th
e
b
r
a
k
e
p
ads are worn.
Brake
p
ads
For information on checkin
g
brake
disc wear, contact a CITRO
Ë
N dealer
o
r a quali
f
ied workshop.
B
ra
k
e
di
sc wea
r
E
lectric parkin
g
brake
Thi
s s
y
stem
d
oes not requ
i
re an
y
rout
i
ne serv
i
c
i
n
g
.
H
owever,
i
n t
h
e
e
vent o
f
a problem, have the system
c
hecked b
y
a CITROËN dealer or a
q
ualified workshop.
O
nl
y
use products recommended b
y
C
ITROËN or products of equivalent
q
ualit
y
and specification.
I
n or
d
er to opt
i
m
i
se t
h
e operat
i
on
o
f
units as important as the brakin
g
sy
stem, CITRO
Ë
N selects and offers
ver
y
speci
f
ic products.
A
f
ter washing the vehicle, dampness,
or in wintr
y
conditions, ice, can
f
orm
on the brake discs and pads: brakin
g
e
fficienc
y
ma
y
be reduced. Make li
g
ht
brake applications to dr
y
and defrost
t
he
b
r
akes
.
For more in
f
ormation, re
f
er to the "Electric
p
arkin
g
brake -
O
peratin
g
f
aults" section.

010
Technical data
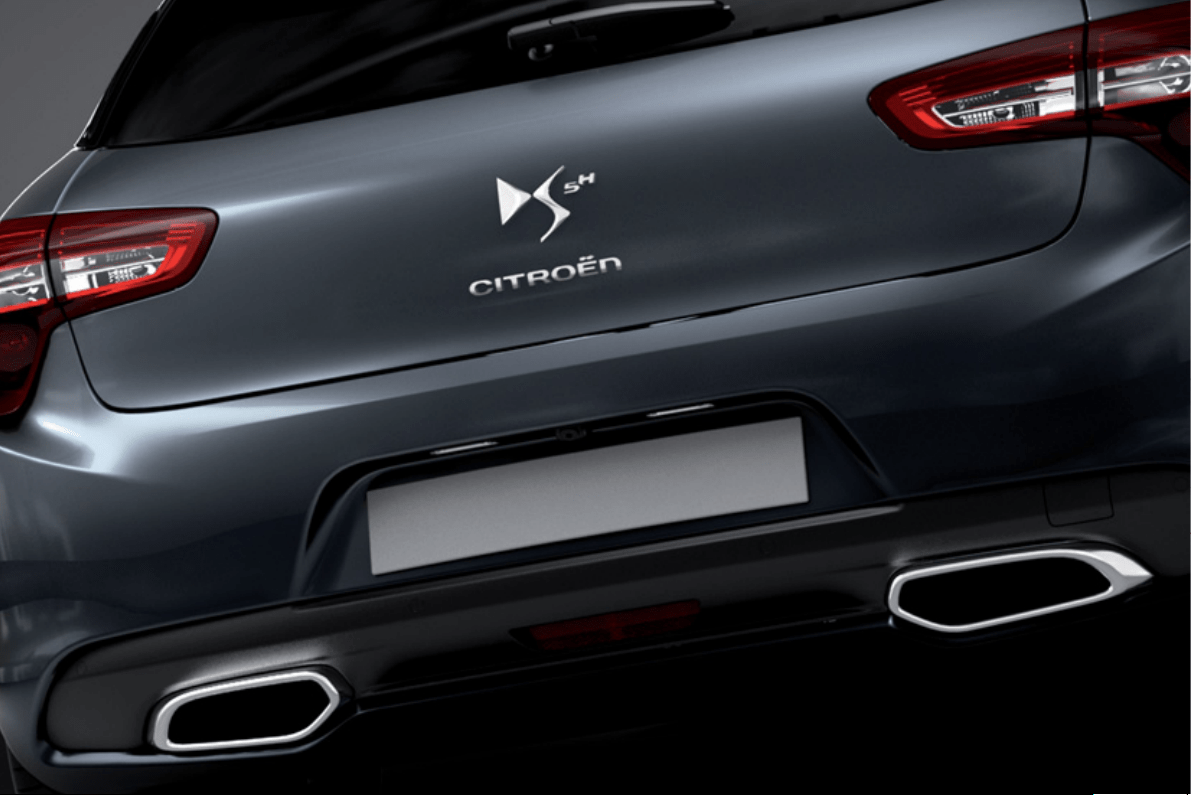

Ran
g
e varies accordin
g
to the ambient climatic conditions, the drivin
g
st
y
le and conditions, the use o
f
vehicle s
y
stems and a
g
ein
g
o
f
the batter
y
.
Electric motor and battery
E
lectric motor
-
Technolo
gy
S
y
nchronous with permanent ma
g
nets.
Max. power: EU standard
(
kW
)
*
27
Max. power speed
(
rpm
)
2
500
Max. torque: EU standard
(
Nm
)
2
00
Max. torque speed
(
rpm
)
1
2
5
0
E
ff
iciency
(%)
80 to 90
Hi
g
h volta
g
e batter
y
Ni
-
MH
(
Nickel Metal H
y
dride
)
Volta
g
e
(
V~
)
2
00
Ener
gy
capacit
y
(
kWh
/
Ah
)
1.1
/
5.5
Ran
g
e
(
miles
(
km
))
1.2
(
2
)
(
approximatel
y)
*
The maximum power corresponds to the value t
y
pe approved on an en
g
ine test bed, under conditions de
f
ined b
y
European le
g
islation
(
directive 1999/99/EC
)
.

2
5
1
Technical data
Engine and gearbox
Di
ese
l
en
gi
n
e
HDi
1
60 PEF
Gearbo
x
Electronic gearbox system
(
6-speed
)
M
o
d
e
l
co
de
RH
C
Cubic capacit
y
(
cc
)
1
99
7
Bore x stroke
(
mm
)
85
x
88
Max power: EU standard
(
kW
)
*
120
Max power en
g
ine speed
(
rpm
)
3
850
Max torque: EU standard
(
Nm
)
300
Max torque en
g
ine speed
(
rpm
)
1
7
50
F
ue
l Di
ese
l
C
atal
y
tic converte
r
yes
P
a
rti
c
l
e
e
mi
ss
i
o
n
f
ilt
er
yes
Oil capacities
(
in litres
)
En
g
ine
(
with filter replacement
)
-
*
The maximum power corresponds to the t
y
pe approved value on a test bed, under conditions de
f
ined b
y
European le
g
islation
(
directive 1999
/
99
/
E
C)
.

D
iesel en
g
in
e
HDi
16
0
P
EF
Gearbox
Electronic
g
earbox s
y
stem
(
6-speed
)
Model cod
e
RH
C
- Unladen wei
g
ht -
- Kerb weight
*
1 7
3
5
- Gross vehicle wei
g
ht
(
GVW
)
2
26
5
- Gross train wei
g
ht
(
GTW
)
on a 12%
g
radient
2 7
65
- Braked trailer
(
within
G
TW limit
)
on a 10
%
or 12
%
g
radient
500
- Braked trailer
**
(
with load trans
f
er with the
G
TW limit
)
800
-
U
nbraked traile
r
500
- Recommended nose wei
g
ht 7
5
Weights and towed loads (in kg)
*
The kerb wei
g
ht is equal to the unladen wei
g
ht + driver
(
75 k
g)
.
** The wei
g
ht of the braked trailer can be increased, within the GTW limit, if the GVW of the towin
g
vehicle is reduced b
y
an equal amount; warnin
g
,
towin
g
usin
g
a li
g
htl
y
loaded towin
g
vehicle ma
y
have an adverse effect on its road holdin
g
.
To make use of the 300 k
g
load transfer, the driver must be alone in the vehicle with no lu
gg
a
g
e in the vehicle.
The GTW and towed load values indicated are valid up to a maximum altitude of 1 000 metres; the towed load mentioned must be reduced b
y
10 % fo
r
e
ach additional 1
000
metres of altitude.
The speed of a towin
g
vehicle must not exceed 60 mph
(
100 km/h
)
(
compl
y
with the le
g
islation in force in
y
our countr
y)
.
Hi
g
h ambient temperatures ma
y
result in a reduction in the performance of the vehicle to protect the en
g
ine; if the ambient temperature is above 37 °C,
li
m
i
t t
he
t
o
w
ed
load
.
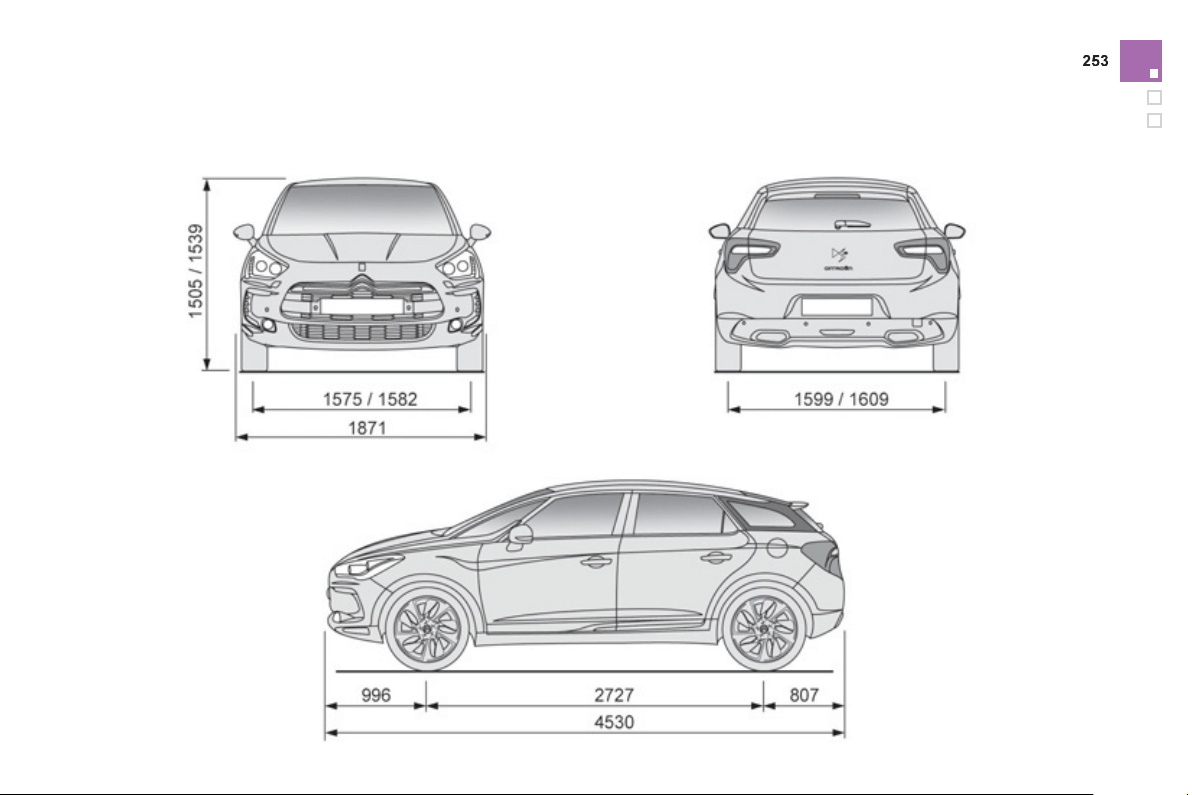
Technical data
Dimensions (in mm)
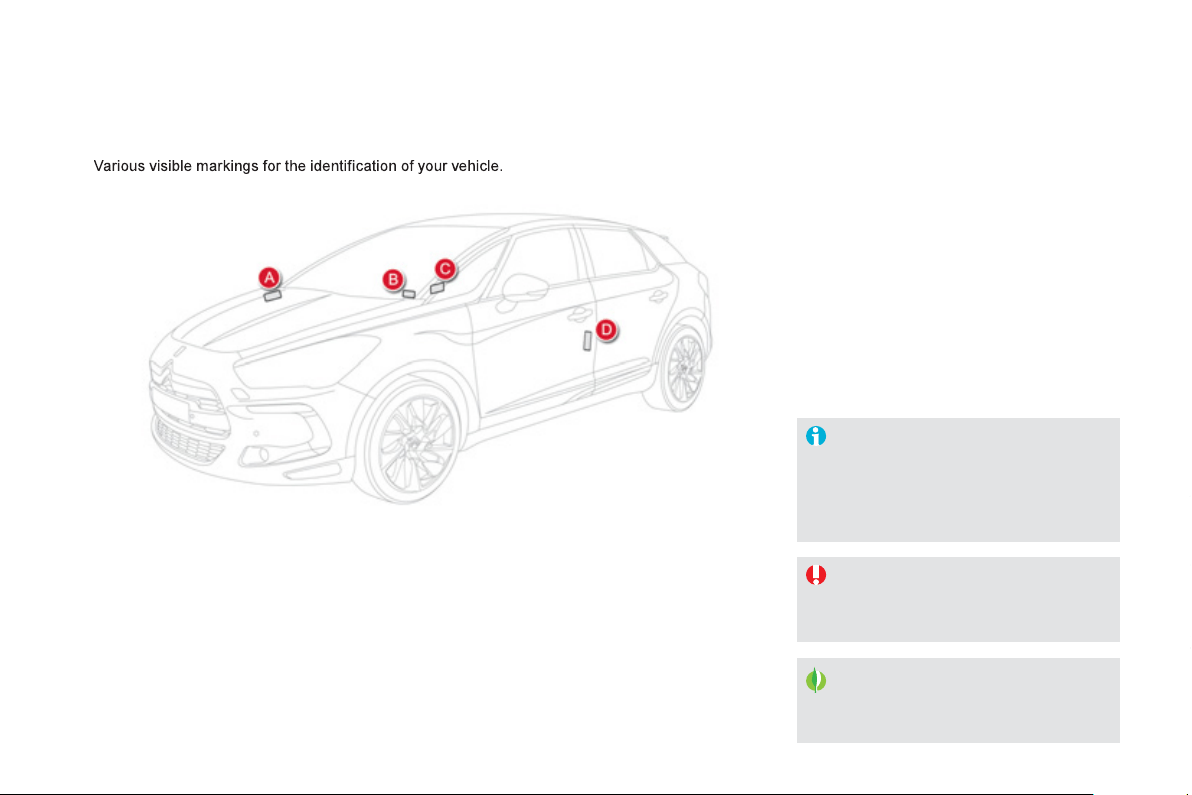
Identifi cation markings
A.
V
ehicle Identification Number
(
VIN
)
u
n
d
er t
h
e
b
onnet
.
Thi
s num
b
er
i
s en
g
rave
d
on t
h
e
b
o
dy
wor
k
n
ear the dam
p
er su
pp
ort.
Th
e t
y
re pressures must
b
e c
h
ec
k
e
d
w
h
en t
h
e t
y
res are co
ld
, at
l
east once
a
m
o
nt
h
.
The rear quarter light cannot be etched
as it is made o
f
pol
y
carbonate material.
I
f
the tyre pressures are too low, this
increases
f
uel consum
p
tion.
B.
V
ehicle identification Number
(
VIN
)
on
the windscreen lower cross member
.
Thi
s
n
u
m
be
r i
s
in
d
i
ca
t
ed
o
n
a
se
lf-
ad
h
es
iv
e
l
abel which is visible throu
g
h the windscreen.
C.
Manufacturer's label
.
The VIN is indicated on a sel
f
-destro
y
in
g
l
abel a
ff
ixed to the door a
p
erture, on the
passenger's side.
D.
Ty
re/paint label
.
This label is affixed to the centre pillar, on
th
e
d
riv
e
r'
s
s
i
de
.
It bears the followin
g
information:
- the t
y
re inflation pressures with and without
load
,
- t
h
e t
y
re s
i
zes,
- the brands o
f
t
y
re recommended b
y
the
m
anu
f
acturer,
- the in
f
lation
p
ressure o
f
the s
p
are wheel,
- the paint colour code.
The use o
f
snow chains is onl
y
au
th
o
ri
sed
o
n th
e
f
r
o
nt wh
ee
l
s
.
The
selec
t
o
r m
us
t
be
i
n
4WD
m
ode
.
2
55
Technical data

011
Audio and telematics
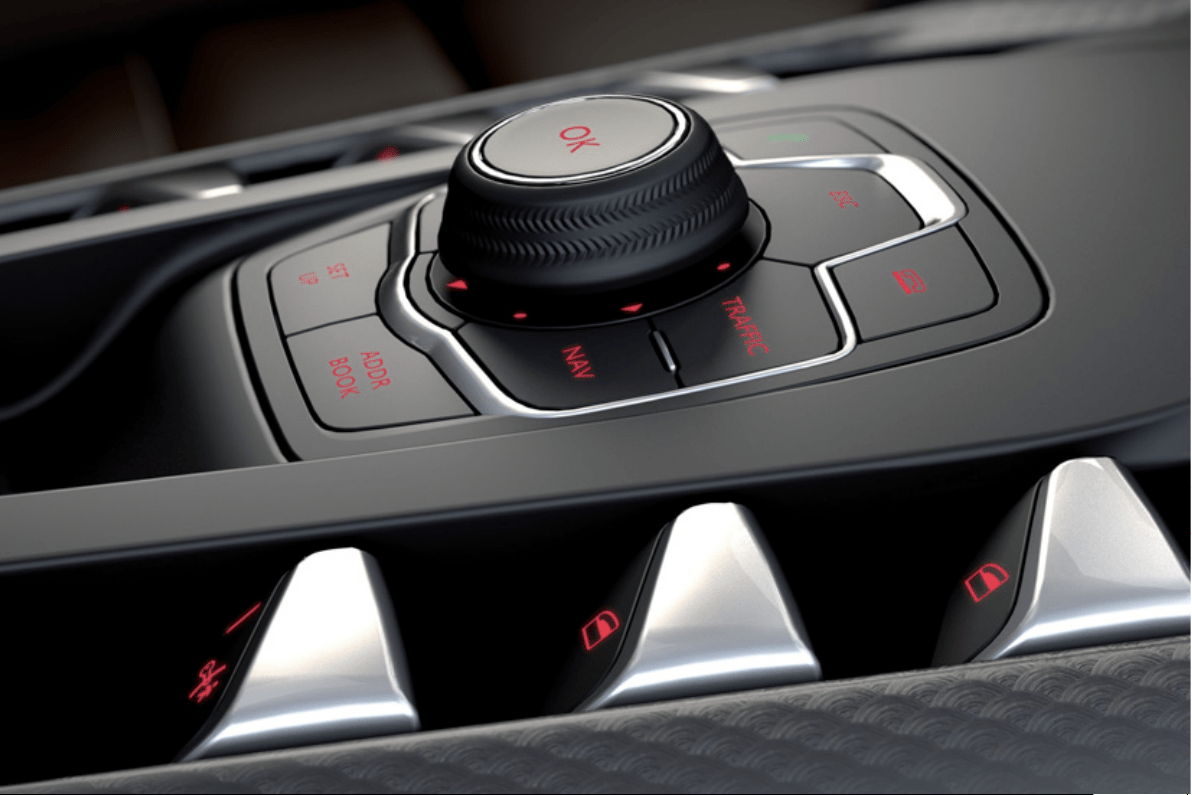
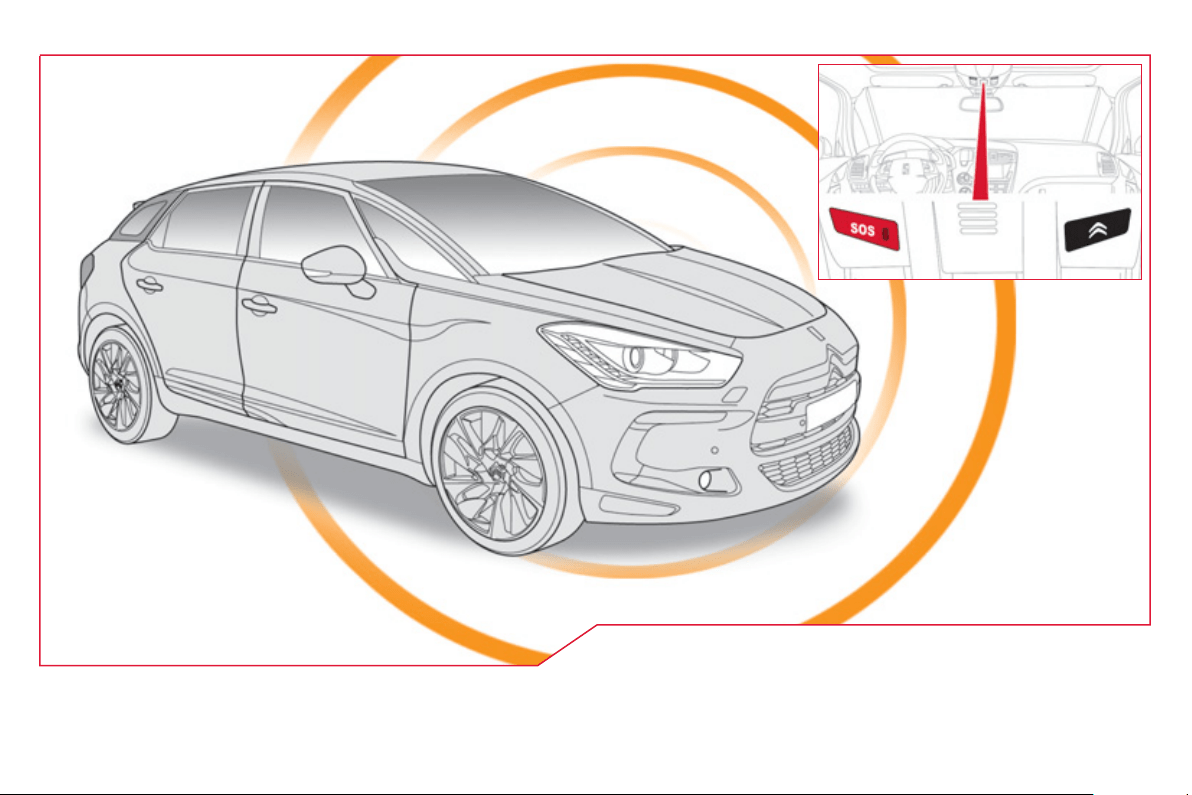
EMERGENCY OR ASSISTANCE CALL
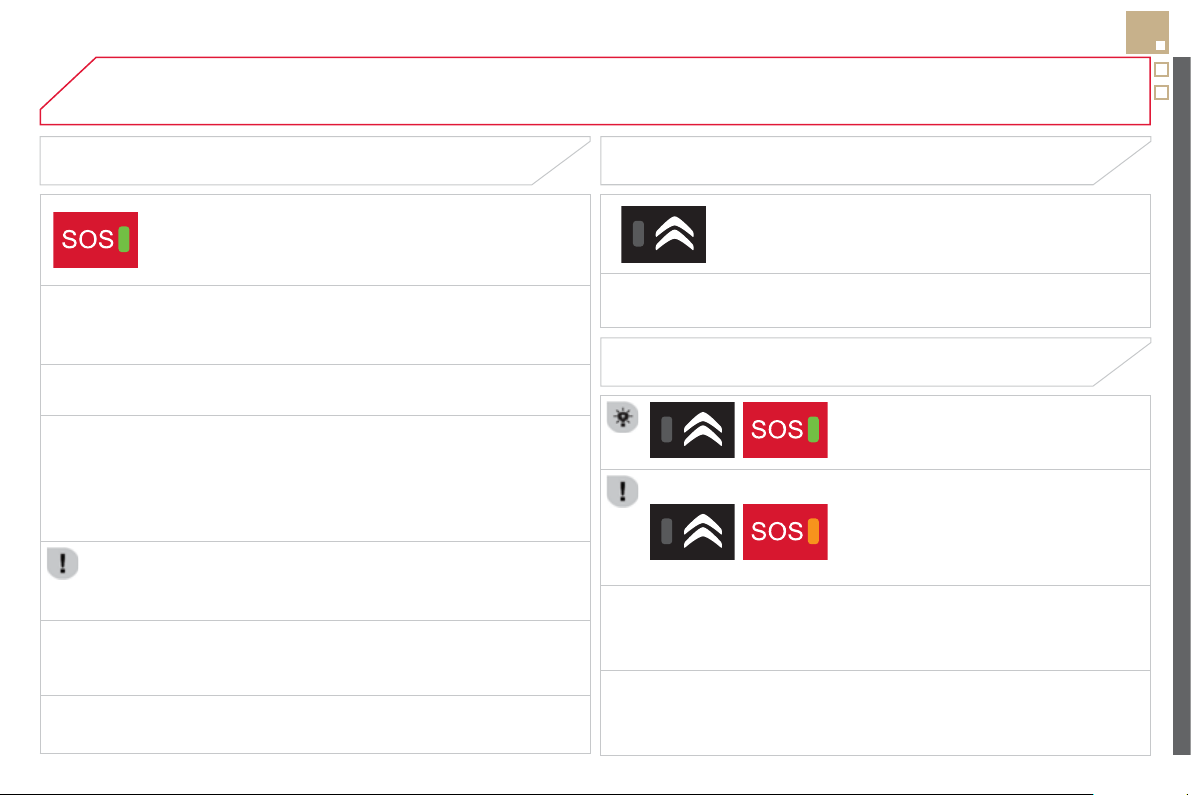
259
EMERGENCY OR ASSISTANCE CALL
CITROËN LOCALISED EMERGENCY CALL
In an emer
g
enc
y
, press this button for more than 2 seconds.
Flashin
g
of the
g
reen LED and a voice messa
g
e confirm
that the call has been made to the CITROËN Emer
g
enc
y
se
rvi
ce
* .
P
ress
i
n
g
t
hi
s
b
utton a
g
a
i
n
i
mme
di
ate
ly
cance
l
s t
h
e ca
ll
.
Th
e
g
reen
LED
g
oes
off
.
Pressin
g
this button
(
at an
y
time
)
f
or more than 8 seconds cancels the call.
CITROËN LOCALISED ASSISTANCE CALL
Wh
en t
h
e
ig
n
i
t
i
on
i
s sw
i
tc
h
e
d
on, t
h
e
g
reen
LED comes on
f
or 3 seconds indicatin
g
that
t
h
e s
y
stem
i
s operat
i
n
g
correct
ly
.
If the oran
g
e LED flashes: there is a
sy
stem fault.
I
f
the oran
g
e LED is on continuousl
y
: the
b
ac
k
up
b
atter
y
must
b
e rep
l
ace
d
.
In either case, contact a CITRO
Ë
N dealer.
Pressin
g
this button a
g
ain immediatel
y
cancels the request.
The cancellation is confirmed b
y
a voice messa
g
e.
Press this button
f
or more than 2 seconds to request
ass
i
s
t
a
n
ce
i
f
th
e
v
e
hi
c
l
e
b
r
ea
k
s
do
wn.
A
voice message con
f
irms that the call has been made
*
.
OPERATION OF THE SYSTEM
The
g
reen LED remains on
(
without flashin
g)
when communication is
established. It
g
oes o
ff
at the end o
f
communication.
If
y
ou purchased
y
our vehicle outside the CITROËN dealer network, we
invite
y
ou to have a dealer check the confi
g
uration of these services and, if
desired, modified to suit
y
our wishes. In a multi-lin
g
ual countr
y
, confi
g
uration
is possible in the official national lan
g
ua
g
e of
y
our choice.
This call is dealt with b
y
the CITRO
Ë
N Emer
g
enc
y
team which receives
l
ocating in
f
ormation
f
rom the vehicle and can send a detailed alert to the
a
ppropriate emer
g
enc
y
services. In countries in which the team is not
operational, or when the locatin
g
service has been expressl
y
declined, the
c
all is dealt with directl
y
b
y
the emer
g
enc
y
services
(
112
)
without the vehicle
loca
ti
o
n.
I
f
an impact is detected b
y
the airba
g
control unit, and independentl
y
o
f the deplo
y
ment of an
y
airba
g
s, an emer
g
enc
y
call is made
automaticall
y
.
* These services are sub
j
ect to conditions and availabilit
y
.
C
onsult a
C
ITR
O
ËN dealer.
If
y
ou benefit from the CITRO
Ë
N eTouch offer,
y
ou also have available
a
dditional services in
y
our M
y
CITRO
Ë
N personal space, via the CITRO
Ë
N
I
nternet we
b
s
i
te
i
n
y
our countr
y
, access
ibl
e on www.c
i
troen.com.
For technical reasons, particularl
y
to improve the qualit
y
o
f
Telematic services
to customers, the manu
f
acturer reserves the ri
g
ht to carr
y
out updates to the
vehicle's on-board telematic system.
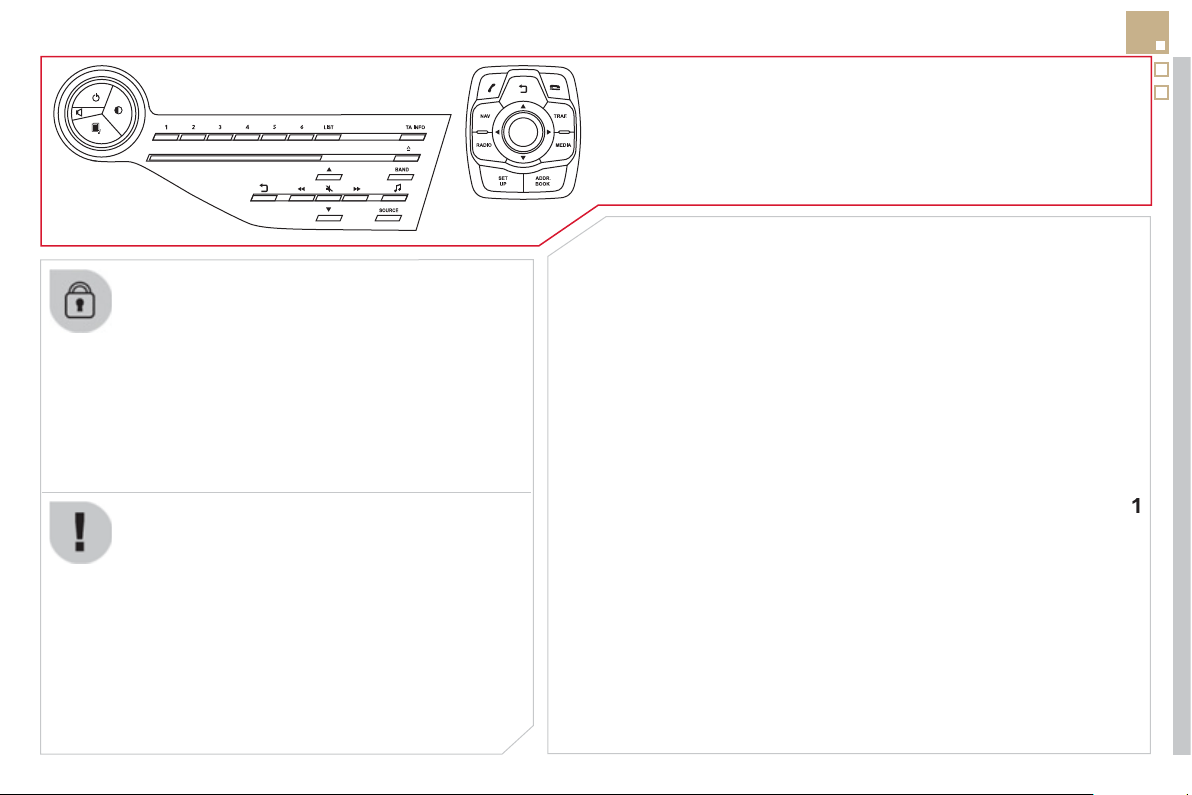
261
The s
y
stem is protected in such a wa
y
that it will onl
y
operate
i
n
y
our ve
hi
c
l
e.
e
M
y
W
ay
01 First steps - Control panel
For safet
y
reasons, the driver must carr
y
out operations
which require prolon
g
ed attention while the vehicle is
s
tationar
y
.
When the en
g
ine is switched o
ff
and to prevent
dischar
g
in
g
o
f
the batter
y
, the s
y
stem switches o
ff
f
ollowing the activation o
f
the energy economy mode.
CONTENTS
02 Steering mounted controls
03 General operation
04 Navigation - Guidance
05 Traffic information
06 Using the telephone
07 Contacts - ADDR BOOK
08 Radio
09 Music media players
10 Audio settings
11 Configuration
12 Screen menu map
p.
p.
p.
p.
p.
p.
p.
p.
p.
p.
p.
p.
2
6
2
2
6
4
2
6
5
2
6
7
2
8
0
2
8
3
2
9
1
29
4
29
7
30
3
30
4
30
6
Frequently asked questions p.
3
0
9
SATELLITE NAVIGATION SYSTEM
MULTIMEDIA BLUETOOTH TELEPHONE AUDIO
SYSTEM
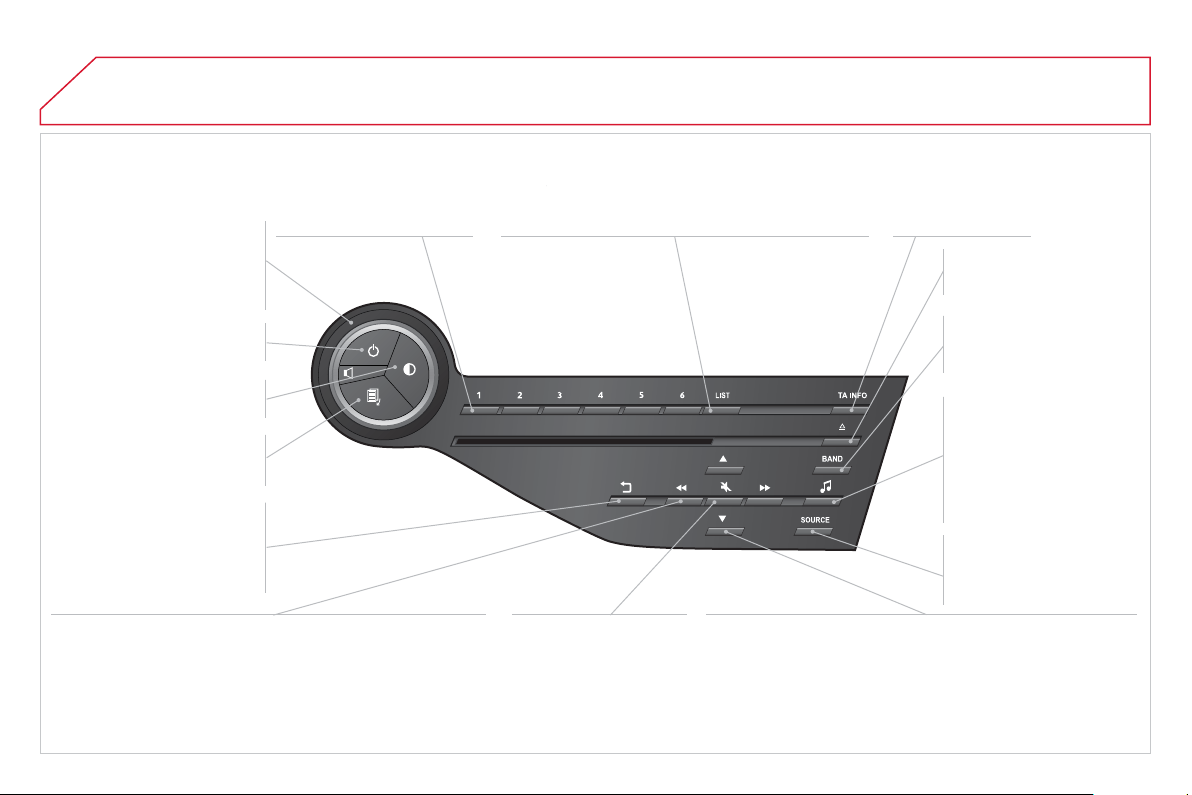
01 FIRST STEPS
Short
p
ress: select a
p
reset
r
ad
i
o
s
t
a
ti
o
n.
L
on
g
press: store t
h
e
cu
rr
e
nt r
adio
s
t
a
t
io
n.
TA
(
Traffi c
Announcement
)
f
unction
O
n
/
Off
.
Displa
y
the list of radio stations received, CD/MP3/
App
le
®
player tracks or folders.
®
Lon
g
press: mana
g
ement of the classifi cation o
f
M
P3
/
WMA
fi
les
/
update the list o
f
stations received.
A
ccess
t
o
"Audio
sett
i
n
g
s
"
: m
usical
am
bi
ences,
b
ass, tre
bl
e,
loudness, distribution, le
f
t
/
right balance,
f
ront
/
rear
f
ader, automatic volume
ad
j
ustment.
Se
l
ec
t th
e
FM w
a
v
eba
n
d
(
AM not available on
Hy
brid vehicles
)
.
P
r
ess
a
n
d
hold
: r
ei
n
i
t
ialise
t
h
e s
y
stem.
S
elect the source:
C
D,
US
B, AUX, Apple
®
pla
y
er,
Bluetooth Streamin
g
,
Rad
i
o
.
Aba
n
do
n th
e
cu
rr
e
nt
operation,
g
o up one level.
Lon
g
press: return to
p
ermanent displa
y
.
O
n
/
Off
.
MOD
E
b
utton: se
l
ect t
h
e t
y
pe
o
f
permanent displa
y
.
Rotation: ad
j
ust volume
(
each source is independent,
includin
g
TA messa
g
es and
n
avi
g
ation instructions
)
.
S
elect:
- the previous/next line in a list or menu.
- the previous next media
f
older.
- step by step previous
/
next radio
f
requency.
- previous
/
next MP3
f
older.
Move u
p
/down, in "Move the map " m
ode
.
S
elect:
- automaticall
y
the previous/next radio frequenc
y
.
- the previous
/
next
C
D, MP3 or media track.
Move le
f
t
/
right, in "Move the ma
p
" m
ode
.
Di
sp
l
a
y
bl
ac
k
screen.
Short press: mute /
r
es
t
o
r
e
sou
n
d
.
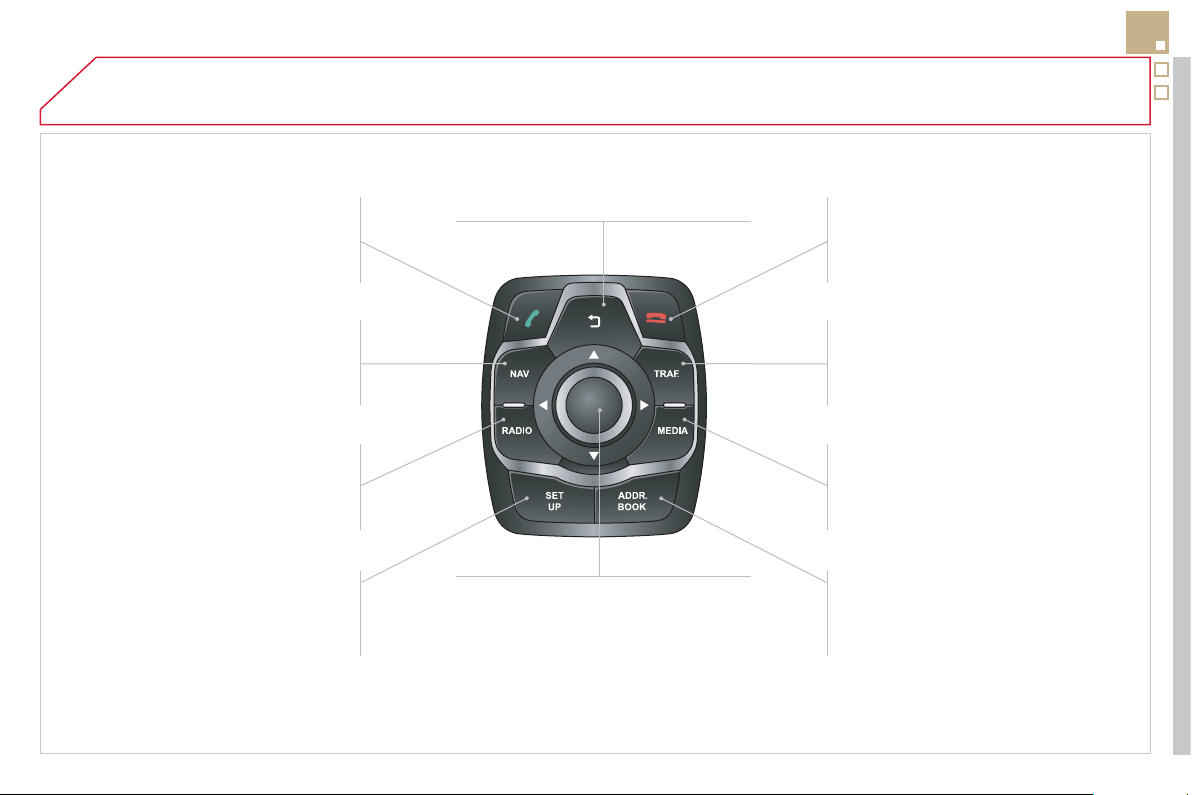
01
263
Access
t
o
t
he
"
T
e
l
e
ph
on
e
"
m
e
n
u
a
nd display the list o
f
recent calls
or accept an incomin
g
call.
Access
t
o
t
he
"
N
av
ig
at
i
on -
g
u
id
anc
e
"
menu an
d
di
sp
l
a
y
t
h
e
rece
nt
des
t
i
n
a
t
io
n
s
.
Radio source, access to the
"
RADIO " menu and displa
y
the list
o
f
s
t
a
ti
o
n
s
r
ece
iv
ed
.
A
ccess
t
o
th
e
"Confi
g
uration"
menu
.
L
on
g
press: access to t
h
e
G
P
S
covera
g
e and navi
g
ation
de
m
o
n
s
tr
a
t
io
n m
ode
.
Re
j
ect an incomin
g
call or end a
c
all in pro
g
ress.
Access
t
o
t
he
"
T
raffi c
i
nformation " menu and displa
y
o
f
cu
rr
e
nt tr
affi
c
a
l
e
rt
s
.
Displa
y
the list of contacts /
Access
t
o
t
he
"
D
irector
y
of
c
ontact
s
"
m
e
n
u
.
Media source, access to "MEDI
A
"
m
enu and displa
y
the list o
f
tr
ac
k
s
.
Ab
an
d
on t
h
e current operat
i
on,
g
o up
o
n
e
le
v
el
.
Long press: return to permanent display.
S
election and
O
K confi rmation dial:
S
elect an item on the screen or in a list o
r
a menu, then confi rm with a short press.
O
ther than
f
or menus and lists, a short
p
ress ca
ll
s up a contextua
l
memor
y
,
accor
di
ng to t
h
e
di
sp
l
ay
i
n t
h
e screen.
Rotation with the map displa
y
ed: zoom
in
/
out in the map.
FIRST STEPS
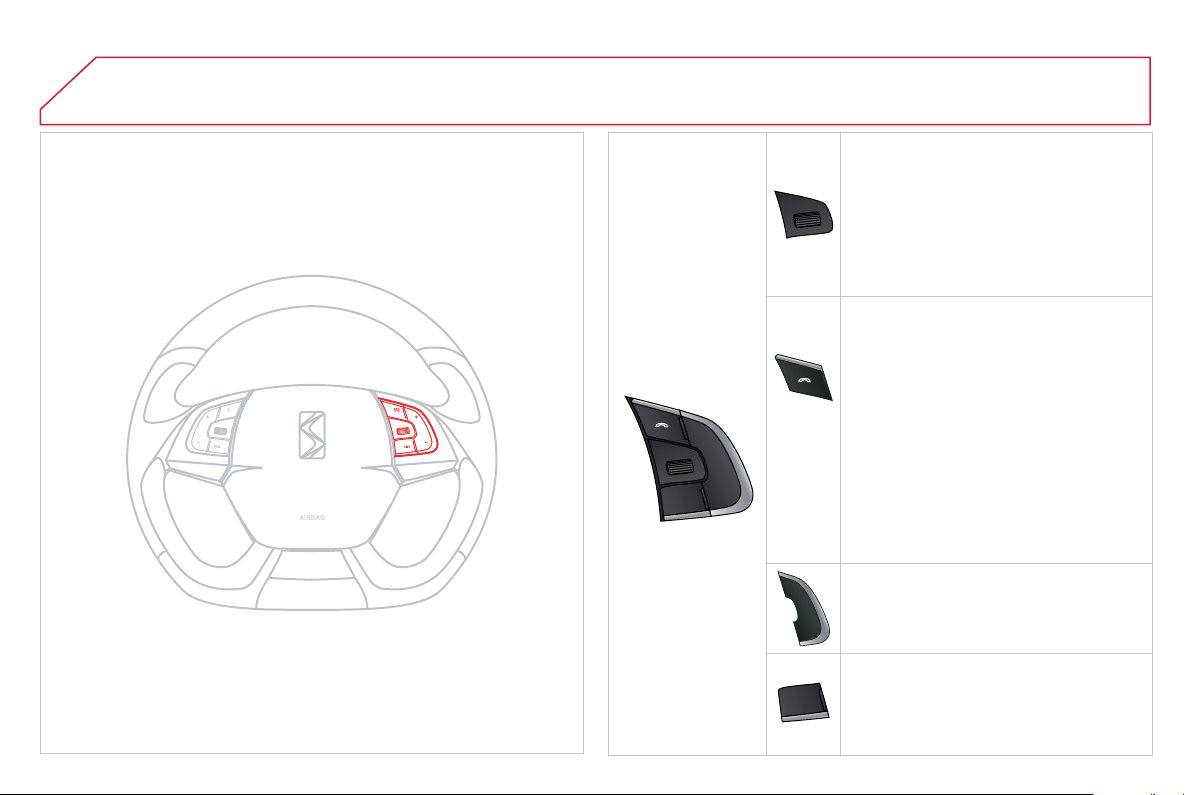
SRC
02
-
+
STEERING MOUNTED CONTROLS
- R
o
t
a
ti
o
n
R
ad
i
o
-
au
t
o
m
a
ti
c
se
l
ec
ti
o
n
of
n
e
xt
/
previous
f
requenc
y
.
Media: previous
/
next track.
- Press then rotation: access to
6
preset
s
t
a
t
io
n
s
.
-
C
han
g
e the audio source.
- TEL button
(
short press
)
:
Accept an incomin
g
call
Call in pro
g
ress: access to telephone
menu: han
g
up, secret mode, hands-free
m
ode
.
- TEL button
(
lon
g
press
)
:
Reject an incoming call or end a call in
progress
.
When not makin
g
a call, access to the
telephone menu
(
Dial,
C
ontacts,
C
alls lo
g
,
Voice mailbox
)
.
- In
c
r
ease
v
o
l
u
m
e
.
- D
ec
r
ease
v
o
l
u
m
e
.
- Radio: displa
y
the list of stations.
Media: displa
y
the list of tracks.
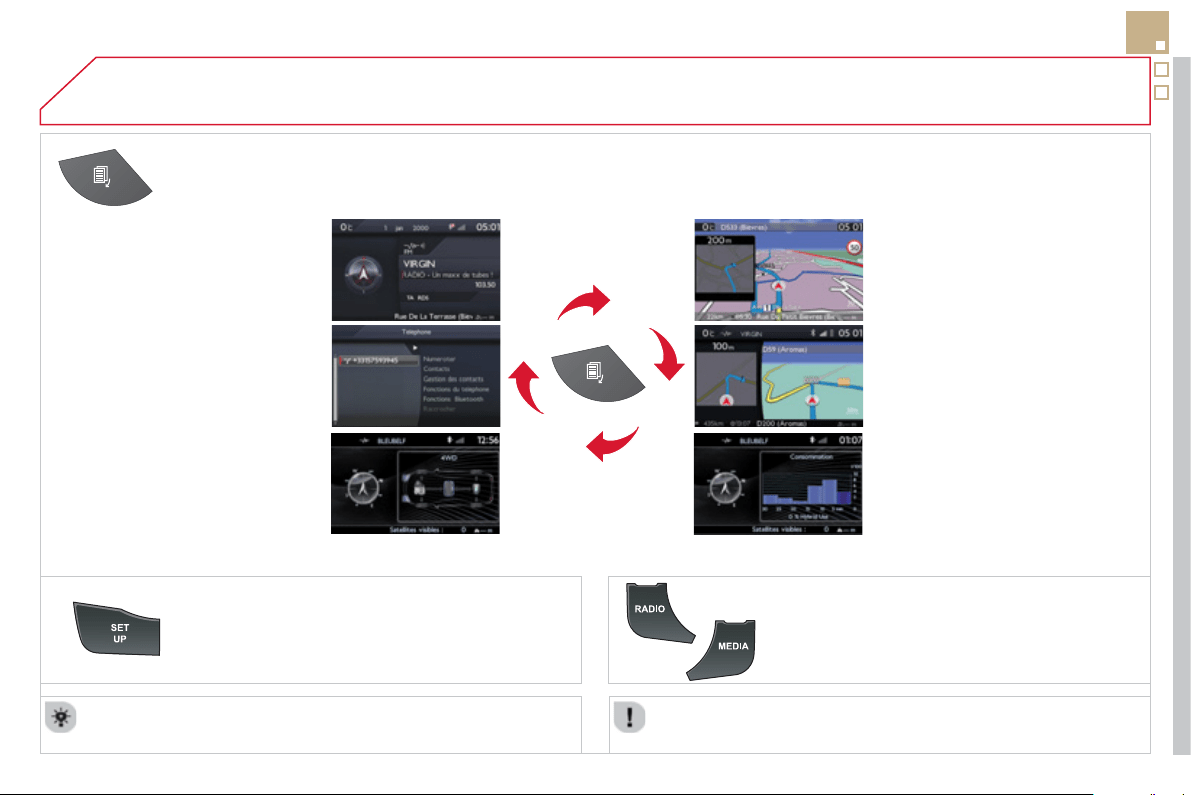
03
265
For the details o
f
the menus, re
f
er to the "
S
creen menu map"
sec
t
io
n.
For cleanin
g
the screen, the use of a soft, non-abrasive cloth
(
spectacles cloth
)
is recommended, with no additional product.
"RADIO "
"
T
ELEPHON
E
"
(
I
f
conversation in pro
g
ress
)
SETUP: PARAMETER
S
date and time, displa
y
con
fi
g
uration, sound, vehicle
s
ett
i
n
g
s.
C
han
g
in
g
the audio source :
R
ADI
O
: RADI
O
broadcasts.
M
USI
C
: pla
y
in
g
MUSIC.
Pr
ess
th
e
M
OD
E
button several times in succession
f
or access to the
f
ollowin
g
displa
y
s:
GENERAL OPERATION
"FULL SCREEN MA
P
"
"
M
AP IN WINDO
W
"
(
I
f
navi
g
ation
g
uidance in pro
g
ress
)
H
YBRID FLO
W
For more in
f
ormation, re
f
er to the
"
H
y
brid
Sy
stem" section, then "View
h
y
brid
fl
ow in
f
ormation".
H
YBRID CONSUMPTION
For more information, refer to the
"
H
y
brid S
y
stem" section, then
"
Consumption of
y
our h
y
brid".
03
A
press on the dial
g
ives access to short-
c
ut menus accordin
g
to the displa
y
in the
sc
r
ee
n.
RADIO:
Activate / Deactivate TA
Activate / Deactivate RDS
GENERAL OPERATION
DISPLAY ACCORDING TO CONTEXT
MUSIC MEDIA PLAYERS,
CD or USB (according to
media):
Pla
y
modes:
Normal
Random
Random on all media
Repetition
TELEPHONE (call in
progress):
Private mode
FULL SCREEN MAP OR IN A
NEW WINDOW:
Stop / Restore guidance
Select destination
E
nter an a
dd
ress
D
irector
y
G
PS coordinate
s
Divert route
Move the map
Info. on location
S
elect as destination
Select as sta
ge
Save this place
(
contacts
)
Quit ma
p
mod
e
Put call on hold
1
1
1
1
1
1
1
1
2
2
2
2
2
1
2
2
2
1
1
1
1
DTMF ring tones
Hang up
1
1
Change waveband
1
TA
Guidance criteria
1
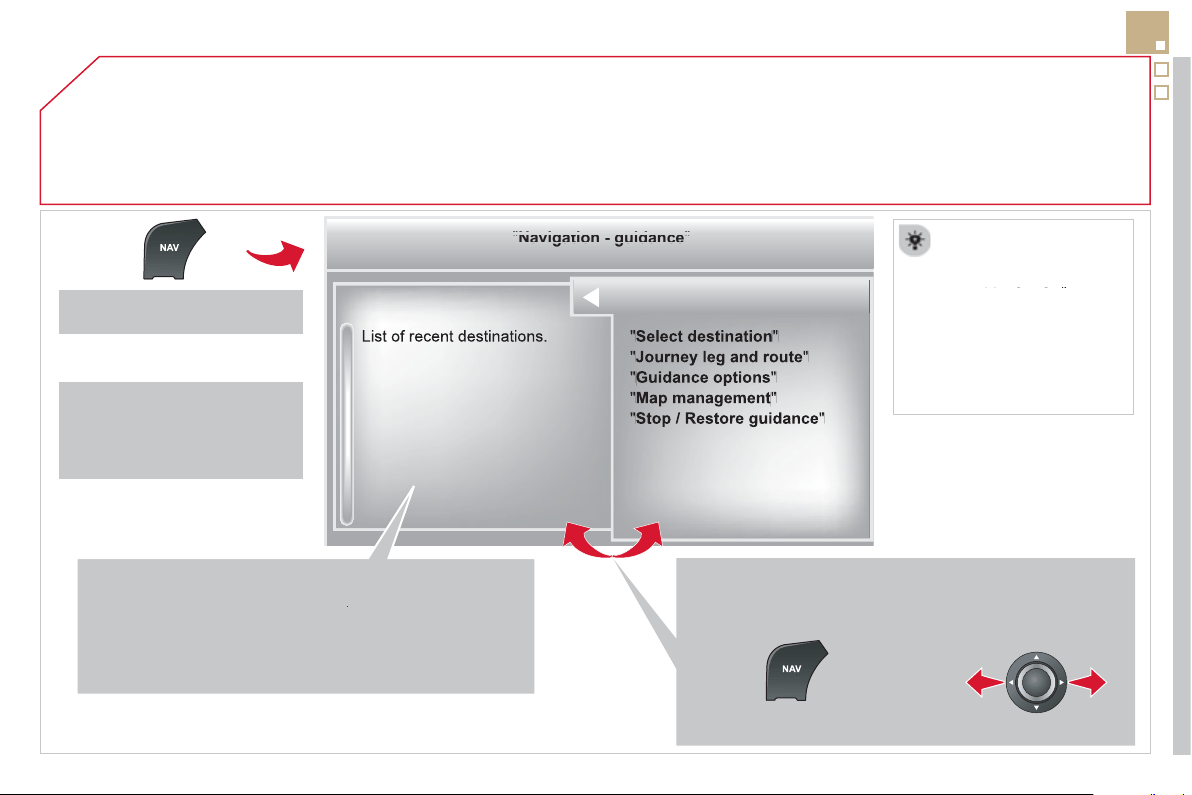
04
267
"
"
"
"
"
"
"
"
"
"
"
"
gg
gg
gg
gg
gg
Navigation
guidance
Navigation guidance
Navigation guidance
Navigation guidance
Navigation guidance
Navigation - guidance
Navigation - guidance
Navigation - guidance
Navigation - guidance
Navigation guidance
Navigation guidance
Navigation guidance
Navigation guidance
N i ti id
N i ti id
N i ti id
N i ti id
N i ti id
N i ti id
N i ti id
N i ti id
N i ti id
Ni i id
"
"
"
"
"
"
"
"
"
"
"
"
To delete the list o
f
recent destinations, select "
G
uidance
o
p
tions" in the navi
g
ation menu then select "
D
elete last
d
estinations
" and confi rm. Select "
Yes
" th
e
n
co
n
fi
rm.
Deletin
g
j
ust one destination is not possible.
Go from the list to the menu
(
left/ri
g
ht
)
.
NAVIGATION - GUIDANCE
Access to the "NAVIGATION" menu
Pr
ess
NAV
.
or
T
o
m
a
k
e
f
u
ll
use
o
f
a
ll
of the functions of
y
our
navi
g
ation s
y
stem, update
the mapping regularly.
C
ontact a CITRO
Ë
N
pp g g
d
ea
l
er or or
d
er
y
ou
r
mapping update at
http:
//
citroen.navi
g
ation.com
A short press on the end o
f
the
li
g
htin
g
control stalk repeats
the last navi
g
ation messa
g
e.
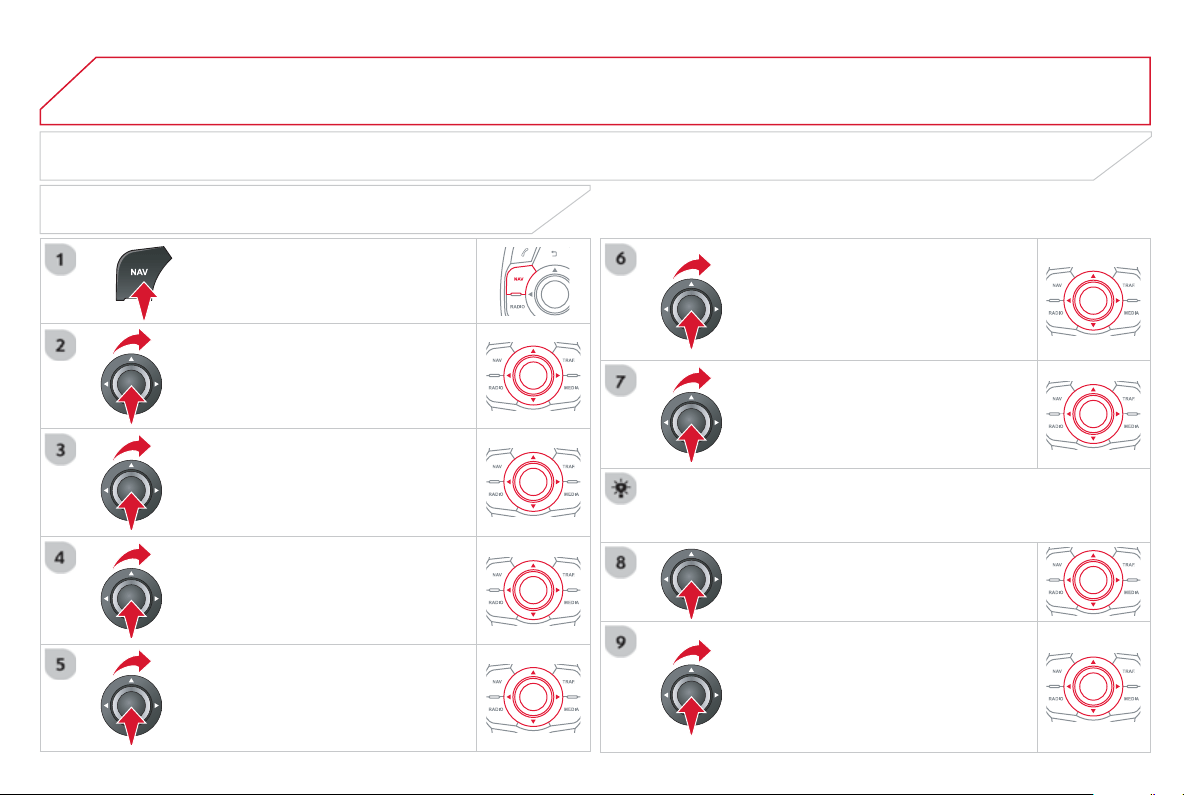
04
Pr
ess
NAV
to displa
y
the
"
N
av
ig
at
i
on -
g
u
id
anc
e
"
m
e
n
u
.
TOWARDS A NEW DESTINATION
NAVIGATION - GUIDANCE
SELECTING A DESTINATION
S
elect "Select destination "
a
n
d
c
onfi rm, then select "
E
nter an address"
a
n
d
co
nfi rm.
S
elect the "
C
ountr
y
"
fu
n
c
ti
o
n th
e
n
co
n
fi
rm.
S
elect the "
T
own "
o
r " Post cod
e
"
f
u
n
c
ti
o
n th
e
n
co
nfi rm.
Se
l
ec
t th
e
l
e
tt
e
r
s
in th
e
n
a
m
e
of
th
e
town or the characters in a post code
o
ne at a time, confi rmin
g
each one with
th
e
kn
ob
.
S
election the town
f
rom the list o
ff
ered,
th
e
n
co
n
fi
rm.
A pre-set list
(
b
y
enterin
g
the
fi
rst
f
ew
l
etters
)
o
f
the towns in the countr
y
selected can be accessed directl
y
b
y
selectin
g
and confi rmin
g
"
L
is
t
" in th
e
sc
r
ee
n.
I
f
possible, enter the "
R
oad "
a
n
d
"N°/
X
"
in
f
ormation in the same wa
y
.
S
elect "Archiv
e
" t
o
sa
v
e
th
e
add
r
ess
e
nt
e
r
ed
in
a
co
nt
ac
t
fi
l
e
.
The s
y
stem allows up to 400 contact
fi
les to be recorded.
C
onfi rm " OK " to start
g
uidance.
S
elect the
g
uidance criteria: "
F
astest
rout
e
"
,
"
S
hortest rout
e
"
or opt
i
m
i
se
d
"
D
istance
/
Tim
e
", then select the
des
ir
ed
r
es
tri
c
ti
o
n
c
rit
e
ri
a
: "With tolls",
"
With Ferr
y
", or "
T
raffi c info" th
e
n
co
nfi rm "OK".
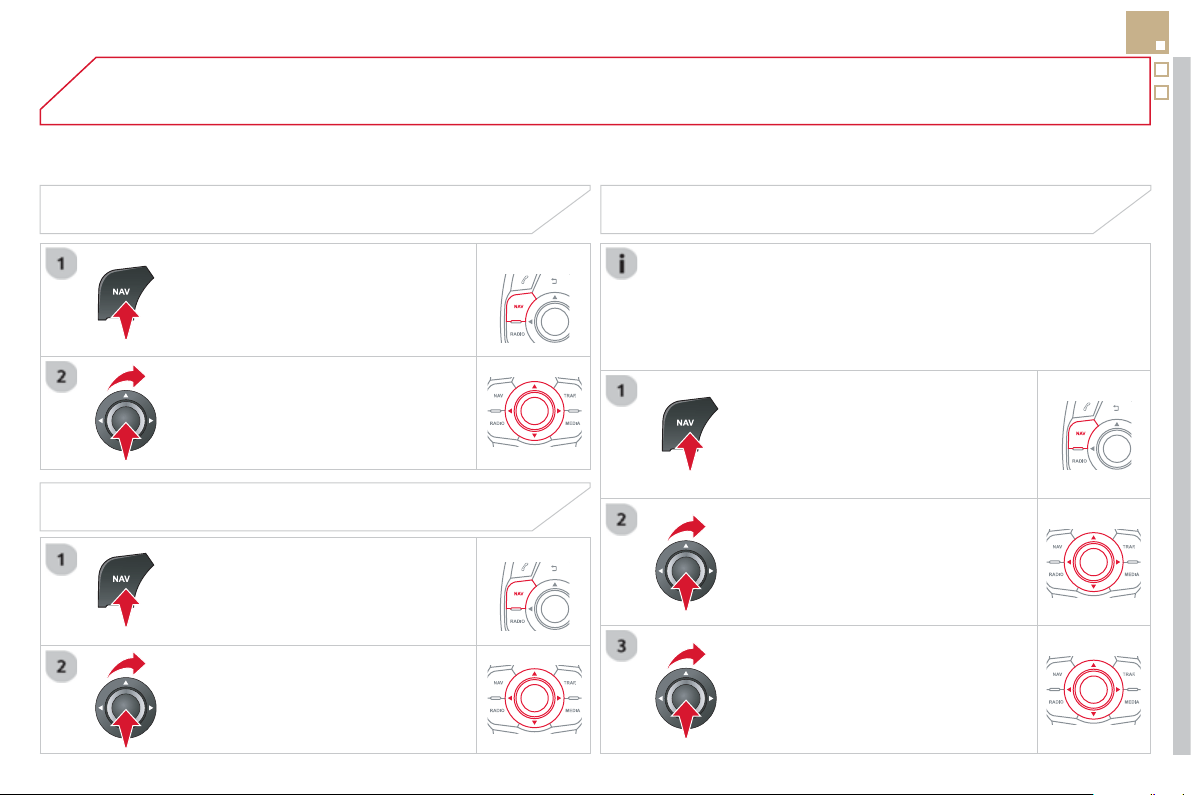
04
269
NAVIGATION - GUIDANCE
TOWARDS ONE OF THE RECENT DESTINATIONS
P
r
ess
NAV
to
di
sp
l
a
y
t
h
e
"
N
av
ig
at
i
on -
g
u
id
anc
e
"
m
e
n
u
.
S
elect the desired destination and
c
on
fi
rm to start
g
uidance.
TOWARDS A CONTACT IN THE CONTACTS DIRECTORY
S
elect "
S
elect destination
"
a
n
d
c
on
fi
rm, then select "
D
irector
y
"
a
n
d
co
n
fi
rm.
Se
l
ec
ti
o
n th
e
des
ir
ed
des
tin
a
ti
o
n
f
r
o
m
y
our contacts and confi rm "OK " t
o
s
t
a
rt
the
g
uidance.
P
r
ess
NAV
to
di
sp
l
a
y
t
h
e
"
Navigation - guidanc
e
" m
e
n
u
.
Navi
g
ation towards a contact is onl
y
possible i
f
it has an address
e
ntered in the audio navigation system.
DELETE RECENT DE
S
TINATION
S
Pr
ess
NAV to displa
y
the "Navi
g
ation -
g
uidanc
e
" m
e
n
u
.
S
elect " Options "
a
n
d
co
nfi rm
a
n
d
th
e
n
"
D
elete recent destinations "
a
n
d
co
nfi rm.
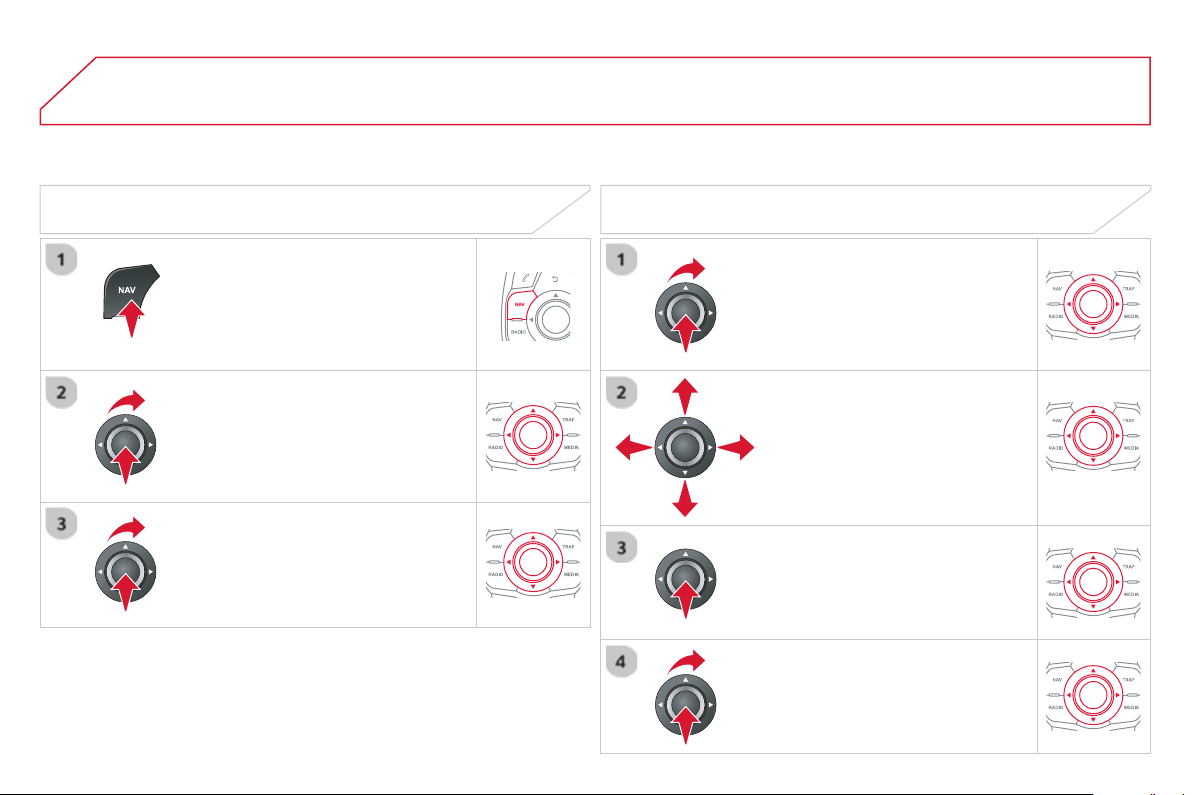
04
S
elect "Select destination
"
a
n
d
c
on
fi
rm, then select " GPS coordinate
s
"
a
n
d
co
n
fi
rm.
Enter the
G
P
S
coordinates and confi rm
"
O
K
"
to start t
h
e
g
u
id
ance.
P
r
ess
NAV
to
di
sp
l
a
y
t
h
e
"
N
av
i
gat
i
on - gu
id
anc
e
"
m
e
n
u
.
NAVIGATION - GUIDANCE
T
OWARDS GPS COORDINATES TOWARDS A POINT ON THE MAP
With the map displa
y
ed, press
O
K t
o
displa
y
the contextual menu.
S
elect
"
Move the map "
a
n
d
co
nfi rm.
Pr
ess
OK to displa
y
the contextual
m
e
n
u
f
o
r "
M
ove the ma
p
" m
ode
.
S
elect " Select as destination
"
or
"
Select as sta
ge
"
a
n
d
co
n
fi
rm.
Move the cursor usin
g
the control to
identif
y
the desired destination.
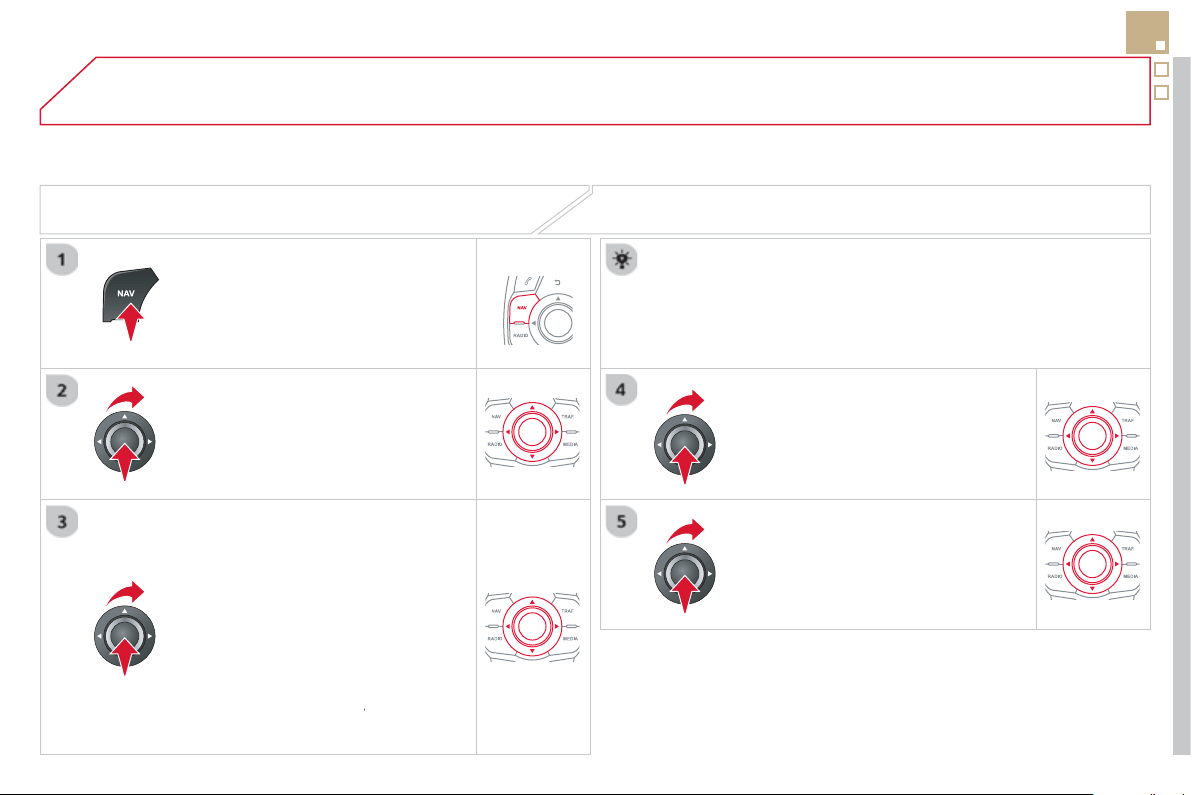
04
271
TOWARDS POINTS OF INTEREST
(
POI
)
NAVIGATION - GUIDANCE
The points o
f
interest
(
P
O
I
)
indicate all o
f
the service locations in the vicinit
y
(
hotels, various businesses, airports...
)
.
S
elect the "
E
nter an a
dd
ress
"
f
unction and con
fi
rm, then select
S
elect destination
a
n
d
co
n
fi
rm.
To select a P
O
I close to your current
l
ocation, select "POI" and con
fi
rm, then
se
l
ec
t "
A
round the current
p
lac
e
"
a
n
d
co
nfi rm.
To select a P
O
I as a sta
g
e on the route,
se
l
ec
t " PO
I
" and confi rm, then select
"
On the rout
e
"
a
n
d
co
nfi rm.
To select a P
O
I as a destination,
fi
rst
e
nter the countr
y
and town
(
see "Towards
a new destination"
)
, select "POI"
a
n
d
c
on
fi
rm,
fi
nall
y
select "
Near
" and confi rm.
r
Search for P
O
Is in the cate
g
ories
su
gg
ested in the followin
g
pa
g
es.
S
elect " Search b
y
Nam
e
" to search for P
O
Is b
y
name and not b
y
p
roximit
y
.
P
r
ess
NAV
to
di
sp
l
a
y
t
h
e
"
N
av
ig
at
i
on -
g
u
id
anc
e
"
m
e
n
u
.
Se
l
ec
t th
e
P
O
I
a
n
d
co
n
fi
rm " O
K
" t
o
s
t
a
rt
the
g
uidance.
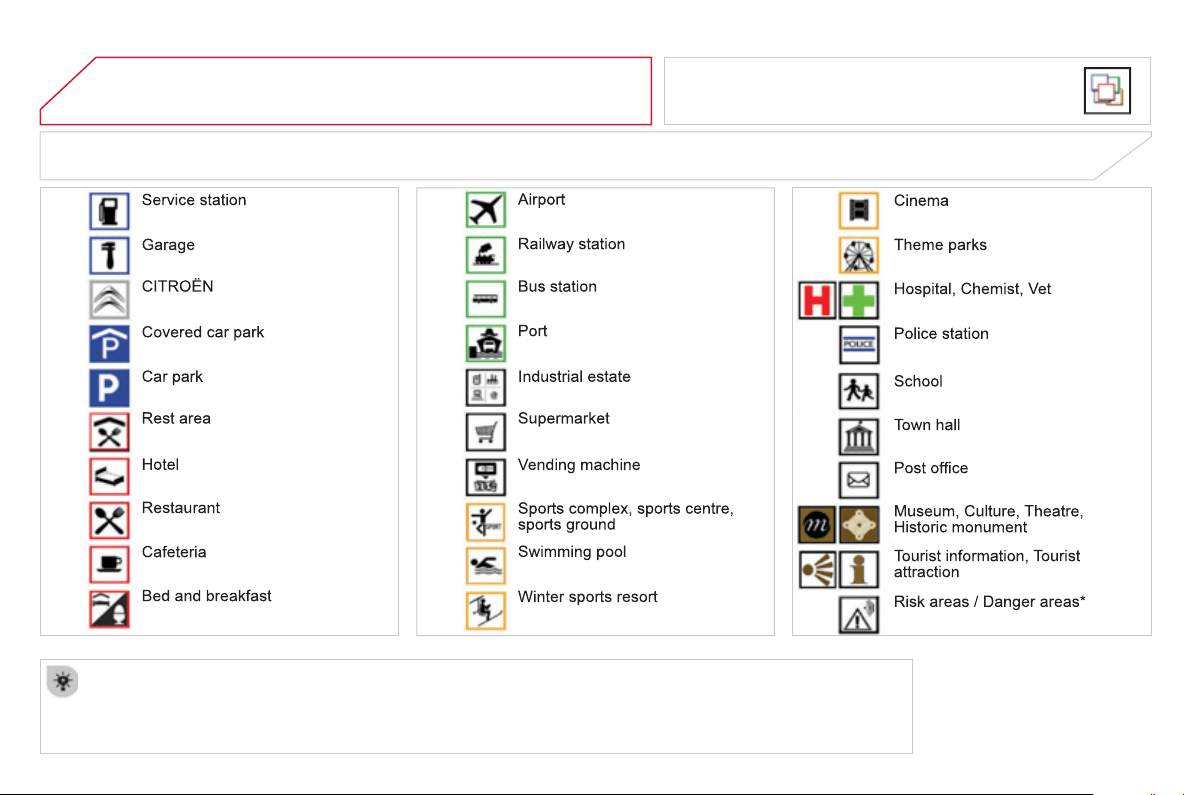
04 NAVIGATION - GUIDANCE
This icon appears when several P
O
Is are
g
rouped
to
g
ether in the same area. Zoomin
g
in on this icon
s
hows details of the P
O
Is.
LIST OF PRINCIPAL POINTS OF INTEREST (POI)
*
Accordin
g
to availabilit
y
in the
c
ountr
y
.
A
n annual mappin
g
update allows new points o
f
interest to be presented to
y
ou.
You can also update the Risk areas
/
Danger areas every month.
The detailed procedure is available on http:
//
citroen.navi
g
ation.com.
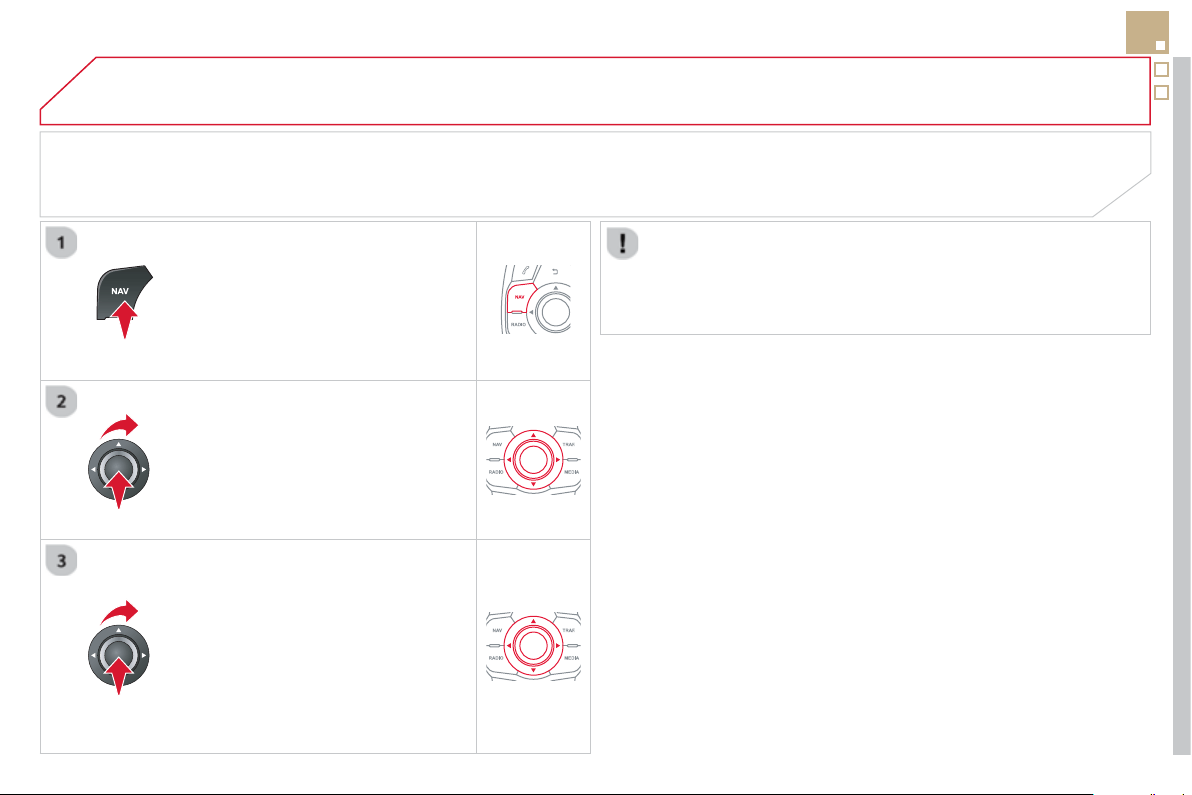
04
273
NAVIGATION - GUIDANCE
ALERT PARAMETERS
RISK AREAS / DANGER AREAS
Pr
ess
NAV
to displa
y
the "Navi
g
ation -
g
uidanc
e
" m
e
n
u
.
Se
l
ec
t:
- "Vi
sua
l
a
l
e
rt"
- "A
ud
i
b
l
e
a
l
e
rt"
-
"Al
ert on
ly
i
n
g
u
id
ance
"
- "
O
verspeed alarm onl
y
".
Th
e
c
h
o
i
ce
of
tim
e
of
n
o
ti
fi
ca
ti
o
n
defi
n
es
h
ow lon
g
in advance that Risk area
warnin
g
s are
g
iven.
S
elect " OK " t
o
co
nfi rm th
e
sc
r
ee
n.
S
elect "
G
uidance o
p
tions " and con
fi
rm,
th
e
n
se
l
ec
t "Set
p
arameters for risk
areas
"
a
n
d
co
n
fi
rm.
These
f
unctions are onl
y
available i
f
risk areas have been
downloaded and installed on the s
y
stem.
The detailed procedure for updatin
g
risk area P
O
Is can be found at
h
ttp://citroen.navi
g
ation.com.
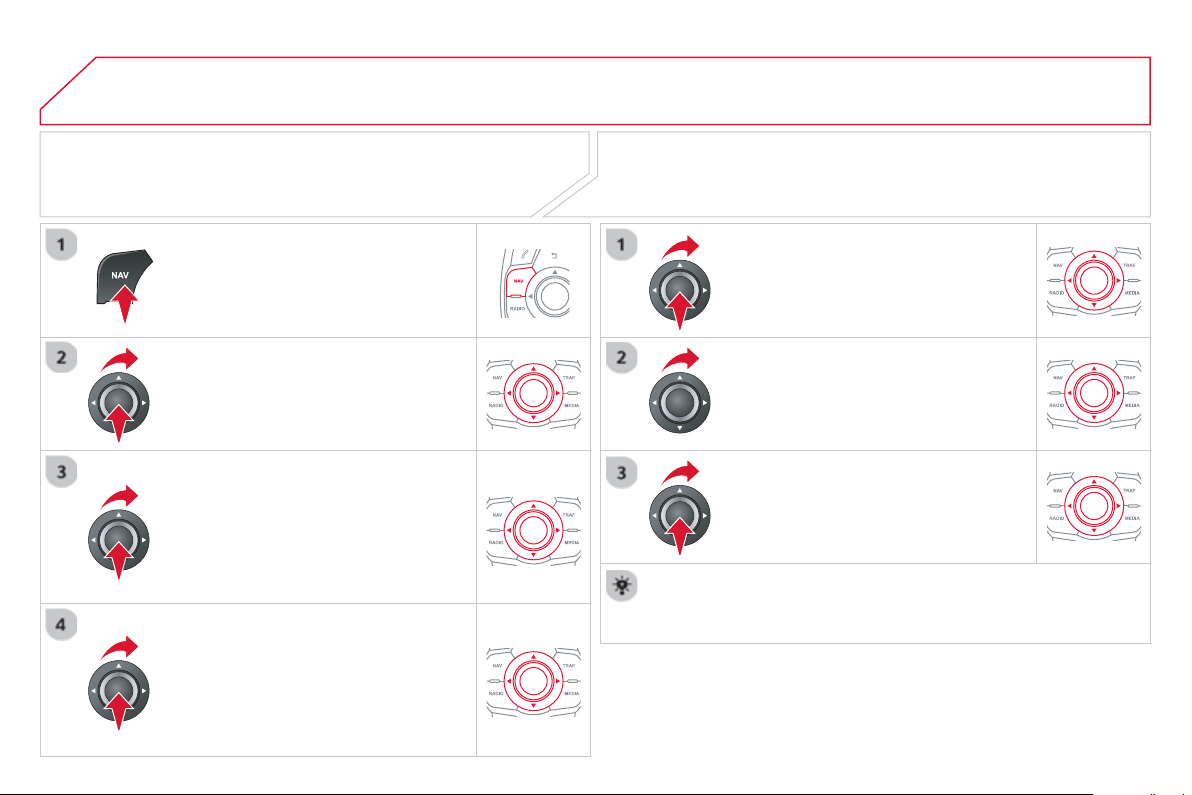
04 NAVIGATION - GUIDANCE
ADDING A STAGE
Pr
ess
NAV
to displa
y
the
"
Navi
g
ation -
g
uidanc
e
" m
e
n
u
.
Se
l
ec
t "
J
ourne
y
le
g
and rout
e
" th
e
n
co
n
fi
rm.
S
elect " Close t
o
" a route passin
g
c
lose to the sta
g
e or " Stric
t
" f
o
r
a
r
ou
t
e
pass
i
n
g
t
h
rou
gh
t
h
e sta
g
e.
C
on
fi
rm " OK
"
to start t
h
e
g
u
id
ance, an
d
g
ive a
g
eneral indication o
f
the
g
uidance
r
oute
.
S
elect "Add a stag
e
" th
e
n
co
n
fi
rm.
The address o
f
the sta
g
e is entered as
a destination, b
y
"
E
nter an address",
a
co
nt
ac
t in "
D
irector
y
", or "
P
revious
d
estinations"
.
ORGANISING STAGES
T
o or
g
an
i
se sta
g
es, carr
y
out
o
perations 1 to 2 a
g
ain, then select
"
Order/delete
j
ourne
y
le
g
s
"
a
n
d
co
n
fi
rm.
S
elect and confi rm to save the
m
od
ifi
ca
ti
o
n
s
.
S
elect the sta
g
e that
y
ou want to move
in th
e
o
r
de
r.
Se
l
ec
t "
D
elet
e
" to delete the sta
g
e.
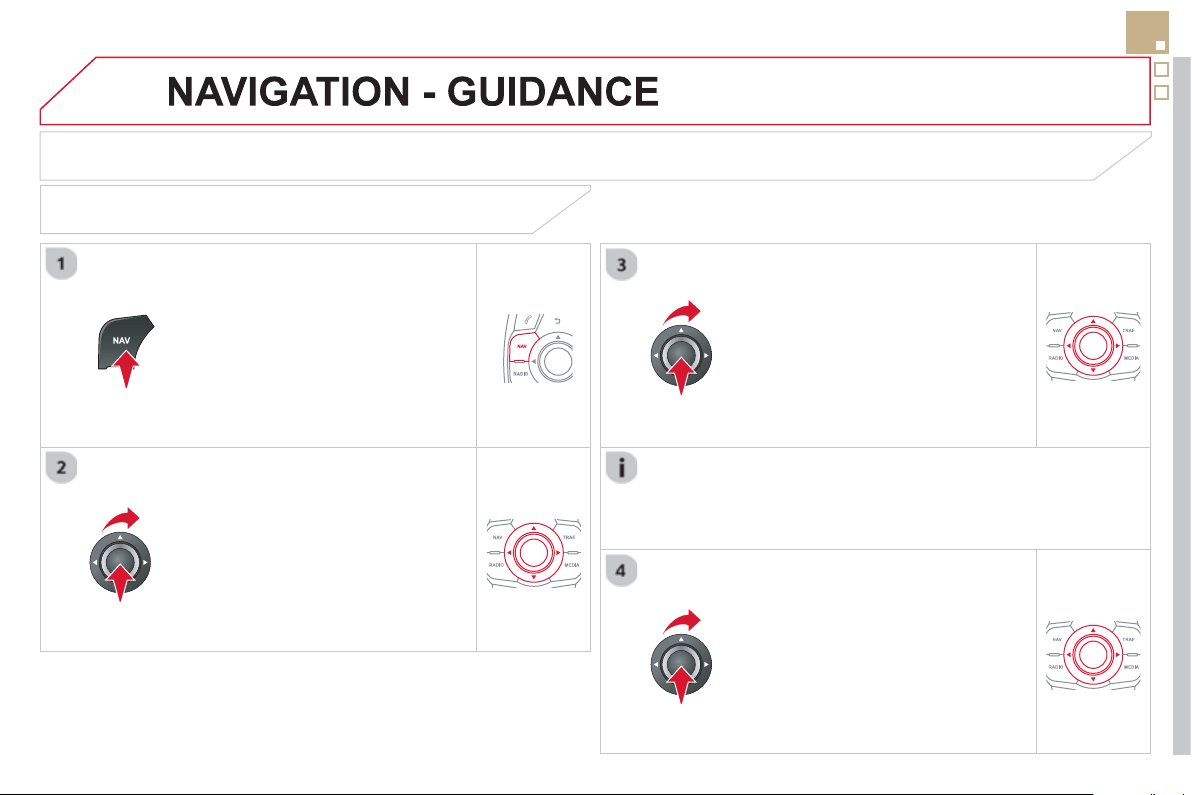
04
275
ROUTE OPTIONS
CALCULATION CRITERIA
S
elect " Guidance o
p
tion
s
"
a
n
d
co
nfi rm.
S
elect " OK "
a
n
d
co
nfi rm t
o
sa
v
e
th
e
mod
ifi
ca
ti
o
n
s
.
S
elect "
D
efi ne calculation criteri
a
"
a
n
d
co
nfi rm.
Thi
s
fu
n
c
ti
o
n
a
ll
o
w
s
m
od
i
fi
ca
ti
o
n
of
:
- the
g
uidance criteria:
(
"
F
astest
rout
e
", "
S
hortest rout
e
",
"
D
istance
/
Tim
e
"
)
,
- the exclusion criteria:
(
" With tolls"
o
r "With Ferr
y
"
)
,
- traffi c avoidance:
(
"
T
raffi c inf
o
"
)
.
P
r
ess
NAV
to
di
sp
l
a
y
t
h
e
"
N
av
ig
at
i
on -
g
u
id
anc
e
"
m
e
n
u
.
I
f
tra
ffi
c avoidance
(
Tra
ffi
c in
f
o
)
is selected, the s
y
stem su
gg
ests
an alternative route if there is a dela
y
on the
g
uidance route.
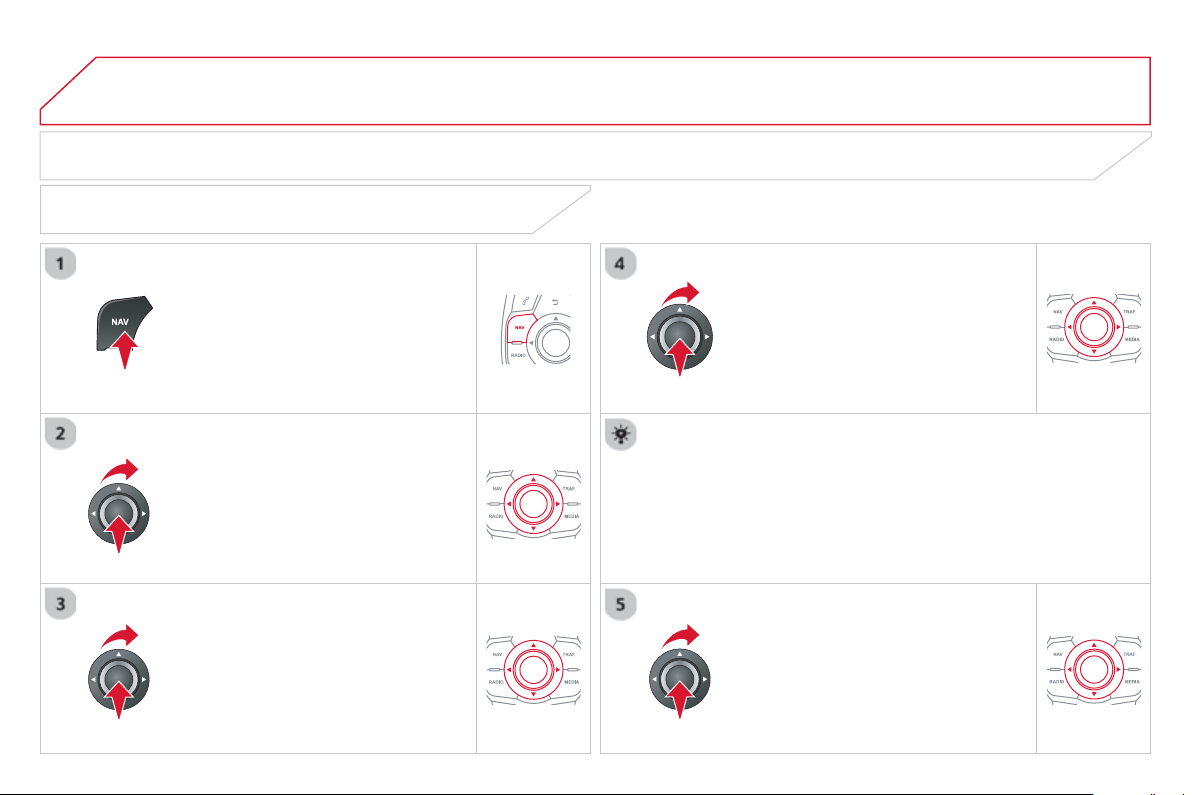
04 NAVIGATION - GUIDANCE
Pr
ess
NAV to display the " Navigation -
g
uidanc
e
" m
e
n
u
.
MAP MANAGEMENT
SELECTING THE POINTS OF INTEREST DISPLAYED ON THE MAP
S
elect "
M
ap mana
g
emen
t
"
a
n
d
co
nfi rm.
S
elect
f
rom the various cate
g
ories the
ones that
y
ou want to displa
y
on the
sc
r
ee
n.
Se
l
ec
t "Ma
p
details"
a
n
d
co
n
fi
rm.
S
elect "
By
defaul
t
" to have onl
y
"Oil stations,
g
ara
g
es"
a
n
d
"
Accident-
p
rone are
a
" appear on the map
(
if installed in the
s
y
stem
)
.
S
elect " OK " th
e
n
co
n
fi
rm
a
n
d
se
l
ec
t
"
O
K
" a
g
ain then con
fi
rm to save the
m
od
i
fi
ca
ti
o
n
s
.

04
277
NAVIGATION - GUIDANCE
S
elect "
M
ap mana
g
emen
t
"
a
n
d
co
nfi rm.
S
elect:
-
"
V
e
hi
c
l
e
di
rect
i
on
"
to
h
ave t
h
e map
f
ollow the direction o
f
travel,
- "North direction" to keep the map
alwa
y
s North up,
- "Perspective view " to displa
y
a
p
ers
p
ective view.
Se
l
ec
t "Ma
p
orientation "
a
n
d
co
n
fi
rm.
The colour o
f
the map, di
ff
erent
f
rom the day and night mode, is
c
on
fi
g
ured in the "
S
ETUP" m
e
n
u
.
MAP ORIENTATION
Pr
ess
NAV to display the
" Navi
g
ation -
g
uidanc
e
" m
e
n
u
.
S
treet names are visible on the map
f
rom the 100 m scale.
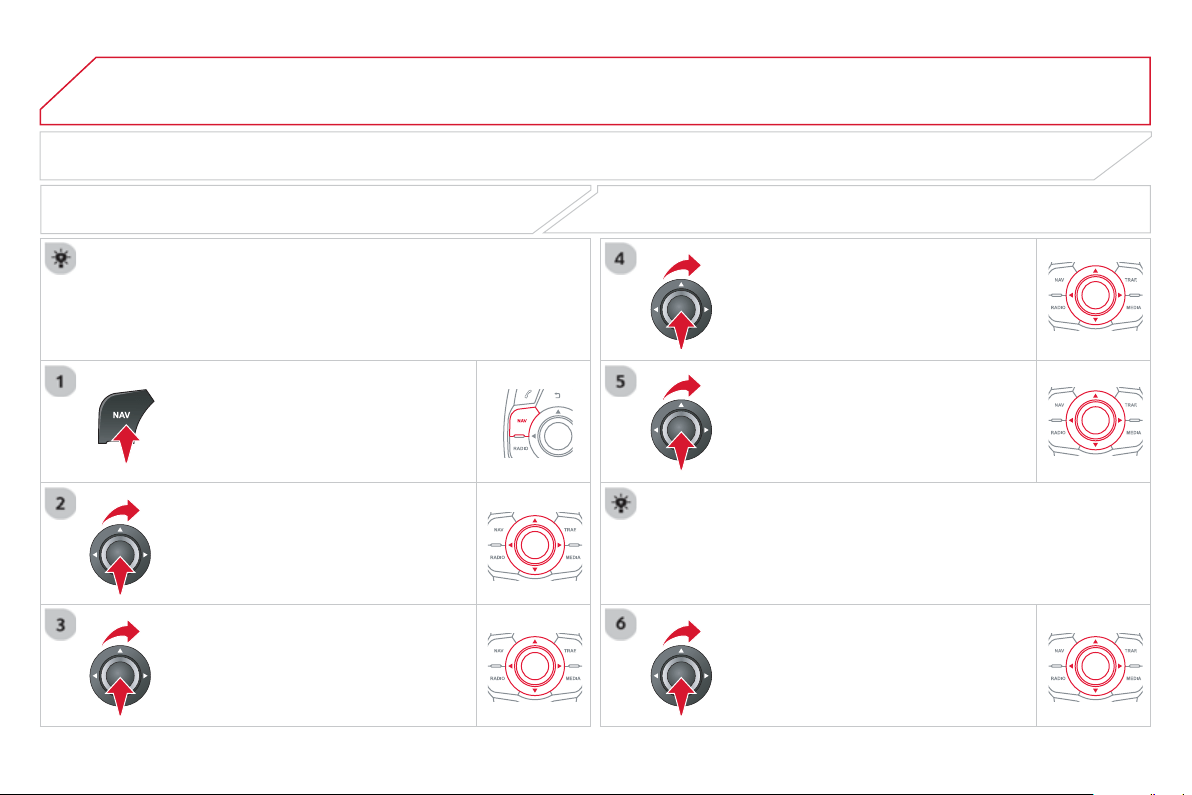
04 NAVIGATION - GUIDANCE
P
r
ess
NAV
to
di
sp
l
a
y
t
h
e
"
N
av
ig
at
i
on -
g
u
id
anc
e
"
m
e
n
u
.
ADJUSTING THE GUIDANCE SPEECH SYNTHESIS
S
elect " Guidance o
p
tion
s
"
a
n
d
co
n
fi
rm.
ADJUSTING THE VOLUME/DEACTIVATION
S
elect " Set speech synthesis"
a
n
d
co
n
fi
rm.
S
elect the volume
g
raph and con
fi
rm.
S
elect "
D
eact
i
vat
e
"
to
d
eact
i
vate vo
i
ce messa
g
es.
S
elect " OK
"
an
d
press t
h
e
di
a
l
to
co
n
fi
rm.
A
d
j
ust the volume to the desired level
a
n
d
co
nfi rm.
The volume o
f
messages can be adjusted during the transmission
of
the messa
g
e usin
g
the volume ad
j
ustment control.
The volume settin
g
o
f
g
uidance messa
g
es is also accessible via the
"
S
ETU
P
"
/
"
V
oice synthesi
s
" m
e
n
u
.
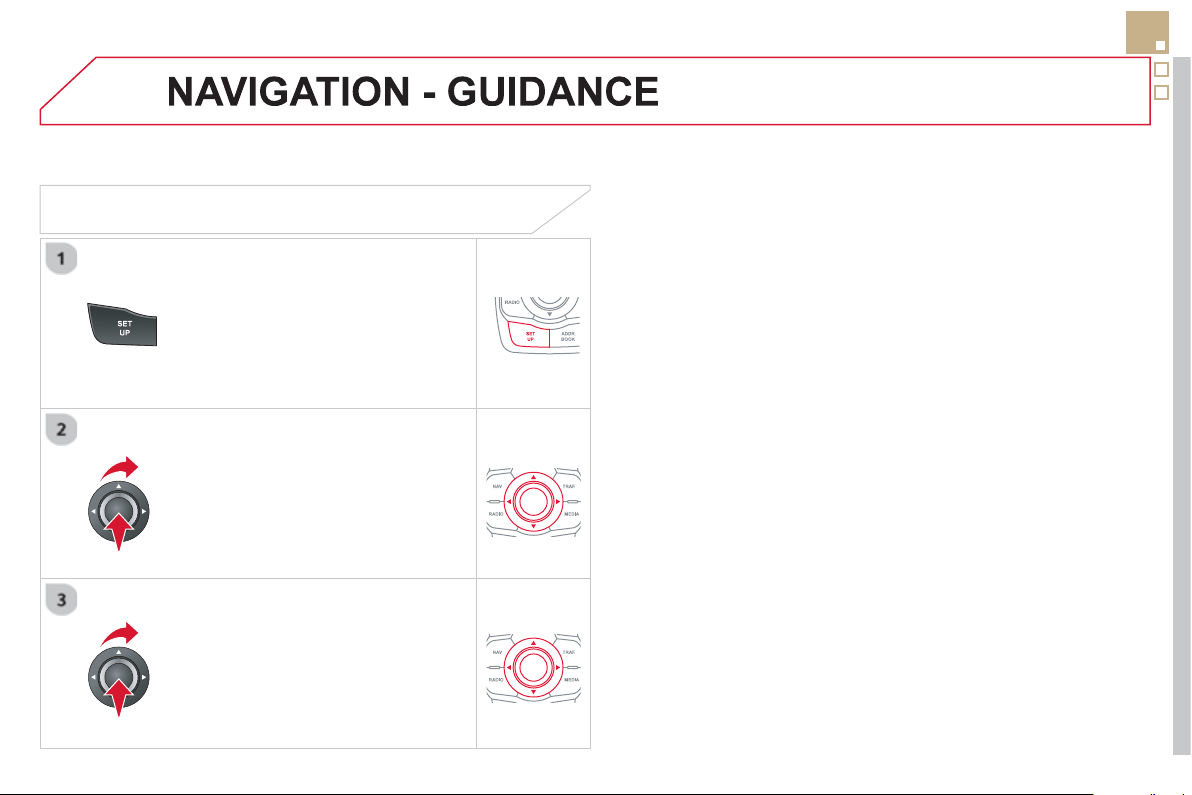
04
279
MALE VOICE / FEMALE VOICE
P
r
ess
SETU
P
to
di
sp
l
a
y
t
h
e
c
on
fi
g
uration menu.
Se
l
ec
t "Select male voic
e
"
o
r "Select
f
emale voic
e
" then confi rm "
Yes
" t
o
ac
tiv
a
t
e
a
m
a
l
e
o
r f
e
m
a
l
e
v
o
i
ce
. Th
e
sy
stem restarts.
S
elect "
V
oice synthesis "
a
n
d
co
n
fi
rm.
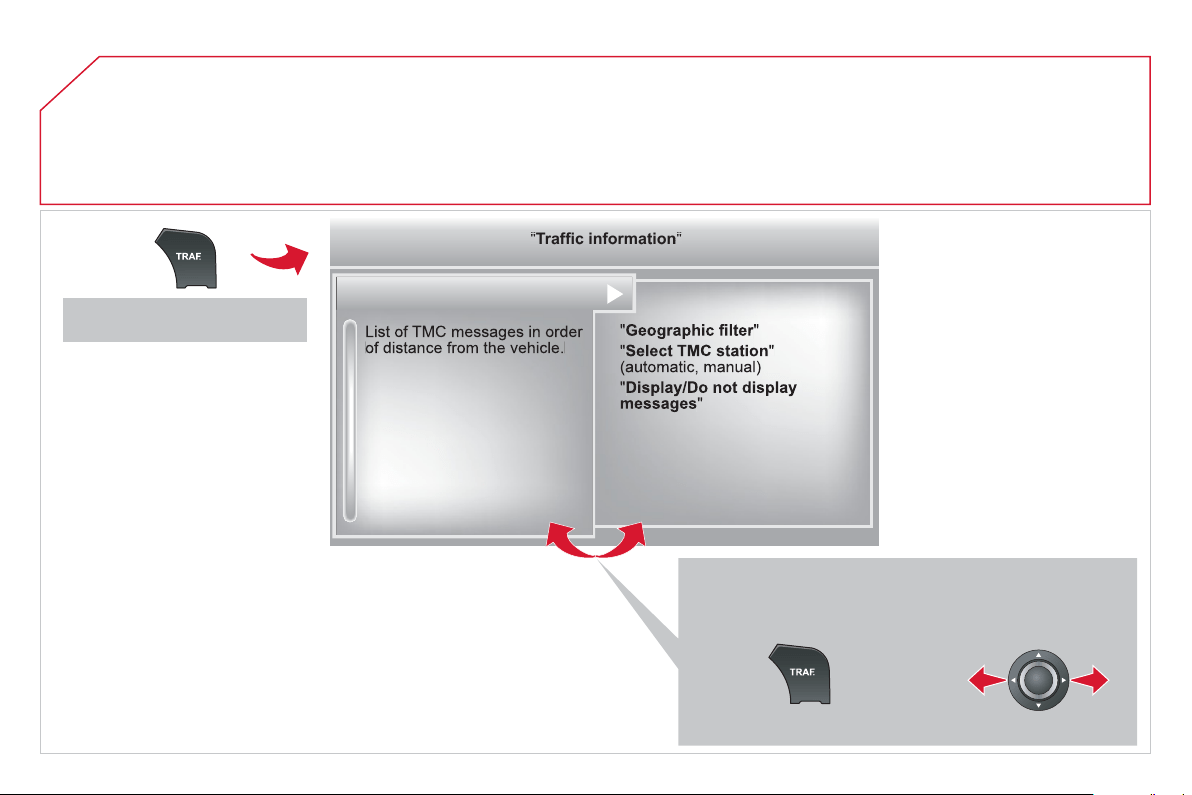
05
TRAFFIC INFORMATION
Access to the "TRAFFIC INFORMATION" menu
G
o
f
rom the list to the menu
(
le
f
t
/
ri
g
ht
)
.
"
"
"
"
"
"
"
a c o at o
Traffi
c
information
Traffic information
Traffic information
Traffic information
Traffic information
Traffic information
Traffic information
Traffic information
Traffic information
Traffic information
Traffic information
Traffic information
Traffic information
Traffic information
Tffi if ti
Tffi if ti
Tffi if ti
Tffi if ti
"
"
"
"
"
"
"
or
P
r
ess
"
T
RAFFI
C
"
.
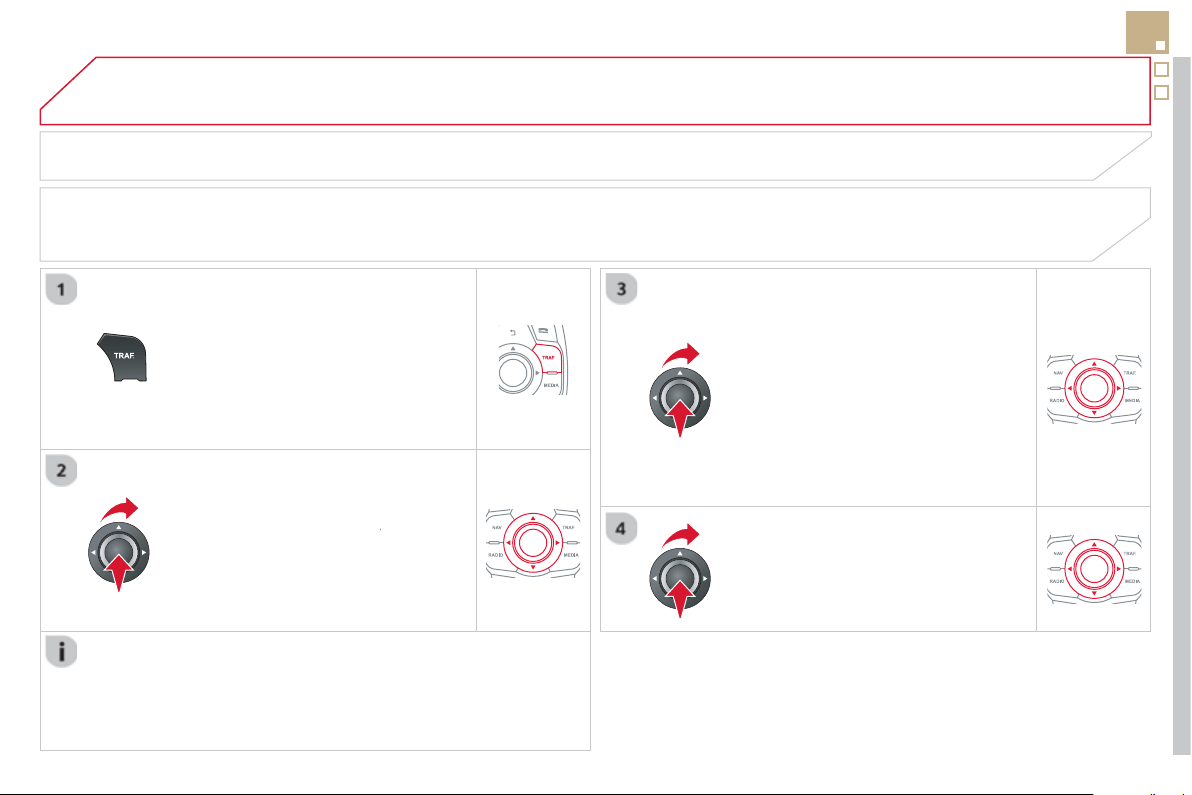
05
281
TRAFFIC INFORMATION
CONFIGURE THE FILTERING AND DISPLAY OF TMC MESSAGES
TM
C
(
Tra
ffi
c Messa
g
e
C
hannel
)
messa
g
es contain in
f
ormation on tra
ffi
c and weather conditions, received in real time and transmitted to the
driver in the
f
orm o
f
audible announcements and s
y
mbols on the navi
g
ation map.
The navi
g
ation s
y
stem can then su
gg
est an alternative route to avoid a traffi c problem.
Pr
ess
th
e
T
RAFFI
C
button to displa
y
the
"
T
raffi c information " m
e
n
u
.
Se
l
ec
t th
e
"
Geographic fi lter
"
fu
n
c
ti
o
n
r
a
n
d
co
nfi rm.
The s
y
stem o
ff
ers a choice o
f
:
- " Retain all the messa
g
es ",
o
r
-"Retain the messa
g
e
s
"
●
"
A
roun
d
t
h
e ve
hi
c
le
",
(
confi rm
the milea
g
e to modi
fy
and select
the distance
)
,
● " On the rout
e
".
C
onfi rm " OK " t
o
sa
v
e
th
e
m
od
ifi
ca
ti
o
n
s
.
We
r
eco
mm
e
n
d
:
-
a
fi
lt
e
r
o
n th
e
r
ou
t
e
a
n
d
-
a
fi
lt
e
r
a
r
ou
n
d
th
e
v
e
hi
c
l
e
of
:
- 12 miles
(
20 km
)
in urban areas,
- 30 miles
(
50 km
)
on motorwa
y
s.
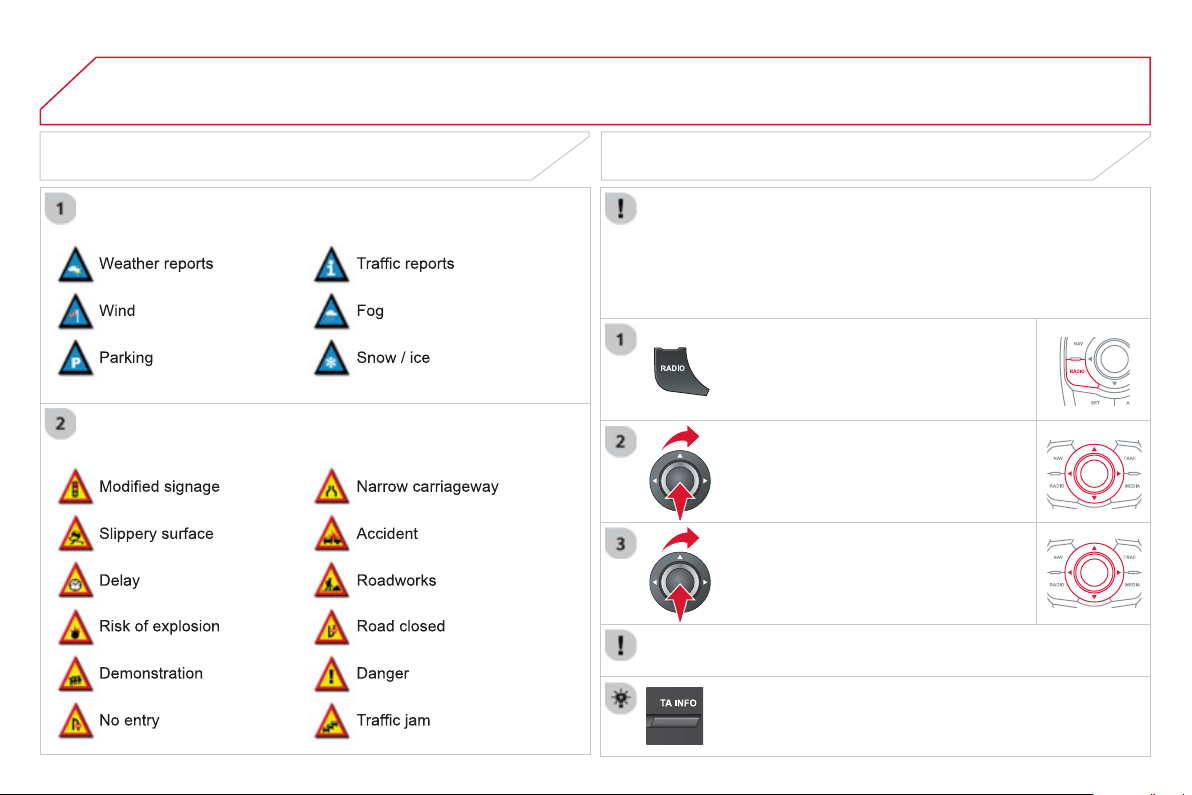
05 TRAFFIC INFORMATION
PRINCIPAL TMC SYMBOLS
Red and
y
ellow trian
g
le: tra
ffi
c in
f
ormation,
f
or example:
Black and blue trian
g
le:
g
eneral information, for example:
RECEIVING TA MESSAGES
The TA
(
Tra
ffi
c Announcement
)
f
unction
g
ives priorit
y
to TA alert
m
essa
g
es. To operate, this function needs
g
ood reception of a
r
adio station transmittin
g
this t
y
pe of messa
g
e. When a traffi c report
is transmitted, the current audio source
(
Radio, CD, USB, ...
)
is
i
nterrupte
d
automat
i
ca
lly
to p
l
a
y
t
h
e
TA
messa
g
e.
N
orma
l
p
l
a
yb
ac
k
of
th
e
aud
i
o
sou
r
ce
r
esu
m
es
a
t th
e
e
n
d
of
th
e
tr
a
n
s
mi
ss
i
o
n
of
th
e
message
.
P
r
ess
R
ADIO to
di
sp
l
a
y
t
h
e menu.
S
elect " Guidance o
p
tion
s
"
t
he
n
co
n
fi
rm.
Ac
t
i
v
a
t
e
o
r
deac
t
i
v
a
t
e
"
TA
" th
e
n
co
n
fi
rm.
The volume settin
g
f
or TA messa
g
es can be ad
j
usted onl
y
durin
g
the
transmission of this t
y
pe of alert.
A
ctivate or deactivate the
f
unction at an
y
time b
y
pressin
g
t
he
bu
tt
o
n.
During a message, press the button to interrupt it.

06
283
USING THE TELEPHONE
Access to the "TELEPHONE" menu
"
"
"
"
"
"
"
"
p
p
p
p
p
Telephone
Telephone
Telephone
Telephone
Telephone
Telephone
Telephone
Telephone
Telephone
Telephone
Telephone
Telephone
Telephone
Telephone
Tl h
Tl h
Tl h
Tl h
Tl h
"
"
"
"
"
"
"
"
P
r
ess
t
his
bu
tt
o
n.
To make a call, select a number in the list and con
fi
rm " O
K
"
t
o
s
t
a
rt t
he
call
.
C
onnectin
g
a di
ff
erent telephone deletes the list o
f
r
ece
nt
calls
.
N
o te
l
ep
h
one connecte
d
.
Tele
p
hone connected.
Incomin
g
call.
O
ut
g
oin
g
call.
S
y
nchronisation
of
add
r
ess
boo
k in
progress
.
Tele
p
hone call in
p
ro
g
ress.
In the top bar of the permanent
d
ispla
y
Go from the list to the menu
(
left/ri
g
ht
)
.
o
r
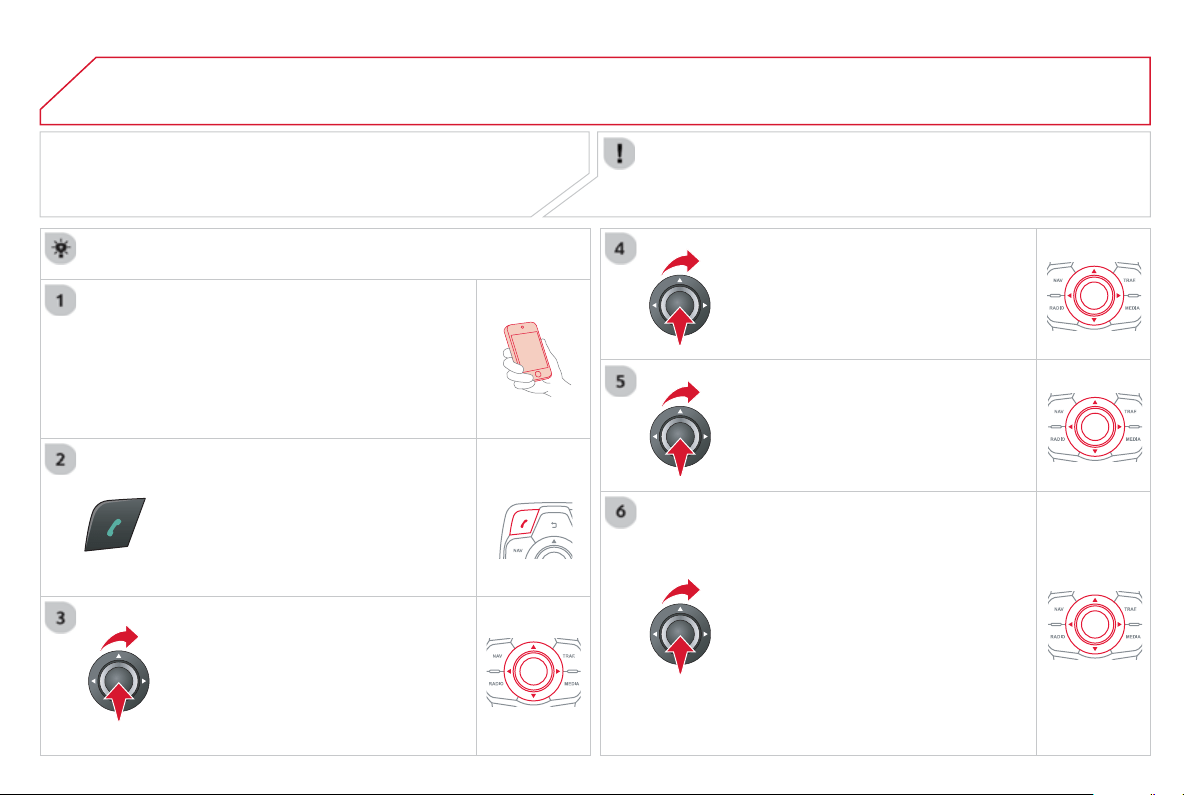
06
PAIRING A BLUETOOTH TELEPHONE
FIRST CONNECTION
For reasons of safet
y
and because the
y
require prolon
g
ed attention
o
n the part o
f
the driver, the operations
f
or pairin
g
the Bluetooth
mobile telephone to the hands-
f
ree system o
f
the audio unit must be
ca
rri
ed
ou
t with th
e
vehicle stationar
y
.
Activate the tele
p
hone's Bluetooth function
a
nd ensure that it is "visible to all"
(
telephone
c
onfi
g
uration
)
.
Pr
ess
thi
s
bu
tt
o
n.
S
elect the name o
f
the desired
peripheral
f
rom the list o
f
devices
de
t
ec
t
ed
th
e
n
se
l
ec
t "Connec
t
"
a
n
d
co
n
fi
rm.
The s
y
stem o
ff
ers to connect the
te
l
ep
h
one:
- in "
H
ands-free mod
e
"
(
telephone
o
nl
y)
,
- in "
A
udio" mode
(
streamin
g
: pla
y
in
g
music fi les on the telephone
)
,
-
o
r "
All
"
(
for selection of both
modes
)
.
S
elect " OK "
a
n
d
co
n
fi
rm.
S
elect "
B
luetooth functions
"
a
n
d
co
n
fi
rm.
Se
l
ec
t "Peri
p
herals search"
a
n
d
co
n
fi
rm.
The list of
p
eri
p
herals detected is
displa
y
ed. Wait until the " Connec
t
"
bu
tt
o
n i
s
a
v
a
il
ab
l
e
.
USING THE TELEPHONE
You can check the compatibility o
f
your telephone at
w
ww.citroen.co.uk
(
services
)
.
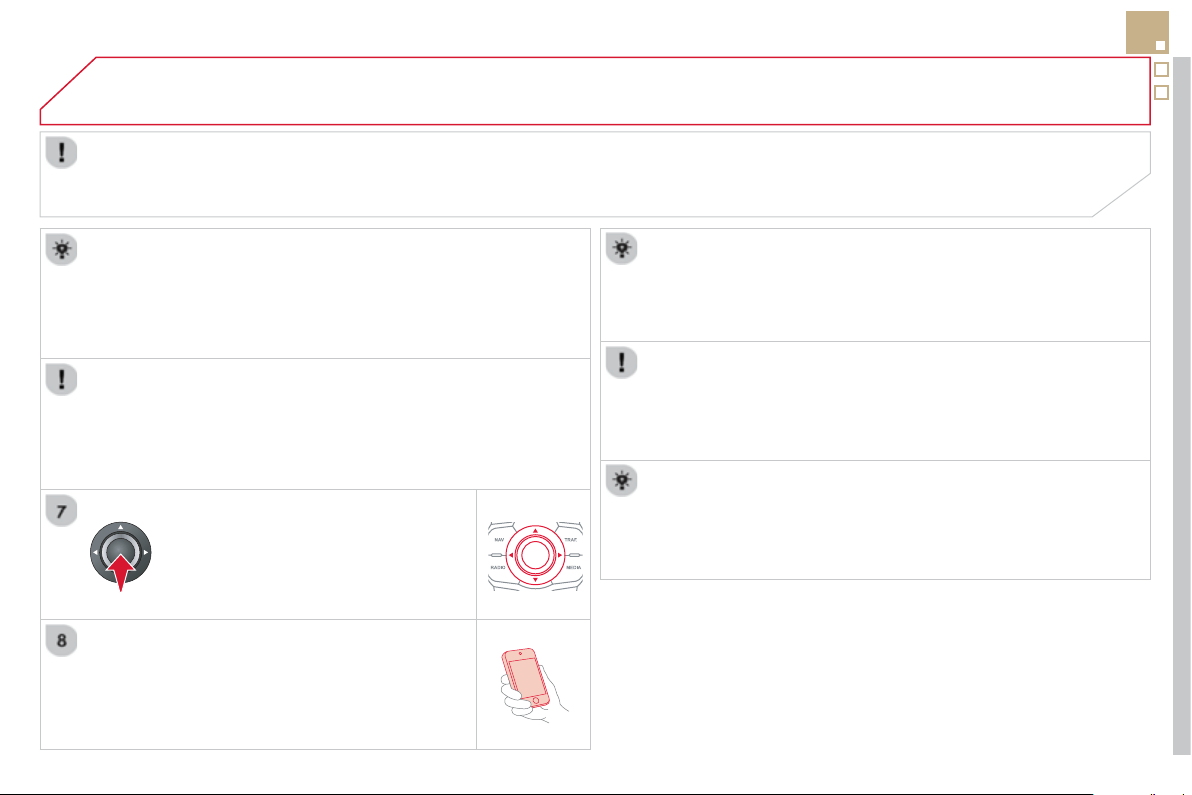
06
285
Enter the same code on the telephone then accept
th
e
co
nn
ec
ti
o
n.
Then accept automatic connection on the telephone to allow the
telephone to reconnect automaticall
y
ever
y
time the vehicle is
s
t
a
rt
ed
.
Dependin
g
on the t
y
pe o
f
telephone, the s
y
stem will ask
y
ou to
accept or not the trans
f
er o
f
y
our contacts.
USING THE TELEPHONE
The
"
Hands-free mod
e
" should be used in preference i
f
"S
treamin
g
" is not desired.
The services available depend on the network, the
S
IM card and the compatibility o
f
the Bluetooth telephone used.
C
heck the telephone
m
anual and with
y
our network provider
f
or details o
f
the services available to
y
ou.
The ability o
f
the system to connect in only one mode depends on
the telephone. The two modes ma
y
both connect b
y
de
f
ault.
S
elect a code
f
or the connection then
co
n
fi
rm " OK ".
O
n return to the vehicle, the last tele
p
hone connected
automaticall
y
reconnects, within around 30 seconds after
s
witchin
g
on the i
g
nition
(
Bluetooth activated and visible
)
.
To modi
fy
the automatic connection mode, remove the pairin
g
and
p
a
i
r t
h
e te
l
ep
h
one a
g
a
i
n w
i
t
h
t
h
e
d
es
i
re
d
mo
d
e.

06
SR
C
USING THE TELEPHONE
Pr
ess
thi
s
bu
tt
o
n.
S
elect "
D
ial" th
e
n
co
nfi rm.
S
elect "
D
irector
y
of contacts" th
e
n
co
nfi rm.
Di
a
l
t
h
e te
l
ep
h
one num
b
er us
i
n
g
t
h
e
v
i
rtua
l
k
e
y
pa
d
se
l
ect
i
n
g
eac
h
num
b
er
in t
u
rn.
Co
n
fi
rm " OK " t
o
m
a
k
e
th
e
ca
ll.
P
ress t
hi
s
b
utton or ma
k
e
l
on
g
press on
t
h
e steer
i
n
g
mounte
d
T
EL/SRC
bu
tt
o
n.
CALLING A NEW NUMBER CALLING A CONTACT
S
elect the desired contact and confi rm.
S
elect the number and confi rm to start
t
he
call
.
MAKING A CALL
Use of the telephone is not recommended while drivin
g
. We
r
ecommended that
y
ou park sa
f
el
y
or make use o
f
the steerin
g
mou
nt
ed
co
ntr
ols
.
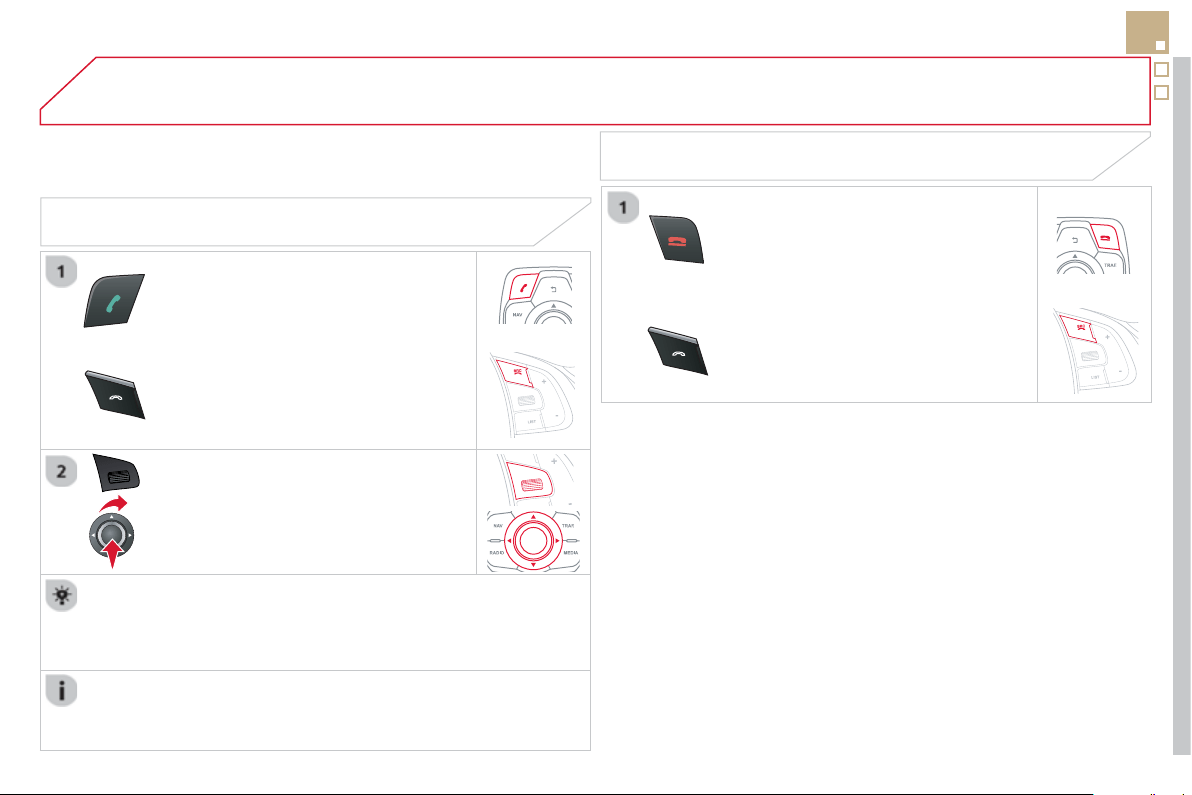
06
SR
C
SR
C
287
USING THE TELEPHONE
CALLING A RECENTLY DIALLED NUMBER
P
ress t
hi
s
b
utton or ma
k
e a
l
on
g
press
on
T
EL/SR
C
, se
l
ect
"
Call lis
t
"
a
n
d
c
on
fi
rm,
S
elect the desired number and con
fi
rm.
To erase the calls lo
g
, press
P
HONE , select "
T
elephone
op
tions"
a
n
d
co
nfi rm th
e
n
se
l
ec
t "
D
elete calls lo
g
"
a
n
d
co
nfi rm.
ENDING A CALL
Pr
ess
H
ANG U
P
o
r
It is alwa
y
s possible to make a call directl
y
f
rom the telephone;
park the vehicle
fi
rst as a sa
f
et
y
measure.
M
a
k
e a
l
on
g
press on t
h
e steer
i
n
g
m
ou
nt
ed
TEL/
S
RC
bu
tt
o
n.
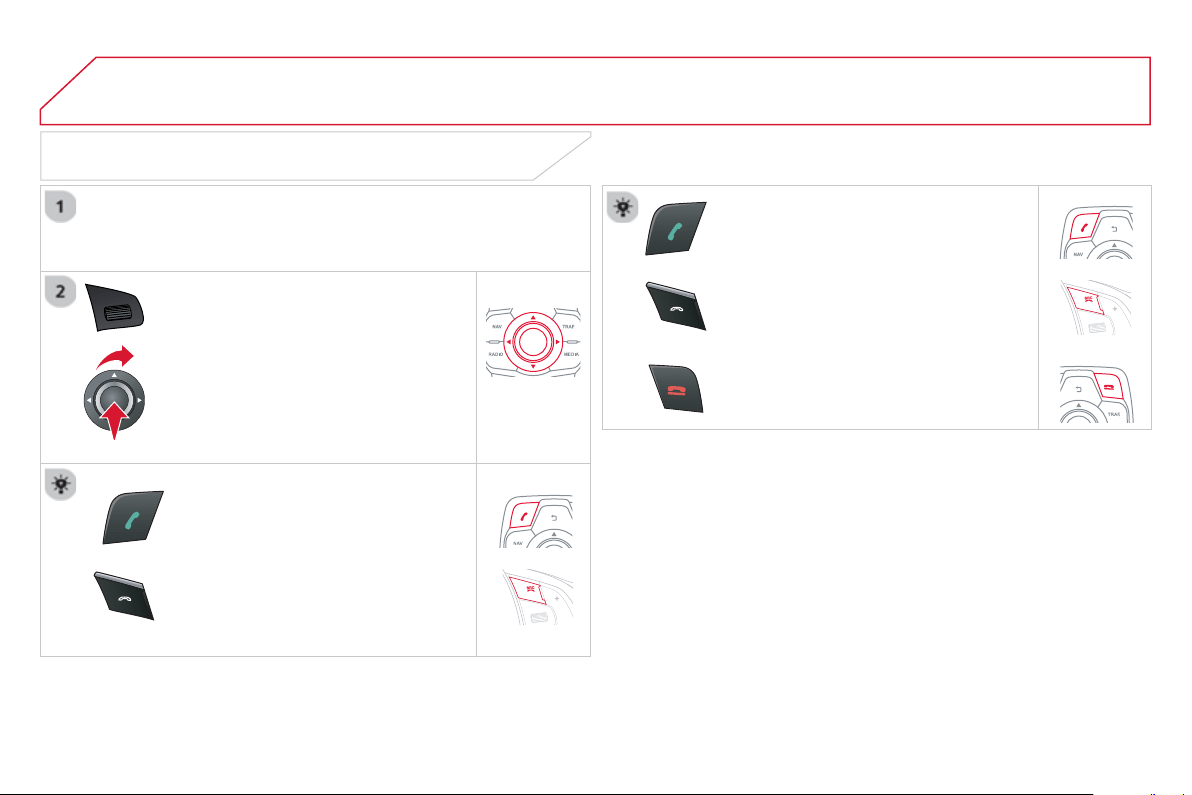
06
SR
C
SR
C
USING THE TELEPHONE
RECEIVING A CALL
A
n incomin
g
call is announced b
y
a rin
g
and a superimposed displa
y
in th
e
sc
r
ee
n.
"Ye
s
" to accept the call is selected by
defau
lt.
Pr
ess
" O
K
" to acce
p
t the call.
S
elect " N
o
" and confi rm to re
j
ect the
ca
ll.
A
s
h
ort press on t
hi
s
b
utton or
T
EL/SRC
accepts an
i
ncom
i
n
g
ca
ll
.
A
lon
g
press on this button or
T
EL/
S
R
C
or a
p
ress on
H
ANG U
P
re
j
ects an
incomin
g
call.
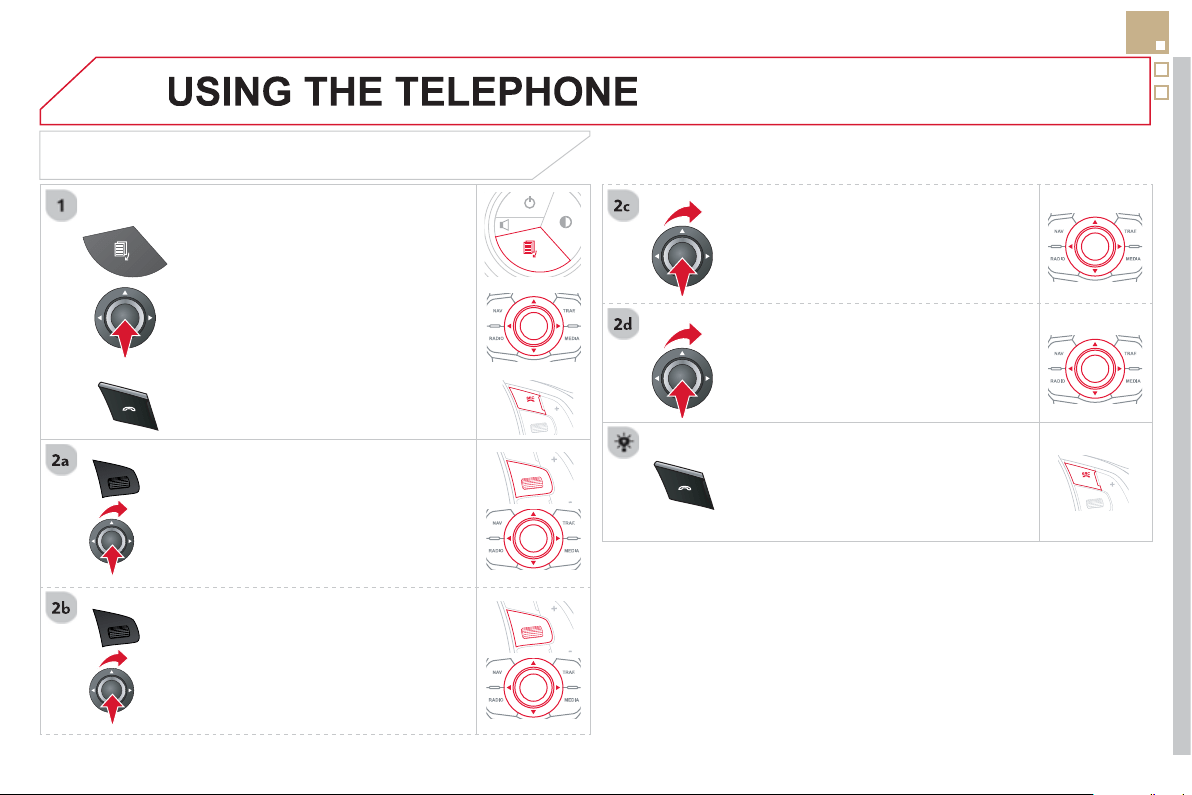
06
SR
C
SR
C
289
OPTIONS DURING A CALL *
Durin
g
a call, press the
M
OD
E
bu
tt
o
n
s
everal times to select displa
y
of the
te
l
ep
h
one screen, t
h
en press
"
OK
"
t
o
open t
h
e contextua
l
menu.
Se
l
ec
t "
P
rivate mod
e
"
a
n
d
co
n
fi
rm t
o
t
a
k
e
th
e
ca
ll
o
n th
e
h
a
n
dse
t.
O
r select "
H
ands-free mod
e
"
a
n
d
co
nfi rm t
o
t
a
k
e
th
e
ca
ll vi
a
th
e
v
e
hi
c
l
e
'
s
spea
k
ers.
Se
l
ec
t "
P
ut call on hold"
a
n
d
co
n
fi
rm t
o
put the current call on hold.
O
r select "
R
esume the call"
a
n
d
co
nfi rm t
o
r
esu
m
e
th
e
ca
ll
o
n h
o
l
d
.
S
elect "
D
TMF rin
g
tones " t
o
use
th
e
numerical ke
y
pad, so as to navi
g
ate
throu
g
h the menu of an interactive vocal
ser
v
er
.
S
elect "
H
an
g
u
p
"
t
o
e
n
d
t
he
call
.
*
Dependin
g
on the compatibilit
y
o
f
the phone and
y
our service plan.
it is possible to hold a 3-wa
y
con
f
erence
c
all b
y
makin
g
2 calls in succession*.
S
elect "
C
onferenc
e
m
ode cal
l
" in th
e
c
ontextual menu accessible usin
g
this
bu
tt
o
n.
O
r make a short press on this button.
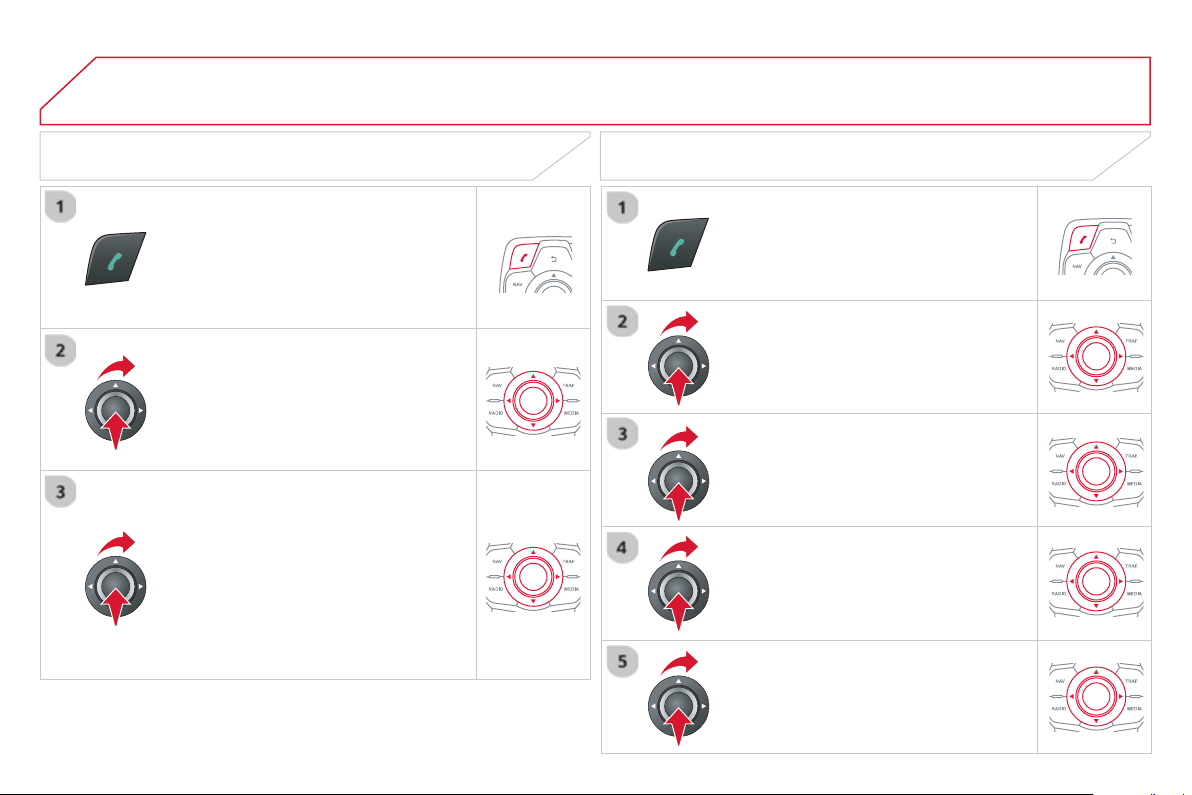
06
Pr
ess
thi
s
bu
tt
o
n.
S
elect "
L
ist of the paired peripherals"
a
n
d
co
nfi rm.
I
t
i
s poss
ibl
e to:
-
"
Connec
t
"
o
r
"
Di
sconnec
t
"
t
he
s
e
l
ecte
d
te
l
ep
h
one,
- delete the pairin
g
o
f
the selected
telephone.
It is also possible to select all pairin
g
s.
USING THE TELEPHONE
MANAGING PAIRED TELEPHONES CHANGING THE RING TONE
Pr
ess
thi
s
bu
tt
o
n.
S
elect "
T
e
l
e
ph
one o
p
t
i
ons
"
a
n
d
co
n
fi
rm.
S
elect "
R
in
g
options"
a
n
d
co
nfi rm.
You can ad
j
ust the volume and the rin
g
t
o
n
e
used
.
S
elect "
B
luetooth functions
".
S
elect " OK "
a
n
d
co
n
fi
rm t
o
sa
v
e
th
e
c
hanges.
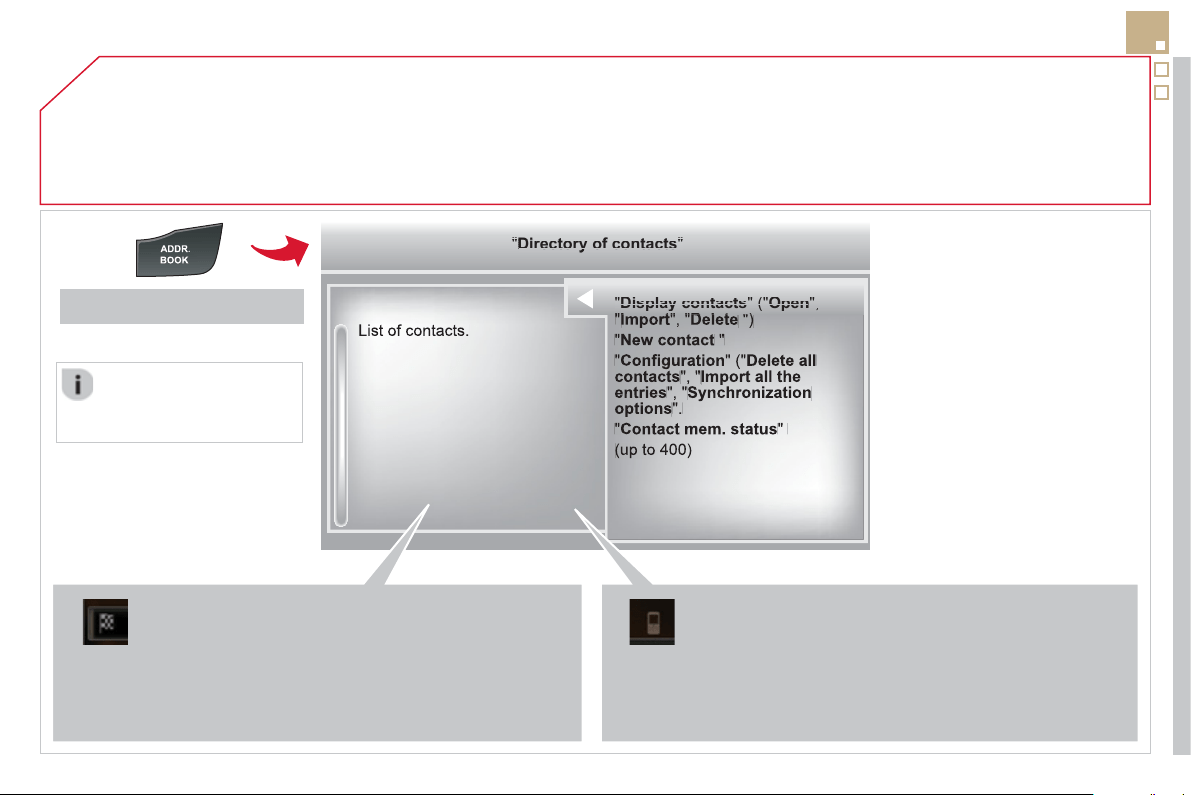
07
291
DIRECTORY - ADDR BOOK
Access to the "CONTACTS" menu
"
"
"
"
"
"
"
"
"
"
py
py
py
py
py
py
py
sp ay co tacts
Display
contacts
Display contacts
Display contacts
Display contacts
Display contacts
Display contacts
Display contacts
Display contacts
Display contacts
Display contacts
Display contacts
Display contacts
Display contacts
Display contacts
Display contacts
Display contacts
Display contacts
Display contacts
Display contacts
Display contacts
Di l t t
Di l t t
Di l t t
Di l t t
Di l t t
Di l t t
Di l
(
(
(
(
(
(
(
(
(
(
(
(
(
(
(
(
(
(
(
(
(
(
(
(
(
"("
"("
"("
"("
"("
"("
"("
"("
"("
"("
p
p
p
p
p
p
p
Ope
Open
Open
Open
Open
Open
Open
Open
Open
Open
Open
Open
Open
Open
Open
Open
Open
Open
Open
Open
Open
O
O
O
O
O
O
O
,
,
,
,
,
,
,
,
,
"
"
"
"
"
"
"
"
"
"
"
"
"
"
It
It
It
It
""
""
""
""
Dlt
Dlt
Dlt
Dlt
")
")
")
")
)
Des
t
i
n
a
t
io
n:
-
f
rom the contacts in the mobile telephone and the
S
IM
c
ard
(
dependin
g
on the s
y
nchronization options in the
Bluetooth menu and the compatibilit
y
o
f
the telephone
)
,
- saved in the s
y
stem.
S
elect a contact and confi rm.
Th
e
n
se
l
ec
t "
G
uid
e
"
a
n
d
co
nfi rm.
T
e
l
ep
h
one contacts:
-
f
rom the mobile telephone and the
S
IM card
(
depending on the synchronization options in the
Bluetooth menu and the compatibilit
y
o
f
the telephone
)
,
- saved in the s
y
stem.
P
r
ess
ADDR BOOK
.
S
elect a telephone contact and con
fi
rm to start the call.
The sortin
g
of the list o
f
c
ontacts
d
epen
d
s on t
h
e
te
l
ep
h
one use
d
.
"
"
"
"
"
"
"
"
y
y
y
y
y
Directory
of
contacts
Directory of contacts
Directory of contacts
Directory of contacts
Directory of contacts
Directory of contacts
Directory of contacts
Directory of contacts
Directory of contacts
Directory of contacts
Directory of contacts
Directory of contacts
Directory of contacts
Directory of contacts
Di t f t t
Di t f t t
Di t f t t
Di t f t t
Di f
"
"
"
"
"
"
"
"
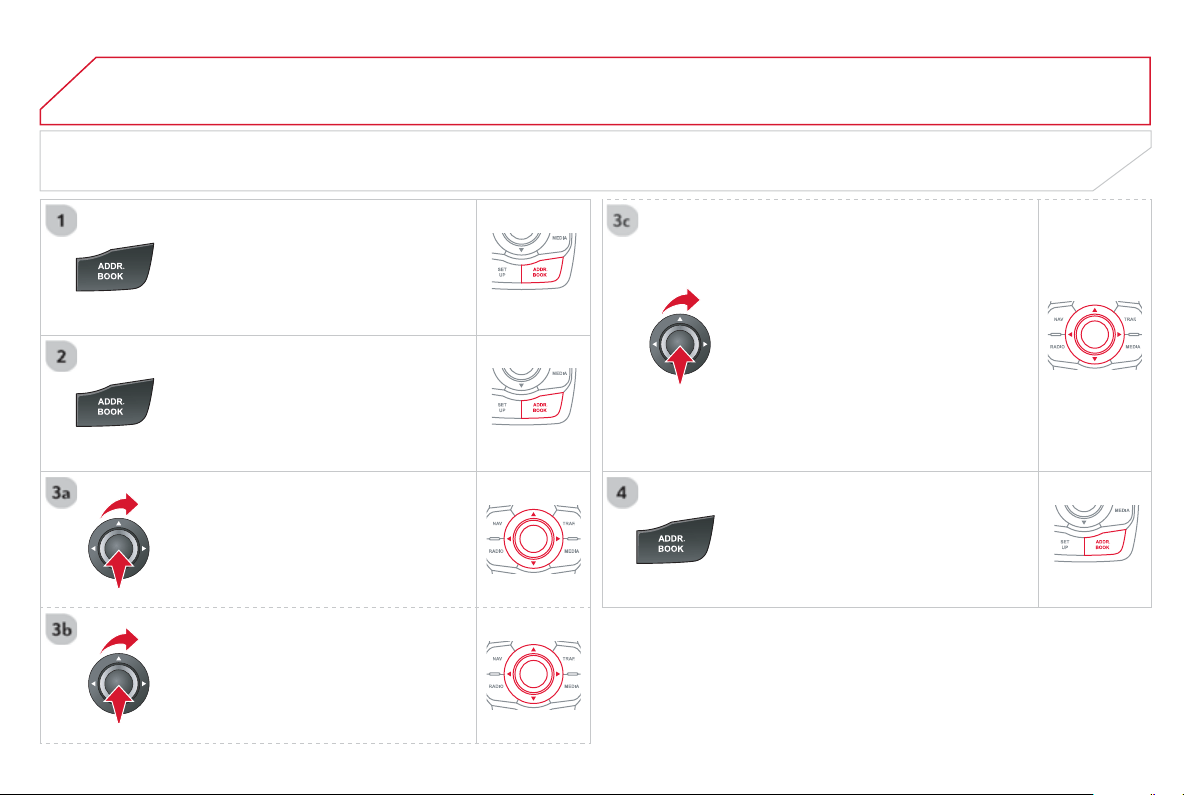
07
ENTERING A NEW CONTACT / SYNCHRONIZING WITH THE TELEPHONE
P
r
ess
ADDR BOO
K
tw
ice
t
he
n
selec
t
"
N
ew contac
t
"
t
o
e
nt
e
r
a
n
e
w
co
nt
ac
t.
Pr
ess
ADDR BOO
K
twi
ce
th
e
n
se
l
ec
t
"Confi
g
uratio
n
"
a
n
d
co
nfi rm.
Se
l
ec
t "
D
elete all contacts" t
o
de
l
e
t
e
the contacts saved in the s
y
stem.
S
elect "Import all the entries " to im
p
ort
all the contacts in the tele
p
hone and
s
ave them in the s
y
stem.
S
elect "S
y
nchronization options "
a
n
d
co
nfi rm:
-
N
o s
y
nc
h
ron
i
zat
i
on: on
ly
t
h
e
c
ontacts save
d
i
n t
h
e s
y
stem
(
alwa
y
s present
)
.
- Display telephone contacts: only the
c
ontacts saved in the telephone.
- Displa
y
SIM card contacts: onl
y
the
c
ontacts saved on the
S
IM card.
- Displa
y
all phone contacts:
c
ontacts on the
S
IM card and in the
te
l
ep
h
one.
P
r
ess
ADDR BOOK tw
ice
t
he
n
selec
t
"
Contact mem. status
"
t
o
see
t
he
n
umber o
f
contacts saved in the s
y
stem
o
r imported, and the
f
ree memor
y
.
DIRECTORY - ADDR BOOK
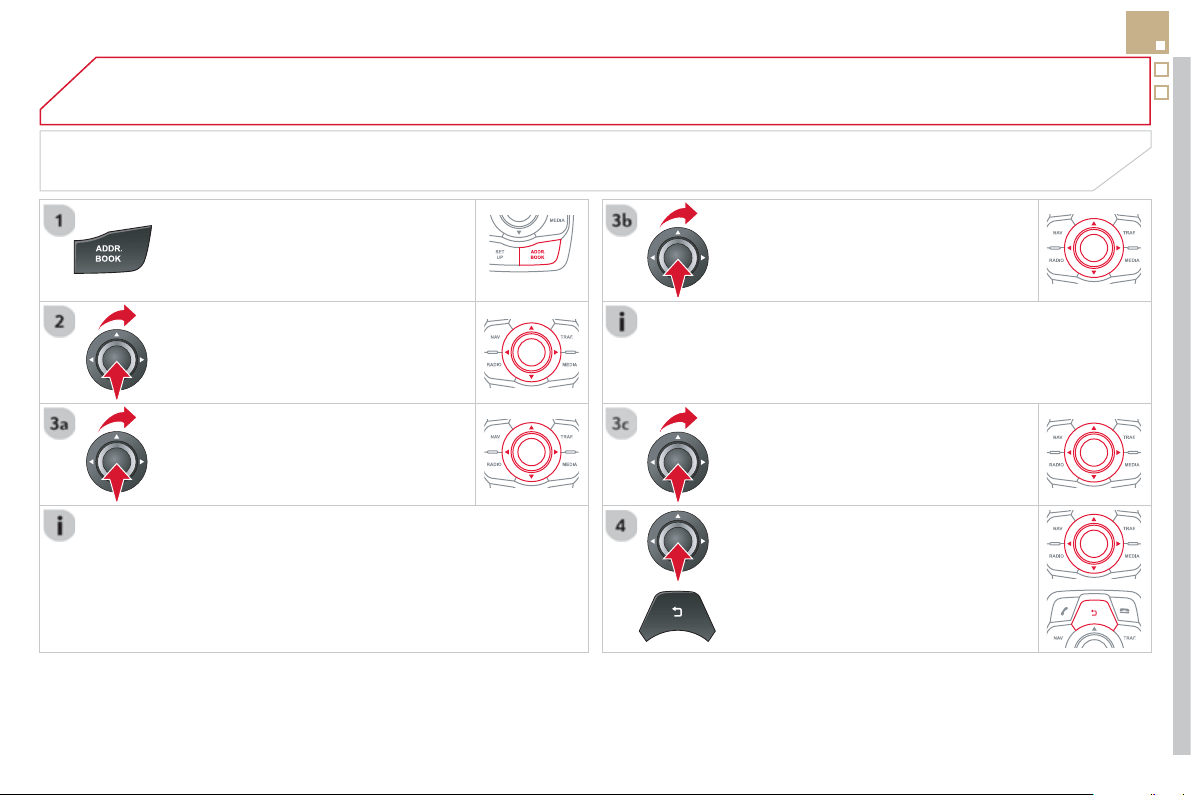
07
293
EDITING, IMPORTING OR DELETING A CONTACT
DIRECTORY - ADDR BOOK
P
r
ess
A
DDR BOOK tw
ice
t
he
n
selec
t
"
Di
sp
l
a
y
contacts "
a
n
d
co
n
fi
rm.
S
elect the desired contact and confi rm.
It is necessar
y
to import an external contact to modi
fy
the record.
I
t will be saved in the s
y
stem. It is not possible to modi
fy
or delete
c
ontacts in the tele
p
hone or the SIM card via the Bluetooth
co
nn
ec
ti
o
n.
Se
l
ec
t OK or press this button to exit this
m
e
n
u
.
I
n t
his
"
Di
sp
l
a
y
contacts" menu, the import or deletion o
f
contacts
in the system is done one at a time.
S
elect "Impor
t
" to cop
y
the contacts to
the s
y
stem.
S
elect "
D
elet
e
"
a
n
d
co
nfi rm.
S
elect "
Op
en
"
t
o
v
ie
w
a
n
e
xt
e
rn
al
co
nt
ac
t
o
r modi
f
y a contact saved in the system.
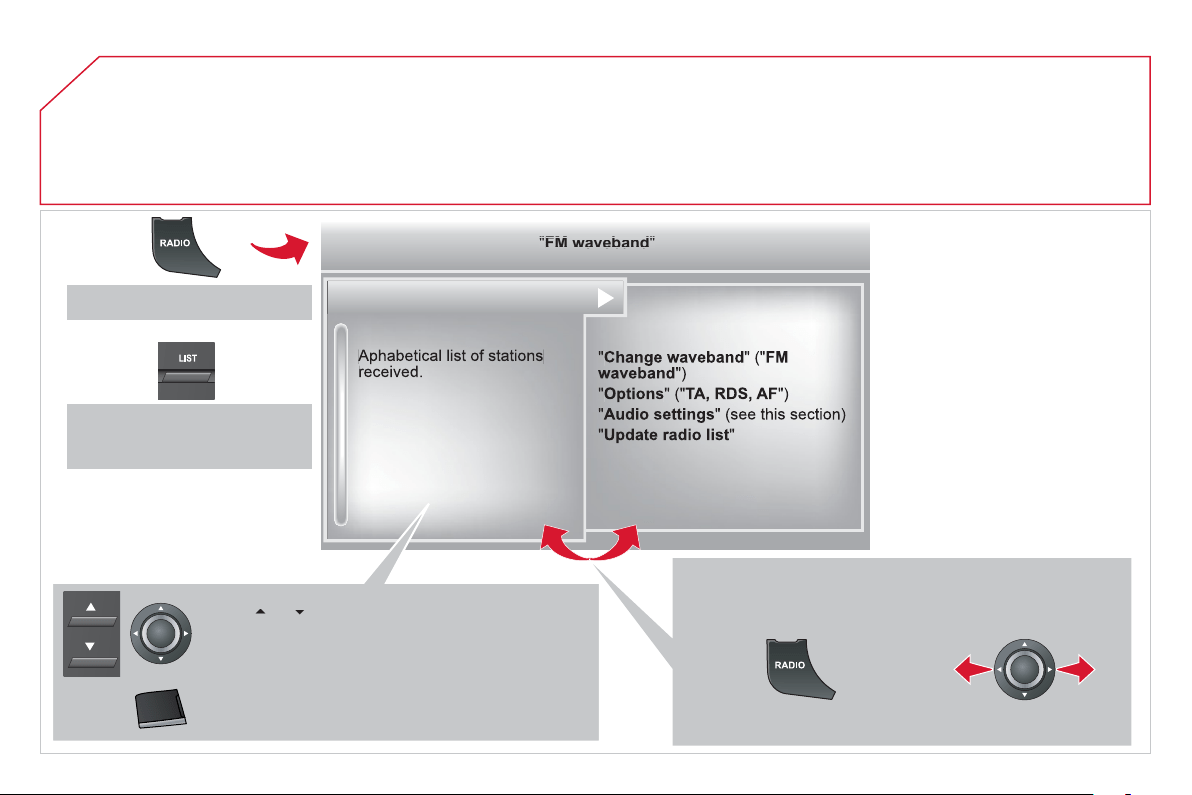
08
RADIO
Access to the "RADIO" menu
"
"
"
"
"
"
"
"
FM
FM
FM
FM
FM
FM
FM
FM
FM
FM
FM
FM
FM
FM
FM
FM
FM
FM
FM
waveband
waveband
waveband
waveband
waveband
waveband
waveband
waveband
waveband
waveband
waveband
waveband
waveband
waveband
bd
bd
bd
bd
bd
"
"
"
"
"
"
"
"
Pr
ess
or
or use the rotary control to select the
previous or next station in the list.
Thi
s
li
st can a
l
so
b
e
di
sp
l
a
y
e
d
by
press
i
n
g
L
IS
T
on
the steering mounted controls.
G
o
f
rom the list to the menu
(
le
f
t
/
ri
g
ht
)
.
or
A lon
g
press on
L
IST r
e
fr
es
h
es
th
e
li
s
t
o
f
s
t
a
ti
o
n
s
r
ece
iv
ed
.
Pr
ess
RADIO
.
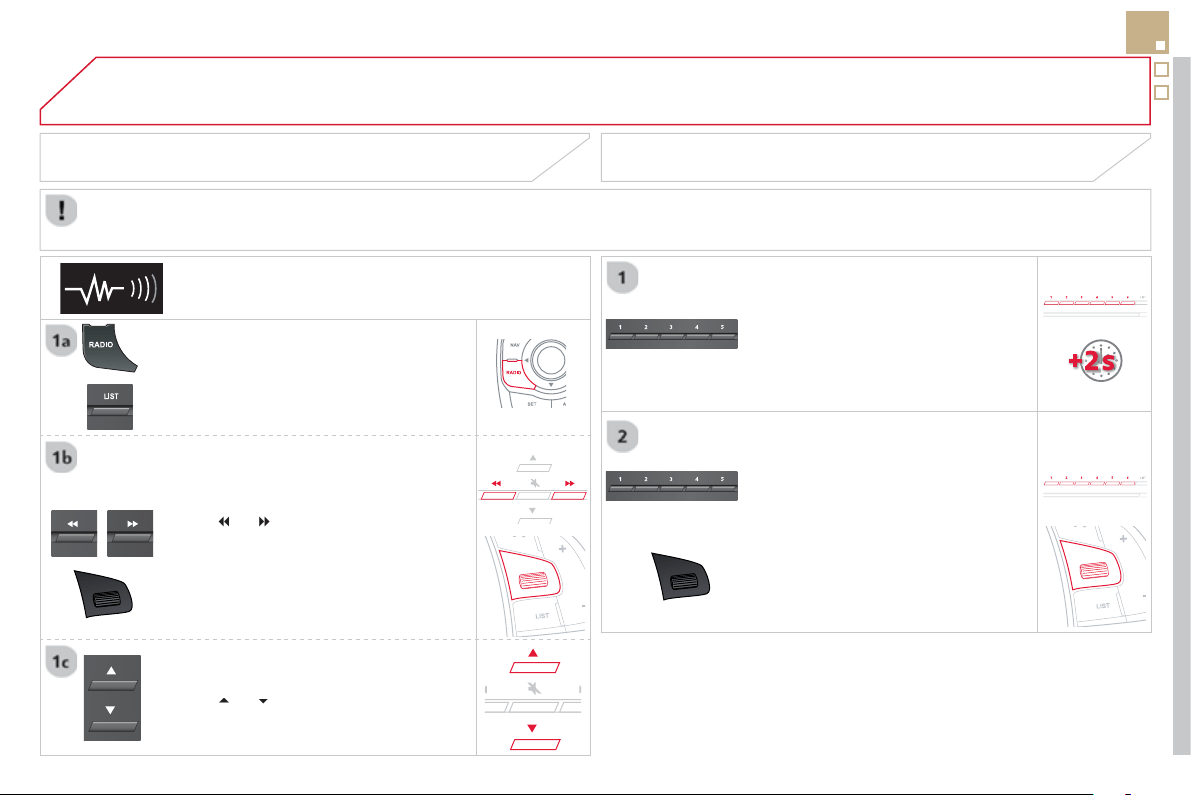
08
295
RADIO
By alphabetical list
Pr
ess
R
ADIO
or
L
I
ST
, select the station
o
f
y
our choice and con
fi
rm.
B
y
automatic frequenc
y
search
P
r
ess
or
fo
r th
e
au
t
o
m
a
ti
c
sea
r
c
h
f
or a lower or higher radio
f
requency.
O
r turn the thumb wheel at the steerin
g
m
ou
nt
ed
co
ntr
o
l
s
.
B
y
manual frequenc
y
search
Pr
ess
o
r
to ad
j
ust the radio
f
requenc
y
step b
y
step.
Pr
ess
th
e
bu
tt
o
n
o
n th
e
n
u
m
e
ri
ca
l
k
e
y
pa
d
to reca
ll
a preset stat
i
on.
O
r press then turn the thumb wheel at
t
h
e steer
i
n
g
mounte
d
contro
l
s.
SELECTING A STATION
The external environment
(
hill, buildin
g
, tunnel, under
g
round car park...
)
ma
y
interfere with the reception, includin
g
in RDS station trackin
g
mode.
T
his phenomenon is a normal result of the wa
y
in which radio waves are transmitted and does not in an
y
wa
y
indicate a fault with the audio
sy
stem.
PRESETTING A STATION
A
f
ter selectin
g
a station, press one o
f
the buttons on the numerical ke
y
pad
f
o
r
2
seconds to preset the current station.
An audible si
g
nal con
fi
rms that the
s
tation has been preset.
The qualit
y
o
f
reception is represented b
y
the number o
f
a
ctive waves in this symbol.
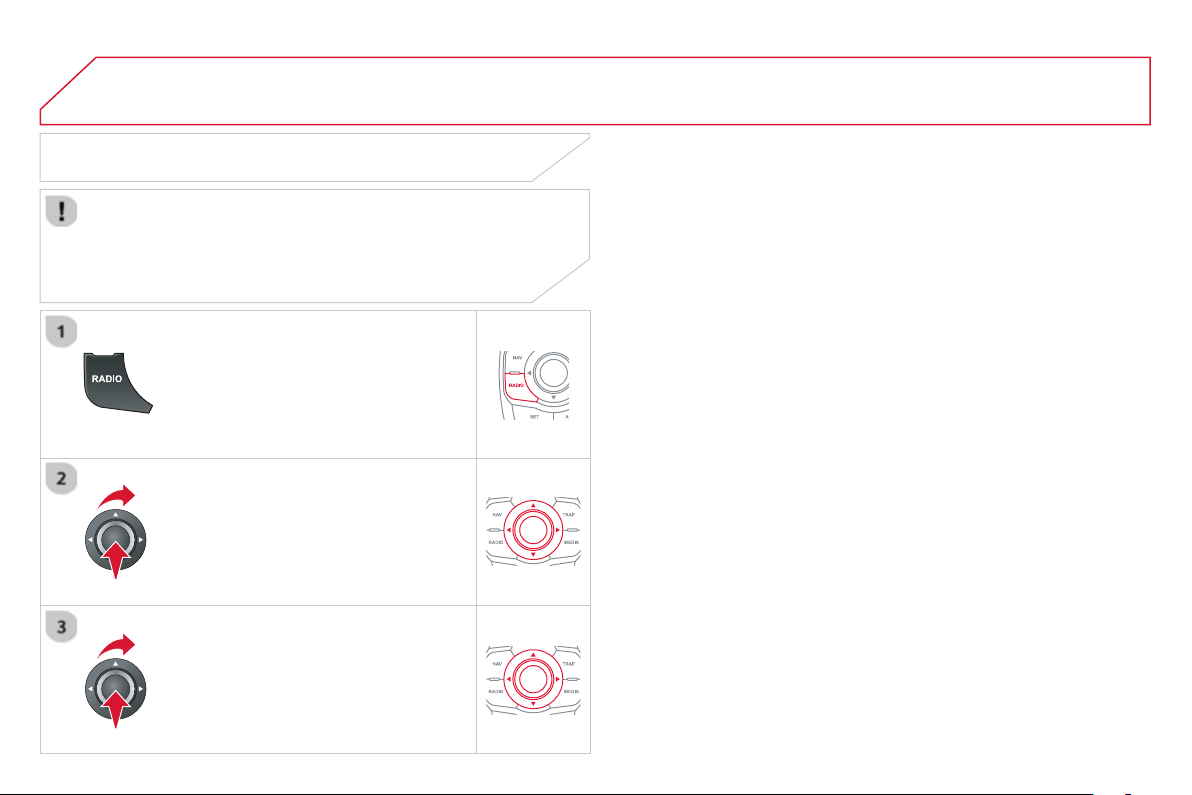
08
Pr
ess
RADIO
.
ACTIVATE / DEACTIVATE RDS
RD
S
, i
f
activated, allows
y
ou to continue listenin
g
to the same
s
tation b
y
automatic retunin
g
to alternative
f
requencies. However,
in certain conditions, covera
g
e of an RDS station ma
y
not be
assured throu
g
hout the entire countr
y
as radio stations do not
c
over 100 % of the territor
y
. This explains the loss of reception o
f
t
h
e stat
i
on
d
ur
i
n
g
a
j
ourne
y
.
S
elect "
G
uidance options" th
e
n
co
nfi rm.
Ac
t
i
v
a
t
e
o
r
deac
t
i
v
a
t
e
"
R
D
S
"
t
he
n
co
n
fi
rm.
RADIO
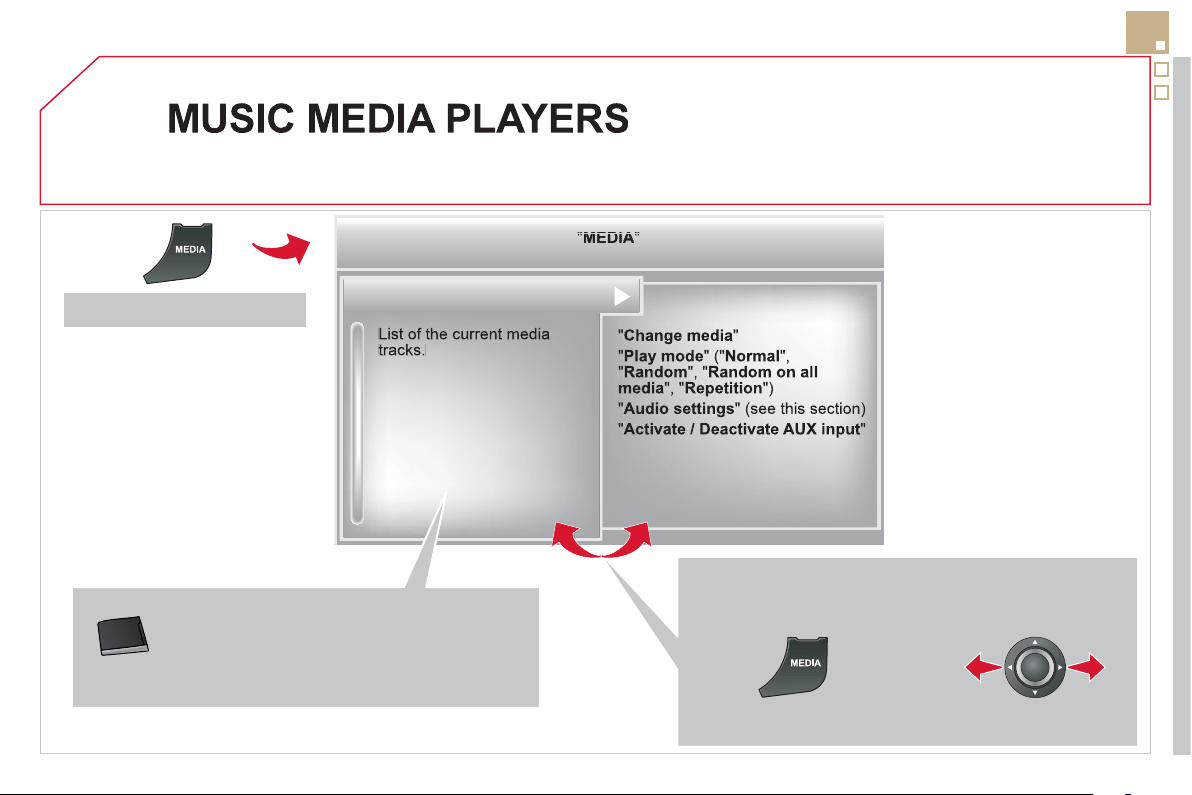
09
297
Access to the "MUSIC MEDIA PLAYER" menu
"
"
"
"
"
"
"
"
MEDIA
MEDIA
MEDIA
MEDIA
MEDIA
MEDIA
MEDIA
MEDIA
MEDIA
MEDIA
MEDIA
MEDIA
MEDIA
MEDIA
MEDIA
MEDIA
MEDIA
MEDIA
MEDIA
"
"
"
"
"
"
"
"
Thi
s
li
st can a
l
so
b
e
di
sp
l
a
y
e
d
by
press
i
n
g
L
IS
T
a
t the steering mounted controls.
G
o
f
rom the list to the menu
(
le
f
t
/
ri
g
ht
)
.
or
P
r
ess
MEDIA
.
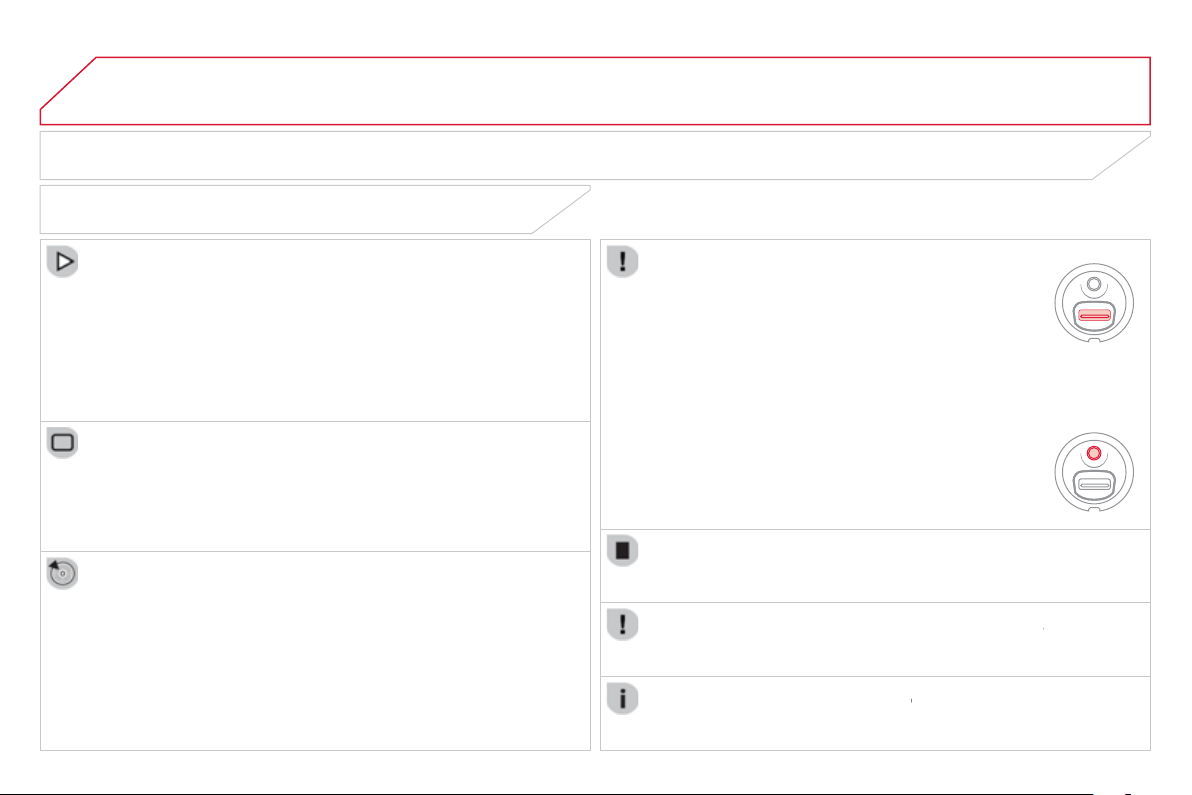
09 MUSIC MEDIA PLAYERS
CD, MP3 CD / USB PLAYER
The audio equipment will onl
y
pla
y
audio
fi
les with ".wma, .aac, .
fl
ac,
.
o
gg
and .mp3"
fi
le extensions and with a bit rate o
f
between 32 Kbps
and
320
Kbps.
It also supports VBR
(
Variable Bit Rate
)
mode.
No other t
y
pe o
f
fi
le
(
.mp4, .m3u...
)
can be pla
y
ed.
WMA fi les must be of the standard wma 9 t
y
pe.
The samplin
g
rates supported are 11, 22, 44 and 48 KHz.
It is advisable to restrict
fi
le names to 20 characters, without usin
g
o
f
s
pecial characters
(
e.
g
.: " "
?
; ù
)
to avoid an
y
pla
y
in
g
and displa
y
in
g
p
roblems.
In order to be able to pla
y
a recorded CDR or CDRW, when recordin
g
it is preferable to select the IS
O
9660 level 1, 2 or Joliet standard.
I
f
the disc is recorded in another
f
ormat it ma
y
not be pla
y
ed correctl
y
.
I
t
i
s recommen
d
e
d
t
h
at t
h
e same recor
di
n
g
stan
d
ar
d
i
s a
l
wa
y
s use
d
f
or an individual disc, with as low a speed as possible
(
4x maximum
)
f
or optimum sound qualit
y
.
In the
p
articular case of a multi-session CD, the Joliet standard is
reco
mm
e
n
ded
.
INFORMATION AND ADVICE
The s
y
stem supports USB mass stora
g
e or iPod
devices via the U
S
B port
(
suitable cable not supplied
)
.
I
f
a partitioned U
S
B memor
y
ke
y
is connected to the
sy
stem, onl
y
the
fi
rst partition is reco
g
nised.
C
ontrol o
f
the peripheral device is with the audio
sy
stem controls.
The number of tracks is limited to 2000 maximum,
9
99 tracks
p
er folder.
If the current consumption at the USB port exceeds
5
00 mA, the s
y
stem
g
oes into protection mode and
d
eact
i
vates t
h
e port.
O
ther peripherals, not recognised on connection, must
be connected to the auxiliar
y
socket usin
g
a Jack cable
(
not supplied
)
.
In order to be read, a U
S
B memor
y
stick must be
f
ormatted FAT 16
or
3
2.
The s
y
stem does not support the operation of an Apple
®
player and a
®
US
B memor
y
stick connected at the same time.
It is recommended that o
ffi
cial Apple
®
USB cables are used to ensure
®
c
orrect operation.
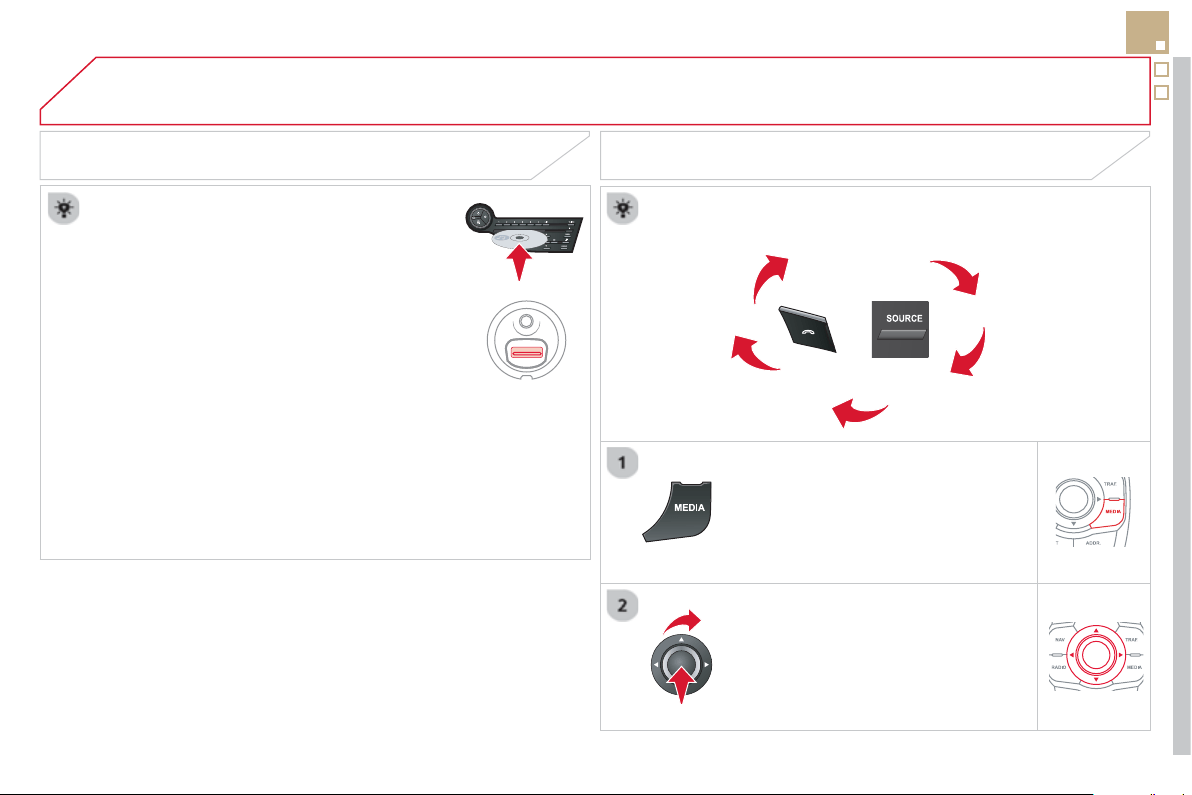
09
SRC
/
299
MUSIC MEDIA PLAYERS
SOURCES
Insert the CD in the pla
y
er, insert the USB memor
y
s
tick in the USB pla
y
er or connect the USB
p
eripheral to the USB port usin
g
a suitable cable
(
not supplied
)
The system builds playlists
(
in temporary memory
)
,
an operation which can take
f
rom a
f
ew seconds to
se
v
e
r
a
l min
u
t
es
a
t th
e
fi
r
s
t
co
nn
ec
ti
o
n.
R
educe
th
e
n
u
m
be
r
o
f n
o
n-m
us
i
c
fi l
es
a
n
d
th
e
n
umber of folders to reduce the waitin
g
time.
The pla
y
lists are updated ever
y
time the i
g
nition is
s
witched off or connection of a USB memor
y
stick.
H
owever, t
h
e s
y
stem memor
i
ses t
h
ese
li
sts an
d
i
f
the
y
are not modi
fi
ed, the loadin
g
time will be
s
h
o
rt
e
r.
Pla
y
starts automaticall
y
a
f
ter a period which
depends on the capacit
y
o
f
the U
S
B memor
y
stick.
S
ELECTION OF
S
OURCE
The
SOURCE or SRC
b
utton on t
h
e steer
i
n
g
mounte
d
contro
l
s
allows a direct change to the next media source.
"CD / CD MP
3
"
"
U
SB, iPod "
"
A
U
X
" " STREAMIN
G
"
"RADI
O
"
P
r
ess
MEDIA
to
di
sp
l
a
y
t
h
e
"
MEDIA
"
menu
.
S
elect "Change medi
a
"
a
n
d
co
n
fi
rm.
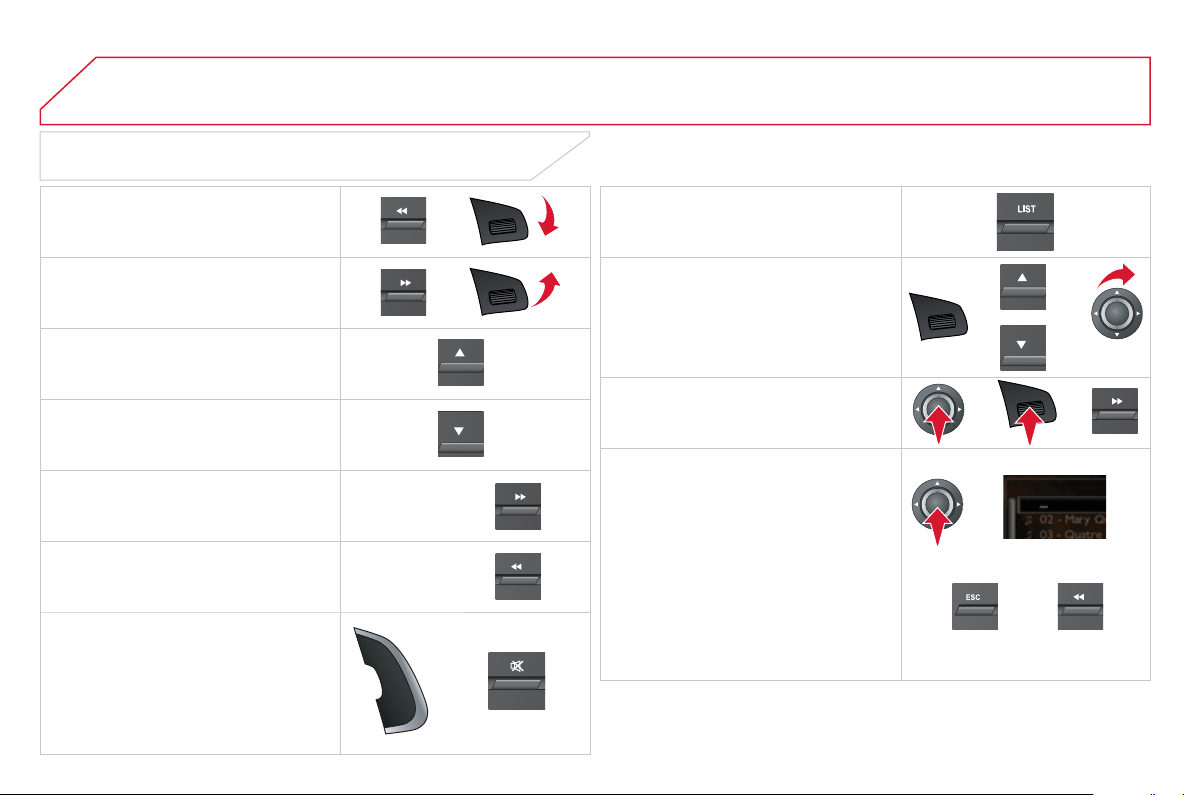
09
/
/
//
//
/
+/
-
+
/
SELECTING A TRACK
MUSIC MEDIA PLAYERS
Pr
e
vi
ous
tr
ac
k.
N
e
xt tr
ac
k.
Pr
e
vi
ous
f
o
l
de
r.
N
e
xt f
o
l
de
r.
F
as
t f
o
rw
a
r
d
.
Fas
t
back
w
a
r
d
.
Pause: double press on the steerin
g
mou
nt
ed
V
ol+/Vol-
bu
tt
o
n
o
r
o
n Mut
e
in
t
h
e contro
l
pane
l
.
LI
S
T: List of U
S
B or CD tracks o
r
f
olders
Up or down in the list.
Confi rm
,
next menu level.
U
p one menu
l
eve
l
.
Lon
g
press
L
on
g
press
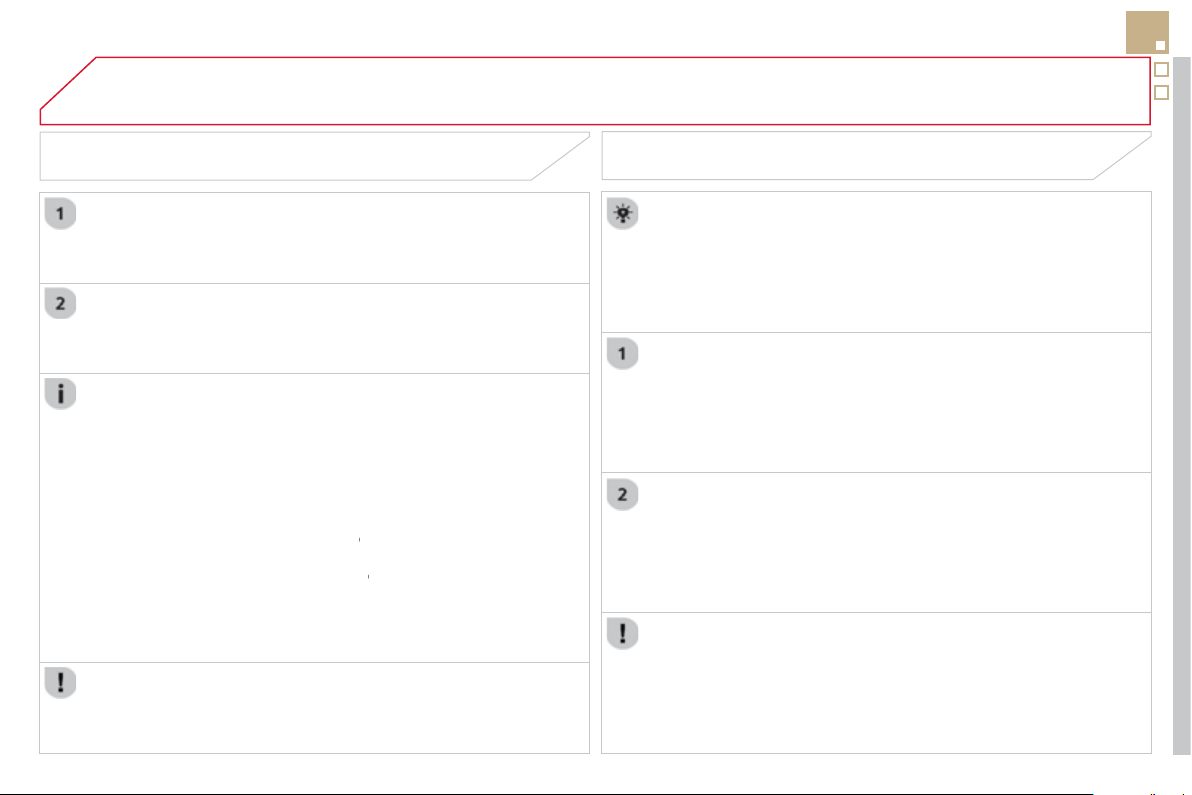
09
301
AUDIO STREAMING
S
treamin
g
allows audio
fi
les on
y
our telephone to be pla
y
ed via the
vehicle's speakers.
C
onnect the telephone: see "U
S
IN
G
THE TELEPH
O
NE".
Se
l
ec
t "
A
udio"
o
r "
A
ll" pro
fi
le.
I
f
pla
y
does not start automaticall
y
, it ma
y
be necessar
y
to start the
a
udio pla
y
back
f
rom the telephone.
Control is from the peripheral device or b
y
usin
g
the audio s
y
stem
bu
tt
o
n
s
.
O
nce connected in streamin
g
mode, the telephone is considered to be
a
m
edia
sou
r
ce
.
It is recommended that
y
ou activate "
R
e
p
ea
t
"
o
n th
e
Bl
ue
t
oo
th
peripheral.
MUSIC MEDIA PLAYERS
CONNECTING APPLE
®
PLAYERS
Connect the A
pp
le
®
pla
y
er to the USB port usin
g
a suitable cable
(
not
supplied
)
.
Pl
a
y
starts automat
i
ca
lly
.
C
ontrol is via the audio s
y
stem.
The classi
fi
cations available are those o
f
the portable device
c
onnected
(
artists
/
albums
/
genres
/
playlists
/
audiobooks
/
p
odcasts
)
.
The de
f
ault classi
fi
cation used is b
y
artist. To modi
fy
the classi
fi
cation
u
sed, return to the fi rst level of the menu then select the desired
c
lassifi cation
(
pla
y
lists for example
)
and confi rm to
g
o down throu
g
h
th
e
m
e
n
u
t
o
th
e
des
ir
ed
tr
ac
k.
The "
S
huffl e tracks" mode on an iPo
d
®
corresponds to the "Random"
®
mo
d
e on t
h
e au
di
o s
y
stem.
The "
S
hu
ffl
e albums" mode on an iPod
®
corresponds to the "Random
®
all" on the audio system.
"
S
hu
ffl
e tracks" is restored b
y
de
f
ault on each connection.
The version o
f
so
f
tware in the audio s
y
stem ma
y
not be compatible
with the
g
eneration o
f
y
our Apple
®
p
l
a
y
er.
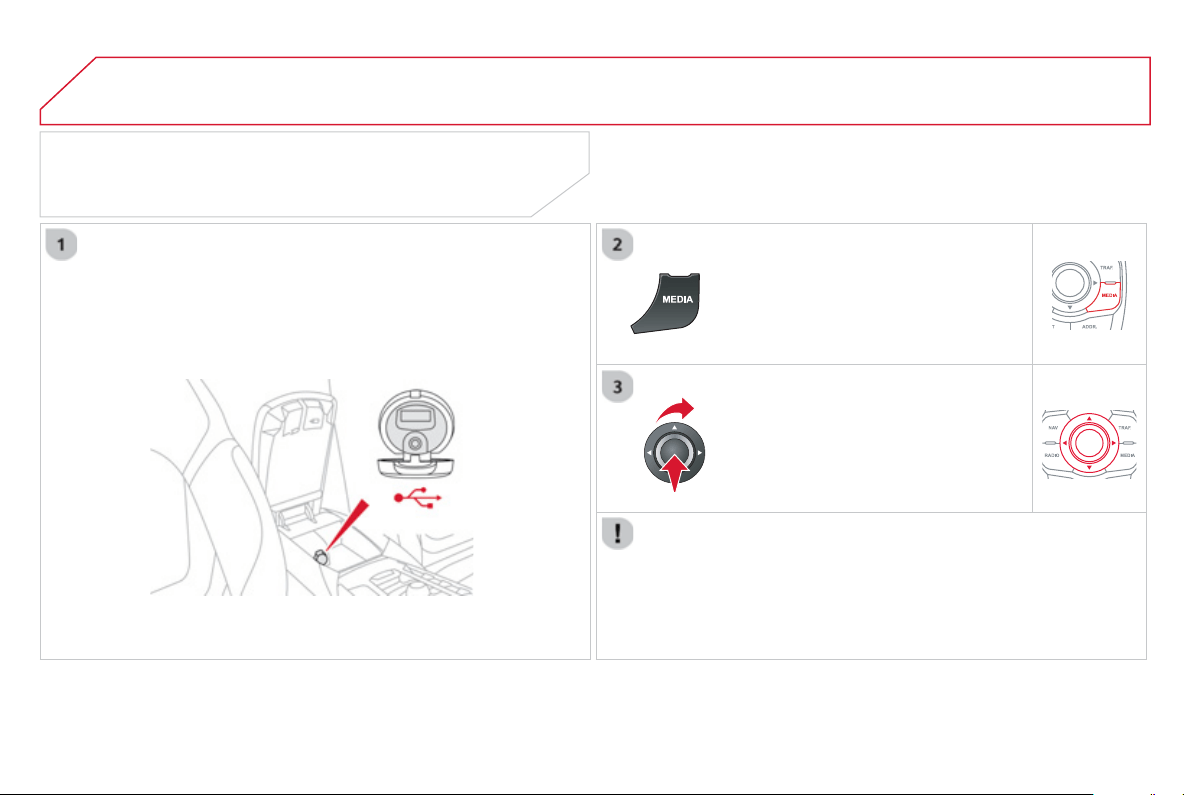
09 MUSIC MEDIA PLAYERS
USING THE AUXILIARY INPUT (AUX)
Cable not supplied
C
onnect the portable device
(
MP3 pla
y
er…
)
to the auxiliar
y
JA
C
K
soc
k
et us
i
n
g
an au
di
o ca
bl
e.
P
r
ess
MEDIA
to
di
sp
l
a
y
t
h
e
"
MEDIA
"
menu
.
S
elect "Activate / Deactivate AUX
inpu
t
"
a
n
d
co
nfi rm.
First ad
j
ust the volume of
y
our portable
device
(
to a hi
g
h level
)
. Then ad
j
ust the
volume o
f
y
our audio s
y
stem.
Displa
y
and mana
g
ement of the controls are via the portable device.
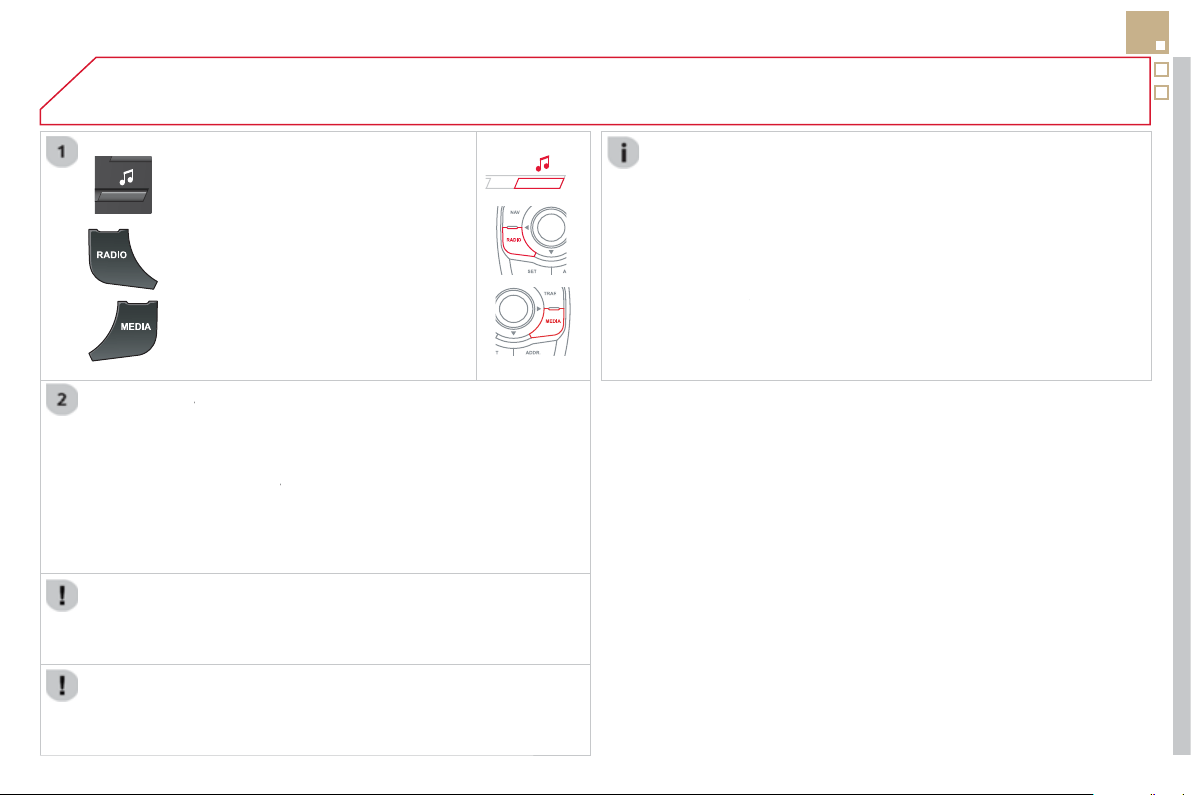
10
303
A
UDIO SETTINGS
The
y
are accessible b
y
the
M
U
S
IC
button in the control panel or b
y
a lon
g
p
ress on RADIO
o
r
M
EDI
A
accordin
g
to
th
e
sou
r
ce
in
use
.
-"
E
qualize
r
" (choice of 6 musical ambiences)
r
-"Bass"
-
"
T
re
ble
"
-
"
Lou
d
ness"
(
Activate
/
Deactivate
)
- "
D
istribution"
(
"
Driver
", "
r
All passenger
s
"
)
- " Le-Ri balanc
e
"
(
Le
f
t
/
Ri
g
ht
)
- " Fr-Re balanc
e
"
(
Front
/
Rear
)
-"
A
uto. Volum
e
" dependin
g
on road speed
(
Activate/Deactivate
)
The audio settin
g
s
(
Equalizer
,
r
B
ass
,
T
re
ble
a
n
d
L
ou
d
ness
)
are
di
ff
erent and independent
f
or each sound source.
The settings
f
or distribution and balance are common to all sources.
The distribution
(
or spatialisation usin
g
the Arkam
y
s
©
s
y
stem
)
of sound
is an audio process that allows the audio qualit
y
to be adapted to the
n
u
m
be
r
o
f li
s
t
e
n
e
r
s
in th
e
v
e
hi
c
l
e
.
O
n-board audio: Arkam
y
s
©
Sound Sta
g
in
g
.
W
ith Sound Sta
g
in
g
, the driver and passen
g
ers are immersed in an
"
audio scene" recreatin
g
the natural atmosphere of an auditorium:
trul
y
a part of the scene and its surroundin
g
s.
This new sensation is made possible b
y
so
f
tware in the audio s
y
stem
which processes the di
g
ital si
g
nals
f
rom the media pla
y
ers
(
radio,
C
D, MP3…
)
without changing the audio settings. This processing
takes account o
f
the characteristics o
f
the passen
g
er compartment to
p
roduce optimum results.
The Arkam
y
s
©
software installed in your audio system processes
©
the di
g
ital si
g
nal from the media pla
y
ers
(
radio, CD, MP3, ...
)
and
r
ecreates a natural musical scene, with harmonious placement o
f
instruments and voices in the space in front of passen
g
ers, level with
t
he
w
i
n
dsc
r
ee
n.
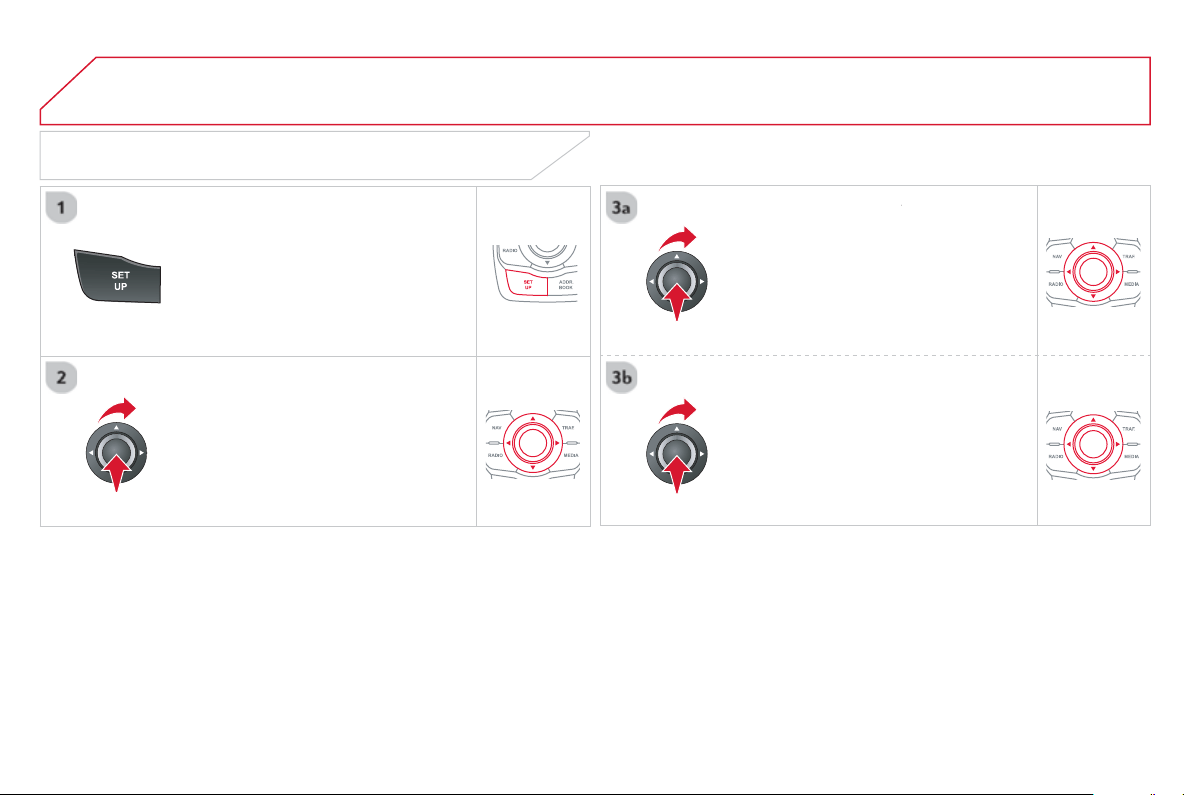
11 CONFIGURATION
DISPLAY CONFIGURATION
Pr
ess
SETU
P
to displa
y
the
"
Confi
g
uration " m
e
n
u
.
S
elect "
Choose colour
"
a
n
d
co
nfi rm t
o
r
select the screen colour harmon
y
and
t
h
e map presentat
i
on mo
d
e:
-
d
a
y
mo
d
e,
- n
igh
t mo
d
e,
- automatic day
/
night mode,
a
ccordin
g
to whether the
headlamps are on.
S
elect "
Adj
ust
l
um
i
nos
i
t
y
"
a
n
d
co
nfi rm
to a
dj
ust t
h
e screen
b
r
igh
tness.
Pr
ess
" O
K
" to save the changes.
The settings
f
or day and night are
i
ndependent.
S
elect "
D
ispla
y
confi
g
uration"
a
n
d
co
nfi rm.
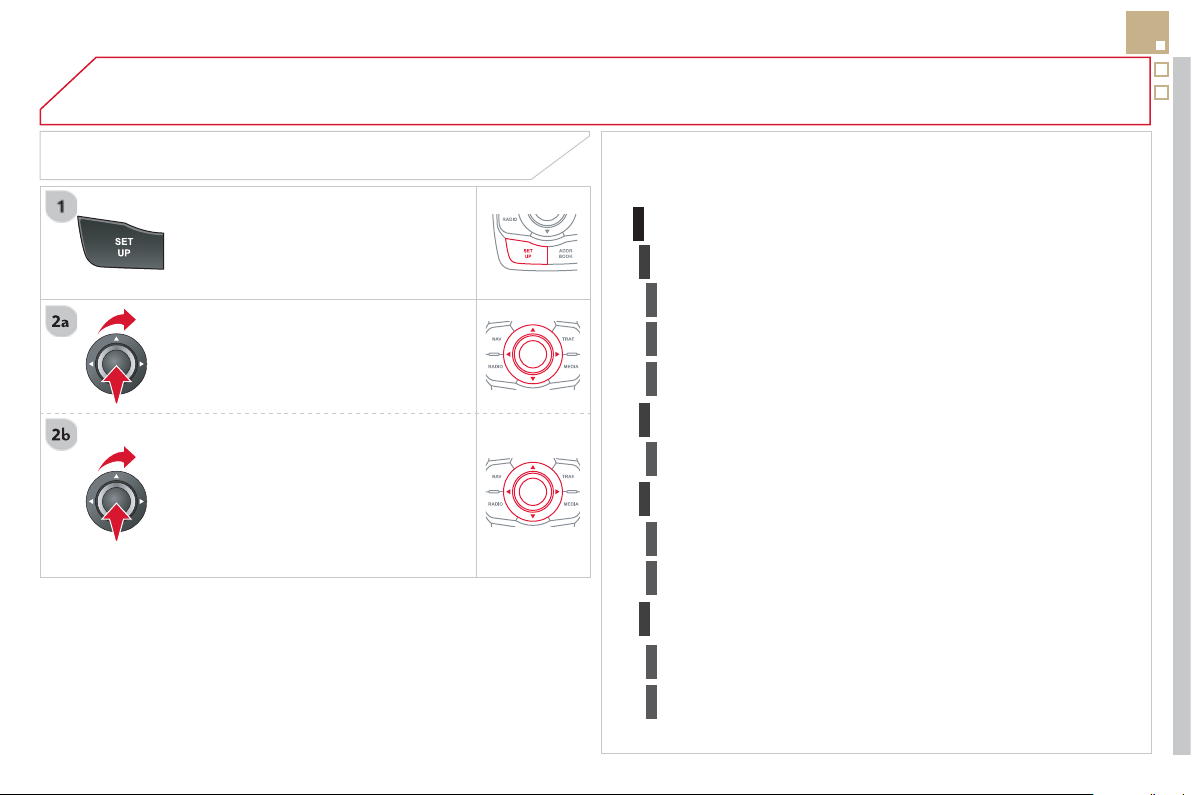
11
305
Pr
ess
SETU
P
to displa
y
the
"
Confi
g
uration
"
m
e
n
u
.
A
d
j
ust the settin
g
s one b
y
one.
Th
e
n
se
l
ec
t "O
K
"
o
n th
e
sc
r
ee
n
a
n
d
c
onfi rm to save the settin
g
s.
Se
l
ec
t "
V
ehicle
p
arameters "
a
n
d
co
nfi rm.
VEHICLE SETTINGS
CONFIGURATION
"SETUP" MENU
Vehicle parameters
D
rivin
g
aids
Rear wiper with reverse
g
ear
Automatic parkin
g
brake
1
2
Memorised speeds
3
3
3
V
e
hi
c
l
e acces
s
2
D
r
i
ver open
i
n
g
s se
l
ect
i
v
i
t
y
3
D
riving lightin
g
2
D
a
y
t
i
me runn
i
n
g
l
amps
3
Directional headlamps
3
Comfort li
g
htin
g
2
W
e
l
come
ligh
t
i
n
g
3
G
uide me home li
g
htin
g
3
12
"NAVIGATION - GUIDANCE"
MENU
E
nter an address
Select destination
D
irector
y
G
PS coordinates
(
Archive
)
Journey leg and route
Add a sta
ge
Ent
e
r
a
n
add
r
ess
Director
y
Pr
e
vi
ous
des
tin
a
ti
o
n
s
Order/delete
j
ourne
y
le
g
s
Di
vert rout
e
Chosen destination
Guidance options
D
efi ne calculation criteri
a
Set speech s
y
nthesi
s
D
e
l
ete
l
ast
d
est
i
nat
i
ons
Map management
M
a
p
or
i
entat
i
on
Select TMC station
Automatic TMC
Manual TMC
L
ist of TMC stations
Display / Do not display
messages
SCREEN MENU MAP
MAIN FUNCTION
M
a
p
d
eta
il
s
M
ove the map
/
"Vehicle monitorin
g
"
M
app
i
ng an
d
up
d
at
i
ng
D
escri
p
tion of risk areas databas
e
Stop / Restore guidance
"TRAFFIC INFORMATION"
MENU
Geographic filter
Retain all the messa
g
es
:
Retain the messa
g
es
:
A
r
ou
n
d
th
e
v
e
hi
c
l
e
O
n the route
Set
p
arameters for risk areas
1
2
2
2
1
2
2
3
3
1
1
3
3
2
2
2
2
1
3
1
1
2
2
2
2
2
2
2
2
2
2
2
1
2
Option A
1
O
ption A11
Option A
1
2
3
Option B...
1
12
307
SCREEN MENU MAP
Dial
Directory of contacts
Telephone options
Rin
g
option
s
"TELEPHONE" MENU
1
2
1
1
3
3
2
1
3
3
2
2
1
2
2
2
1
1
2
2
2
1
3
3
3
3
1
2
2
1
1
3
3
3
3
3
3
2
Configuration
D
elete all contacts
I
m
p
ort all the entries
S
y
nchronization options
No s
y
nchronization
"CONTACTS" MENU
Display contacts
Open
I
m
p
or
t
D
elet
e
New contact
Eq
ualize
r
"RADIO" MENU
Following waveband
Options
Activate / Deactivate T
A
Activate / Deactivate RD
S
Audio settings
Displa
y
telephone contacts
Displa
y
SIM card contacts
Contact mem. status
Displa
y
all phone contacts
Bluetooth functions
L
ist of the paired peripherals
Co
nn
ec
t
Di
sco
nn
ec
t
D
e
l
e
t
e
Peri
p
herals search
D
e
l
e
t
e
a
ll
Rename radiotele
p
hon
e
N
o
n
e
C
lassical
J
azz
Rock
Tech
n
o
Vocal
12 SCREEN MENU MAP
2
3
3
1
4
2
2
1
4
4
2
2
1
1
1
2
1
1
2
2
2
2
2
2
2
3
3
2
2
2
1
Random on all medi
a
Re
p
etition
Audio settings (same as RADIO)
Activate / Deactivate AUX
input
"MEDIA" MENU
Following media source
Eject USB support
Read mode
Norma
l
Rando
m
All passen
g
ers
L
e-Ri balanc
e
Fr-Re balanc
e
A
uto. Volum
e
Update radio list
Bass
T
rebl
e
L
oudness
D
istribution
Driv
er
Ni
g
ht mode
A
uto Da
y/
Ni
g
ht
Ad
j
ust luminosit
y
Set date and tim
e
"SETUP" MENU
Display configuration
Choose colou
r
Harmon
y
C
arto
g
raph
y
Da
y
mode
Voice synthesis
G
uidance instructions volum
e
S
elect male voice /
S
elect female voic
e
1
Vehicle settings
The settin
g
s var
y
accordin
g
to the vehicle
(
see "Confi
g
uration"
)
.

309
FREQUENTLY ASKED QUESTIONS
The
f
ollowin
g
table
g
roups to
g
ether the answers to the most
f
requentl
y
asked questions concernin
g
y
our audio s
y
stem.
Q
UESTIO
N
A
NSWER SOLUTIO
N
Th
e
r
ou
t
e
ca
l
cu
l
a
ti
o
n i
s
no
t
success
f
u
l.
The
g
uidance criteria ma
y
confl ict with the current location
(
exclusion o
f
toll roads on a toll motorwa
y)
.
Check the
g
uidance criteria on the Navi
g
ation
M
enu, "Guidance options"\ "Defi ne calculation
c
r
i
t
e
r
ia"
.
I am unable to enter my
p
ost code.
The system only accepts post codes o
f
up to 5 characters.
The P
O
Is do not appear. The P
O
Is have not been selected.
S
elect the P
O
Is in the list of P
O
Is.
Th
e
ri
s
k
a
r
eas
aud
i
b
l
e
warnin
g
does not work.
The audible warnin
g
is not active.
A
ctivate audible warnin
g
s in the
G
uidance options
m
enu, "Navi
g
ation -
g
uidance", "
S
et parameters
f
o
r ri
s
k
a
r
eas
".
Th
e s
y
stem
d
oes not
s
u
gg
est a
d
etour aroun
d
a
n in
c
i
de
nt
o
n th
e
r
ou
t
e
.
The
g
uidance criteria do not take account o
f
TM
C
messa
g
es.
S
elect the "Tra
ffi
c in
f
o"
f
unction in the list o
f
g
u
id
ance cr
i
ter
i
a.
I r
ece
iv
e
a
Ri
s
k
a
r
ea
a
l
e
rt
which is not on m
y
route.
O
ther than
g
uidance, the s
y
stem announces all Risk areas positioned in a
c
one located in front of the vehicle. It ma
y
provide an alert for a Risk area
l
ocate
d
on near
by
or para
ll
e
l
roa
d
s.
Zoom in on the ma
p
to view the exact
p
osition of
the Risk area. Select "
O
n the route" to no lon
g
er
r
ece
i
ve a
l
erts ot
h
er t
h
an
g
u
id
ance or to re
d
uce t
h
e
tim
e
fo
r th
e
a
nn
ou
n
ce
m
e
nt.

FREQUENTLY ASKED QUESTIONS
Q
UESTIO
N
A
N
S
WER
S
OLUTIO
N
C
ertain tra
ffi
c jams
alon
g
the route are not
in
d
i
ca
t
ed
in r
ea
l tim
e
.
O
n starting, it is several minutes be
f
ore the system begins to receive the
tr
affi
c
in
fo
rm
a
ti
o
n.
Wait until the tra
ffi
c in
f
ormation is being received
c
orrectl
y
(
displa
y
o
f
the tra
ffi
c in
f
ormation icons on
the map
)
.
Th
e
fi lt
e
r
s
a
r
e
t
oo
r
es
tri
c
tiv
e
. Modif
y
the "Geo
g
raphic fi lter" settin
g
s.
In certain countries, onl
y
ma
j
or routes
(
motorwa
y
s...
)
are listed
f
or the
tr
affi
c
in
fo
rm
a
ti
o
n.
Thi
s p
h
enomenon
i
s norma
l
.
Th
e s
y
stem
i
s
dependent on the tra
ffi
c in
f
ormation available.
Th
e
a
ltit
ude
i
s
n
o
t
displa
y
ed.
O
n startin
g
, the initialisation o
f
the
G
P
S
ma
y
take up to 3 minutes to
r
eceive more than 4 satellites correctl
y
.
Wait until the s
y
stem has started up completel
y
.
Check that there is a GPS covera
g
e of at least
4 satellites
(
lon
g
press on the SETUP button, then
s
elect "GPS covera
g
e"
)
.
Dependin
g
on the
g
eo
g
raphical environment
(
tunnel...
)
or the weather,
the conditions o
f
reception o
f
the
G
P
S
si
g
nal ma
y
var
y
.
Thi
s p
h
enomenon
i
s norma
l
.
Th
e s
y
stem
is dependent on the
G
P
S
si
g
nal reception
co
n
d
iti
o
n
s
.
I
a
m
u
n
ab
l
e
t
o
co
nn
ec
t
my
Bluetooth telephone.
The telephone's Bluetooth
f
unction ma
y
be switched o
ff
or the telephone
ma
y
not be visible.
-
C
heck that
y
our telephone's Bluetooth
fu
n
c
ti
o
n i
s
s
wit
c
h
ed
o
n.
- Check in the telephone settin
g
s that it is
"
v
isible
t
o
all"
.
Th
e
Bl
uetoot
h
te
l
ep
h
one
i
s not compat
ibl
e w
i
t
h
t
h
e s
y
stem. You can check the compatibilit
y
o
f
y
our telephone
on www.citroen.co.uk
(
services
)
Th
e
v
o
l
u
m
e
of
th
e
tele
p
hone connected
in Bl
ue
t
oo
th m
ode
i
s
in
aud
i
b
l
e
.
The volume depends both on the s
y
stem and on the telephone. Increase the volume o
f
the audio s
y
stem, to
m
aximum if re
q
uired, and increase the volume o
f
the telephone if necessar
y
.
The ambient noise level has an infl uence on the qualit
y
of telephone
co
mm
u
n
ica
t
io
n.
Reduce the ambient noise level
(
close the windows,
r
educe the booster
f
an speed, slow down, ...
)
.

311
FREQUENTLY ASKED QUESTIONS
Q
UESTIO
N
A
N
S
WER
S
OLUTIO
N
S
ome contacts are
duplicated in the list.
The options
f
or synchronizing contacts are synchronizing the contacts
on the
S
IM card, the contacts on the telephone, or both . When both
s
y
nchronizations are selected, some contacts ma
y
be duplicated.
S
elect "Display
S
IM card contacts" or "Display
telephone contacts".
C
ontacts are not shown
i
n a
l
p
h
a
b
et
i
ca
l
or
d
er.
Some telephones offer displa
y
options. Dependin
g
on the settin
g
s
c
hosen, contacts can be transferred in a specifi c order.
Modif
y
the displa
y
settin
g
in the telephone
di
rector
y
.
The system does not
r
eceive
S
M
S
text messa
g
es.
The Bluetooth mode does not permit sending
S
M
S
text messages to the
s
y
stem.
The CD is e
j
ected
automaticall
y
or is not
p
la
y
ed b
y
the pla
y
er.
The CD is inserted upside down, is unpla
y
able, does not contain an
y
a
udio data or contains an audio format which the pla
y
er cannot pla
y
.
- Check that the CD is inserted in the pla
y
er the
ri
g
ht wa
y
up.
-
C
heck the condition of the
C
D: the
C
D cannot
be pla
y
ed if it is too dama
g
ed.
-
C
heck the content in the case o
f
a recorded
C
D: re
f
er to the in
f
ormation and advice in the
"
M
US
I
C
MEDIA PLAYER
S
"
sec
ti
o
n.
-
The audio s
y
stem's
C
D pla
y
er does not pla
y
DVDs.
- Some recorded CDs will not be pla
y
ed b
y
the audio s
y
stem because the
y
are not of the
c
orrect qualit
y
.
The
C
D has been recorded in a
f
ormat that is not compatible with the
player
(
ud
f
, ...
)
.
The
C
D is protected b
y
an anti-piratin
g
protection s
y
stem which is not
r
eco
g
nised b
y
the audio s
y
stem.
Th
ere
i
s a
l
on
g
wa
i
t
i
n
g
period
f
ollowin
g
the insertion
of
a
C
D or connection o
f
a
US
B memor
y
stick.
When a new medium is inserted, the s
y
stem reads a certain amount o
f
data
(
director
y
, title, artist, etc.
)
. This ma
y
take
f
rom a
f
ew seconds to a
fe
w min
u
t
es
.
The
C
D pla
y
er sound is poor.
This
p
henomenon is
no
rm
a
l.
The CD used is scratched or of poor qualit
y
. Insert
g
ood qualit
y
CDs and store them in suitable
co
n
d
iti
o
n
s
.
The audio equipment settin
g
s
(
bass, treble, ambiences
)
are unsuitable. Set the treble or bass level to 0, without selectin
g
a
n
a
m
bie
n
ce
.

FREQUENTLY ASKED QUESTIONS
Q
UESTIO
N
A
NSWER SOLUTIO
N
S
ome characters in the
med
i
a
in
fo
rm
a
ti
o
n
a
r
e
n
o
t
displa
y
ed correctl
y
while
p
la
y
in
g
.
The audio s
y
stem does not displa
y
some t
y
pes o
f
characters.
U
se stan
d
ar
d
c
h
aracters to name trac
k
s an
d
fo
l
de
r
s
.
Pla
y
in
g
of streamin
g
fi les
does
n
o
t
s
t
a
rt.
The peripheral device connected does not support automatic pla
y
. Start the pla
y
back from the device.
Th
e
n
a
m
es
of
tr
ac
k
s
a
n
d
the track len
g
th are not
displa
y
ed on the screen
when streamin
g
audio.
The Bluetooth pro
fi
le does not allow the trans
f
er o
f
this in
f
ormation.
The qualit
y
of reception
of
th
e
r
ad
i
o
s
t
a
ti
o
n
li
stene
d
to
g
ra
d
ua
lly
de
t
e
ri
o
r
a
t
es
o
r th
e
s
t
o
r
ed
s
t
a
ti
o
n
s
do
n
o
t
fu
n
c
ti
o
n
(
no sound, 87.5 Mhz is
displa
y
ed...
)
.
The vehicle is too far from the transmitter used b
y
the station listened
to or t
h
ere
i
s no transm
i
tter
i
n t
h
e
g
eo
g
rap
hi
ca
l
area t
h
rou
gh
w
hi
c
h
t
h
e
ve
hi
c
l
e
i
s trave
lli
n
g
.
A
ctivate the "RDS" function b
y
means of the
sh
ort-cut menu to ena
bl
e t
h
e s
y
stem to c
h
ec
k
whether there is a more power
f
ul transmitter in the
geographical area.
The environment
(
hills, buildin
g
s, tunnels, basement car parks...
)
block
r
eception, includin
g
in RDS mode.
This phenomenon is normal and does not indicate
a fault with the audio s
y
stem.
The aerial is absent or has been dama
g
ed
(
for example when
g
oin
g
throu
g
h a car wash or into an under
g
round car park
)
.
Have the aerial checked b
y
a CITROËN dealer.
I
ca
nn
o
t
fi
n
d
so
m
e
r
ad
i
o
s
t
a
ti
o
n
s
in th
e
li
s
t
of
s
t
a
ti
o
n
s
r
ece
iv
ed
.
Th
e stat
i
on
i
s not rece
i
ve
d
or
i
ts name
h
as c
h
an
g
e
d
i
n t
h
e
li
st.
Some radio stations send other information in place of their name
(
the title of the son
g
for example
)
.
The s
y
stem interprets this in
f
ormation as the name o
f
the station.
Th
e
n
a
m
e
o
f th
e
r
ad
i
o
s
tat
i
on c
h
an
g
es.

313
FREQUENTLY ASKED QUESTIONS
Q
UESTIO
N
A
NSWER SOLUTIO
N
I
n c
h
an
gi
n
g
t
h
e sett
i
n
g
of
tr
eb
l
e
a
n
d
bass
th
e
e
qualizer settin
g
is
dese
l
ec
t
ed
.
The selection o
f
an equalizer settin
g
imposes the balance settin
g
s.
Modi
f
ying one without the other is not possible.
Modi
fy
the balance or equalizer settin
g
s to obtain
th
e
des
ir
ed
m
us
i
ca
l
a
m
b
i
e
n
ce
.
In chan
g
in
g
the equalizer
s
ettin
g
, treble and bass
re
t
u
rn t
o
z
e
r
o
.
When changing the
balance settin
g
s, the
distribution settin
g
is
dese
l
ec
t
ed
.
The selection o
f
a distribution setting imposes the balance settings.
Modi
fy
in
g
one without the other is not possible.
Modi
f
y the balance or distribution settings to
ob
t
a
in th
e
des
ir
ed
m
us
i
ca
l
a
m
b
i
e
n
ce
.
Wh
en c
h
an
gi
n
g
an
di
str
ib
ut
i
on sett
i
n
g
,
t
h
e
b
a
l
ance sett
i
n
g
i
s
dese
l
ec
t
ed
.
Th
e
r
e
i
s
a
d
i
ffe
r
e
n
ce
in
s
ound qualit
y
between
th
e
d
iff
e
r
e
nt
aud
i
o
s
ources
(
radio, CD...
)
.
For optimum sound qualit
y
, the audio settin
g
s
f
or Volume, Bass, Treble,
E
q
ualizer and Loudness can be ada
p
ted to the different sound sources,
which ma
y
result in audible differences when chan
g
in
g
source
(
radio,
CD...
)
.
C
heck that the audio settin
g
s
f
or
(
Volume, Bass,
Treble, Equalizer, Loudness
)
are adapted to
th
e
sou
r
ces
li
s
t
e
n
ed
t
o
. It i
s
ad
vi
sab
l
e
t
o
se
t th
e
A
UDI
O
functions
(
Bass, Treble, Fr-Re balance,
Le-Ri balance
)
to the middle position, select the
"N
one
"
, mus
i
ca
l
am
bi
ence an
d
set t
h
e
l
ou
d
ness
c
orrection to the "Active" position in
C
D mode or
to the "Inactive" position in radio mode.

A
NSWER SOLUTIO
N
With the en
g
ine off, the
sy
stem switches o
ff
a
f
ter
a
fe
w min
u
t
es
of
use
.
When the en
g
ine is switched off, the s
y
stem's operatin
g
time depends on
t
h
e
b
atter
y
c
h
ar
g
e.
The switch-o
ff
is normal: the system switches to economy mode and
switches o
ff
to prevent dischar
g
in
g
o
f
the vehicle's batter
y
.
Start the vehicle's en
g
ine to increase the batter
y
ch
ar
g
e.
Pla
y
back of m
y
USB
m
emor
y
st
i
c
k
starts on
ly
a
f
ter a ver
y
lon
g
wait
(
around 2 to 3 minutes
)
.
Some fi les supplied with the memor
y
stick ma
y
g
reatl
y
slow down access
to readin
g
the memor
y
stick
(
multiplication b
y
10 o
f
the catalo
g
ue time
)
.
Delete the fi les supplied with the memor
y
stick
a
n
d
limit th
e
n
u
m
be
r
of
sub
-
fo
l
de
r
s
in th
e
fi
l
e
s
tructure on t
h
e memor
y
st
i
c
k
.
When I connect m
y
iPh
one as te
l
ep
h
one an
d
to the U
S
B port at the
s
ame t
i
me,
I
am una
bl
e
to play the music
fi
les.
When the iPhone connects automaticall
y
as a telephone, it forces the
streamin
g
function. The streamin
g
function takes the place of the USB
f
unction which is then not useable, there is a period without sound o
f
the
trac
k
b
e
i
n
g
p
l
a
y
e
d
w
i
t
h
A
pp
l
e
®
players.
®
Disconnect and reconnect to the USB port
(
the
U
SB function takes priorit
y
over streamin
g)
.
When I connect m
y
A
pple
®
player or my
®
Bl
ac
kB
err
y
®
to the
®
U
S
B port, I have alert
m
essa
g
es on t
h
e current
c
onsumption by the U
S
B
p
ort.
When char
g
in
g
, the current consumption of these smartphones is
g
reate
r
than the ratin
g
of the USB port, which is 500mA.
FREQUENTLY ASKED QUESTIONS
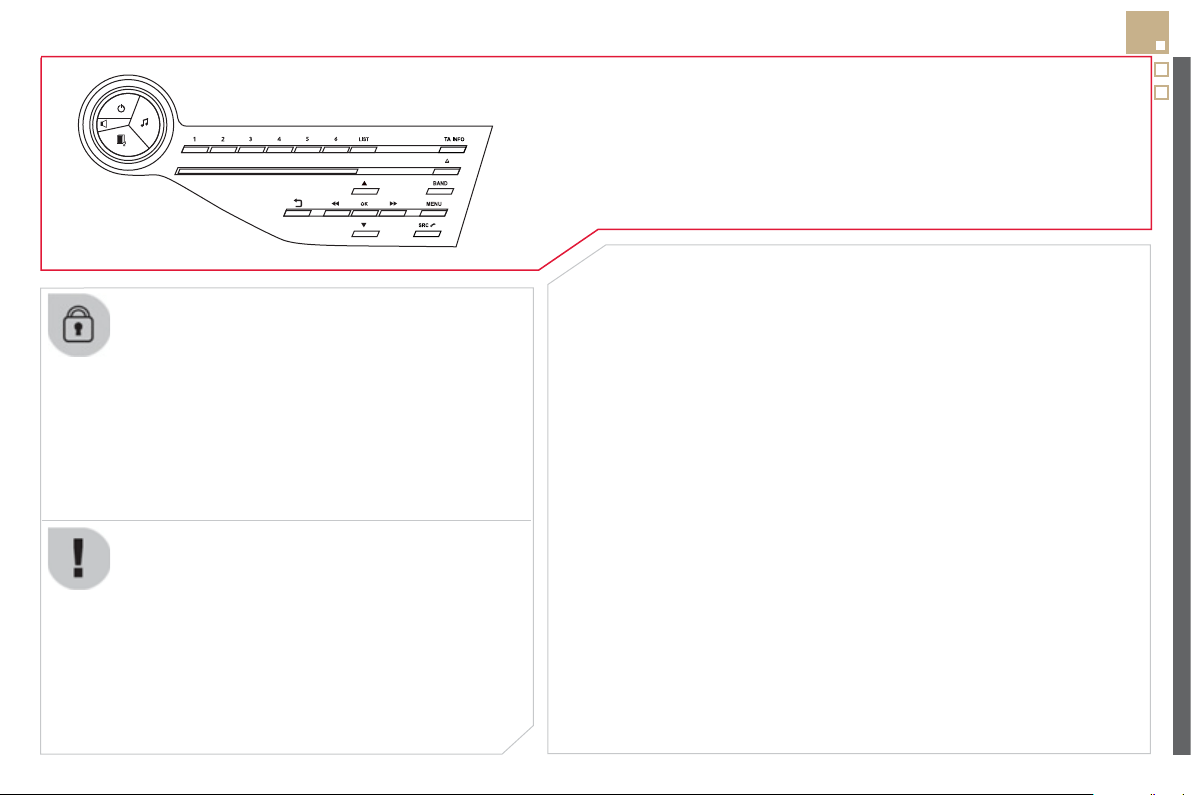
315
Th
e s
y
stem
i
s co
d
e
d
i
n suc
h
a wa
y
t
h
at
i
t w
ill
on
ly
operate
i
n
y
our ve
hi
c
l
e.
AUDIO SYSTEM / BLUETOOTH
01 First steps
For safet
y
reasons, the driver must onl
y
carr
y
out
operat
i
ons w
hi
c
h
requ
i
re pro
l
on
g
e
d
attent
i
on w
hil
e t
h
e
ve
hi
c
l
e
i
s stat
i
onar
y
.
When the engine is switched o
ff
and to prevent
dischar
g
in
g
o
f
the batter
y
, the audio s
y
stem ma
y
switch
off
af
t
e
r
a
fe
w min
u
t
es
.
CONTENTS
02 Steering mounted controls
03 Main menu
04 Audio
05 Using the telephone
06 Audio settings
07 Screen menu map
Frequently asked questions
p.
p.
p.
p.
p.
p.
p.
p.
3
1
6
3
1
7
3
1
8
3
1
9
32
9
3
3
7
3
3
8
3
4
0

01
O
n
/
Off
.
FIRST STEPS
V
o
l
u
m
e
ad
j
ustment.
S
elect screen displa
y
be
tw
ee
n m
odes
:
Full screen: Audio
(
o
r
telephone i
f
call in pro
g
ress
)
/
In a window: Audio
(
or
telephone if call in pro
g
ress
)
-
Ti
me or
T
r
i
p computer.
L
on
g
press:
bl
ac
k
screen
(
DARK
)
.
Se
l
ec
t th
e
FM w
a
v
eba
n
d
(
AM not available on H
y
brid
vehicles
)
.
S
elect preset radio
s
t
a
t
io
n.
Long press: store a
s
t
a
ti
o
n.
Displa
y
the list of stations received,
C
D
/
MP
3
tracks or
f
olders.
L
on
g
press: mana
gi
n
g
t
h
e
c
lassi
fi
cation o
f
MP
3/
WMA
fi
les
/
update the list o
f
stations received.
TA
(
Traffi c Announcement
)
f
unction
O
n
/
O
ff.
Lon
g
press: access to t
y
pe o
f
inf
o
rm
a
ti
o
n.
C
onfi rmation
o
r displa
y
o
f
co
nt
e
xt
ua
l m
e
n
u
.
Automatic search u
p
/ down for
radio fre
q
uencies.
S
elect previous / next CD, USB,
s
tream
i
n
g
trac
k
.
N
av
ig
at
i
on
i
n a
li
st.
Aba
n
do
n th
e
cu
rr
e
nt
operation.
Up one level
(
menu or
f
older
)
.
Manual step b
y
step search up / down for radio
fre
q
uencies.
S
elect previous / next MP3 folder.
S
elect previous / next folder /
g
enre / artist /
p
la
y
list in the U
S
B device.
N
av
i
gat
i
on
i
n a
li
st.
S
elect source:
R
adio, CD, AUX, USB,
S
treamin
g
.
A
ccept an
i
ncom
i
n
g
ca
ll
.
A
ccess
t
o
m
a
in m
e
n
u
.
A
u
di
o sett
i
n
g
s:
au
di
o am
bi
ences, tre
bl
e,
b
ass,
l
oudness, distribution, le
f
t
/
ri
g
ht
balance,
f
ront
/
rear
f
ader, automatic
v
o
l
u
m
e
.
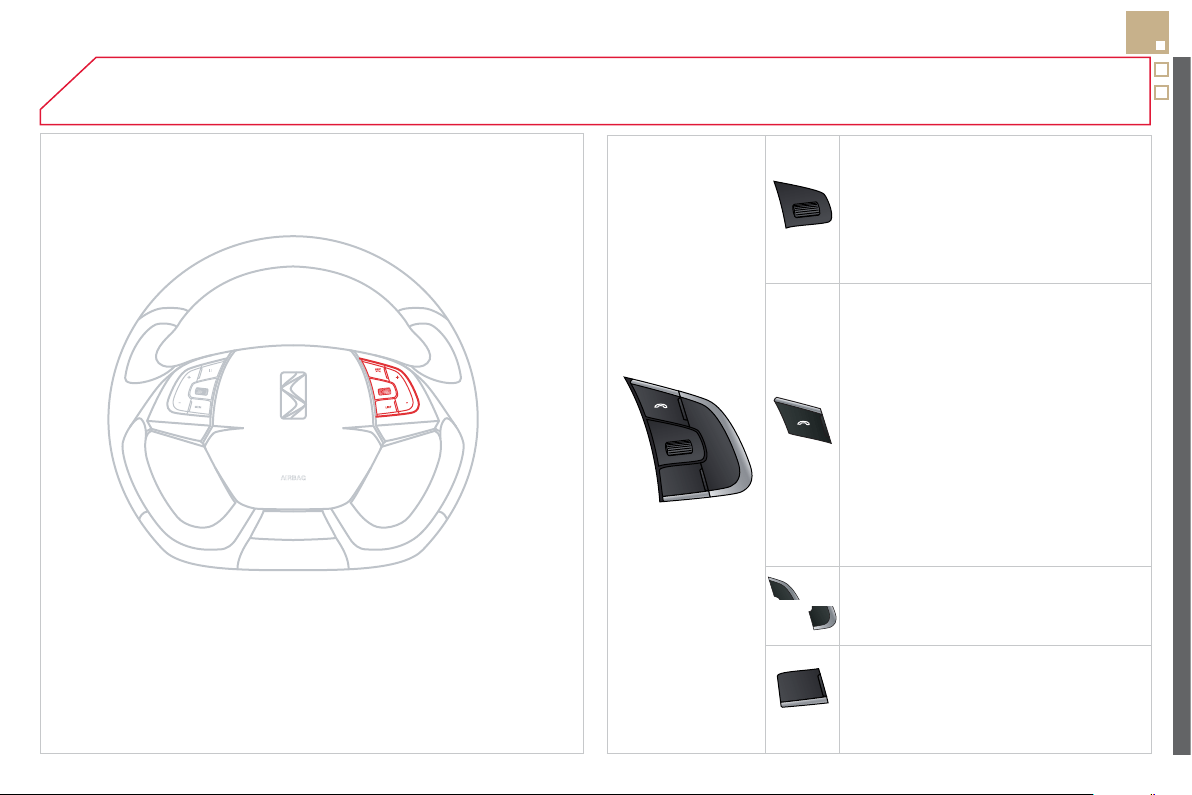
02
SRC
+
-
317
STEERING MOUNTED CONTROLS
- R
o
t
a
ti
o
n
Radio -automatic selection of next
/
p
revious frequenc
y
.
Media: previous / next track.
-
P
r
ess
t
he
n r
o
t
a
t
io
n:
access
t
o
6
preset stations.
-
C
han
g
e the audio source.
- TEL button
(
short press
)
:
Accept an incomin
g
call
Call in pro
g
ress: access to telephone
m
enu:
h
an
g
up, secret mo
d
e,
h
an
d
s-
f
r
ee
m
ode
.
- TEL button
(
lon
g
press
)
:
Re
j
ect an incomin
g
call or end a call
in pro
g
ress.
When not makin
g
a call, access to
the telephone menu
(
Dial, Contacts,
C
alls lo
g
, Voice mailbox
)
.
- In
c
r
ease
v
o
l
u
m
e
.
- D
ec
r
ease
v
o
l
u
m
e
.
- Radio: displa
y
the list o
f
stations.
Media: display the list o
f
tracks.
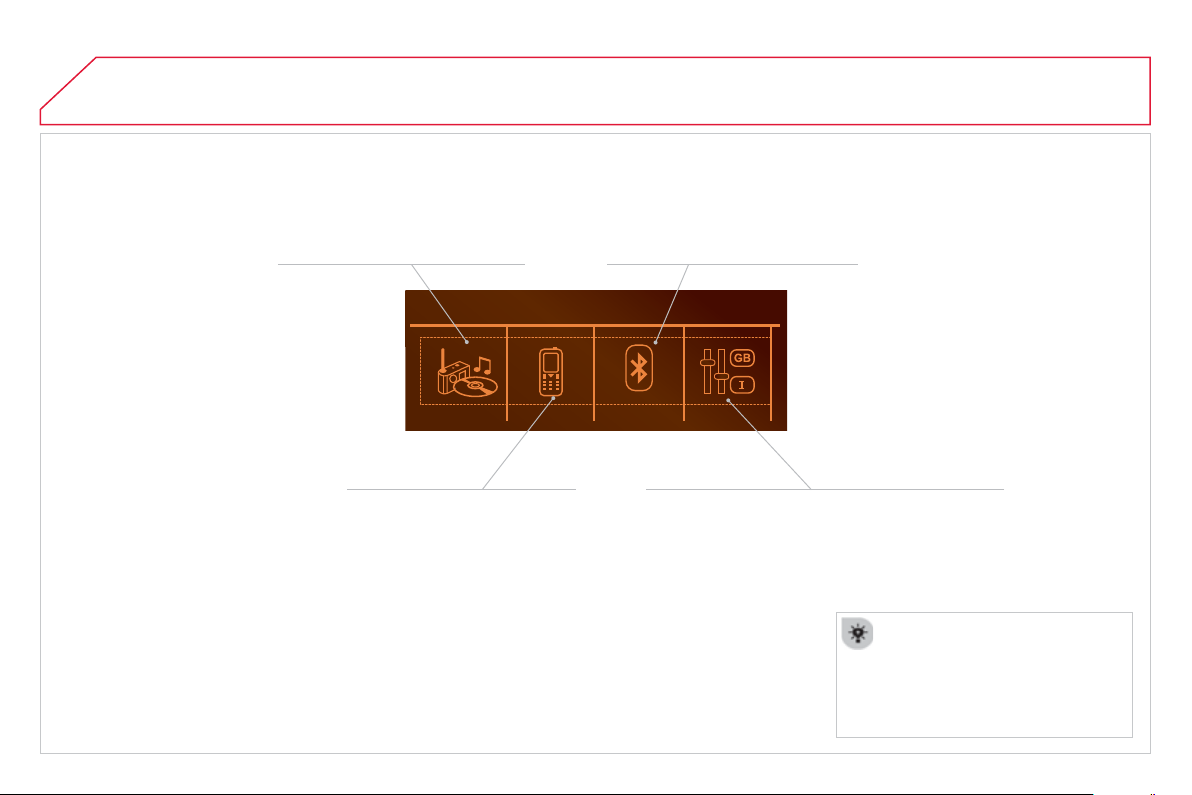
03
"
M
ultimedi
a
": Media parameters,
R
adio
p
arameters.
For a detailed
g
lobal view o
f
the
menus available, re
f
er to the
"S
creen menu map" section.
> SCREEN C
"
B
luetooth connection":
C
onnections mana
g
ement,
S
earch
f
o
r
a
de
vi
ce
.
"
T
ele
p
hon
e
":
C
all, Director
y
mana
g
ement, Telephone
mana
g
ement, Han
g
up.
MAIN MENU
"
P
ersonalisation-confi
g
uration": D
efi
n
e
th
e
vehicle parameters,
C
hoice o
f
lan
g
ua
g
e, Displa
y
c
on
fi
g
uration,
C
hoice o
f
units, Date and time
ad
j
ustment.
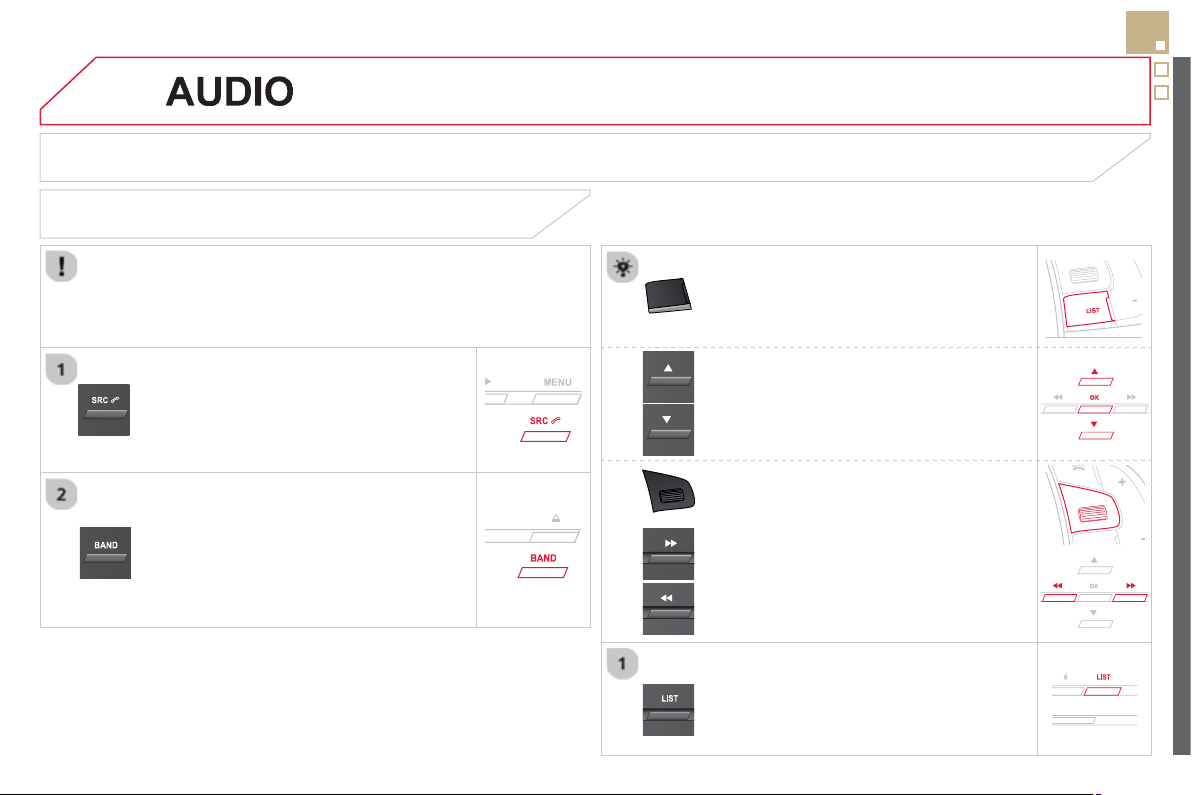
04
319
Pr
ess
SOURC
E
or
SR
C
se
v
e
r
a
l tim
es
in
success
i
o
n
a
n
d
se
l
ec
t r
ad
i
o
.
P
r
ess
BAND
t
o
selec
t
a
w
a
v
eba
n
d
.
Pr
ess
LIS
T
to displa
y
the list of stations
r
eceived in al
p
habetical order.
A
press c
h
an
g
es to t
h
e next or prev
i
ous
l
etter
(
e.g. A, B, D, F,
G
, J, K, ...
)
.
RADIO
S
elect the desired radio station and
c
onfi rm b
y
pressin
g
OK
.
S
ELECTING A
S
TATION
A lon
g
press on
L
I
S
T builds or updates
the list o
f
stations; audio reception is cut
momentaril
y
.
The exterior environment
(
hills, buildin
g
s, tunnel, car park, below
g
round...
)
ma
y
prevent reception, even in RD
S
station trackin
g
m
ode. This phenomenon is normal in the propa
g
ation o
f
radio
waves and is in no way indicative o
f
a
f
ault with the audio system.
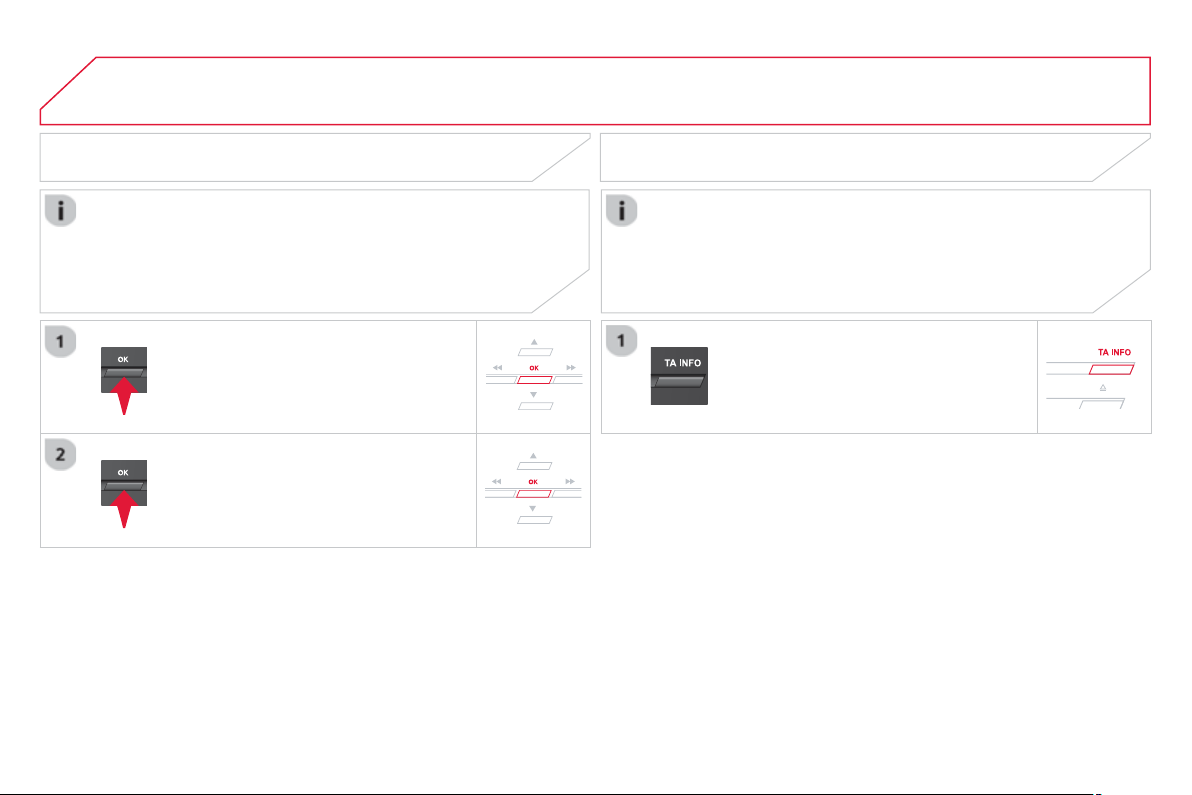
04
RDS, if displa
y
ed, enables
y
ou to continue listenin
g
to the same
s
tation b
y
automatic retunin
g
to alternative frequencies. However,
in certain conditions, covera
g
e o
f
an RD
S
station ma
y
not be
assure
d
t
h
rou
gh
out t
h
e countr
y
as ra
di
o stat
i
ons
d
o not cover
100
%
o
f
the territory. This explains the loss o
f
reception o
f
the
s
tation durin
g
a
j
ourne
y
.
A
UDIO
RDS RECEIVING TA MESSAGES
The TA
(
Tra
ffi
c Announcement
)
f
unction gives priority to TA alert
m
essa
g
es. To operate, this
f
unction needs
g
ood reception o
f
a
r
adio station transmittin
g
this t
y
pe o
f
messa
g
e. When a tra
ffi
c
r
eport is transmitted, the current audio source
(
Radio, CD,
USB, ...
)
is interrupted automaticall
y
to pla
y
the TA messa
g
e.
N
ormal pla
y
back of the audio source resumes at the end of the
transmission of the messa
g
e.
Pr
ess
T
A INFO t
o
ac
tiv
a
t
e
o
r
deac
tiv
a
t
e
the reception of traffi c messa
g
es.
Wh
en t
h
e ra
di
o
i
s
di
sp
l
a
y
e
d
on t
h
e
screen
,
press
OK to
di
sp
l
ay t
h
e
co
nt
e
xt
ua
l m
e
n
u
.
S
elect "
R
D
S
"
a
n
d
co
nfi rm t
o
sa
v
e
.
"
RD
S
"
i
s
di
sp
l
a
y
e
d
i
n t
h
e screen.
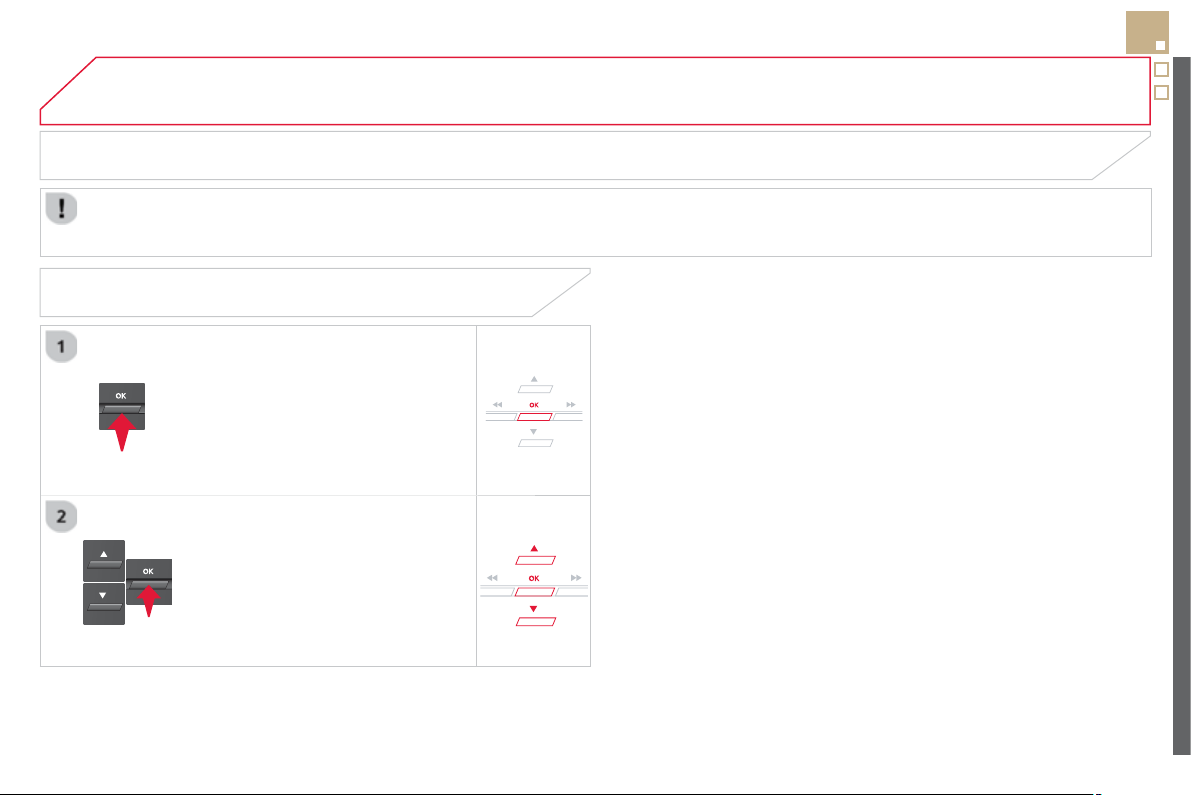
04
321
A
UDIO
Radio text is in
f
ormation transmitted b
y
the radio station related to the current pro
g
ramme or son
g
.
With the radio displa
y
ed on the screen,
press
O
K
to
di
sp
l
a
y
t
h
e contextua
l
menu
.
S
elect "
R
adioText
(
TXT
)
displa
y
"
a
n
d
co
nfi rm OK t
o
sa
v
e
.
DISPLAY RADIO TEXT
S
CREEN C
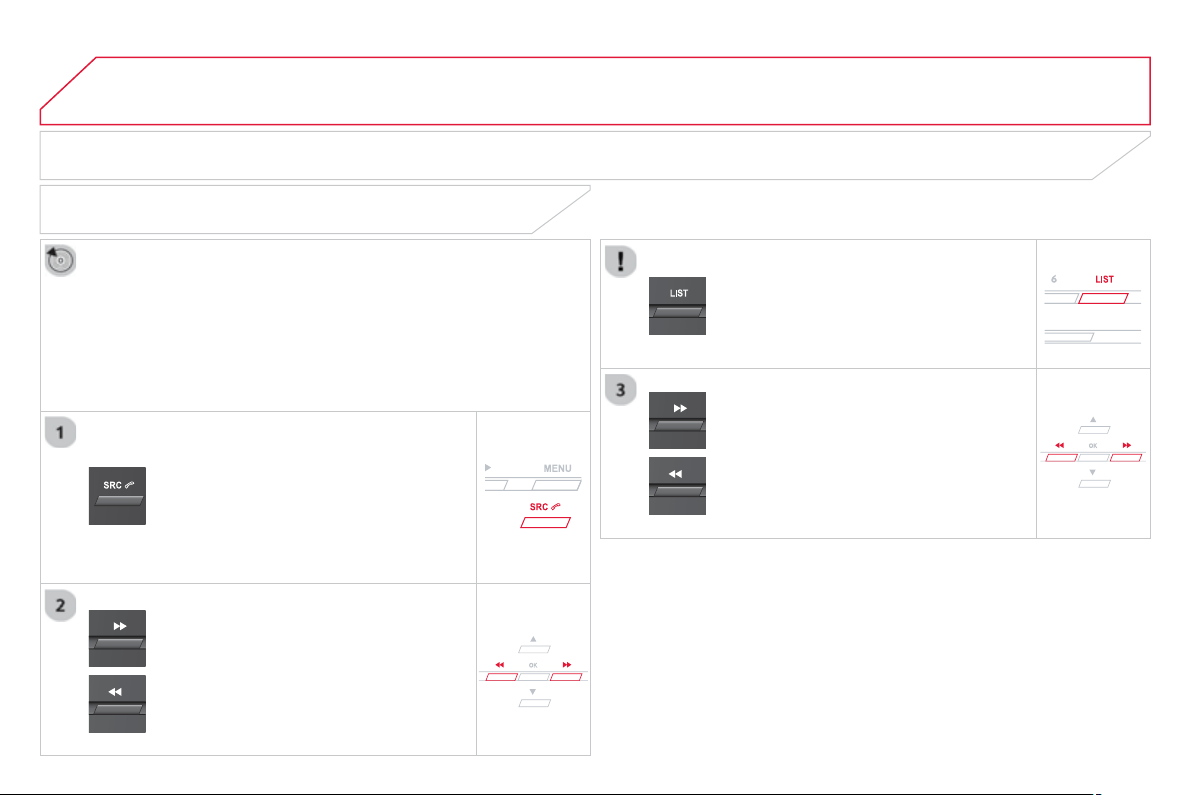
04
A
UDIO
AUDIO CD
Insert 12 cm diameter circular compact discs onl
y
.
Some anti-piratin
g
s
y
stems, on ori
g
inal discs or CDs copied usin
g
a
p
ersonal recorder, ma
y
cause faults which are no refl ection on the
q
ualit
y
o
f
the ori
g
inal pla
y
er.
Wi
t
h
out press
i
n
g
t
h
e
E
JECT button, insert a
C
D in the pla
y
er, pla
y
begins automatically.
T
o p
l
a
y
a
di
sc w
hi
c
h
h
as a
l
rea
dy
b
een
i
nserte
d
, press t
h
e SOURC
E
or
SR
C
bu
tt
o
n
se
v
e
r
al
t
i
m
es
i
n
successio
n
a
n
d
se
l
ec
t "
CD
".
Pr
ess
o
n
e
o
f th
e
bu
tt
o
n
s
t
o
se
l
ec
t
a
track on the
C
D.
PLAYING A CD
Pr
ess
L
IST to displa
y
the list of tracks
o
n the
C
D.
Pr
ess
a
n
d
h
o
l
d
o
n
e
o
f th
e
bu
tt
o
n
s
f
or
fas
t
fo
rw
a
r
d
o
r
bac
kw
a
r
d
.
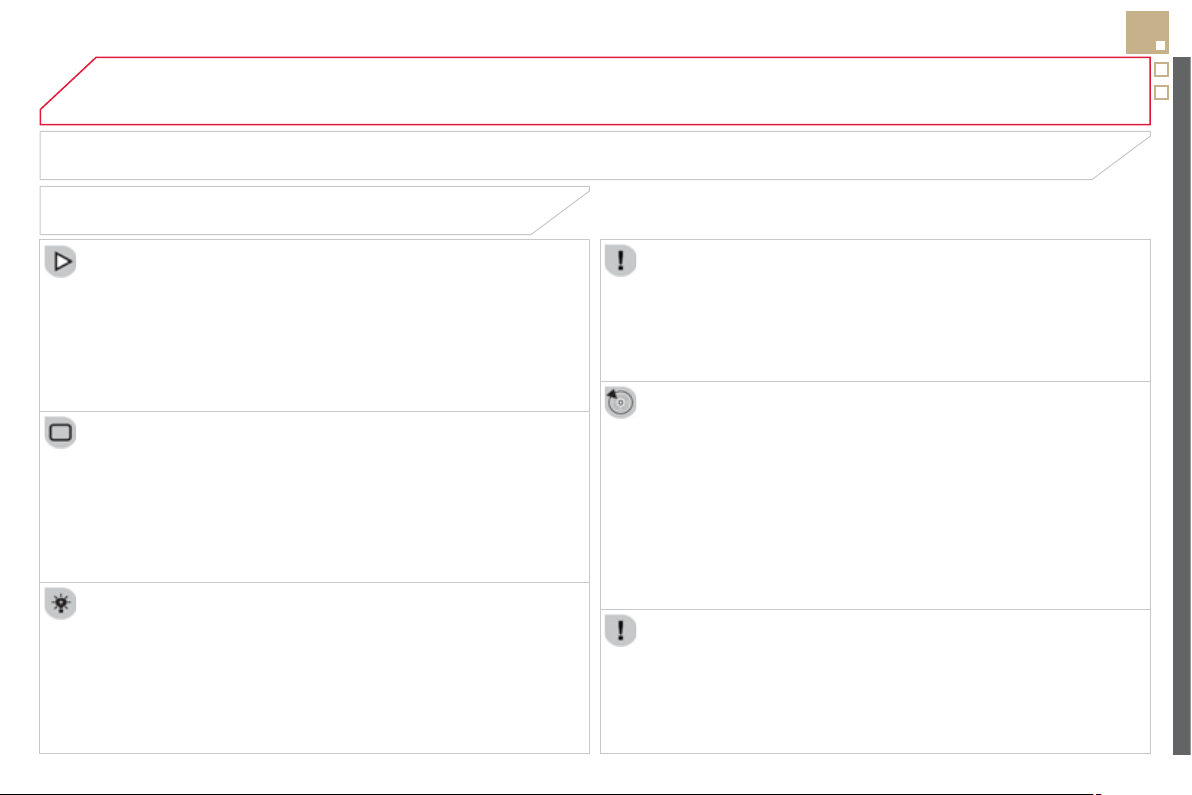
04
323
A
UDIO
CD, USB
INFORMATION AND ADVICE
O
n a sin
g
le disc, the CD pla
y
er can read up to 255 MP3 fi les spread
over 8 director
y
levels. However, it is recommended that this be kept
to 2 levels so as to limit the time taken to access and pla
y
the
C
D.
Durin
g
pla
y
, the
f
older structure is not observed.
In order to be able to pla
y
a recorded CDR or CDRW, when recordin
g
it is
p
referable to select standards IS
O
9660 level 1.2 or Joliet.
If the disc is recorded in another format, it ma
y
not be pla
y
ed correctl
y
.
I
t
i
s recommen
d
e
d
t
h
at t
h
e same recor
di
n
g
stan
d
ar
d
i
s a
l
wa
y
s use
d
f
or an individual disc, with as low a speed as possible
(
4x maximum
)
f
or optimum sound quality.
In the particular case o
f
a multi-session
C
D, the Joliet standard is
r
eco
mm
e
n
ded
.
Do not connect a hard disk or U
S
B device other than audio pla
y
ers to
the U
S
B port. This ma
y
cause dama
g
e to
y
our installation.
The audio system will only play
fi
les with extension ".mp3" or ".wma"
and a compression rate that is constant or variable between
32
Kbps
and
320
Kbps.
It is advisable to restrict fi le names to 20 characters without usin
g
s
pecial characters
(
e.
g
. " ? ; ù
)
to avoid an
y
pla
y
in
g
or displa
y
in
g
p
ro
bl
ems.
The pla
y
lists accepted are t
y
pes .m3u and .pls.
The number o
f
fi
les is limited to 5 000 in 500 directories on a
m
aximum o
f
8 levels.
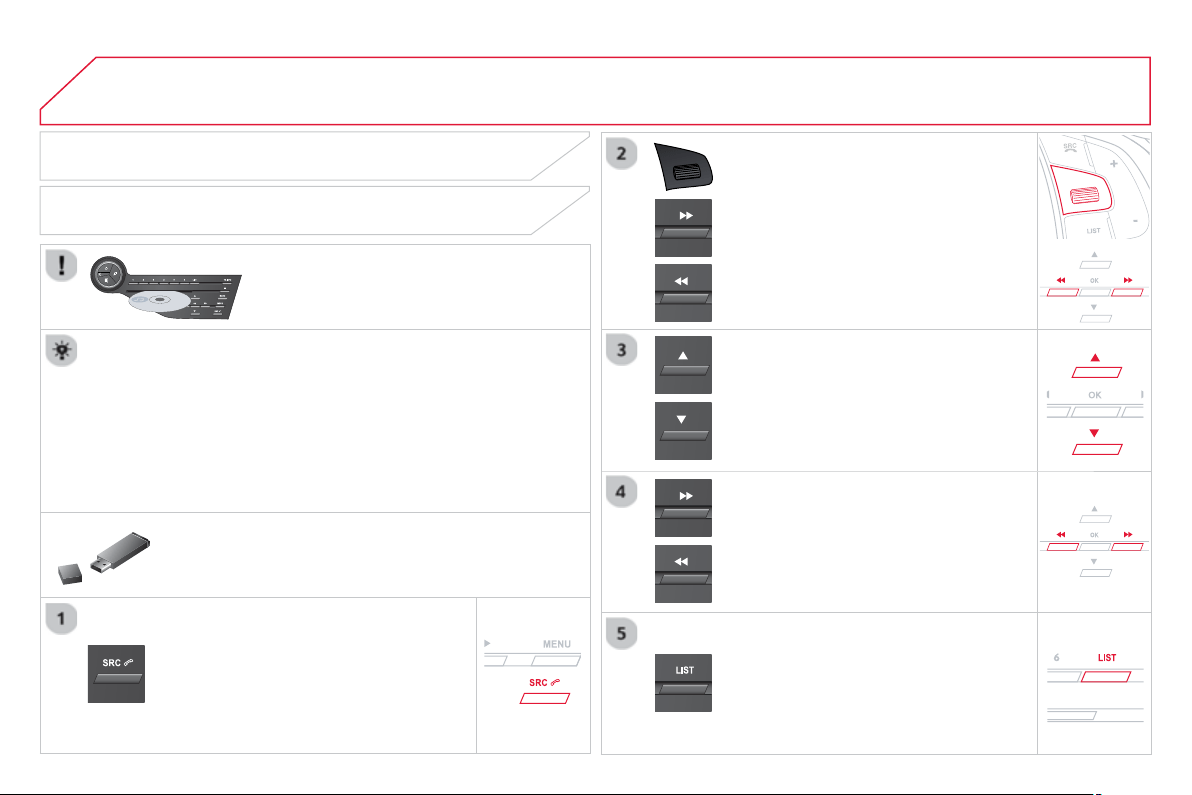
04
CD, USB
A
UDIO
PLAYING A COMPILATION
Insert an MP3 compilation in the
C
D pla
y
er
or connect a memor
y
stick to the USB port,
directl
y
or via an extension lead.
The s
y
stem creates pla
y
lists
(
temporar
y
memor
y)
the creation time
f
o
r whi
c
h
ca
n t
a
k
e
fr
o
m
a
f
e
w
seco
n
ds
t
o
se
v
e
r
a
l min
u
t
es
.
The pla
y
lists are updated ever
y
time the i
g
nition is switched o
ff
or a
US
B memor
y
stick is connected.
Pla
y
starts automaticall
y
a
f
ter a period which depends on the
c
apacit
y
o
f
the U
S
B memor
y
stick.
A
t a fi rst connection, the order su
gg
ested is b
y
folder.
Wh
en connect
i
n
g
a
g
a
i
n, t
h
e or
d
er prev
i
ous
ly
c
h
osen
i
s
re
t
ai
n
ed
.
T
o p
l
ay a
di
sc or memory st
i
c
k
w
hi
c
h
h
as alread
y
been inserted, press
SOURCE
or
SRC
se
v
e
r
a
l tim
es
in
success
i
o
n
a
n
d
se
l
ec
t "
CD
"
o
r "
U
S
B
".
Pr
ess
o
n
e
of
th
e
bu
tt
o
n
s
t
o
se
l
ec
t th
e
n
ext or previous track.
Pr
ess
o
n
e
o
f th
e
bu
tt
o
n
s
t
o
se
l
ec
t th
e
n
ext or previous
f
older in the order
chose
n.
Pr
ess
a
n
d
h
o
l
d
o
n
e
o
f th
e
bu
tt
o
n
s
f
o
r
f
as
t f
o
rw
a
r
ds
o
r
bac
kw
a
r
ds
.
P
r
ess
L
IS
T
to displa
y
the menu o
f
f
olders in the compilation.

04
325
S
elect a line in the list.
S
elect a track or a folder.
S
ki
p
a track.
Up a level in the menu.
A
UDIO
USB MEMORY STICK - FILE
CLASSIFICATION
Havin
g
selected the desired classifi cation
(
"
By
folders", " B
y
artists", "
By
g
enres", "
By
p
la
y
lists "
)
press O
K
.
Th
e
n
co
nfi rm OK t
o
sa
v
e
th
e
m
od
ifi
ca
ti
o
n
s
.
-
By
folders: all
f
olders containin
g
audio
fi
les recognised on the peripheral device,
i
n alphabetical order without
f
ollowin
g
the
fo
l
de
r
s
tr
uc
t
u
r
e
.
-
By
artist
s
:
a
ll
o
f th
e
a
rti
s
t n
a
m
es
de
fi n
ed
i
n the ID3 Ta
g
s, in alphabetical order.
-
By
g
enre
s
: all of the
g
enres defi ned in the
I
D3 Ta
g
s.
-
By
p
l
a
yli
sts : i
f
pla
y
lists have been saved.
M
a
k
e a
l
on
g
press on LIS
T
or
press
MEN
U
, select "
M
ultimedi
a
", then
"
M
edia
p
arameters" and
fi
nall
y
"Choice
o
f track listin
g
" to displa
y
the di
ff
erent
c
l
ass
ifi
ca
ti
o
n
s
.
04
A
UDIO
APPLE
®
PLAYERS or
PORTABLE PLAYER
Mana
g
ement o
f
the device is via the audio s
y
stem controls.
The audio
fi
les on a Mass
S
torage portable player
*
can
be heard throu
g
h the vehicle's speakers b
y
connectin
g
it to the U
S
B port
(
cable not supplied
)
.
If the portable pla
y
er is not reco
g
nised b
y
the USB port,
c
onnect it to the auxiliar
y
Jack socket.
The Apple
®
player must be updated regularly for the best
®
co
nn
ec
ti
o
n.
The pla
y
lists are those de
fi
ned in the Apple
®
p
l
a
y
er.
The Apple
®
player must be generation 5 or later.
*
C
heck
y
our pla
y
er's manual.
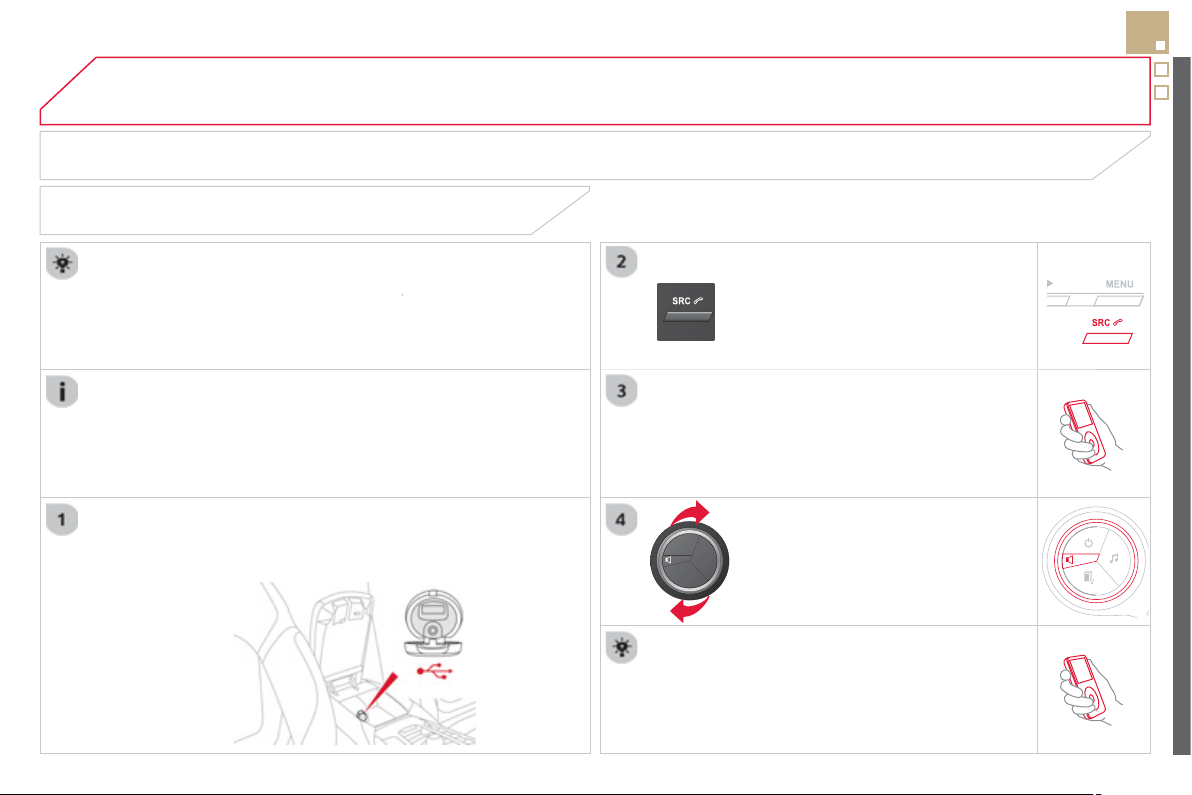
04
327
A
UDIO
AUXILIARY SOCKET (AUX)
AUXILIARY JACK SOCKET
Do not connect a device to the USB port and to the auxiliar
y
J
ack socket at the same time.
The auxiliar
y
Jack socket permits the connection of a portable
non-mass stora
g
e device or an Apple
®
player if not recognised
®
by
the USB port.
C
onnect the portable device to the auxiliar
y
Jack socket usin
g
a
suitable cable
(
not supplied
)
.
Pr
ess
th
e
SOURC
E
o
r SRC
bu
tt
o
n
se
v
e
r
a
l tim
es
in
success
i
o
n
a
n
d
se
l
ec
t
"
AUX
".
First ad
j
ust the volume on
y
our portable device.
Then ad
j
ust the volume of the audio
s
y
stem.
The displa
y
and mana
g
ement of controls is on the
p
ortable device.
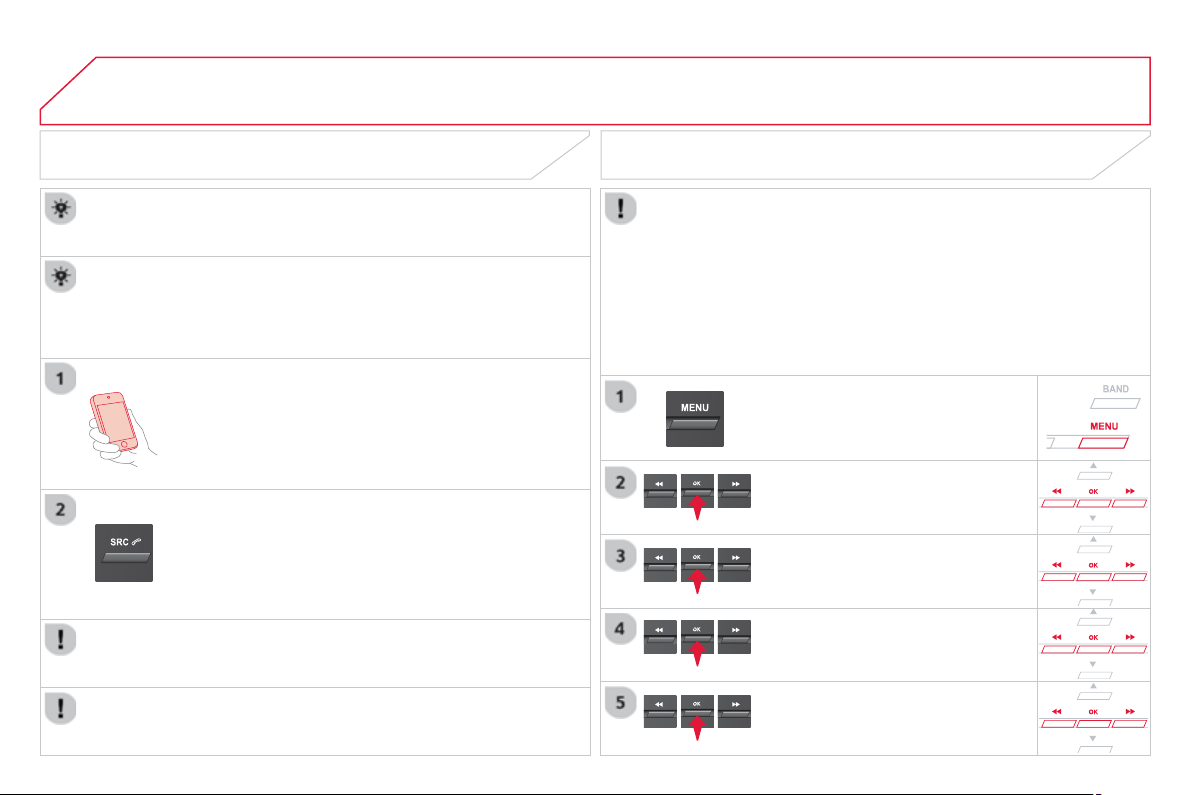
04
A
UDIO
STREAMING - PLAYING AUDIO FILES
VIA BLUETOOTH
Dependin
g
on the compatibilit
y
of the phone
Pair
/
connect the telephone: see the "U
S
IN
G
THE
TELEPH
O
NE" section.
S
treamin
g
allows music
fi
les on a telephone to be heard via the
ve
hi
c
l
e
'
s spea
k
ers.
The telephone must support the appropriate bluetooth pro
fi
les
(
Pro
fi
les A2DP
/
AVR
C
P
)
.
A
ctivate the streamin
g
source b
y
pressin
g
SOURC
E
or
SRC . Control of pla
y
back is via the audio s
y
stem. The
c
ontextual information can be displa
y
ed in the screen.
In certain cases, pla
y
in
g
of the audio fi les must be initiated from
the telephone.
The audio quality depends on the quality o
f
the transmission
f
rom
the telephone.
PLAY MODE
The pla
y
modes available are:
- Normal: the tracks are pla
y
ed in order, dependin
g
on the
c
l
ass
ifi
ca
ti
o
n
o
f th
e
se
l
ec
t
ed
fi l
es
.
- Random: the tracks in an album or
f
older are pla
y
ed in a
ra
n
do
m
o
r
de
r.
- Random all: all o
f
the tracks saved in the media are played in
ra
n
do
m
o
r
de
r.
- Repeat: the tracks pla
y
ed are onl
y
those from the current
a
l
bu
m
o
r f
o
l
de
r.
S
elect "
M
ultimedi
a
"
a
n
d
co
nfi rm.
S
elect "
M
edia parameters"
a
n
d
co
nfi rm.
S
elect "Read mod
e
"
a
n
d
co
nfi rm.
S
elect the desired pla
y
mode and
co
n
fi
rm O
K
t
o
sa
v
e
th
e
m
od
i
fi
ca
ti
o
n
s
.
Pr
ess
OK
fo
r
access
t
o
th
e
co
nt
e
xt
ua
l
menu
.
o
r
Pr
ess
M
EN
U
.
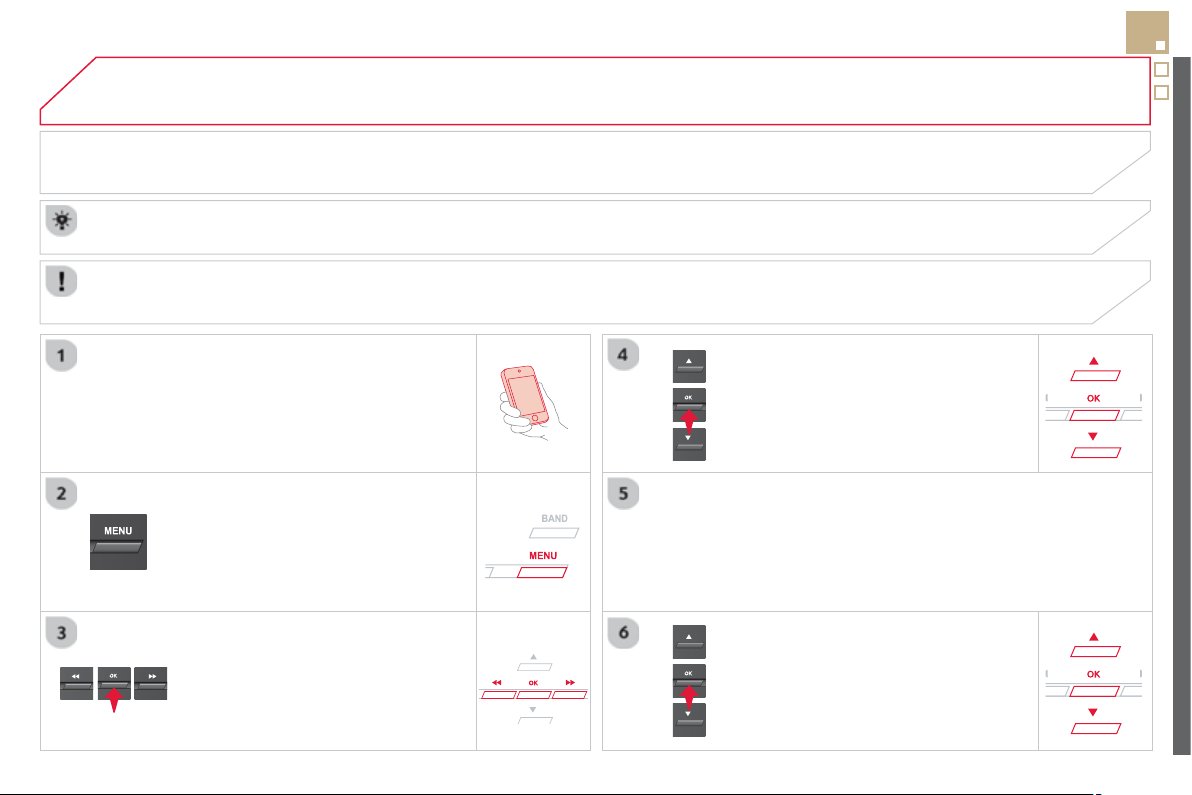
05
329
USING THE TELEPHONE
PAIRING A TELEPHONE
FIRST CONNECTION
The services offered depend on the network, the SIM card and the compatibilit
y
of the Bluetooth telephone used.
Consult
y
our telephone's manual and
y
our operator to fi nd out which services are available to
y
ou.
A
ctivate the telephone's Bluetooth function and
e
nsure that it is "visible to all"
(
refer to the telephone
user
g
uide
)
.
Pr
ess
M
EN
U
.
A
window is displayed "Search in progress
…
".
Select the tele
p
hone to be connected
f
rom the list.
O
nl
y
one telephone can
be
co
nn
ec
t
ed
a
t
a
t
i
m
e
.
S
elect " Search for a devic
e
".
For sa
f
et
y
reasons and because the
y
require prolon
g
ed attention on the part o
f
the driver, the operations
f
or pairin
g
o
f
the Bluetooth mobile
telephone with the Bluetooth hands-
f
ree s
y
stem o
f
y
our audio s
y
stem must be carried out with the
v
e
hi
c
l
e stat
i
onar
y
an
d
t
h
e
ig
n
i
t
i
on on.
Visit www.citroen.co.uk
f
or more in
f
ormation
(
compatibilit
y
, additional help, ...
)
.
S
elect "
Bl
uetoot
h
connect
i
on
"
a
n
d
co
n
fi
rm.
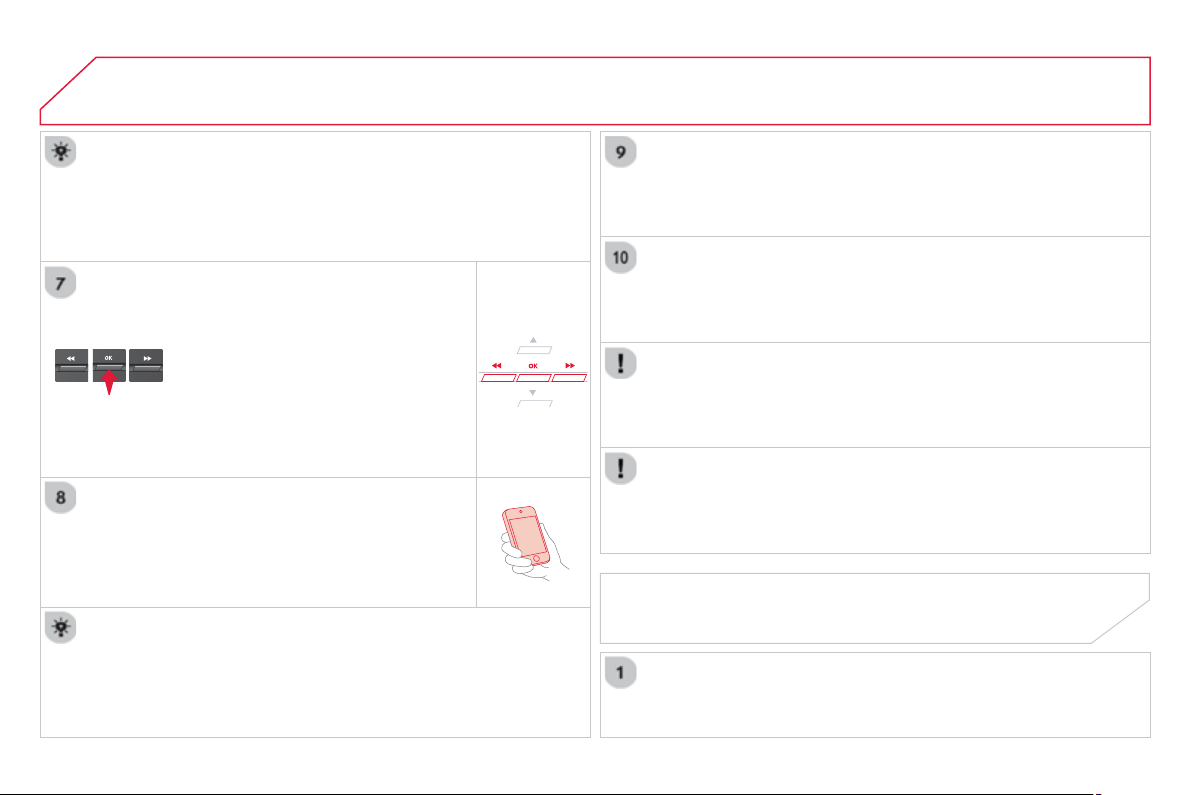
05 USING THE TELEPHONE
A virtual keypad is displayed on the
screen: enter a code with at least 4 di
g
its
a
n
d
co
n
fo
rm with
O
K
.
A
messa
g
e is displa
y
ed on the screen o
f
the
tele
p
hone: enter the same code and confi rm.
A
messa
g
e appears in the screen to con
fi
rm the result o
f
the
co
nn
ec
t
io
n.
Pairin
g
can also be initiated from the telephone b
y
searchin
g
for
de
t
ec
t
ed
Blue
t
oo
t
h
de
v
ices
.
A
ccept the connection to the telephone.
I
f
pairin
g
f
ails, tr
y
a
g
ain; the number o
f
attempts is not limited.
The director
y
and the calls list can be accessed a
f
ter the
s
y
nchronisation period
(
i
f
the telephone is compatible
)
.
A
utomatic connection must be confi
g
ured in the telephone to allow
th
e
co
nn
ec
ti
o
n
eac
h tim
e
th
e
v
e
hi
c
l
e
i
s
s
t
a
rt
ed
.
In some cases, the reference number of the tele
p
hone or the
Bluetooth address ma
y
appear instead of the name of the telephone.
Pair/connect the telephone then listen: see the AUDI
O
section.
STREAMING - PLAYING AUDIO FILES
VIA BLUETOOTH
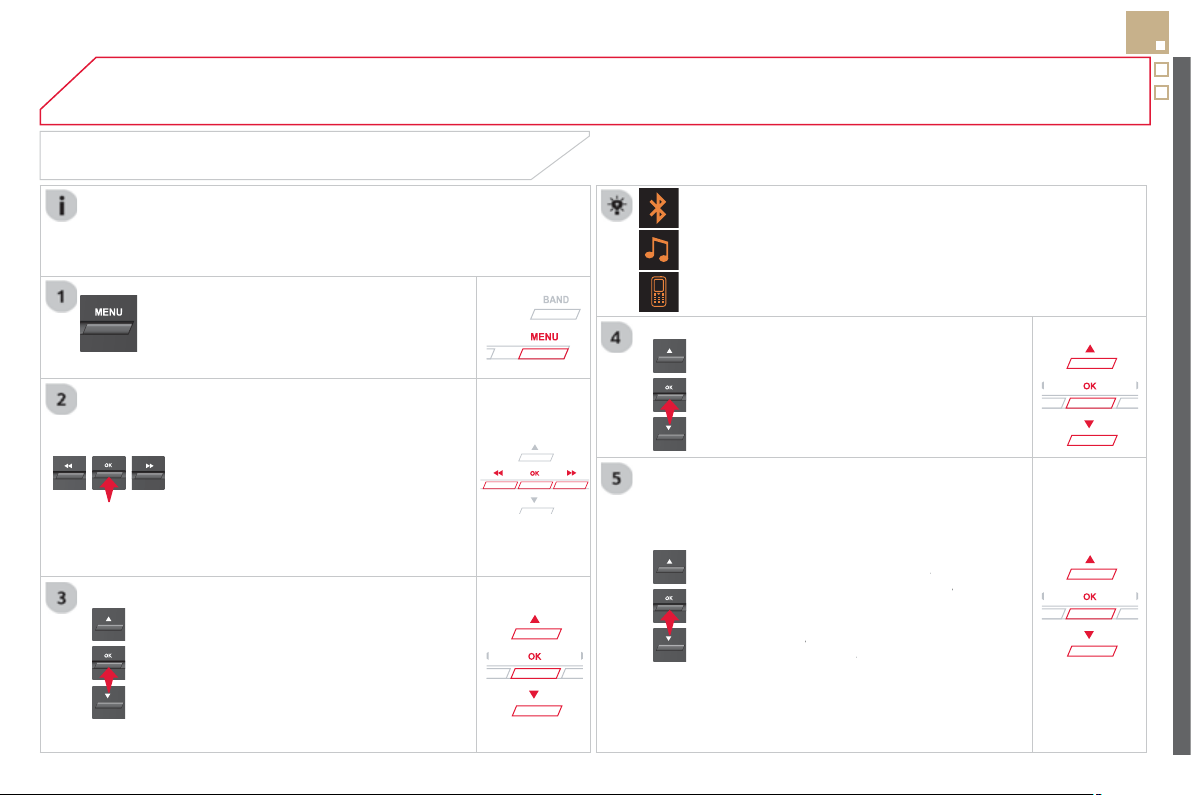
05
331
USING THE TELEPHONE
The telephone connection automatically includes hands
f
ree operation
and audio streamin
g
.
The abilit
y
o
f
the s
y
stem to connect to
j
ust one pro
fi
le depends on the
telephone. Both profi les ma
y
connect b
y
default.
Pr
ess
M
EN
U
.
S
elect "
Bl
uetoot
h
connect
i
on
"
a
n
d
co
n
fi
rm.
Indicates connection of the audio steamin
g
profi le.
MANAGING CONNECTIONS
S
elect " Connections mana
g
emen
t
"
a
nd con
fi
rm. The list o
f
paired
telephones is displa
y
ed.
S
elect a telephone and con
fi
rm.
Indicates connection o
f
the hands-
f
ree pro
fi
le.
Th
e
n
se
l
ec
t
a
n
d
co
n
fi
rm:
- " Connect telephon
e
"
/
"
D
isconnect
telephon
e
": to connect
/
disconnect
the telephone or the hands-free
c
onnect
i
on on
ly
.
-
"
Connect media player
"
/
r
"
Disconnect media player
"
: t
o
r
c
onnect
/
disconnect only streaming.
- " Connect tele
p
hone + media
player
" / "
r
D
isconnect telephone +
media player
": to connect /
r
disconnect the telephone
(
hands-free
and streamin
g)
.
-
"
D
e
l
ete connect
i
on
"
: t
o
dele
t
e
t
he
p
a
i
r
i
n
g
.
In
d
i
ca
t
es
th
a
t
a
de
vi
ce
i
s
co
nn
ec
t
ed
.
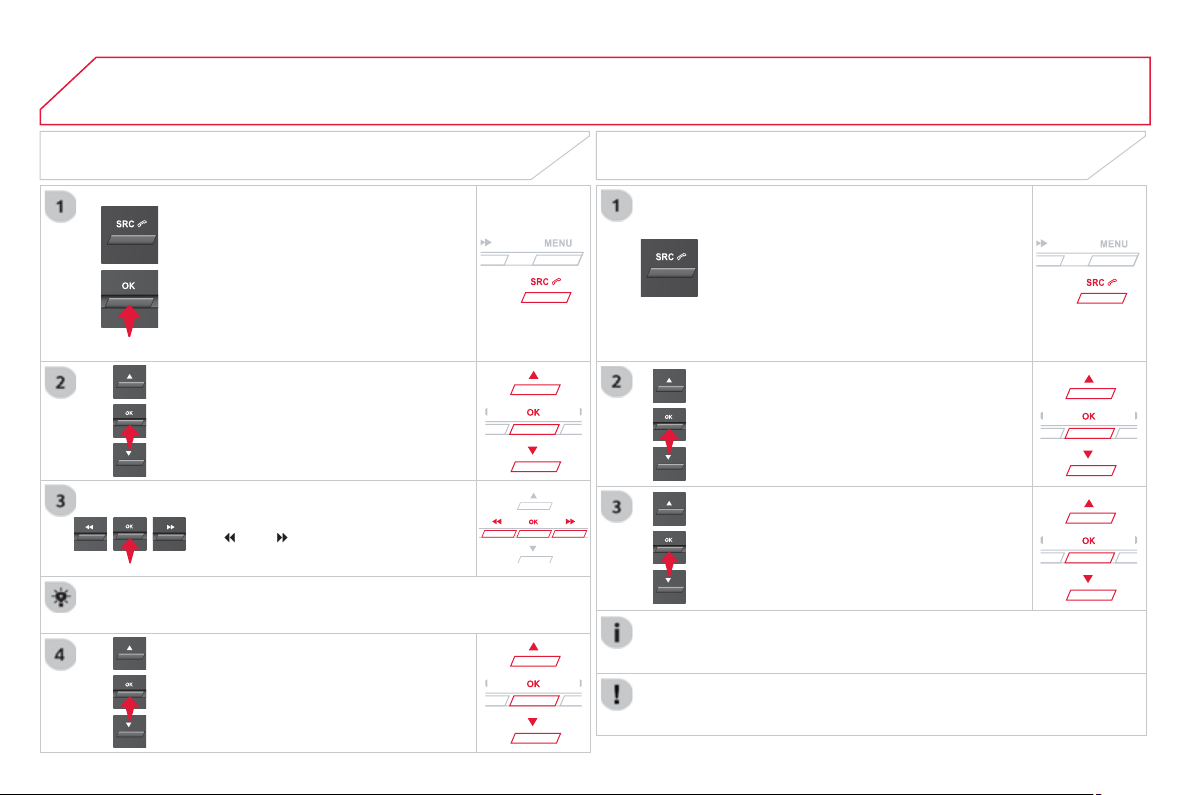
05 USING THE TELEPHONE
To displa
y
the "
T
ELEPHONE " m
e
n
u
:
- Make alon
g
press on SOURC
E
o
r
SR
C
.
-
O
r, press OK to
di
sp
l
a
y
t
h
e
c
ontextual menu.
S
elect "
C
all
"
a
n
d
co
n
fi
rm.
-
O
r, press MEN
U
, select
"
T
ele
p
hon
e
"
a
n
d
co
n
fi
rm.
Se
l
ec
t
"
C
all "
a
n
d
co
n
fi
rm.
S
elect "
Di
a
l
"
t
o
e
nt
e
r
a
n
u
m
be
r
a
n
d
co
n
fi
rm.
T
o
di
sp
l
a
y
t
h
e
"
T
ELEPHON
E
"
m
e
n
u
:
-
M
a
k
e a
l
on
g
press on SRC/TEL
.
-
O
r, press the dial to display the
co
nt
e
xt
ua
l m
e
n
u
.
Se
l
ec
t "Cal
l
"
a
n
d
co
n
fi
rm.
-
O
r, press
M
EN
U
, select
"
T
elephon
e
" and confi rm.
S
elect
"
Cal
l
"
a
n
d
co
nfi rm.
S
elect O
K
a
n
d
co
n
fi
rm t
o
s
t
a
rt th
e
ca
ll.
S
elect "Calls lis
t
"
a
n
d
co
n
fi
rm.
MAKING A CALL - DIALLING
S
elect numbers one at a time using
th
e
a
n
d
bu
tt
o
n
s
a
n
d
co
n
fi
rm.
MAKING A CALL - RECENTLY
CALLED NUMBERS *
S
elect the number and con
fi
rm to
s
t
a
rt th
e
ca
ll.
The calls list includes calls sent and received in the vehicle usin
g
the
c
onnected tele
p
hone.
*
Dependin
g
on the compatibilit
y
o
f
the telephone.
C
orrection allows numbers to be deleted one at a time.
It is possible to make a call directl
y
from the telephone; park the
vehicle
fi
rst as a sa
f
et
y
measure.
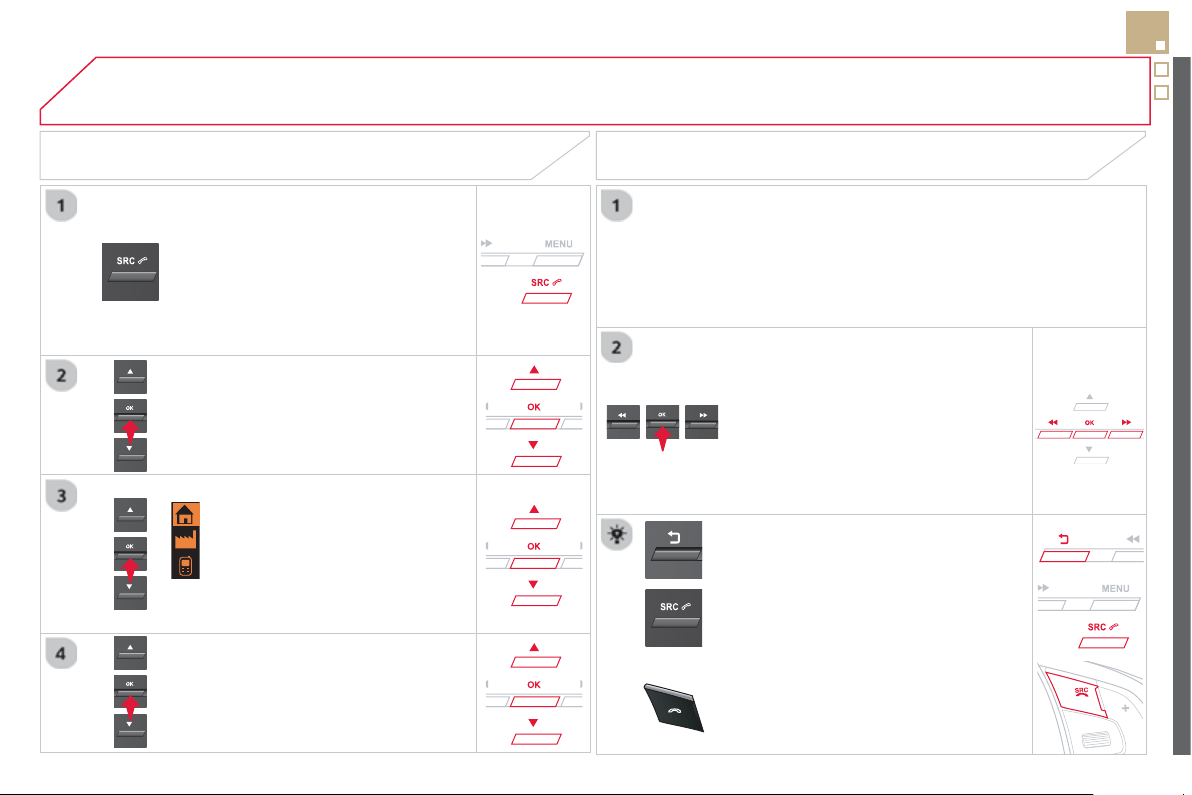
05
SR
C
333
USING THE TELEPHONE
To displa
y
the "
T
ELEPHON
E
" m
e
n
u
:
- Make a lon
g
press on SRC/TEL
.
-
O
r, press the dial to displa
y
the
c
ontextual menu.
S
elect "
C
all "
a
n
d
co
nfi rm.
-
O
r, press
MENU
,
se
l
ect
"
T
e
l
e
ph
on
e
" and con
fi
rm.
S
elect
"
C
all "
a
n
d
co
n
fi
rm.
S
elect "
D
irector
y
"
a
n
d
co
nfi rm.
A
n
i
ncom
i
n
g
ca
ll
i
s announce
d
by
a r
i
n
g
an
d
a super
i
mpose
d
di
sp
l
a
y
in th
e
m
u
lti
fu
n
c
ti
o
n
sc
r
ee
n.
Mobile
(
dependin
g
on the in
f
ormation
a
v
a
il
ab
l
e
in th
e
co
nt
ac
t r
eco
r
ds
of
the telephone connected
)
.
"
YES
" to accept the call is selected b
y
de
f
au
lt.
P
r
ess
OK to accept t
h
e ca
ll
.
S
elect " NO " and con
fi
rm to re
j
ect the
call
.
or
Press one o
f
these buttons to accept
th
e
ca
ll.
MAKING A CALL - FROM THE DIRECTORY
Se
l
ec
t
a
co
nt
ac
t th
e
n
co
n
fi
rm.
RECEIVING A CALL
S
elect the number and con
fi
rm.
A
lon
g
press on ESC
o
r
o
n
TEL
,
SOURC
E
or
SR
C
also re
j
ects an
i
ncom
i
n
g
ca
ll
.
B
us
in
ess
H
o
m
e
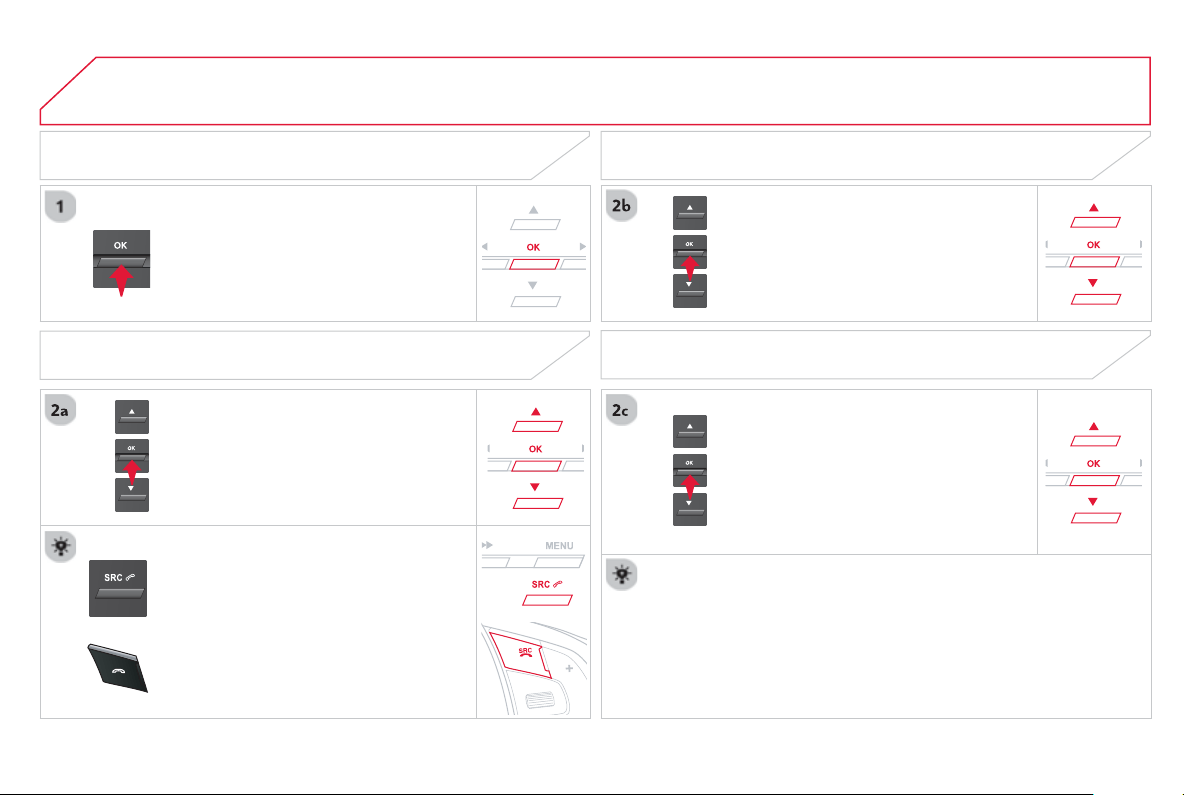
05
SR
C
USING THE TELEPHONE
Durin
g
a call, press OK to displa
y
the
co
nt
e
xt
ua
l m
e
n
u
.
Han
g
up
I
n t
he
co
nt
e
xt
ual
m
e
n
u
:
-
se
l
ec
t "
T
ele
p
hone mod
e
" t
o
trans
f
er the call to the telephone.
-
dese
l
ec
t "
T
ele
p
hone mod
e
" t
o
tr
a
n
s
f
e
r th
e
ca
ll t
o
th
e
v
e
hi
c
l
e
.
In th
e
co
nt
e
xt
ua
l m
e
n
u
:
-
se
l
ec
t "
M
icro OFF " t
o
s
wit
c
h
o
ff th
e
microphone.
-
deselec
t
"
M
icro OFF
"
t
o
s
w
i
t
ch
t
he
m
i
crop
h
one on.
In certain cases, the combined mode has to activated
f
rom the
telephone.
If the contact has been cut off, when
y
ou reconnect on returnin
g
to
the vehicle, the Bluetooth connection will be restored automaticall
y
(
dependin
g
on the compatibilit
y
of the telephone
)
.
MANAGING CALLS
A lon
g
press on one of these buttons
also
e
n
ds
t
he
call
.
I
n t
h
e contextua
l
menu, se
l
ect
"
H
an
g
up
"
t
o
e
n
d
t
he
call
.
Secret - Mute
(
so that the caller cannot hear
)
Combined mode
(
to leave the vehicle without endin
g
the call
)
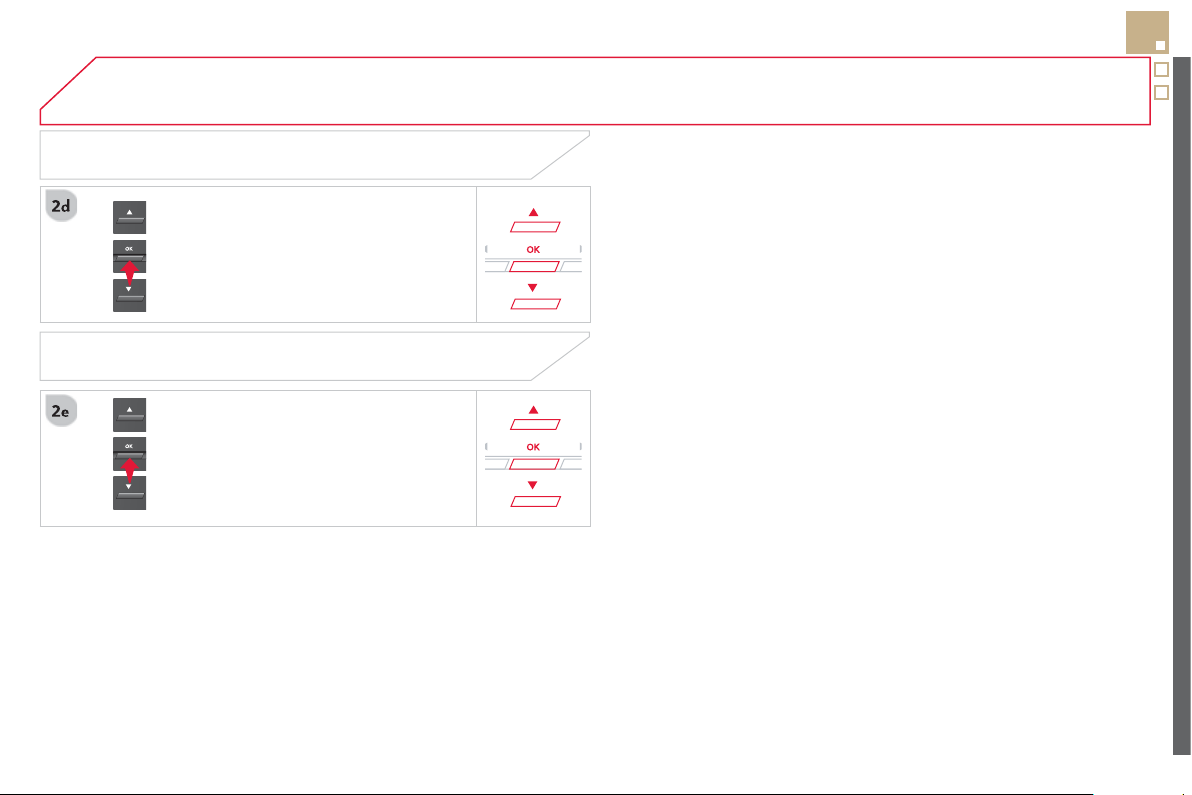
05
335
USING THE TELEPHONE
From the contextual menu, select
"
D
TMF tone
s
"
a
n
d
co
nfi rm t
o
use
the di
g
ital ke
y
pad to navi
g
ate in the
interactive voice response menu.
F
rom t
h
e contextua
l
menu, se
l
ect
"
Switch"
a
n
d
co
n
fo
rm t
o
r
e
t
u
rn t
o
a
ca
ll
lef
t
o
n h
o
l
d
.
I
nteract
i
ve vo
i
ce res
p
onse
Consultation call
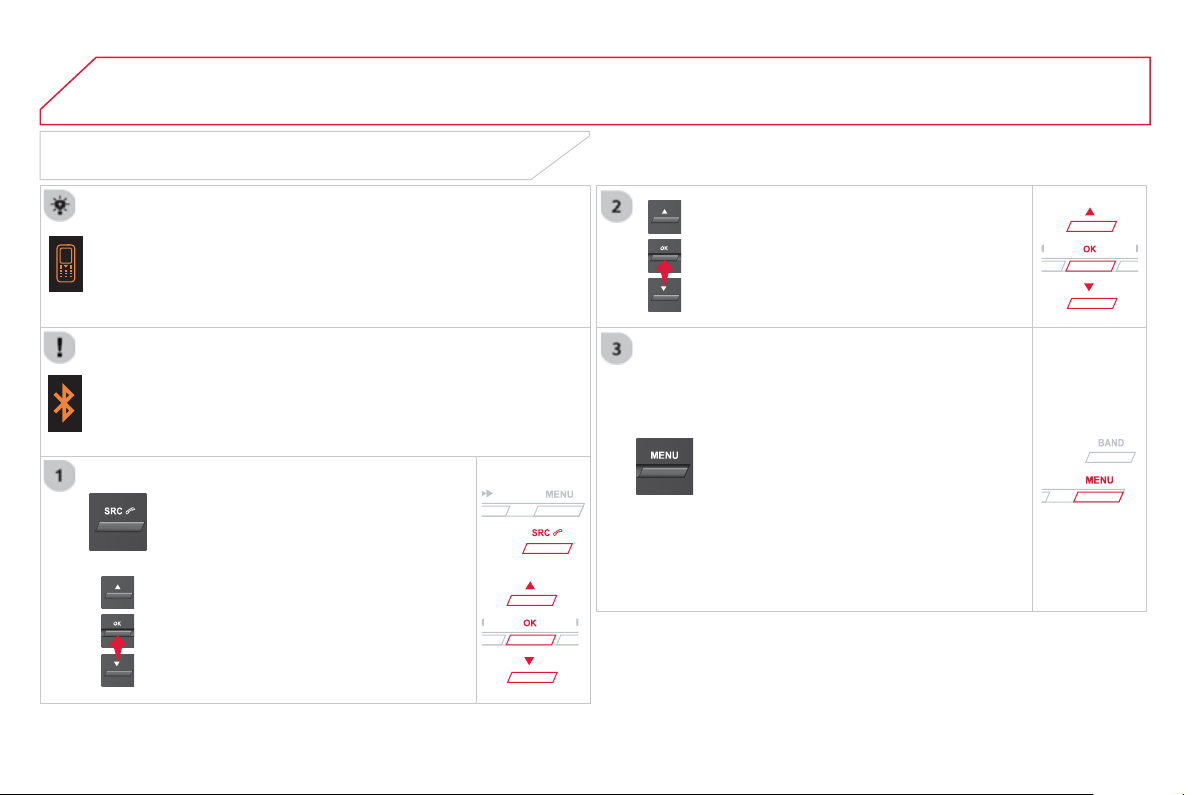
05 USING THE TELEPHONE
DIRECTORY
The telephone director
y
is sent to the s
y
stem, dependin
g
on the
c
ompatibilit
y
of the telephone.
Th
e
di
rector
y
i
s prov
i
s
i
ona
l
an
d
d
epen
d
s on t
h
e
Bl
uetoot
h
co
nn
ec
t
io
n.
Contacts imported from the telephone to the audio s
y
stem director
y
are save
d
i
n a permanent
di
rector
y
v
i
s
ibl
e to a
ll
, w
h
atever t
h
e
te
l
ep
h
one connecte
d
.
To modi
fy
the contacts saved in the
sys
t
em, press
M
EN
U
th
e
n
se
l
ec
t
"
T
ele
p
hon
e
"
a
n
d
co
n
fi
rm.
S
elect "
D
irector
y
mana
g
emen
t
"
a
n
d
co
nfi rm.
Y
ou
ca
n:
-
"
Consult an entr
y
",
-
"
D
e
l
ete an entr
y
"
,
-
"
D
e
l
ete a
ll
entr
i
e
s
"
.
S
elect "
Di
rector
y
" t
o
see
th
e
li
s
t
of
co
nt
ac
t
s
.
Make a lon
g
press on SOURC
E
o
r SRC
f
or access to the director
y
or
press
O
K
, an
d
selec
t
"
Cal
l
"
a
n
d
co
n
fi
rm.
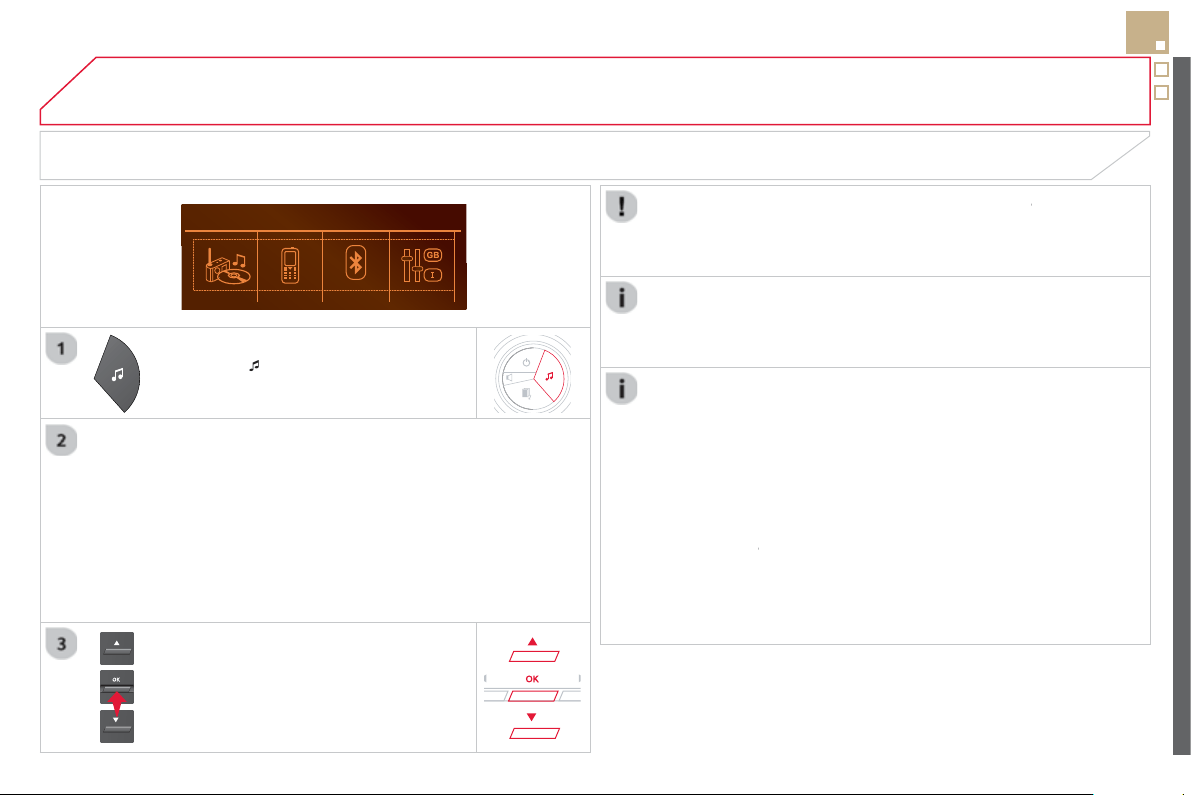
06
337
P
r
ess
to
di
sp
l
a
y
t
h
e au
di
o sett
i
n
g
s
menu
.
The settin
g
s available are:
-
A
m
bi
ence
,
-
B
ass
,
-
T
re
bl
e,
- Loudness,
- Distribution: Personalised or Driver,
- Left / ri
g
ht balance,
- Fader
(
front / rear balance
)
,
-
Au
t
o
. v
olu
m
e
.
SCREEN C
The distribution
(
or spatialisation usin
g
the Arkam
y
s
©
system), is
©
an audio process which allows the sound qualit
y
to be improved
accordin
g
to the settin
g
chosen, correspondin
g
to the position of the
li
s
t
e
n
e
r
s
in th
e
v
e
hi
c
l
e
.
A
UDIO SETTINGS
S
elect and confi rm " Other settin
g
s
…
"
to displa
y
the next settin
g
in the list.
The Ambience, Treble and Bass audio settin
g
s are different and
i
nde
p
endent for each sound source.
O
n-board audio: Arkam
y
s
©
Sound Sta
g
in
g
.
W
ith Sound Sta
g
in
g
, the driver and passen
g
ers are immersed in an
"
audio scene" recreatin
g
the natural atmosphere of an auditorium:
trul
y
a part of the scene and its surroundin
g
s.
This new sensation is made possible b
y
so
f
tware in the audio
s
y
stem which processes the di
g
ital si
g
nals
f
rom the media pla
y
ers
(
radio,
C
D, MP3…
)
without changing the audio settings. This
p
rocessin
g
takes account o
f
the characteristics o
f
the passen
g
er
c
ompartment to produce optimum results.
The Arkam
y
s
©
software installed in your audio system processes
©
the di
g
ital si
g
nal from the media pla
y
ers
(
radio, CD, MP3, ...
)
and
r
ecreates a natural musical scene, with harmonious placement o
f
i
nstruments and voices in the space in
f
ront o
f
passen
g
ers, level
w
i
t
h
t
he
w
i
n
dsc
r
ee
n.

07 SCREEN MENU MAP
SCREEN C
MEDIA
Media parameters
Choice of pla
y
back mod
e
Choice of track listin
g
TELEPHONE
Call
D
ial
D
irector
y
C
alls lis
t
V
oice mail bo
x
Directory management
Consult an entr
y
D
elete an entr
y
D
elete all entries
Telephone management
T
ele
p
hone statu
s
Hang up
BLUETOOTH CONNECTION
N
o
rm
a
l
Ra
n
do
m
R
a
n
do
m
a
ll
Repeat
B
y
f
olders
B
y
artists
B
y
g
enres
B
y
pla
y
lists
Radio parameters
1
2
2
1
2
2
2
2
1
2
2
2
1
2
1
1
1
3
3
3
3
3
3
3
3
1
MAIN FUNCTION
Connections management
Search for a device
Option A
1
O
ption A11
Option A
1
2
3
Option B...
1
07
339
SCREEN MENU MAP
PERSONALISATION-
CONFIGURATION
Define the vehicle parameters
A
ccess to the vehicl
e
Plip action
Drivin
g
position settin
g
Unlockin
g
boot onl
y
D
rivin
g
assistanc
e
R
ear w
i
pe
i
n reverse
g
ea
r
Parkin
g
brake automatic
S
peeds memorised
V
ehicle li
g
htin
g
D
a
y
t
i
me
ligh
ts
Directional headlamps
Interior li
g
htin
g
Welcome li
g
htin
g
F
o
ll
ow-me-
h
ome
h
ea
dl
amps
Choice of language
Display configuration
Choice of unit
s
D
ate an
d
t
i
me a
dj
ustmen
t
D
ispla
y
parameter
s
B
r
igh
tnes
s
Choice of sounds
1
2
3
3
3
2
3
3
3
2
3
3
2
3
3
1
1
2
2
2
2
1

FREQUENTLY ASKED QUESTIONS
Q
UESTIO
N
A
NSWER SOLUTIO
N
Th
e
r
e
i
s
a
d
iff
e
r
e
n
ce
in
s
ound qualit
y
between
th
e
d
iff
e
r
e
nt
aud
i
o
s
ources
(
radio, CD...
)
.
For optimum sound qualit
y
, the audio settin
g
s
(
Volume, Bass, Treble,
Ambience, Loudness
)
can be adapted to the different sound sources,
which ma
y
result in audible differences when chan
g
in
g
source
(
radio,
CD...
)
.
Check that the audio settin
g
s
(
Volume, Bass,
Treble, Ambience, Loudness
)
are adapted to
th
e
sou
r
ces
li
s
t
e
n
ed
t
o
. It i
s
ad
vi
sab
l
e
t
o
se
t
the AUDI
O
functions
(
Bass, Treble, Front-Rear
F
ader, Le
f
t-Ri
g
ht Balance
)
to the middle position,
selec
t t
he
m
usical
a
m
bie
n
ce
"No
n
e"
a
n
d
se
t t
he
l
oudness correction to the "Active" position in
C
D
m
ode or to the "Inactive" position in radio mode.
Wh
en c
h
an
gi
n
g
t
h
e
s
ettings
f
or treble and
bass, the ambience
s
ettin
g
is deselected.
When chan
g
in
g
the
ambience settin
g
, treble
a
n
d
bass
a
r
e
r
ese
t t
o
zero
.
C
hoosin
g
an ambience imposes settin
g
s
f
or treble and bass. Modi
fy
in
g
one without the other is not possible.
Modi
fy
the treble and bass settin
g
s or the
ambience setting to obtain the desired sound
q
ualit
y
.
When changing the
balance settin
g
,
d
i
s
tri
bu
ti
o
n i
s
dese
l
ec
t
ed
.
C
hoosing a distribution setting imposes a balance setting. Modi
f
ying one
without the other is not possible.
Modi
f
y the balance setting or the distribution
s
ettin
g
to obtain the desired sound qualit
y
.
The
f
ollowing tables contain answers to the most
f
requently asked questions.

341
FREQUENTLY ASKED QUESTIONS
Q
UESTIO
N
A
N
S
WER
S
OLUTIO
N
The qualit
y
o
f
reception
of
th
e
r
ad
i
o
s
t
a
ti
o
n
listened to
g
raduall
y
de
t
e
ri
o
r
a
t
es
o
r th
e
s
t
o
r
ed
s
t
a
ti
o
n
s
do
n
o
t f
u
n
c
ti
o
n
(
no sound, 87.5 MHz is
displa
y
ed...
)
.
The vehicle is too
f
ar
f
rom the transmitter used b
y
the station listened
to or there is no transmitter in the
g
eo
g
raphical area throu
g
h which the
vehicle is travellin
g
.
A
ctivate the RD
S
f
unction to enable the s
y
stem
to check whether there is a more power
f
ul
transmitter in the
g
eo
g
raphical area.
The environment
(
hills, buildin
g
s, tunnels, basement car parks...
)
block
r
eception, includin
g
in RD
S
mode.
Thi
s p
h
enomenon
i
s norma
l
an
d
d
oes not
i
n
di
cate
a
f
ailure o
f
the audio equipment.
The aerial is absent or has been dama
g
ed
(
for example when
g
oin
g
throu
g
h a car wash or into an under
g
round car park
)
.
Have the aerial checked b
y
a CITROËN dealer.
S
ound cut-outs o
f
1 to
2
seco
n
ds
in r
ad
i
o
m
ode
.
Durin
g
this brie
f
sound cut-out, the RD
S
searches
f
or an
y
f
requenc
y
permittin
g
better reception o
f
the station.
Deactivate the RD
S
f
unction i
f
the phenomenon is
too
f
requent and alwa
y
s on the same route.
Th
e
tr
a
ffi
c
a
nn
ou
n
ce
m
e
nt
(
TA
)
is displa
y
ed. I do
n
ot receive an
y
traffi c
in
fo
rm
a
ti
o
n.
Th
e
r
ad
i
o
s
t
a
ti
o
n
does
n
o
t
b
r
oadcas
t tr
a
ffi
c
inf
o
rm
a
ti
o
n. T
u
n
e
t
o
a
r
ad
i
o
s
t
a
ti
o
n whi
c
h
b
r
oadcas
t
s
tr
a
ffi
c
inf
o
rm
a
ti
o
n.
Th
e
s
t
o
r
ed
s
t
a
ti
o
n
s
a
r
e
n
ot
f
ound
(
no sound,
8
7.5 MHz is displa
y
ed...
)
.
An in
co
rr
ec
t w
a
v
eba
n
d
i
s
se
l
ec
t
ed
. Pr
ess
th
e
BAND
bu
tt
o
n t
o
r
e
t
u
rn t
o
th
e
w
a
v
eba
n
d
o
n whi
c
h th
e
s
t
a
ti
o
n
s
a
r
e
s
t
o
r
ed
.

FREQUENTLY ASKED QUESTIONS
Q
UESTIO
N
A
NSWER SOLUTIO
N
The
C
D is e
j
ected
automaticall
y
or is not
p
la
y
ed b
y
the pla
y
er.
The
C
D is inserted upside down, is unpla
y
able, does not contain an
y
a
udio data or contains an audio
f
ormat which the pla
y
er cannot pla
y
.
The CD is protected b
y
an anti-piratin
g
protection s
y
stem which is not
r
eco
g
nised b
y
the audio equipment.
-
C
heck that the
C
D is inserted in the pla
y
er the
ri
g
ht wa
y
up.
-
C
heck the condition of the
C
D: the
C
D cannot
be pla
y
ed if it is too dama
g
ed.
-
C
heck the content in the case of a recorded
C
D: consult the advice in the "Audio" section.
- The audio equipment's
C
D pla
y
er does not
play DVDs.
- Due to their qualit
y
level, certain writeable
C
Ds will not be pla
y
ed b
y
the audio s
y
stem.
The CD pla
y
er sound is
poor
.
The CD used is scratched or of poor qualit
y
. Insert
g
ood qualit
y
CDs and store them in suitable
co
n
di
t
io
n
s
.
The audio settin
g
s
(
bass, treble, ambience
)
are unsuitable.
S
et the treble or bass level to 0, without selectin
g
a
n
a
m
b
i
e
n
ce
.
I
a
m
u
n
ab
l
e
t
o
co
nn
ec
t
my
Bl
uetoot
h
te
l
ep
h
one.
It is possible that Bluetooth is switched off on the telephone or that the
te
l
ep
h
one
h
as not
b
een ma
d
e not v
i
s
ibl
e.
- Check that
y
our telephone has Bluetooth
s
w
i
t
ched
o
n.
-
C
heck in the telephone's settin
g
s that it is
"Visible
t
o
all"
.
The Bluetooth telephone is not compatible with the s
y
stem. You can check the compatibilit
y
o
f
y
our telephone
on www.citroen.co.uk
(
services
)
The
Blue
t
oo
t
h
co
nn
ec
t
io
n
is
cu
t.
The batter
y
of the peripheral ma
y
not be suffi cientl
y
char
g
ed. Rechar
g
e the batter
y
of the peripheral device.

343
FREQUENTLY ASKED QUESTIONS
Q
UESTIO
N
A
NSWER SOLUTIO
N
The messa
g
e "U
S
B
device error" is displa
y
ed
o
n th
e
sc
r
ee
n.
The U
S
B memor
y
stick is not reco
g
nised.
The memor
y
stick ma
y
be corrupt.
Re
f
ormat the memor
y
stick
(
FAT 32
)
.
A
te
l
ep
h
one connects
automat
i
ca
lly
,
disconnecting another
telephone.
Au
t
o
m
a
t
ic
co
nn
ec
t
io
n
o
v
e
rr
ides
m
a
n
ual
co
nn
ec
t
io
n. Modi
fy
the telephone settin
g
s to remove automatic
co
nn
ec
t
io
n.
The A
pp
le
®
player is
®
n
ot reco
g
nised when
c
onnectin
g
to the USB
p
ort.
The A
pp
le
®
pla
y
er is of a
g
eneration that is not compatible with the USB. Connect the A
pp
le
®
pla
y
er to the AUX Jack socket
u
sin
g
a suitable cable
(
not supplied
)
.
When I connect my
A
pple
®
player or my
®
BlackBerr
y
®
to the
®
USB
p
ort, I have alert
m
essa
g
es on the current
c
onsumption b
y
the USB
p
ort.
When charging, the current consumption o
f
these smartphones is greate
r
than the ratin
g
o
f
the U
S
B port, which is 500mA.
The
ha
r
d
disk
o
r
de
v
ice
is not recognised when
c
onnectin
g
to the U
S
B
p
ort.
S
ome hard disks and devices need a power suppl
y
g
reater than is
provided by the audio system.
C
onnect the device to the 230 V socket, the 12 V
s
ocket or an external power supply.
Caution :
e
n
su
r
e
th
a
t th
e
de
vi
ce
does
n
o
t tr
a
n
s
mit
a volta
g
e
g
reater than 5 V
(
risk of destruction of
the s
y
stem
)
.
When streamin
g
, the
s
oun
d
cuts momentar
ily
.
Some telephones prioritise connection of the "hands-free" profi le. Delete the "hands-free" connection profi le to
i
mprove stream
i
n
g
.

FREQUENTLY ASKED QUESTIONS
Q
UESTIO
N
A
NSWER SOLUTIO
N
In "Random all" pla
y
,
no
t
a
ll
of
th
e
tr
ac
k
s
a
r
e
p
la
y
ed.
In "Random all" pla
y
, the s
y
stem can onl
y
take into account up to
999
tr
ac
k
s
.
With the en
g
ine o
ff
, the
audio system switches
off
af
t
e
r
a
fe
w min
u
t
es
of
use
.
When the en
g
ine is switched o
ff
, the audio s
y
stem operatin
g
time
depends on the battery charge.
The switch-o
ff
is normal: the audio s
y
stem switches to econom
y
mode
a
nd switches off to prevent dischar
g
in
g
the vehicle's batter
y
.
S
tart the vehicle's en
g
ine to increase the batter
y
c
harge.
Th
e messa
g
e
"
t
h
e au
di
o
sy
stem
i
s over
h
eate
d"
appears on t
h
e
di
sp
l
a
y
.
In order to protect the installation if the surroundin
g
temperature is too
high
, t
h
e au
di
o s
y
stem sw
i
tc
h
es to an automat
i
c t
h
erma
l
protect
i
on mo
d
e
l
eadin
g
to a reduction o
f
the volume or stoppin
g
o
f
the pla
y
in
g
o
f
the
C
D.
Switch the audio s
y
stem off for a few minutes to
a
ll
ow t
h
e s
y
stem to coo
l
.
345

Index
Alphabetical index - Visual search
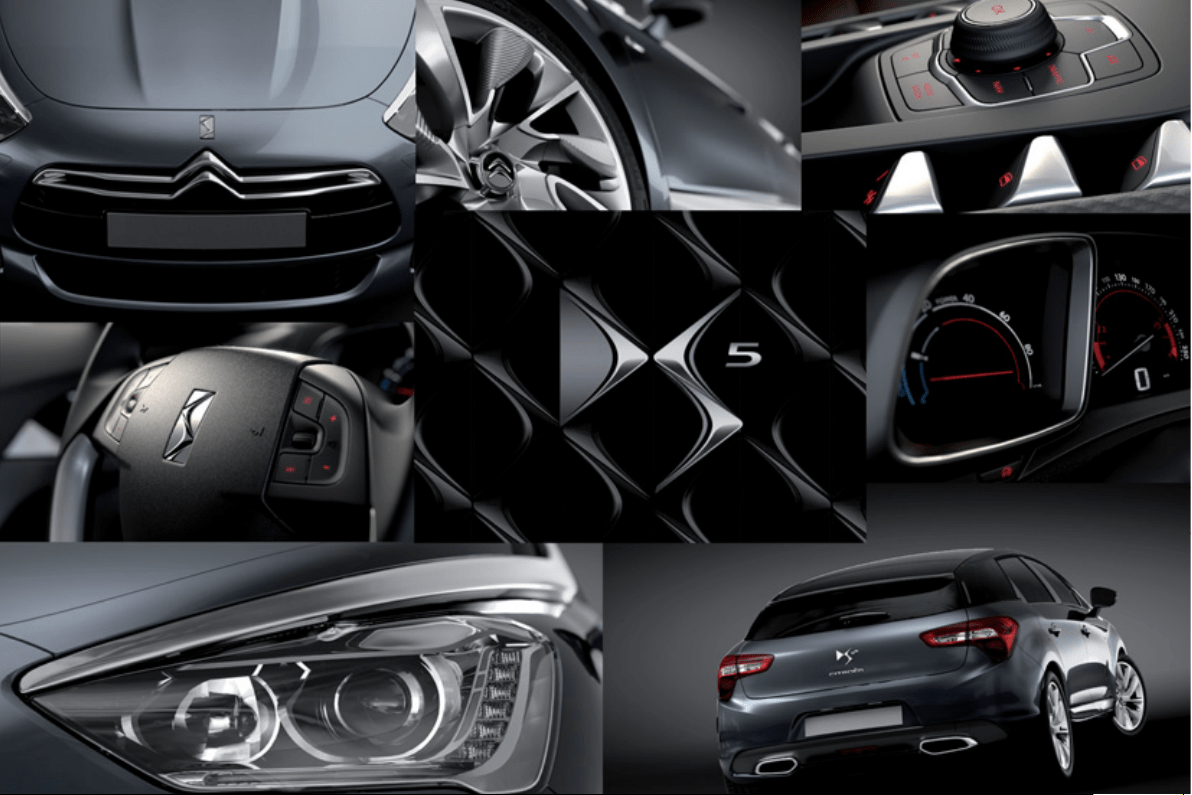

A
A
B
S
...............................................................
1
8
7
Accesso
ri
es
.......................................
3
3
,
8
3
,
2
3
4
A
ccessor
y
position
.....................................
3
3
,
8
3
A
ccessor
y
socket, 12
V
...........................
1
1
0
,
11
1
A
d
j
ustin
g
headlamps
.....................................
16
0
A
d
j
ustin
g
head restraints
.......................
10
0
,
10
3
A
d
j
ustin
g
seat belt hei
g
h
t
..............................
19
1
A
d
j
ustin
g
the steerin
g
wheel..........................
10
9
A
irba
g
s ....................................................
6
7
, 19
5
A
irbags, curtai
n
.
..................................... 1
9
5
, 1
9
6
A
irba
g
s,
f
ron
t
.........................................
1
9
3
, 1
9
6
Ai
r
b
a
g
s,
l
atera
l
.......................................
1
9
5
,
1
9
6
Ai
r con
di
t
i
on
i
n
g
........................................
4
7
,
12
0
Ai
r con
di
t
i
on
i
n
g
,
digi
ta
l
............................
11
7
,
11
8
Air fi lter
..........................................................
r
24
6
A
ir fl
ow
.............................................................
4
7
A
ir v
e
nt
s
.........................................................
1
1
6
A
l
a
rm
...............................................................
8
9
A
nti-lock brakin
g
s
y
stem
(
ABS
)
.....................
18
7
A
nti-pinc
h
.
........................................................
9
3
A
nti-th
eft
..........................................................
3
3
A
rmr
est
.......................................................... 1
1
0
A
rmrest,
f
ron
t
................................................. 1
1
2
Armrest, rear
..................................................
r
11
3
A
s
h
tra
y
, porta
ble
............................................
11
0
ASR
...............................................................
1
8
7
A
ss
i
stance, emer
g
enc
y
b
ra
ki
n
g
.....................
1
8
7
Assis
t
a
n
ce
call
.......................................
1
8
5
,
2
5
9
A
udible warnin
g
.............................................
1
8
5
A
udio streamin
g
(
Bluetooth
)
..........
30
1
,
32
8
,
33
0
A
udio s
y
stem
.................................................
31
5
A
utomatic headlamps
..............................
6
0
,
15
7
A
utomatic illumination of headlamps .....
15
3
,
1
5
6
A
utomat
i
c operat
i
on
of hazard warnin
g
lamps
.............................
1
8
4
A
u
t
o
m
a
ti
c
r
a
in
se
n
s
itiv
e
w
indscreen wipers
...............................
16
3
,
16
5
Auxiliar
y
socke
t
......................
112
,
301
,
302
,
32
7
Backup startin
g
.......................................
.
3
4
,
2
2
6
Backup switching off
........................................
f
3
4
B
atter
y
...............
8
,
2
8
,
5
0
-
5
2
,
1
0
7
,
22
5
-
22
7
,
24
5
B
atter
y
, c
h
ar
gi
n
g
............................................
22
6
Batter
y
, remote contro
l
..............................
8
5
,
8
6
Black pane
l
......................................................
7
3
Bluetooth
(
hands-free
)
...........................
28
4
,
32
9
Bluetooth
(
telephone
)
...........................
.
28
4
,
329
B
oot
................................................................
.
8
8
Boot
(
opening
)
................................................
.
8
0
Boot
fl
oor, ad
j
ustabl
e
.....................................
11
4
B
r
ake
discs
....................................................
24
7
B
ra
k
e
l
amps
...................................................
21
9
Brake pads
....................................................
24
7
Br
a
k
es
.....................................................
6
2
,
24
7
C
han
g
in
g
a bul
b
.....................................
21
4
-
22
1
C
han
g
in
g
a fus
e
.....................................
22
2
-
224
C
han
g
in
g
a wheel
...................................
20
6
-21
2
C
han
g
in
g
a wiper blad
e
.........................
16
6
,
22
9
C
han
g
in
g
the dat
e
.....................................
7
4
,
7
5
C
han
g
in
g
the remote control batter
y
..............
.
8
5
C
hanging the tim
e
.............................
7
4
,
7
5
,
30
5
C
heckin
g
level
s
......................................
24
2
-
24
5
C
heckin
g
the en
g
ine oil leve
l
...........................
7
1
C
heckin
g
t
y
re pressures
(
usin
g
the kit
)
.........
2
0
0
C
hecks
............................................
24
0
,
24
5
-
24
7
C
hildre
n
..................................
172-181, 192, 194
C
hild loc
k
.......................................................
18
1
C
hild seats ............................................
.
17
2
-
180
C
hild seats, conventiona
l
.
......................
17
5
,
17
6
Cigar lighter
....................................................
r
1
1
1
C
l
ock
................................................................
7
4
C
losin
g
the boo
t
...............................................
8
8
C
losin
g
the door
s
.......................................
8
0
,
8
2
C
onnectors
,
audio
.................
11
2
,
301
,
302
,
32
7
C
oolant leve
l
............................................
6
8
,
24
3
Coolant temperature indicator
.........................
r
6
8
C
ourtes
y
lamps
.
.............................................
16
7
C
ruise contro
l
........................................
1
4
2
,
1
4
5
Cup holder
.....................................................
r
1
1
0
B
C
ables, hi
g
h volta
ge
........................................
5
2
C
apacit
y
,
f
uel tank
...........................................
9
5
C
D
.........................................................
298
,
32
2
C
D MP
3
.........................................
298
,
32
3
,
32
4
C
entral lockin
g
...........................................
8
0
,
8
2
C
Date
(
settin
g)
.....................................
7
4
,
7
5
, 30
5
Da
y
time runnin
g
lamps
..................
21
4
,
2
1
7
,
2
1
8
Deactivating E
S
P........................................... 1
8
9
D
eact
i
vat
i
n
g
t
h
e passen
g
er a
i
r
b
a
g
................
1
9
4
Deadlockin
g
...............................................
8
3
,
8
4
D

3
4
9
Alphabetical index
De
f
rostin
g
..............................................
1
0
8
,
12
2
Demistin
g
.......................................................
12
2
Di
esel
...................................................
4
2
,
4
6
,
6
1
Di
ese
l
add
itiv
e
l
e
v
el
.......................................
2
44
Dim
e
n
s
i
o
n
s
....................................................
2
5
3
Dipped beam ..........................
.
6
0
,
15
2
,
21
4
,
21
5
Di
p
stick ....................................................
7
1
, 24
2
Di
rect
i
ona
l
ligh
t
i
n
g
.................................
1
6
1
, 1
6
2
Di
r
ec
t
io
n
i
n
dica
t
o
r
s
........
1
5
8
,
1
8
4
,
21
4
,
21
7
,
21
9
Drivin
g
positions
(
memorisin
g)
......................
1
0
2
D
y
namic emer
g
enc
y
brakin
g
..................
12
6
-
1
3
1
D
y
namic stabilit
y
control
(
DSC
)
.......................................
6
3
,
6
6
,
18
7
,
18
9
E
BA
(
Emer
g
enc
y
brakin
g
assistance
)
...........
1
8
7
E
BF
D
.............................................................
1
8
7
E
co-drivin
g
......................................................
4
7
E
conomical drivin
g
.........................................
4
7
E
conom
y
mod
e
..............................................
2
2
8
Eco off
.............................................................
f
4
6
E
lectronic brake force distribution
(
EBFD
)
....
18
7
Electronic engine immobiliser
....................
r
3
3
,
8
6
E
lectronic
g
earbo
x
.........................
13
5,
22
7
,
2
4
7
E
mer
g
enc
y
boot releas
e
..................................
8
8
E
mer
g
enc
y
cal
l
......................................
18
5
,
25
9
E
mer
g
enc
y
warnin
g
lamps
....................
11
5
,
18
4
e
M
y
Wa
y
...................................................
7
3
,
26
1
E
ner
gy
econom
y
mod
e
..................................
22
8
E
n
g
ine, Diesel ........................
.
9
7
,
24
0
,
2
4
1
,
2
5
1
E
n
g
ine compartmen
t
...............................
5
3
,
2
4
0
F
illin
g
with
f
ue
l
............................................
9
5
-
9
7
F
ittin
g
a whee
l
...............................................
211
F
ittin
g
roof bars
..............................................
2
3
3
F
ittin
g
s, boo
t
..................................................
11
4
F
lashin
g
indicators................................
.
15
8
,
18
4
Flat bed lorry or trailer
............................
.
r
5
5
,2
3
1
F
oglamps,
f
ron
t
.
..................... 1
5
4, 16
2
,
21
4, 2
1
8
Foglamps, rear
..............................
r
1
5
4
,
219, 22
0
F
oldin
g/
un
f
oldin
g
the door mirrors
.................
1
0
8
F
r
o
nt
sea
t
s
..............................................
1
0
0
-
1
0
2
Fuel
............................................................
4
7
,
9
7
F
uel consumptio
n
......................................
4
7
,
4
9
F
uel consumption fi
g
ures
................................
4
9
F
uel fi ller cap ...................................................
9
5
F
uel
fi
ller
fl
a
p
............................................
.
9
5
,
9
6
F
uel gaug
e
.
.........................................
.
2
1, 57,
9
5
Fuel
t
a
n
k
....................................................
9
5
,
9
6
F
use
b
ox,
d
as
hb
oar
d
......................................
2
2
3
Fuses
.............................................................
22
2
E
F
G
G.P.S. ...........................................................
.
26
7
G
earbox, electroni
c
............................... 1
3
5
,
24
7
G
ear lever, electronic gearbox system .........
.
1
3
5
Gu
i
da
n
ce
.......................................................
2
6
7
Gu
i
de
-m
e
-h
o
m
e
.....................................
1
5
6
,
15
8
En
g
ine compartment
f
usebo
x
........................
2
2
4
Engine oil level indicator
..........................
r
7
1
,
24
2
En
g
ines
..................................................
25
0
,
2
5
1
Envir
o
nm
e
n
t
..................
9
,
4
7
,
8
5
,
11
7,
122
,
2
45
H
alo
g
en headlamps
.
.....................................
.
21
4
Ha
n
ds
-
f
r
ee
ki
t
........................................ 2
8
4
,
32
9
H
azar
d
warn
i
n
g
l
amps
...........................
11
5
,
1
8
4
H
ea
d
-up
di
sp
l
a
y
.............................
14
0
,
14
3
,
14
5
H
ea
dl
amp a
dj
ustmen
t
....................................
1
6
0
H
eadlamps, directiona
l
..........................
1
6
1
,
21
4
H
eadlamp was
h
.....................................
1
6
4
,
24
4
H
ead restraints, fron
t
.............................
10
0
,
10
3
Head restraints, rear
.....................................
.
r
10
7
Hea
t
ed
sea
t
s
................................................
.
1
0
4
H
eatin
g
.................................................... 4
7
, 116
H
e
igh
t an
d
reac
h
a
dj
ustment,
s
teer
i
n
g
w
h
ee
l
.............................................
1
0
9
High
vo
l
ta
ge
...............................
5
0
,
5
2
,
22
7
,
23
9
H
ill
s
t
a
rt
ass
i
st
...............................................
1
3
4
H
istor
y
.............................................................
4
9
Hy
bri
d
.....................................................
8
,
26
-54
Hy
brid fl o
w
......................................................
.
4
0
Hy
brid selector
.
...............................................
.
3
5
H
ybrid system........................................
.
8
, 26-54
H

J
ac
k
...............................................................
2
0
6
J
A
C
K socke
t
..........................
1
1
2
, 301, 302,
32
7
J
Mat
..................................................................
11
1
M
enu, ma
in
....................................................
31
8
Mi
rror, rear v
i
e
w
.............................................
1
0
9
Mirrors, door
..................................................
r
1
0
8
M
isfuel preventio
n
...........................................
9
6
M
otorwa
y
function
(
direction indicators
)
....................................
18
4
M
ountin
g
s
f
or I
SO
FIX seats ..........................
17
8
M
P
3
CD
.........................................
2
96,
3
2
3
,
32
4
M
us
i
c me
di
a p
l
a
y
ers
......................................
2
9
7
Navi
g
atio
n
......................................................
2
6
7
Number plate lamps
......................................
2
2
1
N
Labels, identifi catio
n
.....................................
.
25
4
Lamps, warnin
g
and indicator
.
....................
5
9
-6
7
Lane Departure Warning
S
ystem
(
LDW
S)
...
.
1
3
9
LED
d
a
y
t
i
me runn
i
n
g
l
amps
..........................
1
5
5
Level, brake
fl
ui
d
...........................................
24
3
L
eve
l
,
h
ea
dl
amp was
h
...................................
24
4
Level, power steerin
g
fl ui
d
.............................
24
3
L
e
v
e
l
s
a
n
d
c
h
ec
k
s
..................................
24
0
-24
6
Li
g
htin
g
..........................................................
16
8
Li
g
htin
g
,
g
uide-me hom
e
......................
.
1
5
6
,
15
8
Lighting, interior
....................................
.
r
16
7
,
16
8
Lighting bulbs
(
replacement
)
..................2
1
4
-
2
2
1
Ligh
t
i
n
g
contro
l
sta
lk
..............................
1
5
2
,
1
5
8
Lighting dimmer
...............................................
r
7
2
Lighting on reminder
......................................
r
1
5
5
Loadin
g
....................................................
4
7
,
2
3
3
L
oad
r
educ
ti
o
n m
ode
.....................................
2
2
8
L
oca
li
sed
ass
i
s
t
a
n
ce
ca
l
l
...............................
25
9
Localised emer
g
enc
y
call .............................
.
25
9
Locatin
g
y
our vehicl
e
......................................
.
8
7
Locking
f
rom the insid
e
.
..................................
.
8
7
L
oc
ki
n
g
t
h
e
d
oors
............................................
8
7
L
on
g
o
bj
ects, transport
i
n
g
.............................
11
3
L
o
w
fue
l l
e
v
el
...................................................
9
6
Lumbar
..................................................
r
100
,
10
1
L
Identi
fi
cation plates
........................................
2
5
4
I
g
nitio
n
.......................................................
3
3
,
8
3
I
g
nition o
n
..................................................
3
3
,
8
3
Indicator lamps, status
................................
59
-
67
Indicators, directio
n
......................
.
18
4
,
21
7,
219
In
fl
atin
g
accessories
(
usin
g
the kit
)
...............
2
0
5
In
fl
ating tyres ........................................... 4
7
, 25
4
Inputs
f
or audio s
y
stem
.........
112, 301, 302,
32
7
I
nstrument pane
l
ligh
t
i
n
g
.................................
7
2
I
nstrument pane
l
s
............................................
5
8
In
s
tr
u
m
e
nt
s
a
n
d
co
ntr
o
l
s
.................................
1
6
Intelli
g
ent Traction Contro
l
.............................
1
8
8
Interior fi ttin
g
s
................................................
11
0
Interior mood li
g
htin
g
.....................................
16
8
I
SO
FIX child seats .................................
.
17
8
-
18
0
I
SO
FIX mountings ......................................... 1
7
8
I
K
eepin
g
children saf
e
.............
1
7
2
-
181
,
192
,
194
K
e
y
............................................................
.
8
0
-
8
6
K
e
y
, electronic .....................................
.
3
4,
8
0
-
8
4
K
eyless Entry and
S
tartin
g
........................
8
1
,
8
6
K
e
y
not reco
g
n
i
se
d
..........................................
3
4
K
e
y
w
i
t
h
remote contro
l
...................................
3
3
K
Mai
n
bea
m
........................
6
0
,
1
5
2
,
21
4
-
21
6
,
21
8
Ma
int
e
n
a
n
ce
....................................................
4
7
M
arkin
g
s, identifi catio
n
..................................
25
4
M
assa
g
e function ........................................
.
10
4
M
Oil fi lter
..........................................................
r
24
6
O
il leve
l
....................................................
7
1
,
24
2
Openin
g
the boo
t
.................................
8
0
,
8
1
,
8
8
O
penin
g
the doors
.....................................
8
0
,
8
1
O
peration indicator lamps
...........................
59
-
67
O
P
a
int
co
l
ou
r
code
...........................................
2
54
Parkin
g
brake,
e
l
ec
tri
c
..............................
6
1, 65, 12
6
-133, 24
7
P

3
5
1
Alphabetical index
P
ar
ki
n
g
l
amps
................................................
1
5
8
Parkin
g
sensors, fron
t
....................................
14
8
Parking sensors, rear
....................................
r
14
7
P
a
rti
c
l
e
e
mi
ss
i
o
n fi lt
e
r
............................
2
4
4
,
2
4
6
Passen
g
er compartment fi lter
.
.......................
2
4
6
Pla
y
er,
C
D MP3.............................
298
,
32
3
,
32
4
Port, U
S
B....................................... 1
1
2
, 298,
32
5
Power
..............................................................
r
3
8
Primin
g
the
f
uel s
y
stem
.................................
24
1
P
rotect
i
n
g
c
hild
re
n
..................
172-181, 192, 194
P
u
n
c
t
u
r
e
........................................................
2
0
0
R
Rad
i
o
..................................................... 2
9
4
,
31
9
R
ead
y
lam
p
.....................................................
3
5
R
ear
f
o
g
lam
p
.........................................
154, 220
R
ear screen
(
demistin
g)
........................
10
8
,
12
2
R
ec
h
ar
gi
n
g
t
h
e
b
atter
y
..................................
2
2
6
Reduc
ti
o
n
o
f
e
l
ec
tri
ca
l l
oad
...........................
22
8
R
e
g
eneration o
f
the particle
emissions fi lter
.............................................
r
2
4
6
R
einitialisin
g
the remote control
......................
8
5
Re
m
o
t
e
co
ntr
ol
..........................................
.
8
0
-8
6
R
emovin
g
a wheel
.........................................
2
0
9
R
emovin
g
the ma
t
..........................................1
1
1
R
epair kit, punctur
e
.......................................
2
0
0
R
ep
l
ac
i
n
g
b
u
lb
s
......................................
21
4
-
22
1
R
eplacin
g
fuses
......................................
22
2
-
22
4
Replacing the air fi lter
....................................
r
24
6
Replacing the oil fi lter
....................................
r
2
4
6
T
Replacin
g
the passen
g
e
r
compartment fi lter
........................................
r
24
6
Replacin
g
wiper blades
.........................
16
6
,
22
9
Reset histor
y
.................................................... 4
9
Resetting the service indicator
........................
r
7
0
Resetting the trip recorder
...............................
r
7
2
R
evers
i
n
g
camer
a
.........................................
14
9
R
evers
i
n
g
l
am
p
..............................................
21
9
Risk areas
(
update
)
.......................................
27
2
R
oo
f
ba
r
s
.......................................................
2
3
3
R
ou
tin
e
c
h
ec
k
s
.......................................
2
42-24
7
Runnin
g
out of fuel
(
Diesel
)
...........................
2
4
1
Table o
f
wei
g
hts
.............................................
25
2
Tables of en
g
ines
...................................
2
5
0
,
25
1
T
ab
l
es
o
f f
uses
...............................................
22
2
Tank, fuel
.........................................................
9
6
T
ec
hni
ca
l
da
t
a
.
.......................................
.
25
0
-
2
5
2
Tele
p
hon
e
.............................................. 2
8
4
,
32
9
T
em
p
erature, coo
l
an
t
......................................
.
6
8
S
idelamps
..............
1
5
2
,
1
5
5
,
1
5
8
,
21
4
, 217,
21
9
Side repeater
.................................................
r
21
8
S
ki fl a
p
...........................................................
1
1
3
S
now chai
n
....................................................
25
4
S
now chains .................................................
.
21
3
S
pare whee
l
..................................................
.
20
6
Sp
eed limiter
.
......................................... 14
2
,
1
4
3
Speedometer
.............................................
r
3
8
,
5
8
S
potlamps, sid
e
.....................................
1
5
9
,
21
8
S
tartin
g
the vehicl
e
............................
3
1
,
3
4
,
1
3
5
S
teerin
g
mounted controls,
aud
i
o
....................................................
2
6
4
,
31
7
S
toppin
g
the vehicl
e
..........................
3
1
,
3
4
,
13
5
S
top & Star
t
............................
9
5
,
11
9
,
12
2
,
22
5
,
23
9
,
2
4
1
-
2
4
3
,
24
5
S
torag
e
............................................1
1
0
, 1
1
2
-
1
1
4
S
torin
g
drivin
g
positions
................................
1
0
2
S
witchin
g
o
ff
the en
g
in
e
............................
3
1
,
3
4
Sy
nchronisin
g
the remote
co
ntr
o
l
............................................................
8
5
Sy
nthesiser, voic
e
..........................................
27
8
Sy
stem, navi
g
atio
n
........................................
2
6
7
S
S
creen, colour and mappin
g
..........................
2
6
5
S
creen, instrument
p
ane
l
..........................
.
57,
7
6
S
creen, monochrom
e
...........................
.
31
8
,
33
8
S
creen, multi
f
unction
(
with audio equipment
)
................................
31
8
S
creen menu ma
p
.........................
30
6
,
33
8
,
33
9
S
creenwash, fron
t
..........................................
16
4
S
creenwash fl uid level
...................................
24
4
S
eat
,
rear benc
h
....................................
1
0
5
,
1
0
7
S
eat ad
j
ustmen
t
.....................................
1
0
0
,
1
0
1
S
eat belts
................................................
1
9
0
-
1
9
2
Seats, rear
..............................................
r
1
0
5
-
1
0
7
S
erial number, vehicl
e
...................................
2
5
4
Service indicator
..............................................
r
6
9
S
ervicin
g
.......................................................... 4
7
S
ettin
g
the clock .......................................
.
7
4
,
7
5
S
hort-cut menus ............................................
26
6

V
e
hi
c
l
e
i
de
ntifi
ca
ti
on
......................................
2
5
4
V
e
ntil
a
ti
on
...............................................
11
6
,
11
7
Visibilit
y
.........................................................
.
12
2
V
T
emperature contro
l
f
o
r h
ea
t
ed
sea
t
s
...........................................
1
0
4
Temporar
y
t
y
re repair ki
t
................................
2
0
0
Third brake lamp
............................................
22
1
Tim
e
........................................................... 74,
7
5
TM
C
(
Tra
ffi
c in
f
o
)
...........................................
28
1
T
oo
l
s
.............................................................. 2
0
6
Total distance recorder
....................................
r
7
2
Towbar
...........................................................
r
2
3
1
To
w
ed
loads
...................................................
2
5
2
Towin
g
another vehicl
e
.....................
5
5
,
22
9
-
2
3
1
Traction control
(
ASR
)
.......................
6
3
,
6
6
,
1
8
7
Traffi c information
(
TA
)
..........................
28
2
,
32
0
Traffi c information
(
TMC
)
.......................
28
1
,
28
2
Trailer
............................................................
r
23
1
Trip computer
............................................
r
7
6
,
7
7
Trip distance recorder
......................................
r
7
2
Ty
re pressures
.......................................
2
0
1
,
2
5
4
Ty
res
........................................................
4
7
, 25
4
T
y
re under-infl ation
de
t
ec
ti
on
......................................................
1
8
6
W
arn
i
n
g
l
amps
............................................
59
-
67
W
arn
i
n
g
tr
i
an
gle
............................................
11
5
Wash-wipe, rear
............................................
r
1
6
4
Washin
g
(
advice
)
.............................................
5
4
Wei
g
hts
..........................................................
25
2
Welcome li
g
htin
g
..........................................
.
15
9
Win
do
w
co
ntr
o
l
s
.............................................
.
9
1
Wiper, rear
....................................................
.
r
164
Wip
er contro
l
sta
lk
..................................
1
6
3
-
1
6
5
Wi
pers
.............................................
6
2
,
1
6
3
,
1
6
5
W
U
nder-in
fl
ation
(
detection
)
............................. 1
8
6
U
nlockin
g
...................................................
8
0
,
8
1
U
nlockin
g
f
rom the insid
e
................................
8
7
U
n
l
oc
ki
n
g
t
h
e
b
oo
t
...........................................
8
0
U
n
l
oc
ki
n
g
t
h
e
d
oor
s
.........................................
8
7
U
pdate risk areas
..........................................
2
7
3
U
pdatin
g
the dat
e
......................................
7
4
,
7
5
U
pdatin
g
the tim
e
......................................
7
4
,
7
5
USB player
...................................
.
r
11
2
,
298
,
324
U
X
enon
h
ea
dl
amps
..........................................
21
4
X
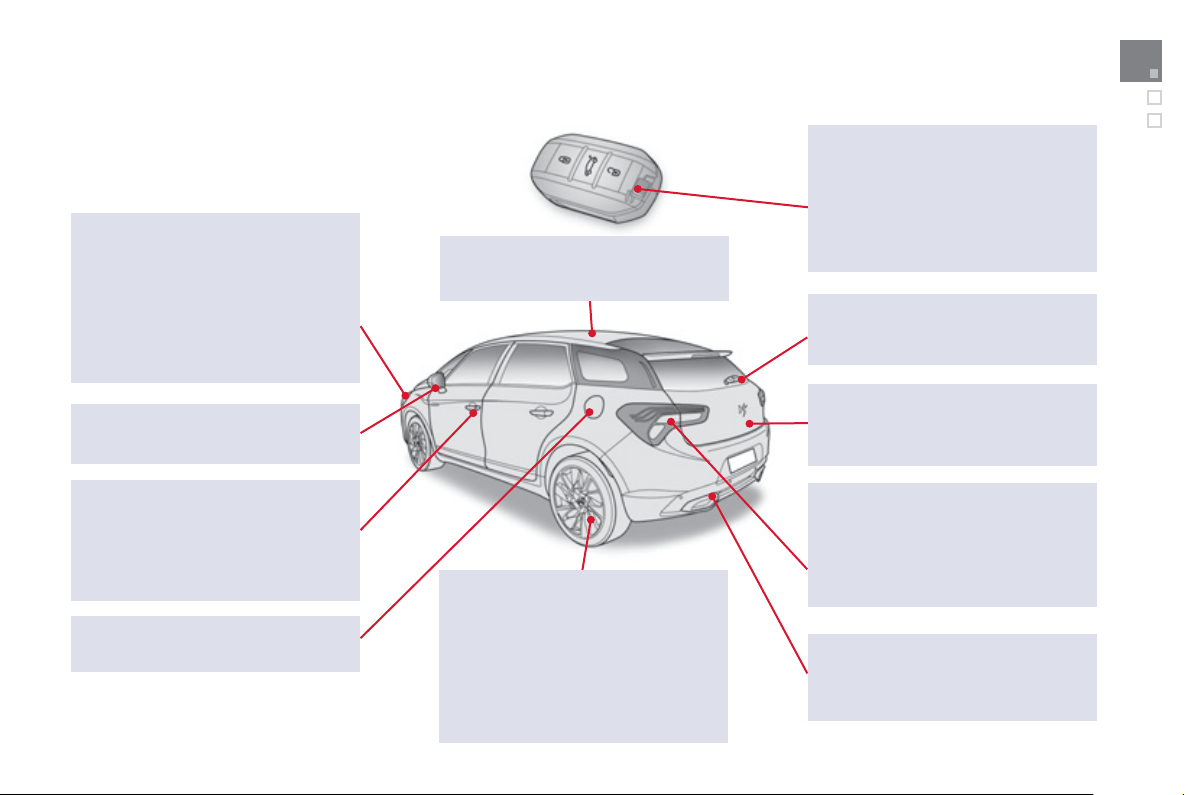
3
5
3
Visual search
Exterior
Electronic key / Keyless Entry and
Starting .............................31-34, 80-86
- openin
g
/
closin
g
- anti-the
f
t
p
rotection
- battery
- startin
g
- accessor
y
position
Welcome lighting ................................ 159
Directional lighting .............................. 161
Cornering lighting ............................... 162
Headlamp height adjustment .............. 160
Changing bulbs............................ 214-218
- front lamps
- fo
g
lamps
- direction indicator repeaters
Wipers .........................................163-166
Changing a wiper blade .............. 166, 229
Doors ......................................... 80-84, 87
- Ke
y
less Entr
y
and Startin
g
- openin
g
/ closin
g
- centra
l
l
oc
ki
n
g
- emer
g
enc
y
proce
d
ure
Alarm ............................................... 89-90
Fuel tank, misfuel
prevention ....................................95-97
Cockpit glass roof ............................93-94
Roof bars ............................................ 233
Accessories ................................. 234-235
ESC: ABS, EBA, ASR, DSC ........ 187-189
Tyre under-infl ation detection ............. 186
Tyre pressures .................................... 254
Changing a wheel ........................ 206-212
- t
ools
- removin
g
/
re
f
ittin
g
Snow chains ....................................... 213
Temporary puncture repair kit ...... 200-205
Boot ................................................ 80, 88
- openin
g
/ closin
g
- emer
g
enc
y
release
Changing bulbs............................219-221
- rear lamps
- 3rd brake lamp
- num
b
er p
l
ate
l
amps
-
f
o
g
lamps
Parking sensors ...........................147-148
Reversing camera .............................. 149
Recovery (fl at bed) ................55, 229-231
Towbar ......................................... 231-232
Door mirrors ........................................ 108
Door mirror spotlamps ........................ 159
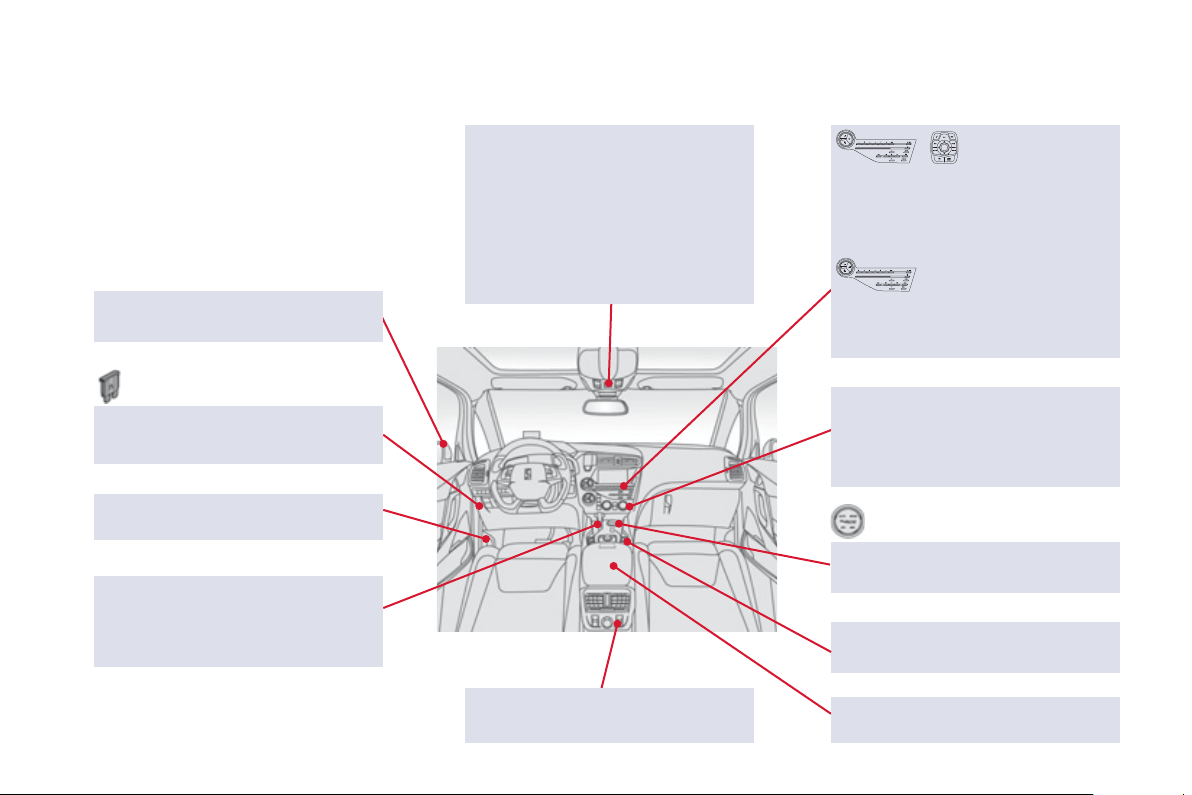
Instruments and controls
Courtesy lamps................................... 167
Seat belt / passenger's front
airbag warning lamps display ... 191, 194
Rear view mirror ................................. 109
Cockpit glass roof ............................ 93-94
Head-up display
controls .....................................140-141
Emergency or assistance
call ........................................... 185, 258
Door mirrors ........................................ 108
Heating, ventilation .......................116-117
Digital air conditioning ................. 118-121
Demisting / defrosting ......................... 122
USB Player / Auxiliary
socket ............................. 112, 302, 327
Dashboard fuses ......................... 222-223
Electronic gearbox
system ...................................... 135-138
Hill start assist .................................... 134
eMyWay .......................................261-314
Setting the date/time............................. 75
Audio system ...............................315-344
Setting the date/time............................. 74
Opening the bonnet ............................ 239
Rear electric windows......................91-92
Accessory socket......................... 110, 111
Electric windows, deactivating .........91-92
Hybrid4 mode selector.....................35-37
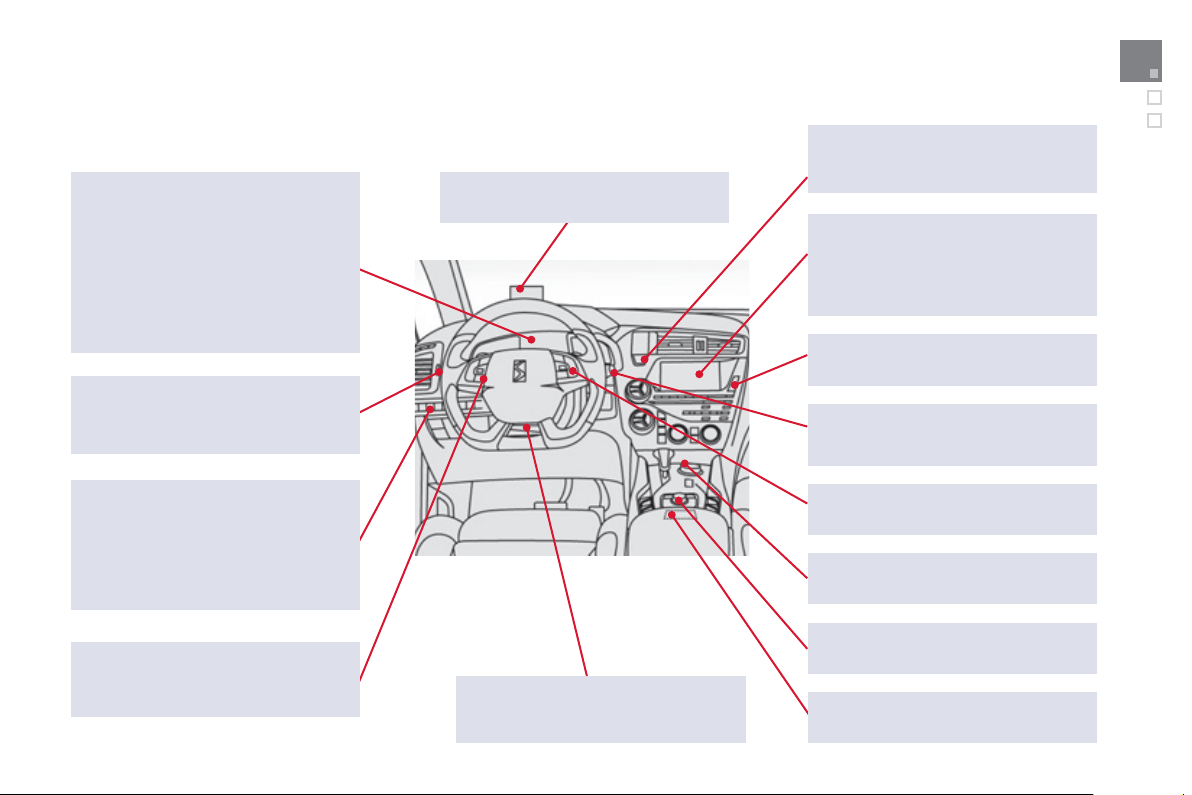
3
55
Visual search
Steering mounted audio
system controls ....................... 264, 317
Head-up display...........................140-141
Memorising speeds ............................ 142
Speed limiter................................ 143-144
Cruise control ..............................145-146
Lighting controls .......................... 152-158
Automatic headlamp dipping .............. 157
Direction indicators ............................. 184
Wiper controls..............................163-166
Trip computer ..................................76-77
Instrument panels, screens ....... 58, 68-73
-
c
h
ec
k
/
se
rvi
ce
in
d
i
ca
t
o
r
/
tr
i
p
di
stance recor
d
e
r
- li
g
htin
g
dimmer
/
black panel
Warning lamps .................................59-67
Ready lamp .......................................... 35
Energy consumption /
generation meter .......................... 38-39
Indicators ......................................... 68-71
Colour screen ......................265, 306-308
Screen C.............................. 318, 338-339
Hybrid power fl ows .......................... 40-41
Hybrid consumption,
eco-driving ....................................47-49
Instruments and controls (continued)
Electric parking
brake ........................................126-133
Starting/stopping..............................31-32
Accessory position.......................... 33, 83
Clock..................................................... 74
Hazard warning lamps ........................ 184
Steering wheel adjustment ................. 109
Horn .................................................... 185
Switch panels, switchess ...................... 14
Opening the fuel fi ller fl ap ..................... 95
Opening the boot .................................. 88
Alarm ............................................... 89-90
Eco OFF ............................................... 46
Headlamp height adjustment .............. 160
Hybrid4 mode selector.....................35-37
eMyWay controls ................................ 263
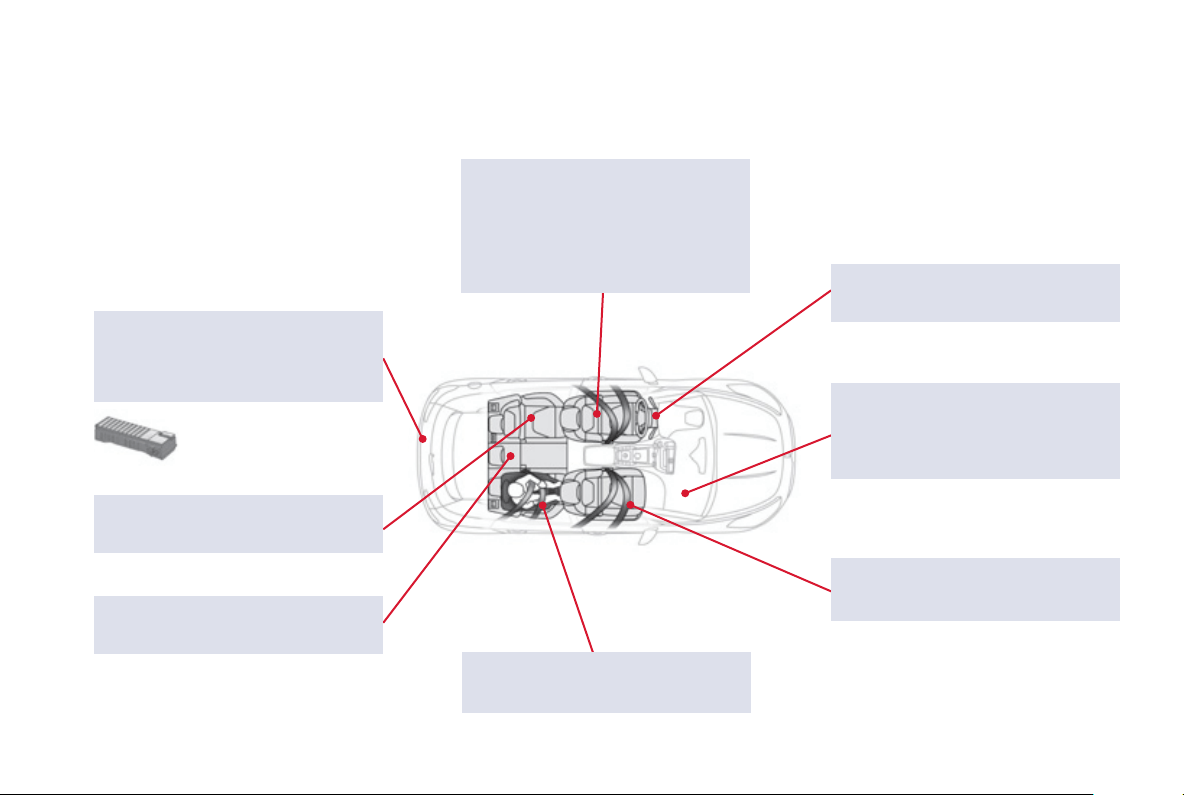
Interior
Boot fi ttings ......................................... 114
Warning triangle
(storage) .......................................... 115
High voltage battery......................... 50-52
Conventional child seats..............172-177
Electric child lock ................................ 181
Front seats...................................100-104
-
head
r
es
tr
ai
nt
s
-
hea
t
ed
- m
a
n
ual
-
elec
tr
ic
-
massage
Rear armrest, ski fl ap ......................... 113
Mats ..................................................... 111
Airbags ........................................ 193-196
Interior fi ttings ..................................... 110
Cigarette lighter / accessory socket.....111
Deactivating the passenger's
front airbag ....................... 173-174, 194
Seat belts.....................................190-192
Rear seats ...................................105-107
ISOFIX child seats ....................... 178-180

3
57
Visual search
Maintenance - Technical data
Dimensions ......................................... 253
Identifi cation markings ........................ 254
High voltage cables .........................52-53
Running out of fuel, Diesel ......... 240, 241
12 V battery .................................225-227
Load reduction, economy mode ......... 228
Engine compartment fuses ......... 222, 224
Opening the bonnet ............................ 239
Diesel weights .................................... 252
Checking levels ........................... 242-245
-
o
il
-
b
r
a
k
e
fl
u
i
d
- power steerin
g
fluid
-
coo
l
a
nt
- screenwash/headlamp wash fluid
Checking components .................245-247
-
12
V batter
y
-
a
ir filt
er
- passen
g
er compartment filter
-
o
il filt
e
r
- particle emissions filter
- brake pads / discs
- electric parkin
g
brake
Under the bonnet, Diesel .................... 240
Diesel engine ...................................... 251
Electric motor...................................... 250
Changing bulbs............................214-221
-
f
r
o
nt
-
rear


4
Dconce
pt
Di
ade
i
s
Edipr
o
0
2-1
3
This handbook describes all of the equipment
available in the whole range.
Your vehicle will be fi tted with some of this
equipment described in this document, depending
on its trim level, version and the specifi cation for the
country in which it is sold.
The descriptions and illustrations are given without
any obligation. Automobiles CITROËN reserves
the right to modify the technical specifi cations,
equipment and accessories without having to update
this edition of the handbook.
This document is an integral part of your vehicle. It
should be passed on to the new user in the event of
sale or transfer.
Automobiles CITROËN declares, by application
of the provisions of the European regulation
(Directive 2000/53) relating to End of Life Vehicles,
that it achieves the objectives set by this regulation
and that recycled materials are used in the
manufacture of the products that it sells.
Reproduction or translation of all or part of this
handbook is prohibited without written authorisation
from Automobiles CITROËN.
Printed in the EU
Anglais
For any work on your vehicle, use a qualifi ed
workshop that has the technical information,
competence and equipment required, which a
CITROËN dealer is able to provide.