Congratulations on the purchase of your Samsung Refrigerator. We hope you will enjoy the many state-of-the-art features and efficiencies that this new appliance has to offer.
This refrigerator must be properly installed and located in accordance with the manual before it is used.
Use this appliance only for its intended purpose as described in this instruction manual.
We strongly recommend that any servicing be performed by a qualified individual.
Please dispose of the packaging material for this product in an environmentally friendly manner
Selecting the best location for the refrigerator
Select a location without direct exposure to sunlight.
Select a location with level (or nearly level) flooring.
Select a location with enough space for the refrigerator doors to open easily.
Allow sufficient space to install the refrigerator on a flat surface.
If your refrigerator is not level, the internal cooling system may not work correctly.
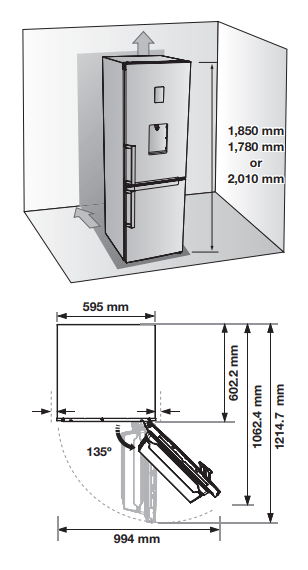
Overall space required in use. Refer to drawing and dimension as below.
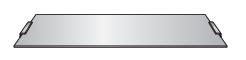
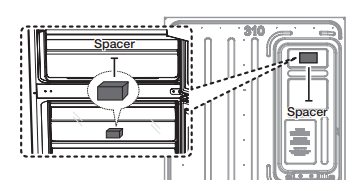
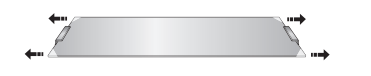
Remove paper on spacer and then attach a spacer (Gray block) on the back side of refrigerator for better performance. Make sure a spacer fix like above image when you install the refrigerator. It is improving the refrigerator performance. (Only for A+++ energy grade models)
Allow sufficient space to the right, left, back and top for air circulation. This will help reduce power consumption and keep your energy bills lower.
Do not install the refrigerator where the temperature will go below 10 °C.
Please ensure that appliance can be moved freely in the event of maintenance & service
FLOORING
For proper installation, this refrigerator must be placed on a level surface of hard material that has the same height as the rest of the flooring. This surface should be strong enough to support a fully loaded refrigerator (or approximately 65 kg). To protect the floor finish, cut a large section of the cardboard carton and place it under the refrigerator where you are working.
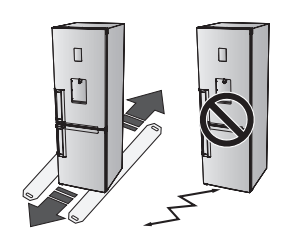
Pulling or pushing the refrigerator may damage the floor. Moving the refrigerator after installation may damage the floor.
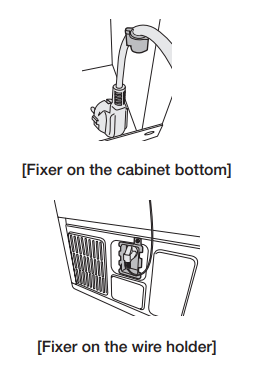
When you move the refrigerator, the Power Cord should be fixed with the fixer of the back side. (Some model’s fixer on the cabinet bottom or wire holder)
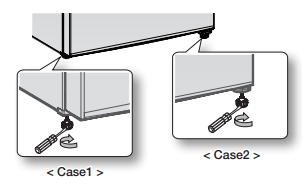
LEVELLING THE REFRIGERATOR
If the front of the appliance is slightly higher than the rear, the door can be opened and closed more easily.
Case 1) The appliance tilts down to the left. Turn the left adjusting leg in the direction of the arrow until the appliance is level.
Case 2) The appliance tilts down to the right. Turn the right adjusting leg in the direction of the arrow until the appliance is level.
SETTING UP THE REFRIGERATOR
Now that you have your new refrigerator installed and in place, you are ready to set up and enjoy the full features and functions of the appliance. By completing the following steps, your refrigerator should be fully operational.
If not, first check the power supply and electricity source or try the troubleshooting section at the back of this user guide.
If you have any further questions, contact your Samsung Electronics service center.
Place the refrigerator in an appropriate location with reasonable clearance between the wall and the refrigerator. Refer to installation instructions in this manual.
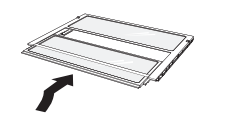
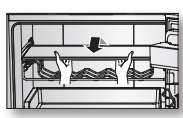
Before using the refrigerator please remove the shelf corner covers shown on below figure. (The covers are used to secure your refrigerator during transportation).
Once the refrigerator is plugged in, make sure the interior light comes on when you open the doors.
Set the temperature control to the coldest temperature and wait for an hour. The freezer should get slightly chilled and the motor should run smoothly.
After powering the refrigerator, it will take a few hours to reach the appropriate temperature. Once the refrigerator temperature is sufficiently cool, you can store food and drink in the refrigerator.
After powering the refrigerator, the alarm will sound. Press Freezer or Fridge button. (Only for Coolselect Zone function model and RB37 series) Refer to on page 19 “Using the control Panel
operating your refrigerator
USING THE CONTROL PANEL
1. Freezer
Press the Freezer button to set the freezer to desired temperature from range between -15 °C and -23 °C. Default set temperature is set on -19 °C and each time you press the Freeze button, temperature will be changed in the following order and temperature indicator will display the desired temperature.
Press this button for 3 seconds to activate the Power Freeze function. Power Freeze indicator ( ) will light up and the refrigerator will speed up the time to needed to freeze products in the freezer.
This function will be activated for 50 hours and freezer indicator will not change display. This function switches off automatically. When the Power Freeze process is completed, the Power freeze indicator switches off and the freezer switches back to the previous temperature setting. When you use this function, the energy consumption will increase.
Remember to turn it off when you do not need it and return the freezer to your original temperature setting. To deactivate this function, press the Freezer button for 3 seconds.
If you need to freeze large amount of food stuff, activate Power Freeze function 20 hours before.
2. Fridge
Press the Fridge button to set the fridge to desired temperature between 1 °C and 7 °C. Default set temperature is set on 3 °C and each time to you press the Fridge button, temperature will be changed in the following order and temperature indicator will display the desired temperature.
Press this button for 3 seconds to activate the Vacation function. Vacation indicator ( ) will light up and the refrigerator will set the temperature to under 17 °C to minimize you are going on a long vacation or business trip or you do not need to use the refrigerator. While Vacation function is activated, freezer compartment remains on. Vacation function will be automatically deactivated if you adjust fridge temperature while Vacation function is on. Make sure to remove foods in the fridge compartment before using Vacation function.
3. Coolselect Zone
Press Coolselect Zone button to activate the Coolselect Zone function. Coolselect Zone indicator ( ) will light up and then you can store meat and fish. Press Coolselect Zone button again, Coolselect Zone indicator ( ) will light off and then you can store vegetable.
Temperature Alarm (Only for Coolselect zone function model, RB37J5**9**, RB37J5**5**, RB31&RB29 series)
When the freezer compartment is too warm because there has been a power failure, the temperature LED are blinking and the alarm sounded. Press Freezer or Fridge button to stop them.
This warning may occur:
When the refrigerator is turned on.
The freezer compartment is too warm due to a power failure.
Some of the feature such as Water tank and Cool Select Zone ( 1 ) can be different and may not be available depending on the model.
The fruits or the vegetables could get frozen in Cool Select Zone and Fresh Zone. (Optional)
To freeze large quantities of food quickly, use the very bottom drawer ( 2 ) where food freezes particularly quickly.
ADDITIONAL SHELF
If the additional shelf is provided in optional, you can remove all drawers except for the bottom drawer ( 2 ) and place the additional shelf just above the bottom drawer.
It does not affect thermal and mechanical characteristics.
A declared storage volume of the freezer compartment is calculated with these parts removed for the additional shelf provided models.
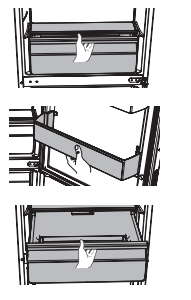
USING THE FOLDABLE SHELF (OPTIONAL)
You can tuck in the foldable shelf if you need to accommodate taller containers or products on the shelf underneath.
Slightly lift up the shelf and slide it inward.
You can simply pull the tucked in shelf to use the fully extended shelf.
provided models.
FEATURES OF THE FREEZER COMPARTMENT
Frozen-food mark on the Door panel
The figures above to the symbols indicate the permitted storage period of the produce in months. When purchasing frozen produce, observe the date of manufacture or sell-by date.
Freezing food
Freeze fresh, undamaged food only. Keep food which is to be frozen away from food which is already frozen. To prevent food from losing its flavour or drying out, place in airtight containers.
Packing food correctly:
Place the food in the packaging.
Press out all the air.
Seal the wrapping.
Label the wrapping with the contents and date.
The following products are not suitable for wrapping food:
Wrapping paper, greaseproof paper, cellophane, refuse bags and used shopping bags.
The following products are suitable for wrapping food:
Plastic film, polyethylene blown film, aluminium foil and freezer tins. These products can be purchased from your dealer.
The following products are suitable for sealing the wrapped food:
Rubber bands, plasic clips, string, cold-resistant adhesive tape or similar. Bags and polyethylene blown film can be sealed with a film sealer.
Shelf life of frozen food
Storage duration depends on the type of food. At a temperature setting of -18 °C:
Fresh Poultry(whole chicken), Fresh meat (steaks, Roasts) : up to 12 months
Fish(Lean fish, Cooked fish), Fresh shrimp, scallops, squid: up to 6 months
Pizza, Sausage: up to 2 months
Storage duration is refered to FDA web site (http://www.fda.gov/).
Purchasing and storing deep-frozen food
When purchasing frozen food, observe the following:
Check that the packaging is not damaged.
Check the sell-by date.
The temperature of the supermarket freezer should be below -18 °C or lower. If not, the shelf life of the frozen food is reduced.
Purchase deep-frozen food last. Wrap food in newspaper or place in a cool bag and take home.
At home immediately place deep-frozen food in the freezer compartment. Consume the frozen food before the use-by date expires.
Thawing frozen food
Depending on the type and application, select one of the following options:
At room temperature.
In the refrigerator.
In an electric oven, with/without fan assisted hot-air.
In a microwave oven.
Do not refreeze food which is beginning to thaw or which has already thawed. The food cannot be refrozen until it has been prepared (boiled or fried).
Do not store the frozen products longer than the max storage period.
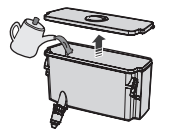
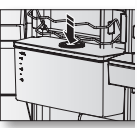
USING THE WATER DISPENSER (OPTIONAL)
With the water dispenser, you can obtain chilled water easily without opening the refrigerator door.
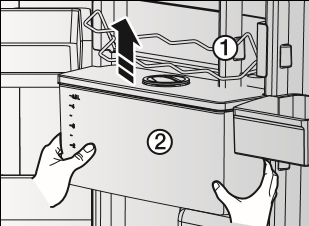
Lift up the Can Carry ( 1 ).
Lift up and pull out the water tank ( 2 ).
Hold the handgrips on both sides to lift out the water tank.
Clean the inside of water tank before using it for the first time.
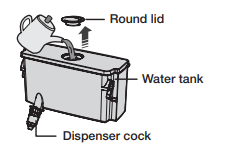
Fill the water tank with water, ensuring that it is in a stable position, allowing for the extended water supply outlet.
Fill with water up to 4.5 L. If it is filled higher than this, it may overflow when the lid is closed.
If water dripping occur after first filling, the water tank pour some water approximately 500 ml.
It is impossible to fill the tank with water while it is positioned in the refrigerator.
Method 1.
Fill the water lifting the round lid in the arrow direction to open.
Method 2.
Please fill the water after holding and lifting the large lid to open it
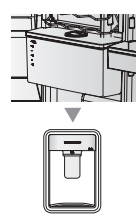
Close the refrigerator door after fitting the water tank.
Confirm that the dispenser cock is outside after closing the door.
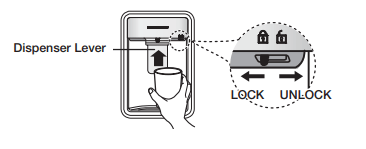
Place a glass underneath the water outlet and push gently against the dispenser lever with your glass. Make sure the glass is in line with the dispenser to prevent the water from bouncing out
CAUTION Check that the locking device is set to “UNLOCK”. Water can only be dispensed on this setting
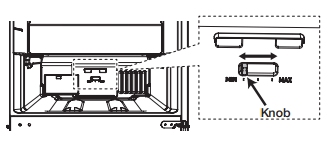
USING THE COOLSELECT DUO (OPTIONAL)
1. Disassemble the chilled room box. (Depending on the specification, the box can be easily disassembled when the guard on the right side is removed.)
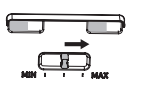
2. Move the knob to the left or right side to manually set the desired temperature. (The temperature of the chilled room is highest when the knob is on left side, and lowest when the knob is on the right side.)
CAUTION If you set the knob greater than medium value, The Chilled Room inner temperature can be lower than a Fridge temperature, and the vegetables and fruit can be frozen.
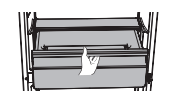
3. After manually setting the desired temperature, put the box back to the original place. (If the guard is removed, assemble the guard into its original place.)
REMOVING THE INTERIOR PARTS
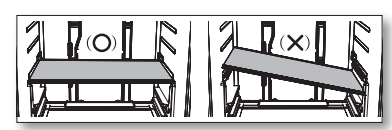
When you put the shelves back, make sure the side with the label “Front” on it face the front of the refrigerator.
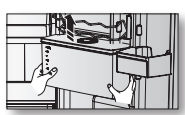
Shelves
Gently lift up the shelves with both hands and pull it toward you. (Glass shelf)
CAUTION Do not put the shelves upside down or backwards. There is a risk of falling.
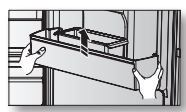
Door guards
Firmly grab the door guards with both hands and lift it up gently to remove the door guards.
Water tank
Lift up the Can Carry and then firmly grab the water tank with both hands and lift it up towards you gently to remove the water tanks.
Water tank may not be available depending on the model.
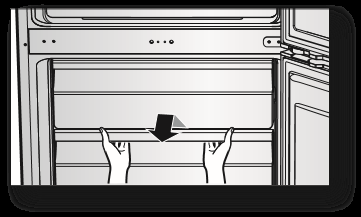
Drawers
Pull the drawers out fully then slightly lift it up to remove the drawers.
If the drawers get stuck to door, remove drawer by lifting up after remove shelves.
CLEANING THE REFRIGERATOR
Do not use Benzene, Thinner or Clorox™
Unplug the power cord of the refrigerator.
Slightly dampen a soft lint-free cloth or paper towel with water. Do not use any kind of detergent to clean the refrigerator because that can discolor or damage the refrigerator.
Wipe the inside and outside of refrigerator until it is clean and dry.
Plug the power cord of the refrigerator.
When water dispenser do not come out water, push on top of the water tank down slightly.
REPLACING THE LED LAMP
When the interior or exterior LED lamp has gone out, do not disassemble the lamp cover and LED lamp by yourself
troubleshooting
PROBLEM
SOLUTION
The appliance is not operating at all or the temperature is too high.
Check if the power plug is correctly connected.
Is the temperature control on the front panel correctly set?
Does sun shine on the appliance or are there any heat sources nearby?
Is the back of the appliance too close to the wall?
The food in the refrigerator is frozen.
Is the temperature control on the front panel set to the coldest temperature?
Is the surrounding temperature too low?
There are unusual noises.
Check if the appliance is installed on a stable and even floor.
Is the back of the appliance too close to the wall?
Have any foreign objects fallen behind or under the appliance?
Is the noise coming from the compressor in the appliance?
A ticking sound occurs when the various accessories contract or expand.
The front corners and sides of the appliance are warm and condensation starts to form.
Heat-proof pipes are installed in the front corners of the appliance to prevent condensation from forming. When the surrounding temperature rises, this may not always be effective. However, this is not abnormal.
In very humid weather, condensation may form on the outer surface of the appliance when the moisture in the air comes into contact with the cool surface of the appliance.
You can hear a liquid bubbling in the appliance.
• This is the refrigerant, which cools the inside of the appliance.
There is a bad smell inside the appliance.
Is there any spoiled food inside of the refrigerator?
Make sure that strong smelling food (for example, fish) is wrapped so that it is airtight.
Clean out your refrigerator periodically and throw away any spoiled or suspect food.
There is a layer of frost on the appliances walls.
Are the air outlet vents blocked by food stored inside the refrigerator?
Space the food out as much as possible to improve ventilation.
Is the door fully closed?
Condensation forms on the inside wall of the appliance and around vegetables.
Food with a high water content is stored uncovered with a high humidity level or the door has been left open for a long time.
Store the food with a cover or in sealed containers.
Q: I am finding that ice is forming underneath the bottom drawer in the freezer. Unless I remove the ice every few days water will spill out onto the floor. I've had the fridge/freezer for less than 3 years. Reply


 ) will light up and the refrigerator will speed up the time to needed to freeze products in the freezer.
 ) will light up and the refrigerator will set the temperature to under 17 °C to minimize you are going on a long vacation or business trip or you do not need to use the refrigerator. While Vacation function is activated, freezer compartment remains on. Vacation function will be automatically deactivated if you adjust fridge temperature while Vacation function is on. Make sure to remove foods in the fridge compartment before using Vacation function.
 ) will light up and then you can store meat and fish. Press Coolselect Zone button again, Coolselect Zone indicator (