It's a proven fact: helmets and protective apparel significantly reduce the number and severity of head and other injuries. So always wear an approved helmet and protective apparel→ P. 7
Before Riding
Make sure that you are physically fit, mentally focused and free of alcohol and drugs. Check that you are wearing an approved helmet and protective apparel.
Take Time to Get to Know Your Vehicle
Because every motorcycle is unique, take time to become thoroughly familiar with how this one operates and responds to your commands before placing your machine, and yourself, in competition.
Ride within Your Limits
Never ride beyond your personal abilities or faster than conditions warrant. Fatigue and inattention can impair your ability to use good judgment and ride safely
Never Carry a Passenger
There are no handholds, seat, or footrests to carry a passenger.
Don't Drink or Use Drugs and Ride
Alcohol or drugs and riding don't mix. Even one alcoholic drink can reduce your ability to respond to changing conditions, and your reaction time gets worse with every additional drink. The same is true for drug use. Don't drink or use and ride, and don't let your friends do it either.
Keep Your Honda in Safe Condition
Maintaining your vehicle properly is critical to your safety. A loose bolt, for example, can cause a breakdown in which you can be seriously injured.
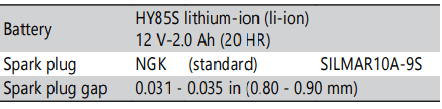
Lithium-Ion (Li-Ion) Battery
If you smell an unusual odor coming from the lithium-ion (li-ion) battery, park your vehicle in a safe place outside and away from flammable objects, then stop the engine. Have your vehicle inspected by your dealer immediately
Carbon Monoxide Hazard
Exhaust contains poisonous carbon monoxide, a colorless, odorless gas. Breathing carbon monoxide can cause loss of consciousness and may lead to death. If you run the engine in confined or even partly enclosed area, the air you breathe could contain a dangerous amount of carbon monoxide. Never run your vehicle inside a garage or other enclosure.
Safety Labels
Safety and information labels on your vehicle provide important safety information and may warn you of potential hazards that could cause serious injury. Read these labels carefully and don't remove them. If a label comes off or becomes hard to read, contact your dealer for a replacement.
Safety Precautions
Protective Apparel
Make sure that you are wearing an approved helmet, eye protection, and other appropriate riding gear.
Helmet
Should be safety-standard certified, highvisibility, and correct size for your head
● Must fit comfortably but securely, with the chin strap fastened.
● Approved eye protection
Protective Gear
Whether you’re practicing to improve your skills, or riding in competition, always wear an approved helmet, eye protection, and proper protective gear.
Riding Precautions
Break-in Period
During the first operating day or 15 miles (25 km) of running, follow these guidelines to ensure your vehicle's future reliability and performance.
● Avoid full-throttle starts and rapid acceleration.
● Avoid hard braking and rapid down-shifts.
● Ride conservatively.
This same procedure should be followed each time when:
● Piston is replaced
● Piston rings are replaced
● Cylinder is replaced
● Crankshaft or crank bearings are replaced
Parking
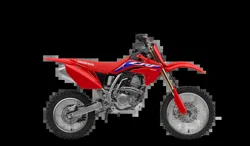
CRF450RX
● Park on a firm, level surface.
● If you must park on a slight incline or loose surface, park so that the vehicle cannot move or fall over.
● Make sure that high-temperature parts cannot come into contact with flammable materials.
● Do not touch the engine, muffler, brakes and other high-temperature parts until they cool down.
Parking with the Side Stand
1. Stop the engine.
2. Push the side stand down.
3. Slowly lean the vehicle to the left until its weight rests on the side stand.
4. Turn the handlebar fully to the left.
→Turning the handlebar to the right reduces stability and may cause the vehicle to fall.
Refueling and Fuel Guidelines
Follow these guidelines to protect the engine and fuel system:
● Use only unleaded gasoline.
● Use recommended octane number. Using lower octane gasoline will result in decreased engine performance.
● Do not use fuels containing a high concentration of alcohol→ P. 67
● Do not use stale or contaminated gasoline or an oil/gasoline mixture.
● Avoid getting dirt or water in the fuel tank.
Honda selectable torque control
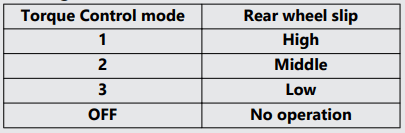
When the Honda selectable torque control (Torque Control) detects rear wheel spin during acceleration, the system will limit the amount of torque applied to the rear wheel based on the Torque Control level selected. Rear wheel spin during acceleration is reduced at the higher Torque Control level setting. Select a level that is appropriate for your skill and riding conditions. Torque Control does not work during deceleration and will not prevent the rear wheel from skidding due to engine braking. Do not close the throttle suddenly, especially when riding on slippery surfaces. Torque Control may not compensate for rough track conditions or rapid throttle operation. Always consider track and weather conditions, as well as your skills and condition, when applying throttle. Always use the recommended tires and sprockets to ensure correct Torque Control operation.
Accessories & Modifications
We strongly advise that you do not add any accessories that were not specifically designed or approved for your vehicle by Honda or make modifications to your vehicle from its original design. Doing so can make it unsafe.
Do not pull a trailer with, or attach a sidecar to, your vehicle. Your vehicle was not designed for these attachments, and their use can seriously impair your vehicle's handling. Do not attempt modify the vehicle to carry a passenger. The subframe was not designed to carry the additional weight of a passenger.
Operation Guide
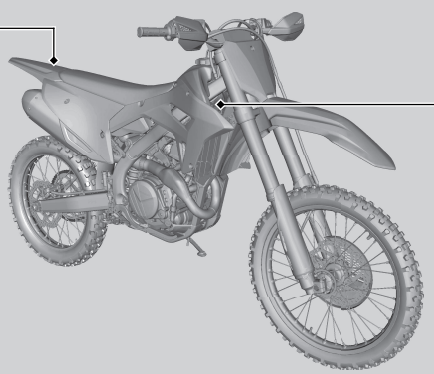
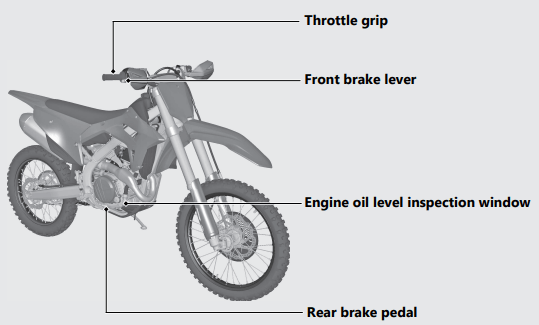
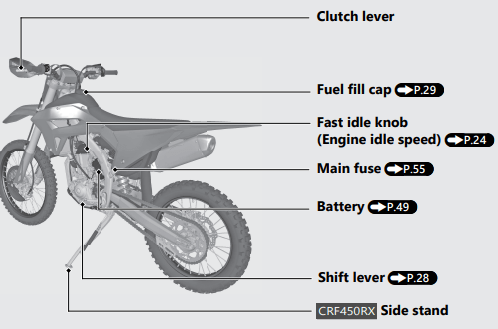
Parts Location
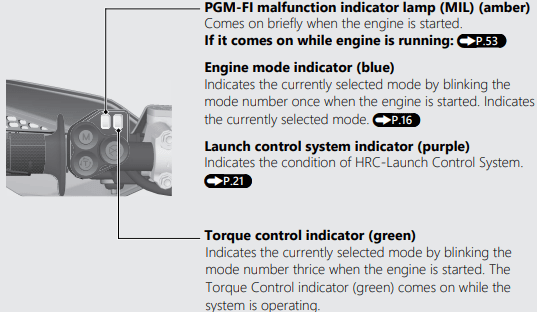
Indicators
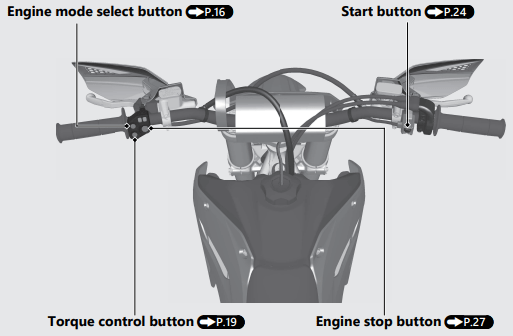
Switches
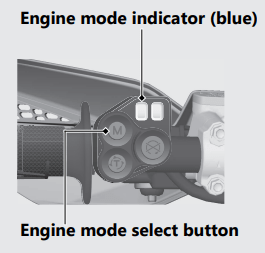
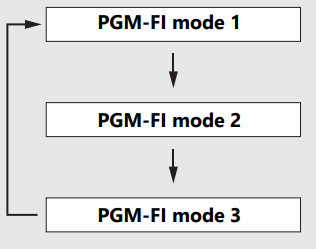
Engine Mode
You can change engine output characteristic depending on track conditions by using the engine mode select button.
● PGM-FI mode 1: standard setting
● PGM-FI mode 2: smooth setting (reduce throttle response from the standard setting)
● PGM-FI mode 3: aggressive setting (increase throttle response from the standard setting)
Current Mode
Start the engine and push the engine mode select button with your vehicle stopped. The engine mode indicator over the engine mode select button indicates the selected mode by blinking the mode number in blue 3 times.
The engine mode indicator also indicates the currently selected mode by blinking the mode number once when the engine is started.
PGM-FI mode 1: The indicator blue blinks once and repeats it 3 times.
PGM-FI mode 2: The indicator blue blinks 2 times and repeats it 3 times.
PGM-FI mode 3: The indicator blue blinks 3 times and repeats it 3 times.
If the engine mode indicator stays on or does not come on when it should, have your dealer check it for problems.
Mode Selection
1. Start the engine.
2. With your vehicle stopped and the throttle closed, push and hold the engine mode select button for 1 or more second.
Make sure that the fast idle knob is pushed in. (P.24) If the fast idle knob is pulled out, the engine mode will not change.
3. Release the engine mode select button. The engine mode indicator will indicate a selected mode by the number of times the indicator blue blinks
4. Repeat steps 2 – 3 until the desired mode is indicated.
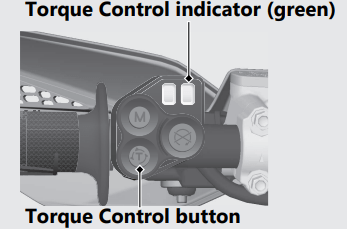
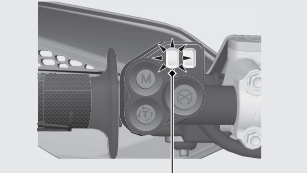
Honda selectable torque control
Torque Control level can be selected or turned on/ off, according to your skill and track conditions by using the Torque Control button. The Torque Control indicator (green) comes on while the system is operating.
Current Mode
Start the engine. The Torque Control indicator indicates the selected mode by blinking the mode number 3 times
Torque Control mode 1: The indicator short blinks once and repeats it 3 times.
Torque Control mode 2: The indicator short blinks 2 times and repeats it 3 times.
Torque Control mode 3: The indicator short blinks 3 times and repeats it 3 times.
Torque Control off: The indicator does not light up.
Mode Selection
1. Start the engine.
2. Press the Torque Control button to select a mode level. The mode changes every time you press the button.
→The Torque Control indicator (green) will indicate a selected mode by the number of times the indicator blinks.
→The last mode selected will be saved.
→The factory setting is mode 2. u Torque Control can be turned on and off by press and hold the Torque Control button.
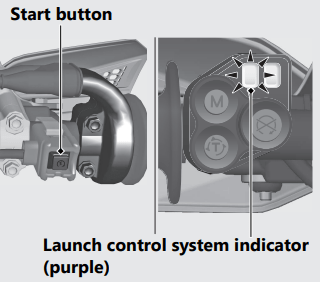
HRC-Launch Control System
The HRC-Launch Control System reduces slip and assists for an effective start by temporarily decreasing the rev limit when starting. You can select the rev limit level while the system is operating according to your skill and track conditions.
To change the level
1. Start the engine and wait more than 2 seconds.
2. Close the throttle completely, press and hold the start button while pulling the clutch lever in until the launch control system indicator blinks (purple).
→The system goes into standby, and the launch control system indicator indicates the selected level by blinking (purple).
→From standby, the control to decrease the rev limit starts.
→The system may become disabled if you snap the throttle excessively.
→If the idle speed is low, the system may not go into standby. Set the idle speed to standard rpm.
→To disable the system, quickly press the start button. The launch control system indicator stops blinking.
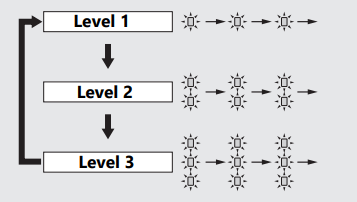
3. Press and hold the start button. The level changes every time you press and hold.
→The level selected last is saved.
→The factory setting is level 2.
4. To continue using the system, refer to step 2 in “To operate the system” (next page). To disable the system, quickly press the start button. The launch control system indicator stops blinking and the system is disabled.
Pressing and holding the start button while the launch control system is in standby
To operate the system
1. Perform steps 1 and 2 in “To change the level”.
2. Shift into 1st or 2nd gear.
3. When launching, open the throttle halfway or more. The system operates
→The reduced rev limit is controlled and will gradually return to normal in a few seconds. Once the rev limit returns to normal, the system is disabled.
→The launch control system indicator comes on (purple) while the system is operating. u If you open the throttle halfway or more before starting, control system stops before starting and there is no effect.
→If you close the throttle immediately, the system may not operate.
→When the launch control system operates, these following conditions will disable launch control:
● Vehicle is in 3rd gear
● The throttle completely closed
4. Make sure that the launch control system indicator is off. If it is not off, the system is not disabled. Quickly press the start button to disable the system.
Starting the Engine
Start your engine using the following procedure.
To restart a warm engine, follow the procedure for “Warm Engine Starting”.
This vehicle does not have a start inhibitor. Pull the clutch lever all the way in when pressing the start button.
→The vehicle can move when pressing the start button if the transmission is in gear and the clutch lever is not pulled.
Cold Engine Starting
1. Shift the transmission to neutral.
2. If the temperature is 50 °F (10 °C) or below, pull the fast idle knob fully out.
3. With the throttle completely closed. Pull the clutch lever all the way in, and press the start button.
4. About a minute after the engine starts, push the fast idle knob back all the way to fully off.
Warm Engine Starting
1. Shift the transmission into neutral.
2. With the throttle completely closed. Pull the clutch lever all the way in, and press the start button.
Starting the engine excessively charged with fuel by throttle blipping or other reasons
1. Shift the transmission into neutral.
2. With the throttle fully opened, pull the clutch lever and press the start button for 5 seconds to discharge excessive fuel from the engine.
3. With the throttle completely closed. Pull the clutch lever all the way in, and press the start button.
If Engine Will Not Start→(P.52)
When starting the engine, the PGM-FI malfunction indicator lamp (MIL) (amber) will stay on for 2 seconds, then go off. And then the engine mode indicator (blue) indicates the current engine mode for 0.8 seconds, then goes off. If the PGM-FI malfunction indicator lamp (MIL)/engine mode indicator does not come on or go off when it should, have your dealer check it for problems.
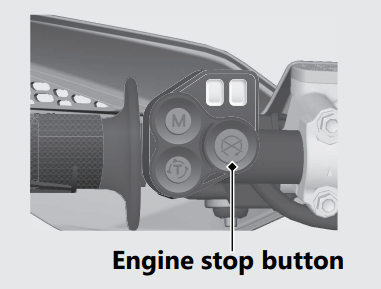
2. Push and hold the engine stop button until the engine stops completely.
Emergency Engine Stop
To stop the engine in an emergency, push and hold the engine stop button.
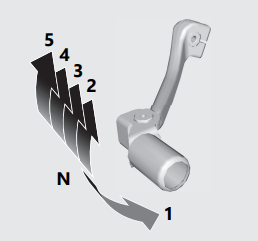
Shifting Gears
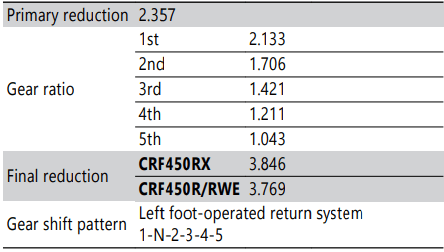
Your vehicle transmission has 5 forward gears in a one-down, four-up shift pattern.
Refueling
Be careful not to damage the fuel pump while filling the fuel tank. Avoid overfilling the tank. There should be no fuel in the filler neck.
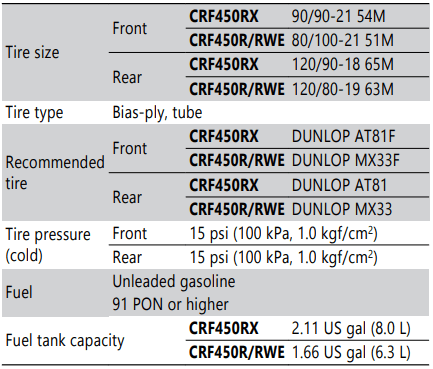
Fuel type: Unleaded gasoline only
Recommended fuel octane number: Pump Octane Number (PON) 91 or higher.
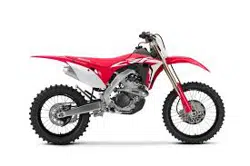
CRF450RX
Tank capacity: 2.11 US gal (8.0 L)
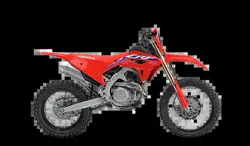
CRF450R/RWE
Tank capacity: 1.66 US gal (6.3 L)
Refueling and Fuel Guidelines (P.9)
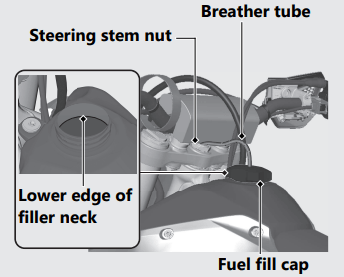
Opening the Fuel Fill Cap
1. Pull the breather tube out of the steering stem nut. bTurn the fuel fill cap counterclockwise and remove it.
2. Turn the fuel fill cap counterclockwise and remove it.
Closing the Fuel Fill Cap
1. After refueling, close the fuel fill cap securely.
2. Insert the breather tube into the steering stem nut
Maintenance
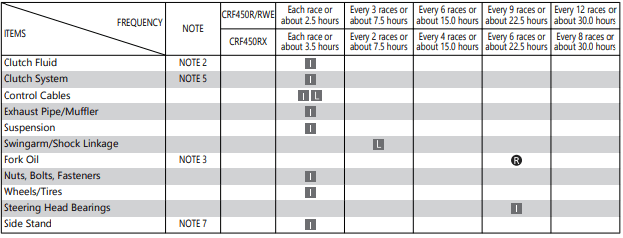
Maintenance Schedule
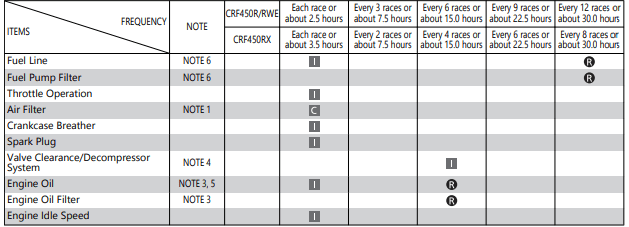
CRF450RX
Service intervals in the maintenance schedule are expressed in terms of races and riding hours. To avoid overlooking required service, we urge you to develop a convenient way to record the number of races and/or hours you ride.
CRF450R/RWE
Service intervals in the maintenance schedule are expressed in terms of motos and riding hours. To avoid overlooking required service, we urge you to develop a convenient way to record the number of motos and/or hours you ride. If you do not feel capable of performing a given task or need assistance, remember that your Honda dealer knows your vehicle best and is fully equipped to maintain and repair it. If you decide to do your own maintenance, use only Honda Genuine Parts or their equivalents for repair or replacement to ensure the best quality and reliability
Make sure whoever performs the scheduled maintenance completes the maintenance record. Retain all service documents. If you sell your vehicle, these service documents should be transferred with the vehicle to the new owner.
Perform the Pre-ride Inspection →P. 39) at each scheduled maintenance period.
WE RECOMMEND THESE ITEMS BE SERVICED BY REFERRING TO THE OFFICIAL HONDA SERVICE MANUAL. This maintenance schedule is based upon average riding condition. Machine subjected to severe use require more frequent servicing.
Maintenance Legend
Inspect (clean, adjust, lubricate, or replace, if necessary)
Lubricate
Replace
Clean
Notes:
1 : Clean after every moto for dusty riding condition.
2 : Replace every 2 years. Replacement requires mechanical skill.
3 : Replace after the first break-in ride
4 : Inspect after the first break-in ride.
5 : Replace the engine oil, if the clutch discs and plates are replaced.
6 : Replace every year.
7 : Only RX type.
Maintenance Fundamentals
Pre-ride Inspection
To ensure safety, it is your responsibility to perform a pre-ride inspection and make sure that any problem you find is corrected. A pre-ride inspection is a must, not only for safety, but because having a breakdown, or even a flat tire, can be a major inconvenience. Refer to Competition Handbook for procedures. Competitive riding can be tough on a motorcycle, so it’s important to inspect your vehicle and correct any problems you find before each ride. Check the following before each ride:
● Engine oil level.
● Fuel line for condition.
● Coolant for proper level.
● Cooling system and hoses for condition.
● Spark plug for proper heat range, carbon fouling and spark plug wire terminal for looseness.
● Air cleaner for condition and contamination.
● Clutch lever freeplay.
● Breather drain for cleaning.
● Steering head bearing and related parts for condition.
● Throttle operation.
● Tires for damage or improper inflation pressure.
● Spokes for looseness.
● Rim locks for looseness.
● Front and rear suspension for proper operation.
● Front and rear brakes, check operation.
● Drive chain for correct slack and adequate lubrication.
● Drive chain sliders and drive chain rollers for damage or wear.
● Exhaust pipe/Muffler for looseness.
● Every possible part for looseness (such as cylinder head bolts, engine mounting bolts/ nuts, axle nuts, handlebar holder bolts, fork bridge pinch bolts, drive chain adjuster, lock nuts, drive chain roller bolt/nut, wire harness connectors).
After practice or between races you have a chance to make additional checks and adjustments.
CRF450R/RWE
After practice or between motos you have a chance to make additional checks and adjustments
• Clean accumulated dirt from under the fenders and off the wheels, suspension components, handgrips, controls, and footpegs. A stiff, nylon parts cleaning brush works well.
• Check tire air pressure.
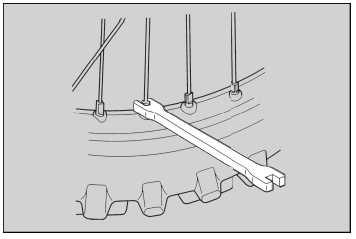
• Check spoke tension, and make sure the rim locks are secure.
• Check to make sure the sprocket bolts and nuts are secure.
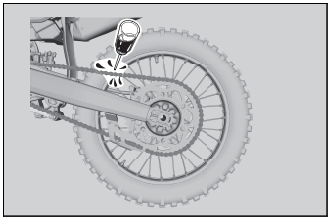
• Clean the sides of the drive chain with a stiff, nylon parts-cleaning brush. Lubricate and adjust the chain as necessary
Do not perform maintenance while engine is running. Injury to your fingers or hands may result.
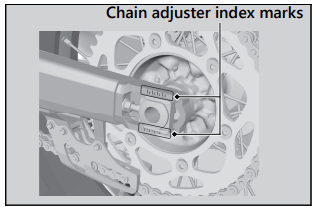
• After adjustment, check that the chain adjuster index marks are in the same position on each side. This will ensure that the rear wheel is in proper alignment and allow maximum performance from the rear disc brake.
Maintaining proper wheel alignment will also extend brake pad lifespan.
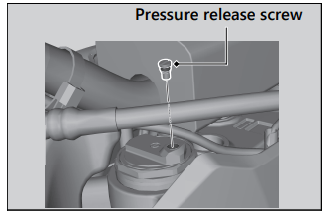
• Suspend the front wheel above the ground and use the pressure release screws to release the built-up pressure in the forks. This pressure is caused by normal fork action while riding.
Tighten the pressure release screws to the specified torque:
After Competition Maintenance
It is important to the long term performance of your vehicle to practice a consistent maintenance program. Right after the event is a good time to begin your next maintenance cycle.
After Race Lubrication
Apply a light coating of rust-inhibiting oil to the drive sprocket and any steel portions of the chassis or engine where the paint has worn away. This will prevent rusting of the exposed metal. Apply rust-inhibiting oil more heavily if the event was particularly wet or muddy. Take care to avoid spraying any oil near the brake pads or the brake discs.
Take care to prevent catching your fingers between the chain and sprocket. Remove the drive chain, clean and lubricate it. Be sure the chain is wiped clean and is dry before lubricating the chain
Routine Cleaning
If your vehicle is only slightly dirty, it is best to clean it by hand with the aid of a stiff bristled nylon brush and some clean rags.Take care to prevent catching your fingers between the chain and sprocket. A variety of reasonably priced cleaning brushes are available from variety, drug, food, and hardware stores. Some of these brushes are extremely useful in removing dirt from the many tight contours of the metal pieces of your vehicle. Avoid using stiff, abrasive brushes on the plastic or rubber parts. If your vehicle was exposed to sea air or salt water, rinse it as soon as possible after the event, dry it, and apply a spray lubricant to all metal parts. If you decide to wash your vehicle or use cleaners, refer to "Caring for Your Vehicle". →P 58
Replacing Parts
Always use Honda Genuine Parts or their equivalents to ensure reliability and safety.
Lithium-Ion (Li-Ion) Battery
Your vehicle has a lithium-ion (li-ion) battery. Clean the battery terminals if they become dirty or corroded.
What to do in an emergency
If any of the following occurs, immediately see your doctor.
● Electrolyte splashes into your eyes:
→Wash your eyes repeatedly with cool water for at 15 minutes. Using water under pressure can damage your eyes.
● Electrolyte splashes onto your skin:
→Remove affected clothing and wash your skin thoroughly using water
● Electrolyte splashes into your mouth
→Rinse mouth thoroughly with water, and do not swallow.
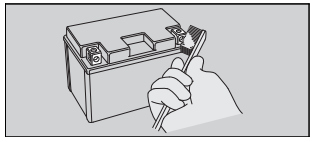
Cleaning the Battery Terminals
1. Remove the battery→P. 49
2. If the terminals are starting to corrode and are coated with a white substance, wash with warm water and wipe clean.
3. If the terminals are heavily corroded, clean and polish the terminals with a wire brush or sandpaper. Wear safety glasses.
4. After cleaning, reinstall the battery. The battery has a limited life span. Consult your dealer about when you should replace the battery. Always replace the battery with another lithium-ion (li-ion) battery of the same type.
Charging
If you use electrical accessories that drain the battery or you do not ride frequently, we recommend that you charge the battery every 30 days using a charger recommended by your lithium-ion (li-ion) battery manufacturer. Contact your dealer before charging the battery. Make sure the battery terminals are disconnected before charging the battery.
Fuses
Fuses protect the electrical circuits on your vehicle. If something electrical on your vehicle stops working, check for and replace any blown fuses. → P. 55
Inspecting and Replacing Fuses
Turn the engine off to remove and inspect the fuses. If a fuse is blown, replace with a fuse of the same rating. For fuse ratings, see “Specifications.”→ P. 73
If a fuse fails repeatedly, you likely have an electrical fault. Have your vehicle inspected by your dealer.
Tires (Inspecting/Replacing)
Checking the Air Pressure
Visually inspect your tires and use an air pressure gauge to measure the air pressure before each ride. Always check air pressure when your tires are cold. If you decide to adjust the tire pressure for a particular riding condition, make changes a little at a time.
Inspecting for Damage
Inspect the tires for cuts, slits, or cracks that exposes fabric or cords, or nails or other foreign objects embedded in the side of the tire or the tread. Also inspect for any unusual bumps or bulges in the side walls of the tires.
Inspecting for Abnormal Wear
Inspect the tires for signs of abnormal wear on the contact surface.
Inspecting Rims and Valve Stems
Inspect the rims for damage and loose spokes. Also inspect the valve stems for their positions. A tilted valve stem indicates the tube is slipping inside the tire or the tire is slipping on the rim. See your dealer.
Have your tires replaced by your dealer. For recommended tires and air pressure, see “Specifications.” → P. 71 Follow these guidelines whenever you replace tires.
● Use the recommended tires or equivalents of the same size, construction, speed rating, and load range
● Remember to replace the inner tube whenever you replace a tire. The old tube will probably be stretched, and it could fail if installed in a new tire.
● If a tube is punctured or damaged, you should replace it as soon as possible. A repaired tube may not have the same reliability as a new one, and it may fail while you are riding. Use a replacement tube equivalent to the original.
Removing & Installing Body Components
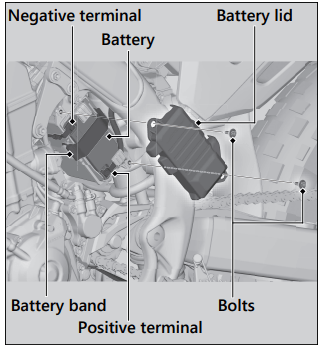
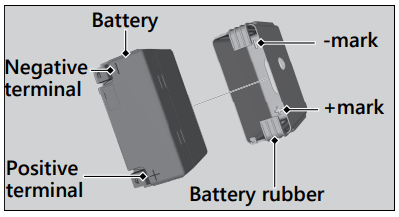
Battery
Removal
1. Remove the battery lid by removing the bolts.
2. Disconnect the negative terminal from the battery.
3. Disconnect the positive terminal from the battery.
4. Remove the battery band.
5. Remove the battery assembly taking care not to drop the terminal nuts.
6. Separate the battery and battery rubber.
Installation
1. Assemble the battery and battery rubber.
→ Make sure the + and - marks on the bottom of the battery rubber align with the positive and negative of the battery terminals.
2. Install the battery assembly.
3. Install and tighten the battery terminal bolts. Always connect the positive terminal first. Make sure that bolts and nuts are tight.
4. Tighten the positive terminal bolt and negative terminal bolt to the specified torque:
5. Install the battery band.
6. Install the battery lid and tighten the bolts to the specified torque:
For proper handling of the battery, see “Maintenance Fundamentals.” → P. 44 “Battery Goes Dead.” → P. 54
Troubleshooting
Engine Will Not Start
Starter Motor Operates But Engine Does Not Start
Check the following items:
● Check the correct engine starting sequence. → P. 24
● Check that there is gasoline in the fuel tank.
● Check if the PGM-FI malfunction indicator lamp (MIL) is on.
Starter Motor Does Not Operate
Check the following items:
● Check the correct engine starting sequence. → P. 24
● Check for a blown fuse. → P. 55
● Check for a loose battery connection (→ P. 49) or battery terminal corrosion (→ P. 45).
● Check the condition of the battery. → P. 54
If the problem continues, have your vehicle inspected by your dealer as soon as possible or refer to an official Honda Service Manual available for purchase from your dealer. → P. 68
If the indicator comes on while riding, you may have a serious problem with the PGM-FI system. Reduce speed and have your vehicle inspected by your dealer as soon as possible or refer to an official Honda Service Manual available for purchase from your dealer. → P. 68
Electrical Trouble
Battery Goes Dead
Battery charging is needed. A battery charger recommended by your lithium-ion (li-ion) battery manufacturer is needed for battery charging. Contact your dealer before charging the battery. Remove the battery from the vehicle before charging.
NOTICE : Only use a charger recommended by your lithium-ion (li-ion) battery manufacturer. Using a battery charger that is not recommended can cause permanent damage to your battery.
If the battery does not recover after recharging, contact your dealer.
NOTICE: Do not jump-start, as this can damage your vehicle's electrical system and battery. Bump starting is not recommended.
Check the battery voltage using a digital multi meter with the cable connected. Below 1V: The battery has failed; replace the battery.
Between 1V and 8V: The battery may have failed; charge the battery and then recheck. If you can’t charge the battery or it appears unable to hold a charge, see your dealer.
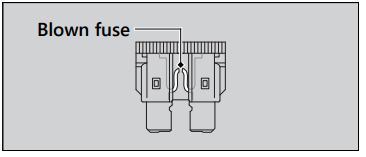
Blown Fuse
Before handling fuses, see “Inspecting and Replacing Fuses.” → P. 46
1. Disconnect the negative - terminal. → P. 49
2. Pull back the coupler cover.
3. Disconnect the connector from the starter magnetic switch.
4. Remove the starter magnetic switch stay bolt.
5. Remove the starter magnetic switch cover.
6. Pull the main fuse and check for a blown fuse. Always replace a blown fuse with a spare of the same rating.
7. Install the starter magnetic switch cover.
8. Install and tighten the starter magnetic switch stay bolt.
 PGM-FI mode 1: The indicator blue blinks once and repeats it 3 times.
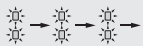 PGM-FI mode 2: The indicator blue blinks 2 times and repeats it 3 times.
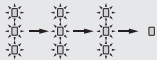 PGM-FI mode 3: The indicator blue blinks 3 times and repeats it 3 times.
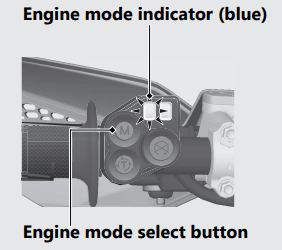
 Torque Control mode 1: The indicator short blinks once and repeats it 3 times.
 Torque Control mode 2: The indicator short blinks 2 times and repeats it 3 times.
 Torque Control mode 3: The indicator short blinks 3 times and repeats it 3 times.
 Torque Control off: The indicator does not light up.
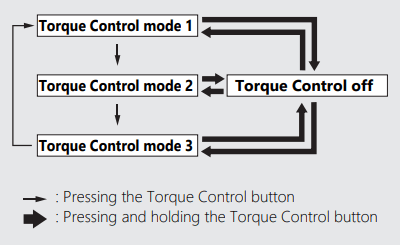
 Pressing and holding the start button while the launch control system is in standby

 Inspect (clean, adjust, lubricate, or replace, if necessary)
 Lubricate
 Replace
 Clean
Clean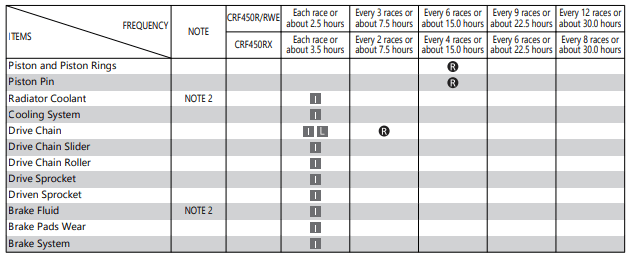

 terminal from the battery.
 terminal from the battery.


 terminal.