Operating Instructions for Natural Gas BBQ
PRODUCT DESCRIPTION
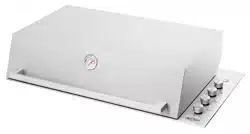
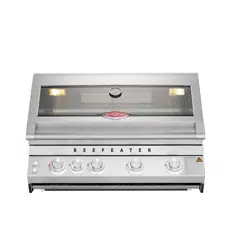
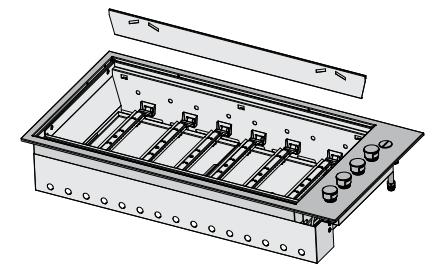
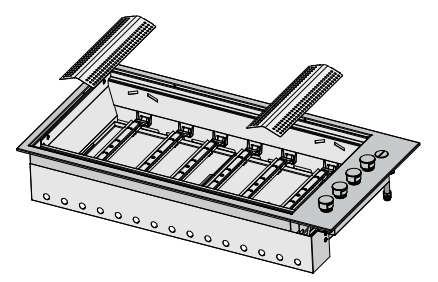
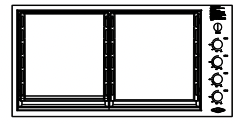
Integrated barbecue with roasting hood BSH158SA
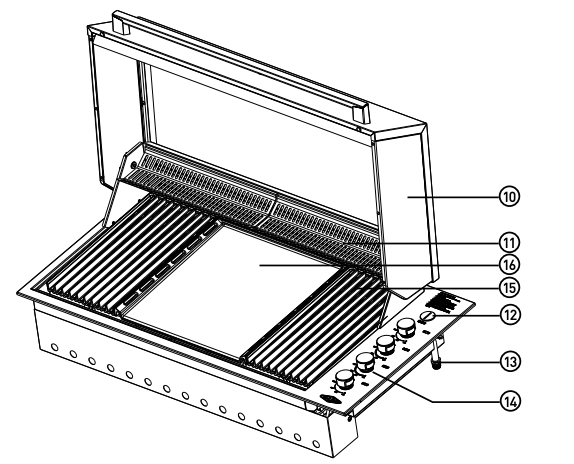
10 Roasting hood
11 Warming racks
12 Battery cover
13 Gas connection point
14 Burner controls
15 Cast Iron Grill
16 Cast Iron Hotplate
17 Removable oil reservoir located at front of cooking surface (not illustrated)
18 Flame tamers x 2 located under grills (not illustrated)
PARTS

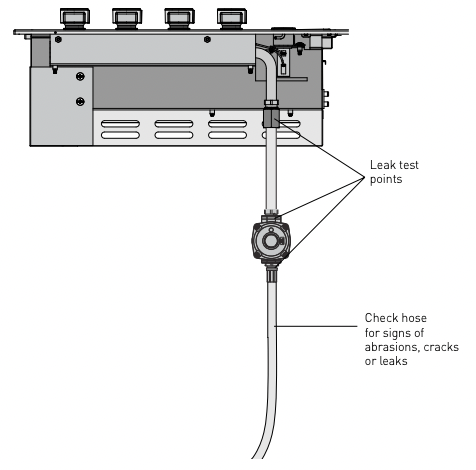
LEAK TEST PROCEDURE
Leak test procedure
- Ensure all gas valves are in the ‘OFF’ position.
- In a small container, mix a solution of water and detergent or soap.
- After connection of the hose, turn on the gas supply at the gas bottle or mains as appropriate.
- Using a brush apply the solution to the gas connection points and look for bubbles forming.
- Bubbling will indicate a leak.
- Turn off the gas supply and re-tighten the joint. Repeat the leak test.
- If the leak persists, turn off the gas at the isolation valves and contact a licensed gas fitter to correct.
INSTALLATION INSTRUCTIONS
Choosing a location
When planning the location and preparing the installation structure for this appliance note the following:
- This appliance is Certified to AS 4563, and Clause 6.10.2 of AS/NZS 5601.1 is applicable.
- Requirements in these instructions for clearances to combustible materials also apply to combustible materials that have non-combustible materials attached to their surface.
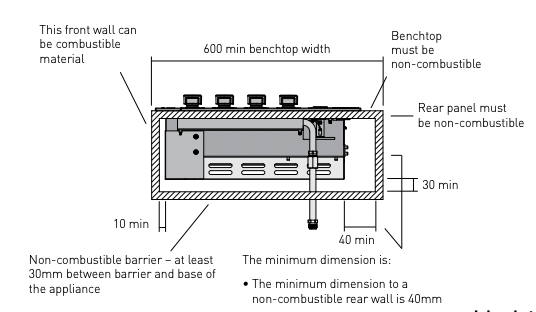
- This appliance must be installed such that no part of the appliance is in contact with or within 10mm of any combustible material.
- The minimum clearance to a vertical wall or splashback above bench level and behind the barbecue that is made from combustible material is 450mm for a model with a roasting hood and 250mm for a slimline lid model.
- The vertical clearance above the cooking surface to any combustible materials must be at least 1000mm.
- The minimum clearance to a vertical wall above bench level made from a combustible material is 250mm on the left and right hand side.
- When using Universal LPG in an enclosure ventilation must be provided. Gas is highly explosive and can cause serious injury and damage to property if allowed to accumulate and then be ignited.
- This barbecue is intended to be built into a benchtop with a minimum depth (front to rear) of 600 mm.
- Avoid windy positions as this will affect cooking performance and burner efficiency. If this situation cannot be avoided some shielding may be necessary
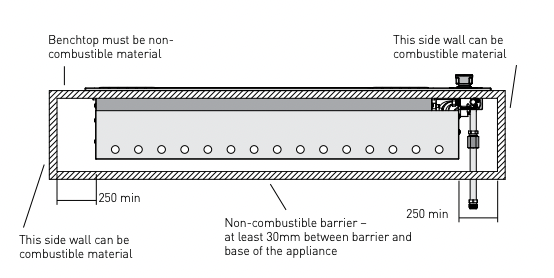
The mounting enclosure
- The barbecue requires a non-combustible barrier under the barbecue to prevent excessive temperatures being accessed. The barrier panel is to be placed at least mm under the base of unit.
- The benchtop that supports the barbecue must be constructed from non-combustible material. Suitable materials include masonry, granite, marble, Hardiplank®, Villaboard® over a metal frame, or tiles on a non-combustible substrate.
- This appliance requires venting. The vent opening can be in either of two alternative locations – Front wall below the bench, or the non-combustible barrier under the barbecue. Refer to diagrams {on next page} for vent specification and location alternatives.
- This appliance can be mounted either in an island type bench or a bench with a splashback. Please read the specific requirements for each mounting situation.
- For Universal LPG use, cabinetry below the barbecue must have low level venting to prevent the possibility of Universal LPG accumulating.
- Clearances to parts of the supporting structure must be in accordance with the following diagrams:
DIMENSIONS
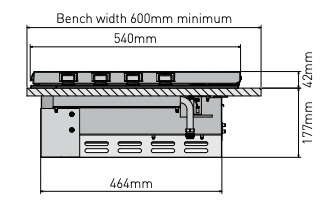
Island style installation
(example shown with barbecue with slimline line)
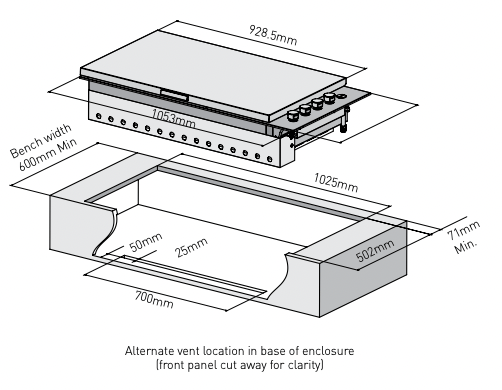
WARNING! This appliance requires venting. An open area as indicated must be allowed for. A suitable grille can be fitted if desired. This vent area is to allow air into the enclosure for the correct combustion of gases and for the correct exhausting of the products of combustion. The vent must be no less than 700mm x 25mm.
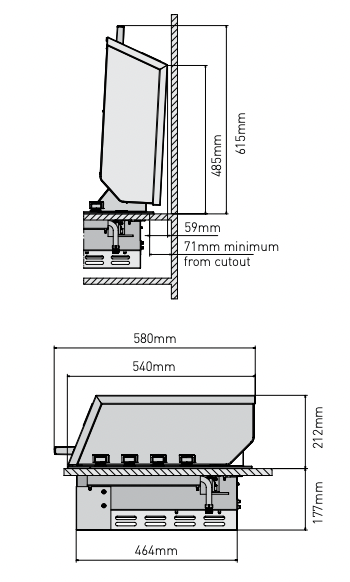
Installation in a bench with splashback
(example shown with barbecue with roasting hood)
WARNING! This appliance requires venting. An open area as indicated must be allowed for. A suitable grille can be fitted if desired. This vent area is to allow air into the enclosure for the correct combustion of gases and for the correct exhausting of the products of combustion. The vent must be no less than 700mm x 25mm.
Installing in a bench with a splashback
- The splashback must be made from a non-combustible material unless it is at least 450mm from the appliance.
- Clearances between the barbecue and a combustible splashback are 250mm for the slimline lid model and 450mm for the roasting hood model.
- The minimum depth (front to rear) of the mounting bench is 600mm.
- The bench cut-out size required is 1025mm x 502mm. Refer to diagram above to left.
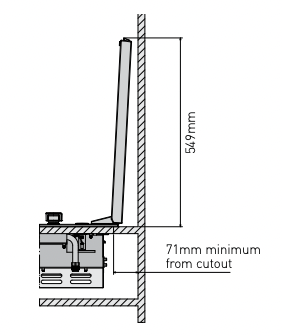
- For roasting hood models there is a specific clearance required at the back of the barbecue between the splashback and the bench cut-out of 71mm minimum. This is to allow clearance for the hood to open.
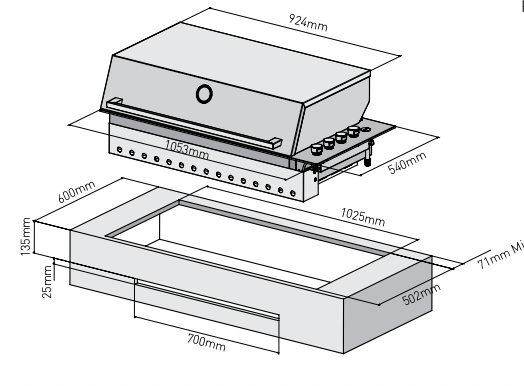
Island style installation
- If this appliance is installed in an island mount, it can be centrally positioned. provided all other instructions regarding clearances to combustible materials are followed. Special attention should be given to the overalll size of the island top to consider the hood open and the overhang. Please see illustration.
- The cut-out size required is 1025mm x 502mm. Refer to diagram.
GAS REQUIREMENTS
Natural Gas requirements
- The enclosure must be constructed so that access can be gained to the Natural Gas regulator at all times.
- For pipe sizing requirements for supply pipe refer to AS/NZS 5601.1.
Universal LPG Requirements
WARNING!
- If an LPG bottle is to be stored in the enclosure under the barbecue unit, it must be isolated from the barbecue unit with a non-combustible panel. The enclosure must comply with the requirements of AS/NZS 5601.1.
- AS/NZS 5601.1 ventilation requirements for cylinder storage are: Where of sheet metal or similar impervious construction there shall be ventilation openings at the top and bottom of the enclosure or recess, each opening providing a free area of at least 200cm2 for every cylinder enclosed.
- For Universal LPG installations having enclosed cabinetry below the separation panel that does not contain a gas bottle, low level venting must be installed. This is to allow the gas which is heavier than air to escape from the enclosure in the situation where there may be a leak. A minimum opening of 200cm2 is required.
Setting up the barbecue
Setting up the barbecue in mounting enclosure
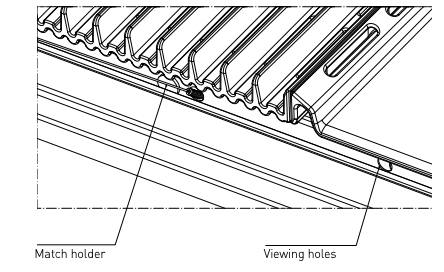
- A match holder with attached chain has been included with the instruction manual. This is provided for manual ignition in the event the automatic ignition does not work. The free end of chain is required to be permanently fixed to the installation in a location that enables the match holder to reach each burner (refer to page 15 for manual lighting instructions).
ASSEMBLING THE BARBECUE
1. Remove all components from box.
2. Attach heat shield to rear of unit by inserting the three top tabs into the rear holes and sliding the shield down.
3. Install flame tamers (under grills) and fix back edge of flame tamer into the heat shield panel.
4. Fit oil reservoirs at front of barbecue
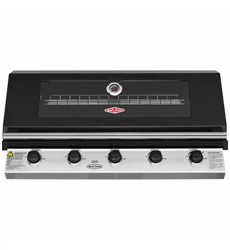
HOTPLATE CONFIGURATION
5. Install hotplates and grills as shown, ensuring that the flame tamers are located under the grills.
NOTE: ensure that grill assemblies are orientated correctly so that the surface of the grill is sloping forward to allow oil to drain into oil reservoirs.
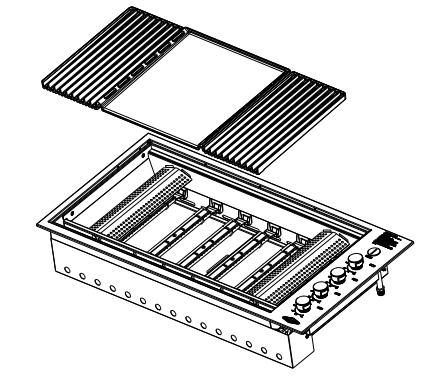

Recommended configuration: Hotplate in centre.
Recommended for roasting and grilling and offer the optimal heat distribution across the cooking surface.
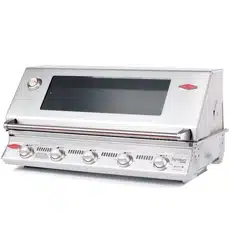
Non-recommended configuration: two Hotplates.
This may cause damage to the appliance as well as excessive temperatures in surrounding surfaces and reduced roasting performance (if roasting hood is fitted).
OPERATING INSTRUCTIONS
Control functions
Before lighting the barbecue:
- Check that all hoses and gas fittings are tight.
- Open the slimline lid or the roasting hood.
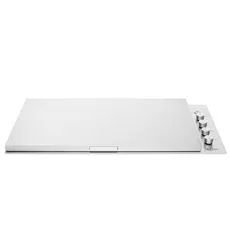
NOTE: The slimline lid is designed as a cover for weather protection. The lid is not designed to be used as a cooking hood.
- Check all control knobs are in the ‘OFF’ position.
- Ensure that the cooking surfaces are clean.
- Turn the gas isolation valve ‘ON’.
Lighting instructions
- Do not attempt to light burners with the cooking surfaces covered.
- Read instructions before lighting.
- To light a burner, depress the knob and rotate to ‘BOOST’.
- Hold for 3 seconds, release and check the flame.
- If burner did not light, turn knob to the ‘OFF’ position. Allow gas to disperse, then repeat lighting procedure.
Manual lighting
- If, in the event of the automatic ignition system not working, the barbecue can be lit manually.
- To light manually, fit a 40mm match to match holder provided. Pass lit match through viewing holes below the front of cooking plates down towards the burner, then rotate the knob to ‘BOOST’ to ignite. If ignition fails turn the control valve off and allow several minutes for the gas to disperse before attempting to light again.
- Once alight, repeat for other burners as required.
Preheating
For best cooking results it is recommended to preheat the barbecue prior to cooking.
- This barbecue is fitted with high power burners. In most conditions it will only be necessary to preheat the barbecue for 5 minutes before cooking can commence.
- As with most things, experience will familiarise you with the time required to achieve the desired cooking temperature.
- If the barbecue is fitted with slimline lid, it is advisable to remove the slimline lid in windy conditions.
- If the unit does not operate correctly refer to troubleshooting section on page 18.
Cooking methods:
Direct cooking / grilling
- For best cooking results testing has shown that once preheated burners can be reduced to a Medium to Low setting to maintain satisfactory cooking temperatures.
- If burners are left to run too hot there will be excessive smoking during the cooking process and subsequent burning of the food being prepared. This may also result in excessive flaring of the fat being emitted from the food.
Indirect cooking / roasting
- For barbecue models fitted with a roasting hood, it is recommended that once preheated only use the two outer burners on a low setting to maintain satisfactory cooking temperatures.
- Using more than two burners is not recommended as hood can overheat and may cause damage to the appliance. The temperature gauge indicates the desired range of roasting temperatures.
To turn the burners off
When the cooking is complete, rotate the knob fully clockwise so the pointer is positioned at the off position.
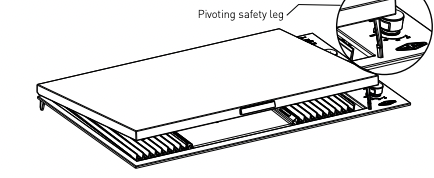
LID SAFETY – SLIMLINE ONLY
To ensure that the user remembers to turn off the gas before closing the lid, a pivoting safety leg has been fitted.
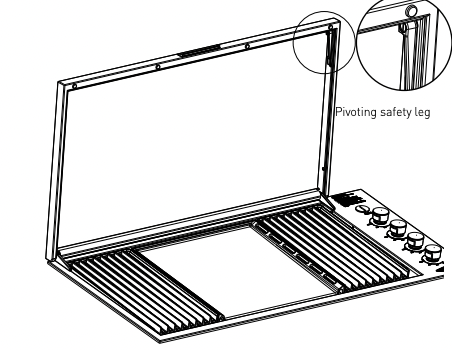
When closing the lid the safety leg will pivot forward and rest against the trim surface to prevent the lid closing. After ensuring the gas has been turned off, to fully close the lid, the leg needs to be rotated backwards.
WARNING!
THE SLIMLINE LID MUST NOT BE CLOSED WHEN THE BURNERS ARE OPERATING. Closing the lid during burner operation can cause discolouration and damage to the lid and barbecue unit. Any damage caused to the unit by closing the lid during the burner operation will not be claimable under your manufacturer’s warranty
The BeefEater Integrated barbecue has been constructed from select grade stainless steel which, if not cared for, may discolour over time. To keep your barbecue looking its best we recommend that the cooking surfaces are cleaned after every use.
The cleaning and care instructions are essential for the proper functioning and operation of your appliance over time. Failure to adhere to these care instructions may affect your ability to make a claim under the manufacturer’s warranty.
WARNING! Please ensure that your barbecue is switched off and has cooled down before following the instructions below.
Cast Iron plates
The cooking plates and grills have a porcelain enamel coating.
NOTE: Many food acids, juices, marinades and sauces contain highly acidic elements that will slowly attack the surface of the cast iron if not removed immediately after cooking.
After use remove all the solid material from the cooking surface using a brass bristled barbecue brush or plastic bristled scourer. Wipe off the remaining grease with paper toweling. Gently wash the surfaces with a cloth or a sponge and a mild detergent and hot water. Dry the components immediately and coat the cooking surface with a light layer of cooking oil. This protects the surface when not in use. Do not clean the cooking surface in a dishwasher.
Intensive cleaning cycle
Suitable for cast Hotplate and cast grills only!
In instances when the cooking surface becomes heavily soiled and harder to clean, the barbecue can be set-up for an intensive cleaning cycle.
To do this you must have the hood/lid fully open and remove any stainless steel attachments such as the warming racks. Turn all the burners on and set all controls to ‘BOOST’. After approximately 30 minutes, this should turn any baked on food or grease to ash. Once the surface has cooled, the residual ash can be wiped clean with a damp cloth.
After cleaning, lightly season the cast MaxiPlate and cast grills with cooking oil.
WARNING!
The hood or lid must be fully open during the cleaning process.
Failure to do so can result in damage to the stainless steel surfaces and to the barbecue unit.
Other stainless steel surfaces
CAUTION! Do not use abrasive or caustic cleaners, scourers or metal scrapers on these stainless steel surfaces as they may permanently scratch and damage your barbecue. Take particular care around the control knob graphics and instructions.
- Wash all stainless steel components, including the slimline lid, the roasting hood and control knobs with a soft dishcloth using hot soapy water.
- The barbecue interior can be wiped down with a soft cloth in hot soapy water. The rear panel of the interior is removable for easy cleaning.
- Ensure that all surfaces are dried with a clean dry cloth.
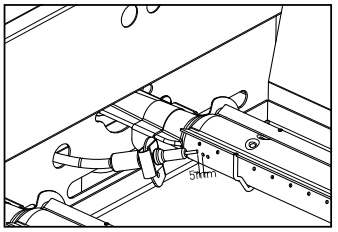
CAUTION! Take extra care (particularly when cleaning on and around the control knobs) to ensure that water and soapy residue do not enter the control panel, where the valves are or into the burners. Care should also be taken not to disturb the spark electrode and thermocouple.
A distance of 5mm should be maintained between it and the burners (see diagram below).
Cleaning inside the barbecue
The inside of the burner box should be regularly cleaned to prevent any build up of food residue.
To access the burner box remove the cooking plates and flame tamers and rear heat shield panel. The burners can then be removed (refer page 8 “Changing Injectors”). The heat shield panels in the base of the burner box can then be lifted out for cleaning purposes.
Ensure all oil and food particles are removed. After cleaning complete, re-assemble ensuring the burner is correctly located over the injector.
Cleaning the oil reservoirs
The Integrated barbecue has a unique oil management system which uses channels to drain all oil to the front into easily removed reservoirs and should be cleaned after each use.
- To remove reservoirs, pull upwards from the front of the barbecue and dispose of the contents of the catchment responsibly. Rinse oil reservoirs in warm soapy water. The reservoirs can be placed in the dishwasher if desired.
IMPORTANT!
Special note on “tea staining”
Sometimes stainless steel surfaces are affected by a brown discolouration called tea staining. This usually occurs in areas which use high heat and can be easily removed using specialised stainless steel cleaners. For best results, we recommend that specialised cleaners be used regularly on all stainless steel components.
IMPORTANT!
Special note on stainless steel
The stainless steel panels may distort while in use but will return to normal when cold.
Please note that environmental conditions need to be taken into account with regards to the maintenance required on your product. In particular units installed in humid climates or seaside locations will be more susceptible to surface corrosion/discolouration over time. In these conditions BeefEater strongly recommends cleaning and drying your barbecue after every use and covering it when not in use to minimise exposure to the elements. Surface corrosion can be removed by using a specialized stainless steel cleaner.
MAINTENANCE
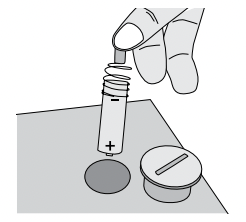
The ignition system
To change the battery rotate the cover anti-clockwise to release. Lift off the cover to access spring and battery. Lift out the spring and battery. Replace with a new AA battery and replace the cover. Test by depressing the knob and an audible ‘clicking’ sound should be heard.
NOTE: Ensure that the battery has been placed in the correct orientation.
Air vents
The mounting enclosure air vents should be checked prior to each use, to ensure they are clear of any obstructions that may affect the free flow of air.
Stainless steel burners
Burners should be checked at least once per year and cleaned as necessary. Inspect burners to ensure no residues have been deposited and gas ports are clear.
TROUBLESHOOTING
| PROBLEM |
POSSIBLE CAUSE |
REMEDY |
Barbecue won’t light
|
No gas |
- Check isolation valve is ON.
- Gas bottle empty - refill or change gas bottle
|
| Ignition system not working |
- Check battery - should hear a clicking noise when the knob is depressed.
- Replace battery.
- Manually light the barbecue.
|
| Ignition electrode wet or dirty |
Gently clean and dry electrode ensuring position is correct. |
Flame not staying on when kob is released
|
Knob not held down long enough for flame safeguard to engage |
Repeat lighting procedure and hold knob down for 5 seconds |
| Port blockage adjacent to thermocouple |
Check the flame is present and the tip of the thermocouple is heated by the flame |
| Excess smoke being emitted from the cooking area |
Gas valve set too high |
Turn gas valves down or turn off selected burners. |
|
Smell of gas
DO NOT ATTEMPT TO LIGHT THE APPLIANCE
|
Gas leak |
- Turn off gas at the isolation valves.
- Check for leaks, tighten joints.
- If problem persists call Electrolux Service.
|
Oil not draining into removable reservoirs
|
Incorrect orientation of plate and grills. |
Ensure plate and grills are assembled as shown on page 14. |
| Plate and grill not clean |
Follow cleaning procedure for cast iron plates as detailed on page 16. |
| Too hot when roasting |
Incorrect burner settings |
When roasting only use 2 outer burners on a low setting. Check temperature gauge and adjust accordingly to achieve desired roasting temperature. |
| Too hot when grilling |
Incorrect burner settings |
Once preheated, only use a low burner setting. Running “Boost” will quickly achieve temperatures in excess of 400°C and will char food on contact. This should be avoided. |