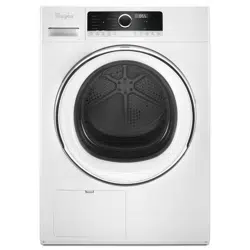
Use & Care Guide Heat Pump Dryer
OPERATING INSTRUCTIONS
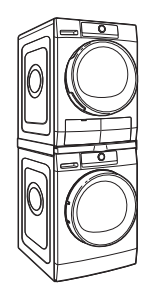
Accessories
Stack Kit - If space is at a premium, the stack kit allows the dryer to be installed on top of the washer.
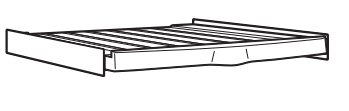
12" Pedestal - Color-matched pedestals raise the washer and dryer to a more comfortable working height.
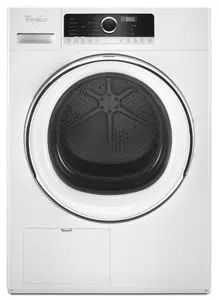
Heat Pump Technology
A typical dryer uses large amounts of energy; this dryer consumes a fraction of the energy by recycling and reclaiming heat. This dryer is a ventless heat pump dryer that uses a refrigeration system to dry and recycle the same air. The laundry is dried with low temperatures; therefore it may feel cooler than expected during and after the drying process. The heat pump dryer’s heating phase is longer than in traditional dryers. If possible, do not open the dryer door during the process as heat can escape from the drum and can make longer drying times.
Heat Pump Unit
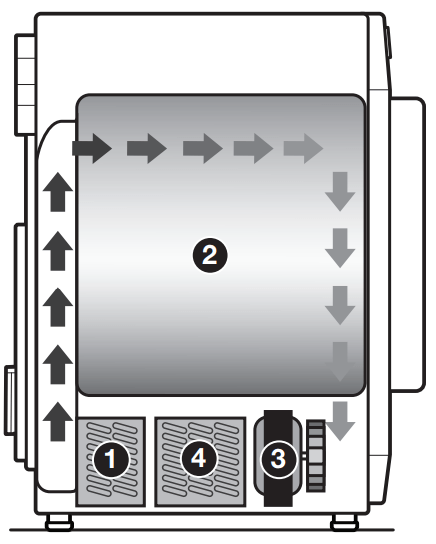
- Condenser is heating up the air
- Drying
- Air blower
- Evaporator is drying air and discharging condensation water
Benefits of a Heat Pump
- ENERGY: Regenerates energy to reduce overall energy consumption.
- PERFORMANCE: Allows flexibility to manage drying performance and energy savings.
- FABRIC CARE: Capability to use less heat than vented dryer.
- VENTLESS DESIGN: Allows installation in more locations throughout the home.
New Sounds from a Heat Pump
- Dryer runs on a compressor like your refrigerator and you may notice a hum from the compressor.
- The water from wet clothes is pumped out to your drain or water tank. You may notice a gurgling sound occasionally.
Use Automatic Cycles for better fabric care and energy savings
Use the Automatic Cycles to provide the most energy savings and enhanced fabric care from the dryer. During Automatic Cycles, heat pump unit temperature and moisture level are sensed in the load. This sensing occurs throughout the drying cycle and the dryer shuts off when the load reaches the selected dryness. Use the NORMAL dryness level to provide optimal energy savings.
With Timed Dry, the dryer runs the amount of time set and can result in shrinkage, wrinkling, and static due to over-drying. Use Timed Dry for the occasional damp load that needs a little more drying time.
Control Panel and Features
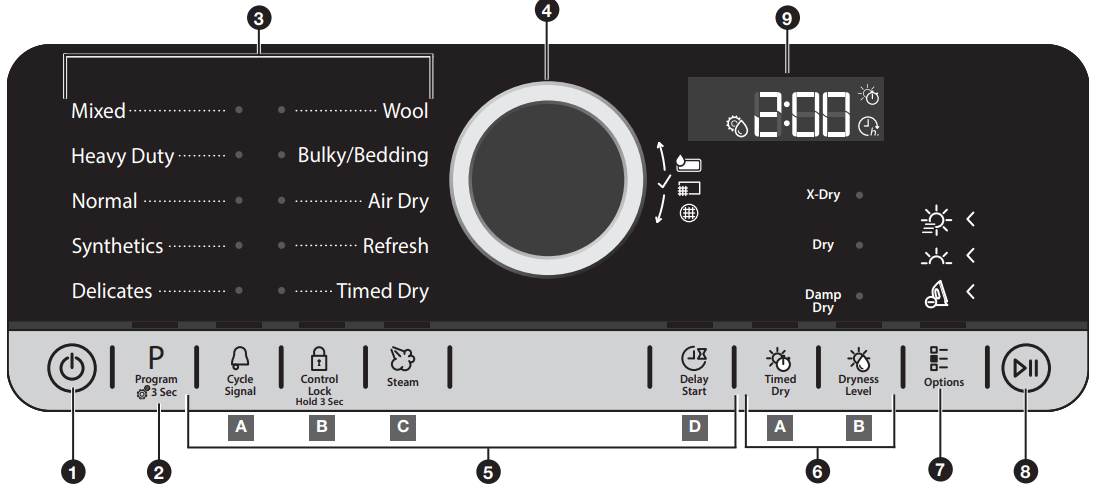
1 POWER BUTTON Touch until the indicator above the Program button lights up. Symbols appear on the control panel and sounds are played.
2 PROGRAM (cycle) When you turn on the dryer, the light above this button will turn on. The program settings which you used last will appear on the control panel. This button also lets you set water conductivity (see “Adapting the dryer to water conductivity” for more information).
3 PROGRAM/CYCLE AREA An indicator next to each program/cycle lights up as you use the knob to scroll through the list. Press the knob when the indicator next to the desired program/cycle lights up.
4 CONTROL KNOB Turn the knob to select a program/cycle for your laundry load, change dryness level, set drying time or delay start time, or select Other Options. Press the knob to confirm your selection.
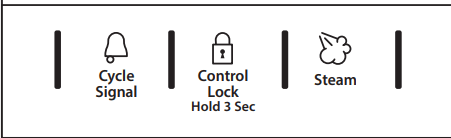
5 OPTIONS Touch to activate additional dry options or additional features on the dryer before touching the Start/Pause button. Additional dry options or additional features selected after touching the Start/Pause button may not be activated. To return to factory default cycle settings, unplug the dryer for 30 seconds, then plug back in. NOTE: Not all options are available with all cycles
- A Cycle Signal - Use to turn on or off the signal indicating the end of a drying cycle. NOTE: Touch and hold the Cycle Signal button for about one second to turn sounds on or off.
- B Control Lock - Use to lock the controls of the dryer and avoid an accidental change in cycle options or preferences during a drying cycle. Touch and hold CONTROL LOCK to lock or unlock the controls of the dryer. NOTE: The Control Lock function may be enabled when recovering from a power failure. To unlock the control, touch and hold CONTROL LOCK.
- C Steam - Touch to activate the Steam option, which adds humidity to the end of the Heavy Duty, Normal, or Synthetics cycle to help smooth out wrinkles.
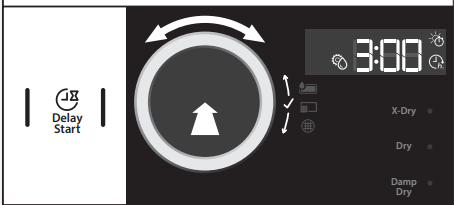
- D Delay - Start Touch to start your program/cycle at a later time.
6 SETTINGS
- A Timed Dry - Sets the length of a Timed Dry cycle.
- B Dryness Level - When using some Automatic Cycles, you may select a Dryness Level based on the type of load you are drying. NOTE: Dryness Level is for use with Automatic Cycles only.
7 OTHER OPTIONS
 Save Time - This option provides quicker drying.
 Gentle - This option dries laundry more gently by reducing the drying temperature.
 Wrinkle Shield™ - This option helps to avoid creasing if you cannot unload the laundry soon after the program/cycle ends. The dryer starts to tumble the laundry periodically a few minutes after the program/cycle ends. This tumbling will last up to approximately 12 hours. Tumbling can be stopped any time by touching the Power button to turn off the dryer.
8 START/PAUSE BUTTON Touch to start, or touch and hold to pause, a program/ cycle.
9 LED DISPLAY When you select a program/cycle, its default settings will light up and the Estimated Time Remaining will be displayed. Factors such as load size and dryness level may affect the time shown in the display.
 Drying time
 Delay start
 Conductivity adjustment
USING YOUR DRYER
1. Empty water tank
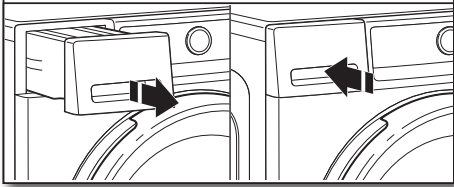
Hold the handle and carefully pull out the water tank. Holding the full water tank with both hands, empty out the water. Then push the container back into place. Make sure that it is properly inserted.
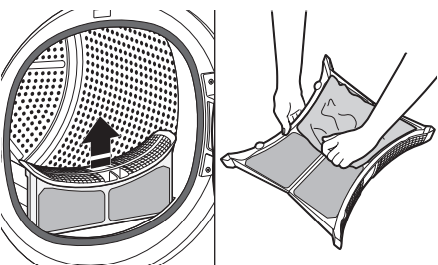
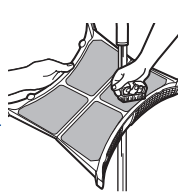
2. Clean door lint screen
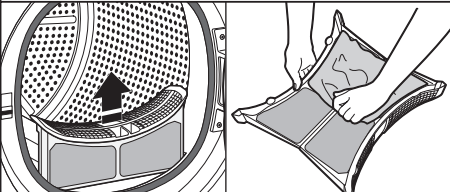
Clean the lint screen before each load. Pull the lint screen straight up and out. Press tab down and open lint screen. Roll lint off the screen with your fingers. Push the lint screen firmly back into place.
IMPORTANT: Clean lint screen before each dryer use as a screen blocked with lint will increase drying time.
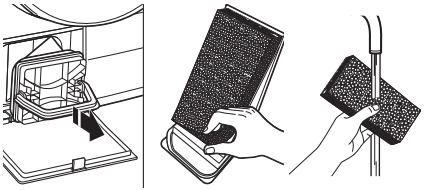
3. Clean bottom filter
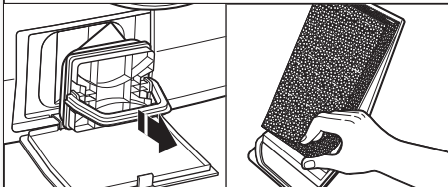
Clean the bottom filter after every 5 cycles. Open the filter door on the bottom of the dryer and grab the handle to pull out filter. Remove the foam from the bottom filter. Clean the filter foam and filter by hand or rinse with water – do not wash the filter foam in a washer. Wring out the filter foam – do not insert it in the bottom filter dripping wet. For additional cleaning information, see “Dryer Care.” Replace the filter foam on the bottom filter. Replace the bottom filter in the filter chamber. Fold the filter handle down and close the bottom door.
NOTE: To turn off the “Clean bottom filter” status indicator, the filter must be removed and replaced with the Power button touched ON and no cycle running.
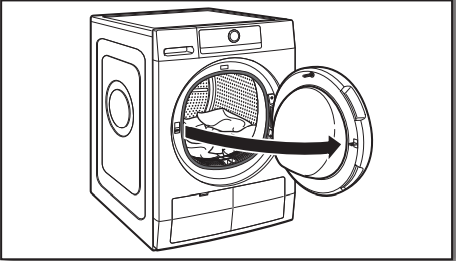
4. Load dryer
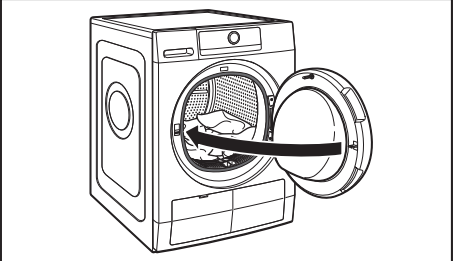
Open the door by pulling on the handle. Place laundry in the dryer. Add a dryer sheet to wet load if desired. Close the door.
IMPORTANT: Do not tightly pack the dryer. Items need to tumble freely. Tightly packing can lead to poor drying performance and may increase wrinkling and tangling.
5. Touch Power button to turn on dryer

6. Select program/cycle
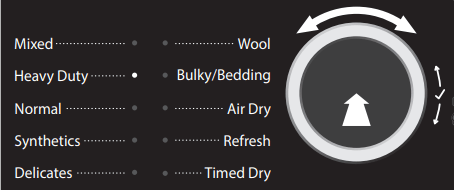
Turn the knob to select a program/cycle for your laundry load. As you turn the knob, an indicator light will light up next to the program/cycle names to the left of the knob. Stop turning when the indicator next to the desired program/cycle lights up. Press the knob to confirm your selection. See “Program/Cycle Guide” for details on program/cycle features.
7. Select options, if desired
8. Setting a delayed start, if desired
If you do not want to begin a cycle immediately, you may choose the Delay Start option. This will delay the start of the drying cycle by up to 23 hours. To set a Delayed Start:
- Touch the Delay Start button to set the desired delay time.
- Turn the knob to the number of hours you want to delay the start of the drying cycle. The delay time will appear on the display. Press the knob to confirm your selection.
After touching the Start/Pause button, the time will count down until the delay time has been reached. The dryer will start and the display will show the remaining time in the cycle.
9. If Air Dry or Timed Dry was selected, set drying time

When you select a timed cycle, the indicator light above “Timed Dry” lights up. Turn the knob to select the desired time, up to 180 minutes. Press the knob to confirm your selection.
10. If an automatic cycle was selected, set dryness level
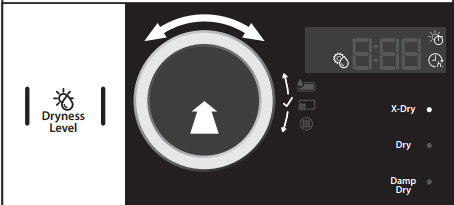
When you select an automatic cycle, the indicator light above “Dryness Level” lights up. Turn the knob to select the desired level. As you turn the knob, an indicator light will light up next to the dryness levels to the right of the knob. Stop turning when the indicator next to the desired level lights up. Press the knob to confirm your selection.
11. Select any additional options*
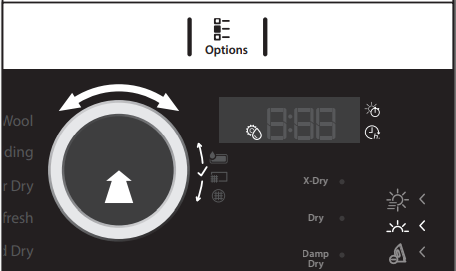
After setting drying time or dryness level, the indicator light above “Options” lights up. Turn the knob to select the desired option(s). As you turn the knob, the option symbols above the Options button will light up one at a time as you turn the knob. Stop turning when the symbol of the desired option lights up. Press the knob to confirm your selection.
Not all options and settings are available with all program/ cycles. See “Program/Cycle Guide” for available options and settings.
12. Touch Start/Pause button to begin drying program/cycle

Touch the Start/Pause button to start the drying program/ cycle. To pause a program/cycle in progress, touch the Start/ Pause button once, then touch again to continue the program/ cycle. To cancel a program/cycle, touch the Power button.
13. Touch Power button to turn off dryer after program/cycle ends

When the display indicates that the cycle has finished, touch the Power button to turn off the dryer. Open the door and take out your laundry. To save energy, the dryer turns off automatically about a quarter hour after the program/cycle ends. If not turned off right after the program/cycle ends, the dryer will tumble the laundry for about 10 minutes to prevent wrinkling. The display shows an animation.
NOTE: If the Power button is touched and held, a countdown will be displayed. At the end of the countdown, any errors will be erased and the program/cycle will restart.
14. Remove garments promptly after cycle is finished
Promptly remove garments after cycle has completed to reduce wrinkling.
DRYER CARE
CLEANING THE DRYER LOCATION
Keep dryer area clear and free from items that would block the airflow for proper dryer operation. This includes clearing piles of laundry in front of the dryer.
CLEANING THE DRYER INTERIOR
To clean dryer drum:
- Use a mild hand dish detergent mixed at a low concentration with very warm water, and rub with a soft cloth.
- Rinse well with a wet sponge or towel.
- Tumble a load of clean clothes or towels to dry drum OR Use a microfiber cloth and hot water in a spray bottle to clean the drum and a second microfiber towel to dry.
REMOVING ACCUMULATED LINT
From Inside the Dryer Cabinet: Lint should be removed every 2 years, or more often, depending on dryer usage. Cleaning should be done by a qualified appliance servicer.
CLEANING THE LINT SCREEN
Clean lint screen after every load. The lint screen is located in the door opening of the dryer. A screen blocked by lint can increase drying time.
To clean:
1. Pull the lint screen straight up and out. Press tab down and open lint screen. Roll lint off the screen with your fingers.
2. Push the lint screen firmly back into place.
IMPORTANT: Do not run the dryer with the lint screen loose, damaged, blocked, or missing. Doing so can cause overheating and damage to both the dryer and fabrics.
As-needed cleaning - Laundry detergent and fabric softener residue can build up on the lint screen. This buildup can cause longer drying times for your clothes, or cause the dryer to stop before your load is completely dry. Clean the lint screen with a nylon brush every 6 months, or more frequently, if it becomes clogged due to a residue buildup.
To wash lint screen:
- Roll lint off the screen with your fingers.
- Wet both sides of lint screen with hot water.
- Wet a nylon brush with hot water and liquid detergent. Scrub lint screen with the brush to remove residue buildup.
- Rinse screen with hot water.
- Thoroughly dry lint screen with a clean towel. Reinstall screen in dryer.
CLEANING THE BOTTOM FILTER
Clean bottom filter after every 5 loads. The filter is located in bottom corner of dryer.
1. Open the filter door on the bottom of the dryer and grab the handle to pull out the filter. Remove the foam from the bottom filter. Clean the filter foam and the filter by hand or rinse with water – do not wash the filter foam in a washer. Wring out the filter foam – do not insert it in the bottom filter dripping wet.
2. Replace the filter foam on the bottom filter. Replace the bottom filter in the filter chamber. Fold the filter handle down and close the bottom door.
IMPORTANT: Do not run the dryer with the filter loose, damaged, blocked, or missing. Doing so can cause overheating and damage to both the dryer and fabrics.
NON-USE, STORAGE, AND MOVING CARE
Non-Use or Storage Care - If you will be on vacation or not using your dryer for an extended period of time, you should:
- Empty water tank.
- Unplug dryer or disconnect power.
- Clean lint screen. See “Cleaning the Lint Screen.”
- In colder climates, store your dryer where it will not freeze. Because some water may stay in the hose, freezing can damage your dryer.
Moving Care - For power supply cord-connected dryers:
- Empty water tank.
- Unplug the power supply cord.
- Make sure leveling legs are secure in dryer base.
- Use tape to secure dryer door.
For direct-wired dryers:
- Empty water tank.
- Disconnect power.
- Disconnect wiring.
- Make sure leveling legs are secure in dryer base.
- Use tape to secure dryer door.
Reinstalling the Dryer
Follow the “Installation Instructions” section to locate, level, and connect the dryer.
INSTALLATION INSTRUCTIONS
Installation Requirements
Tools needed:
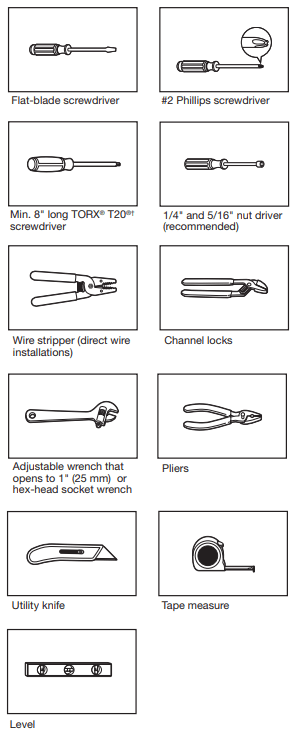
If using a power supply cord: Use a UL-listed power supply cord kit marked for use with clothes dryers. The kit should contain:
- A UL-listed 30-amp power supply cord, rated 120-/240-volt minimum. The cord should be type SRD or SRDT and be at least 4 ft. (1.22 m) long. The wires that connect to the dryer must end in ring terminals or spade terminals with upturned ends.
Additional Accessories: (Not supplied with dryer) Refer to “Operating Instructions” for information about accessories available for your dryer.
Location Requirements
Check code requirements. Some codes limit, or do not permit, installing dryer in garages, closets, mobile homes, or sleeping quarters. Contact your local building inspector.
You will need:
- A separate 30-amp circuit.
- If using power supply cord, a grounded electrical outlet located within 2 ft. (610 mm) of either side of dryer. See “Electrical Requirements.”
- Floor must support dryer weight of 200 lbs. (90.7 kg). Also consider weight of companion appliance.
- Level floor with maximum slope of 1" (25 mm) under entire dryer. If forward slope is greater than 1" (25 mm), water could run out from front of filter. If not level, clothes may not tumble properly and automatic sensor cycles may not operate correctly.
- For garage installation, place dryer at least 18" (460 mm) above floor. If using a pedestal, you will need 18" (460 mm) to bottom of dryer.
IMPORTANT: Do not operate, install, or store dryer where it will be exposed to water, weather, or at temperatures below 40°F (4°C). Lower temperatures may cause dryer not to shut off at end of automatic sensor cycles, resulting in longer drying times.
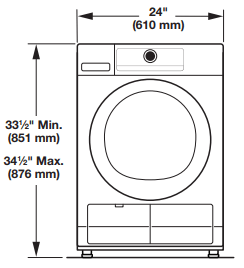
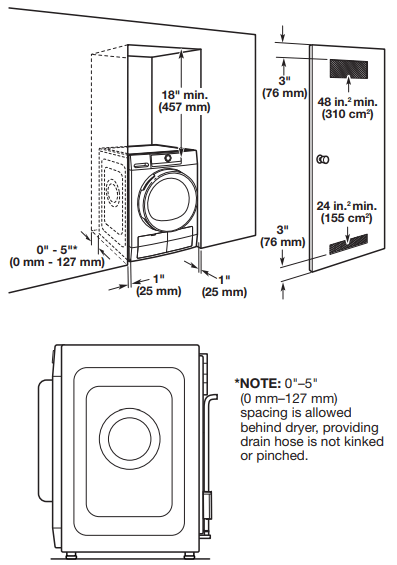
DRYER DIMENSIONS
Front view:
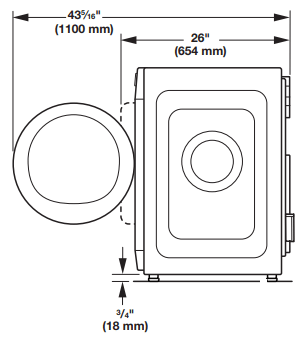
Side view:
Back view:
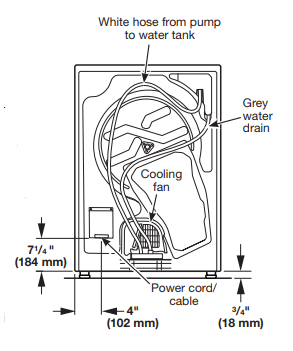
- Allow clearance behind dryer for proper drain hose routing and cooling fan ventilation. Push dryer back as far as possible and make sure drain hose is not crushed or kinked.
- Water can be drained into an alternate location. Remove the top end of the white hose from the water tank and install, for example, in a floor standpipe (see “Drain System”).
Installation spacing for recessed area or closet installation
All dimensions show recommended and minimum spacing allowed.
- Additional spacing should be considered for ease of installation and servicing.
- Additional clearances might be required for wall, door, floor, moldings, and drain system.
- Additional spacing should be considered on all sides of the dryer to reduce noise transfer.
- For closet installation with a door, minimum ventilation openings in the top and bottom of the door are required. Louvered doors with equivalent ventilation openings are acceptable.
- Companion appliance spacing should also be considered.
Recommended installation clearances (dryer only):
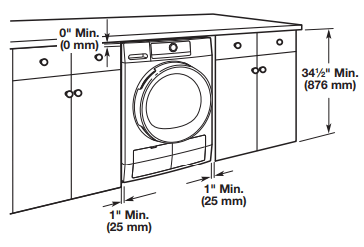
Custom under-counter installation:
Mobile home – Additional installation requirements:
This dryer is suitable for mobile home installations. The installation must conform to the Manufactured Home Construction and Safety Standard, Title 24 CFR, Part 3280 (formerly the Federal Standard for Mobile home construction and Safety, Title 24, HUD Part 280) or Standard CAN/CSA-Z240 MH.
Drain System
Drain system can be installed by routing the white hose to a floor drain, wall standpipe, floor standpipe, or laundry tub instead of to the water tank. Select the method you need.
IMPORTANT: To avoid siphoning, only 4.5" (114 mm) of drain hose should be inside standpipe; do not force excess hose into standpipe. Always secure drain hose with a cable tie (not supplied).
Floor standpipe drain system
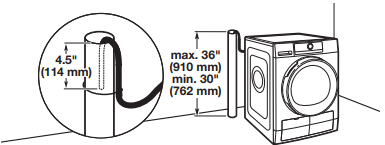
Minimum diameter for a standpipe drain: 2" (51 mm). Top of standpipe must be at least 30" (762 mm) high; install no higher than 36" (910 mm) from bottom of dryer.
Electric Installation – U.S.A. Only
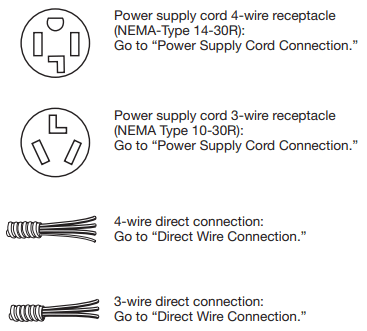
1. Choose electrical connection type
NOTE: If local codes do not permit connection of a cabinet-ground conductor to neutral wire, go to “Optional External Ground for 3-Wire Connection.” This connection can be used with either a power supply cord or a direct wire connection.
2. Remove terminal block cover
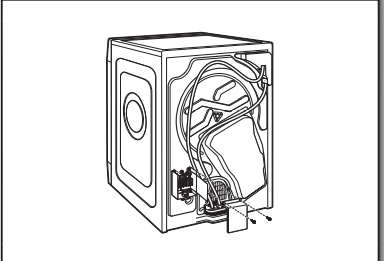
Remove hold-down screws and terminal block cover.
Level Dryer
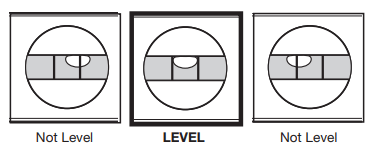
1. Level dryer
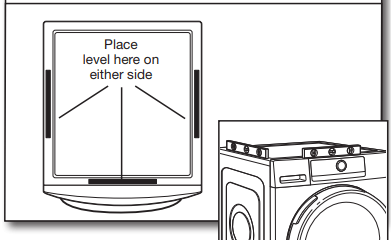
Check levelness of dryer from side to side. Repeat from front to back. NOTE: The dryer must be level for the moisture-sensing system to operate correctly. If forward slope of dryer is greater than 1" (25 mm), water could run out from front of filter.
2. Adjust leveling legs
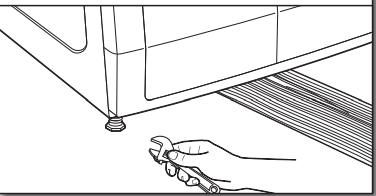
If dryer is not level, prop up using a wood block, use wrench to adjust legs up or down, and check again for levelness. Once dryer is level, make sure all four legs are snug against the floor and dryer does not rock.
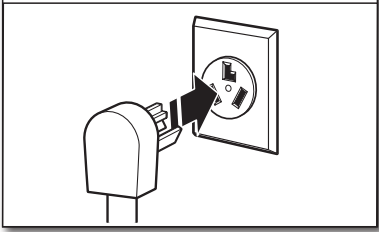
3. Plug into a grounded 3 prong outlet
Complete Installation Checklist
- Check that all parts are now installed. If there is an extra part, go back through steps to see what was skipped.
- Check that dryer is level. See “Level Dryer.”
- Check that you have all of your tools.
- Dispose of/recycle all packaging materials.
- Check dryer’s final location. q Remove any tape remaining on dryer.
- Wipe dryer drum interior thoroughly with a damp cloth to remove any dust. q Read “Using Your Dryer” in “Operating Instructions.”
- For power supply cord installation, plug into a grounded outlet. For direct wire installation, turn on power.
- Select a Timed Dry heated cycle and start dryer. If dryer will not start, check the following:
- Controls are set in a running or ON position.
- Start/Pause button has been pushed firmly and held for 3 seconds.
- Dryer is plugged into an outlet and/or electrical supply.
- Household fuse is intact and tight or circuit breaker has not tripped.
- Dryer door is closed.
This dryer automatically runs an installation diagnostic routine at the start of its first cycle. NOTE: You may notice an odor when dryer is first heated. The odor will go away.
TROUBLESHOOTING
Dryer Operation
Dryer will not run
- Door not closed completely.
- Make sure the dryer door is closed completely.
- Start/Pause button not touched firmly.
- Touch the Start/Pause button firmly.
- Bottom filter not in place.
- Place filter back in dryer and make sure the handle is properly seated. The bottom filter indicator will light up if not properly seated.
- Household fuse is blown or circuit breaker has tripped.
- There may be 2 household fuses or circuit breakers for the dryer. Check that both fuses are intact and tight, or that both circuit breakers have not tripped. Replace the fuses or reset the circuit breaker. If the problem continues, call an electrician.
- Incorrect power supply.
- Electric dryers require 240-volt power supply. Check with a qualified electrician.
- Wrong type of fuse.
Unusual Noise
Thumping noise
- Dryer hasn’t been used in a while.
- This is due to temporary flat spots on the drum rollers. The thumping sound will diminish after a few minutes.
Rattling or vibrating noise
- A small object caught between the edges of dryer drum.
- Check the front and rear edges of the drum for small objects. Clean out pockets before laundering.
- Dryer isn’t properly leveled.
- The dryer may vibrate if not properly installed. See “Installation Instructions.” All four dryer feet should be in firm contact with the floor.
- Clothing is balled up in dryer.
- When balled up, the load will bounce, causing the dryer to vibrate. Separate the load items and restart the dryer.
Loud humming or increased noise during cycle
- Load is packed tightly.
- Reduce load size to recommended load size in “Program/Cycle Guide.” Run the dryer for 5–10 minutes.
Dryer Results
Clothes are not drying satisfactorily or drying times are too long
- Lint screen is clogged with lint.
- Clean lint screen before each load.
- Bottom filter and screen is clogged with lint.
- Clean bottom filter after every 5th cycle.
- The dryer is not level.
- Clothes not contacting the moisture sensors during Automatic Cycles. See “Level Dryer” in “Installation Instructions.”
- Fabric softener sheets are blocking the grille.
- Separate the load to tumble freely.
- The load is too large and heavy to dry quickly.
- The air outlet grille is just inside the door. Check that it is not blocked by a fabric softener sheet. Use only one fabric softener sheet, and use it only once.
- The dryer is located in a room with temperature below 45ºF (7ºC).
- Proper operation of dryer cycles requires temperatures above 45ºF (7ºC).
- The dryer is located in a closet
- Closet doors must have ventilation openings at the top and bottom of the door. The front of the dryer requires a minimum of 1" (25 mm) of airspace, and, for most installations, the rear of the dryer requires 5" (127 mm). See “Installation Instructions.”
There may be some water in the bottom filter or on floor
- The dryer is not level.
- Floor needs to have a slope less than 1" (25 mm). See “Level Dryer” in “Installation Instructions.”
- Bottom filter is not properly seated.
- Make sure filter is placed in the housing cabinet correctly. See “Cleaning the Bottom Filter.”
- Drain hose is longer than what was provided. Verify water container and hose connections.
- Drain hose can be installed no higher than 36" (91 cm) from bottom of the dryer. See “Drain System” in “Installation Instructions.”
Cycle time is too short
- The load may not be contacting the sensor strips on Automatic Cycles.
- Level the dryer. See “Installation Instructions.” All four dryer feet should be in firm contact with the floor.
- The Automatic Cycle is ending early.
- Change the dryness level setting on Automatic Cycles. Increasing or decreasing the dryness level will change the amount of drying time in a cycle. If loads are consistently ending too early, also see “Adapting the dryer to water conductivity.”
Lint on load
- Lint screen is clogged with lint.
- Clean lint screen before each load.
Stains on load
- Improper use of fabric softener.
- Add dryer fabric softener sheets at the beginning of the cycle. Fabric softener sheets added to a partially dried load can stain your garments. Do not use fabric softener sheets with steam cycles.
Stains on drum
- Loose dyes in clothes.
- Drum stains are caused by dyes in clothing (usually blue jeans). These will not transfer to other clothing.
Loads are wrinkled
- The load was not removed from dryer at the end of the cycle.
- Refer to garment care label instructions. Dry-clean-only garments are not recommended.
- The dryer was tightly packed.
- Dry smaller loads that can tumble freely. Results may also vary depending on fabric type.
Odors
- Recent painting, staining, or varnishing in the area where your dryer is located.
- Ventilate the area. When the odors or fumes are gone from the area, rewash and dry the clothing.
- Odors are left in garments after wearing.
- Rewash and dry the clothing
Load too hot
- Load removed before cool-down portion of cycle complete.
- Allow the dryer to complete the cool-down portion of the cycle before removing the load.
Stains or lint buildup on wall behind dryer
- Dryer too close to wall.
- Move dryer away from wall and make sure you have proper ventilation.
Dryer Displays Code Message or LED Symbol Lights Up

- Water tank is filled with water.
- Empty water tank; make sure to insert it properly afterwards.
- Water tank is not correctly positioned.
- Push in the water tank to make sure that it is correctly inserted in the tank compartment.

- Bottom filter is blocked by lint.
- Clean the bottom filter; make sure to insert it properly afterwards.
- Bottom filter is not correctly positioned.
- Push in the bottom filter and move the release levers into a vertical position to make sure the filter is correctly inserted in the filter compartment. Close the flap.

- Door filter is blocked by lint.
- Remove and clean the door filter; afterwards, make sure to insert it properly in the filter compartment.
- Door filter is not correctly positioned.
- Check position of the door filter; make sure that it is properly inserted in the filter compartment.
F01 to F04
- A component has failed.
- Touch and hold the Power button for at least 3 seconds while dryer is on.
F05 to F09
- A component has failed.
- Turn off and unplug the dryer. Immediately open the door and take out the laundry so that the heat can dissipate. Make sure that the ambient temperature ranges between 41°F (5°C) and 95°F (35°C). After about one hour, plug in the dryer, load the laundry, and start the program/cycle again. If the failure persists, call for service.
F10 to F24
- A component has failed.
- Turn off and unplug the dryer. After about half an hour, plug in the dryer and start the program/cycle again. If the failure persists, call for service.