
ENGLISH FRANÇAIS
OWNER'S MANUAL
DRYER
Read this owner's manual thoroughly before operating the appliance and keep it handy
for reference at all times.
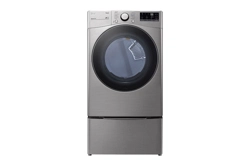
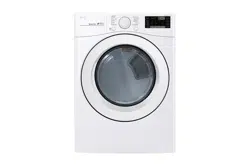
DLE3500*, DLG3501*
DLE3095*, DLE3090*
DLEX3700*, DLGX3701*
DLEX3900*, DLGX3901*
MFL67652523
Rev.04_011119
www.lg.com
Copyright © 2018 - 2019 LG Electronics Inc. All Rights Reserved.

2
TABLE OF CONTENTS
3 PRODUCT FEATURES
4 SAFETY INSTRUCTIONS
5 IMPORTANT SAFETY INSTRUCTIONS
9 PRODUCT OVERVIEW
9 Parts
9 Accessories
10 INSTALLATION
10 Installation Overview
10 Product Specifications
11 Installation Location Requirements
12 Clearances
14 Leveling the Dryer
15 Reversing the Door
16 Installing the Side Vent Kit
17 Stacking the Dryer
18 Venting the Dryer
20 Connecting the Inlet Hose
(Steam Models)
21 Connecting Gas Dryers
23 Connecting Electric Dryers
24 Special Electrical Requirements
24 Final Installation Check
25 Installation Test (Duct Check)
28 OPERATION
28 Using the Dryer
29 Check the Lint Filter Before Every Load
29 Sorting Laundry
29 Loading the Dryer
30 Control Panel
33 Cycle Guide
37 Cycle Modifier Buttons
37 Option Buttons
38 Special Functions
39 Steam Functions
(Steam Models)
41 SMART FUNCTIONS
41 LG SmartThinQ Application
44 Smart Diagnosis™ Function
45 MAINTENANCE
45 Regular Cleaning
46 TROUBLESHOOTING
46 FAQs: Frequently Asked Questions
47 Before Calling for Service
53 WARRANTY
3PRODUCT FEATURES
ENGLISH
PRODUCT FEATURES
Easy-to-Use Control Panel
Rotate the cycle selector knob to select the desired dry cycle. Add cycle options or adjust settings with the
touch of a button.
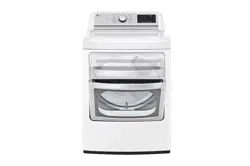
Easy-Access Reversible Door
The wide-opening door provides easy access for loading and unloading. The door hinge can be reversed to
adjust for installation location.
Steam Functions (Steam Models)
LG’s steam technology allows you to inject fabrics with a swirling jet of hot steam to refresh clothes, reduce
static, and make ironing easier. Simply select the Steam Fresh™ cycle, or you can add a Steam option to
selected cycles.
Flow Sense™ Duct Blockage Sensing System Indicator
The Flow Sense™ duct blockage sensing system detects and alerts you to restrictions in the installed
household ductwork that reduce exhaust airflow through the dryer. If you see the alert: Clean or repair the
ducts to remove the restrictions. Keep your ducts clean to help increase efficiency and reduce long drying
times caused by blocked ducts.
Smart Diagnosis™
Should you experience any technical difficulty with your dryer, it has the capability of transmitting data via your
telephone to the Customer Information Center. The call center agent records the data transmitted from your
machine and uses it to analyze the issue, providing a fast and effective diagnosis.
SmartThinQ™
Download the new LG smart phone app to set options, self-diagnose and troubleshoot problems with the
appliance, and other useful features. This function uses Wi-Fi.
C
E
R
T
I
F
I
E
D
D
E
S
I
G
N
Protocol P154 Sanitization
Performance of Residential Clothes
dryer
4 SAFETY INSTRUCTIONS
SAFETY INSTRUCTIONS
READ ALL INSTRUCTIONS BEFORE USE
Your safety and the safety of others are very important.
We have provided many important safety messages in this manual and on your appliance. Always read and
follow all safety messages.
This is the safety alert symbol.
This symbol alerts you to potential hazards that can kill or injure you and others.
All safety messages will follow the safety alert symbol and either the word WARNING or CAUTION.
These words mean:
WARNING
You may be killed or seriously injured if you do not follow instructions.
CAUTION
You may be slightly injured or cause damage to the product if you do not follow instructions.
All safety messages will tell you what the potential hazard is, tell you how to reduce the chance of injury, and
tell you what may happen if the instructions are not followed.
WARNING- Risk of Fire
Install the clothes dryer according to the manufacturer’s instructions and local codes.
• Clothes dryer installation must be performed by a qualified installer.
• Do not install a clothes dryer with flexible plastic venting materials. If flexible metal (foil type) duct is installed,
it must be of a specific type identified by the appliance manufacturer as suitable for use with clothes dryers.
Flexible venting materials are known to collapse, be easily crushed, and trap lint. These conditions will obstruct
clothes dryer airflow and increase the risk of fire.
• To reduce the risk of severe injury or death, follow all installation instructions.
• Save these instructions.
WARNING
FIRE OR EXPLOSION HAZARD
Failure to follow safety warnings exactly could result in serious injury, death or property damage.
• Do not store or use gasoline or other flammable vapors and liquids in the vicinity of this or any other
appliance.
• WHAT TO DO IF YOU SMELL GAS
- Do not try to light any appliance.
- Do not touch any electrical switch; do not use any phone in your building.
- Clear the room, building or area of all occupants.
- Immediately call your gas supplier from a neighbor’s phone. Follow the gas supplier’s instructions.
- If you cannot reach your gas supplier, call the fire department.
• Installation and service must be performed by a qualified installer, service agency or your gas supplier.

5SAFETY INSTRUCTIONS
ENGLISH
IMPORTANT SAFETY INSTRUCTIONS
WARNING
To reduce the risk of explosion, fire, death, electric shock, scalding or injury
to persons when using this product, follow basic precautions, including the
following:
INSTALLATION
• Before use, the appliance must be properly installed as described in this manual.
• Connect to a properly rated, protected, and sized power circuit to avoid electrical overload.
• To reduce the risk of severe injury or death, follow all installation instructions.
• The appliance must be installed and electrically grounded by qualified service personnel in accordance with
local codes.
• Disconnect the power cord, house fuse or circuit breaker before installing or servicing the appliance.
• When moving or installing the product in a different location, call qualified service personnel for installation
and service.
• Keep packing materials out of the reach of children. Packaging material can be dangerous for children.
There is a risk of suffocation.
• Moving or installation of the appliance requires two or more people.
• This appliance is not designed for maritime use or for mobile installations such as in RVs, trailers, or aircraft.
• Store and install the appliance where it will not be exposed to temperatures below freezing or exposed to
outdoor weather conditions.
• This appliance must be positioned near to an electrical power supply.
• Do not, under any circumstances, cut or remove the third (ground) prong from the power cord.
• When installing or moving the appliance, be careful not to pinch, crush, or damage the power cord.
• Do not install the appliance in humid spaces.
• Destroy the carton, plastic bag, and other packing materials after the appliance is unpacked. Children might
use them for play. Cartons covered with rugs, bedspreads, or plastic sheets can become airtight chambers.
• Adhere to all industry recommended safety procedures including the use of long sleeved gloves and safety
glasses.
• Never attempt to operate this appliance if it is damaged, malfunctioning, partially disassembled, or has
missing or broken parts, including a damaged cord or plug.
• Do not install a clothes dryer with flexible plastic venting materials. If flexible metal (foil type) duct is
installed, it must be of a specific type identified by the appliance manufacturer as suitable for use with
clothes dryers. Flexible venting materials are known to collapse, be easily crushed, and trap lint. These
conditions will obstruct clothes dryer airflow and increase the risk of fire.

6 SAFETY INSTRUCTIONS
• Place the dryer at least 18 inches above the floor for a garage installation.
• Do not use sheet metal screws or other fasteners which extend into the duct that could catch lint and reduce
the efficiency of the exhaust system. Secure all joints with duct tape.
• Use only rigid, semi-rigid or flexible metal 4-inch diameter duct inside the dryer cabinet or for exhausting to
the outside. Use of plastic or other combustible ductwork may cause a fire. Punctured ductwork may cause
a fire if it collapses or becomes otherwise restricted in use or during installation.
• The exhaust duct must be 4 inches (10.2 cm) in diameter with no obstructions. The exhaust duct should be
kept as short as possible. Make sure to clean any old ducts before installing your new dryer.
• Rigid, semi-rigid or flexible metal ducting is recommended for use between the dryer and the wall. All non-
rigid metal transition duct must be UL-listed. Use of other materials for transition duct could affect drying
time.
• Ductwork is not provided with the dryer, and you should obtain the necessary ductwork locally. The end cap
should have hinged dampers to prevent backdraft when the dryer is not in use.
• Gas dryers MUST be exhausted to the outside.
• The dryer exhaust system must be exhausted to the outside of the dwelling. If the dryer is not exhausted
outdoors, some fine lint and large amounts of moisture will be expelled into the laundry area. An
accumulation of lint in any area of the home may create a health and fire hazard.
• Do not install near another heat source such as a stove, oven or heater.
• Keep area around the exhaust opening and adjacent surrounding areas free from the accumulation of lint,
dust, and dirt.
• The appliance must not be supplied through an external switching device, such as a timer, or connected to
a circuit that is regularly switched on and off by a utility.
OPERATION
• Repair or immediately replace all power cords that have become frayed or otherwise damaged. Do not use
a cord that shows cracks or abrasion damage along its length or at either end.
• If you detect a strange sound, a chemical or burning smell, or smoke coming from the appliance, unplug it
immediately, and contact an LG Electronics customer information center.
• Never unplug the appliance by pulling on the power cord. Always grip the plug firmly and pull straight out
from the outlet.
• Do not use an extension cord or adapter with this appliance.
• Do not grasp the power cord or touch the appliance controls with wet hands.
• Do not modify or extend the power cord.
• If the product has been submerged, contact an LG Electronics customer information center for instructions
before resuming use.
• Do not store or use gasoline or other flammable vapors and liquids in the vicinity of this or any other
appliance.
• Keep the area underneath and around your appliances free of combustible materials (lint, paper, rags, etc.),
gasoline, chemicals and other flammable vapors and liquids.
• This appliance is not intended for use by persons (including children) with reduced physical, sensory or
mental capabilities, or lack of experience and knowledge, unless they have been given supervision or
instruction concerning the use of the appliance by a person responsible for their safety.

7SAFETY INSTRUCTIONS
ENGLISH
• Read all instructions before using the appliance and save these instructions.
• Use this appliance only for its intended purpose.
• Do not abuse, sit on, or stand on the door of the appliance.
• Do not allow children to play on, in or with the appliance. Close supervision of children is necessary when
the appliance is used near children.
• Do not tamper with controls.
• In the event of a gas leak (propane gas, LP gas, etc.) do not operate this or any other appliance. Open a
window or door to ventilate the area immediately.
• Under certain conditions, hydrogen gas may be produced in a hot-water system that has not been used
for two weeks or more. HYDROGEN GAS IS EXPLOSIVE. If the hot-water system has not been used for
such a period, before using the appliance turn on all hot water faucets and let the water flow from each for
several minutes. This will release any accumulated hydrogen gas. As the gas is flammable, do not smoke or
use an open flame during this time.
• Fix the drain hose securely in place.
• Do not put oily or greasy clothing, candles or flammable materials on top of the appliance.
• Do not use fabric softeners or products to eliminate static unless recommended by the manufacturer of the
fabric softener or product.
• Do not reach into the appliance if the drum is moving.
• Do not dry articles that have been previously cleaned in, washed in, soaked in, soiled with or spotted with
gasoline, dry cleaning solvents, vegetable oil, cooking oil or other flammable or explosive substances, as
they give off vapors that could ignite or explode.
• Do not use heat to dry articles containing foam rubber or similarly textured rubber-like materials.
• Do not store plastic, paper, or clothing that may burn or melt on top of the dryer during operation.
• Always check the inside of the appliance for foreign objects.
• Gas appliances can cause minor exposure to four potentially hazardous substances, namely benzene,
carbon monoxide, formaldehyde, and soot, caused primarily by the incomplete combustion of natural gas or
LP fuels.
• Properly adjusted dryers will minimize incomplete combustion. Exposure to these substances can be
minimized further by properly venting the dryer to the outdoors.
STEAM (Steam models)
• Do not open the dryer door during STEAM CYCLE.
• Do not touch the steam nozzle in the drum during or after the STEAM CYCLE.
8 SAFETY INSTRUCTIONS
MAINTENANCE
• Do not repair or replace any part of the appliance. All repairs and servicing must be performed by qualified
service personnel unless specifically recommended in this Owner’s Manual. Use only authorized factory
parts.
• Do not disassemble or repair the appliance by yourself.
• Remove any dust or foreign matter from the power plug pins.
• Disconnect this appliance from the power supply before cleaning and attempting any user maintenance.
Turning the controls to the OFF position does not disconnect this appliance from the power supply.
• Remove the door before the appliance is removed from service or discarded to avoid the danger of children
or small animals getting trapped inside.
• Unplug the appliance before cleaning to avoid the risk of electric shock.
• Clean the lint filter before or after each load.
• The interior of the appliance and exhaust duct should be cleaned periodically by qualified service personnel.
GROUNDING INSTRUCTIONS
• Improper connection of the equipment-grounding conductor can result in a risk of electric shock. Check with
a qualified electrician or service personnel if you are in doubt whether the appliance is properly grounded.
Do not modify the plug provided with the appliance; if it will not fit the outlet, have a proper outlet installed by
a qualified electrician.
• The appliance must be grounded. In the event of a malfunction or breakdown, grounding will reduce the risk
of electric shock by providing a path of least resistance for electric current. The appliance is equipped with
a cord having an equipment-grounding conductor and a grounding plug. The plug must be plugged into an
appropriate outlet that is installed and grounded in accordance with all local codes and ordinances.
• This dryer must be plugged into a properly grounded outlet. Electrical shock may result if the dryer is not
properly grounded. Have the wall outlet and circuit checked by a qualified electrician to make sure the outlet
is properly grounded. Failure to follow these instructions may create an electric shock hazard and/or a fire
hazard.
WARNING
Fire Hazard
Failure to follow safety warnings exactly could result in serious injury, death or
property damage.
• Do not install a booster fan in the exhaust duct.
• Install all clothes dryers in accordance with the installation instructions of the manufacturer of the dryer.
SAVE THESE INSTRUCTIONS
9PRODUCT OVERVIEW
ENGLISH
PRODUCT OVERVIEW
Parts
Control panel
Lint filter
Leveling feet
Reversible
door
Power Cord
(gas models)
Gas connection
(gas models)
Exhaust Duct Outlet
Terminal Block
Access Panel
(electric models)
Accessories
Included Accessories
NOTE
• For your safety and extended product life, use only authorized components. The manufacturer is not
responsible for product malfunction or accidents caused by the use of unauthorized components or parts.
• The images in this manual may be different from the actual components and accessories which are subject to
change by the manufacturer without prior notice for product improvement purposes.
Drying Rack
(on some models)
Optional Accessories
Pedestal (sold separately) Stacking kit (sold separately) Side vent kit
(sold separately)
Kit No. 383EEL9001B
Y connector
(Steam Models)
Hoses
(Steam Models)
10 INSTALLATION
INSTALLATION
Installation Overview
Please read the following installation instructions first after purchasing this product or transporting it to another
location.
Check and choose the
proper location
Level the dryer Vent the dryer
Product Specifications
The appearance and specifications listed in this manual may vary due to constant product improvements.
Dryer Models
DLE3500* / DLG3501* /
DLE3095* / DLE3090*
DLEX3700* /
DLGX3701*
DLEX3900* /
DLGX3901*
Description Non-steam Dryer Steam Dryer Steam Dryer
Electrical requirements Please refer to the rating label for detailed information.
Gas requirements
NG: 4 - 10.5-inch (10.2 - 26.7 cm) WC
LP: 8 - 13-inch (20.4 - 33.1 cm) WC
Dimensions
27” (W) X 30.2” (D) X 39” (H), 51.4” (D with door open)
68.6 cm (W) X 76.5 cm (D) X 99 cm (H), 130.5 cm (D with door open)
Net weight
Gas : 123.02 lb (55.8kg)
Electric : 122.36 lb (55.5kg)
Gas : 125.44 lb (56.9kg)
Electric : 123.90 lb (56.2kg)
Gas : 126.77 lb (57.5kg)
Electric : 125.66 lb (57kg)
Drying capacity
Steam Cycle - IEC 7.4 cu.ft. (8 lb/3.6 kg)
Normal Cycle IEC 7.4 cu.ft. (22.5 lb/10.2 kg)
Electric dryerGas dryer
Connect the Electric dryerConnect the Gas dryerConnect the inlet hose
(steam models)
Test runInstallation test
Model numbers can be found on the cabinet inside the door.
NOTE
Plug in the power cord

11INSTALLATION
ENGLISH
Installation Location Requirements
WARNING
• Read all installation instructions completely before installing and operating your dryer! It is important that
you review this entire manual before installing and using your dryer. Detailed instructions concerning
electrical connections, gas connections, and exhaust requirements are provided on the following pages.
The installation requires:
• A location that allows for proper exhaust installation. A gas dryer must be exhausted to the outdoors. See
Venting the Dryer.
• A grounded electrical outlet located within 2 ft. (61 cm) of either side of the dryer. See Connecting Electric
Dryers.
• A sturdy floor to support the total dryer weight of 200 lb (90.7 kg). The combined weight of a companion
appliance should also be considered.
• No other fuel-burning appliance can be installed in the same closet as a dryer.
• Additional clearances might be required for wall, door and floor moldings.
• Companion appliance spacing should also be considered.
NOTE
• The floor must be level, with a maximum slope of 1 inch (2.5 cm) under the entire dryer. Clothes may not
tumble properly, and automatic sensor cycles may not operate correctly if the dryer is not level.
• For garage installation, you will need to place the dryer at least 18 inches (45.7 cm) above the floor. The
standard pedestal height is 15 inches (38 cm). You will need 18 inches (45.7 cm) from the garage floor to the
bottom of the dryer.
• Do not operate your dryer at temperatures below 45 °F (7 °C). At lower temperatures, the dryer might not shut
off at the end of an automatic cycle. This can result in longer drying times.
• The dryer must not be installed or stored in an area where it will be exposed to water and/or weather.
• Check code requirements that limit, or do not permit, installation of the dryer in garages, closets, mobile homes
or sleeping quarters. Contact your local building inspector.
12 INSTALLATION
Clearances
1"*
(25 mm)
14" max.*
(356 mm)
18" min.*
(457 mm)
14" max.*
(356 mm)
18" min.*
(457 mm)
30.2"
(765mm)
5"**
(127 mm)
1"*
(25 mm)
30.2"
(765mm)
5"**
(127 mm)
24 in.
2*
(
155 cm
2
)
2*
(310 cm
2
)
3"
*
(76 mm)
48 in.
3"
*
(76 mm)
1"
(25 mm)
1"
(25 mm)
27"
(686 mm)
0"
(0 mm)
39"
(990 mm)
1"
(25 mm)
1"
(25 mm)
27"
(686 mm)
Closet Door
Vent Requirements
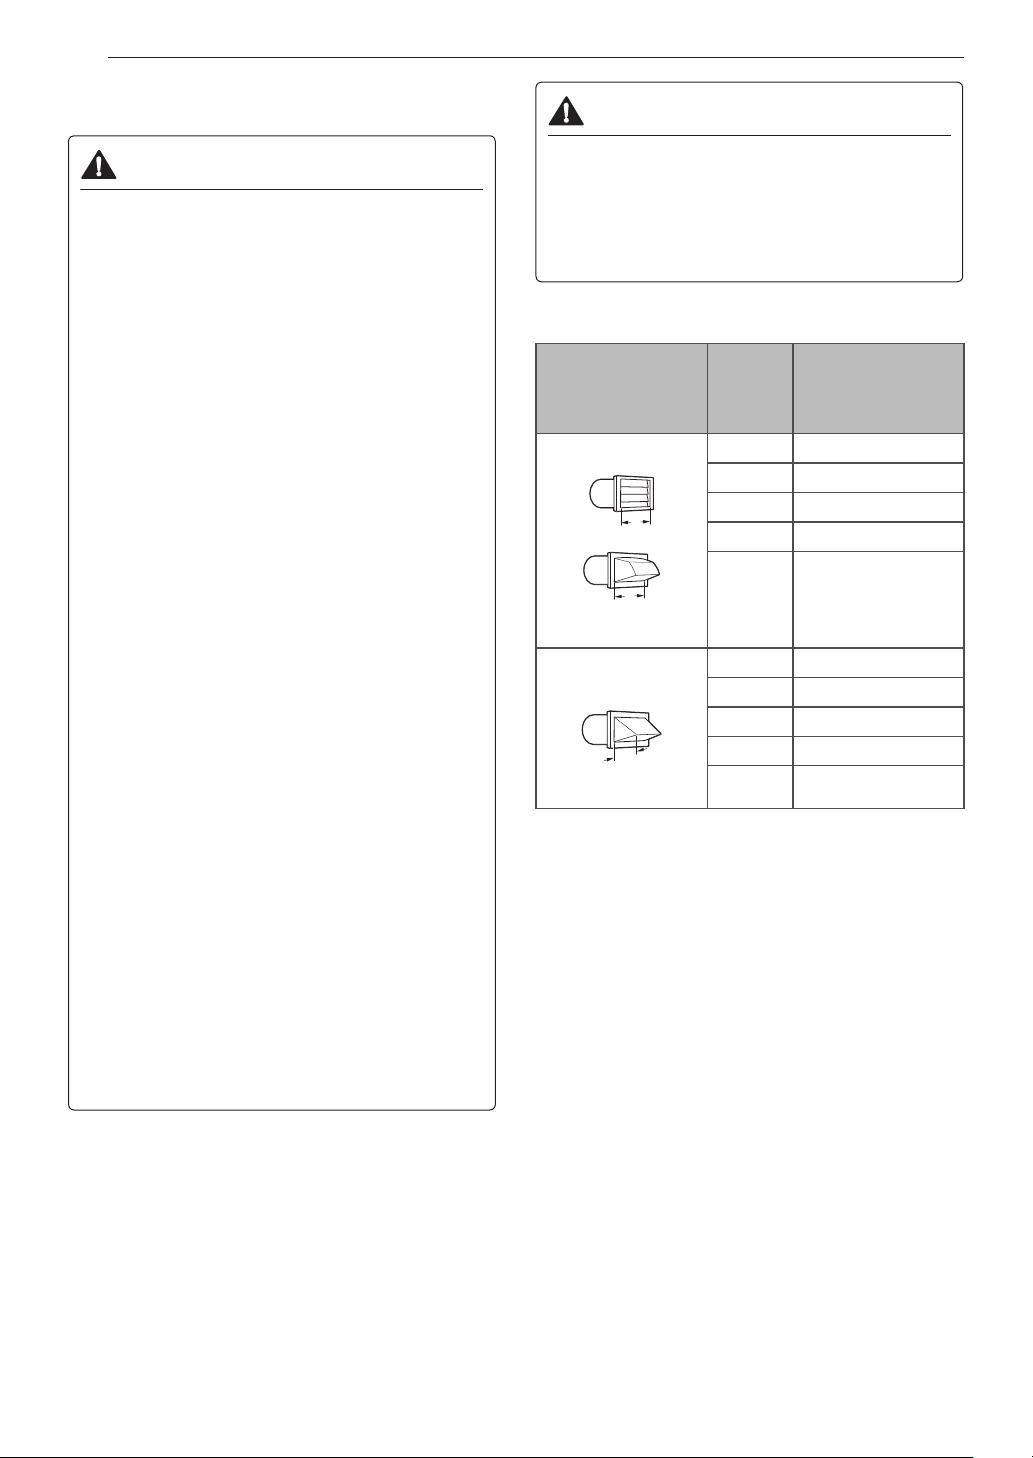
Installation Spacing for Recessed Area or Closet Installation
The following clearances are recommended for this dryer. This dryer has been tested for clearances of 1 inch
(2.5 cm) on the sides and rear. Recommended clearances should be considered for the following reasons:
• Additional clearances should be considered for ease of installation and servicing.
• Additional clearances should be considered on all sides of the dryer to reduce noise transfer. For closet
installation, with a door, minimum ventilation openings in the top and bottom of the door are required. Louvered
doors with equivalent ventilation openings are acceptable.
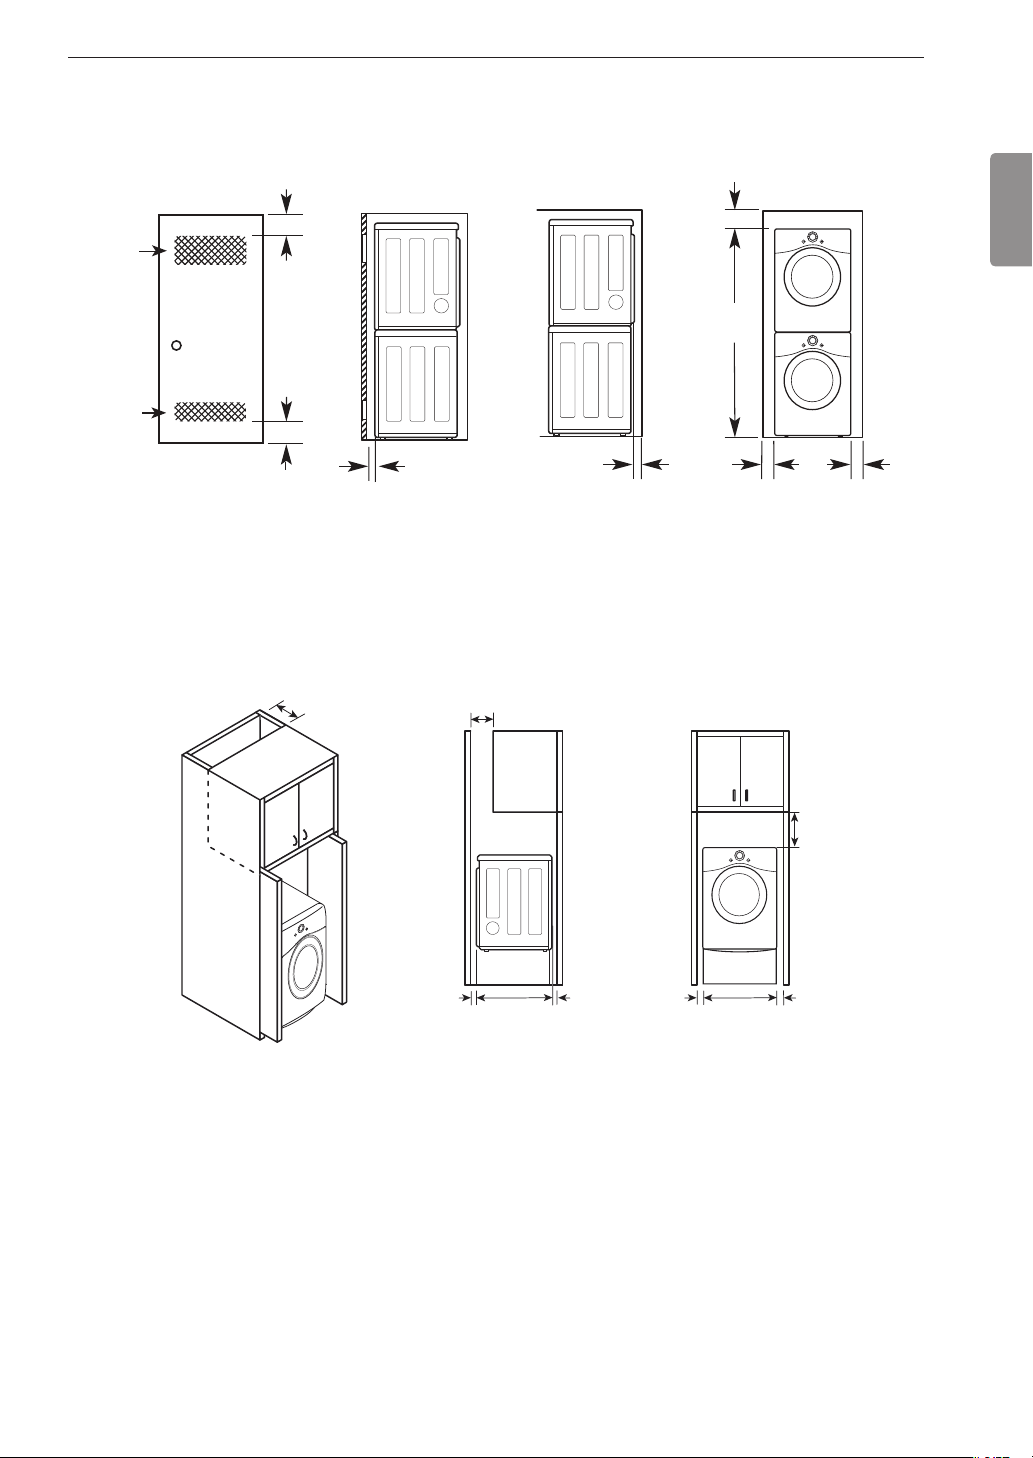
Closet Ventilation Requirements
Closets with doors must have both an upper and lower vent to prevent heat and moisture buildup in the closet.
One upper vent opening with a minimum opening of 48 sq. in. (310 cm
2
) must be installed no lower than 6 feet
above the floor. One lower vent opening with a minimum opening of 24 sq. in. (155 cm
2
) must be installed no
more than one foot above the floor. Install vent grills in the door or cut down the door at the top and bottom to
form openings. Louvered doors with equivalent ventilation openings are also acceptable.
NOTE
• There should be at least a little space around the dryer (or any other appliance) to eliminate the transfer of
vibration from one appliance to another. If there is enough vibration, it could cause appliances to make noise or
come into contact, causing paint damage and further increasing noise.
13INSTALLATION
ENGLISH
Installation Spacing for Recessed Area or Closet, with Stacked Washer and
Dryer
24 in.
2*
(155 cm
2
)
2*
(310 cm
2
)
48 in.
3"
*
(76 mm)
3"
*
(76 mm)
1"
*
(25 mm)
1"
(25 mm)
1"
(25 mm)
27"
(686 mm)
5 ½"
**
(140 mm)
6"
*
(152 mm)
77 ½"
(1968 mm)
* Required spacing
** For side or bottom venting, 2-inch (5.1 cm) of spacing is allowed.
Installation Spacing for Cabinet
For cabinet installation with a door, minimum ventilation openings in the top of the cabinet are required.
* Required spacing
7" *
(178 mm)
7" *
(178 mm)
9" *
1"
(25 mm)
1"
(25 mm)
27"
(686 mm)
5"*
(127 mm)
1"*
(25 mm)
30.2"
(765 mm)
(229 mm)
14 INSTALLATION
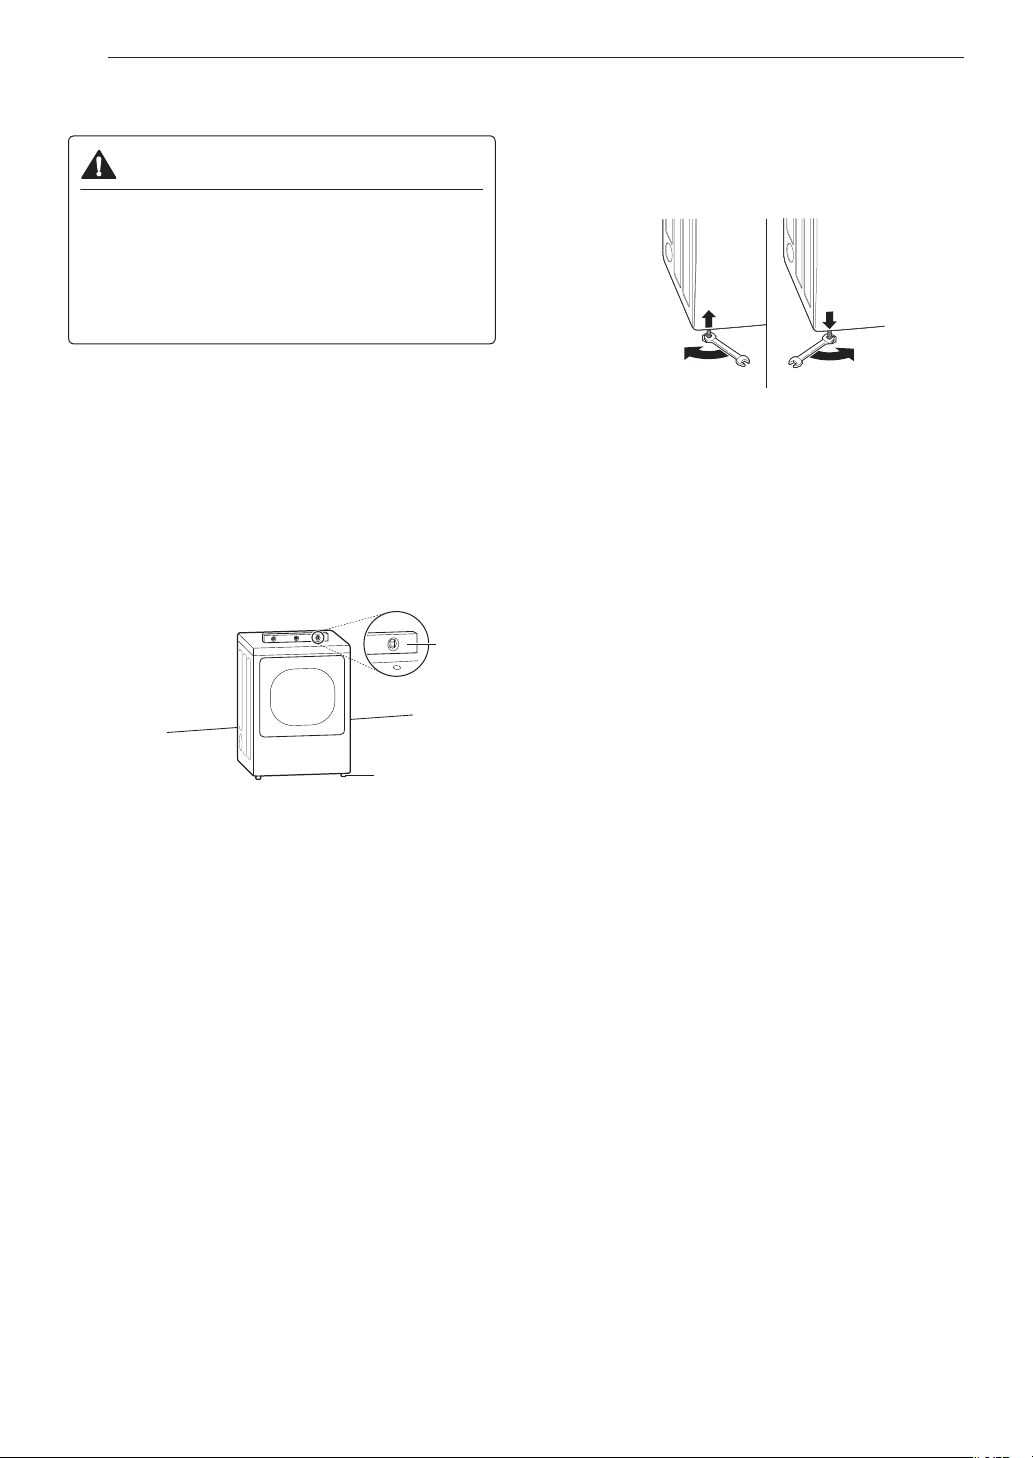
Leveling the Dryer
WARNING
To reduce the risk of serious injury or death,
follow basic precautions, including the
following:
• Use long-sleeved gloves and safety glasses.
• The appliance is heavy. Two or more people are
required when installing the dryer.
NOTE
• Adjust the leveling feet only as far as necessary
to level the dryer. Extending the leveling feet more
than necessary may cause the dryer to vibrate.
• To ensure that the dryer provides optimal drying
performance, it must be level. To minimize vibration,
noise, and unwanted movement, the floor must be a
perfectly level, solid surface.
1
Position the dryer in the final location. Place a
level across the top of the dryer.
Level
Leveling Feet
• All four leveling feet must rest solidly on the
floor. Gently push on the top corners of the
dryer to make sure that the dryer does not rock
from corner to corner.
NOTE
• If you are installing the dryer on the optional
pedestal, you must use the leveling feet on the
pedestal to level the dryer. The dryer leveling feet
should be fully retracted.
2
Use an adjustable wrench to turn the leveling
feet. Unscrew the legs to raise the dryer or
screw in the legs to lower it. Raise or lower with
the leveling feet until the dryer is level from side
to side and front to back. Make sure that all four
leveling feet are in firm contact with the floor.
15INSTALLATION
ENGLISH
Reversing the Door
Tools Required
• Phillips screwdriver
• Large flat blade screwdriver (recommended for
hinge screws if they are tight or your Phillips
screwdriver is worn)
• Small flat blade screwdriver (for lifting out parts)
WARNING
To reduce the risk of damage to the dryer,
property damage or personal injury, follow
basic precautions, including the following:
• Support the door with a stool or box that fits
under the door, or have an assistant support the
weight of the door.
• Avoid dropping the door.
• Unplug the dryer or turn off power at the main
circuit breaker before beginning door reversal.
• Always reverse the door BEFORE stacking the
dryer on top of the washer.
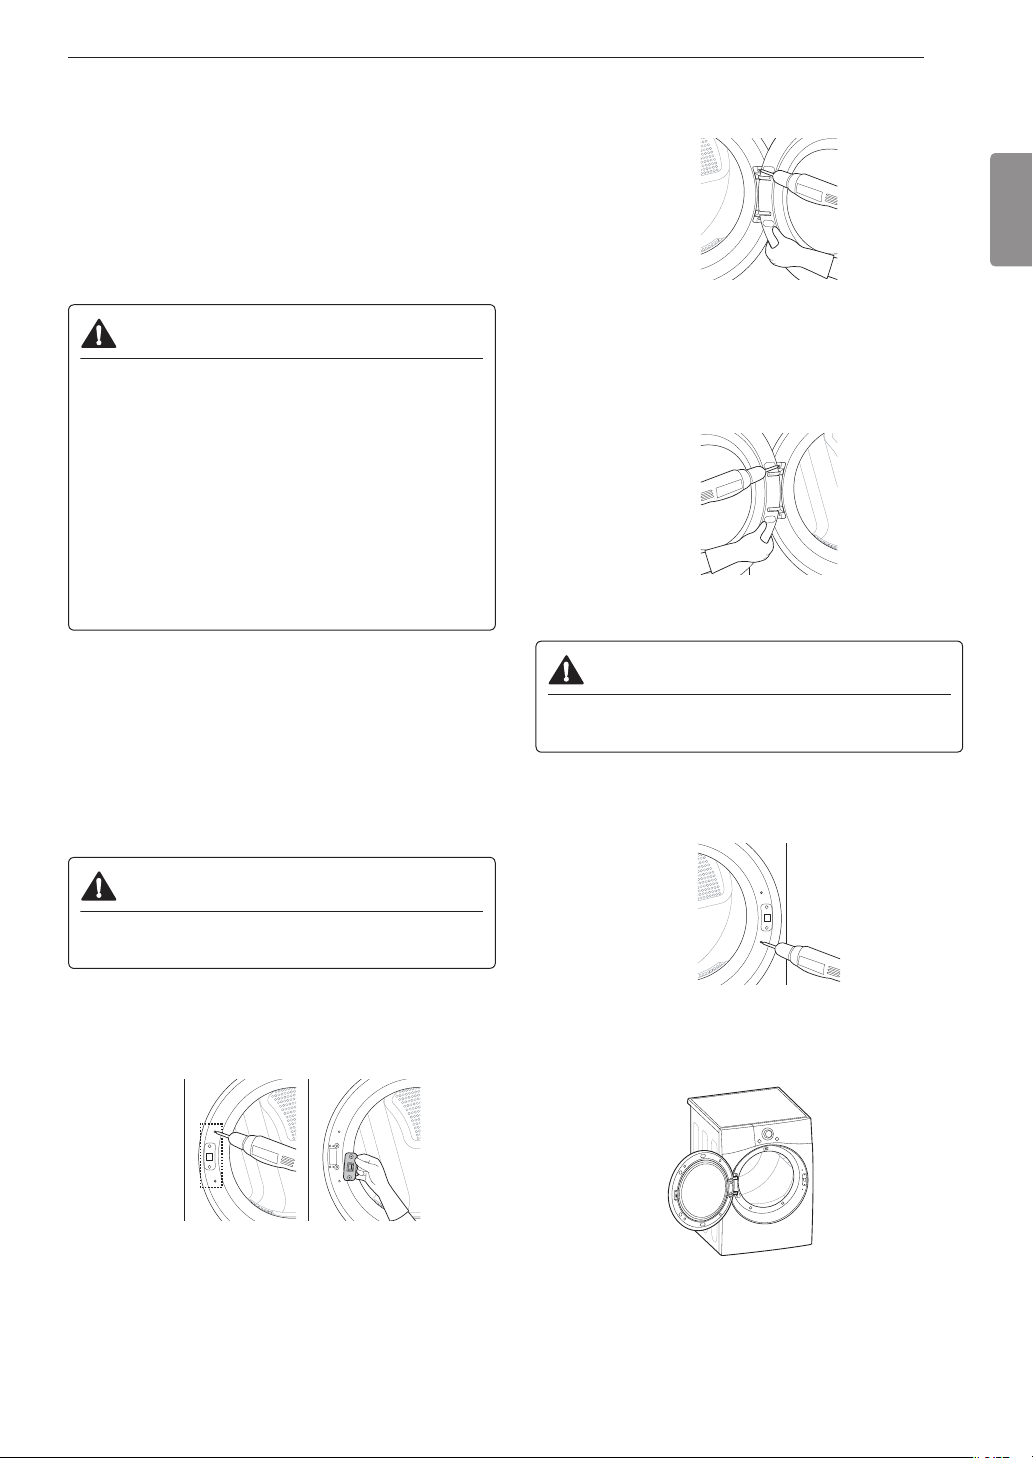
Door Reversal Instructions
The instructions here are for changing the door swing
from a right to a left side hinge. If the door has been
reversed, and it is necessary to change it back, use
care when following these instructions. Some of
the illustrations and the left/right references will be
reversed, and you will need to read the instructions
carefully.
WARNING
• Be sure to support the weight of the door before
removing the hinge screws.
1
Open the door and remove the two decorative
screws, two latch screws, and the latch on the
catch side with a screwdriver. Save these for
step 4.
2
While supporting the door, remove the 2 screws
on the door hinge. Remove the door.
3
Turn the door upside down and line up the holes
in the hinge with the holes on the opposite side
of the cabinet. Reinstall the door with the screws
removed in step 2.
WARNING
• Be sure to support the weight of the door before
installing the hinge screws.
4
Install the two decorative screws, the latch,
and two latch screws removed in step 1 on the
opposite side from which they were removed.
5
Check that the door closes properly.
16 INSTALLATION
Installing the Side Vent Kit
WARNING
To reduce the risk of serious injury, death or
property damage, follow basic precautions,
including the following:
• Use long-sleeved gloves and safety glasses.
• Use a heavy metal vent.
• Do not use plastic or thin foil ducts.
• Clean old ducts before installing this dryer.
Your new dryer is configured to vent to the rear. It can
also vent to the bottom or side (right-side venting is
not available on gas models).
An adapter kit, part number 383EEL9001B, may be
purchased from your LG retailer. This kit contains
duct components necessary to change the dryer vent
location.
1
Remove the rear exhaust duct retaining screw.
Pull out the exhaust duct.
Retaining Screw
Rear Exhaust Duct
Option 1: Side Venting
2
Press the tabs on the knockout and carefully
remove the knockout for the desired vent
opening (right-side venting is not available on
gas models). Press the adapter duct onto the
blower housing and secure to the base of the
dryer as shown.
Adapter Duct
Bracket
Knockout
3
Preassemble a 4-inch (10.2 cm) elbow to the
next 4-inch (10.2 cm) duct section, and secure
all joints with duct tape. Be sure that the male
end of the elbow faces AWAY from the dryer.
Insert the elbow/duct assembly through the
side opening and press it onto the adapter duct.
Secure it in place with duct tape. Be sure that
the male end of the duct protrudes 1.5 inches
(3.8 cm) to connect the remaining ductwork.
Attach the cover plate to the back of the dryer
with the included screw.
Cover Plate
Elbow
1½" (38 mm)
Option 2: Bottom Venting
2
Press the adapter duct onto the blower housing
and secure it to the base of the dryer as shown.
Adapter Duct
Bracket
3
Insert the 4-inch (10.2 cm) elbow through the
rear opening and press it onto the adapter duct.
Be sure that the male end of the elbow faces
down through the hole in the bottom of the
dryer. Secure it in place with duct tape. Attach
the cover plate to the back of the dryer with the
included screw.
Cover Plate
Elbow
17INSTALLATION
ENGLISH
Stacking the Dryer
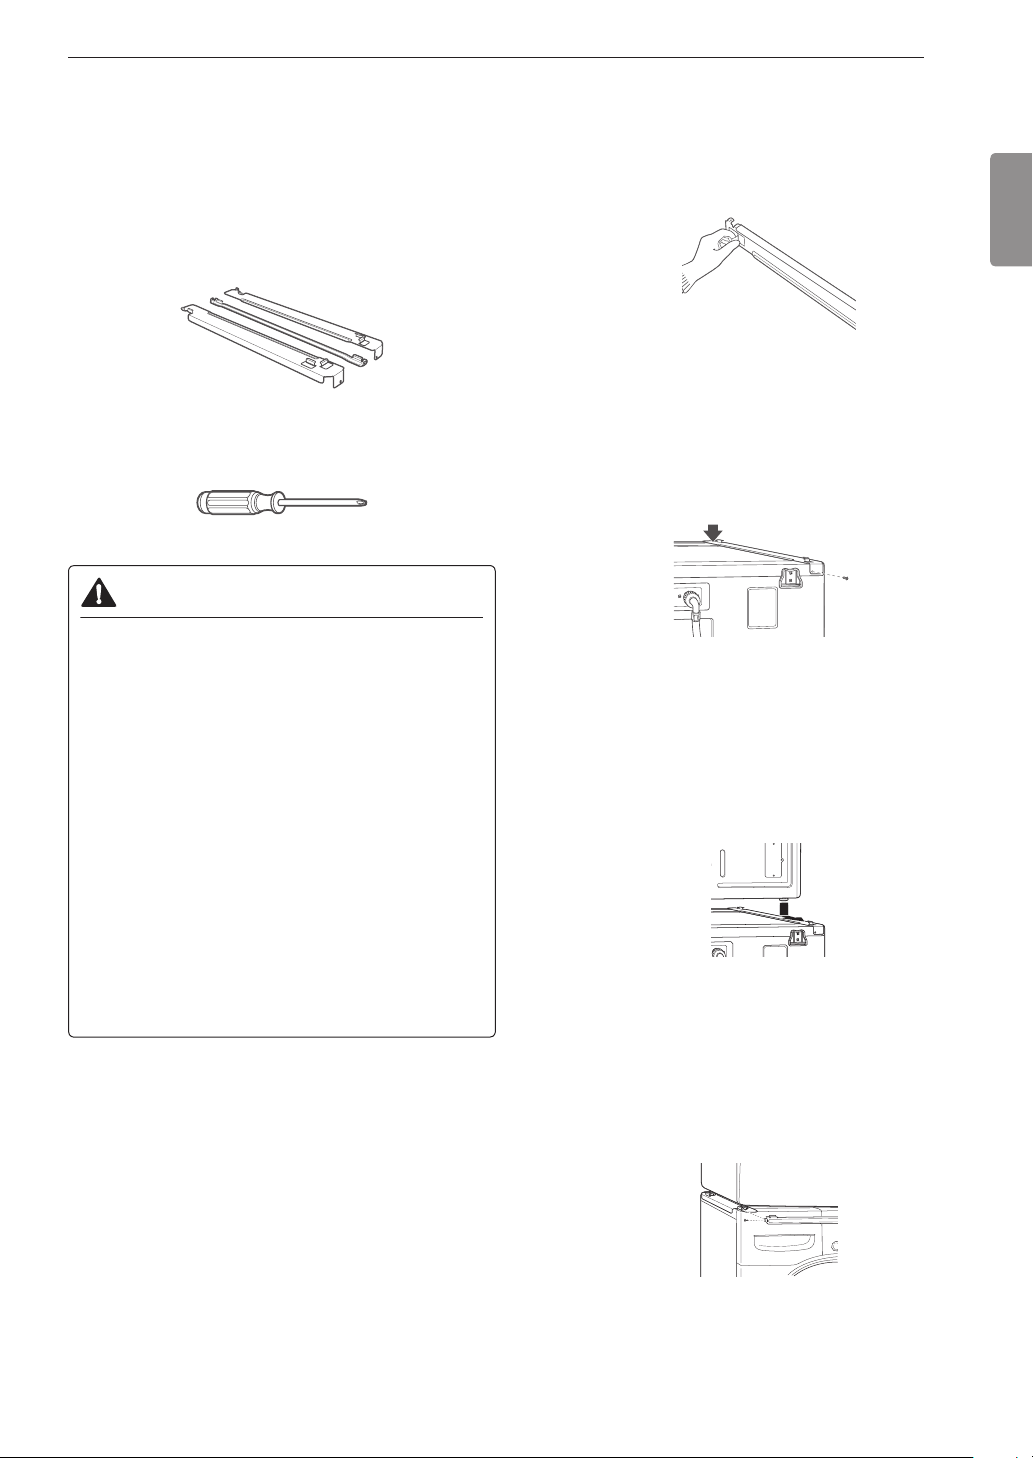
Stacking Kit Installation
This stacking kit includes:
• Two (2) side rails
• One (1) front rail
• Four (4) screws
Tools Needed for Installation:
• Phillips screwdriver
WARNING
To reduce the risk of electrical shock, fire,
explosion, property damage, serious injury or
death, follow basic precautions, including the
following:
• The weight of the dryer and the height of
installation make this stacking procedure too
risky for one person. Two or more people are
required when installing the stacking kit.
• Do not use the stacking kit with a gas dryer in
potentially unstable conditions such as a mobile
home.
• Place the washer on a solid, stable, level
floor capable of supporting the weight of both
appliances.
• Do not stack the washer on top of the dryer.
• If appliances are already installed, disconnect
them from all power, water, or gas lines and from
draining or venting connections.
To ensure safe and secure installation, please
observe the following instructions.
1
Make sure the surface of the washer is clean
and dry. Remove paper backing from the tape
on one of the stacking kit side brackets.
2
Fit the side bracket to the side of the washer top
as shown in the below illustration. Firmly press
the adhesive area of the bracket to the washer
surface. Secure the side bracket to the washer
with a screw on the back side of the bracket.
Repeat steps 1 and 2 to attach the other side
bracket.
3
Place the dryer on top of the washer, fitting the
dryer feet into the side brackets as illustrated.
Avoid finger injuries; do not allow fingers to be
pinched between the washer and dryer.
Slowly slide the dryer toward the back of the
washer until the side bracket stoppers catch the
dryer feet.
4
Insert the front rail between the bottom of the
dryer and the top of the washer. Push the front
rail toward the back of the washer until it comes
in contact with the side rail stoppers.
Install the two remaining screws to secure the
front rail to the side rails.
18 INSTALLATION
Venting the Dryer
WARNING
To reduce the risk of fire or explosion, electric
shock, property damage, injury to persons or
death when using this appliance, follow basic
safety precautions, including the following:
• Do not crush or collapse ductwork.
• Do not allow ductwork to rest on or contact sharp
objects.
• If connecting to existing ductwork, make sure it is
suitable and clean before installing the dryer.
• Venting must conform to local building codes.
• Gas dryers MUST exhaust to the outdoors.
• Use only 4-inch (10.2 cm) rigid, semi-rigid or
flexible metal ductwork inside the dryer cabinet
and for venting outside.
• To reduce the risk of fire, combustion, or
accumulation of combustible gases, DO
NOT exhaust dryer air into an enclosed and
unventilated area, such as an attic, wall, ceiling,
crawl space, chimney, gas vent, or concealed
space of a building.
• To reduce the risk of fire, DO NOT exhaust the
dryer with plastic or thin foil ducting.
• The exhaust duct must be 4-inch (10.2 cm) in
diameter with no obstructions. The exhaust duct
should be kept as short as possible. Make sure
to clean any old ducts before installing your new
dryer.
• Rigid, semi-rigid or flexible metal ducting is
recommended for use between the dryer and
the wall. All non-rigid metal transition duct must
be UL-listed. Use of other materials for transition
duct could affect drying time.
• DO NOT use sheet metal screws or other
fasteners which extend into the duct that could
catch lint and reduce the efficiency of the
exhaust system. Secure all joints with duct tape.
• Do not exceed the recommended duct length
limitations noted in the chart. Failure to follow
these instructions may result in extended drying
times, fire or death.
WARNING
• Ductwork is not provided with the dryer. You
should obtain the necessary ductwork locally.
The vent hood should have hinged dampers to
prevent backdraft when the dryer is not in use.
• The total length of flexible metal duct must not
exceed 8 ft. (2.4 m).
Ductwork
Wall Cap Type
Number
of 90°
Elbows
Maximum
length of 4-inch
diameter rigid
metal duct
Recommended
a
a
a: 4" (10.2 cm)
0 65 ft.(19.8 m)
1 55 ft.(16.8 m)
2 47 ft.(14.3 m)
3 36 ft.(11.0 m)
4 28 ft.(8.5 m)
Use only for short
run installations
b
b: 2.5" (6.35 cm)
0 55 ft.(16.8 m)
1 47 ft.(14.3 m)
2 41 ft.(12.5 m)
3 30 ft.(9.1 m)
4 22 ft.(6.7 m)
NOTE
• Deduct 6 ft. (1.8 m) for each additional elbow. Do
not use more than four 90° elbows.
• In Canada, only those foil-type flexible ducts, if any,
specifically identified for use with the appliance by
the manufacturer should be used. In the United
States, only those foil-type flexible ducts, if any,
specifically identified for use with the appliance by
the manufacturer and that comply with the Outline
for Clothes Dryer Transition Duct, Subject 2158A,
should be used.
19INSTALLATION
ENGLISH
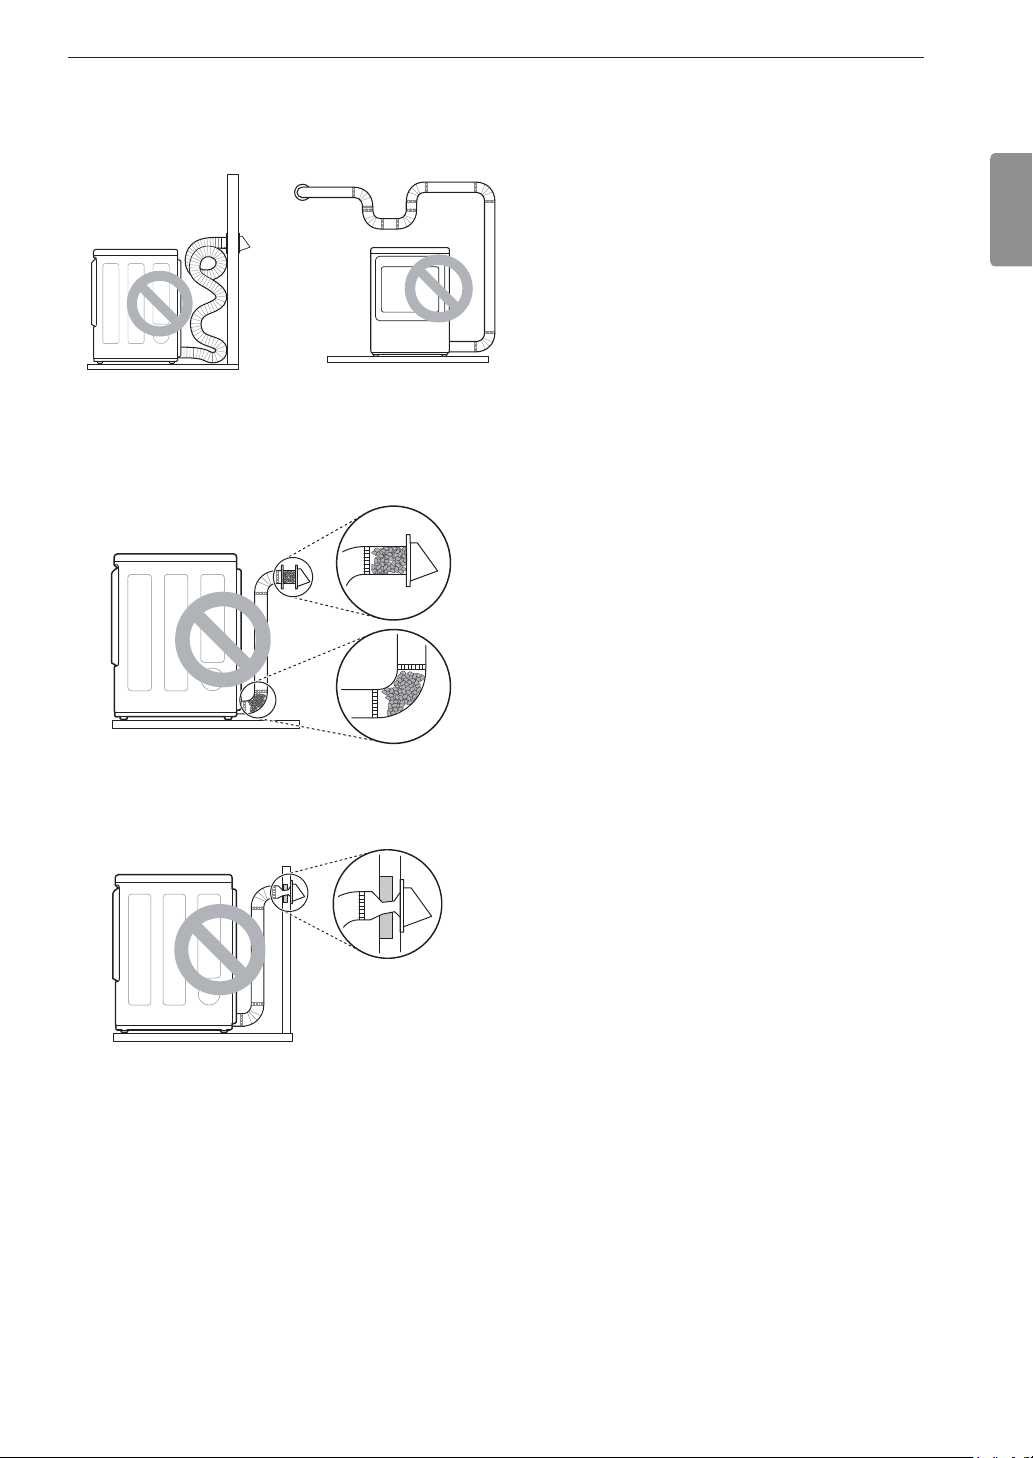
Routing and Connecting Ductwork
NOTE
Follow the guidelines below to maximize drying
performance and reduce lint buildup and
condensation in the ductwork. Ductwork and
fittings are NOT included and must be purchased
separately.
• Use 4-inch (10.2 cm) diameter rigid, semi-rigid or
flexible metal ductwork.
• The exhaust duct run should be as short as
possible.
• Use as few elbow joints as possible.
• The male end of each section of exhaust duct must
point away from the dryer.
• Use duct tape on all duct joints.
• Insulate ductwork that runs through unheated areas
in order to reduce condensation and lint buildup on
duct surfaces.
• Incorrect or inadequate exhaust systems are not
covered by the dryer warranty. Dryer failures or
service required because of such exhaust systems
will not be covered by the dryer warranty.
Correct Venting
Incorrect Venting
20 INSTALLATION
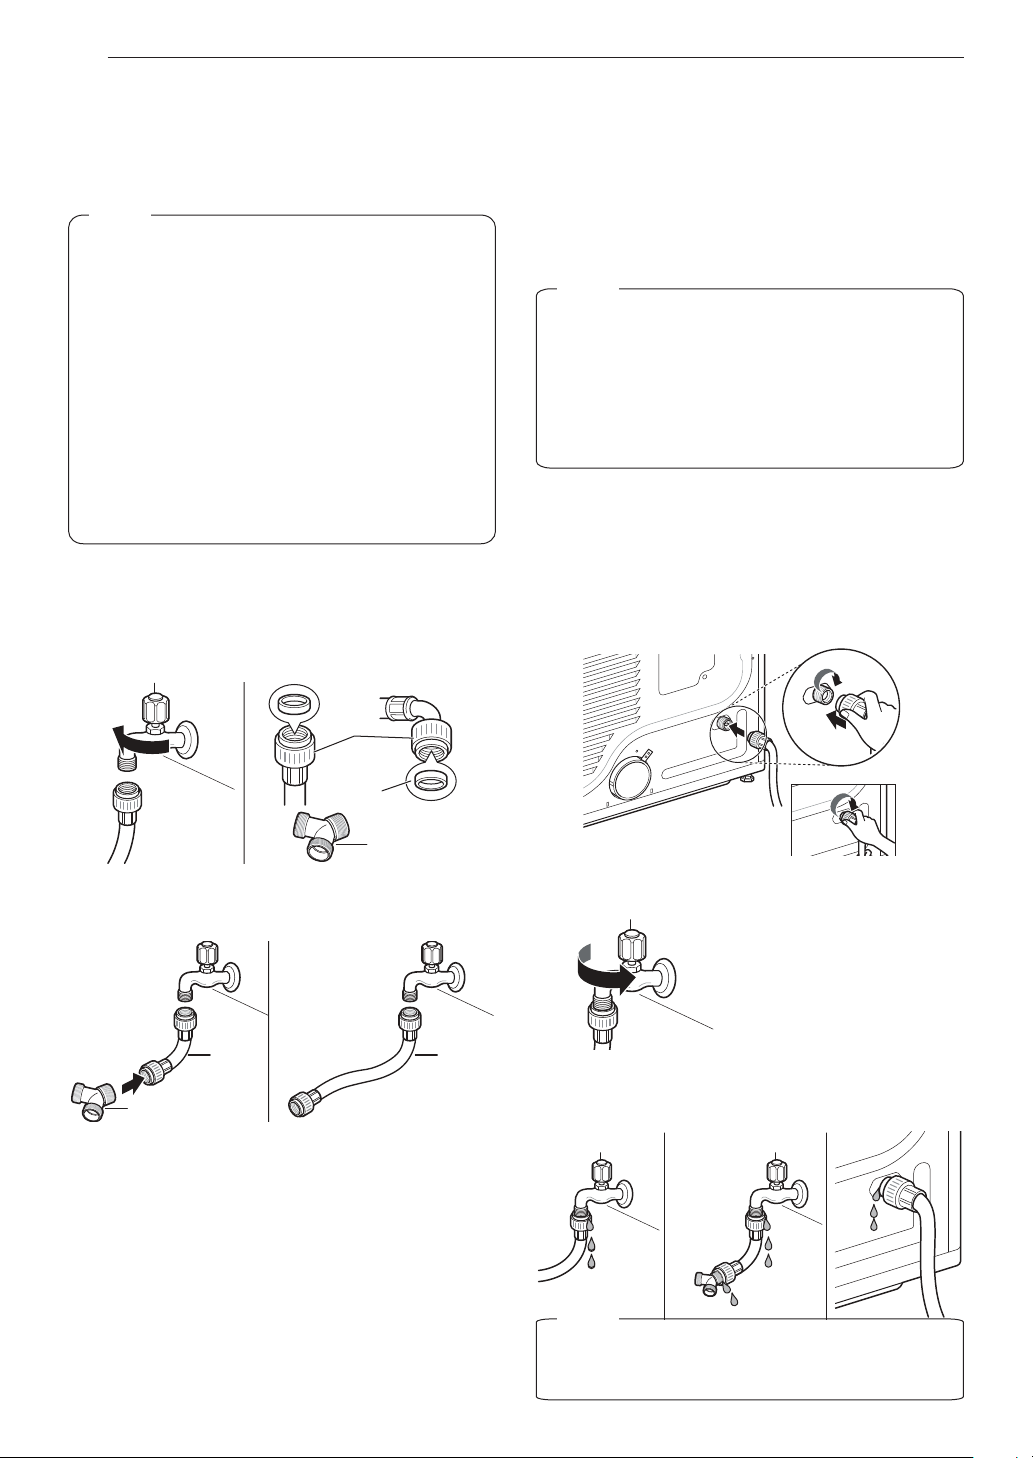
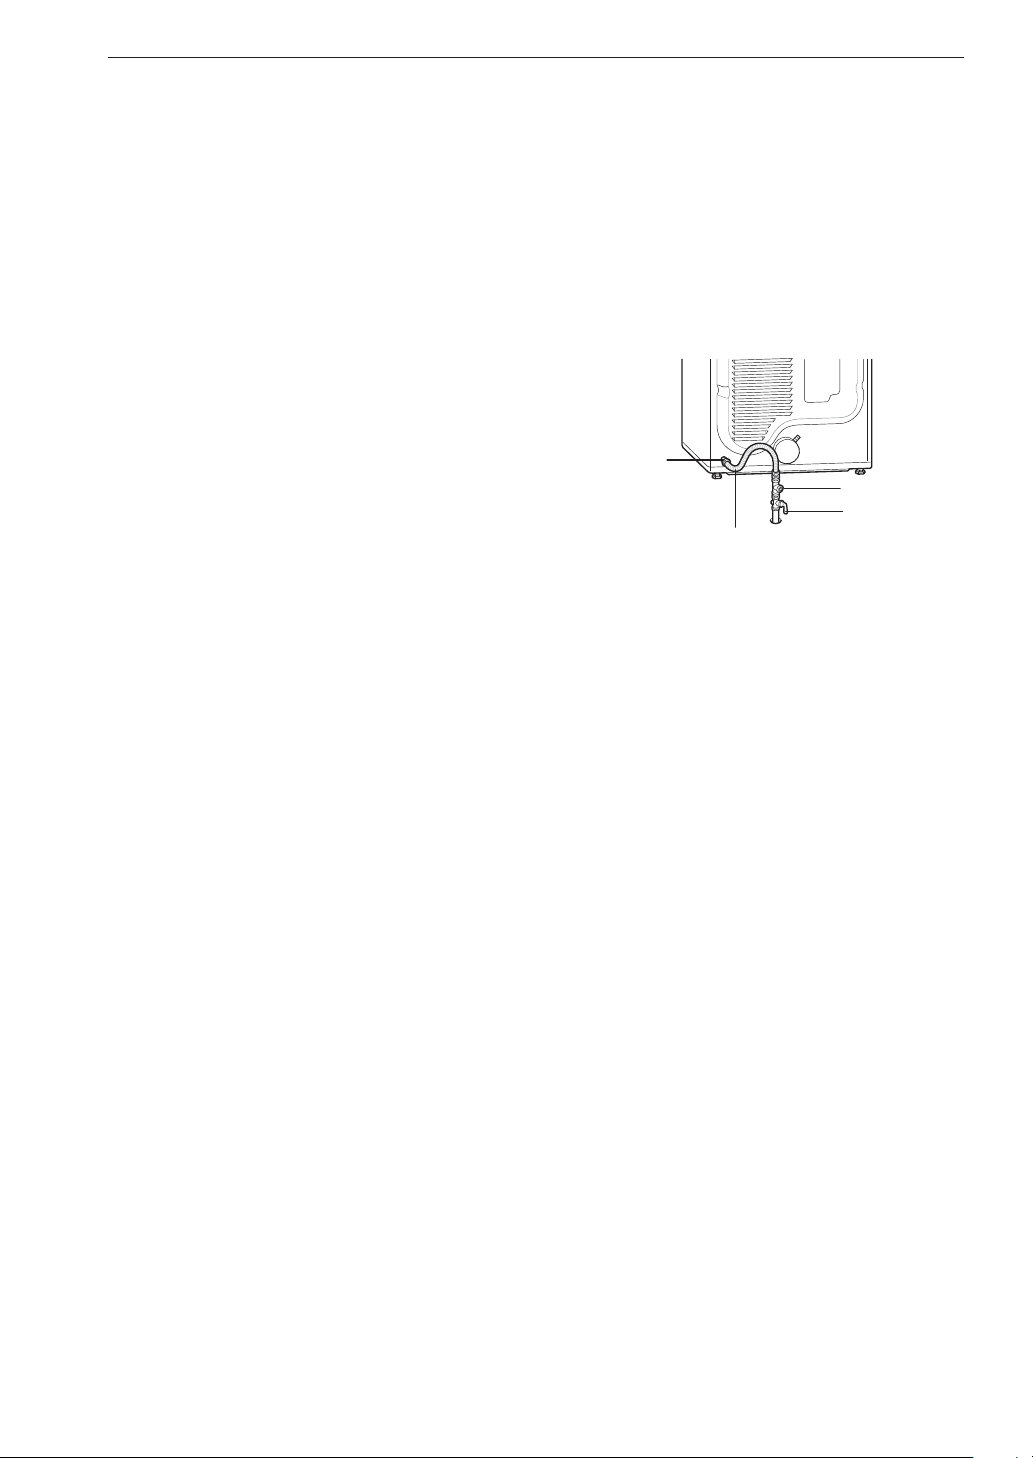
Connecting the Inlet Hose
(Steam Models)
The dryer must be connected to the cold water tap using
the new water supply hose. Do not reuse old hoses.
1
Check the rubber seal at each end of the inlet
hoses. Two ru ber seals are supplied with each
inlet hose. They are used for preventing water
leaks. Make sure the connection to the cold
water tap is tight.
2
Check the installation type.
Connect all water supply hoses tightly by hand
and then tighten another 2/3 turn with pliers.
WITH WASHER: When connecting the dryer to the
same faucet as a washer.
a. Shut off the cold water tap and remove the washer
hose.
b. Connect the short hose to the Y-connector using
one of the rubber seals.
c. Connect the other end of the short hose to the cold
water faucet.
NOTE
• Water supply pressure must be between 20
and 120 psi (138 - 827 kPa) .
• Do not strip or cross-thread when connecting
the inlet hose to the valve.
• If the water supply pressure is more than 800
kPa, a pressure-reducing valve should be
installed.
• Periodically check the condition of the hose
and replace the hose if necessary.
• Replace inlet hoses after 5 years of use to
reduce the risk of hose failure.
• Record hose installation or replacement dates
on the hoses for future reference.
Hose
connector
Y connector
Rubber
seal
Long
hose
WITH WASHER
WITHOUT WASHER
Short
hose
Y connector
d. Connect the long dryer hose to one side of the
Y-connector and connect the washer hose to the
other side.
WITHOUT WASHER: If the dryer does not share
the cold water tap with a washer.
a. Connect the straight end of the long hose to the
cold water faucet.
3
Connect the hose to the dryer. Connect the
water supply hose to the dryer inlet valve tightly
by hand and then tighten another 2/3 turn with
pliers.
Make sure that there are no kinks in the hoses
and that they are not crushed.
4
Turn on the cold water faucet.
5
Check for leaks at the Y-connector (if used) and
in all hoses.
NOTE
• Before connecting the water line to the dryer,
flush several gallons of water into a drain or
bucket. This will help prevent foreign particles
such as sand and scale from clogging the dryer
inlet valve.
• Do not overtighten. Damage to the coupling
may result.
NOTE
• If any leaks are found, shut off the water faucet,
remove the hose and check the condition of the
rubber seal.
21INSTALLATION
ENGLISH
Connecting Gas Dryers
WARNING
To reduce the risk of fire or explosion, electric
shock, property damage, injury to persons,
or death when using this appliance, follow
requirements including the following:
Electrical Requirements for Gas
Models Only
• Do not, under any circumstances, cut or remove
the third (ground) prong from the power cord.
• For personal safety, this dryer must be properly
grounded.
• This dryer must be plugged into a 120-VAC,
60-Hz. grounded outlet protected by a
15-ampere fuse or circuit breaker.
• Where a standard 2-prong wall outlet is
encountered, it is your personal responsibility
and obligation to have it replaced with a properly
grounded 3-prong wall outlet.
ELECTRIC SHOCK HAZARD
Failure to follow safety warnings could result
in serious injury
• This dryer is equipped with a three-prong
grounding plug for protection against shock
hazard and should be plugged directly into a
properly grounded three-prong receptacle. Do
not cut or remove the grounding prong from this
plug.
Gas Supply Requirements
• As shipped from the factory, this dryer is
configured for use with natural gas (NG). It can
be converted for use with propane (LP) gas.
Gas pressure must not exceed 8-inch (20.4 cm)
water column for NG, or 13-inch (33.1 cm) water
column for LP.
• A qualified service or gas company technician
must connect the dryer to the gas service.
• Isolate the dryer from the gas supply system by
closing its individual manual shutoff valve during
any pressure testing of the gas supply.
• DO NOT attempt any disassembly of the dryer;
disassembly requires the attention and tools of
an authorized and qualified service technician or
company.
• Securely tighten all gas connections.
• Connect the dryer to the type of gas shown on
the nameplate.
WARNING
Gas Supply Requirements (continued)
• Supply line requirements: Your laundry room
must have a rigid gas supply line to your dryer.
In the United States, an individual manual shutoff
valve MUST be installed within at least 6 ft. (1.8
m) of the dryer, in accordance with the National
Fuel Gas Code ANSI Z223.1 or Canadian gas
installation code CSA B149.1. A 1/8-inch NPT
pipe plug must be installed.
• If using a rigid pipe, the rigid pipe should be
0.5-inch IPS. If acceptable under local codes and
ordinances and when acceptable to your gas
supplier, 3/8-inch approved tubing may be used
where lengths are less than 20 ft. (6.1 m). Larger
tubing should be used for lengths in excess of 20
ft. (6.1 m).
• To prevent contamination of the gas valve,
purge the gas supply of air and sediment before
connecting the gas supply to the dryer. Before
tightening the connection between the gas
supply and the dryer, purge remaining air until
the odor of gas is detected.
• DO NOT use an open flame to inspect for gas
leaks. Use a noncorrosive leak detection fluid.
• Use only a new AGA- or CSA-certified
gas supply line with flexible stainless steel
connectors.
• Use Teflon tape or a pipe-joint compound that is
insoluble in propane (LP) gas on all pipe threads.
Connecting the Gas Supply
• Installation and service must be performed by
a qualified installer, service agency, or the gas
supplier.
• Use only a new stainless steel flexible connector
and a new AGA-certified connector.
• A gas shutoff valve must be installed within 6 ft.
(1.8 m) of the dryer.
• The dryer is configured for natural gas when
shipped from the factory. Make sure that the
dryer is equipped with the correct burner nozzle
for the type of gas being used (natural gas or
propane gas).
• If necessary, the correct nozzle (for the LP
nozzle kit, order part number 383EEL3002D)
should be installed by a qualified technician and
the change should be noted on the dryer.
• All connections must be in accordance with
local codes and regulations. Gas dryers MUST
exhaust to the outdoors.
22 INSTALLATION
NOTE
• In the Commonwealth of Massachusetts: This
product must be installed by a licensed plumber
or gas fitter. When using ball-type gas shut off
valves, they shall be T-handle-type. A flexible gas
connector, when used, must not exceed 3 feet.
This dryer is configured from the factory for natural
gas (NG). If the dryer is to be used with propane
(LP) gas, it must be converted by a qualified service
technician.
1
Make sure that the gas supply to the laundry
room is turned OFF and the dryer is unplugged.
Confirm that the type of gas available in your
laundry room is appropriate for the dryer.
2
Remove the shipping cap from the gas fitting at
the back of the dryer. Be careful not to damage
the threads of the gas connector when removing
the shipping cap.
3
Connect the dryer to your laundry room’s gas
supply using a new flexible stainless steel
connector with a 3/8-inch NPT fitting.
NOTE
• DO NOT use old connectors.
4
Securely tighten all connections between the
dryer and your laundry room’s gas supply.
5
Turn on your laundry room’s gas supply.
6
Check all pipe connections (both internal and
external) for gas leaks with a noncorrosive leak-
detection fluid.
7
Proceed to Venting the Dryer.
3/8" NPT gas
Connection
AGA/CSA-Certified
Stainless Steel Flexible
Connector
Gas Supply Shutoff
Valve
1/8" NPT Pipe Plug
High-Altitude Installations
The BTU rating of this dryer is AGA-certified for
elevations below 10,000 feet.
If your gas dryer is being installed at an elevation
above 10,000 feet, it must be derated by a qualified
technician or gas supplier.
23INSTALLATION
ENGLISH
Connecting Electric Dryers
WARNING
To reduce the risk of fire or explosion, electric
shock, property damage, injury to persons,
or death when using this appliance, follow
requirements including the following:
Electrical Requirements for
Electric Models Only
• The wiring and grounding must conform to
the latest edition of the National Electrical
Code, ANSI/NFPA 70 and all applicable local
regulations. Please contact a qualified electrician
to check your home’s wiring and fuses to ensure
that your home has adequate electrical power to
operate the dryer.
• This dryer must be connected to a grounded
metal, permanent wiring system, or an
equipment-grounding conductor must be run
with the circuit conductors and connected to the
equipment-grounding terminal or lead on the
dryer.
• The dryer has its own terminal block that must
be connected to a separate 230 VAC, 60-Hertz,
single-phase circuit, fused at 30 amperes (the
circuit must be fused on both sides of the line).
ELECTRICAL SERVICE FOR THE DRYER
SHOULD BE OF THE MAXIMUM RATE
VOLTAGE LISTED ON THE NAMEPLATE. DO
NOT CONNECT THE DRYER TO 110-, 115-, OR
120-VOLT CIRCUIT.
• If the branch circuit to dryer is 15 ft. (4.5
m) or less in length, use UL (Underwriters
Laboratories) listed No.-10 AWG wire (copper
wire only), or as required by local codes. If over
15 ft. (4.5 m), use UL-listed No.-8 AWG wire
(copper wire only), or as required by local codes.
Allow sufficient slack in wiring so the dryer
can be moved from its normal location when
necessary.
• The power cord (pigtail) connection between the
wall receptacle and the dryer terminal block IS
NOT supplied with the dryer. Type of pigtail and
gauge of wire must conform to local codes and
with instructions on the following pages.
WARNING
• A 4-wire connection is required for all mobile and
manufactured home installations, as well as all
new construction after January 1, 1996. A 4-wire
connection must be used where local codes do
not permit grounding through the neutral wire.
• Do not modify the plug and internal wire provided
with the dryer.
• The dryer should be connected to a 4-hole outlet.
• If the plug does not fit the outlet, a proper outlet
will need to be installed by a qualified electrician.
• Connect the power cord to the terminal block.
Each colored wire should be connected to
the same color screw. Wire color indicated on
manual is connected to the same color screw in
the block.
• Grounding through the neutral conductor is
prohibited for: (1) new branch-circuit installations,
(2) mobile homes, (3) recreational vehicles, and
(4) areas where local codes prohibit grounding
through the neutral conductor.
• This dryer is supplied with the neutral wire
grounded. This white ground wire MUST BE
MOVED to the neutral terminal when a 4-wire
cord is to be used, or where grounding through
the neutral conductor is prohibited.
NOTE
• For electrical requirements for mobile or
manufactured homes, see Special Electrical
Requirements.

24 INSTALLATION
Special Electrical
Requirements
(For Mobile or Manufactured Homes)
• Any installation in a manufactured or mobile
home must comply with the Manufactured Home
Construction and Safety Standards Title 24 CFR,
Part 3280 or Standard CAN/ CSA Z240 MH and
local codes and ordinances. If you are uncertain
whether your proposed installation will comply with
these standards, please contact a service and
installation professional for assistance.
• A 4-wire connection is required for all mobile and
manufactured home installations, as well as all new
construction after January 1, 1996.
• A gas dryer must be permanently attached to the
floor.
• The electrical connection for an electric dryer must
be a 4-wire connection. More detailed information
concerning the electrical connection is provided in
the section Connecting Electric Dryers.
• To reduce the risk of combustion and fire, the dryer
must be vented to the outside.
• DO NOT vent the dryer under a manufactured home
or mobile home.
• Electric dryers may be vented to the outside using
the back, left, right, or bottom panel.
• Gas dryers may be vented to the outside using the
back, left, or bottom panel. Gas dryers may not
be vented to the outside using the right side panel
because of the burner housing.
• The dryer exhaust duct must be affixed securely to
the manufactured or mobile home structure, and the
exhaust duct must be made of a material that will
resist fire and combustion. It is recommended that
you use a rigid, semi-rigid or flexible metal duct.
• DO NOT connect the dryer exhaust duct to any
other duct, vent, chimney, or other exhaust duct.
• Make sure the dryer has adequate access to
outside fresh air to ensure proper operation. The
opening for outside fresh air must be at least
25 sq. in (163 cm²).
• It is important that the clearance of the duct from
any combustible construction be at least 2 inches
(5 cm), and when venting the dryer to the outdoors,
the dryer should be installed with a clearance of at
least 1 inch (2.5 cm) at the sides and back of the
dryer.
• Please be aware that venting materials are not
supplied with the dryer. You must obtain the venting
materials necessary for proper installation.
Final Installation Check
Once you have completed the installation of the dryer
and it is in its final location, confirm proper operation
with the following tests and Installation Test (Duct
Check).
Testing Dryer Heating
GAS MODELS
Close the dryer door and press the Power button
to turn the dryer on. Press the Time Dry and Start/
Pause buttons to start the test. When the dryer starts,
the igniter should ignite the main burner.
NOTE
• If all air is not purged from the gas line, the gas
igniter may turn off before the main burner ignites. If
this happens, the igniter will reattempt gas ignition
after approximately two minutes.
ELECTRIC MODELS
Close the dryer door and press the Power button
to turn the dryer on. Press the Time Dry and Start/
Pause buttons to start the test. The exhaust air
should be warm after the dryer has been operating
for 3 minutes.
Checking Airflow
Effective dryer operation requires proper airflow.
The adequacy of the airflow can be measured by
evaluating the static pressure. Static pressure in the
exhaust duct can be measured with a manometer,
placed on the exhaust duct approximately 2 ft.
(60.9 cm) from the dryer. Static pressure in the
exhaust duct should not exceed 0.6 inch (1.5 cm).
The dryer should be checked while the dryer is
running with no load.
Checking Levelness
Once the dryer is in its final location, recheck the
dryer to be sure it is level. Make sure it is level front
to back and side to side, and that all four leveling feet
are in firm contact with the floor.
25INSTALLATION
ENGLISH
Installation Test (Duct Check)
Once you have completed the installation of the
dryer, use this test to make sure the condition of the
exhaust system is adequate for proper operation of
the dryer. This test should be performed to alert you
to any serious problems in the exhaust system of
your home.
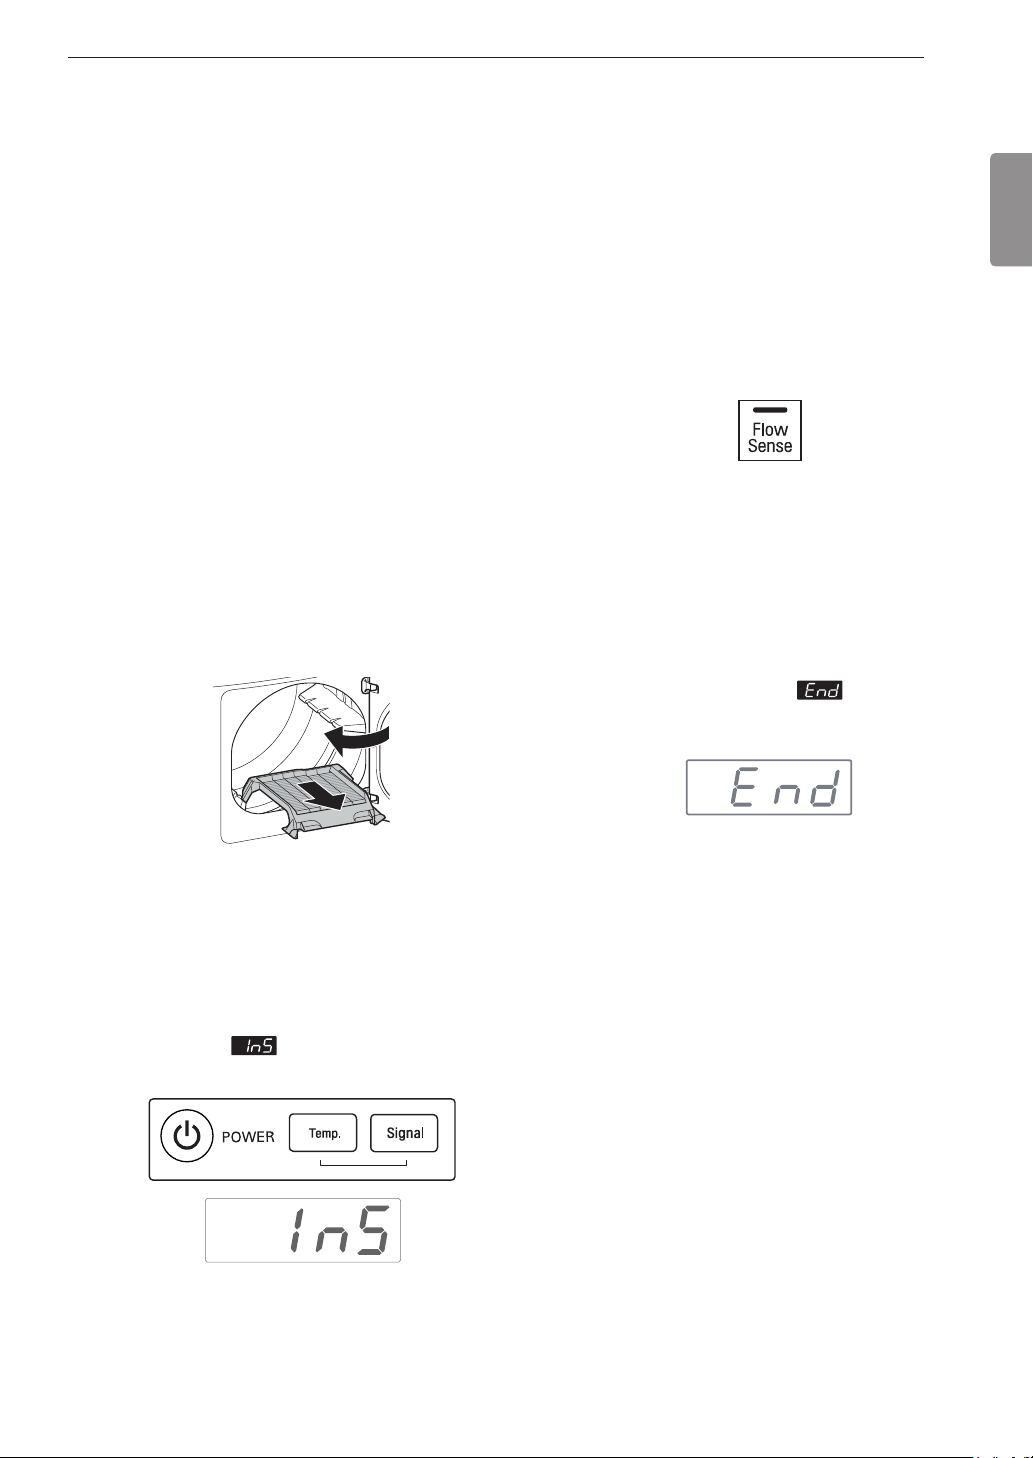
• Your dryer features Flow Sense™, an innovative
sensing system that automatically detects
blockages and restrictions in dryer ductwork.
Keeping ductwork clean of lint buildup and free of
restrictions allows clothes to dry faster and reduces
energy use.
NOTE
• The dryer should be cool before starting this test. If
the dryer was warmed up during installation, run the
Air Dry cycle for a few minutes to reduce the interior
temperature.
Activating the Installation Test
1
Remove the drying rack and literature, and
then close the door.
Do not load anything in the drum for this test, as
it may affect the accuracy of the results.
2
Press and hold the Signal and Temp. buttons
and then press the Power button.
(On models with a glass touch control panel,
press the Power button then IMMEDIATELY
press and hold the Temp. and Signal buttons.)
This button sequence activates the installation
test. The code will display if the activation
is successful.
3
Press the Start/Pause button.
The dryer will start the test, which will last a
few minutes. The heat will be turned on and the
temperatures in the drum will be measured.
4
Check the display for results.
During the test cycle, monitor the Flow Sense™
display on the control panel. If the Flow Sense™
LED has not turned on, when the cycle ends,
the exhaust system is adequate. If the exhaust
system is severely restricted, the Flow Sense™
LED will turn on. Other problems may also be
shown with error codes. See the chart on the
next page for error code details and solutions.
LED; turned on :
RESTRICTED
The Flow Sense™ LED indicates that the exhaust
system is severely restricted. Have the system
checked immediately, as performance will be poor.
5
End of cycle.
At the end of the test cycle, will display.
The test cycle will end and the dryer will shut off
automatically after a short delay.

26 INSTALLATION
Check the Duct Condition
If the Flow Sense™ LED is turned on, check the
exhaust system for restrictions and damage. Repair
or replace the exhaust system as needed.
NOTE
• When the dryer is first installed, this test should be
performed to alert you to any existing problems with
the exhaust duct in your home. However, since the
test performed during normal operation provides
more accurate information on the condition of the
exhaust duct than the installation test, the number
of bars displayed during the two tests may not be
the same.
• Do not interrupt the test cycle, as this could result in
inaccurate results.
• Even if no bars are displayed during the test cycle,
some restrictions may still be present in the exhaust
system. Refer to the Venting the Dryer section
of this manual for complete exhaust system and
venting requirements.
• Your dryer features Flow Sense™, an innovative
sensing system that automatically detects
blockages and restrictions in the dryer ductwork.
Keeping ductwork clean of lint buildup and free of
restrictions allows clothes to dry faster and reduces
energy use.
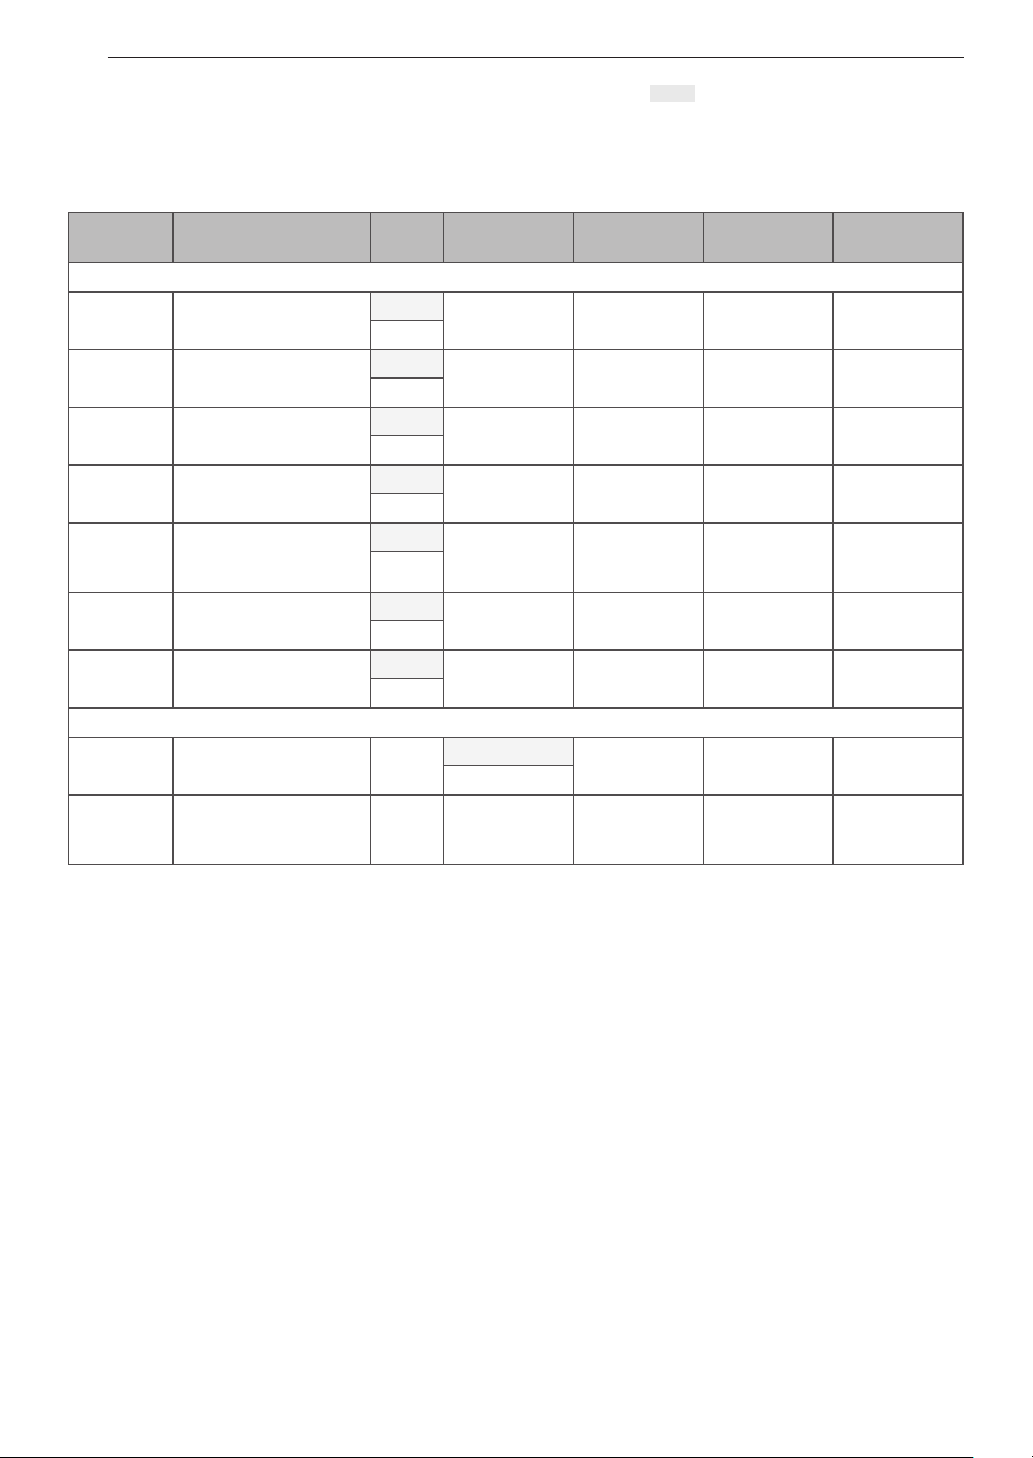
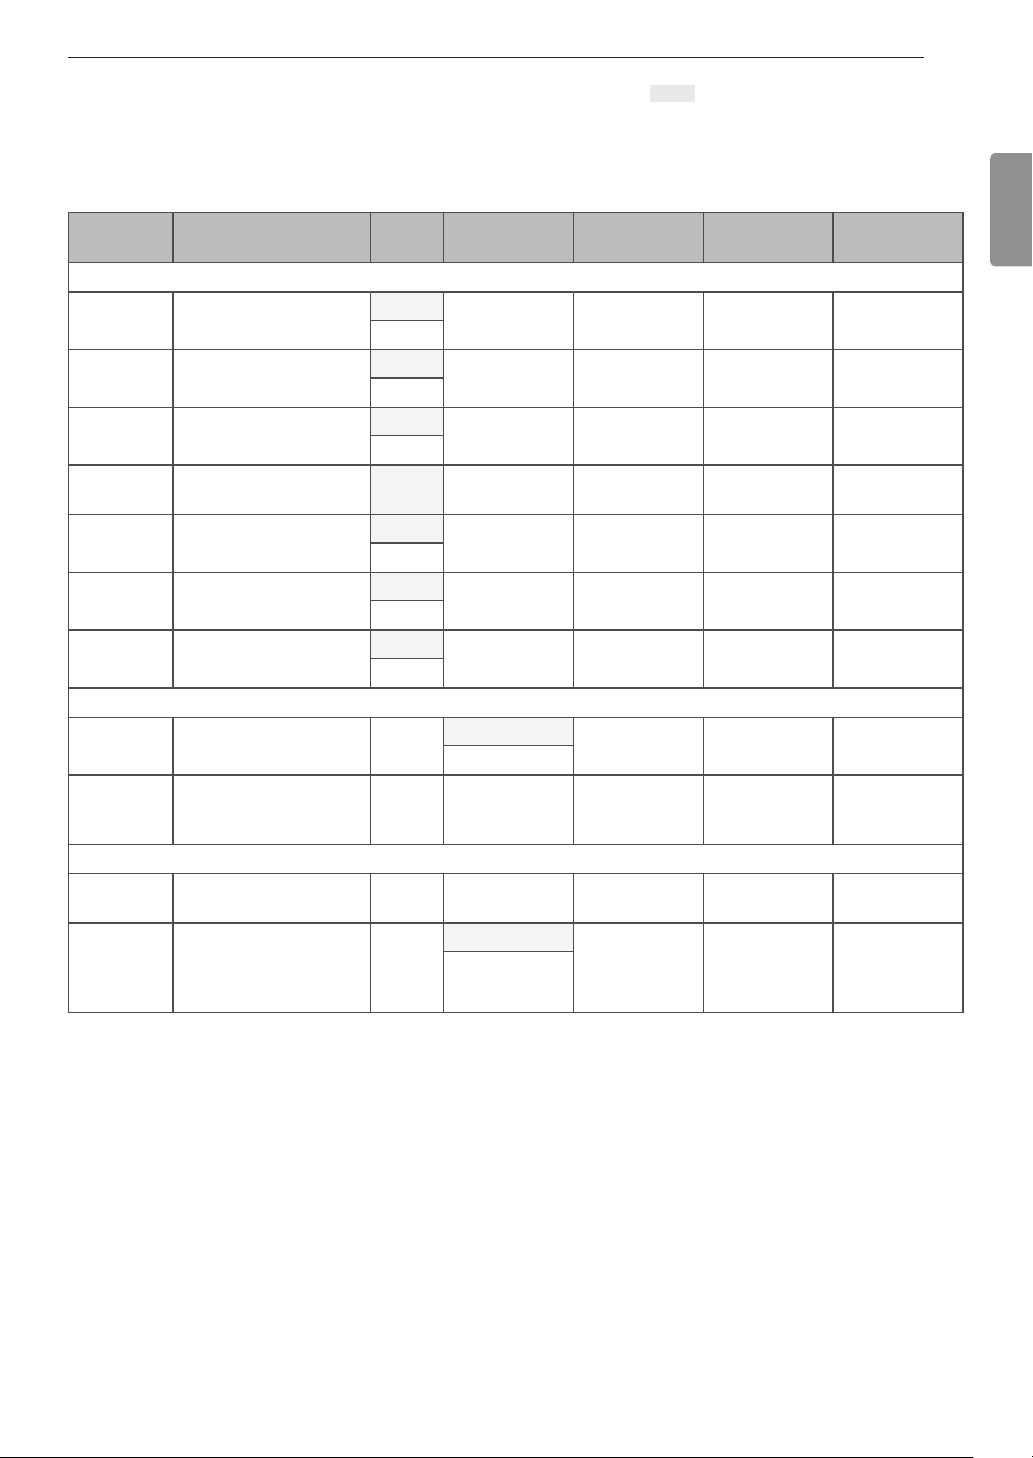
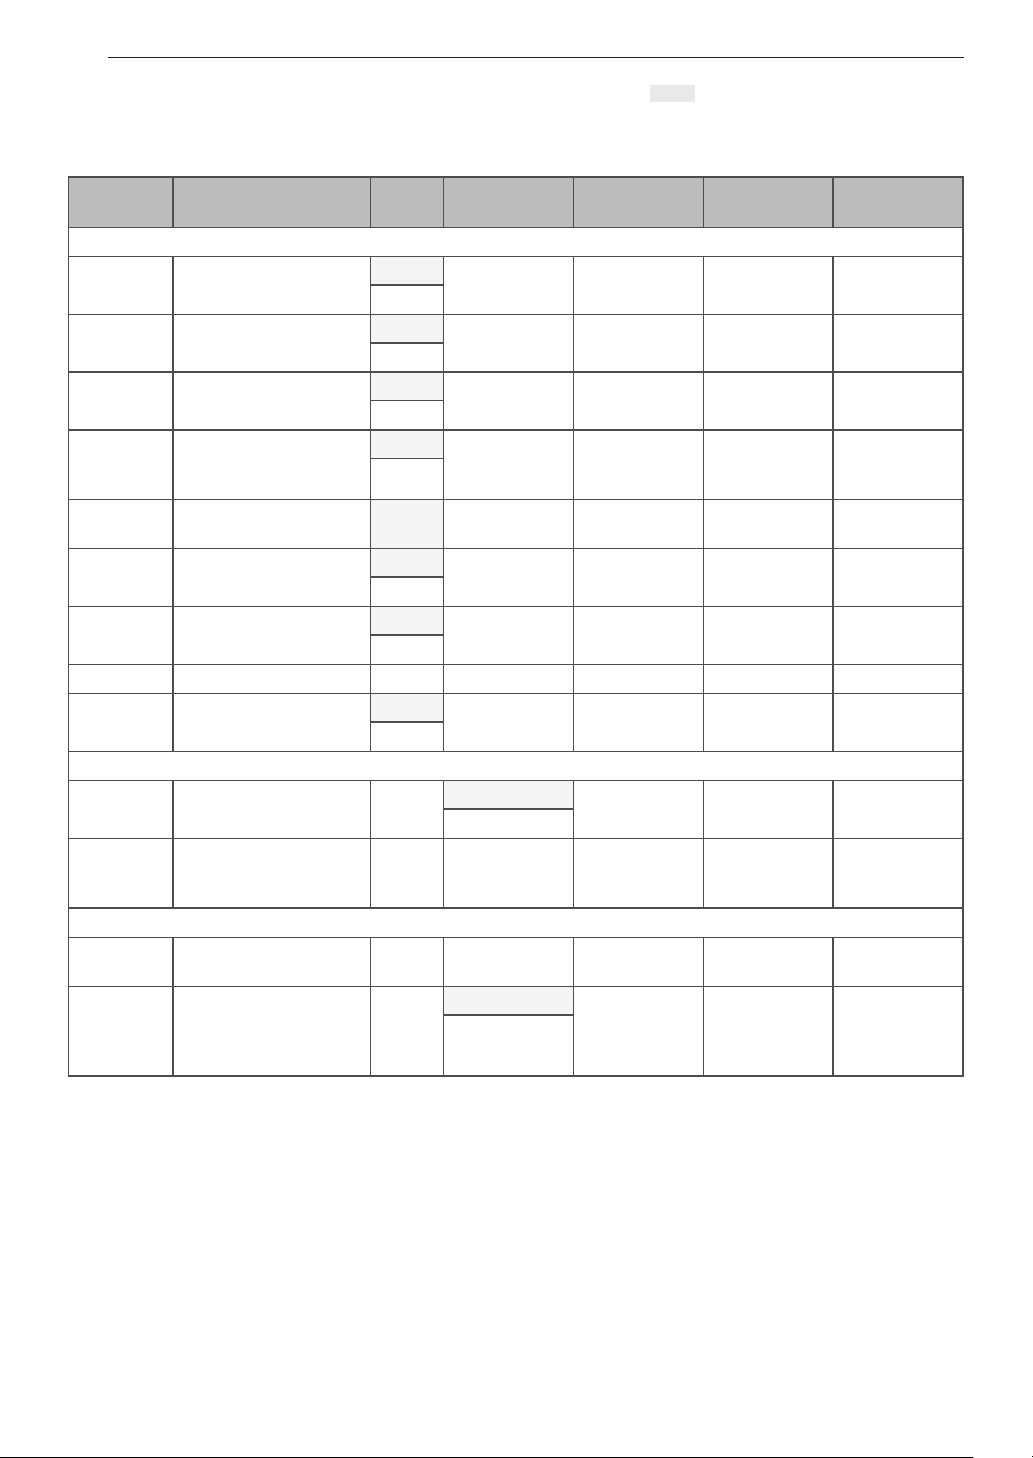
Error Codes
Check the error code before you call for service.
Error
Code
Possible
Causes
Solutions
tE1 or
tE2
Temperature
sensor failure.
Turn off the dryer and call
for service.
HS
Humidity sensor
failure.
Turn off the dryer and call
for service.
PS,
PF, or
nP
Electric dryer
power cord is
not connected
correctly, or
house power
supply is
incorrect.
Check the power supply
or the connection of
the power cord to the
terminal block. Refer to
the Connecting Electric
Dryers section of this
manual for complete
instructions.
House fuse is
blown, circuit
breaker has
tripped, or
power outage
has occurred.
Reset circuit breaker
or replace fuse. Do
not increase the fuse
capacity.
If the problem is a
circuit overload, have it
corrected by a qualified
electrician.
gAS
Gas supply or
service turned
off. (Gas Model
only.)
Confirm that house gas
shutoff and the dryer
gas shutoff are both fully
open.
27INSTALLATION
ENGLISH
Restricted or Blocked Airflow
Avoid long runs or runs with multiple elbows or
bends.
Excess or crushed
transition duct
Too many elbows or
exhaust too long
Check for blockages and lint buildup.
Lint buildup or blockage
Make sure the ductwork is not crushed or restricted.
Crushed or damaged
exhaust
28 OPERATION
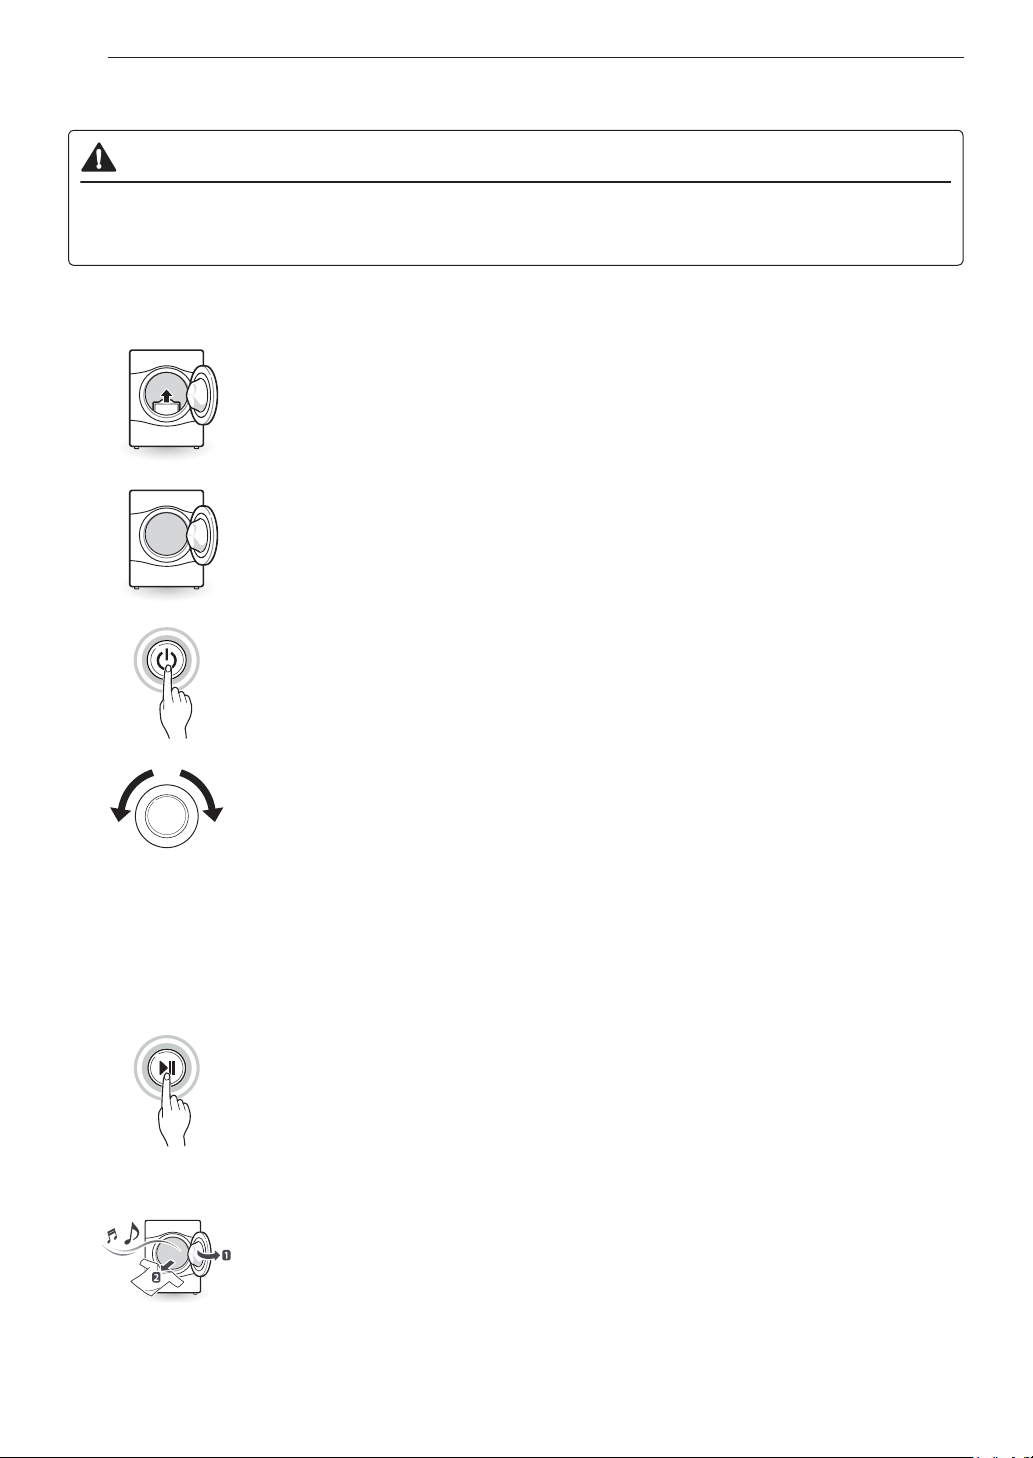
OPERATION
WARNING
• To reduce the risk of fire, electric shock, or injury to persons, read the SAFETY INSTRUCTIONS before
operating this appliance.
Using the Dryer
1
2
3
4
5
6
Clean the Lint Filter
If the lint filter has not already been cleaned, lift out the filter and remove the
lint from the last load. This will help ensure the fastest and most efficient drying
performance. Make sure to reinstall the filter, pressing down until it clicks firmly
into place.
Load the Dryer
Load the dryer with the wet laundry from the washer. If the load is extra large,
you may need to divide it into smaller loads for proper performance and fabric
care.
Turn on the Dryer
Press the Power button to turn on the dryer. The cycle LEDs will illuminate and
a chime will sound.
Select a Cycle
Turn the cycle selector knob either direction until the LED for the desired cycle
is on. The preset temperature, dry level, and option settings for that cycle will be
shown. Default settings for the selected cycle can now be changed if desired.
Refer to the Cycle Setting and Options page for details.
NOTE
• Not all options or modifiers are available on all cycles. Refer to the Cycle
Guide page for default settings and available options. A different chime will
sound and the LED will not come on if the selection is not available.
Begin Cycle
Press the Start/Pause button to begin the cycle. The cycle can be paused at
any time either by opening the door or by pressing the Start/Pause button. If
the cycle is not restarted within 60 minutes of being paused, the dryer will shut
off and the settings will be lost.
End of Cycle
When the cycle is finished, the chime will sound. Immediately remove your
clothing from the dryer to reduce wrinkling. If Wrinkle Care is selected, the dryer
will tumble briefly every few minutes to help prevent wrinkles from setting in the
clothes.
29OPERATION
ENGLISH
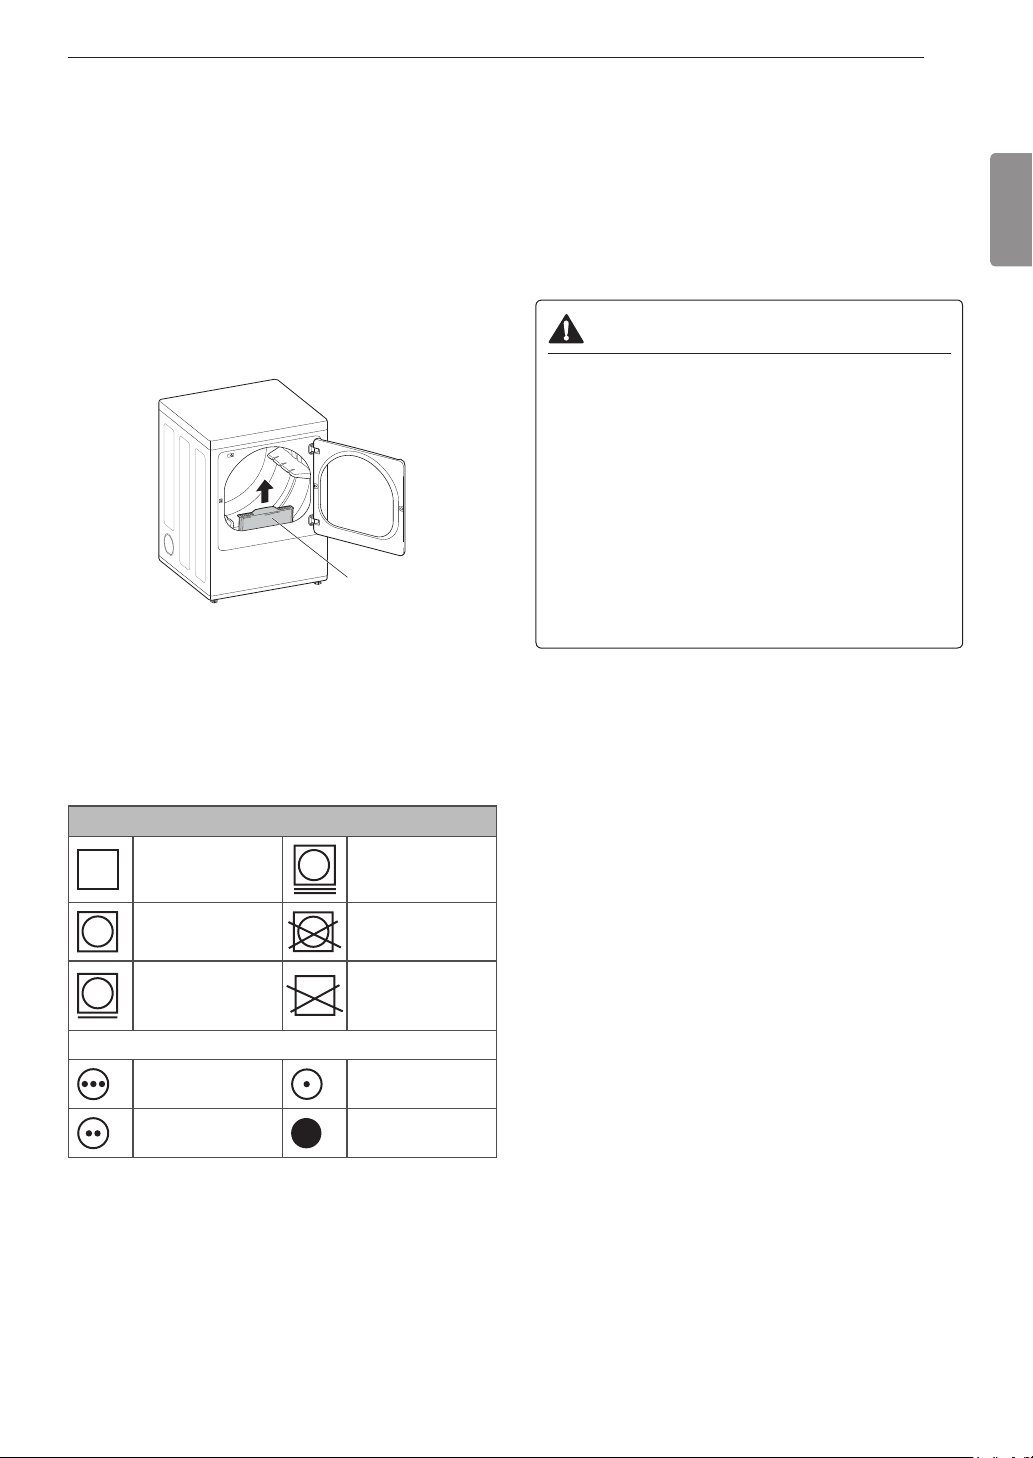
Check the Lint Filter Before
Every Load
Always make sure the lint filter is clean before
starting a new load; a clogged lint filter will increase
drying time. To clean, pull the lint filter straight up and
roll any lint off the filter with your fingers. Push the lint
filter firmly back into place. See Regular Cleaning
for more information.
Always ensure the lint filter is properly installed
before running the dryer. Running the dryer with a
loose or missing lint filter will damage the dryer and
articles in the dryer.
Lint Filter
Sorting Laundry
Fabric Care Labels
Many articles of clothing include a fabric care label.
Using the chart below, adjust the cycle and option
selections to care for your clothing according to the
manufacturer’s recommendations.
Tumble dry
Dry Gentle/delicate
Normal
Do not tumble
dry
Permanent
Press/ wrinkle
resistant
Do not dry (used
with do not wash)
Heat setting
High Low
Medium No heat/air
Grouping Similar Items
For best results, sort clothes into loads that can be
dried with the same drying cycle.
Different fabrics have different care requirements,
and some fabrics will dry more quickly than others.
Loading the Dryer
WARNING
To reduce the risk of fire, explosion, electric
shock, injury to persons, and death when
using this appliance, follow basic precautions,
including the following:
• Check all pockets to make sure that they are
empty. Items such as clips, pens, coins, and
keys can damage both the dryer and your
clothes. Flammable objects such as lighters or
matches could ignite, causing a fire.
• Never dry clothes that have been exposed to
oil, gasoline, or other flammable substances.
Washing clothes will not completely remove oil
residues.
NOTE
Loading Tips
• Combine large and small items in the same load.
• Damp clothes will expand as they dry. Do not
overload the dryer; clothes require room to tumble
and dry properly.
• Close zippers, hooks, and drawstrings to prevent
these items from snagging or tangling on other
clothes.
30 OPERATION
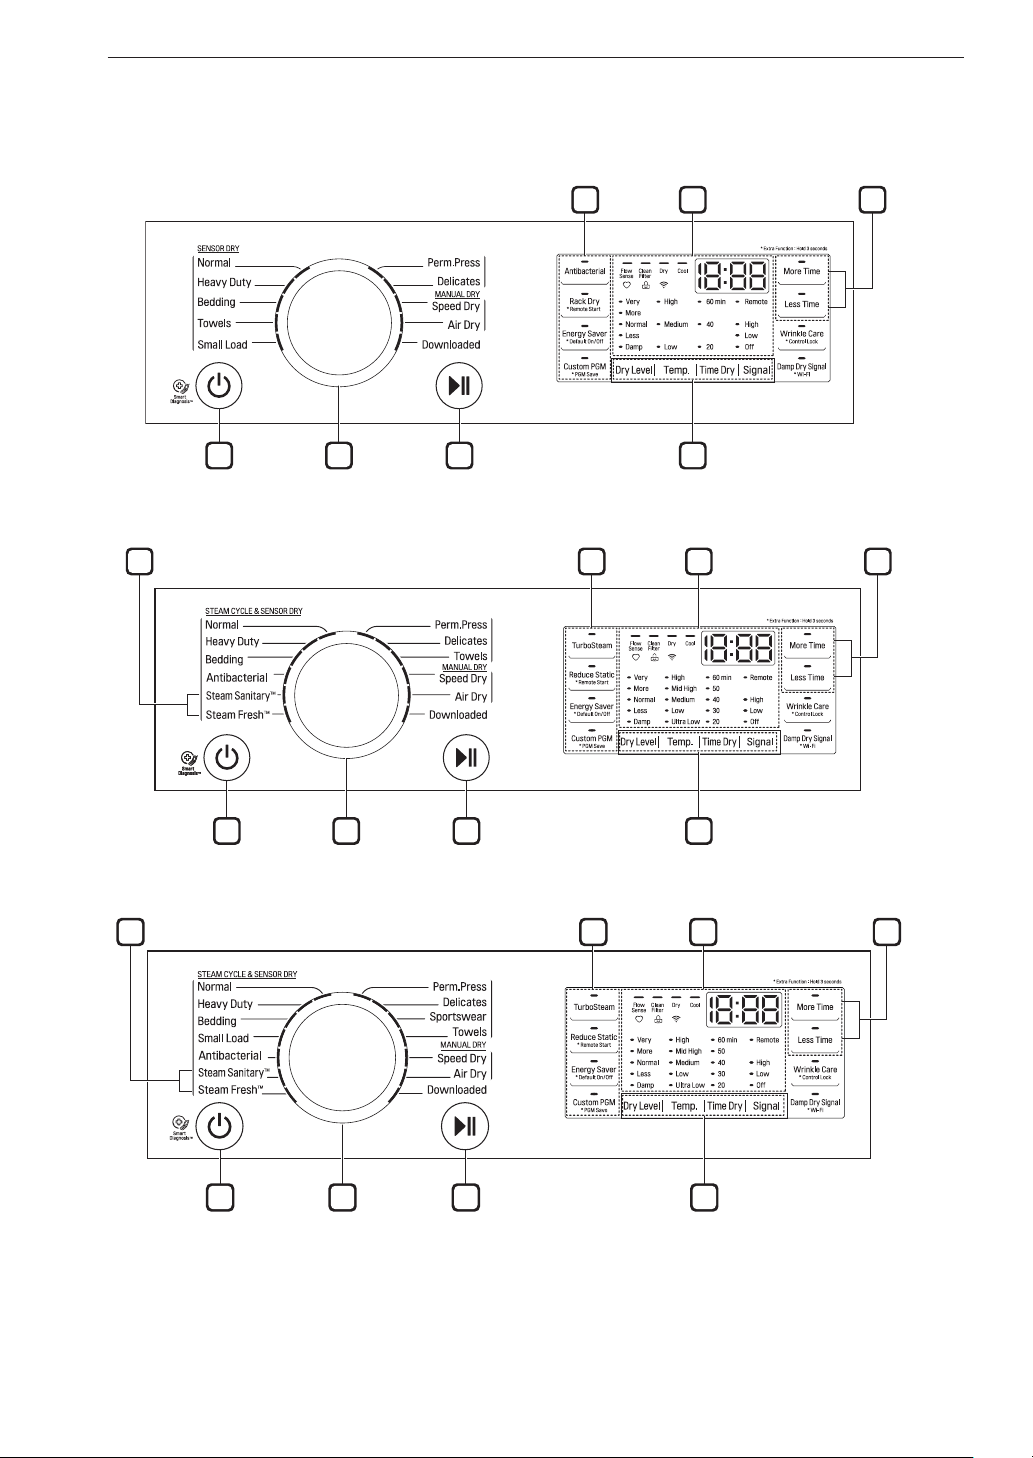
Control Panel
Non-Steam Models (DLE3500*, DLG3501*, DLE3095*, DLE3090*)
7 6
1 2 3 4
5
Steam Models (DLEX3700*, DLGX3701*)
7 6
1 2 3 4
8 5
Steam Models (DLEX3900*, DLGX3901*)
7 6
1 2 3 4
8 5
NOTE
• Model numbers can be found on the cabinet inside the door.

31OPERATION
ENGLISH
1
Power Button
Press the button to turn the dryer ON. Press again to
turn the dryer OFF.
NOTE
• Pressing the Power button during a cycle will
cancel that cycle and any load settings will be lost.
2
Cycle Selector Knob
Turn this knob to select the desired cycle. Once
the desired cycle has been selected, the standard
presets will be shown in the display. On Manual Dry
cycles, these settings can be adjusted using the cycle
modifier buttons anytime before starting the cycle.
3
Start/Pause Button
Press this button to start the selected cycle. If the
dryer is running, use this button to pause the cycle
without losing the current settings.
NOTE
• If you do not press the Start/Pause button to
resume a cycle within 60 minutes, the dryer turns off
automatically and all cycle settings are lost.
4
Cycle Modifier Buttons
Use these buttons to select the desired cycle settings
for the selected cycle. The current settings are shown
in the display. Press the button for that option to view
and select other settings.
5
More Time/Less Time Buttons
Use these buttons with the Time Dry and other
Manual Dry cycles to adjust the drying time. Press
the More Time button to increase the selected
manual cycle time by 1 minute; press the Less Time
button to decrease the cycle time by 1 minute.
6
Time and Status Display
The display shows the settings, estimated time
remaining, options, and status messages for the
dryer.
7
Cycle Option Buttons
Press each of these buttons to select additional
cycle options. And press and hold any button marked
with an asterisk for 3 seconds to activate a special
function.
8
Steam Functions
LG’s steam technology allows you to inject fabrics
with a swirling jet of steam to refresh clothes, reduce
static, and make ironing easier. Simply select the
Steam Fresh™ or Steam Sanitary™ cycle or you
can add a Steam option to selected cycles.

32 OPERATION
13
14
15
9
10
11
12
9
Flow Sense Duct Blockage Sensing System
Indicator
The Flow Sense™ duct blockage sensing system
detects and alerts you to blockages in the ductwork
that reduce exhaust flow from the dryer. Maintaining
a clean exhaust system improves operating efficiency
and helps minimize service calls, saving you money.
10
Custom PGM
If you have a special combination of settings that
you use frequently, you can save these settings as a
Custom Program.
11
Control Lock Indicator
When Control Lock is set, the Control Lock indicator
appears and all buttons are disabled except the
Power button. This prevents children from changing
settings while the dryer is operating.
12
WI-FI Indicator
When the appliance is connected to the Internet
through a home Wi-Fi network, this indicator appears.
13
Clean Filter Reminder
The display will show Clean Filter when the dryer is
turned on as a reminder to clean the filter. It turns off
when the Start/Pause button is pressed.
14
Estimated Time Remaining
This display shows the estimated time remaining for
Sensor Dry cycles or the actual time remaining for
Time Dry or Manual Dry cycles.
NOTE
• The cycle time on Sensor Dry cycles may fluctuate
as the dryer recalculates drying time for optimal
results.
15
Cycle Completion Indicator
This portion of the display shows which stage of the
drying cycle is currently underway (Dry or Cool).

33OPERATION
ENGLISH
Cycle Guide
Sensor Dry Cycles
Sensor Dry cycles utilize LG’s unique dual sensor
system to detect and compare the moisture level
in clothes and in the air and adjust the drying time
as needed to ensure superior results. The dryer
automatically sets the dryness level and temperature
at the recommended setting for each cycle. The
estimated time remaining will be shown in the display.
NOTE
• To protect your garments not every dryness level,
temperature, or option is available with every cycle.
See the Cycle Guide for details.
Manual Dry Cycles
Use Manual Dry cycles to select a specific amount of
drying time and a drying temperature. When a Manual
Dry cycle is selected, the Estimated Time Remaining
display shows the actual time remaining in your
cycle. You can change the actual time in the cycle by
pressing the More Time or Less Time buttons.
NOTE
• The Energy Saver option is turned on by default in
the Normal Cycle. Turn off the Energy Saver option
for a faster Normal cycle which begins with heated
drying. To turn the Energy Saver default off, press
and hold the Energy Saver button. ON or OFF
appears in the display.
NSF Certification
NSF International (formerly the National Sanitation
Foundation), certifies that the Antibacterial cycle
reduces 99.9% of bacteria on laundry, and none of
the bacteria will carry over onto the next laundry load.
• The default settings for the Antibacterial cycle are
High temperature and Very dry level. These default
settings cannot be changed.
• Do NOT use this cycle with delicate items or fabrics.
Protocol P154 Sanitization
Performance of Residential
Clothes dryer
(DLE3500*, DLG3501*, DLE3095*, DLE3090*,
DLEX3700*, DLGX3701*, DLEX3900*, DLGX3901*)
34 OPERATION
Non-Steam Models (DLE3500*, DLG3501*, DLE3095*, DLE3090*)
= default setting
●
= allowable option
* = Energy Saver on by default
Cycle Fabric Type
Dry
Level
Temp. Wrinkle Care
Damp Dry
Signal
Anti
Bacterial
SENSOR DRY
Normal*
Work clothes,
corduroys, etc.
Normal
Medium ● ● ●
Adj.
Heavy
Duty
Jeans, heavyweight
items
Normal
High ● ● ●
Adj.
Bedding
Comforters, Pillows,
Shirts
Normal
Medium
Adj.
Towels
Denims, towels, heavy
cottons
Normal
Medium ● ● ●
Adj.
Small
Load
Only normal & cotton/
towels fabric type (Max.
3lb)
Normal
High ●
Adj.
Perm.
Press
Permanent press,
synthetic items
Normal
Medium ● ●
Adj.
Delicates
Lingerie, sheets,
blouses
Normal
Low ● ●
Adj.
MANUAL DRY
Speed Dry
For small loads with
short drying times
Off
High
●
Adj.
Air Dry
For items that require
heat-free drying such
as plastics or rubber
Off No Heat ●
35OPERATION
ENGLISH
Steam Models (DLEX3700*, DLGX3701*)
= default setting
●
= allowable option
* = Energy Saver on by default
Cycle Fabric Type
Dry
Level
Temp. Wrinkle Care
Damp Dry
Signal
Reduce
Static
SENSOR DRY
Normal*
Work clothes,
corduroys, etc.
Normal
Mid High ● ● ●
Adj.
Heavy
Duty
Jeans, heavyweight
items
Normal
High ● ● ●
Adj.
Bedding
Comforters, pillows,
shirts
Normal
Medium ●
Adj.
Anti
Bacterial
Do not use this cycle
with delicate fabrics
Very High ●
Perm.
Press
Permanent press,
synthetic items
Normal
Medium ● ● ●
Adj.
Delicates
Lingerie, sheets,
blouses
Normal
Low ● ● ●
Adj.
Towels
Denims, towels, heavy
cottons
Normal
Mid High ● ● ●
Adj.
MANUAL DRY
Speed Dry
For small loads with
short drying times
Off
High
● ●
Adj.
Air Dry
For items that require
heat-free drying such
as plastics or rubber
Off No Heat ●
STEAM CYCLE
Steam
Sanitary™
Comforter, bedding,
children's clothing
Off High ●
Steam
Fresh™
Comforter, shirts,
trousers (except
especially delicate
fabrics)
Off
Mid High
●
Adj.
36 OPERATION
Steam Models (DLEX3900*, DLGX3901*)
= default setting
●
= allowable option
* = Energy Saver on by default
Cycle Fabric Type
Dry
Level
Temp. Wrinkle Care
Damp Dry
Signal
Reduce
Static
SENSOR DRY
Normal*
Work clothes,
corduroys, etc.
Normal
Mid High ● ● ●
Adj.
Heavy
Duty
Jeans, heavyweight
items
Normal
High ● ● ●
Adj.
Bedding
Comforters, pillows,
shirts
Normal
Medium ●
Adj.
Small
Load
Only normal & cotton/
towels fabric type (Max.
3lb)
Normal
High ●
Adj.
Anti
Bacterial
Do not use this cycle
with delicate fabrics
Very High ●
Perm.
Press
Permanent press,
synthetic items
Normal
Medium ● ● ●
Adj.
Delicates
Lingerie, sheets,
blouses
Normal
Low ● ● ●
Adj.
Sportswear
Sports Wear Off ● ●
Towels
Denims, towels, heavy
cottons
Normal
Mid High ● ● ●
Adj.
MANUAL DRY
Speed Dry
For small loads with
short drying times
Off
High
● ●
Adj.
Air Dry
For items that require
heat-free drying such
as plastics or rubber
Off No Heat ●
STEAM CYCLE
Steam
Sanitary™
Comforter, bedding,
children's clothing
Off High ●
Steam
Fresh™
Comforter, shirts,
trousers (except
especially delicate
fabrics)
Off
Mid High
●
Adj.

37OPERATION
ENGLISH
Cycle Modifier Buttons
Sensor Dry cycles have preset settings that are
selected automatically. Manual Dry cycles have
default settings, but you may also customize the
settings using the cycle modifier buttons. Press
the button for that option to view and select other
settings.
Dry Level
Use this button to select the level of dryness for the
cycle. Press the Dry Level button repeatedly to scroll
through available settings.
• This option is only available with Sensor Dry cycles.
• The dryer will automatically adjust the cycle time.
Selecting More or Very will increase the cycle time,
while Less or Damp will decrease the cycle time.
• Use a Less or Damp setting for items that you wish
to iron.
Temp.
Use this button to adjust the temperature setting.
This allows precise care of fabrics and garments.
Press the Temp. button repeatedly to scroll through
available settings.
Time Dry
Use this button to manually select the drying time,
from 20 to 60 minutes, in 10-minute increments. Use
this for small loads or to remove wrinkles. Use the
More Time/Less Time buttons to add or reduce the
drying time in 1-minute increments.
Signal
Use this button to adjust the volume of the end of
cycle signal or turn off the signal. Press the button
repeatedly until the desired volume setting is
illuminated.
Option Buttons
The dryer features several additional cycle options to
customize cycles to meet individual needs. Certain
option buttons also feature a special function that
can be activated by pressing and holding that option
button for 3 seconds.
Adding Cycle Options to a Cycle
1
Turn on the dryer and turn the Cycle selector
knob to select the desired cycle.
2
Use the cycle modifier buttons to adjust the
settings for that cycle.
3
Press the cycle option button(s) to add the
desired options. A confirmation message is
shown in the display.
4
Press the Start/Pause button to start the cycle.
The dryer starts automatically.
Wrinkle Care
Selecting this option will tumble the load periodically
for up to 3 hours after the selected cycle, or until the
door is opened. This is helpful in preventing wrinkles
when you are unable to remove items from the dryer
immediately.
Damp Dry Signal
When this option is selected, the dryer signals when
the load is approximately 80% dry. This allows you
to remove faster-drying lightweight items or items
that you would like to iron or hang while they are still
slightly damp.
Energy Saver
This option helps to reduce the energy consumption
of the Normal Cycle, depending on the load size.
When the Energy Saver option is selected, the cycle
begins with an air dry section and the drying time is
increased.
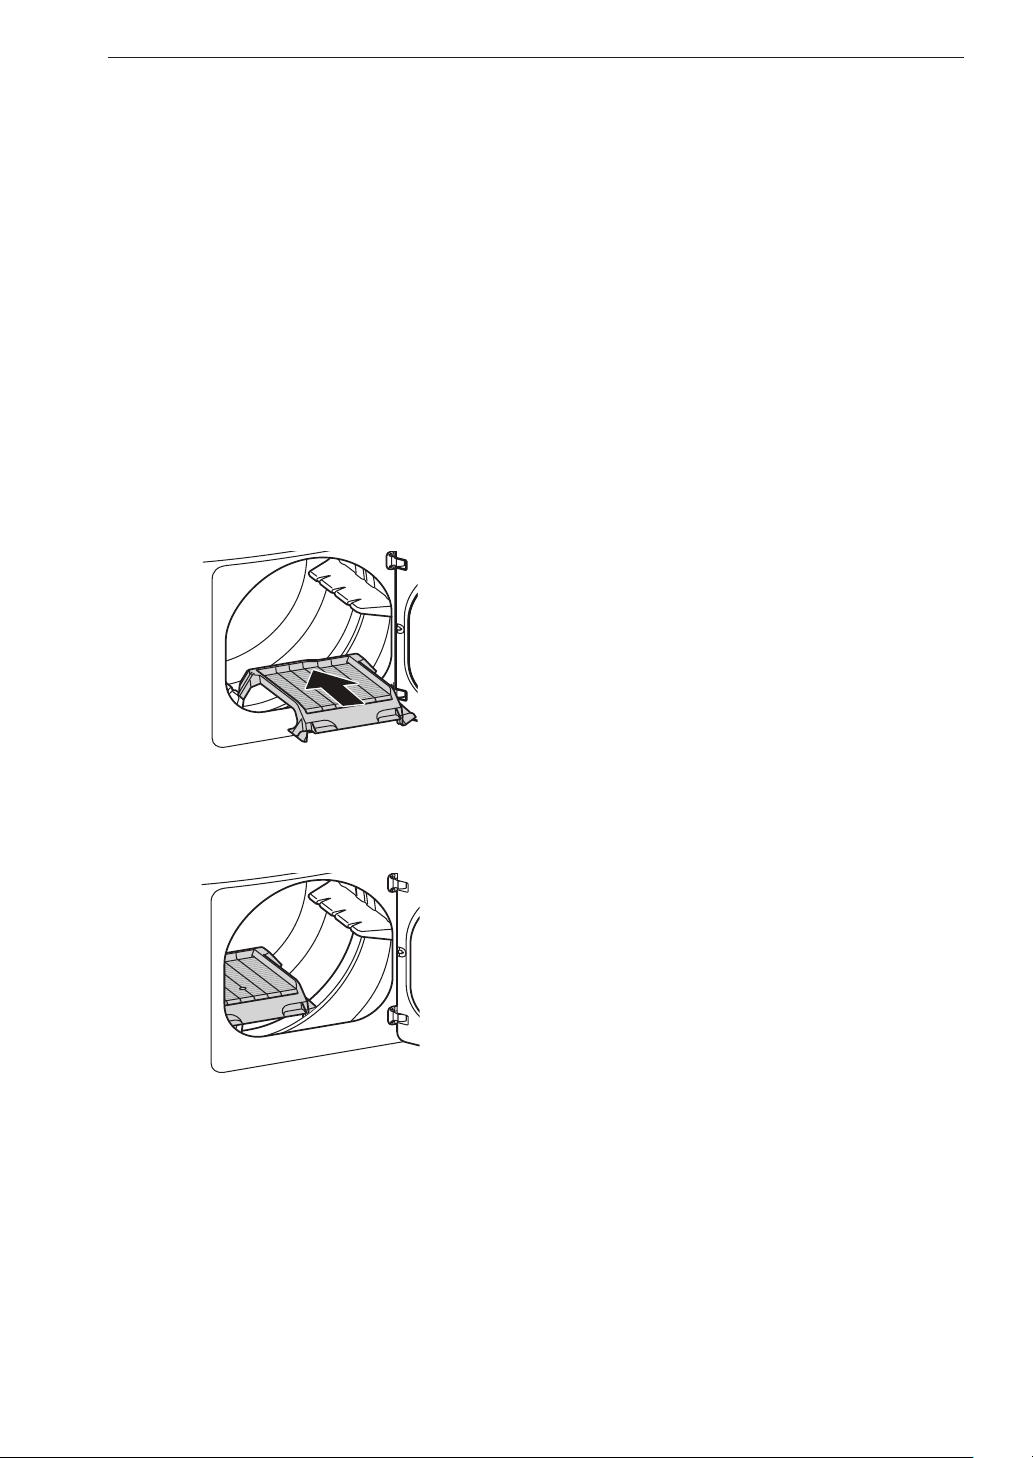
38 OPERATION
Rack Dry (On Some Models)
Use the Rack Dry function with items, such as wool
swearters, silk items, and lingerie, that should be
dried flat. Rack Dry can also be used with items that
should not be tumbled dry, such as gym shoes or
stuffed animals.
NOTE
• NEVER tumble dry a load of clothing with the rack
installed.
• When the rack is installed, the drum will rotate as
usual, but the rack will not move. Make sure all
articles to be dried remain completely on the rack
and cannot fall off or be pulled off by the turning
drum. Be sure to remove the rack after use.
Using the Rack Dry Cycle
1
With the dryer door open, slide the rack into
the dryer drum.
2
Make sure it is seated evenly on the edge
of the inner door rim and resting flat on the
inside of the dryer.
3
Place wet items on the rack. Allow space
around the items for air to circulate.
4
Close the door and select Rack Dry.
5
Press Temp. to select a temperature option.
If no temperature is selected, Rack Dry
defaults to no heat.
Special Functions
Some cycle option buttons also activate secondary
functions. These special functions are marked with an
asterisk (*). Press and hold the option button marked
with the special function to activate it.
Control Lock
Use this option to prevent unwanted use of the dryer
or to keep cycle settings from being changed while
the dryer is operating.
Activating the Control Lock Function
Press and hold the Wrinkle Care button for 3
seconds.
The Control Lock icon will be shown in the display,
and all controls will be disabled except the Power
button.
Deactivating the Control Lock Function
Press and hold the Wrinkle Care button for 3
seconds.
Once set, Control Lock remains active until it is
manually deactivated. Control Lock must be turned
off to run another cycle.
Custom PGM
Save special combinations of settings that are used
frequently as a custom program.
Saving a Custom Program
1
Turn on the dryer and select the desired settings
using the cycle selector knob and cycle modifier
or option buttons.
2
Press and hold the Custom PGM button for
three seconds.
NOTE
• Only one custom program can be saved at a time.
Pressing and holding the Custom PGM button will
overwrite any previously saved custom program.
Recalling a Custom Program
1
Turn on the dryer and press the Custom PGM
button.
2
Press the Start/Pause button to start the cycle.
Default On/Off
This option allows the Energy Saver settings to be
changed. To run a Normal cycle without the Energy
Saver option, press and hold the Energy Saver
button for three seconds. ON or OFF appears in the
display.
39OPERATION
ENGLISH
The Steam Options
The Reduce Static option injects steam late in the
drying cycle to reduce the static electricity caused by
dry fabrics rubbing together.
NOTE
• When Sensor Dry is selected with the Reduce
Static option, a Dry level of Less or Damp cannot be
selected.
• The Reduce Static option can also be selected
during Time Dry cycles.
• After the Steam option is selected in Time Dry, the
More Time or Less Time buttons will change the
steam time ONLY.
• Depending on the load (quantity of items), you can
change the amount of time for the cycle by pressing
the More Time or Less Time button. (Reduce
static: 7, 9, 11, 14, 16, or 18)
Adding Steam to a Standard Cycle
1
Turn on the dryer and turn the cycle selector
knob to select the desired cycle.
2
Use the cycle setting buttons to adjust the
settings for that cycle.
3
Press the Steam option button (Reduce Static,
or Wrinkle Care) for the desired steam option.
Then adjust for the load size using the More
Time or Less Time buttons.
4
Press Start/Pause to start the cycle.
NOTE
• Steam may not be clearly visible during the steam
cycles. This is normal.
• Do not use Steam Fresh™ with items such as wool,
wool blankets, leather jackets, silk, wet clothes,
lingerie, foam products, or electric blankets.
• For best results, load articles of similar size and
fabric type. Do not overload.
• When the filter/duct is clogged, the steam option
may not have optimal results.
• When the steam function is operating, the drum will
stop to allow steam to stay in the drum.
Steam Functions
(Steam Models)
LG’s new steam technology injects fabrics with a
swirling jet of hot steam to refresh clothes, reduce
static, and make ironing easier.
Simply select the Steam Fresh™ cycle, or add a
steam option to selected cycles.
WARNING
To reduce the risk of serious injury, death,
explosion, or fire, follow basic safety
precautions, including the following:
• Do not open the dryer door during steam cycles.
• Do not touch the steam nozzle in the drum
during or after the steam cycle.
The Steam Sanitary™ Cycle
The Steam Sanitary™ cycle is ideal for sanitizing
non-washable items quickly and easily using the
power of steam.
Use this cycle for cotton and polyester material.
(Do NOT use for urethane foam, down feathers or
delicate items).
The Steam Fresh™ Cycle
Steam Fresh™ uses the power of steam to quickly
reduce wrinkles and odors in fabrics. It brings new
life to wrinkled clothes that have been stored for an
extended time and makes heavily wrinkled clothes
easier to iron. Steam Fresh™ can also be used to
help reduce odors in fabrics.
NOTE
• Reduce Static options can also be used during the
Steam Fresh™ cycle.
• The cycle time depends on the load (number of
items). Press the More Time or Less Time button
to change the display to reflect the number of items
in the load. The display will show 3, 5, or . 3
means 3 or fewer items, 5 is for 4 or 5 items, and
indicates a large load such as a comforter.
Using the Steam Fresh™ Cycle
1
Turn on the dryer and turn the cycle selector
knob to select the Steam Fresh™ cycle.
2
To add an option function, select Reduce
Static, or Wrinkle Care.
3
The display shows the load size (number of
items). Change the steam time by pressing
the More Time or Less Time buttons to fit
the size of the load.
4
Press Start/Pause to start the cycle.

40 OPERATION
Steam Cycle Guide
Steam
Default
Time
Temp.
Dry
Level
Fabric
State
Fabric
Type
Maximum
Amount
Steam
Sanitary
TM
Turbo
Steam
31 minutes Dry
Comforter
Bedding
Single
(1 each)
Children’s
clothing
3 lbs.
Steam
Fresh
TM
Turbo
Steam
10 minutes ● Dry
Comforter
Single
(1 each)
Shirts* 5 each
Steam
Option
Reduce
Static
Follows
Selected
Cycle
● Wet
Varies by
selected
cycle
8 lbs.
(18 Items.)
Turbo
Steam
Follows
Selected
Cycle
● Wet
Varies by
selected
cycle
8 lbs.
(18 Items.)
Time Dry
Reduce
Static
38 minutes ● Wet
Varies by
selected
cycle
8 lbs.
(18 Items.)
* Shirt: 70% cotton, 30% poly blend. Except especially delicate fabrics
= default setting
●
= allowable option
41SMART FUNCTIONS
ENGLISH
SMART FUNCTIONS
LG SmartThinQ Application
The LG SmartThinQ application allows you to
communicate with the appliance using a smartphone.
Before Using LG SmartThinQ
• For appliances with the or logo
1
Use a smartphone to check the strength of
the wireless router (Wi-Fi network) near the
appliance.
• If the distance between the appliance and the
wireless router is too far, the signal strength
becomes weak. It may take a long time to
register or installation may fail.
2
Turn off the Mobile data or Cellular Data on
your smartphone.
3
Connect your smartphone to the wireless router.
NOTE
• To verify the Wi-Fi connection, check that Wi-Fi
icon on the control panel is lit.
• The appliance supports 2.4 GHz Wi-Fi networks
only. To check your network frequency, contact your
Internet service provider or refer to your wireless
router manual.
• LG SmartThinQ is not responsible for any network
connection problems or any faults, malfunctions, or
errors caused by network connection.
• The surrounding wireless environment can make
the wireless network service run slowly.
• If the appliance is having trouble connecting to the
Wi-Fi network, it may be too far from the router.
Purchase a Wi-Fi repeater (range extender) to
improve the Wi-Fi signal strength.
• The network connection may not work properly
depending on the Internet service provider.
• The Wi-Fi connection may not connect or may
be interrupted because of the home network
environment.
• If the appliance cannot be registered due to
problems with the wireless signal transmission,
unplug the appliance and wait about a minute
before trying again.
• If the firewall on your wireless router is enabled,
disable the firewall or add an exception to it.
• The wireless network name (SSID) should be a
combination of English letters and numbers. (Do not
use special characters.)
• Smartphone user interface (UI) may vary depending
on the mobile operating system (OS) and the
manufacturer.
• If the security protocol of the router is set to WEP,
network setup may fail. Change the security
protocol (WPA2 is recommended), and register the
product again.
Installing the LG SmartThinQ
Application
Search for the LG SmartThinQ application from the
Google Play Store or Apple App Store on a smart
phone. Follow instructions to download and install the
application.
NOTE
• If you change your wireless router, Internet service
provider, or password, delete the registered
appliance from the LG SmartThinQ application and
register it again.

42 SMART FUNCTIONS
LG SmartThinQ Application Features
• For appliances with the or logo
Dryer Cycle
Download new and specialized cycles that are not
included in the standard cycles on the appliance.
Appliances that have been successfully registered
can download a variety of specialty cycles specific to
the appliance.
Only one cycle can be stored on the appliance at a
time.
Once cycle download is completed in the appliance,
the appliance keeps the downloaded cycle until a
new cycle is downloaded.
Venting Tips
Provides venting tips.
Smart Diagnosis™
This function provides useful information for
diagnosing and solving issues with the appliance
based on the pattern of use.
Energy Monitoring
The dryer energy usage is affected by the cycles and
options so you may see some changes in energy
usage from one cycle to another.
Push Alerts
When the cycle is complete or the appliance has
problems, you have the option of receiving push
notifications on a smart phone.
Settings
Set the product nickname and delete product.
NOTE
• To verify the Wi-Fi connection, check that Wi-Fi
icon on the control panel is lit.
• LG Smart ThinQ is not responsible for any network
connection problems or any faults, malfunctions, or
errors caused by network connection.
• The machine supports 2.4 GHz Wi-Fi networks only.
• If the appliance is having trouble connecting to the
Wi-Fi network, it may be too far from the router.
Purchase a Wi-Fi repeater (range extender) to
improve the Wi-Fi signal strength.
• The Wi-Fi connection may not connect or may
be interrupted because of the home network
environment.
• The network connection may not work properly
depending on the internet service provider.
• The surrounding wireless environment can make
the wireless network service run slowly.
• This information is current at the time of publication.
The application is subject to change for product
improvement purposes without notice to users.
Using Remote Start
Use a smart phone to control the appliance remotely
or check to see how much time is left in the cycle.
1
Press the Power button.
2
Load the laundry.
3
Press and hold the Remote Start button for 3
seconds to enable the Remote Start function.
4
Start a cycle from the LG Smart ThinQ
application on your smart phone.
NOTE
• Once the Remote Start mode is enabled, you can
start a cycle from the LG Smart ThinQ smartphone
application. If the cycle is not started, the machine
will wait to start the cycle until it is turned off
remotely from the application or the Remote Start
mode is disabled.
• If the door is opened, Remote Start is disableb\d.
Disabling Remote Start
When the Remote Start is activated, press and hold
the Remote Start button for 3 seconds.

43SMART FUNCTIONS
ENGLISH
Industry Canada Statement (For transmitter
module contained in this product)
This device contains licence-exempt transmitter(s)/
receiver(s) that comply with Innovation, Science and
Economic Development Canada’s licence-exempt
RSS(s).
Operation is subject to the following two conditions:
(1) This device may not cause interference.
(2) This device must accept any interference,
including interference that may cause undesired
operation of the device.
IC Radiation Exposure Statement
This equipment complies with IC radiation exposure
limits set forth for an uncontrolled environment.
This equipment should be installed and operated with
a minimum distance of 20 cm (7.8 inches) between
the antenna and your body.
NOTE
• THE MANUFACTURER IS NOT RESPONSIBLE
FOR ANY RADIO OR TV INTERFERENCE
CAUSED BY UNAUTHORIZED MODIFICATIONS
TO THIS EQUIPMENT. SUCH MODIFICATIONS
COULD VOID THE USER’S AUTHORITY TO
OPERATE THE EQUIPMENT.
Open Source Software Notice
Information
To obtain the source code under GPL, LGPL, MPL,
and other open source licenses, that is contained in
this product, please visit http://opensource.lge.com.
In addition to the source code, all referred license
terms, warranty disclaimers and copyright notices are
available for download.
LG Electronics will also provide open source code
to you on CD-ROM for a charge covering the cost
of performing such distribution (such as the cost of
media, shipping, and handling) upon email request
to [email protected]. This offer is valid for three
(3) years from the date on which you purchased the
product.
Wireless LAN Module Specifications
Model LCW-004
Frequency Range 2412 to 2462 MHz
Output Power (Max)
IEEE 802.11 b: 22.44 dBm
IEEE 802.11 g: 24.68 dBm
IEEE 802.11 n: 24.11 dBm
FCC Notice
This equipment has been tested and found to comply
with the limits for a Class B digital device, pursuant
to Part 15 of the FCC Rules. These limits are
designed to provide reasonable protection against
harmful interference in a residential installation. This
equipment generates, uses, and can radiate radio
frequency energy and, if not installed and used in
accordance with the instructions, may cause harmful
interference to radio communications. However, there
is no guarantee that interference will not occur in a
particular installation. If this equipment does cause
harmful interference to radio or television reception,
which can be determined by turning the equipment
off and on, the user is encouraged to try to correct
the interference by one or more of the following
measures:
• Reorient or relocate the receiving antenna.
• Increase the separation between the equipment and
the receiver.
• Connect the equipment to an outlet on a circuit
different from that to which the receiver is
connected.
• Consult the dealer or an experienced radio/TV
technician for help.
This device complies with part 15 of the FCC Rules.
Operation is subject to the following two conditions:
1) this device may not cause harmful interference and
2) this device must accept any interference received,
including interference that may cause undesired
operation of the device.
Any changes or modifications in construction of this
device which are not expressly approved by the party
responsible for compliance could void the user’s
authority to operate the equipment.
FCC RF Radiation Exposure Statement
This equipment complies with FCC radiation
exposure limits set forth for an uncontrolled
environment. This transmitter must not be co-located
or operating in conjunction with any other antenna or
transmitter.
This equipment should be installed and operated with
a minimum distance of 20 cm (7.8 inches) between
the antenna and your body. Users must follow the
specific operating instructions for satisfying RF
exposure compliance.

44 SMART FUNCTIONS
SmartThinQ Smart Diagnosis™
• For appliances with the or logo
Use the Smart Diagnosis feature in the SmartThinQ
application for help diagnosing issues with the
appliance without the assistance of the LG Customer
Information Center.
Follow the instructions in the SmartThinQ application
to perform a Smart Diagnosis using your smartphone.
NOTE
• Smart Diagnosis™ cannot be activated unless
the appliance can be turned on using the Power
button. If the appliance cannot be turned on,
troubleshooting must be done without using Smart
Diagnosis™.
Smart Diagnosis™ Function
Should you experience any problems with the
appliance, it has the capability of transmitting data
via your telephone to the LG Customer Information
Center. NFC or Wi-Fi equipped models can also
transmit data to a smartphone using the LG
SmartThinQ application.
Smart Diagnosis™ through the
Customer Information Center
• For appliances with the or logo
This method allows you to speak directly to our
trained specialists. The specialist records the data
transmitted from the appliance and uses it to analyze
the issue, providing a fast and effective diagnosis.
1
Call the LG Electronics Customer Information
Center at:
(LG U.S.A.) 1-800-243-0000
(LG Canada) 1-888-542-2623
2
When instructed to do so by the call center,
place the mouthpiece of the phone close to the
Smart Diagnosis™ icon. Do not press any other
buttons.
3
Press and hold the Temp. button for 3 seconds.
4
Keep the phone in place until the tone
transmission has finished.
5
Once the countdown is over and the tones have
stopped, resume your conversation with the call
center agent, who will then be able to assist you
using the information transmitted for analysis.
NOTE
• Smart Diagnosis™ cannot be activated unless
the appliance can be turned on using the Power
button. If the appliance cannot be turned on,
troubleshooting must be done without using Smart
Diagnosis™.
• For best results, do not move the phone while the
tones are being transmitted.
• If the call center agent is not able to get an accurate
recording of the data, you may be asked to try
again.
• The Smart Diagnosis™ function depends on the
local call quality.
• Bad call quality may result in poor data transmission
from your phone to the call center, which could
cause Smart Diagnosis™ to malfunction.
45MAINTENANCE
ENGLISH
MAINTENANCE
Regular Cleaning
WARNING
To reduce the risk of fire, electric shock,
injury to persons, or death when using this
appliance, follow basic precautions, including
the following:
• Unplug the dryer before cleaning.
• Never use harsh chemicals, abrasive cleaners,
or solvents to clean the washer. They will
damage the finish.
Cleaning the Exterior
Proper care of your dryer can extend its life. The
outside of the machine can be cleaned with warm
water and a mild, nonabrasive household detergent.
Immediately wipe off any spills with a soft, damp
cloth.
NOTE
• Do not use methylated spirits, solvents, or similar
products.
• Never use steel wool or abrasive cleansers; they
can damage the surface.
Cleaning the Interior
Wipe around the door opening and seal with a soft,
damp cloth to prevent lint and dust buildup that could
damage the door seal.
Clean the window with a soft cloth dampened with
warm water and a mild, nonabrasive household
detergent, then wipe dry.
The stainless steel drum can be cleaned with a
conventional stainless steel cleaner, used according
to the manufacturer’s specifications. Never use steel
wool or abrasive cleansers; they may scratch or
damage the surface.
Cleaning Around and Under the
Dryer
Vacuum lint and dust from around the dryer and
underneath it regularly. Vent ductwork should be
checked for lint buildup and cleaned at least once per
year. If any noticeable reduction in airflow or drying
performance occurs, immediately check ductwork for
obstructions and blockages.
Maintaining Ductwork
Vent ductwork should be checked for lint buildup
once per month and cleaned at least once per
year. If any noticeable reduction in airflow or drying
performance occurs, immediately check ductwork
for obstructions and blockages. Contact a qualified
technician or service provider.
Cleaning the Lint Filter
Always clean the lint from the filter after every cycle.
Lint Filter
To clean the lint filter, open the dryer door and pull
the lint filter straight up. Then:
1
For everyday cleaning, roll any lint off the filter
with your fingers, or
2
Vacuum the lint filter.
3
If the lint filter has become very dirty or clogged
with fabric softener, wash the lint filter in warm,
soapy water and allow it to dry thoroughly before
reinstalling.
NOTE
• NEVER operate the dryer without the lint filter in
place.

46 TROUBLESHOOTING
TROUBLESHOOTING
FAQs: Frequently Asked Questions
Q: When I press a button, why does my dryer beep and then nothing happens?
A: The Control Lock feature is turned on. To turn off Control Lock, turn the dryer on, then press and hold
the button that has *Control Lock on or under it for 3 seconds.
Q: Why does my dryer take so long to dry clothes?
A: Proper airflow is critical to the efficient operation of clothes dryers. A lint filter which is full of lint or
clogged with fabric softener sheet residue can reduce the airflow to the point that the time required
to dry clothing will be greatly increased. Another factor affecting dry time is your home exhaust
system. An exhaust system which is dirty and clogged with lint, or is excessively long, needs to be
professionally cleaned or repaired.
Q: Why does my dryer start by itself every few minutes?
A: This is how the Wrinkle Care feature works. The dryer runs briefly every few minutes for up to 3
hours after the cycle finishes. This feature is designed to help prevent wrinkles from setting in when
the dryer is not unloaded immediately after the cycle is finished.
Q: Why does my dryer show 3 minutes when I select the Steam Fresh™ cycle?
A: When the Steam Fresh™ cycle is selected, the dryer displays the recommended number of garments
for the cycle, not the estimated cycle time, until the cycle is started. Use the More Time or Less
Time buttons to adjust the load size setting for the number of garments you desire. For a large load
or single bulky item use the (big) setting.

47TROUBLESHOOTING
ENGLISH
Before Calling for Service
This dryer is equipped with an automatic error-monitoring system to detect and diagnose problems at an early
stage. If the dryer does not function properly or does not function at all, check the following before you call for
service.
Operation
Problem Possible Cause Solutions
The Flow Sense™
indicator remains
active after clearing
the restriction in
the venting.
After clearing the restriction,
the Flow Sense™ system
requires multiple, consecutive
cycles to determine that
the performance value has
improved before the Flow
Sense™ indicator is reset.
• If the Flow Sense™ indicator remains active for more
than five cycles after the restriction has been cleared,
call for service.
Dryer will not turn
on
Power cord is not properly
plugged in.
• Make sure that the plug is securely plugged into a
grounded outlet matching the dryer’s rating plate.
House fuse is blown, circuit
breaker has tripped, or power
outage has occurred.
• Reset circuit breaker or replace fuse. Do not increase
fuse capacity. If the problem is a circuit overload, have
it corrected by a qualified electrician.
Dryer does not heat
House fuse is blown, circuit
breaker has tripped, or power
outage has occurred.
• Reset circuit breaker or replace fuse. Do not increase
fuse capacity. If the problem is a circuit overload, have
it corrected by a qualified electrician.
• NOTE: Due to the design of electric dryers, it is
possible for a circuit problem to allow an electric dryer
to run without heat.
Gas supply or service is
turned off.
• Confirm that the house gas shutoff and the dryer gas
shutoff valves are both fully open. Even if gas is not
supplied to the dryer, it will run and no error codes will
display. Verify that other gas appliances in the home
are working normally.
ENERGY SAVER option
selected (on some models)
• If using the Normal cycle, deselect the ENERGY
SAVER option. The Energy Saver option is selected by
default. This option reduces energy use by adding an
air dry section to the beginning of the cycle. It is normal
to feel no heat at the beginning of the cycle while in
ENERGY SAVER mode.
Clothes take too
long to dry
Exhaust ducts are blocked,
dirty, or duct run is too long.
• Confirm that the exhaust duct is properly configured
and free of debris, lint, and obstructions. Make sure that
outside wall dampers can open properly and are not
blocked, jammed, or damaged.
Load is not properly sorted.
• Separate heavy items from lightweight items. Larger
and heavier items take longer to dry. Light items in a
load with heavy items can fool the sensor because the
light items dry faster.
Display show error
code nP
Electric dryer power cord
is not connected correctly,
or house power supply is
incorrect.
• Check the power supply or the connection of the power
cord to the terminal block.
Display show error
code gAS
Gas supply or service turned
off (gas models only).
• Confirm that house gas shutoff and the dryer gas
shutoff are both fully open.

48 TROUBLESHOOTING
Problem Possible Cause Solutions
Clothes take too
long to dry
Large load of heavy fabrics.
• Heavy fabrics take longer to dry because they tend
to retain more moisture. To help reduce and maintain
more consistent drying times for large and heavy
fabrics, separate these items into smaller loads of a
consistent size.
Dryer controls are not set
properly.
• Use the appropriate control settings for the type of load
you are drying. Some loads may require an adjustment
of the dry level setting for proper drying.
Lint filter needs to be cleaned.
• Remove the lint from the filter before every load. With
the lint removed, hold the filter up to a light to see if it
is dirty or clogged. With some loads that produce high
amounts of lint, such as new bath towels, it may be
necessary to pause the cycle and clean the filter during
the cycle.
House fuse is blown, circuit
breaker has tripped, or power
outage has occurred.
• Reset circuit breaker or replace fuse. Do not increase
fuse capacity. If the problem is a circuit overload, have
it corrected by a qualified electrician.
• NOTE: Due to the design of electric dryers, it is
possible for a circuit problem to allow an electric dryer
to run without heat.
Dryer is overloaded.
• Divide extra large loads into smaller loads for better
drying performance and efficiency.
Dryer is underloaded.
• If you are drying a very small load, add a few extra
items to ensure proper tumbling action. If the load is
very small and you are using SENSOR DRY cycles, the
electronic control cannot properly sense the dryness of
the load and may shut off too soon. Use TIME DRY or
add some extra wet clothes to the load.
ENERGY SAVER option
selected (on some models)
• If using the Normal cycle, deselect the ENERGY
SAVER option. This option reduces energy use by
adding an air dry section to the beginning of the cycle.
Drying time is not
consistent
Heat settings, load size, or
dampness of clothing is not
consistent.
• The drying time for a load will vary depending on the
type of heat used (electric, natural gas, or LP gas),
the size of the load, the type of fabrics, the wetness of
the clothes, and the condition of the exhaust duct and
lint filter. Even an unbalanced load in the washer can
cause poor spinning, resulting in wetter clothes which
will take longer to dry.

49TROUBLESHOOTING
ENGLISH
Performance
Problem Possible Cause Solutions
Greasy or dirty
spots on clothes
Fabric softener used
incorrectly.
• Confirm and follow the instructions provided with your
fabric softener.
Clean and dirty clothes are
being dried together.
• Use your dryer to dry only clean items. Soil from dirty
clothes can transfer to the clean clothes in the same or
later loads.
Clothes were not properly
cleaned or rinsed before being
placed in the dryer.
• Stains on dried clothes could be stains that were not
removed during the washing process. Make sure
that clothes are being completely cleaned or rinsed
according to the instructions for your washer and
detergent. Some difficult soils may require pre-treating
prior to washing.
Clothes are
wrinkled
Clothes dried too long (over
dried).
• Over drying a load of laundry can lead to wrinkled
clothes. Try a shorter drying time or LESS DRY setting
and remove items while they still retain a slight amount
of moisture.
Clothes left in dryer too long
after cycle ends.
• Use the WRINKLE CARE option. This feature will
tumble the clothes briefly every few minutes for up to 3
hours to help prevent wrinkling.
Clothes are
shrinking
Garment care instructions are
not being followed.
• To avoid shrinking your clothes, always consult and
follow fabric care instructions. Some fabrics will
naturally shrink when washed. Other fabrics can be
washed but will shrink when dried in a dryer. Use a low
or no heat setting.
Lint on clothes
Lint filter not cleaned properly.
• Remove the lint from the filter before every load. With
the lint removed, hold the filter up to a light to see if it
is dirty or clogged. If it looks dirty, follow the cleaning
instructions. With some loads that produce high
amounts of lint, it may be necessary to clean the filter
during the cycle.
Laundry not sorted properly.
• Some fabrics are lint producers (i.e., a fuzzy white
cotton towel) and should be dried separately from
clothes that are lint trappers (i.e., a pair of black linen
pants).
Excess static in clothes.
• Use a fabric softener to reduce static electricity. Be sure
to follow the manufacturer’s instructions. Overdrying a
load of laundry can cause a buildup of static electricity.
Adjust settings and use a shorter drying time, or use
SENSOR DRY cycles.
Dryer is overloaded. • Divide extra large loads into smaller loads for drying.
Tissue, paper, etc., left in
pockets.
• Check pockets thoroughly before washing and drying
clothes.

50 TROUBLESHOOTING
Problem Possible Cause Solutions
Excess static in
clothes after drying
Fabric softener is not used or
used incorrectly.
• Use a fabric softener or the REDUCE STATIC option, if
equipped, to reduce static electricity. Be sure to follow
the manufacturer’s instructions.
Clothes dried too long
(overdried).
• Overdrying a load of laundry can cause a buildup of
static electricity. Adjust settings and use a shorter
drying time, or use MANUAL DRY cycles. Select
a LESS DRY setting on SENSOR DRY cycles, if
necessary.
Drying synthetics, permanent
press, or synthetic blends.
• These fabrics are naturally more prone to static buildup.
Try using fabric softener, or use LESS DRY and/or
shorter TIME DRY time settings.
Clothes have
damp spots after a
Sensor Dry cycle.
Very large load or very small
load.Single large item such as
a blanket or comforter.
• If items are too tightly packed or too sparse the sensor
may have trouble reading the dryness level of the load.
Use a TIME DRY cycle for very small loads.
• Large, bulky items such as blankets or comforters can
sometimes wrap themselves into a tight ball of fabric.
The outside layers will dry and register on the sensors,
while the inner core remains damp. When drying a
single bulky item, it may help to pause the cycle once
or twice and rearrange the item to unwrap and expose
any damp areas.
• To dry a few remaining damp items from a very large
load or a few damp spots on a large item after a sensor
cycle has completed, empty the lint trap, then set a
TIME DRY cycle to finish drying the item(s).
Trouble connecting
appliance and
smartphone to Wi-
Fi network
The password for the Wi-
Fi network was entered
incorrectly.
• Delete your home Wi-Fi network and begin the
registration process again.
Mobile data for your
smartphone is turned on.
• Turn off the Mobile data on your smartphone before
registering the appliance.
The wireless network name
(SSID) is set incorrectly.
• The wireless network name (SSID) should be a
combination of English letters and numbers. (Do not
use special characters.)
The router frequency is not 2.4
GHz.
• Only a 2.4 GHz router frequency is supported. Set the
wireless router to 2.4 GHz and connect the appliance
to the wireless router. To check the router frequency,
check with your Internet service provider or the router
manufacturer.
The distance between the
appliance and the router is too
far.
• If the appliance is too far from the router, the signal
may be weak and the connection may not be
configured correctly. Move the router closer to the
appliance or purchase and install a Wi-Fi repeater.

51TROUBLESHOOTING
ENGLISH
Steam Functions (Steam Models)
Problem Possible Cause Solutions
Water drips from nozzle when
STEAM CYCLE starts
This is normal.
• This is steam condensation. The
dripping water will stop after a short
time.
Garments still wrinkled after Steam
Fresh™
Too many or overly different
types of garments in dryer.
• Small loads of 1 to 5 items work best.
Load fewer garments. Load similar
types of garments.
Creases or pleats are gone from
garments after Steam Fresh™
The function of this cycle is to
remove wrinkles from fabric.
• Use an iron to replace creases and
pleats in garments.
Garments have static after using the
Reduce Static option
This is normal.
• The amount of static experienced will
depend on the individual moisture
level in the skin.
Garments are too damp or too dry
after using the Reduce Static option
Correct drying options not
selected.
• Select the load weight manually
before starting the Reduce Static
option.
Steam does not generate, but no
error code is shown
Water level error. • Unplug dryer and call for service.
Water drips from door during
STEAM CYCLE
This is normal.
• Condensation will normally form on
the inside of the dryer door during
steam operation. Some condensation
may drip out the bottom of the door.
Steam is not visible during STEAM
CYCLE
This is normal.
• Steam vapor is difficult to see
when the door is closed. However,
condensation will normally form on
the inside of the dryer door if the
steam system is operating normally.
Drum does not turn during STEAM
CYCLE
This is normal.
• The drum is turned off so that the
steam vapor remains in the drum.
The drum will normally turn for about
2 seconds once a minute.
Cannot see steam vapor at the
beginning of cycle
This is normal.
• Steam is released at different stages
of the cycle for each option.
Odors remain in clothing after
Steam Fresh™
Steam Fresh™ did not remove
odor completely.
• Fabrics containing strong odors
should be washed in a normal cycle.
52 TROUBLESHOOTING
Error Codes
Problem Possible Cause Solutions
Error code: tE1 through tE7
Temperature sensor
failure.
• Turn off the dryer and call for service.
Display shows error code: PS
Power cord is connected
incorrectly.
• Check the connection of the power cord to
the terminal block.
*Flow Sense™ indicator shows
four bars during the drying cycle
or the display shows "d80" after
drying
* This warning light is not a dryer
failure and is not covered by the
dryer warranty. Contact a duct
cleaning service to set up an
appointment to have your exhaust
system cleaned and inspected.
Exhaust system is too
long or has too many
turns/restrictions.
• Install a shorter or straighter duct run. See
the Installation Instructions for details.
Partial blockage of the
ductwork due to lint
buildup or other foreign
object.
• Ductwork should be checked/cleaned
immediately. Dryer can be used in this
condition, but drying times will be longer and
energy consumption will increase.
The appliance has
detected a restriction
in the external dryer
venting.
• If exhaust restrictions are sensed by the Flow
Sense™ system, the indicator will remain
on for 2 hours after the end of the cycle.
Opening the door or pressing the Power
button will turn off the display.
The Flow Sense™ indicator
remains active after clearing the
restriction in the venting.
After clearing the
restriction, the Flow
Sense™ system requires
multiple, consecutive
cycles to determine that
the performance value
has improved before the
Flow Sense™ indicator
is reset.
• If the Flow Sense™ indicator remains active
for more than five cycles after the restriction
has been cleared, call for service.
The display shows
More Time button was
pressed.
• This display indicates that the steam option
has been set for a “big” item such as a
comforter.
Press the LESS TIME button to reduce the
indicated load size.
The display shows
The duct work is about
75% - 95% blocked.
(“d75”, “d80”, “d90”
or “d95” error code is
displayed for 2 hours
only)
• Do not use the dryer until the exhaust system
has been cleaned and/or repaired. Using the
dryer with a severely restricted exhaust is
dangerous and could result in a fire or other
property damage.
Check the outside dryer vent while the dryer
is operating to make sure there is strong
airflow.
If the exhaust system is extremely long, have
it repaired or rerouted.
House exhaust system
blocked.
• Keep the area around the dryer clean and
free of clutter.
Check vent hood for damage or lint clogging.
Make sure the area around the vent hood is
clear.
Check filter indicator is on during
the drying cycle
Lint filter not cleaned
properly.
• Remove the lint from the filter before every
load. With the lint removed, hold the filter up
to a light to see if it is dirty or clogged. If it
looks dirty, follow the cleaning instructions.
With some loads that produce high amounts
of lint, it may be necessary to clean the filter
during the cycle.

53WARRANTY
ENGLISH
WARRANTY
ARBITRATION NOTICE: THIS LIMITED WARRANTY CONTAINS AN ARBITRATION PROVISION THAT
REQUIRES YOU AND LG TO RESOLVE DISPUTES BY BINDING ARBITRATION INSTEAD OF IN COURT,
UNLESS THE LAWS OF YOUR PROVINCE OR TERRITORY DO NOT PERMIT THAT, OR, IN OTHER
JURISDICTIONS, IF YOU CHOOSE TO OPT OUT. IN ARBITRATION, CLASS ACTIONS AND JURY TRIALS
ARE NOT PERMITTED. PLEASE SEE THE SECTION TITLED “PROCEDURE FOR RESOLVING DISPUTES”
BELOW.
WARRANTY: Should your LG Dryer (“Product”) fail due to a defect in material or workmanship under normal
home use during the warranty period set forth below, LG Canada will at its option repair or replace the Product
upon receipt of proof of original retail purchase. This warranty is valid only to the original retail purchaser of the
product and applies only to a Product distributed in Canada by LG Canada or an authorized Canadian distributor
thereof. The warranty only applies to Products located and used within Canada. Coverage for “in Home” repairs,
for products in-warranty, will be provided if the Product is within a 150 km radius from the nearest authorized
service center (ASC), as determined by LG Canada. If your Product is located outside a 150 km radius from a
ASC, as determined by LG Canada, it will be your responsibility to bring the Product, at your sole expense, to
the ASC for in-warranty repair.
WARRANTY PERIOD: (Note: If the original date of purchase can not be verified, the warranty will begin
sixty(60) days from the date of manufacture).
Period
One (1) year from the date of original
retail purchase
Ten (10) years from the date of
original retail purchase
Scope of Warranty
Parts and Labor (internal/functional
parts only)
Dryer Drum (Parts only)
• Replacement products and parts are warranted for the remaining portion of the original warranty period or
ninety (90) days, whichever is greater.
• Replacement products and parts may be new or remanufactured.
• LG Authorized Service Center warranties their repair work for thirty (30) days.
LG CANADA’S SOLE LIABILITY IS LIMITED TO THE WARRANTY SET OUT ABOVE. EXCEPT AS
EXPRESSLY PROVIDED ABOVE, LG CANADA MAKES NO AND HEREBY DISCLAIMS ALL OTHER
WARRANTIES AND CONDITIONS RESPECTING THE PRODUCT, WHETHER EXPRESS OR IMPLIED,
INCLUDING, BUT NOT LIMITED TO, ANY IMPLIED WARRANTY OR CONDITION OF MERCHANTABILITY
OR FITNESS FOR A PARTICULAR PURPOSE, AND NO REPRESENTATIONS SHALL BE BINDING ON LG
CANADA. LG CANADA DOES NOT AUTHORIZE ANY PERSON TO CREATE OR ASSUME FOR IT ANY
OTHER WARRANTY OBLIGATION OR LIABILITY IN CONNECTION WITH THE PRODUCT. TO THE EXTENT
THAT ANY WARRANTY OR CONDITION IS IMPLIED BY LAW, IT IS LIMITED TO THE EXPRESS WARRANTY
PERIOD ABOVE. LG CANADA, THE MANUFACTURER OR DISTRIBUTOR SHALL NOT BE LIABLE FOR
ANY INCIDENTAL, CONSEQUENTIAL, SPECIAL, DIRECT OR INDIRECT DAMAGES, LOSS OF GOODWILL,
LOST PROFITS, PUNITIVE OR EXEMPLARY DAMAGES OR ANY OTHER DAMAGE, WHETHER ARISING
DIRECTLY OR INDIRECTLY FROM ANY CONTRACTUAL BREACH, FUNDAMENTAL OR OTHERWISE, OR
FROM ANY ACTS OR OMISSIONS, TORT, OR OTHERWISE.
This warranty gives you specific legal rights. You may have other rights which may vary from province to
province depending on applicable provincial laws. Any term of this warranty that negates or varies any implied
condition or warranty under provincial law is severable where it conflicts with provincial law without affecting the
remainder of this warranty’s terms.
THIS LIMITED WARRANTY DOES NOT COVER:
• Service trips to deliver, pick up, or install the product; instructing a customer on operation of the product; repair
or replacement of fuses or correction of wiring or plumbing, or correction of unauthorized repairs/installation.
• Failure of the product to perform during power failures and interruptions or inadequate electrical service.
• Damage caused by leaky or broken water pipes, frozen water pipes, restricted drain lines, inadequate or
interrupted water supply or inadequate supply of air.
• Damage resulting from operating the Product in a corrosive atmosphere or contrary to the instructions outlined
in the Product owner’s manual.
• Damage to the Product caused by accidents, pests and vermin, lightning, wind, fire, floods, or acts of God.
• Damage or product failure caused by unauthorized modification or alteration, or use for other than its intended
purpose, or resulting from any water leakage due to improper installation.
• Damage or Product failure caused by incorrect electrical current, voltage, or plumbing codes, commercial or
industrial use, or use of accessories, components, or cleaning products that are not approved by LG Canada.
• Conversion of product from natural gas or L.P. gas.
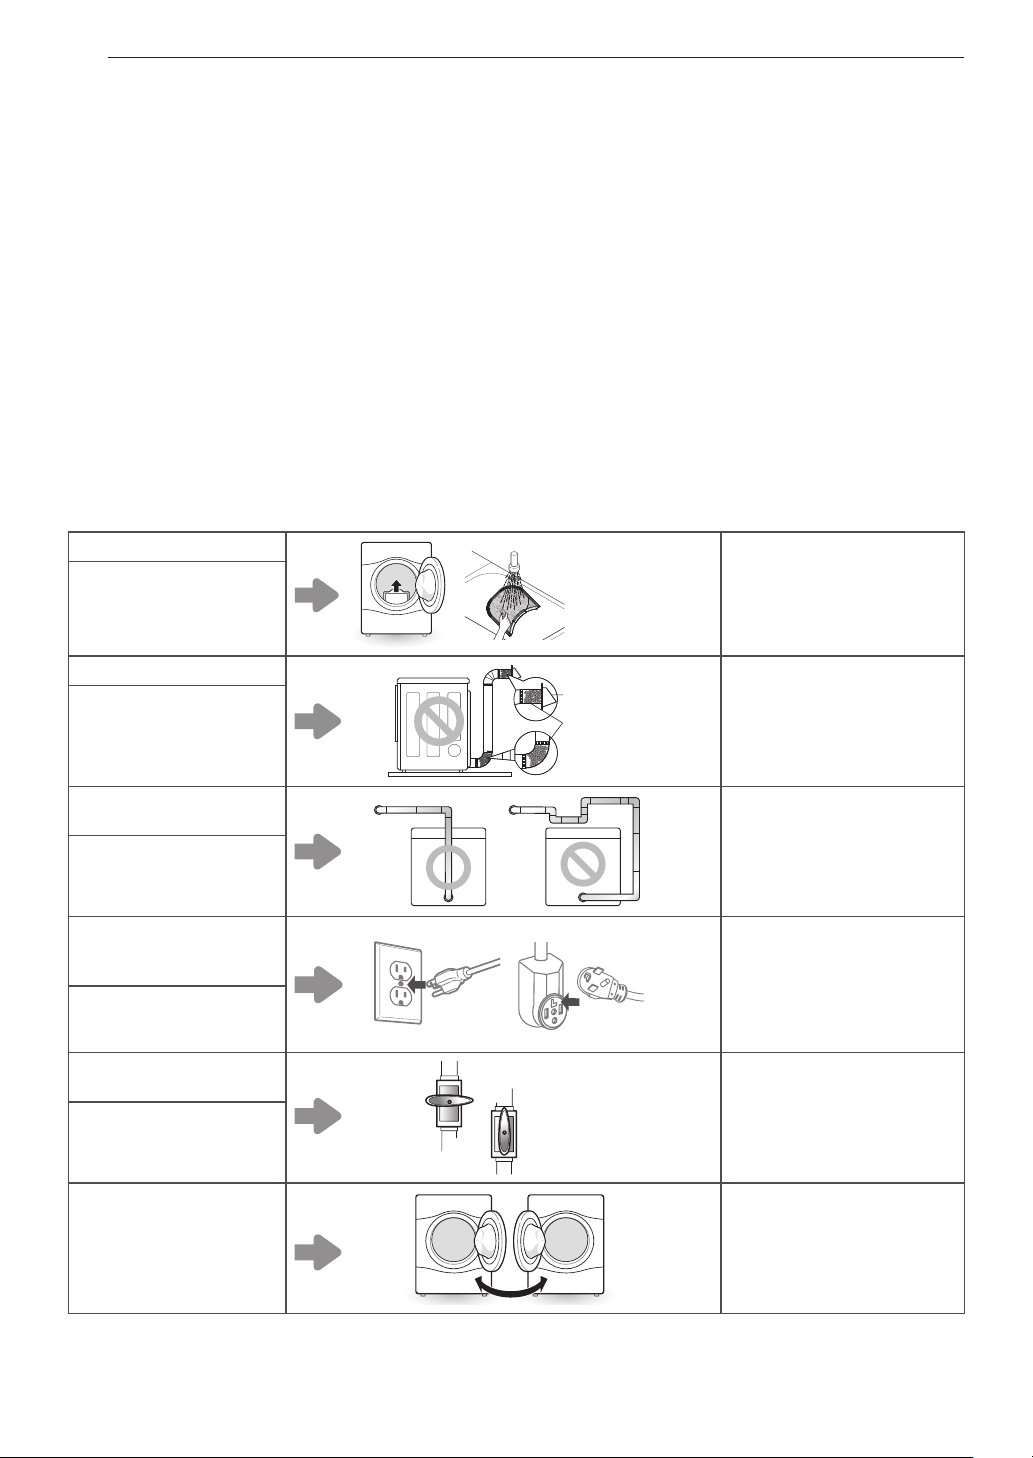
54 WARRANTY
• Damage caused by transportation and handling, including scratches, dents, chips, and/or other damage to the
finish of your product, unless such damage results from defects in materials or workmanship and is reported
within one (1) week of delivery.
• Damage or missing items to any display, open box, discounted, or refurbished Product.
• Products with original serial numbers that have been removed, altered, or cannot be readily determined. Model
and Serial numbers, along with original retail sales receipt, are required for warranty validation.
• Increases in utility costs and additional utility expenses.
• Replacement of light bulbs, filters, or any consumable parts.
• Repairs when your Product is used in other than normal and usual household use (including, without limitation,
commercial use, in offices or recreational facilities) or contrary to the instructions outlined in the Product
owner’s manual.
• Costs associated with removal of the Product from your home for repairs.
• The removal and reinstallation of the Product if it is installed in an inaccessible location or is not installed in
accordance with published installation instructions, including the Product owner’s and installation manuals.
• Accessories to the Product such as door bins, drawers, handles, shelves, etc.. Also excluded are parts besides
those that were originally included with the Product.
• Damage resulting from the misuse, abuse, improper installation, repair, or maintenance of the Product.
Improper repair includes use of parts not approved or specified by LG Canada.
Filter is clogged.
Clean the lint filter.
Not heating, long dry time
Duct is clogged.
Clean the hood and duct.
Not heating, long dry time
Excessive duct length
and/or multiple elbows
Keep exhaust ducts as
short as possible, using as
few elbows and bends as
possible.
Not heating, long dry time
Improperly connected
power cord or electrical
outlet issue.
Reconnect power cord,
replace house fuse or reset
breaker. If outlet is issue,
electrician may be required.
No Power
Not Heating
Gas valve is not turned
on. (Gas Dryer)
Open the gas valve.
Not heating
Door Reversal
Instructions for door reversal
can be found in the owner’s
manual.

55WARRANTY
ENGLISH
All costs associated with the above excluded circumstances shall be borne by the consumer.
For complete warranty details and customer assistance, please call or visit our website:
Call 1-888-542-2623 (7 A.M. to 12 A.M., 365 days a year) and select the appropriate option from the menu, or
visit our website at http://www.lg.com
Write your warranty information below
Product Registration Information
Model
Serial Number
Date of Purchase

56 WARRANTY
PROCEDURE FOR RESOLVING DISPUTES:
EXCEPT WHERE PROHIBITED AT LAW, ALL DISPUTES BETWEEN YOU AND LG ARISING OUT OF
OR RELATING IN ANY WAY TO THIS LIMITED WARRANTY OR THE PRODUCT SHALL BE RESOLVED
EXCLUSIVELY THROUGH BINDING ARBITRATION, AND NOT IN A COURT OF GENERAL JURISDICTION.
EXCEPT WHERE PROHIBITED AT LAW, YOU AND LG BOTH IRREVOCABLY AGREE TO WAIVE THE RIGHT
TO A JURY TRIAL AND TO BRING OR PARTICIPATE IN A CLASS ACTION.
Definitions. For the purposes of this section, references to “LG” mean LG Electronics Canada, Inc., its parents,
subsidiaries and affiliates, and each of their officers, directors, employees, agents, beneficiaries, predecessors
in interest, successors, assigns and suppliers; references to “dispute” or “claim” shall include any dispute,
claim or controversy of any kind whatsoever (whether based in contract, tort, statute, regulation, ordinance,
fraud, misrepresentation or any other legal or equitable theory) arising out of or relating in any way to the sale,
condition or performance of the product or this Limited Warranty.
Notice of Dispute. In the event you intend to commence an arbitration proceeding, you must first notify LG in
writing at least 30 days in advance of initiating the arbitration by sending a letter to LGECI Legal Team at 20
Norelco Drive, North York, Ontario, Canada M9L 2X6 (the “Notice of Dispute”). You and LG agree to engage
in good faith discussions in an attempt to amicably resolve your claim. The notice must provide your name,
address, and telephone number; identify the product that is the subject of the claim; and describe the nature
of the claim and the relief being sought. If you and LG are unable to resolve the dispute within 30 days of LG’s
receipt of the Notice of Dispute, the dispute shall be resolved by binding arbitration in accordance with the
procedure set out herein. You and LG both agree that, during the arbitration proceeding, the terms (including any
amount) of any settlement offer made by either you or LG will not be disclosed to the arbitrator until the arbitrator
determines the dispute.
Agreement to Binding Arbitration and Class Action Waiver. Upon failure to resolve the dispute during the
30 day period after LG’s receipt of the Notice of Dispute, you and LG agree to resolve any claims between you
and LG only by binding arbitration on an individual basis, unless you opt out as provided below, or you reside
in a jurisdiction that prevents full application of this clause in the circumstances of the claims at issue (in which
case if you are a consumer, this clause will only apply if you expressly agree to the arbitration). To the extent
permitted by applicable law, any dispute between you and LG shall not be combined or consolidated with a
dispute involving any other person’s or entity’s product or claim. More specifically, without limitation of the
foregoing, except to the extent such a prohibition is not permitted at law, any dispute between you and LG shall
not under any circumstances proceed as part of a class or representative action. Instead of arbitration, either
party may bring an individual action in small claims court, but that small claims court action may not be brought
on a class or representative basis except to the extent this prohibition is not permitted at law in your province or
territory of jurisdiction as it relates to the claims at issue between you and LG.
Arbitration Rules and Procedures. To begin arbitration of a claim, either you or LG must make a written
demand for arbitration. The arbitration will be private and confidential, and conducted on a simplified and
expedited basis before a single arbitrator chosen by the parties under the provincial or territorial commercial
arbitration law and rules of the province or territory of your residence. You must also send a copy of your
written demand to LG at LG Electronics, Canada, Inc., Attn: Legal Department- Arbitration, 20 Norelco Drive,
North York, Ontario M9L 2X6. This arbitration provision is governed by your applicable provincial or territorial
commercial arbitration legislation. Judgment may be entered on the arbitrator’s award in any court of competent
jurisdiction. All issues are for the arbitrator to decide, except that, issues relating to the scope and enforceability
of the arbitration provision and to the arbitrability of the dispute are for the court to decide. The arbitrator is
bound by the terms of this provision.
Governing Law. The law of the province or territory of your purchase shall govern this Limited Warranty and
any disputes between you and LG except to the extent that such law is preempted by or inconsistent with
applicable federal or provincial/territorial law. Should arbitration not be permitted for any claim, action, dispute or
controversy between you and LG, you and LG attorn to the exclusive jurisdiction of the courts of the province or
territory of your purchase for the resolution of the claim, action, dispute or controversy between you and LG.

57WARRANTY
ENGLISH
Fees/Costs. You do not need to pay any fee to begin an arbitration. Upon receipt of your written demand for
arbitration, LG will promptly pay all arbitration filing fees unless you seek more than $25,000 in damages, in
which case the payment of these fees will be governed by the applicable arbitration rules. Except as otherwise
provided for herein, LG will pay all filing, administration and arbitrator fees for any arbitration initiated in
accordance with the applicable arbitration rules and this arbitration provision. If you prevail in the arbitration, LG
will pay your attorneys’ fees and expenses as long as they are reasonable, by considering factors including, but
not limited to, the purchase amount and claim amount. Notwithstanding the foregoing, if applicable law allows
for an award of reasonable attorneys’ fees and expenses, an arbitrator can award them to the same extent
that a court would. If the arbitrator finds either the substance of your claim or the relief sought in the demand
is frivolous or brought for an improper purpose (as measured by the applicable laws), then the payment of all
arbitration fees will be governed by the applicable arbitration rules. In such a situation, you agree to reimburse
LG for all monies previously disbursed by it that are otherwise your obligation to pay under the applicable
arbitration rules. Except as otherwise provided for, LG waives any rights it may have to seek attorneys’ fees and
expenses from you if LG prevails in the arbitration.
Hearings and Location. If your claim is for $25,000 or less, you may choose to have the arbitration conducted
solely (1) on the basis of documents submitted to the arbitrator, (2) through a telephonic hearing, or (3) by an
in-person hearing as established by the applicable arbitration rules. If your claim exceeds $25,000, the right to
a hearing will be determined by the applicable arbitration rules. Any in-person arbitration hearings will be held at
the nearest, most mutually-convenient arbitration location available within the province or territory in which you
reside unless you and LG both agree to another location or agree to a telephonic arbitration.
Severability and Waiver. If any portion of this Limited Warranty (including these arbitration procedures) is
unenforceable, the remaining provisions will continue in full force and effect to the maximum extent permitted by
applicable law. Should LG fail to enforce strict performance of any provision of this Limited Warranty (including
these arbitration procedures), it does not mean that LG intends to waive or has waived any provision or part of
this Limited Warranty.
Opt Out. You may opt out of this dispute resolution procedure. If you opt out, neither you nor LG can require the
other to participate in an arbitration proceeding. To opt out, you must send notice to LG no later than 30 calendar
days from the date of the first consumer purchaser’s purchase of the product by either (i) sending an e-mail to
[email protected], with the subject line: “Arbitration Opt Out;” or (ii) calling 1-800-980-2973. You must include
in the opt out e-mail or provide by telephone: (a) your name and address; (b) the date on which the product
was purchased; (c) the product model name or model number; and (d) the serial number (the serial number
can be found (i) on the product; or (ii) online by accessing https://www.lg.com/ca_en/support/repair-service/
schedulerepair and clicking on “Find My Model & Serial Number”).
In the event that you “Opt Out”, the law of the province or territory of your residence shall govern this Limited
Warranty and any disputes between you and LG except to the extent that such law is preempted by or
inconsistent with applicable federal or provincial/territorial law. Should arbitration not be permitted for any claim,
action, dispute or controversy between you and LG, you and LG agree to attorn to the exclusive jurisdiction
of the courts of the province or territory of your residence for the resolution of the claim, action, dispute or
controversy between you and LG.
You may only opt out of the dispute resolution procedure in the manner described above (that is, by e-mail or
telephone); no other form of notice will be effective to opt out of this dispute resolution procedure. Opting out of
this dispute resolution procedure will not affect the coverage of the Limited Warranty in any way, and you will
continue to enjoy the full benefits of the Limited Warranty. If you keep this product and do not opt out, then you
accept all terms and conditions of the arbitration provision described above.
Conflict of Terms. In the event of a conflict or inconsistency between the terms of this Limited Warranty and the
End User License Agreement (“EULA”) in regards to dispute resolution, the terms of this Limited Warranty shall
control and govern the rights and obligations of the parties and shall take precedence over the EULA.

58 MEMO

59MEMO

60 MEMO

61MEMO

62 MEMO

FRANÇAIS
MANUEL DU PROPRIÉTAIRE
SÉCHEUSE
Veuillez lire attentivement le présent manuel de lʼutilisateur avant de faire fonctionner lʼappareil
et conservez-le à portée de la main pour le consulter en tout temps.
DLE3500*, DLG3501*
DLE3095*, DLE3090*
DLEX3700*, DLGX3701*
DLEX3900*, DLGX3901*
www.lg.com
Copyright © 2018 - 2019 LG Electronics inc. Tous droits réservés.

2
TABLE DES MATIÈRES
3 CARACTÉRISTIQUES DU
PRODUIT
4 CONSIGNES DE SÉCURITÉ
5 CONSIGNES DE SÉCURITÉ IMPORTANTES
9 APERÇU DU PRODUIT
9 Pièces
9 Accessoires
10 INSTALLATION
10 Aperçudelʼinstallation
10 Caractéristiquesduproduit
11 Conditionsrequisespourl'emplacement
d'installation
12 Dégagements
14 Miseàniveaudelasécheuse
15 Changementducôtédelaporte
16 Installationdelaventilationlatérale.
17 Superpositiondelasécheuse
18 Ventilationdelasécheuse
20 Raccordementdutuyaud’arriveed’eau
(modèlesàvaporisation)
21 Raccordementdessécheusesaugaz
23 Raccordementdessécheusesélectriques
24 Conditionsdel'alimentationparticulières
24 Vérificationfinaledel'installation
25 Essaid'installation
(Vérificationdesconduitsd'évacuation)
28 FONCTIONNEMENT
28 Utilisationdelasécheuse
29 Vérifierlefiltreàfibresavantchaquebrassée
29 Tridesarticles
29 Chargementdelasécheuse
30 Panneaudecontrôle
33 Guide sur les cycles
37 Boutonsdemodificationdescycles
37 Boutonsd'option
38 Fonctionsspéciales
39 Fonctionsdevapeur
(modèlesàvaporisation)
41 FONCTIONS INTELLIGENTES
41 ApplicationLGSmartThinQ
44 FonctionSmartDiagnosis
MC
45 ENTRETIEN
45 Nettoyagerégulier
46 DÉPANNAGE
46 Foireauxquestions
47 Avantdʼappelerleréparateur
53 GARANTIE
3CARACTÉRISTIQUESDUPRODUIT
FRANÇAIS
CARACTÉRISTIQUES DU PRODUIT
Panneau de commande convivial
Tournezleboutondesélectiondecyclepoursélectionnerlecycledeséchagevoulu.Ajoutezlesoptionsdecycleou
ajustezlesréglagesenappuyantsurunbouton.
Porte réversible bidirectionnelle
Laporteàgrandeouvertureoffreunaccèsfacilepourlechargementetledéchargement.Lescharnièresdelaporte
peuventêtreinverséespours'ajusteràl'emplacementd'installation.
Fonctions de vapeur (modèles à vaporisation)
LatechnologieàvapeurdeLGpermetd’émettreunjetdevapeurtourbillonnantedanslestissusafinderafraîchirles
vêtements,réduirel’électricitéstatiqueetfaciliterlerepassage.Vousn’avezqu’àsélectionnerlecycleSteamFresh
MC
ouajouterl’optiondevapeurauxcycleschoisis.
Système de détection des blocages dans le conduit d'évacuation Flow Sense
MC
Lesystèmededétectiondesblocagesdansleconduitd’évacuationFlowSense
MC
détectelesblocagesdansles
conduitsquiréduisentledébitd’airdanslasécheuseetvousenavertit.Sivousvoyezl'alerte:nettoyezouréparez
lesconduitsafind’enleverlesobstructions.Lapropretédessystèmesd’évacuationaugmentel’efficacitéetréduitles
tempsdeséchage.
Smart Diagnosis
MC
Sivotresécheuseprésentedesdifficultéstechniques,celle-cialacapacitédetransmettredesdonnéespartéléphone
auCentred’informationàlaclientèle.L'agentducentred’appelsenregistrelesdonnéestransmisesdepuisvotre
machineetlesutilisepouranalyserl'incidentetfournirundiagnosticrapideetefficace.
Application Smart ThinQ
MC
TéléchargezlanouvelleapplicationpourtéléphoneintelligentdeLGpourréglerlesoptions,diagnostiquervous-même
lesproblèmesdevotreappareiletlesrésoudre,etdécouvrird’autrescaractéristiquesutiles.Cettefonctionutilisele
Wi-Fi.
C
E
R
T
I
F
I
E
D
D
E
S
I
G
N
Protocol P154 Sanitization Performance
of Residential Clothes dryer
4 CONSIGNES DE SÉCURITÉ
CONSIGNES DE SÉCURITÉ
LISEZ TOUTES LES CONSIGNES AVANT LʼUTILISATION
Il est très important dʼassurer votre sécurité et celle des autres.
Nousfournissonsdenombreuxconseilsdesécuritéimportantsdanscemanueletsurvotreappareil.Liseztoujours
l'ensembledesmessagesdesécuritéetrespectez-les.
Ceciestlesymboledʼalertedesécurité.
Cesymboleestdestinéàvousalerterdesdangerspotentielspouvantentraînerlamortoudesblessures.
TouslesmessagesdesécuritéserontprécédésdusymboledʼalertedesécuritéetdutermeAVERTISSEMENT
ou MISE EN GARDE.
Voicilemessagequecesmotsvéhiculent:
AVERTISSEMENT
Vouspouvezêtretuéougrièvementblessésivousnesuivezpaslesconsignes.
MISE EN GARDE
Vouspouvezêtrelégèrementblesséoupouvezendommagerleproduitsivousnesuivezpaslesconsignes.
Touslesmessagesdesécuritévousindiquerontquelestledangerpotentiel,commentréduirelesrisquesde
blessuresetcequipeutseproduireencasdenon-respectdesconsignes.
AVERTISSEMENT- risque d'incendie
Installezlasécheuseensuivantlesconsignesdufabricantetlescodeslocaux.
• L'installationd'unesécheusedoitêtreeffectuéeparuninstallateurqualifié.
• N'installezpasunesécheuseavecdesmatériauxd'évacuationenplastiqueflexible.Siunconduitmétalliqueflexible
(semblableàdupapieraluminium)estinstallé,celui-cidoitêtredutypequelefabricantdel'appareilaétablicomme
convenablepourl'utilisationavecdessécheuses.Lesmatériauxd'évacuationflexiblessontréputéspours'affaisser,
pours'écraserfacilementetpouremprisonnerlesfibres.Cesconditionsobstruerontlacirculationd'airdelasécheuse
etaugmenterontlerisqued'incendie.
• Pourréduirelerisquedeblessuregraveoudedécès,suiveztouteslesconsignesdʼinstallation.
• Conserveztouteslesprésentesinstructions.
AVERTISSEMENT
DANGER DE FEU OU D'EXPLOSION
Lenon-respectdecesinstructionspourraitprovoquerlamort,desblessuresgraveset/oudesdommagesmatériels
importants.
• Nʼentreposezounʼutilisezpasdʼessenceoudʼautresvapeursinflammablesàproximitédecetappareiloudʼautres
appareils.
• CEQU'ILFAUTFAIRESIVOUSDÉTECTEZUNEODEURDEGAZ
- N'essayezpasdemettretoutappareilsoustension.
- Netouchezàaucuninterrupteurélectrique.N'utilisezaucuntéléphonedanslebâtiment.
- Évacueztoutepersonneprésentedanslapièce,lebâtimentouàproximité.
- Appelezimmédiatementvotrefournisseurdegazavecletéléphoned'unvoisin.Suivezattentivementles
consignesdufournisseurdegaz.
- Sivousnepouvezpasjoindrevotrefournisseurdegaz,appelezleserviced'incendie.
• L'installationetl'entretiendoiventêtreeffectuésparuninstallateurqualifié,uneagencedeserviceouvotre
fournisseurdegaz.

5CONSIGNES DE SÉCURITÉ
FRANÇAIS
CONSIGNES DE SÉCURITÉ IMPORTANTES
AVERTISSEMENT
Pour réduire les risques dʼexplosion, dʼincendie, de mort, de décharge électrique,
de brûlure ou de blessures lors de lʼutilisation de lʼappareil, prenez les précautions
élémentaires, y compris les suivantes :
INSTALLATION
• Avantd’êtreutilisé,l'appareildoitêtreinstalléconformémentauxdirectivesdecemanuel.
• Branchezlʼappareildansuncircuitélectriqueàprotection,àvaleursnominalesetdetailleadéquatespour
éviterunesurchargeélectrique.
• Pourréduirelerisquedeblessuregraveoudedécès,suiveztouteslesconsignesdʼinstallation.
• Lʼappareildoitêtreinstalléetmisàlaterreconformémentaucodedubâtimentlocalparlepersonnel
qualifié.
• Débranchezlecordond'alimentation,lefusibledemaisonouledisjoncteuravantl'installationouun
entretiendel'appareil.
• Pourdéplacerouinstallerlʼappareildansunautreemplacement,faitesappelàuntechnicienqualifié.
• Gardezlematérieldʼemballagehorsdeportéedesenfants.Lematérieldʼemballageposeundangerpour
lesenfants.Ilyaunrisquedesuffocation.
• Aumoinsdeuxpersonnessontrequisespourdéplacerouinstallerlʼappareil.
• Cetappareilnʼestpasconçupourunusagenautiqueoumobile,commedansunvéhiculerécréatif,une
roulotteouunavion.
• Entreposezetinstallezlʼappareildansunendroitoùilneserapasexposéàdestempératuressouslepoint
decongélationniauxintempéries.
• Cetappareildoitêtreplacéprèsdʼunepriseélectrique.
• Necoupeznin’enlevezjamaislabrochedemiseàlaterreducâbled’alimentation.
• Lorsquevousinstallezoudéplacezl'appareil,faitesattentiondenepaspincer,écraser,niendommagerle
câbled’alimentation.
• Nʼinstallezpaslʼappareildansunendroithumide.
• Détruisezlʼemballageencarton,lesacenplastiqueettoutautrematérieldʼemballageaprèsavoirdéballé
lʼappareil.Lesenfantspourraientjoueraveccesarticles.Lecarton,lorsquerecouvertdetapis,dedrapsou
depelliculedeplastique,peutsetransformerenchambreétanche.
• Respecteztouteslesprocéduresdesécuritérecommandéesdelʼindustrie,incluantleportdegantsàlongs
poignets et de lunettes de sécurité.
• N’essayezjamaisd’utilisercetappareils’ilestendommagé,défectueuxoupartiellementdésassemblé,s’il
manquedespiècesousidespièces,incluantlecâbleetlafiche,sontendommagées.
• N'installezpasunesécheuseavecdesmatériauxd'évacuationenplastiqueflexible.Siunconduit
métalliqueflexible(semblableàdupapieraluminium)estinstallé,celui-cidoitêtredutypequelefabricant
del'appareilaétablicommeconvenablepourl'utilisationavecdessécheuses.Lesmatériauxd'évacuation
flexiblessontréputéspours'affaisser,pours'écraserfacilementetpouremprisonnerlesfibres.Ces
conditionsobstruerontlacirculationd'airdelasécheuseetaugmenterontlerisqued'incendie.

6 CONSIGNES DE SÉCURITÉ
• Pourl'installationdansungarage,placezlasécheuseàaumoins18poucesduplancher.
• ÉVITEZd'utiliserdesvisàtôleoud'autresfixationsquitraversentlaparoiduconduit,carellespourraient
retenirlacharpieetréduireainsil'efficacitédusystèmed'évacuation.Recouvreztouslesjointsderubanà
conduit.
• N’utilisezquedesconduitsmétalliquesrigides,semi-rigidesouflexiblesd’undiamètrede4poucesà
l’intérieurdelasécheuseoupourl’évacuationversl’extérieur.L’utilisationdeconduitsdeplastiqueou
d’autresmatériauxcombustiblespeutcauserunincendie.Pendantl’installationoul’utilisation,desconduits
percéspeuventcauserunincendies’ilss’affaissentous’ilssontcomprimés.
• Lediamètreduconduitd'évacuationdoitêtrede4pouces(10,2cm),sansobstruction.Leconduit
d'évacuationdoitêtreaussicourtquepossible.Assurez-vousdenettoyerlesvieuxconduitsavantd'installer
votre nouvelle sécheuse.
• Ilestrecommandéd'utiliserunconduitmétalliquerigide,semi-rigideouflexibleentrelasécheuseetlemur.
ToutconduitmétalliquedetransitionnonrigidedoitêtrehomologuéUL.Unconduitdetransitionfabriquéà
partird'autresmatériauxpeutaugmenterletempsdeséchage.
• Lesconduitsnesontpasfournisaveclasécheuse.Vousdevezvousprocurerlesconduitsrequisdevotre
proprechef.L'emboutd'extrémitédoitavoirdesclapetsàcharnièrespourempêcherlerefoulementd'air
lorsquelasécheusenefonctionnepas.
• Labouched'extractiondessécheusesaugazDOITêtredirigéeversl'extérieur.
• Lesystèmed'évacuationdelasécheusedoitêtredirigéversl'extérieurdel'habitation.Silabouche
d'évacuationdelasécheusen'estpasdirigéeversl'extérieur,definescharpiesetdegrandesquantitésde
moisissureserontexpulséesauxalentoursdelasécheuse.Uneaccumulationdecharpiesàtoutendroitde
l'habitationpeutprésenterdesrisquessanitairesetd'incendie.
• N'installezpaslasécheuseàproximitéd'uneautresourcedechaleur,commeunfour,unpoêleouun
appareildechauffage.
• Maintenezl'espaceautourdelabouched'extractiond'airetadjacenteàcelle-cilibredetouteaccumulation
decharpie,depoussièreetdesaleté.
• L’appareilnedoitpasêtrealimentéparundispositifdecommutationexterne,telqu’uneminuterie,niêtre
raccordéàuncircuitquiestrégulièrementmissousethorstensionparlesservicespublics.
FONCTIONNEMENT
• Réparezouremplacezimmédiatementtoutcâbled’alimentationeffilochéouendommagé.N’utilisezpasun
câbleavecdesfissuresoudesdommagesd’abrasionsursalongueurousurunedesesextrémités.
• Silʼappareilproduitunbruitbizarre,uneodeurchimiqueoudebrûléoudelafumée,débranchez-le
immédiatementetcommuniquezavecleCentredʼinformationàlaclientèledeLGElectronics.
• Nedébranchezjamaisl'appareilentirantsurlecordond'alimentation.Preneztoujourslafichefermementet
tirez-ladelaprisedecourant.
• N'utilisezpasderallongeélectriquenid'adaptateuraveccetappareil.
• Nesaisissezpaslecordond'alimentationetnetouchezpaslesboutonsdel'appareilaveclesmains
mouillées.
• Nemodifiezetneprolongezpaslecordond'alimentation.
• Silʼappareilaétéimmergé,communiquezavecleCentredʼinformationàlaclientèledeLGElectronicspour
obtenirdesdirectivesavantderecommenceràlʼutiliser.
• Nʼentreposezounʼutilisezpasdʼessenceoudʼautresvapeursinflammablesàproximitédecetappareilou
dʼautresappareils.
• Veillezàmaintenirlazonesituéeen-dessousetautourdevosappareilsélectroménagersdégagéede
matièrescombustibles(peluche/charpie,papier,chiffons,etc.),dʼessence,deproduitschimiquesetdʼautres
vapeursouliquidesinflammables.
• Cetappareilnʼestpasdestinéàêtreutilisépardespersonnes(incluantdesenfants)dontlescapacités
physiques,mentalesousensoriellessontréduites,ouquinʼontpaslʼexpérienceoulesconnaissancespour
lefaire,àmoinsdʼavoirreçudesinstructionsetdʼavoirétésuperviséesparunepersonneresponsablede
leur sécurité.

7CONSIGNES DE SÉCURITÉ
FRANÇAIS
• Liseztouteslesinstructionsavantdʼutiliserlʼappareiletconservezcesinstructions.
• Nʼutilisezlʼappareilquʼauxfinspourlesquellesilestconçu.
• Neforcezpaslaporteetneposezpasvotrepoidssurlaportedelʼappareil.
• Nelaissezpasdesenfantsjouersur,dansouaveclʼappareil.Ilestnécessairedesurveillerétroitementles
enfantslorsquelʼappareilfonctionneàproximitédʼeux.
• Nemodifiezpaslescommandes.
• Encasdefuitedegaz(propane,gaznaturel,etc.),nefaitespasfonctionnercetappareilnitoutautre
appareil.Ouvrezimmédiatementunefenêtreouuneportepouraérerlazone.
• Danscertainesconditions,delʼhydrogènepeutseformerdansunsystèmedʼeauchaudequipasétéutilisé
pendantdeuxsemainesouplus.LʼHYDROGÈNEESTUNGAZEXPLOSIF.Silesystèmedʼeauchaude
nʼapasservipendantunetelledurée,ouvreztouslesrobinetsdʼeauchaudeetlaissezlʼeaucoulerpendant
plusieursminutesavantdʼutiliserlʼappareil.Cetteprocédurepermettradʼévacuertoutetracedʼhydrogène
accumulé.Commelʼhydrogèneestungazinflammable,nefumezpaspendantcetemps,etnʼutilisezpas
de feu.
• Fixezletuyaudevidangeenserrantfermement.
• Neplacezpasd’articleshuileuxougraisseux,dechandellesoudematièresinflammablesau-dessusde
l'appareil.
• N'utilisezpasd'assouplissantoudeproduitspouréliminerlastatique,saufsirecommandéparlefabricant
del'assouplissantouduproduit.
• Nemettezpasvosmainsdansl'appareilsiletambourestenmouvement.
• Neséchezpasd'articlesquiontéténettoyés,lavés,trempésdansdel'essenceoutachésouéclaboussés
d'essence,desolvantsdenettoyageàsec,d'huilevégétaleouàfritureoud'autressubstances
inflammablesouexplosives,puisquelesvapeurspourraients'enflammerouexploser.
• N'utilisezpasdechaleurpoursécherdesarticlescontenantdecaoutchoucmousseoudesmatériaux
caoutchouteuxdetexturesimilaire.
• Nemettezpasdeplastique,depapieroudevêtementsquipourraientbrûleroufondreau-dessusdela
sécheusependantsonfonctionnement.
• Vérifieztoujourss'ilyadesobjetsinhabituelsàl'intérieurdel'appareil.
• Lesappareilsaugazpeuventcauseruneexpositionmineureauxquatresubstancespotentiellement
dangereusesquisuivent:lebenzène,lemonoxydedecarbone,leformaldéhydeetlasuie.Cetteexposition
estprincipalementcauséeparunecombustionincomplètedegaznatureloudegazdepétroleliquéfié.
• Dessécheusescorrectementajustéesminimisentlacombustionincomplète.L'expositionàcessubstances
peutêtreminimiséedavantageenventilantcorrectementlasécheuseversl'extérieur.
VAPEUR (modèles à vaporisation)
• N'ouvrezpaslaportedelasécheusependantleCYCLEDEVAPEUR.
• NetouchezpasàlabusedevapeurdansletambourpendantouaprèsleCYCLEDEVAPEUR.
8 CONSIGNES DE SÉCURITÉ
ENTRETIEN
• Neréparezpasetneremplacezpasdepiècedelʼappareil.Touslesentretiensetlesréparationsdoivent
êtrefaitspardupersonneldʼentretienqualifié,àmoinsdʼindicationscontrairesdansleprésentguidede
lʼutilisateur.Utilisezseulementdespiècesautoriséesparlefabricant.
• Nedésassemblezpasetneréparezpaslʼappareilvous-même.
• Retireztoutepoussièreoutoutcorpsétrangerdesfichesducâbled’alimentation.
• Débranchezcetappareildel’alimentationélectriqueavantdelenettoyeretd’effectuertoutentretien.Lefait
deplacerlescommandesenpositiond’arrêtnedébranchepascetappareildel’alimentationélectrique.
• Avantdemettrelelave-vaissellehorsserviceouaurebut,retirez-enlaportepouréviterquedesenfantsou
despetitsanimauxysoientaccidentellementenfermés.
• Débranchezlʼappareilavantdelenettoyerpouréviterlerisquededéchargeélectrique.
• Nettoyezlefiltreàcharpiesavantouaprèschaquebrassée.
• L'intérieurdel'appareiletleconduitd'évacuationdoiventêtrenettoyéspériodiquementparuntechnicien
qualifié.
CONSIGNES DE MISE À LA TERRE
• Laconnexionincorrecteduconducteurpourrelierlesappareilsàlaterrepeutcréerunrisquededécharge
électrique.Vérifiezavecunélectriciencompétentouunpersonneldeservicesivousn'êtespascertainque
l'appareilestcorrectementmisàlaterre.Nemodifiezpaslafichefournieavecl'appareil;siellen'entrepas
danslaprise,faitesinstallerunepriseappropriéeparunélectriciencompétent.
• L'appareildoitêtremisàlaterre.Encasd'unmauvaisfonctionnementoud'unepanne,lamiseàterre
réduiralerisqued'unchocélectriqueenfournissantlemoinsderésistancepourlecourantélectrique.
L'appareilestéquipéd'uncordonavecunconducteurpourrelierlesappareilsàlaterre.Lafichedoitêtre
branchéesurunepriseappropriée,installéeetreliéeàlaterreconformémentauxcodesetrèglements
locaux.
• Cettesécheusedoitêtrebranchéedansuneprisecorrectementmiseàlaterre.Unemiseàlaterre
inadéquatedelasécheusepeutcauserunedéchargeélectrique.Faitesvérifierlaprisemuraleetlecircuit
parunélectricienqualifiéafindevousassurerquelapriseestcorrectementmiseàlaterre.Lenon-respect
decesinstructionspeutcauserundangerdedéchargeélectriqueoud'incendie.
AVERTISSEMENT
Risque d'incendie
Le non-respect de ces instructions pourrait provoquer la mort, des blessures graves et/
ou des dommages matériels importants.
• N'installezpasunventilateursurletuyaud'évacuation
• Installezlesèchelingeenrespectantlesconsignesdufabricant
GARDEZ CES CONSIGNES
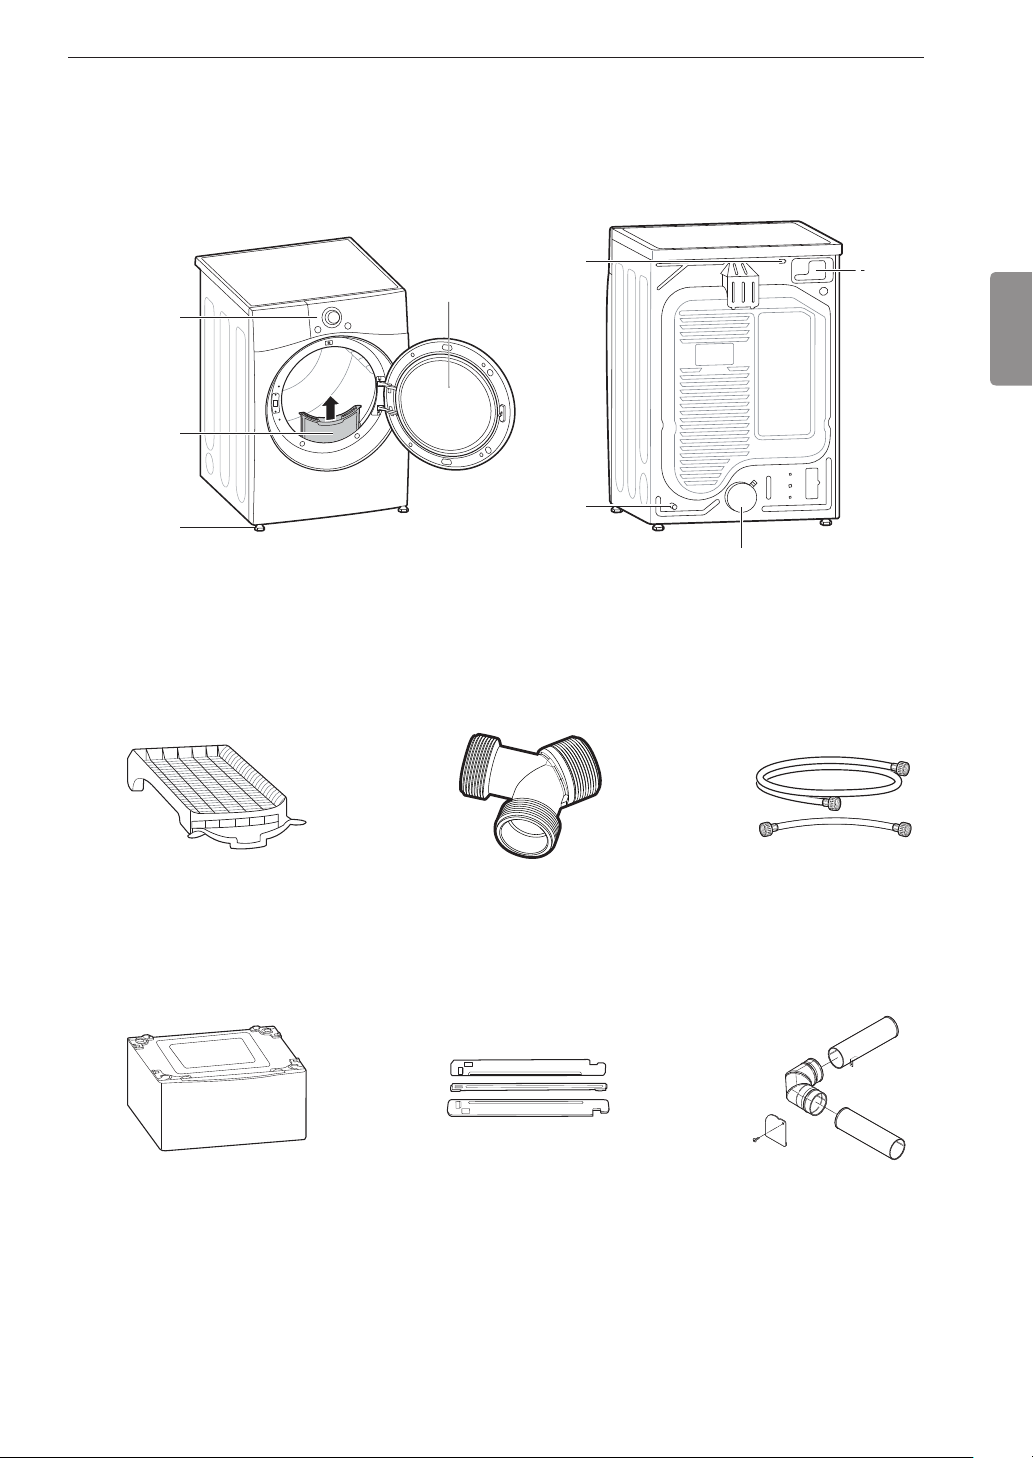
9APERÇU DU PRODUIT
FRANÇAIS
APERÇU DU PRODUIT
Pièces
Panneaude
commande
Filtre à fibres
Pieds de
nivellement
Porte
réversible
Cordon
d'alimentation
(modèlesau
gaz)
Raccordàla
canalisationdegaz
(modèlesaugaz)
Sortieduconduitd'évacuation
d'air
Panneaud'accèsau
blocdejonction
(modèlesélectriques)
Accessoires
Accessoires inclus
Grilledeséchage
(surcertainsmodèles)
RaccordenY
(modèlesàvaporisation)
Tuyau
(modèlesàvaporisation)
Accessoires facultatifs
Piédestal(venduséparément)
REMARQUE
• Pourvotresécuritéetpourprolongerlavieduproduit,n'utilisezquedescomposantsautorisés.Lefabricantdécline
touteresponsabilitéencasdedysfonctionnementduproduitoud'accidentsconsécutifsàl'utilisationdepiècesnon
autorisées.
• Lesillustrationscontenuesdanscemanuelpeuventêtredifférentesdescomposantsetaccessoiresréels,etceux-ci
peuventêtremodifiéssanspréavisparlefabricantdanslebutd’améliorerleproduit.
Ensembled'empilage(vendu
séparément)
Troussed’aérationlatérale
(vendueséparément)
Référence:383EEL9001B
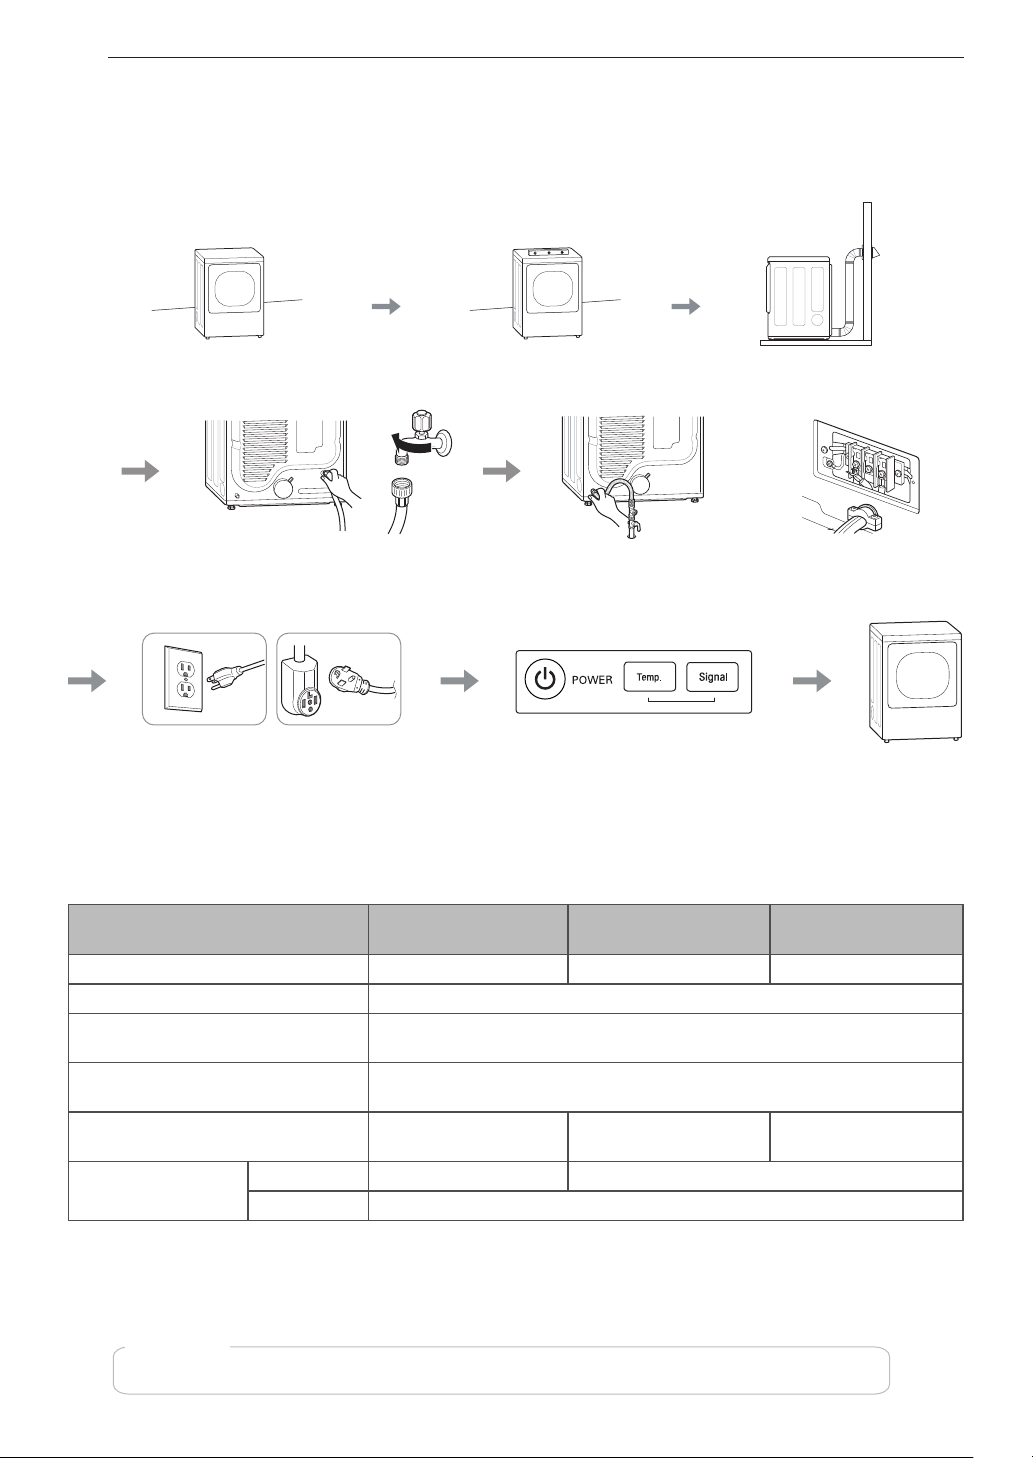
10 INSTALLATION
INSTALLATION
Aperçu de lʼinstallation
Veuillezd'abordlirecesinstructionsd'installationaprèsl'achatdeceproduitousondéplacementdansunautrelieu.
Examinerleslieuxetchoisir
l'emplacementadéquat
Mettrelasécheuseà
niveau
Installerlesconduitsde
ventilation
Alimentationeneau
Raccorderlasécheuseaugaz Raccorderlasécheuseélectrique
(modèlesàvapeur)
Sécheuseaugaz Sécheuseélectrique Essaid'installation Tester le
fonctionnement
Caractéristiques du produit
Lʼaspectetlescaractéristiquesénumérésdansleprésentmanuelpeuventvarierenraisondesconstantesaméliorations
apportéesauproduit.
Modèles de sécheuse
DLE3500* / DLG3501* /
DLE3095* / DLE3090*
DLEX3700* /
DLGX3701*
DLEX3900* /
DLGX3901*
Description Sécheusesansvapeur Sécheuseàlavapeur Sécheuseàlavapeur
Alimentation électrique Veuillezconsulterlaplaquesignalétiquepourlesrenseignementsdétaillés.
Alimentation en gaz
Gaznaturel:4à10,5po(10,2à26,7cm)WC
Propaneliquide:8à13po(20,4à33,1cm)WC
Dimensions
27po(larg.)x30,2po(prof.)x39po(haut.),51,4po(diam.porteouv.)
68,6cm(larg.)x76,5cm(prof.)x99cm(haut.),130,5cm(diam.porteouv.)
Poids net
Gaz:123,02lb(55,8kg)
Électrique:122,36lb(55,5kg)
Gaz:125,44lb(56,9kg)
Électrique:123,90lb(56,2kg)
Gaz:126,77lb(57,5kg)
Électrique:125,66lb(57kg)
Capacité de séchage
Cycledevapeur - IEC7,4pi3(8lb/3,6kg)
Cyclenormal IEC7,4pi3(22,5lb/10,2kg)
REMARQUE
Lesnumérosdemodèlesetrouventàl’intérieurdelaportedelasécheuse.
Brancherlecordond'alimentation

11INSTALLATION
FRANÇAIS
Conditions requises pour l'emplacement d'installation
AVERTISSEMENT
• Lisezlesdirectivesd’installationdansleurintégralitéavantd’installeretd’utiliservotresécheuse!Ilestimportant
quevouslisiezcemanueldanssonintégralitéavantd’installeretd’utiliservotresécheuse.Ilcontientdes
instructionsdétailléespourlesconnexionsélectriquesetlesraccordsdegazainsiquelesexigencesenmatière
d’évacuationdel’air.
L'installationrequiertcequisuit:
• Unemplacementpermettantl'installationadéquatedelabouched'évacuation.Labouched'extractiondessécheuses
augazdoitêtredirigéeversl'extérieur.ConsultezlasectionVentilationdelasécheuse.
• Unepriseélectriquemiseàlaterresituéeàmoinsde2pi(61cm)dechaquecôtédelasécheuse.Consultezlasection
Raccordementdessécheusesélectriques.
• Unplancherrobustepoursupporterlepoidstotaldelasécheuse(200lb/90,7kg).Lepoidscombinéd'unappareil
associédoitégalementêtreprisenconsidération.
• Aucunautreappareilconsommantdel'essencenepeutêtreinstallédanslemêmeplacardentantquesécheuse.
• Desdégagementssupplémentairessontàprévoirpourlesmouluresauniveaudesmurs,desportesetdesplanchers.
• Ilfautconsidérerundégagementpourunappareilassocié.
REMARQUE
• L'inclinaisonduplanchernedoitpasdépasser1po(2,5cm)souslasécheuseauxfinsdenivellement.Larotationdes
vêtementspeutêtreinadéquateetlescyclesdescapteurspeuventêtrefausséssilasécheusen’estpasàniveau.
• Sivousinstallezlasécheusedansungarage,vousdevezlaplaceràaumoins18pouces(45,7cm)au-dessusdu
sol.Lahauteurstandarddupiédestalest15pouces(38cm).Lebasdelasécheusedoitcependantêtreà18pouces
(45,7cm)dusol.
• Nefaitespasfonctionnervotresécheuseàdestempératuresinférieuresà45°F(7°C).Àdestempératures
inférieures,ilestpossiblequelasécheusenes'éteignepasàlafind'uncycleautomatique.Celapeutprolongerles
tempsdeséchage.
• Lasécheusenedoitpasêtreinstalléeouentreposéedansunespaceoùelleseraexposéeàl'eauouauxintempéries.
• Certainesréglementationslimitentouinterdisentl'installationdelasécheusedansdesgarages,desplacards,des
maisonsmobilesoudescouchettes.Communiquezavecvotreinspecteurenbâtimentlocal.

12 INSTALLATION
Dégagements
1po*
(25 mm)
14po max.*
(356 mm)
18po min.*
(457 mm)
14po max.*
(356 mm)
18po min.*
(457 mm)
30,2 po
(765mm)
5po**
(127 mm)
1po*
(25 mm)
30,2 po
(765mm)
5po**
(127 mm)
24 po
2*
(
155 cm
2
)
2*
(310 cm
2
)
3po
*
(76 mm)
48 po
3po
*
(76 mm)
1po
(25 mm)
1po
(25 mm)
27po
(686 mm)
0po
(0 mm)
39po
(990 mm)
1po
(25 mm)
1po
(25 mm)
27po
(686 mm)
Espace pour une installation en encastrement ou dans un placard
Lesdégagementssuivantssontrecommandéspourcettesécheuse.Nousavonstestécettesécheusepourun
dégagementutilede1po(2,5cm)surlescôtésetàl’arrièredel’appareil.Vousdeveztenircomptedudégagement
recommandépourlesraisonssuivantes:
• Ilfautprendreencompteundégagementsupplémentairepourfaciliterl’installationetl’entretiendel’appareil.
• Ilfautaussiprévoirundégagementsupplémentairesurtouslescôtésdelasécheuseafinderéduirelapropagation
dubruit.S’ils’agitd’uneinstallationdansunplacard,desouverturesdeventilationminimalesdoiventêtreréaliséesen
hautetenbasdelaporteduplacard.Desportesàpersiennesdotéesd’ouverturesdeventilationéquivalentessont
acceptables.
Exigences de ventilation du placard
Lesplacardsavecdesportesdoiventavoiruneouverturedeventilationsupérieureetinférieurepourempêcher
l'accumulationdechaleuretd'humiditédansleplacard.Uneouverturedeventilationsupérieured'aumoins48po²
(310cm²)doitêtreinstalléeà6pietplusdusol.Uneouverturedeventilationinférieured'aumoins24po²(155cm²)
doitêtreinstalléeà1pietmoinsdusol.Installezlesgrillesdeventilationdanslaporteoucoupezlespartiesinférieure
etsupérieuredelaportepourcréerlesouverturesdeventilation.Desportesàpersiennesdotéesd’ouverturesde
ventilationéquivalentessontégalementacceptables.
REMARQUE
• Laissezaumoinsunpetitespaceentrelasécheuseettoutautreobjetouappareilpouréviterlestransfertsde
vibrations.Lesvibrationspeuventcauserdubruit,entraîneruncontactentrelesappareilsetendommagerlafinition,ce
quipourraitcauserencoreplusdebruit.
Exigencesdeventilation
pourportedeplacard
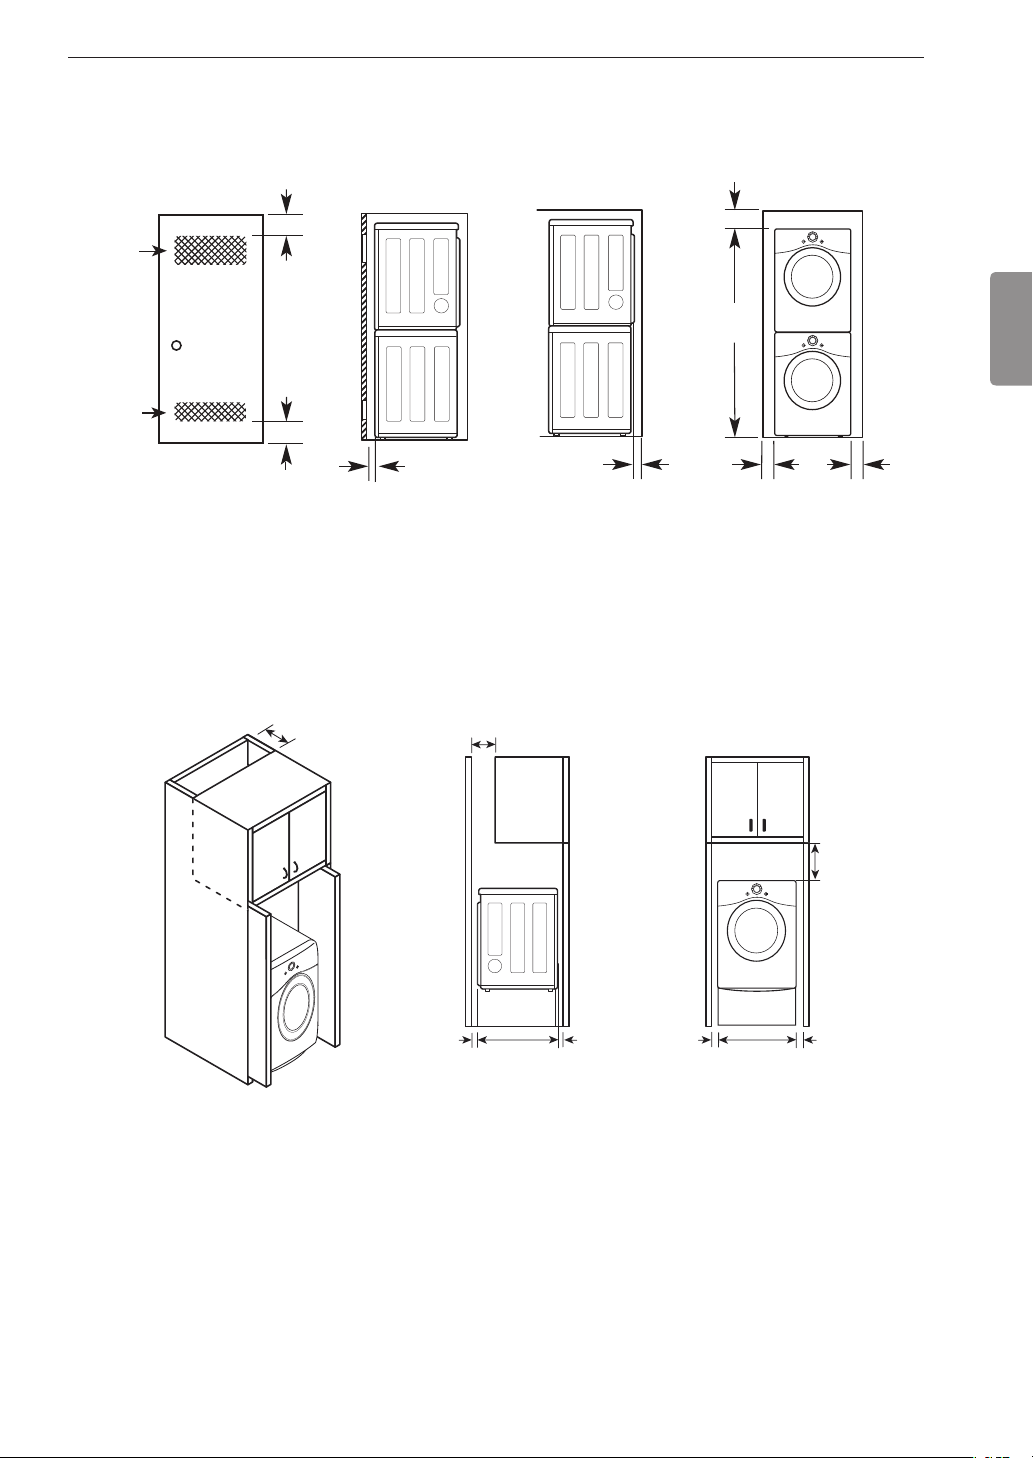
13INSTALLATION
FRANÇAIS
Espacement pour une installation en encastrement ou dans un placard, avec
laveuse et sécheuse superposées
24 po
2*
(155 cm
2
)
2*
(310 cm
2
)
48 po
3po
*
(76 mm)
3po
*
(76 mm)
1po
*
(25 mm)
1po
(25 mm)
1po
(25 mm)
27po
(686 mm)
5 ½po
**
(140 mm)
6po
*
(152 mm)
77 ½po
(1968 mm)
*Espacementrequis
**Pouruneventilationlatéraleouparlebas,unespacementde2po(5,1cm)estpermis.
Espacement pour une installation dans une armoire
S’ils’agitd’uneinstallationdansunearmoireavecporte,desd’ouverturesdeventilationminimalesdoiventêtreréalisées
enhautdelaportedel'armoire.
*Espacementrequis
7po *
(178 mm)
7po *
(178 mm)
9po **
(229 mm)
1po
(25 mm)
1po
(25 mm)
27po
(686 mm)
5po*
(127 mm)
1po*
(25 mm)
30,2 po
(765 mm)
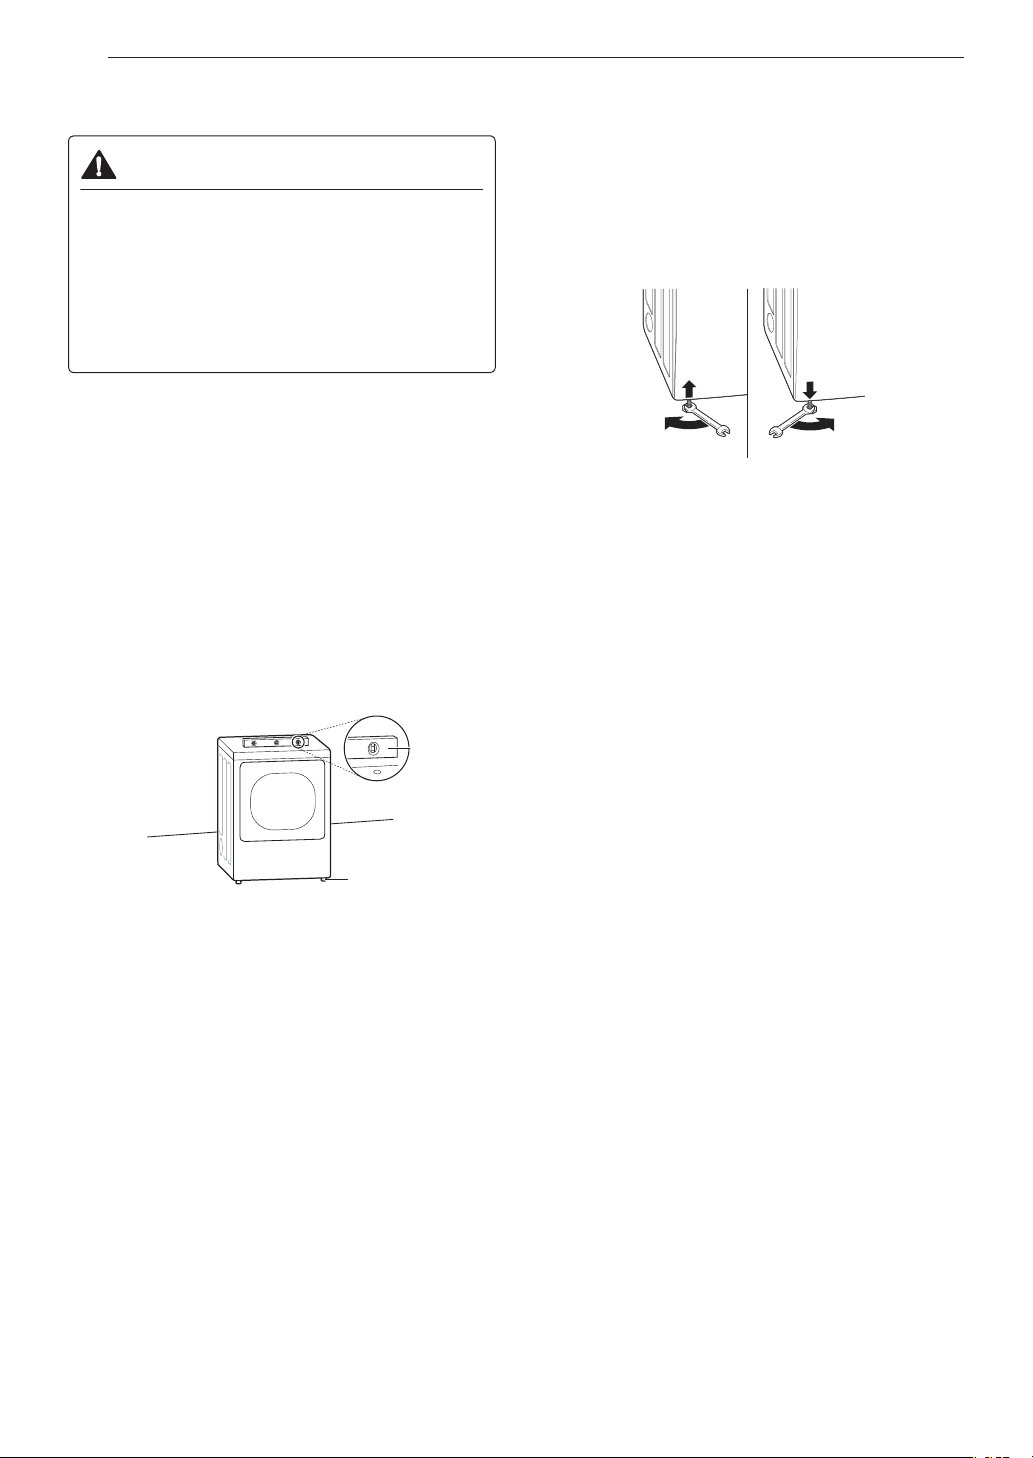
14 INSTALLATION
Mise à niveau de la sécheuse
AVERTISSEMENT
Pour réduire le risque de blessure grave ou
de mort, respectez les mesures de sécurité
élémentaires qui suivent :
• Portezdesgantsàlongspoignetsetdeslunettesde
sécurité.
• Cetappareilestlourd.Deuxpersonnesouplussont
nécessairespourl'installation.
REMARQUE
• Ajustezlespiedsdenivellementuniquementpourles
besoinsdelamisedeniveaudelasécheuse.Les
allongerplusquenécessairepourraitprovoquerdes
vibrations.
• Pourunrendementoptimal,lasécheusedoitêtrede
niveau.Pourminimiserlesvibrations,lebruitetles
mouvementsindésirables,leplancherdoitêtresolideet
parfaitementdeniveau.
1
Placezlasécheuseàsonemplacementchoisi.
Placezunniveaulelongdelapartiesupérieuredela
sécheuse.
Niveau
Piedsdenivellement
• Lesquatrepiedsdenivellementdoiventreposer
solidementsurleplancher.Appuyezdoucement
surlescoinssupérieursdelasécheusepourvous
assurerquelasécheusenesebalancepasd'un
coinàl'autre.
REMARQUE
• Sivousinstallezlasécheusesurlesupportenoption,
vousdevezutiliserlespiedsdenivellementdusupport
pourmettrelasécheuseàniveau.Lespiedsde
nivellementdelasécheusedoiventêtreentièrement
rétractés.
2
Utilisezunecléanglaiseajustablepourtourner
lespiedsdenivellement.Dévissezlespiedspour
souleverlasécheuseouvissezlespiedspour
l'abaisser.Soulevezouabaissezlasécheuseàl'aide
despiedsdenivellementjusqu'àcequelasécheuse
soitàniveaud'uncôtéàl'autreetdel'avantà
l'arrière.Assurez-vousquelesquatrepiedsde
nivellementreposentfermementsurleplancher.
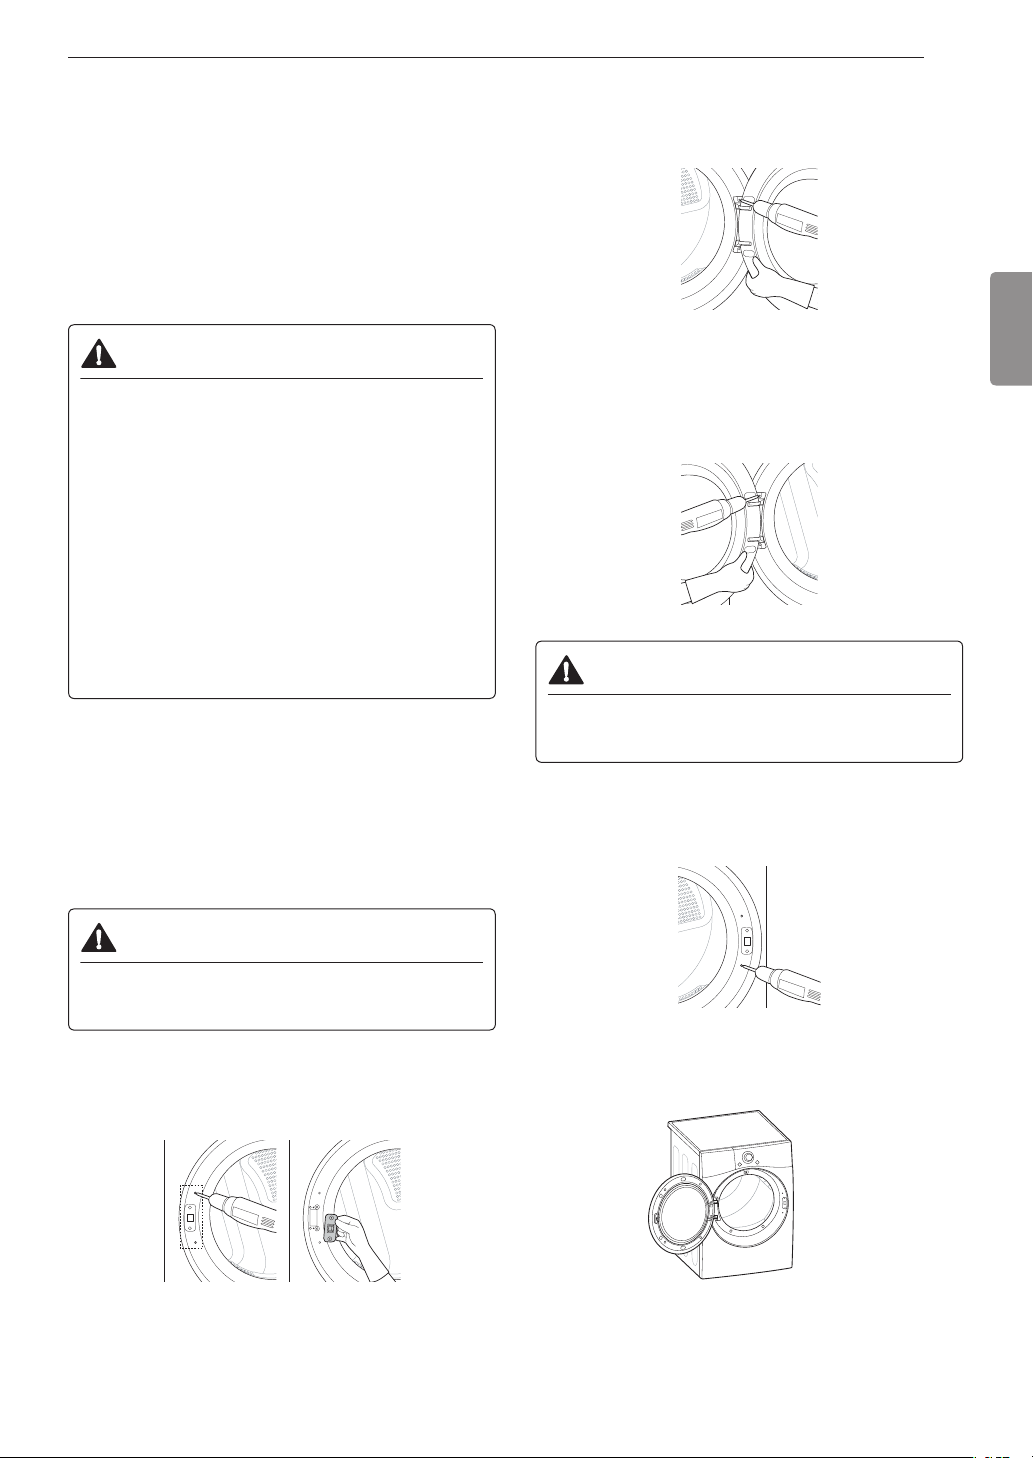
15INSTALLATION
FRANÇAIS
Changement du côté de la porte
Outils requis
• Tournevis Phillips
• Grandtournevisàpointeplate(recommandépourles
visdecharnièressicelles-cisontserréesousivotre
tournevisàtêtecruciformeestusé)
• Petittournevisàpointeplatecourte(poursouleverles
pièces)
AVERTISSEMENT
Pour réduire le risque de dommages à la
sécheuse, de dommages matériels ou de
blessures, des précautions de base doivent être
prises, y compris les suivantes :
• Soutenezlaporteavecuntabouretouunecaissede
dimensionsappropriées,oufaites-vousaiderpour
soutenirlepoidsdelaporte.
• Évitezdelaissertomberlaporte.
• Débranchezlasécheuseoufermezledisjoncteur
principalavantdecommencerlaprocédure
d'inversiondelaporte.
• InverseztoujourslaporteAVANTdesuperposerla
sécheusesurlalaveuse.
Directives pour l'inversion de la porte
Lesinstructionsci-aprèsvouspermettrontdefaire
passerlaporteàouverturelatéraleducôtédroitau
côtégauche.Unefoislaporteinversée,sivousdevez
l'inverserdenouveau,faitespreuvedevigilancelorsque
vousexécutezcesinstructions.Certainesillustrations
devrontêtreinterprétéesàl'enversetvousdevrezlireles
instructionsd'autantplusattentivement.
AVERTISSEMENT
• Supportezbienlepoidsdelaporteavantd'enlever
lesvisdescharnières.
1
Ouvrezlaporteetretirezlesdeuxvisdécoratives,les
deuxvisduverrouetleverrouducôtéloquetavecun
tournevis.Conservez-lespourl'étape4.
2
Toutensoutenantlaporte,retirezlesdeuxvisdela
charnièredelaporte.Enlevezlaporte.
3
Retournezlaporteàl’enversetalignezlestrousdela
charnièreaveclestroussituésducôtéopposédela
carrosserie.Réinstallezlaporteaveclesvisretirées
àl’étape2.
AVERTISSEMENT
• Supportezbienlepoidsdelaportepourposerles
visdescharnières.
4
Installezlesdeuxvisdécoratives,leverrouetles
deuxvisduverrouenlevésàl'étape1surlecôté
opposéàceluiduquelilsontétéretirés.
5
Vérifiezquelaportesefermecorrectement.

16 INSTALLATION
Installation de la ventilation
latérale.
AVERTISSEMENT
Pour réduire le risque de blessure grave, de
mort ou de dommages matériels, respectez les
mesures de sécurité élémentaires qui incluent les
suivantes :
• Portezdesgantsàlongspoignetsetdeslunettesde
sécurité.
• Utilisezunebouched'évacuationmétalliquelourde.
• N'utilisezpasdeconduitsd'évacuationenplastique
ouenaluminiummince.
• Nettoyezlesconduitsd'évacuationexistantsavant
d'installerlasécheuse.
Votrenouvellesécheuseestconfiguréedefaçonàce
quel'airs'évacueparl'arrière.Ellepeutaussiévacuer
l'airparledessousouparlecôté(l'évacuationparlecôté
droitn'estpaspossiblesurlesmodèlesaugaz).
Vouspouvezacheterlatroussed'adaptationchezvotre
détaillantLG(nºdepièce383EEL9001B).Cettetrousse
contientlescomposantsnécessairespourchanger
l'emplacementdel'évacuationd'airdelasécheuse.
1
Enlevezlavisderetenueduconduitd'évacuation
arrière.Retirezleconduitd'évacuation.
Vis de retenue
Conduitd'évacuationarrière
Option 1 : Évacuation latérale
2
Appuyezsurlesattachesdeladébouchuredésirée
etretirezdélicatementladébouchure(l'évacuation
parlecôtédroitn'estpaspossiblesurlesmodèlesau
gaz).Raccordezleconduitadaptateurauboîtierde
lasoufflanteetfixez-lesurlabasedelasécheuse,
commeillustré.
Conduitadaptateur
Support
Débouchure
3
Assemblezuncoudede4po(10,2cm)àlasection
deconduitde4po(10,2cm)suivanteetrecouvrez
touslesjointsderubanàconduit.Assurez-vous
quel'extrémitémâleducoudeestorientéeVERS
L'EXTÉRIEURdelasécheuse.Insérezl'ensemble
coude-conduitdansl'ouverturelatéraleetraccordez-
leauconduitadaptateur.Recouvrezlejointderuban
àconduit.Faitesensortequel'extrémitémâledu
conduitdépassede1,5po(3,8cm)àl'extérieurpour
leraccordementaurestedusystèmed'évacuation.
Fixezlaplaqued'obturationàl'arrièredelasécheuse
aveclavisdelatrousse.
Plaqued'obturation
Raccordcoudé
1½"(38mm)
Option 2 : Évacuation par le dessous
2
Raccordezleconduitadaptateurauboîtierdela
soufflanteetfixez-lesurlabasedelasécheuse,
commeillustré.
Conduitadaptateur
Support
3
Insérezlecoudede4po(10,2cm)dansl'ouverture
inférieureetraccordez-leauconduitadaptateur,
enveillantàcequel'extrémitémâleducoudesoit
orientéeversl'ouverturepratiquéedanslepanneau
inférieurdelasécheuse.Recouvrezlejointderuban
àconduit.Fixezlaplaqued'obturationàl'arrièredela
sécheuseaveclavisdelatrousse.
Plaqued'obturation
Raccordcoudé
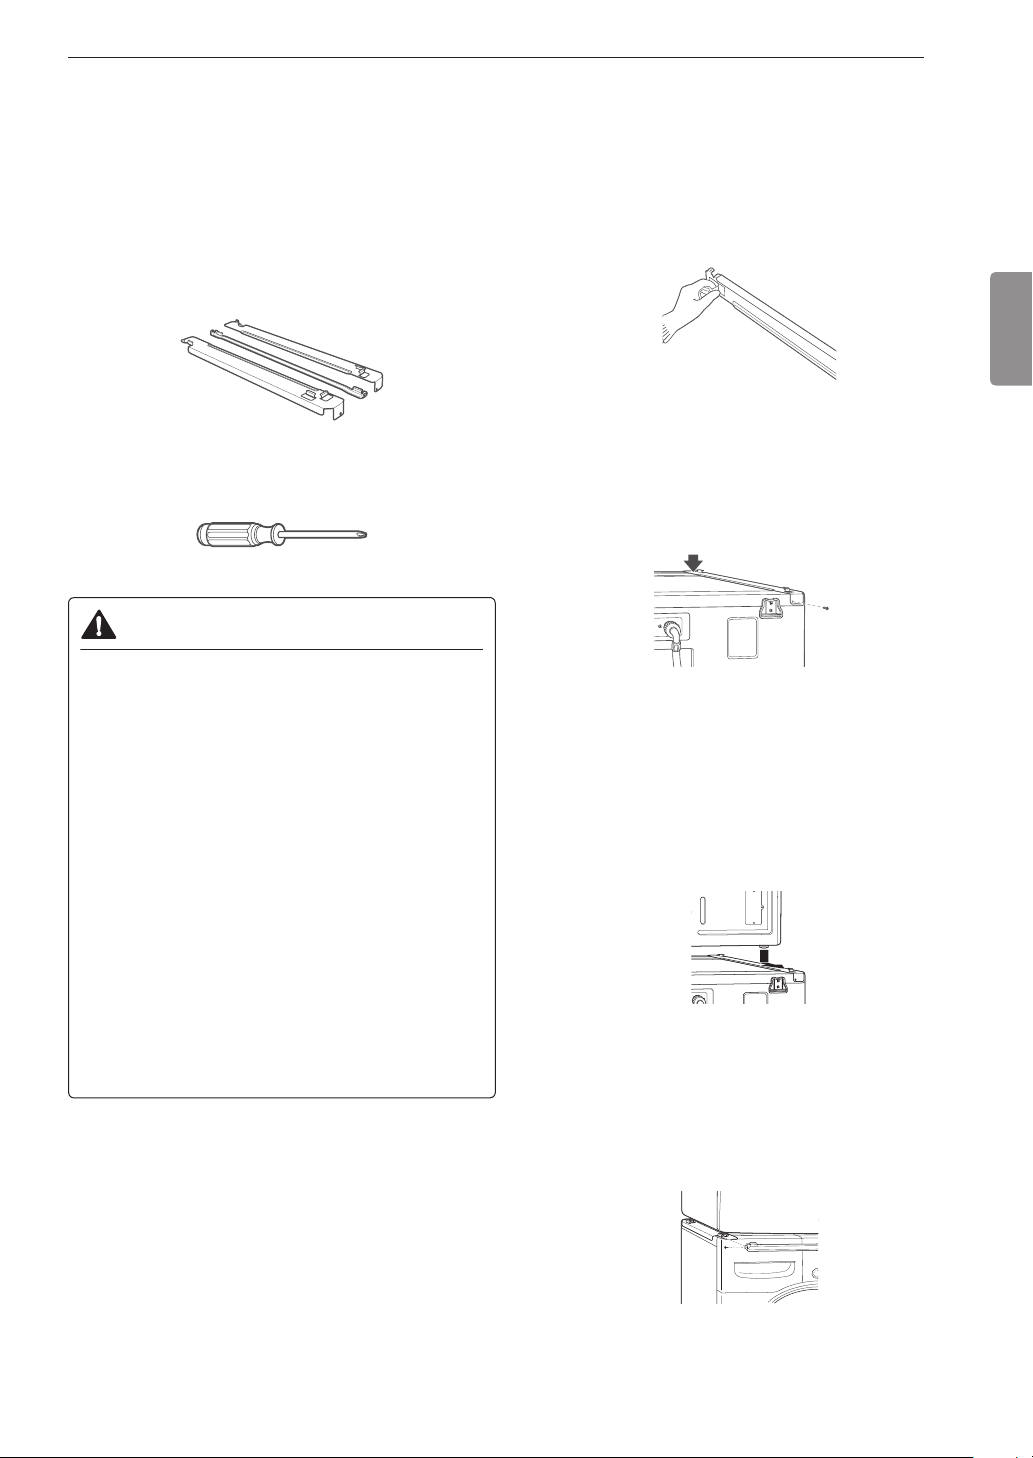
17INSTALLATION
FRANÇAIS
Superposition de la sécheuse
Installation de la trousse de
superposition
Cettetroussedesuperpositioninclut:
• Deux(2)railslatéraux
• Un(1)railavant
• Quatre(4)vis
Outilsrequispourl'installation:
• Tournevis Phillips
AVERTISSEMENT
Pour réduire le risque de blessure grave ou
de mort, respectez les mesures de sécurité
élémentaires qui incluent les suivantes :
• Lepoidsdelasécheuseetlahauteurde
l'installationrendentlaprocéduredesuperposition
tropdangereusepourunepersonneseule.
Deuxpersonnesouplussontnécessairespour
l'installationdelatroussedesuperposition.
• N’utilisezpaslatroussedesuperpositionavec
unesécheuseaugazdansdesconditions
potentiellementinstablescommedansunemaison
mobile,parexemple.
• Placezlalaveusesurunplanchersolide,stableet
deniveau,capabledesupporterlepoidsdesdeux
appareils.
• Nesuperposezpaslalaveusesurlasécheuse.
• Sidesappareilsménagerssontdéjàinstallés,
déconnectezlesraccordsd'alimentation,d'eauou
degazetlesraccordsdevidangeetd'aération.
Poureffectueruneinstallationsécuritaire,veuillez
observerlesconsignessuivantes.
1
Assurez-vousquelasurfacedelalaveuseest
propreetsèche.Retirezlapelliculedepapierdu
rubansurundessupportslatérauxdelatroussede
superposition.
2
Placezlesupportlatéralsurlecôtédudessusdela
laveuse,commeilestillustréci-dessous.Appuyez
fermementsurlazoneadhésivedusupportpourbien
lacolleràlasurfacedelalaveuse.Fixezlesupport
latéralàlalaveuseavecunevisplacéeàl’arrièredu
support.Répétezlesétapes1et2pourplacerl’autre
supportlatéral.
3
Placezlasécheusesurledessusdelalaveuse
enpositionnantlespiedsdelasécheusedansles
supportslatéraux,telqu’ilestillustré.Évitezdevous
blesserauxdoigts;nelaissezpasvosdoigtssefaire
coincerentrelalaveuseetlasécheuse.
Faitesglisserlentementlasécheuseversl'arrière
delalaveusejusqu'àcequelesbutéesdusupport
latéralreçoiventlespiedsdelasécheuse.
4
Insérezlerailavantentrelebasdelasécheuseet
ledessusdelalaveuse.Poussezlerailavantvers
l'arrièredelalaveusejusqu'àcequ'ilentreencontact
aveclesbutéesduraillatéral.
Installezlesdeuxvisrestantespourfixerlerailavant
auxrailslatéraux.
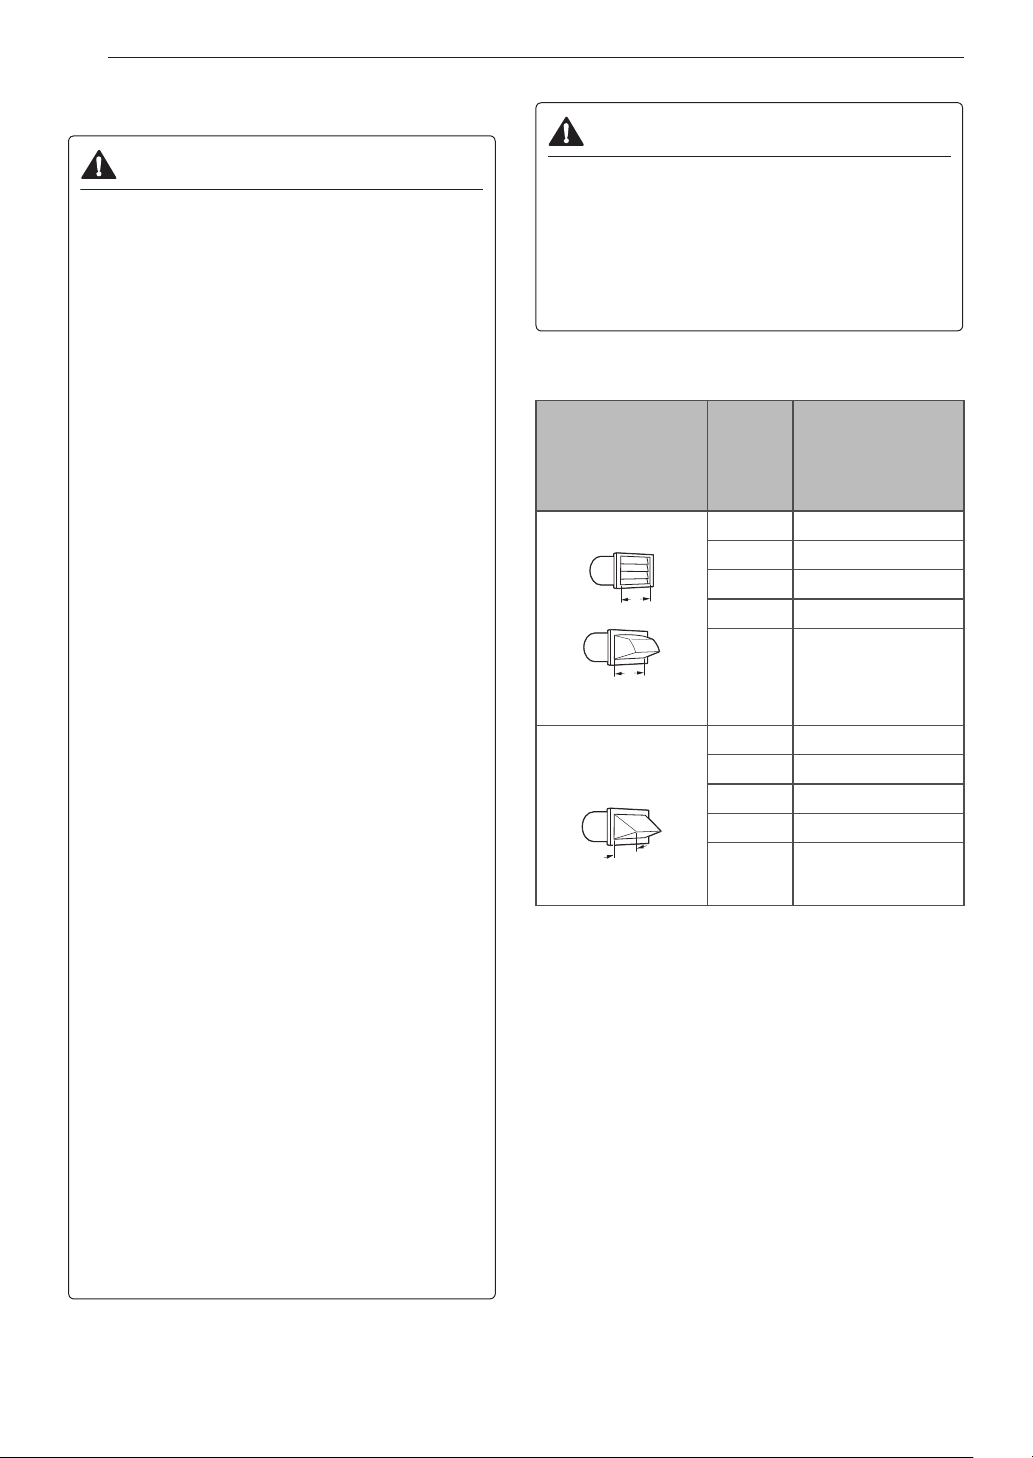
18 INSTALLATION
Ventilation de la sécheuse
AVERTISSEMENT
Pour réduire le risque d'incendie ou d'explosion,
de décharge électrique, de dégâts matériels,
de blessures ou même de décès en utilisant
cet appareil, respectez les mesures de sécurité
élémentaires, notamment :
• Évitezd'écraseroudeplierlesconduits.
• Lesconduitsnedoiventpasêtreencontactavec
desobjetscoupants.
• Sivousraccordezlasécheuseàdesconduits
d'évacuationexistants,vérifiezs'ilssontappropriés
etpropresavantl'installation.
• Lesystèmed'évacuationdoitêtreconformeaux
codeslocauxdeconstructionoudubâtiment.
• L'évacuationdessécheusesaugazdoit
ABSOLUMENTêtreacheminéeversl'extérieur.
• Utilisezuniquementdesconduitsmétalliquesde
4po(10,2cm)rigides,semi-rigidesouflexibles
àl'intérieurdel'armoiredesécheuseetvers
l'extérieur.
• Pourréduirelerisqued'incendie,decombustion
oud'accumulationdegazcombustibles,ÉVITEZ
d'acheminerl'aird'évacuationdelasécheusevers
unendroitclosetnonventilécommelegrenier,
unmur,leplafond,unegalerietechnique,une
cheminée,unconduitd'évacuationdesgazde
combustionouunespacedissimulédubâtiment.
• Pourréduirelerisqued'incendie,ÉVITEZd'utiliser
desconduitsd'évacuationenplastiqueouen
aluminiummince.
• Lediamètreduconduitd'évacuationdoitêtrede
4pouces(10,2cm),sansobstruction.Leconduit
d'évacuationdoitêtreaussicourtquepossible.
Assurez-vousdenettoyerdesvieuxconduitsavant
d'installervotrenouvellesécheuse.
• Ilestrecommandéd'utiliserunconduitmétallique
rigide,semi-rigideouflexibleentrelasécheuseetle
mur.Toutconduitmétalliquedetransitionnonrigide
doitêtrehomologuéUL.Unconduitdetransition
fabriquéàpartird'autresmatériauxpeutaugmenter
letempsdeséchage.
• ÉVITEZd'utiliserdesvisàtôleoud'autresfixations
quitraversentlaparoiduconduit,carelles
pourraientretenirlesfibresetréduireainsil'efficacité
dusystèmed'évacuation.Recouvreztouslesjoints
derubanàconduit.
• Évitezdedépasserleslimitesdelongueur
recommandéesdutableau.Lenon-respectdecette
consignepeutprolongerletempsdeséchage,ou
provoquerunincendieouundécès.
AVERTISSEMENT
• Lesconduitsnesontpasfournisaveclasécheuse.
Voustrouverezlesconduitsnécessairesdansvotre
localité.Labouched'évacuationdoitêtremunie
devoletsàcharnièrepouréviterlesrefoulements
lorsquelasécheuseestarrêtée.
• Lalongueurtotaleduconduitmétalliqueflexiblene
doitpasdépasser8pi(2,4m).
Conduits
Type de capuchon
mural
Nombre
de
coudes
à 90°
Longueur
maximale de
conduit métallique
rigide de 4 po de
diamètre
Recommandé
a
a
a:4po(10,2cm)
0 65pi(19,8m)
1 55pi(16,8m)
2 47pi(14,3m)
3 36pi(11m)
4 28pi(8,5m)
Pourinstallations
temporaires
seulement
b
b:2,5po(6,35cm)
0 55pi(16,8m)
1 47pi(14,3m)
2 41pi(12,5m)
3 30pi(9,1m)
4 22pi(6,7m)
REMARQUE
• Soustrayez6pi(1,8m)pourchaquecoudeadditionnel.
N'utilisezpasplusdequatrecoudesde90°.
• AuCanada,seulslesconduitsflexiblesenaluminium
spécifiquementindiquésparlefabricantdel'appareil
doiventêtreutilisés,aubesoin.AuxÉtats-Unis,seuls
lesconduitsflexiblesenaluminiumspécifiquement
indiquésparlefabricantdel'appareiletconformesau
«OutlineforClothesDryerTransitionDuct,Subject
2158A»doiventêtreutilisés,aubesoin.
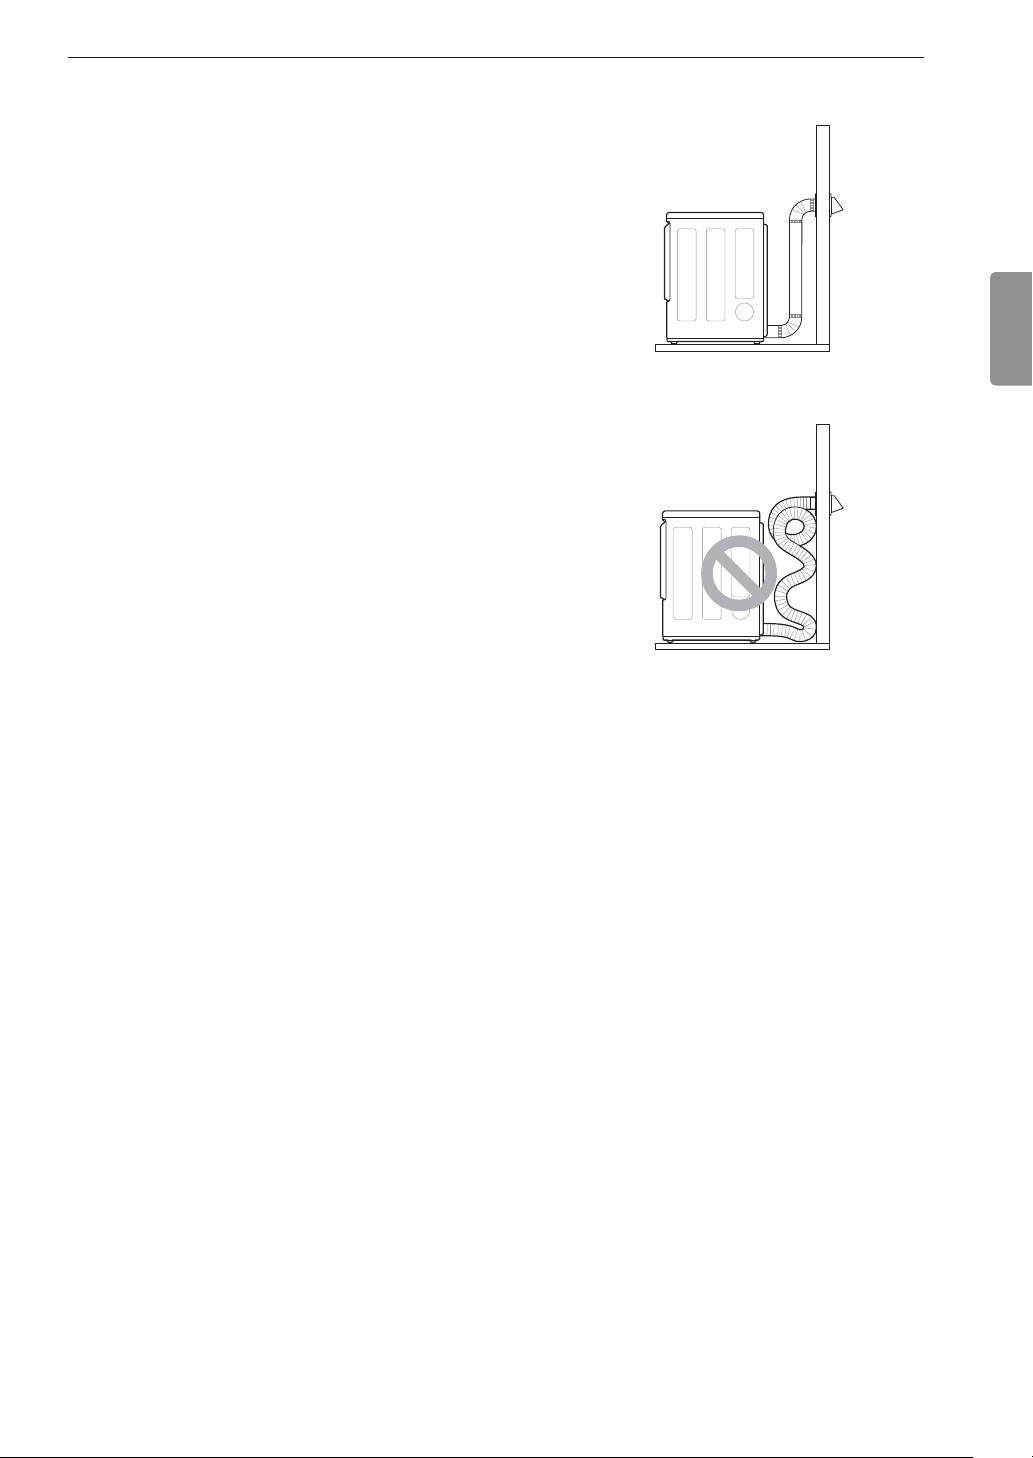
19INSTALLATION
FRANÇAIS
Acheminement et raccordement des
conduits
REMARQUE
Suivez les directives ci-dessous pour maximiser
le rendement du séchage et réduire l'accumulation
de fibres et la condensation dans les conduits
d'évacuation. Les conduits d'évacuation et les
raccords ne sont PAS INCLUS et doivent être achetés
séparément.
• Utilisezdesconduitsd'évacuationmétalliquesrigides,
semi-rigidesouflexiblesde4po(10,2cm)dediamètre.
• L'ensembledesconduitsd'évacuationdoitêtreleplus
court possible.
• Utilisezlemoinsdecoudespossible.
• L'extrémitémâledechaquesectionduconduit
d'évacuationdoitêtreorientéeversl'extérieurdela
sécheuse.
• Recouvreztouslesjointsderubanàconduit.
• Isolezlesconduitsd'évacuationquitraversentdes
endroitsnonchauffésafinderéduirelacondensationet
l'accumulationdefibressurlesparoisdesconduits.
• Lessystèmesd'évacuationd'airinadéquatsouinstallés
demanièreincorrectenesontpascouvertsparla
garantiedelasécheuse.Lesproblèmesdesécheuse
oulesappelsdeservicereliésàdetelssystèmes
d'évacuationd'airneserontpascouvertsparlagarantie
delasécheuse.
Acheminement correct
Acheminement incorrect
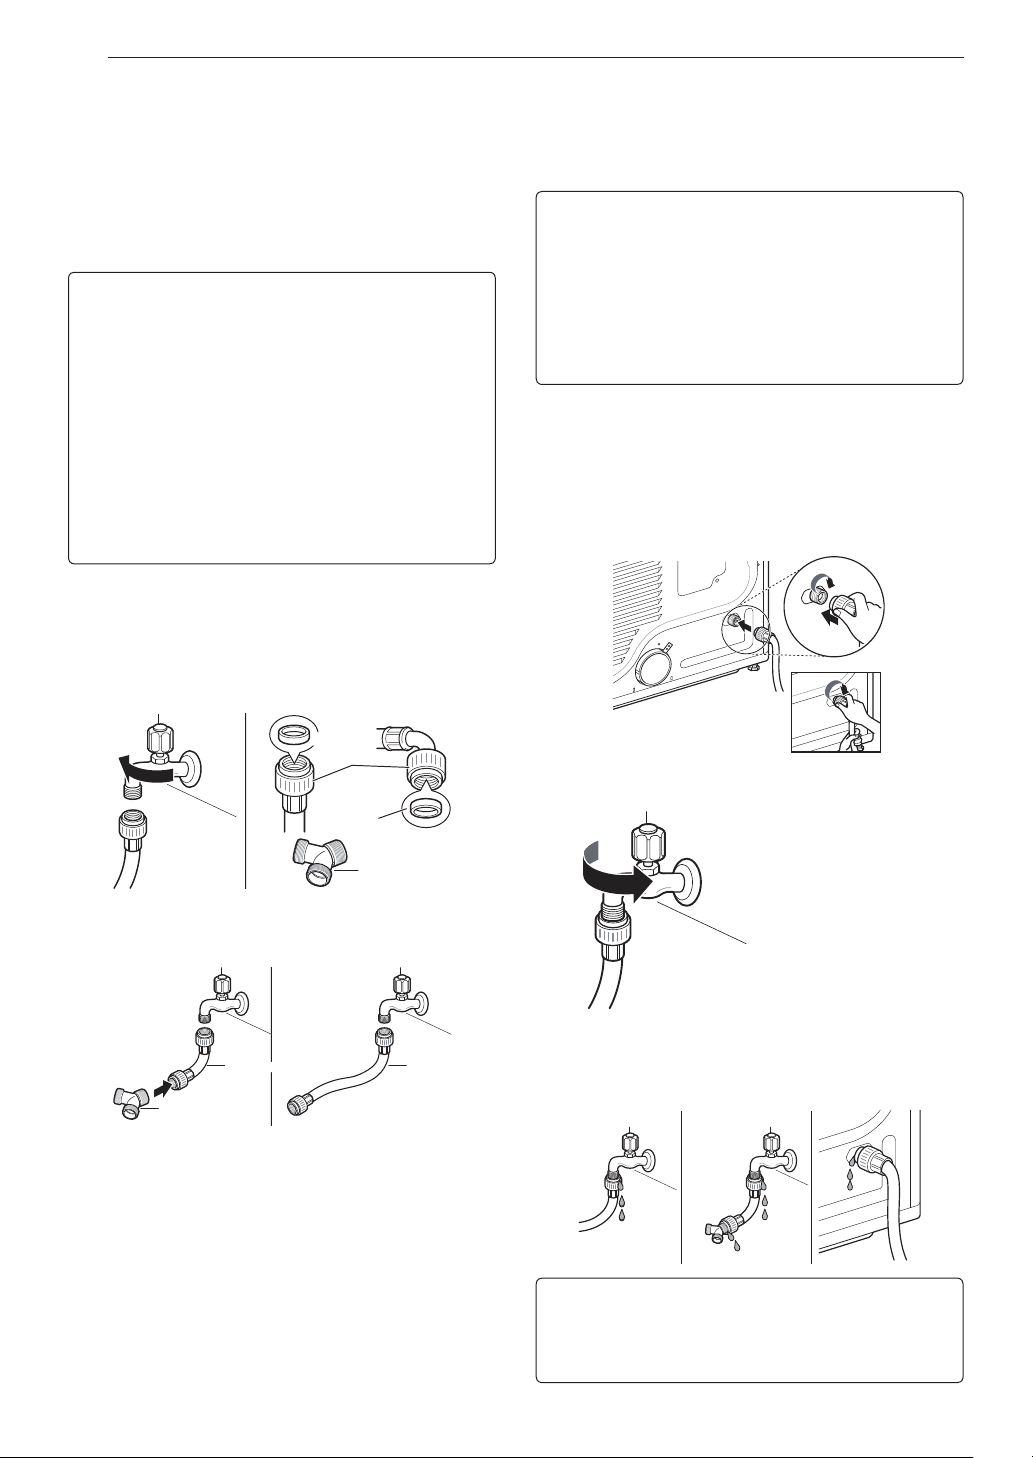
20 INSTALLATION
SANS LA LAVEUSE : Si la sécheuse ne partage pas le
robinet d’eau froide avec une laveuse.
a.Raccordezl’extrémitédroitedulongtuyauaurobinet
d’eaufroide.
REMARQUE
• Avantderaccorderlaconduited’eauàlasécheuse,
faitescoulerplusieurslitresd’eaudansundrain
oudansunseau.Celaéviteraquedesparticules
étrangèrestellesquedusableoudesécailles
obstruentlavalved’entréedelasécheuse.
• Neserrezpasexcessivement.Leraccordement
pourraitêtreendommagé.
3
Raccordezletuyaud’alimentationeneauàlavalve
d’entréedelasécheuseàlamaindefaçonétanche
puisserrezunautre2/3detouràl’aidedepinces.
Assurez-vousqu’iln’yaaucunplidanslestuyauxet
qu’ilsnesontpasécrasés.
4
Ouvrezlerobinetd’eaufroide.
5
Vérifiezs’ilyaunefuiteauraccordY(s’ilestinstallé)
etdanstouslestuyaux.
REMARQUE
• S’ilyaunefuite,fermezlerobinet,enlevezletuyau
etvérifiezlaconditiondujointd’étanchéitéen
caoutchouc.
Raccordement du tuyau
d’arrivee d’eau (modèles à
vaporisation)
Lasécheusedoitêtreraccordéeaurobinetd’eaufroide
àl’aidedunouveautuyaud’alimentationeneau.Ne
réutilisezpasdevieuxtuyaux.
REMARQUE
• Lapressiondel’alimentationeneaudoitsesituer
entre20et120psi(138et827kPa).
• Nedécouvrezpasounecroisezpasletuyau
d’alimentationlorsquevousleraccordezaurobinet.
• Silapressiondel’alimentationeneauest
supérieureà800kPa,unrobinetréducteurde
pressiondoitêtreinstallé.
• Vérifiezdetempsentempslaconditiondutuyauet
remplacez-lesinécessaire.
• Remplacezletuyaud’alimentationaprèscinqans
d’utilisationafinderéduirelerisquederupturedu
tuyau.
• Notezlesdatesd’installationouderemplacementà
mêmeletuyaupourconsultationfuture.
1
Vérifiezlejointd’étanchéitéencaoutchoucàchaque
extrémitédutuyaud’alimentation.Deuxjoints
d’étanchéitéencaoutchoucsontfournisavecchaque
tuyaud’alimentation.Ilssontutilisésafindeprévenir
lesfuitesd’eau.Assurez-vousqueleraccordau
robinetd’eaufroideestétanche.
Raccordde
flexible
Joint en
caoutchouc
RaccordenY
2
Vérifiezletyped’installation.
Tuyaucourt
RaccordenY
AVEC LAVEUSE
Tuyaulong
SANS LAVEUSE
Raccordez tous les tuyaux d’alimentation en eau à
la main de façon étanche puis serrez un autre 2/3 de
tour à l’aide de pinces.
AVEC LA LAVEUSE : Lorsque vous raccordez la
sécheuse au même robinet que la laveuse.
a.Fermezlerobinetd’eaufroideetenlevezletuyaude
lalaveuse.
b.RaccordezlepetittuyauauraccordenYenutilisant
undesjointsd’étanchéitéencaoutchouc.
c.Raccordezl’autreextrémitédupetittuyauaurobinet
d’eaufroide.
d.Raccordezlelongtuyaudelasécheuseàuncôté
duraccordenYetraccordezletuyaudelalaveusede
l’autrecôté.

21INSTALLATION
FRANÇAIS
Raccordement des sécheuses
au gaz
AVERTISSEMENT
Suivez l’information contenue dans ce manuel afin
de réduire les risques d’incendie et d’explosion,
de décharge électrique, ainsi que pour éviter les
dommages matériels, les blessures corporelles ou
la mort.
Électricité – exigences pour les
modèles au gaz seulement
• Necoupeznin’enlevezjamaislabrochedemiseà
laterreducâbled’alimentation.
• Pourdesraisonsdesécuritépersonnelle,cette
sécheusedoitêtrecorrectementmiseàlaterre.
• Cettesécheusedoitêtrebranchéedansuneprise
avecmiseàlamassede120VCAà60Hzprotégée
parunfusibleouundisjoncteurde15ampères.
• Sivousavezuneprisec.a.standardà2trous,vous
avezlaresponsabilitéetl’obligationdelaremplacer
paruneprisec.a.à3trouscorrectementmiseàla
terre.
DANGER D'ÉLECTROCUTION
Passer outre ces instructions et mises en garde
de sécurité peut entraîner un accident grave
• Cesèche-lingeousécheuseestéquipéd'uneprise
demiseàlaterretripolairepouruneprotection
adéquatecontrel’électrocutionetdoitêtrebranché
directementsuruneprisetripolairecorrectement
miseàlaterre.Ilestimportantdenepascouperet
denepasretirerlabrochedemiseàlaterredela
fiche.
Exigences pour l'alimentation en gaz
• Àlasortiedel'usine,cettesécheuseestconçue
pourlegaznaturel.Ellepeutêtreconvertiepour
lefonctionnementaupropaneliquide.Lapression
degaznedoitpasdépasser8pod'eau(20,4cm)
pourlegaznaturelet13po(33,1cm)d'eaupourle
propaneliquide.
• Leraccordementauservicedegazdoitêtreeffectué
paruntechnicienqualifiéouparlacompagniede
gaz.
• Pourtoutessaidepressiondel’alimentationengaz,
isolezlasécheusedusystèmed’alimentationengaz
enfermantlasoupaped'arrêtmanuelledel’appareil.
• N’essayezJAMAISdedémonterlasécheuse;tout
démontagedoitêtreeffectuéparlacompagniede
gazouparuntechnicienqualifié,autoriséetéquipé
desoutilsappropriés.
• Serrezsolidementtouslesraccordsdegaz.
• Raccordezlasécheuseautypedegazindiquésur
laplaquesignalétique.
AVERTISSEMENT
Exigence en matière d'alimentation en gaz (suite)
• Conduitd’alimentationrequis:Lasalledelavage
doitêtremunied’untuyaurigided’alimentationen
gazverslasécheuse.AuxÉtats-Unis,unesoupape
d'arrêtmanuelleDOITêtreinstalléeàaumoins
6pi(1,8m)delasécheuseenconformitéavec
lanormeANSIZ223.1,ou,auCanada,avecle
Coded’installationdugaznatureletdupropane
CSA-B149.1.UnbouchondecanalisationNPTde
1/8podoitêtreinstallé.
• Sivousutilisezuntuyaurigide,ildoitêtrede0,5po
IPS.Silescodesetrèglementslocauxl’autorisentet
quelefournisseurdegazl’accepte,utilisezuntuyau
de3/8pohomologuésilalongueurestdemoins
de20pi(6,1m).Untuyaudeplusgranddiamètre
doitêtreutilisépourdeslongueursdépassant20pi
(6,1m).
• Pouréviterlacontaminationlasoupape
d’alimentationengaz,purgezletuyaud’alimentation
detoutairetdetoussédimentsavantdele
raccorderàlasécheuse.Avantdeserrerles
raccordsentrel’alimentationengazetlasécheuse,
purgezl’airrestantjusqu’àcequevousdéceliezune
odeurdegaz.
• N’utilisezJAMAISuneflammenuepourrechercher
desfuitesdegaz.Utilisezunliquidededétection
des fuites non corrosif.
• Utilisezuniquementuntuyaud’alimentationen
gazneufhomologuéAGAouCSAavecraccords
flexiblesenacierinoxydable.
• Enroulezdurubandetéflonouappliquezdela
pâteàjointsinsolubledanslepropanesurtousles
filetages.
Raccordement de l'alimentation en
gaz
• L'installationettoutentretiendoiventêtreeffectués
paruninstallateurouunagentdeservicequalifié,
ouparlefournisseurdegaz.
• Utilisezuniquementunraccordflexibleneufenacier
inoxydableetunraccordhomologuéAGAneuf.
• Unesoupaped'arrêtpourgazdoitêtreinstalléeà
6pi(1,8m)oumoinsdelasécheuse.
• Àlasortiedel'usine,cettesécheuseestconçue
pourlegaznaturel.Assurez-vousquelasécheuse
estpourvuedugicleurdebrûleurappropriéautype
degazutilisé(gaznatureloupropaneliquide).
• Aubesoin,faitesinstallerlegicleurapproprié
(pourlepropaneliquide,commandezlapièce
nº383EEL3002D)paruntechnicienqualifiéetnotez
lechangementsurlasécheuse.
• Touslesraccordementsdoiventêtreconformes
auxcodesetrèglementslocaux.L'évacuation
dessécheusesaugazdoitABSOLUMENTêtre
acheminéeversl'extérieur.
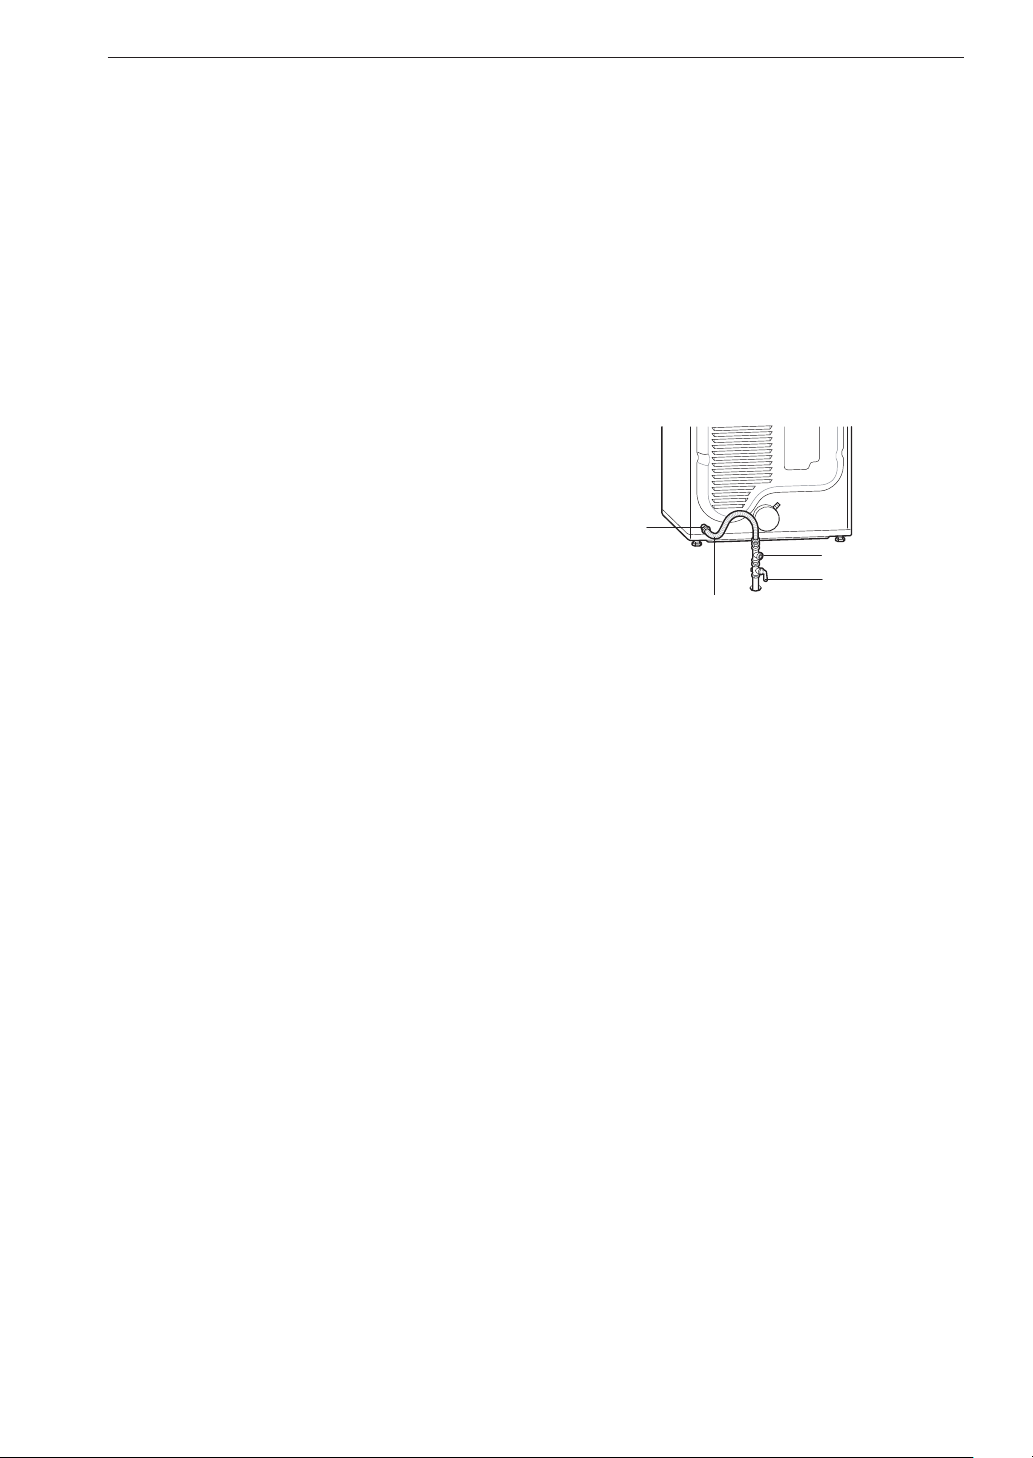
22 INSTALLATION
REMARQUE
• DansleCommonwealthduMassachusetts:Ce
produitdoitêtreinstalléparunplombierouunmonteur
d'installationsaugazautorisé.Lorsdel'utilisationde
robinetsd'arrêtdelaconduitedegazdetypeàbilles,
letypeàmancheenformedeTdoitêtreutilisé.Lorsde
l'utilisationd'unconnecteurdegazflexible,celui-cine
doitpasmesurerplusde3pieds.
Lasécheuseestexpédiéedel’usineenétantprêtepour
l’utilisationavecdugaznaturel.Sielledoitêtreutilisée
avecdugazdePL(propaneliquide),elledoitêtre
convertieparuntechniciendeservicequalifié.
1
Assurez-vousquel'alimentationengazdelasalle
delavageestCOUPÉEetquelasécheuseest
débranchée.Confirmezqueletypedegazdisponible
dansvotresalledelavageestappropriépourla
sécheuse.
2
Retirezlecapuchond'expéditionduraccorddegazà
l'arrièredelasécheuse.Prenezgarded'endommager
lefiletageduraccorddegazenretirantlecapuchon
d'expédition.
3
Raccordezlasécheuseàl'alimentationengazde
lasalledelavageavecuntuyauflexibleenacier
inoxydableneufetunraccordde3/8poNPT.
REMARQUE
• N’utilisezpasdevieuxraccords.
4
Serrezsolidementtouslesraccordsentrela
sécheuseetl'alimentationengazdelasallede
lavage.
5
Ouvrezl'alimentationengazdelasalledelavage.
6
Recherchezlesfuitesàtouslesraccordsde
tuyauterie(intérieursetextérieurs)avecunliquidede
détection des fuites non corrosif.
7
Procédezàlaventilationdelasécheuse.
RaccordNPTde
3/8po(9,5mm).
Tuyauflexibleenacier
inoxydablehomologuéAGA/
CSA
Soupapedefermeturede
l’alimentationengaz
Bouchondecanalisation
NPT1/8po(3,1mm)
Installation en haute altitude
LetauxdeBTUdecettesécheuseesthomologué
AGApourunealtitudeinférieureà10000pieds(3048
mètres).
Sivotresécheuseaugazestinstalléeàunealtitude
supérieureà10000pieds,sacapacitédoitêtre
recalculéeàlabaisseparuntechnicienqualifiéouparle
fournisseurdegaz.
23INSTALLATION
FRANÇAIS
Raccordement des sécheuses
électriques
AVERTISSEMENT
Suivez l’information contenue dans ce manuel afin
de réduire les risques d’incendie et d’explosion,
de décharge électrique, ainsi que pour éviter les
dommages matériels, les blessures corporelles ou
la mort.
Électricité – exigences pour les
modèles électriques seulement
• Lecâblageetlamiseàlaterredoiventse
conformeràl’éditionlaplusrécenteduCode
nationaldel’électricité,ANSI/NFPA70etàtousles
règlementslocauxenvigueur.Veuillezfairevérifier
paruntechnicienqualifiéquevotremaisonaune
alimentationélectriquesuffisammentpuissantepour
fairefonctionnerunesécheuse.
• Cettesécheusedoitêtrereliéeàunréseaude
câblagemétalliquepermanentmisàlamasse,ou
unconducteurdemiseàlamassepourl'appareil
doitlongerlesconducteursducircuitetêtrereliéàla
borneouaufildemiseàlamassedelasécheuse.
• Lasécheusecomportesonpropreblocdejonction
quidoitêtrereliéàuncircuitmonophasédistinctde
230VCAà60Hzmunidefusiblesde30ampères
(lecircuitdoitcomporterunfusibledesdeuxcôtés
ducâblage).L’ALIMENTATIONÉLECTRIQUEDOIT
ÊTREÀLATENSIONNOMINALEMAXIMALE
INDIQUÉESURLAPLAQUESIGNALÉTIQUE
DELASÉCHEUSE.NEBRANCHEZPASLA
SÉCHEUSEÀUNCIRCUITDE110,115OU120
VOLTS.
• Silecircuitdedérivationverslasécheuseestde
15pi(4,5m)oumoinsdelongueur,utilisezun
filnº10AWG(encuivreseulement)homologué
UL(UnderwritersLaboratories),ouconformeaux
exigencesdescodeslocaux.Silalongueurestde
plusde15pi(4,5m),utilisezunfilnº8AWG(en
cuivreseulement)homologuéUL,ouconformeaux
exigencesdescodeslocaux.Laissezaucâblage
suffisammentdejeupourvouspermettrede
déplacerlasécheuseaubesoin.
• Leraccordflexiblepourlaconnexionducordon
d’alimentationentrelaprisemuraleetleblocde
jonctiondelasécheuseN’ESTPASfourniavecla
sécheuse.Letypederaccordflexibleetlecalibredu
fildoiventêtreconformesauxcodeslocauxetaux
instructionsdespagessuivantes.
AVERTISSEMENT
• Uneconnexionàquatrefilsestexigéepourtoute
installationdansunemaisonmobileoupréfabriquée
demêmequepourtoutenouvelleconstructionà
partirdu1erjanvier1996.Uneconnexionàquatre
filsdoitaussiêtreutiliséedanslesrégionsoùles
codeslocauxnepermettentpaslamiseàlamasse
parlefilneutre.
• N’apportezaucunemodificationàlaficheetau
câblageinternedelasécheusetelsquefournis.
• Lasécheusedoitêtreconnectéeàuneprise
quadriphasée.
• Silafichenes’adaptepasàlaprisemurale,faites
installerunepriseadéquateparunélectricien
qualifié.
• Vérifiezlaconnexionducâbled’alimentationaubloc
duterminal.Chaquefildoitêtreconnectéàlavis
delamêmecouleur.Danslemanuel,chaquefilest
connectéàlavisdecouleurcorrespondantedans
le bloc.
• Lamiseàlamasseparleconducteurneutreest
interditepour:1-lesnouvellesinstallationsde
dérivation;2-lesmaisonsmobiles;3-lesvéhicules
récréatifs;et4-lesrégionsoùlaréglementation
localeinterditlamiseàlamasseparleconducteur
neutre.
• Cettesécheuseestfournieavecfildemasse
duneutre.CefildemasseblancDOITÊTRE
DÉPLACÉversleterminalneutrelorsqu’on
souhaiterutiliseruncordond’alimentationàquatre
filsoulorsquelamiseàlamasseparleconducteur
neutre est interdite.
REMARQUE
• Pourlesexigencesélectriquespourlesmaisons
mobilesoupréfabriquées,voirConditions de
l’alimentation particulières.

24 INSTALLATION
Conditions de l'alimentation
particulières
(Pour les maisons mobiles ou usinées)
• Touteinstallationdansunemaisonmobileou
préfabriquéedoitêtreconformeauxnormesdesécurité
etdeconstructiondesmaisonspréfabriquées,chapitre
24CFR,partie3280,ouàlanormeCAN/CSAZ240
MHainsiqu’auxcodesetrèglementslocaux.Encasde
douteconcernantàlaconformitéàcesnormesdevotre
installation,demandezl'assistanced'unprofessionnel
enserviceeteninstallation.
• Uneconnexionàquatrefilsestexigéepourtoute
installationdansunemaisonmobileoupréfabriquéede
mêmequepourtoutenouvelleconstructionàpartirdu
1erjanvier1996.
• Unesécheuseaugazdoitêtrefixéeauplancherde
manièrepermanente.
• Laconnexionélectriqued'unesécheuseélectrique
doitêtreuneconnexionàquatrefils.Voustrouverez
desrenseignementsplusdétailléssurlesconnexions
électriquesdanslasectionRaccordementdes
sécheusesélectriques.
• Pourréduirelerisquedecombustionetd’incendie,la
sécheusedoitêtreventiléeversl’extérieur.
• NeventilezJAMAISunesécheusesousunemaison
mobileoupréfabriquée.
• Lessécheusesélectriquespeuventêtreventiléesparle
côtégaucheoudroit,parl'arrièreouparledessous.
• Lessécheusesaugazpeuventêtreventiléesparle
côtégauche,parl'arrièreouparledessous.Ilest
impossibledeventilerunesécheuseaugazvers
l’extérieurparlecôtédroitenraisondelaprésencedu
boîtierdubrûleur.
• Leconduitd’évacuationd’airdelasécheusedoitêtre
solidementfixéàlastructuredelamaisonmobileou
préfabriquée,etdoitêtrefabriquédansunmatériau
quirésisteraauxflammesetàlacombustion.Ilest
recommandéd’installerunconduitmétalliquerigide,
semi-rigideouflexible.
• NereliezJAMAISleconduitd’évacuationd’airde
lasécheuseàunautreconduit,àunsystèmede
ventilation,àunecheminéeouàunautreconduit
d’évacuationd’air.
• Faitesensortequelasécheusedisposed’unaccès
adéquatàdel’airfraisdel'extérieurafind'assurerun
bonfonctionnement.L’ouverturepourl’apportd’airfrais
del'extérieurdoitêtred’aumoins25po2(163cm²).
• Ilestimportantdemaintenirundégagementd’au
moins2po(5cm)entreleconduitd’évacuationd’air
ettouteconstructioncombustible,etildoitexisterun
dégagementd'aumoins1po(2,5cm)surlescôtéset
àl'arrièredelasécheusepourlaventilationdel'airvers
l’extérieur.
• Lesélémentsdusystèmedeventilationnesontpas
fournisaveclasécheuse.Vousdevrezvousprocurer
lespiècesdeventilationrequisespouruneinstallation
adéquate.
Vérification finale de
l'installation
Unefoisl’installationdelasécheusecomplétéeàson
emplacementdéfinitif,effectuezlesessaissuivants
pourvérifiersil'installationestcorrecteetsil'appareil
fonctionneadéquatement(Essaid'installationet
vérificationdesconduitsd'évacuation).
Essai du module de chauffage dela
sécheuse
MODÈLES AU GAZ
Fermezlaportedelasécheuseetappuyezsurlebouton
Marche/arrêtpourmettrelasécheuseenmarche.
AppuyezsurlesboutonsTime Dry (Séchage minuté) et
Démarrer/pausepourdémarrerletest.Audémarragede
lasécheuse,ledispositifd’allumagedevraitenflammerle
brûleurprincipal.
REMARQUE
• S'ilrestedel'airdansletuyaud'alimentationengaz,il
sepeutqueledispositifd'allumages'arrêteavantque
lebrûleurprincipalsoitenflammé.Sicelaarrivait,le
dispositifd'allumagevatenterdenouveaud'allumerle
gazaprèsenvirondeuxminutes.
MODÈLES ÉLECTRIQUES
Fermezlaportedelasécheuseetappuyezsurlebouton
Marche/arrêtpourmettrelasécheuseenmarche.
AppuyezsurlesboutonsTime Dry (Séchage minuté)
et Démarrer/pausepourdémarrerletest.L’airévacué
devraitêtrechaudaprèstroisminutesdefonctionnement.
Vérification du débit d'air
Pourbienfonctionner,lasécheuseabesoind'undébit
d’airadéquat.Onpeutévaluerledébitd’airenmesurant
lapressionstatiquedansleconduitd'évacuationd'air.
Placezunmanomètresurleconduitd’évacuationd'air
àenviron2pi(60,9cm)delasécheuse.Lapression
statiquedansleconduitd'évacuationnedoitpas
dépasser0,6po(1,5cm).Lefonctionnementdela
sécheusedoitêtrevérifiésanscharge.
Vérification du niveau
Unefoislasécheuseinstalléeàsonemplacement
définitif,revérifiezsielleestauniveau.Assurez-vous
qu'elleestdeniveaud’avantenarrièreetd’uncôté
àl’autre,etquelesquatrepiedsdenivellementsont
fermementposéssurleplancher.

25INSTALLATION
FRANÇAIS
Essai d'installation (Vérification
des conduits d'évacuation)
Unefoisterminéel’installationdelasécheuse,effectuez
cetessaipourvérifiersilesystèmed'évacuationest
enbonétatpourassurerlebonfonctionnementdela
sécheuse.Cetessaidoitêtreeffectuépourvousalerter
deproblèmessérieuxquepourraitprésenterlesystème
d'évacuationdevotrehabitation.
• VotresécheuseestéquipéedusystèmeFlowSense
MC
,
quidétecteautomatiquementlesrestrictionsetles
obstructionsdanslesconduitsd'évacuationdela
sécheuse.Retirerlesaccumulationsdefibresetles
obstructionsduconduitpermetauxvêtementsde
sécherplusrapidementetréduitlaconsommation
d’énergie.
REMARQUE
• Lasécheusedoitêtrerefroidieavantdecommencer
letest.Danslecasoùlasécheuseachauffépendant
l’installation,lancezuncycledeséchageàl'air
pendantquelquesminutespourréduirelatempérature
intérieure.
Activation de l'essai d'installation
1
Retirez la claie de séchage et la documentation,
puis refermez la porte.
Laissezletambourdelasécheusecomplètement
videpourcetessai,sansquoilesrésultats
pourraientêtrefaussés.
2
Enfoncez et maintenez simultanément le
bouton Signal (tonalité) et le bouton Temp.
(température), appuyez ensuite sur le bouton
Marche/arrêt.
(Surlesmodèlesavecunpanneaudecommande
tactileenverre,appuyezsurleboutondemise
enmarche,puisappuyezIMMÉDIATEMENTet
maintenezlapressionsurleboutondeTemp.
(température) Control et de Signal (tonalité).)
Cetteséquenceactivel'essaid'installation.Lecode
s'affichesil'activationafonctionné.
3
Appuyez sur le bouton Démarrer/pause.
Lasécheusedémarreletest,quidureraquelques
minutes.Lachaleurestactivéeetlestempératures
sontmesuréesdansletambour.
4
Vérifiez les résultats sur l’afficheur.
SilaDELFlowSense
MC
s’allumepas,àlafindu
cycle,lesystèmed’échappementestadéquat.Si
lesystèmed’échappementestfortementlimité,la
DELFlowSense
MC
s’allumera.D’autresproblèmes
peuventégalementêtreaffichésavecdescodes
d’erreur.Voirletableauci-dessouspourlesdétails
etlessolutionsducoded’erreur.
DEL allumée:
LIMITÉ
La DEL Flow Sense
MC
indique que le système
d'échappement est fortement limité. Faites vérifier
immédiatement le système, car les performances
seront médiocres.
5
Fin du cycle.
Àlafinducycled'essai, s'affiche.Le
cycled'essaisetermineetlasécheuses'arrête
automatiquementaprèsunbrefdélai.

26 INSTALLATION
Vérifiez l'état des conduits d'évacuation
SilevoyantDELFlowSense
MC
estallumé,vérifiezsi
lesystèmed'évacuationcomportedesrestrictionsou
estendommagé.Aubesoin,réparezouremplacezle
systèmed'évacuation.
REMARQUE
• Cetestdevraitêtreréalisélorsdel’installationdela
sécheusepourvousindiquerl’existenced’unproblème
quelconqueauniveauduconduitd’évacuationdevotre
logement.Toutefois,puisqueletest,lorsqu’ilestréalisé
dansdesconditionsnormalesd’utilisation,fournitdes
indicationsplusfidèlessurl’étatduconduitd’évacuation
queletestd’installation,ilsepeutquelenombrede
barresaffichéeslorsdesdeuxtestsdiffère.
• Nepasinterromprelecycledetest,carcelapeutavoir
uneincidencesurl’exactitudedesrésultats.
• Mêmesilevoyantn’estpasaffichéaucoursducycle
detest,desobstructionspeuventêtreprésentesdans
lesystèmed’échappement.Reportez-vousàlasection
Ventilationdelasécheuseduprésentmanuelpourles
conditionsrelativesausystèmed’échappementetàla
ventilation.
• LasécheuseestmuniedelafonctionFlowSense
MC
,
unsystèmededétectionnovateurquidétecte
automatiquementlesblocagesetlesobstructionsdu
conduitdelasécheuse.Retirerlesaccumulations
defibresetlesobstructionsduconduitpermetaux
vêtementsdesécherplusrapidementetréduitla
consommationd’énergie.
Codes dʼerreur
Consultezletableaudescodesd'erreuravantd'appeler
un technicien.
Code
dʼerreur
Causes
Possibles
Solutions
tE1 ou
tE2
Capteurde
température
défectueux.
Éteignezlasécheuseet
appelezuntechnicien.
HS
Capteur
d'humidité
défectueux
Éteignezlasécheuseet
appelezuntechnicien.
PS, PF
ou nP
L'alimentation
électriqueest
incorrecte
(cordonmal
branchéou
problème
desystème
électriquede
l'habitation).
Vérifiezl'alimentationou
laconnexionducâble
d'alimentationsurlebloc
dejonction.Consultezla
sectionRaccordementdes
sécheusesélectriquesde
cemanuel,quicontientdes
instructionscomplètes.
Un fusible de
votre résidence
estbrûlé,un
disjoncteuraété
déclenché ou il y
aunepannede
courant.
Réinitialisezledisjoncteur
ouremplacezlefusible.
N'augmentezpasla
capacitédufusible.
S’ils’agitd’unproblèmede
surchargeducircuit,faites-
lecorrigerparunélectricien
qualifié.
gAS
Alimentationen
gazferméeou
service coupé
(uniquementpour
lesmodèlesà
gaz).
Vérifiezl’ouverture
del’alimentationengaz
delamaisonetdela
soupapedefermeture
del’alimentationengaz
del’appareil.
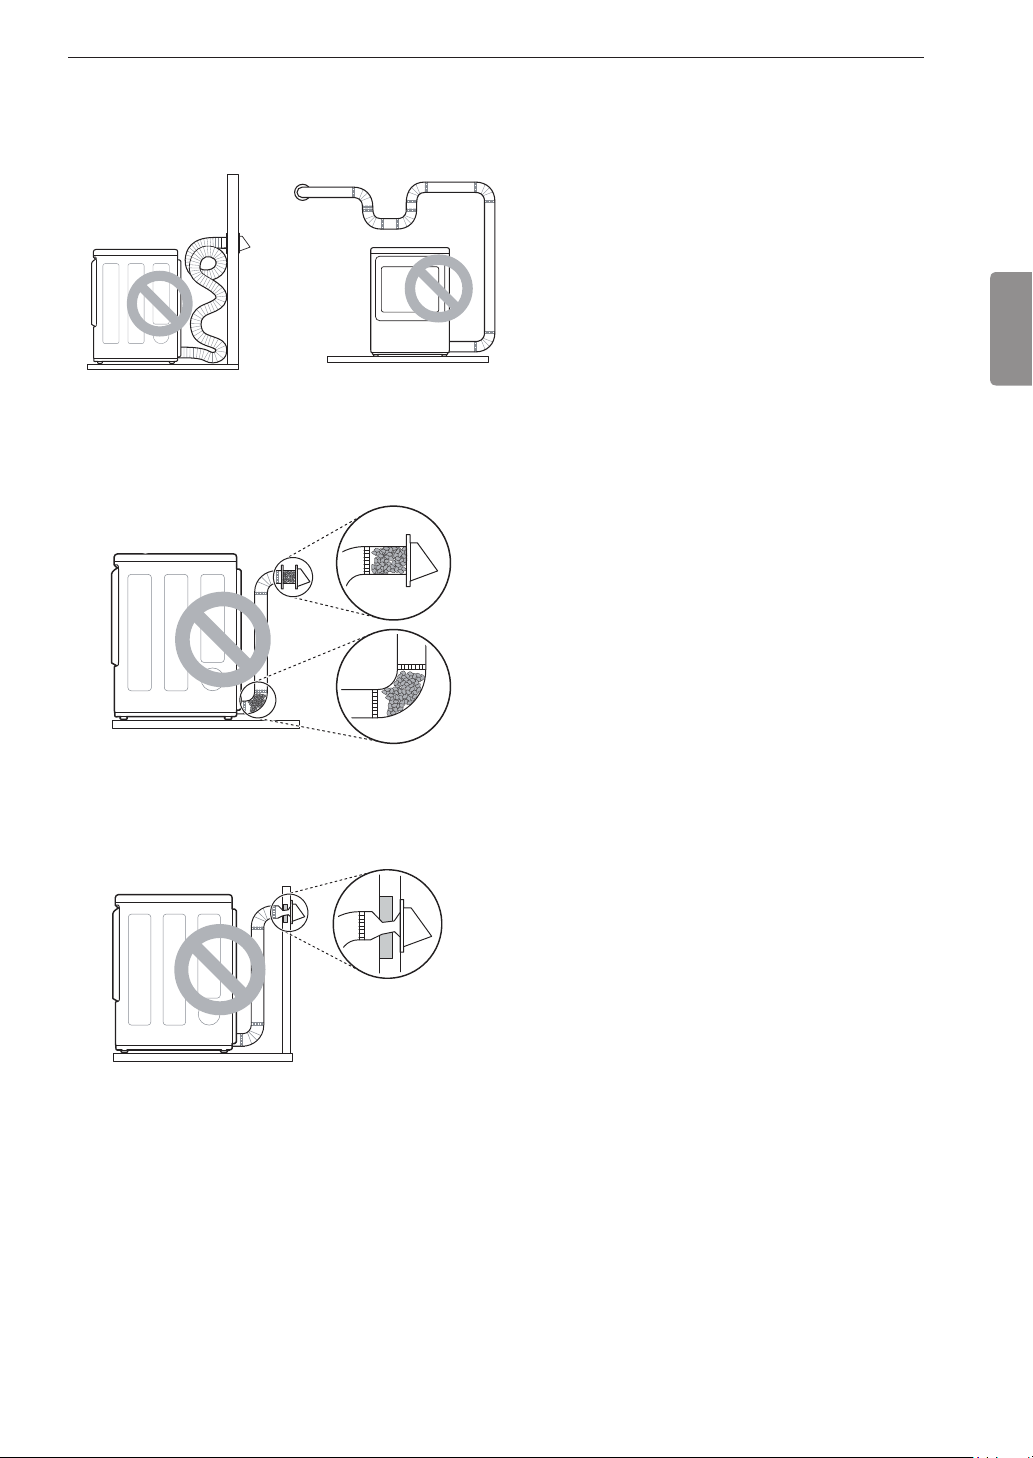
27INSTALLATION
FRANÇAIS
Débit d'air restreint ou bloqué
Évitezleslongsconduitsoulesconduitscomportant
plusieurs coudes ou courbes.
Excèsouconduitde
raccordobstrué
Trop de coudes ou
échappementtroplong
Repérezlesblocagesetlesaccumulationsdefibres.
Accumulationdefibresou
blocages
Assurez-vousquelesconduitsd’évacuationnesontni
écrasésnirestreints.
Échappementobstruéou
endommagé
28 FONCTIONNEMENT
FONCTIONNEMENT
AVERTISSEMENT
• Pourréduirelerisqued’incendie,dedéchargeélectriqueoudeblessures,lisezlesDIRECTIVESDESÉCURITÉ
avantd’utilisercetappareil.
Utilisation de la sécheuse
1
2
3
4
5
6
Nettoyez le filtre à charpie
Silefiltreàfibresn’apasdéjàéténettoyé,retirez-leetenlevezlesfibresdela
brasséeprécédente.Celapermettrad’assurerunséchageplusrapideetefficace
Assurez-vousderéinstallerlefiltreenappuyantverslebasjusqu’àcequevous
entendiezun«clic».
Chargez la sécheuse
Chargezlasécheuseavecdulingemouilléprovenantdelamachineàlaver.Sila
brasséeesttrèsvolumineuse,vousdevrezpeut-êtrelarépartirenplusieursbrassées
pluspetitesafind’obtenirunmeilleurséchageetdeprendresoindesvêtements.
Mettez la sécheuse sous tension
AppuyezsurleboutonPowerpourmettrelalaveuseenmarche.Lesvoyantsdes
programmess’allumerontetunesonnerieretentira.
Sélectionnez un cycle.
Tournezleboutondesélectiondecycledansn'importequelledirectionjusqu'àce
quelevoyantàDELducycledésirés'allume.Latempérature,leniveaudeséchage
etlesoptionsducycles’afficheront.Lesparamètrespardéfautducyclesélectionné
peuventalorsêtremodifiésaubesoin.Consulterlapagedesparamètresetdes
optionsdescyclespourdeplusamplesrenseignements.
REMARQUE
• Lesoptionsoumodificateursnesontpastousdisponiblespourtousles
programmes.VoirlapageGuidedescyclespourensavoirplussurlesréglagespar
défautetlesoptionsdisponibles.Unindicateursonoredifférentretentiraetlevoyant
nes’allumerapassilasélectionn’estpaspossible.
Démarrer le cycle
AppuyezsurleboutonDémarrer/pausepourdémarrerlecycle.Celui-cipeut
êtreinterrompuàtoutmoment,enouvrantlaporteouenappuyantsurlebouton
Démarrer/pause.Sileprogrammen’estpasredémarrédansles60minutesqui
suivent,lasécheuseseramisehorstensionetlesparamètresduprogrammeseront
perdus.
Fin de cycle
Lorsqueleprogrammeestterminé,unesonnerieretentitsielleaétéactivée.Retirez
immédiatementlesvêtementsafindelimiterlesfauxplis.Sil’optionWrinkle Care
(Antifroissement)estsélectionnée,letambourferaquelquestoursàquelques
minutesd’intervallepouréviterquelesvêtementsnesefroissent.
29FONCTIONNEMENT
FRANÇAIS
Vérifier le filtre à fibres avant
chaque brassée
Assurez-vousquelefiltreàfibresesttoujourspropre
avantdesécherunenouvellebrassée.Eneffet,un
filtreobstruépardesfibresaugmenteraletempsde
séchage.Pourlenettoyer,tirezdroitverslehautsurle
filtreetfaitesunebouledecharpieavecvosdoigts.Ne
pasrincernilaverlefiltrepourretirerlesfibres.Poussez
fermementsurlefiltreàfibrespourleremettreenplace.
VoyezlasectionNettoyage régulierpourplusdedétails.
Assurez-vousquelefiltreàfibressoittoujours
correctementinstalléavantdedémarrerlasécheuse.Un
fonctionnementdelasécheuseavecunfiltremalfixéou
manquantrisqueraitd’endommagerlasécheuseetles
articlesdanslasécheuse.
Filtre à fibres
Tri des articles
Étiquettes d'entretien des tissus
Beaucoupdevêtementscomportentuneétiquette
d’entretiendestissus.Consultezletableauci-dessous
pour choisir le cycle et les options en fonction des
recommandationsdufabricantdevosvêtements.
Séchage par culbutage
Séchage Doux/délicats
Normal(Normal)
Nepassécherpar
culbutage
Tissus
infroissables/
résistantsau
froissement
Nepassécher
(utiliséavecNe
paslaveràla
machine)
Réglagedelachaleur
High(élevé) Low(faible)
Medium(Moyen)
Sanschaleur/
séchageàl'air
Regrouper les articles similaires
Pourdemeilleursrésultats,triezlesvêtementspouren
fairedesbrasséesquipeuventêtreséchéesaumême
cycledeséchage.
Différentstissusexigentdessoinsparticuliersetcertains
d’entreeuxsèchentplusrapidementqued’autres.
Chargement de la sécheuse
AVERTISSEMENT
Pour réduire le risque d'incendie, d'explosion,
de décharge électrique, de blessures ou même
de mort en utilisant cet appareil, respectez les
mesures de sécurité élémentaires, notamment les
suivantes :
• Vérifiezquetouteslespochessontvides.Des
articlescommedestrombones,desstylos,de
lamonnaie,etdescléspeuventendommager
votresécheuseetvosvêtements.Desobjets
inflammablescommedesbriquetsoudesallumettes
risqueraientdes’enflammeretdeprovoquerun
incendie.
• Neséchezjamaisdesvêtementsquiontété
exposésàdel’huile,del’essence,oud’autres
substancesinflammables.Lelavagedesvêtements
n’enlèverapascomplètementlesrésidusd’huile.
REMARQUE
Conseils de chargement
• Combinezlesarticlesgrandsetpetitsdansune
brassée.
• Lesvêtementsmouillésprennentduvolumeau
séchage.Nesurchargezpaslasécheuse;les
vêtementsontbesoind’espacepourculbuteretsécher
correctement.
• Fermezlesfermetures-éclair,lescrochetsetattachez
lescordonspourlesempêcherdes’accrocheroude
s’emmêlerauxautresvêtements.
30 FONCTIONNEMENT
Panneau de contrôle
Modèles sans vapeur (DLE3500*, DLG3501*, DLE3095*, DLE3090*)
7 6
1 2 3 4
5
Modèles avec vapeur (DLEX3700*, DLGX3701*)
7 6
1 2 3 4
8 5
Modèles avec vapeur (DLEX3900*, DLGX3901*)
7 6
1 2 3 4
8 5
REMARQUE
• Lesnumérosdemodèlesetrouventàl’intérieurdelaportedelasécheuse.

31FONCTIONNEMENT
FRANÇAIS
1
Bouton Marche/arrêt
Appuyezsurceboutonpourallumerlasécheuse.
Appuyezdenouveaupourlamettrehorstension.
REMARQUE
• Appuyer sur le bouton Marche/arrêtpendantuncycle
annuleracecycle,ettouslesréglagessélectionnés
pour ce cycle seront perdus.
2
Bouton de sélection des cycles
Tournezceboutonpoursélectionnerlecyclevoulu.Une
foisleboncyclesélectionné,lespréréglagesstandards
serontaffichésàl’écran.PourlescyclesManual
Dry(séchage manuel),cesréglagespeuventêtre
modifiésàl’aidedesboutonsdemodificationdecycle
avantledébutducycle.
3
Bouton Démarrer/pause
Appuyezsurcettetouchepourdémarrerlecycle
sélectionné.Silasécheuseestenfonction,utilisezce
boutonpourfaireunepausedanslecyclesansperdre
lesparamètresactuels.
REMARQUE
• Sileprogrammen'estpasredémarrédansles
60minutesenappuyantsurleboutonDémarrer/pause,
lasécheuseseramisehorstensionautomatiquementet
touslesréglagesdescyclessontperdus.
4
Boutons de modification des cycles
Cesboutonspermettentdechoisirlesparamètrespour
lecyclesélectionné.Lesparamètressélectionnéssont
affichésàl’écran.Appuyezsurleboutoncorrespondant
àcetteoptionpourafficheretsélectionnerd’autres
réglages.
5
Boutons More Time / Less Time (Plus de temps/
Moins de temps)
Cesboutonspeuventêtreutiliséspourréglerladurée
deséchagedescyclesdeséchageminutésetd'autres
cyclesdeséchagemanuels.LeboutonMore Time
(Plus de temps)permetd’ajouteruneminuteaucycle
deséchagemanueletleboutonLess Time (Moins de
temps)permetderéduireladuréeducycled’uneminute.
6
Affichage de l’heure et de l’état
L’afficheurprésentelesréglages,letempsrestantestimé,
lesoptionsetlesmessagesd’étatdelasécheuse.
7
Boutons d’options de cycle
Appuyezsurchacundecesboutonspoursélectionner
desoptionsdecycleadditionnelles.Etappuyezet
maintenezn'importequelboutonmarquéd'unastérisque
pendant3secondespouractiverunefonctionspéciale.
8
Fonctions de vapeur
LatechnologievapeurdeLGpermetdevaporisersurles
tissusdesjetsdevapeurpourrafraîchirlesvêtements,
réduirel’électricitéstatiqueetrendrelerepassageplus
facile.Vousn’avezqu’àsélectionnerlecycleSteam
Fresh
MC
ouSteamSanitary
MC
ouàajouterl’optionde
vapeurauxcycleschoisis.
32 FONCTIONNEMENT
13
14
15
9
10
11
12
9
Système de détection des blocages dans le
conduit d’évacuation Flow Sense
Lesystèmededétectiondesblocagesdeconduit
FlowSense
MC
détectelesblocagesdanslesconduits
quiréduisentledébitd’airdanslasécheuseetvous
enavertit.Maintenirpropreslesconduitsdusystème
d’évacuationpermetd’améliorerl’efficacitéde
fonctionnementetaideàréduireauminimumlesappels
aucentredeservice(vouséconomisezainsidel’argent).
10
Custom PGM (programme personnalisé)
Sivousutilisezfréquemmentunecombinaison
particulièredeparamètres,vouspouvezenregistrerces
derniersdansunprogrammepersonnalisé.
11
Indicateur de Control Lock (Verrouillage des
commandes)
Lorsquel’optiondeverrouillagedesécuritéestactivée,
l’indicateurdeverrouillagedesécuritéapparaîtettousles
boutonssontdésactivésàl’exceptionduboutonMarche/
arrêt.Celaempêchequ’unenfantmodifielesréglages
pendantquelasécheuseestenfonction.
12
Indicateur Wi-Fi
Lorsquel’appareilestconnectéàInternetparunréseau
Wi-Fidomestique,cetindicateurapparaît.
13
Rappel de nettoyage du filtre
L’écranaffiche«CleanFilter»(nettoyagedufiltre)
lorsquelasécheuseestmisesoustensionafindevous
rappelerdenettoyerlefiltre.Cemessages’éteintlorsque
le bouton Démarrer/pause est enfoncé.
14
Temps restant estimé
Cetécranafficheletempsrestantestimépourlescycles
deSensorDry(Séchageàcapteur)ouletempsrestant
réelpourlescyclesdeTimeDry(Séchageminutés)ou
ManualDry(Séchagemanuel).
REMARQUE
• LaduréedescyclesdeSensorDry(Séchageàcapteur)
peutfluctuerpuisquelasécheuserecalculeletempsde
séchageafind'obtenirdesrésultatsoptimaux.
15
Indicateur de fin de cycle
Cettepartiedel’afficheurindiquel’étapeducyclede
séchageencours(séchage,refroidissement).

33FONCTIONNEMENT
FRANÇAIS
Guide sur les cycles
Cycles de Sensor Dry(Séchage à
capteur)
Les cycles de Sensor Dry(Séchage à capteur) utilisent
lesystèmeexclusifàdoublecapteurdeLGquidétecte
etcompareleniveaud’humiditédesvêtementset
celuidel’airambiant,etrègleletempsdeséchageen
conséquencepouroptimiserlesrésultats.Lasécheuse
règleautomatiquementleniveaudeséchageetla
températureauxparamètresrecommandéspourchaque
cycle.L’afficheurindiqueletempsrestantestimé.
REMARQUE
• Pourprotégervosvêtements,lesdifférentesoptionsde
niveaudeséchage,températureouautresnesontpas
toutesdisponiblesavecchacundescycles.Consultezle
Guidedescyclespourobtenirplusdedétails.
Cycles de Manual Dry(séchage manuel)
UtilisezlescyclesdeManual Dry(séchage manuel)
poursélectionneruntempsetunetempératurede
séchageprécis.Lorsdelasélectiond’uncyclede
Manual Dry(séchage manuel),l’afficheurdetemps
restantestiméindiqueletempsréelquiresteaucycle.
Vouspouvezmodifierletempsducycleenappuyantsur
les boutons More Time (Plus de temps) ou Less Time
(Moins de temps).
REMARQUE
• L’optionEnergy Saver (économie dʼénergie) est
activeepardefautpourlecycleNormal.Sivous
souhaitezunsechageplusrapidequelereglagepar
defautCoton/Normal,vouspouvezdesactiverl’option
Energy Saver (économie dʼénergie).Pourdesactiver
lafonctiond’Energy Saver (économie dʼénergie)
pardefaut,appuyezsurleboutonWrinkle Care
(Antifroissement)etmaintenez-leenfoncependant
troissecondes.MARCHEouARRETs’afficheal’ecran.
NSF Certification
NSFInternational(anciennementlaNational
SanitationFoundation),certifiequelecycle
ANTIBACTERIAL(ANTIBACTÉRIEN)diminuede99,9
%lesbactériesprésentessurlestissusetqu’aucune
bactérieneseratransféréeàlabrasséesuivante.
• Lesréglagespardéfautducycle
ANTIBACTERIAL(ANTIBACTÉRIEN)sontÉlevée
(température)etTrèssec(niveaudeséchage).Ces
réglagespardéfautnepeuventpasêtremodifiés.
• N’UTILISEZPAScecyclepourlesarticlesoulestissus
délicats.
Protocol P154 Sanitization
Performance of Residential
Clothes dryer
(DLE3500*, DLG3501*, DLE3095*, DLE3090*,
DLEX3700*,DLGX3701*,DLEX3900*,DLGX3901*)
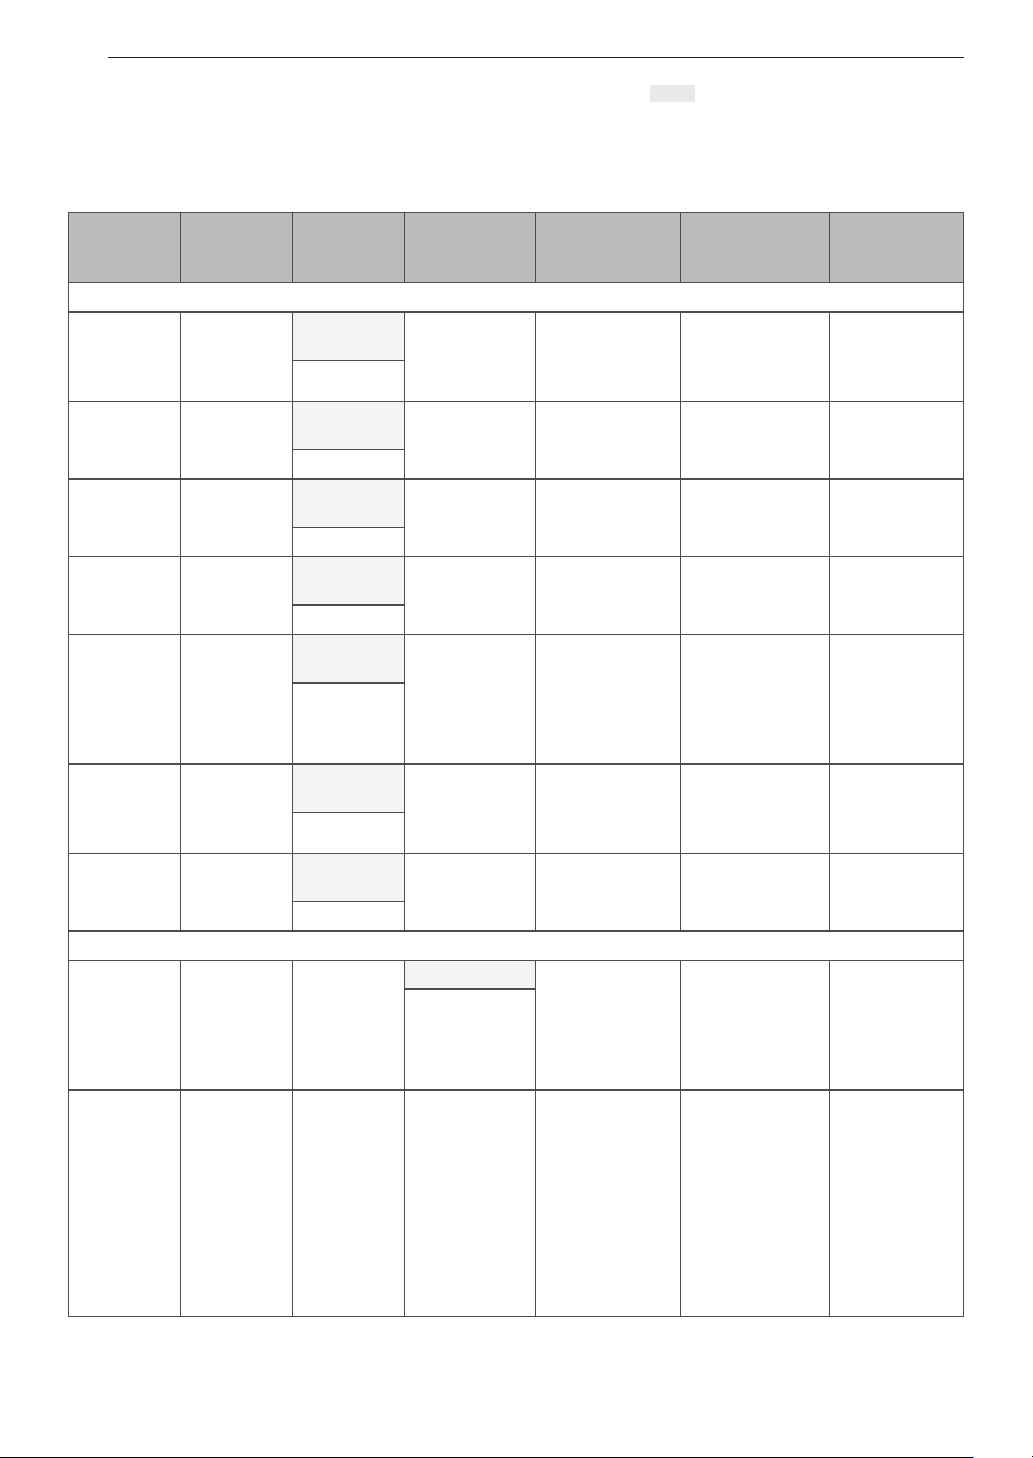
34 FONCTIONNEMENT
Modèles sans vapeur (DLE3500*, DLG3501*, DLE3095*, DLE3090*)
=réglagepardéfaut
●
= option disponible
*=EnergySaver(économiedʼénergie)
Cycle
Types de
tissus
Dry Level
(Niveau de
séchage)
Temp.
Wrinkle Care
(Antifroissement)
Damp Dry
Signal (Signal
humide sec)
Antibacterial
(Antibactéries)
SENSOR DRY (Séchage à capteur)
Normal*
Vêtements
detravail,
velours
côtelé,etc.
Normal
(Normal)
Medium
(Moyen)
● ● ●
Réglable
Heavy Duty
(vêtements
très sales)
Jeans,
articles
lourds
Normal
(Normal)
High(élevé) ● ● ●
Réglable
Bedding
(Literie)
Édredons,
oreillers,
chemises
Normal
(Normal)
Medium
(Moyen)
Réglable
Towels
(serviettes)
Denims,
serviettes,
cotons lourds
Normal
(Normal)
Medium
(Moyen)
● ● ●
Réglable
Small Load
(petite
brassée)
Seul. pour
tissus de
typenormal
etcoton/
serviettes
(max.3lb)
Normal
(Normal)
High(élevé) ●
Réglable
Perm. Press
(tissus
infroissables)
Pressage
permanent,
tissus
synthétiques
Normal
(Normal)
Medium
(Moyen)
● ●
Réglable
Delicates
(Délicats)
Lingerie,
draps,
blouses
Normal
(Normal)
Low(faible) ● ●
Réglable
MANUAL DRY (Séchage manuel)
Speed Dry
(séchage
rapide)
Pour les
petites
brassées
dontletemps
deséchage
est court
Off(Arrêt)
High(élevé)
●
Réglable
Air Dry
(séchageà
l’air)
Pour les
articlesqui
doivent être
séchéssans
chaleur,
commeles
plastiques
ou les
caoutchoucs
Off(Arrêt) Sanschaleur ●

35FONCTIONNEMENT
FRANÇAIS
Modèles avec vapeur (DLEX3700*, DLGX3701*)
=réglagepardéfaut
●
= option disponible
*=EnergySaver(économiedʼénergie)
Cycle Types de tissus
Dry
Level
(Niveau
de
séchage)
Temp.
Wrinkle Care
(Antifroissement)
Damp Dry
Signal (Signal
humide sec)
Reduce Static
(Réduit l’électr.
statique)
SENSOR DRY (séchage à capteur)
Normal*
Vêtementsdetravail,
velourscôtelé,etc.
Normal
(Normal)
MidHigh
(MoyenHaut)
● ● ●
Réglable
Heavy Duty
(vêtements
très sales)
Jeans,articleslourds
Normal
(Normal)
High(élevé) ● ● ●
Réglable
Bedding
(Literie)
Édredons, oreillers,
chemises
Normal
(Normal)
Medium
(Moyen)
●
Réglable
Antibacterial
(Antibactéries)
N’utilisezpascecycle
pourlesarticlesdélicats.
Very
(Très)
High(élevé) ●
Perm. Press
(tissus
infroissables)
Pressagepermanent,
tissussynthétiques
Normal
(Normal)
Medium
(Moyen)
● ● ●
Réglable
Delicates
(Délicats)
Lingerie,draps,blouses
Normal
(Normal)
Low(faible) ● ● ●
Réglable
Towels
(serviettes)
Denims,serviettes,
cotons lourds
Normal
(Normal)
MidHigh
(MoyenHaut)
● ● ●
Réglable
MANUAL DRY (séchage manuel)
Speed Dry
(séchage
rapide)
Pourlespetitesbrassées
dontletempsdeséchage
est court
Off
(Arrêt)
High(élevé)
● ●
Réglable
Air Dry
(séchage à
l’air)
Pourlesarticlesqui
doivent être séchés
sanschaleur,comme
lesplastiquesoules
caoutchoucs
Off
(Arrêt)
Sanschaleur ●
STEAM CYCLE (Cycle de vapeur)
Steam
Sanitary
MC
Pourlesarticlesqui
doivent être séchés
sanschaleur,comme
lesplastiquesoules
caoutchoucs
Off
(Arrêt)
High(élevé) ●
Steam
Fresh
MC
Pourlesarticlesqui
doivent être séchés
sanschaleur,comme
lesplastiquesoules
caoutchoucs
Off
(Arrêt)
MidHigh
(MoyenHaut)
●
Réglable
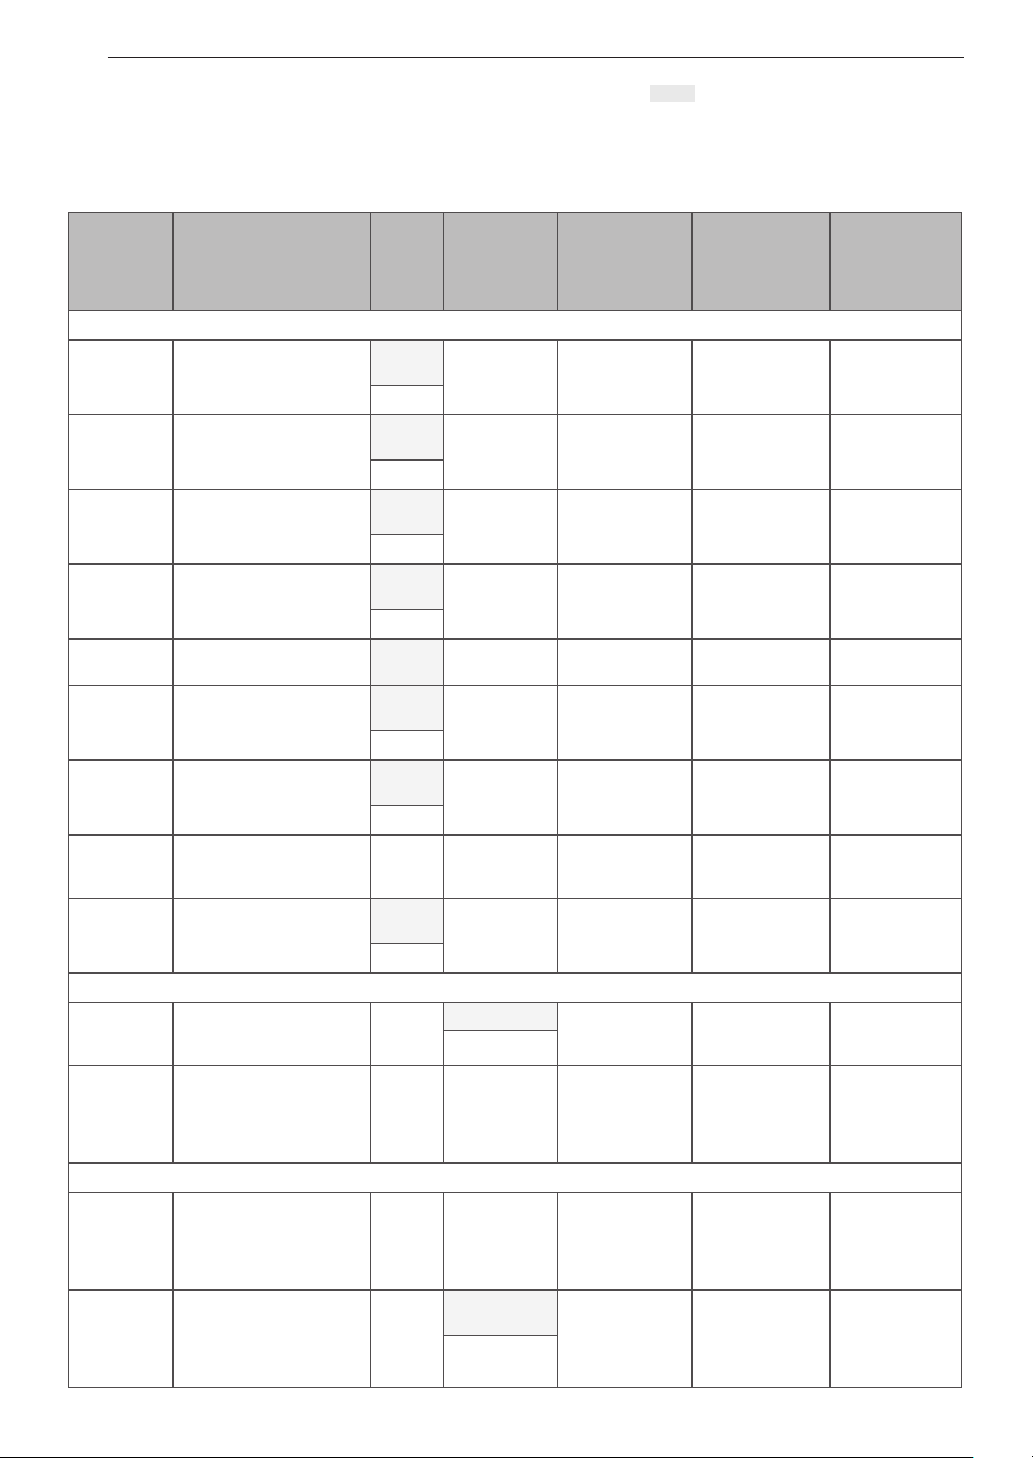
36 FONCTIONNEMENT
Modèles avec vapeur (DLEX3900*, DLGX3901*)
=réglagepardéfaut
●
= option disponible
*=EnergySaver(économiedʼénergie)
Cycle Types de tissus
Dry
Level
(Niveau
de
séchage)
Temp.
Wrinkle Care
(Antifroissement)
Damp Dry
Signal (Signal
humide sec)
Reduce
Static (Réduit
l’électr.
statique)
SENSOR DRY (séchage à capteur)
Normal*
Vêtementsdetravail,
velourscôtelé,etc.
Normal
(Normal)
MidHigh
(MoyenHaut)
● ● ●
Réglable
Heavy Duty
(vêtements
très sales)
Jeans,articleslourds
Normal
(Normal)
High(élevé) ● ● ●
Réglable
Bedding
(Literie)
Édredons, oreillers,
chemises
Normal
(Normal)
Medium
(Moyen)
●
Réglable
Small Load
(petite
brassée)
Seul. pour tissus de type
normaletcoton/serviettes
(max.3lb)
Normal
(Normal)
High(élevé) ●
Réglable
Antibacterial
(Antibactéries)
N’utilisezpascecycle
pourlesarticlesdélicats.
Very
(Très)
High(élevé) ●
Perm. Press
(tissus
infroissables)
Pressagepermanent,
tissussynthétiques
Normal
(Normal)
Medium
(Moyen)
● ● ●
Réglable
Delicates
(Délicats)
Lingerie,draps,blouses
Normal
(Normal)
Low(faible) ● ● ●
Réglable
Sportswear
(Vêtements
de sport)
Vêtementsdesport
Off
(Arrêt)
● ●
Towels
(serviettes)
Denims,serviettes,
cotons lourds
Normal
(Normal)
MidHigh
(MoyenHaut)
● ● ●
Réglable
MANUAL DRY (séchage manuel)
Speed Dry
(séchage
rapide)
Pourlespetitesbrassées
dontletempsdeséchage
est court
Off
(Arrêt)
High(élevé)
● ●
Réglable
Air Dry
(séchage à
l’air)
Pourlesarticlesqui
doivent être séchés
sanschaleur,comme
lesplastiquesoules
caoutchoucs
Off
(Arrêt)
Sanschaleur ●
STEAM CYCLE (Cycle de vapeur)
Steam
Sanitary
MC
Pourlesarticlesqui
doivent être séchés
sanschaleur,comme
lesplastiquesoules
caoutchoucs
Off
(Arrêt)
High(élevé) ●
Steam
Fresh
MC
Pourlesarticlesqui
doivent être séchés
sanschaleur,comme
lesplastiquesoules
caoutchoucs
Off
(Arrêt)
MidHigh
(MoyenHaut)
●
Réglable

37FONCTIONNEMENT
FRANÇAIS
Boutons de modification des
cycles
Les cycles de Sensor Dry(Séchage à capteur)
comportentdesréglagesprédéfinisquisontsélectionnés
automatiquement.LescyclesdeManual Dry(séchage
manuel)ontdesréglagespardéfaut,maisvouspouvez
lespersonnaliseràl’aidedesboutonsdemodification
descycles.Appuyezsurleboutoncorrespondantàcette
optionpourafficheretsélectionnerd’autresréglages.
Dry Level (Niveau de séchage)
Ceboutonpermetdesélectionnerleniveaudeséchage
ducycle.AppuyezsurleboutonDry Level (Niveau
de séchage)àrépétitionpourfairedéfilerlesréglages
disponibles.
• Cetteoptionn’estoffertequepourlescyclesdeSensor
Dry(Séchageàcapteur).
• Lasécheuseajusteraautomatiquementletempsdu
cycle.LeréglageMoreDry(Plussec)ouVeryDry(Très
sec)augmenteraletempsducycle,tandisquele
réglageLessDry(Moinssec)ouDampDry(Humidesec)
lediminuera.
• UtilisezleréglageLessDry(Moinssec)ouDamp
Dry(Humidesec)pourlesarticlesquevoussouhaitez
repasser.
Temp. (température)
Utilisezceboutonpourréglerlatempérature.Cela
permetd'assurerunentretienadéquatdevostissus
etdevosvêtements.AppuyezsurleboutonTemp.
(température)àrépétitionpourfairedéfilerlesréglages
disponibles.
Time Dry (Séchage minuté)
Ceboutonpermetdesélectionnerletempsdeséchage
allantde20à60minutes,parintervallesde10minutes.
Utilisez-lepourlespetitesbrasséesoupourdéfroisser
vosvêtements.UtilisezlesboutonsMoreTime/Less
Time(Plusdetemps/Moinsdetemps)pouraugmenter
ouréduireletempsdeséchaged’uncycledeséchage
manuel,parintervallesd'une(1)minute.
Signal (tonalité)
Utilisezceboutonpourréglerlevolumedusignal
annonçantlafinducycleoupourledésactiver.Appuyez
plusieursfoissurleboutonjusqu’àcequeleréglagede
volumesouhaités’allume.
Boutons d'option
Lasécheuseoffreplusieursoptionsdecycle
supplémentairesafindepersonnaliserlescyclesetainsi
répondreàdesbesoinsparticuliers.Certainsboutons
d’optionspermettentégalementd’activerunefonction
spécialeenmaintenantenfoncéleboutondel’option
pendant3secondes.
Ajout d'options de cycle à un cycle
1
Mettezlasécheuseenmarcheettournezlebouton
sélecteur de cycle pour choisir le cycle voulu.
2
Utilisezlesboutonsdemodificationdescyclespour
modifierlesréglagesducycle.
3
Appuyezsurlesboutonsdemodificationdescycles
pourajouterlesoptionsdésirées.Unmessagede
confirmationapparaîtsurl'affichage.
4
AppuyezsurleboutonDémarrer/pause pour
démarrerlecycle.Lasécheusedémarre
automatiquement.
Wrinkle Care (Antifroissement)
Cetteoptionculbuteralabrasséerégulièrementsurune
périodeallantjusqu’àtroisheuresaprèslafind’uncycle
oujusqu’àl’ouverturedelaporte.Elleestutilepour
éviterlefroissementdevosvêtementslorsquevousêtes
dansl’impossibilitédelesretirerimmédiatementdela
sécheuse.
Damp Dry Signal (Signal humide sec)
Grâceàcetteoption,lasécheuseémettraunsignal
sonorelorsquelabrasséeserasècheàenviron80%.
Vouspourrezainsiretirerdelasécheuselesarticles
légersquisèchentplusrapidementouceuxquevous
souhaitezrepasseroususpendrependantqu’ilssont
encoreunpeuhumides.
Energy Saver (économie dʼénergie)
Cetteoptionpermetderéduirelaconsommation
d’énergieducycleNormalenfonctiondelatailledela
brassée.Lorsquelafonctionnalitéd’économied’énergie
estsélectionnée,lecyclecommenceparunséchageà
l’airetletempsdeséchageestaugmenté.
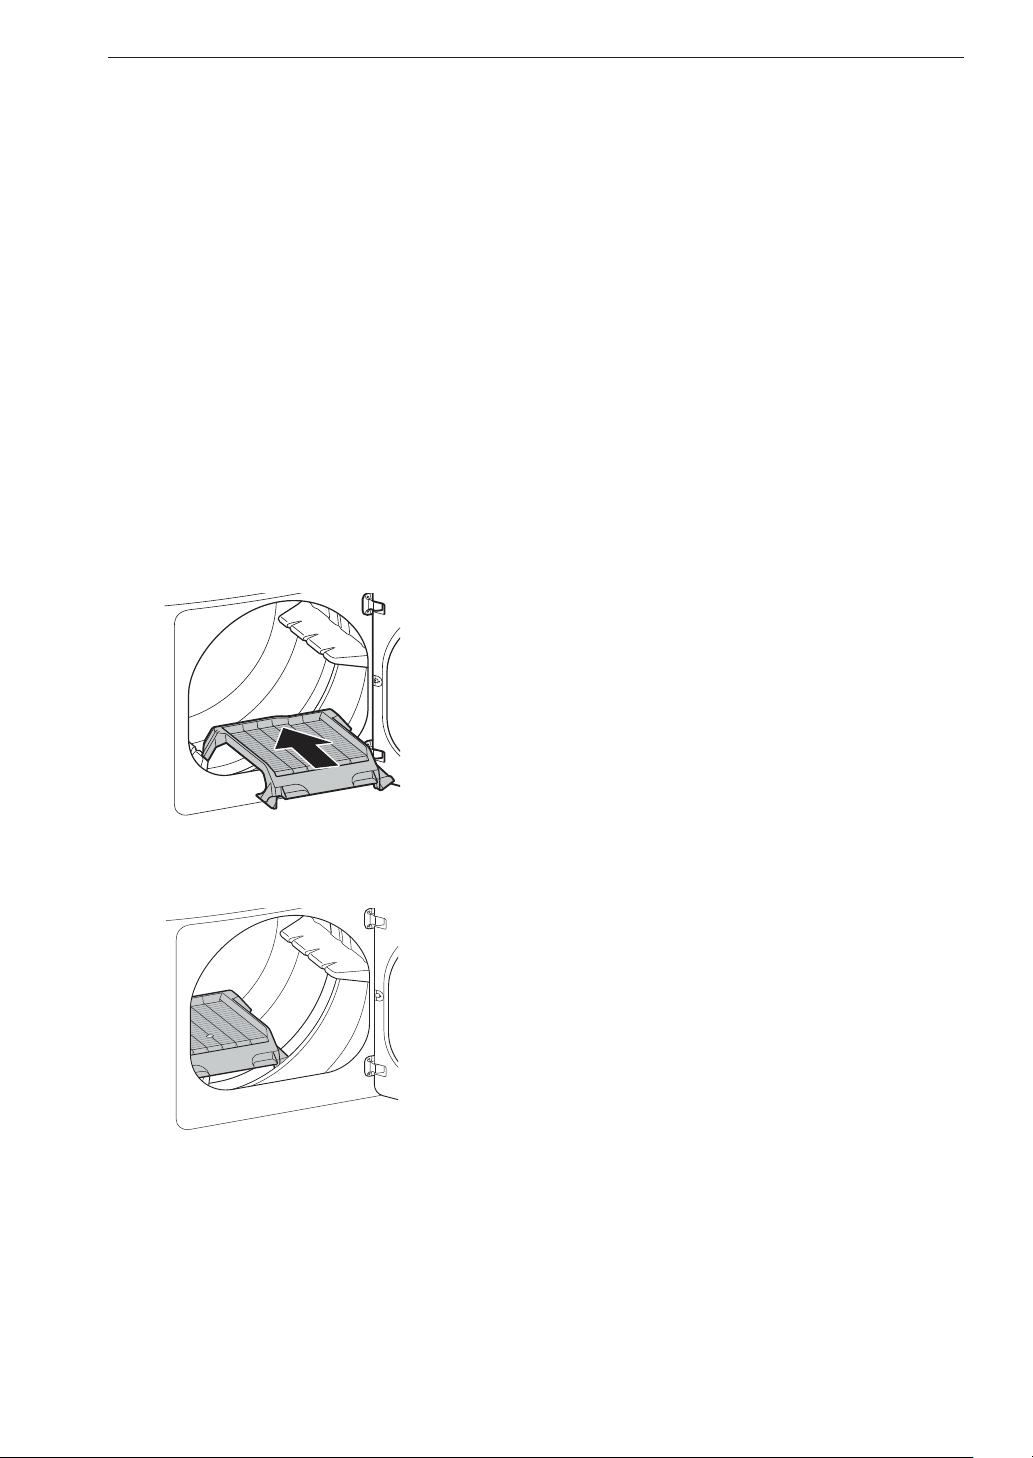
38 FONCTIONNEMENT
Rack Dry(Séchage sur grille) (sur
certains modèles)
UtilisezlafonctiondeRackDry(Séchagesurgrille)
pourlesarticles,commelesgiletsdelaine,lasoieoula
lingerie,quidoiventsécheràplat.Onpeutaussiutiliserla
fonctiondeRackDry(Séchagesurgrille)pourlesarticles
quinedoiventpasêtreséchésparculbutage,commeles
chaussuresdesportoulesanimauxenpeluche.
REMARQUE
• N’utilisezJAMAISlagrillelorsd'uncycledeséchage
parculbutage.
• Lorsquelagrilledeséchageestinstallée,letambour
tournecommeàl'habitude,maislagrillenebougepas.
Assurez-vousquetouslesarticlesàsécherrestentsur
lagrille,qu'ilsnepeuventpastomberetqu'ilsnese
trouventpasdanslatrajectoiredutambourquitourne.
Assurez-vousderetirerlagrilleaprèsusage.
Utilisation de la fonction de Rack Dry(Séchage sur
grille) :
1
Ouvrezlaportedelasécheuseetglissezlagrille
dansletambourdelasécheuse.
2
Assurez-vousquelagrilleestappuyéeuniformément
surlebordintérieurdel’ouverturedelaporteet
reposeàplatdanslasécheuse.
3
Placezlesarticlesmouilléssurlagrille.Laissezde
l'espaceautourdesarticlespourquel'aircircule.
4
FermezlaporteetsélectionnezleboutonRack
Dry(Séchage sur grille).
5
AppuyezsurleboutonTemp. (température) Control
poursélectionneruneoptiondetempérature.Si
aucunetempératuren’estsélectionnée,lecyclede
Rack Dry(Séchage sur grille)seréglerapardéfaut
àunséchagesanschaleur.
Fonctions spéciales
Certainsboutonsd’optionsdecycleactiventégalement
desfonctionsaccessoires,Cesfonctionsspécialessont
marquéesd'unastérisque(*).Maintenezenfoncéle
boutondel’optionoùestindiquéelafonctionspéciale
pouractivercettedernière.
Control Lock
(Verrouillage des commandes)
Utilisezcettefonctionpourprévenirtouteutilisationnon
désiréedelasécheuseoupourconservervosréglages
intactspendantquelasécheuseestenmarche.
Activation de la fonction de Control Lock
(Verrouillage des commandes)
MaintenezenfoncéleboutonWrinkle Care
(Antifroissement)pendanttroissecondes.
L’icôneControl Lock(Verrouillage des commandes)
s’afficheàl’écranettouteslescommandessont
désactivées,àl’exceptionduboutonMarche/Arrêt.
Désactivation de la fonction de Control
Lock(verrouillage des commandes)
MaintenezenfoncéleboutonWrinkle Care
(Antifroissement)pendanttroissecondes.
Lorsqu’ilestsélectionné,leControl Lock(verrouillage
des commandes)resteactivéjusqu’àcequ’ilsoit
désactivémanuellement.LeControl Lock(verrouillage
des commandes)doitêtredésactivépourexécuterun
autrecycle.
Custom PGM (programme personnalisé)
Sauvegardeunecombinaisonprécisederéglagesutilisés
fréquemmententantqueprogrammepersonnalisé.
Mémoriser un Custom Program (programme
personnalisé)
1
Mettezlasécheuseenmarcheetsélectionnezles
réglagesdésirésàl'aideduboutonsélecteurde
cycleetdesboutonsdemodificationdescyclesou
d'option.
2
MaintenezenfoncéleboutonCustom
PGM (programme personnalisé)pendant
trois secondes.
REMARQUE
• Onnepeutsauvegarderqu'unseulprogramme
personnaliséàlafois.Sivousmaintenezle
bouton Custom PGM (programme personnalisé)
enfoncé,toutprogrammepersonnalisésauvegardé
antérieurementseraécrasé.
Rappel d'un Custom PGM (programme personnalisé)
1
Mettezenmarchelasécheuseetappuyezsurle
bouton Custom PGM (programme personnalisé).
2
AppuyezsurleboutonDémarrer/pause pour
démarrerlecycle.
Default On/Off (Marche/Arrêt par défaut)
Cetteoptionpermetdemodifierlesréglagesd’économie
d’énergie.PoureffectueruncycleNormalsansl’option
d’économied’énergie,maintenezenfoncélebouton
Energy Saver (économie dʼénergie)pendanttrois
secondes.ONouOFFs’affiche.

39FONCTIONNEMENT
FRANÇAIS
Fonctions de vapeur
(modèles à vaporisation)
LanouvelletechnologieàvapeurdeLGinjecteunjet
devapeurtourbillonnantedanslestissuspourrafraîchir
lesvêtements,réduirel’électricitéstatiqueetfaciliterle
repassage.
Vousn’avezqu’àsélectionnerlecycleSteamFresh
MC
ou
àajouterl’optiondevapeurauxcycleschoisis.
AVERTISSEMENT
Pour réduire le risque de blessure grave, de mort,
d'explosion ou d'incendie, respectez les mesures
de sécurité élémentaires qui suivent :
• N’ouvrezpaslaportedelasécheusependantles
cyclesdevapeur.
• Netouchezpasàlabusedevapeurdansle
tambourpendantouaprèslecycledevapeur.
Le cycle Steam Sanitary
MC
LecycleSteamSanitary
MC
estidéalpourdésinfecterles
articlesnonlavablesrapidementetfacilementenutilisant
lapuissancedelavapeur.
Utilisezcecyclepourlestissusencotonetenpolyester.
(NevousenservezPASpourlamoussed'uréthane,le
duvetetlesplumes,oulesarticlesdélicats.)
Le cycle Steam Fresh
MC
LecycleSteamFresh
MC
faitappelàlapuissancedela
vapeurpourréduirerapidementlesplisetlesodeurs
danslestissus.Cecycleravivelesvêtementsfroissés
quisontrestésrangéspendantlongtemps,enplusde
faciliterlerepassagedesvêtementstrèsfroissés.Le
cycleSteamFresh
MC
peutégalementserviràréduireles
odeursdanslestissus.
REMARQUE
• LesoptionsdeReduceStatic(Réductiondel’électricité
statique)peuventaussiêtreutiliséesdurantlecycle
SteamFresh
MC
.
• Laduréeducycledépenddelabrassée(nombres
d'articles).AppuyezsurlesboutonsMore Time (Plus
de temps) ou Less Time (Moins de temps) pour
changerl'affichagepourqu'ilreflètelenombred'articles
danslabrassée.L'affichagevamontrer3,5,ou . 3
signifie3articlesoumoins,5estpour4ou5articleset
indiqueunegrossebrasséecommeunédredon,
parexemple.
Utiilisation du cyle de Steam Fresh
MC
1
Mettezlasécheuseenmarcheettournezlebouton
desélectiondecyclepourchoisirlecycleSteam
Fresh
MC
.
2
Pourajouteruneoption,sélectionnezReduce Static
(Réduction de l’électricité statique) ou Wrinkle
Care (Antifroissement).
3
L'affichagemontrelagrosseurdelabrassée
(nombred'articles).Modifiezladuréedelavapeur
enappuyantsurlesboutonsMore Time (Plus de
temps) ou Less Time (Moins de temps) pour
l'ajusteràlagrosseurdelabrassée.
4
AppuyezsurDémarrer/pausepourdémarrerle
cycle.
Les options de vapeur
L'optiondeReduceStatic(Réductiondel’électricité
statique)injectelavapeurverslafinducycledeséchage
pourréduirel'électricitéstatiquecauséepardestissus
secsquifrottentlesunssurlesautres.
REMARQUE
• QuandleSensorDry(Séchageàcapteur)est
sélectionnéavecl'optiondeReduceStatic(Réduction
del’électricitéstatique),leDryLevel(Niveaude
séchage)LessDry(Moinssec)ouDampDry(Humide
sec)nepeutpasêtresélectionné.
• L’optionReduceStatic(Réductiondel’électricité
statique)peutaussiêtresélectionnéedurantlescycles
TimeDry(Séchageminuté).
• Aprèsquel'optiondevapeuraétésélectionnéedans
lecycledeTimeDry(Séchagesminutés),lesboutons
MoreTime/LessTime(Plusdetemps/Moinsdetemps)
changerontletempsdevapeurSEULEMENT.
• Selonlabrassée(quantitéd’articles),vouspouvez
changerladuréeducycleenappuyantsurlesboutons
MoreTime/LessTime(Plusdetemps/Moinsdetemps).
(ReduceStatic(Réductiondel’électricitéstatique):7,
9,11,14,16,ou18)
Ajout de vapeur à un cycle régulier
1
Mettezlasécheuseenmarcheettournezlebouton
sélecteur de cycle pour choisir le cycle voulu.
2
Utilisezlesboutonsderéglagepourmodifierles
réglagesducycle.
3
Appuyezsurleboutond'optiondevapeur(Reduce
Static(Réductiondel’électricitéstatique),ouWrinkle
Care(Antifroissement))pourl'optiondevapeur
désirée.Réglezensuitelagrosseurdelabrasséeen
utilisantlesboutonsMore Time/Less Time (Plus de
temps/Moins de temps).
4
AppuyezsurDémarrer/pausepourdémarrerle
cycle.
REMARQUE
• Lavapeurpeutnepasêtretrèsvisiblependantles
cyclesdevapeur.Celaestnormal.
• N’utilisezpasl’optionSteamFresh
MC
aveclesarticles
telsquelalaine,lescouverturesdelaine,lesvestes
decuir,lasoie,lesvêtementsmouillés,lessous-
vêtements,lesproduitsavecdelamousseoules
couverturesélectriques.
• Pourobtenirlesmeilleursrésultats,chargezdesarticles
detaillesimilaireetfaitsdumêmetypedetissu.Ne
surchargezpaslasécheuse.
• Quandlefiltre/conduitestbouché,l'optiondevapeur
pourraitnepasdonnerderésultatsoptimaux.
• Quandlafonctiondevapeurestactivée,letambourva
s'arrêterpourpermettreàlavapeurderesterdansle
tambour.

40 FONCTIONNEMENT
Guide des cycles de vapeur
Vapeur
Durée par
Défaut
Temp.
Niveau de
séchage
État du
Tissu
Type de
Tissu
Quantité
Maximale
Steam
Sanitary
MC
Turbo
Steam
31minutes Séchage
Édredons et
literie
Un seul
(1 de
chacun)
Vêtements
d'enfants
3 lb
Steam
Fresh
MC
Turbo
Steam
10minutes ● Séchage
Édredon
Un seul
(1 de
chacun)
Chemises* 5chacune
Options de
Vapeur
Reduce
Static
(Réduction
de
l’électricité
statique)
Suit le Cycle
Sélectionné
● Humide
Varieselon
le cycle
sélectionné
8 lb
(18articles)
Turbo
Steam
Suit le Cycle
Sélectionné
● Humide
Varieselon
le cycle
sélectionné
8 lb
(18articles)
Time Dry
(Séchage
minuté)
Reduce
Static
(Réduction
de
l’électricité
statique)
38minutes ● Humide
Varieselon
le cycle
sélectionné
8 lb
(18articles)
*Chemises:Mélange70%coton,30%polyesterExceptélestissusparticulièrementdélicats
=réglagepardéfaut
●
= option disponible
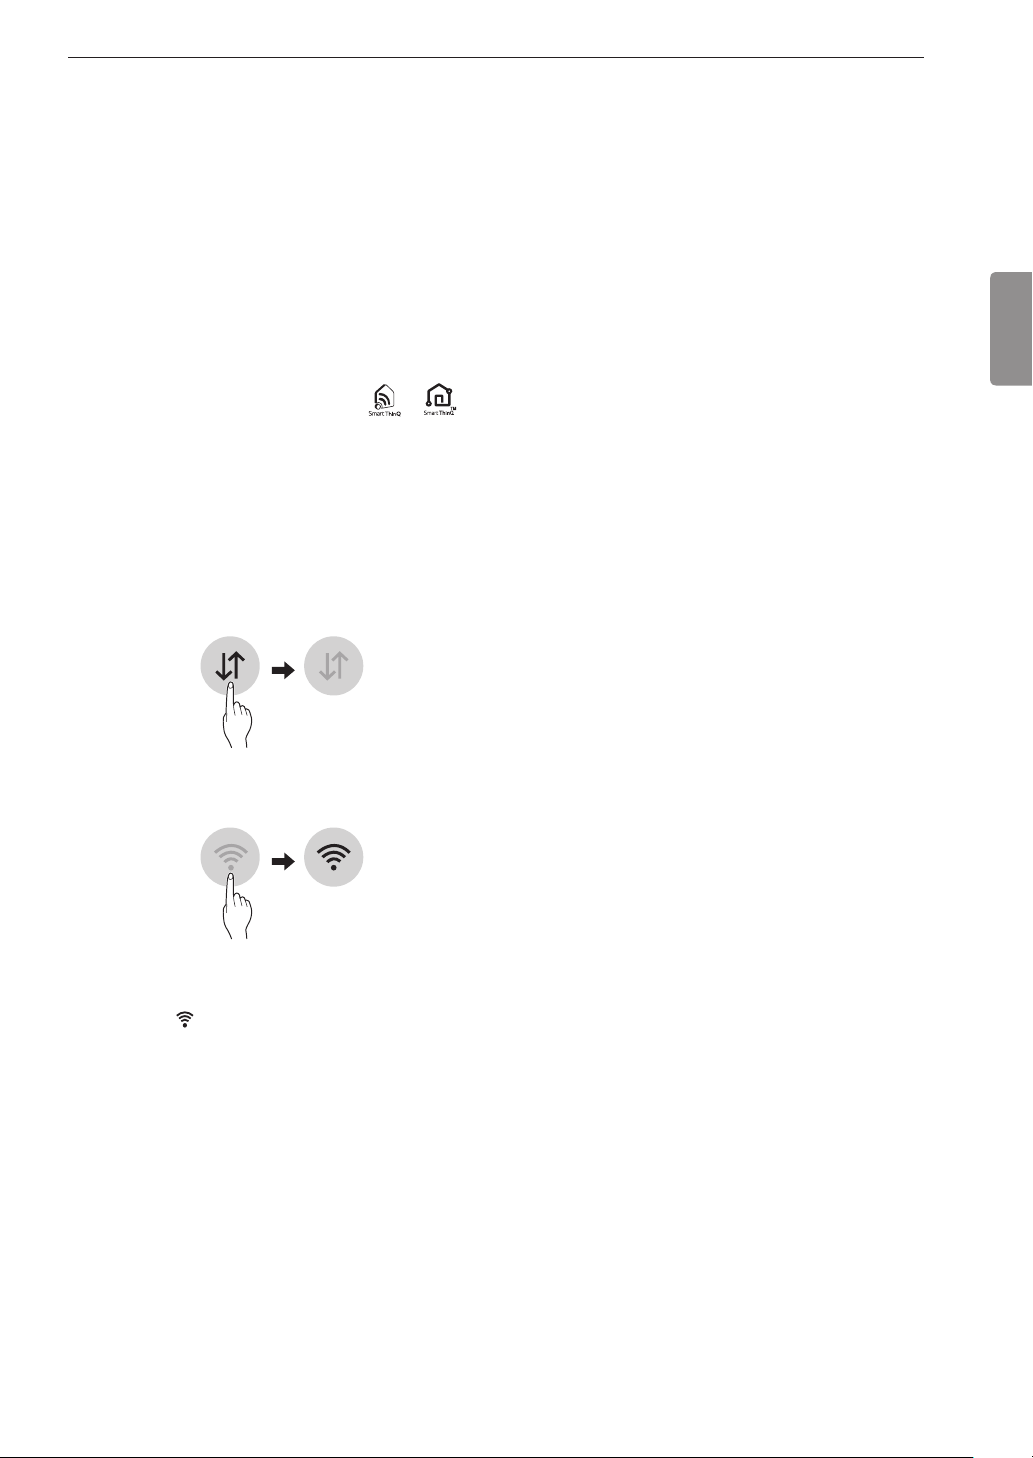
41FONCTIONS INTELLIGENTES
FRANÇAIS
FONCTIONS
INTELLIGENTES
Application LG SmartThinQ
L’applicationLGSmartThinQvouspermetde
communiqueravecl’appareilàl’aided’untéléphone
intelligent.
Avant d’utiliser l’application LG
SmartThinQ
• Pourlesélectroménagersaveclelogo ou .
1
Utilisezuntéléphoneintelligentpourvérifierla
forcedusignaldurouteursansfil(réseauWi-Fi)à
proximitédel’appareil.
• S’ilyaunetropgrandedistanceentrel’appareil
etlerouteursansfil,l’intensitédusignals’affaiblit.
L’enregistrementpeutprendredutempsou
l’installationpeutéchouer.
2
DésactivezlesDonnées mobiles ou les Données
cellulaires sur votre téléphone intelligent.
3
Connectezvotretéléphoneintelligentaurouteur
sansfil.
REMARQUE
• Pourconnaîtrel'étatduréseauWi-Fi,vérifiezque
l'icôneWi-Fi estalluméesurlepanneaude
configuration.
• L’appareilprendseulementenchargelesréseauxWi-Fi
de2,4GHz.Pourvérifierlafréquencedevotreréseau,
contactezvotrefournisseurdeservicesInternetou
reportez-vousaumanueldevotrerouteursansfil.
• LGSmartThinQn’estpasresponsabledes
problèmesdeconnexionauréseauoudesdéfauts,
dysfonctionnementsouerreurscausésparlaconnexion
auréseau.
• L'environnementsansfilenvironnantpeutfaireensorte
queleservicederéseausansfilfonctionnelentement.
• Sil'appareiladesdifficultésàseconnecterauréseau
Wi-Fi,ilestpeut-êtretroploindurouteur.Procurez-vous
unrépéteurWi-Fi(rallongedeportée)pouraméliorerla
forcedusignalWi-Fi.
• Laconnexionréseaupeutnepasfonctionner
correctementselonlefournisseurdeservicesInternet.
• LaconnexionWi-Fipeutnepassefaireouêtre
interrompueàcausedel'environnementduréseau
domestique.
• Sil’appareilnepeutpasêtreenregistréenraisonde
problèmesaveclatransmissiondusignalsansfil,
débranchezl’appareiletattendezenvironuneminute
avantderéessayer.
• Silepare-feudevotrerouteursansfilestactivé,
désactivez-leouajoutez-yuneexception.
• Lenomduréseausansfil(SSID)doitêtreune
combinaisondelettresetdechiffresanglais.(N’utilisez
pasdecaractèresspéciaux.)
• L’interfaceutilisateur(IU)dutéléphoneintelligentpeut
varierenfonctiondusystèmed’exploitation(SE)mobile
etdufabricant.
• Si le protocole de sécurité du routeur est configuré sur
WEP,laconfigurationduréseaupeutéchouer.Veuillez
changerleprotocoledesécurité(nousrecommandons
WPA2)etenregistrezleproduitànouveau.
Installation de l’application LG
SmartThinQ
Àpartird’untéléphoneintelligent,cherchezl’application
LGSmartThinQdanslaboutiqueGooglePlayoul’App
Stored’Apple.Suivezlesdirectivespourtéléchargeret
installerl’application.
REMARQUE
• Sivouschangezlerouteursansfil,lefournisseur
deservicesInternetoulemotdepasse,supprimer
l’appareilenregistrédel’applicationLGSmartThinqet
l’enregistrerànouveau.

42 FONCTIONS INTELLIGENTES
Fonctionnalités de l’application LG
SmartThinQ
• Pourlesélectroménagersaveclelogo ou .
Cycle de séchage
Téléchargezdenouveauxcyclesspécialisésquinesont
pasinclusdanslescyclesstandardsdel’appareil.
Lesappareilsquiontétécorrectementenregistrés
peuventtéléchargerunevariétédecyclesdespécialité
spécifiquesàlʼappareil.
Onnepeutstockerquʼunseulcycleàlafoisdans
lʼappareil.
Unefoislecycletéléchargédanslʼappareil,cedernierle
conservejusquʼàcequʼunnouveaucyclesoittéléchargé.
Notification du système de détection de débit
Offredesconseilssurlaventilation.
Smart Diagnosis
MC
Cettefonctionfournitdesrenseignementsutilespour
diagnostiqueretrésoudrelesproblèmesaveclʼappareil
ensebasantsurleprofildʼutilisation.
Surveillance de la consommation d'énergie
Lescyclesetlesoptionssélectionnésinfluencentla
consommationd’énergiedel’appareil;celle-cipeutdonc
varierd’uncycleàl’autre.
Notifications poussées
Quandlecycleestterminéouquel'appareilades
problèmes,vousavezl'optionderecevoirdesalertes
instantanéessuruntéléphoneintelligent.
Paramètres
Définissezlesurnomduproduitetsupprimezleproduit.
REMARQUE
• Pourconnaîtrel’étatduréseauWi-Fi,vérifiezque
l’icôneWi-Fi estalluméesurlepanneaude
configuration.
• LGSmartThinQn’estpasresponsabledes
problèmesdeconnexionauréseauoudesdéfauts,
dysfonctionnementsouerreurscausésparlaconnexion
auréseau.
• LamachineestcompatibleaveclesréseauxWi-Fide
2,4GHzseulement.
• Sil’appareiladesdifficultésàseconnecterauréseau
Wi-Fi,ilestpeut-êtretroploindurouteur.Procurez-vous
unrépéteurWi-Fi(rallongedeportée)pouraméliorerla
forcedusignalWi-Fi.
• LaconnexionWi-Fipeutnepassefaireouêtre
interrompueàcausedel'environnementduréseau
domestique.
• Laconnexionauréseaupourraitnepasfonctionner
correctementenfonctiondufournisseurd'accès
Internet.
• L'environnementsansfilenvironnantpeutfaireensorte
queleservicederéseausansfilfonctionnelentement.
• Cetteinformationestàjouraumomentdela
publication.L'applicationestsujetteàdeschangements
envuedel'améliorationduproduitsansqueles
utilisateursn'ensoientavisésaupréalable.
Utiliser le démarrage à distance
Utilisezuntéléphoneintelligentpourcontrôlerl’appareilà
distanceoupourvérifierletempsrestantaucycle.
1
AppuyezsurleboutonMarche/arrêt.
2
Placezlesarticlesdanslacuve.
3
AppuyezsurleboutonRemote Start(démarrage
àdistance)etmaintenez-leenfoncépendant
3secondespouractiverlafonctionnalitéde
démarrageàdistance.
4
Démarrezuncycleàpartirdel’applicationLGSmart
ThinQsurvotretéléphoneintelligent.
REMARQUE
• Lorsquelafonctiondedémarrageàdistanceest
activée,vouspouvezlanceruncycleàl’aidede
l’applicationpourtéléphoneintelligentLGSmartThinQ.
Silecyclenes’amorcepas,l’appareilretarderale
démarragejusqu’àcequelecyclesoitdésactivéà
distanceàpartirdel’applicationouquelafonctionde
démarrageàdistancesoitdésactivée.
• Silaporteestouverte,lafonctionnalitédedémarrageà
distanceestdésactivée.
Désactivation de la fonction de démarrage à
distance
Lorsquelafonctiondedémarrageàdistanceestactivée,
appuyezsurleboutonRemote Startetmaintenez-le
enfoncépendanttroissecondes.

43FONCTIONS INTELLIGENTES
FRANÇAIS
Caractéristiques du module LAN sans
fil
Modèle LCW-004
Gamme de
fréquences
2412à2462MHz
Puissance de sortie
max
IEEE802.11b:22,44dBm
IEEE802.11g:24,68dBm
IEEE802.11n:24,11dBm
Renseignements relatifs à la réglementation
FCC
Cetéquipementaététestéetjugéconformeauxlimites
d'unappareilnumériquedeclasseB,conformément
àlapartie15desrèglesdelaFCC.Ceslimitessont
établiespourfourniruneprotectionraisonnablecontreles
interférencesnuisiblesdansuneinstallationrésidentielle.
Cetéquipementproduit,utiliseetpeutémettrede
l’énergieradioélectriqueet,s'iln'estpasinstalléet
utiliséconformémentauxprésentesinstructions,peut
causerdesinterférencesnuisiblesauxcommunications
radio.Quoiqu'ilensoit,onnepeutpasgarantirque
desinterférencesneseproduirontpasdanscertaines
installations.Sicetappareilcausedesinterférences
nuisiblesàlaréceptiondessignauxderadiooude
télévision,cequipeutêtredéterminéenallumanteten
éteignantl'appareil,onencouragel'utilisateuràessayer
decorrigercesinterférencesparl'undesmoyens
suivants:
• Réorientezoudéplacezl’antennederéception.
• Augmentezladistanceséparantl'équipementdu
récepteur.
• Branchezl'appareilsuruncircuitélectriquedifférentde
celuioùlerécepteurestbranché.
• Contactezvotrerevendeurouuntechnicienradio/
télévisionexpérimenté.
Cetappareilestconformeàlapartie15durèglement
delaFCCLefonctionnementestsoumisauxdeux
conditionssuivantes:
1)l’appareilnedoitpasproduiredebrouillage;et
2)l’appareildoitacceptertoutbrouillageradioélectrique
subi,mêmesilebrouillageestsusceptibled’en
compromettrelefonctionnement.
Toutchangementoutoutemodificationapportésà
cetappareiletquinesontpasapprouvésdemanière
expliciteparlefabricantsontsusceptiblesd’annuler
l’autoritédel’utilisateurquantàutiliserl’appareil.
Énoncé FCC sur l’exposition aux radiations RF
Cetéquipementestconformeauxlimitesderadiation
delaFCCdéfiniespourunenvironnementnoncontrôlé.
Cetappareiletsaousesantennesnedoiventpasêtre
colocalisésouopérésenconjonctionavectoutautre
antenneoutransmetteur.
Cetéquipementdoitêtreinstalléetmisen
fonctionnementàunedistanceminimalede20cm(7,8
pouces)entrel’antenneetvous-même.
Lesutilisateursdoiventsuivrelesinstructionsd’utilisation
pertinentesafinderespecterlesdirectivesenmatière
d’expositionauxradiofréquences.
Avis d’Industrie Canada (pour le module de
transmission compris dans e produit)
L’émetteur/récepteurexemptdelicencecontenudansle
présentappareilestconformeauxCNRd’Innovation,
SciencesetDéveloppementéconomiqueCanada
applicablesauxappareilsradioexemptsdelicence.
L’exploitationestautoriséeauxdeuxconditionssuivantes:
(1)Cetappareilnedoitpasprovoquerd’interférences.
(2)Cetappareildoitacceptertouteslesinterférences,y
compriscellespouvantentraînersondysfonctionnement.
Énoncé d’IC concernant l’exposition à la
radiation
Cetappareilestconformeauxlimitesd’expositionaux
rayonnementsd’IndustrieCanadapourunenvironnement
noncontrôlé.
Cetappareildoitêtreinstalléetutilisédefaçonàgarder
unedistanceminimalede20cm(7,8pouces)entrela
sourcederayonnementetvotrecorps.
REMARQUE
• LEFABRICANTN’ESTPASRESPONSABLE
DESINTERFÉRENCESRADIOÉLECTRIQUES
CAUSÉES PAR DES MODIFICATIONS NON
AUTORISÉESAPPORTÉESÀCETAPPAREIL.DE
TELLES MODIFICATIONS POURRAIENT ANNULER
L’AUTORISATIONACCORDÉEÀL’UTILISATEURDE
FAIREFONCTIONNERL’APPAREIL.
Renseignements sur l'avis de logiciel
ouvert
Pourobtenirlecodesourceconformémentaux
dispositionsdelalicencepubliquegénérale,delalicence
publiquegénéralelimitée,delalicencepubliqueMozilla
etdetouteautrelicencerégissantleslogicielsàcode
sourcelibrecontenusdanscetappareil,visitezlesite
http://opensource.lge.com.Enplusducodesource,
touteslesdispositionsdelicence,lesexonérationsde
garantieetlesavisdedroitsd’auteurspeuventaussiêtre
téléchargés.
LGElectronicsmettraégalementàvotredispositionle
codesourcelibresurCD-ROMpourunprixcouvrantle
coûtdeladistribution(coûtdusupport,del’expédition
etdelamanutention)sursimpledemandeparcourrielà
l’adresse[email protected].Cetteoffreestvalable
pendanttrois(3)annéesàcompterdeladated’achatdu
produit.

44 FONCTIONS INTELLIGENTES
Fonction Smart Diagnosis
MC
Sivouséprouvezdesproblèmesavecvotre
électroménager,celui-cialacapacitédetransmettredes
donnéesaucentred’informationàlaclientèledeLGpar
l’intermédiairedevotretéléphone.Lesmodèleséquipés
delatechnologieNFCouduWi-Fipeuventégalement
transmettredesdonnéesàuntéléphoneintelligentà
l’aidedel’applicationLGSmartThinQ.
Smart Diagnosis
MC
– diagnostic par le
Centre dʼinformation à la clientèle
• Pourlesélectroménagersaveclelogo ou
Cetteméthodevouspermetdeparlerdirectementàl’un
denosspécialistesformés.Lespécialisteenregistre
lesdonnéestransmisesparl’appareiletlesutilisepour
analyserleproblème,fournissantainsiundiagnostic
rapideetefficace.
1
AppelezleCentredʼinformationàlaclientèledeLG
Electronicsau:
(LGÉtats-Unis)1800243-0000
(LGCanada)1888542-2623
2
Quandlecentredeservicevouslʼindique,placezla
partiedutéléphonedanslaquellevousparlezprès
delʼicôneSmartDiagnosis
MC
.Nʼappuyezpassurles
autrestouches.
3
MaintenezleboutonTemp. (température) enfoncé
pendant3secondes.
4
Gardezletéléphoneenplacejusquʼàlafindela
transmission.
5
Unefoisledécompteterminéetlatonalitéarrêtée,
reprenezlaconversationaveclʼagentducentre
deservice,quiseraalorsenmesuredevousaider
grâceauxdonnéestransmisespourlʼanalyse.
REMARQUE
• LafonctionSmartDiagnosis
MC
nepeutêtreactivéeque
sil’appareilpeutêtremissoustensionàl’aidedela
touche Power.Sil’appareilnepeutpasêtremissous
tension,ledépannagedoitêtreeffectuésansutiliserla
fonctionSmartDiagnosis
MC
.
• Pourobtenirlesmeilleursrésultats,évitezdebougerle
téléphonependantlatransmissionsonore.
• Silʼagentducentredeservicenʼapaspuobtenirun
enregistrementexactdesdonnées,ilsepeutquʼilvous
demandedʼessayerdenouveau.
• LafonctionSmartDiagnosis
MC
dépenddelaqualitéde
lʼappellocal.
• Unemauvaisetélécommunicationpeutentraîner
unepiètretransmissiondedonnéesentrevotre
téléphoneetlecentred’appels,desortequeleSmart
Diagnosis
MC
risquedenepasfonctionnercorrectement.
LG SmartThinQ et Smart Diagnosis
MC
• Pourlesélectroménagersaveclelogo ou
UtilisezlafonctionSmartDiagnosisdel’application
LGSmartThinQpourvousaideràdiagnostiquerles
problèmesavecl’appareilsansl’assistanceducentre
d’informationàlaclientèledeLG.
Suivezlesinstructionsdel’applicationLGSmartThinQ
poureffectuerundiagnosticintelligentàl’aidedevotre
téléphone intelligent.
REMARQUE
• LafonctionSmartDiagnosis
MC
nepeutêtreactivée
quesil’appareilpeutêtremissoustensionàl’aidede
latoucheMarche/arrêt.Sil’appareilnepeutpasêtre
missoustension,ledépannagedoitêtreeffectuésans
utiliserlafonctionSmartDiagnosis
MC
.
45ENTRETIEN
FRANÇAIS
ENTRETIEN
Nettoyage régulier
AVERTISSEMENT
Pour réduire le risque d'incendie, de décharge
électrique, de blessures ou même de mort en
utilisant cet appareil, respectez les mesures de
sécurité élémentaires, notamment les suivantes :
• Débranchezlasécheuseavantdelanettoyer.
• N’utilisezjamaisdenettoyantsforts,denettoyants
abrasifs,nidesolvantspournettoyerlalaveuse.Ils
peuventendommagerlefini.
Nettoyage de lʼextérieur
Unentretienadéquatdevotresécheusepeutprolonger
saduréedevieutile.L’extérieurdelamachinepeutêtre
nettoyéàl’eauchaudeavecundétergentménagerdoux
etnonabrasif.Essuyezimmédiatementtoutdéversement
àl’aided’unchiffondouxethumide.
REMARQUE
• N’utilisezjamaisd’alcoolméthylé,desolvantnide
produitssimilaires.
• N’utilisezjamaisdelained’acieroudenettoyeurs
abrasifs;ilspourraientendommagerlasurface.
Nettoyage de lʼintérieur
Essuyezautourdel’ouvertureetdujointdelaporteavec
unchiffondouxethumidepourprévenirl’accumulation
defibresetdepoussièresquipourraientendommagerle
jointdeporte.
Nettoyezlehublotavecunchiffondouxhumidifiéavec
del’eauchaudeetundétergentménagerdouxetnon
abrasif,puisessuyezpoursécher.
Ilestpossibledenettoyerletambourenacierinoxydable
avecunnettoyeurpouracierinoxydabletraditionnel
conformémentauxdirectivesdufabricant.N’utilisez
jamaisdelained’acieroudenettoyeursabrasifs;ils
pourraientégratignerouendommagerlasurface.
Nettoyage autour et sous la sécheuse
Aspirezrégulièrementlacharpieetlapoussièreautour
etsouslasécheuse.Aumoinsunefoisparan,vérifiezle
systèmedeconduitsafindedécelertouteaccumulation
decharpie,puisnettoyezlesconduits.Sivousremarquez
uneréductiondudébitd’airouunebaissedurendement
delasécheuse,vérifiezimmédiatementsilesystèmede
conduitsestobstruéoubloqué.
Entretien du système de conduits
Aumoinsunefoisparan,vérifiezlesystèmede
conduitsafindedécelertouteaccumulationdecharpie,
puisnettoyezlesconduits.Sivousremarquezune
réductiondudébitd’airouunebaissedurendementde
lasécheuse,vérifiezimmédiatementsilesystèmede
conduitsestobstruéoubloqué.Communiquezavecun
technicienouunfournisseurdeservicequalifié.
Nettoyage du filtre à fibre
Nettoyezlefiltreàfibresaprèschaquecycle.
Filtre à fibres
Pournettoyerlefiltreàcharpie,ouvrezlaportedela
sécheuseetretirezlefiltreentiranttoutdroitverslehaut.
Puis:
1
Danslecasd'unnettoyagequotidien,faitesune
bouledefibresavecvosdoigts,ou
2
Nettoyezlefiltreavecunaspirateur,ou
3
Silefiltreesttrèssaleoubouchéparunproduit
assouplissant,lavezlefiltreàfibresdansune
solutiond’eauchaudesavonneuse,puislaissez-le
séchercomplètementavantdeleréinstaller.
REMARQUE
• N’utilisezJAMAISlasécheusesanslefiltreàfibresen
place.

46 DÉPANNAGE
DÉPANNAGE
Foire aux questions
Q : Lorsque j'enfonce un bouton, pourquoi la sécheuse émet un son sans que rien ne se produise?
R:
LafonctiondeControlLock(verrouillagedescommandes)estactivée.PourdésactiverleControl
Lock(verrouillagedescommandes),mettezlasécheuseenmarche,repérezlebouton*Control
Lock(verrouillage des commandes)(inscriptionsurousouslebouton)etmaintenez-leenfoncépendant
trois secondes.
Q : Pourquoi est-ce si long avant que mes vêtements soient secs?
R: Undébitd'airadéquatestessentielaubonfonctionnementd'unesécheuse.Ledébitd'airpeutêtre
réduitparunfiltreàfibrespleinoubouchéparunefeuilled'assouplissantaupointd'augmenterdefaçon
considérableletempsdeséchagedesvêtements.Lesystèmed'évacuationdevotremaisonestunautre
facteurquiaunimpactsurletempsdeséchage.Unsystèmed'évacuationsaleoubouchépardesfibres,ou
excessivementlongdevraêtrenettoyéouréparéparunprofessionnel.
Q : Pourquoi ma sécheuse se met en marche toute seule à quelques minutes d'intervalle?
R: Ils'agitdufonctionnementnormaldel'optionantifroissement.Lasécheusefonctionnebrièvementà
quelquesminutesd'intervallesurunepériodedejusqu'à3heuresaprèslafind'uncycle.C’estune
optionpratiquequiaideàprévenirlaformationdeplislorsquevousêtesdansl’impossibilitéderetirer
immédiatementlesarticlesdelasécheuseàlafind'uncycle.
Q : Pourquoi ma sécheuse indique-t-elle 3 minutes lorsque je sélectionne le cycle Steam Fresh
MC
?
R: LorsquelecycleSteamFresh
MC
estsélectionné,lasécheuseindiquelenombredevêtementsrecommandé
pourlecycle,pasladuréeestiméeducycle,jusqu'àcequelecyclecommence.UtilisezlesboutonsPlus
detempsouMoinsdetempspourajusterleréglagedelatailledelabrasséeenfonctiondunombrede
vêtements.Pourunegrossebrasséeouunseularticledegrandetaille,utilisezleréglage (gros).

47DÉPANNAGE
FRANÇAIS
Avant dʼappeler le réparateur
Cettesécheuseestdotéed’unsystèmedecontrôledeserreursautomatiquequidétecteetdiagnostiquelesproblèmes
dèsleurapparition.Silasécheusenefonctionnepascorrectementounefonctionnepasdutout,vérifiezleséléments
suivantsavantd’appeleruntechnicien.
FONCTIONNEMENT
Problème Cause possible Solutions
L'indicateur Flow Sense
MC
demeure
actif une fois le conduit d'évacuation
débloqué.
Une fois l'obstruction nettoyée,
le système Flow Sense
MC
requiert
plusieurs cycles consécutifs pour
déterminer si le rendement s'est
amélioré avant de réinitialiser
l'indicateur Flow Sense
MC
.
• Sil'indicateurFlowSense
MC
demeure
actifpendantplusdecinqcyclesune
foislarestrictioncorrigée,appelezle
servicededépannage.
La sécheuse refuse de se mettre en
marche
Le câble d’alimentation n’est pas
correctement branché.
• Assurez-vousquelafichesoitbien
enfichéedansuneprisemiseàla
terrecorrespondantàlaplaque
signalétiquedelasécheuse.
Un fusible de votre résidence est
brûlé, un disjoncteur a été déclenché
ou il y a une panne de courant.
• Réinitialisezledisjoncteurou
remplacezlefusible.N’augmentez
paslacapacitédufusible.S’ils’agit
d’unproblèmedesurchargeducircuit,
faites-lecorrigerparunélectricien
qualifié.
La sécheuse ne chauffe pas
Un fusible de votre résidence est
brûlé, un disjoncteur a été déclenché
ou il y a une panne de courant.
• Réinitialisezledisjoncteurou
remplacezlefusible.N’augmentez
paslacapacitédufusible.S’ils’agit
d’unproblèmedesurchargeducircuit,
faites-lecorrigerparunélectricien
qualifié.
• REMARQUE:Enraisonde
laconceptiondessécheuses
électriques,ilestpossiblequ'un
problèmedecircuitpermetteàune
sécheuseélectriquedefonctionner
sanschaleur.
Alimentation en gaz fermée ou
service coupé.
• Confirmezl’ouverturedel’alimentation
engazdelamaisonetdelasoupape
defermeturedel’alimentationengaz
del’appareil.Mêmesil'appareiln'est
pasalimentéengaz,ilfonctionnera
etaucuncoded'erreurnes'affichera.
Vérifiezquelesautresappareils
augazdelamaisonfonctionnent
normalement.
L’option Energy Saver (économie
dʼénergie) a été sélectionnée (sur
certains modèles)
• SivousutilisezlecycleNormal,
désélectionnezl’optionEnergy
Saver(économiedʼénergie).L’option
d’économied’énergieestsélectionnée
pardéfaut.Cetteoptionréduit
l’énergieutiliséeenajoutantune
sectiondeséchageàl’airaudébutdu
cycle.Ilestnormaldenepassentir
dechaleuraudébutducycleenmode
EnergySaver(économiedʼénergie).
Les vêtements prennent trop de temps à sécher
Les conduits d’évacuation d’air sont
bloqués, sales ou trop longs.
• Confirmezlabonneconfigurationdu
systèmedeconduitsetl'absencede
débris,defibresetd’obstructions.
Assurez-vousquelesclapets
extérieurss’ouvrentcorrectement
etnesontpasbloqués,bourrésou
endommagés.
La brassée est mal triée.
• Séparezlesarticlespluslourdsdesarticlesplus
légers.Lesarticlesplusgrandsetlourdsprennent
plusdetempsàsécher.Lecapteurpourrait
avoirdumalàdécelerleniveaud'humidité
desvêtementssiunebrasséed'articleslourds
contientdesarticleslégers,quieuxsèchentplus
rapidement.
L’écran affiche le code d’erreur nP.
L’alimentation électrique est incorrecte (cordon
mal branché ou problème de système électrique
de l’habitation).
• Vérifiezl’alimentationoulebranchementdu
câbled’alimentationsurleblocdejonction.câble
d’alimentationsurleblocdejonction.
L’écran affiche le code d’erreur gAS.
Alimentation en gaz fermée ou service coupé
(uniquement pour les modèles à gaz).
• Vérifiezquelessoupapesdefermeturede
l’alimentationengazdudomicileetdela
sécheuse sont ouvertes.

48 DÉPANNAGE
Problème Cause possible Solutions
Les vêtements
prennent trop de
temps à sécher
Brassée importante de tissus
lourds
• Lestissuslourdsretiennentplusd’humiditéetsèchent
doncpluslentement.Pouraideràréduireetàmaintenir
lestempsdeséchageplusconstants,séparezlesgrands
articlesetlestissuslourdsenbrasséespluspetitesdetaille
consistante.
Mauvais réglage des commandes
de séchage
• Utilisezlesparamètresappropriéspourletypedebrassée
quevousséchez.Aveccertainesbrassées,unréglagedu
niveaudeséchagepourraitêtrenécessaire.
Le filtre à fibres doit être nettoyé.
• Assurez-vousquelefiltreàcharpieestpropreavant
chaquebrassée.Tenezensuitelefiltredevantunesource
delumièrepourvoirs'ilestencrasséouobstrué.Avec
certainesbrasséesquiproduisentunequantitéélevéede
charpie,parexempledenouvellesserviettes,ilserapeut-
êtrenécessairedenettoyerlefiltreencoursdecycle.
Un fusible de votre résidence
est brûlé, un disjoncteur a été
déclenché ou il y a une panne de
courant.
• Réinitialisezledisjoncteurouremplacezlefusible.
N’augmentezpaslacapacitédufusible.S’ils’agitd’un
problèmedesurchargeducircuit,faites-lecorrigerparun
électricienqualifié.
• REMARQUE:Enraisondelaconceptiondessécheuses
électriques,ilestpossiblequ'unproblèmedecircuit
permetteàunesécheuseélectriquedefonctionnersans
chaleur.
La sécheuse est surchargée.
• Divisezlesgrossesbrasséesdelessiveenbrasséesplus
modestespourdemeilleursrendementetefficacitéde
séchage.
Sécheuse avec charge
insuffisante.
• Sivousséchezunetrèspetitecharge,ajoutezquelques
articlessupplémentairespourgarantirunbonculbutage.Si
vousséchezunetrèspetitebrasséeetutilisezuncyclede
SensorDry(Séchageàcapteur),lacommandeélectronique
peutnepasêtreenmesurededécelerleniveaud’humidité
desvêtementsetlecyclepeuts’interrompretrop
rapidement.UtilisezlecycledeTimeDry(Séchageminuté)
ouajoutezdesvêtementsmouillésàlabrassée.
L’option Energy Saver (économie
dʼénergie) a été sélectionnée (sur
certains modèles)
• SivousutilisezlecycleNormal,désélectionnezl’option
EnergySaver(économiedʼénergie).Cetteoptionréduit
l’énergieutiliséeenajoutantunesectiondeséchageàl’air
audébutducycle.
Le temps de séchage
n’est pas constant.
Les paramètres de séchage,
la taille de la charge et le taux
d’humidité des vêtements ne
sont pas constants.
• Letempsdeséchaged’unechargevarieselonletype
dechaleurutilisée(électrique,augaznaturelouGPL),la
tailledelacharge,letypedetissus,letauxd’humiditédes
vêtementsetlaconditiondusystèmedeconduitsetdu
filtreàfibres.Unechargedéséquilibréedanslalaveuse
peutaltérerleculbutage,causantainsidesvêtementsplus
mouillésquiprennentplusdetempsàsécher.

49DÉPANNAGE
FRANÇAIS
Performances
Problème Cause possible Solutions
Taches graisseuses
ou sales sur les
vêtements
Produits assouplissants mal
utilisés.
• Confirmezetsuivezlesdirectivesfourniesparlefabricant
del’assouplissant.
Séchage des vêtements
propres et des vêtements sales
ensemble.
• Assurez-vousdenesécherquedesvêtementspropres
dansvotresécheuse.Desarticlessalespeuventsouiller
lesvêtementspropresdumêmelavageoudeslavages
suivants.
Les vêtements n'ont pas été
correctement nettoyés ou rincés
avant d'être placés dans la
sécheuse.
• Lestachessurdesvêtementssecssontsouventdes
souilluresquin'ontpasétécorrectementéliminéespendant
lecycledelavage.Assurez-vousquelesvêtementssont
complètementpropresourincésselonlesdirectives
d'utilisationdevotremachineàlaveretlemoded'emploi
devotredétergent.Ilestpossiblequecertainestaches
tenacesnécessitentunprétraitementavantlelavage.
Les vêtements sont
froissés
Les vêtements ont séché trop
longtemps (séchage excessif).
• Leséchageexcessifd’unechargepeutfroisserles
vêtements.Essayezuntempsdeséchagepluscourtou
utilisezl'optionLessDry(Moinssec)etretirezlesarticles
pendantqu’ilsconserventencoreunpeud’humidité.
Les vêtements sont restés trop
longtemps dans la sécheuse
après le cycle.
• Utilisezl’optionWrinkleCare(Antifroissement).Ainsi,le
culbutagedesvêtementsreprendraàlafinducyclepar
intervallesdequelquesminutespendantjusqu’àtrois
heuresafind'éviterlefroissage.
Les vêtements ont
rétréci
Les directives d'entretien
des vêtements n’ont pas été
respectées.
• Pouréviterlerétrécissement,consultezetsuivez
soigneusementlesdirectivesd’entretiendestissusde
votrevêtement.Certainstissusrétrécirontnaturellement
aulavage.D'autrestissuspeuventêtrelavés,maisils
rétrécirontlorsqu'ilsserontséchésdansunesécheuse.
Utilisezleparamètredechaleurbasseoudeséchagesans
chaleur.
Présence de fibres
sur les vêtements
Le filtre à fibres n’est pas bien
nettoyé.
• Assurez-vousquelefiltreàfibresestpropreavantchaque
brassée.Tenezensuitelefiltredevantunesourcede
lumièrepourvoirs'ilestencrasséouobstrué.S'ilsemble
encrassé,suivezlesinstructionsdenettoyage.Certaines
chargesproduisentbeaucoupdefibres,etilpeuts'avérer
nécessairedenettoyerlefiltrependantlecycle.
Les charges ne sont pas triées
correctement.
• Certainstissusproduisentdesfibres(commeuneserviette
decotonblanchepelucheuse)etdevraientêtreséchés
séparémentdesvêtementsquiattirentlesfibres(comme
unpantalondelinnoir).
Excès d’électricité statique dans
les vêtements.
• Utilisezunproduitassouplissantpourréduirel’électricité
statique.Assurez-vousdesuivrelesdirectivesdes
étiquettesd’entretiendufabricant.Leséchageexcessif
d’unebrasséedelessivepeutcauserl’accumulation
d’électricitéstatique.Réglezlesparamètresetutilisezun
tempsdeséchagepluscourt,ouutilisezlescyclesde
SensorDry(Séchageàcapteur).
La sécheuse est surchargée.
• Divisezlesgrosseschargesenchargespluspetitespourle
séchage.
Mouchoirs, morceaux de papier,
etc., laissés dans les poches.
• Vérifiezsoigneusementlespochesavantlelavageetle
séchagedesvêtements.

50 DÉPANNAGE
Problème Cause possible Solutions
Excès d’électricité
statique dans les
vêtements après le
séchage
Aucun assouplissant utilisé ou
utilisé incorrectement.
• UtilisezunassouplissantpourReduceStatic(Réduit
l’électr.statique)ouactivezlafonctionBOUCLIER
STATIQUE,lecaséchéant,afinderéduirel’électricité
statique.Assurez-vousdesuivrelesdirectivesdes
étiquettesd’entretiendufabricant.
Les vêtements ont séché trop
longtemps (séchage excessif).
• Leséchageexcessifd’unebrasséedelessivepeutcauser
l’accumulationd’électricitéstatique.Ajustezlesréglages
etutilisezuntempsdeséchagepluscourt,ouutilisez
lescyclesManualDry(Séchagemanuel).Sélectionnez
leréglageLessDry(Moinssec)danslescyclesSensor
Dry(Séchageàcapteur),aubesoin.
Séchage de tissus synthétiques
ou infroissables, ou de tissus
faits de mélanges de fibres
synthétiques.
• Cestissuspeuventfavoriserl’accumulationd’électricité
statique.Essayezd'utiliserunassouplissant,ouutilisez
l'optionLessDry(Moinssec)ouuneduréepluscourtedu
TimeDry(Séchageminuté).
Certaines parties
des vêtements sont
encore humides
après un cycle de
Sensor Dry(Séchage
à capteur).
Brassée très grosse ou très
petite. Une seule grande pièce
de tissu, par exemple une
couverture, un édredon ou une
couette.
• Silesarticlessonttropserrésouclairsemés,ilseradifficile
pourlecapteurdesaisirleniveaudeséchagedelacharge.
UtilisezuncycledeTimeDry(Séchageminuté)pourde
trèspetitescharges.
• Lesgrosarticlescommelescouvertures,édredonsou
couettess'enroulentsouventenunebouledetissu.Les
couchesextérieuressécheront,cequiserasaisiparles
capteurs,maisl'intérieurdelabouleseraencorehumide.
Pourfairesécherunseularticlevolumineux,ilvautmieux
interromprelecycleuneoudeuxfoisetrepositionner
l'articleafindeledérouleretd'exposerlespartieshumides.
• Poursécherquelquespartieshumidesdesarticlesd’une
chargetrèsvolumineuseoud’articlesvolumineuxaprèsla
find’uncycleàcapteur,videzlecompartimentàcharpie,
puisutilisezuncycledeTimeDry(Séchageminuté)pour
finirdesécherlesarticles.
L’appareil et le
téléphone intelligent
n’arrivent pas à se
connecter au réseau
Wi-Fi.
Le mot de passe du réseau Wi-Fi
a été mal saisi.
• SupprimezvotreréseauWi-Fidomestiqueetrecommencez
leprocessusd’enregistrement.
Les données mobiles de votre
téléphone intelligent sont
activées.
• Désactivezlesdonnéesmobilessurvotretéléphone
intelligentavantd’enregistrerl’appareil.
Le nom du réseau sans fil (SSID)
est erroné.
• Lenomduréseausansfil(SSID)doitêtreunecombinaison
delettresetdechiffresanglais.(N’utilisezpasde
caractèresspéciaux.)
La fréquence du routeur n’est
pas de 2,4 GHz.
• Seuleunefréquencederouteurde2,4GHzestpriseen
charge.Réglezlerouteursansfilà2,4GHzetconnectez-y
l’appareil.Pourconnaîtrelafréquencedurouteur,informez-
vousauprèsdevotrefournisseurdeservicesInternetoudu
fabricantdurouteur.
La distance entre l’appareil et le
routeur est trop grande.
• Sil’appareilesttropéloignédurouteur,lesignalpeut
êtrefaibleetlaconnexionpeutnepasêtreconfigurée
correctement.Placezlerouteurplusprèsdel’appareilou
achetezetinstallezunrépéteurWi-Fi.

51DÉPANNAGE
FRANÇAIS
Fonctions de vapeur (modèles à vaporisation)
Problème Cause possible Solutions
De l'eau s'écoule de la buse lorsque le
CYCLE DE VAPEUR commence
Cela est normal.
• Ils'agitdecondensationdevapeur.
L'écoulementd'eaucesseraaprèsun
courtlapsdetemps.
Les vêtements sont encore froissés
après le cycle Steam Fresh
MC
Les vêtements sont en trop
grand nombre dans la sécheuse
ou bien ils sont trop différents
les uns des autres.
• Lesmeilleursrésultatssontobtenus
avecdepetiteschargesde1à
5articles.Mettezmoinsd'articlesdans
lasécheuse.Mettezdestypessimilaires
devêtementsdanslasécheuse.
Le plissé a disparu des vêtements
après le cycle Steam Fresh
MC
Ce cycle sert à éliminer les plis
des tissus.
• Utilisezunferàrepasserpourmarquer
ànouveauleplissédesvêtements.
Il y a de l'électricité statique dans
les vêtements après l'utilisation de
l'option de Reduce Static (Réduction
de l’électricité statique)
Cela est normal.
• Lacharged'électricitéstatiquereçue
dépendraduniveaud'humiditédela
peaud'unepersonne.
Les vêtements sont trop humides ou
trop secs après l'utilisation de l'option
de réduction de l'électricité statique
(Reduce Static)
L'option appropriée de séchage
n'a pas été sélectionnée.
• Sélectionnezmanuellementlepoids
delachargeavantdedémarrerl'option
deréductiondel'électricitéstatique
(ReduceStatic)
Aucune vapeur n'est générée, et aucun
code d'erreur ne s'affiche
Erreur de niveau d'eau.
• Débranchezlasécheuseet
communiquezavecleserviceaprès-
vente.
De l'eau s'écoule de la porte pendant le
CYCLE DE VAPEUR
Cela est normal.
• Unecondensationnormaleseforme
àl'intérieurdelaportedelasécheuse
pendantlefonctionnementducycle
devapeur.Quelquesgouttesdecette
condensationpeuventfiltreraubasde
laporte.
La vapeur n'est pas visible pendant le
CYCLE DE VAPEUR
Cela est normal.
• Ilestdifficiledevoirlavapeurlorsque
laportedelasécheuseestfermée.
Toutefois,unecondensationnormale
seformeraàl'intérieurdelaportede
lasécheuselorsquelecycledevapeur
fonctionnenormalement.
Le tambour ne tourne pas pendant le
CYCLE DE VAPEUR
Cela est normal.
• Letambourestdésactivépourque
lavapeurrestedansletambour.Le
tambourtournerapendantenvirondeux
secondesparminute.
On ne voit pas la vapeur au début du
cycle
Cela est normal.
• Lavapeurestlibéréeàdifférentes
étapesducyclepourchaqueoption.
Des odeurs subsistent sur les
vêtements après un cycle Steam
Fresh
MC
La fonction Steam Fresh
MC
n'a
pas éliminé complètement les
odeurs.
• Lestissusayantuneforteodeurdoivent
êtrelavésdansuncyclenormal.
52 DÉPANNAGE
Codes dʼerreur
Problème Cause possible Solutions
Code d'erreur : de tE1 à tE7
Capteur de température
défectueux.
• Éteignezlasécheuseetappelezuntechnicien.
L'affichage indique le code d'erreur
: PS
Le cordon d'alimentation
n'est pas branché
correctement.
• Vérifierlebranchementducordond'alimentation
aublocduterminal.
*Le témoin Flow Sense
MC
affiche
quatre barres pendant le cycle de
séchage ou l'affichage indique
« d80 » après le séchage
* Ce témoin n'est pas une défaillance
de la sécheuse et n'est pas couvert
par la garantie de la sécheuse.
Communiquez avec un service de
nettoyage de conduits avec qui vous
fixerez un rendez-vous pour faire
inspecter et nettoyer votre système
d'échappement.
Le conduit d'échappement
est trop long ou comporte
trop de coudes et
d'obstructions.
• Installerunconduitpluscourtoumoinssinueux.
Reportez-vousauxinstructionsd'installationpour
plusdedétails.
Blocage partiel du conduit
en raison de l'accumulation
de charpie ou de débris.
• Le conduit doit être vérifié et nettoyé
immédiatement.Lasécheusepeutêtreutilisée
danscetétat,maisladuréeduséchagesera
pluslongueetlaconsommationd'énergiesera
accrue.
L'électroménager a détecté
une obstruction dans le
système de ventilation
externe de la sécheuse.
• Sidesobstructionsàl'échappementd'airsont
détectéesparlesystèmeFlowSense
MC
, le
témoinresteraallumépendant2heuresaprèsla
finducycle.Pouréteindrecetaffichage,ouvrez
laporteouappuyezsurleboutonMarche/arrêt.
L'indicateur Flow Sense
MC
demeure
actif une fois le conduit d'évacuation
débloqué.
Une fois l'obstruction
nettoyée, le système Flow
Sense
MC
requiert plusieurs
cycles consécutifs pour
déterminer si le rendement
s'est amélioré avant de
réinitialiser l'indicateur
Flow Sense
MC
.
• Sil'indicateurFlowSense
MC
demeureactif
pendantplusdecinqcyclesunefoislarestriction
corrigée,appelezleservicededépannage.
L'affichage indique
Vous avez appuyé sur le
bouton More Time.
• Cetécranindiquequel’optiondevapeura
étédéfiniepourunarticle«volumineux»,par
exemple,unédredon.
AppuyezsurleboutonLessTime(Moinsde
temps)pourréduirelatailleindiquéedela
brassée.
L'affichage indique
Le conduit est obstrué à
environ 75 % à 95 %. (Le
code d'erreur « d75 »,
« d80 », « d90 » ou « d95 »
ne s'affiche que pendant
deux (2) heures.)
• N'utilisezpaslasécheusejusqu'àcequele
systèmed'échappementaitéténettoyéou
réparé.L'utilisationdelasécheuseavecun
échappementtrèsobstruéestdangereuse
etpeutentraînerunincendieoud'autres
dommagesàlapropriété.
Vérifiezlesconduitsdeventilationextérieurs
lorsquelasécheusefonctionnepourvous
assurerquel'aircirculelibrementetavec
puissance.
Silesystèmed'échappementestextrêmement
long,faitesensortequ'ilsoitréparéouremanié.
Système d'échappement
de la maison bloqué.
• Gardezlazoneautourdelasécheusepropreet
libred'objets.
Vérifiezlahotted'aérationpourtoutdommage
ouaccumulationdecharpie.
Assurez-vousquelazoneautourdelahotte
d'aérationestlibred'objets.
Vérifiez si le voyant du filtre est
allumé pendant le cycle de séchage.
Le filtre à fibres n’est pas
bien nettoyé.
• Assurez-vousquelefiltreàfibresestpropre
avantchaquebrassée.Tenezensuitelefiltre
devantunesourcedelumièrepourvoirs'ilest
encrasséouobstrué.S'ilsembleencrassé,
suivezlesinstructionsdenettoyage.Certaines
chargesproduisentbeaucoupdefibres,etilpeut
s'avérernécessairedenettoyerlefiltrependant
le cycle.

53GARANTIE
FRANÇAIS
GARANTIE
AVISD’ARBITRAGE:LAPRÉSENTEGARANTIELIMITÉECONTIENTUNEDISPOSITIONSURL’ARBITRAGE
QUIEXIGEQUELERÈGLEMENTDESDIFFÉRENDSENTREVOUSETLGS’EFFECTUEPARARBITRAGE
EXÉCUTOIREPLUTÔTQUEDEVANTUNTRIBUNAL,ÀMOINSQUELESLOISDEVOTREPROVINCEOU
TERRITOIREL’INTERDISENTOUQUE,DANSUNAUTRETERRITOIREDECOMPÉTENCE,VOUSVOUS
PRÉVALIEZD’UNEOPTIONDERETRAIT.LESRECOURSCOLLECTIFSETLESPROCÈSDEVANTJURYNESONT
PASAUTORISÉSPARLEPROCESSUSD’ARBITRAGE.VEUILLEZVOUSRÉFÉRERCI-DESSOUSÀL’ARTICLE«
PROCÉDUREDERÈGLEMENTDEDIFFÉREND».
GARANTIE:SivotresécheuseLG(le«produit»)s’avèredéfectueuseenraisond’undéfautdematériauxoude
fabricationlorsd’uneutilisationnormale,pendantlapériodedegarantiepréciséeci-après,LGCanadarépareraou
remplaceraàsadiscrétionleproduitàlaréceptiondelapreuved’achatoriginalefournieparledétaillant.Cettegarantie
n’estoffertequ’àl’acheteuroriginalduproduitchezundétaillantetnes’appliquequ’àunproduitdistribuéauCanada
parLGCanadaouparundistributeurcanadienautorisé.Lagarantienes’appliquequ’auxproduitssituésetutilisésau
Canada.Pourlesproduitssousgarantie,lesréparationsàdomicileseronteffectuéesàconditionqueleproduitsoit
situédansunrayonde150kmducentredeserviceautoriséleplusprès,telqu’ilaétédéterminéparLGCanada.Si
leproduitestsituédansunrayondeplusde150kmducentredeserviceautorisé,telqu’ilaétédéterminéparLG
Canada,vousserezresponsabled’apporterleproduit,àvosfrais,aucentredeserviceautoriséenvuedelaréparation
sousgarantie.
PÉRIODEDEGARANTIE:(Remarque:Siladated'achatinitialenepeutêtrevérifiée,lagarantiedébuterasoixante(60)
joursaprèsladatedefabrication).
Période
Un(1)anaprèsladatedʼachatoriginal
delʼappareil.
Dix(10)ansaprèsladatedʼachat
originaldelʼappareil.
Portéedelagarantie
Piècesetmain-d’oeuvre(pièces
internesfonctionnellesseulement)
Cuvedelasécheuse(Piècesde
rechangeseulement.)
• Lesproduitsetpiècesderemplacementsontgarantispourlaportionrestantedelapériodedegarantieoriginaleou
quatre-vingt-dix(90)jours,selonlapériodelapluslongue.
• Lesproduitsetpiècesderechangepeuventêtreneufs,reconditionnés,remisàneufouautrementfabriquésenusine,
tousàlaseulediscrétionde«LGECI».
• LecentredeserviceautorisédeLGgarantitlestravauxderéparationpendanttrente(30)jours.
LASEULERESPONSABILITÉDELGCANADAESTLIMITÉEÀLAGARANTIEÉNONCÉECI-DESSUS.SAUFSELON
LES MODALITÉS EXPRESSÉMENT PRÉVUES CI-DESSUS, LG CANADA NE FAIT AUCUNE DÉCLARATION ET
PARLAPRÉSENTEEXCLUTTOUTEAUTREGARANTIEETCONDITIONCONCERNANTLEPRODUIT,QU’ELLE
SOITEXPRESSEOUIMPLICITE,YCOMPRIS,MAISSANSS’YLIMITER,TOUTEGARANTIEDEQUALITÉ
MARCHANDEOUD’ADAPTATIONÀUNUSAGEPARTICULIER,ETAUCUNEDÉCLARATIONNEPOURRALIER
LGCANADA.LGCANADAN’AUTORISEPASUNEPERSONNEÀCRÉEROUÀASSUMERENSONNOMTOUTE
AUTRE GARANTIE, OBLIGATION OU RESPONSABILITÉ EN RAPPORT AVEC LE PRODUIT. DANS LA MESURE
OÙTOUTEGARANTIEOUCONDITIONESTIMPLICITEPARLALOI,CETTEGARANTIEESTLIMITÉEÀLA
PÉRIODEDEGARANTIEEXPLICITECI-DESSUS.LGCANADA,LEFABRICANTOULEDISTRIBUTEURN’ESTPAS
RESPONSABLE DES DOMMAGES ACCESSOIRES, CONSÉCUTIFS, SPÉCIAUX, DIRECTS OU INDIRECTS, DE LA
PERTEDECLIENTÈLE,DELAPERTEDEBÉNÉFICES,DESDOMMAGES-INTÉRÊTSPUNITIFSOUEXEMPLAIRES
OUDETOUTAUTREDOMMAGEDÉCOULANTDIRECTEMENTOUINDIRECTEMENTDUMANQUEMENTAUX
OBLIGATIONS, FONDAMENTAL OU AUTRE, OU DE TOUTE AUTRE ACTION OU OMISSION, DÉLICTUELLE OU
AUTRE.
Cettegarantievousconfèredesdroitslégauxspécifiques.Vouspouvezjouird’autresdroitsquipeuventvarieren
fonctiondelaprovinceetdesloisquiysontappliquées.Touteclausedecettegarantiequiannuleoumodifietoute
conditionougarantieimpliciteenvertudelaloiprovincialeestdissociablesielleentreenconflitaveclaloiprovinciale,
sanstoutefoisaffecterlerestedesconditionsdecettegarantie.
LA PRÉSENTE GARANTIE LIMITÉE NE COUVRE PAS CE QUI SUIT :
• Lesdéplacementsdutechniciend’entretienpourlivrer,ramasser,ouinstallerleproduit;donnerdesinstructions
auclientsursonutilisation;réparerouremplacerlesfusibles;corrigerlecâblageoulaplomberie;oucorrigertoute
réparationouinstallationnonautorisée.
• Ledysfonctionnementduproduitencasdedéfaillancesoudepannesdecourant,ouencasdeserviceélectrique
inadapté.
• Lesdommagescauséspardestuyauxdʼeauquifuientquisontinadaptésougelés,despetitstuyauxdevidange,une
arrivéedʼeauinadaptéeoucoupée,ouunearrivéedʼairinadaptée.
• Lesdommagesconsécutifsàl’utilisationduproduitdansuneatmosphèrecorrosiveoudefaçoncontraireaux
instructionsspécifiéesdanslemanueld’utilisation.
• Lesdommagesauproduitcauséspardesaccidents,desinsectesnuisibles,delavermine,lafoudre,levent,un
incendie,uneinondationouunecatastrophenaturelle.
• Lesdommagesouladéfaillanceduproduitcausésparunemodificationouunealtérationnonautorisée,ouune
utilisationàdesfinsautresquecellespourlesquellesilaétéconçu,oudécoulantdetoutefuited’eaucauséeparune
installationinadéquate.
• Lesdommagesouladéfaillanceduproduitcausésparuncourantouunetensionélectriqueincorrects,pardescodes
deplomberieincorrects,paruneutilisationcommercialeouindustrielleinappropriée,ouparl’utilisationd’accessoires,
decomposantsoudeproduitsdenettoyagenonapprouvésparLGCanada.
• Laconversiondel’appareildepuislegaznatureloulegazdepétroleliquéfié.
54 GARANTIE
• Lesdommagescausésparletransportetlamanutention,ycomprislesrayures,bosses,entaillesouautresdommages
àlafinitiondelʼappareil,àmoinsquecesdommagesnerésultentdedéfautsdepièceoumain-d'œuvreetsoient
rapportésdanslapremièresemainesuivantlalivraison.
• Lesdommagesoulesélémentsmanquantsdetoutaffichage,boîteouverte,produitenrabaisouproduitremisàneuf.
• Lesproduitsdontlesnumérosdesérieoriginauxontétéeffacés,modifiés,ounepeuventêtredéterminésavec
exactitude.Lesnumérosdemodèleetdesérieainsiquelereçuoriginaldeventeaudétailsontrequispourune
validationdelagarantie.
• Lesaugmentationsdesfraisdefonctionnementetdesautresdépensesdefonctionnement.
• Leremplacementdesampoules,desfiltresoudetoutepiècedétachée.
• Lesréparationseffectuéeslorsqueleproduitestutiliséàdesfinsautresquel’utilisationdomestiquehabituelle
etnormale(ycompris,maissanss’ylimiter,unusagecommercial,dansdesbureauxoudansdesinstallations
récréatives)oudefaçoncontraireauxinstructionsdumanueld’utilisationduproduit.
• Lescoûtsassociésaudéplacementduproduitàpartirdevotremaisonpourdesréparations.
• Ledéplacementetlaréinstallationduproduit,s’ilestinstallédansunendroitinaccessibleous’iln’estpasinstallé
conformémentauxinstructionsd’installationpubliées,ycompriscellesdesmanuelsd’installationetd’utilisationdu
produit.
• Lesaccessoiresdelʼappareilcommelesbacsdeporte,lespaniers,lespoignées,lesétagères,etc.Lespiècesautres
quecellesinclusesdansleproduitdʼoriginesontégalementexclues.
• Lesdommagesrésultantdelamauvaiseutilisation,installation,réparationouentretien,oudelʼabusdelʼappareil.La
mauvaiseréparationcomprendlʼutilisationdepiècesnonapprouvéesouindiquéesparLGCanada.
Le filtre est obstrué.
Nettoyer le filtre à fibres.
Aucunechaleur,longue
duréeduséchage
Le conduit est obstrué.
Nettoyerlahotted'aérationetle
conduit.
Aucunechaleur,longue
duréeduséchage
Longueurexcessivedu
conduitounombreux
coudes
Garderlesconduits
d'échappementaussicourts
quepossible,avecunnombre
aussiréduitquepossiblede
coudes et de courbes.
Aucunechaleur,longue
duréeduséchage
Cordond'alimentationmal
branchéouproblèmeavec
lapriseélectrique.
Rebrancherlecordon
d'alimentation,remplacerle
fusibleouréactiverlecoupe-
circuit.Sileproblèmeprovient
delapriseélectrique,ilpeut
êtrenécessairedefaireappelà
un électricien.
Pasd'alimentation
Pasdechaleur
Lerobinetdegazn'estpas
tourné.(Sécheuseaugaz)
Ouvrirlerobinetdegaz.
Pasdechaleur
Inversiondelaporte
Lesinstructionsrelativesà
l'inversiondelaportefigurent
danslemanueldel'utilisateur.

55GARANTIE
FRANÇAIS
Tous les coûts associés aux circonstances exclues ci-dessus sont assumés par le consommateur.
Pourobtenirdesrenseignementsdétaillésconcernantlagarantieetleserviceàlaclientèle,veuilleznouscontacterou
visiternotresiteWeb:
Appelezle1-888-542-2623(7hàminuit-l’annéelongue)etsélectionnezl’optionappropriéeaumenu,ou;Visitezlesite
webà:http://www.lg.com
Écrivez vos informations de garantie ci-dessous
Informationsdʼenregistrementduproduit
Modèle
Numérodesérie
Datedʼachat

56 GARANTIE
PROCÉDURE DE RÈGLEMENT DE DIFFÉREND :
SAUFLAOÙLALOIL’INTERDIT,TOUTDIFFÉRENDENTREVOUSETLGASSOCIÉDEQUELQUEFAÇONQUECE
SOITÀLAPRÉSENTEGARANTIELIMITÉESERÈGLEEXCLUSIVEMENTPARARBITRAGEEXÉCUTOIREPLUTÔT
QUEDEVANTUNTRIBUNALDEDROITCOMMUN.SAUFLAOÙLALOIL’INTERDIT,VOUSETLGRENONCEZ
IRRÉVOCABLEMENTÀTOUTDROITÀUNPROCÈSDEVANTJURY,AINSIQU’ÀEXERCERUNRECOURS
COLLECTIFOUÀYPARTICIPER.
Définitions.Auxfinsduprésentarticle,«LG»désigneLGElectronicsCanadaInc.,sessociétésmères,sesfilialeset
sessociétésaffiliéesettousleursdirigeants,administrateurs,employés,agents,bénéficiaires,détenteursprécédents
desmêmesdroits,successeurs,cessionnairesetfournisseurs;«différend»et«réclamation»englobenttout
différend,réclamationoulitigedequelquesortequecesoit(fondéssuruneresponsabilitécontractuelle,délictuelle,
légale,réglementaireoudécoulantd’uneordonnance,parfraude,faussereprésentationousousquelquerégimede
responsabilitéquecesoit)découlantdequelquefaçonquecesoitdelavente,desconditionsoudel’exécutiondu
produitoudelaprésenteGarantielimitée.
Avis de différend.Sivousprévoyezengageruneprocédured’arbitrage,vousdevezd’abordenvoyeràLGunpréavis
écritd’aumoins30joursàl’adressesuivante:ÉquipejuridiqueLGECI,NorelcoDrive,NorthYork,Ontario,Canada
M9L2X6(l’«avisdedifférend»).VousetLGconvenezdediscuterentoutebonnefoipourtenterderéglerledifférend
àl’amiable.L’avisdoitmentionnervotrenom,votreadresse,votrenumérodetéléphone,leproduitfaisantl’objetdela
réclamation,lanaturedelaréclamationetlaréparationdemandée.SivousetLGneparvenezpasàréglerledifférend
dansles30jourssuivantlaréceptiondel’avisdedifférendparLG,ledifférenddoitêtreréglépararbitrageexécutoire
conformémentàlaprocédureétablieauxprésentes.VousetLGconvenezque,toutaulongduprocessusd’arbitrage,
lesmodalités(ycomprislesmontants)detouteoffrederèglementformuléeparvousouparLGneserontpas
divulguéesàl’arbitreetresterontconfidentiellesàmoinsd’accordcontraireentrelesdeuxpartiesouquel’arbitrerèglele
différend.
Entente d’arbitrage exécutoire et renonciation à un recours collectif.Silaréclamationn’apuêtrerégléedansles
30jourssuivantlaréceptiondel’avisdedifférendparLG,vousetLGconvenezdeneréglerlesréclamationsvous
opposantquepararbitrageexécutoireaucasparcas,àmoinsquevousvousprévaliezdel'optionderetraitévoquée
plushautouquevousrésidiezdansunterritoiredecompétencesquiinterditlapleineapplicationdecetteclausedans
lecasderéclamationsdecetype(Danslequelcas,sivousêtesunconsommateur,cetteclausenes'appliqueraquesi
vousacceptezexpressémentl'arbitrage).Danslamesureoùlaloienvigueurlepermet,aucundifférendentrevouset
LGnepeutêtrecombinéouregroupéavecundifférendfaisantintervenirleproduitoularéclamationd'unepersonneou
entitétierce.Plusprécisémentetsanslimiterlaportéedecequiprécède,saufdanslamesureoùunetelleinterdiction
n'estpasautoriséeendroit,enaucuncasundifférendentrevousetLGnepeutêtretraitédanslecadred'unrecours
collectif.Aulieudel'arbitrage,lespartiespeuventintenteruneactionindividuelledevantunecourdespetitescréances,
maiscetteactionnepeutpasêtreintentéedanslecadred'unrecourscollectif,saufdanslamesureoùunetelle
interdictionn'estpasautoriséeendroitdansvotreprovinceouterritoiredecompétencespouruneréclamationencause
quinousoppose.
Règles et procédures d’arbitrage.Poursoumettreuneréclamationàunarbitrage,l’unedesdeuxparties,soitvousou
LG,doitdéposerunedemandeécriteàceteffet.L’arbitrageestprivéetconfidentielets’effectueselonuneprocédure
simplifiéeetaccéléréedevantunarbitreuniquechoisiparlespartiesconformémentauxloisetrèglementsenvigueur
portantsurl’arbitragecommercialdevotreprovinceouterritoirederésidence.Vousdevezégalementenvoyerunecopie
devotredemandeécriteàLGElectronicsCanadaInc.,LegalDepartment-Arbitration,20NorelcoDrive,NorthYork,
OntarioM9L2X6.Laprésentedispositionsurl’arbitrageestrégieparlesloisetrèglementssurl’arbitragecommercial
applicablesdevotreprovinceouterritoire.Lasentencearbitralepeutdonnerlieuàunjugementden’importequel
tribunalcompétent.Touteslesdécisionsrelèventdel’arbitre,àl’exceptiondesquestionsassociéesàlaportéeetà
l’applicabilitédeladispositionsurl’arbitrageetàl’arbitrabilitédudifférend,quisontduressortdutribunal.L’arbitreest
tenuderespecterlesmodalitésdelaprésentedisposition.
Droit applicable.Lesloisdevotreprovinceouterritoirede’achatrégissentlaprésenteGarantielimitéeettoutdifférend
entrenous,saufdanslamesureoùdetellesloissontsupplantéespardesloisfédérales,provincialesouterritoriales
applicablesousontincompatiblesaveccesdernières.Sil'arbitragen'estpasautorisépourrégleruneréclamation,une
poursuite,undifférendouunlitigenousopposant,nousnousenremettronsàlacompétenceexclusivedestribunauxde
votreprovinceouterritoirede’achatcompétencepourlerèglementdelaréclamation,delapoursuite,dudifférendoudu
litigenousopposant.

57GARANTIE
FRANÇAIS
Frais et coûts.Aucunsfraisnesontexigiblespourentameruneprocédured’arbitrage.Àlaréceptiondevotredemande
d’arbitrageécrite,LGréglerarapidementlatotalitédesfraisdedépôtdelademanded’arbitrage,saufsivousréclamez
desdommages-intérêtssupérieursà25000$.Danscecas,lepaiementdecesfraisserarégiparlesrèglesd’arbitrage
applicables.Saufdispositioncontraireauxprésentes,LGpaieratouslesfraisdedépôtdedemandeetd’administration
ainsiqueleshonorairesdel’arbitreconformémentauxrèglesd’arbitrageapplicablesetàlaprésentedispositionsur
l’arbitrage.Sivousremportezl’arbitrage,LGrègleravosfraisethonorairesjuridiquesaprèsavoirdéterminés’ilssont
raisonnablesensefondantsurdesfacteurscomme,entreautres,lemontantdel’achatetlemontantdelaréclamation.
Sil’arbitrejugequelemotifdelaréclamationoulesréparationsdemandéessontfutilesousefondentsurdesmotifs
déplacés(auregarddesloisapplicables),lepaiementdetouslesfraisd’arbitrageserarégiparlesrèglesd’arbitrage
applicables.Dansuntelcas,vousacceptezderembourseràLGlatotalitédesmontantsversésqu’ilvousrevient
autrementdepayerenvertudesrèglesd’arbitrageapplicables.Saufdispositioncontraireetsielleremportel’arbitrage,
LGrenonceàtoussesdroitsdevousréclamerdesfraisethorairesjuridiques.
Audience et lieu de l’arbitrage.Sivotreréclamationestégaleouinférieureà25000$,vouspouvezopterpourun
arbitrageconduitselonl’unedesmodalitéssuivantesuniquement:1)surexamendesdocumentsremisàl’arbitre,2)par
audiencetéléphoniqueou3)paraudienceenpersonneselonlesdispositionsdesrèglesd’arbitrageapplicables.Sivotre
réclamationdépasse25000$,ledroitàuneaudienceseradéfiniparlesrèglesd’arbitrageapplicables.Lesaudiences
arbitralesenpersonnesetiendrontàl’endroitleplusprocheetlepluspratiquepourlesdeuxpartiessituédansvotre
provinceouvotreterritoirederésidence,saufsinousconvenonsmutuellementd’unautrelieuoud’unarbitragepar
téléphone.
Dissociabilité et renonciation.SiunepartiedelaprésenteGarantielimitée(ycomprislesprésentesprocédures
d’arbitrage)n’estpasapplicable,lesdispositionsrestantesdemeurentenvigueurdanslamesurepermiseparlaloi
applicable.Lefaitdenepasexigerlastricteexécutiond’unedispositiondelaprésenteGarantielimitée(ycomprisles
présentesprocéduresd’arbitrage)nesignifiepasquenousayonsrenoncéniquenousayonsl’intentionderenoncerà
toutedispositionoupartiedelaprésenteGarantielimitée.
Option de retrait.Vouspouvezvousretirerdelaprésenteprocédurederèglementdedifférend.Danscecas,nivous
niLGnepouvezimposeràl’autrepartiedeparticiperàuneprocédured’arbitrage.Pourvousprévaloirdel’optionde
retrait,vousdevezenvoyerunpréavisàLGdanslestrente(30)jourscivilsàcompterdeladatedel’achatduproduit
parlepremieracheteuri)dansuncourrieladresséà[email protected]etdontlaligned’objetportelamention«Retrait
del’arbitrage»ouii)encomposantle1-800-980-2973.Quecesoitparcourrieloupartéléphone,vousdevrezdonnera)
votrenometvotreadresse;b)ladated’achatduproduit;c)lenomoulenumérodemodèleduproduitetd)lenuméro
desérie[qu’ilestpossibledetrouveri)surleproduitouii)enliqneauhttps://www.lg.com/ca_fr/soutien/reparation-
garantie/demande-reparation,Trouvermesnumérosdemodèleetdesérie].
Sivousvousprévalezdel’optionderetrait,lesloisdevotreprovinceouterritoirederésidencerégissentlaprésente
Garantielimitéeettoutdifférendentrenous,saufdanslamesureoùdetellesloissontsupplantéespardeslois
fédérales,provincialesouterritorialesapplicablesousontincompatiblesaveccesdernières.Sil’arbitragen’estpas
autorisépourrégleruneréclamation,unepoursuite,undifférendouunlitigenousopposant,nousnousenremettrons
àlacompétenceexclusivedestribunauxdevotreprovinceouterritoiredecompétencepourlerèglementdela
réclamation,delapoursuite,dudifférendoudulitigenousopposant.
Vousnepouvezvousprévaloirdel’optionderetraitquedelamanièredécriteplushaut(c’est-à-direparcourrielou
partéléphone).Aucunautretyped’avisneseraprisencomptepourleretraitdelaprésenteprocédurederèglement
dedifférend.Lefaitdeseretirerdelaprésenteprocédurederèglementdedifférendnecomprometd’aucunefaçon
laprotectionaccordéeenvertudelaGarantielimitée,etvouscontinuerezàjouirdetouslesavantagesprévusparla
Garantielimitée.Sivousconservezceproduitsansvousprévaloirdel’optionderetrait,vousacceptezlesconditions
généralesdeladispositionsurl’arbitrageénoncéeci-dessus.
Conflit de modalités.Encasdeconflitoud’incompatibilitéentrelesmodalitésdelaprésentegarantielimitéeetle
contratdelicenced’utilisation(CLU)encequiconcernelerèglementdesdifférends,lesmodalitésdelaprésente
garantielimitéecontrôlentetrégissentlesdroitsetobligationsdespartiesetontpréséancesurleCLU.

58 MEMO

59MEMO

60 MEMO

61MEMO

LG Customer Information Center
Register your product Online!
www.lg.com
For inquiries or comments,
visit www.lg.com or call:
1-800-243-0000
U.S.A.
1-888-542-2623
CANADA