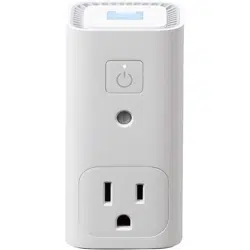
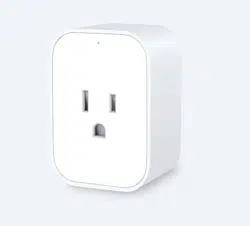
Gosund Mini Smart Socket InstructionWhat's in the Box
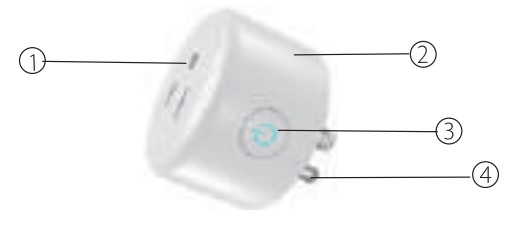
- Socket Panel
- Flame Resistant Material
- ON/OFF Button
- Power Plug
Note: ON/OFF button can be used as restore button. long press can change the flashing speed and will restore your smart socket to factory defaults. Only do this if you are sure you want to erase all your settings.
Parameters
Model Number: WP5
Rated Voltage: 100-240V
Rated Current: 10 A (Max)
AC Frequency: 50/60Hz
Working Temp:-10 ~ 60°C
WIFI frequency: 24GHz
Maximum Total Power Output: 2200W
Install the “Smart Life /Go Smart” APP
- You may find the “Smart Life /Go Smart" app on Apple App store. Google Play. or Scan the QR code below and install it;
- Enter the register / log in interface. input the email address for getting the verification code to register an eee (Smartlife )
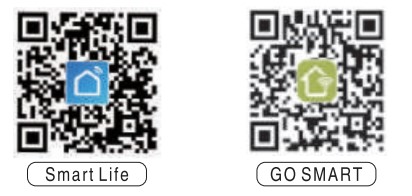
The free app "Smart Life” and "GO SMART" are compatible with mobile devices that support IOS 8.0 above. Android 4.4 above.
Connecting Your Socket with Smart Life
A.Easy Mode (Recommend)
- Please make sure the mini socket has connected with electricity at the beginning. then open the "Smart Life" APP. tap the "ADD DEVICES" or the "+" at the upper right comer of the page and select “Electrical outlet
- Long press on/off button of the device for 5 seconds until indicator light quickly flashed. the interface page already stepped into * Add Device" Page as the above;
- Make sure the indicator light is lashing rapidly and confirm it in app;
- Choose the local WIFI and enter the correct password and confirm;
- Wait for configuring successfully. then tap “Done".
B.AP Mode
- Please change to “AP Mode" if connecting failed in “Easy Mode". The AP Mode is at the upper right comer of the * ADD DEVICE" page.
- Long press on/off button until the indicator light flashes slowly;
- Make sure the indicator light is flashing slowly and confirm itin App;
- Choose the local WIFI and enter the correct password and confirm;
- Tap" Connect Now’. choose WIFI hotspot named" SmartLife xxx". then back to " Smart Life” application;
- Wait for configuring successfully. then tap Done’.
Getting to Know “Smart Life” APP
A Devices
You can add listed devices by tap the” +" at the top right at this page.
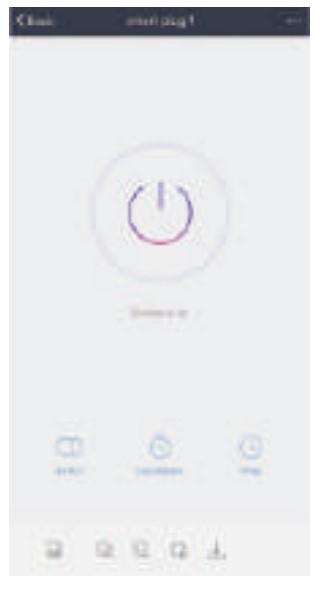
- Switches
Switches allows you to turn on/off your device anywhere. As long as you have an internet connection you can control the device in your home.
Tap to the icon at the upper right of the page. you are able to modify the device name or even create a group ( If you have several device ). which means you can turn multiple devices on or off at the same time. - Timer
You can set the devices on or off after the specific time as you want with this function. - Countdown
With the count down timer feature. you can automatically switches on/off the running household appliances.
B.Scenes
With this function. you can create your characteristic as you want.
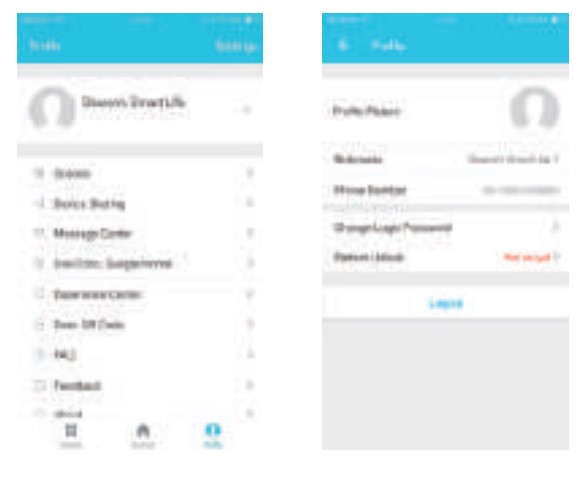
C. Profile
Profile is the entrance for the users to manage personal information.
The device is recommended for use indoors and in a dry location only. power outlet shall be used within i’s stated outlet rating on the instructions.
Please contact seller for replacement if there is any damage caused by transportation.
Please plug in the socket in proper condition and away from children.
Please plug in the socket fully while using for safety concer.
Please do not disassemble or install the socket. otherwise there may cause product damaged or security risks.
Using Amazon Echo Quick Guide
What You'll Need
Amazon Alexa APP & Account
Smart Life / Go Smart APP & Account (Users need to register your own account. select region as + The United States")
Echo. Echo Dot. Tap or other Amiazon voice operated devices
Mini Smart Socket
Tip: Rename the device after configuring successfully. The name of the device is recommended to use easy pronunciation of the English words. (Amazon Echo only supports English temporarily)
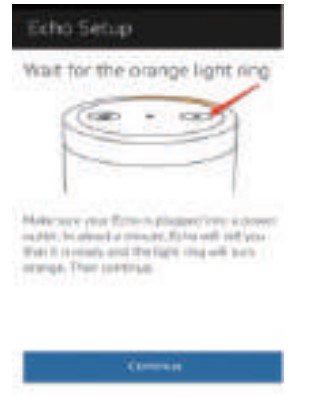
Set Your Echo Speaker by Alexa APP
- Sign in with Alexa account & password (If not registered. sign up first); After login. click the menu at the top left. then click “Settings'. and choose “Set up a new device’;
- Choose a device (for example. Echo). When the right page appears. long press the small dot on your Echo device until the light tums to yellow. Then click +Continue" on App. (Note: at this time the mobile phone can not open a variety of VPN software)
- Choose users’ WIFI and wait for a few minutes.
- After an introduction video. click next step. it will tums to “Home” page automatically. Now the Echo is connected to Alexa APP through WiFi successfully.
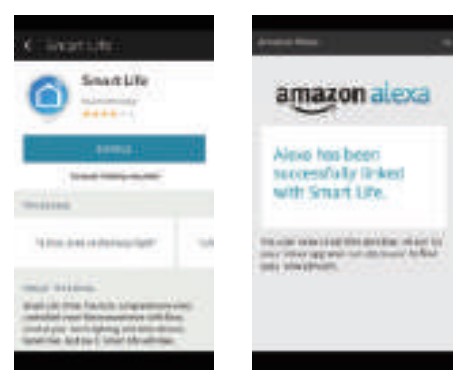
Enable Our Skill in Alexa APP
- Choose “Skill in the options bar. and then search "Smart Life’ in the search bar; Select "Smart Life" in the search results. and then click “Enable.”
- Input the user name and password that you had previously registered (Only support the account in the United States); When you see the right page. it means the Alexa account is linked with Smart Life account.
Control Smart Socket by Voice
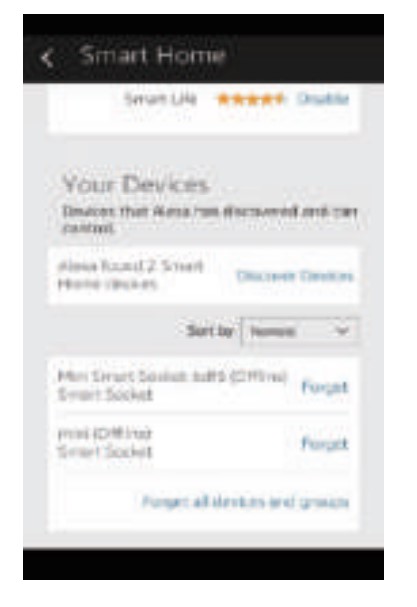
After the previous operation. you can control the socket Via Echo.
- Discovering devices: Firstly. users need to say to Echo: "Echo(or Alexa). Discover my devices.” Echo will start to finding the devices which is added in Smart Life APP. it will take about 20 seconds to show the result. Or you may click Discover devices" in Alexa APP. it will show the devices that found successfully.
Note: Echo" is one of the wake-up name. which can be any of these three names (Settings): Alexa/Echo/Amazon. - Support Skil List
User can control devices by instructions like below:
Alexa. turn on {fridge socket]
Alexa. turn off [fridge socket]
Attention: The name of the device must be consistent with the addition of Smart Life App. \» Warranty mart socket is covered by a limited warranty from
During the warranty period and upon verification of defects. this product will be replaced when returned with proper proof of purchase. (> Contact us
For any inquiries or comments concerning to our products. please do not hesitate to send email to [email protected]. and we will respond to you in 24 hours.
Quick Guide of Using IFTTT to Control Smart Devices
What you need to get started
Before using IFTTT to control your smart devices, make sure you meet the following conditions.
- Stable Wi-Fi network which could access to IFTTT server.
- A device, which could use IFTTT service, including computer or mobile device.
- An IFTTT account, could be replaced by Facebook account or Google account.
- Smart Life app and a related account. Smart devices, could be control by IFTTT service.
Add devices in Smart Life app (Refer to App Instruction)
You can skip this part if you've already add some devices to your Smart Life account, and in the meantime the devices' name is easily recognized.
- Download Smart Life app (Refer to App Instruction)
You can scan the QR code as below to download the Smart Life app:
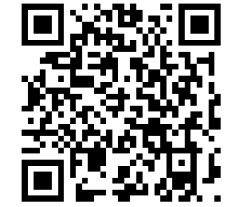
You can also search "Smart Life" in either App Store or Google Play to install the app. - Register a Smart life account and sign in the app (Refer to App Instruction)
Open the Smart Life app, tap "Register" to register an account, then sign in the app. - Add device and change device's name (Refer to App Instruction)
Sign in with the Smart Life account, add the device, then change device name to an easily recognized word or phrase, like "bedroom light".
Set up IFTTT and enable Smart Life Skill
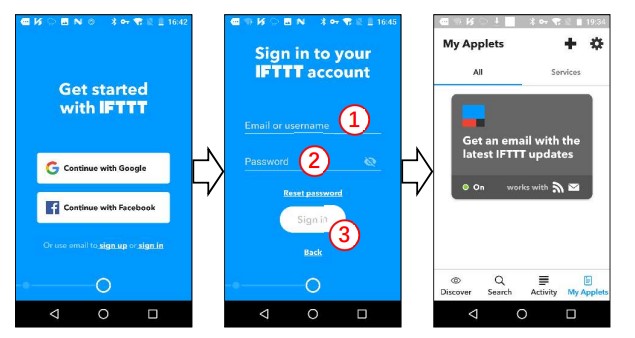
User can configure IFTTT through web or app. We take app configuration as an example in this guide. App: Search "IFTTT" in App Store or Google Play to install the app.
Sign in IFTTT app
You can skip this part if you have signed in IFTTT app.
- Open the IFTTT app by tapping the app icon on your mobile device.
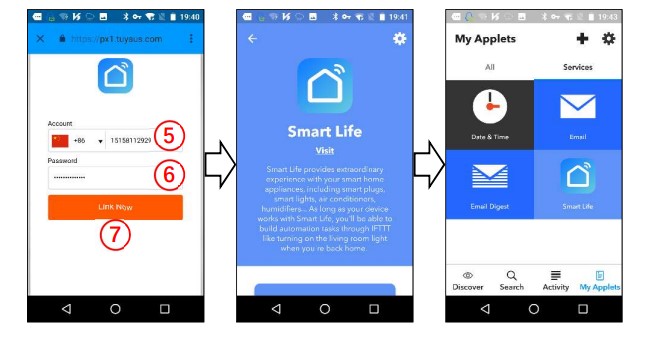
- Type in your IFTTT account and password, then tap "Sign in". IFTTT account could be replaced by Facebook’s account or Google’s account.
- When you sign in IFTTT app successfully, the display in the app is shown as below.
Link Smart Life account to IFTTT
You can skip this part if you have linked Smart Life account to IFTTT.
- Tap " Search" below the screen, then enter "Smart Life" in the search box, select the "Smart Life" option, and tap "Connect" to enable Smart Life.
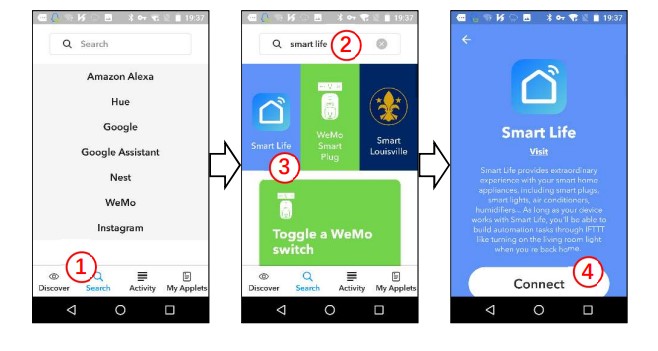
- You will be redirected to the account link page. Type in your Smart Life account and password, don't forget to select the country/region where your account belongs to. Then tap "Link Now" to link your Smart Life account. You can check it in the "Services" of "My Applet".
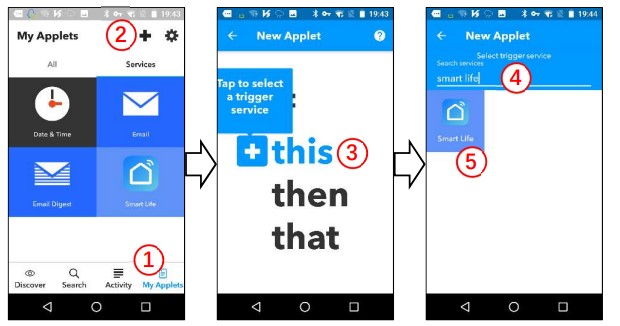
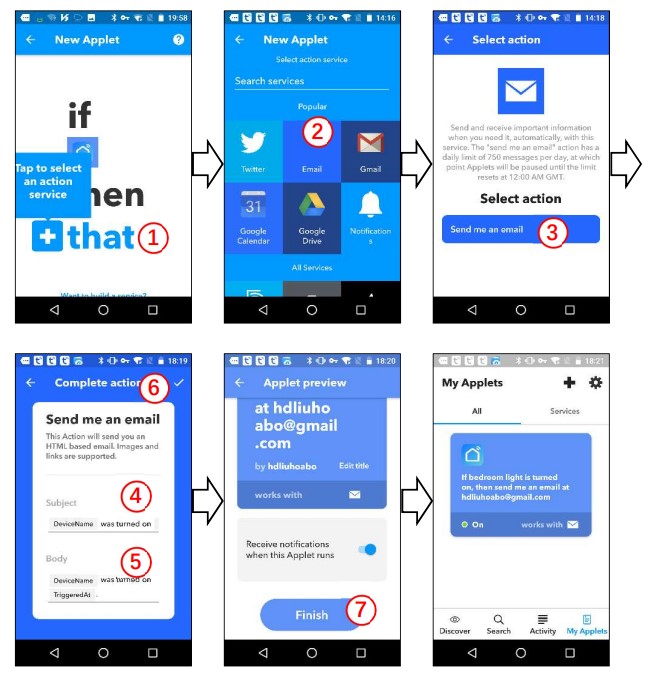
Create Applet to control your smart devices (Example 1)
IFTTT is the abbreviation of "If this then that". "Applet" represents a complete task composed of conditions & tasks. "this" represents the condition, while "that" represents the task.
Example 1: create an Applet (If my bedroom light is turned on, the system will send an email to my mailbox automatically)
Create "this" to configure the trigger
- Tap "My Applets" tab in IFTTT app, and then tap the "+" symbol on the top right of screen to establish a new Applet.
- Tap "this" to add a condition in the new page, and then enter "Smart Life" in the search box, select the "Smart Life" option.
- Select detail trigger in Smart Life, choose the corresponding equipment, and tap the "
 " on the top right of screen to save this condition. Here we select "Device or group is turned on" & "bedroom light".
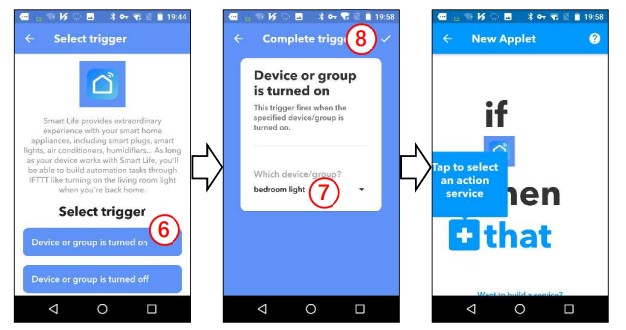
Create "that" to configure the task
Step 1, tap "that" to add a task for Applet, and then tap "Email" on the service search page.
Step 2, select detail action in "Email", such as " Send me an email".
Step 3, customize the contents of "Subject & Body" in the new page.
Step 4, tap the "" on the top right of screen to save this task.
Step 5, tap "Finish" to complete the creation of this Applet, and it will be saved automatically. You can check it in the "All" of "My Applet".
Create Applet to control your smart devices (Example 2)
IFTTT is the abbreviation of "If this then that". "Applet" represents a complete task composed of conditions & tasks. "this" represents the condition, while "that" represents the task.
Example 2: create an Applet (If I come to the area, my bedroom light will be turned on automatically)
Create "this" to configure the trigger
Step 1, tap "My Applets" tab in IFTTT app, and then tap the "+" symbol on the top right of screen to establish a new Applet.
Step 2, tap "this" to add a condition for Applet, and then tap "Location" on the service search page.
Step 3, select detail trigger in "Location", such as "You enter an area".
Step 4, select a specific area by dragging the map or directly entering the location name.
Step 5, tap the "" on the top right of screen to save this condition.

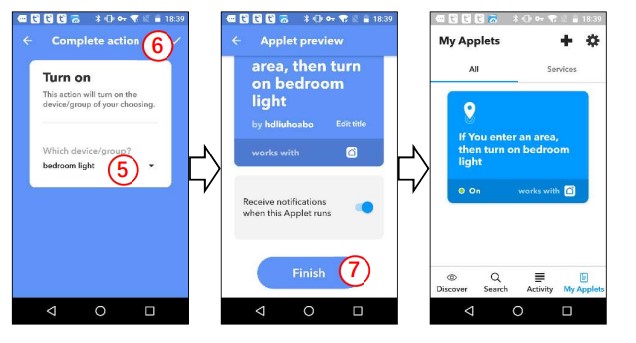
Create "that" to configure the task
- Tap "that" to add a task, and then enter "Smart Life" in the search box, select the "Smart Life" option.
- Select detail action in Smart Life, such as "Turn on".
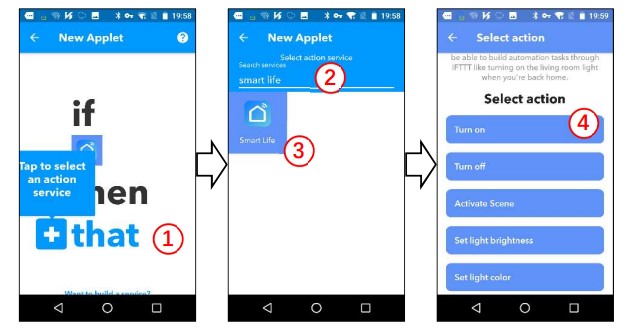
- Choose the corresponding equipment, and then tap the "" on the top right of screen to save this task.
- Tap "Finish" to complete the creation of this Applet, and it will be saved automatically. You can check it in the "All" of "My Applet". When we turn on the bedroom light (trigger condition), the color of the light will be set to green automatically (to perform the task).