Loading ...
Loading ...
Loading ...
6_ Part and features
Part and features
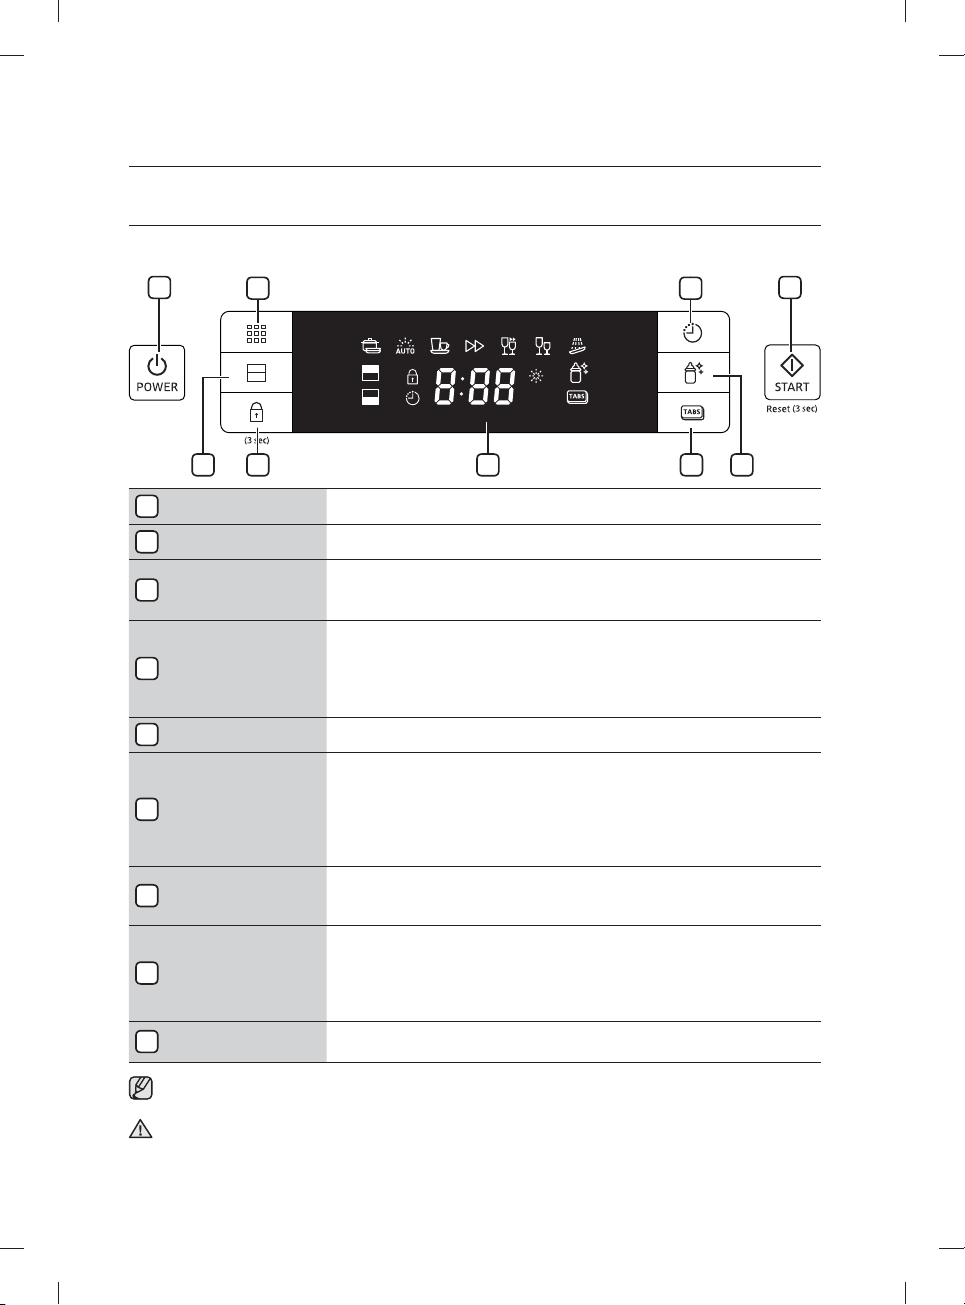
CONTROL PANEL
3 4
9
2 7
1 6
8
5
1 POWER BUTTON Press this button to turn on your dishwasher: the screen lights up.
2 PROGRAM BUTTON To select washing program press this button.
3
HALF LOAD
BUTTON
For small amount of loading items, use either the upper or lower basket
only to save energy.
Press the Half load button to select the upper or lower basket.
4
CHILD LOCK
BUTTON
This option allows you to lock the buttons on the control panel so children
cannot accidentally start the dishwasher by pressing the buttons on the
panel.
To lock and unlock the buttons on the control panel, hold down both the
Child lock buttons for three (3) seconds.
5 DISPLAY WINDOW Running indicator, delay time, error codes and etc.
6 START BUTTON
In Power on condition, close the dishwasher door and select the cycle and
desired options. Press the START button to begin the cycle. When you
want to pause the dishwasher while running, press the START button and
make sure to open the door slowly and carefully.
You can reset the machine by pressing the START button for 3 seconds
during washing. After reset, the dishwasher goes to the initial state.
7
DELAY START
BUTTON
Press this button to set the delayed hours for washing. You can delay the
start of washing up to 24 hours. One press on this button delays the start
of washing by one hour.
8 HYGIENE BUTTON
Push the Hygiene button for the best possible hygiene in your dishwasher.
At the final rinse it heat up to 67 °C and hold this temperature for a several
minutes.
This function is available with all program except Pre Wash, Delicate and
Quick Wash.
9 MULTI IN 1 BUTTON
To select Multi in 1 option which needs rinse aid but a Multi in 1 tablet. This
option can be selected on Intensive, Auto or Normal program only.
• When the door is open only the POWER button will operate.
• You can select options (Multi in 1, Delay start and/or Half load) before starting a cycle.
IMPORTANT: To get the best performance from your dishwasher, read all the operating instructions
before using it for the first time.
DD81-01651H_EN_150130.indd 6DD81-01651H_EN_150130.indd 6 2015-01-30 3:11:522015-01-30 3:11:52
Loading ...
Loading ...
Loading ...