
the Kitchen Wizz
™
8
Instruction Book - BFP580, BFP560

2
BREVILLE
RECOMMENDS
SAFETY FIRST
At Breville we are very safety
conscious. We design and
manufacture consumer
products with the safety of you,
our valued customer, foremost
in mind. In addition we ask
that you exercise a degree of
care when using any electrical
appliance and adhere to the
following precautions.
IMPORTANT
SAFEGUARDS
CAREFULLY READ ALL
INSTRUCTIONS BEFORE
OPERATING THE
APPLIANCE FOR THE
FIRST TIME AND SAVE
FOR FUTURE REFERENCE.
• Remove any packaging material
and promotional labels before
using the appliance for the
first time.
• Do not place the appliance near
the edge of a bench or table
during operation. Ensure the
surface is level, clean and free
of water, flour, etc. Vibration
during operation may cause the
appliance to move.
• Handle the appliance and
attachments with care -
remember the blades and discs
are razor-sharp and should be
kept out of reach of children.
• Care shall be taken when
handling the sharp cutting
blades, emptying the bowl and
during cleaning.
• Always make sure the appliance
is completely assembled before
operating. The appliance will
not operate unless properly
assembled.
• Switch off the appliance and
disconnect from supply before
changing accessories or
approaching parts that move
in use.
• Always disconnect the
appliance from the supply if it
is left unattended and before
assembling, disassembling
or cleaning.

3
• Always operate the appliance
with the lid securely in position.
• Always ensure the spindle is in
place prior to attaching Quad
blade, dough blade, reversible
shredder, adjustable slicer or
potato peeler.
• Do not push food into the feed
chute with your fingers or other
utensils. Always use the food
pusher provided.
• Do not use attachments other
than those provided with
the appliance.
• Do not attempt to operate
the appliance by any method
other than those described in
this booklet.
• Please do not crush ICE in
the processing bowl. This will
cause damage to the blades.
We recommend that you use a
blender for ice crushing.
• Some stiff mixtures, such
as dough may cause the
processing blade to rotate
more slowly than normal. If this
happens, do not process for
longer than 30 seconds.
• Do not process or blend hot or
boiling liquids - allow liquids
to cool before placing into the
processing bowl or blender jug.
• Do not use the appliance on
slippery, unstable or uneven
surfaces such as a sink
drain board.
• To protect against electric shock
do not immerse power cord,
plug or motor base in water or
any other liquid.
• Do not move the appliance
whilst in operation.
• Do not place any part of
the appliance in the
microwave oven.
• Do not fill processing bowl or
blender jug above marked liquid
levels or shredding level. Always
add drier or thicker ingredients
prior to adding fluids.
• Never remove the lid while the
appliance is operating. Always
switch off the appliance before
removing the lid.
• Keep the appliance clean.
Follow the cleaning instructions
provided in this book.

4
IMPORTANT
SAFEGUARDS
FOR ALL
ELECTRICAL
APPLIANCES
• Unwind the power cord fully
before use.
• Do not let the power cord
hang over the edge of a table,
counter, touch hot surfaces or
become knotted.
• Cleaning and user maintenance
shall not be made by children
without supervision.
• This appliance shall not be used
by children. Keep the appliance
and its cord out of reach of
children.
• Children shall not play with
the appliance.
• Appliances can be used by
persons with reduced physical,
sensory or mental capabilities
or lack of experience and
knowledge if they have been
given supervision or instruction
concerning use of the appliance
in a safe way and understand
the hazards involved.
• This appliance is for household
use only. Do not use this
appliance for anything other
than its intended use. Do not
use in moving vehicles or boats.
Do not use outdoors.
• The installation of a residual
current device (safety switch)
is recommended to provide
additional safety protection
when using electrical
appliances. It is advisable that
a safety switch with a rated
residual operating current not
exceeding 30mA be
installed in the electrical circuit
supplying the appliance.
See your electrician for
professional advice.

5
FOR HOUSEHOLD USE ONLY
SAVE THESE INSTRUCTIONS
• It is recommended to regularly
inspect the appliance. Do not
use the appliance if power
supply cord, plug or appliance
becomes damaged in any way.
Return the entire appliance to
the nearest authorised Breville
Service Centre for examination
and/or repair.
• All maintenance (other than
cleaning) is to be done by
an authorised Breville
Service Centre.
• Authorised Breville Service
Centres can be found on our
website www.Breville.com.au
Alternatively, you can contact
the Breville Customer Care
Centre by phone on
1300 139 798 or email
AskUs@breville.com.au
6
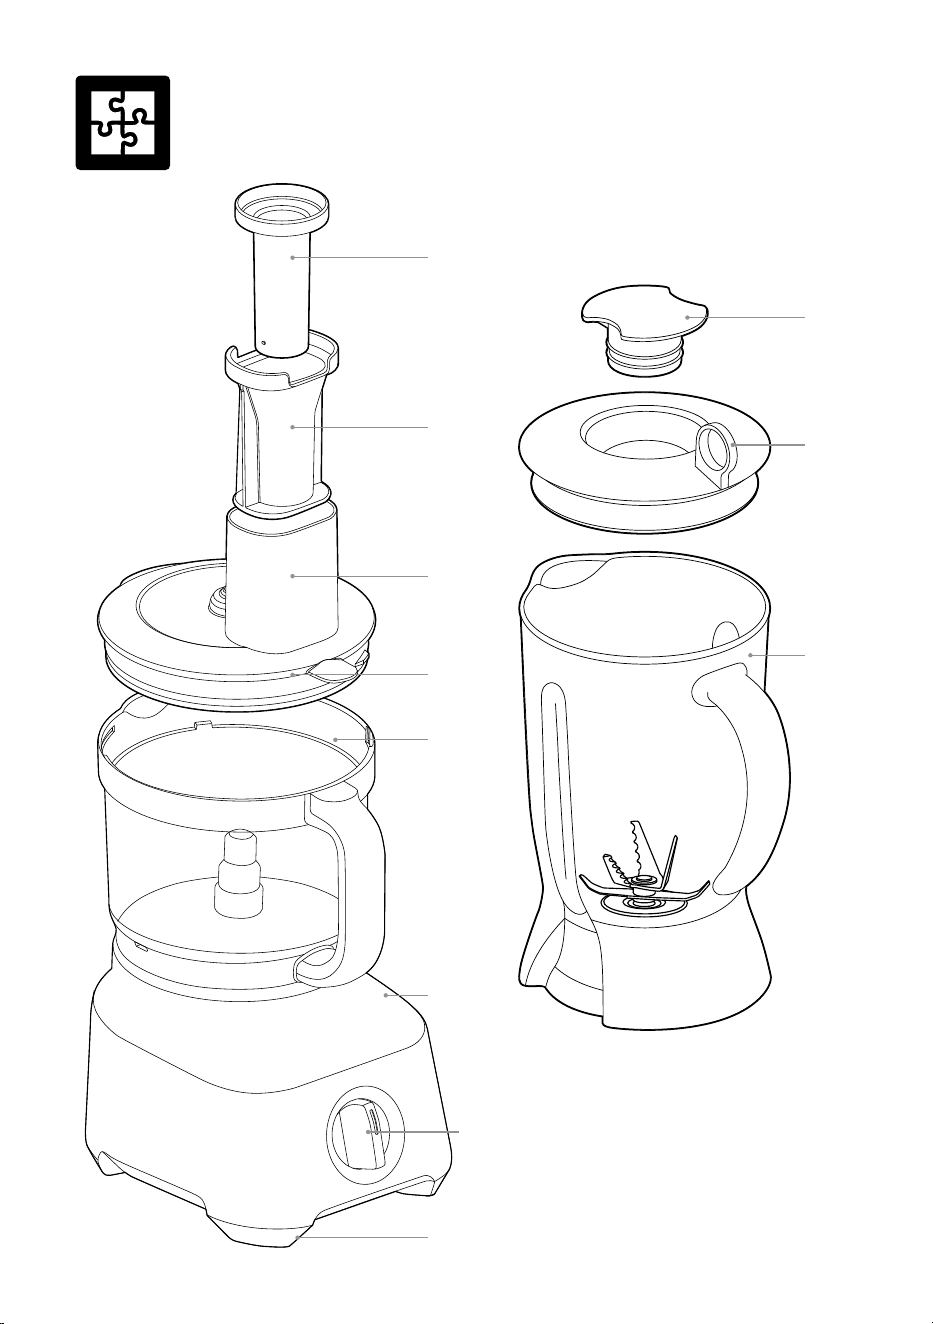
Components
A
B
C
D
E
I
J
K
H
F
G

7
A. Small food pusher
Use to process smaller ingredients with
improved control. It also doubles as a
measuring cup for ingredients.
B. Large food pusher
The food pusher A and B is packaged in
2 parts. To unlock and separate the 2 parts,
twist the little pusher counter clockwise.
C. Feed chute
D. Processing lid
E. Processing bowl
11 cup capacity for dry ingredients and
8 cups for thick liquid ingredients (eg. soups).
The processing bowl locks onto the motor
base by turning clockwise.
F. Motor base
High torque for reliable results.
G. Speed control dial
2 speeds and pulse.
H. No-skid rubber feet
I. Inner measuring cap
Remove to add ingredients while blending.
J. Breville Assist
™
lid
Ring pull lid for easy removal.
K. 1.4 litre BPA-free blending jug
L. Potato peeler
Rapid peel batches of 6–7 potatoes in
30 seconds.
M. Dough blade
Blunt blade designed for a softer action of
combining dough ingredients.
N. Quad
®
blade™
Swift action for even chopping, mixing,
whipping and processing a variety of
ingredients. Safety braking system rapidly
stops Quad
®
blades if lid is unexpectedly
opened.
O. Adjustable slicer
Accurate slicing with 24 thickness settings
from 0.3mm-8.0mm.
P. Fine and coarse reversible shredder
Q. Spindle
Use with all blades and discs.
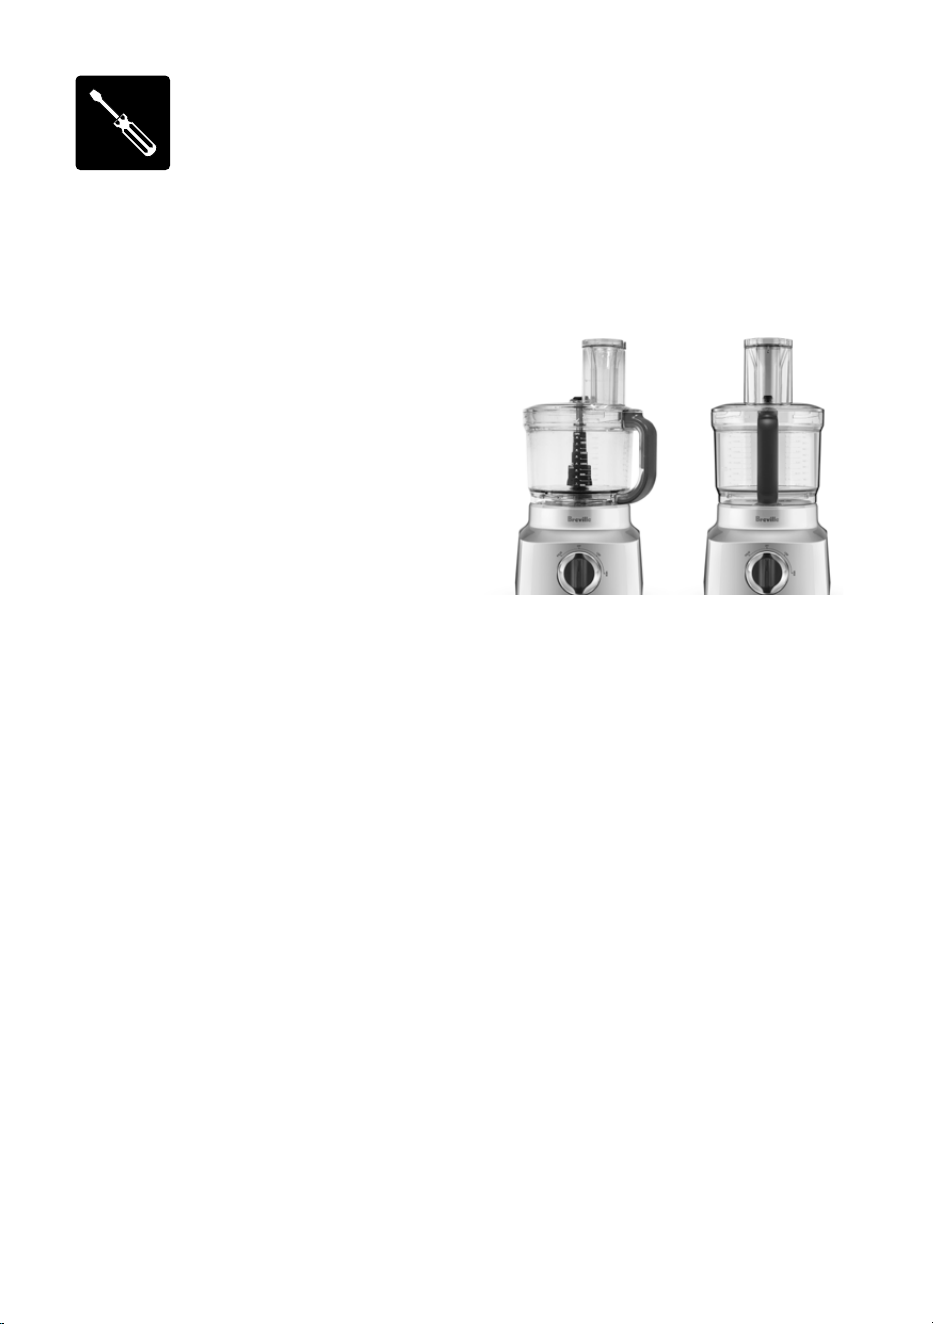
BLENDER ATTACHMENT
The blending jug is part of the Kitchen Wizz
8 Plus (BFP580) only. If you have purchased
the Kitchen Wizz 8 (BFP560), you will have
all other tools and accessories, excluding the
blending jug.
BREVILLE ASSIST™ PLUG
Your Breville appliance comes with a unique
Breville Assist™ Plug, conveniently designed
with a finger hole to easy removal from the
wall outlet.
L
M
N
O
P
Q

8
POTATO PEELER
Potato peeling made easy
Take the hard work out of peeling potatoes.
The Breville peeler will peel potatoes in
batches of 6–7, depending on the exact size.
Peeling is very fast, and may finish quicker
than expected. Keep your eye on progress,
and it should be done in 20 to 30 seconds.
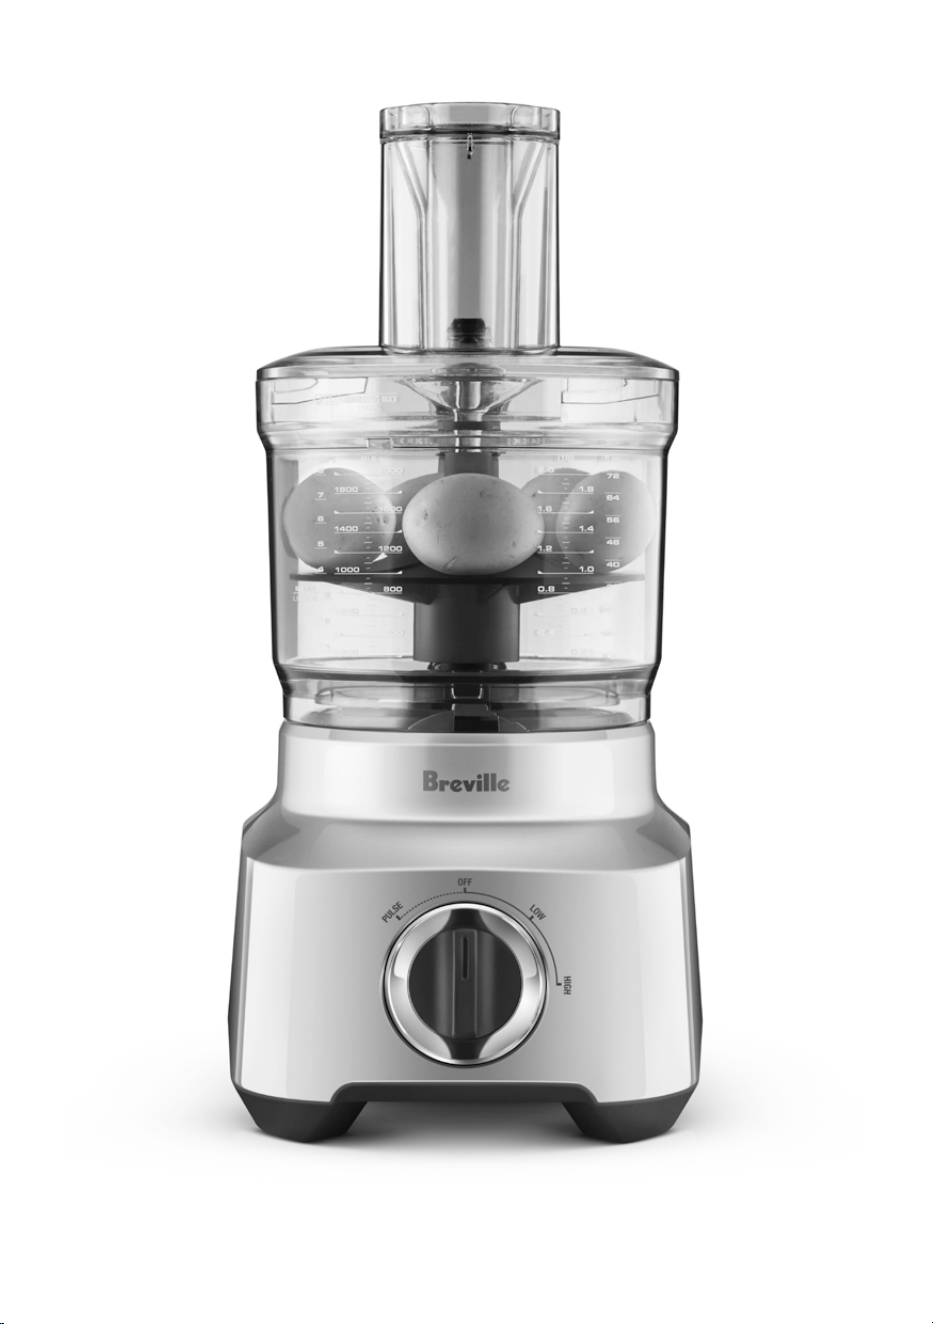
Size matters
The best size potatoes to use are around
65mm x 65mm, which is about the size of this
illustration. Choose potatoes that are round,
rather than elongated. Use whole potatoes, as
cutting potatoes into half or quarters creates
square edges that won't peel efficiently.
Using rounder potatoes will reduce the
amount of waste.
Positioning the peeler
Place the spindle into the bowl, then the
peeler over the top. Position peeler with
curved side up, and supporting ribs
facing down.
The best size potato
for the peeling disc is
around 65mm x 65mm.
Choose potatoes that are
round, rather than elongated.
Loading the potatoes
Position 6–7 potatoes evenly on top of the
peeler. Potatoes should have enough room
to freely roll and rumble. If potatoes are
too tightly packed, the peeling won't be as
effective. Keep in mind that the peeling works
best with a complete batch, and peeling just
a couple of potatoes won't be as efficient.
Lock lid in place before starting, and never
insert potatoes through the chute.
How long to peel
Peeling is very quick, with most potatoes
taking 25–30 seconds. Less time in the
peeler means less waste, but you may have to
remove the eyes by hand with a paring knife.
More time in the peeler will take a thicker
layer off, including most of the eyes.
9
10
ASSEMBLY
1. Position the processing bowl onto the motor
base with the handle in line with the ALIGN
HANDLE graphic on the motor base.
2. Turn the bowl clockwise until the handle
locks to the front. The processing bowl
should now be securely locked into position.
The food processor will not operate unless
the bowl is locked into position correctly.
UNLOCKED LOCKED
3. The spindle is required when using ALL
discs and blades. Failing to use the spindle
will damage the parts, and incorrect use this
way may cause the parts to fuse together.
4. Before placing the lid onto the processing
bowl, position the spindle over the coupling
in the centre of the processing bowl. Then
position your chosen blade or disc over it.
The blades drop down lower than the discs.
5. Place lid onto the processing bowl so that
the ALIGN | LOCK graphics on the lid
and handle align. To LOCK the lid, hold the
chute and turn clockwise so that the handle
parts align.
6. To use the blender (in the BFP580), position
the blending jug onto the motor base, with
ALIGN graphics matching. Turn clockwise
until the handle locks to the front.
Assembly
BEFORE FIRST USE
• Before using your food processor or blender for
the first time, remove any packaging material
and promotional labels. Ensure the POWER
button is OFF and the appliance is unplugged.
• Be careful when handling the blades and discs
as they are extremely sharp.
• Wash the processing bowl, processing lid
and all attachments in warm soapy water
with a soft cloth. Rinse and dry thoroughly.
The attachments may be washed in
the dishwasher.
• When first using your appliance, you may
notice an odour coming from the motor.
This is normal and will dissipate with use.
• Always use the appliance on a dry,
level work surface.

Functions
SPEED CONTROL
Many recipes process best with
a combination of speeds with occasional use
of pulse.
PULSE
Momentary burst of high power.
LOW
Low speed to combine more delicate foods,
and is good for combining wet and dry
ingredients.
HIGH
High speed is ideal for breaking down
ingredients to make cocktails (in the blender),
and other fine textured mixtures (in the food
processor).
OPERATION
The food processor will only operate when
the processing bowl or blending jug is
correctly locked into position.
To prevent premature motor wear, always use
the control dial to turn the food processor on
and off.
Tips
• After processing, wait until the blades/discs
have stopped moving before unlocking the lid.
To ensure safe handling, turn off and unplug at
the power outlet before handling the blades.
• When removing blades/discs, lift by carefully
grip the plastic hub in the centre.
• If the volume (while blending) is below the
maximum line, the inner measuring cap can be
removed and oils/liquids can be added while
blender is in use.
• Caution should be taken if blending large
volumes or thin liquids, as splashing may occur
through the centre cap area.
• Run the blender only for the appropriate
amount of time required. Do not over blend
ingredients.
• Use the PULSE setting when food is too thick
or coarse to circulate within the blender jug.
• Do not exceed the maximum mark when
adding foods and liquids into the blender.
• Ingredients may stick to the sides of the
blender jug. To push food back onto the blades,
turn the blender off and unplug at the wall. Use
a plastic spatula to scrape down the sides of
the jug, and then continue blending.
• If any moisture or liquid appears on top of the
motor base during blending, turn the blender
off and unplug at the wall. Remove the blender
jug, and wipe motor base immediately with a
dry cloth or paper towel.
• The maximum amount of ice cubes that the
blender can process is 8 cubes from a standard
ice tray.
• Use the PULSE function for foods that only
require short bursts of power, such as chopping
nuts and crushing ice.
• When blending drinks with ice cubes or frozen
fruit, use PULSE in short bursts.
• Thicker mixtures puree more efficiently if the
jug is ¼ to ½ full.

12
• Do not use metal utensils, as they may damage
the blades or blender jug.
• Do not blend a heavy mixture for more than
10 seconds. For normal blending tasks, do not
blend longer than 1 minutes at a time. If you
need to blend longer, turn off the blender and
stir ingredients before starting again. This rest
will help protect the motor from wear and tear.
• The blender will not knead dough, or
mash potatoes.
• When blending warm ingredients, do not put
more than 2 cups at a time in.
• Do not blend hot or boiling ingredients.
Allow food to cool down to a warm state before
placing in the blender. This is to safeguard
against sudden bursts of steam that could
cause the lid to dislodge.
• If blending warm ingredients, place a tea towel
over the lid and hold down firmly.
OVERLOAD PROTECTION SYSTEM
• The motor is protected from burning out by
an automatic cut-out switch. If the appliance
is overloaded or operated continuously for too
long, the motor may overheat and stop.
• Unplug and allow to cool for 30 minutes.
Once cooled, you will be able to use the food
processor as usual again.
• Note that some stiff mixtures (such as bread
dough) may cause the blade to rotate more
slowly than normal. If this happens, do not
process for more than 1 minute.
• If the blades or discs jam with food while
processing, immediately and unplug from
the power outlet before clearing the wedged
food. If this happens more than once, the
bowl may be overloaded. Try processing in
smaller batches.
PEELING POTATOES WITH
THE PEELER DISC
• Size and shape matter when using the peeler
disc. Choose round (rather than long) potatoes,
and aim for approximately 65mm in diameter.
There is a size guide at the front of this
instruction book.
• Place the peeler over the spindle. Position
peeler with curved side up, and supporting ribs
facing down.
• With the lid still off, evenly space the potatoes
around the disc. Peeling works best when
the peeler is fully loaded, making sure that
potatoes are in a single row around the edge.
Do not stack or cram additional potatoes in, as
they need space to roll.
• Use whole potatoes only, do not use potatoes
that have been cut in half or quarters.
• Place and lock the lid before peeling, and never
insert potatoes through the chute.
• Keep your eye on the potatoes during peeling,
as they may finish more quickly than expected.
For minimum waste, there may be some eyes
remaining, which can be removed with a
paring knife.
CHOPPING WITH THE QUAD
®
BLADE
The micro-serrated Quad blade chops raw and
cooked food to the consistency required, from
coarsely chopped to minced. The blades process
very efficiently, and may take less time than
expected to process many large tasks.
Always remember to place the spindle and Quad
blade into the processing bowl before adding
the food.
Avoid over-processing by checking the
consistency frequently. For many tasks, we
recommend using the PULSE button, as it may
only take a few seconds to fully process food to
your desired consistency.
If necessary, turn the POWER off and use a
spatula to scrape down the sides of the bowl to
encourage even processing.

13
Raw vegetables, fruit and cooked meats
Trim and cut food into 2.5cm cubes.
Process no more than 5½ cups at a time using
the PULSE button at 1–2 second intervals
until chopped to desired size or consistency.
Raw meat, chicken and fish
Trim excess fat and cut food into
2.5cm cubes. Ensure all bones are removed.
Chill well in freezer until firm as this will
help to cut through the food more readily.
Process no more than 1kg of raw meat at a
time. At this capacity the motor should run
for no more than 30 seconds at a time. Use a
combination of the START and the PULSE
button until chopped or minced to the
desired consistency.
Garlic, chilli and ginger
Peel garlic cloves and process them whole.
Leave chillies whole, or remove seeds for
milder chilli. Peel and cut ginger into
2.5cm cubes.
For other solid herbs like lemongrass or
galangal, peel and cut into cubes or pieces
between 1 and 2cm in size.
Size should be made smaller for harder or
more dense herbs.
Process using the PULSE button at
1–2 second intervals until chopped to the
desired consistency.
If adding garlic, chilli or ginger to other
ingredients, drop whole pieces down the
small feed chute while the motor is running.
Leafy herbs
Wash and dry herbs thoroughly.
Remove any coarse stems. Process no more
than 2 bunches of herbs (approx. 4 cups) at
a time using the PULSE button at
1–2 second intervals until chopped to the
desired consistency.
Use leafy herbs immediately for the most
aromatic results in your recipe.
Nuts
Process no more than 4 cups of shelled
nuts at a time using the PULSE button at
1–2 second intervals until chopped to the
desired consistency.
Dried fruit
Dried fruit can be sticky, and may stick to the
blades during processing. We recommend
putting dried fruit in the freezer for about
10 minutes before processing. Process no
more than 2 cups at a time using the PULSE
button at 1–2 second intervals until chopped
to the desired consistency.
If chopping fruit to add to cake mixture,
process the fruit before making the cake mix.
Add a little flour (from the quantity of flour
in the recipe) to prevent fruit from sticking to
the Quad blade.
We do not recommend chopping large dried
fruits such as dates and figs.
Soft breadcrumbs
Break stale bread into chunks (fresh bread
will stick to blades). Process no more than
4 slices at a time using the PULSE button at
1–2 second intervals until crumbed to desired
consistency. For best results when making
bread crumbs, add one slice at a time.
Dried breadcrumbs
Tear bread into chunks and toast in oven
until golden and crisp. Do not over
brown. Process no more than 4–6 slices
at a time using the PULSE button at
1–2 second intervals.
Biscuit crumbs
Break biscuits into quarters, and weigh a
maximum of 250g. Process using the PULSE
button at 1–2 second intervals until chopped
to the desired consistency. Sweet or savoury
biscuit crumbs can be used as an alternative
to pastry for sweet or savoury pies.
Do not process very hard biscuits as this may
damage the blades.

14
PURÉEING WITH THE QUAD
®
BLADE
The micro-serrated Quad blade purées raw
and cooked food to the consistency required,
including baby food. The blades process very
efficiently, and cut the time needed to purée
many tasks.
Always remember to place the Quad blade into
the processing bowl before adding the food.
Carefully remove the Quad blade after puréeing
food and use a spatula to scrape food adhering
to the blade and bowl.
Baby food
Trim and cut vegetables and meat into
2.5cm cubes. Cook vegetables and meat
before processing. Process no more than
5½ cups at a time using the START button in
intervals until the food is puréed to a smooth
and even consistency. Stock, milk or gravy
can be added through the small feed chute if
the mixture becomes too thick.
Excess baby food can be frozen in ice-cube
trays, and packed in single serve freezer bags
ready for use.
Peanut butter
Process no more than 4 cups of shelled
nuts at a time using the START button until
chopped to the desired consistency.
The volume of nuts reduces after processing,
for example 2 cups of nuts will make around
1 cup of nut butter.
Natural nut butter (without using stabilisers)
will separate on standing, and needs to be
stirred before use.
MIXING WITH THE QUAD
®
BLADE
The Quad blade mixes ingredients for cakes,
batters, and cookie doughs.
Always remember to place the spindle and
Quad blade into the processing bowl before
adding the food.
Butter cake and biscuit dough
Place softened, chopped butter and sugar
into the processing bowl. Process using the
START button until the mixture is lightly
creamed. With the motor running, add eggs
one at a time through the small feed chute,
mixing well after each egg is added. Take lid
off and add liquid and dry ingredients to the
mixture. Process using the PULSE button
until folded evenly. Scrape down sides of bowl
as needed. Do not over-process.
Add choc chips, nuts, dried fruit, etc. after
the main mixture is done. Use the PULSE
button in very short bursts until the additions
are combined. Do not over-process, as these
larger ingredients will break down quickly.
Quick-mix cakes and batters
Place all ingredients in the bowl, starting with
liquids, and being careful not to exceed the
MAX LIQUID level. Process using the PULSE
button until folded evenly. Scrape down sides
of bowl as needed. Do not over-process.
This method can also be used for melt ’n’ mix
cakes, packet cake mixes and crêpe batters.
Pastry dough
Place flour and chilled, cubed butter into the
processing bowl.
Do not process more than 2 cups (300g)
of flour using the START button in intervals
until the butter is absorbed into the flour.
Steadily add liquid through the small feed
chute with the motor still running.
Process until the mixture forms a ball.

15
KNEADING WITH THE
DOUGH BLADE
Always remember to place the spindle and
dough blade into the processing bowl before
adding the food.
The edges of the plastic dough blade
create a softer action for combining dough
ingredients. The dough blade encourages the
gluten strands to be stretched rather than cut,
and should be used for all yeast doughs, and
any other doughs that require kneading.
Bread or pizza dough
Place flour and dry ingredients into the
processing bowl, including instant active
dry yeast.
The food processor can handle up to 1kg of
flour, however for best results we recommend
not processing more than 6 cups (800g)
at a time. Process using the START button
in intervals.
Steadily add liquid (including oil, if
applicable) through the small feed chute
with the motor still running. Process until
the mixture until it forms a soft, elastic
dough ball.
Transfer dough ball to a lightly floured
surface and knead for a further 5 minutes if
necessary until soft and pliable.
If processing more than two recipes of dough
ingredients (800g flour), allow the motor
base to cool for an extended period before
subsequent kneading to prevent the motor
from overloading.
Place dough into a large, greased mixing
bowl and cover. Stand in a warm place until it
has doubled in size. Turn the dough out onto
a lightly floured surface and knead again until
smooth and elastic. Shape the dough then
allow to rise in a warm area before baking.
SLICING, GRATING AND SHREDDING
IMPORTANT
The spindle must be used with all blades
and attachments.
Adjustable slicer
The adjustable slicer will slice food to an even
and consistent thickness. It can be adjusted
to 24 settings, from very fine (0.3mm) to thick
(8.0mm). To adjust the slicing thickness,
hold the adjustable slicing disc by the outer
edge with one hand, and turn the adjustment
dial on the underside with the other hand.
An arrow graphic indicates the thickness of
the slice you have chosen.
Reversible grater and shredder
This disc has an array of small blades on
both sides of the disc. Align the disc so larger
holes face up for courser textured results,
or with the smaller holes facing up for finer
results. The discs are labelled showing which
side faces up.

16
CONTROLLING THE INGREDIENTS
It is important to position the food in the
chute to gain maximum control and best
results.
The chute can be packed to fill the width of
the chute. The food should fit snugly so it is
supported in an upright position in the chute,
but not so tight that it could prevent the food
from moving down the chute.
For long thin foods such as carrots,
cucumbers, zucchini, etc., use the small feed
chute. This will avoid the ingredient from
tipping over during slicing.
Pressure
When processing, never force the food down
the chute as this can damage the discs.
Apply light pressure for soft foods such as
tomatoes and bananas.
Apply medium pressure for firmer foods such
as potatoes and apples.
Apply firm pressure for hard foods such
as parmesan cheese and deli meats such
as salami.
Round fruit and vegetables
Prepare fruit or vegetables by washing and
peeling (if necessary).
Small fruit and vegetables should be trimmed
on one end so the food sits flat inside the
feed chute.
Large fruit and vegetables may need to be cut
in half to fit in the chute.
Long fruit and vegetables
Prepare fruit or vegetables by washing and
peeling (if necessary).
Ingredients can be cut cross-sectionally to
create circular results. Use the small and
medium feed chute, or pack ingredients
vertically in the large feed chute.
Ingredients can be cut lengthwise to create
ribbons. Use the large feed chute, and trim
ingredients if necessary to encourage them to
sit flat in the feed chute when the disc starts.
Pack the large feed chute horizontally.
Leafy vegetables
Cut cabbage into wedges to fit the feed chute.
For lettuce, separate leaves, then roll up and
pack vertically in the feed chute.
Cheese
Caution should be taken when processing
cheese in a food processor. For soft cheese
such as mozzarella, partially freeze it until
firm. This will help prevent jamming the disc.
Round cheeses such as mozzarella should be
trimmed at one end to encourage them to sit
flat in the feed chute with the disc starts.
Hard cheeses such as parmesan must be
checked first to ensure they are not too hard
(to avoid damaging blade edges). The cheese
should slice easily with a sharp knife and
remove the rind before processing.
Wedged shaped cheeses such as parmesan
can be packed side by side to form a
rectangular shape in the chute.
Deli meats
Cut in lengths to fit the height of the feed
chute. The length must not be higher than
MAX CHUTE FILL graphic. Pack with the
cut side facing down. For hard cured sausages
like salami and pepperoni trim on one end
and process one sausage at a time through
the small or medium feed chute, depending
on size.
Grated chocolate
Break a block of chocolate into small pieces,
and chill until firm. Pack into the small feed
chute, and then grate using either the coarse
or fine side (do not use Quad blade or
adjustable slicer).

17
Blending Chart
FOOD PREPARATION & USAGE QUANTITY FUNCTIONS TIME
Nuts Remove shells 200g CHOP 10–30 secs
Breadcrumbs Cut into 2cm pieces 80g (2 slices) PULSE 50–60 secs
Biscuits Halved 125g PULSE 60 secs
Whipped cream
Add sugar or vanilla
if desired
300ml PULSE 30–40 secs
Smoothie
Milk, chopped fresh
fruits, yoghurt, ice cream
Max
800ml
BLEND or
LIQUIFY
60 secs
Fresh
Fruit Sauce
Whole berries 250g CHOP 30–40 secs
Blended Soups Cool to room temperature 800ml BLEND 50–60 secs
Dressing
Oil, vinegar or lemon
juice, seasonings
250ml BLEND 15–20 secs
Ice
Max 8
ice cubes
PULSE 60 secs
NOTE: This blending chart should be used as a guide only. The blender attachment is part of
the Kitchen Wizz 8 Plus (BFP580) only.

18
Food Processing Guide
For more information about preparation of food and how to process, refer to basic
processing techniques. For specific recipes, refer to the recipe section.
FOOD BLADE TYPE ADJUSTABLE SLICING
DISC THICKNESS
RECOMMENDED
DISC TYPE
Avocado
Quad blade
Use: Guacamole
2–5
Beetroot (cooked) 2–5
Shredder
Use: Salad
Butternut Pumpkin
Quad blade
Use pumpkin soup
Cabbage / Lettuce
Thin 1–2 and med 2–3
Use: Accompaniment
Shredder
Use: Salad
Carrot
Quad blade
Use: Vegetable soup
0–5
Shredder
Use: Salad
Cauliflower (cooked)
Quad blade
Use: Cauliflower soup
Celery
Quad blade
Use: Vegetable soup
Thin 1–2 med 2–3
Use: Salad
Eggplant
Quad blade
Use: Accompaniment
2–5
Use: Grilled eggplant
Herbs
Quad blade
Use: Seasoning or pesto
Leeks
Quad blade
Use: Cooked for soups
2–5
Use: Vegetable soup
Onion
Quad blade
Use: Soups, sauces
0–5
Use: Salad
Potatoes (whole, raw)
Peeler
Use: As usual
Potatoes (raw)
0.3–6
Use: Potato au gratin
Shredder
Use: Hash browns
Potatoes (cooked)
Quad blade
Use: Mash potato
Tomatoes
Quad blade
Use: Salsa
2–5
Use: Caprese salad,
tomato relish

19
FOOD BLADE TYPE ADJUSTABLE SLICING
DISC THICKNESS
RECOMMENDED
DISC TYPE
Apple / Pear
Quad blade
Use: Apple sauce
2–5
Use: Apple pie
Apple / Pear
(cooked)
Quad blade
Use: Baby food
4–6
Use: Fruit salad
Dried Fruit
Quad blade
Use: Fruit salad, dessert
sauce
Batters
Quad blade
Use: Cakes, pancake,
waffle batter
Breadcrumbs
Quad blade
Use: Coatings,
breadcrumb stuffing
Cheese
2–5
Use: Garnish,
sandwich fillings
Shredder - coarse
or fine
Use: Grated cheese
for pizza
Chocolate
Shredder -
Coarse or fine
Use: Dessert
decoration
Doughs
Dough blade
Use: Bread, pizza
Pastry Quad blade
Eggs (whole or yolks)
Quad blade
Use: Mayonnaise
Meat (raw)
Quad blade
Use: Meatloaf, burgers,
meatballs
Meat (cooked)
Quad blade
Use: Sandwich fillings,
pate, baby food
Meat (deli)
1–6
Use: Sandwiches,
antipasto, pizza toppings

20
Care & Cleaning
Remove the power cord from the power outlet
after use for safety reasons.
Blender jug, processing bowl and lids
To avoid food drying on the blades and jug,
follow the below steps as soon as possible
after use:
• Rinse the jug and lid and wash separately in
warm soapy water with a soft cloth or bottle
brush.
• Take care to rinse all detergent off the jug after
cleaning.
• It is most effective to clean the jug immediately
after use.
Blades and discs
Blades and discs are razor sharp, do not touch.
Always use a spatula or brush to remove food
or when cleaning blades.
Motor base
To clean the motor base, wipe with a soft,
damp cloth then dry thoroughly. Wipe any
excess food particles from the power cord.
Cleaning agents
Do not use abrasive scouring pads or
cleansers on either the motor base or the jug,
as they may scratch the surface. Use only
warm soap water with a soft cloth.
Dishwasher
The blender jug, processing bowl and
lids may occasionally be washed in the
dishwasher (top shelf only), however washing
in the dishwasher is not recommended on a
regular basis, as prolonged exposure to harsh
detergents and high heat may shorten the life
of the plastic.
Stubborn food stains and odours
Strong smelling foods such as garlic, fish and
some vegetables such as carrots may leave an
odour or stain the bowl or lid.
To remove, pour warm soapy water and fill to
the MAX LIQUID mark. Set aside to soak for
5 minutes, without immersing the whole bowl.
Then wash with a mild detergent and warm
water, rise well and dry thoroughly. Store the
bowl with the lid off.
Storage
Place the large food pusher (with small
pusher inserted) into the feed chute for
storage.
Store your food processor upright, with the
bowl and lid resting in position, but not
locked. Locking the bowl and lid can put
unnecessary strain on the safety interlock.
All accessories should be kept in a safe
place out of the reach of children to avoid
accidental cuts. It is not recommended to
store the discs in a drawer with other utensils.
For the BFP580, store accessories in the
storage box provided, with the Quad blade
inside the bowl. For the BFP560, store the
Quad blade inside the bowl, with the variable
slicer on top. These blades are extremely
sharp, and the bowl provides natural
protection.
Do not place anything else on top of your
food processor during storage.

21
Troubleshooting
FOOD PROCESSOR
PROBLEM EASY SOLUTION
Food is unevenly
processed
•
Ingredients should be cut evenly into 2.5cm pieces before processing.
•
Ingredients should be processed in batches to avoid overloading.
Slices are slanted
or uneven
•
Place evenly cut food into the feed chute.
•
Apply even pressure on the pusher.
Food falls over in
the feed chute
•
The large feed chute must be packed full for best results.
If processing smaller quantities, place items to the far left in the feed chute,
or use the small or medium feed chute, depending on the food size.
Some food remains
on top of the disc
after processing
•
It is normal for small pieces to remain after processing.
Motor slows
down when
kneading dough
•
Amount of dough may exceed maximum capacity.
Remove half and process in two batches.
•
Dough may be too wet (see next page). If motor speeds up, continue processing.
If not, add more flour, 1 tablespoon at a time until the motor speeds up.
Process until dough cleans the side of the processing bowl.
Dough doesn’t
clean inside of the
processing bowl
•
Amount of dough may exceed food processor maximum capacity.
Remove half and process in two batches.
•
Dough may be too dry.
Dough nub forms on
top of dough blade and
dough does not become
uniformly kneaded
•
Stop machine, carefully remove dough, divide it into 3 pieces and redistribute
them evenly in the processing bowl.
Dough feels tough
after kneading
•
Divide dough into 2 or 3 pieces and redistribute evenly in processing bowl.
Process 10 seconds or until uniformly soft and pliable.
Dough is too dry
•
While machine is running, add water through the small feed chute,
1 tablespoon at a time until dough cleans the inside of the processing bowl.
Dough is too wet
•
While machine is running, add flour through the small feed chute,
1 tablespoon at a time until dough cleans the inside of the processing bowl.
The motor
slowed down
during operation
•
This is normal as some heavier loads (e.g. slicing/shredding cheese) may require
the motor to work harder. Reposition the food in the feed chute and continue
processing.
•
The maximum load capacity may have been exceeded. Remove some of the
ingredients and continue processing.

22
PROBLEM EASY SOLUTION
The motor does
not start
•
There is a safety interlock switch to prevent the motor from starting if it is not
properly assembled. Make sure the processing bowl and lid are securely locked
into position.
•
If you are slicing or shredding and the above solution does not work, make sure
that the food contents in the feed chute are cut below the maximum fill line so
that the activation rod can engage the motor.
•
Make sure the large food pusher is inserted in the feed chute low enough to
engage safety interlock switch.
•
If the motor still will not start, check the power cord and power outlet.
The food processor
shuts off during
operation
•
The lid may have become unlocked; check to make sure it is securely in position.
•
If the motor overloads, all buttons will flash in unison.
Unplug at the wall, and allow the food processor to cool for 20–30 minutes
before resuming.
The food processor
vibrates/moves
during processing
•
Make sure the rubber feet at the bottom of the unit are clean and dry.
Also make sure that the maximum load capacity is not being exceeded.
•
This is normal as some heavier loads may require the motor to work harder.
BLENDER
PROBLEM EASY SOLUTION
Motor doesn’t start or
blade doesn’t rotate
•
Check that the power plug is properly inserted into the power outlet.
•
Motor Overload Protection may have operated (see below).
Food is unevenly
chopped
•
This can happen when too much food is being blended at one time.
Try a smaller amount, and work in batches if necessary.
•
The ingredients may be too large. Try cutting into smaller pieces.
For best results, ingredients should be in pieces no larger than 2cm.
Food is chopped too
fine or is watery
•
Try blending for shorter period of time. Use PULSE for better control.
Food sticks to
blade and jug
•
The mixture may be too thick. Try adding more liquid and/or using a slower
speed for blending.
Blender overloaded
•
This blender has overload protection to prevent damage to the motor.
Unplug and allow the blender to cool down for 15 minutes. Once cooled,
you will be able to use the blender as usual again.
•
We recommend blending in smaller batches, or cutting ingredients into
smaller batches.

23

Breville, the Breville Logo, Barista Express and Temp Control are trademarks of Breville Pty Ltd (“Breville”) and Breville's products
are distributed in Australia and New Zealand under license.
Copyright Breville Pty. Ltd. 2021.
Due to continued product improvement, the products illustrated/photographed
in this brochure may vary slightly from the actual product.
BFP580/BFP560 ANZ D21
Australian Customers
Phone:
1300 139 798
Web: www.breville.com
New Zealand Customers
Phone:
0800 273 845
Web: www.breville.com
Breville Customer Service Centre