
TABLET
User Manual
Please read this manual before operating
your device and keep it for future reference.

Special Features ..............................1
Users .......................................2
Multi Window ................................2
Media Volume Limiter ........................2
Secure Folder ................................2
Getting Started .............................. 3
Set Up Your Device .............................4
Assemble Your Device ........................5
Start Using Your Device .......................8
Learn About YourDevice .......................10
Front View ..................................11
Back View
..................................13
Navigation .................................14
Home Screen ...............................16
Customize Your Home Screen ................18
Notification Panel ...........................21
Multi Window .............................. 23
Enter Text ................................. 25
Apps .........................................28
Use Apps .................................. 29
Apps Settings .............................. 32
Calculator .................................34
Table of Contents
VZW_T378V_EN_UM_TN_QJ4_073118_FINAL

iii Table of Contents
Calendar
.................................. 35
Camera and Video .......................... 38
Clock ..................................... 43
Contacts .................................. 46
Email .....................................54
Gallery ................................... 57
Google Apps ................................61
Message+ .................................64
My Files ....................................67
SamsungNotes ............................68
Verizon Apps .............................. 70
Additional Apps .............................71
Settings ..................................... 72
Access Settings ............................ 73
Search for Settings ......................... 73
Connections
..................................74
Wi-Fi .......................................75
Bluetooth ................................. 78
Data Usage ................................80
Airplane Mode ............................. 82
Mobile Hotspot ............................ 83
Tethering ..................................85
Mobile Networks ...........................86
Location ...................................86
Nearby Device Scanning ....................88
Printing ...................................88
Virtual Private Networks ...................89
Ethernet ..................................90
View Your Verizon Account ..................90

Learn about your mobile device
hardware, assemblyprocedures,
and how to get started usingyour
new device.
Getting Started

Set Up Your Device 8
Start Using Your Device
Turn Your Device On or Off
The instructions below explain how to turn your device
on or off.
To turn the device on:
► Press and hold the Power key until the device
turnson.
To turn the device off:
1. Press and hold the Power key.
2. Tap Power off, and confirm when prompted.
Use the Setup Wizard
The first time you turn your device on, the Setup Wizard
guides you through the basics of setting up your device.
Follow the prompts to choose a default language,
connect to a Wi-Fi
®
network, set up accounts, choose
location services, learn about your device’s features,
and more.
Lock or Unlock Your Device
Use your device’s screen lock features to secure your
device. By default, the device locks automatically when
the screen times out.
To lock the device:
► Press the Power key.

Set Up Your Device 9
The default Screen lock on your device is Swipe. To
choose a more secure screen lock, see “Set a Secure
Screen Lock” on page113.
To unlock the device:
► Press the Power key or Home key, and then drag
your finger across the screen.
Add a Google Account
Your new device uses your Google
™
Account to fully
utilize its Android
™
features.
1. From a Home screen, swipe up to access Apps.
2. Tap Settings > Accounts.
3. Tap Addaccount > Google.
Note: When you sign in to a Google Account, Factory
Reset Protection (FRP) is activated. FRP requires your
Google Account information when resetting to factory
settings. For more information, see “Factory Reset
Protection” on page111.
Add a Samsung Account
Create a Samsung account for access to Samsung
content and apps on your device.
1. From a Home screen, swipe up to access Apps.
2. Tap Settings > Accounts.
3. Tap Addaccount > Samsungaccount.
AddanEmailAccount
View and manage all of your email accounts.
1. From a Home screen, swipe up to access Apps.
2. Tap Settings > Accounts.
3. Tap Addaccount > Email.

Learn About
Your Device
Learn some of the key features of your
mobile device, including the screens
and icons, as well as how to navigate the
device and enter text using the keyboard.

12Learn About YourDevice
•
Power key
-
Press to turn the screen on or off.
-
Press and hold to select a power control option.
•
Volume key
-
Adjust the volume of your device’s sounds and
audio playback.
-
In the camera app, press a volume key to take a
photo.
13Learn About YourDevice
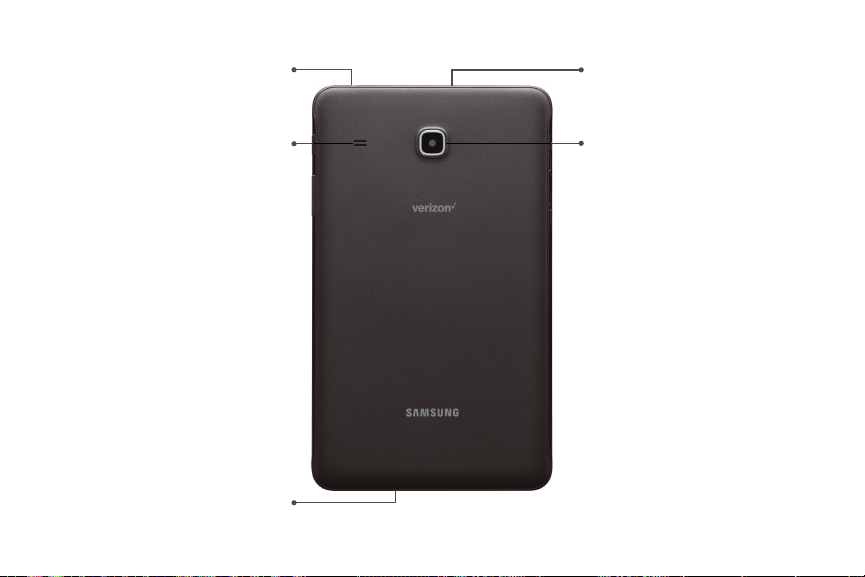
Back View
Devices and software are constantly evolving — the illustrations you see here are for reference only.
Speaker
Rear camera
Microphone
USB charger/Accessoryport
Headset jack

14Learn About YourDevice
Navigation
Learn the basics for navigating through your device.
Touchscreen Navigation
Please note that a touchscreen responds best to a
light touch from the pad of your finger or a capacitive
stylus. Using excessive force or a metallic object on the
touchscreen may damage the tempered glass surface
and void the warranty.
Tap
Lightly tap items to select or launch them.
•
Tap the keyboard to enter characters ortext.
•
Tap an item to select it.
•
Tap an app shortcut to launch the application.
Double-Tap
Lightly tap items twice to select or launch them.
•
Double‑tap an image to zoom in or out.
Touch and Hold
Touch and hold items on the screen to activate them.
•
Touch and hold a field to display a pop‑up menu of
options.
Swipe
Lightly drag your finger vertically or horizontally across
the screen.
•
Swipe the screen to unlock the device.
•
Swipe the screen to scroll through the Homescreens
or menu options.

19Learn About YourDevice
To remove a shortcut:
1. Touch and hold an app shortcut to open the
optionsmenu.
2. Tap Remove shortcut.
•
Removing a shortcut does not delete the app, it
just removes the shortcut from a Home screen.
To move a shortcut from one Home screen to another:
1. Touch and hold an app shortcut to release it.
2. Drag the app shortcut to a new Home screen, and
then release it.
Use Folders
You can organize App shortcuts in folders on an
Appslist screen.
For more information, see “Create and Use Folders” on
page30.
Wallpapers
Change the look of the Home and Lock screens with
wallpaper. You can display a favorite picture or choose
from preloaded wallpapers.
1. From a Home screen, pinch the screen.
2. Tap Wallpapers to customize.
3. Tap From Gallery to see additional wallpaper
images.
4. Tap an image to choose it, and then select which
screen you want to use it for.
5. Tap Set as wallpaper.

30Apps
Sort Apps
App shortcuts can be listed alphabetically or in your
own custom order.
1. From a Home screen, swipe up to access Apps.
2. Tap Moreoptions > Sort.
•
Alphabetical order: Sort apps alphabetically.
•
Custom order: Arrange apps manually.
-
To remove empty spaces between apps,
tap Moreoptions > Clean up pages.
Create and Use Folders
Create a folder to organize App shortcuts on an
Appslist screen.
1. From a Home screen, swipe up to access Apps.
2. Touch and hold an app shortcut, and then drag it on
top of another app shortcut until it is highlighted.
3. Release the app shortcut to create the folder.
•
Enter folder name: Name the folder.
•
Palette: Change the folder color.
•
Add apps: Place more apps in the folder.
Tapapps to select them, and then tapAdd.
4. Tap Back to close the folder.

33Apps
•
Permissions: View permissions granted to the
app for access to your device’s information.
•
Set as default: Set the app as a default for a
certain category of apps.
Default Apps
If you have multiple applications of the same type, you
can select one app to be the default.
1. From a Home screen, swipe up to access Apps.
2. Tap Settings > Apps > Default apps.
3. Tap the following to choose default apps:
•
Browser app: Choose a default browser app.
•
Home screen: Choose a Home screen type.
•
Device assistance app: Choose an app that
provides assistance for using your device.
•
Default app selection: Choose default apps for
other functions.
•
Set as default: Choose default apps for other
functions.
Apps Settings Shortcuts
Shortcuts to the settings for various apps are available
in one convenient location.
1. From a Home screen, swipe up to access Apps.
2. Tap Settings > Apps.
3. Tap an option to display the settings for the
selected app.

36Apps
Create an Event
Use your Calendar to create events.
1. From a Home screen, swipe up to access Apps.
2. Tap Calendar > Add to add an event.
3. Enter details for the event, and then tap Save.
Share an Event
Share events from your Calendar.
1. From a Home screen, swipe up to access Apps.
2. Tap Calendar, tap an event, and tap again to
edit it.
3. Tap Share, choose a sharing method, and follow the
prompts.
Delete an Event
Delete events from your Calendar.
1. From a Home screen, swipe up to access Apps.
2. Tap Calendar, tap an event, and tap again to
edit it.
3. Tap Delete, and confirm when prompted.
Create a Task
Use your Calendar to create tasks. Tasks are items you
add to the calendar to be accomplished on a certain
day. A task is displayed as a checklist item and is
removed once you mark the task as complete.
1. From a Home screen, swipe up to access Apps.
2. Tap Calendar > View > Tasks.
3. Tap Add to add a task.
4. Enter details for the task, and then tap Save.

41Apps
Camera Settings
Use the icons on the main camera screen and the
settings menu to configure your camera’s settings.
1. From a Home screen, swipe up to access Apps.
2. Tap Camera > Settings.
Rear camera
•
Picture size: Select a resolution. Selecting a
higher resolution for higher quality requires
more memory.
•
Video size: Select a resolution. Selecting a
higher resolution for higher quality requires
more memory.
•
Timer: Take time-delayed pictures or videos.
•
Focus mode:
-
Auto focus: Focus the picture automatically.
-
Macro: Focus on objects closer to the camera
lens.
Front camera
•
Picture size: Select a resolution. Selecting a
higher resolution for higher quality requires
more memory.
•
Save pictures as previewed: Save self-portraits
or self-recordings as viewed on the camera
screen, not as flipped images.
•
Shooting methods:
-
Tap screen: Tap the screen to take selfies.
-
Show palm: Hold the palm of your hand
toward the camera to have your picture taken
in a few seconds.
•
Timer: Take time-delayed pictures or videos.

48Apps
Import Contacts
Your device can import contacts from an installed
memory card (not included).
1. From a Home screen, swipe up to access Apps.
2. Tap Contacts > Moreoptions >
Managecontacts.
3. Tap Import/Export contacts.
4. Tap Import and follow the prompts.
Export Contacts
Manually back up contacts to an installed memory card
(not included).
1. From a Home screen, swipe up to access Apps.
2. Tap Contacts > Moreoptions >
Managecontacts.
3. Tap Import/Export contacts.
4. Tap Export and follow the prompts.

51Apps
Groups
Use groups to organize your contacts.
Create a Group
Create your own contact groups.
1. From a Home screen, swipe up to access Apps.
2. Tap Contacts > Moreoptions > Groups.
3. Tap Create, and then tap fields to enter information
about the group:
•
Group name: Enter a name for the new group.
•
Add member: Select contacts to add to the new
group, and then tap Done.
4. Tap Save.
Add or Remove Group Contacts
Add more contacts to a group, or remove contacts.
1. From a Home screen, swipe up to access Apps.
2. Tap Contacts > Moreoptions > Groups, and
then tap a group.
3. Tap Edit.
•
To add a contact, tap Add member, and then tap
the contacts you want to add. When finished,
tapDone.
•
To remove a contact, tap Remove next to a
contact.
4. Tap Save.

57Apps
Gallery
View, edit, and manage pictures and videos. The
following categories allow you to organize your
content:
•
Pictures: View pictures and videos in the order they
were saved. Content is organized by date.
•
Albums: Create custom albums to organize your
pictures and videos.
•
Stories: Create custom collections of related
pictures and videos and share them with your
contacts.
View Pictures
Pictures stored on your device are viewable in the
Gallery app.
1. From a Home screen, swipe up to access Apps.
2. Tap Gallery > Pictures.
3. Tap a picture to view it. Swipe left or right to view
other pictures or videos.
•
To mark the picture as a favorite, tap
Favorite. The picture is added to Favorites
under the Albums tab.
•
To access the following features, tap
Moreoptions:
-
Details: View information about a picture.
-
Set as wallpaper: Set the picture as
wallpaper.
-
Print: Send the picture to a connected
printer.
-
Open in Photo Editor Pro: Edit the picture in
Photo Editor Pro.

59Apps
Share Pictures and Videos
Share pictures and videos from your Gallery app.
1. From a Home screen, swipe up to access Apps.
2. Tap Gallery > Pictures.
3. Tap Moreoptions > Share, and then tap pictures
and videos to select them.
4. Tap Share, and then choose an app or connection to
use for sharing your selection. Follow the prompts.
Delete Pictures and Videos
Delete pictures and videos stored on your device.
1. From a Home screen, swipe up to access Apps.
2. Tap Gallery > Pictures.
3. Tap Moreoptions > Edit.
4. Tap pictures and videos to select them, or tap the
All checkbox at the top of the screen to select all
pictures and videos.
5. Tap Delete, and confirm when prompted.
Take a Screenshot
Capture an image of your screen. A Screenshots album
is automatically create in the Gallery app.
► From any screen, press and hold the Power and
Volume down keys.

69Apps
Notes Options
Edit, share, or manage notes.
1. From a Home screen, swipe up to access Apps.
2. Tap SamsungNotes.
3. Tap More options for the following options:
•
Edit: Select notes to share, delete, or move.
•
Sort by: Change the way notes are organized.
•
List/Grid view: Switch between List view and
Grid view.
•
Settings: View settings for the SamsungNotes
app.

Connections
Manage connections between your device
and a variety of networks and other devices.

Settings 75
Wi-Fi
Connect your device to a Wi-Fi network.
1. From a Home screen, swipe up to access Apps.
2. Tap Settings > Wi-Fi, and then tap On/Off to
turn on Wi-Fi.
•
When Wi-Fi is turned on, your device
automatically scans for available networks and
displays them.
3. Tap the network you want to connect to.
•
When you select an open network, you are
automatically connected to the network.
Otherwise, enter a password to connect.
Manually Connect to a Wi‑FiNetwork
Connect your device to a Wi-Fi network that is hidden.
1. From a Home screen, swipe up to access Apps.
2. Tap Settings > Wi-Fi, and then tap On/Off to
turn on Wi-Fi.
3. Tap Addnetwork.
4. Enter information about the Wi-Fi network:
•
Network name: Enter the name of the Wi-Fi
network.
•
Security: Select a security option and enter your
password.
•
Auto reconnect: Connect to this network
automatically whenever available.
•
Show advanced options: Add advanced options
such as IPsettings and Proxy settings.
5. Tap Connect to store the new information and
connect to your target wireless Access Point.

Settings 76
Wi-Fi Preferences
Customize advanced Wi-Fi services.
1. From a Home screen, swipe up to access Apps.
2. Tap Settings > Wi-Fi, and then tap On/Off to
turn on Wi-Fi.
3. Tap More options > Advanced for options:
•
Show Wi-Fi pop-up: Notify if Wi-Fi is available
when opening apps.
•
Smart network switch: Connect automatically
to a mobile network connection when the Wi-Fi
connection is unstable.
•
Wi-Fi notifications: Receive notifications when
open networks in range are detected.
•
Hotspot 2.0: Connect automatically to public
Wi-Fi access points that support Hotspot 2.0.
•
Manage networks: View your saved Wi-Fi
networks.
•
WPS push button: Connect to a Wi-Fi network
by pressing the WPS button on a router.
•
WPS PIN entry: Connection to a Wi-Fi network
by entering your WPS PIN.
•
Keep Wi-Fi on during sleep: Specify whether to
disconnect from Wi-Fi when the device is asleep.
•
Install network certificates: Install
authentication certificates.
•
Wi-Fi control history: View devices that have
turned your Wi-Fi on or off.
•
MAC address: View your device’s MAC address,
which is required when connecting to some
secured networks (notconfigurable).
•
IP address: View your device’s IP address
(notconfigurable).

Settings 77
Wi-Fi Direct
Wi-Fi Direct allows direct device-to-device connections
using Wi-Fi without having to connect to a Wi-Fi
network.
Connect to a Device with Wi-Fi Direct
Use Wi-Fi Direct to connect directly to other
Wi-FiDirect devices.
1. From a Home screen, swipe up to access Apps.
2. Tap Settings > Wi-Fi, and then tap On/Off to
turn on Wi-Fi.
•
Wi-Fi must be on to configure settings.
3. Tap Wi-Fi Direct. Your device automatically scans
for nearby Wi-Fi Direct devices.
4. Select a device, and then follow the prompts to
complete the connection.
Share Data with Wi-Fi Direct
Share data with another device using Wi-Fi Direct.
1. Connect your tablet to the device using Wi-FiDirect.
2. From an app, tap Share or More options >
Share.
3. Tap Wi-Fi Direct and follow the prompts.
Disconnect from Wi-Fi Direct
Disconnect your tablet from a Wi-Fi Direct device.
1. From a Home screen, swipe up to access Apps.
2. Tap Settings > Wi-Fi > Wi‑FiDirect.
3. Tap a device to disconnect it.

Settings 79
Rename a Paired Device
Once you have paired your device to another device,
you can rename the paired device to make it easier to
recognize.
1. From a Home screen, swipe up to access Apps.
2. Tap Settings > Bluetooth, and then tap On/Off
to turn on Bluetooth.
3. Tap Settings next to the previously paired
device, and then tap Rename.
4. Enter a new name, and tap Rename.
Share Data with Bluetooth
Use Bluetooth to transfer information between your
tablet and another Bluetooth-enabled device.
To send data to another device using Bluetooth:
1. From an app, tap Share or More options >
Share.
2. Tap Bluetooth and follow the prompts.
To receive data from another device using Bluetooth:
1. When another device attempts to send a file to your
tablet using Bluetooth, you will see a request to
accept the file.
2. Tap Accept.
3. To open the file, drag down the Notification panel
and tap Filereceived.
Connect with a Bluetooth Device
Listen to music using a Bluetooth stereo headset, or
have hands-free conversations using a compatible
Bluetooth headset or car kit.
1. From a Home screen, swipe up to access Apps.
2. Tap Settings > Bluetooth, and then tap On/Off
to turn on Bluetooth.
3. Tap a paired device.

Settings 83
Mobile Hotspot
Activate Mobile hotspot to allow other devices to use
your device’s Internet connection.
1. From a Home screen, swipe up to access Apps.
2. Tap Settings > Mobile hotspot and tethering >
Mobile hotspot.
3. Tap On/Off to turn Mobile hotspot on or off.
Connect a Device to Your
MobileHotspot
Use the other device’s Wi-Fi control to connect to
Mobile hotspot.
1. From a Home screen, swipe up to access Apps.
2. Tap Settings > Mobile hotspot and tethering >
Mobile hotspot.
3. Tap On/Off to turn on Mobile hotspot.
4. Activate Wi-Fi on the target device.
5. Scan for Wi-Fi hotspots and select your device’s
Mobile hotspot from the list.
6. Enter your device’s Mobile hotspot password on the
target device.

Settings 85
Configure Mobile Hotspot Settings
Manage your Mobile hotspot security and connecting
settings.
1. From a Home screen, swipe up to access Apps.
2. Tap Settings > Mobile hotspot and tethering >
Mobile hotspot.
3. Tap More options > Configure mobile hotspot for
the following settings:
•
Network name: View and change the name of
your Mobile hotspot.
•
Hide my device: Make your tablet invisible to
others.
•
Security: Choose the security level for your
Mobile hotspot.
•
Password: If you choose a security level that
uses a password, enter the password. Adefault
password is displayed on the Mobile hotspot
screen.
•
Show advanced options: Access advanced
options, including Broadcast channel, and
to specify the channel your device uses for
Mobilehotspot.
Tethering
Use Bluetooth or USB tethering to share your device’s
Internet connection with a computer.
1. From a Home screen, swipe up to access Apps.
2. Tap Settings > Mobile hotspot and tethering.
3. Tap an option:
•
Tap Bluetooth tethering to share your device’s
Internet connection using Bluetooth.
•
Connect the computer to the device using a
USBcable, and then tap USB tethering to turn
on tethering.

Settings 90
Connect to or Disconnect from
YourVPN
Once you have set up a VPN connection, connecting to
and disconnecting from the VPN is easy.
To connect to a VPN:
1. From a Home screen, swipe up to access Apps.
2. Tap Settings > More > VPN.
3. Tap the VPN, enter your log in information, and tap
Connect.
To disconnect from a VPN:
1. From a Home screen, swipe up to access Apps.
2. Tap Settings > More > VPN.
3. Tap the VPN, and then tap Disconnect.
Ethernet
Configure an Ethernet connection with your device.
1. From a Home screen, swipe up to access Apps.
2. Tap Settings > More > Ethernet, and follow the
prompts.
View Your Verizon
Account
View your Verizon account and data plan information.
1. From a Home screen, swipe up to access Apps.
2. Tap Settings > More > View Verizon Account.

Sounds and
Vibration
Configure the sounds and vibrations used to
indicate notifications, screen touches, and
other interactions.

Settings 95
•
App rules: Manage rules set by apps.
•
Hide visual notifications: Select options for
preventing visual notifications for apps silenced
by Do not disturb.
System Sounds
Set various other system sound options.
1. From a Home screen, swipe up to access Apps.
2. Tap Settings > Sounds and vibration, and tap to
enable each option:
•
Touch sounds: Play tones when you touch or tap
the screen to make selections.
•
Screen lock sounds: Play a sound when you
unlock the screen.
•
Charging sound: Play a sound when a charger is
connected.
Key-Tap Feedback
Play tones when the dialing keypad or the keyboard is
tapped.
1. From a Home screen, swipe up to access Apps.
2. Tap Settings > Sounds and vibration, and then
tap to enable the following option:
•
Keyboard sound: Play a sound when the
Samsung keyboard is tapped.

Settings 96
Sound Quality and
Effects
You can enable sound effects when connected to
a headset. Sound effects are only available when
headphones or a compatible Bluetooth headset
(notincluded) is connected.
Choose from advanced sound options to customize your
audio experience.
1. From a Home screen, swipe up to access Apps.
2. Tap Settings > Sounds and vibration >
Soundquality andeffects.
3. Tap Equalizer and choose a setting, or tap
Advanced or Basic to customize your sound
settings.
4. Tap On/Off to enable each option:
•
Surround: Recreate the effects of rich surround
sound.
•
Tube Amp Pro: Simulate the soft timbre of a
tube amplifier.
•
Concert hall: Simulate the reverb of a
concerthall.
5. Tap Adapt sound and follow the prompts to
customize your sound settings.

Settings 98
Block App Notifications
Block notifications for apps.
1. From a Home screen, swipe up to access Apps.
2. Tap Settings > Notifications.
3. Tap On/Off next to an app or All apps to enable or
disable notifications.
Customize App
Notifications
Customize notification settings for each application
individually.
1. From a Home screen, swipe up to access Apps.
2. Tap Settings > Notifications.
3. Tap an app, and select an option:
•
Allow notifications: Receive notifications from
this app.
•
Show silently: Do not make a sound or vibrate,
and block previews in pop-ups.
•
On lock screen: Show content from this app on
the lock screen.
-
This option is only displayed when a lock
screen is enabled. For more information, see
“Set a Secure Screen Lock” on page113.
•
Set as priority: Allow notifications from this app
to sound and turn on the screen while Do not
disturb is turned on.

Device
Maintenance
View the status of your device’s battery,
storage, and memory. You can also
automatically optimize your device’s system
resources.

Settings 104
Battery
View how battery power is used for device activities.
1. From a Home screen, swipe up to access Apps.
2. Tap Settings > Battery for options:
•
Battery usage: View details of battery usage
byitem.
•
Power saving mode: Extend battery life by
selecting a power saving mode level. Choose
Off, Mid, or Max. Estimated remaining battery
life for each mode is provided.
•
App power monitor: Put apps to sleep so that
they do not use battery power when not in use.
Tap Save power to enable.
•
Unmonitored apps: Select apps to exclude from
being put to sleep by the App power monitor.
•
Always sleeping apps: Select apps that will
be put to sleep immediately when they are not
being used.
•
Moreoptions > Advanced settings: Configure
advanced battery settings and notifications.
Storage
View the device memory and usage. Mount, unmount,
or format an optional memory card (notincluded).
Device Memory
View and manage the memory used by the device.
1. From a Home screen, swipe up to access Apps.
2. Tap Settings > Storage.

Settings 105
Memory Card (SD Card)
Once an optional memory card (not included) has been
installed in your device, the card memory is displayed
in the Storage setting.
For more information, see “Install a Memory Card” on
page6.
Mount a Memory Card
When you install an optional memory card, it is
automatically mounted (connected to the device) and
prepared for use. However, should you unmount the
card without removing it from the device, you need to
mount it before it can be accessed.
1. From a Home screen, swipe up to access Apps.
2. Tap Settings > Storage.
3. Under Portable storage, tap your SD card, and then
tap Mount.
Remove a Memory Card
To prevent damage to information stored on the
memory card, unmount the card before removing it
from the device.
1. From a Home screen, swipe up to access Apps.
2. Tap Settings > Storage.
3. Under Portable storage, tap your SD card, and then
tap Unmount.
4. Remove the memory card from the device.

Settings 109
Date and Time
By default, your device receives date and time
information from the wireless network. When you are
outside network coverage, you can set date and time
information manually using the date and time settings.
1. From a Home screen, swipe up to access Apps.
2. Tap Settings > Date and time. The following
options are available:
•
Automatic date and time: Receive date and
time updates from the wireless network.
When Automatic date and time is disabled, the
following options are available:
-
Set date: Enter the current date.
-
Set time: Enter the current time.
-
Select time zone: Choose your local time
zone.
•
Use 24-hour format: Set the format for
displaying time.
Reset
Reset device and network settings. You can also reset
your device to its factory defaults.
Reset Settings
Reset your device to its factory default settings, which
resets everything except the security, language, and
account settings. Personal data is not affected.
1. From a Home screen, swipe up to access Apps.
2. Tap Settings > Backup and reset >
Resetsettings.
3. Tap Reset settings, and confirm when prompted.

Settings 111
Factory Reset Protection
When you sign in to a Google Account on your device,
Factory Reset Protection is activated. Factory Reset
Protection (FRP) prevents other people from using
your device if it is reset to factory settings without
your permission. For example, if your device is lost
or stolen and a factory data reset is performed, only
someone with your Google Account username and
password can use the device. For more information,
visit samsung.com/us/support/frp.
You will not be able to access the device after a factory
data reset if you do not have your Google Account
username and password. Formore information, see
“Factory Data Reset” on page110.
System Updates
Check for and install available software updates for
your device.
1. From a Home screen, swipe up to access Apps.
2. Tap Settings > System updates >
Checkforsystem updates.
•
Tap Show system update history to view
previous software updates.
•
Tap Use software upgrade assistant to install a
tool to install system updates.
3. Follow the prompts to check for available software
updates to download and install.

Settings 113
Screen Lock Types
The various Screen lock types offer high, medium, or
no security. Choose from the following: Swipe, Pattern,
PIN, Password, and None.
Set a Secure Screen Lock
It is recommended that you secure your device using a
secure screen lock (Pattern, PIN, or Password).
To set a secure screen lock:
1. From a Home screen, swipe up to access Apps.
2. Tap Settings > Lock screen and security >
Screen lock type and tap a secure screen lock
(Pattern, PIN, or Password).
3. Tap On/Off to enable showing notifications on the
lock screen. The following options are available:
•
Hide content: Enable to hide the content of
notifications.
•
Notification icons only: Enable to hide
notification details and show only the icon.
4. Tap Done when finished.
5. Configure the following screen lock options:
•
Smart Lock: Unlock your device automatically
when trusted locations or other devices have
been detected. A secure screen lock is required
for this feature.
•
Secure lock settings: Customize your secure
lock settings. A secure screen lock is required for
this feature.

Settings 115
Secure Startup
Protect your device by requiring a numeric PIN, pattern,
or password to be entered before it starts up. You
must have a secured screen lock for this option to be
available.
1. From a Home screen, swipe up to access Apps.
2. Tap Settings > Lock screen and security >
Secure startup and select an option.
Encrypt SD Card
Protect your SD card by encrypting its data.
1. From a Home screen, swipe up to access Apps.
2. Tap Settings > Lock screen and security >
Encrypt SDcard.
3. Tap Encrypt SD card and follow the prompts to
encrypt all data on your memory card.
Set Up SIM Card Lock
Require your SIM card PIN to unlock and use your
SIMcard.
1. From a Home screen, swipe up to access Apps.
2. Tap Settings > Lock screen and security >
Othersecurity settings > SetupSIM card lock and
follow the prompts.
•
Tap Lock SIM card to enable the feature.
•
Tap Change SIM card PIN to create a new PIN.
View Passwords
Display password characters briefly as you type them.
1. From a Home screen, swipe up to access Apps.
2. Tap Settings > Lock screen and security >
Other security settings > Makepasswords visible
to turn the feature on.

Settings 117
Credential Storage
Manage your security certificates. If a certificate
authority (CA) certificate gets compromised or for some
other reason you do not trust it, you can disable or
remove it.
1. From a Home screen, swipe up to access Apps.
2. Tap Settings > Lock screen and security >
Other security settings for the following options:
•
Storage type: Select a storage location for
credential contents.
•
View security certificates: Display certificates
in your device’s ROM and other certificates you
have installed.
•
User certificates: View user certificates.
•
Install from device storage: Install a new
certificate from storage.
•
Clear credentials: Erase the credential contents
from the device and reset the password.
Advanced Security
Settings
Use these options to configure advanced security
settings.
1. From a Home screen, swipe up to access Apps.
2. Tap Settings > Lock screen and security >
Other security settings for the following advanced
options:
•
Trust agents: Perform selected actions when
trusted devices are connected.
-
This option is only displayed when a lock
screen is enabled. For more information,
see“Set a Secure Screen Lock” on page113.
•
Pin windows: Pin an app on your device screen,
preventing access to other features of your
device.

Settings 121
Account Settings
Each account has its own set of settings. In addition,
you can configure common settings for all accounts of
the same type.
Account settings and available features vary between
account types and service providers. Contact your
service provider for more information on your account’s
settings.
1. From a Home screen, swipe up to access Apps.
2. Tap Settings > Accounts > [Accounttype].
3. Tap an account to configure that account’s sync
settings.
4. Tap other available options for the account type.
Remove an Account
Remove accounts from your device.
1. From a Home screen, swipe up to access Apps.
2. Tap Settings > Accounts > [Accounttype].
3. Tap the account and then tap Moreoptions >
Removeaccount. Confirm when prompted.


135Legal
Legal Information
READ THIS INFORMATION BEFORE USING YOUR
MOBILE DEVICE.
Arbitration Agreement - This Product is subject
to a binding arbitration agreement between you
and SAMSUNG ELECTRONICS AMERICA, INC.
(“Samsung”). You can opt out of the agreement
within 30 calendar days of the first consumer
purchase by emailing [email protected] or
calling 1-800-SAMSUNG (726-7864) and providing
the applicable information. For complete terms
and conditions that bind you and Samsung, refer to
the “Arbitration Agreement” section of the Terms &
Conditions, included with the Product.
Find Legal Information Online
The full Arbitration Agreement, Standard Limited
Warranty, End User License Agreement (EULA),
and Health & Safety Information for your device are
available online:
Arbitration Agreement, Standard Limited Warranty,
and Health & Safety Information:
Phone:
•
English: samsung.com/us/Legal/Phone-HSGuide
•
Spanish: samsung.com/us/Legal/Phone-HSGuide-SP
Tablet:
•
English: samsung.com/us/Legal/Tablet-HSGuide
•
Spanish: samsung.com/us/Legal/Tablet-HSGuide-SP
End User License Agreement:
•
English: samsung.com/us/Legal/SamsungLegal-EULA4
•
Spanish: samsung.com/us/Legal/SamsungLegal-
EULA4/#SPANISH

136Legal
Find Legal Information on the Mobile Device
The full Arbitration Agreement, Standard Limited
Warranty, End User License Agreement (EULA) and
Health & Safety Information are also available on the
device, in the Samsung legal section of Settings. The
location depends on the device, and is usually in the
“About device” or “About phone” section, for example:
•
Settings > About phone or About device or
Abouttablet > Legalinformation > Samsung legal
•
Or, use the Search feature to search for “Legal”.
Intellectual Property
All Intellectual Property, as defined below, owned by
or which is otherwise the property of Samsung or its
respective suppliers relating to the SAMSUNG mobile
device, including but not limited to, accessories, parts,
or software relating thereto (the “mobile device”), is
proprietary to Samsung and protected under federal
laws, state laws, and international treaty provisions.
Intellectual Property includes, but is not limited to,
inventions (patentable or unpatentable), patents, trade
secrets, copyrights, software, computer programs, and
related documentation and other works of authorship.
You may not infringe or otherwise violate the rights
secured by the Intellectual Property. Moreover, you
agree that you will not (and will not attempt to)
modify, prepare derivative works of, reverse engineer,
decompile, disassemble, or otherwise attempt to create
source code from the software. No title to or ownership
in the Intellectual Property is transferred to you. All
applicable rights of the Intellectual Property shall
remain with SAMSUNG and its suppliers.