Documents: Go to download!
User Manual
- Owner's manual - (English, French, Spanish)
- Quick specs - (English)
- Operating Instructions
- Installation Instructions
- Troubleshooting Tips
Table of contents
Owner’s Manual GE Refrigerators
Operating Instructions
About the features. *
About the features
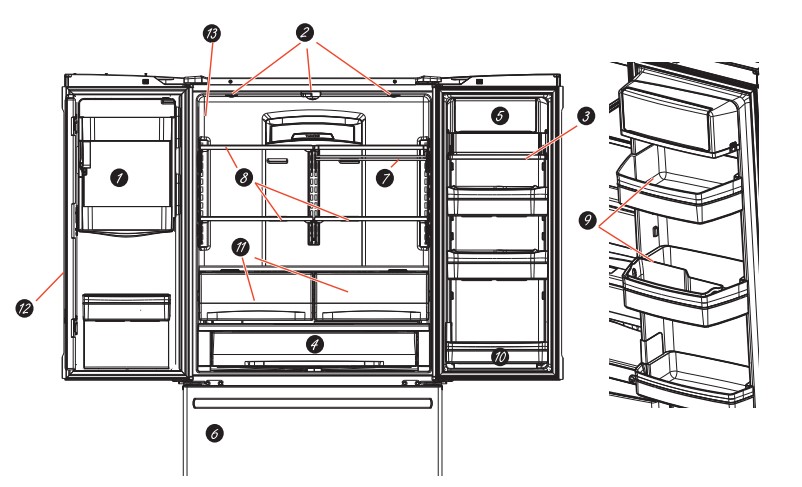
- Space-saving ice maker*
Ice maker and bin are located on the door creating more usable storage space. - Showcase LED lighting
LED lighting is positioned throughout the interior to spotlight areas in the refrigerator. LEDs are located under the fresh food door to light the freezer when opened. - Drop-down tray*
Allows for extra door storage when you need it and tucks away when you don’t. - Full-width temperature controlled drawer (on some models)
Adjustable temperature control bin that can accommodate larger items. - Dairy bin
Separate compartment for your items. - Dual ice maker/utility bin (on some models)
An ice maker in both compartments gives you more ice whenever you need it or a utility bin designed for flexible storage. - QuickSpace™ shelf
Functions as a normal full-sized shelf when needed and easily slides back to store tall items below. - Spillproof shelves
Designed to capture your spills for easier clean up. - Removable condiment bin
Separate bin designed for easy removal and storage. - Removable door bin
Can be removed for those with a wall limiting the door opening. - Climate zone bin
Separate bins for produce storage. - In-the-door filter*
Located in the door for more available space in the fresh-food section and easy replacement. - Water filter*
Filters water & Ice
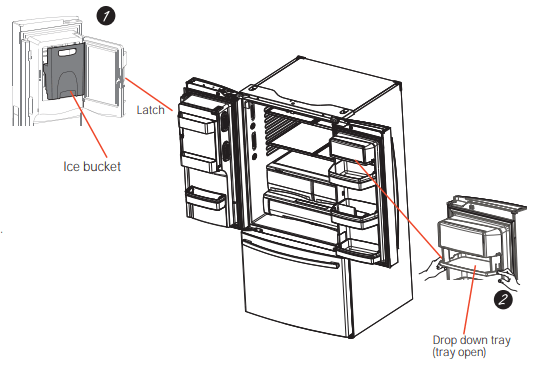
- Door ice bin*
- Open left fresh food door.
- Pull down latch to release bin door.
- Using handhold lift ice bucket up and out to clear locators in bottom of bin.
- To replace the ice bucket, set it on the guide brackets and push until the ice bucket seats properly.
- If bucket cannot be replaced, rotate the Ice Bucket Fork 1/4 turn clockwise.
- Drop down dairy bin*
- Open right fresh food
- Depress both buttons on lower sides and bin will drop down.
- Reverse to reinstall.
- Door ice/water filter Remove filter/bypass plug
Push the indent on the cover and open filter door. Pull up on filter/bypass plug and pull straight out to remove. Installing the filter cartridge Push the indent at the bottom of the cover and open. Lift door and align tabs on filter to filter/holder and push filter into place. Filter cover is designed to be reinstalled if accidently removed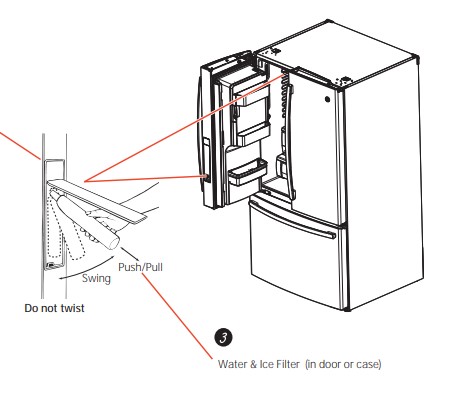
About the controls with temperature settings.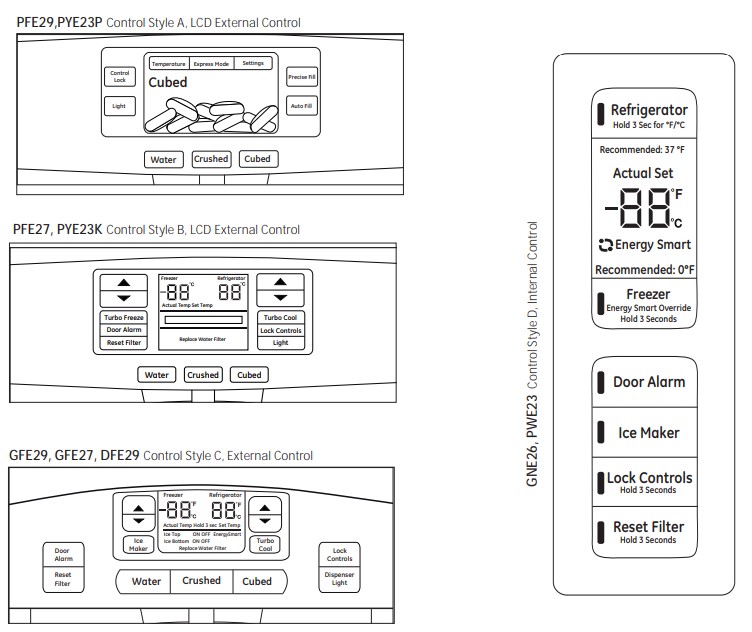
NOTE: The refrigerator is shipped with protective film covering the temperature controls. If this film was not removed during installation, remove it now.
The temperature controls are preset in the factory at 37°F for the refrigerator compartment and 0°F for the freezer compartment. Allow 24 hours for the temperature to stabilize to the preset recommended settings. The temperature controls can display both the SET temperature as well as the actual temperature in the refrigerator and freezer. The actual temperature may vary slightly from the SET temperature based on usage and operating environment.
Changing the Temperature for Control Style A
To Change the Refrigerator Temperature:
- Access By: Temperature Button

- Activate By: Below the word “Refrigerator”, use the arrows to select the desired temperature. Press DONE when finished to return to HOME screen.
- To Change the Freezer Temperature:
- Access By: Temperature Button

- Activate By: Below the word “Freezer”, use the arrows to select the desired temperature.
- Press DONE when finished to return to HOME screen
- To turn OFF the cooling system, access SETTINGS from the HOME screen. Page over and tap COOLING SYSTEM ON.
- Press DONE to return to HOME screen. To turn ON cooling system, access SETTINGS from the HOME screen. Page over and tap COOLING SYSTEM OFF. Press DONE to return to HOME screen. Turning the cooling system off stops the cooling to refrigerator, but it does not shut off the electrical power
Changing the Temperature for Control Style B
- To change the temperature, press and release the
 pad. The ACTUAL TEMP light will come on and the display will show the actual temperature. To change the temperature, tap either the
  pad until the desired temperature is displayed
 - To turn OFF cooling system, press and hold the Freezer
 pads simultaneously for 3 seconds. When the cooling system is OFF the display should read 0 FF.
 - To turn ON cooling system, press either
 pad. The display will show ON and then the actual temperature for the refrigerator and the freezer. Turning the cooling system OFF stops the cooling to the refrigerator, but it does not shut OFF the electrical power.
Changing the Temperature for Control Style C
- To change the temperature, press and release the
 pad. The ACTUAL TEMP light will come on and the display will show the actual temperature. To change the temperature, tap either the
  pad until the desired temperature is displayed.
 - To turn OFF cooling system, press and hold the Freezer
 pads simultaneously for 3 seconds. When the cooling system is OFF the display should read OFF.
 - To turn ON cooling system, press either
 pad. The display will show the preset temperature settings of 37°F for refrigerator and 0°F for freezer. Turning the cooling system off stops the cooling to refrigerator, but it does not shut off the electrical power.
Changing Temp. for Control Style D
- Temperature Display is located on inside of left-hand refrigerator door. To change the temperature, press and release the REFRIGERATOR or FREEZER pad. The ACTUAL TEMP light will come on and the display will show the actual temperature. To change the temperature, tap either the REFRIGERATOR or FREEZER pad until the desired temperature is displayed.
- To turn OFF cooling system, press and hold the REFRIGERATOR and FREEZER pads simultaneously for 3 seconds. When the cooling system is OFF the display should read OFF. To turn ON cooling system, press either REFRIGERATOR or FREEZER pad. The display will show the preset temperature settings of 37°F for refrigerator and 0°F for freezer. Turning the cooling system off stops the cooling to refrigerator, but it does not shut off the electrical power.
NOTE: For optimal temperature performance, we recommend to avoid placing food items directly at the air flow vents of the fresh food air tower and thus blocking the air flow.
About the controls - features.
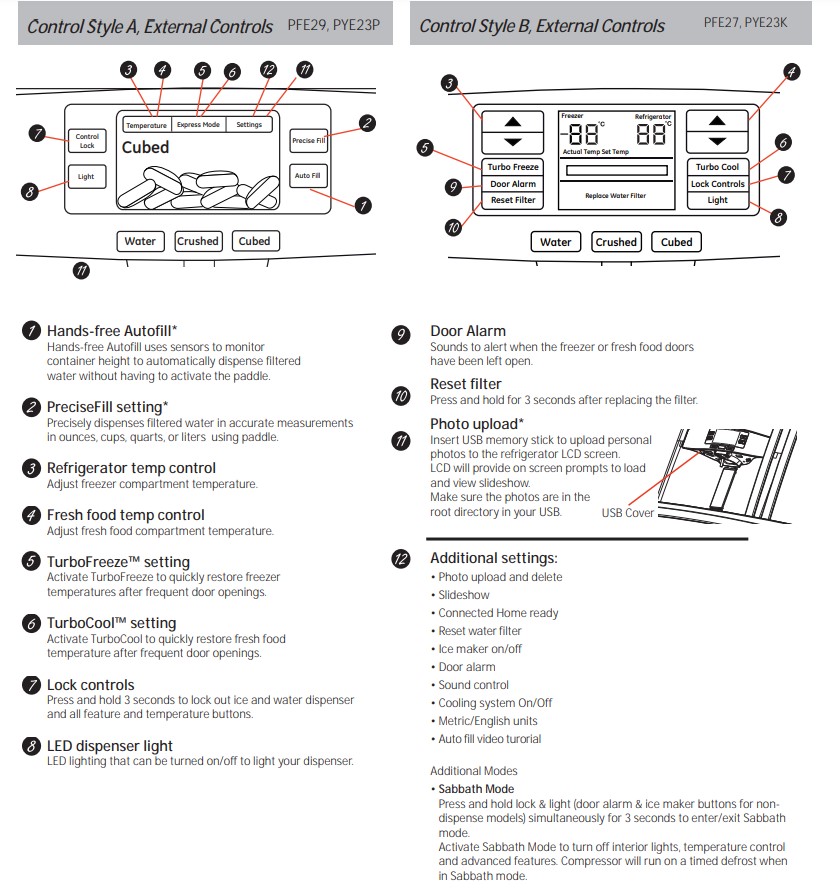
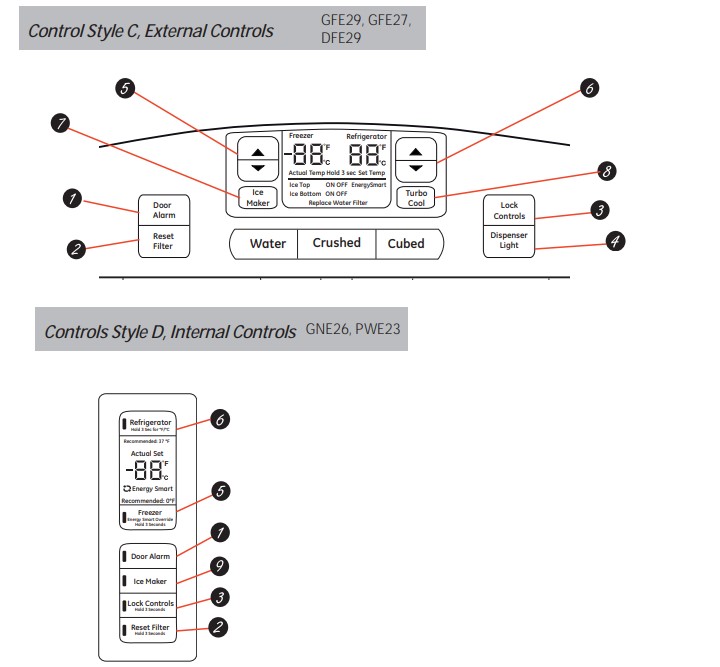
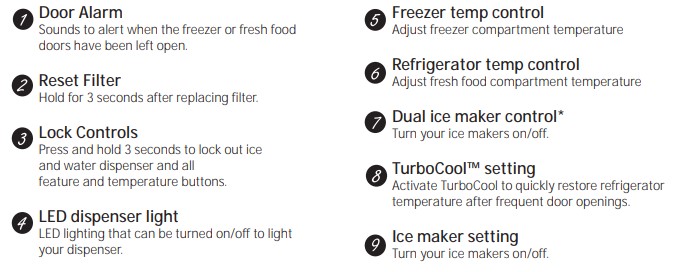
About the dispenser.*
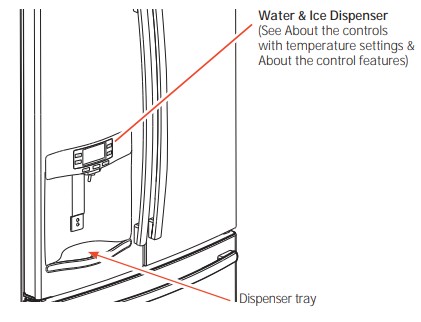
- If no water is dispensed when the refrigerator is first installed, there may be air in the water line system. Press the dispenser paddle for at least five minutes to remove trapped air from the water line and to fill the water system. To flush out impurities in the water line, throw away the first six full glasses of water.
To remove Dispenser Tray
- Pull Dispenser Tray out until it stops.
- Locate tab in the center on the bottom and push up.
- Pull Dispenser Tray assembly out.
- Lift metal Dispenser Tray out at center notch to clean.
To reinstall Dispenser Tray
- Place the Dispenser Tray cover on top of catch tray and position under the two plastic retainers on either side.
- Center Dispenser tray, and align with center guides.
- Push in until it firmly in place.
Important Facts About Your Dispenser
- Do not add ice from trays or bags to the door ice maker bucket. It may not crush or dispense.
- Avoid overfilling glass with ice and use of narrow glasses. Backed-up ice can jam the chute or cause the door in the chute to freeze shut. If ice is blocking the chute remove the ice bucket, poke it through with a wooden spoon.
- Beverages and foods should not be quick-chilled in the door ice maker bin. Cans, bottles or food packages in the storage drawer may cause the ice maker or auger to jam.
- To keep dispensed ice from missing the glass, put the glass close to, but not touching, the dispenser opening.
- Some crushed ice may be dispensed even though you selected CUBED ICE. This happens occasionally when a few cubes accidentally get directed to the crusher.
- After crushed ice is dispensed, some water may drip from the chute.
- Sometimes a small mound of snow will form on the door in the ice chute. This condition is normal and usually occurs when you have dispensed crushed ice repeatedly. The snow will eventually evaporate.
To Use the Internal Water Dispenser*
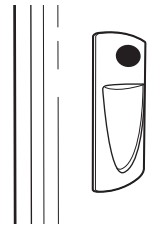
The water dispenser is located on the left wall inside the refrigerator compartment.
To dispense water:
- Hold the glass against the recess.
- Push the water dispenser button.
- Hold the glass underneath the dispenser for 2–3 seconds after releasing the dispenser button. Water may continue to dispense after the button is released.
If no water is dispensed when the refrigerator is first installed, there may be air in the water line system. Press the dispenser button for at least 5 minutes to remove trapped air from the water line and to fill the water system. During this process, the dispenser noise may be loud as the air is purged from the water line system. To flush out impurities in the water line, throw away the first 6 glassfuls of water.
NOTE: To avoid water deposits, the dispenser should be cleaned periodically by wiping with a clean cloth or sponge.
About autofill.*
To Use HANDS FREE AUTO FILL:
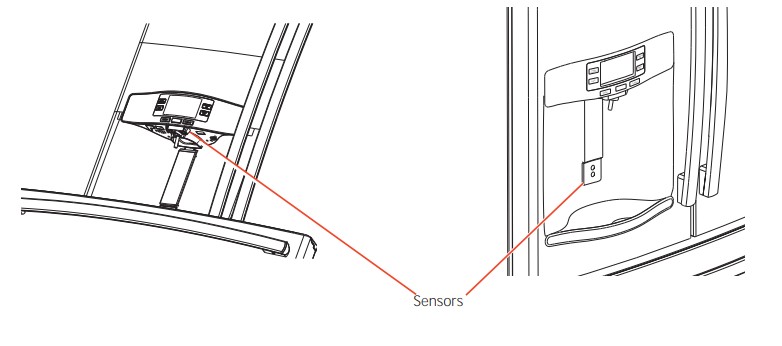
- Center container on Recess Dispenser Tray (not touching bottom sensors) and remove hand from container
- Press AUTO FILL
To Stop AUTO FILL
- Press CANCEL, to resume filling press AUTO FILL.
Important Facts about AUTO FILL
- For optimum results, use a uniform container between 4-8” tall and 2-6” wide. Container should be as tall as the bottom sensors.
- Container shape, fill level and functionality may vary on containers taller than 8”.
- Container volumes may vary, if error message “Container Not Found” is given, try a different container.
- AUTO FILL will time out.
- Handles and garnishes on the rim of the container my cause overfilling or variation in fill volumes.
- Splashing may occur depending on the location of the container, water flow rate, container shape, and ice cubes.
- Keep sensors clean with a clean damp cloth, and do not spray liquid or cleaners directly on sensors
- AUTO FILL works best with household water pressure of 60 to 100 psi.
About the GE® RPWF water filter cartridge.
Water Filter Cartridge
The water filter cartridge is located in one of the following places: Bottom-freezer (BF) refrigerators:
- In the water filter compartment on the right side wall of the left-hand fresh food door.
- In the fresh food interior on the left side wall, near the top.
When to replace the filter cartridge
- The filter cartridge should be replaced every six months or earlier if the flow of water to the dispenser or icemaker decreases.
- Touch Screen Models: A filter status message will appear on the screen when the water filter needs to be replaced. The filter status message must be reset manually.
- The “Water Filter: Replace” status message can be reset by entering the Settings menu from the home screen. Then, select the Water Filter menu and press the RESET button. This will reset the filter status.
- Non-touch Screen Models: A filter indicator light (or message) will illuminate on the screen when the water filter needs to be replaced. This light must be reset by pressing and holding the Reset Filter button for three seconds. The filter cartridge has a maximum life of six months and should be replaced when indicated by the filter indicator on the refrigerator, or sooner if a significant reduction in flow occurs.
Removing the filter cartridge
- To replace the filter, first remove the old cartridge by opening the filter door and pulling on the bottom of the cartridge to allow it to swing outward. When the cartridge can no longer swing, gently pull to unseat it from the cartridge holder. DO NOT TWIST CARTIDGE. A small amount of water may drip out.
Installing the Filter Cartridge
- Align top of filter with cartridge holder and push until cartridge is fully seated.
- While continuing to ensure cartridge is fully seated in the holder, gently swing the filter inward until it is in a vertical position. If filter will not swing easily, check to ensure filter is properly aligned and fully seated within the cartridge holder.
- Run 2 gallons of water through the cold water dispenser (about 5 minutes) to remove air from the system. A newly installed filter cartridge will cause water to spurt from the dispenser. Use a large pitcher or sports bottle to catch the water spray. DO NOT use the hot water dispenser or hands-free auto-fill (some models) until all air is removed from the system.
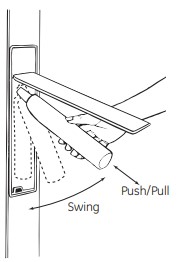
- Reset Filter Status message
- Touch Screen Models: Access RESET button through the Water Filter menu.
- Non-touch Screen Models: Press and hold the Reset Filter button for three seconds.
WARNING: Using the hot water dispenser prior to purging air from the system may result in spurting of hot water and lead to hot water scalding. Follow the instructions above to purge all air from the system through the cold water dispenser prior to using the hot water dispenser.
Note: It is normal for water to appear discolored during the initial system flush. Water color will return to normal after first few minutes of dispensing.
Filter Bypass Plug
- To reduce the risk of property damage due to water leakage, you MUST use the filter bypass plug when a replacement filter cartridge is not available. The dispenser and icemaker will not operate without either the filter or bypass plug installed. The bypass plug is installed in the same way as a filter cartridge.
About the fresh food storage options.
Rearranging the Shelves: Shelves in the refrigerator compartment are adjustable.
To remove:
- Remove all items from the shelf.
- Tilt the shelf up at the front.
- Lift the shelf up at the back and bring the shelf out.
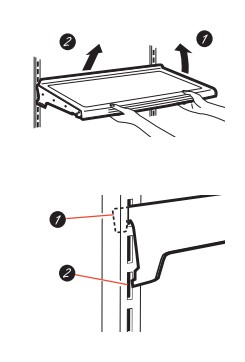
To replace
- While tilting the shelf up, insert the top hook at the back of the shelf in a slot on the track.
- Lower the front of the shelf until the bottom of the shelf locks into place.
Spillproof Shelves
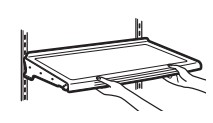
- Spillproof shelves have special edges to help prevent spills from dripping to lower shelves. Shelves in the refrigerator compartment are adjustable.
Quick Space Shelf
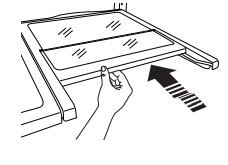
- This shelf splits in half and slides under itself for storage of tall items on the shelf below. This shelf can be removed and replaced or relocated (just like spillproof shelves).
- NOTE: The location of the upper Quick Space Shelf is not adjustable
Non-Adjustable Dairy Bin
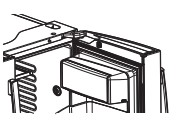
- To remove: Lift the dairy bin straight up, then pull out.
- To replace: Engage the bin in the molded door supports and push down. The bin will lock in place.
Adjustable Bins on the Door
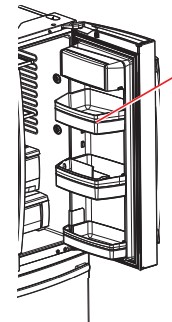
Adjustable bins can easily be carried from refrigerator to work area.
- To remove: Lift bin straight up, then pull out.
- To replace or relocate: Slide in the bin just above the molded door supports, and push down. The bin will lock in place
Drop down tray * (tray open)
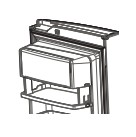
- Open right fresh food door
- Depress both buttons on lower sides of bin and bin will drop down.
- Reverse to reinstall.
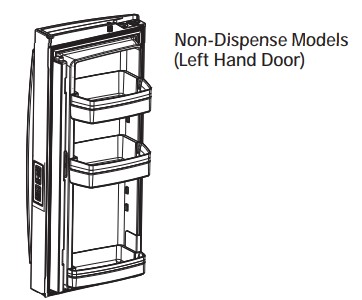
Non-Adjustable Bins on the Door
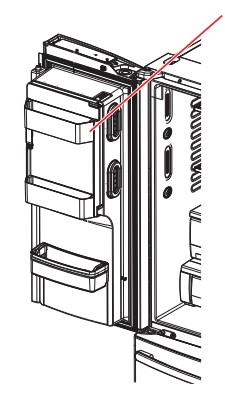
- To remove: Lift the bin straight up, then pull out.
- To replace: Engage the bin in the molded supports on the door and push down. It will lock in place. The ice maker door bins are not interchangeable, note the location upon removal and replace the bin in its proper location
About the climate zone and temperature controlled drawer.
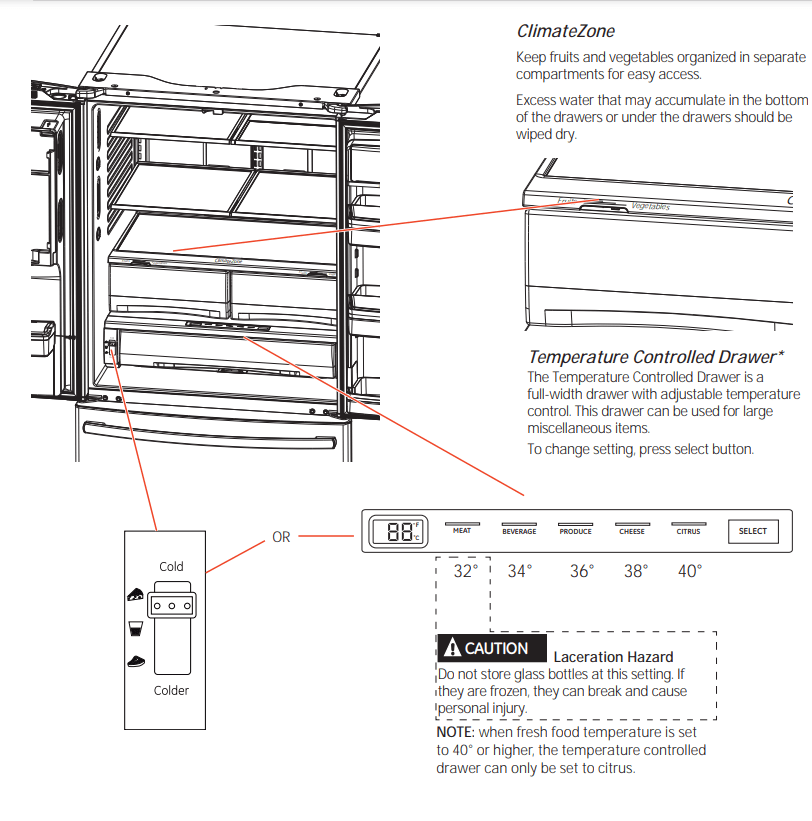
ClimateZone
- Keep fruits and vegetables organized in separate compartments for easy access.
- Excess water that may accumulate in the bottom of the drawers or under the drawers should be wiped dry
Temperature Controlled Drawer*
- The Temperature Controlled Drawer is a full-width drawer with adjustable temperature control. This drawer can be used for large miscellaneous items.
- To change setting, press select button.
How to Remove and Replace the Adjustable Deli/Produce Drawer
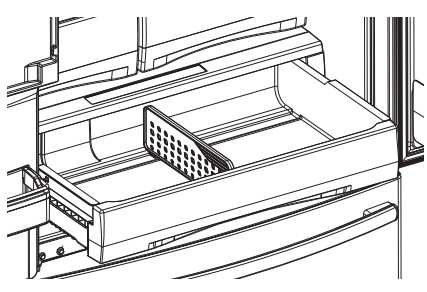
To remove:
- Pull the drawer out to the stop position.
- Lift the front of the drawer up and out.
To replace:
- Pull left and right slides until fully extended.
- Place drawer back in first and rotate drawer front down to seat on slide.
- Push the drawer in to closed position.
How to Remove and Replace Drawer Divider
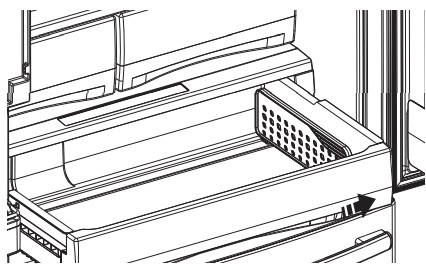
To remove:
- Pull the drawer out to the stop position.
- Raise the front side of the divider to unhook it from the rear wall of the drawer.
To replace:
- Hook the back of the divider over the rear wall of the drawer.
- Push the divider down.
About the freezer.
Freezer Basket and Drawer
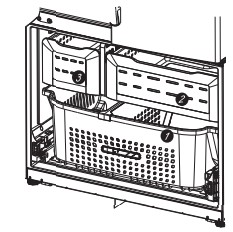
- Basket.
- Drawer
- Utility Bin / Ice Bucket
Non-Adjustable Bin in the Freezer
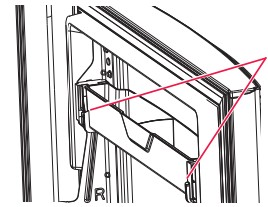
- To remove: push in plastic tab on either left or right side
- To replace: slide bin into location until it locks into place.
Basket Removal
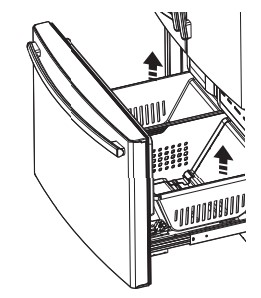
To remove, Standard Depth models only:
- Open freezer door to the stop position.
- Remove freezer door bin by pushing plastic tab on either left or right side to release bin hinge pin.
- Remove freezer basket by lifting up the rear of the basket and moving basket rearward until the front of the basket can be rotated upward and out.
- Lift it out to remove.
To remove, PYE and PWE models only:
- Open fresh food doors.
- Open freezer door to the stop position.
- Remove freezer basket by lifting up the rear of the basket and rotate it upward.
- Lift it out to remove.
To replace: Reverse step 1 thru 4 to replace.
About the automatic ice maker.
Automatic Ice Maker*
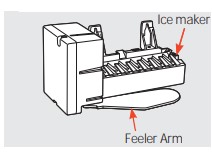
- The ice maker will produce seven cubes per cycle approximately 100–130 cubes in a 24-hour period, depending on freezer compartment temperature, room temperature, number of door openings and other use conditions.
- The ice maker will fill with water when it cools to 15°F (–10°C). A newly installed refrigerator may take 12 to 24 hours to begin making ice cubes.
- If the refrigerator is operated before the water line connection is made to the unit or if the water supply to an operating refrigerator is turned off, make sure that the ice maker is turned off. Once the water has been connected to the refrigerator, the ice maker may be turned on. See the table below for details.
- You may hear a buzzing sound each time the ice maker fills with water. Throw away the first few batches of ice to allow the water line to clear. Be sure nothing interferes with the sweep of the feeler arm. When the bin fills to the level of the feeler arm, the ice maker will stop producing ice. It is normal for several cubes to be joined together. If ice is not used frequently, old ice cubes will become cloudy, taste stale and shrink.
NOTE: In homes with lower-than-average water pressure, you may hear the ice maker cycle multiple times when making one batch of ice.
WARNING: To minimize the risk of personal injury, avoid contact with the moving parts of the ejector mechanism, or with the heating element that releases the cubes. Do not place fingers or hands on the automatic ice making mechanism while the refrigerator is plugged in.
Ice Bucket and Dispenser*
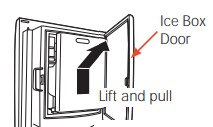
- Open the ice box door on inside of the left door.
- Pull up and out on on the ice bucket in the left hand door to remove it from the compartment .
- To replace the ice bucket, set it on the guide brackets and push until the ice bucket seats properly.
- If bucket cannot be replaced, rotate the ice bucket fork 1/4 turn clockwise.
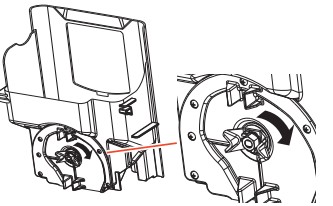
Extra Ice Storage*

There is additional ice storage in the freezer compartment drawer.
- Open the freezer drawer.
- The ice bucket is located on the left side below the mullion.
- Pull the ice bucket forward.
Care and Cleaning
Cleaning the Outside
- The stainless steel panels, door handles and trim. Do not use appliance wax, polish, bleach, or other products containing chlorine on stainless steel. Stainless steel (on some models) can be cleaned with a commercially available stainless steel cleaner. A spray-on stainless steel cleaner works best.
- Silver-accented plastic parts. Wash parts with soap or other mild detergents. Wipe clean with a sponge, damp cloth or paper towel. Do not use scouring pads, powdered cleaners, bleach or cleaners containing bleach because these products can scratch and weaken the paint finish.
Cleaning the Inside
- To help prevent odors, leave an open box of baking soda in the refrigerator and freezer compartments.
- Unplug the refrigerator before cleaning.
- If this is not practical, wring excess moisture out of sponge or cloth when cleaning around switches, lights or controls. Use an appliance wax polish on the inside surface between the doors.
- Use warm water and baking soda solution - about a tablespoon (15 ml) of baking soda to a quart (1 liter) of water. This both cleans and neutralizes odors. Rinse and wipe dry.
- CAUTION: Do not clean glass shelves or covers with warm water when they are cold. Glass shelves and covers may break if exposed to sudden temperature changes or impact such as bumping or dropping. Tempered glass is designed to shatter into many small pieces if it breaks.
Behind the Refrigerator
- Be careful when moving the refrigerator away from the wall. All types of floor coverings can be damaged, particularly cushioned coverings and those with embossed surfaces.
- Raise the leveling legs located at the bottom front of the refrigerator.
- Pull the refrigerator straight out and return it to position by pushing it straight in. Moving the refrigerator in a side direction may result in damage to the floor covering or refrigerator.
- Lower the leveling legs until they touch the floor.
- When pushing the refrigerator back, make sure you don’t roll over the power cord or water supply line.
Preparing for Vacation
- For long vacations or absences, remove food and unplug the refrigerator. Clean the interior with a baking soda solution of one tablespoon (15 ml) of baking soda to one quart (1 liter) of water. Leave the doors open.
- LCD Models: turn refrigerator off at control (pg 7) .
- If the temperature can drop below freezing, have a qualified service technician drain the water supply system to prevent serious property damage due to flooding.
- Turn refrigerator off (pg. 7) or unplug the refrigerator.
- Empty ice bucket
- Turn water supply off
If you cut the water supply off, turn off the ice maker (pg. 18). Upon returning from vacation:
- Replace the water filter.
- Run 2 gallons of water through the cold water dispenser (about 5 minutes) to flush the system.
Preparing to Move
Secure all loose items such as shelves and drawers by taping them securely in place to prevent damage.
- When using a hand truck to move the refrigerator, do not rest the front or back of the refrigerator against the hand truck. This could damage the refrigerator.
- Handle only from the sides of the refrigerator.
- Be sure the refrigerator stays in an upright position during moving.
Replacing the Lights
Refrigerator Lights (LEDs)
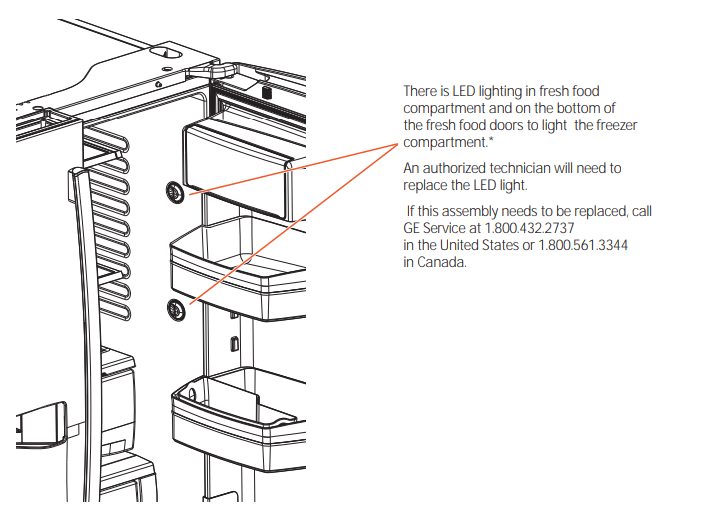
There is LED lighting in fresh food compartment and on the bottom of the fresh food doors to light the freezer compartment.* An authorized technician will need to replace the LED light. If this assembly needs to be replaced, call GE Service at 1.800.432.2737 in the United States or 1.800.561.3344 in Canada.
Installation Instructions
BEFORE YOU BEGIN
Read these instructions completely and carefully.
WARNING: Tip Over Hazard. Built-in style models (model PYE, CYE, and PWE) are top heavy, especially with any doors open. These models must be secured with the anti-tip floor bracket to prevent tipping forward, which could result in death or serious injury. Read and follow the entire installation instructions for installing the anti-tip floor bracket packed with your refrigerator.
- IMPORTANT - Observe all governing codes and ordinances. Save these instructions for local inspector’s use.
- Note to Installer – Be sure to leave these instructions with the Consumer.
- Note to Consumer – Keep these instructions for future reference.
- Skill level – Installation of this appliance requires basic mechanical skills.
- Completion time – Refrigerator Installation can vary Water Line Installation 30 minutes
- Proper installation is the responsibility of the installer.
- Product failure due to improper installation is not covered under the Warranty.
PREPARATION
MOVING THE REFRIGERATOR INDOORS
If the refrigerator will not fit through a doorway, the refrigerator door and freezer drawer can be removed.
- To remove the refrigerator door, see the Installing the Refrigerator section.
- To remove the freezer drawer, see the Removing the Freezer Drawer section.
WATER SUPPLY TO THE ICE MAKER AND DISPENSER
If the refrigerator has an ice maker, it will have to be connected to a cold water line. A GE water supply kit (containing tubing, shutoff valve, fittings and instructions) is available at extra cost from your dealer, by visiting our website at GEAppliances.com (in Canada at www. GEAppliances.ca) or from Parts and Accessories, 800.626.2002 (in Canada 1.800.661.1616)
Moving THE REFRIGERATOR
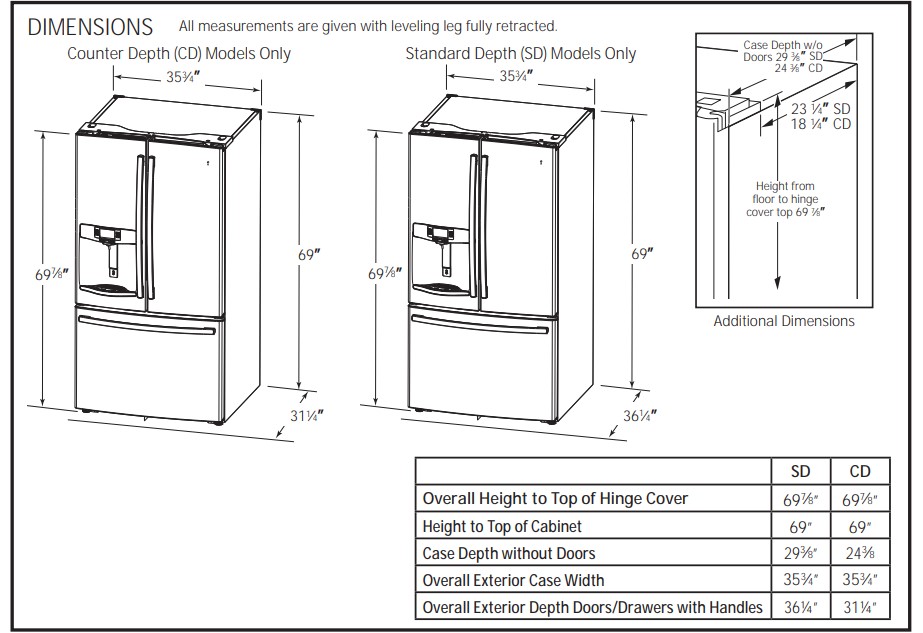
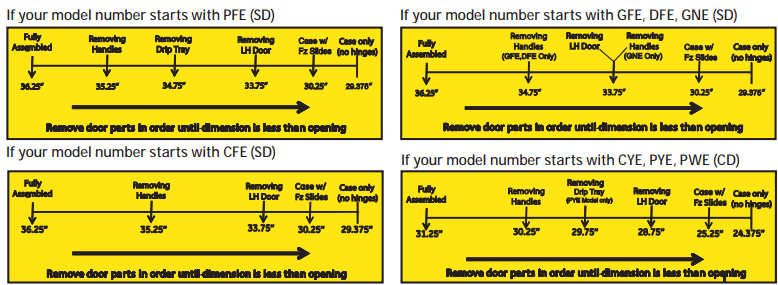
- Using the chart below determine if the width of your passageway can accommodate the depth of the refrigerator. Ensure you have clearance to prevent damage to the refrigerator before safely moving it to the final location.
- If passageways are large enough to accommodate the refrigerator without removing the handles skip to Step 6. Leave tape, film and all packaging on doors until the refrigerator is in the final location.
- NOTE: Use a padded hand truck or moving straps to move this refrigerator. Place the refrigerator on the hand truck with a side against the truck. We strongly recommend that two people move and complete this installation.
INSTALLING THE REFRIGERATOR
REFRIGERATOR LOCATION
- Do not install the refrigerator where the temperature will go below 60°F (16°C) because it will not run often enough to maintain proper temperatures.
- Do not install the refrigerator where the temperature will go above 100°F (37°C) because it will not perform properly.
- Install it on a floor strong enough to support it fully loaded.
REMOVING THE REFRIGERATOR DOORS
- IMPORTANT NOTE: This refrigerator is 361/4” deep (311/4” for CD models). Doors and passageways leading to the installation location must be at least 361/4” wide in order to leave the doors and handles attached to the refrigerator while transporting it into the installation location. If passageways are less than 361/4”, the refrigerator doors and handles can easily be scratched and damaged. The top cap and doors can be removed to allow the refrigerator to be safely moved indoors. If passageways are less than 311/4”, start with Step 1.
- If it is not necessary to remove doors, skip to Step 11. Leave tape and all packaging on doors until the refrigerator is in the final location.
- NOTE: Use a padded hand truck to move this refrigerator. Place the refrigerator on the hand truck with a side against the truck. We strongly recommend that TWO PEOPLE move and complete this installation.
- REMOVE THE FRESH FOOD DOOR HANDLE
Handle Design varies based on models, however Installation is same. Stainless steel and plastic handles: Loosen the set screws with the 1/8” Allen wrench and remove the handle.
NOTE: If the handle mounting fasteners need to be tightened or removed, use a 1/4” Allen wrench.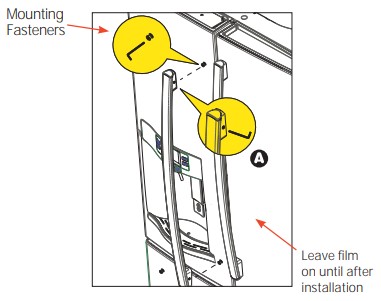
- REMOVE THE FREEZER DOOR HANDLE
Handle Design varies based on models, however Installation is same. Stainless steel and plastic handles: Loosen the set screws with the 1/8” Allen wrench and remove the handle.
NOTE: If the handle mounting fasteners need to be tightened or removed, use a 1/4” Allen wrench.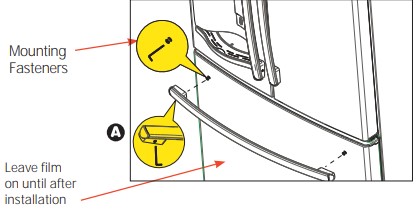
- REMOVE THE REFRIGERATOR DOORS
- Securely tape the door shut with masking tape or have a second person support the door.
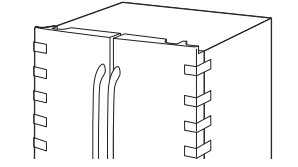
- Start with left-hand door first: Remove the hinge cover on top of the left refrigerator door by removing all hex screws and pulling it up. Do the same for the right-hand door and the middle cover.
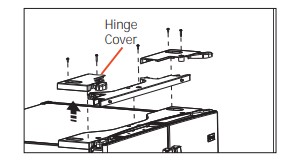
- Disconnect both electrical connectors at the top cover.
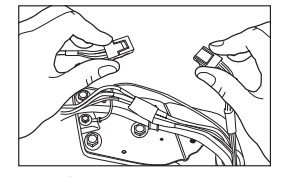
Remove the 1/4” hex head screw to disconnect the ground wire from the hinge. Remove the 1/4” hex head screw to remove the strain relief from the water line.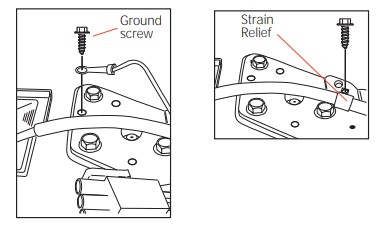
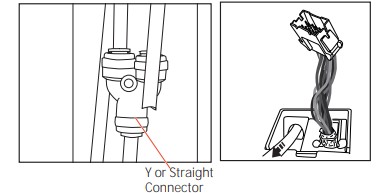
- Disconnect the water line from the back of the unit by pressing down on the dark grey collar while pulling up on the water line. Pull water line through case conduit from the top to free the line for door removal. The water line is more than 4’ long and may need to be taped to Door for accessibility when reinstalling.
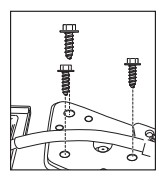
- Using a 3/8” socket ratchet/driver, remove the screws securing the top hinge to the cabinet, then lift the hinge straight up to free the hinge pin from the location in the top of the door.
CAUTION: Lifting Hazard. Single person lift could cause injury. Use assistance when handling, moving or lifting the refrigerator doors. Note: when removing door, to prevent damage to door and electronics, carefully place the door in a proper location.
Note: The lower door hinge pin and hinge are keyed and must be matched correctly for the door to self close properly. Please follow the directions carefully. - Remove the tape and keeping the door as straight as possible, open the door to 90º then lift straight up to remove it.
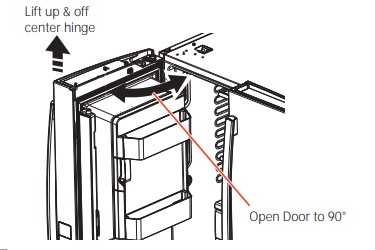
- Securely tape the door shut with masking tape or have a second person support the door.
- REMOVE OPPOSITE DOOR Follow the same procedure on the opposite door. There are no wires or water lines on the opposite side
REMOVE CENTER HINGE (if necessary) Remove the 3/8ļscrews securing the center hinge to the cabinet. Use T20 driver to remove outboard screw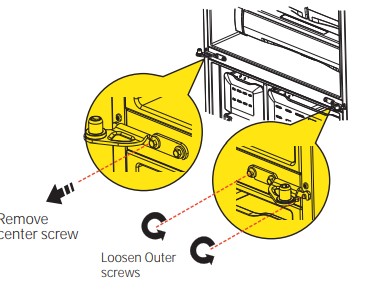
- REINSTALLING THE REFRIGERATOR DOORS
- Reinstall center hinge first and torque the screws to 65 in-lbs. With the LH door at 90º to the front of the case, lower the refrigerator door onto the center hinge. Ensure that the door and hinge align correctly.
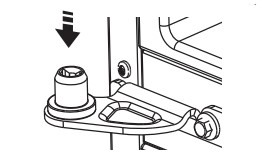
- Rotate doors closed and make sure moveable center sealing portion of the door aligns with the striker. If the door will not self-close after reinstalling, remove door, turn door upside down, check alignment mark and arrow; (there is an alignment mark on the door closure mechanism It corresponds to an alignment arrow on the plastic ring. Rotate door closure mechanism to align mark and arrow, reinstall door)
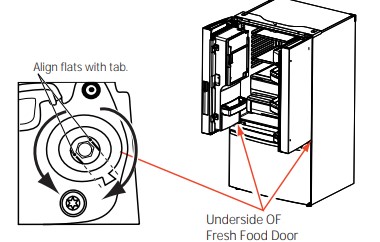
- Be sure to reinstall the ground wire and strain relief to the top hinge.
- Reinstall hinge cover.
NOTE: Ensure wires are not pinched or under screw bosses before tightening screws
- Reinstall center hinge first and torque the screws to 65 in-lbs. With the LH door at 90º to the front of the case, lower the refrigerator door onto the center hinge. Ensure that the door and hinge align correctly.
- REMOVE THE FREEZER DOOR
- Pull the freezer door open to full extension.
- Remove 3 attachment screws, located at the bottom on each side of the freezer door using 3/8” hex socket driver.
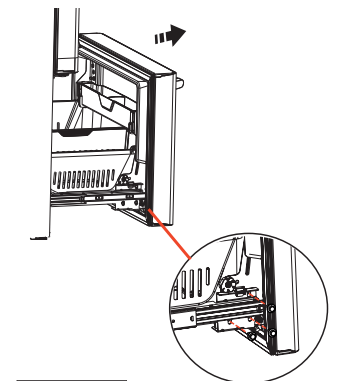
- Lift the freezer door to disengage it from the slide mechanism
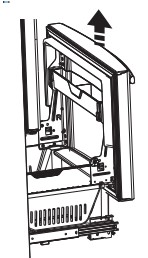
- REPLACING THE FREEZER DOOR
- Pull the slide Mechanism to full extension using both hands simultaneously.
- Remove the basket resting on the slides
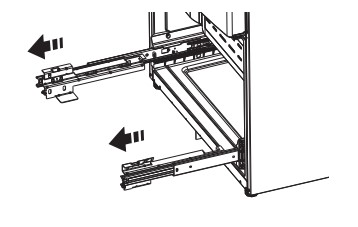
- Lift the freezer door and place it on the slide mechanism
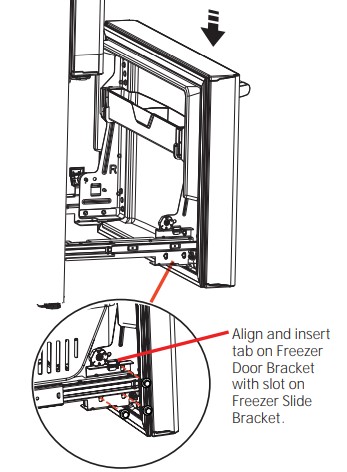
- Replace the attachment screws and torque the screws to 65 in-lb
- For adjusting freezer door gaps, follow the instructions on pg 27.
- Replace the basket
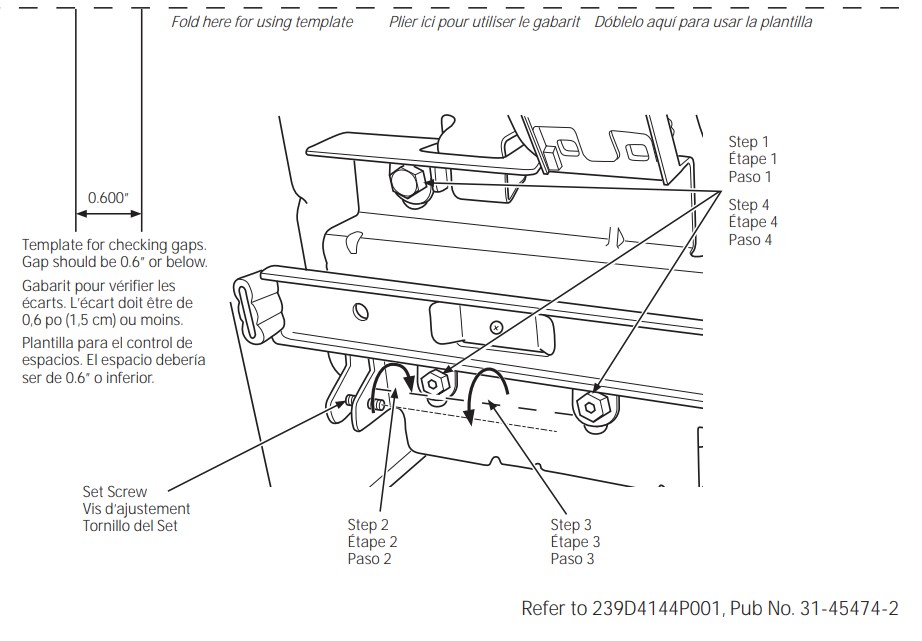
Instructions for adjusting freezer door gaps:
- IMPORTANT! The 6 mounting screws (3 on each side) are NOT interchangeable with the center or top hinge screws. Drawer screws have flat washer heads, and other screws have lines/ribs on washer heads.
- After installation of the freezer door, check for uniform gaps (top and bottom of right and left hand side) with the template provided. In the event of excessive gaps use the following steps to adjust the freezer door.
- Step 1 - Loosen the 3 screws on each side (right and left) of the freezer door.
- Step 2 - Adjust set screw clockwise if gap at the top is too big (see template). Turn the set screw using 3/32” hex key clockwise by quarter to half a rotation
- Step 3 - Adjust set screw counter-clockwise if gap at the bottom is too big (see template). Turn the set screw using 3/32” hex key counter-clockwise by quarter to half a rotation
- Step 4 - Tighten the 3 screws on each side (right and left).
- Step 5 - Re-check the gaps using the template and repeat steps 1 to 4 if required and complete with step 5
8. LEVEL THE FREEZER DOOR
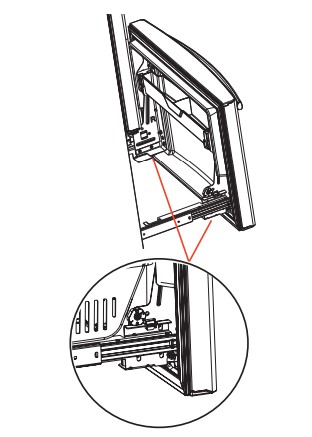
- Locate the height adjuster cam in the freezer door. Slightly loosen the three door attachment screws on both sides using a 3/8” hex socket driver.
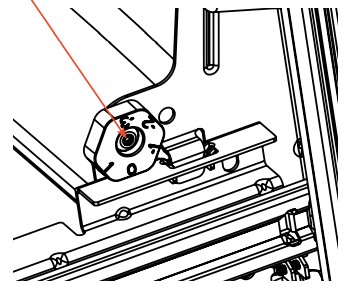
- Locate and loosen the cam screw using the T-27 screw driver.
- Lift the door on the side requiring adjustment, rotate the cam to required position.
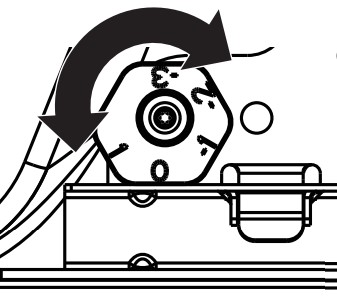
0 - Initial position
1 - Lift by 0.050”
-1 - Lower by 0.050”
-2 - Lower by 0.100
-3 - Lower by 0.150”
- After adjustment tighten the 3 attachment screws using to 65 in-lb.
10. REMOVE PACKAGING
- Remove all tape, foam and protective packing from shelves and drawers.
11. CONNECTING THE REFRIGERATOR TO THE HOUSE WATER LINE
A cold water supply is required for automatic ice maker operation. If there is not a cold water supply, you will need to provide one. See Installing the Water Line section. NOTES:
- Before making the connection to the refrigerator, be sure the refrigerator power cord is not plugged into the wall outlet.
- If your refrigerator does not have a water filter, we recommend installing one if your water supply has sand or particles that could clog the screen of the refrigerator’s water valve. Install it in the water line near the refrigerator. If using GE SmartConnect™ Refrigerator Tubing Kit, you will need an additional tube (WX08X10002) to connect the filter. Do not cut plastic tube to install filter.
- Before connecting the water line to the house, purge the house line for at least 2 minutes.
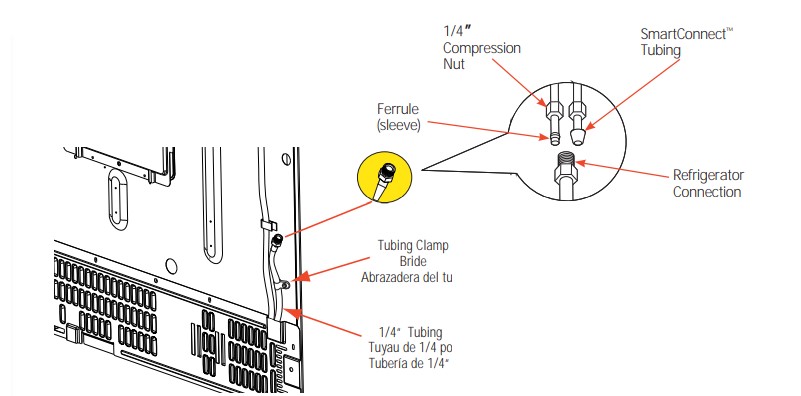
- If you are using copper tubing, place a compression nut and ferrule (sleeve) onto the end of the tubing coming from the house cold water supply. If you are using the GE SmartConnect™ tubing, the nuts are already assembled to the tubing
- If you are using copper tubing, insert the end of the tubing into the refrigerator connection, at the back of the refrigerator, as far as possible. While holding the tubing, tighten the fitting. If you are using GE SmartConnect™ tubing, insert the molded end of the tubing into the refrigerator connection, at the back of the refrigerator, and tighten the compression nut until it is hand tight. Then tighten one additional turn with a wrench. Over tightening may cause leaks.
- Fasten the tubing into the clamp provided to hold it in position. You may need to pry open the clamp
12. TURN ON THE WATER SUPPLY
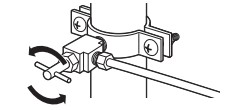
- Turn the water on at the shutoff valve (house water supply) and check for any leaks.
13. PLUG IN THE REFRIGERATOR
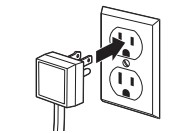
See the grounding information attached to the power cord.
14. LEVEL THE REFRIGERATOR
The leveling legs have 2 purposes:
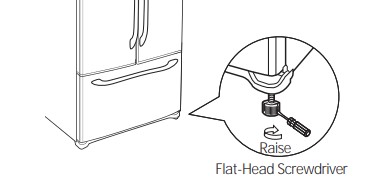
- Leveling legs adjust so the refrigerator is firmly positioned on the floor and does not wobble.
- Leveling legs serve as a stabilizing brake to hold the refrigerator securely in position during operation and cleaning. The leveling legs also prevent the refrigerator from tipping. Turn the leveling legs clockwise to raise the refrigerator, counterclockwise to lower it.
15. LEVEL THE REFRIGERATOR DOORS
Remember a level refrigerator is necessary for getting the doors perfectly even. If you need help, review the previous section on leveling the refrigerator.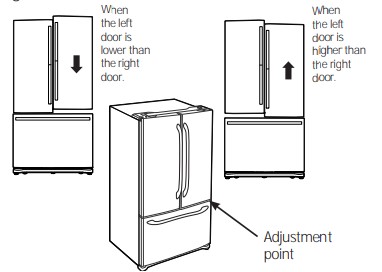
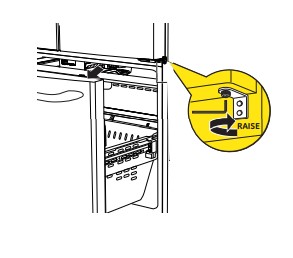
- If you open the freezer door, you can see the center hinge.
- Insert 1/4” Allen wrench into the shaft of the center hinge.
- Adjust the height by turning clockwise or counterclockwise. When you turn counterclockwise, the door will move up.
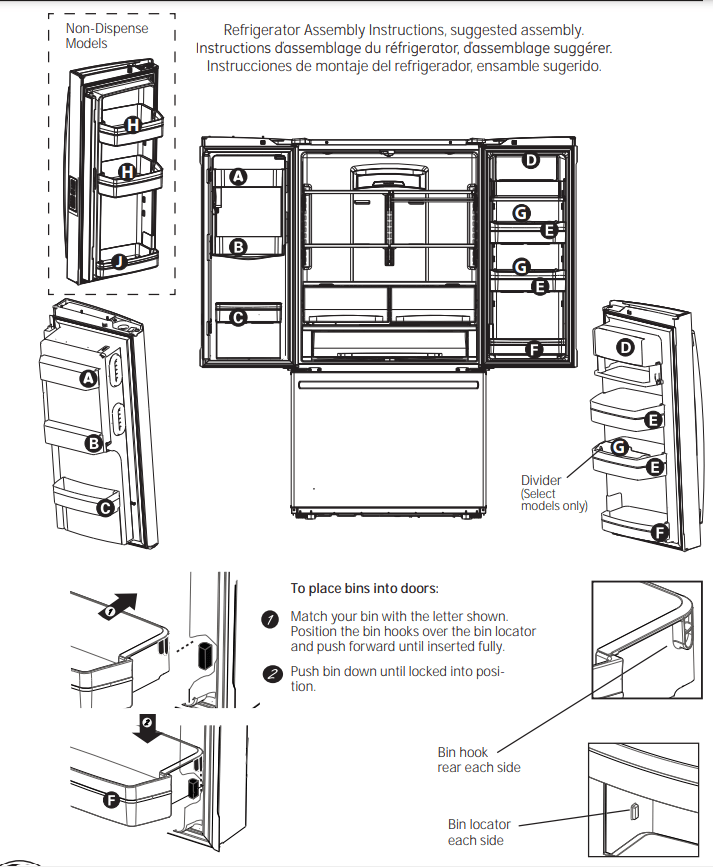
Installing the Water Line
- SHUT OFF THE MAIN WATER SUPPLY
- Turn on the nearest faucet long enough to clear the line of water.
- CHOOSE THE VALVE LOCATION
- Choose a location for the valve that is easily accessible. It is best to connect into the side of a vertical water pipe. When it is necessary to connect into a horizontal water pipe, make the connection to the top or side, rather than at the bottom, to avoid drawing off any sediment from the water pipe.
- Choose a location for the valve that is easily accessible. It is best to connect into the side of a vertical water pipe. When it is necessary to connect into a horizontal water pipe, make the connection to the top or side, rather than at the bottom, to avoid drawing off any sediment from the water pipe.
- DRILL THE HOLE FOR THE VALVE
- Drill a 1/4” hole in the water pipe (even if using a self-piercing valve), using a sharp bit. Remove any burrs resulting from drilling the hole in the pipe. Take care not to allow water to drain into the drill. Failure to drill a 1/4” hole may result in reduced ice production or smaller cubes.
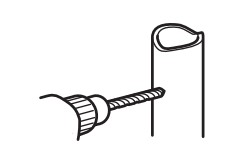
- Drill a 1/4” hole in the water pipe (even if using a self-piercing valve), using a sharp bit. Remove any burrs resulting from drilling the hole in the pipe. Take care not to allow water to drain into the drill. Failure to drill a 1/4” hole may result in reduced ice production or smaller cubes.
- FASTEN THE SHUTOFF VALVE
- Fasten the shutoff valve to the cold water pipe with the pipe clamp.
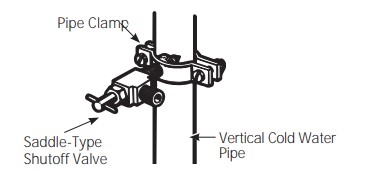
NOTE: Commonwealth of Massachusetts Plumbing Codes 248CMR shall be adhered to. Saddle valves are illegal and use is not permitted in Massachusetts. Consult with your licensed plumber.
- Fasten the shutoff valve to the cold water pipe with the pipe clamp.
- TIGHTEN THE PIPE CLAMP
- Tighten the clamp screws until the sealing washer begins to swell.
NOTE: Do not over tighten or you may crush the tubing.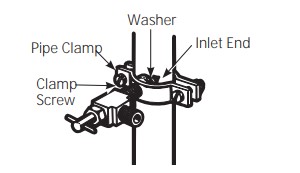
- Tighten the clamp screws until the sealing washer begins to swell.
- ROUTE THE TUBING
- Route the tubing between the cold water line and the refrigerator. Route the tubing through a hole drilled in the wall or floor (behind the refrigerator or adjacent base cabinet) as close to the wall as possible.
- CONNECT THE TUBING TO THE VALVE
- Place the compression nut and ferrule (sleeve) for copper tubing onto the end of the tubing and connect it to the shutoff valve.
- Make sure the tubing is fully inserted into the valve. Tighten the compression nut securely.
- For plastic tubing from a GE SmartConnect™ Refrigerator Tubing kit, insert the molded end of the tubing into the shutoff valve and tighten compression nut until it is hand tight, then tighten one additional turn with a wrench. Over tightening may cause leaks.
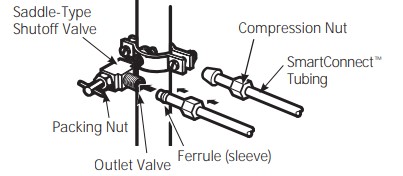
NOTE: Commonwealth of Massachusetts Plumbing Codes 248CMR shall be adhered to. Saddle valves are illegal and use is not permitted in Massachusetts. Consult with your licensed plumber.
- FLUSH OUT THE TUBING
- Turn the main water supply on and flush out the tubing until the water is clear. Shut the water off at the water valve after about one quart (1 liter or 2 minutes) of water has been flushed through the tubing.
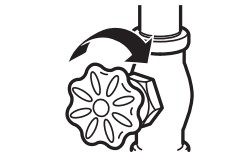
- Turn the main water supply on and flush out the tubing until the water is clear. Shut the water off at the water valve after about one quart (1 liter or 2 minutes) of water has been flushed through the tubing.
Troubleshooting Tips
Before you call for service…
Troubleshooting Tips Save time and money! Review the charts on the following pages first and you may not need to call for service.
| Problem | Possible Causes | What to Do |
| Water filter indicator light remains lit after replacing filter | Water filter indicator must be reset | Non-LCD models:
|
| Water filter indicator light is not lit | This is normal. This indicator will turn on to tell you that you need to replace the filter soon. | See About the Water Filter for more information. |
| Handle is loose/handle has a gap. | Handle needs adjusting | See Attach Fresh Food Handle and Attach the Freezer Handle sections for detailed instructions. |
| Refrigerator beeping | This is door alarm |
|
| Not cooling | The cooling system is off | See About Controls |
| Water has poor taste/odor* | Water dispenser has not been used for a long time | Dispense water, until all water in system is replenished |
| Water in glass is warm* | Normal when refrigerator is first installed Water dispenser has not been used for a long time Water system has drained | Wait 24 hours for the refrigerator to completely cool down. Dispense water, until all water in system is replenished Allow several hours for replenished supply to chill |
| Water dispenser does not work* | Water supply line turned off or not connected Water filter clogged or filter/bypass plug not installed Air may be trapped in the water system Water in reservoir is frozen because the controls are set too cold | See Installing the Water Line Replace filter cartridge or remove filter and install bypass plug Press the dispenser arm for at least 5 minutes Set the refrigerator control to a warmer setting and wait 24 hours. If the water does not dispense after 24 hours, call for service |
| Water spurting from dispenser* | Newly installed filter cartridge | Run water from the dispenser for 5 minutes (about 2 gallons) |
| No water or ice cube production | Supply line or shutoff valve is clogge Water filter is clogged Filter cartridge not properly installed Ice maker is turned off | Call a plumber Replace filter cartridge or remove filter and install bypass plug Remove and reinstall filter cartridge, being certain that it locks in place. Check that the ice maker is turned on. See About the Automatic Ice Maker. |
| Water is leaking from dispenser* | Air may be present in the water line system, causing water to drip after being dispensed | Dispense water for at least 5 minutes to remove air from system |
| Photos not found* | Photos not in root directory of USB Photos not in JPEG format Camera/PC used with USB cord | Make sure the photos are in the root directory in your USB Photos must be in JPEG format Must use a USB drive |
| AUTO FILL under fill/no fill* | Not all containers work with AUTO FILL Container not found/ Unstable container/ Misaligned container | See pg. 11 Try different container |
| AUTO FILL overfills* | Not all containers work with AUTO FILL | Try different container |
| PRECISE FILL will not fill container* | Normal, PRECISE FILL requires use of dispenser paddle | For a specific amount of water, select PRECISE FILL to dispense water |
| Freezer cooling, fresh food not cooling | Normal, when refrigerator first plugged in or after extended power outage | Wait 24 hours for temperature in both compartments to reach selected temperatures |
| Ice dispenser opens after closing freezer drawer * | Normal | The ice dispenser door may open after closing freezer door to allow access |
Truth or Myth
| Truth or Myth? | Answer | Explanation |
| The refrigerator water filter may require replacement, even though the filter indicator has not turned red, or reads “Filter Expired.” | TRUE | The water filter indicator will indicate the need to replace the water filter every six months. Water quality varies from city to city; if water flow from the dispenser slows, or ice production decreases, the water filter should be replaced, even though the filter indicator may not indicate the need for replacement |
| The automatic ice maker in my refrigerator will produce ice when the refrigerator is plugged into a power receptacle. | MYTH | The refrigerator must be connected to water, and the ice maker must be turned on. Make sure the ice maker is turned on, only after the water line is connected and water is turned on. The ice maker can be turned on/ off from the controls and ensure the ice maker is on, as indicated on the refrigerator control panel. See About the Automatic Ice Maker. |
| After the refrigerator has been plugged in and connected to water, I will immediately have unlimited chilled water available from the water dispenser. | MYTH | The water dispenser tank located inside the refrigerator stores water for dispensing. The water in this tank requires 24 hours to chill after installation. High usage conditions will not allow time for the water to chill. |
| After water dispenses, a few drops of water are normal. | TRUE | A few drops of water may fall from the dispenser, after the dispenser paddle has been released. To minimize the drops, remove the glass slowly from the dispenser. |
| I will never see frost inside the freezer compartment. | MYTH | Frost inside the freezer typically indicates that the door is not properly sealed, or has been left open. If frost is found, clear the frost using a plastic spatula and towel. then check to ensure that no food packages or containers are preventing the freezer door from closing. Check the refrigerator control panel to ensure the door alarm is on. |
| When the refrigerator is installed, or after replacing the water fiter. I must dispense water for five minutes. | TRUE | A newly installed refrigerator or water filter contains air in the water lines. Press the dispenser paddle and dispense cold water for at least 5 minutes to remove air from the waterline and flush the filter. |
| To fill the ice bucket to the maximum capacity. should dispense 12 and 18 hours after installation. | TRUE | Dispensing 3-4 cubes 12 hours and 18 hours after installation, allows ice to disperse within the ice bucket, which in tums calls on the ice maker to produce additional ice. Normal ice production = 100 cubes in 24 hours. |
| I can use the water filter bypass plug to determine ifthe filter requires replacement. | TRUE | Decrease in flow from the water dispenser. or decreased ice production, may indicate the need to replace the water filter. Install the water filter bypass plug (provided with the refrigerator on some models*) and check flow from the dispenser. If water flow returns to normal with the bypass plug in place, replace the water filter. |
| The top of the refrigerator doors will always be aligned. | MYTH | Several things can affect the fresh food door alignment, including the floor the refrigerator is installed on and loading of doors. If the top of the fresh food doors are not aligned, use a 1/4” allen wrench to adjust the right/left hand door. The adjustment screw is located on the bottom right or left hand side of the door, open the freezer door to access the screw. |
| Refrigerator door handles can be easily tightened. | TRUE | If door handles are loose or have a gap. the handle can be adjusted using a 1/8" allen wrench. on set screws located on the ends of the handles. |
| There may be odor and taste problems with your ice. | TRUE | After starting the ice maker, throw away 24 hours of ice production to avoid odor and taste problems. |
| I can make fine adjustments to the fresh food doors to align them. | TRUE | If the fresh food doors are not aligned, use a 1/4” Allen wrench to adjust the right hand door. The adjustment screw is located on the bottom of the right tleft hand door. Open the freezer door to access. |
| Door handles should always be removed for installation. | MYTH | If the doors must be removed do not remove the handles. or if the refrigerator will fit easily through the passage way opening. Adjust handles that are loose or have a gap, by adjusting 1/8” set screws on either end of handles. |
| Door removal is always required for installation. | MYTH | Check chart on reverse side of this instruction. Doors should only be removed when necessary to prevent damage from passage way or access to final location. |
| Refrigerator doors that won't close after installation, can be adjusted to close properly. | TRUE | Door mechanism works best if installed at 90°+. ifinstalled at 180°. remove the door from the mid hinge, and swing the door 180° before reinstalling. See Reinstalling the Refrigerator Doors. |
| There is an adjustment to rear wheels. | MYTH | Front leveling legs are adjustable and should be used to balance the refrigerator. Leveling legs are used to make initial fresh food door adjustment. |
| Check for leaks after all water connections are made. | TRUE | While purging the air from the water system. check all water line connections for leaks. Check the connection to the household water supply at back of refrigerator and door water line connect. |
| Any packaging residue can be cleaned off the refrigerator using any cleaner. | MYTH | Do not use wax. polish. bleach. or other products containing chlorine Stainless Stee! panels. door handles and trim. Check this 1struction under “Cleaning the Outside” for full details. |
See other models: GYE22HBLETS JBP35DJ1WW JDP47BF3BB ZBD6900P00II GDF630PSM2SS
