User Guide Dehumidifier
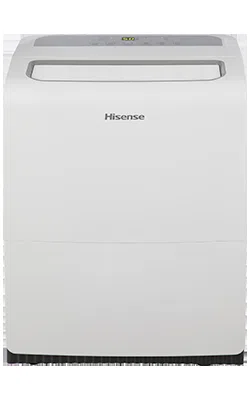
Product Overview

INSTALLATION REQUIREMENTS
Electrical Requirements
Specific electrical requirements are listed In the chart below. a the requirements for the type of plug on the power supply cord.
Power supply cord Wiring Requirements

- 115 V (103.5 min. to 126.5 max.)
- 15 A time-delay fuse or circuit breaker
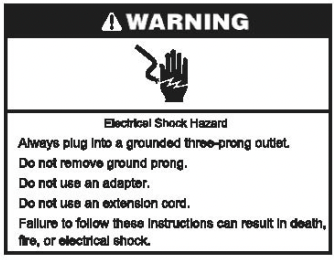
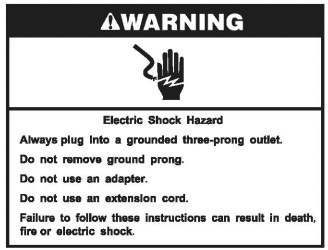
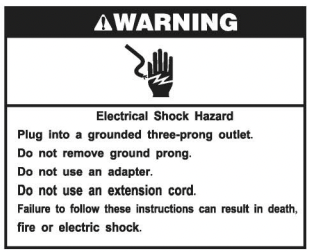
Recommended Grounding Method
This dehumidifier must be grounded. This dehumidifier & equipped with & power supply cord with a three-prong grounding plug. The cord must be plugged Into a mating. grounded three-prong outiet. grounded In accordance with all local codes and ordinances. Ifa mating autlet is not available. it is the customer's responsibility to have a properly grounded three-prong outlet installed by a qualified electrical installer.
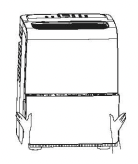
Location Requirements
NOTE:Your model may differ from the one shawn.
- Do not use outdoors. This dehumidifier is Intended for Indoor. residential use only. This dehumidifier is not recommended for commercial use.
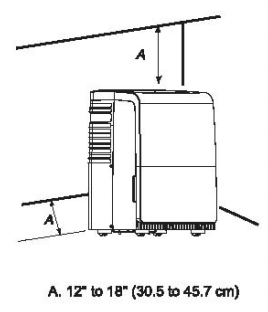
- Allow at least 12" to 18" {30.5em to 45.7 cm) of space on the side of the dehumidifier for models with back louver and above the dehumidifier for models with top louvers.
- You will need a surface strong enough to support the dehumidifier when its bucket Is full of water.
- You will need a surface level enough to keep the water from spilling when the bucket Ie full of water.
- Keep all outside doors. windows and other openings closed when you are operating the dehumidifier. Humid outdoor air will Increase the dehumidifier’s workload. dramatically increasing energy consumption due to continuous running (This happens when the dehumidifier is never be able to reach the humidistat's set point).
- Install the dehumidifier In an area where the temperature will not fall below 38 °F (3 °C) for DH100KPF1WG. or 34 °F (1 °C) for DH100TP1WG. Lower temperatures will cause performance to drop.
- Do not block the louvers of the unit.
- Never operate this dehumidifier in an area that is likely to accumulate standing water. If this condition develops. or your safety disconnects the power supply before stepping into the water.
DEHUMIDIFIER USE
Setting the Controls
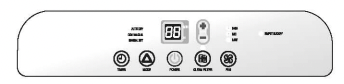
Control Panel
Control Type 1
Control Type 2 (PUMP)
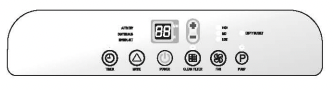
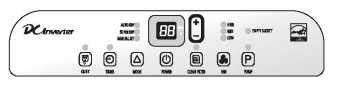
NOTES:
- The control panel of your model may differ from the one shown above
- PUMP button may not be displayed on the pane if your model does not have these functions.
Starting/Stopping the Dehumidifier
WARNING: The dehumidifier should be upright for at least 2 hours before use.
NOTES:
- Before turning on the dehumidifier. be sure that the bucket is emply and fits all the way into the dehumidifier.
- Each time you unplug the dehumidifier or power is interrupted. the controls will retum to the previous settings when power is restored
- Humidity displayed is between 30% Relative Humidity and 90% Relative Humidity
- Humidity can be adjusted between 30% Relative Humidity and 80% Relative Humidity.
- It's important to set the desired humidity level to an achievable setting. To ensure energy-efficient operation. only use the dehumidifier in a closed space. with no open windows or other sources of moist air (to avoid continuous running)
- 1.Plug into a grounded three-prong outlet.
- 2.Press POWER to turn on the dehumidifier.
- 3.Press FAN to choose the fan speed.
- 4.Press MODE to choose the mode.
- 5.Press the plus or minus button to choose the level of humidity.
- 6.Press POWER to turn off the dehumidifier.

NOTE: The dehumidifier will retain your last settings.
EMPTY BUCKET Light
If this light is on. the dehumidifier is not running. This light indicates that you need to check:
- lf the bucket is full. empty and reinstall bucket.
- lf the bucket is not in position. remove the bucket and reinstall it. Make sure the bucket fits all the way into the dehumidifier and the light is off. or dehumidifier will not run.
Fan Speed
- 1. Press FAN to select fan speed.
- 2. Choose Low. Mid or High.

- LOW-Will reach the desired humidity setting with lower sound level
- MID- Will achieve set humidity at normal speed.
- HIGH-Will reach the desired humidity setting faster.
NOTE
Once the humidity set point is reached. the dehumidifier will stop running continuously. and the fan will be off periodically. The fan may periodically turn on. to read the humidity level. without the compressor running.
Desired Humidity-Mode
- 1.Press MODE to select the desired humidity setting.

- 2.Choose Auto Dry. CONTINUOUS/Super Dry or Manual Set.
- AUTO DRY: The dehumidifier will operate in dry mode only. The Fan Speed can be adjusted. The Desired Humidity is set to 50% automatically.
- CONTINUOUS/SUPER DRY: The Desired Humidity is set to 30% automatically. The Fan Speed can be adjusted. The Desired Humidit can not be set.
- MANUAL SET:The dehumidifier will operate at the selected fan speed and desired humidity level. If the humidity level of the room is higher than the desired humidity setting. he compressor will turn on.lf the humidity level of the room is lower than the desired humidity setting. he compressor will turn off. s well as the fan.
NOTE:
The de-icing function will turn off the compressor if a low temperature condition occurs. Pressing the MODE button or the plus or minus button will not increase or decrease the amount of moisture removed. When the de-icer senses then correct operating temperature. the compressor will cycle back on. Some freezing is normal will dehumidifiers are used at low temperatures.
Quiet

The dehumidifier will run in Low speed.
NOTE:
Once the Mode or Fan speed is changed. the dehumidifier will quit Quiet mode automatically.
Humidity Level
- 1. Press the Plus or Minus button to activate the humidity setting program. Digits in the digital display will flash.
- 2. Press the Plus or Minus button again to set your desired humidity.

- 3. Digital display will stop flashing five seconds after setting. The actual room humidity will be displayed.
NOTE:
Humidity can only be adjusted manually in Manual Set mode. In Continuous/Super Dry and Auto Dry mode. humidity level is set automatically.
Digital Display
Display shows relative humidity or time (depending on setting).
- 1.When the dehumidifier operates in Manual Set modes. he display shows the relative humidity of the room.
- 2.When the timer is selected. the display shows the time when the dehumidifier will turn on or turn off operates. depending on the setting.

NOTE:
The humidity displayed is only for reference. For accurate humidity. please check a hygrometer.
Timer
To set Timer for a 30-minute to 24-hour delay before the dehumidifier is turned off (the dehumidifier must be On):
- 1. Press TIMER. Timer indicator light will come on. the Display will flash. The display will show remaining time before the dehumidifier will turn off.

- 2. Press the Plus or Minus button to change the delay time. from 30 minutes to 24 hours.
To set Timer to turn on the dehumidifier. with previous setting:
- 1. Turn off the dehumidifier.
- 2. Press TIMER. Timer indicator light will flash. The display will show remaining time before the dehumiditier will turn on.
- 3. Press the Plus or Minus button to change the delay time. from 30 minutes to 24 hours.
To clear the Timer delay program:
NOTE: Dehumiditier can be either on or off.
- 1. Press TIMER once after it has been programmed. Display will show remaining time.
- 2. While the display is showing the remaining time. press TIMER again. Timer indicator light will turn off.
To see the remaining time.
Press TIMER once after it has been programmed. Display will show remaining time.
Clean Filter
- 1. When CLEAN FILTER indicator light is on. remove. clean and replace air filter. See “Cleaning the Air Filter’.
- 2. Press CLEAN FILTER after cleaning and replacing the air filter to reset the filter monitor.

NOTE:
When the light is on. it will remain on for 360 hours or until you press CLEAN FILTER. After 180 hours. it will turn off automatically.
Pump (for Pump function model only)
This feature pumps water horizontally or vertically. Pump water to a drain. out a window or anywhere you think suitable.
IMPORTANT: You must connect the drain hose to the unit before pressing the Pump button. or the pump will not operate. See “Pump drain” for connecting instructions.

- 1. Press PUMP to activate the pump system for active drainage.
- 2. Once the pump button is pressed. the pump light will switch on.
NOTE:
- If the pump light flashes. it means that the pump is not functioning properly.
- If the drain hose is not correctly connected to the unit or is bent. the pump light will flash and the pump system will not work. See “Troubleshooting” for direction.
NOTE:
- If the pump light flashes. it means that the pump is not functioning properly.
- If the drain hose is not correctly connected to the unit or is bent, the pump light will flash and the pump system will not work. See “Trouble shooting” for direction.
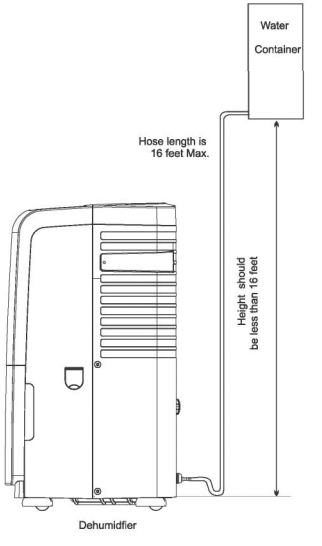
Site for installing hose for pump function:
Draining the Dehumidifier
Option 1 Bucket Draining
If your floor drain is not available. or you do not plan to run your dehumidifier continuously. you may want to simply empty the bucket.
1.Grasp the bucket sides to slide out bucket.
2.Grasp the handle and bottom of the bucket to lift bucket.
3.Pour water through opening into a sink or tub.
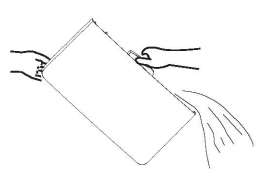
4. Fold Down the handle and reinstall the bucket.

IMPORTANT: If the EMPTY BUCKET light comes on. he dehumidifier will not operate. Empty or adjust bucket.
Option 2 Gravity Draining
If you plan to run your dehumidifier continuously. you can choose direct draining by attaching a garden hose to the unit.
- 1.Uncover the connector cover.
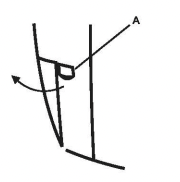
- 2. Remove bucket.
- 3. Attach a garden hose to the drain hose connector on the inside of the dehumidifier. Screw down to make sure the connector has no water leak.
Note : The garden hose is sold separately
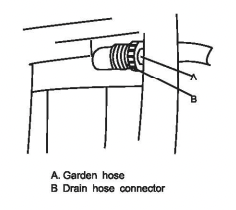
IMPORTANT:
In the US. the garden hose connectors is 3/4" diameter straight (non-tapered) thread with a pitch of 11.5 threads per inch (male part has an outer diameter of 1 1/16 inches (26.99 mm).
- 4. Place the other end of garden hose into a floor drain. Check to see that the hose lies flat and is in the drain. Make sure the hose end that gose to the drain is on a lower level than the hose end that connects to the dehumidifier. The hose should not be kinked or pinched.
NOTES:
- To use the bucket without the garden hose. remove the the garden hose. Then reinstall bucket.
- The bucket must be installed and properly aligned for the the dehumidifier to operate with or without a garden hose connected.
Option 3 PUMP-Drain (for Pump function model only)
This feature can help to pump water horizontally or vertically with a 16 feet hose included. You can also pump water to a floor drain. out a window or anywhere you think suitable.
NOTE: You must connect the drain hose (with connector B) to drain hose connector A before pressing Pump button. If the pump does not function properly. see “Trouble shooting” for direction.
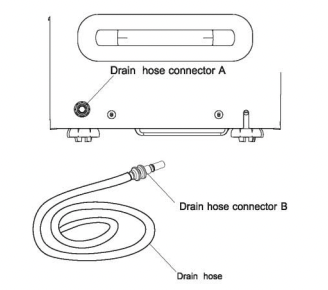
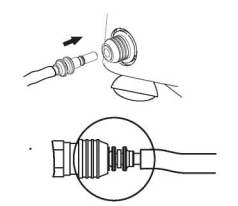
1. To connect drain hose to the unit.
Push drain hose connector B into the connector A.
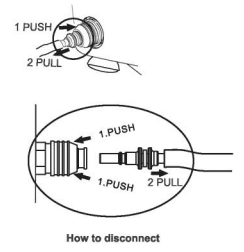
2. To disconnect drain hose.
Push drain hose connector A in. and then pull connector B out.
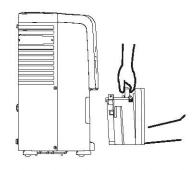
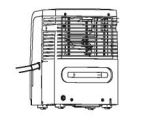
NOTE: If the unit will not used for a certain period of time. please unplug the water plug as shown in the picture and drain the dehumidifier completely.
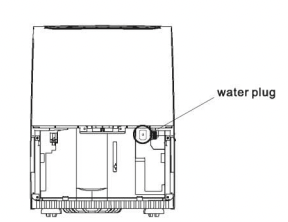
IMPORTANT: Before using. please ensure the water plug is tightly plugged. otherwise hose drainage option and pump drainage option will not work properly.
Normal Sounds
When your dehumidifier is operating normally. you may hear sounds such as:
- Compressor sounds. which may be loud. This is normal.
- Air movement from the fan.
- Pump sounds. which may be loud. is normal.
- Clicking sounds when the dehumidifier or compressor turns off and on.
DEHUMIDIFIER CARE
Your new dehumidifier is designed to give you many years of dependable service. This section tells you how to clean and care for your dehumidifier.
Cleaning the Air Filter
The air filter is removable for easy cleaning. A clean filter helps remove dust. lint. and other parti from the air and is important for best operating efficiency.Check the filter every two weeks to see whether it needs cleaning.
- 1.Turn off the dehumidifer.
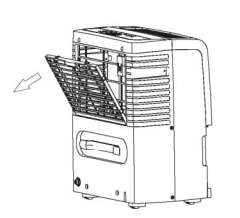
- 2.Remove the air intake grill.
- 3.Take out the air filter.
- 4.Use a vacuum cleaner to clean air filter If the. air filter is dirty. wash it in warm water with a mild detergent. Do not wash air filter in the dishwasher or use any chemical cleaners. Air dry filter completely before replacing to ensure maximum efficiency.
- 5.Reinstall the air filter and the air intake grill.
- 6.Turn on the dehumidifier.
Cleaning the Dehumidifier
Exterior
NOTE:
- 1. Turn off the dehumidifier and unplug the power supply cord.
- 2. Dust the surface of the unit with a soft brush or the dusting attachment of your vaccum cleaner.
Water Bucket
Every few weeks. rinse the inside of the water buket with a mild detergent to aviod growth of mold. mildew and bacteria.
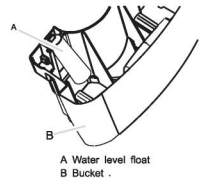
Water Level Float
The dehumidifier has a EMPTY BUCKET light and a water float. The bucket must be properly aligned for the water levie float and the EMPTY BUCKET light to work.
NOTE:Be sure the float is snapped in place
TROUBLESHOOTING
Before calling for service. try the suggestions below to see whether you can solve your problem without outside help.
Dehumidifier will not run
- Is the dehumidifier turned on?
- Turn on the dehumidifier.
- Is the power cord plugged into a grounded three-prong outlet?
- Plug into a grounded three-prong outlet. See Electrical Requirements.
- Has a household fuse blown or has a circuit breaker tripped?
- Replace the fuse or reset the circuit breaker. If the problem continues. call an electrician. See “Electrical Requirements.”
- Is the bucket installed properly?
- Reinstall the bucket so that it fits all the way into the dehumidifier.
- Does the bucket need to be emptied?
- Is the water level float in place?
- Remove the bucket. Make sure the float is snapped in place. Reinstall the bucket.
Ice forms on coils
- All models have an automatic de-icing function that will shut off the compressor and allow the fan to run.
- This reduces the ice build-up on the coils. The compressor will cycle back on when the de-icing function senses the correct operating temperature.
Dehumidifier runs but does not dehumidify
- All models have an automatic de-icing function that will shut off the compressor and allow the fan fo run.
- When the de-icing function senses the correct operating temperature. he compressor will cycle back on.
- Is the control set to Continuous/Super Dry?
- lf you have selected Continuous/Super Dry Run. the dehumidifier will run continuously. If the room humidity level is low. little or no water may be collected.
- The filter is dirty or obstructed by debris.
- Air coming from the dehumidifier is warm
- Dehumidifier will pull out warm air under normal operating conditions.
Dehumidifier displays error codes
- lf the dehumidifier displays an error code. please contact the Hisense customer service.
Pump system does not work
- Does the pump indicator flash?
- 1. Check and make sure the drain hose is correctly connected to the unit.
- 2. Press the POWER button to turn off the unit. Restart the unit by pressing POWER button again.