HR1878
HR1874
HR1873
HR1871
HR1870
HR1869
User manual
4203.064.6125.1
1

ENGLISH
Introduction
Congratulations on your purchase and welcome to Philips! To fully benet from the
support that Philips offers, register your product at www.philips.com/welcome.
General description
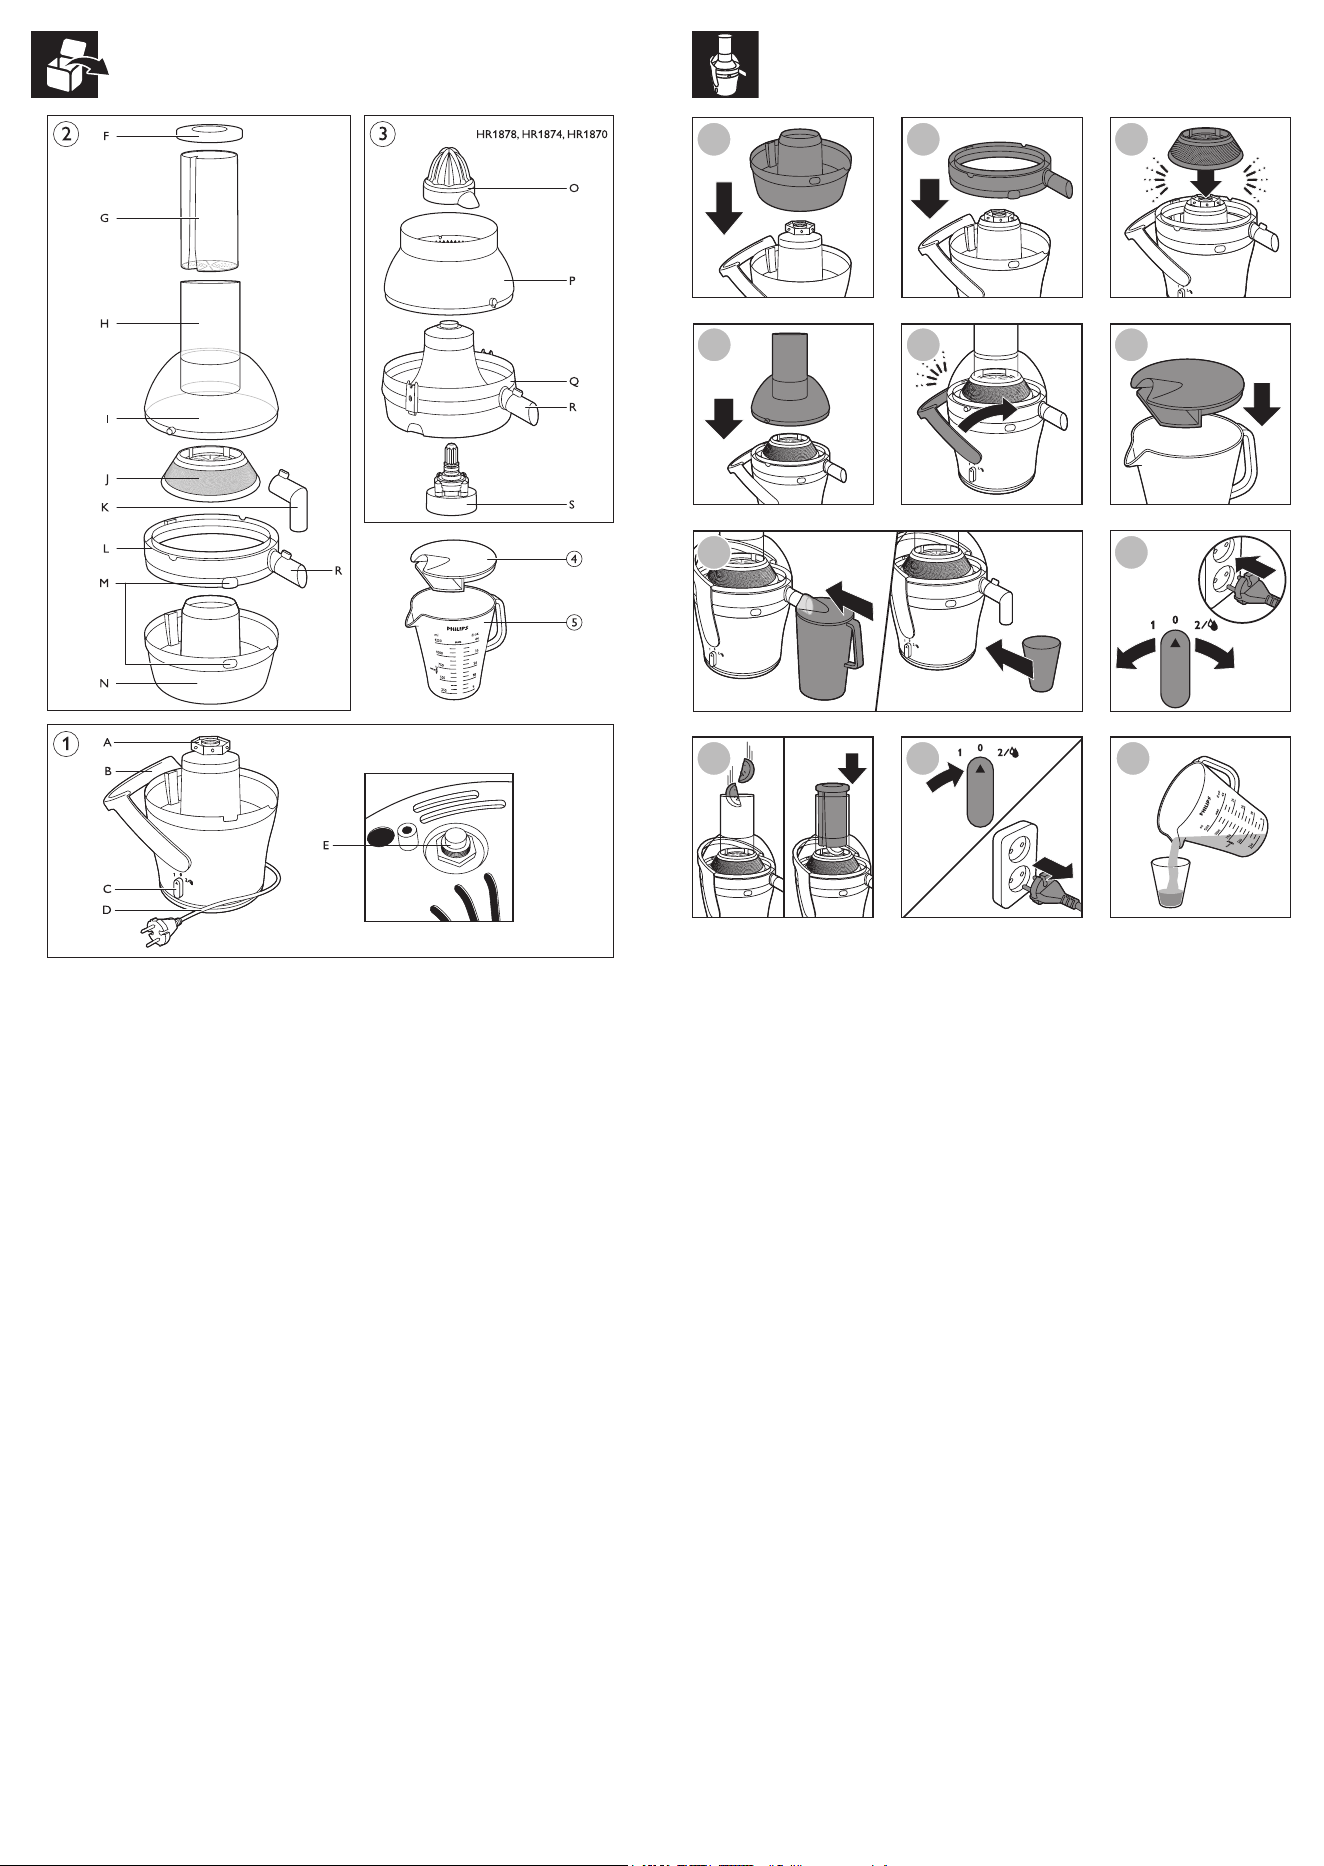
1 Motor unit
- A Driving shaft
- B Locking arm
- C Control knob
- D Cord storage facility
- E Overload protection button
2 Juicer
- F Cover of pusher
- G Pusher with pre-clean function
- H Feeding tube
- I Lid
- J Sieve
- K Direct serve spout accessory
- L Juice collector with (R) detachable spout
- M Pulp window
- N Pulp container
3 Citrus press (HR1878, HR1874, HR1870 only)
- O Cone
- P Sieve
- Q Juice collector
- R Detachable spout
- S Citrus press coupling unit
4 Juice jug lid with integrated foam separator
5 Juice jug
Important
Read this user manual carefully before you use the
appliance and save it for future reference.
Danger
- Never immerse the motor unit or the citrus press
coupling unit in water or any other liquid, nor rinse
it under the tap.
- Do not clean the motor unit or the citrus press
coupling unit in the dishwasher.
Warning
- Check if the voltage indicated on the base of the
appliance corresponds to the local mains voltage
before you connect the appliance.
- Do not use the appliance if the plug, the mains cord
or other components are damaged.
- If the mains cord is damaged, you must have it
replaced by Philips, a service centre authorised by
Philips or similarly qualied persons in order to avoid
a hazard.
- This appliance can be used by persons with reduced
physical, sensory or mental capabilities or lack of
experience and knowledge if they have been given
supervision or instruction concerning use of the
appliance in a safe way and if they understand the
hazards involved.
- This appliance shall not be used by children. Keep the
appliance and its cord out of the reach of children.
- Children shall not play with the appliance.
- Never let the appliance operate unattended.
- Always disconnect the appliance from the mains
if you leave it unattended or before you assemble,
disassemble or clean it.
- If you detect cracks in the lter or if the lter is
damaged in any way, do not use the appliance
anymore and contact the nearest Philips service
centre.
- Never reach into the feeding tube with your ngers
or an object while the appliance is operating.
Only use the pusher for this purpose.
- Do not touch the small cutting blades in the base
of the lter. They are very sharp.
- Always place and use the appliance on a dry,
stable and level surface.
- To ensure that the appliance stands stably,
keep the surface on which the appliance stands
and the bottom of the appliance clean.
Caution
- This appliance is intended for household use only.
- Do not hold the appliance by the locking arm when
you carry it.
- Never use any accessories or parts from other
manufacturers or that Philips does not specically
recommend. If you use such accessories or parts,
your guarantee becomes invalid.
- Make sure all parts are correctly assembled before
you switch on the appliance.
- Only use the appliance when the locking arm is in
locked position.
- Before you disassemble the appliance and before
you clean it, set the control knob to off position and
remove the plug from the wall socket. Then lower the
locking arm to unlocked position.
- Only lower the locking arm to unlocked position after
you have switched off the appliance and the lter has
stopped rotating.
- HR1870, HR1874, HR1878: Do not use the citrus
press longer than 10 minutes without interruption.
- HR1870, HR1874, HR1878: Never immerse the citrus
press coupling unit in water nor rinse under the tap.
- HR1870, HR1874, HR1878: Never clean the citrus
press coupling unit in the dishwasher.
- Always unplug the appliance after use.
- Noise level: Lc = 78 dB(A).
Safety feature
This appliance is tted with a safety feature which safeguards against overheating
due to excessive loads. In case of overheating, the juicer automatically activates the
overload protection and switches itself off. If this occurs, set the control knob to 0,
unplug the appliance and let it cool down for 15 minutes. Remove the juice jug and
detach the lid, the juice collector and the pulp container and then press the overload
protection button on the bottom of the motor unit.
Electromagnetic elds (EMF)
This Philips appliance complies with all applicable standards and regulations regarding
exposure to electromagnetic elds.
Before first use
Thoroughly clean the parts that come into contact with food before you use the
appliance for the rst time (see chapter ‘Cleaning and storage’).
Tips
- Always check the lter before use. If you detect any cracks or damage,
do not use the appliance.
- Make sure the locking arm is locked into position.
- To keep your juice fresh longer, put the lid on the juice jug after juicing
Using the appliance
Juicer
You can use the juicer to produce fruit and vegetable juice.
Tips
- Do not operate the juicer for more than 40 seconds at a time when you juice
heavy loads and let it cool down sufciently afterwards.
- Turn the control knob to setting 1 (low speed) or 2 (normal speed).
- Speed 1 is especially suitable for soft fruits and vegetables such as watermelons,
grapes, tomatoes and cucumbers.
- Speed 2 is suitable for all other kinds of fruit and vegetables such as apples,
carrots and beetroots.

Note: This appliance can process 7.5kg of carrots in 60 seconds (not including the time
required to remove the pulp). When you have nished processing the carrots, switch off
the appliance and let it cool down for 15 minutes.
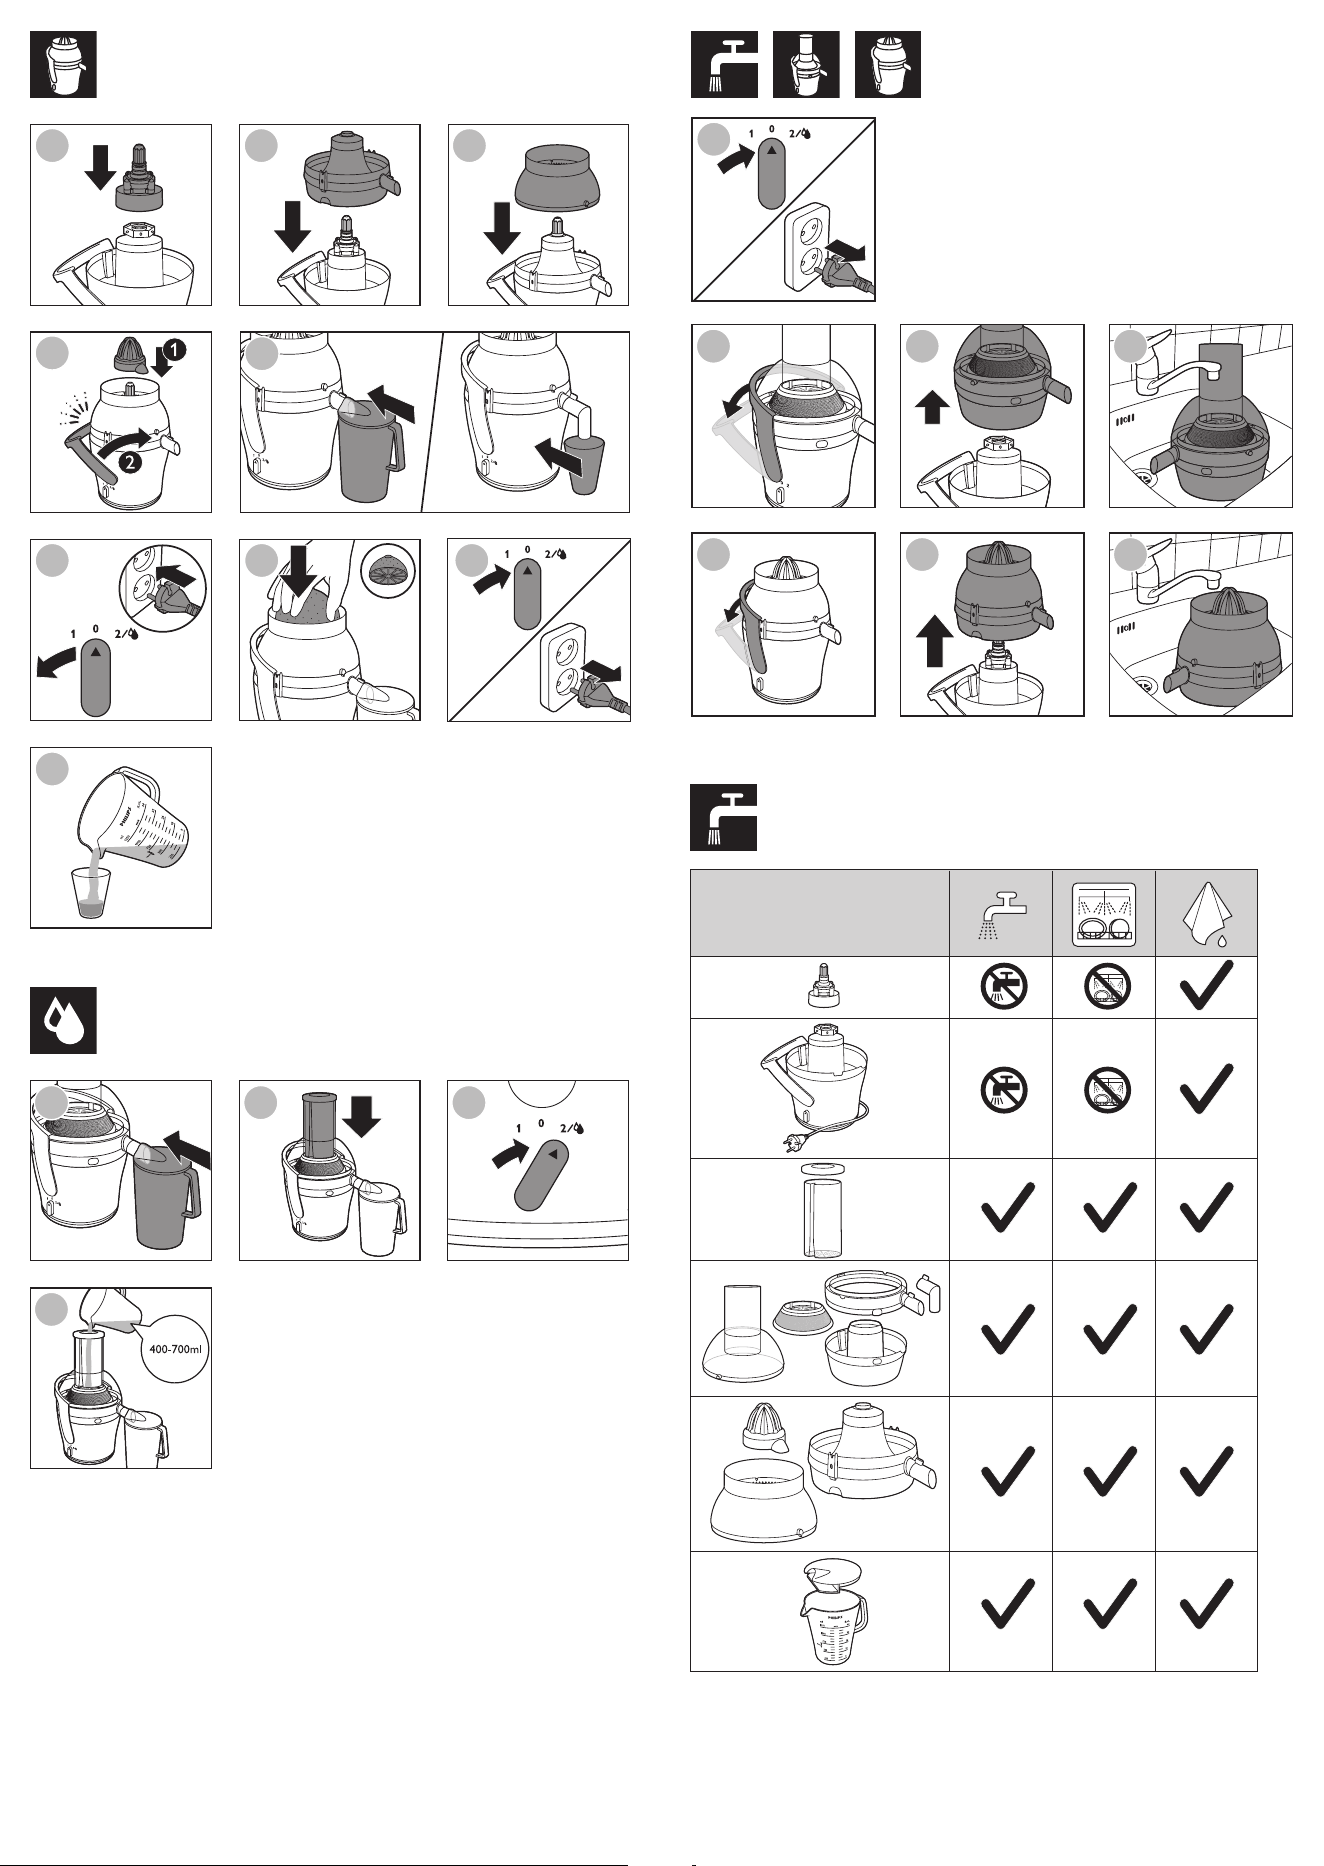
Cleaning
Never use scouring pads, abrasive cleaning agents or aggressive liquids such as
alcohol, petrol or acetone to clean the appliance.
The appliance is easier to clean if you do so immediately after use.
Pre-clean function
When you use the pre-clean function, the lid and the sieve are rinsed with water.
Use the pre-clean function:
- To make the juicer easier to clean.
- To rinse the juicer when you switch to a different fruit or vegetable and want to
avoid mixing avours.
- To dilute the juice with water and catch even the last drop of juice.
Juicer
To keep your kitchen clean, all detachable parts (pulp container, juice collector,
lter and lid) can be carried to the sink in one go.
Tip: Use a sponge to clean the lter.
Citrus press (HR1878, HR1874, HR1870 only)
To keep your kitchen clean, all detachable parts (except the citrus press coupling unit)
can be carried to the sink in one go.
Storage
To store the cord, wind it round the cord storage facility in the base of the appliance.
Caution: Do not hold the appliance by the locking arm or spout when you carry it.
Ordering accessories
To buy accessories or spare parts, visit www.shop.philips.com/service or go to
your Philips dealer. You can also contact the Philips Consumer Care Centre in your
country (see the worldwide guarantee leaet for contact details).
Environment
- Do not throw away the appliance with the normal household waste at the end
of its life, but hand it in at an ofcial collection point for recycling. By doing this,
you help to preserve the environment (Fig. 1).
Guarantee and support
If you need information or support, please visit www.philips.com/support
or read the separate worldwide guarantee leaet.
DEUTSCH
Einführung
Herzlichen Glückwunsch zu Ihrem Kauf und willkommen bei Philips! Um die
Unterstützung von Philips optimal nutzen zu können, registrieren Sie Ihr Produkt bitte
unter www.philips.com/welcome.
Allgemeine Beschreibung
1 Motoreinheit
- A Antriebsachse
- B Verriegelungsarm
- C Drehschalter
- D Kabelaufwicklung
- E Überhitzungsschutztaste
2 Entsafter
- F Abdeckung des Stopfers
- G Stopfer mit Vorreinigungsfunktion
- H Einfüllöffnung
- I Deckel
- J Sieb
- K Ausgießer-Aufsatz zum Servieren
- L Saftauffangschale mit (R) abnehmbarem Ausgießer
- M Fruchteischfenster
- N Fruchteischbehälter
3 Zitruspresse (nur HR1878, HR1874, HR1870)
- O Presskegel
- P Sieb
- Q Saftauffangschale
- R Abnehmbarer Ausgießer
- S Verbindungseinheit der Zitruspresse
4 Deckel der Saftkanne mit integriertem Schaumsieb
5 Saftkanne
Notes
- Do not exert too much pressure on the pusher, as this could affect the quality
of the end result. It could even cause the lter to come to a halt.
- Never insert your ngers or an object into the feeding tube.
- If the pulp container becomes full during use, switch off the appliance and detach
the lid and the juice collector. Then carefully remove the pulp container and
empty it.
- After you have processed all ingredients and the juice ow has stopped,
pour the juice from the jug into the glass.
Empty the pulp container
Note: When the pulp container has reached its maximum capacity, pulp ends up in the
juice collector, lid and in the juice.
If the pulp container becomes overlled, the appliance may become blocked.
When this occurs, switch off the appliance and remove the pulp from the pulp
container. Let the appliance cool down for 15 minutes and press the overload
protection button on the bottom of the motor unit to reset (?).
Note: The pulp window helps you to see when the pulp container is full and needs to be
emptied. Because the pulp window may become blocked before the maximum capacity
of the container has been reached, also check the level indication on the juice jug.
The pulp window is more likely to become blocked when you juice hard ingredients,
such as carrots or beetroots.
Citrus press (HR1878,HR1874,HR1870 only)
Note
- If you want to extract juice straight into a glass, use the direct serve spout
accessory.
- To prevent damage and injuries, keep the operating appliance away from long
hair, clothes, cords, etc.
- Only use speed 1 for the citrus press.
Tips
Preparations
- Use fresh fruit and vegetables, as they contain more juice. Pineapples, beetroots,
celery stalks, apples, cucumbers, carrots, spinach, melons, tomatoes, oranges and
grapes are particularly suitable for processing in the juicer.
- The juicer is not suitable for processing very hard and/or brous or starchy fruits
or vegetables such as sugar cane.
- Leaves and leaf stalks of e.g. lettuce can also be processed in the juicer.
- Remove stones from cherries, plums, peaches, etc. You do not have to remove
cores or seeds from fruits like melons, apples and grapes.
- When you use the juicer, you do not have to remove thin peels or skins.
Only remove thick peels that you would not eat, e.g. those of oranges, pineapples,
kiwis, melons and uncooked beetroots.
- When you prepare apple juice, take into consideration that the thickness of
the apple juice depends on the kind of apple you use. The juicier the apple,
the thinner the juice. Choose a kind of apple that produces the type of juice
you prefer.
- If you want to process citrus fruits with the juicer, remove the peel as well as
the white pith. The white pith gives juice a bitter taste.
- Fruits that contain starch, such as bananas, papayas, avocados, gs and mangoes
are not suitable for processing in the juicer. Use a food processor, blender or
hand blender to process these fruits.
- To extract the maximum amount of juice, always press down the pusher slowly.
Serving
- Drink the juice immediately after you have extracted it.
- If you want clear juice without a foam layer, put the lid with integrated foam
separator on the juice jug. If you want cloudy juice with a foam layer, remove the
lid with integrated foam separator from the juice jug and stir the juice before you
pour it in a glass.
- Apple juice turns brown very quickly. To slow down this process, add a few drops
of lemon juice.
- When you serve cold drinks, add a few ice cubes.
Healthy recipe
Orange carrot juice
Ingredients:
- 1kg carrots
- 4 oranges
- 1 tbsp olive oil
- 1 large fresh mint sprig (optional garnish)
1 Peel the oranges.
2 Process the carrots and oranges in the juicer.
3 Add a tablespoon of olive oil and a few ice cubes to the juice.
4 Mix well.
5 Pour the juice into a glass.

- Prüfen Sie, bevor Sie das Gerät einschalten, ob alle
Teile korrekt zusammengesetzt sind.
- Verwenden Sie das Gerät erst dann, wenn sich der
Verriegelungsarm in gesperrter Position bendet.
- Bevor Sie das Gerät auseinandernehmen oder
reinigen, stellen Sie den Drehschalter auf die Aus-
Position, und ziehen Sie den Netzstecker aus der
Steckdose. Schieben Sie dann den Verriegelungsarm in
die entsperrte Position.
- Entsperren Sie den Verriegelungsarm erst, nachdem
Sie das Gerät ausgeschaltet haben und der Filter zum
Stillstand gekommen ist.
- HR1870, HR1874, HR1878: Benutzen Sie die
Zitruspresse nicht länger als 10 Minuten ohne
Unterbrechung.
- HR1870, HR1874, HR1878: Tauchen Sie die
Verbindungseinheit der Zitruspresse nie in Wasser,
und spülen Sie sie nicht unter ießendem Wasser ab.
- HR1870, HR1874, HR1878: Reinigen Sie die
Verbindungseinheit der Zitruspresse nie in der
Spülmaschine.
- Ziehen Sie nach jedem Gebrauch den Netzstecker
aus der Steckdose.
- Geräuschpegel: Lc = 78 dB(A)
Sicherheitsfunktion
Dieses Gerät ist mit einer Sicherheitsfunktion zum Schutz vor Überhitzung bei zu
großen Füllmengen ausgestattet. Im Fall einer Überhitzung aktiviert der Entsafter
automatisch den Überhitzungsschutz und schaltet sich aus. Stellen Sie den
Drehschalter in diesem Fall auf 0, ziehen Sie den Netzstecker, und lassen Sie das
Gerät 15 Minuten abkühlen. Nehmen Sie die Saftkanne heraus, und entfernen Sie den
Deckel, die Saftauffangschale und den integrierten Fruchteischbehälter. Drücken Sie
dann die Überhitzungsschutztaste am Boden der Motoreinheit.
Elektromagnetische Felder
Dieses Philips Gerät erfüllt sämtliche Normen und Regelungen bezüglich der
Exposition in elektromagnetischen Feldern.
Vor dem ersten Gebrauch
Reinigen Sie vor dem ersten Gebrauch des Geräts alle Teile gründlich, die mit
Lebensmitteln in Kontakt kommen (siehe “Reinigung und Aufbewahrung”).
Tipps
- Prüfen Sie den Filter stets vor dem Gebrauch. Wenn Sie Risse oder
Beschädigungen entdecken, verwenden Sie das Gerät nicht mehr.
- Stellen Sie sicher, dass sich der Verriegelungsarm in gesperrter Position bendet.
- Setzen Sie den Deckel nach dem Entsaften auf die Saftkanne, damit der Saft
länger frisch bleibt.
Das Gerät benutzen
Entsafter
Sie können den Entsafter für Frucht- und Gemüsesaft verwenden.
Tipps
- Betreiben Sie den Entsafter bei der Verarbeitung größerer Mengen höchstens
40 Sekunden lang in einem Arbeitsgang, und lassen Sie ihn anschließend
genügend abkühlen.
- Drehen Sie den Regler auf Stufe 1 (niedrige Geschwindigkeit)
oder Stufe 2 (normale Geschwindigkeit).
- Stufe 1 eignet sich besonders für weiches Obst/Gemüse, z. B. Wassermelonen,
Weintrauben, Tomaten und Gurken.
- Stufe 2 eignet sich für alle Obst- und Gemüsesorten, z. B. Äpfel, Möhren und
rote Beete.
Bemerkungen
- Drücken Sie den Stopfer nicht zu stark; andernfalls könnten Sie das Ergebnis
beeinträchtigen und sogar den Filter zum Stillstand bringen.
- Stecken Sie keinesfalls Ihre Finger oder Gegenstände in die Einfüllöffnung.
- Bei vollem Fruchteischbehälter während des Betriebs schalten Sie das Gerät aus,
und entfernen Sie den Deckel und die Saftauffangschale. Dann nehmen Sie den
Behälter vorsichtig ab, und entleeren Sie ihn.
- Nachdem Sie alle Zutaten verarbeitet haben und kein Saft mehr ausießt,
gießen Sie den Saft aus der Kanne in ein Glas.
Wichtig
Lesen Sie diese Bedienungsanleitung vor dem Gebrauch
des Geräts aufmerksam durch, und bewahren Sie sie für
eine spätere Verwendung auf.
Gefahr
- Tauchen Sie die Motoreinheit oder die Zitruspresse
niemals in Wasser oder andere Flüssigkeiten. Spülen
Sie sie auch nicht unter ießendem Wasser ab.
- Reinigen Sie die Motoreinheit oder die
Verbindungseinheit der Zitruspresse nicht in der
Spülmaschine.
Warnhinweis
- Prüfen Sie vor Inbetriebnahme, ob die
Spannungsangabe an der Unterseite des Geräts mit
der örtlichen Netzspannung übereinstimmt.
- Benutzen Sie das Gerät nicht, wenn der Netzstecker,
das Netzkabel oder ein anderes Teil des Geräts defekt
oder beschädigt ist.
- Um Gefährdungen zu vermeiden, darf ein defektes
Netzkabel nur von einem Philips Service-Center,
einer von Philips autorisierten Werkstatt oder einer
ähnlich qualizierten Person durch ein Original-
Ersatzkabel ersetzt werden.
- Dieses Gerät kann von Personen mit verringerten
physischen, sensorischen oder psychischen Fähigkeiten
oder Mangel an Erfahrung und Kenntnis verwendet
werden, wenn sie bei der Verwendung beaufsichtigt
wurden oder Anweisung zum sicheren Gebrauch des
Geräts erhalten und die Gefahren verstanden haben.
- Das Gerät darf nicht von Kindern verwendet werden.
Halten Sie das Gerät und das Netzkabel außerhalb
der Reichweite von Kindern.
- Kinder dürfen nicht mit dem Gerät spielen.
- Lassen Sie das eingeschaltete Gerät niemals
unbeaufsichtigt.
- Trennen Sie das Gerät immer von der
Stromversorgung, wenn Sie es unbeaufsichtigt
lassen und bevor Sie es zusammensetzen,
auseinandernehmen oder reinigen.
- Wenn sich Risse oder andere Schäden am Filter
bemerkbar machen, benutzen Sie das Gerät nicht
mehr und wenden Sie sich an das nächstgelegene
Philips Service-Center.
- Greifen Sie niemals bei laufendem Motor mit den
Fingern oder einem Gegenstand in die Einfüllöffnung.
Verwenden Sie hierzu nur den Stopfer.
- Vermeiden Sie jede Berührung mit den kleinen
Raspelklingen am Boden des Filters. Sie sind sehr
scharf.
- Verwenden Sie das Gerät immer auf einer trockenen,
stabilen und ebenen Unterlage.
- Halten Sie die Arbeitsäche, auf der das Gerät steht,
und die Unterseite des Geräts sauber, damit es nicht
rutschen kann.
Achtung
- Dieses Gerät ist nur für den Gebrauch im Haushalt
bestimmt.
- Tragen Sie das Gerät nicht am Verriegelungsarm.
- Verwenden Sie keine Zubehörteile anderer Hersteller
oder solche, die von Philips nicht ausdrücklich
empfohlen werden. Falls Sie derartiges Zubehör
benutzen, erlischt die Garantie.

Pflege
Benutzen Sie zum Reinigen des Geräts keine Scheuerschwämme und -mittel oder
aggressive Flüssigkeiten wie Alkohol, Benzin oder Azeton.
Am einfachsten lässt sich das Gerät unmittelbar nach dem Gebrauch reinigen.
Vorreinigungsfunktion
Wenn Sie die Vorreinigungsfunktion verwenden, werden der Deckel und das Sieb mit
Wasser gespült.
Verwenden Sie die Vorreinigungsfunktion:
- Damit der Entsafter leichter zu reinigen ist.
- Um den Entsafter zu spülen, wenn Sie zu einer anderen Obst- oder
Gemüsesorte wechseln und ein Vermischen der Aromen vermeiden möchten.
- Um den Saft mit Wasser zu verdünnen und auch den letzten Tropfen Saft
aufzufangen.
Entsafter
Damit Ihre Küche sauber bleibt, lassen sich alle abnehmbaren Teile
(Fruchteischbehälter, Saftauffangschale, Filter und Deckel) mit einem Mal zum
Spülbecken tragen.
Tipp: Verwenden Sie einen Schwamm zum Reinigen des Filters.
Zitruspresse (nur HR1878, HR1874, HR1870)
Damit Ihre Küche sauber bleibt, lassen sich alle abnehmbaren Teile (außer der
Verbindungseinheit der Zitruspresse) mit einem Mal zum Spülbecken tragen.
Aufbewahrung
Sie können zur Aufbewahrung das Netzkabel um die Kabelaufwicklung an der
Geräteunterseite wickeln.
Achtung: Tragen Sie das Gerät nicht am Verriegelungsarm oder am Ausgießer.
Zubehör bestellen
Um Zubehörteile oder Ersatzteile zu kaufen, besuchen Sie www.shop.philips.com/
service, oder gehen Sie zu Ihrem Philips Händler. Sie können auch das Philips
Service-Center in Ihrem Land kontaktieren (die Kontaktdetails nden Sie in der
internationalen Garantieschrift).
Umwelt
- Werfen Sie das Gerät am Ende der Lebensdauer nicht in den normalen
Hausmüll. Bringen Sie es zum Recycling zu einer ofziellen Sammelstelle.
Auf diese Weise helfen Sie, die Umwelt zu schonen (Abb. 1).
Garantie und Support
Für Unterstützung und weitere Informationen besuchen Sie die Philips Website unter
www.philips.com/support, oder lesen Sie die internationale Garantieschrift.
FRANÇAIS
Introduction
Félicitations pour votre achat et bienvenue dans l’univers Philips ! Pour proter
pleinement de l’assistance Philips, enregistrez votre produit sur le site à l’adresse
suivante : www.philips.com/welcome.
Description générale
1 Bloc moteur
- A Axe d’entraînement
- B Bras de verrouillage
- C Bouton de commande
- D Rangement du cordon
- E Bouton de protection anti-surchauffe
2 Centrifugeuse
- F Couvercle de poussoir
- G Poussoir avec fonction de pré-nettoyage
- H Cheminée de remplissage
- I Couvercle
- J Filtre
- K Accessoire bec verseur pour service direct
- L Récupérateur de jus avec (R) bec verseur amovible
- M Fenêtre à pulpe
- N Réservoir à pulpe
Entleeren des integrierten Fruchteischbehälters
Hinweis: Wenn der Fruchteischbehälter seine maximale Füllmenge erreicht hat, gelangt
Fruchteisch in die Saftauffangschale, den Deckel und den Saft.
Wenn der Fruchteischbehälter zu voll wird, kann das Gerät verstopfen. Wenn das
passiert, schalten Sie das Gerät aus, und entfernen Sie das Fruchteisch aus dem
Fruchteischbehälter. Lassen Sie das Gerät 15 Minuten lang abkühlen, und drücken
Sie dann die Überhitzungsschutztaste unten an der Motoreinheit, um das Gerät
zurückzusetzen.
Hinweis: Durch das Sichtfenster können Sie erkennen, wann der Fruchteischbehälter
voll ist und entleert werden muss. Weil das Fruchteischfenster bereits blockiert sein
kann, bevor die maximale Füllmenge des Behälters erreicht ist, prüfen Sie auch die
Füllstandsanzeige an der Saftkanne. Beim Entsaften harter Zutaten wie Möhren oder
Rote Bete kann das Fruchteischfenster möglicherweise schneller blockieren.
Zitruspresse (nur HR1878, HR1874, HR1870)
Hinweis
- Wenn Sie Saft direkt in ein Glas pressen möchten, verwenden Sie den Ausgießer-
Aufsatz zum Servieren.
- Um Beschädigungen und Verletzungen zu vermeiden, halten Sie das
eingeschaltete Gerät von langen Haaren, Kleidung, Schnüren usw. fern.
- Verwenden Sie für die Zitruspresse nur Stufe 1.
Tipps
Vorbereitungen
- Verarbeiten Sie nur frisches Obst und Gemüse, weil es saftiger ist. Ananas,
Rote Bete, Stangensellerie, Äpfel, Gurken, Möhren, Spinat, Melonen, Tomaten,
Orangen und Weintrauben eignen sich hervorragend zum Entsaften.
- Der Entsafter eignet sich nicht zum Verarbeiten von besonders hartem,
faserigem und stärkehaltigem Obst und Gemüse (z. B. Zuckerrohr).
- Blätter und Stiele (z. B. Strünke von Blattsalat) können ebenfalls in diesem
Entsafter verarbeitet werden.
- Entsteinen Sie Kirschen, Paumen, Prsiche usw. Aus Obst wie Melonen,
Äpfeln und Trauben müssen die Kerne bzw. Samen nicht entfernt werden.
- Wenn Sie den Entsafter verwenden, müssen Sie dünne Schalen nicht unbedingt
entfernen. Entfernen Sie nur dicke Schalen, die Sie nicht essen, z. B. Schalen von
Orangen, Ananas, Kiwis, Melonen und roher Rote Bete.
- Berücksichtigen Sie bei der Zubereitung von Apfelsaft, dass die Konsistenz des
Saftes von der verwendeten Apfelsorte abhängt. Je saftiger der Apfel, desto
dünnüssiger der Saft. Wählen Sie eine Apfelsorte, deren Saft Ihrem Geschmack
entspricht.
- Wenn Sie Zitrusfrüchte mit dem Entsafter verarbeiten möchten, entfernen
Sie die Schale sowie die weiße Haut. Die weiße Haut verleiht dem Saft einen
bitteren Geschmack.
- Stärkehaltige Früchte (z. B. Bananen, Papayas, Avocados, Feigen und Mangos)
sind zum Entsaften in diesem Gerät nicht geeignet. Verwenden Sie für solche
Früchte eine Küchenmaschine, einen Mixer oder einen Stabmixer.
- Um eine hohe Saftausbeute zu erzielen, sollten Sie den Stopfer stets langsam
drücken.
Servieren
- Trinken Sie den Saft sofort nach der Zubereitung.
- Wenn Sie klaren Saft ohne eine Schaumkrone erhalten möchten, setzen Sie den
Deckel mit integriertem Schaumsieb auf die Saftkanne. Wenn Sie trüben Saft
mit einer Schaumkrone möchten, entfernen Sie den Deckel mit integriertem
Schaumsieb nach dem Entsaften von der Saftkanne, und rühren Sie den Saft um,
bevor Sie ihn in ein Glas gießen.
- Apfelsaft wird schnell braun. Sie können diesen Vorgang verzögern, indem Sie
dem Apfelsaft einige Tropfen Zitronensaft beifügen.
- Fügen Sie beim Servieren von kalten Getränken ein paar Eiswürfel hinzu.
Gesunde Rezept
Orangen-Möhrensaft
Zutaten:
- 1 kg Möhren
- 4 Orangen
- 1 EL Olivenöl
- 1 großer Zweig frische Minze (zum Garnieren)
1 Schälen Sie die Orangen.
2 Verarbeiten Sie die Möhren und Orangen im Entsafter.
3 Fügen Sie einen Esslöffel Olivenöl und ein paar Eiswürfel zum Saft hinzu.
4 Gut umrühren.
5 Gießen Sie den Saft in ein Glas.
Hinweis: Dieses Gerät kann 7,5 kg Möhren in 60 Sekunden verarbeiten (die Zeit zum
Entfernen des Fruchteischs nicht mitgerechnet). Wenn Sie die Verarbeitung der Karotten
abgeschlossen haben, schalten Sie das Gerät aus, und lassen Sie es 15 Minuten lang
abkühlen.

Attention
- Cet appareil est destiné à un usage domestique
uniquement.
- Ne tenez pas l’appareil par le bras de verrouillage
lorsque vous le transportez.
- N’utilisez jamais d’accessoires, ni de pièces d’autres
fabricants ou qui n’ont pas été spéciquement
recommandés par Philips. Votre garantie ne sera pas
valable en cas d’utilisation de tels accessoires ou
pièces.
- Avant de mettre l’appareil en marche, assurez-vous
que tous les éléments sont correctement assemblés.
- Mettez toujours le bras de verrouillage en position
verrouillée avant d’utiliser l’appareil.
- Avant de démonter l’appareil et de le nettoyer,
réglez le bouton de commande sur la position d’arrêt
et débranchez la che de la prise secteur. Ensuite,
abaissez le bras de verrouillage pour le déverrouiller.
- Abaissez le bras de verrouillage pour le déverrouiller
uniquement après avoir éteint l’appareil et patienté
jusqu’à l’arrêt complet du ltre.
- HR1870, HR1874, HR1878 : n’utilisez pas le
presse-agrumes pendant plus de 10 minutes sans
interruption.
- HR1870, HR1874, HR1878 : ne plongez jamais l’unité
d’assemblage du presse-agrumes dans l’eau et ne la
rincez pas sous le robinet.
- HR1870, HR1874, HR1878 : ne nettoyez jamais l’unité
d’assemblage du presse-agrumes dans le lave-vaisselle.
- Débranchez toujours l’appareil après utilisation.
- Niveau sonore : Lc = 78 dB(A).
Fonction de sécurité
Cet appareil est doté d’une sécurité qui le protège contre la surchauffe lorsque
vous pressez une importante quantité de fruits et légumes. En cas de surchauffe,
la protection anti-surchauffe est automatiquement activée par la centrifugeuse,
ce qui met l’appareil hors tension. Si cela se produit, réglez le bouton de commande
sur 0, débranchez l’appareil et laissez-le refroidir pendant 15 minutes. Retirez le pichet,
détachez le couvercle, le récupérateur de jus et le réservoir à pulpe, puis appuyez sur
le bouton de protection anti-surchauffe situé au bas du bloc moteur.
Champs électromagnétiques (CEM)
Cet appareil Philips est conforme à toutes les normes et à tous les règlements
applicables relatifs à l’exposition aux champs électromagnétiques.
Avant la première utilisation
Avant la première utilisation, nettoyez soigneusement toutes les pièces en contact
avec des aliments (voir chapitre « Nettoyage et rangement »).
Conseils
- Vériez toujours la verseuse avant l’utilisation. Si vous remarquez des ssures ou
dommages, n’utilisez pas l’appareil.
- Assurez-vous que le bras de verrouillage est verrouillé.
- Pour que vos jus restent frais plus longtemps, placez le couvercle sur le réservoir
après les avoir pressés.
Utilisation de l’appareil
Centrifugeuse
Vous pouvez utiliser la centrifugeuse pour préparer des jus de fruits ou de légumes.
Conseils
- Ne faites pas fonctionner cette centrifugeuse pendant plus de 40 secondes sans
interruption lorsque vous pressez une grande quantité de fruits/légumes et
laissez-la refroidir après utilisation.
- Réglez le bouton de commande sur la position 1 (vitesse basse) ou sur la
position 2 (vitesse normale).
- La vitesse 1 convient pour les fruits et les légumes tendres tels que les melons,
les raisins, les tomates et les concombres.
- La vitesse 2 convient pour tous les autres types de fruits et légumes tels que les
pommes, les carottes et les betteraves.
3 Presse-agrumes (HR1878, HR1874, HR1870 uniquement)
- O Cône
- P Tamis
- Q Récupérateur de jus
- R Bec verseur amovible
- S Unité d’assemblage du presse-agrumes
4 Couvercle du pichet avec séparateur de mousse intégré
5 Pichet
Important
Lisez attentivement ce mode d’emploi avant d’utiliser
l’appareil et conservez-le pour un usage ultérieur.
Danger
- Ne plongez jamais le bloc moteur ou l’unité
d’assemblage du presse-agrumes dans l’eau, ni dans
d’autres liquides et ne le/la rincez pas.
- Ne nettoyez pas le bloc moteur ou l’unité
d’assemblage du presse-agrumes dans le lave-vaisselle.
Avertissement
- Avant de brancher l’appareil, vériez que la tension
indiquée sur le socle correspond à la tension secteur
locale.
- N’utilisez pas l’appareil si la che, le cordon
d’alimentation ou d’autres éléments sont
endommagés.
- Si le cordon d’alimentation est endommagé, il doit
être remplacé par Philips, par un Centre Service
Agréé Philips ou par un technicien qualié an
d’éviter tout accident.
- Cet appareil peut être utilisé par des personnes dont
les capacités physiques, sensorielles ou intellectuelles
sont réduites ou des personnes manquant
d’expérience et de connaissances, à condition que ces
personnes soient sous surveillance ou qu’elles aient
reçu des instructions quant à l’utilisation sécurisée
de l’appareil et qu’elles aient pris connaissance des
dangers encourus.
- L’utilisation de cet appareil est strictement interdite
aux enfants. Tenez l’appareil et son cordon hors de
portée des enfants.
- Les enfants ne doivent pas jouer avec l’appareil.
- Ne laissez jamais l’appareil fonctionner sans
surveillance.
- Débranchez toujours l’appareil du secteur si vous
ne vous en servez pas ou avant de l’assembler, de le
démonter ou de le nettoyer.
- Si vous remarquez des ssures dans le ltre ou si
le ltre est endommagé de quelque manière que
ce soit, cessez d’utiliser l’appareil et contactez le
Centre Service Agréé Philips le plus proche.
- Ne mettez jamais vos doigts ou tout autre objet
dans la cheminée lorsque l’appareil est en cours de
fonctionnement. Utilisez exclusivement le poussoir à
cet effet.
- Ne touchez pas les petites lames à la base du ltre.
Elles sont très coupantes.
- Placez et utilisez toujours l’appareil sur une surface
sèche, stable et plane.
- Pour garantir une position stable de l’appareil,
assurez-vous que la surface sur laquelle l’appareil
repose et le fond de l’appareil restent toujours
propres.

4 Mélangez bien.
5 Versez le jus dans un verre.
Remarque : Cet appareil peut presser 7,5 kg de carottes en 60 secondes (le temps
nécessaire pour retirer la pulpe n’est pas inclus). Lorsque vous avez ni de presser les
carottes, éteignez l’appareil et laissez-le refroidir pendant 15 minutes.
Nettoyage
N’utilisez jamais de tampons à récurer, de produits abrasifs ou de détergents
agressifs tels que de l’alcool, de l’essence ou de l’acétone pour nettoyer l’appareil.
Il est plus facile de nettoyer l’appareil immédiatement après son utilisation.
Fonction de pré-nettoyage
Lorsque vous utilisez la fonction de pré-nettoyage, le couvercle et le ltre sont rincés
à l’eau.
Utilisez la fonction de pré-nettoyage :
- Pour faciliter le nettoyage de la centrifugeuse.
- Pour rincer la centrifugeuse lorsque vous passez à un autre fruit ou légume et
que vous souhaitez éviter de mélanger les saveurs.
- Pour diluer le jus avec de l’eau et atteindre jusqu’à la dernière goutte de jus.
Centrifugeuse
Pour que votre cuisine reste propre, tous les éléments amovibles (réservoir à pulpe,
récupérateur de jus, ltre et couvercle) peuvent être transportés simultanément
jusqu’à l’évier.
Conseil : Utilisez une éponge pour nettoyer le ltre.
Presse-agrumes (HR1878, HR1874, HR1870 uniquement)
Pour que votre cuisine reste propre, tous les éléments amovibles (sauf l’unité
d’assemblage du presse-agrumes) peuvent être transportés simultanément jusqu’à
l’évier.
Rangement
Pour ranger le cordon, enroulez-le autour du rangement prévu à cet effet sur la base
de l’appareil.
Attention : Ne tenez pas l’appareil par le bras de verrouillage ou le bec verseur
lorsque vous le transportez.
Commande d’accessoires
Pour acheter des accessoires ou des pièces de rechange, visitez le site Web
www.shop.philips.com/service ou rendez-vous chez votre revendeur Philips.
Vous pouvez également contacter le Service Consommateurs Philips de votre pays
(voir le dépliant de garantie internationale pour les coordonnées).
Environnement
- Lorsqu’il ne fonctionnera plus, ne jetez pas l’appareil avec les ordures ménagères,
mais déposez-le à un endroit assigné à cet effet, où il pourra être recyclé.
Vous contribuerez ainsi à la protection de l’environnement (g. 1).
Garantie et assistance
Si vous avez besoin d’une assistance ou d’informations supplémentaires, consultez
le site Web www.philips.com/support ou lisez le dépliant séparé sur la garantie
internationale.
ITALIANO
Introduzione
Congratulazioni per l’acquisto e benvenuti in Philips! Per trarre il massimo vantaggio
dall’assistenza Philips, registrate il vostro prodotto su www.philips.com/welcome.
Descrizione generale
1 Gruppo motore
- A Albero motore
- B Braccio di blocco
- C Manopola di comando
- D Supporto per cavo
- E Pulsante di protezione da sovraccarico
2 Centrifuga
- F Coperchio del pestello
- G Pestello con funzione pre-pulizia
- H Apertura di inserimento cibo
- I Coperchio
- J Setaccio
- K Beccuccio per servire direttamente
- L Raccogli-succo con (R) beccuccio estraibile
- M Finestra di controllo della polpa
Remarques
- N’exercez pas une pression trop forte sur le poussoir car vous risqueriez
d’altérer la qualité du résultat, voire de bloquer le ltre.
- Ne mettez jamais vos doigts ou tout autre objet dans la cheminée.
- Si le réservoir à pulpe se remplit entièrement en cours d’utilisation, éteignez
l’appareil et retirez le couvercle et le récupérateur de jus. Ensuite, retirez le
réservoir à pulpe avec précaution et videz-le.
- Après avoir pressé tous les fruits et légumes et lorsque le jus ne s’écoule plus,
versez le jus dans un verre.
Vider le réservoir à pulpe
Remarque : Lorsque le réservoir à pulpe est plein, la pulpe se répand dans le
récupérateur de jus, le couvercle et le jus.
Si vous remplissez le réservoir à pulpe au-delà de sa capacité maximale, l’appareil
peut se bloquer. Si cela se produit, éteignez l’appareil et retirez la pulpe du réservoir
à pulpe. Laissez l’appareil refroidir pendant 15 minutes et appuyez sur le bouton de
protection anti-surchauffe situé au bas du bloc moteur pour réinitialiser.
Remarque : La fenêtre à pulpe vous permet de voir si le réservoir à pulpe est plein et
doit être vidé. La fenêtre à pulpe peut se bloquer avant même que le réservoir ait atteint
sa capacité maximale ; c’est pourquoi nous vous recommandons de vérier également
l’indication de niveau sur le pichet. Cette situation se présente le plus souvent lorsque
vous pressez des aliments durs tels que des carottes ou des betteraves.
Presse-agrumes (HR1878,HR1874,HR1870 uniquement)
Remarque
- Si vous voulez préparer du jus directement dans un verre, utilisez l’accessoire bec
verseur de service direct.
- Pour prévenir tout dommage ou blessure, évitez de faire fonctionner l’appareil
près de cheveux longs ou à proximité de vêtements, câbles, etc.
- Utilisez la vitesse 1 uniquement pour le presse-agrumes.
Conseils
Préparations
- Utilisez des fruits et légumes frais car ils sont plus juteux. La centrifugeuse est
particulièrement adaptée à l’extraction de jus d’ananas, de betteraves, de céleri,
de pommes, de concombres, de carottes, d’épinards, de melons, de tomates,
d’oranges et de raisins.
- N’utilisez pas la centrifugeuse pour la préparation de fruits ou légumes trop durs,
breux ou amylacés tels que la canne à sucre.
- Les feuilles de salade peuvent être traitées dans la centrifugeuse.
- Enlevez les noyaux des cerises, des prunes, des pêches, etc. Il n’est pas nécessaire
d’enlever les trognons ni les pépins des fruits tels que les melons, les pommes et
les raisins.
- Lorsque vous utilisez la centrifugeuse, il n’est pas nécessaire d’enlever les
peaux nes. N’épluchez que les fruits et légumes dont vous ne souhaitez pas
consommer la peau épaisse, comme les oranges, les ananas, les kiwis, les melons
ou les betteraves crues.
- Lorsque vous préparez un jus de pommes, n’oubliez pas que la consistance du
jus dépend du type de pomme utilisé. Plus la pomme est juteuse, plus le jus sera
liquide. Choisissez donc le type de pomme en conséquence.
- Si vous voulez presser des agrumes avec la centrifugeuse, pelez-les et retirez leur
peau blanche. Cette dernière donne un goût amer aux préparations.
- Les fruits qui contiennent de l’amidon, tels que les bananes, les papayes, les
avocats, les gues et les mangues, ne conviennent pas pour une utilisation avec
la centrifugeuse. Utilisez plutôt un robot ménager, un blender ou un mixeur
plongeant.
- Pour extraire un maximum de jus, appuyez lentement sur le poussoir.
Présentation
- Buvez le jus immédiatement après l’avoir extrait.
- Si vous souhaitez obtenir un jus clair sans mousse, positionnez le couvercle avec
séparateur de mousse intégré sur le pichet. Si vous souhaitez obtenir un jus
plus trouble avec de la mousse, retirez le couvercle avec séparateur de mousse
intégré du pichet et mélangez le jus avant de le verser dans un verre.
- Le jus de pommes prend une couleur marron très rapidement. Pour ralentir ce
processus, ajoutez quelques gouttes de jus de citron.
- Lorsque vous servez des boissons fraîches, ajoutez-y quelques glaçons.
Recette saine
Jus d’oranges et de carottes
Ingrédients :
- 1 kg de carottes
- 4 oranges
- 1 cuillère à soupe d’huile d’olive
- 1 grosse branche de menthe fraîche (facultatif)
1 Pelez les oranges.
2 Pressez les carottes et les oranges à l’aide de la centrifugeuse.
3 Ajoutez une cuillère à soupe d’huile d’olive et quelques glaçons dans le jus.

- Non tenete l’apparecchio per il braccio di blocco
quando lo trasportate.
- Non usate mai accessori o parti di altri produttori o
non specicatamente consigliati da Philips. Nel caso
in cui utilizziate detti accessori o parti, la garanzia
decade.
- Prima di accendere l’apparecchio, controllate che
tutte le parti siano state montate correttamente.
- Utilizzate l’apparecchio solo quando il braccio di
blocco risulta serrato.
- Prima di smontare e di pulire l’apparecchio, impostate
la manopola di comando sulla posizione OFF e
rimuovete la spina dalla presa di corrente.
Quindi abbassate il braccio di blocco in modo da
posizionarlo nella posizione di sblocco.
- Solo dopo aver spento l’apparecchio e quando il ltro
ha smesso di ruotare, sbloccate il braccio di blocco
abbassandolo.
- HR1870, HR1874, HR1878: non utilizzate lo
spremiagrumi per un tempo superiore ai 10 minuti
senza interruzione.
- HR1870, HR1874, HR1878: non immergete mai
l’unità di aggancio dello spremiagrumi in acqua né
risciacquatelo sotto l’acqua corrente.
- HR1870, HR1874, HR1878: non lavate l’unità di
aggancio dello spremiagrumi in lavastoviglie.
- Scollegate sempre il cavo di alimentazione dopo l’uso.
- Livello di rumorosità: Lc = 78 dB(A)
Funzione di sicurezza
Questo apparecchio è dotato di una funzione di sicurezza che protegge il sistema
dal surriscaldamento causato da carichi eccessivi. In caso di surriscaldamento, la
centrifuga attiva automaticamente il sistema di protezione da sovraccarico e si spegne.
Se questo accade, impostate la manopola di comando su 0, scollegate l’apparecchio e
lasciate che si raffreddi per 15 minuti. Rimuovete il bicchiere per succo e togliete il
coperchio, il raccogli-succo e il contenitore della polpa, quindi premete il pulsante di
protezione da sovraccarico sulla parte inferiore del gruppo motore.
Campi elettromagnetici (EMF)
Questo apparecchio Philips è conforme a tutti gli standard e alle norme relativi
all’esposizione ai campi elettromagnetici.
Primo utilizzo
Al primo utilizzo dell’apparecchio, lavate con cura tutte le parti che verranno a
contatto con gli alimenti (consultate il capitolo “Come pulire e riporre l’apparecchio”).
Consigli
- Controllate sempre il ltro prima dell’uso. Nel caso di incrinature o altri danni,
non utilizzate l’apparecchio.
- Assicuratevi che il braccio di blocco si trovi nella posizione di chiusura.
- Per mantenere fresco il succo più a lungo, applicate il coperchio sul bicchiere per
succo dopo la preparazione.
Modalità d’uso dell’apparecchio
Centrifuga
La centrifuga può essere utilizzata per succhi di frutta e di verdura.
Consigli
- Non accendete la centrifuga per più di 40 secondi alla volta quando spremete
dei grossi carichi; lasciate raffreddare l’apparecchio dopo l’utilizzo.
- Ruotare la manopola di comando sull’impostazione 1 (bassa velocità)
o 2 (velocità normale).
- La velocità 1 è particolarmente indicata per frutta e verdure tenere come
anguria, uva, pomodori e cetrioli.
- La velocità 2 è invece indicata per tutti gli altri tipi di frutta e verdura, come mele,
carote e barbabietole.
Note
- Non esercitate una pressione eccessiva con il pestello per evitare di
compromettere il risultato nale e per non bloccare il ltro.
- Non inserite mai le dita o altri oggetti nell’apertura di inserimento cibo.
- Se il contenitore della polpa si riempie durante l’uso, spegnete l’apparecchio
e togliete il coperchio e il raccogli-succo. Quindi rimuovete con cautela il
contenitore della polpa e svuotatelo.
- N Contenitore polpa
3 Spremiagrumi (solo HR1878, HR1874, HR1870)
- O Cono
- P Setaccio
- Q Raccogli-succo
- R Beccuccio estraibile
- S Unità di aggancio dello spremiagrumi
4 Coperchio del bicchiere per il succo con separatore della schiuma integrato
5 Bicchiere per il succo
Importante
Prima di utilizzare l’apparecchio, leggete attentamente
il presente manuale e conservatelo per eventuali
riferimenti futuri.
Pericolo
- Non immergete mai il gruppo motore o l’unità di
aggancio dello spremiagrumi in acqua o in altri liquidi
né risciacquatelo sotto l’acqua corrente.
- Non lavate il gruppo motore o l’unità di aggancio
dello spremiagrumi in lavastoviglie.
Avviso
- Prima di collegare l’apparecchio alla presa di corrente,
controllate che la tensione indicata sulla base
dell’apparecchio corrisponda a quella della rete locale.
- Non usate l’apparecchio nel caso in cui il cavo di
alimentazione, la spina o altri componenti risultassero
danneggiati.
- Nel caso in cui il cavo di alimentazione fosse
danneggiato, dovrà essere sostituito presso i centri
autorizzati Philips, i rivenditori specializzati oppure
da personale debitamente qualicato, per evitare
situazioni pericolose.
- Questo apparecchio può essere usato da persone
con capacità mentali, siche o sensoriali ridotte,
prive di esperienza o conoscenze adatte a condizione
che tali persone abbiano ricevuto assistenza o
formazione per utilizzare l’apparecchio in maniera
sicura e capiscano i potenziali pericoli associati
a tale uso.
- L’apparecchio non deve essere usato dai bambini.
Tenete l’apparecchio e il suo cavo di alimentazione
fuori dalla portata dei bambini.
- Evitate che i bambini giochino con l’apparecchio.
- Non lasciate mai in funzione l’apparecchio senza
sorveglianza.
- Scollegate l’apparecchio dall’alimentazione se
incustodito o prima di montarlo, smontarlo o pulirlo.
- Nel caso il ltro presenti incrinature o altri danni,
non usate l’apparecchio e rivolgetevi al centro
autorizzato Philips più vicino.
- Non inserite le dita, né altri oggetti, nell’apertura di
inserimento cibo mentre l’apparecchio è in funzione.
Servitevi soltanto del pestello.
- Non toccate le piccole lame poste alla base del ltro,
poiché sono molto aflate.
- Posizionate e utilizzate sempre l’apparecchio su una
supercie asciutta, piana, stabile e orizzontale.
- Per assicurarsi che l’apparecchio sia stabile, mantenere
la supercie su cui poggia il dispositivo e la parte
inferiore di quest’ultimo pulite.
Attenzione
- Questo apparecchio è destinato esclusivamente a uso
domestico.

Pulizia
Non usate prodotti o sostanze abrasive o detergenti aggressivi, come benzina o
acetone, per pulire l’apparecchio.
Per pulire più facilmente l’apparecchio, eseguite la pulizia subito dopo l’uso.
Funzione di pre-pulizia
Quando si utilizza la funzione pre-pulizia, il coperchio e il setaccio vengono
risciacquati con acqua.
Utilizzate la funzione pre-pulizia:
- Per semplicare la pulizia della centrifuga.
- Per risciacquare la centrifuga quando passate ad altra frutta o verdura e volete
evitare di mescolare i sapori.
- Per diluire il succo con acqua ed estrarre anche l’ultima goccia di succo.
Centrifuga
Al ne di mantenere la cucina pulita, tutte le parti separabili (contenitore della polpa
integrato, raccogli-succo, ltro e coperchio) possono essere messe nel lavandino in
una volta sola.
Consiglio: Usate una spugna per pulire il ltro.
Spremiagrumi (solo HR1878, HR1874, HR1870)
Al ne di mantenere la cucina pulita, tutte le parti separabili (ad eccezione dell’unità
di aggancio dello spremiagrumi) possono essere messe nel lavandino in una volta sola.
Conservazione
Per riporre il cavo, avvolgetelo attorno all’apposito supporto nella base
dell’apparecchio.
Attenzione: Non tenete l’apparecchio per il braccio di blocco o per il beccuccio
quando lo trasportate.
Ordinazione degli accessori
Per acquistare accessori o parti di ricambio, visitate il sito www.shop.philips.com/
service oppure recatevi presso il vostro rivenditore Philips. Potete contattare anche
il centro assistenza Philips del vostro paese (per i dettagli di contatto, consultate
l’opuscolo della garanzia internazionale).
Tutela dell’ambiente
- Per contribuire alla tutela dell’ambiente, non gettate l’apparecchio tra i riuti
domestici quando non viene più utilizzato, ma consegnatelo a un centro di
raccolta ufciale (g. 1).
Garanzia e assistenza
Per assistenza o informazioni, visitate il sito Web all’indirizzo www.philips.com/
support oppure leggete l’opuscolo della garanzia internazionale.
NEDERLANDS
Introductie
Gefeliciteerd met uw aankoop en welkom bij Philips! Als u volledig wilt proteren
van de ondersteuning die Philips biedt, registreer uw product dan op
www.philips.com/welcome.
Algemene beschrijving
1 Motorunit
- A. Aandrijfas
- B. Vergrendelarm
- C. Bedieningsknop
- D. Snoeropbergvoorziening
- E. Overbelastingsbeveiligingsknop
2 Sapcentrifuge
- F. Deksel van stamper
- G. Stamper met voorspoelfunctie
- H. Vultrechter
- I. Deksel
- J. Zeef
- K. Tuitopzetstuk voor direct serveren
- L. Sapopvangbak met (R) afneembare tuit
- M. Pulpvenster
- N. Pulpopvangbak
- Dopo aver centrifugato tutti gli ingredienti e quando non esce più succo,
versate il succo nei bicchieri.
Svuotate il contenitore per polpa
Nota: Quando il contenitore della polpa ha raggiunto la capacità massima, la polpa nisce
nel raccogli-succo, nel coperchio e nel succo stesso.
Se il contenitore della polpa si riempie eccessivamente, l’apparecchio potrebbe
bloccarsi. Quando questo accade, spegnete l’apparecchio e rimuovete la polpa
dal contenitore. Lasciate raffreddare l’apparecchio per 15 minuti, quindi premete il
pulsante per la protezione da sovraccarico sulla parte inferiore del gruppo motore
per ripristinare l’apparecchio.
Nota: La nestra di controllo della polpa vi aiuta a vedere quando il contenitore della
polpa è pieno e deve essere svuotato. Poiché la nestra di controllo della polpa potrebbe
bloccarsi prima che si raggiunga la capacità massima del contenitore, controllate
l’indicazione di livello sul bicchiere per succo. La nestra di controllo della polpa è più
soggetta al blocco in caso di lavorazione di ingredienti duri come carote o barbabietole.
Spremiagrumi (solo HR1878, HR1874, HR1870)
Nota
- Se volete estrarre il succo direttamente in un bicchiere, utilizzate il beccuccio.
- Per evitare danni e ferite, tenete l’apparecchio in funzione lontano da capelli
lunghi, vestiti, cavi eccetera.
- Per lo spremiagrumi utilizzate solo la velocità 1.
Consigli
Preparazione
- Utilizzate frutta e verdura fresca, che contengono una quantità maggiore di succo.
Sono particolarmente indicati ananas, barbabietole, sedano, mele, cetrioli, carote,
spinaci, meloni, pomodori, arance e uva.
- Questo apparecchio non è adatto per centrifugare frutta o verdura
particolarmente dura e/o brosa/ricca d’amido, come la canna da zucchero.
- Con questa centrifuga è possibile utilizzare anche le foglie e i piccioli
(ad esempio di lattuga).
- Rimuovete il nocciolo da ciliegie, susine, pesche, ecc. Non è necessario rimuovere
le parti interne o i semi da meloni, mele e uva.
- Non è necessario rimuovere le bucce sottili, rimuovete solo quelle spesse che
non si possono ingerire, ad esempio delle arance, degli ananas, dei kiwi, dei
meloni e delle barbabietole crude.
- Quando preparate il succo di mela, ricordate che la densità del succo dipende
dalla qualità di mele utilizzate. Più succosa sarà la mela e meno denso risulterà il
succo. Scegliete il tipo di mela più adatto al succo che volete ottenere.
- Se volete estrarre il succo dagli agrumi con la centrifuga, rimuovete la buccia e le
parti bianche che conferiscono alla bevanda un sapore amaro.
- Questo apparecchio non è indicato per la frutta che contiene amido, come
banane, papaya, avocado, chi e mango. Per frullare questo tipo di frutta,
consigliamo di usare un robot da cucina o un frullatore, anche a immersione.
- Per estrarre la massima quantità di succo, premete il pestello lentamente.
Come servire
- Bere il succo immediatamente dopo averlo spremuto.
- Se volete che il succo esca chiaro e senza schiuma, inserite il coperchio con il
separatore di schiuma integrato sul bicchiere per succo. Per un succo più torbido
con uno strato di schiuma, rimuovete il coperchio con il separatore di schiuma
integrato dal bicchiere per succo e mescolate il succo prima di versarlo in un
bicchiere.
- Il succo di mela annerisce rapidamente. Per rallentare questo processo,
aggiungete alcune gocce di limone.
- Per servire bevande fredde, aggiungete dei cubetti di ghiaccio.
Ricetta sana
Succo di carota e arancia
Ingredienti:
- 1 kg di carote
- 4 arance
- 1 cucchiaio di olio d’oliva
- 1 rametto grande di menta fresca (per la guarnizione facoltativa)
1 Sbucciate le arance.
2 Centrifugate le carote e le arance.
3 Aggiungete un cucchiaio di olio d’oliva e qualche cubetto di ghiaccio al succo.
4 Mescolate bene.
5 Versate il succo in un bicchiere.
Nota: Questo apparecchio può lavorare 7,5 kg di carote in 60 secondi (senza contare
il tempo necessario a rimuovere la polpa). Una volta concluso il processo, spegnete
l’apparecchio e lasciatelo raffreddare per 15 minuti.

- Gebruik geen accessoires of onderdelen van andere
fabrikanten of die niet speciek door Philips worden
aanbevolen. Als u dergelijke accessoires of onderdelen
gebruikt, vervalt de garantie.
- Zorg dat alle onderdelen op de juiste wijze zijn
bevestigd voordat u het apparaat inschakelt.
- Gebruik het apparaat alleen als de vergrendelarm in
de vergrendelde stand staat.
- Zet de bedieningsknop in de ‘uit’-stand en haal de
stekker uit het stopcontact voordat u het apparaat uit
elkaar haalt en schoonmaakt. Duw de vergrendelarm
omlaag naar de ontgrendelde stand.
- Duw de vergrendelarm pas omlaag naar de
ontgrendelde stand nadat u het apparaat hebt
uitgeschakeld en het lter tot stilstand is gekomen.
- HR1870, HR1874, HR1878: gebruik de citruspers
nooit langer dan 10 minuten achter elkaar.
- HR1870, HR1874, HR1878: dompel de koppelunit
voor de citruspers niet in water en spoel deze niet af
onder de kraan.
- HR1870, HR1874, HR1878: maak de koppelunit voor
de citruspers niet schoon in de vaatwasmachine.
- Haal na gebruik altijd de stekker uit het stopcontact.
- Geluidsniveau: Lc = 78 dB(A).
Veiligheidsvoorziening
Dit apparaat is voorzien van een veiligheidsvoorziening die beschermt tegen
oververhitting als gevolg van overmatige belasting. Bij oververhitting activeert de
sapcentrifuge automatisch de overbelastingsbeveiliging en schakelt het apparaat
zichzelf uit. Zet als dit gebeurt de bedieningsknop op 0, haal de stekker uit het
stopcontact en laat het apparaat 15 minuten afkoelen. Verwijder de sapkan,
het deksel, de sapopvangbak en de pulpopvangbak en druk vervolgens op de
overbelastingsbeveiligingsknop aan de onderkant van de motorunit.
Elektromagnetische velden (EMV)
Dit Philips-apparaat voldoet aan alle toepasbare richtlijnen en voorschriften met
betrekking tot blootstelling aan elektromagnetische velden.
Voor het eerste gebruik
Maak alle onderdelen die in aanraking komen met voedsel grondig schoon voordat u
het apparaat voor het eerst gebruikt (zie hoofdstuk ‘Schoonmaken en opbergen’).
Tips
- Controleer voor gebruik altijd het lter. Gebruik het apparaat niet als u barsten
of beschadigingen ziet.
- Zorg ervoor dat de vergrendelarm in de vergrendelde stand staat.
- Het sap blijft langer vers als u na gebruik het deksel op de sapkan plaatst.
Het apparaat gebruiken
Sapcentrifuge
U kunt de sapcentrifuge gebruiken voor fruit- en groentesap.
Tips
- Laat de sapcentrifuge bij een zware belasting niet langer dan 40 seconden achter
elkaar werken en laat het apparaat naderhand voldoende afkoelen.
- Draai de bedieningsknop naar stand 1 (lage snelheid) of 2 (normale snelheid).
- Snelheid 1 is met name geschikt voor zacht fruit en zachte groenten zoals
watermeloen, druiven, tomaten en komkommer.
- Snelheid 2 is geschikt voor alle andere soorten fruit en groenten zoals appels,
wortels en rode bieten.
Opmerkingen
- Oefen niet te veel druk uit op de stamper, omdat dit een negatief effect kan
hebben op de kwaliteit van het sap. Het lter kan er zelfs door tot stilstand
komen.
- Steek nooit uw vingers of een voorwerp in de vultrechter.
- Als de pulpopvangbak tijdens gebruik vol raakt, schakel het apparaat dan
uit en verwijder het deksel en de sapopvangbak. Verwijder vervolgens de
pulpopvangbak voorzichtig en leeg deze.
- Verwerk alle ingrediënten en wacht totdat er geen sap meer uit de tuit stroomt.
Giet het sap vanuit de kan in het glas.
3 Citruspers (alleen HR1878, HR1874, HR1870)
- O. Perskegel
- P. Zeef
- Q. Sapopvangbak
- R. Afneembare tuit
- S. Koppelunit voor citruspers
4 Deksel van sapkan met ingebouwde schuimscheider
5 Sapkan
Belangrijk
Lees deze gebruiksaanwijzing zorgvuldig door
voordat u het apparaat gaat gebruiken. Bewaar de
gebruiksaanwijzing om deze zo nodig later te kunnen
raadplegen.
Gevaar
- Dompel de motorunit of de koppelunit voor de
citruspers nooit in water of een andere vloeistof en
spoel deze ook niet onder de kraan af.
- Maak de motorunit of de koppelunit voor de
citruspers niet schoon in de vaatwasmachine.
Waarschuwing
- Controleer of het voltage aangegeven op de
onderkant van het apparaat overeenkomt met de
plaatselijke netspanning voordat u de stekker in het
stopcontact steekt.
- Gebruik het apparaat niet indien de stekker,
het snoer of andere onderdelen beschadigd zijn.
- Indien het netsnoer beschadigd is, moet u het
laten vervangen door Philips, een door Philips
geautoriseerd servicecentrum of personen met
vergelijkbare kwalicaties om gevaar te voorkomen.
- Dit apparaat kan worden gebruikt door personen
met verminderde lichamelijke, zintuiglijke of geestelijke
capaciteiten of weinig ervaring en kennis, mits zij
toezicht of instructie hebben ontvangen aangaande
veilig gebruik van het apparaat, en zij de gevaren van
het gebruik begrijpen.
- Dit apparaat mag niet worden gebruikt door
kinderen. Houd het apparaat en het netsnoer buiten
bereik van kinderen.
- Kinderen mogen niet met het apparaat spelen.
- Laat het apparaat nooit zonder toezicht werken.
- Trek altijd de stekker uit het stopcontact als u het
apparaat onbeheerd achterlaat en voordat u het
apparaat in elkaar zet, uit elkaar haalt of schoonmaakt.
- Als u barstjes in het lter ontdekt of het lter
anderszins beschadigd is, gebruik het apparaat
dan niet meer en neem contact op met het
dichtstbijzijnde Philips-servicecentrum.
- Steek nooit uw vingers of een voorwerp in de
vultrechter wanneer het apparaat in werking is.
Gebruik hiervoor uitsluitend de stamper.
- Raak de kleine messen onder in het lter niet aan.
Deze zijn zeer scherp.
- Plaats en gebruik het apparaat altijd op een droge,
stabiele en vlakke ondergrond.
- Houd het oppervlak waarop het apparaat staat en de
bodem van het apparaat schoon om er zeker van te
zijn dat het apparaat stabiel staat.
Let op
- Dit apparaat is uitsluitend bedoeld voor huishoudelijk
gebruik.
- Houd het apparaat niet vast aan de vergrendelarm
wanneer u het verplaatst.

Schoonmaken
Gebruik nooit schuursponzen, schurende schoonmaakmiddelen of agressieve
vloeistoffen zoals alcohol, benzine of aceton om het apparaat schoon te maken.
Het apparaat is gemakkelijker schoon te maken als u dat direct na gebruik doet.
Voorspoelfunctie
Wanneer u de voorspoelfunctie gebruikt, worden het deksel en de zeef gespoeld
met water.
Gebruik de voorspoelfunctie:
- Om de sapcentrifuge eenvoudiger schoon te maken.
- Om de sapcentrifuge te spoelen als u ander fruit of andere groente wilt gaan
verwerken en u wilt voorkomen dat de smaken worden vermengd.
- Om het sap te verdunnen met water en het sap tot de laatste druppel op te
vangen.
Sapcentrifuge
Voor een opgeruimde, schone keuken kunnen alle afneembare onderdelen
(pulpopvangbak, sapopvangbak, lter en deksel) in één keer naar de gootsteen
worden gedragen.
Tip: Gebruik een spons om het lter schoon te maken.
Citruspers (alleen HR1878, HR1874, HR1870)
Voor een opgeruimde, schone keuken kunnen alle afneembare onderdelen
(behalve de koppelunit voor de citruspers) in één keer naar de gootsteen
worden gedragen.
Opbergen
Berg het snoer op door het om de snoeropbergvoorziening in de voet van het
apparaat te wikkelen.
Let op: Houd het apparaat niet vast aan de vergrendelarm of schenktuit wanneer
u het verplaatst.
Accessoires bestellen
Ga naar www.shop.philips.com/service om accessoires en reserveonderdelen
te kopen of ga naar uw Philips-dealer. U kunt ook contact opnemen met het Philips
Consumer Care Centre in uw land (zie het ‘worldwide guarantee’-vouwblad voor
contactgegevens).
Milieu
- Gooi het apparaat aan het einde van zijn levensduur niet weg met het normale
huisvuil, maar lever het in op een door de overheid aangewezen inzamelpunt
om het te laten recyclen. Op die manier levert u een bijdrage aan een schonere
leefomgeving (g. 1).
Garantie en ondersteuning
Als u informatie of ondersteuning nodig hebt, bezoek dan www.philips.com/
support of lees het ‘worldwide guarantee’-vouwblad.
De pulpopvangbak legen
Opmerking: Wanneer de pulpopvangbak zijn maximale capaciteit heeft bereikt,
komt de pulp in de sapopvangbak, het deksel en het sap terecht.
Als de ingebouwde pulpopvangbak te vol wordt, kan het apparaat verstopt raken.
Wanneer dit het geval is, moet u het apparaat uitschakelen en de pulp uit de
pulpopvangbak verwijderen. Laat het apparaat 15 minuten afkoelen en druk op de
overbelastingsbeveiligingsknop aan de onderkant van de motorunit om het apparaat
te resetten.
Opmerking: Dankzij het pulpvenster kunt u zien wanneer de pulpopvangbak vol is en
moet worden geleegd. Controleer ook de niveauaanduiding op de sapkan, want het is
mogelijk dat het pulpvenster verstopt raakt voordat de maximale capaciteit van de
opvangbak is bereikt. Het pulpvenster raakt waarschijnlijk eerder verstopt wanneer u sap
maakt van harde ingrediënten, zoals wortels of rode bieten.
Citruspers (alleen HR1878, HR1874, HR1870)
Opmerking
- Als u sap rechtstreeks in een glas wilt laten lopen, kunt u het tuitopzetstuk voor
direct serveren gebruiken.
- Voorkom lichamelijk letsel of beschadiging: houd het ingeschakelde apparaat uit
de buurt van lange haren, kleding, kabels enz.
- Gebruik alleen snelheid 1 voor de citruspers.
Tips
Voorbereidingen
- Gebruik verse vruchten en groenten, omdat deze meer sap bevatten. Bij
uitstek geschikt om te verwerken in een sapcentrifuge zijn ananas, rode bieten,
bleekselderij, appels, komkommer, wortels, spinazie, meloen, tomaten, sinaasappels
en druiven.
- De sapcentrifuge is niet geschikt voor het verwerken van zeer harde en/of
vezelrijke of zetmeelrijke vruchten en groenten, zoals suikerriet.
- Bladeren en bladstelen van bijvoorbeeld sla kunnen ook in de sapcentrifuge
worden verwerkt.
- Verwijder de pit uit kersen, pruimen, perziken enz. De kernen of zaden van fruit
zoals meloenen, appels en druiven hoeft u niet te verwijderen.
- U hoeft bij gebruik van de sapcentrifuge dunne schilletjes en vliesjes niet te
verwijderen. Verwijder alleen de dikke schillen die u niet zou eten, bijvoorbeeld
die van sinaasappels, ananas, kiwi’s, meloenen en ongekookte rode bieten.
- Als u appelsap maakt, onthoud dan dat de dikte van het sap afhangt van het
soort appel dat u gebruikt. Hoe sappiger de appel, hoe dunner het sap wordt.
Kies een appelsoort die het soort sap oplevert waarvan u houdt.
- Als u citrusvruchten met de sapcentrifuge wilt verwerken, verwijder dan de schil
en de witte binnenschil. De witte binnenschil geeft het sap een bittere smaak.
- Vruchten die zetmeel bevatten, zoals bananen, papaja’s, avocado’s, vijgen en
mango’s, zijn niet geschikt om in de sapcentrifuge te verwerken. Gebruik een
keukenmachine, een blender of een staafmixer om deze vruchten te verwerken.
- Om zoveel mogelijk sap te verkrijgen, moet u de stamper altijd langzaam naar
beneden duwen.
Serveren
- Drink het sap meteen nadat u het hebt gemaakt.
- Als u helder sap zonder schuimlaag wilt, plaatst u het deksel met ingebouwde
schuimscheider op de sapkan. Als u troebel sap met een schuimlaag wilt, haalt u
het deksel met ingebouwde schuimscheider van de sapkan en roert u het sap
door voordat u het in een glas schenkt.
- Appelsap wordt heel snel bruin. U kunt dit proces vertragen door een paar
druppels citroensap toe te voegen.
- Wanneer u koude dranken serveert, voeg dan een paar ijsblokjes toe.
Gezond recept
Sinaasappel-wortelsap
Ingrediënten:
- 1 kg wortels
- 4 sinaasappels
- 1 eetlepel olijfolie
- 1 groot vers munttakje (optionele garnering)
1 Schil de sinaasappels.
2 Verwerk de wortels en sinaasappels in de sapcentrifuge.
3 Voeg een eetlepel olijfolie en een paar ijsblokjes toe aan het sap.
4 Meng goed.
5 Giet het sap in een glas.
Opmerking: Dit apparaat kan 7,5 kg wortels verwerken in ongeveer 1 minuut
(de tijd voor het verwijderen van de pulp niet meegerekend). Schakel het apparaat uit
wanneer u de wortels hebt verwerkt en laat het 15 minuten afkoelen.
9 10 11
7
1 2 3
4 5 6
8
9
1 2
3
4
6 7 8
5
1
0
2
1
2
2
3
3
4
4
1 2 3
4