. . _-- u
m w
Vacuum Cleaner
OWNER'SMANUAL
READTHISMANUAL for important safety,
assembly and operating instructions.
C_ 1ZARBg)_U_-437_536
-----CONTENTS
WARRANTY .............................. 2
SERVICE ................................. 2
IMPORTANT SAFETYINSTRUCTIONS ....... 3
PARTSAND FEATURES................... 4-5
ASSEMBLY.............................. 6-7
USE ...................................... 8
How to Start ............................. 8
Vacuuming Tips .......................... 9
Suggested Pile Height Settings ............. 9
Attachments ........................... 10
Attachment Use Chart ................... 10
Performance Features ................... 11
HOW YOUR VACUUM WORKS ........... 12
CANISTERCARE ......................... 12
Bag Changing .......................... 12
Motor Safety Filter Cleaning ............... 13
Cleaning Exterior and Attachments ........ 13
POWER-MATEm CARE ..................... 14
Light Bulb Changing ..................... 14
Belt Changing and Brush Cleaning ...... 14-15
Brush Servicing .......................... 1(5
Brush A_sembly ......................... 16
TROUBLESHOOTING..................... 17
Proper assembly and safe use of your vacuum cleaner are your responsibilities. Your cleaner is intend-
ed only for household use. The cleaner should be stored in a dry, indoor area. Read this Owner's Manu-
al carefully for important use and safety information.
54/ARRANTY
KENMOREVACUUM CLEANER
FULLONE-YEARWARRANTY
When used forprivatehousehold purposes,ifwithin
one year from the date of purchase, thlsvacuum
cleanerfallsdue toa defectinmaterialorworkmanship,
RETURN ITTO THE NEAREST SEARS SERVICE CENTER/
DEPARTMENT IN THE UNITED STATES,and Sears will
repairitfreeofcharge.
This warranty gives you specific legal rights, and you
may also have other rightswhich vary from state to state.
SEARS,ROEBUCKAND CO., D/817 WA,
Hoffman Estates, IL 60179
Ifyou need serviceor parts,visityour nearestSears
ServiceCenter ortheServiceDepartment locatedat
most Sears RetailStores.They willbe able to solve
your problem and supplyany needed replacement
parts.Any serviceneeded otherthan described in
thisOwner's Manual should be done by a Sears
authorizedservicerepresentative.
How to Order Repair Parts
When requestingserviceor orderingparts,have the
followinginformationavailable:
I.Canistermodel number and serialnumber.
2.POWER-MATE TM model number and serialnumber.
3.Descriptionofproblem.
4.Partnumber.
5. Name of part.
6. Location of part - Canister or POWER-MATErM,
EnglishSpeaking:
To Call TollFree ForService:
To Call Toll Free For Parts:
Spanish Speaking:
To Call TollFree ForService:
To Call TollFree For Parts:
(I-8[]D-4-REPAIR)
(I-800-473-7247)
(I-800-FON-PART)
(I-800-366-7278)
(1-800-626-5811)
(I-800-659-7084)
2
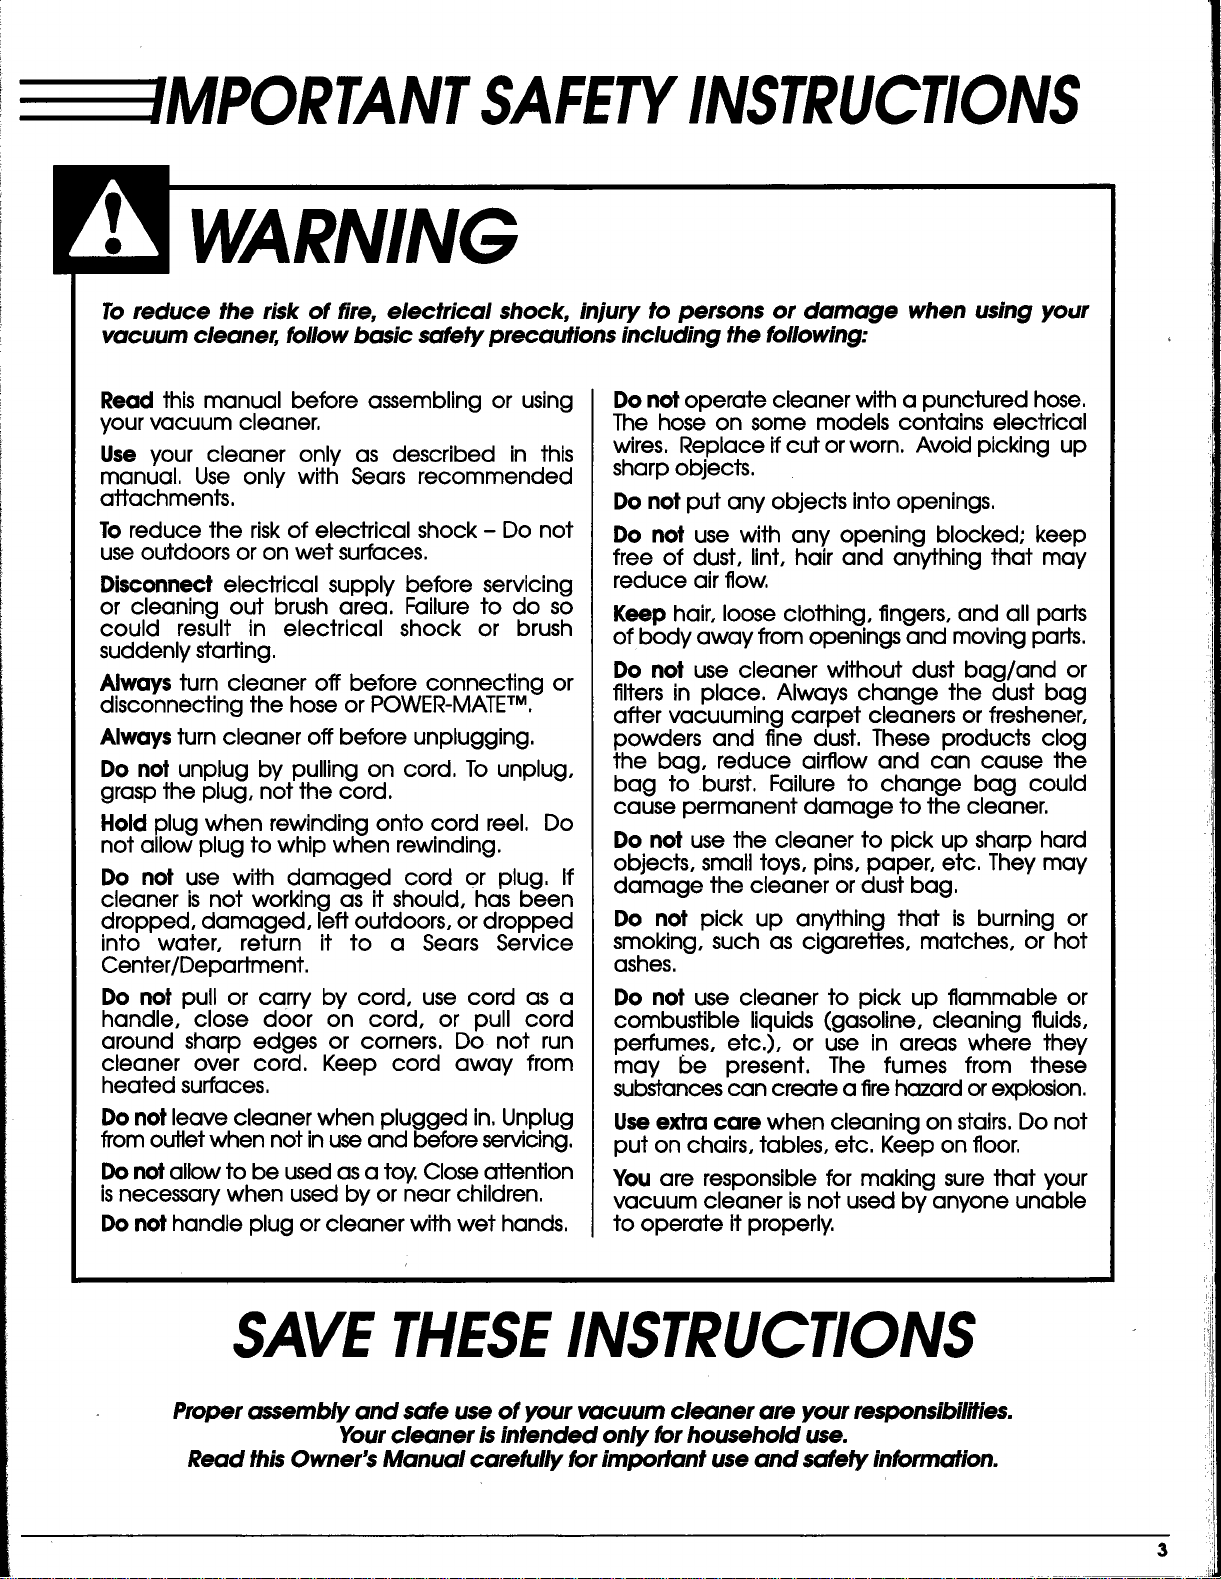
MPORTANT SAFETYINSTRUCTIONS
To reduce the risk of fire, electrical shock, injury to persons or damage when using your
vacuum cleaner, follow basic safety precautions including the following:
Read this manual before assembling or using
your vacuum cleaner.
Use your cleaner only as described in this
manual. Use only with Sears recommended
attachments.
To reduce the risk of electrical shock - Do not
use outdoors or on wet surfaces.
Disconnect electrical supply before servicing
or cleaning out brush area. Failure to do so
could result in electrical shock or brush
suddenly starting.
Always turn cleaner off before connecting or
disconnecting the hose or POWER-MATETM.
Always turn cleaner off before unplugging.
Do not unplug by pulling on cord. To unplug,
grasp the plug, not the cord.
Hold plug when rewinding onto cord reel. Do
not allow plug to whip when rewinding.
Do not use with damaged cord or plug. If
cleaner is not working as it should, has been
dropped, damaged, left outdoors, or dropped
into water, return it to a Sears Service
Center/Department.
Do not pull or carry by cord, use cord as a
handle, close door on cord, or pull cord
around sharp edges or corners. Do not run
cleaner over cord. Keep cord away from
heated surfaces.
Do notleavecleanerwhen plugged in.Unplug
fromoutletwhen notinuseand beforeservicing.
Do notallowto be used as a toy.Closeattention
isnecessarywhen used by or near children.
Do nothandle plug orcleanerwithwet hands.
Do not operate cleaner with a punctured hose.
The hose on some models contains electrical
wires. Replace ifcut or worn. Avoid picking up
sharp objects.
Do not put any objects intoopenings.
Do not use with any opening blocked; keep
free of dust, lint, hair and anything that may
reduce air flow.
Keep hair, loose clothing, fingers, and all parts
of body away from openings and moving parts.
Do not use cleaner without dust bag/and or
filters in place. Always change the dust bag
after vacuuming carpet cleaners or freshener,
powders and fine dust. These products clog
the bag, reduce airflow and can cause the
bag to burst. Failure to change bag could
cause permanent damage to the cleaner.
Do not use the cleaner to pick up sharp hard
objects, small toys, pins, paper, etc. They may
damage the cleaner or dust bag.
Do not pick up anything that isburning or
smoking, such as cigarettes,matches, or hot
ashes.
Do not use cleaner to pick up flammable or
combustible liquids (gasoline, cleaning fluids,
perfumes, etc.), or use in areas where they
may be present. The fumes from these
substancescan create a firehazard or explosion.
Use extra care when cleaning on stairs. Do not
put on chairs, tables, etc. Keep on floor.
You are responsible for making sure that your
vacuum cleaner isnot used by anyone unable
to operate it properly.
SAVETHESEINSTRUCtiONS
Proper assembly and safe use of your vacuum cleaner are your responsibilities.
Your cleaner is intended only for household use.
Read this Owner's Manual carefully for important use and safety information.
3
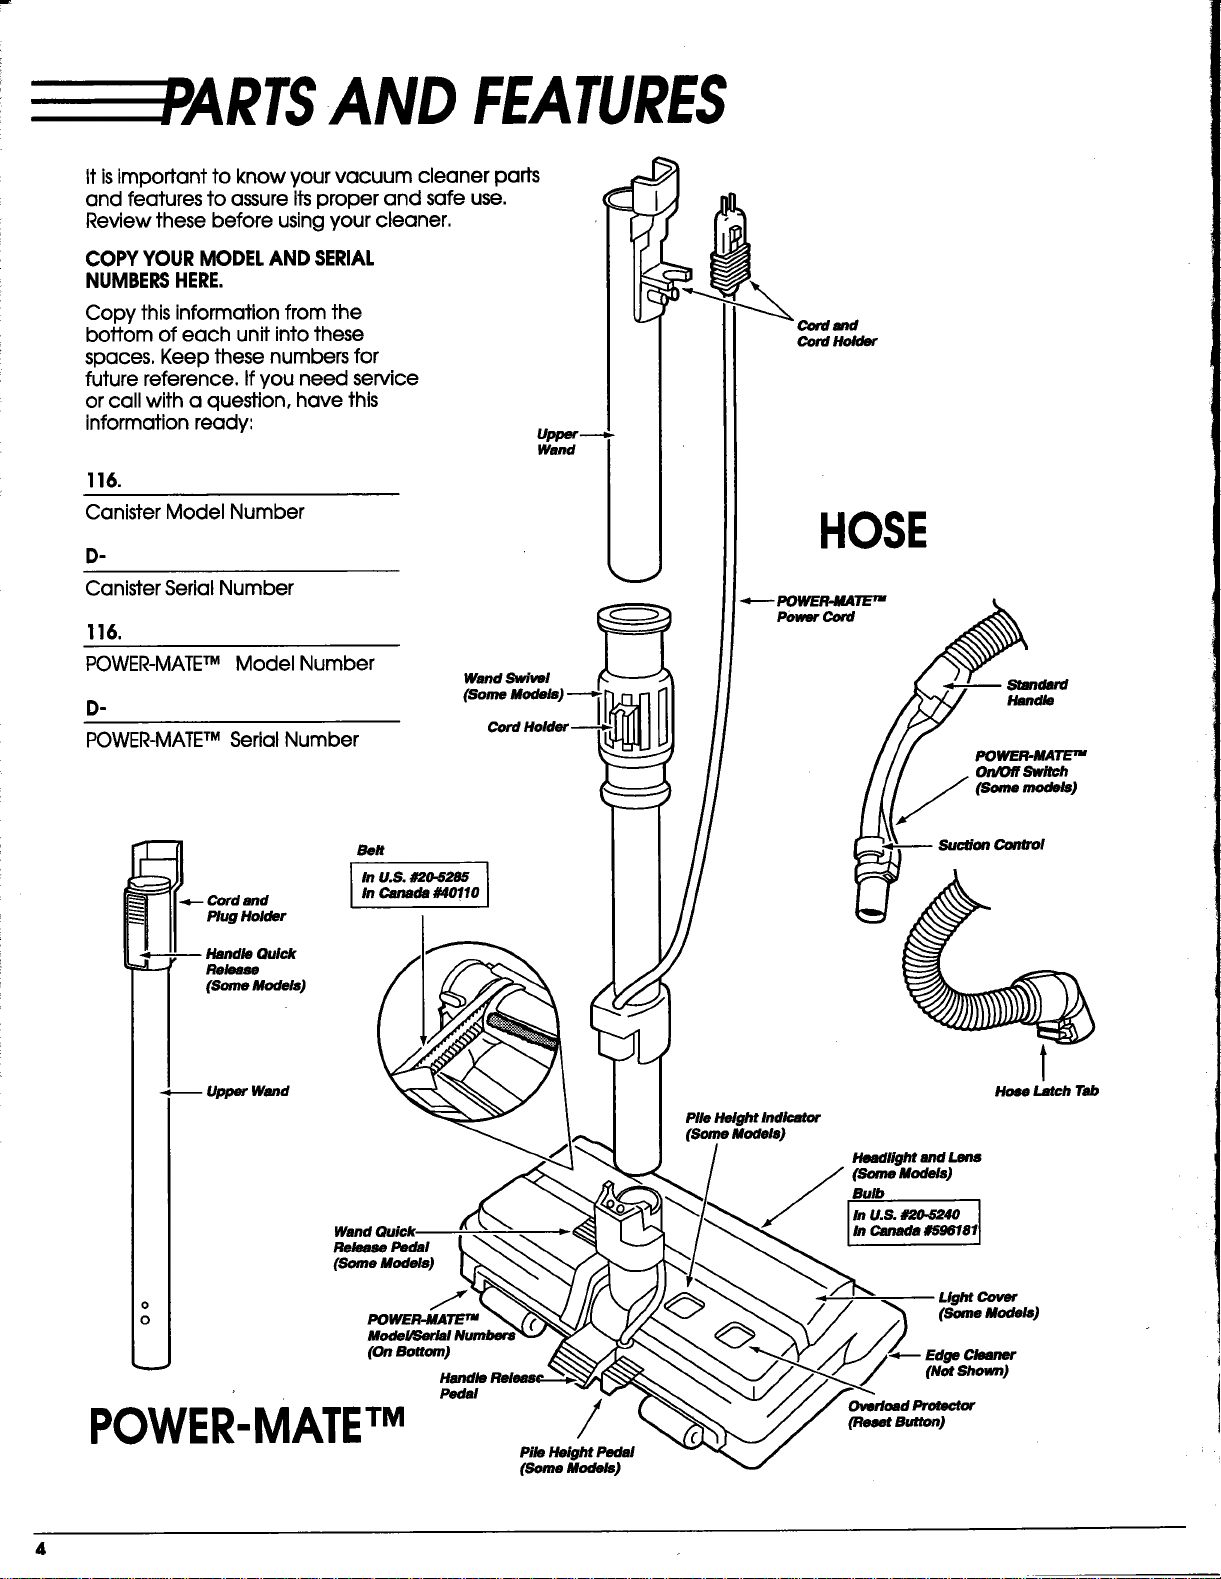
AND FEATURES
it isimportant to know your vacuum cleaner parts
and features to assure itsproper and safe use.
Review these before using your cleaner.
COPY YOUR MODELAND SERIAL
NUMBERSHERE.
Copy this information from the
bottom of each unit intothese
spaces. Keep these numbers for
future reference. If you need service
or call with a question, have this
information ready:
116.
Canister Model Number
.
Canister Serial Number
116.
POWER-MATETM Model Number
.
POWER-MATETM Serial Number
Wand Swivel
md
Cord Holder
HOSE
_- POWER.MATETM
Power Cord
Standard
Handle
POWER.MATE TM
On/Ofl Switch
(somemodels)
Belt
In U.S. #20-5285 I
In Canada #40110
I
Wand Quick
Release Pedal
(Soma Models)
o J
0 POWER-MATE TM
(OnB_tom)
Pedal
POWER-MATETM
/
Pile Height Pedal
(someModal)
Pile Height Indicator
(Somemodels)
Suction Control
Hose Latch Tab
Headlight and Lens
(SomeModels]
Bulb
In U.S. d_.5240
In Canada #_96181
LightCover
(SomeModek,]
Edge Cleaner
(Not Shown)
Overload ProMctor
(P._mtS_ton)
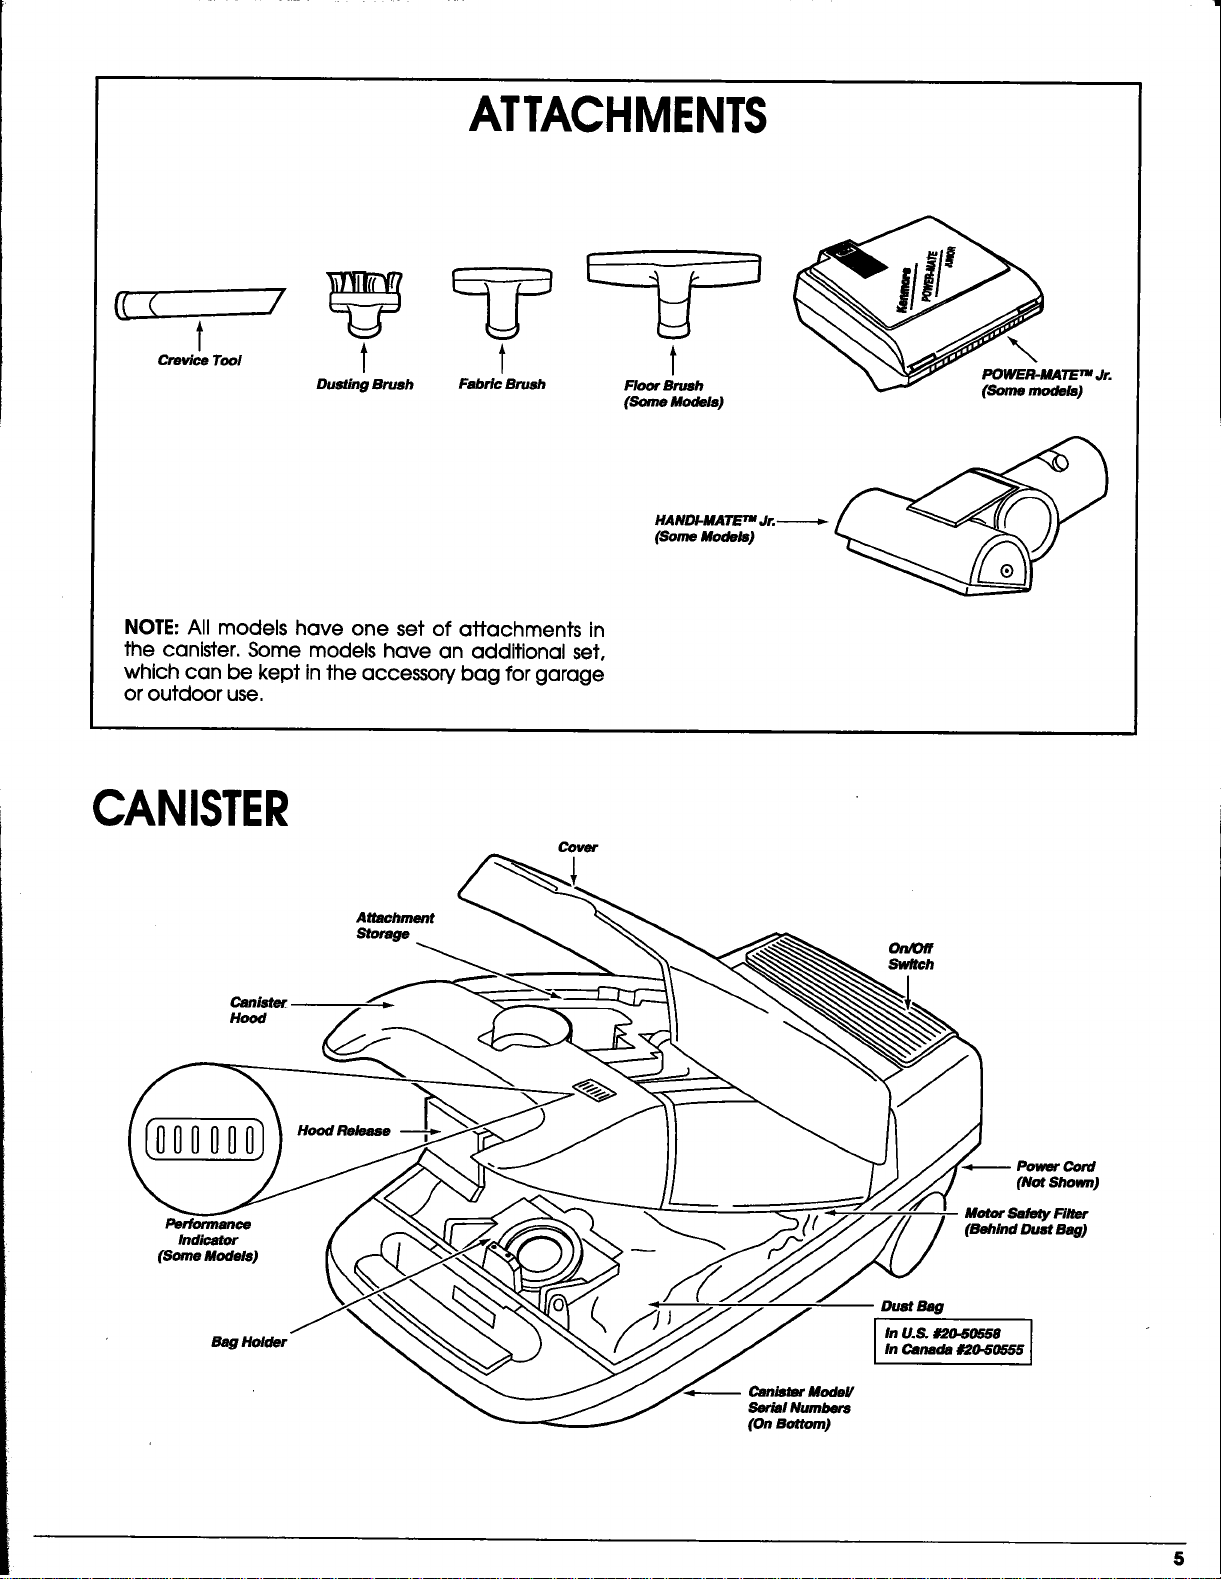
ATTACHMENTS
t
_,_.,.T_, t t t
Dusting Brush Fabric Brush Floor Brush
(Some Models)
POWER-MATE TM Jr.
(Some mode_]
HANDt.MATErmJr.-------_-
(Some Models)
NOTE: Allmodels have one set of attachments in
the canister.Some models have an additionalset,
which can be kept inthe accessorybag forgarage
oroutdoor use.
CANISTER
Attachment
Storage
Cover
On/Off
Sw/tch
[oooooo3
Performance
Indicator
(Some Models)
H_Release
Cord
(Not Shown)
Motor Safety Fileer
(Behind Dust Bag)
Bag Holder
Canismr ModeV
Ser_l Numbers
(OnBottom)
5
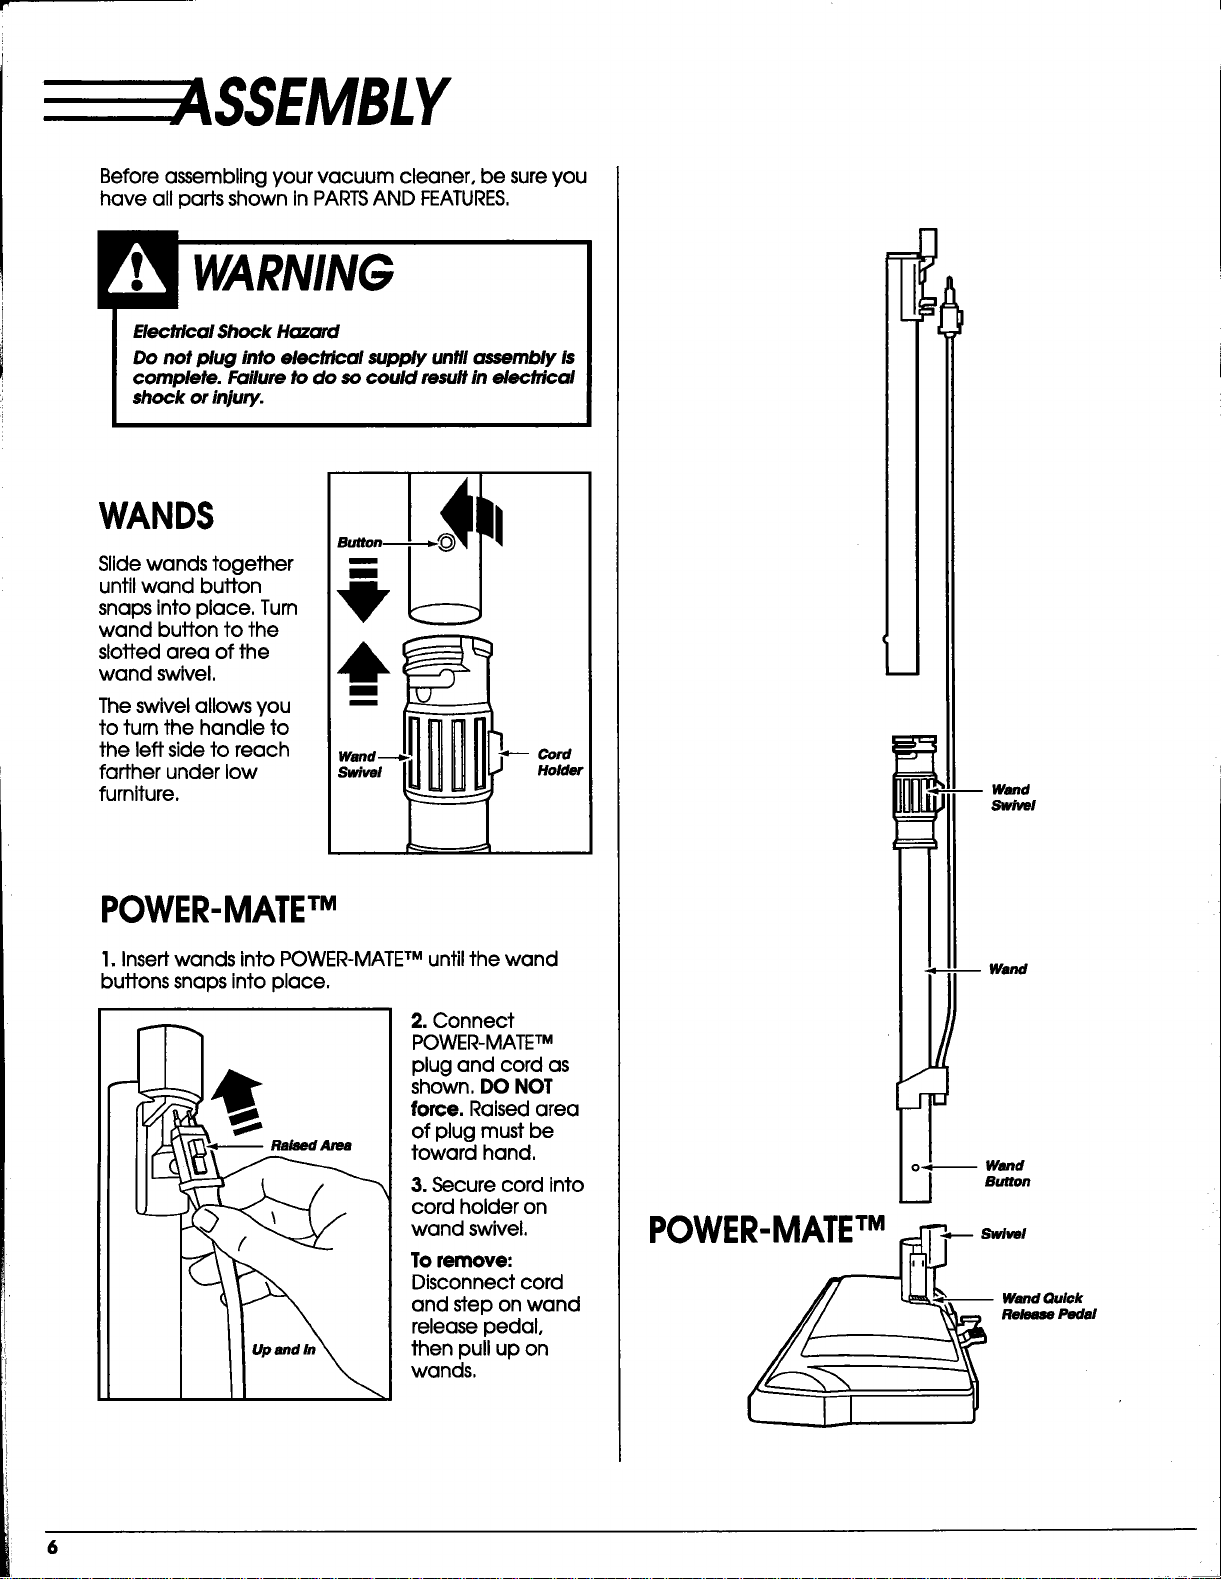
----ASSEMBLY
Before assembling your vacuum cleaner, be sure you
have all parts shown in PARTSAND FEATURES,
Elecfrlcal Shock Hazard
Do not plug into electrical supply untilassembly is
complete. Failureto do socould resultin electrical
shock or injury.
WANDS
Slidewands together
untilwand button
snaps intoplace,Turn
wand buttonto the
slottedarea ofthe
wand swivel.
The swivelallowsyou
toturnthe handle to
the leftsidetoreach
fartherunder low
furniture.
Cord
Holder
POWER-MATE"rM
I.Insertwands intoPOWER-MATE TMuntilthe wand
buttonssnaps intoplace.
2. Connect
POWER-MATE TM
plugand cord as
shown, DO NOT
force.Raisedarea
ofplugmust be
toward hand.
3. Secure cord into
cord holder on
wand swivel.
To remove:
Disconnect cord
and step on wand
release pedal,
then pull up on
wands,
Wand
Swivel
-,- -- Wand
/,
J
o_ Wand
._J Button
CANISTER
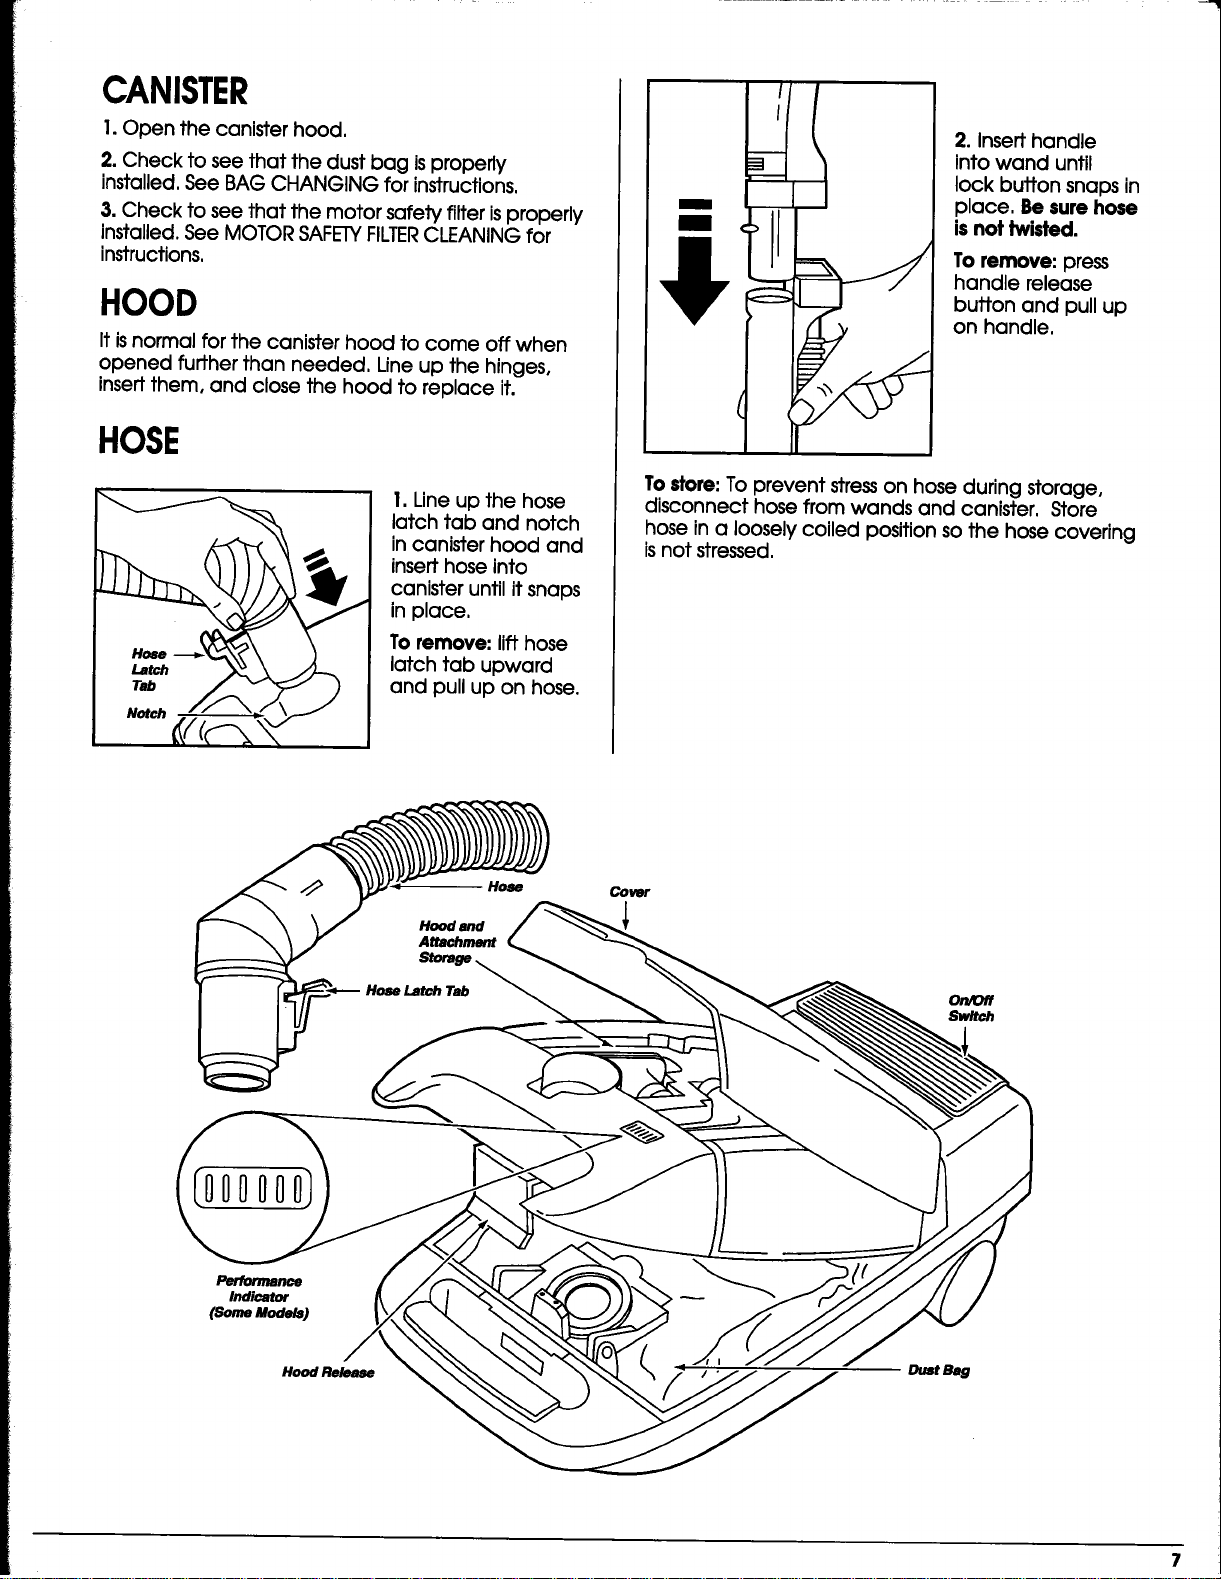
I. Open the canister hood,
2. Check to see that the dust bag isproperly
installed. See BAG CHANGING for instructions.
3. Check to see that the motor safety filter isproperly
installed. See MOTOR SAFETYFILTERCLEANING for
instructions.
HOOD
It is normal for the canister hood to come off when
opened further than needed. Line up the hinges,
insert them, and close the hood to replace it.
HOSE
I.Lineup the hose
latchtab and notch
incanisterhood and
inserthose into
canisteruntilitsnaps
inplace,
To remove: lifthose
latchtab upward
and pullup on hose.
m
m
2. Insert handle
into wand until
lock button snaps in
place. Be sure hose
is not twisted.
To remove: press
handle release
button and pullup
on handle,
To store: To prevent stress on hose during storage,
disconnect hose from wands and canister. Store
hose in a loosely coiled position so the hose covering
isnot stressed.
Hose
Hood and
Attachment
Cover
On/Off
Sw/tch
[ooooool
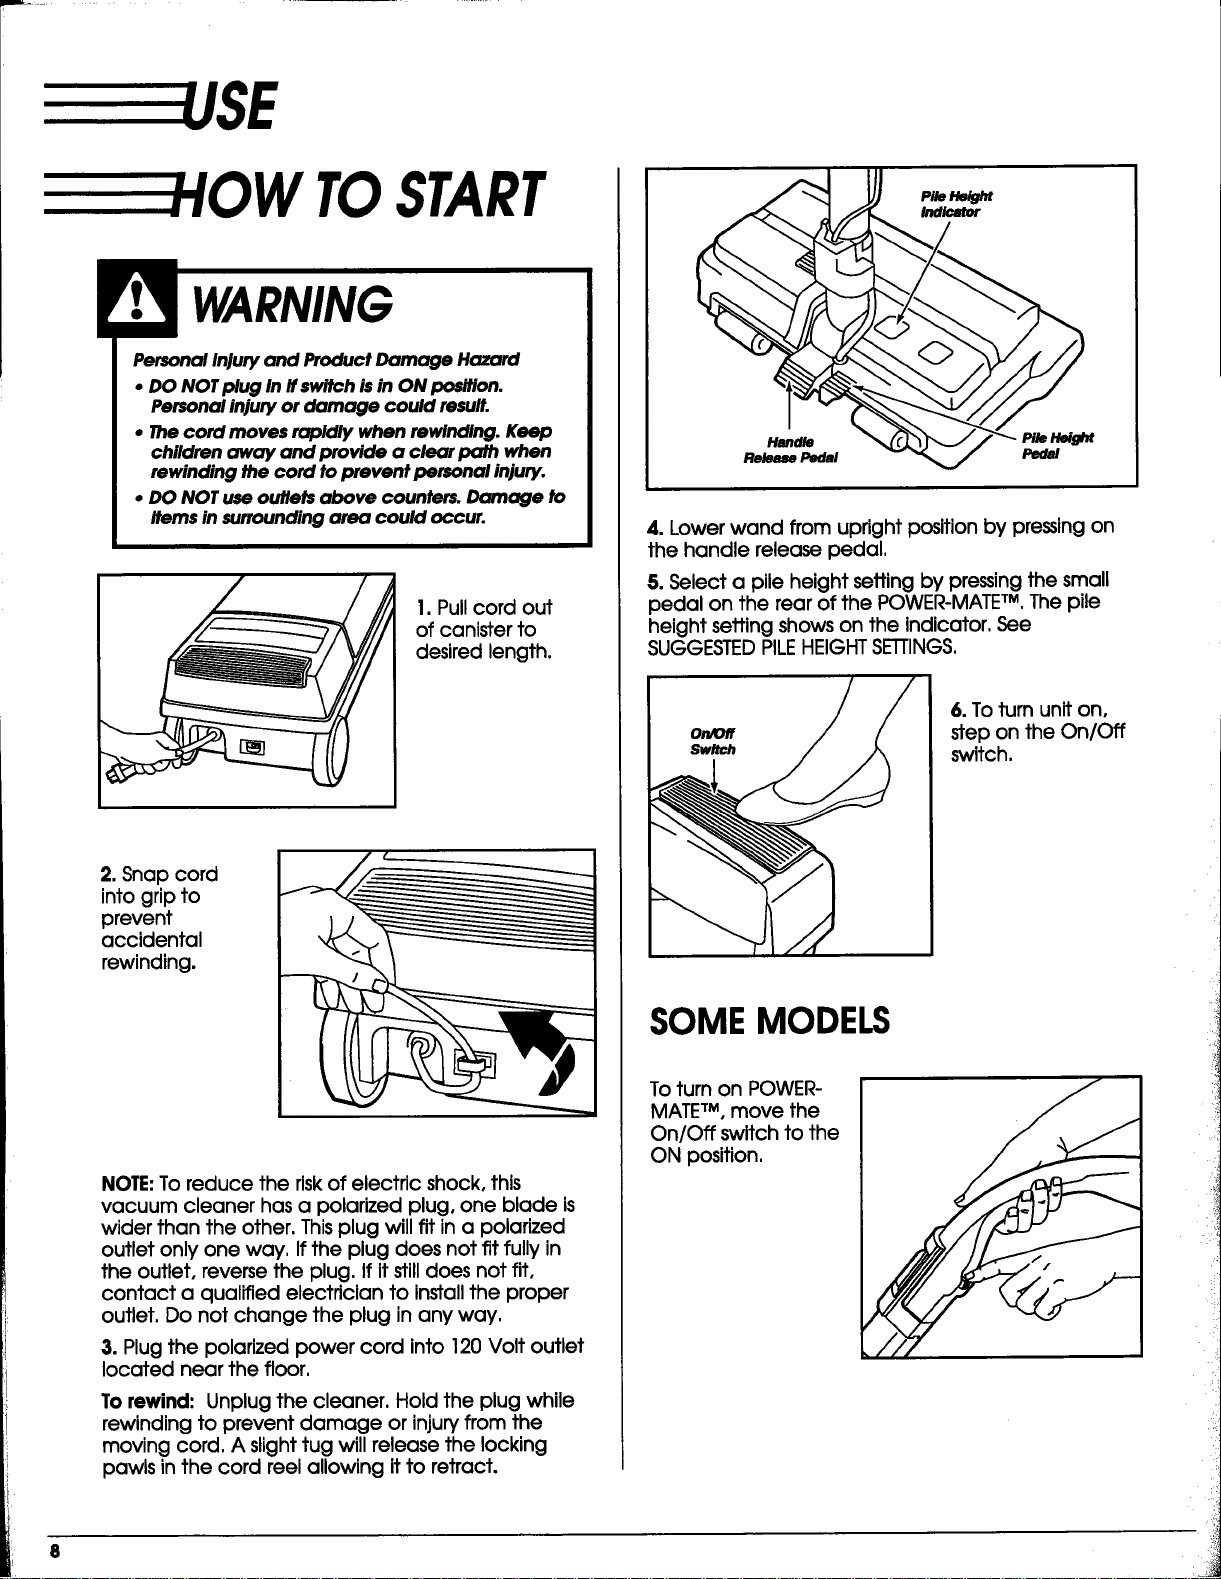
TOSTART
Personal Injury and Product Damage Hazard
• DO NOT plug In If switch is in ON position.
Personal injury or damage could result.
• The cord moves rapidly when rewinding. Keep
children away and provide o clear path when
rewinding the cord to prevent personal injury.
• DO NOT use outlets above counters. Damage to
Items in F4Jrrounding area could occur.
1. Pull cord out
of canister to
desired length.
2. Snap cord
into grip to
prevent
accidental
rewinding.
NOTE:To reduce the risk of electric shock, this
vacuum cleaner has a polarized plug, one blade is
wider than the other. Thisplug will fit in a polarized
outlet only one way. Ifthe plug does not fit fully in
the outlet, reverse the plug. If itstill does not fit,
contact a qualified electrician to install the proper
outlet. Do not change the plug in any way.
3. Plugthe polarizedpower cord into120 Voltoutlet
locatednear the floor.
To rewind: Unplug the cleaner. Hold the plug while
rewinding to prevent damage or injun/from the
moving cord. A slighttug will release the locking
pawls in the cord reel allowing it to retract.
Handle Pile Height
Release Pedal Pedal
4.Lower wand from uprightpositionby pressingon
the handle releasepedal.
5. Selecta pileheightsettingby pressingthe small
pedal on the rearofthe POWER-MATE TM, The pile
heightsettingshows on the indicator,See
SUGGESTED PILEHEIGHT SETTINGS,
On/Off
Sw/tch
6.To turnuniton,
stepon the On/Off
switch,
SOMEMODELS
To turnon POWER-
MATE TM, move the
On/Off switchtothe
ON position,

/ACUUMING TIPS
Suggested sweeping pattern.
For best cleaning action, the POWER-MATETM should
be pushed straight away from you and pulled
straight back. At the end of each pull stroke, the
direction of the POWER-MATETM should be changed
to point into the next section to be cleaned. This
pattern should be continued across the rug with
slow, gliding motions.
NOTE: Fast,jerkystrokesdo not provide
complete cleaning.
PersonalInjuryHazard
Usecam ifccmisteris_ on _. lfltfal_ _
injuryorpropertydamage cou/dresult.
Forbest cleaning results, keep the airflow passage
open. Check each assembly area, shown in
HOW YOURVACUUM WORKS, occasionally for clogs.
Unplug from outlet before checking.
Small areas can be
cleaned without
moving the
canister. The hose
swivel allows the
hose to turn from
side to side while
the canister stays in
place. Check hose
for twisting before
pulling canister.
Carpeted dairsneed to be vacuumed regularly.For
bestcleaningresults,fullyclosethe suctioncontrol.
See PERFORMANCE FEATURES.
UGGESTED
PILEHEIGHT
SETTINGS
For best deep clown cleaning, use the AUTO setting.
However, you may need to raise the height to make
some jobs easier, such as scatter rugs and some
deep pile carpets, and to prevent the vacuum
cleaner from shutting off. Suggested settings are:
HI - Shag, deep pile, or scatter rugs.
MED - Medium to deep pile.
LO- Low to medium pile.
AUTO - Most carpets and bare floors,
9
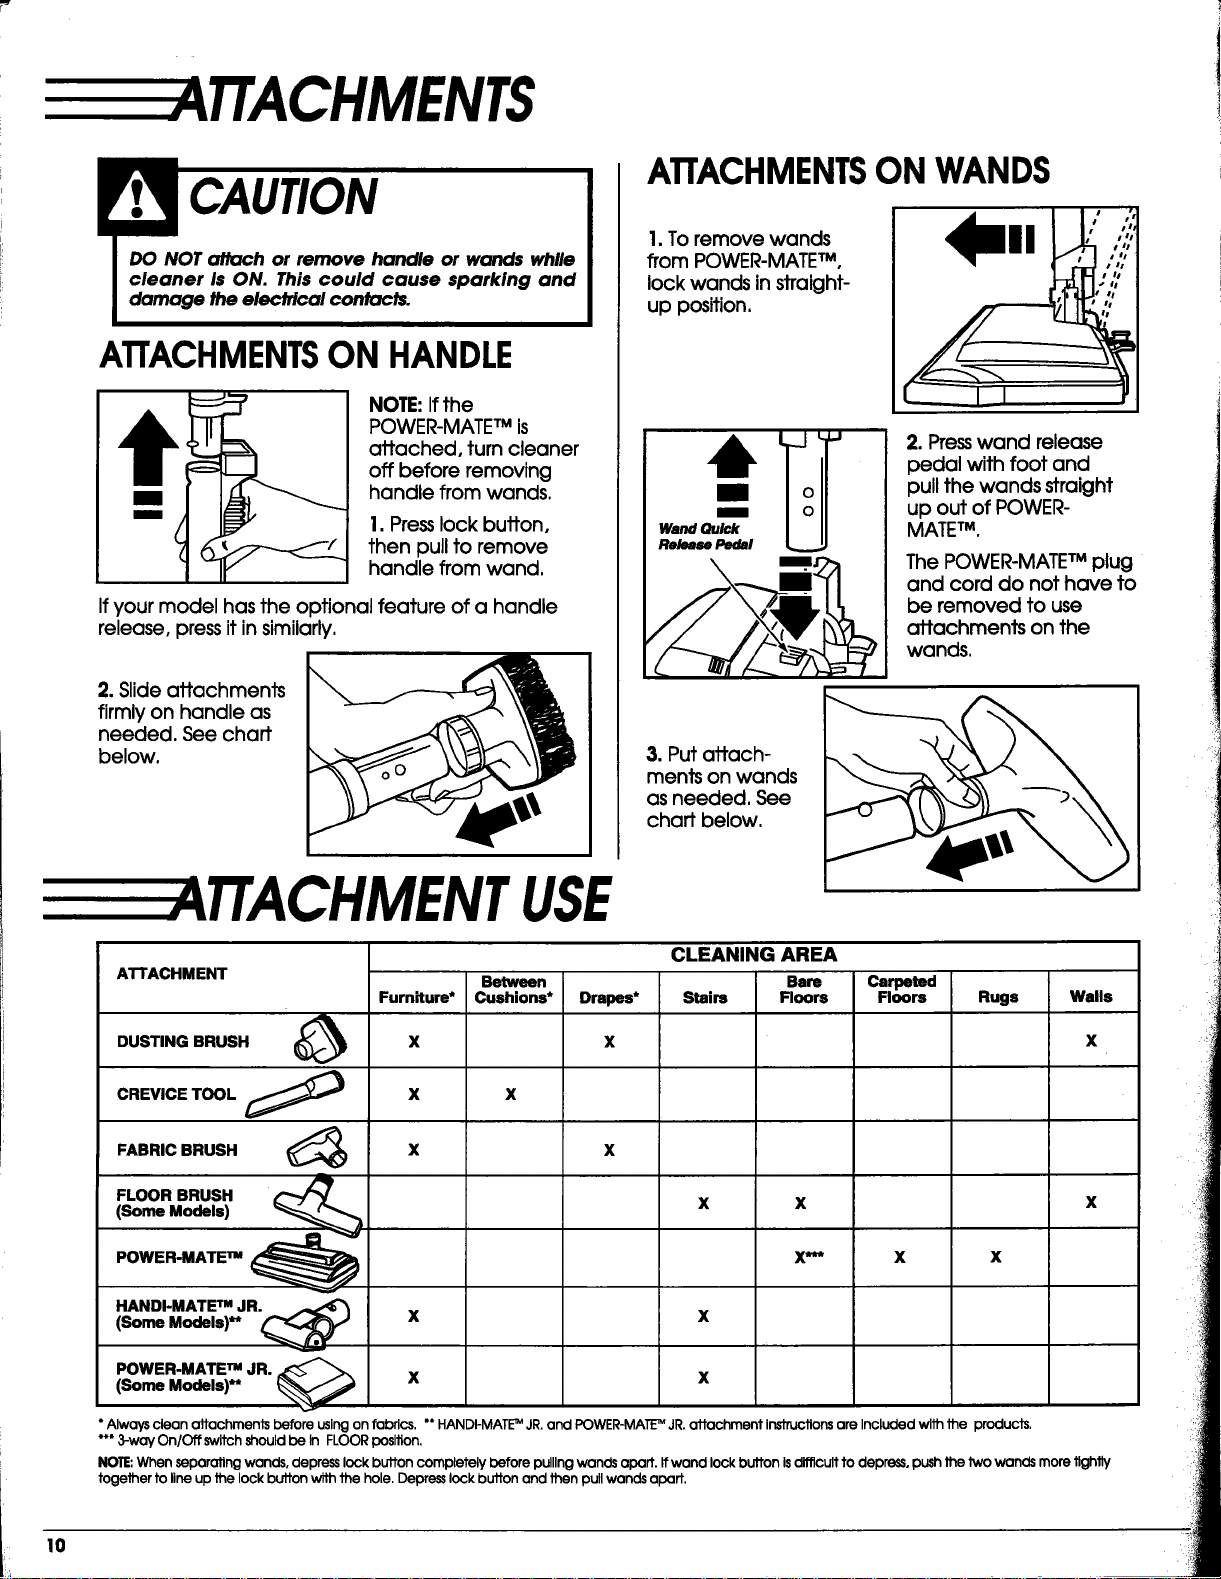
TTACHMENTS
ATTACHMENTSON HANDLE
NOTE: Ifthe
POWER-MATETMis
attached, turn cleaner
off before removing
handle from wands.
1. Press lock buffon,
then pull to remove
handle from wand,
If your model has the optional feature of a handle
release, press it in similarly.
2. Slide attachments
firmly on handle as
needed. See chaff
below.
ATTACHMENTSON WANDS
1.To remove wands
from POWER-MATETM,
lock wands in straight-
up position,
Wand Quick
Release Pedal
m
2. Presswand release
pedal with foot and
pull the wands straight
up out of POWER-
MATEm.
The POWER-MATETMplug
and cord do not have to
be removed to use
attachments on the
wands,
3. Put attach-
ments on wands
as needed. See
chaff below.
TTA CHMENTUSE
ATTACHMENT
DUSTING BRUSH
CREVICE TOOL
FABRIC BRUSH
FLOOR BRUSH
(Some Models)
POWER-MATE nm
Furn_um*
X
X
X
HANDI-MATE TMJR.
(Some Models)** _ X
POWER-MATE_ JR. _ _
(Some Models)** X
Between
Cushions*
X
Drapes*
X
CLEANING AREA
Bars
Stairs Floors
x x
X***
X
X
Carpeted
Floors
X
Rugs
X
Walls
X
X
Always clean attachments before using on fabrics. ** HANDI-MATI_MJR.and POWER-MATE"_ JR.attachment Instructions are Included with Jhe products.
*** 3-way On/Off switch should be In FLOOR position.
NOTE'.When separating wands, depress lock button completely before pulllng wands apart. If wand lock button isdifficult to depress, push the two wands more tightly
together to line up De lock button with the hole. Depress lock button and then pull wands apart.
0
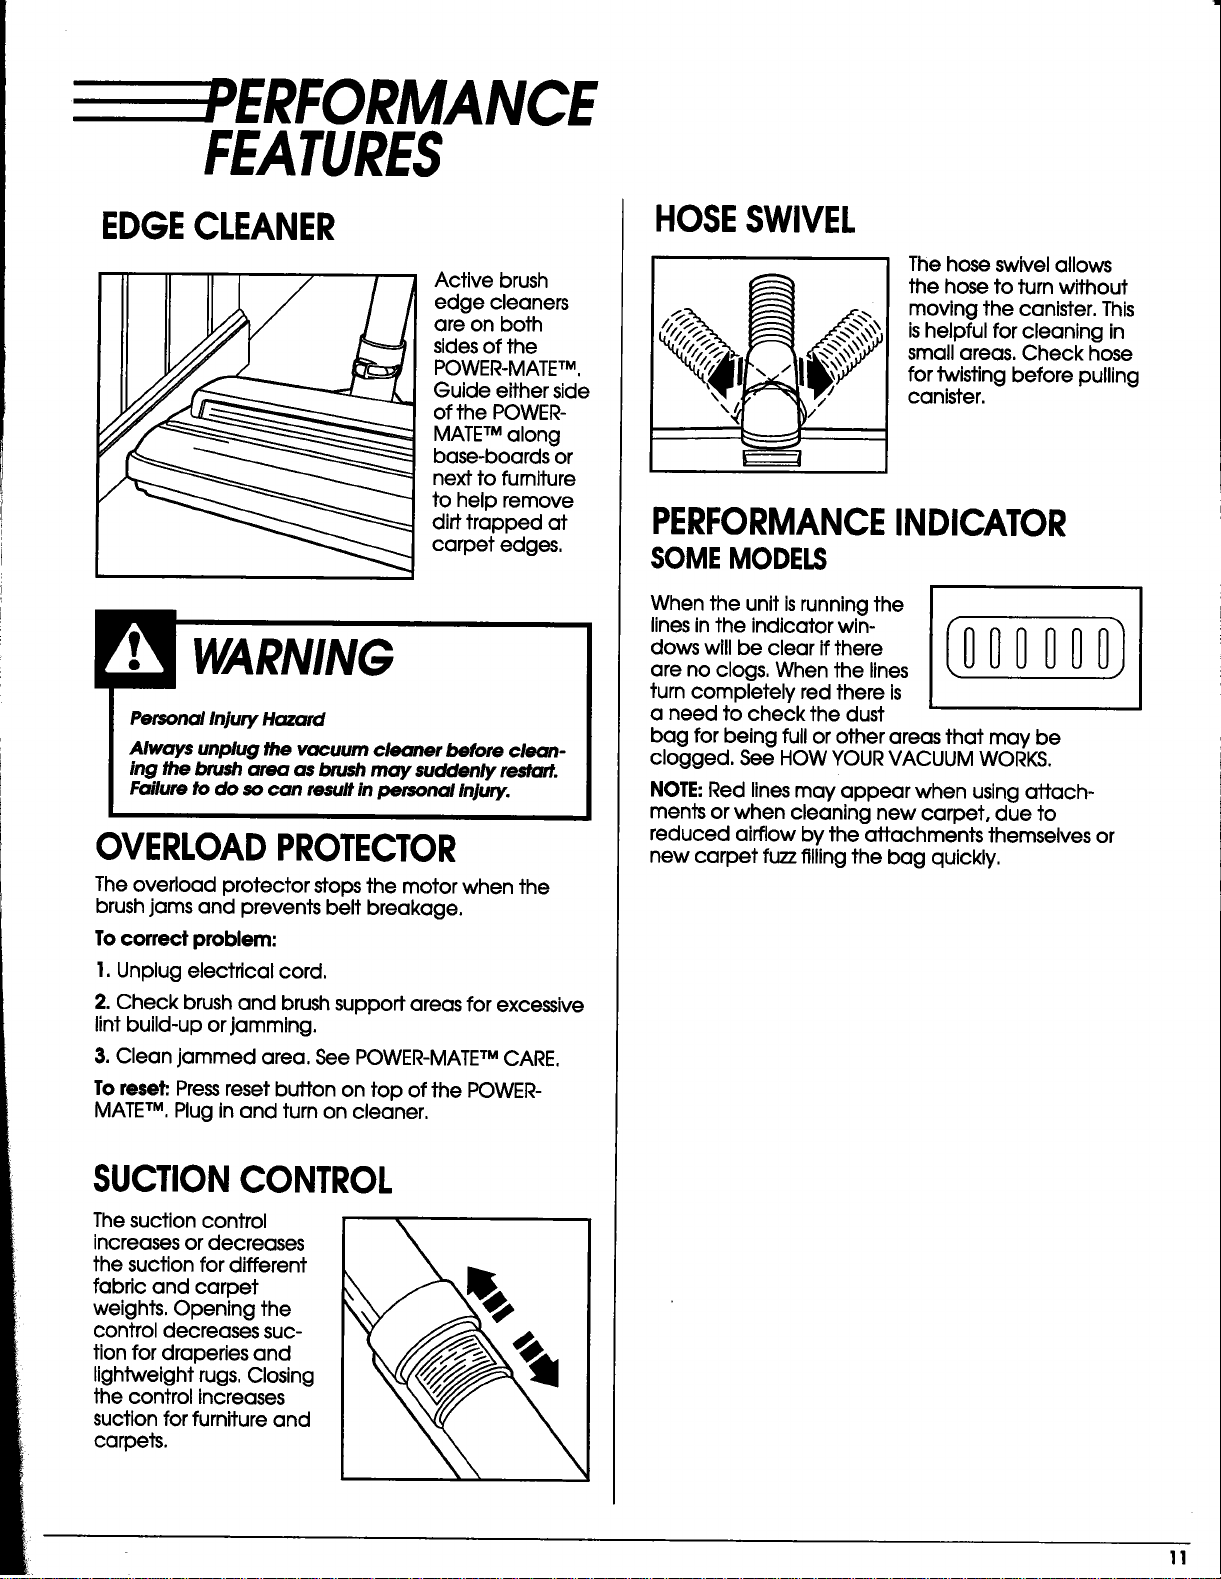
EPERFORMANCE
FEATURES
EDGECLEANER
Activebrush
edge cleaners
are on both
sidesofthe
POWER-MATE TM,
Guide eitherside
ofthe POWER-
MATE TM along
base-boards or
nexttofurniture
tohelpremove
dirttrapped at
carpetedges.
WARNING
Personal Injury Hazard
Always unplug the vacuum cleaner before clean-
ing the brusharea as brushmay suddenly re.art.
Failure to do socan resultin personal Injury.
OVERLOADPROTECTOR
The overload protectorstopsthe motor when the
brushjams and preventsbeltbreakage.
To correct problem:
I. Unplug electrical cord,
2. Check brush and brush support areas for excessive
lint build-up or jamming.
3. Clean jammed area. See POWER-MATETM CARE.
To reset: Pressreset button on top of the POWER-
MATETM, Plug in and turn on cleaner,
SUCTIONCONTROL
The suctioncontrol
increasesordecreases
the suctionfordifferent
fabricand carpet
weights.Opening the
controldecreases suc-
tionfordraperiesand
lightweightrugs.Closing
the controlincreases
suctionforfurnitureand
carpets.
\
HOSESWIVEL
The hose swivelallows
the hose toturnwithout
moving the canister.This
ishelpfulforcleaningin
smallareas.Check hose
fortwistingbeforepulling
canister.
PERFORMANCEINDICATOR
SOMEMODELS
When the unltisrunnlngthe
linesinthe indicatorwin-
dows willbe clearifthere
are no clogs.When the lines
turncompletelyred thereis
a need tocheck the dust
bag for being full or other areas that may be
clogged. See HOW YOUR VACUUM WORKS.
NOTE: Red linesmay appear when usingattach-
ments orwhen cleaningnew carpet,due to
reduced airflowby the attachments themselvesor
new carpet fuzzfillingthe bag quickly.
11
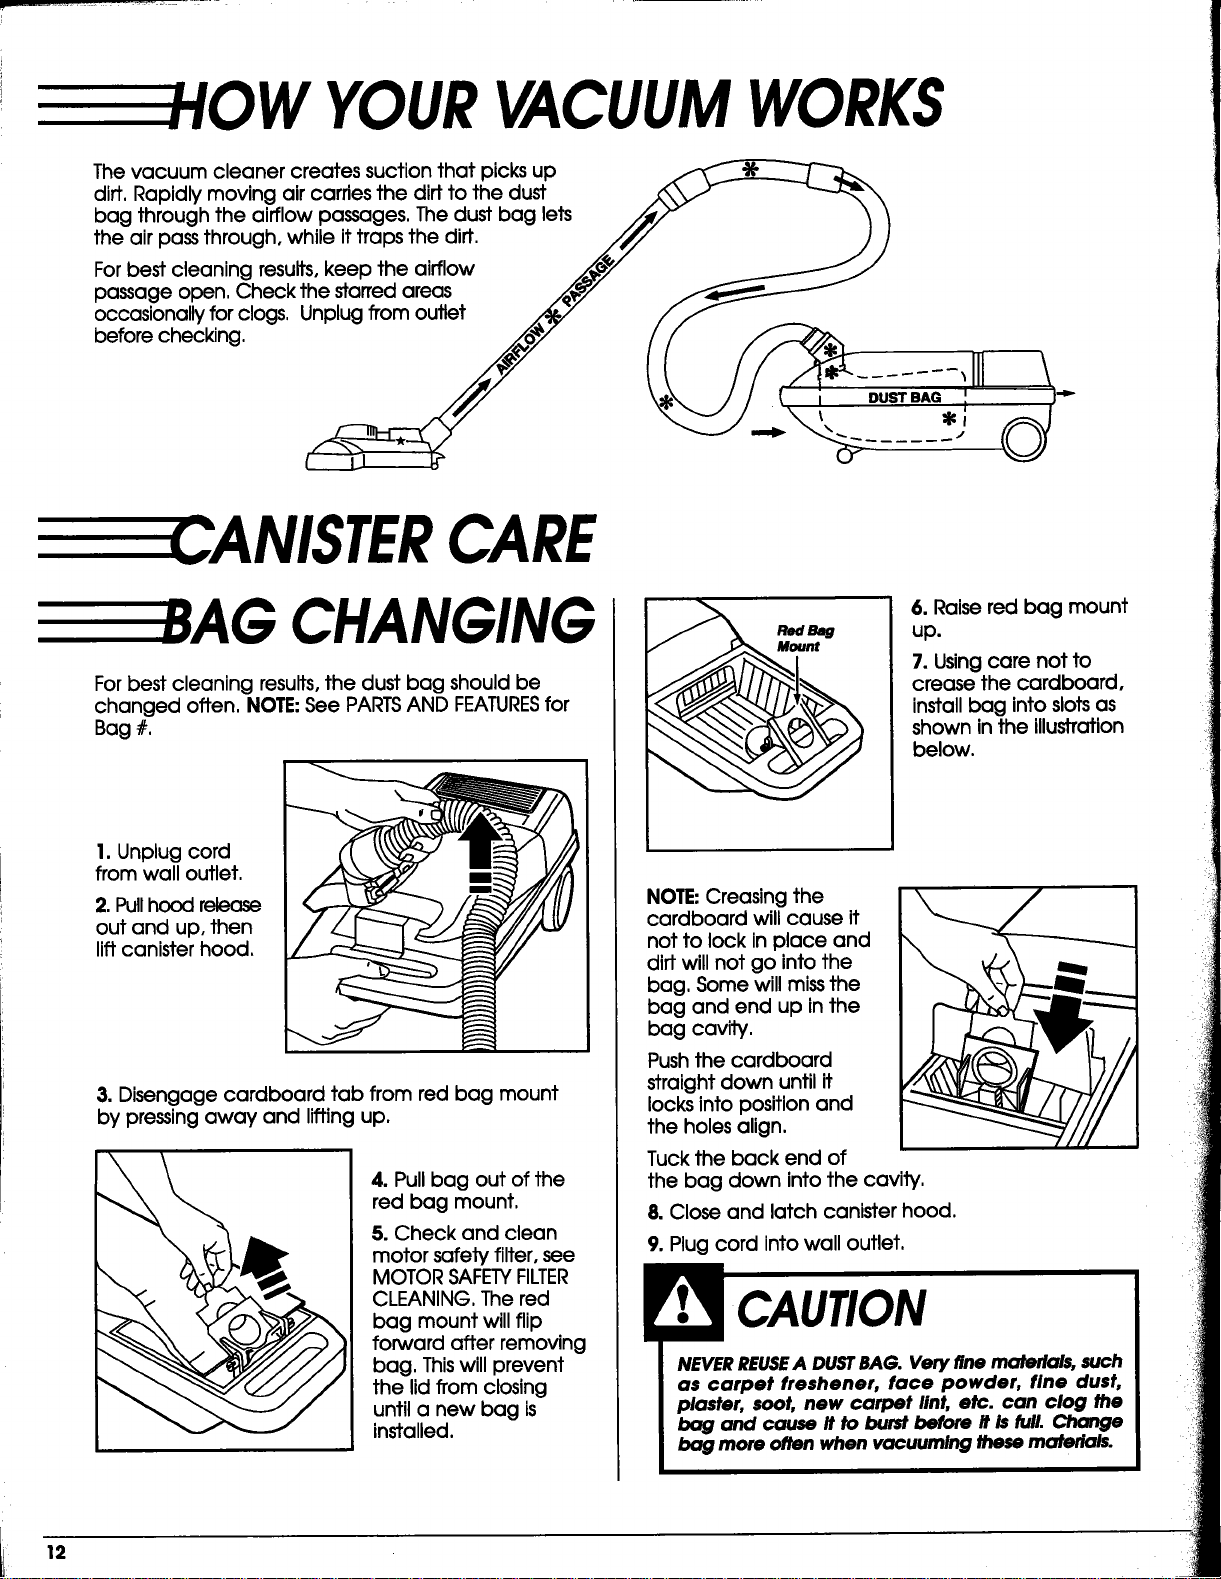
YOURVACUUMWORKS
The vacuum cleaner creates suction that picks up
diff, Rapidly moving air carries the dirt to the dust
bag through the airflow passages. The dust bag lets
the air pass through, while it traps the diff.
For best cleaning results, keep the airflow
passage open. Check the starred areas
occasionally for clogs, Unplug from outlet
before checking.
==_-CANISTERCARE
CHANGING
For best cleaning results, the dust bag should be
changed often, NOTE:See PARTSAND FEATURESfor
Bag #,
1. Unplug cord
from wall outlet.
2. Pullhood release
out and up. then
lift canister hood.
3. Disengage cardboard tab from red bag mount
by pressing away and lifting up.
4. Pull bag out of the
red bag mount,
5.Check and clean
motor safety filter, see
MOTOR SAFETYFILTER
CLEANING, The red
bag mount will flip
forward after removing
bag, Thiswill prevent
the lid from closing
until a new bag is
installed.
6. Raise red bag mount
up.
7. Usingcare not to
crease the cardboard,
install bag into slotsas
shown in the illustration
below.
NOTE Creasing the
cardboard will cause it
not to lock in place and
dirt will not go into the
bag, Some will missthe
bag and end up in the
bag cavity.
Pushthe cardboard
straightdown untilit
locksintopositionand
the holesalign.
Tuck the back end of
the bag down intothe cavity,
8.Closeand latchcanlsterhood.
9. Plug cord into wall outlet,
NEVER REUSEA DUSTBAG. Very fine materials, such
as carpet freshener, face powder, fine dust,
plaster, soot, new carpet lint, etc. can clog the
bag and cause it to burst before it is full. Change
bag more often when vacuuming these materials.
12
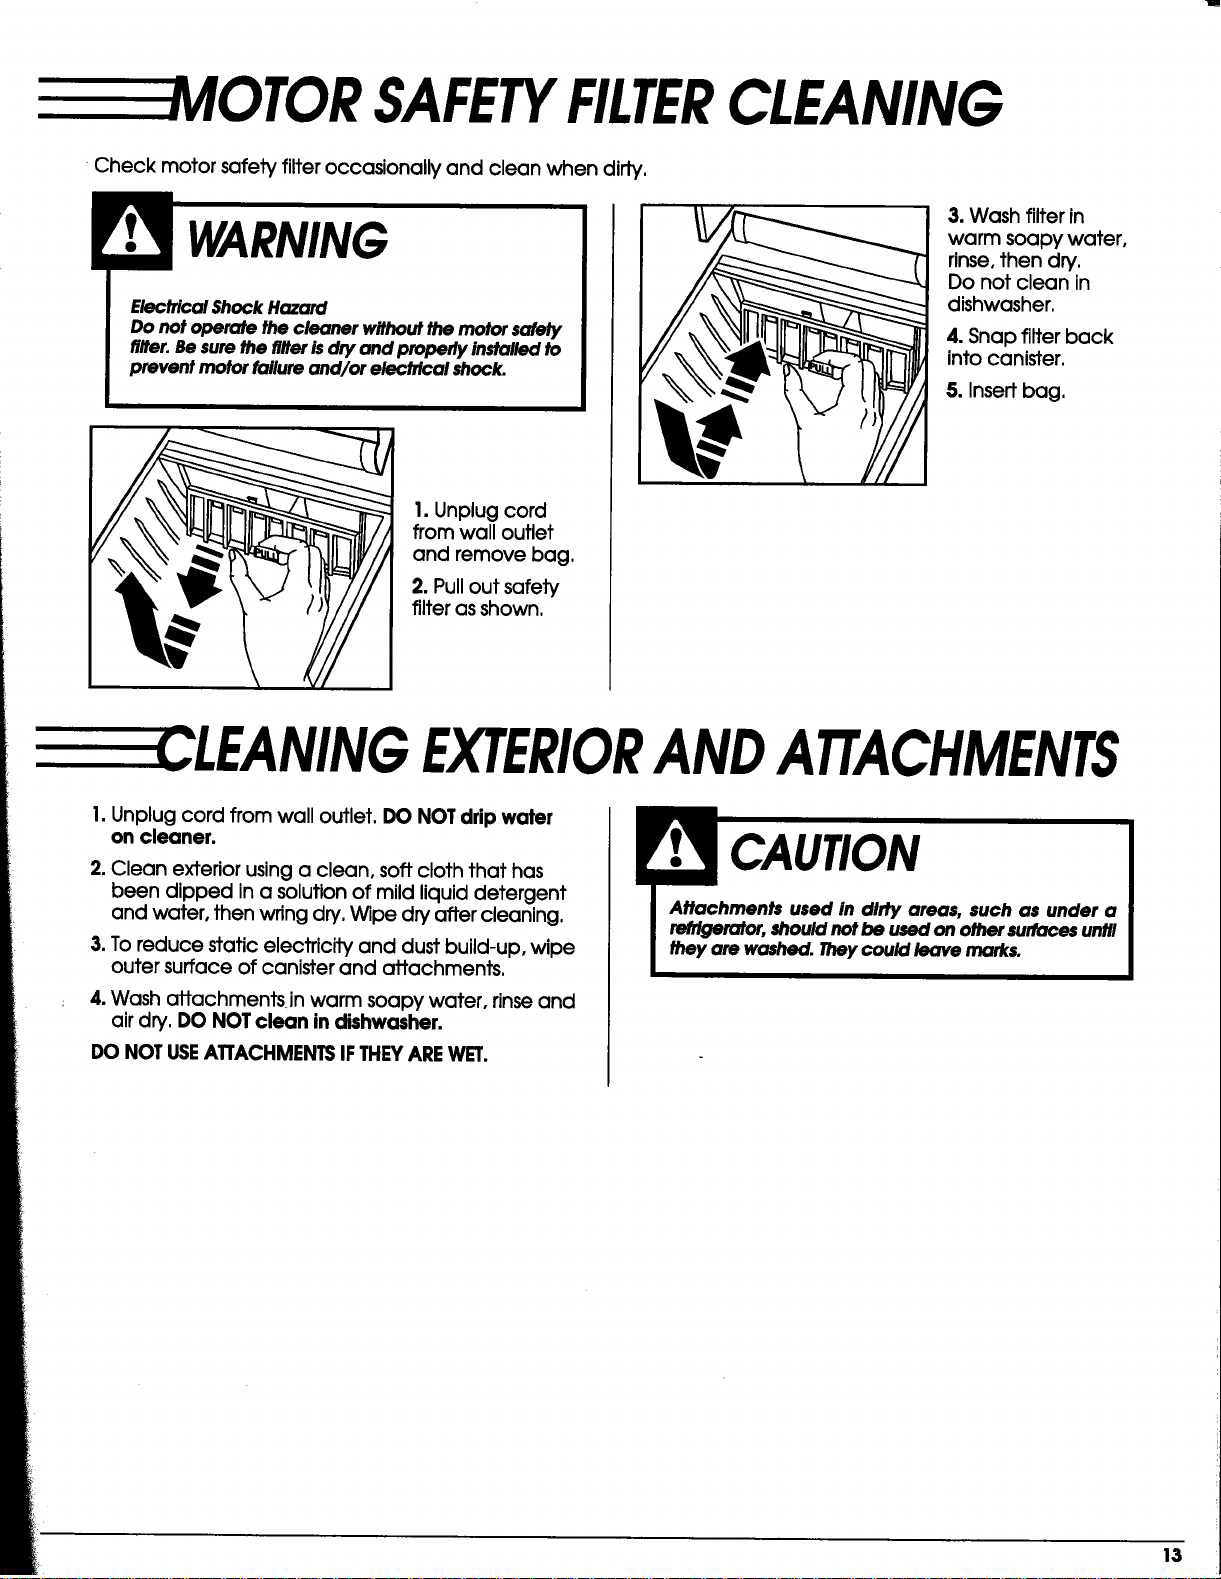
VIOTOR SAFETYFILTERCLEANING
•Check motor safety filter occasionally and clean when dirty.
ElectricalShockHazard
Do not operate the cleormr withoutthe motorsalety
filter.Besurethe riflerisdry and properlyinstalledto
prevent motorfailureand/or electrical shock.
1. Unplug cord
from wall outlet
and remove bag.
2. Pull out safety
filter as shown.
3. Wash filter in
warm soapy water,
rinse, then dry.
Do not clean in
dishwasher.
4. Snap filter back
into canister.
5. Insert bag.
----CLEANING EXTERIORANDATTACHMENTS
I. Unplug cord from wall outlet. DO NOT drip water
on cleaner.
2. Clean exterior using a clean, soft cloth that has
been dipped in a solution of mild liquid detergent
and water, then wring dry. Wipe dry after cleaning.
3. To reduce static electricity and dust build-up, wipe
outer surface of canister and attachments.
4. Wash attachmentsjn warm soapy water, rinseand
air dry. DO NOT clean in dishwasher.
DO NOT USEATTACHMENTSIFTHEYAREWET.
_: 13
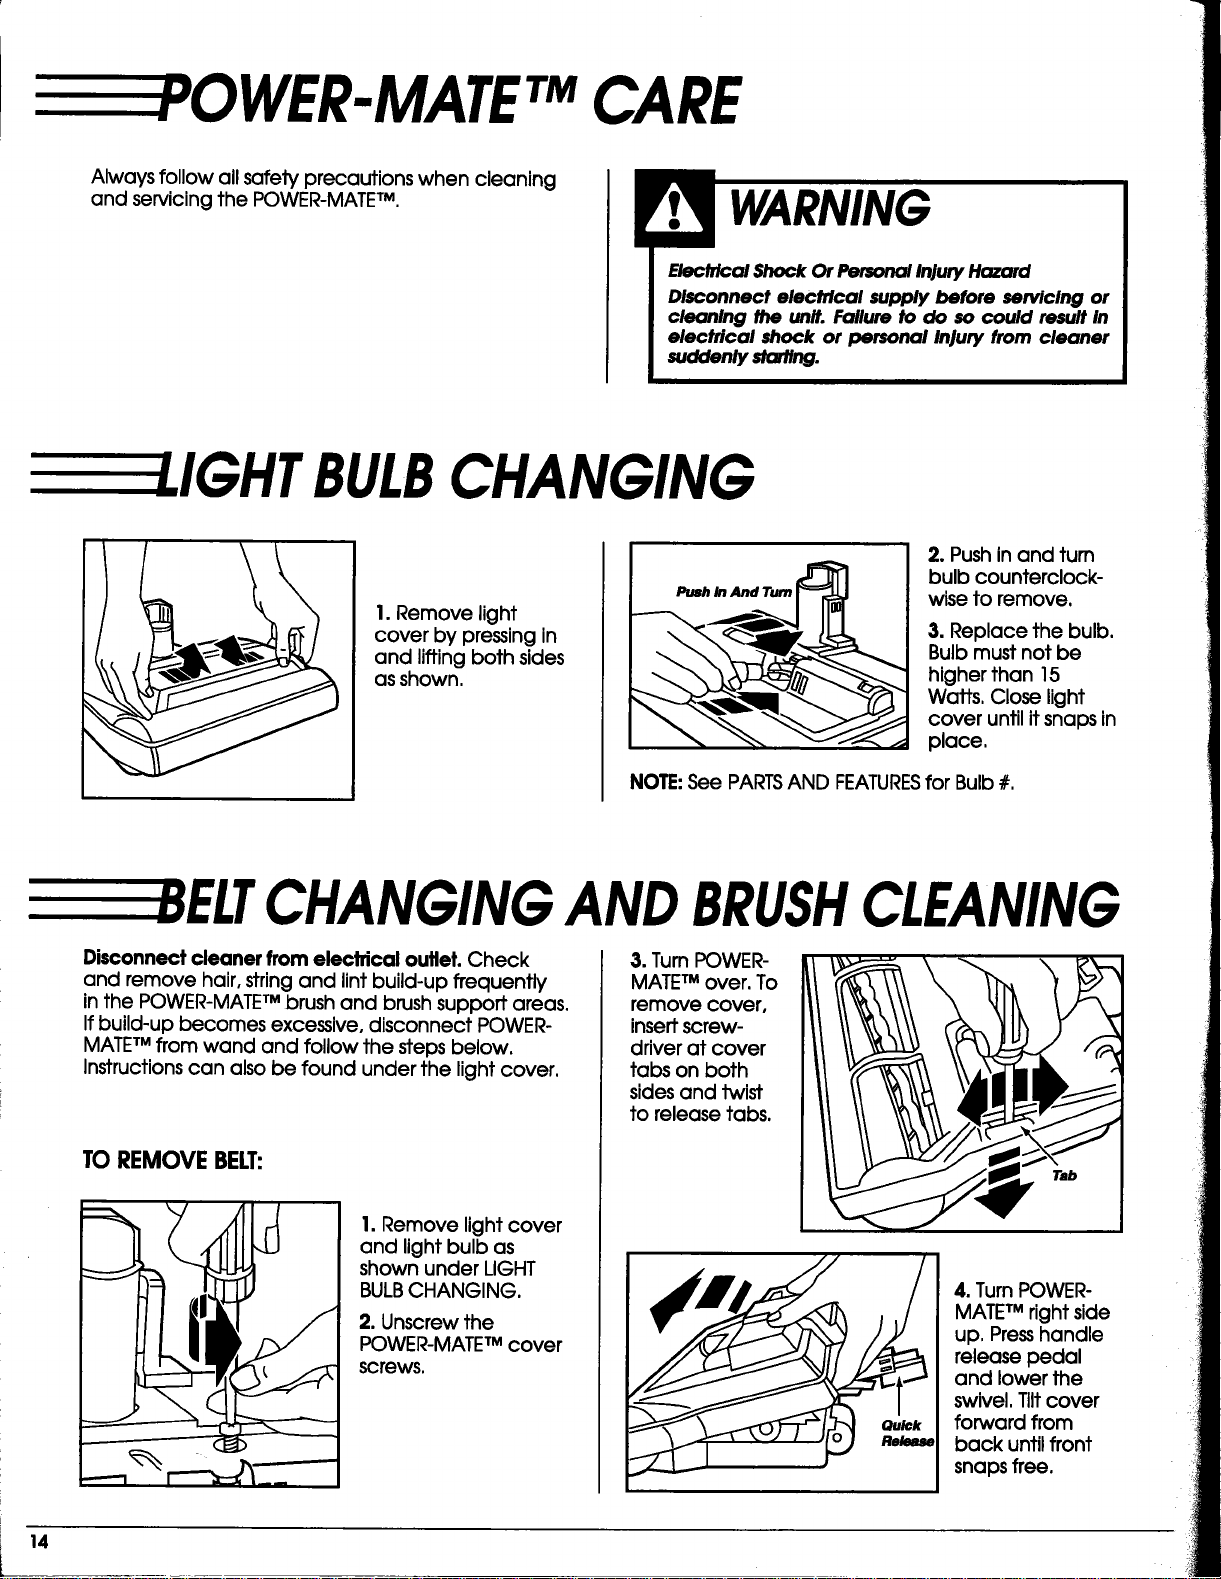
WER-MATETMCARE
Always follow all safety precautions when cleaning
and servicing the POWER-MATETM.
Elecfrtoal Shock Or Personal Injury Hazard
Disoonnect electrical supply before servicing or
cleaning the unit. Failure to do so could result in
electrical shock or personal Injury from cleaner
sodden/y sto#/ng.
I.IGHT BULBCHANGING
1. Remove light
cover by pressing in
and lifting both sides
as shown.
Push ln And Tum
2. Push in and tum
bulb counterclock-
wise to remove.
3. Replace the bulb.
Bulb must not be
higher than 15
Watts, Close light
cover until it snaps in
place,
NOTE:See PARTSAND FEATURESfor Bulb #.
CHANGINGANDBRUSHCLEANING
Disconnect cleaner from electrical outlet. Check
and remove hair, string and lint build-up frequently
inthe POWER-MATETM brush and brush support areas,
Ifbuild-up becomes excessive, disconnect POWER-
MATETM from wand and follow the steps below.
Instructionscan also be found under the light cover.
TOREMOVEBELT:
1. Remove light cover
and light bulb as
shown under LIGHT
BULBCHANGING.
2. Unscrew the
POWER-MATETM cover
screws,
3. Turn POWER-
MATETM over. To
remove cover,
insertscrew-
driver at cover
tabs on both
sides and twist
to release tabs.
Tab
4. Turn POWER-
MATETM right side
up, Presshandle
release pedal
and lower the
swivel. Tilt cover
forward from
back until front
snaps free.
14
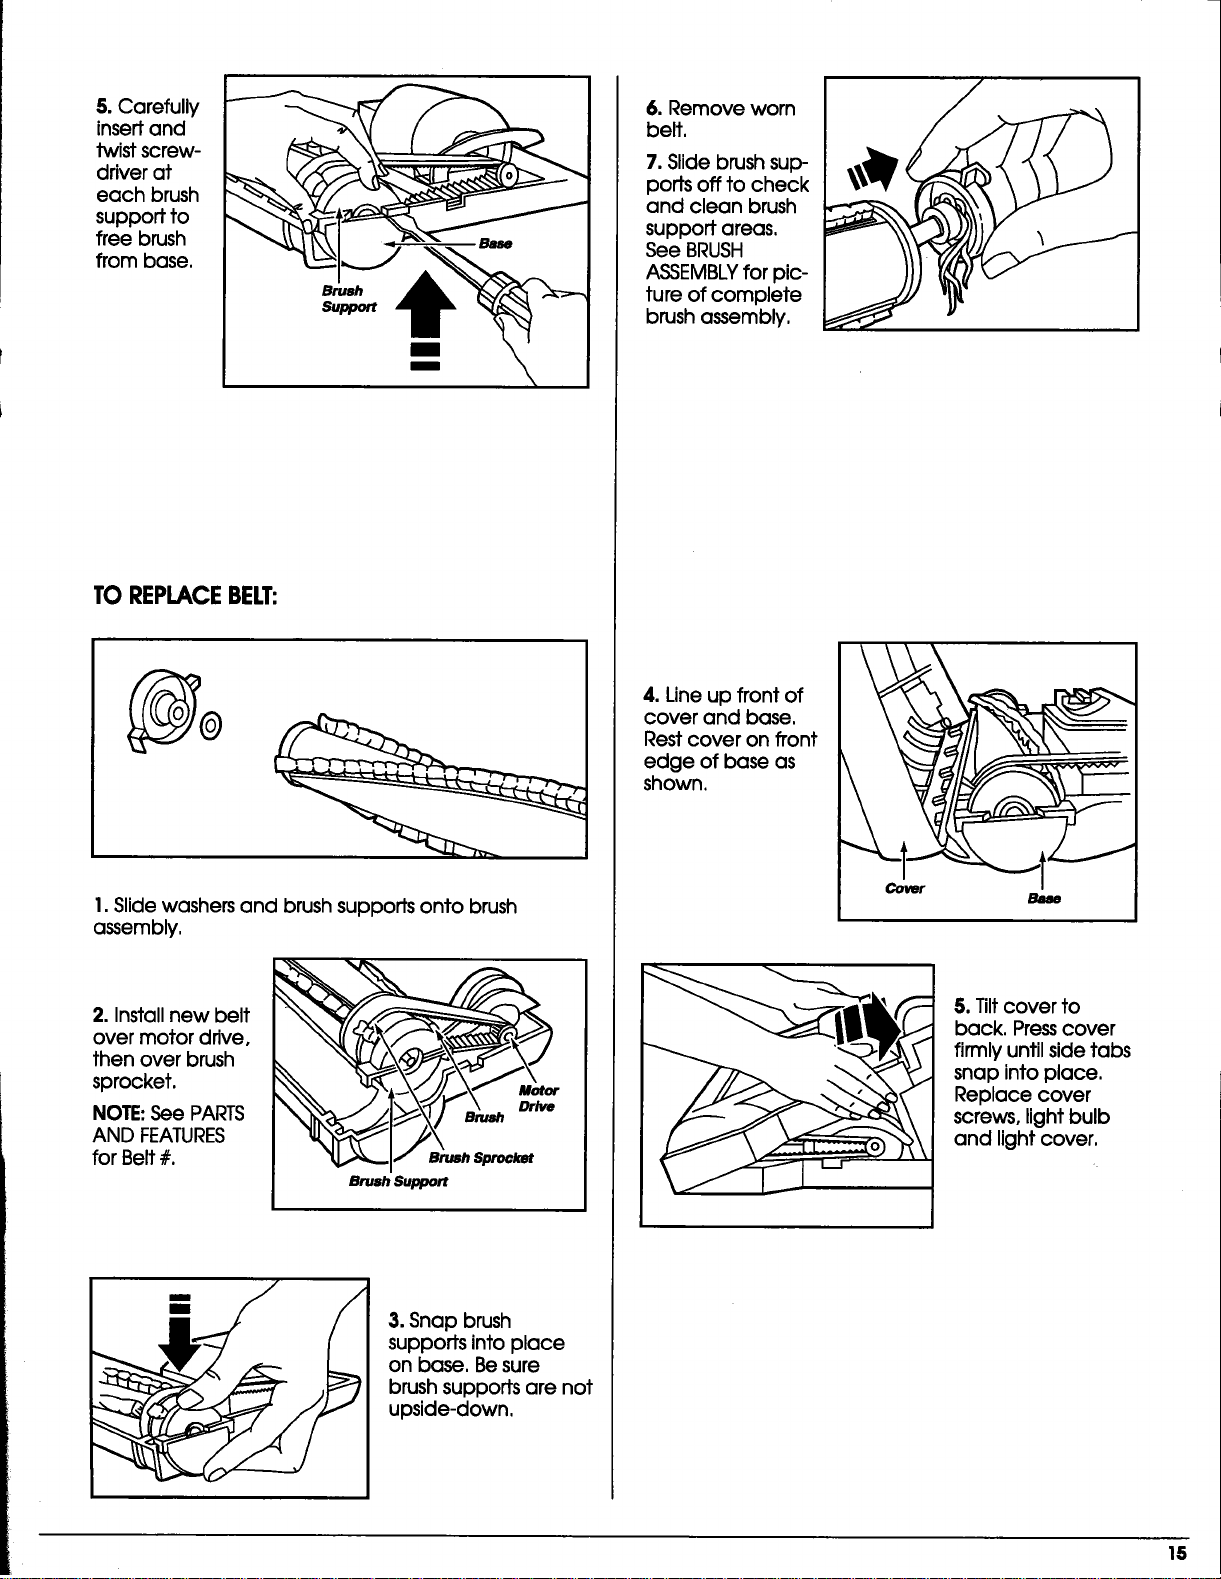
5.Carefully
insert and
twist screw-
driver at
each brush
support to
free brush
from base.
Brush t_
Support
TO REPLACEBELT:
1. Slide washers and brush supports onto brush
assembly.
2. Install new belt
over motor drive,
then over brush
sprocket.
NOTE:See PARTS
AND FEATURES
for Belt #.
Motor
_ SrushSproc_
Brush Support
3. Snap brush
supports into place
on base. Be sure
brush supports are not
upside-down,
6. Remove worn
belt,
7. Slide brush sup-
ports off to check
and clean brush
support areas.
See BRUSH
ASSEMBLYfor pic-
ture of complete
brush assembly,
4.Lineup frontof
cover and base,
Restcover on front
edge ofbase as
shown.
5. Tilt cover to
back. Press cover
firmly until side tabs
snap into place.
Replace cover
screws, light bulb
and light cover.
15
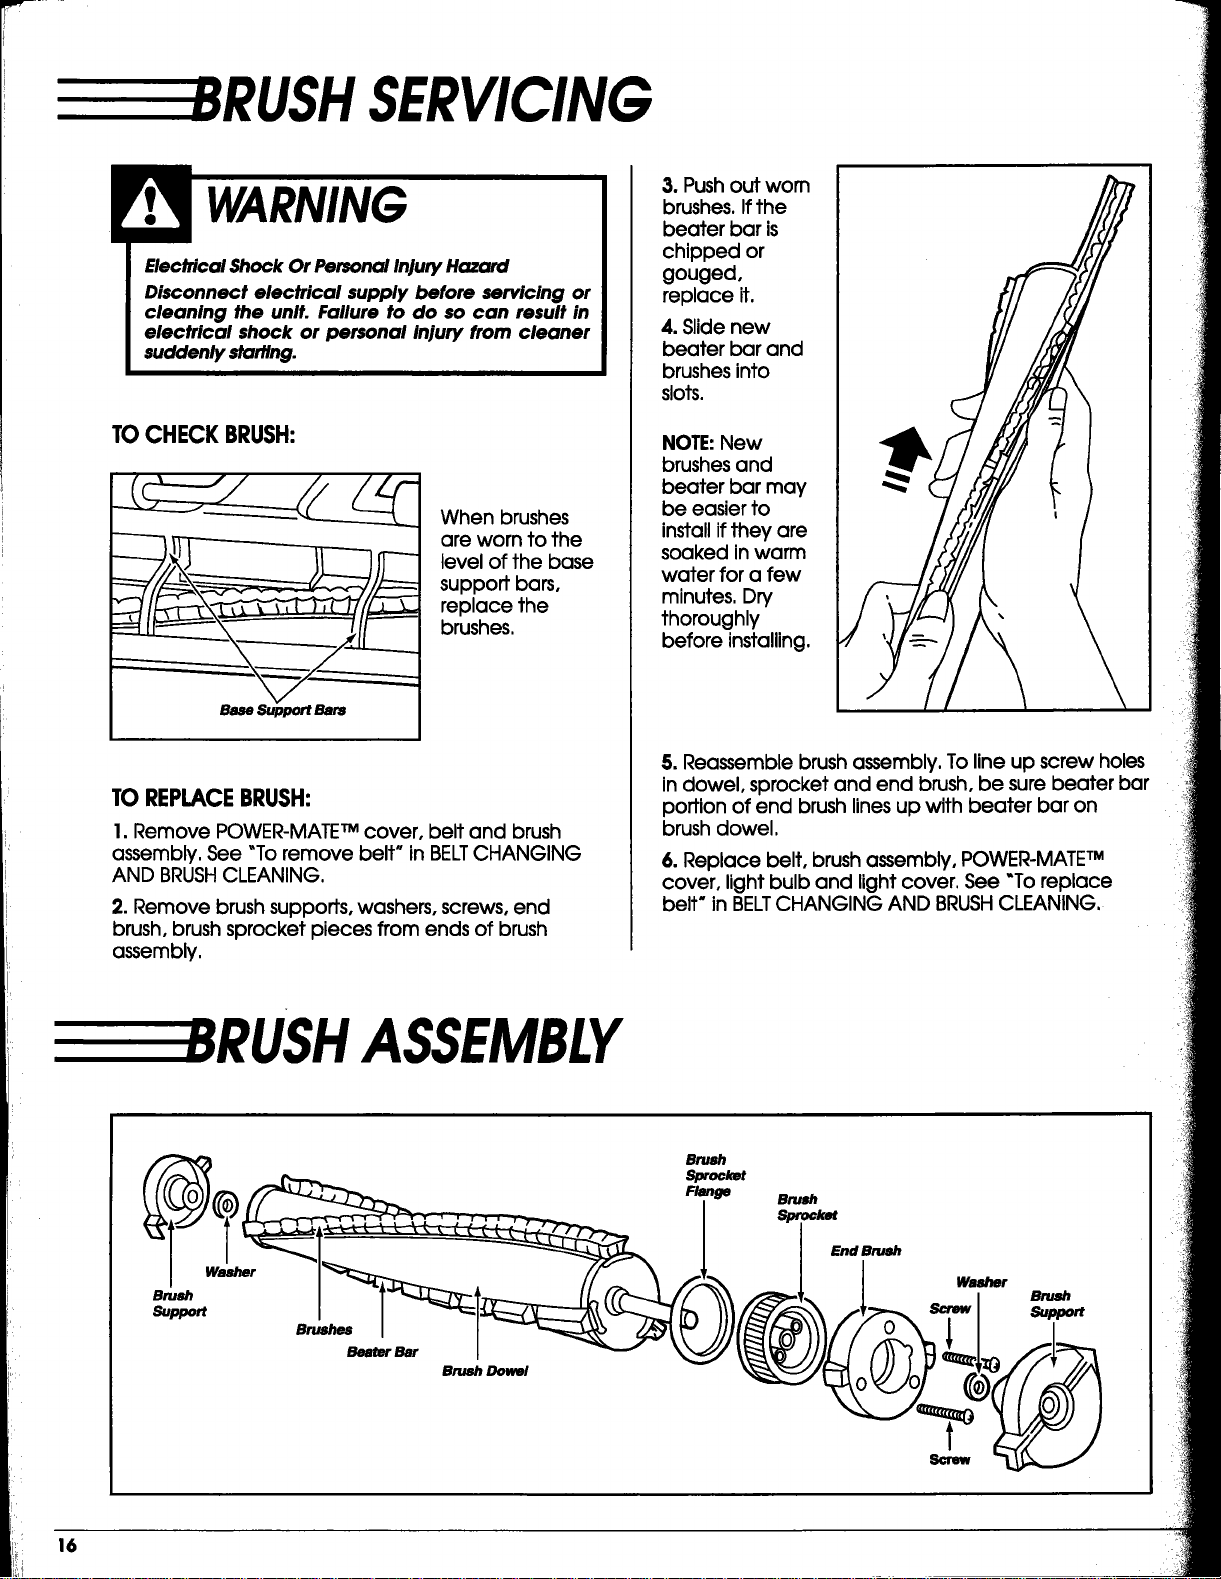
RUSH SERVICING
Electrical Shock Or Personal Injury Hazard
Disconnect electrical supply before servicing or
cleaning the unit. Failure to do so can result in
electrical shock or personal injury from cleaner
suddenly starting.
TOCHECKBRUSH:
Base Support Bars
When brushes
are worn to the
level of the base
support bars,
replace the
brushes.
TOREPLACEBRUSH:
1. Remove POWER-MATETM cover, belt and brush
assembly. See "To remove belt" in BELTCHANGING
AND BRUSHCLEANING.
2. Remove brush supports, washers, screws, end
brush, brush sprocket pieces from ends of brush
assembly.
3. Push out worn
brushes. If the
beater bar is
chipped or
gouged,
replace it.
4. Slide new
beater bar and
brushes into
slots.
NOTE:New
brushes and
beater bar may
be easier to
installifthey are
soaked in warm
water for a few
minutes. Dn/
thoroughly
before installing.
5. Reassemble brush assembly. To line up screw holes
in dowel, sprocket and end brush, be sure beater bar
portion of end brush linesup with beater bar on
brush dowel.
6. Replace belt, brush assembly, POWER-MATETM
cover, light bulb and light cover. See "Toreplace
belt* in BELTCHANGING AND BRUSHCLEANING.
RUSH ASSEMBLY
_r
Brush
Support
Brushes
BeaterBar
Brush Dowel
Brush
Sprocket
Flange
Brush
Sproc_t
End Brush
Brush
Support
t
Screw
16

Review this chaff to find do-it-yourself solutions for minor performance problems,
I1:1
Cleaner won't stad.
Poor job of dirt
pick-up.
Cleanerdartsbut
cutsoff.
POWER-MATETM will
run when attached.
Pelformanceindicator
bred.
Cleanerpicksup movable
rugs-or- POWER-MATE"*
pushestoohard.
3,
4.
Unplugged at wall outlet. I.
Tripped circuit breaker/blown fuse at 2.
household service panel.
Loose hose electrical connections. 3.
Tripped overload protector 4.
in POWER-MATE TM.
1,
2.
3.
4.
5.
6.
7.
8.&9.
10.
I. Fullor clogged dust bag.
2. Clogged airflow passages.
3. Dirty motor sefety filter.
4. Wrong pile height setting.
5. Open suction control.
6. Hole in hose.
7. Worn POWER-MATE TM brushes.
8. Worn or broken belt.
9. Dirty brush or brush suppods.
10. Canister hoed open.
I. Hose or hood electrical connections.
2. Tripped overload protector
in POWER-MATE TM.
3. Tripped overload protector
in canister.
I. POWER-MATE TM connections
unplugged.
2. Worn or broken belt.
3. Dirty brush or brush supports.
4. Tripped overload protector
in POWER-MATE TM.
I. Full or clogged dust bag.
2. Dirty motor safety tilter.
3. Blocked airflow passage.
4. Certain attachment tools.
I. Wrong pile height setting.
2. Suction too SJTong.
Burned out bulb.
Dirty power cord.
Cord jammed.
Wrong vacuuming pattern.
Plug in firmly, push On/Off switch to ON.
Reset circuit breaker or replace fuse.
Reconnect hose ends, (pages 5, 6).
Clean brush and brush supporls, then
reset, (pages 14, 18).
Change beg, (page 12).
Clear airflow passages, (page 12).
Clean filter, (page 13).
Adjust setting, (page 8).
Adjust control (page 1I).
Replace hose.
Change brushes, (pages14-16).
See BELTCHANGING AND BRUSH
CLEANING, (pages 14, 15).
Close and latch hood.
I. Check connections, reconnect hose ends,
(pages 5, 6).
2. Remove any items that may be caught or
jammed, then reset. If cleaner starts and stops
again, clean brush and brush supports, then
reset, (pages 14, 15).
3. Change dust bag, clear airflow blockage,
(page 12). Walt 20 minutes for motor to
cool and automatically reset.
I,
2.&3.
4.
Plug in firmly, (page 5).
See BELTCHANGING AND BRUSH
CLEANING, (pages 14, 15).
Check brush area for excessive lint build-
up or Jamming. Clean brush and brush
supports, then reset, (pages 14-16).
I. Change bag, (page 12).
2. Clean filter, (page 13).
3. Clear blockage from airflow passage, (page 12).
4. Thisisnormal. Ught should go off when
tool is removed
I. Adjust setting, (page 8).
2. Open suction control, (page 1I).
Lightw_work. I. I. Change bulb, (page 14).
Cord won_ rewind. I. i. Clean the power cord.
2. 2. Pull out cord and rewind.
Cleaner leaves marks I. I. See VACUUMING TIPS, (page 8).
o11ol_lT_It.
i 17

U
8EAF
Aspiradora
MAN UALDELPROPIETARIO
LEAESTEMANUAL para enterarse de instrucciones importantes
acerca de la $eguridad, armado y funcionamiento.
C_ 1ZARB_U_-437_536
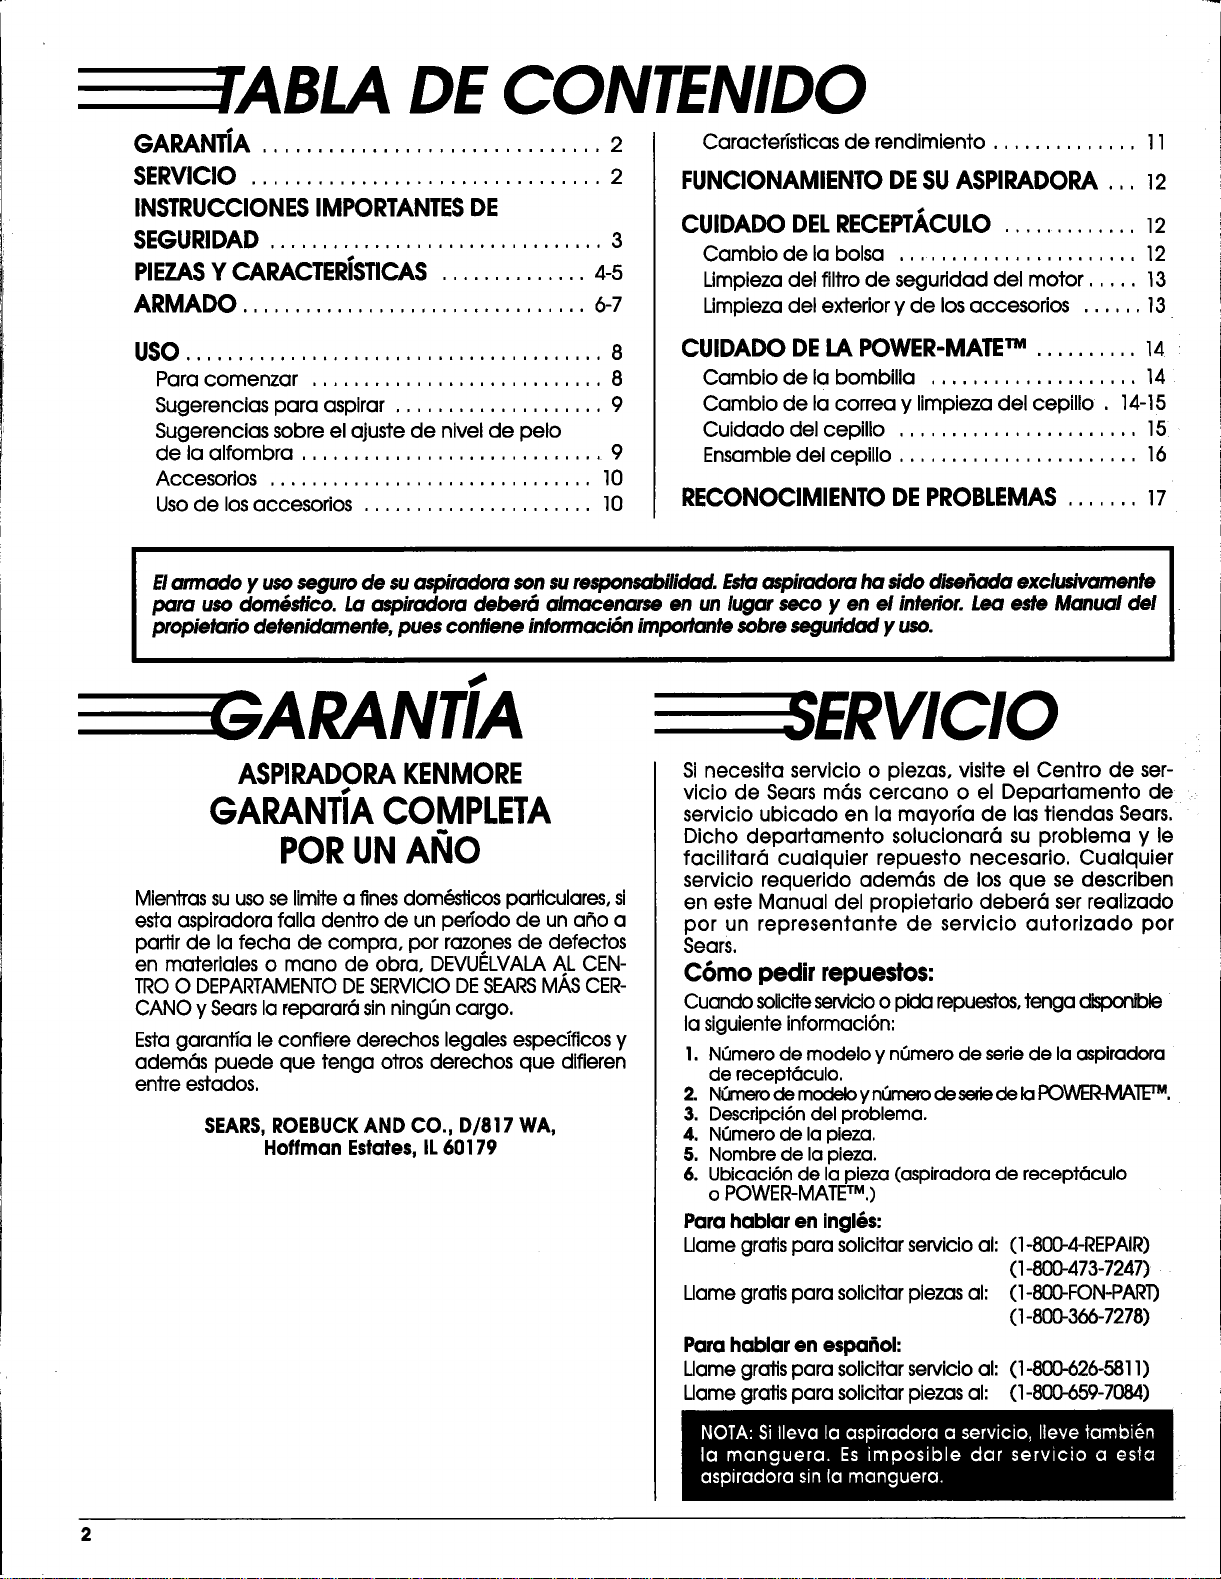
DE CONTENIDO
GARANTiA ............................... 2
SERVlClO ................................ 2
INSTRUCCIONESIMPORTANTESDE
SEGURIDAD ................................ 3
PIEZASY CARACTERISTICAS.............. 4-5
ARMADO ................................. 6-7
USO........................................ 8
Para comenzar ............................ 8
Sugerencias para aspirar .................... 9
Sugerencias sobre el ajuste de nivel de pelo
de la alfombra ............................. 9
Accesorios ............................... 10
Usode losaccesorios ...................... 10
Caracteristicasde rendimiento.............. 11
FUNClONAMIENTODESUASPIRADORA ,,, 12
CUIDADO DELRECEPT._.CULO.............. 12
Cambio de la bolsa ........................ 12
Umpieza del filtro de segufidad del motor ..... 13
Limpieza del exterior y de los accesorios ...... 13
CUIDADO DELAPOWER-MATETM ..........14
Cambio de labombilla ....................14
Cambio de lacorreay limpiezadel cepillo. 14-15
Cuidado delcepillo.......................15
Ensamble delcepillo.......................16
RECONOClMIENTO DEPROBLEMA$....... 17
Elarmado y usoseguro de su aspiradora son surespansabilidad. Estaaspiradora ha sidodisel_nda exclusivamente
para uso dom6stico. La aspiradora deber6 almacenarse en un lugar seco yen e/interior. Lea este Manual del
propietario detenidamente, pues confiene inforrnaci6n importante sobre seguridad y uso.
ASPIRADORAKENMORE
GARANTIACOMPLETA
PORUNANO
Mientras suusose Iimite a fines dom_dricos parftculares, si
esta aspiradora falla dentro de un pefiodo de un aflo a
parftr de la fecha de compra, por razones de defectos
en materiales o mano de obra, DEVUELVALA AL CEN-
TROO DEPARTAMENTODESERVIClODESEARSM/kSCER-
CANO y Searsla reparar6 sin ning_n cargo.
Esta garantia le confiere derechos legales espedficos y
adem6s puede que tenga otros derechos que difieren
entre estados.
SEARS,ROEBUCKAND CO., D/817 WA,
Hoffman Estates, IL60179
SInecesitaservlcioo piezas,visiteelCentro de ser-
viciode Searsm6s cercano o el Departamento de
servicioubicado en lamayofia de lastiendasSears,
Dicho departamento solucionar6su problema y le
facilitar6cualquierrepuesto necesario.Cualquler
serviciorequeridoadem6s de losque se describen
en esteManual del propietariodeber6 serrealizado
por un representante de servicioautorizado por
Sears.
C6mo pedir repuestos:
Cuando soliciteservicioo pida repuestos,tenga
la siguiente informaci6n:
1. NQmero de modelo y nCJmerode sefle de la aspiradora
de recept_culo.
2. NOmerodemodeloynOmerodesededelal:K:)WER-MATETM,
3. Descripci6n del problema.
4. N_mero de la pieza.
5. Nombre de la pieza.
6. Ubicaci6nde la pieza (aspiradora de recept6culo
o POWER-MATETM.)
Para hablar en ingl6s:
Uame grafts para solicitarservicioal: (1-800-4-REPAIR)
(1-800-473-7247)
Llame grafts para solicitar piezas al: (1-800-FON-PAR1)
(1-800-366-7278)
Para hablar en espa_ol:
Llame gratispara solicitarservicioal: (I-800-626-581 I)
Uame graftspara solicitarpiezas al: (I-800-659-7084)
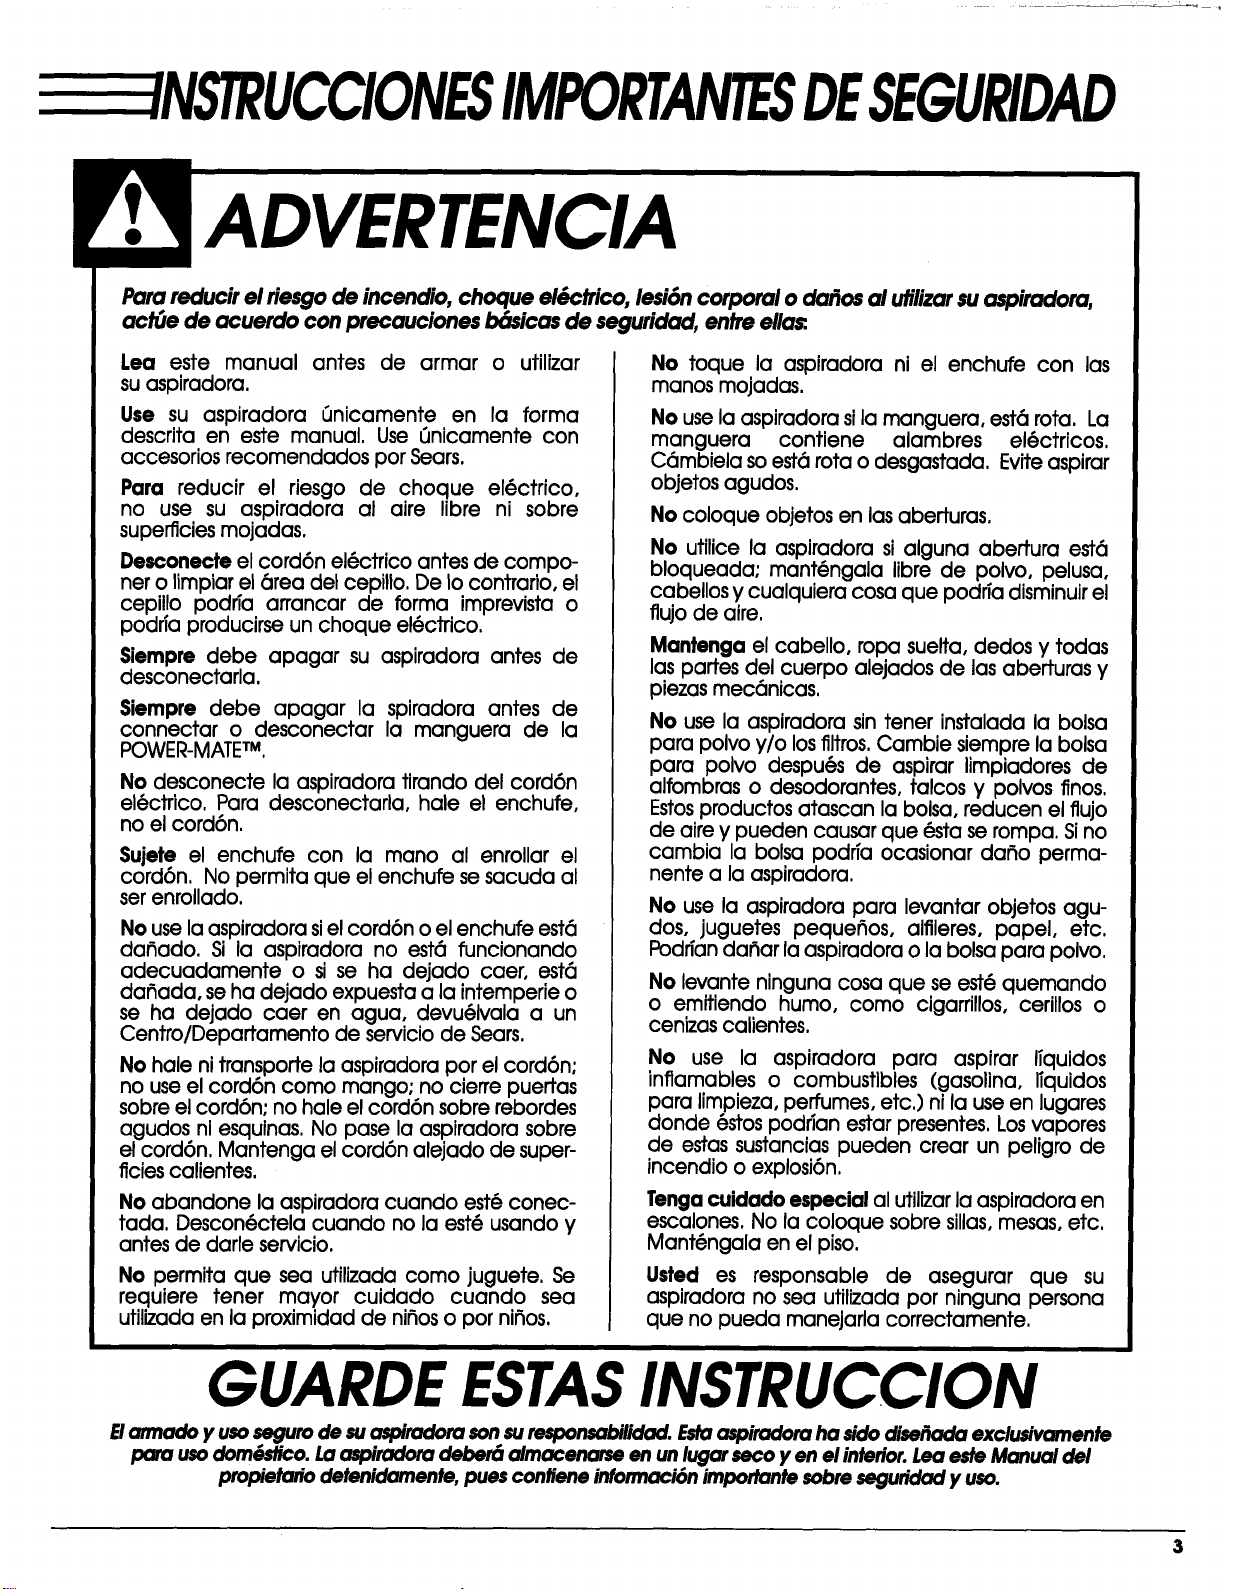
NSTRUCCIONESIMPORTANTESDESEGURIDAD
Para reducir el riesgode incendio, cheque el&ctrico, lesi6ncorporal o da_os al utilizarsu aspiradora,
act(Je de acuerdo con precauciones b6sicas de seguridad, entre ella_.
Lea este manual antes de armar o utilizar
suaspiradora.
Use su aspiradora _Jnicamente en la forma
descritaen este manual. Use 6nicamente con
accesoriosrecomendados per Sears.
Par(] reducir el riesgo de cheque el(_ctrico,
no use su aspiradora al aire libreni sobre
superficiesmojadas.
Desconecte elcord6n el(_ctricoantesde compo-
nero limpiarel(_readelcepillo.De tocontrafio,el
cepillopodfia arrancar de forma imprevistao
podrfaproclucirseun cheque el(_ctrico.
$iempre debe apagar su aspiradoraantes de
desconectarla.
SJempre debe apagar la spJradora antes de
connectar o desconectar la manguera de la
POWER-MATETM.
No desconecte laaspiradoratirandodel cord6n
el@ctrico.Para desconectarla,hale el enchufe,
no elcord6n.
Sujete el enchufe con la mane al enrollar el
cord6n. No permita que el enchufe se sacuda al
serenrollado.
No use laaspiradorasielcord6n o elenchufe est6
dafiado. Si la aspiradorano est6 funcionando
adecuadamente o sise ha dejado caer, est6
dafiada,se ha dejado expuestaa laintemperieo
se ha dejado caer en agua, devu(_Ivalaa un
Centro/Departamento de serviciode Sears.
No halenitransportelaaspiradoraper elcord6n:
no use elcord6n come mango; no cierrepuertas
sobreelcord6n:no haleelcord6n sobrerebordes
agudos niesquinas.No pase laaspiradorasobre
elcord6n.Mantenga elcord6n alejadode super-
ficiescalientes.
No abandone la aspiradora cuando est6 conec-
tada. Descon(_ctela cuando no la est(_ usando y
antes de darle servicio.
No permita que sea utilizadacome juguete.Se
requiere tener mayor cuidado cuando sea
utilizadaen laproximidadde nifioso per nifios.
No toque la aspiradorani el enchufe con las
manes mojadas.
No use laaspiradorasilamanguera, est6rota.La
manguera contiene alambres el@ctricos.
C6mbiela so est6rotao desgastada. Eviteaspirar
objetosagudos.
No coloque objetos en las aberturas.
No utilice la aspiradora si alguna abertura est6
bloqueada; mant@ngala Iibre de polvo, pelusa,
cabellos y cualquiera cosa que podffa disminuirel
flujo de aire.
Mantenga el cabello, ropa suelta, dedos y todas
las partes del cuerpo alejados de las aberturas y
piezas mec6nicas.
No use la aspiradora sin tener instalada la balsa
para polvo y/o los filtros. Cambie siempre la bolsa
para polvo despu(_s de aspirar limpiadores de
alfombras o desodorantes, talcos y pelves fines.
Estosproductos atascan la bolsa, reducen el flujo
de aire y pueden causar que @stase rompa. Sino
cambia la bolsa podffa ocasionar dafio perma-
nente a la aspiradora.
No use la aspiradora para levantar objetos agu-
dos, juguetes pequefios, alfileres, papel, etc.
Podrian dafiar la aspiradora o la bolsa para polvo.
No levante ninguna cosa que se est@quemando
o emitiendo humo, come cigarrillos, cerillos o
cenizascalientes,
No use la aspiradora para aspirar lTquidos
inflamableso combustibles (gasolina,ITquidos
para limpieza,perfumes,etc.)nilause en lugares
donde 6stospodfianestarpresentes.Losvapores
de estassustanciaspueden crear un peligrode
incendioo explosi6n.
Tenga cuidado especial al utilizar la aspiradora en
escalones. No la coloque sobre sillas, mesas, etc.
Mant(_ngala en el piso.
Usted es responsable de asegurar que su
aspiradora no sea utilizada per ninguna persona
que no pueda manejarla correctamente,
GUARDE ESTASINSTRUCCION
E/armado y useseguro de suaspiradora son suresponsabilidocl.Estoaspiradora ha side diseFxx_ exclusivamente
pare usedomOstico.Laaspiradom deber6 almacenarse en un lugar seco yen el interior.Lea este Manual del
propietario detenidarnente, pues contiene informaci6n imporlante sobre seguridad y use.
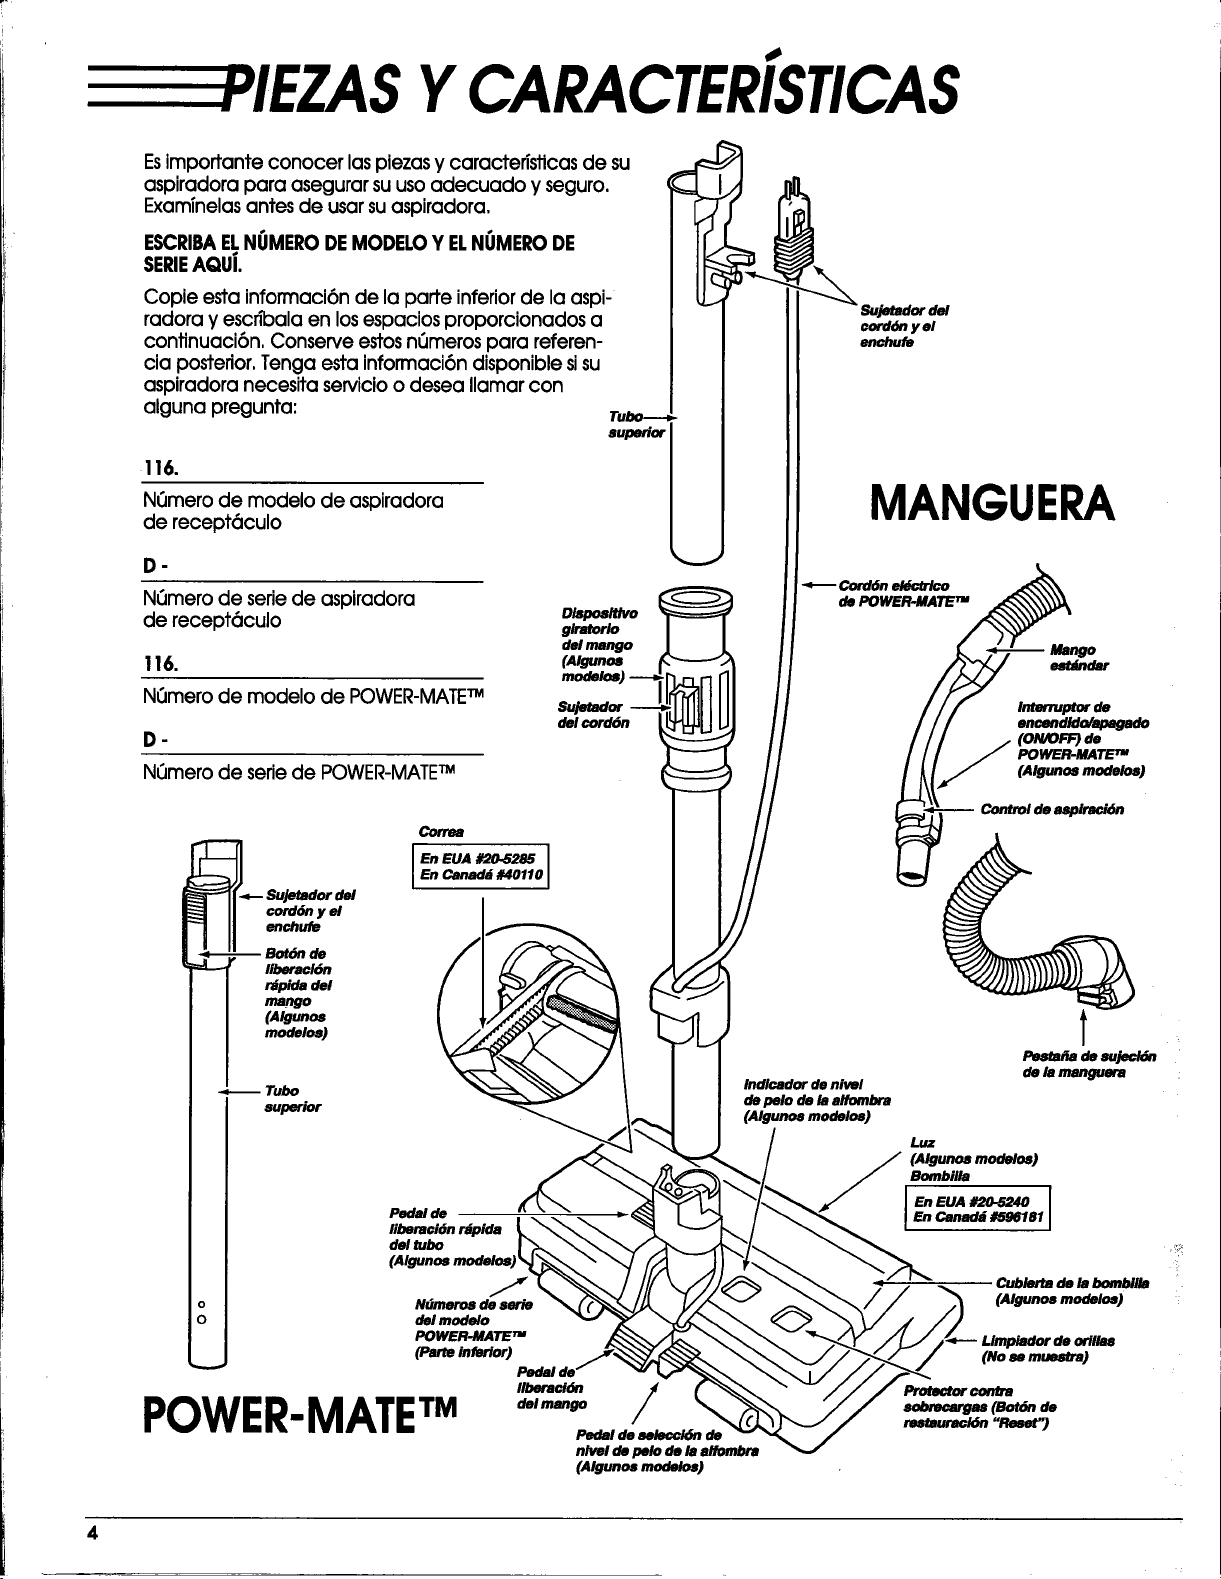
YCARACTER[STICAS
Esimportante conocer laspiezas y caracteristicas de su
aspiradora para asegurar suusoadecuado y seguro.
Exam_nelasantes de usarsuaspiradora.
ESCRIBAELNIJMERODEMODELOY ELNUMERODE
SERIEAQui.
Copie estainformaci6nde laparteinferiorde laaspi-
radoray escn'balaen losespaciosproporcionadosa
continuaci6n,ConserveestosnCJmerospara referen-
ciaposterior,Tenga estainformaci6ndisponiblesisu
aspiradoranecesitaservicioo desea llamarcon
algunapregunta:
116.
N_mero de modelo de aspiradora
de recept6culo
D-
N_mero de seriede aspiradora
de recept6culo
116.
Nk_merode modelo de POWER-MATETM
.
N_Jmerode seriede POWER-MATE TM
oW_r_vo
glratorlo
del mango
(Algunos
Sujetador
del corddn
cord6n y el
enchufe
MANGUERA
_ Cord_ eklc/r/co
de POWER.MATETM
Mango
est_dar
Interruptorde
encendido/apmgado
(ON/OFF) de
POWER-MATETM
(Algunos modelos)
Correa
_.__ _u_;reldel I En EuA #20.5285
En Canad_ #40110
su_
liberaci6n r_pida
del tubo
(Algunos modelosJ
o N_meros de serie
O del modelo
POWER.MATE TM
(Parte inferior)
"" Pedal de
POWER.MATETM /
Pedal de _/6n de
nlveldepelodelaalf_rd_ra
(Algunos modelos)
Indlcador de nivel
de pelo de la alfombra
[Algunos modelos]
Pemfra de sujecl6n
de la manguera
luz
(Algunos modelos)
Bombilla
i
En EUA #20.5240 I
En Canad_ #596181
I
Cublerta de la bombilla
(Algunos modelos)
4
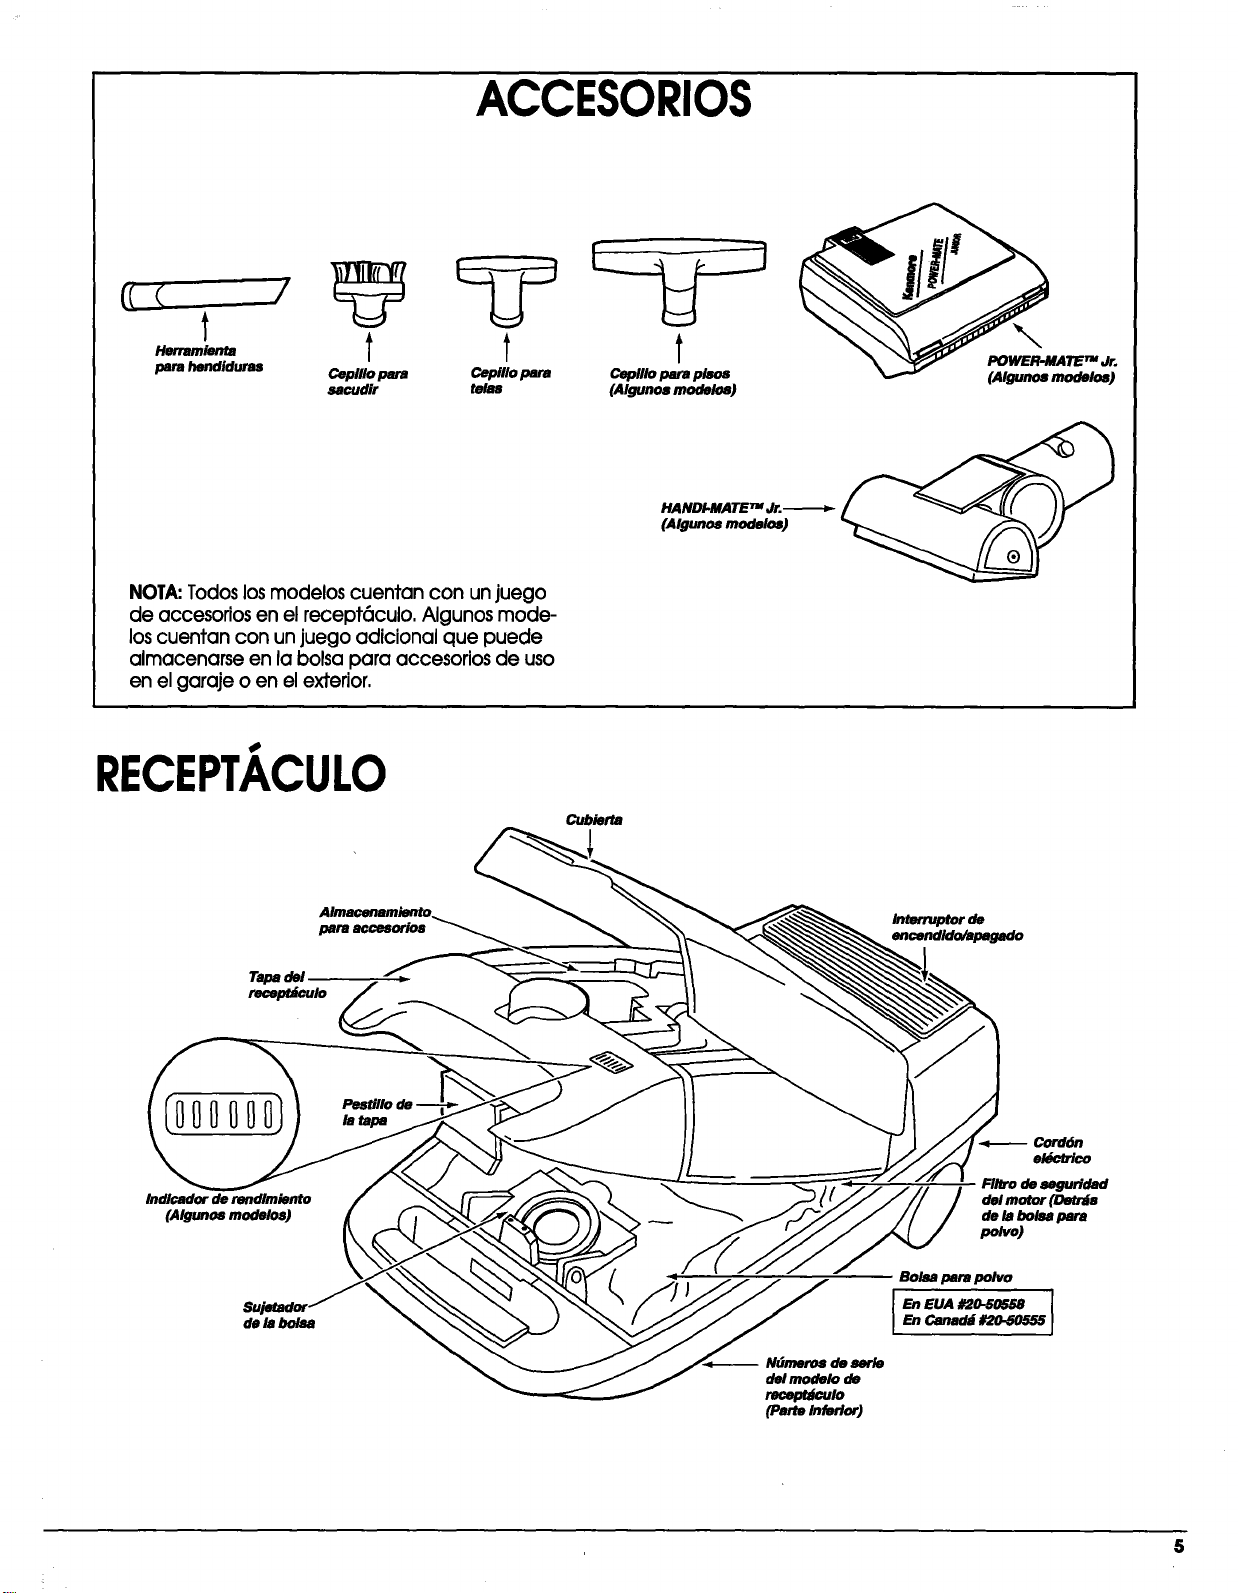
ACCESORIOS
t
Herramien_ I
para hendiduras Cepillo para
sacudir
t t
Cepillo para Ceplllo para pisos
telas (Algunos modelos)
\
POWER-MATE TM Jr.
(Algunos modelos)
HANDI-MATE_ Jr.
(Algunos modelos)
NOTA:Todos los modelos cuentan con un juego
de accesorios en el recept6culo, Algunos mode-
los cuentan con un juego adicional que puede
almacenarse en la bolsa para accesorios de uso
en el garaje o en el exterior,
RECEPTACULO
Cubierta
para accesorlos
Tapa del ,,
recepu_ulo
Interruptor de
encendido/apagado
Indlcador de rendlmiento
(Algunos modelos)
de la boisa
la tapa
-- Ndmeros de serle
delmodelo de
recept_#o
(Pane Inferior)
Cord6n
el6c_co
Filtro de seguridad
del motor (Detr_s
de la bolsa para
p_vo)
Bolsa para polvo
5
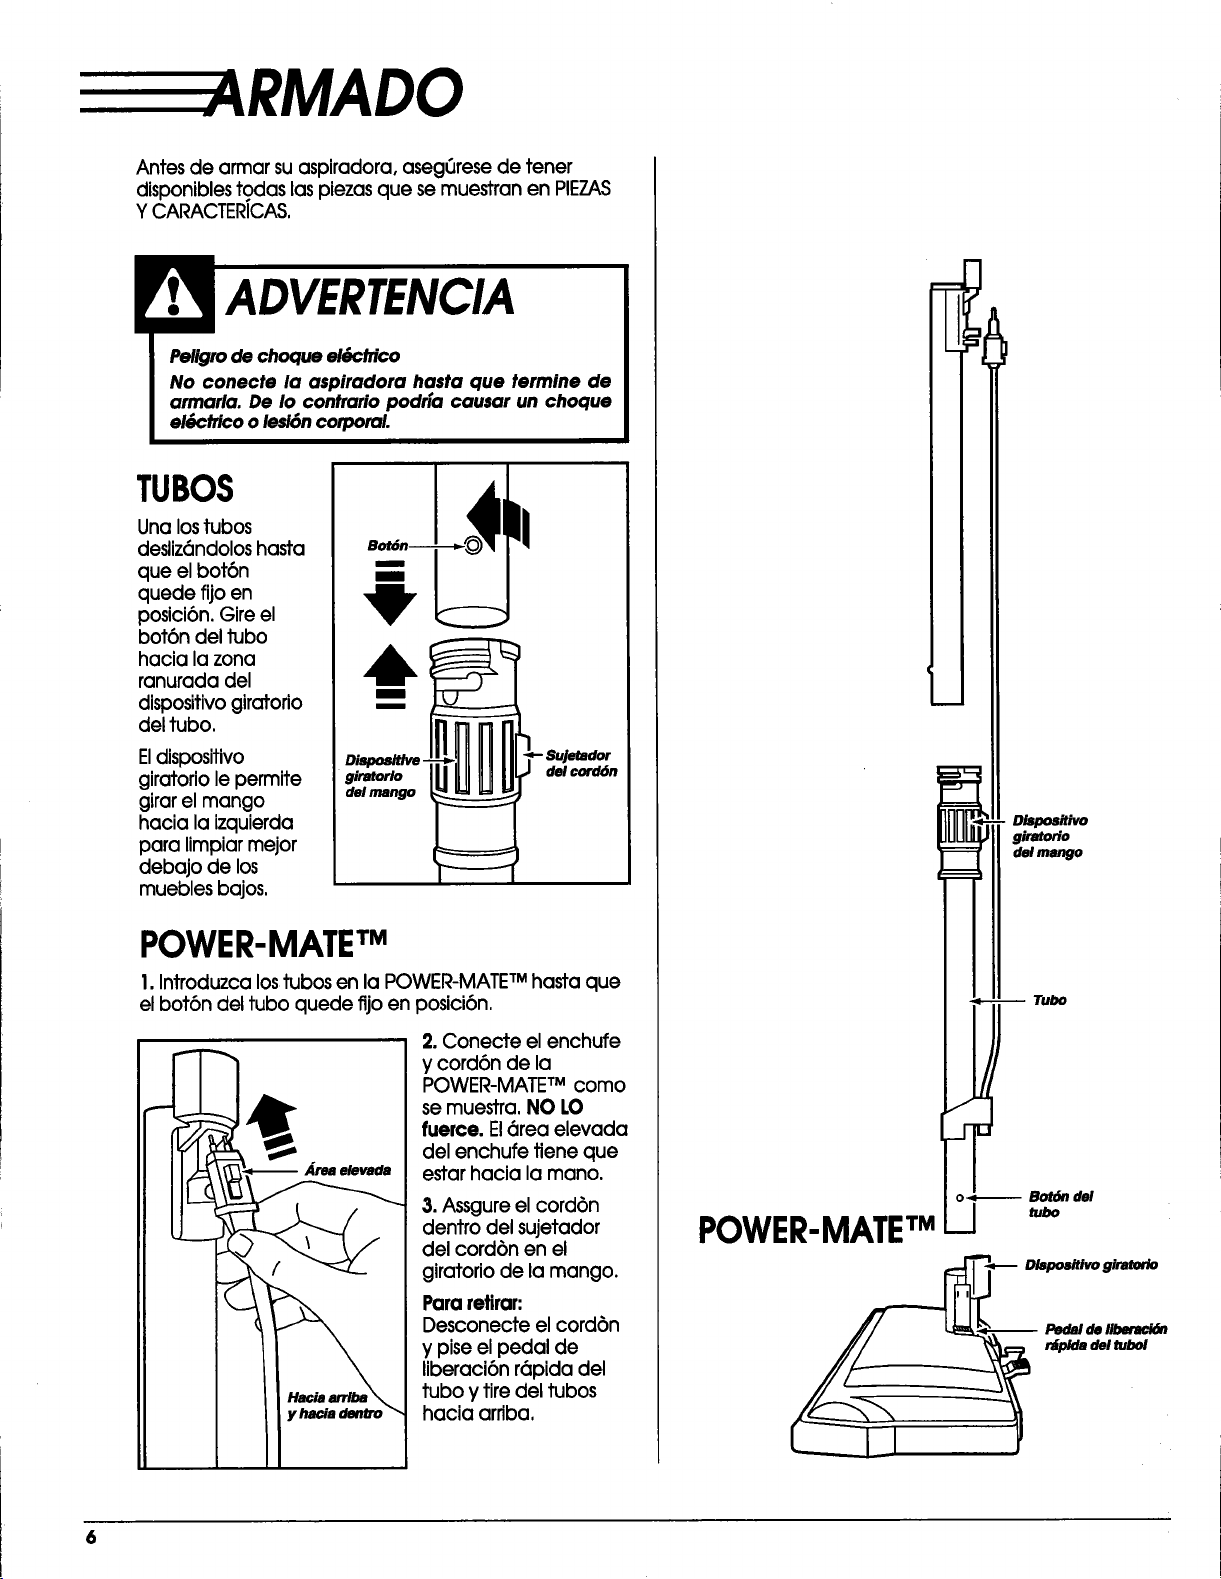
E RMADO
Antesde armarsuaspiradora,aseg_resede tener
disponiblestodaslaspiezasque semuestranen PIEZAS
Y CARACTERICAS.
Peligro de choque ek_PcMco
No conecte la aspiradora hasta que termine de
armarla. De Io contrario podrfa causar un choque
el_Pctricoo lesi6n corporal.
TUBOS
Una lostubos
desliz6ndoloshasta
que elbot6n
quede fijoen
posici6n.Gireel
bot6ndeltubo
hacialazona
ranuradadel
dlspositivogiratorio
deltubo.
Eldispositivo
giratoriolepermite
girarelmango
hacialaizquierda
paralimpiarmejor
debajo de los
mueblesbajos.
m_
.=___._____.___-
giratorio
del mango
_ Sujetador
del cord6n
POWER-MATE TM
I. Introduzca lostubas en la POWER-MATETM hasta que
el bot6n del tubo quede fijo en posici6n,
Area elevada
2. Conecte elenchufe
y cord6n de la
POWER-MATE TM como
semuestra.NO LO
fuerce.El6rea elevada
delenchufefieneque
estarhacialamano.
3. Assgure el cord6n
dentro del sujetador
del cord6n en el
giratorio de la mango.
Para retirar:
Desconecte el cord6n
y pise el pedal de
lJberaci6n r6pida del
tubo y tire del tubos
hacia arriba,
DisposiUvo
giratorio
del mango
m Tubo
o_-- Bot6n del
POWER.MATETMI
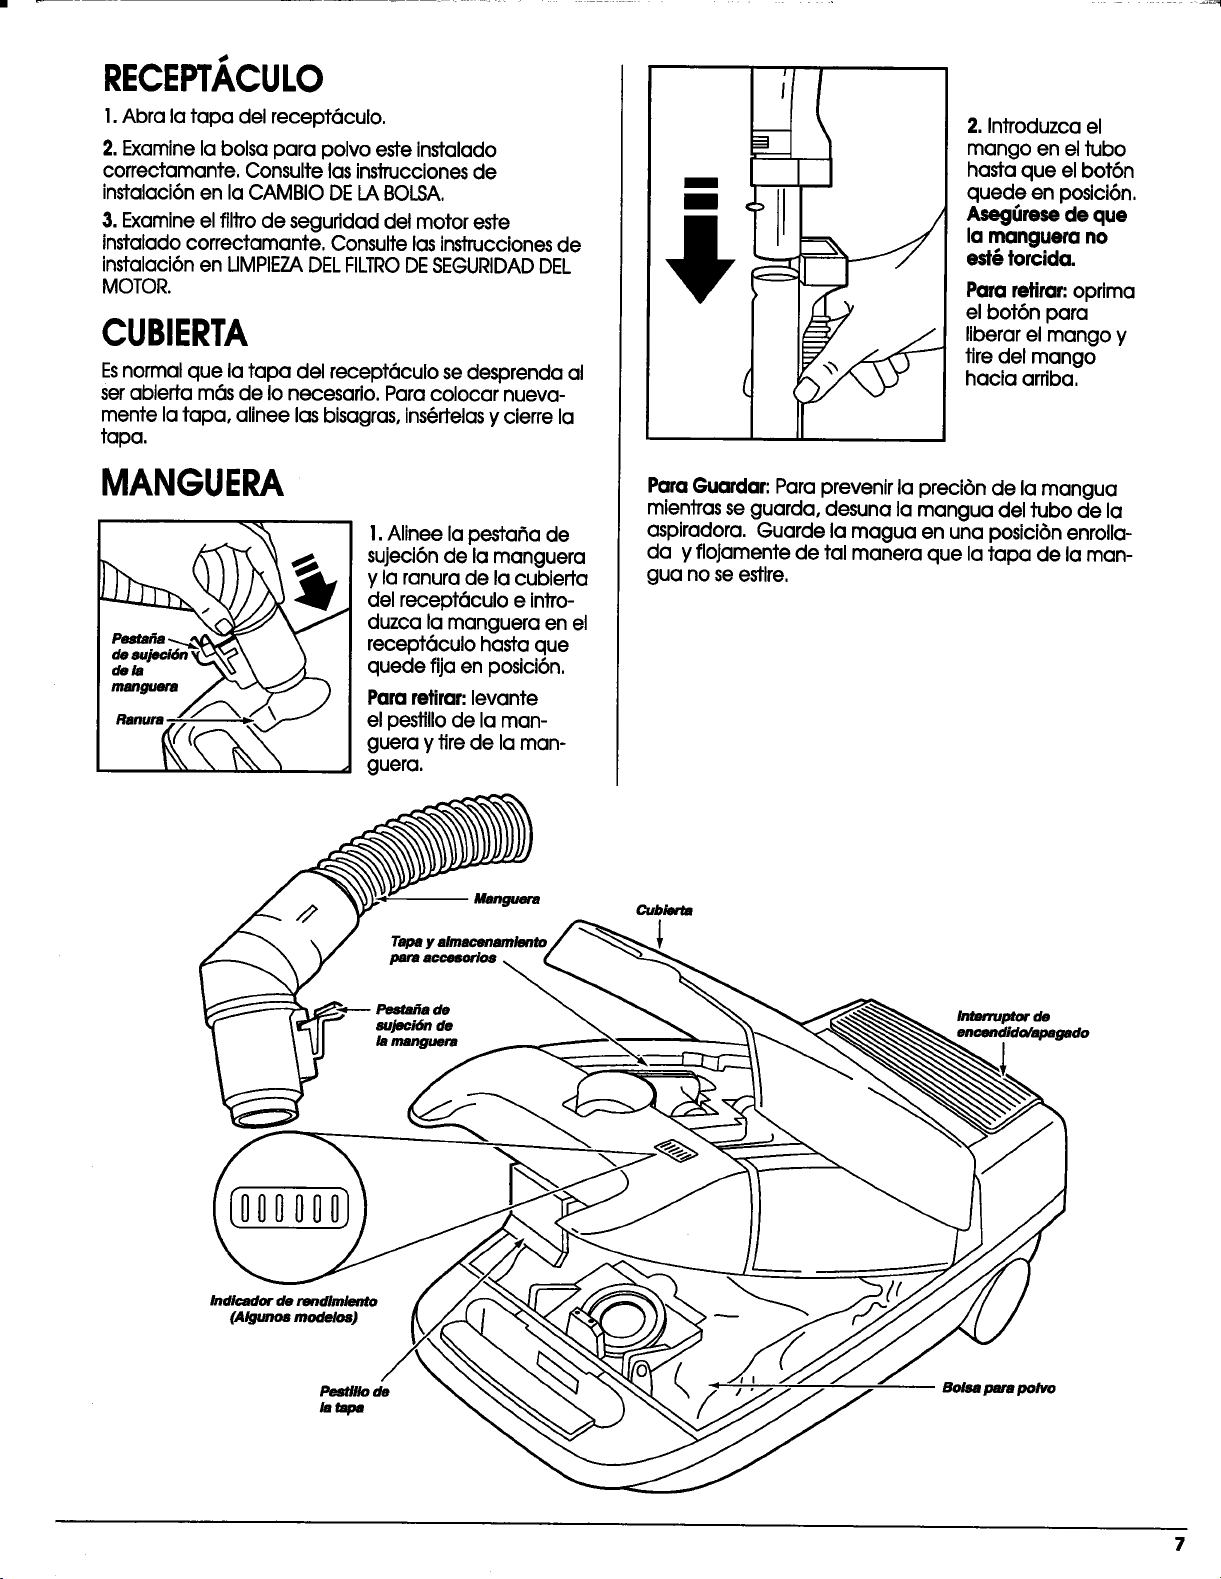
RECEPT/ ,CULO
1.Abra la tapa del recept6culo.
2. Examine la bolsa para polvo este instalado
correctamante. Consulte lasinstruccionesde
instalaci6n en la CAMBIO DE LA BOLSA.
3. Examine elfiltro de seguridad del motor este
instalado correctamante. Consulte las instruccionesde
instalaci6nen UMPIEZADELFILTRODESEGURIDADDEL
MOTOR.
CUBIERTA
Esnormal que la tapa del recept6culo se desprenda al
serabierta m6s de Io necesario. Para colocar nueva-
mente la tapa, alinee las bisagras, ins(_rtelasy cierre la
tapa.
MANGUERA
1.Alinee la pesta_a de
sujeci6n de la manguera
y la ranura de la cubien_a
del recept6culo e intro-
duzca la manguera en el
recept6culo hasta que
quede fija en posici6n.
Para retirar:levante
el pestillo de la man-
guera y fire de la man-
guera.
2. Introduzca el
mango en el tubo
hasta que el bot6n
quede en posici6n.
Aseg_rese de que
la manguera no
est6 torcida.
Par(] retirar:oprima
el bot6n para
liberar el mango y
tire del mango
hacia arriba.
Par(]Guardar: Para prevenir la preci6n de la mangua
mientras se guarda, desuna la mangua del tubo de la
aspJradora. Guarde la magua en una posici6n enrolla-
da y flojamente de tal manera que la tapa de la man-
gua no se estlre,
CUbier_
Irrmrruptorde
encendido/apagado
Indicador de rendimlento
(AIg.r_,mod_os)
Bolnparapolvo
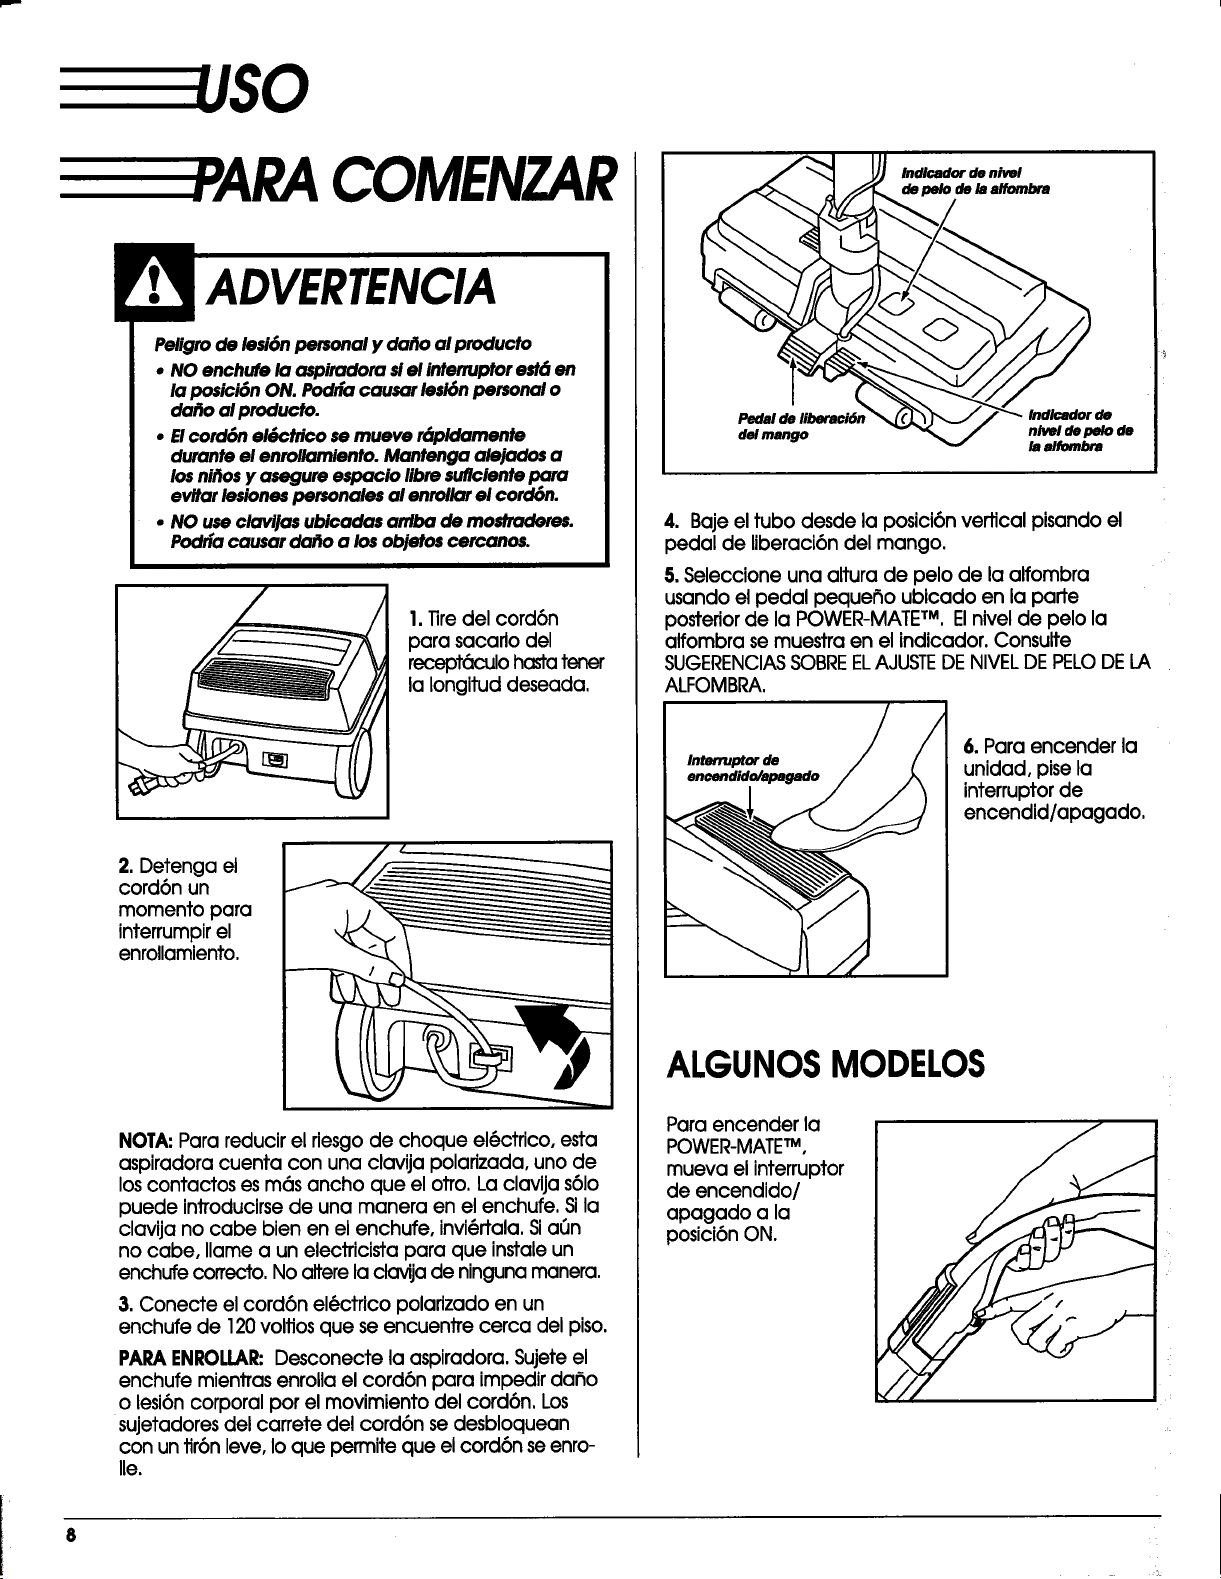
COMENZAR
Peligro de lesi6n personal y datto al producto
• NO enchule la aspiradora siel interruptor est6 en
la posici6n ON. Podr[a causar lesl6n personal o
da_o al producto.
• E1cord6n el6ctrico se mueve r6pldamente
durante el enrollamlento. Mantenga alejados a
losni_os y asegure espacio libre suflclente para
evitar _onw personales al enrollar el cord6n.
• NO use clavijas ubicadas arrlba de mostraderes.
Podrla causar darlo a los obletos cercanos.
I.Tiredelcord6n
parasacarlodel
recept_K:_lohastatener
lalongltuddeseada.
2. Detenga el
cord6n un
momento para
interrumpirel
enrollamiento.
NOTA:Para reducir el riesgo de choque el6ctrico, esta
aspiradora cuenta con una clavija polarizada, uno de
los contactos es m6s ancho que el otro. La clavija s61o
puede introducirse de una manera en el enchufe. Sila
clavija no cabe bien en el enchufe, invi(_rtala. Sia_Jn
no cabe, Ilame a un electricista para que instale un
enchufe correcto, No altere la ctavija de ninguna manera.
3.Conecte elcord6n el6ctricopolarlzadoen un
enchufede 120volfiosque se encuentrecerca delpiso.
PAPA ENROLLAR:Desconecte la aspiradora. Sujete el
enchufe mientras enrolla el cord6n para impedir dafio
o lesi6ncorporal por el movimiento del cord6n. Los
sujetadores del carrete del cord6n se desbloquean
con untir6n leve, Io que permite que el cord6n se enro-
lle.
/nd/cador de nivel
de pe/o de/a a/fombra
Pedal de liberaci61
del mango
nivel depelo de
la alfombra
4. Bajeeltubodesde laposici6nverticalpisandoel
pedal de liberaci6ndelmango.
5. Seleccione una altura de pelo de la alfombra
usando el pedal pequefio ublcado en la parte
posterior de la POWER-MATETM,Elnivel de pelo la
alfombra se muestra en el indicador. Consulte
SUGERENCIASSOBREELAJUSTEDENIVELDEPELODELA
ALFOMBRA.
Interruptor de
6.Para encender la
unidad,pisela
interruptorde
encendld/apagado.
ALGUNOSMODELOS
Paraencender la
POWER-MATE TM,
mueva elinterruptor
de encendido/
apagado a la
posici6nON.
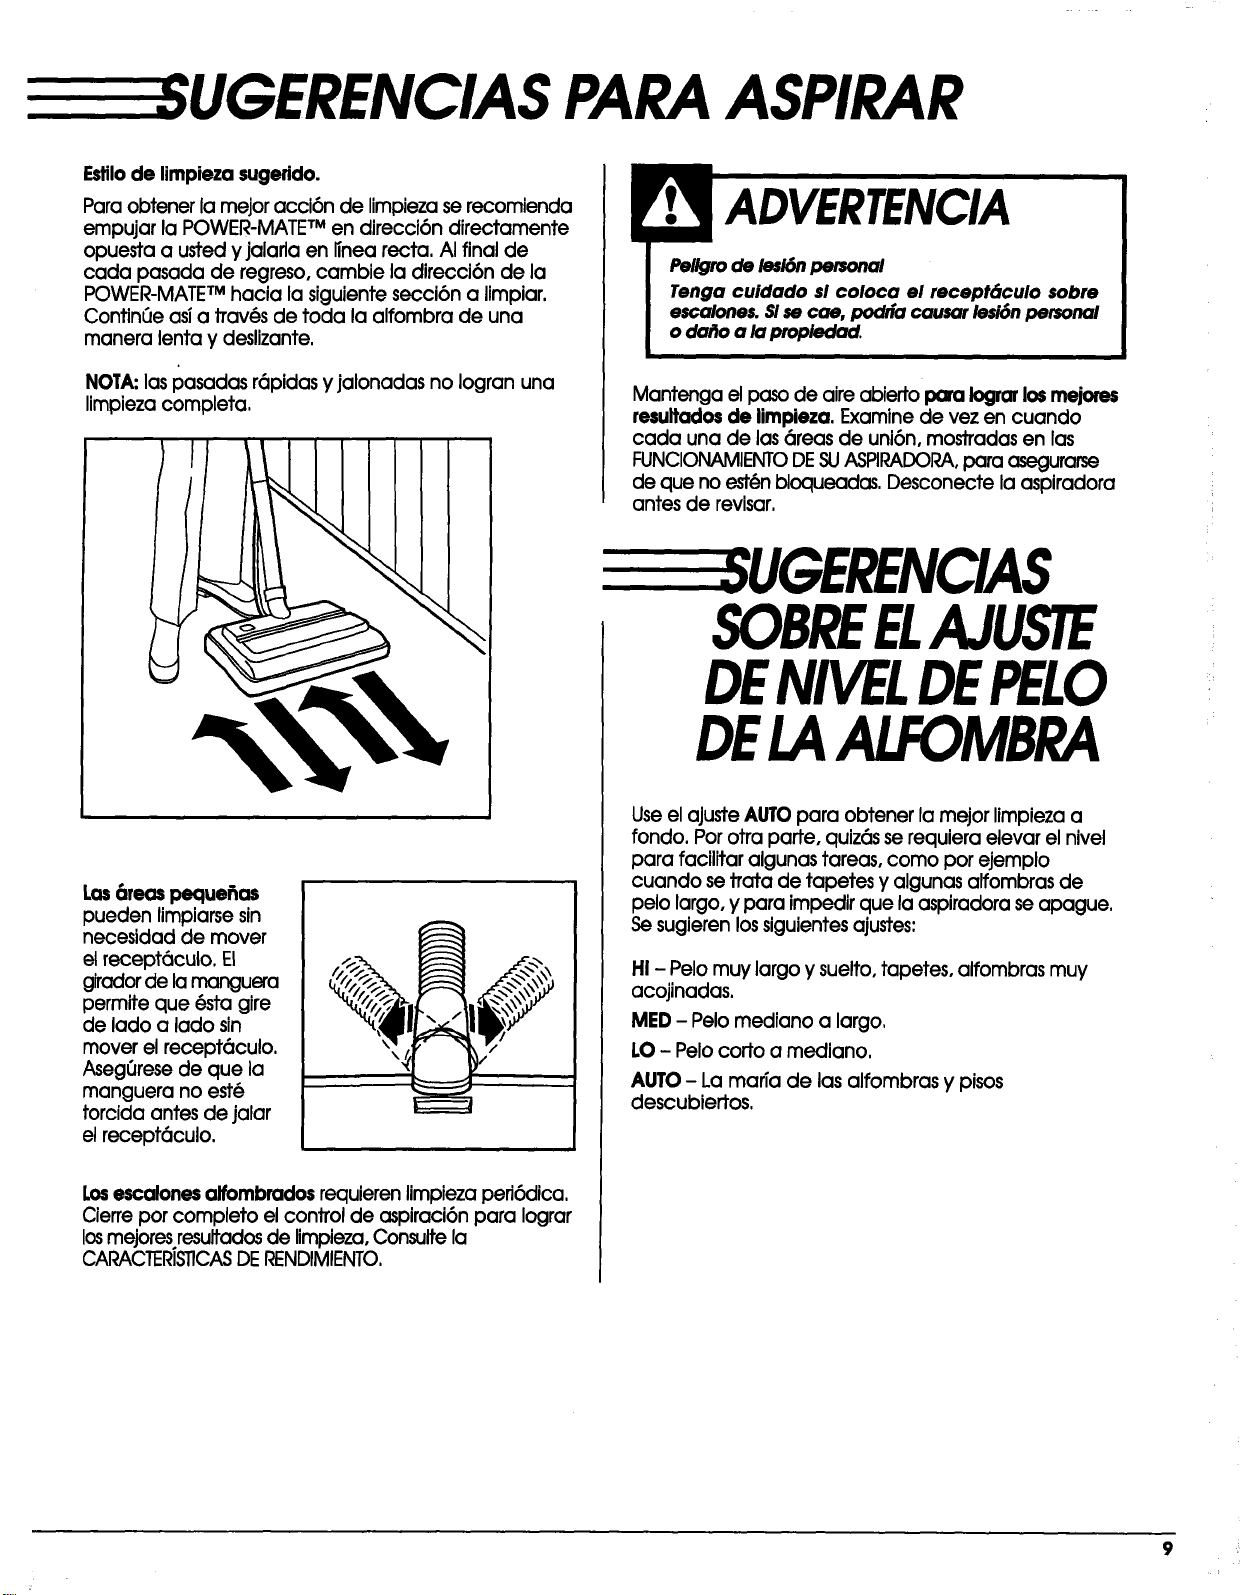
UGERENCIAS PARAASPIRAR
Estilode limpieza sugerido.
Para obtener la mejor acci6n de Iimpieza se recomienda
empujar la POWER-MATETMen direcci6n directamente
opuesta a usted y jalarla en Iinea recta. AI final de
cada pasada de regreso, cambie la direcci6n de la
POWER-MATETMhacia la siguiente secci6n a limpiar.
Confin6e asi a trav(_sde toda la alfombra de una
manera lenta y deslizante.
NOTA:las pasadas r6pidas y jalonadas no logran una
limpiezacompleta,
Peligrode lesi6npersonal
Tenga cuidado si coloca el recept6culo $obre
escalones.Slse cae, podria causar lesi6npersonal
odo[_oa lapropiedad.
Mantenga elpaso de aire abierto para Iograrlos mejores
resultadosde limpieza. Examine de vez en cuando
cada una de las 6reas de uni6n, mostradas en las
FUNCIONAMIENTODESUASPIRADORA,para asegurarse
de que no est(_nbloqueadas, Desconecte la aspiradora
antes de revisar,
Las6teas pecluefias
pueden limpiarse sin
necesidad de mover
el recept6culo. El
girador de lamanguera
permite que @stagire
de lado a lado sin
mover el recept6culo.
Aseg_rese de que la
manguera no est@
torcida antes de jalar
el recept6culo.
/# "f._
Losescalones alfombrados requierenlimpiezapefi6dica.
Cierreporcompleto elcontrolde aspiraci6npara lograr
losmejoresresultadosde limpieza,Consultela
CARACTERISTICASDE RENDIMIENTO.
UGERENCIAS
SOBREELAJUSTE
DEMVELDEPELO
DELAALFOMBRA
UseelajusteAUTOpara obtenerlamejorlimpiezaa
rondo.Porotraparte,quiz6sserequieraelevarelnivel
para facilitaralgunastareas,como porejemplo
cuando setratade tapetesy algunasalfombrasde
pelolargo,y paraimpedirque laaspiradoraseapague.
Se sugierenlossiguientesajustes:
HI - Pelo muy largo y suelto, tapetes, alfombras muy
acojinadas.
MED - Pelo mediano a largo,
LO - Pelo corto a mediano.
AUTO- La marTa de las alfombras y pisos
descubiertos,
9
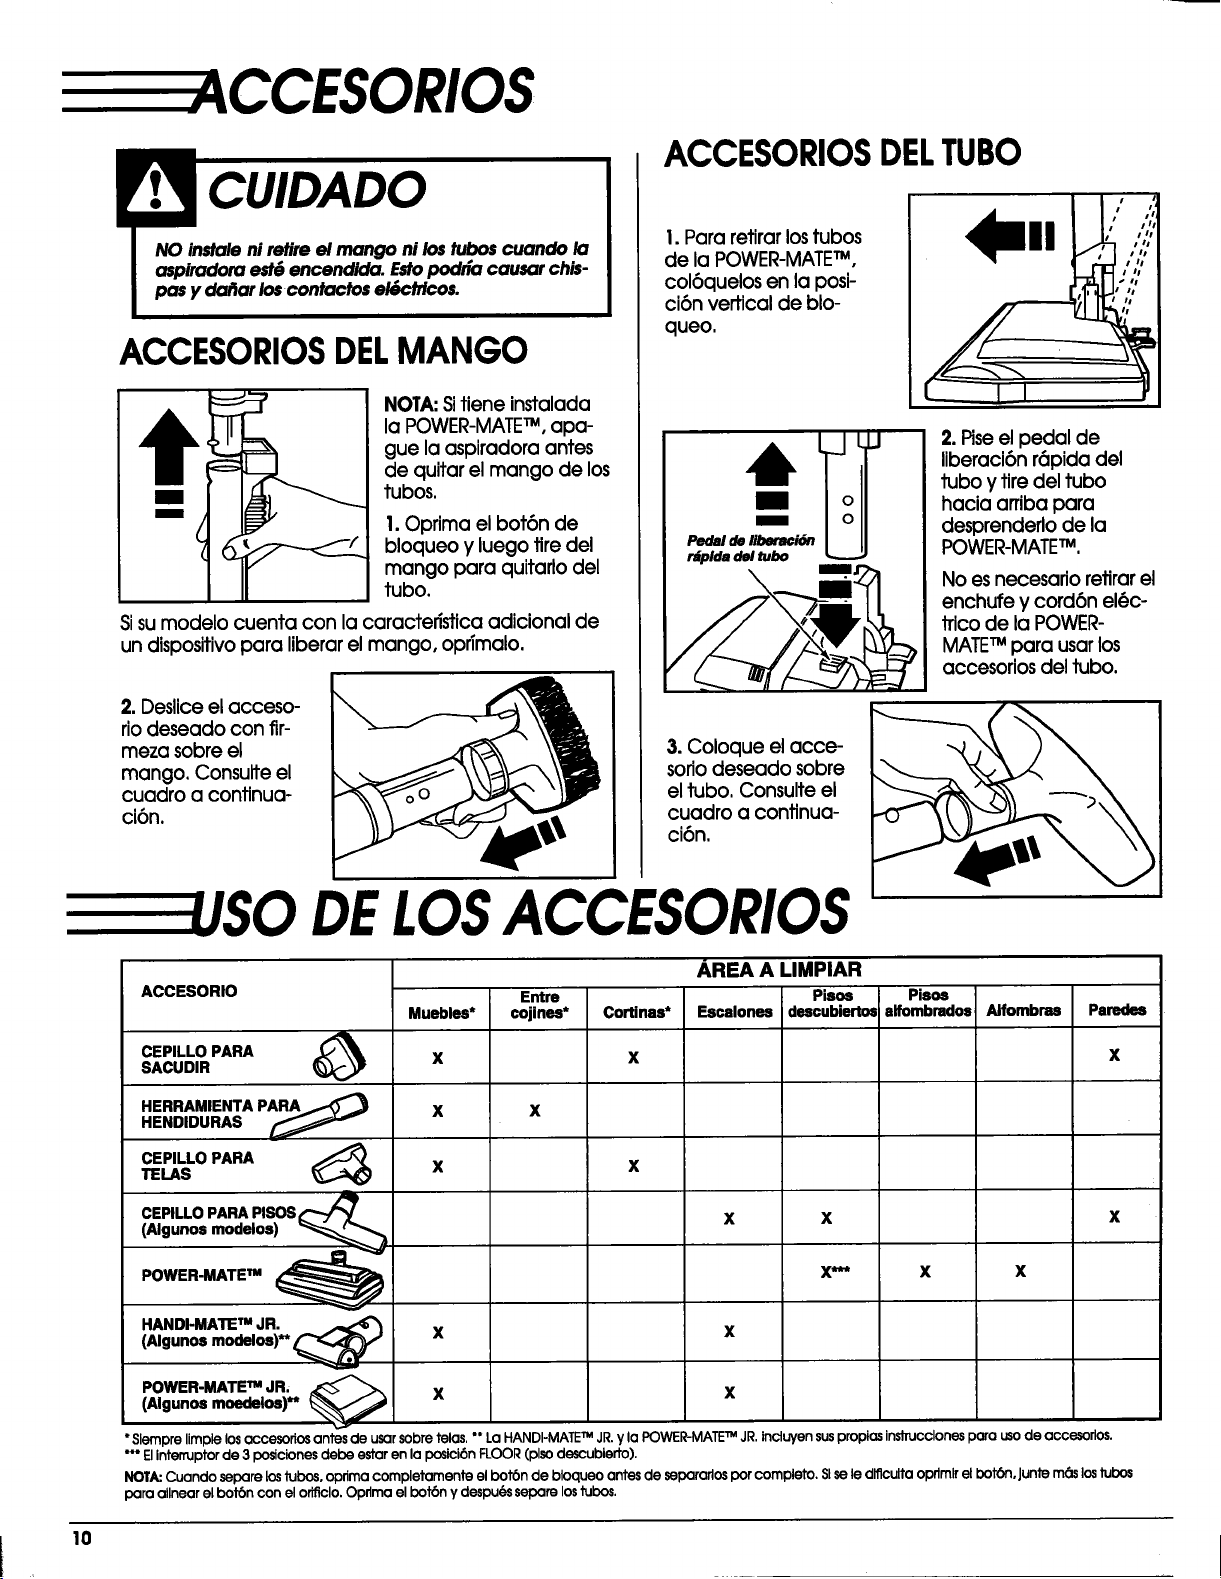
ACCESORIOS
ACCESORIOSDELMANGO
t
m
m
NOTA: Sitieneinstalada
laPOWER-MATE TM, apa-
gue laaspiradoraantes
de quitarelmango de los
tubos.
I. Oprima el bot6n de
bloqueo y luego tire del
mango para quitado del
tubo.
Sisumodelo cuenta con lacaracteristicaadicionalde
un dispositivopara liberarelmango, oprimalo.
2. Deslice el acceso-
rio deseado con fir-
meza sobreel
mango. Consulte el
cuadro a continua-
ci6n.
ACCESORIOSDELTUBO
I.Pararetirarlostubos
de laPOWER-MATE TM,
col6quelosen laposi-
ci6nverticalde blo-
queo.
"--U
Pedal de liberaci6n
r_plda del tubo
2.Piseelpedal de
llberaci6nr6pidadel
tuboytiredeltubo
haciaarribapara
desprenderlode la
POWER-MATE TM.
No esnecesario retirar el
enchufe y cord6n el@c-
trico de la POWER-
MATETM para usarlos
accesorios del tubo.
3. Coloque el acce-
soriodeseado sobre
el tubo, Consulte el
cuadro a continua-
ci6n.
DELOSACCESORIOS
ACCESORIO
CEPILLO PARASACUDIR
HERRAMIENTA P_
HENDIDURAS
CEPILLO PARA _)
TELAS
CEPILLO PARA PISOS
(Algunos modelos)
POWER'MATEm _
Muebles*
x
x
x
Entre
cojines*
Cortinas*
X
AREA A LIMPIAR
Pisos
Escalones descubiertos
X
x
X
X/nt_
Pisos
alfombrados
HANDI-MATE TM JR.
(Algunos modelos)** ¢ X
POWER-MATE TM JR; _
(Algunos moedelos)** X
X
x
X
X
AJfombras
X
Paredes
X
X
* Slempre limpie los accesorios antes de usar sobre telas. ** La HANDI-MATETM JR.y la POWER-MATETM JR.incluyen suspropias inslTUcclonespara uso de accesorlos.
*** Elinte_uptor de 3 posiciones debe estar en la posici6n FLOOR (plso descubieffo).
NOT_ Cuando mpare los Jubos,oprima completamente el bot6n de bloqueo antes de separarlos pot complete. Sl se le dlflculta oprlmlr el bot6n, Juntem6s los tubo_
par(] allnear el bot6n con el o_clo. Oprlma el bot6n y despu6s separe los tubos.
10
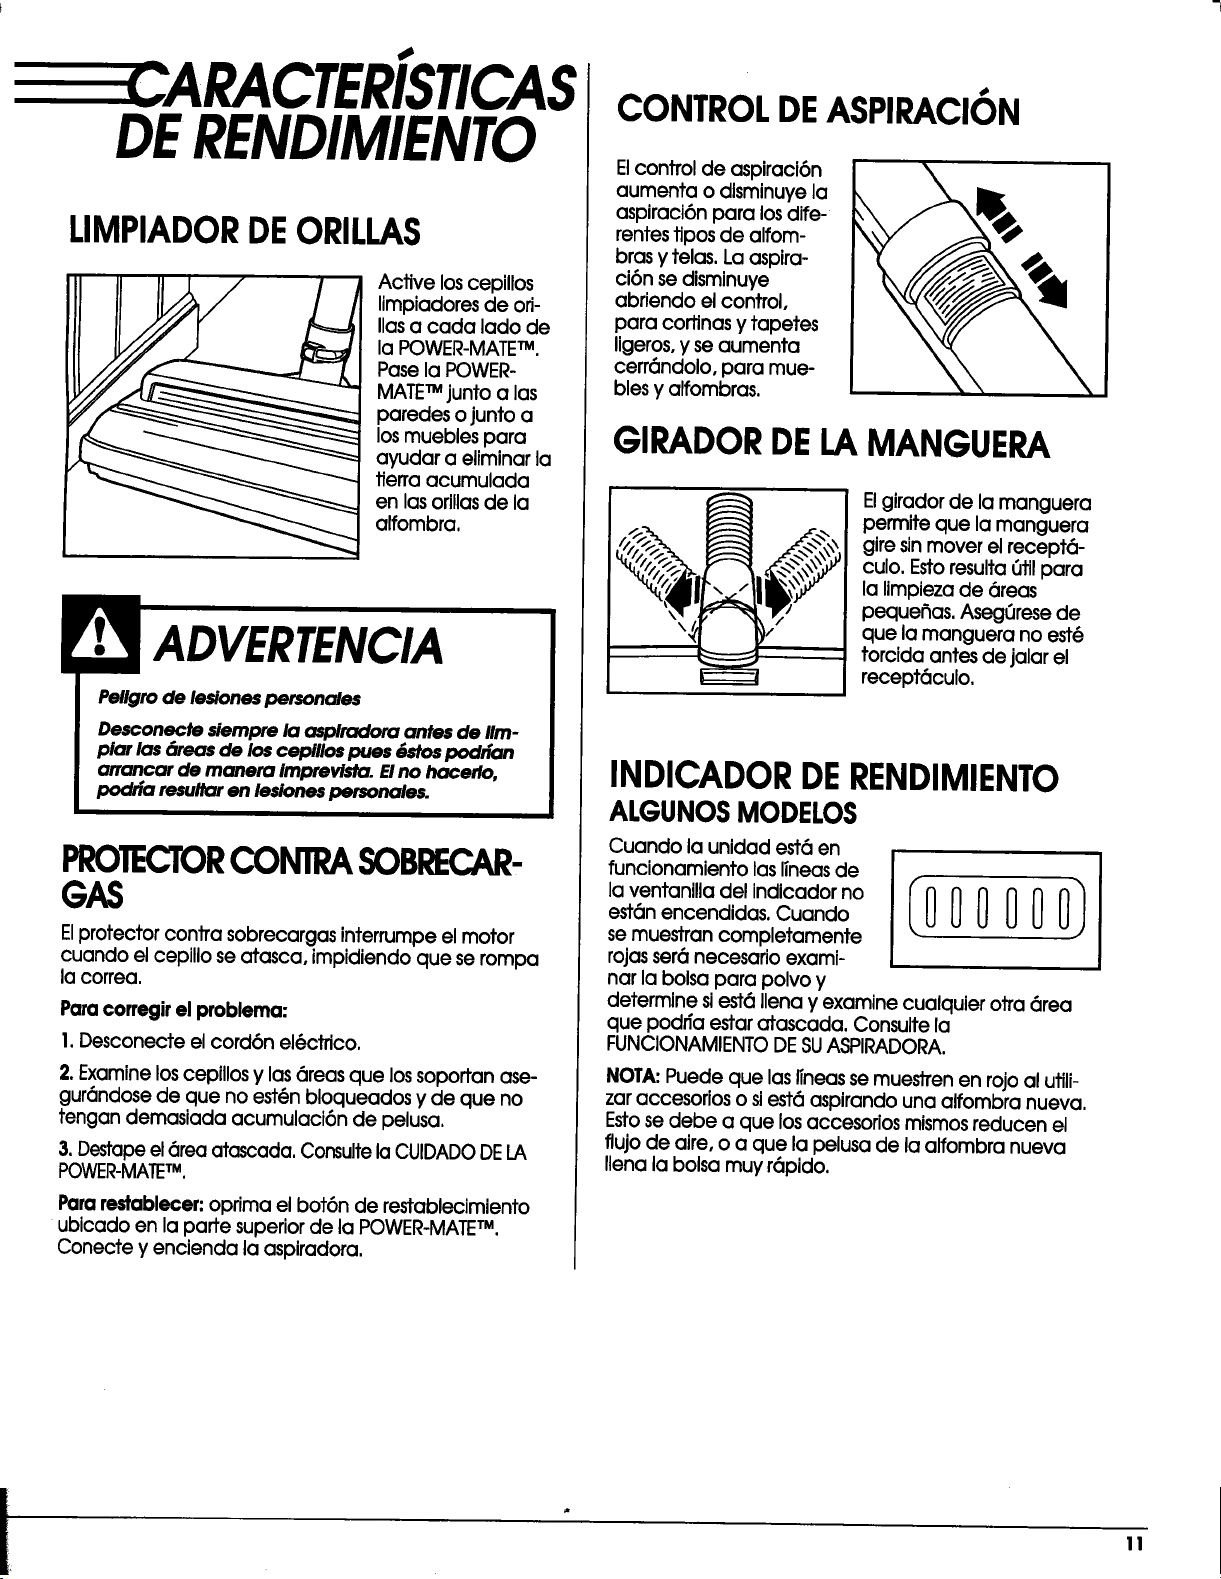
RACTER{STICAS
DERENDIMIENTO
LIMPIADORDEORILLAS
Active los cepillos
limpiadores de ori-
llas a cada lado de
la POWER-MATETM.
Pase la POWER-
MATETM junto alas
paredes o junto a
los muebles para
ayudar a eliminar la
tierra acumulada
en las orillas de la
alfombra,
Pellgro de lesiones personales
Desconecte siempre la asplradora antes de IIm-
plar las 6teas de los cepillos pues {)stos podrian
arrancar de manera imprevista. Elno hacerlo,
podria resu/tar en lesiones personales.
PROTECTORCONTRASOBRECAR-
GAS
Elprotectorcontrasobrecargasinterrumpeelmotor
cuando elcepillose atasca,impidiendoque serompa
lacorrea.
Paracorregir el problema:
I. Desconecte el cord6n el_ctrico.
2.Examine loscepillosy las 6reas que los sopoffan ase-
gur6ndose de que no est6n bloqueados y de que no
tengan demasiada acumulaci6n de pelusa,
3. Destapeel 6rea atascada, Consultela CUIDADODELA
POWER-MATETM,
Pararestablecer:oprimaelbot6n de restablecimiento
ublcadoen lapartesuperiorde laPOWER-MATE TM,
Conecte y encienda laaspiradora.
CONTROLDEASPIRACION
Elcontrolde aspiraci6n
aumenta o dlsminuyela
aspiraci6npara losdife-
rentestiposde alfom-
brasy telas.Laasplra-
ci6nsedismlnuye
abriendoelcontrol,
para cortlnasy tapetes
ligeros0y seaumenta
cerr6ndolo,para mue-
blesy alfombras.
GIRADORDELAMANGUERA
Elgiradorde iamanguera
permiteque lamanguera
giresinmover elrecept_-
culo.Estoresulta6tilpara
lalimpiezade 6reas
pequefias.Aseg6resede
que lamanguera no est@
torcidaantesde jalarel
recept6culo.
INDICADORDERENDIMIENTO
ALGUNOSMODELOS
Cuando launidadest6en
funcionamientolaslineasde
laventanilladelindicadorno
est6nencendidas.Cuando
semuestrancompletamente
rojasser6necesarioexami-
narlabolsapara polvoy
determinesiest(_llenay examine cualquierotra6rea
que podffaestaratascada.Consultela
FUNCIONAMIENTO DE SU ASPIRADORA.
NOTA:Puede que las Ifneasse muestren en rojo al utili-
zar accesorios o siest6 aspirando una alfombra nueva,
Estose debe a que losaccesorios mismos reducen el
flujo de aire, o a que la pelusa de la alfombra nueva
Ilena la bolsa muy r6pido.
!!
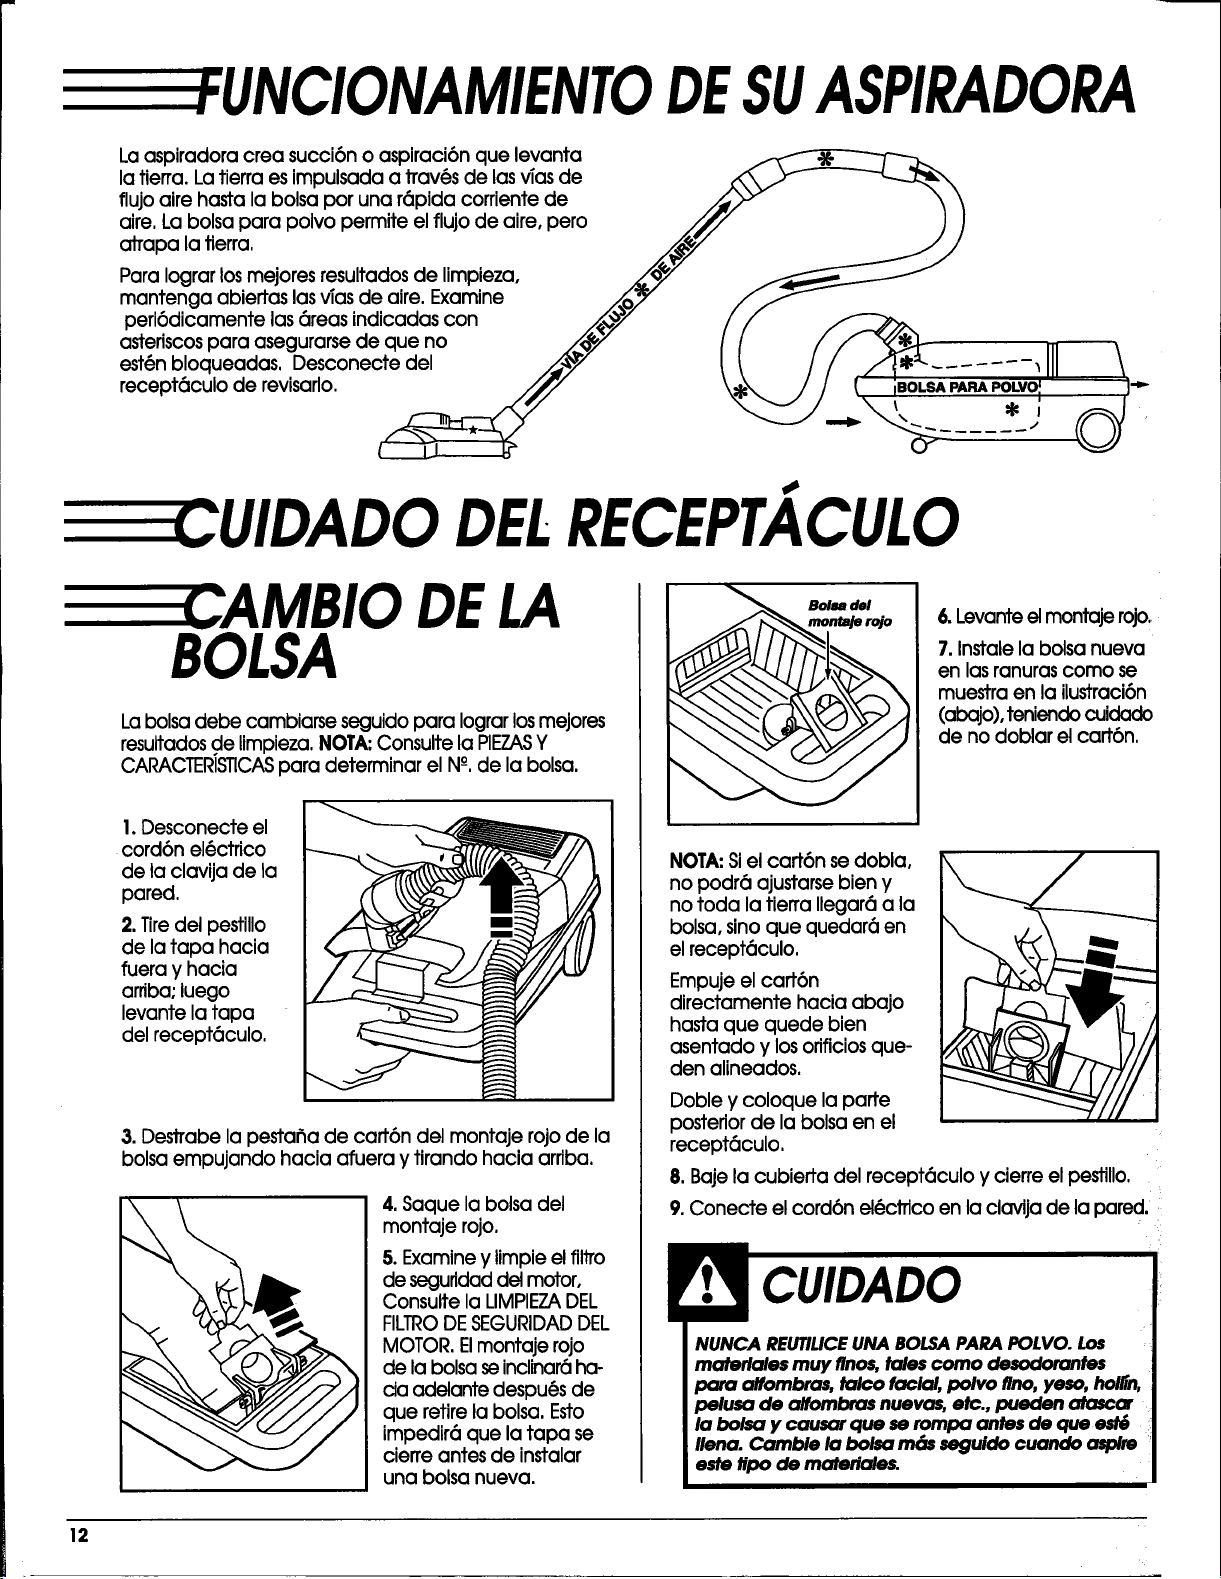
EFUNCIONAMIENTODESUASPIRADORA
Laaspiradoracreasucci6no aspiraci6nque levanta
latierra.Latierraesimpulsadaa trav(_sde lasvTasde __
flujoairehastalabolsaporuna r6pidacorrientede /_/3Y "_
aire,Labolsapara polvopermiteelflujode aire,pero Jfi" I }
atrapa la tierra, .._,_ _J
Paralograrlosmejoresresultadosde limpieza, ._/_o_/ __
mantenga abiertaslasvTasde aire.Examine /..o/W" f_
peri6dicamentelas6reasindicadascon _,,%" / /
asteriscos para asegurarse de que no _'j_/,7 I ( / ,/_
111 \
est6nbloqueadas,Desconecte del _ _I // /'I*=".......'III \
recept6culo de revisaflo. /// \:_ / / _" ;BOLSA PARA POLVO I I"P"
_.L'_j'_._\'. ,, _]
-" ...... "
CUIDADO DELRECEPT. CULO
E CAMBIO DELA
BOLSA
La bolsa debe cambiarse seguidopara Iograr losmejores
resultados de limpieza. NOTA;Consulte la PIEZASY
CARACTER/STiCASpara determinar el N°-,de la bolsa.
I.Desconecte el
cord6n el(_ctrico
de laclavijade ia
pared,
2. Tiredel pestillo
de la tapa hacia
fuera y hacia
arriba; luego
levante la tapa
del recept6culo.
3. Destrabe la pestafla de cart6n del montaje rojo de la
bolsa empujando hacia afuera y tirando hacia arriba.
4.Saque labolsadel
montaje rojo.
5. Examine y Iimpie el filJTo
de segufldad del motor,
Consulte la LIMPIEZADEL
FILTRODESEGURIDADDEL
MOTOR. Elmontaje rojo
de la bolsa seinclinar6 ha-
cia adelante despu6s de
que retire la bolsa, Esto
impedir6 que la tapa se
cierre antes de instalar
una bolsa nueva.
Bo/sa de/
monlaJe rojo
6. Levante el montaje rojo,
7. Instale la bolsa nueva
en las ranuras como se
muestra en la ilustraci6n
(abajo), tenJendo cuidado
de no doblarelcart6n.
NOTA:Siel cart6n se dobla,
no podr6 ajustarsebien y
no toda la tierra llegar6 a la
bolsa, sinoque quedar6 en
elrecept(_culo.
Empuje el cart6n
directamente hacia abajo
hasta que quede bien
asentado y los orificios que-
den alineados.
Doble y coloque la parte
posterior de la bolsa en el
recept6culo.
8. Baje la cubierta del recept6culo y cierre el pestillo.
9.Conecte el cord6n el@ctrico en la clavija de la pared._
materlales muy flnos,tales corno desodorantes
para alfombras, talco facial, polvo firm,yeso, holl{n,
pelusa de alfombras nuevas, etc., pueden atasc_
la bolsa y causar cluese rompa antes de que
llena. Camble la bolsa rr_s seguldo cuando aspire
este tipo de materiales.
12
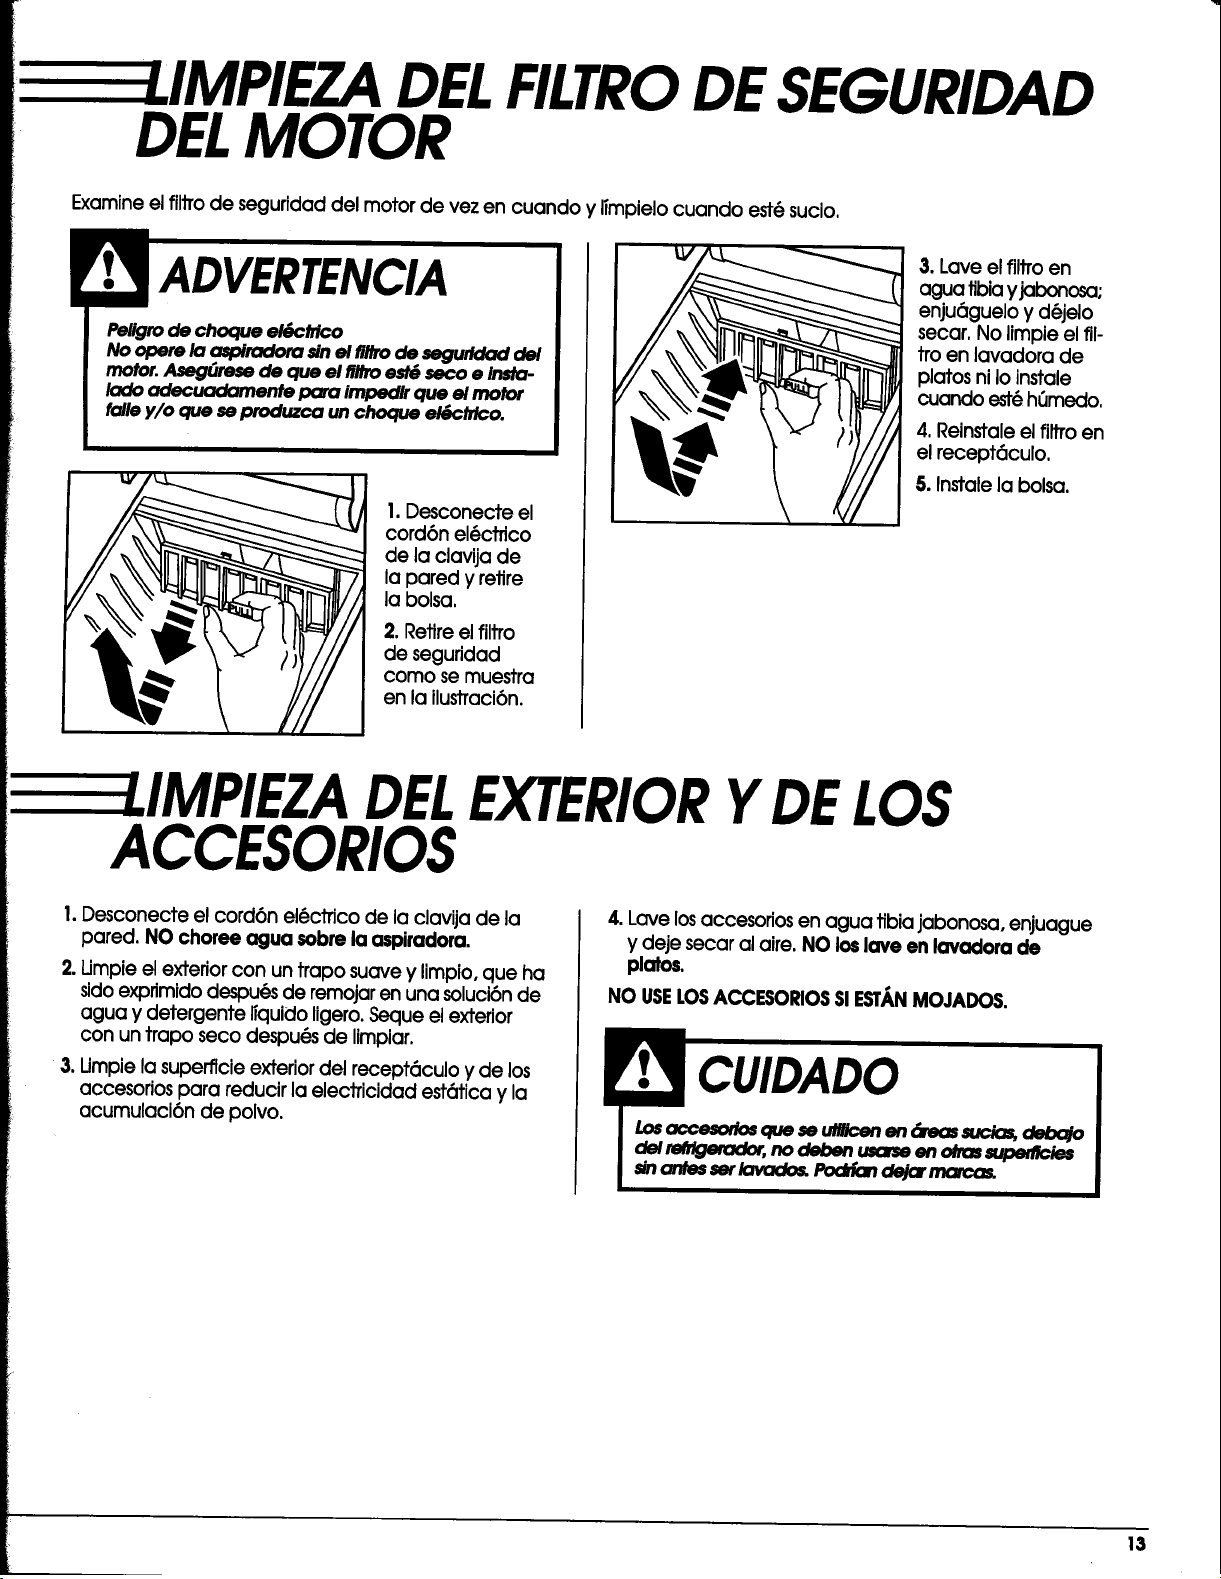
E EE I.IMPIEZADELFILTRODESEGURIDAD
DELMOTOR
Examine el filtTode seguridad del motor de vez en cuando y limpielo cuando est@sucio.
Pellgrode choque elSctrico
No opere la a_oiradora sinel flltrode segurldad del
motor.A41e_rese de que el fl#roest_ seco e Insta-
lado adecuadamente para impedlr que el motor
falle y/o que seproduzca unchoque el6ctrlco.
I. Desconecte el
cord6n el_ctrlco
de la clavija de
la pared y retire
la bolsa.
2. Retire el filtro
de seguridod
como se muestra
en la ilustraci6n.
3. Lave el filtro en
agua tibia yjabonosa;
enju6guelo y d6jelo
secar. No limpie el fll-
tro en lavadora de
platos ni Io instale
cuando est(_h_medo.
4.Reinstaleelfiltroen
elrecept6culo.
5.Instalelabolsa.
:LIMPIEZA DELEXTERIORYDELOS
ACCESORIOS
I. Desconecte el cord6n el6ctrico de la clavija de la
pared. NO choree agua sobre la aspiradera.
2.Llmpieelexteriorcon un traposuaveylimplo,que ha
sidoexprimidodespu@sde remojaren una soluci6nde
agua y detergentellquidoligero,Seque elexterior
con un traposeco despu(_sde limpiar.
3. Umpie la superflcie exterior del recept_culo y de los
accesorios para reducir la electricidad est6tica y la
acumulacl6n de polvo.
4. Lave losaccesoriosen agua tibiajabonosa, enjuague
y deje secar al aire. NO Io6 lave en lavadora de
platos.
NO USELOSACCE$ORIOSSlESTANMOJADOS.
13
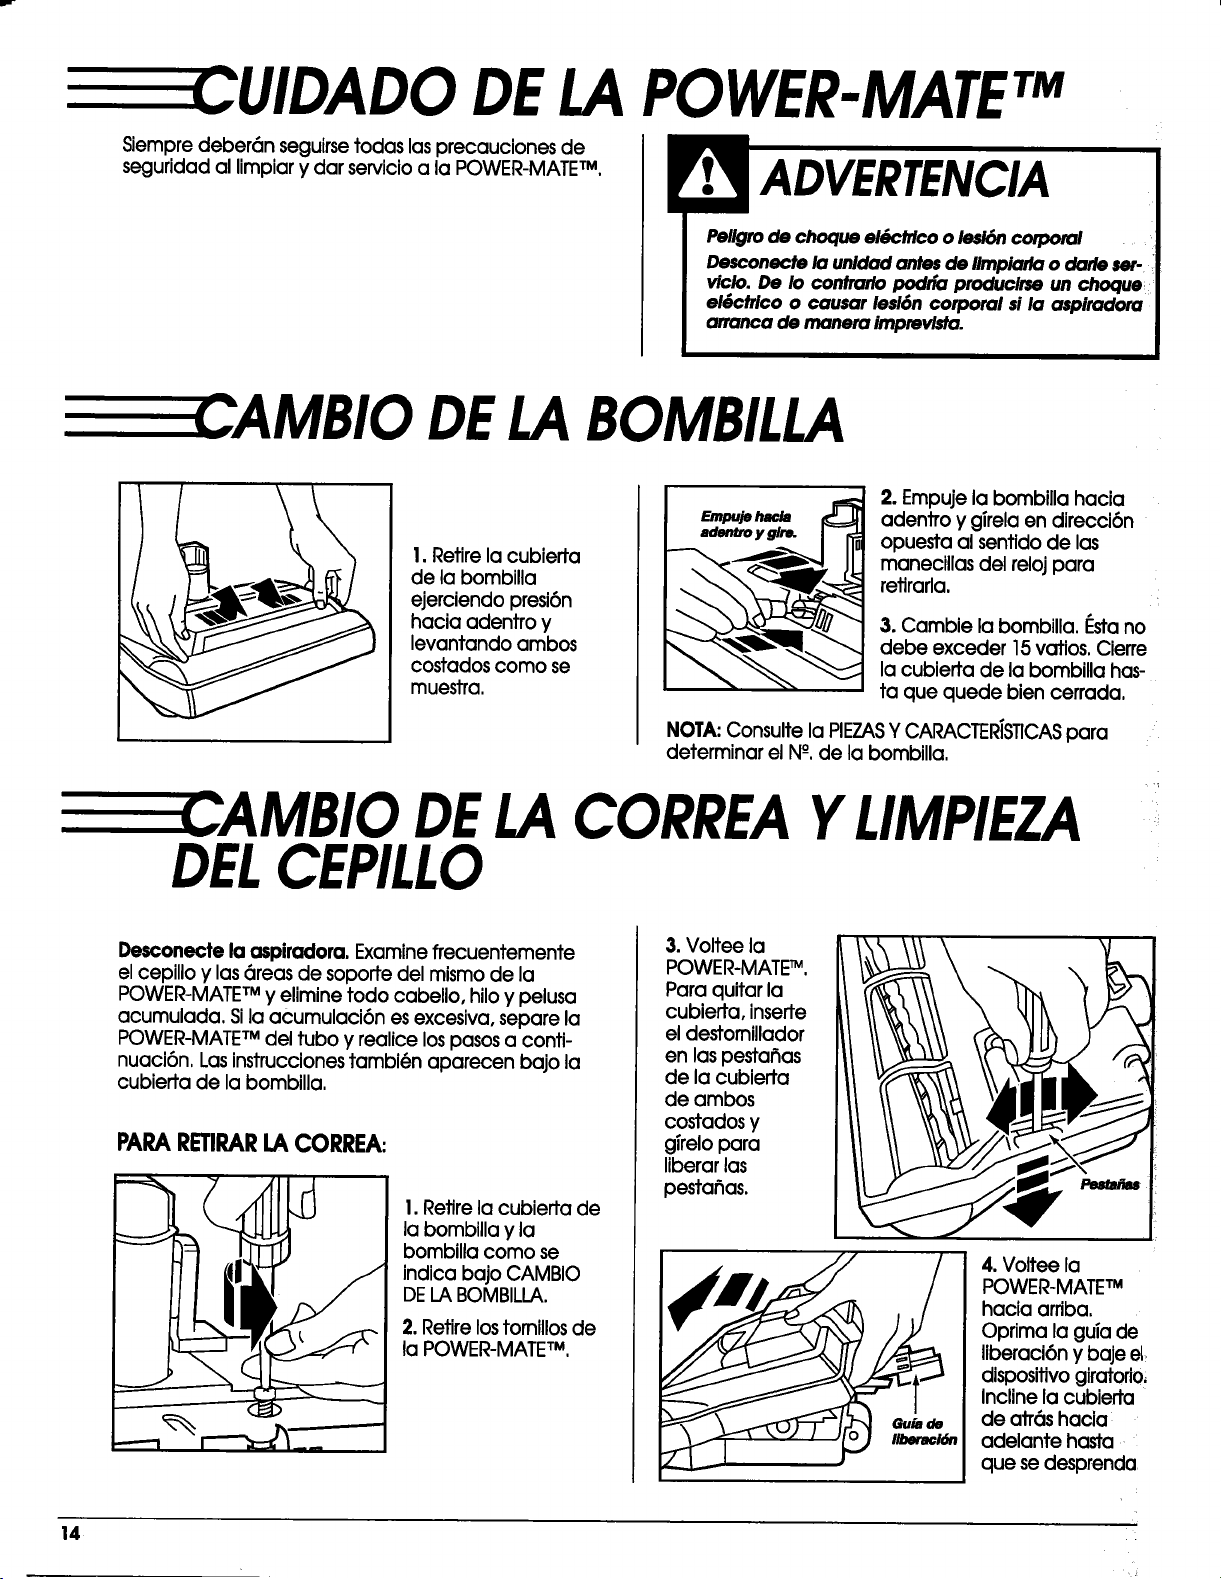
CUIDADO DELAPOWER-MATETM
Siempre deber6n seguirse todas las precauciones de
seguridad al limpiar y dar servicio a la POWER-MATETM.
[3
ADVERTENCIA
Peligro de choque el_pctricoo lesi6n corporal
Desconecte la unidad antes de Iimpiarla o darle ser-
viclo. De Io contrarlo podria produclrse un choque _
eg)ctrico o causar lesi6n corporal si la aspiradora
arranca de manera Imprevlsta.
,AMBIO DELABOMBILLA
!. Retire la cubierta
de la bombilla
ejerciendo presi6n
hacia adentro y
levantando ambos
costados como se
muestra.
Em_ie h_._
adentro y glre.
2. Empuje la bombilla hacia
adentro y gTrelaen direcci6n
opuesta al sentido de las
manecillas del reloj para
retirarla.
;L
3. Cambie la bombilla, f:stano
debe exceder 15vatios. Cierre
la cubierta de la bombilla has-
ta que quede bien cerrada.
NOTA:Consulte la PIEZASY CARACTER/STICASpara
determinar el N°, de la bombilla.
CAMBIO DELACORREAYLIMPIEZA
DELCEPILLO
Desconecte la aspiradora. Examine frecuentemente
el cepillo y las 6teas de soporte del mlsmo de la
POWER-MATETMy elimine todo cabello, hiloy pelusa
acumulada. Sila acumulaci6n es excesiva, separe la
POWER-MATETMdel tubo y realice lospasosa conti-
nuaci6n. Lasinstruccionestambi@n aparecen bajo la
cubierta de la bombilla.
PARARETIRARLACORREA:
1.Retire la cubierla de
la bombilla y la
bombilla como se
indica bajo CAMBIO
DELABOMBILLA.
2. Retire lostom,los de
la POWER-MATETM,
3. Voltee la
POWER-MATE_.
Para quitar la
cubierta, inserte
el destomillador
en las pesta_as
de la cubierta
de ambos
costados y
girelo para
liberar las
pestahas.
4. Voltee la
POWER-MATETM
hacia arriba,
Oprima la guia de
liberaci6n y baje el
dispositivo giratorio,
Incline la cubierta
de atr6s hacia
adelante hasta
que se desprenda
14
5.Inserteel
destomiflodor
cuidadosa-
mente en
cada soporte
delcepilloy
girelopara
retirarelcepil-
Iode labase.
Sopa_e
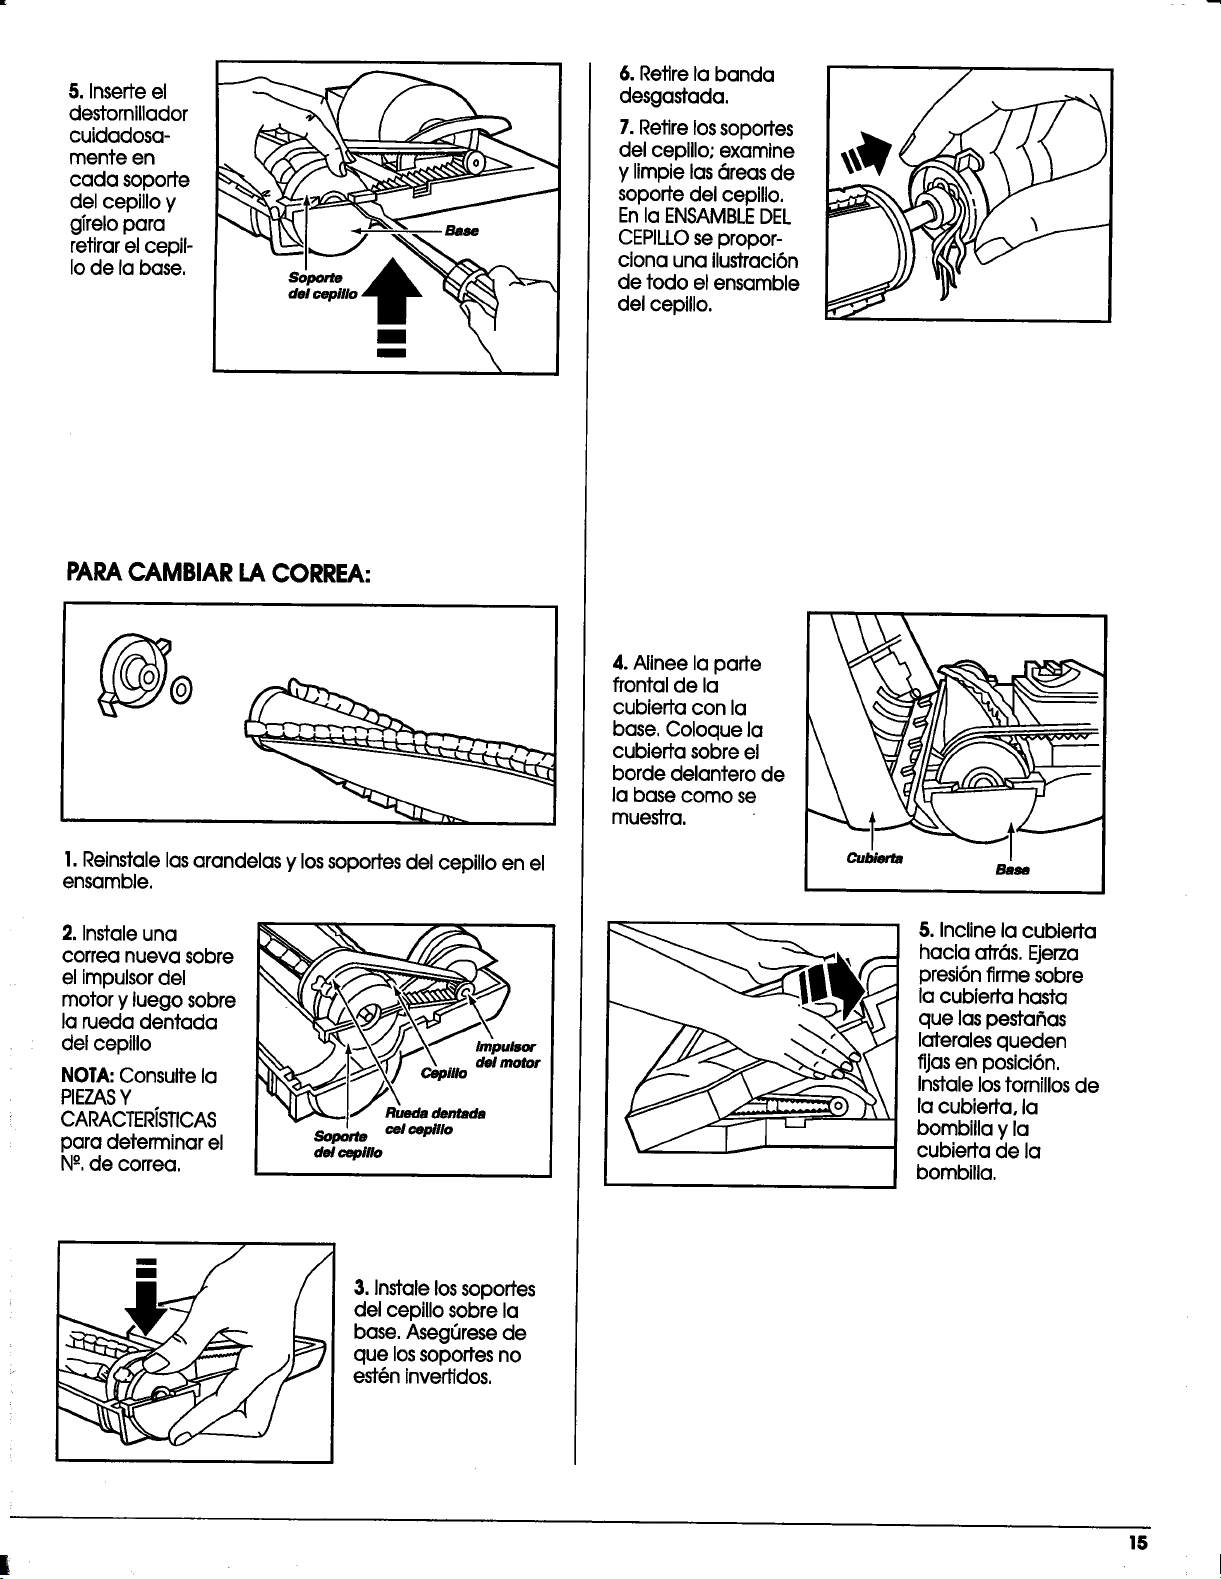
PARACAMBIAR LACORREA:
@
1.Reinstale las arandelas y lossoportes del cepillo en el
ensamble,
2. Instale una
correa nueva sobre
el Impulsor del
motor y luego sobre
la rueda dentada
del cepillo
NOTA:Consulte la
PIEZASY
CARACTER/STICAS
para deterrninar el
N°, de correa.
_/sor
Soporte cel cepillo
del cepillo
3. Instale los soportes
del ceplUosobre la
bose. Asegerese de
que lossoportes no
est@ninvertidos.
6. Retire la banda
desgastada.
7.Retirelossoportes
delcepillo;examine
y Iimpielasareasde
soportedelcepillo.
En laENSAMBLE DEL
CEPILLOsepropor-
cionauna ilustracl6n
de todo elensamble
delcepillo.
4.AlineeIoporte
frontalde la
cublertacon la
base,Coloque la
cublertasobreel
horde delanterode
labase como se
muestra.
Bm_
5. Incline la cubierta
hacia atr6s. Ejerza
presi6n firme sobre
la cubieffa hasta
que laspestafias
laterales queden
fijas en posici6n,
Instalelostornillos de
la cubierta, la
bombilla y la
cubierta de la
bombilla,
IS
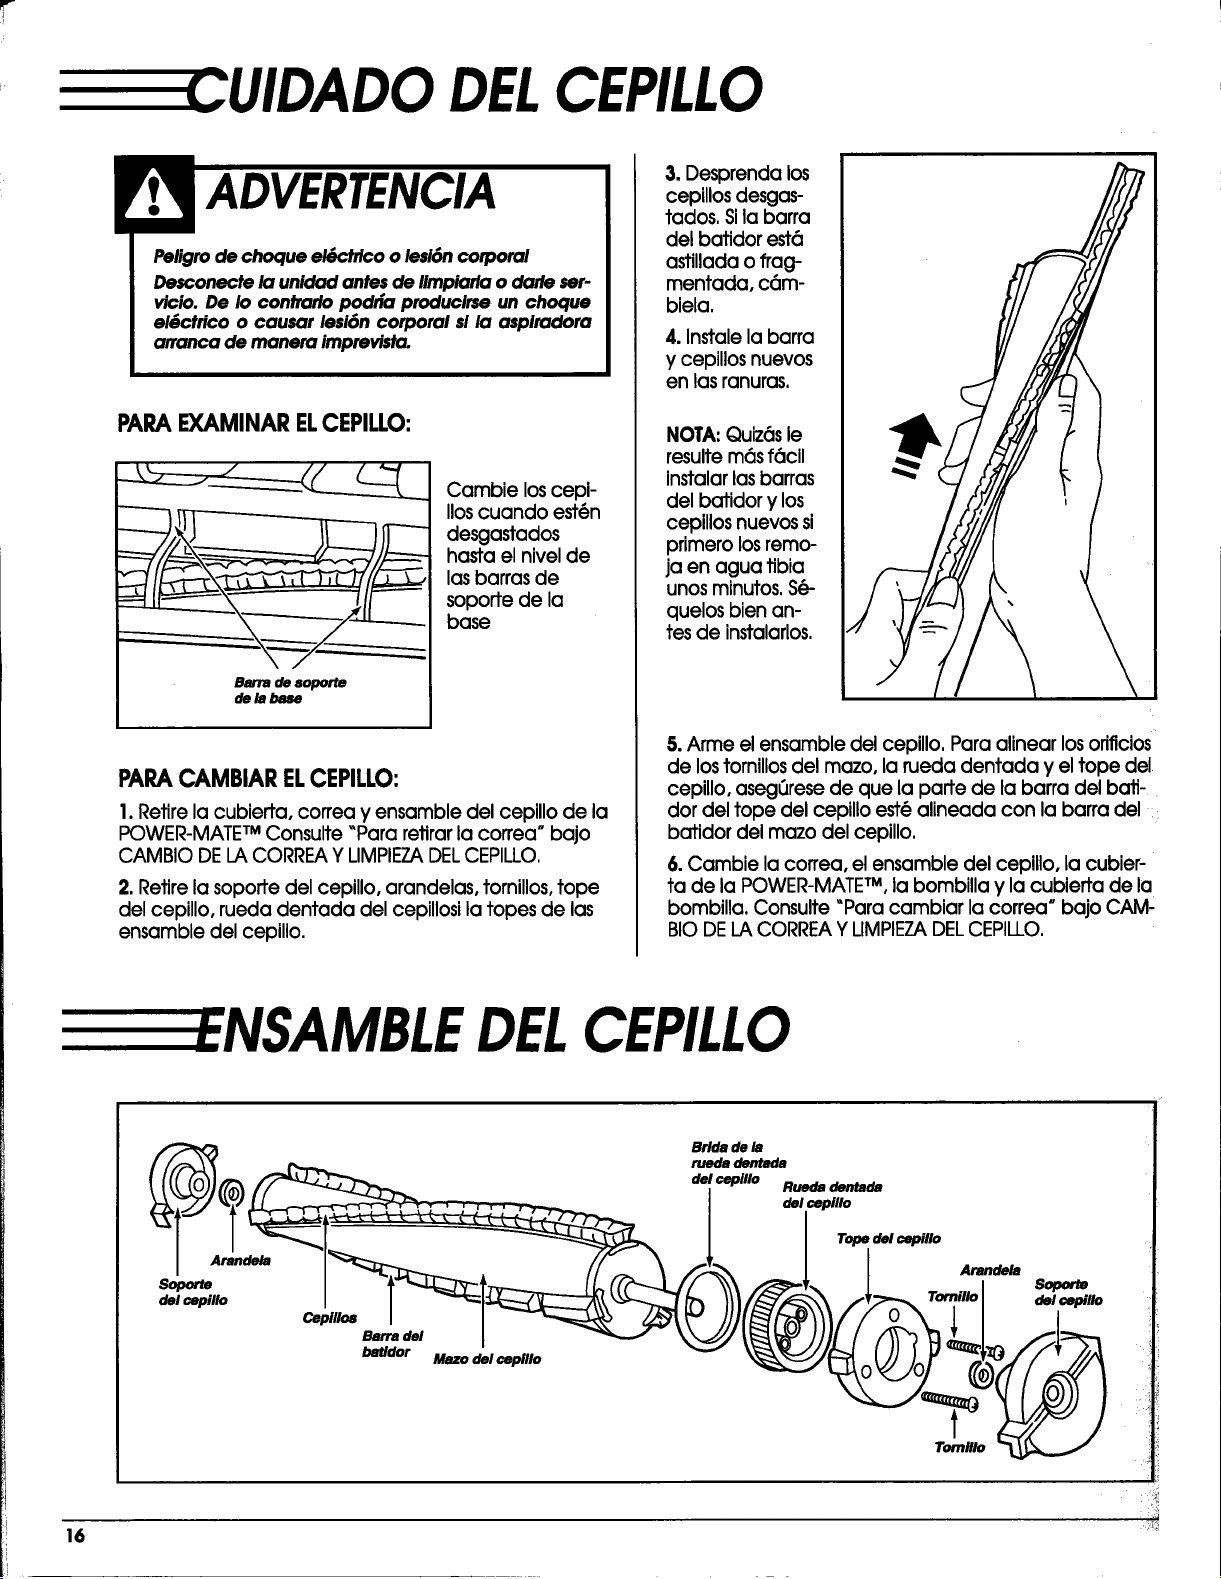
E CUIDADO DELCEPILLO
Peligro de choque el_ctrlco o le$16ncorporal
Desconecte la unidad antes de Iimpiorla o darle ser-
vicio. De Io contrarlo podrfa producirse un choque
el&ctrico o causar lesi6n corporal sl la aspiradora
arranca de manera imprevista.
PARAEXAMINARELCEPILLO:
Barra de soporle
de la base
Cambie loscepi-
llos cuando est(in
desgastados
hasta el nivel de
lasbarras de
soporte de la
base
PARACAMBIARELCEPILLO:
1.Retire la cubierta, correa y ensamble del cepillo de la
POWER-MATETM Consulte _Para retirar la correa* bajo
CAMBIO DELA CORREAY LIMPIEZADELCEPILLO.
2. Retire la soporte del cepillo, arandelas, tornillos, tope
del cepillo, rueda dentada del cepillosi la topes de las
ensamble del cepillo.
3. Desprenda los
cepillosdesgas-
tados. Sila barra
del bafidor est6
astillada oflag-
mentada, c6m-
biela.
4. Instale la barra
y cepillosnuevos
en las ranuras,
NOTA: Quiz6sle
resultem6s f6cll
instalarlasbarras
delbatidorylos
cepillosnuevossi
primerolosremo-
jaen agua tibia
unosminutos,S_-
quelosbienan-
tesde instalarlos.
5. Arme el ensamble del cepillo. Para alinear los orificios
de lostornillos del mazo, la rueda dentada y el tope del
cepillo, aseg_rese de que la parte de la barra del bati-
dot del tope del cepillo est(_alineada con la barra del ::
batidor del mazo del cepillo.
6. Cambie la correa, el ensamble del ceplllo, la cubier-
ta de la POWER-MATETM, la bombilla y la cubierta de la
bombilla, Consulte "Para cambiar la correa * bajo CAM'
BIODELACORREAY LIMPIEZADELCEPILLO.
:ENSAMBLE DELCEPILLO
Brida de la
ruedadentllda
rilndeltl _I_I;;:IL-'__ f///'- _k r | m Arande_
Sopor_ _ Soporm
16 :_
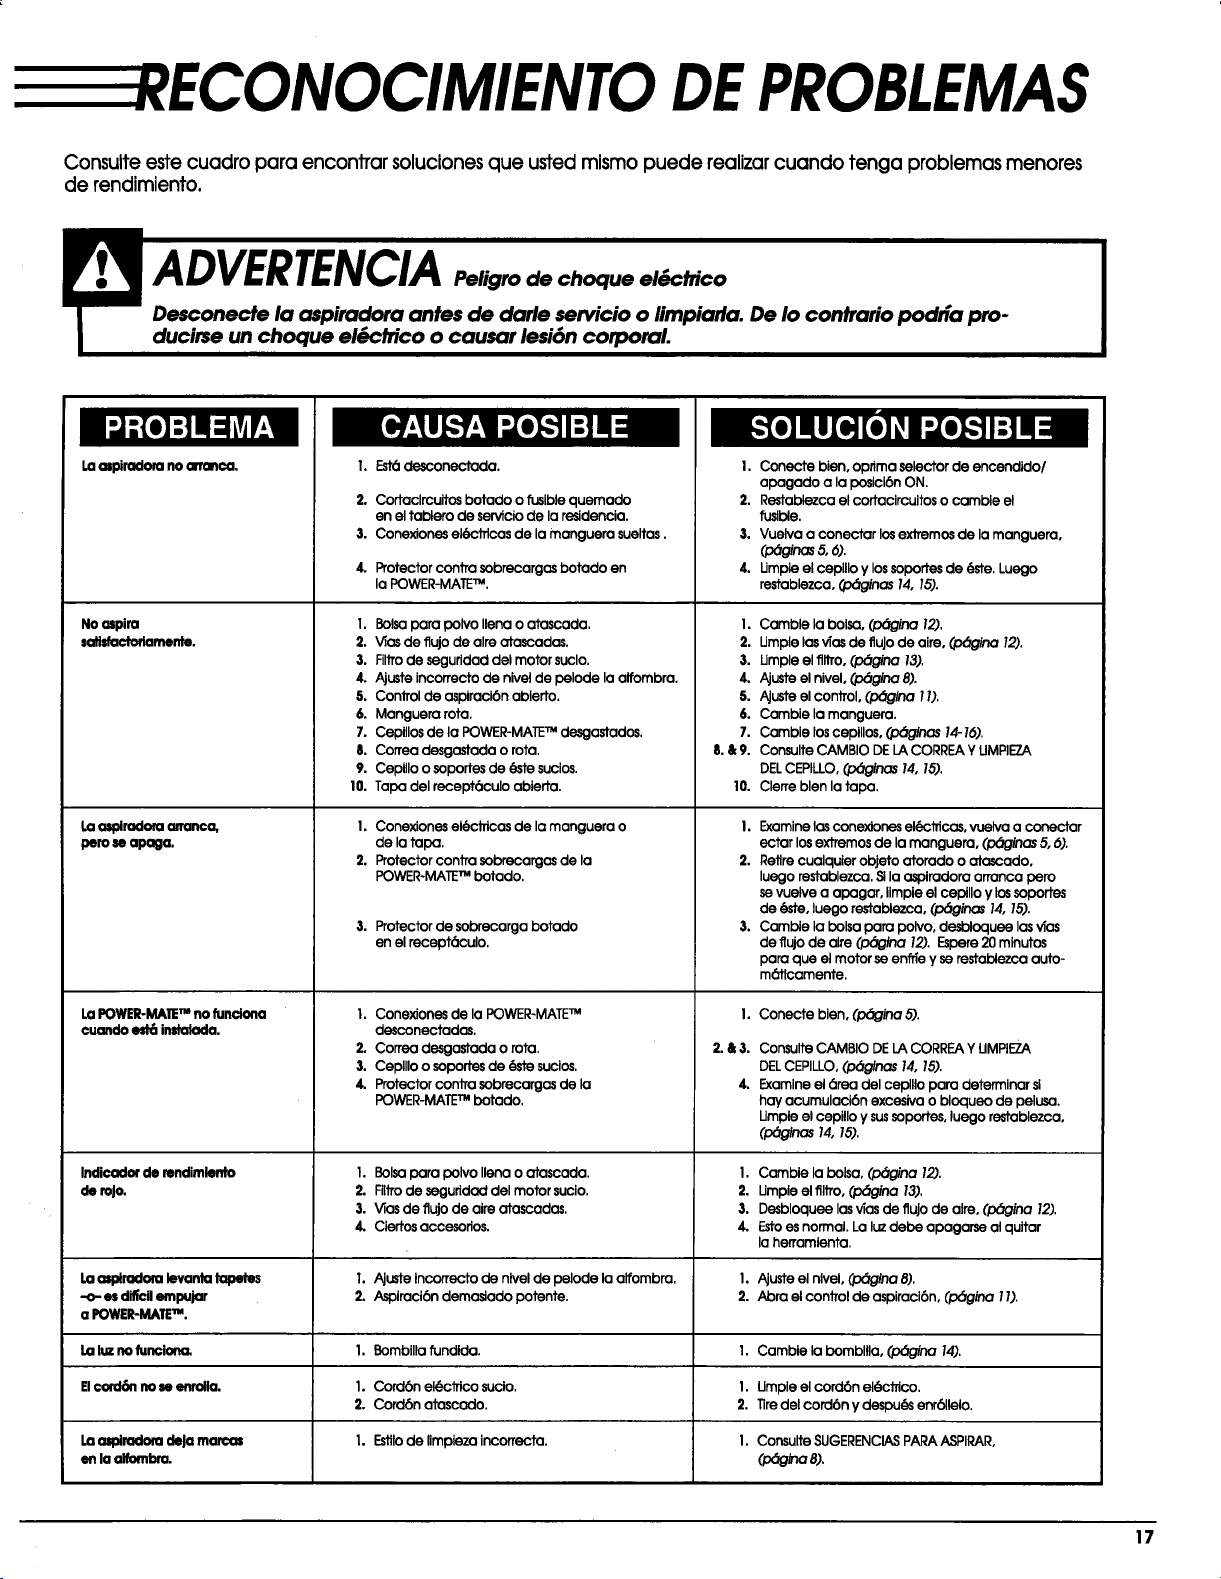
RECONOCIMIENTO DEPROBLEMAS
Consulteestecuadro para encontrarsolucionesque ustedmismo puede realizarcuando tenga problemasmenores
de rendimiento.
I:]ml=1
Laamiradon:uno cm'r_ca,
Noospira
satisfactodarnonte.
Laasplradoraananca,
pero80apaga.
La POWER-MAIETM no funciona
cuondo _ instalada.
I. Est_desconectada.
2.
3.
4.
Cortaclrcuitos botaclo o fusible quemado
en el tablero de servicio de la residencia.
Cone)clonesel6ctrJcasde lamanguera sueltas.
Protector contra sobrecargos botado en
la POWER-MAE TM.
I. Bolsa para polvo llena o atascada.
2. V_asde flujo de alre atascadas.
3. Filtrode seguridad del motor suclo.
4. Ajuste incorrecto de nivel de pelode la alfombra.
5. Control de aspiraci6n ablerto,
6. Manguera rota.
7. Cepillos de la POWER-MATETM dosgastados.
8. Correa desgastada o rota.
9. Cepillo o soportes de _ sucios.
10. Tapa del recept(_culo ablerta.
I. Conex_ones el_ctricas de la manguera o
de la tapa.
2, Protector contra sobrecargas de la
POWER-MATETM botado.
3. Protector de sobrecarga botado
en el recept(_culo.
I. Cone]clonesde laPOWER-MATE TM
desconectados.
2. Correa desgastada o rota.
3. Cepllloo soportesde (_e sucios.
4. ProtectorconJTasobrecargasde la
POWER-MATE TM botado.
I. Conecte bien,optima selectorde encendido/
apagado a laposlcl6nON.
2. Restablezcaelcortacircuitoso camble el
fuslble.
,I.Vuelva a conectarlosexlremosde lamanguera,
4. Umple el cepillo y lossoportes de (_ste.Luego
restablezca, (l_inas 14, 15).
I.
2.
3.
4.
5.
6.
7.
8.&9.
10.
Camble la bolsa, (pbgina 12).
Umple las vTasde fluJode aire, (p_gina 12).
Umple el _tro, (pbgina 13).
Ajuste el nivel, (p_gina 8).
AJusteel control, (l:_gina11).
Cambie la manguera.
Camble los cepillos, (pbginas 14-16).
Consulte CAMBIO DE LA CORREA Y UMPIE7.A
DELCEPILLO, (,/:x_nas 14, 15).
Clerre blen la tapa.
I. Examine los conexJones el_CJTicas,vuelva a conectar
ectar los extremos de la manguera, (pbginas 5, 6).
2. Retire cualquier objeto atorado o atascado,
luego restablezca. Sila ospiradora arranca pero
se vuelve a apagar, ilmpie el cepillo y los soportes
de _te, luego restabiezca, (p_inas 14, 15).
3. Cambie la bolsa para polvo, desbloquee las vTas
de ffujo de alre (p_ina 12). Espere 20 minutos
para que el motor se en_e y se restablezca auto-
m(_ticamente.
I.
2.&3.
4.
Conecte bien, (p_ina 5).
Consulte CAMBIO DE LA CORREA Y UMPIE7_A
DEL CEPILLO, (p_glnas 14, 15).
Examine el 6tea del cepillo para determinar si
hay acumulacibn excesiva o bloqueo de pelusa.
Umpie el cepillo y sussoportes, luego restablezca,
_:_:_g_=_ 14, 15).
Indioador de rendlmlento I. Bolsa para polvo llena o atascada. I. Cambie la bolsa, (pbgina 12).
de roJo. 2. Filtro de seguridad del motor sucio. 2. Umpie el flltro, (p_gina 13).
3. V_asde flujo de aire atascadas. 3. Desbloquee losvTasde flujo de alre, (pbgina 12).
4. Ciertos accesorios. 4. Estoes normal. La Iv debe apagarse al quitar
la herramlenta.
Laa_iradora levanta tapetes I. Ajuste incorrecto de nivel de pelode la alfombra. I. Ajuste el nlvel, (pbgina 8).
-o-es _ empujar 2. Aspiraci6n demoslado potente. 2. Abra el control de aspiraci6n, (pbgina 1I).
a POWER-MATETM.
Laluz no funclona_ I, Bombllla ?undlda. I. Camble la bombllla, (p_gina 14).
El€o_16n no so enrolla. 1. Cord6n el6cJflco suclo. I. Umple el cordbn el(_'trico.
2. Cord6n atoscado. 2. Tiredelcord6n y despu_ enrbllelo.
Laamiradom deJa marco; 1. Estilode llmpieza incorrecta. I. Consulte SUGERENCIASPARA ASPIRAR,
en la alfombra. (pbgina 8).
17

LL--LL --
m -- m E
LL --.....................
.... :-- II
,_W_ --
SEARS
SEARS,ROEBUCKAND CO., HOFFMAN ESTATES,IL60179 U.S.A.
PARTNO. C_1ZARBg_U_-437_536
Printed in U.S.A.